

Page 1

Installation Manual
AudioCodes Speech-Driven Dialing Solution for Enterprises
AC Voca
Version 7.8
Page 2

Notice
AC Voca | Installation Manual
Notice
Information contained in this document is believed to be accurate and reliable at the time of
printing. However, due to ongoing product improvements and revisions, AudioCodes cannot guarantee accuracy of printed material after the Date Published nor can it accept
responsibility for errors or omissions. Updates to this document can be downloaded from
https://www.audiocodes.com/library/technical-documents.
This document is subject to change without notice.
Date Published: May-26-2020
WEEE EU Directive
Pursuant to the WEEE EU Directive, electronic and electrical waste must not be disposed of with
unsorted waste. Please contact your local recycling authority for disposal of this product.
Customer Support
Customer technical support and services are provided by AudioCodes or by an authorized
AudioCodes Service Partner. For more information on how to buy technical support for AudioCodes
products and for contact information, please visit our website at
https://www.audiocodes.com/services-support/maintenance-and-support.
Documentation Feedback
AudioCodes continually strives to produce high quality documentation. If you have any comments
(suggestions or errors) regarding this document, please fill out the Documentation Feedback form
on our website at https://online.audiocodes.com/documentation-feedback.
Stay in the Loop with AudioCodes
Related Documentation
Document Name
AC Voca Release Notes
AC Voca Administrator's Guide
Document Revision Record
LTRT Description
23722 Updated document for Version 7.8.0
- ii -
Page 3

Notice
AC Voca | Installation Manual
LTRT Description
23723 Updated document for Version 7.8.1.
■ New sections: Hardware Requirements; System Capacity; AC Voca
Scheduler Tasks; Configuring AC Voca DNN Speech Recognition Mode
■ Updated sections: Using Clean Windows Installation; Configuring the OSN
IP Address; Configuring the OSN IP Address; Installing AC Voca;
Configuring Enghouse Interactive’s Communication Portal (CP); Configuring
Enghouse CP Additional Language Support; Installing the AC Voca License;
Installing CT Connect Media Gateway License; Acapela non-Hebrew Text to
Speech; Running the LDAP Client Setup in AC Voca Cloud Mode; Running
the LDAP Client Setup in AC Voca On-premises Mode; Entering Fields under
LDAP Connection Tab; Setting up LDAP Client Synchronization;
Troubleshooting LDAP Client Connectivity; Installing LDAP Client Service;
Configuring the LDAP Client File (removed)
23724 Updated document for Version 7.8.2.
■ Updated sections: Getting Started; Installing AC Voca; Configuring Enghouse
CP Additional Language Support (Optional); Installing Text to Speech Engine;
Updated screens for LDAP synchronization
- iii -
Page 4

Content
AC Voca | Installation Manual
Table of Contents
1 Introduction 1
2 Getting Started 2
Hardware Requirements 2
System Capacity 2
Entries Support 2
Using Clean Windows Installation 3
Additional Software Installation 3
Disabling Virtual Memory Paging File 3
Using AudioCodes Mediant 800 Installation 4
Installing Windows Security Updates 4
Configuring the OSN IP Address 4
Configuring the Server System Time Settings 9
3 Installing AC Voca 11
4 Configuring AC Voca System 14
AC Voca Scheduler Tasks 14
Configuring Enghouse Interactive Communication Portal (CP) 19
Configuring Enghouse CP Additional Language Support (Optional) 29
5 Installing the AC Voca License 36
6 Installing Third-Party Licenses 40
Installing Enghouse Interactive License 40
Installing Control Panel License 40
Installing CTConnect Media Gateway License 42
Installing Text-to-Speech Engine 42
Acapela non-Hebrew Text to Speech 42
7 Configuring AC Voca DNN Speech Recognition Mode 47
8 Configuring AC Voca LDAP Synchronization 48
LDAP Client Requirements 48
Hardware and Operating System Requirements 48
Network Requirements 48
LDAP Synchronization Requirements 48
Running the LDAP Client Setup 48
Running the LDAP Client Setup in AC Voca Cloud Mode 49
Running the LDAP Client Setup in AC Voca On-premises Mode 49
Configuring the LDAP Client 50
Setting up LDAP Client Synchronization 50
Entering Fields under LDAP Connection Tab 51
Entering Fields under LDAP User Attributes Tab 52
Entering Fields Under VocaNOM Connection Tab 53
Configuring Files in LDAP Client On-premises Mode 54
Configuring the Hosts File 55
Testing LDAP Client Connectivity 55
- iv -
Page 5

Content
LDAP Server Connectivity Testing 55
VocaNOM Server Connectivity Testing 56
AC Voca | Installation Manual
Troubleshooting LDAP Client Connectivity 57
Troubleshooting Customer’s LDAP Server 57
LDAP Client Does not Connect to the VocaNOM Server 59
Error [Run] [LDAP import] edmws exception:Value Cannot be Null 60
Installing LDAP Client Service 61
9 Improving LDAP Synchronization 62
Basic LDAP Filters 62
Advanced LDAP Filters 62
LDAP User Attributes 63
10 Configuring SBC Settings for AC Voca 64
Coder Settings 64
Delayed Offer SDP Settings 64
Terminating SIP OPTIONS Requests 64
Alternative Routing Settings 64
11 Installing Signed Certificates on the IIS 65
Managing Certificates in the MMC Snap-in 65
Adding a Certificate 68
Selecting a Certificate in IIS Manager 68
12 Enabling .NET Framework 3.5 on Windows 70
13 Useful Topics 74
- v -
Page 6

CHAPTER1 Introduction
1 Introduction
AC Voca provides a state-of-the-art voice recognition service for enterprises, enhancing day-to-day
customer interface and employee productivity by making organizational contacts easily accessible
from multiple user environments by voice.
Combining powerful speech recognition engine with a simple-to-use conversational interface, AC
Voca introduces a reliable, 24x7 call routing solution that reduces costs, increases the employee's
productivity and enhances caller experience and satisfaction.
AC Voca easily integrates with any standard PBX based on analog, digital and IP network
protocols and can be deployed as a secured cloud service or On-premises.
AC Voca | Installation Manual
- 1 -
Page 7

CHAPTER2 Getting Started
2 Getting Started
There are a number of ways to install the AC Voca system:
■ Clean Windows Installation: A customer provides a clean-installed Windows 2016 (or
Windows 2012 R2) system with the latest security updates. The installation will be provided by
AudioCodes as a downloadable URL.
■ AudioCodes Mediant 800 Installation: AudioCodes provides a Mediant 800 with a pre-
installed Windows 2016. The installation package will be located at C:\ACVoca_Installer.
■ Pre-installed: AudioCodes offers Voca Software as a Service (SaaS) as a cloud deployment.
Please contact your AudioCodes representative for more information on this option.
The default Administrator's password is "pass123". It is highly recommended to change
the password according to the Enterprise's policy. The updated password must be
stored in a secure location, so that it is accessible to those that need to it.
Hardware Requirements
AC Voca | Installation Manual
The AC Voca server requires the following minimal hardware configuration for On-premises installation:
■ CPU: Intel Core i7-5th Gen @ 2.7GHz with 4 cores or higher - dedicate all cores; enable hyper-
threading.
■ RAM: 32 GB
■ SSD: 256 GB
■ NIC: 1GB Ethernet card
■ Operating System: Windows Server 2016
For private cloud installations, the minimal hardware configuration is:
■ For AWS: Use c5.2xlarge instances or higher
■ For other configurations: Contact your AudioCodes representative
Self-installation is designed to support single tenant deployments. For multi-tenant deployments,
please contact your AudioCodes Sales or Technical Support representative.
System Capacity
The system supports the following channels capacity:
■ For Hebrew and German, up to 6 concurrent channels are supported
■ For English, up to 2 concurrent channels are supported
■ For Spanish (United States, Spain, Central and South America), up to 30 concurrent channels
are supported
In cases of mixed languages under a single tenant, the service is limited to the lowest
number of supported channels per language.
Entries Support
■ Up to 17,000 entries
- 2 -
Page 8
CHAPTER2 Getting Started
Using Clean Windows Installation
It is the customer’s responsibility to provide a clean-installed licensed Windows 2016 (or Windows
2012 R2) system with the following requirements:
■ .NET Framework Features 3.5
If the server has Internet connectivity during installation, the framework will be installed
automatically. Otherwise.NET 3.5 should be pre- installed (see Enabling .NET
Framework 3.5 on Windows on page70).
■ Disabled Virtual Memory paging file
■ Latest security updates
■ Static IP address
Additional Software Installation
The user must not install any additional software on the server, including anti-virus or any real time
scanner. Installation of any third-party software may lead to performance issues, stability problems
and may cause unpredictable results.
AC Voca | Installation Manual
Disabling Virtual Memory Paging File
The procedure below describes how to disable the Virtual Memory Paging file.
➢ To disable Virtual Memory Paging File on a Windows System
1. Press the Windows key and open Control Panel.
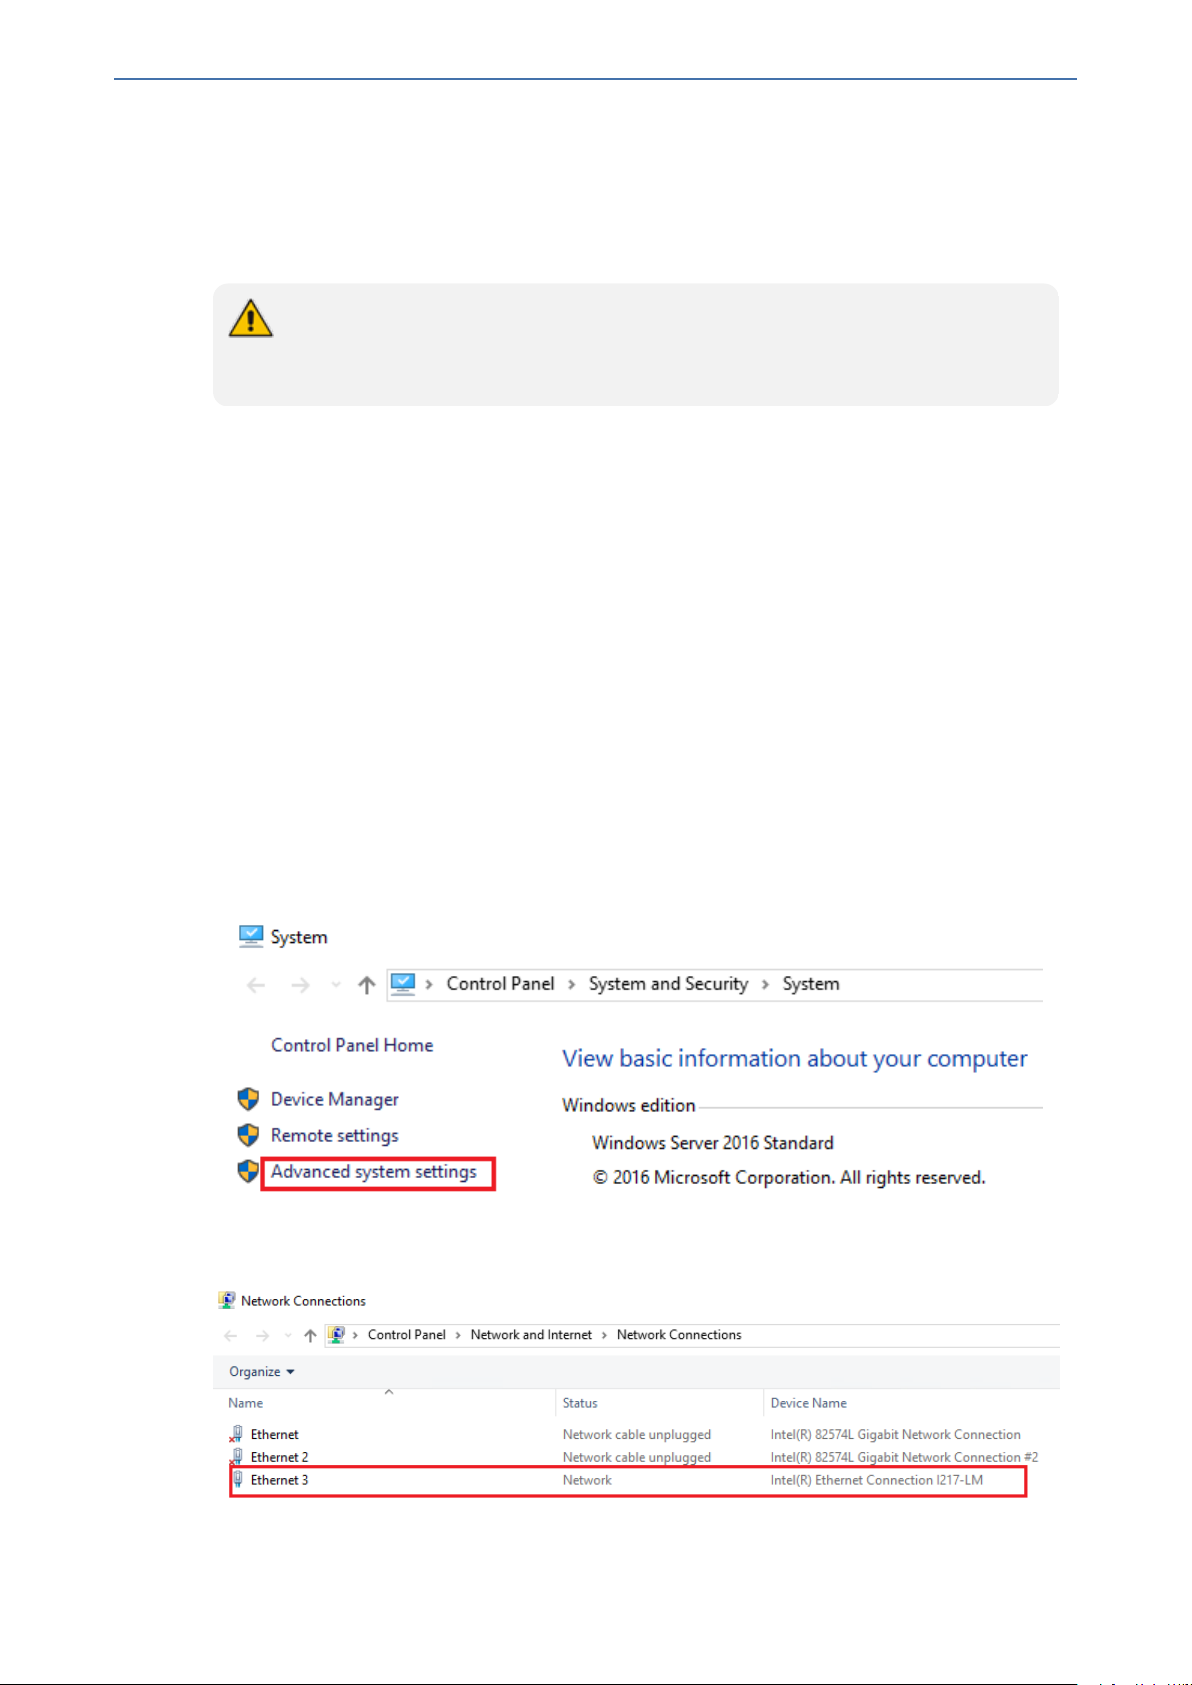
2. Navigate to System and Security > System, and then click Advanced system settings in
the left pane.
3. In the System Properties dialog box, click the Advanced tab, and then click Settings…
under the 'Performance' group.
4. Click the Advanced tab, and then click the Change… button.
- 3 -
Page 9
CHAPTER2 Getting Started
5. Select the drive that it is on, and then click the No paging file option.
6. Clear the 'Automatically manage paging file size for all drives' check box.
7. Click Set, and then click OK.
8. Select Restart Now to apply the changes, and then disable virtual memory.
Using AudioCodes Mediant 800 Installation
Before installing the AC Voca system on AudioCodes Mediant 800, do the following:
■ Install Windows 2012 R2 Security Updates
■ Configure the OSN IP address
■ Configure the Server System Time Settings
Installing Windows Security Updates
Install Windows Security Updates to run the latest service patches and install all missing updates.
Configuring the OSN IP Address
AC Voca | Installation Manual
The AC Voca system must have a static IP address. You can configure a static IP address for the
OSN server on the Mediant 800.
If you are connected remotely, performing this step will disconnect you from the
system. After performing this step, you can re-connect the system with its new location
and IP address.
➢ To configure a static IP address for OSN:
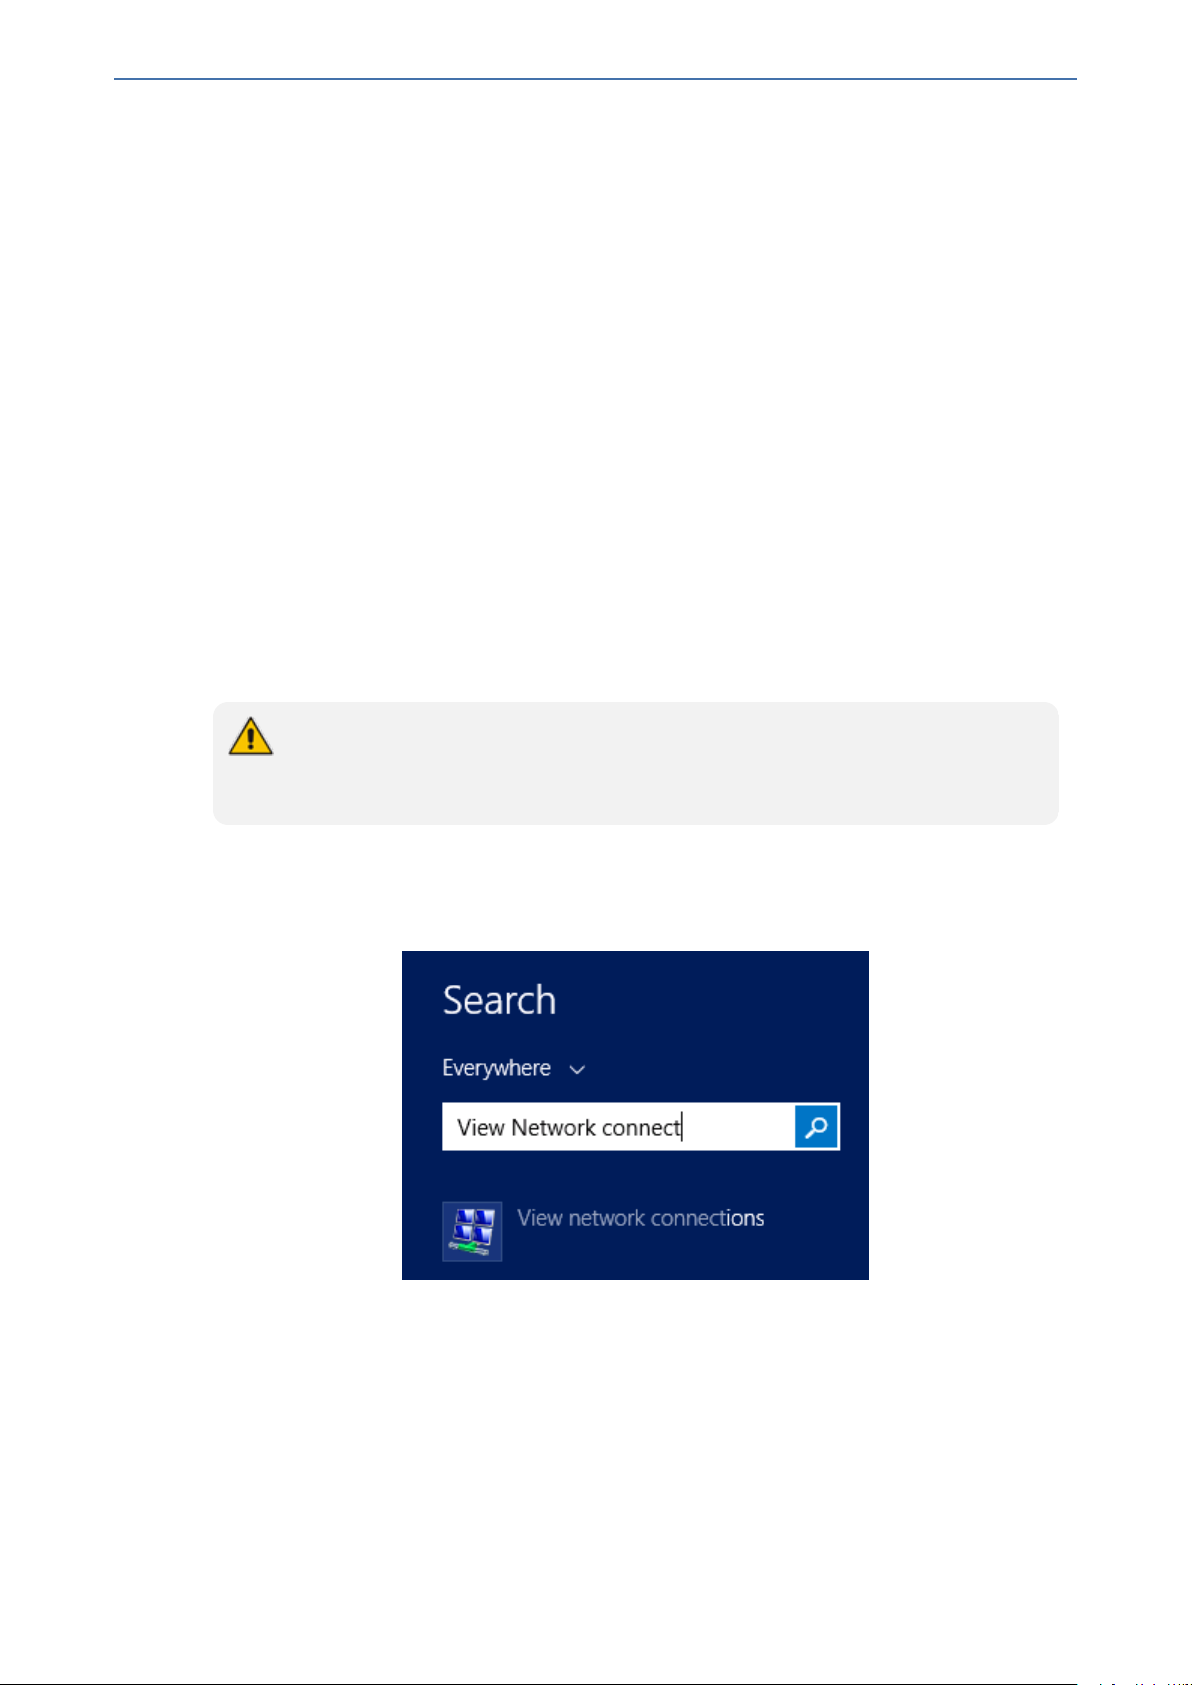
1. Press the Windows key.
2. In the 'Search' text box, enter "View Network connections", and then press Enter.
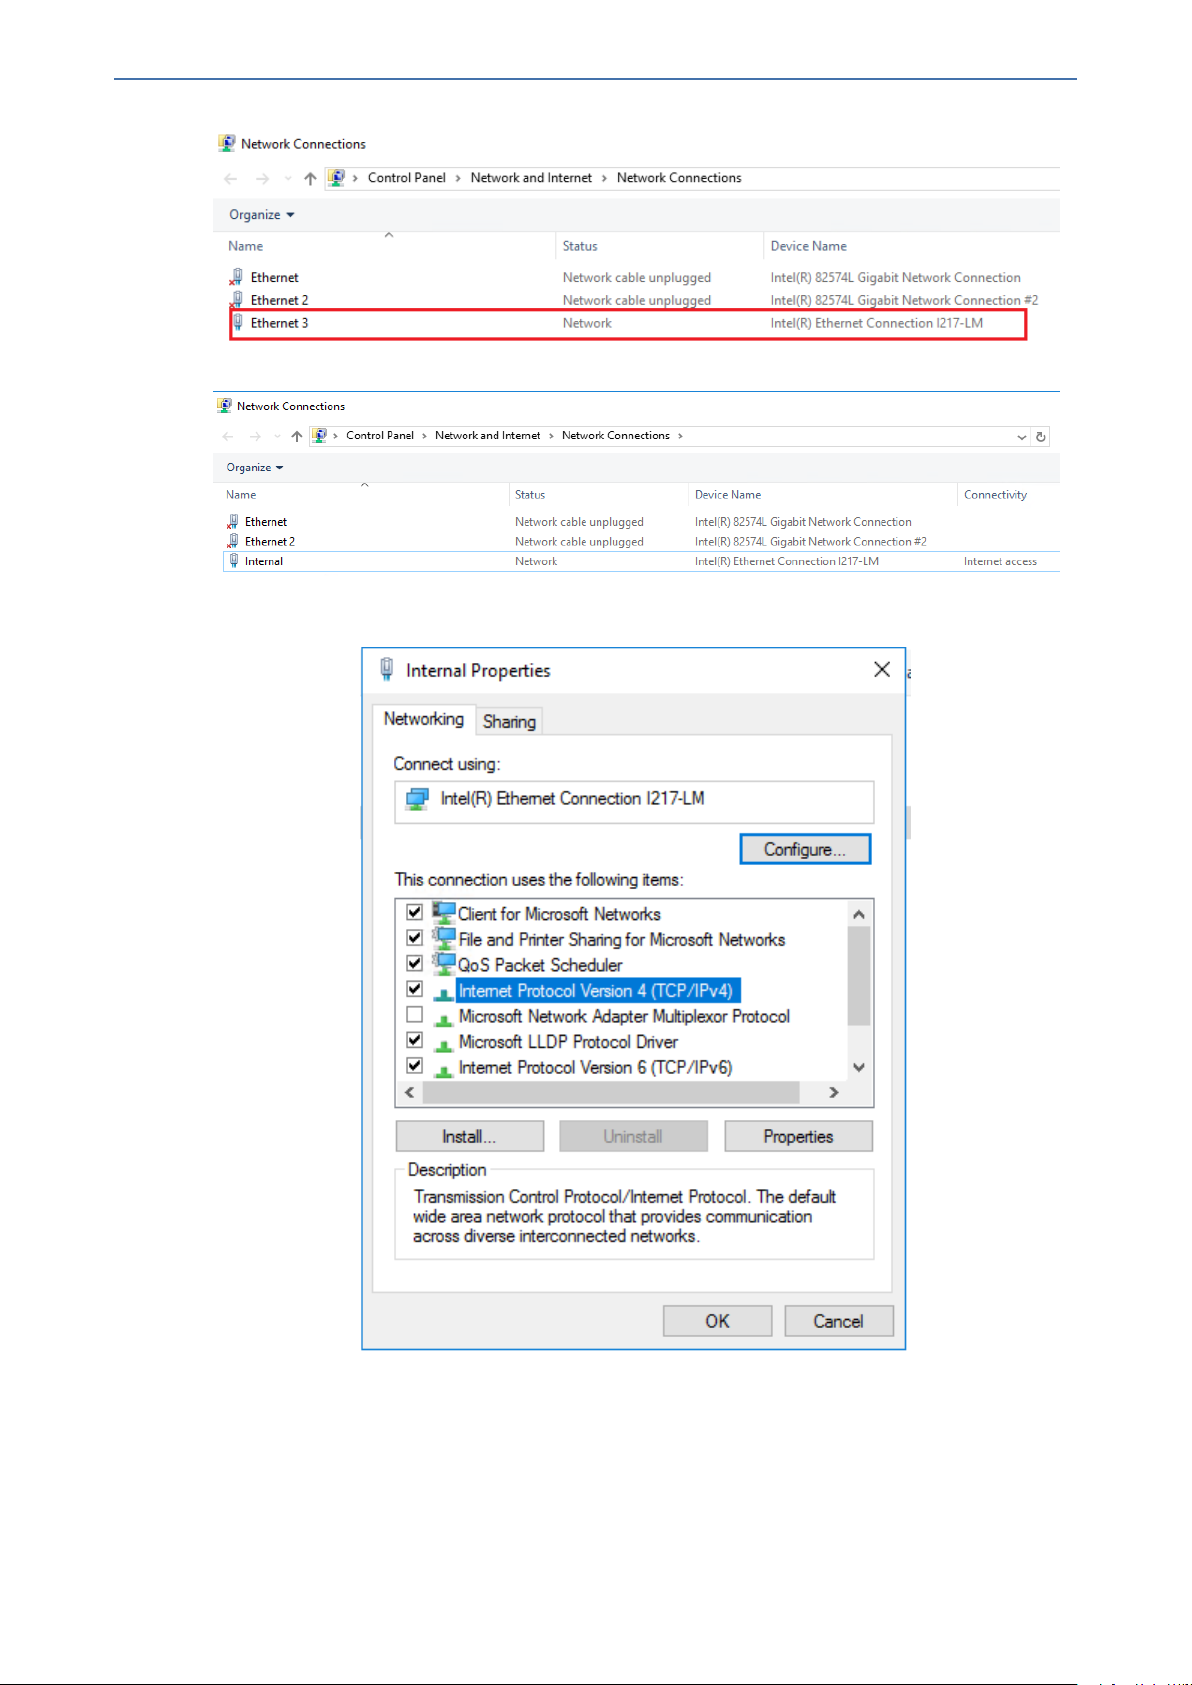
3. Right-click the Intel(R) Ethernet Connection I217-LM network connection, and then from the
shortcut menu, select Rename.
- 4 -
Page 10
CHAPTER2 Getting Started
4. Assign the new alias name as Internal.
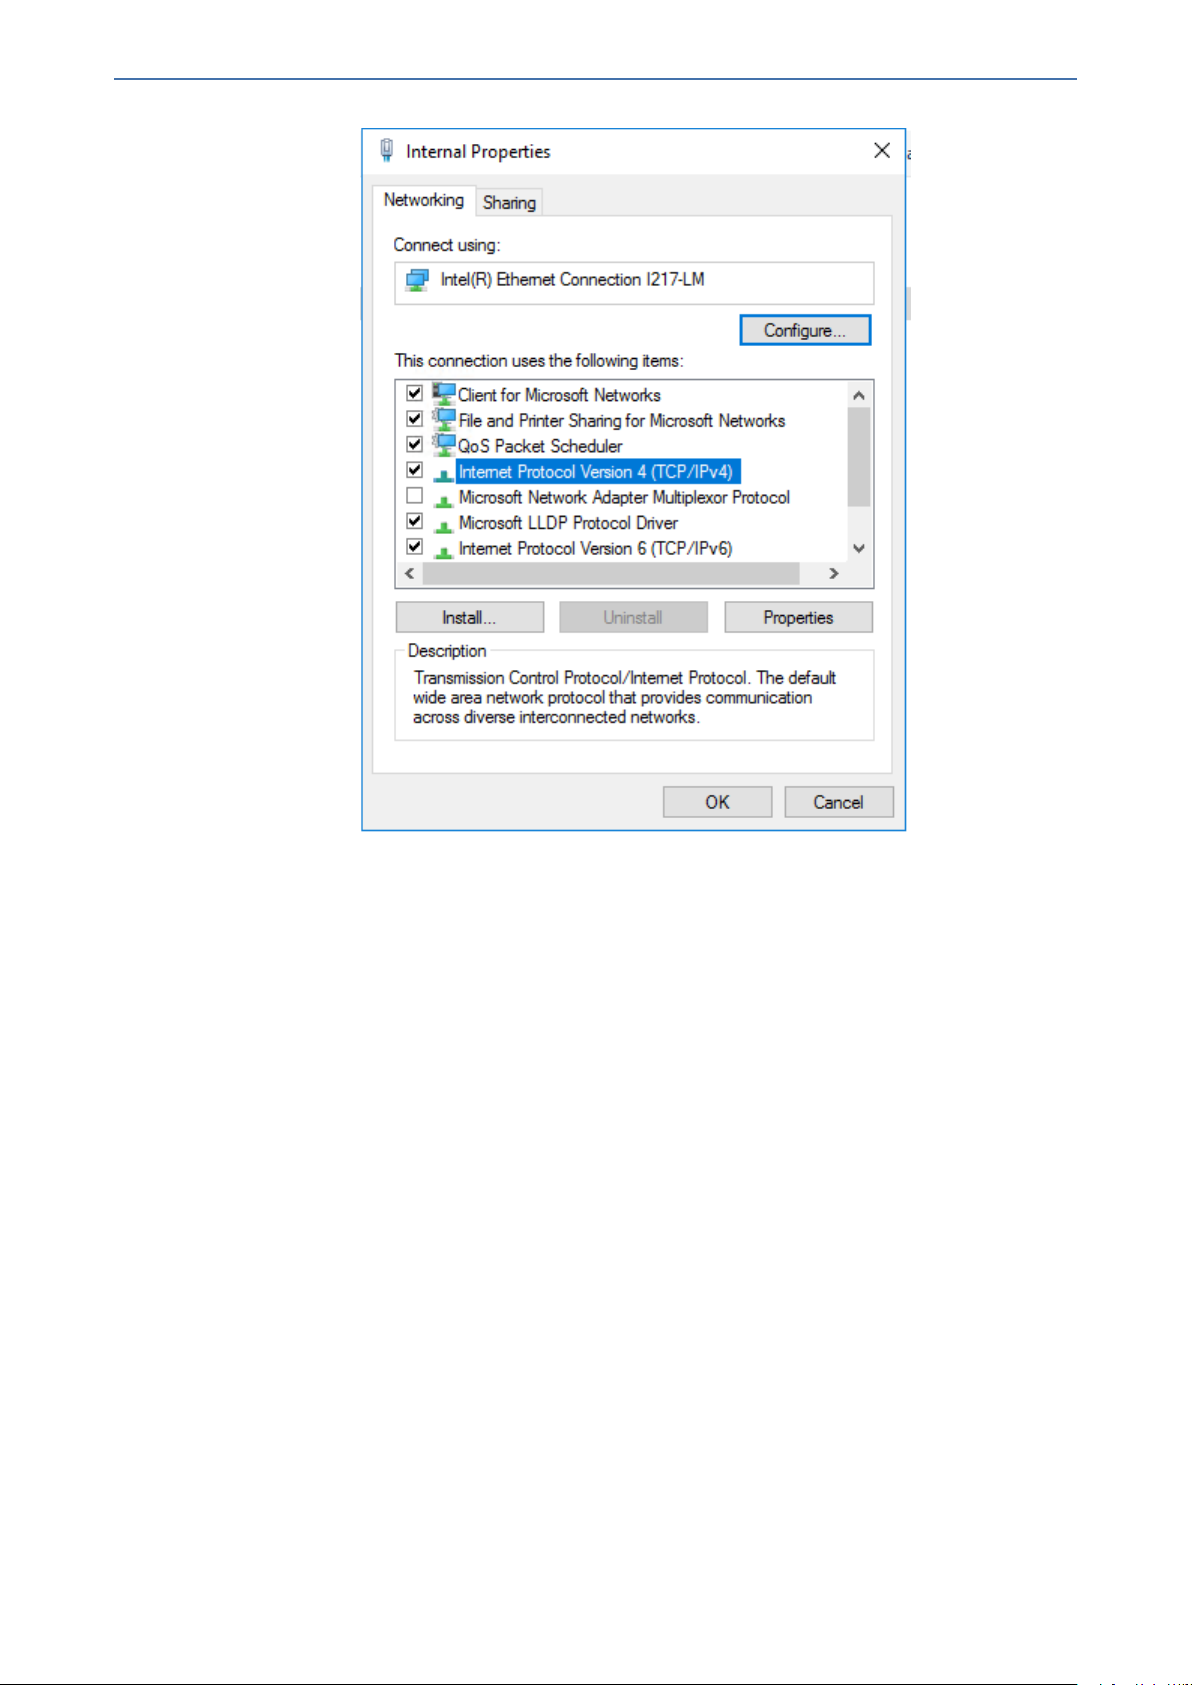
5. Right-click the Internal network connection, and then from the shortcut menu, choose
Properties.
AC Voca | Installation Manual
6. Double-click Internet Protocol Version 4 (TCP/IPv4).
- 5 -
Page 11
CHAPTER2 Getting Started
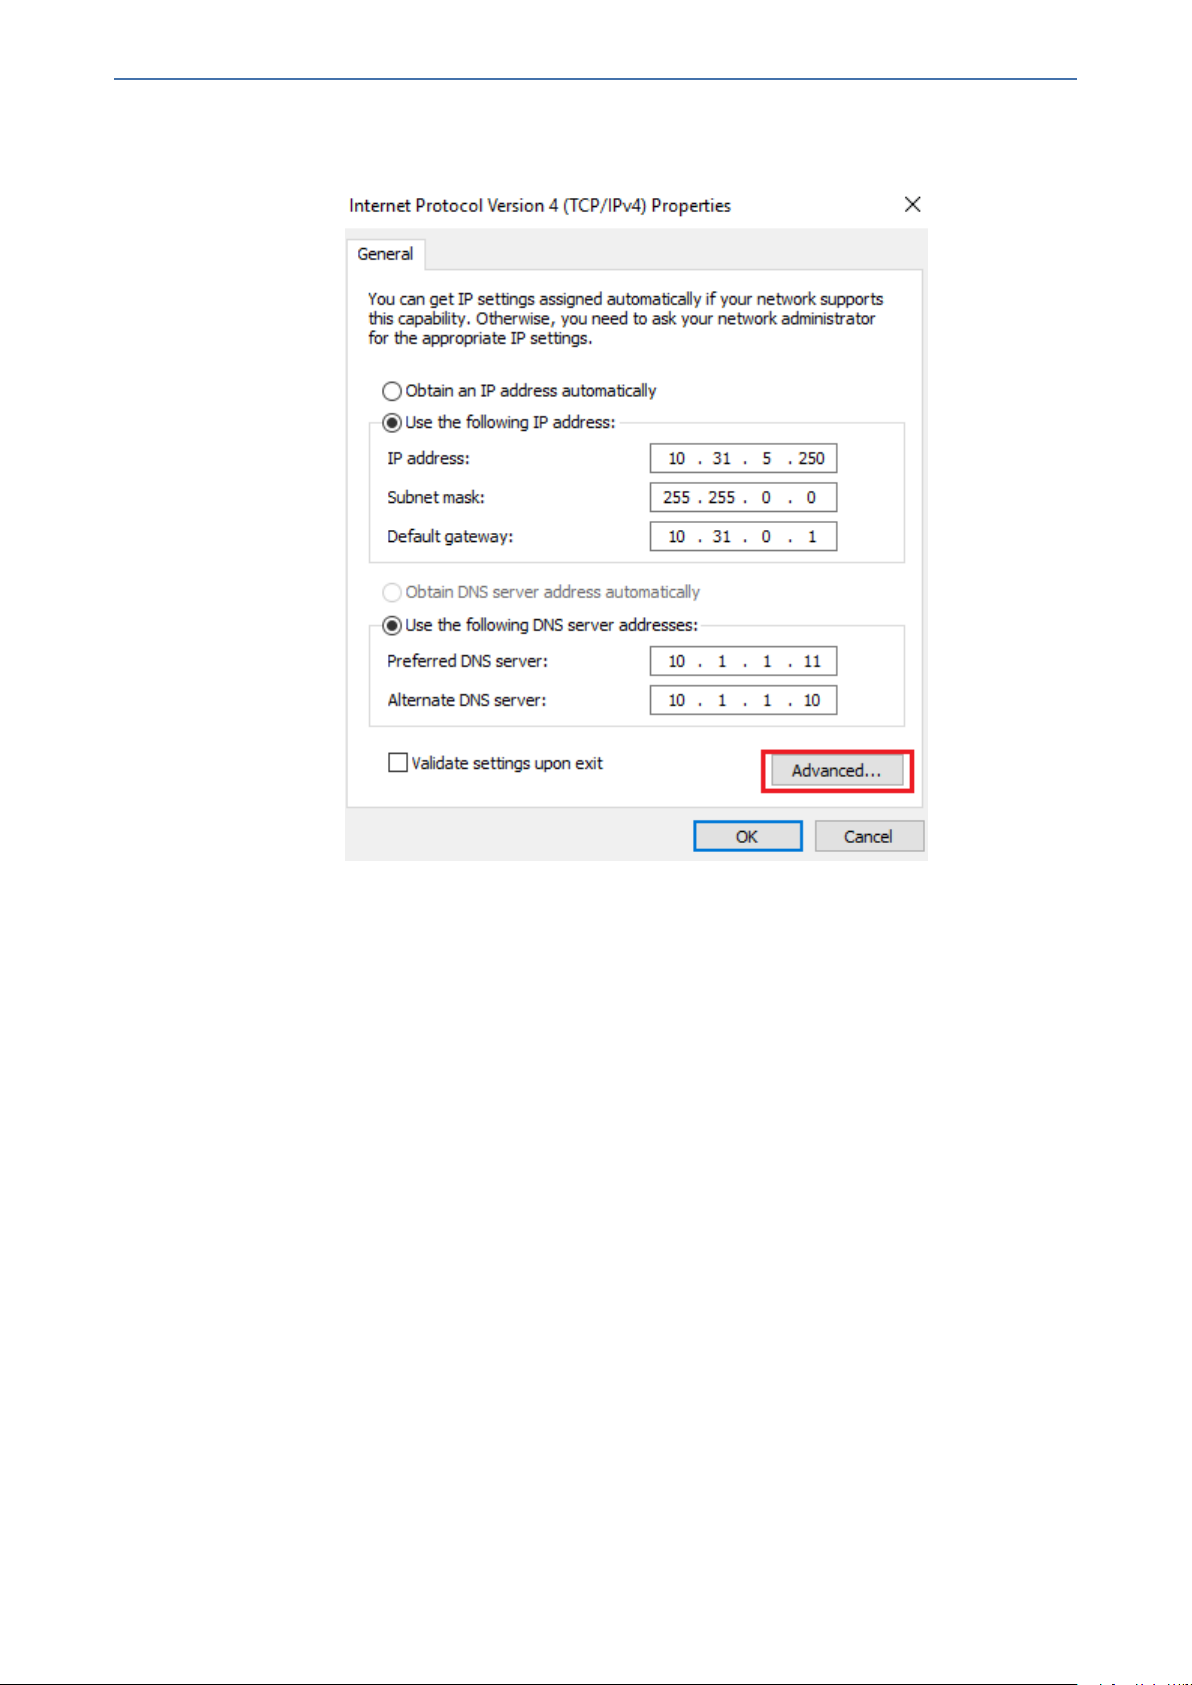
7. Enter the IP address and DNS server addresses.
8. Click Advanced.
AC Voca | Installation Manual
9. Clear the 'Automatic Metric' check box, and then in the 'Interface Metric' field enter "1".
- 6 -
Page 12

CHAPTER2 Getting Started
AC Voca | Installation Manual
A low metric number indicates higher priority. A high metric number indicates low
priority.
10. Click OK to apply the configuration.
- 7 -
Page 13
CHAPTER2 Getting Started
AC Voca | Installation Manual
- 8 -
Page 14
CHAPTER2 Getting Started
11. Click OK to close the Internal Properties window.
12. Close the Network Connections window.
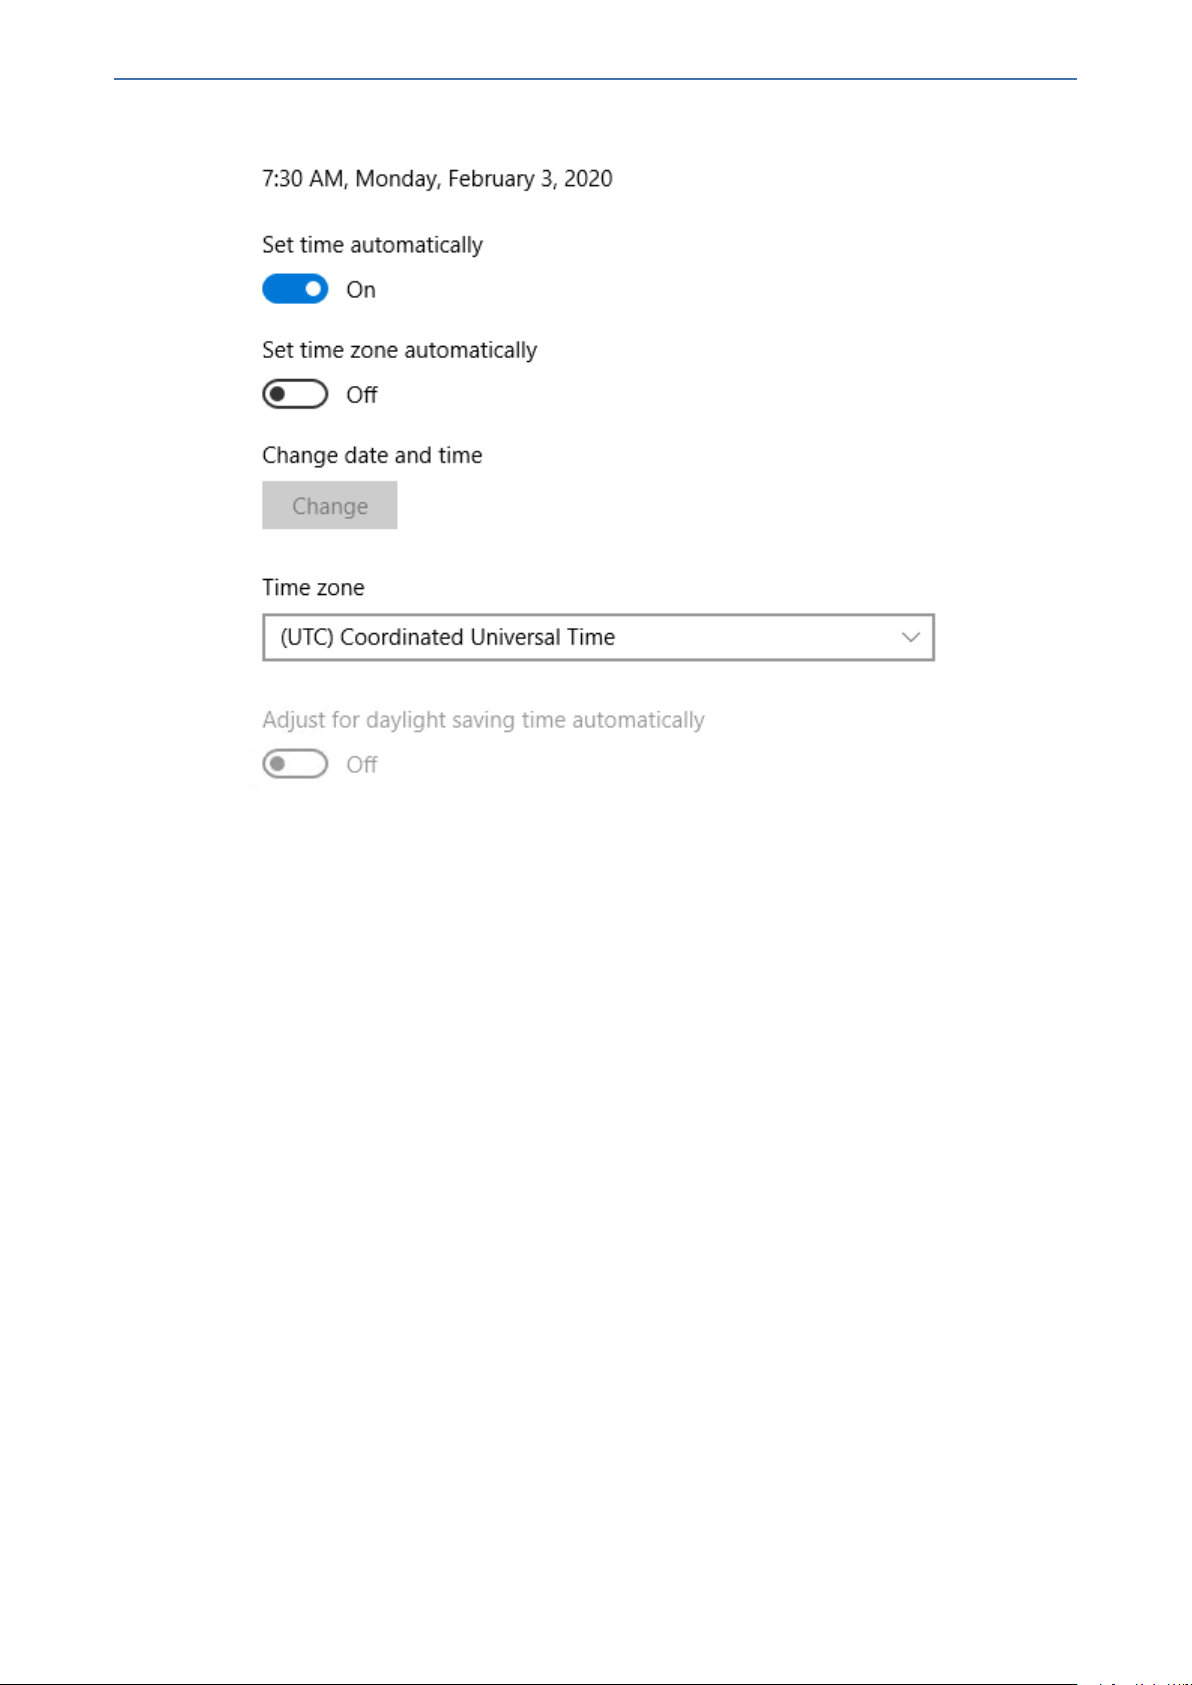
Configuring the Server System Time Settings
For AC Voca system multi-time zone support, Windows 2012 R2 must be configured in the UTC
system time zone. The procedure below describes how to configure your server system time
settings.
Verify that your server time is correctly set to UTC time. Otherwise, perform the
following procedure.
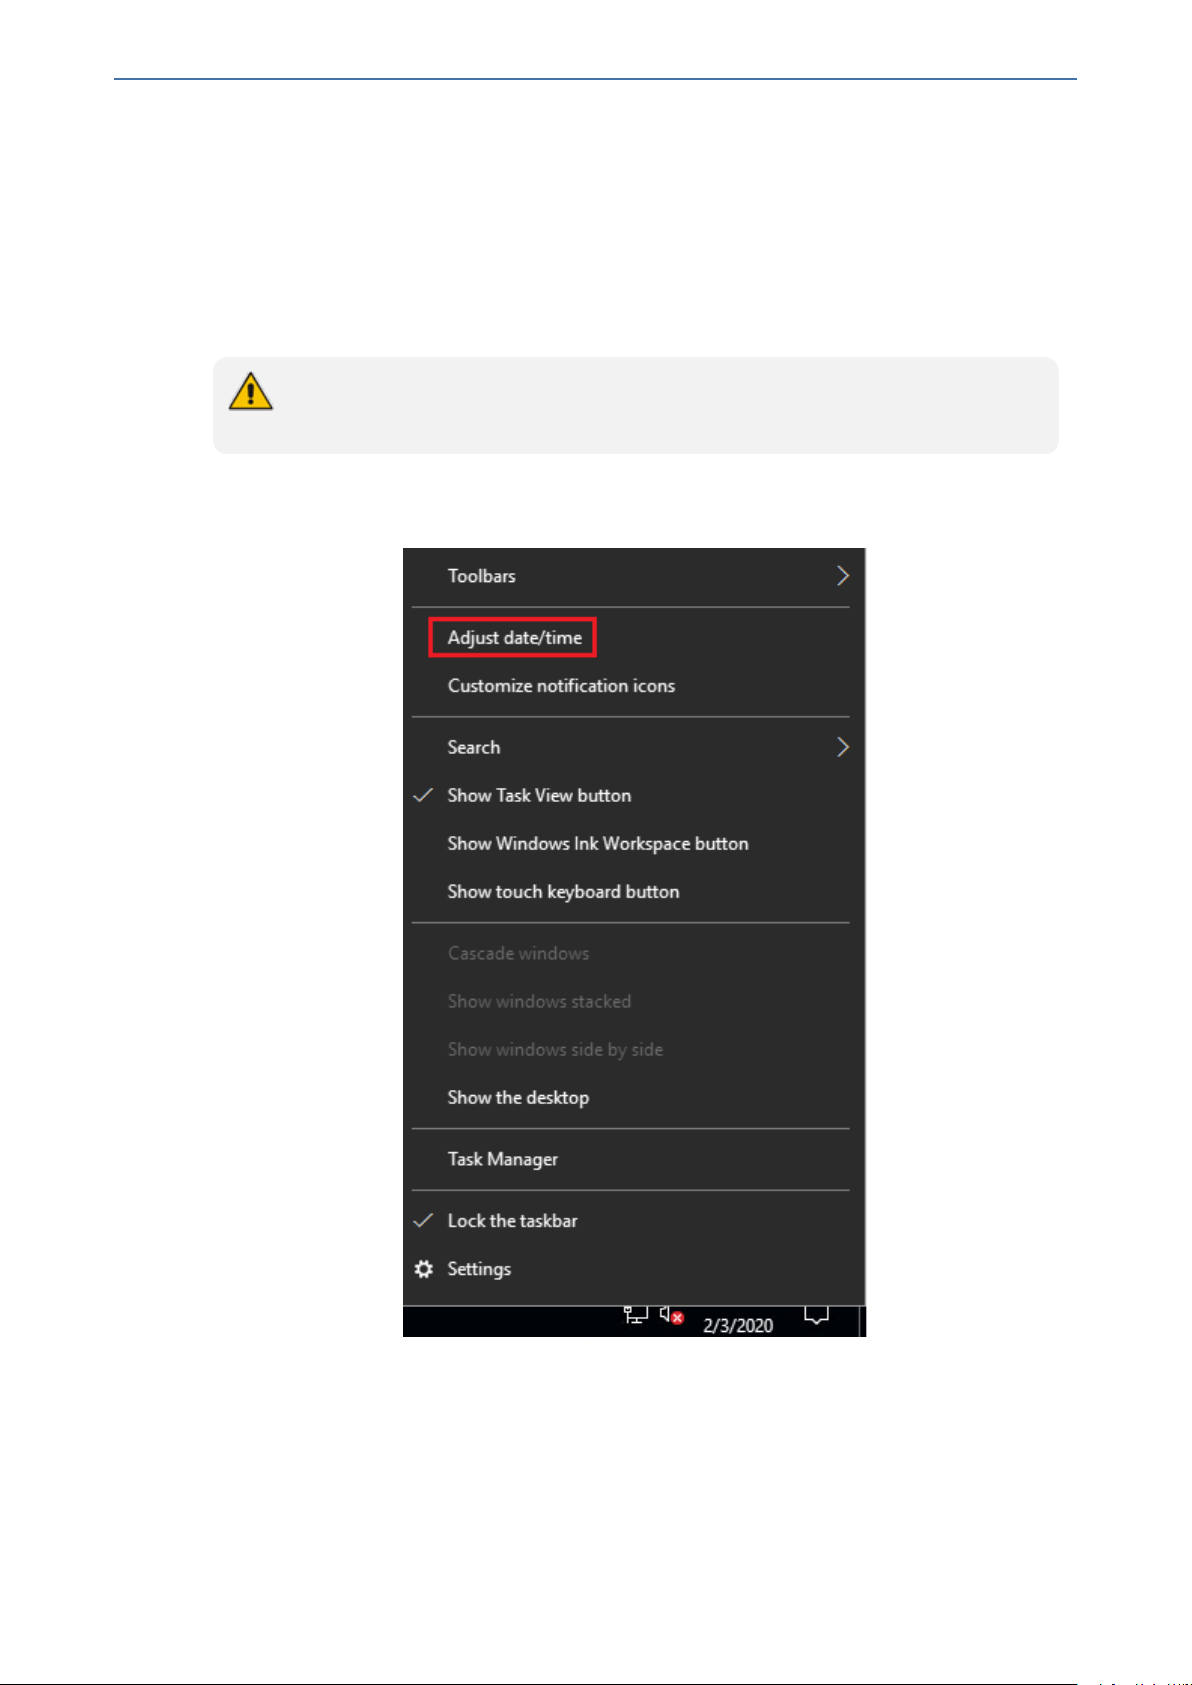
➢ To configure the server system time settings:
1. Right-click the server time and select Adjust date/time.
AC Voca | Installation Manual
2. Assign the correct UTC time zone, date and time and then save the settings.
- 9 -
Page 15
CHAPTER2 Getting Started
AC Voca | Installation Manual
- 10 -
Page 16
CHAPTER3 Installing AC Voca
3 Installing AC Voca
The procedure below describes how to install AC Voca. As noted in Getting Started on page2,
there are a number of ways to install the AC Voca system.
A restart may be required during installation. After the restart has completed, log in to
the server and the installation process will continue automatically.
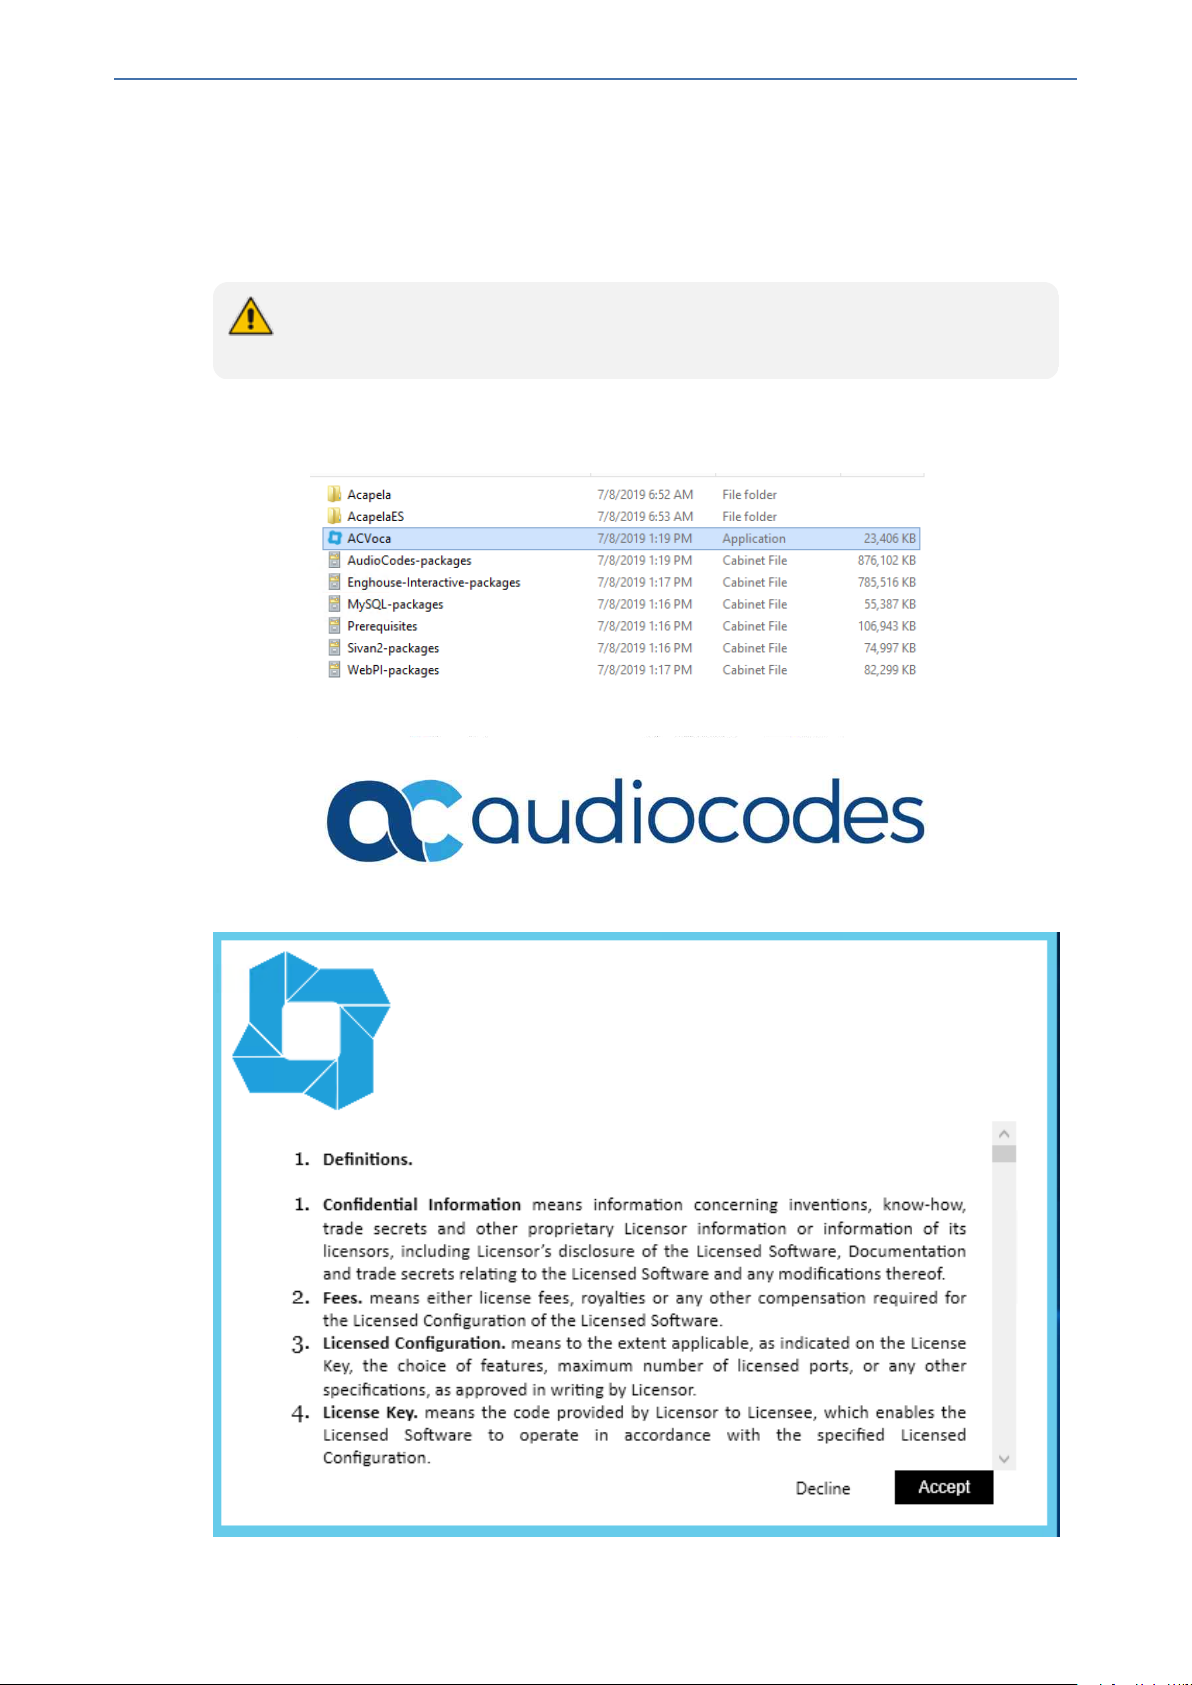
➢ To install AC Voca:
1. Double-click the AC Voca file to start the installation.
AC Voca | Installation Manual
2. After launching the installer, the AudioCodes logo appears:
3. The AC Voca EULA information page appears. You must accept the conditions to continue.
- 11 -
Page 17
CHAPTER3 Installing AC Voca
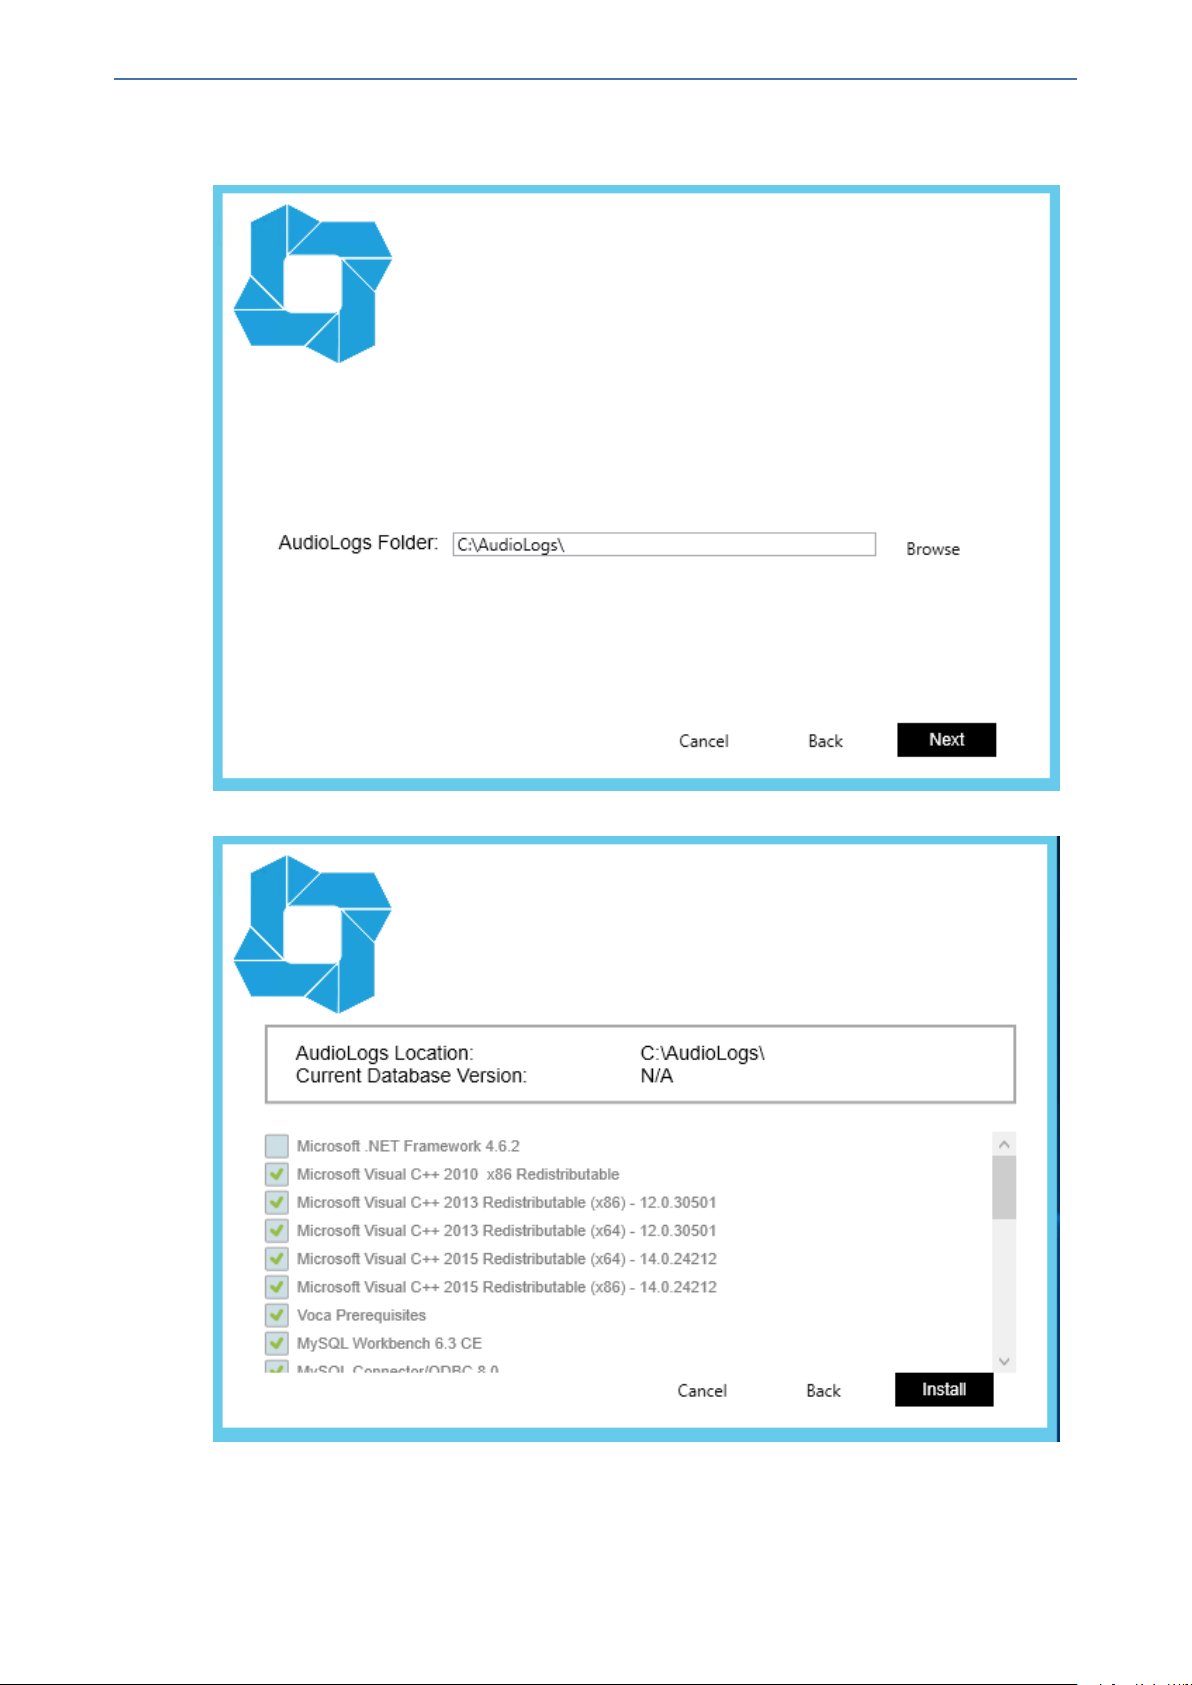
4. The AudioLogs directory window appears. The AC Voca system records and saves the speech
request in an audio logs directory. Assign the AudioLogs directory and click Next.
AC Voca | Installation Manual
5. A window appears displaying the components that are to be installed. Click Install.
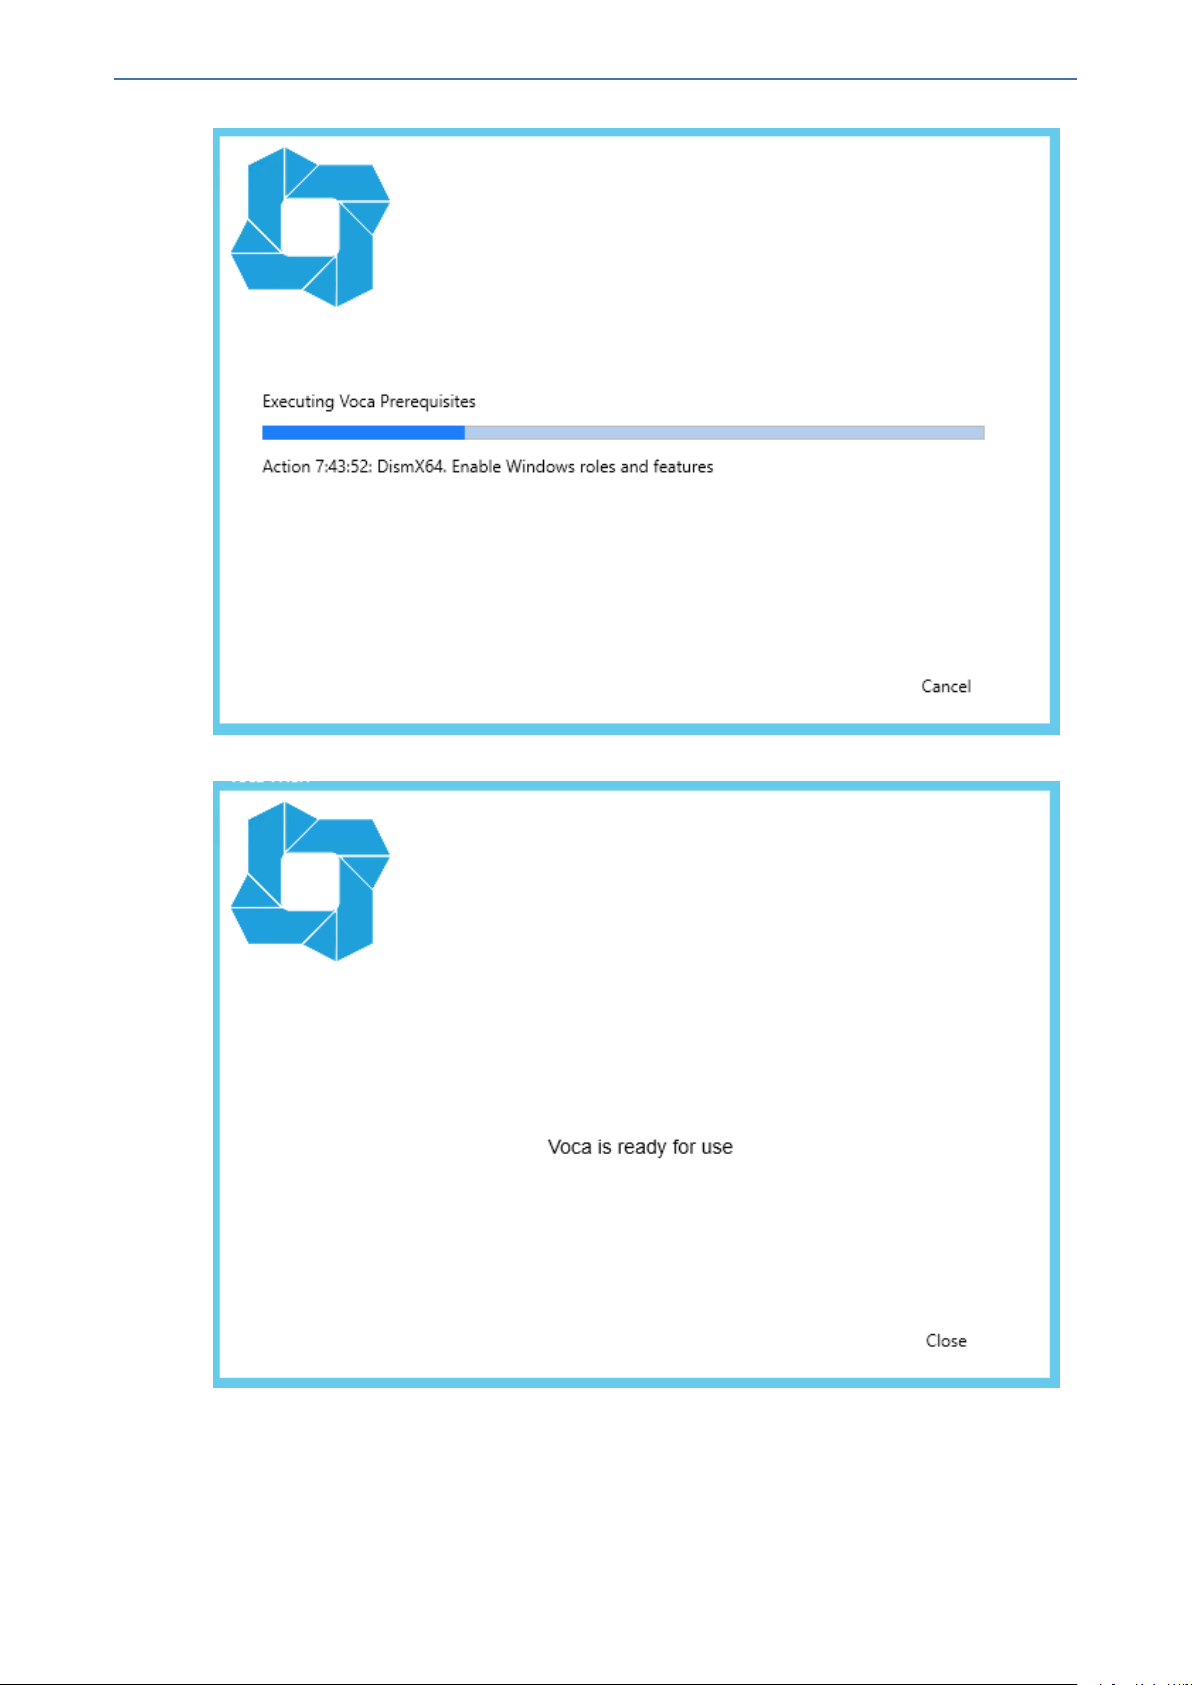
6. Prerequisites and required third-party applications are being installed.
- 12 -
Page 18
CHAPTER3 Installing AC Voca
AC Voca | Installation Manual
7. When completed, the installer displays the following screen. Click Close to restart the server.
- 13 -
Page 19
CHAPTER4 Configuring AC Voca System
4 Configuring AC Voca System
The following describes how to configure the AC Voca system. This configuration procedure should
be performed after completing the AC Voca Installation procedure.
AC Voca Scheduler Tasks
The following describes how to configure the AC Voca system Scheduler tasks:
■ Voca cleanup scheduler task
■ Voca backup scheduler task
➢ To configure Voca Task Scheduler:
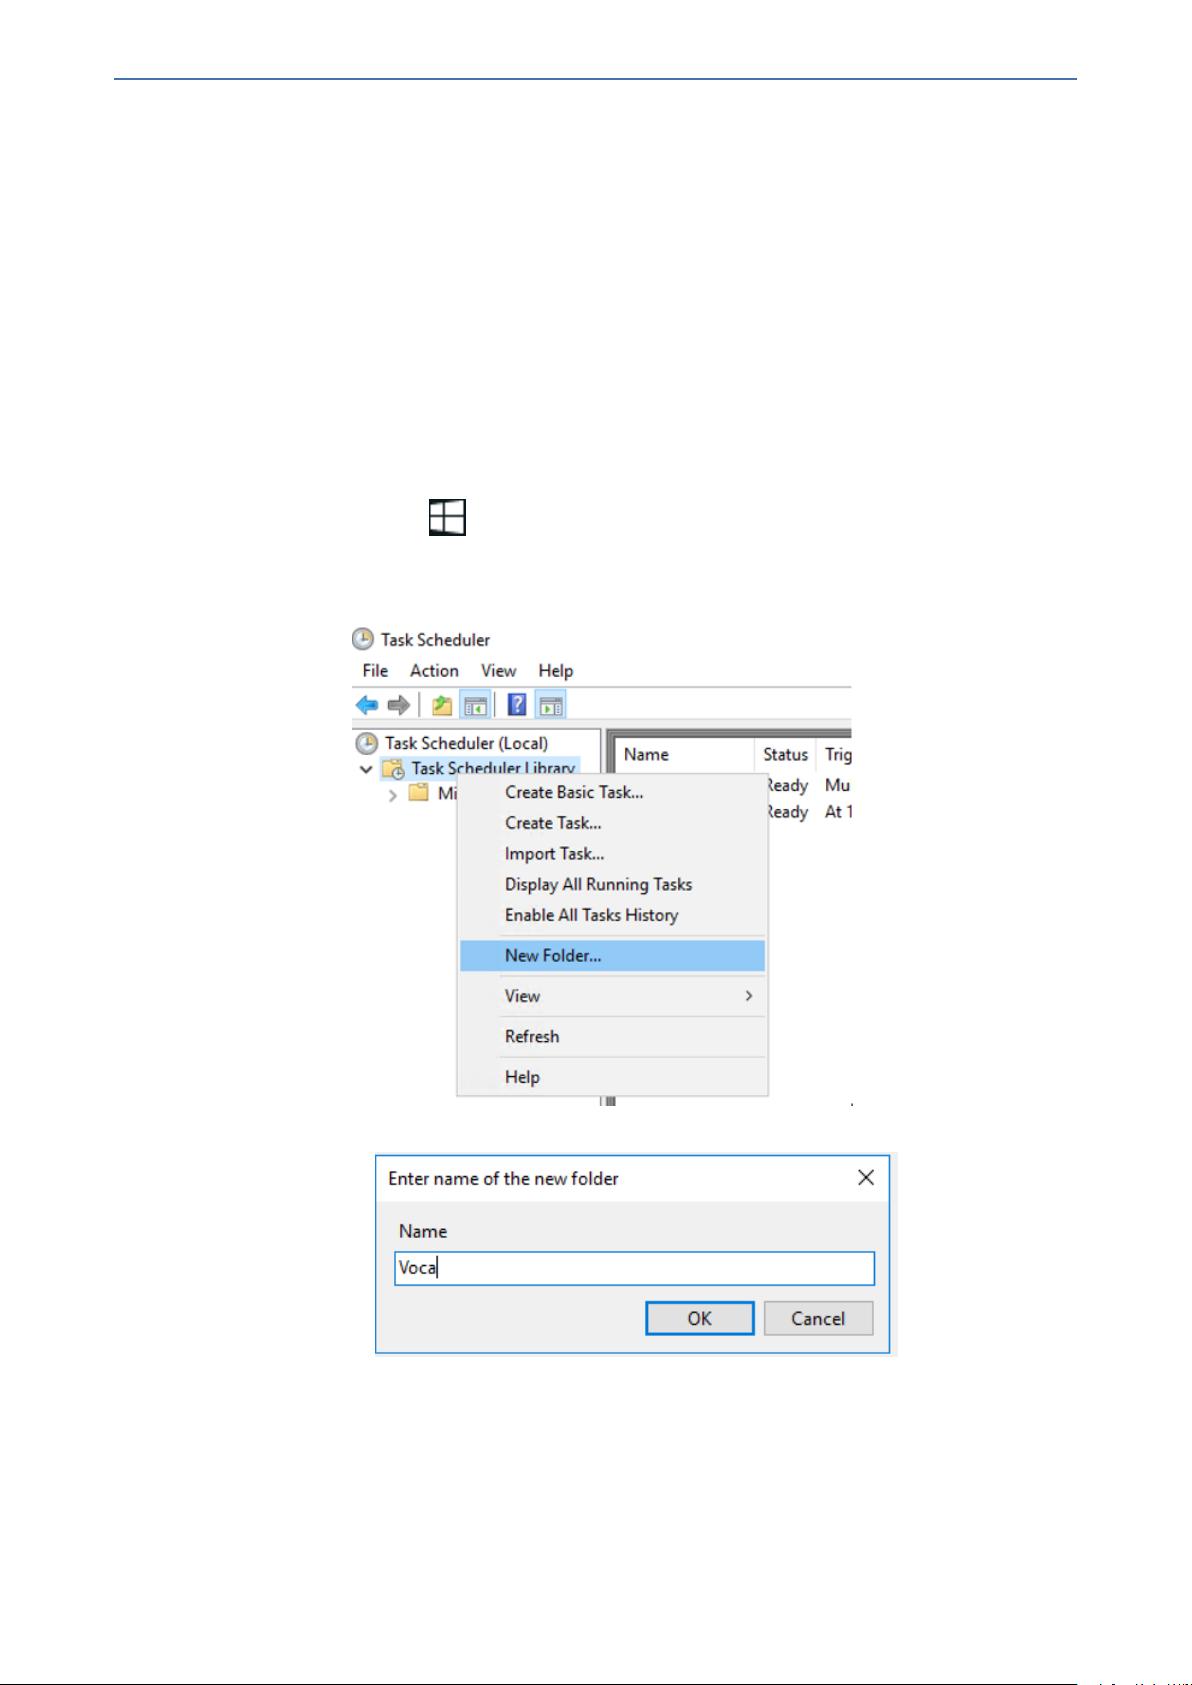
1. Press the Windows key, and then open Administrative Tools.
2. Open the Task Scheduler.
3. Right-click Task Schedule Library, and then choose New Folder.
AC Voca | Installation Manual
4. In the 'Name' field, enter "Voca", and then click OK.
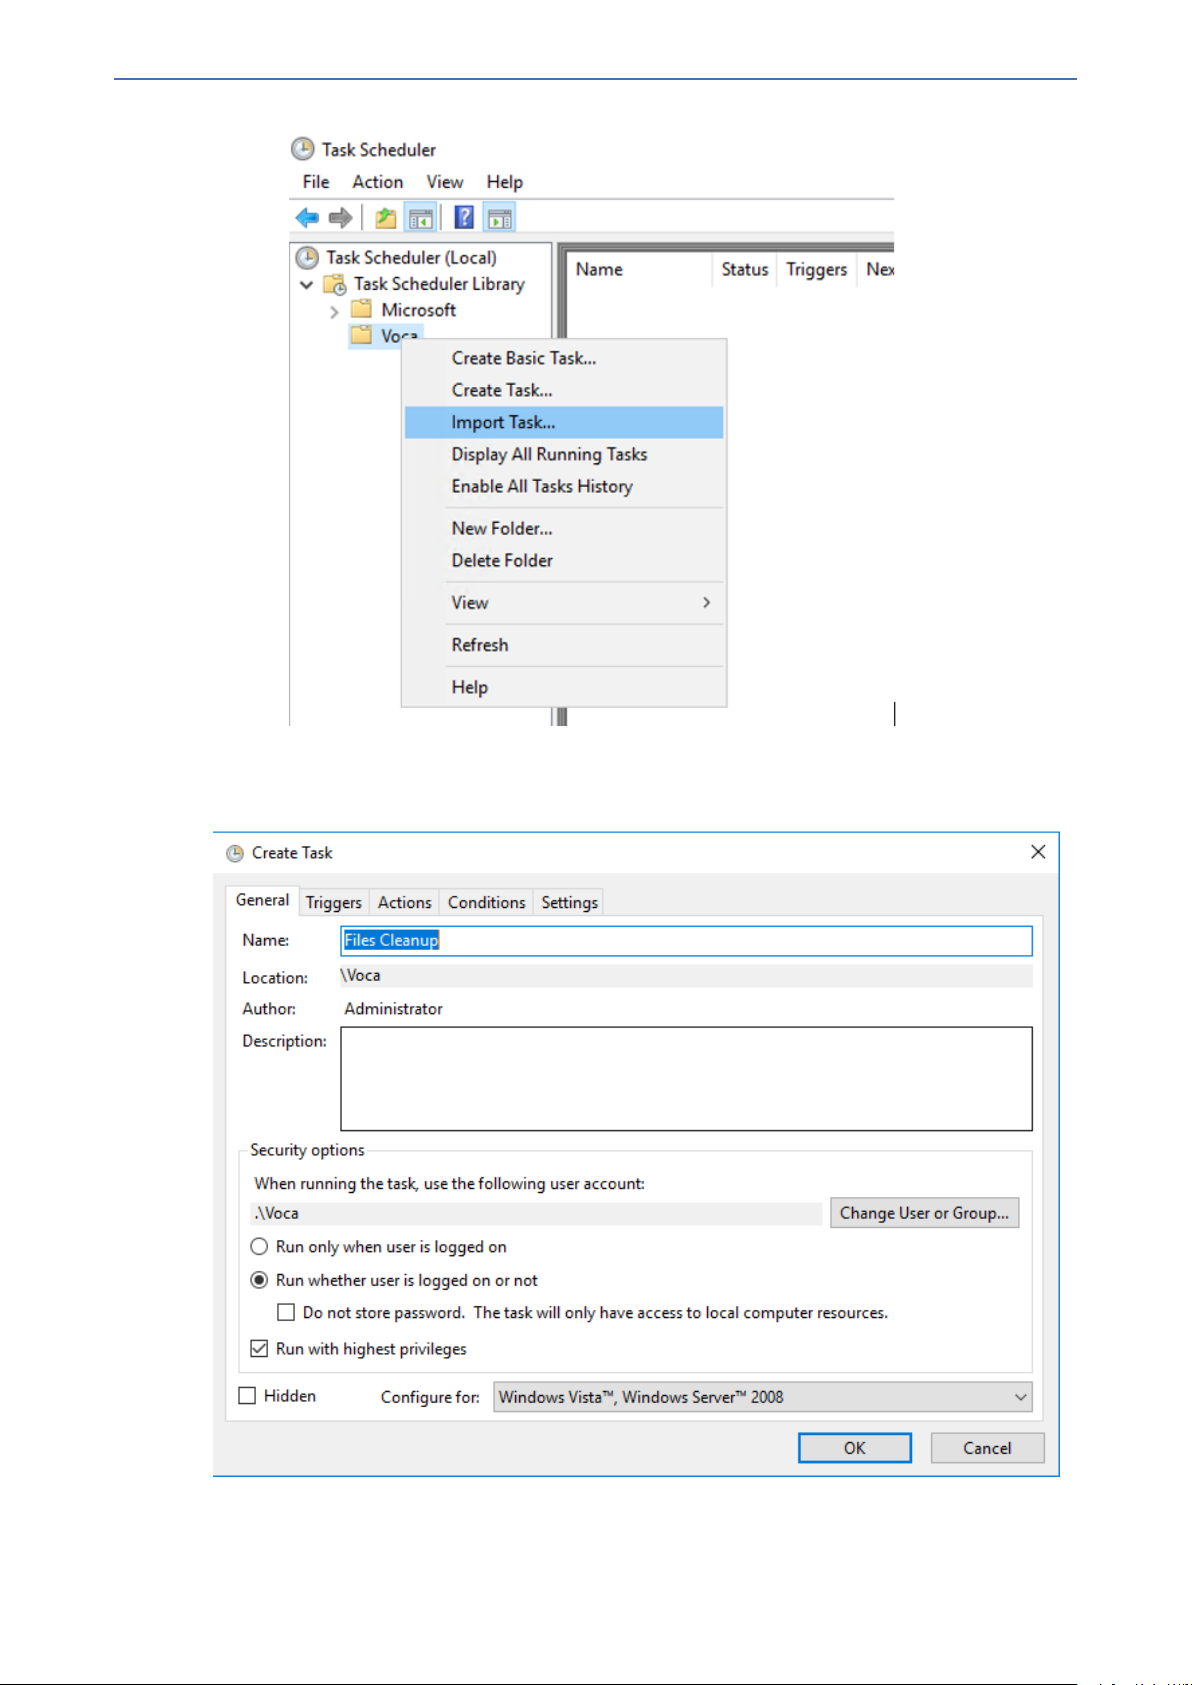
➢ To configure Voca cleanup scheduler task:
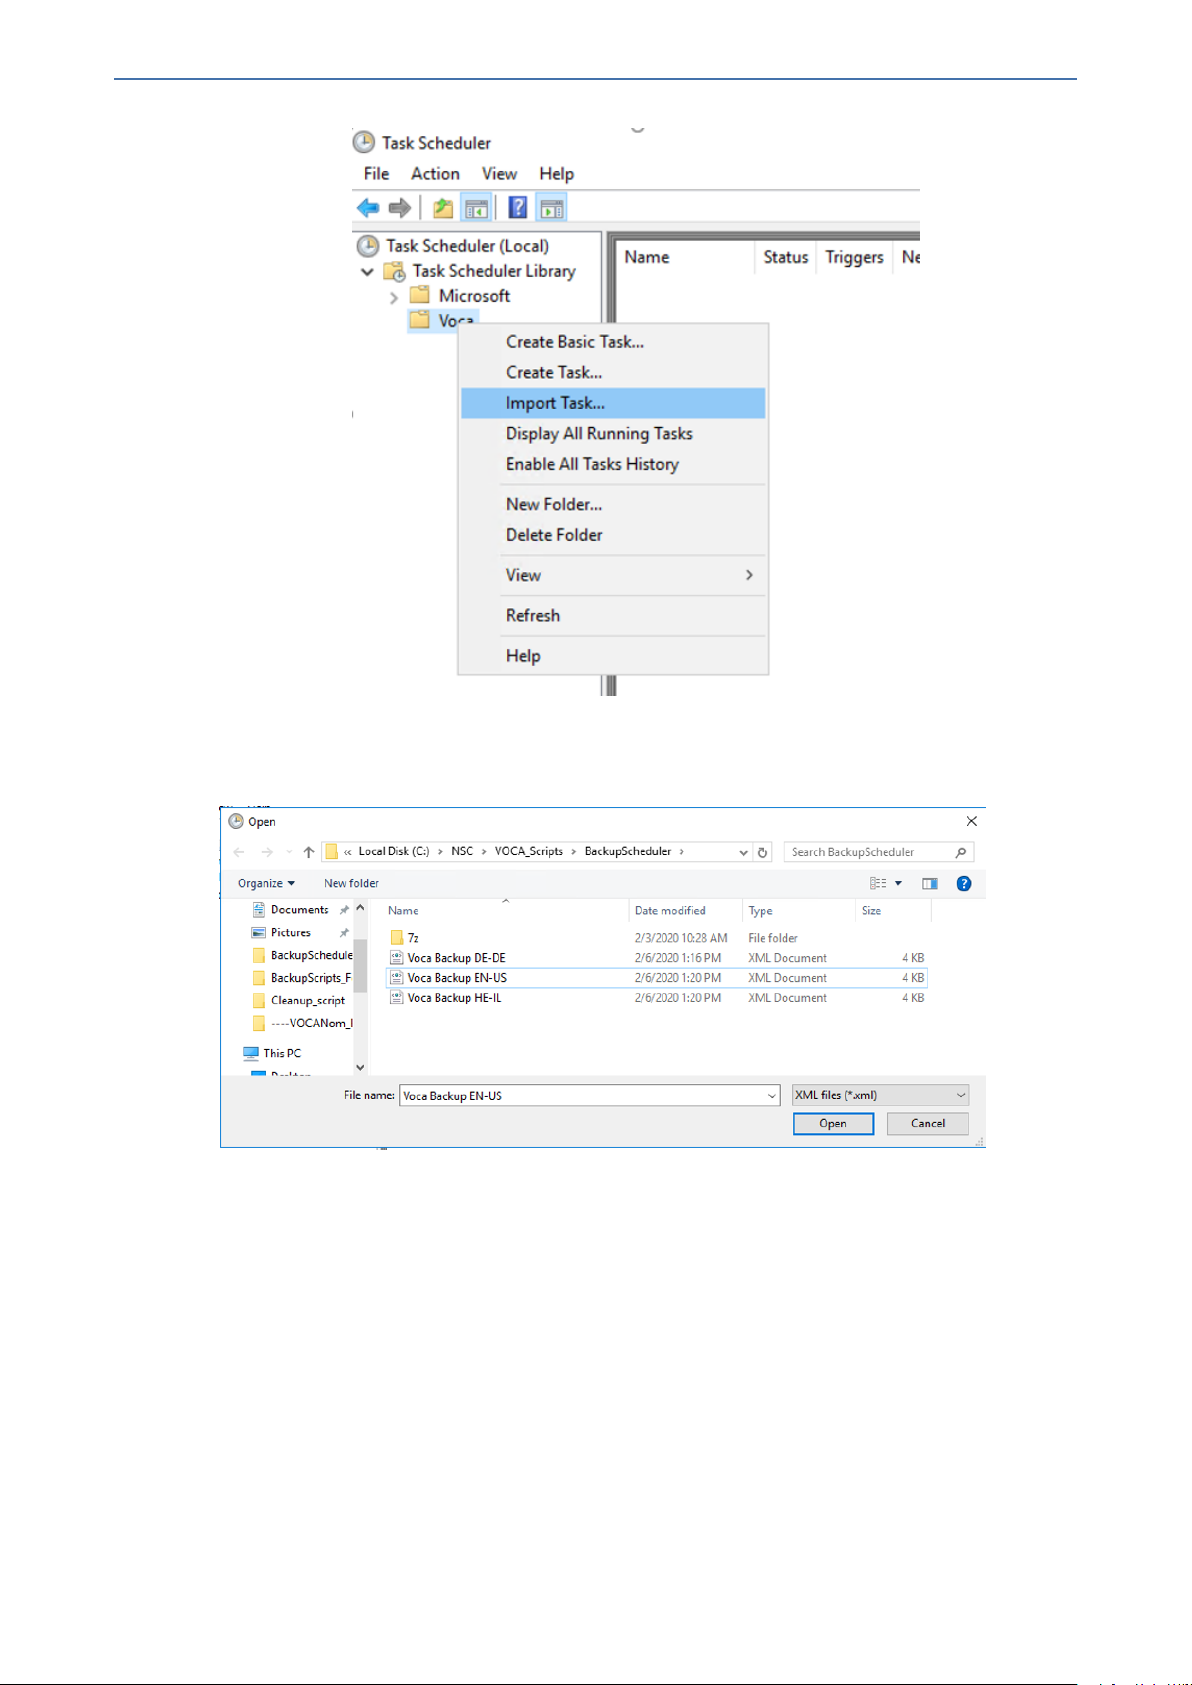
1. Right-click Voca Task Scheduler library > Import Task.
- 14 -
Page 20
CHAPTER4 Configuring AC Voca System
AC Voca | Installation Manual
2. Browse to the cleanup task configuration file location - C:\NSC\VOCA_Scripts\Cleanup_
script\Files Cleanup.xml, and then click OK.
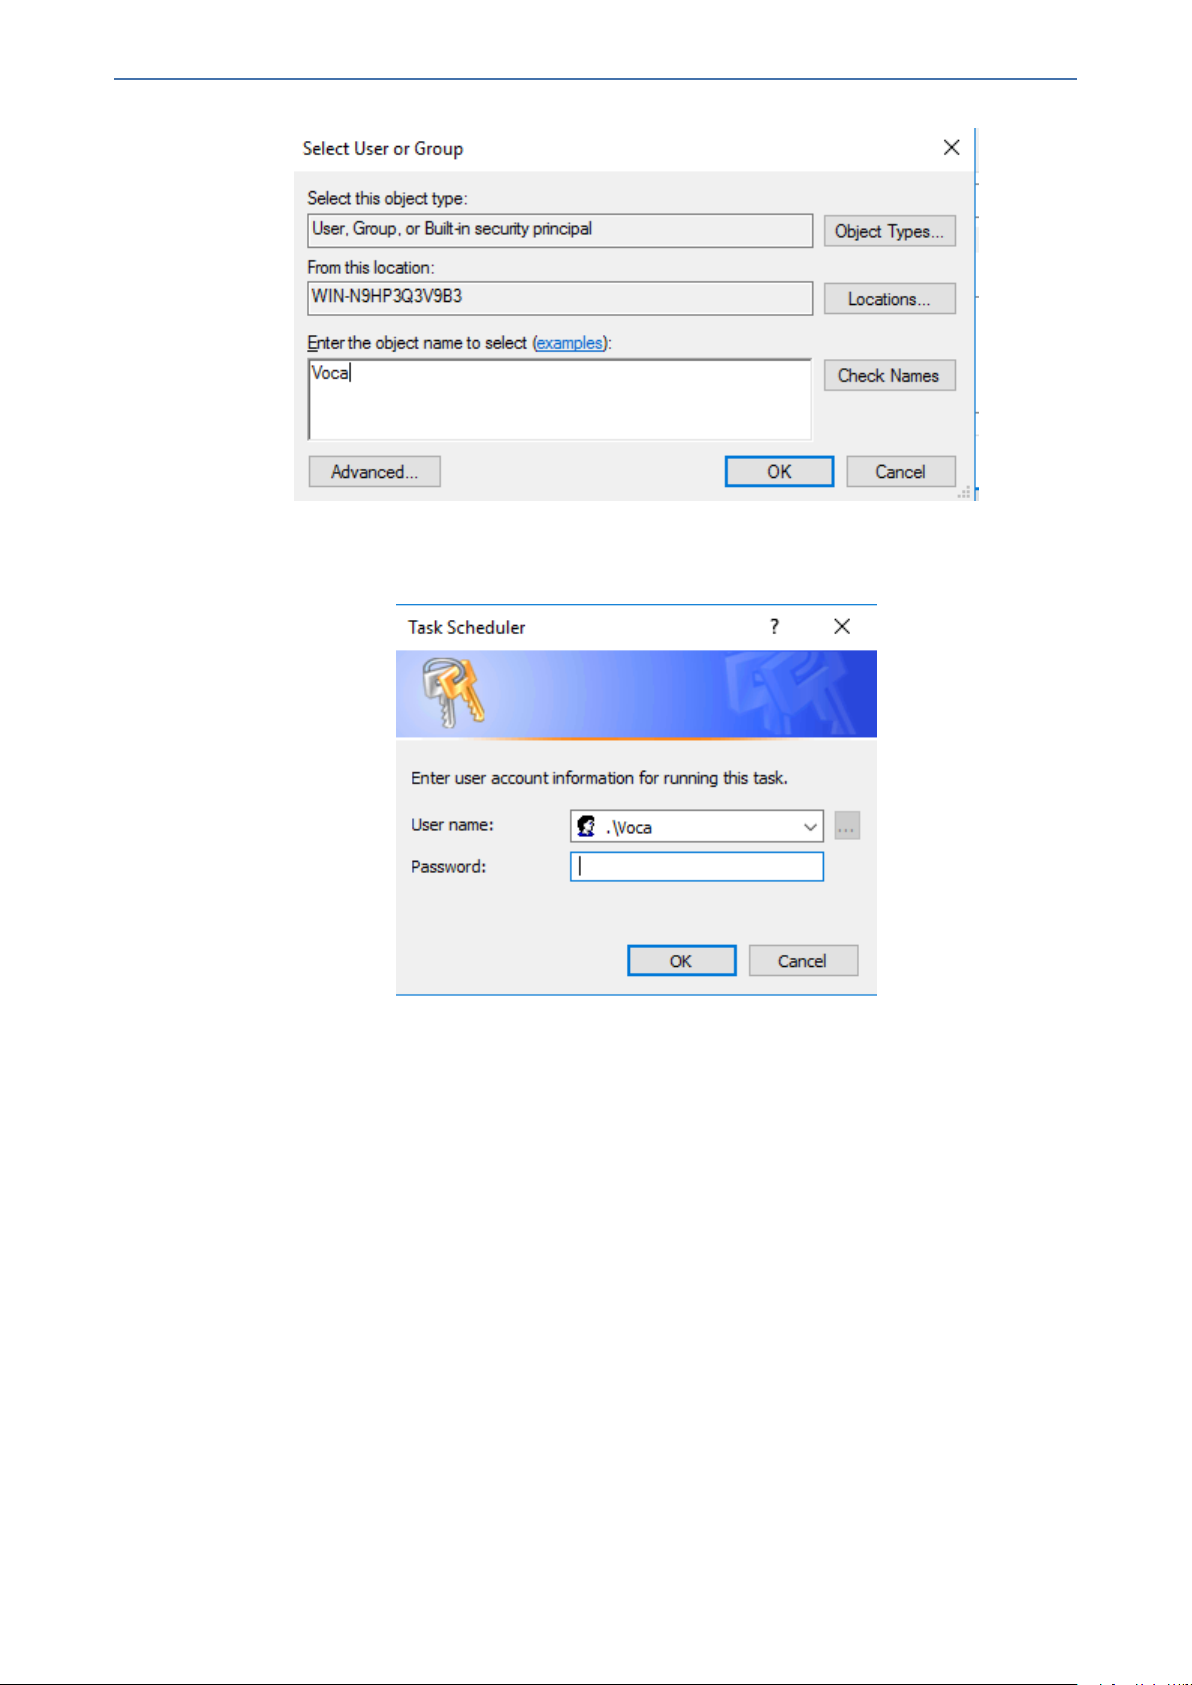
3. Click Change User or Group.
4. In the 'Enter the object name to select' field, enter "Voca", and then click Check Names.
- 15 -
Page 21
CHAPTER4 Configuring AC Voca System
5. Click OK.
6. In the Task Scheduler, enter your credentials (To obtain your credentials, contact your
AudioCodes representative).
AC Voca | Installation Manual
➢ To configure Voca backup scheduler task:
1. Right-click on the Voca Task Scheduler library, and then click Import Task.
- 16 -
Page 22
CHAPTER4 Configuring AC Voca System
AC Voca | Installation Manual
2. Browse to the backup task configuration file location at C:\NSC\VOCA_
Scripts\BackupScheduler/, and then select your system dialect file.
3. Click Open.
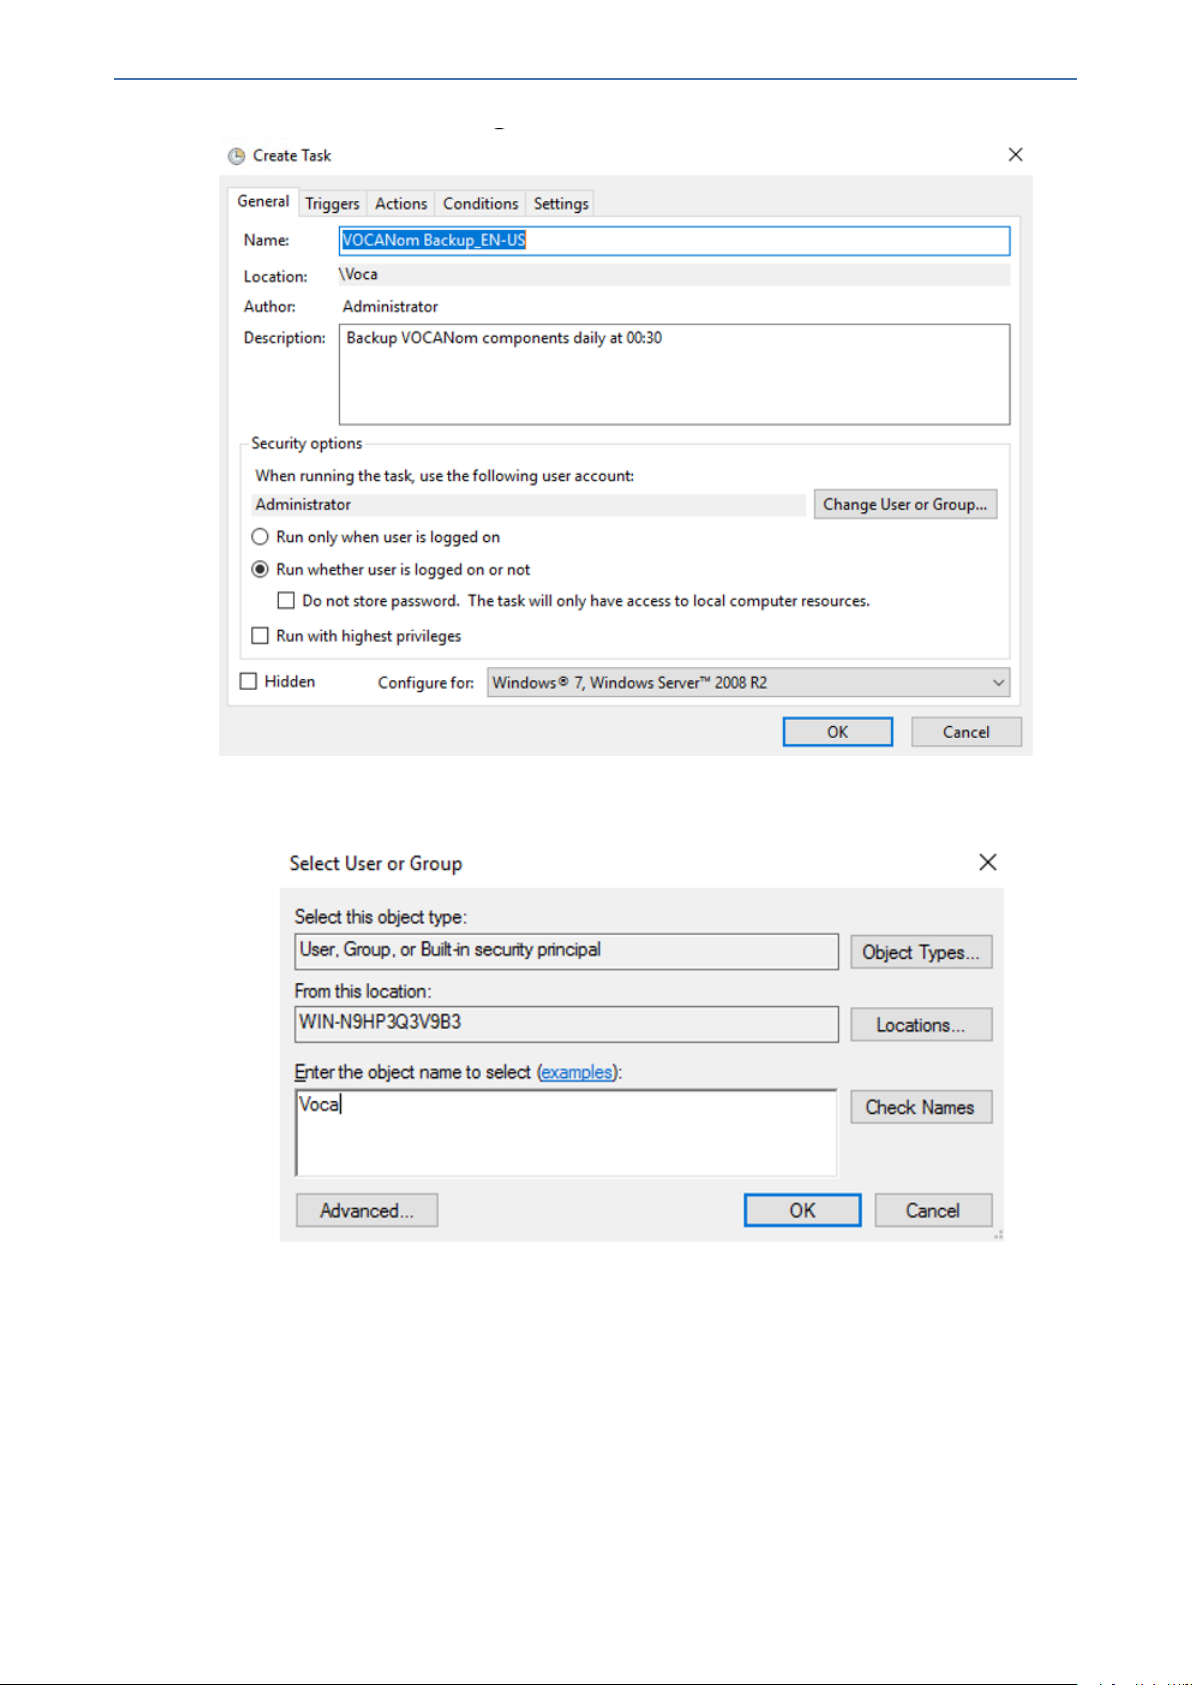
4. Click Change User or Group.
- 17 -
Page 23
CHAPTER4 Configuring AC Voca System
AC Voca | Installation Manual
5. In the 'Enter the object name to select' field, enter "Voca", and then click Check Names.
6. Click OK.
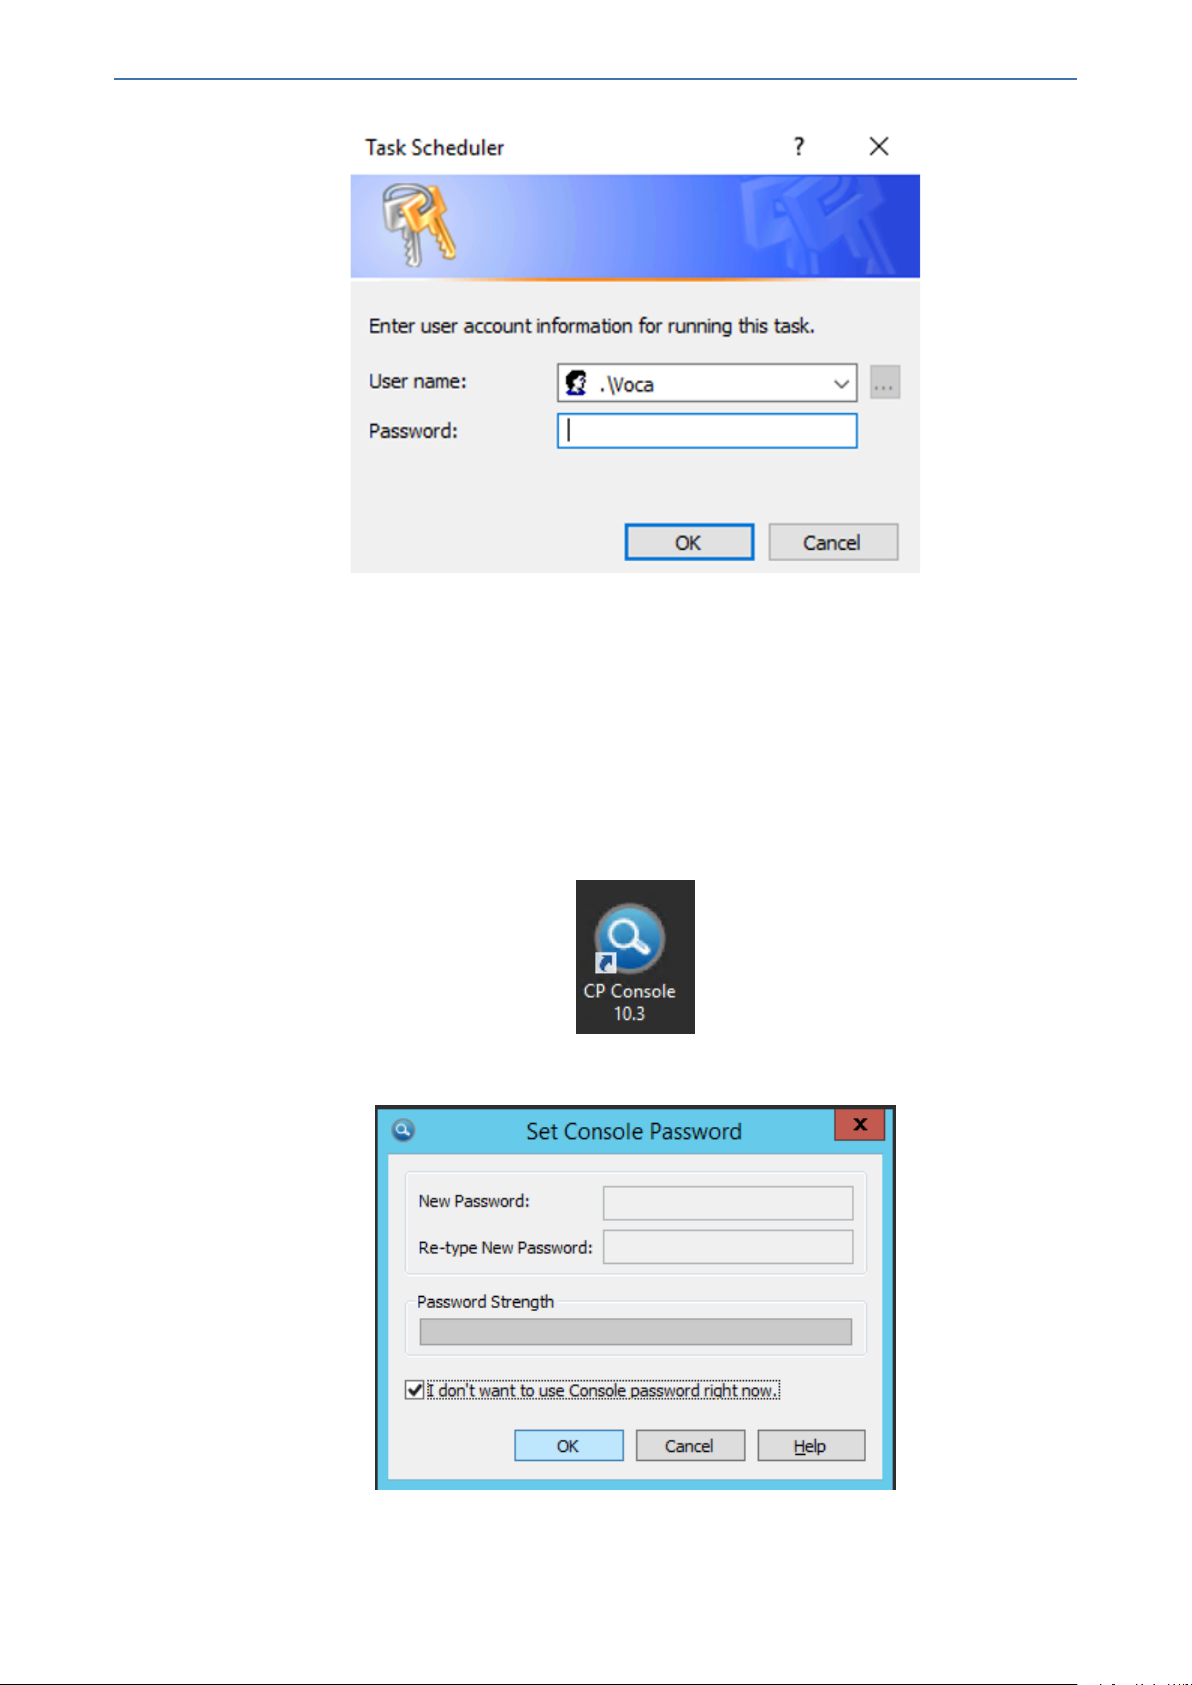
7. In the Task Scheduler, enter your credentials (To obtain your credentials, contact your
AudioCodes representative).
- 18 -
Page 24
CHAPTER4 Configuring AC Voca System
AC Voca | Installation Manual
Configuring Enghouse Interactive Communication Portal (CP)
Enghouse Interactive (CP) is a third-party application responsible for SIP connectivity between a
customer's PBX and the AC Voca speech recognition agent.
➢ To configure Enghouse Interactive’s CP:
1. Launch the CP Console 10.3.
2. When prompted to set a password, select the 'I don’t want to use…' check box, and then click
OK.
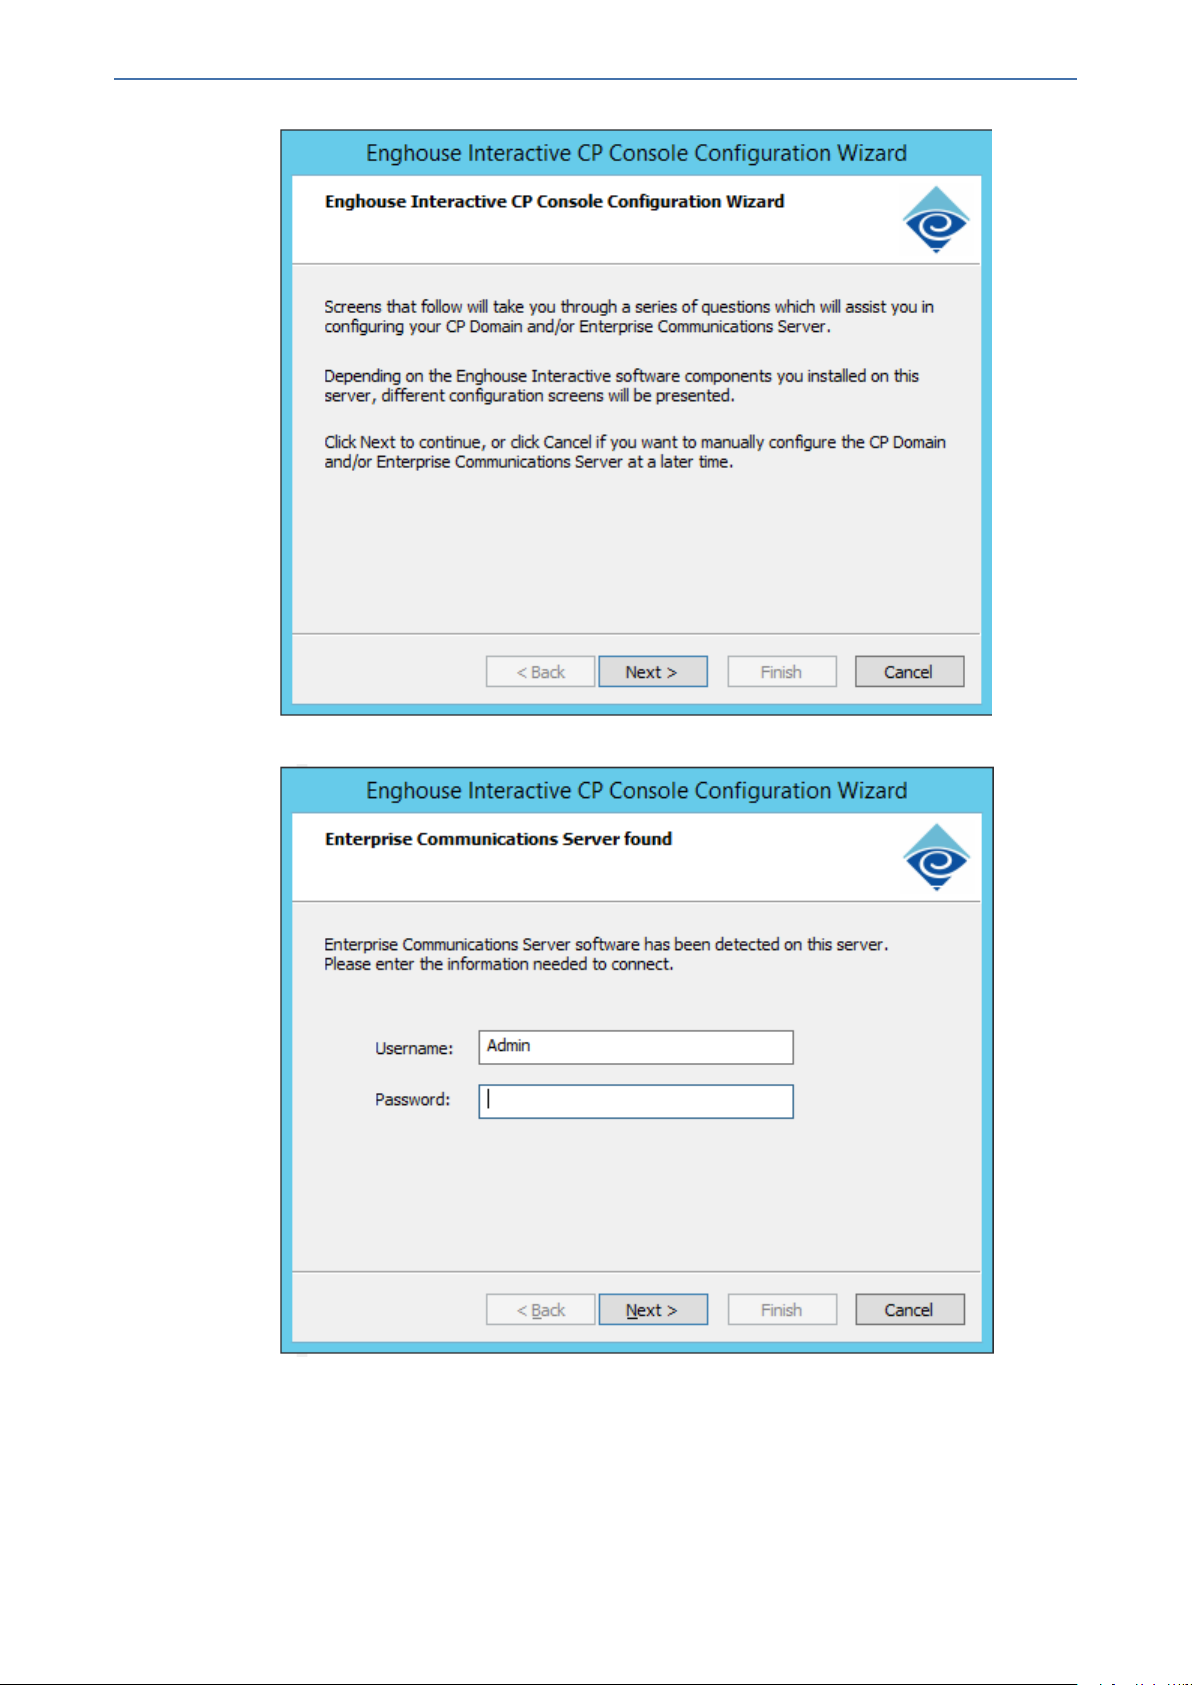
3. When the configuration wizard starts, click Next.
- 19 -
Page 25
CHAPTER4 Configuring AC Voca System
AC Voca | Installation Manual
4. When prompted, enter the password AC123456.
5. Click Finish when the configuration completes.
- 20 -
Page 26

CHAPTER4 Configuring AC Voca System
AC Voca | Installation Manual
6. On the ECS view tab, select Engine Settings > Dispatcher.
- 21 -
Page 27

CHAPTER4 Configuring AC Voca System
7. Under Dispatchers, on the right pane, right-click IP channels, and then click Set Dispatcher.
8. Select Voca_ 3.0.xxMT.
9. Select the 'Restart script after error' check box, and then click Set Dispatcher.
10. If the following Information window appears, click OK.
11. If the channel is not active, right-click IP Channels, and then select Activate Dispatcher.
AC Voca | Installation Manual
12. On the ECS view tab, select Engine Settings > Speech > Interface Configurations > ASR
Direct APIs > MRCP_ASR.
- 22 -
Page 28

CHAPTER4 Configuring AC Voca System
AC Voca | Installation Manual
13. Make sure all the parameters appear as shown below.
14. In the 'MRCPv2 server address' field, assign the AC Voca local static IP address and port.
15. On the ECS view tab, select Engine Settings > Speech > Interface Configurations >
MRCP Local SIP Track.
- 23 -
Page 29

CHAPTER4 Configuring AC Voca System
AC Voca | Installation Manual
16. Make sure all the parameters appear as shown below.
17. In the 'SIP stack address' field, assign the AC Voca local static IP address and port.
18. In the ECS view, right-click the computer name, and then select Restart CP Engine(s).
- 24 -
Page 30

CHAPTER4 Configuring AC Voca System
AC Voca | Installation Manual
19. Click the Restart immediately option, and then and click OK.
20. Configure the service account of Enghouse Interactive Enterprise Communications Server
service.
a. Open Administrative Tools > Services.
b. Open the Enghouse Interactive Enterprise Communications Server service.
- 25 -
Page 31

CHAPTER4 Configuring AC Voca System
AC Voca | Installation Manual
c. Select the Log On tab, and then click the This account option.
- 26 -
Page 32

CHAPTER4 Configuring AC Voca System
AC Voca | Installation Manual
d. Enter the .\Voca account name.
e. Enter and confirm your password. To get the credentials, please contact your AudioCodes
representative.
f. Click OK.
- 27 -
Page 33

CHAPTER4 Configuring AC Voca System
AC Voca | Installation Manual
g. Click OK when the following screen appears.
21. Configure the Media Gateway IP address settings.
a. Edit the Media Gateway configurator file C:\Program Files\Enghouse Interactive\Media
Gateway\conf\vars.xml, using Notepad++.
b. Add the following line with the AC Voca system IP address.
<X-PRE-PROCESS cmd="set" data="local_ip_v4=10.31.5.250"/>
- 28 -
Page 34

CHAPTER4 Configuring AC Voca System
This line should be added before ...data=”domain$$… line.
22. Restart the server.
23. Refer to Installing the AC Voca License.htmI and Installing Third Party Licenses.htmI.
Configuring Enghouse CP Additional Language Support (Optional)
This section describes how to add additional languages to Enghouse Control Panel. By default,
Enghouse CP supports English (US) and German (Germany) languages. If Hebrew or Spanish
languages are required, you need to run the Enghouse CP installation. If there is no need to add
additional languages, skip this section.
➢ To add additional language support:
1. Run the Enghouse CP installation file C:\ACVoca_Install\Enghouse_Interactive_
CP\Enghouse_Interactive_CP_103_GA.exe.
2. The Communications Portal installation begins. Choose Modify, and then click Next.
AC Voca | Installation Manual
3. In the components window, select the required languages:
● English (US)
● German (Germany)
● Spanish (Spain)
● Spain (Mexico)
● Hebrew
4. Click Next.
- 29 -
Page 35

CHAPTER4 Configuring AC Voca System
AC Voca | Installation Manual
5. Click Install.
6. Click Finish.
- 30 -
Page 36

CHAPTER4 Configuring AC Voca System
AC Voca | Installation Manual
7. Run the Enghouse CP Service Pack installation file, C:\ACVoca_Install\Enghouse_
Interactive_CP\ Enghouse_Interactive_CP_103_SPX.exe., and then click Next.
8. Click I accept.
- 31 -
Page 37

CHAPTER4 Configuring AC Voca System
AC Voca | Installation Manual
9. Click Finish.
10. Activate (load) the language support and Launch CP Console 10.3.
- 32 -
Page 38

CHAPTER4 Configuring AC Voca System
11. If the engine has not started, right-click the server name, and then click
Start CP Engine(s).
AC Voca | Installation Manual
12. Click ECS View, on the lower part of the screen, and then browse the
Language Modules.
- 33 -
Page 39

CHAPTER4 Configuring AC Voca System
AC Voca | Installation Manual
13. Right-click on the Language module name, and then click Load Language.
14. Restart the CP Engine by right-clicking the server name >
Restart CP Engine(s).
- 34 -
Page 40

CHAPTER4 Configuring AC Voca System
AC Voca | Installation Manual
- 35 -
Page 41

CHAPTER5 Installing the AC Voca License
5 Installing the AC Voca License
AudioCodes provides a license to use AC Voca. You can obtain a "finger print" file from the server
that you want to install AC Voca on. This file is sent to AudioCodes so that a license file can be
created and sent back to the customer.
➢ To install the AC Voca License:
1. Log in to AC Voca by navigating to https://<IP Address> in your Chrome browser.
2. To get the Administrator credentials, please contact your AudioCodes representative.
AC Voca | Installation Manual
The default Administrator credentials should be modified after installation.
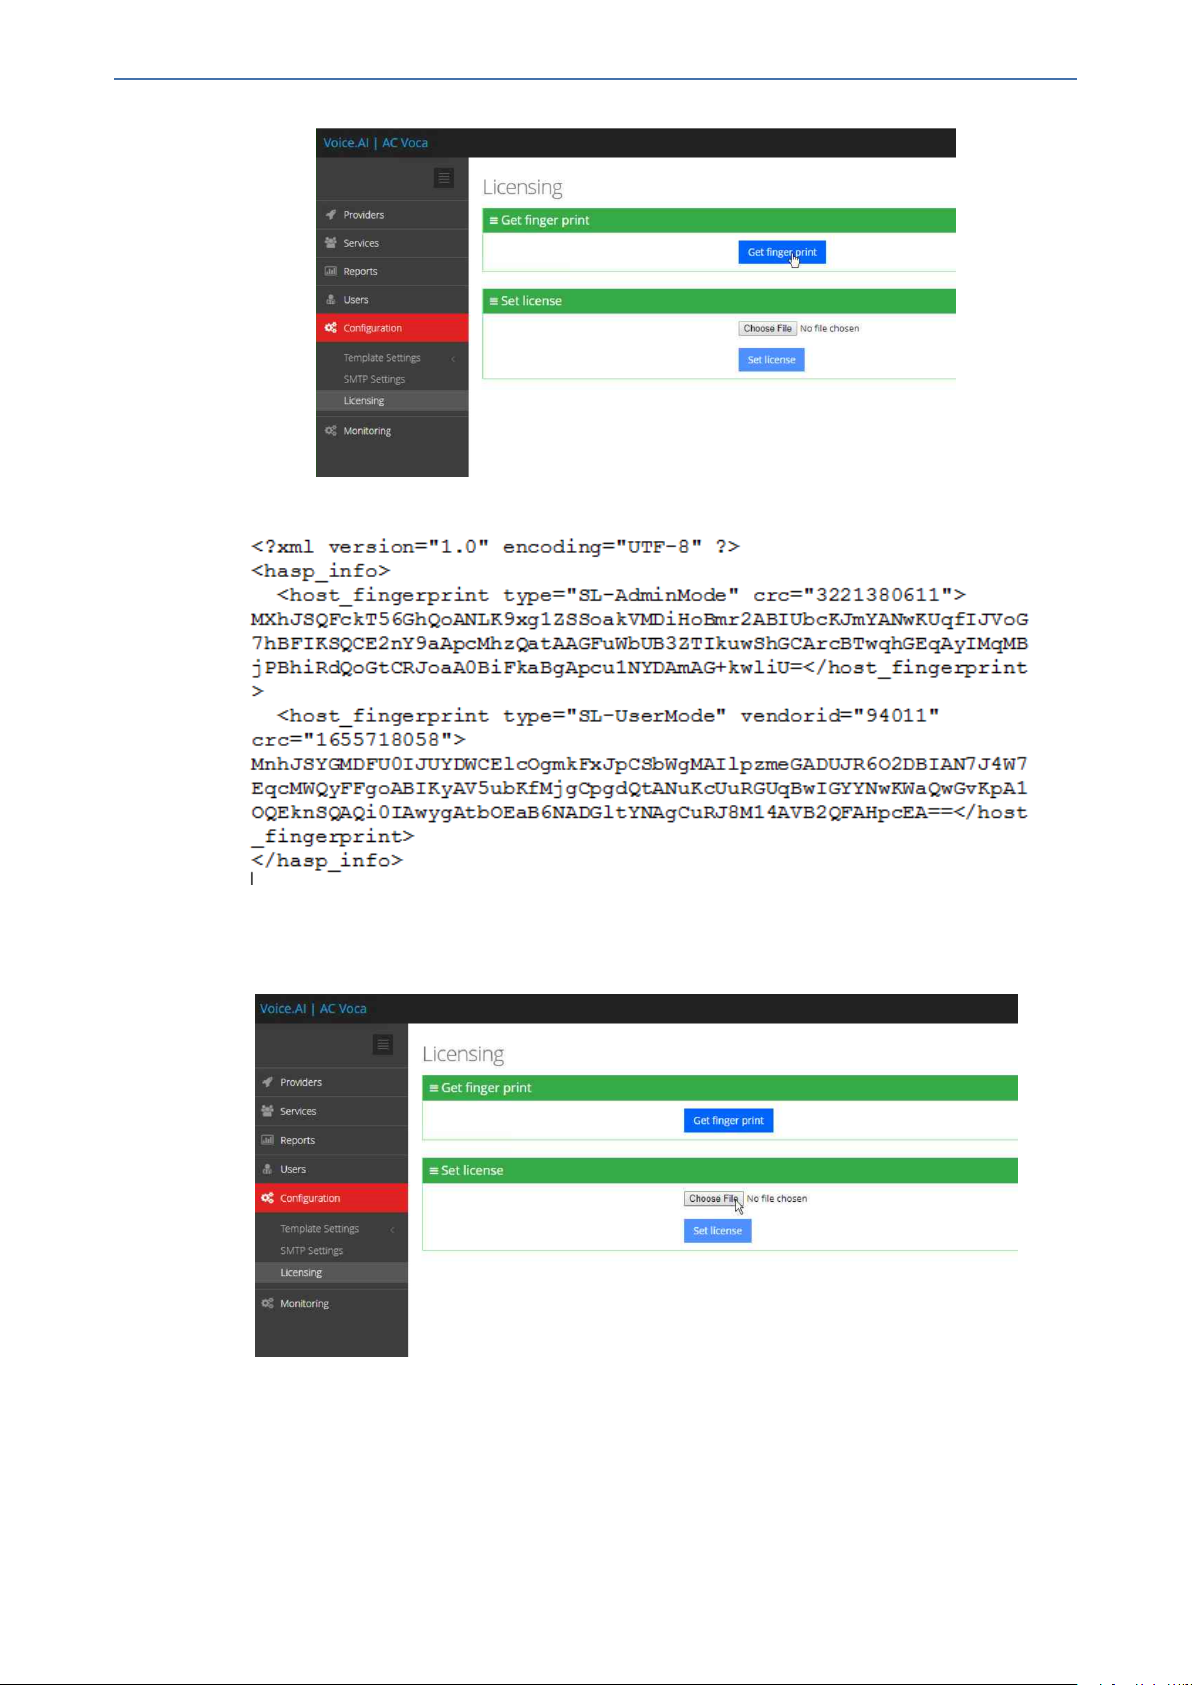
3. On the Licensing page (Configuration > Licensing), click Get finger print. A finger print file
is created on your server.
- 36 -
Page 42
CHAPTER5 Installing the AC Voca License
This is a sample Finger print file:
AC Voca | Installation Manual
4. Send the Finger print file to AudioCodes.
5. When you have received your License file from AudioCodes, copy it to your server.
6. Click Choose File to select your license.
7. Select the license file name, and then click Open.
- 37 -
Page 43

CHAPTER5 Installing the AC Voca License
8. In the Set License window, click Set license to activate your AC Voca license.
AC Voca | Installation Manual
9. After you have set the license, the total number of licenses should be displayed on the screen.
This is an example of what a license file looks like.
- 38 -
Page 44

CHAPTER5 Installing the AC Voca License
AC Voca | Installation Manual
- 39 -
Page 45

CHAPTER6 Installing Third-Party Licenses
6 Installing Third-Party Licenses
In addition to the previous section that explains how to install the AC Voca license, you must also
install the Enghouse Interactive license and a relevant Text to Speech license. This section first
describes how to install Enghouse Interactive licenses. Once you have completed this installation,
you must then install and configure an appropriate Text to Speech license.
Installing Enghouse Interactive License
You can install the Enghouse Interactive license. Once this has been installed, you must also
install the Control Panel and CTConnect Media Gateway licenses.
➢ To install the Enghouse Interactive License:
1. Run the Envox License Utility application from C:\Program Files (x86)\Enghouse Inter-
active\CP\CPLicensingUtility.exe.
2. Verify your System ID number and send it to AudioCodes.
AC Voca | Installation Manual
Enghouse Interactive has two licenses that you need to install:
■ Control Panel License
■ CTConnect Media Gateway License
Installing Control Panel License
Once you have received your Control Panel license back from AudioCodes, see
Installing Enghouse Interactive License above Paragraph Verify your System ID
number and send it to AudioCodes. above,and continue with the following procedure.
➢ To install the Control Panel License:
1. Run the Envox License Utility application from C:\Program Files (x86) \Enghouse Inter-
active\CP\CPLicensingUtility.exe.
2. On the Enghouse Interactive CP Licensing Utility screen, click Load license.
- 40 -
Page 46

CHAPTER6 Installing Third-Party Licenses
3. Browse to the license file location, and then select the CP_import.XML license file.
AC Voca | Installation Manual
4. Click Open.
5. On the Enghouse Interactive System Information screen, click Apply License; a confirmation
message box appears informing you that the license has been applied successfully.
6. Click OK.
- 41 -
Page 47

CHAPTER6 Installing Third-Party Licenses
Installing CTConnect Media Gateway License
Once you have received your CTConnect Media Gateway license back from AudioCodes (see
Installing Enghouse Interactive License ), verify your System ID number, and then send it to your
AudioCodes representative. Continue with the following procedure.
➢ To install the CTConnect Media Gateway License:
1. Copy the Enghouse CTConnect Media Gateway License XML file to C:\Program Files
(x86)\Enghouse Interactive\CTI Connect\Licenses.
AC Voca | Installation Manual
The filename must be named import.xml.
2. Restart the server to complete the license installation.
Installing Text-to-Speech Engine
The following describes how to install the Acapela Text to Speech engine.
Acapela non-Hebrew Text to Speech
● This installation is only applicable for non-Hebrew text to speech.
● The license key is dependent on your server's MAC address.
➢ To install the Acapela Text-to-Speech license:
1. Verify the server MAC address.
a. Enter "cmd" in the Run dialog box, and then click OK.
b. Enter "ipconfig/all".
- 42 -
Page 48

CHAPTER6 Installing Third-Party Licenses
2. Find the Intel<R> 82579LM Gigabit Network Adapter, and then send the MAC address
(“Physical Address”) to AudioCodes.
AC Voca | Installation Manual
3. AudioCodes will send you the license key.
4. Click ÿ, and then in the 'Search' field, enter "Acapela TTS Server Control Center”.
5. Select it in the Search results.
6. On the Acapela TTS Server Control Center screen, click Server configuration.
- 43 -
Page 49

CHAPTER6 Installing Third-Party Licenses
AC Voca | Installation Manual
7. Under the License System/Key Device group, select MACIDKEY.
8. Copy the received license key into the key string field.
9. Click Apply, and then OK.
10. Configure the Acapela Telecom TTS Service:
a. Open Administrative Tools > Services.
b. Open Acapela Telecom TTS Service Properties.
c. From the 'Startup type' drop-down list, select Automatic.
d. Click Start.
e. Click OK.
- 44 -
Page 50

CHAPTER6 Installing Third-Party Licenses
AC Voca | Installation Manual
11. Enable the TTS connector on the database:
a. In the Run dialog box, enter "cmd", and then click OK.
b. Run the following command:
C:\NSC\MYSQLServer\bin\mysql.exe -h localhost -u seda -p -e
"UPDATE `seda`.`main_configuration` SET `Category`='TTS_Conn'
WHERE `Value` = 'Acapela' AND `Name` = 'EN-US'
- 45 -
Page 51

CHAPTER6 Installing Third-Party Licenses
Make sure you assign the correct dialect name in the command:
English USA: EN-US
German: DE-DE
Spanish Spain: ES-ES
Spanish USA: ES-US
Spanish Mexico: ES-MX
c. Enter the password for the "seda" username (Contact your AudioCodes representative if
you don't have the password).
AC Voca | Installation Manual
- 46 -
Page 52

CHAPTER7 Configuring AC Voca DNN Speech Recognition Mode
AC Voca | Installation Manual
7 Configuring AC Voca DNN Speech
Recognition Mode
This section describes how to configure and enable AC Voca Deep Neural Networks (DNN)
Speech Recognition Mode, which supports English, German and Hebrew dialects only. AC Voca
DNN Speech Recognition service runs on a licensed system only (see Installing AC Voca.htm).
During configuration, you will be asked to enter your database credentials.
➢ To obtain your credentials:
1. Contact your AudioCodes representative.
2. Run the C:\NSC\VOCA_Scripts\DNN_Conf_Script\dnn.bat file.
3. Enter the password for the "seda" username (Contact your AudioCodes representative if you
don't have the password).
DNN Speech Recognition Mode is enabled.
- 47 -
Page 53

CHAPTER8 Configuring AC Voca LDAP Synchronization
AC Voca | Installation Manual
8 Configuring AC Voca LDAP Synchronization
This section describes how to configure Lightweight Directory Access Protocol (LDAP)
synchronization for AC Voca On-premises and AC Voca Cloud installations.
LDAP Client Requirements
This section describes the system requirements for the AC Voca LDAP Client.
Hardware and Operating System Requirements
■ AC Voca On-premises mode: The client is running on an AC Voca On-premises server.
■ AC Voca Cloud mode: The client is running on a customer-provided server with the Windows
operating system.
Network Requirements
■ The customer LDAP server should be reachable by network for AC Voca LDAP Client
The following requirements are only applicable to AC Voca Cloud mode.
■ The AC Voca Cloud server should be reachable by the network for the AC Voca LDAP Client.
■ Confirm that you can access the following link: https://admin.vocanom.com
LDAP Synchronization Requirements
Customers need to provide the following information:
■ LDAP server address or FQDN name
■ LDAP Base Distinguished Name (DN)
■ LDAP user with “Password never expired” enabled settings
Running the LDAP Client Setup
The procedure below describes how to run the LDAP client setup in the following modes:
■ AC Voca Cloud
■ AC Voca On-premises
- 48 -
Page 54

CHAPTER8 Configuring AC Voca LDAP Synchronization
Running the LDAP Client Setup in AC Voca Cloud Mode
The procedure below describes how you can run the LDAP client in AC Voca Cloud mode.
➢ To run the LDAP client in AC Voca Cloud mode
1. Create the C:\LDAP\VocaLdapService directory.
2. Copy the LDAP client files to this directory.
3. Create shortcut on the Desktop by doing the following:
a. Right-click Desktop > New > Shortcut.
b. Browse to C:\LDAP\VocaLdapService\VocaLdapSetup.exe.
c. Click Next, and then click Finish.
AC Voca | Installation Manual
Running the LDAP Client Setup in AC Voca On-premises Mode
The procedure below describes how you can run the LDAP client in AC Voca On-premises mode.
➢ To run the LDAP client in AC Voca On-premises mode:
1. Create a shortcut on the Desktop by doing the following:
a. Right-click Desktop > New > Shortcut.
b. Browse to C:\LDAP\VocaLdapService\VocaLdapSetup.exe.
c. Click Next, and then click Finish.
- 49 -
Page 55

CHAPTER8 Configuring AC Voca LDAP Synchronization
2. Right-click on the VocaLdapSetup icon ; the following screen appears:
3. Select Run as administrator.
Configuring the LDAP Client
The procedure below describes how to configure the LDAP client.
Setting up LDAP Client Synchronization
AC Voca | Installation Manual
➢ To run the LDAP Client Synchronization Setup
1. On the Configurator/Monitor screen, click Configure.
The following screen appears.
- 50 -
Page 56

CHAPTER8 Configuring AC Voca LDAP Synchronization
2. Click Add.
3. Select the 'Enable' check box.
4. In the 'Configuration Name' field, enter the appropriate name.
AC Voca | Installation Manual
Entering Fields under LDAP Connection Tab
Enter the following fields under the LDAP Connection tab:
Server: Defines the LDAP server IP address or FQDN name.
User: Defines the LDAP user name.
Password: Defines the LDAP user password.
Ask the customer to enable the 'Password never expires' property for the LDAP user in
the Active Directory.
BaseDN: Defines the Base DN
Filter: See Useful Topics on page74 regarding filter configuration
FilterUsage: "2"
Encoding: Default
- 51 -
Page 57

CHAPTER8 Configuring AC Voca LDAP Synchronization
AC Voca | Installation Manual
If you are using a secure LDAP connection, use Port 636 instead of the non-secure
Port 389 (default).
Entering Fields under LDAP User Attributes Tab
Enter the following fields under the LDAP User Attributes tab:
UniqueID: "objectGUID"
FirstName: "givenName"
LastName: "sn"
Extension: "telephoneNumber"
Mobile: "mobile"
Dect:
The DECT or WLAN phone should be enabled on the AC Voca system.
Department: "department"
Email: "mail"
If your organization is using a DECT or WLAN phone, then assign
the LDAP field of this phone type.
- 52 -
Page 58

CHAPTER8 Configuring AC Voca LDAP Synchronization
AC Voca | Installation Manual
Entering Fields Under VocaNOM Connection Tab
1. Enter the following fields under the VocaNOM Connection tab:
● User: Defines the Service Administrator Name
● Password: Defines the Service Administrator Password
● Organization ID:Defines the Service ID (ask your system integrator for the System ID)
● Language:Defines the service dialect
● Incremental mode:
◆ When Incremental mode is enabled, the LDAP sync disables all contacts NOT in the
list.
◆ When incremental mode is not enabled, the LDAP sync adds the contacts to the
system (without disabling the contacts that do not appear in the updated list)
- 53 -
Page 59

CHAPTER8 Configuring AC Voca LDAP Synchronization
AC Voca | Installation Manual
2. Click OK; the following screen appears:
3. Click OK.
4. Click Close.
Configuring Files in LDAP Client On-premises Mode
The following files need to be configured only in On-premises mode:
■ Host file
■ LDAP Client file
- 54 -
Page 60

CHAPTER8 Configuring AC Voca LDAP Synchronization
Configuring the Hosts File
The procedure below describes how to configure the hosts file.
➢ To configure the hosts file:
1. Using a text editor (for example, Notepad++), open theC:\Win-
dows\System32\drivers\etc\host file.
2. Add a line that includes the VocaNOM System IP Address and admin.vocanom.com.
Testing LDAP Client Connectivity
AC Voca | Installation Manual
The procedure below describes how to test LDAP connectivity
LDAP Server Connectivity Testing
The procedure below describes how to test the LDAP server connection.
➢ To test the LDAP server connection:
1. On the VocaNOM Directory Client Configuration screen, select the LDAP User Attributes
tab.
2. Click Test LDAP.
● If the Connection OK!!! dialog box appears, then the LDAP server is reachable by the
network.
- 55 -
Page 61

CHAPTER8 Configuring AC Voca LDAP Synchronization
AC Voca | Installation Manual
● If the Connection ERR!!! dialog box appears, see Troubleshooting Customer’s LDAP
Server on the next page.
VocaNOM Server Connectivity Testing
The procedure below describes how to test the VocaNOM server connection.
- 56 -
Page 62

CHAPTER8 Configuring AC Voca LDAP Synchronization
➢ To test the VocaNOM server connection:
1. On the Directory Import Configurations screen, click Import Now.
2. Confirm that contacts have been successfully created in the VocaNOM system.
3. If the VocaNOM Cloud system is not synchronized with the customer’s LDAP and some errors
appear in the C:\LDAP\VocaLdapService\logs\ log file, see LDAP Client Does not Connect to
the VocaNOM Server on page59.
AC Voca | Installation Manual
Troubleshooting LDAP Client Connectivity
The procedure below describes how to troubleshoot LDAP client connectivity.
Troubleshooting Customer’s LDAP Server
The procedure below describes how to troubleshoot the customer's LDAP server.
➢ To troubleshoot the customer's LDAP server:
1. If you click on Test LDAP, the "Connection ERR!!!" dialog box appears.
- 57 -
Page 63

CHAPTER8 Configuring AC Voca LDAP Synchronization
AC Voca | Installation Manual
2. Check the C:\LDAP\VocaLdapService\logs\ log file. If an 'LDAP error' appears, then the LDAP
server is not operational.
● You can also test the Telnet connectivity to the LDAP server by running the following
command in the Command Line console:
telnet <LDAP server name or IP> 389
For example:
telnet ldap.audiocodes.com 389
telnet 10.10.10.10 389
Figure 8-1: Command Prompt
● If the LDAP server is not reachable by Telnet, check the network connectivity (firewall,
routing and DNS).
3. Check if the following error appears in the C:\LDAP\VocaLdapService\logs\ log file:
ErrorLDAP error ……The user name or password
If so:
● Verify the customer user name and password of the LDAP user
- 58 -
Page 64

CHAPTER8 Configuring AC Voca LDAP Synchronization
● Re-enter them under the LDAP Connection tab, as shown in the figure below.
AC Voca | Installation Manual
LDAP Client Does not Connect to the VocaNOM Server
Check if the following error appears in the C:\LDAP\VocaLdapService\logs\ log file.
Server was unable to process request. ---> Authentication error!!!
If so, check the User and Password under the VocaNOM Connection tab, and then re-enter these
fields if necessary.
- 59 -
Page 65

CHAPTER8 Configuring AC Voca LDAP Synchronization
AC Voca | Installation Manual
Error [Run] [LDAP import] edmws exception:Value Cannot be Null
Check If the following error appears.
Error [Run] [LDAP import] edmws exception:Value cannot be null
If so, check connectivity to the VocaNOM server.
For LDAP Client On-premises mode, check that the settings described in Configuring Files in
LDAP Client On-premises Mode on page54 have been applied.
For LDAP Client Cloud mode, check if the VocaNOM cloud server is reachable by network and do
the following:
1. Run the following command in the Command Line console.
telnet admin.vocanom.com 443
2. Check access using the following link: https://admin.vocanom.com.
- 60 -
Page 66

CHAPTER8 Configuring AC Voca LDAP Synchronization
3. If the VocaNOM server is not reachable by Telnet or by the provided link, ask the customer to
check network connectivity (Firewall, Routing and DNS).
Installing LDAP Client Service
The procedure below describes how to install the LDAP client service to enable automatic
synchronization procedures.
➢ To install the LDAP client service:
1. On the Directory Import Configuration screen, click Install Service.
AC Voca | Installation Manual
The LDAP client service is installed.
2. By default, the VocaNOM LDAP service runs the synchronization procedure each day at
23:00.
- 61 -
Page 67

CHAPTER9 Improving LDAP Synchronization
9 Improving LDAP Synchronization
This appendix describes how to improve LDAP synchronization by using the following filters.
■ Basic LDAP
■ Advanced LDAP
■ LDAP User Attributes
Basic LDAP Filters
■ The following LDAP filter receives active (not disabled) contacts with first and last name and
office or mobile phones.
(&(givenName=*)(sn=*)(!(|(userAccountControl=514)(userAccountControl=546)))(|
(telephoneNumber=*)(mobile=*)))
■ The following filter is the same as the above, but receives only active contacts i.e., contacts
without phones.
AC Voca | Installation Manual
(&(givenName=*)(sn=*)(!(|(userAccountControl=514)(userAccountControl=546))))
Advanced LDAP Filters
Sometimes, after LDAP synchronization, VocaNOM contains irrelevant contacts or objects. You
need to understand the LDAP structure and improve the filter. VocaNOM contains the non-users
contacts (printers, computers etc.).
Add the following user’s object to the filter:
■ objectCategory=person
■ objectClass=user
For example:
■ Filter without phones:
(&(objectCategory=person)(objectClass=user)(givenName=*)(sn=*)(!(|
(userAccountControl=514)(userAccountControl=546))))
■ Filter with phones:
(&(objectCategory=person)(objectClass=user)(givenName=*)(sn=*)(|
(telephoneNumber=*)(mobile=*))(!(|(userAccountControl=514)
(userAccountControl=546))))
VocaNOM contains the following contacts:
■ Dismissed employees
■ Employees who have resigned
These contacts are usually disabled by the System Administrator in the Active Directory.
The filters provided by AudioCodes don’t receive contacts with userAccountControl=514 and
userAccountControl=546 (i.e., disabled contacts). Sometimes the disabled contacts have other
userAccountControl values which need to be added to the filters.
- 62 -
Page 68

CHAPTER9 Improving LDAP Synchronization
For more information on how to use the UserAccountControl flags, refer to
https://support.microsoft.com/en- us/help/305144/how- to- use- the- useraccountcontrol- flags- tomanipulate-user-account-pro.
LDAP User Attributes
The Active Directory sometimes contains relevant information in another attribute, which needs to
be changed on the VocaNOM LDAP Client. For example, the LDAP telephoneNumber attribute is
empty, but the msRTCSIP attribute contains the phone number. See the default settings below:
AC Voca | Installation Manual
The figure below displays how to change the attribute in the VocaNOM LDAP client.
- 63 -
Page 69

CHAPTER10 Configuring SBC Settings for AC Voca
AC Voca | Installation Manual
10 Configuring SBC Settings for AC Voca
This section describes how to configure the AC Voca, on the SBC side.
■ Coder settings
■ Delayed offer SDP settings
■ Terminate OPTIONS request
■ Alternate routing settings
Coder Settings
AC Voca only supports G.711U-law and G.711A-law coders.
These coders should be configured in the Allowed Audio Coder Group in the IP Profile of the AC
Voca SIP entity on the SBC.
If the PBX system doesn’t support G.711U-law and/or G.711A-law coders, i.e., the coders do not
exist in the SDP offer of the incoming SIP message, the coders should be configured in Extension
Coders Group in the IP Profile of the AC Voca SIP entity.
Delayed Offer SDP Settings
AC Voca doesn’t support incoming SIP messages without the SDP offer.
If an incoming SIP message doesn’t have the SDP offer, the 'Remote Delayed Offer Support' field
should be set as Not Supported in the IP Profile of the AC Voca SIP entity.
For the Remote Delayed Offer Support function, you need to assign extension coders in
the IP Profile of the AC Voca SIP entity as discussed above.
Terminating SIP OPTIONS Requests
To terminate SIP OPTIONS messages at the SBC device (i.e., to handle them locally), create a
routing rule with the following settings:
Source IP Group: ANY
Request Type: OPTIONS
Destination Type: Dest Address
Destination Address: Internal
Alternative Routing Settings
When AC Voca does not respond, or responds with a SIP error, create the alternative routing
setting and redirect the call to customer’s extension.
- 64 -
Page 70

CHAPTER11 Installing Signed Certificates on the IIS
AC Voca | Installation Manual
11 Installing Signed Certificates on the IIS
To configure AC Voca to work with HTTPS, you must first install a valid signed certificate.
Use the following procedures to install the certificate on the Internet Information Server (IIS).
Managing Certificates in the MMC Snap-in
You can manage certificates in the MMC Snap-in.
➢ To manage certificates in the MMC Snap-in:
1. Open the Command Prompt window.
2. Enter MMC and then press ENTER.
To view certificates in the local machine store, you must be set up as an Administrator.
3. On the Console Root, click File > Add/Remove Snap.
- 65 -
Page 71

CHAPTER11 Installing Signed Certificates on the IIS
4. From the File menu, choose Add/Remove Snap In.
5. In the 'Available snap-ins', select Certificates.
AC Voca | Installation Manual
6. Click Add > to add snap-ins.
- 66 -
Page 72

CHAPTER11 Installing Signed Certificates on the IIS
7. In the Certificates snap-in group, click the Computer Account option, and then click Next.
AC Voca | Installation Manual
You can select either My user account or Service account options. If you are not an
Administrator of the computer, you can manage certificates only for your user account.
8. Click the Local computer option.
9. In the Select Computer dialog box, click Finish.
10. In the Add/Remove Snap-in dialog box, click OK.
11. In the Console Root window, click Certificates (Local Computer) to view the certificate
stores for the computer.
- 67 -
Page 73

CHAPTER11 Installing Signed Certificates on the IIS
AC Voca | Installation Manual
12. To view certificates for your account, repeat steps 3 to 6. In step 7, instead of selecting
Computer account, click My User account and repeat steps 8 to 10 (Optional step).
13. From the File menu, choose Save or Save As. Save the console file for later reuse (Optional
step).
Adding a Certificate
1. Navigate to Console Root > Certificates (Local Computer) > Personal > Certificates.
2. On right pane, select All Tasks > Import.
3. Follow the dialog to install the certificate.
Selecting a Certificate in IIS Manager
You can select a certificate in the Internet Information Services (IIS) Manager.
➢ To select a certificate in IIS Manager:
1. Open the IIS Manager.
- 68 -
Page 74

CHAPTER11 Installing Signed Certificates on the IIS
AC Voca | Installation Manual
2. Right-click the default site, and then choose Edit Site – Bindings.
3. Select HTTPS binding (Port 443), and then click Edit.
4. From the 'SSL certificate' drop-down list, select the new certificate, and then click OK.
- 69 -
Page 75

CHAPTER12 Enabling .NET Framework 3.5 on Windows
AC Voca | Installation Manual
12 Enabling .NET Framework 3.5 on Windows
You can use Server Manager to enable .NET Framework 3.5. For more information, see Microsoft’s
guidelines here.
Before enabling .NET Framework 3.5, ensure that you have the following:
■ Windows Server 2012 R2 or 2016
■ Administrator user rights. The current user must be a member of the local Administrators group
to add or remove Windows features.
■ Target computers might need network access and rights to use either alternate sources or an
Internet connection to use Windows Update.
■ Installation media (only if you have no Internet connection to use Windows Update)
➢ To enable .NET Framework 3.5 on a Windows System:
1. On the Server Manager page, click Manage, and then select Add Roles and Features to start
the Add Roles and Features Wizard.
2. On the Before you Begin page, click Next.
3. On the Select Installation Type page, click the Role-based or feature-based installation
option, and then click Next.
- 70 -
Page 76

CHAPTER12 Enabling .NET Framework 3.5 on Windows
AC Voca | Installation Manual
4. On the Selection Destination Server page, select the target server, and then click Next.
5. On the Select Server Roles page, click Next.
- 71 -
Page 77

CHAPTER12 Enabling .NET Framework 3.5 on Windows
AC Voca | Installation Manual
6. On the Select Features page, select the '.Net Framework 3.5 Features' check box, and then
click Next.
7. On the Confirm Installation Selections page, click Install.
- 72 -
Page 78

CHAPTER12 Enabling .NET Framework 3.5 on Windows
On the Confirm Installation Selections page, a warning is displayed asking Do you need
to specify an alternate source path?. If the target computer does not have access to
Windows Update, click the Specify an alternate source path link to specify the path
to the \sources\sxs folder on the installation media and then click OK. After you have
specified the alternate source, or if the target computer has access to Windows
Update, click the X next to the warning, and then click Install.
AC Voca | Installation Manual
- 73 -
Page 79

CHAPTER13 Useful Topics
13 Useful Topics
The following are some useful links to refer to for additional information:
■ For Active Directory - LDAP Syntax Filters, go to
https://social.technet.microsoft.com/wiki/contents/articles/5392.active-directory-ldap-syntaxfilters.aspx
■ For using the UserAccountControl Flags, go to https://support.microsoft.com/en-
us/help/305144/how-to-use-the-useraccountcontrol-flags-to-manipulate-user-account-pro
■ For LDAP Filter Syntax, go to http://www.ldapexplorer.com/en/manual/109010000-ldap-filter-
syntax.htm
AC Voca | Installation Manual
- 74 -
Page 80

CHAPTER13 Useful Topics
AC Voca | Installation Manual
This page is intentionally left blank.
- 75 -
Page 81

International Headquarters
1 Hayarden Street,
Airport City
Lod 7019900, Israel
Tel: +972-3-976-4000
Fax: +972-3-976-4040
AudioCodes Inc.
200 Cottontail Lane
Suite A101E
Somerset NJ 08873
Tel: +1-732-469-0880
Fax: +1-732-469-2298
Contact us: https://www.audiocodes.com/corporate/offices-worldwide
Website: https://www.audiocodes.com/
©2020 AudioCodes Ltd. All rights reserved. AudioCodes, AC, HD VoIP, HD VoIP Sounds Better,
IPmedia, Mediant, MediaPack, What’s Inside Matters, OSN, SmartTAP, User Management Pack,
VMAS, VoIPerfect, VoIPerfectHD, Your Gateway To VoIP, 3GX, V ocaNom, AudioCodes One
Voice, AudioCodes Meeting Insights, AudioCodes Room Experience and CloudBond are trademarks or registered trademarks of AudioCodes Limited. All other products or trademarks are property of their respective owners. Product specifications are subject to change without notice.
Document #: LTRT-23724
 Loading...