

Page 1

User's Manual
AudioCodes High Definition IP Phones Series
445HD IP Phone
Generic SIP
Version 3.4.3
Page 2

Page 3

User's Manual Contents
Table of Contents
1 Introducing the 445HD IP Phone ................................................................................ 9
1.1 445HD IP Phone with Wi-Fi............................................................................................. 9
1.2 About AudioCodes' Series of High Definition IP Phones ................................................. 9
1.3 Cutting Edge Voice Quality & HD VoIP ........................................................................... 9
2 Setting up the Phone ................................................................................................. 11
2.1 Unpacking ..................................................................................................................... 11
2.2 Device Description ........................................................................................................ 11
2.2.1 Front View ..................................................................................................................... 11
2.2.2 Rear View ..................................................................................................................... 13
2.3 Cabling.......................................................................................................................... 14
2.4 Mounting the Phone ...................................................................................................... 15
2.4.1 Desktop Mounting ......................................................................................................... 15
2.4.1.1 Routing the Handset Cable ............................................................................. 15
2.4.2 Wall Mounting ............................................................................................................... 15
3 Getting Started........................................................................................................... 17
3.1 Getting Acquainted with the Phone Screen ................................................................... 17
3.2 Softkeys ........................................................................................................................ 18
3.3 Navigating the Phone Menu .......................................................................................... 19
3.4 Switching between Letters | Numbers ........................................................................... 20
3.5 Switching to Symbols .................................................................................................... 21
4 Configuring a Line ..................................................................................................... 23
4.1 Connecting to Wi-Fi....................................................................................................... 23
4.2 Displayed Messages ..................................................................................................... 25
5 Customizing the Phone ............................................................................................. 27
5.1 Changing the Language ................................................................................................ 27
5.2 Selecting Ring Tone ...................................................................................................... 27
5.3 Enabling Call Waiting .................................................................................................... 29
5.4 Handling Simultaneous Incoming Calls ......................................................................... 29
5.5 Configuring Call Forwarding .......................................................................................... 31
5.6 Making Sure the NTP Server is Enabled ....................................................................... 33
5.7 Configuring Screen Brightness ...................................................................................... 35
5.8 Selecting an Audio Device ............................................................................................ 36
5.9 Adjusting Volume .......................................................................................................... 37
5.9.1 Adjusting Ring Volume .................................................................................................. 37
5.9.2 Adjusting Tones Volume ................................................................................................ 37
5.9.3 Adjusting Handset Volume ............................................................................................ 38
5.9.4 Adjusting Speaker Volume ............................................................................................ 38
5.9.5 Adjusting Headset Volume ............................................................................................ 39
5.10 Managing your Personal Directory ................................................................................ 39
5.10.1 Adding a Contact to the Personal Directory.................................................................... 39
5.10.2 Editing Contact Information ........................................................................................... 40
5.10.3 Deleting a Contact from the Personal Directory .............................................................. 41
5.10.4 Searching for a Contact in the Personal Directory .......................................................... 43
5.10.4.1 Selecting A/a/1 Input....................................................................................... 44
5.11 Configuring a Function Key for Speed Dialing ............................................................... 45
5.11.1 Configuring Pause Dialing for a Speed Dial to an Ext. behind an IVR ............................. 46
Version 3.4.3 3 445HD IP Phone
Page 4

445HD IP Phone
5.11.2 Configuring a Speed Dial Key through the Personal Directory ........................................ 46
5.11.3 Configuring a Speed Dial Key in the Sidecar Fields ....................................................... 46
5.11.4 Editing a Speed Dial ...................................................................................................... 47
5.11.5 Deleting a Speed Dial .................................................................................................... 47
5.12 Programmable Softkeys (PSKs) .................................................................................... 48
5.13 Configuring a PSK for a Customized UI Experience ...................................................... 48
5.14 Configuring a Function Key for Paging .......................................................................... 50
5.15 Configuring a Programmable Key for Speed Dialing ..................................................... 52
5.15.1 Deleting a Speed Dial .................................................................................................... 53
5.16 Configuring a Programmable Key for Paging ................................................................ 54
5.17 Configuring a Programmable Key for a Key Event ........................................................ 55
5.17.1 Deleting a Key Event ..................................................................................................... 56
6 Performing Basic Operations ................................................................................... 57
6.1 Using Audio Devices ..................................................................................................... 57
6.2 Making Calls ................................................................................................................. 57
6.2.1 Dialing ........................................................................................................................... 58
6.2.2 Redialing ....................................................................................................................... 59
6.2.3 Dialing a Missed Call ..................................................................................................... 60
6.3 Answering a Call ........................................................................................................... 60
6.4 Rejecting an Incoming Call............................................................................................ 61
6.5 Silencing an Incoming Call ............................................................................................ 61
6.6 Making a New Call Even Though a Call is Coming in .................................................... 62
6.7 Ending an Established Call ........................................................................................... 62
6.8 Viewing Missed, Received and Dialed Calls .................................................................. 63
6.9 Using Multiple Lines ...................................................................................................... 65
6.9.1 Choosing a Line ............................................................................................................ 65
6.9.2 Making a Call on a Line ................................................................................................. 65
6.9.3 Making Two Calls on a Line ........................................................................................... 65
6.9.4 Making Multiple Line Calls ............................................................................................. 66
6.9.5 Toggling Between Multiple-Line Calls ............................................................................ 66
6.9.6 Toggling Between Calls on the Same Line ..................................................................... 66
6.9.7 Answering Calls ............................................................................................................ 67
6.9.8 Ending Calls .................................................................................................................. 67
6.10 Paging a Group ............................................................................................................. 67
6.10.1 Receiving an Incoming Paging Call................................................................................ 67
6.10.1.1 If Paged when in a Regular Call and Barge-in is Disabled ............................... 68
6.10.1.2 If Paged when in a Regular Call and Barge-in is Enabled ................................ 69
7 Performing Advanced Operations ........................................................................... 71
7.1 Answering Waiting Calls
7.2 Placing Calls On Hold ................................................................................................... 73
7.3 Calling a Contact Listed in the Directory........................................................................ 73
7.4 Enabling Auto Redial..................................................................................................... 73
7.5 Handling Multiple Incoming Calls .................................................................................. 74
7.6 Using a Speed Dial to Call ............................................................................................ 75
7.7 Transferring Calls .......................................................................................................... 75
7.7.1 Performing a Blind Transfer ........................................................................................... 75
7.7.2 Performing a Consultation Transfer ............................................................................... 77
7.7.3 Merging Calls into a Conference Call ............................................................................. 78
7.7.4 Leaving a 3-Way Conference You Set up without Disconnecting the Others .................. 79
............................................................................................... 71
User's Manual 4 Document #: LTRT-14850
Page 5

User's Manual Contents
7.8 Activating Do Not Disturb .............................................................................................. 79
7.9 Retrieving Voice Mail Messages ................................................................................... 81
7.10 Parking a Call................................................................................................................ 82
7.11 BLF Call Pickup ............................................................................................................ 83
7.12 Managing a Conference ................................................................................................ 83
7.13 Muting Your Speaker, Handset or Headset ................................................................... 85
7.14 Configuring a Default Audio Device ............................................................................... 85
7.15 Configuring Bluetooth on the Phone .............................................................................. 87
A Specific Third-Party Features ................................................................................... 91
A.1 Ribbon Communications Genband SLA ........................................................................ 91
A.1.1 Configuring Shared Line Appearance ............................................................................ 91
A.1.2 Configuring a Call Pickup Group .................................................................................... 91
A.1.3 Configuring BLFs........................................................................................................... 91
A.2 BroadSoft ...................................................................................................................... 92
A.2.1 Shared Call Appearance................................................................................................ 92
A.2.1.1 Demonstrating the SCA Feature's Capabilities ................................................ 93
A.2.2 Monitored Lines Based on BroadSoft's BroadWorks BLF Service .................................. 96
A.2.3 Using Xsi Interface Services .......................................................................................... 96
A.2.3.1 Call Center List ............................................................................................... 96
A.2.3.2 Contact Synchronization ................................................................................. 97
A.2.3.3 Call Log Synchronization ................................................................................ 97
A.2.4 Configuring the 'Forward No Reply' Timeout as Number of Rings .................................. 97
A.2.5 Automatically Receiving an External Line ...................................................................... 97
A.2.6 Limiting Configuration of Function Keys as Line Keys .................................................... 97
A.2.7 Viewing VOICEMAIL Indications Per Line ...................................................................... 97
A.2.8 Listening in Capability for Call Center Supervisors ......................................................... 98
A.2.9 Recording an Agent's Welcome Greeting....................................................................... 98
A.3 Genesys' Contact Centers ............................................................................................ 99
A.3.1 Using the BroadSoft ACD .............................................................................................. 99
A.3.1.1 Setting Unavailability Status............................................................................ 99
A.3.1.2 Setting Availability Status................................................................................ 99
A.3.2 Presence Management ............................................................................................... 100
A.3.3 Logging In ................................................................................................................... 100
A.3.4 Logging Out ................................................................................................................ 100
A.3.5 Configuring Do Not Disturb (DnD) ................................................................................ 100
A.3.6 Configuring Automatic Forwarding ............................................................................... 100
A.3.7 Listening in Capability for Call Center Supervisors ....................................................... 101
A.3.8 Setting up a Remote Conference ................................................................................. 101
Version 3.4.3 5 445HD IP Phone
Page 6

445HD IP Phone
List of Figures
Figure 2-1: Front View................................................................................................................................. 12
Figure 2-2: Rear View ................................................................................................................................. 13
Figure 2-3: Cabling ..................................................................................................................................... 14
Figure 3-1: Phone Screen in Idle State ........................................................................................................ 17
Figure 3-2: Phone Menu ............................................................................................................................. 19
Figure 3-3: Switching between Letters | Numbers ........................................................................................ 20
Figure 3-4: Entering a Symbol, e.g., a dot ................................................................................................... 21
Figure 3-5: Reverting to Letters, e.g., abc.................................................................................................... 22
Figure A-1: SCA .......................................................................................................................................... 92
Figure A-2: Two 440HD Phones in the SCA Group ..................................................................................... 93
Figure A-3: Phones in the SCA Group Ring, Alerting to an Incoming Call .................................................... 94
Figure A-4: Phone 1 after Answering the Incoming Call ............................................................................... 94
Figure A-5: Phone 2 after Phone 1 Answers ................................................................................................ 95
List of Tables
Table 2-1: Font View Description................................................................................................................. 12
Table 2-2: Rear View Description ................................................................................................................ 13
Table 3-1: Phone Screen in Idle State ......................................................................................................... 17
Table 3-2: Softkeys ..................................................................................................................................... 18
Table 4-1: Displayed Messages Indicating Processes In Progress............................................................... 25
Table 5-1: Screen Brightness Options ......................................................................................................... 35
Table A-1: LED Behaviors on an IP Phone in an SCA Group ....................................................................... 93
Table A-2: Genesys Contact Center Phones' BroadSoft ACD ...................................................................... 99
User's Manual 6 Document #: LTRT-14850
Page 7

User's Manual Notices
Notice
Information contained in this document is believed to be accurate and reliable at the time of printing.
However, due to ongoing product improvements and revisions, AudioCodes cannot guarantee accuracy
of printed material after the Date Published nor can it accept responsibility for errors or omissions.
Updates to this document can be downloaded from https://www.audiocodes.com/library/technical-
documents.
This document is subject to change without notice.
Date Published: July-07-2020
Trademarks
AudioCodes Ltd. All rights reserved. AudioCodes, AC, HD VoIP, HD VoIP Sounds Better, IPmedia,
Mediant, MediaPack, What’s Inside Matters, OSN, SmartTAP, VMAS, VoIPerfect, VoIPerfectHD,
Your Gateway To VoIP, 3GX, VocaNom, AudioCodes One Voice and CloudBond are trademarks
or registered trademarks of AudioCodes Limited All other products or trademarks are property of
their respective owners. Product specifications are subject to change without notice.
WEEE EU Directive
Pursuant to the WEEE EU Directive, electronic and electrical waste must not be disposed of with
unsorted waste. Please contact your local recycling authority for disposal of this product.
Customer Support
Customer technical support and services are provided by AudioCodes or by an authorized
AudioCodes Service Partner. For more information on how to buy technical support for AudioCodes
products and for contact information, please visit our Web site at
https://www.audiocodes.com/services-support/maintenance-and-support.
Stay in the Loop with AudioCodes
Abbreviations and Terminology
Each abbreviation, unless widely used, is spelled out in full when first used.
Documentation Feedback
AudioCodes continually strives to produce high quality documentation. If you have any comments
(suggestions or errors) regarding this document, please fill out the Documentation Feedback form
on our Web site at http://online.audiocodes.com/documentation-feedback.
Version 3.4.3 7 445HD IP Phone
Page 8

445HD IP Phone
Related Documentation
Document Name
400HD Series IP Phones Release Notes – Generic SIP.
400HD Series IP Phones Administrator’s Manual - Generic SIP.
445HD IP Phone Quick Guide - Generic SIP.
400HD Series IP Phones for Skype for Business Hosting Partner (LHPv2) Environment Configuration Note
User's Manual 8 Document #: LTRT-14850
Page 9

User's Manual 1. Introducing the 445HD IP Phone
1 Introducing the 445HD IP Phone
AudioCodes' 445HD IP Phone – Generic SIP is based on AudioCodes High Definition voice
technology, providing clarity and a rich audio experience in Voice-over-IP (VoIP) calls.
The 445HD IP phone is an advanced high-end business phone with a 4.3" color screen. The 445HD
includes an integrated, dedicated LCD sidecar displaying contacts and their presence.
The phone is a 1-line, 2 concurrent calls per line, premium model which includes a large, color,
multi-language graphic Liquid Crystal Display (LCD).
The phone is a fully-featured telephone that provides voice communication over an IP network,
allowing you to place and receive phone calls, put calls on hold, transfer calls, make conference
calls, etc.
AudioCodes IP phones can be offered as part of our of Managed IP Phones solution which defines
the phone as an IT-managed entity and delivers unique and complete lifecycle management of
end-user desktop devices.
Read this User’s Manual carefully to learn how to operate the product and take advantage of its
rich feature set.
1.1 445HD IP Phone with Wi-Fi
The UC445HDEG-BW and UC445HDEPSG-BW models of the 445HD phone can connect to an
Access Point via Wi-Fi. The Wi-Fi interface can be used when the phone is installed in an
environment free of LAN/cables, to perform VoIP calls over Wi-Fi. See Section 4.1 for more
information.
1.2 About AudioCodes' Series of High Definition IP Phones
AudioCodes Series of High Definition IP Phones offers a new dimension of voice call quality and
clarity for the IP Telephony market. This new series of IP Phones further expands AudioCodes’
VoIP product offering for the service providers’ hosted services, Enterprise IP telephony and
Enterprise contact centers markets. As a natural addition to the AudioCodes Mobile Clients, Media
Gateway, Media Server & Multi-Service Business Gateway products, the AudioCodes Series of
High Definition IP Phones enable Systems Integrators and end-customers to build end-to-end
solutions that rely on AudioCodes’ technological advantage and proven track record in providing
state-of-the-art products. The AudioCodes Series of High Definition IP Phones meet a growing
demand for High Definition VoIP solutions in end-user phones and terminals, improving the
productivity and efficiency of business communications with new quality standards set by the High
Definition voice technology.
1.3 Cutting Edge Voice Quality & HD VoIP
Based on AudioCodes’ advanced, robust and field-proven VoIPerfectHD™ software, AudioCodes’
IP Phones are designed to utilize wideband coders. The phones feature enhanced proprietary
capabilities such as packet loss concealment, high quality wideband acoustic echo canceler, and
low-delay adaptive jitter buffers to enrich the HDVoIP experience.
Version 3.4.3 9 445HD IP Phone
Page 10

445HD IP Phone
This page is intentionally left blank.
User's Manual 10 Document #: LTRT-14850
Page 11

User's Manual 2. Setting up the Phone
2 Setting up the Phone
2.1 Unpacking
When unpacking, make sure the following items are present and undamaged:
IP Phone / Stand Handset / Cord
Cat 5e Ethernet Cable AC Power Adapter (Optional)
If anything appears to be missing or broken, contact the distributor from whom you purchased the
phone for assistance.
2.2 Device Description
Use the graphics below to identify and familiarize yourself with the device's hardware functions.
2.2.1 Front View
The front view of the phone is shown in Figure 2-1 and described in Table 2-1.
Version 3.4.3 11 445HD IP Phone
Page 12

445HD IP Phone
1
Ring LED
Flashing blue light visually indicates an incoming call.
2
Function Keys
33 Function Keys that users can configure for Speed Dials, Paging, Lines,
VocaNOM, Parking Lots or Key Events.
3
Screen
Interactive screen displaying calling information and letting you configure
phone features.
4
Softkeys
See Section 3.2 for details on the four softkeys and the available functions
they offer.
5
Navigation
Press the upper rim to scroll up menus/items in the screen. Press the lower
a menu/item/option.
6
Voicemail
Retrieves voicemail messages.
7
CONT ACTS
Press to open the ‘Personal Directory’.
8
MENU
Accesses menus: (1) Call Log (2) Contacts (3) Keys (4) Settings
(5) Administration (6) Status
9
REDIAL
Accesses a list of recently dialed numbers; one can be selected to redial.
10
Kensington lock
Allows locking the device.
11
TRANSFER
Transfers a call.
12
HOLD
Places an active call on hold.
Figure 2-1: Front View
Table 2-1: Font View Description
Item # Label/Name Description
Control / OK
rim to scroll down. Press the left or right rim to move the cursor left or right
(when editing a contact number for example). Press the OK button to select
User's Manual 12 Document #: LTRT-14850
Page 13
User's Manual 2. Setting up the Phone
13
Alphanumerical
Keypad
Keys for entering numbers, alphabetical letters and symbols (e.g., colons)
14
Microphone
Allows talking and listening. Network administrators can disable it if required.
15
SPEAKER
Activates the phone's speaker, allowing a hands-free conversation.
16
HEADSET
Activates a call using an external headset.
17
MUTE
Mutes a call.
▲ VOL
Increases or decreases the volume of the handset, headset, speaker, ring
▼ VOL
19
x
Cancel an action, such as dialing a number, after beginning it.
Programmable
Keys
Six Programmable Keys, three on each side of the screen, which users can
configure as a Speed Dial, Line, Key Event, VocaNOM or Parking Lot.
2
3
4
5
Item # Label/Name Description
18
20
2.2.2 Rear View
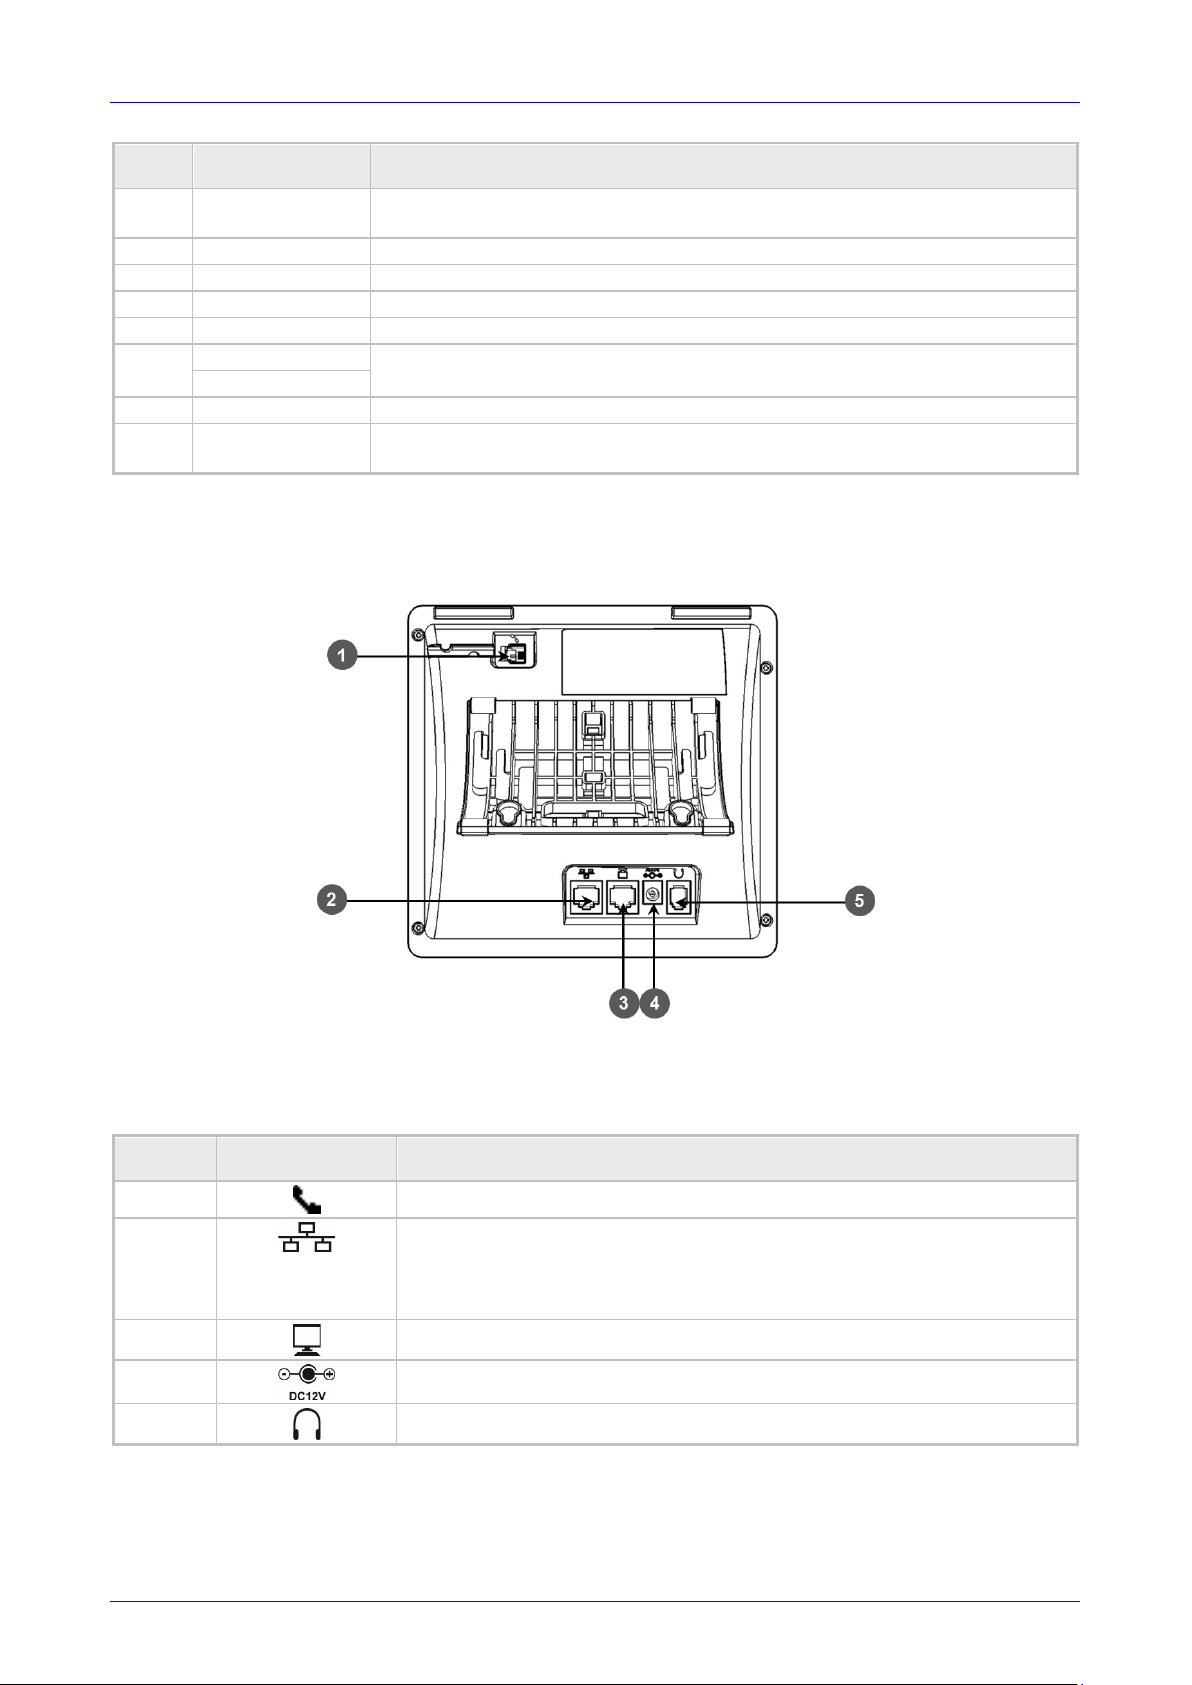
The rear view of the phone is shown in the figure below and described in the table below.
tone and call progress tones.
Figure 2-2: Rear View
Table 2-2: Rear View Description
# Label Description
1
Handset jack, i.e., RJ-9 port, to connect the handset.
RJ-45 port to connect to the Ethernet LAN cable for the LAN connection
(uplink - 10/100/1000 Mbps). If you're using Power over Ethernet (PoE),
power to the phone is supplied from the Ethernet cable (draws power
from either a spare line or signal line).
RJ-45 port to connect the phone to a PC (10/100/1000 Mbps downlink).
12V DC power jack that connects to the AC power adapter.
Headset jack, i.e., RJ-9 port that connects to an external headset.
Version 3.4.3 13 445HD IP Phone
Page 14
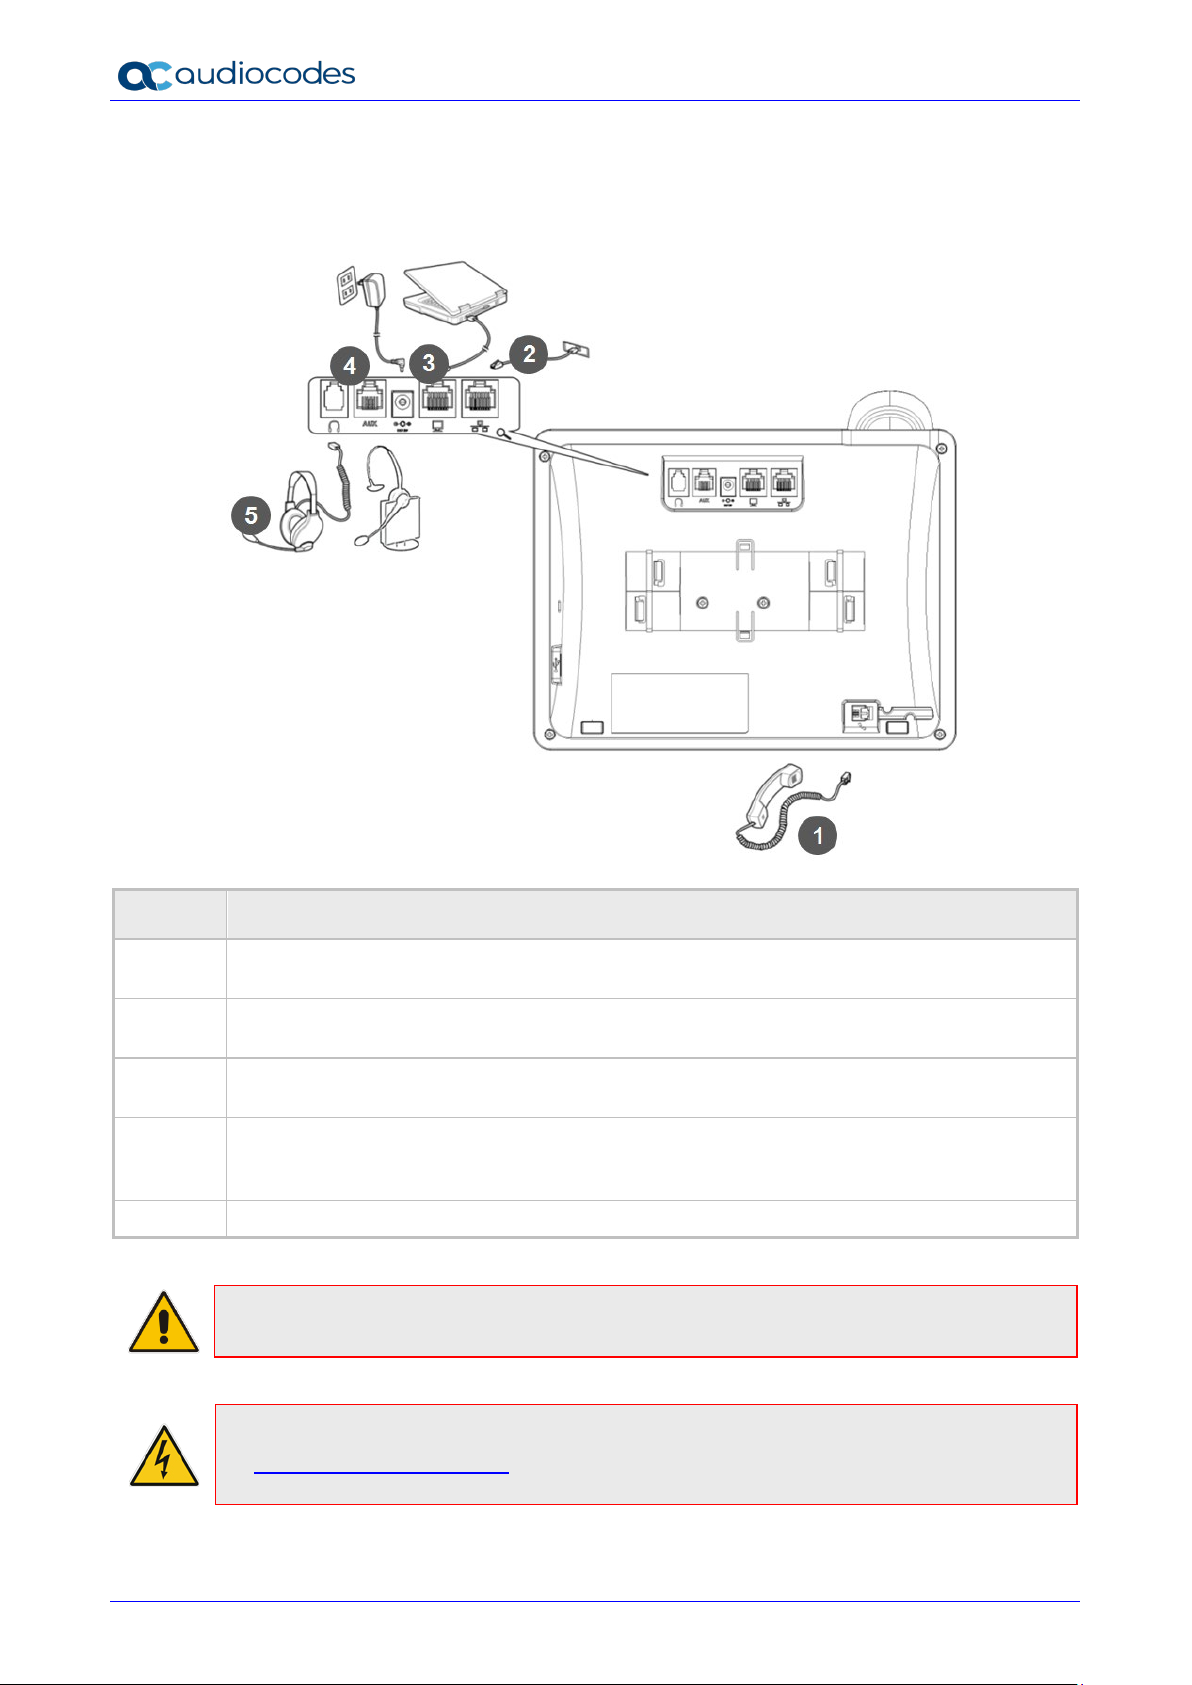
2.3 Cabling
Here's how to cable your phone.
445HD IP Phone
Figure 2-3: Cabling
Action Description
1
2
3
4
5
Connect the short, straight end of the cord to the handset.
Connect the longer, straight end to the jack (RJ-9 port, for the handset) on the phone.
Connect the RJ-45 LAN port to your LAN network (LAN port or LAN switch/router), using a
CAT 5 / 5e Ethernet cable
Connect the RJ-45 PC port to a computer, using a CAT 5 / 5e straight-through Ethernet
cable
Connect the connector tip of the AC power adapter to the phone’s power socket (labelled DC
12V). Connect the two-prong AC adapter directly to the electrical wall outlet. When the
phone powers up, all the LEDs momentarily light up
Connect the RJ-9 headset jack to a headset (optional)
Note: If the LAN to which the phone is connected supports Power over Ethernet (PoE), no
AC adapter is required; the phone receives power from the Ethernet network.
Prior to connecting power, refer to the Compliancy and Regulatory Information at
www.audiocodes.com/library.
User's Manual 14 Document #: LTRT-14850
Page 15
User's Manual 2. Setting up the Phone
2.4 Mounting the Phone
The phone can be mounted on a:
Desk (see Section 2.4.1 below)
Wall (see Section 2.4.2)
See also https://www.youtube.com/watch?v=oGe9STB9lFE to assemble the base stand.
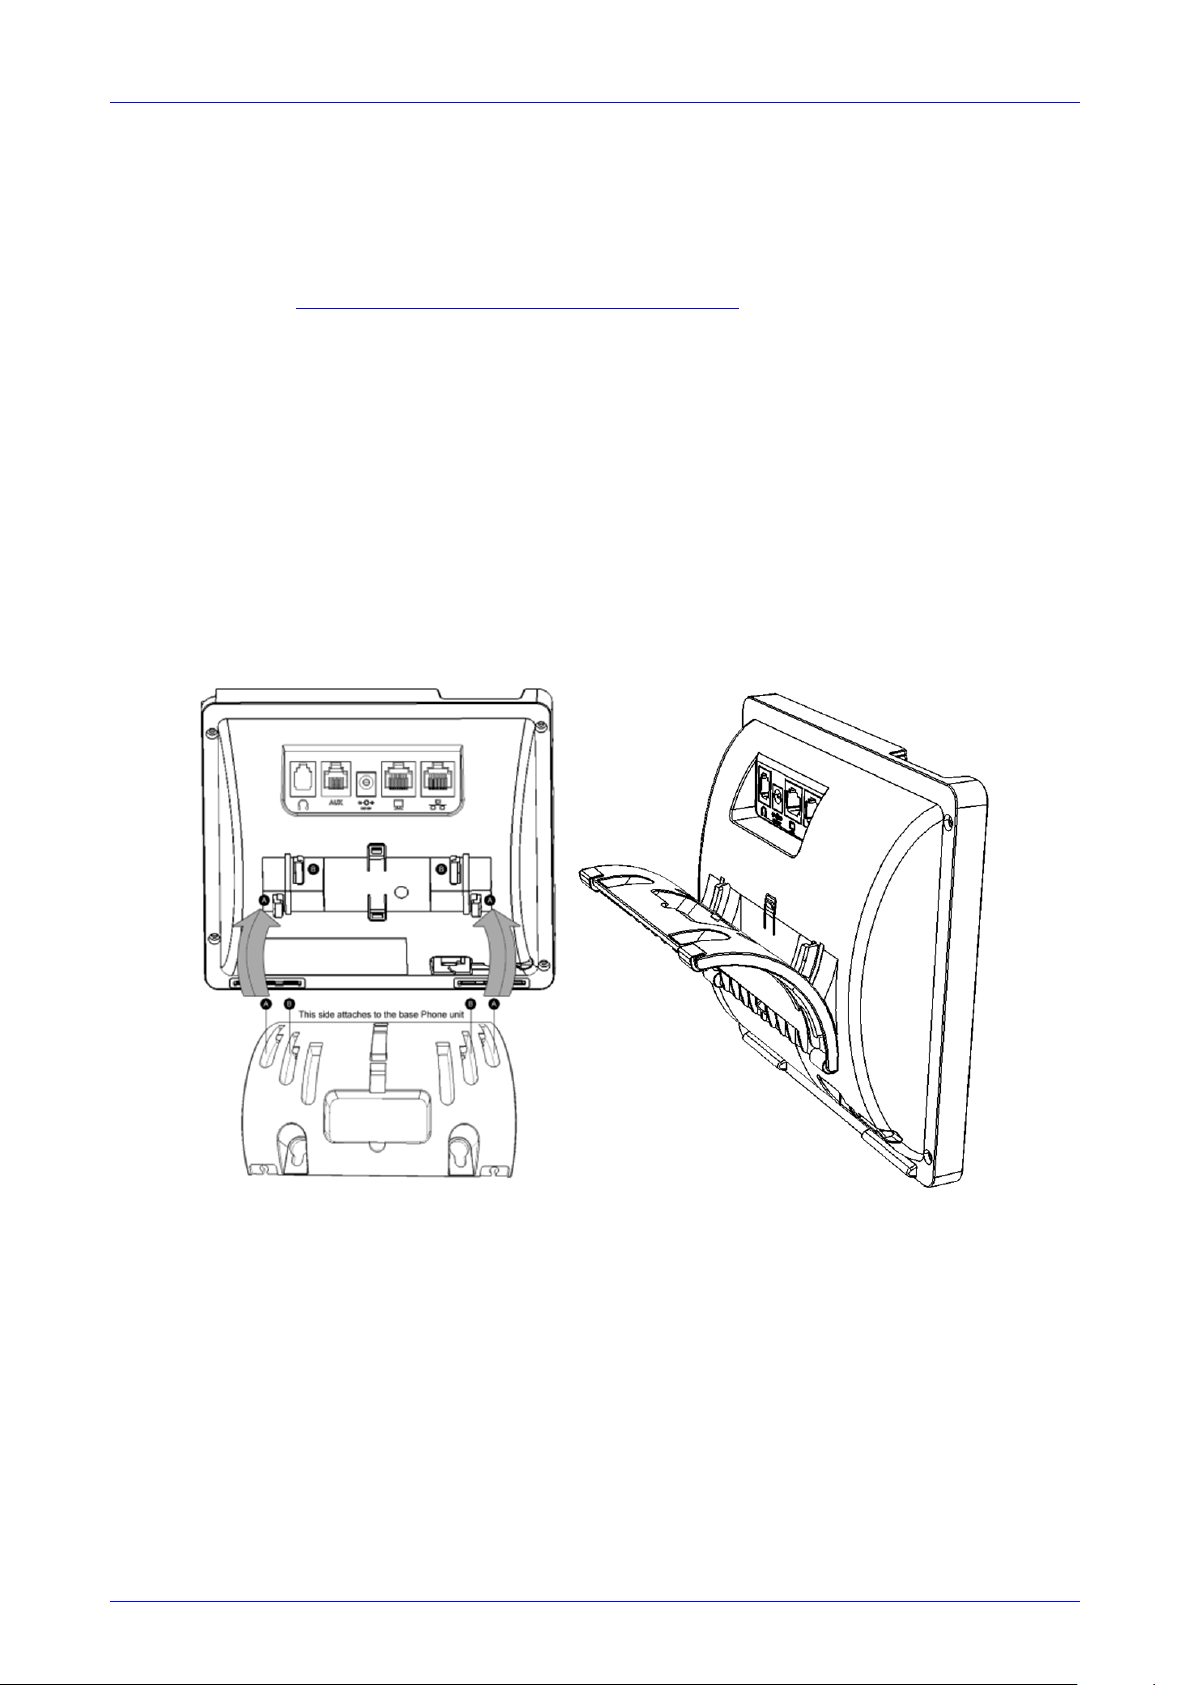
2.4.1 Desktop Mounting
Here's how to place the phone on a desk or flat surface.
To mount the phone on a desk or flat surface:
1. Off-hook the handset (if on-hook) and place the phone upside down, i.e., base-up, on your
desktop.
2. On the phone's base, identify outer rails.
3. On the phone's stand, identify outer notches.
4. Invert the stand and align its outer notches with the base's outer rails.
5. Insert the stand's outer notches into the base's outer rails and slide the notches along the rails
until the stand click-locks into the base.
6. Revert the phone and stand it on the desktop.
2.4.1.1 Routing the Handset Cable
The phone features a groove for routing the handset cable.
2.4.2 Wall Mounting
Here's how to mount the phone on a wall.
To mount the phone on a wall:
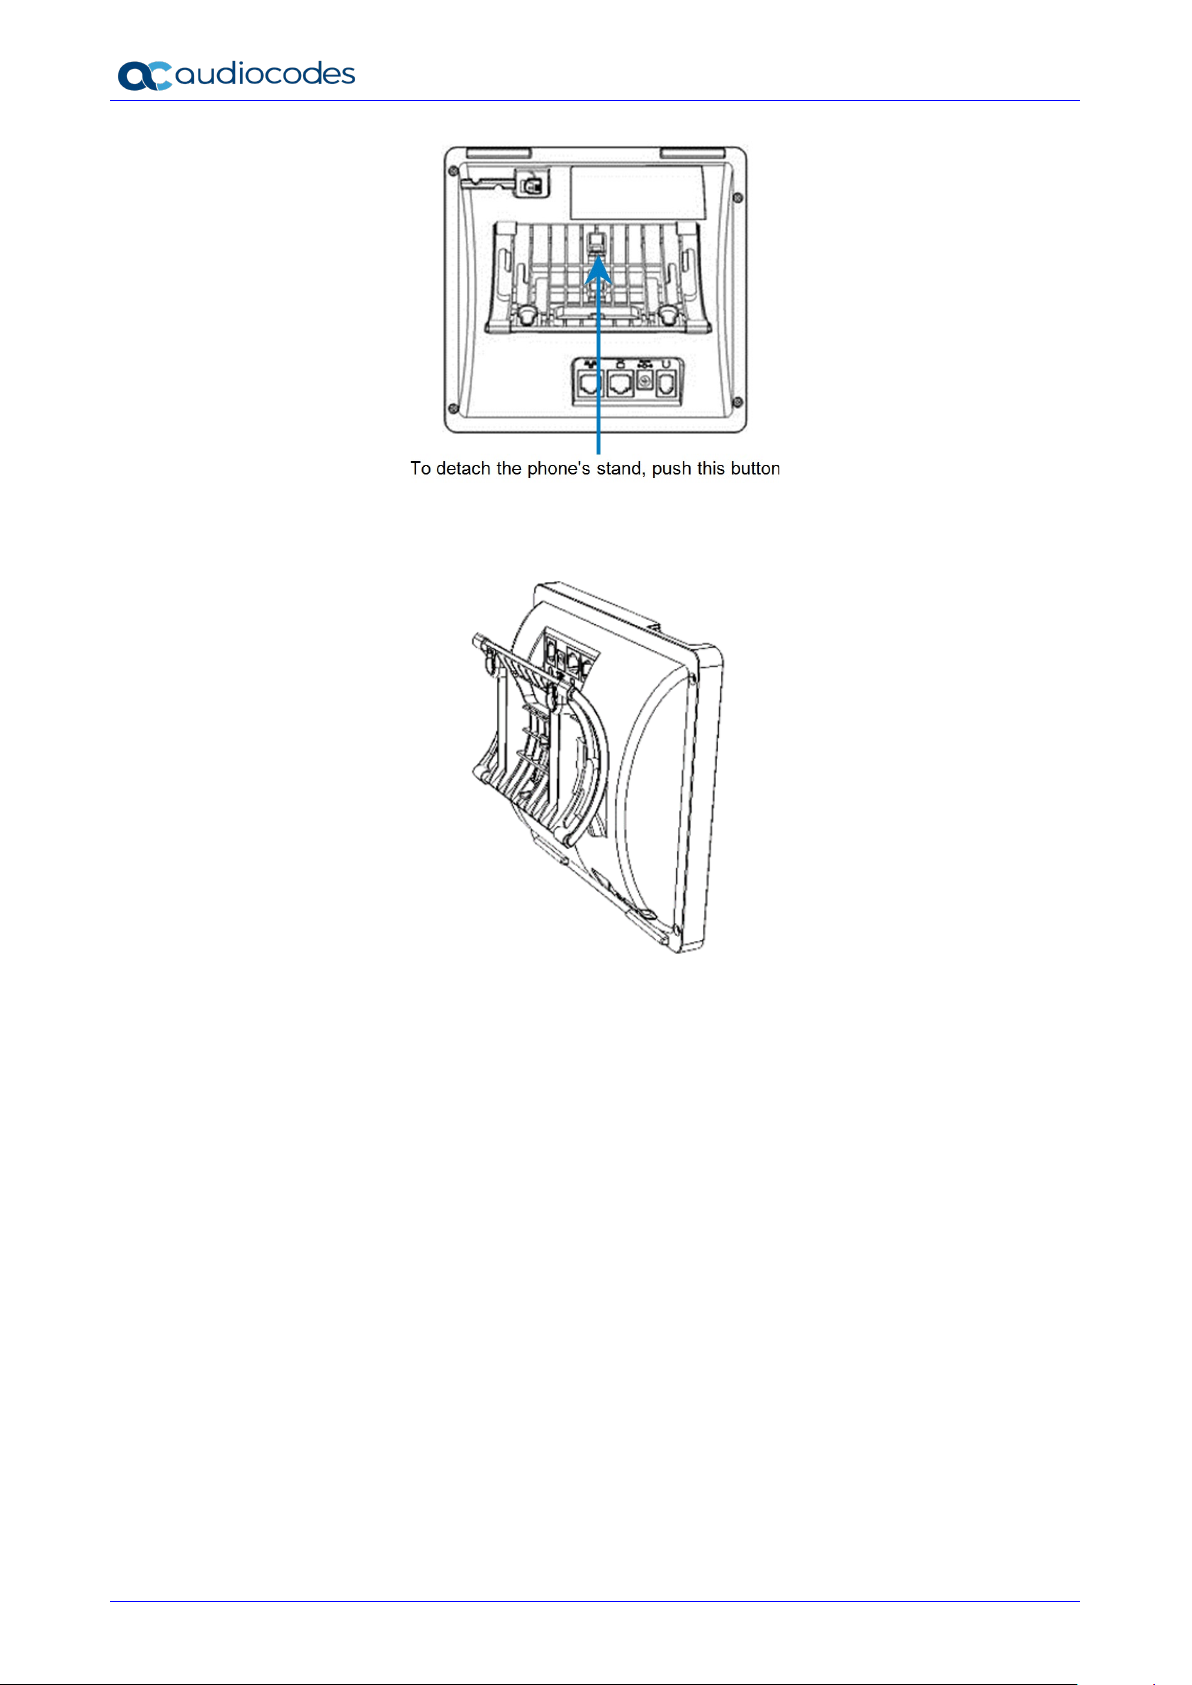
1. Attach the stand of the phone for the purpose of a wall mounting:
a. Detach the base.
Version 3.4.3 15 445HD IP Phone
Page 16
445HD IP Phone
b. Attach it again as you did for a desktop mounting (see Section 2.4.1) only now make
sure that it's flatly aligned to lie flush against the wall, i.e., slide the inner rails of the
phone stand onto the phone base's inner notches.
2. Connect the AC power adapter, LAN and PC cords.
3. In the wall, drill two horizontal holes at a distance of 3 15/16 inches (100 mm) from one another,
in line with the template.
4. Insert two masonry anchors into the holes if necessary.
5. Thread two screws (not supplied) into the two masonary anchors; ensure that the heads
extend sufficiently (about 3/16 inch or 5 mm from the wall) for the phone stand's keyhole slots
to hang on.
6. Hang the phone stand's keyhole slots on these screws.
User's Manual 16 Document #: LTRT-14850
Page 17
User's Manual 3. Getting Started
1
2
3
3 Getting Started
Now you can get started with your phone. The phone's screen provides you with an intuitive, menudriven user interface for configuring the device and viewing call information.
3.1 Getting Acquainted with the Phone Screen
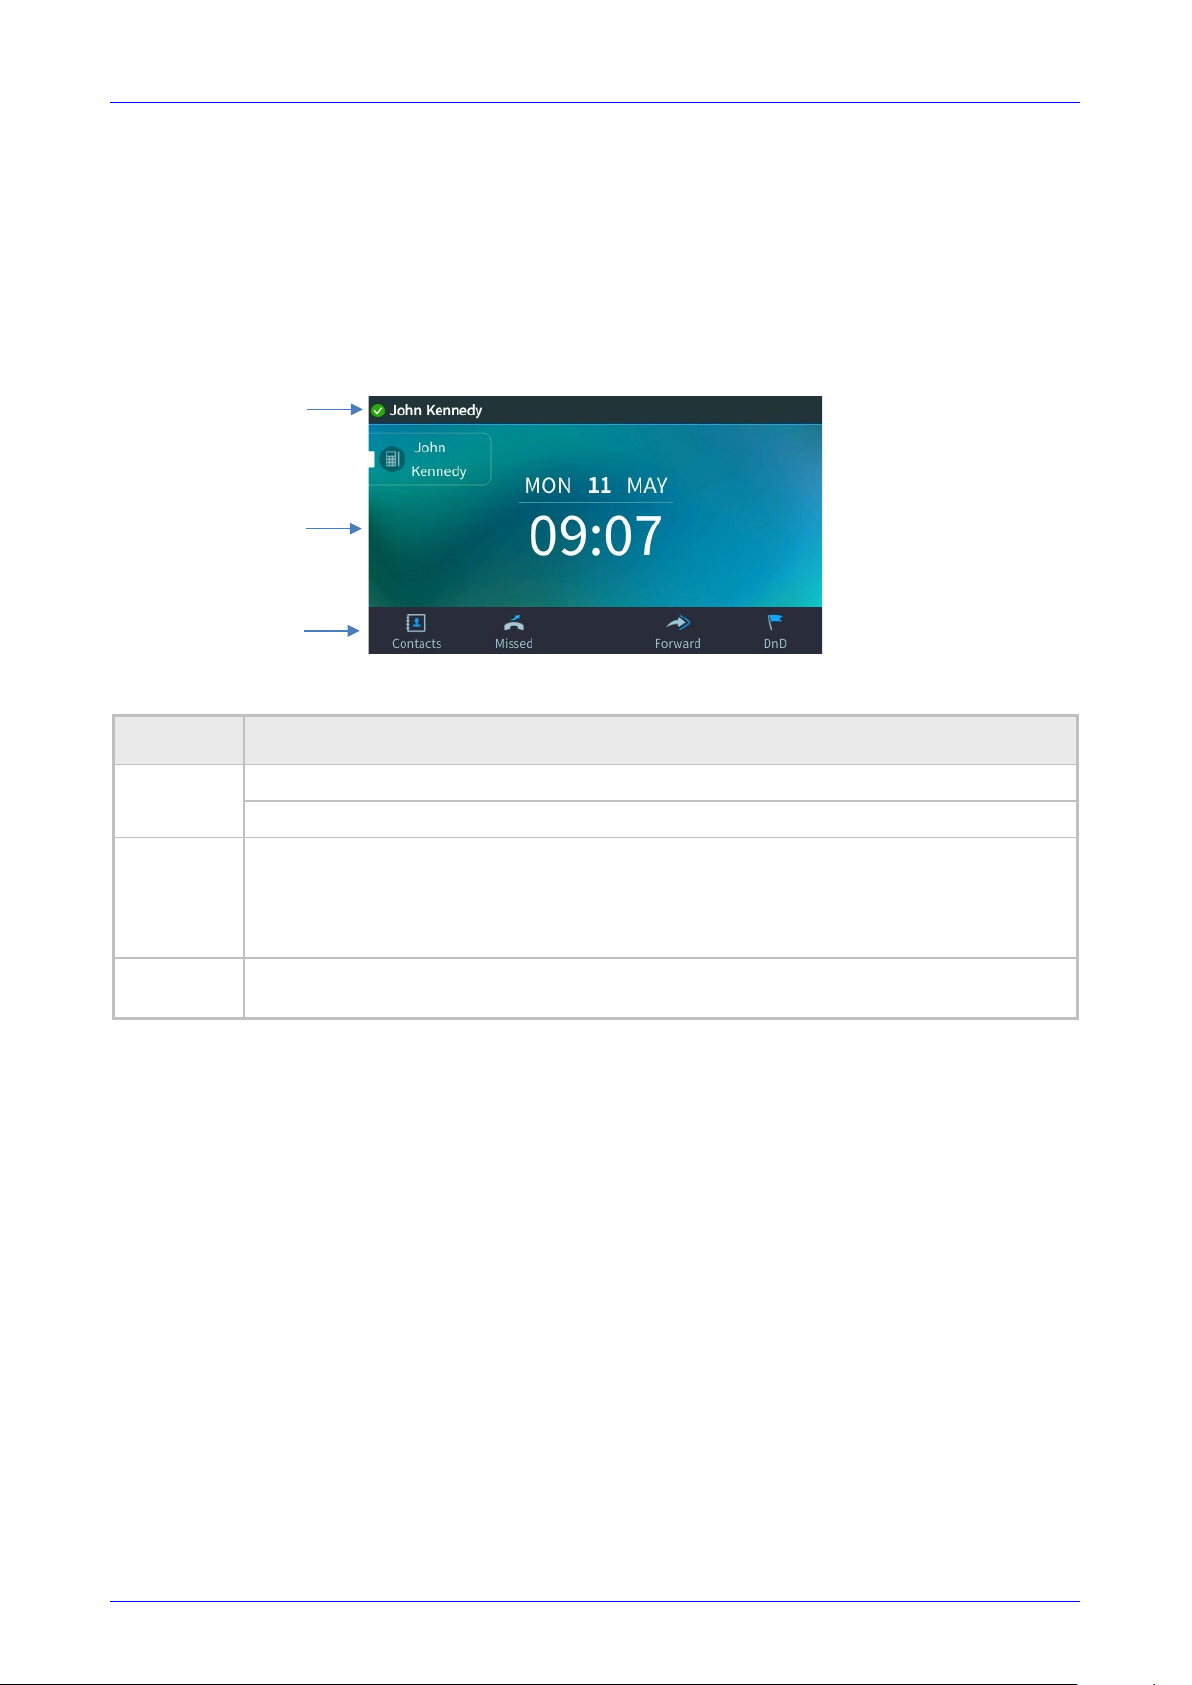
The figure below shows the phone’s screen in idle state.
Figure 3-1: Phone Screen in Idle State
Table 3-1: Phone Screen in Idle State
Reference Description
1
2
3
Presence status (Available, Busy, Do not disturb)
User name and phone number configured by your network administrator.
Day, Date and Month, automatically retrieved from the Network Time Protocol (NTP)
server, enabled by your network administrator.
Time, automatically retrieved from the Network Time Protocol (NTP) server, enabled by
your network administrator.
Softkeys. To activate one, press the hard key on the device, located below it,
corresponding to the softkey. See Table 3-2 for softkey descriptions.
Version 3.4.3 17 445HD IP Phone
Page 18

445HD IP Phone
after
or merge a call if there
after
3.2 Softkeys
Here are descriptions of the softkeys that are displayed in the phone screen.
Table 3-2: Softkeys
Softkey Description
Missed
Forward
DnD
Contacts
Call Log
Select
A/a/1
Save
Cancel
Dial
Clear
Call Menu
Conf
BXfer
Displays missed calls.
Automatically forwards calls.
Do not Disturb (see Section 7.8).
Displayed after lifting the handset (for example). Opens the 'Personal Directory'.
Displayed after lifting the handset (for example).
Identical to the hard OK key on the phone. Either can be used. Selects a menu or option.
Enables switching between input modes: abc, ABC, Abc or 123.
Saves settings.
Cancels the currently initiated call or configuration.
Displayed after a number is keyed, a directory contact is selected, or a logged call is
selected.
Displayed after entering a digit of a phone number (for example). Deletes from right to left.
Displayed after dialing a number and it's answered, and after you answer a call.
Displayed (1) after a number is dialed and the call is answered on the other side and (2)
you answer a call. Pressing it displays the ADD PARTICIPANT screen
are two calls.
Displayed (1) after a number is dialed and the call is answered on the other side and (2)
a call is answered. Lets you transfer the call in a blind transfer.
URL
Detail
End
Back
Edit
Delete
Silent
Reject
Accept
Displayed after lifting the handset (for example). Enables calling a URL.
Displayed after selecting a call log (for example). If selected, the details of a logged call are
displayed (Time, Date, etc.).
Displayed after pressing the Dial softkey (for example). Ends the call.
Displayed after pressing the MENU key (for example). Returns to the previous screen.
Displayed after you select a contact to be edited (for example).
Displayed after pressing the MENU key and then selecting Call Log (for example).
Displayed when the phone rings on an incoming call. Lets you silence the ring.
Displayed when the phone rings, alerting to an incoming call. Lets you reject the call.
Displayed when the phone rings, alerting to an incoming call. Lets you accept the call.
User's Manual 18 Document #: LTRT-14850
Page 19
User's Manual 3. Getting Started
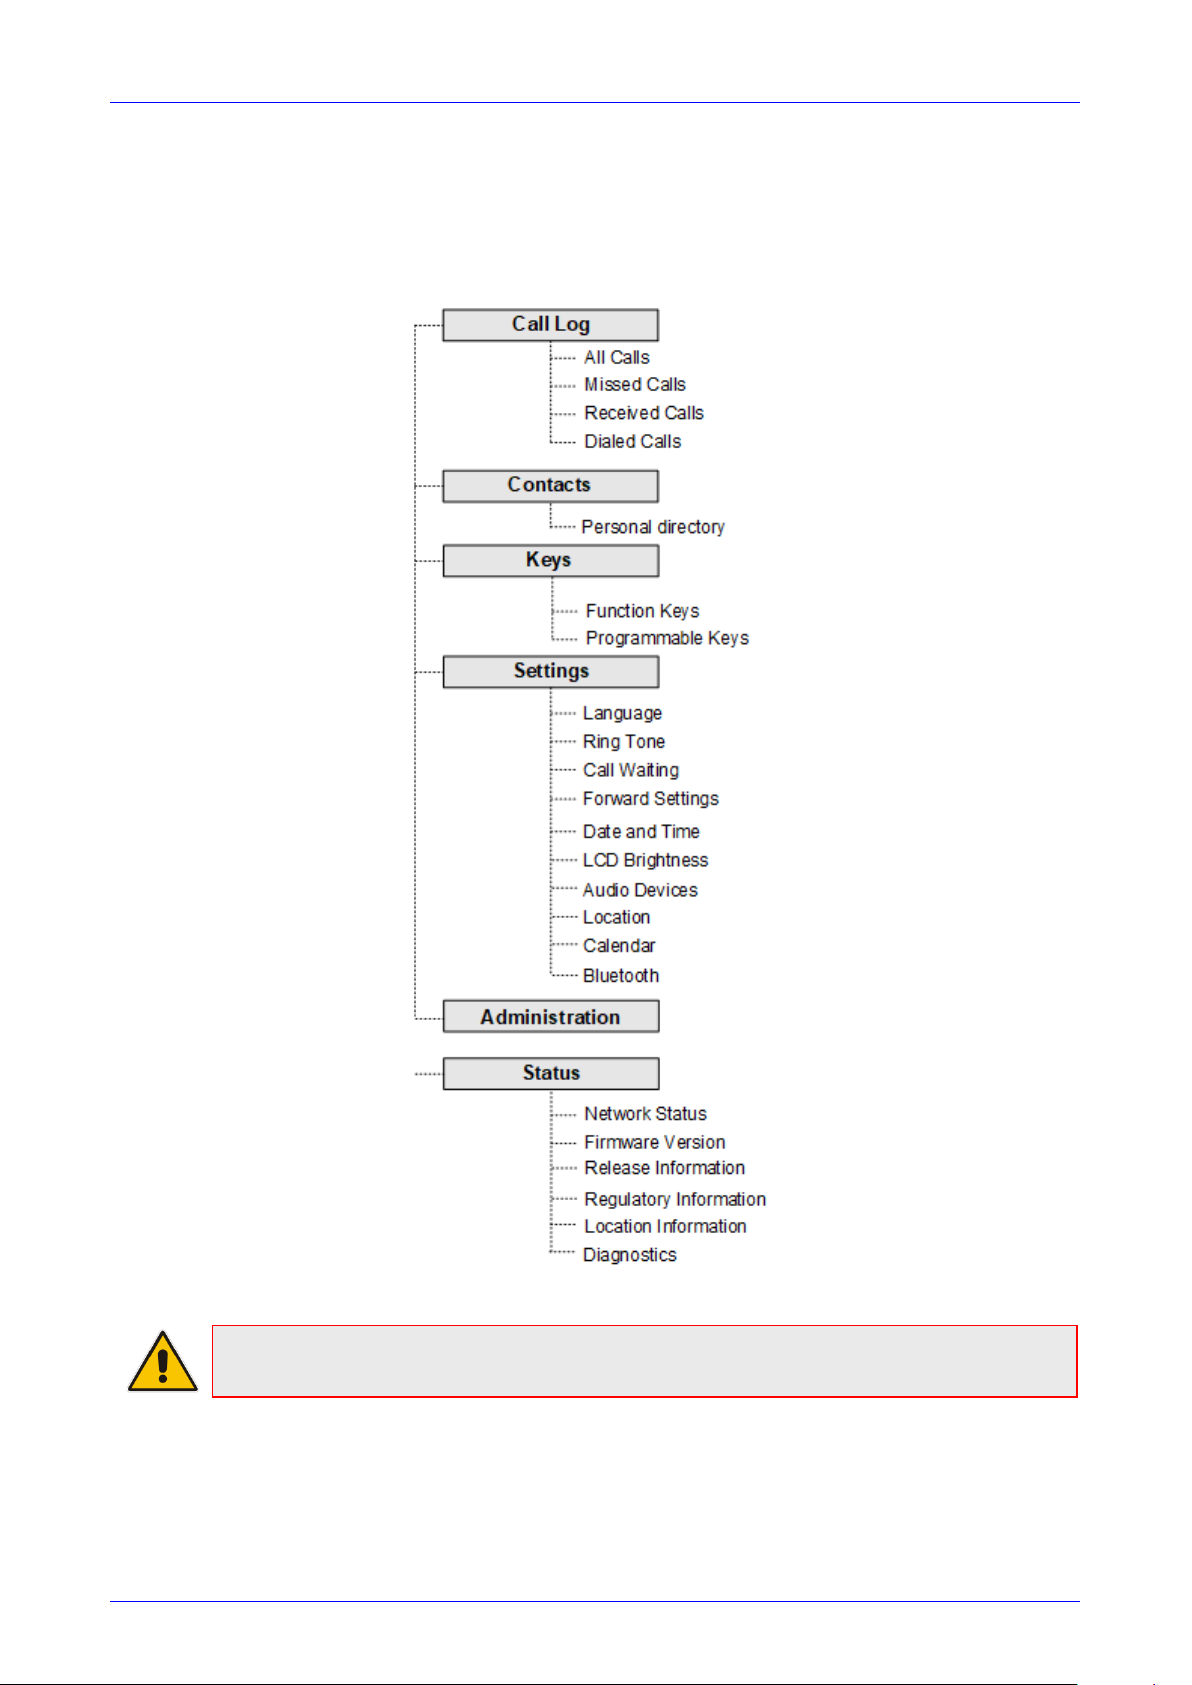
3.3 Navigating the Phone Menu
The MENU key on the phone lets you access information and configure settings shown in the figure
below. Press it to view call logs, configure speed dials, customize phone settings, determine device
status, perform administration and access 'Contacts'.
Figure 3-2: Phone Menu
Note: The Administration option is intended for network administrators only. It is password
protected. See the Administrator’s Manual for details.
Version 3.4.3 19 445HD IP Phone
Page 20
445HD IP Phone
To access the menus:
Press the MENU key located on the device.
To navigate to menu items:
After opening the menu, press the navigation control button's lower rim -OR- press the menu
item's number, e.g., press 3 to navigate to Keys Configuration.
To select a menu or menu item:
Press the Select softkey or press the navigation control's OK button.
To cancel and move to a previous menu level:
Press the Back softkey.
3.4 Switching between Letters | Numbers
The keypad allows you to enter upper case letters, lower case letters and numbers, and to switch
from one mode to another.
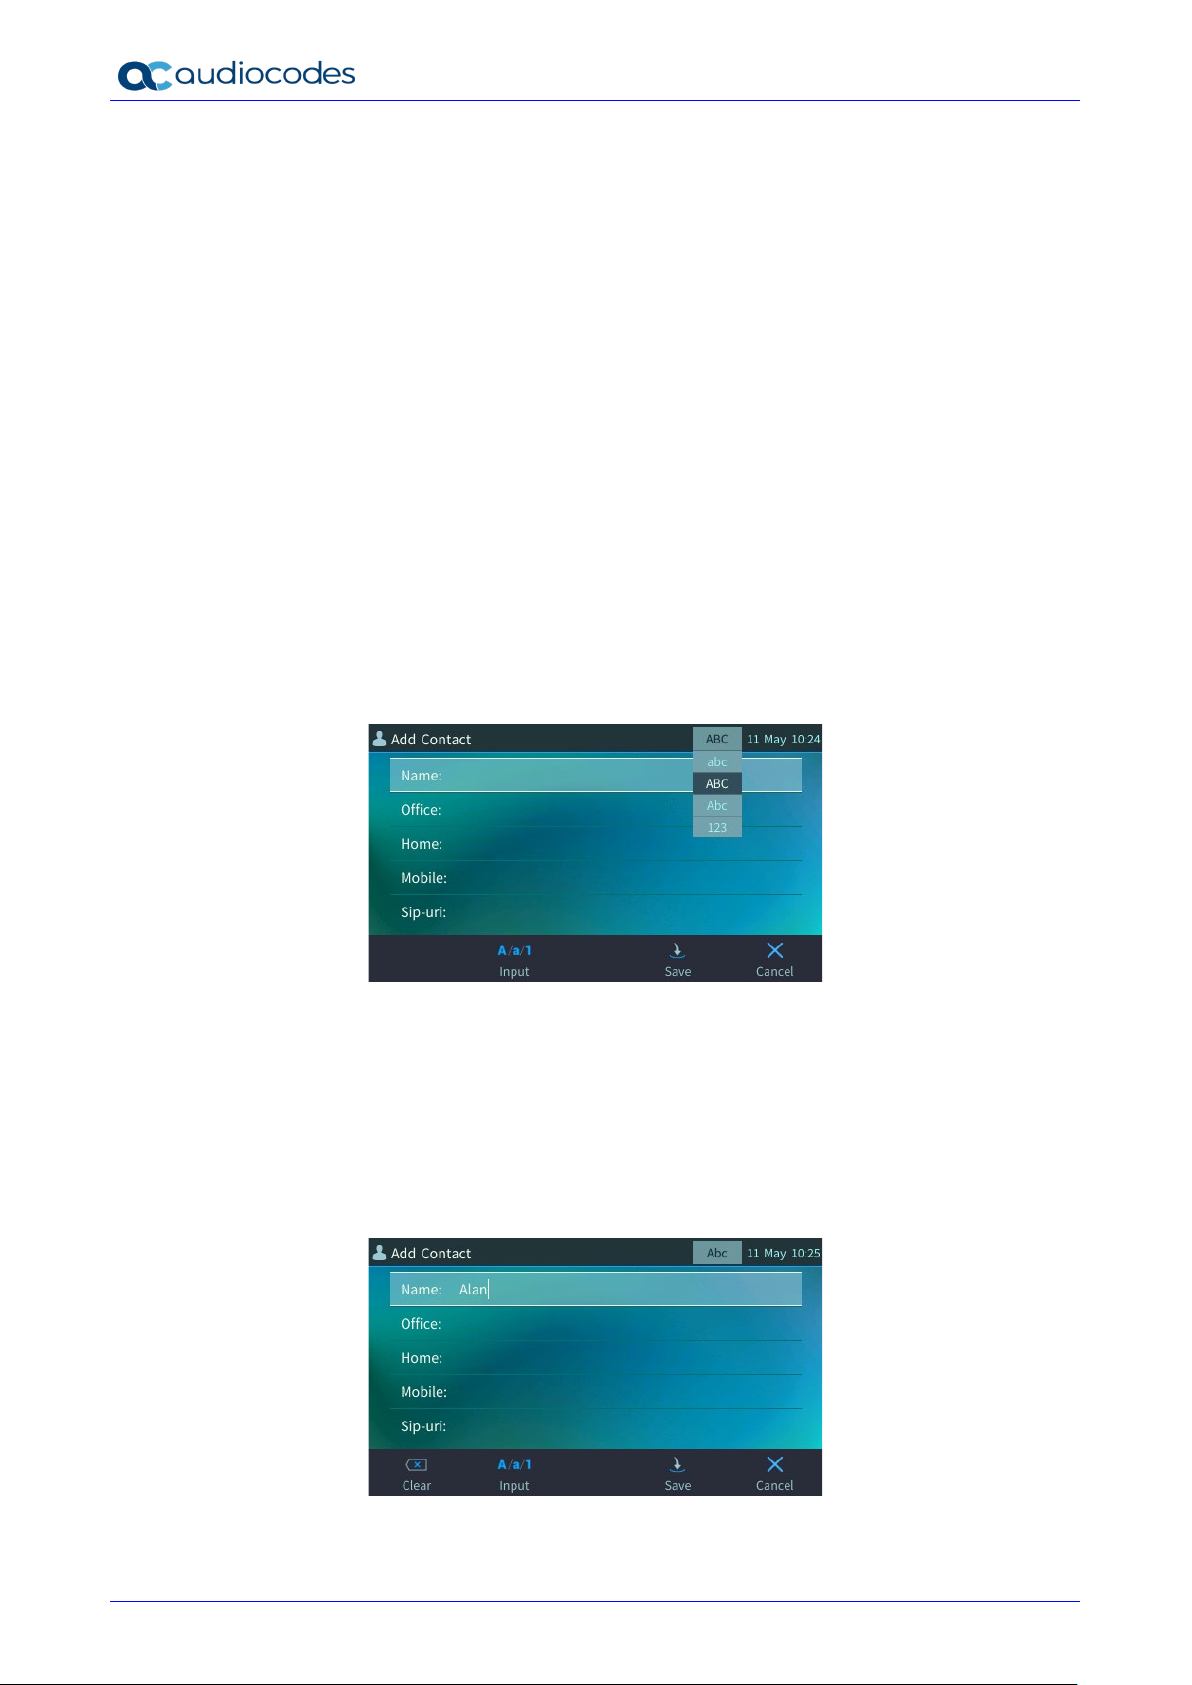
To enter a contact's name (for example):
1. In the Add Contact screen, press the # key on the keypad.
Figure 3-3: Switching between Letters | Numbers
2. Press the # key successively to navigate to and select the mode:
• abc = lower case letters
• ABC = upper case letters
• Abc = first letter upper case, the rest lower case
• 123 = numbers
3. [For example] Select Abc mode and then on the keypad, press the 2 key; A is entered. Press
the 5 key three successive times; l is entered (once produces j, twice produces K). Similarly,
enter a and n.
User's Manual 20 Document #: LTRT-14850
Page 21

User's Manual 3. Getting Started
3.5 Switching to Symbols
The keypad allows you to switch to symbols and to revert from symbols mode to letters or numbers
mode.
To enter a symbol (e.g., dot or @ or hyphen):
1. Press the # key successively to navigate to and select abc (mandatory).
2. Press the 1 key on the keypad; a period / full stop is entered. Immediately press the 1 key
again; a backslash is entered. Pressing successively produces the following symbols:
Symbol Explanation Symbol Explanation
. Dot * Star sign
@ At = Equal sign
\ Backslash ` Grave accent
, Comma | Separator
; Semi-colon ( Open parenthesis
: Colon ) Close parenthesis
# Pound { Open parenthesis
$ Dollar } Close parenthesis
% Percentage [ Open square parenthesis
^ Caret ] Close square parenthesis
& Ampersand " Double quotation marks
! Exclamation mark ' Single quotation mark
? Question mark > Greater than
- Hyphen < Less than
_ Underscore / Forward slash
~ Approximates
Note that the asterisk (*) symbol is entered directly using the star key.
Figure 3-4: Entering a Symbol, e.g., a dot
To revert to letters, e.g., abc:
Make sure you're in abc mode and successively press the 7 key three times to produce (for
example) r:
Version 3.4.3 21 445HD IP Phone
Page 22

445HD IP Phone
Figure 3-5: Reverting to Letters, e.g., abc
User's Manual 22 Document #: LTRT-14850
Page 23
User's Manual 4. Configuring a Line
4 Configuring a Line
See the Administrator’s Manual for information about configuring a line.
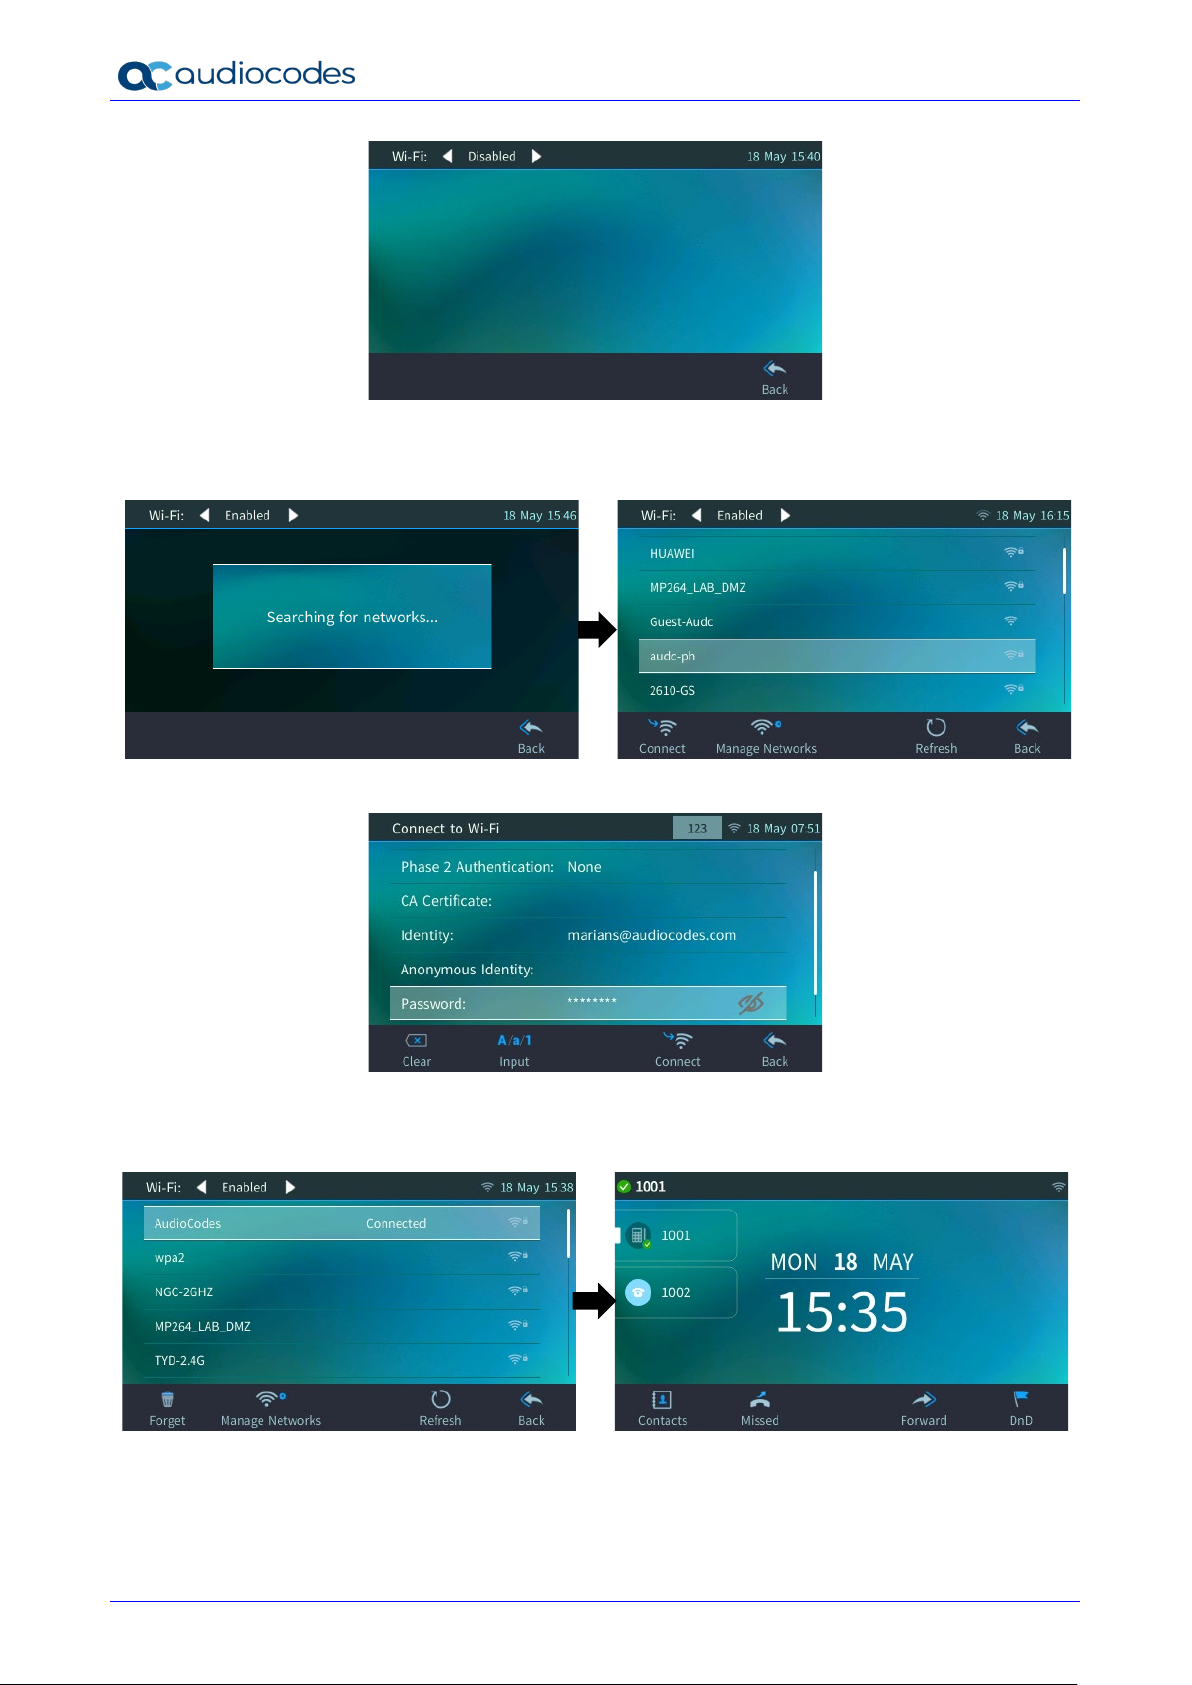
4.1 Connecting to Wi-Fi
Note: Applies only to 445HD phone models UC445HDEG-BW and UC445HDEPSG-BW .
The phone can connect to an Access Point via Wi-Fi. The Wi-Fi interface can be used when the
phone is installed in an environment free of LAN/cables, to perform VoIP calls over Wi-Fi.
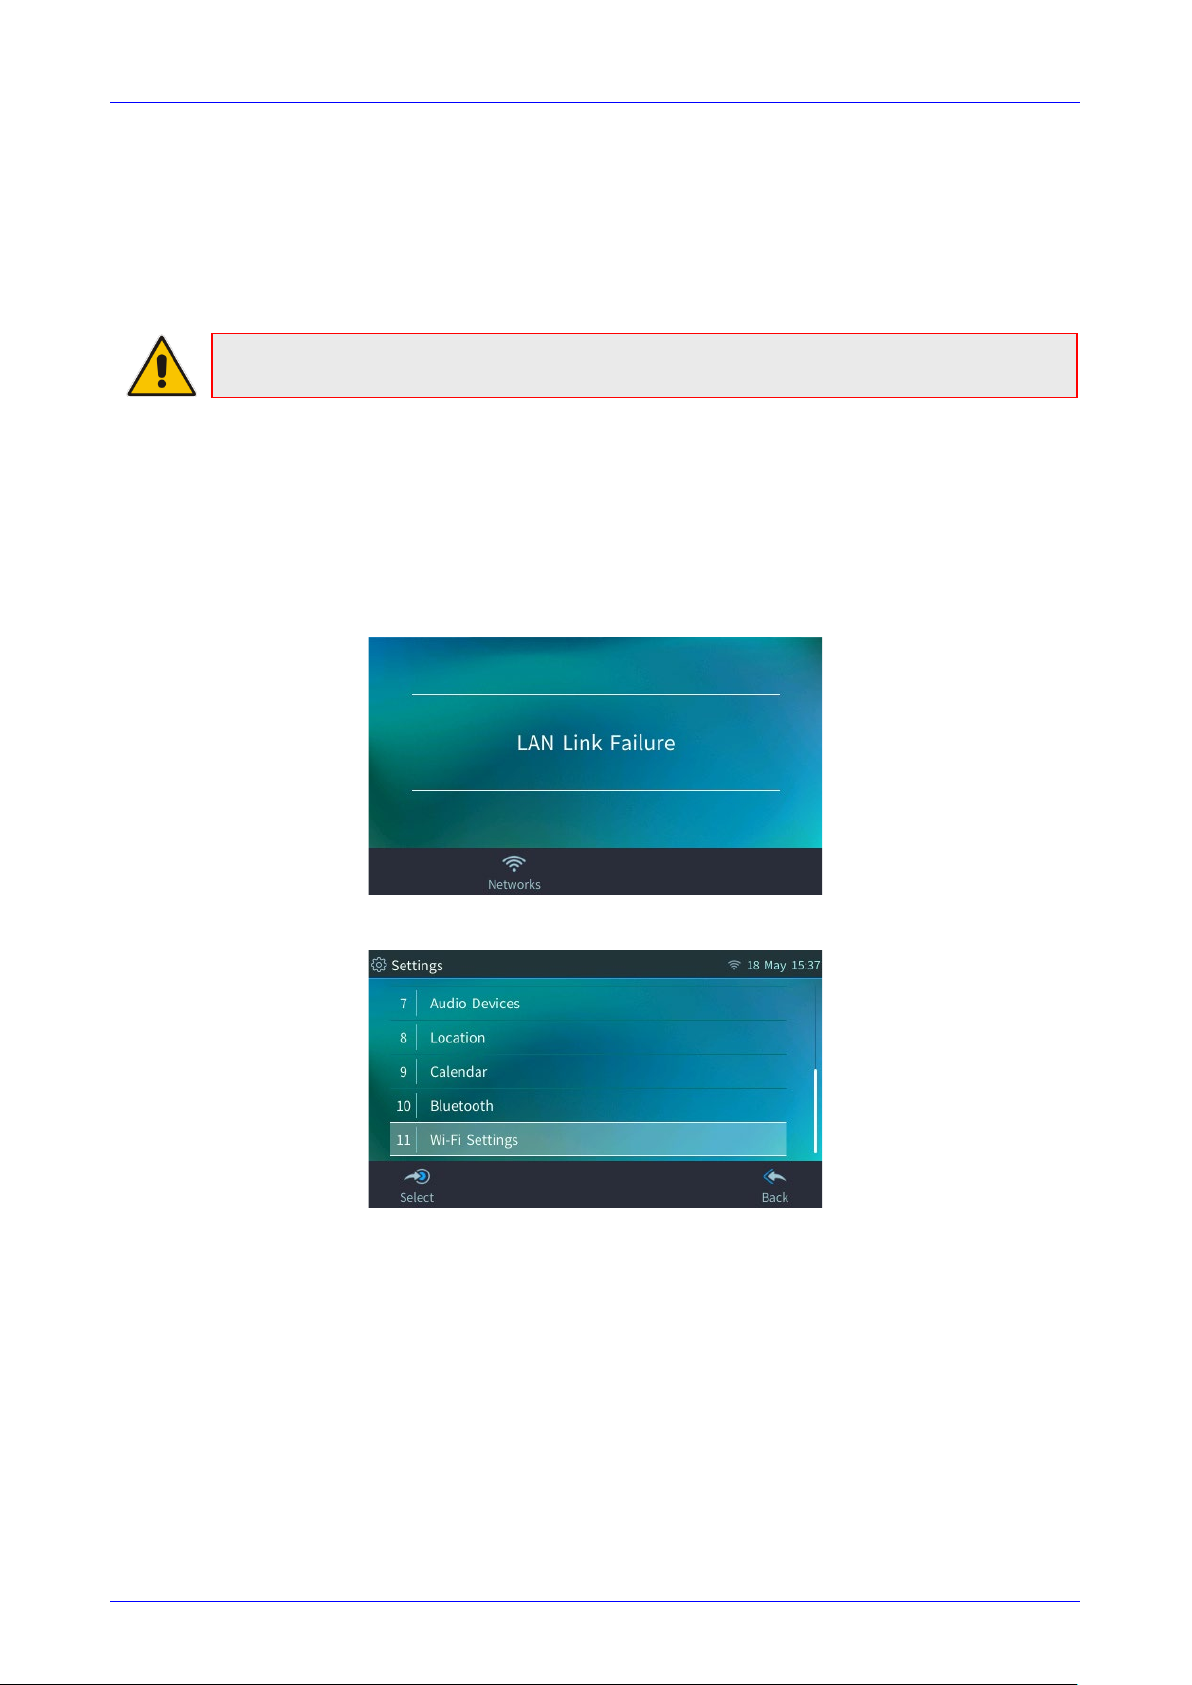
To connect to Wi-Fi:
1. In the phone’s main menu, press the Networks icon -or- in the ‘Settings’ menu, navigate to
and select the Wi-Fi option.
If an Ethernet cable does not connect the 445HD phone to a LAN port, the phone displays a
‘LAN Link Failure’ message and a Networks softkey.
2. Alternatively access Wi-Fi settings via the MENU hard key > Settings > Wi-Fi Settings.
3. Enable | disable Wi-Fi by pressing the right rim | left rim of the navigation button on the phone.
Wi-Fi is disabled by default.
Version 3.4.3 23 445HD IP Phone
Page 24
445HD IP Phone
4. After enabling Wi-Fi, the screen indicates the phone is ‘Searching for networks…’. The phone
then displays the available Wi-Fi Access Points. If necessary, press the Refresh softkey to
display more options.
5. After selecting a Wi-Fi Access Point, configure Access Point parameters.
6. After configuring the Wi-Fi parameters, press the Connect softkey and wait about 20-30
seconds for the phone to connect to Wi-Fi and receive an IP address; the Wi-Fi icon is then
displayed in the uppermost right corner of the screen:
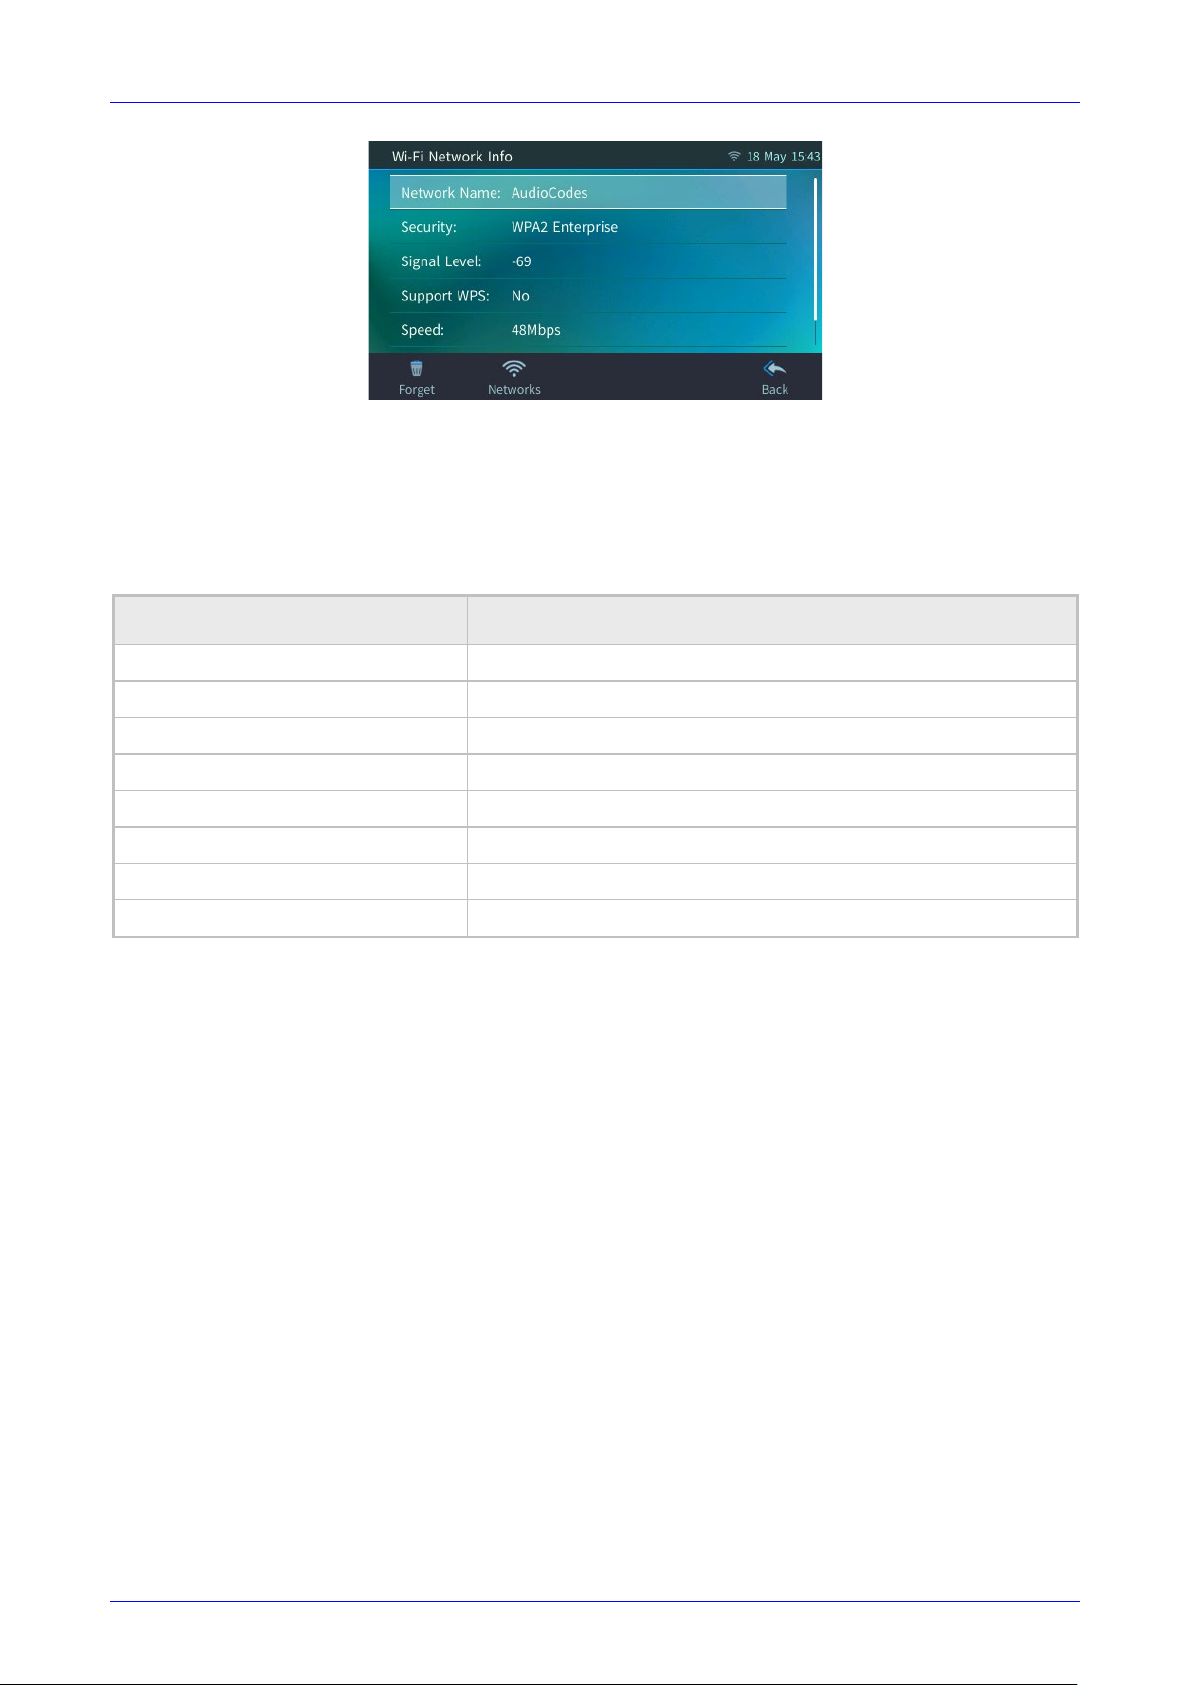
7. Determine Wi-Fi status (network name, authentication method and Wi-Fi signal strength) from
the Wi-Fi Network Info screen (Device Status > Wi-Fi).
User's Manual 24 Document #: LTRT-14850
Page 25
User's Manual 4. Configuring a Line
4.2 Displayed Messages
Messages indicating processes in progress, displayed in the screen, include:
Table 4-1: Displayed Messages Indicating Processes In Progress
Message Description
Initializing Initializing
Discovering LLDP Discovering VLAN using Link Layer Discovery Protocol (LLDP)
Discovering CDP Discovering VLAN using Cisco Discovery Protocol (CDP) )
Acquiring IP Acquiring an IP address from a DHCP server
Initializing Network Initializing the network
Downloading Firmware File Downloading a firmware file
Upgrading Firmware Upgrading the phone’s img firmware
Updating Configuration File Upgrading the phone’s cfg configuration file
Version 3.4.3 25 445HD IP Phone
Page 26

445HD IP Phone
This page is intentionally left blank.
User's Manual 26 Document #: LTRT-14850
Page 27

User's Manual 5. Customizing the Phone
5 Customizing the Phone
You can customize the phone screens to suit personal requirements for a friendlier user experience.
5.1 Changing the Language
The phone supports multiple languages. English is the default, but you can change it to any other.
To change the default:
Open the Languages screen (MENU key > Settings > Language), navigate to and select
the language you require and then press the displayed Save softkey.
5.2 Selecting Ring Tone
A ring tone can be selected to suit personal preference from a range of ring tones.
To select a ring tone:
Open the Ring Tone screen (MENU key > Settings > Ring Tone) and then navigate to and
select the ring tone of your choice and then Save.
As you navigate down the list a sample of each ring tone is played.
If line extensions are defined on your phone, you can assign a ring tone per line extension.
Version 3.4.3 27 445HD IP Phone
Page 28

445HD IP Phone
To assign a ring tone per line extension:
1. Open the Ring Tone screen (MENU key > Settings > Ring Tone).
2. Navigate to and select the line extension for which to configure a ring tone.
3. In the Ring Tone screen that opens, select the ring tone of your choice and then Save.
User's Manual 28 Document #: LTRT-14850
Page 29
User's Manual 5. Customizing the Phone
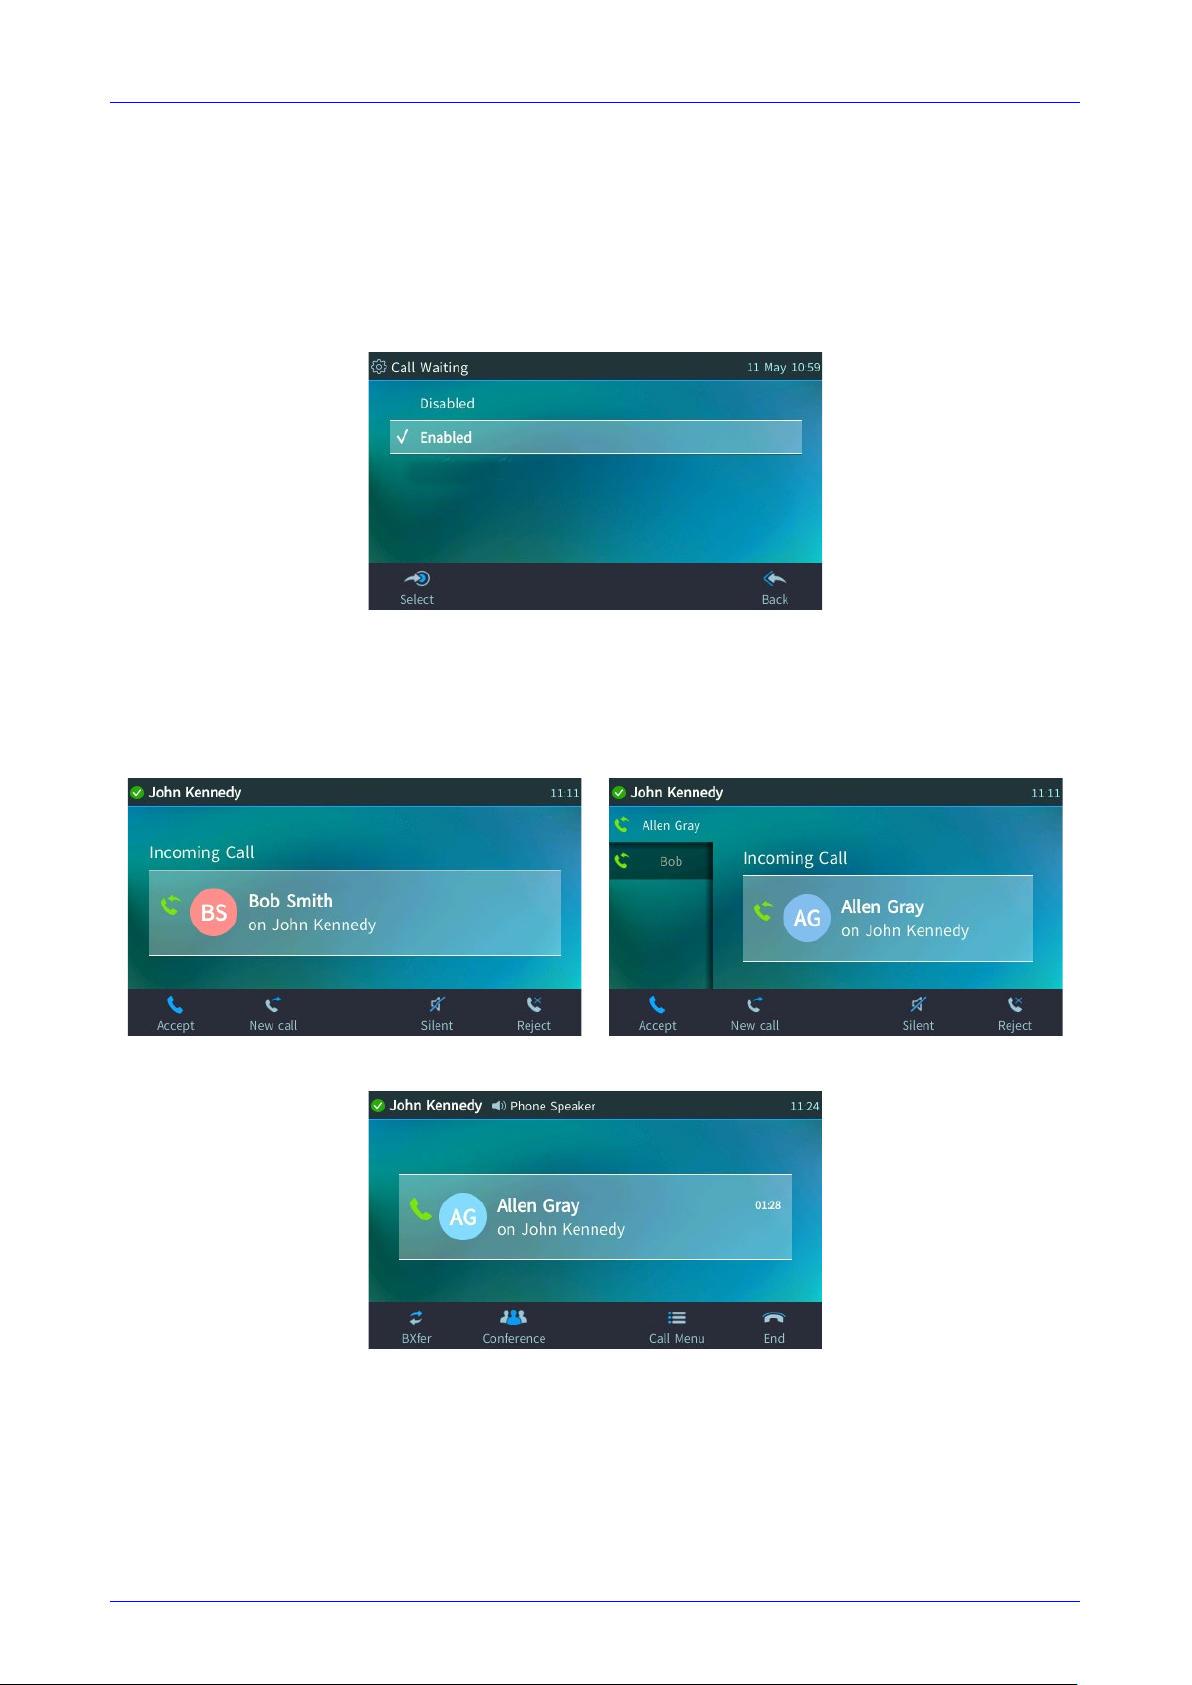
5.3 Enabling Call Waiting
The phone lets you suspend a call that's in progress in order to accept another call coming in on
the line.
To enable or disable call waiting:
Open the Call Waiting screen (MENU key > Settings > Call Waiting), navigate to and select
Disable or Enable and then Save.
5.4 Handling Simultaneous Incoming Calls
If you're in a call and another party calls, or if two calls come in on your phone simultaneously, the
phone's screen displays both calls in a way which facilitates easy and efficient handling.
Simultaneous incoming calls:
When one of the incoming calls is answered:
Version 3.4.3 29 445HD IP Phone
Page 30

445HD IP Phone
When a phone is in a call and another comes in:
Visual indications on the phone are:
The Ring LED in the upper right corner of the device flashes blue when a call comes in
The LED of the programmable key that is configured as an extension flashes green when a
call comes in on that extension (if there’s an available BLF for the line extension and the
server supports it)
The LED of the programmable key that is configured as an extension is illuminated red after
a call that comes in on that extension is answered (if there’s an available BLF for the line
extension and the server supports it)
User's Manual 30 Document #: LTRT-14850
Page 31

User's Manual 5. Customizing the Phone
5.5 Configuring Call Forwarding
This feature enables you to automatically redirect an incoming call to another phone number,
including a mobile phone number, if a user-defined condition is met, e.g., if the line is busy. All Call
Forwarding options can be configured from the phone.
Note: [Support pending] If your enterprise deployed BroadSoft's BroadWorks server, your
network administrator can control the Call Forwarding feature on the phone from the server.
For more information, see the Administrator's Manual.
To configure call forwarding:
1. Open the Automatic Forward screen (MENU key > Settings > Forward settings -or- press
the Forward softkey when the screen is in idle state).
2. In the Automatic Forward screen, select either:
• Always; incoming calls will always be forwarded
• Busy; incoming calls will be forwarded when the user is using the phone
• No Reply 6 sec; incoming calls will be forwarded if the user doesn’t answer after a
specified number of seconds; the default is 6 but you can configure up to 98 seconds.
3. After the selection, configure the phone number to which you want the calls to be forwarded.
4. Alternatively, navigate to and select the Select From Directory option and then choose the
contact to whose number you want the calls to be forwarded.
5. Press the Start softkey that’s then activated; you're returned to the idle screen; in the idle
screen, view a check mark in the corner of the Forward softkey; calls will automatically be
forwarded to the configured number.
Version 3.4.3 31 445HD IP Phone
Page 32

445HD IP Phone
To configure call forwarding on multiple lines:
1. Open the Forward screen (press the Forward softkey when the screen is in idle state).
2. Navigate to and select the line extension on which to configure call forwarding; the Automatic
Forward screen is displayed, as shown in the previous instruction set.
3. Configure call forwarding on that line extension and then proceed to the next line extension on
which you want to configure call forwarding.
To stop call forwarding:
When the phone is in idle state, press the Forward softkey; the check mark in the corner
disappears.
User's Manual 32 Document #: LTRT-14850
Page 33

User's Manual 5. Customizing the Phone
5.6 Making Sure the NTP Server is Enabled
You can manually set date and time displayed on your phone but if a Network Time Protocol (NTP)
server is deployed and enabled by your administrator, date and time are automatically retrieved
over the Internet from the server and manually setting them will not be possible. You'll then receive
a message Set by NTP.
Note:
• It's recommended to implement an NTP server. If the phone's 'NTP server' setting is set to
'Disabled', inform the network administrator. Only the network administrator can change it. It
must be set to 'Enabled' for date and time to be automatically retrieved from the NTP
server. System administrators can see the Administrator’s Manual for detailed information.
• If date and time are manually set, the settings are not retained after rebooting the phone or
powering off. You will need to manually reset date and time if you reboot or power off.
To make sure the NTP server is enabled:
1. Open the Date and Time screen (MENU key > Settings > Date and Time).
2. If not already 'Enabled', notify your network administrator.
To enable/disable obtaining time zone from the DHCP server:
Note: If 'Obtain Time Zone from DHCP' is set to 'Disabled', inform the network administrator.
Only the network administrator can change the setting on the phone because it is password
secured.
To configure the time format:
Navigate to and select the Time format option and then select the format of your choice.
To configure the date format:
Navigate to and select the Date Format option and select the format of your choice.
Version 3.4.3 33 445HD IP Phone
Page 34

445HD IP Phone
User's Manual 34 Document #: LTRT-14850
Page 35

User's Manual 5. Customizing the Phone
example after a calendar reminder pops up in your screen or when a call
High (default)
Switch to dimmer mode
Defines the timeout of 'active mode', in minutes. If it expires, the screen
changes to 'dimmer mode' (see the next description). Configure either 15
out configured for 'active mode'
High
it expires, the screen
the brightness of the screen when it's in 'night mode'. The screen
'dimmer mode'
High
5.7 Configuring Screen Brightness
The screen can be configured to a level of brightness to suit personal preference, for a pleasant
user experience.
To select a brightness level:
1. Open the LCD Brightness screen (MENU hard key > Settings > LCD Brightness).
2. Navigate down to an option and then navigate to the level that suits you best. Use the table
below as reference.
Table 5-1: Screen Brightness Options
LCD Brightness Option Description
Active mode brightness
Defines the brightness of the screen when it's in 'active mode', which is for
comes in or after you press a key on the dialpad.
• Low
• Medium
•
after
(default), 30, 45 or 60 minutes.
Dimmer mode brightness
Defines the brightness of the screen when it's in 'dimmer mode'. The screen
changes to 'dimmer' mode after the time
expires (see above). You can configure either:
• Low
• Medium (default)
•
Switch to night mode after
Defines the timeout of 'dimmer mode', in minutes. If
changes to 'night mode'. Configure either 30, 60 (default), 90 or 120 minutes.
Night mode brightness
Defines
changes to 'night mode' after the timeout configured for
expires (see above). You can configure either:
• Low (default)
• Medium
•
3. Save the setting.
Version 3.4.3 35 445HD IP Phone
Page 36

445HD IP Phone
5.8 Selecting an Audio Device
You can select the speaker or the headset to be activated when you answer calls. The default is
the speaker. This means that when you press the Accept softkey to answer a call, or when you
dial another party by pressing the number keys on the keypad and then pressing the Dial softkey,
the default device will be the speaker.
To change the default:
Open the Select Audio Device screen (MENU key > Settings > Audio Devices), navigate to
and select Analog Headset or other connected USB/Bluetooth entities and then Set as
Default.
User's Manual 36 Document #: LTRT-14850
Page 37

User's Manual 5. Customizing the Phone
5.9 Adjusting Volume
The phone allows you to adjust
Ring volume
Tone v olume (e.g., dial tone)
Handset volume
Speaker v olume
Headset v olume
5.9.1 Adjusting Ring Volume
The volume of the phone's ring alerting you to an incoming call can be adjusted to suit personal
preference.
Note: By default, you can adjust ringing volume in the phone's LCD. Your network
administrator, however, can block this capability and provision ringing volume remotely. If this
was done and you need to adjust the ringing volume, consult your network administrator.
To adjust ring volume:
1. When the phone is in idle state, press the VOL or VOL key on the phone; the Ringer
Volume bar is displayed on the screen:
2. After the adjustment, the Ringer Volume level disappears from the screen.
Note: You can alternatively press the upper and lower rim of the navigation control button to
increase or decrease ring volume, tones volume or call voice volume. When you press the
OK on the navigation control button, the volume screen disappears.
5.9.2 Adjusting Tones Volume
The phone's tones, including dial tone, ring-back tone and all other call progress tones, can be
adjusted to suit personal preference.
To adjust tones volume:
1. Off-hook the phone (using handset, speaker or headset).
2. Press the VOL or VOL key; the Tones Volume bar displays on the screen:
Version 3.4.3 37 445HD IP Phone
Page 38

445HD IP Phone
3. After the adjustment, the Tones Volume bar disappears from the screen.
5.9.3 Adjusting Handset Volume
The volume of the handset can be adjusted to suit personal preference. The adjustment is
performed during a call or when making a call. The newly adjusted level applies to all subsequent
handset use.
To adjust handset volume:
1. During a call or when making a call, make sure the handset is off-hook.
2. Press the VOL or VOL key; the Call Voice Volume bar is displayed on the screen.
3. After the adjustment, the Handset Volume bar disappears from the screen.
5.9.4 Adjusting Speaker Volume
The volume of the speaker can be adjusted to suit personal preference. It can only be adjusted
during a call.
To adjust the speaker volume:
1. During a call, press the SPEAKER key on the phone.
2. Press the VOL or VOL key; the Call Voice Volume bar is displayed on the screen.
3. After the adjustment, the Speaker Volume bar disappears from the screen.
User's Manual 38 Document #: LTRT-14850
Page 39

User's Manual 5. Customizing the Phone
5.9.5 Adjusting Headset Volume
The volume of the headset can be adjusted to suit personal preference. It can only be adjusted
during a call.
To adjust the headset volume:
1. During a call, press the HEADSET key on the phone.
2. Press the VOL or VOL key on the phone; the Call Voice Volume bar is displayed on the
screen.
3. After the adjustment, the Headset Volume bar disappears from the screen.
5.10 Managing your Personal Directory
The phone supports the Personal directory.
Note:
• You can add, edit and delete contacts in the Personal directory.
• You can add a maximum of 1,000 contacts to your Personal directory. After adding a
contact, you can call the contact directly from the directory. If you receive an incoming call
5.10.1 Adding a Contact to the Personal Directory
from a contact listed in the directory, the screen displays the name listed.
• The Personal directory displays the presence status of contacts (depending on server BLF
support).
• If you assign a speed dial key to a contact, you can press it to call them.
The home number, office number, mobile number and/or SIP URI of a contact can be added to the
Personal Directory. You can also configure a speed dial to place calls quickly to the contact (see
Section 5.11). After adding the contact, you can search for them in the group, dial them, edit their
contact information or delete them.
To add a contact to the Personal directory:
1. Open the Personal directory (use the CONTACTS hard key on the phone).
Version 3.4.3 39 445HD IP Phone
Page 40

445HD IP Phone
2. Select New Contact.
3. In the 'Add Contact' screen, key in the ‘Name’ of the new contact.
4. Navigate down and key in the new contact's office phone number.
5. [Optionally] Navigate down and key in the new contact's home and mobile numbers as well.
6. [Optionally] Navigate down and enter their SIP URI, e.g., mike.dubb@audiocodes.com. This
option can be useful to you if you don't know their phone number.
7. Press the Sp. Dial softkey to assign a speed dial key if required.
8. Navigate to and select the first 'Empty' speed dial, and then save it; the speed dial key is
displayed in the phone's sidecar.
5.10.2 Editing Contact Information
Information about a contact in the Personal directory can be edited. This is important if a contact
changes their phone number, for example.
To edit contact information:
1. Open the Personal directory (press the CONTACTS hard key on the phone), navigate to the
name of the contact whose information you want to edit and then press the OK hard key on
the phone.
User's Manual 40 Document #: LTRT-14850
Page 41

User's Manual 5. Customizing the Phone
2. Press the Edit softkey.
3. Edit the contact’s details and press Save.
5.10.3 Deleting a Contact from the Personal Directory
Contacts can be deleted from the Personal directory. This can be necessary if they leave the
company, for example.
To delete a contact:
1. Open the Personal directory (press the CONTACTS hard key on the phone), navigate to the
name of the contact to delete and then press the OK hard key on the phone.
2. Press the Delete softkey; a 'Delete current contact?' warning message appears:
Version 3.4.3 41 445HD IP Phone
Page 42

445HD IP Phone
3. Press the Yes softkey to remove the contact from the phone directory or No if you want to
keep the contact in the directory.
User's Manual 42 Document #: LTRT-14850
Page 43

User's Manual 5. Customizing the Phone
5.10.4 Searching for a Contact in the Personal Directory
The search feature enables you to quickly and easily locate a contact in a directory. The feature
increases user productivity, especially if you have a long list of contacts.
To search for a contact in the Personal Directory:
Open the Personal Directory and then
a. Navigate down to the contact in the list
or (if the directory is large)
b. Key the first letter of the contact's name, for example, J, to search for Jonathan.
c. Key the next letter, o.
d. Key the next letter (if necessary), n.
Note: If you key in a letter and there are no matching entries in the Personal Directory, you’ll
be indicated No Matches. To exit, press OK to accept the result, Back to exit from the
Contacts and Clear to allow a new search.
Version 3.4.3 43 445HD IP Phone
Page 44

445HD IP Phone
5.10.4.1 Selecting A/a/1 Input
You can select A/a/1 input when for example you need to search for a contact in the Personal
Directory.
To select A/a/1 input:
1. Open the Personal Directory (press the CONTACTS hard key on the phone) and then
• press the Input softkey
or
• press the # key on the phone
2. Successively press the Input softkey or the # key on the phone to navigate to the
alphanumerical option you require.
User's Manual 44 Document #: LTRT-14850
Page 45

User's Manual 5. Customizing the Phone
5.11 Configuring a Function Key for Speed Dialing
Up to 33 Function Keys on the phone's sidecar can be configured as a speed dial. Each lets you
place a call to a contact at the press of a sidecar button.
Note:
• Speed dials can also be configured when adding a contact – see here for details.
• Five programmable keys can also be configured as speed dials – see here for details.
Speed dials are private. They're for each user's own personal use. They're preserved even if you
sign out, sign in as another user, sign out as that user, and then sign in again as your own user.
To configure a Function Key as a speed dial:
1. Open the Function Keys screen (MENU key > Keys > Function Keys or long-press one of
the 1-33 sidecar buttons).
2. Navigate to and select an empty (unconfigured) Function Key.
3. Navigate to and select Speed Dial.
Version 3.4.3 45 445HD IP Phone
Page 46

445HD IP Phone
4. Enter the number of the contact or select the contact from a directory.
5. Enter a Key Label – the name of the contact to be displayed on the sidecar.
6. Press the displayed Save softkey.
5.11.1 Configuring Pause Dialing for a Speed Dial to an Ext. behind an IVR
The 'Pause Dialing' feature creates a time break typically needed for a speed dial to a destination
extension number that is behind an Interactive Voice Response (IVR) system.
Note: Your network administrator will configure 'Pause Dialing' if you need to configure a
speed dial to a number behind an IVR system. See the Administrator's Manual for more
information.
5.11.2 Configuring a Speed Dial Key through the Personal Directory
You can configure a Speed Dial key through the Personal Directory.
To configure a Speed Dial key through the Personal directory:
1. Open the ‘Personal directory’ (MENU key > Contacts > Personal directory), select the
contact and then press the Edit softkey.
2. Navigate to the phone number for which to define a speed dial and press the Sp. Dial softkey.
3. Navigate to an ‘Empty’ or to a previously defined speed dial number. In the latter case, the
previously defined speed dial number will be overwritten.
4. Press the Select softkey and then navigate to and select an ‘Empty’ Function Key.
5. Press the Save softkey; the Speed Dial is assigned to the contact and displayed in the sidecar.
5.11.3 Configuring a Speed Dial Key in the Sidecar Fields
You can configure up to 33 Speed Dials in the sidecar fields.
To configure a Speed Dial key in a sidecar field:
1. On the sidecar, long-press a button adjacent to a field.
2. In the Functional Key screen that opens, select Speed Dial.
3. In the ‘Function Key #n’ screen that opens, configure the phone number of the contact to whom
to assign the Speed Dial key.
4. Enter a label that will facilitate quick and easy identification of the key.
5. Press the Save softkey; the field displays the name of the contact to whom you assigned the
Speed Dial.
User's Manual 46 Document #: LTRT-14850
Page 47

User's Manual 5. Customizing the Phone
5.11.4 Editing a Speed Dial
Editing a speed dial will usually be necessary if a contact's phone number changes.
To edit a speed dial:
1. Long-press the sidecar button next to the contact's speed dial and then Select.
2. In the 'Number' field of the Function Key screen, press the Clear softkey to delete digits.
3. Navigate to the 'Key Label' field and edit by pressing the Clear softkey to delete letters.
4. Save the edit.
5.11.5 Deleting a Speed Dial
Deleting a speed dial will typically be necessary if a contact leaves the company.
To delete a speed dial:
Long-press the sidecar button next to the speed dial to delete, navigate to 'Empty' and then
press the Select softkey.
Version 3.4.3 47 445HD IP Phone
Page 48

445HD IP Phone
5.12 Programmable Softkeys (PSKs)
Located under your phone's LCD are four configurable softkeys. The idle screen by default displays
(from left to right) Contacts, Missed, Forward, and DnD softkeys.
Note: PSKs can only be configured by the network administrator (see the Administrator's
Manual).
The four softkeys can be configured for different key events. The administrator can add additional
softkeys. When additional softkeys (more than four) are added, the rightmost softkey is set to More.
If you press it, you're scrolled to the next page of the softkey display.
Note: You can scroll up to seven pages according to the supported number of configured
softkeys (see the Administrator's Manual).
When a PSK is configured to connect to a voicemail server or to access an intercom, for example,
you can be prompted after pressing the voicemail softkey to enter a personal voicemail code. After
entering the voicemail code, you can press Start to dial to the voicemail serv er, Clear to clear the
entry or Cancel.
5.13 Configuring a PSK for a Customized UI Experience
Note: Only the network administrator can configure this feature. See the phone’s Administrator’s
Manual for more information.
Network administrators can configure Programmable Softkeys for New Call state, Ongoing call
state and Idle screen state as part of the phone’s capability of allowing a customized user interface
experience.
Administrators can customize the ongoing call screen (shown in the figure below) in line with the
preferences / requirements of enterprise management and / or the employees.
For example, the BXfer softkey in the ongoing call screen shown in the preceding figure can be
replaced with the New Call softkey shown in the figure below on the phones of enterprise users
who infrequently transfer calls.
User's Manual 48 Document #: LTRT-14850
Page 49

User's Manual 5. Customizing the Phone
Administrators can customize the idle screen (shown in the figure below) in line with the preferences
/ requirements of enterprise management and / or the employees.
For example, the Contacts softkey in the idle screen shown in the preceding figure can be replaced
with the Call softkey shown in the figure below.
Version 3.4.3 49 445HD IP Phone
Page 50

445HD IP Phone
5.14 Configuring a Function Key for Paging
Live announcements can be made (paged) from a phone to a group of phones, to notify a team (for
example) that a meeting is about to commence. The paged announcement is multicast via a
designated group IP address, in real time, on all idle phones in the group, without requiring listeners
to pick up their receivers. The name of the group is displayed on phone screens when the paging
call comes in.
Note: The feature must be enabled in the configuration file by the network administrator
before a Function Key can be configured for paging. By default the feature is disabled.
Consult the network administrator if you need it. See the Administrator's Manual for more
information.
Each of the 12 Function Keys on the sidecar can be configured to page a group. The feature allows
live announcements to be made (paged) from a phone to a group of phones, to notify a team (for
example) that a meeting is about to commence. The paged announcement is multicast via a
designated group IP address, in real time, on all idle phones in the group, without requiring listeners
to pick up their receivers. Listeners view the name of the group displayed on their sidecar when the
paging call comes in.
To configure a Function Key as a paging dial:
1. Long-press a button on the phone's sidecar and then navigate to and select Paging.
Note: The screen can alternatively be accessed via the MENU key > Keys > Function Keys
> select 'Empty' > navigate to and select Paging.
2. In the 'Group Name' field, enter the name of the group, to be displayed in the phone's screen
when there's an incoming / outgoing paging call.
3. In the ‘Key Label’ field, configure the paging group name to be displayed in other phone
screens or in the phone’s sidecar Function Keys when paging them from this phone.
4. In the 'Multicast Address' field, enter the paging group's multicast IP address.
User's Manual 50 Document #: LTRT-14850
Page 51

User's Manual 5. Customizing the Phone
Default: 240.0.0.0. For phones to be in a group, all must be configured with the identical
multicast address.
5. In the 'Multicast Port' field, enter the paging group's port. Default: 8888. For phones to be in a
group, all must be configured with the same port.
6. Press the Save softkey to save the configuration.
Version 3.4.3 51 445HD IP Phone
Page 52

445HD IP Phone
5.15 Configuring a Programmable Key for Speed Dialing
Six programmable keys are located on either side of the phone screen, three on each side. Each
can be configured as a speed dial, exactly the same as the 12 Function Keys. A total of 18 speed
dials can therefore be configured on the phone: Twelve Function Keys + six programmable keys.
To configure a programmable key for speed dialing:
1. Long-press one of the 1-6 programmable keys and then navigate to and select Speed Dial.
Note: The screen can alternatively be accessed via MENU key > Keys > Programmable
Keys > select 'Empty'.
2. Configure the 'Number' and 'Key Label' field or navigate down to Select from Directory, and
then Save.
3. Test the speed dial by pressing the adjacent key on the phone.
User's Manual 52 Document #: LTRT-14850
Page 53

User's Manual 5. Customizing the Phone
5.15.1 Deleting a Speed Dial
Deleting a speed dial will typically be required if a contact leaves the company.
To delete a speed dial:
1. Long-press the key on the phone configured as a speed dial.
2. Navigate to and select Empty. The speed dial indication disappears from the idle screen.
Version 3.4.3 53 445HD IP Phone
Page 54

445HD IP Phone
5.16 Configuring a Programmable Key for Paging
Six programmable keys are located on either side of the phone screen. Three are on each side.
Each can be configured for paging a group, exactly like the 12 function keys. So a total of 18 keys
can be configured on the phone for paging: Twelve function keys + six programmable keys.
The paging feature allows a live announcement to be made (paged) from a phone to a group of
phones, to notify a team (for example) that a meeting is about to commence. The paged
announcement is multicast via a designated group IP address, in real time, on all idle phones in the
group, without requiring listeners to pick up their receivers. The name of the group is displayed on
phone screens when the paging call comes in.
To configured a programmable key for paging:
Note: Make sure paging is enabled on the network. Consult your network administrator if it
isn't.
1. Open the Programmable Keys screen (MENU key > Keys > Programmable Keys):
2. Select an 'Empty' (unconfigured) programmable key and then select Paging.
3. In the 'Group Name' field, enter the name of the group to be displayed in the phone's screen
when there's an incoming / outgoing paging call.
User's Manual 54 Document #: LTRT-14850
Page 55

User's Manual 5. Customizing the Phone
4. In the ‘Key Label’ field, enter a name for the programmable key-paging dial to be displayed in
the phone's screen.
5. In the 'Multicast Address' field, enter the paging group's multicast IP address.
Default: 240.0.0.0. For phones to be in a group, all must be configured with the identical
multicast address.
6. In the 'Multicast Port' field, enter the group's port. Default: 8888. For phones to be in a group,
all must be configured with the identical port.
7. Save the configuration.
5.17 Configuring a Programmable Key for a Key Event
Any of the six programmable keys located on either side of the phone screen can be configured as
a Key Event. A Key Event can be Dialed Calls, Missed Calls, Received Calls, Directory, DnD All,
and Forward The figure below, for example, shows a programmable key configured as a ‘Dialed’
Key Event. Pressing the key directly opens the Dialed Calls screen.
To configure a programmable key as a Key Event:
1. Long-press any of the six programmable keys located on either side of the phone screen or
press the MENU key > Keys.
2. Select Programmable Keys and then select an 'Empty' Programmable Key.
3. Navigate to and select Key Event:
Version 3.4.3 55 445HD IP Phone
Page 56

445HD IP Phone
4. In the ‘Key Label’ field, configure an identifier that you’ll easily identify in the phone screen,
e.g., 'Dialed'.
5. In the ‘Key Event’ field, select the Key Event you want to configure, for example, ‘Dialed Calls’.
6. Save the configuration and view in the phone's idle screen the Key Event you configured.
5.17.1 Deleting a Key Event
If necessary, configured programmable keys can be deleted.
To delete a configured programmable key:
Long-press the programmable key and then in the key's screen, select Empty.
User's Manual 56 Document #: LTRT-14850
Page 57

User's Manual 6. Performing Basic Operations
6 Performing Basic Operations
This section shows basic phone operations.
6.1 Using Audio Devices
Users can switch between audio devices (e.g., USB, Bluetooth, etc.) by long-pressing the
speaker/headset key. Any of the following audio devices can be used for speaking and listening:
Handset: To make a call or answer a call, lift it.
Speaker (hands-free mode). To activate it, press the speaker key during a call or when
making a call. To deactivate it, press the speaker key again.
Headset (hands-free mode). When talking on the phone, you can relay audio to a connected
headset. To enable it, press the headset key. To disable it, press it again.
The audio device can be switched during a call.
To switch from speaker/headset to handset:
Activate speaker/headset and pick up the handset.
To change from handset to speaker/headset:
Off-hook the handset and press the speaker/headset key to activate the speaker/headset.
Return the handset to the cradle; the speaker/headset remains activated.
To change to a Bluetooth headset:
Press the hard headset button on the phone. If for example more than one headset is
connected to the phone (analog, USB and/or Bluetooth), long-press the button and in the
Select Audio Device screen that opens, select USB /analog /Bluetooth.
To change to a USB headset:
Press the hard headset button on the phone. If for example more than one headset is
connected to the phone (analog, USB and/or Bluetooth), long-press the button and in the
Select Audio Device screen that opens, select USB /analog /Bluetooth.
6.2 Making Calls
The screen that is displayed after dialing provides caller-friendly orientation information.
the name of the calling party
outgoing call
presence status of the called party
the name of the called party if listed in the phone directory
the number of the called party
The phone plays a ring-back tone indicating to the caller that the called party's phone is ringing.
Version 3.4.3 57 445HD IP Phone
Page 58

To end dialing a call before it's answered:
Press the End softkey or on your active audio device, press the speaker button or headset
button, or on-hook the handset.
Note: For advanced dialing using the phone directory, see Section 5.10. To configure a key
for speed dialing, see Section 5.11.
6.2.1 Dialing
Here are the available dialing options:
Key in the digits of the phone number on the keypad
Press the speaker/headset key and enter the digits of the phone number in the 'New Call'
field
Lift the handset and enter the phone number in the 'New Call' field
To dial:
1. On the keypad, key in the first digit of the number; the screen displays the digit in the 'New
Call' field.
445HD IP Phone
• Key in the remaining digits. To delete (from right to left) entered digits, press the Clear
softkey. To cancel the call, press the Cancel softkey.
2. Do any of the following:
• Don't do anything; dialling is automatically performed after a few seconds.
• Press the Dial softkey; dialing is performed.
• Pick up the receiver; dialing is performed.
• Press the speaker/headset button; dialing is performed.
• Press # if you switched on speaker/handset/headset before keying in the digits of the
phone number; dialing is performed.
To dial a URL:
1. Press the speaker/headset key or lift the handset.
User's Manual 58 Document #: LTRT-14850
Page 59

User's Manual 6. Performing Basic Operations
2. Press the URL softkey and enter a URL address.
3. Press the # key on the dialpad until abc is selected and then enter the letters in the name.
4. On the dialpad, press the digit 1 twice for the @ symbol.
5. Press the # key on the dialpad until 123 is selected and then enter numbers. To enter a full
stop, press the # key on the dialpad until abc is selected and press the digit 1.
6. Press the Clear softkey to delete (from right to left) entered letters/numerals/symbols.
Press the Cancel softkey to cancel the call.
7. Press the Dial softkey.
6.2.2 Redialing
Any phone number previously dialed can be redialed. The phone logs all dialed number.
To redial:
1. Press the REDIAL key on the phone; the Dialed Calls screen is displayed, listing in
chronological order, recently dialed numbers.
2. Select the number to redial and then press the Dial softkey or press the OK key.
Version 3.4.3 59 445HD IP Phone
Page 60

445HD IP Phone
6.2.3 Dialing a Missed Call
The phone logs missed calls. The number of missed calls is displayed in the idle screen.
To dial a missed call:
1. Press the Missed softkey displayed in the idle screen.
2. Select the missed call to dial if more than one is listed.
3. Press the Dial softkey or press the OK key.
6.3 Answering a Call
The screen displayed when a call comes in provides friendly orientation information.
presence status of the called party
the name of the called party
the number of the called party
incoming call
the name of the calling party if listed in the phone directory
the number of the calling party
The called party's phone rings.
To answer:
Pick up the handset -OR- press the headset key (make sure the headset is connected to the
phone) -OR- press the speaker key -OR- press the Accept softkey (the speaker is
automatically activated). After you answer, the screen displays the HD icon and the caller’s
details and call duration.
To answer a call with a Bluetooth headset:
Tap the answer/end button on the headset
To answer a call with a USB headset:
Press the headphone hard key on the phone or tap the answer button on the USB headset
User's Manual 60 Document #: LTRT-14850
Page 61

User's Manual 6. Performing Basic Operations
Note:
• HD in the screen indicates a high-definition call (using a wideband voice coder).
• If a contact is in a call and they're listed in your phone's BLF list, the red BLF LED flashes
on and off to indicate that the contact is in a call. If that contact is in a call with another
contact listed in your phone's BLF list, the red BLF LEDs of both the calling contact and
the called contact flash on and off on your phone.
• When two calls come in simultaneously, the names of the calling parties appear on the
screen and the adjacent icons flash. If a user is in a call and a third party calls, the
name of the calling party appears on the screen and the adjacent icon flashes.
6.4 Rejecting an Incoming Call
An incoming call can be rejected if for example you're busy or unavailable to take the call. The
caller on the other side will hear a busy tone from your phone.
To reject an incoming call:
Press the Reject softkey.
Note: A Reject softkey will only be displayed if voicemail is not activated on your phone.
6.5 Silencing an Incoming Call
An incoming call's ringing can be silenced if for example a colleague is consulting you in your office
when the call comes in. The caller on the other side will hear regular ringing but no answer.
To silence the ringing of an incoming call:
Press the Silent softkey.
Version 3.4.3 61 445HD IP Phone
Page 62

445HD IP Phone
Only the ringing will be silent. The call will continue to be active. You can answer it.
6.6 Making a New Call Even Though a Call is Coming in
A new call can be made even though a call is coming in, typically needed when it's more important
and pressing to make a new call than to accept an incoming.
To make a new call when a call is coming in:
1. In the Incoming Call screen, press the New Call softkey.
2. In the New Call screen, enter the destination number to call and then press the Dial softkey.
3. When the destination number answers, you can toggle to the calling party and reject or accept
them.
6.7 Ending an Established Call
You can end an established call.
To end an established call:
Return the handset to the phone cradle if it was used to take the call -or- press the headset
key -or- press the speaker key -or- press the End softkey.
User's Manual 62 Document #: LTRT-14850
Page 63

User's Manual 6. Performing Basic Operations
6.8 Viewing Missed, Received and Dialed Calls
The phone logs calls missed, received and dialed calls. In idle state, the screen displays the number
of missed calls (if any). In the example below, 1 missed call is indicated.
To view missed calls:
Press the Missed softkey.
Note: After viewing Missed Calls (by pressing the Missed softkey), the indication in the idle
screen disappears. It'll reappear the next missed call.
To view call history:
1. Open the Call Log screen (MENU key > Call Log).
2. In the Call Log screen, navigate to and select the call log you require.
• All Calls = calls that were missed, received and dialed
• Missed Calls = calls that were not answered
• Received Calls = the most recently answered numbers
• Dialed Calls = the most recently dialed numbers
3. Select the option you want, for example, Missed Calls.
4. Press a softkey:
• Dial [dials the number of the selected logged entry]
• Save [saves the related information about the call entry in the personal directory]
Version 3.4.3 63 445HD IP Phone
Page 64

445HD IP Phone
• Detail [accesses the Call Details screen, which displays details of the log entry]
The screen displays:
• Number [phone number logged]
• Time [the time the call was logged]
• Date [the date on which the call was logged]
• Duration [the duration of the call]
Note:
• Log entries are stored from newest to oldest entries. The maximum number of entries for
each log type is 20. When the 20th entry is reached, it's deleted and replaced with the new
entry.
• Log entries are saved on a daily basis. If a power failure occurs, information may be lost.
User's Manual 64 Document #: LTRT-14850
Page 65

User's Manual 6. Performing Basic Operations
6.9 Using Multiple Lines
Your phone supports up to six lines. Each is configured with its own extension number. The figure
below displays the idle screen of a phone set up with two lines whose extensions are ‘1002’ and
‘1010’. The default extension line is boldened. In the example screen below it is 1002.
Note: Only your phone/network administrator can configure lines. See the Administrator's
Manual for detailed information.
6.9.1 Choosing a Line
You can select a line to use. The screen displays a bar above the extension number of the line
currently being used. Until you change this line, all new calls are made on it.
To change lines:
1. Make sure that the LCD is in idle state and that no calls are established. View the two
configured lines displayed in the screen. View the bar above the currently used line.
2. Navigate to and select the other line; the bar moves above it; all new calls will now be made
on it.
6.9.2 Making a Call on a Line
To make a call on a line:
1. When the screen is in idle state, raise the handset or press the key of the first digit of the
number to call; the NEW CALL screen is displayed.
2. Enter the number of the person to call or select a contact from the Directory and press the Dial
softkey; the dialed number is called and the line on which the call is made is indicated in the
screen.
6.9.3 Making Two Calls on a Line
To make two calls on a line:
1. On line 1 call A. After establishing this call, press the New Call softkey; the call with A is
automatically put on hold and the NEW CALL screen is displayed.
2. Enter B’s phone number or select their entry in the directory, and press the Dial softkey. B
answers.
3. To toggle between A (on hold) and B, press the navigation control's upper and lower rim (see
Section 6.9.6 on page 66).
Version 3.4.3 65 445HD IP Phone
Page 66

445HD IP Phone
6.9.4 Making Multiple Line Calls
Your phone supports multiple line calls. Calls can run simultaneously on each line. You can
therefore have up to 12 calls running simultaneously, where one is active and 11 are on hold.
Example scenario:
1. Line 1 calls A
2. Line 2 calls B
To make a multiple line call:
1. When the screen is in idle state, navigate to and select the extension line.
2. Lift the handset; in the NEW CALL screen displayed, enter the phone number or select a
contact from your directory.
3. Press the Dial softkey. The called party answers.
4. Press the New Call softkey; the called party is automatically put on hold and you're prompted
to enter a phone number or select a contact.
5. Press the navigation control's upper or lower rim to navigate to another extension line.
6. Make another call exactly like you made the first (on hold) but on the other extension line:
Enter a phone number or select a contact and press the Dial softkey.
7. To toggle between the first called party who’s on hold and the active called party, press the
navigation control's upper and lower rim (see below).
6.9.5 Toggling Between Multiple-Line Calls
After making calls on two different lines, you can toggle between them. When using two lines, one
line is active while the other is on hold. Toggling between lines therefore involves putting the
currently active call on hold and resuming the previously held call.
Indicates an active line.
A call on hold is indicated like this:
To toggle between multiple-line calls:
Navigate to and select the conversation to resume and press the Resume softkey or the OK
hard key to resume the call.
6.9.6 Toggling Between Calls on the Same Line
You can toggle between calls on the same line. How you toggle depends on whether the firstplaced call is active or the second-placed call is active.
To switch from the first-placed call to the second-placed call:
Navigate to and select the second-placed call and then press the Resume softkey; the first-
placed call is automatically put on hold.
User's Manual 66 Document #: LTRT-14850
Page 67

User's Manual 6. Performing Basic Operations
To switch from the second-placed call to the first-placed call:
Navigate to and select the first-placed call and then press the Resume softkey; the second-
placed call is automatically put on hold.
6.9.7 Answering Calls
To answer a call:
1. Determine on which line the call is coming in.
2. Press the Line key.
6.9.8 Ending Calls
You can only end calls that are active, i.e., not on hold.
To end a call:
1. Make sure that the call is active and not on hold.
2. Press the End softkey or the SPEAKER key.
6.10 Paging a Group
After configuring a paging group and a paging dial on the phone (see Sections 5.14 and 5.16), you
can page others in your group, and they can page you, to announce a change of venue, for
example. You can use the speaker, handset or headset as the audio device to page your group.
To page others in your group:
1. Press the function key or programmable key that you configured for paging the group.
2. Pick up the receiver and make the announcement, or talk directly into the speaker.
6.10.1 Receiving an Incoming Paging Call
Any other user configured in your group can page you.
To receive a paging call from another user configured in your group:
View in your phone's screen which group the paging call is coming from and listen to the
incoming paging call.
Version 3.4.3 67 445HD IP Phone
Page 68

445HD IP Phone
6.10.1.1 If Paged when in a Regular Call and Barge-in is Disabled
If you're in a call when paged and the 'Barge-in' feature was disabled by your network administrator,
you're prompted to accept/reject the paged call.
If you press the Accept softkey; the regular call is put on hold (with MoH) and the paged call
is heard.
Note: If you'd have pressed Reject, the paging wouldn't have barged in on the regular call.
When you've heard the paging call, press the End softkey and then the Resume softkey to
resume the regular call that was put on hold.
User's Manual 68 Document #: LTRT-14850
Page 69

User's Manual 6. Performing Basic Operations
6.10.1.2 If Paged when in a Regular Call and Barge-in is Enabled
If you're in a call when paged and the 'Barge-in' feature was enabled by your network administrator,
the paging call barges into the regular call which is put on hold.
Press the End softkey and then the Resume softkey to resume the regular call.
Version 3.4.3 69 445HD IP Phone
Page 70

445HD IP Phone
This page is intentionally left blank.
User's Manual 70 Document #: LTRT-14850
Page 71

User's Manual 7. Performing Advanced Operations
7 Performing Advanced Operations
This section shows how to perform advanced operations such as answering waiting calls, placing
calls on hold, etc.
7.1 Answering Waiting Calls
You can accept a call on an extension on which there already is an active call.
To answer a waiting call:
a. A call with Bob is in progress
b. A call comes in from Allen Grey
To answer Allen Grey:
1. Press the Accept softkey; the waiting call from Allen Grey is answered; the previous call from
Bob is put on hold:
2. Press the navigation control's upper or lower rim to toggle between calls.
Version 3.4.3 71 445HD IP Phone
Page 72

445HD IP Phone
Note: To enable / disable the call waiting feature, see Section 5.3.
User's Manual 72 Document #: LTRT-14850
Page 73

User's Manual 7. Performing Advanced Operations
7.2 Placing Calls On Hold
You can place a call on hold in order to answer an incoming call (see Section 7.1) or to make
another call. The party put on hold will hear music played (Music on Hold (MOH)).
To place a call on hold:
Accept an incoming call and then press the HOLD key on the phone; the call is put on hold:
To retrieve a call on hold:
Press the HOLD key again -OR- press the Resume softkey or the OK hard key to resume
the call.
Note: When using the handset in a call, if the handset is on-hooked after putting the call on
hold, the call is not disconnected and the audio is switched to the speaker. For the call to be
disconnected, as it was in earlier versions, refer to your network administrator.
7.3 Calling a Contact Listed in the Directory
You can call a contact listed in your directory.
To call a contact listed in the directory:
3. Press the CONT ACTS key and then select the directory.
4. Navigate to the contact to call.
5. Press the Dial softkey or the OK key.
7.4 Enabling Auto Redial
Note: Support pending.
If a called party is unavailable because, for example, they're busy, the caller's phone's LCD
prompts Extension Busy. Activate auto redial on busy?
If the caller presses the Yes softkey to the prompt, the busy extension is automatically redialed
every n seconds (configurable by the caller). The caller can stop the redialing at any time.
Note: Contact your network administrator to enable the feature if it is disabled (default).
Version 3.4.3 73 445HD IP Phone
Page 74

445HD IP Phone
When activated, the prompt Dialing <ext> within <x>s is indicated in the LCD (remote extension
and timer). If activated in Multiple Line mode, (Line <n>) (line number) is also indicated in the
LCD.
Pressing the Dial softkey redials the extension. Pressing the Cancel softkey deactivates autoredial.
Note:
• Calls can be made and received while auto-redial is activated.
• If auto-redial is activated while another extension is called - which is also unavailable - the
caller is prompted to activate auto-redial on the new (busy) extension; the previous autoredial is then deactivated.
• If auto-redial is activated on an unavailable extension and on that same extension an
incoming call is answered, the feature is deactivated.
To change the redial interval:
1. Open the 'Automatic redial' screen in the phone LCD (MENU > Settings > Automatic Redial).
2. Enter the interval you require and then press the Apply softkey.
7.5 Handling Multiple Incoming Calls
The phone is capable of handling up to eight concurrent calls per line. Multiple calls can be put on
hold and you can switch between them. This feature is important for front desk personnel.
To manage multiple incoming calls:
If a call comes in from Hilary and then after it, a call comes in from Steve, when you answer
Steve, Hilary is put on hold.
If a third call comes in, this one from Alan, and you answer it, Steve is also put on hold, so
now both Hilary (caller 1) and Steve (caller 2) will be on hold.
To toggle between callers:
Press the upper or lower rim of the navigation control button.
User's Manual 74 Document #: LTRT-14850
Page 75

User's Manual 7. Performing Advanced Operations
7.6 Using a Speed Dial to Call
To quickly place a call you can press the function key or programmable key that you configured for
speed dialing.
To configure a function key for speed dialing, see Section 5.11.
To configure a programmable key for speed dialing, see Section 5.15.
To speed dial:
Press a function key that you configured for speed dialing
-OR-
Press a programmable key that you configured for speed dialing.
Note:
• Long-pressing a function key that is not configured for speed dialing allows you to
configure one. See Section 5.11.
• Long-pressing a programmable key that is not configured for speed dialing allows you to
configure one. See Section 5.15.
7.7 Transferring Calls
A second party can be transferred to a third party using the blind transfer method (default) or
Method Description
Blind
Consultation
7.7.1 Performing a Blind Transfer
consultation transfer method, whichever is convenient at the moment.
Connects a second party to a third party before the third party answers.
Connects a second party to a third party after the third party answers and
agrees to take the call from the second party.
Note:
• The TRANSFER key on the phone by default performs blind transfer.
• Your network administrator can change the key's default to consultation transfer.
See the Administrator's Manual for more information.
A second party can be transferred to a third party before the third party answers, without consulting
with them.
To perform a blind transfer:
1. Bob Smith asks you – John Kennedy - to transfer him to Allen Gray. Press the TRANSFER
key on the phone or press the Call Menu softkey > Blind transfer. Bob is put on hold.
Version 3.4.3 75 445HD IP Phone
Page 76

445HD IP Phone
2. Enter Allen Gray’s number (2309) and then select Transfer.
3. On the other side, Allen Gray’s phone (2309) rings. Your phone - John – is immediately
disconnected from Bob Smith who is transferred to Allen Gray.
User's Manual 76 Document #: LTRT-14850
Page 77

User's Manual 7. Performing Advanced Operations
7.7.2 Performing a Consultation Transfer
You can consult with a third party before transferring a second party to the third party. This
consultation (semi-attended) transfer can be performed using the Trans. softkey or the TRANSFER
key on the phone.
Note: The Trans. softkey is not available by default on the phone and must be configured in
the configuration file. For more information, see the Administrator's Manual.
To perform a consultation transfer:
1. In a call with Bob Smith, he asks you – John Kennedy - to transfer him to Allen Gray. Press
the Call Menu sof tkey and then select Consultation transfer.
2. Enter Allen Gray’s number (2309) and then select Dial. Allen Gray’s phone rings and he
answers.
3. Consult with Allen Gray. Ask him for example if he’s willing to take the call from Bob Smith. If
he’s agreeable, press the Transfer softkey.
Allen Gray is connected to Bob Smith and you (John Kennedy) are disconnected.
Version 3.4.3 77 445HD IP Phone
Page 78

445HD IP Phone
7.7.3 Merging Calls into a Conference Call
When in a call, you can add another participant and then merge all into a conference call. Merging
is therefore similar to adding a participant to a conference. It can be performed on the phone
softkey.
To merge calls on the phone:
1. When in a call with Bob Smith, you (John Kennedy) decide you want to add Allen Gray to the
call. Press the Call Menu softkey, select New Call, enter Allen Gray’s number and then press
the Dial softkey; Bob Smith is put on hold. Allen Gray answers.
2. Press the Call Menu softkey and navigate to and select Merge Calls in the Call Menu screen.
3. View your call with Bob Smith merged with the newly made call with Allen Gray (2309).
User's Manual 78 Document #: LTRT-14850
Page 79

User's Manual 7. Performing Advanced Operations
7.7.4 Leaving a 3-Way Conference You Set up without Disconnecting the Others
A caller who sets up a three-way conference call with two other parties can leave it without
disconnecting the two other parties. The two others continue uninterrupted. The 'Drop from
Conference' feature supports this capability.
To leave a conference you set up, without disconnecting the other parties:
On-hook to end the call or press the End softkey; you're disconnected from the conference;
the two remaining parties continue unaffected.
Note: The initiator of a call conference can also drop out of the conference by on-hooking the
phone, without disrupting parties B and C. In a conference call initiated by user A with
participants B and C, user A can on-hook to drop out, and B and C can continue talking
uninterruptedly. Previously, only a softkey option was available for dropping out. A new
enable parameter commands the new SIP behavior (a 'Refer' is sent when user A on-hooks)..
7.8 Activating Do Not Disturb
The Do Not Disturb (DnD) feature stops the phone from ringing if anyone calls.
If DnD is activated and someone calls:
The caller hears a tone indicating that your phone is busy.
The call is blocked and the idle screen indicates 'Missed Calls'.
To activate DnD:
1. Make sure your phone is in idle state and that the idle screen is displayed, i.e., that you're not
in an active call or dialing a number.
2. Press the DnD softkey:
The screen displays a red ‘no entry’ icon adjacent to the extension line indicating that
incoming calls are blocked, as well as a tick symbol next to the DnD softkey, as shown in the
figure above.
Note:
• If DnD is activated on all line extensions, the tick symbol is colored light blue.
• If DnD is activated on only some of the line extensions, the tick symbol is colored gray.
To activate DnD on multiple line extensions:
1. Make sure your phone is in idle state and that the idle screen is displayed, i.e., that you're not
in an active call or dialing a number.
Version 3.4.3 79 445HD IP Phone
Page 80

445HD IP Phone
2. Press the DnD softkey:
3. Select All Extensions to activate the feature on all line extensions or navigate to and select the
extensions on which to activate DnD and then Save.
To deactivate DnD:
4. Make sure that the phone is in idle state and that the idle screen is displayed, i.e., that you're
not in a call or dialing a number.
5. Press the DnD softkey; the ‘no entry’ icon is no longer displayed on the screen and your phone
will now ring for incoming calls.
Note: [Support pending] If your enterprise deployed a BroadSoft server, your network
administrator can control the DnD on the phone from the BroadSoft server.
User's Manual 80 Document #: LTRT-14850
Page 81

User's Manual 7. Performing Advanced Operations
7.9 Retrieving Voice Mail Messages
Voicemail is indicated per line in the phone’s idle screen when the phone is in a multi-line
configuration. You can determine if new messages are in your Voice Mail if:
The Ring LED on the front of the phone is permanently lit blue (see Figure 2-1, label 1).
A stutter dial tone is heard when you pick up the handset.
The Voice Mail key is lit red.
To listen to Voice Mail messages:
1. Press the Voice Mail key on the phone (it’ll be illuminated red if there’s voicemail); you’re
prompted to enter the Voice Mail number.
Note: The preceding screen will only be displayed if your network administrator did not
configure the Voice Mail server number.
2. Enter the Voice Mail number (get it from your network administrator) and press the Save
softkey.
3. Press the Voice Mail key again; the phone dials your enterprise’s Voice Mail box; the Voice
Mail screen is displayed showing listed Voice Mail messages.
4. Press the All softkey; the list is updated.
5. Scroll in the list to a message to play, delete, etc.
Version 3.4.3 81 445HD IP Phone
Page 82

445HD IP Phone
7.10 Parking a Call
A call can be transferred to a "parking lot" where it can be picked up on any other phone in the
enterprise by a party who dials a retrieval number to retrieve it. The retrieval number is configured
in the server's parking lot parameter by the network administrator.
Tip: Don't park a call unless you know precisely who you want to answer it. If you park a call,
it can be answered by anyone in the enterprise listed in the server's parking lot parameter.
To configure a Functional Key for parking a call:
1. Long-press any of the unconfigured buttons adjacent to the sidecar fields.
2. Press the right rim of the navigation key button to navigate to and select Parking Lot.
3. Obtain the ‘Number’ from your network administrator and enter it in the ‘Number’ field.
4. Enter an intuitive ‘Key Label’ for enhanced usability, for example, Call park, and press Save.
To use the feature:
When you’re in a call, press the configured button adjacent to the sidecar field. Go to the
other phone on which you want to pick up the parked call. Pick it up on that phone.
User's Manual 82 Document #: LTRT-14850
Page 83

User's Manual 7. Performing Advanced Operations
7.11 BLF Call Pickup
This feature allows you to ‘pick up’ on your phone a call that comes in on another employee’s phone
but that employee is OOO (for example).
After configuring a speed dial for an employee, when a call comes in on that employee’s phone the
sidecar’s BLF button next to the speed dial on your phone flashes green, allowing you to ‘pick up’
the call by pressing the BLF button.
Note: Before using this feature, make sure your network administrator has enabled it on the
server.
7.12 Managing a Conference
Users can manage a three-way call conference, based on SIP, from the phone. This supported
conference capability is locally based (phone based), i.e., the initiator of the conference call adds
participants.
To start a conference:
1. In the phone's idle screen, make a call and press Conference.
2. In the Add Participant screen that opens, enter the participant’s phone number and press the
now activated Dial softkey.
3. When the call is established, press the Conference softkey, enter the next participant to add
to the conference and then press the now activated Dial softkey.
Version 3.4.3 83 445HD IP Phone
Page 84

445HD IP Phone
To view conference information:
In the Conference screen, press the Call Menu softkey and then select Conference Info.
User's Manual 84 Document #: LTRT-14850
Page 85

User's Manual 7. Performing Advanced Operations
7.13 Muting Your Speaker, Handset or Headset
During a call, you can mute the microphone of the handset, headset or speaker so that the other
side cannot hear you. While the call is muted, you can still hear the other party. Muting the
microphone of the handset, headset or speaker can also be performed during conference calls.
To mute/unmute:
1. During a call, press the mute key on the phone.
2. To unmute, press the mute key again.
7.14 Configuring a Default Audio Device
Users can configure their default audio device. This is the device that’s used when the user presses
the accept key to answer calls or when the user dials using a speed dial.
To configure the default audio device:
1. Open the Select Audio Device screen (Settings > Audio device).
2. Choose the device to set as default:
Users can switch between any available audio device either by pressing the headset / speaker key
or by long-pressing the speaker / headset key and then if there are more devices, selecting the
device from the list.
Version 3.4.3 85 445HD IP Phone
Page 86

445HD IP Phone
The device indicates the selected audio device in the screen title.
User's Manual 86 Document #: LTRT-14850
Page 87

User's Manual 7. Performing Advanced Operations
7.15 Configuring Bluetooth on the Phone
The phones support integrated Bluetooth for (wireless) USB headset connectivity.
Note:
• Beta level
• Only applies to the 445HD-BW model.
• Supported in specific regions such as the USA, Canada, the European Union, Switzerland,
South Africa and Israel, and requires a specific CPN with a ‘BW’ suffix when ordering. For an
updated list of supported regions, contact AudioCodes.
To enable Bluetooth on the phone:
1. Access the Bluetooth screen (Menu > Settings > Bluetooth):
2. Press the right/left rim of the navigator key to configure Enabled:
3. Configure the device (Bluetooth headset or speaker) to allow pairing and then press the
Refresh softkey; the phone attempts to discover available devices:
4. Press the Pair softkey to pair the device. After pairing is complete, the phone displays
‘Connected’.
Version 3.4.3 87 445HD IP Phone
Page 88

445HD IP Phone
• When the phone is connected via Bluetooth, its battery level is visually indicated
adjacent to the ‘Connected’ indication. Bluetooth connectivity is indicated on the upper
bar by the Bluetooth icon.
♦ indicates Bluetooth is enabled, not paired
♦ indicates that the device is connected
• Start using the device.
• The following Bluetooth call controls are supported (and can be used from the Bluetooth
device itself):
♦ Accept call
♦ End call
♦ Reject call
♦ Mute/unmute
♦ Volume up/down
User's Manual 88 Document #: LTRT-14850
Page 89

User's Manual 7. Performing Advanced Operations
Note:
• All Bluetooth headsets are defined by the phone as headsets and the phone’s headset hard key
onhooks / offhooks the headset.
• Connecting both the USB headset and the Bluetooth headset is currently not recommended.
• Known speakers such as the HRS 457, Jabra 710 and Jabra 510 are not defined as Bluetooth
headsets. Users can define a known Bluetooth speaker as the phone’s default Audio Device
from Settings > Audio Device:
• After it is selected, the Bluetooth speaker will be used whenever a call is answered via the
Accept softkey or initiated via the Dial key. The phone’s hard speaker and headset keys are
used for its speaker and connected headset, for example, USB headset.
Version 3.4.3 89 445HD IP Phone
Page 90

445HD IP Phone
This page is intentionally left blank.
User's Manual 90 Document #: LTRT-14850
Page 91

User's Manual 7. Performing Advanced Operations
A Specific Third-Party Features
Note: Support pending.
This appendix describes phone features that are only applicable to specific third parties.
A.1 Ribbon Communications Genband SLA
The following Kandy Business Solutions (KBS) softswitch solution features can be configured:
Shared Line Appearance (SLA)
Call pickup
Busy Lamp Fields (BLFs)
A.1.1 Configuring Shared Line Appearance
When a call comes in on a shared line, all phones ring in the SLA group. When answered by
someone in the group, all other users in the group can see there’s an active call on the line. When
there’s an active call on the line, no other phone can initiate a call on the line. When a call is put on
hold, the caller hears music; other users in the group can see the call is on hold (color indication or
flashing). When a call is on hold, the same phone or another phone can retrieve the call. Full
documentation on this feature is pending.
A.1.2 Configuring a Call Pickup Group
When configuring a call pickup group, basic configuration options determine:
the numbers that route into a call pickup group
whether or not vertical service code (VSC) dialing can be used by group members
group members
Advanced configuration options allow you to specify:
the maximum number of group members
the maximum number of call queues
whether or not SIP dialog event package subscriptions are enabled
Full documentation on this feature is pending.
A.1.3 Configuring BLFs
Full documentation on this feature is pending.
Version 3.4.3 91 445HD IP Phone
Page 92

445HD IP Phone
Shared line 1
Shared line 2
Shared line 3
Shared line 4
Speed Dials
for quick
transfer from
main line
A.2 BroadSoft
A.2.1 Shared Call Appearance
The SCA feature enables multiple phones to be associated in an SCA group so that calls can be
made or received on any phone in the group. The 440HD phone fully supports the feature. The 405
/ 405G / 420HD / 430HD phones support the feature as participant only.
Note:
• For detailed information on how to configure the SCA feature, see the Administrator's
Manual.
• Icons in the phone's screen indicate if line keys are configured in an SCA group, or as
private lines.
A hollow icon indicates a phone configured in an SCA group.
A solid icon indicates a phone configured as private.
If a call comes in to a phone in the SCA group, all phones in the group ring simultaneously. The
first to answer is connected to the caller. All other phones then stop ringing. The recipient can then
opt to put the call on hold. All calls put on hold and all active calls are displayed in all phones'
sidecars. An SCA group user can pick up a call by pressing their sidecar BLF LED.
Figure A-1: SCA
To make a call, answer a call, put a call on hold, forward a call, etc., is the same as for private
phones, but LEDs indicate that a phone is in an SCA group. The table below shows LED behaviors
on the phones in an SCA group.
User's Manual 92 Document #: LTRT-14850
Page 93

User's Manual 7. Performing Advanced Operations
Table A-1: LED Behaviors on an IP Phone in an SCA Group
State Phone LED Behavior
When the phone is in idle state No LED indications on any phones No behavior
Off hooked phone Solid green (for a 15
When a phone is seized (off hooked)
Other phones in the group Solid red (for a 15
second default timeout)
second default timeout)
When an outgoing call is progressing
Calling phone
Other phones in the group
When a call comes in All phones
Active phone
When a phone is busy (active)
Other phones in the group
Phone on hold
When a phone is put on hold
Other phones in the group
A.2.1.1 Demonstrating the SCA Feature's Capabilities
This section demonstrates the SCA feature's capabilities.
Figure A-2 below shows two 440HD phones in an SCA group, whose numbers end in suffixes 1
and 2.
Figure A-2: Two 440HD Phones in the SCA Group
Solid green
Solid red
Fast flashing green
Solid green
Solid red
Slow flashing green
Slow flashing red
Figure A-3 below shows an incoming call from Arik. Both phones in the SCA group ring in order to
alert group members to the call.
Version 3.4.3 93 445HD IP Phone
Page 94

445HD IP Phone
Figure A-3: Phones in the SCA Group Ring, Alerting to an Incoming Call
Phone 1 answers:
Figure A-4: Phone 1 after Answering the Incoming Call
Note: In the figure above:
• Phone 1's line key LED is illuminated steady green.
• Phone 1's sidecar displays the call from Arik - the adjacent BLF LED is illuminated steady
green.
• The sidecar displays all active calls in the SCA group.
• If phone 1 puts the call from Arik on hold, the line key LED and the sidecar's BLF LED flash
green.
User's Manual 94 Document #: LTRT-14850
Page 95

User's Manual 7. Performing Advanced Operations
Figure A-5 below shows phone 2 after phone 1 answers.
Figure A-5: Phone 2 after Phone 1 Answers
Note: In the figure above:
• Phone 2's line key LED is illuminated steady red.
• Phone 2's sidecar displays the call from Arik that was answered by phone 1. The adjacent
BLF LED is also illuminated steady red.
• All active calls in the group are displayed in the sidecar.
Phone 2 can barge in on the call by pressing the sidecar BLF LED illuminated steady red.
If phone 1 puts the call from Arik on hold, the line key LED and the sidecar's BLF LED on
phone 2 flash red.
Phone 2 can then press the sidecar's BLF LED flashing red, and pick up the call.
Version 3.4.3 95 445HD IP Phone
Page 96

445HD IP Phone
A.2.2 Monitored Lines Based on BroadSoft's BroadWorks BLF Service
This section shows how to configure Monitored Lines based on the BroadWorks BLF service,
typically used by executive assistants or front desk operators to monitor lines in the network.
Notes:
• The feature can also be configured by the network administrator. See the Administrator's
Guide for detailed information.
• Before configuring monitored lines, your network administrator must enable the BLF service
feature in BroadSoft's BroadWorks server. See the Administrator's Guide for detailed
information.
To configure a monitored line:
1. On the device, long-press a Programmable Key or a Function Key, and in the Line Key /
Function Key screen that opens (respectively), navigate to and select Speed Dial + BLF; the
Line Key or Function Key screen (respectively) opens.
Note: Up to six Programmable Keys and up to 12 Function Keys can be configured as Speed
Dial + BLF.
2. Enter the telephone number to assign the speed dial to. For Function Keys you can select the
number from the Directory.
3. Navigate to enter a label (Programmable Key only), and then press the Save softkey.
4. View the line number displayed in the LCD's idle screen / BLF (440HD only).
A.2.3 Using Xsi Interface Services
If phones are configured to access BroadSoft's BroadWorks server's Xsi interface using HTTP/S
authentication, BroadSoft environment users can enter their BroadWorks user credentials for Xsi
access and then benefit from the following three supported Xsi services:
A.2.3.1 Call Center List
Your network administrator can assign you up to three call centers that will be displayed on the
right side of your phone screen.
The screen displays three call centers, for example: Dept. B, Dept. C and Dept. A, configured on
programmable keys 4-6. You can enable | disable each by pressing its programmable key.
The feature allows enterprise front desk personnel to indicate their availability status (available or
unavailable), in each call center, to the BroadWorks server. The server then efficiently distributes
incoming calls to front desk personnel, saving callers from the inconvenience of unanswered
referrals or disconnections.
User's Manual 96 Document #: LTRT-14850
Page 97

User's Manual 7. Performing Advanced Operations
A.2.3.2 Contact Synchronization
Contact directories are pulled directly from the BroadWorks server. Case-insensive Abc name
search is performed instantly. Supported directories are Group Directory, Enterprise Directory,
Group Common, Enterprise Common and Personal Directory. The feature cannot coexist with
contacts saved locally on the phone.
A.2.3.3 Call Log Synchronization
Call Logs are pulled directly from the BroadWorks server. The phone displays the following Call
Logs: All Calls, Missed Calls, Received Calls and Dialed Calls.
A.2.4 Configuring the 'Forward No Reply' Timeout as Number of Rings
The 'Forward No Reply' timeout can be configured as 'number of rings' rather than as 'seconds'.
Consult with your network administrator to enable this feature (see the Administrator's Manual for
details). For example, the phone can be configured to ring 2r (2 rings), or 4r (4 rings), for example,
before calls are forwarded. The setting can be changed according to user preference.
A.2.5 Automatically Receiving an External Line
The phone by default features automatic switching. Users do not need to press the 9 key, for
example, in order to receive an external line; they can directly dial the number of the party they
want. To configure manual switching, consult the network administrator (see the Administrator's
Manual). When configured, users must press the 9 key, for example, to get a line to outside the
enterprise; after pressing the key, they hear a secondary tone. They only then can dial the number
of the party they need.
A.2.6 Limiting Configuration of Function Keys as Line Keys
Users cannot configure all six Function Keys as Line Keys.
A.2.7 Viewing VOICEMAIL Indications Per Line
Note: Applies to all environments (not only to BroadSoft).
When a phone is in a Multi Line configuration, VOICEMAIL is indicated per line.
Version 3.4.3 97 445HD IP Phone
Page 98

445HD IP Phone
A.2.8 Listening in Capability for Call Center Supervisors
Call center supervisors can pick up an operator's phone and listen in on the conversation that the
operator is conducting on headphones with the customer, without the customer at the other end
sensing that the supervisor is listening in (because the supervisor is in effect muted).
A.2.9 Recording an Agent's Welcome Greeting
Agents in a call center can record personal voice greetings which play automatically when calls
come in. An agent's recorded voice greeting welcomes callers to the service they’re seeking. For
example: Thanks for contacting Julie at Southern California Edison, how can I assist you?
Note: Before using this feature, your network administrator must enable it. For more
information, see the Administrator's Manual.
The feature
Allows agents to record greetings directly on the phones
Replaces cumbersome management from a media server
Replaces ad-libbed amateurish greetings
Gives callers a good first impression of the call center
Professionalizes customer care
Improves agent productivity
Makes customers feel welcome when they consistently hear a cheerful and polite greeting.
To record a welome greeting:
1. Open the Greeting Message screen (MENU key > Settings > Greeting Message).
Note: While the Greeting menu is open no calls can come in.
2. Press the recording softkey and record your welcome greeting (max length: 10 seconds)
3. When you finish recording, press the stop softkey.
4. Press the play softkey to play back your recording.
5. Press the Save softkey to save the recording. To delete the message select the Delete
softkey.
User's Manual 98 Document #: LTRT-14850
Page 99

User's Manual 7. Performing Advanced Operations
Missed Calls
Missed Calls
A.3 Genesys' Contact Centers
This section shows how to use AudioCodes IP phones in Genesys contact centers.
Note: The section is intended mainly for agents / hotline operators.
A.3.1 Using the BroadSoft ACD
Genesys Contact Center phones support the BroadSoft ACD. The table below shows how to use
the functionalities.
Table A-2: Genesys Contact Center Phones' BroadSoft ACD
State Softkeys Displayed Command Menu Options
Idle Ready
Not Ready
Idle ACW
A.3.1.1 Setting Unavailability Status
In the course of a shift, you may need to leave your desk for a break or to attend to other issues.
Before leaving your desk, change your status to 'Not Ready' (unavailable) so that incoming calls to
the Contact Center will not be sent to you.
To change your status to 'Not Ready':
1. In the idle screen, press the Not Ready softkey and select the reason for not being ready to
take a call. For example, you'll be at lunch or on a coffee break; the 'Ready' indication changes
to 'Not Ready':
2. If you have just finished a session with a customer and wish to carry out administrative tasks
related to the call, then press the ACW (After Call Work). The 'After Call' status is displayed
on the phone's LCD.
-
-
-
Forward
DnD
Missed Calls
Forward
DnD
Forward
DnD
A.3.1.2 Setting Availability Status
Version 3.4.3 99 445HD IP Phone
When you return to your desk after taking a break or after attending to an external issue, it's
important to restore your status to 'Ready' and resume work.
To restore your status to 'Ready':
In the idle screen, press the Ready softkey; the 'Not Ready' indication changes to 'Ready'.
Page 100

445HD IP Phone
A.3.2 Presence Management
This section describes how to login to and logout from the Call Center SIP server and to update
your presence status when the ACD (Automatic Call Distribution) feature is enabled.
Note: When the ACD feature is enabled, whenever you login or logout or change your
presence status, these updates are sent to the Call Center SIP server. This server then can
automatically distribute incoming calls to different agents' phones based on their relative
availability. For more information, see the Administrator's Manual.
A.3.3 Logging In
This section shows you how to log in to the Genesys Call Center SIP server. Log in immediately
after starting a shift.
To log in to the phone:
1. When the phone's LCD is in idle mode (Logged Out), press the Login softkey; the Log In
screen is displayed.
2. Enter your Username. Obtain it from your system administrator. Press the A/a/1 softkey
successively to navigate to and select the alphanumerical mode you require (abc, ABC, or
Abc).
3. Scroll down and enter your Password.
4. Press the Login softkey; the Ready idle screen is displayed.
You're now available to take incoming calls. Incoming calls from now on will be directed to your
phone.
A.3.4 Logging Out
At the end of your shift, log out of the phone.
To log out of the phone:
In the idle screen, press the Logout softkey; the Logged Out indication is displayed:
A.3.5 Configuring Do Not Disturb (DnD)
You can configure the phone so that no incoming calls will disturb you.
To configure DnD:
1. From the idle screen, open the Command Menu.
2. Scroll down and select the DnD option.
3. In the idle screen to which you're returned, view the DnD indication.
A.3.6 Configuring Automatic Forwarding
When you leave your workstation you can configure the phone so that any incoming calls will be
forwarded.
To configure automatic forwarding:
1. In the idle screen, press the softkey; the Command Menu opens.
2. Select the Forward option; the Automatic Forward screen opens.
3. Select the Always option or scroll down and select the Busy or No Reply option.
User's Manual 100 Document #: LTRT-14850
 Loading...