


MMI Navigation System plus
Oper
ating Manual
Audi
V
orsprung durch Technik
MMI Navigation System plus Englisch 06.2012
MMI Navigation System plus
Operating Manual
Englisch 06.2012
131.566.3MH.20
1315663MH20 www.audi.com

© 2012 AUDI AG
AUD
I AG works continuously to develop and
further improve all models. You will appreciate that we must therefore reserve the right
to alter any part of the vehicle and its equipment or technical specifications at any time.
No legal commitment can therefore be implied by the information, illustrations or descriptions in this Manual.
No part of this publication may be reprinted,
reproduced or translated without the written
permission of AUDI AG. All rights under the
laws of copyright are expressly reserved by
AUDI AG. Subject to alteration and amendment. Printed in Germany.
Date of publication: 20.04.2012
For the sake of the environment
This paper was bleached without use of
chlorine.

Foreword
Thank you for choosing the MMI Navigation System plus
.
Your new Audi is designed with the latest technology, enabling you to control all
on-board electronic systems and other settings centrally via the MMI.
We recommend that you read this Operating Manual carefully so that you quickly become familiar with all the available functions of the MMI and can take full
advantage of them in everyday use.
Please note that this Operating Manual is intended to supplement the information in the Owner's Manual for your vehicle, so it should only be used in conjunction with the current edition of the Owner's Manual.
We wish you safe and enjoyable motoring with your Audi.
AUDI AG
1315663MH20

2 Table of Contents
Notes about this Operating
Manual . . . . . . . . . . . . . . . . . . . . . . . . 4
Controls . . . . . . . . . . . . . . . . . . . . . . . 5
Overview . . . . . . . . . . . . . . . . . . . . . . 5
Controls and displays at a glance . . . . 5
Notes on traffic safety . . . . . . . . . . . . . 5
Cleaning and care . . . . . . . . . . . . . . . . . 6
Notes on software licences . . . . . . . . . 6
MMI control console . . . . . . . . . .
7
Switching the MMI system on/off . . . .
7
Adjusting the volume . . . . . . . . . . . . .
7
How to use the controls . . . . . . . . . . . .
7
MMI touch . . . . . . . . . . . . . . . . . . . . . .
8
Speller for letters/numbers . . . . . . . .
9
Menus and symbols . . . . . . . . . . . . . . .
10
Multi-function steering wheel
12
How to use the controls . . . . . . . . . . . .
12
Using the telephone . . . . . . . . . . . . . .
13
Navigation . . . . . . . . . . . . . . . . . . . . . .
14
Listening to the radio . . . . . . . . . . . . . .
15
Playing media . . . . . . . . . . . . . . . . . . . . 15
Speech dialogue system . . . . . . 17
How to use the speech dialogue
system
. . . . . . . . . . . . . . . . . . . . . . . . . 16
Notes on the overviews of commands 18
Global commands . . . . . . . . . . . . . . . . 18
Telephone . . . . . . . . . . . . . . . . . . . . . . . 18
Navigation . . . . . . . . . . . . . . . . . . . . . . 19
Radio . . . . . . . . . . . . . . . . . . . . . . . . . . 21
Media . . . . . . . . . . . . . . . . . . . . . . . . . . 21
Media drives/connections . . . . 22
Introduction . . . . . . . . . . . . . . . . . . . . . 22
Notes . . . . . . . . . . . . . . . . . . . . . . . . . . 22
Jukebox . . . . . . . . . . . . . . . . . . . . . . . . . 23
DVD drive . . . . . . . . . . . . . . . . . . . . . . . 24
SD card readers . . . . . . . . . . . . . . . . . . 24
Bluetooth audio players . . . . . . . . . . . . 25
Audi music interface . . . . . . . . . . . . . . 25
Supported media and file formats . . . 27
Troubleshooting . . . . . . . . . . . . . . . . . . 28
System settings . . . . . . . . . . . . . . . 29
Setting the time/date . . . . . . . . . . . . . 29
Adjusting the sound . . . . . . . . . . . . . . . 29
Adjusting the system volume . . . . . . . 30
Restarting the MMI system (Reset) . . 31
Speed display on driving school
vehicles
. . . . . . . . . . . . . . . . . . . . . . . . . 31
Other settings . . . . . . . . . . . . . . . . . . .
31
Communication . . . . . . . . . . . . . . .
33
Telephone . . . . . . . . . . . . . . . . . . . . .
33
Introduction . . . . . . . . . . . . . . . . . . . . .
33
Bonding a mobile phone . . . . . . . . . . .
33
Calling up the telephone . . . . . . . . . . .
35
Dialling a telephone number . . . . . . . .
35
Answering/ignoring telephone calls . .
36
During a telephone call . . . . . . . . . . . .
37
Storing a telephone number . . . . . . . .
37
Other settings . . . . . . . . . . . . . . . . . . .
38
Audi Phone Box . . . . . . . . . . . . . . . . . .
39
Directory . . . . . . . . . . . . . . . . . . . . . . 41
Calling up the directory . . . . . . . . . . . . 41
Storing a contact . . . . . . . . . . . . . . . . . 41
Using a contact . . . . . . . . . . . . . . . . . . 42
Editing/deleting a contact . . . . . . . . . . 43
Importing/exporting contacts . . . . . . 43
Other settings . . . . . . . . . . . . . . . . . . . 44
Navigation . . . . . . . . . . . . . . . . . . . . . 45
Navigation . . . . . . . . . . . . . . . . . . . . . 45
Calling up the navigation menu . . . . . 45
Entering a destination . . . . . . . . . . . . . 45
Starting/stopping route guidance . . . . 48
How to use the map . . . . . . . . . . . . . . . 49
Calling up traffic information . . . . . . . 50
Other settings . . . . . . . . . . . . . . . . . . . 50
Entertainment . . . . . . . . . . . . . . . . 54
Listening to the radio . . . . . . . . . 54
Calling up the radio . . . . . . . . . . . . . . . 54
Radio functions . . . . . . . . . . . . . . . . . . 54

3Table of Contents
ControlsCommunicationNavigationEntertainment
Other settings . . . . . . . . . . . . . . . . . . . 55
Troubleshooting . . . . . . . . . . . . . . . . . . 57
Playing media . . . . . . . . . . . . . . . . . 58
Calling up the media menu . . . . . . . . . 58
Media centre . . . . . . . . . . . . . . . . . . . . 59
Other settings . . . . . . . . . . . . . . . . . . . 60
Index . . . . . . . . . . . . . . . . . . . . . . . . . . 62

4 Notes about this Operating Manual
This Operating Manual contains important information, tips
, suggestions and warnings.
Please ensure that this Operating Manual is
always kept in the vehicle. It should always be
available to anyone else driving the vehicle,
i.e. anyone renting, borrowing or buying the
vehicle from you.
Some sections of this Operating Manual do
not apply to all vehicles. If this is the case, a
text at the start of the section indicates which
vehicles it applies to, e.g. “Applies to vehicles:
with phone pre-installation”. This optional or
vehicle-specific equipment is also marked
with an asterisk “*”.
Illustrations are intended as a general guide,
and may vary from the equipment fitted in
your vehicle in some details.
At the beginning of this Operating Manual,
you will find a table of contents showing all
the items described in this manual in the order in which they appear. An alphabetical in-
dex is included at the end of the Operating
Manual.
All references to positions such as “left”,
“right”, “front” or “rear” are given as seen facing in the direction of travel.
Optional or vehicle-specific equipment.
The section is continued on the following
page.
Registered trademarks are marked ®.
However, the absence of this symbol does
not constitute a waiver of the rights concerning any proprietary name.
ð
Refers to a “WARNING” within the same
section. If the
WARNING symbol is followed
by a page number the warning text referred to
is included in a different section.
WARNING
Texts with this symbol contain safety information.
They warn you of serious dangers,
possibly involving accident or injury.
*
®
CAUTION
Texts with this symbol draw your attention
to a possible risk of damage to your vehicle.
For the sake of the environment
Texts with this symbol refer to points relevant to the pr
otection of the environment.
Note
Texts with this symbol contain additional
information of a mor
e general nature.

5Overview
ControlsCommunicationNavigationEntertainment
Overview
Con
trols and displays at a glance
The Multi Media Interface (MMI) combines different communication, navigation* and entertainment systems in your Audi.
Fig. 1 MMI controls and displays
You can operate your MMI system via the MMI
contr
ol console, the multi-function steering
wheel* or the speech dialogue system*
ð Fig. 1:
Multi-function steering wheel . 12
Driver information system . . . . 12
MMI display
Button for folding the MMI display in and out
ON/OFF button . . . . . . . . . . . . . .
7
Buttons for calling up menus dir
ectly . . . . . . . . . . . . . . . . . . . . . .
7
MMI control console . . . . . . . . .
7
Note
– Please note that only the MMI and its
components ar
e described in this Operat-
ing Manual. For more information about
1
2
3
4
5
6
7
your vehicle's equipment and features,
please r
efer to your Owner's Manual.
– This manual describes the equipment
available for the vehicle at the time of
going to print. Some of the equipment
described here will not be available until
a later date, or may only be available in
certain markets.
– The arrangement of the system compo-
nents on right-hand drive models* may
be slightly different from the layout
shown in ð Fig. 1. However, the symbols
used to identify the controls are the
same.
Notes on traffic safety
Y
ou should only perform important functions,
e.g. enter a destination, while the vehicle is
stationary. Please always be prepared to stop

6 Overview
operating the system in the interest of your
safety and that of other r
oad users.
WARNING
– T
oday's driving conditions require your
full attention. As the driver, you have full
responsibility for the safety of the vehicle and other road users. For this reason,
only operate the MMI system when the
traffic conditions allow you to do so safely and when you can maintain proper
control of your vehicle - risk of accident.
– The volume of the audio sources (radio,
CD player, etc.) should only be set at a
level which enables you to hear distant
police and emergency vehicles clearly –
failure to do so could result in an accident.
–
Please observe the laws regulating the
use of telephones in vehicles
.
Cleaning and care
For information on the car
e and cleaning of
the infotainment system's controls and displays, please refer to the Cleaning and care
chapter of your car's Owner's Manual.
Notes on software
licences
For information on the MMI system's software
and its licence conditions, select:
MENU
but-
ton > contr
ol button Setup MMI > Version in-
formation > section Software info; or go to
www.audi.com/softwareinfo.

7MMI control console
ControlsCommunicationNavigationEntertainment
MMI control console
Switching the MMI
system on/
off
The MMI system is switched on/off automatically when the ignition is switched on/off. In
addition it can be switched on/off manually.
– To switch on manually: Briefly press the
ON/OFF button
5
ð page 5, Fig. 1
.
– T
o switch off manually: Press and hold the
ON/OFF button until the MMI is switched
off. The MMI system will not be switched on
automatically when the ignition is switched
on if it was turned off manually the last
time it was operated.
When the system is switched on, the last selected menu will be displayed, and the last selected audio source will be played.
The MMI system remains in operative mode
for approximately ten minutes after the ignition is switched off. If you do not press any
button or the rotary pushbutton on the MMI
control console within this period, the MMI
system will be switched off automatically.
Note
– If the engine is switched of
f and the battery charge level is low, the MMI system
will be switched off automatically.
– You can also switch on the MMI system
manually by pressing the
MENU
button
or one of the buttons for calling up menus dir
ectly
6
ð page 5, Fig. 1.
Adjusting the volume
Using the ON/OFF button, you can adjust the
volume of an audio source or system message
(e.g. during a speech dialogue) directly while
it is being played.
– V
olume up/down: Turn the ON/OFF button
clockwise or anti-clockwise.
– Mute: Briefly press the ON/OFF button.
– Unmute: Briefly press the ON/OFF button or
turn the ON/OFF button clockwise.
Note
When you switch on the MMI system, very
high/
very low volume levels are automati-
cally reduced/increased to a preset level.
How to use the
con
trols
You can easily call up the various functions of
the MMI system with its intuitive and standardised control layout.
Fig. 2 How to use the controls
Selecting and confirming a function
►
A
T
o select a function: Turn the rotary
pushbutton to the desired function.
►
B
T
o confirm the function: Press the rotary
pushbutton.
Calling up a function in a corner of the
display
►
Press the control button
C
that corre-
sponds to the corner of the displa
y. For instance, the top right control button corresponds with the top right corner of the display.

8 MMI control console
Calling up the main menu
►
Press the
MENU
button. The MMI menus
(
e.g. Radio) are displayed.
Calling up a menu directly
►
Press the corresponding button
6
ð page 5, Fig. 1 towar
ds the menu you wish
to open (e.g.
RADIO
or
MED
IA
).
R
eturning to the previous function level
►
Press the
BA
CK
button.
MMI touch
The MMI touch pad is located on the surface
of the rotary pushbutton.
Fig. 3
Entering a navigation destination
Fig. 4
Display when MMI touch is active
When you can operate the system using the
MMI touch pad, the MMI scr
een shows the
symbol
A
ð Fig. 4
and the ring on the outside
of the touch pad on the r
otary pushbutton
lights up.
Entering letters, numbers and symbols
– Write the character on the touch pad using
your finger. When the system recognises the
character, it will show it on the MMI display
1
ð Fig. 3 and r
ead it out loud.
– T
o select a different character: Turn the ro-
tary pushbutton clockwise or anti-clockwise
and press it
2
.
– T
o enter a space: Move your finger from left
to right across the touch pad.
– To delete a character: Move your finger from
right to left across the touch pad.
– To end the entry: Press the rotary pushbut-
ton.
In navigation* mode you can stop entering
characters (e.g. for a destination) and jump directly to the selection list (of e.g. the towns
found) by pressing the rotary pushbutton.
Finding a contact in the directory
– To jump to a particular initial letter in the
list: Write the desired letter on the touch
pad with your finger.
– To narrow your search: Write further letters
on the touch pad with your finger.
You can select the function Find contact if you
want to stop entering letters for the contact;
you can then jump directly to the selection list
of the contacts found by pressing the rotary
pushbutton.
Moving the map/adjusting the sound
focus
– To move the crosshairs on the map: Press
the rotary pushbutton. The crosshairs will
appear on the map. To move the crosshairs,
move your finger in the desired direction on
the touch pad.
– Alternatively: Put your finger on the corre-
sponding area at the edge of the touch pad.
– To move the crosshairs of the sound focus:
Move your finger in the desired direction on
the touch pad.
Browsing through album covers/selecting
an album cover
– To browse through the album covers: Move
your finger to the left or right on the touch
pad.
– To select an album cover: Press the rotary
pushbutton.

9MMI control console
ControlsCommunicationNavigationEntertainment
Operating the DVD main menu
– T
o select a menu option: Move your finger
up/down or to the left/right on the touch
pad.
– T
o confirm your selection: Press the rotary
pushbutton.
Speller for letters/numbers
Applies to vehicles: with phone pr
e-installation or navigation system
Fig. 5 Speller
– T
o enter a letter/number: Turn the rotary
pushbutton and use the pointer
1
ð Fig. 5
to select the desir
ed letter/number. The selected character will appear larger in the selection ring
2
. Press the rotary pushbutton
to confirm the letter
/number. Your entry
will appear in the entry field
13
. When you
ha
ve entered all characters, select and con-
firm OK
5
.
– T
o delete a letter/number: Using the rotary
pushbutton, turn the pointer to
9
and
pr
ess the rotary pushbutton. To delete all
characters in the entry field, select and
press and hold the rotary pushbutton until
all characters have been deleted.
– T
o enter a special character: Press the con-
trol button for 0-9
7
ð Fig. 5 and enter the
desir
ed special character (such as a hyphen
or full stop) using the speller for numbers.
– Input help: In some cases (such as the navi-
gation function) certain letters are not available for selection if they are an illogical option. This means that you can only select
those letters that are offered as a logical
possibility for this entry.
Overview of the symbols in the speller
The symbols of the speller for letters/numbers are explained in the following table:
Symbol / marking Explanation
1
Pointer
The selected character is highlighted in white and appears larger
in the selection ring.
2
Selection ring The character selected with the pointer appears larger.
3
To enter a space in the entry field.
4
To move the cursor in the entry field forwards and backwards.
5
OK To confirm the entry.

10 MMI control console
Symbol / marking Explanation
6
To switch from lower case to upper case letters and vice versa.
7
0-9/A-Z To switch the speller from letters to numbers and vice versa.
8
List To display a list of suggestions.
9
/Delete To delete the character to the left of the cursor.
10
No. of entries The number of list entries found is displayed.
11
List of suggestions
E.g. while entering a destination, a list of large towns first and
then other towns in alphabetical or
der is displayed.
12
Cursor The position that is currently being edited is marked.
13
Entry field The current entry is displayed.
Menus and symbols
Fig. 6 Menus and symbols
Symbol / marking Explanation
1
Selected option Selected function
2
Arrow
up/
down
Further available functions
3
Mute Audio source muted ð page 7
4
TMC Reception of TMC traffic information
5
Copying procedure Copying of audio/video files to the jukebox
6
Time Time setting ð
page 29
7
Bluetooth* Bluetooth activated on the MMI ð page 38
8
TP Reception of traffic announcements ð table on page 56
9
Import process Import/update of contacts in the directory/call list
10
Bluetooth* Bluetooth device connected ð page 25 / ð page 33
11
Signal strength indica-
tor
Reception strength of mobile phone network of a connected mobile phone ð page 33

11MMI control console
ControlsCommunicationNavigationEntertainment
Symbol / marking Explanation
12
Entry field
Entries that can be changed using the speller for letters/numbers ð page 9
13
Selection list
Settings for the selected function that can be called up by pressing the r
otary pushbutton
14
Arrow
Submenu with additional functions that can be called up by
pr
essing the rotary pushbutton
15
Heading Selected menu (e.g. T
elephone)
12 Multi-function steering wheel
Multi-function steering
wheel
Ho
w to use the
controls
Applies to vehicles: with multi-function steering wheel
You can use the multi-function steering wheel
to operate a number of MMI functions, adjust
the volume and switch the speech dialogue
system on/off.
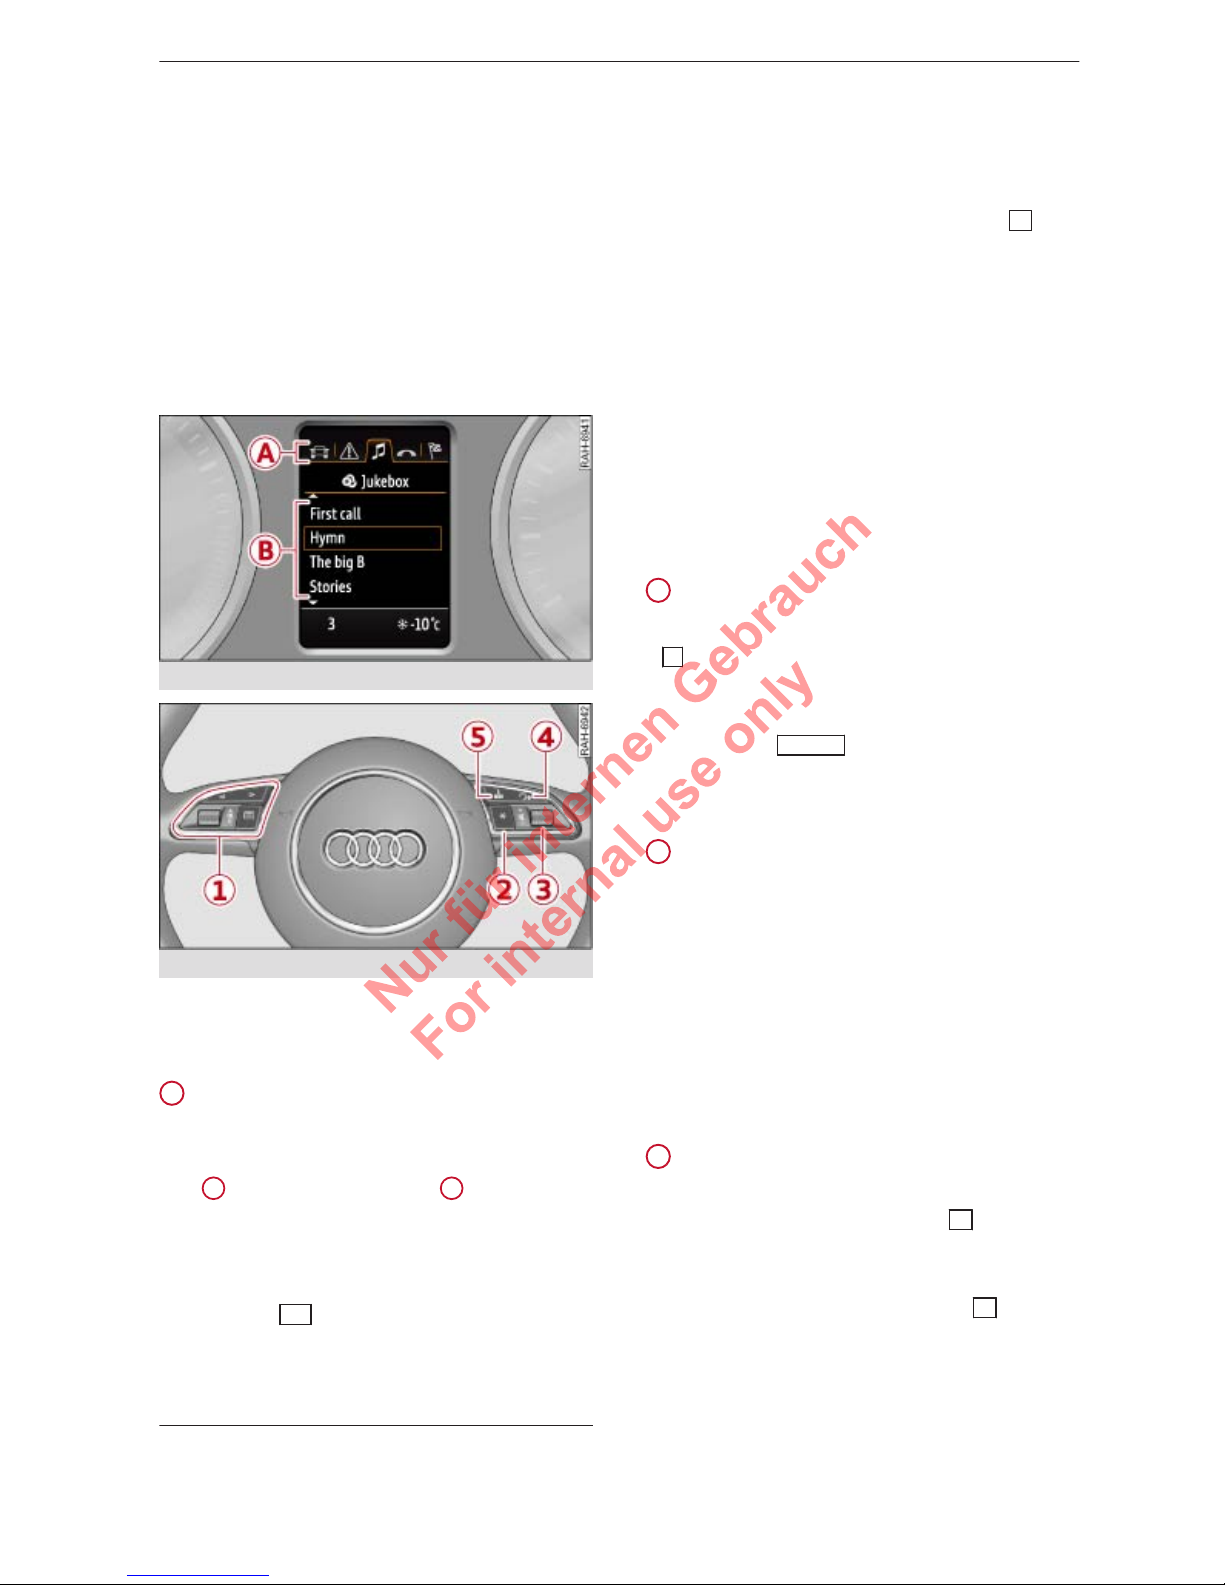
Fig. 7 Driver information system
Fig. 8 Controls on the multi-function steering wheel
Important: The ignition and the MMI system
must be switched on ð page 7.
1
How to use the driver information
system
The driver information system shows information B in several display tabs A. The driver
information system can be oper
ated using the
multi-function steering wheel:
– To switch between tabs: Press the left/right
side of the
button.
– T
o select a function: Scroll the left thumb-
wheel to the desired function.
– T
o confirm your selection: Press the left
thumbwheel.
– To scroll through lists rapidly: Scroll the
left thumbwheel quickly.
– To open/leave a submenu: Press the
but-
ton.
The equipment installed on your vehicle determines which of the following tabs ar
e avail-
able:
– 1st tab: Information on car, assist systems
– 2nd tab1): Warning/indicator lamps, driver
messages, speed warning
– 3rd tab: Radio/media ð page 15
– 4th tab: Telephone* ð page 13
– 5th tab: Navigation* ð page 14
2
Steering wheel button
– T
o call up the assigned function: Press the
button on the multi-function steering
wheel
.
– To change the assigned function: On the
MMI, select
MENU
button > Car > contr
ol
button Car systems* > Vehicle settings >
Steering wheel button.
3
Adjusting the volume
Y
ou can adjust the volume of an audio source
or system message (e.g. during a speech dialogue) directly while it is being played.
– Volume up/down: Scroll the right thumb-
wheel up/down.
– Mute: Press the right thumbwheel.
– Unmute: Scroll the right thumbwheel up or
press the right thumbwheel.
4
Switching the speech dialogue system
on/
off
– To switch on: Briefly press the
button on
the mul
ti-function steering wheel. Give a
spoken command after the beep signal.
– To switch off: Press and hold the
button
for sever
al seconds. Or: Say the command
CANCEL.
1)
The second tab is only visible if one or more warning/
indicator lamps or driver messages ar
e displayed or if
the relevant system is switched on.

13Multi-function steering wheel
ControlsCommunicationNavigationEntertainment
For more information about the speech dialogue system, r
efer to ð page 17.
5
Navigation cue during active route
guidance*
– T
o have the last navigation cue repeated:
Press the
button.
– T
o adjust the volume of the navigation
cues: Scroll the right thumbwheel up/down
while a navigation cue is being played.
Using the telephone
Overview
Applies to vehicles: with mul
ti-function steering wheel
and phone pre-installation
Fig. 9 Directory
Important: A mobile phone must be connected to the MMI ð
page 33, and the tele-
phone display tab must be displayed
ð page 12.
The following options are available when you
press the
button:
– T
o call a directory contact: Select Directory.
Select and confirm a contact.
– To call a contact in the call list: Select Call
list. Select and confirm a contact.
Directory contacts: Only directory contacts for
which a telephone number is stored are displayed in the driver information system. If
several telephone numbers are stored for one
contact, the list of stored telephone numbers
is displayed first when the contact is selected.
For more information on the symbols displayed, refer to ð page 41, Fig. 33.
Call list: The call lists contain all received,
placed and missed calls ð page 35, Fig. 26.
Note
– The functions of the telephone can be
oper
ated using the multi-function steer-
ing wheel only if the telephone equipment was installed at the factory.
– The functions of the telephone depend
on your mobile phone and whether they
are supported by your mobile network
service provider.
Incoming call
Applies to vehicles: with mul
ti-function steering wheel
and phone pre-installation
►
To answer a call: Press the left thumbwheel
when there is an incoming call.
►
To ignore a call: Select and confirm Ignore
when there is an incoming call.
►
To end a call: Select and confirm End call.
Caller information: Depending on whether
the caller is stored in the directory and whether the telephone number is transmitted with
the call, the name, the telephone number or
Unknown will appear on the display of the
driver information system.
During a call
Applies to vehicles: with mul
ti-function steering wheel
and phone pre-installation
– To make a further call: Select Hold >
but-
ton > Directory or Call list > entry in list.
– T
o answer a further call when you are talk-
ing on the phone and have another call on
hold: Select Replace. The current call will be
replaced by the incoming call.
Other functions are:
Microphone off: If you select and confirm this
option, the caller will no longer be able to
hear you; you will still be able to hear the caller.
Hold/Resume: You can put a call on hold and
retrieve it from the hold queue later.
Switch: You can switch between two phone
calls (one of them will be on hold at any given
time). Select End call to end whichever call is

14 Multi-function steering wheel
active. The call on hold will remain in the hold
queue and can be r
etrieved by selecting Re-
sume.
Conference: Up to five callers and one caller
on hold can take part in a conference (depending on the network service). To set up a further call, select Hold to place all the members
of an existing conference on hold. You can
then press the
button to place another call
to a contact in the dir
ectory or the call list. Select Resume if you want to retrieve all participants in an existing conference from the hold
queue.
Note
The option Call waiting must be activated
on your mobile phone for you to be made
a
ware of incoming calls during a conversation. The call options depend on your mobile network service provider. For more information, contact your service provider.
Navigation
Overview
Applies to vehicles: with mul
ti-function steering wheel
and navigation system
Important: A destination or tour plan must
have been entered ð page 45, the route
guidance function must have been started
ð page 48, and the navigation display tab
must be open ð page 12.
The following options are available when you
press the
button:
– T
o display the navigation screen when
route guidance is active: Select Route guidance.
– To display the compass when route guid-
ance is not active: Select Compass.
– To cancel the active route guidance: Select
Stop route guidance.
– To switch off the navigation cues: Select
Voice guidance off.
– To start route guidance to the stored home
address: If applicable, select Stop route
guidance, and then select Home address.
Display when route guidance is active
Applies to vehicles: with na
vigation system
Fig. 10 Display when a lane change is required
Fig. 11 Display when a turn-off is required
After you have entered a destination or a tour
and ha
ve started route guidance, the navigation display tab is opened in the driver information system:
Distance to turn-off
Total distance to destination/
next stopover
Estimated time of arrival
Name of motorway, major road
or street you are driving on. If
the symbol is displayed in
front of the street name, you are
being directed to turn into the
street.
Arrow indicating direction of upcoming turn-off
Lane recommendation
If an arrow is displayed, a bar
graph will also appear. The fewer bars are displayed, the shorter the distance to the turn-off
point.
If route guidance has not been started, a compass is shown in the navigation display tab.
1
2
3
4
5
6
7

15Multi-function steering wheel
ControlsCommunicationNavigationEntertainment
WARNING
The route calculated by the navigation system is a r
ecommendation of how best to
reach a destination. Pay attention to traffic
lights, no-stopping signs, lane change restrictions, one-way streets, etc.
Note
An exclamation mark “!” in fr
ont of the
street name indicates that the navigation
data of the MMI system do not contain all
the information on this street or street
section. Pay attention to traffic rules such
as one-way streets or pedestrian zones.
Listening to the radio
Applies to vehicles: with mul
ti-function steering wheel
Fig. 12 Radio menu
Important: The radio/media display tab must
be displa
yed ð page 12.
►
To tune to a station from the station list:
Select and confirm a radio station.
The following options are available when you
press the
button:
– T
o tune to a station from the memory list:
Select and confirm Memory and then select
and confirm a radio station.
– To set the waveband: Select and confirm
the waveband.
– To call up media via the overview of sour-
ces: Select and confirm an audio source.
Playing media
Applies to vehicles: with multi-function steering wheel
Important: A media drive must contain audio
files ð page 22, and the media display tab
must be displayed ð page 12.
►
To play an audio file: Select and confirm a
tr
ack.
►
To pause/resume playback: Press the right
thumbwheel. To continue playback, press
the right thumbwheel again.
The following options are available when you
press the
button:
– T
o select a source: Select and confirm a
source, e.g. Audi music interface.
– To call up the radio via the overview of
sources: Select and confirm a waveband.
Note
The MMI media drives do not support
DRM-pr
otected files; these files are
marked with the symbol .

16 Speech dialogue system
Fig. 13 Overview of commands

17Speech dialogue system
ControlsCommunicationNavigationEntertainment
Speech dialogue
system
Ho
w to use the speech
dialogue system
Applies to vehicles: with speech dialogue system
You can operate many infotainment functions conveniently by voice.
Fig. 14 Talk button and right thumbwheel
Important: The ignition and the MMI system
must be switched on ð page 7, you must not
be talking on the phone, and the parking aid
must not be active.
►
To switch on: Briefly pr
ess the
button
1
ð Fig. 14 on the mul
ti-function steering
wheel* and give a spoken command after
the beep signal.
►
To switch off: Pr
ess and hold the
button
for sever
al seconds. Or: Say the command
CANCEL.
Input help
The system guides you through the input routine with cues and messages.
– Input help messages on screen: After the
speech dialogue system is switched on, the
MMI display will show a selection of possible commands.
– Spoken input help cues: To have the system
play the commands currently possible,
switch on the speech dialogue system and
say Help.
How to help the system understand you
Speak clearly in a normal volume. Speak louder if you are driving fast.
Speak in a normal tone without long pauses.
A
void speaking when the speech dialogue sys-
tem is saying a cue.
Close doors, windows and sun roof* to reduce
background noise. Make sure that passengers
are not talking when you say a command.
Keep the air outlets of the air distribution system pointed away from the microphone,
which is fitted in the vicinity of the front interior lights in the headliner.
The system should only be operated by the
driver, since the handsfree microphone is directed towards the driver.
Other settings
Press the Setup MMI control button to access
the main menu if you would like to change
other settings, e.g. for the individual speech
training to adapt the system to your voice,
the Command display or the volume of the
navigation cues ð page 31.
WARNING
– Please dir
ect your full attention to the
road at all times! As the driver, you have
full responsibility for the safety of the
vehicle and other road users. For this reason, you should only use the functions in
a manner that allows you to maintain
control of the vehicle in all situations accident risk!
– The speech dialogue system must not be
used in cases of emergency, since the
voice changes in stressful situations. This
could result in a failed or delayed telephone connection. Always dial emergency numbers manually!
Note
– Y
ou can interrupt a spoken cue from the
speech dialogue system any time by
pressing the
button; you can now en-
ter a new command.
– The speech dialogue system can be can-
celled and deactivated by pr
essing any

18 Speech dialogue system
one of the buttons on the MMI control
console (
except the rotary pushbutton).
– The dialogue is paused when an incom-
ing telephone call is received; you can
continue the dialogue by ignoring the
call. If you answer the call, the dialogue
will be cancelled.
– No navigation cues* or traffic announce-
ments are given when a dialogue is running.
–
The command display can be switched
on/
off in the main menu via the Setup
MMI control button.
– Y
ou can select an entry from a list both
via the speech dialogue system and using the rotary pushbutton.
Notes on the overviews
of commands
The following over
views show you the commands that you can give to operate the MMI
via the speech dialogue system.
Alternative commands are separated by the
symbol “|”; for example you can say: Tele-
phone | (or) Navigation | (or) Radio.
Commands that belong together and should
be spoken as a sequence are marked with the
symbol “>”; for example you can say: Enter
address > (and subsequently) Enter country.
Global commands
Applies to vehicles: with speech dialogue system
You can give global commands any time, irrespective of the menu curr
ently selected.
Function Say:
Calling up the menu Telephone | Directory | Navigation | Radio | Media
Having the system play the possible commands
Help | Help speech Dialogue System | Help Telephone | Help
Navigation | Help Map | Help Radio | Help Media
Telephone functions Call (XY), e.g. Call John Smith |
Enter number | Redial | Directory
Navigation functions Navigate to (XY), e.g. Navigate to John Smith |
Enter address | Stop route guidance | Map
Selecting an entry from a list Line (XY)
Scrolling through a list Next page | Previous page
Switching off the speech dialogue
system
Cancel
Telephone
Applies to vehicles: with speech dialogue system and phone pr
e-installation
Important: A mobile phone must be connected to the MMI ð page 33, and the T
ele-
phone menu must be open ð page 35.

19Speech dialogue system
ControlsCommunicationNavigationEntertainment
Function Say:
Calling a contact from the director
y
Call (XY), e.g. Call John Smith
Dialling a specific number stored
for a contact
Call (XY) business | private | land line | mobile,
e.g. Call John Smith private
Dialling a phone number when an
address card is open
Call | Call business number | Call private number | Call land
line | Call mobile business number
Displaying call list Call list
Calling the last number dialled Redial
Dialling a telephone number Enter number > phone number in blocks of individual digits
when requested, e.g. 0744 12 345 67 > Dial
Correcting an entered phone
number
Delete number | Correction
Displaying contact information Directory > desired contact when requested, e.g. John Smith
Listening to voice mail messages Call mailbox
Note
If you have a mobile phone that transmits
first names and surnames separ
ately, you
can select directory contacts both by entering the full name (“first name, sur
name” and “surname, first name”) and by
saying only the first name or surname.
Navigation
Applies to vehicles: with speech dialogue system and na
vigation system
Important: The Navigation must be open
ð page 45.
You can say the following commands to enter
a destination:
Function Say:
Calling up a navigation list Last destinations | F
avourites | Home address
Entering an address with assistance from the system
Enter address > follow the directions given by the system
Entering an address directly Enter address > name of town, street and house number,
e.g. “London, Edgware Road 132”.
Individual commands for entering
a destination
Enter address > Country | Town | Post code | Street | House
number
Entering a town centre as the destination
Enter address > town when requested > Centre > Start route
guidance
Navigating to a contact Navigate to (XY), e.g. Navigate to John Smith
Navigating to a specific address
stored for a contact
Navigate to (XY) business address | Private address,
e.g. Navigate to John Smith business address
Starting route guidance when an
address card is open
Navigate | Navigate to private address | Navigate to business address
Changing the address while route
guidance is active
Enter address > desired address when requested > confirm
new destination when requested
 Loading...