

Page 1
User Guide
AT&T Wireless Internet
Page 2

Page 3

Welcome To AT&T
Thank you for purchasing the AT&T Wireless Internet device (Model: IFWA-40).
To get the most from your new device, check out our videos and interactive
tutorials at att.com/devicehowto.
I
Page 4

II
Page 5

Contents
Getting Started .........................................................................................................................................1
In The Box .......................................................................................................................................................................................1
Getting To Know Your Device ...................................................................................................................................... 2
How It Works ...............................................................................................................................................................................4
Installation ..................................................................................................................................................................................... 5
Voicemail ......................................................................................................................................................................................12
Setup .......................................................................................................................................................................................12
Message Waiting ...........................................................................................................................................................12
Retrieving Messages ..................................................................................................................................................12
Remote Retrieval .......................................................................................................................................................... 12
Transferring A Phone Number ..................................................................................................................................13
AT&T Wireless Internet Manager .............................................................................................................................13
Using Your Device ................................................................................................................................. 16
Calling ..............................................................................................................................................................................................16
Making Calls .......................................................................................................................................................................16
Placing A Call On Hold ..............................................................................................................................................16
Three-Way Calling ........................................................................................................................................................16
Call Forwarding ...............................................................................................................................................................18
Call Log...................................................................................................................................................................................18
Internet Access .......................................................................................................................................................................19
Connect Other Devices ...........................................................................................................................................19
Changing Wi-Fi Network Name And Password ................................................................................. 20
Important Messages ................................................................................................................................................ 20
Managing Connected Devices .........................................................................................................................20
Parental Control ............................................................................................................................................................20
III
Page 6

Checking Your Voice And Data Usage ................................................................................................................ 21
Helpful Tips ................................................................................................................................................................................. 23
Home Answering Machines .................................................................................................................................23
Adjusting Volume .........................................................................................................................................................23
Powering On/O ........................................................................................................................................................... 24
TTY Support ...................................................................................................................................................................... 24
Important Information ........................................................................................................................25
E911 Service ................................................................................................................................................................................25
Power Outages .......................................................................................................................................................................25
Backup Battery ....................................................................................................................................................................... 26
Device Compatibility ..........................................................................................................................................................26
In-Home Wiring ....................................................................................................................................................................... 27
Frequently Asked Questions ............................................................................................................28
Troubleshooting .....................................................................................................................................31
General ...........................................................................................................................................................................................31
Phone .............................................................................................................................................................................................. 32
Internet ..........................................................................................................................................................................................35
IV
Page 7

Device Conguration ...........................................................................................................................38
Navigating The User Interface...................................................................................................................................38
Help ................................................................................................................................................................................................... 39
Status .............................................................................................................................................................................................. 39
Connected Devices .............................................................................................................................................................40
Wi-Fi Settings ...........................................................................................................................................................................41
Messages ......................................................................................................................................................................................45
Networking .................................................................................................................................................................................46
Data Usage ................................................................................................................................................................................. 54
Call Log/Blocking ..................................................................................................................................................................55
Parental Control .....................................................................................................................................................................56
System ............................................................................................................................................................................................58
Safety Information...............................................................................................................................................................62
FCC regulations.......................................................................................................................................................................63
RF Exposure Information ...............................................................................................................................................64
CTIA ................................................................................................................................................................................................... 65
Warranty........................................................................................................................................................................................66
V
Page 8

VI
Page 9
Getting Started
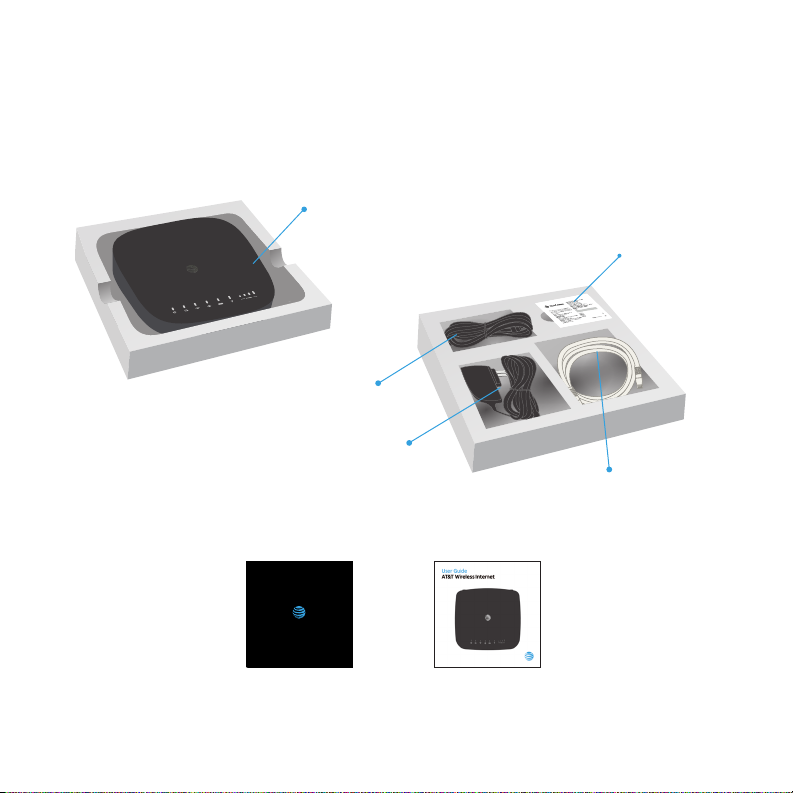
In The Box
The package contains the following items:
AT&T Wireless Internet Device
Phone Cable
(Optional)
Power Cord
Also included:
Let’s get started
AT&T Wireless Internet
Backup
Battery
Ethernet Cable
(Optional)
Quick Start
User Guide
1
Page 10
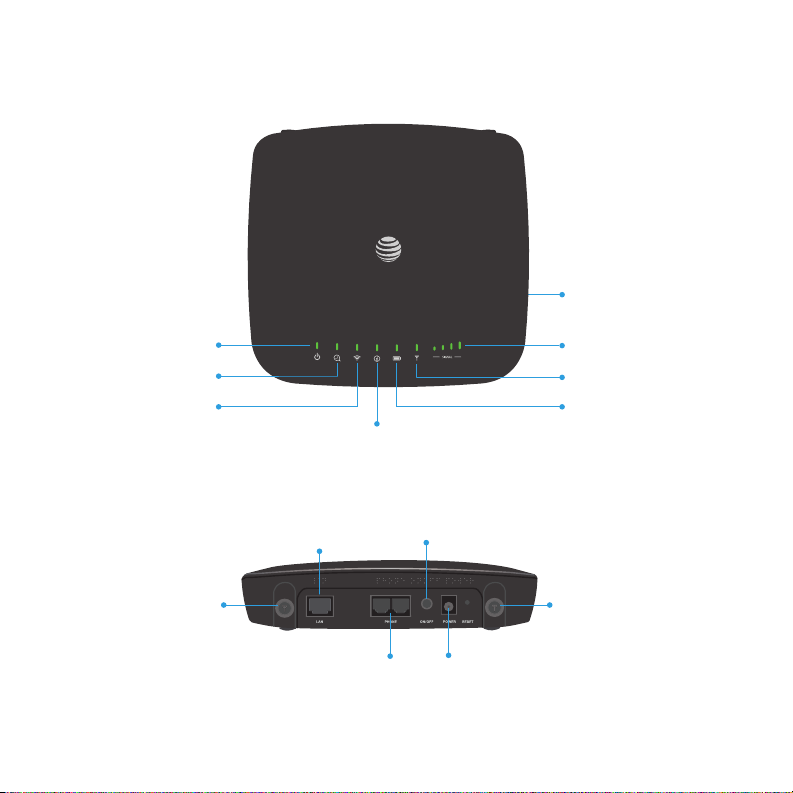
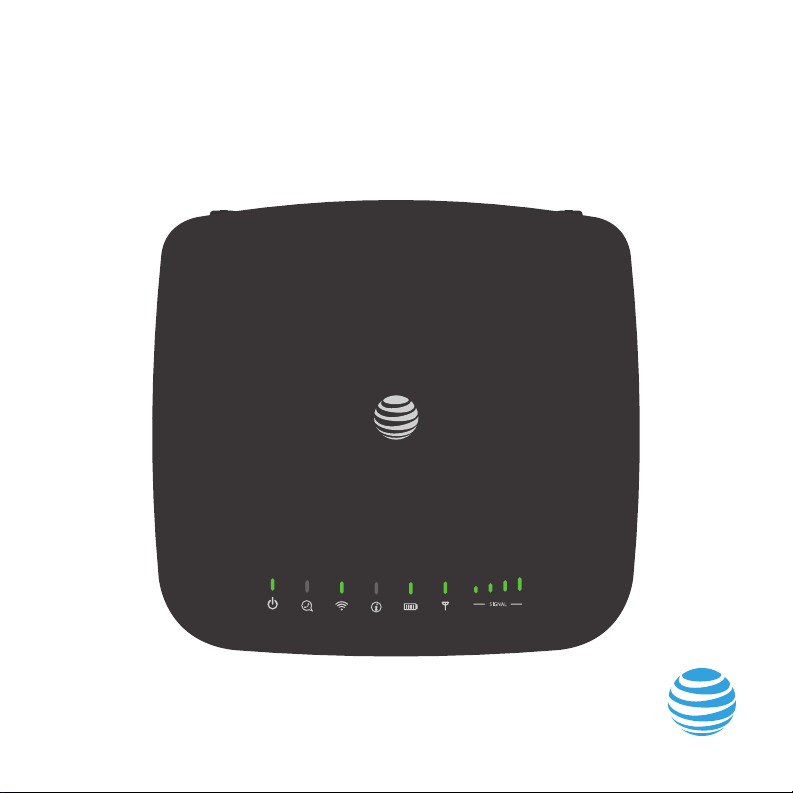
Getting To Know Your Device
WPS
Power
Voicemail
Wi-Fi
Ethernet
Information
Telephone
Ports
On/Off
Power
Input
(See AT&T Wireless Internet Manager on page 13)
Antenna Port
(Optional)
2
Signal Strength
Network Status Indicator
Battery Level
Antenna Port
(Optional)
Page 11
LED Indicator Lights
The table below describes possible states for each of the indicator lights.
Indicator Name Status Meaning
Green solid On (AC power)
Power
Voicemail
Wi-Fi
Information
Battery
Level
Green blinking On (battery power)
O No power
Green blinking New voicemail
O No new voicemail
Green solid
Green ickering Wi-Fi on, data transferring
O Wi-Fi o
Green blinking
O No unread messages
Green solid Battery level >50%
Yellow solid Battery level 20% to 50%
Red blinking Battery level <20%
O Battery not installed or needs replacing
Wi-Fi on
Check the AT&T Wireless Internet Manager new message(s)
3
Page 12
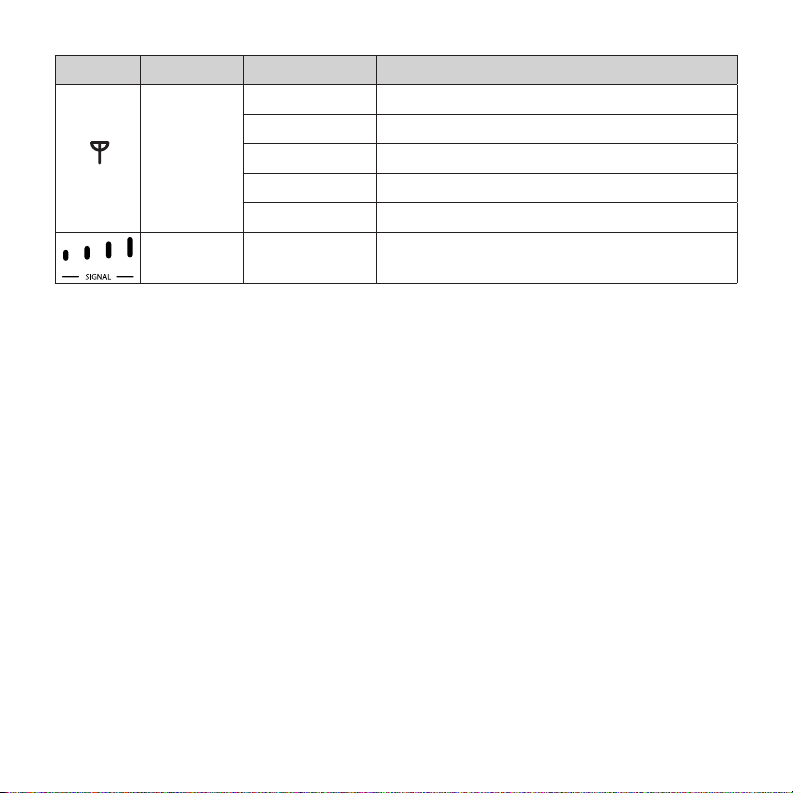
Indicator Name Status Meaning
O No SIM
Network
Status
Indicator
Signal
Strength
Red blinking SIM error
Red solid No service
Blue solid 3G/HSPA+ service
Green solid LTE service
Green solid
or OFF
More bars indicates higher signal strength
How It Works
The AT&T Wireless Internet device uses the AT&T cellular network to provide phone
service to your cordless or corded home phone(s) and Internet access to your
computer and Wi-Fi enabled devices. It does not require the use of a home phone
wall jack, unlike a traditional home phone service. Place it anywhere in your home
where you have a strong wireless signal. The AT&T Wireless Internet device provides
many calling services for your home phone(s), such as Voicemail, Caller Number ID,
Call Waiting, Call Forwarding, and Three-Way Calling. It also features a backup battery
to provide service in the case of a power outage.
4
Page 13

Installation
Before You Begin
The AT&T Wireless Internet device works exclusively with the AT&T cellular network
and DOES NOT use your home phone wall jacks.
Your device should be located:
• Where you have a strong signal from a cell
tower, typically near a window or outer wall.
Signal strength may vary in dierent parts
of your home.
• Near an electrical wall outlet.
• In the general area where you’ll be using
your home phone, computer, or Wi-Fi
enabled devices.
Select which phone and computer/Wi-Fi enabled device you will use with the AT&T
Wireless Internet device:
• A cordless phone system with multiple handsets should be used to place phones
throughout your home.
• If using an existing phone, unplug it from the wall jack.
• For Internet access, you can simultaneously connect up to twenty (20) devices
per Wi-Fi network (2.4 GHz and 5 GHz), forty (40) total, and one (1) via Ethernet.
5
Page 14

Step 1: Setting Up The AT&T Wireless Internet Device
A Install The Backup Battery
1. Open the battery compartment by pushing the tab in and then liing up
the cover.
Ports
2. Insert the backup battery.
Battery
3. Replace the cover.
NOTES:
• The backup battery is intended for backup purposes only and can take up
to four (4) hours to fully charge.
• Charge time may be impacted by environmental factors; the backup
battery will stop charging when the ambient temperature is outside of the
temperature range allowed for charging: 32°F (0°C) - 131°F (55°C)
6
Page 15
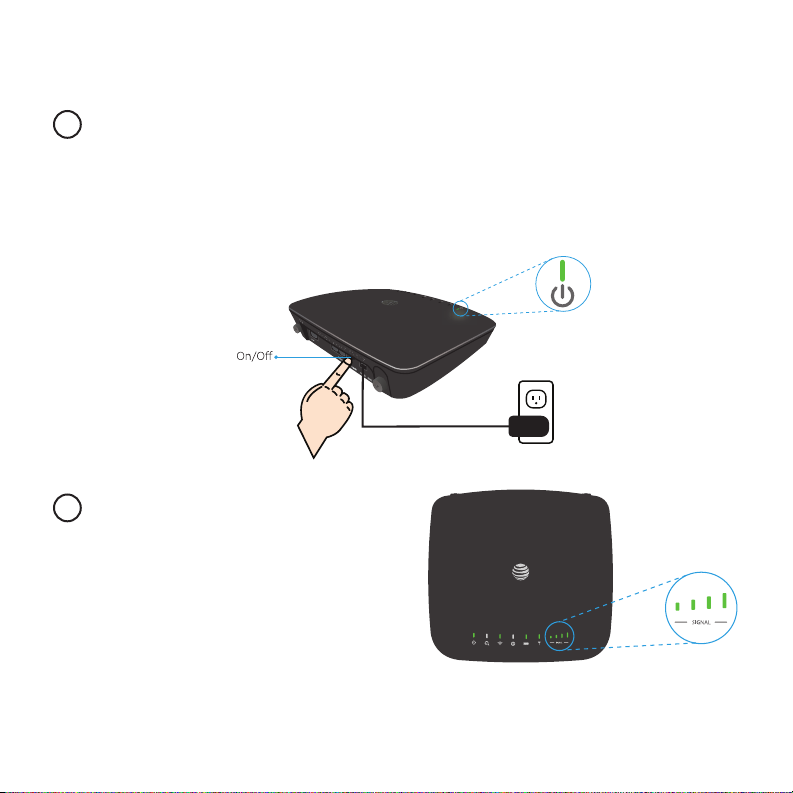
Step 1: Setting Up The AT&T Wireless Internet Device
(continued)
B Turn On Your Device
1. Plug the power cord in to an electrical wall outlet.
2. Connect the other end of the power cord to the Power Input port on the
back of your AT&T Wireless Internet device.
3. Press the On/O button so that it is depressed. The Power light turns
solid green.
C Check the Wireless Signal
Wait a few seconds for the Signal
Strength light to turn on, while your
device connects to the cellular network.
Conrm Signal Strength light has four (4)
lit bars for optimal performance. Fewer
bars indicate a moderate signal, which
may be sucient.
NOTE: If you do not see four (4) lit bars, you may want to choose another location
in your home, such as near a window or outer wall.
7
Page 16
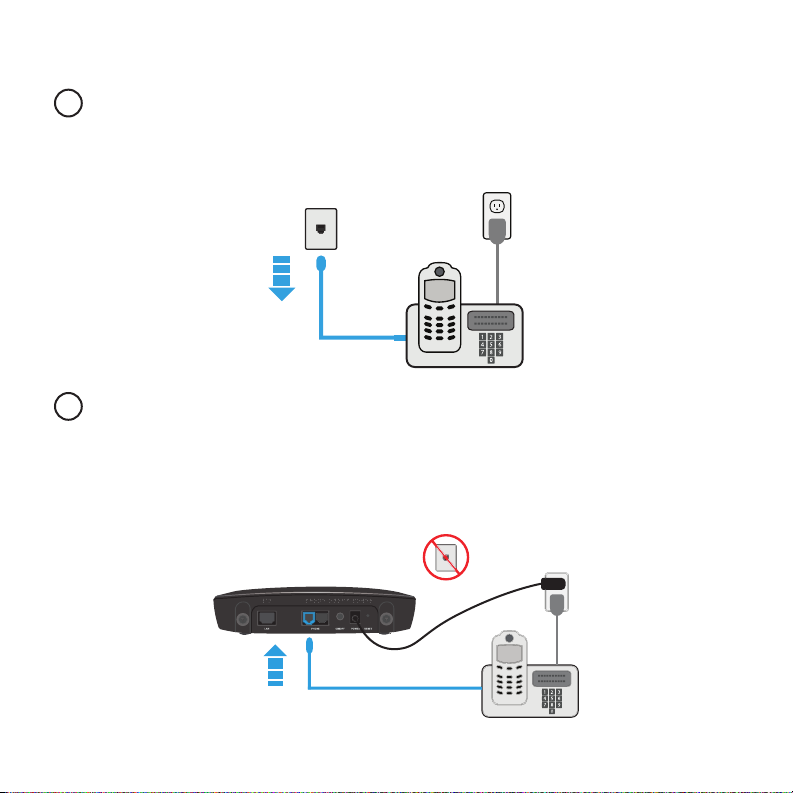
Step 2: Connecting Your Phone
A Unplug Your Phone From The Wall Jack
The AT&T Wireless Internet device is not used with your home phone wall jack.
NOTE: If you have a cordless phone, keep it plugged into a power outlet.
B Connect Your Phone To The Device
Plug your phone into the “Phone” port on the AT&T Wireless Internet device using
your existing phone cable or the included phone cable.
NOTE: Do not plug the AT&T Wireless Internet device or your phones into your
wall jacks.
8
Page 17

Step 2: Connecting Your Phone
(continued)
C Place A Test Call
Place a test call from your connected home phone. Make sure to dial the 10-digit
phone number, including area code.
For best results, place the cordless phone base at least twelve (12) inches from
the AT&T Wireless Internet device.
Important Phone Tips
• Voicemail is included with your service. Dial 1 to set up and access your voicemail.
• If you choose to use an answering machine instead, set it to fewer than four (4)
rings.
• To place phones throughout your home, use a cordless phone system with
multiple handsets. Wall jacks are not used with the AT&T Wireless Internet device.
• The second Phone port can be used to connect an additional phone or
standalone answering machine. It uses the same phone number as the rst
Phone port.
• Your AT&T Wireless Internet device does not support incoming/outgoing fax
service or home alarm systems.
• Your AT&T Wireless Internet device does not support rotary or pulse-dialing
phones.
• Details on using voicemail and transferring a landline phone number can be
found on pages 12-13.
9
Page 18
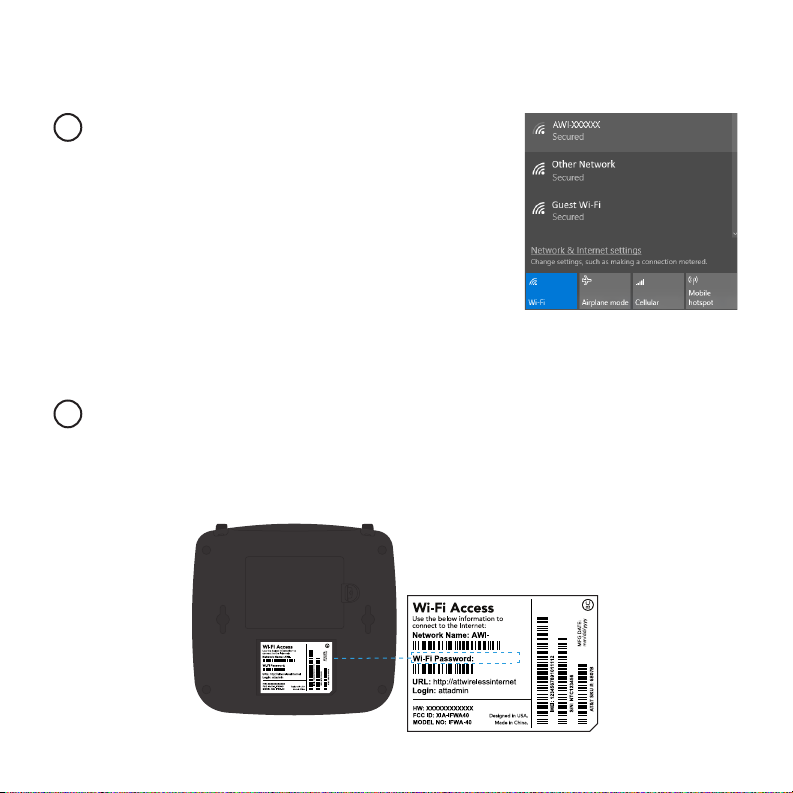
Step 3: Connecting To The Internet
(Requires purchase of a Wireless Internet Data plan)
A Select Your Internet Connection
To Connect via Wi-Fi:
1. Open the Wi-Fi network manager on your
computer or Wi-Fi enabled device.
2. Find and select the AT&T Wireless Internet Wi-Fi
network name (SSID) (e.g., AWI-XXXXXX).
To connect via WPS, see page 19.
To Connect via Ethernet:
Use an Ethernet cable to connect your computer or other device to the Ethernet
port on the back of your AT&T Wireless Internet device. Go to att.net (or your
favorite website) to conrm your Internet connection. Skip Steps 3B and 3C.
B Enter Wi-Fi Network Password
When prompted, enter the Wi-Fi password found on the bottom of the AT&T
Wireless Internet device.
XXXXXX
XXXXXXXXX
XXXXXX
XXXXXXXXX
10
Page 19

Step 3: Connecting To The Internet
(continued)
C Conrm Internet Connection
Go to att.net (or your favorite website) to conrm your Internet connection.
When your device is transmitting to and from the Internet, the Wi-Fi light will
icker green.
Important Internet Tips
• To check your data usage or manage your account, go to att.com/myatt.
• To customize your device settings and view important messages about your
AT&T service plan, use the AT&T Wireless Internet Manager. On any device
connected to the AT&T Wireless Internet device, enter http://attwirelessinternet
directly into your browser address eld. Use “attadmin” as your login.
• To set up a free AT&T email account, go to att.net/signup.
11
Page 20

Voicemail
Your AT&T Wireless Internet device comes with standard wireless voicemail. Follow
the steps below to set up and use your voicemail.
Setup
Dial 1 on any home phone connected to the AT&T Wireless Internet device and wait
four (4) seconds to be connected to your AT&T wireless voicemail. Simply follow the
voice prompts to complete setup. To enable remote voicemail retrieval and for added
security, be sure to create a password during setup.
Message Waiting
There are two indications that a new message is waiting: 1) the Voicemail light and
2) an intermittent dial tone.
The Voicemail light on your AT&T Wireless Internet device blinks green when
a voicemail message is waiting. You will also hear an intermittent dial tone on any
connected phone handset before placing a call.
Retrieving Messages
To retrieve voice messages, dial 1 on any home phone connected to the AT&T
Wireless Internet device, and wait four (4) seconds to be connected to your AT&T
wireless voicemail box. Simply follow the voice prompts to listen to and manage your
messages. Alternatively, you may dial your 10-digit home phone number to access
your voicemail box.
Remote Retrieval
To retrieve voicemail messages from a phone not connected to the AT&T Wireless
Internet device, dial the number associated with your AT&T Wireless Internet
service. When voicemail picks up press the * key. You will then be prompted to enter
your password. Simply follow the prompts to listen to and manage your voicemail
messages.
12
Page 21

Transferring A Phone Number
Transferring a landline phone number to your AT&T Wireless Internet device can
take about four (4) days. Outgoing calls can be made immediately using your AT&T
Wireless Internet device; however, incoming calls (including 911) will continue through
your old service until the transfer is complete. Keep a phone connected to your
wall jack or prior service to continue to receive incoming calls until the transfer is
complete. To check the status of your transfer, visit att.com/port.
AT&T Wireless Internet Manager
The AT&T Wireless Internet Manager allows you to easily manage your AT&T Wireless
Internet device. You can:
• Customize settings
• Change your Wi-Fi network name and
password
• Check signal strength, data usage, and
important messages from AT&T
• Get help and information
To access the AT&T Wireless Internet Manager, rst connect to your AT&T Wireless
Internet device. In your browser address eld, enter http://attwirelessinternet and
log in using “attadmin”.
NOTE: You can customize the login that is used to access the AT&T Wireless Internet
Manager by going to System > Administration.
The AT&T Wireless Internet Manager includes a navigation panel on the le side of
the screen, which contains the following sections:
• Status – Displays general device information and help (see Status on page 39).
• Connected devices – View devices currently connected to your AT&T Wireless
Internet device and block/unblock Wi-Fi devices from connecting (see Connected
Devices on page 40).
13
Page 22

• Wi-Fi – Customize your device’s Wi-Fi and security settings (see Wi-Fi Settings on
page 41).
• Messages – View messages from AT&T about your service plan (see Messages on
page 45).
• Networking – Access a wide range of network and security settings (see
Networking on page 46).
• Data usage – Check your data usage details (see Data Usage on page 54).
• Call log/blocking – View incoming, outgoing, and missed calls placed to and
from your AT&T Wireless Internet device and manage your call block list (see Call
Log/Blocking on page 55).
• Parental control – Control days and times a device can connect to the Internet
and limit the permitted websites (see Parental Control on page 56).
• System – Manage system administration functions such as set Date/Time,
change Password, Backup/Restore, reboot, etc. (see System on page 58).
• Logout – Click to log out of the AT&T Wireless Internet Manager.
14
Page 23
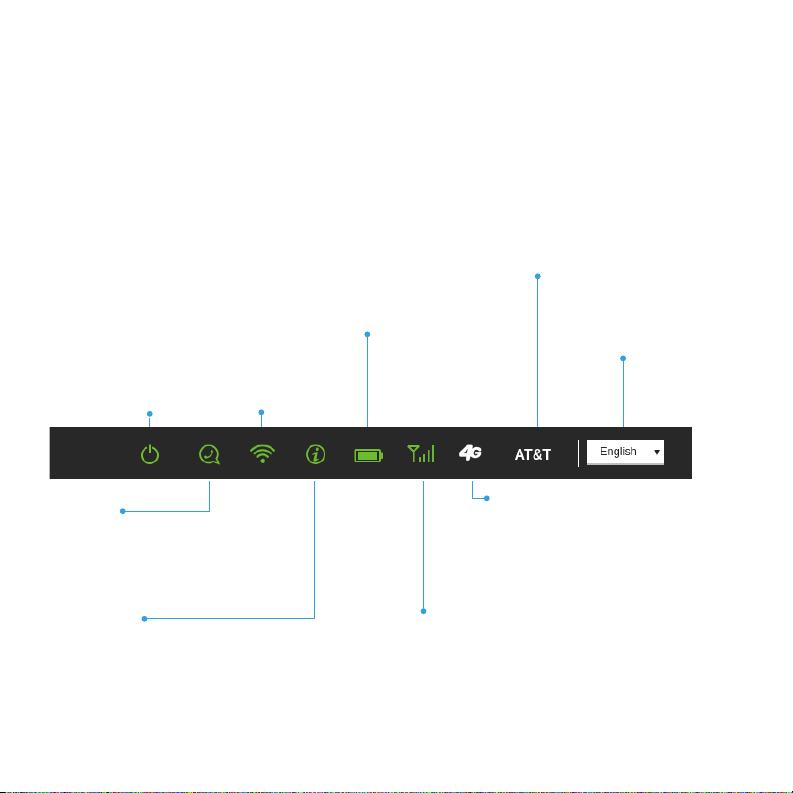
Status Indicators
In addition to the indicators on the device itself (see LED Indicator Lights on page 3),
you can nd information about your device’s current status at the top of the AT&T
Wireless Internet Manager page.
Battery Level
Power
Green: On
Gray: O
Green: High
Yellow: Medium
Red: Low or no charge
Charging: Lightning bolt icon
Gray: No battery
Wi-Fi
Green: On
Gray: O
Service Provider
AT&T or No Service
Language Selector
English or Español
Voicemail
Green: New Voicemail
Gray: No new Voicemail
Information
Green: Unread message(s)
Gray: No unread messages
Network Status Indicator
Technology Icon: 4G LTE or 4G
No Service: No Service
Signal Strength
Green Antenna & 4 Green bars: Strong
& 1-3 Gray bars: Poor-Medium
& 4 Gray bars: No signal
Red Antenna & 4 Gray bars: No Service
15
Page 24

Using Your Device
Calling
Making Calls
Using a phone connected to your AT&T Wireless Internet device, place and receive
calls as you normally would. The AT&T Wireless Internet device supports dialing with
either a cordless or corded phone.
NOTE: Make sure to dial the 10-digit phone number, including area code.
Placing A Call On Hold
While on a call, you can press the Flash (or Phone/Talk) key to put the other party
on hold.
Three-Way Calling
Initiate A Three-Way Call
1. While on a call, press the Flash (or Phone/Talk) key to put the rst party on hold.
2. When you hear a dial tone (wait up to four [4] seconds), dial the second number.
3. When the second party answers, press the Flash (or Phone/Talk) key again to
complete the three-way connection. If the second party does not answer, press
the Flash (or Phone/Talk) key to end the connection and return to the rst party.
16
Page 25

Call Waiting
You will hear two tones if someone calls while you are already on a call. When this
happens, you have several options:
• To hang up on the rst call and connect the incoming call, press the 1 key and
then the Flash (or Phone/Talk) key.
• To continue the rst call and reject the incoming call, press the 0 key and then
the Flash (or Phone/Talk) key.
• To place the rst call on hold and connect the incoming call, press the 2 key and
then the Flash (or Phone/Talk) key.
• To talk with both parties at the same time, rst press the 2 key and then the
Flash (or Phone/Talk) key, and then press the 3 key and then the Flash (or
Phone/Talk) key to merge the three calls.
NOTES:
• Your AT&T Wireless Internet device comes with standard call waiting and threeway calling. Operation of these features will vary depending on your home
phone equipment.
• If your phone does not have a Flash (or Phone/Talk) key, use the o-hook
mechanism supported by your phone.
17
Page 26

Call Forwarding
To forward all calls, dial:
• *21*
• The 10-digit number to which you wish to forward your calls
• #
(For example: dialing “*21*1234567890#” would forward your calls to the phone
number 123-456-7890.)
Please wait at least three (3) seconds to hear a conrmation tone before hanging up.
To stop forwarding calls, dial #21#, and wait at least three (3) seconds to hear a
conrmation tone before hanging up.
NOTE: Applicable wireless minute plan rates apply to forwarded calls.
Call Log
You can view incoming and outgoing calls placed to and from your AT&T Wireless Internet
device at att.com/myatt, or on the AT&T Wireless Internet Manager. To view call details
on the AT&T Wireless Internet Manager, enter http://attwirelessinternet directly into
your browser address eld on any device that is connected to your AT&T Wireless Internet
device. Log in using “attadmin” (or your customized login) and go to Call Log.
You can also block certain numbers so that you no longer receive calls from them
(see Call Log/Blocking on page 55).
18
Page 27

Internet Access
Connect Other Devices
You can simultaneously connect up to twenty (20) devices per Wi-Fi network (2.4 GHz
and 5 GHz), forty (40) total, including smartphones, tablets, and laptops, to your AT&T
Wireless Internet device.
1. Open the Wi-Fi network manager on your Wi-Fi enabled device.
2. Find and select the Wi-Fi network name (SSID): AWI-XXXXXX or AWI-XXXXXX-
GUEST (guest network disabled by default).
NOTE: The AT&T Wireless Internet device supports both 2.4 GHz and 5 GHz WiFi networks. You can simultaneously connect up to twenty (20) Wi-Fi enabled
devices on each network.
3. When prompted, enter the Wi-Fi password found on the bottom of the AT&T
Wireless Internet device.
Connect WPS Devices
Wi-Fi Protected Setup (WPS) allows WPS-enabled devices to be connected to a Wi-Fi
network without having to type a Wi-Fi password.
1. With the AT&T Wireless Internet device powered on, press and hold the WPS
button for one (1) second.
2. Within two (2) minutes, press the WPS button on the wireless device you want to
connect.
3. Your AT&T Wireless Internet device and the wireless device will communicate and
establish the connection.
Connect Via Ethernet
To connect via Ethernet, plug one end of your Ethernet cable in to the Ethernet port
on your computer and the other end in to the Ethernet port on the back of the AT&T
Wireless Internet device.
19
Page 28

Changing Wi-Fi Network Name And Password
You can customize your AT&T Wireless Internet device’s Wi-Fi network name (SSID) and
password using the AT&T Wireless Internet Manager. On any device that is connected to
the AT&T Wireless Internet device, enter http://attwirelessinternet directly into your
browser address eld. Log in using “attadmin” (or your customized login). Go to Wi-Fi >
2.4GHz > EDIT or Wi-Fi > 5GHz > EDIT to change your network name and password.
NOTE: You will need to reconnect all Wi-Fi devices using the new information.
Important Messages
Your AT&T Wireless Internet device is able to receive important messages from AT&T
regarding new soware updates and your service plan. You cannot respond to these
messages.
To view your messages, use any device that is connected to the AT&T Wireless
Internet device and enter http://attwirelessinternet directly into your browser
address eld. Log in using “attadmin” (or your customized login) and go to Messages.
Managing Connected Devices
You can view devices currently connected to your AT&T Wireless Internet device and
block/unblock devices using the AT&T Wireless Internet Manager. On any device that
is connected to the AT&T Wireless Internet device, enter http://attwirelessinternet
directly into your browser address eld. Log in using “attadmin” (or your customized
login) and go to Connected Devices.
Parental Control
With Parental Control, you can manage blocked websites and set time restrictions.
To manage Parental Controls, use any device that is connected to the AT&T Wireless
Internet device and enter http://attwirelessinternet directly into your browser
address eld. Log in using “attadmin” (or your customized login) and go to Parental
Control. From here, you can:
• Select a connected device and add it to the Parental Controls Device List.
• Manage blocked websites and restricted time settings.
20
Page 29

Checking Your Voice And Data Usage
You can check your voice and data plan usage for your current billing cycle by either
downloading the free myAT&T™ app to your smartphone or tablet, or visiting
att.com/myatt on your computer. To download the myAT&T app, go to your device’s
app store, or go to att.com/myattapp from your smartphone or tablet. Data and
messaging rates may apply.
You will need to log in to manage your account and review usage details.
If you don’t already have a user ID and password, select Create one now (on a
computer) or Register (on the myAT&T app), and then follow these steps:
• Enter your AT&T phone number or account number and billing zip code.
• If prompted, enter additional verication information.
• If you receive a validation code, enter it.
• You may be prompted to indicate whether you are the account owner, meaning
your name is on the bill. If you don’t own the account, provide the account
information to gain access.
• Create your User ID and Password.
• Agree to the Terms & Conditions.
21
Page 30

You can view your voice and data usage once you have logged in to your account.
You may need to select the tab for your wireless plan and See all usage to see the
usage details for your AT&T Wireless Internet device’s phone number.
If you did not provide an email address for email notications when you purchased
your AT&T Wireless Internet device, you can choose to do so at att.com/myatt. Once
you have logged in to your account, go to Prole and enter a valid email address. You
will receive email notications when you are approaching or have exceeded your data
plan limit. If you have a limited voice plan, you will also receive notications as you are
approaching or have exceeded your voice plan limit.
You can also use the AT&T Wireless Internet Manager to check data usage details
by device. On any device that is connected to your AT&T Wireless Internet device,
enter http://attwirelessinternet directly into your browser address eld. Log in
using “attadmin” (or your customized login) and go to Data Usage. To view data
usage notications, go to Messages. The Information light on your AT&T Wireless
Internet device will blink green when you have a new notication.
NOTE: Actual billed usage can be higher than the estimated data usage displayed in
the usage meter.
22
Page 31

Helpful Tips
Home Answering Machines
If you choose to use your home answering machine instead of the voicemail provided
by your AT&T Wireless Internet device, you will need to set your answering machine
to pick up calls before four (4) rings, so that it picks up before the network voicemail
service. If you have a standalone answering machine, you can connect it to the
second “Phone” port on the back of your AT&T Wireless Internet device.
Alternatively, you can call AT&T Customer Service at 1-800-331-0500 to turn o the
network voicemail feature.
Adjusting Volume
Use your home phone’s volume adjustment, if available. Alternatively, the volume of
the AT&T Wireless Internet device can be adjusted. Four volume levels are available
(level 1 through level 4), with the default setting at level 4. While on a call, press ** to
decrease the volume. Press ## to increase the volume. Each time ** or ## is pressed,
the volume is decreased or increased by one level.
23
Page 32

Powering On/O
The On/O button is used to turn your AT&T Wireless Internet device on or o. When
powered o, the AT&T Wireless Internet device will no longer send or receive calls, but
it will continue to charge the backup battery if still connected to the wall outlet.
To turn on your AT&T Wireless Internet device, press the On/O button so that it is
depressed. The Power light will turn solid green if connected to a power supply;
it will blink green if on backup battery power. To turn o your AT&T Wireless Internet
device, push the On/O button so that it is not depressed.
TTY Support
TTY (Text Telephony) and TDD (Telecommunications Device for the Deaf) are
supported by the AT&T Wireless Internet device. In order to use the TTY network,
you must have a TTY-compatible phone and be in TTY mode. Note that most digital
wireless devices are TTY-compatible.
To set the TTY mode or turn TTY support o, dial *889n# (*TTYn#) on your
connected phone, replacing n with one of the following numbers:
• Replace n with 0 for TTY O mode. Users who can hear and talk can turn o TTY
support. This is the default setting.
• Replace n with 1 for TTY Full mode. Users who cannot talk or hear can use this
mode to send and receive text messages through a TTY device.
• Replace n with 2 for VCO mode. Users who can talk but cannot hear can use this
mode to talk through the phone and receive responses via text messages.
• Replace n with 3 for HCO mode. Users who can hear but cannot talk can use this
mode to listen to calls and respond via text messages.
24
Page 33

Important Information
E911 Service
For emergency calls, you may have to provide your location address to the 911 operator.
Power Outages
The AT&T Wireless Internet device has a backup battery, for use in the event of a
power outage, with talk time of approximately 180 minutes and standby time of
approximately 29 hours (depending on environmental factors). In the event of a
power outage (commercial power no longer available), the AT&T Wireless Internet
device will automatically begin using the backup battery, provided there is sucient
battery charge le. If there is no battery charge at the time of the power outage, the
device will not be operable.
To make calls using your backup battery, you must plug a corded phone or landline
phone into one of the “Phone” ports on the AT&T Wireless Internet device.
When the AT&T Wireless Internet device is using the backup battery there are three
Power saving modes which can be applied in order to ensure the maximum time
of functioning telephone services. The default setting is the Balanced (Temporary
connectivity) mode. For this setting Wi-Fi and Ethernet connectivity will be disabled
aer a set period of time (ve minutes by default) or once the battery reaches 50%
charge. The Maximum Saving (No connectivity) mode disables Wi-Fi and Ethernet
while operating on battery power. The other setting is None in which all functionality
remains enabled and will function normally for the duration of the battery’s charge. In
either power saving mode, pressing the WPS button will cause the device to return to
normal (no power saving) mode.
If you experience a power outage and your backup battery is fully depleted, it will
be necessary to restart your device when power is restored by toggling the On/O
button; the Power light will turn solid green.
25
Page 34

Backup Battery
A new backup battery should last for approximately ve (5) years, but the life of any
backup battery can be adversely aected by environmental conditions like moisture
and heat. To get the longest service from your backup battery, do not place the AT&T
Wireless Internet device in direct sunlight or in wet or extremely cold environments.
To test the condition of your backup battery, make sure the AT&T Wireless Internet
device is powered on. Unplug the AT&T Wireless Internet device from the wall
power outlet. If the Battery light turns red, then the backup battery may need to be
replaced. If the AT&T Wireless Internet device does not remain on once unplugged
from the wall power outlet, then the backup battery needs to be replaced.
It is recommended that you test your backup battery charge at least once per year
and replace it if necessary.
To order a replacement backup battery and for cost and warranty information, visit
att.com and search for the keywords “Wireless Internet battery.”
Device Compatibility
The AT&T Wireless Internet device is not compatible with wireless messaging services,
home security systems, fax service, medical alert systems, medical monitoring
systems, credit card machines, IP/PBX Phone systems, or dial-up Internet service. May
not be compatible with your DVR/Satellite systems; please check with your provider.
DSL customers should contact their provider before transferring a phone number to
ensure uninterrupted DSL Internet service.
The AT&T Wireless Internet device cannot be used to make 500, 700, 900, 976, 0+
collect, operator-assisted, or dial-around calls (e.g., 1010-XXXX).
26
Page 35

In-Home Wiring
Interconnecting with home telephone wiring is not necessary but is possible;
however, it is not recommended unless you possess sucient knowledge of electrical
systems.
Use with home wiring requires the physical disconnection from other services,
including the landline coming into your home. Use of a qualied licensed electrician is
highly recommended. Improper installation may result in phone equipment damage
or even a re.
27
Page 36

Frequently Asked Questions
What kind of phone do I need to work with the AT&T Wireless Internet device?
Most standard touch-tone phones may be used. Rotary phones are not supported.
Cordless phone systems provide the most exibility and allow you to easily place
additional handsets throughout your home. Cordless phone systems still need to be
plugged in to a power outlet. A standard corded phone can be used if you need only
one phone in your home.
During a power outage, a standard corded phone that doesn’t require electrical
power is required for service.
How do I install my AT&T Wireless Internet device?
Refer to pages 5-11 of this guide for the most common installation methods. Other
helpful information:
• Installation near a window or outer wall is strongly recommended to ensure the
strongest possible wireless signal in order to maximize voice/data performance.
• If the AT&T Wireless Internet device’s Signal Strength light does not display
high signal strength (three [3] to four [4] bars) or voice/data performance is
unacceptable, you may need to relocate the device to another part of the home
with a stronger wireless signal.
Will my AT&T Wireless Internet device work in areas with no or low wireless signal
strength?
A strong wireless signal (three [3] to four [4] bars) is recommended for optimal
performance. A moderate signal (one [1] to two [2] bars) may be sucient. If you do
not see green or blue bars, you may want to move the device to a dierent location.
Does the AT&T Wireless Internet device support both voice and data?
Yes, you can use your AT&T Wireless Internet device for both voice and data, as long
as you subscribe to AT&T Wireless Internet voice and data plans.
28
Page 37

Why don’t I see the name of the caller when Caller ID is displayed?
The AT&T Wireless Internet device, similar to other wireless devices, supports calling
number identication.
However, contact names stored on your cordless home phone display for incoming
calls.
Can I move my AT&T Wireless Internet device and use it in another location?
Yes, you can use your device anywhere in the U.S. where AT&T is authorized to provide
wireless services. All you need is a power outlet and a strong AT&T wireless signal.
When I dial a seven-digit number using the AT&T Wireless Internet device, I get a
message that the number cannot be completed as dialed. Does the AT&T Wireless
Internet device support seven-digit dialing?
No. The AT&T Wireless Internet device requires 10-digit dialing for domestic calls in
most areas.
Can I make international calls with my AT&T Wireless Internet device?
Yes. To add international calling to your account, please call 611 from your connected
phone, or call 1-800-331-0500 from any phone.
Can I use my AT&T Wireless Internet device internationally?
No. Use is limited to the United States, Puerto Rico, and U.S. Virgin Islands.
What is the warranty on the AT&T Wireless Internet device?
The AT&T Wireless Internet device has a twelve (12)-month limited warranty. For
details, see page 66.
I can’t make or receive calls with my AT&T Wireless Internet device. What should
I do?
Please follow the troubleshooting steps in this User Guide (pages 31-37). If further
assistance is required, call 1-800-331-0500.
29
Page 38

How many devices can I connect to my AT&T Wireless Internet device?
There are two (2) phone ports to connect your phone or answering machine. For
data, you can simultaneously connect up to twenty (20) devices per Wi-Fi network
(2.4 GHz and 5 GHz), forty (40) total, and one (1) via Ethernet.
How can I check my data speed?
You can check your data speed by visiting att.com/speedtest.
Will connecting additional devices aect my data speed?
Yes, active use of multiple devices will decrease your data speeds.
Can I change my Wi-Fi network name and password?
Yes, you can change your Wi-Fi network name and password using the AT&T Wireless
Internet Manager. From any connected device, enter http://attwirelessinternet
directly into your browser address eld. Log in using “attadmin” (or your customized
login). Go to Wi-Fi > 2.4GHz > EDIT or Wi-Fi > 5GHz > EDIT to change your network
name and password.
How do I know how much data I’ve used?
To check your data plan usage for your current billing cycle, go to att.com/myatt.
Once I’ve reached the data limit for my plan, can I continue to use my AT&T
Wireless Internet device for data?
Yes, but overage charges may apply. To upgrade your data plan, visit att.com/myatt.
30
Page 39

Troubleshooting
General
Problem Possible Solution
None of the LED
lights on the face
of the device are
illuminated
Network Status
Indicator light is
solid red
Network Status
Indicator light is
blinking red
• Make sure there is AC power to the AT&T Wireless Internet
device. Do not connect to an AC outlet controlled by a wall
switch.
• Press the On/O button (on the back of the device) so
that it is in the ON position (depressed). The Power light
should turn solid green.
• Move your device to another area with sucient network
signal (three [3] to four [4] bars).
• The SIM card may be missing or not installed properly.
1. Remove the battery compartment cover, then remove
the backup battery.
2. Locate the SIM card slot. Insert the SIM card into the
slot. The SIM card will click and lock in place when
properly installed in the correct orientation.
• The SIM card may be invalid or damaged and may need to
be replaced. For a replacement SIM card, take your AT&T
Wireless Internet device to your local AT&T store, or call AT&T
Customer Care at 1-800-331-0500.
31
Page 40

Phone
Problem Possible Solution
No dial tone • Make sure there is AC power to the AT&T Wireless Internet
device. Do not connect to an AC outlet controlled by a wall
switch.
• Make sure your AT&T Wireless Internet device is powered
on. Push the On/O button so that it is in the ON position
(depressed). The Power light should turn solid green.
• Make sure your cordless phone has power and is connected
properly to the AT&T Wireless Internet device.
• Move your AT&T Wireless Internet device to another area
with sucient network signal (three [3] to four [4] bars).
Caller ID shows
number only
My answering
machine won’t
pick up calls
• Like all wireless services, only the calling number is displayed
with Caller ID.
• Your home phone may support the display of names stored
in its contacts memory.
• Set your answering machine to pick up calls before four
(4) rings, so that it picks up before the network voicemail
service.
• Alternatively, have network voicemail removed from your
account by calling AT&T Customer Care. Dial 611 from your
connected phone, or dial 1-800-331-0500 from any phone.
32
Page 41

Phone
Problem Possible Solution
Poor voice quality • Use the phone cable included with the AT&T Wireless
Internet device.
• Make sure all connections are rmly in place.
• Move your device to another area with sucient network
signal (three [3] to four [4] bars).
• Increase the distance between the AT&T Wireless Internet
device and other electronic devices (including cordless base
stations, Wi-Fi routers, and cell phones).
• Move the AT&T Wireless Internet device near a window with a
clear unobstructed view of the sky, and remove any objects
that may be obstructing the wireless signal.
• Make sure the home phone that is connected to the AT&T
Wireless Internet device is of good quality and in good
working order.
• Voice quality may degrade with a low battery charge.
Connect to an AC power source to recharge when power is
available.
Message Waiting
indicator on my
home phone
doesn’t light
• The AT&T Wireless Internet device does not support this
functionality with your home phone.
• The AT&T Wireless Internet device has a dedicated Voicemail
light that will blink green when you have a new voice
message; you will also hear an intermittent dial tone when
you pick up your handset.
33
Page 42

Phone
Problem Possible Solution
I hear an
Intermittent dial
tone
My phone doesn’t
ring when a call
comes in
I hear a constant
low-frequency
tone (not a dial
tone) when I try
to place a call
• You will hear an intermittent dial tone when you have a new
voicemail message waiting.
• Dial 1 from your home phone that is connected to the AT&T
Wireless Internet device to listen to your voicemail messages.
• If you recently transferred your landline phone number,
you will continue to receive incoming calls on your previous
service until the transfer is complete. To check transfer
status, visit att.com/port.
• Make sure your AT&T Wireless Internet device is NOT
connected to your in-home phone wiring.
• Make sure your home phone is powered on and connected
to the AT&T Wireless Internet device.
• Your AT&T Wireless Internet device number may be set
to forward calls to another number. Dial #21# to stop
forwarding calls.
• Hang up your home phone to restore dial tone.
34
Page 43

Internet
Problem Possible Solution
Can’t access the
Internet
• Make sure your AT&T Wireless Internet device is powered
on. Push the On/O button so that it is in the ON position
(depressed). The Power light should turn solid green.
• For Wi-Fi: Make sure your AT&T Wireless Internet device is
located in the general area of your Wi-Fi enabled device(s).
Check that your device is connected to the AT&T Wireless
Internet device’s Wi-Fi network (e.g., AWI-XXXXXX) and that
you are using the correct Wi-Fi password.
• For Ethernet: Make sure the Ethernet cable is securely
inserted into the Ethernet port on the back of the AT&T
Wireless Internet device and your computer (or other device).
• Move your AT&T Wireless Internet device to another area
with sucient network signal (three [3] to four [4] bars).
• Make sure the Wi-Fi light is on. If it is not, restart your
AT&T Wireless Internet device as follows: Push the On/O
button so that it is in the OFF position. Then push it again so
that it is in the ON position (depressed); the Power light
should turn solid green.
• Check the following on the AT&T Wireless Internet Manager
(http://attwirelessinternet):
- Go to Wi-Fi > 2.4GHz > EDIT and Wi-Fi > 5GHz > EDIT and
for both operating frequencies conrm that Access-Point
conguration and Broadcast SSID are both enabled.
- Go to Networking > MAC/IP/Port Filtering and conrm that
the rewall is not set to block your device’s IP and MAC address.
35
Page 44

Internet
Problem Possible Solution
Download or
upload speeds
are slow
The AT&T
Wireless Internet
device’s network
does not appear
in the wireless
network list
• Check your speed at att.com/speedtest.
• Check your Signal Strength lights. If it shows less than three
(3) green bars, choose an alternative location.
• Other connected devices may be transferring a large
amount of data. To view and block other connected devices,
go to the AT&T Wireless Internet Manager
(http://attwirelessinternet) under Connected devices.
• A phone call in progress may slow down the data speed.
• Check your wireless network connection using the AT&T
Wireless Internet Manager (http://attwirelessinternet).
4G LTE oers the fastest data speeds, so if possible, locate
your AT&T Wireless Internet device in an area with 4G LTE
coverage.
• Make sure the AT&T Wireless Internet device is powered
on. The Power light should be solid green if connected
to a power outlet or blinking green if on backup battery.
When your device is on backup battery power, Wi-Fi may
be disabled. See Power Outages on page 25 for more
information.
• Refresh the network list on the device you are trying to
connect.
• Restart your AT&T Wireless Internet device: Push the On/O
button so that it is in the OFF position. Then push it again so
that it is in the ON position (depressed); the Power light
should turn solid green.
36
Page 45

Internet
Problem Possible Solution
Can’t connect to
my AT&T Wireless
Internet device
Can’t access the
AT&T Wireless
Internet Manager
• Check that you are connecting to your AT&T Wireless
Internet Wi-Fi network name (SSID) (e.g., AWI-XXXXXX). If
connected via Ethernet, make sure the Ethernet cable is
rmly attached.
• Make sure you entered the correct Wi-Fi password, either the
one found on the bottom of your device or your customized
password, if you changed it.
• Make sure you are trying to access on a device that is
currently connected to your AT&T Wireless Internet device
via either Wi-Fi or Ethernet connection.
• Make sure you have entered the correct URL
(http://attwirelessinternet or http://192.168.1.1) directly
into the browser address eld on your connected device.
• Make sure you have entered the correct login, either
“attadmin” or your customized login. If you have changed the
login and have forgotten the new one, you must restore the
device to the factory default settings. Remove the bottom
cover of your device, and using a ballpoint pen, press and
hold the RESET button for eight (8) seconds. You may then
log in using the default login “attadmin.”
37
Page 46

Device Conguration
You can manage your AT&T Wireless Internet device settings using the AT&T Wireless
Internet Manager. To access this page, rst connect to your AT&T Wireless Internet
device and enter http://attwirelessinternet directly into your browser address eld.
Log in using “attadmin” (or your customized login).
Navigating The User Interface
The AT&T Wireless Internet user interface presents a navigation menu down the
le side of the screen. Click on the menu items to display related information and
settings on the right side of the screen.
38
Page 47

Help
Click the Help button located on any page to expand a window containing
information on the setting displayed on that page.
The Networking and System sections have additional pages with a sub-menu
displayed horizontally at the top of the screen, for example:
Status
The Status page displays an overview of the device’s status such as whether there
are new voicemails, Wi-Fi radio status, battery level, rmware version, network
connection status, network type and signal strength.
39
Page 48

Connected Devices
The Connected devices page displays a list of both Wi-Fi and Ethernet devices that
are currently connected to your AT&T Wireless Internet. This can be used to monitor
who has access to your network and block (or unblock) devices as required.
40
Page 49

Wi-Fi Settings
You can manage your AT&T Wireless Internet device’s Wi-Fi Settings by selecting the
Wi-Fi menu from the le side of the screen. This displays a summary of the current
conguration of the 2.4 GHz and 5 GHz Wi-Fi settings.
Wi-Fi
41
Page 50

To make changes to the conguration, click the EDIT button of the 2.4 GHz or 5 GHz
settings.
42
Page 51

Radio Conguration
Operating frequency:
• Mode: Indicates which mode is active for connecting via Wi-Fi. The default is
Automatic and allows the device to accept connections from devices supporting
802.11b/g/n (on 2.4 GHz) and 802.11a/n/ac (on 5 GHz).
• Channel: Indicates the wireless channel that the radio is operating on. In most
situations, leaving this as Automatic will work best, but you can manually
override the channel selection using this option.
Access-Point Conguration
Enable: When selected, this indicates that the Wi-Fi radio is operating.
Network name (SSID): The wireless name that is displayed to wireless clients when
they scan for networks to join.
Broadcast SSID: When selected, this will allow the wireless network name to be
displayed to clients scanning for a wireless network. If unselected, the wireless
network must be added manually on the client.
Security mode: Select the desired Wi-Fi security option.
• WPA2-PSK is the latest and most secure method and should be used if possible
• WPA-PSK/WPA2-PSK allows older clients that do not support WPA2-PSK to
connect while also supporting WPA2-PSK.
• None: Allows any client to connect to your Wi-Fi network without entering a
password. For your security, avoid using this option.
Password: The password that must be entered on your client device to connect to
the AT&T Wireless Internet. You can use this eld to change the password.
Maximum number of Wi-Fi devices: Species how many client devices can
simultaneously connect to your AT&T Wireless Internet device.
Enable Wi-Fi Protected Setup (WPS): This feature is turned on by default. If you
change these settings, currently connected devices may be disconnected.
43
Page 52

Wi-Fi: WPS
WPS, or Wi-Fi Protected Setup, is a standard that allows easy establishment of a
secure wireless home network. This feature is turned on by default. If you change
these settings, currently connected devices may be disconnected.
To connect a client device using WPS, on the Wi-Fi overview page, select a WPS mode.
The modes are described below.
• Device PIN: If selected, you will need to specify a 4-digit or 8-digit PIN that other
devices must enter to connect via this method. Enter the desired PIN in the PIN
eld and click the Submit button.
• Push Button: If selected, this will act in the same way as manually pushing the
WPS button on the back of the AT&T Wireless Internet device. Click the Push
WPS button, and within two (2) minutes, you will need to activate WPS on the
device you wish to connect to the AT&T Wireless Internet device via a physical or
virtual button to complete the connection process.
NOTES:
• Refer to your connecting device’s documentation for specic information on
how to complete the WPS process on the desired device.
• If the Broadcast Network Name (SSID) option is turned o, the WPS function will
not be available.
44
Page 53

Messages
The Messages page is used to access text messages on your AT&T Wireless Internet
device. This may include messages from AT&T about your service plan. Up to 100
messages can be displayed.
When there are more than 100 messages, older messages will be automatically
deleted to make room for the new messages.
To manually delete messages, select the checkbox(s) on the le side of the display
for the messages you wish to delete, then click the DELETE button.
45
Page 54

Networking
LAN Settings
LAN Setting
These settings aect the Local Area Network connection.
46
Page 55

LAN Settings
(continued)
• Ethernet Port: Use this setting to enable or disable the Ethernet port on the
back of the device.
• IPv4 Address: This is the IPv4 address of the AT&T Wireless Internet device. By
default, this is set to 192.168.1.1.
• IPv4 Netmask: The IPv4 Netmask of the AT&T Wireless Internet device. By
default, this is set to 255.255.255.0
• DHCP Server: Enables or disables the DHCP server on the device. The DHCP
server allows the AT&T Wireless Internet device to automatically assign a local IP
address from the DHCP pool to wireless clients as they connect.
• DHCP Address Pool Start: The rst address in the DHCP pool which is assigned
to clients.
• DHCP Address Pool End: The last address in the DHCP pool which is assigned to
clients.
• DHCP Lease Time (hours): The length of the DHCP lease. This is the length of
time that the IP address is reserved for a particular client.
Active DHCP Leases
Displays the active DHCP leases and the length of time remaining.
Static Leases
Static leases are used to assign xed IP addresses and symbolic hostnames to DHCP
clients. By setting up a static lease, you can ensure that your device receives the
same IP address when it connects.
47
Page 56

DMZ
The DMZ or “Demilitarized Zone” opens up all ports to a specic local host. This
means the specied host will not be protected by the built-in rewall and therefore
this feature should be used with care. Under normal operation, this feature should
remain disabled.
48
Page 57

Port Forwarding
Port forwarding allows remote computers on the Internet to connect to a specic
computer or service within the private LAN. It operates based on rules specifying a
protocol, the external ports, the internal IP address and internal ports.
You can create a new rule by entering the required details and then pressing the
ADD button.
49
Page 58

MAC/IP/Port Filtering
This feature can be used to allow or block certain users and/or ports from accessing
the Internet. It operates based on rules specifying the direction of packets, the source
MAC and IP, the destination IP, protocol, source ports, destination ports and an action
to perform on the packets that match the rule.
The Global parameter setting gives you quick access to turn the ltering on or o for
all rules.
50
Page 59

VPN Passthrough
This feature allows VPN client soware on connected devices to connect through this
device to remote VPN servers. You can specify the VPNs allowed by protocol. Under
normal operation, these should be le as Enabled.
Security Level
This feature protects the internal network according to the precongured security
policy. There are low, medium and high levels which may be set, or you can select
Customised Security to set your own options. Use the checkboxes to allow trac on
the local network via the specied protocols. The default setting is disabled.
51
Page 60

UPnP
Universal Plug and Play allows clients on the local network to automatically congure
the router to allow certain trac to pass through the AT&T Wireless Internet device.
52
Page 61

Active UPnP Redirects
Displays the active UPnP redirects on the AT&T Wireless Internet device.
UPnP Settings
• Start UPnP and NAT-PMP service: Starts or kills the UPnP and NAT-PMP service
to allow UPnP and NAT-PMP functionality.
• Enable UPnP functionality: Enables or disables the UPnP functionality on the
AT&T Wireless Internet. This service allows local client soware to automatically
congure the device for trac to pass through.
• Enable NAT-PMP functionality: Enables or disables the AT&T Wireless Internet
to automatically learn network address translation (NAT) settings and port
forwarding congurations.
• Enable secure mode: When enabled, this setting creates UPnP redirects only to
the requesting IP address.
• Port: The port used for the UPnP and NAT-PMP services.
53
Page 62

Data Usage
The Data Usage page shows the approximate Internet data usage of each client.
• Detailed data usage: Turns on the detailed logging of data per client. When
this setting is enabled, the speed of your AT&T Wireless Internet service may be
aected. The default setting is disabled.
• Auto reset usage: When selected, the statistics presented under Data usage
details is reset automatically on a specied day of the month.
• Day of month to reset (1-31): Enter the day of the month to reset the data
usage details every month. For example, when set to ‘1’, the data usage details
will be reset on the rst day of each month.
54
Page 63

Call Log/Blocking
This feature displays a log of the last 100 calls to and from the AT&T Wireless Internet
device as well as allowing you to block up to 30 phone numbers.
You can block numbers from the call log by selecting the call in the Call log and then
clicking the BLOCK NUMBER button. Alternatively, you can manually enter a number
to block under ‘Add number’. When adding a number manually, it’s a good idea to add
a description for the number so that it is easily identiable in the Call block list.
If the Call log or Call block list contain 100 or 30 entries respectively, delete some old
entries to allow more to be shown/added.
55
Page 64

Parental Control
The Parental Control page is used to keep a list of rules to control access to specic
websites. Rules can be applied to specic devices on your local area network and at
specic times.
To create a rule:
1. Click the ADD button.
2. In the Rule name eld, enter a name for this rule so that it is easily identiable to you.
3. Using the Device name drop-down list, select the local device on your network
to create a rule for.
56
Page 65

Parental Control
(continued)
4. To allow this device Internet access, check the Allow Internet checkbox. To deny
Internet access to this device, click the checkbox so that it is not checked.
5. Click the EDIT button.
6. In the Blocked websites eld, enter the domain name of the site you want to
block. Use the icon to add another blocked website. Repeat this step for as many
websites as you want to block.
7. Under Restricted time, use the drop-down list to select a day of the week, then
enter a Start time and Stop time. Use the icon to add another time period.
Repeat this for as many time periods you want to add.
8. When you have nished conguring the rule, click the SAVE & APPLY button.
9. On the Parental Control page, click the SAVE & APPLY button. The rule is applied.
57
Page 66

System
Date & Time
The Date & Time page lets you set the time, time zone and the Network Time
Protocol (NTP) server to use for synchronization. The time on your AT&T Wireless
Internet device is important for accurate logging of calls, messages, data usage
statistics and parental control.
Use the Timezone drop-down list to select the time zone that the device is located in.
Under Time synchronization, select the Time set mode.
To manually set the time, select Manual set time then use the drop-down lists to
select the date and time and click the SAVE & APPLY button.
58
Page 67

To synchronize the time on the AT&T Wireless Internet device with a time server,
enter the domain name of the time server in the NTP server candidates elds. The
AT&T Wireless Internet device will attempt to synchronize with the rst server in the
list. If synchronization fails, it will attempt synchronization with the next in the list
until it is successful.
Administration
The Administration page is used to congure the administrator password to access
the web user interface of the AT&T Wireless Internet device.
To change the password, enter a new password in both the New password and
Re-enter password elds. The passwords entered must be identical otherwise the
password will not be updated.
59
Page 68

Conguration
This page is used to backup and restore the conguration of your AT&T Wireless
Internet device or reset it to the factory default settings. Take care with using this
feature as all settings and messages stored on the device will be lost when the device
is factory reset.
Reboot
This page is used to perform a so reboot of the AT&T Wireless Internet device. The
device will restart and all previous settings and messages will be retained.
60
Page 69

Power Saving mode
Select from three Power saving modes to manage the maximum time of functioning
telephone services when the AT&T Wireless Internet device is operating on the backup
battery. The default setting is the Balanced (Temporary connectivity) mode set
for a time out period of ve minutes or once the battery reaches 50% charge. You
can manually set the timeout period for 1-90 minutes. The Maximum Saving (No
connectivity) mode disables Wi-Fi and Ethernet while operating on battery power.
In the None setting all functionality remains enabled and will all services will function
normally for the duration of the battery’s charge. In either power saving mode, pressing
the WPS button will cause the device to return to normal (no power saving) mode.
61
Page 70

Safety Information
• Some electronic devices may be susceptible to electromagnetic interference.
Locate the router away from TV set, radio and other electronic equipment to
avoid electromagnetic interference.
• The router may interfere with medical devices like hearing aids and
pacemakers. Consult a physician or the manufacturer of the medical device
before using the router.
• Please keep yourself at least eight (8) inches away from the router.
• Do not use your router in dangerous environments such as oil terminals or chemical
factories where there are explosive gases or explosive products being processed.
• Please use original accessories or accessories that are authorized by AT&T.
Unauthorized accessories may aect the router performance, damage the
router or cause danger to you.
• Do not attempt to dismantle the router. There are no user serviceable parts.
• Do not allow the router or accessories to come into contact with liquid or
moisture at any time. Do not immerse the router in any liquid.
• Do not place objects on top of the router. This may lead to overheating of the device.
• The device must be placed in ventilated environment for use.
• Do not expose the router to direct sunlight or store it in hot areas. High
temperature can shorten the life of electronic devices.
• Do not allow children to play with the router or charger.
• Keep the length of the cable between the router and the phone less than 11 yards.
• The router is for indoor use only. Do not use the router outside. Do not connect
telephone extensions which run outside of the building. These can result in
lightning damage to your unit.
62
Page 71

FCC regulations
Federal Communications Commission Notice (United States): Before a wireless device
model is available for sale to the public, it must be tested and certied to the FCC that
it does not exceed the limit established by the government-adopted requirement for
safe exposure.
This device complies with part 15 of the FCC Rules. Operation is subject to the
following two conditions:
(1) This device may not cause harmful interference, and
(2) this device must accept any interference received, including interference that may
cause undesired operation.
This device has been tested and found to comply with the limits for a Class B digital
device, pursuant to Part 15 of the FCC Rules. These limits are designed to provide
reasonable protection against harmful interference in a residential installation.
This equipment generates, uses and can radiate radio frequency energy and, if
not installed and used in accordance with the instructions, may cause harmful
interference to radio communications. However, there is no guarantee that
interference will not occur in a particular installation. If this equipment does cause
harmful interference to radio or television reception, which can be determined
by turning the equipment o and on, the user is encouraged to try to correct the
interference by one or more of the following measures:
• Reorientate or relocate the receiving antenna.
• Increase the separation between the equipment and receiver.
• Connect the equipment into an outlet on a circuit dierent from that to which
the receiver is connected.
• Consult the dealer or an experienced radio/TV technician for help.
Any changes or modications not expressly approved by the party responsible for
compliance could void the user‘s authority to operate the equipment.
63
Page 72

RF Exposure Information
Your device contains a transmitter and a receiver. When it is on, it receives and
transmits RF energy. When you communicate with your device, the system handling
your connection controls the power level at which your device transmits.
• This device meets the government’s requirements for exposure to radio waves.
• This device is designed and manufactured not to exceed the emission limits for
exposure to radio frequency (RF) energy set by the Federal Communications
Commission of the U.S. Government.
• This device complies with FCC radiation exposure limits set forth for an
uncontrolled environment. To ensure compliance with RF exposure guidelines
the device must be used with a minimum of 8 inches (20cm) separation from
the body. Failure to observe these instructions could result in your RF exposure
exceeding the relevant guideline limits.
64
Page 73

CTIA
• Do not disassemble or open, crush, bend or deform, puncture or shred the
battery.
• Do not modify or remanufacture, attempt to insert foreign objects into the
battery, immerse or expose to water or other liquids, expose to re, explosion or
other hazard.
• Only use the battery for the system for which it is specied.
• Only use the battery with a charging system that has been qualied with the
system per CTIA Certication Requirements for Battery System Compliance
to IEEE 1725. Use of an unqualied battery or charger may present a risk of re,
explosion, leakage, or other hazard.
• Do not short circuit a battery or allow metallic conductive objects to contact
battery terminals.
• Replace the battery only with another battery that has been qualied with
the system per this standard, IEEE-Std-1725. Use of an unqualied battery may
present a risk of re, explosion, leakage, or other hazard.
• Promptly dispose of used batteries in accordance with local regulations.
• Battery usage by children should be supervised.
• Avoid dropping the AT&T Wireless Internet device or battery. If the device or
battery is dropped, especially on a hard surface, and the user suspects damage,
take it to a service center for inspection.
• Improper battery use may result in a re, explosion, or other hazard.
65
Page 74

Warranty
The AT&T Wireless Internet device comes with a limited warranty that the enclosed
subscriber unit and its enclosed accessories will be free from defects in material
and workmanship for a period that expires one (1) year from the date of sale of the
Product to you, provided that you are the original end-user purchaser of the Product
and provided that your purchase was made from a supplier authorized by the Seller.
Transfer or resale of a Product will automatically terminate warranty coverage with
respect to that Product. This limited warranty is not transferable to any third party,
including but not limited to any subsequent purchaser or owner of the Product. This
limited warranty is applicable only to end users in the United States.
• This product or phone is warranted for twelve (12) months from date of
purchase.
• For warranty service information, please call the toll-free AT&T service number:
800-331-0500.
• This warranty only applies if the product has been used in accordance with the
manufacturer’s instructions under normal use and with reasonable care.
• What this warranty does not cover:
a) Defects or damages resulting from the misuse of this product.
b) Defects or damages from abnormal use, abnormal conditions, improper
storage, exposure to moisture, dampness or corrosive environments,
unauthorized modications, unauthorized repair, neglect, rough handling, abuse,
accident, alteration, improper installation, incorrect voltage application, food or
liquid spillage, acts of God.
c) Normal wear and tear.
d) If the Product has been opened, modied or repaired by anyone other than a
warranty service center or if it is repaired using unauthorized spare parts.
e) If the serial number or mobile accessory date code has been removed, erased,
defaced, altered, or are illegible in any way subject to sole judgment of AT&T.
66
Page 75

LIMITED WARRANTY
TO THE EXTENT PERMITTED BY APPLICABLE LAW, THIS LIMITED WARRANTY IS YOUR
SOLE AND EXCLUSIVE REMEDY AGAINST AT&T AND AT&T’S SOLE AND EXCLUSIVE
LIABILITY IN RESPECT OF DEFECTS IN PRODUCT. HOWEVER, THIS LIMITED WARRANTY
SHALL NOT EXCLUDE NOR LIMIT ANY OF YOUR LEGAL (STATUTORY) RIGHTS UNDER
THE APPLICABLE NATIONAL LAWS.
TO THE EXTENT PERMITTED BY APPLICABLE LAW AT&T DOES NOT ASSUME ANY
LIABILITY FOR LOSS OF OR DAMAGE TO OR CORRUPTION OF DATA, FOR ANY LOSS OF
PROFIT, LOSS OF USE OF PRODUCTS OR FUNCTIONALITY, LOSS OF BUSINESS, LOSS
OF REVENUES OR LOSS OF ANTICIPATED PROFIT, INCREASED COSTS OR EXPENSES
OR FOR ANY INDIRECT, OR SPECIAL OR CONSEQUENTIAL LOSS OR DAMAGE. TO THE
EXTENT PERMITTED BY APPLICABLE LAW, AT&T’S LIABILITY SHALL BE LIMITED TO THE
PURCHASE VALUE OF THE PRODUCT. THE ABOVE LIMITATIONS SHALL NOT APPLY
TO DEATH OR PERSONAL INJURY CAUSED BY DEFECT OF PRODUCT IN MATERIAL,
DESIGN, AND WORKMANSHIP.
How to Get Warranty Service
To obtain warranty service, please call 800-331-0500. Please have the following
information available when you send the device in for repair:
• A valid Proof of Purchase
• Return address
• Daytime phone number or fax number
• Model number
• IMEI number (Look for the 15-digit IMEI number behind the backup battery of the
device.)
• Complete description of the problem
• Transportation prepaid
Other Warranty Programs
You may have other warranty programs with your purchase, such as warranty
exchange. If so, please refer to equipment package or the original point of sale.
67
Page 76

The AT&T Wireless Internet device is a mobile device. It may be used in the U.S.
with home phone equipment, computers, and other Wi-Fi compatible devices. For
emergency calls, you may have to provide your location address to the 911 operator.
The AT&T Wireless Internet device has a backup battery in the event of a power
outage. However, a cordless phone connected to the AT&T Wireless Internet device
will not operate (including 911) during a power outage. To use backup battery power,
you must plug a corded phone into the AT&T Wireless Internet device. Corded or
other landline phone equipment and Internet-capable devices (e.g., PCs, tablets)
not provided with service. Provides voice and wireless data service. Not compatible
with wireless messaging services, security systems, fax services, medical alert and
monitoring systems, credit card machines, IP/PBX phone systems, or dial-up Internet
service. May not be compatible with DVR/ satellite systems; please check with your
provider. DSL customers should contact their provider before transferring a phone
number to ensure uninterrupted DSL Internet service. The AT&T Wireless Internet
device is sold for use on the AT&T wireless network and cannot be activated on other
carriers’ wireless networks.
Service provided by AT&T Mobility. © 2019 AT&T Intellectual Property. All rights
reserved. AT&T, the AT&T logo and all other AT&T marks contained herein are
trademarks of AT&T Intellectual Property and/or AT&T aliated companies. All other
marks contained herein are the property of their respective owners.
Portions Copyright © 2019 AT&T CORPORATION.
All rights reserved.
No part of this publication may be excerpted, reproduced, translated or utilized in
any form or by any means, electronic or mechanical, including photocopying and
microlm, without the prior written permission of AT&T.
The manual is published by AT&T. We reserve the right to make modications on print
errors or update specications without prior notice.
Version No. : v1.0
Manual No. : MPRT-00014-000
68
 Loading...