

Page 1

MERLIN
ATTENDANT’S GUIDE:
MODELS 1030 AND 3070
WITH FEATURE MODULE 1
Page 2

™
MERLIN
COMMUNICATIONS SYSTEM
ATTENDANT’S GUIDE:
MODEL 1030 AND 3070
WITH FEATURE MODULE 1
Page 3

Table of Contents
Key to Symbols
Attendant Console for a Small System
Attendant Console for a Large System
Before You Start
Intercom Auto Dial
Shift Buttons
Answering Calls
Distinctive Ringing
Line Ringing Options
Call Coverage
Answering While on a Call — The Hold Feature
Transferring Calls
Transfer
Transfer with Voice Announcement
Screening Calls
Call Park with Loudspeaker Paging
Loudspeaker Paging
Send Message
Small Systems
Large Systems
Placing Calls
Intercom Calls with Voice Announcement
Intercom Calls with Ringing Signal
Outside Calls
Outside Auto Dial
Page
10
10
10
11
11
12
13
13
13
14
14
14
14
14
3
Other Useful Features
4
5
6
6
7
8
8
8
9
9
Using the Speaker
On-Hook Dialing
Monitoring a Call on Hold
Group Listening
Headset Adapter
Night Service
Custom Features
Last Number Redial
Saved Number Redial
Privacy
Touch-Tone Enable
Programming Your Console
Assigning Custom Features to Buttons
Feature Programming Chart
Changing an Outside Auto Dial Number
Special Characters with Auto Dial
Automatic Line Selection
Programmable Line Ringing
Personalized Ringing
Voice Announcement Disable
Attendant Quick Reference Chart
Index
Page
16
16
16
16
16
16
16
17
17
17
17
17
18
18
19
20
20
20
21
21
21
22
23
Setting Up Conference Calls
Drop
Connecting Outside Callers to Outside Lines
2
15
15
15
Page 4
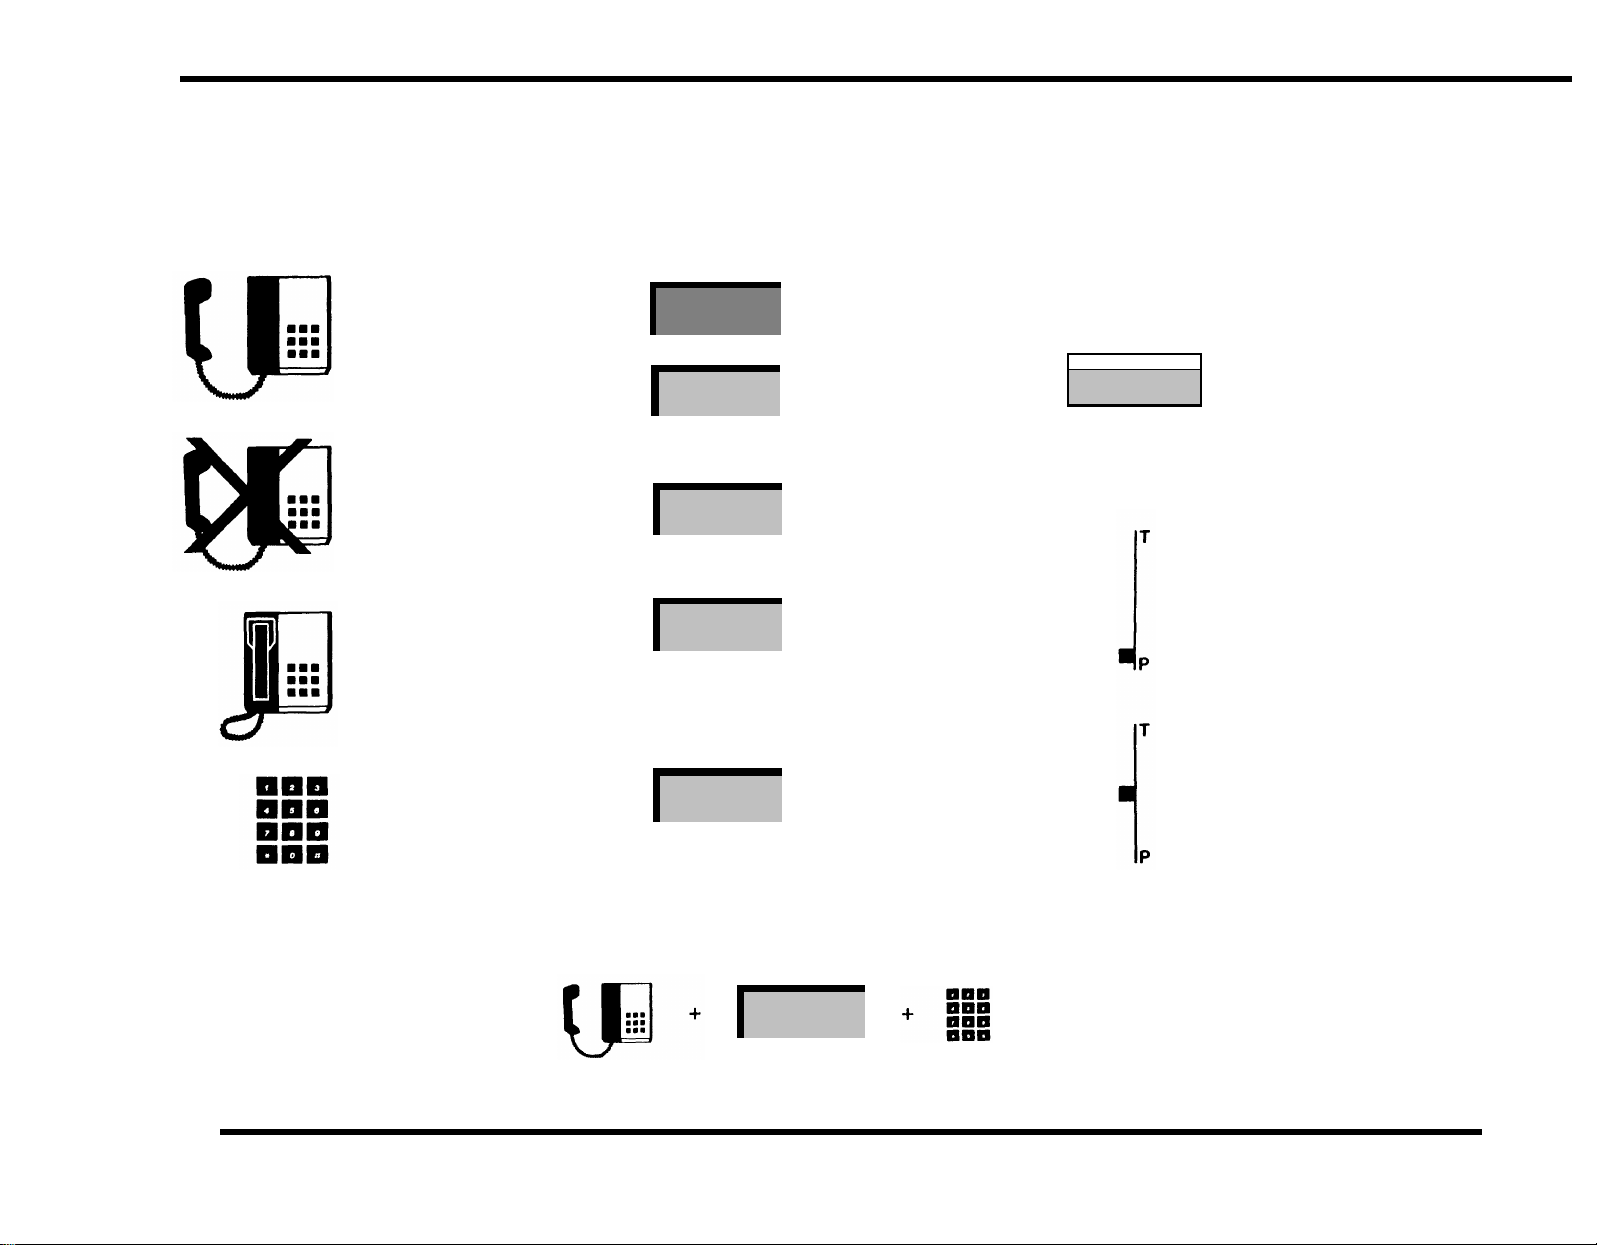
Key To Symbols
The following symbols are used throughout this document to illustrate the steps for using your MERLIN communications system
attendant console. After you are familiar with the steps, the symbols should serve as a quick reminder. (Buttons are shaded and
labeled to look like the actual buttons on your console. A shaded light indicates that it is lit.)
Lift handset
Don’t lift handset
Hang up your
handset
Dial (an outside
number, intercom
or feature code)
Conference
Send Message
555-1234
(outside line)
Intercom
Ring
(intercom line)
Joan
31
Touch a
feature button
Touch a line
button
Touch an
Intercom Auto
Dial button (with
large systems,
your buttons have
only numbers on
them)
10-20-30
Touch a Shift
button (large
systems only —
select the button
controlling the
group that includes the intercom number you
want)
Slide the T/P
switch to the P
position
Return the T/P
switch to the
center position
Since each symbol represents one action, a sequence of two or more symbols illustrates a procedure. For example,
Intercom
Ring
means, lift your handset, touch the Intercom-Ring button, and dial the number.
3
Page 5
Keep track of calls easily
with a separate button and
lights for each line:
●
Red light indicates the
line you are on
●
Green light indicates if
line is free, busy, or on
hold:
- Steady green = the line
is busy
- Fast flashing = you put
the call on hold
- Slower flashing =
someone else put the
call on hold
Touch
Intercom-Voice
nounce calls before you
transfer them or to give a
short message. Use
Intercom-Ring to have a
two-way conversation with
someone in your business.
(See p. 14.)
Set up Conference calls
that connect up to two outside and two inside lines at
once. (See p. 15.)
Drop one line from a conference call leaving other
lines connected. (See p. 15.)
to an-
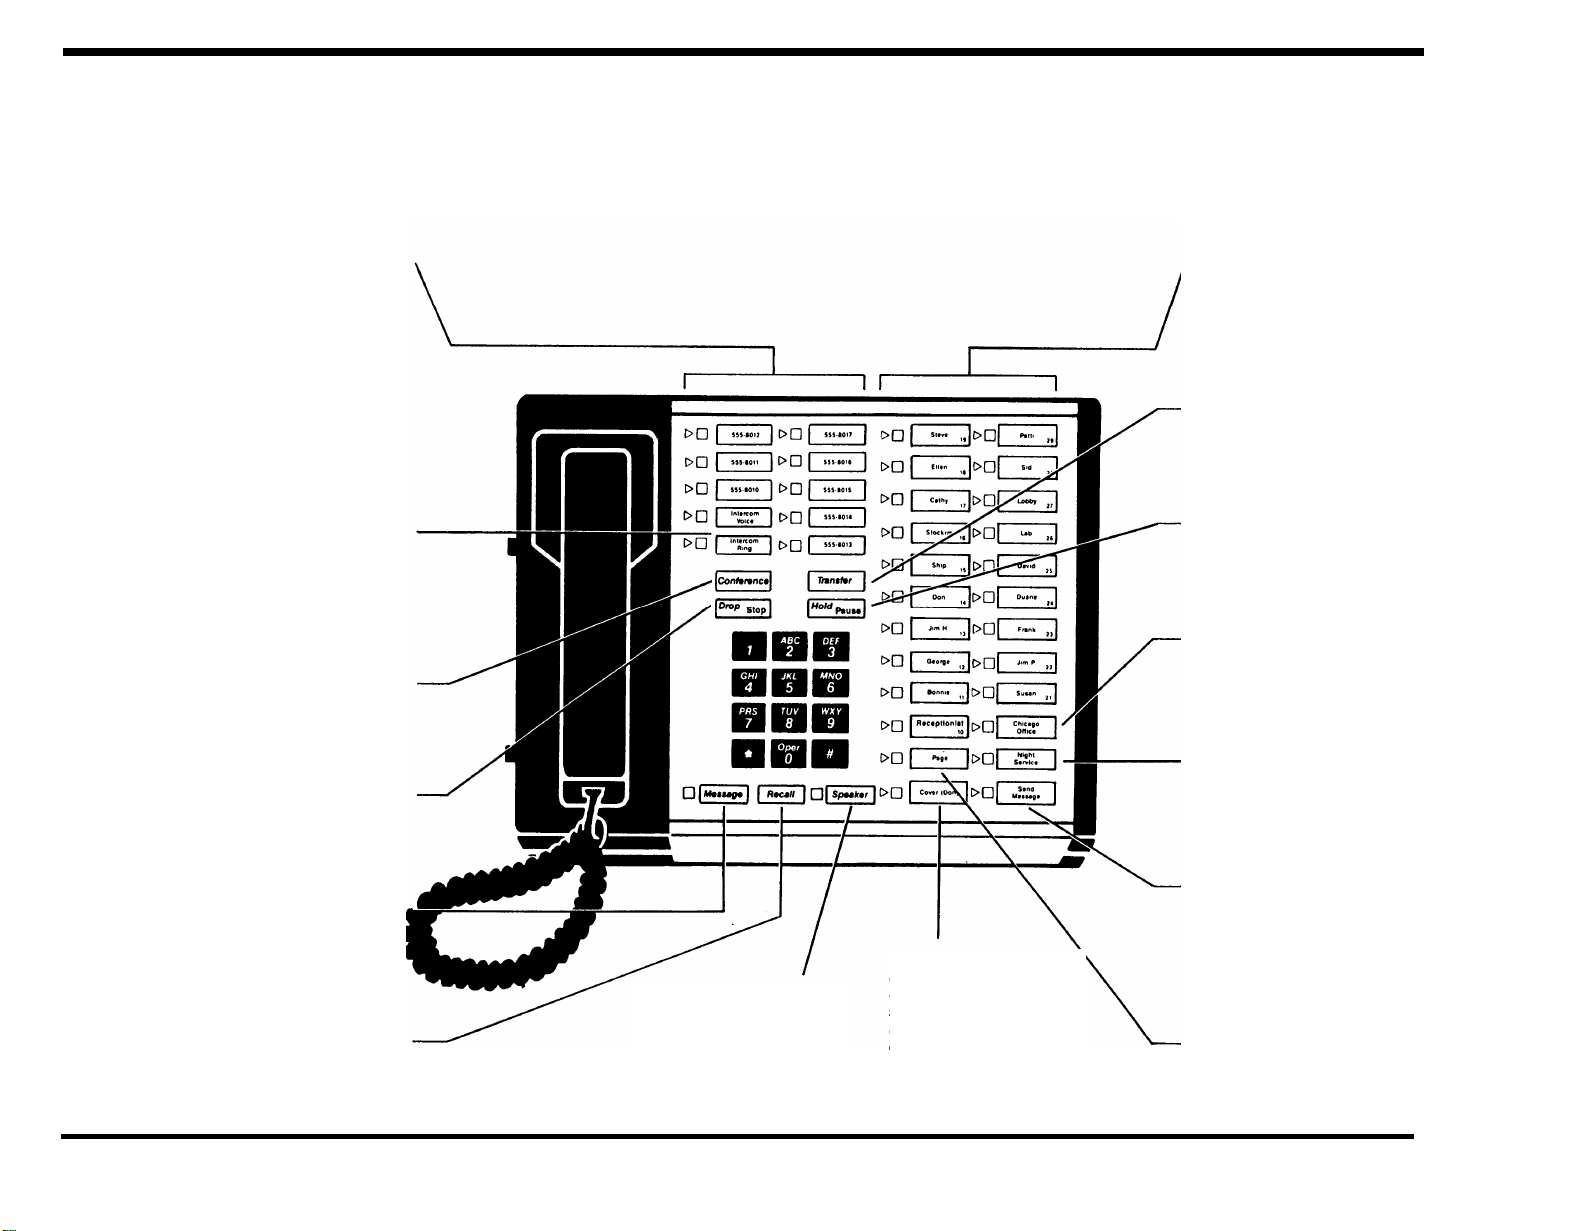
ATTENDANT CONSOLE FOR A SMALL SYSTEM
Intercom Auto Dial buttons
help transfer calls quickly.
The lights beside each button tell you:
●
Steady green = the person is on a call
●
Fast flashing green =
the person is calling you
●
Steady red = the person's message light is on
Transfer calls to people
either with or without a
voice announcement. Unanswered calls return to you
automatically. (See p. 10.)
Use Hold to screen calls or
hold one call while you
answer another. (See p. 11.)
Program a button to give you
one-touch dialing for an outside number you call frequently. (See p. 14.)
Activate alerting devices
such as bells or lights, that
let people know a call has
come in when you are not
on duty. (See p. 16.)
The green light beside the
Message button goes on if
another attendant takes a
message for you.
Touch Recall to disconnect
a call without hanging up
the handset. With Centrex or
PBX service, use Recall instead of a switchhook flash.
4
Touch Speaker for on-hook
dialing, group listening, and
on-hook monitoring for the
other person's return when
you are put on hold.
(See p. 16.)
Program Cover buttons to
provide backup coverage for
another attendant, a personal line that does not
appear on your telephone,
or anyone who needs intercom and transferred calls
answered. (See p. 9.)
Touch Send Message to
turn on the message light at
the voice terminal of the person for whom you have a
message. (See p. 13.)
Program a Page button for
loudspeaker paging of up to
three separate areas of your
business. Use with the Call
Park feature to pass on a
call to someone whose exact
location you do not know.
(See p. 12.)
Page 6
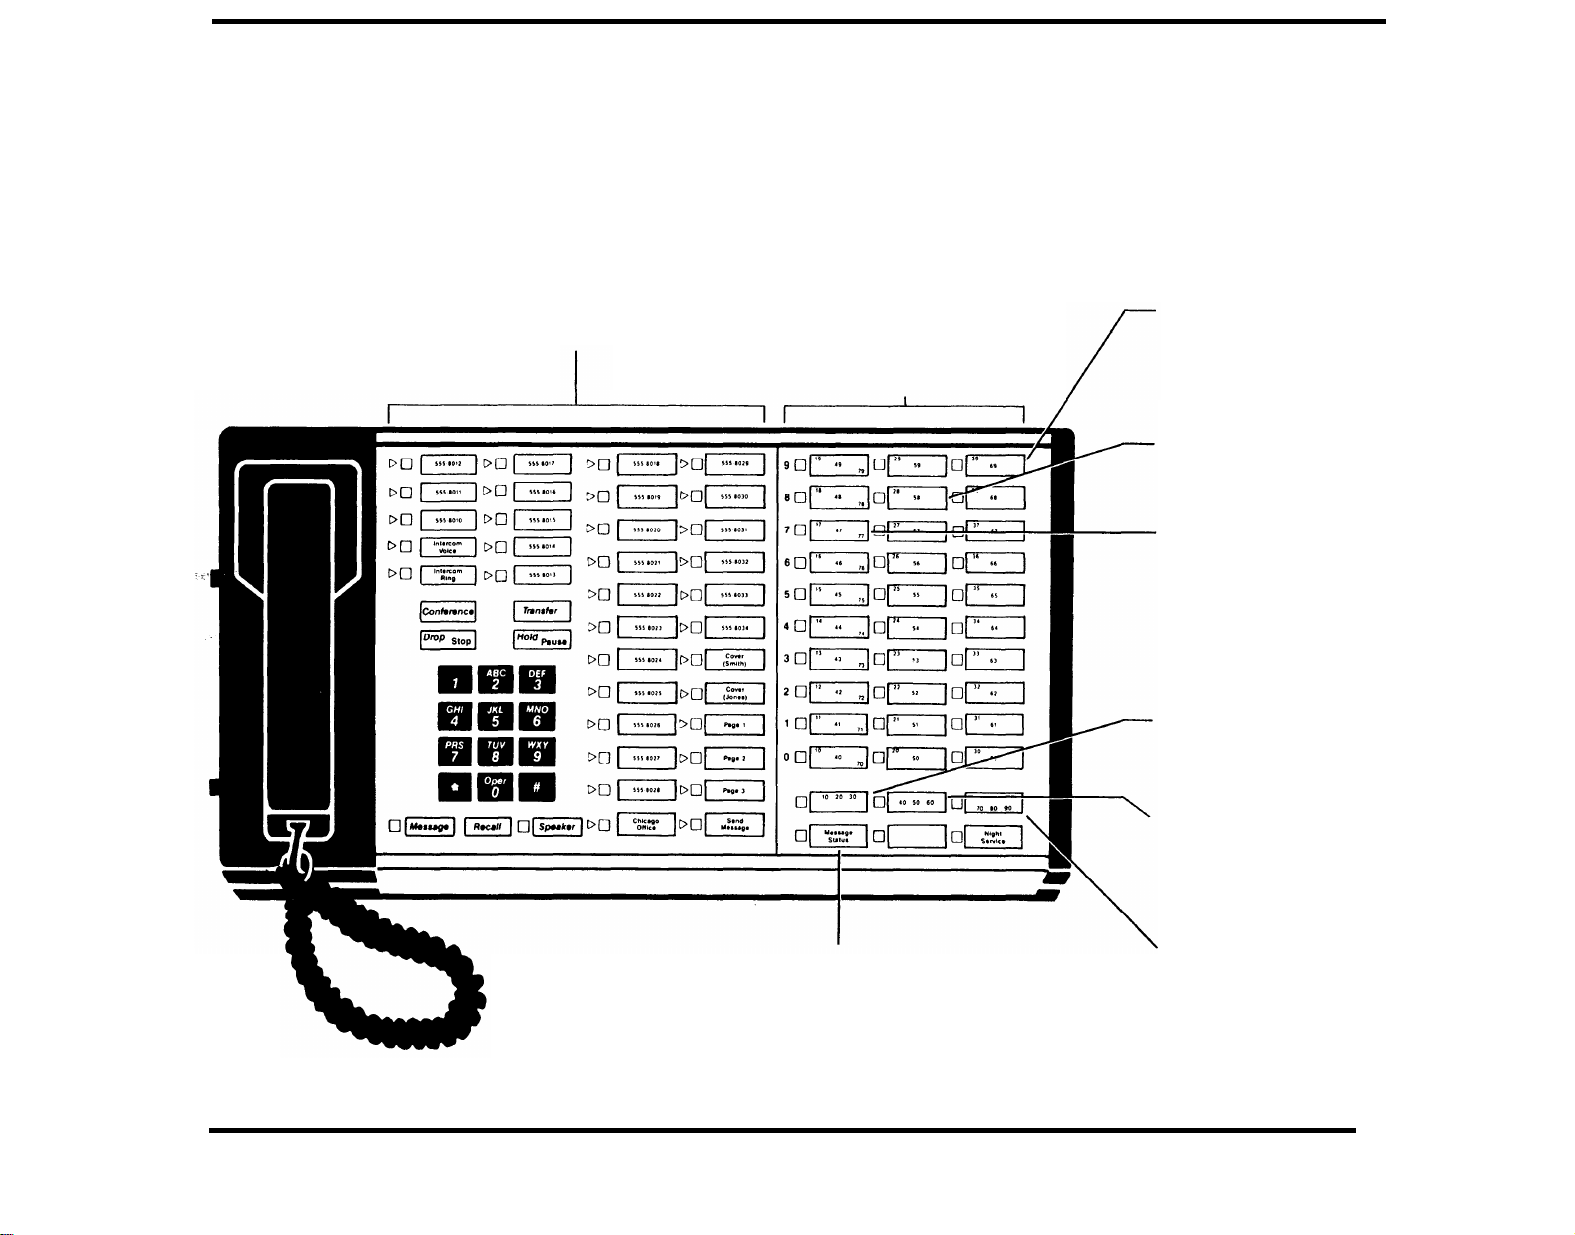
ATTENDANT CONSOLE FOR A LARGE SYSTEM
The large attendant console provides the same features as the smaller console pictured on the opposite page,
but it gives you more line and Intercom Auto Dial buttons.
Line buttons. Any buttons you
don't need for a line can be
programmed with a custom
feature. (See p. 18.)
Intercom Auto Dial buttons.
The light beside each button
tells you:
●
Steady green = the person is on call
●
Fast flashing green =
the person is calling you
Use Message Status in
combination with shift buttons to see what telephones
have message lights turned
on:
● Steady green = the per-
son's messaqge light is on
(See p. 13.)
Buttons in this column
represent intercom numbers
30-39 or 60-69. depending
on which Shift button you
touch.
Buttons in this column
represent intercom numbers
20-29 or 50-59, depending
on which Shift button you
touch.
Buttons in this column
represent intercom numbers
10-19, 40-49, or 70-79,
depending on which Shift
button you touch.
Touch this Shift button to
use Intercom Auto Dial buttons for intercom numbers
10-39, or to see if the green
lights show any of these telephones are in use.
(See p. 7.)
Touch this Shift button to
use Intercom Auto Dial buttons for intercom numbers
40-69, or to see if the green
lights show any of these telephones are in use.
(See p. 7.)
Touch this Shift button
use Intercom Auto Dial buttons for intercom numbers
70-79, or to see if the green
lights show any of these telephones are in use.
(See p. 7.)
5
Page 7
Before You Start...
As the system attendant or receptionist, it is your job to use the MERLIN
system in such a way that it works effectively for the people in your office.
This manual contains the information you need to use MERLIN system
features to your best advantage. Read the manual carefully before starting to work at your console.
Two MERLIN system features used frequently in your work are the
Intercom Auto Dial buttons and the Shift buttons. It is essential that you
understand these features thoroughly in order to operate your system
efficiently.
INTERCOM AUTO DIAL
The Intercom Auto Dial feature lets you contact the people in your business
and helps you transfer calls to them quickly as well, simply by touching
a button instead of dialing a number. Each person’s voice terminal
(
MERLIN
extension number. Intercom codes, ranging from 10 through 29 if you have
a small system, or 10 through 79 if you have a large system, are
automatically assigned to the Intercom Auto Dial buttons on your console.
You should have a button for everyone in your office, or at least for every
person who receives calls frequently. (See page 19 for instructions on programming Intercom Auto Dial buttons.)
system telephone ) has a unique intercom code, similar to an
Joan
31
The green light next to each intercom Auto Dial button gives you information about the status of the line, so when a call comes in for someone,
you can tell whether or not that person is using the phone. If the green
light for a particular intercom number is lit, the line is busy. If the green
light flashes rapidly, the person is calling you on the intercom.
You can also use an Intercom Auto Dial button to signal someone briefly.
Leave the handset on the hook and touch the Intercom Auto Dial button
one or more times. Each time you touch the button, a “beep” sounds at
the other person’s voice terminal.
6
Joan
31
Joan
31
Page 8
SHIFT BUTTONS (Large Systems Only)
The console for a large system has three Shift buttons that make it possible for you to attend as many as 70 voice terminals by using only the 30
intercom Auto Dial buttons on the console. When you touch one of the
Shift buttons, you change the intercom numbers assigned to each Intercom
Auto Dial button, Use the left Shift button to select intercom numbers 10
through 39, the center Shift button to select intercom numbers 40 through
69, and the right Shift button to select intercom numbers 70 through 79.
If you want to call a particular intercom number, you must first touch the
Shift button that provides access to the group of intercom numbers that
includes the one you want. For example, if you want to call intercom number
31, touch the left Shift button. The light next to the Shift button comes
on, and the Intercom Auto Dial buttons now represent intercom numbers
10 through 39. If intercom 31 or any other telephone in that group is busy,
the green light next to its Intercom Auto Dial button comes on. the console continues to display the line status for intercom numbers 10 through
39 until you shift to another group.
Important: Whenever you use the Intercom Auto Dial buttons on
a large system console, make sure the light is on next to the Shift
button that selects the intercom number you want to call.
10-20-30
7
Page 9
Answering Calls
The MERLIN system makes it easy to answer calls. Even though you
may have many lines appearing on your voice terminal, you can readily
tell which line has the incoming call because the green light beside the
line button flashes on and off. Just lift your handset, and you are
automatically connected to the ringing line.
If two calls come in at once, the red light next to the line button tells you
which line you will get when you lift the handset. If you want to answer
the other line instead, select it manually by touching its line button. For
example, when someone in your company is expecting an important call
on a personal line and that line rings at the same time another line rings,
you will want to answer the personal line first.
In addition to giving you line status lights and automatically selecting the
ringing line when you pick up the handset, the MERLIN system offers
a number of other features that help you answer calls.
DISTINCTIVE RINGING
Different ringing patterns indicate the origin of a call:
one long ring = outside
two short rings followed by one long ring = intercom
one short ring followed by one long ring = transferred
555-1234
LINE RINGING OPTIONS
You can program any line to ring immediately, to ring only if a call has
not been answered elsewhere after three rings, or not to ring at all. Most
lines should be programmed to ring at your console immediately, but if
you need to answer calls on a line only when someone else doesn’t answer
them, program the line for delayed ringing. (See page 21 for instructions
on programming Line Ringing.)
If someone else is also responsible for answering calls when you are busy,
it may be advisable to program that person’s console for delayed ringing.
If you and one or more attendants are usually kept busy answering calls,
however all consoles should have all lines programmed to ring immediately.
8
Page 10

CALL COVERAGE
The Call Coverage feature lets you answer intercom and transferred calls,
as well as calls for people who have personal lines that do not appear
on your console. You and the person you cover for must decide whether
the person’s calls should ring at your console immediately, after a delay,
or not at all. If you program a Cover button so the person’s calls don’t
ring at your console, you must rely on seeing the green light flash next
to the Cover button. (See page 18 for programming information.)
The Cover button is similar to a line button. If a line on your console rings
and the green light next to the Cover button flashes, lift the handset to
answer the call. If you’ve programmed the button so the calls to be covered
don’t ring (you’ll still see the green light flash), lift your handset and touch
Cover
to answer.
ANSWERING WHILE ON A CALL – THE HOLD FEATURE
To answer a second call when you are already on a line, touch Hold (the
green light next to the held call’s line button flashes rapidly), and touch
the line button where the second call is ringing (the flashing green light
becomes steady). If you touch the line button where the second call is
ringing without touching Hold first, the original call will be disconnected.
Hold
Pause
555-1234
To return to the call you put on hold, simply touch its line button (the rapidly
flashing green light makes it clear which button to touch). Calls that other
people in your office have put on hold show on your console, too, but the
green light next to these lines flashes more slowly.
555-1234
9
Page 11

Transferring Calls
Once you’ve answered a call, your task is usually to pass it on to the right
person. There are several ways to do this: using Transfer, Transfer with
Voice Announcement, Hold and Intercom to screen calls, or Call Park with
Loudspeaker Paging.
TRANSFER
This is the quickest way of transferring a call. Without hanging up or
touching any other button, touch Transfer (puts the call on hold), touch
the appropriate Shift button (large systems only), touch the Intercom Auto
Dial button for the person to whom you are transferring the call, and hang
up. If no one answers the call, it returns to your console, ringing in the
manner distinctive to a transferred call.
NOTE: To transfer a call to someone for whom you do not have an
Intercom Auto Dial button, simply dial the person’s intercom number after
touching
Transfer.
Transfer
Joan
31
TRANSFER WITH VOICE ANNOUNCEMENT
If people in your office prefer to know who is calling them before they
answer the phone, use the Voice Announcement feature. To do this, touch
Transfer, touch Intercom-Voice, touch the appropriate Shift button (large
systems only), touch an Intercom Auto Dial button, announce the call, and
hang up. If no one answers the call, it returns to your console, ringing in
the manner distinctive to a transferred call.
NOTE: To transfer a call to someone for whom you do not have an
Intercom Auto Dial button, dial the person’s intercom number after touching
Intercom-Voice.
10
Transfer
Joan
31
Intercom
Voice
Page 12

SCREENING CALLS
Using Hold and Intercom-Voice (or Intercom-Ring) to screen calls before
passing them on makes it possible for you to find out if a person wants
to accept an incoming call. This method differs from Transfer in that the
call does not ring at the person’s phone. To screen calls, touch
Hold,
touch
Intercom-Ring, touch the appropriate Shift button (large systems only),
touch the appropriate Intercom Auto Dial button, ask the person if he or
she will accept the call, wait for a response, and hang up.
If you have the type of system in which all people have the same lines
on their telephones, the person takes the call by touching the button for
the line on which the call is held. So when you announce the call, you
must also announce its line number. If you do not have this type of system,
touch the line button to take the call off hold, then use the Transfer feature
to pass the call on.
NOTE: To call someone for whom you do not have an Intercom Auto Dial
button, dial the person’s intercom number after touching
lntercom-Voice.
CALL PARK WITH LOUDSPEAKER PAGING
You may not always be able to use the Transfer feature to pass calls on.
For example, if a call comes in for a person who may be in any one of
several locations, you won’t know where to transfer the call. By using the
Call Park and Loudspeaker Paging features together (see page 12 for information on Loudspeaker Paging), you can notify the person to pick up
the call from any MERLIN system telephone. Call Park is a special kind
of hold that lets you “park” a call by transferring it to yourself. The person
taking the call can pick it up from any telephone in your system by using
the Call Pickup feature, which means dialing * 7 plus your intercom
number.
Hold
Pause
Joan
31
Intercom
Voice
To park the call until you can reach the person, touch
Transfer
and touch
your own Intercom Auto Dial button. Then page the person with a message
such as, “Ms. Jones, dial star seven and then dial ten.”
Transfer
Attendant
10
11
Page 13

Loudspeaker Paging
By using the Intercom feature, you can connect to an optional loudspeaker
paging system, which may have up to three separate zones. For example,
a paging system in a medical group shared by several doctors could be
set up with one zone covering only those locations specific to a particular
doctor, such as a consulting office, lab, and examining room. The same
could be done for other people in the group, Then, you can page one
person without bothering anyone else.
To page someone, lift your handset, touch Intercom-Voice, and dial one
of the codes listed below. Make your announcement by speaking through
your handset.
Paging codes:
All Zones
Zone 1
Zone 2
Zone 3
You may also program buttons for these zones (Page-All, Page 1, and so
on) so that you can touch a single button to page instead of dialing a code.
(See page 18 for programming instructions.)
80
81
82
83
Intercom
Voice
12
Page 14

Send Message
As a system attendant, you may have to take messages for people who
are away from their desks. Whenever you take a message for a person,
turn on the message light at the person’s voice terminal. If someone works
with you as an attendant, make sure you leave messages in a central location so they can be found easily when people call for their messages. The
Send Message procedure differs for small and large systems.
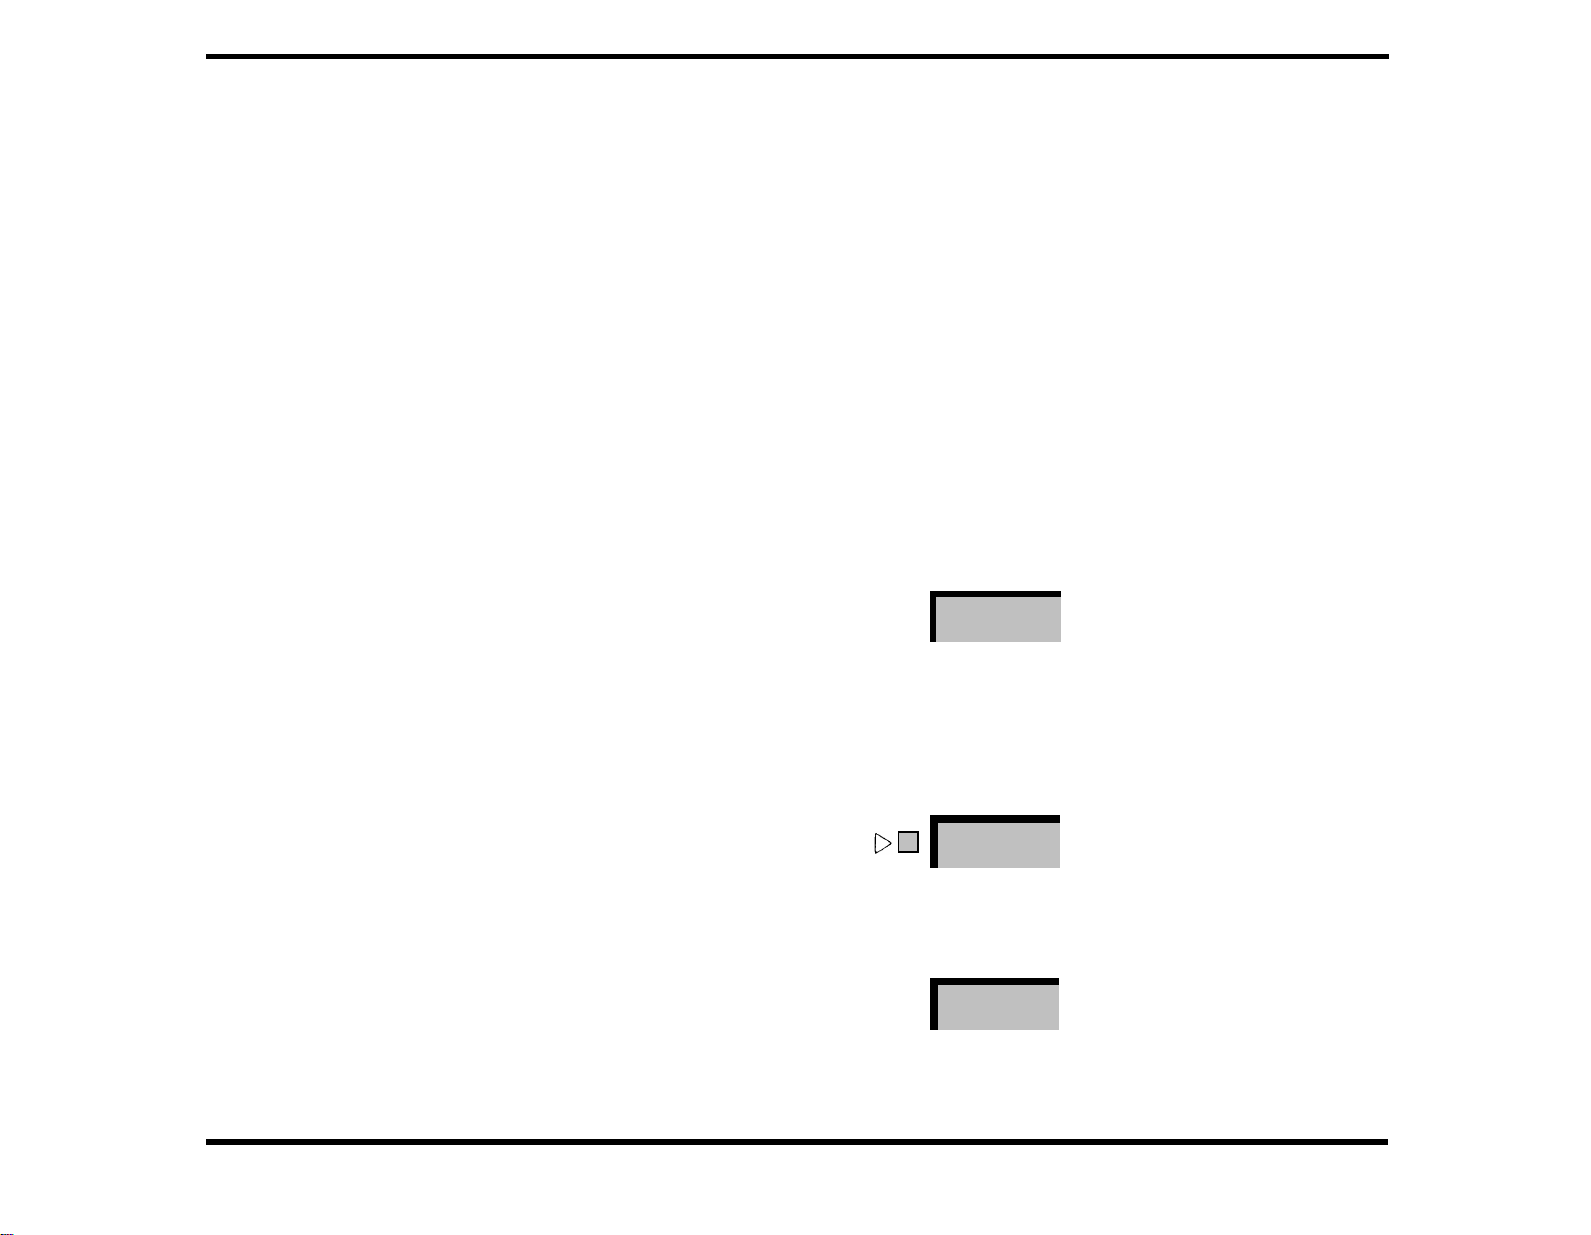
SMALL SYSTEMS
If you have a small system console and you want to turn on a message
light at someone’s voice terminal, touch Send Message and the appropriate Intercom Auto Dial button. The red light next to the Intercom Auto
Dial button comes on to tell you that the person’s message light is now
on. If the red light is already on, you know not to use the Send Message
button when you take a second message. In fact, by repeating the procedure, you will turn the person’s message light off. If someone’s message
light is on and you want to turn it off, touch Send Message and then touch
the Intercom Auto Dial button.
LARGE SYSTEMS
If you have a large system console and you want to see whether or not
a person’s message light is already on, touch Message Status and the
Shift button that controls the intercom number you want to check. A green
light next to the Intercom Auto Dial button means that the person’s message
light is on. If the green light is not lit, touch Send Message and touch
the person’s Intercom Auto Dial button. Touch Message Status again so
that you can use the lights to check line status.
Send Message
Message Status
Message Status
Joan
31
10-20-30
Joan
31
Message Status
Keep in mind that when the green light next to the Message Status button is on, you can see which voice terminals have message lights on, When
the green light is off, you can determine which lines are busy and use
the buttons for placing intercom calls and for transferring calls,
13
Page 15

Placing Calls
INTERCOM CALLS WITH VOICE ANNOUNCEMENT
To make a brief announcement to someone in your system, lift the handset, touch Intercom-Voice, touch the appropriate Shift button (large
systems only), touch the Intercom Auto Dial button for the person you want
to call, and speak into your handset. Your voice will be heard through the
person’s speaker. Since intercom calls don’t interrupt existing outside calls,
this feature is particularly useful when you need to inform someone of an
urgent incoming call and he or she is already on another line.
Intercom
Voice
Joan
31
NOTE:
button, simply dial the person's intercom number after touching
To call someone for whom you do not have and Intercom Auto Dial
Intercom-
Ring.
INTERCOM CALLS WITH RINGING SIGNAL To converse with someone in your office, lift the handset, touch lntercom-
Ring, touch the appropriate Shift button (large systems only), and touch
the Intercom Auto Dial button for that person. Your call will ring at the person’s voice terminal and he or she will have to pick up the handset to
speak with you.
NOTE: To call someone for whom you do not have an Intercom Auto Dial
button, simply dial the person’s intercom number after touching
lntercom-
Ring.
OUTSIDE CALLS
To place an outside call, lift the handset and dial the number. The
MERLIN
system automatically selects a free line for you. You can select a different
line by touching the appropriate line button.
OUTSIDE AUTO DIAL
If you have any extra buttons that you don’t need for lines, you may want
to program Outside Auto Dial buttons for numbers that you call often. When
you touch an Outside Auto Dial button, the MERLIN system selects an
outside line, turns on the speaker, and dials the number for you, When
the other person answers, lift the handset to speak. If no one answers,
touch Speaker to cancel the call. (See page 19 for instructions on programming Outside Auto Dial buttons,)
Home
Intercom
Ring
Joan
31
14
Page 16

Setting Up Conference Calls
If someone asks you to set up a conference call, you have two options: you
may either keep the person who requested the call on the line or you may
add the person to the conference call last. Keep in mind that the maximum number of people who can engage in a conference call is five (two
inside, two outside, and the person requesting the call).
With the person already on the line, touch Conference, touch a free line
button, and dial the other person’s number. To add more people to the
conference call, simply touch
Conference
and a free line button each time.
To add in the person who requested the call after the conference connections are established (or to add in other MERLIN system users), touch
Conference,
touch
Intercom-Voice
(or
Intercom-Ring),
touch the appropriate Shift button (large systems only), and touch the Intercom Auto Dial
button for the person you are adding. Once the connections are completed,
touch Hold to remove yourself from the call. The lines used in the conference show busy lights at your console until the people hang up.
NOTE: To add someone for whom you do not have an Intercom Auto Dial
button, dial the intercom number after touching Intercom-Voice (or
Intercom-Ring).
If you put a call on hold while you are establishing conference connections, you can add in the held call by touching Conference and the held
call’s line button.
DROP
Use the Drop feature if you get a busy signal or no answer when trying
to add connections to a conference call. To disconnect a line without affecting other connections, touch Drop and the button for the line you are
unable to connect. You can also use Drop to disconnect any caller from
a conference call.
Conference
Conference
Joan
31
Drop
Stop
Hold
555-1234
Intercom
Voice
Pause
555-1234
CONNECTING OUTSIDE CALLERS TO OUTSIDE LINES
There may be times when you have to connect an incoming call to someone who is not at the office. For instance, a caller may want to talk with
someone in your company who is visiting another business location or
who is working at home that day. You can “transfer” the call to the person
by establishing a conference connection.
With the caller on the line, touch Conference, touch a free line button,
and dial the number of the person who is away from the office. Once they
are connected, touch Hold to remove yourself from the call.
Conference
555-1234
Hold
Pause
15
Page 17

Other Useful Features
USING THE SPEAKER
On-Hook Dialing
Instead of lifting your handset to place a call, you may use your console’s
built-in speaker. Touch Speaker, dial the number and lift your handset
when the person answers, If the line is busy or you get no answer, touch
Speaker to cancel the call, Monitoring a Call on Hold
If someone puts you on hold, you can monitor the call while you go about
your work. Touch Speaker and hang up the handset, When you hear the
person come back on the line, just lift your handset and continue the
conversation.
Group Listening
If you are on a call that you want others in the room to hear, touch
Although everyone can hear the person on the line, you must use your
handset to speak to that person.
HEADSET ADAPTER
If you have a heavy call-handling load, you may prefer to use a headset
with the optional Headset Adapter rather than lifting and holding your handset throughout the day. To place or answer a call using the Headset Adapter,
simply touch On, leaving your handset on the hook. To end calls, touch
Off. If you want to speak with someone in your office while you’re on
another call, mute the Headset Adapter’s microphone by holding down
the Quiet button. When you are ready to resume your call, release the
Quiet button.
NIGHT SERVICE
During regular business hours, you — and perhaps others — answer
incoming calls. After hours when no attendant is available, however, your
business may use the Night Service feature to turn on extra alerting devices
so that others will hear and answer incoming calls. For example, when
no MERLIN system attendant is on duty, a loud bell or flashing light may
be needed in some areas of your business to let people working there
know that a call is ringing. Extra alerting devices are an optional part of
the
MERLIN
system,
Anyone can take a night service call from any telephone in the system
by using the Call Pickup feature, which means dialing * 7 plus the intercom number of your console.
To activate the Night Service feature, touch
Night Service.
goes on next to this button to remind you that extra alerting devices will
sound or light whenever a call comes in, Touch Night Service again to
turn off the extra alerting devices (the green light goes off).
Speaker.
The green light
Speaker
Speaker
Speaker
Night Service
16
Page 18

Custom Features
The
MERLIN
find useful. You can program these for your console if there are any extra
buttons you don’t need to represent lines. See page 18 to program these
features. If you want to have any lines removed from your console,
however, ask your system administrator.
LAST NUMBER REDIAL
To redial the outside number you dialed most recently, touch
SAVED NUMBER REDIAL
You can save a number for later redialing by touching Saved Number
before you hang up. Other calls you make will not affect the saved number.
To redial, touch Saved Number.
PRIVACY
The Privacy feature prevents anyone from joining your calls. Activate the
feature by touching Privacy (green light comes on). A Privacy button is
needed only if others share a particular line with you.
system offers numerous other custom features that you may
Last Number.
Last Number
Saved Number
Privacy
TOUCH-TONE ENABLE
If your system has lines that carry rotary signals, you can switch over to
touch tone service in the middle of a call to use computerized services,
such as credit card authorizations, that require tone signals. Dial the first
part of the number as usual (you hear rotary clicks). Then touch Touch-
Tone Enable,
and dial whatever additional numbers you need (you hear
tone signals).
Touch-Tone
Enable
17
Page 19

Programming Your Console
Although most of your buttons must be used to represent lines or intercom numbers, you can customize your console to meet your special working needs. With short, simple procedures, you can program buttons for
convenient, one-touch access to features, and even customize the ringing sound of your telephone. Keep in mind, however, that you cannot
reassign the Send Message or Night Service buttons or any of the permanently labeled dark grey buttons such as Conference, Hold, or
Speaker. Also, if you have a console for a large system, you cannot
reassign any of the Intercom Auto Dial buttons.
ASSIGNING CUSTOM FEATURES TO BUTTONS
You can assign a custom feature to any spare line button on your console
by using the following simple programming procedure.
●
Label the button(s) you want to program.
●
Slide the T/P (Test/Programming) switch toward you to the P (Programming) position. The console rings every five seconds to remind
you that you are programming and that you cannot place or receive
calls.
●
Touch the button you want to program.
●
Dial the appropriate feature code (see table on next page).
●
Dial additional numbers (if required).
●
Program any other buttons you want to use for custom features.
●
Return the T/P switch to the center position.
18
Page 20

Feature Programming Chart
Feature Name
Call Coverage
Intercom Auto Dial
Last Number Redial
Loudspeaker Paging
All Zones
Zone 1
Zone 2
Zone 3
Outside Auto Dial
Privacy
Saved Number Redial
Feature Programming Code
✱ 4 and intercom number
✱ 6 and intercom number name or location
✱ 73
✱ 680 Page-All
✱ 681
✱ 682
✱ 683
✱ 90 and outside number
✱ 72
✱ 74
Button Label
Cover and name
Last Number
Page and location
Page and location
Page and location
name or location 14 Stores frequently called outside numbers.
Privacy
Saved Number 17
Refer to Page Notes
9
6
See also Secondary Coverage.
Stores frequently called intercom
numbers. The system assigns these to
your console automatically, but in small
systems you can change them.
17
12
Used with optional loudspeaker
equipment.
17
Needed if you share a line with others.
Secondary Coverage
TouchTone Enable
✱ 5 and intercom number
✱ 76
Cover and name
Touch-Tone Enable 17
Used to back up a person who has a
Cover button for someone’s telephone.
19
Page 21

CHANGING AN OUTSIDE AUTO DIAL NUMBER
Auto Dial button, Slide the T/P switch to the P position, touch the Outside
Auto Dial button whose number you want to change, and dial the new
number. Return the T/P switch to the center position.
SPECIAL CHARACTERS WITH AUTO DIAL
An Outside Auto Dial button can store up to 16 digits. For some types of
calls, however, you need to program an automatic pause, stop, or switchhook flash with the number. For example, if your MERLIN system works
in combination with a PBX system that does not immediately return a dial
tone after dialing 9 to get an outside line, you must program a pause after
the 9 on your Outside Auto Dial button, Or, when you program an Outside
Auto Dial button to dial a long-distance service sequence or call in a credit
card authorization code, you may need to program an automatic stop.
●
To program a pause into an auto dialing sequence, touch Hold
(pause).
●
To program a stop into an auto dialing sequence, touch Drop (stop).
●
To program a switchhook flash at the beginning of an auto dialing
sequence for Centrex/PBX codes, touch Recall, and then touch Hold
(pause).
AUTOMATIC LINE SELECTION
This feature controls the order in which the system selects a free line when
you make a call. If the first line in the selection sequence is busy, the system
automatically connects you to the line next in the sequence so you don’t
have to touch a line button to get a line. You can specify up to eight of
your line buttons for Automatic Line selection, and you can specify the
order in which the system should select them. Slide the T/P switch to the
P position; dial * *, touch the line buttons in the desired order, and return
the T/P switch to the center position.
Chicago Office
555-1234
20
Page 22

PROGRAMMABLE LINE RINGING
To program Line Ringing, slide the T/P switch to the P position. Touch the
line button successively until the red light indicates the type of ringing you
want.
● red on = ring
● red flash =
● red off
delayed ring
= no ring
Return the T/P switch to the center position.
NOTE: This programming does not affect intercom calls or calls trans-
ferred to you. Such calls will always ring or be announced at your console.
PERSONALIZED RINGING
If your console’s ringing is often confused with the ringing of other phones,
you can choose another sound from eight different ringing options.
555-1234
To program personalized ringing, slide the T/P switch to the P position.
You will hear the ringing sound that your console makes when someone
calls. Touch Speaker repeatedly until you hear a ringing sound that you
like. Return the T/P switch to the center position.
VOICE ANNOUNCEMENT DISABLE
Ordinarily, people can talk to you through your speaker when they call
you on the intercom. You can prevent voice signaling and have all intercom calls ring instead by using the Voice Announcement Disable feature.
To program this feature on your console, slide the T/P switch to the P
position, and touch Intercom-Voice:
● green light on
● green light off = voice announcement prevented
= voice announcement allowed
Return the T/P switch to the center position.
Speaker
Intercom
Voice
21
Page 23

Attendant’s Quick Reference
If you want to . . . .
USE THE SHIFT BUTTONS
For access to intercom numbers 10 to 39
●
Touch the left Shift button
●
Touch the Intercom Auto Dial button for the telephone you want
For access to intercom numbers 40 to 69
●
Touch the middle Shift button
●
Touch the Intercom Auto Dial button for the telephone you want
For access to intercom numbers 70 to 79
●
Touch the right Shift button
●
Touch the Intercom Auto Dial button for the telephone you want
TRANSFER A CALL WITH INTERCOM-RING
●
Touch Transfer
●
Touch appropriate Shift button (large systems only)
●
Touch Intercom Auto Dial button (or dial intercom number)
●
Hang up
●
If person doesn’t answer, call returns to you
TRANSFER A CALL WITH INTERCOM-VOICE
●
Touch Transfer
●
Touch Intercom-Voice
●
Touch appropriate Shift button (large systems only)
●
Touch Intercom Auto Dial button (or dial intercom number)
●
Announce call, and hang up
●
If person doesn’t take the call, it returns to you
SCREEN A CALL
●
Touch Hold
●
Touch Intercom-Ring or Intercom-Voice
●
Touch appropriate Shift button (large systems only)
●
Touch Intercom Auto Dial button (or dial intercom number)
●
Check to see if person will take call
no?
● Touch call’s line button
● Advise caller
● Hang up
Yes?
If call’s line button appears on person’s phone —
● He or she can take call by touching the call’s line button
(Large Systems Only)
Otherwise —
●
Touch call’s line button
●
Touch Transfer
●
Touch appropriate Shift button (large systems only)
●
Touch Intercom Auto Dial button (or dial intercom
number)
●
Hang up
PARK A CALL TO PAGE SOMEONE
●
Touch Transfer
●
Touch the left Shift button (large systems only)
●
Touch your own Intercom Auto Dial button (or dial your intercom number)
●
Touch Intercom-Voice
●
Touch Page
●
Page person to pick up call by dialing *7 plus your intercom
number.
CONNECT AN OUTSIDE CALL TO ANOTHER OUTSIDE LINE
● Touch Conference
●
Touch free line button (or special purpose line)
● Dial number
Connection made?
● Touch Hold to remove yourself
● Hang up
Not made?
● Touch Drop
● Inform caller, and hang up.
NOTIFY SOMEONE YOU TOOK A MESSAGE
Small Systems
● Check red light beside person’s Intercom Auto Dial button
● Red light on? Do nothing (message light already on)
● Red light off?
● Touch Send Message
● Touch Intercom Auto Dial button
Large Systems
●
Touch
●
Touch appropriate Shift button
● Touch Message Status again to return to normal operation
Message Status
● Green light on? Do nothing (message light already on)
● Green light off?
● Touch Send Message
● Touch Intercom Auto Dial button
22
Page 24

Index
Answering calls, 8, 9
Automatic Line Selection, 20
Call Coverage, 9, 19
Secondary Coverage, 19
Call Park, 11, 22
Call Pickup, 11
Conference calls, 15
Connecting outside callers to outside lines,
15, 22
Drop, 15
Cover button, 9
Custom features, 17 - 19
How to program, 18 - 19
Last Number Redial, 17, 19
Saved Number Redial, 17, 19
Privacy, 17, 19
TouchTone Enable, 17, 19
Delayed ringing, See Ringing options
Distinctive Ringing, 8
Drop, 15
Extra alert, 16
Group Listening, 16
Headset Adapter, 16
Hold, 9, 11, 18
Monitor call on hold, 16
Intercom Auto Dial, 6, 19
Meaning of button lights, 4 - 5, 6
Signaling, 6
Intercom calls, 14
With Ringing Signal, 14
With Voice Announcement, 14
Intercom codes, 6
Intercom-Ring, 14, 22
Intercom-Voice, 14, 22
Last Number Redial, 17, 19
Line buttons, 4 - 5, 8
Meaning of lights, 4 - 5, 8
Loudspeaker Paging, 11, 12, 19, 22
Message service, See Send Message
Message Status, 13
Night Service, 16, 18
On-Hook Dialing, 16
Outside Auto Dial, 14, 19, 20
Shortcut for changing numbers, 20
Special characters, 20
Paging codes, 12. See also Loudspeaker Paging
Pause, 20
Personalized Ringing, 21
Placing calls, 14
Conference calls, 15
Intercom calls, 14
Outside calls, 14
Privacy, 17, 19
Programming, 18 - 21
Automatic Line Selection, 20
Custom features, 18 - 19
Feature programming chart, 19
Line ringing options, 21
Personalized Ringing, 21
Shortcut for Outside Auto Dial numbers, 20
Special characters, 20
Voice Announcement Disable, 21
Quiet button, See Headset Adapter
Recall button, 20
Ringing options, 8
How to program, 21
Ringing patterns, 8
Rotary signals, 17
Saved Number Redial, 17, 19
Screening calls, 11, 22
Secondary Coverage, 19. See also
Call Coverage
Send Message, 13, 18, 22
Large systems, 13
Message Status, 13
Small systems, 13
Shift buttons, 7, 22
Speaker, 16, 18
Group Listening, 16
On-Hook Dialing, 16
Monitor call on hold, 16
stop, 20
Switchhook flash, 20
Touch-Tone Enable, 17, 19
T/P (Test/Programming) switch, 18, 20 - 21
Transferring Calls, 10 - 11
Call Park with Loudspeaker Paging, 11
Transfer, 10, 22
Transfer with Voice Announcement, 10, 22
Screening calls, 11, 22
Voice Announcement Disable, 21
23
Page 25

AT&T
Information Systems
MERLIN is a trademark of AT&T.
Copyright 1984 AT&T. Printed in U.S.A.
999-502-137 IS
Issue 1 September 1984
 Loading...