

Page 1
1412 2002.12.7 9:20 AM Page II
2.4 GHz Two-Line Cord l e s s
Speakerphone 1412 with
Caller ID/Call Waiting on Handset
USER’S MANUAL
Pa rt 2
Please also read
Part 1 — Important
Product Information
AT&T and the Globe Symbol are tra d e m a rks of AT & TC o r p.,licensed to A d vanced A m e rican Te l e p h o n e s .
© 2002 A d vanced A m e rican Te l e p h o n e s . All Rights Reserve d .
Page 2

1412 2002.12.7 9:20 AM Page III
Visit us at www.telephones.att.com
© 2002 Advanced American Telephones.
All Rights Reserved.
AT&T and the Globe Design are
trademarks of AT&T Corp., licensed to
Advanced American Telephones.
Printed in China. Issue 1AT&T 12/02
Page 3

1412updatedmanual 2002.12.7 9:20 AM Page IV
CONTENTS
BEFORE YOU BEGIN.................. 1
Parts List........................................... 1
About Caller Identification
(Caller ID).................................... 2
About Call History........................... 2
INSTALLATION......................... 3
Before You Install.............................3
Table/Desk Installation................... 4
Wall Installation............................... 6
Belt Clip........................................... 8
Headset............................................ 8
Data Port...........................................9
FEATURE SETUP..................... 10
Feature Setup Menu ...................... 10
Set Line 1 Ringer............................ 11
Set Line 2 Ringer............................ 12
Set Voice Messages Indicators ...... 13
Set Time......................................... 14
Set Date.......................................... 15
Set Dial Mode................................ 16
TELEPHONE OPERATION ........... 17
Idle Screen..................................... 17
Make a Call ................................... 17
Answer a Call................................. 18
Volume ........................................... 19
Redial.............................................. 20
Flash/Call Waiting.......................... 21
Mute................................................ 22
Temporary Tone Dialing............... 23
Handset Locator..............................24
Display Screen Messages .............. 25
Display Screen Icons..................... 25
Handset Lights.................................26
Base Lights..................................... 26
INTERCOM OPERATION............. 27
At the Handset............................... 27
At the Base..................................... 28
Conference Calls............................ 29
Three-Way Conference Call.......... 29
Four-Way Conference Call............ 30
End a Conference Call .................. 30
Place a Conference Call on Hold... 31
Speak Privately with One Party.... 31
Switch a Conference Call
Between Handset and Base...... 32
DIRECTORY........................... 33
Store a Number and Name in
the Directory.............................. 33
Store a Number from Handset
Redial in the Directory.............. 35
Keypad Characters..........................37
Dial a Number in the Directory.... 38
Edit a Number/Name in the
Directory..................................... 39
Delete a Directory Entry............... 40
Turn Distinctive Ring On/Off....... 41
BASE MEMORY ...................... 42
S t o re a Number in Base Memory... 42
Dial a Base Memory Number....... 43
CALLER ID OPERATION............. 44
Review Call History....................... 45
Remove a Call Record................... 46
Store a Call Record in the
Directory..................................... 47
Display Dial ................................... 48
Dialing Options.............................. 49
BATTERIES............................ 50
Battery Life..................................... 50
Charge the Handset
Battery Pack............................... 50
Replace the Handset
Battery Pack............................... 51
IN CASE OF DIFFICULTY............ 52
DEFAULT SETTINGS................. 56
TECHNICAL SPECIFICATIONS...... 57
INDEX.................................. 58
I V
Page 4
1412 2002.12.7 9:20 AM Page 1
BEFORE YOU BEGIN
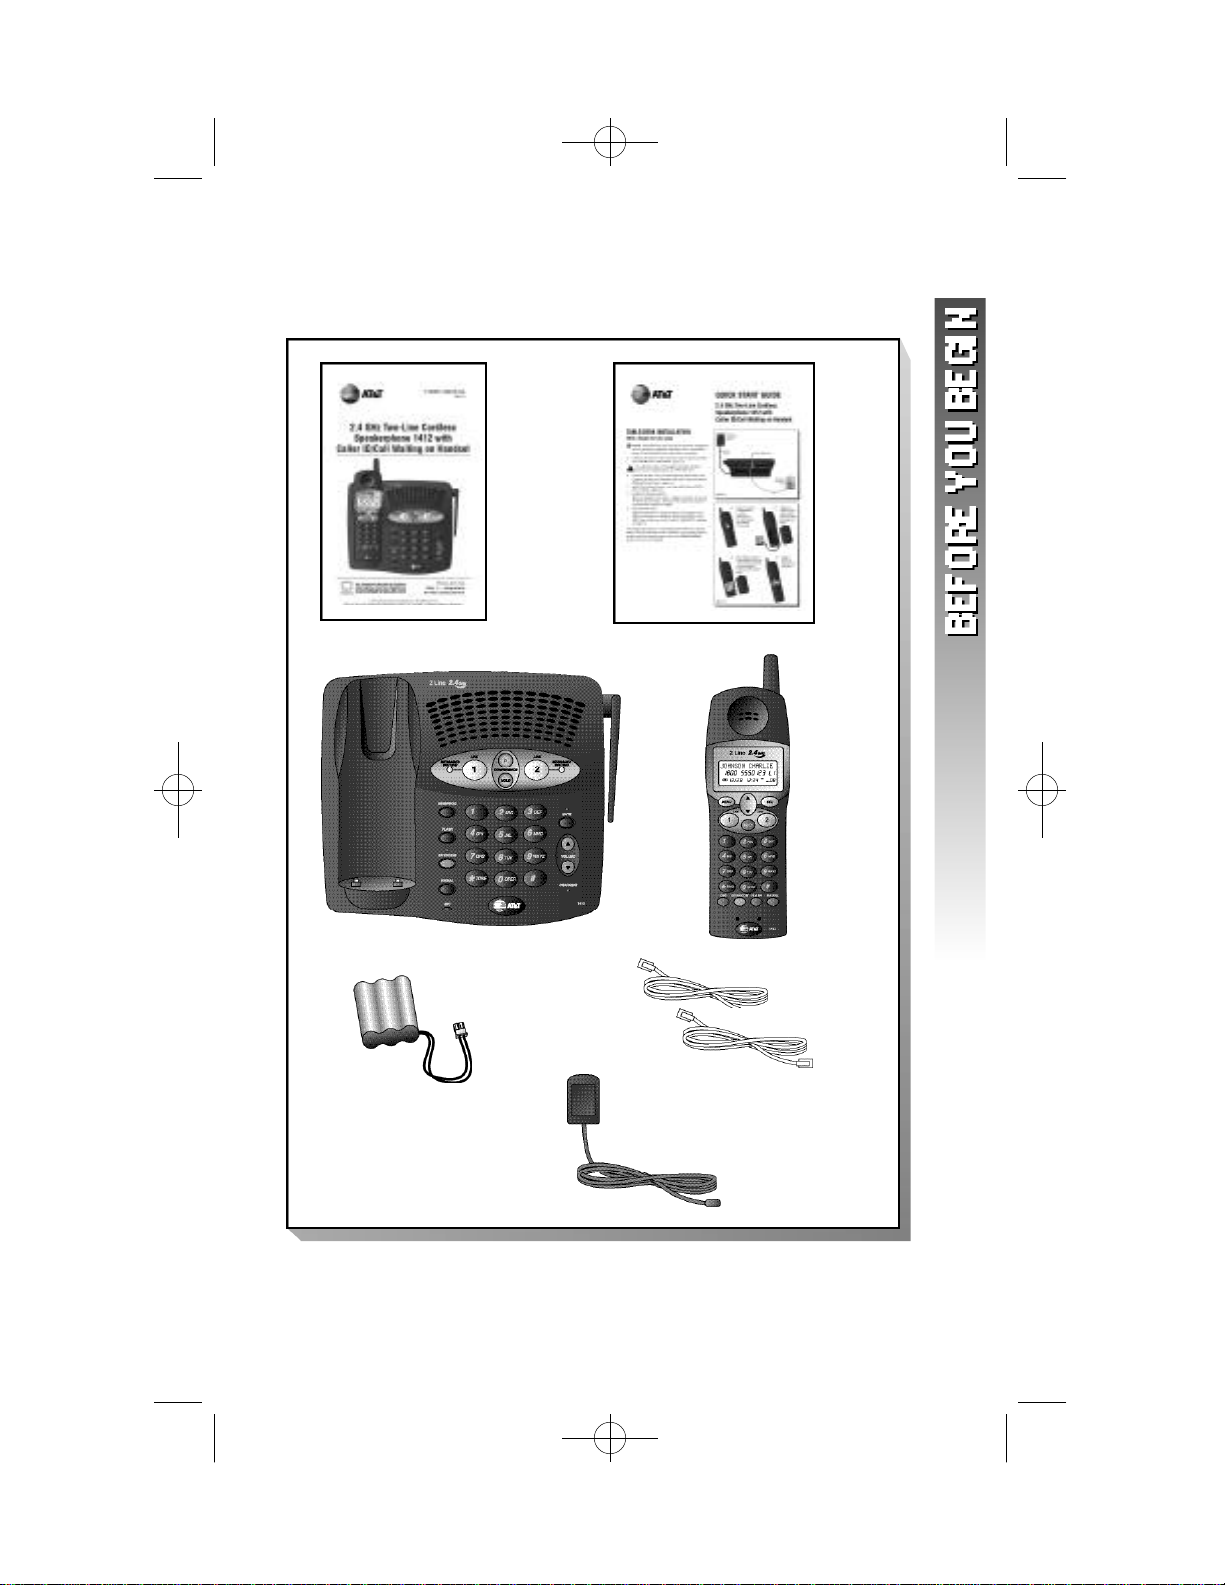
P a rts List
Your box should include:
Base unit
This User’s
Manual
Quick
Start
Guide
Handset
NiCd
battery
pack
2 Telephone
line cords
Power cord
1
Page 5

1412 2002.12.7 9:20 AM Page 2
About Caller Identification (Caller ID)
This product has a Caller ID with Call Waiting feature that works with
service from your local phone service provider.
Caller ID with Call Waiting lets you see who’s calling before you answer
the phone,even when you’re on another call.
You may need to change your phone service to use this feature.
Contact your phone service provider if:
• You have both Caller ID and Call Waiting,but as separate
services (you may need combined service)
• You have only Caller ID service,or only Call Waiting service
• You don’t subscribe to any Caller ID or Call Waiting services.
You can use this product with regular Caller ID service,and you can
use this product’s other features without subscribing to either Caller ID
or combined Caller ID with Call Waiting service.
There are fees for Caller ID services,and they may not be available in
all areas.
This product can provide information only if both you and the caller
are in areas offering Caller ID service,and if both telephone companies
use compatible equipment.
About Call History
This phone assigns each incoming call a number from 1 to 90. The
most recent call will have the highest number. Calls from both lines are
stored together. When the memory is full,the oldest call information is
deleted to make room for new incoming call information. See CALLER
ID OPERATION,beginning on page 44,for more details.
2
Page 6
1412 2002.12.7 9:20 AM Page 3
INSTALLATION
Before You Install
1 Choose a location for the base near an electrical outlet
and a telephone jack.
This phone requires a modular telephone jack and a standard
electrical outlet (110v AC) not controlled by a wall switch.
NOTE: Install the base unit away from electronic equipment,
¥
such as personal computers, television sets or microwave ovens.
Avoid excessive heat, cold, dust or moisture.
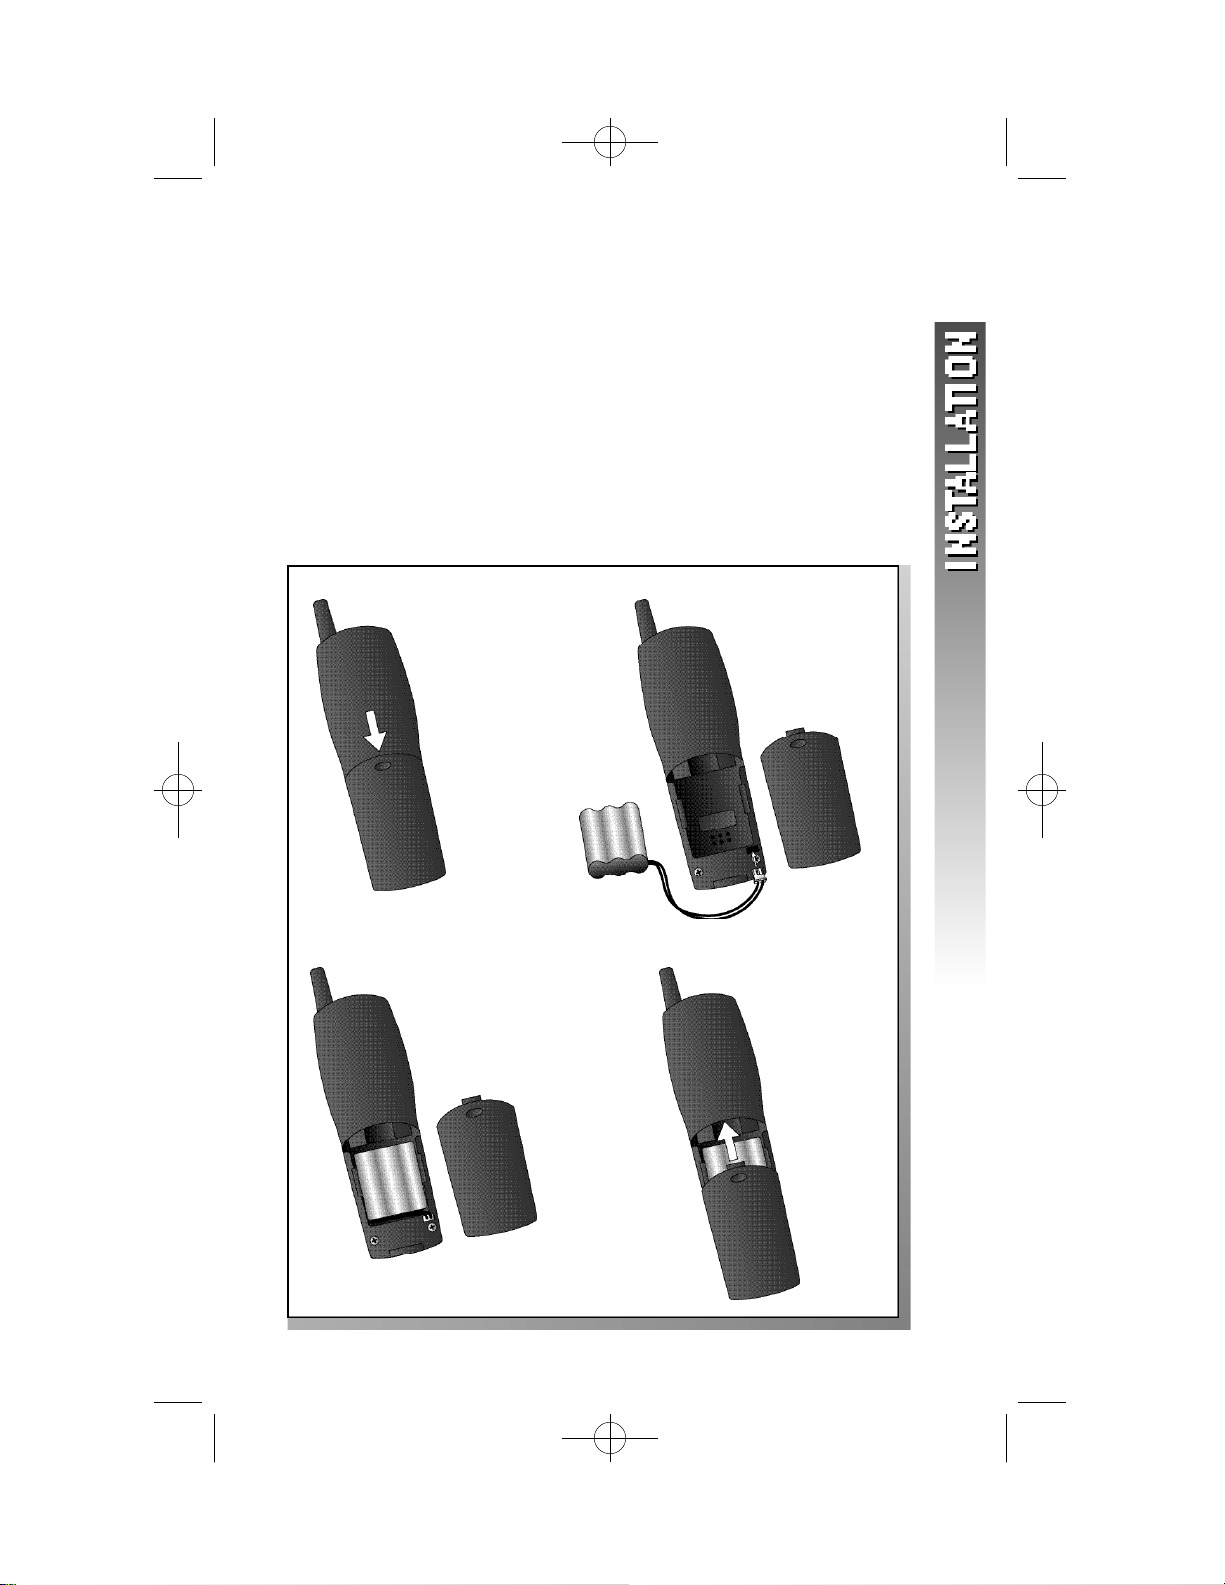
2 Install the handset battery.
Use onlyAT&T Battery 3301:SKU #91076.
a) Remove battery
compartment
cover by
pressing on
the indentation
and sliding
downward.
c ) Place battery pack in
c o m p a rtment with the
w i res in the lower left
c o rn e r,along the
bottom of the battery
p a ck .
b) Align two
holes in plug
with socke t
p i n s ,and snap
the plug into
p l a c e .
d) Replace
cover by
sliding it up
into place.
3
Page 7
1412 2002.12.7 9:20 AM Page 4
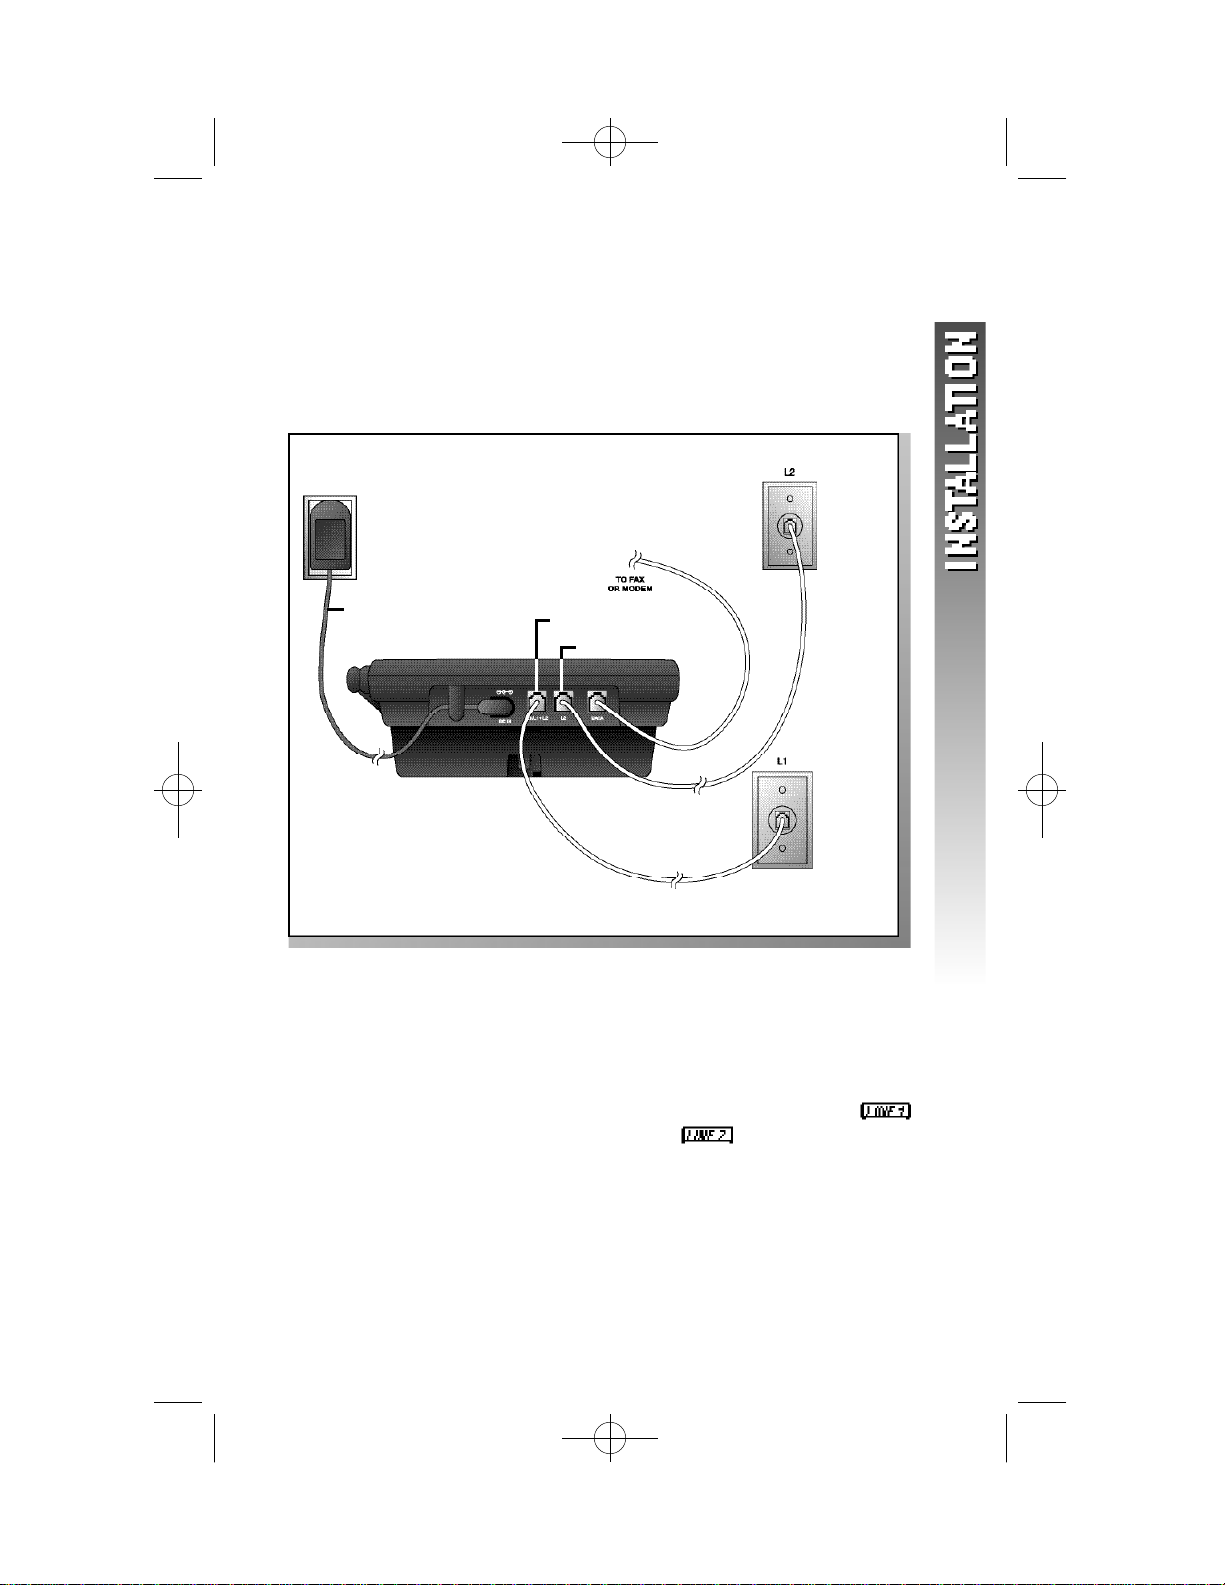
Table/Desk Installation
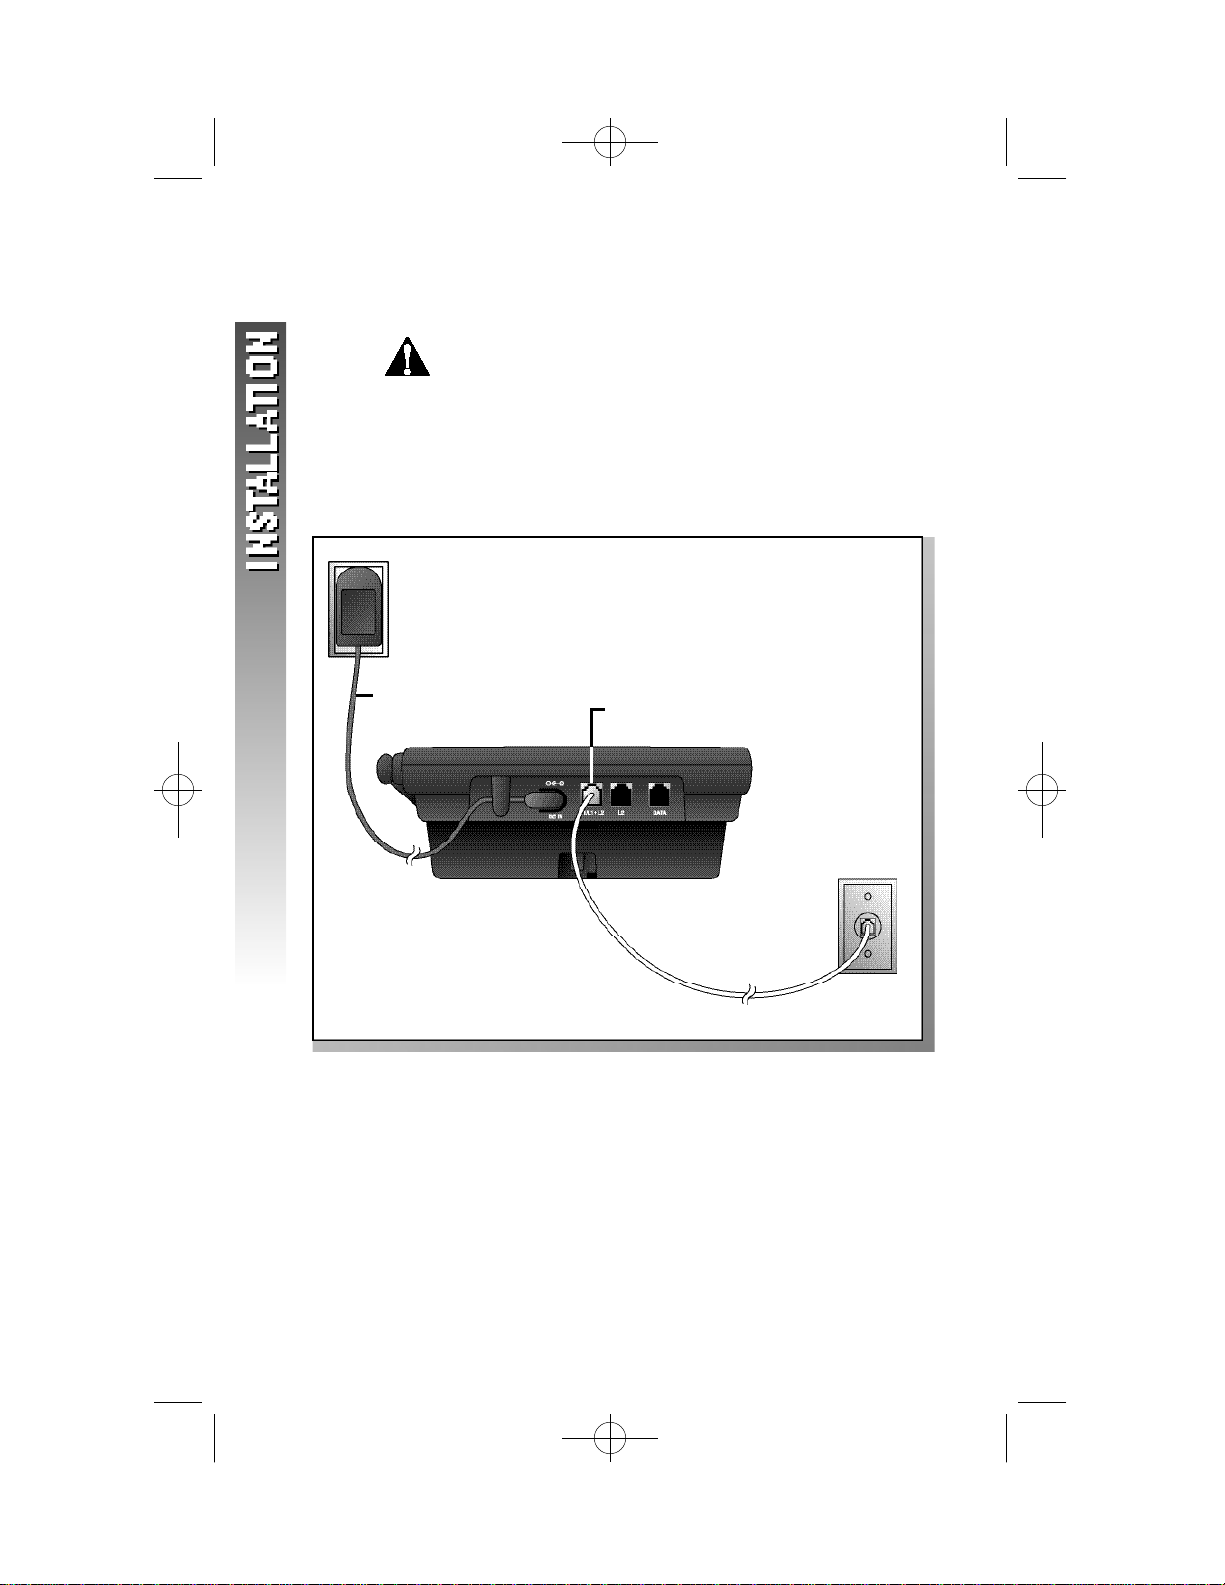
1 Connect the power cord.
2 Connect the telephone line cord(s).
If you have a two-line jack, use only the four-wire (RJ-14) line
cord. Connect the line cord from the wall jack to the jack
labeled L1/L1+L2 on the base. Make sure the plugs snap firmly
into place.
Standard
electrical
outlet
Use only the power cord supplied with this product.
If you need a replacement,call 1 800 222–3111.
Power
Cord
L1/L1+L2 Jack
L1/L2
Modular
telephone
jack
4
Page 8
1412 2002.12.7 9:20 AM Page 5
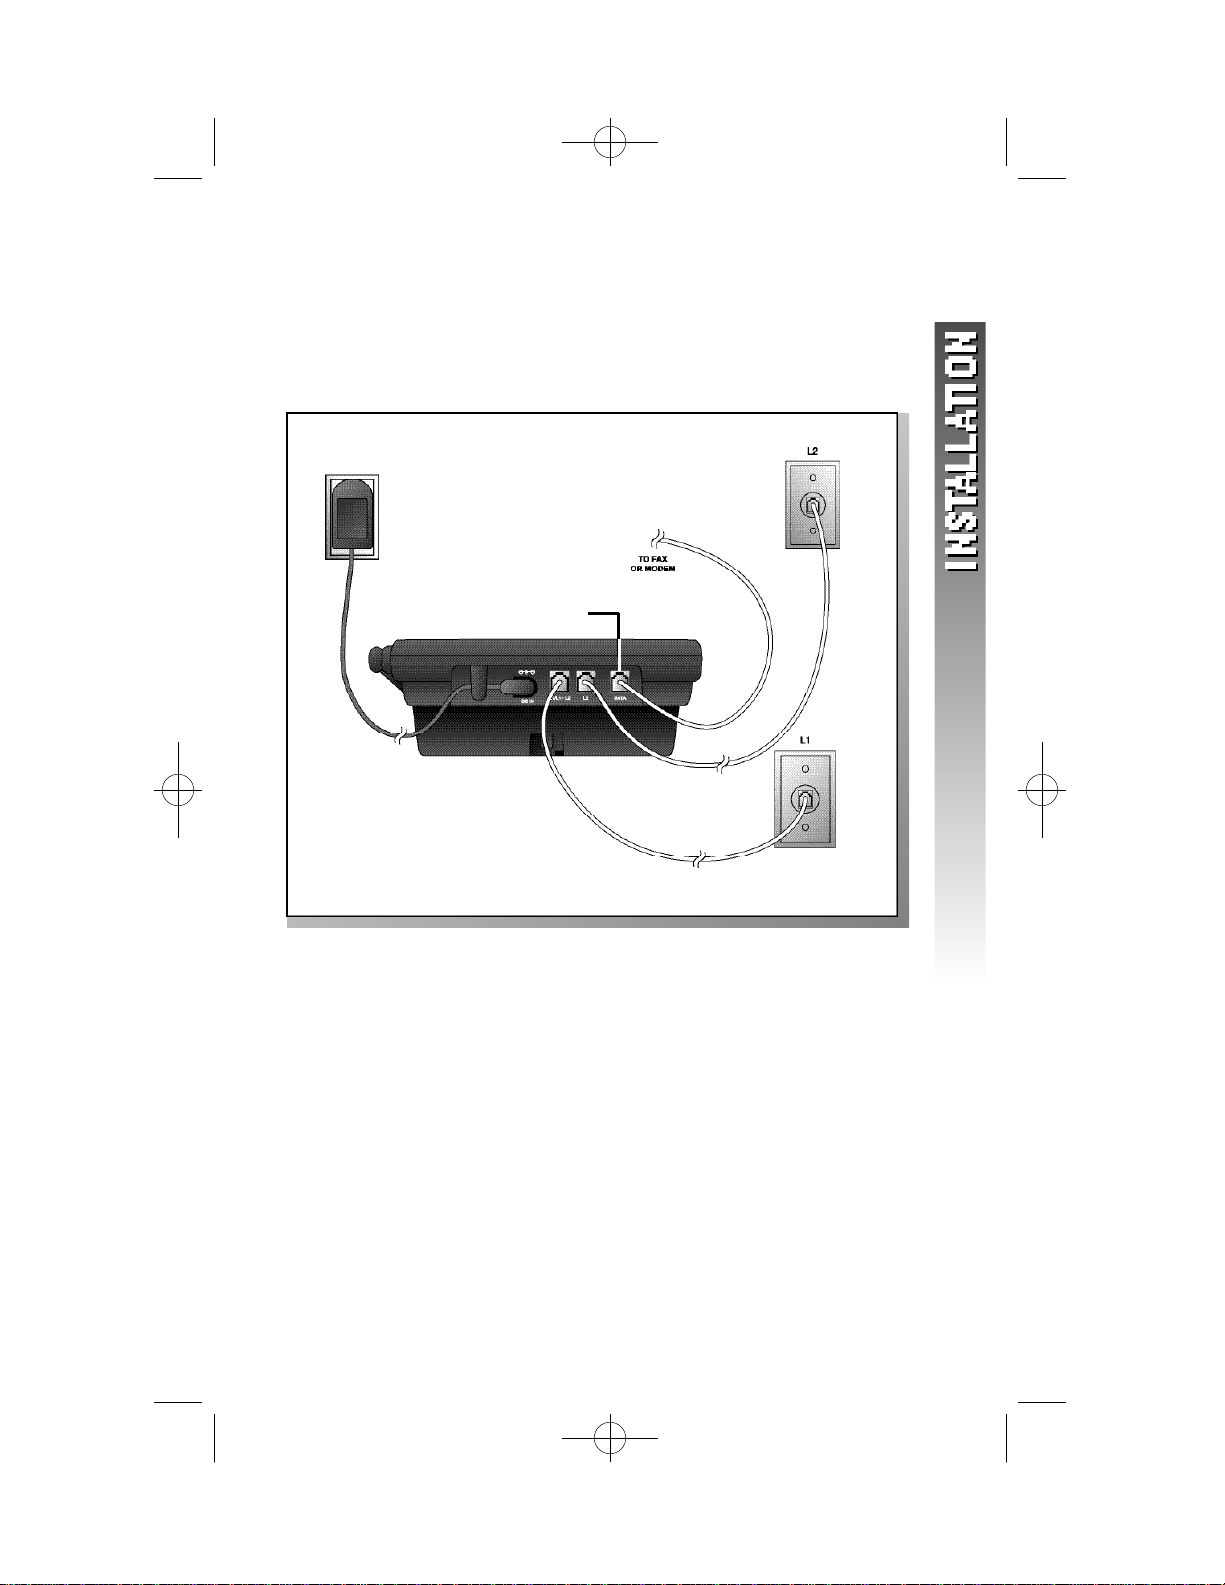
If you have two separate jacks, use both long line cords.
Connect a line cord from the wall jack you wish to designate as
your Line 1 to the jack labeled L1/L1+L2 on the back of the
base. Connect the other line cord from the remaining wall jack
to the jack labeled L2 on the back of the base. Make sure the
plugs snap firmly into place.
Standard
electrical
outlet
Power
Cord
L1/L1+L2 Jack
L2 Jack
Line 2
Modular
telephone
jack
3 Charge the handset battery.
Place the handset in the base. Charge the battery overnight the
first time. After the first charge,the battery typically charges in
eight hours.
4 Check for dial tone.
After the batteries are charged,pick up the handset,press
and listen for a dial tone. Then press . If you don’t hear a
dial tone,see IN CASE OF DIFFICULTY starting on page 52.
5 Turn base ringers on or off.
Use the L1 RINGER and L2 RINGER switches on the right side
of the base to set the base ringer volume to OFF,LOW or HIGH
for each line.
Line 1
Modular
telephone
jack
5
Page 9
1412 2002.12.7 9:20 AM Page 6
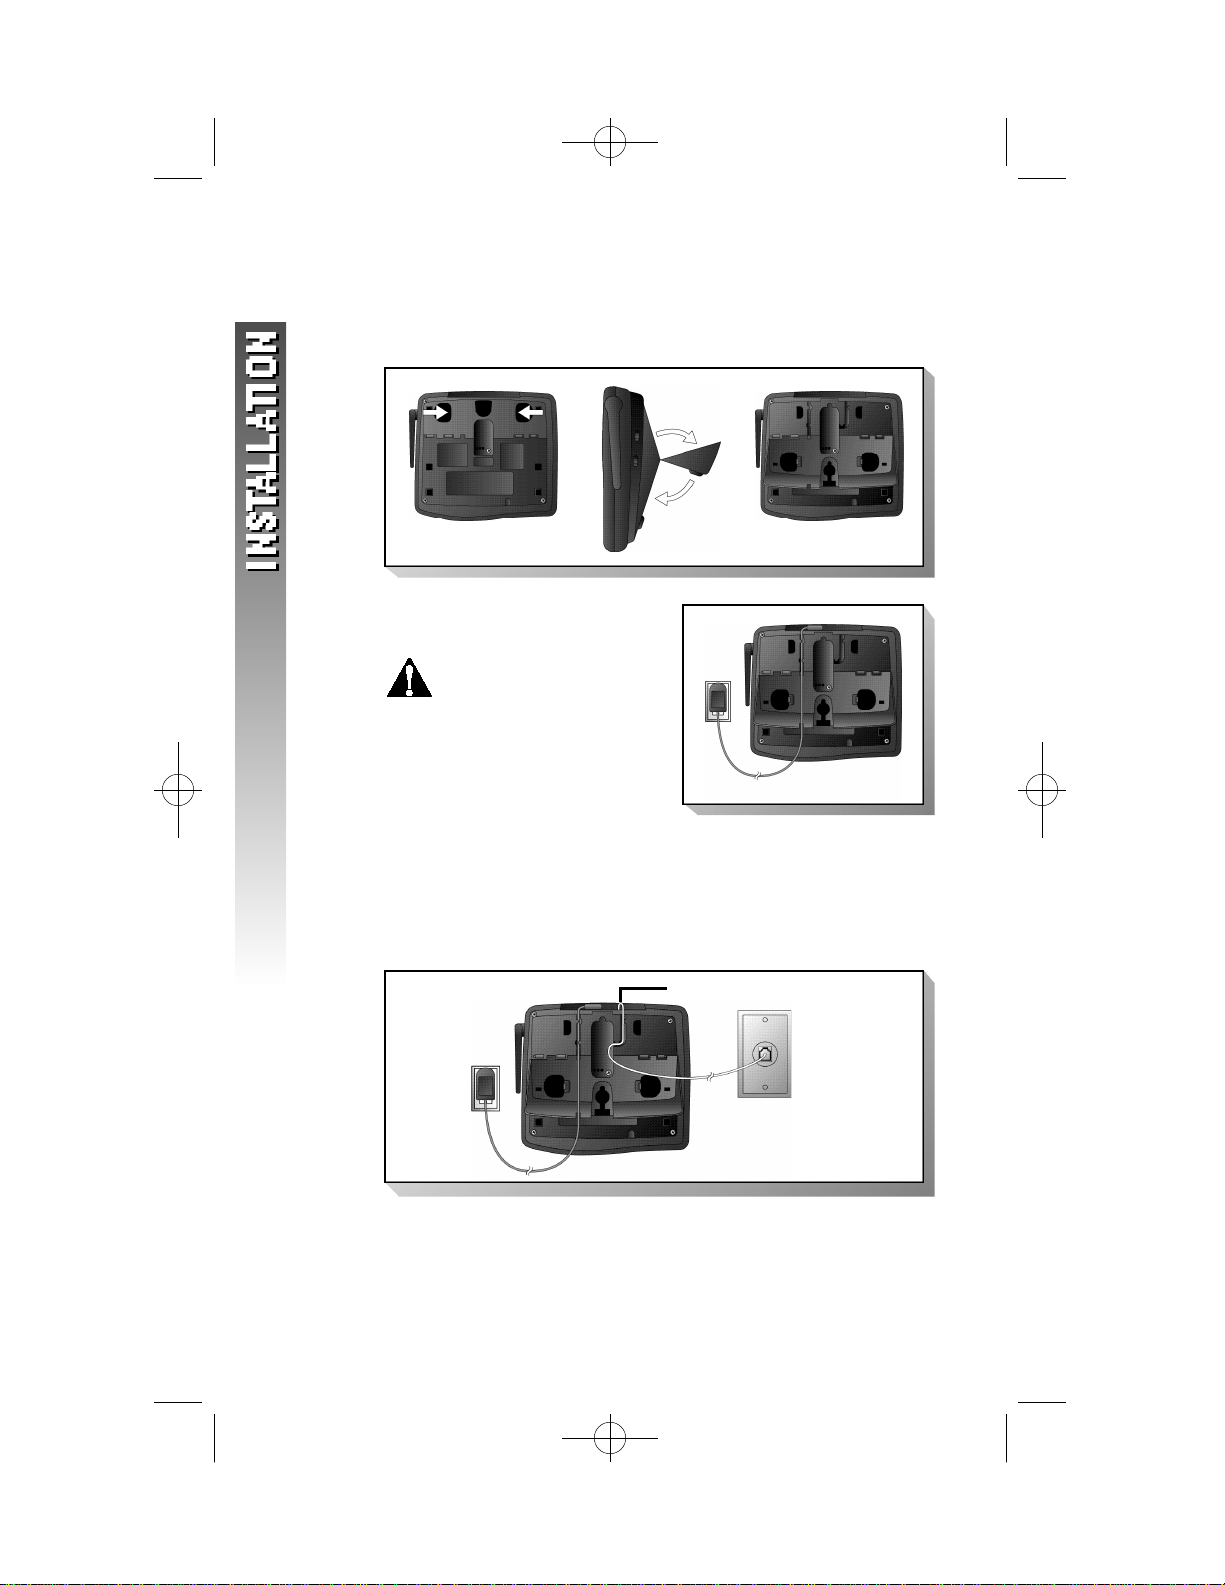
Wall Installation
1 Reverse the wedge under the base. Place your fingers in
the holes as shown and swing the top of the wedge down.
2 Connect the power cord and
place the cord as shown.
Use only the power cord
supplied with this pro d u c t .
If you need a re p l a c e m e n t ,
call 1 800 222–3111.
3 Connect the telephone line cord ( s ) .
If you have a two-line jack, use only the four-wire (RJ-14) line
cord. Connect the line cord from the wall jack to the jack
labeled L1/L1+L2 on the base. Make sure the plugs snap firmly
into place.
Standard
electrical
outlet
6
L1/L1+L2 Jack
Line 1/Line 2
Modular
telephone jack
Page 10
1412 2002.12.7 9:20 AM Page 7
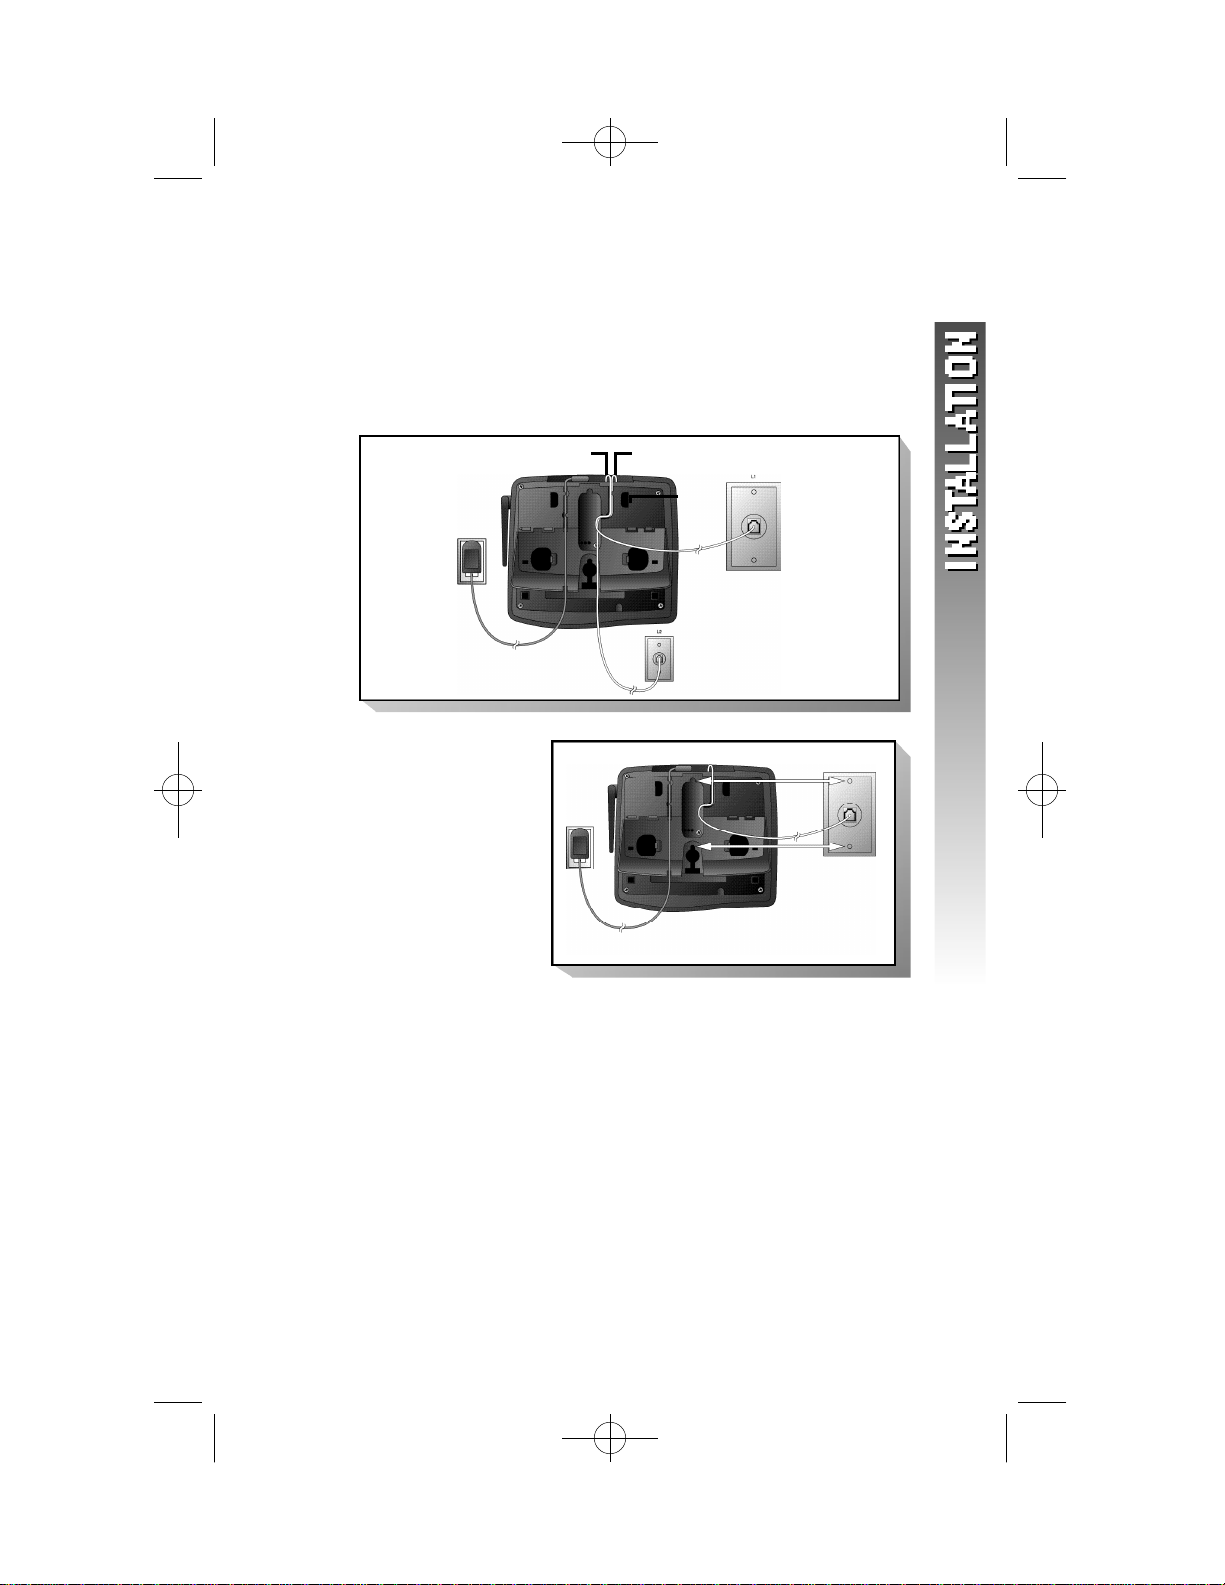
If you have two separate jacks, use both long line cords.
Connect a line cord from the wall jack you wish to designate as
your Line 1 to the jack labeled L1/L1+L2 on the back of the
base. Connect the other line cord from the remaining wall jack
to the jack labeled L2 on the back of the base. Make sure the
plugs snap firmly into place.
Standard
electrical
outlet
L1/L1+L2 Jack L2 Jack
Line 1
Modular
telephone
jack
Line 2 Modular
telephone jack
4 Mount base
on wall.
a Place power
and line cords
as shown.
b Align holes
on base with
mounting studs
on wall jack.
c Pull base down
on mounting
studs until it
locks into place.
5 Follow Steps 3 – 5 in “Table/Desk Installation.”
7
Page 11
1412 2002.12.7 9:20 AM Page 8
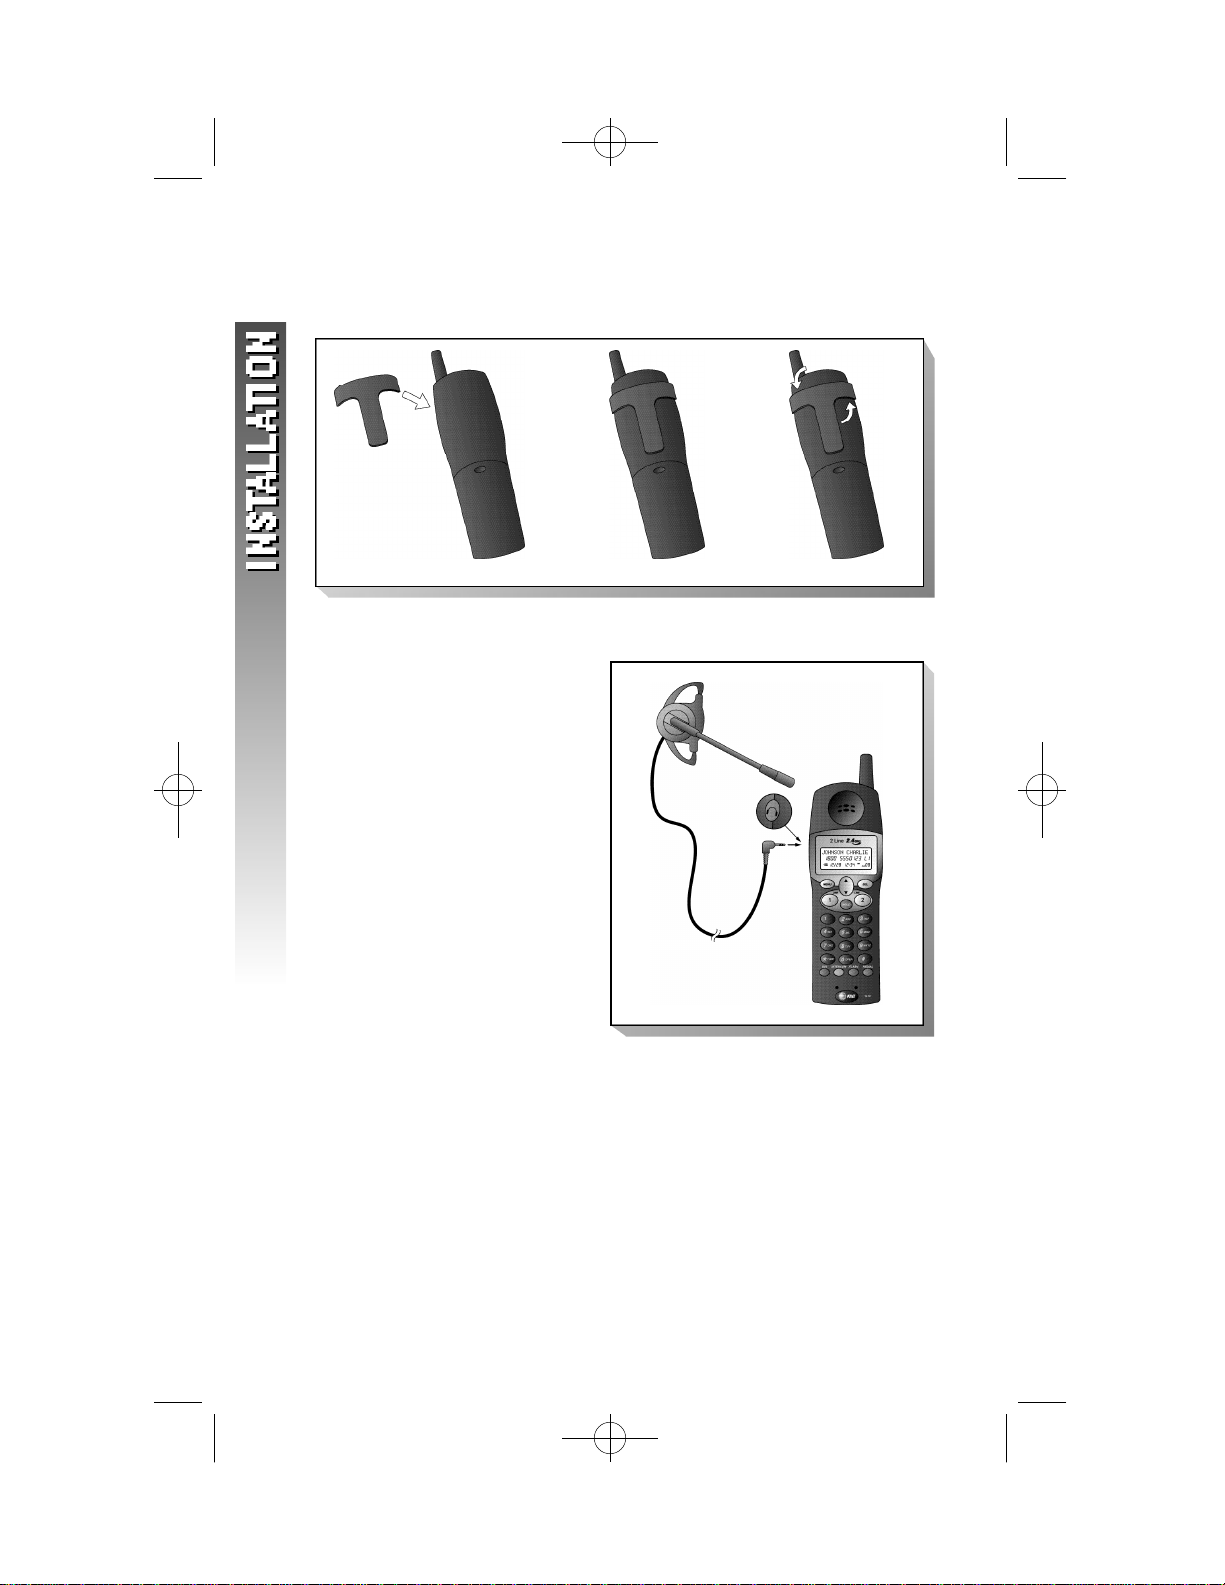
Belt Clip
You may choose to use the optional belt clip with your handset.
To attach To remove
H e a d s e t
You can use this telephone
hands-free when you install
any industry standard 2.5
mm headset (purch a s e d
s e p a ra t e ly ) .For best results
use an AT&T 2.5 mm
headset.
Plug the headset into the
jack located on the left side
of the handset (under the
small rubber flap). Do not
force the connection,but
make sure the plug fits
securely.
8
Page 12
1412 2002.12.7 9:20 AM Page 9
Data Port
If you want to connect another device (such as a modem or fax
machine) to the wall jack, you can use the jack on the phone labeled
DATA. A call picked up at another extension may interrupt a fax,
modem or message transmission.
DATAPort
9
Page 13
1412 2002.12.7 9:20 AM Page 10
F E ATURE SETUP
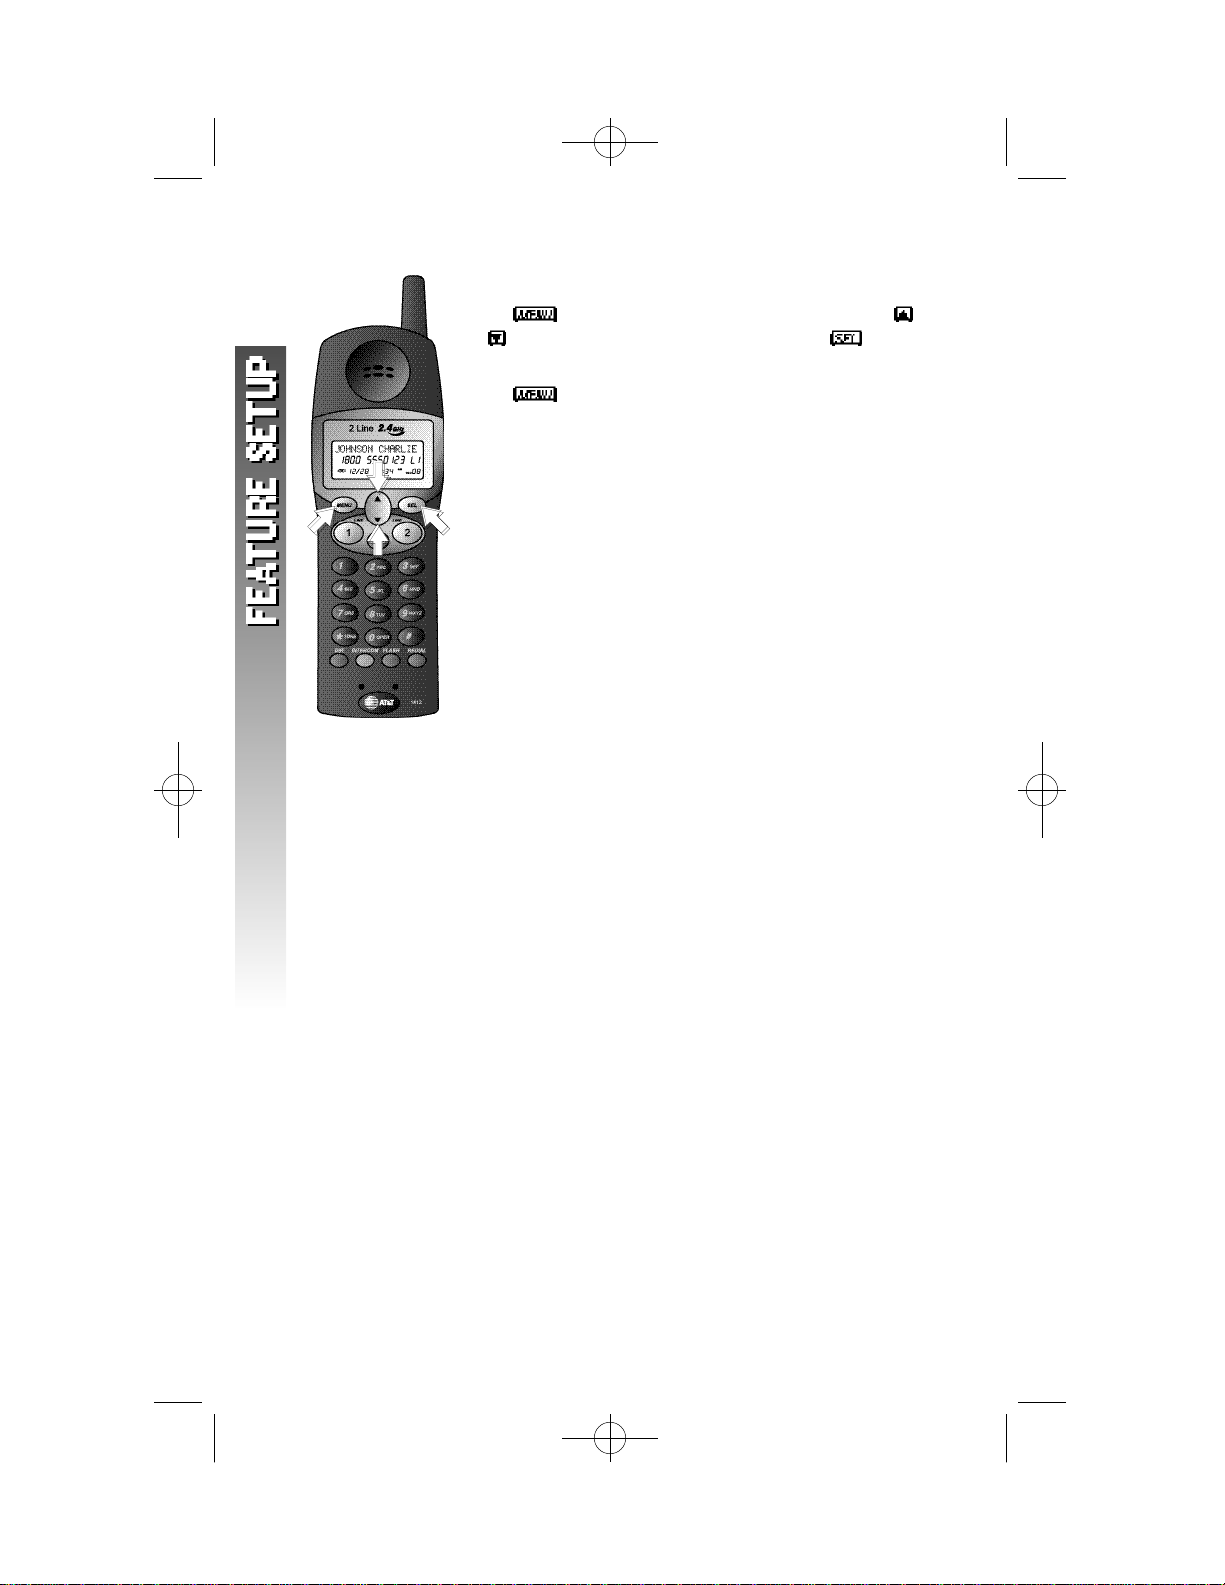
F e a t u re Setup Menu
Press to enter the Feature Setup Menu. Use
or to scroll through choices,then press to
enter your selection.
Press at any time during Feature Setup to exit
Feature Setup and return to the idle screen.
1 0
Page 14
1412 2002.12.7 9:20 AM Page 11
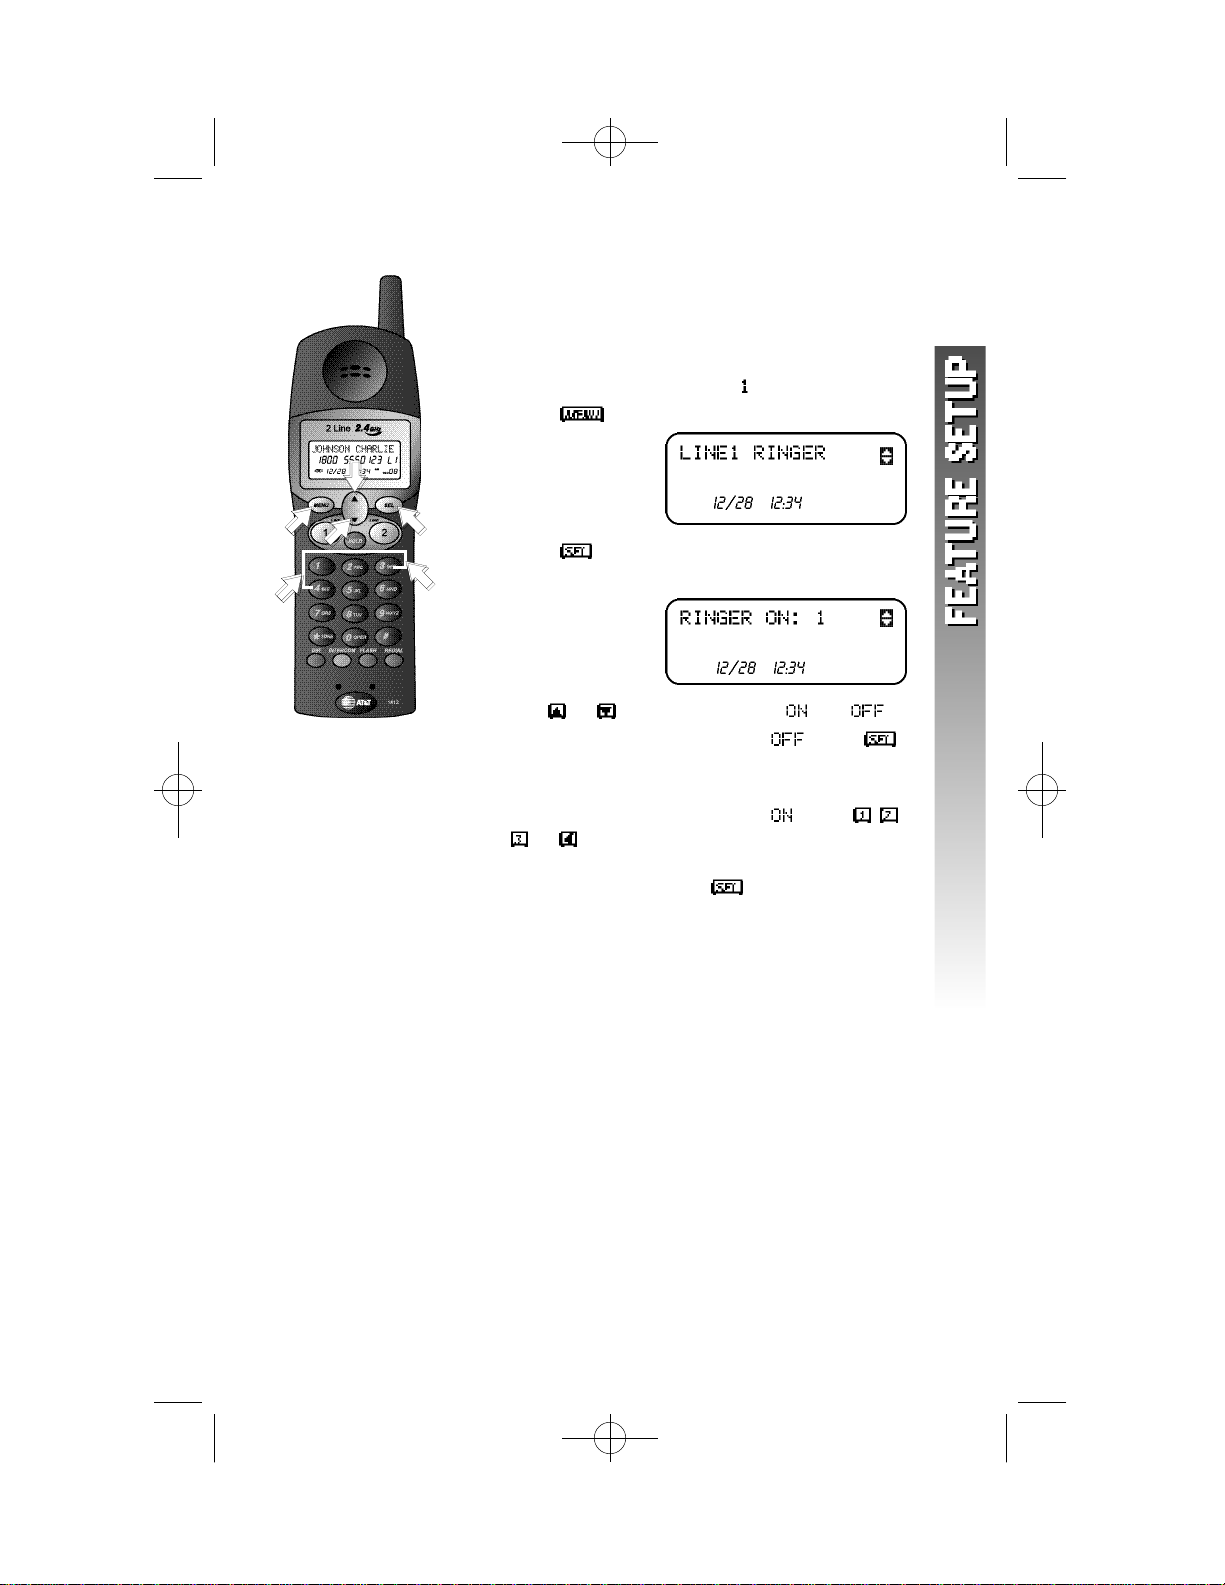
Set Line 1 Ringer
Turn the handset ringer for Line 1 on or off and
choose the ringer type when the handset ringer is
turned on. The phone comes with the handset ringers
for both lines turned on and set to .
1 Press . The screen displays
AM
2 Press . The screen displays the current
setting and looks similar to
AM
3 Use or to switch between and .
4 If you set the Line 1 Ringer to ,press
to save the setting.
— OR —
If you set the Line 1 Ringer to ,press , ,
or on the keypad to hear a sample of
each ringer type. When the desired ringer
type is displayed,press to save the setting.
1 1
Page 15
1412 2002.12.7 9:20 AM Page 12
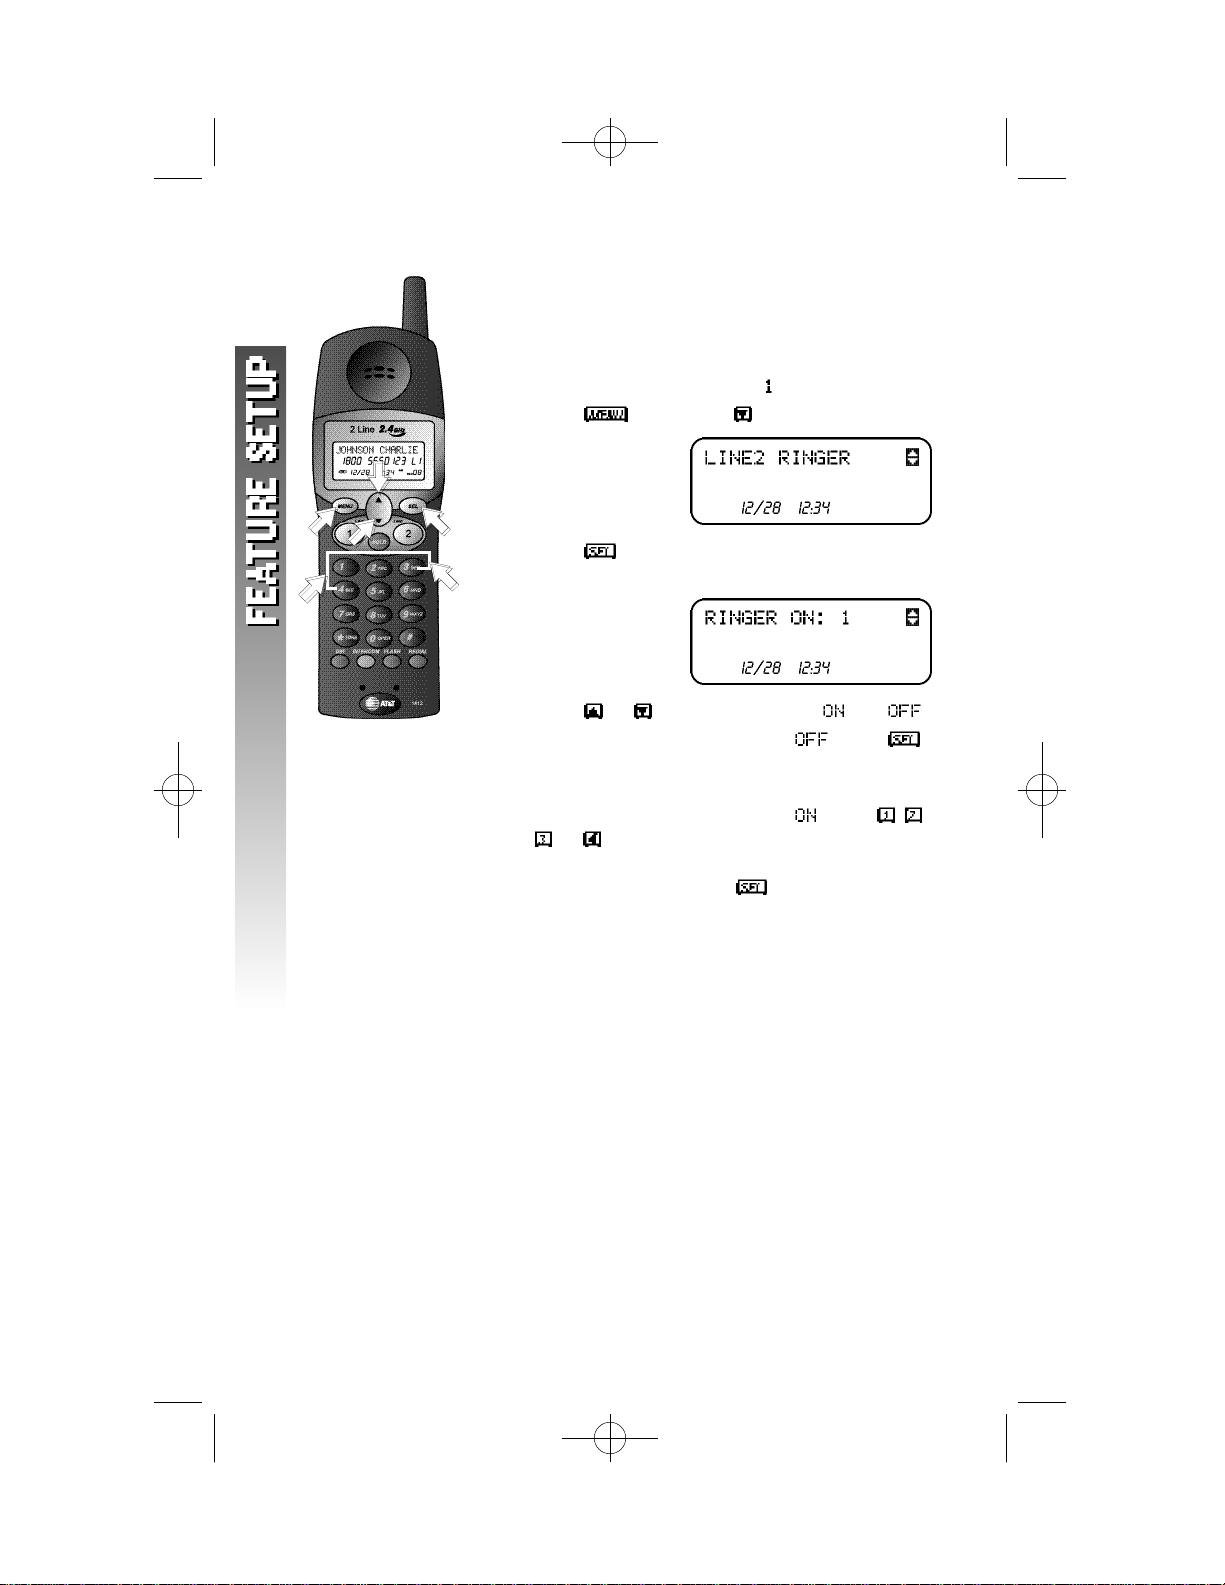
Set Line 2 Ringer
Turn the handset ringer for Line 2 on or off and
choose the ringer type when the handset ringer is
turned on. The phone comes with the handset ringers
for both lines turned on and set to .
1 Press ,then press . The screen displays
AM
2 Press . The screen displays the current
setting and looks similar to
AM
3 Press or to switch between and .
4 If you set the Line 2 Ringer to ,press
to save the setting.
— OR —
If you set the Line 2 Ringer to ,press , ,
or on the keypad to hear a sample of
each ringer type. When the desired ringer
type is displayed,press to save the setting.
1 2
Page 16

1412 2002.12.7 9:20 AM Page 13
Set Voice Messages Indicators
If you subscribe to Voice Mail service with your local
telephone service provider,you can choose how you
want this phone to indicate that you haveVoice Mail
messages for each line. Choosing or
affects the handset voice messages
indicator for that line and the MESSAGES light on the
base.Choosing will turn off the
handset voice messages indicator and the MESSAGES
WAITING light on the base will not show messages
waiting. The phone comes set to .
1 Press . The screen displays
AM
2 Press or until the screen displays
AM
3 Press . The screen displays
AM
4 Press or to scroll through the options.
5 When your desired setting is displayed,press
to save the setting.
6 Repeat Steps 2–5 to set the messages waiting
indicators for Line 2.
1 3
Page 17
1412 2002.12.7 9:20 AM Page 14
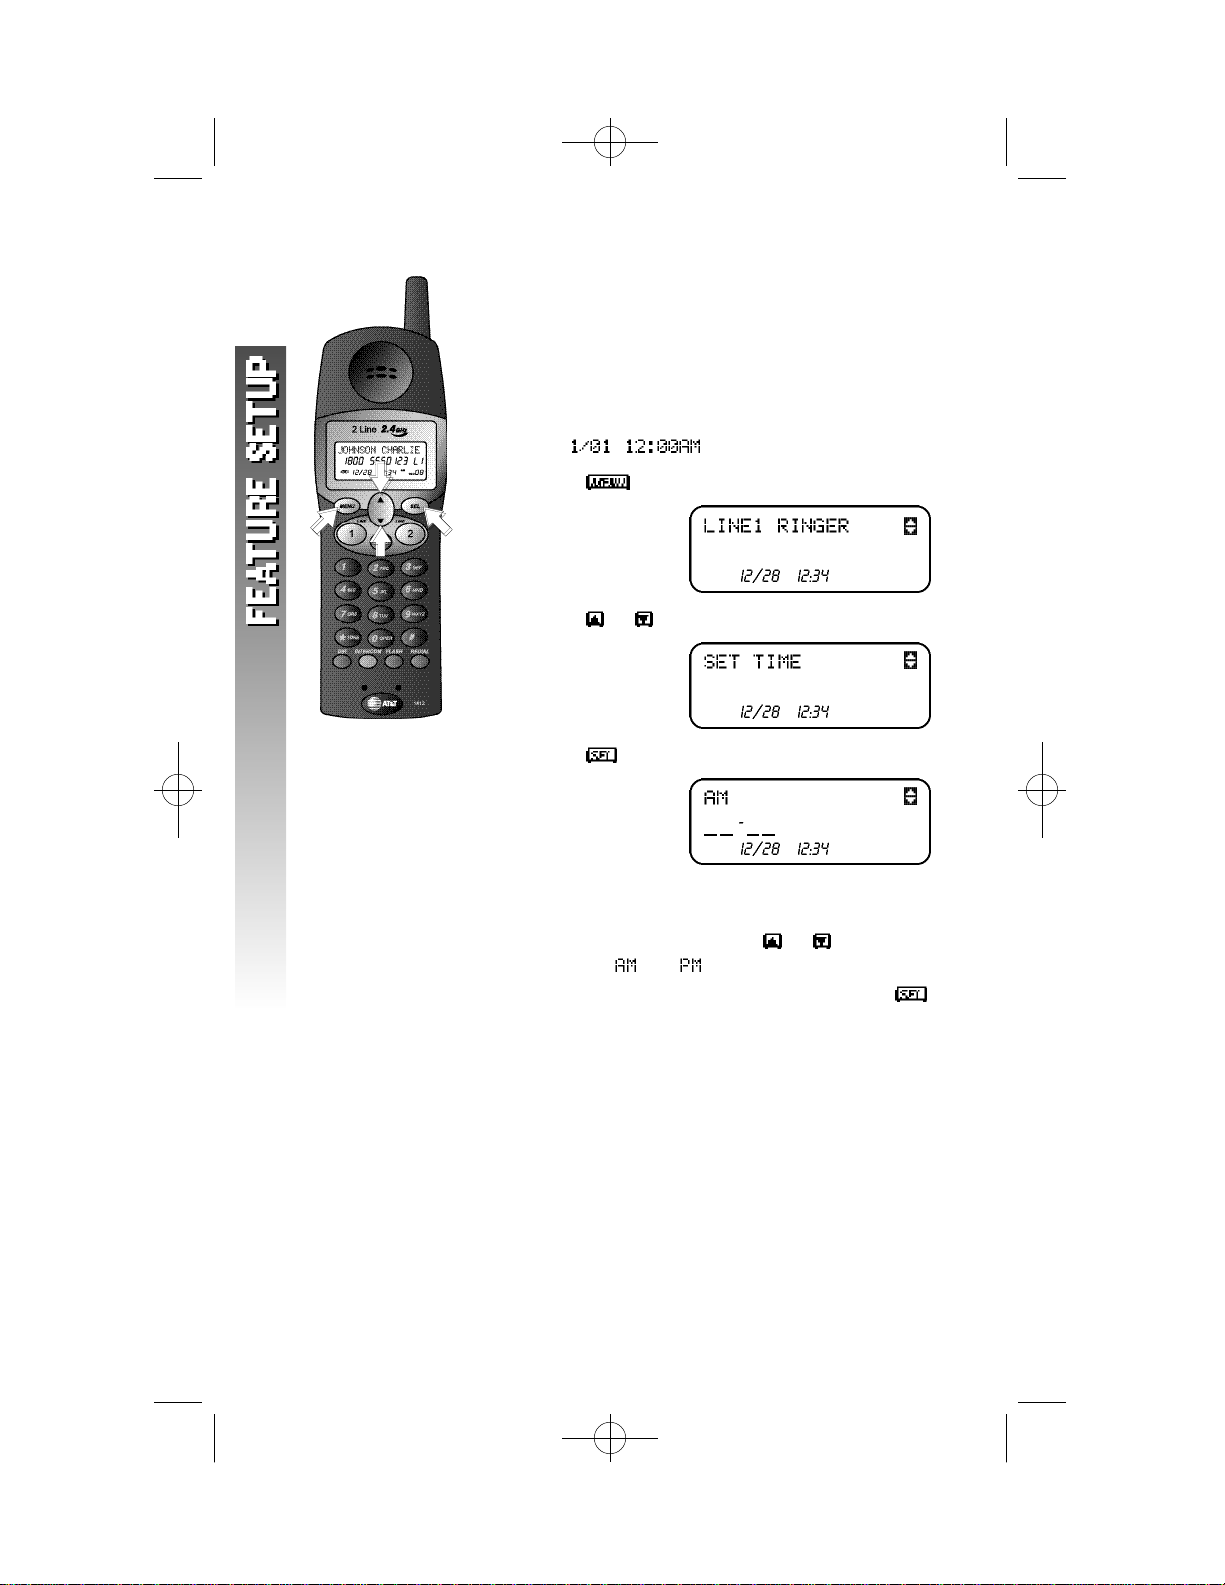
Set Ti m e
The date and time are automatically set with incoming
call information. You can set the clock manually if you
wish.
NOTE: After you replace the handset batteries
¥
and base AC power, the date and time will be
reset to .
1 Press . The screen displays
AM
2 Press or until the screen displays
AM
3 Press . The screen displays
AM
and the component to be changed blinks.
4 Use the keypad to enter the correct hour and
minutes setting. Then use or to switch
between and .
5 When the desired time is displayed,press
to save the new time setting.
1 4
Page 18
1412 2002.12.7 9:20 AM Page 15
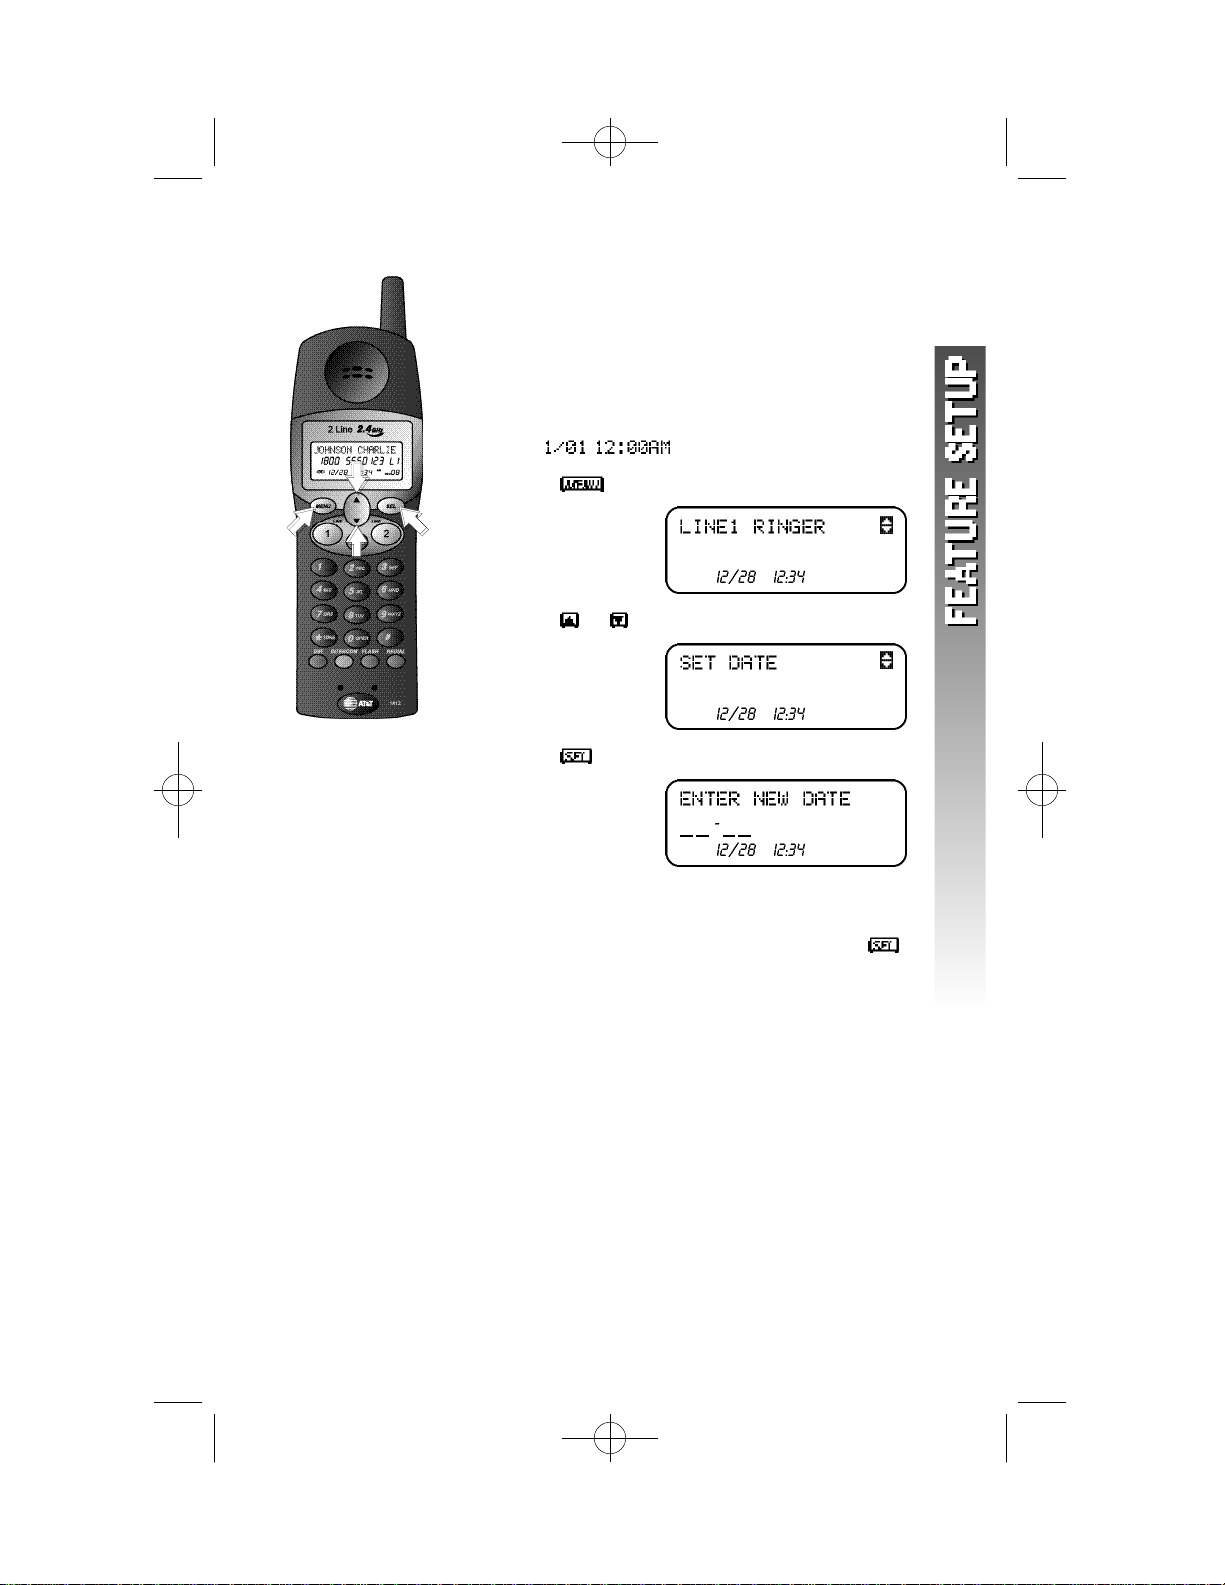
Set Date
The date and time are automatically set with incoming
call information. You can set the date manually if you
wish.
NOTE: After you replace the handset batteries
¥
and base AC power, the date and time will be
reset to .
1 Press . The screen displays
AM
2 Press or until the screen displays
AM
3 Press . The screen displays
AM
4 Use the keypad to enter the correct month
and day setting.
5 When the desired date is displayed,press
to save the setting.
1 5
Page 19

1412 2002.12.7 9:20 AM Page 16
Set Dial Mode
This phone comes set for touch tone ( ) dialing. If
you have dial pulse (rotary) service,you must set the
dial mode to .
1 Press . The screen displays
AM
2 Press or until the screen displays
AM
3 Press . The screen displays
AM
4 Use or to switch between and
.
5 When your desired setting is displayed,press
to save the setting.
1 6
Page 20

1412 2002.12.7 9:20 AM Page 17
TELEPHONE OPERAT I O N
Idle Scre e n
When the handset is within range of the base and not
on a call or in feature setup mode,the screen displays
AM
Other icons may also be displayed. See “Display Screen
Icons”for more information.
Make a Call
At the handset
1 Press a or ,then dial the number
—OR—
Dial the number,then press a or .
2 To end the call,press the button again
—OR—
Place the handset in the base.
At the Base
1 Press a or ,then dial the number.
The base speakerphone is automatically
activated.
2 To end the call,press the button again.
1 7
Page 21

1412 2002.12.7 9:20 AM Page 18
Answer a Call
When you re c e i ve an incoming call,a LINE light fl a s h e s
q u i ck ly to indicate which line the caller is using.
1 Press the appropriate button to answer
the call. If you are at the base,the
speakerphone is automatically activated.
2 To end the call,press the button again
—OR—
Place the handset in the base.
1 8
Page 22

1412 2002.12.7 9:20 AM Page 19
Vo l u m e
At the Handset
While you are on a call,you can use the key on the
right side of the handset to adjust the volume of what
you hear. The screen displays and the
current volume setting ( – ). Level is the highest
setting. Pressing the key c y cles through the vo l u m e
l evels continu o u s ly.
At the Base
While you are on a call,you can use VOLUME and
VOLUME on the base to adjust the volume of what
you hear through the base speakerphone. There are
eight volume level settings. When you reach the
maximum or minimum volume setting, you will hear
a tone.
1 9
Page 23

1412 2002.12.7 9:20 AM Page 20
R e d i a l
At the Handset
The handset stores the last five numbers dialed from
the handset.
1 Press . The screen displays the last
number dialed from the handset.
2 Use or to scroll through the numbers
stored in the redial memory.
3 Press a button. The phone automatically
calls the displayed number.
Erase a Number from Handset Redial Memory
1 Press . The screen displays the last
number dialed from the handset.
2 Use or to scroll through the numbers
stored in the redial memory.
3 When the number you want to erase is
displayed,press . The screen displays
2 0
AM
4 Press . The screen displays
AM
5 Press . The number is removed from
handset redial memory.
At the Base
You can redial the last number called from the base.
1 Press a button.
2 Press . The phone automatically calls
the last number dialed at the base.
Page 24

1412 2002.12.7 9:20 AM Page 21
Flash/Call Wa i t i n g
If you subscribe to Call Waiting service with your local
telephone service provider,you can answer a new
incoming call on the same line without losing your
current call.
1 When you receive a Call Waiting signal,press
to connect to the new call.
2 Press again to return to the original call.
NOTE: Use to access other phone
¥
company subscriber services as described by
your provider.
2 1
Page 25

1412 2002.12.7 9:20 AM Page 22
M u t e
At the Handset
1 Press or until the screen displays
2 Press . The other party will not be able to
hear you but you will still be able to hear the
other party.
To return to two-way conversation:
1 Press or until the screen displays
2 Press .
At the Base
Press to prevent the other party from hearing
you (you will still be able to hear the other party).
Press again to return to two-way conversation.
2 2
Page 26

1412 2002.12.7 9:20 AM Page 23
Te m p o r a ry Tone Dialing
If you have dial pulse (rotary) service,you can change
from dial pulse to touch tone dialing during a call.
1 Make the call and wait until it is connected.
2 Press . Keys pressed after this send
touch tone signals.
3 After you hang up,the phone automatically
returns to dial pulse (rotary) service.
2 3
Page 27

1412 2002.12.7 9:20 AM Page 24
Handset Locator
Page the handset from the base by pressing .
The handset will sound the intercom ring tone.
To cancel the page,press again on the base
or place the handset in the base. The tone will stop
after three minutes if it is not cancelled sooner.
2 4
Page 28

1412 2002.12.7 9:20 AM Page 25
DISPLAY SCREEN MESSAGES (HANDSET ONLY)
SCREEN DISPLAYS: WHEN:
The handset is establishing a line
connecting through the base.
The handset is unable to establish a line
connection through the base.
Battery charge is low.
The handset microphone is muted.
The handset is establishing a new line
connection.
The battery must be recharged. Place
handset in base.
You have unrev i ewed voice mail message s .
( You must subscribe to Voice Mail serv i c e
with your local telephone service prov i d e r. )
The Line 1 ri n ger is off.
The Line 2 ri n ger is off.
The ri n ge rs for Line 1 and Line 2 are off.
DISPLAY SCREEN ICONS (HANDSET ONLY)
THIS ICON: INDICATES
The battery needs to be recharged.
NEW
OLD
This call record has not been reviewed
This call record has been reviewed
2 5
Page 29

1412 2002.12.7 9:20 AM Page 26
HANDSET LIGHTS
LIGHT STATUS MEANS
LINE on steadily This line is in use.
BASE LIGHTS
LIGHT STATUS MEANS
LINE on steadily This line is in use.
flashing slowly This line is on hold.
flashing quickly There is an incoming call on this
line.
flashing slowly This line is on hold.
flashing quickly There is an incoming call on this
line.
C H A R G I N G on steadily The handset is charging in the
base.
flashing The handset was just placed in
the base.
INTERCOM on steadily The base and handset are on an
intercom call.
flashing The base is making or receiving an
intercom call.
MUTE on The base microphone is muted.
MESSAGES flash You have voice mail waiting for
this line. (You must subscribe to
Voice Mail service from your local
telephone service provider.)
on You have a new Caller ID record.
2 6
Page 30

1412 2002.12.7 9:20 AM Page 27
INTERCOM OPERAT I O N
At the Handset
Make an I n t e rcom Call
1 Press . The screen displays
.
2 When someone at the base answers the call
the handset screen displays and
you can speak with the party at the base.
3 Press at the handset or the base to
end the call.
If you make an intercom call while you’re already on a
phone call,the phone call is automatically placed on
hold.
If you try to make an intercom call when the base is
on a phone call, you will hear a warning tone and the
screen will display . The intercom call will not be
connected.
Answer an Intercom Call
1 Press . The screen displays
and you can speak with the party at the base.
2 Press at the handset or the base to
end the call.
Answer an Incoming Phone Call While on an
I n t e rcom Call
If you are on an intercom call when an incoming
phone call is received,you will hear a special ring at
the handset,the LINE light of the incoming call will
flash,and the screen will show caller information as
usual. You can answer the call by pressing for the
ringing line. The intercom call will automatically end.
2 7
Page 31

1412 2002.12.7 9:20 AM Page 28
At the Base
Make an I n t e rcom Call
1 Press . A paging tone will sound at
the handset and base until someone at the
handset answers the call.
2 Press at the base or handset to end
the call.
Make an Intercom Call While on a Phone Call
1 Press to place the phone call on hold.
2 Press to signal the handset. Speak
with the party at the handset.
3 Press the button of the phone call to
return to your original phone call.
If you try to make an intercom call when the handset
is on a phone call,you will hear a warning tone to
indicate that the intercom call cannot be connected.
Answer an Intercom Call
1 Press .
2 Press at the base or handset to end
the call.
Answer an Incoming Phone Call While on an
I n t e rcom Call
If you are on an intercom call when an incoming
phone call is received,the base will sound the
intercom tone and the LINE light of the incoming call
will flash. You can answer the call by pressing the
button of the ringing line. The intercom
call will automatically end.
2 8
Page 32

1412 2002.12.7 9:20 AM Page 29
C o n f e rence Calls
When the handset or base is on a phone call,someone
at the other location can join the call by pressing the
appropriate button.
T h re e - Way Conference Call
You can also use Lines 1 and 2 to establish a three-way
conversation at the handset or base.
At the Handset
1 Press a button and make a call.
2 Once the first call is established,press
to place the call on hold.
3 Press the other button and connect the
second call.
4 When the second call is established,press
or until the screen shows the conference
menu.
5 Press to connect both far end parties to
the conversation. Both LINE lights will remain
lit during the call.
NOTE: You cannot use during a three-way
¥
conference call.
At the Base
1 Press a button and make a call.
2 Once the first call is established,press
to place the call on hold.
3 Press the other button and connect the
second call.
4 When the second call is established press
to connect both far end parties to
the conversation. Both LINE lights will remain
lit during the call.
NOTE:You cannot use during a three-way
¥
conference call.
2 9
Page 33

1412 2002.12.7 9:20 AM Page 30
F o u r- Way Conference Call
You can connect four parties to a conversation using
Lines 1 and 2,the handset and the base.
1 Establish a three-way conference call at the
handset or base.
2 Once all three parties are connected,the
fourth party can press either button at
the base or handset not already connected to
the call. All four parties will now be able to
hear each other.
End a Conference Call
To release one of the outside parties from a confe re n c e
call,press for the party you wish to keep
connected. The other line will be disconnected.
To release the entire conference call,press the
buttons on the base and/or handset connected to
the call twice.
3 0
Page 34

1412 2002.12.7 9:20 AM Page 31
Place a Conference Call on Hold
While on a conference call,press on the handset
or base. All parties to the conference call are now
on hold.
To return to the conference call,press at
the base,or press on the handset when the screen
shows the conference menu.
Speak Privately with One Part y
You can speak with one party in a conference call
without disconnecting the other parties.
1 Press to place the entire conference call
on hold.
2 Press the button for the party you want
to speak with privately.
To return to the conference call with all parties,press
at the base
— OR —
Press or on the handset until the conference
menu appears on screen;then press .
3 1
Page 35

1412 2002.12.7 9:20 AM Page 32
Switch a Conference Call Between
Handset and Base
If you place a conference call from one location,
you can switch it to the other location without
disconnecting the call.
Switch from Handset to Base
1 At the handset,press .
2 At the base,press or ,then press
twice.
Now, the call is connected at the base and
automatically disconnected at the handset.
Switch from Base to Handset
1 At the base,press .
2 At the handset,press or then
press .
3 Press or at the handset until the
conference menu appears on screen;then
press .
Now, the call is connected at the handset and
automatically disconnected at the base.
3 2
Page 36

1412 2002.12.7 9:20 AM Page 33
D I R E C T O RY
This handset can store up to 50 telephone numbers
and names. Each number can be up to 24 digits long
and each name can be up to 15 characters long.
Entries are stored alphabetically
NOTE:You can exit the Directory at any time by
¥
pressing again.
S t o re a Number and Name in the Dire c t o ry
1 From the idle screen,press . The screen
displays
AM
(If the directory is empty, the screen displays
and then the screen above.)
2 Press . The screen displays
AM
3 Use the keypad to enter the number you want
to store.
The screen displays the number on the second
line as you enter it. P ress to backspace
and delete the previous digi t . To enter a pause
in the dialing sequence,p ress and hold the
d i git just befo re you want the phone to pause
when dialing.
AM
3 3
Page 37

1412 2002.12.7 9:20 AM Page 34
4 Press when you finish entering the
number. The screen displays
NOTE: Every directory entry must include a
¥
number. If you press without entering a
number, the screen will not change and you will
not be able to enter a name.
5 Use the keypad and the chart on page 37 to
enter the name. The screen displays
AM
AM
To add a space or move to the next position,
press . Press to backspace and delete the
previous character.
6 Press when you finish entering the name.
The screen displays ,then
AM
NOTE: Every directory entry must include a
¥
name. If you press without entering a
name, the screen will not change and you will
not be able to complete the directory entry.
7 Press or to switch between
and .
If you want the phone to alert you with a
special ring when you receive an incoming
call with Caller ID information from this
number,set this directory entry to
. Choose
if you do not wish to hear the special alert.
8 Press to confirm the ring setting and save
the new directory entry.
3 4
Page 38

1412 2002.12.7 9:20 AM Page 35
S t o re a Number from Handset Redial
in the Dire c t o ry
1 Press . The screen displays the last
number dialed from the handset.
2 Use or to scroll through the numbers
stored in the handset redial memory.
3 When the number you want to store in the
directory is displayed,press . The screen
displays
AM
4 Press . The displayed number is stored in
the directory and the screen displays
5 Use the keypad and the chart on page 37 to
enter the name. The screen displays
To add a space or move to the next position,
press . Press to backspace and delete the
previous character.
6 Press when you finish entering the name.
The screen displays ,then
NOTE: Every directory entry must include a
¥
name. If you press without entering a
name, the screen will not change and you will
not be able to complete the directory entry.
AM
AM
AM
3 5
Page 39

1412 2002.12.7 9:20 AM Page 36
7 Press or to switch between
and .
If you want the phone to alert you with a
special ring when you receive an incoming
call with Caller ID information from this
number,set this directory entry to
. Choose
if you do not wish to hear the special alert.
8 Press to confirm the ring setting and save
the new directory entry.
3 6
Page 40

1412 2002.12.7 9:20 AM Page 37
Keypad Characters
D i a l P re s s e s
K e y 1 2 3 4 5 6
1
A B C 2
D E F 3
G H I 4
J K L 5
M N O 6
P Q R S 7
T U V 8
W X Y Z 9
0
*
&
’
, - . #
3 7
Page 41

1412 2002.12.7 9:20 AM Page 38
Dial a Number in the Dire c t o ry
1 Press . The screen displays
AM
2 Press or to scroll through the directory
entries
— OR —
Press ,then enter the first letter of the
stored name you want to find. The screen
displays the first entry starting with this letter.
3 Continue entering the letters of the name you
want to find until the correct directory entry
appears on the screen
— OR —
Use or to scroll through the directory.
4 When the number you want to call is
d i s p l ayed on scre e n ,p ress for the line
you want to use to dial the call. The call is
dialed automatically.
— OR —
Press to allow the phone to automatically
select a free line and dial the call.
3 8
Page 42

1412 2002.12.7 9:20 AM Page 39
Edit a Number/Name in the Dire c t o ry
1 Press . The screen displays
AM
2 Press or to scroll through the directory
entries
— OR —
Press ,then enter the first letter of the
stored name you want to find. The screen
displays the first entry starting with this letter.
3 Continue entering the letters of the name you
want to find until the correct directory entry
appears on the screen
— OR —
Use or to scroll through the directory.
4 When the entry you want to change is
displayed,press . The screen displays
AM
5 Press until the screen displays
or .
6 Press when the option you wish to
choose is displayed.
7 Use the keypad and the chart on page 37 to
edit the name or number. To add a space or
move to the next position,press . Press
to backspace and delete the previous
character. To enter a pause in the dialing
sequence,press and hold the digit just before
you want the phone to pause while dialing.
8 When you are finished making your changes,
press to save the revised entry. The
screen displays the revised entry. You can
now search for another entry or return to the
idle screen by pressing .
3 9
Page 43

1412 2002.12.7 9:20 AM Page 40
Delete a Dire c t o ry Entry
1 Press .
2 Press or to scroll through the directory
entries
— OR —
Press ,then enter the first letter of the
stored name you want to find. The screen
displays the first entry starting with this letter.
3 Continue entering the letters of the name you
want to find until the correct directory entry
appears on the screen
— OR —
Use and to scroll through the directory.
4 When the entry you want to delete is displaye d ,
press . The screen displays
AM
5 Press to exit without deleting the entr y
— OR —
Press to delete the entry. The screen
displays the next entry.
4 0
Page 44

1412 2002.12.7 9:20 AM Page 41
Tu rn Distinctive Ring On/Off
If you want the phone to alert you with a special ring
when you receive an incoming call with Caller ID
information which matches a specific directory entry,
set that directory entry to .
Choose if you do not wish to hear the
special alert. If an entry is set for distinctive ringing,
appears next to the entry name on screen.
1 Press . The screen displays
AM
2 Press or to scroll through the directory
entries
— OR —
Press ,then enter the first letter of the
stored name you want to find. The screen
displays the first entry starting with this letter.
3 Continue entering the letters of the name you
want to find until the correct directory entry
appears on the screen
— OR —
Use or to scroll through the directory.
4 When the entry you want to change is
displayed,press ,press or until the
screen displays.
AM
Then press .
5 Press or to switch between
and .
6 Press to save the ring setting. The screen
displays the revised entry.
4 1
Page 45

1412 2002.12.7 9:20 AM Page 42
BASE MEMORY
This base can store up to 10 telephone numbers. Each
number can be up to 24 digits long.
S t o re a Number in Base Memory
1 P ress and hold until you hear a beep.
2 Use the keypad to enter the number you want
to store
— OR —
Enter the last number dialed at the handset by
pressing .
3 When you are finished entering the number to
be stored,press .
4 Press the key for the location where you want
to store the number ( – ). The number is
now saved. You will hear a confirmation tone.
4 2
Page 46

1412 2002.12.7 9:20 AM Page 43
Dial a Base Memory Number
1 Press a button.
2 Press . Then press the number key of
the number you want to dial.
3 The number is automatically dialed.
4 3
Page 47

1412 2002.12.7 9:20 AM Page 44
CALLER ID OPERAT I O N
If you subscribe to Caller ID service with your local phone service
provider,this handset stores all incoming calls with valid Caller ID
information in call history. Name,number,time and date information
can all be stored,if they are sent with the call. The line on which the
call was received appears next to the phone number on the screen
display ( or ). Calls are automatically stored in the order they are
received,with call “1”stored as the oldest call. The call history number
appears in the bottom right corner of the screen along with NEW for
unreviewed or OLD for previously reviewed call information.
If an incoming phone number matches the most recent record in call
history,the new date and time will replace the older date and time. All
other incoming call information which matches a record already in call
history will be entered as a call.
If Caller ID information has been received you can see a summary of the
new calls in call history on the idle screen.
AM NEW
4 4
Page 48

1412 2002.12.7 9:20 AM Page 45
Review Call History
1 From the idle screen press . The screen
displays the most recent call record in call
history.
AM NEW
If there are no calls in call history,the screen
will show ,and return to the idle
screen after five seconds.
2 Use or to scroll through call history.
3 To exit call history,press and hold until
you hear a tone.
4 5
Page 49

1412 2002.12.7 9:20 AM Page 46
Remove a Call Record
1 From the idle screen press . The screen
displays the most recent call record in call
history.
AM NEW
2 Use or to scroll through call history and
find the record you want to delete.
3 When the record you want to delete is
displayed,press . The screen displays
4 Press to delete the displayed call record.
NOTE: To exit without removing the call record,
¥
press at any time.
AM NEW
4 6
Page 50

1412 2002.12.7 9:20 AM Page 47
S t o re a Call Record in the Dire c t o ry
1 From the idle screen press . The screen
displays the most recent call record in call
history.
AM NEW
2 Use or to scroll through call history
and find the record you want to store in the
directory.
3 When the record you want to store in the
directory is displayed,press . The screen
displays
AM NEW
4 Press or until the screen displays
AM NEW
5 Press three times. The displayed call
record is now stored in the handset directory.
See DIRECTORY b e ginning on page 33 fo r
detailed instructions for using the handset
d i re c t o ry.
4 7
Page 51

1412 2002.12.7 9:20 AM Page 48
Display Dial
While you are reviewing call history, you can dial a
number displayed on the screen.
1 From the idle screen press . The screen
displays the most recent record in call history.
AM NEW
2 Use or to scroll through call history and
find the number you want to call.
3 When the record for the party you want to
call is displayed,press a button. The
handset automatically dials the number as it
is displayed.
4 8
Page 52

1412 2002.12.7 9:20 AM Page 49
Dialing Options
If necessary,you can change the format of a displayed
number so that it will be dialed differently than it
appears in call history.
1 When the record for the party you want to
call is displayed,press . The screen
displays
AM NEW
2 Press . The screen displays
AM NEW
3 Press ,then press until the number
appears the way you want to dial it.
For example: (The number is 908 555 1212)
1908 555 1212
555 1212
1 555 1212
908 555 1212
The number of dialing alternates available for
each call displayed depends on the format of
the original call.
4 When the number is displayed the way you
want to dial it,press to dial the call.
4 9
Page 53

1412 2002.12.7 9:20 AM Page 50
B AT T E R I E S
Battery Life
Battery life depends on how far the handset is from the base,and other
environmental conditions.
NOTE: For optimum performance, charge your handset on the
¥
base every night.
Charge the Handset Battery Pack
• This battery should remain charged for up to nine days. A fully
charged battery provides an average talk time of about nine hours.
• The battery pack needs charging when:
• The batter icon ( ) flashes.
• A warning tone sounds,or
• The screen displays or
when idle.
• Place the handset in the base so the CHARGING light goes on. The
battery pack typically charges in eight hours. For best results,the
initial charge should be overnight.
• You can keep the battery fully charged by returning the handset to
the base after each use.
• If you repeatedly get a low battery indicator,even after eight
hours of charging, the battery should be replaced. Use onlyAT&T
Battery 3301,SKU #91076.
5 0
CAUTION: Charge the battery provided with or identified for
use with this product only in accordance with the instructions
and limitations specified in the User’s Manual, Part 1.
Page 54

1412 2002.12.7 9:20 AM Page 51
Replace the Handset Battery Pack
1 Install the handset battery.
Use onlyAT&T Battery 3301,SKU #91076.
a) Remove battery
compartment
cover by
pressing on
the indentation
and sliding
downward.
c ) Place battery pack in
c o m p a rtment with the
w i res in the lower left
c o rn e r,along the
bottom of the battery
p a ck .
b) Align two
holes in plug
with socke t
p i n s ,and snap
the plug into
p l a c e .
d) Replace
cover by
sliding it up
into place.
2 Charge the handset battery.
Place the handset in the base. C h a rge the battery ove rnight the
fi rst time. After the fi rst ch a rge ,the battery typically fully
charges in eight hours.
5 1
Page 55

1412 2002.12.7 9:20 AM Page 52
IN CASE OF DIFFICULT Y
If you have difficulty operating this phone,try the suggestions below.
For Customer Service,visit our website at www.telephones.att.com
or call 1 800 222–3111. Please retain your receipt as your proof
of purc h a s e.
PHONE
PROBLEM SOLUTION
If the phone does not • Make sure the power cord is plugged
work at all, check these into the base and an electrical outlet
items first: not controlled by a wall switch.
If the above suggestions do not solve the problem,try re-initializing the
handset and base (see “To re-initialize the handset and base”).
• Make sure the telephone line cord is
plugged firmly into the base unit and
the telephone jack.
• Make sure the battery pack is installed
correctly.
PROBLEM SOLUTION
If you have no dial tone: Check all the previous suggestions.
If you still do not hear a dial tone,
disconnect the phone and try another
phone in the same jack. If there is
no dial tone on that phone either,the
problem is probably in your wiring or local
service.
PROBLEM SOLUTION
If you hear a long •The handset and base are not
tone when you try to communicating properly. You might be
use the handset: out of range. Move closer to the base
and try again.
• If moving closer to the base does
not help,follow the directions “To
re-initialize the handset and base.”
PH
5 2
Page 56

1412 2002.12.7 9:20 AM Page 53
PHONE
PROBLEM SOLUTION
To re-initialize the 1 Disconnect the power to the base.
handset and base:
PROBLEM SOLUTION
If you hear noise or •You may be out of range. Move closer to
interference when the base.
using the phone:
2 Remove the handset battery pack.
3 Wait at least 15 seconds.
4 Insert the handset battery pack.
5 Connect the power to the base.
• Press or until the screen displays
,then press . If
noise is exceptionally loud,move closer
to the base before changing channels.
• Household appliances plugged into the
same circuit as the base can sometimes
cause interference. Try moving the
appliance or the base to another outlet.
•The layout of your home or office may
be limiting the operating range. Try
moving the base to another location,
preferably on an upper floor.
• Using the handset near household
appliances (microwaves,computers,
televisions,stereos,etc.) can sometimes
cause interference. Move away from
appliances while using the handset.
PROBLEM SOLUTION
If you hear other calls • Press or until the screen displays
while using your phone: , then press .
• Disconnect the base from the modular
j a ck and plug in a corded telephone. I f
you still hear other calls,the pro blem is
p ro b ably in your wiring or local serv i c e .
Call your local telephone service company.
5 3
Page 57

1412 2002.12.7 9:21 AM Page 54
PHONE
PROBLEM SOLUTION
If you lose a call after You we re pro b ably almost out of ra n ge .
changing channels: Move closer to the base before changing
PROBLEM SOLUTION
If the phone does not • Make sure the ringers are on. (See “Set
ring when you receive Line 1 Ringer”and “Set Line 2 Ringer”in
a call: the FE ATURE SETUPsection of this manu a l .
channels. Before placing another call,
set the handset in the base for at least
15 seconds.
• Make sure the telephone line cord is
connected firmly to the base and the
telephone jack.
• Make sure the AC adapter is plugged
firmly into an electrical outlet not
controlled by a wall switch.
•You might be too far from the base;move
closer.
•You might have too many extension
phones on your telephone line to allow
all of them to ring. Try unplugging some
of them.
PROBLEM SOLUTION
If your telephone • If you have dial pulse (rotary) service,
misdials: you’ll need to set the dial method to
. Follow the instructions under
“Set Dial Mode”in the FEATURE SETUP
section of this manual.
• If you have touch tone service and you
hear clicks while you are dialing, you’ll
need to set the dial method to .
Follow the instructions under “Set Dial
Mode”in the FEATURE SETUP section of
this manual.
5 4
Page 58

1412 2002.12.7 9:21 AM Page 55
PHONE
PROBLEM SOLUTION
If you are unable to If you have dial pulse (rotary) service,
operate special follow the directions under “Temporary
telephone services or Tone Dialing”in the TELEPHONE
other equipment OPERATION section of this manual.
requiring touch tone
signals:
CALLER ID
PROBLEM SOLUTION
If the caller’s name or • Make sure you subscribe to Caller ID
phone number is not service from your local telephone
displayed: company.
• Make sure the battery is charged.
• Caller ID service might not work when
the phone is connected to a Private
Branch Exchange (PBX).
PROBLEM SOLUTION
If the caller’s name or •You should call your service provider to
phone number is not confirm that you subscribe to combined
displayed during Caller ID with Call Waiting service.
Call Waiting:
• Caller ID information received during
Call Waiting is displayed only on the
handset that is in use.
• Make sure the battery is charged.
5 5
Page 59

1412 2002.12.7 9:21 AM Page 56
D E FA U LT SETTINGS
DEFAULT SETTINGS
FUNCTION: DEFAULT SETTING:
Line 1 Ringer ON:1
Line 2 Ringer ON:1
Voice Messages ON
Time 12:00 AM
Date 1/01
Dial Mode TONE
5 6
Page 60

1412 2002.12.7 9:21 AM Page 57
TECHNICAL SPECIFICAT I O N S
TECHNICAL SPECIFICATIONS
Frequency Control Crystal controlled
Transmit Frequency
Handset 912.75 –917.10 MHz
Base 2411.15 – 2418.40 MHz
Receive Frequency
Handset 2411.15 – 2418.40 MHz
Base 912.75 – 917.10 MHz
Channels 30 Channels
N o rmal Effective Range Maximum power allowed by FCC and IC.
PLL synthesizer
Actual operating range may vary according
to environmental conditions at the time
of use.
Size
Handset 193mm x 60mm x 40.5mm
(including antenna)
Base 193.4mm x 172.4mm x 76.8mm
(including antenna)
Weight
Handset 159 grams
Base 536 grams
(excluding battery pack)
Power Requirements
Handset 3.6V 600mAh Ni-Cd Battery Pack
Base 9V DC @ 500mA
Memory
Base Speed Dial 10 Memory locations
24 digits per location
SPECIFICATIONS ARE TYPICAL AND MAY CHANGE WITHOUT NOTICE.
5 7
Page 61

1412 2002.12.7 9:21 AM Page 58
I N D E X
B
base ringers 5
Base unit 1
25,50
27
C
Call History 2,44–49
Call Waiting service 21
Call Waiting signal 21
Caller ID information 44, 55
Caller ID service 2,44,55
Caller ID with Call Waiting 2,55
caller’s name or phone number
is not displayed during Call
Waiting 55
27
53
25
25
D
41
49
dial mode 16
dial pulse (rotary) service 23
34,36,41
E
39
39
34,35
H
hands-free 8
Handset 1
handset battery 3,5, 50,51
Handset Redial Memory 20
handset ringer 11, 12
I
13
27
Intercom Call 27,28
L
25
25
25
25
LINE light 18,27–29
long tone when your try to use
the handset 52
lose a call after changing
channels 54
M
MESSAGES WAITING light 13
N
25,50
NEW
44
no dial tone 52
33
noise or interference when using
the phone 53
34,36,41
5 8
Page 62

1412 2002.12.7 9:21 AM Page 59
O
44
OLD
P
phone does not ring 54
phone does not work at all 52
16,54
R
re-initialize the handset and
base 53
ringer type 11,12
S
25
T
telephone misdials 54
16,54
touch tone 23
22,25
17,22
V
voice messages indicator 13
volume 19
19
5 9
 Loading...