

Page 1

gebruiksaanwijzing
instructions for use
mode d’emploi
Gebrauchsanweisung
koelkast
refrigerator
réfrigérateur
Kühlschrank
Page 2
Table of Contents
Entry
Important Safety Instruction
Identification of Parts
Where to Install
Door Removal
Mount the freezer and refrigerator compartment
Feed Water Pipe Installation
Height Adjustment
Getting started
Designation of Functional Adjustment Board
Adjusting the Temperatures and Functions
Automatic Ice maker & Dispenser
Home bar
Shelf
Egg Box
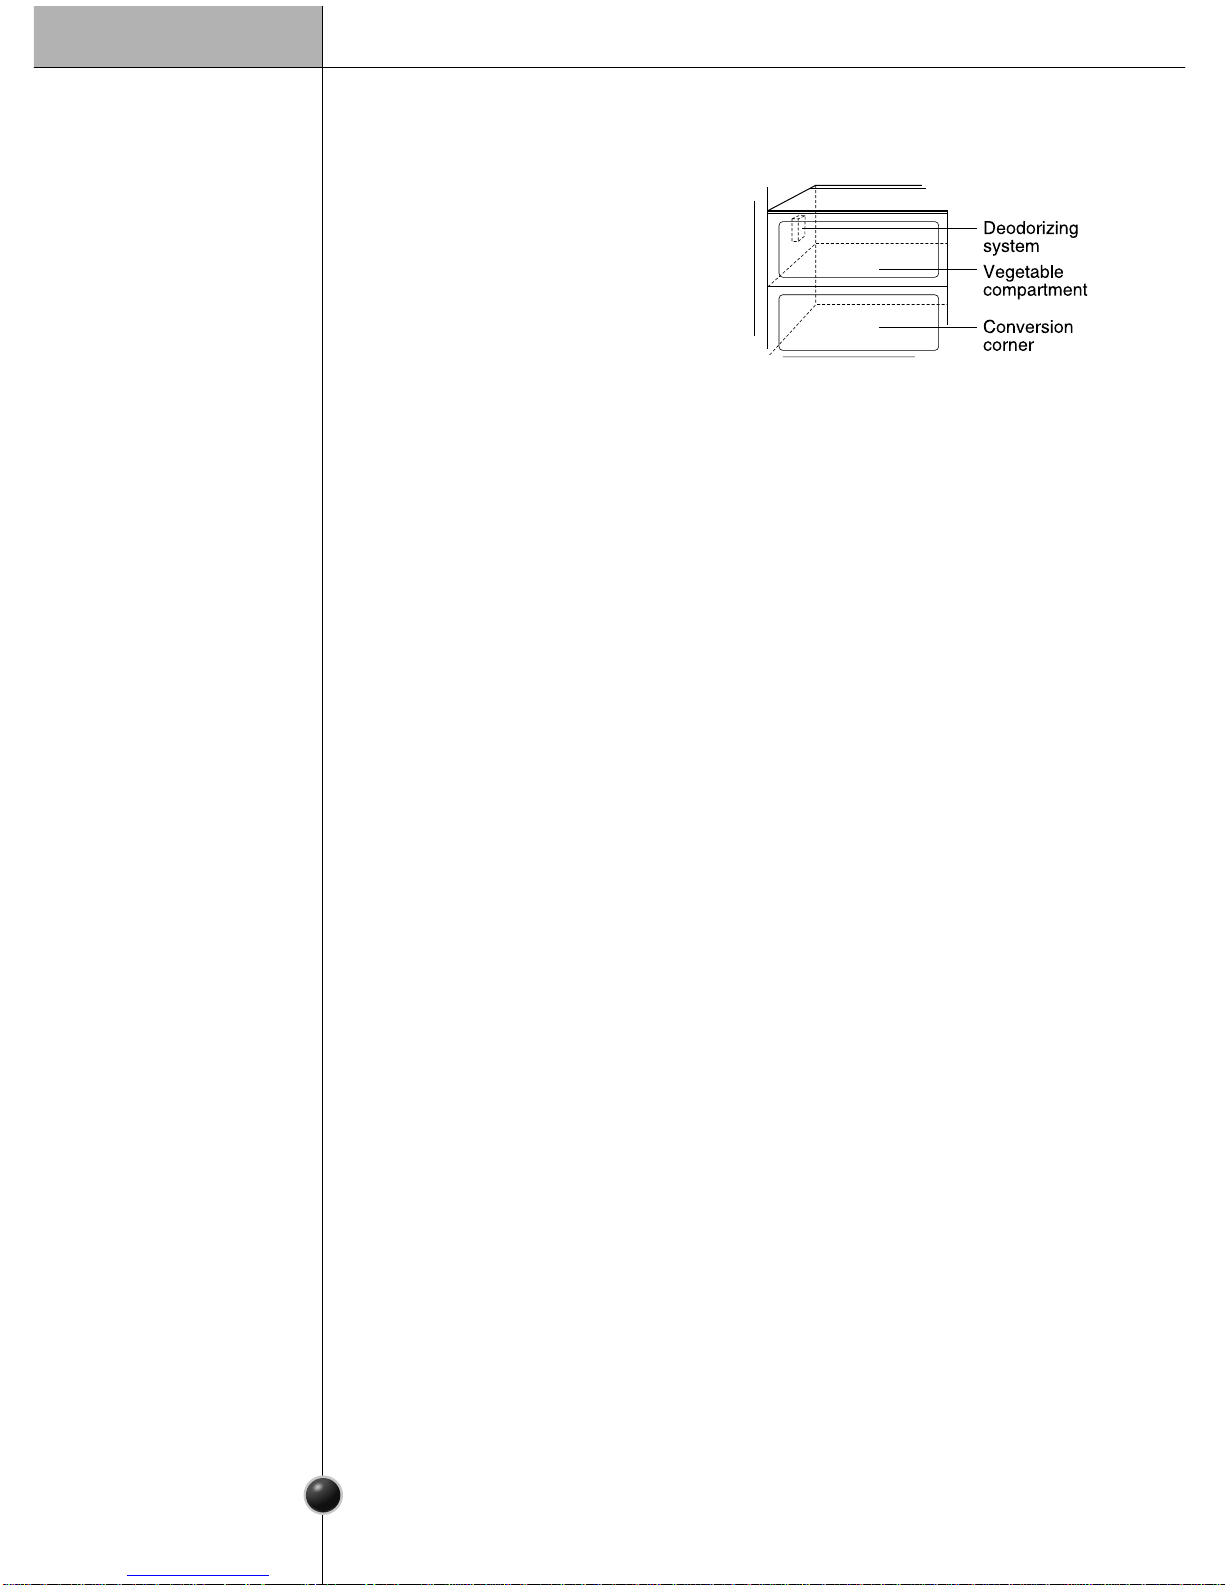
Convert into a Vegetable or fresh compartment
Deodorizer
Location of Foods
Storing Foods
How to Dismantle Parts
General Information
Cleaning
Trouble Shooting
Introduction
Installation
Operation
Suggestion on
food
storage
Care and
maintenance
3
3
4
5
6
7
7
8
9
9
10
11
14
15
16
16
17
18
19
20
22
22
23
2
Page 3

Entry
The model and serial numbers are found on the inner case of the refrigerator
compartment of this unit. These numbers are unique to this unit and not
available to others. You should record requested information here and retain
this guide as a permanent record of your purchase. Staple your receipt here.
Date of Purchase :
Dealer Purchased From :
Dealer Address :
Dealer Phone No. :
Model No. :
Serial No. :
Before it is used, this refrigerator must be properly installed and located in accordance
with the installation instructions in this document.
Never unplug your refrigerator by pulling on the power cord. Always grip plug firmly and
pull it straight out from the outlet.
When moving your appliance away from the wall, be careful not to roll over the power
cord or to damage it in any way.
After your refrigerator is in operation, do not touch the cold surfaces in the freezer
compartment
, particularly when your hands are damp or wet. Skin could adhere to
these extremely cold surfaces.
Unplug the power cord from the power outlet for cleaning or other requirements. Never
touch it with wet hands because you can get an electric shock or be hurt.
Never damage, process, severely bend, pull out, or twist the power cord because power
damage to the cord may cause a fire or electric shock. You have doubts on whether the
appliance is properly grounded.
Never place glass products in the freezer because they may be broken due to expansion
when their contents are frozen.
Never allow your hands within the ice storage bin of the automatic ice maker. You could
be hurt by the operation of the automatic ice maker.
Never allow anyone to climb, sit, stand or hang on the Home Bar door. These actions
may damage the refrigerator and even tip it over, causing severe personal injury.
If possible, connect the refrigerator to its own individual electrical outlet to prevent it and
other appliances or household lights from causing an overload that could cause a power
outage.
If the supply cord is damaged, it must be replaced by a special cord or assembly from
the manufacturer or its service agent.
Don’t use an
extension cord
Power cord
replacement
Introduction
3
Important Safety Instruction
Page 4
4
Identification of Parts
DANGER: Risk of child entrapment.
Before you throw away your old refrigerator or freezer:
Take off the doors but leave the shelves in place so that children may not easily climb
inside.
The appliance is not intended for use by young children or infirm persons without
supervision.
Young children should be supervised to ensure that they do not play with the appliance.
Don’t store or use gasoline or other flammable vapor and liquids in the vicinity of this or
any other appliance.
In the event of an electric short circuit, grounding (earthing) reduces the risk of electric
shock by providing an escape wire for the electric current.
In order to prevent possible electric shock, this appliance must be grounded
Improper use of the grounding plug can result in an electric shock. Consult a qualified
electrician or service person if the grounding instructions are not completely
understood, or if you have doubts on whether the appliance is properly grounded.
Child entrapment
warning
Don’t store
Grounding (Earthing)
Introduction
•
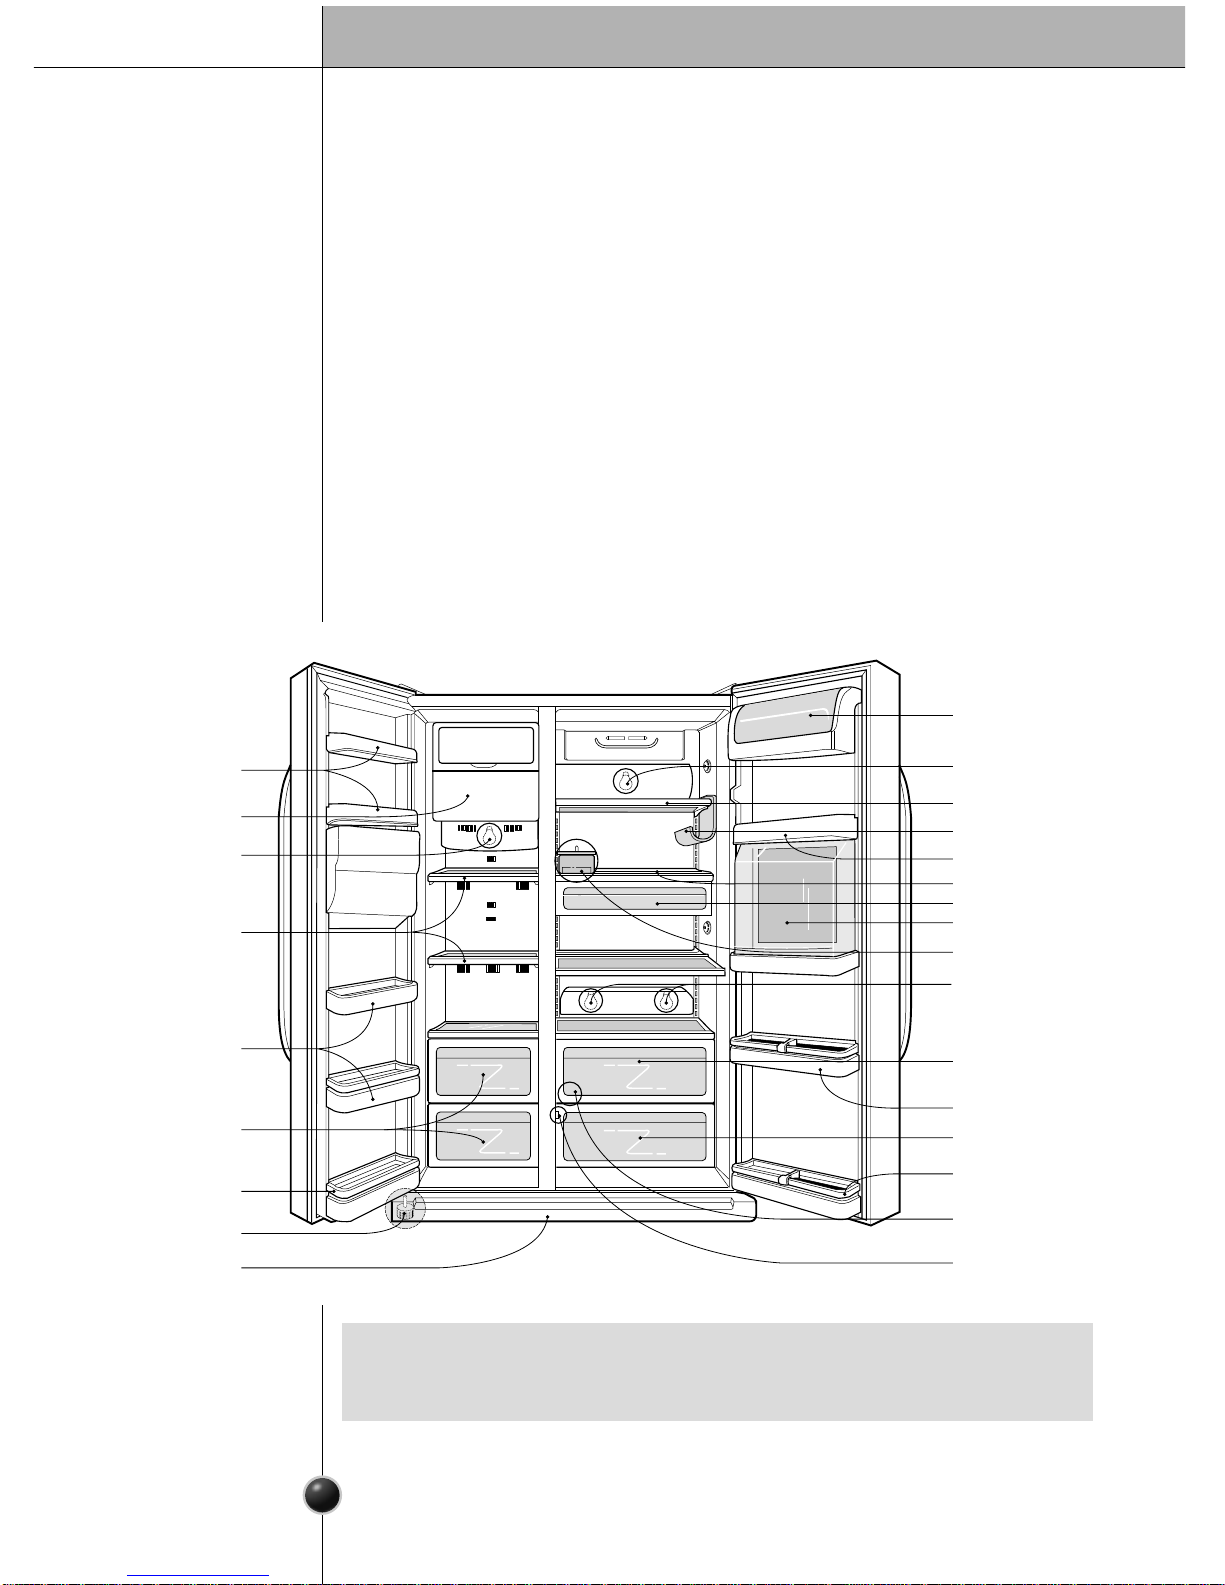
If you found some parts missing from your unit, they may be parts only used in other
models. (i.c. the “Home Bar” is not included in all models)
NOTE
Freezer
Compartment
Refrigerator
Compartment
Dairy Compartment
Door Rack
Automatic
Ice Maker
Lamp
Shelf
Door Rack
Drawer
Door Rack
Support
Height
Adjusting screw
Lower Cover
Lamp (Upper)
Shelf
Door Rack
Shelf (Slide Type)
Snack Drawer
Home Bar
Egg Box
Lamp (Lower)
Vegetable Drawer
Door Rack
Vegetable
Drawer/Fresh Drawer
Door Rack Support
Deodorizer
Conversion Switch
(Vegetable Drawer/
Fresh Drawer)
Wine Storage Rack
(Optional)
Page 5
Installation
5
Strong
and even floor
A proper
distance from
adjacent items
Where feed
water pipe can
be easily
connected in a
dry place
Where is free
from heat or coal
gas
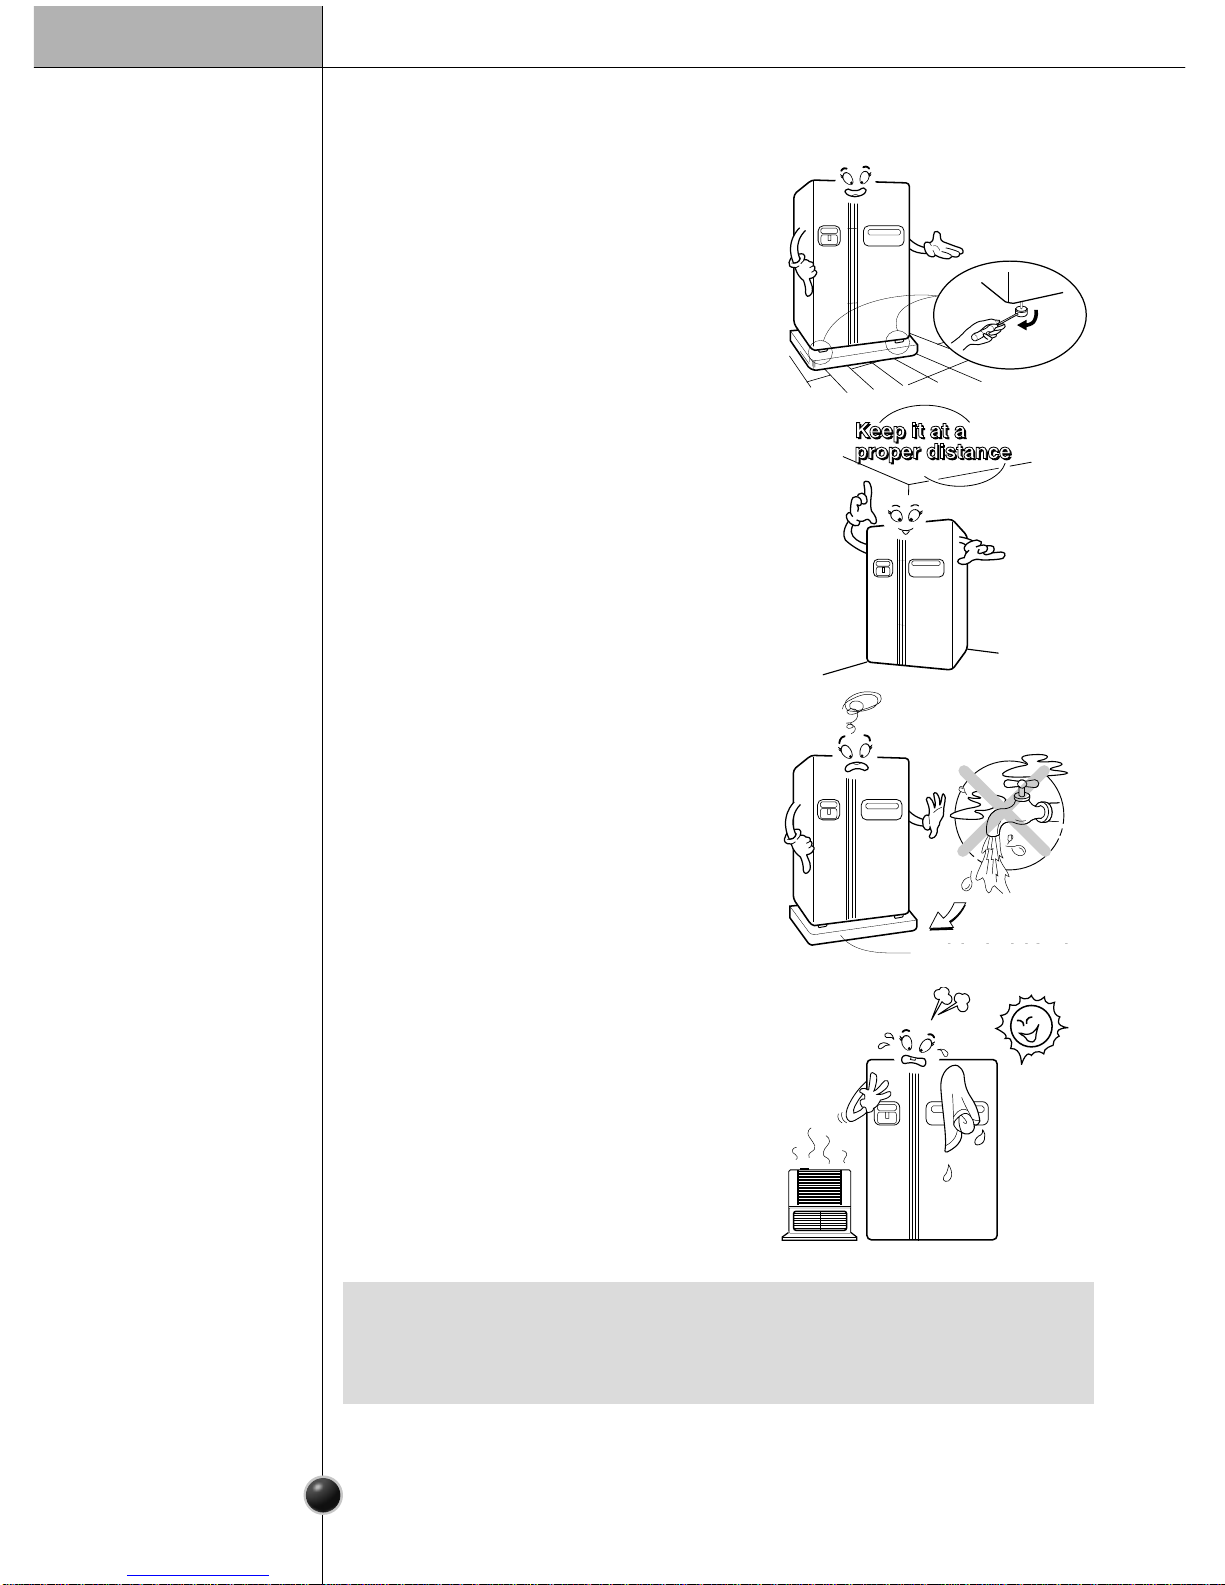
Please keep the refrigerator at a proper
distance from other things. Too small a
distance from adjacent items may result in
lowered freezing capability and increased
electricity charges consumption.
Select a place where a feed water pipe can
be easily connected between the automatic
ice maker and dispenser.
A wet or near-water place, refrigerator may
be rusted or electricity may be leaking
Places where ambient temperature are
high, freezing capability is deteriorated and
electric charge is increased.
Coal gas and smoke may discolor the
appearance of refrigerator.
Height
Acolchado del fondo
Where to lnstall
Unstable installation may cause vibration and
noise. If the floor to install the refrigerator on
is not even, make the refrigerator level by
rotating the height adjusting screw. Carpet
or floorcloth on which a refrigerator is
installed may be discolored by heat from the
bottom of the refrigerator. So, it is necessary
to place a thick pad below the refrigerator.
•
Install the refrigerator at a place where the ambient temperature is 5˚C~43˚C.
Too high or low ambient temperature may cause functional troubles. Also, the tube
between the dispenser and automatic ice maker may be frozen.
NOTE
Bottom Pad
Page 6
Door Removal
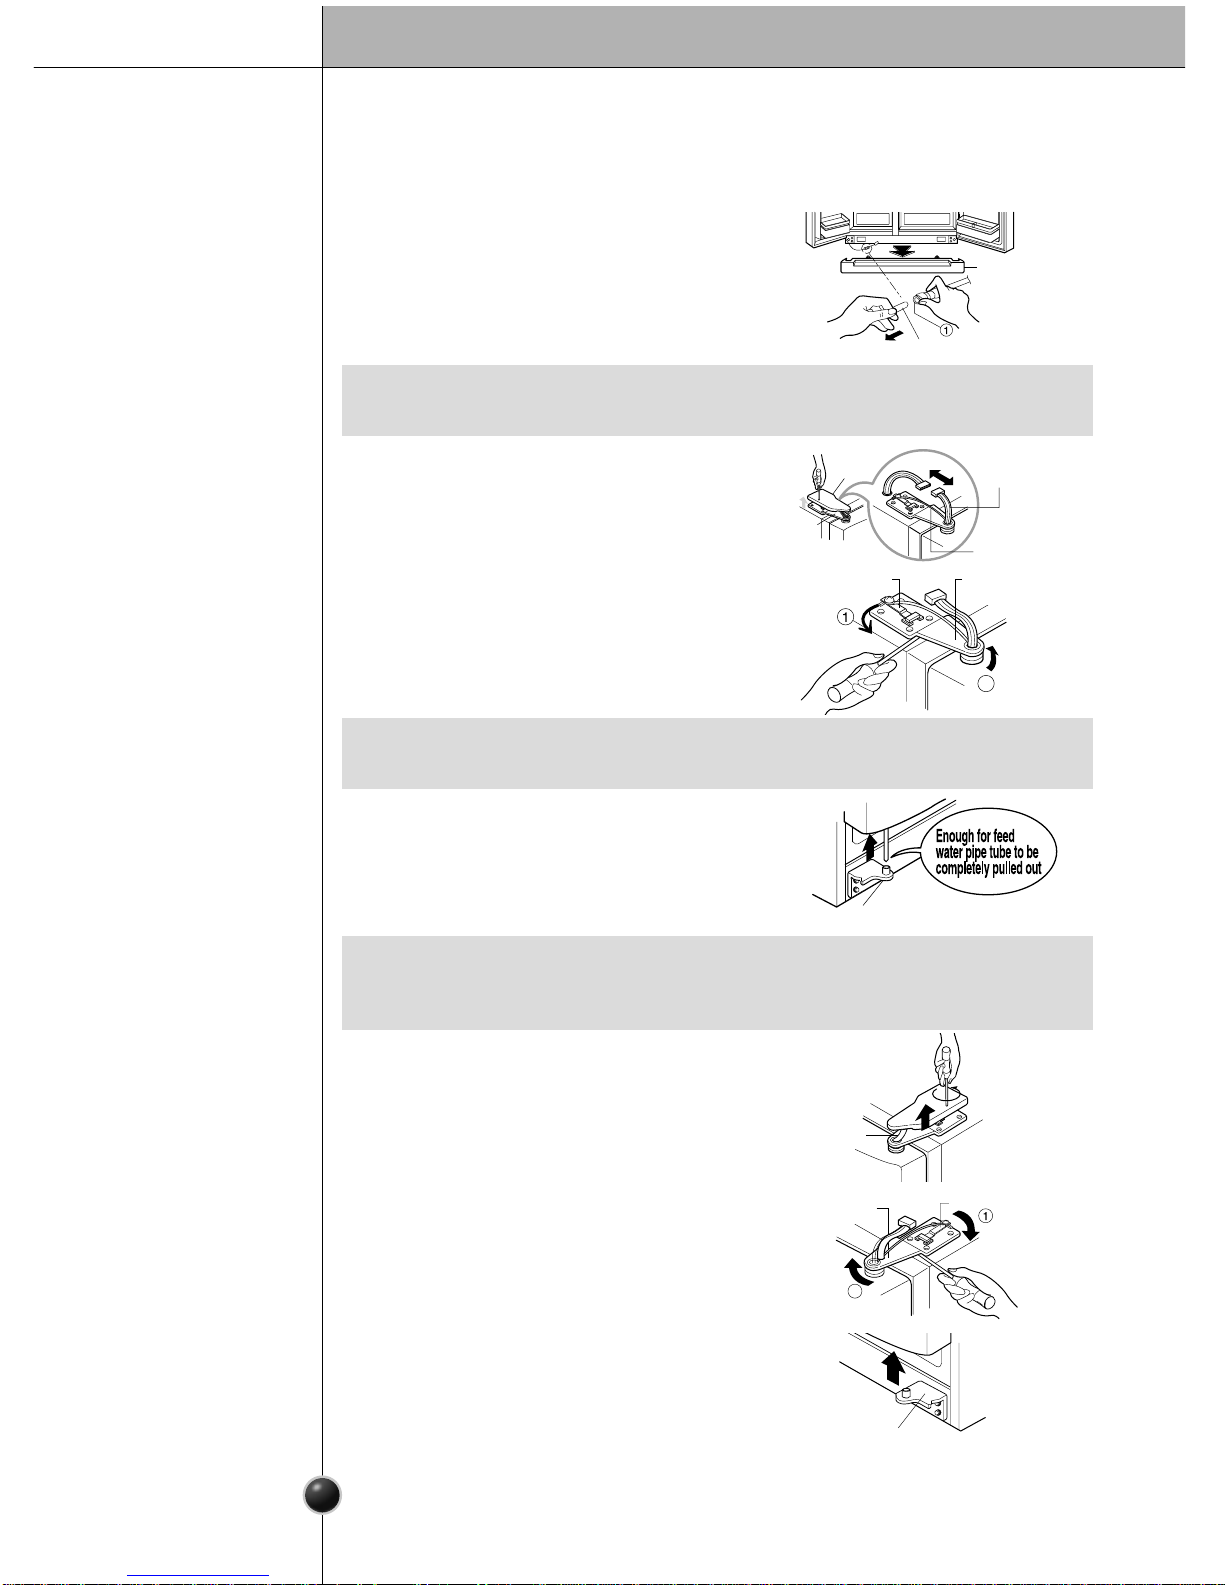
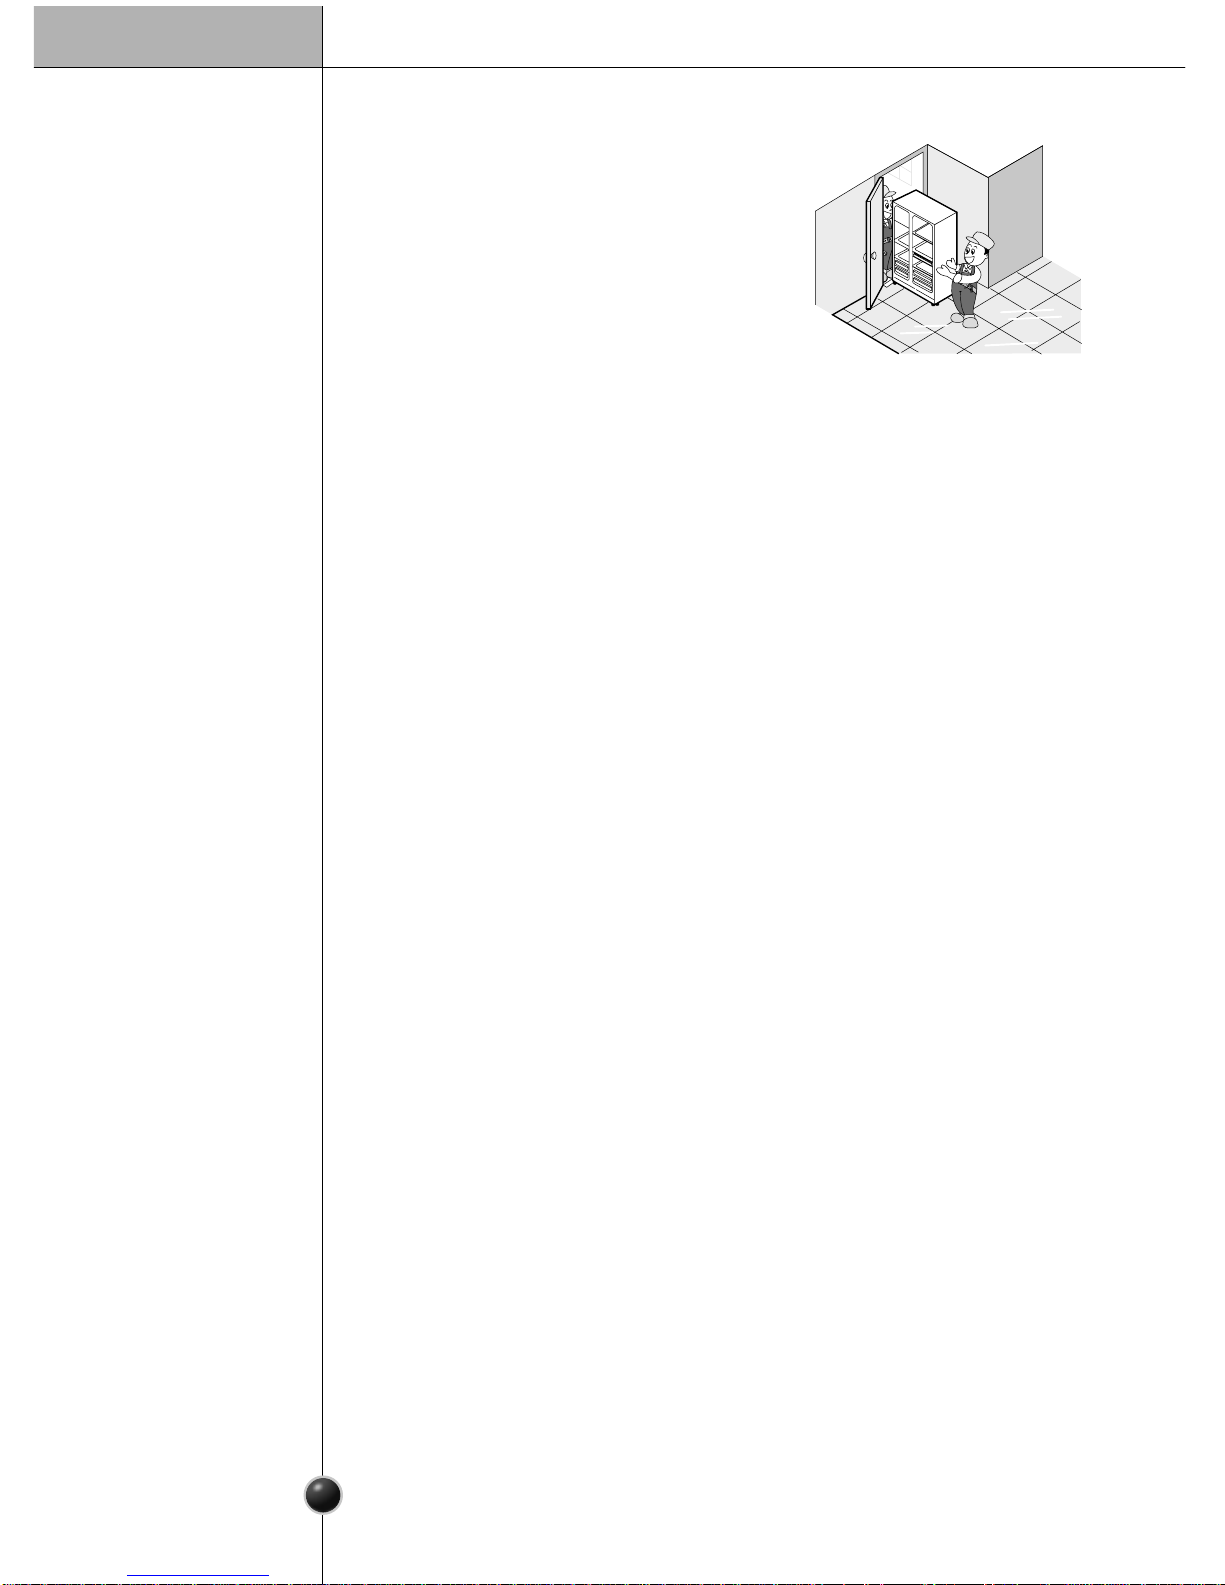
If your access door is too narrow for the refrigerator to pass the through, remove
the refrigerator door and pass the refrigerator
laterally.
Remove the lower cover by lifting upward, and
then pull up the feed water tube while pressing
area "shown in the figure to the right.
Remove lower
cover and
then feed water
pipe
Remove the
freezer
compartment
door
Remove the
refrigerator
door
Installation
6
1) Separate all connection wires except for the
earth line after removing the hinge cover by
loosening the screws.
2) Remove the keeper by rotating it to counted
clockwise (
")
and then lifting the upper
hinge up (
# ).
3) Remove the freezer compartment door by
lifting it upward. This time, the door should
be lifted enough for the feed water pipe tube
to be completely pulled out.
1) Loosen the hinge cover screws and remove
the cover. Remove all connection wires, if
any, except for the earth line
2) Remove keeper by rotating it clockwise (")
and then remove the upper hinge by lifting
it up (
#
).
3) Remove the refrigerator compartment door
by lifting it up.
•
If a tube end is deformed or abraded, cut the part away.
NOTE
•
In removing the upper hinge, be careful so that the door does not to fall over frontward.
NOTE
•
Move the refrigerator compartment door passing through the access door and
laying it down but be careful not to damage the feed water pipe tube.
NOTE
2
Lower
Cover
Lower Hinge
Lower
Hinge
Keeper
Feed Water Tube
2
Connection
wires
Connection
wires
Hinge
Cover
Upper
Hinge
Upper
Hinge
Keeper
Upper
Hinge
Earth Line
Page 7
7
Mount the freezer and refrigerator
compartment doors
Feed water pipe Installation
Pass the refrigerator laterally through the access
door as shown in the right figure.
$
Automatic ice maker operation needs water pressure of 147~834 kPa (1.5~8.5
kgf/cm2) (That is, an instant paper cup (180cc) will be fully filled within 3 sec.).
$
If water pressure does not reach the rating 147kPa (1.5 kgf/cm2) or below, it is
necessary to purchase a separate pressure pump for normal automatic icing and
cool water feed.
$
Keep the total length of the feed water pipe tube within 12m and be careful for the
tube not be bent straightly. If the tube is 12m or longer it may cause trouble in
water feed owing to the drain water pressure.
$
Install the feed water pipe tube at a place free from heat.
$
Connect to potable water supply only.
Mount them in the reverse sequence of removal after they pass through the access
door.
Pass the
refrigerator
Before
installation
Warning
Installation
Page 8
8
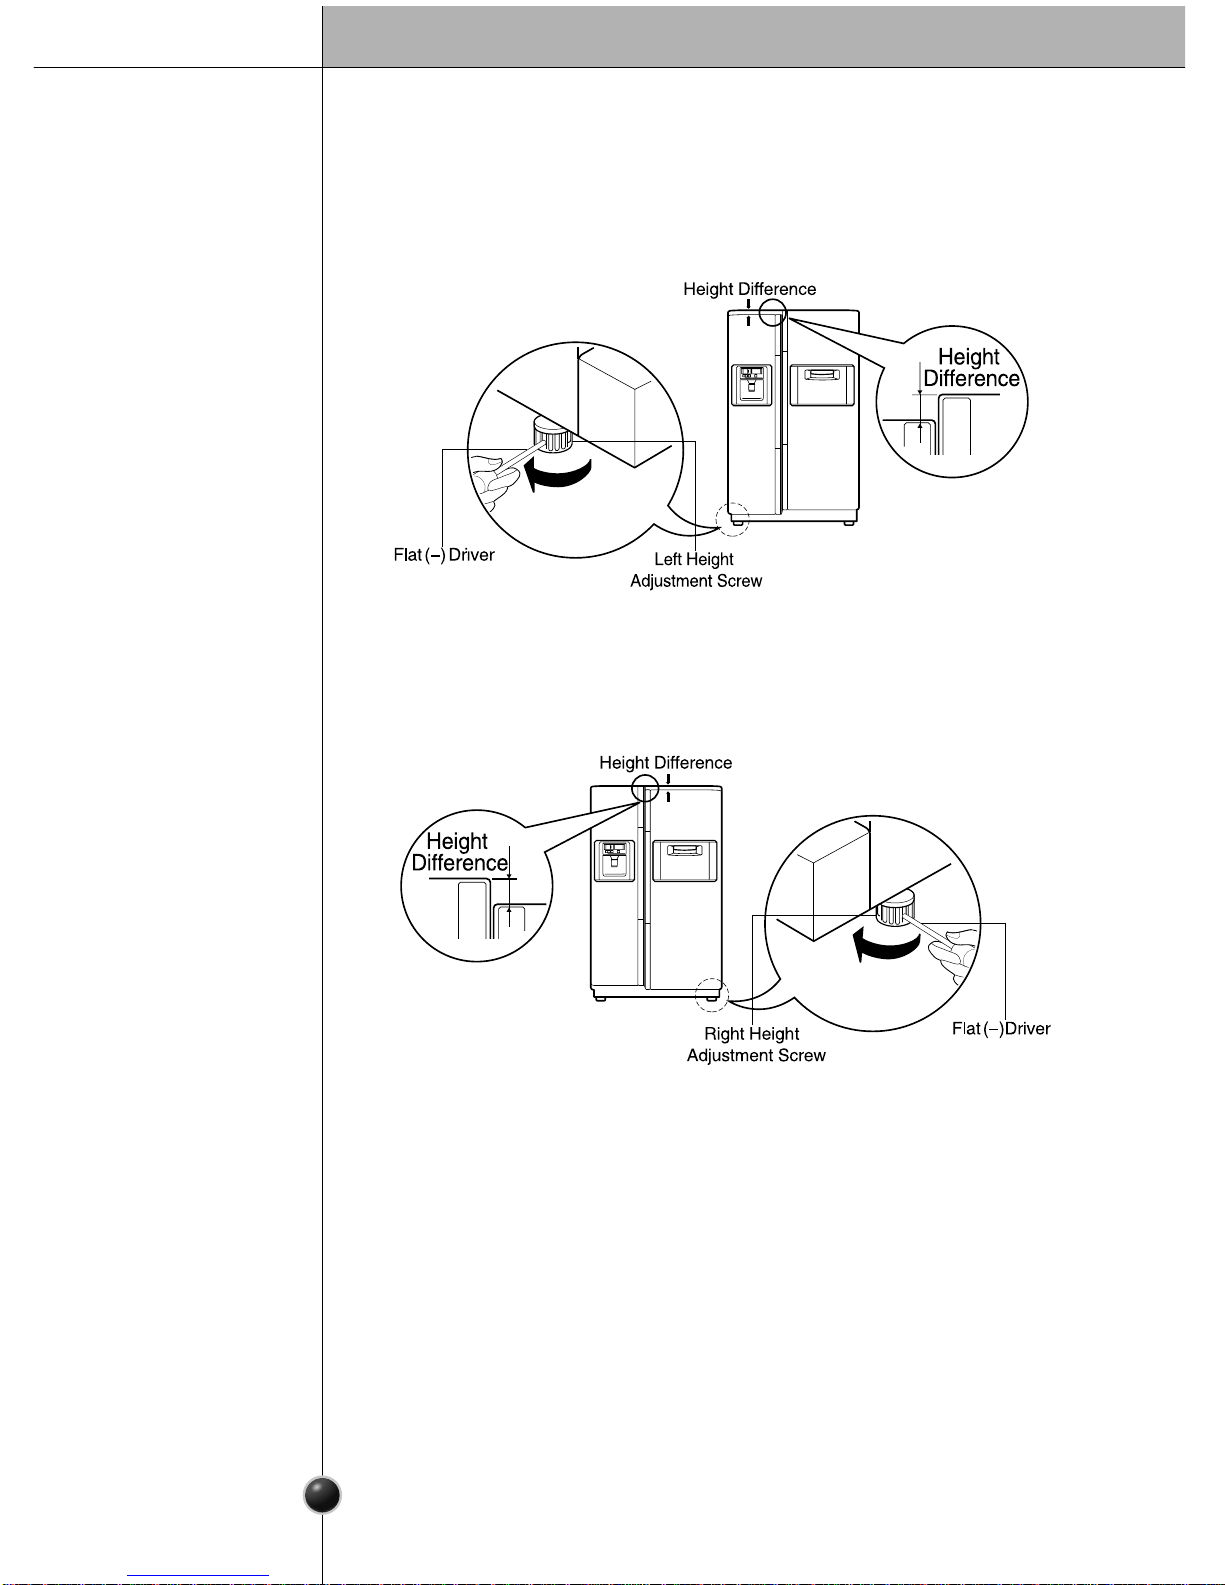
Height Adjustment
Make them level by inserting flat (
-
type) driver into the groove of the left height adjusting
screw and rotating it clockwise (").
Make them level by inserting flat (
-
type) driver into the groove of the right height
adjusting screw and rotating it clockwise (").
Refrigerator door will close smoothly by heightening the front side by adjusting the
height adjusting screw. If the door does not close well because of bad Open/Close,
performance may be affected.
If the freezer
compartment door
is lower than the
refrigerator
compartment door
If the freezer
compartment door
is higher than the
refrigerator
compartment door
After leveling the
door height
Installation
"
"
Page 9

9
Getting Started
Designation of Functional Adjustment Board
When your refrigerator is first installed, allow it to stabilize at normal operating
temperatures for 2~3 hours prior to filling it with fresh or frozen foods.
If operation is interrupted, wait 5 minutes before restarting.
9
3
2
1
FR
POVVER
FREEZE
Operation
Page 10
This lamp indicates the selection between
water and ice.
$
At the first powering or after a power failure,
will be lit.
$
Crushed ice, water, or cubed ice can be
selected with the button.
10
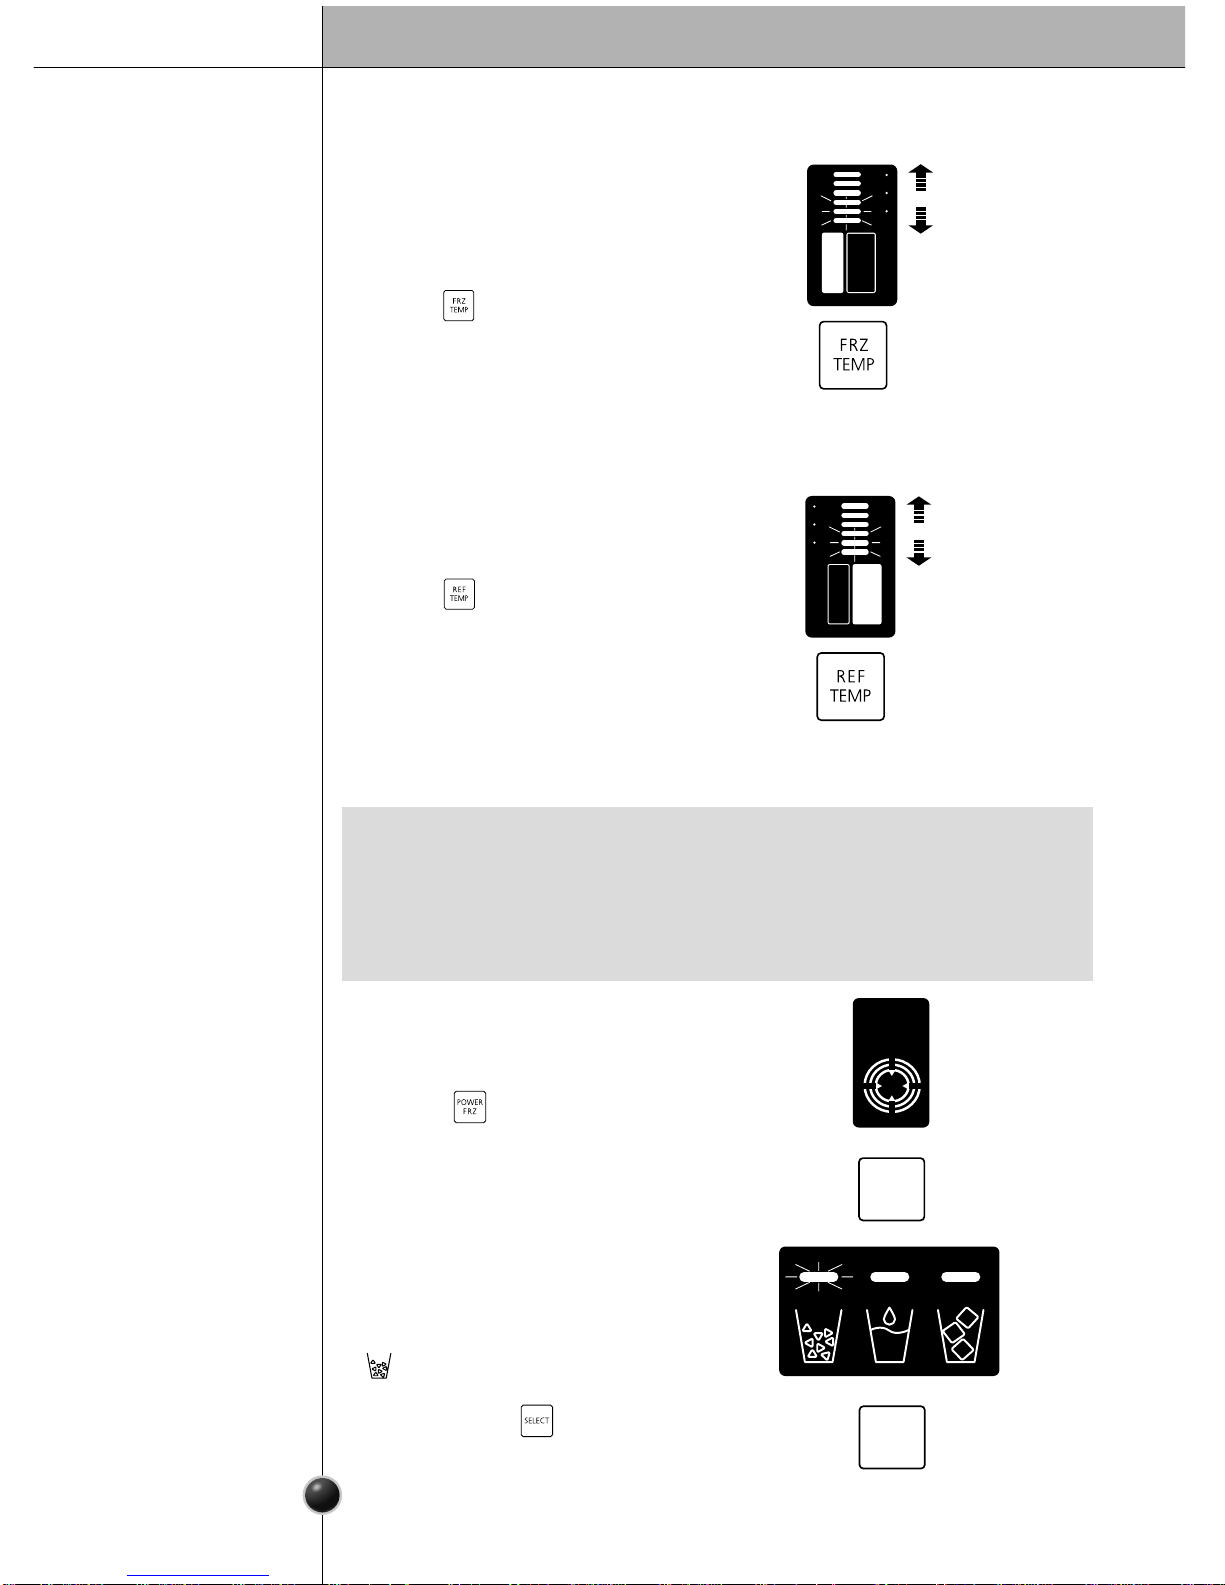
Adjust the Temperature and Functions
This lamp indicates the temperature status
of the freezer compartment.
$
At first powering or after a power failure,
2(Proper) will be lit.
$
Pressing button will move the
temperature setting through 2(Proper) ➔
(Proper Strong) ➔ 3(Strong) ➔(Strongest)
➔1(Weak) ➔(Proper Weak) in sequence.
This lamp indicates the temperature status
of the refrigerator compartment
$
At first powering or after a power failure,
2(Proper) will be lit.
$
Pressing button will move the
temperature setting through 2(Proper) ➔
(Proper Strong) ➔ 3(Strong) ➔(Strongest)
➔1(Weak) ➔(Proper Weak) in sequence
.
$
Generally, 2(Proper) is good for food
storing.
$
Pressing button operates power
freeze function, with the lamp ON.
$
One pressing of the button switches the
status from setting to release, or reversely.
$
Power freeze will be automatically released,
though no release action is taken, after a
certain time passes.
This lamp indicates that the power freeze
function is in operation. The power freeze
function is used to freeze food or make ice
faster in the
freezer compartment.
$
Generally, 2(Proper) is good for food storing. Select an appropriate one among
1(Weak),(proper Weak) or (Proper Strong), 3(Strong), and (Strongest)
according to the storing amount and using frequency.
Select an appropriate one among 1(Weak),
(Proper Weak) or(Proper Strong), 3(Strong) and (Strongest) according to
the storing amount and using frequency.
How to adjust the
temperature in
the freezer
compartment
How to adjust
the
temperature in
refrigerator
compartment
Power freeze
Dispenser use
selection
3
2
1
F
R
3
2
1
Low Temperature
(When frozen foods
are thawing)
High Temperature
(When foods are
severely thawing)
Low Temperature
(
To make
food cooler
)
High Temperature
(
When foods
are frozen
)
POVVER
FREEZE
•
Set the temperature adjusting board to a desirous compartment as inner temperature
may be varied according to the using environment. Inner temperature is increasingly
lowered getting to 3.
•
Detach the protective tape on the front surface of function display board to make the
surface and light more clear.
NOTE
POWER
FRZ
SELECT
Operation
Page 11
Operation
The Self-diagnosis function operates when something is wrong with the unit.
When an error occurs in the unit, pressing any of the buttons will have no effect.
Immediately contact the service center without turning the power OFF. If the power
is OFF, it takes much longer for the service engineer to find the cause of the problem.
Water is cooled while stored in the water tank in the refrigerator compartment, and
then sent to the dispenser. Ice is made in the automatic ice maker and sent to the
dispenser divided into crushed or cubed form ice.
An alarm will ring 3 times if the refrigerator door is left opened for more than 1 minute.
This alarm will ring at 30 sec. and stop when the door is opened. ‘Door Open Alarm’
function makes alarm sound only, having no separate indicating function. If the alarm
sound does not stop even after the freezer and refrigerator compartment doors are
closed, contact the service center.
Door open alarm
Self-diagnosis
(fault detection)
function
How ice/cold
water is supplied
How to use
dispenser
Automatic ice maker and Dispenser
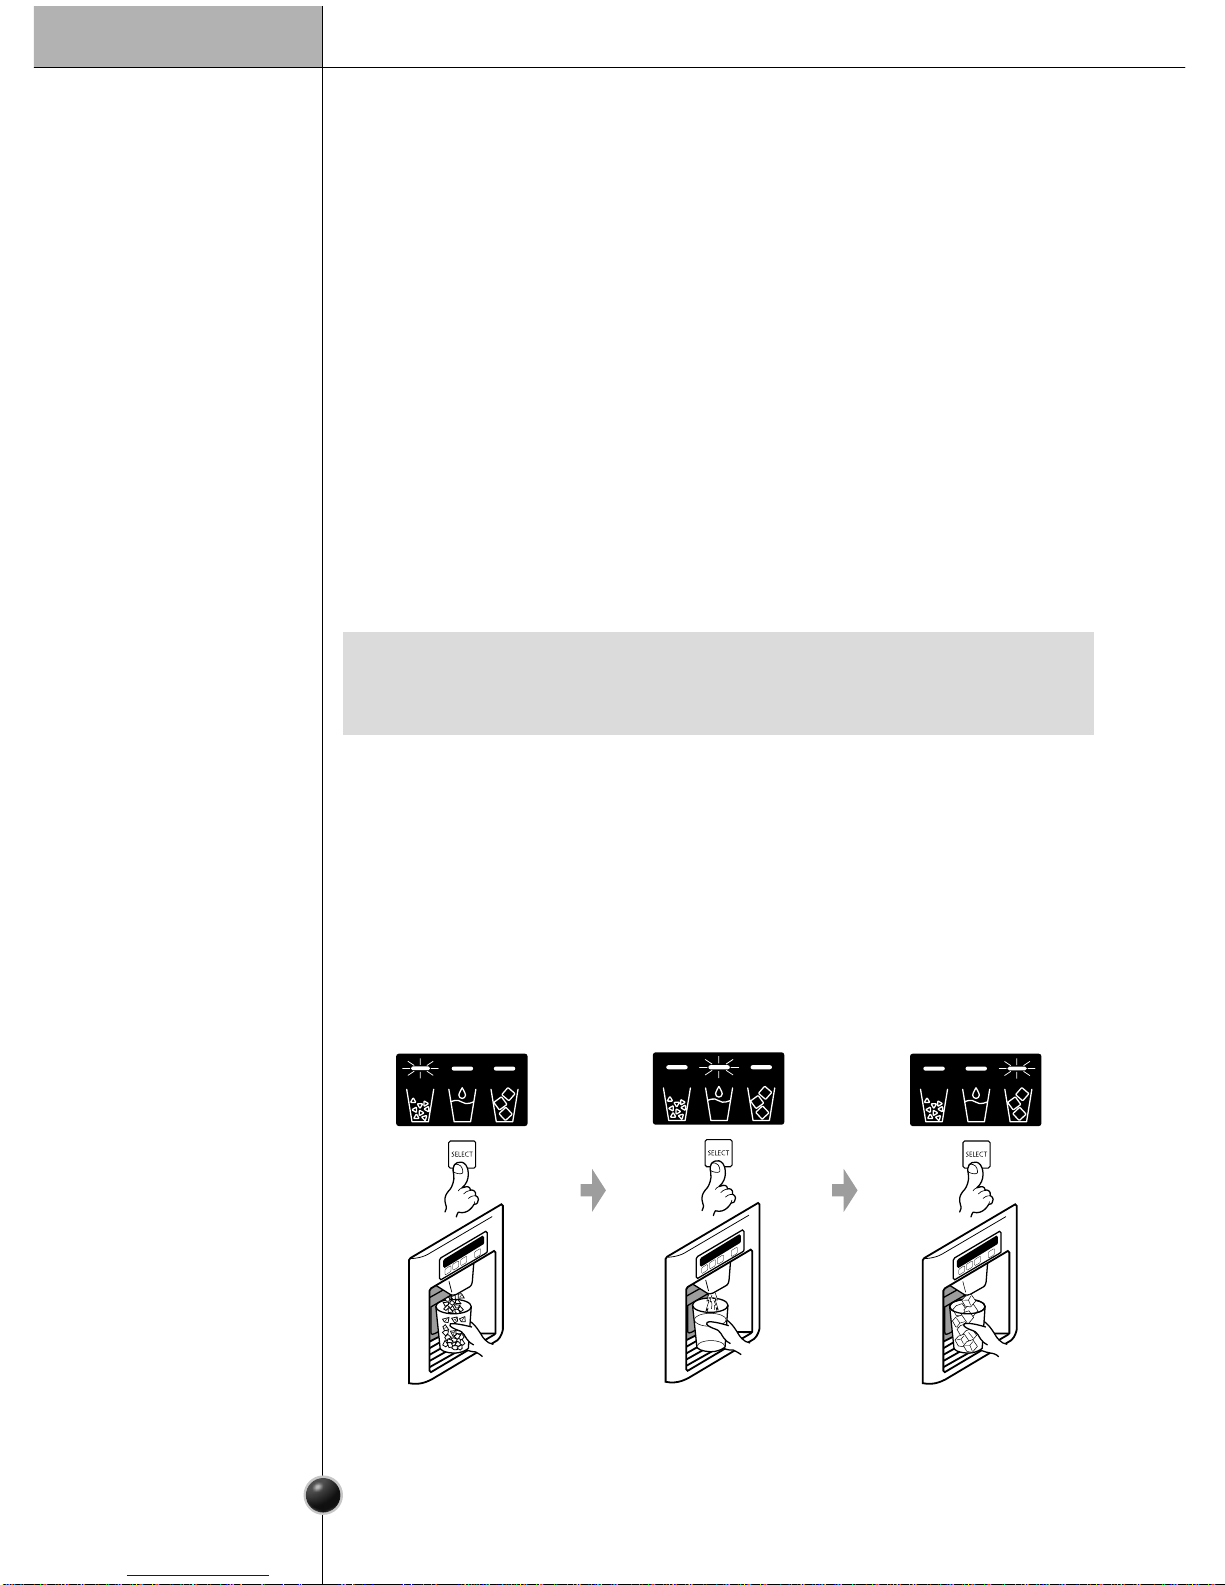
$
Select one among crushed ice, water, and cubed ice and slightly press the push
switch with a glass or other container.
Crushed Ice
•
Light the crushed ice
indicating lamp by
pressing the selection
button.
•
C
rushed
ice will be
dispensed by pressing the
push switch with a glass.
Water
•
Light the water
indicating lamp by
pressing the selection
button.
•
Water will be dispensed
by pressing the push
switch with a glass.
Cubed Ice
•
Light the cubed ice
indicating lamp by
pressing the selection
button.
•
Cubed ice will be dispensed
by pressing the push
switch with a glass.
•
It is normal that the water is not very cold enough at first. If you want colder
water, add ice into the glass.
NOTE
11
Page 12
12
$
The automatic ice maker can automatically make 8 pieces of ice cube at a time, 80
pieces a day. But these quantities may be varied according to various conditions
including how many times the refrigerator door opens and closes.
$
Ice making stops when the ice storage bin is full.
Ice is lumped together
$
When ice is lumped together, take the ice lumps out of the ice storage bin, break
them into small pieces, and then place them into the ice storage bin again.
$
When the ice maker produces too small or lumped ice, the amount of water
supplied to the ice maker need to adjusted. Contact the service center.
❈
If ice is not used frequently, it may lump together.
Power failure
$
Ice meet drop into the freezer compartment. Take the ice storage bin out and
discard all the ice then dry it and place it back. After the machine is powered again,
crushed ice will be automatically selected.
The unit is newly installed
$
It takes about 12 hours for a newly installed refrigerator to make ice in the freezer
compartment.
Automatic ice
maker
When ice maker
does not operate
smoothly
•
Crushed ice will be automatically selected after a power failure or when the power plug
is connected again.
•
Place glasses or other containers near the ice outlet otherwise ice is likely to be dropped
on the floor.
•
A snap sound will be heard in 5 seconds after ice is fully dispensed.
This sound is made when the ice outlet is closed.
•
Please leave your glass near the ice outlet for 2~3 seconds after releasing your glass
from pressing the push switch to allow any left over water or ice to be dispansed.
•
Please wipe away water dropped below the dispenser by removing the water
collector cover.
•
If cubed ice is selected following crushed ice, there may still be some left over
crushed ice that is dispansed.
NOTE
•
It is normal that a noise is produced when ice made is dropped into the ice storage
bin.
NOTE
Operation
Page 13
13
Throw away the ice (about 20 pieces) and water (about 7 glasses) first made
after refrigerator installation.
The first ice and water may include particles or odor from the feed water pipe or feed
water box. This is necessary in case that the refrigerator has not been used for a long
time.
Keep children away from the dispenser.
Children may push switch incorrectly bad or damage lamps.
Be careful that food is not block the ice
passage.
If foods are placed at the entrance of ice
passage, ice may not be dispensed. The ice
passage may also be covered with ice
powder if splinter ice is used only. This time,
remove the ice powder
accumulated.
Never store beverage cans or other foods in ice storage bin for the purpose of
rapid cooling.
Such actions may damage the automatic ice maker.
Never use thin crystal glass or crockery to collect ice.
Such glasses or containers may be broken.
Put ice first into a glass before filling water or other beverages.
Water may be splashed if ice is added to existing liquid in a glass.
Never touch a hand or other tools on ice outlet.
Touch may cause a part breakage or hand injury.
Never remove the ice maker cover.
Sometimes level the surface so that the ice storage bin is fully filled with ice.
Ice is piled up just near the ice maker. So, such status may be considered, by the ice
maker, that the ice storage bin is fully filled and ice making operation may stop.
If discolored ice is dispensed, immediately contact Service Center, stopping
use.
Never use too narrow or deep glass.
Ice may be jammed in ice passage and, thus, the refrigerator may be failed.
Keep the glass at a proper distance from ice outlet.
A glass too close to the outlet may hinder ice from coming out.
Cautions
Operation
Page 14
14
Home Bar (In select Models Only)
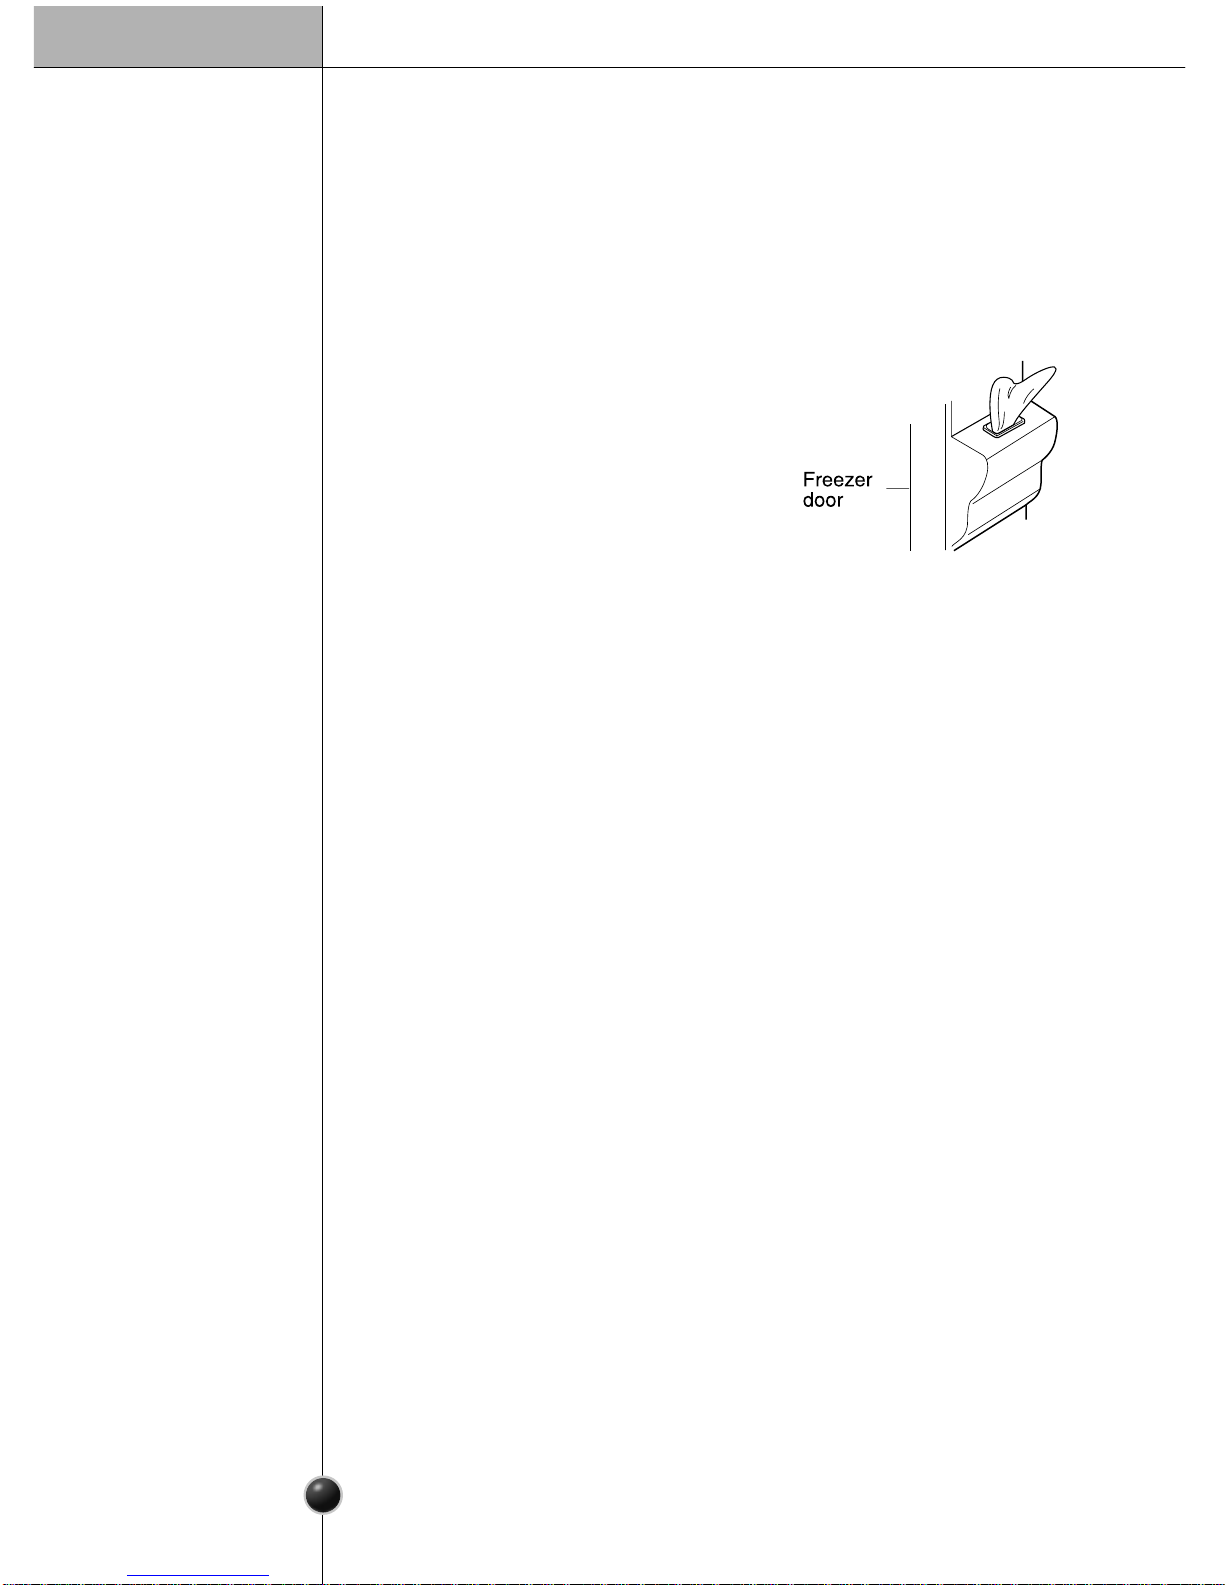
Gently pull the handle of the home bar
to open it.
$
You can access the home bar without
opening the refrigerator door, thus saving
electricity.
$
The Inner lamp is lit in the refrigerator
compartment when the home bar door
opens. So it is easy to see item in the
compartment.
$
You can use the home bar door as a stand
to pour beverages and such but never use
the home bar door as a chopping board
and take care not to damage it with sharp
objects.
$
Never rest your arms or press down on
it.
$
The Home bar will not function properly
without the cover.
$
Not only the home bar door may be
damaged, but also children may get hurt.
How to use
Never place
heavy matters on
the home bar
door or allow
children to hang
on it.
Never take out
the inner home
bar cover
Use the home
bar door as a
stand
Operation
Page 15
Operation
15
Shelf
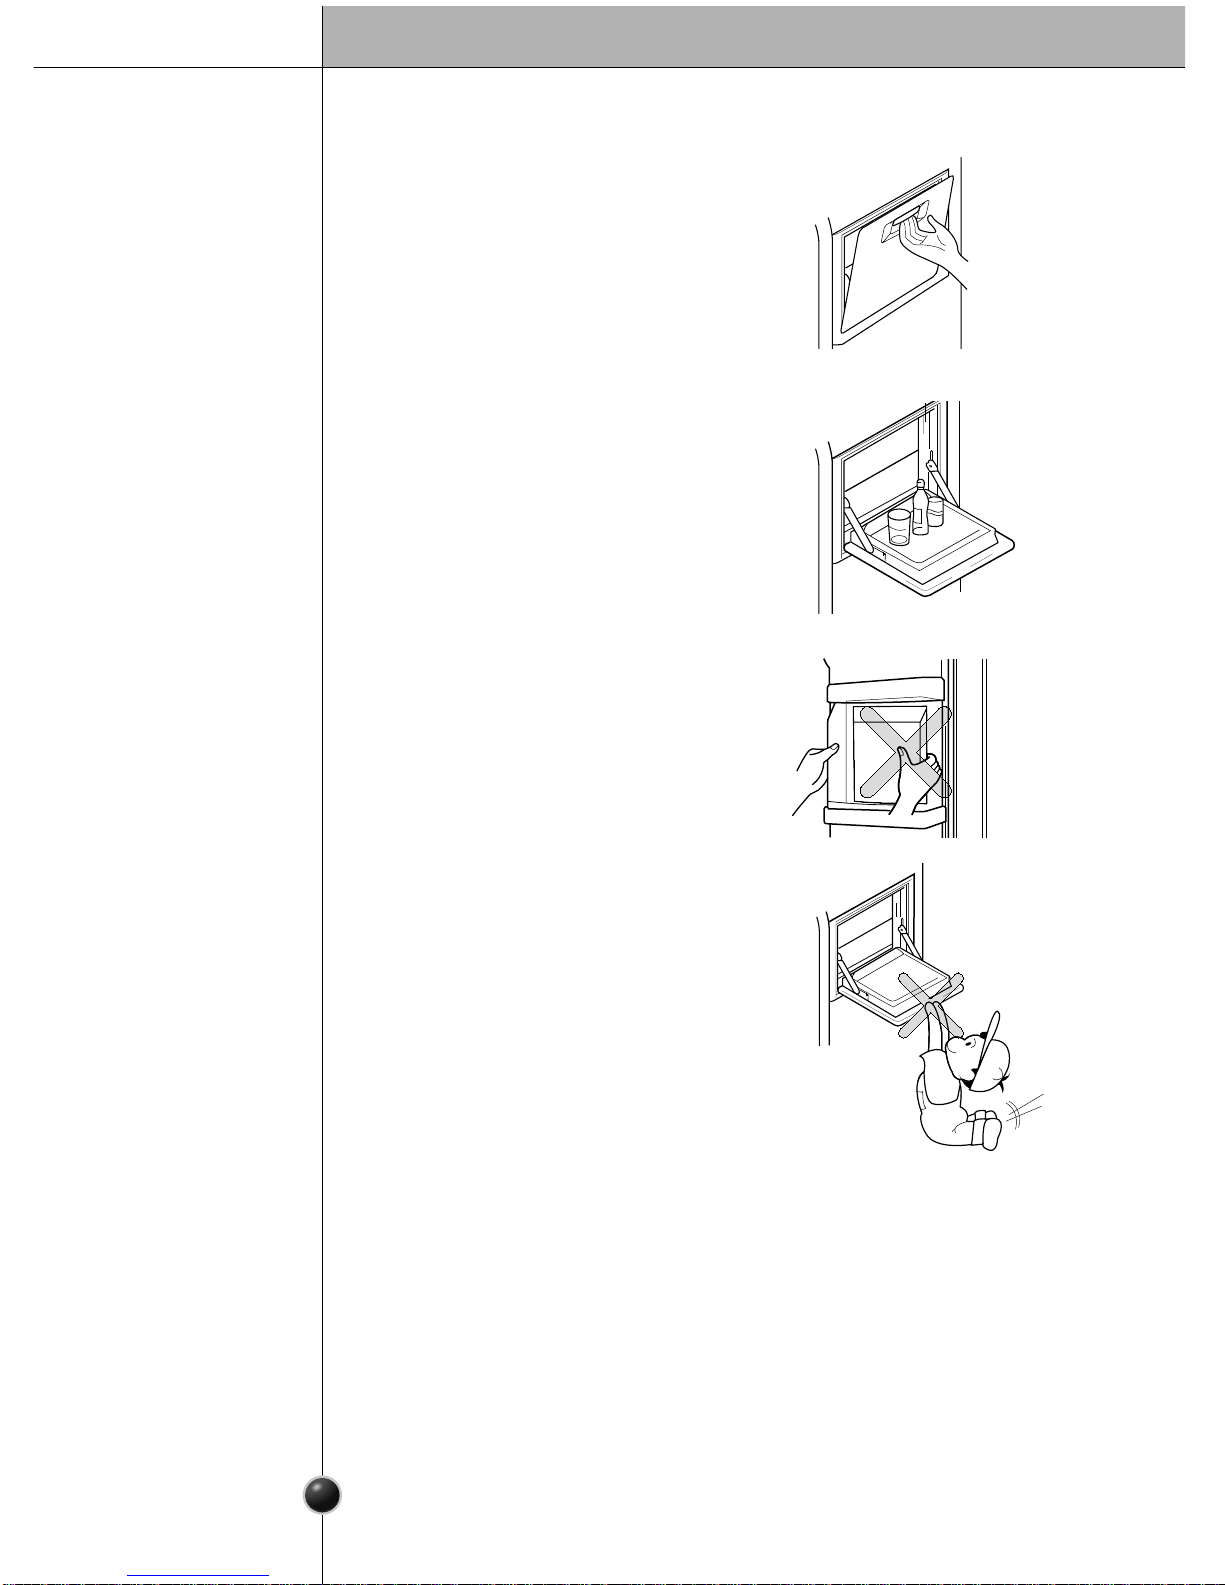
Slide type shelf allows you to place or take
food out or put it in more conveniently.
The Refrigerator compartment shelf is movable so that you can place it at a proper
height according to the space you need for different food items..
Wine holder adjustment :
Wine holder can be separated by pulling
it straight out and installed by placing
it at
the end of the shelf you want and
pushing
it inward.
Bottles can be stored laterally with this wine
corner. This can be attached to any shelf.
Slide type
tempered
glass shelf
(In select models
only)
Attachable wine
corner (In select
models only)
Shelf height
adjustment
1
1
2
2
•
Make the shelf horizontal. Otherwise it
may fall off.
NOTE
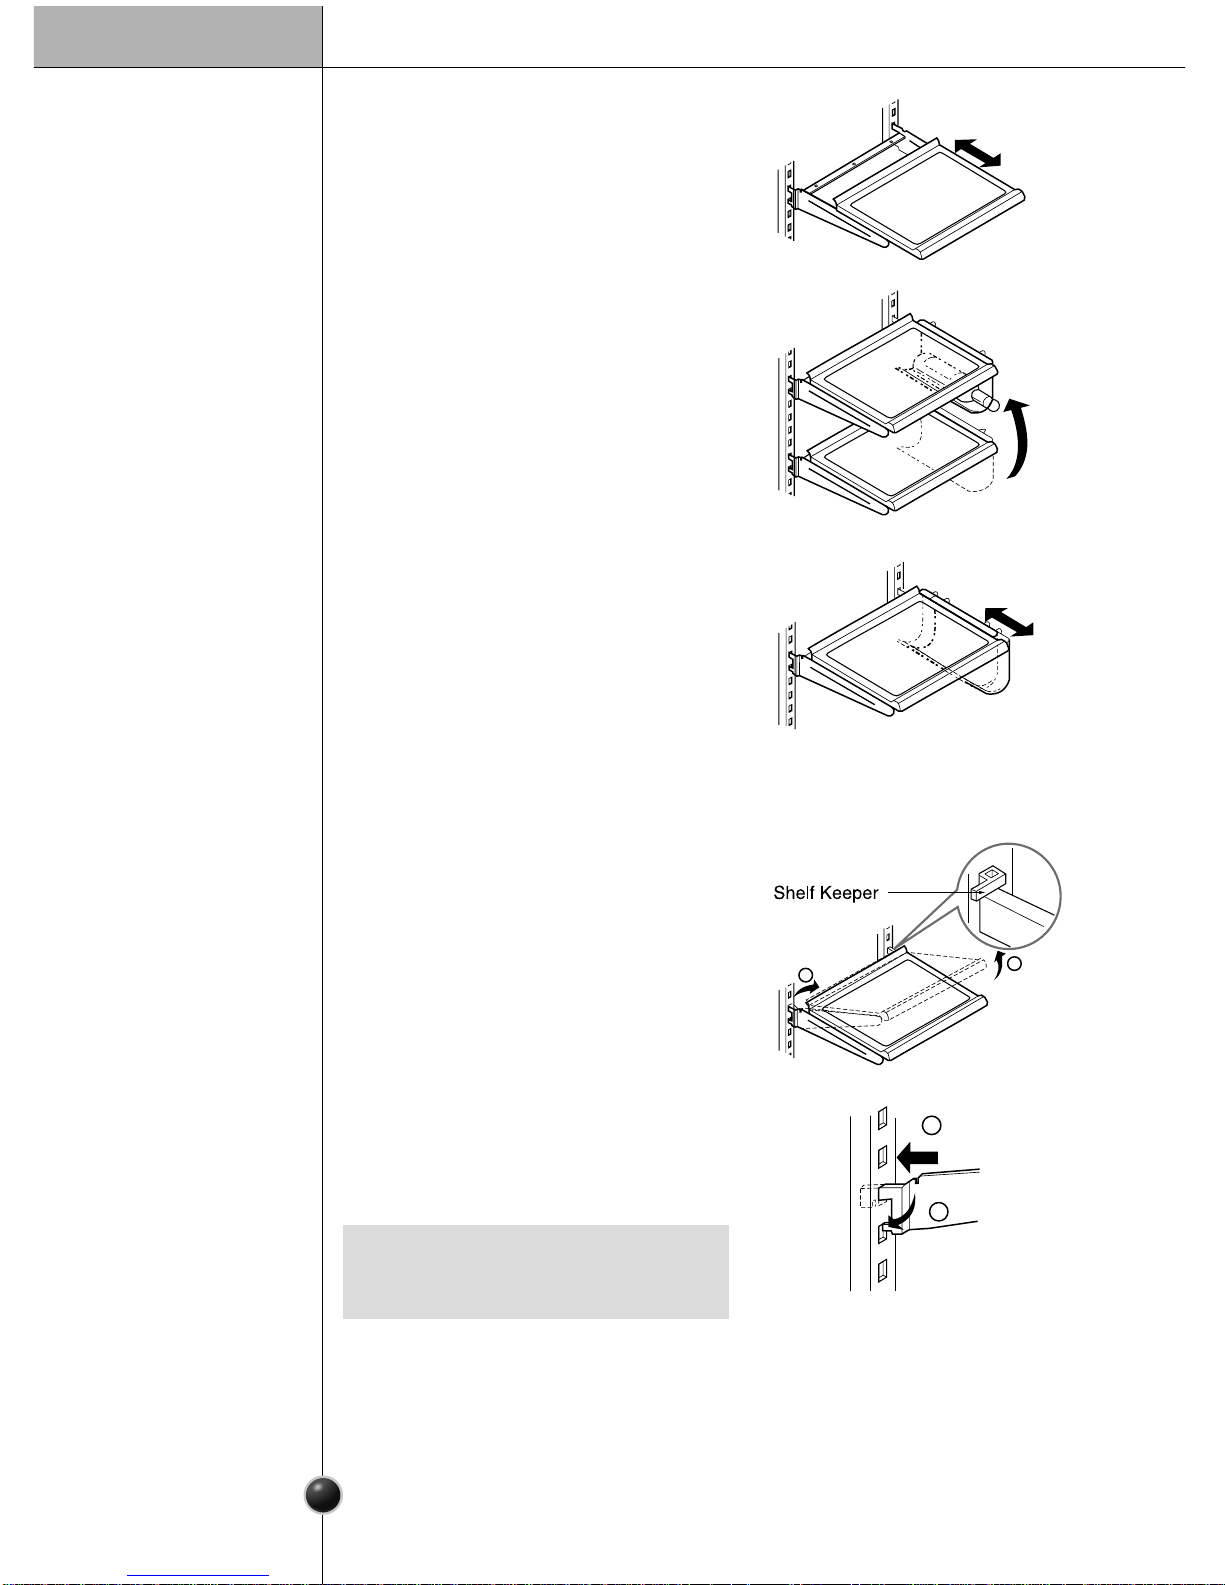
How to separate a shelf :
At delivery, shelves are fixed with keepers
so that they cannot be moved during
distribution.
So, remove keepers first, lift the shelf up ("),
and then separate it pushing it down (#).
How to install a shelf :
Position the shelf at the desired height and
hang its links on the grooves. This time,
lower the front side of the shelf and hang it
on the grooves.
Page 16

16
Egg Box
Convert into a Vegetable or Fresh compartment
You can move the egg box to a place you want and select another form of box
according to the amount of eggs.
The Fresh compartment maintains the temperature at a lower point than the
refrigerator compartment so that meat or fish can be stored fresh longer.
$
The Bottom drawer in the refrigerator can be converted into a vegetable or fresh
compartment
•
Never use the egg box as an ice storage bin. It can break.
•
Never store the egg box in the freezer compartment or fresh compartment.
NOTE
•
Vegetables or fruits are frozen if the conversion switch is set to fresh
compartment. So, be sure to check it before storing foods.
•
If possible, do not place food around the cool air feed hole.
NOTE
Operation
[Normal] [For Many Eggs]
Page 17
Operation
17
Deodorizer
(In select Models Only)
This system efficiently absorbs strong odors
by using the optical catalyst. This system
does hot have any affect on stored food.
$
Since it is installed already installed onto the cool air intake duct from the from
the refrigerator compartment, you need no separate installation.
$
Please use closed containers to store food with pungent odors.
Otherwise, this oder can be absorbed by other food in the compartment.
How to use the
deodorizing
system
Page 18
Suggestion on Food storage
18
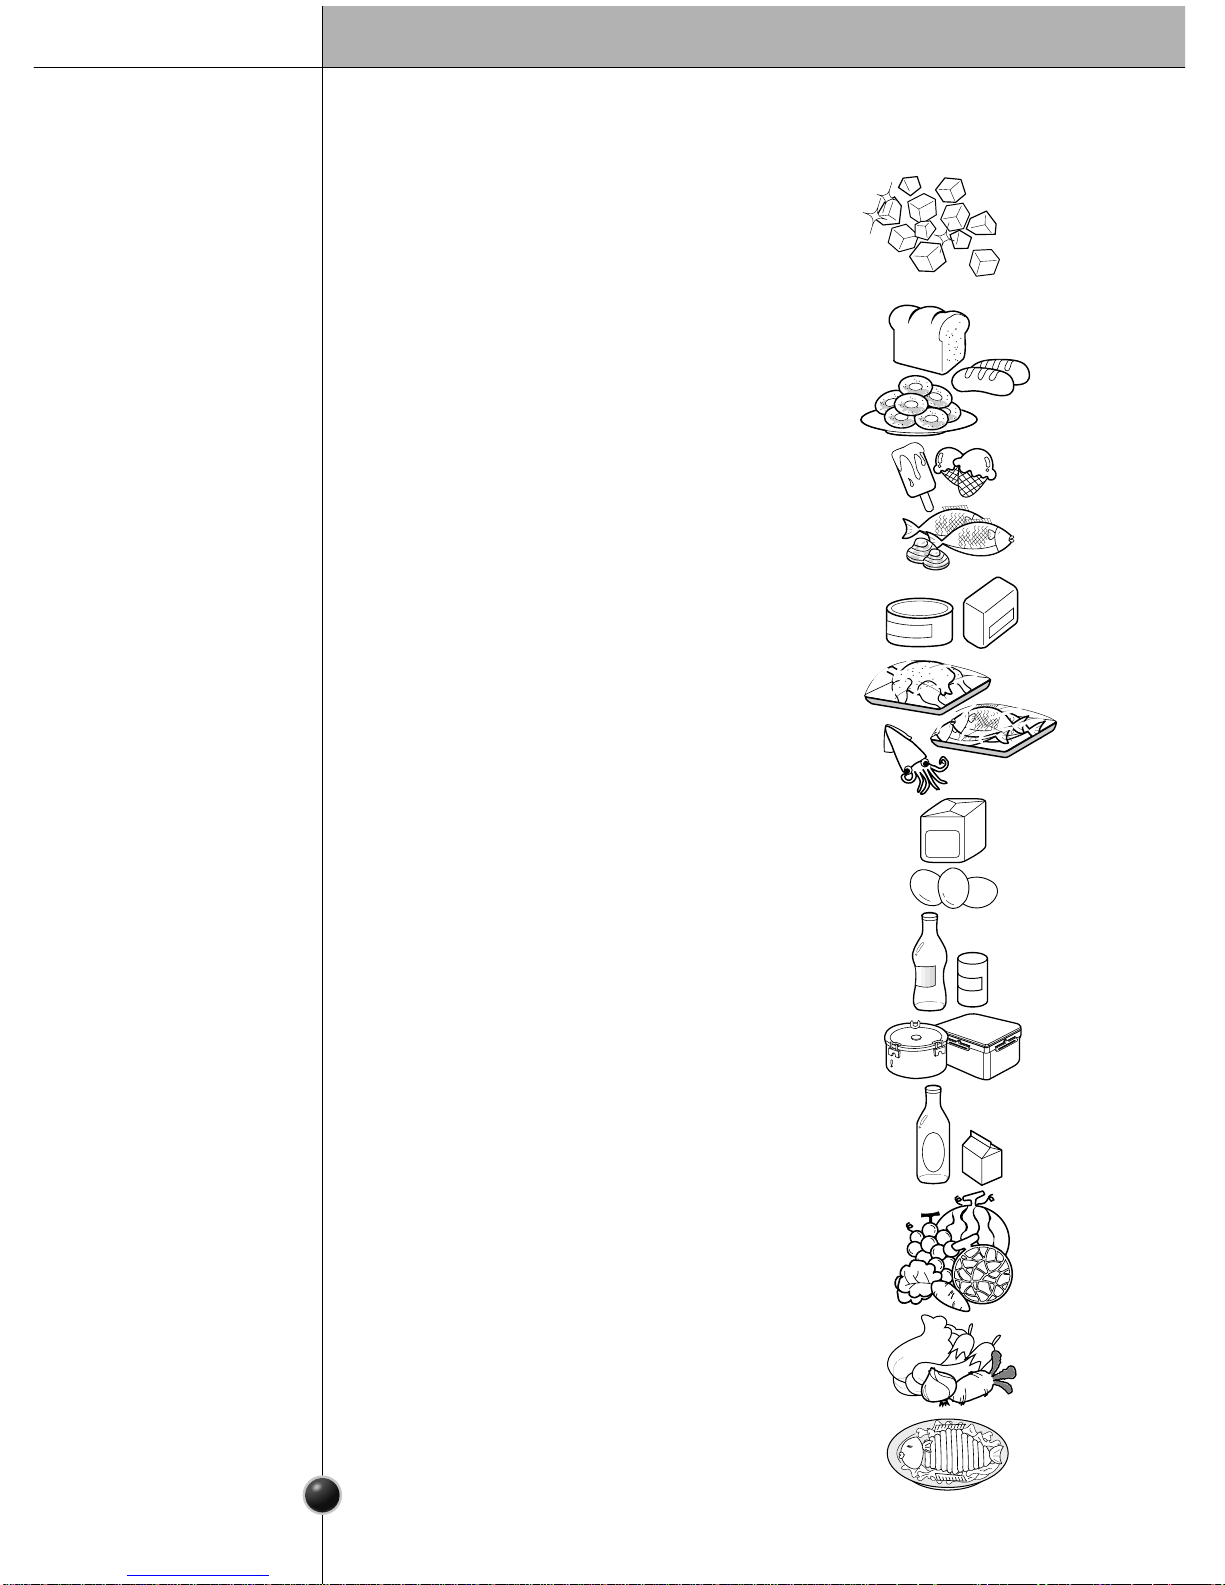
Location of Foods
(Refer to 4pages, Identification of Parts)
Automatically made ice is stored.
Store wine.
Store small foods such as bread, snacks, etc.
Store various frozen foods such as meat, fish,
ice cream, frozen snacks, etc.
$
Store small packaged frozen food.
$
Temperature is likely to increase as door
opens.
So, do not store long-term food such as
ice cream.
Automatic ice
maker
Wine rack
Snack Drawer
Freezer
compartment
shelf
Freezer
compartment
door rack
Freezer
compartment
drawer
Dairy
compartment
Egg box
Home bar
Refrigerator
compartment
shelf
Refrigerator
compartment
door rack
Vegetable
compartment
Vegetable
compartment/fre
sh compartment
conversion
corner
$
Store meat, fish, chicken, etc. after wrapping
them with aluminum.
Store dairy products such as butter, cheese,
etc.
Place this egg box in the proper location.
Store frequently accessed foods such as
beverage, etc..
Store side dishes or other foods at a proper
distance from each other for effective
cooling.
Store small packaged food or beverages
such as milk, juice, beer, etc..
Store vegetables or fruits.
Store vegetable, fruits, meat to thaw, fish, etc.
setting the conversion switch as necessary.
Be sure to check the conversion switch
setting before storing foods.
Page 19
19
Storing Foods
$
Store fresh food in the refrigerator compartment. How food is frozen and thawed is an
important factor in maintaining its freshness and flavor.
$
Do not store food which goes bad easily at low temperatures, such as bananas, and
melons.
$
Allow hot food to cool prior to storing, placing hot food in the refrigerator could spoil
other food, and lead to higher energy consumption.
$
When storing the food, cover it with vinyl wrap or store in a container with a lid. This
prevents moisture from evaporating, and helps food to keep its taste and nutrients.
$
Please keep a distance at least 15 mm from the air vents to food.
$
Do not open the door frequently. Opening the door lets warm air enter the refrigerator,
and cause temperatures to rise.
$
Never keep too much food in door rack because they may push against by inner
racks so that the door cannot be fully closed.
$
Do not store bottles in the freezer compartment - they may break when frozen.
$
Do not refreeze food that has been thawed. This causes loss of taste and nutrient.
$
When storing frozen food like ice cream for a long period, place it on the freezer
shelf, not in the door rack.
$
Avoid placing moist food in top refrigerator shelves, it could freeze from direct
contact with chilled air.
$
Always clean food prior to refrigeration. Vegetables and fruits should be washed and
wiped, and packed food should be wiped, to prevent adjacent food from spoiling.
$
When storing eggs in their storage rack or box, ensure that they are fresh, and always
store them in an upright position, which keeps them fresh longer.
Freezer
compartment
Refrigerator
compartment
•
If you keep the refrigerator in a hot and humid place, and frequently open the door or
put a lot of vegetables in it, moisture may form in it which has no effect on its
performance. Just wipe the moisture with a cloth free.
NOTE
Suggestion on Food storage
Page 20
20
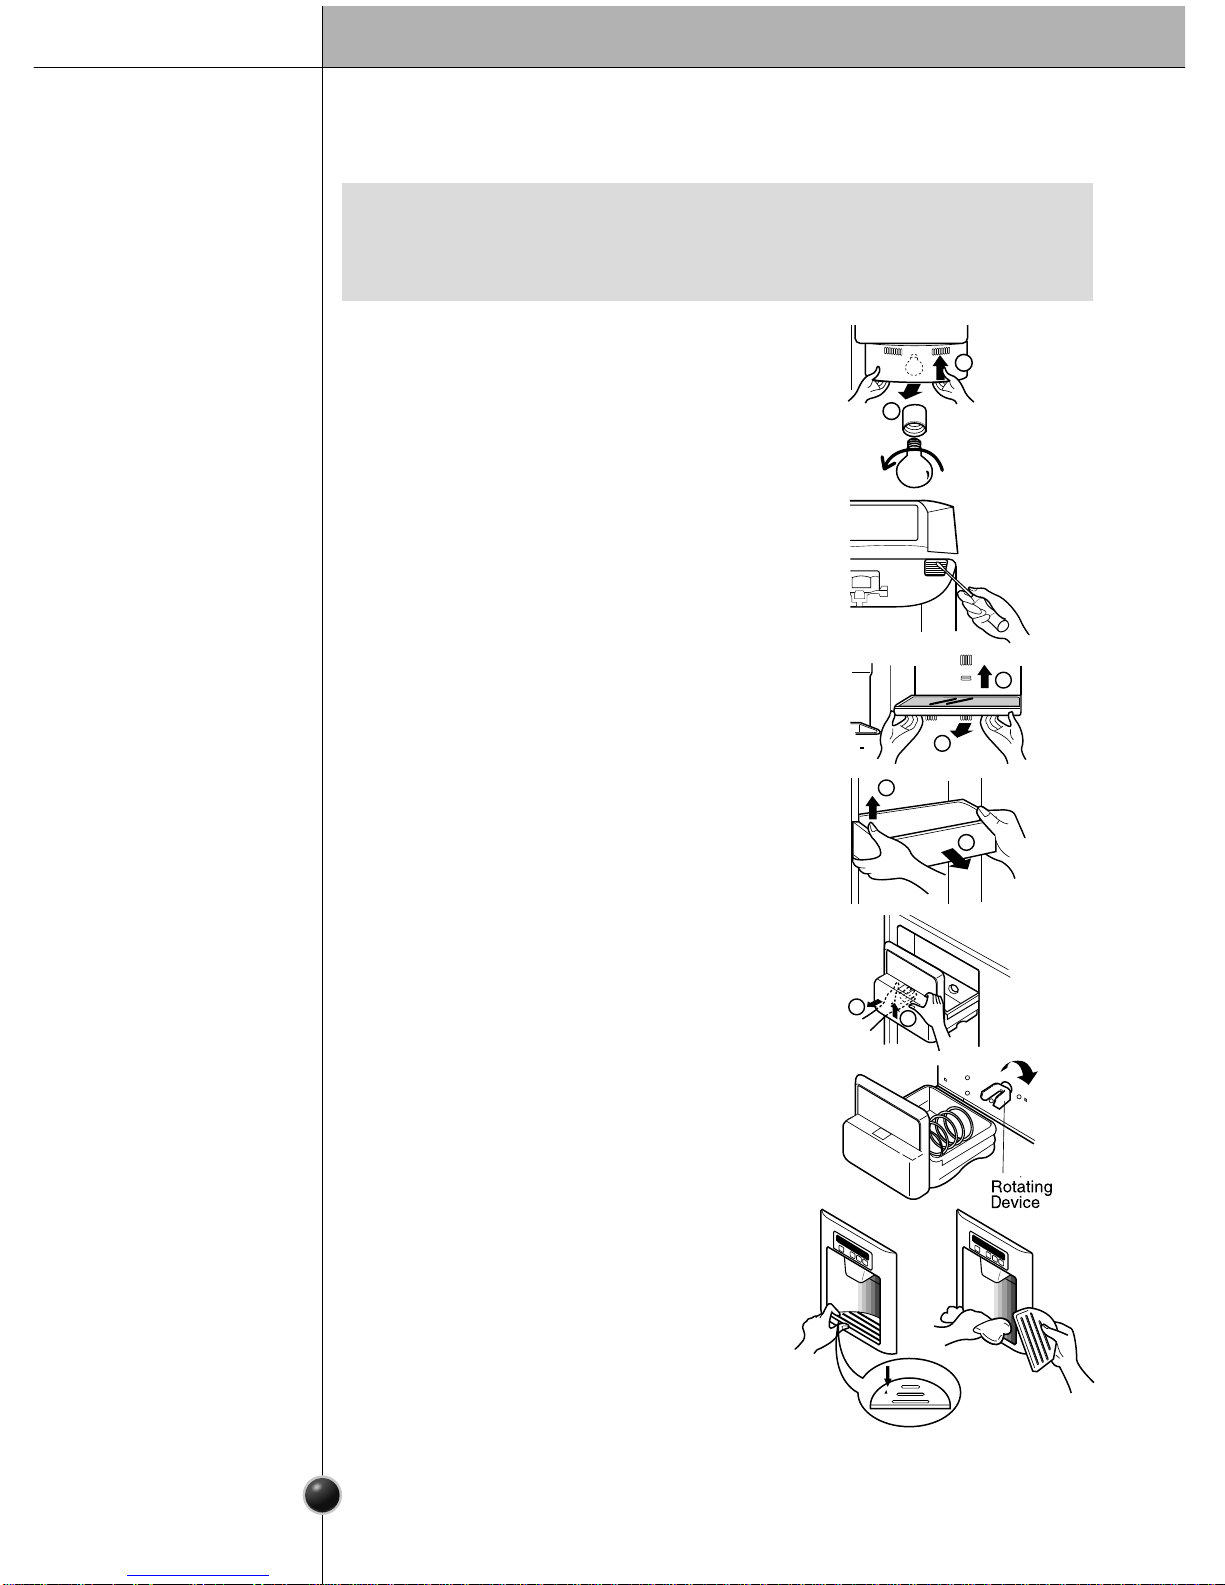
How to Dismantle Parts
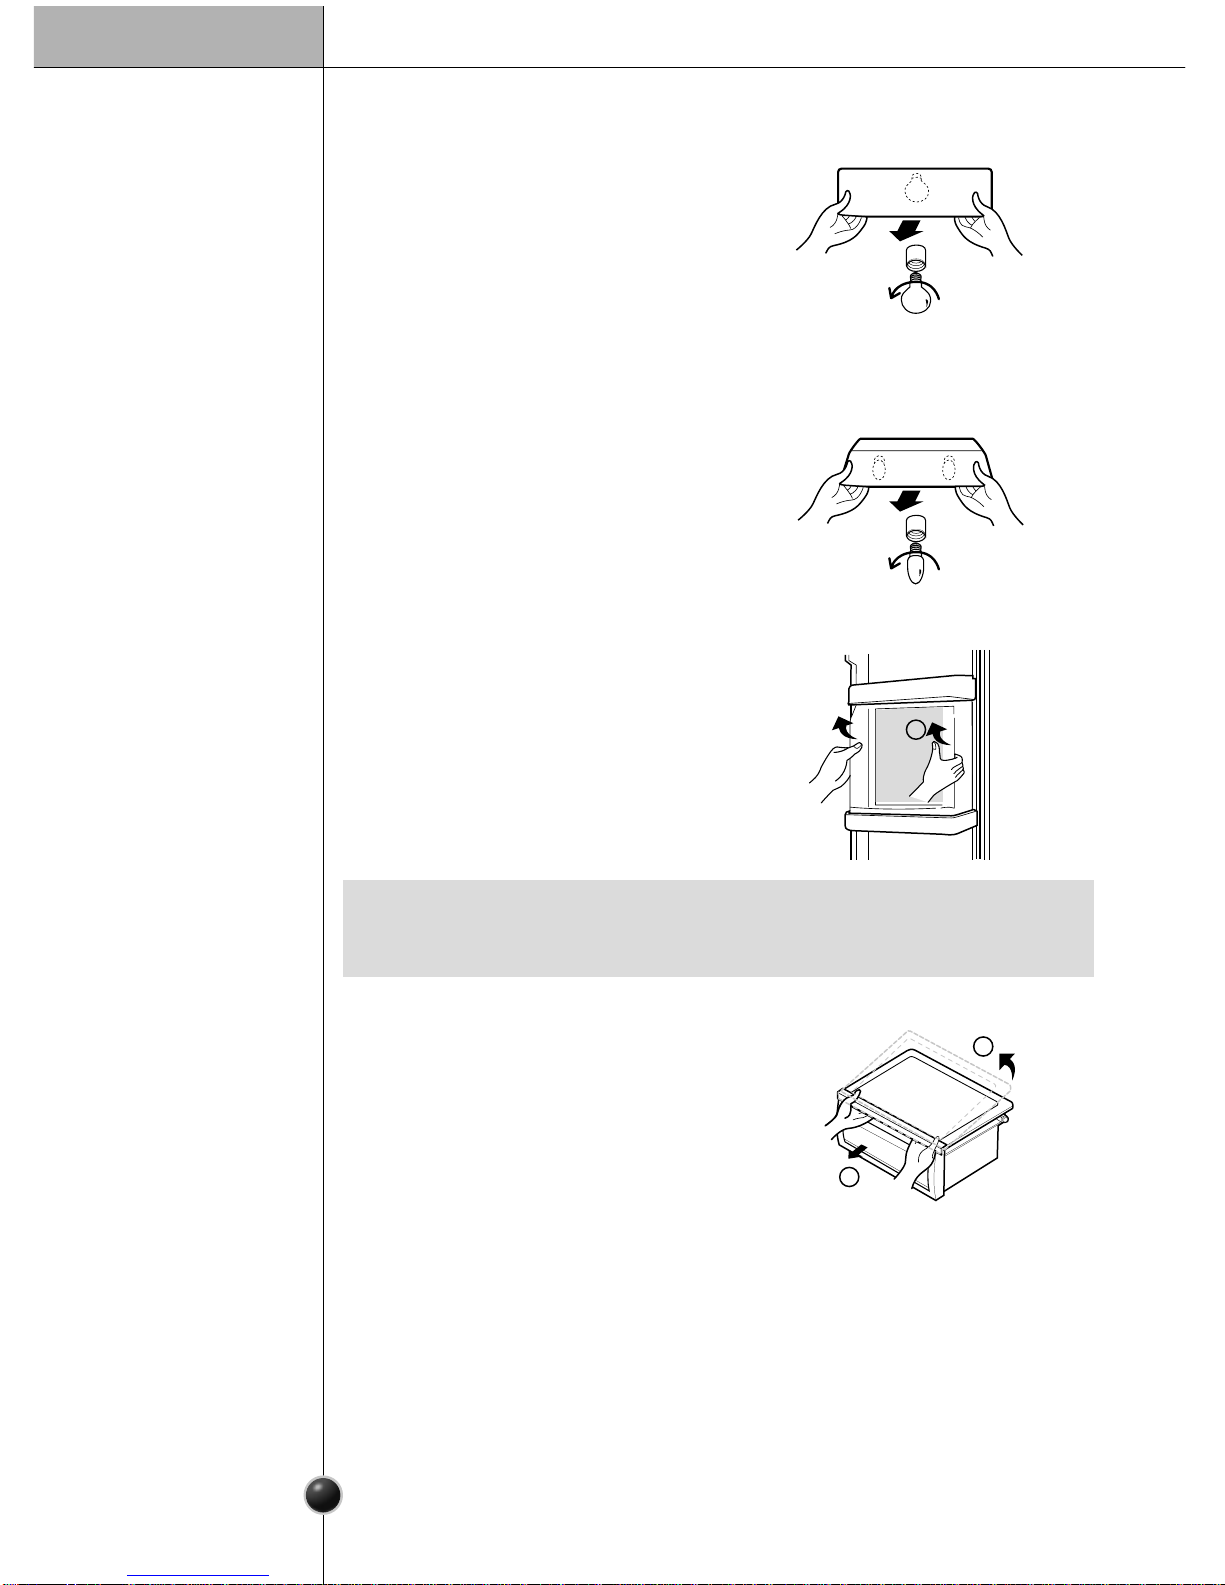
Separate the lamp by pulling it out
(#)
while
slightly lifting the lamp cover (
" )
.
Turn the bulb counterclockwise. Max. 240 V .
60 W bulb for refrigerator is used and can be
purchased at a service center.
Freezer
compartment
lamp
Dispenser lamp
Freezer
compartment
shelf
Door rack and
support
Ice storage bin
After dispenser
is used
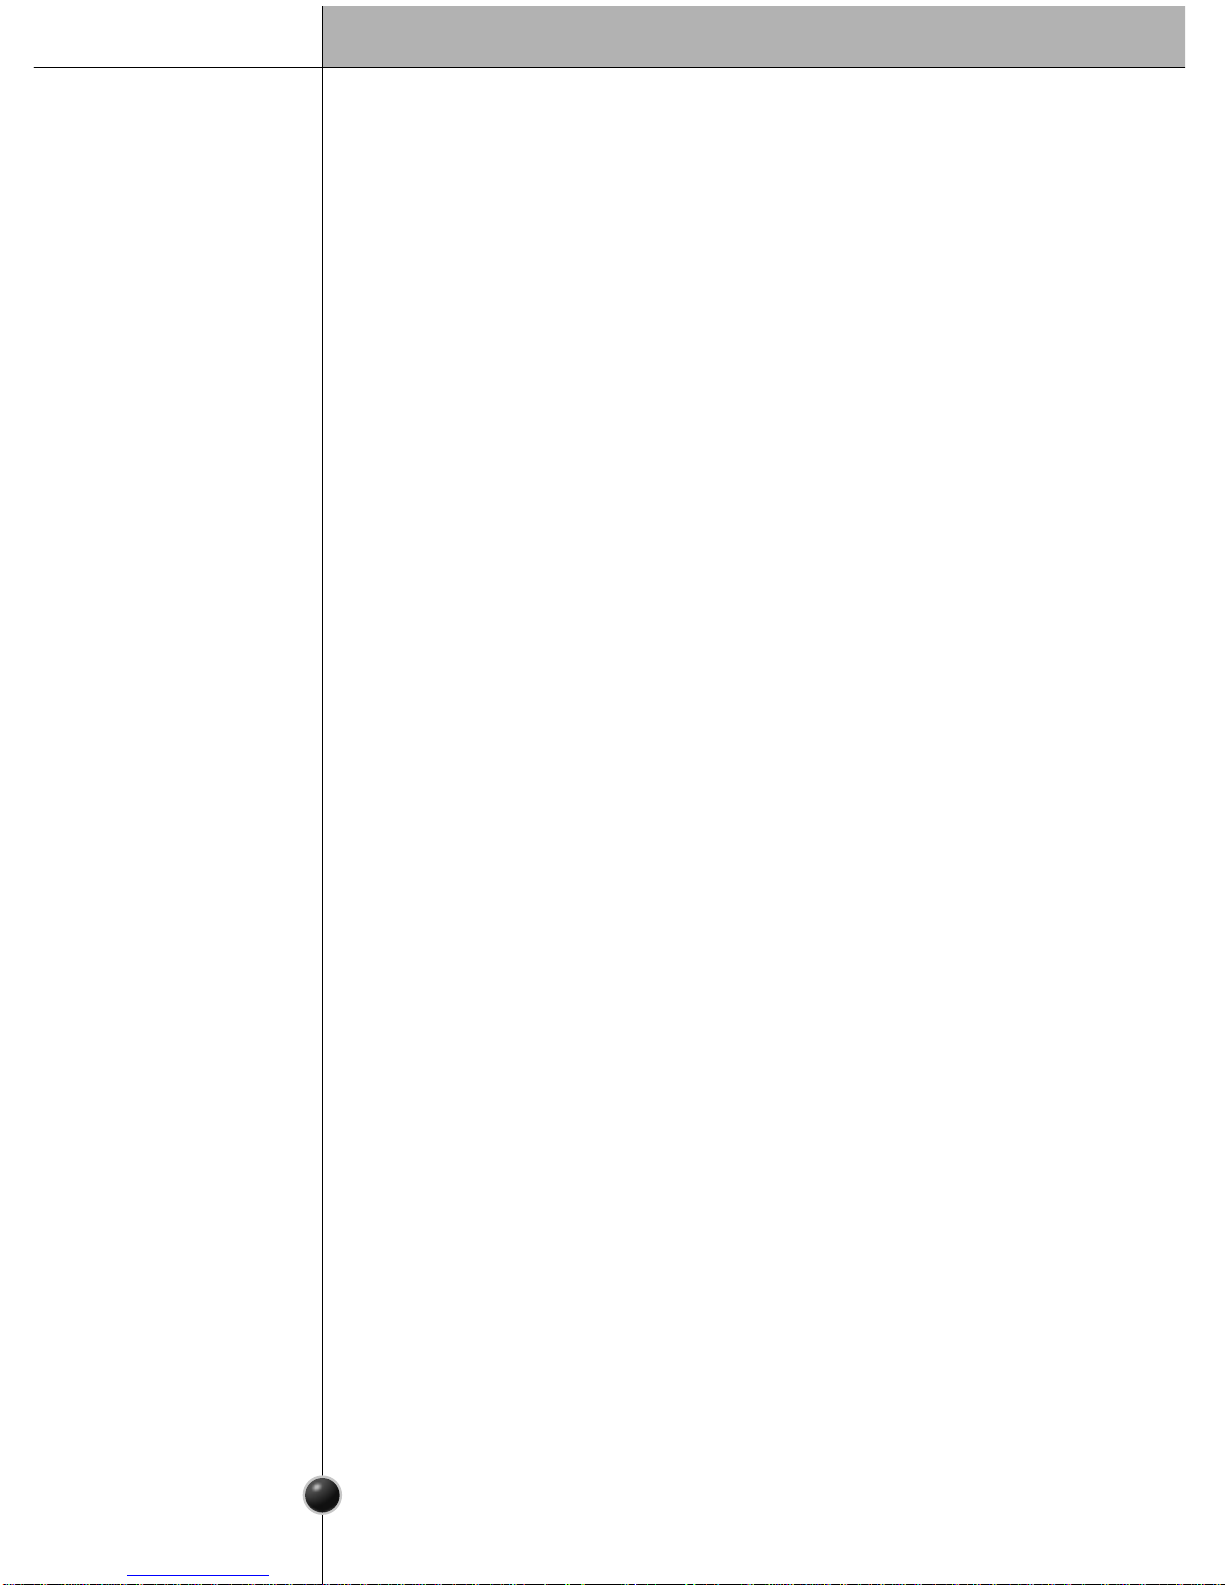
Remove the cover by inserting a flat (-type)
driver into the front groove and pulling it out,
and then remove the ramp. Max. 240 V 15 W
bulb for refrigerator is used and can be
purchased at a service center.
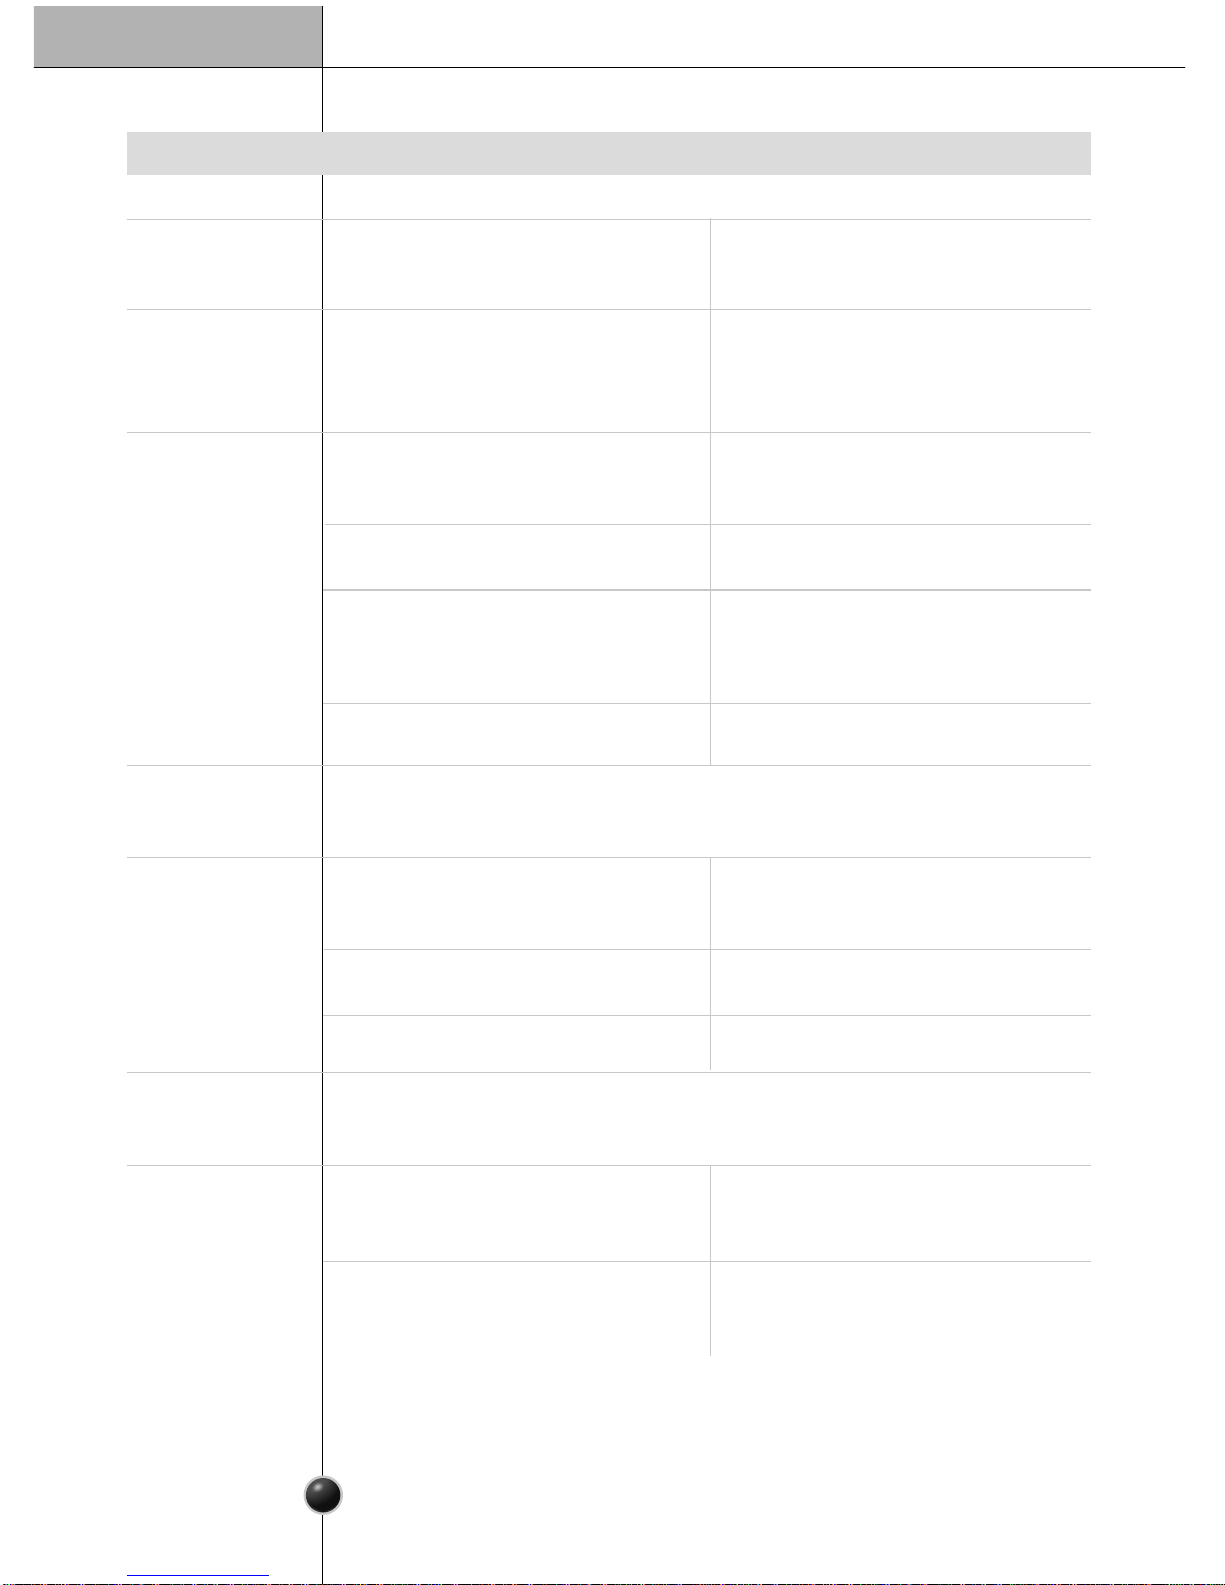
Lift the front side (") and pull it out (#).
Lift the door rack holding both sides (") and
pull it out to
(
#
)
direction.
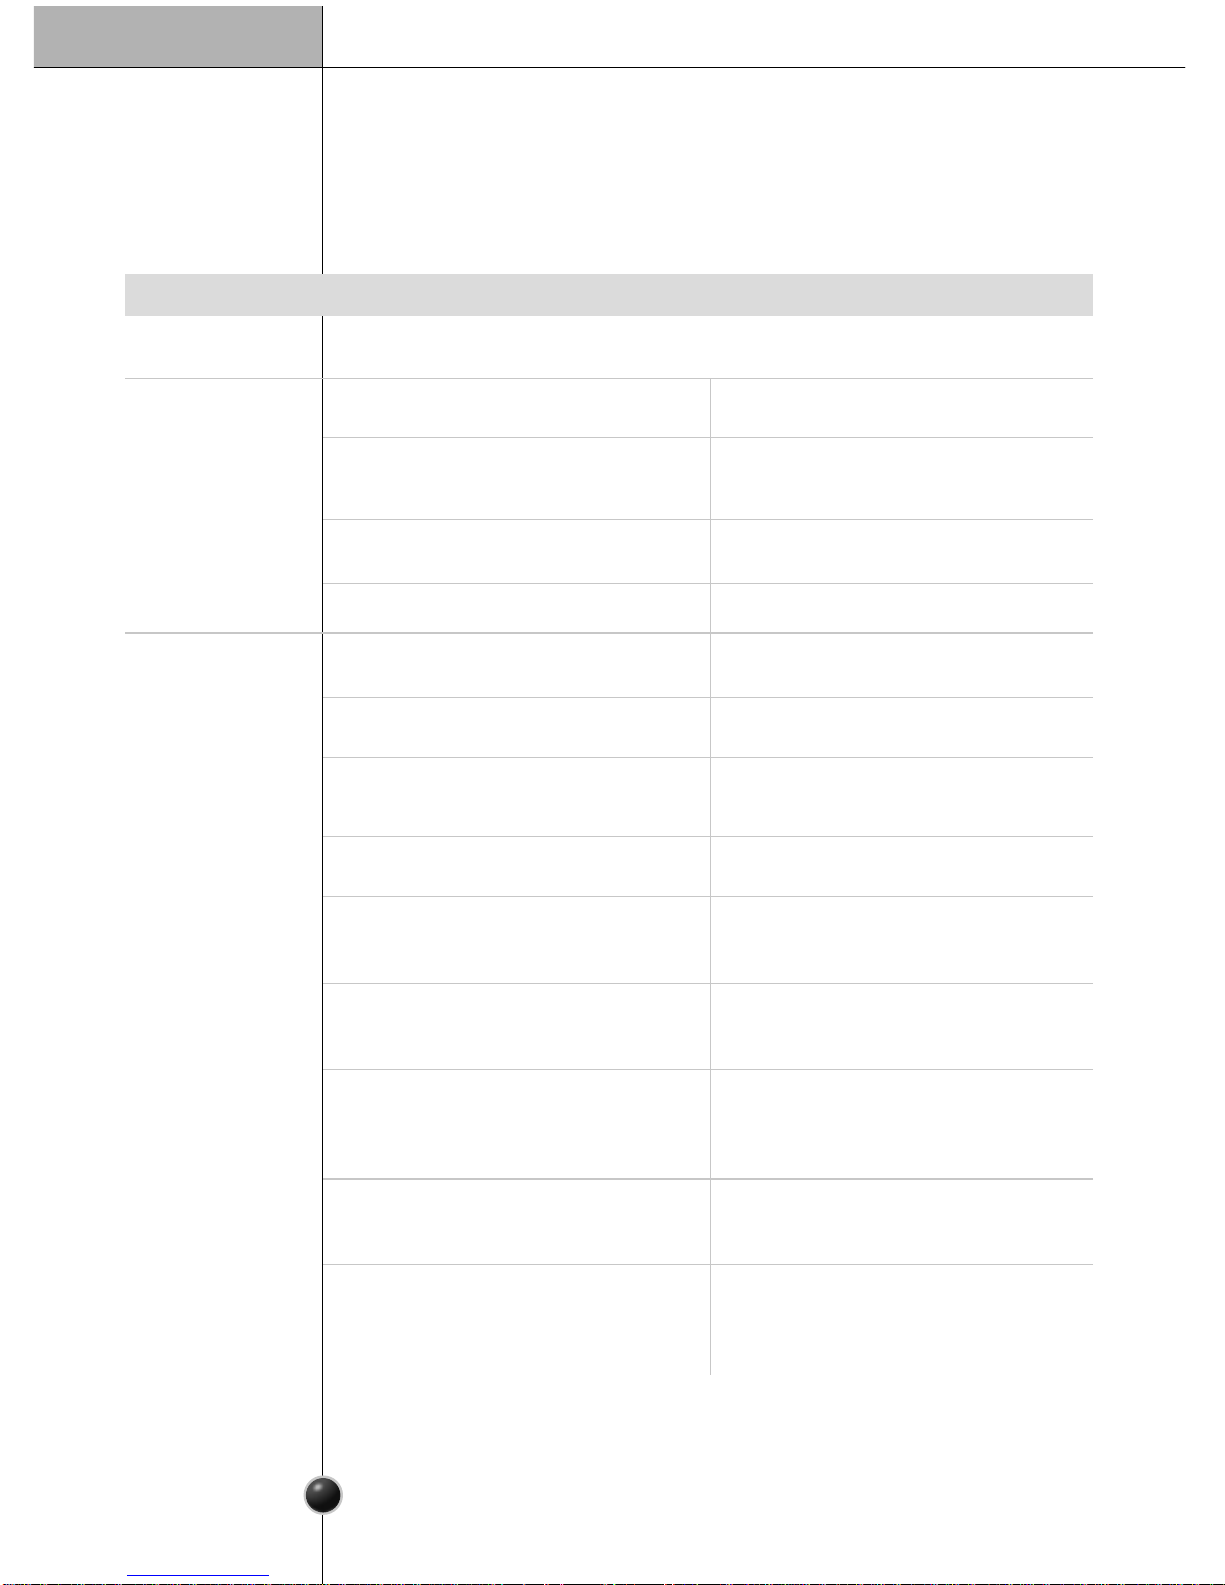
Water collector has no self-drainage function.
So it should be cleaned regularly.Remove the
cover by pressing the left side of water
collector cover and dry it with a cloth.Press
the point marked as shown in the figure to
the right to remove the water collector cover.
Hold the ice storage bin as shown in the right
figure and pull it out
(#)
while slightly lifting it
(
" ).
$
It is recommended not to dismantle the ice
storage bin unless it is necessary.
$
Be sure to use both hands when removing
the ice storage bin, not to drop it on the floor.
$
If the ice storage bin does not fit well, slightly
rotate the rotating device.
2
1
1
2
1
2
2
1
•
Dismantling is done in the reverse sequence of assembly.
Be sure to unplug the power plug before dismantling and assembly.
Never apply severe force to dismantle parts. Parts may be damaged.
NOTE
Care and Maintenance
Page 21
Care and Maintenance
21
To remove the lamp cover, pull the lamp
cover forwards while pressing the bottom
side of the lamp cover upwards. Turn the
bulb counterclockwise.
Max. 240 V 60 W bulb for refrigerator is used
and can be purchased at a service center.
Upper lamp in
refrigerator
compartment
Separate the lamp cover by holding both
lower sides of it and pulling it it forwards.
Turn the bulb counterclockwise. Max.
240 V 30 W bulb for refrigerator is used
and can be purchased at a service center.
Lower lamp in
refrigerator
compartment
$
Separate the upper rack of the home bar
and then pull out the home bar cover (").
$
The Home bar corner can be removed by
pulling it upwards.
Home bar
$
Pull out the vegetable compartment cover ( # )
with its backside lifted up (" ), and the cover
can be removed.
$
To install the cover, push it fully until it touches
the back wall.
Vegetable
compartment
cover
1
2
1
•
Be sure to remove parts on the refrigerator door to remove the vegetable compartment,
snack drawer and home bar cover.
NOTE
Page 22
22
General Information
Cleaning
During average length vacations, you will probably find it best to leave the refrigerator
in operation. Place freezable items in freezer for longer storage.
When you plan not to operate, keep it running remove all food, disconnect the power
cord, clean the interior thoroughly, and leave each door OPEN to prevent odor formation.
Vacation time
Power failure
If you move
Anti
condensation
pipe
Most power failures are corrected in an hour or two will not affect your refrigerator
temperatures.
However, you should minimize the number of door openings while the power is off.
During power failures of longer duration, place a block of dry ice on top of your frozen
packages.
Remove or securely fasten down all loose items inside the refrigerator.
To avoid damaging the height adjusting screws, turn them all the way into the base.
The outside wall of the refrigerator cabinet may sometimes get warm, especially just
after installation.
Don’t be alarmed. This is due to the anti-condensation pipe, which pumps hot air
refrigerator to prevent “sweating” on the outer cabinet wall.
Regular cleaning is recommended. Wash all compartments with a baking soda
solution or a mild detergent and warm water. Rinse and dry.
Please verify that the power cord is not damaged, power outlet is not overheated, or
power plug is inserted well into the power outlet.
Always remove power cord from the wall outlet prior to cleaning in the vicinity of
electrical parts (lamps, switches, controls, etc.).
Wipe up excess moisture with a sponge or cloth to prevent water or liquid from
getting into any electrical part and causing an electric shock.
Never use metallic scouring pads, brushes, coarse abrasive cleaners, strong alkaline
solutions, flammable or toxic cleaning liquids on any surface.
Do not touch frozen surfaces with wet or damp hands, because damp object will stick
or adhere to extremely cold surfaces.
It is important that your refrigerator be kept clean to prevent undesirable odors. Spilled
food should be wiped up immediately, since it may acidify and stain plastic surfaces if
left uncleaned.
Use a lukewarm solution of mild soap or detergent to clean the durable finish of your
refrigerator.
Wipe with a clean damp cloth and then dry.
Exterior
Interior
After cleaning
Warning
Care and Maintenance
Page 23
Trouble Shooting
Before calling for service, review this list. It may save you both time and expense.
This list includes common occurrences that are not the result of defective
workmanship or materials in this appliance.
Possible Cause
Refrigerator control is off.
Refrigerator is in defrost cycle.
Plug at wall outlet is disconnected.
Power outage. Check house lights.
Refrigerator is larger than the previous
one you owned.
Room or outside weather is hot.
Refrigerator has recently been
disconnected for a period of time.
Automatic ice maker is operating.
Large amounts of warm or hot food
may have been stored recently.
Doors are opened too frequently or too
long.
Refrigerator or freezer door may be
slightly open.
Refrigerator control is set too cold.
Refrigerator or freezer gasket is dirty,
worn, cracked, or poorly fitted.
Solution
Set refrigerator control.
This is normal for a fully automatic
defrosting refrigerator. The defrost
cycle occurs periodically.
Make sure plug is tightly pushed into
outlet.
Call local electric company.
This is normal. Larger, more efficient
units run longer.
It is normal for the refrigerator to work
longer under these conditions.
It takes a few hours for the refrigerator
refrigerator to come down to room
temperature completely.
Operation of the ice maker causes the
refrigerator to run slightly longer.
Warm food will cause the refrigerator
to run longer until the desired
temperature is reached.
Warm air entering the refrigerator
causes it to run more. Open the door
less often.
Make sure the refrigerator is level.
Keep food and containers from
blocking the door. See problem
section. OPENING/CLOSING of Doors.
Set the refrigerator control to a
warmer setting until the refrigerator
temperature is satisfactory.
Clean or change gasket. Leaks in the
door seal will cause the refrigerator to
run longer in order to maintain desired
temperatures.
Normal Operations
Refrigerator
Refrigerator
compressor
does not run.
Refrigerator
runs too much
or too long
Occurrence
23
Care and Maintenance
Page 24

Refrigerator
compressor
does not run.
Occurrence
Temperatures are
too cold
T emperature in the
freezer is too cold
but the Refrigerator
T emperature is
Satisfactory .
T emperature in the
refrigerator
is too warm but
the freezer
temperature is
satisfactory .
Temperatures in
the refrigerator
or freezer are
too warm.
Temperatures
are too warm
Meat stored in
fresh meat
drawer freezes.
Food stored in
drawers freezes.
Possible Cause
Thermostat is keeping the refrigerator
at a constant temperature.
Freezer control is set too cold
Doors are opened too frequently or too
long.
Door is slightly open.
Large amounts of warm or hot food
may have been stored recently.
Refrigerator has recently been
disconnected for a period of time.
Refrigerator control is set too warm.
Refrigerator control is set too warm.
Refrigerator control has some effect on
freezer temperature.
Freezer control is set too warm.
Refrigerator control is set too cold.
Refrigerator control is set too cold.
Meat should be stored at a temperature
just below the freezing point of water (32˚F,
0˚C) for maximum fresh storage time.
Solution
This is normal. The Refrigerator goes on
and off to keep the temperature constant.
Set the refrigerator control to a colder
setting.
A refrigerator requires some hours to
cool down completely.
Wait until the refrigerator or freezer
has had a chance to reach its selected
temperature.
Warm air enters the refrigerator/ freezer
whenever the door is opened.
Open the door less often.
Set the freezer or refrigerator control to a
colder setting until the freezer or
refrigerator temperature is satisfactory.
Set the freezer or refrigerator control to
a colder setting until the freezer or
refrigerator temperature is satisfactory.
It is normal for ice crystals to form due
to the moisture content of meat.
Set the refrigerator control to a
warmer setting
See above solution.
Set the freezer control to a warmer
setting until the freezer temperature is
satisfactory.
Close the door completely.
T emperature in the
refrigerator is too
cold and the
freezer
temperature
is satisfactory .
24
Care and Maintenance
Page 25
Sound and Noise
Occurrence
Louder sound
levels when
Refrigerator is on.
Louder sound
levels when
compressor
comes on.
Moisture collects
on the inside walls
of the refrigerator.
Water/Moisture/Ice
Outside
Refrigerator
Moisture forms
on the outside of
the refrigerator
or between doors.
Vibrating or
rattling noise.
Water/Moisture
/Ice Inside
Refrigerator
Possible Cause
Today’s refrigerators have increased
storage capacity and maintain more
even temperatures.
Refrigerator is touching wall or cabinets.
The weather is hot and humid which
increases the rate of frost buildup
and internal sweating.
Door is slightly open.
Door is opened too often or too long.
Weather is humid.
Door is slightly open,causing cold air
from the inside the refrigerator to meet
warm air from the outside.
Floor is uneven or weak.
Refrigerator rocks on the floor when it is
moved slightly.
Refrigerator operates at higher pressures
during the start of the ON cycle.
Items placed on the top of the refrigerator
are vibrating.
Dishes are vibrating on the shelves in
the refrigerator.
Solution
This time, close the door completely.
This is normal in humid weather.
When humidity is lower, the moisture
should disappear.
See problem section Opening/Closing of
doors.
Move refrigerator so that it does not
touch the wall or refrigerator.
This is normal.
It is normal for dishes to vibrate slightly.
Move dishes slightly.
Make sure refrigerator is level and firmly
set on floor.
Be sure floor is level and solid and can
adequately support refrigerator.
Remove items.
It is normal for sound levels to be higher.
This is normal. The sound will level off as
the refrigerator continues to run.
Open the door less often.
25
Care and Maintenance
Page 26
Odors in Refrigerator
Occurrence
Door(s) will not
close.
Door(s) will not
close.
Drawers are
difficult to move.
Dispenser
Dispenser will not
dispense ice
Opening/Closing of
Doors/Drawers
Possible Cause
Food is touching shelf on top of the
drawer
Track that drawer slides on is dirty.
Ice storage bin is empty.
Freezer temperature is set too warm.
Household water line valve is not open.
Refrigerator or freezer door is not
closed.
Refrigerator is not level. It rocks on the
floor when it is moved slightly.
Floor is uneven or weak.
Refrigerator rocks on the floor when it
is moved slightly.
Refrigerator is touching wall or cabinets.
Interior needs to be cleaned.
Food with strong odor is in the refrigerator.
Some containers and wrapping materials
produce odors.
Food package is keeping door open.
Door was closed too hard, causing other
door to open slightly.
Solution
Be sure both doors are closed.
Open household water line valve and
allow sufficient time for ice to be made.
When ice is made, dispenser should
operate.
Turn the freezer control to a higher
setting so that ice cubes will be made.
When the first supply of ice is made, the
dispenser should operate.
Clean drawer and track.
Be sure floor is level and can adequately
support refrigerator.
Contact carpenter to correct sagging or
sloping floor.
Move refrigerator.
.
Keep less food in drawer.
Adjust the height adjusting screw.
Use a different container or brand of
wrapping
materials
.
Move packages that keep door from
closing.
Close both doors gently.
Cover food completely.
Clean interior with sponge,warm water
and baking soda.
When the first supply of ice is dropped
into the bin, the dispenser should operate.
26
Care and Maintenance
Page 27

Dispenser will
not
dispense
ice.
Ice dispenser
is jammed.
Occurrence
Water has an
odd taste
and/or odor.
Dispenser will
not dispense
water.
Possible Cause
Water has been in the tank for too long.
Unit not properly connected to cold
water line.
This sound is normally made when automatically made ice is dropped into
ice storage bin. Volume may vary according to refrigerator’s location.
This sound is normally made when ice maker is supplied with water after
dropping the automatically made ice.
Please thoroughly read ‘Automatic ice maker and Dispenser’ in this manual.
Ice cubes are frozen together.
Ice has melted and frozen around auger
due to infrequent use,
temperature fluctuations and/or power
outrages.
Ice cubes are jammed between the ice
maker arm and back of the bin.
Ice cubes that have been purchased or
made in some other way have been
used in the dispenser.
Household water line valve is not open.
See problem “Ice maker is not making
any ice.”
Refrigerator or freezer door is not closed.
Solution
Be sure both doors are closed.
Draw and discard 7 glasses of water
to freshen the supply. Draw and discard
an additional 7 glasses to
completely rinse out tank.
Connect unit to cold water line which
supplies water to kitchen faucet.
Open household water line valve.
Use the dispenser often so that cubes do
not freeze together.
Only the ice cubes made by the ice
maker should be used with the
dispenser.
Remove the ice cubes that are jamming
the dispenser.
Remove ice storage bin, and thaw and
the contents. Clean bin, wipe dry and
replace in proper position.
When new ice is made, dispenser should
operate.
27
Care and Maintenance
Sound of ice
dropping
Sound of water
supply
Other
Page 28

28
Warranty Certificate
For offer a 12-month warranty for this apparatus
During the 12-month warranty period, we will repair your apparatus at no cost to you or make available
spare parts to your dealer free, if this apparatus fails due to manufacturing or material defects. Further
claims are excluded. We are not liable for damages due to acts of providence or damages occurring
during transport. The buyer assumes shipping and packaging costs. Your warranty conditions on the
rear also apply!
Type of apparatus : Serial number :
Name of buyer :
Purchase date : Dealer’s stamp and signature
Page 29
29
Warranty conditions for refrigerator
1.
The warranty period begins on the purchase date
and is valid for 12 months. Begin of warranty period
is proven if, the buyer submits purchase receipt
together with the warranty card, filled in and signed
by the seller. The serial number of the product
must agree with the number entered onto the
warranty card.
2. During the warranty period, we will correct any
defects at no cost to you, if it can be proven that
these are attributed to manufacturing or material
defects.
3.
Damages due to incorrect handling, noncompliance with instructions for use and normal
wear are not covered by this warranty. Also, the
warranty does not cover wear parts or easily
broken parts (for example, viewing glass, light
bulbs). The buyer is responsible for any damages
during transport as well as shipping and packaging
costs.
4. We decide whether to make repairs, exchange
or replace parts. Exchanged or replaced parts
are our property. The original warranty period is not
prolonged if a refrigerator is repaired or certain
parts are replaced.
5.
The warranty is nullified if any person intervenes
in the apparatus that are not authorised by LG
Electronics, if the apparatus is used for commercial
purposes.
6. Always keep the original packaging, so that if
the apparatus requires servicing, it can be transported
without damaging it.
7. If a repair is covered by this warranty, always
contact your dealer or an authorised service centre.
8. Further claims are excluded.
If parts of these
provisions are invalid, they apply in the sense of
the wording. The validity of the other provisions is
not effected.
Page 30
Inhalt
Angabe Modell- und Seriennummer
Wichtige Sicherheitsmaßnahmen
Beschreibung der Teile
Wo das Gerät installiert werden sollte
Die Tür entfernen
Türen vom Tiefkühl- und Kühlabteil montieren
Wasserzufuhrleitung anbringen
Die richtige Höhe einstellen
Inbetriebnahme
Beschreibung der Funktionstasten
Temperatureinstellung und Funktionen
Automatischer Eisbereiter und Wasserspender
Hausbar
Ablage
Eierbehälter
Einstellung Gemüse- oder Frischhalteabteil
Geruchfilter
Was kommt wohin?
Hinweise für die Lagerung
Wie Sie Teile abmontieren
Allgemein
Reinigung
Problemlösungen
Einleitung
Installierung
Betrieb
Die Lagerung
der
Lebensmittel
Pflege und
Wartung
31
31
32
33
34
35
35
36
37
37
38
39
42
43
44
44
45
46
47
48
50
50
51
30
Page 31

Angabe Modell- und Seriennummer
Modell- und Seriennummer befinden sich im Inneren vom Kühlabteil
dieses Geräts. Die jeweilige Nummer ist nur für dieses eine Gerät bestimmt.
Tragen Sie die entsprechenden Informationen hier bitte ein und
bewahren Sie diese Bedienungsanleitung als Ankaufbeweis auf. Heften Sie
den Kassenzettel bitte hier fest.
Ankaufdatum :
Händler :
Anschrift vom Händler :
Telefonnummer Händler :
Modellnummer :
Seriennummer :
Wichtiger Sicherheitshinweis
Dieser Kühlschrank muß vor Inbetriebnahme zuerst anhand der Anweisungen aus
dieser Bedienungsanleitung installiert und plaziert werden.
Um den Kühlschrank auszuschalten, niemals das Stromkabel ziehen. Nehmen Sie
den Stecker immer richtig fest in die Hand und ziehen den Stecker aus der
Steckdose heraus.
Wenn Sie das Gerät verschieben, achten Sie bitte darauf, das Kabel nicht einzuklemmen oder sonst zu beschädigen.
Wenn Ihr Kühlschrank in Betrieb ist, sollten Sie die kalten Flächen im Gefrierabteil
nicht berühren, insbesondere nicht mit nassen Händen. Sonst könnte die Haut an
diesen sehr kalten Flächen festfrieren.
Ziehen Sie den Stecker vom Netzkabel, bevor Sie das Gerät reinigen. Fassen Sie
den Stecker nie mit nassen Händen an, weil dies einen Stromschlag oder sonstige
Verletzungen verursachen kann.
Sie dürfen das Netzkabel nie beschädigen, bearbeiten, stark knicken, ziehen oder
aufwickeln, weil Schadstellen Feuer oder einen Stromschlag verursachen können.
Vergewissern Sie sich, daß das Gerät richtig geerdet ist.
Lagern Sie nie Glasbehälter im Gefrierabteil, weil diese platzen könnten, wenn der
Inhalt gefriert.
Stecken Sie Ihre Hände nie in den Vorratbehälter vom automatischen Eisbereiter,
weil Sie sich verletzen könnten, sobald der Eisbereiter in Wirkung tritt.
Man darf nie auf die Tür der Hausbar klettern, sitzen, stehen oder lehnen.
Hierdurch könnte der Kühlschrank sich beschädigen oder sogar kippen, und
könnte man sich schwer verletzen.
Schließen Sie den Kühlschrank womöglich an eine nur für das Gerät bestimmte
Steckdose an um überbelastung und Stromausfall zu vermeiden.
Falls das Stromkabel Schadstellen aufweist, muss es durch ein Spezialkabel vom
Lieferanten oder dessen Vertreter ersetzt werden.
Benutzen Sie kein
Verlängerungskabel
Das Netzkabel
erneuern
Einleitung
31
Page 32

GEFÄHRLICH : Kinder könnten sich eventuell einsperren.
Bevor Sie Ihren alten Kühl- oder Tiefkühlschrank wegwerfen, müssen Sie unbeding :
die Türen abmontieren, aber die Ablagen an ihrem Platz lassen, damit keine Kinder
hineinklettern können.
Das Gerät darf nicht unbeaufsichtigt durch Kleinkinder oder Behinderte benutzt werden.
Kleine Kinder sollten außerdem nie alleine beim Gerät gelassen werden, weil es kein
Spielzeug ist.
Lagern Sie kein Benzin oder andere leicht entflammbare Gase oder Flüssigkeiten in
der Nähe von diesem oder anderen Geräten.
Bei einem eventuellen Kurzschluß kann die Erdung das Risiko von einem Stromschlag
reduzieren, weil hierdurch der elektrische Strom über eine Erdungsleitung abgeführt
werden kann.
Um das Risiko von einem eventuellen Stromschlag auszuschließen, muß dieses Gerät
geerdet werden.
Unsachgemäße Benutzung vom Erdungsstecker kann dem Benutzer einen elektrischen Schlag versetzen. Wenden Sie sich an einen qualifizierten Elektroinstallateur
oder an den Kundendienst, falls die Erdungsanweisungen nicht vollständig verstanden wurden oder Sie nicht sicher sind, ob das Gerät richtig geerdet ist.
Beschreibung der Teile
Achtung: Kinder
könnten sich
einsperren
Nicht im
Kühlschrank
lagern
Erdung vom
Gerät
Einleitung
Butter-/Käsefach
Lampe (oben)
Ablage
Flaschenfach
(Optional)
Türablage
Schiebeablage
Imbißfach
Hausbar
Eierbehälter
Lampe (unten)
Gemüseschublade
Türablage
Gemüse/Frischhalteschublade
Türablage
Geruchfilter
Umschalter Gemüse-
/Frischhalteschublade
Gefrierabteil Kühlabteil
Türablage
Automatischer
Eisbereiter
Lampe
Ablage
Türablage
Schublade
Türablage
Nivellierungs-
schraube
Untere
Abdeckung
• Falls bei Ihrem Gerät bestimmte Teile fehlen, handelt es sich wahrscheinlich um Teile,
die nur bei bestimmten Modellen zur Ausstattung gehören (die “Hausbar” gibt es z.B.
nicht bei allen Modellen)
HINWEIS
32
Page 33

Wo das Gerät installiert werden sollte
Falls das Gerät nicht richtig fest steht, kann
dies Vibrationen und Lärm zur Folge haben.
Falls der Boden uneben ist, stellen Sie den
Kühlschrank völlig waagerecht durch Drehen
der Nivellierungsschraube.
Falls der Kühlschrank auf Teppich oder
Teppichboden installiert wird, können diese
sich durch die Hitze unterm Kühlschrank
verfärben.
Deswegen muß der Kühlschrank auf eine dicke
Unterlage gestellt werden.
Berücksichtigen Sie bitte, daß der Kühlschrank
weit genug von anderen Gegenständen
entfernt stehen muß. Falls der Abstand zu
Möbeln, Wand usw . zu gering ist, bedeutet dies
eine geringere Gefrierleistung und höheren
Stromverbrauch.
Wählen Sie einen Ort, wo die
Wasseranschlußleitung leicht mit dem
automatischen Eisbereiter und Wasserspender
verbunden
werden kann. An einer feuchten
Stelle, wo Wasser fließt, kann der Kühlschrank
rosten oder Elektrizität abgeleitet werden.
Wenn die Umgebungstemperatur zu hoch
ist, wird die Kühlleistung schlechter und ist
der Stromverbrauch höher.
Durch Leuchtgas und Rauch kann die Farbe
vom Kühlschrank angegriffen werden.
Ein fester,
ebener Boden
Den richtigen
Abstand
einhalten
Wo der
Anschluß an die
Wasserleitung
problemlos ist,
an einer
trockenen Stelle
Ohne Hitze oder
Leuchtgas
Installierung
33
Höhe
Den richtigen
Abstand
Unterlage
• Stellen Sie den Kühlschrank an einem Ort wo die Raumtemperatur zwischen 5°C und
43°C ist. Falls die Temperatur zu hoch oder zu niedrig ist, kann dies Probleme
verursachen. Außerdem kann die Leitung zwischen Eis- und Wasserspender und
Eisbereiter vereisen.
HINWEIS
Den richtigen
Abstand
DD
eenn
rriicchhttiiggeenn
AAbbssttaanndd
Page 34

Die Tür entfernen
Falls Ihre Eingangstür nicht breit genug ist für den Kühlschrank, entfernen Sie die Tür
vom Kühlschrank und transportieren den
Kühlschrank quer durch die Türöffnung.
Schieben Sie die untere Abdeckung nach
oben um diese zu entfernen, und ziehen
dann das Wasserleitungsröhrchen, während
Sie auf Fläche (➀) drücken, wie auf der
Abbildung rechts.
1) Alle Verbindungskabel (außer der
Erdungsleitung) entfernen, nachdem die
Scharnierabdeckung durch Lockern der
Schrauben entfernt wurde.
2) Entfernen Sie den Halter durch diesen
gegen Uhrzeigersinn (➀) zu drehen und
heben Sie dann das obere Scharnier (➁) an.
3) Entfernen Sie die Tür vom Gefrierabteil
durch Hochziehen.
Jetzt muß die Tür so weit angehoben werden, daß das Wasserleitungsröhrchen
vollständig hinausgezogen werden kann.
1) Lockern Sie die Schrauben der
Scharnierabdeckung und entfernen Sie
dieAbdeckung.
Entfernen Sie alle Verbindungskabel außer
der Erdungsleitung.
2)
Entfernen Sie die Halterung durch Drehen in
Uhrzeigersinn (➀) und entfernen Sie dann
das obere Scharnier durch Hochziehen (➁).
3) Entfernen Sie die Tür vom Kühlabteil
durch Hochziehen.
Die untere
Abdeckung
entfernen und
dann das
Wasserleitungs-
röhrchen
Die Tür vom
Gefrierabteil
entfernen
Die Tür vom
Kühlschrank
entfernen
Installierung
34
2
2
Untere
Abdeckung
Wasserleitungsröhrchen
• Falls das Ende vom Röhrchen verformt oder abgenutzt ist, schneiden Sie ein
Stückchen ab.
HINWEIS
Scharnierabdeckung
Verbindungskabel
Erdungsleitung
Scharnier
(oben)
Halter
Oberes
Scharnier
Unteres Scharnier
Genügend, damit das
Wasserleitungsröhr-
chen vollständig
hinausgezogen
werden kann.
• Schaffen Sie die Tür vom Kühlabteil durch die Eingangstür und legen diese hin, aber
achten Sie darauf, das Wasserleitungsröhrchen nicht zu beschädigen.
HINWEIS
•
Wenn Sie das obere Scharnier entfernen, achten Sie bitte darauf, daß die Tür nicht fällt.
HINWEIS
Verbindungskabel
Oberes Scharnier
Unteres Scharnier
Halterung
Page 35

Schieben Sie den Kühlschrank quer durch
die Eingangstür, wie auf der Abbildung.
Türen vom Gefrier- und Kühlabteil montieren
Nachdem Sie die Türen durch die Eingangstür hereingebracht haben, montieren Sie
diese wieder in umgekehrter Reihenfolge.
Bevor Sie die Zuführungsleitung anbringen
• Damit die automatische Eiszubereitung richtig funktionieren kann, wird ein
Wasserdruck von 1,5-8,5 kgf/cm
2
(147-834 kPa) benötigt. (Dies bedeutet, daß ein
Pappbecher von 180 cc in 3 Sekunden gefüllt ist).
• Falls der Wasserdruck 1,5 kgf/cm
2
(147 kPa) nicht erreicht, benötigen Sie eine
zusätzliche Wasserpumpe um den automatischen Eisbereiter und Spender richtig
funktionieren zu lassen.
• Die Wasserzufuhrleitung darf höchstens 12 m lang sein. Sie müssen außerdem
darauf achten, daß diese nicht geknickt werden darf. Falls die Leitung 12 m oder länger
ist, kann dies durch zu niedrigen Wasserdruck Schwierigkeiten bei der Wasserzufuhr
verursachen.
• Installieren Sie die Wasserzufuhrleitung unweit einer Wärmequelle.
• Schließen Sie das Gerät nur an die Trinkwasserleitung an.
Den
Kühlschrank
durch die
Türöffnung
schieben
Wasserzufuhr-
leitung anbringen
Achtung
Installierung
35
Page 36

Die richtige Höhe einstellen
Richten Sie diese folgendermaßen aneinander aus. Stecken Sie einen flachen
Schraubenzieher in die Rille der linken Nivellierungsschraube und drehen im
Uhrzeigersinn (➀).
Richten Sie diese folgendermaßen aneinander aus. Stecken Sie einen flachen
Schraubenzieher in die Rille der rechten Nivellierungsschraube und drehen im
Uhrzeigersinn (1).
Die Tür kann besser geschlossen werden, wenn Sie mit Hilfe der Nivellierungsschraube
dafür sorgen, daß die Vorderseite etwas höher steht. Falls die Tür nicht richtig schließt,
kann hierdurch die Kühlleistung beeinträchtigt werden.
Falls die Tür vom
Gefrierabteil
niedriger ist als
die Tür vom
Kühlabteil
Falls die Tür vom
Gefrierabteil
höher ist als die
Tür vom
Kühlabteil
Nachdem der
Höhenunterschied
der Türen
ausgeglichen
wurde
Installierung
36
Höhenunterschied
Höhenunterschied
Höhenunter
schied
Flacher
Schraubenzieher
Linke
Nivellierungsschraube
Höhenunterschied
AFlacher
Schraubenzieher
Rechte
Nivellierungsschraube
➀
➀
Page 37

Inbetriebnahme
Wenn Ihr Kühlschrank das erste Mal installiert wird, braucht er 2-3 Stunden um
die normale Temperatur zu erreichen, bevor Sie Lebensmittel (frisch oder
tiefgekühlt) einlagern können. Falls der Betrieb unterbrochen wird, warten Sie
zuerst 5 Minuten, bevor Sie das Gerät wieder einschalten.
Beschreibung der Funktionstasten
Betrieb
37
3
2
1
FR
POVVER
FREEZE
Wasser-/Eisausgabe
Druckschalter
Spender
Spenderlampe
(Unterseite
Funktionstastendispl
ay)
Griff Hausbar
Hausbar
(nur bei einigen
Modellen)
Funktionstastendisplay
Temperaturregl
er Gefrierabteil
Temperaturregl
er Kühlabteil
Schnellgefriertaste Wahltaste Spender
Page 38

Temperatureinstellung und Funktionen
Dieses Lämpchen zeigt die Temperatur im
Gefrierabteil an
" Bei der Inbetriebnahme oder nach einem
Stromausfall leuchtet 2 (Standard) auf.
" Wenn Sie die Taste drücken, wechselt
die Einstellung jeweils von 2 (Standard) ➔
(Standard hoch) ➔ 3 (Hoch) ➔ (Maximum)
➔ 1 (Niedrig) ➔ (Standard Niedrig).
" Normalerweise ist 2 (Standard) geeignet für
die Aufbewahrung der Lebensmittel.
Wählen Sie zwischen 1(Niedrig), (Standard
Niedrig) und (Standard Hoch), 3 (Hoch) und
(Maximum), je nachdem, wieviele
Lebensmittel gelagert werden und wie oft
Sie das Gefrierabteil benutzen.
Dieses Lämpchen zeigt die Temperatur im
Kühlabteil an.
" Bei der Inbetriebnahme oder nach einem
Stromausfall leuchtet 2 (Standard) auf.
" Wenn Sie die Taste drücken, wechselt
die Einstellung jeweils von 2 (Standard) ➔
(Standard hoch) ➔ 3 (Hoch) ➔ (Maximum)
➔ 1 (Niedrig) ➔ (Standard Niedrig).
Dieses Lämpchen zeigt an, daß die
Schnellgefrierfunktion in Betrieb ist.
Diese Funktion dient dazu, im Gefrierabteil die
Lebensmittel schneller einzufrieren oder um Eis
zu bereiten.
" Wenn Sie die Taste drücken, wird die
Schnellgefrierfunktion eingeschaltet und
leuchtet das Lämpchen.
" Wenn Sie die Taste einmal drücken,
können Sie die Schnellgefrierfunktion
entweder ein- oder ausschalten.
" Schnellgefrieren wird aber auch nach einer
bestimmten Zeit automatisch wieder ausgeschaltet.
Dieses Lämpchen zeigt die Wahl zwischen
Wasser oder Eis an.
" Bei Inbetriebnahme oder nach einem
Stromausfall wird aufleuchten.
" Zerkleinertes Eis, Wasser oder Eiswürfel
werden mit der Taste gewählt.
Temperatur-
einstellung im
Gefrierabteil
Temperatur-
einstellung im
Kühlabteil
Schnellgefrieren
Wahltaste
Spender
Betrieb
38
POVVER
FREEZE
Niedrige Temperatur
(um Lebensmittel
abzukühlen)
Hohe Temperatur
(wenn die
Lebensmittel
gefroren sind)
•
Stellen Sie die Temperatur für das gewünschte Abteil ein, da die Innentemperatur jeweils
von der Umgebungstemperatur abhängt. Die niedrigste Temperatur ist immer Einstellung 3
.
• Entfernen Sie die Schutzfolie, die sich an der Vorderseite vom Display befindet, damit
Sie die Funktionen leichter ablesen können.
HINWEIS
Niedrige Temperatur
(Wenn Tiefgekühltes
auftaut)
Hohe Temperatur
(Wenn Lebensmittel
sehr schnell auftauen)
" Normalerweise ist 2 (Standard) geeignet für die Aufbewahrung der Lebensmittel.
Wählen Sie zwischen 1(Niedrig), (Standard Niedrig) und (Standard Hoch), 3
(Hoch) und (Maximum), je nachdem, wieviele Lebensmittel gelagert werden und
wie oft Sie das Kühlabteil benutzen.
Page 39

Falls die Tür vom Kühlschrank länger als 1 Minute offen bleibt, klingelt dreimal ein
Tonwarner. Dieser Tonwarner macht sich 30 Sekunden lang bemerkbar und hört auf,
wenn die Tür geschlossen wird. Diese Funktion Tonwarner “Tür offen” ist nur akustisch
und wird sonst nicht angezeigt. Falls der Tonwarner nicht aufhört, wenn die Türen von
Kühl- und Gefrierabteil wieder geschlossen sind, wenden Sie sich bitte an den
Kundendienst.
Die Selbstdiagnosefunktion setzt sich in Betrieb, sobald etwas mit dem Gerät nicht in
Ordnung ist. Wenn beim Gerät eine Störung vorliegt, hat das Drücken der Knöpfe keine
Auswirkung. Wenden Sie sich sofort an den Kundendienst, aber schalten Sie das
Gerät nicht AUS. Falls Sie das Gerät AUS schalten, braucht der Techniker vom
Kundendienst viel länger um das Problem zu erörtern.
Automatischer Eisbereiter und Wasserspender
Das Wasser wird zuerst im Wasserbehälter im Kühlabteil gekühlt und dann zum
Spender befördert.
Eis wird im automatischen Eisbereiter gemacht und daraufhin als zerkleinertes Eis
und Eiswürfel gespendet.
" Wählen Sie zwischen zerkleinertem Eis, Wasser oder Eiswürfeln und drücken Sie
dann mit einem Glas oder einem anderen Behälter gegen den Druckschalter vom
Spender.
Tonwarner Tür
offen
Selbstdiagnose
(Fehlersuche)
Spender
Eis/kaltes Wasser
Benutzung vom
Spender
Betrieb
• Es ist ganz normal, daß das Wasser am Anfang nicht sehr kalt ist. Falls Sie kälteres
Wasser wünschen, fügen Sie einfach etwas Eis hinzu.
HINWEIS
Zerkleinertes Eis
• Betätigen Sie die
Wahltaste bis das
Lämpchen von zerkleinertem Eis aufleuchtet.
• Das zerkleinerte Eis wird
gespendet, wenn Sie
den Druckschalter mit
einem Glas berühren.
Wasser
• Betätigen Sie die
Wahltaste bis das
Lämpchen von Wasser
aufleuchtet.
• Das Wasser wird
gespendet, wenn Sie
den Druckschalter mit
einem Glas berühren.
Eiswürfel
• Betätigen Sie die
Wahltaste bis das
Lämpchen von
Eiswürfeln aufleuchtet.
• Die Eiswürfel werden
gespendet, wenn Sie
den Druckschalter mit
einem Glas berühren.
39
Page 40

" Der automatische Eisbereiter kann jeweils 8 Eiswürfel bereiten, 80 Stück am Tag.
Diese Menge ist aber von mehreren Bedingungen abhängig, z.B. auch davon, wie oft
die Tür vom Kühlschrank auf- und zugemacht wird.
" Die Eisbereitung hört auf, sobald der Eisbehälter voll ist.
Das Eis klumpt zusammen.
" Falls das Eis zusammenklumpt, nehmen Sie das Eis aus dem Vorratsbehälter,
brechen die Klumpen in Stückchen und geben diese wieder in den Behälter hinein.
" Falls der Eisbereiter zu kleines oder zusammengeklumptes Eis produziert, muß
die Wassermenge angepaßt werden. Wenden Sie sich an den Kundendienst.
❈ Falls Sie nur selten Eis verwenden, kann dies ebenfalls zusammenklumpen.
Stromausfall
" Es kann geschmolzenes Eis ins Gefrierabteil herunterfallen. Nehmen Sie den
Eisvorratsbehälter heraus, nehmen Sie das sämtliche Eis heraus, trocknen den
Behälter ab und geben ihn wieder hinein. Nachdem es wieder Strom gibt, wird
automatisch zerkleinertes Eis gewählt.
Das Gerät wurde gerade in Betrieb genommen
" Bei einem Kühlschrank, der gerade in Betrieb genommen wurde, dauert es etwa
12 Stunden, bevor im Gefrierabteil Eis gemacht wird.
Automatischer
Eisbereiter
Falls der
Eisbereiter nicht
einwandfrei
funktioniert
Betrieb
• Nach einem Stromausfall oder wenn Sie den Stecker wieder in die Steckdose stecken,
wird automatisch zerkleinertes Eis gewählt.
• Halten Sie Gläser oder andere Behälter immer nah an der Ausgabeöffnung, damit kein
Eis herausfallen kann.
• 5 Sekunden nach der Eisentnahme hören Sie, wie es klickt. Dies bedeutet, daß die
Öffnung für die Eisausgabe gesperrt wird.
• Lassen Sie bitte Ihr Glas noch 2-3 Sekunden an der Öffnung für die Eisausgabe, ohne
den Druckschalter zu berühren, damit eventuell noch vorhandenes Wasser oder Eis in
das Glas fließen kann.
• Wischen Sie eventuell heruntergefallenes Wasser auf, und entfernen dazu den Deckel
vom Wasserauffangbecken.
• Falls Sie zuerst zerkleinertes Eis gewählt hatten und daraufhin Eiswürfel, kommt
eventuell zuerst noch etwas zerkleinertes Eis heraus.
HINWEIS
• Der Lärm, der entsteht, wenn das bereitete Eis in den Eisbehälter fällt, ist völlig normal.
HINWEIS
40
Page 41

Werfen Sie, nachdem der Kühlschrank in Betrieb genommen wurde, immer
das erste Eis (etwa 20 Würfel) und das erste Wasser (etwa 7 Gläser) weg.
In diesem ersten Eis oder Wasser können sich Teilchen oder Gerüche von der
Wasserzufuhrleitung oder aus dem W asserbehälter befinden. Das Gleiche gilt, falls der
Kühlschrank längere Zeit nicht benutzt wurde.
Kinder dürfen den Spender nicht berühren.
Sie könnten z.B. die Druckschalter falsch bedienen oder die Lämpchen kaputt
machen.
Achten Sie darauf, daß die Lebensmittel
den Eisdurchlauf nicht behindern.
Falls Lebensmittel den Durchlauf behindern, wird kein Eis gespendet.
Der Eisdurchlauf kann auch mit Eisstaub
bedeckt sein, insbesondere, wenn nur
zerkleinertes Eis benutzt wird. In dem Fall
müssen Sie das angesammelte Pulvereis
entfernen.
Lagern Sie nie Getränkedosen oder andere Lebensmittel, die Sie schnell
abkühlen wollen, im Eisvorratsbehälter.
Hierdurch könnte der automatische Eisbereiter beschädigt werden.
Benutzen Sie nie zerbrechliche Gläser oder Geschirr um das Eis zu
entnehmen, da diese zerbrechen könnten.
Geben Sie zuerst Eis in das Glas hinein und fügen erst danach Wasser oder
andere Getränke hinzu, um Spritzen zu vermeiden.
Berühren Sie die Öffnung für die Eisentnahme nie mit Ihren Händen oder mit
irgendwelchen Gegenständen.
Sonst könnten Sie entweder Ihre Hände verletzen oder das Gerät beschädigen.
Lassen Sie den Deckel immer auf dem Eisbereiter.
Verteilen Sie das Eis regelmäßig im Eisbehälter, damit der Behälter ganz
gefüllt wird.
Das Eis wird einfach neben dem Eisbereiter gesammelt. Falls Sie nicht manchmal
selber das Eis gleichmäßig verteilen, registriert das Gerät fälschlicherweise, daß
der Behälter voll ist und wird die Eisbereitung eingestellt.
Falls verfärbtes Eis gespendet wird, wenden Sie sich sofort an Ihren
Kundendienst und stellen die Benutzung ein.
Benutzen Sie nie ein Glas das zu schmal oder zu tief ist.
Das Eis könnte sich einklemmen und der Kühlschrank könnte kaputtgehen.
Halten Sie das Glas in der richtigen Entfernung von der Öffnung für die
Eisentnahme.
Falls Sie das Glas zu nah dran halten, kann das Eis nicht herauskommen.
Vorsichts-
maßnahmen
Betrieb
Gefrierabteiltür
41
Page 42

Hausbar (Nur bei bestimmten Modellen)
Um die Hausbar zu öffnen, ziehen Sie vorsichtig am Griff.
" Sie können die Hausbar benutzen ohne
die Tür vom Kühlschrank aufzumachen,
und verbrauchen also weniger Energie.
" Die Innenlampe im Kühlabteil leuchtet auf,
sobald die Tür der Hausbar geöffnet wird,
damit Sie den Inhalt gut sehen können.
" Sie können die Tür von der Hausbar als
Ablage benutzen um z.B.
Getränke einzuschenken, aber dürfen die
Tür nie als Schneidebrett oder ähnliches
benutzen. Achten Sie auch darauf,
die Tür nie mit scharfen Gegenständen zu
beschädigen.
" Stützen Sie sich nie auf die Tür und lehnen
sich nie dagegen.
" Die Hausbar funktioniert nur richtig, wenn
diese Abdeckung an seinem Platz bleibt.
" Die Tür von der Hausbar könnte abbrechen,
und außerdem könnten die Kinder sich
verletzen.
Benutzung
Benutzung der
Tür als Ablage
Innere
Barabdeckung nie
entfernen
Nie schwere
Gegenstände
draufstellen oder
Kinder schaukeln
lassen.
Betrieb
42
Page 43

Ablage
Mit diesen ausziehbaren Ablagen können
Sie die Lebensmittel leichter hineingeben
oder herausnehmen.
Mit diesem Flaschenhalter können Sie
Weinflaschen liegend lagern. Kann an jede
Ablage befestigt werden.
Umgang mit dem Flaschenhalter:
Um den Flaschenhalter herauszunehmen,
müssen Sie ihn gerade herausziehen. Um
ihn zu befestigen, bringen Sie ihn auf den
Rand der gewünschten Ablage und schieben
ihn hinein.
Wie Sie eine Ablage herausnehmen:
Bei der Lieferung sind die Ablagen mit
Halterungen befestigt, damit sie beim
Transport nicht verschieben. Entfernen Sie
also zuerst diese Halterungen, heben die
Ablage hoch (➀) und ziehen Sie sie heraus
wie (➁).
Wie Sie eine Ablage befestigen:
Plazieren Sie die Ablage auf der gewünscht-
en Höhe und hängen die V erbindungsstücke
in die entsprechende Öffnungen. Jetzt
müssen Sie die V orderseite der Ablage nach
unten drücken und sie in die Öffnungen einrasten lassen.
Ausziehbare
Ablage aus
Spezialglas (Nur
bei bestimmten
Modellen)
Herausnehmbarer
Flaschenhalter
(Nur bei
bestimmten
Modellen)
Höhe der Ablagen
Betrieb
43
1
1
2
2
Die Ablagen vom Kühlabteil sind verstellbar. Sie können diese also jeweils auf die
gewünschte Höhe für die verschiedenen Lebensmittel einstellen.
Halterung der
Ablage
• Achten Sie darauf, daß die Ablage
waagerecht sein muß, da diese sonst
herausfallen könnte.
HINWEIS
Page 44

Eierbehälter
Sie können den Eierbehälter woanders hinstellen oder eine andere Behälterform
wählen, abhängig von der Menge Eier.
[Normal] [Für viele Eier]
Einstellung Gemüse- oder Frischhalteabteil
" Die untere Schublade im Kühlabteil kann als Gemüseschublade oder auch als
Frischhalteabteil benutzt werden.
Das Frischhalteabteil hat eine niedrigere Temperatur als im Kühlschrank selber. So
bleiben Fleisch oder Fisch länger frisch.
Betrieb
44
• Benutzen Sie den Eierbehälter nie als Eiswürfelbehälter, da er dadurch kaputtgehen
könnte.
• Stellen Sie den Eierbehälter nie ins Gefrierabteil oder ins Frischhalteabteil.
HINWEIS
Einstellung :
Gemüseschublade
Einstellung :
Frischhalteabteil
Umschalter
Frischluftzufuhr
Achten Sie darauf,
die Einstellung zu prüfen,
bevor Sie Lebensmittel
hineingeben.
• Gemüse oder Obst gefrieren, falls der Wahlschalter auf Frischhalteabteil eingestellt ist.
Prüfen Sie die Einstellung also, bevor Sie die Lebensmittel hineingeben.
• Stellen Sie möglichst keine Lebensmittel bei der Frischluftzufuhröffnung, weil diese
Öffnung mit dem Wahlschalter verbunden ist, der in dem Fall also nur schwer zu bedi-
enen wäre.
HINWEIS
Page 45

Geruchfilter (Nur bei bestimmten Modellen)
Das System kann mit Hilfe eines optischen
Katalysators starke Gerüche problemlos
absorbieren.
Dieses System beeinträchtigt die gelagerten
Lebensmittel keineswegs.
" Weil dieses System schon im Luftansaugkanal im Kühlabteil eingebaut ist, brauchen
Sie weiter nichts mehr zu tun.
" Benutzen Sie aber geschlossene Behälter für die Aufbewahrung von Lebensmitteln mit
starkem Geruch.
Sonst könnten diese Gerüche von anderen Lebensmitteln im Abteil absorbiert
werden :
Benutzung vom
Geruchfilter
Betrieb
45
Geruchfilter
Gemüseabteil
Konversionsecke
Page 46

Welche Lebensmittel kommen wohin?
(Siehe Seite 32, Beschreibung der Teile)
Hier wird das automatisch bereitete Eis
aufbewahrt
Lagerung von Weinflaschen
Für Brot, Aufschnitt und andere kleine
Speisen
Für Tiefkühlprodukte wie Fleisch, Fisch,
Speiseeis, Tiefkühlgerichte usw.
" Für Tiefkühlprodukte in kleinen
Packungen.
" Bei jedem Öffnen der Tür werden die
Speisen warmer Luft ausgesetzt. Lagern
Sie hier also kein Speiseeis oder andere
Speisen, die länger tiefgekühlt bleiben
müssen.
" Lagern Sie hier Fleisch, Fisch, Geflügel
usw. in Alufolie gewickelt.
Für Milcherzeugnisse wie Butter, Käse usw.
Wählen Sie eine geeignete Stelle für den
Eierbehälter.
Für Getränke usw. die oft benutzt werden.
Stellen Sie hier Beilagen oder andere Speisen
ab, weit genug von einander entfernt um eine
wirksame Kühlung zu gewährleisten.
Für kleine Packungen Lebensmittel oder
Getränke, Milch, Saft, Bier usw.
Für Obst und Gemüse.
Um Obst und Gemüse zu lagern oder auch
um Fleisch und Fisch aufzutauen.
Benutzen Sie den Umschalter um die richtige
Einstellung zu wählen, die jeweils geprüft
werden muß, bevor Sie die Lebensmittel
hineingeben.
Automatischer
Eisbereiter
Flaschenhalter
Imbißschublade
Ablage im
Gefrierabteil
Türablage im
Gefrierabteil
Schublade im
Gefrierabteil
Butter-/Käsefach
Eierbehälter
Hausbar
Ablage im
Kühlabteil
Türablage im
Kühlabteil
Gemüseabteil
Gemüse/
Frischhalteabteil
Die Lagerung der Lebensmittel
46
Page 47

Lebensmittel lagern
" Frische Lebensmittel werden im Kühlabteil aufbewahrt. Das richtige Einfrieren und
Auftauen ist sehr wichtig für die Erhaltung von Geruch und Geschmack der
Lebensmittel.
" Lagern Sie keine Lebensmittel, die bei niedrigen Temperaturen leicht verderblich
sind, wie z.B. Bananen und Melonen.
" Lassen Sie warme Speisen zuerst abkühlen, bevor Sie sie in den Kühlschrank
hineingeben. Falls Sie warme Speisen sofort in den Kühlschrank stellen, könnten
hierdurch andere Lebensmittel verderben und wird außerdem mehr Energie ver-
braucht.
" Bewahren Sie die Speisen in einem Behälter mit Deckel auf oder wickeln sie in
Klarsichtfolie. Hierdurch kann keine Flüssigkeit verdunsten und werden Geschmack
und Nährstoffe der Lebensmittel erhalten.
" Der Abstand von Luftschlitz zu Lebensmittel muß mindestens 15 mm gehalten
werden.
" Machen Sie die Tür nicht zu oft auf. Bei jedem Öffnen der Tür kommt warme Luft
in das Kühlabteil, wodurch die Temperatur höher wird.
" Bewahren Sie nie zu viele Lebensmittel in der Türablage auf, weil dies eventuell
zur Folge haben könnte, daß die Tür sich nicht richtig schließen läßt.
" Lagern Sie keine Flaschen im Gefrierabteil, da diese platzen könnten, wenn der
Inhalt gefriert.
" Frieren Sie aufgetaute Lebensmittel niemals wieder ein, damit Geschmack und
Nährwert erhalten bleiben.
" Falls Sie Tiefkühlprodukte wie z.B. Speiseeis längere Zeit im Gefrierabteil aufbe-
wahren, legen Sie diese auf die Ablage im Gefrierabteil selber und nicht in die
Türablage.
" Lagern Sie Lebensmittel mit anhaftendem Wasser nie auf den oberen Ablagen im
Kühlabteil, weil diese durch den direkten Kontakt mit der kalten Luft gefrieren
könnten.
" Machen Sie die Lebensmittel immer sauber, bevor Sie diese in den Kühlschrank
legen. Obst und Gemüse werden gewaschen und abgetupft, und auch verpackte
Lebensmittel werden abgewischt, damit Lebensmittel die sich bereits im
Kühlschrank befinden nicht schmutzig werden.
" Die Eier in Eierleiste oder-behälter müssen stets frisch sein und dürfen nicht
liegend gelagert werden, damit sie länger frisch bleiben.
Gefrierabteil
Kühlabteil
Die Lagerung der Lebensmittel
47
•
Falls der Kühlschrank an einer warmen, feuchten Stelle steht, die Tür öfters aufgemacht
wird
oder viel Gemüse gelagert wird, kann sich im Inneren Kondenswasser bilden.
Dies hat aber keine nachteilige Auswirkung auf die Kühlleistung. Wischen Sie die
Kondensbildung einfach ab.
HINWEIS
Page 48

Wie Sie Teile abmontieren
Entfernen Sie das Lämpchen durch
Herausziehen (➁) während Sie die
Abdeckung (➀) etwas anheben. Drehen
Sie die Glühbirne im Gegenuhrzeigersinn.
Eine Kühlschrank-Glühbirne von Max.
240 V, 60 W kann beim Kundendienst
erstanden werden.
Entfernen Sie die Abdeckung mit Hilfe eines
flachen Schraubenziehers, den Sie in die
vordere Öffnung hineinführen. Entfernen Sie
die alte Lampe.
Es wird eine Kühlschrank-Glühbirne benötigt
von max.
240 V, 15 W, erhältlich beim Kundendienst.
Heben Sie die Vorderseite (➀) hoch und
ziehen die Ablage heraus (➁).
Heben Sie den Träger hoch, während Sie
beide Seiten (➀) festhalten und ziehen ihn
in Richtung (➁) heraus.
Halten Sie den Eisvorratsbehälter fest wie
auf der rechten Abbildung gezeigt wird und
ziehen diesen heraus (➁), während Sie ihn
leicht hochheben (➀).
" Demontieren Sie den Eisvorratsbehälter
nur, falls dies unbedingt notwendig ist.
" Benutzen Sie beide Hände um den
Eisvorratsbehälter zu entfernen, da dieser
sonst herunterfallen könnte.
" Falls der Eisvorratsbehälter nicht richtig
einrastet, drehen Sie die Drehvorrichtung
etwas.
Das Wasser im Auffangbecken läuft nicht
automatisch ab.
Deswegen sollte es regelmäßig saubergemacht
werden.
Entfernen Sie den Deckel durch an der linken
Seite darauf zu drücken (wie im Bild rechts
gezeigt) und trocknen es mit einem Tuch
ab.
Lämpchen
Gefrierabteil
Lämpchen vom
Spender
Ablage
Gefrierabteil
Türrahmen und
Träger
Eisvorratsbehälter
Nach Benutzung
vom Spender
Pflege und Wartung
48
• Normalerweise müssen Sie beim Abmontieren in umgekehrter Reihenfolge verfahren.
Achten Sie immer darauf, daß der Netzstecker herausgezogen sein muß, bevor Sie Teile
abmontieren oder installieren. Wenden Sie keine Gewalt an um die Teile zu entfernen, um
diese nicht zu beschädigen.
HINWEIS
2
1
2
1
1
2
1
2
Drehvorrichtung
Page 49

Um die Abdeckung vom Lämpchen zu entfer-
nen, ziehen Sie die Abdeckung nach vorne,
während Sie die Unterseite der Abdeckung
hochziehen. Drehen Sie die
Glühbirne gegen
Uhrzeigersinn.
Es wird eine Kühlschrank-Glühbirne benötigt
von max.
240 V, 60 W, erhältlich beim Kundendienst.
Entfernen Sie die Abdeckung durch nach
vorne Ziehen der Abdeckung, während Sie
diese mit beiden Händen festhalten.
Drehen Sie die Glühbirne gegen Uhrzeigersinn.
Es wird eine Glühbirne benötigt von max.
240 V, 30 W, erhältlich beim Kundendienst.
" Entfernen Sie die obere Gitterablage von
der Hausbar und ziehen die Abdeckung
(➀) heraus.
" Die Abdeckung der Hausbar kann durch
Hochziehen der Abdeckung entfernt werden.
" Ziehen Sie den Deckel vom
Gemüseabteil (➁) heraus mit dem
rückwärtigen Teil nach oben gezogen
(➀) und dann kann der Deckel entfernt
werden.
" Um den Deckel anzubringen, schieben
Sie den Deckel ganz hinein, bis er den
Rückwand berührt.
Lämpchen im
Kühlabteil (oben)
Lämpchen im
Kühlabteil (unten)
Hausbar
Deckel vom
Gemüseabteil
Pflege und Wartung
49
1
• Achten Sie darauf, daß Sie unbedingt die Teile der Kühlschranktür entfernen müssen
um Gemüseabteil, Imbißschublade und Abdeckung der Hausbar entfernen zu können.
HINWEIS
1
2
Page 50

Allgemein
Falls der Urlaub nicht sehr lang ist, werden Sie wahrscheinlich den Kühlschrank
eingeschaltet lassen. Lebensmittel die sich zum Einfrieren eignen können dann im
Gefrierabteil aufbewahrt werden, damit sie länger gelagert werden können.
Falls Sie das Gerät ausschalten möchten, entfernen Sie alle Lebensmittel, ziehen
den Stecker, machen das Innere gründlich sauber und lassen die Tür OFFEN, damit
sich keine Gerüche bilden.
Meistens ist ein Stromausfall nach ein bis zwei Stunden behoben und wird die
Temperatur im Kühlschrank nicht beeinträchtigt.
Sie sollten dann aber wohl darauf achten, die Tür so wenig wie möglich zu öffnen,
solange kein Strom da ist.
Falls der Stromausfall länger dauert, sollten Sie Trockeneis auf Ihre Tiefkühlpackungen legen.
Entfernen Sie bei einem Umzug alle nicht festsitzende Teile im Kühlschrank, oder
machen diese gut fest.
Damit die Nivellierungsschrauben sich nicht beschädigen, schrauben Sie diese ganz
hinein.
Die Außenwand vom Kühlschrankgehäuse wird manchmal warm, insbesondere
wenn das Gerät gerade installiert wurde.
Dies ist ganz normal. Die Antikondensleitung pumpt warme Luft zum Kühlabteil,
damit die Außenwand nicht “schwitzt”.
Reinigung
Es ist sehr wichtig, den Kühlschrank sauber zu halten, damit sich keine
unerwünschten Gerüche entwickeln können. Lebensmittelspuren sollten sofort
aufgewischt werden, weil diese sich in Säure verwandeln können und Flecken auf
den Kunststoffflächen verursachen können, falls sie nicht sofort entfernt werden.
Benutzen Sie eine milde, lauwarme Seifen- oder Spülmittellauge um die
strapazierfähige Oberfläche von Ihrem Kühlschrank zu reinigen.
Wischen Sie mit einem sauberen, feuchten Tuch nach und reiben das Gerät trocken.
Sie sollten das Innere regelmäßig saubermachen. Reinigen Sie alle Abteile mit
Natriumbikarbonat oder einem milden Reinigungsmittel und warmem Wasser.
Nachspülen und abtrocknen.
Achten Sie bitte darauf, daß das Netzkabel keine Schadstellen aufweist, die Steckdose
nicht überhitzt ist und der Stecker richtig in der Steckdose steckt.
Nehmen Sie immer das Netzkabel aus der Steckdose heraus, bevor Sie Stellen bei
Elektroteilen (Lämpchen, Schaltern, usw.) saubermachen.
Wischen Sie überflüssiges Wasser mit einem Schwamm oder Tuch auf, damit kein
Wasser oder andere Flüssigkeit in die Elektroteile geraten kann, was einen
Elektroschlag verursachen könnte.
Benutzen Sie nie Topfreiniger oder Bürsten aus Metall, aggressive Scheuermittel,
stark alkalische Lösungen, feuergefährliche oder giftige Reinigungsmittel auf den
jeweiligen Flächen. Berühren Sie die gefrorenen Flächen nicht mit nassen oder
feuchten Händen, weil diese an sehr kalten Flächen festfrieren können.
Urlaub
Stromausfall
Umzug
Antikondenzleitung
Außenseite
Innenseite
Nach dem
Saubermachen
Achtung
Pflege und Wartung
50
Page 51

Problemlösungen
Bevor Sie den Kundendienst anrufen, lesen Sie zuerst diese Liste. Hierdurch
können Sie eventuell Zeit und Kosten sparen. In dieser Liste sind alle Probleme
aufgeführt, die nicht auf Material- oder Verarbeitungsfehler zurückzuführen sind.
Normalbetrieb
Kühlabteil
Kompressor
außer Betrieb
Kühlschrank zu
oft oder zu lang
in Betrieb
Pflege und Wartung
51
Vorfall Eventuelle Ursache Lösung
Kühlschrank ausgeschaltet.
Kühlschrank taut ab.
Stecker steckt nicht fest in der
Steckdose.
Stromausfall. Brennt das Licht?
Dieser Kühlschrank ist größer als Ihr
voriger Kühlschrank.
Das Zimmer ist warm oder die
Außentemperatur hoch.
Kühlschrank war längere Zeit ausgeschaltet.
Automatischer Eisbereiter in Betrieb
Es wurden gerade warme oder heiße
Speisen hineingegeben.
Türen zu oft oder zu lang offen.
Tür von Kühlschrank oder
Gefrierabteil ist nicht ganz zu.
Kühlschrank ist zu kalt eingestellt.
Dichtung vom Kühl- oder Gefrierabteil
ist schmutzig, abgenutzt, porös oder
falsch montiert.
Schalten Sie den Kühlschrank ein.
Dies ist normal für einen Kühlschrank
der vollautomatisch abtaut.
Der Abtauvorgang findet regelmäßig
statt.
Prüfen Sie, ob der Stecker richtig
eingesteckt ist.
Wenden Sie sich an Ihr Elektrowerk.
Dies ist ganz normal. Größere, leis-
tungsfähigere Geräte sind länger in
Betrieb.
Es ist ganz normal, daß der Kühlschrank
in dem Fall länger läuft.
Der Kühlschrank braucht in dem Fall
einige Stunden um wieder auf
Temperatur zu kommen.
Wenn der Eisbereiter in Betrieb ist,
läuft der Motor etwas länger.
Falls warme Lebensmittel
hineingegeben werden, läuft der
Kühlschrank länger, bis die gewünschte
Temperatur wieder erreicht ist.
Weil beim Öffnen der Tür warme Luft
hereinkommt, läuft der Motor länger.
Machen Sie die Tür nicht so oft auf.
Sehen Sie nach ob der Kühlschrank
waagerecht steht. Achten Sie darauf,
daß keine Lebensmittel oder Gefäße
die Tür blockieren.
Siehe Problembereich Türen AUF/ZU.
Stellen Sie die Temperatur höher ein, bis
die gewünschte Temperatur erreicht ist.
Dichtung reinigen oder auswechseln.
Falls die Türdichtung undicht ist, muß
der Kühlschrank länger laufen um die
gewünschte Temperatur zu erreichen.
Page 52

Pflege und Wartung
52
Kompressor vom
Kühlschrank läuft
nicht
Temperatur in Kühloder Gefrierabteil zu
niedrig
Temperatur im
Gefrierabteil zu kalt,
aber Temperatur im
Kühlschrank ist
richtig.
Temperatur im
Kühlabteil zu niedrig,
aber die Temperatur
im Gefrierabteil ist
richtig.
Die Lebensmittel in
den Schubladen
gefrieren.
Fleisch im
Frischhalteabteil
gefriert
Temperatur zu hoch
Temperatur im Kühloder Gefrierabteil ist
zu hoch.
Temperatur im
Kühlschrank zu hoch,
aber Temperatur im
Gefrierabteil ist richtig.
Vorfall Eventuelle Ursache Lösung
Der Thermostat hält den Kühlschrank
auf einer konstanten Temperatur
Gefrierabteil ist zu kalt eingestellt.
Kühlabteil ist zu kalt eingestellt.
Kühlabteil ist zu kalt eingestellt.
Um Fleisch so lange wie möglich frisch
zu halten, sollte es bei einer Temperatur
aufbewahrt werden die gerade unter
dem Gefrierpunkt von Wasser liegt (0°C,
32°F)
Gefrierabteil ist zu warm eingestellt.
Kühlabteil ist zu warm eingestellt. Die
Einstellung vom Kühlabteil ist einigermaßen von Einfluß auf die Temperatur
im Gefrierabteil.
Türen zu oft oder zu lang offen.
Tür ist nicht ganz zu.
Es wurde gerade eine größere
Menge warmer oder heißer Speisen
hineingegeben.
Der Kühlschrank war längere Zeit
ausgeschaltet.
Temperatureinstellung im Kühlabteil
ist zu hoch.
Dies ist normal. Der Kühlschrank schaltet
sich ein und aus um die Temperatur
konstant zu halten.
Stellen Sie die Temperatur vom
Gefrierabteil wärmer ein, bis die
gewünschte Temperatur in Gefrierabteil
erreicht ist.
Stellen Sie die Temperatur vom Kühlabteil
wärmer ein.
Siehe oben.
Es ist normal, daß sich Eiskristalle
bilden, weil Fleisch Wasser enthält.
Stellen Sie die Temperatur vom
Gefrierabteil oder vom Kühlabteil kälter
ein, bis die gewünschte Temperatur
erreicht ist.
Stellen Sie die Temperatur vom
Gefrierabteil oder vom Kühlabteil kälter
ein, bis die gewünschte Temperatur
erreicht ist.
Bei jedem Öffnen der Tür vom Kühl-
oder Gefrierabteil kommt warme Luft
herein. Machen Sie die Tür nicht so oft
auf.
Machen Sie die Tür richtig zu.
Warten Sie ab, bis das Kühl- oder
Gefrierabteil wieder auf Temperatur
kommen konnte.
Der Kühlschrank benötigt einige
Stunden um vollständig auf Temperatur
zu kommen.
Stellen Sie die Temperatur im Kühlabteil
kälter ein.
Page 53

Pflege und Wartung
53
Lärm und
Geräusche
Wenn der
Kühlschrank in
Betrieb ist, ist er
ziemlich laut.
Es gibt mehr
Geräusche, wenn
der Kompressor
eingeschaltet
wird.
Vibrieren oder
Rattern
Wasser/ Eis /
Feuchtigkeit im
Kühlschrank
Feuchtigkeit an
den Innenwänden
vom Kühlschrank
Wasser/ Eis /
Feuchtigkeit an der
Außenseite vom
Kühlschrank
Es bildet sich
Feuchtigkeit an
der Außenseite
vom Kühlschrank
oder zwischen
den Türen.
Vorfall Eventuelle Ursache Lösung
Heutzutage haben Kühlschränke eine
höhere Leistung und halten eine konstante Temperatur.
Der Kühlschrank arbeitet unter
höherem Druck, falls er EIN geschaltet wird.
Der Boden ist nicht eben oder unfest.
Der Kühlschrank steht nicht fest am
Boden, wenn er leicht berührt wird.
Gegenstände die auf dem Kühlschrank
stehen, vibrieren.
Teller usw. die im Kühlabteil stehen,
vibrieren.
Der Kühlschrank berührt die Wand
oder Schränke.
Bei warmem, feuchtem Wetter bildet
sich mehr Reif und Schwitzen im
Inneren vom Kühlschrank.
Tür ist nicht ganz zu.
Tür zu oft oder zu lang offen.
Feuchtes Wetter.
Tür ist nicht ganz zu, so daß kalte Luft
aus dem Inneren vom Kühlschrank und
warme Außenluft aufeinanderstoßen.
Es ist normal, daß sie auch etwas lauter
sind.
Dies ist normal. Der Geräuschpegel wird
niedriger, wenn der Kühlschrank länger
läuft.
Vergewissern Sie sich, daß der Boden
eben und fest genug für den
Kühlschrank ist.
Entfernen Sie diese Gegenstände.
Es ist normal, daß Teller im
Kühlschrank leicht vibrieren. Achten
Sie darauf, daß der Kühlschrank ge-
rade und fest am Boden steht.
Verschieben Sie den Kühlschrank so,
daß er die Wand oder die Schränke
nicht mehr berührt.
Dies ist normal.
Siehe Problembereich Türen AUF/ZU.
Machen Sie die Tür nicht so oft auf.
Bei feuchtem Wetter ist dies normal.
Wenn das Wetter wieder weniger
feucht ist, sollte diese Feuchtigkeit verschwinden.
Machen Sie die Tür richtig zu.
Page 54

Pflege und Wartung
54
Gerüche im
Kühlschrank
Türen /
Schubladen auf-
und zumachen.
Tür schließt
nicht
Türen schließen
nicht.
Schubladen
gehen nur
schwer auf.
Eis- und
Wasserspender
Der Spender
gibt kein Eis ab.
Vorfall Eventuelle Ursache Lösung
Das Innere vom Kühlschrank muß
sauber gemacht werden.
Es befinden sich stark riechende
Lebensmittel im Kühlschrank
Bestimmte Behälter und
Verpackungsfolien haben einen
Eigengeruch.
Vielleicht gibt es eine
Lebensmittelpackung, die die Tür
blockiert.
Die eine Tür wurde so unsanft
zugemacht, daß die andere Tür etwas
aufgegangen ist.
Kühlschrank steht nicht waagerecht
und wackelt, wenn man ihn berührt.
Boden ungerade oder unfest. Der
Kühlschrank wackelt, wenn man ihn
berührt.
Kühlschrank berührt die Wand oder
Schränke usw.
Lebensmittel berühren die Ablage über
der Schublade.
Die Schiene ist schmutzig.
Eisvorratsbehälter ist leer.
Die Temperatur im Gefrierabteil ist zu
warm eingestellt.
Der Hahn der Wasserleitung ist
abgesperrt.
Tür von Kühlschrank oder Gefrierabteil
ist nicht zu.
Reinigen Sie das Innere mit einem
Schwamm, warmem Wasser und
Natriumbikarbonat.
Decken Sie diese Lebensmittel
vollständig zu.
Benutzen Sie einen anderen Behälter
oder Folie von einer anderen Marke.
Legen Sie die Packung so hin, daß die
Tür richtig schließt.
Machen Sie beide Türen richtig zu.
Benutzen Sie die
Nivellierungsschrauben um die richtige
Höhe einzustellen.
Vergewissern Sie sich, daß der Boden
eben ist und den Kühlschrank tragen
kann. Eventuell muß der Boden von
einem Zimmermann in Ordnung
gebracht werden.
Verschieben Sie den Kühlschrank.
Geben Sie weniger Lebensmittel hinein.
Reinigen Sie Schublade und Schiene.
Sobald die erste Ladung Eis in den
Behälter gefallen ist, sollte der Spender
funktionieren.
Stellen Sie die Temperatureinstellung
kälter, damit Eiswürfel bereitet werden
können. Sobald die erste Ladung Eis
bereitet ist, sollte der Spender funktionieren.
Machen Sie den Wasserhahn auf und
lassen Sie genügend Zeit um Eis zu
bereiten. Sobald das Eis bereitet ist,
sollte der Spender funktionieren.
Vergewissern Sie sich, daß beide Türen
zu sind.
Page 55

Pflege und Wartung
55
Eisspender gibt
kein Eis ab.
Eisspender
verstopft.
Spender gibt
kein Wasser ab.
Wasser hat
einen eigenarti-
gen Geschmack
und/oder
Geruch.
Geräusch von
fallendem Eis.
Geräusch von
fließendem
Wasser
Sonstiges
Vorfall Eventuelle Ursache Lösung
Das Eis ist geschmolzen und dann
wieder zusammengefroren, weil es
nur selten benutzt wird, bzw. durch
Temperaturschwankungen u/o
Stromausfall.
Es sind Eiswürfel zwischen dem Arm
vom Eisbereiter und der Rückseite vom
Behälter eingeklemmt.
Eiswürfel aneinander fest gefroren.
Es wurden gekaufte oder andere
Eiswürfel im Spender benutzt.
Die Wasserleitung ist gesperrt.
Siehe: Eisspender gibt kein Eis ab.
Tür von Kühl- oder Gefrierabteil ist nicht
zu.
Das Wasser war zu lange im Behälter.
Das Gerät ist nicht richtig an die
Wasserleitung angeschlossen.
Nehmen Sie den Vorratsbehälter für
das Eis heraus, werfen das alte Eis
weg, machen den Behälter sauber,
trocknen ihn ab und geben ihn wieder
hinein. Sobald das neue Eis fertig ist,
sollte der Spender funktionieren.
Entfernen Sie die Eiswürfel, die den
Spender blockieren.
Benutzen Sie den Spender öfter,
damit die Würfel nicht festfrieren
können.
Es dürfen nur Eiswürfel im Spender
verwendet werden, die vom
Eisbereiter gemacht wurden.
Machen Sie den Wasserhahn auf.
Machen Sie beide Türen richtig zu.
Lassen Sie 7 Gläser Wasser heraus-
laufen und schütten es in den Abfluß,
um den Wasservorrat zu erneuern.
Machen Sie dasselbe nochmals um
den Behälter auszuspülen.
Verbinden Sie das Gerät mit der
Kaltwasserleitung vom Wasserhahn in
der Küche.
Dieses Geräusch ist ganz normal, wenn das automatisch bereitete Eis in den
Eisvorratsbehälter fällt. Je nachdem, wo das Gerät aufgestellt ist, kann es mehr
oder weniger laut sein.
Dieses Geräusch hört man normalerweise, wenn der Eisbereiter wieder mit Wasser
versorgt wird, nachdem das Eis in den Behälter gefallen ist.
Lesen Sie bitte den Abschnitt “Automatischer Eisbereiter und Spender” in diesem
Handbuch durch.
Page 56

56
Garantieurkunde
Für dieses Gerät übernehmen wir 12 Monate Garantie!
Wir verpflichten uns, während der 12-monatigen Garantiezeit lhr Gerät kostenlos instandzusetzen bzw .
Ihrem Fachhändler die Ersatzteile kostenlos zur Verfügung zu stellen, wenn es infolge eines
Fabrikations -oder Materialfehlers versagen sollte. Weitergehende Ansprüche gegen uns sind ausgeschlossen. Beschädigungen durch höhere Gewalt oder auf dem Transportweg sowie Versand -und
Verpackungskosten gehen zu lhren Lasten. Im Übrigen gelten unsere umseitig aufgeführten
Garantiebedingungen!
Gerätetyp : Seriennummer :
Name des Käufers :
Kaufdatum : Stempel / Unterschrift des Fachhändlers
Page 57

57
Garantiebedingungen für Kühlschrank
1. Die Garantiezeit beginnt mit dem Kaufdatum
und erstreckt sich über 12 Monate. Der Beginn der
Garantiezeit gilt als nachgewiesen, wenn der
Käufer den Kaufbeleg (Quittung / Kassenzettel)
zusammen mit der vom Verkäufer ausgefüllten
und unterschriebenen Garantiekarte vorlegt.
Die
Seriennummer des Produkts muß mit der
einge
tragenen Nummer auf der Garantiekarte
übereinstimmen!
2. Während der Garantiezeit beheben wir kostenl
os alle Mängel, soweit sie nachweislich auf
Fabrikations - oder Materialfehler zurückzuführen
sind.
3.
Ausgeschlossen von der Garantie sind Schäden,
die durch unsachgemäße Behandlung, Nichtbeachtung
der Anleitung und betriebsbedingte Abnutzung
auftreten. Ebenso erstreckt sich die Garantie nicht
auf Verschleißteile und leicht zerbrechliche
Produktteile (wie z .B. Sichtscheiben, Glimm-oder
Glühlampen). Schäden, die auf dem Transport
entstehen, gehen ebenso wie Versand -und
Verpackungskosten zu Lasten des Käufers
.
4. Die Entscheidung über Reparatur, Austausch
oder Ersatz bleibt bei uns. Ausgetauschte oder
ersetzte Teile gehen in unser Eigentum über. Durch
Reparatur oder Teileersatz wird die ursprüngliche
Garantiezeit nicht verlängert!
5.
Der Garantieanspruch erlischt, sobald Personen
in das Gerät eingreifen, die von LG Electronics
nicht für den Service autorisiert sind -
ebenso,
sobald das Gerät zu gewerblichen Zwecken
einge-
setzt wird.
6.
Heben Sie unbedingt die Originalverpackung auf,
damit das Gerät im Servicefall ohne
Beschädigun-
gen
transportiert werden kann.
7. Wenden Sie sich im Garantiefall an lhren Fachhändler oder an eines unserer autorisierten Service
-
center.
8. Weitergehende Ansprüche sind ausgeschlossen!
Sollten Teile dieser Bestimmungen unwirksam
sein, so gelten sie sinngemäß. Die Wirksamkeit
der übrigen Bestimmungen wird hiervon nicht
berührt.
Page 58

T ABLE DES MATIERES
58
59
59
60
61
62
63
63
64
65
65
66
67
70
71
72
72
74
73
75
76
78
78
79
Enregistrement
Importantes instructions de sécurité
Identification des pièces
Où le placer
Enlever la porte
Montage des compartiments congélateur et réfrigérateur
Installation du tuyau d’alimentation en eau
Réglage de la hauteur
Mise en marche
Panneau de réglage des fonctions
Réglage de la température et des fonctions
Producteur automatique de glace & distributeur
Bar
Clayettes
Porte-oeufs
Conversion en compartiment à légumes ou frais
Désodoriseur
Emplacement des aliments
Conservation des aliments
Comment démonter les pièces
Informations générales
Nettoyage
Recherche des problèmes
Page 59

Enregistrement
59
Importantes instructions de sécurité
Page 60

60
Identification des pièces
Page 61

Acolchado del fondo
61
Où le placer
Page 62

, comme indiqué sur la
.
Cette fois, la
puis
.
62
Enlever la porte
Page 63

3
63
Montage des compartiments congélateur et
réfrigérateur
Installation du tuyau d’alimentation en eau
Page 64

64
Réglage de la hauteur
Page 65

35
V
65
Indication du panneau de réglage des fonctions
Mise en marche
Page 66

V
66
Réglage de la température et des fonctions
Page 67

67
Producteur automatique de glaçons et Distributeur
Page 68

•
68
Page 69

69
Page 70

70
Bar (Pour certains modèles uniquement)
Page 71

,
direction .
71
Clayettes
Page 72

72
Conservation en compartiment à légumes ou frais
Porte-oeufs
Page 73

73
Désodoriseur (Pour certains modèles uniquement)
Page 74

74
Emplacement des aliments
Page 75

75
Conservation des aliments
Page 76

.
.
.
76
Comment démonter les pièces
Page 77

.
77
Page 78

78
Informations générales
Nettoyage
Page 79

79
Recherche des problèmes
Page 80

trop chaude mais la
80
Page 81

81
Page 82

82
Page 83

83
Page 84

84
Certificat de garantie
Cet appareil est couvert par une garantie de 12 mois !
Nous nous engageons, pendant la durée de garantie de 12 mois, à réparer gratuitement votre
appareil et/ou à fournir gratuitement à votre revendeur les pièces de rechange, en cas de panne due à
un vice de fabrication ou de matière. Des revendications plus importantes à notre encontre sont
exclues. Les dommages dus à un cas de force majeure ou intervenant en cours de transport ainsi que
les frais d'expédition et d'emballage sont à votre charge. Pour le reste, nos conditions de garantie
spécifiées au verso sont applicables !
Modèle : N° de série :
Nom de l'acheteur :
Date d'achat : Cachet/signature du revendeur
Page 85

85
Conditions de garantie du réfrigérateur
1. La période de garantie prend cours à la date
d'achat et s'étend sur 12 mois. Le début de la
période de garantie est considéré comme attesté
lorsque l'acheteur présente la preuve d'achat
(reçu / ticket de caisse) avec la carte de garantie
complétée et signée par le revendeur.
Le numéro de série du produit doit coïncider avec
le numéro figurant sur la carte de garantie !
2. Pendant la période de garantie, nous
remédions gratuitement à tous les défauts, pour
autant qu'ils soient dus, preuve à l'appui, à un
vice de fabrication ou de matière.
3.
Sont exclus de la garantie les dommages dus à
une manipulation inappropriée, au non-respect du
mode d'emploi ou à une usure normale de
l'appareil. De même, la garantie ne s'applique pas
aux pièces usées et aux éléments fragiles du
produit (p. ex., voyants, lampes à effluves ou
lampes à incandescence). Les dommages qui
surviendraient pendant le transport sont à charge
de l'acheteur, de même que les frais d'expédition et
d'emballage.
4. La décision de réparation, d'échange ou de
remplacement nous revient. Les éléments
échangés ou remplacés sont notre propriété. La
réparation ou le remplacement de pièces ne
prolonge pas la durée de garantie initiale !
5.
Le droit à garantie s'éteint dès que des
personnes non autorisées par LG Electronics pour
le service interviennent sur l'appareil, ou que celuici est utilisé à des fins professionnelles.
6.
Conservez impérativement l'emballage original
pour pouvoir transporter l'appareil en toute
sécurité en cas de service.
7. En cas de recours en garantie, contactez
votre revendeur ou l'un de nos centres de service
agréés.
8. Des revendications plus importantes sont
exclues!
Si des points de ces conditions devaient
s'avérer caducs, ils sont applicables par analogie.
La validité des autres dispositions n'en est pas
affectée.
Page 86

Inhoudsopgave
Registratie
Belangrijke veiligheidsaanwijzingen
Identificatie van de onderdelen
Waar installeren?
Verwijderen van de deuren
Monteren van de koelkast- en diepvriescompartimenten
Installatie van de watertoevoerleiding
Hoogte-instelling
De eerste start
Uitleg bij het paneel voor instelling van de functies
De temperatuur en functies instellen
De automatische ijsmaker en dispenser
De huisbar
De legplaten
Het eierbakje
Omvorming van groentelade tot vershoudlade
Geurfilter
De juiste plaats voor het voedsel
Voedsel bewaren
De onderdelen demonteren
Algemene informatie
Reiniging
Oplossen van problemen
Inleiding
Installatie
Bediening
Raadgevingen
voor het
bewaren van
voedsel
Reiniging en
onderhoud
87
87
88
89
90
91
91
92
93
93
94
95
98
99
100
100
101
102
103
104
106
106
107
86
Page 87

Registratie
U vindt het model- en serienummer op de binnenzijde van het koelkastcompartiment van dit toestel. Deze nummers zijn uniek voor dit toestel en niet
beschikbaar voor derden. U moet de gevraagde informatie hieronder
invullen en deze gids bijhouden als blijvend bewijs van uw aankoop. Niet
uw ontvangstbewijs hier vast.
Aankoopdatum :
Gekocht van dealer :
Adres van dealer :
Telefoonnr. van dealer :
Modelnr. :
Serienr. :
Belangrijke veiligheidsaanwijzingen
Deze koelkast moet op de juiste manier en plaats worden opgesteld, conform de
installatievoorschriften in dit document, vooraleer u ze in gebruik neemt.
Trek nooit aan het netsnoer om de koelkast los te koppelen van het net. Grijp de
stekker stevig vast en trek hem recht uit het stopcontact.
Wanneer u uw toestel wegtrekt van de wand moet u erop letten het niet over het
netsnoer te verrijden of het netsnoer niet op een andere manier te beschadigen.
Als de koelkast-diepvriezercombinatie eenmaal in bedrijf is, mag u de koude
oppervlakken in het diepvriesvak niet meer aanraken, vooral niet met natte of
klamme handen. De huid kan vastvriezen aan deze uiterst koude oppervlakken.
Trek de stekker uit het stopcontact vooraleer u begint met het schoonmaken van de
koelkast of met andere werkzaamheden. Raak het nooit aan met natte handen :
u zou geëlektrocuteerd of gewond kunnen worden.
Zorg ervoor het netsnoer niet te hard te vouwen, te verwringen, brutaal uit te
trekken of eraan te werken want een beschadigd netsnoer kan brand of elektrocutie veroorzaken. Raadpleeg een elektricien als u twijfelt of het toestel correct is
geaard.
Plaats nooit glazen kommen e.d. in de diepvriezer want ze kunnen barsten
wanneer de inhoud uitzet als ze bevriezen.
Steek uw handen nooit in het ijsreservoir van de automatische ijsmaker.
U zou gewond kunnen worden door de werking van de automatische ijsmaker.
Laat nooit iemand klimmen, zitten of staan op of hangen aan de deur van de huisbar. Dit kan de koelkast beschadigen of doen kantelen, met risico voor ernstig
persoonlijk letsel.
Verbind de koelkast, voor zover mogelijk, met een eigen, apart stopcontact om
overbelasting door het toestel en andere apparaten of huishoudelijke verlichting te
voorkomen. Dit zou een stroomonderbreking kunnen veroorzaken.
Als het netsnoer beschadigd is, moet het worden vervangen door een speciaal snoer
of geheel dat verkrijgbaar is bij de fabrikant of zijn serviceafdeling.
Gebruik geen ver-
lengsnoer
Vervanging van het
netsnoer
Inleiding
87
Page 88

GEVAAR : Risico voor opsluiting van kinderen.
Voor u uw oude koelkast of diepvriezer dumpt, moet u de deuren verwijderen maar de
legplaten op hun plaats laten, zodat kinderen niet gemakkelijk in de koelkast
kunnen kruipen.
Dit toestel is niet bestemd voor gebruik door jonge kinderen of door mindervaliden
zonder toezicht.
Jonge kinderen moeten in het oog worden gehouden om te voorkomen dat ze spelen
met het toestel.
Bewaar of gebruik geen benzine of andere licht ontvlambare vloeistoffen of gassen in
de nabijheid van dit of andere toestellen.
De aardverbinding (aarding) verkleint het gevaar voor elektrocutie door een
afleidingsdraad te voorzien waarlangs de elektrische stroom kan wegvloeien.
Om mogelijke elektrocutie te voorkomen moet dit toestel worden geaard.
Onoordeelkundig gebruik van de aardklem kan elektrocutie veroorzaken. Raadpleeg
een erkende elektricien of een onderhoudstechnicus als u de instructies betreffende
het aarden niet goed begrijpt of als u twijfelt of het apparaat correct is geaard.
Identificatie van de onderdelen
Waarschuwing
voor opsluiting
van kinderen
Bewaar geen...
Aarding
(
aardverbinding)
Inleiding
Wijnflessenhouder
(optie)
Deurrek
Uittrekbare legplaat
Snacklade
Huisbar
Eierbakje
Lamp (onder)
Groentelade
Deurrek
Deurrek
Geurfilter
Omschakelaar
(Groentelade/Vershou
dlade)
Zuivelcompartiment
Lamp (boven)
Legplaat
Groentelade/Vershoudlade
Diepvriezergedeelte Koelkastgedeelte
Deurrekken
Automatische ijsmaker
Lamp
Legplaat
Deurrekken
Laden
Deurrek
Stelschroef
Onderste afdekplaat
• Wanneer sommige onderdelen ontbreken in uw koelkast, is het mogelijk dat die enkel
voorkomen in andere modellen (de "Huisbar" is b.v. niet in alle modellen ingebouwd).
OPMERKING
88
Page 89

Waar installeren?
Een onstabiele opstelling kan trillingen en
lawaai veroorzaken. Als de vloer, waarop de
koelkast moet worden geplaatst, niet vlak is,
kan u de koelkast pas stellen door verdraaien
van de hoogte-instelschroef.
Tapijten of vloerbedekking onder de
koelkast kunnen verkleuren door de warmte,
afgegeven door de onderkant van de koelkast.
Daarom is het noodzakelijk een dikke onderlegger onder de koelkast aan te brengen.
Plaats de koelkast op een voldoende afstand
van andere voorwerpen. Een te kleine vrije
ruimte kan leiden tot vermindering van de
koelcapaciteit en tot stijging van het
elektriciteitsverbruik.
Kies een plaats waar de watertoevoerleiding
voor de automatische ijsmaker en dispenser
gemakkelijk kan worden aangesloten.
In een vochtige ruimte of op een plaats te
dicht bij water kan de koelkast roesten of kan
de elektriciteit weglekken.
In ruimten met een te hoge omgevingstemperatuur gaat de koelcapaciteit achteruit en
stijgt de elektriciteitsrekening.
Rook en kolengas kunnen de koelkast doen
verkleuren.
Een stevige,
vlakke
ondergrond
Voldoende
afstand tot de
omringende
voorwerpen
In een droge
ruimte, waar de
watertoevoerlei-
ding gemakkelijk
kan worden
aangesloten
Ver van warmte en
rook
Installatie
89
Hoogte
Onderlegger
• Installeer de koelkast in een plaats waar de omgevingstemperatuur ligt tussen 5 °C
en 43 °C. Een te hoge of te lage omgevingstemperatuur kan de goede werking in het
gedrang brengen. De waterleiding naar de ijsmaker en dispenser kan bevriezen.
OPMERKING
BBeewwaaaarr vvooll--
ddooeennddee aaffssttaanndd
Page 90

Verwijderen van de deuren
Als de toegangsdeur van uw woning te smal is om de koelkast door te laten, kan u de
deuren van de koelkast verwijderen en het
toestel zijdelings binnenschuiven.
Til de onderste afdekplaat op om ze te verwijderen. Maak dan de watertoevoerleiding los
door te drukken op de zone (➀) zoals getoond
in de afbeelding hiernaast.
1)
Verwijder eerst het afdekkapje van het
scharnier door de schroeven los te
schroeven. Maak dan alle verbindingsdraden los, met uitzondering van de
aardgeleider.
2) Verwijder de vastzetklem door ze tegen
de wijzers van de klok in te draaien (➀) en
vervolgens het bovenste scharnier op te
lichten (➁).
3) Verwijder de deur van de diepvriezer door
ze op te heffen. De deur moet voldoende
hoog worden getild om de watertoevoerleiding volledig los te trekken.
1) Maak de schroeven van het afdekkapje
van het scharnier los en verwijder het.
Maak alle aanwezige verbindingsdraden
los, met uitzondering van de aardgeleider.
2) Verwijder de vastzetklem door ze in de richt-
ing van de wijzers van de klok te draaien
(➀) en vervolgens het bovenste scharnier
door he t o p t e lichten (➁).
3) Verwijder de deur van het
koelkastgedeelte door ze op te heffen.
Verwijderen van
de onderste
afdekplaat en van
de watertoevoer-
leiding
Verwijderen van
de diepvriezer-
deur
Verwijderen van
de koelkastdeur
Installatie
90
2
2
Onderste
afdekplaat
Watertoevoerleiding
• Als het uiteinde van de leiding vervormd of versleten is, moet u een stuk wegsnijden.
OPMERKING
Afdekkapje
van het
scharnier
Verbindings
draden
Aardgeleider
Bovenste
scharnier
Vastzetklem
Bovenste
scharnier
Onderste scharnie
Voldoende hoog
om de watertoe-
voerleiding volledig
los te trekken
• Breng de deur van het diepvriezergedeelte binnen via de toegangsdeur en leg ze
neer, maar wees voorzichtig om de watertoevoerleiding niet te beschadigen.
OPMERKING
•
Wees voorzichtig bij het verwijderen van het bovenste scharnier: de deur zou voorover
kunnen vallen.
OPMERKING
Verbindingsdraden
Bovenste scharnier
Onderste scharnier
Vastzetklem
Page 91

Schuif de koelkast nu zijdelings door de
toegangsdeur, zoals getoond in de
afbeelding hiernaast.
Opnieuw monteren van de deuren van het
diepvriezer- en koelkastgedeelte
Monteer ze, nadat alles via de toegangsdeur is binnengebracht, in de omgekeerde
volgorde als voor het demonteren.
Aansluiting van de watertoevoerleiding
• Voor een goede werking heeft de automatische ijsmaker een waterdruk nodig
van 147 - 834 kPa (1,5 - 8,5 kgf/cm
2
). Hiermee kan een papieren
wegwerpbekertje van 180 cm3 volledig worden gevuld in 3 seconden).
• Als de druk van het voedingswater geen 147 kPa (1,5 kgf/cm
2
) bereikt, dan moet
een afzonderlijke drukpomp worden aangekocht om de normale werking van de
automatische ijsmaker en de koudwaterdispenser mogelijk te maken.
• De totale lengte van de watertoevoerleiding mag maximaal 12 m bedragen. Let erop
dat er geen knikken ontstaan in de leiding. Als de toevoerleiding langer is dan 12 m
kunnen er problemen rijzen met de watertoevoer ten gevolge van het drukverlies.
• Leg de watertoevoerleiding aan ver van warmtebronnen.
• Sluit het systeem uitsluitend op een drinkwaterleiding aan.
De koelkast
binnenbrengen
Vóór de
aansluiting
Waarschuwing
Installatie
91
Page 92

Hoogte-instelling
Breng ze op gelijke hoogte door een rechte schroevendraaier ( – ) in de gleuven van
de linker stelschroef te steken en ze in de richting van de wijzers van de klok (➀) te
draaien.
Breng ze op gelijke hoogte door een rechte schroevendraaier ( – ) in de gleuven van
de rechter stelschroef te steken en ze in de richting van de wijzers van de klok (➀)
te draaien.
De deuren zullen gemakkelijker dichtvallen als u de voorzijde van de koelkast wat hoger
opstelt met behulp van de stelschroeven. Als de deuren niet goed sluiten kan het
rendement nadelig worden beïnvloed.
Als de deur van
de diepvriezer
lager hangt dan
die van de
koelkast
Als de deur van
de diepvriezer
hoger hangt dan
die van de
koelkast
Na de
hoogte-instelling
van de deuren
Installatie
92
Hoogteverschil
Hoogteverschil
Hoogteverschil
Rechte ( – )
schroevendraaier
Linker stelschroef
Hoogteverschil
Rechte ( – )
schroevendraaier
Rechter stelschroef
➀
➀
Page 93

De eerste start
Nadat uw koelkast is geïnstalleerd, moet u ze 2 tot 3 uur laten draaien om op
normale bedrijfstemperatuur te komen, vooraleer u ze vult met vers of ingevroren
voedsel.
Wacht 5 minuten voor u ze opnieuw opstart wanneer de stekker werd uitgetrokken.
Uitleg bij het paneel voor instelling van de
functies
Bediening
93
3
2
1
FR
POVVER
FREEZE
Uitvoer van water of ijs
Drukhendel van de
dispenser
Lamp van de dispenser
(onderzijde van het
bedieningspaneel)
Handvat van de
huisbar
Huisbar
(slechts bij sommige
modellen
beschikbaar)
Bedieningspaneel
Temperatuurinstelknop voor het
diepvriesgedeelte
Temperatuurinstelknop voor het
koelkastgedeelte
Knop voor snel
invriezen
Keuzeknop van
de dispenser
Page 94

Temperatuurinstelling en andere functies
Deze lamp geeft de status weer van het
diepvriescompartiment.
" Als voor het eerst wordt opgestart of na een
stroomonderbreking zal, 2 (Normaal) branden.
" Door te drukken op de knop zal de tem-
peratuurinstelling van 2 (Normaal) achtereenvolgens verder lopen ➔ (Normaal/Krachtig)
➔ 3 (Krachtig) ➔ (Krachtigst) ➔ 1 (Zwak) ➔
(Zwak/Normaal).
" Over het algemeen is stand 2 (Normaal) vol-
doende voor het bewaren van voedsel.
Kies anders tussen de standen 1 (Zwak),
(Zwak/Normaal), (Normaal/Krachtig), 3
(Krachtig) of (Krachtigst), afhankelijk van de
te bewaren hoeveelheid en de frequentie
van het inbrengen van voedsel.
Deze lamp geeft de status weer van het
koelkastcompartiment.
" Als voor het eerst wordt opgestart of na een
stroomonderbreking, zal 2 (Normaal) branden.
" Door te drukken op de knop zal de tem-
peratuurinstelling van 2 (Normaal)
achtereenvolgens verder lopen ➔
(Normaal/Krachtig) ➔ 3 (Krachtig) ➔
(Krachtigst) ➔ 1 (Zwak) ➔ (Zwak/Normaal).
Deze lamp geeft aan dat de functie ‘snel invriezen’
werkzaam is. De functie ‘snel invriezen’ wordt
gebruikt om voedsel in te vriezen of om sneller
ijs te maken in het diepvriescompartiment.
" Een druk op de knop schakelt de functie
‘snel invriezen’ in, waarbij de lamp oplicht.
" Elke volgende druk op de knop schakelt deze
functie afwisselend uit of weer in.
" De functie ‘snel invriezen’ wordt na enige tijd
automatisch uitgeschakeld, ook als u niet
ingrijpt.
Deze lamp geeft aan welke keuze er is gemaakt
voor water of ijs.
" Bij het opstarten of na een stroomonder-
breking, zal het pictogram branden.
" Met de knop kan u kiezen tussen
gemalen ijs, gekoeld water of ijsblokjes.
Temperatuurinstel-
ling van het
diepvriesgedeelte
Temperatuurinstel-
ling van het
koelkastgedeelte
Snel invriezen
Keuze van de
dispenserfuncties
Bediening
94
POVVER
FREEZE
Lage temperatuur
(Om voedsel kouder
te maken)
Hogere temperatuur
(Als het voedsel
ingevroren is)
•
Stel op het bedieningspaneel de temperatuur voor elk compartiment in op de gewenste
waarde, omdat de binnentemperatuur varieert met de omgevingstemperatuur. De binnentemperatuur wordt het laagst op stand 3.
• Verwijder de beschermende kleeffolie van het bedieningspaneel om het oppervlak en
de lampjes duidelijker te zien.
OPMERKING
Lage temperatuur
(Waarbij
diepgevroren voedsel ontdooit)
Hogere temperatuur
(Waarbij het voedsel
zeer snel ontdooid)
" Over het algemeen is stand 2 (Normaal) voldoende voor het bewaren van voedsel. Kies
anders tussen de standen 1 (Zwak), (Zwak/Normaal), (Normaal/Krachtig), 3 (Krachtig)
of (Krachtigst), afhankelijk van de te bewaren hoeveelheid en de frequentie van het
inbrengen van voedsel.
Page 95

Een alarmsignaal zal 3 maal weerklinken als de koelkastdeur langer dan een minuut is
blijven openstaan. Dit alarm zal om de 30 seconden weerklinken tot de deur wordt gesloten. Het opendeuralarm werkt enkel akoestisch, er is geen andere aanwijzing. Als
het alarm niet stopt nadat de deuren van de koelkast en de depvriezer werden gesloten,
moet u de serviceafdeling bellen.
De zelfdiagnosefunctie treedt in werking wanneer er wat fout loopt in het systeem. Als een
fout is ontdekt zal het drukken op om het even welke knop zonder gevolg blijven. Neem
onmiddellijk contact op met de serviceafdeling, maar schakel het toestel NIET UIT.
Als de stroom werd uitgeschakeld zal de technieker veel meer tijd nodig hebben om de
oorzaak van de storing te lokaliseren.
Automatische ijsmaker en dispenser
Water wordt gekoeld in een reservoir in het koelkastcompartiment, vanwaar het naar
de dispenser stroomt. IJs wordt aangemaakt in de automatische ijsmaker en
afgeleverd door de dispenser als gemalen ijs of als
ijsblokjes.
" Kies één van de opties, gemalen ijs, gekoeld water of ijsblokjes en druk dan licht-
jes tegen de drukhendel met het glas of een andere kom e.d.
Opendeuralarm
Zelfdiagnosefunc-
tie (foutdetectie)
Hoe ijs of
gekoeld water
worden bereid
Het gebruik van
de dispenser
Bediening
• Het is mogelijk dat het water in het begin niet koud genoeg is. Voeg dan wat ijsblokjes
toe aan het water in het glas.
OPMERKING
Gemalen ijs
• Druk op de knop
‘SELECT’ tot het lampje
‘gemalen ijs’ oplicht.
• Het gemalen ijs zal wor-
den afgegeven als u met
het glas tegen de
drukhendel duwt.
Water
• Druk op de knop
‘SELECT’ tot het lampje
‘water’ oplicht.
• Het gekoelde water zal
worden afgegeven als u
met het glas tegen de
drukhendel duwt.
Ijsblokjes
• Druk op de knop
‘SELECT’ tot het lampje
‘ijsblokjes’ oplicht.
• De ijsblokjes zullen
worden afgegeven als u
met het glas tegen de
drukhendel duwt.
95
Page 96

" De ijsmaker kan 8 ijsblokjes tegelijk maken en 80 blokjes per dag. Deze hoeveelheid
hangt echter af van verschillende factoren, o.a. hoe vaak de deuren van het toestel
worden geopend en gesloten.
" De productie van ijs valt stil wanneer het ijsvoorraadbakje vol is.
Het ijs is samengeklonterd
" Als het ijs is samengeklonterd, moet u het uit het voorraadbakje nemen en
losbreken. Leg de kleine stukjes terug in het voorraadbakje.
" Als de ijsmaker te weinig of samengeklonterd ijs produceert, moet de hoeveelheid
water die wordt aangevoerd naar de ijsmaker misschien worden bijgeregeld.
Neem contact op met de serviceafdeling.
❈ Als het ijs niet regelmatig wordt verbruikt, kan het samenklonteren.
Stroomonderbreking
" Er kan smeltend ijs in de diepvriezer lekken. Verwijder het ijsvoorraadbakje, giet
het leeg en droog het uit. Plaats het dan terug. Zodra de machine weer stroom
krijgt, zal automatisch de stand 'gemalen ijs' worden gekozen.
Het toestel is pas geïnstalleerd
" Een pas geïnstalleerd toestel heeft ongeveer 12 uur nodig vooraleer er ijs wordt
aangemaakt in het diepvriezercompartiment.
De automatische
ijsmaker
Als de ijsmaker
niet vlot werkt
Bediening
• Na een stroomonderbreking of wanneer de stekker opnieuw in het stopcontact wordt
gestoken, start het toestel in de stand ‘gemalen ijs’.
• Houd uw glas of andere voorwerpen zo dicht mogelijk bij de uitstroomopening. Anders
kan er ijs op de vloer vallen.
• 5 seconden na afgave van al het ijs hoort u een klikkend geluid. Dit betekent dat de
ijsafvoeropening zich sluit.
• Laat uw glas 2 - 3 seconden onder de uitstroomopening staan nadat u de drukhendel
heeft losgelaten. Zo kan het laatste water of ijs erin vallen.
• Veeg a.u.b. water, dat onder de dispenser is gelopen, weg. Neem hiervoor het deksel
van de wateropvangbak weg.
• Als u ‘ijsblokjes’ kiest na ‘gemalen ijs’, dan is het mogelijk dat er nog wat gemalen ijs
voorkomt tussen de blokjes.
OPMERKING
• Het is normaal dat u wat lawaai hoort wanneer het geproduceerde ijs in het voorraadbakje valt.
OPMERKING
96
Page 97

Werp het eerste geproduceerde ijs (ongeveer 20 blokjes) en het eerste gekoelde
water (ongeveer zeven glazen) weg, onmiddellijk na de installatie van de
koelkast.
Het eerste water en ijs kan een geur of smaak hebben of verontreinigingen bevatten, afkomstig van de watertoevoerleiding of het voedingswaterreservoir. Dit is ook
geldig wanneer de koelkast lange tijd buiten gebruik is gebleven.
Houd kinderen uit de buurt van de dispenser. Kinderen zouden de drukhendel verkeerd kunnen bedienen of de lampen beschadigen.
Let erop dat de ijsdoorgang niet wordt
gehinderd door voedsel.
Wanneer er voedsel wordt gestapeld
voor de ijsdoorgang kan geen ijs worden
afgegeven. Wanneer uitsluitend gemalen
ijs wordt gebruikt kan de ijsdoorgang ook
worden verstopt door ijskorrels. Verwijder
in dat geval het opgehoopte ijspoeder.
Plaats nooit drankblikken in het ijsvoorraadbakje om ze snel af te koelen.
Dit kan de automatische ijsmaker beschadigen.
Gebruik geen fijne kristallen glazen of breekbaar vaatwerk om het ijs op te
vangen. De glazen of andere voorwerpen zouden kunnen breken.
Leg de ijsblokjes altijd eerst in uw glas, vooraleer u het vult met water of
andere dranken. Het water zou kunnen spatten als de ijsblokjes in de vloeistof
in het glas vallen.
Raak de ijsuitvoeropening niet aan met de handen of met gereedschap.
Dit zou hetzij verwondingen, hetzij beschadiging kunnen veroorzaken.
Verwijder nooit het deksel van de ijsmaker.
Spreid af en toe het ijs uniform uit over de gehele oppervlakte van het ijsvoor-
raadbakje.
Het ijs valt normaal op een hoopje, vlakbij de ijsmaker. Als de top van de stapel te
hoog wordt, kan de ijsmaker veronderstellen dat het voorraadbakje vol is en bijgevolg
stoppen met de ijsproductie.
Als het afgegeven ijs gekleurd is, moet u onmiddellijk contact opnemen met
de serviceafdeling en het niet meer gebruiken.
Gebruik nooit een te smal of te diep glas.
De ijsdoorvoer zou kunnen verstopt raken, wat een defect aan de koelkast kan
veroorzaken.
Houd het glas op een voldoende afstand van de ijsuitvoeropening.
Als u het te dicht bij de opening houdt, dan kan het beletten dat het ijs uit het toestel valt.
Voorzorgsmaatre-
gelen
Bediening
Diepvriesdeur
97
Page 98

De huisbar (enkel bij bepaalde modellen)
Trek zachtjes aan het handvat van de
huisbar om hem te openen.
" U kan in de huisbar komen zonder de
koelkastdeur te openen, zodat elektriciteit
wordt bespaard.
" De binnenverlichting van de koelkast gaat
aan wanneer het deurtje van de huisbar
wordt geopend. Zo kan u gemakkelijk zien
wat er zich in dit vak bevindt.
" U kan de opengeklapte huisbardeur
gebruiken om er uw glazen op te zetten
en dranken uit te gieten, maar gebruik ze
nooit als snijplank en beschadig ze niet
met scherpe voorwerpen.
" Leun er nooit op en druk ze niet naar bene-
den.
" De huisbar zal niet correct werken zonder
dit deksel.
" Er bestaat niet alleen gevaar voor
beschadiging van de deur, maar ook voor
verwonding van de kinderen.
Gebruik
Gebruik de
huisbardeur als
hulptafeltje
Verwijder nooit
het binnendeksel
van de huisbar
Plaats geen zware
voorwerpen op de
huisbardeur en
laat er geen
kinderen aan
hangen.
Bediening
98
Page 99

Uittrekbare legplaten
De legplaten op glijdende geleiders
vergemakkelijken het plaatsen of uitnemen
van voedsel.
In deze wijnflessenhouders kunnen flessen
langs de zijkanten liggend worden bewaard.
De houders kunnen aan alle legplanken
worden bevestigd.
Hoogte-instelling van de
wijnflessenhouders:
De wijnflessenhouders kunnen worden losgemaakt door ze recht vooruit te trekken.
Dan plaatst u ze tegen de voorkant van de
legplaat waar u ze wilt hebben en duwt u ze
recht achteruit.
De legplaten losmaken:
Bij levering zijn de legplaten bevestigd met
klemmen, zodat ze niet kunnen loskomen
tijdens het transport.
Verwijder dus eerst de klemmen, til dan de
legplank op (➀) en trek ze vooruit (➁).
De legplaten terugplaatsen:
Plaats de legplaat op de gewenste hoogte
en steek de haken in de gleuven (➀).
Laat dan de voorzijde zakken zodat de
steunen (➁) in de gaten vallen.
Uittrekbare legplaat
uit gehard glas
(enkel bij
bepaalde
modellen)
Aanhechtbare
wijnflessenhou-
ders (enkel bij
bepaalde
modellen)
Hoogte-instelling
van de legplaten
Bediening
99
1
1
2
2
De legplaten van het koelkastcompartiment zijn verstelbaar, zodat u ze kan installeren
op de hoogte die het best beantwoordt aan de ruimte die nodig is voor de
verschillende producten.
Legplaatklem
• Zorg ervoor dat de legplaten horizontaal
hangen, anders zouden ze kunnen vallen.
OPMERKING
Page 100

Het eierbakje
U kan het eierbakje plaatsen waar u het wenst en de vorm aanpassen in functie van
de hoeveelheid eieren.
[Normaal] [Voor veel eieren]
Omvorming van groentelade tot vershoudlade
" De onderste lade in de koelkast kan worden gebruikt als groentelade of als vers-
houdlade.
De vershoudlade houdt de temperatuur op een lager niveau dan in het
koelkastcompartiment. Hierdoor kunnen vlees of vis langer vers worden bewaard.
Bediening
100
• Gebruik het eierbakje nooit als ijsvoorraadbakje, het zou kunnen breken.
• Plaats het eierbakje nooit in de diepvriezer of in de vershoudlade.
OPMERKING
Groentelade
Vershoudlade
Conversieschakelaar
Toevoeropening voor
koude lucht
Controleer de
stand van de conversie-
schakelaar vooraleer
u voedsel in de
lade legt
• Groenten en fruit zullen bevriezen als de conversieschakelaar in de stand 'vershoudlade' staat. Controleer dus de stand vooraleer u voedsel in de lade legt.
• Leg het voedsel niet te dicht tegen de toevoeropening voor koude lucht, die wordt bediend via de conversieschakelaar. Anders is de conversieschakelaar moeilijk te
gebruiken.
OPMERKING
 Loading...