

Page 1

OX6111E
gebru
iksaanwijzing
Multifunctionele oven
mode
d'emploi
four multifonction
Bedienu
ngsanleitu
ng
Multifunktionaler Backofen
instructions
for
use
...............
multi-function
ove
ATAG
Page 2

Your multi-function oven
Introduction
Dear Sir / Madam
Thank you for choosing
an
Atag oven. You
have
made the right
choice.
To
get the most out
of
your new cooking
aid
we
suggest you
read
and fol-
low the advice contained
in
this manual.
Atag
is
continually improving its technology so that it
can
provide the best
oven there
is
and the one you
have
chosen
has
the most innovative featu-
res.
By
combining the various functions
and
accessories you will get the
greatest use out of your oven
and
produce the best results from your favou-
rite recipes.
We hope you will find cooking
with
our oven
an
enjoyable experience that
brings pleasure to
all.
GB 45
Page 3
Your multi-function oven
recommendations
GB 46
Please
read
these instructions before installing
and
using your oven.
The oven
has
been designed for domestic use only for cooking food.
No
asbestos
has
been used
in
its construction .
USING
FORTHE FIRSTTIME:
Before you use your oven for the first time, leave it empty and, with the door
closed, turn it
on
to maximum temperature and let it heat
up
for
15
minutes.
This
"runs the oven
in".
During this time there may
be
some smell from the
mineral wool that insulates the oven
and
there could
be
some smoke. This
is
perfectly normal.
NORMAL USE:
-Always close the door properly.
The
oven
is
fitted with a seal designed to work
with
a closed door.
- Never
lean
or let anyone sit
on
the oven door when it
is
open.
-The oven parts and accessories
can
become hot when the door
is
left partial-
ly
open
and
the grill on. Always keep children at a safe distance.
- When the oven
is
on
it will get hot.
Take
care not to touch the heating
elements inside the oven.
-
Always protect your hands
with
oven gloves or something similar when remo-
ving food, accessories or containers from the oven.
-
Do
not line your oven
with
kitchen foil. The metal will increase the heat pro-
duced and
could ruin the food and damage the enamel.
-
Do
not use a steam or high-pressure cleaner.
- Always check that the oven
is
off before you clean the inside.
-
For
your safety your oven
is
equipped with
an
AUTOMATIC
STOP
should
you
inadvertently forget to turn off your oven. Afte 10 hours' operation, the
AS
(Automatic Stop) function
is
activated and your oven stops heating.
AS
is
displayed
in
place of the time and a series of 2 successive pips
is
sounded for
a certain time.
Please note: it
is
very important to reset the function selector to zero
in
order
to
re
-use your oven.
ENVIRONME
NTAL
PROT
ECTION:
-This appliance's packaging material
is
recyclable. Help recycle it and protect
the environment by dropping it off
in
the municipal receptacles provided for
this purpose.
~
-
Your
appliance also contains a great amount
of
recyclable material. It
is
marked with this label to indicate the used appliances that should
not
be
mix
ed
with other waste. This
way,
the
applian<;:e
recycling orga-
• nised
by
your manufacturer will
be
done under the best possible condi-
•••
tions,
in
compliance with European Directive 2002/96/EC
on
Waste
Electri
cal
and Electronic Equipment. Contact your town
hall
or your
retailer for the used appliance collection points closest to your home.
We thank you doing your part to protect the environment.
Page 4

your
oven,
how
it
works
ex p
lanation
of
controls
how
to
use
your
oven
setting
the
time
to
carry
out
cookins right
awa
:i
p
rogramming
the
cooking
delay
ing
the
cooking
usin
the
timer
Your multi-function oven
contents
48
49
50
51
52
52
different
cooking
methods
descrip
tion
of
features
53
oven
accessories
accessories 54
installer's
information
_
connecting
up
55
housing
563
-
general
maintenance
changins the
light
bulb
57
troubleshooting
65
GB 47
Page 5
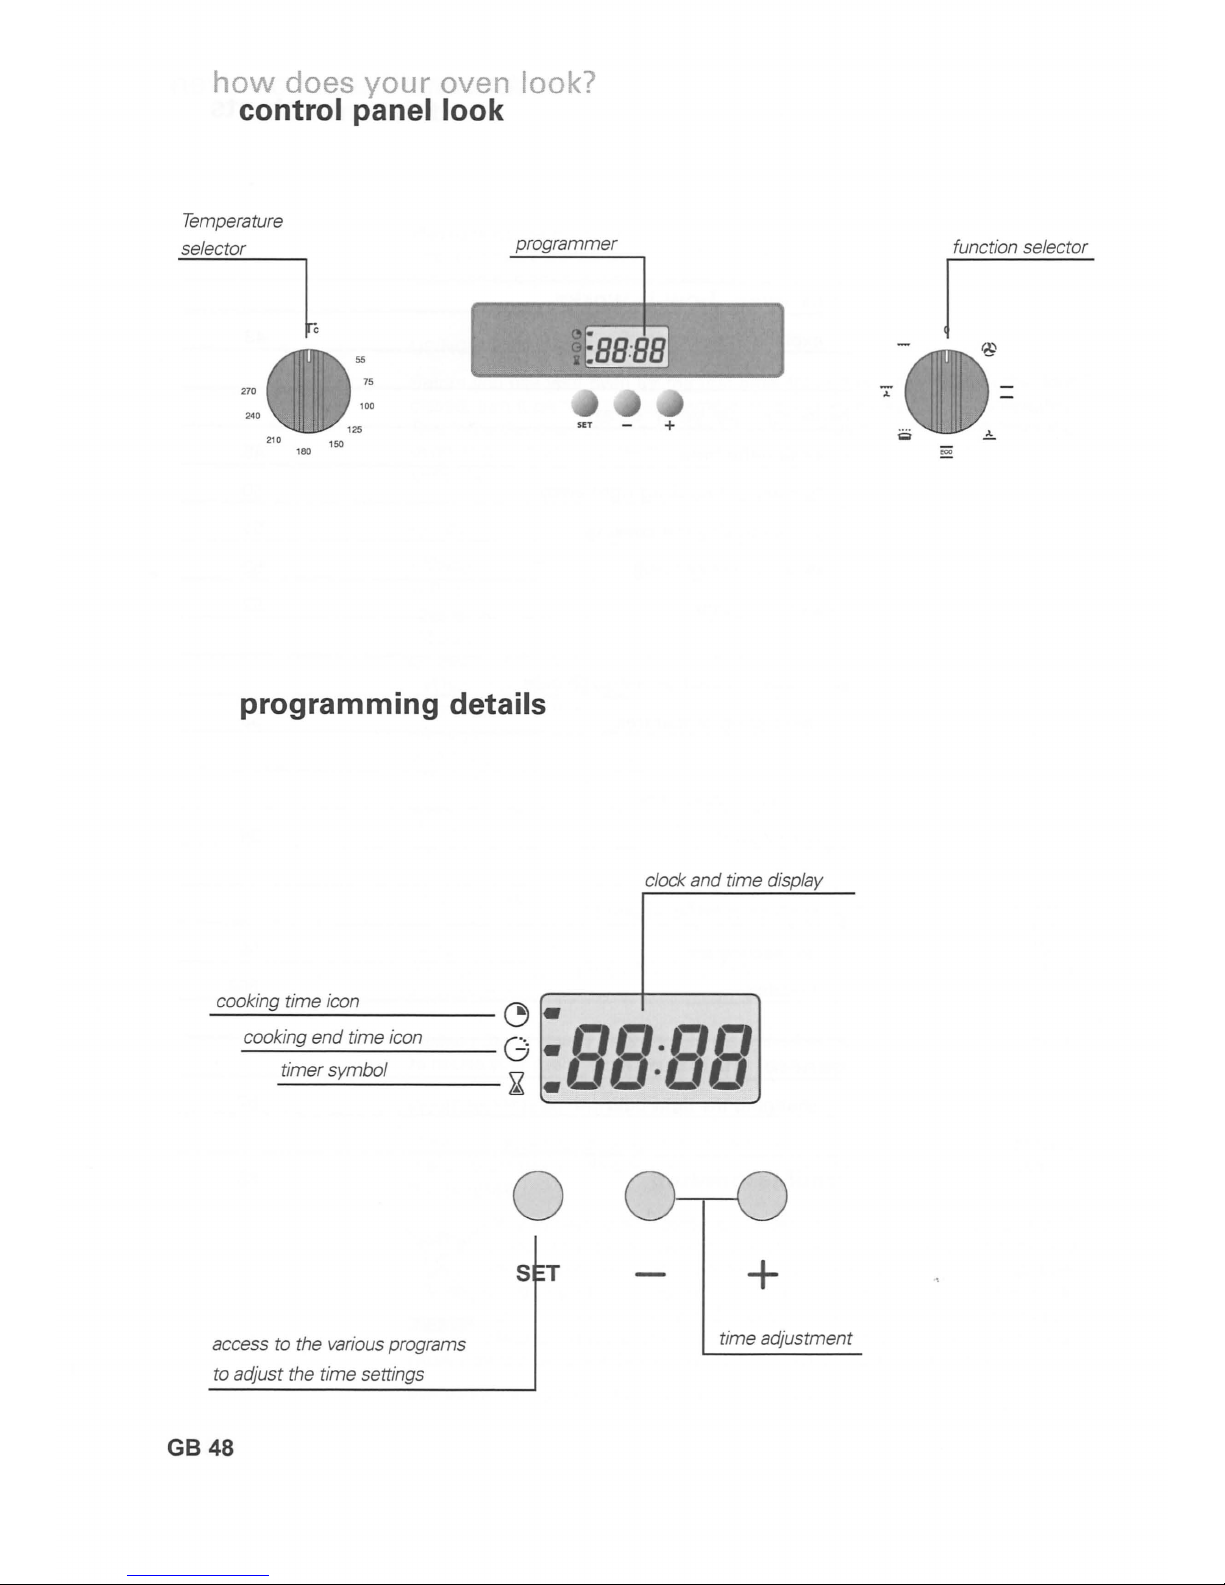
how
does you r oven look?
control panel look
Temperature
selector
programmer
~
~E88:88
1
55
75
270
100
240
SET
+
210
lSO
lS0
programming details
clock and time display
cooking time icon
----~--------------
~
.
cooking end time icon
G'~'~
,r-t,r-t
---.::---
..:
.•
!-'
!-,.
!-' !-'
timer symbol I "
,.
I " ,
-...:.....----
~
.1..
I..
I..
I..
access to the various programs
to adjust the time settings
GB 48
o
S T
+
time adjustment
function selector
I
Page 6

~
/
~
_
n.nn
II
U'UU
OOQ
SET - D
how
to use you r oven?
setting
the
time
When plugging in
The
time display flashes 0:00.
Set the time
by
pressing the + or - touch controls (holding
do
wn the but-
ton
allows you to rapidly scroll through the numbers).
Example: 12:30
The
time
is
set automatically after a few seconds (the display
no
longer flas-
hes).
Resetting
the
clock
time
Simultaneously press the +
and
- touch controls for a
few
seconds until the
display
is
flashing.
The
time display flashes, indicating that it
is
now possible to adjust the
time.
Adjust the
clock setting using the + or -.touch controls.
Press the SET touch control to validate.
NOTE
: If it
is
not validated
by
pressing the SET button, the time
is
auto-
matically saved after a
few
seconds.
GB 49
Page 7

how
to use you r oven?
cooking immediately
o
GB 50
The programmer should display only the time; it
must
not be flashing.
Choose the cooking
mode:
Rotate the cooking selector to the position you have chosen.
example: position
~
Select the recommended temperature for your recipe.
example: temperature indicator at
210°C.
Place
your
dish in
the
oven based
on
the recommendations provided
by the cook book.
After a cooking cycle,
the
fan rotor will continue
to
operate for a while,
in order
to
cool
the
oven.
WARNING : When cooking
on
the
grill,
the
oven's
accessible parts will
become hotter
than
during a
regular
cooking process.
Keep young children away.
Page 8

o
G
n.jn
~~
li
U·3U
00
SET
how
to use your oven?
using programmed cooking
-Adjust the cooking mode that
you
want
and
adjust the temperature
r.;;;;J_
example: natural convection position
l=I
temperature
210
°C.
- Press the SET touch control until the ~ indicator starts to flash
(cooking time)
The display flashes
0:00
as
well
as
the ~ symbol to indicate that you
can
now
adjust the setting.
-
Press
the + or - touch controls to set the desired time.
example:
30
min cooking time.
The
set time
is
recorded automatically after a few seconds -> the display stops
flashing.
The
countdown of the length of time begins immediately after it
has
been set.
After these steps,
the
oven heats up.
At the end of cooking (end of programmed time):
- the oven turns off;
- the cooking time indicator turns off;
-
0:00
is
displayed;
- A series
of
beeps
is
emitted for a
few
minutes.
The beeps
can
be
stopped by pushing
on
any touch control, and the display
then returns to the time
of
day.
GB
51
Page 9

how
to
use
your
oven?
delayed cooking
00
SET
Proceed
as
for a programmed cooking, then after entering the cooking time:
-
Press
the SET touch control until the
end
cooking
icon
begins
flas-
hing
G.
The
display flashes a 0:00 to indicate that
you
can
now adjust the setting.
-
Press
the + or -
touch
controls.
example: 13:00.
Now
you
can
set the cooking time for up to 23:59 hours.
After
these
steps, the
oven
heating
is
delayed
so
that cooking ends at
13:00.
At the end of cooking (end of programmed time):
- the oven turns off;
- the cooking time indicator turns off;
-
0:00
is
displayed;
- a series of beeps sounds for a
few
minutes.
The beeps
can
be stopped by pushing on any touch control,
and
the display
then returns
to
the time
of
day.
If you are using a cooking program
with
fan-circulated
air,
unless you
return the function selector to
0,
the
fan
will continue to operate to make
the temperature
in
the oven uniform.
how
to
use
your
oven?
using
the
timer
GB 52
Your
oven
is
equipped
with
an
electronic
timer
that
is
independ-
ent
of
the
oven
functions,
making
it
possible
to
countdown a set
time.
In
this case, the timer display
has
priority over the clock display.
Press the
SET touch control; the display will flash
and
the timer
icon will appear
and
also flash.
Press the
+
or-
touch control until the desired length of time
is
displayed
(60
minutes maximum).
The
display stops flashing after a few seconds
and
the timer starts working,
counting down the time
in
seconds. Once the time
has
expired, the timer
emits a series of beeps to notify
you.
NOTE:
You
can
at
all
times
change
or cancel the timer programming.
Page 10

different cooking methods
description
of
features
Functions
Elements in
Description
of
function
operation
~
Quick increase
in
temperature. Some dishes
~
Circulating
can
be placed
in
a cold oven.
Recommended to keep poultry, fish and
heat
vegetables tender.
'--'
For
cooki
ng
several dishes
on
up to three
levels.
~
This mode combines high and low heat
-
Natural
® sources.
~
<I>
Ideal for slow and delicate cooking.
-
convection
<I>
- for soft game
<D
- to simmer small dishes
- to bake bread.
~
This mode combines the
low
heat source
Pulsed
with
the fan .
,l
- for moist dishes (quiches, juicy
shelf
fruit tarts ... )
-
- for dishes that rise (cakes, brioche,
Kugelhupf, souffles ... )
This mode allow for energy savings while
~
maintaining good quality cooking. The
ECO
-
Eco
®
position
is
used for the energy label perfor-
ECO F""'"i
<I>
cooking
~
<I>
mance.
-
NB:
all
cooking
is
undertaken
without
pre-
<D
heating the oven.
~
Low temperature stabilisation
is
ensured
by
Low
a fan that circulates the hot air around the
. . . .
dish .
~
temperature
- to make bread dough rise
stabilisation
- to warm plates
- keep dishes warm
~
This
mode
alternately
combines the effect of the
fan
and
that
of
the
grill:
the
grill
pulses
the
food
............
Turbo
with
infrared
and
the
air
movement
generated
by
"-
the
fan
attenuates
the
effect.
Grill
- for sealing and cooking through red
meats and poultry
- to slowly cook poultry up to 1.7kg.
The double grill covers the entire surface
of
~
the grid.
............
High
"
Preheat for 5 mins.
<I>
- to grill thin pieces of meat
grill
<I>
- to toast bread
\ '
CD
Slide the drip tray onto the 1 st shelf to collect
the juice.
When
in
use
the
oven
get
s hot.
Recommended
level
s
g
51h
@
3rd
1st
I-
1st
[;]
D
~
~
~
2
em
0
or
4th
,
Do
not
touch any heating element inside the ove
n.
Young
children should
be
kept well away.
GB
53
Page 11

cookware
accessories
Rear
Front
GB 54
Tip proof safety grid
The
grid
can
be
used to
hold
all
dishes
and
moulds contai
ing
foodstuffs to
be
cooked
or
browned. It
can
be
used
fc
barbecues
(to
be
placed
directly
on
the
grid).
Multi
function pans
(reserved
for
pastries)
It serves
as
a cake dish and
has
a sloped edge. It
is
used
for cooking pastries such
as
cream puffs, meringues,
madeleines, puff pastry, etc.
Inserted into the shelf supports under the grid, it catches
barbecue juices and grease.
It
can
also be used half-full of
water for double-boiler cooking methods.
Avoid placing roasts or meats directly
in
the dish because
you are certain to have major spattering
on
the oven walls
Deep dish equipped
with
a support grill (spe-
cialized
for
grilling)
It
is
used to collect juices and grease when cooking with
the high
grill or the fan assisted grill.
It
can
be
used
as
a cooking dish when suitable for the size
of
the item to
be
cooked
(e.g
. whole poultry surrounded
with
vegetables, at moderate temperature).
Never place this dish directly
on
the base, except
in
GRILL
position.
Handle for deep dishes
Important tips:
-
Do
not cover the inside
of
the oven with aluminium foil
in
an attempt
to protect it from becoming dirty. This
will cause overheating and dam-
age the oven space's
enamel lining.
- After cooking, do not pick up dishes (grills, rotisserie ... ) with bare
hands.
Page 12

installer's information
connecting up
As
a specialist, you alone are competent to install and connect
up
Atag appliances.
Our guarantee therefore applies only
and
exclusively to
appliances which have been installed
and
connected up
by
you
in
accordance
with
the provisions of current regulations.
Failure to
meet
this requirement would incur the fitter's liability and
release the Atag company from any liability.
The electrical connections are made before the oven
is
installed
in
its
housing.
• The oven
must
be connected using
an
approved 3-core cable (live, neu-
tral
and
earth)
with
1.5
mm
square conductors . This should be connected
via a 3- pin-socket (live, neutral, and earth
to
the
main supply which
should be should be a
220-
240V,
alternating single-phase current. If the
oven
is
not connected using a plug and socket, it
must
be connected to
a mUlti-pole switch
with
a minimum gap
of 3 mm
between contacts. The
earth wire (green
and
yellow) should
be
connected
to
the terminal mar-
ked
with
the earth symbol @ on the appliance
and
to the earth
in
the
switch .
• Where the oven is connected using a separate plug and socket this
must
be
accessible after the oven
has
been installed.
• The neutral wire (blue) of the oven must be connected to the neutral
in
the main supply.
• Tighten the clamp to hold the cable.
• Close the trapdoor using the
two
screws.
installer's information
connecting up
Fused 16A or differential circuit breaker
Electricity meter
(mains)
(20A, singlephase
220-240 V alternating
current
50
Hz)
220-240 V single phase
alternating current supply
Connecting cable approx
1.50
m. long
•
The
supply cable (H05
RR-F,
H05
RN-F
or H05
W-F)
must
be
long enough
to allow the oven to rest
on
the floor
in
front of its housing.
With the
oven
sitting
on
the floor
and
disconnected:
• Open the trapdoor
at
the bottom right
hand
side
at
the
back
of the oven
by
removing the 2 screws
and
swinging the door
away.
• Remove the sheath from
each
wire
in
the new cable
up
to
12
mm.
• Twist the ends carefully together.
• Unscrew the terminal screws
and
remove the wires that need changing.
•
Pass
the new cable through the wire clamp to the right of the terminals.
• Connect the wires
up
in
accordance with the markings
on
the terminals.
• Make sure
all
wires
are
trapped under the screws.
•
The
brown wire
(live)
going to terminal marked
L.
•
The
green
and
yellow wire
(earth)
going to the one marked @.
• The blue wire (neutral) going to the terminal marked N.
• Tighten the screws
and
check,
by
tugging
on
each wile, that they are
firmly connected.
• Tighten the clamp to hold the cable.
• Close the trapdoor using the
two
screws .
GB 55
Page 13

Axation
saow
position
\
Flxatloosaow \
position
GB 56
Installer's information
Housing
_ The oven
may
be housed either under a
work
surface or built into a co-
lumn
that
is
open*
or closed
with
a suitable opening.
Your ov
en
works at its best
and
produces excellent results w
hen
cooking
and
cleaning itself, if its air circulation
is
not compromised:
•
The oven
must
be
centred
in
the unit
so
that there
is
a minimum distan-
ce
of 5 mm
between it
and
the surrounding unit.
• The housing unit or its outer surface
must
be
capable
of
withstanding
heat.
•
To
ensure the ov
en
rests firml y
in
the housing, screw it to the housing unit
using the
holes
on
the side uprights provided (see diagram
).
To
do this:
1)
Remove the rubber stoppers masking the fixing holes.
2)
To
prevent the housing unit splintering, drill two holes 2
mm
in
diameter
in
the w
all
of the housi
ng
unit opposite the fixing holes.
3) Attach the ov
en
using the two screws.
4)
Conceal
the
hole using
the
rubber
stoppers
. (
These
also help to
cushi
on
the closing of the ov
en
door
).
(
*)
If
the
housing unit is open
at
the
back,
the
gap
must
not be more
than
70
mm.
Page 14

general maintenance
Leave the oven to cool down before cleaning it manually.
In general, don't use any type of scouring powder or metal-backed
sponge, or any sharp objects for cleaning.
changing the light bulb
bulb
fitting
~
@
~
.
-
1-
-[]---
-
---
-
---
-
---
-
---
~
unscrew
- The bulb
is
located
in
the top of the oven .
WARNING! Disconnect
the
oven before touching
the
bulb; leave
the
oven to cool
down
if necessary.
-
Turn
the protective shade to the left a quarter of a turn.
- Unscrew the
bulb
in
the same direction.
The
bulb used
is
a:
-15W
- 220/240 V
-
300
°C
- E
14
screw-fitting bulb
- Change the bulb, then refit the protective shade.
-
Plug
the oven back
in.
Note: It
is
easier
to
unscrew the
shade
and bulb
if
you
wear a rubber
glove.
GB
57
Page 15

YOU
OBSERVETHAT.
..
The oven is
not
heating
.
The oven
light
is
no longer work-
ing.
The
cooling
fan
continues
to
oper-
ate after the oven stops.
GB
58
breakdown
what
to
do
in
the
event of ...
POSSIBLE
CAUSES
• The oven is
not
plugged in.
• The
fuse
in
your
electrical panel is
not
working.
• The selected temperature is
too
low.
•
The sensor is defective
• The thermostat is defective.
• The oven has overheated and is
in
safety
mode
.
• The
light
is
out
of
order
.
• The oven is
not
connected
or
the
fuse
is
not
working
.
• The fan
should
work
for a maximum
of
1
hour
after
cooking,
or
when
the
oven
temperature
is
greater
than
125°
C.
•
If
it
does
not
stop
after 1 hour
.
WHAT
SHOULD
YOU
007
- Plug in the oven.
-
Replace
the
fuse in your electrical set-up
and check its capacity (16A).
-Increase the selected temperature.
-
Call the
After
Sales Service Department.
-
Call
the
After
Sales Service Department.
-
Call the After Sales Service Department.
-
Replace the light.
- Connect
the
oven
or
replace
the
fuse.
-
Open
the
oven door
to
accelerate the
cooling
down
of
the
oven .
-
Call
the
After-Sales Service Department.
Page 16

99641202 -
04107
 Loading...