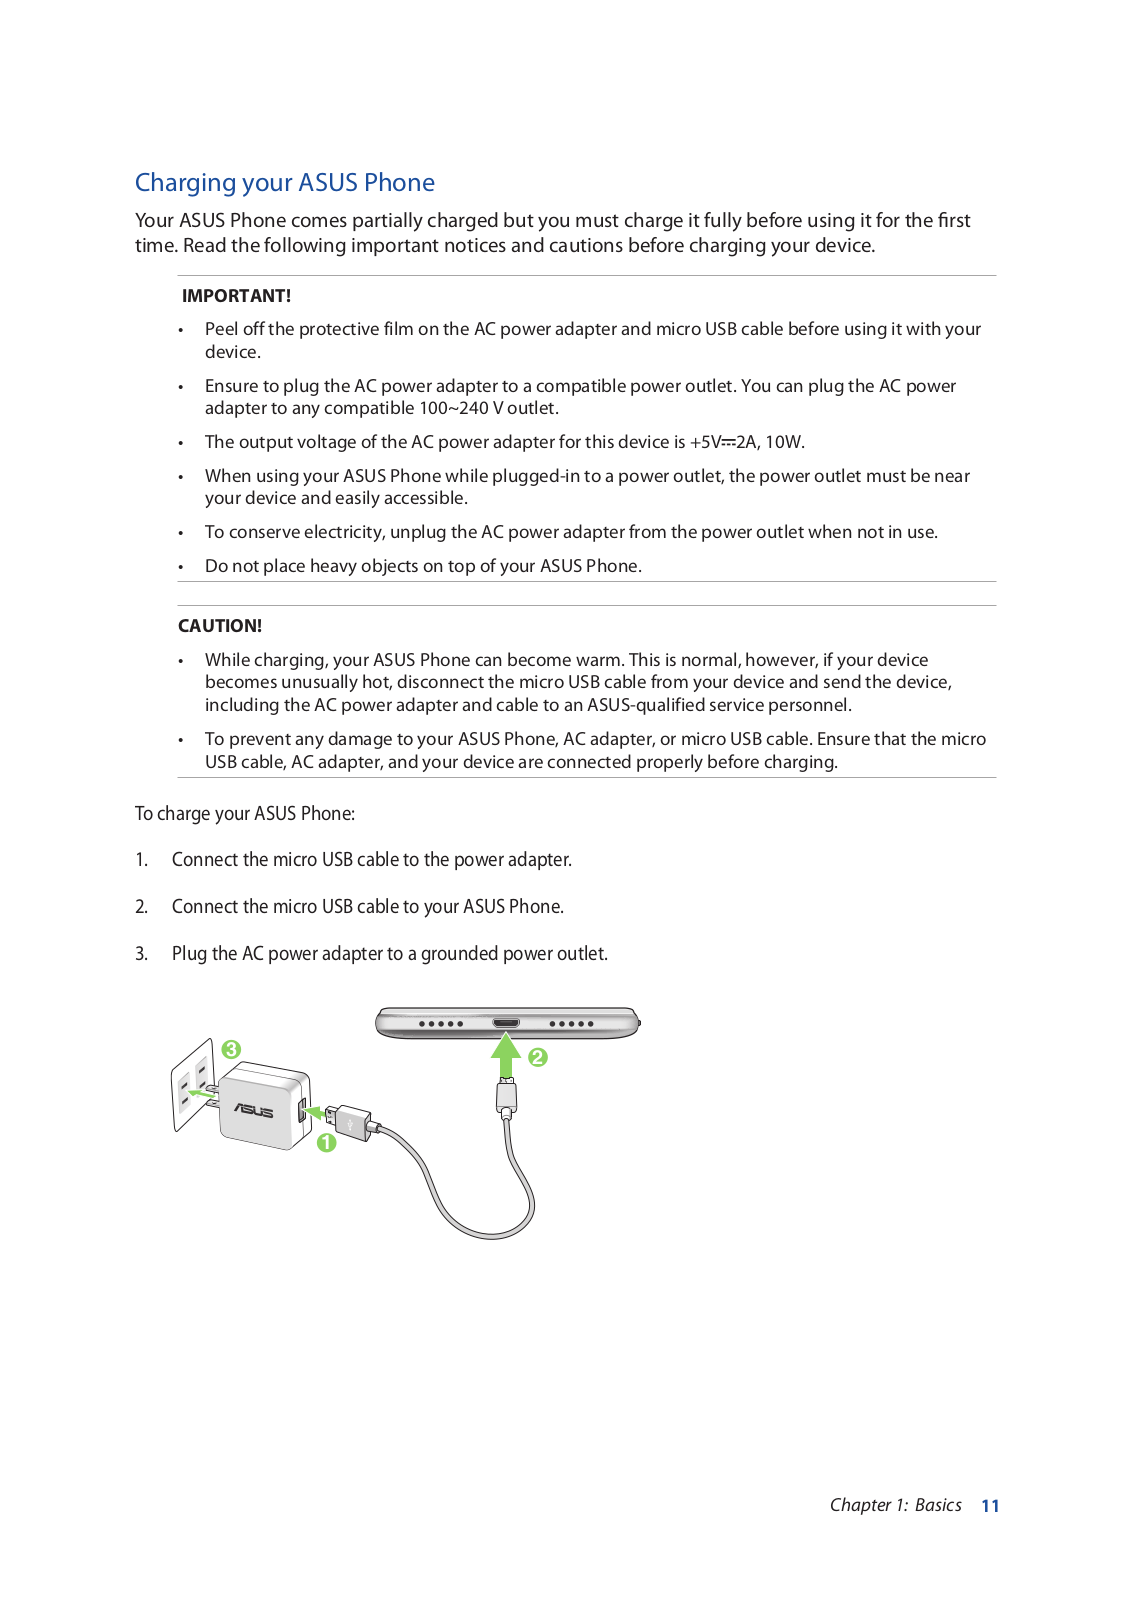
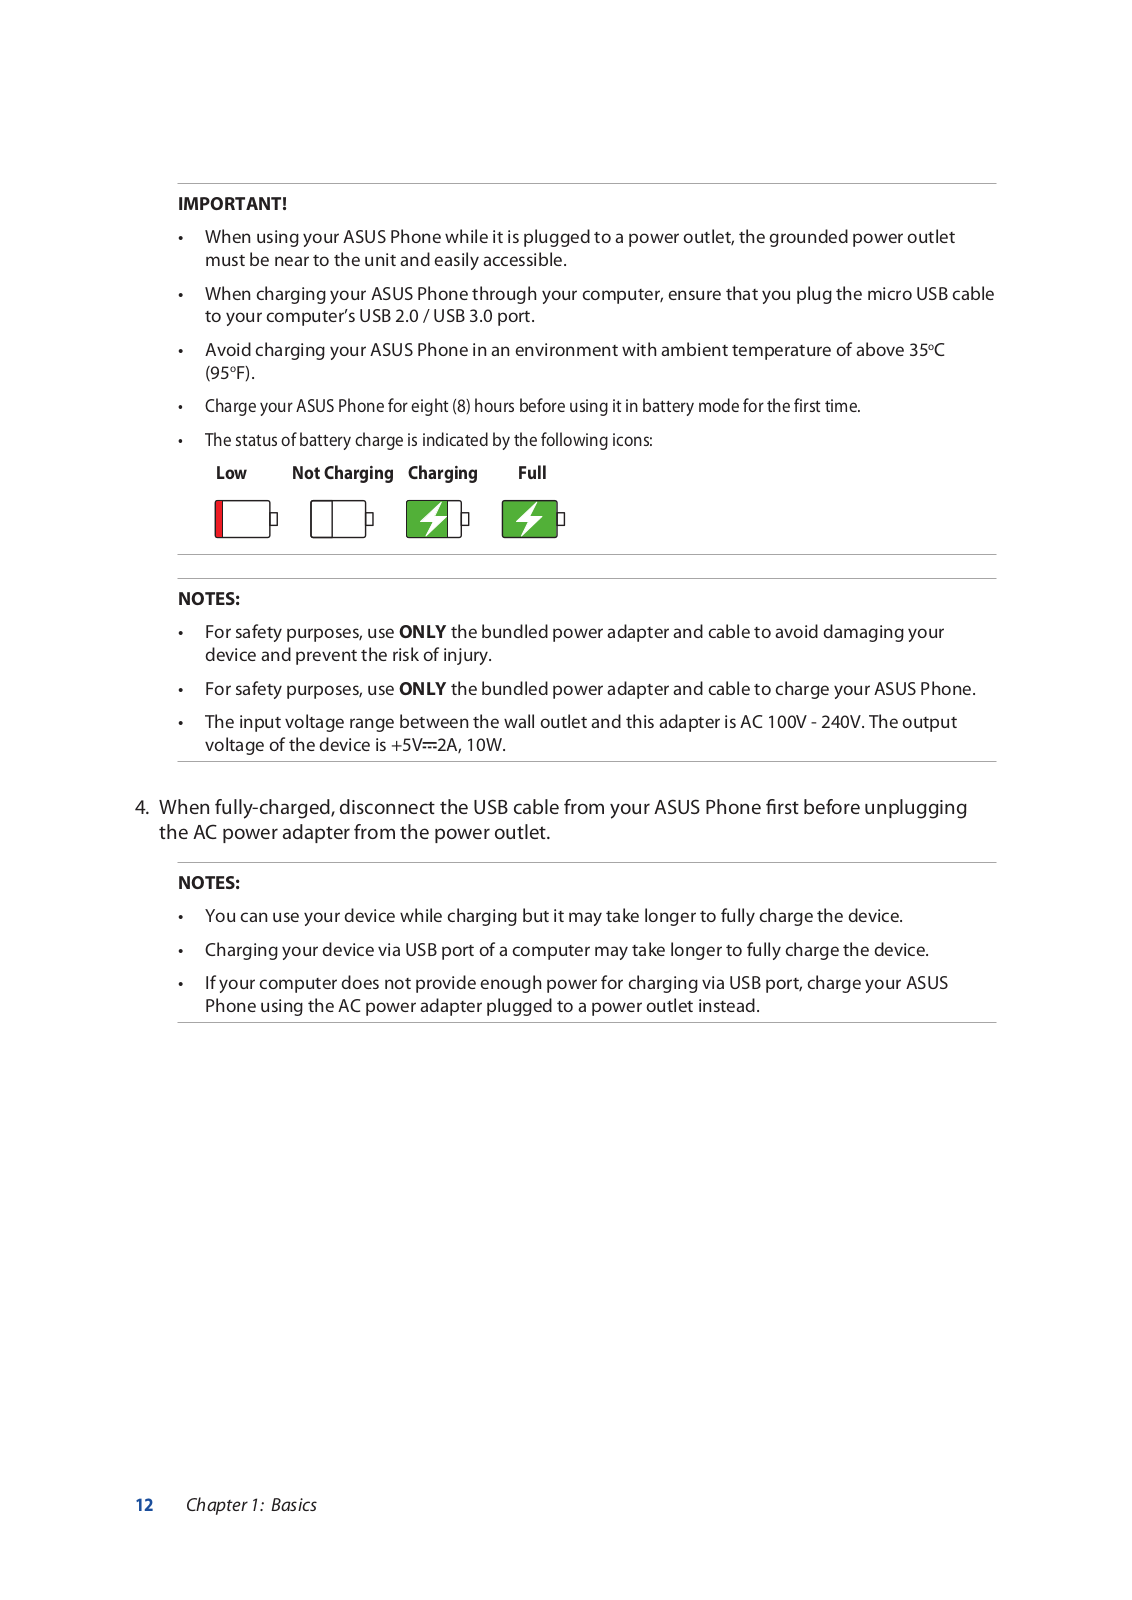
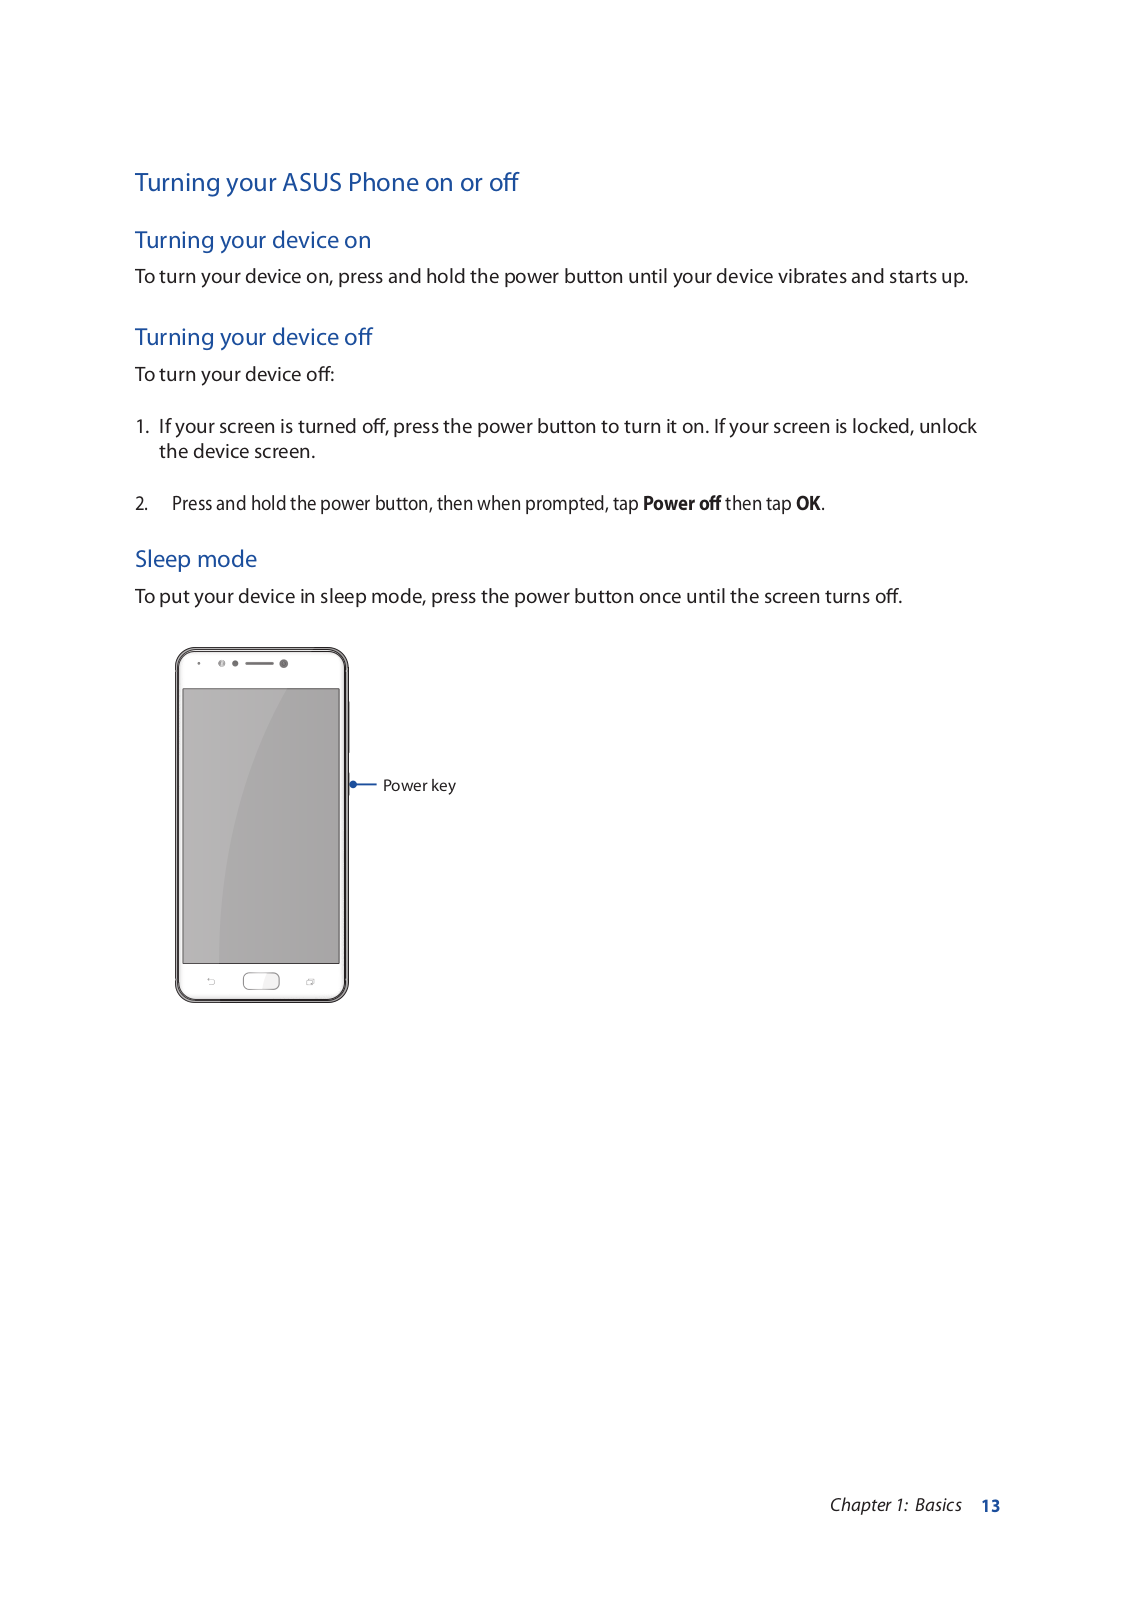
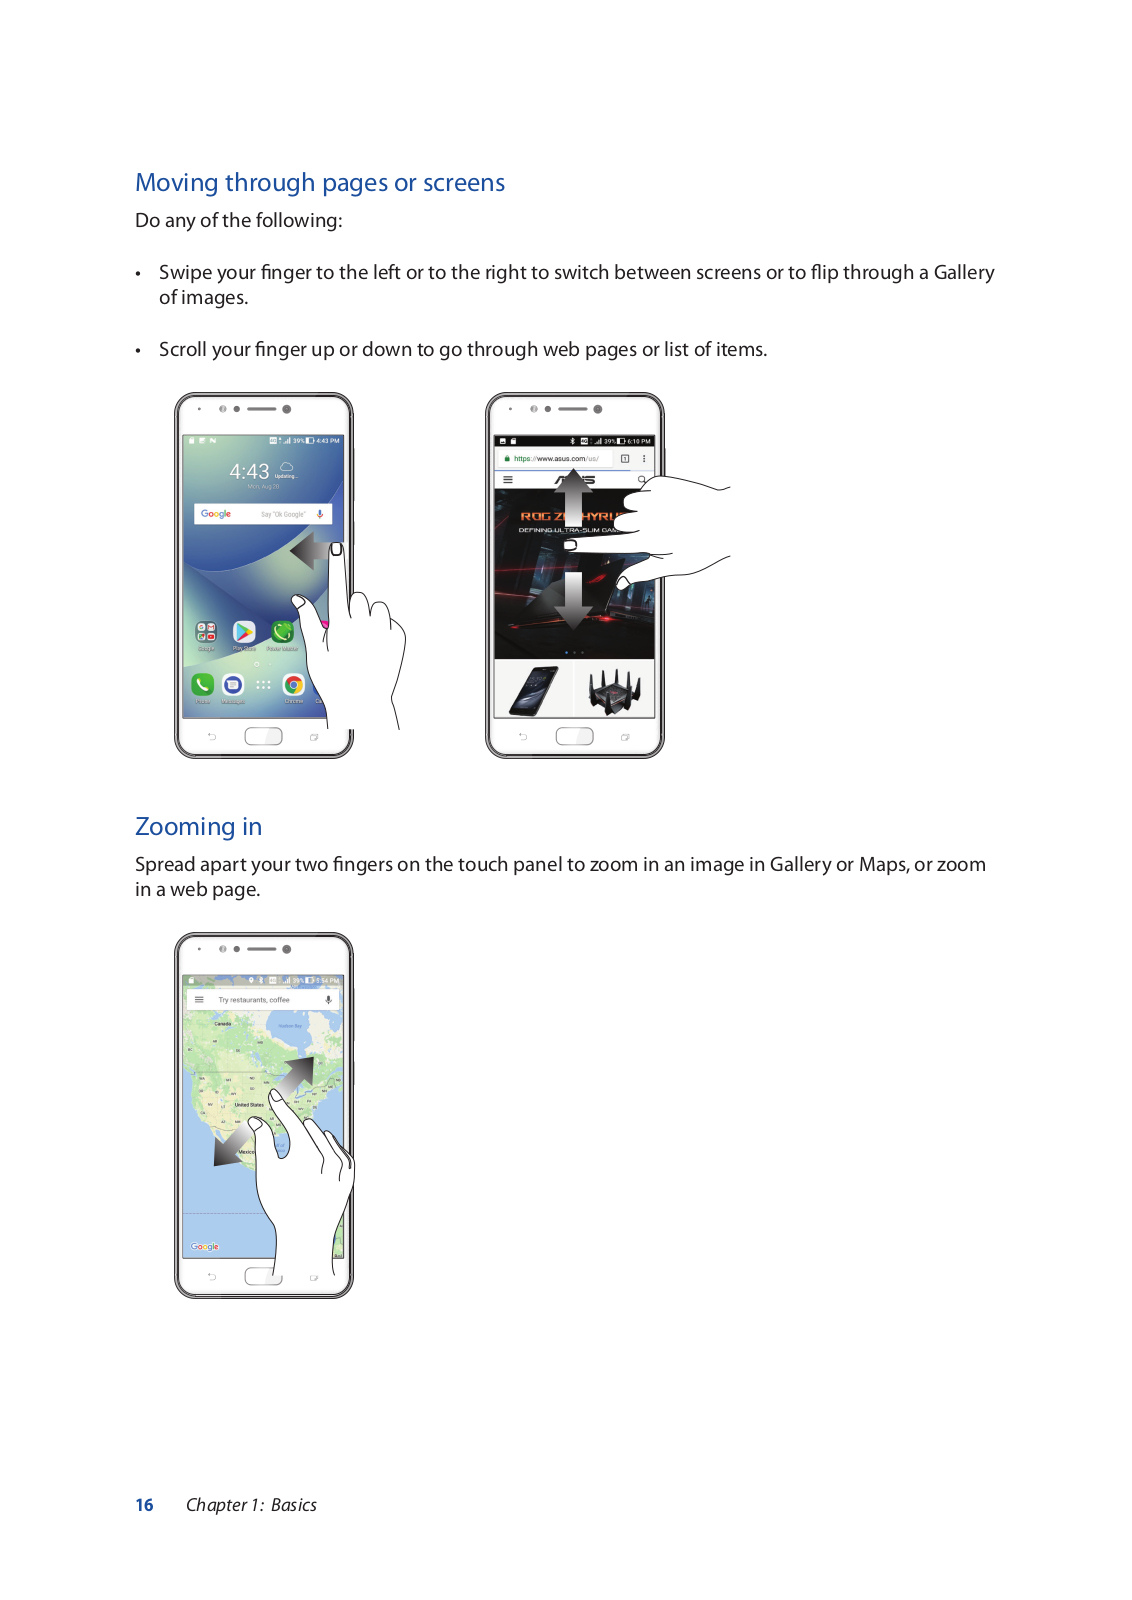
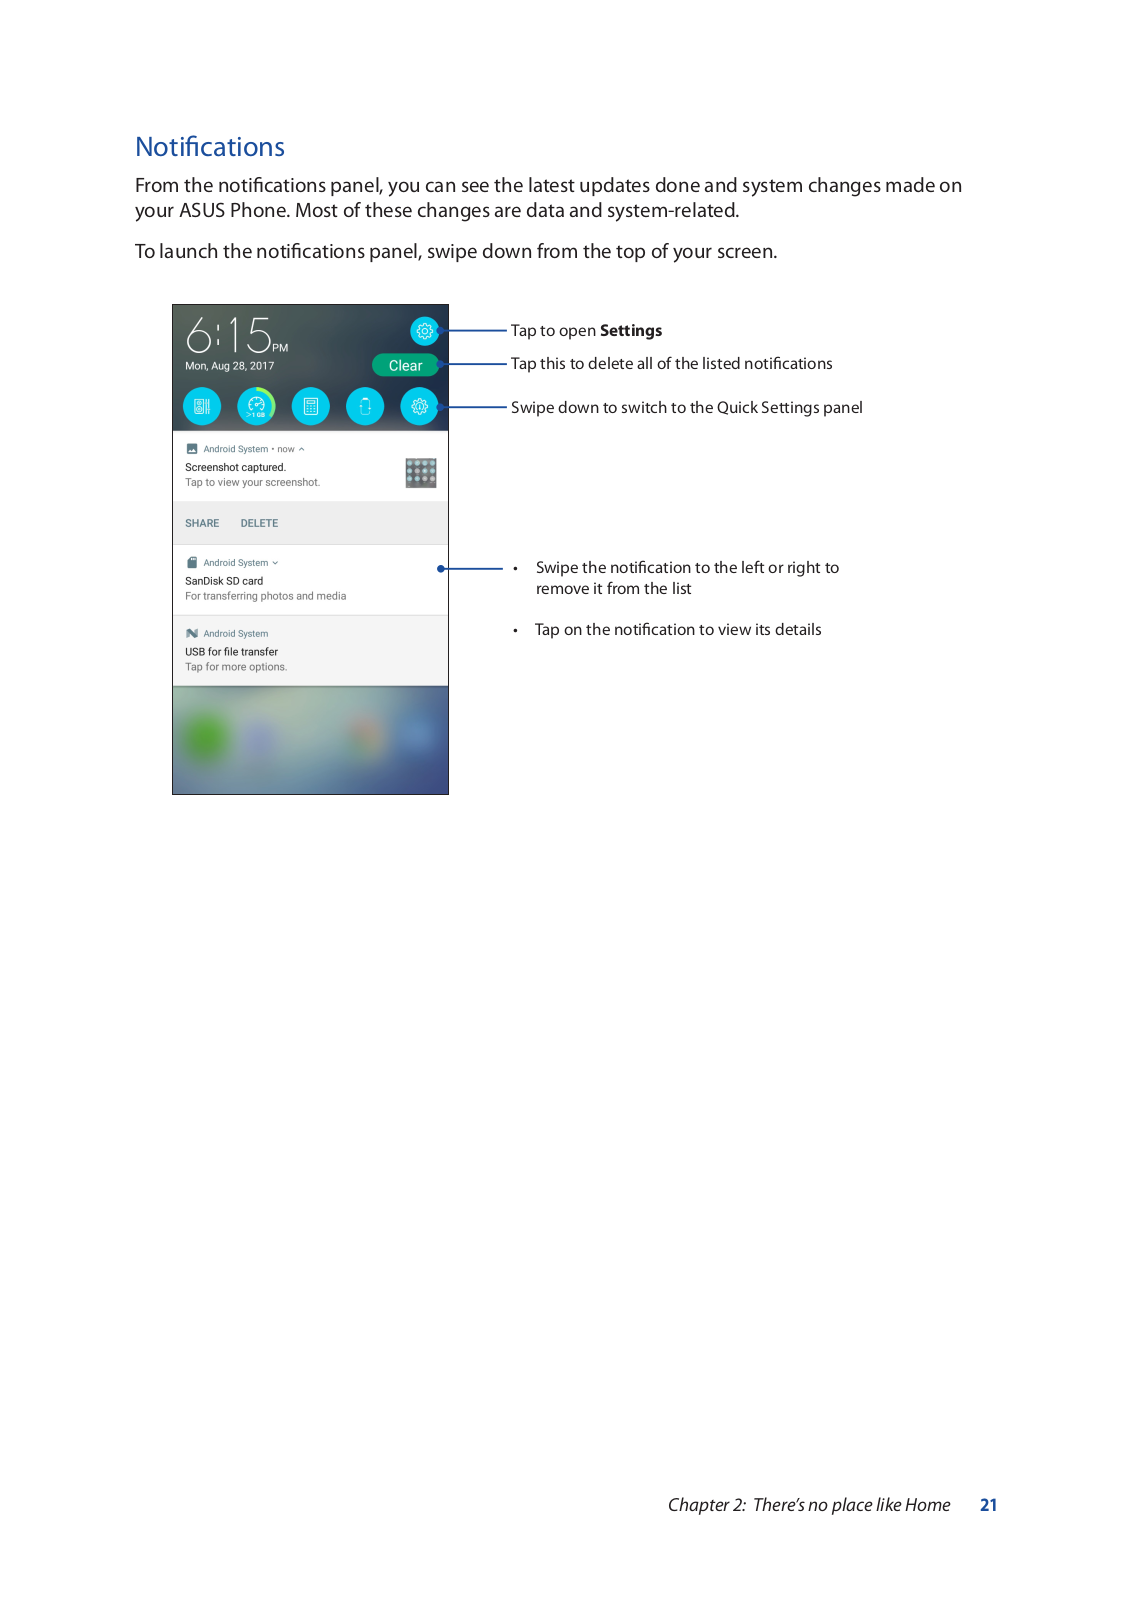
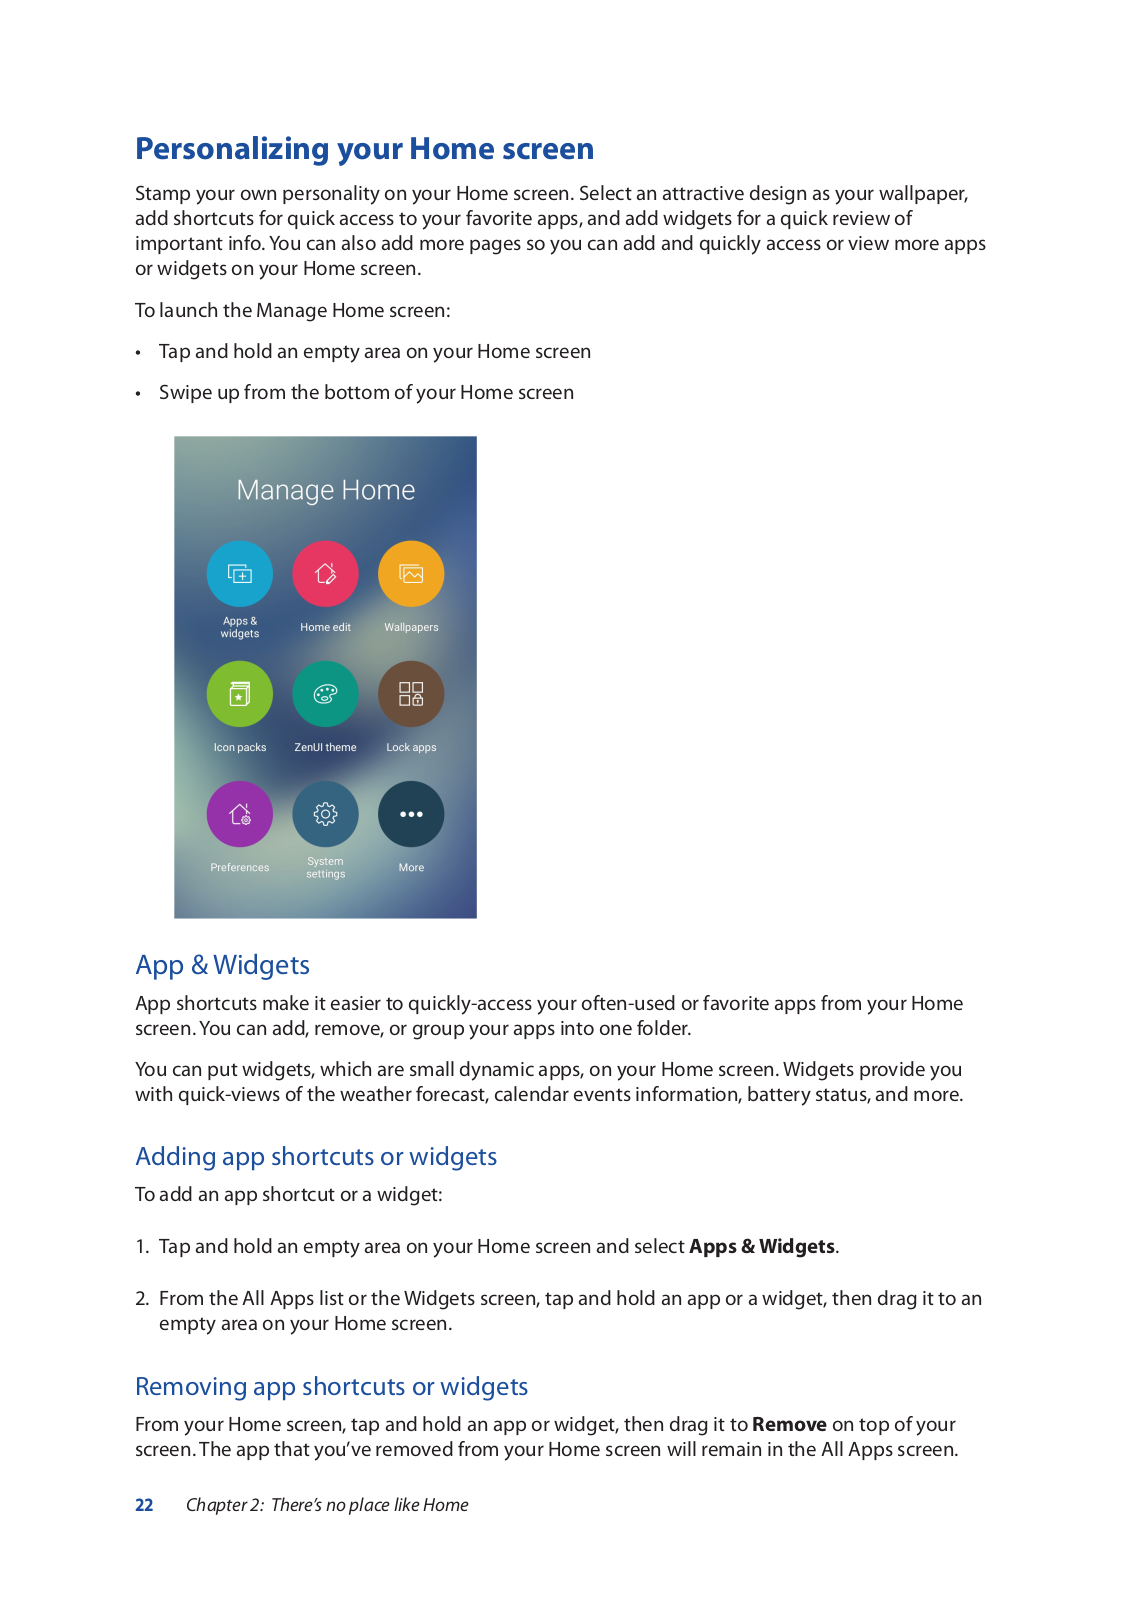
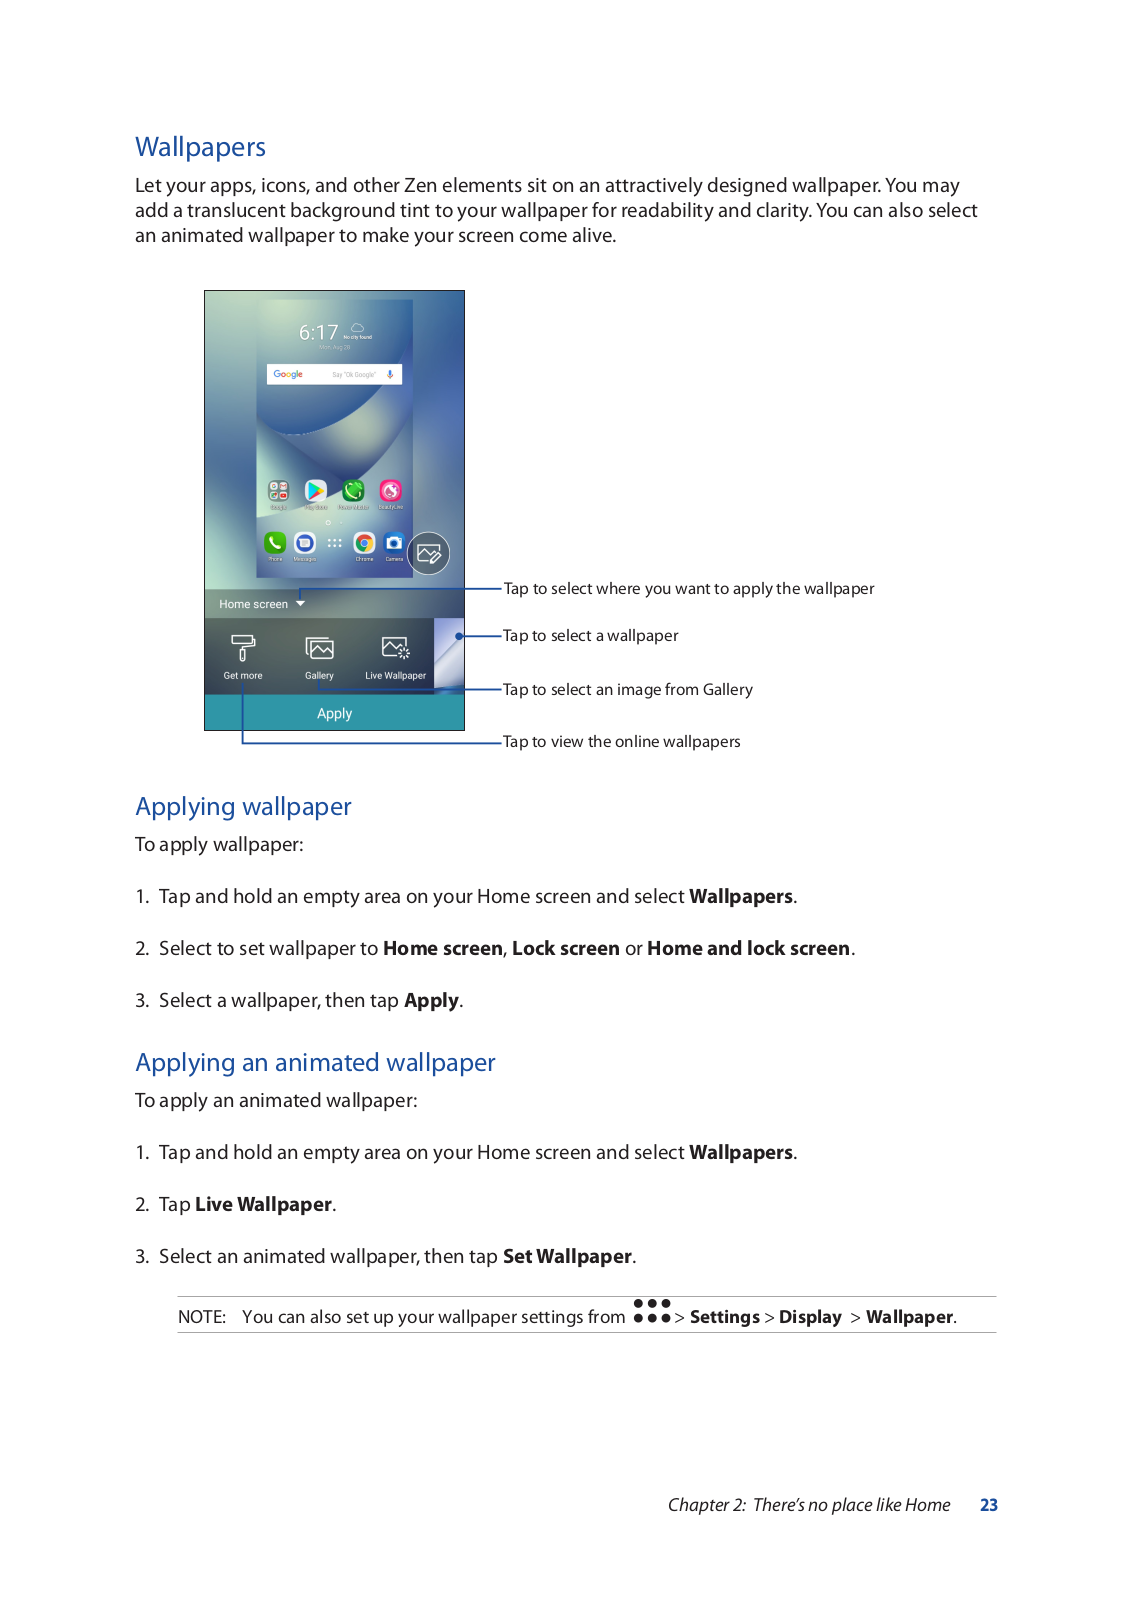
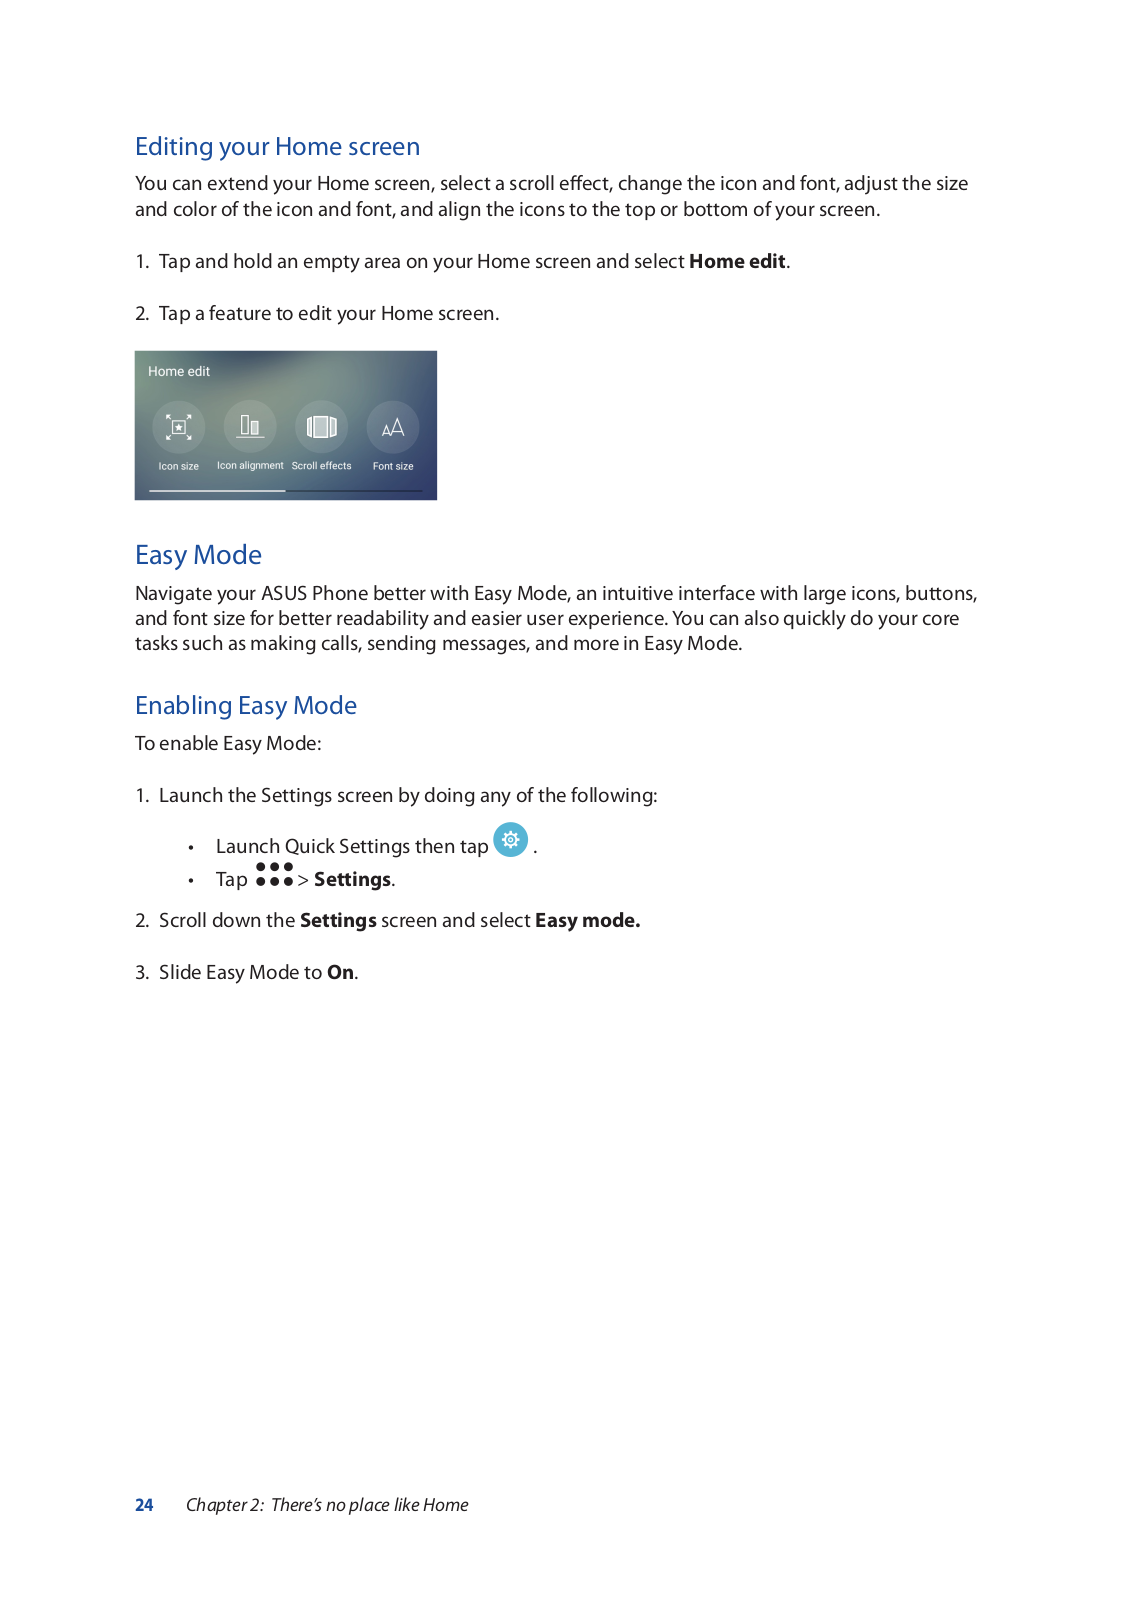
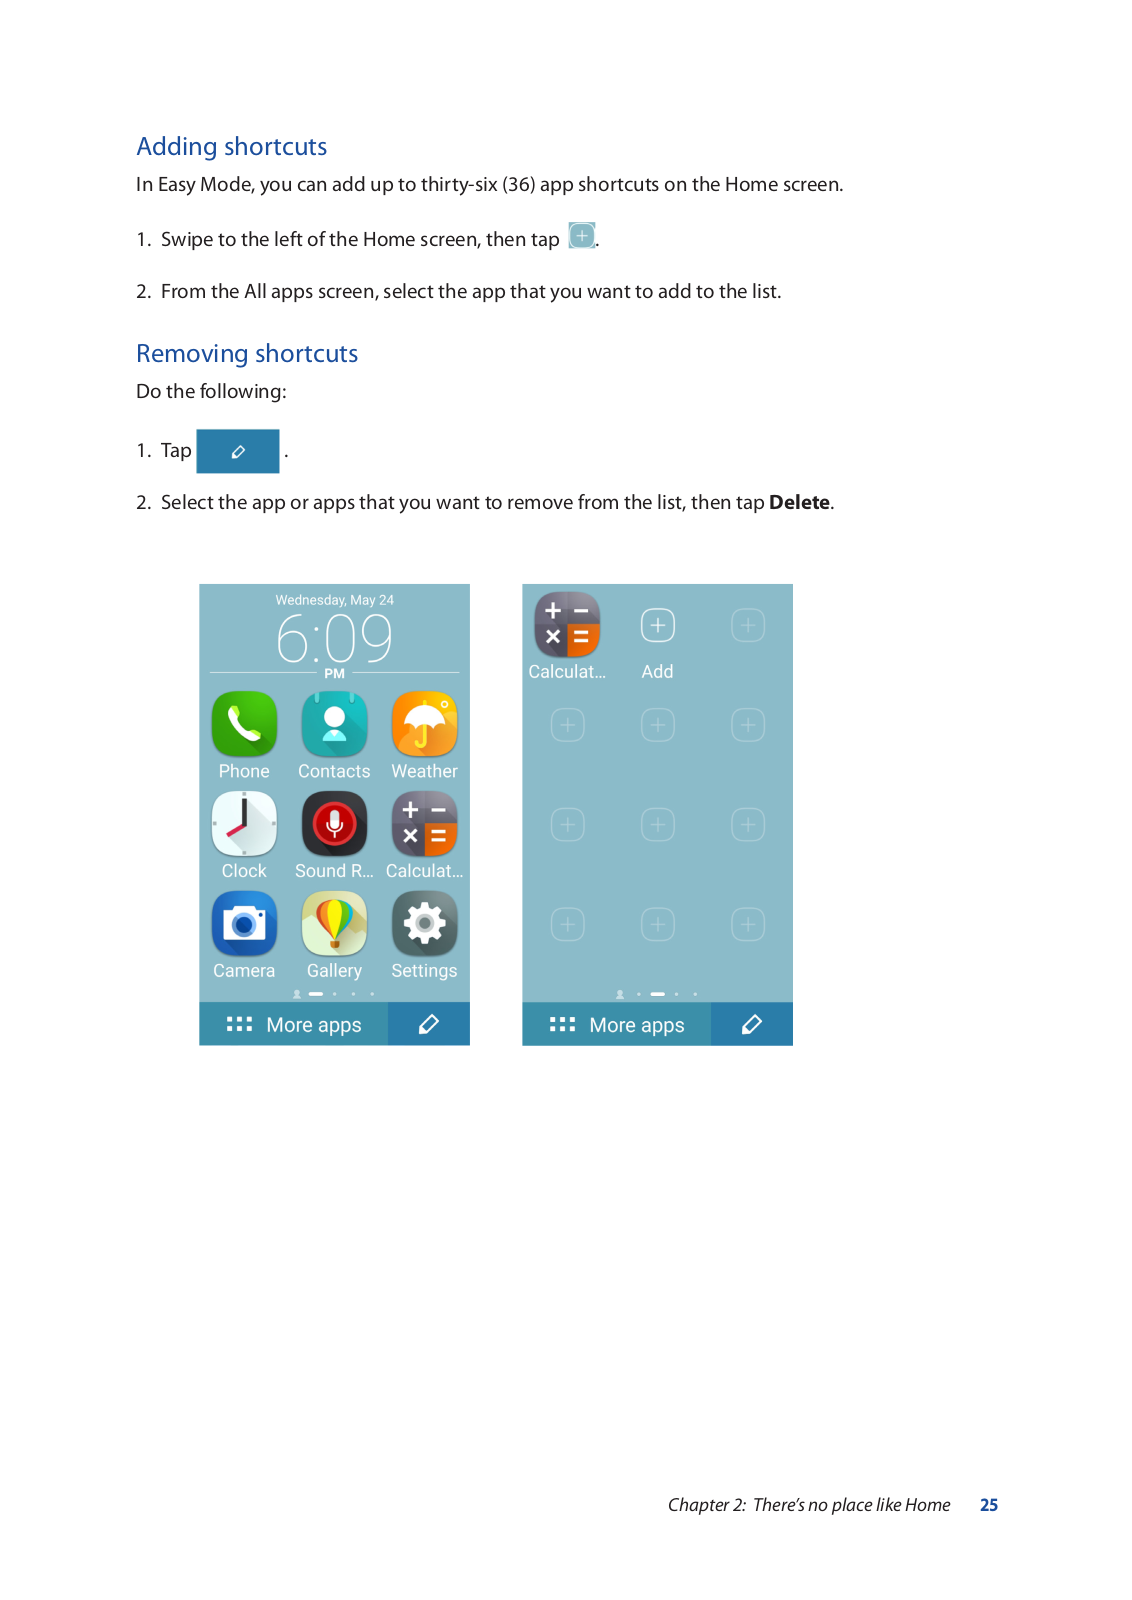
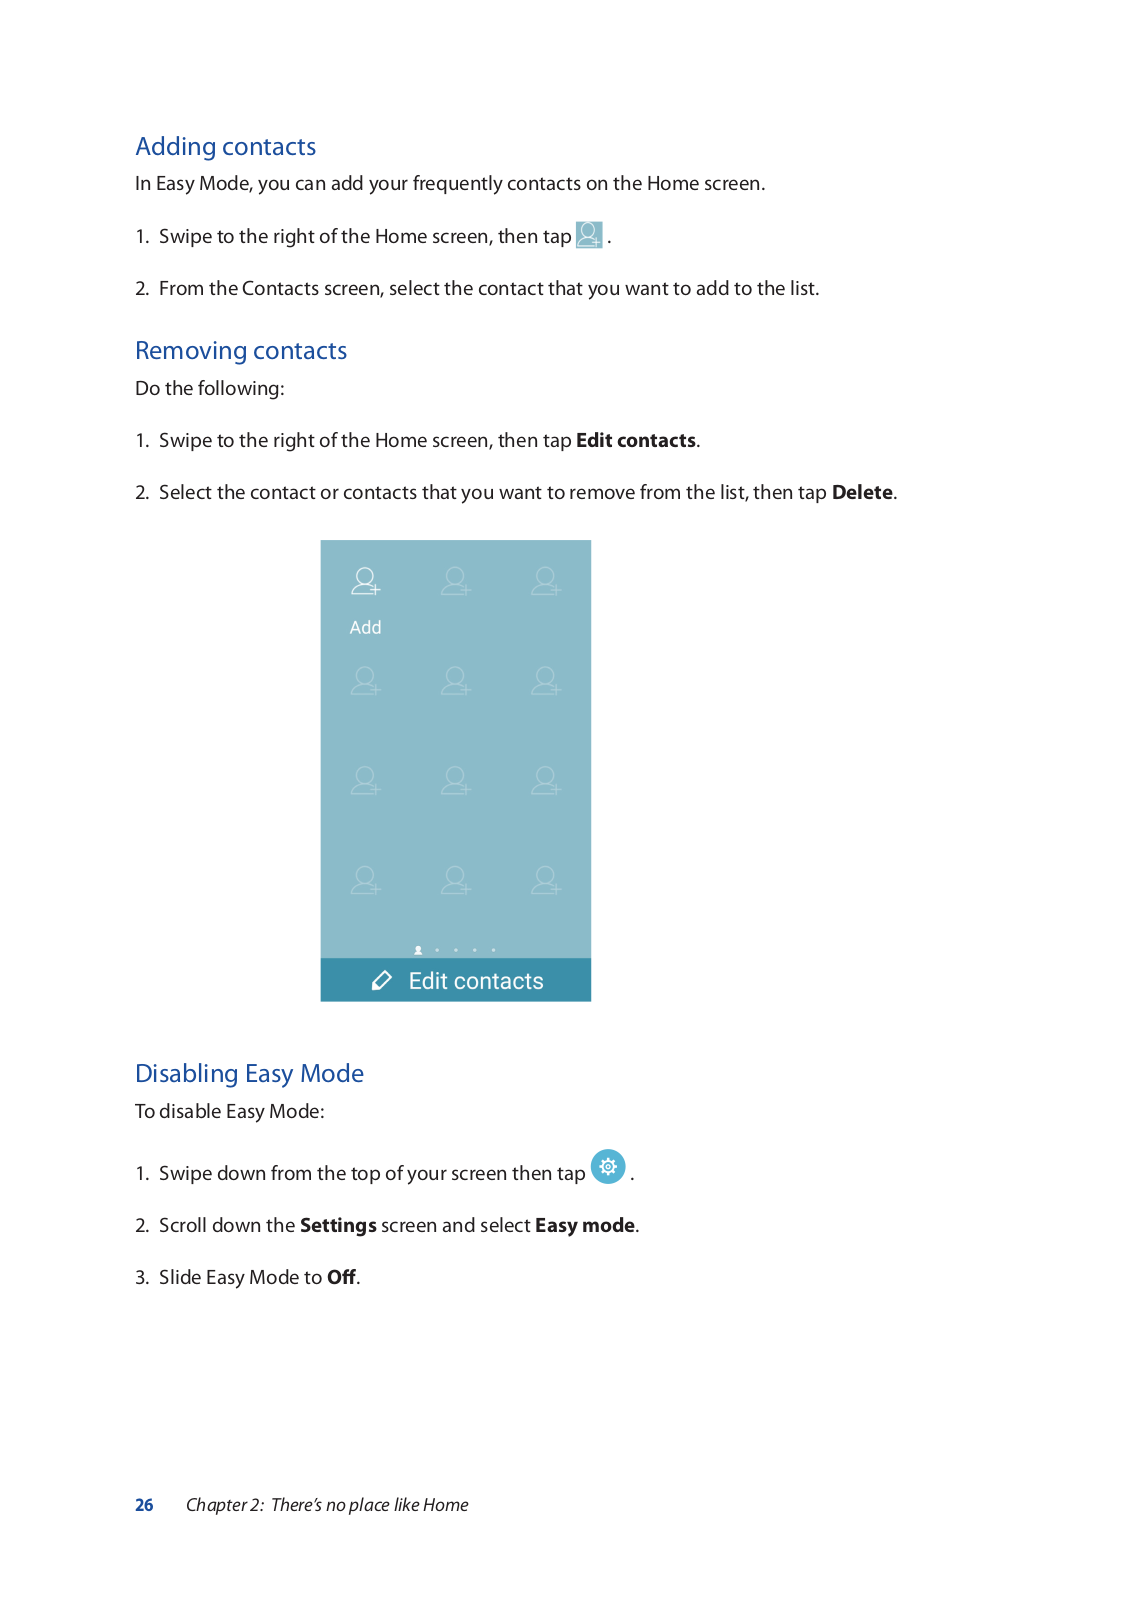
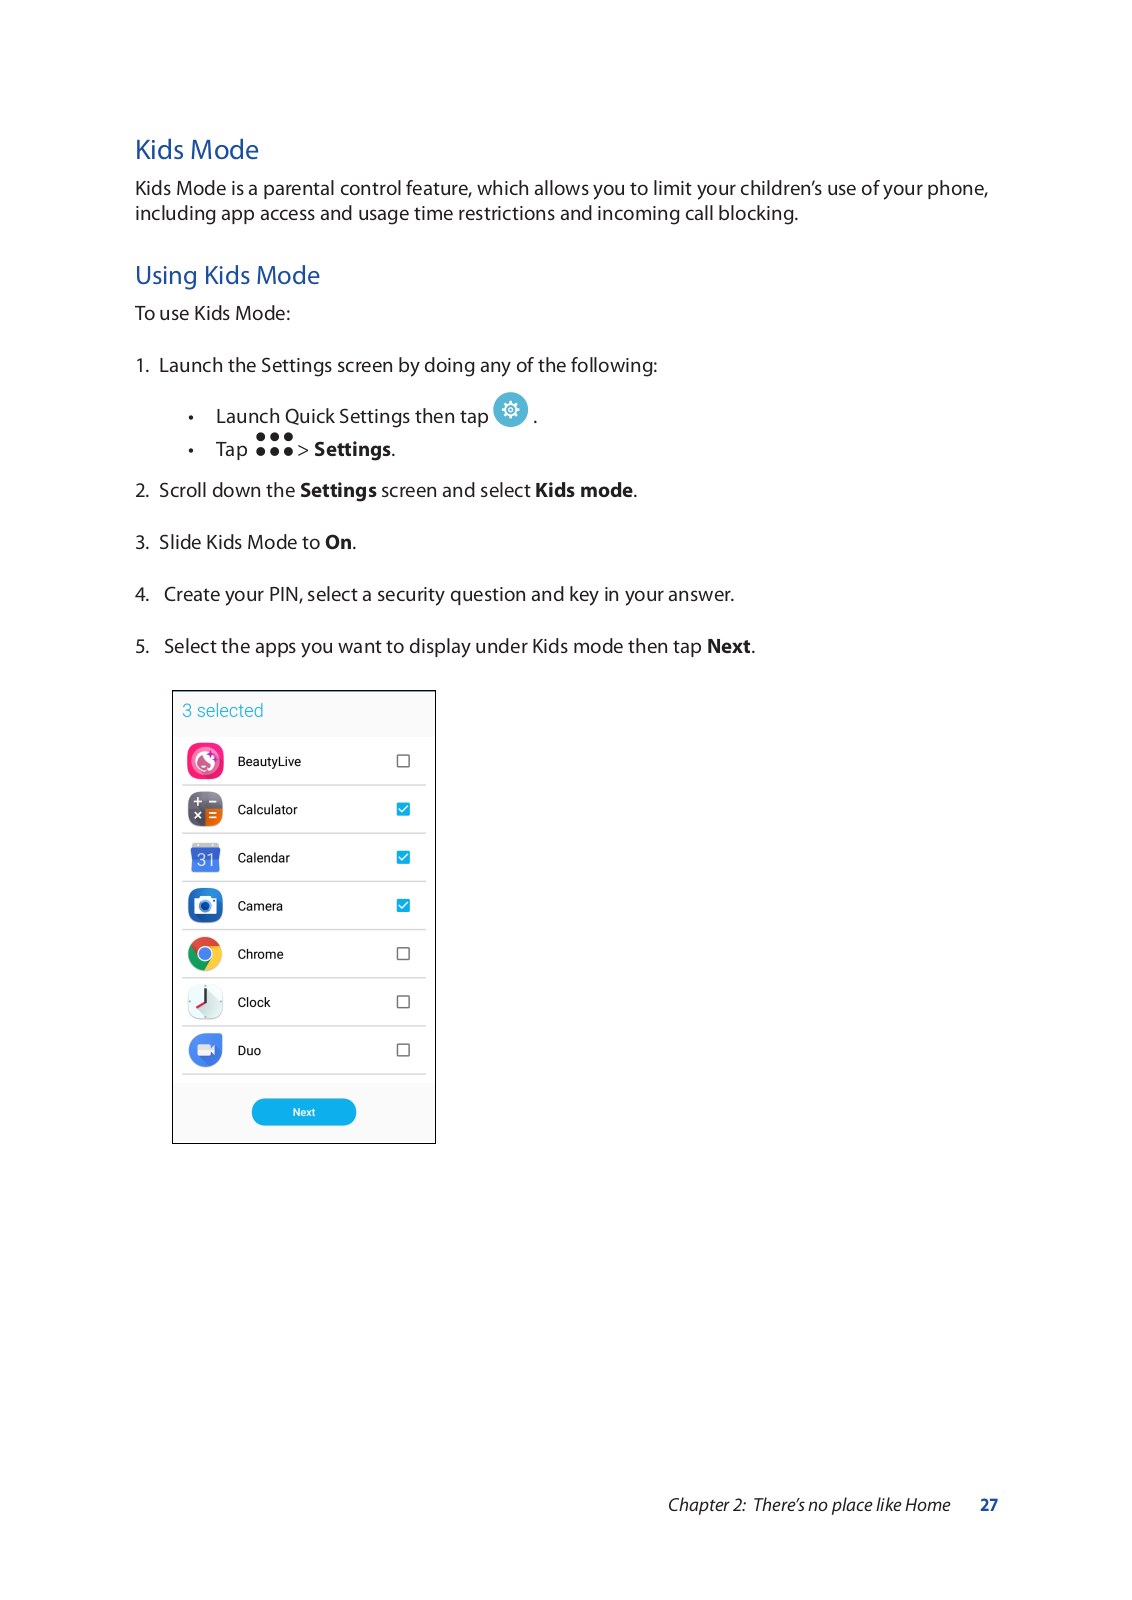
Asus ZB520KL User’s Manual

ZB520KL

User Guide

E13333

August 2017

First Edition

Care and safety

Guidelines

Road safety comes first. We strongly recommend not to use your device when driving or operating any type of vehicle.

This device should only be used in environments with ambient temperatures between 0°C (32°F) and 35°C (95°F).

Turn off your device in restricted areas where the use of mobile devices is prohibited. Always obey rules and regulations when in restricted areas, such as, in aircraft, movie theater, in hospitals or near medical equipment, near gas or fuel, construction sites, blasting sites and other areas.

Use only AC adapters and cables approved by ASUS for use with this device. Refer to the rating label on the bottom of your device and ensure that your power adapter complies with this rating.

Do not use damaged power cables, accessories, and other peripherals with your device.

Keep your device dry. Do not use or expose your device near liquids, rain, or moisture.

You can put your device through x-ray machines (such as those used in conveyor belts for airport security), but do not expose the device to magnetic detectors and wands.

The device screen is made of glass. If the glass gets broken, stop using the device and do not touch the broken glass parts. Immediately send device for repair to ASUS-qualified service personnel.

Do not listen at high volume levels for long periods to prevent possible hearing damage.

Disconnect the AC power before cleaning your device. Use only a clean cellulose sponge or chamois cloth when cleaning your device screen.

Send device for repair to ASUS-qualified service personnel only.

2

Proper disposal

Risk of explosion if battery is replaced by an incorrect type. Dispose of used batteries according to the instructions.

DO NOT throw the battery in municipal waste. The symbol of the crossed out wheeled bin indicates that the battery should not be placed in municipal waste.

DO NOT throw this product in municipal waste. This product has been designed to enable proper reuse of parts and recycling. The symbol of the crossed out wheeled bin indicates that the product (electrical, electronic equipment and mercurycontaining button cell battery) should not be placed in municipal waste. Check local regulations for disposal of electronic products.

DO NOT throw this product in fire. DO NOT short circuit the contacts. DO NOT disassemble this product.

WARNING

Cancer and Reproductive Harm-

www.P65Warnings.ca.gov

ZenTalk Fans Forum (http://www.asus.com/zentalk/global_forward.php)

NOTE: For more legal and e-labelling information, check on your device from Settings > About >

Legal information / Regulatory labels.

NOTE: The app descriptions shown in this manual are for reference purposes only, and may not exactly match what you see on your device.

3

Contents


1

Basics


Welcome!..................................................................................................................................................

7


Get your ASUS Phone ready!..............................................................................................................

8


Starting for the first time...................................................................................................................

14


Using the touchscreen.......................................................................................................................

15

2

There’s no place like Home


Zen Home features......................................................................................................

18


Home screen..........................................................................................................................................

18


Quick settings........................................................................................................................................

20


Notifications...........................................................................................................................................

21


Personalizing your Home screen................................................................................

22


App & Widgets .....................................................................................................................................

22


Wallpapers..............................................................................................................................................

23


Easy Mode...............................................................................................................................................

24


Kids Mode...............................................................................................................................................

27


Setting up the date and time...........................................................................................................

29


Setting up your ringtone and alert sounds................................................................................

29


Lock Screen..................................................................................................................

30


Customizing your lock screen.........................................................................................................

30


Customizing the quick access buttons.........................................................................................

31


Fingerprint ID sensor..................................................................................................

32


Starting your ASUS phone for the first time...............................................................................

32


Setting up fingerprint ID from Settings.......................................................................................

33


ZenUI Keyboard...........................................................................................................

34


Resizing your ZenUI keyboard........................................................................................................

34


Editing texts...........................................................................................................................................

34

3

Work hard, play harder


Chrome.........................................................................................................................

36


Launching Chrome..............................................................................................................................

36


Sharing pages........................................................................................................................................

37


Bookmarking pages............................................................................................................................

37


Clearing the browsing data..............................................................................................................

37


Gmail............................................................................................................................

38


Google Calendar..........................................................................................................

39


Creating events.....................................................................................................................................

39


Editing or removing events..............................................................................................................

39


Creating reminders..............................................................................................................................

40


Editing or removing reminders.......................................................................................................

40


File Manager................................................................................................................

41


The Cloud.....................................................................................................................

42


ASUS WebStorage................................................................................................................................

42

4

4

Keeping in touch


Call in style...................................................................................................................

43


Dual SIM feature...................................................................................................................................

43


Making calls...........................................................................................................................................

45


Receiving calls.......................................................................................................................................

47


Other call options................................................................................................................................

48


Managing multiple calls....................................................................................................................

49


Recording calls......................................................................................................................................

49


Managing contacts......................................................................................................

50


Contacts Settings.................................................................................................................................

50


Setting up your profile.......................................................................................................................

50


Adding contacts...................................................................................................................................

51


Setting up your VIPs............................................................................................................................

52


Marking your favorite contacts.......................................................................................................

54


Importing contacts..............................................................................................................................

54


Exporting contacts..............................................................................................................................

55


Social networking with your contacts..........................................................................................

56


Send messages and more...........................................................................................

57


Google Messenger...............................................................................................................................

57

5

Fun and entertainment


Using a headset...........................................................................................................

58


Connecting the audio jack................................................................................................................

58


Google Play Music.......................................................................................................

59

6

Your precious moments


Capture moments........................................................................................................

60


Launching the Camera app..............................................................................................................

60


Using the Gallery.........................................................................................................

64


Viewing files from your social network or cloud storage......................................................

64


Viewing the photo location..............................................................................................................

65


Sharing files from the Gallery..........................................................................................................

66


Deleting files from the Gallery........................................................................................................

66


Editing images......................................................................................................................................

66

7

Staying connected


Mobile network...........................................................................................................

67


Enabling the mobile network..........................................................................................................

67


Wi-Fi..............................................................................................................................

67


Enabling Wi-Fi........................................................................................................................................

67


Connecting to a Wi-Fi network........................................................................................................

68


Disabling Wi-Fi......................................................................................................................................

68


Bluetooth® ...................................................................................................................

68


Enabling Bluetooth®...........................................................................................................................

68


Pairing your ASUS Phone to a Bluetooth® device....................................................................

69


Unpairing your ASUS Phone from the Bluetooth® device.....................................................

69

5


Tethering......................................................................................................................

70


Wi-Fi Hotspot..........................................................................................................................................

70


Bluetooth Tethering............................................................................................................................

71

8

Travel and Maps


Weather........................................................................................................................

72


Launching the Weather app.............................................................................................................

72


Weather home screen........................................................................................................................

73


Clock.............................................................................................................................

74


World Clock............................................................................................................................................

74


Alarm clock.............................................................................................................................................

75


Stopwatch...............................................................................................................................................

75


Timer.........................................................................................................................................................

76

9

Zen Everywhere


Special Zen Tools.........................................................................................................

77


Calculator................................................................................................................................................

77


Sound Recorder....................................................................................................................................

78


Mobile Manager...................................................................................................................................

80


PowerMaster..........................................................................................................................................

81

10

Maintain your Zen


Keeping your device up-to-date................................................................................

82


Updating your system........................................................................................................................

82


Storage.....................................................................................................................................................

82


Backup and reset..................................................................................................................................

82


Securing your ASUS Phone..............................................................................................................

83

Appendix


Safety information......................................................................................................

86


Notices..........................................................................................................................

88

Index

6

Basics

1


Welcome!

Explore the intuitive simplicity of ASUS ZenUI!

ASUS ZenUI is a charming and intuitive interface exclusively for ASUS Phones. It provides you with special apps, which are integrated in or with other apps, to fit your unique individual needs and make your life easier while letting you have fun with your ASUS Phone.

ZenUI FAQ

Find answers from FAQs (Frequently Asked Questions) or provide your feedbacks in the user forum.

Camera

With PixelMaster technology, capture those precious moments in vivid and high-quality photos and videos.

NOTE: Availability of ASUS ZenUI apps vary per region and ASUS Phone model. Tap from your Home screen to check the apps available on your ASUS Phone.

Chapter 1: Basics

7

Get your ASUS Phone ready!

Parts and features

Take a hold of your device and have it running in a jiffy.

Audio jack


Rear cameras


Proximity sensor


Camera flash

and light sensor


Receiver


Front camera

Microphone


Camera flash


LED indicator

Nano SIM/

Volume key


microSD card


slot

Power key


Touch screen


display


Fingerprint sensor

Touch keys

Speaker

Speaker

Micro USB port

WARNING!

To avoid network connection and battery issues:

DO NOT place a metallic sticker on the antenna area.

DO NOT use a metallic protective frame/case on your ASUS Phone.

DO NOT cover the antenna area with your hands or other objects while using some functions such as making calls or using the mobile data connection.

We recommend that you use ASUS-compatible screen protectors. Using non-ASUS-compatible screen protectors may cause your ASUS Phone's sensor to malfunction.

NOTES:

The nano SIM card slots support LTE, WCDMA and GSM/GPRS/EDGE network bands.

The microSD card slot supports microSD, microSDHC and microSDXC card formats.

IMPORTANT!

We do not recommend using a screen protector as it can interfere with the proximity sensor. If you want to use a screen protector, ensure that it does not block the proximity sensor.

Keep the device, particularly the touch screen, dry all the time. Water or other liquids can cause the touch screen to malfunction.

8 Chapter 1: Basics

Installing a nano SIM card / memory card

Your nano SIM card slots support LTE, WCDMA and GSM/GPRS/EDGE network bands.

NOTE: To prevent connector damage, ensure to use a standard nano SIM card without a SIM adapter or the use of a cutter.

Your ASUS Phone supports a microSD, microSDHC and microSDXC memory card with up to 2TB capacity.

NOTES:

Some memory cards may not be compatible with your ASUS Phone. Ensure that you use only compatible memory cards to prevent loss of data, damage to your device, or memory card, or both.

The microSD card is sold separately.

CAUTION! Be extra careful when handling a nano SIM card / memory card. ASUS is not responsible for any data loss or damage incurred to your nano SIM cards / memory card.

To install a Nano SIM card / memory card:

1. Push the bundled eject pin into the hole on the card slot to eject the tray out.

CAUTION!

Be careful not to damage the card slot cover or injure your fingernails when you remove the cover.

Do not forcibly remove, shear, or distort the card slot cover.

Do not use sharp tools or solvent on your device to avoid scratches on it.

2.Insert the Nano SIM or microSD card into the appropriate slot.

3. Gently push the tray back in until it’s securely closed.

IMPORTANT! When two SIM cards are inserted, only one SIM card slot supports 4G/3G/2G service. The other SIM card slot only supports 2G/3G service.

Chapter 1: Basics

9

Removing a nano SIM /memory card

CAUTION!

Be extra careful when handling a nano SIM card / memory card. ASUS is not responsible for any data loss or damage incurred to your nano SIM cards / memory card.

Eject the memory card properly to safely remove it from device. To eject the memory card, tap

> Settings > Storage, then under Portable storage, tap beside SD card.

To remove a nano SIM card / memory card:

1. Push the bundled eject pin into the hole on the card slot to eject the tray out.

CAUTION!

Be careful not to damage the card slot cover or injure your fingernails when you remove the cover.

Do not forcibly remove, shear, or distort the card slot cover.

Do not use sharp tools or solvent on your device to avoid scratches on it.

2.Remove the nano SIM or MicroSD card from the card slot.

3. Gently push the tray back in until it’s securely closed.

10 Chapter 1: Basics

Charging your ASUS Phone

Your ASUS Phone comes partially charged but you must charge it fully before using it for the first time. Read the following important notices and cautions before charging your device.

IMPORTANT!

Peel off the protective film on the AC power adapter and micro USB cable before using it with your device.

Ensure to plug the AC power adapter to a compatible power outlet. You can plug the AC power adapter to any compatible 100~240 V outlet.

The output voltage of the AC power adapter for this device is +5V2A, 10W.

When using your ASUS Phone while plugged-in to a power outlet, the power outlet must be near your device and easily accessible.

To conserve electricity, unplug the AC power adapter from the power outlet when not in use.

Do not place heavy objects on top of your ASUS Phone.

CAUTION!

While charging, your ASUS Phone can become warm. This is normal, however, if your device becomes unusually hot, disconnect the micro USB cable from your device and send the device, including the AC power adapter and cable to an ASUS-qualified service personnel.

To prevent any damage to your ASUS Phone, AC adapter, or micro USB cable. Ensure that the micro

USB cable, AC adapter, and your device are connected properly before charging.

To charge your ASUS Phone:

1.Connect the micro USB cable to the power adapter.

2.Connect the micro USB cable to your ASUS Phone.

3.Plug the AC power adapter to a grounded power outlet.

3

2


1

Chapter 1: Basics 11

IMPORTANT!

When using your ASUS Phone while it is plugged to a power outlet, the grounded power outlet must be near to the unit and easily accessible.

When charging your ASUS Phone through your computer, ensure that you plug the micro USB cable to your computer’s USB 2.0 / USB 3.0 port.

Avoid charging your ASUS Phone in an environment with ambient temperature of above 35oC (95oF).

Charge your ASUS Phone for eight (8) hours before using it in battery mode for the first time.

The status of battery charge is indicated by the following icons:

Low

Not Charging Charging

Full


NOTES:

For safety purposes, use ONLY the bundled power adapter and cable to avoid damaging your device and prevent the risk of injury.

For safety purposes, use ONLY the bundled power adapter and cable to charge your ASUS Phone.

The input voltage range between the wall outlet and this adapter is AC 100V - 240V. The output voltage of the device is +5V2A, 10W.

4.When fully-charged, disconnect the USB cable from your ASUS Phone first before unplugging the AC power adapter from the power outlet.

NOTES:

You can use your device while charging but it may take longer to fully charge the device.

Charging your device via USB port of a computer may take longer to fully charge the device.

If your computer does not provide enough power for charging via USB port, charge your ASUS

Phone using the AC power adapter plugged to a power outlet instead.

12 Chapter 1: Basics

Turning your ASUS Phone on or off

Turning your device on

To turn your device on, press and hold the power button until your device vibrates and starts up.

Turning your device off

To turn your device off:

1.If your screen is turned off, press the power button to turn it on. If your screen is locked, unlock the device screen.

2.Press and hold the power button, then when prompted, tap Power off then tap OK.

Sleep mode

To put your device in sleep mode, press the power button once until the screen turns off.

Power key

Chapter 1: Basics 13

Starting for the first time

When you turn your ASUS Phone on for the first time, Setup Wizard will guide you through the setup process. Follow the onscreen instructions to select your language, select input methods, set up your mobile network, Wi-Fi and security features, sync accounts, and configure your location services.

Use your Google or ASUS account to set up your device, if you do not have a Google or ASUS account yet, go ahead and create one.

Google Account

Using a Google Account allows you to fully utilize these Android OS features:

Organize and see all your information from anywhere.

Automatically backup all your data.

Leverage Google services conveniently from anywhere.

ASUS Account

Having an ASUS Account gets you to enjoy the following perks:

Personalized ASUS support service and warranty extension for registered products.

Free 5 GB of Cloud storage space.

Receive the latest device and firmware updates.

Battery power conservation tips

The battery charge is the lifeline of your ASUS Phone. Here are some battery power conservation tips that helps preserve the power of your ASUS Phone battery.

Close all running apps that are not in use.

When not in use, press the power button to put the device in sleep mode.

Decrease brightness of display.

Keep the speaker volume to a low level.

Disable Wi-Fi feature.

Disable Bluetooth feature.

Disable the screen auto-rotate feature.

Disable all auto-sync features in your device.

14 Chapter 1: Basics

Using the touchscreen

Use these gestures on the touchscreen to launch apps, access some settings, and navigate your ASUS Phone.

Launching apps or selecting items

Do any of the following:

To launch an app, simply tap on it.

To select an item such as in File Manager app, simply tap on it.

Moving or deleting items

Do any of the following:

To move an app or widget, tap and hold then drag it to the location where you want it to be.

To delete an app or widget from the Home screen, tap and hold then drag it up to Remove.

Chapter 1: Basics 15

Moving through pages or screens

Do any of the following:

Swipe your finger to the left or to the right to switch between screens or to flip through a Gallery of images.

Scroll your finger up or down to go through web pages or list of items.

Zooming in

Spread apart your two fingers on the touch panel to zoom in an image in Gallery or Maps, or zoom in a web page.

16 Chapter 1: Basics

Zooming out

Bring together your two fingers on the touch panel to zoom out an image in Gallery or Maps, or zoom out of a web page.

NOTE: You may not be able to zoom in/out of some web pages as these pages may have been designed specifically to fit your mobile screen.

Chapter 1: Basics 17

There’s no place like Home

2


Zen Home features

Home screen

Get reminders of important events, app and system updates, weather forecasts, and text messages from people who really matter to you, right from your Home screen.

Swipe down this area once to display System notifications

Swipe down this area twice to display Quick settings

Tap to display Time and Weather settings

Tap to open Google Search page

Tap to open Voice Search

Tap to open All Apps screen

Tap to open an app

18 Chapter 2: There’s no place like Home

Asus ZB520KL User’s Manual

Understanding notification icons

These icons are shown on the status bar and will guide you of the current status of your ASUS Phone.

Mobile network

Shows the signal strength of your mobile network.

1Nano SIM card 1

Shows that Nano SIM card is inserted in Nano SIM card 1 slot.

2Nano SIM card 2

Shows that a Nano SIM card is inserted in Nano SIM card 2 slot.

NOTE: If the SIM card icon is displayed in green, it indicates that it is set as the preferred network.

Messages

Shows that you have an unread message.

Wi-Fi

Shows the signal strength of your Wi-Fi connection.

4G network

Shows your ASUS Phone is connected to 4G network.

Bluetooth

Shows that Bluetooth is turned on.

Battery life

Shows the battery status of your ASUS Phone.

MicroSD card

Shows that a MicroSD card is inserted in your ASUS Phone.

Screenshots

Shows that you took screenshots of your ASUS Phone.

Airplane mode

Shows that your ASUS Phone is on Airplane mode.

Wi-Fi Hotspot

Shows that Wi-Fi hotspot of your ASUS Phone is enabled.

Do not disturb

Shows that Do not disturb mode is enabled.

Vibrate mode

Shows that Vibrate mode is enabled.

Download status

Shows the download status of an app or file.

Chapter 2: There’s no place like Home 19

Quick settings

The Quick settings panel provides a one-tap access to some of the wireless features and settings of your ASUS Phone. Each of these features are represented by an icon.

To launch the Quick settings panel, swipe down twice from the top of your screen.

NOTE: A blue icon indicates that the feature is currently enabled while a gray icon indicates a disabled feature.

Slide left or right to adjust the screen’s brightness

Tap to select/deselect items to display in Quick settings

Tap to open Settings

Swipe up to switch to System notifications panel

Slide left or right to enable or disable automatic adjustment of the screen’s brightness

Tap these buttons to enable or disable their functions.

Adding features

To add features from the Quick Settings panel:

1.Launch Quick settings then tap.

2.Swipe up Drag to add tiles.

3.Under Drag to add tiles, tap and drag an icon up to add it to the Quick Settings panel.

4.Tap to go back and view the current Quick Settings panel.

Removing features

To remove existing features from the Quick Settings panel:

1.Launch Quick settings then tap.

2.Tap and drag an icon below Drag to add tiles to remove it from the Quick Settings panel.

20 Chapter 2: There’s no place like Home

Notifications

From the notifications panel, you can see the latest updates done and system changes made on your ASUS Phone. Most of these changes are data and system-related.

To launch the notifications panel, swipe down from the top of your screen.

Tap to open Settings

Tap this to delete all of the listed notifications

Swipe down to switch to the Quick Settings panel

• Swipe the notification to the left or right to remove it from the list

Tap on the notification to view its details

Chapter 2: There’s no place like Home 21

Personalizing your Home screen

Stamp your own personality on your Home screen. Select an attractive design as your wallpaper, add shortcuts for quick access to your favorite apps, and add widgets for a quick review of important info. You can also add more pages so you can add and quickly access or view more apps or widgets on your Home screen.

To launch the Manage Home screen:

Tap and hold an empty area on your Home screen

Swipe up from the bottom of your Home screen

App & Widgets

App shortcuts make it easier to quickly-access your often-used or favorite apps from your Home screen. You can add, remove, or group your apps into one folder.

You can put widgets, which are small dynamic apps, on your Home screen. Widgets provide you with quick-views of the weather forecast, calendar events information, battery status, and more.

Adding app shortcuts or widgets

To add an app shortcut or a widget:

1.Tap and hold an empty area on your Home screen and select Apps & Widgets.

2.From the All Apps list or the Widgets screen, tap and hold an app or a widget, then drag it to an empty area on your Home screen.

Removing app shortcuts or widgets

From your Home screen, tap and hold an app or widget, then drag it to Remove on top of your screen. The app that you’ve removed from your Home screen will remain in the All Apps screen.

22 Chapter 2: There’s no place like Home

Wallpapers

Let your apps, icons, and other Zen elements sit on an attractively designed wallpaper. You may add a translucent background tint to your wallpaper for readability and clarity. You can also select an animated wallpaper to make your screen come alive.

Tap to select where you want to apply the wallpaper

Tap to select a wallpaper

Tap to select an image from Gallery

Tap to view the online wallpapers

Applying wallpaper

To apply wallpaper:

1.Tap and hold an empty area on your Home screen and select Wallpapers.

2.Select to set wallpaper to Home screen, Lock screen or Home and lock screen.

3.Select a wallpaper, then tap Apply.

Applying an animated wallpaper

To apply an animated wallpaper:

1.Tap and hold an empty area on your Home screen and select Wallpapers.

2.Tap Live Wallpaper.

3.Select an animated wallpaper, then tap Set Wallpaper.

NOTE: You can also set up your wallpaper settings from > Settings > Display > Wallpaper.

Chapter 2: There’s no place like Home 23

Editing your Home screen

You can extend your Home screen, select a scroll effect, change the icon and font, adjust the size and color of the icon and font, and align the icons to the top or bottom of your screen.

1.Tap and hold an empty area on your Home screen and select Home edit.

2.Tap a feature to edit your Home screen.

Easy Mode

Navigate your ASUS Phone better with Easy Mode, an intuitive interface with large icons, buttons, and font size for better readability and easier user experience. You can also quickly do your core tasks such as making calls, sending messages, and more in Easy Mode.

Enabling Easy Mode

To enable Easy Mode:

1. Launch the Settings screen by doing any of the following:

•• Launch Quick Settings then tap .

•• Tap > Settings.

2.Scroll down the Settings screen and select Easy mode.

3.Slide Easy Mode to On.

24 Chapter 2: There’s no place like Home

Adding shortcuts

In Easy Mode, you can add up to thirty-six (36) app shortcuts on the Home screen.

1.Swipe to the left of the Home screen, then tap .

2.From the All apps screen, select the app that you want to add to the list.

Removing shortcuts

Do the following:

1.Tap .

2.Select the app or apps that you want to remove from the list, then tap Delete.

Chapter 2: There’s no place like Home 25

Adding contacts

In Easy Mode, you can add your frequently contacts on the Home screen.

1.Swipe to the right of the Home screen, then tap .

2.From the Contacts screen, select the contact that you want to add to the list.

Removing contacts

Do the following:

1.Swipe to the right of the Home screen, then tap Edit contacts.

2.Select the contact or contacts that you want to remove from the list, then tap Delete.

Disabling Easy Mode

To disable Easy Mode:

1.Swipe down from the top of your screen then tap .

2.Scroll down the Settings screen and select Easy mode.

3.Slide Easy Mode to Off.

26 Chapter 2: There’s no place like Home

Kids Mode

Kids Mode is a parental control feature, which allows you to limit your children’s use of your phone, including app access and usage time restrictions and incoming call blocking.

Using Kids Mode

To use Kids Mode:

1. Launch the Settings screen by doing any of the following:

•• Launch Quick Settings then tap .

•• Tap > Settings.

2.Scroll down the Settings screen and select Kids mode.

3.Slide Kids Mode to On.

4.Create your PIN, select a security question and key in your answer.

5.Select the apps you want to display under Kids mode then tap Next.

Chapter 2: There’s no place like Home 27

6. Configure the incoming call settings then tap Finish.

7.Tap to configure more settings for Kids mode.

8.Tap to disable Kids mode.

28 Chapter 2: There’s no place like Home

Loading...
+ 65 hidden pages