

Page 1

U7062
First Edition V1
Jan. 2012
Xonar Phoebus
PCI Express 7.1-Channel
Gaming Soundcard
Quick Start Guide
U7062_Xonar-Phoebus_QSG.indb 1 18.01.2012 16:12:15 Uhr
Page 2

Table of content
English ............................................................................................... 1
Français ............................................................................................. 18
Deutsch ............................................................................................. 33
Italiano ............................................................................................. 48
Español ............................................................................................. 63
Português .......................................................................................... 78
Pyccкий
............................................................................................ 93
Türkçe ........................................................................................... 108
U7062_Xonar-Phoebus_QSG.indb 2 18.01.2012 16:12:15 Uhr
Page 3

3
ASUS Xonar Phoebus Quick Start Guide
English
1. Introduction
1.1 System requirements
Before installing the Xonar Phoebus audio card, ensure that your computer must meet
the following requirements:
• One PCI Express 1.0 (or higher) compatible slot for the audio card
• 6-pin peripheral power cable connector from your computer’s power supply unit
(PSU)
• Microsoft® Windows® Vista / 7 (32/64bit) / XP (32/64bit) / MCE2005
• Intel® Pentium® 4 1.4GHz or AMD Athlon 1400 CPU or faster CPU
• More than 256 MB system memory
• More than 60 MB available storage space for driver installation
• CD-ROM drive (or DVD-ROM drive) for software installation
• High-quality headphones, powered analog speakers, or a Dolby Digital decoder, to
enjoy the audio card’s high delity sound
1.2 Package contents
Check your ASUS Xonar Phoebus audio card package for the following items:
• ASUS XonarTM Phoebus 7.1 Channel PCI Express Audio Card
• Phoebus Control Box
• Driver CD
• S/PDIF TOSLINK optical adapter x 1
• ATX 4P-to- 6P power cable x 1
• Quick Start Guide
U7062_Xonar-Phoebus_QSG.indb 3 18.01.2012 16:12:16 Uhr
Page 4
4
ASUS Xonar Phoebus Quick Start Guide
English
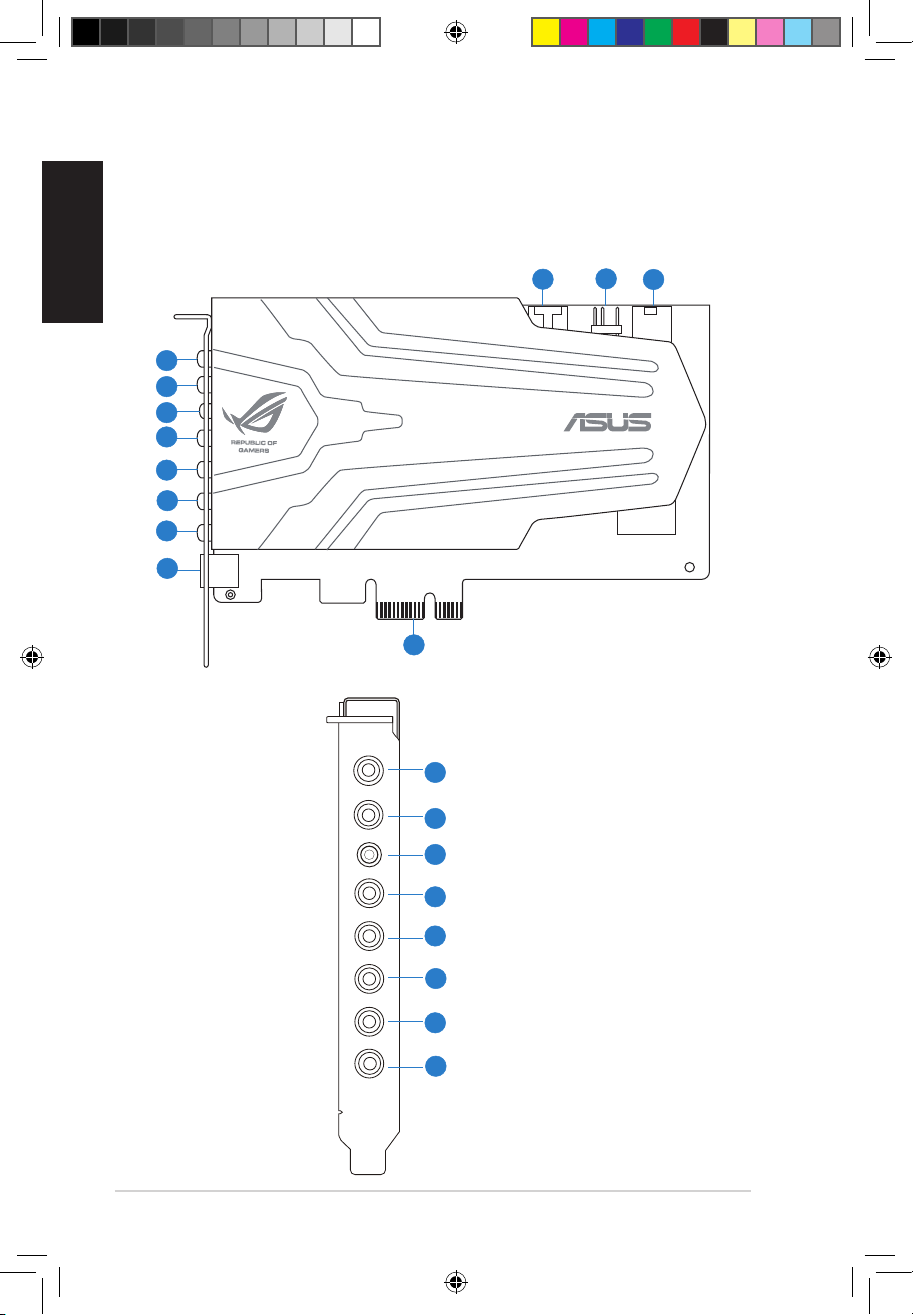
2. Hardware
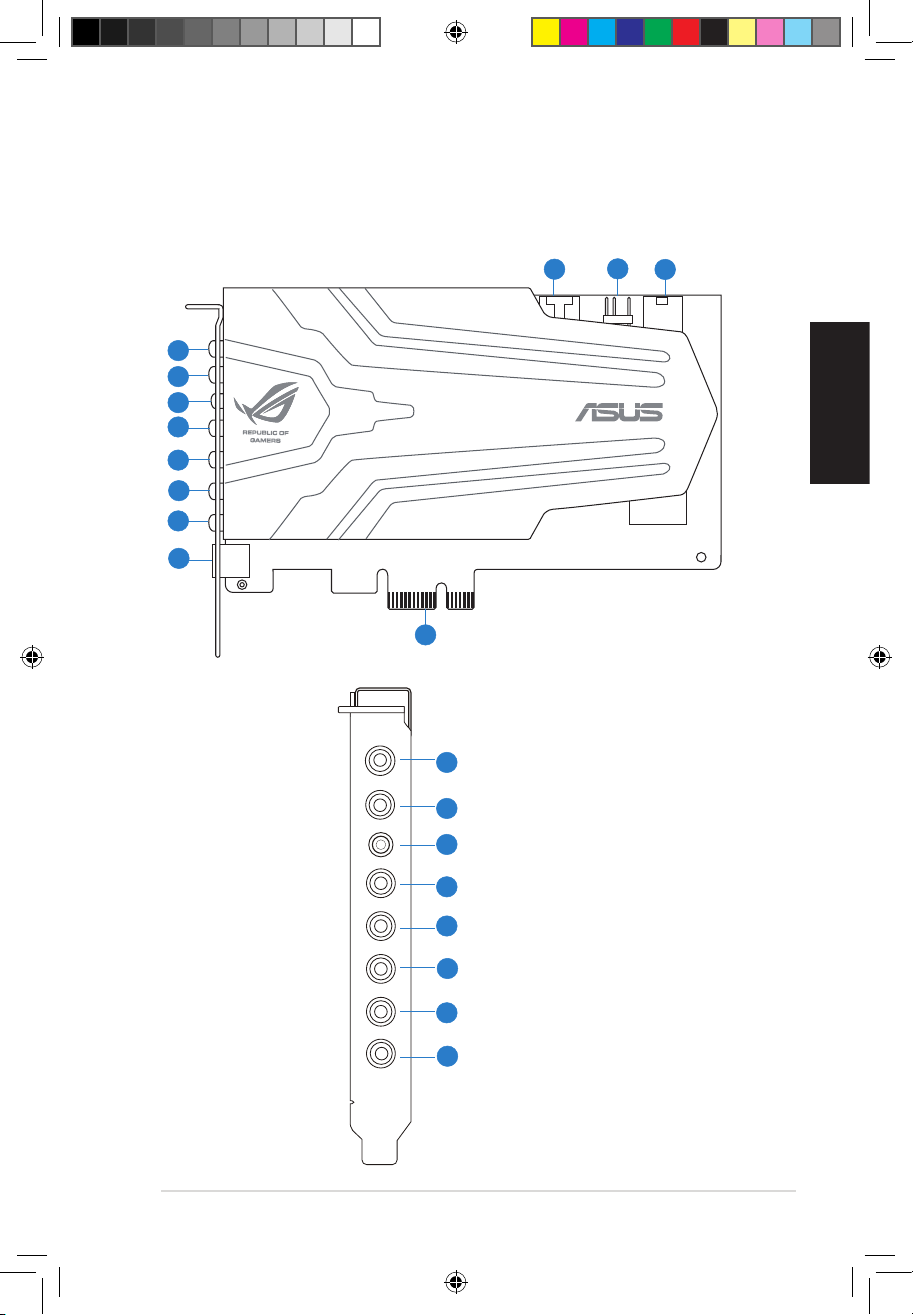
2.1 Xonar Phoebus Audio Processing Card
Mic in
HP out
Box link
Line in
Front
Ctr / Sbw
Rear
Side /
SPDIF out
1
2
3
4
5
6
7
8
1
2
3
4
5
6
7
8
9
10
11
12
U7062_Xonar-Phoebus_QSG.indb 4 18.01.2012 16:12:18 Uhr
Page 5
5
ASUS Xonar Phoebus Quick Start Guide
English
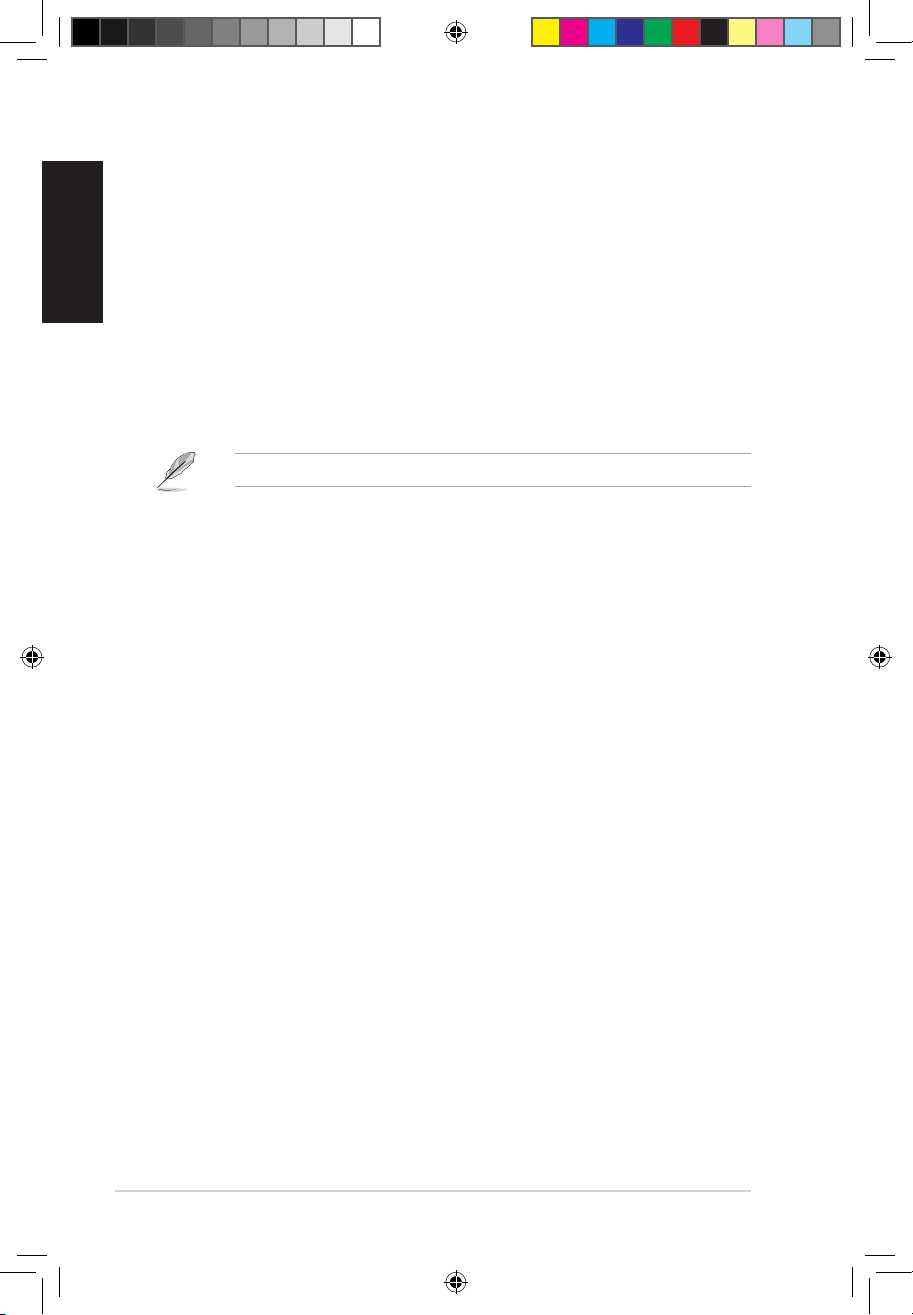
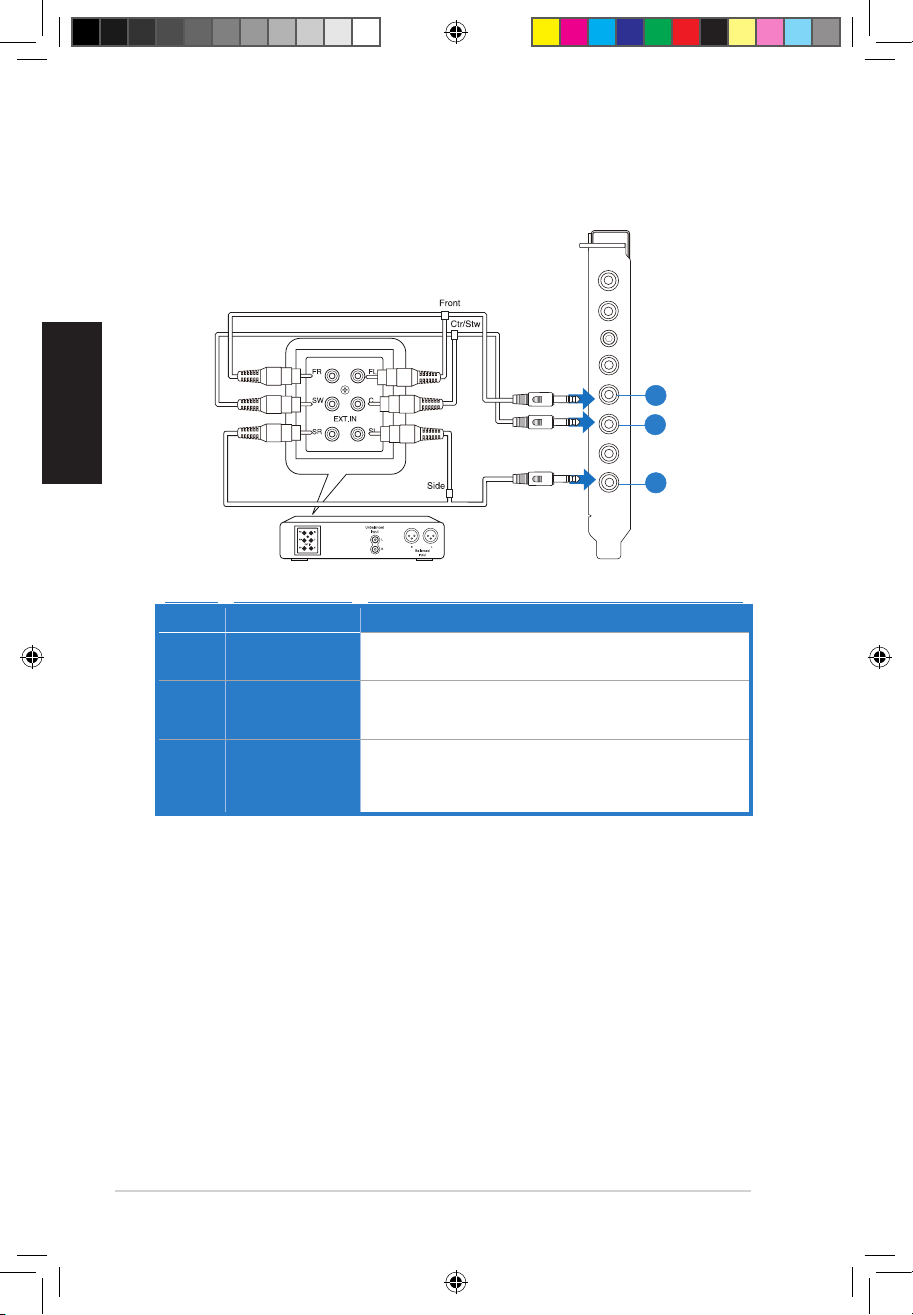
No Item Description
1 Microphone In port
Connect your external PC microphone to this 3.5mm port
for voice input. Built-in high-quality Microphone preamplier.
2
Headphone Out
port
Connect your headphone to this port.
3 Box Link
Connect the Xonar Phoebus Control Box to this 2.5mm
port.
4 Line In port
Connect analog devices like MP3 players, CD players, music
synthesizers, and other line-level sound sources to this
3.5mm port for audio recording or processing.
5 Front Out port
For 2 channel speaker systems, connects to the front
left/right input on the powered speakers.
6
Center/Subwoofer
Out port
Connect to the center/subwoofer input on 5.1/7.1 powered
analog speakers.
7 Rear Out port
Connect to the back surround input on 7.1 powered analog
speakers.
8
S/PDIF Out/Side
Out port
Digital output port. Connect to an external digital decoder
or digital speaker systems, Home Theater systems, AV
receivers for outputting digital audio including PCM,
Dolby Digital, DTS, WMA-Pro, etc. Connect to the surround
channel input on 5.1 powered analog speakers.
9 Aux Input Header
4-pin header. Usually connects to the Analog Audio output
of TV tuner card or other sound source inside your PC
system. (To monitor your TV tuner card’s audio from this
Aux-In, you must enable the “monitor” function for Aux-In
in the Xonar Audio Center software’s recording mixer.)
10 S/PDIF Out Header
Connect to the graphics card with HDMI support.
11 Power Connector
Connect to the 6-pin power cable of your power supply
unit.
12
PCI Express Bus
Golden Fingers
Insert into the PCI Express slot on your motherboard.
U7062_Xonar-Phoebus_QSG.indb 5 18.01.2012 16:12:19 Uhr
Page 6
6
ASUS Xonar Phoebus Quick Start Guide
English
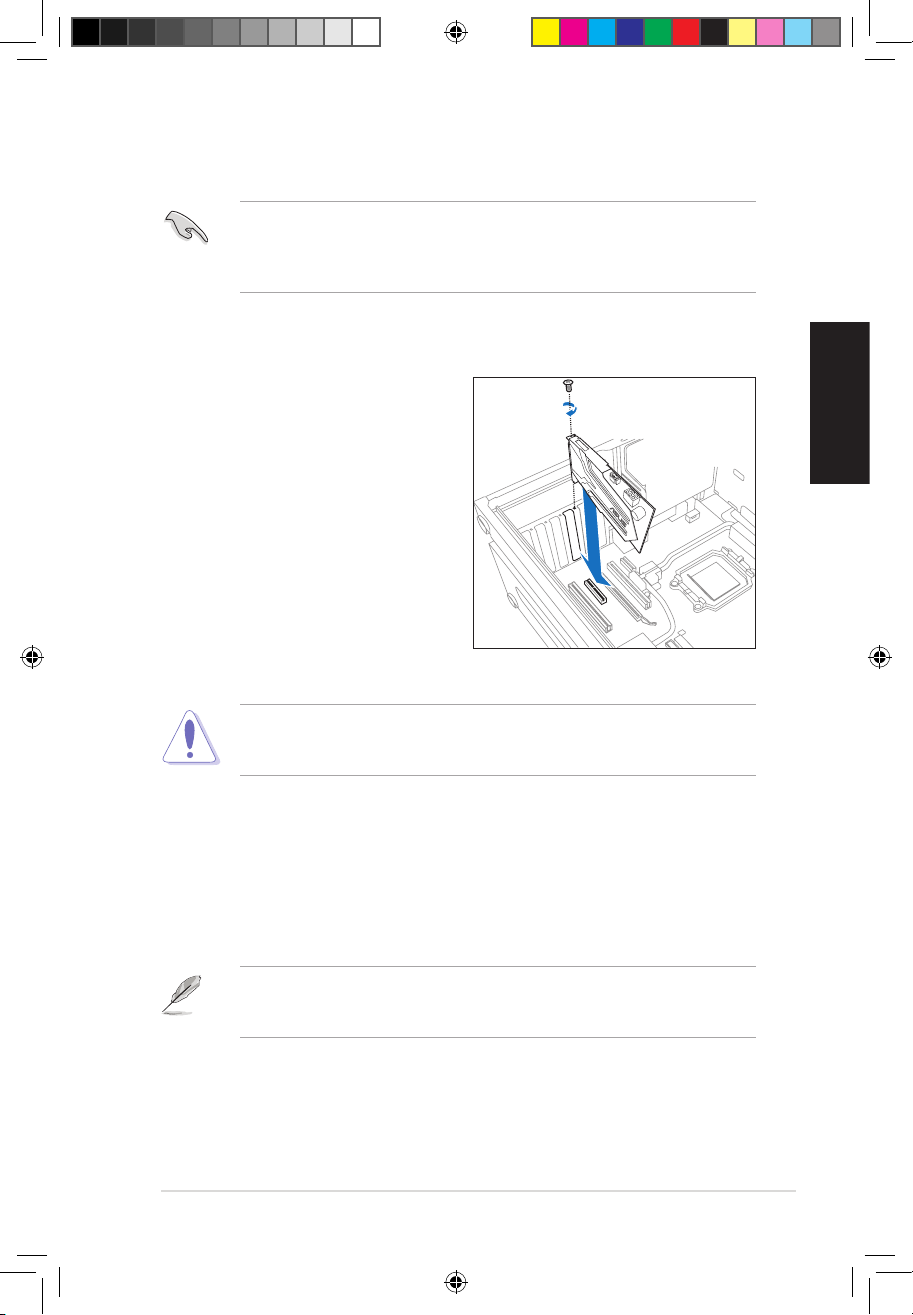
2.1 Card Installation
Before you proceed with the following installation steps, it’s recommended that you
disable your onboard audio device in your BIOS settings, or uninstall any other sound
cards on your PC. (For BIOS setting or uninstallation of other sound cards, please refer
to the user manuals of your motherboard and sound card)
The PCI Express high-quality audio card requires additional power from your
computer. If the power cable is not connected properly, the audio card will not work
at all.
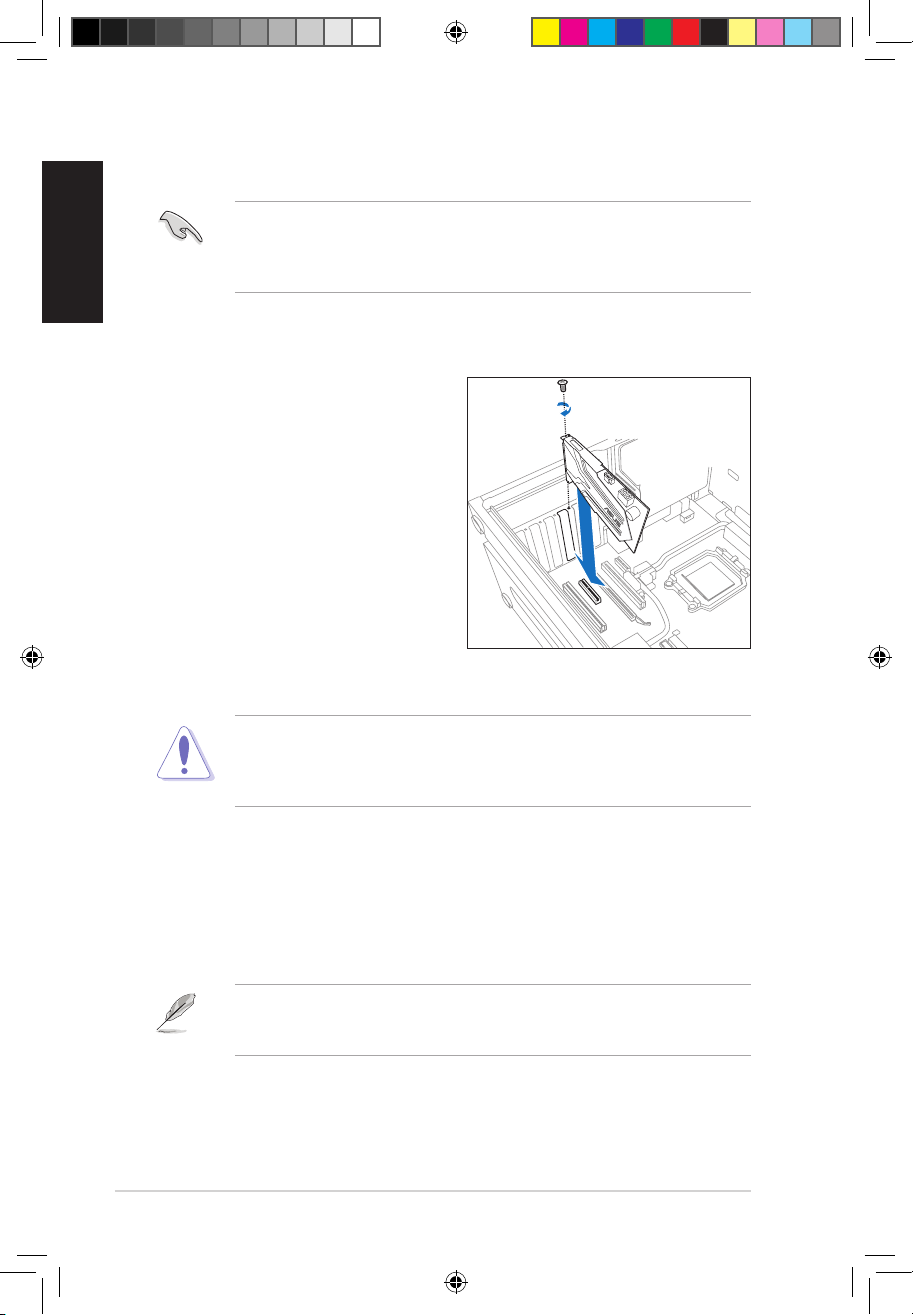
2.1.1 Installing the Xonar Phoebus Card
To install the Xonar Phoebus audio card:
1. Power OFF the computer, the monitor,
and all other peripheral devices
connected to your computer.
2. Unplug the computer power cord from
your computer and power outlet.
3. Touch the metal back or side panel of
the computer to avoid static electricity.
4. Remove the chassis cover.
5. Remove the metal bracket from
an available PCIE slot for the Xonar
Phoebus audio card.
6. Carefully insert the audio card into the PCIE slot. Ensure the audio card sits
properly in place.
Do not force the audio card into the slot. Make sure that the gold pins of the card’s
PCI Express connector are aligned with the motherboard’s PCI Express connector
before you insert the card into the PCI Express slot. If it does not t properly, gently
remove it and try again.
7. Secure the audio card with screws and the metal bracket.
8. Put back the chassis cover.
9. Reconnect all cables.
10. Plug the power cord to the computer and to a power outlet.
11. Power ON the computer.
U7062_Xonar-Phoebus_QSG.indb 6 18.01.2012 16:12:22 Uhr
Page 7
7
ASUS Xonar Phoebus Quick Start Guide
English
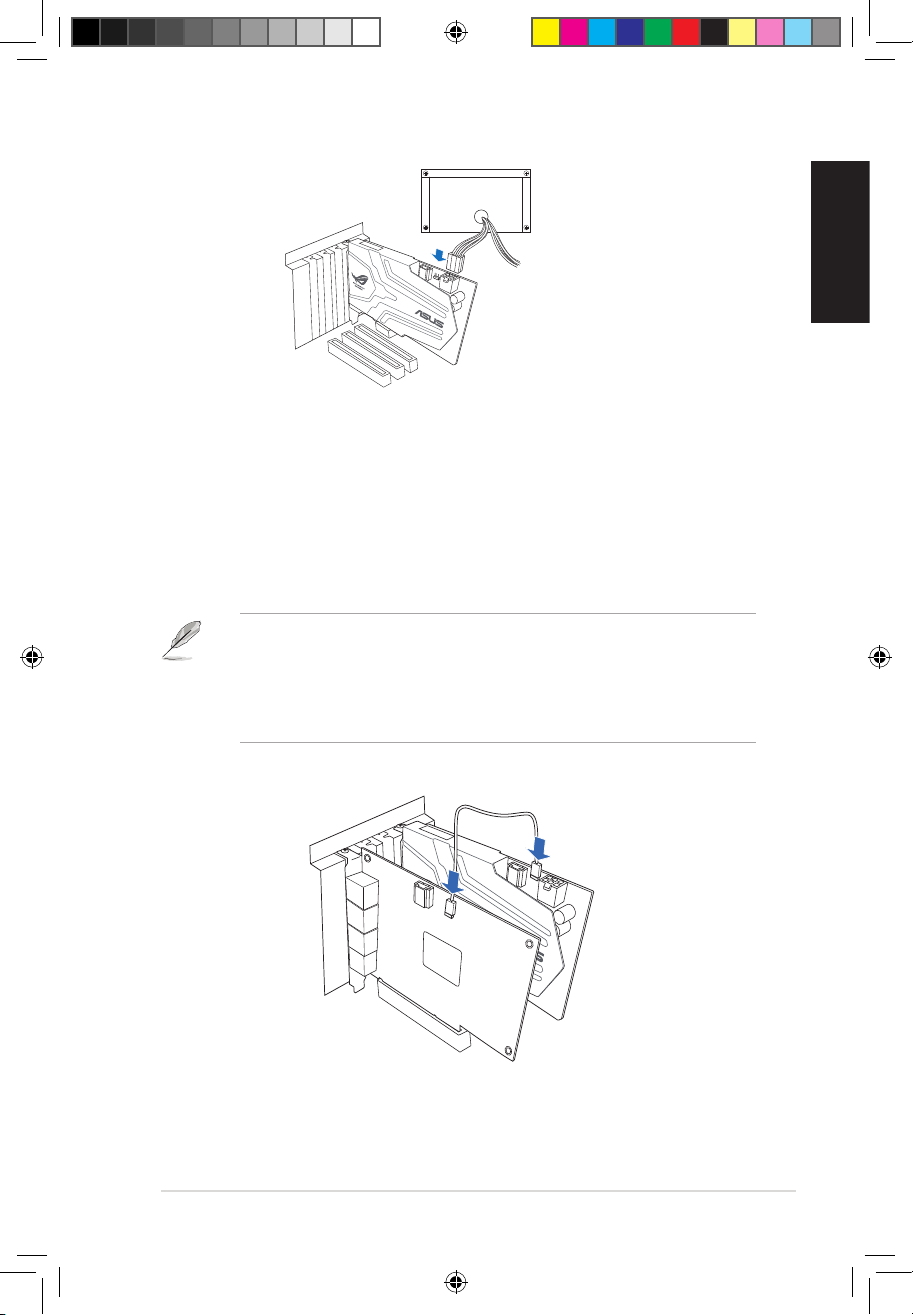
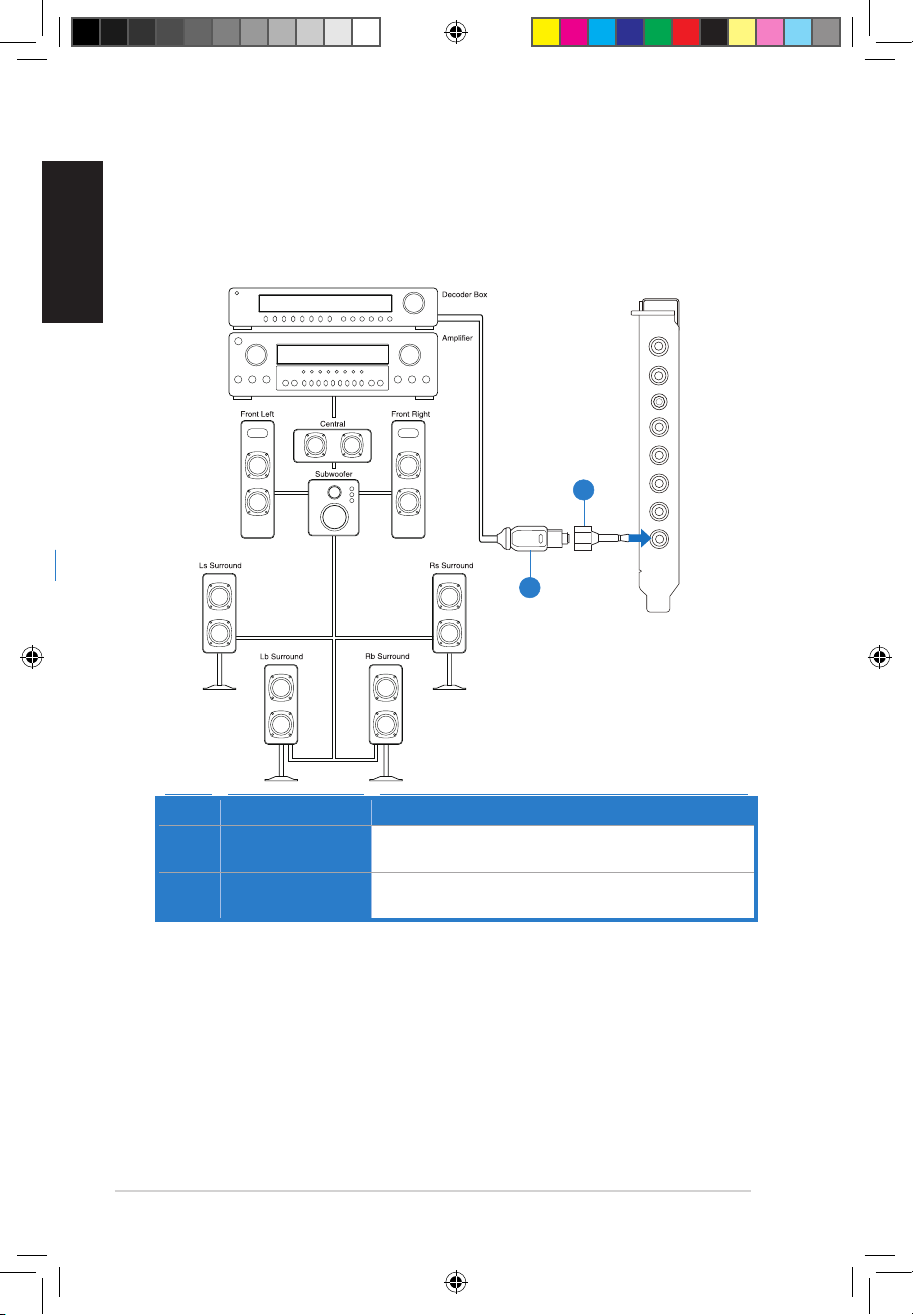
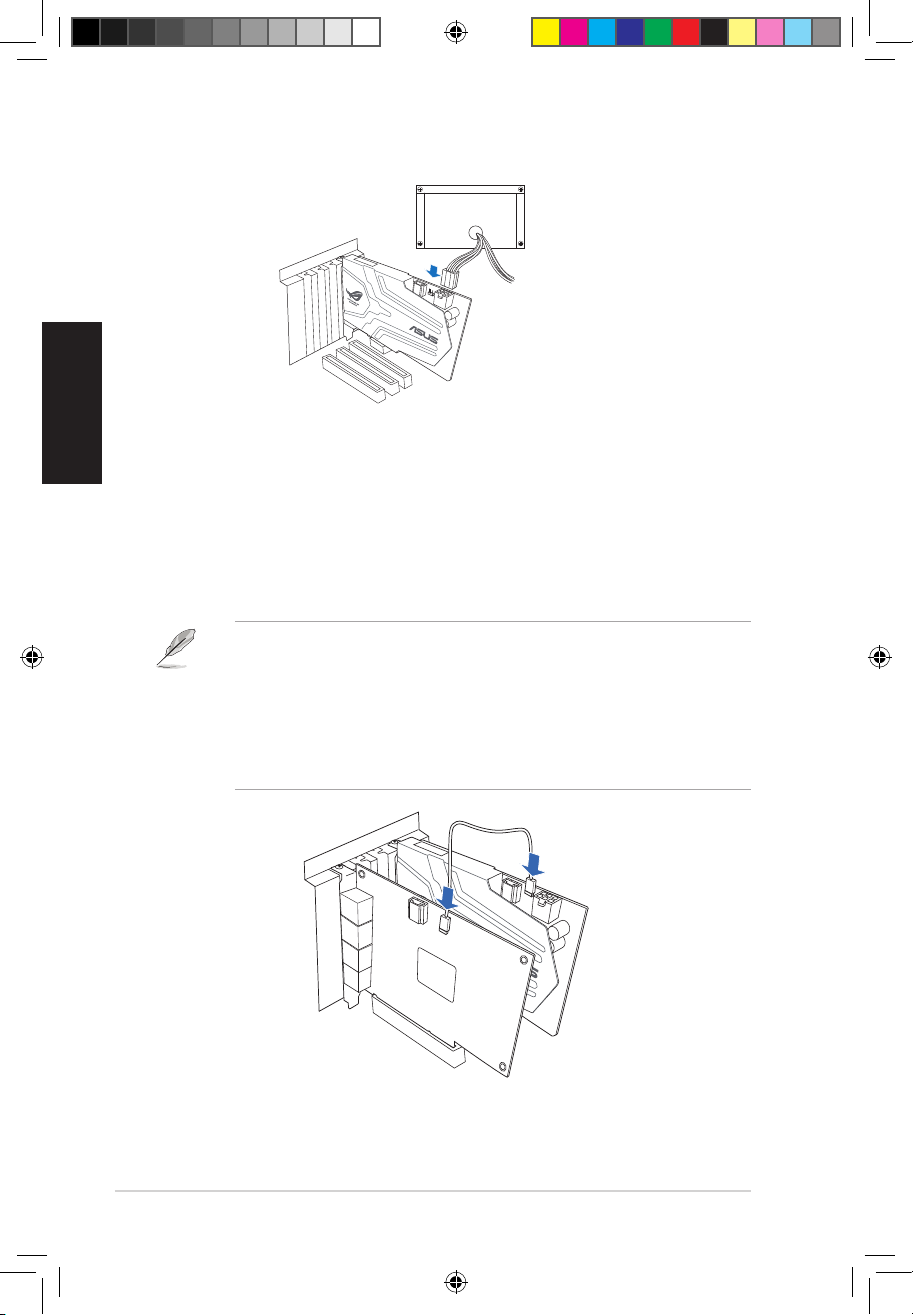
2.1.2 Connecting the TV Tuner Card
If you have a traditional PCI or PCI Express TV tuner card on your computer, you may
need to connect it to the audio card to send the tuner card’s sound to your computer’s
speakers.
1. Secure the PCI/PCI Express TV tuner card and screw it into the back panel.
2. Connect the audio output header from the TV tuner card to the Aux-In header of
the audio card, as shown in the gure below.
For optimum TV audio quality, Xonar uses ADC recording to digitize the signal and
loops it back to DAC playback. Please select Aux-In as the recording source in the
Xonar Audio Center’s recording mixer and enable the monitoring button to pass this
signal to the audio output. Using this setup, you can even turn on sound eects such
as Pro-Logic IIx to expand the stereo TV audio to 5.1 or 7.1 channel surround sound.
TV audio on your PC will become even better than on your TV set!
U7062_Xonar-Phoebus_QSG.indb 7 18.01.2012 16:12:23 Uhr
Page 8
8
ASUS Xonar Phoebus Quick Start Guide
English
3. Driver Installation
3.1 Installing the Xonar Phoebus Card Driver
To install the Xonar Phoebus card driver:
1. After you have installed the Xonar Phoebus card, turn on your computer. Windows®
automatically detects the audio card and searches for device drivers. When
prompted for the audio drivers, click Cancel.
2. Insert the Support CD into the optical drive. If Windows® Autorun is enabled
in your system, the setup starts automatically. If not, run setup.exe from your
support CD.
3. Follow the onscreen instructions to nish the installation.
The version and content of the support CD are subject to change without notice.
3.2 Uninstalling or Reinstalling the Xonar Phoebus Card
Driver
3.2.1 Uninstalling the Xonar Phoebus Card Driver
To uninstall the Xonar Phoebus card driver:
1. Click Start -> Settings -> Control Panel.
2. Double-click the Add/Remove Programs icon.
3. Click the Change or Remove Programs button.
4. Select each program you would like to remove, and then click the Add/Remove
(or Change/Remove) button.
5. In the InstallShield Wizard dialog box, select the Remove option.
6. Restart your computer when prompted.
3.2.2 Reinstalling the Xonar Phoebus Card Driver
To reinstall the Xonar Phoebus card driver:
1. Before reinstalling any software, it’s recommended to uninstall the existing
software rst.
2. After nishing the uninstallation of the software, please follow the installation
process again to reinstall the same or updated software.
U7062_Xonar-Phoebus_QSG.indb 8 18.01.2012 16:12:23 Uhr
Page 9
9
ASUS Xonar Phoebus Quick Start Guide
English
4. Connecting Speakers and Peripherals
4.1 Connecting Phoebus Box
4.1.1 Connecting Phoebus Box
4.1.2 Connecting Phoebus Control Box with external headphone and
microphone
No Item Description
1 Microphone In
Port
Connect the microphone’s 3.5mm plug from the Phoebus
Control Box into this Mic-In port for voice communication,
recording or karaoke.
2 Headphone Port
The headphone port has a built-in high-quality amplier
to drive headphones. Connect the Phoebus Control box
directly to this port.
3 Box Link Port
Connect Phoebus Control box directly to this port.
No Item Description
1 Headphone Port
Connect the headphone to the headphone port on the
Phoebus Control box.
2 Microphone In
Port
Connect the microphone’s 3.5mm plug to the Mic-In port
on the Phoebus Control Box.
Mic in
HP out
Box link
Line in
Front
Ctr / Sbw
Rear
Side /
SPDIF out
1
2
3
Mic In
Headphone Out
1
2
U7062_Xonar-Phoebus_QSG.indb 9 18.01.2012 16:12:26 Uhr
Page 10
10
ASUS Xonar Phoebus Quick Start Guide
English
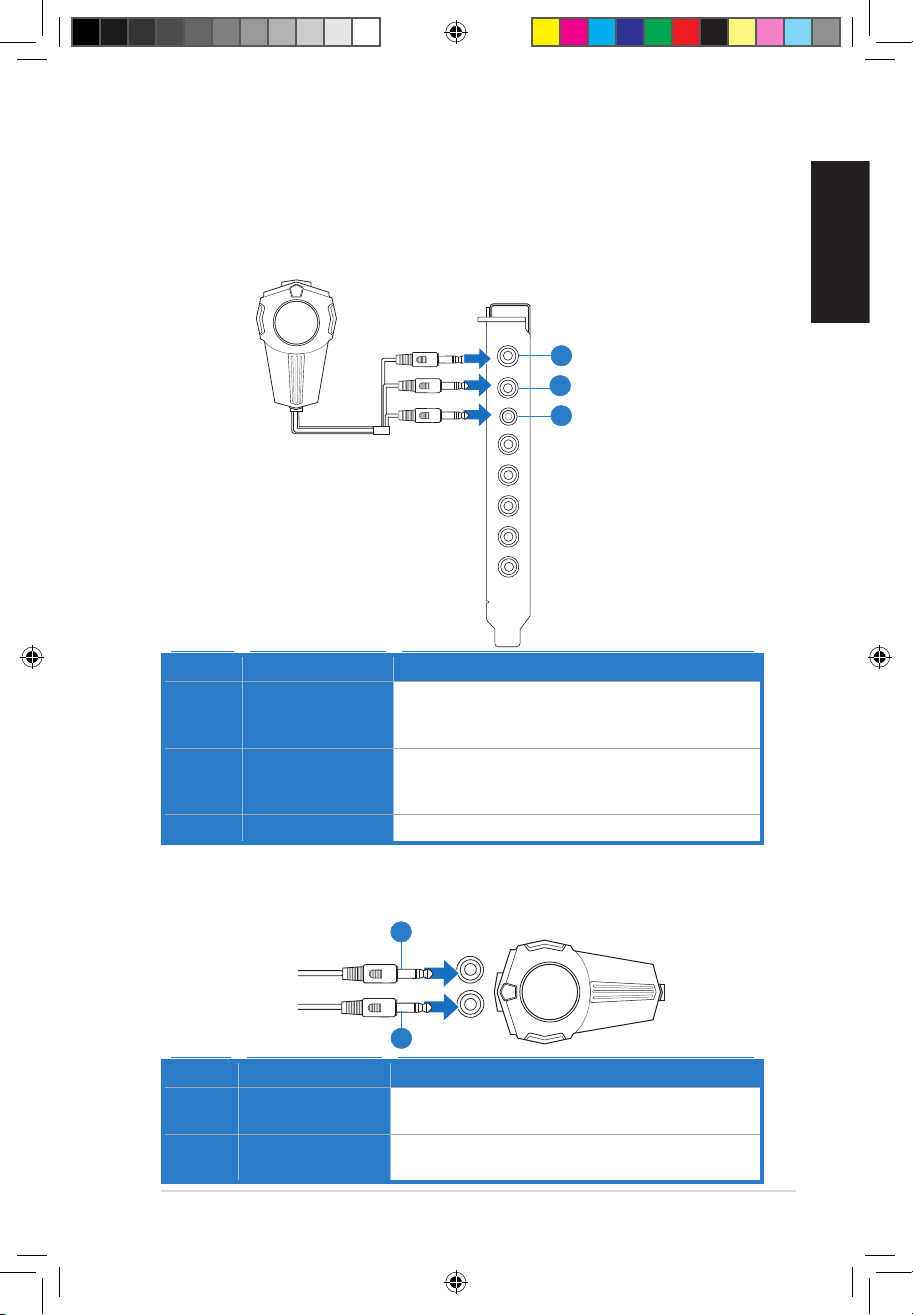
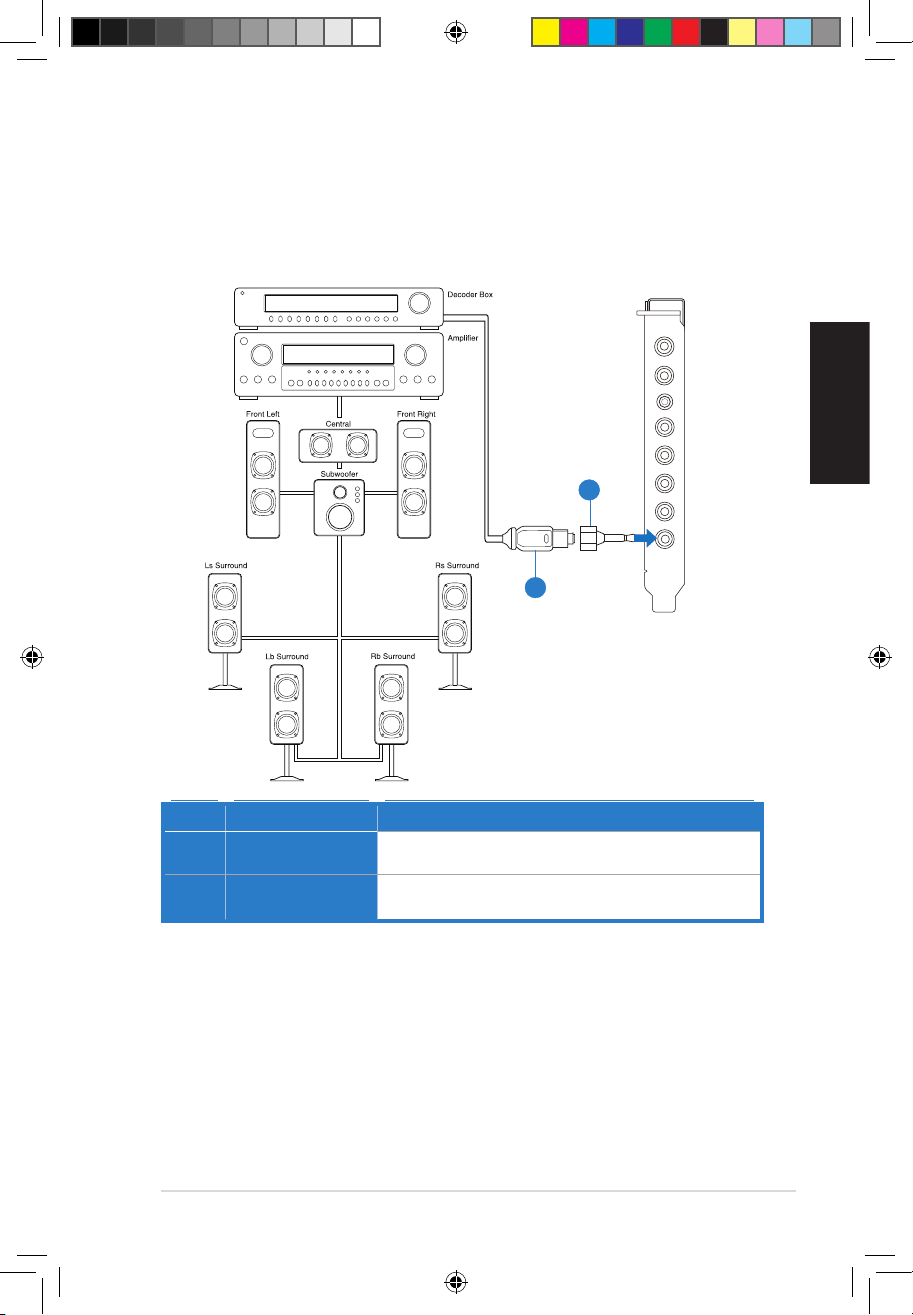
4.1.3 Connecting Digital Speaker Systems (Home Theater)
Xonar Phoebus makes playback through your home theater system possible, creating
an impressive surround sound experience. A single digital cable connection can carry
high-quality digital audio from any of your PC audio sources to any digital speakers or
AV Receivers.
No Item Description
1 Optical adapter
Plug the optical TOSLINK adapter into the S/PDIF-Out
connector.
2 Optical cable
Connect your decoder’s S/PDIF-In port to the optical adapter
with the TOSLINK optical cable
Mic in
HP out
Box link
Line in
Front
Ctr / Sbw
Rear
Side /
SPDIF out
2
1
U7062_Xonar-Phoebus_QSG.indb 10 18.01.2012 16:12:28 Uhr
Page 11

11
ASUS Xonar Phoebus Quick Start Guide
English
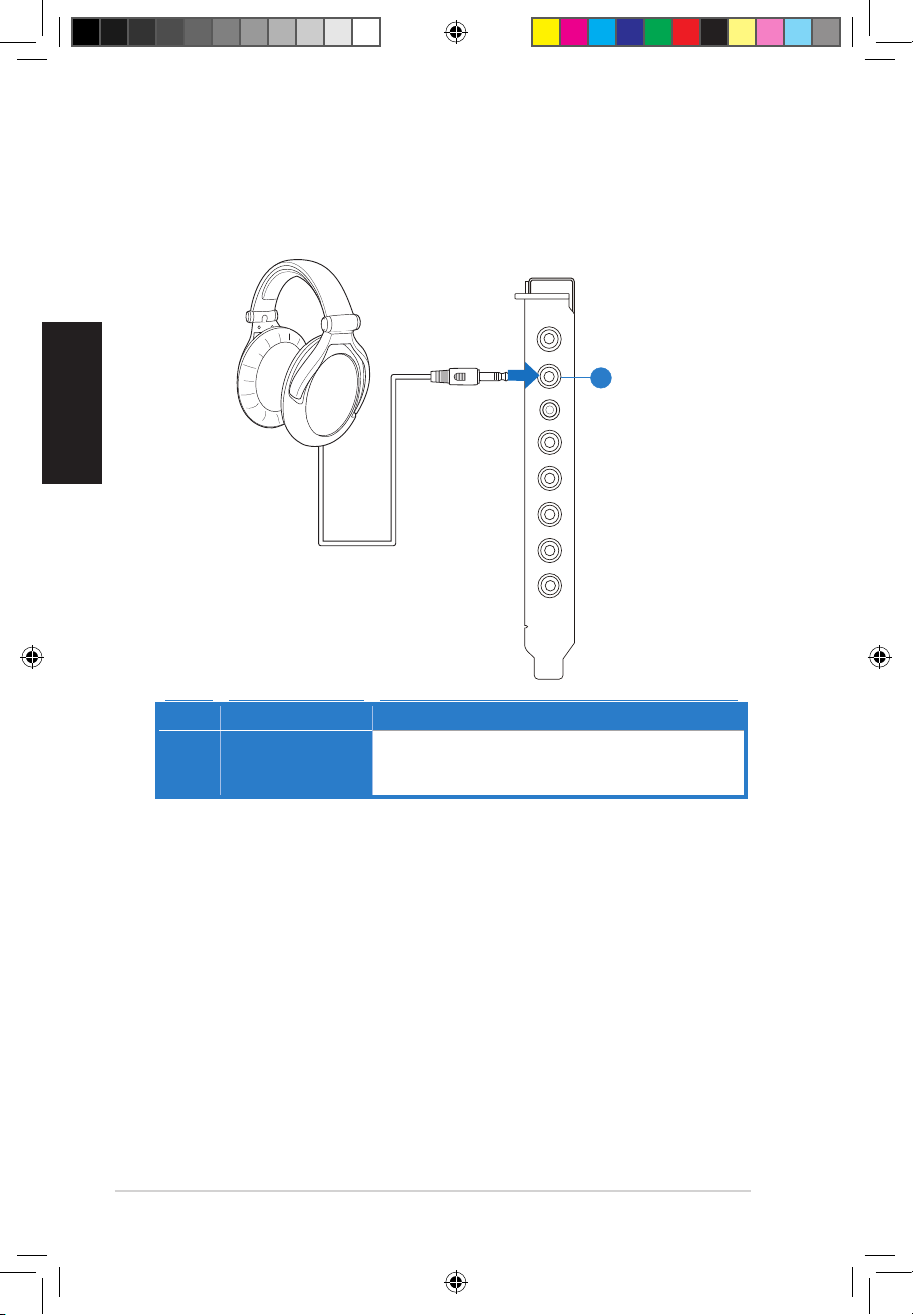
4.1.4 Connecting stereo headphones
Connecting stereo hadphones
Mic in
HP out
Box link
Line in
Front
Ctr / Sbw
Rear
Side /
SPDIF out
No Item Description
1 Headphone Out
Port
The Headphone Out Port has a built-in high-quality
amplier to drive headphones. Please connect your stereo
headphones directly to this jack.
1
U7062_Xonar-Phoebus_QSG.indb 11 18.01.2012 16:12:29 Uhr
Page 12
12
ASUS Xonar Phoebus Quick Start Guide
English
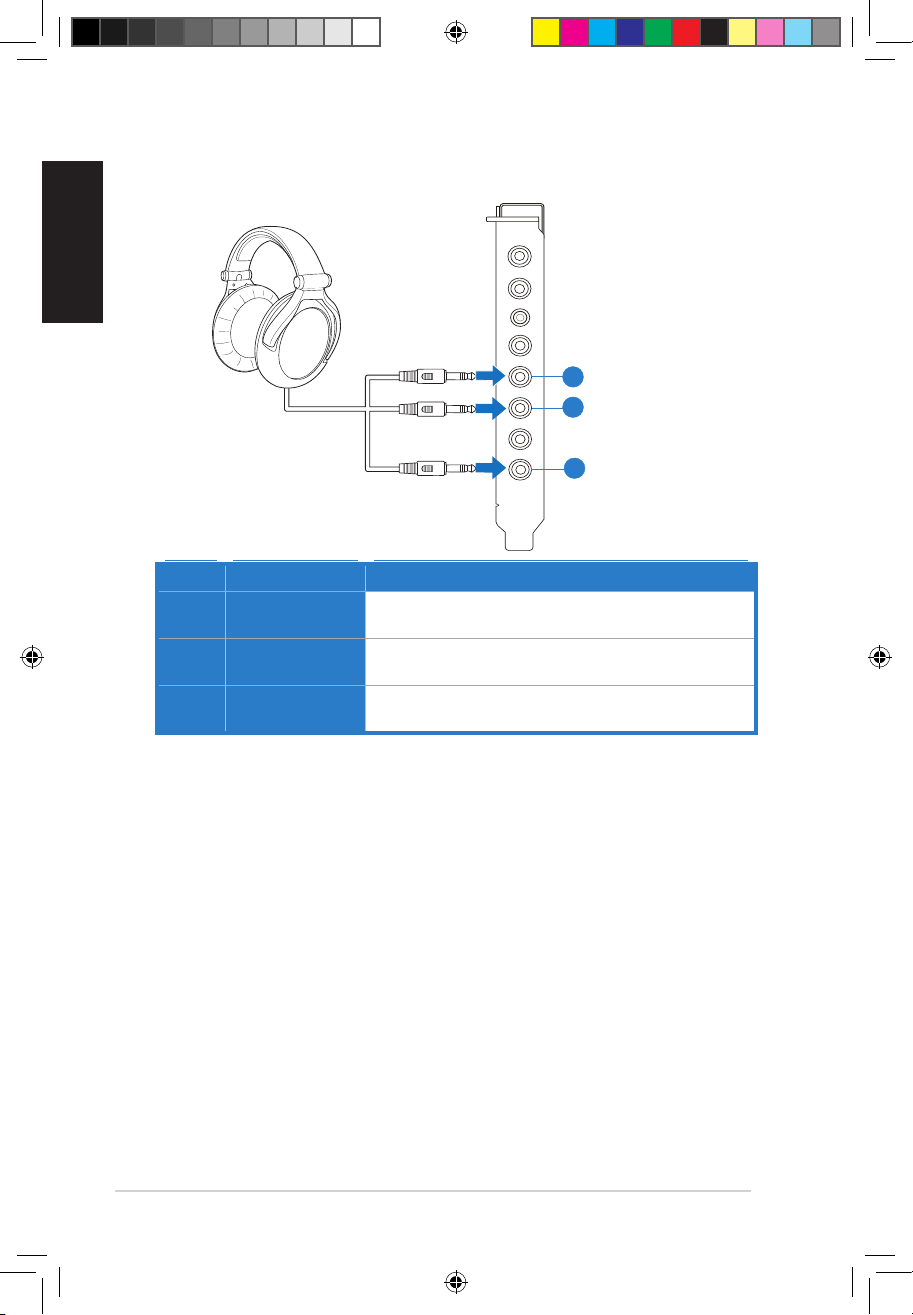
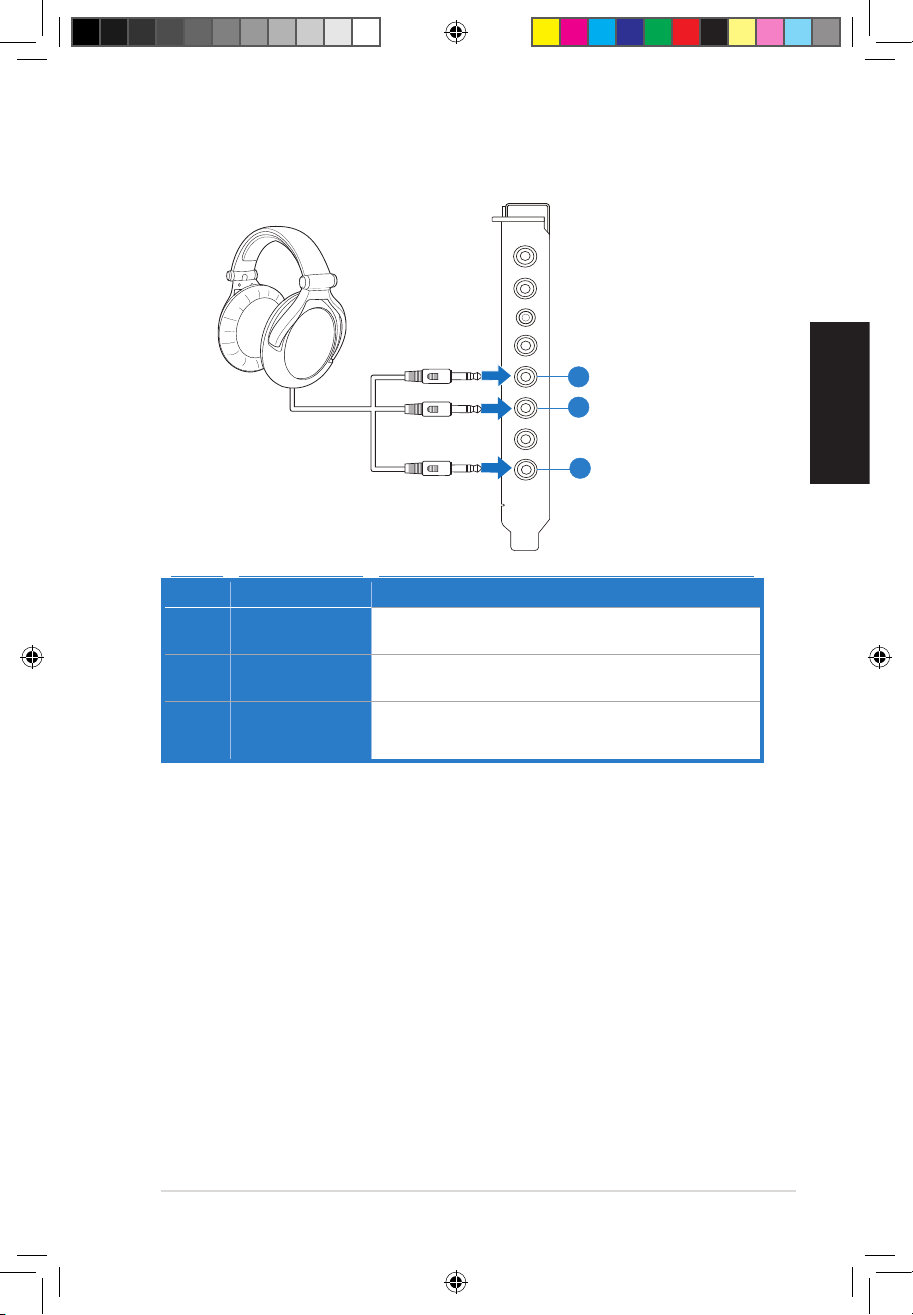
No Item Description
1 Front Out
Connect the front-channel 3.5mm plug of your 5.1
headphones into this jack.
2 Side Surround
Out
Connect the surround-channel 3.5mm plug of your 5.1
headphone into this jack.
3 Center/
Subwoofer Out
Connect the Center/Bass-channel 3.5mm plug of your 5.1
headphone into this jack.
Connecting 5.1 channel hadphones
Mic in
HP out
Box link
Line in
Front
Ctr / Sbw
Rear
Side /
SPDIF out
1
2
3
U7062_Xonar-Phoebus_QSG.indb 12 18.01.2012 16:12:31 Uhr
Page 13
13
ASUS Xonar Phoebus Quick Start Guide
English
4.1.5 Connecting analog speaker systems
Connecting analog power amplier
Mic in
HP out
Box link
Line in
Front
Ctr / Sbw
Rear
Side /
SPDIF out
No Item Description
1 Front Out
Connects to the “left front” and “right front” input ports of the
analog amplier with the mini-jack to RCA cable.
2 Side Surround
Out
Connects to the “left surround” and “right surround” input ports
of the analog amplier with the mini-jack to RCA cable.
3 Center/
Subwoofer
Connects to the “Center” and “subwoofer” input ports of the
analog amplier with the mini-jack to RCA cable.
1
2
3
U7062_Xonar-Phoebus_QSG.indb 13 18.01.2012 16:12:32 Uhr
Page 14

14
ASUS Xonar Phoebus Quick Start Guide
English
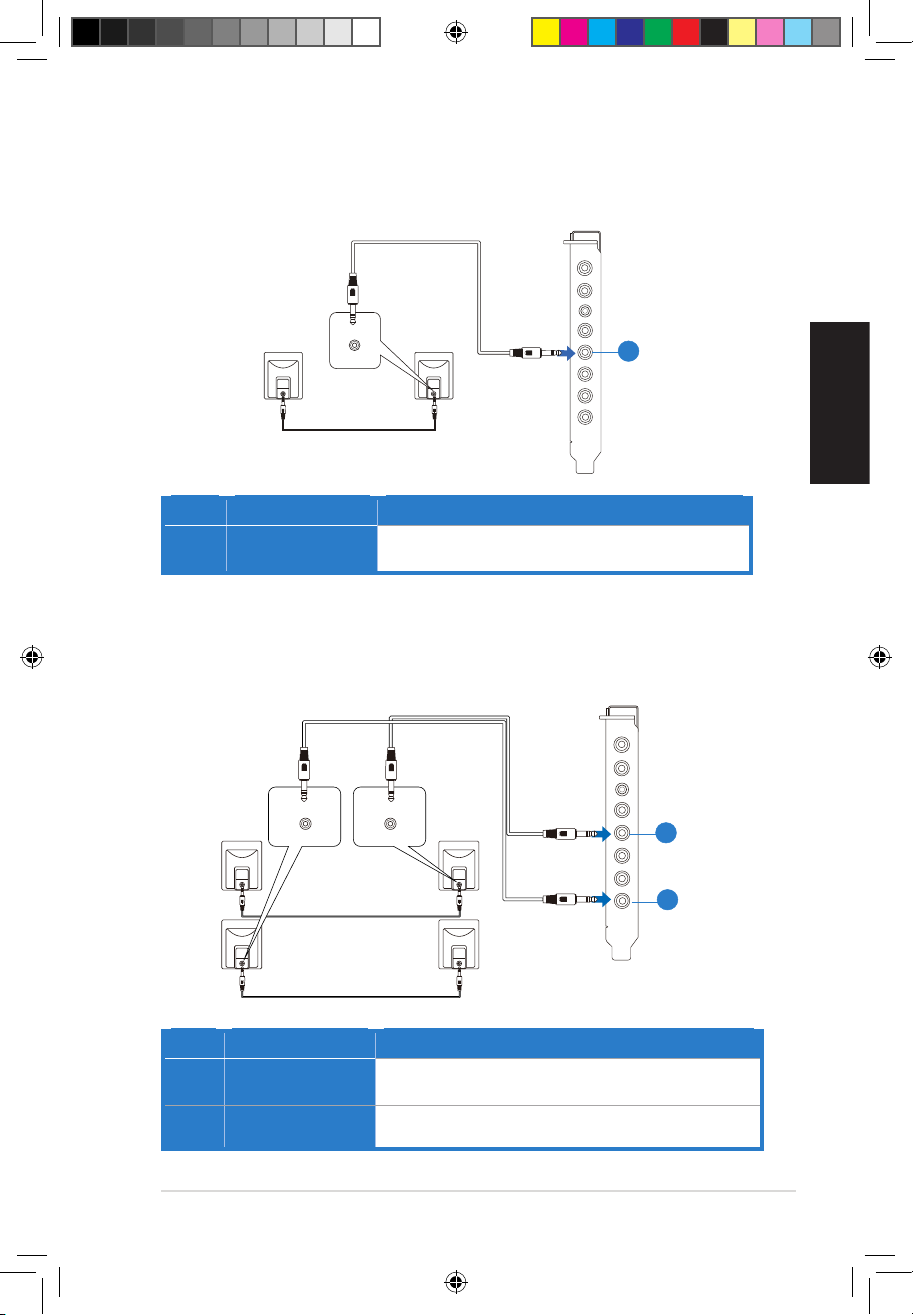
Connecting 2 channel speakers
2 speakers
No Item Description
1 Front Out Port
Connect the 2 channel speaker set’s 3.5mm plug into this
Front Out jack.
Connecting 4 channel speakers
4 speakers
No Item Description
1 Front Out
Connects to the Front input port of the 4/4.1 speakers with
the mini-jack cable.
2 Side Surround
Out
Connects to the Surround input port of the 4/4.1 speakers
with the mini-jack cable.
AUDIO
INPUTS
Mic in
HP out
Box link
Line in
Front
Ctr / Sbw
Rear
Side /
SPDIF out
1
1
2
AUDIO
INPUTS
Side
AUDIO
INPUTS
Front
Mic in
HP out
Box link
Line in
Front
Ctr / Sbw
Rear
Side /
SPDIF out
U7062_Xonar-Phoebus_QSG.indb 14 18.01.2012 16:12:34 Uhr
Page 15
15
ASUS Xonar Phoebus Quick Start Guide
English
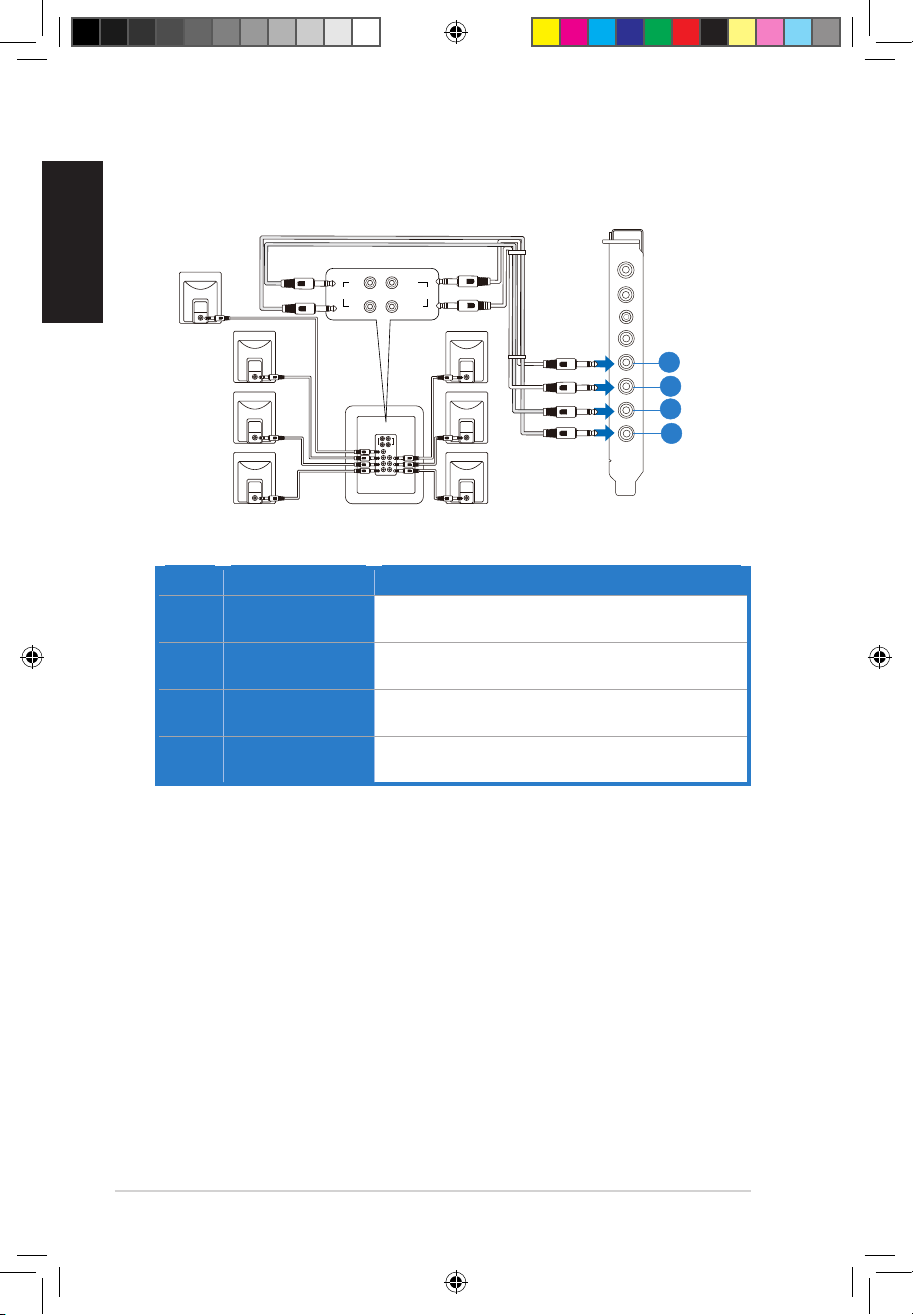
Connecting 5.1 channel speakers
5.1 speakers
Mic in
HP out
Box link
Line in
Front
Ctr / Sbw
Rear
Side /
SPDIF out
Side
Front
Center/
Subwoofer
AUDIO
INPUTS
No Item Description
1 Front Out
Connects to the Front input port of the 5.1 speakers with the
mini-jack cable.
2 Side Surround
Out
Connects to the Surround input port of the 5.1 speakers with
the mini-jack cable.
3 Center/
Subwoofer
Connects to the Center/Subwoofer input port of the 5.1
speakers with the mini-jack cable.
1
2
3
U7062_Xonar-Phoebus_QSG.indb 15 18.01.2012 16:12:35 Uhr
Page 16
16
ASUS Xonar Phoebus Quick Start Guide
English
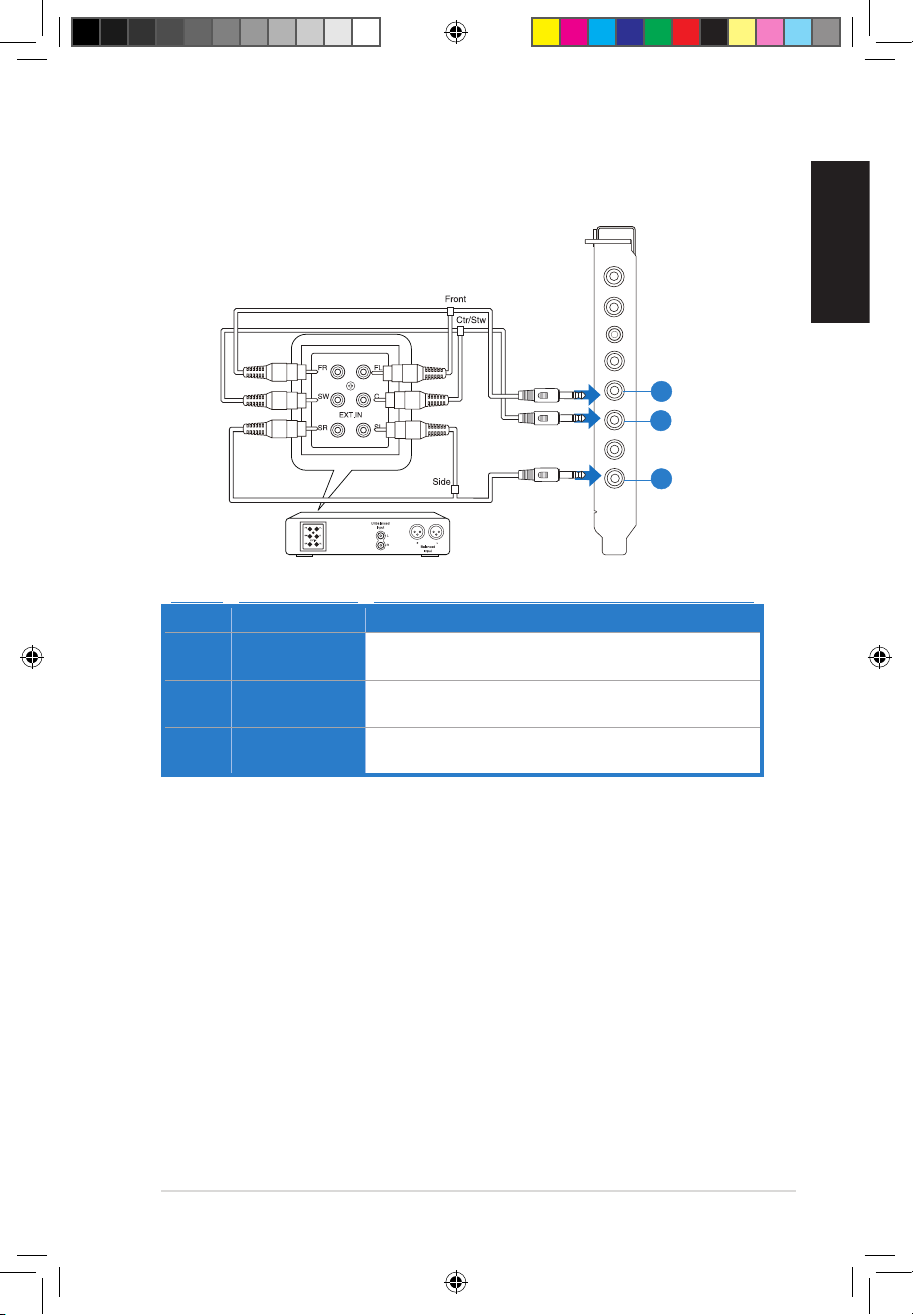
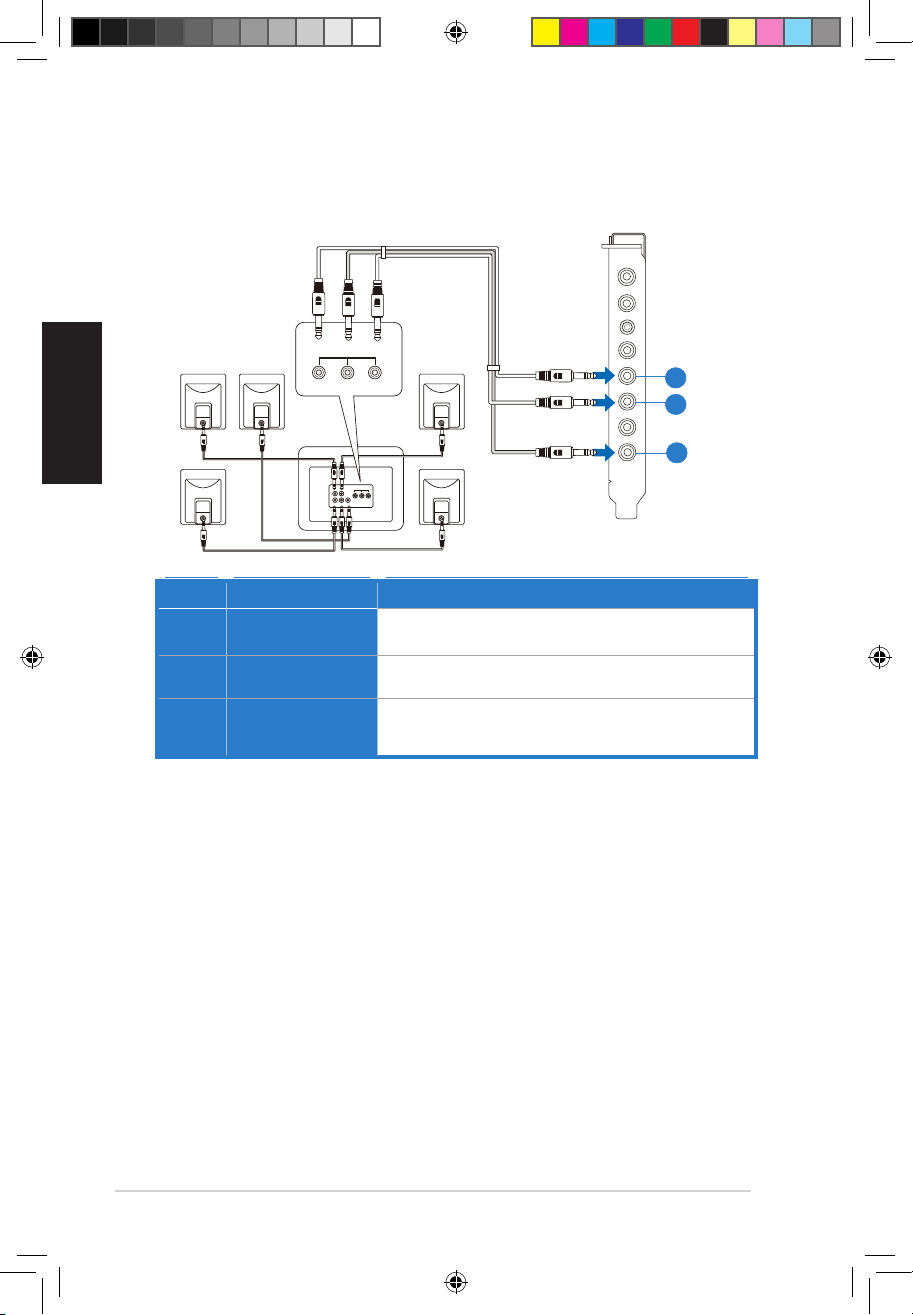
Connecting 7.1 channel speakers
7.1 speakers
Rear
Side
Front
Center/
Subwoofer
AUDIO
INPUTS
AUDIO
INPUTS
Mic in
HP out
Box link
Line in
Front
Ctr / Sbw
Rear
Side /
SPDIF out
No Item Description
1 Front Out
Connects to the Front input port of the 7.1 speakers with
the mini-jack cable.
2 Side Surround
Out
Connects to the Surround input port of the 7.1 speakers
with the mini-jack cable.
3 Center/
Subwoofer
Connects to the Center/Subwoofer input port of the 7.1
speakers with the mini-jack cable.
4 Back Surround
Out
Connects to the Back Surround input port of the 7.1
speakers with the mini-jack cable.
1
3
4
2
U7062_Xonar-Phoebus_QSG.indb 16 18.01.2012 16:12:37 Uhr
Page 17
17
ASUS Xonar Phoebus Quick Start Guide
English
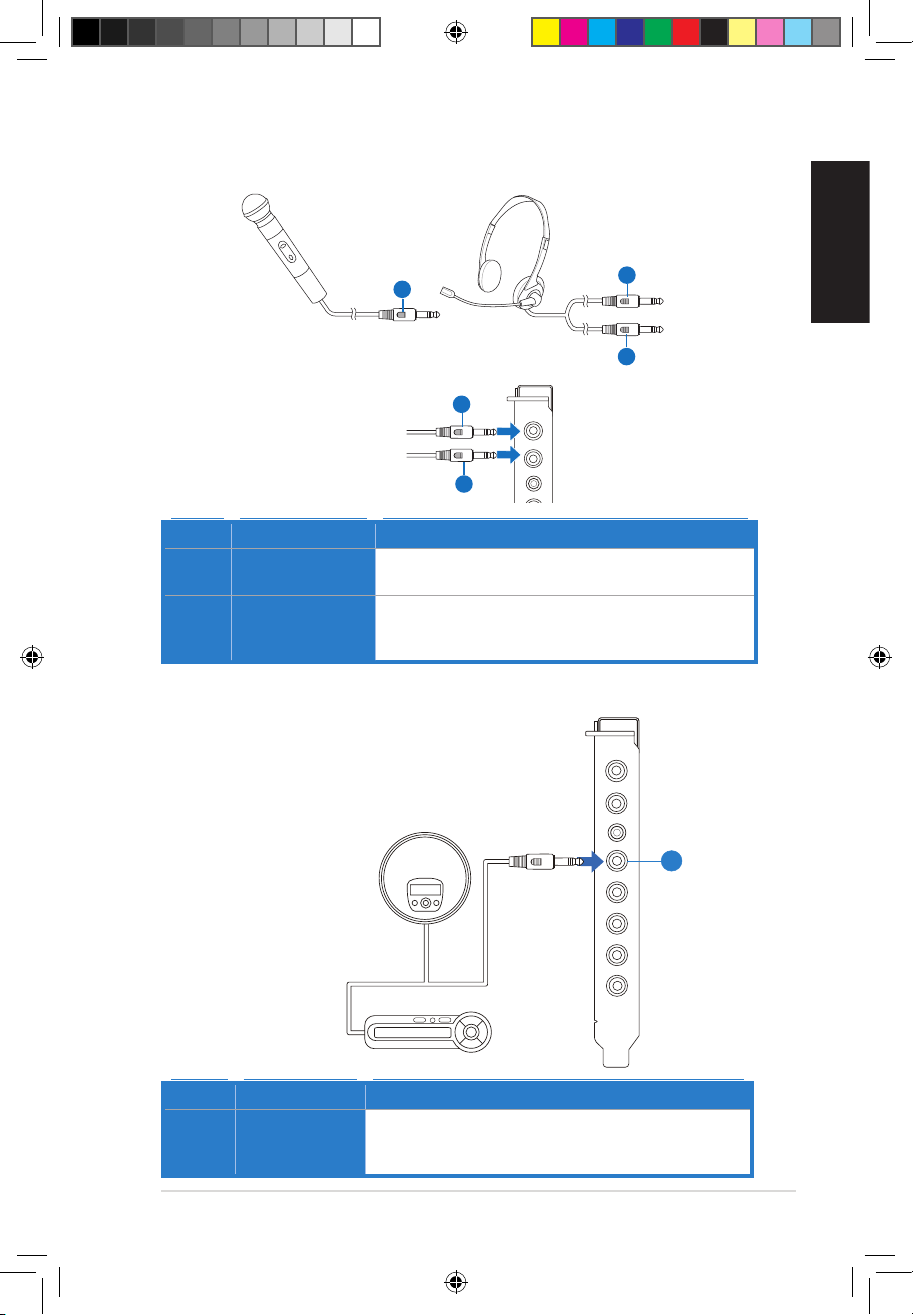
4.1.6 Connecting Microphone
2
Mic in
HP out
Box link
1
2
1
1
No Item Description
1 Microphone In
Port
Connect the microphone’s 3.5mm plug into this Mic-In port
for voice communication, recording, or karaoke.
2 Headphone Port
The headphone port has a built-in high-quality amplier to
drive headphones. Connect your stereo headphones directly
to this jack.
4.1.7 Connecting Line-In audio sources
CD Player
MP3 Player
Mic in
HP out
Box link
Line in
Front
Ctr / Sbw
Rear
Side /
SPDIF out
No Item Description
1 Line In Port
Connect the 3.5mm plug of the CD/MP3 Player or any other
Line level analog audio sources into this Line-In jack for sound
recording.
1
U7062_Xonar-Phoebus_QSG.indb 17 18.01.2012 16:12:40 Uhr
Page 18
18
Guide de démarrage rapide pour carte son ASUS Xonar Phoebus
Français
Français
1. Introduction
1.1 Pré-requis système
Avant d’installer la carte son Xonar Phoebus, assurez-vous que votre ordinateur puisse Xonar Phoebus, assurez-vous que votre ordinateur puisseassurez-vous que votre ordinateur puisse
satisfaire aux critères suivants :
• Un slot PCIE 1.0 (ou supérieur) pour la carte sonUn slot PCIE 1.0 (ou supérieur) pour la carte son
• Une prise d’alimentation 6 broches reliée au bloc d’alimentationUne prise d’alimentation 6 broches reliée au bloc d’alimentation
• Microsoft® Windows® Vista / 7 (32/64bit) / XP (32/64bit) / MCE2005
• Intel® Pentium® 4 1.4GHz or AMD Athlon 1400 CPU or faster CPU
• > 256 Mo de mémoire vive> 256 Mo de mémoire vive
• > 60 Mo d’espace disque disponible pour l’installation des pilotes
• CD-ROM drive (or DVD-ROM drive) for software installation
• Des écouteurs de haute qualité, des haut-parleurs analogiques alimentés, ou unDes écouteurs de haute qualité, des haut-parleurs analogiques alimentés, ou un
décodeur Dolby Digital pour proter pleinement de la qualité audio délivrée par la
carte son
1.2 Contenu de la boîte
Vériez que la boîte de votre carte son ASUS Xonar Phoebus contient bien les éléments ASUS Xonar Phoebus contient bien les élémentscontient bien les éléments
suivants :
• Carte son PCIE ASUS XonarCarte son PCIE ASUS XonarASUS XonarTM Phoebus
• Boîtier de contrôle Phoebus
• CD de supportCD de support
• Adaptateur TOSLINK S/PDIF optique x 1Adaptateur TOSLINK S/PDIF optique x 1
• Câble d’alimentation ATX 4 à 6 broches x 1
• Guide de démarrage rapide x 1Guide de démarrage rapide x 1
U7062_Xonar-Phoebus_QSG.indb 18 18.01.2012 16:12:40 Uhr
Page 19
19
Guide de démarrage rapide pour carte son ASUS Xonar Phoebus
Français
Français
2. Matériel
2.1 Diagramme de la carte son Xonar Phoebus
Mic in
HP out
Box link
Line in
Front
Ctr / Sbw
Rear
Side /
SPDIF out
1
2
3
4
5
6
7
8
1
2
3
4
5
6
7
8
9
10
11
12
U7062_Xonar-Phoebus_QSG.indb 19 18.01.2012 16:12:42 Uhr
Page 20
20
Guide de démarrage rapide pour carte son ASUS Xonar Phoebus
Français
Français
N° Élément Description
1
Port d’entrée
microphone
Connectez le port microphone externe de votre PC sur ce
port 3.5mm. Intègre un préamplicateur de microphone de
haute qualité.
2 Prise casque
Connectez votre casque audio sur ce port.
3 Lien boîtier
Connectez le boîtier de contrôle Xonar Phoebus sur ce port
de 2.5mm.
4 Port d’entrée audio
Connectez des périphériques analogiques (lecteur MP3,
lecteur CD, etc) ou autres sources audio sur ce port 3.5mm.
5
Sortie de signal
avant
Connectez le câble audio droit (rouge) de votre système de
haut-parleurs 2/2.1 sur ce port.
6
Port de sortie
centre/caisson de
basse
Se connecte au port d’entrée centre/caisson de basse
des systèmes de haut-parleurs analogiques alimentés
5.1/6.1/7.1.
7
Port de sortie
arrière
Se connecte au port d’entrée Surround arrière des systèmes
de haut-parleurs analogiques alimentés 6.1/7.1
8
S/PDIF Out/SortieSortie
latérale
Port de sortie numérique TOSLINK. Se connecte à un
décodeur numérique externe, un home cinéma, un
système de haut-parleurs numériques ou un récepteur
pour la transmission d’un signal audio numérique
supportant les technologies PCM, Dolby Digital, DTS,
WMA-Pro, etc.
Se connecte au port d’entrée Surround des systèmes de
haut-parleurs analogiques alimentés 4/4.1/5.1/6.1/7.1.
9
En-tête d’entrée
auxiliaire
Se connecte généralement au port de sortie audio
analogique d’une carte tuner TV ou tout autre source
audio interne du PC. (Pour surveiller les signaux audio de
votre carte tuner TV depuis ce port, vous devrez activer
la fonction de surveillance du port “Aux-In” à partir de
l’utilitaire audio Xonar Audio Center.)
10
En-tête sortie
S/PDIF
Se connecte à une carte graphique avec support HDMI.
11
Connecteur
d’alimentation
Se connecte à l’un des câbles 6 broches du bloc
d’alimentation.
12
Connecteurs dorés
PCI Express
Connectent la carte son au slot PCI Express de la carte
mère.
U7062_Xonar-Phoebus_QSG.indb 20 18.01.2012 16:12:43 Uhr
Page 21
21
Guide de démarrage rapide pour carte son ASUS Xonar Phoebus
Français
Français
2.1 Installation de la carteInstallation de la carte
Avant de continuer, il est recommandé de désactiver le chipset audio embarqué
dans le BIOS ou de désinstaller les autres cartes audio de votre système. (Pour les
options du BIOS ou la désinstallation d’autres cartes son, référez-vous aux manuels
d’utilisation de la carte mère et de la carte audio)
La carte son PCI Express nécessite d’être alimentée pour pouvoir fonctionner
correctement. Assurez-vous d’avoir relié un câble d’alimentation à la carte avant de
l’utiliser.
2.1.1 Installer la carte son Xonar Phoebus
Pour installer la carte son Xonar Phoebus :
1. Éteignez l’ordinateur, le moniteur et
tous les périphériques connectés au PC.
2. Débranchez le cordon d’alimentation de
l’ordinateur et de la prise électrique.
3. Touchez l’arrière métallique ou
le panneau latéral du châssis de
l’ordinateur pour vous décharger de
l’électricité statique.
4. Retirez le panneau latéral du châssis.
5. Retirez le cache métallique d’un slot PCI
Express disponible.
6. Insérez délicatement la carte son sur le slot PCI Express. Assurez-vous que la carte
est bien en place.
NE PAS forcer la carte son sur le slot PCI Express. Assurez-vous que les connecteurs
dorés de la carte sont correctement alignés sur le slot PCI Express de la carte mère. Si
la carte n’est pas bien sécurisée au slot PCI Express, retirez-la puis réessayez.
7. Sécurisez la carte à l’aide de la vis retirée du cache métallique.
8. Replacez le panneau latéral du châssis.
9. Reconnectez tous les câbles.
10. Reliez le cordon d’alimentation à l’ordinateur et à une prise électrique.
11. Allumez l’ordinateur.
U7062_Xonar-Phoebus_QSG.indb 21 18.01.2012 16:12:46 Uhr
Page 22
22
Guide de démarrage rapide pour carte son ASUS Xonar Phoebus
Français
Français
2.1.2 Connexion à une carte tuner TV
Si vous possédez une carte tuner TV PCI/PCI Expresss sur votre ordinateur, vous devrez la
connecter à la carte son pour que le ux audio puisse être envoyé vers votre système de
haut-parleurs.
1. Sécurisez la carte tuner TV PCI/PCI Express au châssis à l’aide d’une vis.Sécurisez la carte tuner TV PCI/PCI Express au châssis à l’aide d’une vis.
2. Connectez l’en-tête de sortie audio de la carte tuner TV à l’en-tête d’entrée
auxiliaire de la carte son.
Pour une qualité d’achage optimale, la carte son Xonar utilise le procédé
d’enregistrement ADC pour numériser le signal et le convertir en lecture DAC.
Sélectionnez Aux-In (entrée auxiliaire) comme source d’enregistrement dans
l’utilitaire audio Xonar Audio Center et activez la fonction de surveillance pour que
le signal soit acheminé vers la sortie audio. Grâce à cette conguration, vous pouvez
même activer certains eets sonores comme la technologie Pro-Logic IIx permettant
de convertir un signal TV stéréo classique en son surround 5.1 ou 7.1. Ce procédé
ore une meilleure qualité audio sur votre ordinateur que sur votre téléviseur.
U7062_Xonar-Phoebus_QSG.indb 22 18.01.2012 16:12:47 Uhr
Page 23

23
Guide de démarrage rapide pour carte son ASUS Xonar Phoebus
Français
Français
3. Installation du pilote de la carte son
3.1 Installer le pilote de la carte Xonar Phoebus
Pour installer le pilote de la carte son :
1. Une fois la carte son installée, allumez votre PC. WindowsUne fois la carte son installée, allumez votre PC. Windows® détectera
automatiquement la carte son et lancera la recherche du pilote approprié. Lorsque
la fenêtre d’installation du pilote apparaît, cliquez sur Annuler.
2. Insérez le CD de support dans votre lecteur optique. Si l’Exécution automatique
est activée, le processus de conguration démarre automatiquement. Si ce n’est
pas le cas, cliquez sur le chier setup.exe contenu dans le CD de support.
3. Suivez les instructions à l’écran pour terminer l’installation.
La version et le contenu du CD de support peuvent être modiés sans avis préalable...
3.2 Désinstaller ou réinstaller le pilote
3.2.1 Désinstaller le pilote
Pour désinstaller le pilote de la carte son :
1. Dans le Bureau de Windows®, cliquez sur Démarrer > Panneau de conguration.
2. Double-cliquez sur Ajout/Suppression de programmes.
3. Cliquez sur Modier ou supprimer des programmes.
4. Sélectionnez le pilote audio, puis cliquez sur Ajouter/Supprimer (ou Modier/
Supprimer).
5. À l’apparition de l’assistant d’installation, sélectionnez l’option Remove
(Supprimer).
6. Redémarrez votre ordinateur.
3.2.2 Réinstaller le pilote
Pour réinstaller le pilote de la carte son :
1. Avant toute chose; il est fortement recommandé de désinstaller le pilote et le
logiciel audio de l’ordinateur.
2. Une fois terminé, répétez les étapes d’installation fournies plus haut pour
réinstaller ou mettre à jour le pilote.
U7062_Xonar-Phoebus_QSG.indb 23 18.01.2012 16:12:48 Uhr
Page 24

24
Guide de démarrage rapide pour carte son ASUS Xonar Phoebus
Français
Français
4. Connexion de haut-parleurs et de
périphériques
4.1 Connexion du boîtier Phoebus
4.1.1 Connecter le boîtier Phoebus
4.1.2 Connecter le boîtier de contrôle Phoebus à un casque ou un
microphone
N° Élément Description
1 Port d’entrée
microphone
Connectez le port microphone du boîtier Phoebus sur
cette prise 3.5mm pour les enregistrements audio ou les
communications vocales..
2 Prise casque
Cette prise est dotée d’un amplicateur de haute qualité
dédié aux casques audio. Connectez directement le boîtier
Phoebus sur ce port.
3 Lien boîtier
Connectez le boîtier de contrôle Xonar Phoebus sur ce
port de 2.5mm.
N° Élément Description
1 Prise casque
Connectez votre casque audio sur cette prise.
2 Prise d’entrée
microphone
Connectez votre microphone sur cette prise.sur cette prise.
Mic in
HP out
Box link
Line in
Front
Ctr / Sbw
Rear
Side /
SPDIF out
1
2
3
Mic In
Headphone Out
1
2
U7062_Xonar-Phoebus_QSG.indb 24 18.01.2012 16:12:50 Uhr
Page 25
25
Guide de démarrage rapide pour carte son ASUS Xonar Phoebus
Français
Français
4.1.3 Connecter un système d’enceintes numérique (Home cinéma)
La carte Xonar Phoebus permet de relier votre home cinéma à votre ordinateur pour
orir une expérience audio impressionnante. Une connexion à un seul câble numérique
permet d’acheminer un son numérique de haute qualité de votre ordinateur à un
quelconque équipement audio numérique.
N° Élément Description
1 Adaptateur
optique
Reliez l’adaptateur optique TOSLINK à la sortie S/PDIF.
2 Câble optique
Reliez le port d’entrée S/PDIF de votre décodeur à
l’adaptateur optique via le câble optique TOSLINK
Mic in
HP out
Box link
Line in
Front
Ctr / Sbw
Rear
Side /
SPDIF out
2
1
U7062_Xonar-Phoebus_QSG.indb 25 18.01.2012 16:12:52 Uhr
Page 26
26
Guide de démarrage rapide pour carte son ASUS Xonar Phoebus
Français
Français
4.1.4 Connecter un casque audio
Casque stéréo
N° Élément Description
1 Port casque
(sortie)
Cette prise est dotée d’un amplicateur de haute qualité
dédié aux casques audio. Branchez directement votre. Branchez directement votre
casque sur ce port.
Mic in
HP out
Box link
Line in
Front
Ctr / Sbw
Rear
Side /
SPDIF out
1
U7062_Xonar-Phoebus_QSG.indb 26 18.01.2012 16:12:53 Uhr
Page 27
27
Guide de démarrage rapide pour carte son ASUS Xonar Phoebus
Français
Français
N° Élément Description
1 Sortie audio
avant
Connectez la prise de votre casque 5.1 dédiée au son surround
avant à ce port.
2 Sortie surround
latérale
Connectez la prise de votre casque 5.1 dédiée au son surround
latéral à ce port.
3 Sortie centrale/
caisson de
basses
Connectez la prise de votre casque 5.1 dédiée au son surround
latéral / caisson de basses à ce port.
Casque 5.1
Mic in
HP out
Box link
Line in
Front
Ctr / Sbw
Rear
Side /
SPDIF out
1
2
3
U7062_Xonar-Phoebus_QSG.indb 27 18.01.2012 16:12:55 Uhr
Page 28
28
Guide de démarrage rapide pour carte son ASUS Xonar Phoebus
Français
Français
4.1.5 Connecter un système d’enceintes analogique
Connexion à un amplicateur audio
N° Élément Description
1 Sortie audio
avant
Se connecte aux prises audio de l’amplicateur dédiées au
haut-parleur avant droit et gauche via un câble audio RCA.
2 Sortie
surround
latérale
Se connecte aux prises audio de l’amplicateur dédiées au
haut-parleur latéral gauche et droite via un câble audio RCA.
3 Sortie
centrale/
caisson de
basses
Se connecte aux prises audio de l’amplicateur dédiées au
haut-parleur central et au caisson de basses via un câble audio
RCA.
Mic in
HP out
Box link
Line in
Front
Ctr / Sbw
Rear
Side /
SPDIF out
1
2
3
U7062_Xonar-Phoebus_QSG.indb 28 18.01.2012 16:12:56 Uhr
Page 29
29
Guide de démarrage rapide pour carte son ASUS Xonar Phoebus
Français
Français
Connexion à un système d’enceintes 2.0
2 enceintes
N° Élément Description
1 Sortie audio
avant
Se connecte aux prises audio du haut-parleur avant droit
et gauche.
Connexion à un système d’enceintes 4.0/4.1
4 enceintes
N° Élément Description
1 Sortie audio
avant
Se connecte aux prises audio du haut-parleur avant droit et
gauche.
2 Sortie surround
latérale
Se connecte aux prises audio des haut-parleur latéraux.
AUDIO
INPUTS
Mic in
HP out
Box link
Line in
Front
Ctr / Sbw
Rear
Side /
SPDIF out
1
1
2
AUDIO
INPUTS
Side
AUDIO
INPUTS
Front
Mic in
HP out
Box link
Line in
Front
Ctr / Sbw
Rear
Side /
SPDIF out
U7062_Xonar-Phoebus_QSG.indb 29 18.01.2012 16:12:58 Uhr
Page 30
30
Guide de démarrage rapide pour carte son ASUS Xonar Phoebus
Français
Français
Connexion à un système d’enceintes 5.1
Enceintes 5.1
N° Élément Description
1 Sortie audio
avant
Se connecte aux prises audio du haut-parleur avant droit et
gauche.
2 Sortie surround
latérale
Se connecte aux prises audio des haut-parleur latéraux.
3 Sortie centrale/
caisson de
basses
Se connecte aux prises audio dédiées au haut-parleur
central et au caisson de basses.
Mic in
HP out
Box link
Line in
Front
Ctr / Sbw
Rear
Side /
SPDIF out
Side
Front
Center/
Subwoofer
AUDIO
INPUTS
1
2
3
U7062_Xonar-Phoebus_QSG.indb 30 18.01.2012 16:13:00 Uhr
Page 31

31
Guide de démarrage rapide pour carte son ASUS Xonar Phoebus
Français
Français
Connexion à un système d’enceintes 7.1
Enceintes 7.1
N° Élément Description
1 Sortie audio
avant
Se connecte aux prises audio du haut-parleur avant droit
et gauche.
2 Sortie surround
latérale
Se connecte aux prises audio des haut-parleur latéraux.
3 Sortie centrale/
caisson de
basses
Se connecte aux prises audio dédiées au haut-parleur
central et au caisson de basses.
4 Sortie audio
arrière
Se connecte aux prises audio du haut-parleur arrière droit
et gauche.
Rear
Side
Front
Center/
Subwoofer
AUDIO
INPUTS
AUDIO
INPUTS
Mic in
HP out
Box link
Line in
Front
Ctr / Sbw
Rear
Side /
SPDIF out
1
3
4
2
U7062_Xonar-Phoebus_QSG.indb 31 18.01.2012 16:13:01 Uhr
Page 32

32
Guide de démarrage rapide pour carte son ASUS Xonar Phoebus
Français
4.1.3 Connecter un
N° Élément Description
1 Port d’entrée
microphone
Reliez le microphone à cette prise 3.5mm pour les
enregistrements audio ou les communications vocales.
2 Prise casque
Cette prise est dotée d’un amplicateur de haute qualité
dédié aux casques audio. Connectez directement votre
casque audio sur ce port.
4.1.3 Connecter une source audio externe
N° Élément Description
1 Port d’entrée
audio
Connectez la prise 3.5mm d’un lecteur CD/MP3 ou de toute
autre source audio sur ce port.
2
Mic in
HP out
Box link
1
2
1
1
CD Player
MP3 Player
Mic in
HP out
Box link
Line in
Front
Ctr / Sbw
Rear
Side /
SPDIF out
1
U7062_Xonar-Phoebus_QSG.indb 32 18.01.2012 16:13:04 Uhr
Page 33

33
ASUS Xonar Phoebus - Schnellstartanleitung
Deutsch
1. Einführung
1.1 Systemanforderungen
Um eine erfolgreiche Installation der Xonar Phoebus-Audiokarte sicherzustellen, muss Ihr
Computer folgende Anforderungen erfüllen:
• Ein PCIE 1.0 (oder höher) -kompatibler Steckplatz für die Audio-Karte
• 6-pol. Stromversorgungskabel vom Computernetzteil
• Microsoft® Windows® Vista / 7 (32/64bit) / XP (32/64bit) / MCE2005
• Intel® Pentium® 4 1.4GHz oder AMD Athlon 1400 CPU oder schneller
• 256 MB (oder mehr) Systemspeicher
• 60 MB freier Festplattenspeicher für die Treiberinstallation
• CD-ROM-Laufwerk (oder DVD-ROM-Laufwerk) für die Software-Installation
• Hochwertige Kopfhörer, aktive Analoglautsprecher oder ein Dolby Digital-Decoder,
um den HiFi-Sound der Karte zu genießen
1.2 Verpackungsinhalt
Überprüfen Sie Ihre ASUS Xonar-Phoebus-Audio-Kartenverpackung auf folgenden
Inhalt:
• ASUS-XonarTM-Phoebus-7.1-Kanla-PCI-Express-Audiokarte
• Phoebus Control Box
• Treiber-CD
• 1x optischer S/PDIF-TOSLINK-Adapter
• 1x ATX 4P-auf-6P-Stromversorgungskabel
• Schnellstartanleitung
U7062_Xonar-Phoebus_QSG.indb 33 18.01.2012 16:13:05 Uhr
Page 34

34
ASUS Xonar Phoebus - Schnellstartanleitung
Deutsch
Deutsch
2. Hardware
2.1 Xonar Phoebus Audioverarbeitungskarte
Mic in
HP out
Box link
Line in
Front
Ctr / Sbw
Rear
Side /
SPDIF out
1
2
3
4
5
6
7
8
1
2
3
4
5
6
7
8
9
10
11
12
U7062_Xonar-Phoebus_QSG.indb 34 18.01.2012 16:13:06 Uhr
Page 35

35
ASUS Xonar Phoebus - Schnellstartanleitung
Deutsch
Deutsch
Nr. Element Beschreibung
1 Mikrofoneingang
Schließen Sie Ihr externes PC-Mikrofon zur
Spracheingabe an diesem Anschluss an. Eingebauter
Mikrofonvorverstärker.
2 Kopfhörerausgang
Verbinden Sie Ihren Kopfhörer mit diesem 3,5mmAnschluss.
3 Box Link
2.5mm Anschlus der Xonar Phoebus Control Box.
4 Line In-Port
Anschluss für analoge Geräte, z.B. MP3-Player, CD-Player,
Musiksynthesizer und andere Line-Tonwiedergabegeräte,
um Tonaufnahmen oder Tonberechnung durchzuführen.
(Über Ultra HiFi 118dB SNR A-D-Konverter)
5 Frontausgang
Bei 2-Kanalsystemen verbinden Sie diesen Ausgang mit
den linken/rechten Frontlautsprecheranschluss der aktiven
Lauftsprechers.
6
Center/SubwooferAusgang
Anschluss für den Center/Subwoofer-Eingang an aktiven
5.1/7.1-Amaloglautsprechern.
7
Rück-SurroundAusgang
Anschluss für die Rückseitigen-Eingänge an aktiven 7.1Analoglautsprechern.
8
S/PDIF-/SeitenAusgang
Digitaler Ausgang. Anschluss für einen externen
Digitaldekoder oder -Lautsprechersystem,
Heimkinosystem, AV-Receiver zur Ausgabe von digitalen
Audio, eingeschlossen PCM, DTS Digital, DTS, WMA-Pro,
usw.
9
AuxEingangsanschluss
Normalerweise der Anschluss für den analogen
Tonausgang der TV-Tunerkarte oder anderen
Tonausgabegeräten in Ihrem PC-System. (Um den Ton
Ihrer TV-Tunerkarte von diesem Anschluss zu überwachen,
müssen Sie für Aux-In die Funktion „Überwachen“ im Xonar
Audio Center-Aufnahme-Mixer aktivieren.)
10
S/PDIFAusgangsanschluss
Verbindet den Grakkartenausgang mit der HDMIUnterstützung
11 Stromanschluss
Anschluss für das 6-pol. Stromversorgungskabel vom
Netzteil.
12
PCI Express BusGoldkontakte
Stecken Sie die Goldkontakte in den PCI-Express-Steckplatz
auf dem Motherboard.
U7062_Xonar-Phoebus_QSG.indb 35 18.01.2012 16:13:07 Uhr
Page 36

36
ASUS Xonar Phoebus - Schnellstartanleitung
Deutsch
Deutsch
2.1.1 Installieren der Xonar Phoebus-Karte
So installieren Sie die Xonar Phoebus-Karte:
1. Schalten Sie den Computer, den
Monitor und alle anderen am Computer
angeschlossenen Peripheriegeräte aus.
2. Ziehen Sie das Netzkabel des Computers
aus der Steckdose heraus.
3. Berühren Sie das Metallgehäuse oder
den Metallrahmen, um statische
Auadungen zu vermeiden.
4. Entfernen Sie die Gehäuseabdeckung.
5. Entfernen Sie die Metallklemme von
einem freien PCIE-Steckplatz für die
Xonar Phoebus-Audiokarte.
6. Stecken Sie die Karte vorsichtig in den PCIE-Steckplatz. Vergewissern Sie sich, dass
die karte richtig im Steckplatz eingesteckt ist.
Stecken Sie die Karte nicht mit Gewalt in den Steckplatz. Vergewissern Sie sich, dass
die Goldkontakte des PCIE-Anschlusses der Karte mit den richtigen Anschluss auf
dem Motherboard ausgerichtet sind, bevor Sie die Karte hinein stecken. Falls die
KJarte nicht richtig sitzt, ziehen Sie sie wieder heraus und versuchen es erneut.
7. Sichern Sie die Karte mit Schrauben und der Metallklemme.
8. Bringen Sie die Gehäuseabdeckung wieder an.
9. Schließen Sie alle Kabel wieder an.
10. Stecken Sie das Netzkabel in eine Steckdose.
11. Schalten Sie den Computer wieder ein.
2.1 Karte Installieren
Bevor Siemit den folgenden Installationsschritten fortfahren, empfehlen wir Ihnen,
dass Sie Ihr Onboard-Audio-Gerät in den BIOS-Einstellungen deaktivieren oder
jede andere Audio-Karte in Ihrem PC deinstallieren. (Für die BIOS-Einstellungen
oder die Deinstallation anderer Audio-Karten beziehen Sie sich bitte auf die
Benutzerhandbücher des Motherboards oder der Audio-Karte)
Die PCI Express High-Quality-Audio-Karte benötigt eine zusätzliche Stromversorgung
von Ihrem Computer. Wenn das Stromversorgungskabel nicht richtig angeschlossen
ist, wird die Karte nicht arbeiten.
U7062_Xonar-Phoebus_QSG.indb 36 18.01.2012 16:13:10 Uhr
Page 37

37
ASUS Xonar Phoebus - Schnellstartanleitung
Deutsch
Deutsch
2.1.2 Verbinden mit der TV-Tuner-Karte
Wenn Sie in Ihren Computer eine traditionelle PCI- oder PCI-Express-TV-Tuner-Karte
installiert haben, können Sie diese mit der Audiokarte verbinden, um das Audiosignal
des TV-Tuners über Ihre PC-Lautsprecher auszugeben.
1. Sichern Sie Ihre PCI/PCI-Express-TV-Tuner-Karte und schrauben Sie sie an der
Rückseite fest.
2. Verbinden Sie den Ausgang der TV-Tuner-Karte mit dem Aux-In-Anschluss der
Audiokarte, siehe folgende Abbildung.
Für optimale TV-Audioqualität verwendet Xonar ADC-Aufnahme, um das Signal
zu digitalisieren und zurück zur DAC-Wiedergabe zu schicken. Wählen Sie im
Aufnahmemixer des Xonar Audio Centers bitte Aux-In als Aufnahmequelle und
aktivieren Sie die Überwachungstaste, um das Signal zum Audioausgang zu schicken.
Die Verwendung dieser Einrichtung ermöglicht sogar die Soundeekte in Pro-Logic
IIx umzuwandeln, um Ihren Stereo-TV-Ton auf 5.1- oder 7.1-Kanal-Surround-Sound
zu erweitern. Der TV-Ton bei Ihrem PC wird dann sogar noch besser als der Ihres
TV-Gerätes sein!
U7062_Xonar-Phoebus_QSG.indb 37 18.01.2012 16:13:11 Uhr
Page 38

38
ASUS Xonar Phoebus - Schnellstartanleitung
Deutsch
Deutsch
3. Treiberinstallation
3.1 Installieren der Xonar Phoebus-Kartentreiber
So installieren Sie die Gerätetreiber:
1. Nachdem Sie die Xonar Phoebus-Karte installiert haben, schalten Sie bitte
Ihren Computer ein. Windows® erkennt die Karte automatisch und sucht nach
Gerätetreibern. Klicken Sie, wenn Sie nach dem Treiber gefragt werden, auf
Abbrechen.
2. Legen Sie die Support-CD in das optische Laufwerk ein. Falls Autorun in Ihrem
System aktiviert ist, startet die Installation automatisch. Falls nicht, starten Sie
setup.exe von Ihrer Support-CD.
3. Folgen Sie den Anweisungen auf dem Bildschirm, um die Installation zu beenden.
Die Version und der Inhalt der Treiber-CD können ohne Vorankündigung geändert
werden.
3.2 Deinstallieren oder Neuinstallation der Xonar
Phoebus-Kartentreiber
3.2.1 Deinstallieren der Xonar Phoebus-Kartentreiber
So deinstallieren Sie die Xonar Phoebus-Kartentreiber:
1. Klicken Sie auf Start -> Einstellungen -> Systemsteuerung.
2. Doppelklicken Sie auf Software.
3. Klicken Sie auf Ändern oder Entfernen von Programmen.
4. Wählen Sie das gewünschte Programm aus und klicken Sie auf Hinzufügen/
Entfernen (oder Ändern/Entfernen).
5. Wählen Sie im Installationsassistenten die Option Entfernen.
6. Starten Sie Ihren Computer neu, wenn Sie dazu aufgefordert werden.
3.2.2 Neuinstallation der Xonar Phoebus-Kartentreiber
So installieren Sie die Xonar Phoebus-Kartentreiber neu:
1. Vor der Neuinstallation jeglicher Software empfehlen wir die existierende Software
zuerst zu deinstallieren.
2. Nach der Deinstallation der Software folgen Sie bitte den
Installationsanweisungen, um die gleiche oder aktualisierte Software erneut zu
installieren.
U7062_Xonar-Phoebus_QSG.indb 38 18.01.2012 16:13:12 Uhr
Page 39

39
ASUS Xonar Phoebus - Schnellstartanleitung
Deutsch
Deutsch
4. Anschluß der Lautsprecher und
Peripheriegeräte
4.1 Anschluß der Phoebus Box
4.1.1 Phoebus Box anschließen
4.1.2 Phoebus Control Box mit externen Kopfhörer und Mikrofon
verbinden
Nr. Element Beschreibung
1 Mikrofoneingang
Verbinden Sie das Mikrofon von der Phoebus
Control Box mit diesen 3.5mm Mikrofoneingang für
Sprachkommunikation. Aufnahmen und Karaoke.
2 Kopfhörerausgang
Der Kopfhörerausgang hat einen eingebauten Verstärker.
Verbinden Sie die Phoebus Control Box direkt mit diesen
Ausgang.
3 Box Link
Verbinden Sie die Phoebus Control Box direkt mit diesen
Ausgang.
Nr. Element Beschreibung
1 Kopfhörerausgang
Verbinden Sie denKopfhörer mit dem Kopfhörerausgang
an der Phoebus Control Box.
2 Mikrofoneingang
Verbinden Sie den 3.5mm Mikrofonstecker mit dm
Mikrofoneingang der Phoebus Control Box.
Mic in
HP out
Box link
Line in
Front
Ctr / Sbw
Rear
Side /
SPDIF out
1
2
3
Mic In
Headphone Out
1
2
U7062_Xonar-Phoebus_QSG.indb 39 18.01.2012 16:13:15 Uhr
Page 40

40
ASUS Xonar Phoebus - Schnellstartanleitung
Deutsch
Deutsch
4.1.3 Anschluss eines digitalen Lautsprechersystems (Heimkinosystem)
Mit Xonar Phoebus können Sie die Wiedergabe über Ihr Heimkinosystem abspielen
und damit beeindruckende Surround-Sound-Ergebnisse erzielen. Eine einzige digitale
Kabelverbindung kann das hochqualitative digitale Audiosignal einer beliebigen PCAudioquelle zu jeden digitalen Lautsprechersystem oder AV-Receiver übertragen.
Nr. Element Beschreibung
1 Optischer Adapter
Stecken Sie den optischen TOSLINK-Adapter in den S/PDIFAusgangsanschluss.
2 Optisches Kabel
Verbinden Sie den S/PDIF-Eingang Ihres Decoder mit dem
optischen TOSLINK-Kabel mit dem optischen Adapter.
Mic in
HP out
Box link
Line in
Front
Ctr / Sbw
Rear
Side /
SPDIF out
2
1
U7062_Xonar-Phoebus_QSG.indb 40 18.01.2012 16:13:16 Uhr
Page 41

41
ASUS Xonar Phoebus - Schnellstartanleitung
Deutsch
Deutsch
4.1.4 Anschluss der Stereokopfhörer
So schließen Sie die Stereokopfhörer an
Mic in
HP out
Box link
Line in
Front
Ctr / Sbw
Rear
Side /
SPDIF out
Nr. Element Beschreibung
1 Kopfhörerausgang
Der Kopfhörerausgang hat einen eingebauten Verstärker.
Verbinden Sie Ihre Stereokopfhörer bitte direkt mit diesen
Anschluss.
1
U7062_Xonar-Phoebus_QSG.indb 41 18.01.2012 16:13:18 Uhr
Page 42

42
ASUS Xonar Phoebus - Schnellstartanleitung
Deutsch
Deutsch
Nr Element Beschreibung
1 Frontausgang
Verbinden Sie den 3.5mm-Stecker des Frontkanals Ihrer
5.1-Kopfhörer mit diesen Anschluss.
2 Seiten-Surround-
Ausgang
Verbinden Sie den 3.5mm-Stecker des Seiten-SurroundKanals Ihrer 5.1-Kopfhörer mit diesen Anschluss.
3 Center-/Subwoofer-
Ausgang
Verbinden Sie den 3.5mm-Stecker des Center/Subwoofer-Kanals Ihrer 5.1-Kopfhörer mit diesen
Anschluss.
5.1-Kanel-Kopfhörer anschließen
Mic in
HP out
Box link
Line in
Front
Ctr / Sbw
Rear
Side /
SPDIF out
1
2
3
U7062_Xonar-Phoebus_QSG.indb 42 18.01.2012 16:13:19 Uhr
Page 43

43
ASUS Xonar Phoebus - Schnellstartanleitung
Deutsch
Deutsch
4.1.5 Analoges Lautsprechersystem anschließen
So schließen Sie einen analogen Verstärker an
Mic in
HP out
Box link
Line in
Front
Ctr / Sbw
Rear
Side /
SPDIF out
Nr. Element Beschreibung
1 Frontausgang
Verbinden Sie diesen Ausgang über das Ministecker-aufRCA-Kabel mit den “Front rechts”- und “Front links”Anschlüssen Ihres analogen Verstärkers.
2 Seiten-Surround-
Ausgang
Verbinden Sie diesen Ausgang über das Ministeckerauf-RCA-Kabel mit den “Surrond rechts”- und “Surround
links”-Anschlüssen Ihres analogen Verstärkers.
3 Center-/Subwoofer-
Ausgang
Verbinden Sie diesen Ausgang über das Ministeckerauf-RCA-Kabel mit den “Center”- und “Subwoofer”Anschlüssen Ihres analogen Verstärkers.
1
2
3
U7062_Xonar-Phoebus_QSG.indb 43 18.01.2012 16:13:21 Uhr
Page 44

44
ASUS Xonar Phoebus - Schnellstartanleitung
Deutsch
Deutsch
2-Kanal-Lautsprecher anschließen
2 Lautsprecher
Nr. Element Beschreibung
1 Frontausgang
Verbinden Sie den 3.5mm Stecker Ihrer 2-KanalLautsprecher mit diesen Anschluss.
4-Kanal-Lautsprecher anschließen
4 Lautsprecher
Nr Element Beschreibung
1 Frontausgang
Verbinden Sie diesen Ausgang über das Ministeckerkabel mit
den Fronteingang Ihrer 4-/4.1-Lautsprecher.
2 Seiten-Surround-
Ausgang
Verbinden Sie diesen Ausgang über das Ministeckerkabel mit
den Surround-Eingang Ihrer 4-/4.1-Lautsprecher.
AUDIO
INPUTS
Mic in
HP out
Box link
Line in
Front
Ctr / Sbw
Rear
Side /
SPDIF out
1
1
2
AUDIO
INPUTS
Side
AUDIO
INPUTS
Front
Mic in
HP out
Box link
Line in
Front
Ctr / Sbw
Rear
Side /
SPDIF out
U7062_Xonar-Phoebus_QSG.indb 44 18.01.2012 16:13:22 Uhr
Page 45

45
ASUS Xonar Phoebus - Schnellstartanleitung
Deutsch
Deutsch
5.1-Kanal-Lautsprecher anschließen
5.1 Lautsprecher
Mic in
HP out
Box link
Line in
Front
Ctr / Sbw
Rear
Side /
SPDIF out
Side
Front
Center/
Subwoofer
AUDIO
INPUTS
Nr. Element Beschreibung
1 Frontausgang
Verbinden Sie diesen Ausgang über das Ministeckerkabel
mit den Fronteingang Ihrer 5.1-Lautsprecher.
2 Seiten-Surround-
Ausgang
Verbinden Sie diesen Ausgang über das Ministeckerkabel
mit den Surround-Eingang Ihrer 5.1-Lautsprecher.
3 Center/
Subwoofer
Verbinden Sie diesen Ausgang über das Ministeckerkabel
mit den Center-/Subwoofer-Eingang Ihrer 5.1-Lautsprecher.
1
2
3
U7062_Xonar-Phoebus_QSG.indb 45 18.01.2012 16:13:24 Uhr
Page 46

46
ASUS Xonar Phoebus - Schnellstartanleitung
Deutsch
Deutsch
7.1-Kanal-Lautsprecher anschließen
7.1 Lautsprecher
Rear
Side
Front
Center/
Subwoofer
AUDIO
INPUTS
AUDIO
INPUTS
Mic in
HP out
Box link
Line in
Front
Ctr / Sbw
Rear
Side /
SPDIF out
Nr. Element Beschreibung
1 Frontausgang
Verbinden Sie diesen Ausgang über das Ministeckerkabel
mit den Fronteingang Ihrer 7.1-Lautsprecher.
2 Seiten-Surround-
Ausgang
Verbinden Sie diesen Ausgang über das Ministeckerkabel
mit den Seiten-Surround-Eingang Ihrer 7.1-Lautsprecher.
3 Center/
Subwoofer
Verbinden Sie diesen Ausgang über das Ministeckerkabel
mit den Center-/Subwoofer-Eingang Ihrer 7.1-Lautsprecher.
4 Hinten-Surround-
Ausgang
Verbinden Sie diesen Ausgang über das Ministeckerkabel
mit den Hinten-Surround-Eingang Ihrer 7.1-Lautsprecher.
1
3
4
2
U7062_Xonar-Phoebus_QSG.indb 46 18.01.2012 16:13:25 Uhr
Page 47

47
ASUS Xonar Phoebus - Schnellstartanleitung
Deutsch
Deutsch
4.1.6 Mikrofon anschließen
2
Mic in
HP out
Box link
1
2
1
1
Nr. Element Beschreibung
1 Mikrofoneingang
Verbinden Sie das Mikrofon mit diesen 3.5mm
Mikrofoneingang für Sprachkommunikation. Aufnahmen
und Karaoke.
2 Kopfhörerausgang
Der Kopfhörerausgang hat einen eingebauten Verstärker.
Verbinden Sie Ihre Stereokopfhörer bitte direkt mit diesen
Anschluss.
4.1.7 Line-In-Audioquellen anschließen
CD Player
MP3 Player
Mic in
HP out
Box link
Line in
Front
Ctr / Sbw
Rear
Side /
SPDIF out
Nr. Element Beschreibung
1 Line In-
Anschluss
Verbinden Sie den 3.5mm-Stecker Ihres CD-/MP3-Players oder
einer anderen geeigneten Audioquelle für die Tonaufnahme
mit diesem Line In-Anschluss.
1
U7062_Xonar-Phoebus_QSG.indb 47 18.01.2012 16:13:28 Uhr
Page 48

48
ASUS Xonar Phoebus - Guida Rapida
Italiano
Italiano
1. Introduzione
1.1 Requisiti del sistema
Per garantire una corretta installazione della scheda Xonar Phoebus, il computer deve
soddisfare i seguenti requisiti:
• Uno slot PCI Express 1.0 (o superiore) per la scheda audio.
• Connettore cavo di alimentazione periferico a 6-pin proveniente dall’unità di
alimentazione del computer (PSU)
• Microsoft® Windows® Vista / 7 (32/64bit) / XP (32/64bit) / MCE2005
• CPU Intel® Pentium® 4 1.4 GHz o AMD® Athlon 1400 CPU più potente.
• Memoria di sistema superiore a 256 MB.
• Oltre 60 MB di spazio libero per l’installazione dei driver.
• Drive CD-ROM (oppure DVD-ROM) per l’installazione del software.
• Cue di alta qualità, altoparlanti analogici alimentati o decodicatore Dolby Digital,
per una riproduzione audio ad altissima fedeltà.
1.2 Contenuto della Confezione
Controllare che nella confezione della scheda audio ASUS Xonar Phoebus siano contenuti
i seguenti articoli:
• Scheda audio PCI Express a 7.1 Canali ASUS XonarTM Phoebus
• Modulo di controllo Phoebus.
• CD Driver
• Adattatore ottico S/PDIF TOSLINK x 1
• Cavo di alimentazione ATX 4P-to- 6P x 1
• Guida Rapida
U7062_Xonar-Phoebus_QSG.indb 48 18.01.2012 16:13:29 Uhr
Page 49

49
ASUS Xonar Phoebus - Guida Rapida
Italiano
Italiano
2. Hardware
2.1 Scheda di elaborazione audio Xonar Phoebus
1
2
3
4
5
6
7
8
9
10
11
12
Mic in
HP out
Box link
Line in
Front
Ctr / Sbw
Rear
Side /
SPDIF out
1
2
3
4
5
6
7
8
U7062_Xonar-Phoebus_QSG.indb 49 18.01.2012 16:13:31 Uhr
Page 50

50
ASUS Xonar Phoebus - Guida Rapida
Italiano
Italiano
No Elemento Descrizione
1
Porta Ingresso
Microfono
Collegare il microfono esterno del PC a questa porta da
3.5mm per l’ingresso vocale. Pre-amplicatore integrato di
alta qualità per microfono.
2 Porta Uscita Cufe
Collegare le cue a questa porta.
3 Box Link
Collegare il modulo di controllo della scheda Xonar
Phoebus a questa porta da 2.5mm.
4
Porta ingresso linea
audio
Collegare dispositivi analogici, come lettori MP3, lettori di
CD, sintetizzatori musicali e altre sorgenti audio a livello
di linea a questa porta da 3.5mm per registrazioni o
elaborazioni audio.
5
Porta Uscita
Frontale
Nei sistemi di altoparlanti a 2 canali, collega all’ingresso di
destra/sinistra e frontale su altoparlanti alimentati.
6
Porta Uscita
Centro/Subwoofer
Collega all’ingresso centro/subwoofer su altoparlanti
analogici alimentati 5.1/7.1.
7
Porta Uscita
Posteriore
Collega all’ingresso surround posteriore su altoparlanti
analogici alimentati 7.1.
8
Uscita altoparlanti
laterali/ Uscita
S/PDIF
Uscita digitale coassiale. Collega ad un decodicatore
digitale esterno o a sistemi di altoparlanti digitali, sistemi
Home Theater, ricevitori AV per l’uscita audio digitale,
fra cui PCM, Dolby Digital, DTS, WMA-Pro, ecc. Collegare
questa porta all’ingresso del canale laterale surround su
altoparlanti analogici alimentati (4/5)/7.1.
9
Header Ingresso
Aux
Header a 4-pin. Di solito, collega all’uscita Audio Analogica
della scheda di sintonizzazione TV o ad altra sorgente
audio all’interno del sistema del PC (per monitorare l’audio
della scheda di sintonizzazione TV dall’ingresso Audio, si
deve attivare la funzione “monitor” per Aux-In nel mixer di
registrazione del Centro Audio Xonar DSX).
10
Header Uscita
S/PDIF
Collega alla scheda graca con il supporto HDMI.
11
Connettore
alimentazione
Collega al cavo di alimentazione a 6-pin dell’unità di
alimentazione.
12
Dentelli dorati Bus
PCI Express
Da inserire nello slot PCI Express della scheda madre.
U7062_Xonar-Phoebus_QSG.indb 50 18.01.2012 16:13:32 Uhr
Page 51

51
ASUS Xonar Phoebus - Guida Rapida
Italiano
Italiano
2.1 Installazione della Scheda
Prima di iniziare l’installazione, si consiglia di disattivare il dispositivo audio sulla scheda
madre, nelle impostazioni del BIOS, o di disinstallare tutte le altre schede audio sul PC.
Per le impostazioni del BIOS o la rimozione di altre schede audio, consultare il manuale
utente della scheda madre e della scheda audio.
La scheda audio PCI Express di alta qualità necessita di alimentazione supplementare
dal computer. Se il cavo di alimentazione non è correttamente collegato, la scheda
audio non funziona.
2.1.1 Procedura di Installazione della Scheda Xonar Phoebus
1. SPEGNERE computer, monitor e tutte le
altre periferiche collegate al computer.
2. Disinserire il cavo di alimentazione del
computer dal computer e dalla presa di
corrente
3. Toccare il pannello laterale o posteriore
in metallo del computer
per evitare elettricità statica.
4. Rimuovere la copertura del telaio.
5. Rimuovere il supporto metallico da
uno slot libero PCIE per la scheda audio
Xonar Phoebus.
6. Inserire delicatamente la scheda audio nello slot PCIE. Assicurarsi che la scheda sia
correttamente installata.
Non forzare la scheda audio nello slot. Prima di inserire la scheda nello slot PCI
Express, assicurarsi che i dentelli dorati del connettore PCI Express della scheda
audio siano allineati al connettore PCI Express della scheda madre. Se non si inserisce
correttamente, rimuoverla e inserirla di nuovo.
7. Fissare la scheda audio con le viti e il supporto metallico.
8. Rimontare la copertura del telaio.
9. Ricollegare tutti i cavi.
10. Inserire il cavo di alimentazione nel computer e in una presa a muro.
11. ACCENDERE il computer.
U7062_Xonar-Phoebus_QSG.indb 51 18.01.2012 16:13:34 Uhr
Page 52

52
ASUS Xonar Phoebus - Guida Rapida
Italiano
Italiano
2.1.2 Connessione della scheda di sintonizzazione TV
Se nel computer è installata una scheda di sintonizzazione TV tradizionale PCI o PCI
Express, potrebbe essere necessario collegarla alla scheda audio per inviarne il suono
agli altoparlanti del computer.
1. Installare la scheda di sintonizzazione TV PCI/PCI Express TV e ssarla con una vite
al pannello posteriore.
2. Collegare l’header dell’uscita audio della scheda di sintonizzazione TV con l’header
Aux-In della scheda audio, come mostrato nella gura di seguito.
Per ottimizzare la qualità audio dei canali televisivi, la scheda Xonar converte il segnale
televisivo ADC in segnale DAC. Selezionare Aux-In come sorgente di registrazione nel
mixer di registrazione del Centro Audio Xonar e attivare il pulsante di monitoraggio
per trasmettere il segnale all’uscita audio. In questo modo, è possibile attivare eetti
sonori come Pro-Logic IIx per espandere l’audio stereo televisivo in surround a 5.1 o
7.1 canali. L’audio dei canali televisivi riprodotto sul PC sarà persino migliore di quello
del televisore.
U7062_Xonar-Phoebus_QSG.indb 52 18.01.2012 16:13:36 Uhr
Page 53

53
ASUS Xonar Phoebus - Guida Rapida
Italiano
Italiano
3. Installazione Driver
3.1 Installazione dei driver della scheda Xonar Phoebus
Per installare i driver della scheda Xonar Phoebus:
1. Dopo aver installato la scheda Xonar Phoebus, accendere il computer. Windows
®
rileva
automaticamente la scheda audio ed inizia la ricerca dei driver del dispositivo. Alla
richiesta dei driver audio, cliccare Cancel (Annulla).
2. Inserire il CD di supporto nell’unità ottica.Se nel sistema è attivata la funzione
di esecuzione automatica, l’installazione ha inizio automaticamente. In caso
contrario, eseguire setup.exe dal CD di supporto.
3. Seguire le istruzioni sullo schermo per completare l’installazione.
La versione e il contenuto del CD di supporto sono soggetti a variazioni senza
obbligo di preavviso.
3.2 Rimozione o reinstallazione dei driver della scheda
Xonar Phoebus
3.2.1 Rimozione del driver della scheda Xonar Phoebus
Per installare i driver della scheda Xonar Phoebus:
1. Cliccare su Start -> Settings -> Control Panel.
2. Fare doppio clic sull’icona Add/Remove Programs.
3. Premere il pulsante Change or Remove Programs.
4. Selezionare il programma da rimuovere, quindi premere il pulsante Add/Remove
(oppure Change/Remove).
5. Nella nestra di dialogo InstallShield Wizard, selezionare l’opzione Remove.
6. A richiesta, riavviare il computer.
3.2.2 Reinstallazione dei driver della scheda Xonar Phoebus
Per reinstallare i driver della scheda Xonar Phoebus:
1. Prima di reinstallare qualunque software, è consigliabile rimuovere il software
esistente.
2. Al termine della rimozione del software, seguire di nuovo la procedura di
installazione per reinstallare lo stesso software o una versione aggiornata.
U7062_Xonar-Phoebus_QSG.indb 53 18.01.2012 16:13:36 Uhr
Page 54

54
ASUS Xonar Phoebus - Guida Rapida
Italiano
Italiano
4. Connessione di altoparlanti e periferiche
4.1 Connessione del modulo di controllo Phoebus
4.1.1 Connessione del modulo di controllo Phoebus
4.1.2 Connessione del modulo di controllo Phoebus con microfono e
cue esterne
No Elemento Descrizione
1 Ingresso
Microfono
Inserire la spina del microfono da 3.5mm del modulo
di controllo Phoebus in questa porta Mic-In per la
comunicazione vocale, registrazione o il karaoke.
2 Porta Cufe
La porta per le cue è dotata di un amplicatore integrato
di alta qualità. Inserire le cue direttamente in questo
connettore.
3 Porta Box Link
Inserire il connettore del modulo di controllo Phoebus
direttamente in questa porta.
No Elemento Descrizione
1 Porta Cufe
Collegare le cue alla porta per le cue sul modulo di
controllo Phoebus.
2 Ingresso
Microfono
Inserire il connettore da 3.5mm del microfono nella porta
Mic-In sul modulo di controllo Phoebus.
Mic In
Headphone Out
1
2
Mic in
HP out
Box link
Line in
Front
Ctr / Sbw
Rear
Side /
SPDIF out
1
2
3
U7062_Xonar-Phoebus_QSG.indb 54 18.01.2012 16:13:39 Uhr
Page 55

55
ASUS Xonar Phoebus - Guida Rapida
Italiano
Italiano
4.1.3 Connessione di sistemi di altoparlanti digitali
(Home Theater)
Xonar Phoebus rende possibile la riproduzione audio tramite un sistema “Home Theater”,
creando un audio surround di grande eetto. Una singola connessione digitale via cavo
è in grado di trasmettere audio digitale di alta qualità da qualunque sorgente audio del
computer su ricevitori AV o altoparlanti digitali di qualunque tipo.
No Elemento Descrizione
1 Adattatore
ottico
Inserire l’adattatore ottico TOSLINK nel connettore S/PDIFOut.
2 Cavo ottico
TOSLINK
Collegare la porta S/PDIF-In del decodicatore all’adattatore
ottico tramite il cavo ottico TOSLINK.
Mic in
HP out
Box link
Line in
Front
Ctr / Sbw
Rear
Side /
SPDIF out
2
1
U7062_Xonar-Phoebus_QSG.indb 55 18.01.2012 16:13:41 Uhr
Page 56

56
ASUS Xonar Phoebus - Guida Rapida
Italiano
Italiano
4.1.4 Connessione delle cue stereo
Connessione delle cue stereo
No Elemento Descrizione
1 Uscita cufe
L’uscita cue è dotata di un amplicatore integrato di alta
qualità. Inserire le cue stereo direttamente in questo
connettore.
Mic in
HP out
Box link
Line in
Front
Ctr / Sbw
Rear
Side /
SPDIF out
1
U7062_Xonar-Phoebus_QSG.indb 56 18.01.2012 16:13:42 Uhr
Page 57

57
ASUS Xonar Phoebus - Guida Rapida
Italiano
Italiano
No Elemento Descrizione
1 Uscita frontale
Inserire la spina da 3.5mm del canale frontale delle cue a 5.1
canali in questo jack.
2 Uscita laterale
Surround
Inserire la spina da 3.5mm del canale surround delle cue a
5.1 canali in questo jack.
3 Uscita centro/
subwoofer
Inserire la spina da 3.5mm del canale centro/bassi delle cue
a 5.1 canali in questo jack.
Connessione di cue a 5.1 canali
Mic in
HP out
Box link
Line in
Front
Ctr / Sbw
Rear
Side /
SPDIF out
1
2
3
U7062_Xonar-Phoebus_QSG.indb 57 18.01.2012 16:13:44 Uhr
Page 58

58
ASUS Xonar Phoebus - Guida Rapida
Italiano
Italiano
4.1.5 Connessione di sistemi di altoparlanti analogici
Connessione di amplicatori analogici alimentati
No Elemento Descrizione
1 Uscita
Frontale
Collega all’ingresso “frontale sinistro” e “frontale destro”
dell’amplicatore analogico tramite il cavo da mini-jack a RCA.
2 Uscita laterale
Surround
Collega all’ingresso “surround sinistro” e “surround destro”
dell’amplicatore analogico tramite il cavo da mini-jack a RCA.
3 Centro/
Subwoofer
Collega all’ingresso “centro” e “subwoofer” dell’amplicatore
analogico tramite il cavo da mini-jack a RCA.
Mic in
HP out
Box link
Line in
Front
Ctr / Sbw
Rear
Side /
SPDIF out
1
2
3
U7062_Xonar-Phoebus_QSG.indb 58 18.01.2012 16:13:45 Uhr
Page 59

59
ASUS Xonar Phoebus - Guida Rapida
Italiano
Italiano
Connessione di altoparlanti a 2 canali
2 altoparlanti
No Elemento Descrizione
1 Uscita frontale
Jack dove inserire la spina da 3.5mm del set di altoparlanti
a 2 canali.
Connessione di altoparlanti a 4 canali
4 altoparlanti
No Elemento Descrizione
1 Uscita frontale
Collega all’ingresso frontale degli altoparlanti 4/4.1 mediante
il cavo mini-jack.
2 Uscita laterale
Surround
Collega all’ingresso surround degli altoparlanti 4/4.1 mediante il
cavo mini-jack.
AUDIO
INPUTS
Mic in
HP out
Box link
Line in
Front
Ctr / Sbw
Rear
Side /
SPDIF out
1
1
2
AUDIO
INPUTS
Side
AUDIO
INPUTS
Front
Mic in
HP out
Box link
Line in
Front
Ctr / Sbw
Rear
Side /
SPDIF out
U7062_Xonar-Phoebus_QSG.indb 59 18.01.2012 16:13:47 Uhr
Page 60

60
ASUS Xonar Phoebus - Guida Rapida
Italiano
Italiano
Connessione di altoparlanti a 5.1 canali
Altoparlanti a 5.1 canali
No Elemento Descrizione
1 Uscita frontale
Collega all’ingresso frontale degli altoparlanti a 5.1 canali
tramite il cavo mini-jack.
2 Uscita laterale
Surround
Collega all’ingresso surround degli altoparlanti a 5.1 canali
tramite il cavo mini-jack.
3 Center/
Subwoofer
Collega all’ingresso centro/subwoofer degli altoparlanti a 5.1
canali tramite il cavo mini-jack.
Mic in
HP out
Box link
Line in
Front
Ctr / Sbw
Rear
Side /
SPDIF out
Side
Front
Center/
Subwoofer
AUDIO
INPUTS
1
2
3
U7062_Xonar-Phoebus_QSG.indb 60 18.01.2012 16:13:48 Uhr
Page 61

61
ASUS Xonar Phoebus - Guida Rapida
Italiano
Italiano
Connessione di altoparlanti a 7.1 canali
Altoparlanti a 7.1 canali
No Elemento Descrizione
1 Uscita frontale
Collega all’ingresso frontale degli altoparlanti a 7.1 canali
mediante il cavo mini-jack.
2 Uscita laterale
Surround
Collega all’ingresso surround degli altoparlanti a 7.1 canali
mediante il cavo mini-jack.
3 Centro/
Subwoofer
Collega all’ingresso centro/subwoofer degli altoparlanti a
7.1 canali mediante il cavo mini-jack.
4 Uscita posteriore
Surround
Collega all’ingresso surround posteriore degli altoparlanti a
7.1 canali mediante il cavo mini-jack.
Rear
Side
Front
Center/
Subwoofer
AUDIO
INPUTS
AUDIO
INPUTS
Mic in
HP out
Box link
Line in
Front
Ctr / Sbw
Rear
Side /
SPDIF out
1
3
4
2
U7062_Xonar-Phoebus_QSG.indb 61 18.01.2012 16:13:50 Uhr
Page 62

62
ASUS Xonar Phoebus - Guida Rapida
Italiano
4.1.6 Connessione microfono
No Elemento Descrizione
1 Ingresso
microfono
Inserire la spina a 3.5mm del microfono in questa porta
Mic-In per la comunicazione vocale, la registrazione audio o
il karaoke.
2 Porta cufe
Questa porta è provvista di amplicatori integrati di alta
qualità. Inserire le cue stereo direttamente in questo jack.
4.1.7 Connessione sorgenti audio Line-In
No Elemento Descrizione
1 Porta Line In
Collegare la spina da 3.5mm di un lettore CD/MP3 o
qualunque altra sorgente audio analogica a livello di linea a
questo jack per la registrazione audio.
2
Mic in
HP out
Box link
1
2
1
1
CD Player
MP3 Player
Mic in
HP out
Box link
Line in
Front
Ctr / Sbw
Rear
Side /
SPDIF out
1
U7062_Xonar-Phoebus_QSG.indb 62 18.01.2012 16:13:52 Uhr
Page 63

63
Guía de inicio rápido de ASUS Xonar Phoebus
Español
1. Introducción
1.1 Requisitos del sistema
Antes de instalar la tarjeta de audio Xonar Phoebus, asegúrese de que el equipo cumple
los siguientes requisitos:
• Tener una ranura compatible con PCIE 1.0 (o superior) para la tarjeta de audio
• Conector de cable de alimentación de 6 contactos para periféricos desde la unidad
de la fuente de alimentación del equipo (PSU, Power Supply Unit)
• Microsoft® Windows® Vista / 7 (32/64bit) / XP (32/64bit) / MCE2005
• Procesador Intel® Pentium® 4 a 1,4 GHz o AMD Athlon 1400, o un procesador más
rápido
• 256 MB de memoria de sistema como mínimo
• 60 MB de espacio de almacenamiento disponible como mínimo para instalar el
controlador
• Unidad de CD-ROM (o DVD-ROM) para instalar el software
• Auriculares de alta calidad, altavoces analógicos alimentados o un descodicador
Dolby Digital para disfrutar de sonido de alta delidad de la tarjeta de audio
1.2 Contenido del paquete
Revise el paquete de la tarjeta de audio ASUS Xonar Phoebus para comprobar que contiene
los siguientes elementos:
• Tarjeta de audio PCI Express de 7.1 canales ASUS XonarTM Phoebus 7.1
• Caja de control Phoebus
• CD con los controladores
• Adaptador óptico TOSLINK S/PDIF x1
• Cable de alimentación de 4 contactos a 6 contactos ATX x 1
• Guía de inicio rápido x1
U7062_Xonar-Phoebus_QSG.indb 63 18.01.2012 16:13:53 Uhr
Page 64

64
Guía de inicio rápido de ASUS Xonar Phoebus
Español
Español
2. Hardware
2.1 Tarjeta de procesamiento de audio Xonar Phoebus
Mic in
HP out
Box link
Line in
Front
Ctr / Sbw
Rear
Side /
SPDIF out
1
2
3
4
5
6
7
8
1
2
3
4
5
6
7
8
9
10
11
12
U7062_Xonar-Phoebus_QSG.indb 64 18.01.2012 16:13:55 Uhr
Page 65

65
Guía de inicio rápido de ASUS Xonar Phoebus
Español
Español
Nº Elemento Descripción
1
Puerto Entrada de
micrófono
Conecte el micrófono externo de su PC a este puerto
de 3,5mm para la entrada de voz. Preamplicador de
micrófono de alta calidad integrado.
2
Puerto para
Auriculares
Conecte los auriculares a este puerto.
3 Enlace de la caja
Conecte la Caja de control Xonar Phoebus a este puerto de
2,5 mm.
4
Puerto Entrada de
línea
Conecte dispositivos analógicos como reproductores MP3,
reproductores de CD, sintetizadores de música y otras
fuentes de sonido de nivel de línea a este puerto de 3,5 mm
para grabar o procesar audio.
5
Puerto para Salida
Frontal
Para sistemas de altavoces de 2 canales, se conecta a la
entrada frontal izquierda/derecha de los altavoces que
estén encendidos.
6
Puerto de Salida
Central/Altavoz de
Graves
Conecta a la entrada central/altavoz de graves en altavoces
analógicos con sistemas 5.1/7.1.
7 Puerto Salida posterior
Conecta a la entrada Posterior de sonido Envolvente en
altavoces analógicos con sistemas 7.1.
8
Puerto Salida S/PDIF/
Salida lateral
Puerto de salida digital coaxial. Permite conectar un
descodicador digital externo o sistemas de altavoces
digitales, sistemas de Cine en casa, receptores de AV para
enviar señales de audio digitales como PCM, Dolby Digital,
DTS, WMA-Pro, etc. Conecta a la entrada del canal de
sonido envolvente en altavoces analógicos con sistemas
4//5/7.1.
9
Base de conexiones
del panel frontal
Permite conectar el panel frontal de la carcasa del equipo
con un cable de base de conexiones de 9 contactos.
10
Base de conexiones de
entrada auxiliar
Base de conexiones de 4 contactos. Normalmente
permite conectar la salida Audio analógico de la tarjeta
de sintonización de TV u otra fuente de sonido de su PC.
Para controlar el audio de la tarjeta de sintonización de
TV desde esta entrada auxiliar, debe habilitar la función
“monitor” para Entrada auxiliar en el mezclador de
grabación del software Xonar Audio Center.
11
Conector de salida
S/PDIF
Para conectarse a la tarjeta gráca con funcionalidad HDMI.
12
Contactos dorados del
bus PCI
Insertar en la ranura PCI Express de la placa base.
U7062_Xonar-Phoebus_QSG.indb 65 18.01.2012 16:13:56 Uhr
Page 66

66
Guía de inicio rápido de ASUS Xonar Phoebus
Español
Español
2.1 Instalación de la
Antes de continuar con los siguientes pasos de instalación, es recomendable
deshabilitar el dispositivo de audio integrado en la conguración del BIOS o
desinstalar cualquier otra tarjeta de audio de su PC. Para obtener información sobre
la conguración del BIOS o la desinstalación de otras tarjetas de sonido, consulte los
manuales de usuario de la placa base y la tarjeta de audio.
La tarjeta de audio de alta calidad requiere alimentación adicional del equipo. Si
el cable de alimentación no está correctamente conectado, la tarjeta de audio no
funcionara.
2.1.1 Instalar la tarjeta Xonar Phoebus
Para instalar la tarjeta de audio Xonar
Phoebus:
1. APAGUE el equipo, el monitor y todos
los dispositivos periféricos conectados
al primero.
2. Desenchufe el cable de alimentación
del equipo y de la toma de corriente
eléctrica.
3. Toque el panel posterior o lateral
metálico del equipo para descargar la
electricidad estática.
4. Retire la tapa del chasis.
5. Extraiga el soporte de metal de una
ranura PCIE que esté disponible para la instalación de la tarjeta de sonido Xonar
Phoebus.
6. Inserte con cuidado la tarjeta de sonido en la ranura PCIE.
No fuerce la tarjeta de audio en la ranura. Asegúrese de que los contactos dorados
del conector PCI Express están alineados con el conector PCI Express de la placa
base antes de insertar la tarjeta en la ranura PCI Express. Si no encaja correctamente,
quítela con cuidado e inténtelo de nuevo.
7. Asegure la tarjeta de audio con los tornillos y el cierre metálico.
8. Vuelva a colocar la tapa del chasis.
9. Conecte de nuevo todos los cables.
10. Enchufe el cable de alimentación a su PC y a una toma de corriente eléctrica.
11. ENCIENDA el equipo.
U7062_Xonar-Phoebus_QSG.indb 66 18.01.2012 16:13:59 Uhr
Page 67

67
Guía de inicio rápido de ASUS Xonar Phoebus
Español
Español
2.1.2 Conectar la tarjeta de sintonización de TV
Si tiene una tarjeta de sintonización de TV PCI tradicional o PCI Express en el equipo,
puede que necesite conectarla a la tarjeta de audio para transmitir el sonido de la tarjeta
de sintonización a los altavoces del equipo.
1. Asegure la tarjeta de sintonización de TV PCI/PCI Express y atorníllela al panel
posterior.
2. Conecte la base de conexiones de salida de audio entre la tarjeta de sintonización
de TV y la base de conexiones Entrada auxiliar de la tarjeta de audio tal y como se
muestra la gura siguiente.
Para obtener una calidad de audio de TV óptima, Xonar utiliza grabación ADC para
digitalizar la señal y autoconectarla para reproducción DAC. Seleccione Entrada
auxiliar como la fuente grabación en el mezclador de Xonar Audio Center y habilite el
botón de supervisión para pasar esta señal a la salida de audio. Mediante este paso,
puede incluso activar efectos de sonidos como Pro-Logic IIx para expandir el audio
del televisor a sonido envolvente de 5,1 o 7,1 canales. ¡El audio del televisor en su PC
será incluso mejor que en el televisor!
U7062_Xonar-Phoebus_QSG.indb 67 18.01.2012 16:14:00 Uhr
Page 68

68
Guía de inicio rápido de ASUS Xonar Phoebus
Español
Español
3. Driver Installation
3.1 Instalar el controlador de la tarjeta Xonar Phoebus
Para instalar el controlador de la tarjeta Xonar Phoebus:
1. Una vez instalada la tarjeta Xonar Phoebus, apague el equipo. Windows® detectará
la tarjeta de audio y buscará los controlares del dispositivo automáticamente.
Cuando el sistema le pregunte por los controladores, haga clic en Cancelar.
2. Inserte el CD de soporte en la unidad óptica. Si la función de ejecución automática
está habilitada en el sistema, la instalación se iniciará automáticamente. En caso
contrario, ejecute el programa setup.exe desde el CD de soporte.
3. Siga las instrucciones en pantalla para nalizar la instalación.
La versión y contenido del CD de soporte están sujetos a cambio sin previo aviso.
3.2 Desinstalar o reinstalar el controlador de la tarjeta
Xonar Phoebus
3.2.1 Desinstalar el controlador de la tarjeta Xonar Phoebus
Para desinstalar el controlador de la tarjeta Xonar Phoebus:
1. Haga clic en Start (Inicio) -> Settings (Conguración) -> Control Panel (Panel
de control).
2. Haga doble clic en el icono Add/Remove Programs (Agregar o quitar
programas).
3. Haga clic en el botón Change or Remove Programs (Cambiar o quitar
programas).
4. Seleccione cada programa que desee quitar y, a continuación, haga clic en el
botón Add/Remove (Agregar o quitar) (or Change/Remove (o Cambiar/
Quitar)).
5. En el cuadro de diálogo InstallShield Wizard (Asistente de InstallShield),
seleccione la opción Remove (Quitar).
6. Reinicie el equipo cuando el sistema se lo indique.
3.2.2 Reinstalar el controlador de la tarjeta Xonar Phoebus
Para reinstalar el controlador de la tarjeta Xonar Phoebus:
1. Antes de reinstalar cualquier software, es recomendable desinstalar primero el
software existente.
2. Después de nalizar la desinstalación del software, siga de nuevo el proceso de
instalación para reinstalar el mismo software o el software actualizado.
U7062_Xonar-Phoebus_QSG.indb 68 18.01.2012 16:14:01 Uhr
Page 69

69
Guía de inicio rápido de ASUS Xonar Phoebus
Español
Español
4. Conectar altavoces y periféricos
4.1 Conectar la Caja de Phoebus
4.1.1 Conectar la Caja de Phoebus
4.1.2 Conectar la Caja de control Phoebus con los auriculares y el
micrófono externo
Nº Elemento Descripción
1 Puerto Entrada de
micrófono
Conecte el enchufe de 3,5 mm procedente del micrófono
de la Caja de control Phoebus en este puerto Entrada de
micrófono para comunicación de voz, grabación o karaoke.
2 Puerto para
auriculares
El puerto para auriculares tiene un amplicador de alta calidad
integrado que permite gobernar los auriculares. Conecte la
Caja de control de Phoebus directamente a este puerto.
3 Puerto de enlace de
la caja
Conecte la Caja de control de Phoebus directamente a este
puerto.
Nº Elemento Descripción
1 Puerto para
auriculares
Conecte los auriculares al puerto de auriculares de la caja
de control Phoebus.
2 Puerto Entrada de
micrófono
Conecte el enchufe de 3,5 mm del micrófono al puerto
Entrada de micrófono de la Caja de control Phoebus.
Mic in
HP out
Box link
Line in
Front
Ctr / Sbw
Rear
Side /
SPDIF out
1
2
3
Mic In
Headphone Out
1
2
U7062_Xonar-Phoebus_QSG.indb 69 18.01.2012 16:14:03 Uhr
Page 70

70
Guía de inicio rápido de ASUS Xonar Phoebus
Español
Español
4.1.3 Conectar un sistema de altavoces digitales (cine en casa)
Con Xonar Phoebus es posible llevar a cabo las reproducciones a través del sistema
de cine en casa, creando una experiencia de sonido envolvente impresionante. Una
sola conexión por cable digital puede transportar el audio digital de alta calidad desde
cualquier fuente de audio de PC a cualquier altavoz digital o receptor de AV.
Nº Elemento Descripción
1 Adaptador óptico
Enchufe el adaptador TOSLINK óptico en el conector Salida
S/PDIF.
2 Cable óptico
Conecte el puerto de entrada S/PDIF del descodicador al
adaptador óptico con el cable óptico TOSLINK.
Mic in
HP out
Box link
Line in
Front
Ctr / Sbw
Rear
Side /
SPDIF out
2
1
U7062_Xonar-Phoebus_QSG.indb 70 18.01.2012 16:14:05 Uhr
Page 71

71
Guía de inicio rápido de ASUS Xonar Phoebus
Español
Español
4.1.4 Conectar auriculares estéreo
Conectar auriculares estéreo
Nº Elemento Descripción
1 Puerto Salida de
auriculares
El puerto Salida de auriculares tiene un amplicador de alta
calidad integrado que permite gobernar los auriculares.
Enchufe los auriculares estéreo directamente a este
conector.
Mic in
HP out
Box link
Line in
Front
Ctr / Sbw
Rear
Side /
SPDIF out
1
U7062_Xonar-Phoebus_QSG.indb 71 18.01.2012 16:14:07 Uhr
Page 72

72
Guía de inicio rápido de ASUS Xonar Phoebus
Español
Español
Nº Elemento Descripción
1 Salida frontal
Inserte el enchufe de 3,5 mm del canal frontal de los
auriculares 5.1 en este conector.
2 Salir envolvente
lateral
Inserte el enchufe de 3,5 mm del canal envolvente de los
auriculares 5.1 en este conector
3 Salida central y
amplicador de
graves
Inserte el enchufe de 3,5 mm del canal central y de graves de
los auriculares 5.1 en este conector
Conectar auriculares de 5.1 canales
Mic in
HP out
Box link
Line in
Front
Ctr / Sbw
Rear
Side /
SPDIF out
1
2
3
U7062_Xonar-Phoebus_QSG.indb 72 18.01.2012 16:14:08 Uhr
Page 73

73
Guía de inicio rápido de ASUS Xonar Phoebus
Español
Español
4.1.5 Conectar sistemas de altavoces analógicos
Conectar un amplicador de potencia analógico
Nº Elemento Descripción
1 Salida frontal
Permite conectar los puertos de entrada “frontal izquierdo” y
“frontal derecho” del amplicador analógico mediante el cable
miniconector a RCA.
2 Salir envolvente
lateral
Permite conectar los puertos de entrada “envolvente izquierdo”
y “envolvente derecho” del amplicador analógico mediante el
cable miniconector a RCA.
3 Salida central y
amplicador de
graves
Permite conectar los puertos de entrada “Center” and
“subwoofer” del amplicador analógico mediante el cable
miniconector a RCA.
Mic in
HP out
Box link
Line in
Front
Ctr / Sbw
Rear
Side /
SPDIF out
1
2
3
U7062_Xonar-Phoebus_QSG.indb 73 18.01.2012 16:14:10 Uhr
Page 74

74
Guía de inicio rápido de ASUS Xonar Phoebus
Español
Español
Conectar altavoces de 2 canales
2 altavoces
Nº Elemento Descripción
1 Salida frontal
Inserte el enchufe de 3,5 mm del juego de altavoces de 2
canales a este conector Salida frontal.
Conectar altavoces de 4 canales
4 altavoces
Nº Elemento Descripción
1 Salida frontal
Permite conectar el puerto de entrada frontal de los altavoces
4/4.1 con el cable de miniconector.
2 Salir envolvente
lateral
Permite conectar el puerto de entrada envolvente de los
altavoces 4/4.1 con el cable de miniconector.
AUDIO
INPUTS
Mic in
HP out
Box link
Line in
Front
Ctr / Sbw
Rear
Side /
SPDIF out
1
1
2
AUDIO
INPUTS
Side
AUDIO
INPUTS
Front
Mic in
HP out
Box link
Line in
Front
Ctr / Sbw
Rear
Side /
SPDIF out
U7062_Xonar-Phoebus_QSG.indb 74 18.01.2012 16:14:12 Uhr
Page 75

75
Guía de inicio rápido de ASUS Xonar Phoebus
Español
Español
Conectar altavoces de 5.1 canales
5.1 altavoces
Nº Elemento Descripción
1 Salida frontal
Permite conectar el puerto de entrada frontal de los
altavoces 5.1 con el cable de miniconector.
2 Salir envolvente
lateral
Permite conectar el puerto de entrada envolvente de los
altavoces 5.1 con el cable de miniconector.
3 Salida central y
amplicador de
graves
Permite conectar el puerto de entrada central y de graves de
los altavoces 5.1 con el cable de miniconector.
Mic in
HP out
Box link
Line in
Front
Ctr / Sbw
Rear
Side /
SPDIF out
Side
Front
Center/
Subwoofer
AUDIO
INPUTS
1
2
3
U7062_Xonar-Phoebus_QSG.indb 75 18.01.2012 16:14:13 Uhr
Page 76

76
Guía de inicio rápido de ASUS Xonar Phoebus
Español
Español
Conectar altavoces de 7.1 canales
7.1 altavoces
Nº Elemento Descripción
1 Salida frontal
Permite conectar el puerto de entrada frontal de los
altavoces 7.1 con el cable de miniconector.
2 Salir envolvente
lateral
Permite conectar el puerto de entrada envolvente de los
altavoces 7.1 con el cable de miniconector.
3 Salida central y
amplicador de
graves
Permite conectar el puerto de entrada central y de graves
de los altavoces 7.1 con el cable de miniconector.
4 Salida envolvente
posterior
Permite conectar el puerto de entrada Salida envolvente de
los altavoces 7.1 con el cable de miniconector.
Rear
Side
Front
Center/
Subwoofer
AUDIO
INPUTS
AUDIO
INPUTS
Mic in
HP out
Box link
Line in
Front
Ctr / Sbw
Rear
Side /
SPDIF out
1
3
4
2
U7062_Xonar-Phoebus_QSG.indb 76 18.01.2012 16:14:15 Uhr
Page 77

77
Guía de inicio rápido de ASUS Xonar Phoebus
Español
Español
4.1.6 Conectar un micrófono
Nº Elemento Descripción
1 Puerto Entrada de
micrófono
Conecte el enchufe de 3,5 mm en este puerto Entrada de
micrófono para comunicación de voz, grabación o karaoke.
2 Puerto para
auriculares
El puerto para auriculares tiene un amplicador de alta
calidad integrado que permite gobernar los auriculares.
Enchufe los auriculares estéreo directamente a este conector.
4.1.7 Conectar fuentes de audio a la Entrada de línea
Nº Elemento Descripción
1 Puerto Entrada
de línea
Inserte el enchufe de 3,5 mm del reproductor de CD/MP3 o
cualquier otra fuente de audio analógica de nivel de línea en
este conector Entrada de línea para grabar sonido.
2
Mic in
HP out
Box link
1
2
1
1
CD Player
MP3 Player
Mic in
HP out
Box link
Line in
Front
Ctr / Sbw
Rear
Side /
SPDIF out
1
U7062_Xonar-Phoebus_QSG.indb 77 18.01.2012 16:14:17 Uhr
Page 78

78
Guia de consulta rápida ASUS Xonar Phoebus
Português
Português
1.Introdução
1.1 Requisitos do sistema
Antes de instalar a placa de áudio Xonar Phoebus, certique-se de que seu computador
cumpre os seguintes requisitos:
• Uma ranhura PCIE 1.0 (ou acima) compatível para a placa de áudio
• Um conector de cabo de alimentação periférico com 6 pinos disponível a partir
fonte de alimentação (PSU) do computador
• Microsoft® Windows® Vista / 7 (32/64bit) / XP (32/64bit) / MCE2005
• CPU Intel® Pentium® 4 de 1,4 GHz ou AMD Athlon 1400 ou acima
• Mais de 256 MB de memória do sistema
• Mais de 60 MB de espaço de armazenamento disponível para instalação do
controlador
• Unidade de CD-ROM (ou de DVD-ROM) para instalação do software
• Auscultadores de alta qualidade, altifalantes analógicos amplicados ou um
descodicador Dolby Digital para desfrutar do som de alta-delidade da placa de
áudio
1.2 Conteúdo da embalagem
Verique se a embalagem da sua placa de áudio ASUS Xonar Phoebus contém os seguintes
itens:
• Placa de Áudio PCI Express ASUS XonarTM Phoebus de 7.1 Canais
• Caixa de controlo Phoebus
• CD de controladores
• Adaptador óptico S/PDIF TOSLINK x1Adaptador óptico S/PDIF TOSLINK x1
• Cabo de alimentação ATX 4P para 6P x 1
• Guia de instalação rápida
U7062_Xonar-Phoebus_QSG.indb 78 18.01.2012 16:14:18 Uhr
Page 79

79
Guia de consulta rápida ASUS Xonar Phoebus
Português
Português
2. Hardware
2.1 Placa de processamento de áudio Xonar Phoebus
1
2
3
4
5
6
7
8
9
10
11
12
Mic in
HP out
Box link
Line in
Front
Ctr / Sbw
Rear
Side /
SPDIF out
1
2
3
4
5
6
7
8
U7062_Xonar-Phoebus_QSG.indb 79 18.01.2012 16:14:20 Uhr
Page 80

80
Guia de consulta rápida ASUS Xonar Phoebus
Português
Português
No
Item
Descrição
1
Porta de entrada
de microfone
Ligue o seu microfone de PC externo a esta porta de
3.5mm para entrada de voz. Pré-amplicador interno de
microfone de alta qualidade.
2
Porta de saída
auscultadores
Ligue os seus auscultadores a esta porta.
3 Ligação da caixa
Ligue a Caixa de Controlo Xonar Phoebus a esta porta de
2,5 mm.
4
Porta de entrada de
linha
Ligue dispositivos analógicos como leitores de MP3,
leitores de CD, sintetizadores e outras fontes de áudio de
nível de linha a esta porta de 3.5mm para gravação ou
processamento de áudio.
5
Porta de saída
frontal
Para um sistema de altifalantes de 2 canais, liga à entrada
frontal esquerda/direita dos altifalantes amplicados.
6
Porta de saída
central/Subwoofer
Liga à entrada central/subwoofer em altifalantes 5.1/7.1
analógicos amplicados.
7 Porta de saída traseira
Liga à entrada traseira/surround em altifalantes 7.1
analógicos amplicados.
8
Porta de saída S/PDIF/
Lateral
Porta de saída digital. Liga a descodicadores digitais ou
sistemas de altifalantes digitais, sistemas de cinema em
casa, receptores AV para saída de áudio digital incluindo
PCM, Dolby Digital, DTS, WMA-Pro, etc. Liga à entrada de
canal surround em altifalantes 5.1 analógicos amplicados.
9
Conector de painel
frontal
Ligue o painel frontal da caixa do seu computador com um
cabo de ligação de 9 pinos.
10
Conector de
entrada Auxiliar
Conector de 4 pinos. Liga normalmente à saída de áudioLiga normalmente à saída de áudio
analógico da placa de TV ou outra fonte de áudio no
sistema do PC. (Para controlar o áudio da sua placa de
TV a partir desta entrada Auxiliar, deverá activar a função deverá activar a função
“monitor” para a Entrada Aux no misturador de gravação
do software Xonar Audio Center.
11
Ficha de Saída
S/PDIF
Liga à placa gráca com suporte HDMI.
12
Contactos dourados
PCI Express
Insira na ranhura PCI Express da placa principal
U7062_Xonar-Phoebus_QSG.indb 80 18.01.2012 16:14:21 Uhr
Page 81

81
Guia de consulta rápida ASUS Xonar Phoebus
Português
Português
2.1 Instalação da placa
Antes de prosseguir com os passos de instalação seguintes, recomendamos que
desactive o seu dispositivo de áudio incorporado nas denições do BIOS, ou
desinstale outras placas de áudio do seu PC. (Para congurar o BIOS ou desinstalar
outras placas de áudio, consulte os manuais do utilizador da sua placa principal e da
placa de áudio)
A placa de áudio PCI Express requer alimentação adicional proveniente do seu
computador. Se o cabo de alimentação não estiver correctamente ligado, a placa de
áudio não funcionará.
2.1.1 Instalar a placa Xonar Phoebus
Para instalar a placa de áudio Xonar Phoebus:
1. Desligue o computador, o monitor e
todos os outros periféricos ligados ao
computador.
2. Desligue o cabo de alimentação do
computador do próprio computador e
da tomada eléctrica.
3. Toque na parte metálica traseira ou no
painel lateral do computador para evitar
a electricidade estática.
4. Remova a tampa do computador.
5. Retire o suporte metálico de uma
ranhura PCIE disponível para a placa de
áudio Xonar Phoebus.
6. Insira cuidadosamente a placa de áudio na ranhura PCIE.
Não exerça força para inserir a placa de áudio na ranhura. Certique-se de que os
pinos dourados do conector da placa PCI Express se encontram alinhados com
o conector PCI Express da placa principal antes de inserir a placa na ranhura PCI
Express. Se a placa não encaixar correctamente, remova-a e tente novamente.
7. Fixe a placa de áudio com os parafusos o suporte metálico.
8. Reponha a tampa do computador.
9. Volte a ligar todos os cabos.
10. Ligue o cabo de alimentação ao computador e à tomada eléctrica.
11. Ligue o computador.
U7062_Xonar-Phoebus_QSG.indb 81 18.01.2012 16:14:24 Uhr
Page 82

82
Guia de consulta rápida ASUS Xonar Phoebus
Português
Português
2.1.2 Ligar a placa de TV
Se o seu computador estiver equipado com uma placa de TV PCI ou PCI Express
tradicional, poderá ser necessário ligá-la à placa de áudio para transmitir o som para os
altifalantes do computador.
1. Fixe a placa de TV PCI/PCI Express ao painel traseiro utilizando um parafuso.
2. Ligue o conector de saída de áudio da placa de TV ao conector de Entrada Aux da
placa de áudio, tal como ilustrado na gura abaixo.
Para obter uma excelente qualidade de áudio de TV, a placa Xonar utiliza a gravação
ADC para digitalizar o sinal e converte novamente para reprodução DAC. Seleccione a
Entrada Aux como fonte de gravação no misturador de gravação do Centro de Áudio
Xonar e active o botão de monitorização para passar este sinal para a saída de áudio.
Utilizando esta conguração, poderá activar efeitos sonoros como o Pro-Logic IIx
para expandir o áudio estéreo da TV para som surround de 5.1 ou 7.1 canais. O áudio
de TV no seu PC será ainda melhor qualidade do que no televisor!
U7062_Xonar-Phoebus_QSG.indb 82 18.01.2012 16:14:25 Uhr
Page 83

83
Guia de consulta rápida ASUS Xonar Phoebus
Português
Português
3. Instalação do controlador
3.1 Instalar o controlador da placa Xonar Phoebus
Para instalar o controlador da placa Xonar Phoebus:
1. Depois de instalar a placa Xonar Phoebus, ligue o seu computador. O Windows®
detecta automaticamente a placa de áudio e procura os controladores do
dispositivo. Quando solicitados os controladores, clique em Cancelar.
2. Insira o CD de suporte na unidade óptica. Se a Reprodução automática estiver
activada no seu sistema, a conguração inicia automaticamente. Caso contrário,
execute setup.exe a partir do CD de suporte.
3. Siga as instruções no ecrã para concluir a instalação.
A versão e o conteúdo do CD de suporte estão sujeitos a alterações sem aviso prévio.
3.2 Desinstalar ou reinstalar o controlador da placa
Xonar Phoebus
3.2.1 Desinstalar o controlador da placa Xonar Phoebus
Para desinstalar o controlador da placa Xonar Phoebus:
1. Clique em Start (Iniciar) -> Settings (Denições) -> Control Panel (Painel de
controlo).
2. Faça duplo clique no ícone Add/Remove Programs (Adicionar ou remover
programas).
3. Clique no botão Change or Remove Programs (Alterar ou remover programas).
4. Seleccione o programa que deseja remover e clique no botão Add/Remove
(Adicionar/Remover) (ou Change/Remove (Alterar/Remover)).
5. Na caixa de diálogo InstallShield Wizard (Assistente InstallShield), seleccione a
opção Remove (Remover).
6. Reinicie o computador quando lhe for solicitado.
3.2.2 Reinstalar o controlador da placa Xonar Phoebus
Para reinstalar o controlador da placa Xonar Phoebus:
1. Antes de reinstalar qualquer software, recomendamos que desinstale primeiro o
software existente.
2. Após a desinstalação do software, execute novamente o processo de instalação
para reinstalar o mesmo software ou uma actualização.
U7062_Xonar-Phoebus_QSG.indb 83 18.01.2012 16:14:26 Uhr
Page 84

84
Guia de consulta rápida ASUS Xonar Phoebus
Português
Português
4. Ligar altifalantes e periféricos
4.1 Ligar a caixa Phoebus
4.1.1 Ligar a caixa Phoebus
4.1.2 Ligar auscultadores e um microfone à Caixa de Controlo Phoebus
No Item Descrição
1 Porta de entrada de
microfone
Ligue a cha de 3,5 mm do microfone da Caixa de
Controlo Phoebus a esta porta de entrada de microfone
para comunicação de voz, gravação ou karaoke.
2 Porta para
auscultadores
A porta para auscultadores está equipada com um
amplicador de alta qualidade incorporado para
amplicar os auscultadores. Ligue a Caixa de Controlo
Xonar Phoebus directamente a esta porta.
3 Porta de ligação da
caixa
Ligue a Caixa de Controlo Xonar Phoebus directamente
a esta porta.
No Item Descrição
1 Porta para
auscultadores
Ligue os auscultadores à porta de auscultadores da Caixa
de Controlo Phoebus.
2 Porta de entrada de
microfone
Ligue a cha de 3,5 mm do microfone à porta de entrada
de microfone da Caixa de Controlo Phoebus.
Mic in
HP out
Box link
Line in
Front
Ctr / Sbw
Rear
Side /
SPDIF out
1
2
3
Mic In
Headphone Out
1
2
U7062_Xonar-Phoebus_QSG.indb 84 18.01.2012 16:14:28 Uhr
Page 85

85
Guia de consulta rápida ASUS Xonar Phoebus
Português
Português
4.1.3 Ligar sistemas de altifalantes digitais (Cinema em casa)
A placa Xonar Phoebus permite a reprodução através do seu sistema de cinema em casa,
criando uma impressionante experiência de som envolvente. Um simples cabo digital
pode transmitir áudio digital de alta qualidade a partir de qualquer fonte de áudio do
seu PC para amplicadores digitais ou receptores AV.
No Item Descrição
1 Adaptador óptico
Ligue o adaptador óptico TOSLINK ao conector de saída
S/PDIF.
2 Cabo óptico
Ligue a porta de entrada S/PDIF do descodicador ao
adaptador óptico com o cabo óptico TOSLINK
Mic in
HP out
Box link
Line in
Front
Ctr / Sbw
Rear
Side /
SPDIF out
2
1
U7062_Xonar-Phoebus_QSG.indb 85 18.01.2012 16:14:30 Uhr
Page 86

86
Guia de consulta rápida ASUS Xonar Phoebus
Português
Português
4.1.4 Ligar auscultadores estéreo
Ligar auscultadores estéreo
No Item Descrição
1 Porta de saída de
auscultadores
A porta de saída para auscultadores está equipada com
um amplicador de alta qualidade incorporado para
amplicar os auscultadores. Ligue os auscultadores estéreo
directamente a esta tomada.
Mic in
HP out
Box link
Line in
Front
Ctr / Sbw
Rear
Side /
SPDIF out
1
U7062_Xonar-Phoebus_QSG.indb 86 18.01.2012 16:14:31 Uhr
Page 87

87
Guia de consulta rápida ASUS Xonar Phoebus
Português
Português
No Item Descrição
1 Saída frontal
Ligue a cha de 3,5 mm do canal frontal dos seus
auscultadores de 5.1 canais a esta tomada.
2 Saída surround
lateral
Ligue a cha de 3,5 mm do canal surround dos seus
auscultadores de 5.1 canais a esta tomada.
3 Saída Central/
Subwoofer
Ligue a cha de 3,5 mm do canal Central/Graves dos seus
auscultadores de 5.1 canais a esta tomada.
Ligar auscultadores de 5.1 canais
Mic in
HP out
Box link
Line in
Front
Ctr / Sbw
Rear
Side /
SPDIF out
1
2
3
U7062_Xonar-Phoebus_QSG.indb 87 18.01.2012 16:14:33 Uhr
Page 88

88
Guia de consulta rápida ASUS Xonar Phoebus
Português
Português
4.1.5 Ligar sistemas de altifalantes analógicos
Ligar um amplicador analógico
No Item Descrição
1 Saída frontal
Liga às portas de entrada “frontal esquerda” e “frontal direita”
do amplicador analógico com o cabo de cha mini para RCA.
2 Saída surround
lateral
Liga às portas de entrada “surround esquerda” e “surround
direita” do amplicador analógico com o cabo de cha mini
para RCA.
3 Saída Central/
Subwoofer
Liga às portas de entrada “Saída Central” e “Subwoofer” do
amplicador analógico com o cabo de cha mini para RCA.
Mic in
HP out
Box link
Line in
Front
Ctr / Sbw
Rear
Side /
SPDIF out
1
2
3
U7062_Xonar-Phoebus_QSG.indb 88 18.01.2012 16:14:35 Uhr
Page 89

89
Guia de consulta rápida ASUS Xonar Phoebus
Português
Português
Ligar altifalantes de 2 canais
2 altifalantes
No Item Descrição
1 Saída frontal
Ligue a cha de 3,5 mm dos altifalantes de 2 canais a esta
tomada de saída frontal.
Ligar altifalantes de 4 canais
4 altifalantes
No Item Descrição
1 Saída frontal
Liga à porta de entrada frontal de altifalantes de 4/4.1 canais
com o cabo de cha mini.
2 Saída surround
lateral
Liga à porta de entrada Surround de altifalantes de 4/4.1
canais com o cabo de cha mini.
AUDIO
INPUTS
Mic in
HP out
Box link
Line in
Front
Ctr / Sbw
Rear
Side /
SPDIF out
1
1
2
AUDIO
INPUTS
Side
AUDIO
INPUTS
Front
Mic in
HP out
Box link
Line in
Front
Ctr / Sbw
Rear
Side /
SPDIF out
U7062_Xonar-Phoebus_QSG.indb 89 18.01.2012 16:14:36 Uhr
Page 90

90
Guia de consulta rápida ASUS Xonar Phoebus
Português
Português
Ligar altifalantes de 5.1 canais
5.1 altifalantes
No Item Descrição
1 Saída frontal
Liga à porta de entrada frontal de altifalantes de 5.1 canais
com o cabo de cha mini.
2 Saída surround
lateral
Liga à porta de entrada Surround de altifalantes de 5.1
canais com o cabo de cha mini.
3 Saída Central/
Subwoofer
Liga à porta de entrada Central/Subwoofer de altifalantes
de 5.1 canais com o cabo de cha mini.
Mic in
HP out
Box link
Line in
Front
Ctr / Sbw
Rear
Side /
SPDIF out
Side
Front
Center/
Subwoofer
AUDIO
INPUTS
1
2
3
U7062_Xonar-Phoebus_QSG.indb 90 18.01.2012 16:14:38 Uhr
Page 91

91
Guia de consulta rápida ASUS Xonar Phoebus
Português
Português
Ligar altifalantes de 7.1 canais
7.1 altifalantes
No Item Descrição
1 Saída frontal
Liga à porta de entrada frontal de altifalantes de 7.1 canais
com o cabo de cha mini.
2 Saída surround
lateral
Liga à porta de entrada Surround de altifalantes de 7.1
canais com o cabo de cha mini.
3 Saída Central/
Subwoofer
Liga à porta de entrada Central/Subwoofer de altifalantes
de 7.1 canais com o cabo de cha mini.
4 Saída surround
traseira
Connects to the Back Surround input port of the 7.1
speakers with the mini-jack cable.
Rear
Side
Front
Center/
Subwoofer
AUDIO
INPUTS
AUDIO
INPUTS
Mic in
HP out
Box link
Line in
Front
Ctr / Sbw
Rear
Side /
SPDIF out
1
3
4
2
U7062_Xonar-Phoebus_QSG.indb 91 18.01.2012 16:14:39 Uhr
Page 92

92
Guia de consulta rápida ASUS Xonar Phoebus
Português
4.1.6 Ligar um microfone
No Item
Descrição
1 Porta de entrada
de microfone
Ligue a cha de 3,5 mm do microfone a esta porta de
entrada de microfone para comunicação de voz, gravação
ou karaoke.
2 Porta para
auscultadores
A porta para auscultadores está equipada com um
amplicador de alta qualidade incorporado para amplicar
os auscultadores. Ligue os auscultadores estéreo
directamente a esta tomada.
4.1.7 Ligar fontes de áudio de entrada de linha
No Item
Descrição
1 Porta de
entrada de linha
Ligue a cha de 3,5 mm do leitor de CD/MP3 ou de qualquer
fonte de áudio analógico com saída de linha a esta tomada de
entrada de linha para gravação de som.
2
Mic in
HP out
Box link
1
2
1
1
CD Player
MP3 Player
Mic in
HP out
Box link
Line in
Front
Ctr / Sbw
Rear
Side /
SPDIF out
1
U7062_Xonar-Phoebus_QSG.indb 92 18.01.2012 16:14:42 Uhr
Page 93

93
Краткое руководство для ASUS Xonar Phoebus
Русский
1. Введение
1.1 Системные требования
Для успешной установки Xonar Phoebus Ваш компьютер должен соответствовать
следующим требованиям:
• Один слот PCI Express 1.0 (или выше) для аудиокарты
• 6--контактный кабель питания от блока питания компьютера
• Microsoft Windows 7 (32/64бит) / Vista (32/64бит) / XP (32/64бит) / MCE2005
• Intel Pentium® 4 1.4ГГц или AMD Athlon 1400 или более быстрый процессор
• Более 256 МБ системной памяти
• Более 60 МБ свободного пространства на жестком диске для установки
драйверов
• CD-ROM (DVD-ROM) привод для установки программного обеспечения
• Высококачественные наушники, активные аналоговые колонки или декодер Dolby
Digital
1.2 Комплект поставки
В комплект поставки аудиокарты ASUS Xonar Phoebus входит следующее:
• ASUS XonarTM 7.1-канальная аудиокарта Phoebus PCI Express
• Пульт управления Phoebus
• Компакт диск с драйверами
• Оптический адаптер S/PDIF TOSLINK x 1
• Кабель питания ATX-4P-6P х 1
• Краткое руководство
U7062_Xonar-Phoebus_QSG.indb 93 18.01.2012 16:14:43 Uhr
Page 94

94
Краткое руководство для ASUS Xonar Phoebus
Русский
2. Аппаратное обеспечение
2.1 Аудиокарта Xonar Phoebus
Mic in
HP out
Box link
Line in
Front
Ctr / Sbw
Rear
Side /
SPDIF out
1
2
3
4
5
6
7
8
1
2
3
4
5
6
7
8
9
10
11
12
U7062_Xonar-Phoebus_QSG.indb 94 18.01.2012 16:14:45 Uhr
Page 95

95
Краткое руководство для ASUS Xonar Phoebus
Русский
Элемент Описание
1
Разъем для
микрофона
Подключение внешнего микрофона для голосового
ввода. Имеется встроенный, высококачественный
предварительный усилитель для микрофона.
2
Разъем для
наушников
Подключение наушников.
3 Разъем для пульта
Предназначен для подключения пульта Phoebus.
4 Аудиовход
Подключение аналоговых устройств (например MP3плееры, проигрыватели компакт-дисков, музыкальные
синтезаторы и другие источники звука) для записи /
обработки звука.
5
Выход
фронтального
канала
Подключение фронтальных колонок для
многоканальных акустических систем.
6
Выход
центрального
канала/сабвуфера
Подключение центрального канала/сабвуфера 5.1/7.1
- канальной акустической системы.
7
Выход тылового
канала
Подключение тыловых колонок 7.1 - канальной
акустической системы.
8
Разъем S/PDIF
Out/Выход
бокового канала
Цифровой выход. Подключение к внешнему цифровому
декодеру или цифровой акустической системе,
домашнему кинотеатру, AV-ресиверу для вывода
цифрового звука, в форматах PCM, Dolby Digital, DTS
и WMA-Pro и т.д. Подключение тыловых колонок 5.1
- канальной акустической системы.
9 Аудиовход
4-контактный разъем. Обычно подключается к
аналоговому аудиовыходу ТВ-тюнера или другого
источника звука внутри компьютера. (Для регулировки
звука ТВ-тюнера, подключенного к Aux-In, Вам нужно
включить функцию “monitor” для Aux-In в микшере
аудиоцентра Xonar.)
10 Разъем S/PDIF Out
Подключение звукового разъема видеокарты с
поддержкой HDMI.
11 Разъем питания
Подключение 6-контактного кабеля питания от блока
питания.
12
Разъем PCI Express
Вставляется в слот PCI Express материнской платы.
U7062_Xonar-Phoebus_QSG.indb 95 18.01.2012 16:14:46 Uhr
Page 96

96
Краткое руководство для ASUS Xonar Phoebus
Русский
2.1.1 Установка карты Xonar Phoebus
Для установки аудиокарты Xonar Phoebus:
1. Выключите компьютер, монитор
и все другие подключенные к
компьютеру периферийные
устройства.
2. Отключите шнур питания
компьютера от розетки.
3. Во избежание повреждения
компонентов статическим
электричеством, перед установкой
коснитесь заземленного
металлического объекта, например
задней или боковой панели
компьютера.
4. Снимите крышку с системного блока.
5. Снимите металлическую крышку свободного слота PCIE.
6. Осторожно вставьте аудиокарту в слот PCIE. Убедитесь, что аудиокарта встала
на место.
При установке аудиокарты в слот не применяйте силу. Перед установкой аудиокарты
в слот PCI Express совместите ее разъем с соответствующим слотом материнской
платы. Если карту не удалось вставить в слот, извлеките ее и попробуйте снова.
7. Закрепите карту в корпусе компьютера винтом.
8. Установите крышку на системный блок.
9. Подключите все кабели.
10. Подключите шнур питания компьютера к розетке.
11. Включите компьютер.
2.1 Установка карты
Перед установкой аудиокарты, отключите встроенную аудиокарту в BIOS, или
извлеките из компьютера любые другие аудиокарты. (Инструкции по настройке
BIOS или извлечению других аудиокарт, смотрите в руководствах материнской
платы и аудиокарты.)
Аудиокарте требуется дополнительное питание от компьютера. Если питающий
кабель не подключен, аудиокарта не будет работать.
U7062_Xonar-Phoebus_QSG.indb 96 18.01.2012 16:14:49 Uhr
Page 97

97
Краткое руководство для ASUS Xonar Phoebus
Русский
2.1.2 Подключение ТВ-тюнера
Если у Вас установлен PCI / PCI Expresss ТВ-тюнер, возможно, для передачи звука с него
на колонки ПК, Вам потребуется подключить его к аудиокарте.
1. Прикрепите PCI / PCI Express ТВ-тюнер винтом к задней панели.
2. Подключите аудиовыход ТВ-тюнера к разъему Aux-In аудиокарты.
Для оптимального качества ТВ-звука, Xonar использует АЦП для оцифровки сигнала,
а затем воспроизводит его через ЦАП. Выберите Aux-In как источник записи в
микшере записи аудиоцентра Xonar и включите кнопку мониторинга для передачи
этого сигнала на аудиовыход. С помощью этой настройки можно включить звуковые
эффекты, например Pro-Logic IIx для 5.1 или 7.1-канальной аудиосистемы. Звуковое
сопровождение телепередач на Вашем ПК станет лучше, чем на телевизоре!
U7062_Xonar-Phoebus_QSG.indb 97 18.01.2012 16:14:50 Uhr
Page 98

98
Краткое руководство для ASUS Xonar Phoebus
Русский
3. Установка драйвера
3.1 Установка драйвера для Xonar Phoebus
Для установки драйвера Xonar Phoebus:
1. После установки аудиокарты, включите компьютер. Windows обнаружит
аудиокарту и начнет поиск драйверов. При появлении окна с предложением
найти драйвера нажмите Cancel.
2. Вставьте Support DVD во внешний оптический привод. Если автозапуск включен,
появится мастер установки. Если нет, запустите setup.exe с компакт-диска.
3. Следуйте инструкциям на экране для завершения установки.
Версия и содержимое ПО на компакт-диске может изменяться без уведомления.
3.2 Удаление или переустановка драйвера Xonar
Phoebus
3.2.1 Удаление драйвера Xonar Phoebus
Для удаления драйвера Xonar Phoebus:
1. Нажмите Пуск > Настройки > Панель управления.
2. Дважды щелкните по иконке Установка и удаление программ.
3. Выберите вкладку Изменение или удаление программ.
4. Выберите программу для удаления и нажмите кнопку Добавить/Удалить (или
Заменить/Удалить).
5. В диалоговом окне выберите опцию Удалить.
6. Перезагрузите компьютер при появлении соответствующего запроса.
3.2.2 Переустановка драйвера Xonar Phoebus
Для переустановки драйвера Xonar Phoebus:
1. Перед установкой любой программы рекомендуется удалить установленную
программу.
2. После удаления программы следуйте инструкциям для установки программы.
U7062_Xonar-Phoebus_QSG.indb 98 18.01.2012 16:14:51 Uhr
Page 99

99
Краткое руководство для ASUS Xonar Phoebus
Русский
4. Подключение колонок и периферии
4.1 Подключение пульта Phoebus
4.1.1 Подключение пульта Phoebus
Элемент Описание
1 Разъем для
микрофона
Предназначен для подключения разъема микрофона
от пульта Phoebus для голосовой связи, записи звука
или караоке.
2 Разъем для
наушников
Разъем для наушников оснащен высококачественным
встроенным усилителем.
3 Разъем для
пульта
Предназначен для подключения пульта Phoebus.
Элемент Описание
1 Разъем для
наушников
Предназначен для подключения наушников к пульту
управления Phoebus.
2 Разъем для
микрофона
Предназначен для подключения микрофона к пульту
управления Phoebus.
Mic in
HP out
Box link
Line in
Front
Ctr / Sbw
Rear
Side /
SPDIF out
1
2
3
Mic In
Headphone Out
1
2
U7062_Xonar-Phoebus_QSG.indb 99 18.01.2012 16:14:54 Uhr
Page 100

100
Краткое руководство для ASUS Xonar Phoebus
Русский
4.1.3 Подключение цифровой ак устической системы (Home
Theater)
Xonar Phoebus позволяет воспроизводить звук через домашний кинотеатр, создавая
впечатляющее объемное звучание. Для вывода звука с ПК на любые цифровые колонки
или AV-ресивер достаточно одного цифрового кабеля.
Элемент Описание
1 Оптический
переходник
Подключите оптический переходник TOSLINK к разъему
S/PDIF-Out.
2 Оптический
кабель
С помощью TOSLINK-кабеля подключите разъем S/PDIF-In
Вашего декодера к оптическому переходнику
Mic in
HP out
Box link
Line in
Front
Ctr / Sbw
Rear
Side /
SPDIF out
2
1
U7062_Xonar-Phoebus_QSG.indb 100 18.01.2012 16:14:56 Uhr
 Loading...