

Page 1
E3910
First Edition V1
May 2008
Xonar HDAV 1.3
(Deluxe)
Audio/Video enhanced combo card
Quick start guide
Page 2

English
1. Package contents
Check your ASUS Xonar HDAV 1.3 (Deluxe) card package for the following items:
• ASUS Xonar HDAV 1.3 PCI Express AV card
• ASUS Xonar H6 DAC extension board (Deluxe only)
• H6 extension board cable x1 (Deluxe only)
• HDMI cable x1
• DVI-to-HDMI cable x1
• Stereo RCA-to-3.5mm cable x1 (x4 for Deluxe)
• S/PDIF TOSLINK optical adapter x1
• Support CD (including ASUS Gamer OSD and RMAA V6.0.6 utilities)
• Quick start guide
• TotalMedia Theatre Bluray Disc/HD-DVD Software Player (ArcSoft) CD
2. System requirements
To ensure a successful installation of the Xonar HDAV 1.3 (Deluxe) card, your
computer must meet the following requirements:
• One DVI/HDMI graphics output (to AV card for HDMI function)
• One PCI Express 1.0 (or higher) compatible slot for the HDAV card, and one
adjacent slot for the H6 DAC extension board
• One available 4-pin ATX power cable from PC’s power supply unit
• Microsoft® Windows® Vista/ XP(32/64bit)/ MCE2005
• Intel® Pentium® 4 1.4GHz or AMD Athlon 1400 CPU or faster CPU
• 256 MB DRAM system memory
• 100 MB available HDD space for driver installation package
• CD-ROM for software installation or Blu-ray/HD-DVD ROM (for HD movies
playback)
• An HDMI-ready AV receiver or TV/monitor set (v.1.3 is better), home theater
system, high-quality headphones, or powered analog speakers, to enjoy the
ultra-high fidelity audio and video of the AV card
2
ASUS Xonar HDAV 1.3 Deluxe Quick start guide
Page 3

3. Hardware introduction
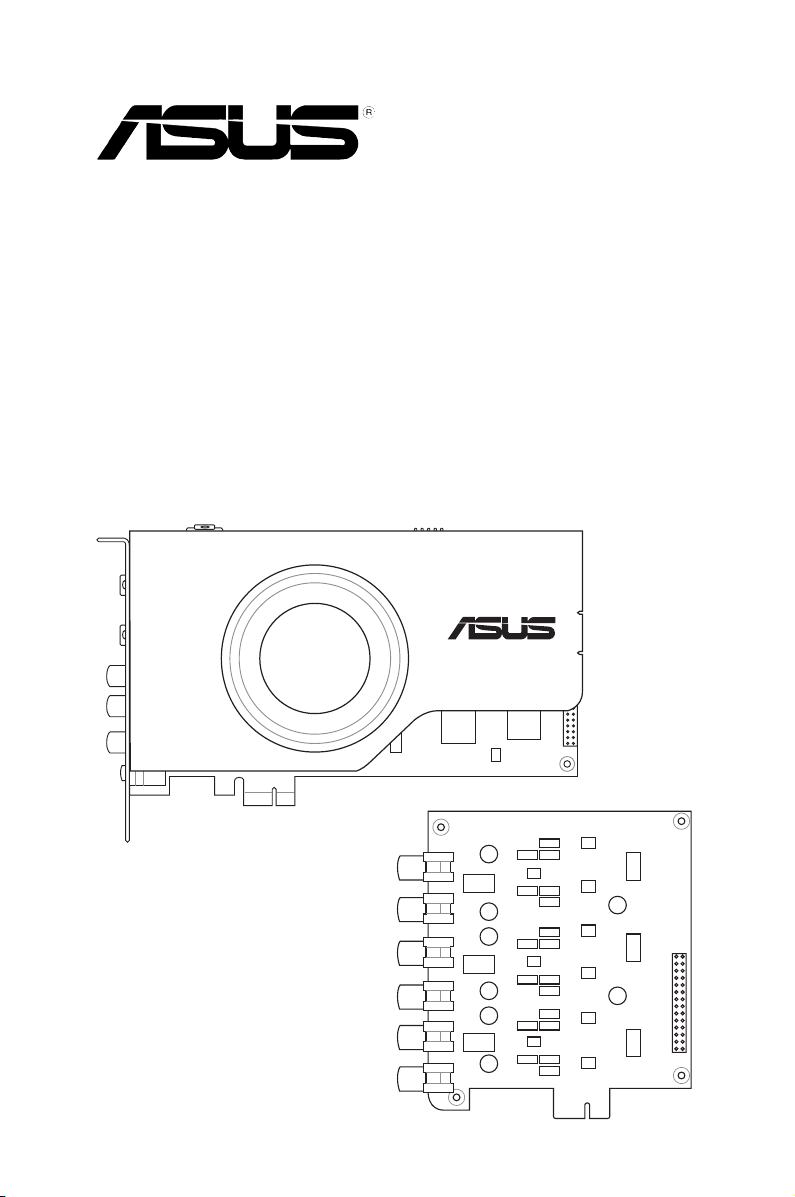
3.1 Xonar HDAV 1.3 Deluxe card layout
Xonar HDAV card H6 DAC Extension board
1
2
3
4
5
6
No Item Description
1 HDMI In port (for DVI
signal input)
7 8
Connects to the DVI port of a graphics card using the
bundled HDMI-to-DVI cable for DVI signal transmission, or
connects to the HDMI Out port of an HDMI graphics card
using an HDMI cable.
2 HDMI Out port
3 S/PDIF Out port
Connects to a device with HDMI support.
Coaxial and optical TOSLINK combo digital output port.
Connects to an external digital decoder or digital speaker
systems, Home Theater systems, AV receivers for outputting
digital audio including PCM, Dolby Digital, DTS, WMA-Pro,
etc.
4 Front Right Out port
Connect the Right audio cable (red) from your 2/2.1 channel
speakers to this port. For multi-channel speaker systems,
connects to the Front Right In port on the powered speakers.
5 Front Left Out port
Connect the Left audio cable (white) from your 2/2.1 channel
speakers to this port. For multi-channel speaker systems,
connects to the Front Right In port on the powered speakers.
6 Microphone In port
Connect your external PC microphone to this 3.5mm port for
voice input. Built-in high-quality Microphone pre-amplifier.
6 Line In port
Connect analog devices like MP3 players, CD players,
music synthesizers and other line-level sound sources to
this 3.5mm port for audio recording or processing. (Through
Ultra-high fidelity 120dB SNR A-D converter)
6 S/PDIF In port
Optical TOSLINK digital input jack. Connects to external
digital audio sources such as MD players, CD players, or
DVD players, for audio recording or loopback.
9
10
11
12
13
14
15
16
17
English
(continued on the next page)
ASUS Xonar HDAV 1.3 Deluxe Quick start guide
3
Page 4

English
1
2
7 Front panel audio
header
8 Aux Input Header
9 Power Connector
10 Bridge connector
11 Right Side Surround
Out port
12 Left Side Surround
Out port
13 Center Out port
14 Subwoofer Out port
15 Right Back Surround
Out port
16 Left Back Surround
Out port
17 Bridge connector
Connect one end of the front panel audio cable to the front
panel audio header on the Xonar HDAV 1.3 card, with the
other end to the chassis-mounted front panel audio I/O
module.
Usually connects to the Analog Audio output of TV tuner card
or other sound source inside your PC system. (To monitor
your TV tuner card’s audio from this Aux-In, you must enable
the “monitor” function for Aux-In in the Xonar HDAV Center ‘s
recording mixer.)
Connects to the power cable of your power supply.
Connects to the extension board with the bundled bridge
cable.
Connects to the surround channel input on 4/5.1/6.1/7.1
powered analog speakers.
Connects to the surround channel input on 4/5.1/6.1/7.1
powered analog speakers.
Connects to the front center input on 5.1/6.1/7.1 powered
analog speakers.
Connects to the front subwoofer input on 6.1/7.1 powered
analog speakers.
Connects to the Right Back Surround input on 6.1/7.1
powered analog speakers.
Connects to the Left Back Surround input on 6.1/7.1 powered
analog speakers.
Connects to the Xonar HDAV card with the bundled bridge
cable.
3.2 Card installation
Securing the Xonar HDAV card and the H6 extension board:
1. Power OFF the computer, the monitor,
and all other peripheral devices
connected to your computer.
2. Unplug the computer power cord from
your computer and power outlet.
3. Touch the metal back or side panel of the
computer to avoid static electricity.
4. Remove the chassis cover.
5. Remove the metal brackets from an
available PCI Express x1 slot for the
Xonar HDAV card and its adjacent slot
for the extension board.
4
ASUS Xonar HDAV 1.3 Deluxe Quick start guide
Page 5

6. Carefully insert the Xonar HDAV card into the PCI Express x1 slot and the
1
2
extension board into the other adjacent slot. Ensure both the Xonar HDAV
card and the extension board sit properly in place.
7. Secure both the Xonar HDAV card and the extension board with screws or
metal brackets.
Connecting cables:
1. Using the bridge cable, connect the Xonar HDAV card to the extension board.
2. Connect a 4-pin ATX power cable to the ATX power connector on the card.
The Xonar HDAV card requires additional power to work. Ensure that you
connect the ATX power connector to the card to provide ample power.
Connecting to a discrete graphics card and an HDMI display device:
1. Install a discrete graphics card on your motherboard.
2. Using the bundled DVI-to-HDMI cable, connect the DVI Out port of the
graphics card to the HDMI In port of the Xonar HDAV card.
English
If you are using an HDMI graphics card, connect your graphics card with the
Xonar HDAV card using the HDMI cable that comes with your graphics card
package.
Xonar HDAV card Graphics card
HDMI In
DVI-to-HDMI cable
ASUS Xonar HDAV 1.3 Deluxe Quick start guide
DVI Out
5
Page 6

English
3. Using an HDMI cable, connect one end to the HDMI out port of the Xonar
HDAV card and the other end to the HDMI display device.
• Ensure that you have properly connected the DVI-to-HDMI cable for normal
video signal transmission. Otherwise, there might be no video on your
HDMI display device.
• HDMI AV output will work only when the source graphics card and the
terminal display device are both properly connected to the Xoanrd HDAV
card’s HDMI input/output ports.
HDMI display device
HDMI cable
Xonar HDAV card
HDMI In
HDMI Out
DVI-to-HDMI cable
Graphics card
4. Driver installation
Installing the Xonar HDAV card driver
• Ensure that you have installed the VGA card driver before installing the
Xonar HDAV driver. Otherwise, driver installation error may occur.
• Some LCD TVs with HDMI inputs do not support PC video resolutions
and may lose audio signals as well, excepting on the following video
resolutions: 480i/p (640x480, 720x480), 720p (1280x720), and 1080i/p
(1920x1080). Hence, it is suggested that you set your LCD TV to one of
these TV resolutions.
• If you are using an ASUS graphics card with the ASUS Enhance Display
driver installed, ensure to remove the driver before installing the Xonar
HDAV driver. Otherwise, the GamerOSD driver installation error may occur.
1. After you have installed the Xonar HDAV card, turn on your computer.
Windows® automatically detects the HDAV card and searches for device
drivers. When prompted for the drivers, click Cancel.
2. Insert the support CD into the optical drive. If Autorun is enabled in your
system, the setup starts automatically. If not, run setup.exe from your
support CD.
3. Follow the on-screen instructions to finish the installation.
DVI Out
The version and content of the driver CD are subject to change without notice.
6
ASUS Xonar HDAV 1.3 Deluxe Quick start guide
 Loading...