

ASUS WI500Q E-Manual

E-Manual

E9643
First Edition
November 2014
COPYRIGHT AND WARRANTY INFORMATION
No part of this user guide, including the products and software described in it, may be
reproduced, transmitted, transcribed, stored in a retrieval system, or translated into any
language in any form or by any means, except documentation kept by the purchaser for
backup purposes, without the express written permission of ASUSTeK Computer INC. (“ASUS”).
Product warranty or service will not be extended if: (1) the product is repaired, modied or
altered, unless such repair, modication of alteration is authorized in writing by ASUS; or (2)
the serial number of the is defaced or missing.
ASUS PROVIDES THIS User guide “AS IS” WITHOUT WARRANTY OF ANY KIND, EITHER EXPRESS
OR IMPLIED, INCLUDING BUT NOT LIMITED TO THE IMPLIED WARRANTIES OR CONDITIONS
OF MERCHANTABILITY OR FITNESS FOR A PARTICULAR PURPOSE. IN NO EVENT SHALL ASUS,
ITS DIRECTORS, OFFICERS, EMPLOYEES OR AGENTS BE LIABLE FOR ANY INDIRECT, SPECIAL,
INCIDENTAL, OR CONSEQUENTIAL DAMAGES (INCLUDING DAMAGES FOR LOSS OF PROFITS,
LOSS OF BUSINESS, LOSS OF USE OR DATA, INTERRUPTION OF BUSINESS AND THE LIKE), EVEN
IF ASUS HAS BEEN ADVISED OF THE POSSIBILITY OF SUCH DAMAGES ARISING FROM ANY
DEFECT OR ERROR IN THIS User guide OR PRODUCT.
Products and corporate names appearing in this user guide may or may not be registered
trademarks or copyrights of their respective companies, and are used only for identication or
explanation and to the owners’ benet, without intent to infringe.
SPECIFICATIONS AND INFORMATION CONTAINED IN THIS User guide ARE FURNISHED FOR
INFORMATIONAL USE ONLY, AND ARE SUBJECT TO CHANGE AT ANY TIME WITHOUT NOTICE,
AND SHOULD NOT BE CONSTRUED AS A COMMITMENT BY ASUS. ASUS ASSUMES NO
RESPONSIBILITY OR LIABILITY FOR ANY ERRORS OR INACCURACIES THAT MAY APPEAR IN THIS
User guide, INCLUDING THE PRODUCTS AND SOFTWARE DESCRIBED IN IT.
Copyright © 2014 ASUSTeK Computer INC. All Rights Reserved.
LIMITATION OF LIABILITY
Circumstances may arise where because of a default on ASUS’ part or other liability, you are
entitled to recover damages from ASUS. In each such instance, regardless of the basis on which
you are entitled to claim damages from ASUS, ASUS is liable for no more than damages for
bodily injury (including death) and damage to real property and tangible personal property;
or any other actual and direct damages resulted from omission or failure of performing legal
duties under this Warranty Statement, up to the listed contract price of each product.
ASUS will only be responsible for or indemnify you for loss, damages or claims based in
contract, tort or infringement under this Warranty Statement.
This limit also applies to ASUS’ suppliers and its reseller. It is the maximum for which ASUS, its
suppliers, and your reseller are collectively responsible.
UNDER NO CIRCUMSTANCES IS ASUS LIABLE FOR ANY OF THE FOLLOWING: (1) THIRDPARTY CLAIMS AGAINST YOU FOR DAMAGES; (2) LOSS OF, OR DAMAGE TO, YOUR RECORDS
OR DATA; OR (3) SPECIAL, INCIDENTAL, OR INDIRECT DAMAGES OR FOR ANY ECONOMIC
CONSEQUENTIAL DAMAGES (INCLUDING LOST PROFITS OR SAVINGS), EVEN IF ASUS, ITS
SUPPLIERS OR YOUR RESELLER IS INFORMED OF THEIR POSSIBILITY.
SERVICE AND SUPPORT
Visit our multi-language web site at http://support.asus.com
2
ASUS ZenWatch E-Manual

Table of Contents
About this manual ............................................................................................. 6
Conventions used in this E-Manual ............................................................. 7
Typography .......................................................................................................... 7
Input mode ........................................................................................................... 7
Chapter 1: Parts and features
ASUS ZenWatch ................................................................................................10
Parts .............................................................................................................10
Features .............................................................................................................11
Charging cradle.................................................................................................13
Parts .............................................................................................................13
Features .............................................................................................................13
Chapter 2: Using your ASUS ZenWatch
Adjusting the strap ..........................................................................................16
Replacing the strap ..........................................................................................17
Charging your ASUS ZenWatch ..................................................................18
Powering on .......................................................................................................19
Powering off .......................................................................................................19
Chapter 3: Working with Android Wear
Installing Android Wear app on your phone .......................................... 22
Pairing for the first time .................................................................................23
Downloading ASUS ZenWatch Manager app on your phone .........25
Navigating your ASUS ZenWatch ............................................................... 26
Waking your ZenWatch ................................................................................26
Watch face .........................................................................................................27
Dimming the screen ......................................................................................28
Using voice actions ........................................................................................29
Start apps ............................................................................................................ 31
Inside Start ....................................................................................................... 32
ASUS ZenWatch E-Manual
3

Chapter 4: Featured ASUS ZenWatch phone apps
Where to get ASUS ZenWatch apps .......................................................... 34
ZenWatch Manager app ................................................................................34
ZenWatch Manager home screen ............................................................34
Watch face .........................................................................................................35
Unlock my phone ...........................................................................................36
Cover to mute ..................................................................................................38
SOS .............................................................................................................39
Find my watch .................................................................................................40
Forgot phone warning..................................................................................40
Flashlight ...........................................................................................................41
Compass ............................................................................................................41
ASUS Wellness app ..........................................................................................42
Using Wellness for the rst time ................................................................42
To set activity goals: ....................................................................................... 44
ASUS Remote Camera app............................................................................45
Remote Camera home screen ....................................................................46
ASUS Remote Link app ...................................................................................47
Using Remote Link .........................................................................................47
Remote Link presentation controller .....................................................48
Appendices
Appendices.........................................................................................................50
Safety precautions..........................................................................................50
Battery precautions .......................................................................................50
Federal Communications Commission Interference Statement ...51
RF exposure warning ..................................................................................52
Canada, Industry Canada (IC) Notices .................................................... 52
4
ASUS ZenWatch E-Manual

Canada, avis d'Industry Canada (IC) .......................................................52
CE Marking ........................................................................................................ 53
Specied Radio Equipment in Japan .......................................................53
Regional notice for Singapore ...................................................................54
Global Environmental Regulation Compliance and Declaration ..54
ASUS Recycling/Takeback Services ..........................................................54
Proper disposal ................................................................................................55
Rechargeable Battery Recycling Service in North America.............55
Regional notice for California .....................................................................55
Regional notice for India ..............................................................................55
Notices for removeable batteries .............................................................56
Avis concernant les batteries remplaçables .........................................56
Australian Communication and Media Authority ...............................56
National Telecommunications Commission (NTC)
of the Philippines ............................................................................................56
Nordic Lithium Cautions (for lithium-ion batteries) ...........................57
ASUS ZenWatch E-Manual
5

About this manual
This manual provides information about the hardware and software
features of your ASUS ZenWatch, organized through the following
chapters:
Chapter 1: Parts and features
This chapter details the hardware components of your ASUS
ZenWatch.
Chapter 2: Using your ASUS ZenWatch
This chapter shows you how to use the dierent parts of your
ASUS ZenWatch.
Chapter 3: Working with Android Wear
This chapter provides an overview of using Android Wear in
your ASUS ZenWatch
Chapter 4: Featured ASUS ZenWatch phone apps
This chapter provides information on some of the features ASUS
ZenWatch apps that you can download and use on your paired
phone.
Appendices
This section includes notices and safety statements for your
ASUS ZenWatch.
6
ASUS ZenWatch E-Manual

Conventions used in this E-Manual
To highlight key information in this E-Manual, some text are
presented as follows:
IMPORTANT! This message contains vital information that must be
followed to complete a task.
NOTE: This message contains additional information and tips that can
help complete tasks.
WARNING! This message contains important information that must
be followed to keep you safe while performing tasks and prevent
damage to your ASUS ZenWatch's data and components.
Typography
Bold = This indicates a menu or an item that must be selected.
Italic = This indicates sections that you can refer to in this user
guide.
Input mode
The icons below indicate the input features you can use to complete
a series of tasks or procedures on your ASUS ZenWatch.
= Use gestures.
= Use voice command.
ASUS ZenWatch E-Manual
7

8
ASUS ZenWatch E-Manual

Chapter 1: Parts and features
1
Parts and features
ASUS ZenWatch
Parts
10
ASUS ZenWatch E-Manual

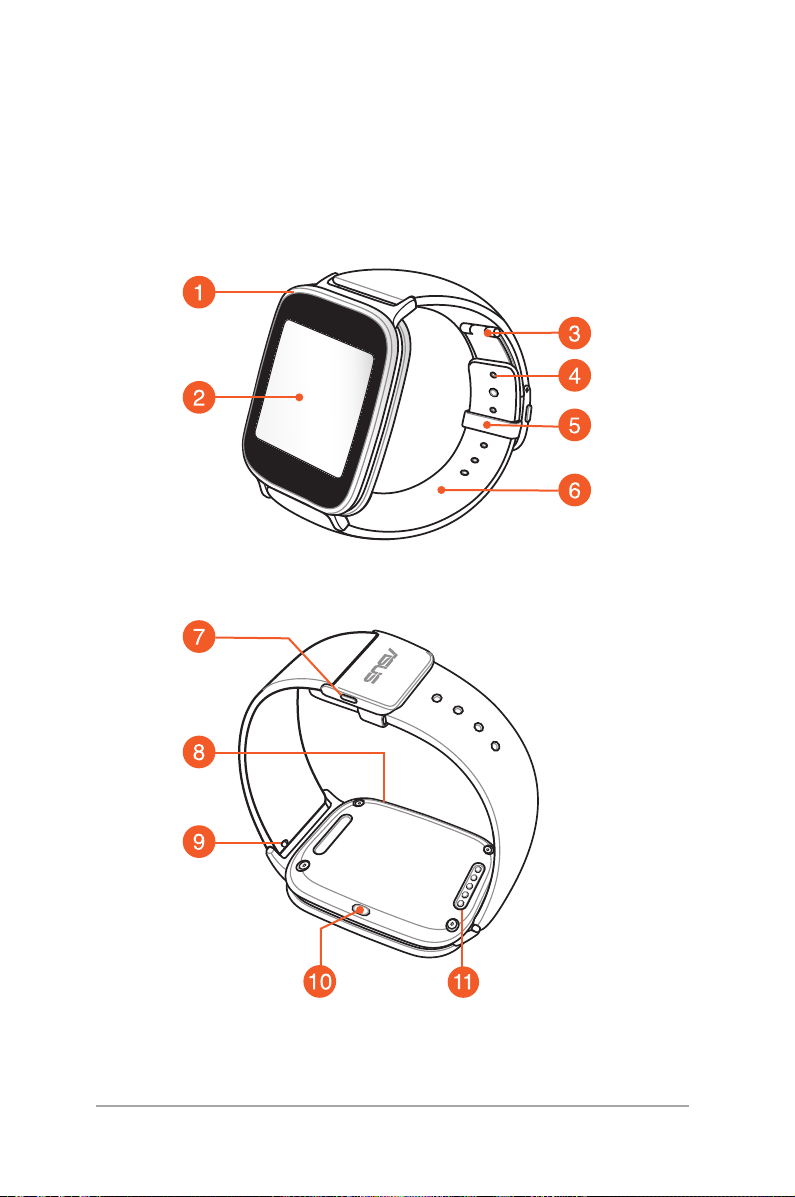
Features
Metal sensor
Place your ngers on the metal sensor, surrounding the
bezel, to measure your physiological data for health and
tness apps.
Touch screen display panel
Use the touch screen display panel to operate your ASUS
ZenWatch using gestures.
NOTE: For more details, refer to the Navigating your ASUS
ZenWatch section in this E-Manual.
Deployment buckle
The deployment buckle allows you to extend the length of
your current straps for a more comfortable t.
NOTE: For more details, refer to the Adjusting the strap
section in this E-Manual.
Adjustment hole
Lock your straps in place by inserting the pin of the
deployment buckle into an adjustment hole.
Loop
Use the loop to tuck away the excess strap of your ASUS
ZenWatch.
ASUS ZenWatch E-Manual
11

Strap
The strap allows you to wear your ASUS ZenWatch on your
wrist.
Release button
Press this button to unlock the straps of your ASUS
ZenWatch.
Microphone
The built-in microphone allows you to operate your ASUS
ZenWatch using voice command.
Spring bar
Press the pin on this spring bar to remove the current strap
of your ASUS ZenWatch.
NOTE: To replace the current strap of your ASUS ZenWatch,
refer to the Replacing the straps section in this E-Manual.
Power and reset button
Press this button to power your ASUS ZenWatch on or o, or
to reset it to its factory settings.
12
NOTE: For details on using the power and reset button, refer
to the Powering on, Powering o, and Resetting your ASUS
ZenWatch sections in this E-Manual.
Charging connectors
Align and connect these charging connectors to the
charging pins of your charging cradle to charge the battery
of your ASUS ZenWatch.
ASUS ZenWatch E-Manual
Charging cradle
Parts
NOTE: For details on using the charging cradle, refer to the Charging
your ASUS ZenWatch section in this E-Manual.
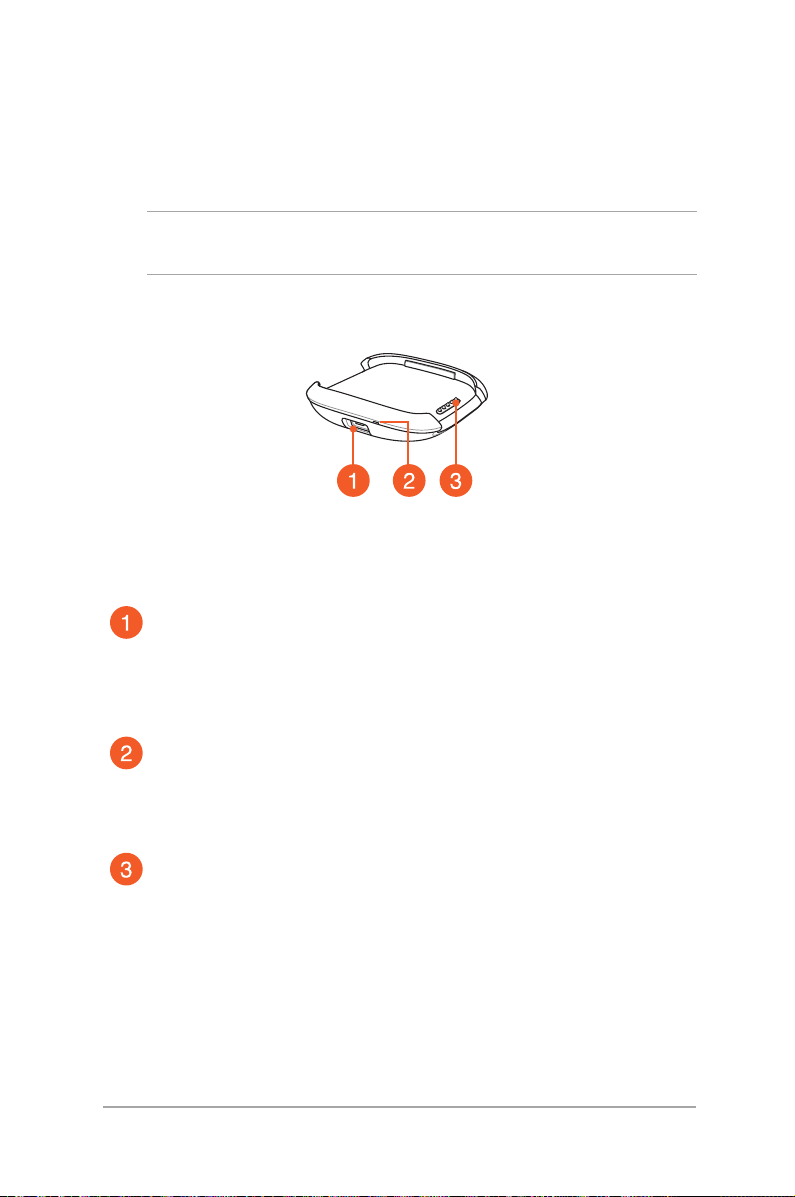
Features
Micro USB port
Insert the bundled micro USB connector of the USB cable
into this port to connect your chargind cradle to a power
supply.
LED indicator
The LED indicator lights up to indicate that the ASUS
ZenWatch is currently on battery charge mode.
Charging pins
Connect these pins to the charging connectors to charge the
battery and supply power to your ASUS ZenWatch.
ASUS ZenWatch E-Manual
13

14
ASUS ZenWatch E-Manual

Chapter 2: Using your ASUS ZenWatch
2
Using your ASUS ZenWatch
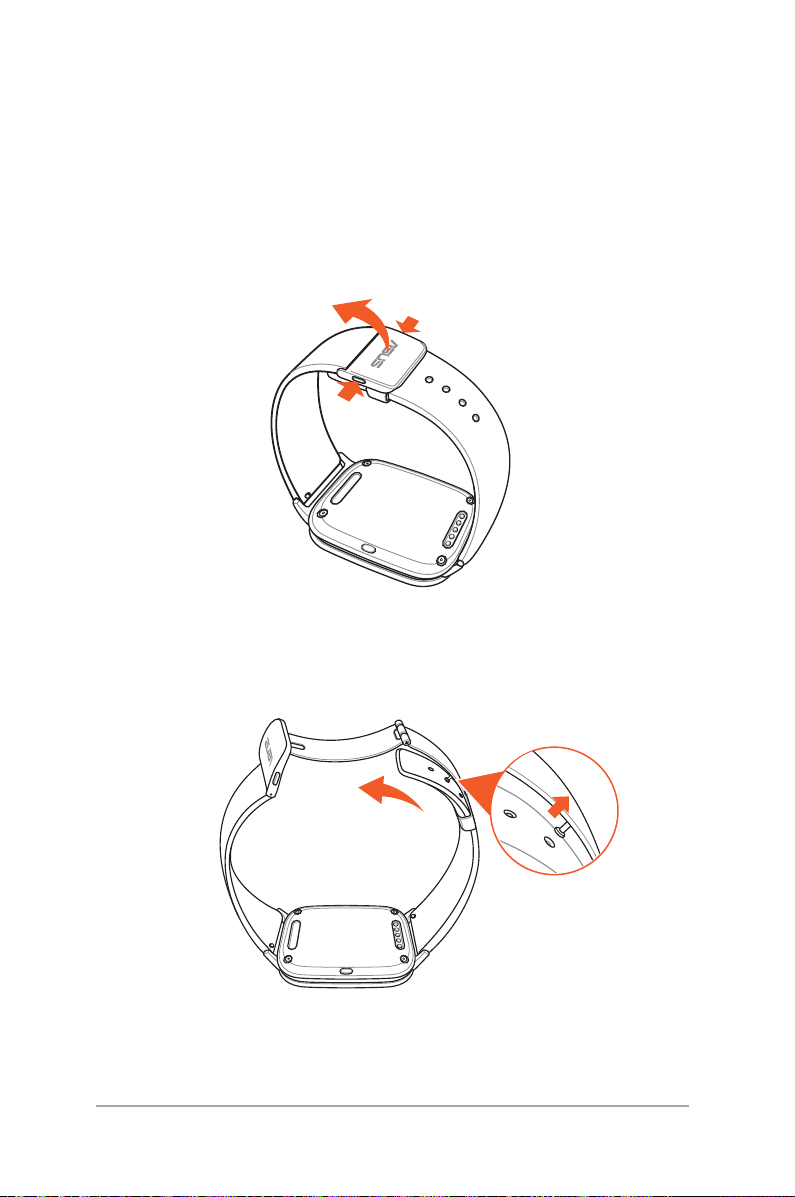
Adjusting the strap
Refer to the following illustrations when adjusting the strap of your
ASUS ZenWatch.
1. Press the release buttons to unfold the deployment buckle.
2. Detach the pin from its current hole, then move the strap
according to your desired length.
16
ASUS ZenWatch E-Manual
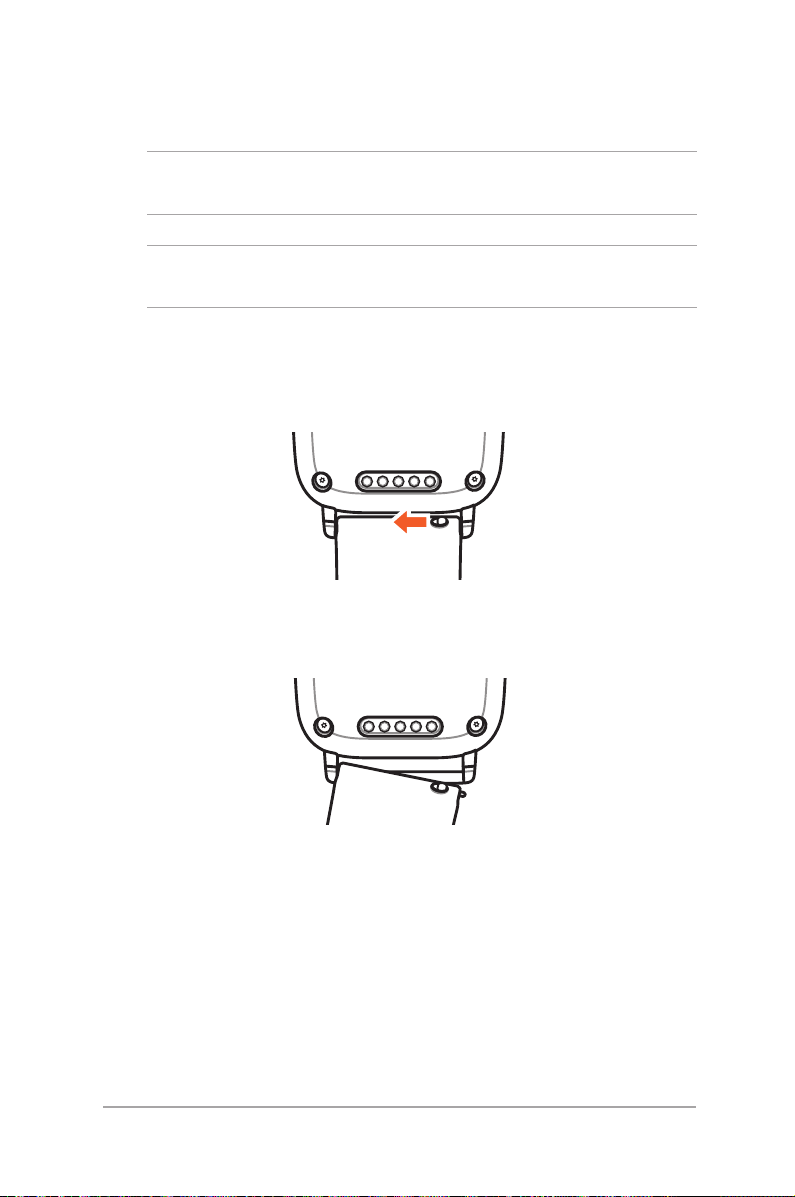
Replacing the strap
IMPORTANT! Your ASUS ZenWatch is compatible with watch straps
that have a standard 22 mm spring bar pin.
NOTE: Refer to your new strap’s user guide for instructions on how to
attach it with your ASUS ZenWatch.
1. Press the pin on your current strap, as shown below, to detach it
from the ASUS ZenWatch.
2. Gently pull out the current strap to replace it with a new one.
Refer to your new wrist band’s replacement instructions.
ASUS ZenWatch E-Manual
17

Charging your ASUS ZenWatch
1. Connect the charging pins to the charging connectors.
2. Connect the micro USB to USB cable to your power adapter,
then connect the power adapter to a nearby power outlet.
3. Connect the micro USB to USB cable to the charging cradle to
start charging your ASUS ZenWatch.
18
ASUS ZenWatch E-Manual
 Loading...