


®
USER’S
GUIDE

®
Copyright © 1999 ASUSTeK COMPUTER INC. All Rights Reserved.
No part of this manual, including the products and software described in it, may be reproduced,
transmitted, transcribed, stored in a retrieval system, or translated into any language in any
form or by any means, except documentation kept by the purchaser for backup purposes,
without the express written permission of ASUSTeK COMPUTER INC. (“ASUS”).
ASUS PROVIDES THIS MANUAL “AS IS” WITHOUT WARRANTY OF ANY KIND,
EITHER EXPRESS OR IMPLIED, INCLUDING BUT NOT LIMITED T O THE IMPLIED
WARRANTIES OR CONDITIONS OF MERCHANTABILITY OR FITNESS FOR A
PARTICULAR PURPOSE. IN NO EVENT SHALL ASUS, ITS DIRECTORS, OFFICERS,
EMPLOYEES OR AGENTS BE LIABLE FOR ANY INDIRECT , SPECIAL, INCIDENTAL,
OR CONSEQUENTIAL DAMAGES (INCLUDING DAMAGES FOR LOSS OF PROFITS,
LOSS OF BUSINESS, LOSS OF USE OR DATA, INTERRUPTION OF BUSINESS AND THE
LIKE), EVEN IF ASUS HAS BEEN ADVISED OF THE POSSIBILITY OF SUCH DAMAGES ARISING FROM ANY DEFECT OR ERROR IN THIS MANUAL OR PRODUCT.
Product warranty or service will not be extended if: (1) the product is repaired, modified or
altered, unless such repair, modification of alteration is authorized in writing by ASUS; or (2)
the serial number of the product is defaced or missing.
Products and corporate names appearing in this manual may or may not be registered
trademarks or copyrights of their respective companies, and are used only for identification or
explanation and to the owners’ benefit, without intent to infringe.
• Windows and MS-DOS are registered trademarks of Microsoft Corporation.
• Adobe and Acrobat are registered trademarks of Adobe Systems Incorporated.
The product name and revision number are both printed on the product itself. Manual revisions
are released for each product design represented by the digit before and after the period of the
manual revision number. Manual updates are represented by the third digit in the manual
revision number.
For previous or updated manuals, BIOS, drivers, or product release information, contact ASUS at
http://www .asus.com.tw or through any of the means indicated on the Contacting ASUS page of
this manual.
SPECIFICATIONS AND INFORMATION CONTAINED IN THIS MANUAL ARE FURNISHED FOR INFORMATIONAL USE ONLY, AND ARE SUBJECT T O CHANGE AT ANY
TIME WITHOUT NOTICE, AND SHOULD NOT BE CONSTRUED AS A COMMITMENT
BY ASUS. ASUS ASSUMES NO RESPONSIBILITY OR LIABILITY FOR ANY ERRORS
OR INACCURACIES THAT MAY APPEAR IN THIS MANUAL, INCLUDING THE
PRODUCTS AND SOFTWARE DESCRIBED IN IT.
Product Name: ASUS TV Box
Manual Revision: 1.00 E289
Release Date: January 1999
ASUS TV Box2

Contents
FCC & DOC Compliance ..........................................................4
Introduction...............................................................................5
Thank you for choosing ASUS................................................ 5
Specifications .......................................................................... 5
Available Models..................................................................... 5
Important Safeguards & Precautions .....................................6
Installation ............................................................................... 6
Operation/Cleaning/Service .................................................... 6
Outdoor Antenna Grounding and Power Lines ....................... 6
Getting Started..........................................................................7
Using the Remote Control .......................................................8
Installing Batteries................................................................... 8
Parts and Functions.................................................................. 9
Components of Your ASUS TV Box ......................................11
Using Your TV Box .................................................................12
CATV/Home Antenna Connections ...................................... 12
Installing and Using Software ...............................................15
Using the ASUS Live Utility Software ................................. 16
ASUS Main Panel ............................................................ 16
Using the ASUS Tuner Panel .................................................18
Buttons and Functions ........................................................... 18
Channel Setting................................................................ 19
Reference ................................................................................20
International TV Systems and Standards............................... 20
Troubleshooting..................................................................... 22
Contacting ASUS ....................................................................23
ASUS TV Box 3

FCC & DOC Compliance
Federal Communications Commission
Statement
This device complies with FCC Rules Part 15. Operation is subject to the
following two conditions:
♦ This device may not cause harmful interference.
♦ This device must accept any interference received, including interference that
may cause undesired operation.
This equipment has been tested and found to comply with the limits for a Class B
digital device, pursuant to Part 15 of the FCC Rules. These limits are designed to
provide reasonable protection against harmful interference in a residential
installation. This equipment generates, uses and can radiate radio frequency
energy and, if not installed and used in accordance with manufacturer’s instructions, may cause harmful interference to radio communications. However, there
is no guarantee that interference will not occur in a particular installation. If this
equipment does cause harmful interference to radio or television reception, which
can be determined by turning the equipment off and on, the user is encouraged to
try to correct the interference by one or more of the following measures:
♦ Reorient or relocate the receiving antenna.
♦ Increase the separation between the equipment and receiver.
♦ Connect the equipment to an outlet on a circuit different from that to which
the receiver is connected.
♦ Consult the dealer or an experienced radio/TV technician for help.
WARNING! The use of shielded cables for connection of the monitor to the
graphics card is required to assure compliance with FCC regulations. Changes
or modifications to this unit not expressly approved by the party responsible
for compliance could void the user’s authority to operate this equipment.
Canadian Department of Communications
Statement
This digital apparatus does not exceed the Class B limits for radio noise emissions from digital apparatus set out in the Radio Interference Regulations of the
Canadian Department of Communications.
ASUS TV Box4

Introduction
Thank you for choosing ASUS
Congratulations on your purchase of an ASUS TV Box. You have selected a
high-quality instrument to give you years of enjoyment.
With an ASUS TV Box, you can watch your favorite TV programs using your
computer monitor as your TV display. The TV Box gives you full or resizable
screen for TV display, quick and easy installation, remote control for easy and
cozy viewing, and TV-like operation. All these features in a small box—and
more, such as the capability to video capture scenes from the programs you
are watching using the provided video capture utility.
Specifications
Dimensions 147.5 (W) x 87.5 (H) x 24 (D) mm (5.8 x 3.5 x 1 in.)
Weight 180 g (TV Box only, without accessories attached)
Input Signal 75 Ohm coaxial TV antenna output
Remote sensor (optional)
Remote control (optional)
S-Video input
Output Signal S-Video output to ASUS graphics card with VIDEO-IN
Audio output (to speaker or looped to sound card)
Video Signal Standards
NTSC model: NTSC-M
PAL D/K model: PAL-D, PAL-K
PAL B/G model: PAL-B, PAL-G
Minimum System Requirements
Windows 95/98
ASUS graphics card with VIDEO-IN connector (not included)
Available Models
NTSC System TV Box (NTSC): NTSC, without remote control
TV Box (NTSC+RC): NTSC, with remote control
PAL System TV Box (PAL D/K): PAL D/K, without remote control
TV Box (PAL D/K+RC): PAL D/K, with remote control
TV Box (PAL B/G): PAL B/G, without remote control
TV Box (PAL B/G+RC): PAL B/G, with remote control
ASUS TV Box 5
Important Safeguards & Precautions
WARNING!
RISK OF ELECTRIC SHOCK
DO NOT OPEN
To reduce the risk of fire or shock hazard, DO NOT expose the TV Box to rain or
moisture.
T o reduce the risk of electric shock, DO NOT remove cover (or back). No user
serviceable parts inside. Refer servicing to qualified service personnel.
CAUTION Read the safety and operating instructions before operating your TV
Box. Follow instructions and heed all warnings on your TV Box and in this guide.
Installation
1 Always turn off power to your computer and other components or peripherals before
you connect or disconnect any cables. This will protect your system and components
from possible electrical surges that could damage your equipment.
2 Protect and route cords or cables so they will not be stepped on or pinched by
anything placed on or against them.
3 Do not cover or block ventilation holes in the TV Box cabinet. Doing so may damage the TV
Box, or cause fire. Do not place your TV Box on a soft surface that could block ventilation
holes on the bottom. A void enclosed installations, unless ventilation is adequate.
4 Avoid excessive humidity, sudden temperature changes, or temperature extremes.
Dew may form inside your TV Box.
5 To avoid costly damage or injury, place your TV Box flat on a solid, stable surface free
from vibrations; do not place any heavy objects on top of it.
!
Operation/Cleaning/Service
1 Keep your TV Box away from wet locations.
2 Use only accessories recommended by ASUS to avoid fire, shock or other hazards.
3 If your TV Box has been exposed to rain, moisture or strong impact, unplug it and have
it inspected by a qualified service technician before resuming use.
4 Unplug your TV Box and disconnect it from the antenna and/or cable system during a
lightning strom or an extended period of discontinued use.
5 Unplug your TV Box before cleaning. Use a damp cloth for cleaning. Do not use
cleaning fluids or aerosols that could enter the unit and cause damage, fire or
electrical shock. These substances may also mar the finish of your TV Box.
6 Keep liquids and foreign objects away from your TV Box. Never operate your TV Box if
any liquid or foreign object has entered it. Electrical shorts could result and possibly
cause fire or shock hazards. Unplug your TV Box immediately and have it inspected by
a qualified service technician.
7 Never open or remove covers or make any adjustments not described in this guide.
Attempting to do so could expose you to any dangerous slectrical shock or other
hazards. It may also cause serious damage to your TV Box.
8 Keep your TV Box away from electrical and magnetic appliances that could impair
performance.
9 Do not attempt to service this TV Box yourself. Instead, contact a qualified service technician.
Outdoor Antenna Grounding and Power Lines
Check your respective area for proper grounding information and other regulations.
ASUS TV Box6
Getting Started
The following steps will help you get your ASUS TV Box connected and
working quickly and assume that your computer is shut down and turned off.
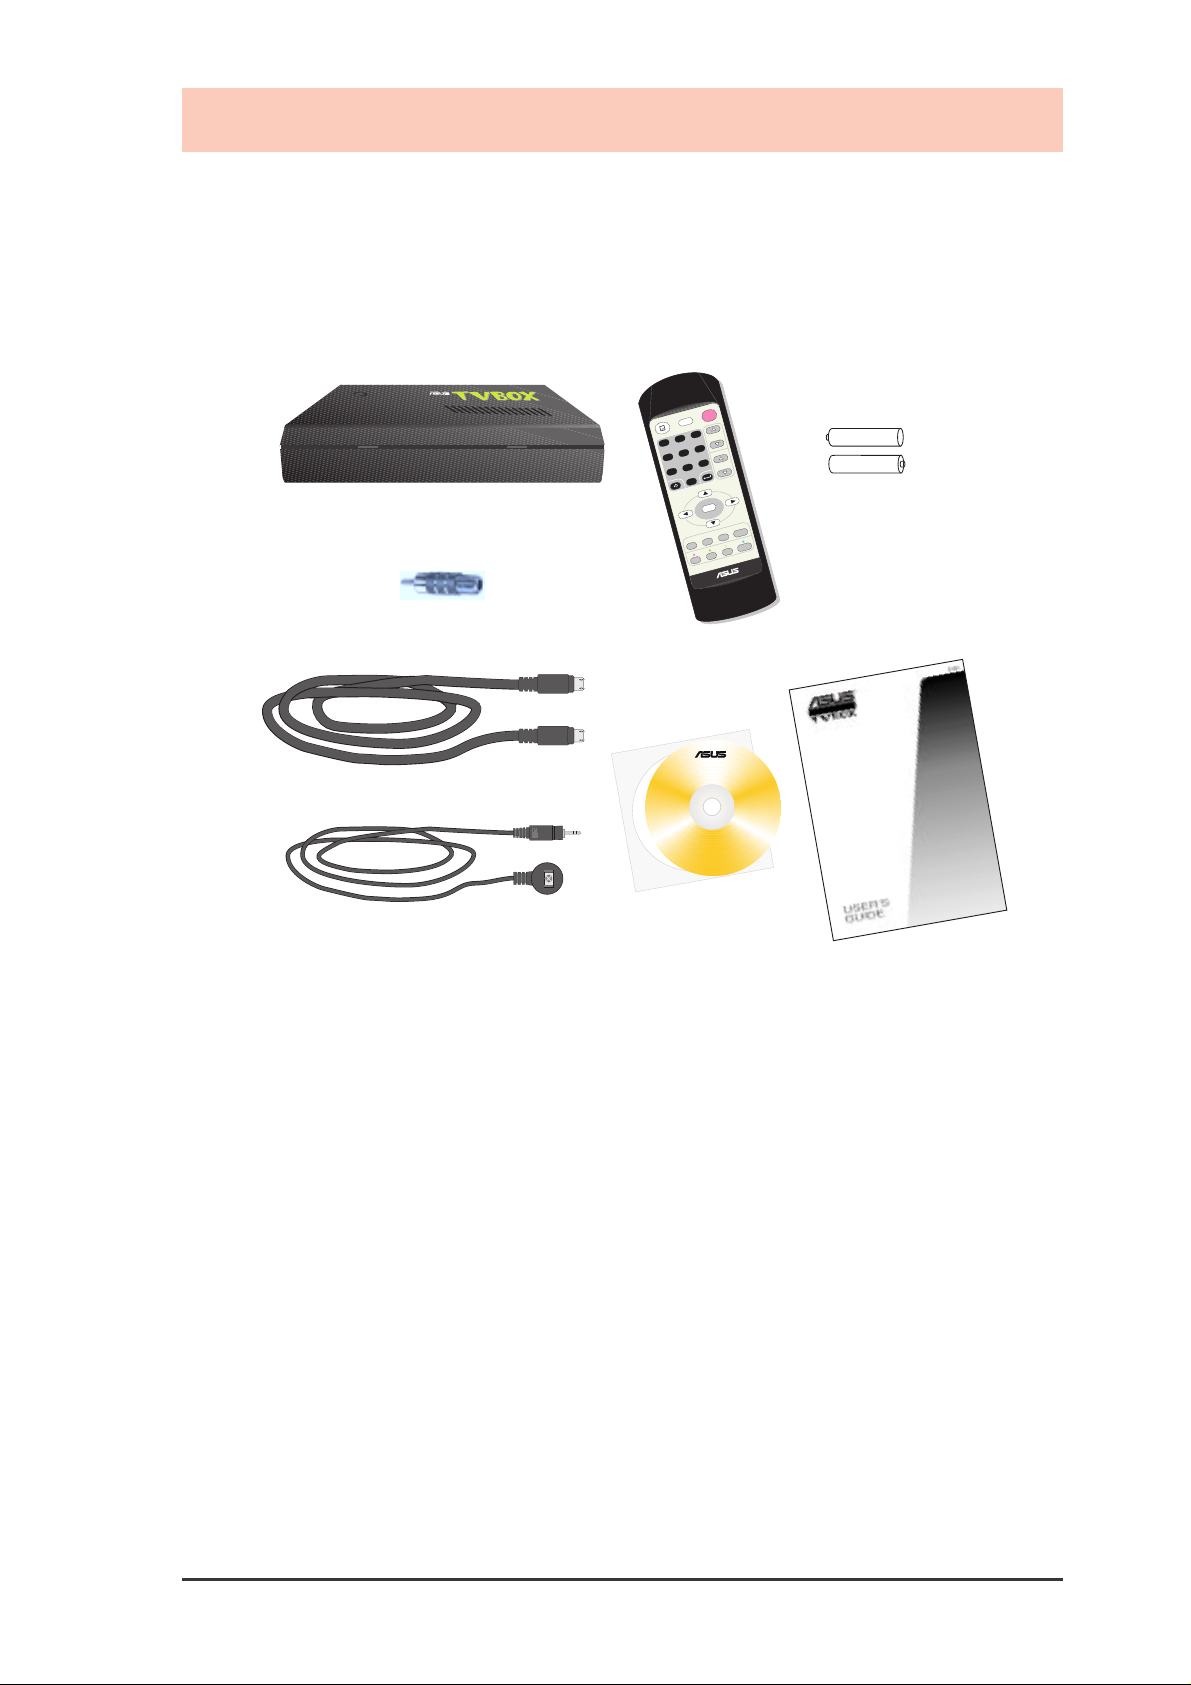
1 Unpack your ASUS TV Box and accessories.
Shown here are the ASUS TV Box and accessories that may have been
packed with your TV Box.
®
Power
te
u
M
3
l
e
n
n
a
h
C
ASUS TV Box
RF to RCA Connector
2
1
6
5
4
9
e
m
lu
o
V
8
7
0
u
n
e
M
n
a
c
S
y
a
l
p
is
D
P
A
/S
S
T
M
n
tio
p
a
C
Remote Control
(optional)
Two AAA (UM-4)
Remote Control
–
+
–
+
Batteries for
(optional)
®
Video Cable
CD Installation Disc
Remote Control Receiver Cable
(optional)
User’s Guide
2 Install batteries in remote control (optional).
♦ Details are on page 8.
3 Connect cables and other accessories.
♦ Details for the different components of your TV Box are on page 11.
♦ Details for connecting a cable TV system and home antenna to your TV
Box starts on page 12.
♦ Details for connecting other devices to your TV Box are on page 14.
4 Start your computer.
5 Install the ASUS Live utility software.
Details for installing the software to run your TV Box are on page 15.
♦
6 Run the ASUS Live utility software.
♦ Details for using the software to run your TV Box are on page 16.
ASUS TV Box 7

Using the Remote Control
The Remote Control (optional accessory) allows you to operate the VCR at
a distance. It has all the major controls necessary for operating your TV
Box, such as turning your TV Box on/off, viewing the TV, and changing the
channels and volume. Aim the front of the Remote Control at the Remote
Control Receiver and press the control buttons as you would on the ASUS
Tuner Panel (see Using the ASUS Tuner Panel). Make sure that the
batteries have been properly installed first.
l
Power
e
nn
a
h
C
e
m
3
®
The remote control sensor or receiver may be
placed anywhere, as long as it is not blocked
Mute
lu
o
V
6
9
2
5
8
1
0
4
7
n
a
c
S
y
Menu
la
p
s
i
D
P
A
S
/
S
T
M
n
o
i
t
p
a
C
Installing Batteries
Install the batteries included with your TV Box.
UM-4
+
–
AAA
–
+
R03,1.5V
Press Down
Battery Cover
Slide
1 Press down on the mark and then slide the battery cover off
2 Insert the batteries, matching their polarities (
Slide
Off
On
as shown.
+
and–) to the
markings inside the Remote Control.
♦ If the Remote Control does not operate or fails to function normally,
replace the batteries. The Remote Control operates on two AAA (UM-
4) 1.5 volt batteries, available at most stores, such as electronics and
camera stores.
ASUS TV Box8

Using the Remote Control
Parts and Functions
C
1
4
7
aption
Power Button
Power
Pressing this button terminates Tuner input and
then switches to Composite or S-Video input.
P
ow
M
ute
2
5
8
0
er
3
C
hannel
6
9
Volum
e
Channel Buttons
Pressing selects the next higher channel while
pressing selects the next lower channel.
Volume Buttons
Pressing increases volume while pressing
Channel
Volume
decreases volume.
M
enu
Mute Button
Mute
Pressing this button quickly reduces sound to
minimum level without affecting the picture. This
M
TS/S
AP
D
isplay
S
can
is especially useful during telephone calls or
other interruptions.
Maximize Button
Pressing this button maximizes or restores the
display window.
Number Buttons
Lets you access any channel number.
Press
to confirm your selection.
1
45
7
3
2
6
9
8
0
Enter Button
Pressing this button confirms the channel number
that you selected.
Previous Channel Button
Pressing this button causes the display to change
back to the last tuned channel.
Menu Button
Menu
Pressing this button shows or hides the video
source options on the display window. Use the
Arrow Buttons to navigate around the menu.
Arrow Buttons
Pressing any one of these buttons
selects a specific video source,
thereby allowing you to adjust its setting.
ASUS TV Box 9
Using the Remote Control
Caption MTS/SAP Display Scan
Caption Button
Not available as of this moment.
MTS/SAP Button
Pressing this button toggles between MTS (Multichannel Television Sound)
stereo audio (providing true, high-fidelity stereo sound) and SAP (Second
Audio Program) audio, if available. Some TV stations that broadcast stereo
also broadcast another sound channel called SAP, which is sometimes used
to offer the program in another language.
Display Button
Pressing this button displays the channel number, channel name (if configured through the Channel Setting dialog box of the ASUS Tuner Panel),
and audio settings on the display window.
Scan Button
Pressing this button automatically cycles through all the channels and place
active channels for your area in channel memory.
Null Buttons
ASUS TV Box10
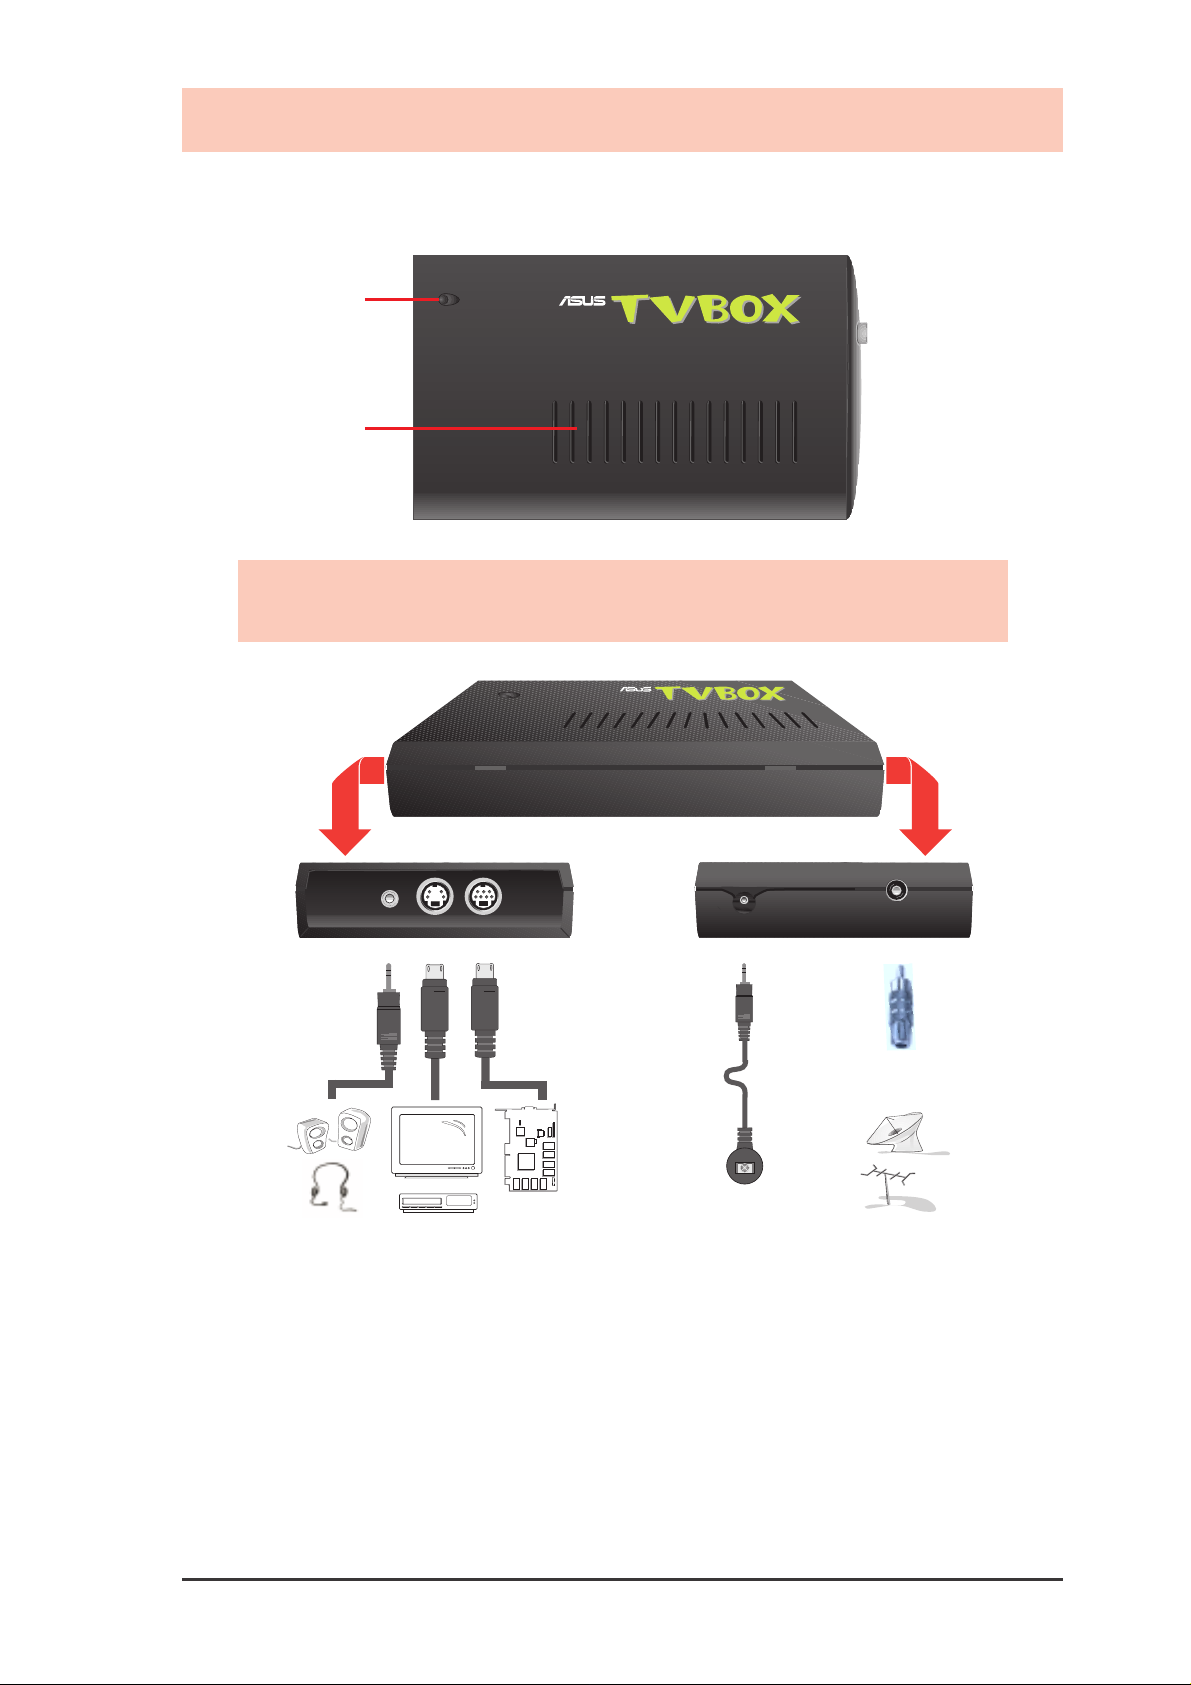
Components of Your ASUS TV Box
Shown here are the major components and connectors and the connection
possibilities of your TV Box.
Power LED
®
Ventilation
Holes
CAUTION Do not cover or block ventilation holes. Doing so may
damage your TV Box or cause fire.
®
➊➋➌ ➍ ➎
J1
VIP Connector A
Connector B
PC to TV
Encoder
Digital
Decoder
VIP
Digital
Video
FAN_PWR
BIOS
VGA
SDRAM
Chip with Fan
SDRAM
RIVA TNT
Processor
Graphics
NVIDIA
SDRAM
TM
SDRAM
SDRAM
SDRAM
SDRAM
SDRAM
R
1 Line Output Jack: allows you to
connect a pair of powered/self-amplified
speakers or a pair of headphones or
earphones for private listening.
2 S-Video Connector (4-pin):
provides for direct S-Video
connection from your TV Box.
3 Video Connector (7-pin): used to
connect your TV Box to an ASUS
graphics card with
VIDEO-IN connector.
CATV
4 Remote Control Receiver Connec-
tor: used to connect the optional
Remote Control Receiver cable.
5 Cable/Antenna Connector: used
when attaching either a home
antenna or cable TV (CATV) system
to your TV Box.
ASUS TV Box 11

Using Your TV Box
There are three general steps in using or setting-up your TV Box.
Step 1 Disconnect the CATV system or antenna from your TV system.
Step 2 Reconnect the CATV system or antenna to your TV Box.
Step 3 Connect the included and other accessories to your TV Box.
CA TV/Home Antenna Connections
There are various types of cable TV (CATV) and antenna connections. Each
type requires a different method of connection.
NOTE Consult your dealer for the type of adaptor, splitter, A/B switch
or combiner that may be required when setting up your TV Box.
Your TV Box is capable of receiving up to 100 channels. If you do not have
a CATV system, you may use an indoor or outdoor antenna that carries only
VHF (channels 2–13), only UHF (channels 14–69), or VHF and UHF
channels to connect to your TV Box.
Your CATV sytem or antenna may be connected in either of the following
two ways: direct to the TV or through a VCR system.
Connection Through a TV System
CATV
Connection Through a VCR System
CATV
To start using your TV Box, follow the steps and sketch on the following
pages to connect a CATV system or home antenna to your TV Box.
ASUS TV Box12

Using Your TV Box
Step 1
Disconnect the CATV system or antenna from your TV system.
CATV
Disconnection from a TV System
CATV
Disconnection from a VCR System
Step 2
Reconnect the CATV system or antenna to your TV Box.
®
R
CATV
Direct Connection
®
R
®
R
®
R
CATV
CATV
Connection Through either an Adaptor, Splitter, A/B Switch or Combiner
ASUS TV Box 13
CATV

Connecting Your TV Box
Step 3
Connect the included and other accessories to your TV Box.
®
Amplifier
Connectionthrough Stereo Audio System
®
Connection through Computer with Audio System
You are now ready to install the software.
ASUS TV Box14

Installing and Using Software
An ASUS Live utility software must be installed first before you can use your
TV Box. The ASUS TV Box takes advantage of the VIDEO-IN function of your
graphics card to work. To install the necessary files, follow the steps below.
NOTE Make sure that you have an ASUS graphics card with
VIDEO-IN
connector installed before attempting to install the software.
1 Insert the CD installation disc or double click the CD drive icon
(ASUS logo) in My Computer to bring up the Welcome box or run
SETUP.EXE in the root directory of your CD drive. Setup starts
preparing the InstallShield® Wizard for the installation process.
2 Click Next to start copying the
necessary files.
Setup automatically starts
copying the necessary files to
the default folder.
3 After all the necessary files
have been copied, you will be
prompted to choose between
two options or both: view the
README file or launch the
installed ASUS Live series
software. Choose either one or
both and then click Finish.
ASUS TV Box 15

Installing and Using Software
Using the ASUS Live Utility Software
The ASUS Live utility software can be used to:
1 View images using your monitor as screen from traditional con-
sumer devices, such as videocassette players, camcorders, digital
cameras, and laser disc players through the onboard RCA or SVHS
VIDEO-IN connectors.
2 Capture live motion video up to 30 frames/second (minimum
Pentium II/266 system).
3 Play any
*.AVI files.
ASUS Main Panel
Capture Frames (F6)
Capture Single Frame (F5)
StopPlayPause
Open Video File
Video Format
About
(Online Help)
About
ASUS Live*
Exit
Minimize
Capture Mode
Video Slider
Full Screen (Ctrl+S)
Show/Hide Tuner Panel
Live Video Mode
To run the software, click Start and point to Programs and then ASUS
LIVE* (where * is the series of your Live software, for example,
LIVE3000 for the ASUS Live 3000) and then click LIVE*.
Capture Video (F7)
Video Source Option
Up Button
Left Button Down Button
Set Capture File
Show/Hide
Right Button
To uninstall the software, click Start and point to Programs and then
ASUS LIVE* and then click Uninstall. You may also uninstall the software
using the Add/Remove Programs Properties dialog box at the Windows
Setup tab. See Windows online help for more information on uninstalling or
removing a Windows component.
NOTE For information on the functions of each button of the ASUS Main
Panel, click the About button to open the online help or user’s guide.
ASUS TV Box16

Installing and Using Software
Show/Hide Video Source Option
When first using ASUS Live, you must set up the video source. By clicking
the Show/Hide Video Source Options button on the ASUS Main Panel,
you can show or hide the video source setup screen.
Use the Up or Down arrow buttons on the ASUS Main Panel to select Video
Connector and then the Left and Right arrow buttons to select Tuner to start
using your TV Box to view programs.
NOTE Users with the PAL D/K models should select PAL-BGHI for the
Video Standard.
If desired, you may adjust Brightness, Contrast, Saturation, and Hue of your
display using the video source setup screen. Click again the Show/Hide Video
Source Options button on the ASUS Main Panel to exit from this screen.
For the other options on the ASUS Live utility software, click the appropriate button on the ASUS Main Panel to open its dialog box.
Video Capture Driver
IMPORT ANT! It is the intent of ASUS that this product be used in full
compliance with the copyright laws of your respective and other countries and
that prior permission be obtained from copyright owners whenever necessary .
When you install the W indows 95/98 Driver of your ASUS graphics card with
the
VIDEO-IN connector, the video capture driver will automatically be installed
on your system. This video capture driver follows Microsoft Video for Windows
standard and can open up to a capture window size of 352 x 240. It can be used
with some applications that use video capture as an option, such as video
conferencing, net meeting, or digital video authoring applications.
To start capturing images on your screen, click the Capture Mode button
on the ASUS Main Panel (click the About button for more information on
the operational procedures for capturing images).
ASUS TV Box 17

Using the ASUS Tuner Panel
The ASUS T uner Panel can be opened in any one of the following three ways:
1 Click the Turn On/Off TV box button on the ASUS Main Panel.
2 Use the ASUS Main Panel.
Click the Show/Hide Video Source Options button.
♦
♦ Use the Up/Down buttoin to move to Video Connector option.
♦ Use Left/Right button to select T uner.
3 Use the remote control (available as an optional accessory).
♦
Press the Menu button.
♦ Move to the Video Connector option.
♦ Select Tuner.
Buttons and Functions
Multifunction Display
Displays information about the current settings,
such as channel and name of TV station (if
configured; see Channel Setting for more
information) and volume level.
Power Button
Turns off TV Box and then switches to Composite or S-Video state.
Minimize Button
Minimizes the onscreen remote control panel.
Number Buttons
Lets you access any channel number. Press to
confirm or wait momentarily to automatically go
to your selection.
Enter Button
Pressing this button confirms the channel number
that you selected.
Previous Channel Button
Pressing this button causes the display to change
back to the last tuned channel.
ASUS TV Box18

Using the ASUS Tuner Panel
Channel Buttons
Pressing selects the next higher channel while pressing selects the next
lower channel.
Volume Buttons
Pressing increases volume while pressing decreases volume.
Mute Button
Pressing this button quickly reduces sound to minimum level without
affecting the picture. This is especially useful during telephone calls or
other interruptions.
Scan Button
Pressing this button automatically cycles through all the channels and place
active channels for your area in channel memory.
Set Button
Use this button to define your favorite channels and their names and to
select an appropriate cable standard for your video system. Pressing this
button brings up the Channel Setting dialog box.
Channel Setting
The Channel Setting dialog box allows you to
program names or labels (up to 10 characters) for
the channel numbers. To label a channel, select
the channel number you want to label and then
type the desired label on the Channel name text
box. Repeat these steps for all the desired
channels. When finished, click OK. The names you select will then appear
on the screen and Multifunction Display whenever the channel number is
displayed or selected. Clearing a channel number check box or more will
make that or those channels unavailable for viewing.
To erase or change a label, simply select the channel number of the
particular name that you want to erase or change and then clear or change
the name on the Channel name box.
ASUS TV Box 19

Reference
International TV Systems and Standards
IMPORTANT! Because systems and standards may change or grow, the
information below are provided only as reference. Be sure that the TV
Box model that you purchased is appropriate for the system and standard
of the country where you will be installing your TV Box. For example, you
should have the NTSC model if you plan to use your TV Box in countries
with NTSC systems, PAL B/G model in countries with PAL-B/PAL-G
systems, or PAL D/K model in countries with PAL-D/PAL-K systems.
Country TV Color Stereo Subtitles
Albania B/G PAL
Argentina N PAL-N
Australia B/G PAL FM-FM Teletext
Austria B/G PAL FM-FM Teletext
Azores Is. (Portugal) B PAL
Bahamas M NTSC
Bahrain B PAL
Barbados N NTSC
Belgium B/G PAL Nicam Teletext
Bermuda M NTSC
Brazil M PAL-M MTS
Bulgaria D SECAM
Canada M NTSC MTS CC
Canary Is B PAL
China D PAL
Colombia N NTSC
Cyprus B PAL
Czech Republic D/K SECAM/PAL
Denmark B PAL Nicam TeleText
Egypt B SECAM
Faroe Islands (DK) B PAL
Finland B/G PAL Nicam TeleText
France E/L SECAM Antiope
Gambia I PAL
Germany B/G PAL FM-FM TeleText
Germany (prev East) B/G SECAM/PAL
Gibraltar B PAL
Greece B/H SECAM
Hong Kong I PAL Nicam
Hungary B/G & D/K PAL (was SECAM) Nicam (Budapest only)
Iceland B PAL
India B PAL
Indonesia B PAL
Iran H SECAM
Ireland I PAL Nicam TeleText
Israel B/G PAL Nicam TeleText
Italy B/G PAL FM/FM TeleText
Jamaica M SECAM
Japan M NTSC Matrix
ASUS TV Box20

Reference
International TV Systems and Standards...
continued
Country TV Color Stereo Subtitles
Jordan B PAL
Kenya B PAL
Korea M NTSC
Luxembourg B/G PAL - TeleText
Madeira B PAL
Madagascar B SECAM
Malaysia B PAL
Malta B/G PAL
Mauritius B SECAM
Mexico M NTSC MTS CC
Monaco L/G SECAM/PAL
Morocco B SECAM
Netherlands B/G PAL FM-FM TeleText
New Zealand B/G PAL Nicam TeleText
North Korea D/K? SECAM
Norway B/G PAL Nicam
Pakistan B PAL
Paraguay N PAL
Peru M NTSC
Philipines M NTSC
Poland D/K PAL Teletext
Portugal B/G PAL Nicam Teletext
Romania G PAL
Russia D/K SECAM
Saudi Arabia B SECAM
Seychelles I P AL
Singapore B PAL
South Africa I PAL
South Korea N NTSC
Spain B/G PAL Nicam
Sri Lanka B/G PAL
Sweden B/G PAL Nicam Teletext
Switzerland B/G PAL FM-FM TeleText
Tahiti KI SECAM
Taiwan M NTSC
Thailand B PAL
Trinidad M NTSC
Tunisia B SECAM
Turkey B PAL - TeleText
United Arab Emirates B/G PAL
United Kingdom I PAL Nicam TeleText
Uruguay N PAL MTS
USA M NTSC MTS CC
Venezuela M NTSC
Yugoslavia B/H PAL
Zimbabwe B PAL
NOTE Your TV Box may not work in countries with SECAM systems.
ASUS TV Box 21

Reference
T roubleshooting
Check this list before calling for technical support or service.
Trouble Possible Causes/Solutions
Live* reports no SAA7111A EVIP
detected on your card.
Live* reports “Cannot auto-set
video source” or “Can’t play live
video...” when starting the ASUS
Live utility software.
Intermittent or no remote control
function
Blank screen
• Your graphics card has no
• Your monitor has the wrong DDC circuit implemented.
Contact your monitor dealer for a solution.
• Your monitor may be set to a display mode not
supported by the software or you may have other video
players, such as the VCD PowerPlayer, opened. Change
to other display modes or close the other video players.
Run the software again and then set up the video source
(see Show/Hide Video Source Option for details).
• Maybe something is between the remote control and
remote control sensor or receiver.
• Maybe the remote control is not aimed directly at the
remote control sensor or receiver.
• Maybe the batteries in the remote control are weak or
dead or installed incorrectly. Try replacing batteries.
• Remove batteries and hold down one or more buttons
for several seconds. Reinstall the batteries and operate
the remote control again.
• Try another channel.
• Maybe you have Screen Saver turned on or your Power
Management Properties of your display are set to turn off
the monitor. Disable your Screen Saver or Power
Management Properties settings.
VIDEO-IN option.
ASUS TV Box22

Contacting ASUS
ASUSTeK COMPUTER INC. (Asia-Pacific)
Marketing
150 Li-Te Road
Peitou, Taipei, Taiwan 112
+886-2-2894-3447 telephone
+886-2-2894-3449 fax
info@asus.com.tw
Technical Support
+886-2-2894-3447 ext. 706 English
+886-2-2894-3447 ext. 701 Chinese
+886-2-2895-9254 fax
news2.asus.com.tw newsgroup
tsd@asus.com.tw email
www.asus.com.tw www
ftp.asus.com.tw/pub/ASUS ftp
ASUS COMPUTER INTERNATIONAL (America)
Marketing
6737 Mowry Avenue
Mowry Business Center, Building 2
Newark, CA 94560, USA
+1-510-608-4555 fax
info-usa@asus.com.tw
Technical Support
+1-510-608-4555 fax
+1-510-739-3774 BBS
tsd-usa@asus.com.tw
www.asus.com
ftp.asus.com.tw/pub/ASUS
ASUS COMPUTER GmbH (Europe)
Marketing
Harkort Str. 25
40880 Ratingen, BRD, Germany
49-2102-445011 telephone
49-2102-442066 fax
info-ger@asus.com.tw
Technical Support
49-2102-499712 hotline
49-2102-448690 BBS
tsd-ger@asus.com.tw
www.asuscom.de
ftp.asuscom.de/pub/ASUSCOM
ASUS TV Box 23
 Loading...