

Page 1
User Manual
Home Server TS mini
E5292
Second Edition V2
December 2009
Page 2

2 HOME SERVER TS mini
Contents
Notices ..........................................................................................................5
Federal Communications Commission Statement ................5
Canadian Department of Communications Statement ....... 6
REACH Notice ......................................................................................6
Macrovision Corporation Product Notice ..................................6
IC Radiation Exposure Statement for Canada .......................... 7
Declaration of Conformity (R&TTE directive 1999/5/EC) .....7
CE Mark Warning ................................................................................ 8
UL Safety Notices................................................................................9
CLASS 1 LASER PRODUCT .............................................................10
Safety information ..................................................................................11
Setting up your server ....................................................................11
Care during use .................................................................................11
Notes for this manual ............................................................................12
Welcome ....................................................................13
Package contents ....................................................................................13
Knowing your TS mini ..............................................14
Front view ..................................................................................................14
Rear view ....................................................................................................15
Top view .....................................................................................................17
System LED indicators ...........................................................................18
Setting up your server ..............................................20
Connecting to the home network ....................................................20
Connecting to the power supply ......................................................20
Powering on the server ........................................................................21
Home network diagram .......................................................................21
System requirements ............................................................................22
Installing the Windows Home Server Connector on the first
computer ...................................................................................................23
Page 3

HOME SERVER TS mini 3
Installing the Windows Home Server Connector on the other
home computers ....................................................................................31
Logging onto the Windows Home Server Console ....................34
Windows Home Server Console configuration ......35
Computers & Backup .............................................................................36
Configuring a home-computer backup ...................................37
Restoring files from a backup ......................................................38
User Accounts ..........................................................................................39
Creating user accounts...................................................................40
Enabling the Guest account .........................................................45
Disabling the Guest account ........................................................45
Shared Folders .........................................................................................46
Adding a shared folder ...................................................................47
Accessing shared folders on the home server .......................49
Server Storage ..........................................................................................54
Adding a hard disk drive ................................................................55
Removing a hard disk drive ..........................................................59
ASUS Xtor Manager ................................................................................62
File Manager .......................................................................................63
Backup ..................................................................................................65
Sync .......................................................................................................66
ASUS WebStorage ...................................................................................68
Initializing ASUS WebStorage ......................................................68
Using My Web Backup ....................................................................69
Viewing My Web Sync ....................................................................70
Configuring the ASUS WebStorage settings ..........................71
ASWM ..........................................................................................................72
The main page ...................................................................................73
Banner ..............................................................................................73
Inventory and configuration menus .....................................74
System health menus .................................................................74
Page 4

4 HOME SERVER TS mini
Information display region .......................................................74
BIOS update .......................................................................................75
avast! antivirus program .......................................................................76
Windows Home Server Settings ........................................................77
General .................................................................................................78
Backup ..................................................................................................79
Passwords ...........................................................................................80
Windows Media Center ..................................................................81
Media Sharing ...................................................................................82
Remote Access ..................................................................................83
Enabling remote access .............................................................84
Accessing the TS mini home page .........................................89
Add-ins .................................................................................................92
ASUS WebStorage ............................................................................94
Resources ............................................................................................95
Performing a Server Recovery or Factory Reset ..........................96
Recovering Windows Home Server ...........................................96
Restoring Factory Defaults.........................................................104
Replacing the main hard drive in your home server ........ 106
Restoring an entire home computer ............................................ 108
Copyright declaration ........................................... 110
Copyright Information ....................................................................... 110
Limitation of Liability.......................................................................... 111
Service and Support ...........................................................................111
Page 5

HOME SERVER TS mini 5
Notices
Federal Communications Commission Statement
This device complies with Part 15 of the FCC Rules. Operation is
subject to the following two conditions:
• This device may not cause harmful interference, and
• This device must accept any interference received including
interference that may cause undesired operation.
This equipment has been tested and found to comply with the limits
for a Class B digital device, pursuant to Part 15 of the FCC Rules.
These limits are designed to provide reasonable protection against
harmful interference in a residential installation. This equipment
generates, uses and can radiate radio frequency energy and, if not
installed and used in accordance with manufacturer’s instructions,
may cause harmful interference to radio communications. However,
there is no guarantee that interference will not occur in a particular
installation. If this equipment does cause harmful interference to
radio or television reception, which can be determined by turning
the equipment off and on, the user is encouraged to try to correct
the interference by one or more of the following measures:
• Reorient or relocate the receiving antenna.
• Increase the separation between the equipment and receiver.
• Connect the equipment to an outlet on a circuit different from
that to which the receiver is connected.
• Consult the dealer or an experienced radio/TV technician for
help.
Any changes or modifications not expressly approved by the
grantee of this device could void the user’s authority to operate
the equipment.
Page 6

6 HOME SERVER TS mini
RF exposure warning
This equipment must be installed and operated in accordance with
provided instructions and the antenna(s) used for this transmitter
must be installed to provide a separation distance of at least 20
cm from all persons and must not be co-located or operating in
conjunction with any other antenna or transmitter. End-users and
installers must be provide with antenna installation instructions
and transmitter operating conditions for satisfying RF exposure
compliance.
Canadian Department of Communications Statement
This digital apparatus does not exceed the Class B limits for
radio noise emissions from digital apparatus set out in the
Radio Interference Regulations of the Canadian Department of
Communications.
This class B digital apparatus complies with Canadian ICES-003.
REACH Notice
Complying with the REACH (Registration, Evaluation, Authorisation,
and Restriction of Chemicals) regulatory framework, we published
the chemical substances in our products at ASUS REACH website at
http://green.asus.com/english/REACH.htm.
Macrovision Corporation Product Notice
This product incorporates copyright protection technology that
is protected by method claims of certain U.S. patents and other
intellectual property rights owned by Macrovision Corporation and
other rights owners. Use of this copyright protection technology
must be authorized by Macrovision Corporation, and is intended
for home and other limited viewing uses only unless otherwise
authorized by Macrovision Corporation. Reverse engineering or
disassembly is prohibited.
Page 7

HOME SERVER TS mini 7
IC Radiation Exposure Statement for Canada
This equipment complies with IC radiation exposure limits set forth
for an uncontrolled environment. To maintain compliance with IC
RF exposure compliance requirements, please avoid direct contact
to the transmitting antenna during transmitting. End users must
follow the specific operating instructions for satisfying RF exposure
compliance.
Operation is subject to the following two conditions:
• This device may not cause interference and
• This device must accept any interference, including interference
that may cause undesired operation of the device.
Declaration of Conformity (R&TTE directive 1999/5/ EC)
The following items were completed and are considered relevant
and sufficient:
• Essential requirements as in [Article 3]
• Protection requirements for health and safety as in [Article 3.1a]
• Testing for electric safety according to [EN 60950]
• Protection requirements for electromagnetic compatibility in
[Article 3.1b]
• Testing for electromagnetic compatibility in [EN 301 489-1] & [EN
301 489-17]
• Effective use of the radio spectrum as in [Article 3.2]
• Radio test suites according to [EN 300 328-2]
Page 8
8 HOME SERVER TS mini
CE Mark Warning
This is a Class B product, in a domestic environment, this product
may cause radio interference, in which case the user may be
required to take adequate measures.
CE marking for devices without wireless LAN/Bluetooth
The shipped version of this device complies with the requirements
of the EEC directives 2004/108/EC “Electromagnetic compatibility”
and 2006/95/EC “Low voltage directive”.
Page 9

HOME SERVER TS mini 9
UL Safety Notices
Required for UL 1459 covering telecommunications (telephone)
equipment intended to be electrically connected to a
telecommunication network that has an operating voltage to
ground that does not exceed 200V peak, 300V peak-to-peak, and
105V rms, and installed or used in accordance with the National
Electrical Code (NFPA 70).
When using the TS mini modem, basic safety precautions should
always be followed to reduce the risk of fire, electric shock, and injury
to persons, including the following:
• DO NOT use the TS mini near water, for example, near a bath tub,
wash bowl, kitchen sink or laundry tub, in a wet basement or near
a swimming pool.
• DO NOT use the TS mini during an electrical storm. There may be
a remote risk of electric shock from lightning.
• DO NOT use the TS mini in the vicinity of a gas leak.
Required for UL 1642 covering primary (nonrechargeable) and
secondary (rechargeable) lithium batteries for use as power sources
in products. These batteries contain metallic lithium, or a lithium
alloy, or a lithium ion, and may consist of a single electrochemical
cell or two or more cells connected in series, parallel, or both, that
convert chemical energy into electrical energy by an irreversible or
reversible chemical reaction.
• Do not dispose the TS mini battery pack in a fire, as they may
explode. Check with local codes for possible special disposal
instructions to reduce the risk of injury to persons due to fire or
explosion.
• Do not use power adapters or batteries from other devices to
reduce the risk of injury to persons due to fire or explosion. Use
only UL certified power adapters or batteries supplied by the
manufacturer or authorized retailers.
Page 10
10 HOME SERVER TS mini
DO NOT throw the HOME SERVER TS mini in municipal waste. This
product has been designed to enable proper reuse of parts and
recycling. This symbol of the crossed out wheeled bin indicates
that the product (electrical, electronic equipment, and mercurycontaining button cell battery) should not be placed in municipal
waste. Check local regulations for disposal of electronic products.
NO DISASSEMBLY
The warranty does not apply to the products that
have been disassembled by users
LASER PRODUCT WARNING
CLASS 1 LASER PRODUCT
Page 11

HOME SERVER TS mini 11
Safety information
Your TS mini is designed and tested to meet the latest standards of
safety for information technology equipment. However, to ensure
your safety, it is important that you read the following safety
instructions.
Setting up your server
• Read and follow all instructions in the documentation before you
operate your server.
• Do not use this product near water or a heated source such as a
radiator.
• Set up the server on a stable surface with the provided stand.
Never use the server alone without the stand.
• Openings on the chassis are for ventilation. Do not block or cover
these openings. Make sure you leave plenty of space around the
server for ventilation. Never insert objects of any kind into the
ventilation openings.
• Use this product in environments with ambient temperatures
between 0˚C and 40˚C.
• If you use an extension cord, make sure that the total ampere
rating of the devices plugged into the extension cord does not
exceed its ampere rating.
Care during use
• Do not walk on the power cord or allow anything to rest on it.
• Do not spill water or any other liquids on your server.
• When the server is turned off, a small amount of electrical current
still flows. Always unplug all power, modem, and network cables
from the power outlets before cleaning the server.
Page 12

12 HOME SERVER TS mini
Notes for this manual
To make sure that you perform certain tasks properly, take note of
the following symbols used throughout this manual.
WARNING: Vital information that you MUST follow to prevent
injury to yourself.
IMPORTANT: Instructions that you MUST follow to complete a
task.
TIP: Tips and useful information that help you complete a task.
NOTE: Additional information for special situations.
• If you encounter the following technical problems with the
product, unplug the power cord and contact a qualified service
technician or your retailer.
• The power cord or plug is damaged.
• Liquid has been spilled into the server.
• The server does not function properly even if you follow
the operating instructions.
• The server was dropped or the cabinet is damaged.
• The server performance changes.
Page 13
HOME SERVER TS mini 13
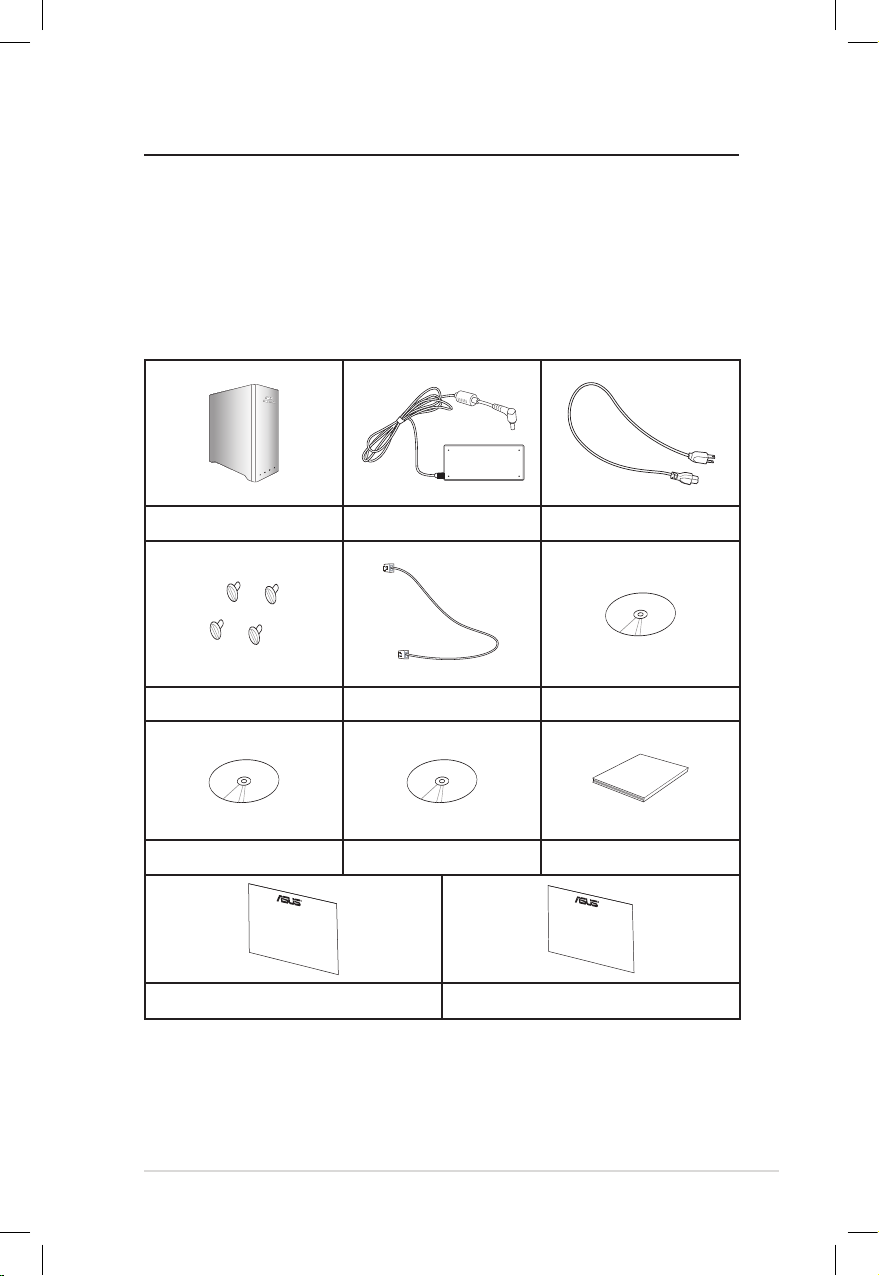
Welcome
Congratulations on your purchase of the HOME SERVER TS mini. The
following illustration displays the package contents of your new TS
mini. If any of the below items is damaged or missing, contact your
retailer.
Package contents
TS mini AC Adapter Power Cord
HDD Screws Package RJ45 LAN Cable Software Installation CD
User Manual
Recovery DVD Restore CD User Manual
Quick Start Guide Warranty Card
Warranty Card
Quick Start Guide
Page 14
14 HOME SERVER TS mini
Knowing your TS mini
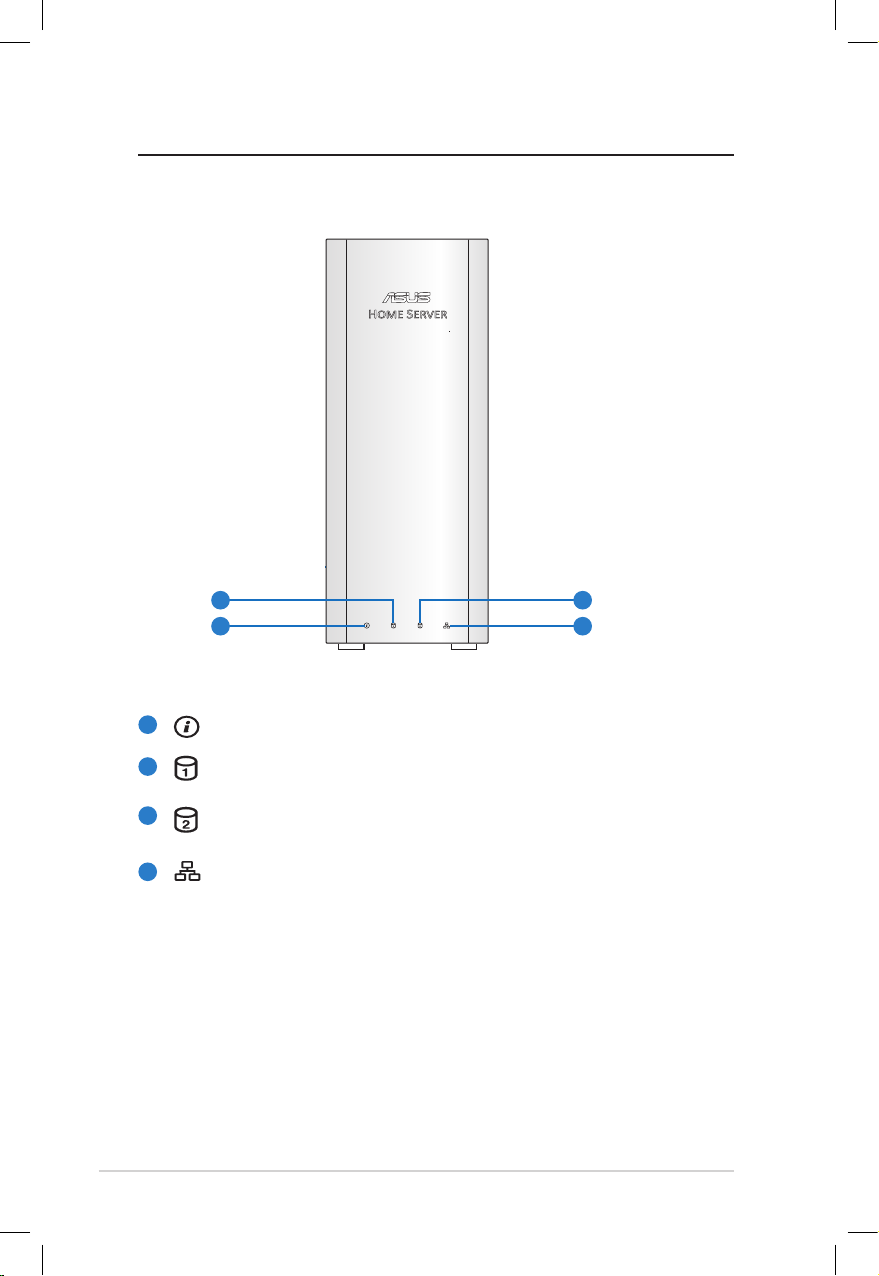
Front view
System status LED indicator
Hard disk drive 1 (HDD1) status LED indicator
Hard disk drive 2 (HDD2) status LED indicator
Network LED indicator
2
1
3
4
1
2
4
3
Page 15
HOME SERVER TS mini 15
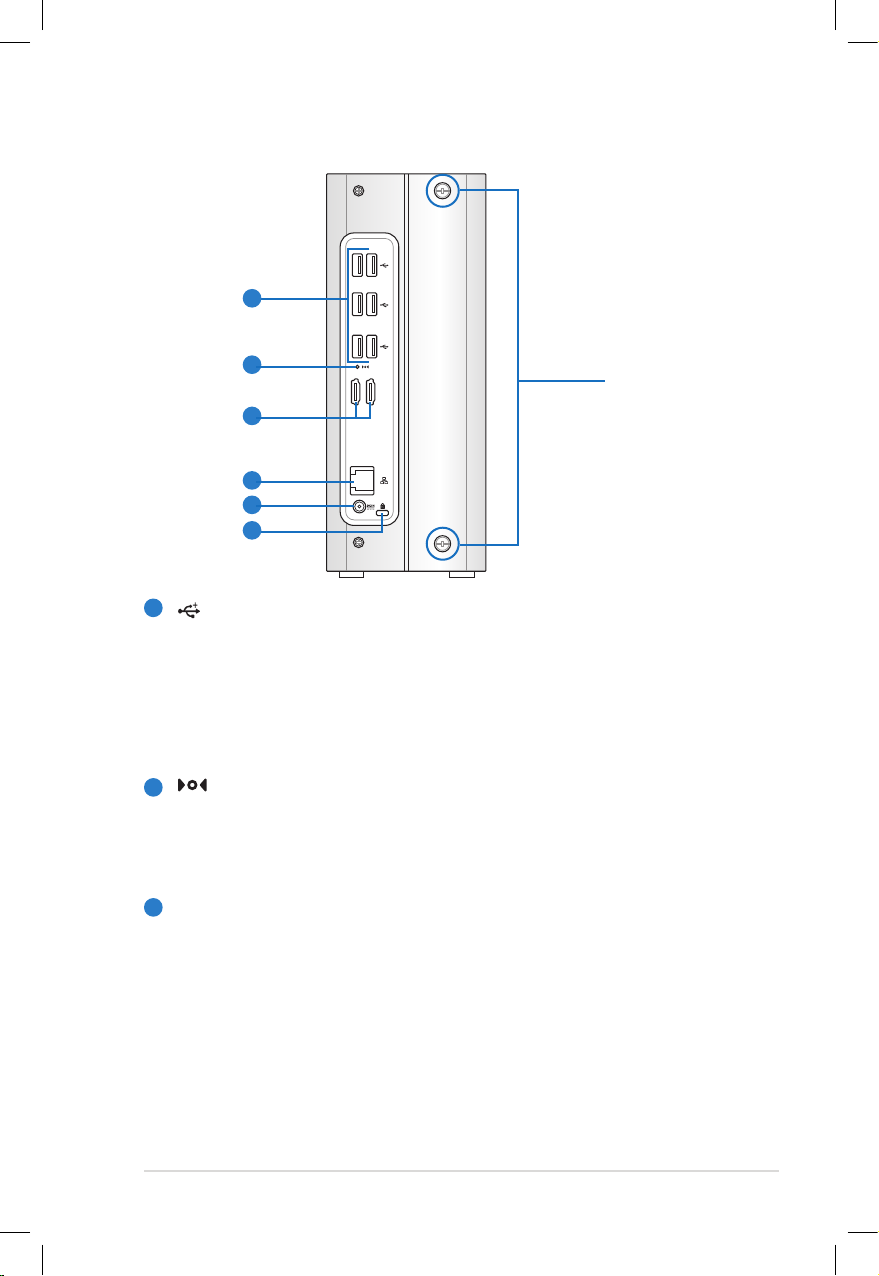
Rear view
E-SATA
USB Ports
The USB (Universal Serial Bus) port is compatible with USB
devices such as USB flash disks, cameras, and hard disk
drives. USB allows many devices to run simultaneously on a
single computer, with some peripheral acting as additional
plug-in sites or hubs.
Recovery Button
The Recovery Button is used when you perform the Server
Recovery function. Refer to the section Performing a
Server Recovery or Factory Reset for more details.
E-SATA
E-SATA Ports
External SATA or eSATA allows external connection of Serial-
ATA devices originally designed for use inside the computer.
It is up to six times faster than existing USB 2.0, & 1394 for
external storage solutions and also supports hot plug using
shielded cables and connectors up to two meters.
Thumbscrews
5
6
7
8
9
10
5
6
7
Page 16

16 HOME SERVER TS mini
LAN Port
The RJ-45 Gigabit LAN port supports a standard Ethernet
cable for connection to a local network.
Power Input (DC 19V)
The supplied power adapter converts AC power to DC
power for use with this jack. Power supplied through this
jack supplies power to the TS mini. To prevent damage to
the TS mini, always use the supplied power adapter.
The power adapter may become warm to hot when in use. Do
not cover the adapter and keep it away from your body.
Kensington® Lock Port
The Kensington® lock port allows the TS mini to be secured
using Kensington® compatible security products. These
security products usually include a metal cable and lock
that prevent the TS mini to be removed from a fixed object.
8
9
10
Page 17
HOME SERVER TS mini 17
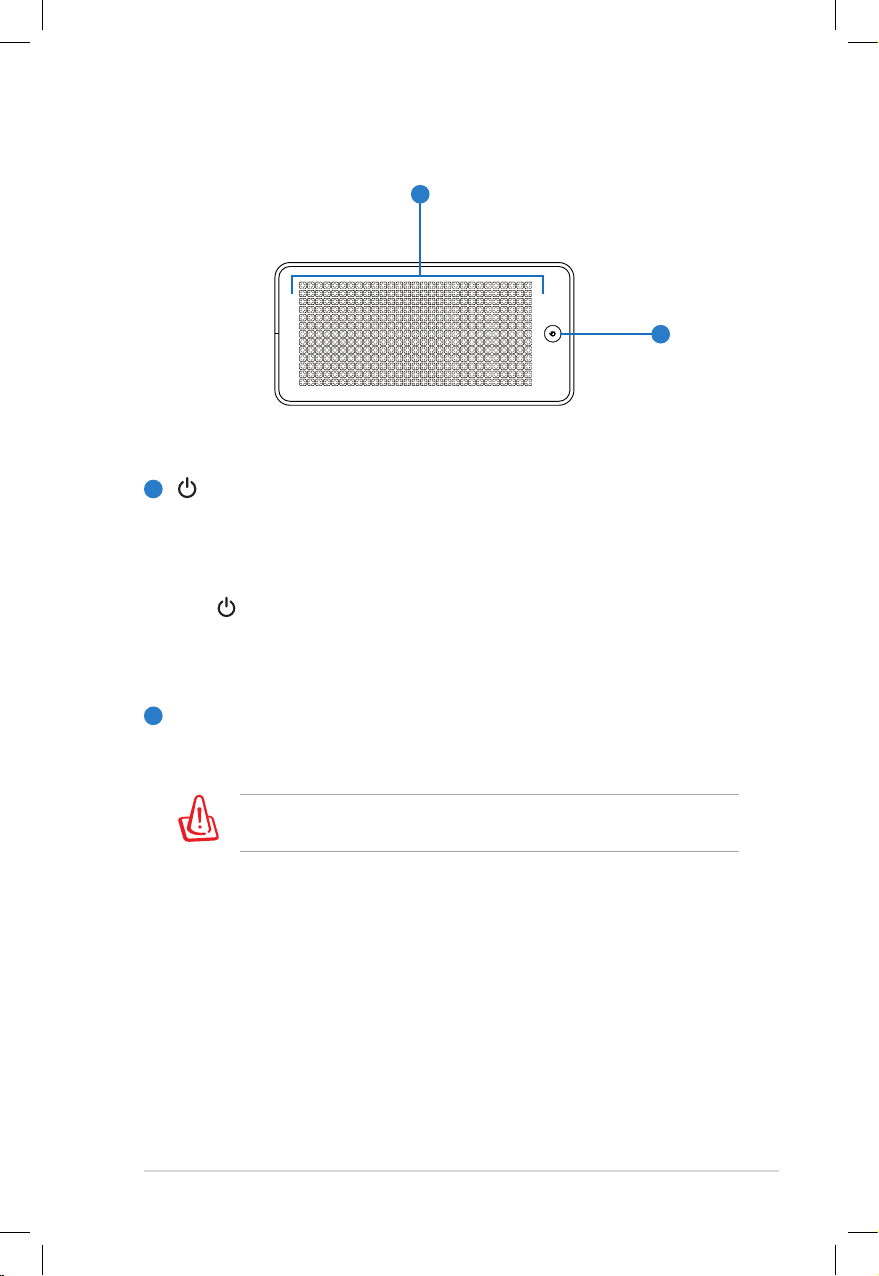
Top view
Power Switch
The power switch allows powering ON and OFF the TS mini.
Press the switch once to turn ON and hold it for 4 seconds
to turn OFF the TS mini.
Power Indicator
The power indicator lights when the TS mini is turned
ON. This indicator is OFF when the TS mini is turned OFF.
Air Vents
The air vents allow cool air to enter and warm air to exit the
TS mini.
Ensure that paper, books, clothing, cables, or other objects do
not block any of the air vents or else overheating may occur.
1
2
1
2
Page 18
18 HOME SERVER TS mini
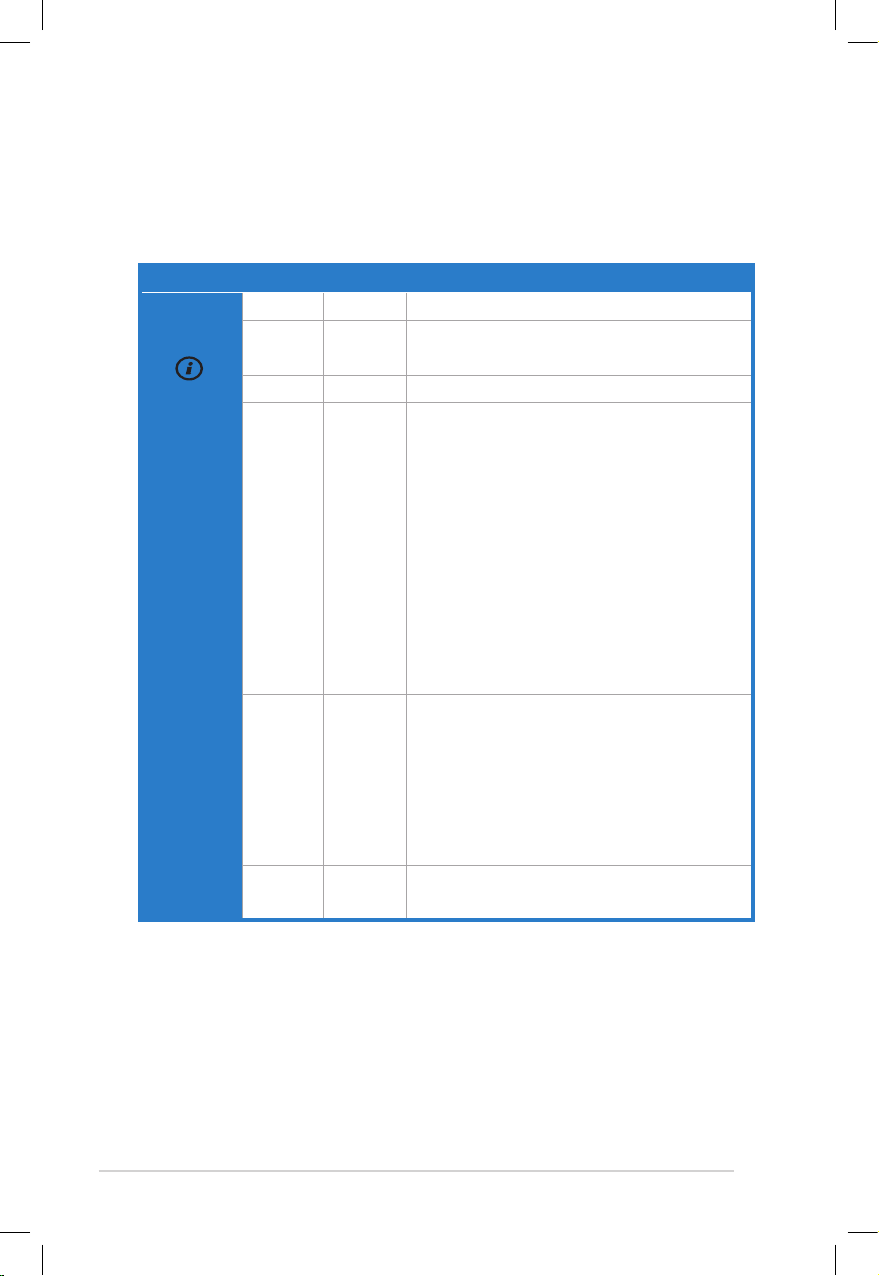
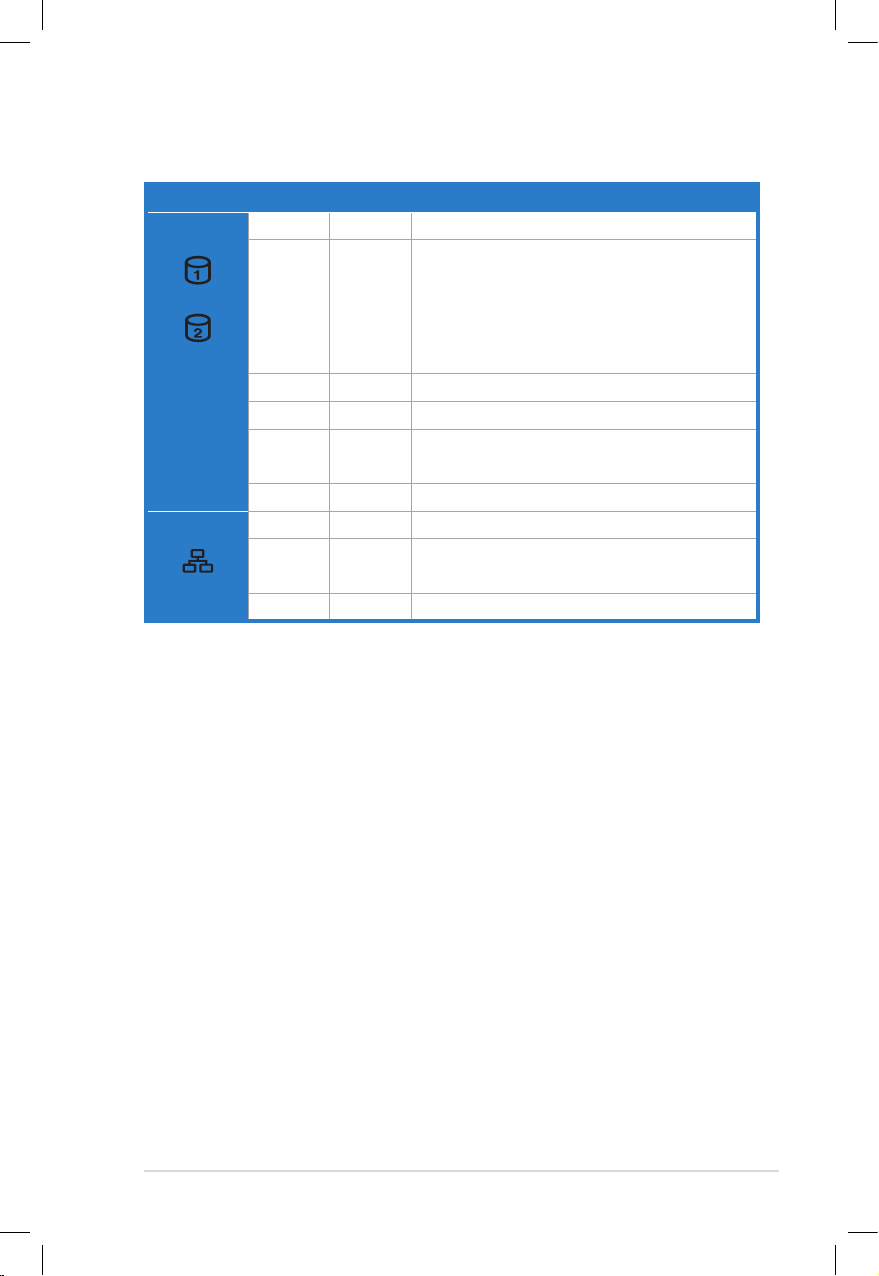
System LED indicators
The front panel features LED indicators that signify the status of the
system, the installed hard drives, and the network connection.
Indicators Color State Description
System
status
Blue Blinking System is booting
Blue On System is connected to the Windows
Home Server and ready for use
Orange Blinking System recovery is in progress
Orange On The system detects failure:
• FAN failure
• System temperature failure
• USB controller failure
• Memory failure
• Voltage failure
• Boot device not found
• HDD failure
- Purple On: internal HDD not found
- Orange On: booting failed on
external HDD
Purple Blinking System BIOS crashes and enter the
ASUS CrashFree mode.
Note: Copy the BIOS file from the
Recovery DVD to a USB device, and then
insert the USB device to your home
server before entering ASUS CrashFree.
Purple On System is booting from a USB / eSATA
device
(Continued on the next page)
Page 19
HOME SERVER TS mini 19
Indicators Color State Description
HDD
Blue On HDD1/2 is ready for use
Blue Blinking Data is being written into or read from
HDD1/2
Note: the HDD LEDs do not blink if the
installed HDDs do not support LED
blinking control.
Off — No HDD installed in the drive bay1/2
Off — HDD1/2 is not found or removed
Purple On HDD1/2 is unknown or is not being
initialized by Windows Home Server
Orange On HDD1/2 failure
Network Blue On System is linked to the network
Blue Blinking During data transmitting or receiving
activity
Orange On Network is disconnected
Page 20
20 HOME SERVER TS mini
Setting up your server
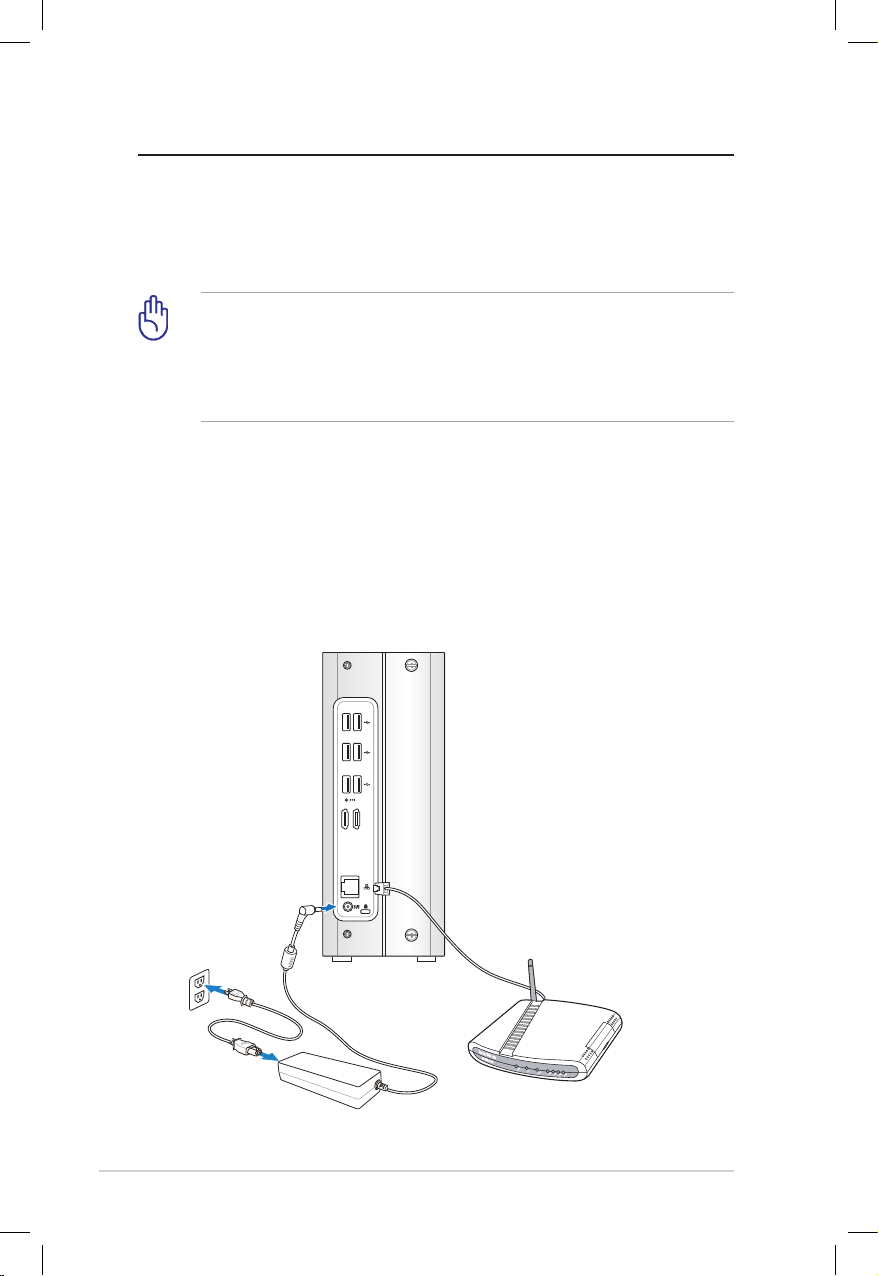
Connecting to the home network
Connect one end of a network cable to the LAN port on the server
rear panel and the other end to your broadband router.
You must use a network cable to connect the TS mini to your
broadband router. Wireless connection to your broadband router
is not supported. However, after you connect your server to your
home network, home computers can connect to your server
through wireless connection.
Connecting to the power supply
Connect the supplied power cord to the supplied AC adapter. Then,
plug the AC adapter to the DC IN jack on the TS mini rear panel and
the power cord to an electrical outlet.
E-SATA
Page 21
HOME SERVER TS mini 21
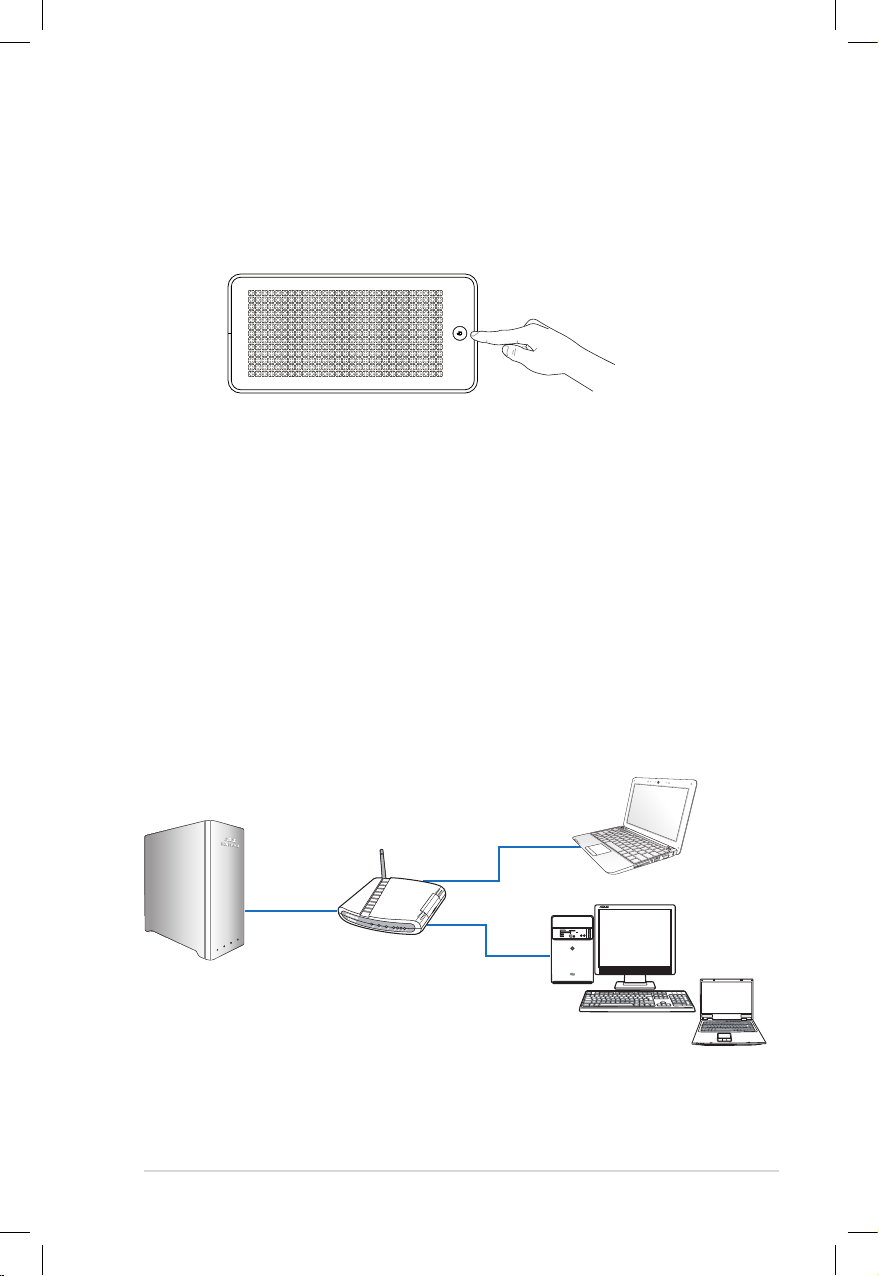
Powering on the server
Press the power switch on the top panel to turn on the TS mini.
Home network diagram
The following diagram illustrates the entire home network
connection to help you understand the relationship between the
connected devices.
SPLENDID MENU
Router
TS mini
Home computers
Home computers
Page 22

22 HOME SERVER TS mini
System requirements
Your home computers must be equipped with one of the following
operating systems in order to install the Windows Home Server
Connector software:
Windows XP (Service Pack 2 or higher)
• Windows XP Home with Service Pack 2 (SP2)
• Windows XP Professional with SP2
• Windows XP Media Center Edition 2005 with SP2 and Rollup 2
• Windows XP Media Center Edition 2005 with SP2
• Windows XP Media Center Edition 2004 with SP2
• Windows XP Tablet Edition with SP2
Windows Vista (X86 and X64)
• Windows Vista Home Basic
• Windows Vista Home N ( European Union only)
• Windows Vista Home Premium
• Windows Vista Business
• Windows Vista Business N ( European Union only)
• Windows Vista Enterprise
• Windows Vista Ultimate
Windows 7 (X86 and X64)
• Windows 7
Page 23
HOME SERVER TS mini 23
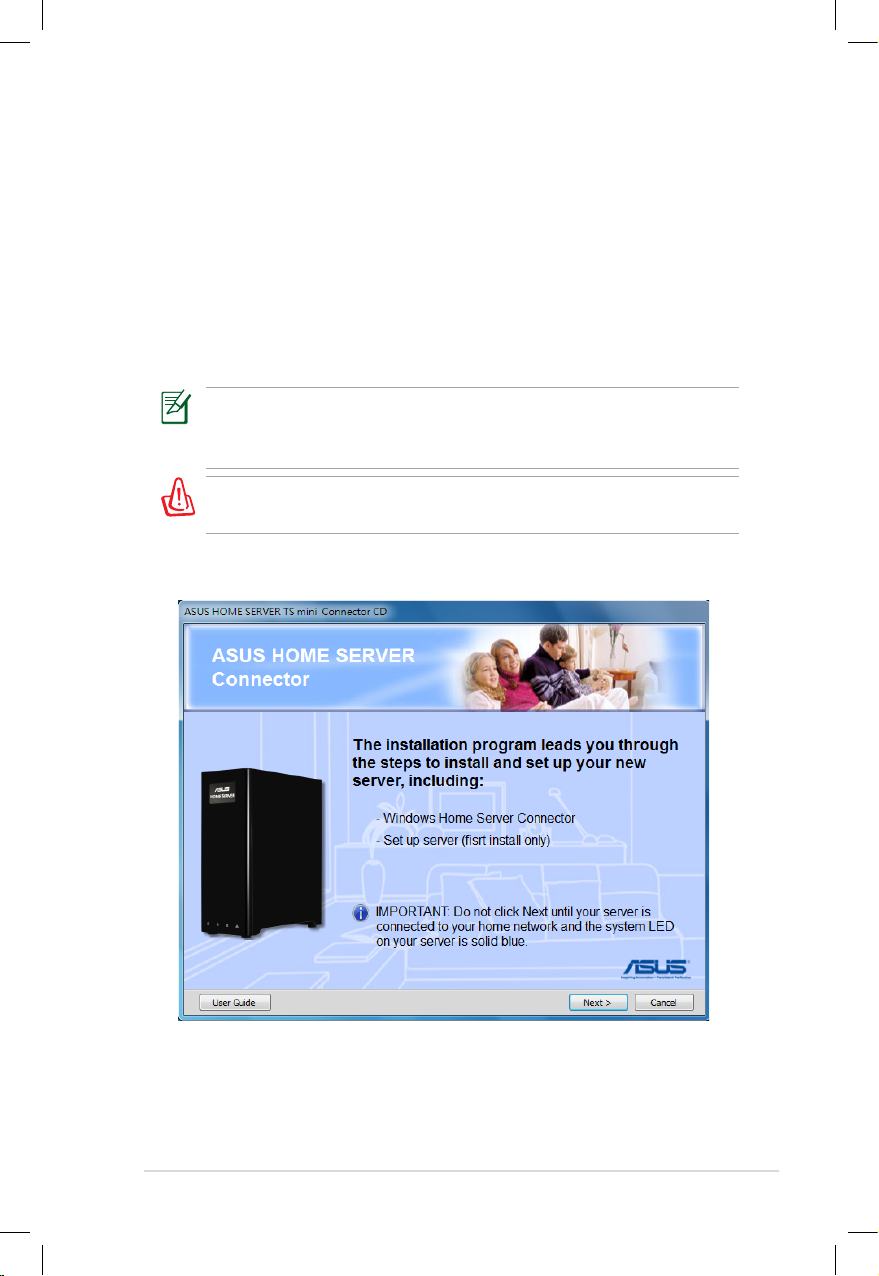
Installing the Windows Home Server
Connector on the rst computer
After setting up your TS mini, you must install the Windows Home
Server Connector on your first computer to connect to Windows
Home Server.
1. Insert the Software Installation CD into the computer that is
connected to your home network. The Windows Home Server
Connector wizard starts.
If Autorun is NOT enabled in your computer, browse the contents
of the Software Installation CD to locate the Install.exe file.
Double-click the Install.exe to run the Connector wizard.
Do not insert any USB/eSATA storage device to the home server
when processing the initialization to avoid any possible error.
2. Click Next.
Page 24
24 HOME SERVER TS mini
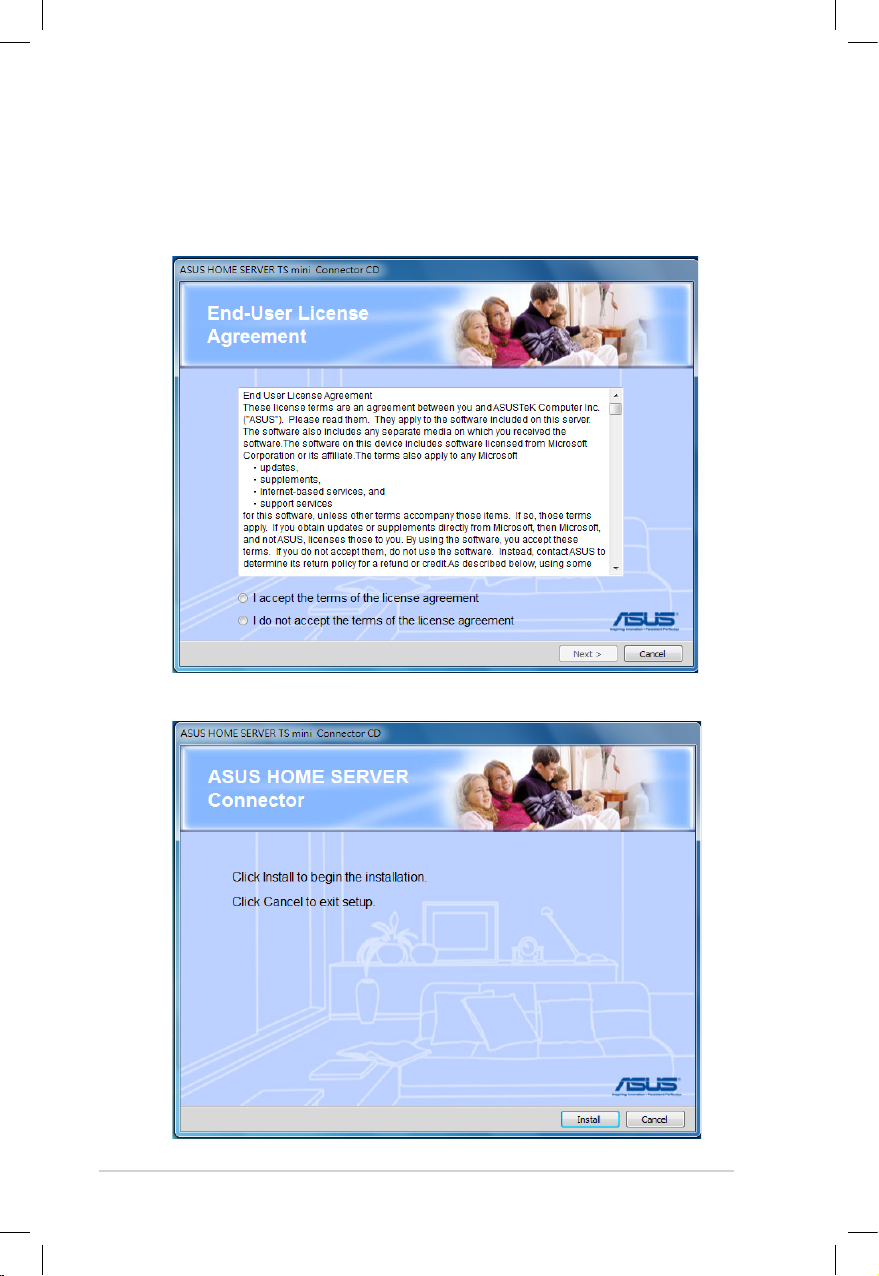
3. Read the End User License Agreement. If you agree with the
terms of the agreement, select the option “I accept the terms of
the license agreement” and then click Next.
4. Click Install to begin the installation process.
Page 25
HOME SERVER TS mini 25
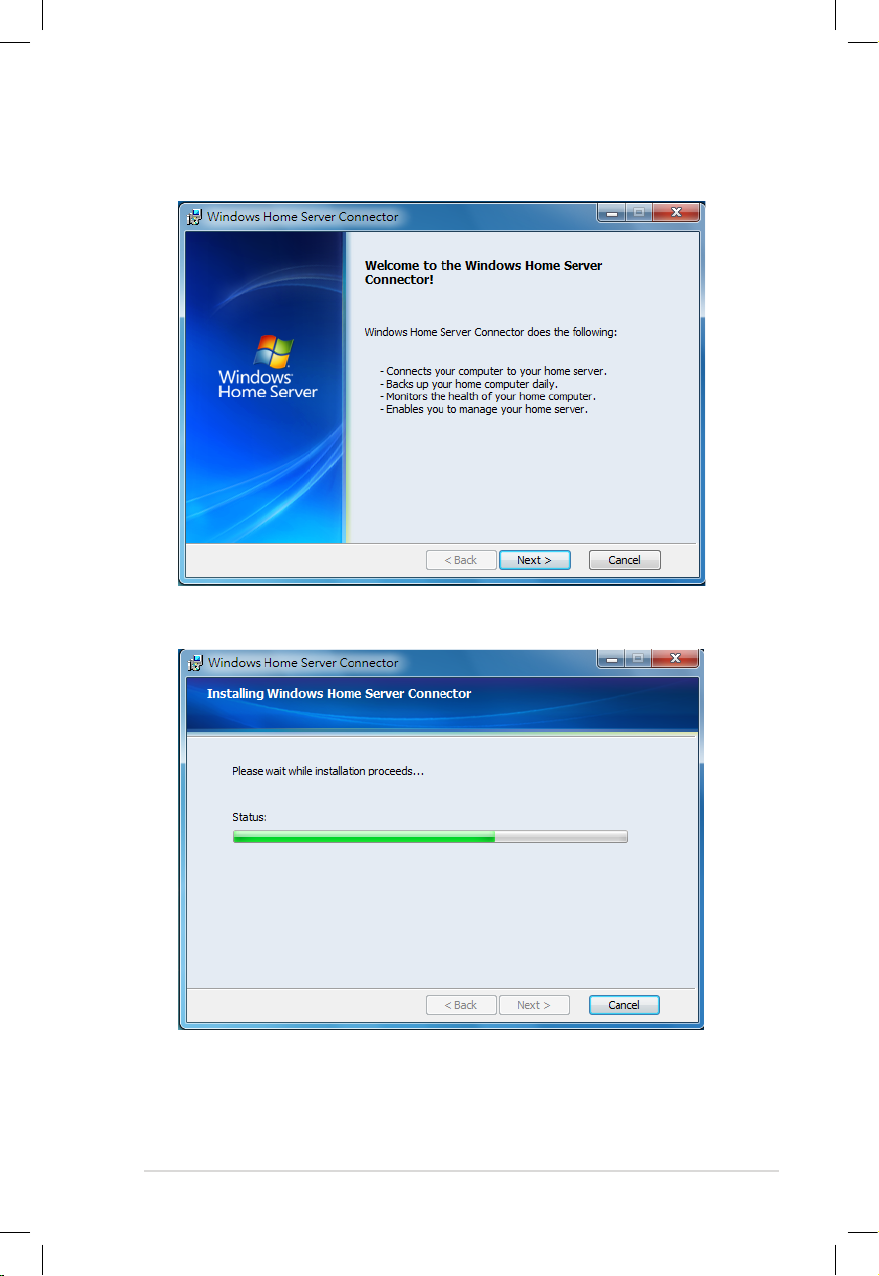
5. The Welcome window appears. Click Next.
6. Click Next.
Page 26
26 HOME SERVER TS mini
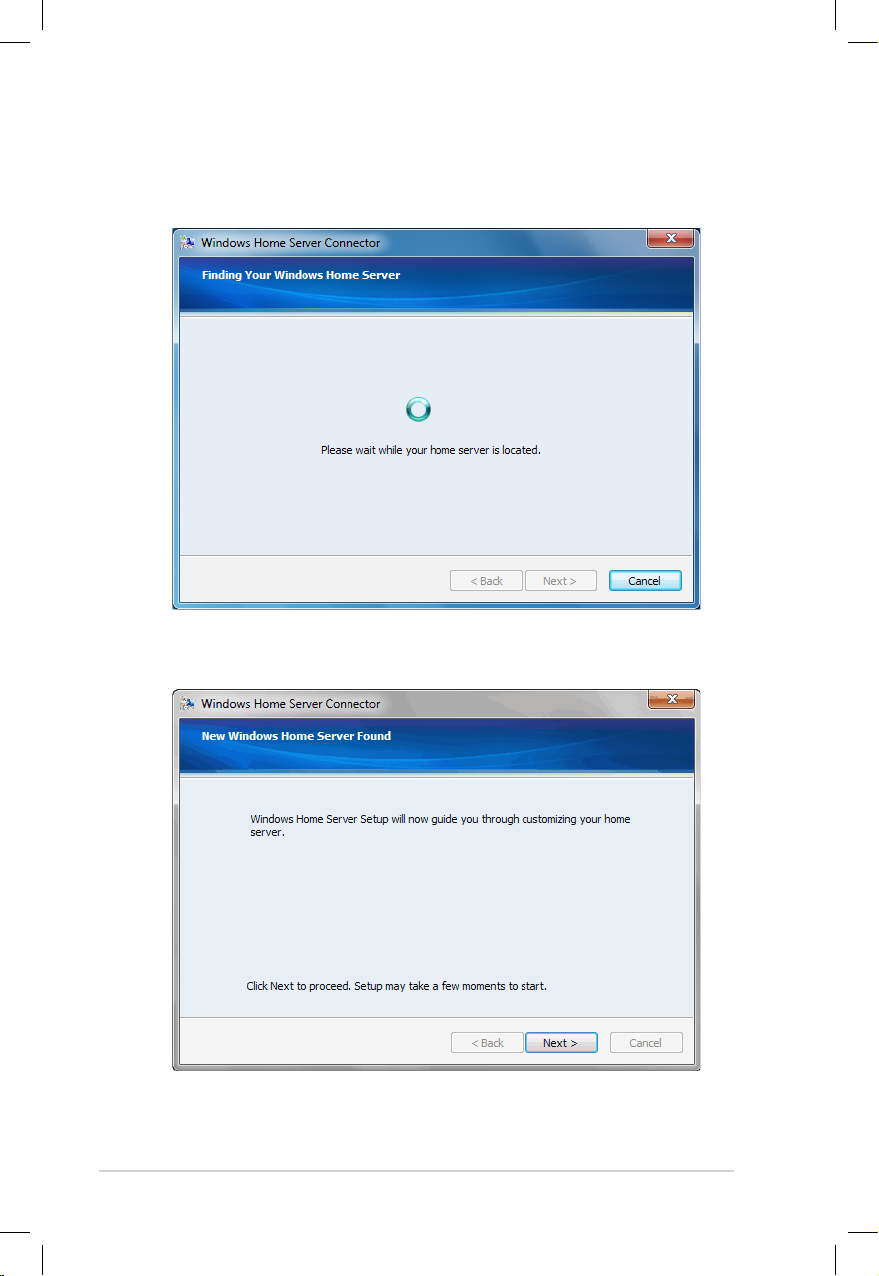
7. The Windows Home Server Connector installation starts to find
and connect to your home server.
8. Click Next to start the Windows Home Server Setup.
Page 27
HOME SERVER TS mini 27
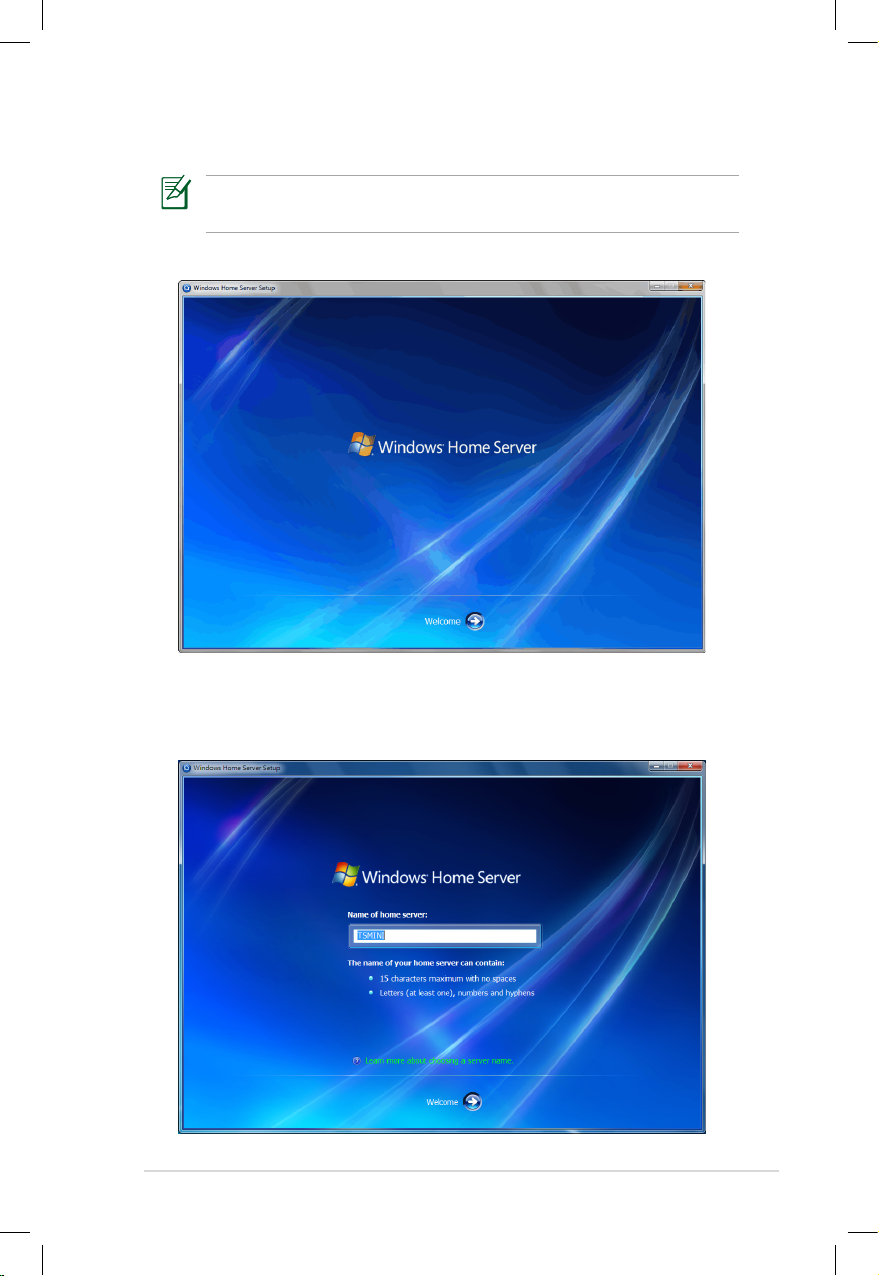
Windows Home Server Setup starts next after you install the
Connector software for the first time.
9. Click the Next arrow to start the initialization.
10. Enter a name for your home server. The name of your home
server contain up to 15 characters (including letters, numbers,
and hyphens) with no spaces.
Page 28
28 HOME SERVER TS mini
11. Click the Next arrow.
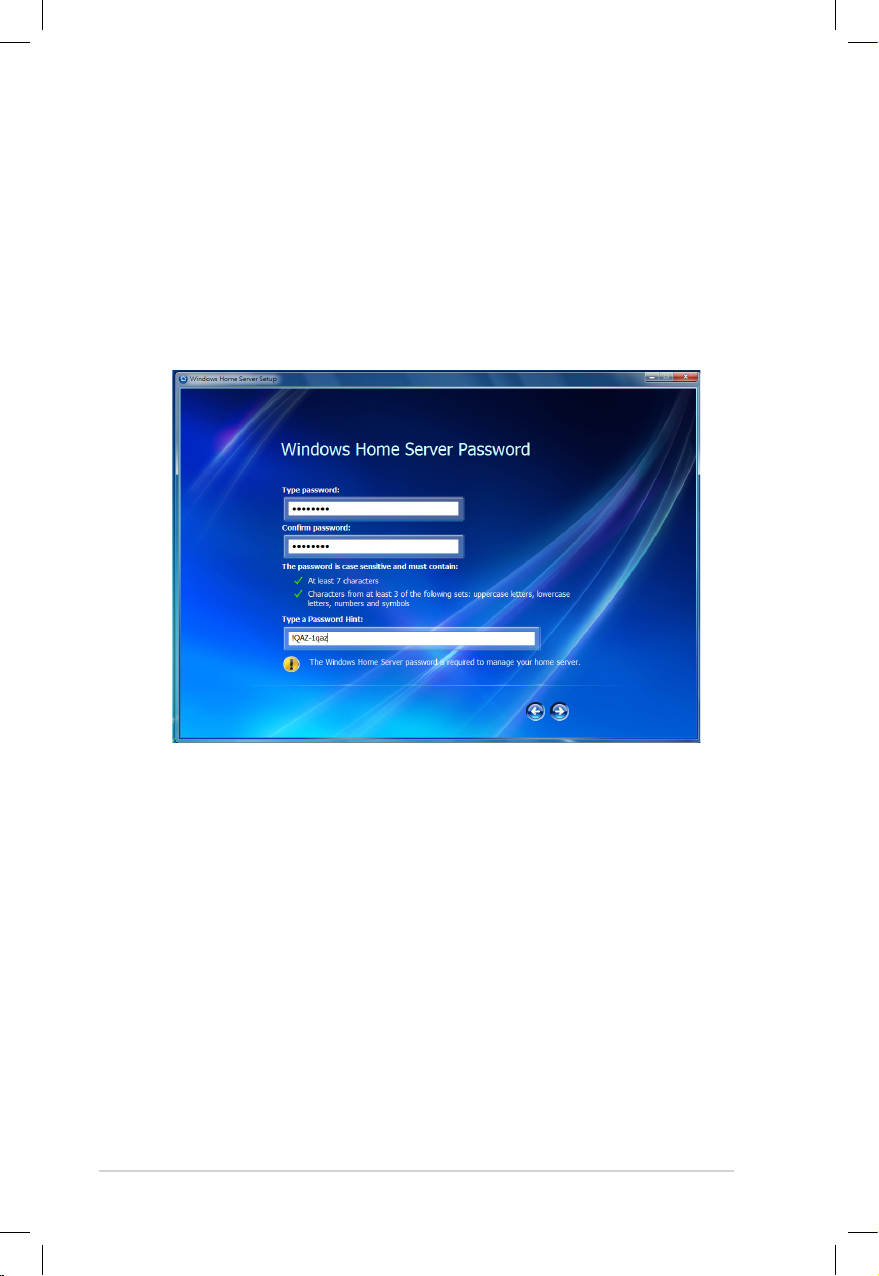
12. Enter a strong password, confirmation password, and a
password hint. You will use this password to log on to the
Windows Home Server Console and manage your home server.
A strong password must be at least 7 characters and must
contain at least 3 of following sets: uppercase letters, lowercase
letters, numbers and symbols, e.g. Tsmini200.
Page 29
HOME SERVER TS mini 29
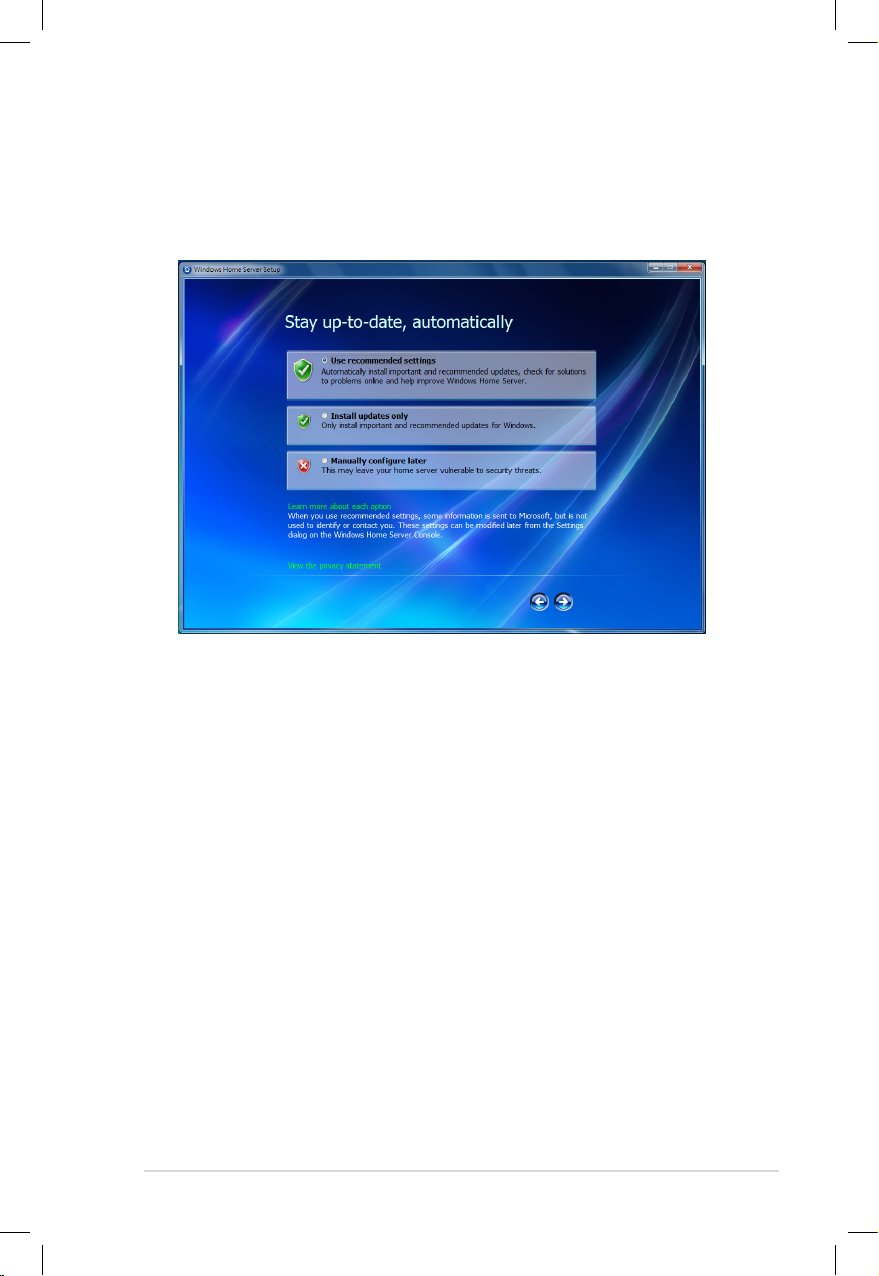
13. Choose if you want Windows Home Server to continue
automatically downloading updates from Windows Update
after Setup, and then click the Next arrow.
Page 30
30 HOME SERVER TS mini
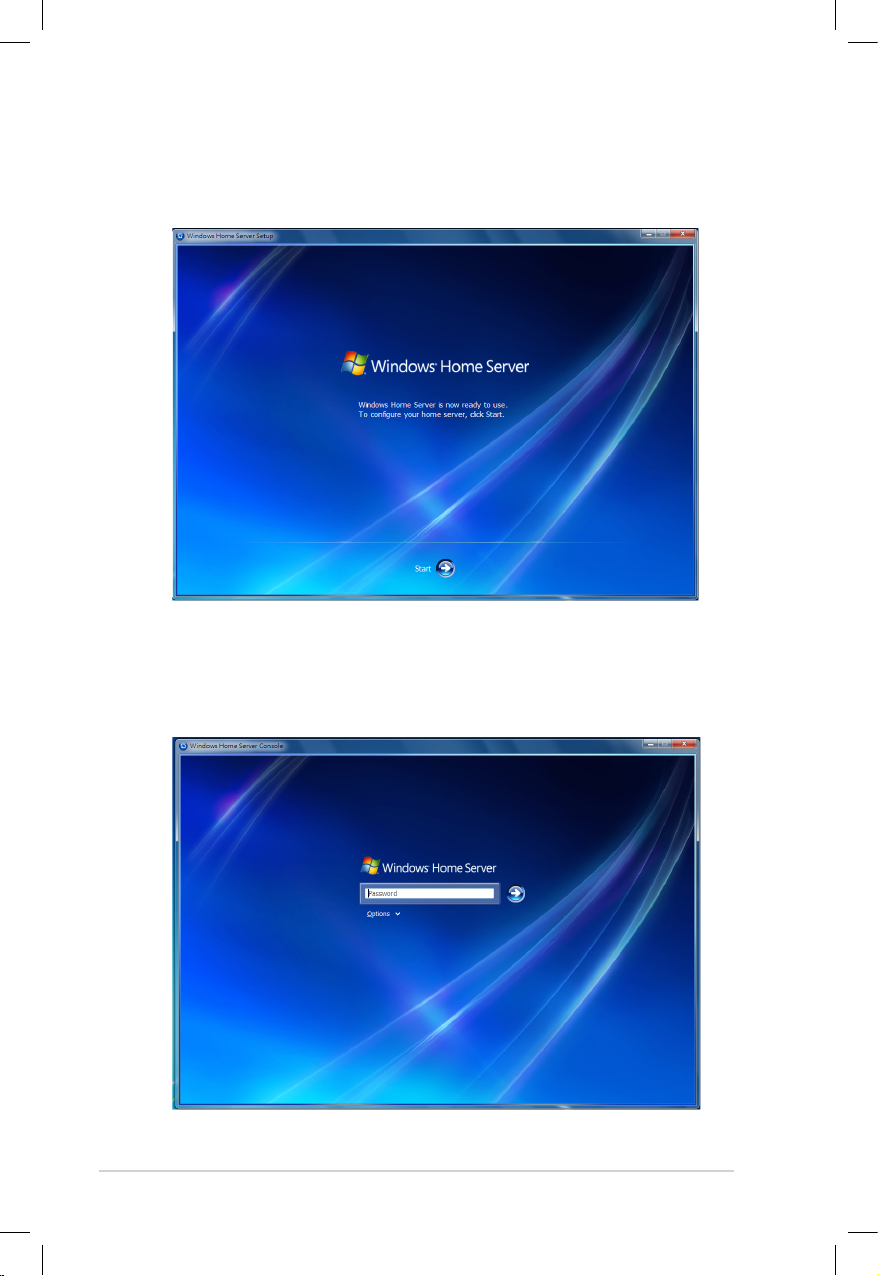
14. When the setup is complete, the Windows Home Server window
is displayed. Click the Next arrow.
15. The Windows Home Server Console logon window appears.
Enter the administrator password, and then click the Next arrow
to start using the Windows Home Server Console.
Page 31

HOME SERVER TS mini 31
Installing the Windows Home Server Connector on the other home computers
Install the Windows Home Server Connector on the other home
computers in your home network to connect to Windows Home
Server.
You can install the Windows Home Server Connector software from
the bundled Software Installation CD or from your home server.
Installing the software from the Software Installation CD
1. Insert the Software Installation CD into the computer that is
connected to your home network. The Windows Home Server
Connector wizard starts.
If Autorun is NOT enabled in your computer, browse the contents
of the Software Installation CD to locate the Install.exe file.
Double-click the Install.exe to run the CD.
2. Click Next.
Page 32

32 HOME SERVER TS mini
3. Read the End User License Agreement. If you agree with the
terms of the agreement, select the option “I accept the terms of
the license agreement” and then click Next.
4. Click Install to begin the installation process.
5. The Welcome window appears. Click Next.
6. The installation status window appears. Click Next.
7. Enter the administrator password you have set for the Windows
Home Server.
8. Click Next and follow the onscreen instructions to complete the
installation.
The Shared Folders shortcuts icon appears on your desktop
and the Windows Home Server icon appears in the system tray
after the complete installation.
Page 33

HOME SERVER TS mini 33
Installing the software from your home server
If you do not have the Connector CD at hand, you can install the
Connector software from your home server through a web browser.
1. Open a Web Browser.
2. In the address bar, enter http://systemname:55000 to bring
up the Windows Home Server Connector Setup window. The
systemname is the server name you set up for the home server
during the initialization.
3. Click the Download Now button.
4. In the File Download dialog box, click Run.
5. Follow the onscreen instructions to complete the installation.
Page 34

34 HOME SERVER TS mini
Logging onto the Windows Home Server Console
You need to log on to the Windows Home Server Console to
remotely control your home server.
To log on to the home server from the Windows Start menu
1. On the Windows desktop, click Start > All Programs > Windows
Home Server Console to bring up the Windows Home Server
Console logon window.
2. Enter the administrator password, and then click the Next arrow.
To log on to the home server from the Windows Home Server
icon
1. On the Windows system tray, right-click the Windows Home
Server icon and then select Windows Home Server Console;
or, double-click the Windows Home Server icon to bring up
the logon window.
2. Enter the administrator password, and then click the Next arrow.
Page 35

HOME SERVER TS mini 35
Windows Home Server
Console conguration
The Windows Home Server Console is a tool that enables you to
remotely view, add, share, and protect important files on your home
server. You can administer user accounts and manage backups of all
your computers on the home network.
From the Windows Home Server Console, you can do the following:
• Add, view, and manage the backups of your home computers
• Configure user accounts
• Configure shared folders
• Configure server storage
• Configure ASUS WebStorage
• Configure ASUS Xtor Manager
• Configure ASWM
• Review network health
• Configure Windows Home Server settings
Click to display items
on the right
Click to display items
on the left
Page 36

36 HOME SERVER TS mini
Computers & Backup
Click the Computer & Backup tab to view the home computers
on the home network, monitor the health status of the home
computers, and customize backups. By default, after you install
the Windows Home Server Connector on each of your home
computers, all the hard-drive volumes on each home computer are
automatically backed up every night.
From the Computer & Backup tab, you can perform the following
tasks for your home computers:
• Viewing Backups
• Backing up Now
• Configuring Backup
• Removing a Computer
• Turning On Backups / Turning Off Backups
• Canceling Backup
Page 37

HOME SERVER TS mini 37
Configuring a home-computer backup
You can customize the backup of each of your home computers
from the Windows Home Server Console.
To configure backups for a home computer
1. Log on to the Windows Home Server Console.
2. Click the Computer & Backup tab.
3. Right-click a computer and then click Configure Backup.
4. Follow the Backup Configuration Backup Wizard to select the
volumes you want to back up and the folders you want to
exclude from the backup.
To adjust the backup time
By default, the backup time starts from 12:00AM to 6:00AM. You can
adjust the backup time from the Backup settings page.
To configure automatic backup management
You can configure how many monthly, weekly, and daily backups to
keep for your home computers. To do this:
1. Log on to the Windows Home Server Console.
2. Click Settings and then Backup.
3. In Automatic Backup Management, specify the number of
months, weeks, and days.
4. Click OK to complete the setting.
Page 38

38 HOME SERVER TS mini
Restoring files from a backup
You can browse and restore lost files and folders from a backup.
To open files and folders from a backup
1. Log on to the Windows Home Server Console.
2. Click the Computers & Backup tab.
3. Select a home computer, and then click View Backups.
4. Select a backup, and then click Open.
5. Select a volume to open, and then click Open.
To restore lost files and folders from a backup
1. When you open the backup, browse and drag the files and
folders that you want to a folder on your home computer.
2. Close the window when you are done copying the files and
folders that you want to restore.
Page 39

HOME SERVER TS mini 39
User Accounts
Click the User Accounts tab to view all users in the home network,
create a personal user account, enable / disable the Guest account,
and administer user accounts on the home server. User accounts are
required in order to control access to the shared folders on Windows
Home Server.
From the User Accounts tab, you can perform the following tasks for
your home computers:
• Adding a user account
• Viewing and changing user account properties
• Removing a user account from the home server
• Enabling / disabling the Guest account
Page 40

40 HOME SERVER TS mini
Creating user accounts
After you complete Windows Home Server Setup and install the
Windows Home Server Connector software on all of your home
computers, you are ready to add user accounts for the people who
use the home network.
Windows Home Server has a 10 user account limit, not including
the built-in Administrator and Guest Account.
To add a personal user account
1. Log on to the Windows Home Server Console.
2. Click the User Accounts tab, and then the User Accounts Setup
window appears.
3. On the User Accounts Setup window, click Set Policy to bring up
the Passwords setting page.
Page 41

HOME SERVER TS mini 41
4. From the Passwords setting page, configure the user accounts
password complexity and then click OK.
Page 42

42 HOME SERVER TS mini
5. On the User Accounts tab, click Add.
6. Enter the user’s name.
When you create user accounts on Windows Home Server, use
logon names that match the logon names of your existing user
accounts on your home computers. Also, use the same password
that you use for your existing user accounts. This makes it easier
to access shared folders on Windows Home Server. If the user
accounts and passwords do not match, you will be prompted for a
user name and a password when you open Windows Home Server
shared folders.
7. Click the “Enable Remote Access for this user” check box if you
allows the user to connect to your server through the Internet .
Click Next.
A strong password is required if Remote Access is enabled.
Page 43

HOME SERVER TS mini 43
8. Enter the password and enter again to confirm it. Click Next.
The password length and complexity adhere to the minimum
settings defined by the password policy you have chosen.
9. Set the user’s access rights to existing shared folders on the
home server.
• Full – the user can create, change, and delete any files in the
shared folder.
• Read – the user can only read the files in the shared folder.
• None – the user cannot read, create, change, and delete files
in the shared folder.
10. Click Finish.
Page 44

44 HOME SERVER TS mini
11. Click Done to exit the wizard.
Page 45

HOME SERVER TS mini 45
Enabling the Guest account
When the Guest account is enabled, all of the users in your
household have full access to all the shared folders and to other
network resources on the home server.
1. Log on to the Windows Home Server Console.
2. Click the User Accounts tab, and then the User Accounts Setup
window appears.
3. Under About Guests, click Enable Guest.
-or-
1. Log on to the Windows Home Server Console.
2. Click the User Accounts tab,.
3. Right-click Guest, and then click Enable Guest Account.
4. Complete the Enable Guest Account Wizard.
Disabling the Guest account
1. Open the Windows Home Server Console.
2. Click the User Accounts tab,.
3. Right-click Guest, and then click Disable Account.
4. A confirmation message appears. Click Yes.
Page 46

46 HOME SERVER TS mini
Shared Folders
Click the Shared Folders tab to add, view the properties of , open,
and remove shared folders on your home server. In shared folders,
you can organize and store files on Windows Home Sever to share
them with other people on your home network.
The following shared folders are created automatically on the home
server:
• Music
• Photos
• Videos
• Software
• Public
• Recorded TV
• MySyncFolder
• A personal shared folder that is automatically created for
each user account.
A personal shared folder is created each time you add a new user
account by using the Add User Account Wizard. By default, only
that user account can access the files in the personal shared folder.
Page 47

HOME SERVER TS mini 47
Adding a shared folder
You can add a shared folder except for the built-in shared folders.
To add a shared folder
1. Log on to the Windows Home Server Console.
2. Click the Shared Folders tab.
3. Click Add to start the Add a Shared Folder Wizard.
4. Enter a name and description of the shared folder.
5. Click the Enable Folder Duplication check box if you want to
duplicate folders and files in the shared folder across multiple
hard disk drives. The folder with Folder Duplication enabled
uses twice the amount of server storage.
You must add more than one hard drive to the server storage
before you can enable Folder Duplication, and there must be
enough storage space available for duplication to take place.
Page 48

48 HOME SERVER TS mini
6. Set the level of access that each user account can have to a
shared folder.
7. Click Done to exit the wizard.
Page 49

HOME SERVER TS mini 49
Accessing shared folders on the home server
You may access the shared folders on your home server in several
ways.
To access individual shared folder from the Windows Home
Server Console
1. Log on to the Windows Home Server Console.
2. Click the Shared Folders tab.
3. Select a shared folder to which you have access privilege, and
then click Open to open it.
Page 50

50 HOME SERVER TS mini
To access the shared folders from the desktop shortcut
1. Double-click the Shared Folders on your computer desktop
shortcut to display the shared folders on your home server.
2. Double-click a shared folder in the window to open it.
To access the shared folders from the Windows Home Server
icon
1. On the Windows system
tray, right-click the
Windows Home Server
icon and then select
Shared Folders to display
the shared folders on your
home server.
2. Double-click a shared
folder to open it.
Page 51

HOME SERVER TS mini 51
To access the shared folders from the Windows Start Menu
• Under Windows XP OS, click Start > Run, and then type
\\homeservername (e.g. \\TSMINI) in the Run search box to
display the shared folders.
• Under Windows Win7 / Vista OS, click Start, and then type
\\homeservername (e.g. \\TSMINI) in the Start Search box to
display the shared folders.
Page 52

52 HOME SERVER TS mini
To access the shared folders from My Network Places
Ensure that you have enabled the Client for Microsoft
Network item in your computer.
• Under Windows XP OS, go to Control Panel > Network
Connections, right-click on the Local Area Connection
icon, and select Properties. Check the Client for Microsoft
Networks box to enable the function.
• Under Windows Win7 / Vista OS, go to Control Panel >
Network and Sharing Center > Manage connections,
right-click on the Local Area Connection icon, and select
Properties. Check the Client for Microsoft Network box
to enable the function.
• Under Windows XP OS, go to My Network Places, and then
type \\homeservername (e.g. \\TSMINI). You are prompted
to enter the account and password which you use to log on to
the Windows Home Server Console, and the shared folders are
displayed.
• Under Windows Win7 / Vista OS, go to Network, and then type
\\homeservername (e.g. \\TSMINI). You are prompted to
enter the account and password which you use to log on to
the Windows Home Server Console, and the shared folders are
displayed.
Page 53

HOME SERVER TS mini 53
To access the shared folders from the Internet
1. Open the Internet Explorer Web browser. and log on to the TS
mini home page. Refer to the section Accessing the TS mini
home page for more details.
2. Click the Shared Folder tab, and then click a shared folder to
open it and download or upload files to the shared folder on
your home server.
Page 54

54 HOME SERVER TS mini
Server Storage
Click the Server Storage tab to view all the hard drives installed on
your home server. You can also use the Server Storage tab to add,
repair, and remove external USB 2.0 hard drives, external SATA hard
drives, or internal hard drives.
Page 55

HOME SERVER TS mini 55
Adding a hard disk drive
Always install the hard disk drive in which the OS is or will be
installed to the HDD1 bay.
1. Install the new HDD to the home server.
(a) Power off the server and unplug the power cord.
(b) Lay the server horizontally on a stable surface, and then
loosen the two thumbscrews to remove the left side case.
1
1
2
1
1
(c) Use a coin to loosen the three screws and put the screws at
a visible place in case they are lost.
(d) Hold the plastic grip, and then lift up the HDD cage
horizontally.
1
2
2
1
1
2
1
1
Page 56

56 HOME SERVER TS mini
(e) Reverse and place the HDD cage on the stable surface.
(f) Fasten the bundled four screws to the new HDD, and then
slide the HDD into the empty HDD bay.
2
1
1
1
1
2
2
1
1
2
1
1
2
(g) Hold the plastic grip and align the two pins on the cage as
shown to the mounting holes. Push down the HDD cage to
the right side case.
(h) Fasten the three screws which were removed and put aside
at the beginning.
2
1
1
2
1
2
1
1
1
2
2
1
1
2
HDD2
HDD1
Page 57

HOME SERVER TS mini 57
(i) Slide the left side case back to the server body, and then
fasten the two thumbscrews back to the case.
1
1
2
2. Add the new hard drive to Server Storage on the Windows
Home Server Console.
(a) Log on to the Windows Home Server Console.
(b) Click the Server Storage tab.
(c) Select the newly added hard drive (either internal or
external) and then click Add to bring up the Add a Hard
Drive Wizard. Click Next.
Page 58

58 HOME SERVER TS mini
(d) Select from the following options:
• Add this hard drive to your server storage to increase the
storage capacity of your home server.
• Use this hard drive to back up files that are stored on your
home server.
(e) For detailed instructions, refer to the Windows Home Server
Console Help.
Ensure that the newly installed hard drive must have 36GB
capacity at least or else the HOME SERVER cannot recognize the
hard drive.
Page 59

HOME SERVER TS mini 59
Removing a hard disk drive
• Before removing a HDD from the home server, ensure to
remove the hard drive from the Windows Home Server Console.
Otherwise, you will lose all files on the hard drive and will no
longer find the hard drive after connecting it again.
• Ensure that the other hard drive has enough space for the data
on the hard drive to be removed.
1. Remove a hard drive from the Windows Home Server Console.
(a) Log on to the Windows Home Server Console.
(b) Click the Server Storage tab.
(c) Select the hard drive you want to remove, and then click
Remove to run the Remove a Hard Drive Wizard.
(d) Click Next.
(e) Click Finish.
Page 60

60 HOME SERVER TS mini
2. Remove the HDD from the home server.
(a) Power off the server and unplug the power cord.
(b) Lay the server horizontally on a stable surface, and then
loosen the two thumbscrews to remove the left side case.
1
1
2
1
1
1
2
2
1
1
2
1
1
(c) Use a coin to loosen the three screws and put the screws at
a visible place in case they are lost.
(d) Hold the plastic grip, and then lift up the HDD cage
horizontally.
Page 61

HOME SERVER TS mini 61
(e) Reverse and place the HDD cage on the stable surface.
(f) Lift the release grip corresponding to the HDD bay where
the HDD to be removed are located.
(g) Slide the HDD from the HDD bay.
(h) Hold the plastic grip and align the two pins on the HDD
cage as shown to the mounting holes. Push down the HDD
cage to the right side case.
(i) Fasten the three screws which were removed and put aside
at the beginning.
2
1
1
2
1
2
1
1
1
2
2
1
1
2
2
1
2
1
1
1
2
HDD2
HDD1
Page 62

62 HOME SERVER TS mini
ASUS Xtor Manager
ASUS Xtor Manager is an add-in tool that helps you easily and
directly back up, synchronize, and manage files and folders on
external USB/eSATA storage devices attached to the home server.
Click the ASUS Xtor Manager tab enter the main page.
An eSATA storage device supports hot-plug function. Simply
unplug an eSATA storage device without the need to select Eject
External Storage.
From the ASUS Xtor Manager tab, you can do the following tasks:
• Managing files between external storage devices and home
server
• Backing up the selected data from external storage devices to
home server
• Synchronizing selected data from external storage devices to
home server
Displays detected
external storage devices
Click to return to
the main page
Click to enter the
corresponding function
Right-click the device icon and then select Eject
External Storage to remove the USB device
Page 63

HOME SERVER TS mini 63
File Manager
Click the File Manger icon or the File Manager tab on the main page
to bring up the File Manager page.
Information about the
detected external storages
Root directory and sub-directories
Folders and files in the selected directory
To manage folders and files
• To add a new folder, right-click a
folder from the root-/sub-directories
and select Create New Folder.
• To delete a folder or a file, right-click
a folder/file and then select Delete.
Page 64

64 HOME SERVER TS mini
• To rename a folder or a file,
right-click a folder/file and then
select Rename.
To copy folders and files
Drag a folder or a file from either the external storage device or the
home server to the destination of the other side.
OR,
1. Right-click a folder or file in the selected directory from the
external storage device.
2. Select Copy to Home Server to copy the selected folder/file to
the home server.
You can also copy folders/files from the home server to the external
storage device by right-clicking the folders/files from the home
server and then select Copy to External Storage.
Page 65

HOME SERVER TS mini 65
Backup
Click the Backup icon or the Backup tab on the main page to bring
up the Backup page.
To back up files to the home server
1. Click to select the folder paths for the external storage
and the home server.
2. Click Backup to start the backup task.
3. The files are listed when the backup task is done.
Page 66

66 HOME SERVER TS mini
Sync
Click the Sync icon or the Sync tab on the main page to bring up the
Sync page.
To synchronize files
1. Click to select the folder paths for the external storage
device and the home server.
2. Click Compare to search for the files needed to be
synchronized.
3. The files needed to be synchronized are listed and categorized
into the following four tabs.
• Newer Files on Server – the files found on the home server
are newer than the same files previously backed up on the
external storage device.
• Newer Files on External – the files found on the external
storage device are newer than the same files previously
backed up on the home server.
Page 67

HOME SERVER TS mini 67
• Not found on External – the files only exist on the home
server.
• Not found on Server – the files only exist on the external
storage device and haven’t been backed up to the home
server before.
4. Click the tab with the ball in green (e.g. ), and then
check the box(es) before the file(s) you want to synchronize.
• If you click the tab Newer Files on Server or the tab Newer
Files on External, you can decide whether to replace
the older files with the newer ones between the external
storage device and the home server or vice versa. Click
or to start the synchronizing task.
• If you click the tab Not found on External, click
to synchronize the selected files from the home server to
the external storage device.
• If you click the tab Not found on Server, click
to synchronize the selected files from the external storage
device to the home server .
To delete selected files
You can remove the selected files from the external storage device
or the home server by simply clicking .
Page 68

68 HOME SERVER TS mini
ASUS WebStorage
ASUS WebStorage allows you to enjoy one-year-free online space.
With Internet connection, you can access and share any files
whenever you want and wherever you are.
Initializing ASUS WebStorage
1. Click the ASUS WebStorage tab to bring up the first-time startup
page.
2. Click See EULA to read the End User License Agreement. If you
accept the agreement, check the box before Please check the
box before if you accept ASUS WebStorage’s end-user license
agreement.
3. Enter your Uer ID, Password, and email address, and then click
OK to finish the registration.
If you are a Eee PC user and already have a set of account
and password for ASUS WebStorage, you can log into ASUS
WebStorage with the account and password without registering
a new set and enjoy the online space and the expire date you
already have. However, if you do so, you will give up the free online
space of 500GB only given to the TS mini user.
Page 69

HOME SERVER TS mini 69
Using My Web Backup
My Web Backup allows you to enable the backup of the shared
folders on the home server.
1. From the ASUS WebStorage tab, click My Web Backup.
2. From the Backup Service, click Disable, and then select the
shared folders that you want to back up to the online space.
3. When done, click Enable to start the backup task. The backup
starts automatically whenever new files are added to the
selected shared folders. Click Refresh to update the current
progress.
Page 70

70 HOME SERVER TS mini
Viewing My Web Sync
My Web Sync page displays the synchronization status of the
MySyncFolder folder.
When you install the ASUS WebStorage utility to whichever
computer, the MySyncFolder folder is automatically created on
the Windows desktop. The files you place to the MySyncFolder
folder from any of the computers with the ASUS WebStorage utility
installed will be synchronized.
From the ASUS WebStorage tab, click My Web Sync, and then
enable the SyncService to view the details on the MySyncFolder
folder.
Page 71

HOME SERVER TS mini 71
Configuring the ASUS WebStorage settings
1. From the ASUS WebStorage tab, click Settings to bring up the
ASUS WebStorage settings page.
2. Under the Login heading, you can modify the User ID and the
password which you use to log into the ASUS WebStorage
website.
3. Under the Account heading, check the box before Low speed
mode if you want to limit the file transporting bandwidth while
uploading files on ASUS WebStorage.
4. Under the Clean Web Storage heading, check the box before
I want to clean all my backup files and folders on the Web
Storage and then click Clean Web Backup. The online space is
then cleaned up.
The Clean Web Storage function is available only when you disable
the Backup Service.
Page 72

72 HOME SERVER TS mini
ASWM
ASWM (ASUS System Web-based Management software) is an
interface that allows you to conveniently manage your home server
status via Windows Home Server Console.
Click the ASWM tab to maintain the system stability with ASWM.
Page 73

HOME SERVER TS mini 73
The main page
The main page of the ASWM user interface includes the:
1. Banner
2. Inventory and Configuration Menus
3. System Health Menus
4. Information Display Region
Banner
The banner is located on the top of the page. The left side of the
banner displays the ASWM trademark along with the server and
OS on which ASWM is running. The right side displays a sequence
of buttons, and the language in which the main page is being
displayed.
The sequence of buttons from left to right includes:
• Discovery - This discovers and manages hosts connected to
specified subnets.
• Help - Displays the on-line help for ASWM.
• About - Displays copyright and version information for ASWM
and the version number of each component in ASWM.
Page 74

74 HOME SERVER TS mini
System health menus
These System Health menu is located on the
left side of the display. The menu options
correspond to their respective system
components and are used for monitoring and
displaying detailed information about the
health of all the system components. When a
critical event occurs, the corresponding menu
option displays a flashing alert icon.
Information display region
This is the main area of the page, where information gathered by all
modules are displayed. Move the mouse pointer over the server icon
(left) to display general information about the server.
Click Help for more detailed instructions.
Inventory and configuration menus
The Inventory and Configuration menus are located just below
the right side of the banner. Move the cursor over these menus to
display the corresponding
sub menus. The sub menus
stay displayed until you click
anywhere else on the screen.
Page 75

HOME SERVER TS mini 75
BIOS update
You are able to update the system BIOS from ASWM.
1. Download the latest BIOS file (.ROM file) from the ASUS website.
2. Open the BIOS folder from the Shared Folders on your home
server. The BIOS folder is under the Software folder (Shared
Folder\Software\BIOS).
3. Move the latest BIOS file to the BIOS folder.
4. On the Windows Home Server Console, click the ASWM tab.
5. From the Configuration menu, select
BIOS Flash.
6. Click Browse to locate the BIOS file in the BIOS folder.
7. Follow the onscreen instructions to finish the BIOS update task.
Page 76

76 HOME SERVER TS mini
avast! antivirus program
avast! antivirus is a package of applications that protect your home
server and computer from virus attack. You can enjoy avast! antivirus
for a 60 day trial.
To use avast! antivirus, you need to install the add-in feature from
the Add-ins settings page. See the section Add-ins for how to install
the add-in. The avast! antivirus tab will appear after the installation.
Start to protect your system by clicking the avast!antivirus tab.
From the avast!antivirus tab, you can perform the following tasks:
• Scheduling a scan or scanning all active computers
• Enabling notifications of the system activities or problems
• Viewing the scan history
• Manually inserting a license key into your home server to
run avast! professional or avast! home edition.
Click Help on the upper right corner of the Console for more
deatiled insturctions.
Page 77

HOME SERVER TS mini 77
Windows Home Server Settings
The Windows Home Server settings enables you to review and
configure the administrative settings for your home server. The
categories include General, Backup, Passwords, Windows
Media Center, Media Sharing, Remote Access, Add-ins, ASUS
WebStorage, and Resources.
To enter the setting window, click the Settings button on the upper
right corner of the Windows Home Server Console window.
Page 78

78 HOME SERVER TS mini
General
The General settings page allows the configuration of date and time,
language selection, Windows Update settings, Customer Experience
Improvement Program, and Windows Error Reporting.
Click the Help button on the lower right corner for detailed
information about how to perform the tasks on the General settings
page.
Page 79

HOME SERVER TS mini 79
Backup
The Backup settings page allows you to specify start and end time
for backing computers on the home network, configure the number
of months, weeks, and days to keep backups on the home server,
and clean up old backups manually.
Click the Help button on the lower right corner for detailed
information about how to perform the tasks on the Backup settings
page.
Page 80

80 HOME SERVER TS mini
Passwords
The Passwords settings page allows you to change the home server
password and adjust the user accounts password policy.
Click the Help button on the lower right corner for detailed
information about how to perform the tasks on the Passwords
settings page.
Page 81

HOME SERVER TS mini 81
Windows Media Center
You are able to play the music, videos, and recorded TV stored
on your home server with Windows Media Center. Follow the
instructions on this Windows Media Center settings page to install
the necessary applications and run Windows Media Center.
Click the Help button on the lower right corner for detailed
information on the Windows Media Center settings page.
Page 82

82 HOME SERVER TS mini
Media Sharing
The Media Sharing settings page allows you to turn on Media LibraryMedia Sharing settings page allows you to turn on Media Library Sharing settings page allows you to turn on Media Library
Sharing to stream music, photos, and videos from shared folders on
your Windows Home Server devices on your home network.
Click the Help button on the lower right corner for detailed
information on the Media Sharing settings page.
Page 83

HOME SERVER TS mini 83
Remote Access
The Remote Access settings page helps you configure necessary
settings to access your Windows Home Server Web site from the
Internet. After completing the configuration, you will be able to
configure the Windows Home for remote access, remotely connect
to the Windows Home Server Console, and remotely administer the
home computers in your home network.
Click the Help button on the lower right corner for detailed
information about how to perform the tasks on the Remote Access
settings page.
Page 84

84 HOME SERVER TS mini
Enabling remote access
To access your data and home computers from the internet
whenever you are, you need to configure Windows Home Server to
allow Remote Access.
1. Log on to the Windows Home Server Console.
2. Click Settings on the upper right corner of the Windows Home
Server Console window, and then click Remote Access in the left
pane.
3. Under the Remote Access heading, click Turn On to enable the
remote access configuration to your home server.
4. Follow the onscreen instructions to go through the remote
access configuration.
5. Under the Router heading, when you enable the remote access
configuration, Windows Home Server automatically configures
your broadband router to forward Web site requests to your
home server. Your router must support Universal Plug and Play
(UPnP) and UPnP must be enabled on your router for Windows
Home Server to automatically configure it.
Page 85

HOME SERVER TS mini 85
Refer to Help on the Remote Access page for more information
about router configuration.
You need certain TCP ports to be forwarded from your router to
Windows Home Server to enable the Remote Access feature.
The ports are as follows:
• TCP 80 - use the HTTP protocol to view your default Web
page for Windows Home Server.
• TCP 443 - use the HTTPS protocol to view your secure
Remote Access Web page for Windows Home Server.
• TCP 4125 - use the Remote Desktop Proxy to connect to
your home computers.
6. Under the Domain Name heading, click Setup to bring up the
Domain Name Setup Wizard.
7. Click Next.
A domain name is the website address of your home server
on the Internet (For example, https://tsmini.homeserver.
com). Wherever you are, you can open a Web browser and type
the domain name in the address text box to connect to your
home server from the Internet. In this way, you don’t have to
remember your IP address at home.
Page 86

86 HOME SERVER TS mini
8. Enter your Windows Live ID email address and password to
begin setting up the domain name.
Windows Home Server includes a free dynamic DNS service that
binds your domain name to the IP address assigned by your
Inter service provider (ISP).
9. Click Next.
10. Click the option “I accept”, and then click Next.
Page 87

HOME SERVER TS mini 87
11. Enter a domain name and select a subdomain name from the
list after the period (“.”).
12. Click Confirm to ensure your domain name is not being used by
others.
13. Click Finish.
Page 88

88 HOME SERVER TS mini
14. Under the Web site settings heading, you can choose the
default home page from the Web site home page drop-down
box and the default Web site headline that appears on your
home server Web site.
15. Click OK.
16. Test if the remote access is available by getting online anywhere
outside of your home and entering your Internet domain name
in a Web browser.
Page 89

HOME SERVER TS mini 89
Accessing the TS mini home page
1. Open the Internet Explorer Web browser.
Ensure to use the Internet Explorer to access the home page. When
you use other Web browsers, you may not use some features like
Remote Access to Computers or Connect to your Home Server.
2. Enter the Internet domain name assigned to you during the
remote access setup procedures (For example, https://tsmini.
homeserver.com). Then, the Logon web page appears.
3. Click the Log On button on the upper right corner.
4. Enter a personal user account and password.
You cannot use the Administrator account or the Guest account to
log on to the home page. You must log on with a user account that
is enabled for Remote Access.
Page 90

90 HOME SERVER TS mini
5. There are three tabs on the home page:
• Home - You see this page every time you log on to the Web
page.
• Computers - You can remotely administer your home server
and connect to your home computers.
On the Computers tab, click Connect to your Home
Server and enter the administrator password, and then the
Windows Home Server Console interface appears.
On the Computers tab, click the name of the home
computer under the Remote Access to Computers
heading to access your home computers.
Page 91

HOME SERVER TS mini 91
• Shared Folders - You can access to the shared folders you
have access privileges over the Internet and upload or
download files from the folders.
On the Shared Folders tab, click a shared folder, and then
you can upload and download files to and from the shared
folder over the Internet. You can also create subfolders in
the selected folder.
Page 92

92 HOME SERVER TS mini
Add-ins
The Add-ins settings page contains add-ins that add additional
features and functionality to Windows Home Server, such as a new
tab to the Windows Home Server Console that enables you to
manage a new service or feature.
Click the Help button on the lower right corner for detailed
information about how to perform the tasks on the Add-ins settings
page.
Page 93

HOME SERVER TS mini 93
To install an Add-in
1. Copy a . msi file to a hard drive on one of your home computers
or to a removable disk drive inserted to your home computer.
2. From the system tray, right-click the Windows Homer Server
icon, and then click Shared Folders to display the Shared Folders
window.
3. Double-click the Software folder.
4. Double-click the Add-Ins folder.
5. Copy the .msi file to the Add-Ins folder, and then close the AddIns folder.
6. Log on to the Windows Home Server Console.
7. Go to Settings > Add-ins, and then click the Available tab.
8. Click Install to install the Add-in.
9. Click OK on the Installation succeeded dialog box to restart the
console.
10. Reconnect to the console. If your new Add-in includes a console
tab, you will see the new tab on the console.
To uninstall an Add-in
1. Log on to the Windows Home Server Console.
2. Go to Settings > Add-ins.
3. On the Installed tab, click Uninstall on the Add-in that you want
to uninstall.
4. Click OK on the Uninstallation succeeded dialog box to restart
the console.
5. Reconnect to the console. If the Add-in includes a console tab,
the tab is now removed from the console.
Page 94

94 HOME SERVER TS mini
ASUS WebStorage
The ASUS WebStorage settings page allows you to configure the
settings for the ASUS WebStorage feature. Refer to the section
Configuring the ASUS WebStorage settings for detailed
instructions.
Click the Help button on the lower right corner for detailed
information on the ASUS WebStorage settings page.
Page 95

HOME SERVER TS mini 95
Resources
The Resources settings page displays the information about your
home server, including Microsoft Windows, Home Server, Version
Information, Additional Windows Home Server links, and Support.
Click the Help button on the lower right corner for detailed
information on the Resources settings page.
Page 96

96 HOME SERVER TS mini
Performing a Server Recovery or Factory Reset
If the operating system of your home server is corrupted or the main
system hard drive is failed, use the bundled ASUS HOME SERVER TS
mini Recovery DVD to recover your home server or to restore the
home server to its factory default.
• If you perform Server Recovery, the server settings and all user
accounts will be deleted; the data in shared folders still exist. If
you perform Factory Reset, all data on the home server’s hard
drives will be deleted.
• Do not insert any USB/eSATA storage device to the home server
when processing the initializtion to avoid any possible error.
Recovering Windows Home Server
To perform Server Recovery
1. Insert the ASUS HOME SERVER TS mini Recovery DVD into the
computer that is connected to your home network. The Server
Recovery wizard starts.
If Autorun is NOT enabled in your computer, browse the contents
of the Recovery DVD to locate the Install.exe file. Double-click the
Install.exe to run the Recovery wizard.
2. Click Next.
Page 97

HOME SERVER TS mini 97
3. Read the End User License Agreement. If you agree with the
terms of the agreement, select the option “I accept the terms of
the license agreement” and then click Next.
Page 98

98 HOME SERVER TS mini
4. Check the status of the system status indicator.
If the indicator blinks orange, select the option “System light is
blinking orange”; if not, select the option “System light is not
blinking orange”. Click Next.
Page 99

HOME SERVER TS mini 99
(a) If you select the option “System light is blinking orange”,
you need to uninstall the Windows Home Server Connector
from your computer. Click Next when the task is done.
Page 100

100 HOME SERVER TS mini
(b) If you select the option “System light is not blinking orange”,
you need to do the following:
1. Uninstall the Windows Home Server Connector from your
computer.
2. Hold down the power button for 4 seconds to turn off the
server.
3. Press the power button to turn on the server.
4. Press and hold the Recovery button at the rear panel of
the server using a paperclip until the system status indicator
is blinking orange.
5. Click Next.
 Loading...