

Page 1

STRIX Sound Card Series
Strix Raid DLX
Strix Raid PRO
Strix Soar
User Manual
Page 2

E11113
Revised Edition v2
November 2015
Copyright © 2015 ASUSTeK COMPUTER INC. All Rights Reserved.
No part of this manual, including the products and software described in it, may be reproduced,
transmitted, transcribed, stored in a retrieval system, or translated into any language in any form or by any
means, except documentation kept by the purchaser for backup purposes, without the express written
permission of ASUSTeK COMPUTER INC. (“ASUS”).
Product warranty or service will not be extended if: (1) the product is repaired, modied or altered, unless
such repair, modication of alteration is authorized in writing by ASUS; or (2) the serial number of the
product is defaced or missing.
ASUS PROVIDES THIS MANUAL “AS IS” WITHOUT WARRANTY OF ANY KIND, EITHER EXPRESS
OR IMPLIED, INCLUDING BUT NOT LIMITED TO THE IMPLIED WARRANTIES OR CONDITIONS OF
MERCHANTABILITY OR FITNESS FOR A PARTICULAR PURPOSE. IN NO EVENT SHALL ASUS, ITS
DIRECTORS, OFFICERS, EMPLOYEES OR AGENTS BE LIABLE FOR ANY INDIRECT, SPECIAL,
INCIDENTAL, OR CONSEQUENTIAL DAMAGES (INCLUDING DAMAGES FOR LOSS OF PROFITS,
LOSS OF BUSINESS, LOSS OF USE OR DATA, INTERRUPTION OF BUSINESS AND THE LIKE),
EVEN IF ASUS HAS BEEN ADVISED OF THE POSSIBILITY OF SUCH DAMAGES ARISING FROM ANY
DEFECT OR ERROR IN THIS MANUAL OR PRODUCT.
SPECIFICATIONS AND INFORMATION CONTAINED IN THIS MANUAL ARE FURNISHED FOR
INFORMATIONAL USE ONLY, AND ARE SUBJECT TO CHANGE AT ANY TIME WITHOUT NOTICE,
AND SHOULD NOT BE CONSTRUED AS A COMMITMENT BY ASUS. ASUS ASSUMES NO
RESPONSIBILITY OR LIABILITY FOR ANY ERRORS OR INACCURACIES THAT MAY APPEAR IN THIS
MANUAL, INCLUDING THE PRODUCTS AND SOFTWARE DESCRIBED IN IT.
Products and corporate names appearing in this manual may or may not be registered trademarks or
copyrights of their respective companies, and are used only for identication or explanation and to the
owners’ benet, without intent to infringe.
Page 3

Contents
1. Introduction ..................................................................................... 4
1.1 Package contents ............................................................. 4
1.2 System requirements ......................................................... 4
1.3 General Specication ......................................................... 5
2. Hardware overview ......................................................................... 8
Control Box ....................................................................................... 9
3. Driver Installation .......................................................................... 11
3.1 Installing the driver ........................................................... 11
3.2 Uninstalling or reinstalling the driver ................................ 12
4. Connecting Speakers and Peripherals ....................................... 13
4.1 Connecting to Strix Control Box
(Strix Raid DLX/PRO only) ............................................. 13
4.2 Connecting to TOSLINK and COAXIAL SPDIF
input connection ............................................................... 15
4.3 Connecting Microphone/ Line In ...................................... 16
4.4 Connecting stereo headphones ...................................... 17
4.5 Connecting Analog Speaker Systems ............................ 18
5. Software Utilities ........................................................................... 22
5.1 Sonic Studio overview ...................................................... 22
5.2 Sonic Radar overview ...................................................... 23
6. Troubleshooting ............................................................................ 24
Notice ......................................................................................... 27
Trademarks ..................................................................................... 27
License ......................................................................................... 27
Copyright ......................................................................................... 27
English
ASUS STRIX Sound Card Series User Manual
3
Page 4

English
1. Introduction
1.1 Package contents
Check your ASUS STRIX sound card series package for the following items:
• STRIX sound card series 7.1-Channel sound card
• Driver CD
• S/PDIF TOSLINK optical adapter x 1
• Quick Start Guide
• Box link cable (Strix Raid DLX/Strix Raid Pro only)
• Strix control box (Strix Raid DLX/Strix Raid Pro only)
1.2 System requirements
To ensure a successful installation of the ASUS Strix sound card series, your
computer must meet the following requirements:
• One PCI Express 1.0 (or higher) compatible slot for the audio card
• One available 6-pin peripheral power cable connector from PC’s power
supply unit
• Microsoft® Windows® 10/8.1/8/7/(32/64bit)
• Intel® Pentium® 4 1.4GHz or AMD Athlon 1400 CPU or faster CPU
• >256 MB DRAM system memory
• >60 MB available HDD space for driver installation package
• CD-ROM drive (or DVD-ROM drive) for software installation
• High-quality headphones, powered analog speakers, or a Dolby Digital
decoder, to enjoy the ultra-high delity sounds of the card
4
ASUS STRIX Sound Card Series User Manual
Page 5
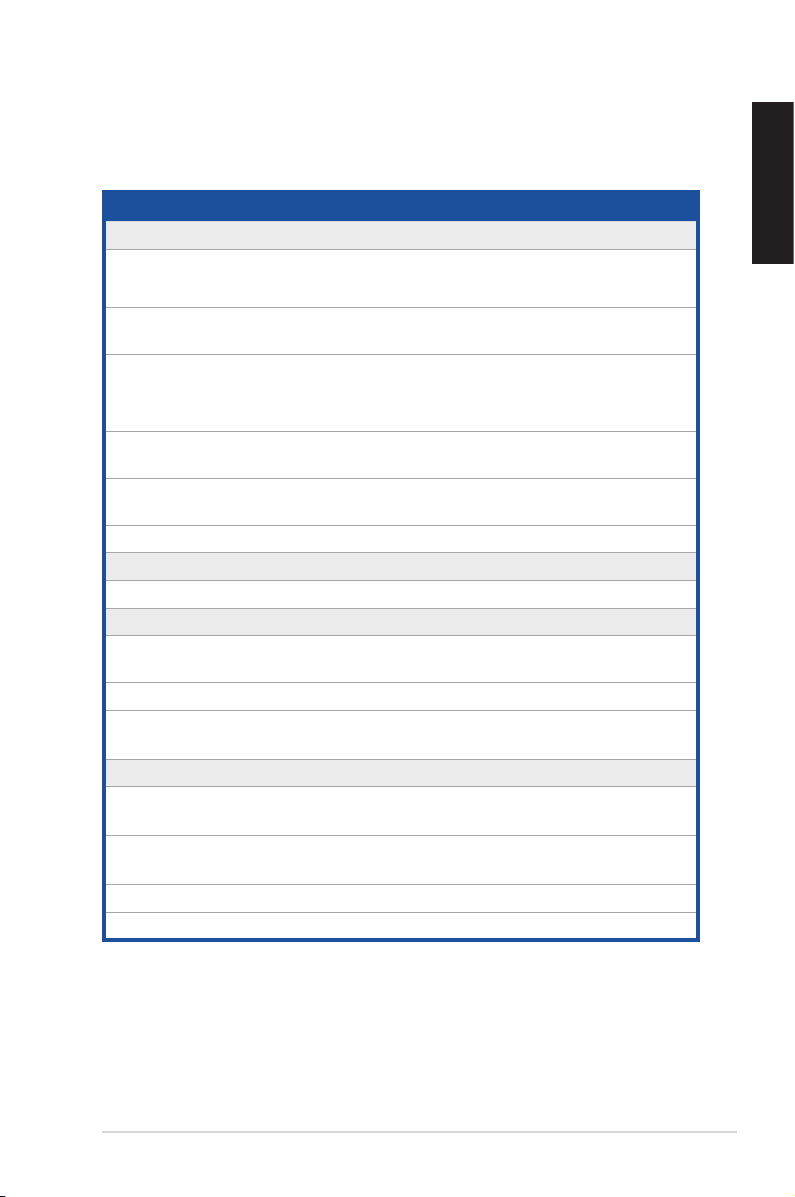
1.3 General Specification
STRIX RAID DLX
Items Description
Audio Performance
Output Signal-to-Noise Ratio
(A-Weighted)
Input Signal-to-Noise Ratio
(A-Weighted)
Output Total Harmonic Distortion +
Noise at 1kHz (-3dB)
Input Total Harmonic Distortion +
Noise at 1kHz (-3dB)
Frequency Response
(-3dB, 24-bit/96kHz format)
Output / Input Full-Scale Voltage 2 Vrms (5.65 Vp-p)
Bus Compatibility
PCI Express PCIe v1.0 or above bus compatible
Main Chipset
Audio Processor Cmedia USB 2.0 High-Denition Sound Processor
D-A Converter of Digital Sources: ESS SABRE9016 Premier 8 Channel Audio DAC
A-D Converter for Analog Inputs: Cirrus-Logic CS5381* 1 (114dB DNR, Max.
Sample Rate and Resolution
Analog Playback Sample Rate and
Resolution
Analog Recording Sample Rate
and Resolution
S/PDIF Digital Output 44.1K/48K/96K/192KHz @ 16/24bit
ASIO 2.0 Driver Support 44.1K/48K/96K/192KHz @ 16/24bit
124dB for Front channel of Line-out
124dB for Headphone-out with 600ohm load
117dB
0.0009% (-107dB) for Line-out
0.0009% (-107dB) for Headphone-out with 600ohm
load
0.000316% (-110dB) for Line-in
< 10Hz to 48KHz
(Max. 384KHz / 24bit)
192kHz/24bit)
44.1K/48K/88.2K/96K/176.4K/192KHz @ 16/24bit
44.1K/48K/88.2K/96K/176.4K/192KHz @ 16/24bit
English
* Individual spec for each card.
(Continued on next page)
ASUS STRIX Sound Card Series User Manual
5
Page 6
English
Items Description
I/O Ports
Analog Output Jack 3.5mm jack (1/8”) (Analog out for all channel)
3.5mm jack (1/8”) (Headphone out)
Analog Input Jack 3.5mm jack (1/8”) (Line-In/Mic-In combo)
Digital S/PDIF Output High-bandwidth Optical connector supports
Driver Features
Operation System Windows 8.1/8/7 (32/64 bit)
192KHz/24bit (Side Surround combo)
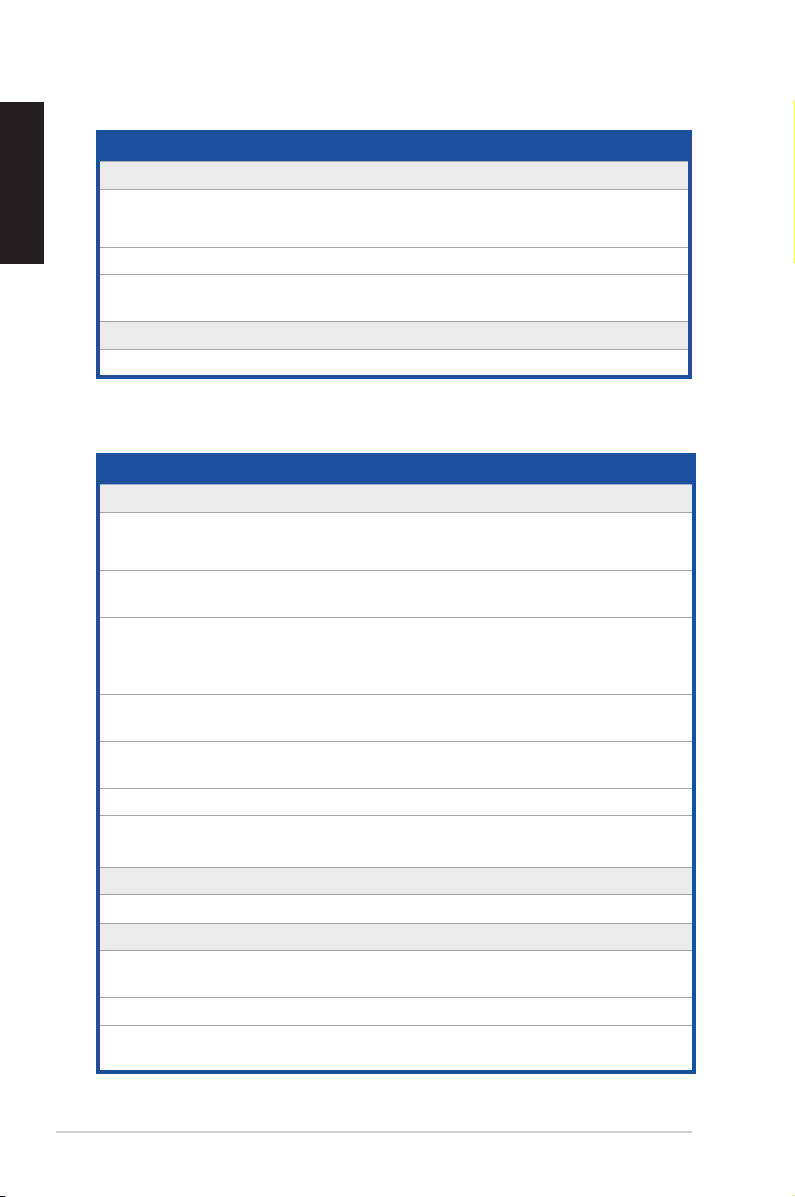
STRIX RAID PRO/SOAR
Items Description
Audio Performance
Output Signal-to-Noise Ratio
(A-Weighted):
Input Signal-to-Noise Ratio
(A-Weighted):
Output Total Harmonic Distortion +
Noise at 1kHz (A-Weighted) :
Input Total Harmonic Distortion +
Noise at 1kHz (A-Weighted) :
Frequency Response (-3dB,
24-bit/96kHz input ):
Output/Input Full-Scale Voltage 2Vrms (5.65Vp-p)
116dB for Line out (Front)
110dB for Headphone-out@600ohm loading
110dB for line-in
0.001% (-100dB) for Line out
0.003% (-90dB) for headphone-out@600ohm
loading
0.000316% (-110dB) for line-in
<10Hz to 48kHz
Headphone Impedance Optimized for 16, 32~600Ω
Bus Compatibility
PCI
Main Chipset
Audio Processor
D-A Converter of Digital Sources: ESS SABRE9006A Premier 8 Channel Audio DAC
A-D Converter for Analog Inputs:
PCIe v1.0 or above bus compatible
Cmedia USB 2.0 High-Denition Sound Processor
(Max. 384KHz/24bit)
Cirrus Logic CS5361*1 (114dB DNR, Max.
192KHz/24bit)
(Continued on next page)
6
ASUS STRIX Sound Card Series User Manual
Page 7
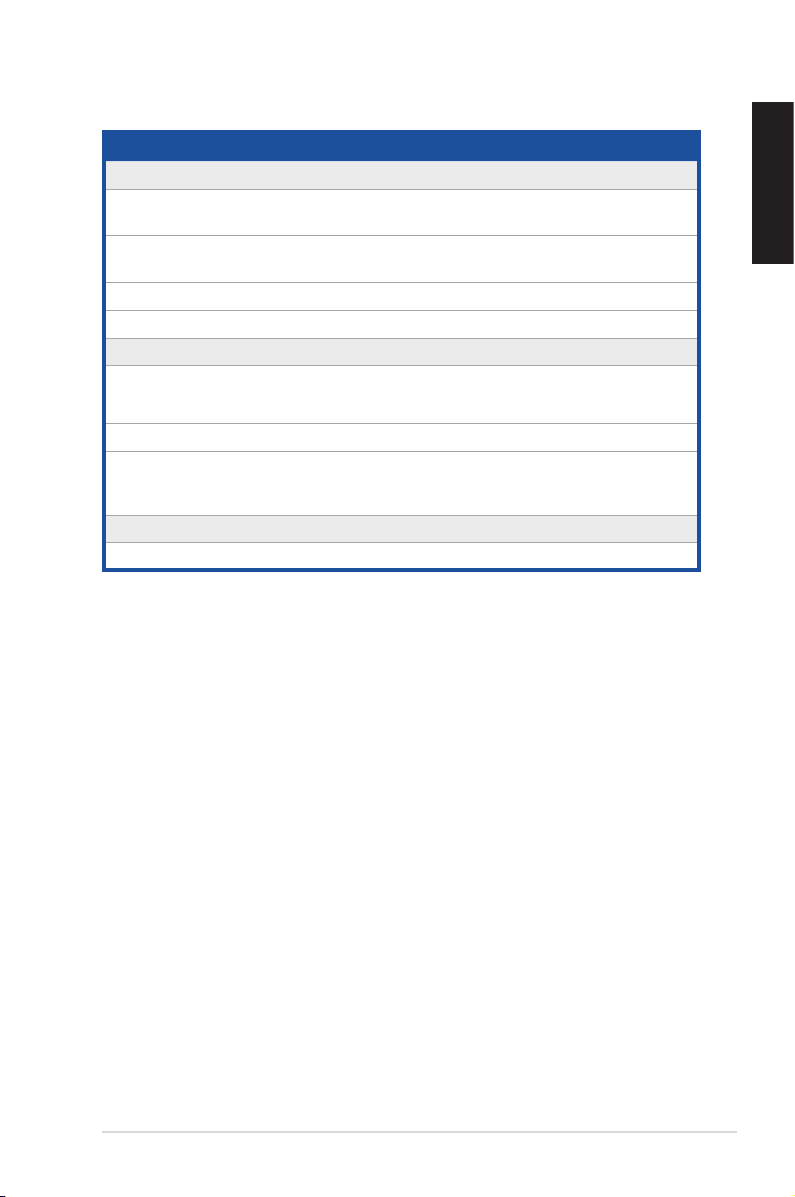
Items Description
Sample Rate and Resolution
Analog Playback Sample Rate and
Resolution
Analog Recording Sample Rate and
Resolution
S/PDIF Digital Output 44.1K/48K/96/192KHz @ 16/24bit
ASIO 2.0 Driver Support: 44.1K/48K/96/192KHz @ 16/24bit
I/O Ports
Analog Output Jack:
Analog Input Jack: 3.5 mm jack (1/8”) (Line-In/Mic-In combo)
44.1K/48K/88.2/96/176.4/192KHz @ 16/24bit for
all channels
44.1K/48K/88.2/96/176.4/192KHz @ 16/24bit for
all channels
3.5 mm jack (1/8”) Analog out for All channel
3.5 mm jack (1/8”) Headphone out
English
Digital S/PDIF Output
Driver Features
Operation System Windows8.1/8/7(32/64bit)
High-bandwidth Optical Connector supports
192KHz/24bit (Side Surround combo)
ASUS STRIX Sound Card Series User Manual
7
Page 8
English
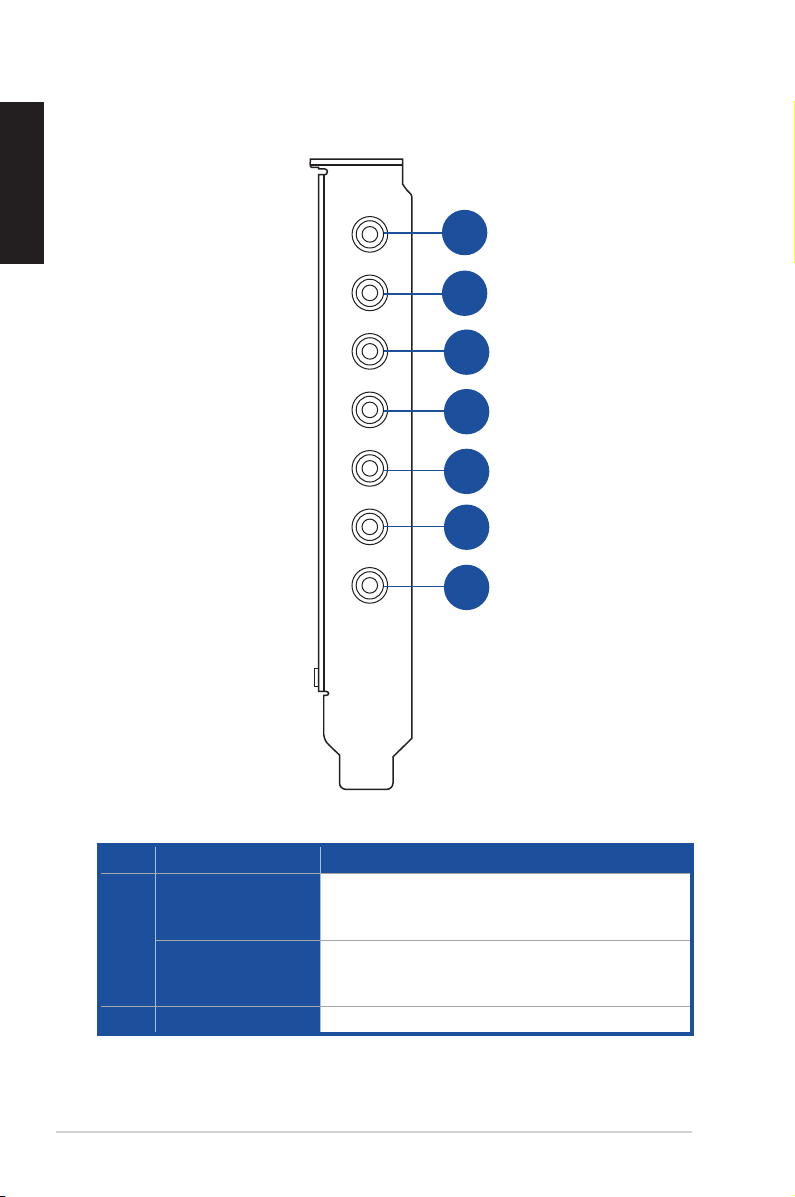
2. Hardware overview
1
Mic/Line-in
2
Headphone
3
Box Link
4
Front
Rear
6
5
Center
7
Side+
S/PDIF Out
No. Items Description
Microphone In port
1
Line In port
2. Headphone Out port Connect your headphone to this port.
Connect your external PC microphone to this 3.5mm
port for voice input. Built-in high-quality Microphone
pre-amplier.
Connect analog devices like MP3 players, CD players,
music synthesizers, and other line-level sound sources
to this 3.5mm port for audio recording or processing.
8
ASUS STRIX Sound Card Series User Manual
Page 9

No. Items Description
3. Box link Connect Strix control box directly to this port.
4. Front Out port
5. Rear Out port
6. Center Out port
Side Out port
7.
S/PDIF Out port
For 2-channel speaker systems, connects to the input
on the powered speakers.
Connects to the rear surround input on 4.1-channel
powered analog speakers.
Connects to the center/subwoofer input on
4.1/5.1-channel powered analog speakers.
Connects to the side surround input on 7.1-channel
powered analog speakers.
Optical digital output jack. Connects to external
digital decoder or digital speaker systems, Home
Theater systems, AV receivers for outputting digital
audio including PCM, Dolby Digital, DTS, WMA-
Pro, etc. Connects to the surround channel input on
4.1/5.1/7.1-channel powered analog speakers.
Control Box
14
13
English
12
15
8
SpeakerHeadphone
11
ASUS STRIX Sound Card Series User Manual
9
10
9
Page 10

English
No.
8.
9. LED Indicators
10.
11. STRIX RAID Mode
12.
13. Microphone Input Port
14.
15. Box link Connect Strix control box directly to this port.
Items Description
Output Select /
Volume Control
Output Source LED
Indicator
Headphone Output
Port
Kensington® Security
Slot
Tab Tab to select output source between the
Long
Press
Turn Turn the knob clockwise or anti-clockwise to
[Custom
Mode]:
Tab
[Custom
Mode]:
Turn
LED indicator that displays intensity level of volume or
effects.
LED indicator that displays selected output device.
Note: When the device is mute, the LED turns red.
This is a programmable key that can customize and
lock a special effect from the Sonic Studio so that you
can control and adjust effects spontaneously in game.
Press on/off to enable/disable Custom Mode. The
LED turns orange to indicate that the Custom Mode is
enabled.
To set up this key, please go to the Sonic Studio and
select an effect to lock the Strix RAID Mode.
Now you can use the knob to enable/disable an effect,
as well as adjust the intensity level of the effect.
Connect your headphone to this port.
Connect your external PC microphone to this 3.5mm
jack for voice input.
Insert kensington lock to lock the device.
headphone and speaker.
Long press to set the selected output
source to mute.
adjust volume level.
CUSTOM MODE (In conjunction with
STRIX RAID MODE)
Tab the knob to turn on/off a selected effect.
Note: This control knob is used in
CUSTOM MODE (In conjunction with
STRIX RAID MODE)
Turn the knob clockwise or anti-clockwise to
adjust intensity level of a selected effect.
conjunction with the Strix RAID key.
When Strix RAID Mode is selected,
this goes into a custom mode.
10
ASUS STRIX Sound Card Series User Manual
Page 11

3. Driver Installation
3.1 Installing the driver
After installing the STRIX sound card series on your computer, you need to install
the device driver that enables the STRIX sound card series to work with Windows
operating system.
• The driver is only needed when you connect ASUS STRIX sound card
series with PC/NB.
• The version and contents of the support CD are subject to change without
notice.
To install the device driver:
1. Insert the ASUS STRIX sound card series support CD into your optical
drive. If Autorun is enabled, the ASUS STRIX sound card series driver
screen appears automatically. Go to step 4. If Autorun is not enabled in your
computer, perform step 2.
2. Click My Computer on your desktop and double-click the optical drive icon.
3. Double-click the setup.exe icon.
4. Follow the on-screen instructions to complete the installation. Read the
END USER LICENSE AGREEMENT in the process and make sure that you
understand and accept it before continuing the installation.
5. When the installation nishes, you may be prompted to restart your
computer. You can choose to restart the computer later if desired.
®
English
ASUS STRIX Sound Card Series User Manual
11
Page 12

English
3.2 Uninstalling or reinstalling the driver
3.2.1 Uninstalling the STRIX sound card series driver
To uninstall the STRIX sound card series driver:
1. Click Start > Settings > Control Panel.
2. Double click the Add/Remove Programs icon.
3. Click the Change or Remove Programs button.
4. Select the program that you want to remove and then click Add/Remove
(or Change/Remove) button.
5. In the InstallShield Wizard dialog box, select Remove.
6. Restart your computer when prompted.
3.2.2 Reinstalling the STRIX sound card series driver
To reinstall the STRIX sound card series driver:
1. Before you reinstall any software, it’s recommended to uninstall the
existing software rst.
2. After you nish the uninstallation of the software, please follow the
installation process again to reinstall the same or updated software.
12
ASUS STRIX Sound Card Series User Manual
Page 13

4. Connecting Speakers and Peripherals
4.1 Connecting to Strix Control Box (Strix Raid DLX/
PRO only)
4.1.1 Connecting Strix Control Box (Strix Raid DLX/PRO only)
2
Mic/Line-in
Headphone
Box Link
Center
Side+
S/PDIF Out
3
1
Front
Rear
English
No. Items Description
1. Box link Connect Strix control box directly to this Box link port .
2. Microphone Input
Port
3. Headphone Output
Port
ASUS STRIX Sound Card Series User Manual
Connect Strix control box directly to the microphone
input port .
Connect Strix control box directly to the headphone
output port.
13
Page 14
English
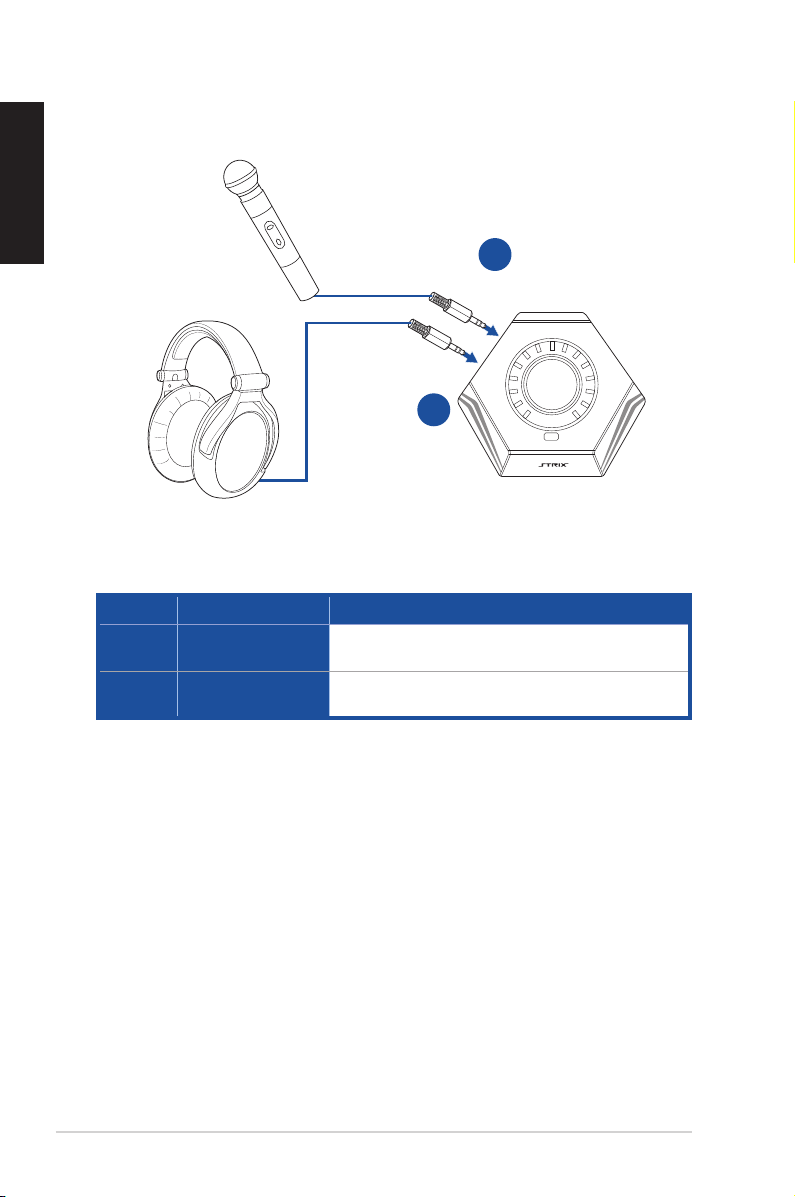
4.1.2 Connecting Strix Control Box with external microphone and
headphone(Strix Raid DLX/PRO only)
1
Mic In
Headphone Out
2
No. Items Description
1. Microphone Input
Port
2. Headphone Output
Port
Connect your external PC microphone to this 3.5mm
jack for voice input.
Connect your headphones to this port.
14
ASUS STRIX Sound Card Series User Manual
Page 15
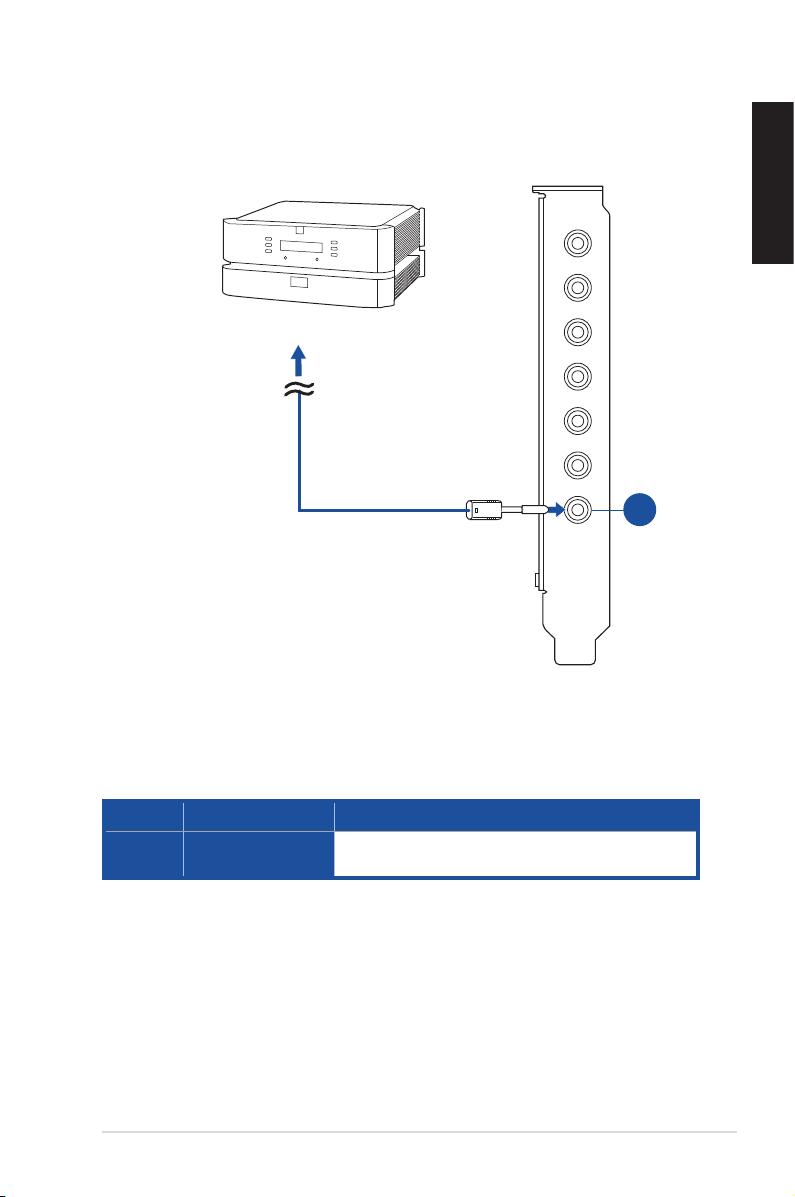
4.2 Connecting to TOSLINK and COAXIAL SPDIF input
connection
Mic/Line-in
English
AVR
Headphone
S/PDIF
S/PDIF Out
No. Items Description
1. S/PDIF Output/Side
Out port
Connects to CD/DVD player or some PC/NB with
SPDIF output to digital input.
Box Link
Front
Rear
Center
1
Side+
ASUS STRIX Sound Card Series User Manual
15
Page 16
English
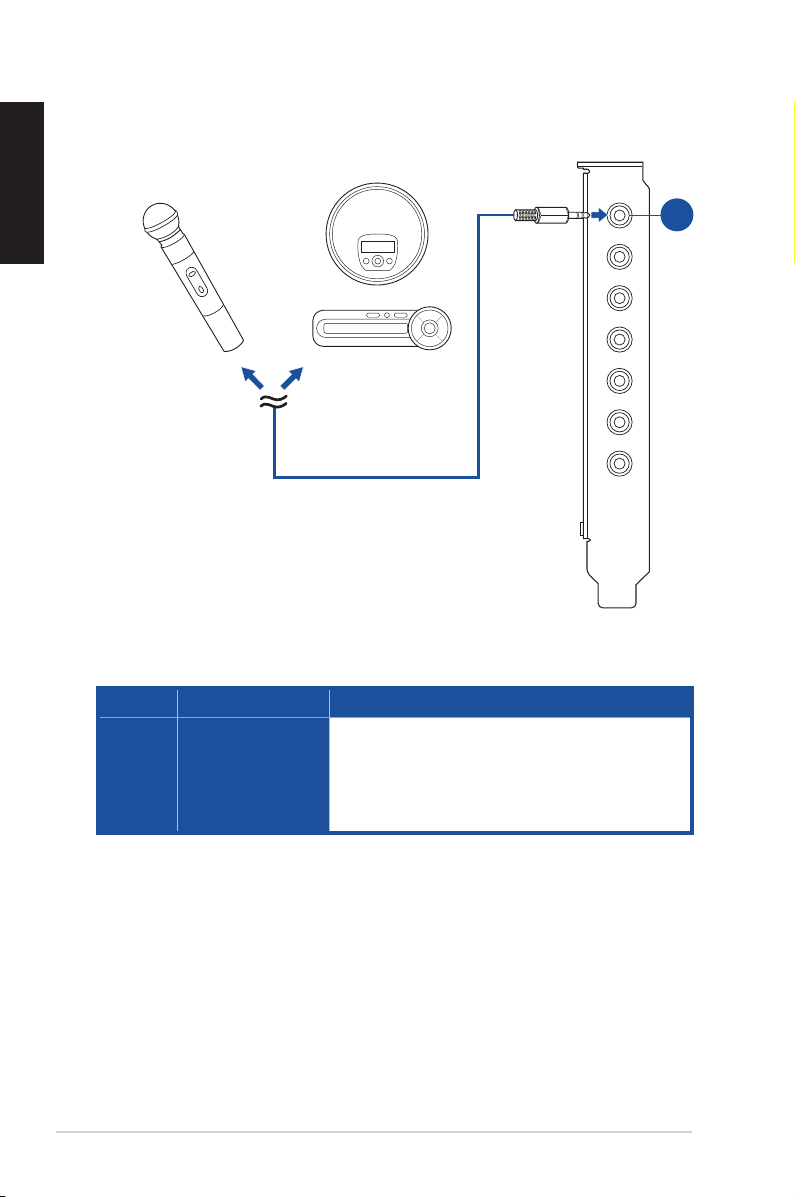
4.3 Connecting Microphone/ Line In
OR
No. Items Description
1. Microphone Input/
Line In Port
Connect the microphone’s 3.5mm plug into this Mic-In
port for voice communication, recording, or karaoke.
Connect the 3.5mm plug of the CD/MP3 Player or any
other Line level analog audio sources into this Line-In
jack for sound recording.
Mic/Line-in
Headphone
Box Link
Front
Rear
Center
Side+
S/PDIF Out
1
16
ASUS STRIX Sound Card Series User Manual
Page 17

4.4 Connecting stereo headphones
4.4.1 Connecting Stereo Headphones
Mic/Line-in
Headphone
Box Link
Front
Rear
Center
Side+
S/PDIF Out
English
1
No. Items Description
1. Front Out The Headphone Out Port has a built-in high-quality
amplier to drive headphones. Please connect your
stereo headphones directly to this jack.
ASUS STRIX Sound Card Series User Manual
17
Page 18

English
4.5 Connecting Analog Speaker Systems
4.5.1 Connecting 2 channel speakers
Mic/Line-in
Headphone
Box Link
Front
Rear
Center
Side+
S/PDIF Out
1
18
No. Items Description
1. Front Out Connects to the front input ports of the 2 channel
speakers with the mini-jack cable.
ASUS STRIX Sound Card Series User Manual
Page 19

4.5.2 Connecting 4 Channel Speakers / Power Amplifier
Amplifier
OR
Mic/Line-in
Headphone
Box Link
Front
Rear
Center
Side+
S/PDIF Out
No. Items Description
1. Front Out Connects to the front input ports of 4.1 speaker.
2. Rear Output Port Connects to the rear surround input port of 4.1
channel speaker.
English
1
2
ASUS STRIX Sound Card Series User Manual
19
Page 20

English
4.5.3 Connecting 5.1 Channel Speakers / 5.1 Channel Headphone
Mic/Line-in
Headphone
Box Link
Front
Rear
Center
Side+
S/PDIF Out
1
2
3
20
No. Items Description
1. Front Out Connects to the front input ports of 5.1 speaker.
2. Rear Output Port Connects to the “left surround” and “right surround” input
ports of 5.1 speaker.
3. Center/Subwoofer Connects to the “Center” and “subwoofer” input ports of
5.1 speaker.
ASUS STRIX Sound Card Series User Manual
Page 21

4.5.4 Connecting 7.1 Channel Speakers
Mic/Line-in
Headphone
Box Link
1
Front
Rear
Center
Side+
S/PDIF Out
4
3
2
No. Items Description
1. Front Out Connects to the front input ports of 5.1 speaker
2. Side Surround Out Connects to the “left surround” and “right surround” input
3. Center/Subwoofer Connects to the Center/Subwoofer input port of the 7.1
4. Rear Output Port Connects to the rear surround input of 7.1 speaker
ports of 7.1 speaker
speakers with the mini-jack cable.
English
ASUS STRIX Sound Card Series User Manual
21
Page 22

English
5. Software Utilities
5.1 Sonic Studio overview
Sonic Studio comes with advanced sound algorithms and virtual surround effects
to enhance your gaming and entertainment experience.
22
For more details about using Sonic Studio please refer to the Sonic Studio and
Sonic Radar manual.
ASUS STRIX Sound Card Series User Manual
Page 23

5.2 Sonic Radar overview
Sonic Radar is a visualization overlay of audio elements that can be easily
selected, combined and re-focused for gaming. This helps gamers to visually
see threats which are heard but are not immediately visible. Gamers can also
customize the appropriate level of sensitivity and graphics settings to meet his/her
needs for different gaming scenarios.
For more details about using Sonic Radar please refer to the Sonic Studio and
Sonic Radar manual.
English
ASUS STRIX Sound Card Series User Manual
23
Page 24

English
6. Troubleshooting
1. I cannot install the audio card driver in my PC.
• Please make sure that you have properly plugged the audio card in
the PCI Express slot on your motherboard.
• Check that the Windows hardware device manager has discovered a
multimedia audio device. If no device is found, please try scanning for
new hardware.
• Please try soft reboot (restart) your Windows.
• Remove the card, plug it into another PCI Express slot, and try again.
2. I couldn’t find the STRIX Sound Card Series Audio Center.
• Please make sure you have installed the driver
• Find the STRIX Sound Card Series Audio Center icon in the system
tray on the bottom right-hand corner of the screen. Double click the
icon to open the STRIX Sound Card Series Audio Center utility.
• If the icon could not be found in the system tray, go to the Windows
Control Panel and double click the “STRIX Sound Card Series Audio
Center” icon to make it visible in the system tray again.
24
• After the driver installation is complete, it’s recommended that you
reboot your computer to complete the setup. If the icon still doesn’t
appear, please try installing the driver package again.
ASUS STRIX Sound Card Series User Manual
Page 25

3. I can’t hear any sound from my analog speakers.
• STRIX sound card series PCI Express audio card needs the power
cable to supply addition power in addition to the basic PCI Express
bus power. Please double check you have plugged the small 4-pin
power plug onto STRIX sound card series power connector. If you did
not plug the internal power, STRIX Sound Card Series Audio Center
will remind you a warning message and won’t allow your operation
when you double click STRIX Sound Card Series Audio Center icon in
the system tray.
• Please ensure that you have connected speakers properly and have
powered on your speakers
• Please ensure that the device master volume or the software player
has NOT been muted on the STRIX Sound Card Series Audio Center
• If you are using Dolby Digital Live encoder through the S/PDIF output,
the analog output will be muted to get rid of the interference between
your digital speaker system and analog speakers or headphones.
Please check if this is the case.
• Please go to the sound and audio device of Windows Control Panel
to check if the playback default device is set to STRIX Sound Card
Series Audio Device, instead of other onboard AC97 or HDA codec
device. If it’s not, please set it to STRIX Sound Card Series Audio
Device and restart your applications.
English
• Please try restart your Windows.
4. I can’t hear any sound from the S/PDIF output.
• Please ensure that you have enabled S/PDIF output in the Audio Center
GUI (Main page)
• Please ensure that you are connecting the correct S/PDIF output jack
on the card to the decoder’s (AV receiver) S/PDIF input jack
• You may need to select the correct input and mode of your decoder or
AV receiver. For Dolby Digital or DTS output, you may have to double
check that the AV receiver is in that decoding mode.
• If you are using 192KHz PCM output, please make sure your decoder
can support 192KHz decoding. Try changing it to 44.1K or 48KHz rst.
ASUS STRIX Sound Card Series User Manual
25
Page 26

English
5. I can’t hear audio input (Mic, Line-in, AUX, etc.) from my
speakers.
• Please select the correct input as the recording source. If you are
using Windows Vista/Win 7, please also go to system audio control
panel to see the current default recording/input device is right.
• Please remember to turn on the digital monitoring button for that
recording source
6. Will PCM sound output through S/PDIF be just 2 channels even
with different analog output channels?
The S/PDIF protocol specication (IEC-60958) can only carry 2-channel
PCM data or non-PCM AC3/DTS data. So, when a user selects PCM
output for S/PDIF, the sound card will always deliver 2 channel PCM
data through the S/PDIF output port. For attaining 5.1 channel surround
sounds, you can select DDO, which will allow the STRIX sound card
series to deliver 5.1 surround sound for DVD movies, and even stereo
music.
26
ASUS STRIX Sound Card Series User Manual
Page 27

Notice
The content furnished in this document is ASUS audio product knowledge
for customers’ reference. However, ASUS assumes no responsibility for the
consequences of use of such information. The information included is subject to
change without notice. This publication supersedes and replaces all information
supplied previously. No part of this manual can be reproduced or transmitted in
any form or by any means for any purpose without the permission of .ASUSTek
Computer Inc.
Trademarks
and ASUS logo are trademarks of ASUSTek Computer Inc. “Dolby” and “Dolby
Digital Live”, “Dolby Pro Logic IIx”, “Dolby Virtual Speaker”, “Dolby Headphone” are
trademarks of Dolby Laboratories. “DTS” and “DTS CONNECT”, “DTS Interactive”,
“DTS Neo: PC” are trademarks of Digital Theater Systems, Inc. EAX and A3D are
trademarks of Creative Technology Ltd. Microsoft, DirectSound3D, Windows are
trademarks of Microsoft Corporation. Other company and product names may be
trademarks of the respective companies with which they are associated. ASIO is a
trademark and software of Steinberg Media Technologies GmbH
License
Dolby Master Studio driver is manufactured under license from Dolby Laboratories;
DTS Connect driver is manufactured under license from Digital Theater Systems,
Inc.
English
Copyright
Copyright © ASUSTek Computer Inc.
D33005
CAN ICE-3 (B)/NMB-3 (B)
ASUS STRIX Sound Card Series User Manual
AEEE Yönetmeliğine Uygundur
27
 Loading...