

Page 1
®
PXI-G45
Gigabit Ethernet Card
User Guide
ASUS PXI-G45 User Guide
i
Page 2

Disclaimer/Copyrights
No part of this manual, including the products and software described in it, may be reproduced,
transmitted, transcribed, stored in a retrieval system, or translated into any language in any
form or by any means, except documentation kept by the purchaser for backup purposes, without
the express written permission of ASUSTeK COMPUTER INC. (“ASUS”).
ASUS PROVIDES THIS MANUAL “AS IS” WITHOUT WARRANTY OF ANY KIND, EITHER
EXPRESS OR IMPLIED, INCLUDING BUT NOT LIMITED TO THE IMPLIED WARRANTIES
OR CONDITIONS OF MERCHANTABILITY OR FITNESS FOR A PARTICULAR PURPOSE.
IN NO EVENT SHALL ASUS, ITS DIRECTORS, OFFICERS, EMPLOYEES OR AGENTS BE
LIABLE FOR ANY INDIRECT, SPECIAL, INCIDENTAL, OR CONSEQUENTIAL DAMAGES
(INCLUDING DAMAGES FOR LOSS OF PROFITS, LOSS OF BUSINESS, LOSS OF USE OR
DA T A, INTERRUPTION OF BUSINESS AND THE LIKE), EVEN IF ASUS HAS BEEN ADVISED
OF THE POSSIBILITY OF SUCH DAMAGES ARISING FROM ANY DEFECT OR ERROR IN
THIS MANUAL OR PRODUCT.
Product warranty or service will not be extended if: (1) the product is repaired, modified or
altered, unless such repair, modification of alteration is authorized in writing by ASUS; or (2) the
serial number of the product is defaced or missing.
Products and corporate names appearing in this manual may or may not be registered trademarks
or copyrights of their respective companies, and are used only for identification or explanation
and to the owners’ benefit, without intent to infringe.
The product name and revision number are both printed on the product itself. Manual revisions
are released for each product design represented by the digit before and after the period of the
manual revision number. Manual updates are represented by the third digit in the manual revision
number.
For previous or updated manuals, BIOS, drivers, or product release information, contact ASUS
at http://www.asus.com.tw or through any of the means indicated on the following page.
SPECIFICATIONS AND INFORMATION CONTAINED IN THIS MANUAL ARE FURNISHED
FOR INFORMA TIONAL USE ONL Y, AND ARE SUBJECT TO CHANGE A T ANY TIME WITHOUT
NOTICE, AND SHOULD NOT BE CONSTRUED AS A COMMITMENT BY ASUS. ASUS
ASSUMES NO RESPONSIBILITY OR LIABILITY FOR ANY ERRORS OR INACCURACIES
THAT MAY APPEAR IN THIS MANUAL, INCLUDING THE PRODUCTS AND SOFTWARE
DESCRIBED IN IT.
Copyright © 2003 ASUSTeK COMPUTER INC. All Rights Reserved.
Product Name: ASUS PXI-G45 E1176
Manual Revision: First Edition
Release Date: May 2003
ii
ASUS PXI-G45 User Guide
Page 3

Contents
About this guide...............................................................................v
Conventions used in this guide ..............................................v
Where to find more information ..............................................v
ASUS contact information ..............................................................vi
Chapter 1: Product introduction
1.1 Introduction......................................................................... 1-2
1.2 Package contents............................................................... 1-2
1.3 Models................................................................................ 1-3
1.4 Layout................................................................................. 1-3
1.5 Feature ............................................................................... 1-4
1.6 LED Descriptions................................................................ 1-4
1.7 System Requirements ........................................................ 1-5
1.8 Installing the Network Card ................................................ 1-5
1.9 Connecting to the Network ................................................. 1-6
1.10 Installing the Network Driver .............................................. 1-6
Chapter 2: Driver Installation
2.1 Microsoft® Windows® NT Server 4.0.................................. 2-2
2.2.1 Intel® LAN Driver Installation.................................. 2-2
2.2 Microsoft
2.2.1 Intel® LAN Driver Installation.................................. 2-7
2.3 Microsoft
2.3.1 Intel® LAN Driver Installation................................ 2-12
2.4 Novell
2.4.1 Intel® LAN Driver Installation................................ 2-14
2.5 UnixWare* 7 and Open UNIX* 8 ...................................... 2-17
2.5.1 Installation and configuration ............................... 2-17
®
Windows® 2000 Server ..................................... 2-7
®
Windows® XP Professional.............................. 2-12
®
NetWare® Server.................................................. 2-14
2.6 Linux RedHat 7.3/8.0........................................................ 2-20
®
2.7.1 Intel
LAN Driver Installation................................ 2-20
ASUS PXI-G45 User Guide
iii
Page 4

About this guide
Conventions used in this guide
To make sure that you perform certain tasks properly, take note of the
following symbols used throughout this manual.
WARNING: Information to prevent injury to yourself when trying
to complete a task.
CAUTION: Information to prevent damage to the components
when trying to complete a task.
IMPORTANT: Information that you MUST follow to complete a
task.
NOTE: Tips and additional information to aid in completing a
task.
Where to find more information
Refer to the following sources for additional information and for product
and software updates.
1. ASUS Websites
The ASUS websites worldwide provide updated information on ASUS
hardware and software products. The ASUS websites are listed in the
ASUS Contact Information on page vi.
2. Optional Documentation
Your product package may include optional documentation, such as
warranty flyers, that may have been added by your dealer. These
documents are not part of the standard package.
iv
ASUS PXI-G45 User Guide
Page 5

ASUS contact information
ASUSTeK COMPUTER INC. (Asia-Pacific)
Address: 150 Li-Te Road, Peitou, Taipei, Taiwan 112
General Tel: +886-2-2894-3447
General Fax: +886-2-2894-3449
General Email: info@asus.com.tw
Technical Support
MB/Others (Tel): +886-2-2890-7121 (English)
Notebook (Tel): +886-2-2890-7122 (English)
Desktop/Server (Tel): +886-2-2890-7123 (English)
Support Fax: +886-2-2890-7698
Web Site: www.asus.com.tw
ASUS COMPUTER INTERNATIONAL (America)
Address: 44370 Nobel Drive, Fremont, CA 94538, USA
General Fax: +1-510-608-4555
General Email: tmd1@asus.com
Technical Support
Support Fax: +1-502-933-8713
General Support: +1-502-995-0883
Web Site: www.asus.com
Support Email: tsd@asus.com
ASUS COMPUTER GmbH (Germany and Austria)
Address: Harkortstr. 25, 40880 Ratingen, BRD, Germany
General Fax: +49-2102-9599-31
General Email: sales@asuscom.de (for marketing requests only)
Technical Support
Support Hotline: Components: +49-2102-9599-0
Support (Email): www.asuscom.de/kontakt (for online support)
Web Site: www.asuscom.de
Support Fax: +49-2102-9599-11
ASUS PXI-G45 User Guide
v
Page 6

vi
ASUS PXI-G45 User Guide
Page 7

Chapter 1
All about the ASUS PXI-G45 Network Interface
Card: the model features, card layout, system
requirements and introduction to network card and
driver installation procedures.
ASUS PXI-G45 User Guide
Introduction
1-1
Page 8

1.1 Introduction
Thank you for buying the ASUS PXI-G45 Gigabit Ethernet card!
This user’s guide tells you how to install and configure the card. It is assumed
that you have adequate knowledge on PCs and some familiarity with Ethernet
networks.
1.2 Package Contents
Check the following items if present in your package. If you discover damaged
or missing items, contact your retailer.
(1) ASUS PXI-G45 Gigabit Ethernet card
(1) Support CD
(1) User Guide
1-2
ASUS PXI-G45 User Guide
Page 9
1.3 Models
The ASUS PXI-G45 Gigabit Ethernet card comes in a standard bracket for
regular PCs.
Standard Model
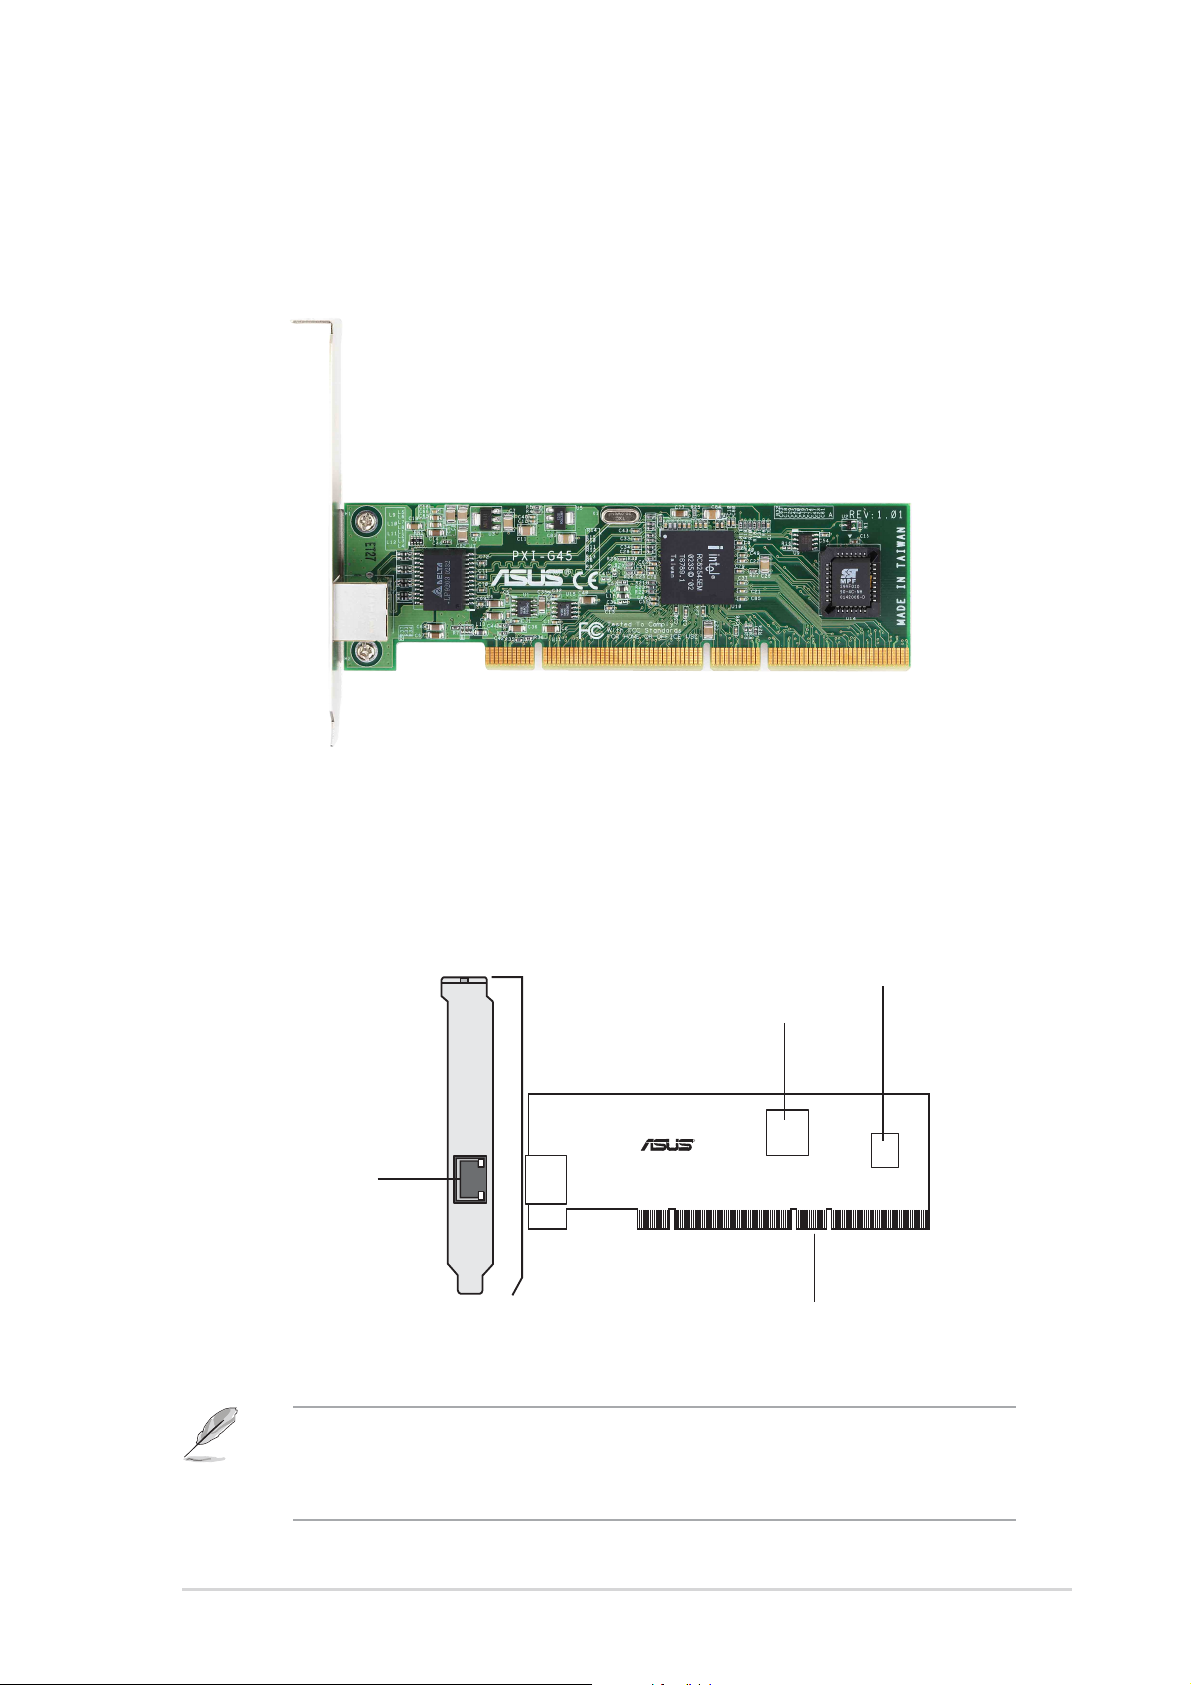
1.4 Layout
RJ-45 LAN Port
The Boot ROM chip is an optional item. If your card did not come
with this chip, an empty socket is provided in case you wish to
install a Boot ROM at a later time.
ACT/LNK
10=OFF
100=ORG
1000=GRN
LAN Controller
PXI-G45
R
Boot ROM
(optional)
intel
RC82545EM
PCI Interface
ASUS PXI-G45 User Guide
1-3
Page 10

1.5 Features
RJ45
PCI-X Interface
• Full 64-bit (133 MHz) PCI-X bus interface
• Zero wait-state bus master data bursts
• PCI-X slot support
Network Interface
• Intel 10/100/1000 BASE-T speed
• RJ-45 LAN port
Boot ROM Interface (optional)
• Supports 64KB/128KB, byte-wide Flash ROM devices
1.6 LED Descriptions
The following describes the activity and speed LED located on the RJ-45 port.
SPEEDACT/LNK
Table 1.6 LED Table
ACT/LINK LED
Status Description
OFF No link
GREEN Linked
Status Description
OFF 10Mbps connection
ORANGE 100Mbps connection
SPEED LED
1-4
FLASHING Acting
ASUS PXI-G45 User Guide
GREEN 1Gbps connection
Page 11

1.7 System Requirements
Your PC or server should meet the following system requirements before
installing the ASUS PXI-G45 Gigabit Ethernet card:
• Pentium processor
• Minimum 64MB memory
• Available bus-mastering PCI or PCI-X slot
1.8 Installing the Network Card
Follow these steps to install the card into your PC.
Before handling the network card, touch a bare metal portion of
your PC to discharge static electricity from your body. Wear a
wrist strap grounded to the PC chassis when handling the card.
1. Make sure that the PC is turned off. Unplug the power cord from the
electrical socket.
2. Remove the PC cover.
3. Locate an empty, non-shared bus-mastering PCI-X slot and remove its
slot cover. Save the screw for later use.
Do not install the network card in a shared PCI-X slot. Otherwise,
the card’s performance will drop depending on the number of
shared cards installed on the same PCI-X segment. Check your
PC documentation to ensure that you install the card into the
correct slot.
4. Carefully insert the card into the PCI-X slot.
5. Secure the card with the screw that you removed earlier.
6. Replace the PC cover and plug in the power cord.
ASUS PXI-G45 User Guide
1-5
Page 12

1.9 Connecting to the Network
Follow these steps to connect the card to the network.
The RJ-45 port on the network card provides a 10 Mbps, 100
Mbps or 1000 Mbps connection, depending on the speed of the
connected hub or switch.
1. Plug the RJ-45 connector of the twisted-pair network cable into the RJ45 port on the card backplate.
2. Connect the other end of the network cable to an active network port.
3. Turn on the PC.
4. Proceed to the next section “Installing the Network Driver.”
1.10 Installing the Network Driver
Before installing the network driver , make sure that:
• You have installed the card in the PC and connected to the
network
• You have the Windows installation files. (These files may
have been already copied to your hard drive when you
installed Windows).
The network driver installation procedures vary depending on your operating
system.
Refer to the online User Guide found in /PRO1000/DOCS of the support CD
for detailed installation procedure of each operating system.
1-6
ASUS PXI-G45 User Guide
Page 13

Chapter 2
This chaper discusses the NIC driver installation
using various operating systems (OS).
ASUS PXI-G45 User Guide
Driver Installation
2-1
Page 14

2.1 Microsoft® Windows® NT Server 4.0
2.1.1 Intel® LAN Driver Installation
A. Preparing the Intel LAN Driver Disk
Windows NT 4.0 does not have the drivers for the Intel 82545EM LAN
controllers. Before installing Windows NT 4.0, copy the LAN drivers from
the support CD into a floppy disk.
• Before installing drivers, install Service Pack 5 or later. Advanced
features for Intel adapters require Service Pack 6a or later.
• Prepare one blank formatted high density floppy disk before
proceeding.
1. Insert the support CD into the CD-ROM drive.
2. Run the utility from the following path:
\Drivers\LAN\MAKEDISK\dcreate.exe
3. In the following screen, click on Make Driver Disk.
4. The next screen allows you to select an operating system to install the
driver. Select Windows NT 4.0. Refer to the next page.
2-2
ASUS PXI-G45 User Guide
Page 15

5. Insert the floppy disk into the floppy disk drive when prompted.
6. Follow the screen instructions to complete the process.
B. New System Installation
1. Double-click the Network icon in the Control Panel to display the
Network Setup Wizard.
2. When the
Next to display the following screen.
Installing Windows NT Networking screen appears, press
ASUS PXI-G45 User Guide
2-3
Page 16

3. Check the Wired to the Network box, then click Next.
4. On the screen that appears, click the button
Select from list... to
display the Select Network Adapter window.
5. Insert the LAN driver disk that you created, then click Have Disk...
6. Type A:\ in the dialog box that appears, then click OK. The following
screen lists the Intel LAN adapters that you can install.
7. Select Intel(R) PRO/1000MT Server Adapter, then click OK. Follow the
succeeding screen instructions.
2-4
ASUS PXI-G45 User Guide
Page 17

8. When done, the following screen appears showing the Intel(R)
PRO/1000MT Server Adapter
in the list.
9. Click Next and follow any other screen instructions to complete the
installation.
ASUS PXI-G45 User Guide
2-5
Page 18

C. Existing System Installation
1. Double-click the Network icon in the Control Panel.
2. Select the
4. Do not select an adapter from the list. Instead, insert the LAN driver
disk that you created from the support CD.
Refer to the section “A. Preparing the Intel LAN Driver Disk” if you
have not yet created the LAN driver disk.
5. Follow steps 5 to 13 in the section “B. New System Installation” to
install the required LAN drivers.
Adapter tab, then click Add. A list of adapters appears.
2-6
ASUS PXI-G45 User Guide
Page 19

2.2 Microsoft® Windows® 2000 Server
2.2.1 Intel® LAN Driver Installation
You may install the Intel 82545EM LAN drivers directly from the support
CD. Proceed to the section “B. Update LAN Driver on an Existing System
Installation.”
If you wish to create a LAN driver disk, proceed to the section
“A.Preparing the Intel LAN Driver Disk.”
A. Preparing the Intel LAN Driver Disk
Prepare one blank formatted high density floppy disk before
proceeding.
1. Insert the support CD into the CD-ROM drive.
2. Run the utility from the following path:
\Drivers\LAN\MAKEDISK\dcreate.exe
3. In the following screen, click on Make Driver Disk.
4. The next screen allows you to select an operating system to install the
driver. Select Windows 2000 (Gigabit). Refer to the next page.
ASUS PXI-G45 User Guide
2-7
Page 20

5. Insert the floppy disk into the floppy disk drive when prompted.
6. Follow the screen instructions to complete the process.
B. Update Driver on an Existing System Installation
You may update the LAN driver directly from the support CD.
1. Insert the support CD into the CD-ROM drive. On the screen that
appears, click on Intel PRO/1000MT Server Adapter, then on the
item Install Base Driver.
2. Follow the screen instructions to complete the driver update.
2-8
ASUS PXI-G45 User Guide
Page 21

When done, your Computer Management window shows the installed
LAN adapters.
3. Highlight the Intel(R) PRO/1000MT Server Adapter, click the right
mouse button, and select Properties to display the following.
4. Click Driver Details to display a list of the files related to the Intel
PRO/1000 MT Server Adapter.
ASUS PXI-G45 User Guide
2-9
Page 22

5. Highlight the Intel(R) PRO/1000 MT Server Adapter Connection, click
the right mouse button, and select Properties to display the following.
2-10
ASUS PXI-G45 User Guide
Page 23

6. Click
Driver Details to display a list of the files related to the Intel
82545EM LAN driver.
You may also update the LAN drivers from the LAN Driver Disk if you
created one.
Follow these steps to update from the LAN driver disk.
1. Boot Windows 2000 system and log on as Administrator.
2. Click on the Start button. Select Settings, then Control Panel.
3. Double-click the
Hardware tab to display the following screen.
4. Click on
5. Highlight
Device Manager, then on Other Devices.
Ethernet Controller, then click the right mouse button and
System icon in the Control Panel. Select the
select Properties.
6. Select the
7. Click
Driver tab and click on Update Drivers.
Next. Select Display a list of the known drivers for this device ...
8. Select Network adapters under Hardware Type, and click Next.
9. Click
Have Disk…, then insert the LAN driver disk.
10. Follow the succeeding instructions to complete the installation.
ASUS PXI-G45 User Guide
2-11
Page 24

2.3 Microsoft® Windows® XP Professional
2.3.1 Intel® LAN Driver Installation
For Windows XP Professional users, we recommended that you use
the Intel 82545EM driver from the support CD.
A. Preparing the Intel LAN Driver Disk
1. Insert the support CD into the CD-ROM drive.
2. Run the utility from the following path:
\Drivers\LAN\MAKEDISK\dcreate.exe
3. In the following screen, click on Make Driver Disk.
4. The next screen allows you to select an operating system to install the
driver. Select Windows XP (32 bit, Gigabit). Refer to the next page.
2-12
ASUS PXI-G45 User Guide
Page 25

5. Follow the succeeding installation instructions.
6. When done, the following screen appears. Click
Finish to complete
the installation.
ASUS PXI-G45 User Guide
2-13
Page 26

2.4 Novell® NetWare® Server
2.4.1 Intel® LAN Driver Installation
You may install the Intel 82545EM LAN drivers directly from the support
CD. Proceed to the section “B. Update LAN Driver on an Existing System
Installation.”
If you wish to create a LAN driver disk, proceed to the section
“A.Preparing the Intel LAN Driver Disk.”
A. Preparing the Intel LAN Driver Disk
Prepare one blank formatted high density floppy disk before
proceeding.
1. Insert the support CD into the CD-ROM drive.
2. Run the utility from the following path:
\Drivers\LAN\MAKEDISK\dcreate.exe
3. In the following screen, click on Make Driver Disk.
4. The next screen allows you to select an operating system to install the
driver. Select Novell Netware. Refer to the next page.
2-14
ASUS PXI-G45 User Guide
Page 27

5. Insert the floppy disk into the floppy disk drive when prompted.
6. Follow the screen instructions to complete the process.
B. NetWare 5.1/6.0 Installations
1. From the NetWare console, type NWCONFIG or Load Install and
press <Enter>.
2. From the Configuration Options screen, choose Driver options and
press <Enter>.
3. Choose Configure network drivers and press <Enter>. If any
drivers are already loaded, a list of them appears.
4. Choose Load an additional driver and press <Enter>. A list of
drivers appears.
5. Insert the Intel CD or floppy disk you've created and choose Install
an unlisted driver by pressing <Insert>.
6. If you're using a floppy disk, insert the disk in drive A and
press<Enter>. If you've mounted the CD as a NetW are volume,
press <F3> andenter the source path (CD volume).
7. The driver name is displayed: Intel(R) PRO PCI adapter. Press
<Enter> to select it.
ASUS PXI-G45 User Guide
2-15
Page 28

8. A prompt appears asking if you want to copy the driver.Select Yes
and press <Enter>.
9. The next screen asks for parameters for loading the driver. Tomodify
any driver parameters or protocols, highlight Select/Modify driver
parameters and protocols and press <Enter>. If you have multiple
adapters,enter the slot number for the adapter you are currently
configuring.When finished configuring the driver , select Save
parameters and loaddriver to continue.
• If your system contains a single network adapter, you may enter
any number for the slot. The driver will automatically detect the
correct slot number and load successfully.
• If your system contains more than one network adapter, you can
find the valid slot numbers for your adapters by pressing <Alt><Esc> to switch to the console screen in NetWare. Type LOAD
<driver_name> (CE100B or CE1000) and press <Enter>. The
driver will attempt to load and prompt you with the available slot
numbers. Note the slot numbers, and press <Esc> to abort the
driver load. Use <Alt>-<Esc> to switch back to the Install screen
and enter the correct slot number.
10. To complete the driver installation process, go back to
theConfiguration Options screen by pressing <Esc> until you seethe
Configuration Options screen.
11. Choose Exit to return to the server console prompt.
2-16
ASUS PXI-G45 User Guide
Page 29

2.5 UnixWare* 7 and Open UNIX* 8
When installing and configuring network adapters, you may need to
refer to Caldera* (formerly SCO) UnixWare 7 or Open UNIX 8
documentation found in /PRO1000/DOCS of the support CD. Have this
documentation available during the installation process.
2.5.1 Installation and Configuration
To ensure predictable behavior when installing network adapters, remove
the configuration settings for all adapters and reboot the system prior to
configuring new adapters or reconfiguring installed adapters (see
instructions below). For maximum system stability, it is recommended that
all network adapters be configured with the same driver type.
Recommendations
• Do not select “Cancel” when in the process of adding an
adapter. To prevent the Network Configuration Manager from
hanging and to avoid rebooting, continue installing the adapter. After
it’s installed, manually remove it.
• If you are installing and configuring a PRO/100 driver, replace
the references to e1008g with eeE8 in the instructions below.
The examples given are for the PRO/1000 driver.
ASUS PXI-G45 User Guide
2-17
Page 30

A. Instructions
1. Start the Network Configuration Manager:
netcfg
2. Remove any adapters that are configured with the old drivers by
selecting the Hardware menu -> Remove Network Device.
Exit the Network Configuration Manager.
3. Verify that there is not an older version of the driver on the system
using ‘pkginfo -l <driver_name>’. For example, enter:
pkginfo -l e1008g
If there is, remove the driver using ‘pkgrm <driver_name>’. For
example:
pkgrm e1008g
Reboot the system:
init 6
4. If you are installing the new driver from the CD, follow these steps.
Otherwise, go to the next step.
Mount the CDROM on the system. For example:
mkdir /<cdrom_mount_location>
mount -F cdfs -r /dev/cdrom/cdrom1 /
<cdrom_mount_location>
You can install the driver directly from the CDROM or spool the
driver from the CDROM so the driver resides on the system.
Example of installing the driver directly from the CD:
pkgadd –d /<cdrom_mount_location>/UNIX/UW7DDI8/
e1008g.pkg
Example of spooling the driver from the CD to the system:
pkgadd -s spool –d /<cdrom_mount_location>/UNIX/
UW7DDI8/e1008g.pkg e1008g
2-18
pkgadd e1008g
ASUS PXI-G45 User Guide
Page 31

5. If you are downloading the latest driver from the Intel website, save
the package to a directory on your system; for example, the /tmp
directory.
You can install the driver from this directory or spool the driver from
the directory so the driver resides on the system. Example of
installing the driver from the directory:
pkgadd –d /<dir_location>/e1008g.pkg
Example of spooling the driver from the directory to the system:
pkgadd -s spool –d /<dir_location>/e1008g.pkg e1008g
pkgadd e1008g
If you will be creating teams and/or VLANs, continue on with the
instructions in Advanced Network Services below. Otherwise, use
the Network Configuration Manager to configure the adapters.
ASUS PXI-G45 User Guide
2-19
Page 32

2.6 Linux RedHat 8.0
2.6.1 Intel® LAN Driver Installation
Linux RedHat 8.0 system can automatically recognize Intel 82545EM
network controller during installation. You don’t need to load or modify the
network driver for the onboard LAN device.
2-20
ASUS PXI-G45 User Guide
 Loading...