

Page 1
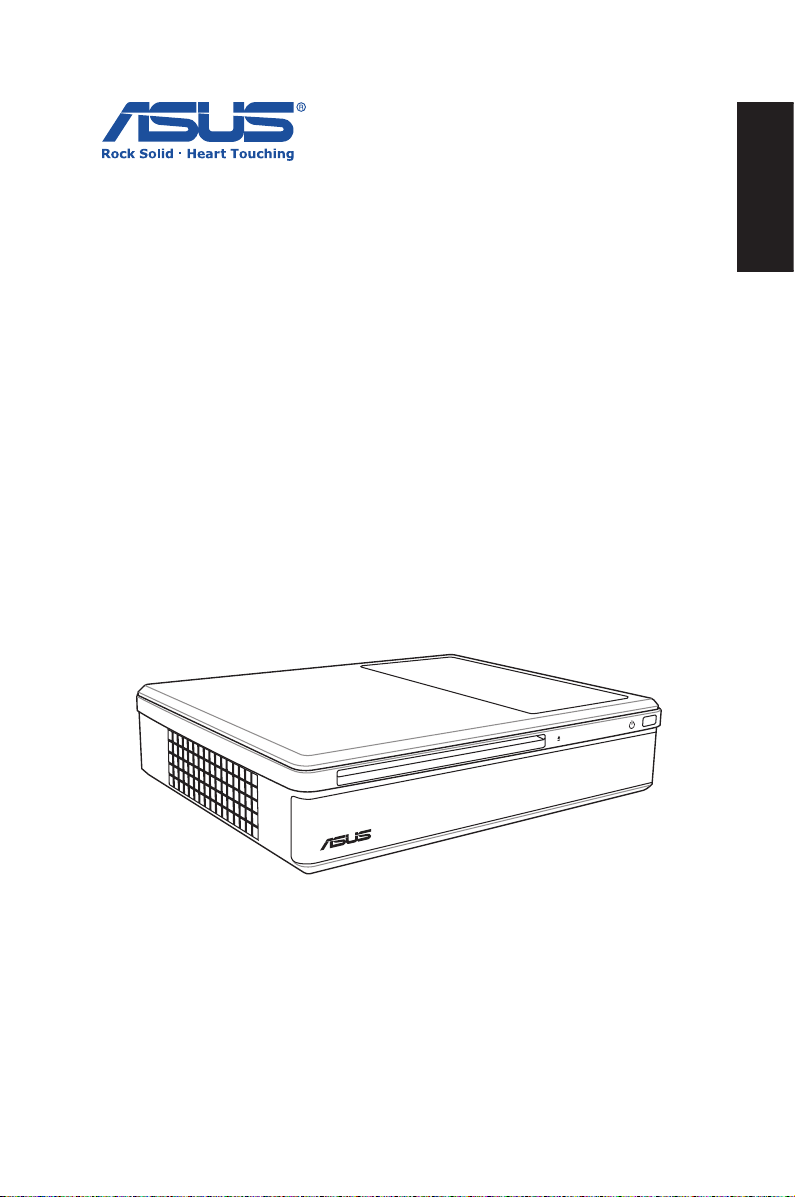
NOVA LITE PX24
User Manual
English
Page 2

English
E3767
Second Edition V2
June 2008
Copyright © 2008 ASUSTeK COMPUTER INC. All Rights Reserved.
No part of this manual, including the products and software described in it, may
be reproduced, transmitted, transcribed, stored in a retrieval system, or translated
into any language in any form or by any means, except documentation kept by the
purchaser for backup purposes, without the express written permission of ASUSTeK
COMPUTER, INC. (“ASUS”).
Products and corporate names mentioned in this manual may or may not be
registered trademarks or copyrights of their respective companies, and are used
for identification purposes only. All trademarks are the property of their respective
owners.
Every effort has been made to ensure that the contents of this manual are correct
and up to date. However, the manufacturer makes no guarantee regarding the
accuracy of its contents, and reserves the right to make changes without prior
notice.
Page 3

Contents
Contents .......................................................................................................3
Notices .......................................................................................................... 5
Safety information .................................................................................... 7
Notes for this manual .............................................................................. 9
Welcome
Package contents ....................................................................................10
Knowing your NOVA PX24
Front view ..................................................................................................11
Rear view ....................................................................................................12
Using the Media Center remote ........................................................14
Positioning your NOVA PX24 ..............................................................17
Using the optical drive ..........................................................................18
Inserting an optical disc .................................................................18
Ejecting an optical disc ..................................................................18
Setting up your NOVA PX24
Connecting to a display (HDMI) ........................................................19
Connecting to a display (DVI) .............................................................19
Connecting to USB devices .................................................................20
Connecting to a network device .......................................................20
Turning on the system ..........................................................................21
Configuring audio output ...................................................................22
Connecting to analog speakers ..................................................23
Connecting to digital speakers ...................................................24
English
Using your NOVA PX24
Configuring wireless connection ......................................................25
Configuring audio output settings ..................................................27
Analog output ...................................................................................27
Digital output ....................................................................................28
Using ASUS Easy Update ......................................................................31
ASUS NOVA LITE PX24 3
Page 4

English
Contents
Using Windows Media Center ............................................................32
Starting Windows Media Center .................................................32
TV + Movies ........................................................................................32
Music .....................................................................................................33
Pictures + Videos ..............................................................................34
Using CyberLink PowerDVD ................................................................35
Recovering your system
Using the recovery DVD .......................................................................36
Crashfree BIOS ...................................................................................37
Using the hidden partition ..................................................................38
4 ASUS NOVA LITE PX24
Page 5

Notices
Federal Communications Commission Statement
This device complies with Part 15 of the FCC Rules. Operation is
subject to the following two conditions:
• This device may not cause harmful interference, and
• This device must accept any interference received including
interference that may cause undesired operation.
This equipment has been tested and found to comply with the limits
for a Class B digital device, pursuant to Part 15 of the FCC Rules.
These limits are designed to provide reasonable protection against
harmful interference in a residential installation. This equipment
generates, uses and can radiate radio frequency energy and, if not
installed and used in accordance with manufacturer’s instructions,
may cause harmful interference to radio communications. However,
there is no guarantee that interference will not occur in a particular
installation. If this equipment does cause harmful interference to
radio or television reception, which can be determined by turning
the equipment off and on, the user is encouraged to try to correct
the interference by one or more of the following measures:
• Reorient or relocate the receiving antenna.
• Increase the separation between the equipment and receiver.
• Connect the equipment to an outlet on a circuit different from
that to which the receiver is connected.
• Consult the dealer or an experienced radio/TV technician for
help.
English
The use of shielded cables for connection of the monitor to
the graphics card is required to assure compliance with FCC
regulations. Changes or modifications to this unit not expressly
approved by the party responsible for compliance could void the
user’s authority to operate this equipment.
ASUS NOVA LITE PX24 5
Page 6

English
Canadian Department of Communications Statement
This digital apparatus does not exceed the Class B limits for radio
noise emissions from digital apparatus set out in the Radio
Interference Regulations of the Canadian Department of
Communications.
This class B digital apparatus complies with Canadian ICES-003.
Macrovision Corporation Product Notice
This product incorporates copyright protection technology that is
protected by method claims of certain U.S. patents and other
intellectual property rights owned by Macrovision Corporation and
other rights owners. Use of this copyright protection technology
must be authorized by Macrovision Corporation, and is intended
for home and other limited viewing uses only unless otherwise
authorized by Macrovision Corporation. Reverse engineering or
disassembly is prohibited.
6 ASUS NOVA LITE PX24
Page 7

Safety information
Your ASUS NOVA PX24 is designed and tested to meet the latest
standards of safety for information technology equipment. However,
to ensure your safety, it is important that you read the following
safety instructions.
Setting up your system
• Read and follow all instructions in the documentation before you
operate your system.
• Do not use this product near water or a heated source such as a
radiator.
• Set up the system on a stable surface.
• Openings on the chassis are for ventilation. Do not block or cover
these openings. Make sure you leave plenty of space around the
system for ventilation. Never insert objects of any kind into the
ventilation openings.
• Use this product in environments with ambient temperatures
between 0˚C and 40˚C.
• If you use an extension cord, make sure that the total ampere
rating of the devices plugged into the extension cord does not
exceed its ampere rating.
English
Care during use
• Do not walk on the power cord or allow anything to rest on it.
• Do not spill water or any other liquids on your system.
• When the system is turned off, a small amount of electrical
current still flows. Always unplug all power, modem, and network
cables from the power outlets before cleaning the system.
• If you encounter the following technical problems with the
product, unplug the power cord and contact a qualified service
technician or your retailer.
• The power cord or plug is damaged.
• Liquid has been spilled into the system.
ASUS NOVA LITE PX24 7
Page 8

English
• The system does not function properly even if you follow
the operating instructions.
• The system was dropped or the cabinet is damaged.
• The system performance changes.
Lithium-Ion Battery Warning
CAUTION: Danger of explosion if battery is incorrectly
replaced. Replace only with the same or equivalent type
recommended by the manufacturer. Dispose of used batteries
according to the manufacturer’s instructions.
LASER PRODUCT WARNING
CLASS 1 LASER PRODUCT
NO DISASSEMBLY
The warranty does not apply to the products that
have been disassembled by users
This symbol of the crossed out wheeled bin indicates that the
product (electrical, electronic equipment, and mercury-containing
button cell battery) should not be placed in municipal waste.
Check local regulations for disposal of electronic products.
8 ASUS NOVA LITE PX24
Page 9
Notes for this manual
To make sure that you perform certain tasks properly, take note of
the following symbols used throughout this manual.
WARNING: Vital information that you MUST follow to prevent
injury to yourself.
IMPORTANT: Instructions that you MUST follow to complete a
task.
TIP: Tips and useful information that help you complete a task.
NOTE: Additional information for special situations.
English
ASUS NOVA LITE PX24 9
Page 10
Welcome
Quick Guid
e
English
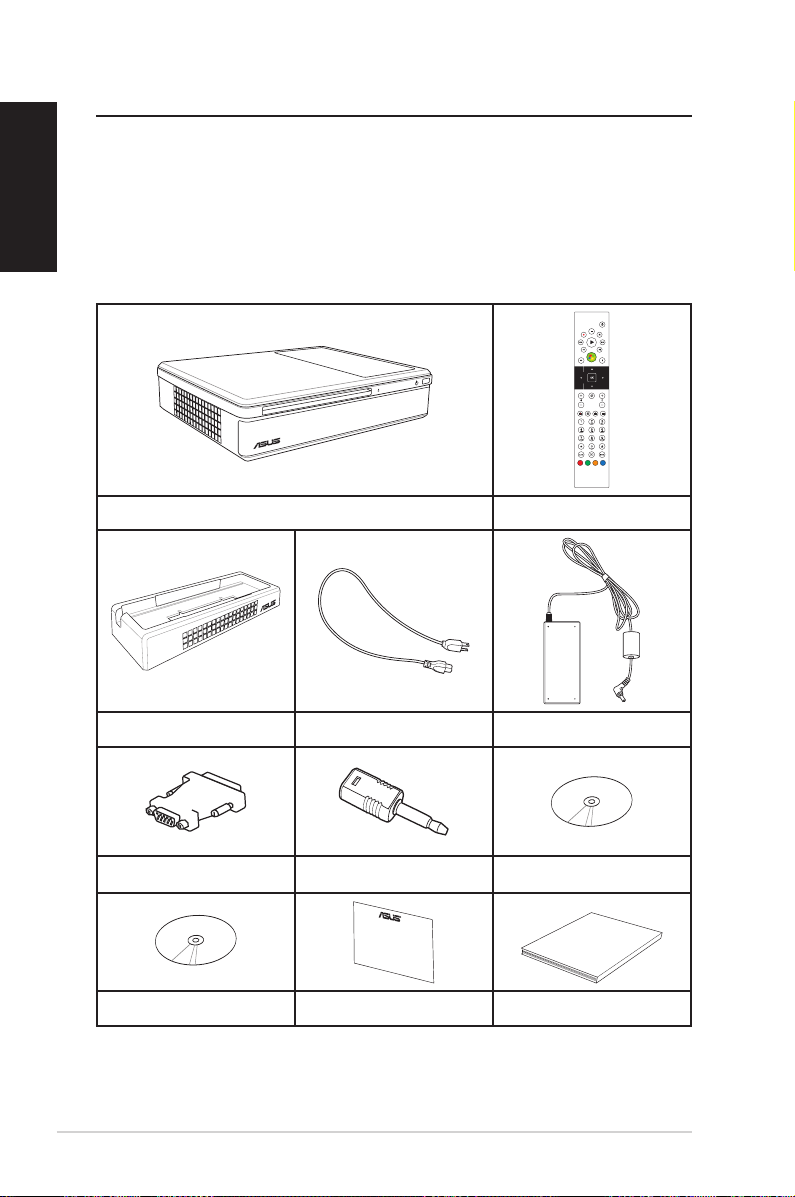
Congratulations on your purchase of the ASUS NOVA LITE PX24. The
following illustration displays the package contents of your new
PX24. If any of the below items is damaged or missing, contact your
retailer.
Package contents
NOVA LITE PX24 Remote control
Stand Power cord AC adapter
DVI to D-Sub adapter Mini jack to S/PDIF adapter Support DVD
Recovery DVD Warranty card Quick guide
10 ASUS NOVA LITE PX24
Page 11
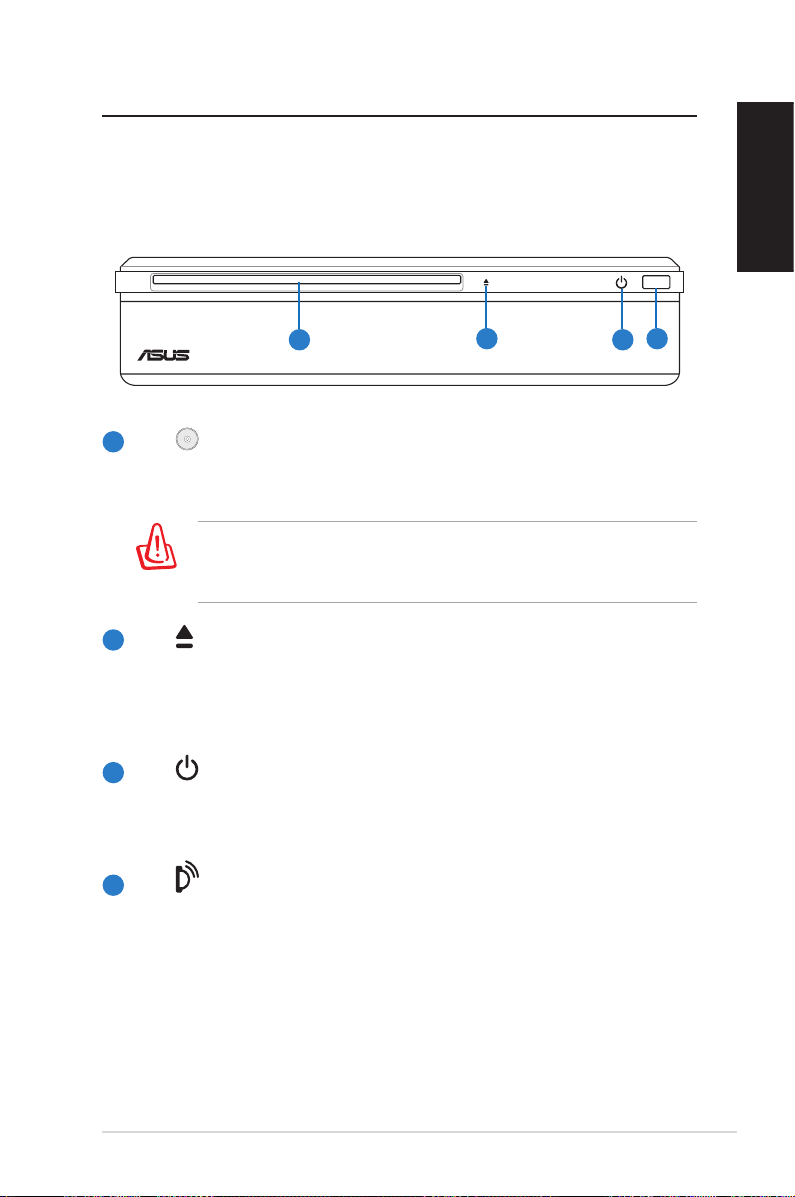
Knowing your NOVA PX24
Front view
Refer to the diagram below to identify the components on this side
of the system.
1
1
Slot-in optical drive
2
4
3
The system comes with a slot-in optical disc drive that
allows you to load or eject optical discs easily.
The slot-in optical drive can only hold the standard optical
discs (12cm). Inserting smaller-sized or larger-sized disc would
damage the optical drive.
2
Optical drive electronic eject (touch-sensitive)
The optical drive eject has an electronic eject button
for unloading the disc. You can also eject the optical
disc through any software player.
3
Power switch (touch-sensitive)
The power switch allows powering ON and OFF the
system.
English
4
Infrared port
The infrared (IrDA) communication port allows
convenient wireless data communication with infrared equipped devices or computer. This allows easy
wireless synchronization with PDAs or mobile phones
and even wireless printing to printers.
ASUS NOVA LITE PX24 11
Page 12
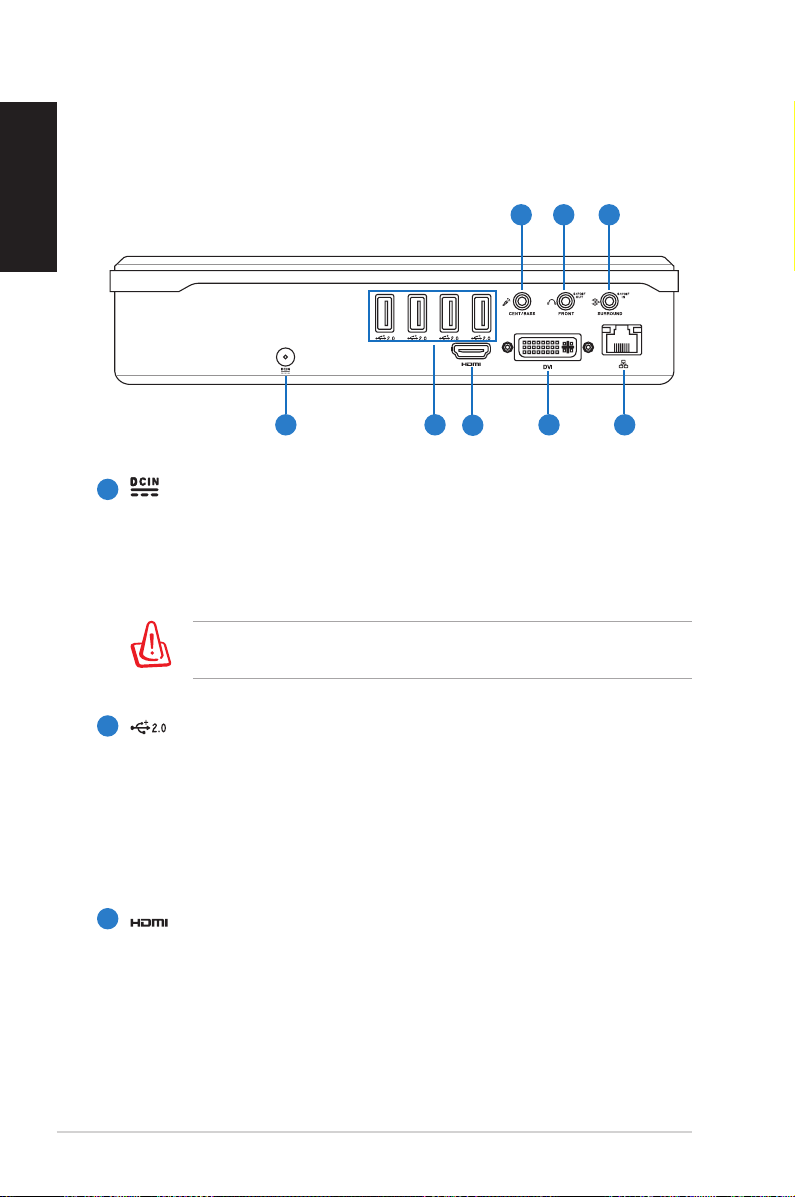
English
Rear view
Refer to the diagram below to identify the components on this side
of the system.
101112
5
Power input (DC 19V)
5 6 8 9
7
The supplied power adapter converts AC power to DC
power for use with this jack. Power supplied through this
jack supplies power to the PC. To prevent damage to the PC,
always use the supplied power adapter.
The power adapter may become warm to hot when in use. Do
not cover the adapter and keep it away from your body.
6
USB port
The USB (Universal Serial Bus) port is compatible with USB
devices such as keyboards, mouse devices, cameras, and
hard disk drives. USB allows many devices to run
simultaneously on a single computer, with some peripherals
acting as additional plug-in sites or hubs.
7
HDMI port
The HDMI (High Definition Multimedia Interface) port
supports a Full-HD device such as an LCD TV or monitor to
allow viewing on a larger external display.
12 ASUS NOVA LITE PX24
Page 13

8
DVI port
The Digital Visual Interface (DVI) port supports a high
quality VGA-compatible device such as a monitor or
projector to allow viewing on a larger external display. For
D-sub connector-equipped display, use the DVI to D-Sub
adapter in the package when connecting the display.
LAN port
9
The eight-pin RJ-45 LAN port supports a standard Ethernet
cable for connection to a local network.
10
Audio In (S/PDIF IN) jack
Plug a 3.5mm mini-jack audio cable into this jack for analog
or digital audio transfer.
Headphone/Audio Out (S/PDIF OUT) jack
11
The stereo headphone jack (3.5mm) is used to connect the
system’s audio out signal to amplified speakers or
headphones. Using this jack automatically disables the
built-in speakers.
Microphone jack
12
The microphone jack is designed to connect the
microphone used for video conferencing, voice narrations,
or simple audio recordings.
English
ASUS NOVA LITE PX24 13
Page 14

English
Using the Media Center remote
Use the remote to launch the Media Center program to watch TV,
record TV programs, play video recordings or other media files such
as music and movies.
Refer to the next page to familiarize yourself with the functions of
the remote control buttons.
1
2
26
25
24
23
22
21
3
4
5
6
7
8
9
20
19
18
17
16
15
14 ASUS NOVA LITE PX24
10
11
12
13
14
Page 15

1
Power: Press to turn off the power of the screen and the
speakers.
2
Pause: Press to pause a playback.
3
Stop: Press to stop playing a media file.
4
Play: Press to play a media file.
5
Fast-foward: Press to fast-forward a media file.
6
Next track: Press to go to the next track.
7
Windows® Media Center: Press to launch the Media Center
program or go back to the main menu.
Information: Press to display program information under Media
8
Center or other menu options.
9
OK: Press to confirm an action.
Channel up/down: Press to change TV channels.*
10
11
Live TV button: Press to watch live TV programs.*
12
DVD button: Press to switch to DVD source.
13
Enter: Press to confirm a selection.
14
Teletext buttons: Available on European models only.
English
Shift: Toggles between numerical and alphabetical input.
15
16
Clear: Press to clear input information.
17
Numeric buttons: Press to enter a channel number.
18
Recorded TV: Press to display a list of your recorded TV
programs.*
19
EPG (Electronic Program Guide): Press to display the
electronic program guide screen.*
20
Volume up/down: Press to increase/decrease the volume.
ASUS NOVA LITE PX24 15
Page 16

English
21
Mute: Press to disable audio output.
22
Four-way navigation buttons: Press to scroll through
on-screen display menus.
23
Return: Press to return to the previous page.
24
Previous track: Press to go back to the previous track.
25
Rewind: Press to rewind a media file.
26
Record: Press to start recording TV.*
*The system does not come with a built-in TV tuner card. To use
the TV function, purchase an external TV box.
16 ASUS NOVA LITE PX24
Page 17

Positioning your NOVA PX24
English
CORRECT
*Note the correct
orientation.
CORRECT
INCORRECT
Use the support stand if you want to stack up your PX24. Stacking
up the system without the support stand will hamper the
ventilation and damage the system.
Insulating paint is applied to the top cover of the system to
prevent electrostatic discharge.
ASUS NOVA LITE PX24 17
Page 18

English
Using the optical drive
Inserting an optical disc
1. Place the disc to the slot-in optical drive with the label side
facing up.
2. Slide the disc into the drive.
Ejecting an optical disc
1. While the system power is on, press the eject button.
2. Remove the disc from the opening.
18 ASUS NOVA LITE PX24
Page 19

Setting up your NOVA PX24
You need to connect peripherals before using your NOVA PX24.
Connecting to a display (HDMI)
Connect one end of an HDMI cable to the display (1) and the other
end to the HDMI port on the system rear panel (2).
2
The package
contents does not
include an HDMI
cable. Use the cable
that comes with
your display.
1
Connecting to a display (DVI)
Connect one end of a DVI cable to the display (1) and the other end
to the DVI port on the system rear panel (2).
English
If your display comes
with a D-Sub port,
use the DVI to D-Sub
adapter in the package
when connecting the
display.
2
1
ASUS NOVA LITE PX24 19
Page 20

English
Connecting to USB devices
Connect USB devices like keyboards, mouse devices, and printers to
the USB ports on the system rear panel.
The package contents does not include USB keyboard and mouse.
Purchase USB peripherals based on your needs.
Connecting to a network device
Connect one end of a network cable to the LAN port on the system
rear panel and the other end to a hub or switch.
Network hub or switch
Network cable with RJ-45 connectors
20 ASUS NOVA LITE PX24
Page 21

Turning on the system
Connect the supplied AC adapter to the DC IN jack on the system
rear panel, and then touch the power switch on the front panel to
turn on the system.
English
2
1
3
4
ASUS NOVA LITE PX24 21
Page 22

English
Conguring audio output
NOVA PX24 supports different types of audio configurations. You
may set up the system using stereo speakers or a multi-channel
audio speaker system.
Speaker configurations
You may set up the system with the following speaker
configurations:
Name Speaker system
2-channel (stereo) Left speaker and right speaker.
5.1-channel
Two front speakers, two rear (surround)
speakers, a center speaker, and a subwoofer.
Audio jack
Headphones
2-channel
5.1-channel S/PDIF
Light Blue Audio In SURROUND S/PDIF IN
Lime Audio Out FRONT S/PDIF OUT
Pink Mic In CENTER/BASS Mic
A stereo speaker set is a left-right, two channel speaker system. A
multi-channel audio speaker has a left-right front and left-right
rear (surround) channel, and it may include a subwoofer and a
center speaker. A subwoofer provides enhanced bass sounds.
“.1” indicates a subwoofer. For instance, 5.1-channel refers to a
six-speaker mode and uses two front speakers (left-right), two rear
(surround) speakers (left-right), a center speaker, and a subwoofer.
22 ASUS NOVA LITE PX24
Page 23

Connecting to analog speakers
FRONT
S/PDIF
OUT
SURROUND
S/PDIF
IN
CENTER/BASS
FRONT
S/PDIF
OUT
NOVA PX24 is equipped with an Audio Out jack (lime) that allows
you to connect to stereo speakers or headphones.
There are three audio jacks enabling you to configure an up to 5.1
channel audio setup.
Refer to the table below for the audio jacks on the rear panel and
their functions.
For stereo speakers or headphones
Audio jack Description
Connects to stereo speakers or headphones.
For a 5.1-channel speaker system
Audio jack Description
FRONT connects to the FRONT jack on your
subwoofer.
SURROUND connects to the REAR jack on your
subwoofer.
CENTER/BASS connects to the SUB/CENTER jack on
your subwoofer.
English
ASUS NOVA LITE PX24 23
Page 24

English
FRONT
S/PDIF
OUT
Connecting to digital speakers
You can also connect NOVA PX24 to your home stereo or home
theater multi-channel audio amplifier to use your existing speaker
system.
Connect an optical (Toslink) digital audio cable with a mini jack to
S/PDIF adapter from the S/PDIF OUT jack on the system rear panel
to your amplifier.
Use the supplied mini jack to S/PDIF adapter to connect
to your amplifier.
Subwoofer
Center
speaker
Front speakers Rear speakers
Amplifier
24 ASUS NOVA LITE PX24
Page 25

Using your NOVA PX24
Conguring wireless connection
To connect to a wireless network, follow the instructions below:
1. Move the pointer to the network icon on the notification
area and you will see Not
Connected.
2. Right-click the network icon
and select Connect to a
network.
3. Select the wireless network
you want to connect to from
the list and click Connect.
English
Select Show Wireless if there are different types of network
connections in your area.
ASUS NOVA LITE PX24 25
Page 26

English
4. Enter the network security
key if necessary.
This screen will not appear
if no security key is needed.
5. After connection was
established, you will see
Connected.
26 ASUS NOVA LITE PX24
Page 27

Conguring audio output settings
After connecting a speaker system to your PX24, follow the steps
below to configure speaker setup:
Analog output
1. From the Windows®
notification area, right-
click the volume icon
and then select Playback
Devices.
2. Under the Playback window,
select Speakers and click
Set Default.
3. Click Configure and the
Speaker Setup window pops
up.
English
4. Select the speaker system
you have and click Next.
You may click Test to test
each of your speakers.
ASUS NOVA LITE PX24 27
Page 28

English
5. Check the boxes that
indicate the speakers
present, and then click Next.
This configuration screen
varies according to the
speakers you have.
6. Check the boxes if you use
full-range speakers, and
then click Next.
7. Click Finish to exit the
speaker setup.
Digital output
1. From the Windows®
notification area, right-
click the volume icon
and then select Playback
Devices.
28 ASUS NOVA LITE PX24
Page 29

2. Under the Playback window,
select Realtek Digital Output
and click Set Default.
3. Click Properties and the
Realtek Digital Output
Properties window pops up.
Click the tabs on the top to
configure related settings.
General
You can customize the device
name and icon, view the
controller/jack information,
and configure the device
usage.
English
Support Formats
You can select the encoded
format and the sample rates.
ASUS NOVA LITE PX24 29
Page 30

English
Levels
You can enable or mute the
Realtek digital output level.
Enhancements
You can apply special sound
effects for the your current
listening configuration.
Advanced
You can select the sample
rate and bit depth from the
drop-down menu.
30 ASUS NOVA LITE PX24
Page 31

Using ASUS Easy Update
ASUS Easy Update is a software tool that automatically detects and
downloads the latest BIOS, drivers, and applications for your PX24.
1. From the Windows® notification
area, right-click the ASUS Easy
Update icon.
2. Select Schedule to set how
often you want to update your
system.
3. Select Update to activate the
update.
4. Click OK to display the items
you can download.
English
5. Check the item(s) you want to
download, and then click OK.
ASUS NOVA LITE PX24 31
Page 32

English
Using Windows Media Center
Starting Windows Media Center
You can take full control of the Windows Media Center using your
remote control.
To start Windows Media Center, do one of the following:
• Press the Media Center button on your Media Center
remote.
• From the Windows® desktop, click Start > All Programs >
Windows Media Center.
TV + Movies
Enjoy your TV/movie viewing experience with the TV + Movies
feature. Use TV + Movies to watch live TV programs, record TV
programs, watch recorded programs, view program information, and
play DVDs.
*The system does not come with a built-in TV tuner card. To use
the TV function, purchase an external TV box.
Watching TV
1. Press the Live TV button on the remote. The last viewed TV
channel is displayed.
2. Use the Channel up/down buttons to change channels while
watching TV.
Recording TV programs
1. Use the Channel up/down or the numeric keys to select the
program you wish to record.
2. Press the Record button on the remote to start recording.
Playing TV recordings
1. Press the Recorded TV button to display a list of recorded
TV programs.
32 ASUS NOVA LITE PX24
Page 33

2. Select a recording and press the Play button to play or
press OK to view details.
Media Center automatically records the program you are watching
for up to 30 minutes and saves it to a buffer. Therefore, if you pause
a live TV program, you can pick up where you left off.
Watching DVDs
Insert a DVD into the optical drive and the DVD will be played
automatically. You can also press the DVD button on the remote
to play it.
Music
Music provides you with a complete music experience. You can
listen to CDs or other music files, create your own playlists, view
album information, and listen to music by albums, genres, artists, etc.
Adding music CDs to music library
1. From the Media Center main menu, select Music.
2. Insert a CD into the Super Multi Drive. The CD will be played
automatically, and a list of options appear on the left side of the
“now playing” screen.
3. Select Copy CD, and then select Yes to confirm your choice.
The CD is copied and saved as music files to the hard disk drive
under music library.
English
Playing Music
1. From the Media Center main menu, select Music > music
library to display your music files.
2. Select music to play by albums, genres, artists, etc.
ASUS NOVA LITE PX24 33
Page 34

English
Pictures + Videos
Enjoy and manage your digital photos/videos or downloaded
pictures/video clips using Pictures + Videos. You can browse the
pictures individually or play them as a slide show with music
background.
Viewing pictures
1. From the Media Center main menu, select Pictures + Videos >
picture library to display your picture folders.
2. Select a folder and press OK to open it. Select an image and
press OK to view.
To play the pictures as a slide show, highlight a folder and press
the Play button to start playing it. You can also select Play
slide show on the sidebar.
Watching videos
1. From the Media Center main menu, select Pictures + Videos >
video library to display your videos.
2. Highlight a video and press the Play button to start playing
it.
34 ASUS NOVA LITE PX24
Page 35

Using CyberLink PowerDVD
We highly recommend that you launch the CyberLink PowerDVD
software to play DVDs or media files. PowerDVD supports various
video and audio formats/codecs including MPEG-4 AVC (H.264).
To use PowerDVD
1. Double-click the PowerDVD icon on the Windows®
desktop.
2. The PowerDVD player launches. Move the pointer
over the buttons on the control panel, and the pop-up
messages will help you get familiar with the button functions.
English
We recommend that you connect to a display through the HDMI
port to enjoy optimum visual performance.
ASUS NOVA LITE PX24 35
Page 36

Recovering your system
English
Using the recovery DVD
The recovery DVD includes an image of the operating system
installed on your system at the factory. The recovery DVD, working
with the support DVD, provides a comprehensive recovery
solution that quickly restores your system to its original working
state, provided that your hard disk drive is in good working order.
Before using the recovery DVD, copy your data files (such as Outlook
PST files) to a USB device or to a network drive and make note of any
customized configuration settings (such as network settings).
1. Turn on your computer and press <F8> to enter the Please
select boot device menu.
2. Insert the recovery DVD into the optical drive and select the
optical drive (“DVDROM: XXX”) as the boot device. Press
<Enter> and then press any key to continue.
3. The ASUS Recovery System window appears. Select where to
install a new system (min. 20GB space is required). Options are:
Recover Windows to a partition
This option will delete only the partition you select from
below, allowing you to keep other partitions, and create a new
system partition as drive “C.” Select a partition and click NEXT.
Recover Windows to entire HD
This option will delete all partitions from your hard disk drive
and create a new system partition as drive “C.” Select and click
Yes.
4. Follow the on-screen instructions to complete the recovery
process.
You will lose all your data during the system recovery. Make sure
that you make a backup of it before recovering the system.
5. Insert the support DVD into the optical drive when you are
asked to. After the system recovery is completed, restart the
computer.
36 ASUS NOVA LITE PX24
Page 37

6. After the system reboots, Windows® will begin system
configurations and install drivers and utilities.
7. Set up your language, time zone, keyboard, computer name, and
user name to enter the Windows® OS.
This recovery DVD is for NOVA PX24 only. DO NOT use it on other
computers. Visit the ASUS website www.asus.com for any updates.
Crashfree BIOS
ASUS Crashfree BIOS allows you to restore the original BIOS data
from the support DVD in case the BIOS update fails or the BIOS
codes and data are corrupted. Change the boot priority and boot
from your support DVD to restore your BIOS.
When you notice the
power LED blink white
and hear two short
beeps followed by one
continuous beep at the
system startup, your BIOS codes are damaged.
power LED
English
Follow the instructions below to restore your BIOS:
1. Insert the support DVD. The system will give two short beeps
and start restoring the BIOS. (No display on screen)
2. When the power LED stops blinking, the restoration is
completed.
3. Press the power switch to start the system. If the system enters
Windows® OS, the BIOS is restored successfully.
ASUS NOVA LITE PX24 37
Page 38

English
Using the hidden partition
The recovery partition includes an image of the operating system,
drivers, and utilities installed on your system at the factory. The
recovery partition provides a comprehensive recovery solution that
quickly restores your system’s software to its original working state,
provided that your hard disk drive is in good working order. Before
using the recovery partition, copy your data files (such as Outlook
PST files) to floppy disks or to a network drive and make note of any
customized configuration settings (such as network settings).
DO NOT delete the partition named “RECOVERY.” The recovery
partition is created at the factory and cannot be restored by the
user if deleted. Take your system to an authorized ASUS service
center if you have problems with the recovery process.
1. Press <F9> during bootup (requires a recovery partition).
2. Press <Enter> to select Windows Setup [EMS Enabled].
3. The ASUS Recovery System window appears. Select Recover
Windows to a partition.
4. Select a partition with min. 20GB space and click Next.
5. Follow the on-screen instructions to complete the recovery
process.
6. Restart the computer after the system recovery is completed.
7. Set up your language, time zone, keyboard, computer name, and
user name to enter the Windows® OS.
38 ASUS NOVA LITE PX24
 Loading...