

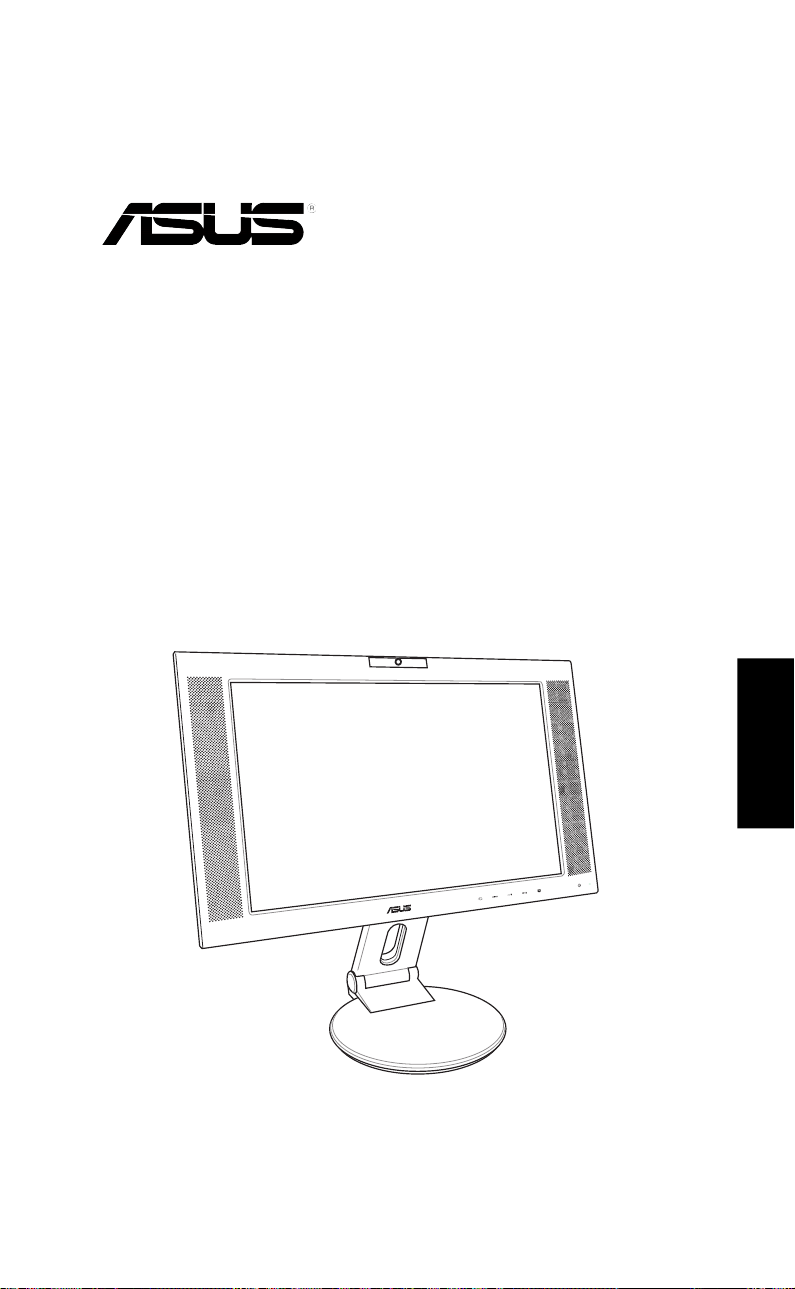
Page 1
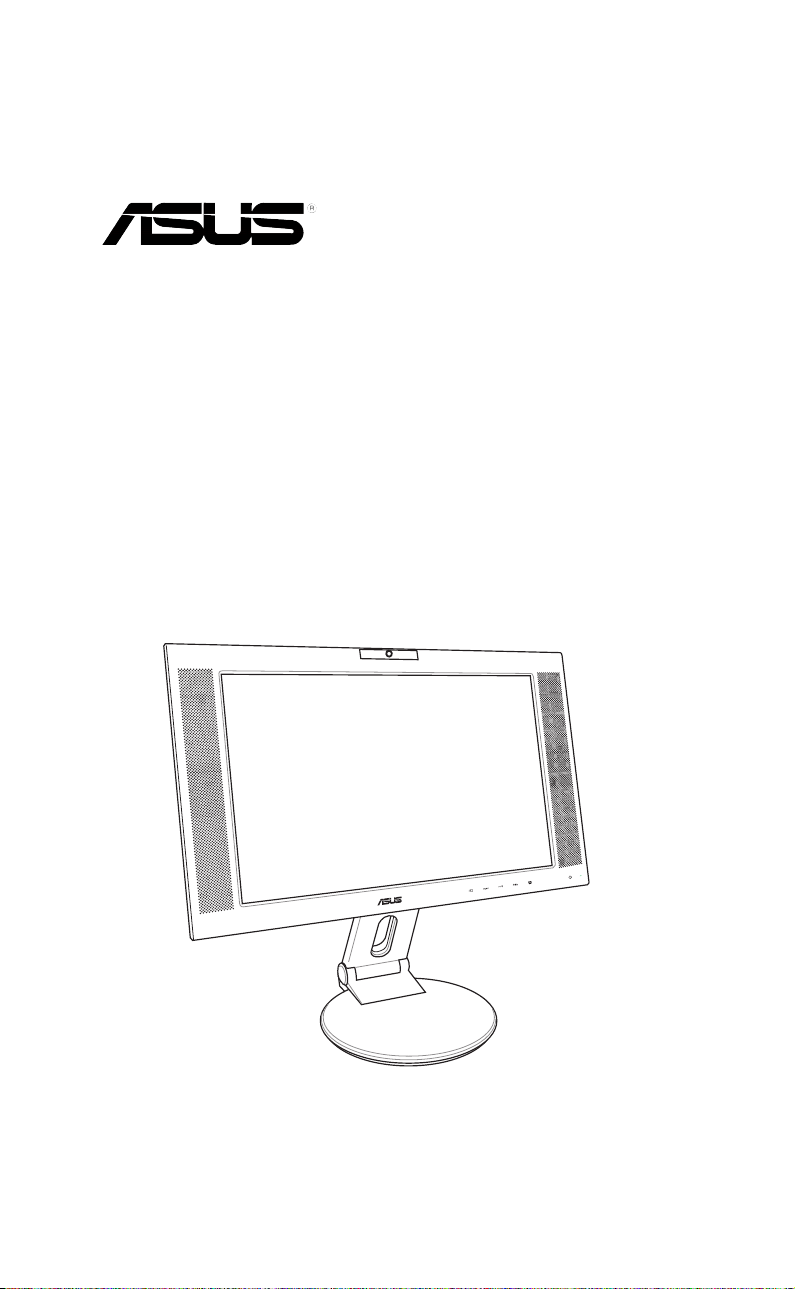
PW201
LCD Monitor
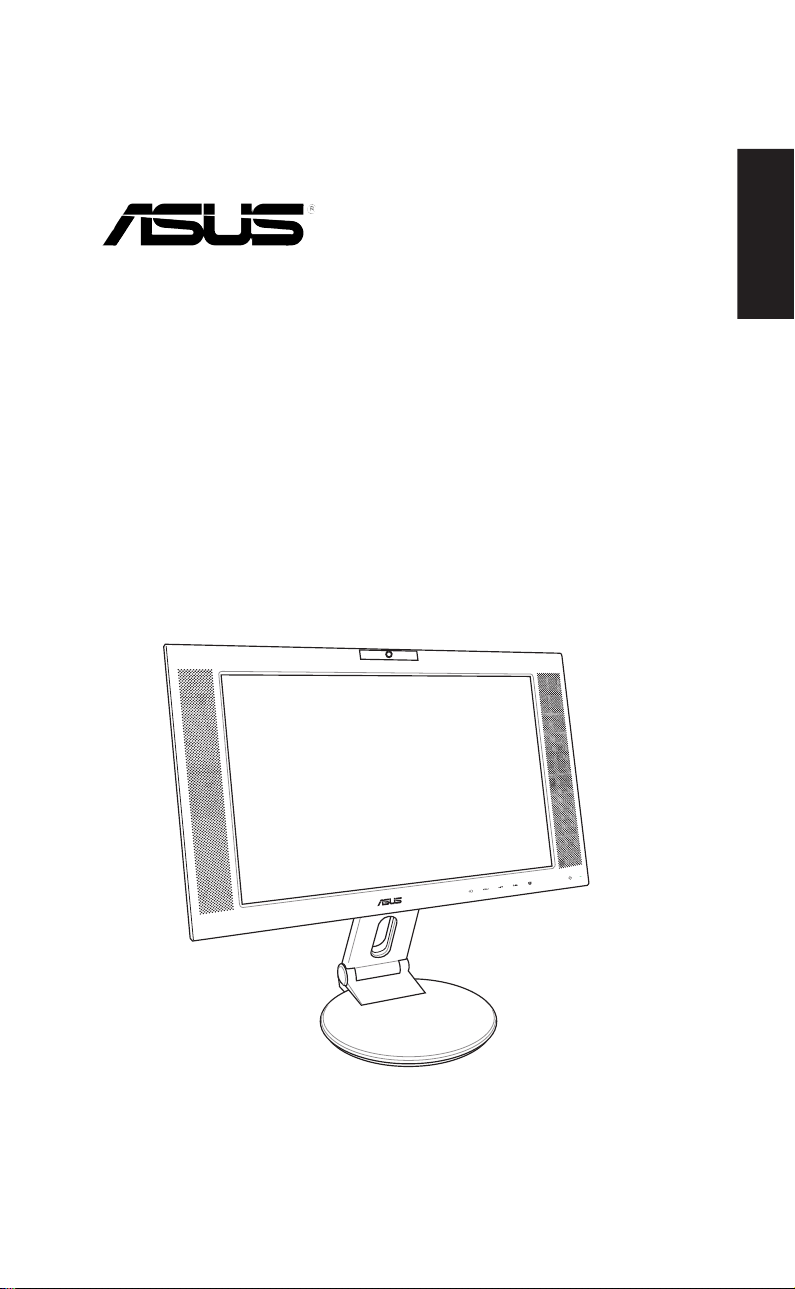
Page 2

PW201
LCD Monitor
Page 3

Table of content
ASUS contact information ........................................................... ii
English...........................................................................................1
Français.........................................................................................9
Deutsch .....................................................................................17
Italiano........................................................................................25
Español........................................................................................33
Pyccкий
......................................................................................41
Nederlands..................................................................................49
.......................................................................................57
.......................................................................................65
..........................................................................................73
..........................................................................................81
Português....................................................................................89
Türkçe.........................................................................................97
.........................................................................................105
...........................................................................................113
Quick Start Guide Quick Start Guide
Quick Start Guide
Quick Start Guide Quick Start Guide
ii
i
ii
Page 4

ASUS contact information
ASUSTeK COMPUTER INC.ASUSTeK COMPUTER INC.
ASUSTeK COMPUTER INC.
ASUSTeK COMPUTER INC.ASUSTeK COMPUTER INC.
Address 15 Li-Te Road, Peitou, Taipei, Taiwan 11259
Telephone +886-2-2894-3447
Fax +886-2-2894-7798
E-mail info@asus.com.tw
Web site www.asus.com.tw
ASUS COMPUTER INTERNATIONAL (America)ASUS COMPUTER INTERNATIONAL (America)
ASUS COMPUTER INTERNATIONAL (America)
ASUS COMPUTER INTERNATIONAL (America)ASUS COMPUTER INTERNATIONAL (America)
Address 44370 Nobel Drive, Fremont, CA 94538, USA
Fax +1-510-608-4555
E-mail tmd1@asus.com
Web site usa.asus.com
Technical Support
Telephone
(General) +1-502-995-0883
(Notebook) +1-510-739-3777
Support fax +1-502-933-8713
Online support http://vip.asus.com/eservice/techserv.aspx
ASUS COMPUTER GmbH (Germany and Austria)ASUS COMPUTER GmbH (Germany and Austria)
ASUS COMPUTER GmbH (Germany and Austria)
ASUS COMPUTER GmbH (Germany and Austria)ASUS COMPUTER GmbH (Germany and Austria)
Address Harkort Str. 25, D-40880 Ratingen, Germany
Telephone +49-2102-95990
Fax +49-2102-959911
Online contact www.asuscom.de/sales
Technical Support
Telephone +49-2102-95990
Fax +49-2102-959911
Online support www.asuscom.de/support
Web site www.asuscom.de/news
iiii
Quick Start Guide Quick Start Guide
ii
Quick Start Guide
iiii
Quick Start Guide Quick Start Guide
Page 5
PW201
LCD Monitor
Quick Start Guide
English
Page 6
Safety information
English
• Before setting up the monitor, carefully read all the documentation that
• To prevent fire or shock hazard, never expose the monitor to rain or
• The monitor should be operated only from the type of power source
• Use the appropriate power plug which complies with your local power
• To ensure satisfactory operation, use the monitor only with UL listed
• If you encounter technical problems with the monitor, contact a qualified
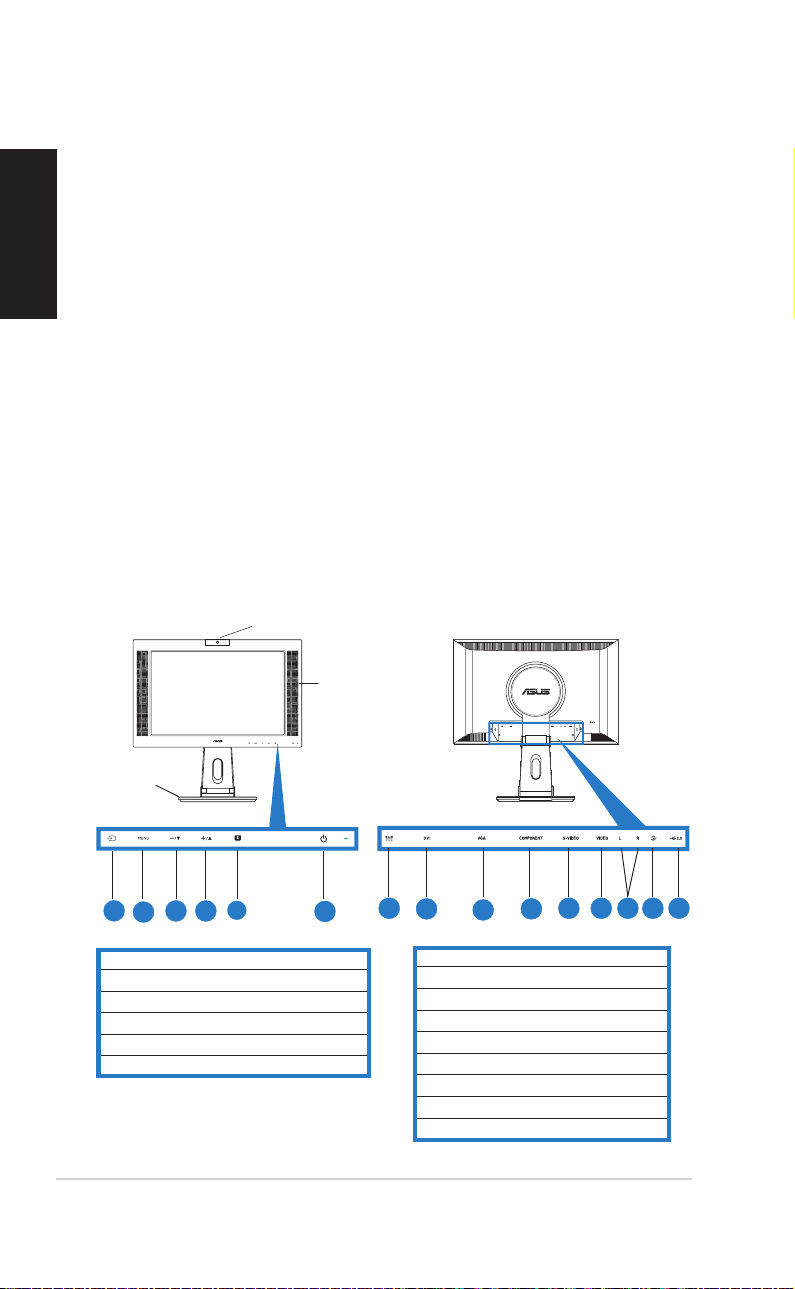
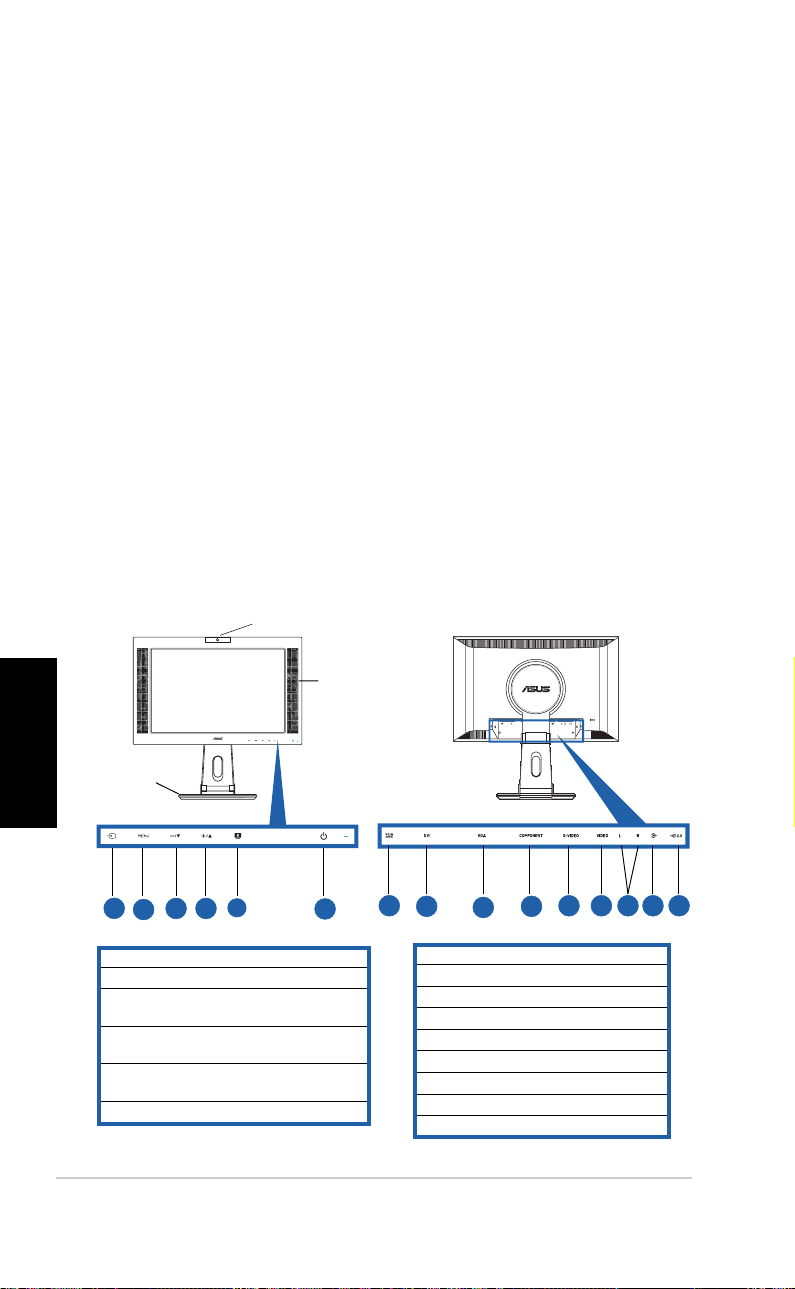
Monitor introduction
Front viewFront view
Front view
Front viewFront view
came with the package.
moisture.
indicated on the label. If you are not sure of the type of power supplied
to your home, consult your dealer or local power company.
standard.
computers which have appropriate configured receptacles marked
between 100-240V AC.
service technician or your retailer.
Rear viewRear view
Rear view
Rear viewRear view
WebcamWebcam
Webcam
WebcamWebcam
Stereo Stereo
Stereo
Stereo Stereo
speakers speakers
speakers
speakers speakers
Stand Stand
Stand
Stand Stand
44
4
44
55
5
11
1
11
11
1
11
22
Quick Start Guide Quick Start Guide
2
Quick Start Guide
22
Quick Start Guide Quick Start Guide
33
3
33
22
2
22
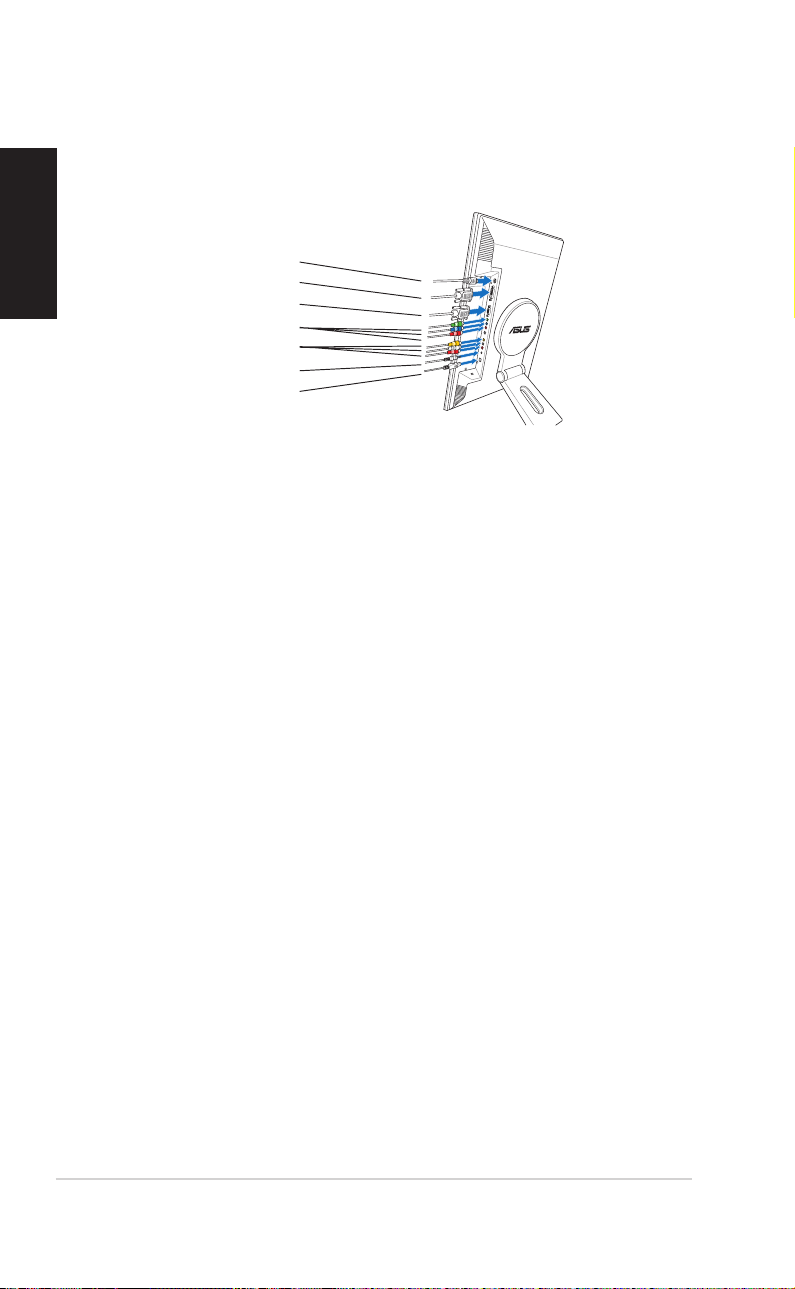
1. Input source sensor
2. MENU sensor
3. Decrease sensor/Volume hotkey
4. Increase sensor/Brightness hotkey
5. SPLENDID™ mode hotkey/Exit MENU
6. Power sensor/indicator
55
44
4
44
66
6
66
77
7
77
88
8
88
7. DC-in port
8. DVI port
9. VGA port
10. Component input port (YPbPr)
11. S-Video port
12. Video port (Composite)
13. L/R Audio ports
14. PC Line-in port
15. USB port
1010
10
1010
99
9
99
1111
11
1111
1212
12
1212
1313
13
1313
1414
14
1414
1515
15
1515
Page 7
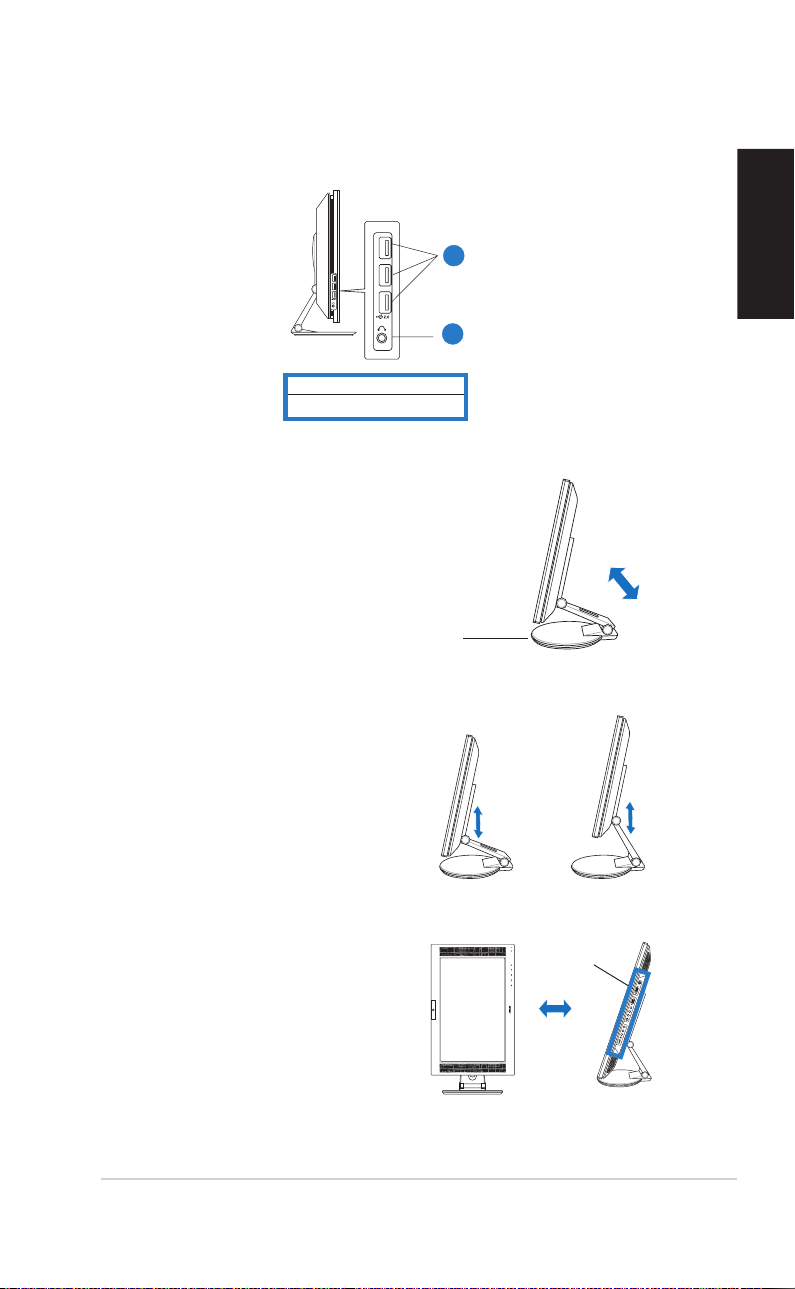
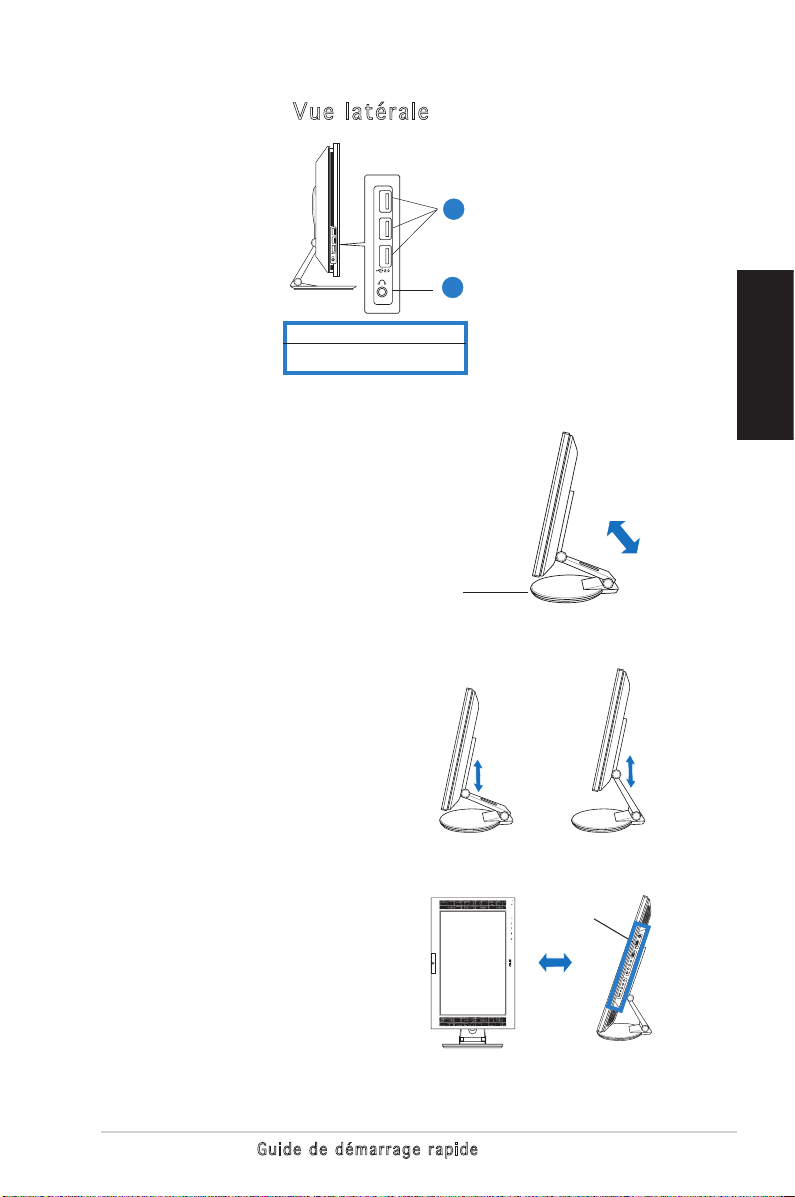
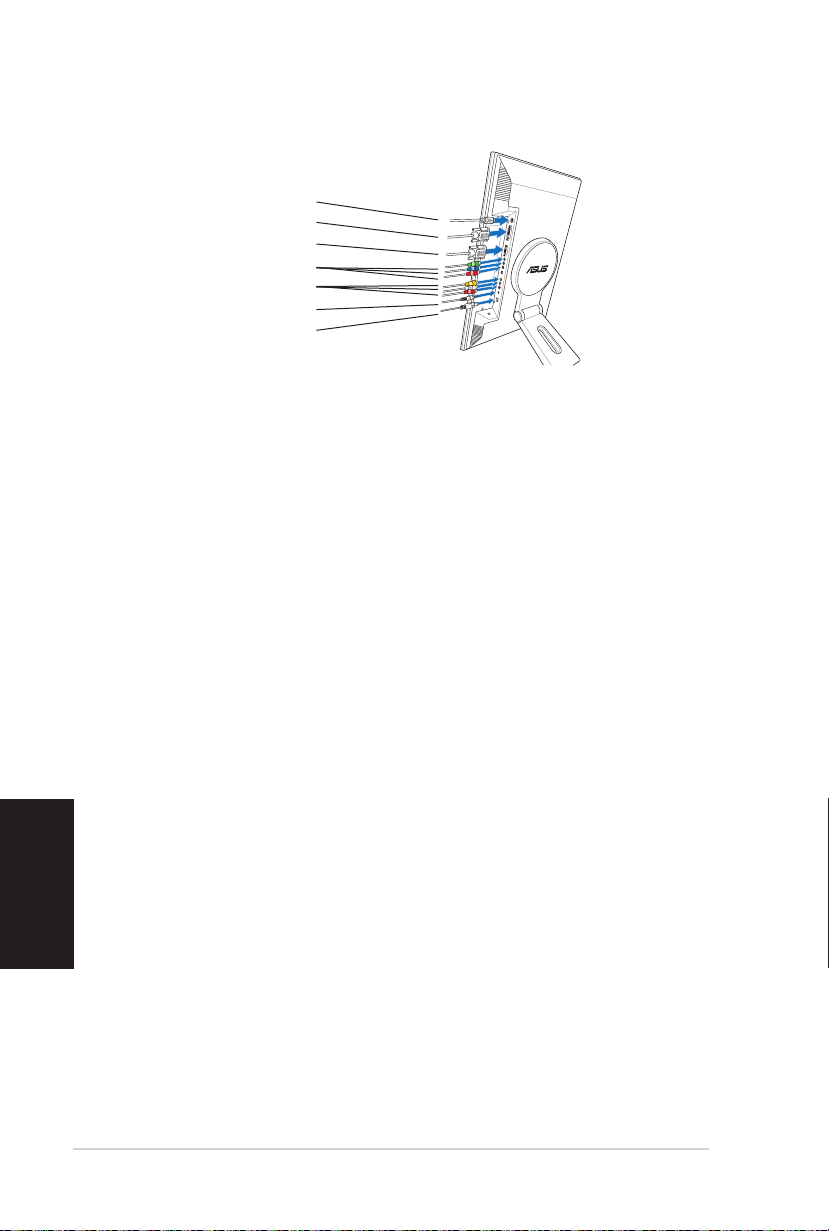
Side viewSide view
Side view
Side viewSide view
1. USB 2.0 ports
2. Headphone port
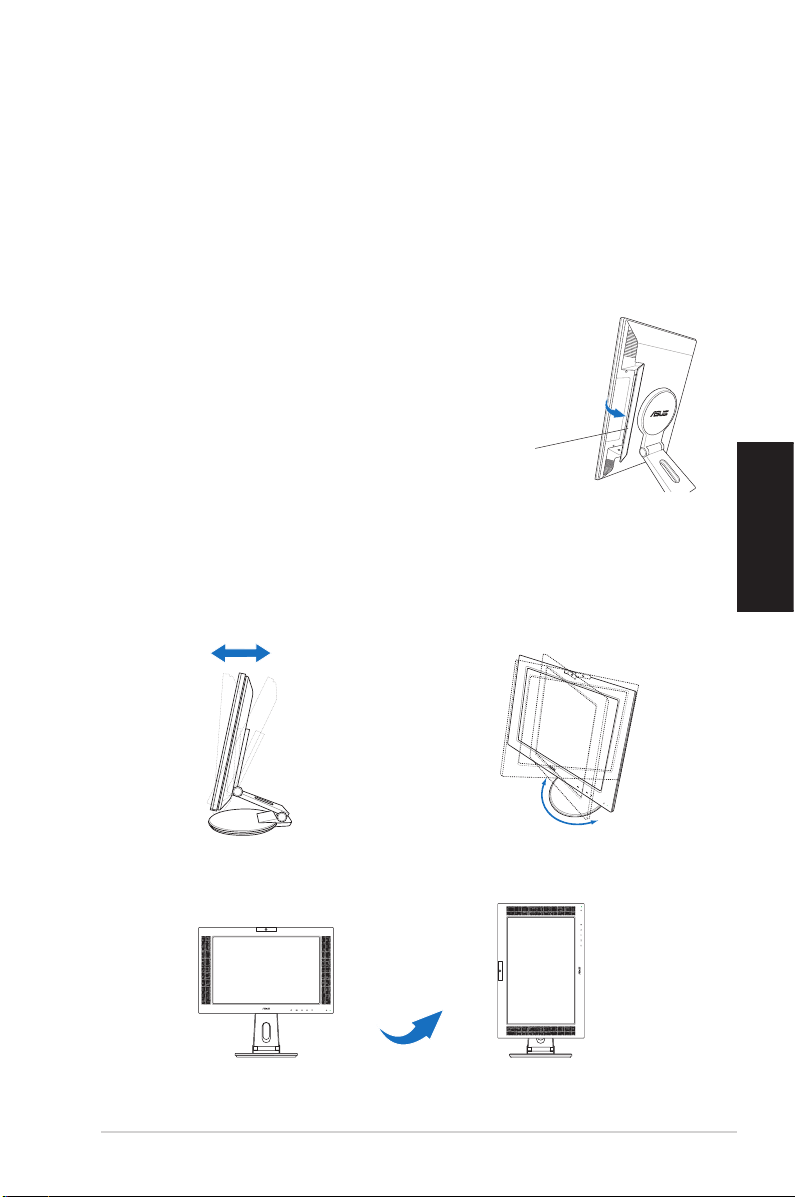
Unfolding the monitor
The monitor is folded in the
package. To unfold the
monitor, hold the stand
with one hand and carefully
tilt the monitor forward
with the other hand.
Stand
Connecting the cables
To connect the cables:
11
1
11
22
2
22
English
1. Adjust the monitor
to your desired
height and tilt.
2. Turn the monitor
90º counterclockwise
so you can clearly see
the ports at the
bottom of the rear
panel.
Front view Side view
Quick Start Guide Quick Start Guide
Quick Start Guide
Quick Start Guide Quick Start Guide
Input ports
33
3
33
Page 8
English
Power adapter
Component cable
PC Audio cable
Connecting a computer equipped with a VGA/DVI portConnecting a computer equipped with a VGA/DVI port
Connecting a computer equipped with a VGA/DVI port
Connecting a computer equipped with a VGA/DVI portConnecting a computer equipped with a VGA/DVI port
Connecting a video equipment with Video (composite) orConnecting a video equipment with Video (composite) or
Connecting a video equipment with Video (composite) or
Connecting a video equipment with Video (composite) orConnecting a video equipment with Video (composite) or
S-Video output ports such as a VCR, V8, or DVS-Video output ports such as a VCR, V8, or DV
S-Video output ports such as a VCR, V8, or DV
S-Video output ports such as a VCR, V8, or DVS-Video output ports such as a VCR, V8, or DV
3. Connect the cables as shown. Refer to the succeeding sections for
detailed instructions.
DVI cable
VGA cable
RCA cable
USB 2.0 cable
1. Plug the VGA, audio, and USB connectors of the supplied
3-in-1 cable to the LCD monitor’s VGA, Line-in, and USB ports
respectively.
2. Connect the other ends of the supplied 3-in-1 cable to your
computer’s VGA, Line-out, and USB ports respectively.
3. Tighten the two screws to secure the VGA connector.
4. Connect one end of the supplied DVI cable to the LCD monitor,
then connect the other end to your computer’s DVI port.
1. Connect one end of the supplied RCA cable to the video and L/R
Audio ports of the LCD monitor, then connect the other end to
the video and Audio ports of your video equipment.
2. Connect one end of the S-Video cable to the LCD monitor’s SVideo port, then connect the other end to the S-Video port of
your video equipment.
3. Plug the red and white connectors of the supplied RCA cable to
the LCD monitor’s L/R Audio ports, then connect the other end to
the Audio ports of your video equipment.
Connecting a video equipment with component outputConnecting a video equipment with component output
Connecting a video equipment with component output
Connecting a video equipment with component outputConnecting a video equipment with component output
ports, such as a DVD player or a satellite set-top boxports, such as a DVD player or a satellite set-top box
ports, such as a DVD player or a satellite set-top box
ports, such as a DVD player or a satellite set-top boxports, such as a DVD player or a satellite set-top box
1. Connect one end of the component cable to the
component ports of the LCD monitor, then connect the other end
to the component output ports of your video equipment.
2. Plug the red and white connectors of the supplied RCA cable to
the LCD monitor’s L/R Audio ports, then connect the other end to
the Audio Line-out ports of your video equipment.
44
Quick Start Guide Quick Start Guide
4
Quick Start Guide
44
Quick Start Guide Quick Start Guide
Page 9
Connecting the power adapterConnecting the power adapter
Connecting the power adapter
Connecting the power adapterConnecting the power adapter
1. Connect the adapter cord securely to the monitor’s DC-in port.
2. Connect the power cord to the adapter port with the other end to
a power outlet.
4. Close the rear connector cover.
Align the cover to the three slots
near the ports and close the cover
carefully. A click indicates that the
cover has been closed successfully.
Rear connector cover
Adjusting the monitor
English
• You can adjust the monitor’s
from -5º to 25º.
-5º~25º
• You can also turn the monitor
90º counterclockwise.
90º
• The stand allows you to turn the
monitor left/right up to 120º.
120º
Quick Start Guide Quick Start Guide
Quick Start Guide
Quick Start Guide Quick Start Guide
55
5
55
Page 10
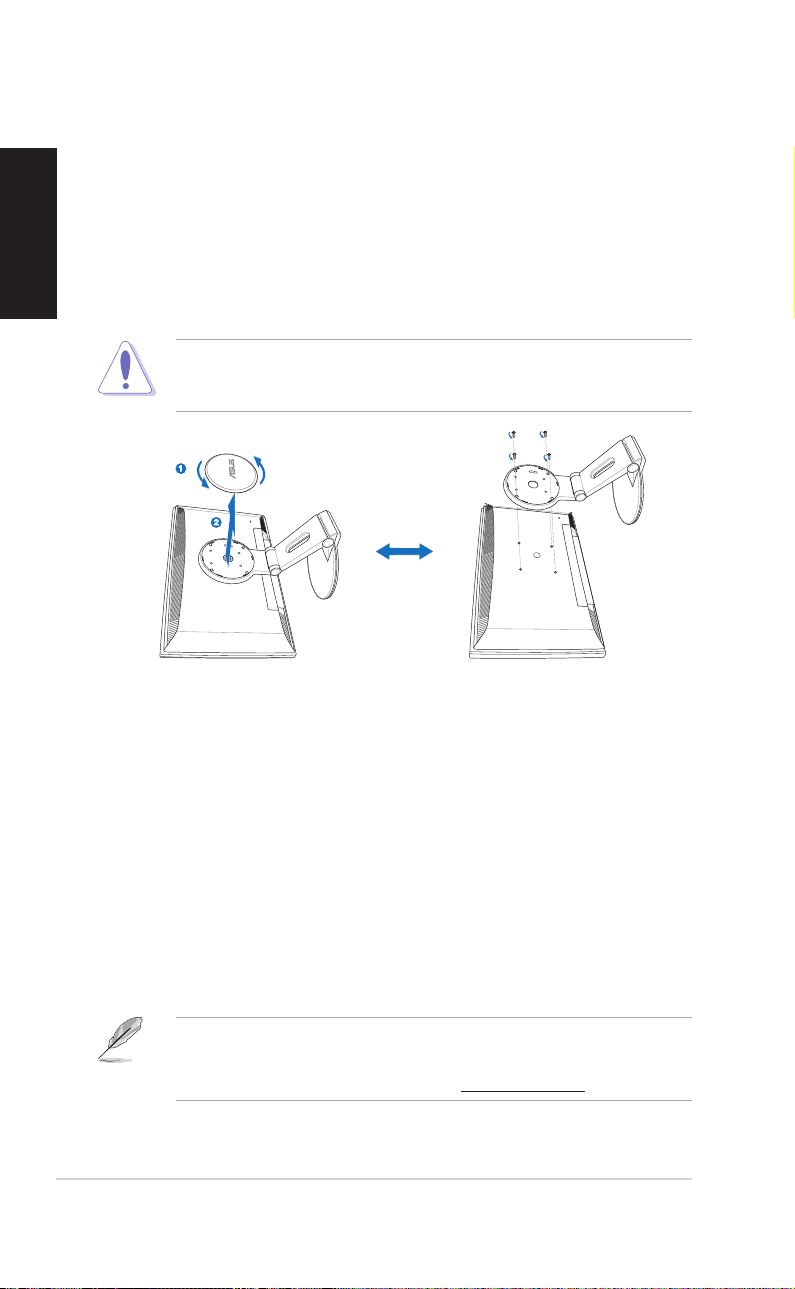
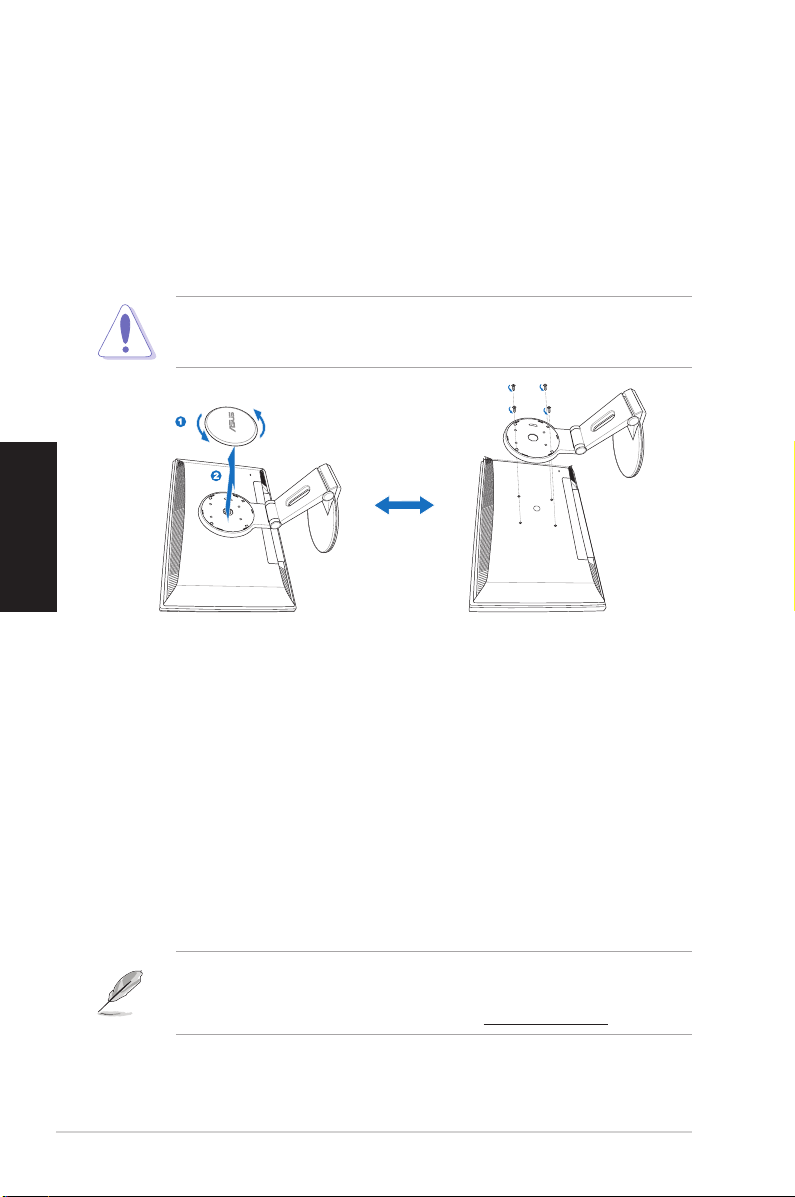
Detaching the stand (for VESA wall mount)
English
To detach the stand:
1. Turn the VESA cover counterclockwise to open it.
2. Remove the VESA cover from the stand.
3. Use a screwdriver to remove the four screws on the stand of the
Pivot®Pro Software
monitor.
CAUTION! CAUTION!
CAUTION! Have the front of the monitor face down to make the
CAUTION! CAUTION!
detachment safer and easier. We recommend that you cover the surface
with soft cloth to prevent damage to the monitor.
Installation instructions:Installation instructions:
Installation instructions:
Installation instructions:Installation instructions:
1. Close all other applications first.
2. Make sure your graphics card manufacturer’s (native)
drivers are installed before you install the Pivot®Pro
software.
3. Insert the support CD into the optical drive and run the
START_PIVOT program.
After the installation, you can set up hotkeys for different rotation degrees
by pressing the right mouse button -- enter Properties -- Settings -Advanced -- Pivot Software -- Hotkeys.
• This software only supports Windows® 98SE, ME, NT 4.0, 2000, and
XP operating systems.
• For more information or help, go to www.portrait.com.
66
Quick Start Guide Quick Start Guide
6
Quick Start Guide
66
Quick Start Guide Quick Start Guide
Page 11
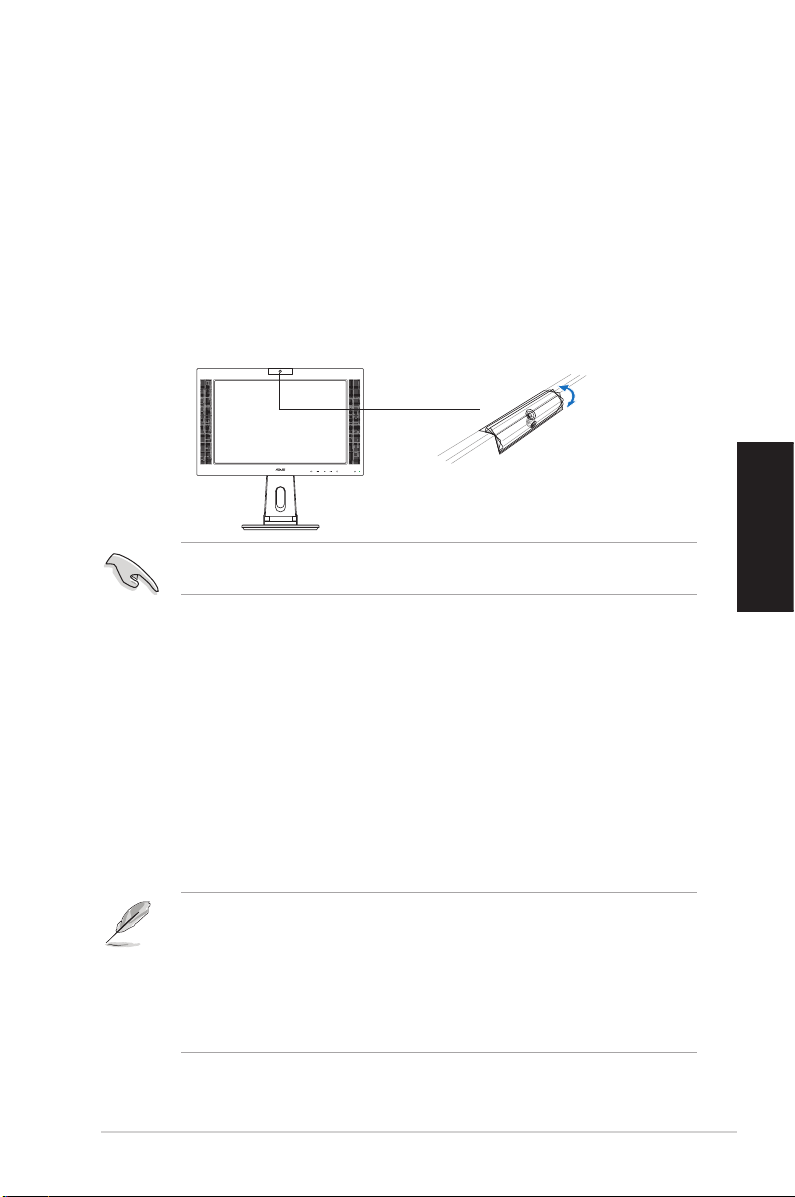
Built-in webcam introduction
This built-in webcam allows you to take photos and make videos; while
talking to friends via Internet-based communication tools, you can use the
webcam to show your vivid image.
HardwareHardware
Hardware
HardwareHardware
• The 1.3 megapixel webcam transmits images to your PC through the USB
ports. Make sure that you have connected the USB plugs of the supplied
3-in-1 cable before you use the webcam.
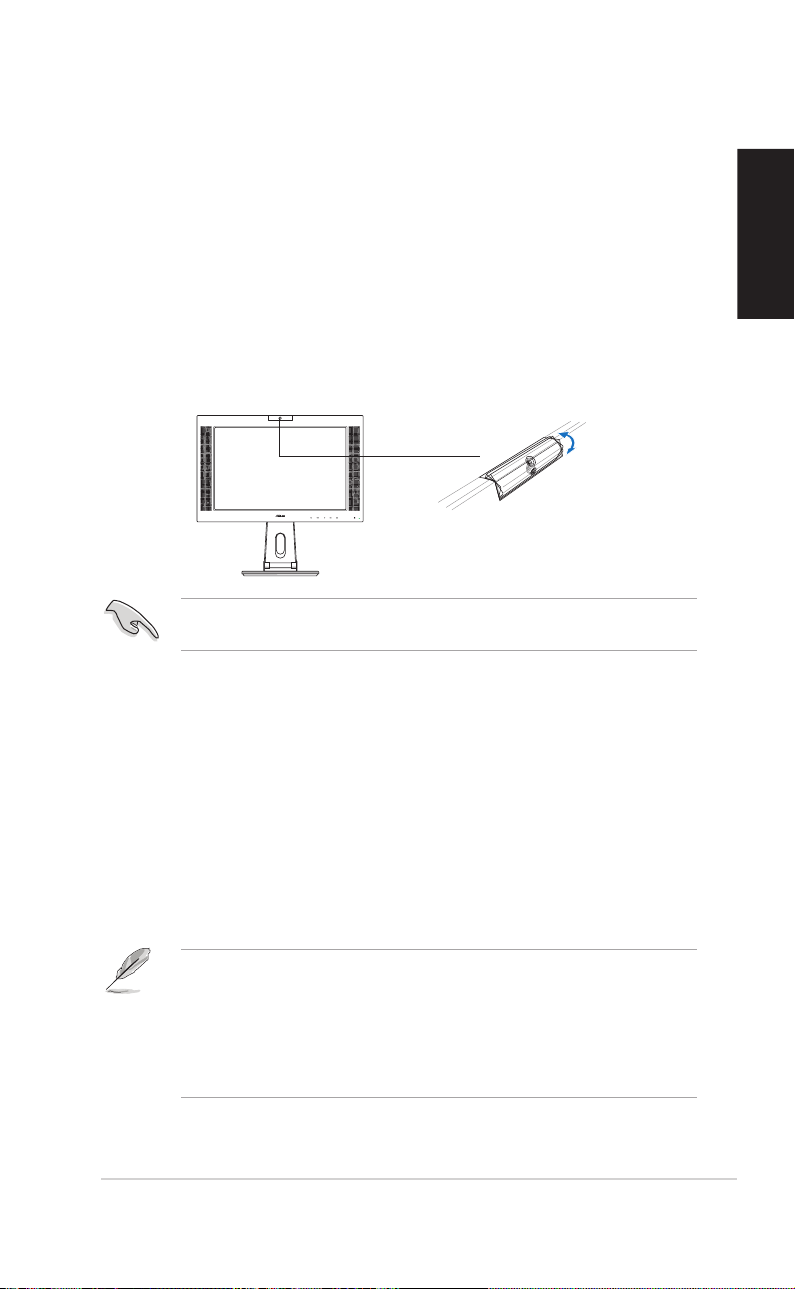
• The webcam is adjustable upward and downward as shown.
-30º ~ 30º
Do not turn the webcam upward or downward over 30º; doing so might
damage the webcam.
SoftwareSoftware
Software
SoftwareSoftware
English
To install the webcam driver:To install the webcam driver:
To install the webcam driver:
To install the webcam driver:To install the webcam driver:
1. Close all other applications first.
2. Insert the support CD into the optical drive and run the
ASUS USB2.0 WebcamASUS USB2.0 Webcam
ASUS USB2.0 Webcam program.
ASUS USB2.0 WebcamASUS USB2.0 Webcam
The default webcam resolution is 640 x 480. If you want to change the
default resolution to meet different kinds of application programs, go to
C:\WINDOWS\ASUS USB2.0 WebcamC:\WINDOWS\ASUS USB2.0 Webcam
C:\WINDOWS\ASUS USB2.0 Webcam and activate the program
C:\WINDOWS\ASUS USB2.0 WebcamC:\WINDOWS\ASUS USB2.0 Webcam
named LifeCam to modify the settings based on your needs.
• The webcam captured video format is VGA (640 x 480) mode in
order to increase the transmission efficiency via all kinds of Internet
commmunication tools.
• Before using the webcam, you need to install the webcam driver into
your PC.
• The webcam driver only supports Microsoft® Windows 2000/XP
operating system with Microsoft® Direct X.
Quick Start Guide Quick Start Guide
Quick Start Guide
Quick Start Guide Quick Start Guide
77
7
77
Page 12
LifeFrame software
English
Introduction and installation instructionsIntroduction and installation instructions
Introduction and installation instructions
Introduction and installation instructionsIntroduction and installation instructions
To capture snapshots or video clips, ASUS PW201provides an
easy-to-use LifeFrame that can work with the built-in webcam, allowing
users to create their own photos or video clips.
System requirements are as follows:System requirements are as follows:
System requirements are as follows:
System requirements are as follows:System requirements are as follows:
Installation instructions:Installation instructions:
Installation instructions:
Installation instructions:Installation instructions:
• LifeFrame only supports Microsoft® Windows® 2000/XP operating
systems.
• Before starting to use this software, install LifeFrame into your PC.
• The LifeFrame software is bundled in the PW201 support CD.
1. A personal computer with Pentium® III 800 MHz or higher
processor
2. Microsoft® Windows® 2000/XP operating systems
3. Minimum 200 MB free hard disk space to run the program
4. 128 MB of RAM or above
5. A display card supporting 16-bit high color mode
1. Close all other applications.
2. Insert the support CD into the optical drive and run the
LifeFrame program.
3. Follow the on-screen instructions to complete the installation
Make sure that you connect the USB plug of the supplied 3-in-1 cable to
the USB port at the back of the LCD monitor; otherwise, the built-in
webcam and LifeFrame will not be activated.
88
Quick Start Guide Quick Start Guide
8
Quick Start Guide
88
Quick Start Guide Quick Start Guide
Page 13
Français
9
PW201
Moniteur LCD
Guide de démarrage rapide
Page 14
10 Gu i de de dém a rra ge rap i de
Français
Informations sur la sécurité
• Avant de configurer le moniteur, assurez-vous dʼavoir lu toute la
documentation incluse dans le paquet.
• Pour éviter les risques dʼincendie et de choc électrique, nʼexposez pas
le moniteur à la pluie ou à lʼhumidité.
• Le moniteur ne doit être utilisé quʼavec le type de source dʼalimentation
indiqué sur lʼétiquette à lʼarrière. Si vous nʼêtes pas sûr du type
dʼalimentation électrique dont vous disposez, contactez votre
revendeur ou votre fournisseur en électricité local.
• Utilisez la prise dʼalimentation compatible avec les standars électriques
de votre région.
• Pour assurer un fonctionnement correct, nʼutilisez le moniteur quʼavec
des ordinateurs certifiés UL, et fonctionnant entre 110-240V.
• Si vous rencontrez un problème technique avec votre moniteur,
contactez un technicien qualifié ou votre revendeur.
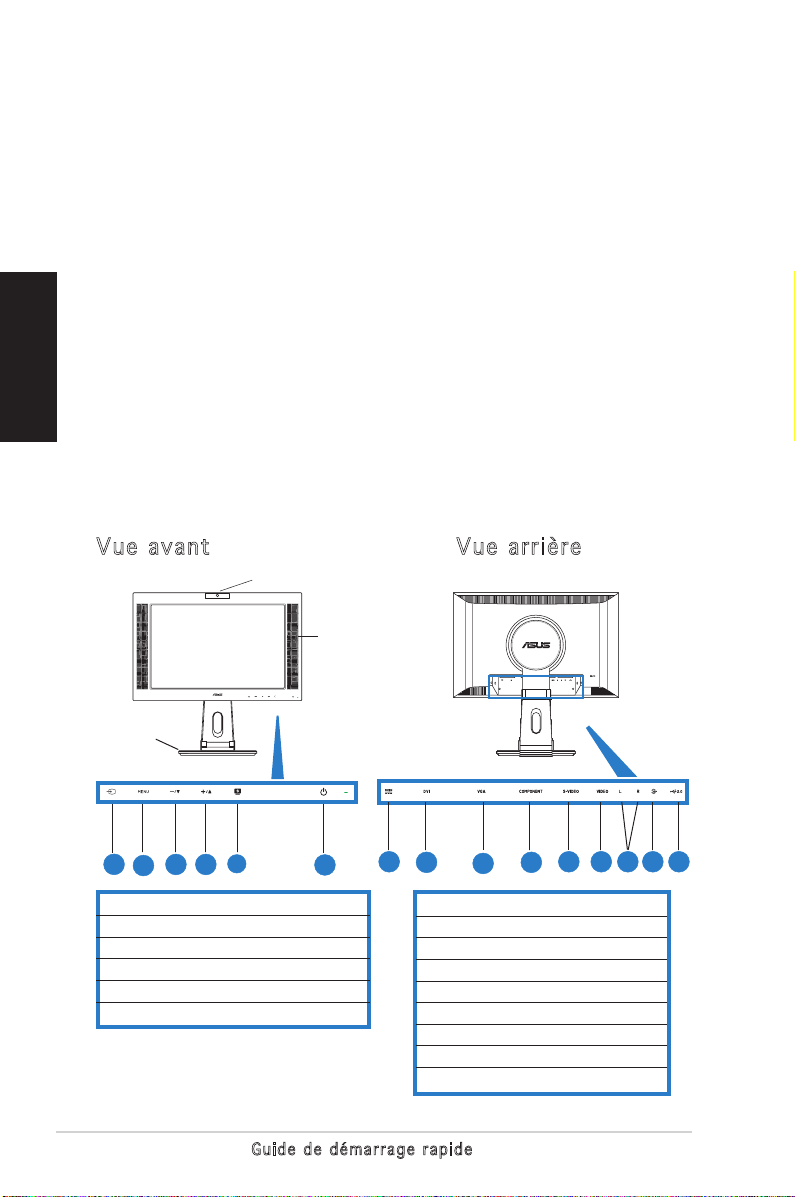
Socle
Haut-parleurs
7 8 10 12 13 14 15
1. Capteur de source dʼentrée
2. Capteur MENU
3. Sélection/Raccourci volume
4. Sélection/Raccourci luminosité
5. Raccourci SPLENDID™/Quitter Menu
6. Capteur/Indicateur dʼalimentation
7. Port DC-in
8. Port DVI
9. Port VGA
10. Port dʼentrée composante (YPbPr)
11. Port S-Vidéo
12. Port Vidéo (Composite)
13. Ports audio L/R
14. Port PC Line-in
15. Port USB
9
11
Introduction au moniteur
Vue avant Vue arrière
6
5
4
4
3
2
1
1
Caméra
Page 15
11 Gu i de de dém a rra ge rap i de
Français
1. Ports USB 2.0
2. Port casque
Vue latérale
2
1
Socle
Le moniteur est emballé
dans la boîte. Pour le
déballer, maintenez le socle
avec une main tout en
lʼinclinant légèrement vers
lʼavant avec lʼautre main.
Déballer le moniteur
Pour connecter les
câbles:
1. Ajustez le moniteur
à la hauteur et à
lʼinclinaison désirée.
2. Tournez le moniteur à
90º dans le sens
inverse des aiguilles
dʼune montre afin de
bien visualiser les ports
situés sous le panneau
arrière.
Connecter les câbles
Vue avant Vue latérale
Ports
dʼentrée
Page 16
12 Gu i de de dém a rra ge rap i de
Français
3. Connectez les câbles comme indiqué ci-dessous. Référez-vous aux
sections suivantes pour les instructions détaillées.
Adaptateur secteur
Câble DVI
Câble VGA
Câble composante
Câble RCA
Câble audio PC
Câble USB 2.0
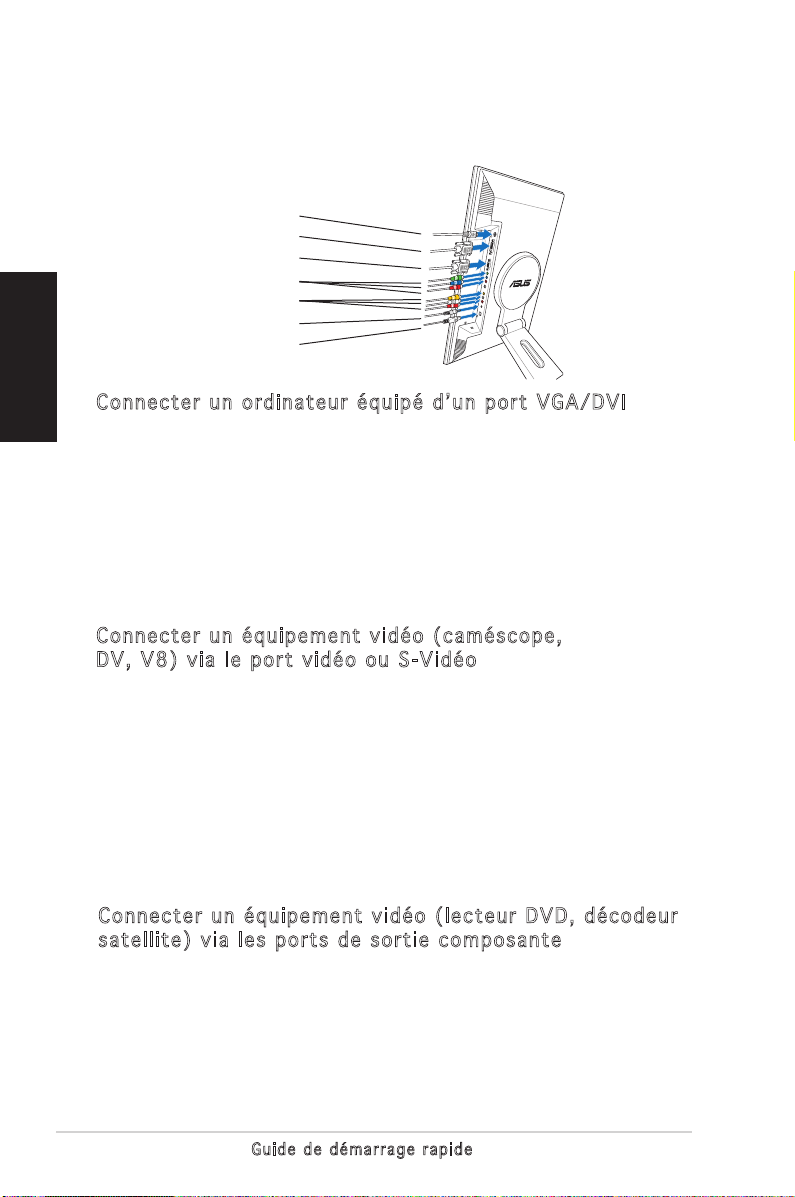
Conne c t er un o r dinate u r équip é dʼun p o r t VGA/ D V I
1. Connecter les câbles VGA, audio, et USB du câble 3-en-1 aux
connecteurs VGA, Line-in, et USB du moniteur LCD.
2. Connectez les autres extrémités du câble 3-en-1 aux ports VGA,
Line-out, et USB de votre ordinateur.
3. Serrez les deux vis pour sécuriser le connecteur VGA.
4. Connectez une extrémité du câble DVI fourni au moniteur LCD,
puis connectez lʼautre extrémité au port DVI de votre ordinateur.
Conne c t er un é q uipeme n t vidéo ( camésc o p e,
DV, V 8 ) via l e port v i d éo ou S - Vidéo
1. Connectez une extrémité du câble RCA fourni aux ports vidéo et
audio du moniteur LCD, puis connectez lʼautre extrémité aux ports
audio/vidéo de votre équipement.
2. Connectez une extrémité du câble S-Vidéo au port S-Vidéo du
moniteur, puis connectez lʼautre extrémité au port S-Vidéo de
votre équipement.
3. Branchez les connecteurs rouge et blanc du câble RCA aux ports
audio L/R de votre moniteur, puis connectez lʼautre extrémité aux
portx audio de votre équipement.
Conne c t er un é q uipeme n t vidéo ( lecteu r DVD, d é c odeur
satel l i te) vi a les po r t s de s o r tie co m p osante
1. Connectez une extrémité du câble composante aux ports
composantes du moniteur LCD, puis connectez lʼautre extrémité
aux ports de sortie composante de votre équipement vidéo.
2. Branchez les connecteurs rouge et blanc du câble RCA aux ports
audio L/R de votre moniteur, puis connectez lʼautre extrémité aux
portx audio de votre équipement.
Page 17

13 Gu i de de dém a rra ge rap i de
Français
Conne c t er lʼa d a ptateu r secteu r
1. Connectez le cordon de lʼadaptateur au port DC-in du moniteur.
2. Connectez le cordon dʼalimentation à lʼadaptateur secteur, et
lʼautre extrémité à une prise élecrique.
4. Fermez le couvercle de protection des
connecteurs. Alignez le couvercle sur
les trois ouvertures près des ports puis
fermez-le délicatement. Un léger cliquetis
indique que le couvercle a bien été fermé.
Ajuster le moniteur
-5º~25º
90º
• Vous pouvez ajuster
lʼinclinaison du moniteur de -5º
à 25º.
• Vous pouvez aussi faire pivoter
le moniteur de 90º dans le
sens inverse des aiguilles dʼune
montre.
• Le socle vous permet de tourner
le moniteur vers la gauche ou la
droite jusquʼà un angle de 120º.
Couvercle des connecteurs arrières
120º
Page 18
14 Gu i de de dém a rra ge rap i de
Français
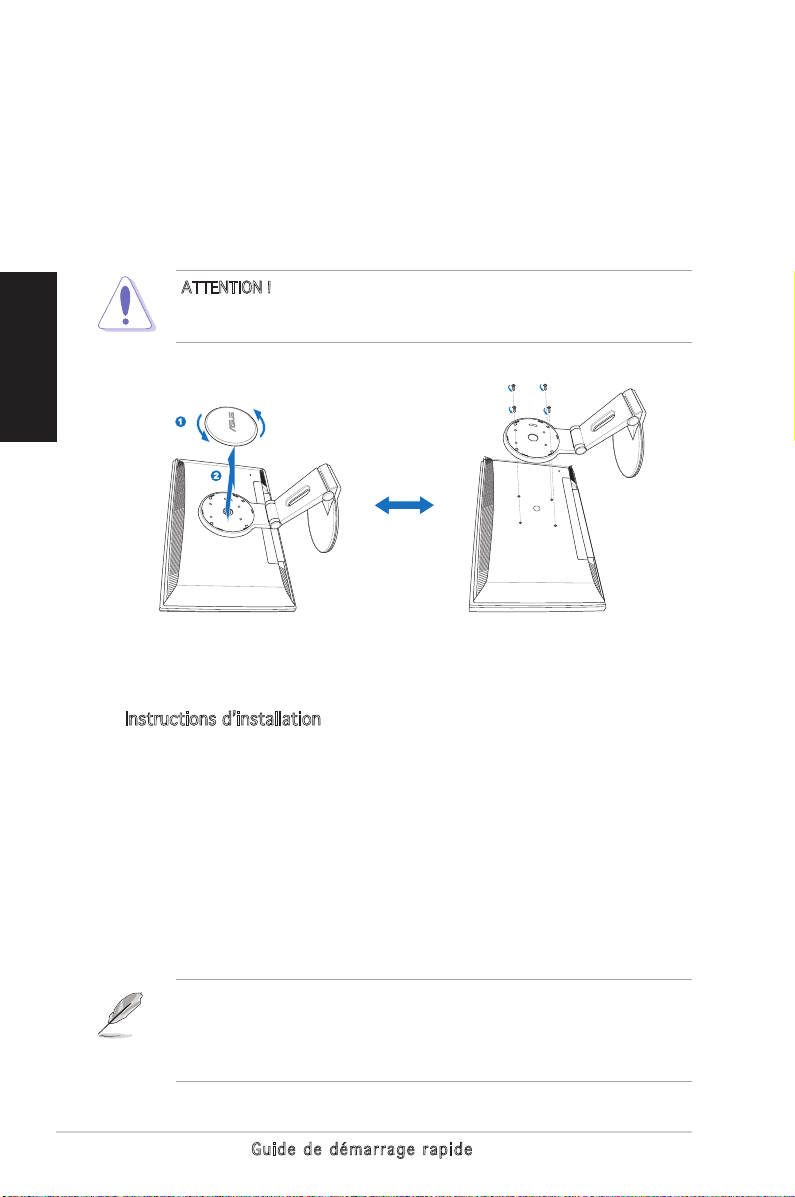
Detacher le socle (pour fixation murale VESA)
Pour détacher le socle:
1. Tournez le couvercle VESA vers la gauche pour lʼouvrir.
2. Retirez le couvercle VESA du socle.
3. Utilisez un tournevis pour retirer les quatre vis sur le socle du
moniteur.
ATTENTION ! Pour simplifier et rendre la manipulation plus sûre, inclinez
le moniteur face vers le bas. il est recommandé de couvrir la surface
avec un tissu doux pour éviter dʼendommager le moniteur.
Logiciel Pivot®Pro
• Instructions dʼinstallation:
1. Fermez toutes les applications en cours dʼéxecution.
2. Assurez-vous que les pilote de votre carte graphique sont bien
installés avant dʼinstaller Pivot® Pro.
3. Insérez le CD de support dans votre lecteur optique et éxecuter
le programme START_PIVOT.
Après lʼinstallation, vous pouvez créer plusieurs raccourcis clavier pour
différents degrés de rotation en faisant un clic droit sur le bureau de
Windows, puis en cliquant sur -->Propriétés -->Paramètres -->Avancé ->Pivot Software -->Hotkeys.
• Ce logiciel ne supporte que les systèmes dʼexploitation Windows
®
98SE, ME, NT 4.0, 2000, et XP.
• Pour plus dʼinformations ou de lʼaide, veuillez visiter www.portrait.
com.
Page 19
15 Gu i de de dém a rra ge rap i de
Français
Introduction de la caméra embarquée
La caméra embarquée vous permet de prendre des photos et créer des
vidéos; mais aussi de discuter avec vos amis via des services de messagerie
instantanée sur Internet, et ainsi de vous montrer tel que vous êtes.
Matériel
• La caméra de 1.3 mégapixels transmets les images vers votre PC via les
ports USB. Assurez-vous dʼavoir connecté le connecteur USB du câble
3-en-1 fourni avant dʼutiliser la caméra.
• Lʼangle de la caméra est ajustable comme illustré ci-dessous.
-30º ~ 30º
Ne tournez pas la caméra vers le haut ou le bas dans un angle supérieur
à 30º, vous pourriez endommager la caméra.
• Le mode de capture de la caméra est VGA (640 x 480) afin
dʼaugmenter la qualité de transmission via un panel dʼutilitaires de
communication Internet.
• Avant dʼutiliser la caméra, il est nécessaire dʼinstaller les pilotes sur
votre PC.
• Les pilotes de la caméra ne sont supportés que par Microsoft®
Windows 2000/XP avec Microsoft® Direct X.
La résolution par défaut de la caméra est 640 x 480. Si vous souhaitez
changer la résolution par défaut de la caméra, localisez le dossier C:\
WIN D OWS\ A SUS U SB2. 0 We b cam et exécutez le programme appellé
LifeCam pour modifier les réglages selon vos besoins.
Logiciel
Pou r ins t alle r le pilo t e de la c améra :
1. Fermez toutes les applications en cours dʼéxecution.
2. Insérez le CD de support dans votre lecteur optique et éxecuter
le programme ASUS USB2.0 Webcam.
Page 20
16 Gu i de de dém a rra ge rap i de
Français
Logiciel LifeFrame
Introduction e t i n s t ructions dʼinstallat i o n
Pour capturer des photos ou des clips vidéo, le PW201dʼASUS intègre
le logiciel LifeFrame, simple dʼutilisation, et pouvant fonctionner avec
la caméra embarquée, permettant aux utilisateurs de créer leur propres
photos et clips vidéo.
• LifeFrame ne supporte que les systèmes dʼexploitation Microsoft
®
Windows® 2000/XP.
• Avant dʼutiliser ce logiciel, veuillez lʼinstaller sur votre PC.
• Le logiciel LifeFrame est contenu dans le CD de support
accompagnant le PW201.
Con f igur a tion requ ise:
1. Un PC avec un processeur Pentium® III 800 MHz ou supérieur
2. Microsoft® Windows® 2000/XP
3. Un minimum de 200 Mo dʼespace disque disponible
4. Un minimum de 128 Mo de RAM
5. Une carte graphique supportant une qualité de couleur de 16-bits
Assurez-vous de connecter le connecteur USB, du câble 3-en-1
fournii, au port USB situé à lʼarrière du moniteur LCD; sinon, la caméra
embarquée et le logiciel LifeFrame ne pourront être activés.
Ins t ruct i ons d ʼins tall a tion :
1. Fermez toutes les applications en cours dʼéxecution.
2. Insérez le CD de support dans votre lecteur optique et éxecuter
le programme LifeFrame.
3. Suivez les instructions apparaissant à lʼécran pour terminer
lʼinstallation.
Page 21
PW201
LCD-Monitor
Schnellstarthilfe
Deutsch
Page 22
Sicherheitsinformationen
• Bevor Sie den Monitor installieren, lesen Sie sorgfältig alle mitgelieferten
Informationen.
• Um Feuer- und Stromschlagrisiken zu vermindern, setzen Sie den
Monitor niemals Regen oder Feuchtigkeit aus.
• Der Monitor sollte nur mit der auf dem Aufkleber bezeichneten
Spannung betrieben werden. Sind Sie sich über die Spannung der von
Ihnen benutzten Steckdose nicht sicher, erkundigen Sie sich bei Ihrem
Energieversorgungsunternehmen vor Ort.
• Verwenden Sie Stromstecker, die mit den Stromstandards Ihrer Region
übereinstimmen.
• Um einen sicheren Betrieb zu gewährleisten, verwenden Sie den Monitor
nur in Verbindung mit Computern, die dem UL-Standard entsprechen
und über korrekt eingestellte Anschlüsse mit einer Spannung von 100240V~ verfügen.
• Sollten technische Probleme mit dem Produkt auftreten, kontaktieren
Deutsch
Sie den qualifizierten Kundendienst oder Ihre Verkaufsstelle.
Monitoreinführung
Vorderansicht Rückseitenansicht
Webcam
Lautsprecher
Ständer
4
1
1
3
2
1. Eingangsquellensensor
2. MENU-Sensor
3. Kleiner-Sensor/Lautstärke
4. Größer-Sensor/Helligkeit
5. SPLENDID™-Modus-Hotkey/Menü
verlassen
6. Power-Sensor/Anzeige
5
4
Stereo-
6
7 8 10 12 13 14 15
7. DC-Eingang
8. DVI-Anschluss
9. VGA-Anschluss
10. Component-Eingang (YPbPr)
11. S-Video-Eingang
12. Video-Anschluss (Composite)
13. L/R Audioanschlüsse
14. PC Line-in-Anschluss
15. USB-Anschluss
18 Schnellstarthilfe
9
11
Page 23
Seitenansicht
1. USB 2.0-Anschlüsse
2. Kopfhörereingang
Aufstellen des Monitors
Der Monitor ist im Paket
zusammengeklappt. Um
ihn aufzustellen, halten Sie
mit einer Hand den Ständer
fest und drücken Sie mit
der anderen vorsichtig den
Bildschirm nach vorn.
Ständer
Anschließen der Kabel
So schließen Sie die Kabel an:
1
2
Deutsch
1. Stellen Sie den Monitor auf
die gewünschte Höhe und den
gewünschten Neigungswinkel ein.
2. Drehen Sie den Monitor 90º
gegen den Uhrzeigersinn, so
dass Sie die Anschlüsse an
der Unterseite genau sehen
können.
Vorderansicht Seitenansicht
Eingänge
19Schnellstarthilfe
Page 24
3. Schließen Sie die Kabel wie im Folgenden beschrieben an. Genauere
Instruktionen finden Sie in den folgenden Abschnitten.
Netzteil
DVI-Kabel
VGA-Kabel
Component-Kabel
RCA-Kabel
PC Audio-Kabel
USB 2.0-Kabel
Anschließen eines Computers mit VGA/DVI-Port
1. Stecken Sie die VGA-, Audio-, und USB-Stecker des beigelegten
Deutsch
3-in-1-Kabels jeweils in die VGA-, Line-in-, und USB-Eingänge des
LCD-Monitors.
2. Verbinden Sie die anderen Enden des 3-in-1-Kabels jeweils mit den
VGA, Line-out, and USB-Anschlüssen Ihres Computers.
3. Ziehen Sie die beiden Schrauben des VGA-Steckers fest.
4. Verbinden Sie ein Ende des beigelegten DVI-Kabels mit dem
LCD-Monitor, und das andere mit dem DVI-Anschluss Ihres Computers.
Anschließen von Videogeräten mit Video (Composite) oder S-VideoAusgängen (z.B. Videorecorder, V8-, oder DV-Player)
1. Verbinden Sie ein Ende des beigelegten RCA-Kabels mit den
Video- und L/R Audio-Anschlüssen des LCD-Monitors, und
verbinden Sie dann das andere Ende mit den Video- und Audio Anschlüssen Ihres Videogeräts.
2. Verbinden Sie ein Ende des S-Videokabels mit dem S-Video Anschluss des LCD-Monitors, und verbinden Sie dann das andere
Ende mit dem S-Video-Anschluss Ihres Videogeräts.
3. Verbinden Sie die roten und weißen Stecker des beigelegten
RCA-Kabels mit den L/R Audioeingängen des LCD-Monitors, und
verbinden Sie dann die anderen Enden mit den Audio-Anschlüssen
Ihres Videogeräts.
Anschließen von Videogeräten mit Component-Ausgängen (z.B.
DVD-Player oder Satellitenreceiver)
1. Verbinden Sie ein Ende des Component-Kabels mit dem
Component-Anschluss des LCD-Monitors, und verbinden Sie dann
das andere Ende mit dem Component-Ausgang Ihres Videogeräts.
20 Schnellstarthilfe
Page 25
2. Verbinden Sie die roten und weißen Stecker des beigelegten
RCA-Kabels mit den L/R Audioeingängen des LCD-Monitors, und
verbinden Sie dann die anderen Enden mit den Audio-Anschlüssen
Ihres Videogeräts.
Anschließen des Netzteils
1. Verbinden Sie das Netzteilkabel mit dem Netzstromeingang des Monitors.
2. Verbinden Sie den Stromstecker mit dem Netzteil, und das andere
Ende des Netzteils mit einer Stromquelle.
4. Schließen Sie die Abdeckung der Rückseitenanschlüsse,
indem Sie die Abdeckung in die drei Schlitze stecken
und vorsichtig schließen. Ein Klickgeräusch zeigt an,
dass die Abdeckung korrekt geschlossen wurde.
Abdeckung der
Rückseitenanschlüsse
Veränderung des Neigungswinkels
• Sie können den Winkel des Monitors
von -5º bis 25º einstellen.
-5º~25º
• Sie können den Monitor auf um 90º
gegen den Uhrzeigersinn drehen.
• Das Standbein macht es
möglich, den Monitor um
bis zu 120º nach links oder
rechts zu drehen.
120º
Deutsch
90º
21Schnellstarthilfe
Page 26
Entfernen des Standbeins
(für VESA-konforme Wandmontage)
So entfernen Sie das Standbein:
1. Drehen Sie die VESA-Abdeckung gegen den Uhrzeigersinn, um sie zu öffnen.
2. Entfernen Sie die VESA-Abdeckung.
3. Entfernen Sie die vier Schrauben am Monitorständer mit einem
Schraubenzieher.
VORSICHT! Legen Sie den Monitor mit dem Bildschirm nach unten, um
die Demontage des Standbeins zu erleichtern. Es wird empfohlen, den
Bildschirm mit einem weichen Tuch abzudecken, um Schäden zu vermeiden.
Deutsch
Pivot®Pro-Software
• Installationsinstruktionen:
1. Schließen Sie alle anderen Anwendungen.
2. Stellen Sie sicher, dass die Treiber Ihres Grafikkartenherstellers
installiert sind, bevor Sie die Pivot®Pro-Software installieren.
3. Legen Sie die Support-CD in Ihr optisches Laufwerk ein und führen
Sie das START_PIVOT-Programm aus.
Nach der Installation können Sie Hotkeys für verschiedene Rotationswinkel
festlegen, indem Sie die rechte Maustaste gedrückt halten und zu
Eigenschaften --> Einstellungen --> Erweitert -->Pivot Software -->Hotkeys
• Diese Software läuft nur unter den Betriebssystemen Windows
98SE, ME, NT 4.0, 2000, und XP.
• Weitere Informationen finden Sie unter
22 Schnellstarthilfe
www.portrait.com.
®
Page 27
Benutzung der integrierten Webcam
Die integrierte Webcam ermöglicht Ihnen, Bilder und Videos aufzunehmen;
sie kann außerdem für Videokonferenzen und Videochats genutzt werden,
um Ihren Bekannten und Freunden live Ihr Bild zu senden.
Hardware
• Die 1,3 Megapixel-Webcam überträgt über die USB-Anschlüsse Bilder zu
Ihrem PC. Vergewissern Sie sich daher, dass die USB-Stecker des beigelegten
3-in-1-Kabels richtig eingesteckt sind, bevor Sie die Webcam benutzen.
• Die Webcam kann, wie hier gezeigt, nach oben oder unten gedreht werden.
-30º ~ 30º
Drehen Sie die Webcam nicht über 30º nach oben oder unten; sie könnte
sonst Schaden nehmen.
Software
So installieren Sie den Webcam-Treiber:
1. Schließen Sie alle geöffneten Anwendungen.
2. Legen Sie die Support-CD ins optische Laufwerk und öffnen Sie
das ASUS USB2.0 Webcam-Programm.
Die Standardauflösung der Webcam liegt bei 640 x 480. Wenn Sie die
Auflösung verändern möchten, gehen Sie zu C:\WINDOWS\ASUS USB2.0
Webcam und aktivieren Sie das Programm LifeCam, um die Einstellungen
nach Ihren Vorstellungen zu verändern.
• Die Webcam-Videodatei wird im VGA (640 x 480)-Modus
aufgezeichnet, damit sie an möglichst viele Internetkommunikationsprogramme übertragen werden kann.
• Bevor Sie die Webcam benutzen können, müssen Sie den WebcamTreiber auf Ihrem PC installieren.
• Der Webcam-Treiber unterstützt nur Microsoft
Betriebssysteme mit Microsoft® Direct X.
®
Windows 2000/XP-
Deutsch
23Schnellstarthilfe
Page 28
LifeFrame-Software
Einführung und Installationsbeschreibung
Zur Aufnahme von Bildern oder Videodateien bietet der ASUS PW201 die
benutzerfreundliche LifeFrame-Software, die es mit Hilfe der integrierten
Webcam Benutzern ermöglicht, ihre eigenen Bilder oder Videos zu erstellen.
• LifeFrame unterstützt ausschließlich Microsoft® Windows® 2000/XPBetriebssysteme.
• Bevor Sie diese Software benutzen, installieren Sie sie auf Ihrem PC.
• Die LifeFrame-Software ist auf der Support-CD des PW201 enthalten.
Folgende Systemanforderungen müssen erfüllt werden:
®
1. Ein PC mit mind. Pentium
®
2. Microsoft
Deutsch
3. Mindestens 200 MB freier Speicher auf der Festplatte
Windows® 2000/XP-Betriebssystem
4. Mindestens 128 MB Arbeitsspeicher
5. Eine Grafikkarte, die den 16-Bit-Farbmodus unterstützt
Installation:
1. Schließen Sie alle geöffneten Anwendungen .
2. Legen Sie die Support-CD ins optische Laufwerk und öffnen Sie
das LifeFrame-Programm.
3. Folgen Sie den Anweisungen auf Ihrem Bildschirm, um die
Installation fertig zu stellen.
III 800 MHz-Prozessor
Vergewissern Sie sich, dass der USB-Stecker des beigelegten 3-in-1Kabels richtig mit dem USB-Anschluss an der Monitorrückseite verbunden
ist; andernfalls können Webcam und LifeFrame nicht funktionieren.
24 Schnellstarthilfe
Page 29
PW201
Monitor LCD
Guida alla
Consultazione Veloce
Italiano
Page 30
Informazioni sulla sicurezza
• Prima di installare il monitor, leggere con attenzione tutta la
documentazione allegata alla confezione.
• Per evitare il rischio d’incendi o scosse elettriche, non esporre il
monitor a pioggia o umidità.
• Il monitor deve essere fatto funzionare solamente con il tipo
d’alimentazione indicato sull’etichetta. Se non si conosce il tipo
d’alimentazione fornita alla propria abitazione, consultare il fornitore
d’energia o la locale compagnia elettrica.
• Usare la spina appropriata conforme agli standard elettrici locali.
• Per assicurare il funzionamento appropriato, usare il monitor solo con
computer marchiati UL con ricettacoli configurati tra 100 e 240V CA.
• Se si riscontrano problemi tecnici con il monitor, mettersi in contatto
con il rivenditore o con un tecnico di servizio qualificato per
l’assistenza.
Introduzione al monitor
Italiano
Parte frontaleParte frontale
Parte frontale
Parte frontaleParte frontale
WebcamWebcam
Webcam
WebcamWebcam
Base Base
Base
Base Base
44
4
44
55
5
11
1
11
11
1
11
33
3
33
22
2
22
1. Sensore origine d’input
2. Sensore MENU
3. Tasto di scelta Diminuisci Sensore/
Volume
4. Tasto di scelta aumenta Sensore/
Luminosità
5. Tasto di scelta modalità SPLENDID™/
Esci da MENU
6. Sensore/indicatore d’alimentazione
55
44
4
44
66
6
66
StereoStereo
Stereo
StereoStereo
CasseCasse
Casse
CasseCasse
Parte posteriore Parte posteriore
Parte posteriore
Parte posteriore Parte posteriore
77
88
7
8
77
88
7. Porta DC-in
8. Porta DVI
9. Porta VGA
10. Porte input componente (YPbPr)
11. Porta S-Video
12. Porta Video (composito)
13. Porte audio D/S
14. Porta PC Line-in
15. Porta USB
1010
10
1010
99
9
99
1111
11
1111
1212
12
1212
1313
13
1313
1414
14
1414
1515
15
1515
2626
Guida alla Consultazione Veloce Guida alla Consultazione Veloce
26
Guida alla Consultazione Veloce
2626
Guida alla Consultazione Veloce Guida alla Consultazione Veloce
Page 31

Parte lateraleParte laterale
Parte laterale
Parte lateraleParte laterale
1. Porte USB 2.0
2. Porta Cuffie
Estendere il monitor
Il monitor è piegato nella
confezione. Per estendere il
monitor, tenere la base con
una mano ed inclinare
delicatamente il monitor in
avanti con l’altra.
Base
Collegamento dei cavi
Per collegare i cavi:
11
1
11
22
2
22
1. Regolare il monitor
all’altezza ed
all’inclinazione
desiderata.
2. Girare il monitor di 90º
Porte d’input
in senso antiorario, così
da poter vedere le
porte sulla parte
inferiore del pannello
posteriore.
Veduta frontale Veduta laterale
Guida alla Consultazione Veloce Guida alla Consultazione Veloce
Guida alla Consultazione Veloce
Guida alla Consultazione Veloce Guida alla Consultazione Veloce
2727
27
2727
Italiano
Page 32

3. Collegare i cavi come mostrato. Fare riferimento alle sezioni che
seguono per istruzioni dettagliate.
Adattatore di corrente
Cavo DVI
Cavo VGA
Cavo Componente
Cavo RCA
Cavo audio PC
Cavo USB 2.0
Collegamento di un computer attrezzato di porta VGA/DVICollegamento di un computer attrezzato di porta VGA/DVI
Collegamento di un computer attrezzato di porta VGA/DVI
Collegamento di un computer attrezzato di porta VGA/DVICollegamento di un computer attrezzato di porta VGA/DVI
1. Inserire i connettori VGA, audio ed USB del cavo 3 in 1 fornito in
dotazione, rispettivamente nelle porte VGA, Line-in ed USB del
monitor LCD.
2. Collegare le altre estremità del cavo 3 in 1 fornito in dotazione,
rispettivamente alle porte VGA, Line-in ed USB del computer.
3. Stringere le due viti per fissare il connettore VGA.
4. Collegare una estremità del cavo DVI fornito in dotazione al
monitor LCD, e l’altra estremità ad una porta DVI del computer.
Collegamento di un’attrezzatura video dotata di porteCollegamento di un’attrezzatura video dotata di porte
Collegamento di un’attrezzatura video dotata di porte
Collegamento di un’attrezzatura video dotata di porteCollegamento di un’attrezzatura video dotata di porte
d’output Video (composito) o S-Video, comed’output Video (composito) o S-Video, come
d’output Video (composito) o S-Video, come
Italiano
d’output Video (composito) o S-Video, comed’output Video (composito) o S-Video, come
videoregistratori, V8 o DVvideoregistratori, V8 o DV
videoregistratori, V8 o DV
videoregistratori, V8 o DVvideoregistratori, V8 o DV
1. Collegare una estremità del cavo RCA fornito in dotazione alle
porte video ed audio L/R del monitor LCD, e l’altra estremità alle
porte video e audio dell’attrezzatura video.
2. Collegare una estremità del cavo S-Video alla porta S-Video del
monitor LCD, e l’altra estremità alla porta S-Video
dell’attrezzatura video.
3. Inserire il connettore rosso e bianco del cavo RCA fornito in
dotazione nelle porte audio L/R del monitor LCD, e l’altra
estremità nelle porte audio dell’attrezzatura video.
Collegamento di un’attrezzatura video dotata di porteCollegamento di un’attrezzatura video dotata di porte
Collegamento di un’attrezzatura video dotata di porte
Collegamento di un’attrezzatura video dotata di porteCollegamento di un’attrezzatura video dotata di porte
d’output componente, come lettori DVD o STB satellitared’output componente, come lettori DVD o STB satellitare
d’output componente, come lettori DVD o STB satellitare
d’output componente, come lettori DVD o STB satellitared’output componente, come lettori DVD o STB satellitare
1. Collegare una estremità del cavo componente alla porta
componente del monitor LCD, e l’altra estremità alle porte
d’output componente dell’attrezzatura video.
2. Inserire il connettore rosso e bianco del cavo RCA fornito in
dotazione nelle porte audio L/R del monitor LCD, e l’altra
estremità nelle porte Line-out dell’attrezzatura video.
2828
Guida alla Consultazione Veloce Guida alla Consultazione Veloce
28
Guida alla Consultazione Veloce
2828
Guida alla Consultazione Veloce Guida alla Consultazione Veloce
Page 33

Collegamento dell’adattatore di correnteCollegamento dell’adattatore di corrente
Collegamento dell’adattatore di corrente
Collegamento dell’adattatore di correnteCollegamento dell’adattatore di corrente
1. Collegare con fermezza il cavo dell’adattatore alla porta DC-in
(Ingresso CC) del monitor.
2. Collegare il cavo alla porta dell’adattatore e l’altra estremità del
cavo ad una presa di corrente.
4. Chiudere il coperchio dei connettori
posteriori. Allineare il coperchio con
i tre fori a fianco delle porte e
chiudere con delicatezza il coperchio.
Uno scatto indicherà che il coperchio
è stato chiuso correttamente.
Coperchio
connettore
posteriore
Regolazione del monitor
• L’angolazione del monitor può
essere regolata da -5º a 25º.
-5º~25º
• Il monitor può anche essere
ruotato di 90º in senso antiorario.
90º
• La base consente di girare il
monitor verso sinistra/destra di
120º al massimo.
Italiano
120º
Guida alla Consultazione Veloce Guida alla Consultazione Veloce
Guida alla Consultazione Veloce
Guida alla Consultazione Veloce Guida alla Consultazione Veloce
2929
29
2929
Page 34

Staccare la base (per montaggio su parete
VESA)
Safeguards
Italiano
Per staccare la base:
1. Girare in senso antiorario la copertura VESA per aprirla.
2. Rimuovere la copertura VESA dalla base.
3. Usare un cacciavite per rimuovere le quattro viti sulla base del
monitor.
AVVERTIMENTO! AVVERTIMENTO!
AVVERTIMENTO! Appoggiare il monitor a faccia in giù per rendere la
AVVERTIMENTO! AVVERTIMENTO!
rimozione più sicura e semplice. Si raccomanda di coprire la superficie
con un panno morbido per prevenire danni al monitor.
Software Pivot®Pro
Istruzioni per l’installazione:Istruzioni per l’installazione:
Istruzioni per l’installazione:
Istruzioni per l’installazione:Istruzioni per l’installazione:
1. Per prima cosa chiudere tutte le altre applicazioni.
2. Accertarsi che siano installati tutti i driver della scheda video del
produttore (originale) prima di installare il software Pivot
3. Inserire il CD di supporto nell’unità ottica ed eseguire il
programma START_PIVOT.
Al termine dell’installazione si possono impostare i tasti di scelta per le
varie angolazioni di rotazione premendo il tasto destro del mouse e
selezionando Proprietà --> Impostazioni --> Avanzate --> Software Pivot -->
Tasti di scelta.
®
Pro.
• Questo software supporta solamente I sistemi operativi Windows
98SE, ME, NT 4.0, 2000 e XP.
• Per altre informazioni o supporto, andare al sito www.portrait.com.
3030
Guida alla Consultazione Veloce Guida alla Consultazione Veloce
30
Guida alla Consultazione Veloce
3030
Guida alla Consultazione Veloce Guida alla Consultazione Veloce
®
Page 35

Introduzione alla Webcam integrata
Questa webcam integrata consente di acquisire foto e video; inoltre può
essere usata per mostrare una vivida immagine di sé stessi quando si usano
gli strumenti di comunicazione su base Internet.
HardwareHardware
Hardware
HardwareHardware
• La webcam 1.3 megapixel trasmette le immagini al PC tramite la porta
USB. Quindi, prima di usare la webcam, accertarsi di avere collegato il
connettore USB del cavo 3 in 1 fornito in dotazione.
• La webcam può essere regolata verso l'alto o il basso, come mostrato.
-30º ~ 30º
Non regolare la webcam verso l’alto oltre i 30°, diversamente si può
danneggiare la webcam.
SoftwareSoftware
Software
SoftwareSoftware
Installazione del software webcam:Installazione del software webcam:
Installazione del software webcam:
Installazione del software webcam:Installazione del software webcam:
1. Per prima cosa chiudere tutte le altre applicazioni.
2. Inserire il CD di supporto nell’unità ottica ed eseguire il programma
ASUS USB2.0 WebcamASUS USB2.0 Webcam
ASUS USB2.0 Webcam.
ASUS USB2.0 WebcamASUS USB2.0 Webcam
La risoluzione predefinita della webcam è 640 x 480. Se si vuole cambiare
la risoluzione predefinita per adeguarla a vari tipi di programmi applicativi,
andare su
programma LifeCam per modificare le impostazioni in base alle proprie
necessità.
Guida alla Consultazione Veloce Guida alla Consultazione Veloce
Guida alla Consultazione Veloce
Guida alla Consultazione Veloce Guida alla Consultazione Veloce
C:\WINDOWS\ASUS USB2.0 WebcamC:\WINDOWS\ASUS USB2.0 Webcam
C:\WINDOWS\ASUS USB2.0 Webcam ed attivare il
C:\WINDOWS\ASUS USB2.0 WebcamC:\WINDOWS\ASUS USB2.0 Webcam
• Il formato video acquisiti dalla webcam è VGA (640 x 480) per
aumentare l’efficienza della trasmissione con tutti i tipi di strumenti
di comunicazione Internet.
• Prima di usare la webcam, è necessario installare il driver webcam sul
PC.
• Il driver webcam supporta solo i sistemi operativiMicrosoft® Windows
2000/XP con Microsoft® Direct X.
3131
31
3131
Italiano
Page 36

Software LifeFrame
Introduzione ed istruzioni per l’installazioneIntroduzione ed istruzioni per l’installazione
Introduzione ed istruzioni per l’installazione
Introduzione ed istruzioni per l’installazioneIntroduzione ed istruzioni per l’installazione
Per acquisire foto o sequenze video, ASUS PW201 mette a disposizione
l’utilità di facile uso LifeFrame, che funziona insieme alla webcam integrata,
consentendo di acquisire autoritratti o sequenze video di sé stessi.
Italiano
• LifeFrame supporta solamente i sistemi operativi Microsoft
Windows® 2000/XP.
• Prima di iniziare ad usare questo software, installare LifeFrame sul
PC.
• Il software LifeFrame è allegato nel CD di supporto PW201.
I requisiti del sistema sono i seguenti:I requisiti del sistema sono i seguenti:
I requisiti del sistema sono i seguenti:
I requisiti del sistema sono i seguenti:I requisiti del sistema sono i seguenti:
1. Personal computer con processore Pentium® III 800 MHz o
superiore
®
2. Sistema operativo Microsoft
Windows® 2000/XP
3. Un minimo di 200 MB di spazio libero su disco per eseguire il
programma
4. 128 MB di RAM o superiore
5. Una scheda video che supporti la modalità colore 16 bit
Istruzioni per l’installazione:Istruzioni per l’installazione:
Istruzioni per l’installazione:
Istruzioni per l’installazione:Istruzioni per l’installazione:
1. Chiudere tutte le altre applicazioni.
2. Inserire il CD di supporto nell’unità ottica ed eseguire il
programma LifeFrame.
3. Seguire le istruzioni su schermo per completare l’installazione
Assicurarsi di collegare il connettore USB del cavo 3 in 1 alla porta USB
sul retro del monitor LCD; diversamente la webcam integrata e LifeFrame
non saranno attivati.
®
3232
Guida alla Consultazione Veloce Guida alla Consultazione Veloce
32
Guida alla Consultazione Veloce
3232
Guida alla Consultazione Veloce Guida alla Consultazione Veloce
Page 37

PW201
Monitor LCD
Guía de Instalación
Rápida
Español
Page 38

34 Guía de Instalación Rápida
Español
Precauciones de Seguridad
• Lea atentamente toda la documentación incluida antes de realizar ajustes
en el monitor.
• Para prevenir riesgos de fuego y/o eléctricos, nunca exponga el monitor a
lluvia o humedad.
• El monitor debe ser operado sólo desde el tipo de fuente de energía indicado
en la etiqueta. Si no esta seguro del tipo de energía que será usada con
su equipo, consulte con su punto de venta o empresa suministradora de
energía en su localidad.
• Utilice enchufes con toma de tierra que se adapten a su estándar local.
• Para asegurar una operación satisfactoria, utilice el monitor sólo con PCs
listados en UL (agencia americana independiente para la seguridad de
productos) con receptáculos congurados apropiadamente con un voltaje
marcado de entre 100-240V de corriente alterna (AC).
• Si encuentra problemas técnicos con el monitor, contacte un servicio técnico
cualicado o con su punto de venta
Descripción del Monitor
Parte frontal Parte trasera
Altavoces
estéreo
BaseBase
4
1
2
1
1. Sensor Entrada de señal
2. Sensor MENÚ
3. Sensor de decremento / Acceso
directo a Volumen
4. Sensor de incremento / Acceso
directo a Brillo
5. Acceso directo a modo SPLENDID™/
Salir del MENÚ
6. Sensor / Indicador de Encendido
5
3
4
2
6
7 8 10 12 13 14 15
7. Puerto de entrada DC
3
8. Puerto DVI
9. Puerto VGA
10. Puerto de Componentes (YPbPr)
11. Puerto de S-Video
12. Puerto de Video (Compuesto)
13. Puertos de sonido (L/R - Izq/Der)
14. Puerto de entrada PC Line-in
15. Puerto USB
9
11
Page 39

35Guía de Instalación Rápida
Español
Parte lateral
1. Puertos USB 2.0
2. Puerto de auriculares
Desplegando el Monitor
Enmonitorviene plegado.ParaEn monitor viene plegado. Para
desplegarlo, sujete la base con
una mano y con cuidado incline
el monitor hacia adelante con
la otra mano.
BaseBase
Conectando los cables
Para conectar los cables.
1
2
1. Ajuste el monitor a
la altura y ángulos
deseados.
2. Gire el monitor 90º en el
sentido contrario a las
agujas del reloj para ver
con claridad los puertos en
la parte inferior trasera.
Puertos de
entrada
Vista frontal Vista lateralVista frontal Vista lateral Vista lateralVista lateral
Page 40
36 Guía de Instalación Rápida
Español
3. Conecte los cables como se muestra en la gura. Reérase a las
Conectando un PC equipado con un puerto VGA/DVI
1. Conecte un extremo de los cables de VGA, audio, y USB a los
2. Conecte los otros extremos del cable 3-en-1 a los puertos VGA,
3. Ajustes los dos tornillos que aseguran el conector VGA.
4. Conecte un extremo de cable DVI proporcionado al monitor LCD, y
Conectando equipos de vídeo con puertos de salida de vídeo
compuesto o S-Video, tales como VCR, V8, o DV
1. Conecte en extremo del cable RCA proporcionado a los puertos de
2. Conecte en extremo del cable S-Video al puerto de vídeo del monitor
3. Conecte los conectores rojo y blanco de cable RCA proporcionado
siguientes secciones para instrucciones detalladas.
Alimentación
Cable DVI
Cable VGA
Cable Componentes
Cable RCA
Cable Audio PC
Cable USB 2.0
conectores del cable 3-en-1 proporcionado a los puertos VGA, LineIn, y USB respectivamente.
Line-In, y USB respectivamente.
el otro extremo a puerto DVI del PC.
vídeo y audio (izquierdo/derecho - L/R) del monitor LCD, y el otro
extremo a los puertos de vídeo y audio a su equipo de vídeo.
LCD, y el otro extremo al puerto de vídeo a su equipo de vídeo.
a los puertos de audio (izquierdo/derecho - L/R) del monitor LCD,
y el otro extremo a los puertos de salida de audio a su equipo de
vídeo.
Conectando equipos de vídeo con puertos de salida de vídeo
compuesto, tales como reproductores DVD o receptores por satélite
(satellite set-top box).
1. Conecte un extremo del cable de componentes al puerto de
componentes del monitor LCD, y el otro extremo al puerto de salida
de componentes de su equipo de vídeo.
2. Conecte los conectores rojo y blanco de cable RCA proporcionado a
los puertos de audio (izquierdo/derecho - L/R) del monitor LCD, y el
otro extremo a los puertos de salida audio a su equipo de vídeo.
Page 41

37Guía de Instalación Rápida
Español
Conectando el cable de alimentación
1. Conecte el extremo del conector del cable del adaptador al puerto Conecte el extremo del conector del cable del adaptador al puertoConecte el extremo del conector del cable del adaptador al puerto
DC-in del monitor LCD.DC-in del monitor LCD.
2. Conecte el extremo del enchufe del cable del adaptador a un enchufe Conecte el extremo del enchufe del cable del adaptador a un enchufeConecte el extremo del enchufe del cable del adaptador a un enchufe
o fuente de alimentación.
4. Cierre la cubierta de conexión trasera.
Alinee la cubierta a los tres zócalos cerca
de los puertos y cierre la cubierta con
cuidado. Un “clic” indica que la cubierta a
sido cerrada con éxito.
Cubierta de conexión trasera
Ajustando el Monitor
• Puede ajustar el ángulo del monitorPuede ajustar el ángulo del monitor
entre -5º a 25º.
-5°~25°
• Puede girar el monitor 90º enPuede girar el monitor 90º en
sentido contrario a las agujas
del reloj.
90°
• La base permite girar elLa base permite girar el
monitor izquierda/derecha en
un ángulo de hasta 120º.
120°
Page 42

38 Guía de Instalación Rápida
Español
Separando la Base
(Para instalaciones VESA en muros)
Para separar la base:
1. Gire la cubierta VESA en el sentido contrario a las agujas del reloj para
abrir ésta.
2. Retire la cubierta VESA de la base.
3. Utilice un destornillador para retirar los cuatro tornillos en la base del
monitor.
Coloque el monitor cara abajo para hacer la separación más segura y fácil.
Recomendamos cubrir la supercie del monitor con un paño suave para
prevenir daños.
Software Pivot®Pro
• Instrucciones de instalación:
1. Cierre todas las aplicaciones antes de comenzar.
2. Asegúrese de que los controladores del fabricante de su tarjeta
gráca (nativos) han sido instalados antes de instalar el software
3. Inserte el CD de soporte en la unidad óptica y ejecute el programa
Tras el proceso de instalación, puede denir teclas de acceso directo para
diferentes grados de rotación a través del botón derecho del ratón --> entre
en Propiedades --> Settings (Conguración) --> Advanced (Avanzado) -->Pivot
Software -->Hotkeys (Teclas de acceso directo).
Pivot®Pro.
START_PIVOT.
• Este software es soportado solamente por los Sistemas Operativos
Windows® 98SE, ME, NT 4.0, 2000, y XP.
• Para más información o ayuda, por favor acceda al sitio Web www.
portrait.com.
Page 43

39Guía de Instalación Rápida
Español
Cámara Webcam integrada
La Webcam integrada permite tomar fotos y hacer vídeos. Podrá mostrar su
imagen mientras habla con amigos a través de herramientas de comunicación
en Internet.
Hardware
• La webcam de 1.3 megapíxeles transmite imágenes a su PC a través del
puerto USB. Asegúrese de que ha conectado el conector USB del cable
3-en-1 proporcionado antes de usar la webcam.
• La webcam puede ser ajustada verticalmente como se muestra en la
gura.
-30º ~ 30º
No gire la webcam más de 30º en cualquier dirección, ya que podría
dañar ésta.
Software
Para instalar el controlador de la webcam:
1. Cierre todas las aplicaciones.
2. Inserte el CD de soporte en la unidad óptica y ejecute el programa
de la webcam ASUS USB2.0 Webcam.
La resolución predeterminada de la webcam es 640 x 480. Si desea cambiar
la resolución para ajustarla a diferentes tipos de aplicaciones, vaya a
C:\WINDOWS\ASUS USB2.0 Webcam y ejecute el programa LifeCam para
modicar los ajustes de acuerdo a sus necesidades.
• El formato de captura de vídeo es VGA (640 x 480) para incrementar
la eciencia en transmisiones a través de diferentes herramientas de
comunicación en Internet.
• Antes de usar la webcam, necesitará instalar el controlador de la
webcam en su PC.
• El controlador de la webcam soporta el sistema operativo Microsoft®
Windows 2000/XP con Microsoft® Direct X.
Page 44

Software LifeFrame
Introducción e instrucciones de instalación
ASUS PW201 proporciona el software LifeFrame, que es muy fácil de usar y
permite usar la webcam integrada para crear sus propias fotos o vídeoclips.
• LifeFrame solo soporta sistemas operativos Microsoft® Windows®
2000/XP.
• No olvide instalar LifeFrame en su PC antes de comenzar a usar éste.
• El software LifeFrame esta incluido en el CD de soporte de PW201.
Requerimientos del sistema:
1. PC con procesador Pentium® III 800 MHz o superior.
2. Sistema Operativo Microsoft® Windows® 2000/XP.
3. Al menos 200 MB de espacio en disco duro disponible.
4. Al menos 128 MB de RAM.
5. Tarjeta gráca con soporte para al menos 16-bit de colores.
Instrucciones de instalación:
1. Cierre todas las aplicaciones.
2. Inserte el CD de soporte en la unidad óptica y ejecute el programa
LifeFrame.
3. Siga las instrucciones en pantalla para completar la instalación.
Asegúrese de que ha conectado el conector USB del cable 3-en-1
proporcionado al puerto USB en la parte trasera del monitor LCD. Si no es
así, la cámara integrada y el software LifeFrame no serán activados.
Español
40 Guía de Instalación Rápida
Page 45

PW201
LCD Монитор
Краткое руководство по
установке
Русский
Page 46

42
Краткое руководство по установке
Русский
Техника безопасности
• Перед установкой монитора, тщательно прочитайте всю
документацию, поставляемую в комплекте.
• Для предотвращения возгорания или короткого замыкания,
оберегайте монитор от дождя и сырости.
• Монитор следует подключать только к источнику питания,
указанному на этикетке. Если вы не уверены в типе электропитания
в вашем доме, проконсультируйтесь с местной энергетической
компанией
• Монитор имеет трехштырьковую вилку с третьим (заземляющим)
контактом. Для подключения используйте только заземленные
розетки для обеспечения заземления прибора.
• Для гарантии нормальной работы используйте монитор только с
компьютерами, соответствующими требованиям UL, имеющими
соответствующую маркировку.
• Если вы столкнулись с техническими проблемами, обратитесь в
сервис или к вашему продавцу.
Изучение монитора
Вид спереди Вид сзади
Камера
Стерео
колонки
Подставка
4
1
1
3
2
1. Кнопка выбора входа
2. Кнопка MENU
3. Уменьшить громкость/яркость
4. Увеличить громкость/яркость
5. Кнопка режима SPLENDID™/выход
6. Кнопка питания/индикатор
7. Разъем DC in
8. Разъем DVI
5
4
6
7 8 10 12 13 14 15
9
9. Разъем VGA
10. Компонентный вход (YPbPr)
11. Разъем S-Video
12. Разъем Video(Композитный)
13. Лев./Пр. аудиоразъемы
14. Разъем аудиовхода ПК
15. Разъем USB
11
Page 47

43
Краткое руководство по установке
Русский
Вид сбоку
1. Порты USB 2.0
2. Разъем для наушников
Разворачивание монитора
Мони тор пос тавляе тся
в сложенном виде. Для
того, чтобы подготовить
монитор к использованию,
удерживайте основание
одной рукой и осторожно
наклоните монитор вперед
другой рукой.
Подставка
Подключение кабелей
Для подключения кабелей:
1
2
1. Установите желаемую
высоту и наклон
монитора.
2. П оверни те мон итор н а
90° против часовой стрелки,
таким образом вы можете
хорошо видеть раъемы,
расположенные в нижней
части задней панели.
Вид спереди Вид сбоку
Разъемы
Page 48

44
Краткое руководство по установке
Русский
3. Подключите кабели как показано. За подробностями обратитесь к
соответствующему разделу.
Блок питания
Кабель DVI
Кабель VGA
Компонентный Кабель
Кабель RCA
Аудиокабель ПК
Кабель USB 2.0
Подключение компьютера с разъемом VGA/DVI
1. Подключите разъемы VGA, аудио и USB поставляемого
(3-в-1) кабеля к разъемам VGA, Line-in и USB LCD монитора.
2. Подключите другой конец поставляемого (3-в-1) кабеля к
разъемам VGA, Line-out и USB компьютера.
3. Затяните два винта для закрепления VGA разъема.
4. Подключите один конец поставляемого DVI кабеля к LCD монитору,
затем подключите другой конец к разъему DVI компьютера.
Подключение видеоустройства с выходом Video (композитный)
или S-Video например VCR, V8 или DV
1. Подключите один конец поставляемого RCA кабеля к видео и
аудиоразъемам LCD монитора, затем подключите другой конец
к видео и аудиоразъемам вашего устройства.
2. Подключите один конец S-Video кабеля к разъему S-Video
LCD монитора, затем другой конец к разъему S-Video вашего
устройства.
3. Подключите красный и белый разъемы поставляемого RCA кабеля
к аудиоразъемам LCD монитора, затем подключите другой конец
к аудиоразъемам вашего устройства.
Подключение видеоустройства с компонентным выходом,
например DVD плеер или cистема спутникового телевидения
1. Подключите один конец компонентного кабеля к компонентному
разъему LCD монитора, затем подключите другой конец к выходу
вашего устройства.
2. Подключите красный и белый разъемы поставляемого RCA кабеля
к аудиоразъемам LCD монитора, затем подключите другой конец
к линейному выходу вашего устройства.
Page 49

45
Краткое руководство по установке
Русский
Подключение блока питания
1. Подключите шнур адаптера к разъему DC-in монитора.
2. Подключите шнур питания к блоку питания а другой конец к
розетке.
4. Закройте заднюю крышку.
Выровняйте и осторожно
закройте крышку. Щелчок
означает, что крышка встала
на место.
Задняя крышка
Регулировка монитора
•
Вы можете регулировать угол
наклона монитора от -5° до 25°.
-5°~25°
• Основани е позволяет вам
разворачивать монитор влево/
вправо на 120°.
120°
• Также вы можете повернуть
монитор на 90° против часовой
стрелки.
90°
Page 50

46
Краткое руководство по установке
Русский
Снятие основания для крепления на стену (VESA wall mount)
Снятие основания:
1. Для снятия крышки VESA поверните ее против часовой стрелки.
2. Снимите крышку VESA с основания.
3. С помощью отвертки открутите четыре винта на основании
монитора.
Осторожно! Для удобного снятия крышки осторожно положите
монитор экраном вниз на ровную поверхность. Мы рекомендуем
застелить поверхность мягкой тканью для предотвращения
повреждения монитора.
Программное обеспечение Pivot®Pro
Инструкции по установке:
1. Сначала закройте все другие приложения.
2. Перед установкой программного обеспечения Pivot®Pro убедитесь,
что драйвера на видеокарту уже установлены.
3. Вставьте компакт-диск в оптический привод и запустите программу
START_PIVOT.
После установки, вы можете назначить горячие клавиши для различных
положений поворота монитора, нажав правую клавишу мыши -->выбрав
Properties --> Settings --> Advanced -->Pivot Software -->Hotkeys.
• Это программное обеспечение поддерживает только
операционные системы Windows® 98SE, ME, NT 4.0, 2000 и XP.
• За помощью или дополнительной информацией пожалуйста
обращайтесь на www.portrait.com.
Page 51

47
Краткое руководство по установке
Русский
Встроенная камера
Эта встроенная камера позволяет вам делать фотографии и видеозаписи;
во время разговора с друзьями через Интернет, вы можете использовать
камеру для показа вашего изображения.
Аппаратура
• 1.3 мегапиксельная камера передает изображение в ваш ПК
через USB порт. Перед использованием камеры убедитесь, что вы
подключили USB разъемы поставляемого (3-в-1) кабеля.
• Камера регулируется вверх и вниз как показано.
-30° ~ 30°
Не поворачивайте камеру ввех или вниз на угол более 30°; это может
повредить камеру.
Программное обеспечение
Установка драйвера:
1. Сначала закройте все другие приложения.
2. Вставьте компакт-диск в оптический привод и запустите
программу ASUS USB2.0 Webcam.
По умолчанию разрешение камеры 640 x 480. Если вы хотите изменить
разрешение по умолчанию, перейдите в C:\WINDOWS\ASUS USB2.0
Webcam и запустите программу LifeCam и установите необходимые
параметры.
• Камера захватывает видео в режиме VGA (640 x 480);
это увеличивает эффективность передачи через Интернет.
• Перед использованием камеры, вам нужно установить драйвер в
ваш ПК.
• Драйвер поддерживает только операционные системы Microsoft
Windows 2000/XP с установленным Microsoft® Direct X.
®
Page 52

Программа LifeFrame
Введение и инструкции по установке
Для захвата изображения или видео, ASUS PW201предоставляет легкую
в использовании программу LifeFrame, которая может работать со
встроенной камерой, позволяя пользователям делать фотографии и
видеоклипы.
• LifeFrame подерживат только операционные системы Microsoft
Windows® 2000/XP.
• Перед использованием этой программы, установите LifeFrame в
ваш ПК.
• Программа LifeFrame находится на компакт-диске PW201.
Системные требования:
1. Компьютер с процессором Pentium® III 800 MГц или выше
2. Операционная система Microsoft® Windows® 2000/XP
3. Минимум 200 Mб свободного места на жестком диске
4. 128 Mб системной памяти или больше
5. Видеокарта, поддерживающая режим high color 16-бит
Инструкции по установке:
1. Закройте все другие приложения.
2. Вставьте компакт-диск в оптический привод и запустите
программу LifeFrame.
3. Следуйте инструкциям для завершения установки
®
Убедитесь, что вы подключили USB разъемы поставляемого (3-в-
1) кабеля к USB портам компьютера и LCD монитора; в противном
случае, встроенная камера и LifeFrame работать не будут.
Русский
48
Краткое руководство по установке
Page 53

PW201
LCD-monitor
Snelstartgids
Nederlands
Page 54

Veiligheidsinformatie
Nederlands
• Lees alle documentatie die bij de verpakking is geleverd aandachtig door
voordat u de monitor installeert.
• Om het risico op brand of schokken te voorkomen, mag u de monitor
nooit blootstellen aan regen of vocht.
• De monitor mag alleen worden gebruikt met het type stroombron dat op
het label is aangegeven. Als u niet zeker bent van het stroomtype in uw
huis, kunt u contact opnemen met uw leverancier of uw lokale
elektriciteitsmaatschappij.
• Gebruik de geschikte voedingsstekker die voldoet aan uw lokale
elektriciteitsnormen.
• Voor een bevredigende werking, mag u de monitor alleen gebruiken met
UL-gecertificeerde computers die over de correct geconfigureerde
contactdoos beschikken met een markering 100-240V AC.
• Als u technische problemen met de monitor ondervindt, moet u contact
opnemen met een bevoegde servicetechnicus of uw verkoper.
Kennismaken met de monitor
Voorkant van deVoorkant van de
Voorkant van de
Voorkant van deVoorkant van de
LCD-monitorLCD-monitor
LCD-monitor
LCD-monitorLCD-monitor
WebcamWebcam
Webcam
WebcamWebcam
StereoStereo
Stereo
StereoStereo
LuidsprekerLuidspreker
Luidspreker
LuidsprekerLuidspreker
VoetstukVoetstuk
Voetstuk
VoetstukVoetstuk
44
4
44
55
5
11
1
11
11
1
11
1. Sensor invoerbron
2. Sensor MENU
3. Sensor voor verhogen/Sneltoets Volume
4. Sensor voor verhogen/Sneltoets helderheid
5. Sneltoets SPLENDID™-modus/MENU afsluiten
6. Voedingssensor/indicator
33
3
33
22
2
22
55
44
4
44
66
6
66
Achterkant van deAchterkant van de
Achterkant van de
Achterkant van deAchterkant van de
LCD-monitorLCD-monitor
LCD-monitor
LCD-monitorLCD-monitor
77
88
7
8
77
88
7. DC-ingang
8. DVI-poort
9. VGA-poort
10. Component-ingangen (YPbPr)
11. S-Video-poort
12. Videopoort (Composite)
13. Audiopoorten L/R
14. Pc-lijningang
15. USB-poort
1010
10
1010
99
9
99
1111
11
1111
1212
12
1212
1313
13
1313
1414
14
1414
1515
15
1515
5050
Snelstartgids Snelstartgids
50
Snelstartgids
5050
Snelstartgids Snelstartgids
Page 55

ZijaanzichtZijaanzicht
Zijaanzicht
ZijaanzichtZijaanzicht
1. USB 2.0-poorten
2. Hoofdtelefoonaansluiting
De monitor openvouwen
De monitor is dicht
gevouwen in de verpakking.
Om de monitor open te
vouwen, houdt u de voet
met de ene hand vast en
kantelt u de monitor
voorzichtig naar voor met
de andere hand.
Voetstuk
De kabels aansluiten
De kabels aansluiten:
11
1
11
Nederlands
22
2
22
1. Stel de monitor af op
de gewenste hoogte en
met de kantelhoek van
uw voorkeur.
2. Draai de monitor 90°
linksom zodat u de
poorten op de
onderkant van het
achterpaneel duidelijk
kunt zien.
Vooraanzicht
Snelstartgids Snelstartgids
Snelstartgids
Snelstartgids Snelstartgids
Ingangen
Zijaanzicht
5151
51
5151
Page 56

Nederlands
3. Sluit de kabels aan zoals weergegeven. Raadpleeg de volgende secties
voor gedetailleerde instructies.
Een computer die voorzien is van een VGA/DVI-poort aansluitenEen computer die voorzien is van een VGA/DVI-poort aansluiten
Een computer die voorzien is van een VGA/DVI-poort aansluiten
Een computer die voorzien is van een VGA/DVI-poort aansluitenEen computer die voorzien is van een VGA/DVI-poort aansluiten
1. Stop de VGA-, audio- en USB-aansluitingen van de meegeleverde
2. Sluit de andere uiteinden van de bijgeleverde 3-in-1-kabel respectievelijk
3. Maak de twee schroeven vast om de VGA-aansluiting te bevestigen.
4. Sluit het ene uiteinde van de bijgeleverde DVI-kabel aan op de
Een videoapparaat met Video- (composiet) of S-Video-Een videoapparaat met Video- (composiet) of S-Video-
Een videoapparaat met Video- (composiet) of S-Video-
Een videoapparaat met Video- (composiet) of S-Video-Een videoapparaat met Video- (composiet) of S-Videouitgangen, zoals VCR, V8 of DV aansluitenuitgangen, zoals VCR, V8 of DV aansluiten
uitgangen, zoals VCR, V8 of DV aansluiten
uitgangen, zoals VCR, V8 of DV aansluitenuitgangen, zoals VCR, V8 of DV aansluiten
1. Sluit het ene uiteinde van de bijgeleverde RCA-kabel aan op de
2. Sluit het ene uiteinde van de S-Videokabel aan op de S-Videopoort
3. Sluit de rode en witte aansluitingen van de bijgeleverde RCA-kabel
Voedingsadapter
DVI-kabel
VGA-kabel
Component-kabel
RCA-kabel
Pc-audiokabel
USB 2.0-kabel
3-in-1 kabel respectievelijk in de VGA-, Lijningang- en USB-poorten
van de LCD-monitor.
aan op de VGA-, lijnuitgang- en USB-poorten van uw computer.
LCD-monitor en sluit het andere uiteinde aan op de DVI-poort van
uw computer.
videopoorten en de audiopoorten L/R van de LCD-monitor, en sluit
vervolgens het andere uiteinde aan op de video- en audiopoorten
van uw video-apparatuur.
van de LCD-monitor en sluit vervolgens het andere uiteinde aan op
de S-video-poort van uw video-appartuur.
aan op de audiopoorten L/R van de LCD-monitor en sluit vervolgens
het andere uiteinde aan op de audiopoorten van uw video-apparatuur.
Video-apparatuur met component-uitgangen, zoals eenVideo-apparatuur met component-uitgangen, zoals een
Video-apparatuur met component-uitgangen, zoals een
Video-apparatuur met component-uitgangen, zoals eenVideo-apparatuur met component-uitgangen, zoals een
dvd-speler of een satelliet settop-box, aansluitendvd-speler of een satelliet settop-box, aansluiten
dvd-speler of een satelliet settop-box, aansluiten
dvd-speler of een satelliet settop-box, aansluitendvd-speler of een satelliet settop-box, aansluiten
1. Sluit het ene uiteinde van de componentkabel aan op de
componentpoorten van de LCD-monitor en sluit vervolgens het andere
uiteinde aan op de component-uitgang van uw video-apparatuur.
2. Sluit de rode en witte aansluitingen van de bijgeleverde RCA-kabel aan
op de audiopoorten L/R van de LCD-monitor en sluit vervolgens het
andere uiteinde aan op de audiolijnuitgang van uw video-apparatuur.
5252
Snelstartgids Snelstartgids
52
Snelstartgids
5252
Snelstartgids Snelstartgids
Page 57

De voedingsadapter aansluitenDe voedingsadapter aansluiten
De voedingsadapter aansluiten
De voedingsadapter aansluitenDe voedingsadapter aansluiten
1. Sluit eerst de kabel van de adapter stevig aan op de
gelijkstroomingang van de monitor.
2. Sluit vervolgens de voedingsstekker aan op de adapterpoort en
stop het andere uiteinde in een stopcontact.
4. Sluit de klep van de aansluiting achteraan.
Lijn de klep uit op de drie sleuven bij de
poorten en sluit de klep grondig. Als u een
klik hoort, betekent dit dat de klep correct
is gesloten.
Klep aansluiting achter
De monitor afstellen
Nederlands
• U kunt de hoek van de monitor
aanpassen tussen -5º en 25º.
-5º~25º
• U kunt de monitor ook 90º
linksom draaien.
90º
• Het voetstuk biedt u de
mogelijkheid de monitor tot 120°
links/rechts te draaien.
120º
Snelstartgids Snelstartgids
Snelstartgids
Snelstartgids Snelstartgids
5353
53
5353
Page 58

Het voetstuk loskoppelen
Nederlands
(voor VESA-wandmontage)
Het voetstuk loskoppelen:
1. Draai de VESA-klep linksom om de klep te openen.
2. Verwijder de VESA-klep van het voetstuk.
3. Gebruik een schroevendraaier om de vier schroeven op het voetstuk
van de monitor te verwijderen.
Leg de monitor met de voorzijde omlaag om het loskoppelen
gemakkelijker en veiliger te laten verlopen. Wij raden u aan het oppervlak
van het beeldscherm af te dekken met een zachte doek om schade aan
de monitor te voorkomen.
Pivot®Pro-software
Installatierichtlijnen:Installatierichtlijnen:
Installatierichtlijnen:
Installatierichtlijnen:Installatierichtlijnen:
1. Sluit eerst alle andere toepassingen.
2. Zorg ervoor dat de (oorspronkelijke) stuurprogramma's van de
fabrikant van de grafische kaart zijn geïnstalleerd voordat u de
Pivot®Pro-software installeert.
3. Plaats de ondersteunings-cd in het optisch station en voer het
programma START_PIVOT uit.
Na de installatie kunt u de sneltoetsen instellen voor verschillende
draaihoeken. Klik hiervoor met de rechtermuisknop op het bureaublad -->
selecteer Eigenschappen --> Instellingen --> Geavanceerd --> Pivot
Software --> Hotkeys.
• Deze software ondersteunt alleen de besturingssystemen Windows
98SE, ME, NT 4.0, 2000, en XP.
• Ga naar www.portrait.com voor meer informatie of hulp.
5454
Snelstartgids Snelstartgids
54
Snelstartgids
5454
Snelstartgids Snelstartgids
®
Page 59

Kennismaken met de ingebouwde webcam
Met deze ingebouwde webcam kunt u foto’s maken en video’s opnemen.
Wanneer u via communicatiehulpprogramma’s die op het internet zijn
gebaseerd, met uw vrienden praat, kunt u de webcam gebruiken om live
beelden weer te geven.
HardwareHardware
Hardware
HardwareHardware
• De webcam met 1,3 megapixels verzendt beelden naar uw pc via de USBpoorten. Zorg er daarom voor dat u de USB-aansluitingen van de
bijgeleverde 3-in-1-kabel hebt aangesloten voordat u de webcam gebruikt.
• De webcam kan omhoog of omlaag worden afgesteld, zoals weergegeven.
-30º ~ 30º
Duw de webcam niet meer dan 30° omhoog of omlaag, anders kunt u de
webcam beschadigen.
SoftwareSoftware
Software
SoftwareSoftware
Nederlands
Het webcamstuurprogramma installeren:Het webcamstuurprogramma installeren:
Het webcamstuurprogramma installeren:
Het webcamstuurprogramma installeren:Het webcamstuurprogramma installeren:
1. Sluit eerst alle andere toepassingen.
2. Plaats de ondersteunings-cd in het optisch station en voer het
programma
ASUS USB2.0 WebcamASUS USB2.0 Webcam
ASUS USB2.0 Webcam uit.
ASUS USB2.0 WebcamASUS USB2.0 Webcam
De standaardresolutie van de webcam is 640 x 480. Als u de
standaardresolutie wilt wijzigen om te voldoen aan de eisen van verschillende
toepassingsprogramma’s, opent u de map
WebcamWebcam
Webcam en activeert u het programma met de naam LifeCam om de
WebcamWebcam
C:\WINDOWS\ASUS USB2.0C:\WINDOWS\ASUS USB2.0
C:\WINDOWS\ASUS USB2.0
C:\WINDOWS\ASUS USB2.0C:\WINDOWS\ASUS USB2.0
instellingen volgens uw behoeften aan te passen.
• Het opgenomen videoformaat van de webcam is VGA (640x480). In
deze modus kan de verzendefficiëntie van alle types
communicatiehulpprogramma’s via het internet verhogen.
• Voordat u de webcam gebruikt, moet u het stuurprogramma van de
webcam installeren op uw pc.
• Het stuurprogramma van de webcam ondersteunt alleen het
besturingssysteem Microsoft® Windows 2000/XP met Microsoft
Direct X.
Snelstartgids Snelstartgids
Snelstartgids
Snelstartgids Snelstartgids
®
5555
55
5555
Page 60

LifeFrame-software
Nederlands
Kennismaking en installatierichtlijnenKennismaking en installatierichtlijnen
Kennismaking en installatierichtlijnen
Kennismaking en installatierichtlijnenKennismaking en installatierichtlijnen
Om foto’s of videoclips te maken, biedt de ASUS PW201 LifeFrame, een
gebruiksvriendelijk programma dat kan werken met de ingebouwde
webcam, zodat gebruikers hun eigen foto's of videoclips kunnen maken.
• LifeFrame ondersteunt alleen de besturingssystemen Microsoft
Windows® 2000/XP.
• Installeer LifeFrame op uw pc voordat u het gebruik van deze
software start.
• De LifeFrame-software wordt meegeleverd op de ondersteunings-cd
van de PW201.
Dit apparaat stelt de volgende systeemvereisten:Dit apparaat stelt de volgende systeemvereisten:
Dit apparaat stelt de volgende systeemvereisten:
Dit apparaat stelt de volgende systeemvereisten:Dit apparaat stelt de volgende systeemvereisten:
®
1. Een pc met een Pentium
III 800 MHz-processor of hoger
®
2. Het besturingssysteem Microsoft® Windows® 2000/XP
3. Minimum 200 MB vrije harde schijfruimte om het programma uit te
voeren
4. 128 MB RAM of meer
5. Een grafische kaart met ondersteuning van de modus 16-bits hoge
kleuren
Installatierichtlijnen:Installatierichtlijnen:
Installatierichtlijnen:
Installatierichtlijnen:Installatierichtlijnen:
1. Sluit alle andere toepassingen.
2. Plaats de ondersteunings-cd in het optisch station en voer het
programma LifeFrame uit.
3. Volg de instructies op het scherm om de installatie te voltooien.
Zorg ervoor dat u de USB-aansluiting van de meegeleverde 3-in-1-kabel
hebt aangesloten op de USB-poort op de achterkant van de LCDmonitor, anders zullen de webcam en LifeFrame niet worden geactiveerd.
5656
Snelstartgids Snelstartgids
56
Snelstartgids
5656
Snelstartgids Snelstartgids
Page 61

PW201
Page 62

UL
4
2
1
1
34
5
6
7
9
8
11
10 15
12
13
14
5858
58
5858
1.
2. OSD
3.
4.
5. SPLENDIDTM
6.
7.
8. DVI
9. VGA
10. YPbPr
11. S
12.
13.
14.
15. USB
Page 63

1
1. USB 2.0
2
2.
PW201
1.
90
2.
90
5959
59
5959
Page 64
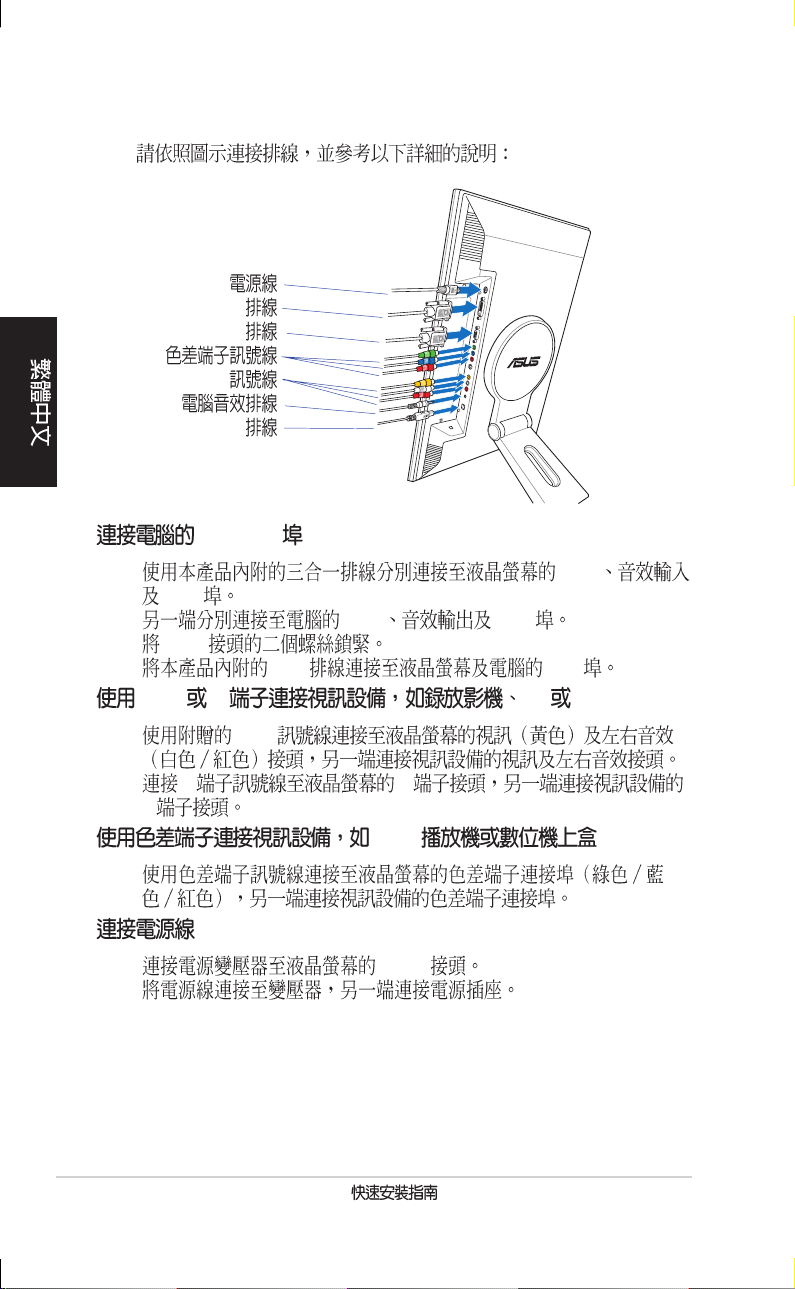
3.
DVI
VGA
RCA
USB 2.0
VGA/DVI
1. VGA
USB
2. VGA USB
3. VGA
4. DVI DVI
RCA S V8 DV
1. RCA
2. S S
S
1.
1. DC-in
2.
6060
60
6060
DVD
Page 65

4.
-5 25
120
-5 ~ 25
120
90
90
6161
61
6161
Page 66

Safeguards
1. VESA VESA
2. VESA
3.
Pivot Pro
1.
2. Pivot Pro
3. support CD START_PIVOT
Windows 98SE, ME, NT 4.0, 2000 XP
Pivot Software/
www.portrait.com
6262
62
6262
Page 67

130 USB
USB USB
1.
2. support CD
-30 ~ 30
30
640 x 480
C:\WINDOWS\ASUS USB2.0 Webcam
640 * 480
Microsoft Windows 2000/XP
Microsoft Direct X
6363
63
6363
Page 68
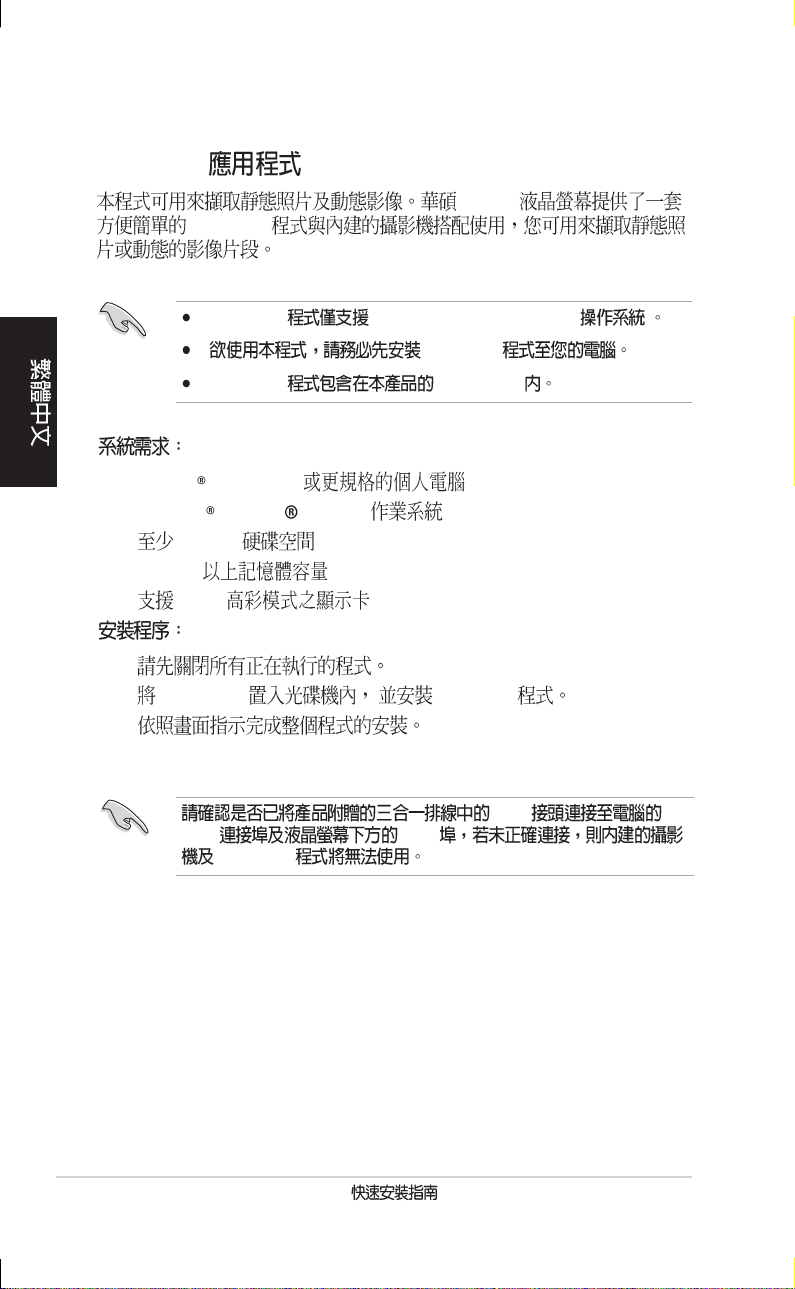
LifeFrame
PW201
LifeFrame
LifeFrame Microsoft Windows 2000/XP
LifeFrame
LifeFrame support CD
1. Pentium III 800 MHz
2. Microsoft Windows 2000/XP
3. 200 MB
4. 128 MB
5. 16-bit
1.
2. support CD LifeFrame
3.
6464
64
6464
USB
USB USB
LifeFrame
Page 69

PW201
Page 70

UL
4
2
1
1
34
5
6
7
9
8
11
10 15
12
13
14
6666
66
6666
1.
2. OSD
3.
4.
5. SPLENDIDTM
6.
7.
8. DVI
9. VGA
10. YPbPr
11. S
12.
13.
14.
15. USB
Page 71

1
1. USB 2.0
2
2.
PW201
1.
90
2.
90
6767
67
6767
Page 72

3.
DVI
VGA
RCA
USB 2.0
VGA/DVI
1. VGA
USB
2. VGA USB
3. VGA
4. DVI DVI
RCA S V8 DV
1. RCA
2. S S S
DVD
1.
1. DC-in
2.
6868
68
6868
Page 73

4.
-5 25
120
-5 ~ 25
120
90
90
6969
69
6969
Page 74

Safeguards
1. VESA VESA
2. VESA
3.
Pivot Pro
1.
2. Pivot Pro
3. support CD START_PIVOT
Windows 98SE, ME, NT 4.0, 2000 XP
Pivot Software/
www.portrait.com
7070
70
7070
Page 75

130 USB
USB USB
1.
2. support CD
-30 ~ 30
30
640 x 480
C:\WINDOWS\ASUS USB2.0 Webcam
640 * 480
Microsoft Windows 2000/XP
Microsoft Direct X
7171
71
7171
Page 76

LifeFrame
PW201
LifeFrame
LifeFrame Microsoft Windows 2000/XP
LifeFrame
LifeFrame support CD
1. Pentium III 800 MHz
2. Microsoft Windows 2000/XP
3. 200 MB
4. 128 MB
5. 16-bit
1.
2. support CD LifeFrame
3.
7272
72
7272
USB
USB USB
LifeFrame
Page 77

PW201
液晶ディスプレイ
クイックスタートガイド
日
本
語
Page 78

安全にお使いいただくために
• モニタをセットアップする前 に 、本製品に添付のマニュアルをお読みください。
• 火気、衝撃、湿気を避けてください。
• ラベルに表示されている電源でご使用ください。家庭用電源のタイプがわからない
場合は、販売店または電力会社にお問い合わせください。
• ご使用の環境の規格に対応した電源プラグをご使用ください。
• UL規格のコンピュータ(100-240VACのレセプタクル)をお使いください。
• 技術的な問題が発生した場合は、販売店にお問い合わせください。
ディスプレ イ
前後
ウェブカム
日
本
語
スタンド
4
1
2
1
1.入力ソースセンサー
2.メニューセンサー
3.調節キー(ー)/ボリュームホットキ ー
4.調節キー(+)/輝度ホットキ ー
5.SPLENDID™モードホットキー/退出メニュー
6.電源センサー/インジケータ
5
3
4
ステレオスピーカ
6
7 8 10 12 13 14 15
9
7.DC入力ポート
8.DVIポート
9.VGAポート
10.コンポーネント入力ポート(YPbPr)
11.Sビデオポート
12.ビデオポート(コンポジット)
13.L/Rオーディオポート
14.PCライン入力ポート
15.USBポート
11
74
クイックスタートガイド
Page 79

1.USB2.0ポート
2.ヘッドホン
液晶ディスプレイを開く
出荷時の状態では、液晶ディス
プレイは折り畳んだ状態で収納
されています。ディス プレイを 開
く時 は 片 手 で スタンドをおさえ
ながらゆっくりとディスプ レイを
上げてください。
スタンド
横
1
2
ケーブルを接続する
手順
1. ディスプレイの高さと傾
きを調 整します。
2. ディスプレイを90º回転さ
せて、リアパネルのポートを
確認します。
入力ポート
前 横
クイックスタートガイド
日
本
語
75
Page 80

日
本
語
3. 下の図のようにケーブルを接続します。詳細は、以下の説明を参考にしてください。
電源アダプタ
DVIケーブル
VGAケーブル
コンポーネントケーブル
RCAケーブル
PCオーディオケーブル
USB2.0ケーブル
VGA/DVIポート装備のコンピュータを接続する
1. 付属の3イン1ケーブルのVGA、オーディオ、USBコネクタをLCDモニタの
VGA、ライン入力 、USBポートに接続します。
2. 3イン1ケーブルの片側をコンピュータのVGA、ライン入力、USBポートに接続
します。
3. ネジをしっかり締めVGAコネクタを固定します。
4. 付属のDVIケーブルの片側をLCDモニタのDVIポートに接続し、片側をコ
ンピュータのDVIポートに接続します。
ビデオ(コンポジット)またはSビデオ出力ポート装備のビデオ装置(VCR、V8、
DV)を接続する
1. 付属のRCAケーブルの片側をLCDモニタのビデオとL/Rオーディオポート
に接続し、片側をビデオ装置のビデオとオーディオポートに接続します。
2. Sビデオケーブルの片側をLCDモニタのSビデオポートに接続し、片側をビ
デオ装置のSビデオポートに接続します。
3. 付属のRCAケーブルのレッドとホワイトのコネクタをLCDモニタのL/Rオー
ディオポ ート に 接 続し 、片側をビデオ装置のオーディオポートに接続します。
コンポーネント出力ポート装備のビデオ装置(DVDプレーヤー、サテライトセ
ット・トップ ボックス)を接続する
1. コンポーネントケーブルの片側をLCDモニタのコンポーネントポートに接続
し、片側をビデオ装置のコンポーネント出力ポートに接続します。
2. 付属のRCAケーブルのレッドとホワイトのコネクタをLCDモニタのL/Rオー
ディオポ ート に 接 続し 、片側をビデオ装置のオーディオライン出力ポートに接続し
ます。
76
クイックスタートガイド
Page 81

電源アダプタを接続する
1. アダプタコードをモニタのDC入力ポートにしっかりと接続します。
2. 片側を電源に接続した電源コードをアダプタポートに接続します。
4. リアコネクタカバーを閉じます。
ポートの側の3つのスロットに合わせて
カチッと音がするまでしっかりと閉めます。
リアコ ネクタカバ ー
ディスプレ イを 調 節 する
• ディスプレイは上下に-5º〜25ºま
で動かすことができます。
-5º~25º
• ディスプレイを縦に90º回転させる
こともで きます。
90º
• スタンドは左右に120ºまで回転可能
です。
120º
日
本
語
クイックスタートガイド
77
Page 82

日
本
語
スタンドを取り外す(VESAウォールマウント)
手順
1. VESAカバーを緩め(左回し)ます。
2. VESAカバーをスタンドから取り外します。
3. スクリュードライバを使ってディスプレイのスタンドにある4つのネジを取り外し
ます。
警告:スタンドを 取り外す際は 、画面にダメージを与えないように、柔らかい布等をか
ぶせ、ディスプレイを前に下げて行ってください。
Pivot®ProSoftware
• インストール手順
1. 全てのアプリケーションを終了させてください。
2. Pivot
バをインストールしてください。
3. 光学ドライブにサポートCDを入れ、STARTPIVOTプログラムを実行してく
ださい。
®
Proをインストールする前に、ビデオカードメーカの(ネイティブ)ドライ
インストールが終了したら、 右 クリックして、プロパティ→設定→詳細設定→Pivot
Software→Hotkeysの順に進み回転角度用のホットキーを設 定します。
• このソフトウェアは、Windows®98SE、ME、NT4.0、2000、XPOSをサポート
します。
• 詳細はwww.portrait.com/jp/をご参照ください。
78
クイックスタートガイド
Page 83

内蔵ウェブカムの概要
ウェブカムを使て、インター ネット上での会話を楽しみながら、簡単に写真を撮ったり、ビ
デオを作ったりすることができます。
ハードウェア
• 1.3メガピクセルウェブカム:USBポートからPCに画像を転送します。ウェブカムを
ご利用の際は、付属の3イン1ケーブルをのUSBプラグを接続してください。
• 内蔵ウェブカムは、上下に調節可能です。(下図参照)
-30º~30º
内蔵ウェブカムを30º以上回転させないでください。
ソフトウェア
ウェブカムドライバをインストールする
1. すべてのアプリケーションを終了してください。
2. 光学ドライブにサポートCDを挿入し、ASUSUSB2.0Webcamプログラムを
起動させます。
日
本
語
デフォルトのウェブカムの解像度は640x480です。デフォルト解像度を変更する必要が
ある場 合は、C:\WINDOWS\ASUSUSB2.0Webcamで、LifeCamをアクティブにし設定
を変更します。
• インターネットコミュニケーションツールでの転送を効率的に行うために、ウェブ
カムで 撮 影した 画像のフォーマットはVGA(640x480)モードで設定されてい
ます。
• ウェブカムをご利用になる前に、お使いになるパソコンにウェブカムドライバを
インストールしてください。
• ウェブカムドライバはMicrosoft®Windows2000/XPOS(Microsoft®DirectX)
のみのサポートです。
クイックスタートガイド
79
Page 84

LifeFrame
概要とインストール方法
本製品には、内蔵ウェブカムを使って簡単に写真やビデオクリップを作成することができ
るLifeFrameが搭載されています。
• LifeFrameはMicrosoft®Windows®2000/XPOSのみのサポートです。
• ソフトウェアをご使用になる前にLifeFrameをPCにインストールしてください。
• LifeFrameは、PW201サポートCDからインストールすることができます。
システム 条 件
®
1. Pentium
2. Microsoft
3. HDDに200MB以上の空き容量(プログラム起動用))
4. RAM128MB以上
5. 16ビット-ハイカラーモードをサポートするディスプレイカード
インストール方法
1. 全てのアプリケーションを閉じます。
2. 光学ドライブにサポートCDを挿入し、LifeFrameを起動します。
3. 画面の指示に従ってインストールを完了させてください。
III800MHz以上のプロセッサ
®
Windows®2000/XPOS
日
本
語
80
付属の3イン1ケーブルのUSBプラグをLCDモニタの後ろにあるUSBポートに接
続していないと、内蔵ウェブカムとLifeFrameは起動しません。
クイックスタートガイド
Page 85

PW201
LCD 모니터
Quick 시작 가이드
81
한국어한국어한국어
Page 86

82
Quick 시작 가이드
한국어
안전 정보
• 모니터를 설치하기 전에, 제품 구입 시 동봉된 모든 문서를 읽어주시기 바랍니
다.
• 화재 또는 전기 누전 등을 막기 위해 모니터를 비가 오거나 습한 곳에 절대 노
출시키지 마십시오.
• 모니터에 전원 연결시, 반드시 레이블에 표시되어있는 전력 유형을 사용해 주
십시오. 만약 사용하는 곳의 전원 유형을 알지 못한다면, 제품 구입자 또는 지
역 전기 회사에 문의해 주십시오.
• 계시는 곳의 전원 규격을 따르는 전원 플러그를 사용해 주십시오.
• 최적의 작동 환경을 만들기 위해 100-240V AC를 사용하고 UL 목록에 등재된
컴퓨터에만 모니터를 사용해 주십시오.
• 만약 기술적 문제가 발생했다면, 인증된 서비스 센터나 구입처에 문의해 주십
시오.
모니터 소개
전면부 후면부
화상 카메라
스테레오
스피커
받침대
2
1
1
1. 입력 센서
2. 메뉴 센서
3. 센서 줄임/볼륨 핫키
4. 센서 높임/밝기 핫키
5. SPLENDID™ 모드 핫키/Exit 메뉴
6. 전원 센서/상태표시 등
4
3
4
5
6
7 8 10 12 13 14 15
9
7. DC-in 포트
8. DVI 포트
9. VGA 포트
10. 부품 입력 포트 (YPbPr)
11. S-Video 포트
12. Video 포트 (콤포지트)
13. L/R Audio 포트
14. PC Line-in 포트
15. USB 포트
11
Page 87

83
Quick 시작 가이드
한국어
측면
1. USB 2.0 포트
2. 헤드폰 포트
모니터 펴기
제품 구입시 모니터는 접혀 있
는 상태로 보관되어 있습니다.
모니터를 펴려면, 한손으로 받
침대를 잡고 다른 한 손으로
조심스럽게 모니터를 앞으로
움직여 주십시오.
받침대
케이블 연결
케이블 연결 방법
1
2
1. 모니터를 원하는 높이
로 맞추어 주십시오.
2. 모니터를 시계 반대 방향
으로 90° 가량 돌리면 패
널 하단부의 포트를 볼 수
있습니다.
전면 측면
입력 포트
Page 88

84
Quick 시작 가이드
한국어
3. 다음과 같이 케이블을 연결해 주십시오. 더 자세한 지시 사항은 다음 장을 참
조해 주십시오.
전원 어댑터
DVI 케이블
VGA 케이블
부품 케이블
RCA 케이블
PC 오디오 케이블
USB 2.0 케이블
VGA/DVI와 컴퓨터 연결
1. 제공된 3-in-1 케이블의 VGA, 오디오, USB 커넥터를 LCD 모니터의
VGA, Line-in, USB 포트에 각각 연결해 주십시오.
2. 제공된 3-in-1 케이블의 다른 한쪽은 컴퓨터의 VGA, Line-out, USB 포
트에 각각 연결해 주십시오.
3. 나사를 조여 VGA 커넥터를 고정시켜 주십시오.
4. 제공된 DVI 케이블의 한쪽을 LCD 모니터에 연결하고 다른 한쪽은 컴퓨
터의 DVI 포트에 연결해 주십시오.
비디오(콤포지트)/S-Video 출력 포트와 비디오 장치(VCR, V8, DV) 연결
1. 제공된 RCA 케이블의 한쪽을 LCD 모니터의 비디오와 L/R 오디오 포트
에 연결하고 다른 한쪽을 비디오 장치의 비디오와 오디오 출력 포트에
연결해 주십시오.
2. S-Video 케이블의 한쪽을 LCD 모니터의 S-Video 포트에 연결하고 비
디오 장치의 S-Video 포트에 다른 한쪽을 연결해 주십시오.
3. 제공된 RCA 케이블의 빨간색과 하얀색 커넥터를 LCD 모니터의 L/R 오
디오 포트에 연결한 후, 다른 한쪽을 비디오 장치의 오디오 포트에 연결
해 주십시오.
컴포넌트 출력 포트와 비디오 장치(DVD 플레이어/위성 셋탑 박스) 연결
1. 컴포넌트 컴포넌트 케이블의 한쪽을 LCD 모니터의 컴포넌트 포트에 연
결한 후, 다른 한쪽을 비디오 장치의 컴포넌트 출력 포트에 연결해 주십
시오.
2. 제공된 RCA 케이블의 한쪽을 LCD 모니터의 비디오와 L/R 오디오 포트
에 연결하고 다른 한쪽을 비디오 장치의 비디오와 오디오 출력 포트에
연결해 주십시오.
Page 89

85
Quick 시작 가이드
한국어
전원 어댑터 연결
1. 모니터의 DC-in 포트에 어댑터 코드를 조심스럽게 연결해 주십시오.
2. 어댑터 포트에 전원 코드를 연결하고 다른 한쪽은 전기 콘센트에 연결해
주십시오.
4. 후면 커넥터 커버를 닫아 주십시오.
커버를 포트 옆에 있는 3개의 슬롯에
맞춘 후, 조심스럽게 닫아 주십시오.
딸칵 소리가 나면 커버가 완전히 닫힌
것입니다.
후면 커넥터 커버
모니터 조정
• 모니터를 앞뒤로 -5°에서 25°까지
조절할 수 있습니다.
-5°~25°
• 또한 시계 반대 방향으로 90° 까지
모니터를 돌릴 수 있습니다.
90°
• 받침대에서 모니터를 좌우로 최대
120°까지 조절할 수 있습니다.
120°
Page 90

86
Quick 시작 가이드
한국어
받침대 제거 (VESA 규격 벽면 부착용)
받침대 제거 방법
1. VESA 커버를 시계 반대 방향으로 돌려 열어 주십시오.
2. 받침대에서 VESA 커버를 제거해 주십시오.
3. 드라이버를 이용해 모니터 받침대에 있는 4개의 나사를 제거해 주십시오.
주의! 더 안전하고 쉽게 받침대를 제거하기 위해 모니터의 전면부를 땅으로 향
하게 한 후 작업해 주십시오. 모니터 화면의 파손을 방지하기 위해 부드러운 천
을 깔고 작업해 주십시오.
Pivot®Pro 소프트웨어
설치 방법
1. 모든 다른 어플리케이션을 닫아 주십시오.
2. Pivot
버가 설치되어 있는지 확인해 주십시오.
3. 옵티컬 드라이브에 CD를 넣고 START_PIVOT 프로그램을 실행시켜 주
십시오.
설치가 완료되면, 마우스 오른쪽 버튼 클릭 --> 속성 --> 설정 --> 고급-->
Pivot 소프트웨어 --> 핫키에서 다른 회전 각도를 조절할 수 있는 핫키를 설정
할 수 있습니다.
®
Pro 소프트웨어를 설치하기 전에 그래픽 카드 제조업체의 드라이
• 본 소프트웨어는 Windows® 98SE, ME, NT 4.0, 2000, 그리고 XP만 지원합
니다.
• 더 자세한 정보와 도움말은
www.portrait.com.을 참조해 주십시오.
Page 91

87
Quick 시작 가이드
한국어
내장형 화상 카메라 사용 방법
ASUS PW201 모니터에 내장된 화상 카메라로 사진과 동영상을 찍을 수 있습
니다. 메신저와 같은 인터넷 기반 프로그램을 통해 친구들과 채팅을 하는 동안
화상 카메라를 이용해 생생한 이미지를 보여줄 수 있습니다.
하드웨어
• 1.3 메가픽셀 화상 카메라에서 찍은 이미지를 USB 포트를 통해 PC로 전송할
수 있습니다. 화상 카메라를 사용하기 전에 제공된 3-in-1 케이블의 USB 프러
그를 연결해 주십시오.
• 화상 카메라는 아래 그림과 같이 위아래로 조절 가능합니다.
-30° ~ 30°
화상 카메라를 30° 이상 돌리지 마십시오. 화상 카메라가 고장날 수 있습니다.
소프트웨어
화상 카메라 드라이버 설치 방법
1. 먼저 사용 중인 모든 어플리케이션을 닫아 주십시오.
2. 옵티컬 드라이브에 제공된 지원 CD를 넣고
ASUS USB2.0 Webcam 프
로그램을 실행 시켜주십시오.
화상 카메라의 기본 해상도는 640 x 480입니다. 만약 기본 해상도를 변경하려면,
C:\WINDOWS\ASUS USB2.0 Webcam으로 가신 후, LifeCam 프로그램을 실행
시켜 사용할 설정으로 변경해 주십시오.
• 화상 카메라의 비디오 캡쳐 형식은 인터넷 기반의 메신저 프로그램에서 효
과적으로 전송할 수 있는 VGA(640 x 480) 모드 입니다.
• 화상 카메라를 사용하기 전에 미리 PC에 화상 카메라 드라이브가 설치되어
있는지 확인해 주십시오.
• 화상 카메라 드라이브는 Microsoft
Windows 2000/XP만 지원합니다. .
®
Direct X를 사용할 수 있는 Microsoft®
Page 92

LifeFrame 소프트웨어
제품 소개 및 설치 지시사항
ASUS PW201 모니터는 스냅샷 또는 동영상 자료를 간편하게 캡쳐할 수 있는
LifeFrame을 제공하여 내장되어 있는 화상 카메라를 이용해 사용자가 직접 자신의
사진이나 동영상을 캡처할 수 있습니다.
• LifeFrame은 Microsoft® Windows® 2000/XP만 지원합니다.
• 소프트웨어를 사용하기 전에 PC에 LifeFrame를 설치해 주십시오.
• LifeFrame 소프트웨어는 PW201에 제공된 지원 CD에 포함되어 있습니다.
최소 요구 사양
1. Pentium® III 800 MHz이나 그 이상급 사양의 프로세서
2. Microsoft
3. 프로그램 설치를 위한 최소 200 MB의 하드 공간 필요
4. 128 MB 이상 RAM 메모리
5. 16bit 하이컬러 모드 지원 그래픽 카드
설치 지시사항
1. 먼저 사용 중인 모든 어플리케이션을 닫아 주십시오.
2. 옵티컬 드라이브에 제공된 지원 CD를 넣고
시켜주십시오.
3. 화면에 나타난 지시사항을 따라 설치를 완료해 주십시오.
®
Windows® 2000/XP
LiteFrame 프로그램을 실행
한국어
88
제공된 3-in-1 케이블의 USB 프러그가 LCD 모니터 후면에 연결되어 있는지
확인해 주십시오. 연결되지 않았다면 화상 카메라와 LifeFrame가 작동하지 않
습니다.
Quick 시작 가이드
Page 93

PW201
Monitor LCD
Guia de consulta rápida
Português
Page 94

Informações de segurança
• Antes de instalar o monitor, leia atentamente toda a documentação que
vem na embalagem.
• Para evitar o perigo de incêndio ou de choque eléctrico, nunca exponha o
monitor à chuva ou a humidade.
• O monitor deve funcionar apenas com a tensão indicada na etiqueta. Se
não tem a certeza quanto ao tipo de tensão que tem em casa, consulte o
vendedor ou a companhia de electricidade.
• Utilize uma ficha de alimentação adequada e compatível com a rede
eléctrica local.
• Para garantir um bom funcionamento, utilize o monitor apenas com
computadores UL com tomadas a.c. 100 - 240 V.
• Se o monitor apresentar quaisquer problemas técnicos, contacte um
técnico qualificado ou o vendedor.
Apresentação do monitor
Parte da frenteParte da frente
Parte da frente
Parte da frenteParte da frente
Base Base
Base
Base Base
1. Sensor de entrada da origem do sinal
2. Botão MENU
3. Botão de ajuste do volume/Redução
Português
4. Botão de ajuste do brilho/Aumento
5. SBotão do modo SPLENDID™/Sair do menu
6. Botão/LED indicador de alimentação
Parte de trásParte de trás
Parte de trás
Parte de trásParte de trás
WebcamWebcam
Webcam
WebcamWebcam
AltifalanteAltifalante
Altifalante
AltifalanteAltifalante
estéreoestéreo
estéreo
estéreoestéreo
44
4
44
55
5
33
3
33
22
2
22
55
44
4
44
66
6
66
77
88
7
8
77
88
7. Porta de entrada d.c.
8. Porta DVI
9. Porta VGA
10. Porta de entrada do sinal componente (YPbPr)
11. Porta S-Vídeo
12. Porta do sinal de vídeo (composto)
13. Portas de áudio E/D
14. Porta de entrada de linha do PC
15. Porta USB
1010
10
1010
99
9
99
1111
11
1111
1212
12
1212
1313
13
1313
1414
14
1414
1515
15
1515
9090
90
9090
Guia de consulta rápidaGuia de consulta rápida
Guia de consulta rápida
Guia de consulta rápidaGuia de consulta rápida
Page 95

Parte lateralParte lateral
Parte lateral
Parte lateralParte lateral
1. Portas USB 2.0
2. Porta dos auscultadores
Abrir o monitor
O monitor encontra-se
dobrado na embalagem.
Para abrir o monitor, segure
na base com uma mão e
com cuidado utilize a outra
mão para inclinar o monitor
para a frente.
Ligação dos cabos
Para ligar os cabos:
Base
11
1
11
22
2
22
1. Ajuste a altura e
inclinação do
monitor conforme
preferir.
2. Rode o monitor 90º no
sentido contrário ao
dos ponteiros do
relógio para poder
aceder às portas
existentes na parte
inferior do painel
traseiro.
Parte da frente Parte lateral
Guia de consulta rápidaGuia de consulta rápida
Guia de consulta rápida
Guia de consulta rápidaGuia de consulta rápida
Portas de
entrada
9191
91
9191
Português
Page 96

3. Ligue os cabos, tal como mostrado. Consulte as secções seguintes
para mais instruções.
Transformador
Cabo DVI
Cabo VGA
Cabo componente
Cabo de áudio para ligação ao PC
Ligação a um computador equipado com uma porta VGA/DVILigação a um computador equipado com uma porta VGA/DVI
Ligação a um computador equipado com uma porta VGA/DVI
Ligação a um computador equipado com uma porta VGA/DVILigação a um computador equipado com uma porta VGA/DVI
1. Ligue os conectores VGA, de áudio e USB do cabo 3-em-1
fornecido às portas VGA, de entrada de linha e USB,
respectivamente, do monitor LCD.
2.Ligue as outras extremidades do cabo 3-em-1 fornecido às portas
VGA, de saída de linha e USB, respectivamente, do computador.
3.Aperte os dois parafusos para fixar o conector VGA.
4.Ligue uma das extremidades do cabo DVI fornecido ao monitor LCD,
de seguida ligue a outra extremidade à porta DVI do computador.
Ligação de um equipamento de vídeo com portas de saídaLigação de um equipamento de vídeo com portas de saída
Ligação de um equipamento de vídeo com portas de saída
Ligação de um equipamento de vídeo com portas de saídaLigação de um equipamento de vídeo com portas de saída
de vídeo (composto) ou S-Vídeo como, por exemplo, umde vídeo (composto) ou S-Vídeo como, por exemplo, um
de vídeo (composto) ou S-Vídeo como, por exemplo, um
de vídeo (composto) ou S-Vídeo como, por exemplo, umde vídeo (composto) ou S-Vídeo como, por exemplo, um
videogravador, um V8 ou um DVvideogravador, um V8 ou um DV
videogravador, um V8 ou um DV
videogravador, um V8 ou um DVvideogravador, um V8 ou um DV
1.Ligue uma das extremidades do cabo RCA fornecido às portas de
vídeo e às portas de áudio E/D do monitor LCD, de seguida ligue a
outra extremidade do cabo às portas de vídeo e de áudio do
equipamento de vídeo.
2.Ligue uma das extremidades do cabo S-vídeo à porta S-vídeo do
monitor LCD e ligue a outra extremidade à porta S-vídeo do
equipamento de vídeo.
3.Ligue os conectores de cor vermelha e branca do cabo RCA
fornecido às portas de áudio E/D do monitor LCD e ligue a outra
extremidade do cabo às portas de áudio do equipamento de vídeo.
Cabo RCA
Cabo USB 2.0
Ligação do equipamento de vídeo com portas de saída deLigação do equipamento de vídeo com portas de saída de
Ligação do equipamento de vídeo com portas de saída de
Ligação do equipamento de vídeo com portas de saída deLigação do equipamento de vídeo com portas de saída de
sinal componente como, por exemplo, um leitor de DVDssinal componente como, por exemplo, um leitor de DVDs
sinal componente como, por exemplo, um leitor de DVDs
sinal componente como, por exemplo, um leitor de DVDssinal componente como, por exemplo, um leitor de DVDs
ou uma set-top box por satéliteou uma set-top box por satélite
ou uma set-top box por satélite
Português
ou uma set-top box por satéliteou uma set-top box por satélite
9292
92
9292
1. Ligue uma das extremidades do cabo de sinal componente às portas de
sinal componente do monitor LCD e ligue a outra extremidade do cabo
às portas de saída de sinal componente do equipamento de vídeo.
2.Ligue os conectores de cor vermelha e branca do cabo RCA fornecido
às portas de áudio E/D do monitor LCD e ligue a outra extremidade do
cabo às portas de saída de linha de áudio do equipamento de vídeo.
Guia de consulta rápidaGuia de consulta rápida
Guia de consulta rápida
Guia de consulta rápidaGuia de consulta rápida
Page 97

Ligação do transformadorLigação do transformador
Ligação do transformador
Ligação do transformadorLigação do transformador
1.Ligue o cabo do transformador à porta de entrada d.c. do monitor.
2.Ligue a ficha do transformador à tomada eléctrica.
4. Feche a tampa do conector traseiro.
Alinhe a tampa com as três ranhuras
existentes perto das portas e feche
com cuidado. Um estalido indica que
a tampa foi correctamente fechada.
Tampa do conector
traseiro
Ajuste do monitor
• Pode ajustar o ângulo do
monitor entre -5º e 25º.
-5º~25º
• Pode também virar o monitor
90º no sentido contrário ao
dos ponteiros do relógio.
90º
• A base permite-lhe virar o monitor
para a esquerda /para a direita
num ângulo máximo de 120º.
120º
Guia de consulta rápidaGuia de consulta rápida
Guia de consulta rápida
Guia de consulta rápidaGuia de consulta rápida
9393
93
9393
Português
Page 98

Remoção da base
(para montagem na parede: VESA)
Safeguards
Para remover a base:
1. Rode a tampa VESA no sentido contrário ao dos ponteiros do relógio
para a abrir.
2. Remova a tampa VESA da base.
3. Utilize uma chave de fendas para remover os quatro parafusos
existentes na base do monitor.
ATENÇÃO! ATENÇÃO!
ATENÇÃO! Coloque o monitor com o ecrã voltado para baixo para uma
ATENÇÃO! ATENÇÃO!
operação mais segura e fácil. Recomendamos-lhe que cubra o ecrã com
um pano macio para evitar danificá-lo.
O software Pivot®Pro
Instruções de instalação:Instruções de instalação:
Instruções de instalação:
Instruções de instalação:Instruções de instalação:
1.Comece por fechar todas as outras aplicações.
2.Certifique-se de que os controladores da sua placa gráfica
(controladores nativos) estão instalados antes de instalar o
software Pivot
3.Introduza o CD de suporte na unidade óptica e execute o programa
START_PIVOT.
®
Pro.
Após a instalação, pode configurar teclas de atalho para os diferentes
graus de rotação premindo a tecla direita do rato – vá até Properties
(Propriedades) – Settings (Definições) -- Advanced (Avançadas)-- Pivot
Português
Software (Software Pivot) – Hotkeys (Teclas de atalho).
9494
94
9494
• Este software apenas suporta os sistemas operativos Windows
98SE, ME, NT 4.0, 2000 e XP.
• Para mais informações ou assistência, visite o site www.portrait.com.
Guia de consulta rápidaGuia de consulta rápida
Guia de consulta rápida
Guia de consulta rápidaGuia de consulta rápida
®
Page 99

Apresentação da webcam incorporada
Esta webcam incorporada permite-lhe tirar fotografias e criar clips de vídeo;
ao mesmo tempo que fala com amigos através de ferramentas de
comunicação com base na Internet, pode também utilizar esta webcam
para ser visto pelos seus amigos.
HardwareHardware
Hardware
HardwareHardware
• Esta webcam de 1,3 megapíxeis transmite imagens para o PC através das
portas USB. Certifique-se de que ligou as fichas USB do cabo 3-em-1
fornecido antes de utilizar a webcam.
• A posição da webcam pode ser ajustada para cima ou para baixo, tal
como mostrado.
-30º ~ 30º
Não vire a webcam para cima ou para baixo num ângulo superior a 30 º;
pois tal pode danificá-la.
SoftwareSoftware
Software
SoftwareSoftware
Para instalar o controlador da webcam:Para instalar o controlador da webcam:
Para instalar o controlador da webcam:
Para instalar o controlador da webcam:Para instalar o controlador da webcam:
1.Comece por fechar todas as outras aplicações.
2.Introduza o CD de suporte na unidade óptica e execute o programa
ASUS USB2.0 WebcamASUS USB2.0 Webcam
ASUS USB2.0 Webcam.
ASUS USB2.0 WebcamASUS USB2.0 Webcam
A resolução predefinida da webcam é de 640 x 480. Se quiser alterar esta
resolução predefinida para ir ao encontro das diferentes aplicações, vá até
C:\WINDOWS\ASUS USB2.0 WebcamC:\WINDOWS\ASUS USB2.0 Webcam
C:\WINDOWS\ASUS USB2.0 Webcam e active o programa LifeCam
C:\WINDOWS\ASUS USB2.0 WebcamC:\WINDOWS\ASUS USB2.0 Webcam
para alterar as definições com base nas suas necessidades.
• O formato de vídeo capturado pela webcam é o formato VGA (640 x
480), pois este permite aumentar a eficácia em termos da
transmissão através de todos os tipos de ferramentas para
comunicação através da Internet.
• Antes de utilizar a webcam, tem de instalar o respectivo controlador
no PC.
• O controlador da webcam apenas suporta o sistema operativo
Microsoft® Windows 2000/XP com o Microsoft® Direct X.
Guia de consulta rápidaGuia de consulta rápida
Guia de consulta rápida
Guia de consulta rápidaGuia de consulta rápida
9595
95
9595
Português
Page 100

O software LifeFrame
Apresentação e instruções para instalaçãoApresentação e instruções para instalação
Apresentação e instruções para instalação
Apresentação e instruções para instalaçãoApresentação e instruções para instalação
Para tirar fotografias ou gravar clips de vídeo, o ASUS PW201oferece-lhe o
software LifeFrame de fácil utilização e que pode ser utilizado em conjunto
com a webcam incorporada para que os utilizadores possam criar as suas
próprias fotografias e clips de vídeo.
• O LifeFrame apenas suporta os sistemas operativos Microsoft
Windows® 2000/XP.
• Antes de começar a utilizar este software, instale o LifeFrame no PC.
• O software LifeFrame vem incluído do CD de suporte do PW201.
Os requisitos do sistema são os seguintes:Os requisitos do sistema são os seguintes:
Os requisitos do sistema são os seguintes:
Os requisitos do sistema são os seguintes:Os requisitos do sistema são os seguintes:
®
1.Computador pessoal com um processador Pentium® III 800 MHz ou
acima
2.Sistemas operativos Microsoft® Windows® 2000/XP
3.Espaço mínimo disponível no disco rígido para execução do
programa: 200 MB
4.128 MB de RAM ou acima
5.Placa gráfica com suporte para modo high color de 16 bits
Instruções de instalação:Instruções de instalação:
Instruções de instalação:
Instruções de instalação:Instruções de instalação:
1.Feche todas as outras aplicações.
2.Introduza o CD de suporte na unidade óptica e execute o programa
LifeFrame.
3.Siga as instruções no ecrã para concluir a instalação.
Certifique-se de que liga a ficha USB do cabo 3-em-1 fornecido à porta
USB existente na parte de trás do monitor LCD; caso contrário, a
webcam incorporada e o LifeFrame não serão activados.
Português
9696
96
9696
Guia de consulta rápidaGuia de consulta rápida
Guia de consulta rápida
Guia de consulta rápidaGuia de consulta rápida
 Loading...