

Page 1
ENGLISH
Getting to know your wireless charging stand
Using your wireless charging stand
Q8630 / First Edition / November 2013
CAUTION! DO NOT throw this product in municipal waste. This product has been designed to
enable proper reuse of parts and recycling. This symbol of the crossed out wheeled bin indicates that
the product (electrical and electronic equipment) should not be placed in municipal waste. Check
local regulations for disposal of electronic products.
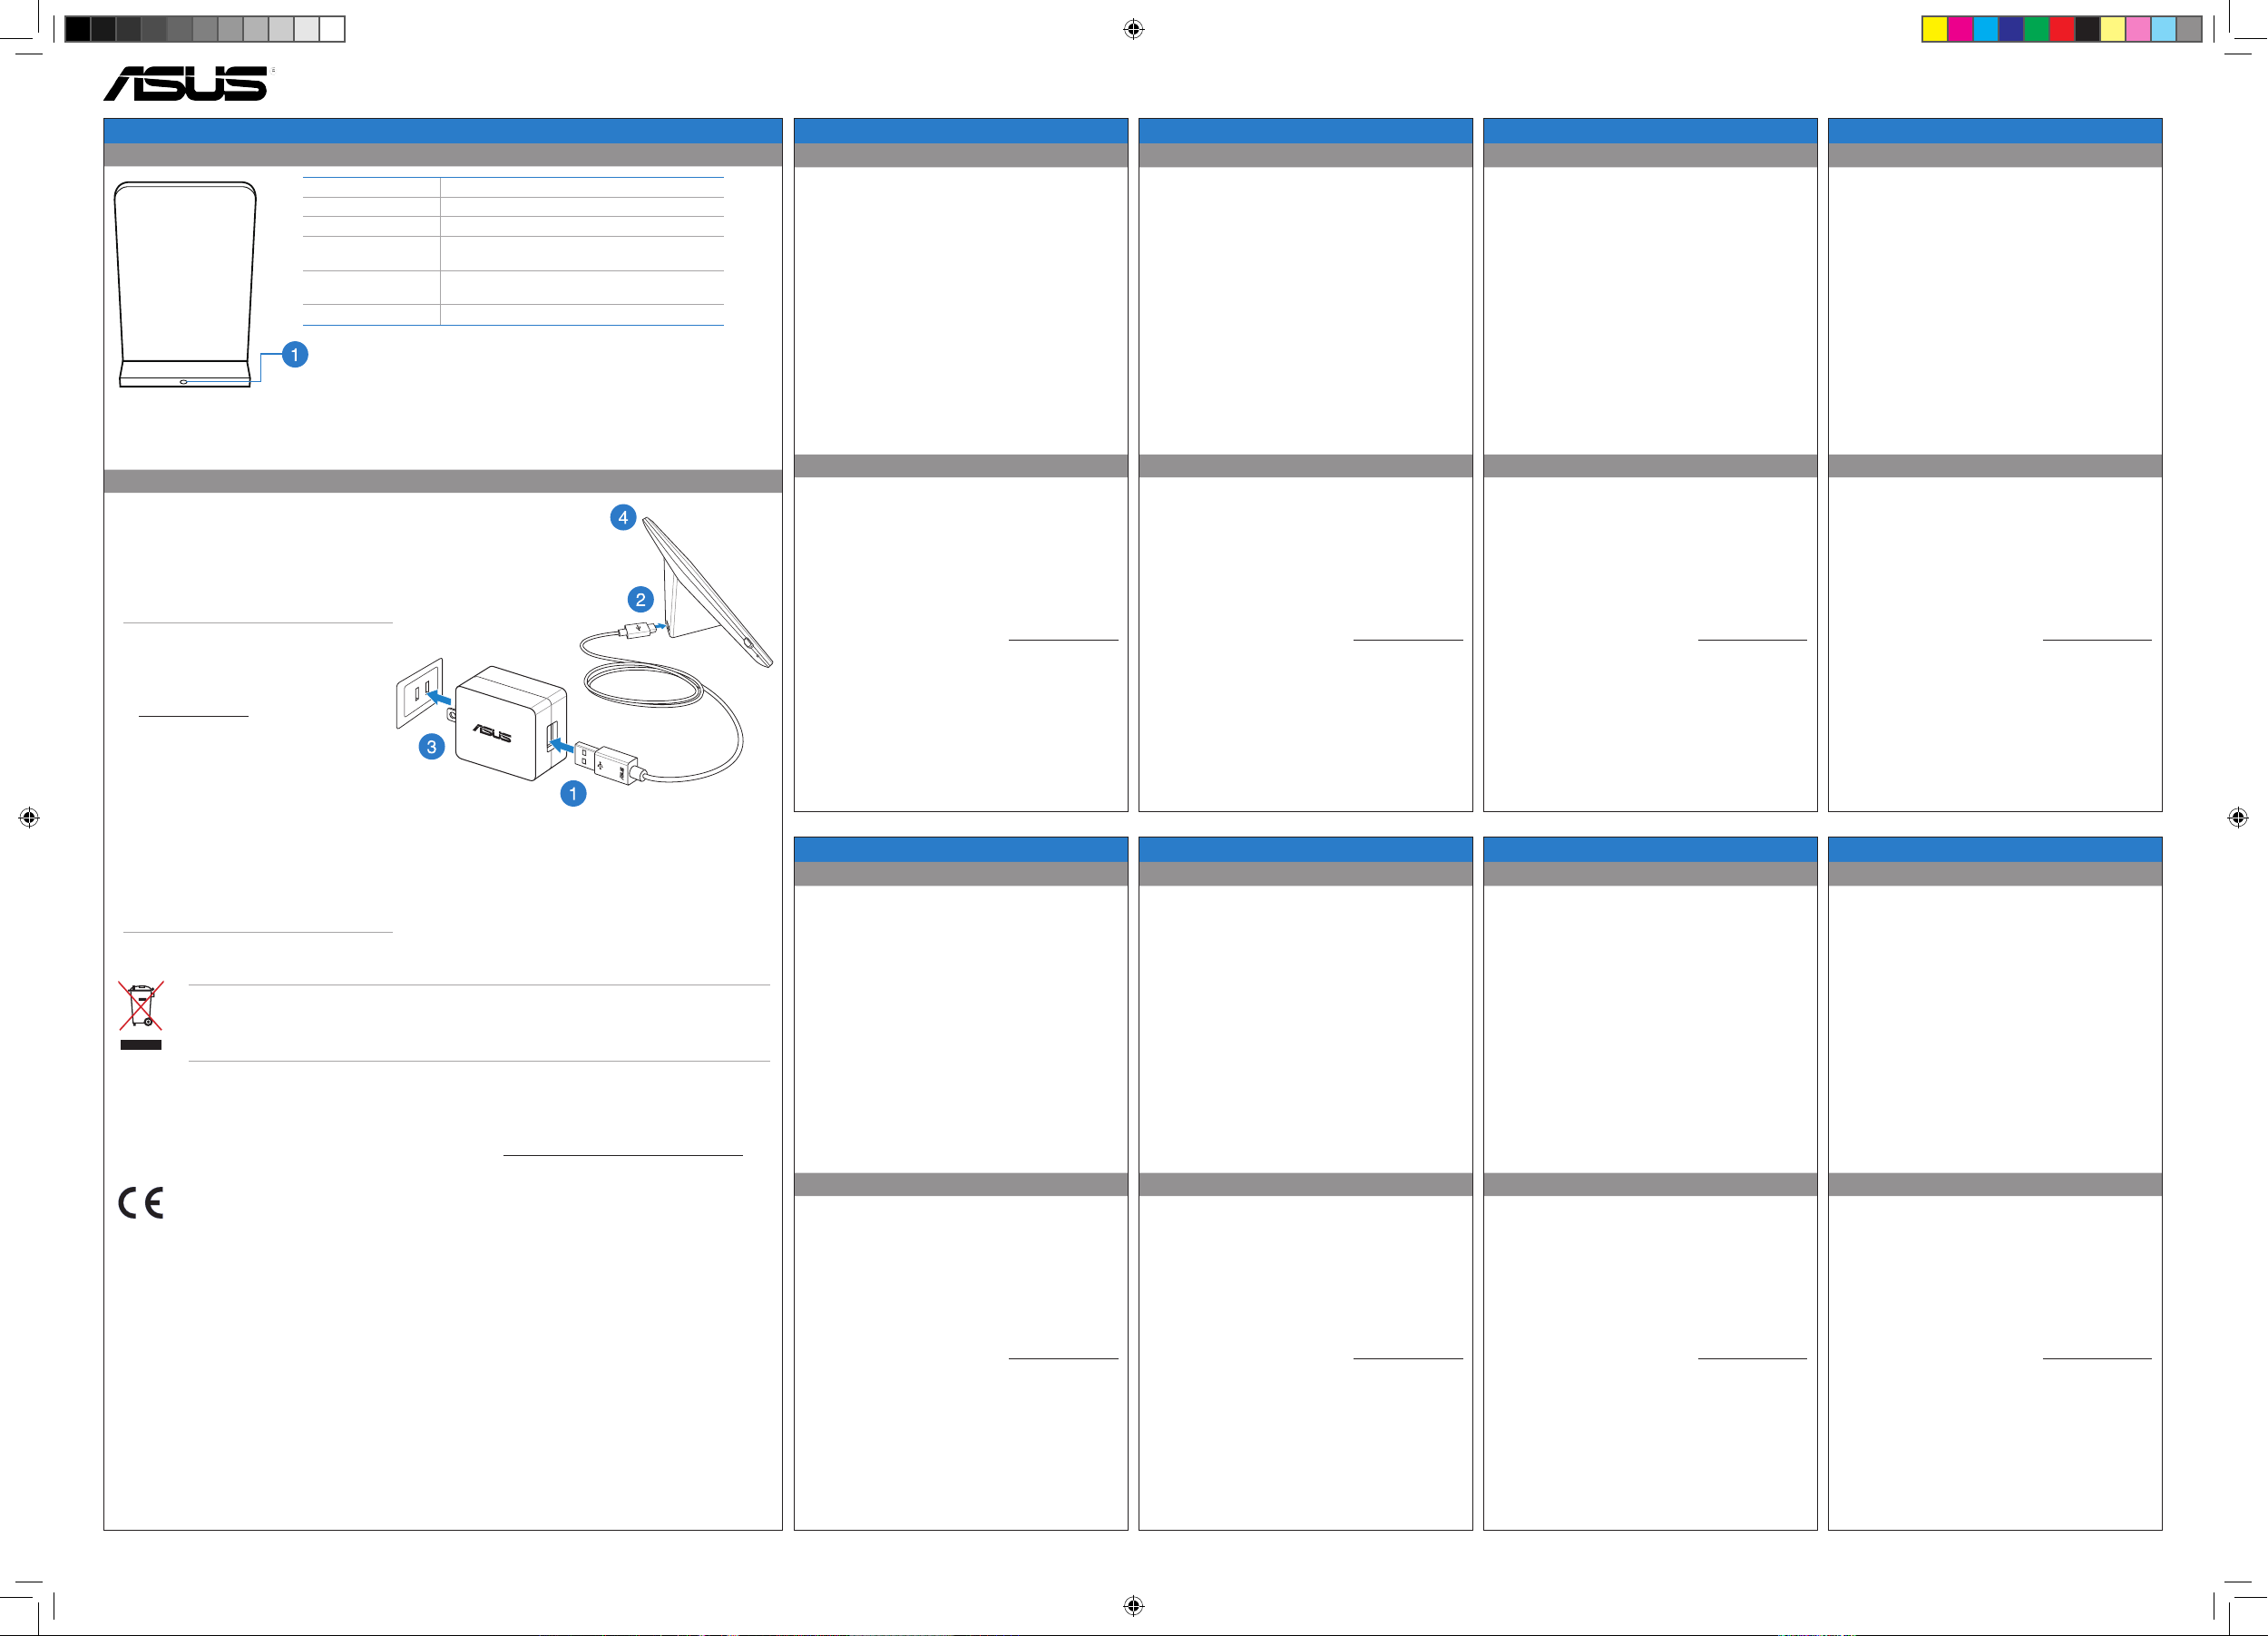
1. Connect the USB cable to the power adapter.
2. Connect the micro USB connector into your
wireless charging stand.
3. Plug the power adapter into a grounded socket
outlet.
4. Place your Qi-compatible device on your wireless
charging stand.
NOTES:
• Ensure that PW100 supports your Qicompatible device. Visit ASUS Support site
at
support.asus.com for the PW100 support
list.
• For a 7-inch device (or bigger), such as
Nexus 7 (2013), place it horizontally on the
wireless charging stand.
• Check if your smart device supports the Qi
wireless standard.
• For better charging efficiency, remove
your device from its cover or sleeve before
charging it on your wireless stand.
• RATING: 100~240Vac, 50/60Hz
Dimension 75 x 75 x 60 mm ( LxWxH)
Weight 200g
Color Black
Power Input: DCV 5V, 2A
Output: 5V, 1A
I/O port 1 x micro USB port
1 x status LED (white)
Charging standard Qi wireless standard
Status LED
• Solid LED: Qi-compatible device is charging.
• Blinking LED: Charging error such as overheating, unrecognized device,
or metallic obstruction.
• LED o: Qi-compatible device is not detected.
PW100 Wireless Charging Stand
S-CHINESE
Getting to know your wireless charging stand
Using your wireless charging stand
ITALIAN
Getting to know your wireless charging stand
Using your wireless charging stand
T-CHINESE
Getting to know your wireless charging stand
Using your wireless charging stand
JAPANESE
Getting to know your wireless charging stand
Using your wireless charging stand
FRENCH
Getting to know your wireless charging stand
Using your wireless charging stand
RUSSIAN
Getting to know your wireless charging stand
Using your wireless charging stand
GERMAN
Getting to know your wireless charging stand
Using your wireless charging stand
CZECH
Getting to know your wireless charging stand
Using your wireless charging stand
Dimension: 75 x 75 x 60 mm ( LxWxH)
Weight: 200g
Color: Black
Power: Input: DCV 5V, 2A; Output: 5V, 1A
I/O port 1 x micro USB port; 1 x status LED (white)
Charging standard Qi wireless standard
1. Status LED
• Solid LED: Qi-compatible device is charging.
• Blinking LED: Charging error such as overheating,
unrecognized device, or metallic obstruction.
• LED o: Qi-compatible device is not detected.
1. Connect the USB cable to the power adapter.
2. Connect the micro USB connector into your wireless
charging stand.
3. Plug the power adapter into a grounded socket
outlet.
4. Place your Qi-compatible device on your wireless
charging stand.
NOTES:
• Ensure that PW100 supports your Qi-compatible
device. Visit ASUS Support site at support.asus.com
for the PW100 support list.
• For a 7-inch device (or bigger), such as Nexus 7
(2013), place it horizontally on the wireless charging
stand.
• Check if your smart device supports the Qi wireless
standard.
• For better charging eciency, remove your device
from its cover or sleeve before charging it on your
wireless stand.
• RATING: 100~240Vac, 50/60Hz
ASUS Recycling/Takeback Services
ASUS recycling and takeback programs come from our commitment to the highest standards for protecting our
environment. We believe in providing solutions for you to be able to responsibly recycle our products, batteries,
other components, as well as the packaging materials. Please go to http://csr.asus.com/english/Takeback.htm for
the detailed recycling information in dierent regions.
0560
This is a Class B product, in a domestic environment, this product may cause radio interference, in which case the
user may be required to take adequate measures.
CE RF Exposure Compliance
This device meets the EU requirements (1999/519/EC) and the International Commission on Non-Ionizing
Radiation Protection (ICNIRP) on the limitation of exposure of the general public to electromagnetic elds by way
of health protection.
Declaration of Conformity
3. Electromagnetic compatibility (Article 3.1(b) of
the R&TTE Directive)
• EN 301 489-1 V1.9.2, EN 301 489-3 V1.4.1
• EN 55022: 2010/AC:2011 Class B
• EN 55011: 2009/A1:2010
4. Radio frequency spectrum usage (Article 3.2 of
the R&TTE Directive)
• EN 300 330-1 V1.7.1, EN 300 330-2 V1.5.1
1. Health (Article 3.1(a) of the R&TTE Directive)
• EN 62311: 2008
• EN 50364: 2010
2. Safety (Article 3.1(a) of the R&TTE Directive)
• EN 60950-1:2006/A11:2009+A1:2010+A12:2011
E8630_PW100_QSG.indd 1 10/31/13 6:03:06 PM
Page 2
Q8630 / First Edition / August 2013
PW100 Wireless Charging Stand
PORTUGUESE
Getting to know your wireless charging stand
Using your wireless charging stand
Dimension: 75 x 75 x 60 mm ( LxWxH)
Weight: 200g
Color: Black
Power: Input: DCV 5V, 2A; Output: 5V, 1A
I/O port 1 x micro USB port; 1 x status LED (white)
Charging standard Qi wireless standard
ROMANIAN
Getting to know your wireless charging stand
Using your wireless charging stand
SLOVAKIAN
Getting to know your wireless charging stand
Using your wireless charging stand
SLOVENIAN
Getting to know your wireless charging stand
Using your wireless charging stand
Dimension: 75 x 75 x 60 mm ( LxWxH)
Weight: 200g
Color: Black
Power: Input: DCV 5V, 2A; Output: 5V, 1A
I/O port 1 x micro USB port; 1 x status LED (white)
Charging standard Qi wireless standard
1. Status LED
• Solid LED: Qi-compatible device is charging.
• Blinking LED: Charging error such as overheating,
unrecognized device, or metallic obstruction.
• LED o: Qi-compatible device is not detected.
1. Connect the USB cable to the power adapter.
2. Connect the micro USB connector into your wireless
charging stand.
3. Plug the power adapter into a grounded socket
outlet.
4. Place your Qi-compatible device on your wireless
charging stand.
NOTES:
• Ensure that PW100 supports your Qi-compatible
device. Visit ASUS Support site at support.asus.com
for the PW100 support list.
• For a 7-inch device (or bigger), such as Nexus 7
(2013), place it horizontally on the wireless charging
stand.
• Check if your smart device supports the Qi wireless
standard.
• For better charging eciency, remove your device
from its cover or sleeve before charging it on your
wireless stand.
• RATING: 100~240Vac, 50/60Hz
HUNGARIAN
Getting to know your wireless charging stand
Using your wireless charging stand
Dimension: 75 x 75 x 60 mm ( LxWxH)
Weight: 200g
Color: Black
Power: Input: DCV 5V, 2A; Output: 5V, 1A
I/O port 1 x micro USB port; 1 x status LED (white)
Charging standard Qi wireless standard
POLISH
Getting to know your wireless charging stand
Using your wireless charging stand
Dimension: 75 x 75 x 60 mm ( LxWxH)
Weight: 200g
Color: Black
Power: Input: DCV 5V, 2A; Output: 5V, 1A
I/O port 1 x micro USB port; 1 x status LED (white)
Charging standard Qi wireless standard
1. Status LED
• Solid LED: Qi-compatible device is charging.
• Blinking LED: Charging error such as overheating,
unrecognized device, or metallic obstruction.
• LED o: Qi-compatible device is not detected.
1. Connect the USB cable to the power adapter.
2. Connect the micro USB connector into your wireless
charging stand.
3. Plug the power adapter into a grounded socket
outlet.
4. Place your Qi-compatible device on your wireless
charging stand.
NOTES:
• Ensure that PW100 supports your Qi-compatible
device. Visit ASUS Support site at support.asus.com
for the PW100 support list.
• For a 7-inch device (or bigger), such as Nexus 7
(2013), place it horizontally on the wireless charging
stand.
• Check if your smart device supports the Qi wireless
standard.
• For better charging eciency, remove your device
from its cover or sleeve before charging it on your
wireless stand.
• RATING: 100~240Vac, 50/60Hz
Dimension: 75 x 75 x 60 mm ( LxWxH)
Weight: 200g
Color: Black
Power: Input: DCV 5V, 2A; Output: 5V, 1A
I/O port 1 x micro USB port; 1 x status LED (white)
Charging standard Qi wireless standard
1. Status LED
• Solid LED: Qi-compatible device is charging.
• Blinking LED: Charging error such as overheating,
unrecognized device, or metallic obstruction.
• LED o: Qi-compatible device is not detected.
1. Connect the USB cable to the power adapter.
2. Connect the micro USB connector into your wireless
charging stand.
3. Plug the power adapter into a grounded socket
outlet.
4. Place your Qi-compatible device on your wireless
charging stand.
NOTES:
• Ensure that PW100 supports your Qi-compatible
device. Visit ASUS Support site at support.asus.com
for the PW100 support list.
• For a 7-inch device (or bigger), such as Nexus 7
(2013), place it horizontally on the wireless charging
stand.
• Check if your smart device supports the Qi wireless
standard.
• For better charging eciency, remove your device
from its cover or sleeve before charging it on your
wireless stand.
• RATING: 100~240Vac, 50/60Hz
UKRAINIAN
Getting to know your wireless charging stand
Using your wireless charging stand
Dimension: 75 x 75 x 60 mm ( LxWxH)
Weight: 200g
Color: Black
Power: Input: DCV 5V, 2A; Output: 5V, 1A
I/O port 1 x micro USB port; 1 x status LED (white)
Charging standard Qi wireless standard
1. Status LED
• Solid LED: Qi-compatible device is charging.
• Blinking LED: Charging error such as overheating,
unrecognized device, or metallic obstruction.
• LED o: Qi-compatible device is not detected.
1. Connect the USB cable to the power adapter.
2. Connect the micro USB connector into your wireless
charging stand.
3. Plug the power adapter into a grounded socket
outlet.
4. Place your Qi-compatible device on your wireless
charging stand.
NOTES:
• Ensure that PW100 supports your Qi-compatible
device. Visit ASUS Support site at support.asus.com
for the PW100 support list.
• For a 7-inch device (or bigger), such as Nexus 7
(2013), place it horizontally on the wireless charging
stand.
• Check if your smart device supports the Qi wireless
standard.
• For better charging eciency, remove your device
from its cover or sleeve before charging it on your
wireless stand.
• RATING: 100~240Vac, 50/60Hz
SPANISH
Getting to know your wireless charging stand
Using your wireless charging stand
TURKISH
Getting to know your wireless charging stand
Using your wireless charging stand
Dimension: 75 x 75 x 60 mm ( LxWxH)
Weight: 200g
Color: Black
Power: Input: DCV 5V, 2A; Output: 5V, 1A
I/O port 1 x micro USB port; 1 x status LED (white)
Charging standard Qi wireless standard
1. Status LED
• Solid LED: Qi-compatible device is charging.
• Blinking LED: Charging error such as overheating,
unrecognized device, or metallic obstruction.
• LED o: Qi-compatible device is not detected.
1. Connect the USB cable to the power adapter.
2. Connect the micro USB connector into your wireless
charging stand.
3. Plug the power adapter into a grounded socket
outlet.
4. Place your Qi-compatible device on your wireless
charging stand.
NOTES:
• Ensure that PW100 supports your Qi-compatible
device. Visit ASUS Support site at support.asus.com
for the PW100 support list.
• For a 7-inch device (or bigger), such as Nexus 7
(2013), place it horizontally on the wireless charging
stand.
• Check if your smart device supports the Qi wireless
standard.
• For better charging eciency, remove your device
from its cover or sleeve before charging it on your
wireless stand.
• RATING: 100~240Vac, 50/60Hz
EEE Yönetmeliğine Uygundur.
MANUFACTURER
ASUSTeK Computer Inc.
Tel: +886-2-2894-3447
Address: 4F, No. 150, LI-TE RD., PEITOU, TAIPEI
112, TAIWAN
AUTHORISED REPRESENTATIVE IN EUROPE
ASUS Computer GmbH
Address: HARKORT STR. 21-23, 40880 RATINGEN,
GERMANY
AUTHORISED DISTRIBUTORS IN TURKEY
Penta Teknoloji Urunleri Dagitim Ticaret A.S.
Tel: 0216 645 8200
Address: Dudullu Organize Sanayi Bolgesi Nato
Yolu 4. CAD No.1 Dudullu Umraniye
34775 Istanbul, Turkey
N13219
FCC RF Exposure Information
This equipment complies with radio frequency (RF)
exposure limits adopted by the Federal Communications
Commission for an uncontrolled environment. This
equipment should be installed and operated with
minimum distance 10 cm between the radiator & your
body.
IC Regulations: RSS-Gen 7.1.3
This device complies with Industry Canada license-exempt
RSS standard(s).
Operation is subject to the following two conditions:
(1) this device may not cause interference, and
(2) this device must accept any interference, including
interference that may cause undesired operation of the
device.
Le présent appareil est conforme aux CNR d’Industrie
Canada applicables aux appareils radio exempts de
licence. L’exploitation est autorisée aux deux conditions
suivantes:
(1) l’appareil ne doit pas produire de brouillage, et
(2) l’utilisateur de l’appareil doit accepter tout brouillage
radioélectrique subi, même si le brouillage est susceptible
d’en compromettre le fonctionnement.”
ICES-003 Issue 5
CAN ICES-3(B)/NMB-3(B)
IC RF Exposure Info
This equipment complies with IC RSS-102 RF exposure
limits set forth for an uncontrolled environment. This
equipment should be installed and operated with
minimum distance 10 cm between the radiator & your
body.
Federal Communications Commission
Interference Statement
This equipment has been tested and found to comply
with the limits for a Class B digital device, pursuant to Part
15 of the FCC Rules. These limits are designed to provide
reasonable protection against harmful interference in a
residential installation.
This equipment generates, uses and can radiate radio
frequency energy and, if not installed and used in
accordance with the instructions, may cause harmful
interference to radio communications.
However, there is no guarantee that interference will not
occur in a particular installation.
If this equipment does not cause harmful interference to
radio or television reception, which can be determined by
turning the equipment o and on, the user is encouraged
to try to correct the interference by one or more of the
following measures:
• Reorient or relocate the receiving antenna.
• Increase the separation between the equipment and
receiver.
• Connect the equipment into an outlet on a circuit
dierent from that to which the receiver is connected.
• Consult the dealer or an experienced radio/TV
technician for help.
This device complies with part 15 of the FCC Rules.
Operation is subject to the following conditions:
(1) This device may not cause harmful interference and
(2) This device must accept any interference received,
including interference that may cause undesired
operation.
CAUTION: Any changes or modifications not expressly approved by the grantee
of this device could void the user's authority to operate.
FCC ID: MSQPW100
E8630_PW100_QSG.indd 2 10/31/13 6:03:08 PM
 Loading...