

Page 1
Declaration of Conformity
We, Manufacturer/Importer
(full address)
ASUS COMPUTER GmbH HARKORT STR. 25
40880 RATINGEN, BRD. GERMANY
declare that the product
( description of the apparatus, system, installation to which it refers)
is in conformity with
(reference to the specification under which conformity is declared)
in accordance with 2004/108/EC-EMC Directive and 1995/5 EC-R &TTE Directive
Product name: LAN PCI Adapter
Model name : PCI-G31
EN 50392
Generic standard to demonstrate the compliance
of electronic and electrical apparatus with the basic
restrictions related to human exposure to electromagnetic
fields (0 Hz-300GHz)
EN 61000-3-2*
EN 61000-3-3*
Disturbances in supply systems caused
Disturbances in supply systems caused
EN 50360
EN 50361
t
he limitation of exposure of the general public
to electromagnetic network equipment fields
(0 Hz to 300 GHz) International Commission
on Non-Ionizing Radiation Protection (1998),
Guidelines for limiting exposure in time-varying
electric, magnetic ,and electromagnetic fields
EN 301893
ʳ
EN 300328
Broadband Radio Access Networks (BRAN); 5 GHz
high performance RLAN; Harmonized EN covering
essential requirements of article 3.2 of
the R&TTE Directive
Electromagnetic compatibility and Radio spectrum
Matters (ERM); wideband transmission equipment
operating in the 2.4GHz ISM band and using spread
spectrum modulation techniques. Harmonized EN
covering essential requirements under article 3.2 of
the R&TTE Directive
EN50081-1
EN50082-2
Generic emission standard Part 1: Residual,
commercial and light industry
Generic immunity standard Part 2: Industrial environment
EN300440-1
EN300440 -2
Electromagnetic compatibility and Radio spectrum
Matters (ERM);Short Range Devices (SRD);Radio
equipment to be used in the 1 GHz to 40 GHz
frequency range; Part 1: Technical characteristics
and test methods
Part 2: Harmonized EN under article 3.2 of the
R&TTE Directive
EN 55020
EN 55022
Immunity from radio interference of broadcast receivers
and associated equipment
Limits and methods of measurement of radio disturbance
characteristics of information
technology equipment
EN 301511
Global System for Mobile communications
(GSM);Harmonized EN for mobile stations in the
GSM 900 and GSM 1800 bands covering essential
requirements under article 3.2 of the R&TTE
directive (1999/5/EC)
EN 55024
EN 55013
Information Technology equipment-Immunity
characteristics-Limits and methods of measurement
Limits and methods of measurement of radio disturbance
characteristics of broadcast receivers and associated
equipment
EN 301 908-1
EN 301 908-2
Electromagnetic compatibility and Radio spectrum
Matters (ERM);Base Stations (BS), Repeaters and
User Equipment (UE) for IMT-2000 Third-Generation
cellular networks; Part 1: Harmonized EN for
IMT-2000, introduction and common requirements,
covering essential requirements of article 3.2 of the
R&TTE Directive
EN 50385
EN 300386
Product standard to demonstrate the compliances or radio
Base stations and fixed terminal stations for
wireless telecommunication systems with the basic
restriction or the reference level to human exposure to
radio frequency electromagnetic) field (110MHZ-40GHZ)
-General public
Electromagnetic compatibility and Radio spectrum
Matters (ERM);Telecommunication Electromagnetic
Compatibility (EMC) requirements
EN 301489
-1
EN 301489
-17
Electromagnetic compatibility and Radio spectrum
Matters (ERM); Electromagnetic compatibility(EMC)
standard for radio equipment and services; Part 17:
Specific conditions for wideband data and
HIPERLAN equipment, Part1: Common technical
requirements
CE marking
(EC conformity marking)
EN 60065
The manufacturer also declares the conformity of above mentioned product
with the actual required safety standards in accordance with LVD 2006/95/EC
Safety requirements for mains operated
EN 60950-1
Safety for info rmation technology equipment
electronic and related apparatus for including electrical business equipment
household and similar general use
Manufacturer/Importer
(Stamp)
Date : Jul. 30, 2008
Page 2
Appendix
Federal Communications Commission Statement
This device complies with Part 15 of the FCC Rules. Operation is subject to the
following two conditions:
• This device may not cause harmful interference.
• This device must accept any interference received, including interference that
may cause undesired operation.
This equipment has been tested and found to comply with the limits for a class
B digital device, pursuant to part 15 of the FCC Rules. These limits are designed
to provide reasonable protection against harmful interference in a residential
installation.
This equipment generates, uses and can radiate radio frequency energy and, if
not installed and used in accordance with the instructions, may cause harmful
interference to radio communications. However, there is no guarantee that
interference will not occur in a particular installation. If this equipment does cause
harmful interference to radio or television reception, which can be determined
by turning the equipment off and on, the user is encouraged to try to correct the
interference by one or more of the following measures:
• Reorient or relocate the receiving antenna.
• Increase the separation between the equipment and receiver.
• Connect the equipment into an outlet on a circuit different from that to which
the receiver is connected.
• Consult the dealer or an experienced radio/TV technician for help.
Caution: Any changes or modications not expressly approved by the party responsible for
compliance could void the user’s authority to operate the equipment.
Prohibition of Co-location
This device and its antenna(s) must not be co-located or operating in conjunction with
any other antenna or transmitter.
Safety Information
To maintain compliance with FCC’s RF exposure guidelines, this equipment should
be installed and operated with minimum distance 20cm between the radiator and
your body. Use on the supplied antenna.
Page 3

Declaration of Conformity for R&TTE directive
1999/5/EC
Essential requirements – Article 3
Protection requirements for health and safety – Article 3.1a
Testing for electric safety according to EN 60950-1 has been conducted. These are
considered relevant and sufficient.
Protection requirements for electromagnetic compatibility – Article 3.1b
Testing for electromagnetic compatibility according to EN 301 489-1 and EN 301
489-17 has been conducted. These are considered relevant and sufficient.
Effective use of the radio spectrum – Article 3.2
Testing for radio test suites according to EN 300 328- 2 has been conducted.
These are considered relevant and sufficient.
CE Mark Warning
This is a Class B product, in a domestic environment, this product may cause radio
interference, in which case the user may be required to take adequate measures.
Reach
Complying with the REACH(Registration, Evaluation, Authorization, and Restriction of
Chemicals) regulatory framework, we publish thee chemical substances in our producs
at ASUS REACH website at http://green.asus.com/english/REACH.htm.
DGT 警語
經型式認證合格之低功率射頻電機,非經許可,公司、商號或使用者均不得擅自變
更頻率、加大功率或變更原設計之特性及功能。
低功率射頻電機之使用不得影響飛航安全及干擾合法通信;經發現有干擾現象時,
應立即停用,並改善至無干擾時方得繼續使用。
前項合法通信,指依電信法規定作業之無線電通信。
低功率射頻電機須忍受合法通信或工業、科學及醫療用電波輻射性電機設備之干
擾。
Page 4

Index
1. English ................................................................................1
2. Bahasa Indonesia ...............................................................6
3.
4. TürkçeTürkçe ...............................................................................14
5.
6.
...................................................................................10
ไทย
繁體中文
簡體中文
...........................................................................18
...........................................................................22
Page 5
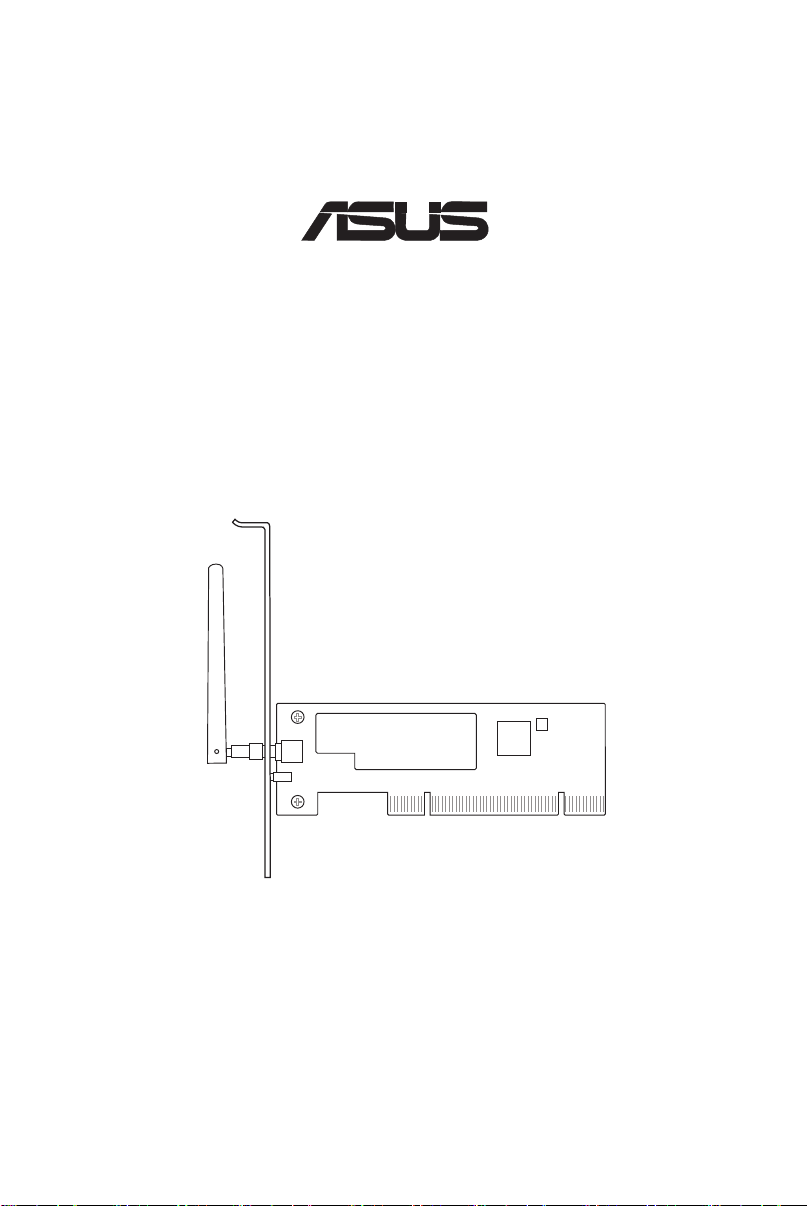
PCI-G31
®
Wireless Local Area Network Card
(For 802.11g & 802.11b Wireless Networks)
Quick Start Guide
Page 6
PCI-G31 WLAN Card Quick Start Guide
2
ASUS WLAN Card
English
1. Introduction
1.1 Package contents
Check your PCI-G31 WLAN Card package for the following items.
• ASUS PCI-G31 WLAN Card x1 • External dipole antenna x1
• Quick Start Guide x1 • Support CD x1
• Low prole bracket x1 • Warranty Card x1
NOTE: If any of the above items is damaged or missing, contact your retailer
immediately.
1.2 System requirements
Before using the PCI-G31 WLAN Card, check if your system meets the following
requirements:
• Windows® Vista/XP/2000/ME • Standard 32-bit PCI slot
• 32MB system memory or larger • 300MHz processor or higher
1.3 Hardware
Status indicator
The PCI-G31 WLAN Card comes with a status indicator that shows the realtime
status of the WLAN card.
ON: The WLAN card is enabled.
Blinking: The WLAN card has connected to a wireless network successfully and
data is being received or transmitted.
OFF: The WLAN card is disabled.
External dipole antenna
The PCI-G31 WLAN Card package includes an external dipole antenna. We
recommend that you straighten up the antenna for the maximum range and best
link quality.
Page 7
PCI-G31 WLAN Card Quick Start Guide
3
ASUS WLAN Card
English
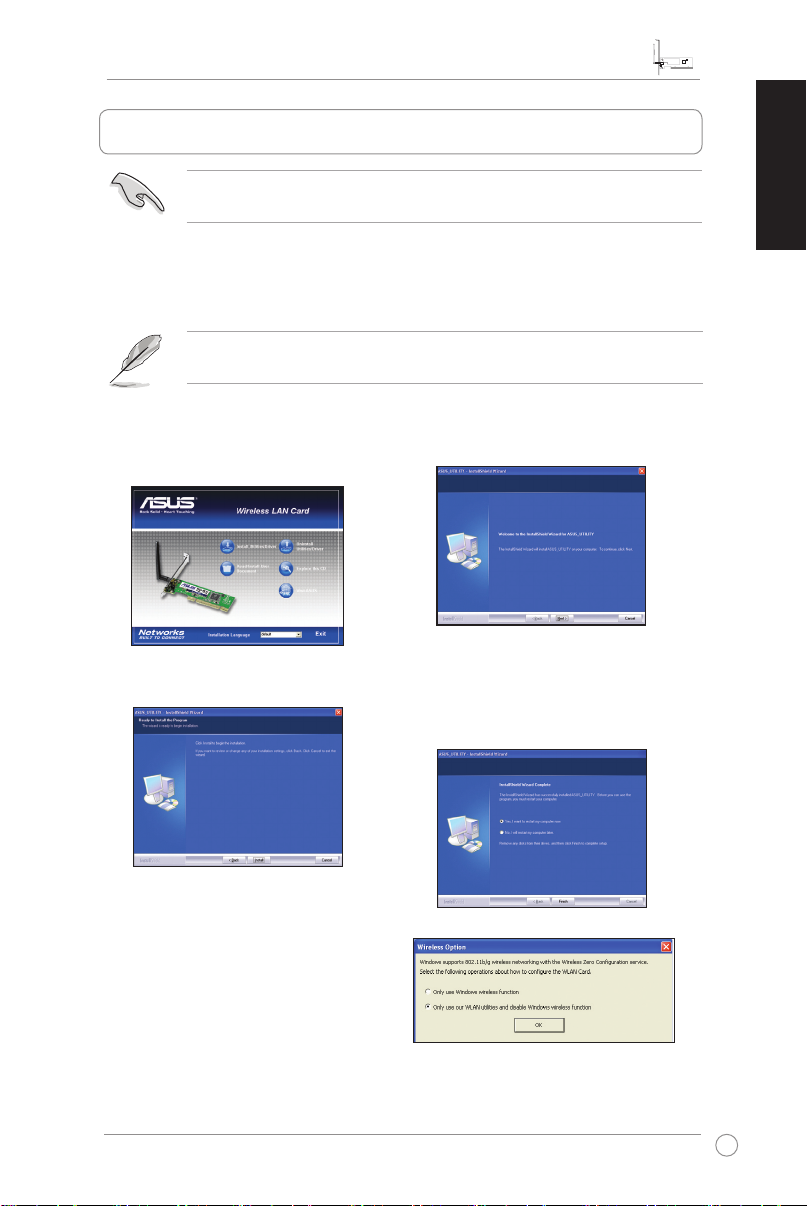
2. Installing the PCI-G31 driver and utilities
IMPORTANT: Install the ASUS PCI-G31 WLAN Card into your computer before
installing the driver and utilities from the bundled Support CD.
To install the driver and utilities for your ASUS PCI-G31 WLAN Card:
1. Place the bundled Support CD into the optical drive. An Autorun screen appears
if the Autorun function is enabled on your computer.
NOTE: If the Autorun function is not enabled on your computer, double-click
SETUP.EXE from the root directory to run the Support CD.
2. From the Autorun screen, select your
language and click
.
Driver
4. Click
Install
Install Utilities/
to start the installation.
3. An
InstallShield Wizard
appears. Click
5. Select
Yes, I want to restart my
computer now
to continue.
Next
. Click
screen
Finish
to
complete the installation.
6. After your computer reboots, select
Only use our WLAN utilities and
disable Windows wireless function
to allow the ASUS utility to manage
your WLAN card. Click OK.
Page 8
PCI-G31 WLAN Card Quick Start Guide
4
ASUS WLAN Card
English
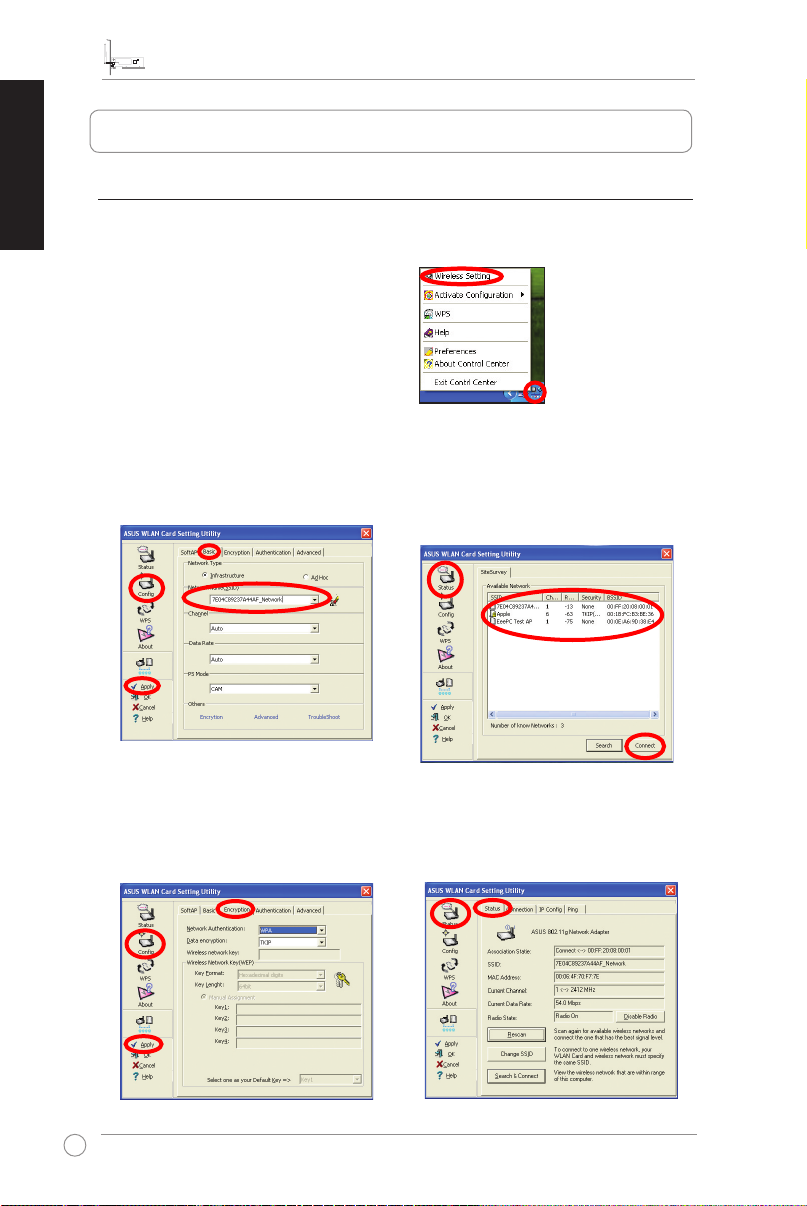
3. ConguringPCI-G31usingASUSutility
3.1 Connecting to a wireless network manually
To connect PCI-G31 to an access point (AP) (Infrastructure mode) or a station
(Ad Hoc mode) manually:
1. Right-click the ASUS WLAN Card
Setting Utility icon in the
Windows® system tray, then select
Wireless Setting
2. Set the
SSID
the same as that of the AP or station
you are trying to connect to. Click
.
Apply
.
of your WLAN card to
You may also click
& Connect
page, then select a network from
the
Connect
to display the
Available Network
.
Status
list. Click
>
Search
SiteSurvey
3. If Security is enabled on the AP or
station, do the same security settings
on your WLAN card as those on the
AP or station. Click
Apply
.
Setup is completed. The
displays information such as the
association state, current data rate,
and radio state.
Status
page
Page 9

PCI-G31 WLAN Card Quick Start Guide
5
ASUS WLAN Card
English
3.2 Connecting to a wireless network using WPS
The ASUS PCI-G31 WLAN Card supports the WPS function that helps you set up
a secure wireless network easily.
IMPORTANT: Ensure that the AP or station you are trying to connect to
supports the WPS function.
To connect PCI-G31 to a WPS-enabled AP or station using the WPS push button:
1. Click the WPS tab.
2. Select
then click
Join a WLAN (Enrollee)
.
Next
,
3. Select
5. Click
Push Button on AP (PBC)
then click
Finish
.
Next
. The picture indicates
that your WLAN card has connected
to the network successfully.
,
4. Press the WPS button on the AP
or station to establish a wireless
connection. The picture indicates that
WPS is scanning for the network.
NOTE: For more details on how
to use this WLAN card, refer to
the user manual included in the
Support CD.
Page 10

Panduan Ringkas Kartu WLAN PCI-G31
6
Kartu WLAN ASUS
Bahasa Indonesia
1. Pendahuluan
1.1 Isi kemasan
Pastikan kemasan Kartu WLAN PCI-G31 berisi item berikut ini.
• 1 Kartu WLAN PCI-G31 ASUS • 1 Antena dipole eksternal
• Panduan Ringkas • 1 CD Dukungan
• 1 Braket prol • 1 dasar Kartu Garansi
CATATAN: Jika salah satu item di atas rusak atau hilang, segera hubungi
peritel Anda.
1.2 Persyaratan sistem
Sebelum menggunakan Kartu WLAN PCI-G31, pastikan sistem telah memenuhi
persyaratan berikut:
• Windows® Vista/XP/2000/ME • Slot PCI 32-bit standar
• Memori sistem berkapasitas 32MB atau lebih besar
• Prosesor 300MHz atau lebih tinggi
1.3 Perangkat keras
Indikator status
Kartu WLAN PCI-G31 dilengkapi indikator status yang menunjukkan status
realtime kartu WLAN tersebut.
HIDUP: Kartu WLAN aktif.
Berkedip: Kartu WLAN berhasil terhubung ke jaringan nirkabel dan data sedang
diterima atau dikirimkan.
MATI: Kartu WLAN tidak aktif.
Antena dipole eksternal
Kemasan Kartu WLAN PCI-G31 dilengkapi antena dipole eksternal. Untuk
jangkauan maksimal dan kualitas sambungan terbaik, sebaiknya pasang antena
tersebut.
Page 11

Panduan Ringkas Kartu WLAN PCI-G31
7
Kartu WLAN ASUS
Bahasa Indonesia
2. Menginstal utilitas dan driver PCI-G31
PENTING: Instal terlebih dulu Kartu WLAN PCI-G31 ASUS ke komputer sebe-
lum menginstal driver dan utilitas dari CD Dukungan yang disertakan.
Untuk menginstal driver dan utilitas Kartu WLAN PCI-G31 ASUS:
1. Masukkan CD Dukungan yang disertakan ke dalam drive optik. Layar Autorun
akan ditampilkan jika fungsi Autorun pada komputer diaktifkan.
CATATAN: Jika fungsi Autorun tidak diaktifkan di komputer Anda, klik dua kali
SETUP.EXE dari direktori akar untuk menjalankan CD Dukungan.
2. Dari layar Autorun, pilih bahasa,
kemudian klik
Utilitas)/Driver
4. Klik
Install (Instal)
Install Utilities (Instal
.
untuk memulai
penginstalan.
6. Setelah komputer menjalankan
boot ulang, pilih
Only use our
WLAN utilities and disable
Windows wireless function (Hanya
gunakan utilitas Windows kami
dan nonaktifkan fungsi nirkabel Windows)
mengelola kartu WLAN. Klik OK.
3. Layar
5. Pilih
InstallShield Wizard (Wizard
InstallShield)
Next (Lanjut)
akan ditampilkan. Klik
untuk melanjutkan.
Yes, I want to restart my
computer now (Ya, Saya ingin
menghidupkan ulang komputer saya
sekarang)
Klik
Finish (Selesai)
menyelesaikan penginstalan.
agar utilitas ASUS dapat
untuk
Page 12

Panduan Ringkas Kartu WLAN PCI-G31
8
Kartu WLAN ASUS
Bahasa Indonesia
3. MengkongurasiPCI-G31menggunakanutilitasASUS
3.1 Membuat sambungan ke jaringan nirkabel secara manual
Untuk menyambungkan PCI-G31 ke AP (jalur akses) (mode Infrastructure) atau
stasiun (mode Ad Hoc) secara manual:
1. Klik kanan ikon
Setting Utility (Utilitas Pengaturan
ASUS WLAN Card)
sistem Windows®, lalu pilih
Setting (Pengaturan Nirkabel)
2. Atur SSID kartu WLAN ke AP atau
stasiun yang sama seperti yang
akan disambungkan. Klik
(Terapkan)
ASUS WLAN Card
pada baris
.
Wireless
Apply
.
Anda juga dapat mengklik
Search & Connect (Cari & Sambung)
untuk menampilkan halaman
SiteSurvey, lalu memilih jaringan dari
daftar
Available Network (Jaringan
Tersedia)
. Klik
Status >
Connect (Sambung)
.
3. Jika
Security (Keamanan)
di AP atau stasiun, buat pengaturan
keamanan pada kartu WLAN
sama seperti pada AP atau stasiun
tersebut. Klik
Apply (Terapkan)
diaktifkan
Kongurasi selesai. Halaman Status
.
akan menampilkan informasi seperti
status keterkaitan, kecepatan data
terkini, dan status radio.
Page 13

Panduan Ringkas Kartu WLAN PCI-G31
9
Kartu WLAN ASUS
Bahasa Indonesia
3.2 Membuat sambungan ke jaringan nirkabel menggunakan WPS
Kartu WLAN PCI-G31 ASUS mendukung fungsi WPS yang akan membantu Anda
mengkongurasi jaringan nirkabel aman dengan mudah.
PENTING: Pastikan AP atau stasiun yang Anda coba sambungkan telah mendukung fungsi WPS.
Untuk menyambungkan PCI-G31 ke AP atau stasiun yang mendukung WPS
menggunakan tombol tekan WPS:
1. Klik tab WPS.
2. Pilih
Join a WLAN (Gabung ke
WLAN) (Enrollee) (Pendaftar)
kemudian klik
Next (Lanjut)
,
.
3. Pilih
Push Button on AP (Tekan
Tombol pada AP) (PBC)
klik
Next (Lanjut)
5. Klik
Finish (Selesai)
, kemudian
.
. Gambar
menunjukkan kartu WLAN telah
berhasil terhubung ke jaringan.
4. Tekan tombol WPS pada AP atau
stasiun untuk membuat sambungan
nirkabel. Gambar menunjukkan WPS
sedang memindai jaringan.
CATATAN: Untuk informasi
lebih rinci tentang cara menggunakan kartu WLAN, lihat
panduan pengguna yang disertakan dalam CD Dukungan ini.
Page 14

คู่มือเริ่มต้นอย่างเร็ว การ์ด PCI-G31 WLAN
10
การ์ด ASUS WLAN
ไทย
1. บทนำ
1.1 รายการในบรรจุภัณฑ์
ตรวจสอบแพคเกจของการ์ด PCI-G31 WLAN ว่ามีรายการต่อไปนี้ครบถ้วน
• การ์ด ASUS PCI-G31 WLAN x1 • เสาอากาศเสาคู่ภายนอก x1
• คู่มือเริ่มต้นอย่างเร็ว x1 • แผ่น CD สนับสนุน x1
• แผ่นโลหะยึดโครงเครื่องต่ำ x1 • ใบรับประกัน x1
หมายเหตุ: ถ้ามีรายการใดด้านบนเสียหาย หรือหายไป
ให้ติดต่อร้านค้าปลีกของคุณทันที
1.2 ความต้องการของระบบ
ก่อนที่จะใช้การ์ด PCI-G31 WLAN,
ให้ตรวจสอบว่าระบบของคุณมีคุณสมบัติตรงตามความต้องการต่อไปนี้:
• Windows® Vista/XP/2000/ME
• สล็อต PCI 32 บิตมาตรฐาน
• หน่วยความจำระบบ 32MB หรือมากกว่า
• โปรเซสเซอร์ 300MHz หรือสูงกว่า
1.3 ฮาร์ดแวร์
ตัวแสดงสถานะ
การ์ด PCI-G31 WLAN มาพร้อมกับตัวแสดงสถานะที่บอกถึงสถานะเรียลไทม์ของการ์ด
WLAN
ติด: การ์ด WLAN เปิดทำงาน
กะพริบ: การ์ด WLAN เชื่อมต่อกับเครือข่ายไร้สายสำเร็จ และกำลังรับหรือส่งข้อมูล
ดับ: การ์ด WLAN ปิดทำงาน
เสาอากาศเสาคู่ภายนอก
ภายในกล่องบรรจุการ์ด PCI-G31 WLAN มีเสาอากาศเสาคู่ภายนอกมาให้
เราแนะนำให้คุณยืดเสาอากาศออก เพื่อให้ได้ระยะการทำงานสูงสุด
และคุณภาพการเชื่อมโยงดีที่สุด
Page 15

คู่มือเริ่มต้นอย่างเร็ว การ์ด PCI-G31 WLAN
11
การ์ด ASUS WLAN
ไทย
2. การติดตั้งไดรเวอร์และยูทิลิตี้ PCI-G31
สำคัญ: ติดตั้งการ์ด ASUS PCI-G31 WLAN
ลงในคอมพิวเตอร์ของคุณก่อนที่จะติดตั้งไดรเวอร์และยูทิลิตี้จากแผ่น CD
สนับสนุนที่มาพร้อมการ์ด
ในการติดตั้งไดรเวอร์และยูทิลิตี้สำหรับการ์ด ASUS PCI-G31 WLAN ของคุณ:
1. ใส่แผ่น CD สนับสนุนที่มาพร้อมาร์ดลงในออปติคัลไดรฟ์ หน้าจอ ทำงานอัตโนมัติ
จะปรากฏขึ้นถ้าฟังก์ชั่น ทำงานอัตโนมัติ เปิดอยู่บนคอมพิวเตอร์ของคุณ
หมายเหตุ: ถ้าฟังก์ชั่น ทำงานอัตโนมัติ ไม่ได้เปิดทำงานบนคอมพิวเตอร์ของคุณ,
ดับเบิลคลิกที่ SETUP.EXE จากไดเรกทอรีราก เพื่อรันแผ่น CD สนับสนุน
2. จากหน้าจอ ทำงานอัตโนมัติ, เลือกภาษา
และคลิก Install Utilities
(ติดตั้งยูทิลิตี้)/Driver (ไดรเวอร์)
4. คลิก Install (ติดตั้ง) เพื่อเริ่มการติดตั้ง
6. หลังจากที่คอมพิวเตอร์บูตใหม่, เลือก
Only use our WLAN utilities
and disable Windows wireless
function (ใช้เฉพาะยูทิลิตี้ WLAN
ของเรา และปิดทำงานฟังก์ชั่นไร้สายของ
Windows) เพื่อให้ยูทิลิตี้ ASUS
จัดการการ์ด WLAN ของคุณ คลิก OK
(ตกลง)
3. หน้าจอ InstallShield Wizard (ตัวช่วยสร้าง
InstallShield) จะปรากฏขึ้น คลิก
Next (ถัดไป) เพื่อทำต่อไป
5. เลือก Yes, I want to restart my
computer now (ใช่
ฉันต้องการเริ่มคอมพิวเตอร์ใหม่เดี๋ยวนี้)
คลิก Finish (เสร็จสิ้น)
เพื่อทำการติดตั้งให้สมบูรณ์
Page 16

คู่มือเริ่มต้นอย่างเร็ว การ์ด PCI-G31 WLAN
12
การ์ด ASUS WLAN
ไทย
3. การกำหนดค่า PCI-G31 โดยใช้ยูทิลิตี้ ASUS
3.1 การเชื่อมต่อไปยังเครือข่ายไร้สายแบบแมนนวล
ในการเชื่อมต่อ PCI-G31 ไปยังจุดเชื่อมต่อ (AP) (โหมดโครงข่ายพื้นฐาน) หรือสถานี
(โหมด Ad Hoc) แบบแมนนวล:
1. คลิกขวาที่ไอคอนยูทิลิตี้การตั้งค่าการ์ด
ASUS WLAN Card ในถาดระบบของ
Windows®, จากนั้นเลือก Wireless
Setting (การตั้งค่าไร้สาย)
2. ตั้งค่า SSID ของการ์ด WLAN
ของคุณให้เหมือนกับของ AP
หรือสถานีที่คุณกำลังพยายามเชื่อมต่อไปยัง
คลิก Apply (ใช้)
3. ถ้าระบบรักษาความปลอดภัยเปิดทำงานบน
AP หรือสถานี,
ให้ทำการตั้งค่าระบบรักษาความปลอดภัยบน
WLAN ให้เหมือนกับของ AP หรือสถานี
คลิก Apply (ใช้)
นอกจากนี้ คุณอาจคลิก Status (สถานะ)
> Search & Connect (ค้นหา &
เชื่อมต่อ) เพื่อแสดงหน้า SiteSurvey
(สำรวจไซต์), จากนั้นเลือกเครือข่ายจา
กรายการ Available Network
(เครือข่ายที่ใช้ได้) คลิก Connect
(เชื่อมต่อ)
การตั้งค่าเสร็จสมบูรณ์ หน้า Status (สถานะ)
แสดงข้อมูลต่างๆ เช่น สถานะการเชื่อมต่อ,
อัตราการรับส่งข้อมูลปัจจุบัน
และสถานะวิทยุ
Page 17

คู่มือเริ่มต้นอย่างเร็ว การ์ด PCI-G31 WLAN
13
การ์ด ASUS WLAN
ไทย
3.2 การเชื่อมต่อไปยังเครือข่ายไร้สายโดยใช้ WPS
การ์ด ASUS PCI-G31 WLAN สนับสนุนฟังก์ชั่น WPS
ที่ช่วยให้คุณตั้งค่าเครือข่ายไร้สายที่มีการป้องกันได้อย่างง่ายดาย
สำคัญ: ให้แน่ใจว่า AP หรือสถานีที่คุณกำลังพยายามเชื่อมต่อ สนับสนุนฟังก์ชั่น WPS
ในการเชื่อมต่อ PCI-G31 ไปยัง AP หรือสถานีที่มีคุณสมบัติ WPS โดยใช้ปุ่มกด WPS:
1. คลิกแท็บ WPS
3. เลือก Push Button on AP (ปุ่มกดบน
AP) (PBC), จากนั้นคลิก Next (ถัดไป)
5. คลิก Finish (เสร็จสิ้น) ภาพแสดงว่าการ์ด
WLAN
ของคุณเชื่อมต่อเข้ากับเครือข่ายสำเร็จแล้ว
2. เลือก Join a WLAN (เข้าร่วม WLAN)
(Enrollee) (ผู้เข้าร่วม), จากนั้นคลิก
Next (ถัดไป)
4. กดปุ่ม WPS บน AP หรือสถานี
เพื่อสร้างการเชื่อมต่อไร้สาย ภาพแสดงถึง
WPS กำลังสแกนหาเครือข่าย
หมายเหตุ: สำหรับรายละเอียดเพิ่มเติมเกี่ยวกับการใช้การ์ด WLAN นี้
ให้ดูในคู่มือผู้ใช้ที่ให้มาในแผ่น CD สนับสนุน
Page 18

PCI-G31WLANKartıHızlıBaşlangıçKılavuzu
14
ASUS WLAN Kartı
Türkçe
1. Giriş
1.1 Paketiniçindekiler
PCI-G31 WLAN Kartınızın paketinde aşağıdakilerin olup olmadığını kontrol edin.
• 1 adet ASUS PCI-G31 WLAN Kartı • 1 adet harici iki kutuplu anten
• 1 adet Hızlı Başlangıç Kılavuzu • 1 adet destek CD’si
• 1 adet düşük prolli braket • 1 Garanti Kartı
NOT: Yukarıdaki öğelerden biri hasarlı veya eksikse, hemen satıcınıza
başvurun.
1.2 Sistem gereksinimleri
PCI-G31 WLAN Kartını kullanmadan önce sisteminizin aşağıdaki gereksinimleri
karşılayıp karşılamadığını kontrol edin:
• Windows® Vista/XP/2000/ME • Standart 32 bit PCI yuvası
• 32MB veya üstü sistem belleği • 300MHz veya üstü işlemci
1.3 Donanım
Durum göstergesi
PCI-G31 WLAN Kartında, WLAN kartının gerçek zamanlı durumunu gösteren bir
durum göstergesi bulunur.
AÇIK: WLAN kartı etkindir.
Yanıp Sönme: WLAN kartı kablosuz bir ağa başarılı bir şekilde bağlanmıştır ve
veri alınmakta veya verilmektedir.
KAPALI: WLAN kartı devre dışıdır.
Harici iki kutuplu anten
PCI-G31 WLAN Kartı paketinde harici iki kutuplu bir anten bulunmaktadır. En iyi
bağlantı kalitesi için anteni en yüksek mesafeye doğrultmanızı tavsiye ederiz.
Page 19

PCI-G31WLANKartıHızlıBaşlangıçKılavuzu
15
ASUS WLAN Kartı
Türkçe
2. PCI-G31sürücüveyardımcıprogramlarınıyükleme
ÖNEMLİ:Aygıtla birlikte verilen Destek CD’sinden sürücü ve yardımcı
programları yüklemeden önce ASUS PCI-G31 WLAN Kartını bilgisayarınıza
takın.
ASUS PCI-G31 WLAN Kartınızın sürücü ve yardımcı programlarını yüklemek için:
1. Aygıtla birlikte verilen Destek CD’sini optik sürücüye yerleştirin. Otomatik
Çalıştır işlevi bilgisayarınızda etkinse bir Otomatik Çalıştır ekranı görünür.
NOT: Bilgisayarınızda Otomatik Çalıştır işlevi etkin değilse, Destek CD’sini
çalıştırmak için kök dizinden SETUP.EXE dosyasına çift tıklayın.
2. Otomatik Çalıştır ekranından, dilinizi
seçin ve
InstallUtilities(Yardımcı
Programları)/Driver(Sürücüyü
Yükle)öğesinetıklayın
4. Kuruluma başlamak için
öğesine tıklayın.
(Yükle)
.
Install
3.
InstallShield Wizard (Kurulum
EkranıSihirbazı)
Devam etmek için
ekranı görünür.
Next(İleri)
öğesine tıklayın.
5.
Yes, I want to restart my computer
now(Evet,bilgisayarımışimdi
yenidenbaşlatmakistiyorum)
tıklayın. Kurulumu tamamlamak için
Finish’e (Bitir)
tıklayın.
6. Bilgisayarınız yeniden başladıktan
sonra, ASUS yardımcı programının
WLAN kartınızı yönetmesini sağlamak
için
Only use our WLAN utilities and
disable Windows wireless function
(YalnızcaWLANyardımcıprogramlarımızıkullanveWindowskablosuz
işlevinidevredışıbırak)
öğesini seçin.
OK’e (TAMAM)
tıklayın.
öğesine
Page 20

PCI-G31WLANKartıHızlıBaşlangıçKılavuzu
16
ASUS WLAN Kartı
Türkçe
3. PCI-G31’iASUSyardımcıprogramını
kullanarakyapılandırma
3.1 Kablosuzbirağamanuelolarakbağlanma
PCI-G31’i bir erişim noktasına (AP) (Altyapı modu) veya bir istasyona (Geçici Mod)
manuel olarak bağlamak için:
1. Windows® sistem çubuğundaki
CardSettingUtiliy(ASUSWLANKartıAyarı
YardımcıProgramı)
ardından
seçin.
2. WLAN kartınızın
denediğiniz AP veya istasyonunkiyle
aynı SSID'ye ayarlayın.
(Uygula)
3. AP veya istasyonda Güvenlik etkinse,
AP veya istasyondakiyle aynı
güvenlik ayarlarını WLAN kartınızda
da yapın.
WirelessSetting’i(KablosuzAyarı)
tıklayın.
Apply’a (Uygula)
simgesine çift tıklayın ve
’sini bağlamayı
SSID
ASUS WLAN
Apply’a
tıklayın.
Ayrıca
Kurulum tamamlanır.
SiteSurvey(SiteAraştırması)
sayfasınıgörüntülemekiçinStatus
(Durum) > Search & Connect’e (Ara
veBağlan)
Network(MevcutAğ)
ağ seçebilirsiniz.
tıklayın.
sayfasında ilişki durumu, mevcut
veri hızı ve radyo durumu gibi bilgiler
gösterilir.
tıklayabilir ve
listesinden bir
Connect’e(Bağlan)
Status (Durum)
Available
Page 21

PCI-G31WLANKartıHızlıBaşlangıçKılavuzu
17
ASUS WLAN Kartı
Türkçe
3.2 KablosuzbirağaWPSkullanarakbağlanma
ASUS PCI-G31 WLAN Kart, kolay bir şekilde güvenli bir kablosuz ağ kurmanıza
yardımcı olan WPS işlevini desteklemektedir.
ÖNEMLİ:Bağlanmaya çalıştığınız AP veya istasyonun WPS işlevini
desteklediğinden emin olun.
PCI-G31’i WPS etkin bir AP veya istasyona WPS basmalı düğme ile bağlanmak
için:
1. WPS sekmesine tıklayın.
2.
JoinaWLAN(BirWLAN’akatıl)
(Enrollee)(Kayıtlı)
ardından
Next’e(İleri)
öğesini seçin,
tıklayın.
3.
Push Button on AP (AP’deki
BasmalıDüğme)(PBC)(PBC)
öğesini seçin, ardından
Next’e(İleri)
tıklayın.
5.
Finish’e (Bitir)
tıklayın. Resimde
WLAN kartınızın ağa başarılı bir
şekilde bağlandığı gösterilir.
4. Kablosuz bir bağlantı kurmak için AP
veya istasyondaki WPS düğmesine
basın. Resimde WPS’nin ağ için
tarama yaptığı gösterilir.
NOT: Bu WLAN kartının
kullanımıyla ilgili daha fazla bilgi
için, Destek CD’sinde bulunan
kullanım kılavuzuna bakın.
Page 22

PCI-G31 無線網卡快速使用指南
18
ASUS WLAN Card
繁體中文
1. 簡介
1.1 包裝內容
請檢查您的 PCI-G31 無線網卡包裝中是否包含以下內容。
• 無線網卡 x1 • 安裝光碟片 x1
• 快速安裝使用手冊 x1 • 全向型天線 x1
• 保證卡 x1 •介面卡短鐵片 x1
注意:以上物品若有任何缺失或損毀,請儘速連絡您的經銷商。
1.2 系統需求
在使用 PCI-G31 無線網卡之前,請檢查您的系統是否符合以下要求:
• Windows® Vista/XP/2000/ME • 標準 32-bit PCI 插槽
• 32MB 或以上系統記憶體 • 300MHz 或以上處理器
1.3 硬體
狀態指示燈
PCI-G31 無線網卡具備一個狀態指示燈,顯示無線網卡的即時狀態。
亮燈: 無線網卡已開啟。
閃爍: 無線網卡已成功連線至無線網路,且正在傳送或接收資料。
熄滅: 無線網卡已關閉。
外接全向型天線
PCI-G31 無線網卡包裝內含一支外接全向型天線。建議您將天線直立安裝以
獲取最大的訊號覆蓋範圍與最佳訊號品質。
Page 23

PCI-G31 無線網卡快速使用指南
19
ASUS WLAN Card
繁體中文
2. 安裝PCI-G31驅動程式與應用程式
重要:請先將華碩 PCI-G31 無線網卡安裝到您的電腦,然後再從附贈光碟
中安裝驅動程式與應用程式。
請依照以下步驟安裝華碩 PCI-G31 無線網卡的驅動程式與應用程式:
1. 將附贈光碟放入光碟機。若您的電腦開啟了「自動安插通知」功能,將
出現一個自動執行畫面。
注意:若您的電腦沒有開啟「自動安插通知」功能,請在附贈光碟的根目
錄下雙按 SETUP.EXE 檔案開啟程式。
2. 在自動執行畫面中,選擇您要安裝
的語言並點選 安裝華碩無線網卡
應用程式 / 驅動程式。
4. 點選 安裝 開始安裝。
6. 當電腦重新啟動後,選擇 Only use
our WLAN utilities and disable
Windows wireless function 以允
許華碩應用程式來管理無線網卡。
點選 OK。
3. InstallShield Wizard 畫面出現。點
選 下一步 繼續。
5. 選擇 是,立即重新啟動電腦。點
選 完成 完成安裝。
Page 24

PCI-G31 無線網卡快速使用指南
20
ASUS WLAN Card
繁體中文
3. 使用華碩應用程式設定PCI-G31
3.1 手動連接到無線網路
請依照以下步驟將 PCI-G31 連接到基地台(AP)(結構模式)或工作站(點
對點模式):
1. 右鍵點選 Windo ws 工作列中的華
碩無線網卡設定程式圖示,並選擇
Wireless Setting。
2. 將無線網卡的 SSID 設定為與您欲
連線的 AP 或工作站相同。點選
Apply。
3. 若您的 AP 或工作站開啟了安全功
能,請在您的無線網卡端做相同的
設定。點選 Apply。
您也可以點選 Status > Search &
Connect 以顯示 SiteSurvey 頁面,
接著從 Available Network 列表中
選擇一個網路。點選 Connect。
設 定 完 成。Status 頁 面 會 顯 示
Association State、Current Data
Rate 與 Radio State 等資訊。
Page 25

PCI-G31 無線網卡快速使用指南
21
ASUS WLAN Card
繁體中文
3.2 使用WPS連線到無線網路
華碩 PCI-G31 無線網卡支援 WPS 功能,可幫助您更簡單地設定安全的無線
網路。
重要:請確認您欲連線的 AP 或工作站支援 WPS 功能。
請依照以下步驟使用 WPS 按鈕將 PCI-G31 連線到開啟 WPS 的 AP 或工作
站:
1. 點選 WPS 標籤頁。
2. 選擇 Join a WLAN (Enrollee),接
著點選 Next。
3. 選擇 Push Button on AP (PBC),接
著點選 Next。
5. 點選 Finish。下圖所示表明您的
無線網卡已經成功連線至網路。
4. 按下 AP 或工作站上的 WPS 按鈕
以建 立 無 線 連接。下圖所示表明
WPS 正在搜尋網路。
注意:有關如何使用無線網卡
的更多資訊,請參考附贈光碟
中的使用手冊。
Page 26

PCI-G31 無線網卡快速使用指南
22
ASUS WLAN Card
簡體中文
1. 簡介
1.1 包裝內容
請檢查您的 PCI-G31 無線網卡包裝中是否包含以下內容。
• 無線網卡 x1 • 安裝光盤片 x1
• 快速安裝使用手冊 x1 • 全向型天線 x1
• 保證卡 x1 • 適配卡短鐵片 x1
注意:以上物品若有任何缺失或損毀,請儘快聯絡您的經銷商。
1.2 系統需求
在使用 PCI-G31 無線網卡之前,請檢查您的系統是否符合以下要求:
• Windows® Vista/XP/2000/ME • 標準 32-bit PCI 插槽
• 32MB 或以上系統內存 • 300MHz 或以上處理器
1.3 硬件
狀態指示燈
PCI-G31 無線網卡具備一個狀態指示燈,顯示無線網卡的實時狀態。
亮燈: 無線網卡已開啟。
閃爍: 無線網卡已成功連接至無線網絡,且正在傳送或接收數據。
熄滅: 無線網卡已關閉。
外接全向型天線
PCI-G31 無線網卡包裝內含一支外接全向型天線。建議您將天線直立安裝
以獲取最大的信號覆蓋範圍與最佳信號品質。
Page 27

PCI-G31 無線網卡快速使用指南
23
ASUS WLAN Card
簡體中文
2. 安裝 PCI-G31 驅動程序與應用程序
重要:請先將華碩 PCI-G31 無線網卡安裝到您的電腦,然後再從附贈光
盤中安裝驅動程序與應用程序。
請依照以下步驟安裝華碩 PCI-G31 無線網卡的驅動程序與應用程序:
1. 將附贈光盤放入光驅。若您的電腦開啟了「自動播放」功能,將出現一
個自動運行畫面。
注意:若您的電腦沒有開啟「自動播放」功能,請在附贈光盤的根目錄下
雙擊 SETUP.EXE 文件開啟程序。
2. 在自動執行畫面中,選擇您要安裝
的語言並點擊【安裝華碩無線網卡
應用程序 / 驅動程序】。
4. 點擊【安裝】開始安裝。
6. 當 電腦重 新 啟 動後,選 擇【Only
use our WLAN utilities and disable
Windows wireless function】以允
許華碩應用程序來管理無線網卡。
點擊【OK】。
3. InstallShield Wizard 畫面出現。點
擊【下一步】繼續。
5. 選 擇【 是, 立 即 重 新 啟 動 電 腦 】。
點擊【完成】完成安裝。
Page 28

PCI-G31 無線網卡快速使用指南
24
ASUS WLAN Card
簡體中文
3. 使用華碩應用程序設置 PCI-G31
3.1 手動連接到無線網絡
請依照以下步驟將 PCI-G31 連接到接入點(AP)(結構模式)或工作站(點
對點模式):
1. 右鍵點擊 Windows 任務欄中的華
碩無線網卡設置程序圖標,並選擇
Wireless Setting。
2. 將無線網卡的 SSID 設置為與您欲
連接 的 A P 或工作站 相同。點擊
【Apply】。
3. 若您的 AP 或工作站開啟了安全功
能,請在您的無線網卡端做相同的
設置。點擊【Apply】。
您也可以點擊【Status】>【Search
& Connec t】以顯示 Site S u r vey
頁面,接著從 Avail able Network
列表 中 選擇 一 個網 絡,然 後 點 擊
【Connect】。
設 置 完 成。S t a t u s 頁 面 會 顯 示
Association State、Current Data
Rate 與 Radio State 等信息。
Page 29

PCI-G31 無線網卡快速使用指南
25
ASUS WLAN Card
簡體中文
3.2 使用 WPS 連接到無線網絡
華碩 PCI-G31 無線網卡支持 WPS 功能,可幫助您更簡單地設置安全的無
線網絡。
重要:請確認您欲連接的 AP 或工作站支持 WPS 功能。
請依照以下步驟使用 WPS 按鈕將 PCI-G31 連接到開啟 WPS 的 AP 或工
作站:
1. 點擊 WPS 標籤頁。
2. 選擇【Join a WLAN (Enrollee)】,
接著點擊【Next】。
3. 選擇【Push Button on AP (PBC)】,
接著點擊【Next】。
5. 點擊【Fini s h】。下圖所示表明您
的無線網卡已經成功連接至網絡。
4. 按下 AP 或工作站上的 WPS 按鈕
以建 立 無 線連接。下圖所示表明
WPS 正在搜索網絡。
注意:有關如何使用無線網卡
的更多信息,請參考附贈光盤
中的用戶手冊。
Page 30

(PBDE)
多溴二苯醚
(PBB)
多溴联苯
六价铬
(Cr(VI))
有害物质或元素
铅 (Pb) 镉 (Cd) 汞 (Hg)
部件名称
印刷電路板及零組件 ○ ○ ○ ○ ○ ○
NA NA NA NA NA NA
NA NA NA NA NA NA
外部信號連接頭及線材 ○ ○ ○ ○ ○ ○
电源适配器
外殼
中央處理器與內存 ○ ○ ○ ○ ○ ○
标准规定的限量要求,然该部件仍符合欧盟指令2002/95/EC的规范。
○:表示该有毒有害物质在该部件所有均质材料中的含量均在SJ/T 11363-2006
标准规定的限量要求以下。
X:表示该有毒有害物质至少在该部件的某一均质材料中的含量超出SJ/T 11363-2006
备注:此产品所标示之环保使用年限,系指在一般正常使用状况下。
Page 31

Українська
ASUS Contact Information
20415800000126
ASUSTeKCOMPUTERINC.(Asia-Pacic)
Company address: 15 Li-Te Road, Beitou, Taipei 11259
Telephone: +886-2-2894-3447
Fax: +886-2-2890-7798
E-mail: info@asus.com.tw
Web site: http://www.asus.com.tw
ASUSCOMPUTERINTERNATIONAL(America)
Company address: 800 Corporate Way, Fremont, CA 94538, USA
General (fax): +1-510-608-4555
Web site address: http://usa.asus.com
Technical support
General support: +1-502-995-0883
Support (fax): +1-502-933-8713
Online support: http://vip.asus.com/eservice/techserv.aspx
ASUSCOMPUTERGmbH(Germany&Austria)
Company address: Harkortstr. 21-23, 40880 Ratingen, Germany
General (tel): +49-02102-95990
General (fax): +49-02102-959911
Web site address: http://www.asuscom.de
Online contact: http://www.asuscom.de/sales
Technical support
Components: +49-02102-95990
Fax: +49-02102-959911
Online support: http://vip.asus.com/eservice/techserv.aspx?SLanguage=de-de
Global service center: http://support.asus.com/service/service.aspx?SLanguage=en-
us
FAQ: http://support.asus.com/faq/faq.aspx?SLanguage=en-us
Online technical support: http://support.asus.com/techserv/techserv.
aspx?SLanguage=en-us
Page 32

Manufacturer:
Authorised representative
in Europe:
Authorised distributors
in Turkey:
ASUSTeK Computer Inc.
Tel: +886-2-2894-3447
Address: No. 150, LI-DE RD., PEITOU, TAIPEI 112,
TAIWAN
ASUS Computer GmbH
Address: HARKORT STR. 21-23, 40880 RATINGEN,
GERMANY
BOGAZICI BIL GISAYAR SAN. VE TIC. A.S.
Tel: +90 212 3311000
Address: AYAZAGA MAH. KEMERBURGAZ CAD.
NO.10 AYAZAGA/ISTANBUL
INDEX BILGISAYAR SISTEMLERI MUHENDISLIK
SAN. VE TIC. A.S.
Tel: +90 212 3312121
Address: AYAZAGA MAH: CENDERE YOLU NO:9
AYAZAGA/ISTANBUL
 Loading...