

Page 1

R
PCI-AS300
SCSI/Audio MediaBus Card
USER'S MANUAL
Page 2

USER'S NOTICE
No part of this product, including the product and software may be reproduced,
transmitted, transcribed, stored in a retrieval system, or translated into any language in any form by any means without the express written permission of ASUST eK
COMPUTER INC. (hereinafter referred to as ASUS) except documentation kept
by the purchaser for backup purposes.
ASUS provides this manual "as is" without warranty of any kind, either express or
implied, including but not limited to the implied warranties or conditions of merchantability or fitness for a particular purpose. In no event shall ASUS be liable for
any loss or profits, loss of business, loss of use or data, interruption of business, or
for indirect, special, incidental, or consequential damages of any kind, even if ASUS
has been advised of the possibility of such damages arising from any defect or error
in this manual or product. ASUS may revise this manual from time to time without
prior notice.
Products mentioned in this manual are mentioned for identification purposes only.
Product names appearing in this manual may or may not be registered trademarks
or copyrights of their respective companies.
The product name and revision number are both printed on the board itself. Manual
revisions are released for each board design represented by the digit before and
after the period of the manual revision number . Manual updates are represented by
the third digit in the manual revision number . For updated BIOS, drivers, or product release information you may visit ASUS' home page at: http://www .asus.com.tw/
© Copyright 1996 ASUSTeK COMPUTER INC. All rights reserved.
Product Name: PCI-AS300
Manual Rev: 1.01
Release Date: January 1997
II
ASUS PCI-AS300 User's Manual
Page 3

ASUS CONTACT INFORMATION
ASUSTeK COMPUTER INC.
Marketing Info:
Address: 150 Li-Te Road, Peitou, Taipei, Taiwan, ROC
Telephone: 886-2-894-3447
Fax: 886-2-894-3449
Email: info@asus.com.tw
Technical Support:
Fax: 886-2-895-9254
BBS: 886-2-896-4667
Email: tsd@asus.com.tw
WWW: http://www.asus.com.tw/
Gopher: gopher.asus.com.tw
FTP: ftp.asus.com.tw/pub/ASUS
ASUS COMPUTER INTERNATIONAL
Marketing Info:
Address: 721 Charcot Avenue, San Jose, CA 95131, USA
Telephone: 1-408-474-0567
Fax: 1-408-474-0568
Email: info-usa@asus.com.tw
Technical Support:
BBS: 1-408-474-0555
Email: tsd-usa@asus.com.tw
ASUS COMPUTER GmbH
Marketing Info:
Address: Harkort Str. 25, 40880 Ratingen, BRD, Germany
Telephone: 49-2102-445011
Fax: 49-2102-442066
Email: info-ger@asus.com.tw
Technical Support:
BBS: 49-2102-448690
Email: tsd-ger@asus.com.tw
ASUS PCI-AS300 User's Manual III
Page 4

CONTENTS
Hardware Setup - SCSI/Audio
I. INTRODUCTION..........................................................1
The PCI-AS300 SCSI/Audio MediaBus Card................................. 1
How this manual is organized.......................................................... 1
Item Checklist .................................................................................. 1
II. FEATURES...................................................................2
PCI-AS300 Features ........................................................................ 2
System Requirements:................................................................ 2
Layout and Connectors of the PCI-AS300 ........................... 2
CD-Audio Connector Pin Definitions .................................. 2
III. INSTALLATION .......................................................3
Installation Steps.............................................................................. 4
1. Jumpers ........................................................................................ 4
Audio Adapter Amplifier ...................................................... 5
Audio Adapter Base I/O Addresses ...................................... 5
2. Install the Expansion Card .................................................... 6
3. Connect Cables...................................................................... 6
Audio Cables ........................................................................ 6
SCSI Cabling ........................................................................ 6
SCSI Cable Limits:............................................................... 6
SCSI Types ........................................................................... 7
Connecting Cables................................................................ 7
4. SCSI ID Numbers & Termination ......................................... 8
SCSI ID Numbers................................................................. 8
SCSI T ermination ................................................................. 8
5. Configuring the SCSI Adapter .............................................. 9
The SCSISelect Configuration Utility.................................. 9
Configure/View Host Adapter Settings ................................ 10
SCSI Disk Utilities ............................................................... 10
Operating System Support.................................................... 10
IV
CE Compliancy................................................................................ 11
Troubleshooting ............................................................................... 12
Cannot Boot from your SCSI Disk Drive .................................. 12
ASUS PCI-AS300 User's Manual
Page 5

CONTENTS
IV. ADAPTEC SCSI SELECT .........................................15
Configuring the SCSI Adapter ......................................................... 15
Configure/View Host Adapter Settings ................................ 15
SCSI Disk Utilities ..................................................................... 15
IV. ADAPTEC EZ-SCSI UTILITY..................................17
Quick Start Instructions ................................................................... 17
Windows95 or WindowsNT....................................................... 17
Windows 3.x............................................................................... 17
DOS............................................................................................ 17
Troubleshooting Tips ....................................................................... 18
SCSI Device Troubleshooting.................................................... 18
Windows95/WindowsNT T roubleshooting................................ 18
Information for DOS/Windows 3.1x Users ..................................... 21
DOS and Windows3.1x Device Drivers..................................... 21
DOS and Windows3.1x ASPI Managers.................................... 21
DOS Formatting Utilities ........................................................... 22
Low-level Formatter (scsifmt).............................................. 22
Formatter and Partitioner (afdisk) ........................................ 23
V. Adaptec System Drivers..............................
84 pages
Creative Labs ViBRA 16C Audio.....................................1
User's Notice.......................................................................2
Manual Information ................................................................... 3
Installation CD ........................................................................... 3
Installation CD Contents ...................................................... 3
VI. Audio Driver Installation............................................3
VII. Win95 Audio Driver ..................................................4
Configuration Manager .............................................................. 5
Creative PnP Configuration Manager (CTCM) ......................... 5
VIII. Win3.1x Audio Driver..............................................5
Audio Drivers............................................................................. 7
Environment Variables ............................................................... 11
SOUND Environment variable............................................. 11
BLASTER Environment Variable ........................................ 11
MIDI Environment Variable ................................................. 12
Maximum Recording Rates for the Audio Hardware........... 12
ASUS PCI-AS300 User's Manual V
Page 6

FCC & DOC COMPLIANCE
Federal Communications Commission Statement
This device complies with FCC Rules Part 15. Operation is subject to the following
two conditions:
• This device may not cause harmful interference, and
• This device must accept any interference received, including interference that
may cause undesired operation.
This equipment has been tested and found to comply with the limits for a Class B
digital device, pursuant to Part 15 of the FCC Rules. These limits are designed to
provide reasonable protection against harmful interference in a residential installation. This equipment generates, uses and can radiate radio frequency energy and, if
not installed and used in accordance with manufacturer's instructions, may cause
harmful interference to radio communications. However, there is no guarantee that
interference will not occur in a particular installation. If this equipment does cause
harmful interference to radio or television reception, which can be determined by
turning the equipment off and on, the user is encouraged to try to correct the interference by one or more of the following measures:
• Re-orient or relocate the receiving antenna.
• Increase the separation between the equipment and receiver.
• Connect the equipment to an outlet on a circuit different from that to which
the receiver is connected.
• Consult the dealer or an experienced radio/TV technician for help.
WARNING: The use of shielded cables for connection of the monitor to the graphics
card is required to assure compliance with FCC regulations. Changes or modifications to this unit not expressly approved by the party responsible for compliance
could void the user's authority to operate this equipment.
Canadian Department of Communications Statement
This digital apparatus does not exceed the Class B limits for radio noise emissions
from digital apparatus set out in the Radio Interference Regulations of the Canadian Department of Communications.
VI
ASUS PCI-AS300 User's Manual
Page 7

I. INTRODUCTION
The PCI-AS300 SCSI/Audio MediaBus Card
This is a brief guie on how to configure and install the PCI-AS300 adapter card in
your system. The card is a composite SCSI adapter and 16-bit audio card that uses
the ASUS MediaBus expansion slot. The MediaBus slot is a composite slot comprised of a 120-pin 5-volt PCI local bus slot and a 72-pin ISA slot extension. On the
PCI-AS300, the SCSI adapter part of the card connects to the PCI slot and the audio
card portion connects to the ISA slot extension.
How this manual is organized
This manual is divided into the following sections:
I. INTRODUCTION - This opening page.
II. FEATURES - Information and specifications concerning the PCI-AS300.
I. INTRODUCTION
(About This Manual)
III.INSTALLATION - Instructions on setting up the PCI-AS300.
IV. AUDIO DRIVERS - Instructions on setting up the audio drivers.
Item Checklist
Please check that your package is complete. If you discover damaged or missing
items, please contact your retailer.
√ PCI-AS300 MediaBus adapter
√ 50 Pin ribbon cable
√ 68 Pin ribbon cable
√ This user's manual
√ 1 CD containing SCSI & audio drivers and utilities
√ 1 diskette containing SCSI drivers for WinNT
√ 1 diskette containing SCSI drivers for SCO Unix, Unix Ware
ASUS PCI-AS300 User's Manual
1
Page 8

II. FEATURES
(Features)
II. FEATURES
PCI-AS300 Features
SCSI:
• PCI Ultra SCSI produced by the Adaptec AHA7880 SCSI Chipset
• Supports 8-bit Fast SCSI with up to seven devices via a 50-pin ribbon cable
connector
• Supports 16-bit W ide SCSI with up to 15 devices via a 68-pin cable connector
• Firmware configuration utility allows easy reconfiguration.
Audio:
• Creative Labs ViBRA 16C PnP Audio Chip
• Full Duplex Supports
• 16-bit or 8-bit PCM 5KHz to 44.1KHz
• Wave Table Upgradeable
• Connections for Sony, Panasonic, and Mitsumi CD-ROM audio.
• Connections for MIDI, audio input/output, microphone input
• Software Includes:
DOS and Window 3.1 Drivers
Windows 95 Driver
Wave Editor
Wave OLE
Quick CD
Mixer Control
System Requirements:
• ASUS motherboard with MediaBus revision 2.0
2
ASUS PCI-AS300 User's Manual
Page 9
III. INSTALLATION
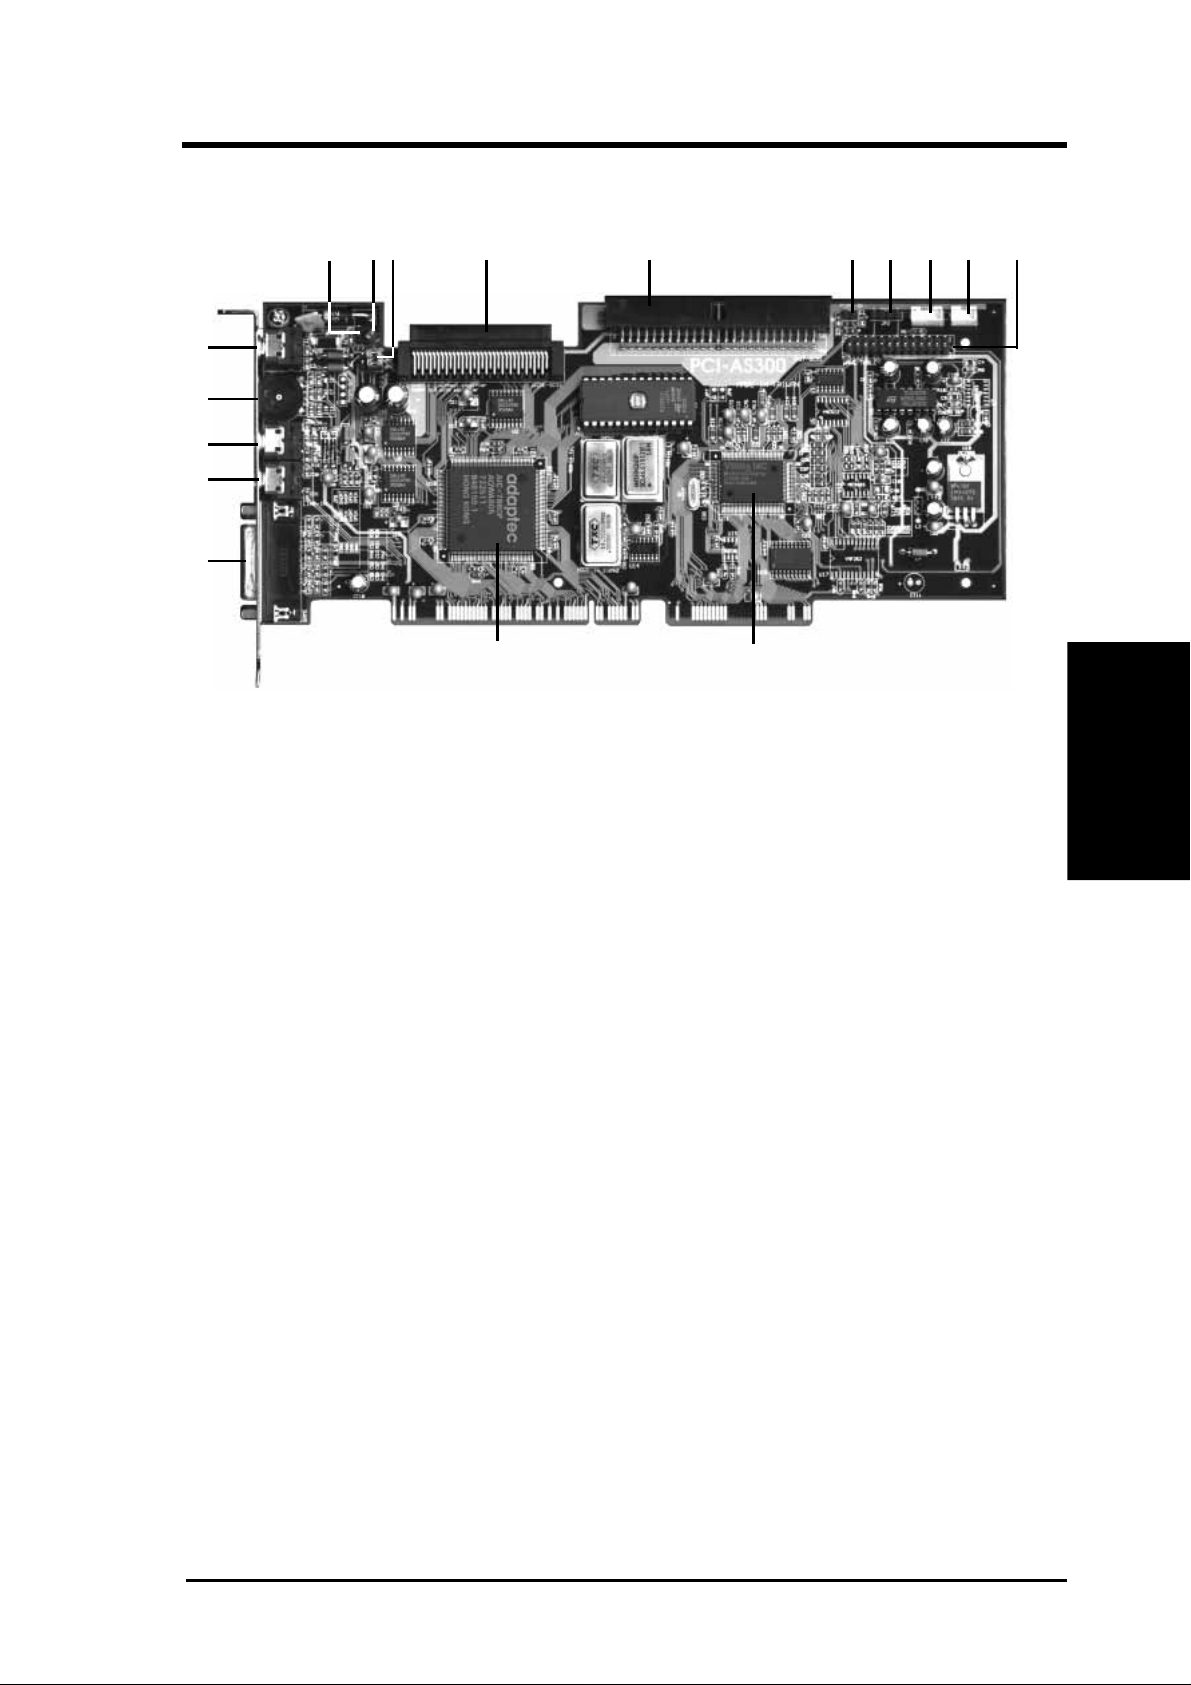
Layout and Connectors of the PCI-AS300
1
2
3
4
5
67
891011121314151617
1. Speaker out
2. Volume Control
3. Microphone Input
4. Line Input
5. Game Port / MIDI connector
6. Adaptec SCSI 7880 Chipset
7. Creative Labs 16C Chipset
8. Wave Table Upgrade
9. Panasonic CD Audio Input
10. Mitsumi CD Audio Input
11. Sony CD Audio Input
12. PCSpeaker Input
13. 8-bit Fast SCSI 50 pin connector
14. 16-bit Wide SCSI 68 pin connector
15. Amplifier Enable / Disable Jumper
16. SCSI Activity LED
17. External LED
CD-Audio Connector Pin Definitions
PANASONIC SONY MITSUMI
1 Left Signal 1 Right Signal 1 GND
2 GND 2 GND 2 Left Signal
3 Right Signal 3 GND 3 GND
-------------------- 4 Left Signal 4 Right Signal
(Precautions)
III. INSTALLATION
PC Speaker In PC Speaker Out
1 Mono Signal 1 Right Signal
2 GND 2 GND
-------------------- 3 Left Signal
-------------------- 4 GND
ASUS PCI-AS300 User's Manual
3
Page 10
Installation Steps
Pin 1
Before using your computer, you must follow the six steps as follows:
1. Set the card's jumpers
2. Install Expansion Card
3. Connect device cables
4. Configure SCSI ID numbers and termination
5. Setup the oncard SCSISelect Utility if you need to change the defaults
6. Setup the BIOS Software.
1. Jumpers
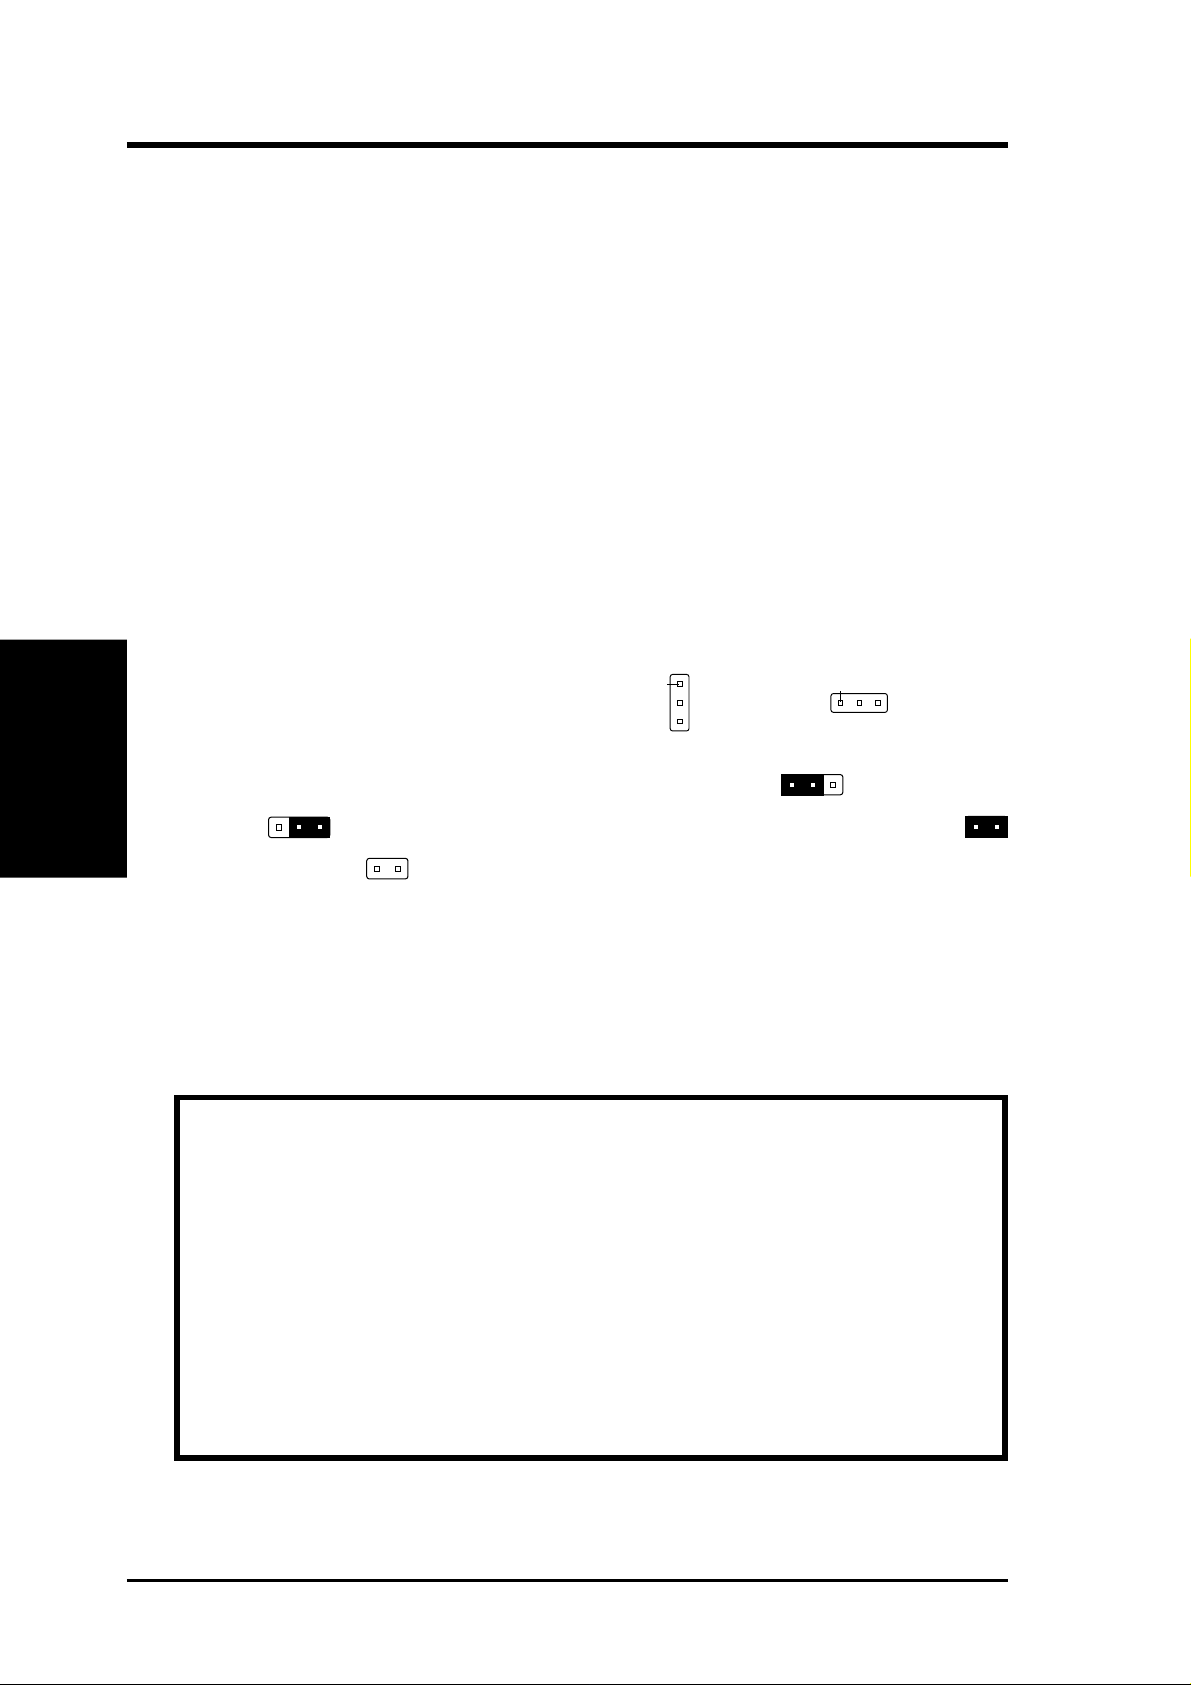
Some hardware settings are made through the use of jumper caps to connect jumper
pins (JP) on the card. The jumper settings will be described numerically such as
(Layout / Connect.)
III. INSTALLATION
[----], [1-2], [2-3] for no connection, connect pins 1&2, and connect pins 2&3 respectively. Pin 1 for our cards is always on top
III. INSTALLATION
Pin 1
or on the left
when holding the connectors to the left. A "1" is written besides pin 1 on jumpers with three
pins. The jumpers will also be shown graphically such as to connect pins
1&2 and to connect pins 2&3. Jumpers with two pins will be shown as
for short (On) and for open (Off). For manufacturing simplicity, the jumpers
may be sharing pins from other groups. Use the diagrams in this manual instead of
following the pin layout on the board. Settings with two jumper numbers require
that both jumpers be moved together. To connect the pins, simply place a plastic
jumper cap over the two pins as diagramed.
WARNING: Computer motheboards and components contain very delicate
Integrated Circuit (IC) chips. To protect the motherboard and other components against damage from static electricity, you should follow some precautions whenever you work on your computer.
1. Unplug your computer when working on the inside.
2. Hold components by the edges and try not to touch the IC chips, leads, or
circuitry.
3. Use a grounded wrist strap before handling computer components.
4. Place components on a grounded antistatic pad or on the bag that came with
the component whenever the components are separated from the system.
4
ASUS PCI-AS300 User's Manual
Page 11
III. INSTALLATION
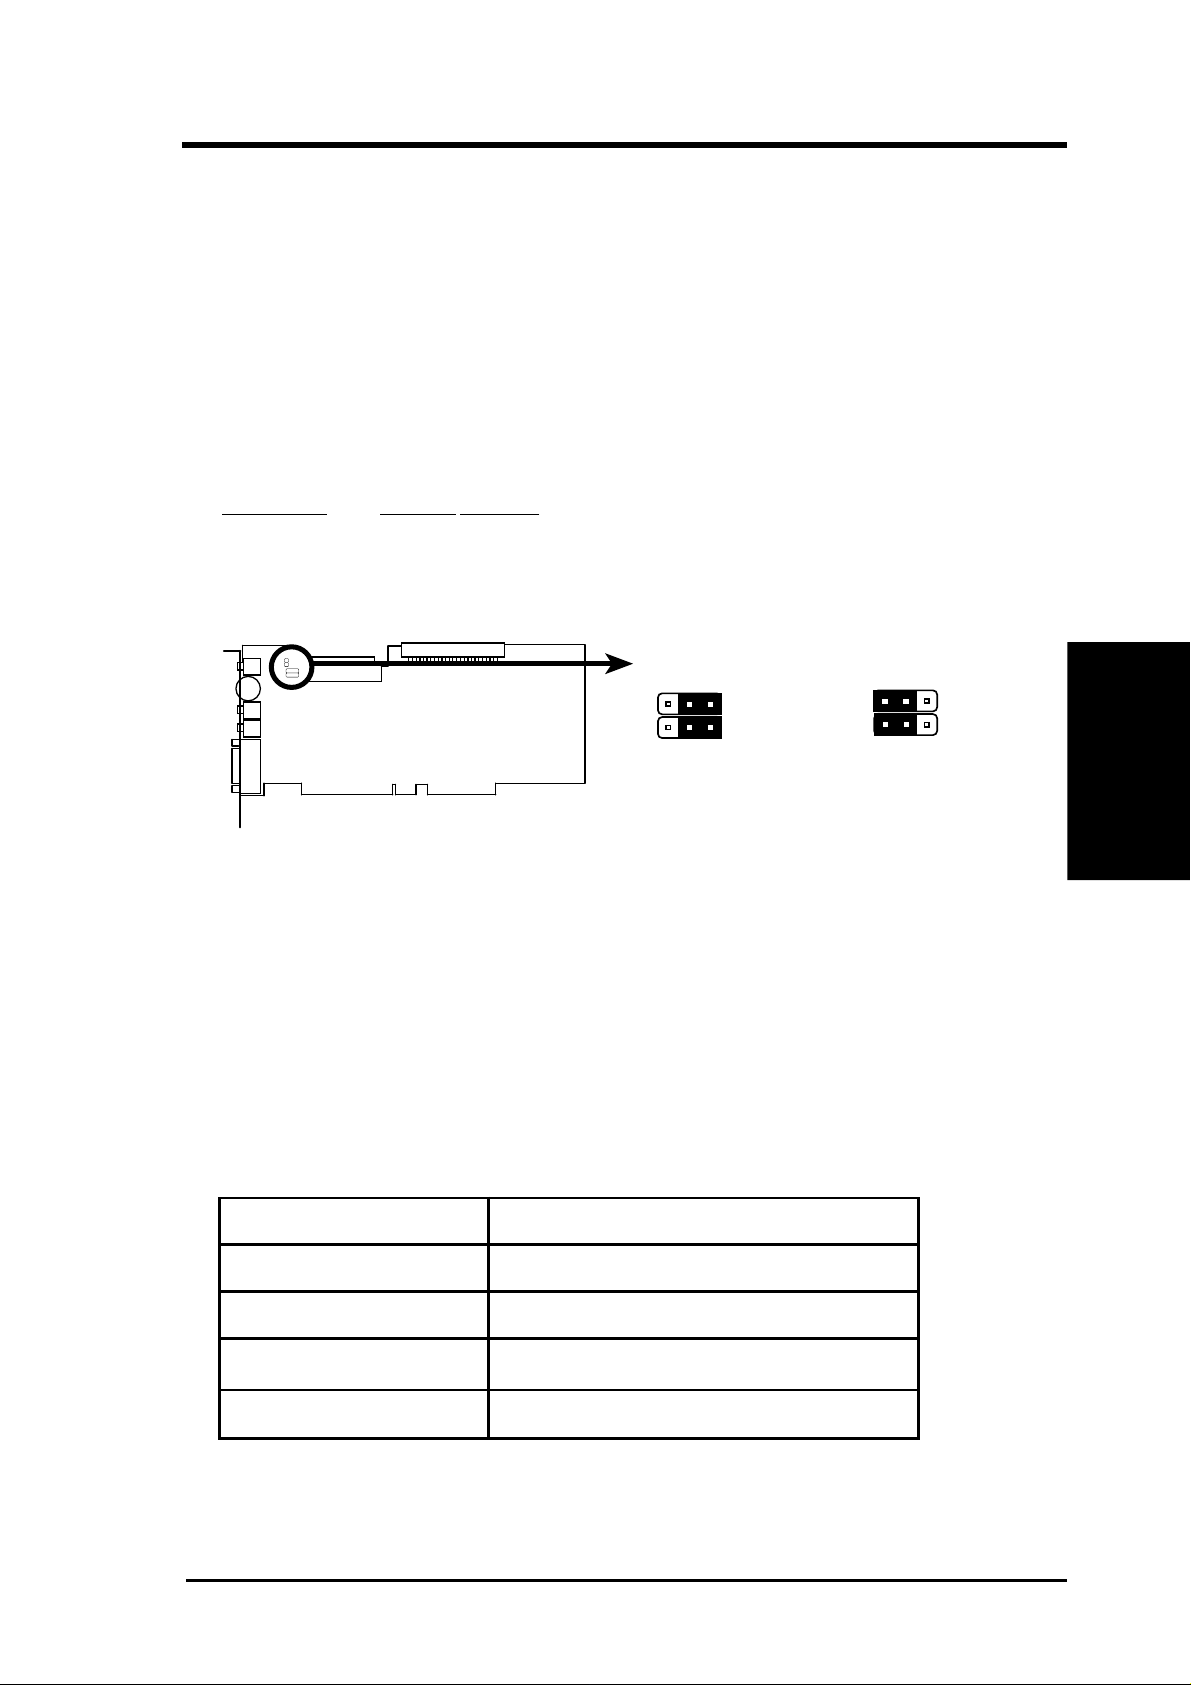
Audio Adapter Amplifier
You can Enable or Disable the audio adapter's amplifier feature using the following
jumpers. If you plan on connecting unamplified speakers to the card, enable the
amplifier. If you will use self-amplified speakers, disabling the amplifier on the
card will improve the sound quality.
Audio Adapter Amplifier Selector (JP4, 5)
(Def)
Amplifier EnableDisable
JP4 [2-3] [1-2]
JP5 [2-3] [1-2]
1
1
23
JP4
JP5
Enable
Onboard Audio Amplifier (Enable / Disable)
23
JP4
JP5
Disable
(Jumpers)
Audio Adapter Base I/O Addresses
I/O addresses (or I/O address range) are areas of memory used by your computer's
microprocessor to distinguish among various peripheral devices connected to your
system when sending or receiving data. There are several such devices on your
audio card. These devices are listed with their factory default I/O addresses.
I/O Address occupied by the Audio Card.
I/O Address Range Usage
200H to 207H Game Port
220H to 233H Audio Interface
330H to 331H MPU-401 UART MIDI Interface
388H to 38BH FM Music Synthesizer
III. INSTALLATION
ASUS PCI-AS300 User's Manual
5
Page 12

2. Install the Expansion Card
1. Unplug your computer. Open the system case and remove the slot
2. Align the connectors and insert the card into the expansion slot
3. Install the card's mounting bracket to the system's case.
4. Attach SCSI cables from your internal SCSI devices and the audio
5. Close your system case and power on your computer in order to setup
3. Connect Cables
Once the card is installed in your system you should connect the cables for whatever
III. INSTALLATION
(Install / Cables)
devices you want to attach to the card. These divide into two types, CD-ROM audio
cables and SCSI bus cables.
III. INSTALLATION
cover for the expansion slot you wish to use.
firmly, making sure that the connectors are evenly inserted.
cable from your CD-ROM.
the software.
Audio Cables
As noted on the card diagram, there are connections for three types of CD-ROM audio
cables. If you have a CD-ROM installed in your system, connect it to the appropriate
connector . Note that many drives manufactured by vendors other than the three noted
have audio cables that are compatible with one of these three connectors. Review the
documentation that came with the drive for further information.
SCSI Cabling
The card has two SCSI cable connectors, one for 8-bit Fast SCSI and the other for
16-bit W ide SCSI. SCSI devices must be connected in a direct line forming a "bus"
with no branching.
SCSI Cable Limits:
SCSI TYPE Cable Length Limit
Single-ended SCSI 6 meters (19.7 feet)
Fast Single-ended SCSI 3 meters (9.8 feet)
WARNING: This adapter is for "Single-Ended" SCSI devices only. Do not
connect "Differential" SCSI devices to this adapter.
6
ASUS PCI-AS300 User's Manual
Page 13

III. INSTALLATION
SCSI Types
Type Specifications Ultra
SCSI 5MB/sec (8bit) N/A
Fast SCSI (II) 10MB/sec (8bit) 20MB/sec
Wide SCSI (III) 20MB/sec (16bit) 40MB/sec
Connecting Cables
1. When you connect a SCSI cable to this card, you must align the cable so that
the Pin 1 side of the cable connector is at the Pin 1 side of the cable connector
on the card. The two SCSI connectors use different cables. The Fast SCSI
connector connects to a 50-pin flat ribbon cable. The Pin 1 side of the ribbon
cable is marked with a colored edge and the Pin 1 side of the connector on the
card is labelled on the card. The W ide SCSI connector connects to a cable that
has a connector which can only be attached to the card in one orientation,
making the Pin 1 matchup automatic.
2. After you connect the cables to the host adapter, review the subject of SCSI
identification (ID) numbers and termination covered in Section 4. Make sure
that all devices you connect to the SCSI adapter have different ID numbers and
that only the SCSI adapter and the last SCSI device on each bus is terminated.
3. Connect a cable between the host SCSI adapter and an internal SCSI device
installed in your system. If there is more than one device, connect the additional devices with additional cables. You can connect up to seven devices to
the Fast SCSI bus and fifteen devices to the Wide SCSI bus.
(SCSI Cables)
III. INSTALLATION
ASUS PCI-AS300 User's Manual
7
Page 14

(SCSI ID / Terminate)
III. INSTALLATION
III. INSTALLATION
4. SCSI ID Numbers & Termination
You must set the SCSI identification numbers and properly terminate the SCSI bus
before you can use the adapter and any peripherals connected to it.
SCSI ID Numbers
Each device on a SCSI bus must have a unique identification number. All SCSI
devices have some means of setting the ID number for the device. The SCSI adapter
must also have an ID number. The default number for the PCI-AS300 is 7. You
should use this unless you know there is a specific need to change it. Consult the
documentation for any other SCSI devices to see how to set their ID numbers. The
recommended numbers are:
SCSI Host Adapter: 7 (Default)
SCSI Hard Disk Boot Device: 0
2nd SCSI Hard Disk: 1
Devices connected to the 8-bit Fast SCSI bus can have numbers from 0 to 7. The
16-bit W ide SCSI bus allows numbers from 0 to 15. SCSI devices vary in how they
set the ID number. Some use jumpers, others have some kind of selector switch.
Refer to the documentation for any devices you install for details on how to set the
SCSI ID number.
SCSI Termination
Both ends of the SCSI bus must be terminated in order for the bus to operate properly . Since this card only supports internal devices, the SCSI adapter must be at one
end of the bus and must be terminated. The device on the other end of the bus daisy
chain must also be terminated.
Since this card supports two SCSI buses, the card termination can be set up to terminate either one or both buses. The WIDE SCSI bus is divided into "Low" and "High"
bytes, the Low part being equivalent to the 8-bit Fast SCSI bus. If you will use both
SCSI connectors, you must change the default setting. The required settings are
shown in the chart below.
Connector/Bus Used Low High
50-pin connector only ON ON (Default)
68-pin connector only ON ON (Default)
50-pin & 68-pin connector OFF ON
8
ASUS PCI-AS300 User's Manual
Page 15

III. INSTALLATION
T o terminate the other end of either SCSI bus, you will need to refer to the documentation for the device at the end of the bus for information on how to terminate the
device. Many devices use either jumpers or a switch to set termination. Others use
resistor modules that must be removed to unterminate the device. It is critical that
the last device, and only the last device be terminated in order of all of the devices
on the bus to operate correctly. This card supplies termination power to the SCSI
bus for devices that need it.
5. Configuring the SCSI Adapter
You probably will not need to change the default configuration of the PCI-AS300
SCSI adapter . In the event that you do need to, a configuration utility , SCSISelect, is
stored on the card. This menu driven utility allows you to control the configuration
of both the SCSI adapter and its interaction with devices connected to it.
After you have installed and connected devices to the card, reassemble your system
according to the instructions in your system documentation. Once your system is
assembled, turn on your computer. You should see a SCSI BIOS banner message
listing connected devices and their ID numbers. If everything is working properly,
you can go ahead and use your system. If you need to change the SCSI adapter
configuration on the PCI-AS300, or if you want to customize the control settings for
an individual SCIS device on the bus, you can run the SCSISelect configuration
utility.
(Configuration)
III. INSTALLATION
The SCSISelect Configuration Utility
To access SCSISelect, press <CTRL A> when you boot the computer, or when you
see the BIOS banner message listing the attached devices. The SCSISelect screen
will come up. Instructions on how to move the cursor and select options are at the
bottom of the program window . Y ou can select either Configure/View Host Adapter
Settings or SCSI Disk Utilities.
ASUS PCI-AS300 User's Manual
9
Page 16

III. INSTALLATION
III. INSTALLATION
Configure/View Host Adapter Settings
If you select the first option, the configuration screen will display. Pressing F6 at
this level will load the adapter's default settings. T o make a change, select an option
and press Enter to display a list of possible settings for that option. To abandon
changes after you have made them, press <ESC> and then choose No when a message appears asking if you will accept the changes made.
SCSI Disk Utilities
The SCSI Disk Utilities option displays information on SCSI IDs 0 through 15,
listing all devices on the bus including non-disk devices. When you select a device
from the list and press the <ENTER> key, another window pops up giving you the
option of selecting one of two sub-utilities, Format Disk or Verify Media. These
utilities are used for hard disk drives only and will have no effect on other non-disk
SCSI devices.
(Utilities)
Format Disk is a SCSI low-level format utility. In general, SCSI hard disks have
already been low-level formatted when you get them, so you generally should not
need to use this.
Verify Media scans the selected drive media for defects, notifies you of any found
and gives you the option of reassigning bad blocks so that data will not be written to
them. Doing this before you start using a disk is a good idea.
Operating System Support
The PCI-AS300 supports both DOS/Windows under MS-DOS 5.0 and up, allowing
you to connect up to seven hard disk drives. You can used the supplied Adapted EZSCSI W indows utility to enable using non-disk SCSI devices such as scanners, tape
drives, or CD-ROM drives. It also allows mounting and removing removable media such as CD-ROMs and support for more than eight hard disks under MS-DOS
5.0 or later and more than two hard disks under earlier versions.
In addition, this card supports operating systems other than DOS, including Novell
NetWare, OS/2, OS/2 Warp, Windows NT, SCO Unix, and Unix Ware. You can
refer to the card's software documentation for more information on this.
10
ASUS PCI-AS300 User's Manual
Page 17

III. INSTALLATION
CE Compliancy
In order to comply with CD specifications, a core must be added to any cable that is
connected to the "Game Port."
15 Pin Game Port
CE Compliant Ferrite Core
Wind the cable around the
core one time as shown and
press the sides of the core
together until it locks.
(CE Compliancy)
III. INSTALLATION
ASUS PCI-AS300 User's Manual
11
Page 18

Troubleshooting
In the event that you have problems getting the PCI-AS300 installed and working
properly, make sure that:
• all the SCSI devices are turned on.
• all the cables connects the SCSI devices in a series.
• all the SCSI devices have a unique ID number on that BUS
• the last SCSI device is terminated.
• the BIOS setup correctly identifies the PCI part of the MediaBus slot
Cannot Boot from your SCSI Disk Drive
If you have any non-SCSI hard disk drives installed in your system, the master nonSCSI drive will be seen as the boot drive. If there are only SCSI drives installed in
III. INSTALLATION
(Troubleshooting)
your system and will not boot from the primary drive, check the following:
• Make sure that all hard disk type entries in the BIOS Setup utility's CMOS
• Make sure the boot drive's SCSI ID is set to 0
• Check that the drive has been properly formatted for the operating system you
III. INSTALLATION
setup are set to "None" or "No Drives Installed."
are using and that the operating system is installed.
If none of the above solves the problem, back-up the drive and try using the SCSISelect
utility to perform a low-level format and verification and then set an active partition
for the operating system you are using and format the drive using your operating
system's format command.
12
ASUS PCI-AS300 User's Manual
Page 19

R
PCI-AS300
SCSI/Audio MediaBus Card
USER'S MANUAL
Adaptec SCSI Drivers & Utilities
Page 20

(This page was intentionally left blank)
14 ASUS PCI-AS300 User's Manual
Page 21

IV. ADAPTEC SCSI SELECT
Configuring the SCSI Adapter
Access the SCSI BIOS by holding down both CTRL and A keys when you see the
BIOS banner message listing the driver name and the attached devices. For example:
Adaptec AIC-7880 Ultra/Wide W BIOS v1.24
(c) 1996 Adaptec, Inc. All Rights Reserved.
<<< Press <Ctrl><A> for SCSISelect(TM) Utility! >>>
The SCSISelect screen will come up. Instructions on how to move the cursor and
select options are listed on the bottom of the program windows. You can select
either Configure/View Host Adapter Settings or SCSI Disk Utilities.
Configure/View Host Adapter Settings
Host Adapter SCSI T ermination......................................................Low ON/High ON
• When using 50-Pin connector only, choose “Low ON/High ON” (Default)
• When using 68-Pin connector only, choose “Low ON/High ON” (Default)
• When using both 50-Pin & 68-Pin, choose “Low OFF/High ON”
Select the default of “Low ON/High ON” and press Enter, then use the up and down
arrows to make your new selection and press Enter. Press ESC to go back to the
Options menu. Press ESC again and select Yes to exit the program.
SCSI Disk Utilities
The SCSI Disk Utilities option displays information on SCSI IDs 0 though 15, listing all devices on the bus including non-disk devices. When you select a device
from the list and press Enter key, another window appears giving you the option of
selecting one of two sub-utilities, Format Disk or V erify Media. These utilities are
used for hard disk drives only and will have no effect on other non-disk SCSI devices.
Format Disk - is a SCSI low-level formatting utility. In general, SCSI hard drive
have already been low-level formatted when you get them, so you generally should
not need to use this function.
IV. SCSI SELECT
(Configuring Adapter)
Verify Media - scans the selected drive media for defects, notifies you of any found
and gives you the option of reassigning bad blocks so that data will not be written to
them. This is only necessary if you suspect that your SCSI disk drive has a problem.
ASUS PCI-AS300 User's Manual 15
Page 22

(This page was intentionally left blank)
16 ASUS PCI-AS300 User's Manual
Page 23

IV. ADAPTEC EZ-SCSI UTILITY
Welcome to Adaptec EZSCSI® 4.00e Adaptec EZSCSI gives you what you need to
use your SCSI devices most effectively with W indows®95 and W indowsNT™. You
can also use Adaptec EZSCSI on computers running DOS, W indows®3.1x, or W indows for Workgroups3.1x.
Quick Start Instructions
First, install SCSI devices (see the hardware documentation for details). Then follow the instructions for your operating system software in one of the following sections. We recommend that after you install Adaptec EZSCSI you run SCSIT utor to
learn more about the features of SCSI.
Windows95 or WindowsNT
If you want to install Windows95 or WindowsNT on a new computer system, you
may not be able to access your SCSI CDROM drive at first. (Usually, you install
Windows95 and WindowsNT from a CDROM disc.) T o gain access to your CDROM
drive, follow the DOS Quick Start instructions. Then reboot your computer and
follow these instructions:
1 Install Windows95 or WindowsNT version 3.51 or above, and start it running
on your computer.
2 Insert the installation CD into your CD-ROM drive.
3 Double click My Computer and your CD drive icon.
4 Double click SCSI\EZSCSI\ folder and Setup.exe
5 Follow the instructions that appear on the screen.
Windows 3.x
1 Install Windows3.1x or Windows for Workgroups3.1x and start it running on
your computer.
2 Insert the installation CD into your CD-ROM drive.
3 Double click File Manager and your CD drive icon.
4 Double click SCSI\EZSCSI\ folder and Setup.exe
5 Follow the instructions that appear on the screen.
DOS
1 Install DOS6.x or above and start it running on your computer.
2 Insert the installation CD into your CD-ROM drive.
3 Change to your CD ROM drive letter.
4 Change to the SCSI\EZSCSI\ folder and run Install.bat
5 Follow the instructions that appear on the screen.
(Intro/Quick Start)
IV. EZ-SCSI UTILITY
ASUS PCI-AS300 User's Manual 17
Page 24

IV. ADAPTEC EZ-SCSI UTILITY
T roubleshooting Tips
SCSI Device Troubleshooting
Review this checklist if your newly-installed SCSI disk drives, CDROM drives, and
other devices do not seem to work properly:
• Be sure that termination is correctly set for all devices on the SCSI bus, as
described in your host adapter documentation.
• Be sure there are no hardware conflicts such as devices in your computer try-
ing to use the same interrupts (IRQs) or DMA channels.
• Be sure the cables connecting the external and internal SCSI devices and the
host adapter are attached securely . Also be sure the pin-1 orientation is correct
for internal cables. See the host adapter documentation for more information.
• Be sure that each SCSI device connected to the host adapter has a unique SCSI
ID.
• Be sure CD-ROM drives and other SCSI devices are attached to a power source
Windows95/WindowsNT T roubleshooting
What is a miniport driver, and how do I make sure that the miniport driver is
IV. EZ-SCSI UTILITY
(Troubleshooting)
installed correctly?
Miniport drivers are a new kind of 32bit protect mode device driver used by Windows95 and WindowsNT to control host adapters and other kinds of devices. Windows95 and W indowsNT include a set of miniport drivers for various types of SCSI
host adapters. The host adapter miniport driver is automatically installed and configured during Windows95 and WindowsNT installation if your host adapter is already installed. To make sure the driver is installed correctly in systems running
Windows95, open the Control Panel, double-click on System, and click the Device
Manager tab. Then double-click the SCSI Controllers icon; you should see the model
name of the SCSI host adapter(s) installed in your system.
What if there is no SCSI controllers icon under Device Manager, or the model
name of the SCSI chipset does not appear under Device Manager?
If the SCSI controllers icon or your host adapter’s model name do not appear , open
Control Panel and double-click the Add New Hardware icon. Let Windows search
for the host adapter by selecting Yes on the second screen of the Add New Hardware
Wizard.
and are turned ON.
If Windows does not detect the host adapter, run the Add New Hardware Wizard
again. This time, select No on the second screen of the wizard, then select SCSI
controllers on the next screen. Select the name of your host adapter when it appears.
18 ASUS PCI-AS300 User's Manual
Page 25

IV. ADAPTEC EZ-SCSI UTILITY
If the name of your SCSI chipset does not appear, you may be able to find its
miniport driver on the Windows95 CD-ROM. Follow these steps:
1 Place the Windows95 CD-ROM in your CDROM drive and run the Add New
Hardware wizard.
2 Select No on the second screen, and select SCSI controllers on the next screen.
3 Click on the Have Disk button, then click the Browse button.
4 Look in the \drivers\storage directory of the CDROM and select the name of
your SCSI host adapter if it appears.
What if a yellow exclamation point or a red X appears in Device Manager in
front of my host adapter?
This means there is some kind of resource problem. First, see if the names of any
host adapters appear that are not actually installed in your computer . If so, select the
name and click Remove. If a red X appears in front of your host adapter name,
remove all the host adapter references under SCSI Controllers and run Add New
Hardware, as described in the previous question/answer. If a yellow exclamation
point appears in front of your host adapter name, the resources that the driver uses
probably do not match the resources used by the hardware. Double-click the host
adapter name, then click on the Resource tab. Deselect the Use automatic settings
box and edit the resources (Interrupt Request, Direct Memory Access, etc.) so they
match those used by the host adapter . If the problem still remains, there is probably
a hardware resource conflict between the host adapter and other hardware in your
computer. You can fix this by changing the hardware resource settings. (See your
hardware documentation.)
What do I need to do if I want to use another host adapter?
1 Open the Control Panel, double-click on System, and click the Device Man-
ager tab.
2 Double-click the SCSI Controllers icon, select the name of the old host adapter,
and click Remove.
3 Turn OFF the computer and physically remove the currently installed host
adapter.
4 Install the new host adapter according to the instructions in the hardware docu-
mentation.
5 Turn the computer ON. If the new host adapter supports Plug and Play, Win-
dows will install and configure it automatically . Otherwise, run Add New Hardware to make sure the new driver is loaded.
(Troubleshooting)
IV. EZ-SCSI UTILITY
ASUS PCI-AS300 User's Manual 19
Page 26

IV. ADAPTEC EZ-SCSI UTILITY
If I am running under Windows95, do I need lines for the Adaptec real mode
ASPI drivers and mscdex in my config.sys and autoexec.bat files?
Usually, you do not need to use these real mode ASPI drivers, because the new
Windows miniport drivers support most SCSI host adapters and SCSI devices. However, you need to load the drivers (including mscdex, if you have a CDROM drive)
if any of the following is true:
• You are running in MSDOS mode
• Y ou are using a scanner or another SCSI device with config.sys- or autoexec.bat-
based drivers, such as HP’s sjiix.sys
• You have an older model SCSI-1 CDROM drive that Windows95 does not
support
• You are using a CD-Recorder drive (however, some newer models of CD-
Recorder drives can use the embedded Windows miniport drivers)
To install the Adaptec EZSCSI DOS drivers, click the Start button and select Re-
start the computer in MS-DOS mode. When the DOS prompt appears, follow the
Quick Start instructions for DOS.
IV. EZ-SCSI UTILITY
(Troubleshooting)
My CDROM drive doesn’t work properly under Windows95.
Some older models of SCSI CDROM drives are not compatible with the embedded
Windows95 CDROM driver. You can add support for the CDROM drive by doing
the following:
1 Click the Start button and select Restart the computer in MS-DOS mode.
2 When the DOS prompt appears, follow the Quick Start instructions for DOS.
3 When you are finished running Adaptec EZSCSI for DOS, find the file named
My CDROM drive shows up as more than one icon under My Computer.
The mapping between mscdex, which runs in real mode, and the W indows95 CDROM
driver does not match. You can correct this in one of two ways:
• Comment out the line that loads mscdex.exe in the autoexec.bat file.
• Change the /L switch on the line that loads mscdex.exe in the autoexec.bat file
cdtsd.vxd in the windows\system\iosubsys directory and rename it cdtsd.sav.
so it assigns the CDROM drive the next highest logical drive letter after the
hard disk drives.
20 ASUS PCI-AS300 User's Manual
Page 27

IV. ADAPTEC EZ-SCSI UTILITY
Information for DOS/Windows 3.1x Users
The following information may be useful if you install Adaptec EZSCSI on a computer running DOS, Windows 3.1x, or Windows for Workgroups3.1x.
NOTE: The Windows95/WindowsNT Troubleshooting section on page 6 describes a few situations when you may need to use the DOS/Windows3.1x drivers and ASPI managers under Windows95 or WindowsNT.
DOS and Windows3.1x Device Drivers
Device drivers are software programs that enable your computer to communicate
with SCSI devices such as hard disk drives, CDROM drives, and scanners. Each
kind of device requires a different device driver. Adaptec EZSCSI includes several
DOS/Windows3.1x device drivers that are copied to your hard disk during installation. Adaptec EZSCSI adds command lines to your config.sys and autoexec.bat files
to load these device drivers if it finds these kinds of devices on your computer.
To learn more about the Adaptec EZSCSI device drivers, including their command
line option information, see the online Adaptec EZSCSI Online Reference, a Windows Help application.
DOS and Windows3.1x ASPI Managers
ASPI (Advanced SCSI Programming Interface) managers are software programs
that enable the SCSI device drivers, your host adapter, and your SCSI devices to
communicate with each other. ASPI managers are written for a specific operating
system, such as DOS, and a specific family of Adaptec host adapters.
Adaptec EZSCSI includes several ASPI managers for DOS/Windows3.1x. When
you install Adaptec EZSCSI on these operating systems, it detects what kind of host
adapter is installed in your computer and automatically configures your system with
the correct ASPI manager. To learn more about these ASPI managers, including
their command line option information, see the Adaptec EZSCSI Online Reference,
a Windows Help application.
(DOS/Win Info.)
IV. EZ-SCSI UTILITY
ASUS PCI-AS300 User's Manual 21
Page 28

IV. ADAPTEC EZ-SCSI UTILITY
DOS Formatting Utilities
Adaptec EZSCSI includes several DOS-based formatting utilities:
Low-level Formatter (scsifmt)
Use the DOS-based scsifmt utility for low-level formatting of SCSI hard disk drives,
removable media, Floptical® drives, and magneto-optical drives. You can also use
it to scan a disk device for surface defects before you store data on it.
Run scsifmt from the DOS prompt, not from the W indows MSDOS prompt. Before
you run it, be sure the disk devices you want to format are connected to the host
adapter and that they are powered. Then follow these steps:
1. Change to the directory where scsifmt.exe is located (usually c:\scsi), type
scsifmt at the DOS prompt, and press Enter.
NOTE: If you are formatting a SCSI disk device that supports more than
one LUN (for example, Iomega’ s Bernoulli dual multidrive) type scsifmt /
L at the command line.
2. When the first screen appears, read it and press Enter to continue. (Press F1 at
IV. EZ-SCSI UTILITY
(Formatting)
3. Use the arrow keys to move the highlight bar to a disk device you want to
4. When the next screen appears, select either Format or Verify (to verify that the
5. If you select Format, confirm that you want to format the disk, then wait while
any time to view Help.) Information about your SCSI disk devices appears on
the screen.
format or verify, then press Enter.
disk is free of surface defects), then press Enter.
WARNING: Back up important data before you format the disk device!
A low-level format erases all data from the disk.
the disk device is formatted. This may take a long time if the disk is large.
If you select Verify, you can press Esc at any time to stop the verification
process. (This does not damage the disk.) If the utility finds bad blocks on the
disk, it displays information about them. You can reassign the bad block(s) to
prevent data from being stored there.
6. Repeat steps 3, 4, and 5, as needed, to format or verify other disk devices.
When you are finished, press Esc to exit.
22 ASUS PCI-AS300 User's Manual
Page 29

IV. ADAPTEC EZ-SCSI UTILITY
Formatter and Partitioner (afdisk)
Use the DOS-based afdisk utility to partition and format SCSI hard disk drives,
Floptical drives, and magneto-optical drives. You can also use afdisk to remove
DOS and non-DOS partitions from a disk drive and to format removable media in
standard hard disk format, OS/2 floppy format, or DOS V (Japanese) format.
NOTE: Use afdisk only if the disk device is not controlled by the host adapter
BIOS—that is, if the host adapter does not have a BIOS or if its BIOS is not enabled. If the disk device is controlled by the host adapter BIOS, use the DOS fdisk
utility to partition and format the disk device. (See the MSDOS documentation.)
Run afdisk from the DOS prompt only, not from the Windows MSDOS prompt.
Before you run it, be sure the disk devices you want to format and partition are
connected to the host adapter and that they are powered. Then follow these steps:
1. Change to the directory where afdisk.exe is located (usually c:\scsi), type afdisk
at the DOS prompt, and press Enter.
Information about your SCSI disk devices appears on the screen. (The number
that appears after Target is the device’s SCSI ID.)
2. Use the arrow keys to move the highlight bar to the disk device you want to
partition, then press Enter.
- If the selected disk device is controlled by the host adapter BIOS, you can
view information about it but you cannot partition it with afdisk (Use the DOS
fdisk and format utilities.)
- If the selected disk device is unpartitioned, you must partition it before you
can format it. To do this, follow the instructions on the screen. (Press F1 to see
an explanation of the partitioning options.)
Information about the selected disk device appears in the lower left of the
screen. Disks smaller than 1Gigabyte have 64 heads, 32 sectors per track, and
cylinders equal to the number of MBytes of available capacity. Disks larger
than 1Gigabyte have 255 heads, 63sectors per track, and one cylinder per
8MBytes of available capacity.
(Partitioning)
IV. EZ-SCSI UTILITY
ASUS PCI-AS300 User's Manual 23
Page 30

3. To create a new partition on the disk device, press Ins. A screen similar to this
4. To change the size of the partition, use the arrow keys to select Start Cylinder
5. When the number of cylinders is what you want, press Esc. When the confir-
IV. EZ-SCSI UTILITY
(Partitioning)
IV. ADAPTEC EZ-SCSI UTILITY
appears:
Adaptec SCSI Disk Setup Program v3.33
Select SCSI Device to Partition
HA #0 - Target 0
HA #0 - Target 4
Logical Drive Info
head
64
sectors/track
32
cylinders
85
bytes/sector
512
megabytes
85
2AEEFh blocks
<Ins> Create, <Del> Delete, <F1> Help, <Esc> Exit
QUANTUM LP105S 910109405
IOMEGA BETA90
The Create a DOS Partition window suggests that you create one partition on
the disk device, equal to its entire capacity . If this is what you want to do, skip
to step5.
and End Cylinder, and type in the numbers you want. Partitions up to 2Gigabytes
are supported.
mation prompt appears, select Yes and press Enter to create the partition.
To create more partitions on the same disk device, repeat steps 3, 4, and 5. As
you create partitions on the disk, they are added to the window at the upper
right of the screen, as shown here:
Type Start End Megs
Create a DOS Partition
Start Cylinder:
End Cylinder:
0
84
Adaptec SCSI Disk Setup Program v3.33
Select SCSI Device to Partition
HA #0 - Target 0
HA #0 - Target 4
Logical Drive Info
head
64
sectors/track
32
cylinders
85
bytes/sector
512
megabytes
85
2AEEFh blocks
<Ins> Create, <Del> Delete, <F1> Help, <Esc> Exit
QUANTUM LP105S 910109405
IOMEGA BETA90
Type Start End Megs
DOS 0 84 85
6. Press Esc to return to the Select SCSI Device to Partition window . If you want
to partition a different disk device, select the device from the list and repeat the
earlier steps.
7. To quit afdisk, press Esc and select Yes to confirm that you want to quit.
24 ASUS PCI-AS300 User's Manual
Page 31

R
PCI-AS300
SCSI/Audio MediaBus Card
USER'S MANUAL
Creative Labs ViBRA 16C Audio
Page 32

User's Notice
Information in this document is subject to change without notice and does not represent a commitment on the part of Creative Technology Ltd. The software described in this document is furnished under a license agreement and may be used or
copied only in accordance with the terms of the license agreement. It is against the
law to copy the software on any other medium except as specifically allowed in the
license agreement. The licensee may make one copy of the software for backup
purposes. No Part of this manual may be reproduced or transmitted in any form or
by any means, electronic or mechanical, including photocopying and recording, for
any purpose without the written permission of Creative Technology Ltd.
© Copyright 1994 Creative Technology Ltd. All rights reserved.
© Copyright 1997 ASUSTeK COMPUTER INC. All rights reserved.
Printed in Taipei, Taiwan by ASUSTeK COMPUTER INC. under license from
Creative Technology Ltd.
Manual Rev.: 1.01
Release Date: January 1997
• Sound Blaster and Sound Blaster 16 are trademarks of Creative Technology
Ltd.
• IBM and PS/2 are registered trademarks of International Business Machines
Corporation.
• MS-DOS is a registered trademark and W indows is a trademark of Microsoft
Corporation.
• ASUS is a registered trademark of ASUSTeK COMPUTER INC.
• All other products are trademarks or registered trademarks of their respective
owners.
2 ASUS PCI-AS300 User’s Manual
Page 33

VI. Audio Driver Installation
Manual Information
The following three sections contain information for the audio software portion of
your product. The first section (pages 1-12) deals with Audio Driver Installation
for Windows 95 and DOS & Windows 3.1x. The second section (70 pages) is the
Audio Software Manual for W indows 95. The third section (86 pages) is the Audio
Software Manual for DOS & Windows 3.1x.
Installation CD
This CD contains a collection of audio drivers and audio software applications
for expansions cards with audio. To install the drivers, please follow the installation procedures in the manuals that came with this product. For additional information, go to the respective directories, and view the "README" files.
NOTE: The drivers were originally created for floppy diskettes. Please substitute
your CD ROM drive letter (such as D:) and the corresponding directory names in
place of any references to "A:" or "B:" floppy drives.
Audio Driver
(Manual & CD Info)
To use the audio under Windows 3.1x, you must install a Configuration Manager
and audio drivers. The following is a list of the main directories used in this audio
section:
Installation CD Contents
\AUDIO\CTCM Creative PnP Configuration Manager for DOS/Win3.1x
(Run install.exe from DOS)
\AUDIO\WIN31 Audio Drivers & Applications for DOS & Win3.1x
(Run install.exe from DOS)
\AUDIO\WIN95 Audio Drivers & Applications for Win95, no CTCM
Double click the "SETUP" icon from Win95
\AUDIO\DISKS Individual installation disks for above drivers
\AUDIO\DISKS\CTCM Copy to 1.44MB 3.5" floppy disks if necessary)
\AUDIO\DISKS\WIN31\DISK1 & \DISK2
\AUDIO\DISKS\WIN95\DISK1 & \DISK2
ASUS PCI-AS300 User’s Manual 3
Page 34

VII. Win95 Audio Driver
Procedures:
1. Insert the installation CD into the CD-ROM drive.
2. Double click on "My Computer" icon
Win95 Audio Driver
(Driver Installation)
3. Double click on your CD-ROM drive
4. Double click on the "Audio" folder.
5. Double click on the "Win95" folder as shown here:
to get the following group:
6. Double click on the "Setup" icon and the setup program will begin running
when the following is displayed:
7. Carefully follow the installation wizard displayed and click the "Next" buttons
to continue through the installation process.
8. When installation is completed, you can run the audio utilities through the
start menu as shown below:
4 ASUS PCI-AS300 User’s Manual
Page 35

VIII. Win3.1x Audio Driver
This section is for DOS and W indows 3.1x that requires manual installations of
audio drivers.
Configuration Manager
In DOS and W indows 3.1x environments a program called the Configuration Manager must be installed in order for the Configuration Manager to do resource allocations for all ISA Plug and Play cards. The audio portion of this card uses 16-bit ISA
specifications.
Creative PnP Configuration Manager (CTCM)
If you try installing the audio drivers first, the audio install program will not be able
to find the PLUGPLAY\DRIVERS\DOS\ESCD.RF database file and give you the
following message: "Configuration Manager not found. Please install the Configuration Manager before installing your Audio Software." "Press a key to continue."
Pressing a key will send you back to the DOS prompt.
Run the Configuration Manager install under DOS prompt by typing:
D: <ENTER>
CD AUDIO <ENTER>
CD CTCM <ENTER>
INSTALL <ENTER>
The first screen shows:
The following path will be used for installing Configuration Manager programs.
Proceed using the settings shown
Configuration Manager Path : C:\CTCM
Microsoft Windows 3.1 Path : C:\WINDOWS
System Bootup Drive : C:\
Press <ENTER> to continue, <F1> for help, or <F3> to exit.
(Config. Manager)
Win3.1x Audio Driver
ASUS PCI-AS300 User’s Manual 5
Page 36

If you need to change the paths shown, you may push the down arrow key and pr ess
<ENTER> when highlighted. If your Windows directory is not detected, you need
to change the path shown to your Windows directory. If you wish to change the
W indows path some other time, you will have to run INST ALL fr om your Configuration Manager installation CD again.
You will get the following message after you press <ENTER>:
W elcome to the Configuration Manager installation program. This program installs
Configuration Manager files onto your computer's hard disk. Before installing, please
read the README file for the latest information. If you need more information
before deciding on a certain option, you can always get help by pressing F1.
Press <ENTER> to continue, <F1> for help, <F2> for README, or
<F3> to exit.
Win3.1x Audio Driver
(Config. Manager)
The following lines will be added to your system files:
VIII. Win3.1x Audio Driver
C:\AUTOEXEC.BAT file
SET CTCM=C:\CTCM
C:\CTCM\CTCU /S /W=C:\WINDOWS
C:\CONFIG.SYS file
DEVICE=C:\CTCM\CTCM.EXE
Press <ENTER> to continue, <F1> for help, or <F3> to exit.
A message will appear on the next screen:
Software installation completed.
The following files were modified and its original saved with B~K extension.
C:\CONFIG.SYS
C:\AUTOEXEC.BAT
Y ou must r eboot in or der for the newly edited CONFIG.SYS to be initiated. You may
choose to exit to DOS by pressing <ENTER> but be sure to r eboot on your own. A
message "Please remember to REBOOT your system" will appear when exiting.
Otherwise, press <F10> to automatically reboot your system.
6 ASUS PCI-AS300 User’s Manual
Page 37

VIII. Win3.1x Audio Driver
Audio Drivers
Now that your Configuration Manager is installed, you may now install the audio
drivers by the following command at the DOS prompt:
D: <ENTER>
CD AUDIO <ENTER>
CD WIN31 <ENTER>
INSTALL <ENTER>
The following Audio Software Installation Screen will appear:
Follow the instructions and make your choice to learn more about INSTALL <F1>,
view the README <F2>, quit <F3>, or install Configuration Manager <ENTER>.
(Audio Installation)
Win3.1x Audio Driver
ASUS PCI-AS300 User’s Manual 7
Page 38

You may choose "Full Installation" to install all components or "Custom Installation" to toggle DOS: (1) Audio Samples (2) Readme and Common Q&A Files and
WINDOWS: (1) WaveEditor (2) QuickCD. You can select Custom Installation if
you are curious about its options and then go back to the previous screen by pressing
<ESC>. Pressing <ENTER> at the above screen will show the installation paths.
You may change the paths or press <ENTER> again if the paths are correct. Press
<ENTER> to continue so that changes can be made to you system files.
Win3.1x Audio Driver
(Audio Installation)
VIII. Win3.1x Audio Driver
You will be prompted that an addition will be made in your C:\AUTOEXEC.BAT
and C:\CONFIG.SYS files. The typical PC will have these settings added to the
system files:
C:\AUTOEXEC.BAT
SET BLASTER=A220 I5 D1 H5 P330 T6
SET SOUND=C:\VIBRA16
SET MIDI=SYNTH:1 MAP:E
C:\VIBRA16\DIAGNOSE /S /W=C:\WINDOWS
C:\VIBRA16\MIXERSET /P /Q
C:\CONFIG.SYS
FILES=40 (If less than 40 or does not exist)
If you wish to use the "Play" and "Record" utility located in \VIBRA16\ directory in
DOS mode, you must also add the following two lines through "Custom Installation."
D
EVICE=C:\VIBRA16\DRV\VIBRA16.SYS /UNIT=0 /BLASTER=A:220 I:5 D:1 H:5
DEVICE=C:\VIBRA16\DRV\CTMMSYS.SYS
8 ASUS PCI-AS300 User’s Manual
Page 39

VIII. Win3.1x Audio Driver
Certain older audio files may already exist in your W indows directory . If so, simply
press <ENTER> to "Backup the original files" as shown here:
(Audio Installation)
Win3.1x Audio Driver
ASUS PCI-AS300 User’s Manual 9
Page 40

The following files will then be saved with a .B~K extension in case you need to
reference your original system file settings:
C:\CONFIG.SYS
C:\AUTOEXEC.BAT
C:\WINDOWS\WIN.INI
C:\WINDOWS\SYSTEM.INI
C:\WINDOWS\CONTROL.INI
You must reboot in order for the newly edited CONFIG.SYS to be initiated. You
may exit to DOS by pressing <ENTER> and edit your CONFIG.SYS file and then
reboot on your own. Otherwise, press <F10> to automatically reboot your system.
Win3.1x Audio Driver
(Audio Installation)
VIII. Win3.1x Audio Driver
After your system is rebooted, enter Windows to see that the Audio Software is
correctly installed. You should here a musical chime as you enter Windows 3.1x
and see the following on your screen:
After this message above, your installation for Windows 3.1x is complete. From
here on, you may refer to Section II and Section III for Audio Software usage.
10 ASUS PCI-AS300 User’s Manual
Page 41

VIII. Win3.1x Audio Driver
Environment Variables
There are three environment variables used to signify information of our audio hardware : SOUND, BLASTER and MIDI. These variables will be setup by
SETPNP.EXE added in the AUTOEXEC.BAT during your audio software installation.
SOUND Environment variable
The SOUND environment variable specifies the directory location of audio drivers
and software. You can type “SET” at the DOS prompt and see the following line for
the setting of the SOUND environment variable:
SOUND=<path>
BLASTER Environment Variable
The BLASTER environment variable specifies the base I/O address, interrupt number and DMA channel hardware configuration of the audio hardware. You can type
“SET” at the DOS prompt and see the following line for the setting of the BLASTER
environment variable:
BLASTER=A220 I5 D1 H5 P330 T6
Where:
A Specifies the audio hardware base I/O port
I Specifies the interrupt request line
D Specifies the Low DMA channel
H Specifies the High DMA channel
P Specifies the MPU-401 base I/O port
(Environ. Variables)
Win3.1x Audio Driver
T Specifies the card type
ASUS PCI-AS300 User’s Manual 11
Page 42

Win3.1x Audio Driver
(Environ. Variables)
VIII. Win3.1x Audio Driver
MIDI Environment Variable
The MIDI environment variable specifies the MIDI file format used and where the
MIDI data is sent to. The MIDI data can be sent to FM chips or audio hardware
MIDI port. Generally, there are three MIDI file formats available in the market,
General MIDI, Extended MIDI and Basic MIDI. You can type “SET” at the DOS
prompt and see the following line for the setting of the BLASTER environment
variable:
MIDI=SYNTH:<1/2> MAP:<G/E/B>
Where:
SYNTH: 1 Specifies internal synthesizer (default)
2 Specifies audio hardware MIDI port
MAP: G Specifies General MIDI file format
E Specifies Extended MIDI file format (default)
B Specifies Basic MIDI file format
Maximum Recording Rates for the Audio Hardware
The sampling rate used for recording is largely influenced by your computer’s main
processor. To obtain 16-bit digital audio using Windows, the following maximum
recording rates are suggested.
SYSTEM RECORDING RATE
386 and above Stereo - 44KHz
Mono - 44KHz
386 SX and below Stereo - 22KHz
Mono - 44KHz
To obtain optimal performance, try configuring the audio hardware to use a high
DMA (Direct Memory Access) channel under Windows. Refer to your audio hardware Getting Started Manual for more information on setting up the sound card to
use a high DMA channel.
12 ASUS PCI-AS300 User’s Manual
 Loading...