

Page 1
Page 2

E1892E1892
E1892
E1892E1892
First edition V1First edition V1
First edition V1
First edition V1First edition V1
January 2005January 2005
January 2005
January 2005January 2005
Copyright © 2005 ASUSTeK COMPUTER INC. All Rights Reserved.Copyright © 2005 ASUSTeK COMPUTER INC. All Rights Reserved.
Copyright © 2005 ASUSTeK COMPUTER INC. All Rights Reserved.
Copyright © 2005 ASUSTeK COMPUTER INC. All Rights Reserved.Copyright © 2005 ASUSTeK COMPUTER INC. All Rights Reserved.
No part of this manual, including the products and software described in it, may be reproduced,
transmitted, transcribed, stored in a retrieval system, or translated into any language in any form
or by any means, except documentation kept by the purchaser for backup purposes, without the
express written permission of ASUSTeK COMPUTER INC. (“ASUS”).
Product warranty or service will not be extended if: (1) the product is repaired, modified or
altered, unless such repair, modification of alteration is authorized in writing by ASUS; or (2)
the serial number of the product is defaced or missing.
ASUS PROVIDES THIS MANUAL “AS IS” WITHOUT WARRANTY OF ANY KIND, EITHER
EXPRESS OR IMPLIED, INCLUDING BUT NOT LIMITED TO THE IMPLIED WARRANTIES
OR CONDITIONS OF MERCHANTABILITY OR FITNESS FOR A PARTICULAR PURPOSE.
IN NO EVENT SHALL ASUS, ITS DIRECTORS, OFFICERS, EMPLOYEES OR AGENTS BE
LIABLE FOR ANY INDIRECT, SPECIAL, INCIDENTAL, OR CONSEQUENTIAL DAMAGES
(INCLUDING DAMAGES FOR LOSS OF PROFITS, LOSS OF BUSINESS, LOSS OF USE
OR DATA, INTERRUPTION OF BUSINESS AND THE LIKE), EVEN IF ASUS HAS BEEN
ADVISED OF THE POSSIBILITY OF SUCH DAMAGES ARISING FROM ANY DEFECT OR
ERROR IN THIS MANUAL OR PRODUCT.
SPECIFICATIONS AND INFORMATION CONTAINED IN THIS MANUAL ARE FURNISHED
FOR INFORMATIONAL USE ONLY, AND ARE SUBJECT TO CHANGE AT ANY TIME
WITHOUT NOTICE, AND SHOULD NOT BE CONSTRUED AS A COMMITMENT BY ASUS.
ASUS ASSUMES NO RESPONSIBILITY OR LIABILITY FOR ANY ERRORS OR
INACCURACIES THAT MAY APPEAR IN THIS MANUAL, INCLUDING THE PRODUCTS
AND SOFTWARE DESCRIBED IN IT.
Products and corporate names appearing in this manual may or may not be registered
trademarks or copyrights of their respective companies, and are used only for identification or
explanation and to the owners’ benefit, without intent to infringe.
ii
Page 3

User guide topicsUser guide topics
User guide topics
User guide topicsUser guide topics
This user guide contains the information you need to efficiently use
the ASUS® P505 Smart PDA Phone.
••
Chapter 1 - Getting startedChapter 1 - Getting started
•
Chapter 1 - Getting started
••
Chapter 1 - Getting startedChapter 1 - Getting started
This chapter introduces the physical features of the P505 Smart
PDA Phone and tells you how to set up and power up the device.
••
Chapter 2 - Learning the basicsChapter 2 - Learning the basics
•
Chapter 2 - Learning the basics
••
Chapter 2 - Learning the basicsChapter 2 - Learning the basics
This chapter teaches you the basic device functions. You will learn
how to enter text, find and organize information, customize the
device, and know the bundled utilities.
••
Chapter 3 - Synchronizing dataChapter 3 - Synchronizing data
•
Chapter 3 - Synchronizing data
••
Chapter 3 - Synchronizing dataChapter 3 - Synchronizing data
This chapter tells you how to use the Microsoft
application that synchronizes data between the device and your
desktop or notebook computer.
..........................................................
.............................
..........................................................
..............................................
.......................
..............................................
................................................
........................
................................................
®
ActiveSync
1-11-1
1-1
1-11-1
2-12-1
2-1
2-12-1
3-13-1
3-1
3-13-1
®
••
Chapter 4 - Using Pocket OutlookChapter 4 - Using Pocket Outlook
•
Chapter 4 - Using Pocket Outlook
••
Chapter 4 - Using Pocket OutlookChapter 4 - Using Pocket Outlook
This chapter details the procedures in using the Microsoft
Outlook Calendar, Tasks, Notes, and Contacts.
••
Chapter 5 - Phone featuresChapter 5 - Phone features
•
Chapter 5 - Phone features
••
Chapter 5 - Phone featuresChapter 5 - Phone features
This chapter provides information on how to use the ASUS Menu
and the device’s phone features.
••
Chapter 6 - Messaging featuresChapter 6 - Messaging features
•
Chapter 6 - Messaging features
••
Chapter 6 - Messaging featuresChapter 6 - Messaging features
This chapter teaches you how to use the device to send MMS,
SMS, and e-mail messages.
••
Chapter 7 - Multimedia featuresChapter 7 - Multimedia features
•
Chapter 7 - Multimedia features
••
Chapter 7 - Multimedia featuresChapter 7 - Multimedia features
This chapter introduces the multimedia features of the device
including sections on Camera, Photo Album, and Pictures
applications.
••
Chapter 8 - Using companion applicationsChapter 8 - Using companion applications
•
Chapter 8 - Using companion applications
••
Chapter 8 - Using companion applicationsChapter 8 - Using companion applications
This chapter includes basic information on how to use Pocket
Word, Pocket Excel, MSN Messenger, Windows Media™ Player for
Pocket PC, and Voice Commander.
..........................................................
.............................
..........................................................
........................................
....................
........................................
..............................................
.......................
..............................................
..............................................
.......................
..............................................
..................
.........
..................
4-14-1
4-1
4-14-1
®
Pocket
5-15-1
5-1
5-15-1
6-16-1
6-1
6-16-1
7-17-1
7-1
7-17-1
8-18-1
8-1
8-18-1
iii
Page 4

••
Chapter 9 - Using Pocket Internet ExplorerChapter 9 - Using Pocket Internet Explorer
•
Chapter 9 - Using Pocket Internet Explorer
••
Chapter 9 - Using Pocket Internet ExplorerChapter 9 - Using Pocket Internet Explorer
..............
.......
..............
9-19-1
9-1
9-19-1
This chapter gives information on using Pocket Internet Explorer
and the Mobile Favorites folder.
••
Chapter 10 - Getting connectedChapter 10 - Getting connected
•
Chapter 10 - Getting connected
••
Chapter 10 - Getting connectedChapter 10 - Getting connected
..........................................
.....................
..........................................
10-110-1
10-1
10-110-1
This chapter provides the procedures for connecting to the Internet,
intranet, and for transferring data using infrared (IR).
®®
®
®®
••
Chapter 11 - BluetoothChapter 11 - Bluetooth
•
Chapter 11 - Bluetooth
••
Chapter 11 - BluetoothChapter 11 - Bluetooth
................................................................
................................
................................................................
This chapter provides information on how to use the Bluetooth
11-111-1
11-1
11-111-1
®
features.
••
Appendix - NoticesAppendix - Notices
•
Appendix - Notices
••
Appendix - NoticesAppendix - Notices
This part includes the safety notices and regulations.
iv
Page 5
P505 Smart PDA Phone specificationsP505 Smart PDA Phone specifications
P505 Smart PDA Phone specifications
P505 Smart PDA Phone specificationsP505 Smart PDA Phone specifications
ProcessorsProcessors
Processors
ProcessorsProcessors
Operating systemOperating system
Operating system
Operating systemOperating system
MemoryMemory
Memory
MemoryMemory
DisplayDisplay
Display
DisplayDisplay
Frequency bandFrequency band
Frequency band
Frequency bandFrequency band
GPRSGPRS
GPRS
GPRSGPRS
CameraCamera
Camera
CameraCamera
ConnectivityConnectivity
Connectivity
ConnectivityConnectivity
RemovableRemovable
Removable
RemovableRemovable
batterybattery
battery
batterybattery
®
PXA270 application processor
Intel
Infineon E-Gold+ baseband processor
®
Microsoft
Pocket PC Phone Edition
64 MB Flash ROM
64 MB SDRAM*
2.8 cm, transflective TFT LCD
65,536 colors, 240x320 resolution
Tri-band GSM (900/1800/1900 MHz)
Class B, Multislot class 10
SXGA resolution (1.3 million pixels) CMOS camera with
still/video capture support and built-in flash
Bluetooth
Infrared : Low power Serial Infrared (SIR)
USB : 1.1
1050 mAH Lithium Ion
4 hours of talktime and 100 hours standby time**
15 hours of operation time
Windows Mobile™ 2003 Second Edition for
®
: V1.1
ExpansionExpansion
Expansion
ExpansionExpansion
AudioAudio
Audio
AudioAudio
ApplicationsApplications
Applications
ApplicationsApplications
Unique featuresUnique features
Unique features
Unique featuresUnique features
LEDsLEDs
LEDs
LEDsLEDs
Side keysSide keys
Side keys
Side keysSide keys
SizeSize
Size
SizeSize
WeightWeight
Weight
WeightWeight
Specifications are subject to change without notice.Specifications are subject to change without notice.
Specifications are subject to change without notice.
Specifications are subject to change without notice.Specifications are subject to change without notice.
**
9 MB/11 MB allocated for Western/Eastern language support9 MB/11 MB allocated for Western/Eastern language support
*
9 MB/11 MB allocated for Western/Eastern language support
**
9 MB/11 MB allocated for Western/Eastern language support9 MB/11 MB allocated for Western/Eastern language support
****
According to Microsoft Logo Test Kit - Battery Life TestAccording to Microsoft Logo Test Kit - Battery Life Test
**
According to Microsoft Logo Test Kit - Battery Life Test
****
According to Microsoft Logo Test Kit - Battery Life TestAccording to Microsoft Logo Test Kit - Battery Life Test
SD/MMC/SDIO card slot
2.5 mm audio port
Built-in microphone and speaker
64CH polyphonic ringtone support
®
Microsoft
Word, Microsoft® Pocket Excel, Microsoft® Pocket
Outlook, Windows® Media Player, Microsoft® ActiveSync,
MSN Messenger
ASUS Menu: PDA mode (supports touch screen)
Power (inside the power button), GSM/GPRS standby,
and Bluetooth®/System notification
5-way joystick, Record, Camera, and Voice Commander
108 mm x 60 mm x 22.5 mm (L x W x H)
165 grams
Pocket Internet Explorer, Microsoft® Pocket
Phone mode
v
Page 6
P505 Smart PDA Phone packageP505 Smart PDA Phone package
P505 Smart PDA Phone package
P505 Smart PDA Phone packageP505 Smart PDA Phone package
contentscontents
contents
contentscontents
Your P505 Smart PDA Phone package includes several accessories.
After unpacking, check the items against the list below and make
sure that they are in good condition. If any item is missing or
damaged, contact your dealer or retailer immediately.
ContentsContents
Contents
ContentsContents
P505 Smart PDA Phone
1050 mAH, 3.7 V Lithium Ion battery 1 2
Cradle
DC/USB cable
AC adapter and power cord
Input : 100 Vac ~ 240 Vac, 0.2 A
Output : 5 Vdc, 1 A
Stylus 1 2
Protection case
Stereo headset
ASUS Bonus CD
Microsoft® Companion CD
User guide
BasicBasic
Basic
BasicBasic
DeluxeDeluxe
Deluxe
DeluxeDeluxe
Quick Start Guide
Warranty card
Optional itemsOptional items
Optional items
Optional itemsOptional items
• Protection case (Type 2 and 3)
• Bluetooth® headset
• Bluetooth® Car Kit
• Bluetooth® GPS
• MMC memory card
• SD memory card
• Wi-Fi® SDIO card
vi
Page 7

Chapter 1Chapter 1
Chapter 1
Chapter 1Chapter 1
Getting startedGetting started
Getting started
Getting startedGetting started
This chapter introduces the
physical features of the P505
Smart PDA Phone and tells you
how to set up and power up the
device.
Page 8

Chapter summaryChapter summary
Chapter summary
Chapter summaryChapter summary
••
•
••
••
•
••
Introducing P505Introducing P505
Introducing P505
Introducing P505Introducing P505
Key PDA features ............................................................ 1-3
Key mobile phone features .............................................. 1-3
Front features (flip closed) .............................................. 1-4
Front features (flip open) ................................................ 1-5
Side features ................................................................... 1-6
Top features .................................................................... 1-7
Bottom features .............................................................. 1-7
Back features .................................................................. 1-8
The stylus ........................................................................ 1-9
The cradle ........................................................................ 1-9
Setting up P505Setting up P505
Setting up P505
Setting up P505Setting up P505
Installing a SIM card and battery .................................... 1-10
Charging the device battery .......................................... 1-11
Viewing the power status .............................................. 1-12
..................................................................................
.........................................
..................................................................................
..................................................................................
.........................................
..................................................................................
1-31-3
1-3
1-31-3
1-101-10
1-10
1-101-10
••
•
••
••
•
••
••
•
••
SD/MMC/SDIO card installationSD/MMC/SDIO card installation
SD/MMC/SDIO card installation
SD/MMC/SDIO card installationSD/MMC/SDIO card installation
Installing and removing an SD/MMC/SDIO card .............. 1-13
Activating the P505Activating the P505
Activating the P505
Activating the P505Activating the P505
Resetting the P505Resetting the P505
Resetting the P505
Resetting the P505Resetting the P505
........................................................................
....................................
........................................................................
..........................................................................
.....................................
..........................................................................
..........................................
.....................
..........................................
1-131-13
1-13
1-131-13
1-141-14
1-14
1-141-14
1-141-14
1-14
1-141-14
1-2
P505 Smart PDA Phone
Page 9

Introducing P505Introducing P505
Introducing P505
Introducing P505Introducing P505
The P505 Smart PDA Phone is a Personal Digital Assistant (PDA) and
a tri-band mobile phone in one. The P505 versatility lets you enjoy all
the benefits of a powerful PDA while providing you with an efficient
mobile communication solution so you can be connected anywhere
you are.
Powered by an Intel
processors, built-in 64 MB SDRAM and 64 MB Flash ROM, and bundled
with the Microsoft® Windows Mobile™ 2003 Second Edition for Pocket
PC Phone Edition operating system, P505 is truly a smart companion
for the business professional.
Key PDA featuresKey PDA features
Key PDA features
Key PDA featuresKey PDA features
• Windows Mobile™ 2003OSSE for PPC PE
• Built-in digital camera/camcorder
• Voice Recorder
• Integrated e-mail, MMS, and SMS messaging
• Windows® Media Player supports MP3 and video playback
• Voice Commander application (English and Chinese only)
• ASUS Menu application (PDA mode)
• Bluetooth® and Infrared (IR) enabled
• Sleek, compact, and stylish design
• Navigation buttons and touchpad for easy input
• SD/MMC/SDIO card slot for memory expansion or I/O interface
• Backup application
• SmartKeeper application automatically backs up
system status when battery power is low
• Supports Microsoft® ActiveSync application
®
PXA270 and an Infineon E-Gold+ baseband
Key mobile phone featuresKey mobile phone features
Key mobile phone features
Key mobile phone featuresKey mobile phone features
• Tri-band GSM Class 10
• MMS/SMS messaging
• ASUS Menu (phone mode) provides quick access to device
features
• 64 polyphonic ring tones
• Conference call
• Photo Contacts application to display photos of callers
• SIM Manager for SIM/device phone book management
Chapter 1: Getting started
1-3
Page 10

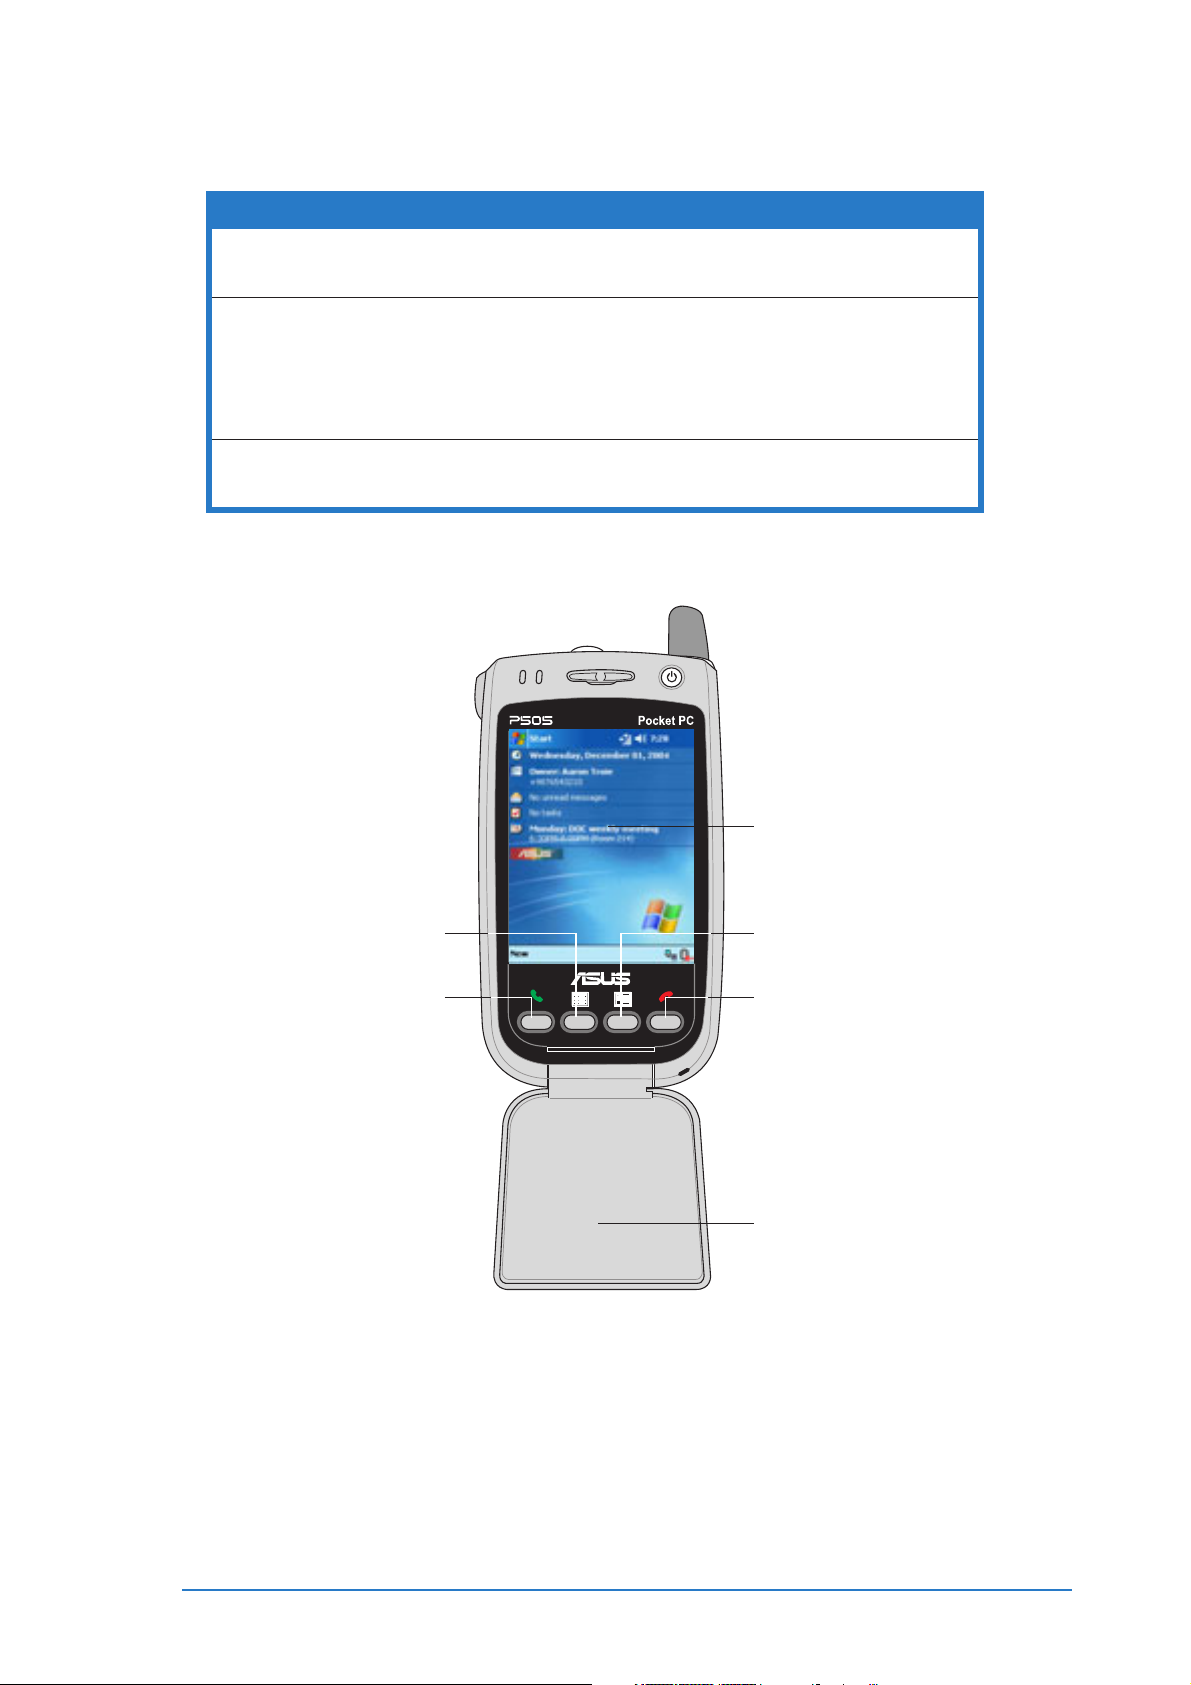
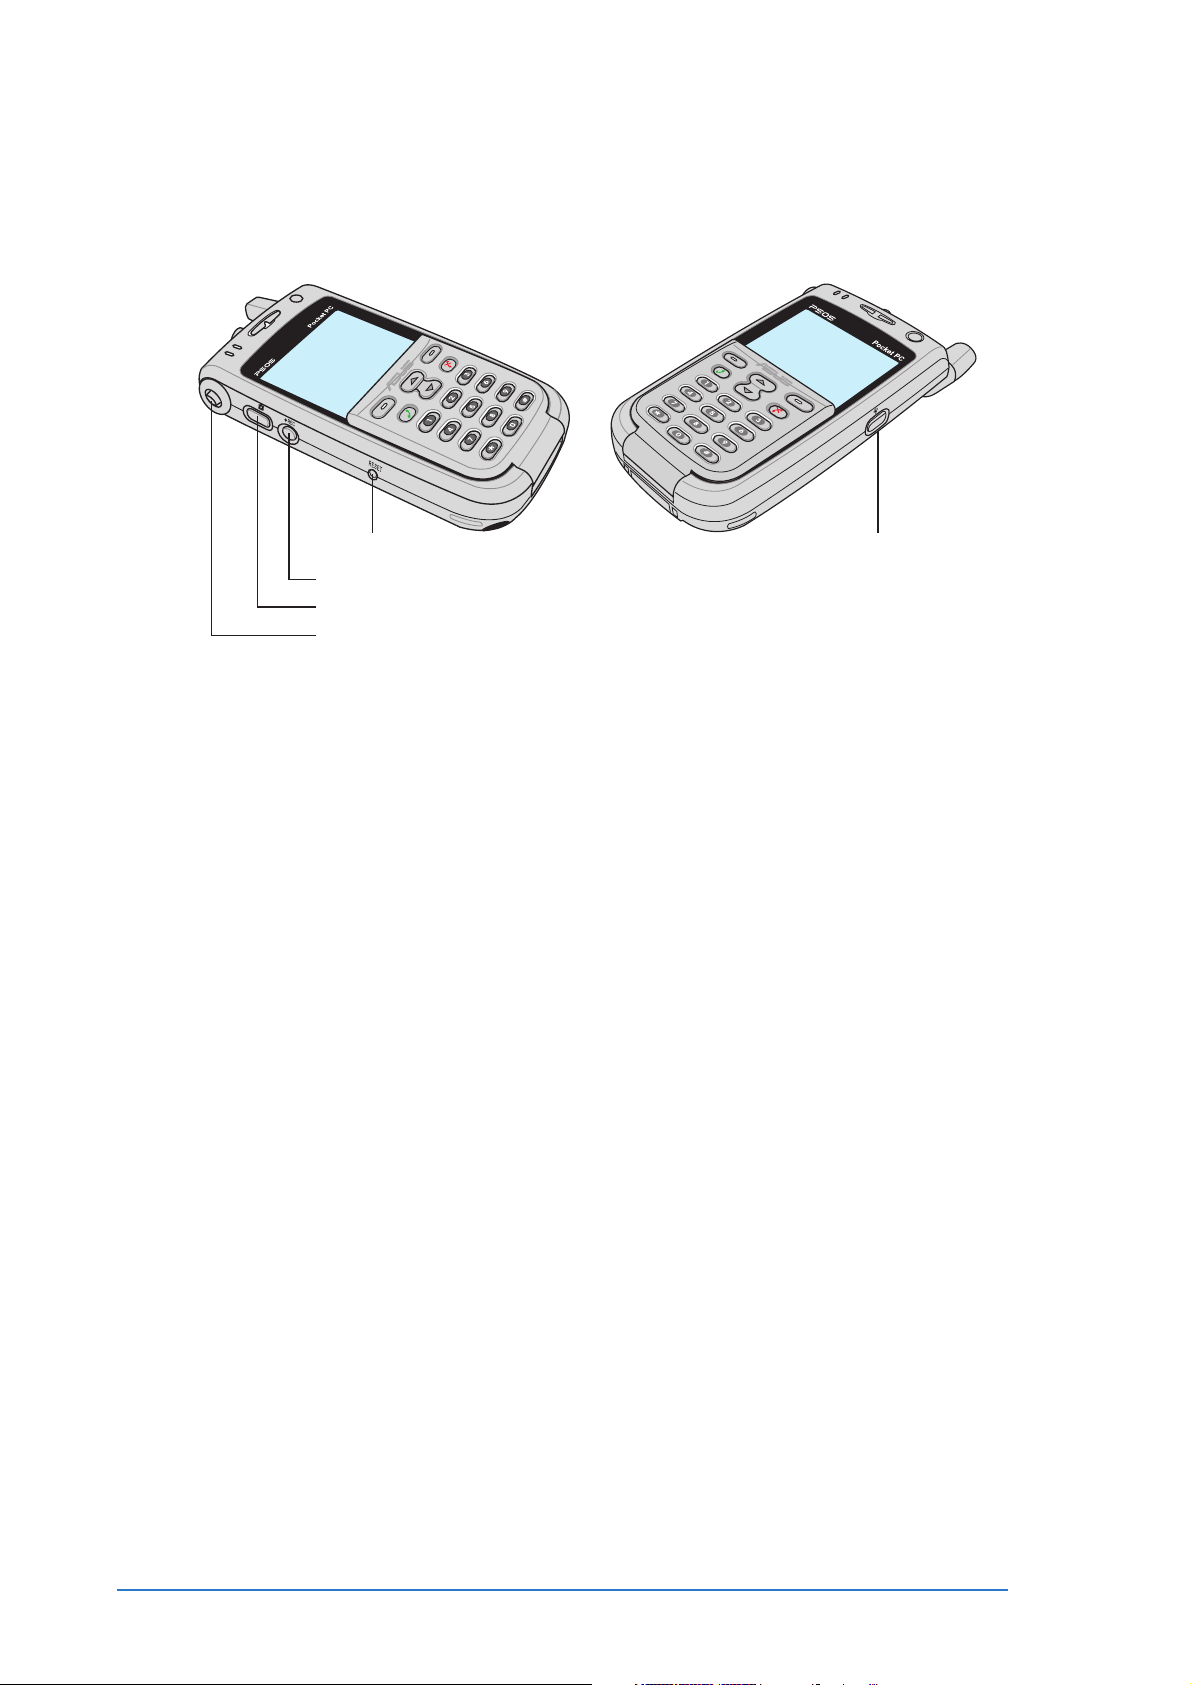
Front features (flip closed)Front features (flip closed)
Front features (flip closed)
Front features (flip closed)Front features (flip closed)
Earpiece
Bluetooth®/System
notification LED
Antenna
GSM/GPRS standby LED
Soft key (left)
Call key
Flip
GSM/GPRS standby LED GSM/GPRS standby LED
•
GSM/GPRS standby LED - Refer to the LED indications table
GSM/GPRS standby LED GSM/GPRS standby LED
Power button/Power LED
Navigation keys
Soft key (right)
End key
Numeric keys
Microphone
on the next page for details.
®®
®
®®
BluetoothBluetooth
•
Bluetooth
BluetoothBluetooth
/System notification LED /System notification LED
/System notification LED - Refer to the LED
/System notification LED /System notification LED
indications table on the next page for details.
Earpiece Earpiece
•
Earpiece - allows you to listen to incoming/outgoing calls.
Earpiece Earpiece
AntennaAntenna
•
Antenna - allows the device to obtain signals.
AntennaAntenna
Power button and power LED Power button and power LED
•
Power button and power LED - press this button to turn on
Power button and power LED Power button and power LED
or off the device. This button lights up amber when the battery is
charging and turns green when the battery is fully-charged.
Soft-key (right) Soft-key (right)
•
Soft-key (right) - displays the phonebook when in idle mode;
Soft-key (right) Soft-key (right)
performs various functions depending on the menu level and
screen display.
End key End key
•
End key - ends a voice or data call.
End key End key
NN
umeric keys umeric keys
•
N
umeric keys - enters numbers and alphanumeric characters.
NN
umeric keys umeric keys
Microphone Microphone
•
Microphone - used for speakerphone function and to enhance
Microphone Microphone
sound recordings
FF
liplip
•
•
•
F
lip
- contains all phone keys for the device phone function.
FF
liplip
Call key Call key
Call key - calls a number; answers a call; displays dialled numbers.
Call key Call key
Soft-key (left) Soft-key (left)
Soft-key (left) - launches the phone menu; enters a phone menu.
Soft-key (left) Soft-key (left)
1-4
P505 Smart PDA Phone
Page 11
LED indications tableLED indications table
LED indications table
LED indications tableLED indications table
LEDLED
LED
LEDLED
GSM/GPRS standby Green Blinking is connected to a GSM network
®
Bluetooth
notification Red Blinking OS has generated an alarm;
Power* Amber On battery is charging
* The Power LED may blink amber and green alternately during charging.
Front features (flip open)Front features (flip open)
Front features (flip open)
Front features (flip open)Front features (flip open)
/System Blue Blinking Bluetooth™ feature is on
ColorColor
Color
ColorColor
Orange Blinking is connected to a GPRS network
Green On battery is fully-charged
StatusStatus
Status
StatusStatus
Indicates that the deviceIndicates that the device
Indicates that the device
Indicates that the deviceIndicates that the device
The device received a new SMS
message or is reminding you of an
appointment, task, etc.
LCD touch screen
Calendar button
Call button
LCD touch screenLCD touch screen
•
LCD touch screen - allows you to enter, read, send, receive, or
LCD touch screenLCD touch screen
Contacts button
End button
Flip
edit data by tapping on it. The screen lumination is increased or
decreased by changing the backlight settings.
Call buttonCall button
•
Call button - launches the Phone application.
Call buttonCall button
Calendar buttonCalendar button
•
Calendar button - launches the Calendar application.
Calendar buttonCalendar button
Contacts buttonContacts button
•
Contacts button - launches the Contacts application.
Contacts buttonContacts button
End button End button
•
End button - ends a call or closes the Phone application.
End button End button
Chapter 1: Getting started
1-5
Page 12
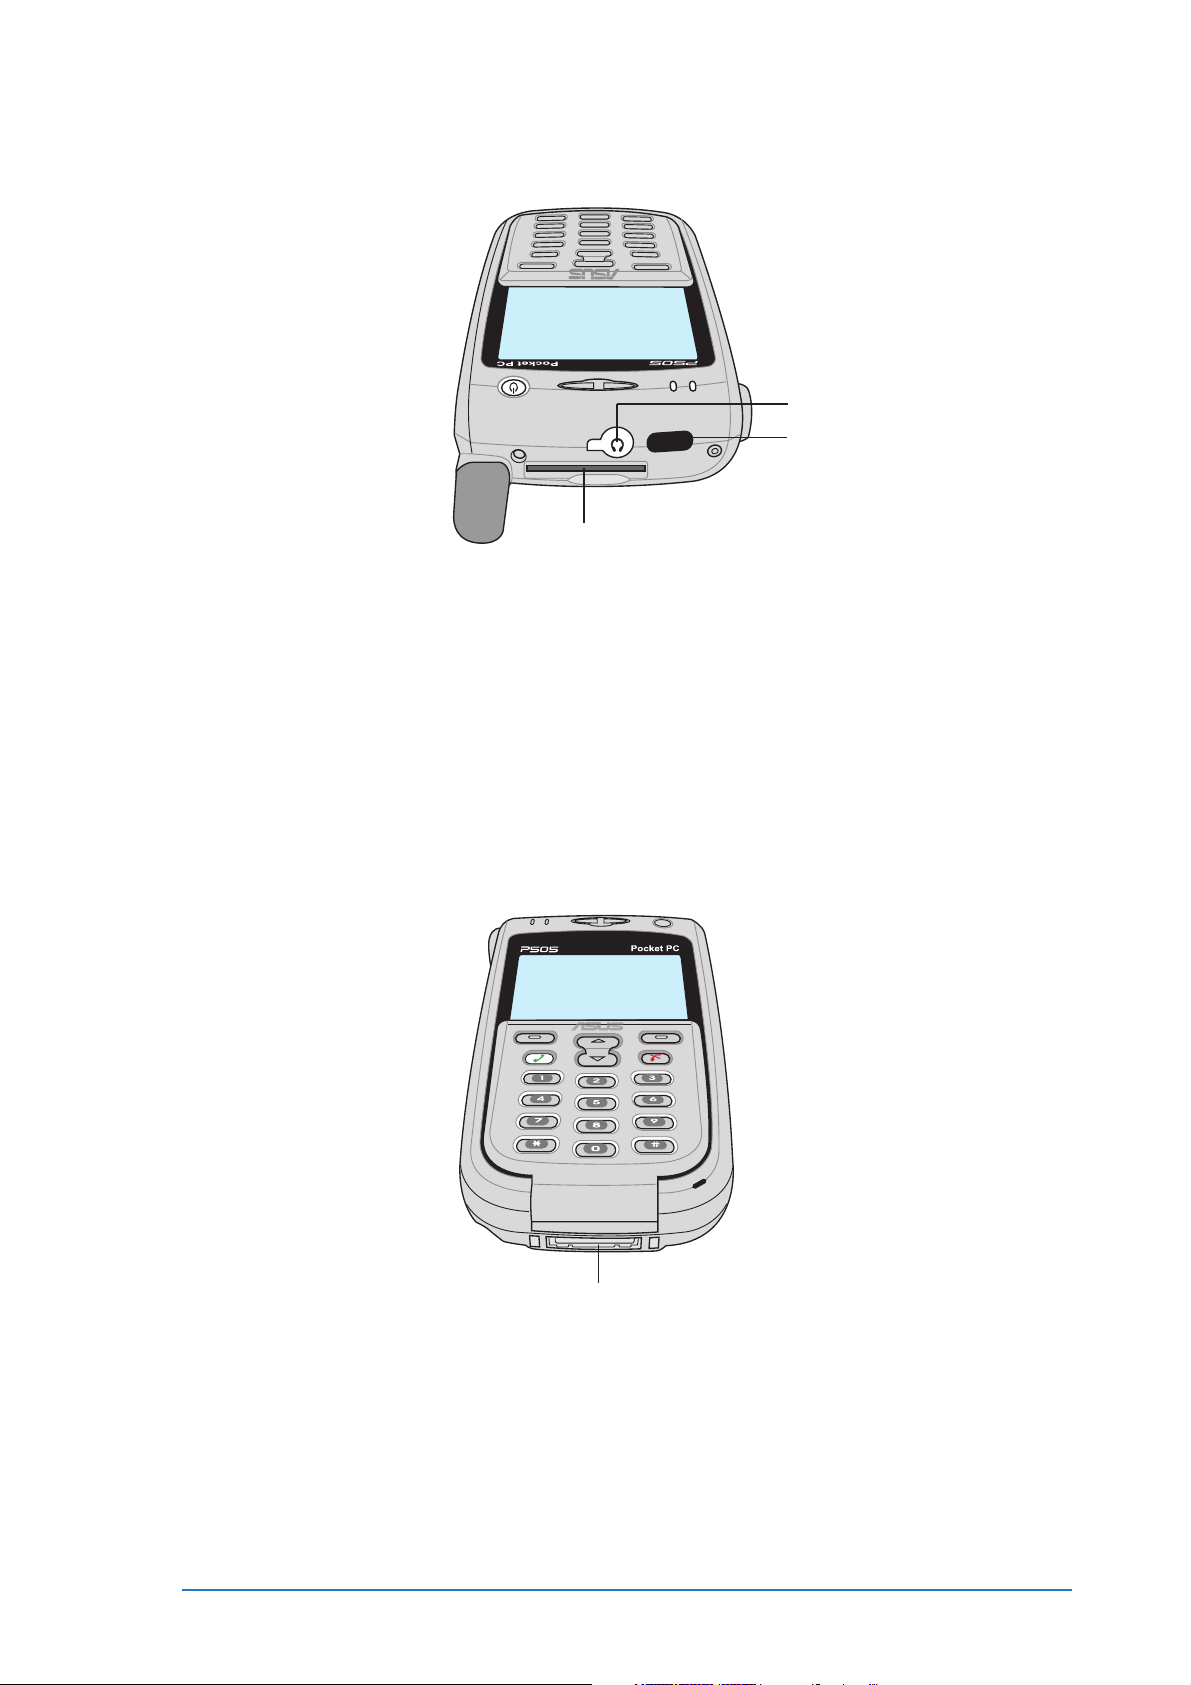
Side featuresSide features
Side features
Side featuresSide features
Software rSoftware r
•
Software r
Software rSoftware r
Left sideLeft side
Left side
Left sideLeft side
Software reset switch
Record button
Camera button
5-way joystick
eset eset
eset
eset eset
switchswitch
switch
switchswitch
- allows you to soft or hard reset the
Right sideRight side
Right side
Right sideRight side
Voice Commander button
device. See the section “Resetting the device” on page 1-14 for
details.
Record button Record button
•
Record button - launches the Notes recorder application.
Record button Record button
Camera button Camera button
•
Camera button - launches the Camera application; captures a
Camera button Camera button
photo or records video.
5-way joystick 5-way joystick
•
5-way joystick - by default, the 5-way joystick allows you to
5-way joystick 5-way joystick
control the device volume settings.
When set as a navigation key, the 5-way joystick functions like
the four arrow keys and the <Enter> key on a keyboard. The
5-way joystick allows you to
- move through the program icons, folders, or files in a menu by
scrolling up, down, right, or left
- launch a selected program, list folder contents, or open a file
by pressing the button
See page 2-28 for details on changing the 5-way joystick
function.
Voice Commander button Voice Commander button
•
Voice Commander button - launches the Voice Commander
Voice Commander button Voice Commander button
application.
1-6
P505 Smart PDA Phone
Page 13
Top featuresTop features
Top features
Top featuresTop features
Audio port
Infrared (IR) port
SD/MMC/SDIO card slot
Audio port Audio port
•
Audio port - connects a headphone.
Audio port Audio port
Infrared (IR) port Infrared (IR) port
•
Infrared (IR) port - allows you to beam data to another device
Infrared (IR) port Infrared (IR) port
that has an IR port.
SD/MMC/SDIO card slot SD/MMC/SDIO card slot
•
SD/MMC/SDIO card slot - accommodates an SD/MMC/SDIO
SD/MMC/SDIO card slot SD/MMC/SDIO card slot
card.
Bottom featuresBottom features
Bottom features
Bottom featuresBottom features
System connector
System connector System connector
•
System connector - connects the device to the system
System connector System connector
connector on the cradle. If you are not using the cradle, connect
the DC/USB cable plug directly to this connector to synchronize
your device with your computer and/or to charge the battery
using the AC adapter or the USB plug.
Chapter 1: Getting started
1-7
Page 14
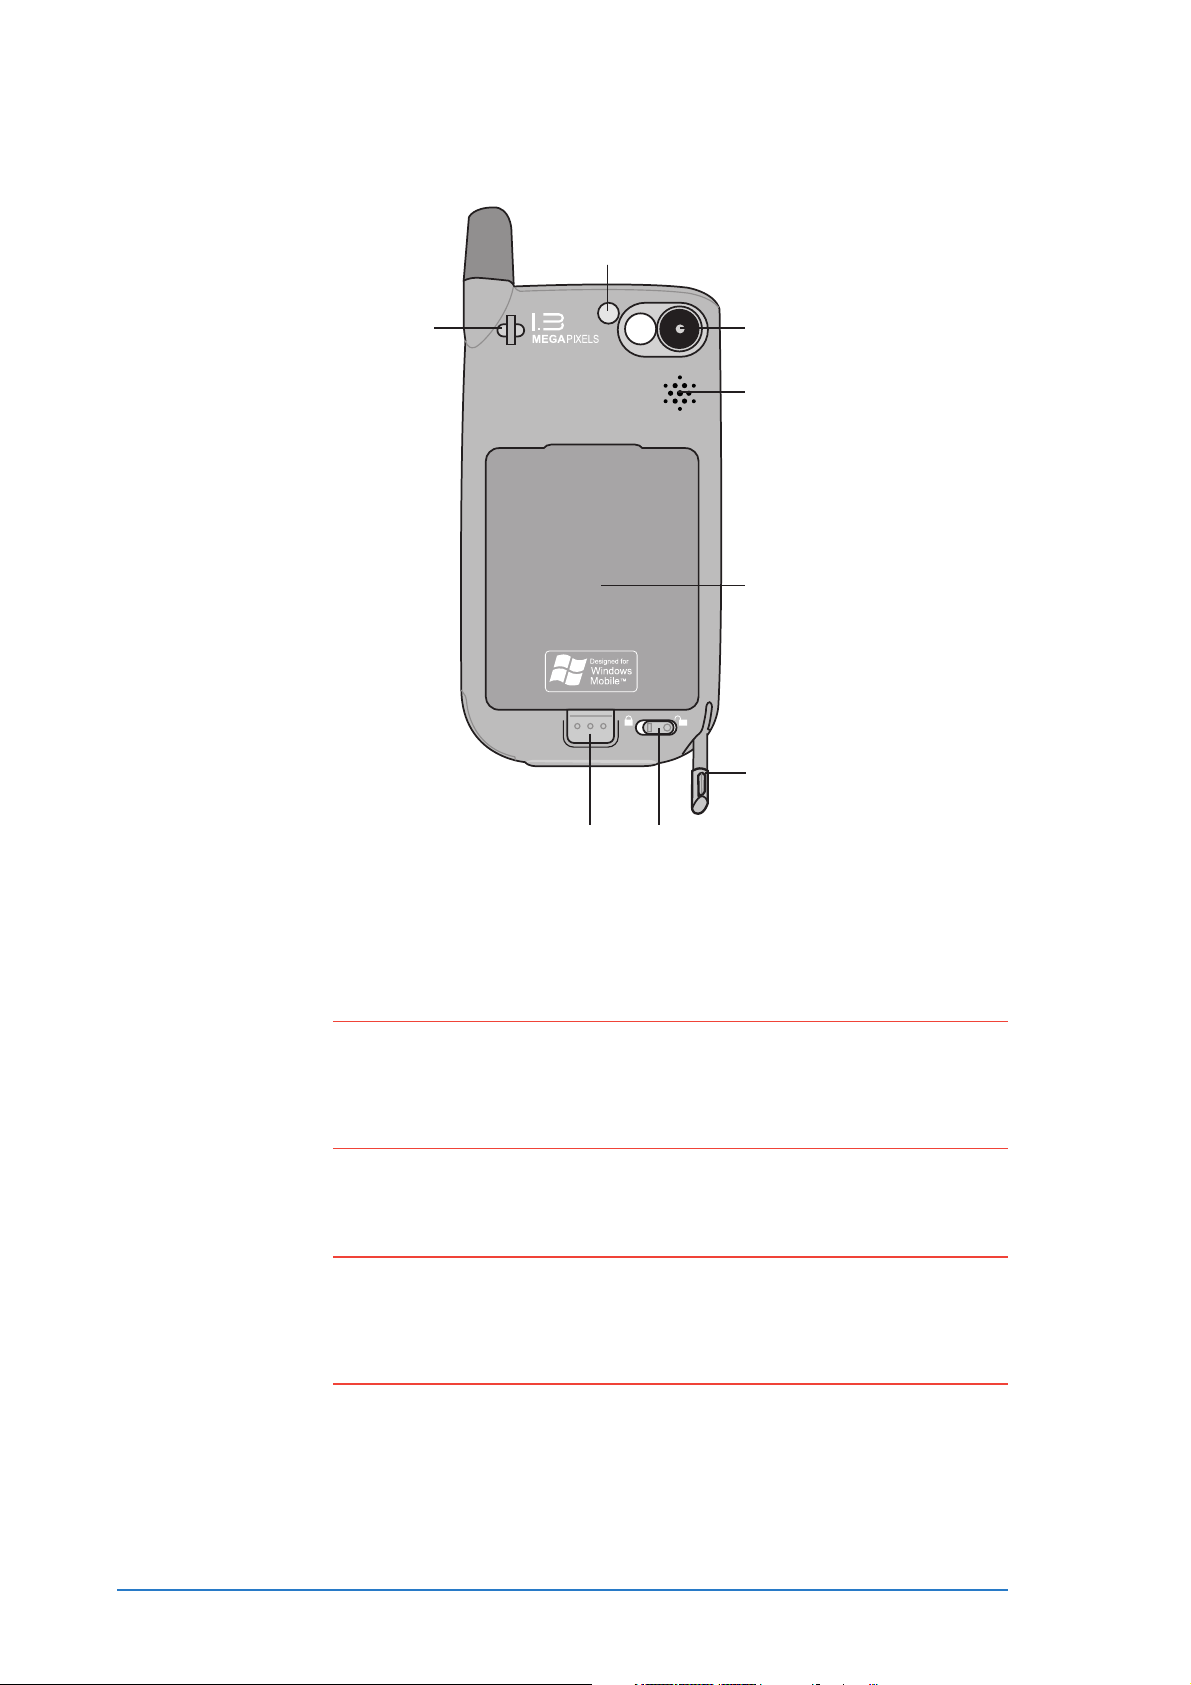
Back featuresBack features
Back features
Back featuresBack features
Flash
Strap holder
Battery lockBattery latch
FlashFlash
•
Flash - provides additional lighting for the built-in camera
FlashFlash
Camera
Speaker
Battery
Stylus
CameraCamera
•
Camera - this is a 1.3 megapixel still/video camera
CameraCamera
Battery Battery
•
Battery - this is a Lithium-Ion battery
Battery Battery
NOTENOTE
NOTE The device comes with a back-up (internal) battery that is
NOTENOTE
charged simultaneously with the battery pack. If the back-up
battery is fully charged, you can swap battery packs within
30 minutes without losing data.
Stylus Stylus
•
Stylus - used for tapping or writing on the LCD screen
Stylus Stylus
Battery lock Battery lock
•
Battery lock - locks or unlocks the battery
Battery lock Battery lock
CAUTION!CAUTION!
CAUTION! Unlocking the battery automatically turns off the device and
CAUTION!CAUTION!
you lose all unsaved data. The device automatically turns on
when you install and lock the battery. Refer to page 2-31 for
details on how to back-up your data.
Battery latch Battery latch
•
Battery latch - secures the battery on the bay
Battery latch Battery latch
Strap holder Strap holder
•
Strap holder - allows you to carry the device using a strap
Strap holder Strap holder
1-8
P505 Smart PDA Phone
Page 15
The stylusThe stylus
The stylus
The stylusThe stylus
The stylus functions on the P505 the
same way a mouse functions on a
computer. Use the stylus to open
programs, execute commands, or to enter
information by writing on the screen or by
tapping on the on-screen keyboard.
Tap.Tap.
•
Tap. Touch the screen once with the
Tap.Tap.
stylus to open programs and select
options.
Drag.Drag.
•
Drag. Hold the stylus on the screen and drag across the screen
Drag.Drag.
to select text and images. Drag in a list to select multiple items.
Tap and hold.Tap and hold.
•
Tap and hold. Tap and hold the stylus on an item to see a list of
Tap and hold.Tap and hold.
actions available for that item. On the displayed pop-up menu, tap
the action that you want to perform.
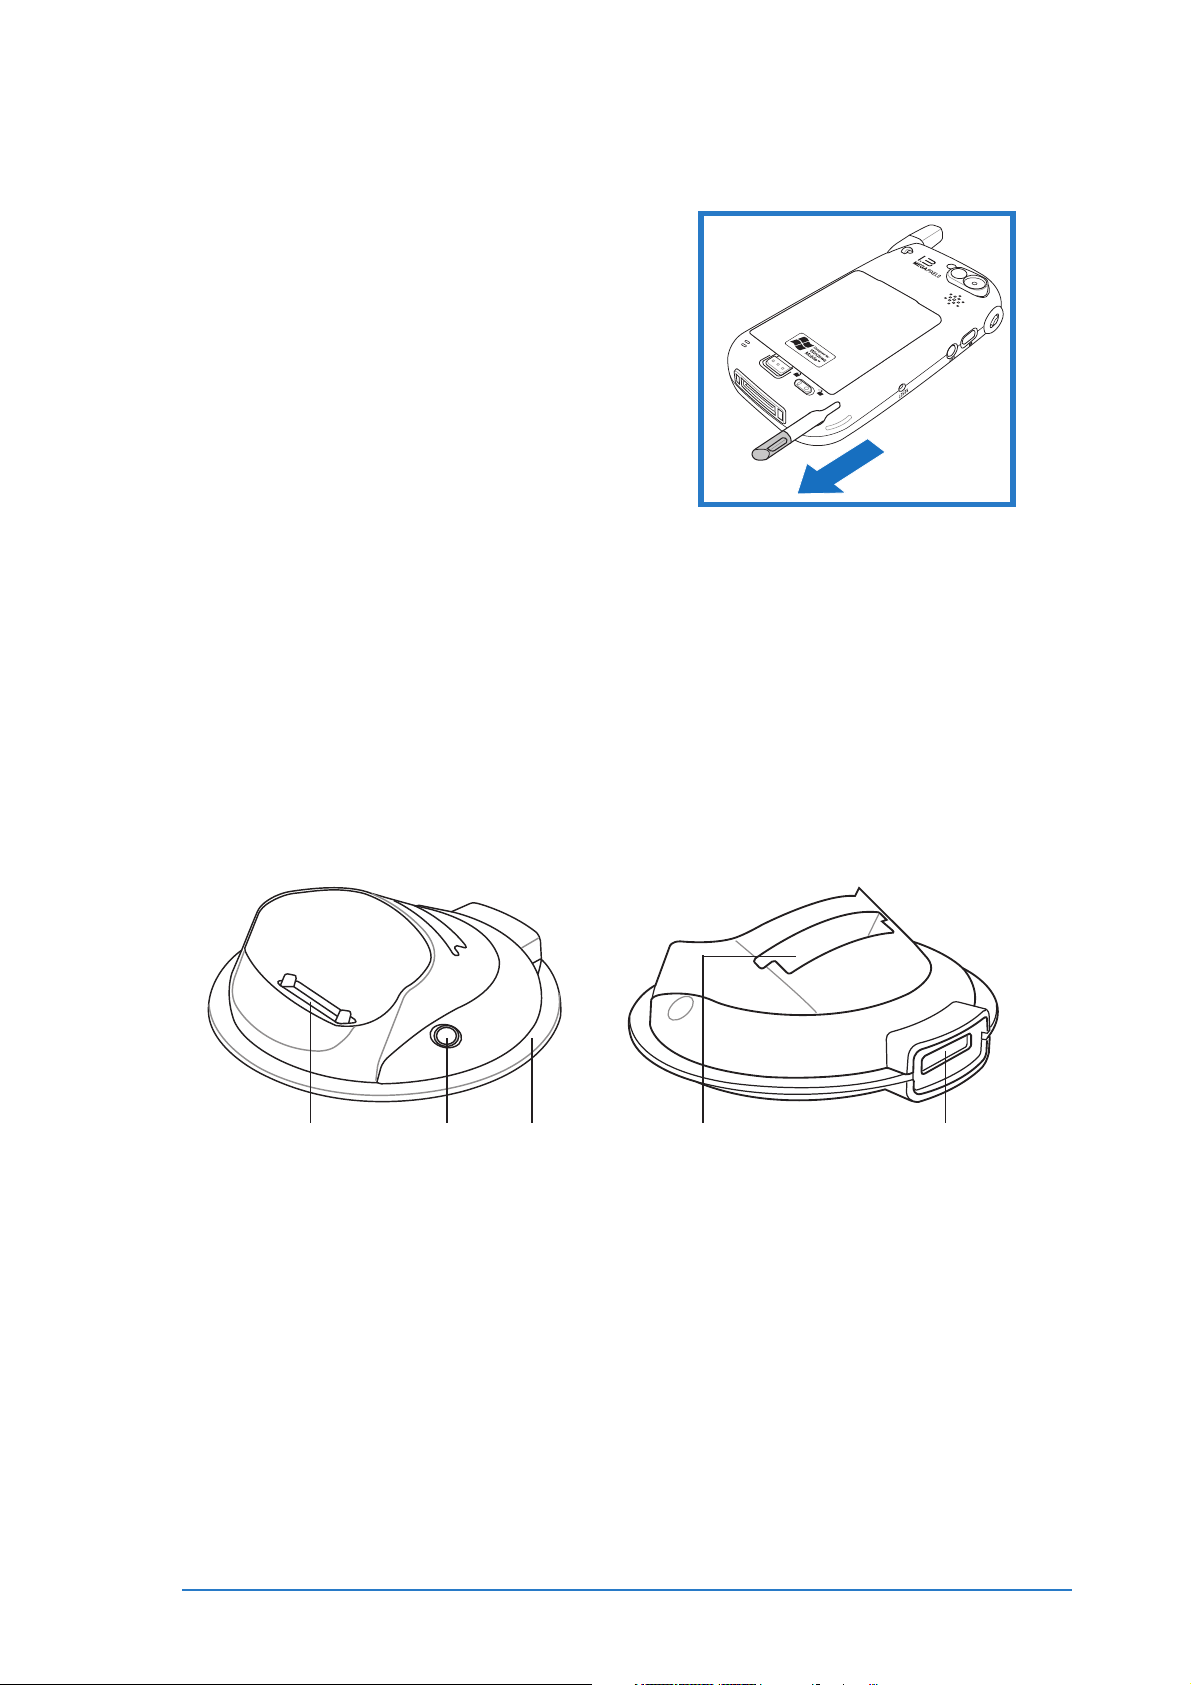
The cradleThe cradle
The cradle
The cradleThe cradle
FrontFront
Front
FrontFront
Device connector Stylus bay
The cradle has two connectors.
Device connectorDevice connector
•
Device connector - holds the device in place. This is a 26-pin
Device connectorDevice connector
connector that matches the system connector at the bottom of the
device.
Base
Battery charger slot
BackBack
Back
BackBack
DC/USB cable
connector
DC/USB cable connector DC/USB cable connector
•
DC/USB cable connector - connects the DC/USB cable plug.
DC/USB cable connector DC/USB cable connector
The DC/USB cable synchronizes the device with your computer
and/or charges the device battery.
Chapter 1: Getting started
1-9
Page 16
Setting up P505Setting up P505
Setting up P505
Setting up P505Setting up P505
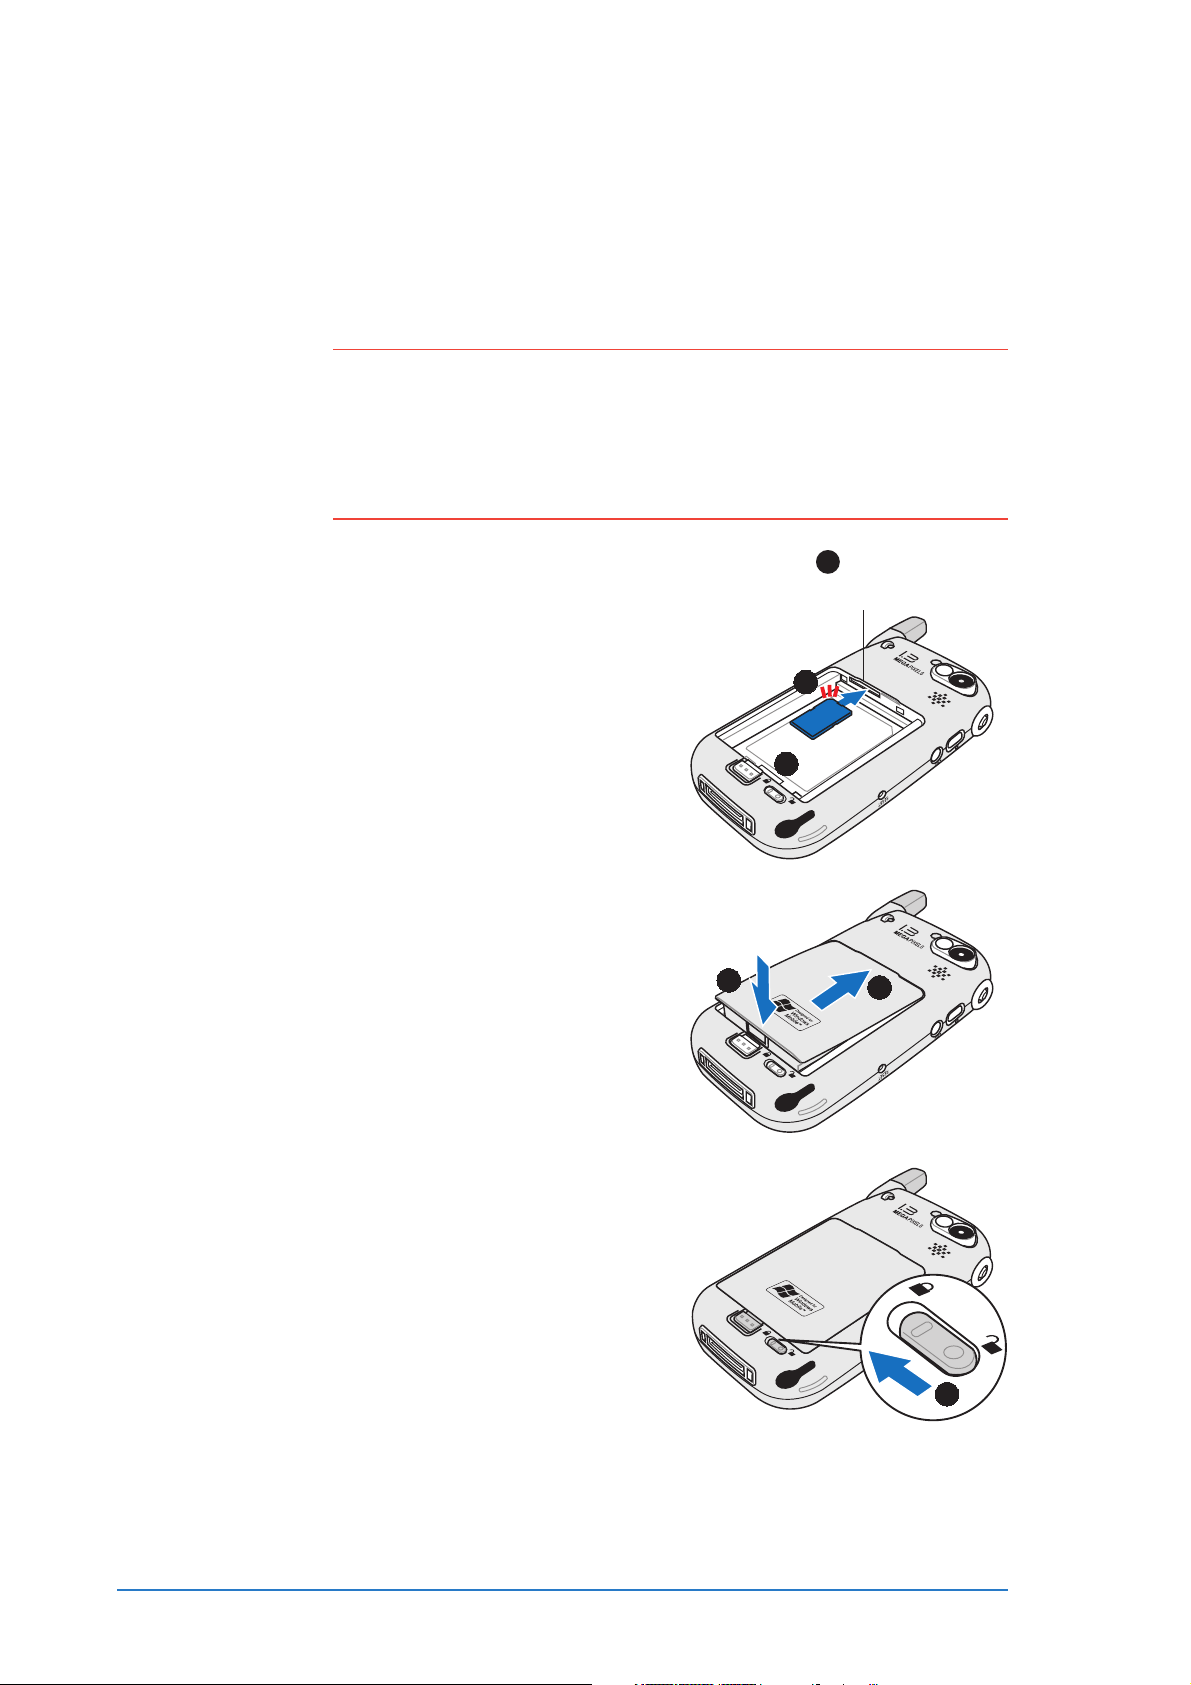
Installing a SIM card and batteryInstalling a SIM card and battery
Installing a SIM card and battery
Installing a SIM card and batteryInstalling a SIM card and battery
To avail of the device phone features you must install a Subscriber
Identification Module (SIM) card.
NOTENOTE
NOTE • Your phone operator provides a SIM card for the device,
NOTENOTE
depending on your network subscription.
• The battery comes uninstalled in the P505 Smart PDA
Phone package. Install the SIM card first before installing
the battery.
11
1
To install a SIM card and the battery:
11
SIM card slot
1. Locate the SIM card slot.
2. Position the SIM card with its
22
2
nicked corner on top and its
22
contacts face down.
3. Insert the SIM card to the slot
until it clicks in place.
4. Install the battery by
matching the battery hooks
to the holes on the
compartment.
5. Slide the battery into the
compartment, then press to
keep it in place. See the
illustration for reference.
6. Use the stylus tip to move
the battery lock to the left to
secure the battery.
33
3
33
55
5
55
44
4
44
1-10
66
6
66
P505 Smart PDA Phone
Page 17
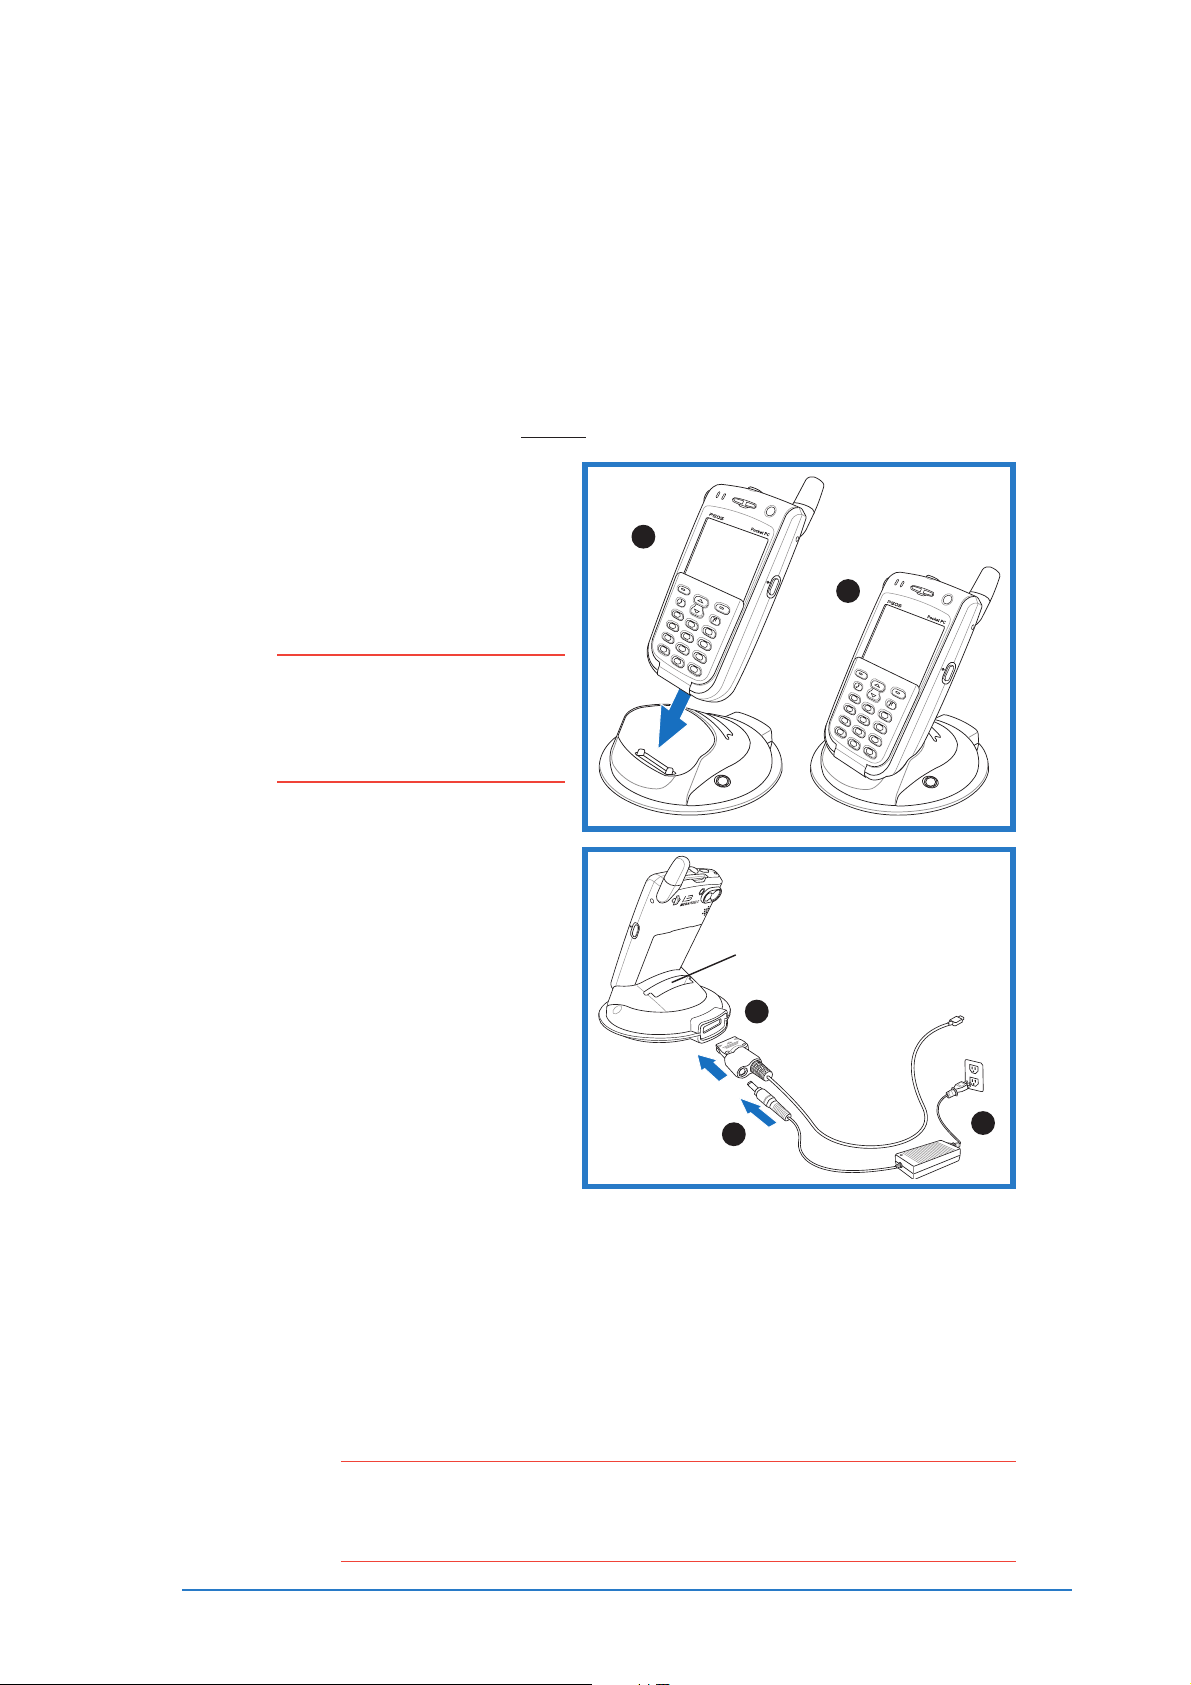
Charging the device batteryCharging the device battery
Charging the device battery
Charging the device batteryCharging the device battery
The device includes a rechargeable Lithium Ion battery. You must fully
charge the battery before using the device for the first time. Initial
battery charging takes about four hours while it takes about 2.5
hours to fully charge the battery after initial use.
To charge the device battery:To charge the device battery:
To charge the device battery:
To charge the device battery:To charge the device battery:
Using the AC adapter Using the AC adapter
Using the AC adapter
Using the AC adapter Using the AC adapter
withwith
with
withwith
the cradle the cradle
the cradle
the cradle the cradle
1. Position the device on the
cradle as shown (A). Match
the connectors and carefully
insert the device until it fits
in place (B).
NOTENOTE
NOTE You can also charge a
NOTENOTE
spare battery using the
battery charger slot on the
cradle.
2. Connect the AC adapter plug
to the DC/USB cable plug.
3. Connect the DC/USB cable
plug to the DC/USB cable
connector at the back of the
cradle.
AA
A
AA
BB
B
1
2
4
3
5
7
6
8
*
9
0
#
Charge a spare battery here
33
3
33
BB
1
2
4
3
5
7
6
8
*
9
0
#
4. Connect the AC power plug
to a grounded wall socket.
22
2
22
44
4
44
The device battery starts charging as soon as you connect the AC
adapter plug to a power source. The cradle base lights up blue to
indicate that the device is properly seated on the cradle. If you
charge a spare battery in the battery charger slot, the cradle base
lights up orange until the spare battery is fully-charged.
The P505 Power LED lights up amber to indicate that the battery is
charging and lights up green when the battery is fully-charged.
IMPORTANTIMPORTANT
IMPORTANT To disconnect the DC/USB cable plug from the system connector
IMPORTANTIMPORTANT
or DC/USB cable connector on the cradle, simultaneously press
the release button on both sides of the plug, then pull.
Chapter 1: Getting started
1-11
Page 18
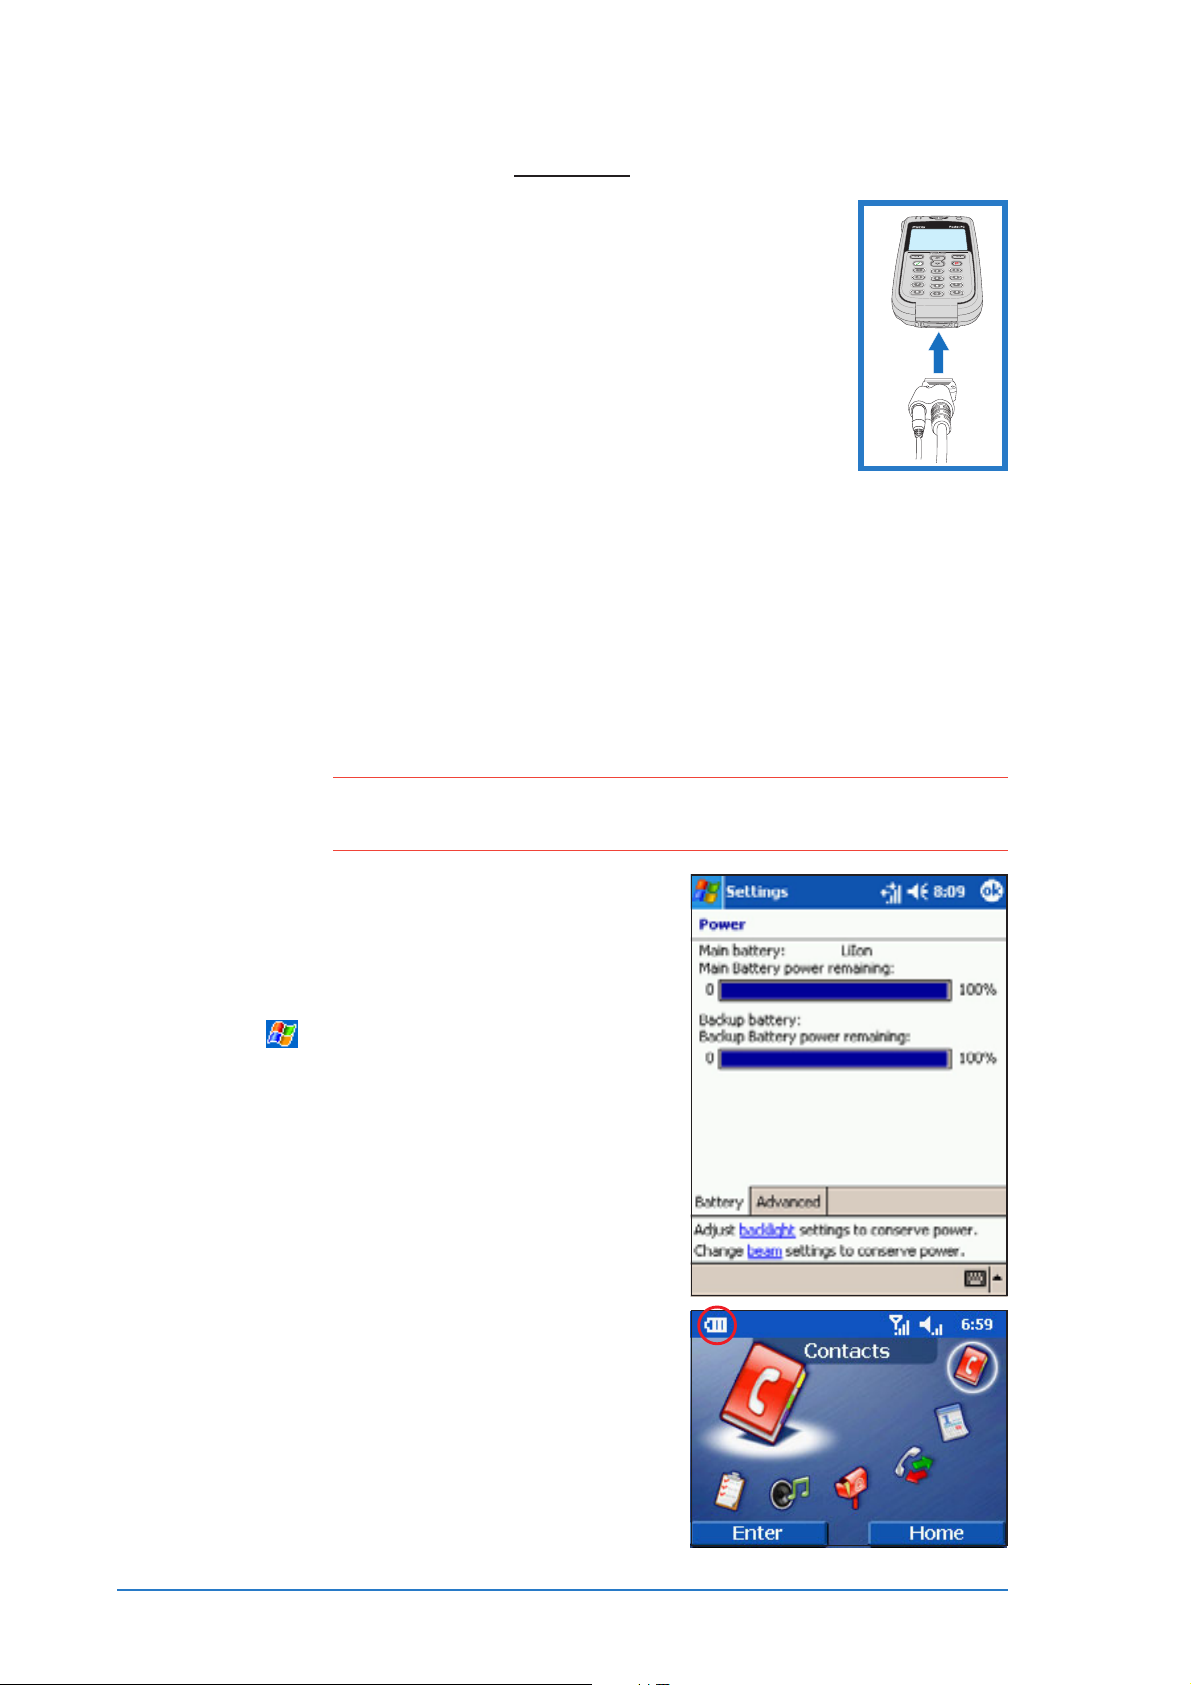
Using the AC adapter Using the AC adapter
Using the AC adapter
Using the AC adapter Using the AC adapter
If you are not using the cradle, connect the DC/USB
cable plug directly to the system connector at the
bottom of the device, then connect the AC power plug
to a grounded wall socket.
The P505 Power LED lights up amber to indicate that
the battery is charging and lights up green when the
battery is fully-charged.
Using a computer or notebook USB portUsing a computer or notebook USB port
Using a computer or notebook USB port
Using a computer or notebook USB portUsing a computer or notebook USB port
To charge the device battery using a USB port:
1. Connect the DC/USB cable plug to the system connector at the
bottom of the device (no cradle) or to the DC/USB connector at
the back of the cradle.
2. Connect the USB plug of the DC/USB cable to an available USB
port on your computer or notebook.
withoutwithout
without
withoutwithout
the cradle
the cradle the cradle
the cradle the cradle
NOTENOTE
NOTE If you charge the device battery using a notebook USB port, make
NOTENOTE
sure that the notebook is connected to an AC power source.
Viewing the power statusViewing the power status
Viewing the power status
Viewing the power statusViewing the power status
To display the power status when the
device is on and the flip is open:
1. Tap
2. Tap the
Power Power
Power icon.
Power Power
When the device is on and the flip is
closed, a battery icon appears in the
leftmost corner of the icon bar to
indicate the battery power level.
, then tap
System System
System tab, then tap the
System System
SettingsSettings
Settings.
SettingsSettings
1-12
P505 Smart PDA Phone
Page 19
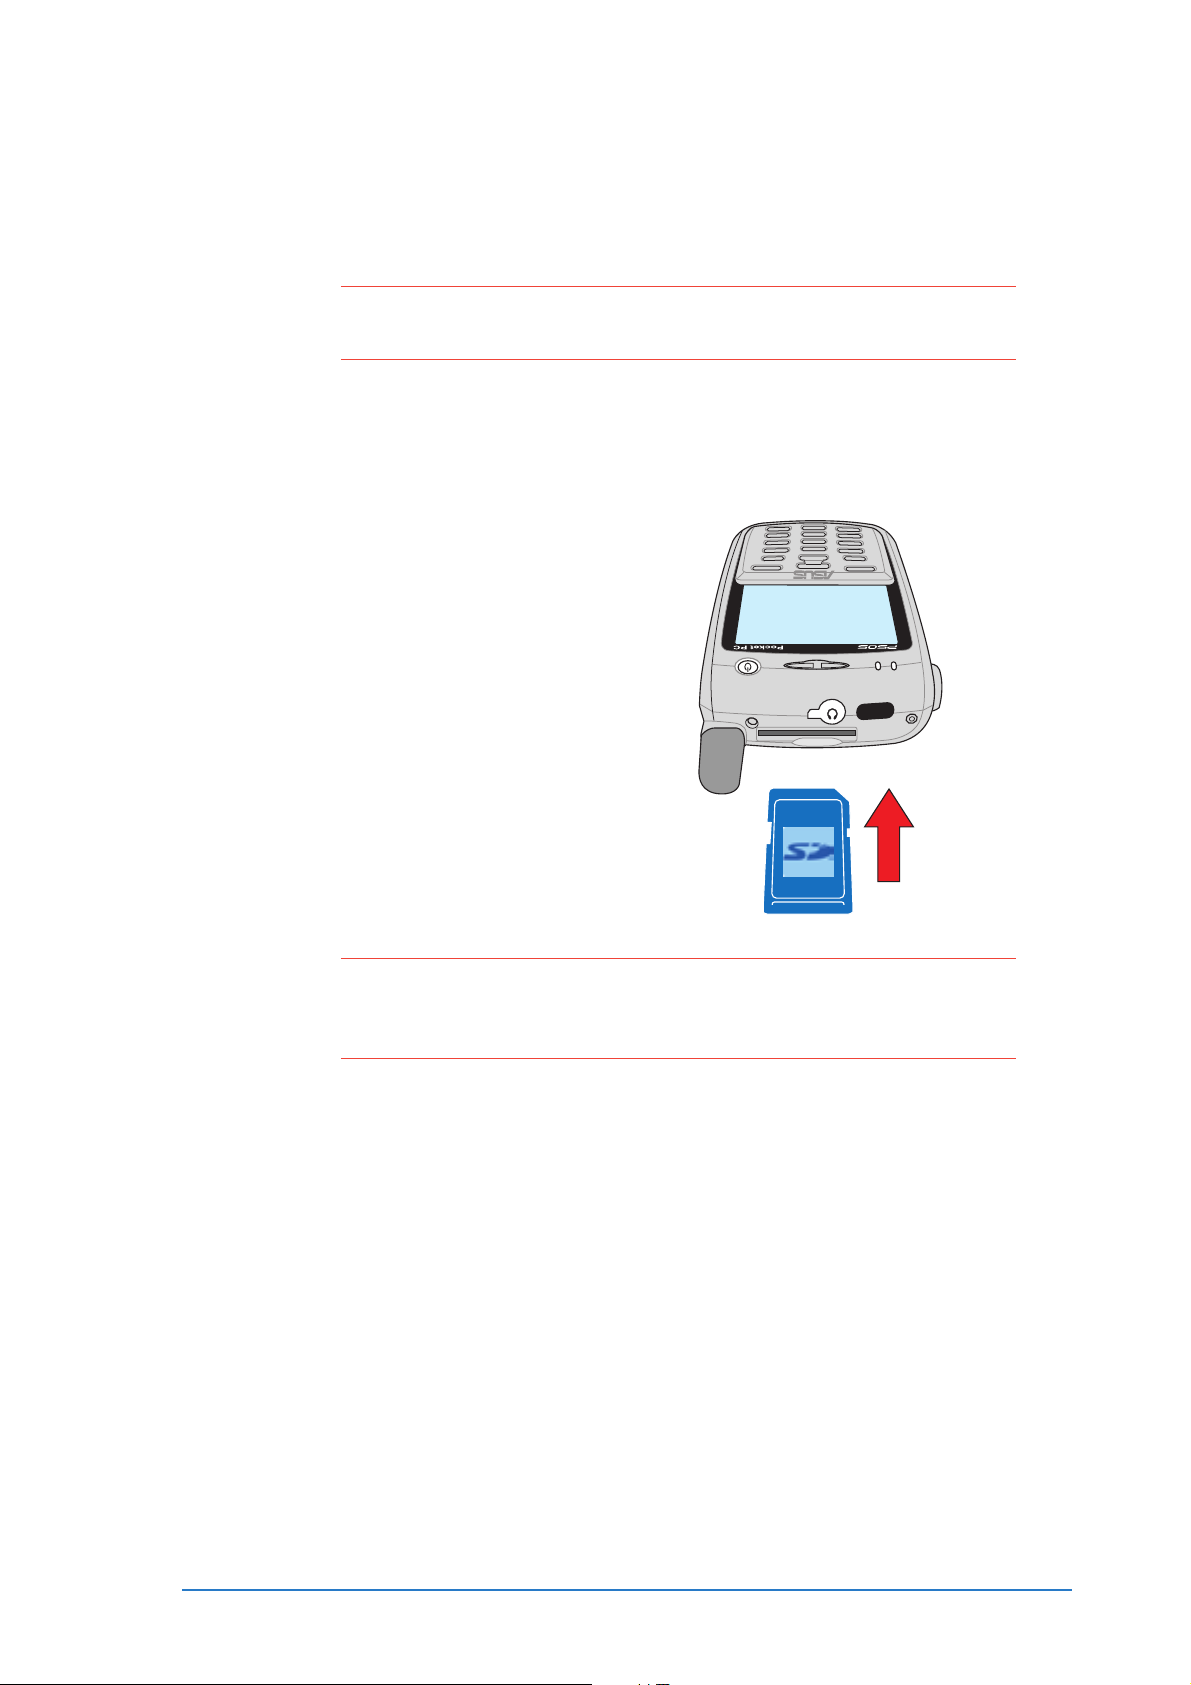
SD/MMC/SDIO card installationSD/MMC/SDIO card installation
SD/MMC/SDIO card installation
SD/MMC/SDIO card installationSD/MMC/SDIO card installation
Your device comes with an SD card slot that accommodates either a
SecureDigital™/MMC memory card or SDIO interface card.
NOTENOTE
NOTE Install an SD/MMC card (with 64 MB or more free space) if
NOTENOTE
you wish to use the SmartKeeper backup application.
Installing and removing an SD/MMC/SDIO cardInstalling and removing an SD/MMC/SDIO card
Installing and removing an SD/MMC/SDIO card
Installing and removing an SD/MMC/SDIO cardInstalling and removing an SD/MMC/SDIO card
To install an SD/MMC/SDIO card:To install an SD/MMC/SDIO card:
To install an SD/MMC/SDIO card:
To install an SD/MMC/SDIO card:To install an SD/MMC/SDIO card:
1. With the label side (usually the
side with the card manufacturer’s name) face up, and the
bar code/serial number side
face down, insert the card into
the slot.
CAUTION!CAUTION!
CAUTION! An SD/MMC/SDIO card fits only in one orientation, and slides
CAUTION!CAUTION!
smoothly into the slot if inserted correctly. DO NOT force the
card into the slot!
2. Push the card all the way into the slot until it fits completely. If
properly installed, the card edge aligns with the top edge of the
device.
To remove an SD/MMC/SDIO card:To remove an SD/MMC/SDIO card:
To remove an SD/MMC/SDIO card:
To remove an SD/MMC/SDIO card:To remove an SD/MMC/SDIO card:
Press the card slightly until it ejects.
Chapter 1: Getting started
1-13
Page 20
Activating the P505Activating the P505
Activating the P505
Activating the P505Activating the P505
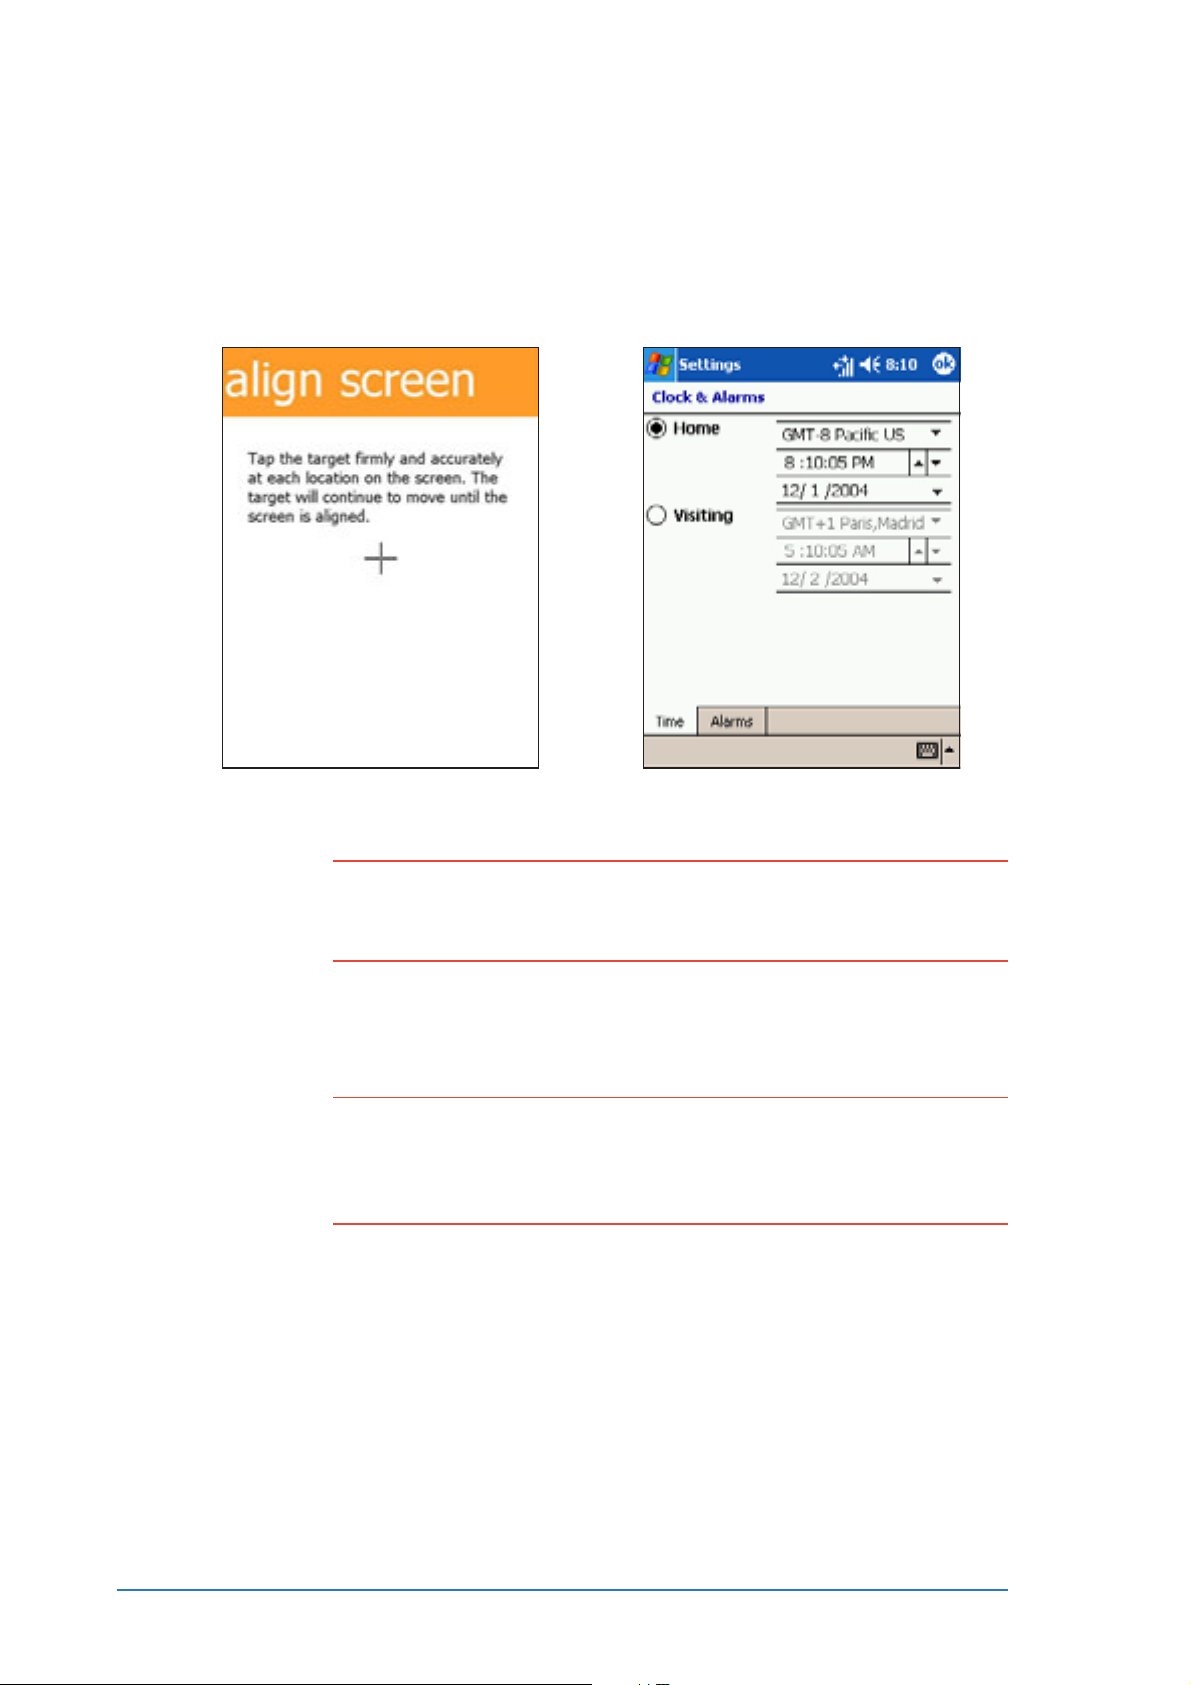
Press the power button to turn on the device, then open the flip. The
first time you start or reset the device, the screen prompts you to
re-calibrate and set the local time zone. Follow onscreen instructions
to proceed.
Screen alignment Setting the local
time zone
NOTENOTE
NOTE It is important that you properly calibrate and activate your
NOTENOTE
device before using it. This process ensures accurate
positioning when entering text and selecting menus.
Resetting the P505Resetting the P505
Resetting the P505
Resetting the P505Resetting the P505
CAUTION!CAUTION!
CAUTION! You lose all unsaved data when you
CAUTION!CAUTION!
Similarly, you lose all personal information management (PIM)
data (contacts, tasks, etc.) and added applications when you
hard hard
h a r d reset the device.
hard hard
You can reset the device in case it malfunctions, or when an
application hangs. You can either perform a
soft resetsoft reset
To
soft reset the device, use the tip of the stylus to press the
soft resetsoft reset
software reset switch on the left side of the device.
soft soft
s o f t reset the device.
soft soft
soft soft
soft or
soft soft
hard hard
hard reset.
hard hard
hard reset hard reset
To
hard reset the device, press the power button and the software
hard reset hard reset
reset switch simultaneously. A hard reset restores the original
configuration of your device and erases all data.
1-14
P505 Smart PDA Phone
Page 21

Chapter 2Chapter 2
Chapter 2
Chapter 2Chapter 2
Learning theLearning the
Learning the
Learning theLearning the
basicsbasics
basics
basicsbasics
This chapter teaches you the
basic device functions. You will
learn how to enter text, find and
organize information, customize
the device, and know the
bundled utilities.
Page 22

Chapter summaryChapter summary
Chapter summary
Chapter summaryChapter summary
••
•
••
••
•
••
••
•
••
••
•
••
••
•
••
Basic Pocket PC screensBasic Pocket PC screens
Basic Pocket PC screens
Basic Pocket PC screensBasic Pocket PC screens
Today screen .............................................................................. 2-3
Start menu ................................................................................. 2-4
New ............................................................................................ 2-4
ASUS menu ................................................................................. 2-5
Command bar ............................................................................. 2-5
Pop-up menus ............................................................................. 2-6
Entering informationEntering information
Entering information
Entering informationEntering information
Entering text using the Input Panel ............................................. 2-7
Writing on the screen ............................................................... 2-11
Drawing on the screen .............................................................. 2-14
Recording a message ................................................................ 2-15
Using a preset message ............................................................ 2-17
Finding and organizing informationFinding and organizing information
Finding and organizing information
Finding and organizing informationFinding and organizing information
Using Find ................................................................................. 2-18
Using Help ................................................................................. 2-19
Using the File Explorer .............................................................. 2-19
Customizing your deviceCustomizing your device
Customizing your device
Customizing your deviceCustomizing your device
Adjusting settings .................................................................... 2-20
Changing system settings ........................................................ 2-21
Customizing personal settings .................................................. 2-30
Backing up your dataBacking up your data
Backing up your data
Backing up your dataBacking up your data
............................................................................
......................................
............................................................................
......................................................................................
...........................................
......................................................................................
..........................................
.....................
..........................................
......................................................................
...................................
......................................................................
................................................................................
........................................
................................................................................
2-32-3
2-3
2-32-3
2-72-7
2-7
2-72-7
2-182-18
2-18
2-182-18
2-202-20
2-20
2-202-20
2-312-31
2-31
2-312-31
••
•
••
••
•
••
Other applicationsOther applications
Other applications
Other applicationsOther applications
Games ...................................................................................... 2-37
Calculator ................................................................................. 2-37
Camera ..................................................................................... 2-38
File Explorer .............................................................................. 2-38
Conference ............................................................................... 2-38
Find .......................................................................................... 2-38
MIDlet Manager ......................................................................... 2-39
Multimedia Album ..................................................................... 2-39
MSN Messenger ........................................................................ 2-39
Photo Contacts ......................................................................... 2-40
Pocket Excel ............................................................................. 2-40
Pictures .................................................................................... 2-40
Pocket MSN .............................................................................. 2-40
Pocket Word ............................................................................. 2-41
STK ........................................................................................... 2-41
Tasks ........................................................................................ 2-41
Windows Media Player ............................................................... 2-42
Terminal Services ...................................................................... 2-42
Voice Commander .................................................................... 2-42
Adding or removing programsAdding or removing programs
Adding or removing programs
Adding or removing programsAdding or removing programs
........................................................................................
............................................
........................................................................................
........................................................
............................
........................................................
2-372-37
2-37
2-372-37
2-432-43
2-43
2-432-43
2-2
P505 Smart PDA Phone
Page 23
Basic P505 screensBasic P505 screens
Basic P505 screens
Basic P505 screensBasic P505 screens
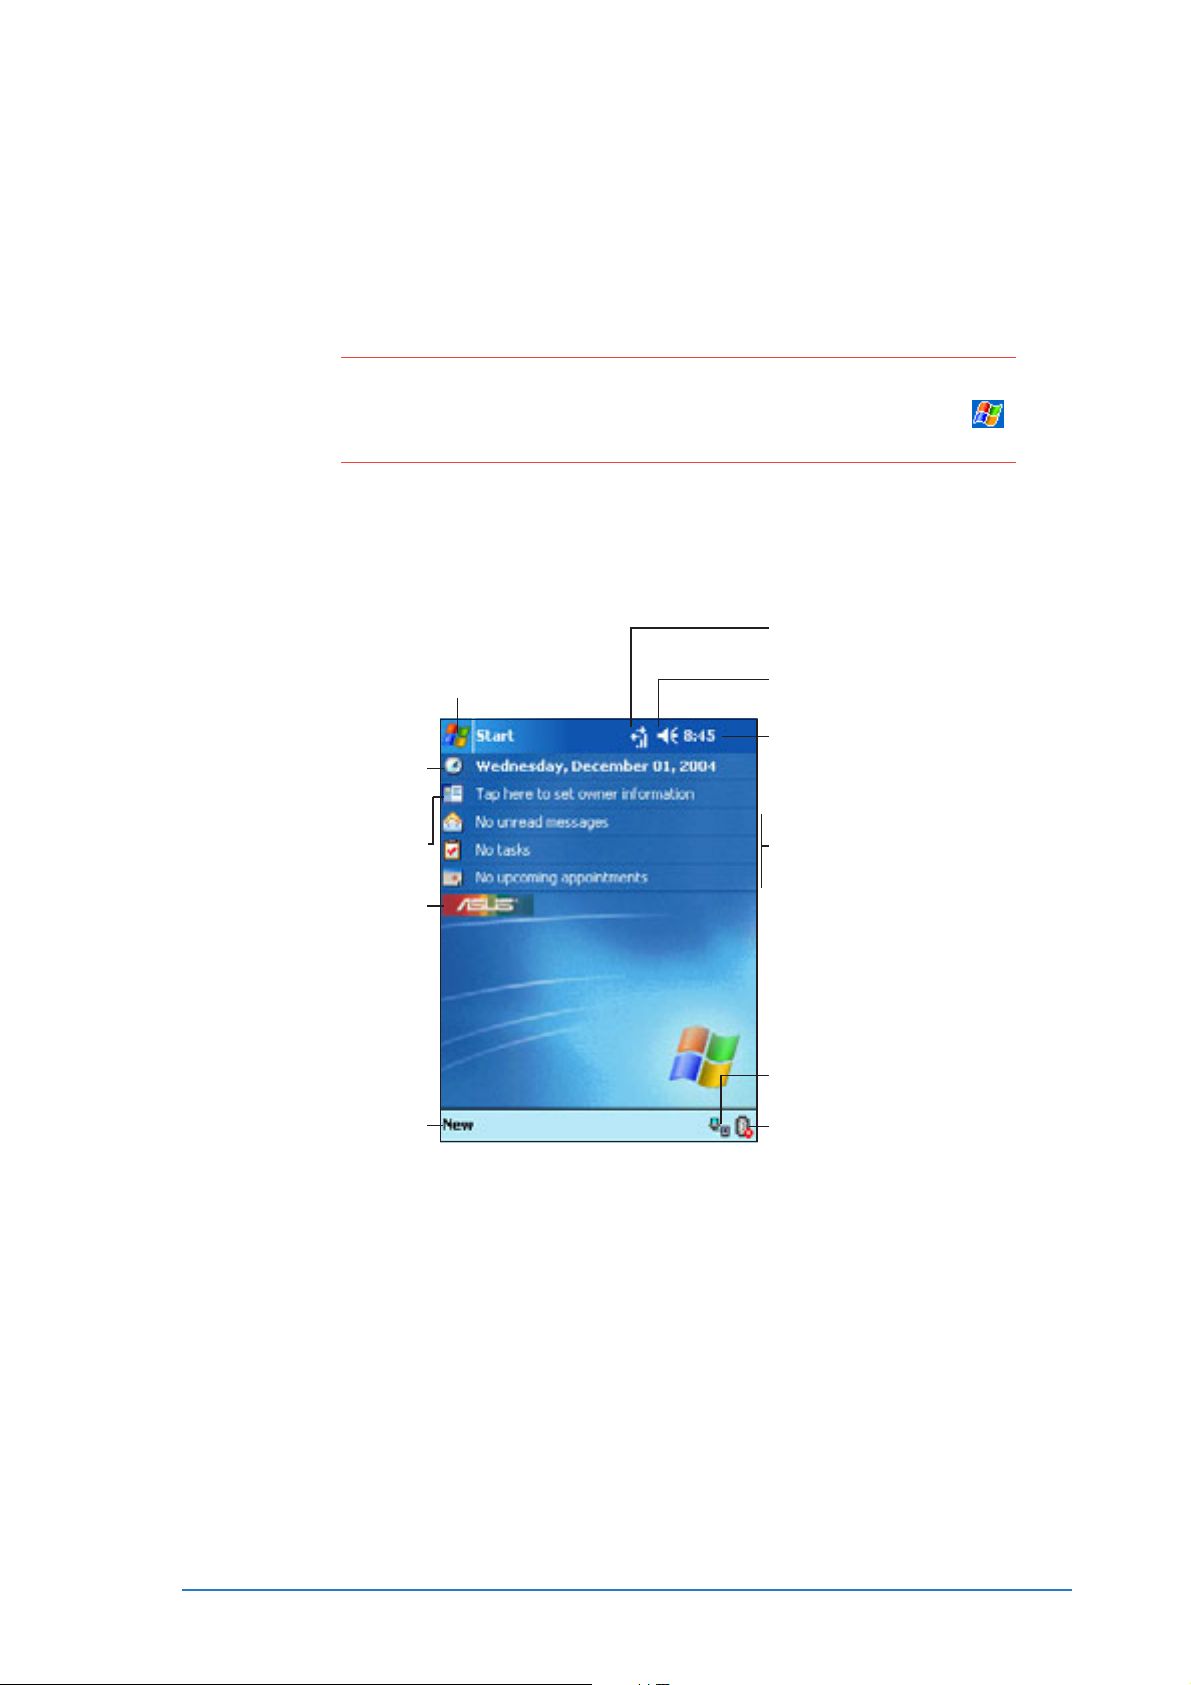
Today screenToday screen
Today screen
Today screenToday screen
Normally, the
Today Today
Today screen appears when you turn on your device
Today Today
and open the phone flip for the first time each day.
NOTENOTE
NOTE When the device is already on and the screen displays another
NOTENOTE
program, you can display the
icon, then tap
TodayToday
Today from the menu.
TodayToday
As shown in the capture below, the
Today Today
Today screen by tapping the
Today Today
Today Today
Today screen lets you see at a
Today Today
glance the summary of the important information for the day.
Tap to set up or change
the network settings
Tap to switch to a program
Tap to change the date
and time
Tap to set owner information
Tap to change the volume
or mute all sounds
Tap to display the date,
time, and your next
appointment
Your day at a glance
Tap to launchTap to launch
Tap to launch
Tap to launchTap to launch
the ASUS menuthe ASUS menu
the ASUS menu
the ASUS menuthe ASUS menu
Tap to display
synchronization status*
Tap to create a new item
From the
Today Today
Today screen, tap any of the listed items with the stylus
Today Today
Tap to display the
Bluetooth™ menu
to display the details.
The following sections explain how to use the Start menu, ASUS
Menu, modify the current tasks or activities, add new items or
information, set the time and owner information, or read e-mail/MMS/
SMS messages.
* The device must be in the cradle or connected to the computer via the DC/USB cable to
display this icon.
Chapter 2: Learning the basics
2-3
Page 24
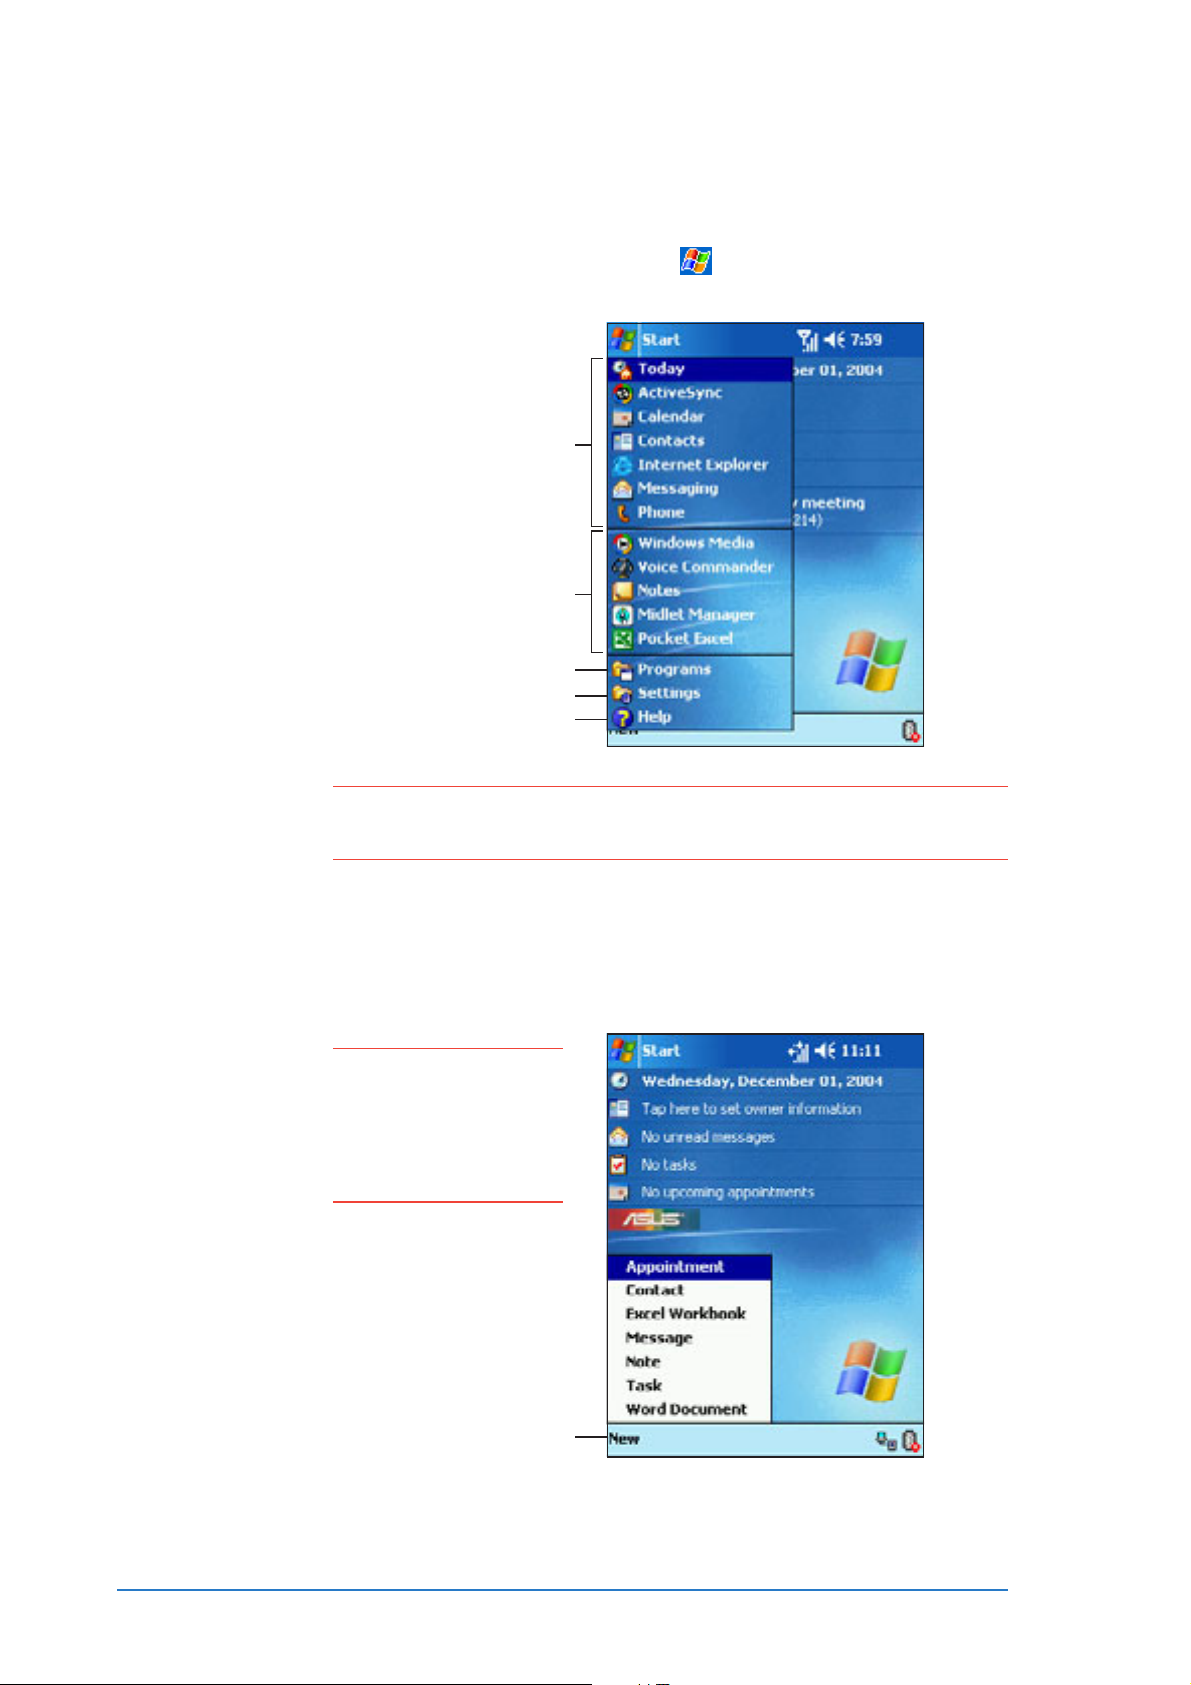
Start menuStart menu
Start menu
Start menuStart menu
From the Start menu, you can select programs, settings, and Help
topics. To display the Start menu, tap the
icon from the top of
the screen.
Tap to open a program
Tap to open a recently used program
Tap to open the Programs menu
Tap to open the Settings menu
Tap to open the Help menu
NOTENOTE
NOTE You can add or remove programs from the Start Menu using
NOTENOTE
Menus Menus
the
Menus option in
Menus Menus
NewNew
New
NewNew
NewNew
Tap
N e w at the bottom left corner of the screen to display a list of
NewNew
SettingsSettings
Settings.
SettingsSettings
programs and tasks you can select from.
NOTENOTE
NOTE You can customize
NOTENOTE
the contents of the
New New
N e w menu using
New New
Menus Menus
the
Menus option
Menus Menus
SettingsSettings
in
Settings.
SettingsSettings
2-4
Tap to open the a menu
P505 Smart PDA Phone
Page 25
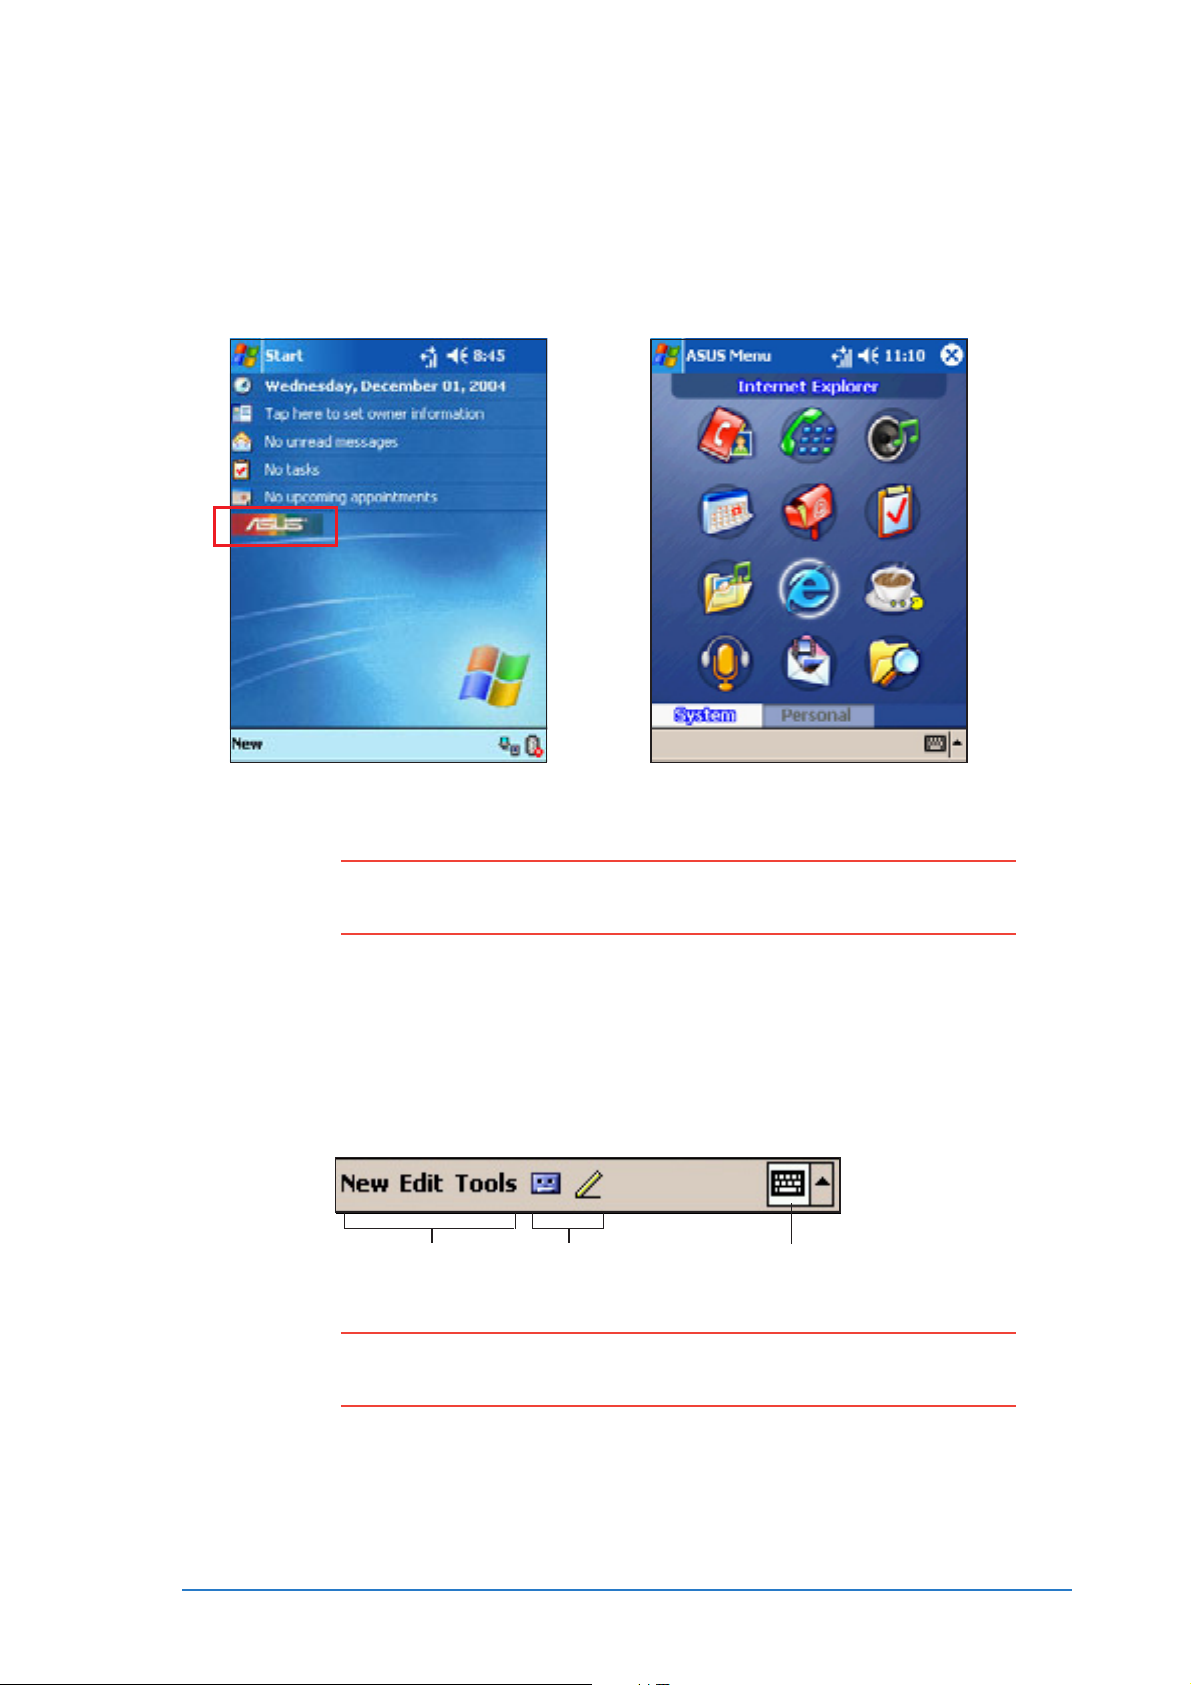
ASUS menuASUS menu
ASUS menu
ASUS menuASUS menu
The ASUS menu provides quick access to commonly used features
mobile applications. You can launch the ASUS menu by tapping the
ASUS ASUS
ASUS logo in the Today screen.
ASUS ASUS
Tap an icon to launch the
application.
NOTENOTE
NOTE See page 5-3 for details on how to change the ASUS menu
NOTENOTE
settings.
Command barCommand bar
Command bar
Command barCommand bar
At the bottom of the screen is the
menus and buttons on the
Command Command
Comman d bar to perform certain tasks in
Command Command
Command Command
Command bar. You can use the
Command Command
an application.
Tap to select
menu commands
NOTENOTE
NOTE The menus and buttons vary depending on the programs you
NOTENOTE
are using.
Tap to select
button commands
Tap to display
the input panel
Chapter 2: Learning the basics
2-5
Page 26
Pop-up menusPop-up menus
Pop-up menus
Pop-up menusPop-up menus
Pop-up menus often appear when you tap and hold an item to help
you choose an action. The actions in the pop-up menus vary from
program to program.
To access a pop-up menu, tap and hold the stylus on the item that
you wish to perform action on. When the menu appears, lift the
stylus, and tap the action that you want to execute. To close the
pop-up menu without performing an action, tap anywhere outside the
menu.
Tap and hold until the pop-up menu appears
Tap the action that you wish to perform
Tap outside the pop-up menu to close it
without performing an action
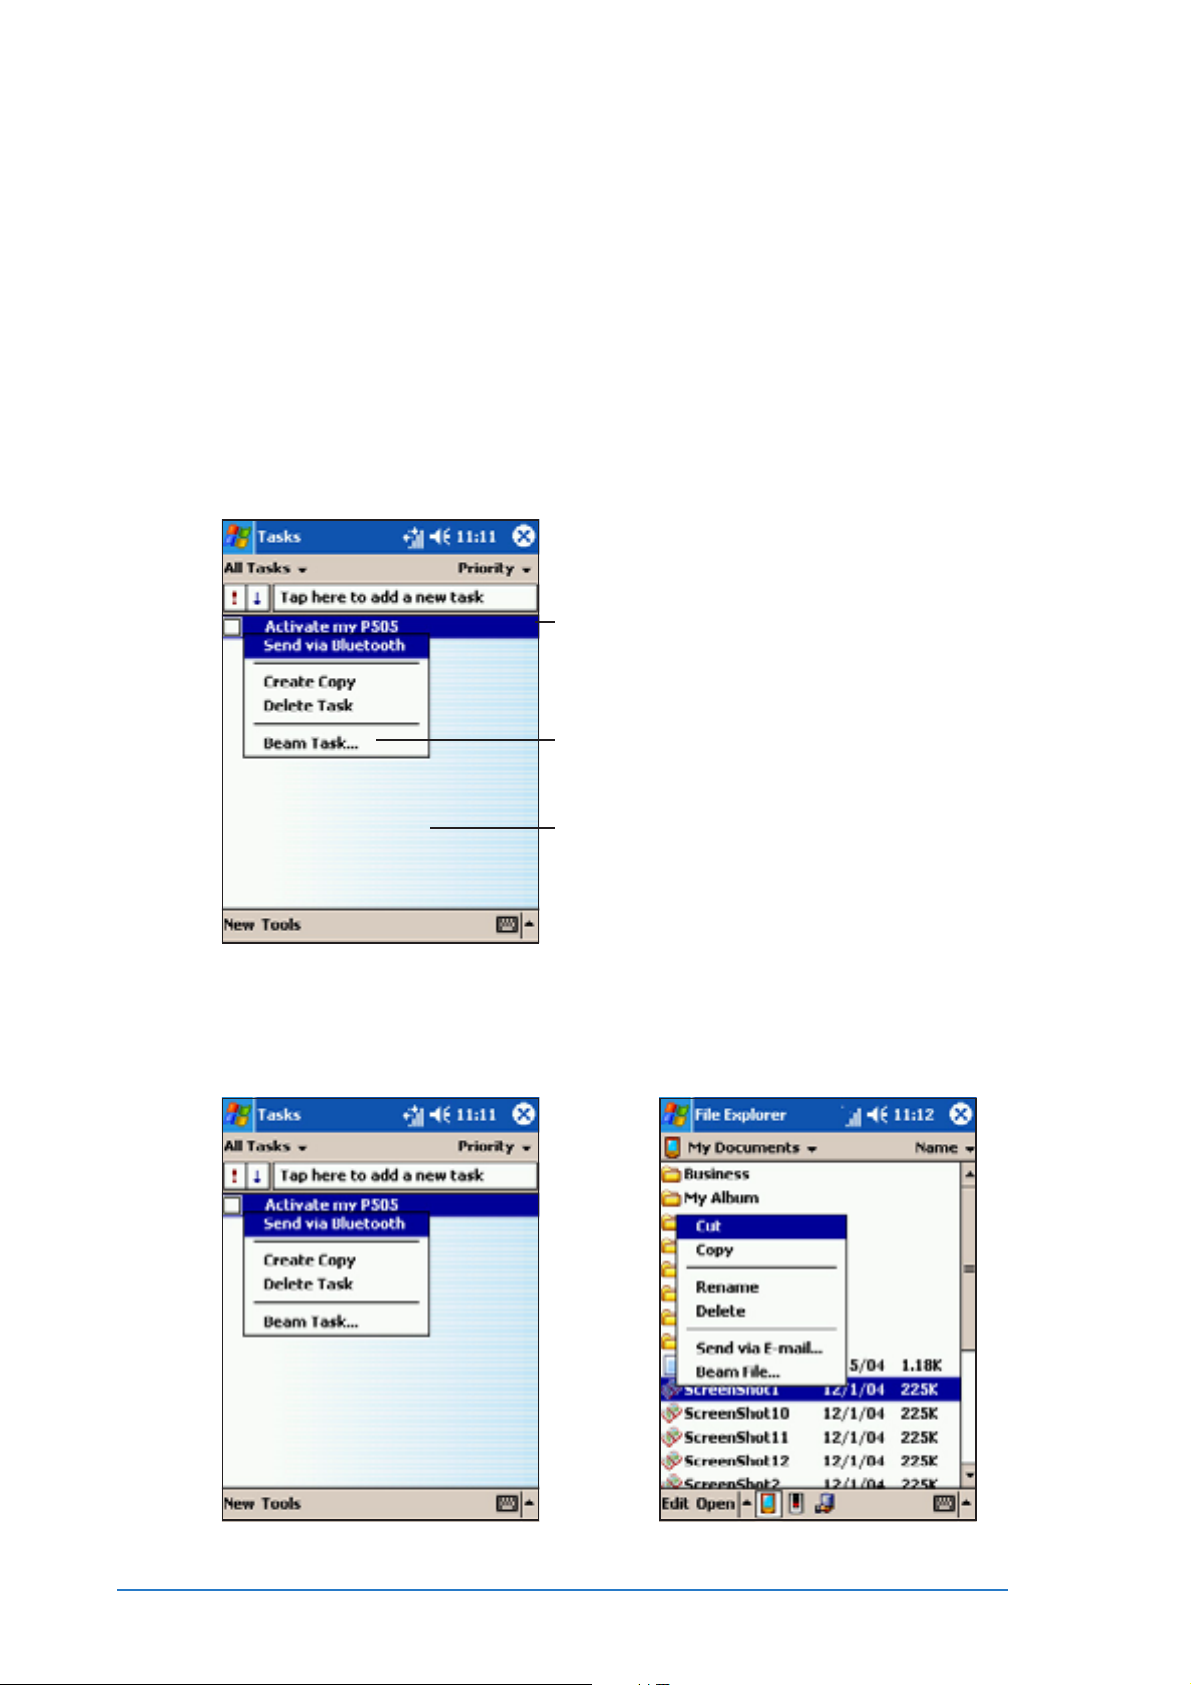
The pop-up menu items vary depending on the program or
application. For example, the
more items than in
TasksTasks
Tasks.
TasksTasks
File ExplorerFile Explorer
File Explorer pop-up menu includes
File ExplorerFile Explorer
2-6
P505 Smart PDA Phone
Page 27

Entering informationEntering information
Entering information
Entering informationEntering information
You can enter information in your device in any of the following ways.
• Use the input panel to enter text using the on-screen keyboard or
the Letter Recognizer
• Write directly on the screen with the stylus
• Draw pictures on the screen
• Speak into the device microphone to record a message
®
• Use the Microsoft
information from your desktop computer to your device
Entering text using the Input PanelEntering text using the Input Panel
Entering text using the Input Panel
Entering text using the Input PanelEntering text using the Input Panel
Use the Input Panel to enter information in any program on your
device, you can either type using the on-screen
using the
TranscriberTranscriber
Transcriber. In either case, the characters appear as typed text on
TranscriberTranscriber
the screen.
Letter RecognizerLetter Recognizer
Letter Recognizer,
Letter RecognizerLetter Recognizer
ActiveSync® to synchronize or copy
KeyboardKeyboard
Keyboard or write
KeyboardKeyboard
Block RecognizerBlock Recognizer
Block Recognizer, or
Block RecognizerBlock Recognizer
To show or hide the input panel, tap the
arrow arrow
the
arrow next to the Input Panel button to see your options.
arrow arrow
Input Panel Input Panel
Input Panel button. Tap
Input Panel Input Panel
Select an input method
Tap to display the input method options
Tap to show or hide the input panel
Open the
creating text.
To open
from the pop-up menu.
Chapter 2: Learning the basics
NotesNotes
Notes application to try out the different options for
NotesNotes
NotesNotes
Notes, tap
NotesNotes
New New
New from the command bar, then select
New New
NotesNotes
Notes
NotesNotes
2-7
Page 28
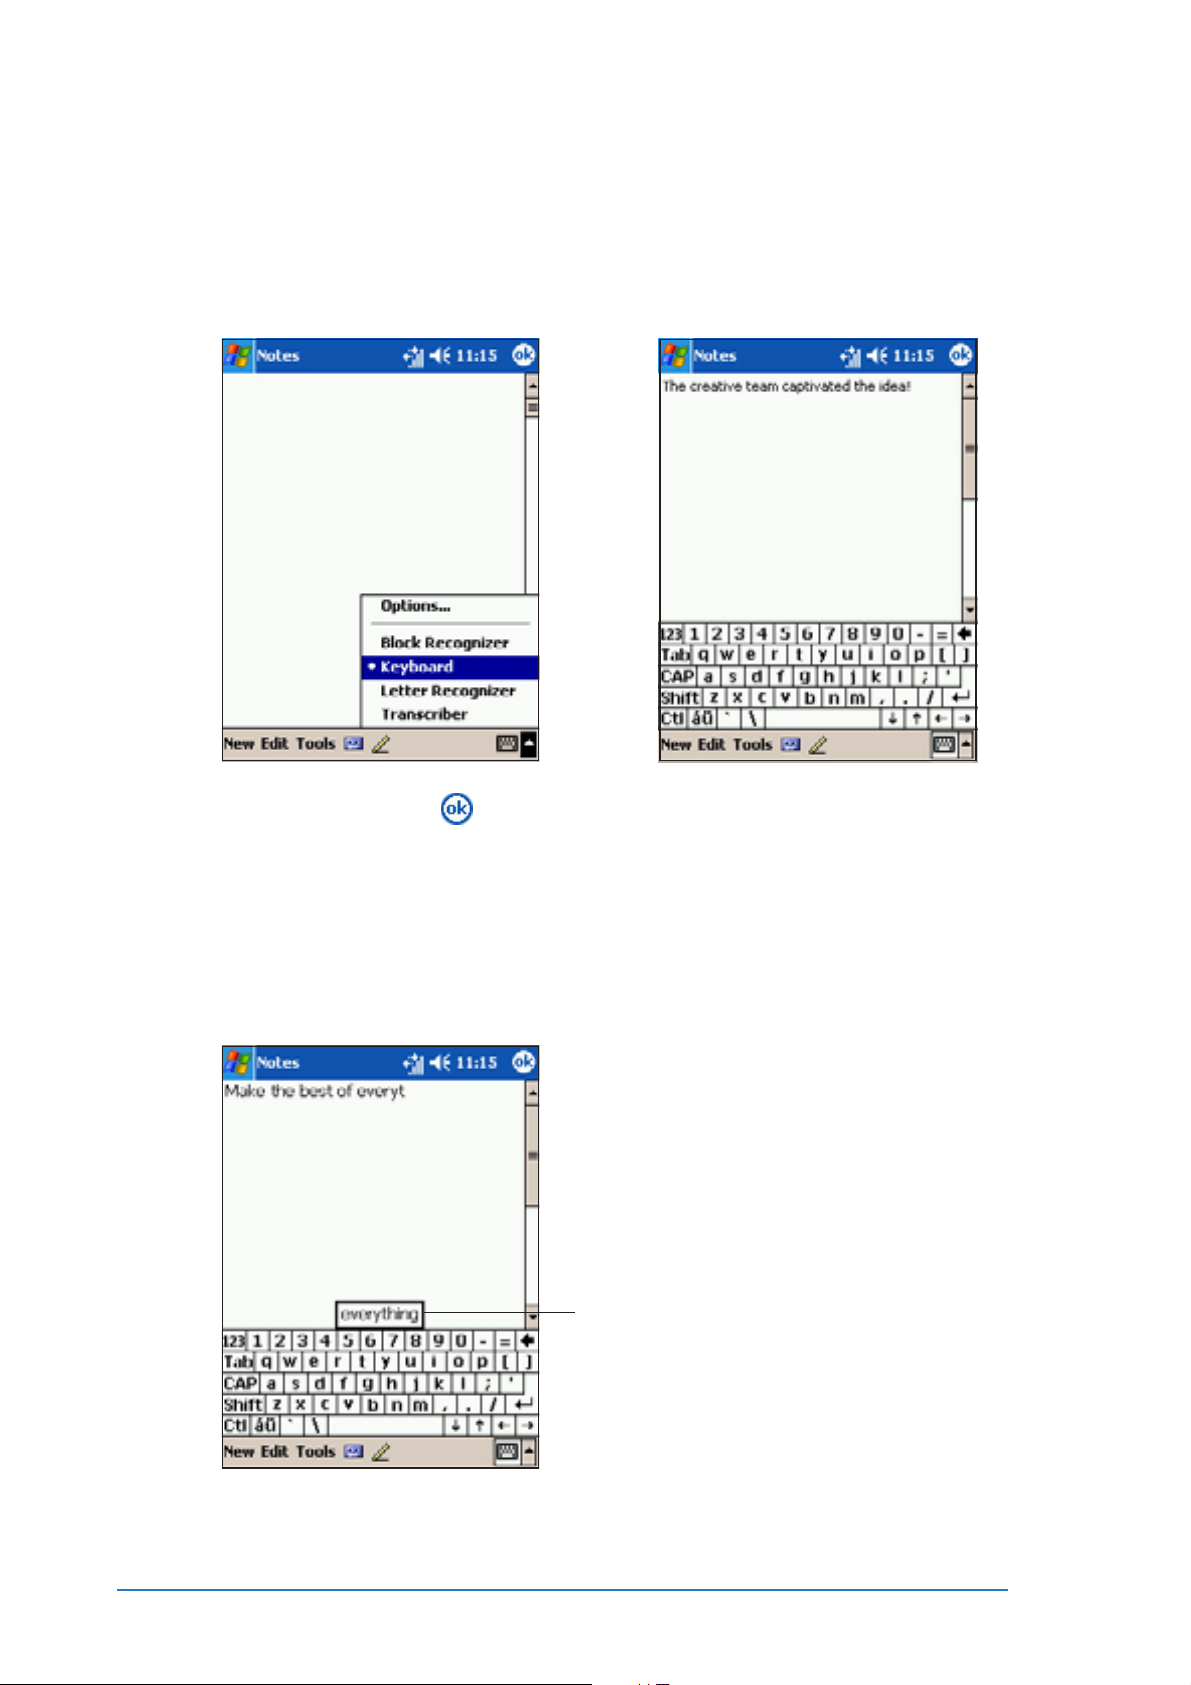
To type with the on-screen keyboard:To type with the on-screen keyboard:
To type with the on-screen keyboard:
To type with the on-screen keyboard:To type with the on-screen keyboard:
1. Tap the arrow next to the Input Panel button, then tap
2. Tap the keys with the stylus to enter information.
3. When finished, tap to save the file.
KeyboardKeyboard
Keyboard.
KeyboardKeyboard
When you use the Input Panel and the on-screen keyboard, your
device predicts the word you are typing and displays it above the
Input Panel. When you tap the displayed word, it is inserted into your
text at the insertion point. The more you use your device, the more
words it learns to predict.
Tap here if this is the word you wish to use
2-8
P505 Smart PDA Phone
Page 29

To change the settings for word completion:To change the settings for word completion:
To change the settings for word completion:
To change the settings for word completion:To change the settings for word completion:
1. Tap .
2. Tap
3. Tap
4. Tap
5. Tap the
6. Make your desired changes.
7. Tap
To use Letter Recognizer:To use Letter Recognizer:
To use Letter Recognizer:
To use Letter Recognizer:To use Letter Recognizer:
With the Letter Recognizer, you can write letters on the screen with
the stylus as you would on paper.
1. Tap the arrow next to the Input Panel button, then tap
RecognizerRecognizer
Recognizer.
RecognizerRecognizer
2. Write a letter or a number in the appropriate on-screen area.
When you write a letter, it is converted to a typed text that
appears on the screen. If the device has trouble recognizing a
character, tap on the question mark next to the writing area and
follow the on-screen instructions to see how to write that
character.
SettingsSettings
Settings.
SettingsSettings
Personal Personal
Personal tab.
Personal Personal
InputInput
Input.
InputInput
Word CompletionWord Completion
Word Completion tab.
Word CompletionWord Completion
to save your changes.
LetterLetter
Letter
LetterLetter
To use Block Recognizer:To use Block Recognizer:
To use Block Recognizer:
To use Block Recognizer:To use Block Recognizer:
With the Block Recognizer, you can input character strokes that are
similar to those used on other devices.
1. Tap the arrow next to the Input Panel button, then tap
RecognizerRecognizer
Recognizer.
RecognizerRecognizer
2. Write a letter or a number in the appropriate on-screen area.
When you write a letter, it is converted to a typed text that
appears on the screen. If the device has trouble recognizing a
character, tap on the question mark next to the writing area and
follow the on-screen instructions to see how to write that
character.
BlockBlock
Block
BlockBlock
Chapter 2: Learning the basics
2-9
Page 30

To use Transcriber:To use Transcriber:
To use Transcriber:
To use Transcriber:To use Transcriber:
With Transcriber, you can use the stylus to write anywhere on the
screen as you would on paper. Unlike Letter Recognizer and Block
Recognizer, you can write a sentence or additional information. Pause
after writing and let Transcriber convert the written characters to
typed characters.
1. Tap the arrow next to the Input Panel button, then tap
TranscriberTranscriber
Transcriber.
TranscriberTranscriber
2. Write anywhere on the screen.
For instructions and demonstration on using Transcriber, with
Transcriber open, tap the
corner of the screen.
To edit typed text:To edit typed text:
To edit typed text:
To edit typed text:To edit typed text:
1. Select the text that you wish to edit using either one of the
following:
question markquestion mark
question mark in the lower right
question markquestion mark
• drag the stylus over the text
• tap twice to select a word
• tap three times to select a paragraph
2. Tap
Edit Edit
Edit on the Command bar and select an action, or use one of
Edit Edit
the tools in the Input Panel.
2-10
P505 Smart PDA Phone
Page 31

Writing on the screenWriting on the screen
Writing on the screen
Writing on the screenWriting on the screen
In any application that accepts writing, such as
notes tab in
CalendarCalendar
Calendar,
CalendarCalendar
ContactsContacts
Contacts, and
ContactsContacts
TasksTasks
Tasks, you can use the
TasksTasks
NotesNotes
Notes, and in the
NotesNotes
stylus to write directly on the screen, like writing on a piece of paper.
You can edit and format what you have written and convert the
information to text at a later time.
To write on the screen:To write on the screen:
To write on the screen:
To write on the screen:To write on the screen:
1. Open the
2. Tap the
Notes Notes
Notes program.
Notes Notes
Pen Pen
Pen button to switch to the writing mode. The screen
Pen Pen
displays blank space with lines to help you write.
3. Write your text.
Tap the Pen button and use
your stylus like a pen
NOTENOTE
NOTE Some applications that accept writing may not have the Pen
NOTENOTE
button. See the documentation for that application to find
out how to switch to writing mode.
Chapter 2: Learning the basics
2-11
Page 32

To edit your writing:To edit your writing:
To edit your writing:
To edit your writing:To edit your writing:
1. With the Pen button highlighted (i.e. not in writing mode), tap and
hold the stylus next to the text that you wish to select until the
insertion point appears.
2. Without lifting, drag the stylus across the text to select it.
If you accidentally write on the screen, tap
and try again. You can also select text by tapping the
to deselect it, then dragging the stylus across the screen.
ToolsTools
Tools, then
ToolsTools
UndoUndo
Undo
UndoUndo
Pen Pen
Pen button
Pen Pen
3. Tap
To select a zoom level:To select a zoom level:
To select a zoom level:
To select a zoom level:To select a zoom level:
• Tap
To convert writing to text:To convert writing to text:
To convert writing to text:
To convert writing to text:To convert writing to text:
1. Tap
Edit Edit
Edit on the Command bar and select an action, or use one of
Edit Edit
the tools in the Input Panel to enter a new text.
ToolsTools
Tools, then tap a zoom percentage from the options.
ToolsTools
ToolsTools
Tools, then select
ToolsTools
RecognizeRecognize
Recognize.
RecognizeRecognize
2. If the conversion is correct, tap
2-12
The writing is turned into text
to save your note.
P505 Smart PDA Phone
Page 33

If the conversion is incorrect, you can select different words from a
list of alternates or return to the original writing.
1. Tap and hold the incorrect word.
2. When the pop-up menu appears, tap
Alternates Alternates
Alternates to display a list
Alternates Alternates
of alternate words for the selection.
3. Tap the word that you want to use, or tap the writing at the top
of the menu to return to the original writing.
Tap an alternate word that you want to use
Or, tap to return to your original writing
Writing recognition tipsWriting recognition tips
Writing recognition tips
Writing recognition tipsWriting recognition tips
• Write neatly.
• Write on the line and draw descenders below the line. Write the
cross of the “t” and apostrophes below the top line so that they
are not confused with the word above. Write periods and commas
above the line.
• For better recognition, try increasing the zoom level to 300%
using the Tools menu.
• Do not spread the letters of a word, keep the letters relatively
close to each other so that the device can easily tell where the
words begin and end.
• Hyphenated words, foreign words that use special characters such
as accents, and some punctuation cannot be converted.
• If you add writing to a word to change it after the word has been
recognized, the writing that you added will be included when you
try to recognize the writing again.
Chapter 2: Learning the basics
2-13
Page 34

Drawing on the screenDrawing on the screen
Drawing on the screen
Drawing on the screenDrawing on the screen
You can draw on the screen in the same way that you write on the
screen. The difference between writing and drawing on the screen is
how you select items and how they can be edited. For example,
selected drawings can be resized, while writing cannot.
To create a drawing:To create a drawing:
To create a drawing:
To create a drawing:To create a drawing:
1. Use the stylus to create a drawing three ruled lines high. A
bounding box appears around the drawing.
2. Start another drawing within the bounding box, then end the
drawing outside the bounding box. The bounding box expands to
include the new drawing.
The bounding box indicates the
drawing boundaries
Pen button
NOTENOTE
NOTE To easily work on or view your drawing, change the zoom
NOTENOTE
level by tapping
To edit your drawing:To edit your drawing:
To edit your drawing:
To edit your drawing:To edit your drawing:
Tools Tools
T o o l s and selecting your desired level.
Tools Tools
1. Tap and hold the stylus on the drawing until the selection handle
appears. To select multiple drawings, deselect the
Pen Pen
Pen button,
Pen Pen
then drag to select the drawings you want.
2. Tap and hold the selected drawing, then tap an editing command
on the pop-up menu or tap a command on the Edit menu.
3. Resize the drawing by deselecting the
and dragging a selection handle to your desired size.
2-14
Pen Pen
Pen button (if selected)
Pen Pen
P505 Smart PDA Phone
Page 35

Recording a messageRecording a message
Recording a message
Recording a messageRecording a message
In any application where you can write or draw on the screen, you can
also quickly capture thoughts, reminders, and phone numbers by
recording a message.
CalendarCalendar
In
Calendar,
CalendarCalendar
Notes Notes
the
Notes tab. In the
Notes Notes
stand-alone recording or include a recording in a written note. If you
want to include the recording in a note, open the note first.
In the
e-mail message.
To create a recording:To create a recording:
To create a recording:
To create a recording:To create a recording:
1. Tap , then tap
2. Tap the
3. Tap the
4. Hold your device with the microphone near to the source of what
MessagingMessaging
Messaging program, you can add a recording to an MMS or
MessagingMessaging
NewNew
Tap
N e w, then
NewNew
recording toolbar.
you are recording.
TasksTasks
Tasks, and
TasksTasks
NotesNotes
Notes or
NotesNotes
NoteNote
Notes
NoteNote
Record icon Record icon
Record icon from the command bar to display the
Record icon Record icon
Record buttonRecord button
Record button (red button) to begin recording.
Record buttonRecord button
ContactsContacts
Contacts, you can include a recording in
ContactsContacts
Notes Notes
Notes program, you can either create a
Notes Notes
5. To stop recording, tap the
beeps. The new recording appears in the Note list, or as an
embedded icon.
6. To play the recording, tap it from the list, or if embedded in a
note, tap the speaker icon.
Record Record
Record button. You will hear two
Record Record
Indicates an embedded recording
Tap to begin recording
Chapter 2: Learning the basics
Tap to show or hide the Recording toolbar
2-15
Page 36

To change the recording format:To change the recording format:
To change the recording format:
To change the recording format:To change the recording format:
1. In
2. Tap the
3. Tap the
4. Tap the
NotesNotes
Notes, tap
NotesNotes
Global Input OptionsGlobal Input Options
Global Input Options link.
Global Input OptionsGlobal Input Options
Options Options
Options tab.
Options Options
Voice recording formatVoice recording format
Voice recording format
Voice recording formatVoice recording format
field to display available recording
formats, then select from the list.
ToolsTools
Tools,
ToolsTools
then
OptionsOptions
Options.
OptionsOptions
Notes on recording formatsNotes on recording formats
Notes on recording formats
Notes on recording formatsNotes on recording formats
••
GSMGSM
•
G S M is a 2.4KB audio codec. It is the recommended format
••
GSMGSM
because it provides good voice recording and less storage space.
••
Pulse Code Modulation (PCM)Pulse Code Modulation (PCM)
•
Pulse Code Modulation (PCM) provides slightly better sound
••
Pulse Code Modulation (PCM)Pulse Code Modulation (PCM)
quality but takes up 50 times more storage space than GSM
recordings.
2-16
P505 Smart PDA Phone
Page 37

Using a preset messageUsing a preset message
Using a preset message
Using a preset messageUsing a preset message
When composing e-mail, MMS, or SMS
messages, or when using MSN
Messenger, use
insert preset or frequently used
messages to the text entry area. To
insert a message, tap
tap your desired message.
To edit a preset message:To edit a preset message:
To edit a preset message:
To edit a preset message:To edit a preset message:
My Text My Text
My Text to quickly
My Text My Text
My Text My Text
My Text and
My Text My Text
1. Tap
2. Select a message and make your
ToolsTools
Tools, then
ToolsTools
MessagesMessages
Messages.
MessagesMessages
desired changes.
Edit My TextEdit My Text
Edit My Text
Edit My TextEdit My Text
Chapter 2: Learning the basics
2-17
Page 38

Finding and organizing informationFinding and organizing information
Finding and organizing information
Finding and organizing informationFinding and organizing information
Find Find
The
Find and
Find Find
information.
Using FindUsing Find
Using Find
Using FindUsing Find
To find information:To find information:
To find information:
To find information:To find information:
1. Tap , tap
2. Enter the text that you want to find, select a data type, then tap
Go Go
G o to start the search. To quickly find information that is taking
Go Go
up space on your device, select
Help Help
Help features on your device helps you quickly locate
Help Help
ProgramsPrograms
Programs, then tap
ProgramsPrograms
Type a word to find
FindFind
Find.
FindFind
Larger than 64 KBLarger than 64 KB
Larger than 64 KB in Type.
Larger than 64 KBLarger than 64 KB
Tap to search for the word
Topics found containing the searched word
2-18
P505 Smart PDA Phone
Page 39

Using HelpUsing Help
Using Help
Using HelpUsing Help
To use the Help feature:To use the Help feature:
To use the Help feature:
To use the Help feature:To use the Help feature:
1. Tap , then tap
2. Tap a link to the topic that you
wish to display.
Using the File ExplorerUsing the File Explorer
Using the File Explorer
Using the File ExplorerUsing the File Explorer
To use the File Explorer to find and organize files:To use the File Explorer to find and organize files:
To use the File Explorer to find and organize files:
To use the File Explorer to find and organize files:To use the File Explorer to find and organize files:
HelpHelp
Help.
HelpHelp
1. Tap , then tap
2. In the Program screen, tap the
files in your device.
ProgramsPrograms
Programs.
ProgramsPrograms
File ExplorerFile Explorer
File Explorer icon to display the
File ExplorerFile Explorer
Tap to display sort options
Tap to select a sort order
Tap to open a path to a network
Chapter 2: Learning the basics
Tap to display the contents of the Flash disk or
the storage card
Tap to display the contents of My Documents
folder
2-19
Page 40

Customizing your deviceCustomizing your device
Customizing your device
Customizing your deviceCustomizing your device
You can customize your device by adjusting the settings, using the
built-in programs, and installing additional software applications.
Adjusting settingsAdjusting settings
Adjusting settings
Adjusting settingsAdjusting settings
You can adjust the device settings to your preference.
To adjust the device settings:To adjust the device settings:
To adjust the device settings:
To adjust the device settings:To adjust the device settings:
1. Tap , then tap
2. Tap the
of the screen.
PersonalPersonal
Personal,
PersonalPersonal
Settings Settings
Settings to display the
Settings Settings
System System
System or
System System
Connections Connections
Connections tab on the bottom
Connections Connections
Settings Settings
Settings screen.
Settings Settings
2-20
P505 Smart PDA Phone
Page 41

Changing system settingsChanging system settings
Changing system settings
Changing system settingsChanging system settings
To change the audio settings:To change the audio settings:
To change the audio settings:
To change the audio settings:To change the audio settings:
1. Tap , then tap
display the
2. Tap the
Audio Audio
the
Audio icon.
Audio Audio
3. Use the stylus to move the
VolumeVolume
Volume,
VolumeVolume
BassBass
Bass, and
BassBass
desired settings.
4. Tap
to close the screen. Otherwise,
Default Default
click
Default to revert to the
Default Default
original settings.
To change the microphone settings:To change the microphone settings:
To change the microphone settings:
To change the microphone settings:To change the microphone settings:
1. Tap , then tap
display the
Settings Settings
Settings screen.
Settings Settings
System System
System tab, then tap
System System
Balance Balance
Balance,
Balance Balance
3D3D
3 D, sliders to your
3D3D
to save the changes and
Settings Settings
Settings screen.
Settings Settings
Settings Settings
Settings to
Settings Settings
Treble Treble
Treble,
Treble Treble
Settings Settings
Settings to
Settings Settings
2. Tap the
the
3. Tap the
4. Tap the
move the slider to the desired
microphone gain.
5. Tap
to close the screen. Otherwise,
click
the original settings.
System System
System tab, then tap
System System
Audio Audio
Audio icon.
Audio Audio
MIC MIC
MIC tab.
MIC MIC
Manual Manual
Manual option, then
Manual Manual
to save the changes and
Load Default Load Default
Load Default to revert to
Load Default Load Default
Chapter 2: Learning the basics
2-21
Page 42

To change the backlight settings:To change the backlight settings:
To change the backlight settings:
To change the backlight settings:To change the backlight settings:
1. Tap , then tap
display the
2. Tap the
Backlight Backlight
the
Backlight icon.
Backlight Backlight
Settings Settings
Settings screen.
Settings Settings
System System
System tab, then tap
System System
Settings Settings
Settings to
Settings Settings
The screen displays the
backlight settings when you are
using the battery power.
Tap the
External Power External Power
External Power tab
External Power External Power
to adjust the backlight settings
when using external power,
3. Adjust the backlight settings, then
press
To adjust the backlight brightness:To adjust the backlight brightness:
To adjust the backlight brightness:
To adjust the backlight brightness:To adjust the backlight brightness:
1. Tap , then tap
display the
.
Settings Settings
Settings to
Settings Settings
Settings Settings
Settings screen.
Settings Settings
2. Tap the
the
3. Tap the
System System
System tab, then tap
System System
Backlight Backlight
Backlight icon.
Backlight Backlight
BrightnessBrightness
Brightness tab.
BrightnessBrightness
4. Adjust the brightness settings
when the device is on battery or
external power, then press
NOTENOTE
NOTE Turning off the backlight when the device is not in use or
NOTENOTE
using a lower level of display brightness saves battery power
and improves battery life.
.
2-22
P505 Smart PDA Phone
Page 43

To change the date and time settings:To change the date and time settings:
To change the date and time settings:
To change the date and time settings:To change the date and time settings:
1. Tap
SettingsSettings
Settings, then the
SettingsSettings
2. Tap the
Clock & Alarms Clock & Alarms
Clock & Alarms icon.
Clock & Alarms Clock & Alarms
SystemSystem
System.
SystemSystem
3. Make your desired settings.
Tap to select a time zone
Highlight an hour part then tap up or down arrow
to set
Tap this down arrow to display the
CalendarCalendar
Calendar
CalendarCalendar
NOTENOTE
NOTE When travelling, setting the home and visiting time zones
NOTENOTE
ensures that synchronized appointments and messages
appear correctly.
To change the alarm settings:To change the alarm settings:
To change the alarm settings:
To change the alarm settings:To change the alarm settings:
1. Tap
SettingsSettings
Settings, then the
SettingsSettings
2. Tap the
Clock & Alarms Clock & Alarms
Clock & Alarms icon, then the
Clock & Alarms Clock & Alarms
SystemSystem
System.
SystemSystem
Alarm Alarm
Alarm tab.
Alarm Alarm
3. Make your desired settings.
Tap and type a description for the alarm
Tap a day of the week for the alarm
Tap to display the clock and specify a time
for the alarm
Chapter 2: Learning the basics
2-23
Page 44

To view the device memory:To view the device memory:
To view the device memory:
To view the device memory:To view the device memory:
1. Tap , then tap
display the
2. Tap the
Memory Memory
the
Memory icon to view the
Memory Memory
Settings Settings
Settings screen.
Settings Settings
System System
System tab, then tap
System System
Settings Settings
Settings to
Settings Settings
main memory information.
3. Tap the
Storage Card Storage Card
Storage Card tab to
Storage Card Storage Card
view the storage card memory,
if available.
4. Tap the
Running ProgramsRunning Programs
Running Programs
Running ProgramsRunning Programs
tab to view and/or stop
applications currently running on
the device.
5. Tap
to return to the previous
window.
To view the device power:To view the device power:
To view the device power:
To view the device power:To view the device power:
1. Tap , then tap
display the
2. Tap the
Power Power
the
Power icon to view the
Power Power
Settings Settings
Settings screen.
Settings Settings
System System
System tab, then tap
System System
Settings Settings
Settings to
Settings Settings
battery power information.
3. Tap the
Advanced Advanced
Advanced tab to
Advanced Advanced
adjust the power settings.
4. Tap
to return to the previous
window.
NOTENOTE
NOTE You can save battery power by:
NOTENOTE
1. Turning off the backlight when the device is not in use.
2. Decreasing the display brightness level.
3. Switching the processor to power saving mode.
See page 2-28 for details.
2-24
P505 Smart PDA Phone
Page 45

To change the regional settings:To change the regional settings:
To change the regional settings:
To change the regional settings:To change the regional settings:
1. Tap , then tap
display the
2. Tap the
Regional Settings Regional Settings
the
Regional Settings icon.
Regional Settings Regional Settings
3. Tap any from the five tabs at
the bottom of the display to
adjust the region, number,
currency, time, and date
settings.
4. Tap
window.
To remove a program from your device:To remove a program from your device:
To remove a program from your device:
To remove a program from your device:To remove a program from your device:
1. Tap , then tap
display the
Settings Settings
Settings screen.
Settings Settings
System System
System tab, then tap
System System
to return to the previous
Settings Settings
Settings screen.
Settings Settings
Settings Settings
Settings to
Settings Settings
Settings Settings
Settings to
Settings Settings
2. Tap the
the
3. From the list, select the program
you wish to remove, then tap
RemoveRemove
Remove.
RemoveRemove
4. Tap
window.
NOTENOTE
NOTE Take caution when removing programs from your device.
NOTENOTE
System System
System tab, then tap
System System
Remove Programs Remove Programs
Remove Programs icon.
Remove Programs Remove Programs
to return to the previous
You may not bes able to restore the program after removing it.
Chapter 2: Learning the basics
2-25
Page 46

To change the screen settings:To change the screen settings:
To change the screen settings:
To change the screen settings:To change the screen settings:
1. Tap , then tap
display the
2. Tap the
Screen Screen
the
Screen icon. The window
Screen Screen
shows the align screen settings.
Refer to the next section for
details.
3. Tap the
enable Clear Type. Clear Type
smoothens the screen font
edges.
4. Tap
window.
To align the screen:To align the screen:
To align the screen:
To align the screen:To align the screen:
1. Tap the
on the
Align Screen Align Screen
Align Screen window appears.
Align Screen Align Screen
Settings Settings
Settings screen.
Settings Settings
System System
System tab, then tap
System System
Clear Type Clear Type
Clear Type tab to
Clear Type Clear Type
to return to the previous
Align Screen Align Screen
Align Screen button ,
Align Screen Align Screen
Screen Screen
Screen window. An
Screen Screen
Settings Settings
Settings to
Settings Settings
2. Tap the centre of the target
accurately. The target moves
from one location to another.
Continue tapping the centre of
the target until the screen
alignment is finished.
The window returns to the
Screen Screen
Screen window.
Screen Screen
NOTENOTE
NOTE Perform a screen alignment if the screen does not respond
NOTENOTE
correctly to stylus taps.
2-26
P505 Smart PDA Phone
Page 47

To change the SmartKeeper utility settings:To change the SmartKeeper utility settings:
To change the SmartKeeper utility settings:
To change the SmartKeeper utility settings:To change the SmartKeeper utility settings:
1. Tap , then tap
display the
2. Tap the
SmartKeeper SmartKeeper
the
SmartKeeper icon. The
SmartKeeper SmartKeeper
window shows the general
screen settings.
3. Check the
backup backup
backup option to allow
backup backup
SmartKeeper to backup your
files and programs to the SD
card automatically when the
battery is low.
Tap the
backup or restore your files and programs. See page 2-27 for
details.
4. Tap
Settings Settings
Settings screen.
Settings Settings
System System
System tab, then tap
System System
Automatic systemAutomatic system
Automatic system
Automatic systemAutomatic system
Manual Manual
Manual tab to manually
Manual Manual
to return to the previous window.
Settings Settings
Settings to
Settings Settings
To view the system information:To view the system information:
To view the system information:
To view the system information:To view the system information:
1. Tap , then tap
display the
2. Tap the
System Infromation System Infromation
the
System Infromation icon.
System Infromation System Infromation
The window shows the device
information.
3. Tap the
the device firmware and
programs version
4. Tap
window.
Settings Settings
Settings screen.
Settings Settings
System System
System tab, then tap
System System
Version Version
Version tab to display
Version Version
to return to the previous
Settings Settings
Settings to
Settings Settings
Chapter 2: Learning the basics
2-27
Page 48

To change the device CPU mode:To change the device CPU mode:
To change the device CPU mode:
To change the device CPU mode:To change the device CPU mode:
1. Tap , then tap
display the
2. Tap the
System Settings System Settings
the
System Settings icon.
System Settings System Settings
Settings Settings
Settings screen.
Settings Settings
System System
System tab, then tap
System System
Settings Settings
Settings to
Settings Settings
The window displays the device
CPU Mode CPU Mode
CPU Mode information.
CPU Mode CPU Mode
3. Select the Run Mode you want
the processor to run by tapping
the circle preceding the option.
See table below.
ModeMode
Mode
ModeMode
Turbo ModeTurbo Mode
Turbo Mode Select this mode when playing videos or games on
Turbo ModeTurbo Mode
your device. This mode increases the processor speed
to 400 MHz, thus reducing battery life.
Standard ModeStandard Mode
Standard Mode Use this mode when listening to MP3 audio files.
Standard ModeStandard Mode
Power Saving ModePower Saving Mode
Power Saving Mode Use this mode when using text-based applications. This
Power Saving ModePower Saving Mode
mode uses a lower processing speed, thus extending
battery life.
Automatic ModeAutomatic Mode
Automatic Mode Sets the processing speed according to the application
Automatic ModeAutomatic Mode
you are running. This is the default mode.
Description Description
Description
Description Description
4. Tap to return to the previous window.
5-way joystick functions5-way joystick functions
5-way joystick functions
5-way joystick functions5-way joystick functions
By default, the 5-way joystick
allows you to control the device
volume settings by pressing it
backward or forward. See page
5-19 for details.
You can also change the 5-way
joystick function to directional
navigator using the following
instructions.
2-28
P505 Smart PDA Phone
Page 49

To change the 5-way joystick function:To change the 5-way joystick function:
To change the 5-way joystick function:
To change the 5-way joystick function:To change the 5-way joystick function:
1. Tap , then tap
2. Tap the
3. Tap the
System System
System tab, then tap the
System System
5-WAY5-WAY
5-WAY tab to display the current function of the 5-way
5-WAY5-WAY
Settings Settings
Settings to display the
Settings Settings
joystick.
4. If you want to use the joystick
as directional navigator, tap the
circle preceding the option
as 5-Way Joystickas 5-Way Joystick
as 5-Way Joystick. Refer to
as 5-Way Joystickas 5-Way Joystick
SetSet
Set
SetSet
the illustration for the directional
functions.
5. Tap
to save your settings
and return to the previous
window.
Settings Settings
Settings screen.
Settings Settings
System Settings System Settings
System Settings icon.
System Settings System Settings
To format the flash disk:To format the flash disk:
To format the flash disk:
To format the flash disk:To format the flash disk:
CAUTION!CAUTION!
CAUTION! The
CAUTION!CAUTION!
1. Tap , then tap
display the
2. Tap the
the
3. Tap the
tap the
System System
System tab, then tap
System System
System Settings System Settings
System Settings icon.
System Settings System Settings
Flash DiskFlash Disk
Flash Disk tab, then
Flash DiskFlash Disk
Format Flash DiskFormat Flash Disk
Format Flash Disk
Format Flash DiskFormat Flash Disk
Flash DiskFlash Disk
Flash Disk is the
Flash DiskFlash Disk
64 MB Read-Only Memory
(ROM) chip that stores
the operating system.
Formatting erases all
data in the flash disk.
Settings Settings
Settings to
Settings Settings
Settings Settings
Settings screen.
Settings Settings
button.
Chapter 2: Learning the basics
2-29
Page 50

Customizing personal settingsCustomizing personal settings
Customizing personal settings
Customizing personal settingsCustomizing personal settings
Selecting sounds and notificationsSelecting sounds and notifications
Selecting sounds and notifications
Selecting sounds and notificationsSelecting sounds and notifications
Your device can remind you of things you have to do in several ways.
For example, if you have set up an appointment in
with a due date, or an alarm in
in any of the following ways.
• A message box appears on the screen
• A sound is played (you can select the type of sound)
• A light flashes on the device
To choose the reminder types and sounds:To choose the reminder types and sounds:
To choose the reminder types and sounds:
To choose the reminder types and sounds:To choose the reminder types and sounds:
Clock & AlarmsClock & Alarms
Clock & Alarms, you will be notified
Clock & AlarmsClock & Alarms
CalendarCalendar
Calendar, a task
CalendarCalendar
1. Tap , then tap
2. From the
Sounds andSounds and
the
Sounds and
Sounds andSounds and
NotificationsNotifications
Notifications icon to display
NotificationsNotifications
Sounds Sounds
the
Sounds screen.
Sounds Sounds
3. Adjust the items to your desired
settings, then tap
your settings and return to the
previous window.
4. Tap the
set the event notification
details.
5. Tap
and return to the previous
window.
Settings Settings
Settings screen, tap
Settings Settings
Notifications Notifications
Notifications tab and
Notifications Notifications
to save your settings
Settings.Settings.
Settings.
Settings.Settings.
to save
2-30
P505 Smart PDA Phone
Page 51

Backing up your dataBacking up your data
Backing up your data
Backing up your dataBacking up your data
Besides the SmartKeeper application that allows you to back up all
your data, the device also includes the
back up your system files and/or data contained in the main system
memory.
Unlike the SmartKeeper application’s automatic backup feature that
backs up the entire system status (system and data) into one backup
file, The
backup files for your system files and data files. You may even
categorize the data files and place into different folders.
To access the Backup utility:To access the Backup utility:
To access the Backup utility:
To access the Backup utility:To access the Backup utility:
BackupBackup
Backup utility allows you to
BackupBackup
Backup Backup
Backup utility that lets you
Backup Backup
manually manually
manually create separate
manually manually
1. Tap , then tap
2. Tap the
A message appears asking you
to stop other programs before
running the backup utility.
3. Tap
programs.
To stop all running programs:To stop all running programs:
To stop all running programs:
To stop all running programs:To stop all running programs:
1. Tap , then tap
2. Tap the
the
3. On the Memory screen, tap the
Running ProgramsRunning Programs
Running Programs tab.
Running ProgramsRunning Programs
4. Tap the
Backup Backup
Backup icon.
Backup Backup
and stop all running
System System
System tab, then tap
System System
Memory Memory
Memory icon.
Memory Memory
Stop AllStop All
Stop All button, then
Stop AllStop All
ProgramsPrograms
Programs.
ProgramsPrograms
SettingsSettings
Settings.
SettingsSettings
tap
NOTENOTE
NOTE Read the notes in the
NOTENOTE
Chapter 2: Learning the basics
.
screen before you backup your data or PIM. See the online
help on your device for online instructions on backing up or
restoring data.
Information Information
Information tab of the backup
Information Information
2-31
Page 52

To back up all data on your device:To back up all data on your device:
To back up all data on your device:
To back up all data on your device:To back up all data on your device:
1. Return to the Programs screen
and tap the
BackupBackup
Backup icon.
BackupBackup
2. Tap the
Backup Backup
Backup tab on the
Backup Backup
Backup screen.
3. Tap
All DataAll Data
All Data button to back up
All DataAll Data
all data on your device.
NOTENOTE
NOTE You need to insert an
NOTENOTE
SD/MMC memory card if
you wish to save your
backup file on SD/MMC.
Otherwise, you can save
the backup file into the
Flash Disk*.
4. In the Backup File screen:
• specify a
file namefile name
file name for the
file namefile name
backup
• specify the
folder folder
folder in which to
folder folder
store the backup file
(optional)
• select the storage device
Flash Disk*Flash Disk*
(
Flash Disk* or
Flash Disk*Flash Disk*
SD cardSD card
SD card)
SD cardSD card
where you wish to save your
backup file
5. Tap
OK OK
O K to start the backup
OK OK
process.
NOTENOTE
NOTE
NOTENOTE
**
* The
**
chip that stores the operating system. The flash disk has
more or less 10 MB of free space that you can use to save or
back up data from your device. Data saved on the flash disk
are permanently stored even after you hard reset the device.
Flash DiskFlash Disk
F l a s h D i s k is the 64 MB Read-Only Memory (ROM)
Flash DiskFlash Disk
2-32
P505 Smart PDA Phone
Page 53

6. The screen shows the status of the backup process. When done, a
message appears indicating that the backup is complete, and
shows the total size of the backed up files.
In case the program fails to back up any items, it will show the
items on the screen.
7. Tap .
To back up only PIM data on your device:To back up only PIM data on your device:
To back up only PIM data on your device:
To back up only PIM data on your device:To back up only PIM data on your device:
1. On the Backup screen, tap
DataData
Data button to back up only
DataData
the personal information
management (PIM) data on your
device.
2. Select the storage device
Flash DiskFlash Disk
(
Flash Disk or
Flash DiskFlash Disk
where you wish to save your
backup file.
Tapping
the previous screen.
3. Tap the
Cancel Cancel
Cancel returns you to
Cancel Cancel
Backup Backup
Backup tab.
Backup Backup
SD cardSD card
SD card)
SD cardSD card
PIMPIM
PIM
PIMPIM
Chapter 2: Learning the basics
2-33
Page 54

4. Type a name for your backup file
and the folder where you wish to
place it. You may opt not to
specify a folder.
5. Check the boxes opposite the
items that you wish to back up,
or tap
Select All Select All
Select All to select all
Select All Select All
listed items.
If you checked the box
Defined FoldersDefined Folders
Defined Folders, tap
Defined FoldersDefined Folders
UserUser
User
UserUser
DefineDefine
Define
DefineDefine
to specify the folders that you
wish to include in the backup
file, then tap
6. Tap
Start Start
Start to begin the backup
Start Start
OKOK
OK.
OKOK
process.
7. When the backup process is
complete, the screen displays
the message “Complete” and a
list of all the backed up items.
2-34
8. Tap
.
P505 Smart PDA Phone
Page 55

To restore all data:To restore all data:
To restore all data:
To restore all data:To restore all data:
1. Tap , then tap
NOTENOTE
NOTE If you saved your backup file into an SD/MMC memory card,
NOTENOTE
you need to insert that SD/MMC memory card to the SD card
slot before restoring the data. Otherwise, you will receive the
message “No storage devices are found!”
ProgramsPrograms
Programs.
ProgramsPrograms
2. On the Programs screen, tap the
BackupBackup
Backup icon. Stop all running
BackupBackup
programs when prompted.
3. Tap the
Restore Restore
Restore tab on the
Restore Restore
Backup screen.
4. Tap
All DataAll Data
All Data.
All DataAll Data
5. In the Backup File screen:
• select the backup
file namefile name
file name
file namefile name
(tap the arrow to list down
other backup files, if any)
• select the
folder folder
folder that
folder folder
contains your backup file
(optional)
• select the storage device
Flash DiskFlash Disk
(
Flash Disk or
Flash DiskFlash Disk
SD cardSD card
SD card)
SD cardSD card
where you stored your backup
file
6. Tap
OK OK
O K to start the restore
OK OK
process.
7. When the restoration is done, a
message appears prompting you
to reset the device.
8. Tap
Chapter 2: Learning the basics
to reset.
2-35
Page 56

To restore PIM data:To restore PIM data:
To restore PIM data:
To restore PIM data:To restore PIM data:
1. On the
DataData
Data instead of All Data.
DataData
2. When prompted, select the
storage device (
SD cardSD card
SD card) where you stored
SD cardSD card
your backup file.
Otherwise, tap
to the previous screen.
3. Tap the
4. Select the backup
(tap the arrow to list down other
backup files, if any).
5. Check the boxes opposite the
items that you wish to restore,
or tap
listed items.
If you checked the box
Defined FoldersDefined Folders
Defined Folders, tap
Defined FoldersDefined Folders
to specify the folders that you
wish to restore, then tap
Restore Restore
Restore tab, tap
Restore Restore
Flash DiskFlash Disk
Flash Disk or
Flash DiskFlash Disk
Cancel Cancel
Cancel to return
Cancel Cancel
Restore Restore
Restore tab.
Restore Restore
file namefile name
file name
file namefile name
Select All Select All
Select All to select all
Select All Select All
PIMPIM
PIM
PIMPIM
UserUser
User
UserUser
DefineDefine
Define
DefineDefine
OKOK
OK.
OKOK
6. Tap
7. When the restoration is done, a
8. Tap
2-36
Start Start
Start to begin the restore
Start Start
process.
message appears prompting you
to reset the device.
to reset.
P505 Smart PDA Phone
Page 57

Other applicationsOther applications
Other applications
Other applicationsOther applications
Your device includes the most common Windows
more.
To access programs:To access programs:
To access programs:
To access programs:To access programs:
1. Tap , then tap
2. Tap any of the icons to
launch a specific application
program.
ProgramsPrograms
Programs.
ProgramsPrograms
®
applications and
GamesGames
Games
GamesGames
Tap the
the available games.
Games Games
Games icon to display
Games Games
CalculatorCalculator
Calculator
CalculatorCalculator
Tap the
the calculator.
Calculator Calculator
Calculator icon to use
Calculator Calculator
Chapter 2: Learning the basics
2-37
Page 58

CameraCamera
Camera
CameraCamera
ConferenceConference
Conference
ConferenceConference
Tap the
and use the built-in camera. Refer
to the “Multimedia features”
chapter for details.
Camera Camera
Camera icon to launch
Camera Camera
Tap the
start a call conference. Refer to
the “Phone features” chapter for
details.
Conference Conference
Conference icon to
Conference Conference
File ExplorerFile Explorer
File Explorer
File ExplorerFile Explorer
Tap the
access or find your files.
See page 2-19 for details.
File Explorer File Explorer
File Explorer icon to
File Explorer File Explorer
FindFind
Find
FindFind
Tap the
folders, or programs in your
device. See page 2-18 for
details.
Find Find
Find icon to find files,
Find Find
2-38
P505 Smart PDA Phone
Page 59

MIDlet ManagerMIDlet Manager
MIDlet Manager
MIDlet ManagerMIDlet Manager
MSN MessengerMSN Messenger
MSN Messenger
MSN MessengerMSN Messenger
Tap the
to install, view, or launch Java
programs and applications.
MIDlet Manager MIDlet Manager
MIDlet Manager icon
MIDlet Manager MIDlet Manager
Tap the
to set up the MSN Messenger.
MSN Messenger MSN Messenger
MSN Messenger icon
MSN Messenger MSN Messenger
Multimedia AlbumMultimedia Album
Multimedia Album
Multimedia AlbumMultimedia Album
Multimedia Album Multimedia Album
The
Multimedia Album allows
Multimedia Album Multimedia Album
you to explore, display, edit, or
share photos, graphics, audio, and
animations via e-mail, MMS, or beam.
NotesNotes
Notes
NotesNotes
Notes Notes
The
Notes window allows you to
Notes Notes
create or record notes and send
them via e-mail or beam.
Chapter 2: Learning the basics
2-39
Page 60

Photo ContactsPhoto Contacts
Photo Contacts
Photo ContactsPhoto Contacts
Photo Contacts Photo Contacts
The
Photo Contacts window
Photo Contacts Photo Contacts
allows you to add photos to
contacts saved in your device or
SIM phonebook.
PicturesPictures
Pictures
PicturesPictures
This window allows you to view,
edit, and manage pictures saved
in your device or in the SD/MMC
memory card.
Pocket ExcelPocket Excel
Pocket Excel
Pocket ExcelPocket Excel
Pocket Excel Pocket Excel
The
Pocket Excel application
Pocket Excel Pocket Excel
allows you to create spreadsheets in your device.
Pocket MSNPocket MSN
Pocket MSN
Pocket MSNPocket MSN
Pocket MSN Pocket MSN
The
Pocket MSN allows you to
Pocket MSN Pocket MSN
browse Internet pages and
connect to the Pocket MSN
website.
2-40
P505 Smart PDA Phone
Page 61

Pocket WordPocket Word
Pocket Word
Pocket WordPocket Word
SIM ManagerSIM Manager
SIM Manager
SIM ManagerSIM Manager
Pocket Word Pocket Word
The
Pocket Word application is
Pocket Word Pocket Word
the PDA version of the Microsoft
Word. Use this application to
create, share, or send documents.
®
SIM ManagerSIM Manager
The
SIM Manager application
SIM ManagerSIM Manager
allows you to view, add, and
manage contacts in your device
or SIM phone book.
STKSTK
STK
STKSTK
STK STK
The
STK window displays the
STK STK
value-added services offered by
your phone operator.
TasksTasks
Tasks
TasksTasks
Tasks Tasks
The
Tasks allows you to set and
Tasks Tasks
prioritize task schedules and
reminders.
Chapter 2: Learning the basics
2-41
Page 62

Terminal ServicesTerminal Services
Terminal Services
Terminal ServicesTerminal Services
Voice CommanderVoice Commander
Voice Commander
Voice CommanderVoice Commander
Terminal Services ClientTerminal Services Client
The
Terminal Services Client
Terminal Services ClientTerminal Services Client
allows you to connect to a
terminal server.
Tap the
icon to launch the Voice
Commander application. Voice
Commander allows voice dialing
and voice commands.
Voice CommanderVoice Commander
Voice Commander
Voice CommanderVoice Commander
Windows Media PlayerWindows Media Player
Windows Media Player
Windows Media PlayerWindows Media Player
Windows Media PlayerWindows Media Player
The
Windows Media Player
Windows Media PlayerWindows Media Player
allows you to play video and
audio files on your device.
2-42
P505 Smart PDA Phone
Page 63

Adding or removing programsAdding or removing programs
Adding or removing programs
Adding or removing programsAdding or removing programs
Programs added to your device at the factory are stored in ROM
(Read-Only Memory). You cannot remove these software applications,
and you will never accidentally lose ROM contents. ROM programs can
be updated using installation programs with a *.xip extension.
All other programs and data files added to your device after factory
installation are stored in RAM (Random Access Memory).
You can install any program created for your device, as long as it has
enough memory. The place to find software for your device is on the
Pocket PC web site (http://www.microsoft.com/mobile/pocketpc).
To add programs using ActiveSync:To add programs using ActiveSync:
To add programs using ActiveSync:
To add programs using ActiveSync:To add programs using ActiveSync:
NOTENOTE
NOTE You need to install the Microsoft ActiveSync on your desktop
NOTENOTE
computer before you can synchronize and/or add programs
to your device. Refer to “Chapter 5: Microsoft ActiveSync”
for installation instructions.
1. Determine your device and processor type so that you know
which version of the software to install. Tap
SettingsSettings
Settings. On the
SettingsSettings
take note of the information in
2. Download the program to your desktop computer (or insert the
CD that contains the program into your desktop computer). You
may see a single
several versions of files for different device types and processors.
Be sure to select the program designed for the Pocket PC and
your device processor type.
3. Read any installation instructions,
documentation that comes with the program. Many programs
provide special installation instructions.
4. Connect your device to your desktop computer.
System System
System tab, tap
System System
ProcessorProcessor
Processor.
ProcessorProcessor
*.xip*.xip
*.xip,
*.xip*.xip
*.exe*.exe
*.exe, or
*.exe*.exe
AboutAbout
About. In the
AboutAbout
*.zip*.zip
*. z i p file, a
*.zip*.zip
Read Me Read Me
Read Me files, or
Read Me Read Me
, then tap
Version Version
Version tab,
Version Version
Setup.exeSetup.exe
Setup.exe file, or
Setup.exeSetup.exe
Chapter 2: Learning the basics
2-43
Page 64

5. Double-click the *.exe file.
• If the file is an installer, the installation wizard begins. Follow
the directions on the screen. Once the software is installed on
your desktop computer, the installer automatically transfers
the software to your device.
• If the file is not an installer, you will see an error message
stating that the program is valid but it is designed for a
different type of computer. You need to move this file to your
device. If you cannot find any installation instructions for the
program in the
ActiveSync Explore ActiveSync Explore
ActiveSync Explore to copy the program file to the
ActiveSync Explore ActiveSync Explore
Program Files Program Files
Program Files folder on your device. For more information
Program Files Program Files
on copying files using
6. When the installation is complete, tap
Read Me Read Me
Read Me file or documentation, use
Read Me Read Me
ActiveSyncActiveSync
ActiveSync
ActiveSyncActiveSync
®
, see
ActiveSync HelpActiveSync Help
ActiveSync Help.
ActiveSync HelpActiveSync Help
ProgramsPrograms
,
Programs, and the
ProgramsPrograms
program icon to switch to it.
To add a program directly from the Internet:To add a program directly from the Internet:
To add a program directly from the Internet:
To add a program directly from the Internet:To add a program directly from the Internet:
NOTENOTE
NOTE You need to be connected to the Internet through a GPRS/
NOTENOTE
CSD connection or a computer before you can add programs
directly from the Internet.
1. Determine your device and processor type so that you know
which version of the software to install. Tap
SettingsSettings
Settings. On the System tab, tap
SettingsSettings
take note of the information in
AboutAbout
About. In the
AboutAbout
ProcessorProcessor
Processor.
ProcessorProcessor
, then tap
Version Version
Version tab,
Version Version
2. Download the program to your device straight from the Internet
using the
*.xip*.xip
*.xip,
*.xip*.xip
Pocket Internet ExplorerPocket Internet Explorer
Pocket Internet Explorer. You may see a single
Pocket Internet ExplorerPocket Internet Explorer
*.exe*.exe
*.exe, or
*.exe*.exe
*.zip*.zip
*. z i p file, a
*.zip*.zip
Setup.exeSetup.exe
Setup.exe file, or several versions
Setup.exeSetup.exe
of files for different device types and processors. Be sure to
select the program designed for the Microsoft
®
Windows Mobile
™
2003 Second Edition for Pocket PC Phone Edition and your device
processor type.
3. Read any installation instructions,
Read Me Read Me
Read Me files, or
Read Me Read Me
documentation that comes with the program. Many programs
provide special installation instructions.
4. Tap the file, such as a
begins. Follow the directions on the screen.
2-44
*.xip*.xip
*.xip or
*.xip*.xip
*.exe*.exe
*.exe file. The installation wizard
*.exe*.exe
P505 Smart PDA Phone
Page 65

To add a program to the Start menu:To add a program to the Start menu:
To add a program to the Start menu:
To add a program to the Start menu:To add a program to the Start menu:
1. Tap , tap
tap the check box for the program. If you do not see the program
on the list, you can either use
move the program to the
ActiveSync ActiveSync
ActiveSync on the desktop computer to create a shortcut to
ActiveSync ActiveSync
the program and place the shortcut in the
2. If you are using the
a. Tap
program (tap the folder list, labeled My Documents by default,
then tap My Device to see a list of all the folders on the
device).
b. Tap and hold the program, then tap
Open the
tap and hold a blank area of the window, then tap
the pop-up menu.
c. The program now appears on the
information on using the
“Finding and organizing information” earlier in this chapter.
SettingsSettings
Settings, tap
SettingsSettings
File Explorer File Explorer
File Explorer on the device:
File Explorer File Explorer
, tap
ProgramsPrograms
Programs, tap
ProgramsPrograms
Start Menu Start Menu
Start Menu folder located in the
Start Menu Start Menu
MenusMenus
Menus, tap the
MenusMenus
File Explorer File Explorer
File Explorer on the device to
File Explorer File Explorer
Start Menu Start Menu
Start Menu folder, or use
Start Menu Start Menu
File ExplorerFile Explorer
File Explorer, and locate the
File ExplorerFile Explorer
File ExplorerFile Explorer
File Explorer, see the section
File ExplorerFile Explorer
Start MenuStart Menu
Start Menu tab, and
Start MenuStart Menu
Start Menu Start Menu
Start Menu folder.
Start Menu Start Menu
Cut Cut
Cut on the pop-up menu.
Cut Cut
Windows Windows
Windows folder,
Windows Windows
Paste Paste
Paste in
Paste Paste
menu. For more
3. If you are using
a. Use the
and locate the program. Right-click the program, then click
Create ShortcutCreate Shortcut
Create Shortcut.
Create ShortcutCreate Shortcut
b. Move the shortcut to the
folder. The shortcut now appears on the
information, see
To remove a program from the Start menu:To remove a program from the Start menu:
To remove a program from the Start menu:
To remove a program from the Start menu:To remove a program from the Start menu:
1. Tap , then tap
ProgramsPrograms
Programs.
ProgramsPrograms
2. If the program does not appear in the list of installed programs,
File Explorer File Explorer
use
File Explorer on your device to locate the program, tap and
File Explorer File Explorer
hold the program, then tap
ActiveSync ActiveSync
ActiveSync on the desktop computer:
ActiveSync ActiveSync
Explorer Explorer
Explorer in
Explorer Explorer
SettingsSettings
Settings. On the
SettingsSettings
ActiveSync ActiveSync
ActiveSync to explore your device files
ActiveSync ActiveSync
Start Menu Start Menu
Start Menu folder in the
Start Menu Start Menu
menu. For more
ActiveSync HelpActiveSync Help
ActiveSync Help.
ActiveSync HelpActiveSync Help
System System
System tab, tap
System System
Delete Delete
Delete on the pop-up menu.
Delete Delete
WindowsWindows
Windows
WindowsWindows
RemoveRemove
Remove
RemoveRemove
Chapter 2: Learning the basics
2-45
Page 66

2-46
P505 Smart PDA Phone
Page 67

Chapter 3Chapter 3
Chapter 3
Chapter 3Chapter 3
SynchronizingSynchronizing
Synchronizing
SynchronizingSynchronizing
datadata
data
datadata
This chapter tells you how to
use the Microsoft® ActiveSync
application that synchronizes
data between the device and
your desktop or notebook
computer.
®
Page 68

Chapter summaryChapter summary
Chapter summary
Chapter summaryChapter summary
••
•
••
••
•
••
••
•
••
IntroductionIntroduction
Introduction
IntroductionIntroduction
................................................................................................
................................................
................................................................................................
3-33-3
3-3
3-33-3
What is ActiveSync®? ...................................................... 3-3
®®
®
®®
Installing ActiveSyncInstalling ActiveSync
Installing ActiveSync
Installing ActiveSyncInstalling ActiveSync
®
Installing ActiveSync
Synchronizing your deviceSynchronizing your device
Synchronizing your device
Synchronizing your deviceSynchronizing your device
on your computer ......................... 3-4
....................................................................
..................................
....................................................................
........................................................
............................
........................................................
3-43-4
3-4
3-43-4
3-73-7
3-7
3-73-7
Connecting your device to a computer ............................ 3-7
Setting up a partnership .................................................. 3-8
Checking synchronized information ................................ 3-10
Manually initiating synchronization ................................. 3-10
Synchronization options ................................................. 3-11
3-2
P505 Smart PDA Phone
Page 69

IntroductionIntroduction
Introduction
IntroductionIntroduction
®®
®
What is ActiveSyncWhat is ActiveSync
What is ActiveSync
What is ActiveSyncWhat is ActiveSync
The Microsoft® ActiveSync® is one of the most important bundled
programs in your P505. With ActiveSync
information on your desktop computer with the information on your
device. Synchronization compares the data on your device with your
desktop computer and updates both computers with the most recent
information.
For example:For example:
For example:
For example:For example:
• Keep Pocket Outlook data up-to-date by synchronizing your device
with Microsoft® Outlook data on your desktop computer.
• Synchronize Microsoft
your device and desktop computer. Your files are automatically
converted to the correct format.
®
®®
??
?
??
®
, you can synchronize the
Word and Microsoft® Excel files between
NOTENOTE
NOTE By default, ActiveSync® does not automatically synchronize
NOTENOTE
all types of information. Use the ActiveSync® options to turn
synchronization on or off for specific information types.
®®
®
With ActiveSyncWith ActiveSync
With ActiveSync
With ActiveSyncWith ActiveSync
• Back up and restore your device data
• Copy (rather than synchronize) files between your device and
desktop computer
• Schedule data synchronization by selecting a synchronization
mode. For example, you can synchronize continually while
connected to your desktop computer or only when you choose to
synchronize.
• Select which information types are synchronized and control how
much data is synchronized. For example, you can choose to
synchronize your appointments of the past two weeks only,
appointments older than two weeks are not synchronized.
®®
, you can also:, you can also:
, you can also:
, you can also:, you can also:
®®
®
For more information about using ActiveSyncFor more information about using ActiveSync
For more information about using ActiveSync
For more information about using ActiveSyncFor more information about using ActiveSync
1. Start ActiveSync® on your desktop computer.
®
2. From the Activesync
ActiveSync HelpActiveSync Help
ActiveSync Help.
ActiveSync HelpActiveSync Help
Chapter 3: Synchronizing data
menu bar, click
Help Help
Help then on
Help Help
MicrosoftMicrosoft
Microsoft
MicrosoftMicrosoft
®®
::
:
::
3-3
Page 70

®®
®
Installing ActiveSyncInstalling ActiveSync
Installing ActiveSync
Installing ActiveSyncInstalling ActiveSync
The ActiveSync® application is already installed on your device. To
synchronize information on your device with your computer, you
must also install ActiveSync® on your computer. Install ActiveSync
from the Companion CD that came with your device.
NOTENOTE
NOTE Before starting the ActiveSync® installation, make sure that
NOTENOTE
you have Microsoft® Outlook® installed on your computer. If
you do not have Outlook, install the Microsoft® Outlook
2002 from the Companion CD. Even if you have Outlook 98
or Outlook 2000 installed, you are encouraged to update to
Outlook 2002.
®®
®
Installing ActiveSyncInstalling ActiveSync
Installing ActiveSync
Installing ActiveSyncInstalling ActiveSync
To install ActiveSyncTo install ActiveSync
To install ActiveSync
To install ActiveSyncTo install ActiveSync
®®
on your computer on your computer
on your computer
on your computer on your computer
®®
®
®®
on your computer: on your computer:
on your computer:
on your computer: on your computer:
®®
®
®
NOTENOTE
NOTE Do not connect the device to your computer until you have
NOTENOTE
finished installing ActiveSync®.
1. Insert the Companion CD to your computer. The CD runs
automatically and displays the initial screen, then the Main Menu
from which you can start the installation.
2. Click
3-4
Start HereStart Here
Start Here from the Main Menu to begin.
Start HereStart Here
P505 Smart PDA Phone
Page 71

3. Read the
OverviewOverview
Overview
OverviewOverview
before installing
ActiveSync® 3.7 to
make sure that you
perform the
installation
sequence correctly.
4. If you have not
installed Outlook,
install it now. Click
Install OutlookInstall Outlook
Install Outlook
Install OutlookInstall Outlook
20022002
2002 and follow the
20022002
screen instructions
to complete the
installation.
5. Click
Download Connection WizardDownload Connection Wizard
Download Connection Wizard and read the overview to
Download Connection WizardDownload Connection Wizard
see if you require the wizard. Follow the screen instructions to install
the wizard on your computer. Return to the Main Menu when done.
6. Click
ActiveSyncActiveSync
ActiveSync
ActiveSyncActiveSync
then click
InstallInstall
Install
InstallInstall
InstallInstall
Install.
InstallInstall
®
3.7 3.7
3.7,
3.7 3.7
Chapter 3: Synchronizing data
3-5
Page 72

7. When prompted, select
this program from itsthis program from its
this program from its
this program from itsthis program from its
current locationcurrent location
current location then click
current locationcurrent location
OKOK
OK.
OKOK
RunRun
Run
RunRun
8. Follow the succeeding screen
instructions. Click
Finish Finish
Finish to
Finish Finish
complete the installation.
9. Click the link
Pocket PC Pocket PC
Pocket PC to connect to the Windows® support web site and
Pocket PC Pocket PC
Configure your Windows Mobile-basedConfigure your Windows Mobile-based
Configure your Windows Mobile-based
Configure your Windows Mobile-basedConfigure your Windows Mobile-based
set up the device phone features.
9. When prompted, restart your computer, then proceed to the next
section to connect your device to your computer and start
synchronization.
3-6
P505 Smart PDA Phone
Page 73

Synchronizing your deviceSynchronizing your device
Synchronizing your device
Synchronizing your deviceSynchronizing your device
Connecting your device to a computerConnecting your device to a computer
Connecting your device to a computer
Connecting your device to a computerConnecting your device to a computer
To connect your device to your computer:To connect your device to your computer:
To connect your device to your computer:
To connect your device to your computer:To connect your device to your computer:
1. Place the device on the cradle.
2. Connect the DC/USB cable plug to the DC/USB cable connector at
the back of the cradle.
3. Connect the USB plug of the DC/USB cable to a USB port on your
computer. See Figure 1.
3
1
2
4
6
5
7
9
8
#
0
Figure 1 Figure 2
To connect your device without the cradle:To connect your device without the cradle:
To connect your device without the cradle:
To connect your device without the cradle:To connect your device without the cradle:
1. Connect the DC/USB cable plug to the system connector at the
bottom of the device.
2. Connect the USB plug of the DC/USB cable to an available USB
port on your computer. See Figure 2.
NOTENOTE
NOTE During synchronization, the battery is charged through the
NOTENOTE
AC adapter (if you plugged the AC adapter plug to the
DC/USB cable plug) or through the USB port.
Chapter 3: Synchronizing data
3-7
Page 74

Setting up a partnershipSetting up a partnership
Setting up a partnership
Setting up a partnershipSetting up a partnership
Immediately after you have completed the installation, the
PartnershipPartnership
Partnership wizard will start automatically to help you establish a
PartnershipPartnership
partnership and customize your synchronization settings. At this
point, you can decide exactly which types of information you would
like to synchronize with your computer.
partnership partnership
A
partnership is a file that allows you to synchronize your
partnership partnership
device with your desktop computer. This file is stored on your
desktop computer. An additional file that enables your
desktop computer to recognize your device is stored on your
device.
To set up a partnership:To set up a partnership:
To set up a partnership:
To set up a partnership:To set up a partnership:
1. When the
screen appears, select
Standard partnershipStandard partnership
Standard partnership for
Standard partnershipStandard partnership
the type of partnership to
establish between your device
and your computer. Click
New PartnershipNew Partnership
New Partnership
New PartnershipNew Partnership
NextNext
Next.
NextNext
NewNew
New
NewNew
2. On the next screen, select
Synchronize with theSynchronize with the
Synchronize with the
Synchronize with theSynchronize with the
desktop computerdesktop computer
desktop computer. Click
desktop computerdesktop computer
NextNext
Next.
NextNext
3-8
P505 Smart PDA Phone
Page 75

3. Select the type of information
that you wish to synchronize.
Click
OROR
OR
OROR
NextNext
Next.
NextNext
If you wish to customize a
synchronized item, highlight
the item then click
SettingsSettings
Settings.
SettingsSettings
On the
Synchronization SettingsSynchronization Settings
Synchronization Settings
Synchronization SettingsSynchronization Settings
CalendarCalendar
Calendar
CalendarCalendar
window, for example, select
from the options how you wish
to synchronize the
appointments on your device
with your computer. Click
4. Click
FinishFinish
Finish to complete
FinishFinish
OKOK
OK.
OKOK
setting a partnership.
Immediately after you set up a
partnership, ActiveSync
®
starts
automatically and initiates the
first synchronization between
your device and your computer.
Refer to the succeeding
sections for more details on
synchronization.
Chapter 3: Synchronizing data
3-9
Page 76

Checking synchronized informationChecking synchronized information
Checking synchronized information
Checking synchronized informationChecking synchronized information
After your first synchronization,
take a look at Calendar, Contacts,
and Tasks on your device. You
will notice that the calendar
information in Microsoft® Outlook
on your computer was copied to
your device, and the information
that you have on your device was
copied to your computer.
NOTENOTE
NOTE Open Microsoft® Outlook on your desktop computer to see
NOTENOTE
the details of copied information from your device.
Manually initiating synchronizationManually initiating synchronization
Manually initiating synchronization
Manually initiating synchronizationManually initiating synchronization
Once you have set up ActiveSync® and completed the first
synchronization process, you can initiate synchronization from your
device at any time.
To manually initiate synchronization:To manually initiate synchronization:
To manually initiate synchronization:
To manually initiate synchronization:To manually initiate synchronization:
1. Tap , then tap
screen.
ActiveSyncActiveSync
ActiveSync® to display the ActiveSync
ActiveSyncActiveSync
Connection status
Tap to connect and synchronize
Tap to stop synchronization
®
3-10
Tap to synchronize via IR or change
synchronization settings
P505 Smart PDA Phone
Page 77

2. To start synchronization, make a connection between your device
and your computer, then tap
SyncSync
Sync.
SyncSync
To end synchronization, tap
For more information on synchronization:For more information on synchronization:
For more information on synchronization:
For more information on synchronization:For more information on synchronization:
Tap while in the ActiveSync® screen, then tap
Synchronization optionsSynchronization options
Synchronization options
Synchronization optionsSynchronization options
The Microsoft® ActiveSync® program allows you to customize your
synchronization settings at any time. You can select the items to
synchronize, set the synchronization schedule, and specify the
synchronization rules.
To display the synchronization options:To display the synchronization options:
To display the synchronization options:
To display the synchronization options:To display the synchronization options:
• From the ActiveSync® window on your desktop computer, click on
Options Options
the
Options icon, or
Options Options
• From the menu bar, click on
StopStop
Stop.
StopStop
ToolsTools
Tools, then
ToolsTools
HelpHelp
Help.
HelpHelp
OptionsOptions
Options.
OptionsOptions
To select items to synchronize:To select items to synchronize:
To select items to synchronize:
To select items to synchronize:To select items to synchronize:
1. Check the box opposite the item that you wish to synchronize.
2. Highlight a checked item then click on
synchronization options for the item.
For example, highlight
display the
Customize the available settings, then click
Calendar Synchronization SettingsCalendar Synchronization Settings
Calendar Synchronization Settings window.
Calendar Synchronization SettingsCalendar Synchronization Settings
Calendar Calendar
Calendar then click on
Calendar Calendar
Settings Settings
Settings to specify
Settings Settings
Settings Settings
Settings to
Settings Settings
OK OK
O K when done.
OK OK
Chapter 3: Synchronizing data
3-11
Page 78

3. Do the same for the other checked items.
NOTENOTE
NOTE You cannot set the options for unchecked items.
NOTENOTE
4. Click
To set synchronization schedule:To set synchronization schedule:
To set synchronization schedule:
To set synchronization schedule:To set synchronization schedule:
1. Click on the
2. Select your desired
synchronization schedule.
3. Click
OK OK
O K when done.
OK OK
Schedule Schedule
Schedule tab.
Schedule Schedule
OK OK
O K when done.
OK OK
To specify synchronization rules:To specify synchronization rules:
To specify synchronization rules:
To specify synchronization rules:To specify synchronization rules:
1. Click on the
2. Select your desired settings
from the available options.
3. Click
OK OK
O K when done.
OK OK
Rules Rules
Rules tab.
Rules Rules
3-12
P505 Smart PDA Phone
Page 79

Chapter 4Chapter 4
Chapter 4
Chapter 4Chapter 4
Using PocketUsing Pocket
Using Pocket
Using PocketUsing Pocket
®®
®
®®
OutlookOutlook
Outlook
OutlookOutlook
This chapter details the
procedures in using the
Microsoft® Pocket Outlook
Calendar, Tasks, Notes, and
Contacts.
Page 80

Chapter summaryChapter summary
Chapter summary
Chapter summaryChapter summary
••
•
••
••
•
••
••
•
••
••
•
••
IntroductionIntroduction
Introduction
IntroductionIntroduction
Calendar: Scheduling appointments and meetingsCalendar: Scheduling appointments and meetings
Calendar: Scheduling appointments and meetings
Calendar: Scheduling appointments and meetingsCalendar: Scheduling appointments and meetings
Creating appointments .................................................... 4-4
Using the summary screen ............................................... 4-5
Creating meeting requests ............................................... 4-5
Sending appointments ..................................................... 4-7
Tasks: Keeping a to do listTasks: Keeping a to do list
Tasks: Keeping a to do list
Tasks: Keeping a to do listTasks: Keeping a to do list
Creating a task ................................................................ 4-8
Using the summary screen ............................................. 4-10
Sending tasks ................................................................ 4-10
Notes: Capturing thoughts and ideasNotes: Capturing thoughts and ideas
Notes: Capturing thoughts and ideas
Notes: Capturing thoughts and ideasNotes: Capturing thoughts and ideas
Creating notes ............................................................... 4-11
................................................................................................
................................................
................................................................................................
......................................................
...........................
......................................................
........................
............
........................
4-34-3
4-3
4-34-3
....
4-34-3
..
4-3
....
4-34-3
4-84-8
4-8
4-84-8
4-114-11
4-11
4-114-11
••
•
••
Contacts: Tracking friends and colleaguesContacts: Tracking friends and colleagues
Contacts: Tracking friends and colleagues
Contacts: Tracking friends and colleaguesContacts: Tracking friends and colleagues
Creating contacts .......................................................... 4-14
Using the summary screen ............................................. 4-15
Changing a contact information display ......................... 4-15
Getting in touch with your contacts .............................. 4-16
Finding a contact ........................................................... 4-19
Adding a photo to a contact .......................................... 4-20
..........
.....
..........
4-134-13
4-13
4-134-13
4-2
P505 Smart PDA Phone
Page 81

IntroductionIntroduction
Introduction
IntroductionIntroduction
Microsoft® Pocket Outlook® includes Calendar, Tasks, Notes,
Contacts, and Messaging. You can use these programs individually or
together. For example, e-mail address stored in Contacts can be used
to address e-mail messages in Messaging.
Using ActiveSync
Outlook or Microsoft® Exchange on your desktop computer with your
device. You can also synchronize this information directly with a
Microsoft® Exchange server. Each time you synchronize, ActiveSync
compares the changes you made on your device and desktop
computer or server and updates both computers with the latest
information. For information on using ActiveSync
Help on your desktop computer.
Calendar: Scheduling appointmentsCalendar: Scheduling appointments
Calendar: Scheduling appointments
Calendar: Scheduling appointmentsCalendar: Scheduling appointments
and meetingsand meetings
and meetings
and meetingsand meetings
Use Calendar to schedule appointments, meetings and other events.
You can check your appointments in one of several views (Agenda,
Hourly, Daily, Weekly, Monthly, and Yearly) and easily switch views
using the View menu.
®
, you can synchronize information in Microsoft
®
, see ActiveSync
®
®
®
Tap to move one week forward
Tap to move one week backward
Tap to go to the day’s appointments
Tap to display or edit the appointment details
Tap to create a new appointment
Tap to view appointment options
Tap an icon to change the calendar view to
agenda, hourly, daily, weekly, monthly, or yearly
NOTENOTE
NOTE You can customize the Calendar display, such as changing the
NOTENOTE
first day of the week, by tapping
Options Options
Options on the
Options Options
Tools Tools
Tools menu.
Tools Tools
Chapter 4: Using Pocket Outlook
®
4-3
Page 82

Creating appointmentsCreating appointments
Creating appointments
Creating appointmentsCreating appointments
To create an appointment:To create an appointment:
To create an appointment:
To create an appointment:To create an appointment:
1. If you are in Day or Week view, tap your desired date for the
appointment.
2. Tap
NewNew
New.
NewNew
Tap to select from a list of predefined subjects
Tap to select from previously entered locations
Tap to specify the time of appointment
Scroll down to see other appointment options
Tap to specify the date of appointment
Tap to set the appointment reminder options
Tap to set the appointment category
Tap to add notes to the appointment
3. Using the input panel, enter a description for the appointment and
the appointment location.
4. If needed, tap the date and time to adjust the appointment
schedule.
5. Enter other desired information. You will need to hide the input
panel or tap
6. To add notes to your appointment, tap the
to scroll down and see all appointment details.
Notes Notes
Notes tab. You can
Notes Notes
enter text, draw, or create a recording. For more information on
creating notes, see the “Notes: Capturing thoughts and ideas”
later in this chapter.
7. When done, tap
NOTENOTE
NOTE If you select
NOTENOTE
remind you according to the options set in the
NotificationsNotifications
Notifications screen. See page 2-30 for details.
NotificationsNotifications
to return to Calendar.
Remind meRemind me
R e m i n d m e in an appointment, your device will
Remind meRemind me
Sounds andSounds and
Sounds and
Sounds andSounds and
4-4
P505 Smart PDA Phone
Page 83

Using the summary screenUsing the summary screen
Using the summary screen
Using the summary screenUsing the summary screen
When you tap an appointment in Calendar, a summary screen appears.
To change the appointment, tap
Creating meeting requestsCreating meeting requests
Creating meeting requests
Creating meeting requestsCreating meeting requests
You can use Calendar to set up meetings with users of Microsoft
Outlook® and mobile phone users. The meeting request will be
created automatically and sent either when you synchronize Inbox or
when you activate the phone.
EditEdit
Edit.
EditEdit
Appointment details
Notes/additional information
on the appointment
Tap to change the appointment details
®
To create a meeting request:To create a meeting request:
To create a meeting request:
To create a meeting request:To create a meeting request:
1. Create an appointment
2. Tap
ToolsTools
Tools, select
ToolsTools
from the menu, then tap the
Appointments Appointments
Appointments tab to indicate
Appointments Appointments
how you want meeting requests
sent.
OptionsOptions
Options
OptionsOptions
Chapter 4: Using Pocket Outlook
®
4-5
Page 84

3. If you send and receive e-mail
messages through ActiveSync
select
Outlook E-mailOutlook E-mail
Outlook E-mail. If you
Outlook E-mailOutlook E-mail
®
,
wish to send the meeting
request to mobile phone
contacts, select
MessagesMessages
Messages.
MessagesMessages
NOTENOTE
NOTE You can only send a text
NOTENOTE
message if your contact
has a mobile phone
number in
To schedule a meeting:To schedule a meeting:
To schedule a meeting:
To schedule a meeting:To schedule a meeting:
TextText
Text
TextText
ContactsContacts
Contacts.
ContactsContacts
1. Create an appointment.
2. In the appointment details, hide the input panel, then tap
AttendeesAttendees
Attendees.
AttendeesAttendees
3. From the list of e-mail addresses you have entered in Contacts,
select the meeting attendees.
The meeting notice is created automatically and placed in the
Outbox folder. For more information on sending and receiving
meeting requests, see Calendar Help and Messaging Help on the
device.
4-6
P505 Smart PDA Phone
Page 85

Sending appointmentsSending appointments
Sending appointments
Sending appointmentsSending appointments
You can send appointments and other schedules to other devices
using the infrared (IR) and Bluetooth™ capabilities of your device.
NOTENOTE
NOTE Refer to “Chapter 10: Getting connected” and “Chapter 11:
NOTENOTE
Using Bluetooth® for details on infrared and Bluetooth
connections.
To send an appointment:To send an appointment:
To send an appointment:
To send an appointment:To send an appointment:
®
1. Select an appointment you wish
to send.
2. Tap and hold the appointment
to display a pop-up menu.
3. Select
Beam AppointmentBeam Appointment
Beam Appointment.
Beam AppointmentBeam Appointment
Send via BluetoothSend via Bluetooth
Send via Bluetooth or
Send via BluetoothSend via Bluetooth
4. Follow screen instructions to
send the appointment.
Chapter 4: Using Pocket Outlook
®
4-7
Page 86

Tasks: Keeping a to do listTasks: Keeping a to do list
Tasks: Keeping a to do list
Tasks: Keeping a to do listTasks: Keeping a to do list
Use Tasks to keep track or prioritize the things you have to do.
Tap to select the category
of tasks you want to
display
Tap to select a sort order of the task list
Tap to quickly add a new task
Tap to display or edit the task details
Tap and hold a task to display a
pop-up menu of actions
Tap an action for the task
Tap to create a new task
Creating a taskCreating a task
Creating a task
Creating a taskCreating a task
To create a task:To create a task:
To create a task:
To create a task:To create a task:
1. Tap , then tap
Start menu, launch it by tapping
Tasks Tasks
Tasks from the menu. After launching,
Tasks Tasks
the recently used program list.
2. Tap
3. Using the input panel, enter a
4. Enter a start date and due date,
New New
New to display a blank task
New New
form.
description.
or enter other information by
tapping the field first. If the
input panel is open, you will
need to hide it to see all
available fields.
TasksTasks
Tasks. If
TasksTasks
TasksTasks
Tasks is not listed as an item in the
TasksTasks
, tap
ProgramsPrograms
Programs, then tap
ProgramsPrograms
Tasks Tasks
Tasks now appears in
Tasks Tasks
5. To assign the task to a
category, tap
select a category from the list.
On the task list, you can display
tasks by category.
4-8
Categories Categories
Categories and
Categories Categories
P505 Smart PDA Phone
Page 87

6. To add notes, tap the
NotesNotes
Notes
NotesNotes
tab. You can enter text, add a
drawing, or create a recording.
For more information on creating
notes, see “Notes: Capturing
thoughts and ideas” later in this
chapter.
7. Tap
when done.
to return to the task list
Chapter 4: Using Pocket Outlook
®
4-9
Page 88

Using the summary screenUsing the summary screen
Using the summary screen
Using the summary screenUsing the summary screen
Tapping a task on the task list displays a summary screen. To change
the task details, tap
EditEdit
Edit.
EditEdit
Task details
Tap to show or hide the task details
Notes/additional information on the task
Tap to change the task details
Sending tasksSending tasks
Sending tasks
Sending tasksSending tasks
You can send tasks to other devices using the infrared (IR) and
Bluetooth™ capabilities of your device.
NOTENOTE
NOTE Refer to “Chapter 10: Getting connected” and
NOTENOTE
“Chapter 11: Using Bluetooth® for details on infrared and
Bluetooth® connections.
To send a task:To send a task:
To send a task:
To send a task:To send a task:
1. Select the task you wish to
send.
2. Tap and hold the taskto display
a pop-up menu.
3. Select
Beam AppointmentBeam Appointment
Beam Appointment.
Beam AppointmentBeam Appointment
4. Follow screen instructions to
send the task.
Send via BluetoothSend via Bluetooth
Send via Bluetooth or
Send via BluetoothSend via Bluetooth
4-10
P505 Smart PDA Phone
Page 89

Notes: Capturing thoughts and ideasNotes: Capturing thoughts and ideas
Notes: Capturing thoughts and ideas
Notes: Capturing thoughts and ideasNotes: Capturing thoughts and ideas
Quickly capture thoughts, reminders, ideas, and phone numbers with
Notes. You can create a written note or a recording. You can also
include a recording in a note. If a note is open when you create the
recording, it will be included in the note as an icon. If the note is
displayed, it will be created as a stand-alone recording.
Tap to change the
sort order of the list
Tap to record
Tap to show or hide the recording toolbar
Tap to create a new note or recording
Creating notesCreating notes
Creating notes
Creating notesCreating notes
To create a note:To create a note:
To create a note:
To create a note:To create a note:
1. Tap , then tap
NOTENOTE
NOTE If
NOTENOTE
2. Tap
Notes Notes
N o t e s is not listed as an
Notes Notes
item in the
it by tapping
ProgramsPrograms
Pr ogr am s, then tap
ProgramsPrograms
After launching,
appears in the recently used
program list.
New New
New to display a blank
New New
NotesNotes
Notes.
NotesNotes
Start Start
S t a r t menu, launch
Start Start
, tap
Notes Notes
Notes now
Notes Notes
note.
NotesNotes
Notes.
NotesNotes
Tap to save the note and
return to the Notes list
3. Create your note by writing,
drawing, typing, or recording.
Chapter 4: Using Pocket Outlook
®
Tap to add a recording
to the note
Tap to write on
the screen
Tap to show
or hide the
input panel
4-11
Page 90

NOTENOTE
NOTE For more information about using the input panel, writing and
NOTENOTE
drawing on the screen, and creating recordings, see Chapter 2.
4. Tap when done.
You may change the default Notes options including the writing
mode, template, file storage, and record button action.
To change the Notes options:To change the Notes options:
To change the Notes options:
To change the Notes options:To change the Notes options:
1. Tap , then tap
2. Tap
ToolsTools
Tools, then
ToolsTools
NotesNotes
Notes.
NotesNotes
Options...Options...
Options... to
Options...Options...
display the options screen.
3. Make your desired changes.
4. Tap
when done to save your
changes.
4-12
P505 Smart PDA Phone
Page 91

Contacts: Tracking friends andContacts: Tracking friends and
Contacts: Tracking friends and
Contacts: Tracking friends andContacts: Tracking friends and
colleaguescolleagues
colleagues
colleaguescolleagues
ContactsContacts
Contacts maintains a list of your friends and colleagues so that you
ContactsContacts
can easily find the information you look for, whether you are at home
or on the road.
With the mobile phone features of your device, you can call your
contact’s home, mobile, or office phone number, send an SMS
message or share the contact information to another device using
the infrared port (IR) or Bluetooth
Tap to select the category of
contacts you want to display
®
.
Tap and enter part of a name
to quickly find it on the list
Tap an entry to display or
edit the contact details
Type of contact information
displayed. Tap to change or select
another contact information.
Tap to sort contacts by name or company
Tap to create a new contact
NOTENOTE
NOTE To change the way information is displayed in the list, tap
NOTENOTE
Tools Tools
Tools then
Tools Tools
OptionsOptions
Options.
OptionsOptions
Chapter 4: Using Pocket Outlook
®
4-13
Page 92

Creating contactsCreating contacts
Creating contacts
Creating contactsCreating contacts
You can create or add a contact information by:
• Using the
• Using Microsoft® Outlook on your computer. New contacts will be
added to the device, the next time it is synchronized with the
computer. See Chapter 3 for details on synchronization.
• Transferring contact information from your SIM card to the
Contacts using the
details.
• Receiving a contact information from other devices using beam or
Bluetooth
To create a contact:To create a contact:
To create a contact:
To create a contact:To create a contact:
1. Tap , then tap
2. Tap
3. Using the input panel, enter a
New New
New to display a blank
New New
contact form.
name and other contact
information. You will need to
scroll down to see all available
fields.
Contacts Contacts
Contacts application
Contacts Contacts
SIM Manager SIM Manager
SIM Manager application. See Chapter 5 for
SIM Manager SIM Manager
®
features.
ContactsContacts
Contacts.
ContactsContacts
4. To assign the contact a
category, scroll to and tap
CategoriesCategories
Categories, then select a
CategoriesCategories
category from the list. On the
contact list, you can display the
contacts by category.
5. To add notes, tap the
create a recording. For more information on creating notes, see
“Notes: Capturing thoughts and ideas” in this chapter.
6. Tap
to return to the contact list when done.
Notes Notes
Notes tab. You can enter text, draw, or
Notes Notes
4-14
P505 Smart PDA Phone
Page 93

Using the summary screenUsing the summary screen
Using the summary screen
Using the summary screenUsing the summary screen
Tapping a contact on the contact
list displays a summary screen. To
change the contact information, tap
EditEdit
Edit.
EditEdit
Contact details
Tap to display notes
Tap to change contact information
Changing a contact information displayChanging a contact information display
Changing a contact information display
Changing a contact information displayChanging a contact information display
If a contact has multiple contact information (e.g. work telephone,
home telephone, car mobile phone, mobile phone), you can change or
select the contact information displayed on screen.
To change a contact information display:To change a contact information display:
To change a contact information display:
To change a contact information display:To change a contact information display:
1. Tap the type of contact
information displayed (last
column of the contact line) to
show additional contact
information.
2. The current displayed contact
information is indicated by a
bullet. Tap another contact
information to change the
contact information display.
Chapter 4: Using Pocket Outlook
®
4-15
Page 94

Getting in touch with your contactsGetting in touch with your contacts
Getting in touch with your contacts
Getting in touch with your contactsGetting in touch with your contacts
To call a contact:To call a contact:
To call a contact:
To call a contact:To call a contact:
1. Tap and hold a contact to
display a pop-up menu. Tap
Call Work/Home/MobileCall Work/Home/Mobile
Call Work/Home/Mobile
Call Work/Home/MobileCall Work/Home/Mobile
to place a call.
2. The phone dials the selected
contact number. Tap
hide the balloon information
End End
or
End to cancel the call.
End End
HideHide
Hide to
HideHide
3. Talk to the called party when
connected. The balloon
displays the call duration.
4. Tap
call.
End End
End to terminate the
End End
4-16
P505 Smart PDA Phone
Page 95

To send an e-mail message to a contact:To send an e-mail message to a contact:
To send an e-mail message to a contact:
To send an e-mail message to a contact:To send an e-mail message to a contact:
1. Tap and hold a contact, then
Send Email Send Email
tap
Send Email from the
Send Email Send Email
pop-up menu.
2. The
Messaging Messaging
Messaging window
Messaging Messaging
appears. Compose the e-mail
message, then tap
Send Send
Send to
Send Send
send the message.
NOTESNOTES
N O T E S • Refer to Chapter 6 for details on composing and sending
NOTESNOTES
e-mail messages.
• E-mail messaging features are network dependent and
may require subscription to a particular service. Contact
your phone operator for details.
Chapter 4: Using Pocket Outlook
®
4-17
Page 96

To send a text message to a contact:To send a text message to a contact:
To send a text message to a contact:
To send a text message to a contact:To send a text message to a contact:
1. Tap and hold a contact, then
Send Text MessageSend Text Message
tap
Send Text Message
Send Text MessageSend Text Message
from the pop-up menu.
2. The
Messaging Messaging
Messaging window
Messaging Messaging
appears. Compose the text
message, then tap
SendSend
Send. The
SendSend
text message is sent to the
contact’s mobile phone.
NOTESNOTES
N O T E S • When sending text messages to contacts with multiple
NOTESNOTES
contact information, the Messaging application
automatically selects the mobile phone number entry.
• Refer to Chapter 6 for details on composing and sending
text messages.
®®
®
To send a contact info by beam or BluetoothTo send a contact info by beam or Bluetooth
To send a contact info by beam or Bluetooth
To send a contact info by beam or BluetoothTo send a contact info by beam or Bluetooth
®®
::
:
::
1. Tap and hold the contact you
wish to send, then tap
Contact... Contact...
Contact... or
Contact... Contact...
BluetoothBluetooth
Bluetooth.
BluetoothBluetooth
Send viaSend via
Send via
Send viaSend via
BeamBeam
Beam
BeamBeam
2. Follow screen instructions to
send the contact information.
NOTENOTE
NOTE Refer to Chapters 10 and
NOTENOTE
11 for details on sending
information via the IR
port and Bluetooth®.
4-18
P505 Smart PDA Phone
Page 97

Finding a contactFinding a contact
Finding a contact
Finding a contactFinding a contact
There are three ways to find a contact:
1. In the contact list, tap the
category list (labelled
ContactsContacts
Contacts by default) and select
ContactsContacts
the type of contact that you
wish to display. To show all
contacts again, select
ContactsContacts
Contacts. To view a contact
ContactsContacts
not assigned to a category,
NoNo
select
2. To view the names of companies
your contacts work for, in the
contact list, tap
select
menu. The number of contacts
that work for that company will
be displayed to the right of the
company name.
Categories Categories
No
Categories.
NoNo
Categories Categories
ViewView
View, then
ViewView
By Company By Company
By Company from the
By Company By Company
AllAll
All
AllAll
AllAll
All
AllAll
11
1
11
Tap the company name to
display the contacts.
3. You can also type the name of
the contact in the
namename
name field. When you type a
namename
letter, the device automatically
searches and displays the
available contacts. Tap a
contact entry from the list to
view the details.
Find aFind a
Find a
Find aFind a
22
2
22
33
3
33
Chapter 4: Using Pocket Outlook
®
4-19
Page 98

Adding a photo to a contactAdding a photo to a contact
Adding a photo to a contact
Adding a photo to a contactAdding a photo to a contact
Photo Contacts Photo Contacts
The
Photo Contacts application allows you to attach photos to
Photo Contacts Photo Contacts
your contacts. The photo is displayed on screen when the contact
calls you.
To add a photo to a contact:To add a photo to a contact:
To add a photo to a contact:
To add a photo to a contact:To add a photo to a contact:
1. Tap and hold a contact, then tap
Arcsoft Photo ContactsArcsoft Photo Contacts
Arcsoft Photo Contacts
Arcsoft Photo ContactsArcsoft Photo Contacts
from the pop-up menu.
2. Tap the
button to display a thumbnail
of each contact.
Tap to view the contact thumbnail
Thumbnail ViewThumbnail View
Thumbnail View
Thumbnail ViewThumbnail View
3. Tap and hold a contact, then
Attach Photo Attach Photo
tap
Attach Photo from the
Attach Photo Attach Photo
pop-up menu.
4. Tap
Browse... Browse...
Browse... to locate the
Browse... Browse...
photo you want to attach.
4-20
P505 Smart PDA Phone
Page 99

5. The selected photo is
displayed. Select a template
and/or ringtone if you wish to
customize the contact call
settings. Tap
OK OK
O K when done.
OK OK
A thumbnail of the attached
photo with the contact name
will appear on screen when
the contact calls.
You can also use the Photo Contacts application to:
• Call and send e-mail/SMS/MMS messages to contacts
• Send the contact information by beam
• Save the contact information to the SIM card phone book.
• Assign a speed dial key to a contact.
Chapter 4: Using Pocket Outlook
®
4-21
Page 100

4-22
P505 Smart PDA Phone
 Loading...