

Page 1
E1893E1893
E1893
E1893E1893
Page 2
Getting to know your P505Getting to know your P505
Getting to know your P505
Getting to know your P505Getting to know your P505
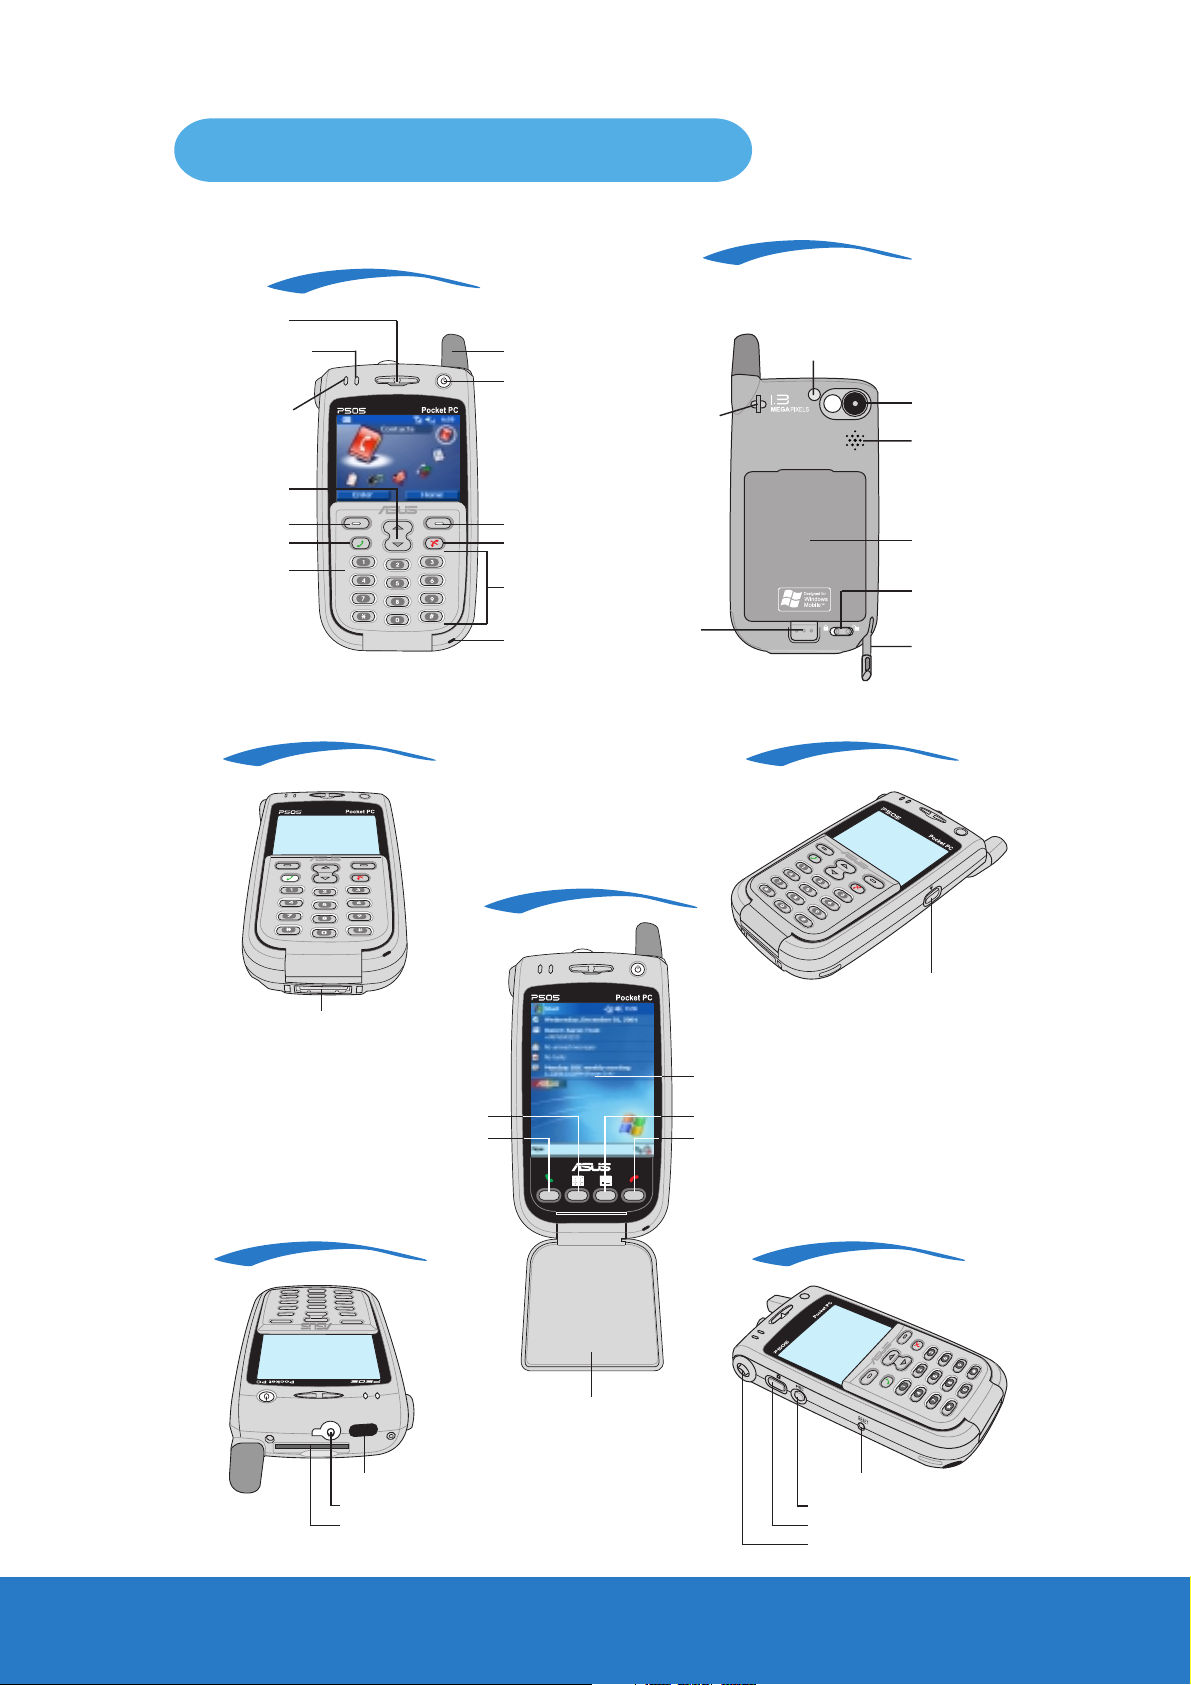
Front featuresFront features
Front features
Front featuresFront features
(flip closed)(flip closed)
(flip closed)
(flip closed)(flip closed)
Earpiece
Bluetooth®/System
notification LED
GSM/GPRS
standby LED
Navigation keys
Soft key (left)
Call key
Flip
Bottom featuresBottom features
Bottom features
Bottom featuresBottom features
Antenna
Power button/Power LED
Strap holder
Soft key (right)
End key
Numeric keys
Microphone
Battery latch
Rear featuresRear features
Rear features
Rear featuresRear features
Flash
Camera
Speaker
Battery
Battery lock
Stylus
Right side featuresRight side features
Right side features
Right side featuresRight side features
System connector
Top featuresTop features
Top features
Top featuresTop features
Front featuresFront features
Front features
Front featuresFront features
(flip open)(flip open)
(flip open)
(flip open)(flip open)
LCD touch screen
Contacts buttonCalendar button
End buttonCall button
Left side featuresLeft side features
Left side features
Left side featuresLeft side features
Flip
Voice Commander
button
Infrared (IR) port
Audio port
SD/MMC/SDIO card slot
Software reset switch
Record button
Camera button
5-way joystick
Page 3
Initial installation and setupInitial installation and setup
Initial installation and setup
Initial installation and setupInitial installation and setup
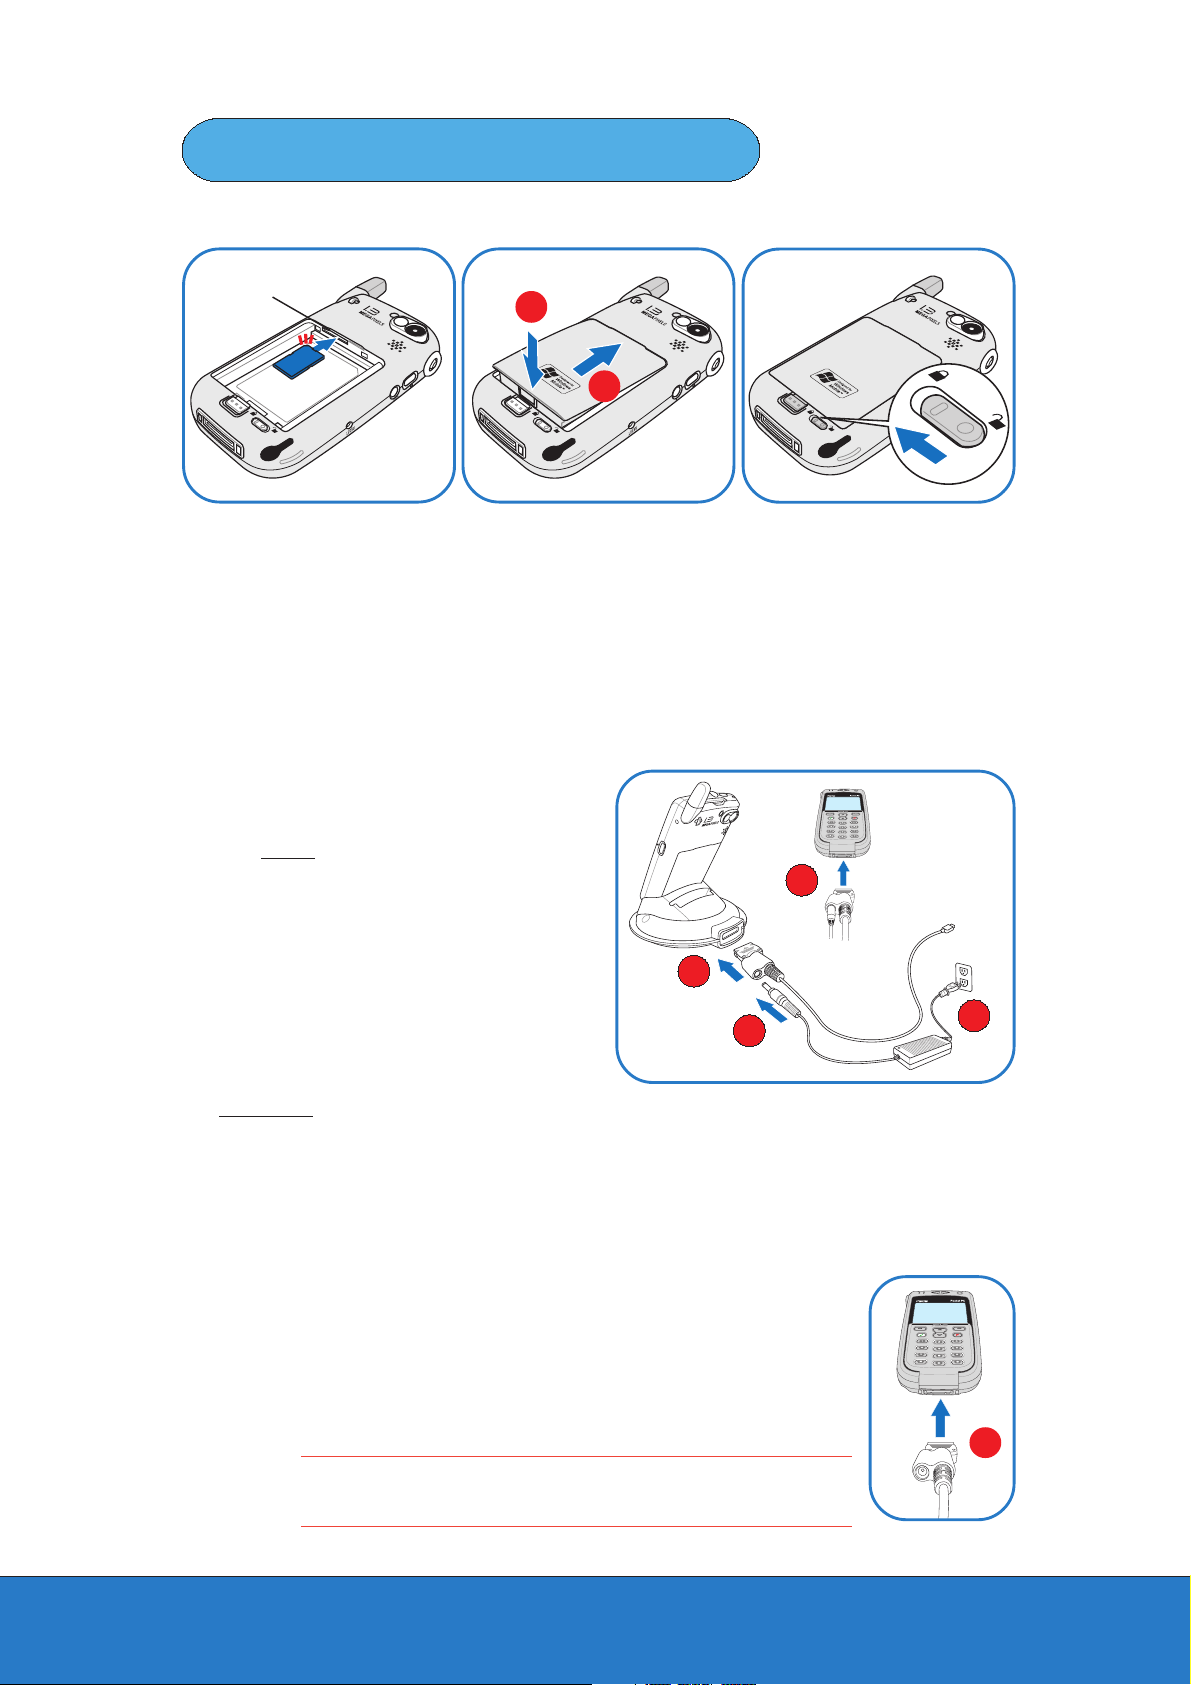
Installing the SIM card and batteryInstalling the SIM card and battery
Installing the SIM card and battery
Installing the SIM card and batteryInstalling the SIM card and battery
SIM card slot
BB
B
BB
AA
A
AA
Locate the SIM card
slot, then insert the
11
1
11
SIM card with its nicked
corner on top and its
contacts face down.
Charging the device batteryCharging the device battery
Charging the device battery
Charging the device batteryCharging the device battery
Using the AC adapterUsing the AC adapter
Using the AC adapter
Using the AC adapterUsing the AC adapter
Connect the AC adapter plug to the
11
1
DC/USB cable plug.
11
WithWith
(A)
22
2
DC/USB cable plug to the system
22
connector at the back of the cradle. The
cradle base lights up blue when the device
battery is charging.
You can charge a spare battery to the
battery charger slot on the cradle. The
cradle base lights up orange until the spare
battery is fully charged.
WithoutWithout
Without
(B)
WithoutWithout
DC/USB cable plug to the system
connector at the bottom of the device.
Connect the AC power plug to a
33
3
grounded wall socket.
33
the cradle the cradle
With
the cradle: Connect the
WithWith
the cradle the cradle
the cradle the cradle
the cradle: Connect the
the cradle the cradle
Install the battery by
sliding it to the com-
22
2
22
partment (A), then press
(B) to keep it in place.
• The Power button LED lights up amber
Use the stylus to
move the battery lock
33
3
33
to the left to secure the
battery.
2B
2A
33
3
11
1
11
when the battery is charging and turns
green when the battery is fully-charged.
Initial charging takes four hours. It is
strongly recommended that you fully
charge the device before use.
33
Using the USB plugUsing the USB plug
Using the USB plug
Using the USB plugUsing the USB plug
Connect the DC/USB cable plug to the system connector at
11
1
the bottom of the device.
11
Connect the USB plug of the DC/USB cable to an available
22
2
USB port on your computer or notebook.
22
NOTENOTE
NOTE If you charge the device battery using a notebook USB port, make
NOTENOTE
sure that the notebook is connected to an AC power source.
11
1
11
Page 4
Getting startedGetting started
Getting started
Getting startedGetting started
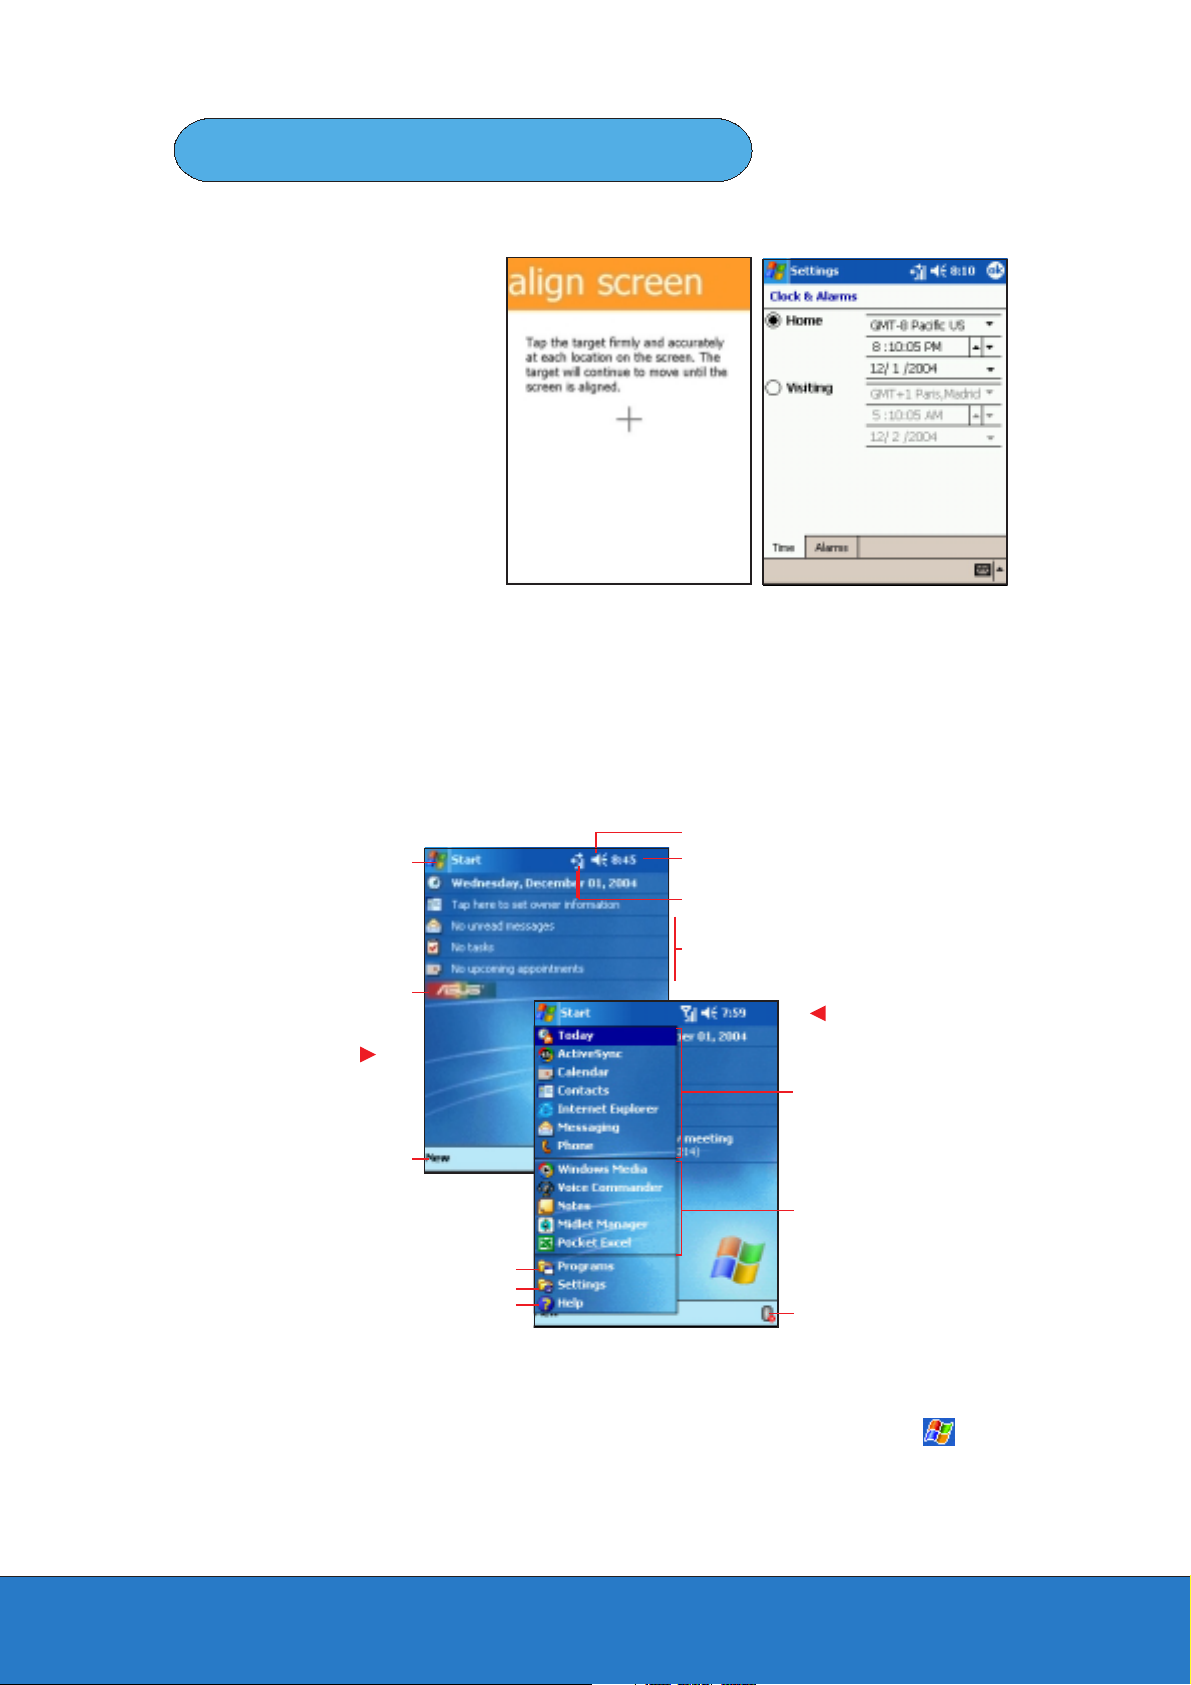
Activating and calibrating the deviceActivating and calibrating the device
Activating and calibrating the device
Activating and calibrating the deviceActivating and calibrating the device
Press the power button to turn
on the device, then open the
flip. The first time you start or
reset the device, the screen
prompts you to re-calibrate and
set the local time zone. Follow
onscreen instructions to
proceed.
Aligning the screen Setting the
local time zone
Today screenToday screen
Today screen
Today screenToday screen
Today Today
The
Today screen lets you see at a glance the summary of the important information
Today Today
for the day. The screen appears when you turn on your device and open the phone flip for
the first time each day. Tap any of the listed items with the stylus to display the details.
Tap to switch to a program
Tap to change the date and time
Tap to set owner information
Tap the ASUS logo toTap the ASUS logo to
Tap the ASUS logo to
Tap the ASUS logo toTap the ASUS logo to
launch the ASUS menulaunch the ASUS menu
launch the ASUS menu
launch the ASUS menulaunch the ASUS menu
Today screenToday screen
Today screen
Today screenToday screen
Tap to create a new item
Tap to open the Programs menu
Tap to open the Settings menu
Start menuStart menu
Start menu
Start menuStart menu
Tap to open the Help menu
Tap to change the volume or mute all sounds
Tap to display the date, time, and
your next appointment
Tap to set up or change the network settings
Your day at a glance
Start menuStart menu
Start menu
Start menuStart menu
Tap to open a program
Tap to open a recently used
program
Tap to display the
Bluetooth™ menu
The Start menu allows you to select programs, settings, and Help topics. Tap from
the top left corner of the screen to display the Start menu.
Page 5

ASUS menuASUS menu
ASUS menu
ASUS menuASUS menu
The ASUS menu provides quick
access to commonly used PDA
and mobile phone applications.
When the flip is open, you can
launch the ASUS menu by
tapping the
Today screen. The ASUS menu
in phone mode is designed for
easy one-hand use.
NOTENOTE
NOTE • Refer to the user guide for details on how to enable, select and change icons,
NOTENOTE
ASUS ASUS
ASUS logo
ASUS ASUS
and launch applications in the ASUS menu.
• When the ASUS menu is in phone mode, the LCD touch screen is disabled. You
can use the LCD touch screen by opening the flip to access the selected
menu or application in PDA mode.
in the
Phone modePhone mode
Phone mode
Phone modePhone mode
PDA modePDA mode
PDA mode
PDA modePDA mode
Entering informationEntering information
Entering information
Entering informationEntering information
Use any one of the following ways to enter information on your deviceUse any one of the following ways to enter information on your device
Use any one of the following ways to enter information on your device
Use any one of the following ways to enter information on your deviceUse any one of the following ways to enter information on your device
TypingTyping
•
Typing Tap the arrow on the lower right corner of the screen, select Keyboard.
TypingTyping
WritingWriting
•
Writing Tap the Pen button on the command bar, use the stylus to write.
WritingWriting
DrawingDrawing
•
Drawing Tap the Pen button on the command bar, use the stylus to draw.
DrawingDrawing
RecordingRecording
•
Recording Press the Record button on the side of the device, or tap the
RecordingRecording
Record button on the recording toolbar.
Typing Recording
Writing Drawing
..
.
..
NOTENOTE
NOTE Refer to the user guide for detailed instructions on entering information on
NOTENOTE
your device.
Page 6

Making a callMaking a call
Making a call
Making a callMaking a call
When the flip is close (Phone mode)When the flip is close (Phone mode)
When the flip is close (Phone mode)
When the flip is close (Phone mode)When the flip is close (Phone mode)
NOTENOTE
NOTE If you opened an application before you close the flip, you may have to press
NOTENOTE
(Home) before you make a call.
Enter the number of
11
1
the party you wish to
11
call, then press .
NOTENOTE
NOTE • The screen displays the contact name and the photo of the person you are
NOTENOTE
calling if you have saved their number and attached a photo for him/her in
Contacts or in the SIM.
• During the call, long press
Speaker onSpeaker on
Speaker on from the menu to switch to speaker phone mode.
Speaker onSpeaker on
When the flip is open (PDA mode)When the flip is open (PDA mode)
When the flip is open (PDA mode)
When the flip is open (PDA mode)When the flip is open (PDA mode)
Tap , then tap
11
1
PhonePhone
Phone. Tap the
PhonePhone
11
number of the party you
wish to call, then tap
TalkTalk
Talk.
TalkTalk
Talk to the called
party when
22
2
22
connected.
or press (Options), then select
Talk to the called
party when connected.
22
2
22
Press anytime
to end the call.
33
3
33
End End
Tap
E n d to terminate
End End
33
3
the call.
33
Page 7

Changing basic phone settingsChanging basic phone settings
Changing basic phone settings
Changing basic phone settingsChanging basic phone settings
••
Changing and activating the SIM card securityChanging and activating the SIM card security
•
Changing and activating the SIM card security
••
Changing and activating the SIM card securityChanging and activating the SIM card security
Personal Identification Number (PIN)Personal Identification Number (PIN)
Personal Identification Number (PIN)
Personal Identification Number (PIN)Personal Identification Number (PIN)
In the Phone
screen, tap
11
1
11
then select
NOTENOTE
NOTE The default SIM card security PIN is printed in the SIM package.
NOTENOTE
Tools,Tools,
Tools,
Tools,Tools,
OptionsOptions
Options.
OptionsOptions
Check the option
Require PIN whenRequire PIN when
Require PIN when
Require PIN whenRequire PIN when
22
2
22
phone is usedphone is used
phone is used, then tap
phone is usedphone is used
Change PINChange PIN
Change PIN.
Change PINChange PIN
Key-in the default
PIN, then press
33
3
33
EnterEnter
Enter. When prompted,
EnterEnter
key-in the new PIN, then
EnterEnter
press
Enter.
EnterEnter
••
Changing the ring type and ring toneChanging the ring type and ring tone
•
Changing the ring type and ring tone
••
Changing the ring type and ring toneChanging the ring type and ring tone
In the Phone
screen, tap
11
1
11
then select
Tools,Tools,
Tools,
Tools,Tools,
OptionsOptions
Options.
OptionsOptions
In the
22
2
option, tap the down
22
arrow button, then select
a ring type from the menu.
Ring TypeRing Type
Ring Type
Ring TypeRing Type
33
3
33
arrow button, then select
a ring tone from the menu.
Tap
In the
option, tap the down
Ring ToneRing Tone
Ring Tone
Ring ToneRing Tone
when finished.
NOTENOTE
NOTE You can also access the phone settings from the Today screen. Tap
NOTENOTE
SettingsSettings
Settings, then tap the Phone icon to view the phone settings screen.
SettingsSettings
StartStart
Start,
StartStart
Page 8

••
Adjusting the volume in phone modeAdjusting the volume in phone mode
•
Adjusting the volume in phone mode
••
Adjusting the volume in phone modeAdjusting the volume in phone mode
System (device) volumeSystem (device) volume
System (device) volume
System (device) volumeSystem (device) volume
1. When the phone is in idle mode, press the
5-way joystick forward or backward to open the
System Volume System Volume
System Volume screen.
System Volume System Volume
2. Press the 5-way joystick backward to decrease
the system (device) volume. Press forward to
increase. Refer to the 5-way joystick direction
below.
3. Press the 5-way joystick to return to the
previous phone menu.
Ring volumeRing volume
Ring volume
Ring volumeRing volume
1. When the phone is in idle mode, press the
center button of the 5-way joystick for two
seconds to open the
2. Press the 5-way joystick backward to decrease
the ring volume. Press forward to increase. Refer
to the 5-way joystick direction below.
3. Press the 5-way joystick to return to the
previous phone menu.
Ring Volume Ring Volume
Ring Volume screen.
Ring Volume Ring Volume
NOTENOTE
NOTE You can only adjust the system and ring volumes when the phone is not in
NOTENOTE
use for an incoming or outgoing call.
In Call volumeIn Call volume
In Call volume
In Call volumeIn Call volume
1. After getting connected to the other party
during an incoming or outgoing call, press the
5-way joystick to open the
screen.
2. Press the 5-way joystick backward to
decrease the in call volume. Press forward to
increase. Refer to the 5-way joystick
direction below.
3. Press the 5-way joystick to return to the
previous phone menu.
NOTENOTE
NOTE You can only adjust the in call
NOTENOTE
volume while you are talking to
another party on the line.
In Call VolumeIn Call Volume
In Call Volume
In Call VolumeIn Call Volume
5-way joystick direction5-way joystick direction
5-way joystick direction
5-way joystick direction5-way joystick direction
to decrease
volume
to increase
volume
Page 9

••
Locking the phoneLocking the phone
•
Locking the phone
••
Locking the phoneLocking the phone
••
Unlocking the phoneUnlocking the phone
•
Unlocking the phone
••
Unlocking the phoneUnlocking the phone
keypad and side keyskeypad and side keys
keypad and side keys
keypad and side keyskeypad and side keys
Put the phone in idle mode, press
(Menu), then press .
Changing the wake-up sourceChanging the wake-up source
Changing the wake-up source
Changing the wake-up sourceChanging the wake-up source
The device automatically wakes-up from sleep depending on the wake-up source you
selected (i.e. pressing the side keys, application buttons, etc.) To save battery power,
it is recommended that you select “Flip Open” as the device wake-up source.
keypad and side keyskeypad and side keys
keypad and side keys
keypad and side keyskeypad and side keys
Press (Unlock), then press .
To change the wake-up source:
In the Today screen,
11
1
11
tap , then tap
SettingsSettings
Settings.
SettingsSettings
22
2
22
Tap the
Source Source
Source icon.
Source Source
Wakeup Wakeup
Wakeup
Wakeup Wakeup
Tap the box before
a wake-up source to
33
3
33
select, then tap
.
Page 10

Using the cameraUsing the camera
Using the camera
Using the cameraUsing the camera
In PDA modeIn PDA mode
In PDA mode
In PDA modeIn PDA mode
Press the camera
11
1
button to aunch the
11
P505 camera. Press up/
down the 5-way joystick to
zoom in/out your subject,
then press the 5-way
joystick to start/stop the
capture.
During preview,
22
2
press the camera
22
button or tap to
select from six capture
modes: Single Shot,
MMS, Burst,
Composition, Video,
and Caller ID.
Tap to select from
33
nine themes: Auto,
3
33
Sunlight, Flourescent,
Candle, Face, Landscape,
Sepia, Night Scene, and
Negative Art. Tap
change the preview
orientation.
to
NONO
TETE
NO
T E Refer to the user guide for detailed camera features and functions.
NONO
TETE
In phone modeIn phone mode
In phone mode
In phone modeIn phone mode
Press the camera button to launch the P505
11
1
camera. Press up/down the 5-way joystick or
11
the
the 5-way joystick to capture the image. For video
capture, press the 5-way joystick again to stop
video recording.
22
2
22
MMS, Burst, Composition, Video, and Caller ID.
33
3
33
44
4
44
Tap
to zoom in/out your subject, then press
During preview, press the camera button to
select from six capture modes: Single Shot,
Press the record button to turn on or off the flash.
Press the Voice Commander button to select from nine themes: Auto, Sunlight,
Flourescent, Candle, Face, Landscape, Sepia, Night Scene, and Negative Art.
to change the preview orientation.
Page 11

Synchronizing your P505Synchronizing your P505
Synchronizing your P505
Synchronizing your P505Synchronizing your P505
Use the P505 Companion CD to install the Microsoft
computer. ActiveSync
NOTENOTE
NOTE Do not connect your device to your computer until you have installed ActiveSync
NOTENOTE
Using the cradleUsing the cradle
Using the cradle
Using the cradleUsing the cradle
Place the device on the cradle, then
11
1
connect the DC/USB cable plug to the
11
system connector at the back of the cradle.
Connect the USB plug of the
22
2
DC/USB cable to a USB port on your
22
computer.
11
1
11
®
is already installed on your device.
Without the cradleWithout the cradle
Without the cradle
Without the cradleWithout the cradle
11
1
11
of the device.
22
2
22
port on your computer.
22
2
22
®
ActiveSync® on your desktop
®
.
Connect the DC/USB cable plug to
the system connector at the bottom
Connect the USB plug of the
DC/USB cable to an available USB
3
1
2
4
6
5
7
9
8
#
0
11
1
11
22
2
22
NOTENOTE
NOTE During synchronization, the battery is charged through the AC adapter
NOTENOTE
(if you connected the AC adapter plug to the DC/USB cable plug) or through
the USB port.
Synchronization statusSynchronization status
Synchronization status
Synchronization statusSynchronization status
Upon connection, your device is automatically synchronized with your computer.
Synchronization status on P505
Connection status
Tap to connect
and synchronize
Tap to stop
synchronization
Synchronization
information
Synchronization status on your computer
Tap to synchronize via IR or
change synchronization settings
Page 12

Copying SIM contacts to P505 ContactsCopying SIM contacts to P505 Contacts
Copying SIM contacts to P505 Contacts
Copying SIM contacts to P505 ContactsCopying SIM contacts to P505 Contacts
SIM ManagerSIM Manager
With
SIM Manager, you can copy contact information from your SIM to the device
SIM ManagerSIM Manager
Contacts and vice-versa. To copy a contact from the SIM to the device Contacts:
Tap ,
1
icon.
Tap the box before the SIM contact(s) you want to
2
copy. To copy all SIM contacts, tap and hold the
SIM Contacts section, then tap
Contacts Contacts
Contacts from the menu.
Contacts Contacts
Tap . If you selected all SIM Contacts, tap and
3
hold anywhere in SIM Contacts section, then tap
Copy All SIM Contacts Copy All SIM Contacts
Copy All SIM Contacts from the menu.
Copy All SIM Contacts Copy All SIM Contacts
The screen displays the selected contact(s) to
4
copy. Tap
Copy DoneCopy Done
A
Copy Done window appears to indicate that
Copy DoneCopy Done
5
you have successfully copied the SIM contact(s) to
the device Contacts.
Tap
to close the window.
ProgramsPrograms
Programs, then tap the
ProgramsPrograms
Select All SIMSelect All SIM
Select All SIM
Select All SIMSelect All SIM
CopyCopy
Copy.
CopyCopy
SIM ManagerSIM Manager
SIM Manager
SIM ManagerSIM Manager
Reference informationReference information
Reference information
Reference informationReference information
Refer to the following sources of additional information for your P505.
OperationOperation
Operation P505 Smart PDA Phone User Guide
OperationOperation
Online HelpOnline Help
Online Help Windows
Online HelpOnline Help
ActiveSync® Help
Web sites and technical support
Technical supportTechnical support
Technical support +886-2-2894-3447 ext. 7122
Technical supportTechnical support
Support faxSupport fax
Support fax +886-2-2890-7698
Support faxSupport fax
Support e-mailSupport e-mail
Support e-mail tsd@asus.com.tw
Support e-mailSupport e-mail
Web siteWeb site
Web site www.asus.com.tw
Web siteWeb site
Software downloadSoftware download
Software download download.asus.com.tw
Software downloadSoftware download
Pocket PC web sitePocket PC web site
Pocket PC web site www.microsoft.com/mobile/pocketpc
Pocket PC web sitePocket PC web site
15-06A193100
®
Pocket PC Help
(on your computer)
(on your device)
 Loading...