

Page 1
P1 Portable LED Projector
User Guide
October 2011
Page 2

Compliance Information
FCC notice
This equipment has been tested and found to comply with the limits for a Class B
digital device, pursuant to part 15 of the FCC Rules. These limits are designed to
provide reasonable protection against harmful interference in residential installation.
This equipment generates, uses and can radiate radio frequency energy and if not
installed and used in accordance with the instructions, may cause harmful
interference to radio communications. However, there is no guarantee that
interference will not occur in a particular installation. If this equipment does cause
harmful interference to radio or television reception, detectable by turning the
equipment in question off and on, the user is encouraged to try to correct the
interference by one or more of the following measures:
• Reorient or relocate the receiving antenna
• Increase the distance between the equipment and the receiver
• Connect the equipment to an outlet on a different circuit than that which the receiver
is connected to
• Or consult the dealer or an experienced radio/TV technician for help.
This device complies with Part 15 of the FCC Rules. Operation is subject to following
two conditions:
1. This device may not cause harmful interference, and
2. This device must accept any interference that may cause undesired operation.
Canadian Department of Communications Statement
This digital apparatus does not exceed the Class B limits for radio noise emissions
from digital apparatus set out in the Radio Interference Regulations of the Canadian
Department of Communications.
This class B digital apparatus complies with Canadian ICES-003.
EN-2
Page 3

Safety instructions
Read all of these instructions before you operate your projector and save for future
reference.
1. Read instructions
All the safety and operating instructions should be read before the appliance is
operated.
2. Notes and warnings
All notes and warnings in the operating instructions should be adhered to.
3. Cleaning
Unplug the projector from the wall socket before cleaning. Use a damp cloth for
cleaning the projector housing. Do not use liquid or aerosol cleaners.
4. Accessories
Do not place this product on an unstable cart, stand, or table. The product may fall,
causing serious damage to the product.
Keep the plastic packing materials (from the projector, accessories and optional
parts) out of the reach of children as these bags may result in death by suffocation.
Be particularly careful around the small children.
5. Ventilation
The projector is equipped with ventilation holes (intake) and ventilation holes
(exhaust).
Do not block or place anything near these slots, or internal heat build-up may
occur, causing picture degradation or damage to the projector.
6. Power sources
Check that the operating voltage of your unit is identical with the voltage of your
local power supply.
7. Servicing
Do not attempt to service this projector yourself. Refer all servicing to qualified
service personnel.
8. Replacement parts
When replacement parts are required, be sure that the replacement parts are
specified by the manufacture. Unauthorized substitutions may result in fire, electric
shock or other hazards.
9. Moisture Condensation
Never operate this projector immediately after moving it from a cold location to a
warm one. When the projector is exposed to such a change in temperature,
moisture may condense on the lens and the crucial internal parts. To prevent the
unit from possible damage, do not use the projector for at least 2 hours when there
is an extreme or sudden change in temperature.
EN-3
Page 4
Notes on the AC power cord
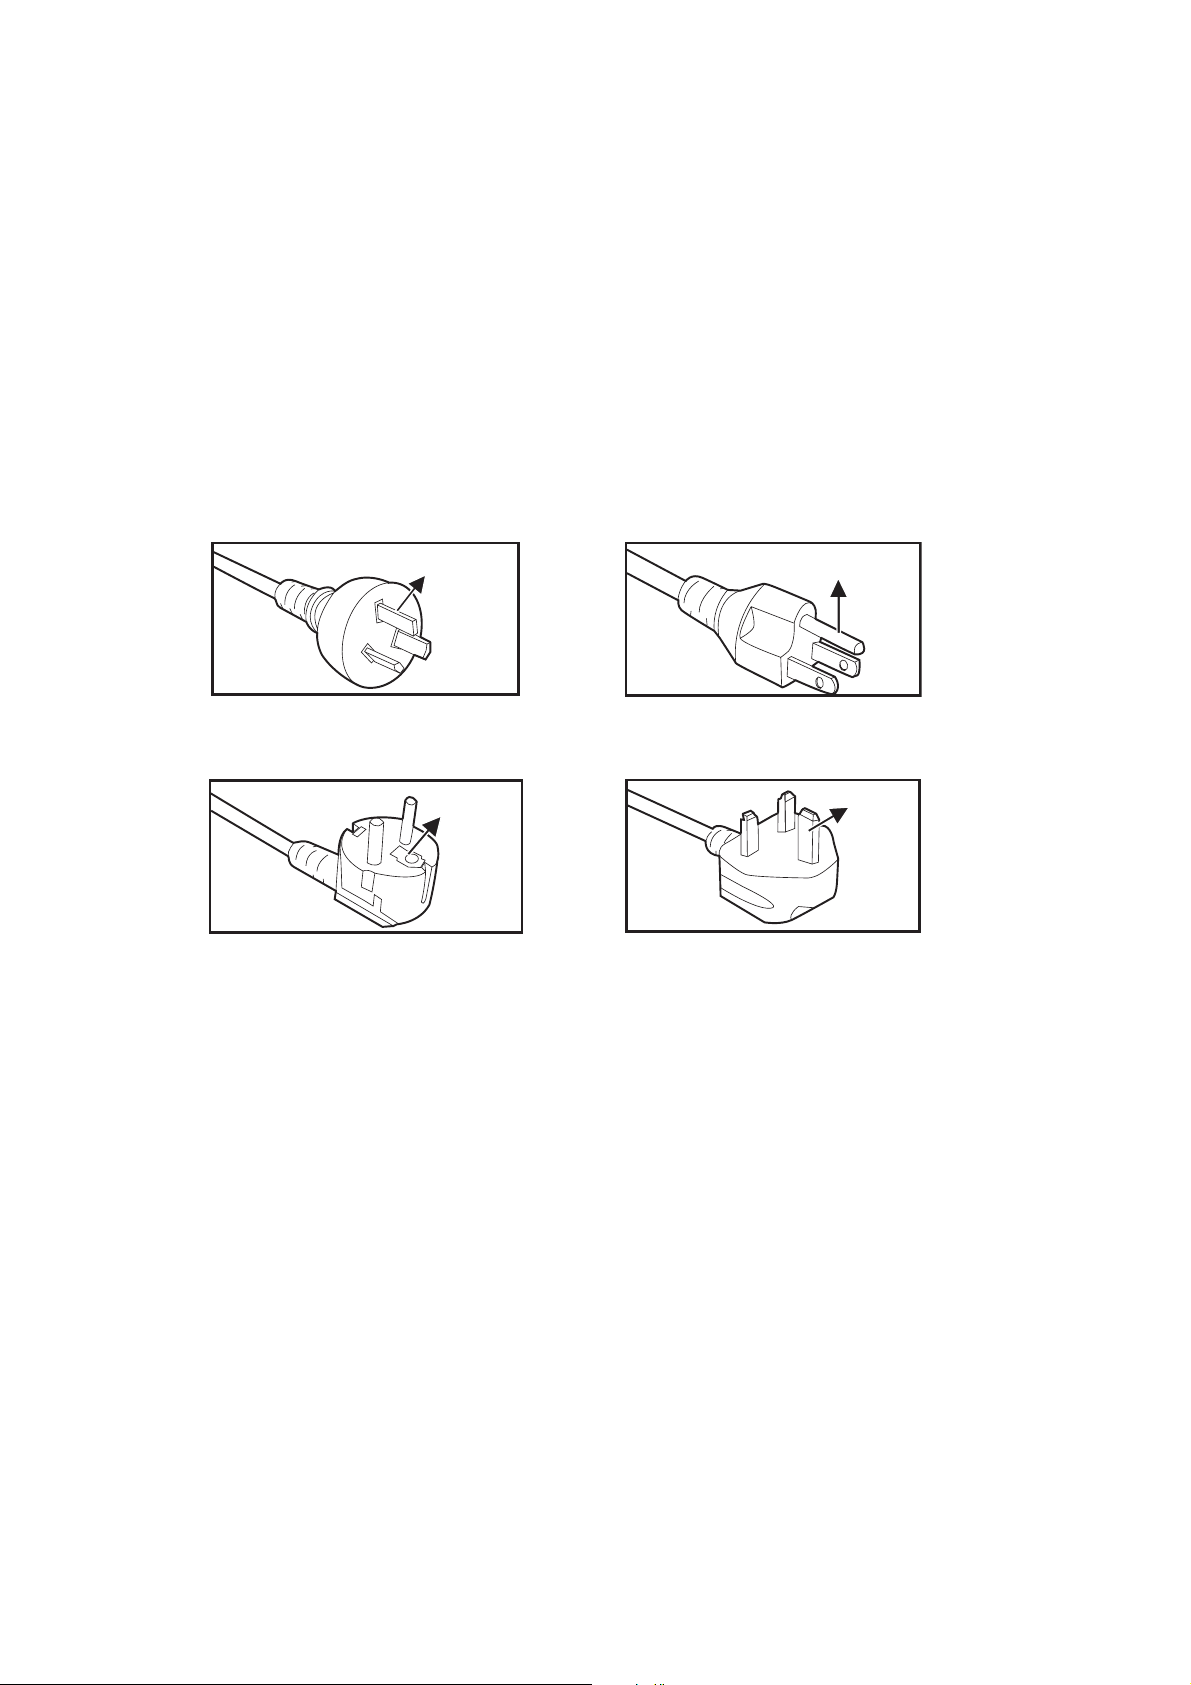
AC Power Cord must meet the requirement of countries where you use this projector.
Please confirm your AC plug type with the graphics below and ensure that the proper
AC Power Cord is used. If the supplied AC Power Cord does not match your AC
outlet, please contact your sales dealer. This projector is equipped with a grounding
type AC line plug. Please ensure that your outlet fits the plug. Do not defeat the safety
purpose of this grounding type plug. We highly recommend using a video source
device also equipped with a grounding type AC line plug to prevent signal interference
due to voltage fluctuations.
For Australia and
Mainland China
For Continental
Ground
Ground
Ground
For the U.S.A. and
Ground
For the U.K.
EN-4
Page 5

Copyright Information
Copyright© 2011 ASUSTeK COMPUTER INC. All Rights Reserved.
No part of this manual, including the products and software described in it, may be
reproduced, transmitted, transcribed, stored in a retrieval system, or translated into
any language in any form or by any means, except documentation kept by the
purchaser for backup purposes, without the express written permission of ASUSTeK
COMPUTER INC. ("ASUS").
Product warranty or service will not be extended if: (1) the product is repaired,
modified or altered, unless such repair, modification of alteration is authorized in
writing by ASUS; or (2) the serial number of the product is defaced or missing.
ASUS PROVIDES THIS MANUAL "AS IS" WITHOUT WARRANTY OF ANY KIND,
EITHER EXPRESS OR IMPLIED, INCLUDING BUT NOT LIMITED TO THE IMPLIED
WARRANTIES OR CONDITIONS OF MERCHANTABILITY OR FITNESS FOR A
PARTICULAR PURPOSE. IN NO EVENT SHALL ASUS, ITS DIRECTORS,
OFFICERS, EMPLOYEES OR AGENTS BE LIABLE FOR ANY INDIRECT, SPECIAL,
INCIDENTAL, OR CONSEQUENTIAL DAMAGES (INCLUDING DAMAGES FOR
LOSS OF PROFITS, LOSS OF BUSINESS, LOSS OF USE OR DATA,
INTERRUPTION OF BUSINESS AND THE LIKE), EVEN IF ASUS HAS BEEN
ADVISED OF THE POSSIBILITY OF SUCH DAMAGES ARISING FROM ANY
DEFECT OR ERROR IN THIS MANUAL OR PRODUCT.
SPECIFICATIONS AND INFORMATION CONTAINED IN THIS MANUAL ARE
FURNISHED FOR INFORMATIONAL USE ONLY, AND ARE SUBJECT TO CHANGE
AT ANY TIME WITHOUT NOTICE, AND SHOULD NOT BE CONSTRUED AS A
COMMITMENT BY ASUS. ASUS ASSUMES NO RESPONSIBILITY OR LIABILITY
FOR ANY ERRORS OR INACCURACIES THAT MAY APPEAR IN THIS MANUAL,
INCLUDING THE PRODUCTS AND SOFTWARE DESCRIBED IN IT.
Products and corporate names appearing in this manual may or may not be registered
trademarks or copyrights of their respective companies, and are used only for
identification or explanation and to the Owners' benefit, without intent to infringe.
EN-5
Page 6

Table of contents
Introduction ........................................................................................... 7
Projector features ................................................................................................................................... 7
Package contents .................................................................................................................................. 8
Projector overview ................................................................................................................................. 9
Using the product ................................................................................ 10
Control panel ........................................................................................................................................ 10
Connection .......................................................................................... 11
Using the power adapter ...................................................................................................................... 11
Connecting a computer ........................................................................................................................ 12
Connecting a composite video source device ...................................................................................... 13
Operation ............................................................................................. 14
Powering on/off the projector ............................................................................................................... 14
Adjusting the projector height .............................................................................................................. 15
Adjusting the projector focus ................................................................................................................ 15
Adjusting projection image size ........................................................................................................... 16
Menu operation .................................................................................................................................... 17
Maintenance ........................................................................................ 22
Cleaning the lens ................................................................................................................................. 22
Cleaning the projector housing ............................................................................................................ 22
Specifications ...................................................................................... 23
Dimensions .......................................................................................................................................... 24
Appendix .............................................................................................. 24
LED Indicator Messages ................................................................. 24
Compatibility modes ............................................................................................................................. 25
Troubleshooting ................................................................................................................................... 26
EN-6
Page 7

Introduction
Projector features
The projector integrates high-performance optical engine projection and a user - friendly
design to deliver high reliability and ease of use.
The projector offers the following features:
• Advanced LED light source provides a longer life span than traditional lamps.
• Single chip 0.45" Texas Instruments DLP® technology
• WXGA (1280 x 800 pixels)
• The projector is small and light, making it useful for business trips and leisure
activities.
• User-friendly, multi-language on-screen display
Note
• The information in this manual is subject to change without notices.
• The reproduction, transfer or copy of all or any part of this document is not permitted
without express written consent.
EN-7
Page 8
Package contents
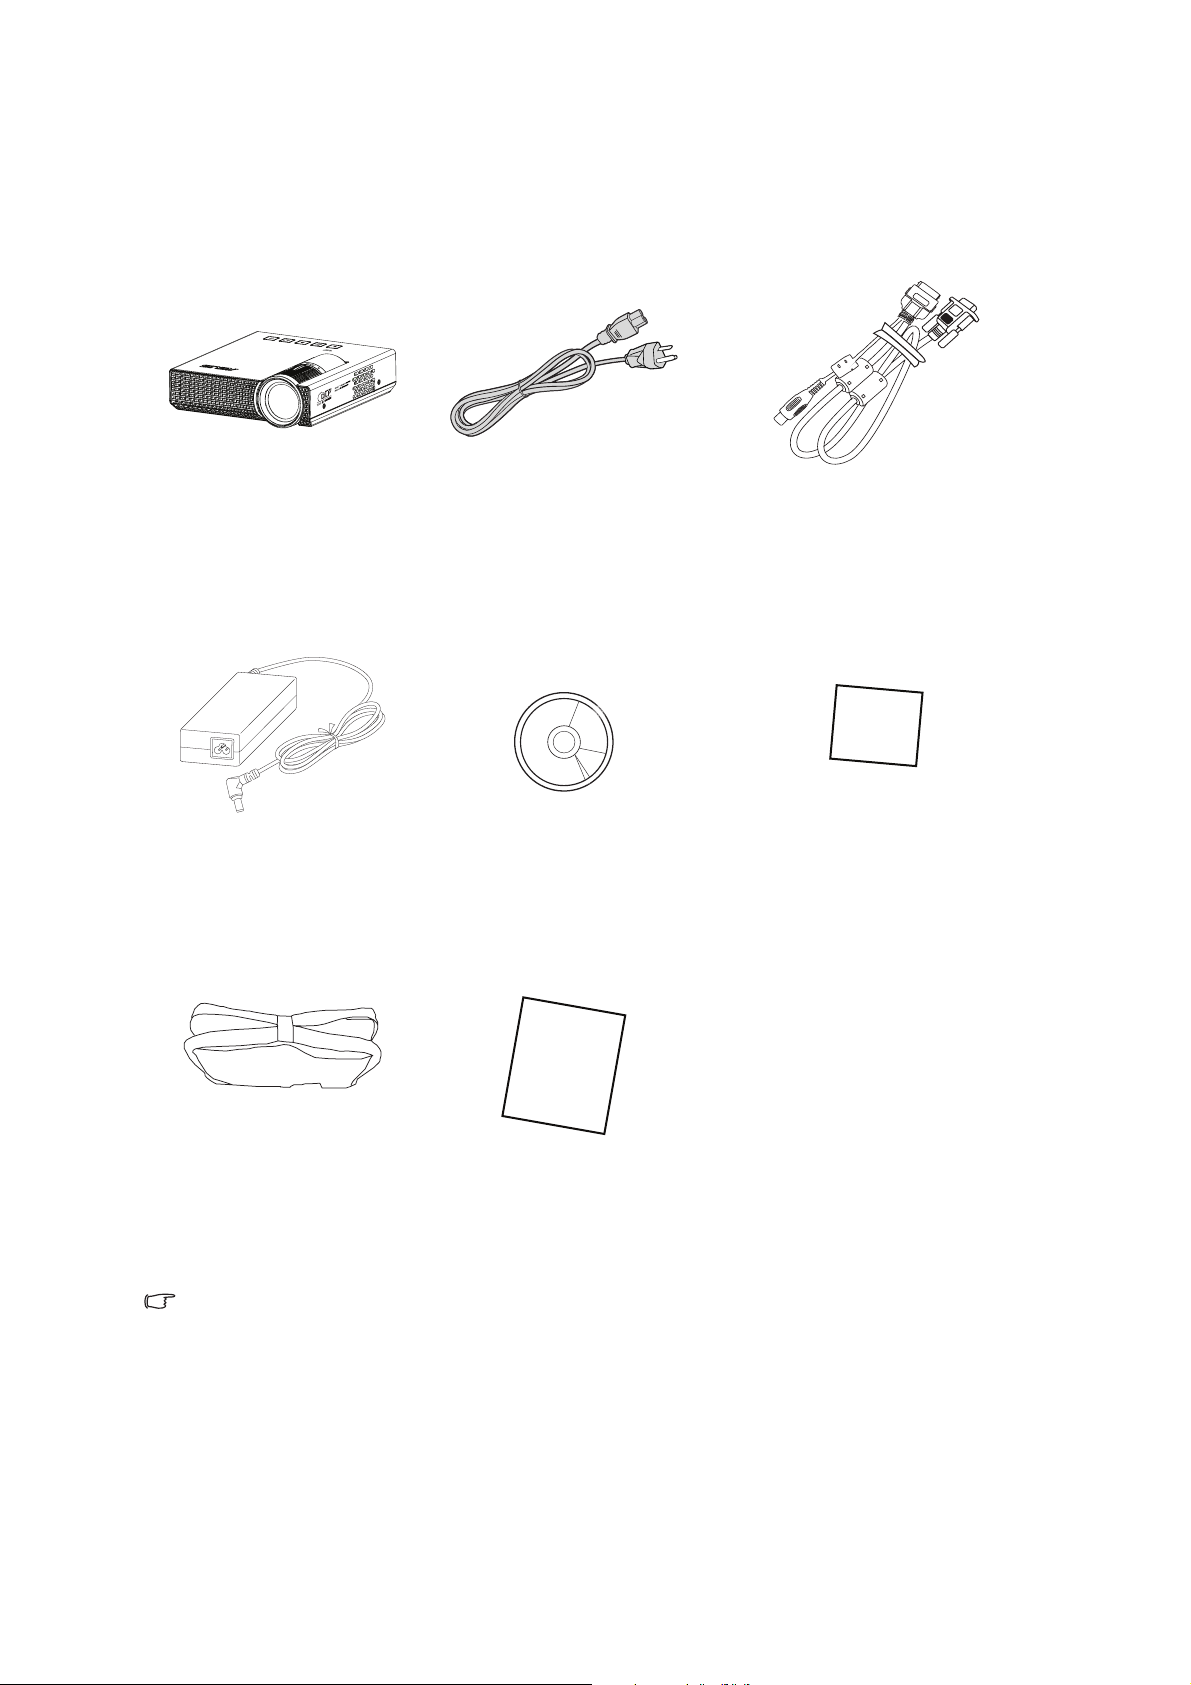
When you unpack the projector, make sure you have all these components:
Projector AC power cord Multi-input cable
(30-pin CEA integrated cable)
Q
uick
Start G
ui
de
Power adapter User manual CD Quick start guide
Projector carrying bag Warranty card
Note
• Contact you dealer immediately if any items are missing, appear damaged, or if the unit
does not work.
• For maximum protection of the product, please save the original shipping carton and
packing materials and repack your product as it was originally packed at the factory if
you need to ship it.
EN-8
Page 9

Projector overview
Front view
43
1
1 3
Ventilation holes Focus ring
2 4
Projection lens Control panel
2
Rear/bottom view
5
6
7
1
9
8
5
Power adapter inlet Tripod socket
6 9
Kensington lock Supporting stand
7
Multi-input socket
8
VGA/composite video signal
input jack
EN-9
Page 10

Using the product
Control panel
1
2 3 2
1
TEMP (Temperature LED indicator)
4
5
Refer to “LED Indicator Messages”.
2
Left/Right keys
Use left/right keys to select items or make adjustments to your selection.
3
Menu
Display the on-screen display menus or confirm the selection.
4
Input
Manually select an input source.
5
Power
Power LED indicator (Refer to “LED Indicator Messages”.)
Turn the projector on or off.
EN-10
Page 11

Connection
Using the power adapter
The projector must be used with the provided power adapter. Damage caused by the
use of an incorrect adapter is not covered under the warranty.
1. Insert the plug from the power adapter into the DC IN terminal.
2. Insert the appropriate end of the power cord into the power adapter.
3. Insert the plug on the power cord into a wall outlet.
3
1
2
Important
• In the connections shown above, some cables may not be included with the projector
(see "Package contents" on page 8). They are commercially available from electronics
stores.
• The connection illustrations above are for reference only. The rear connecting jacks
available on the projector vary with each projector model.
• For detailed connection methods, see pages 12-13.
EN-11
Page 12

Connecting a computer
The projector provides a VGA input socket that allows you to connect it to both IBM®
compatibles and Macintosh® computers. A Mac adapter is needed if you are
connecting legacy version Macintosh computers.
To connect the projector to a notebook or desktop computer:
• Using a VGA cable
1. Take the supplied multi-input cable and connect one end to the D-Sub output
socket of the computer.
2. Connect the other end of the multi-input cable to the multi-input socket on the
projector.
Important
• Many notebooks do not turn on their external video ports when connected to a
projector. Usually a key combo like FN + F8 or CRT/LCD key turns the external display
on/off. Locate a function key labeled CRT/LCD or a function key with a monitor symbol
on the notebook. Press FN and the labeled function key simultaneously. Refer to your
notebook's documentation to find your notebook's key combination.
EN-12
Page 13

Connecting a composite video source device
Examine your video source device to determine if it has a set of unused composite
video output sockets available:
• If so, you can continue with this procedure.
• If not, you will need to reassess which method you can use to connect to the device.
To connect the projector to a composite video source device:
1. Take a video cable and connect one end to the composite video output socket of
the video source device.
2. Connect the other end to the video input socket to the multi-input cable.
Sold separately
EN-13
Page 14

Operation
Powering on/off the projector
Powering on the projector:
1. Connect the power using the power adapter and peripheral signal cable(s)
connections.
2. Press to turn on the projector.
The projector takes several seconds or so to warm up.
3. Turn on your source (computer, notebook, DVD, etc.). The projector automatically
detects your source.
• If you are connecting multiple sources to the projector simultaneously, press
Input to select your desired signal.
4. If the projector is activated for the first time, select your OSD language with / .
5. You may also select your OSD language after Reset All Settings in Setup menu
has been activated.
Warning
• Never look into the lens when the LED light is on. This can damage your eyes.
• This focal point concentrates high temperature. Do not place any object near it to avoid
possible fire hazard.
Powering off the projector:
1. Press to turn off the projector.
2. Disconnect the power cord from the wall socket if the projector will not be used in
an extended period of time.
EN-14
Page 15

Adjusting the projector height
9°
120°
Supporting stand
The projector is equipped with a supporting stand to adjust the image height. Follow
the illustration to open and close it.
Note
• To avoid damaging the projector, make sure that the supporting stand is fully retracted
before placing the projector in its carrying case.
Adjusting the projector focus
Focus ring
Focus the image by rotating the focus ring. A still image is recommended for focusing.
EN-15
Page 16
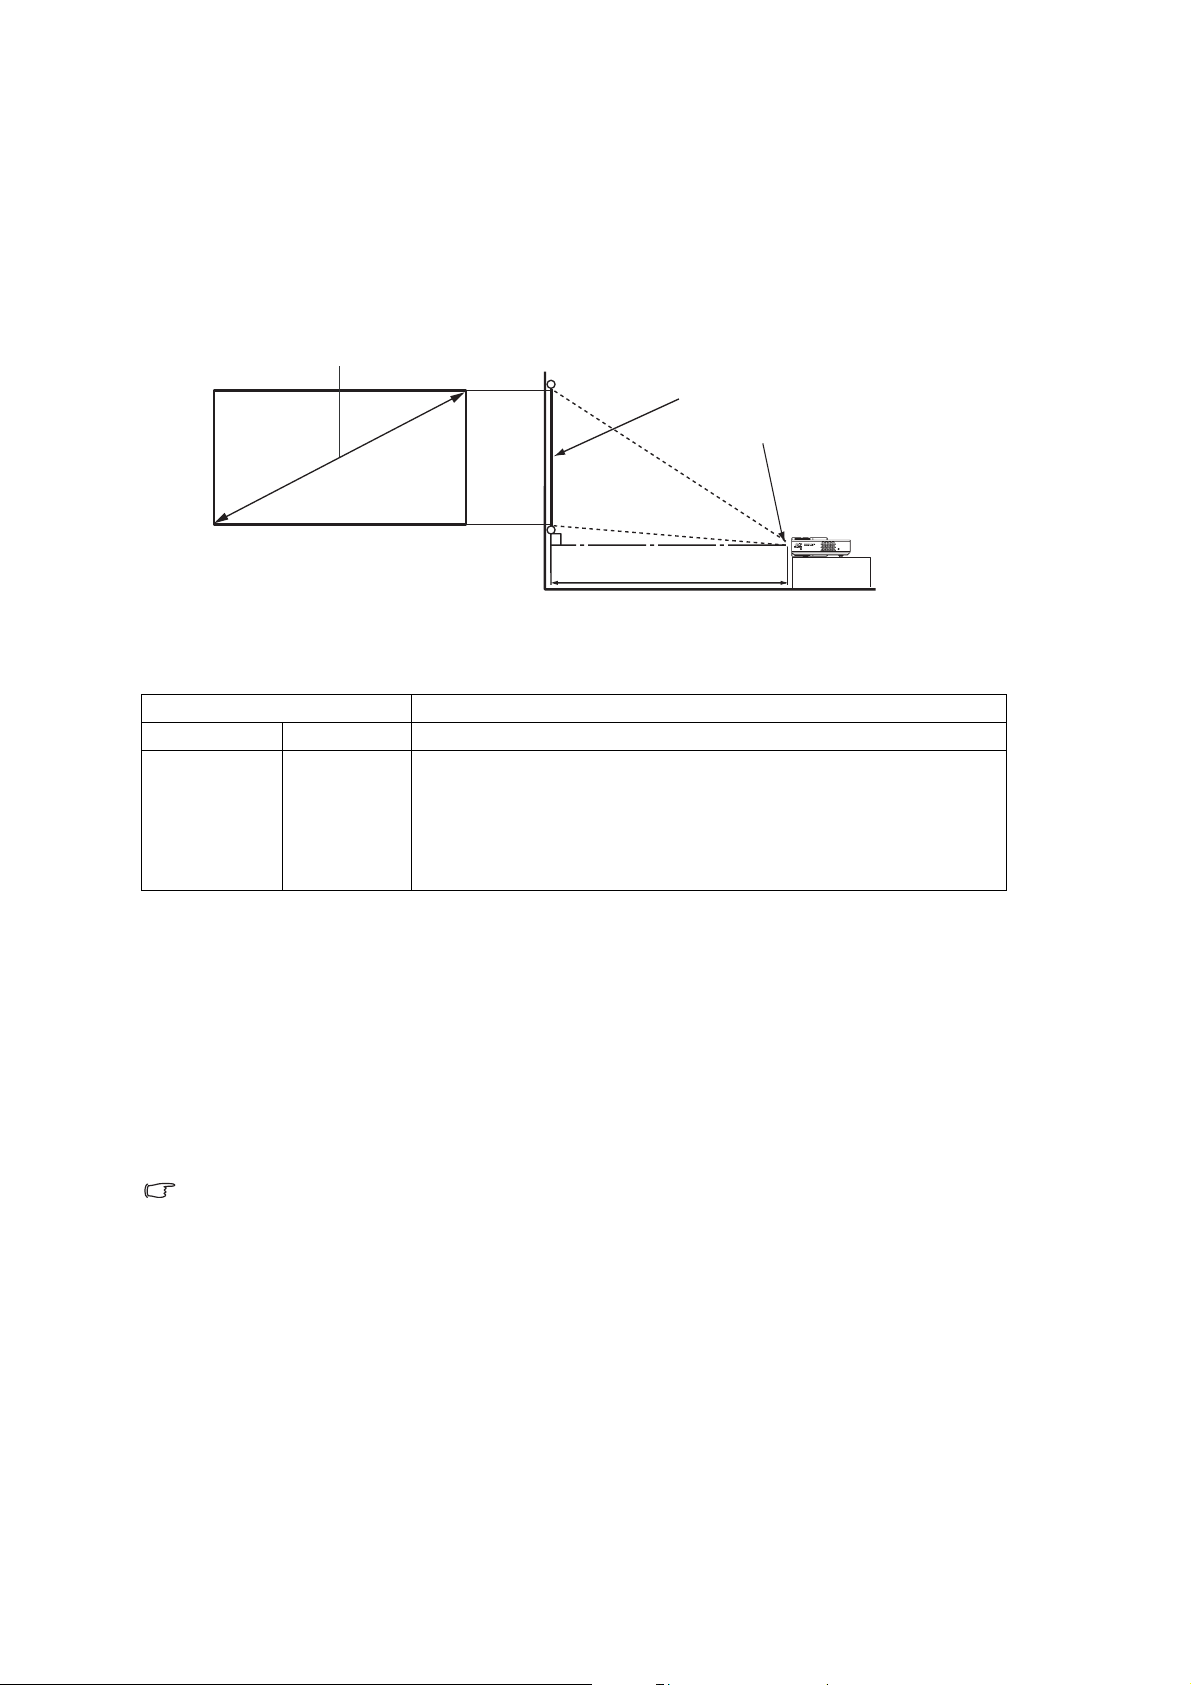
Adjusting projection image size
Refer to the graphic and table below to determine the screen size and projection
distance.
1280:800 screen diagonal
Screen
Center of lens
Projection distance
16:10 screen diagonal Recommended projection distance from screen in mm
Inches* mm** Average
24 610 621
40 1016 1034
56 1422 1448
72 1829 1862
80 2032 2069
* Screen Diagonal (inch) = 40/1034* Projection Distance (mm)
Ex: 24=40/1034*621
** Screen Diagonal (mm) = 40*25.4/1034* Projection Distance (mm)
Ex: 610=40*25.4/1034*621
There is +/-10% tolerance among these numbers due to optical component variations.
Note
• Position the projector in a horizontal position; other positions can cause heat build-up
and damage to the projector.
• Keep a space of 30 cm or more between the sides of the projector.
• Do not use the projector in a smoky environment. Smoke residue may build-up on
critical parts and damage the projector or its performance
• Consult with your dealer for special installation such as suspending from a ceiling.
.
EN-16
Page 17

Menu operation
The projector has multilingual on-screen display menus that allow you to make image
adjustments and change a variety of settings.
Never, Auto, 30 Mins, 60 Mins,
90 Mins, 120 Mins, 150 Mins,
180 Mins
EN-17
Page 18

How to operate
1. Press to open the OSD menu.
2. When OSD is displayed, use / to select any feature in the main menu.
3. After selecting the desired main menu item, press to enter main menu for
feature setting.
4. Use / to adjust the settings and then press to return to the main menu.
5. If you want to select the next item to be adjusted in the sub-menu, use / to
select the item and then press to enter the feature setting.
6. Use / to adjust the settings and then press to return to the sub-menu.
7. Select icon from the sub-menu and press to return to the main menu.
8. To exit OSD, select icon from the main menu and press . The OSD menu will
close and the projector will automatically save the new settings.
Main menu
Setting
Main menu
Sub-menu
Setting
EN-18
Page 19

Brightness
Brighten or darken the image.
Contrast
Set the difference between light and dark areas.
Keystone
Manually correct distorted images resulting from an angled projection.
Aspect Ratio
Select how the picture fits on the screen:
• Auto : Scales an image proportionally to fit the projector's native resolution in its
horizontal or vertical width.
• 4:3 : Scales an image so that it is displayed in the center of the screen with a 4:3
aspect ratio.
• 16:9 : Scales an image so that it is displayed in the center of the screen with a 16:9
aspect ratio.
• 16:10: Scale an image so that it is displayed in the center of the screen with a 16:10
aspect ratio.
Splendid™
P1 provides different preset settings optimized for different using scenario.
• Standard Mode: For normal environments.
• Black Board: For black projection screen type.
• White Board: For white projection screen type.
• Dynamic Mode: For high brightness environments.
• Game Mode: For game content.
• Scenery Mode: For scenery pictures.
• Theater Mode: For home theater.
Image Setting (Composite)
Allow you to set images for composite video input signal.
Sharpness
Sharpen or soften the image.
Tint
Shift colors toward red or green.
Color Saturation
Adjust a video image from black and white to fully saturated color.
EN-19
Page 20

Back
Return to upper level of OSD menu.
Image Setting (VGA)
Allow you to set images for VGA input signal.
Auto Adjust
Automatically determines the best picture timings for the displayed image.
Frequency
Adjust the timing of the projector relative to the computer.
Phase
Adjust the phase of the projector relative to the computer.
Horizontal Position
Adjust the image left or right within the projection area.
Vertical Position
Adjust the image up or down within the projection area.
Back
Return to upper level of OSD menu.
Setup
Allow you to change projector’s system setup.
Auto Keystone
Automatically correct distorted images resulting from an angled projection.
Lamp Power
Display the LED’s elapsed operating time (in hours).
Projector Position
Adjust the picture to match the orientation of the projector: upright or upside-down, in
front of or behind the screen. Invert or reverse the image accordingly.
Menu Timeout
Duration of OSD menu display countly starts (at idle state by second).
Power Timeout
Allows the projector to turn off if no input signal is detected after a set period of time.
• Never: The projector will not turn off no matter whether the projector is active or
inactive.
• Auto: The projector will turn off in 5 minutes from the time when the projector is
detected to be inactive.
EN-20
Page 21

• 30/60/90/120/150/180 minutes: No matter whether the projector is active or
inactive, the projector will turn off according the the selections.
Reset All Settings
Restore settings to factory default.
Information
Display current information of the projector.
Back
Return to upper level of OSD menu.
Exit
Exit OSD menu.
EN-21
Page 22

Maintenance
The projector needs proper maintenance. You should keep the lens clean as dust, dirt
or spots will project on the screen and diminish image quality. If any other parts need
replacing, contact your dealer or qualified service personnel. When cleaning any part
of the projector, always switch off and unplug the projector first.
Warning
• Never open any of the covers on the projector. Dangerous electrical voltages inside the
projector can cause severe injury. Do not attempt to service this product yourself. Refer
all servicing to qualified service personnel.
Cleaning the lens
Gently wipe the lens with lens cleaning paper. Do not touch the lens with your hands.
Cleaning the projector housing
Gently wipe with a soft cloth. If dirt and stains are not easily removed, use a soft cloth
damped with water, or water and neutral detergent, and wipe dry with a soft, dry cloth.
Note
• Turn off the projector and remove the AC power cord from the power outlet before
beginning maintenance work.
• Make sure the lens is cool before cleaning.
• Do not use detergents or chemicals other than those noted above. Do not use benzene
or thinners.
• Do not use chemical sprays.
• Use a soft cloth or lens paper only.
EN-22
Page 23

Specifications
Model P1
Display Technology 0.45" DLP
Light Source R/G/B LED
True Resolution (native) WXGA 1280x800
Brightness (Max. ANSI lumens) 200 lumens
Contrast Ratio(typical) 2000:1
Color Saturation (NTSC) 120%
Throw Ratio 1.16@16:10 (40" @ 1m)
Projection Distance 0.5 ~ 3 meters
Projection/ Screen Size 20 ~ 120 inches
Projection Offset 100%
Zoom Ratio Fixed
Keystone Adjustment Digital (Up to +/- 30 degrees)
Auto Keystone Yes
Aspect Ratio 16:10/ 16:9 / 4:3
Analog Signal Frequency 31 ~ 99 KHz(H)/ 12 ~ 120 Hz(V)
Power On Mode ≦ 50W
Standby Mode < 1W
Acoustic Noise (Typ.) Dynamic mode: 30dBA
Theater mode: 28dBA
Signal Input Computer x 1 (combine in 30 pin connector)
Video Input Video x 1 (combine in 30 pin connector)
Video signal format: NTSC-M, 4.43/ PAL-M, N, B,
D, G, H, I/ SECAM
Tripod Socket Yes
Supporting Stand Yes
Kensington lock Yes
Physical Dimension(WxHxD) 125.5 x 33.5 x 130mm
Box Dimension (WxHxD) 230 x 180 x 122mm TBD
Net Weight (Esti.) 415g
Gross Weight (Esti.) 1.3kg
Operating Temperature 5°C ~ 35°C
Operating Humidity 35%~85%
Accessories carrying bag, power adapter, power cord, 30-pin
CEA integrated cable (D-sub/Composite), User
manual, Quick Start Guide, Warranty card, Support
CD
Note: Design and Specifications are subject to change without prior notice.
®
EN-23
Page 24

Dimensions
125.5 mm (W) x 33.5 mm (H) x 130.0 mm (D)
125.5
130.0
Appendix
33.5
LED Indicator Messages
Status/Problem
Power LED (White) Temp LED (Red)
Standby Solid Off
Normal Solid Off
Temperature error Solid Solid
Fan error Solid Flashing
LED indicators
EN-24
Page 25

Compatibility modes
Computer:
Mode Resolution H Sync (kHz) V-Sync (Hz)
VGA 640 x 480 31.47 59.94
640 x 480 37.86 72.81
640 x 480 37.50 75.00
640 x 480 43.27 85.01
SVGA 800 x 600 35.16 56.25
800 x 600 37.88 60.32
800 x 600 48.08 72.19
800 x 600 46.88 75.00
800 x 600 53.67 85.06
XGA 1024 x 768 48.36 60.00
1024 x 768 56.48 70.07
1024 x 768 60.02 75.03
1024 x 768 68.68 85.00
SXGA 1152 x 864 63.85 70.01
1152 x 864 67.50 75.00
1280 x 960 60.00 60.00
1280 x 1024 63.98 60.02
WXGA (Native) 1280 X 800 (recommend) 49.7 60
WXGA 1366 x 768 48.00 60.00
1440 x 900 55.47 59.90
1440 x 900 55.94 59.89
UXGA 1600 X 1200 75 60
Video:
Compatibility H-Sync [KHz] V-Sync [Hz]
480i 15.734 60
480p 31.469 60
576i 15.625 50
576p 31.25 50
720p 45.0 60
720p 37.5 50
1080i 33.75 60
1080i 28.125 50
EN-25
Page 26

Troubleshooting
Refer to the symptoms and measures listed below before sending the projector for
repairs. If the problem persists, contact your local reseller or service center. Please
refer to "LED Indicator Messages" as well.
Start-up problems
If no lights turn on:
•
Be sure that the power connection is correct
• Press the power button again.
•
Unplug the power adapter and wait for a short while, then plug it in and press the power
button again.
Image problems
If the searching source is displayed:
•
Press
• Be sure the external source is turned on and connected.
Input
to select an active input source.
.
•
For a computer connection, ensure your notebook computer’s external video port is
turned on. Refer to the computer manual.
If the image is out of focus:
• While displaying the on-screen menu, adjust the focus ring.
• Check the projection lens to see if it needs cleaning.
If the image is flickering or unstable for a computer connection:
• Press , go to Image Setting (VGA) and adjust Auto Adjust.
EN-26
 Loading...