

Page 1
First Edition V1
March 2004
ET1605
T2 3-in-1 Upgrade
User’s Guide
Page 2

Copyright © 2004 ASUSTeK COMPUTER INC. All Rights Reserved.
No part of this manual, including the products and software described in it, may be reproduced, transmitted, transcribed, stored in a
retrieval system, or translated into any language in any form or by any means, except documentation kept by the purchaser for backup
purposes, without the express written permission of ASUSTeK COMPUTER INC. (“ASUS”).
Product warranty or service will not be extended if: (1) the product is repaired, modified or altered, unless such repair, modification of
alteration is authorized in writing by ASUS; or (2) the serial number of the product is defaced or missing.
ASUS PROVIDES THIS MANUAL “AS IS” WITHOUT WARRANTY OF ANY KIND, EITHER EXPRESS OR IMPLIED, INCLUDING BUT
NOT LIMITED TO THE IMPLIED WARRANTIES OR CONDITIONS OF MERCHANTABILITY OR FITNESS FOR A PARTICULAR
PURPOSE. IN NO EVENT SHALL ASUS, ITS DIRECTORS, OFFICERS, EMPLOYEES OR AGENTS BE LIABLE FOR ANY INDIRECT,
SPECIAL, INCIDENTAL, OR CONSEQUENTIAL DAMAGES (INCLUDING DAMAGES FOR LOSS OF PROFITS, LOSS OF
BUSINESS, LOSS OF USE OR DATA, INTERRUPTION OF BUSINESS AND THE LIKE), EVEN IF ASUS HAS BEEN ADVISED OF
THE POSSIBILITY OF SUCH DAMAGES ARISING FROM ANY DEFECT OR ERROR IN THIS MANUAL OR PRODUCT.
SPECIFICATIONS AND INFORMATION CONTAINED IN THIS MANUAL ARE FURNISHED FOR INFORMATIONAL USE ONLY, AND
ARE SUBJECT TO CHANGE AT ANY TIME WITHOUT NOTICE, AND SHOULD NOT BE CONSTRUED AS A COMMITMENT BY
ASUS. ASUS ASSUMES NO RESPONSIBILITY OR LIABILITY FOR ANY ERRORS OR INACCURACIES THAT MAY APPEAR IN THIS
MANUAL, INCLUDING THE PRODUCTS AND SOFTWARE DESCRIBED IN IT.
Products and corporate names appearing in this manual may or may not be registered trademarks or copyrights of their respective
companies, and are used only for identification or explanation and to the owners’ benefit, without intent to infringe.
2 ASUS T2 3-in-1 Upgrade User’s Guide
Page 3

Notices
Federal Communications Commission Statement
This device complies with Part 15 of the FCC Rules. Operation is subject to the following two conditions:
• This device may not cause harmful interference, and
• This device must accept any interference received including interference that may cause undesired operation.
This equipment has been tested and found to comply with the limits for a Class B digital device, pursuant to Part 15 of the FCC Rules. These
limits are designed to provide reasonable protection against harmful interference in a residential installation. This equipment generates,
uses and can radiate radio frequency energy and, if not installed and used in accordance with manufacturer’s instructions, may cause
harmful interference to radio communications. However, there is no guarantee that interference will not occur in a particular installation. If
this equipment does cause harmful interference to radio or television reception, which can be determined by turning the equipment off and
on, the user is encouraged to try to correct the interference by one or more of the following measures:
• Reorient or relocate the receiving antenna.
• Increase the separation between the equipment and receiver.
• Connect the equipment to an outlet on a circuit different from that to which the receiver is connected.
• Consult the dealer or an experienced radio/TV technician for help.
WARNING: Any changes or modifications to this product not expressly approved by the manufacturer could void
any assurances of safety or performance and could result in violation of Part 15 of FCC Rules.
Reprinted from the Code of Federal Regulations #47, part 15.193, 1993. Washington DC: Office of the Federal Register, National Archives
and Records Administration, U.S. Government Printing Office.
Canadian Department of Communications Statement
This digital apparatus does not exceed the Class B limits for radio noise emissions from digital apparatus set out in the Radio Interference
Regulations of the Canadian Department of Communications. This class B digital apparatus complies with Canadian ICES-003.
ASUS T2 3-in-1 Upgrade User’s Guide 3
Page 4

Contents
Notices .................................................................................................................. 3
1. Welcome! ....................................................................................................... 5
2. Specifications ................................................................................................. 5
3. Package contents .......................................................................................... 6
4. Installing the T2 3-in-1 Upgrade Card ............................................................ 7
5. Installation of devices................................................................................... 10
6. Driver Setup ..................................................................................................11
7. Troubleshooting ............................................................................................ 11
ASUS Contact Information.................................................................................. 12
4 ASUS T2 3-in-1 Upgrade User’s Guide
Page 5
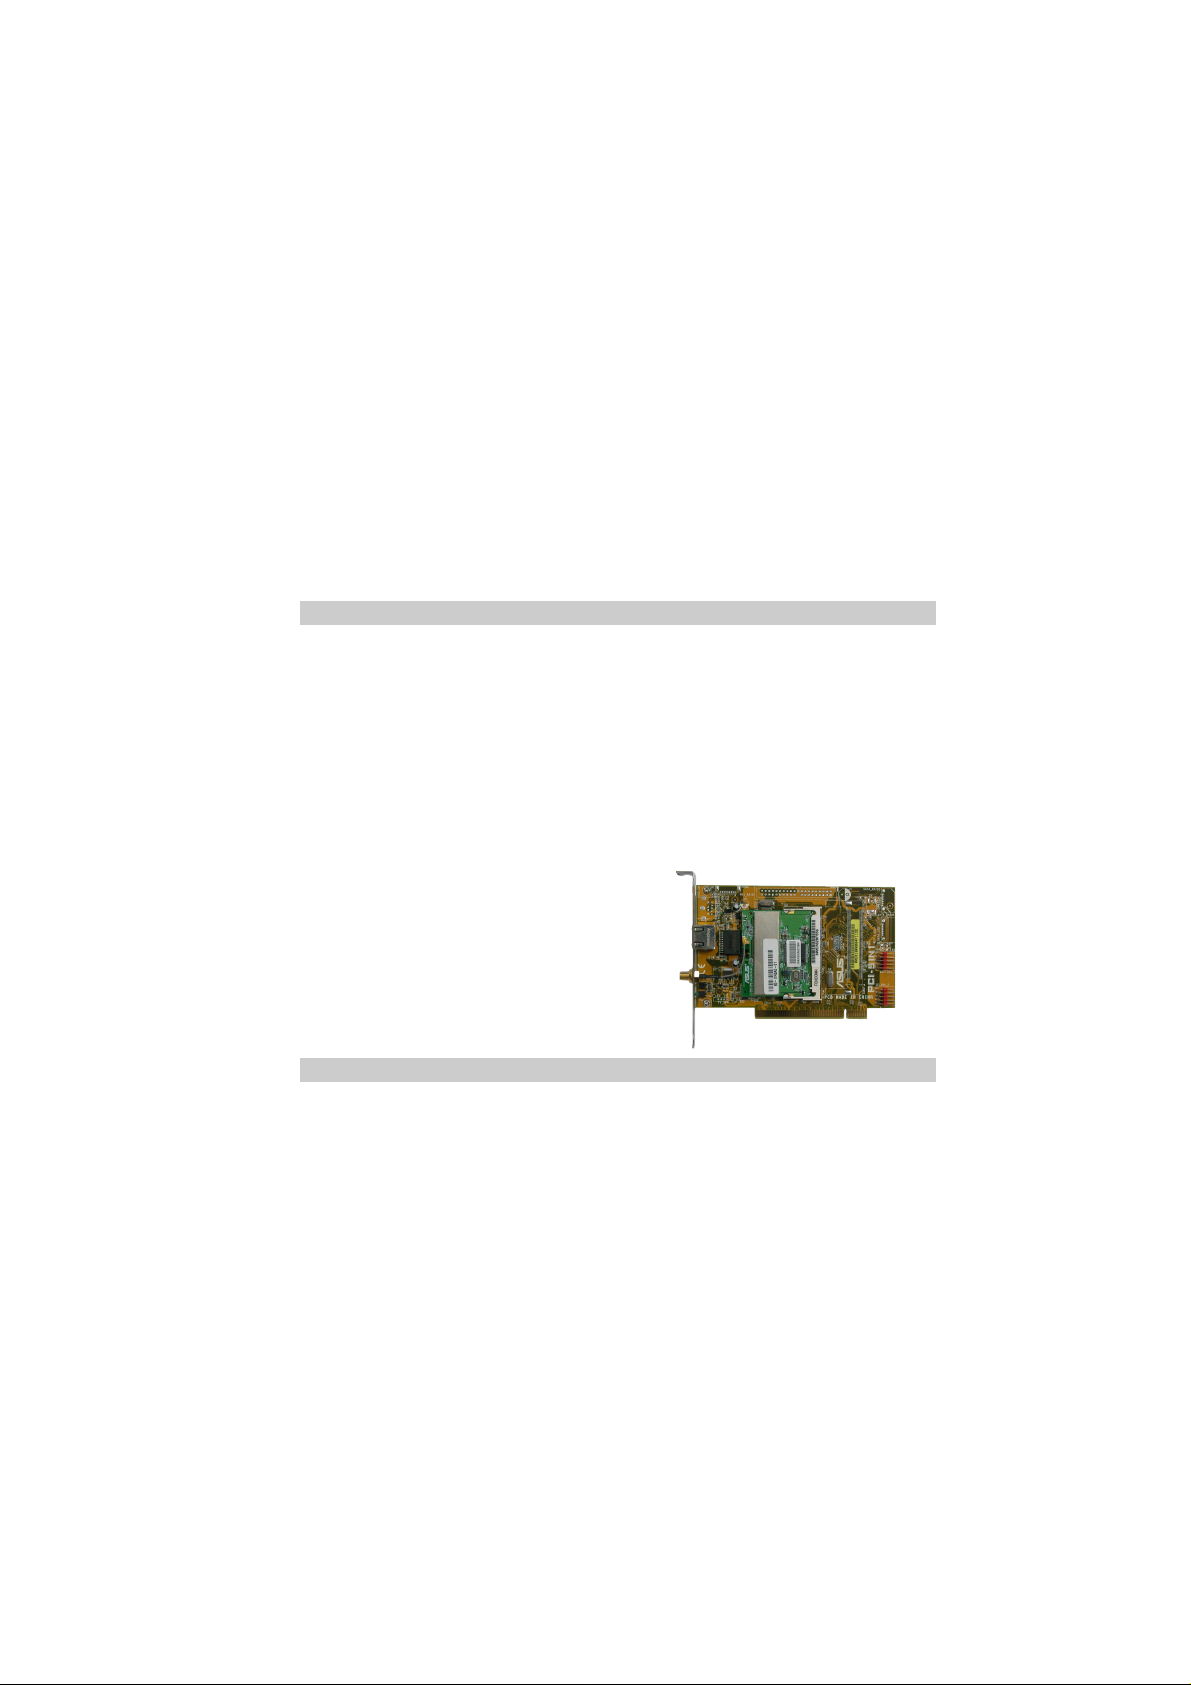
1. Welcome!
Congratulations on your purchase of an ASUS T2 3-in-1 Upgrade card! This card is efficiently
designed to provide a bridge between data-intensive devices and your computer system.
The T2 3-in-1 Upgrade card combines powerful features including a Gigabit LAN controller, an
IEEE 802.11b-compliant wireless LAN and an IEEE 1394 controller . The ASUS T2 3-in-1 Upgrade
card provides Gigabit LAN, wireless LAN and easy-to-use digital interface for throughput devices
such as DV camcorders, digital cameras, DVDs, scanners, and printers.
2. Specifications
• 3COM Gigabit LAN controller
• VIA VT6307 1394 controller
• IEEE 802.11b-compliant wireless LAN controller
• Real-time data transmission
• Two (2) internal 8-pin IEEE 1394 connectors
• Seamless I/O interconnect
• Hot-pluggable connectors
ASUS T2 3-in-1 Upgrade User’s Guide 5
Page 6
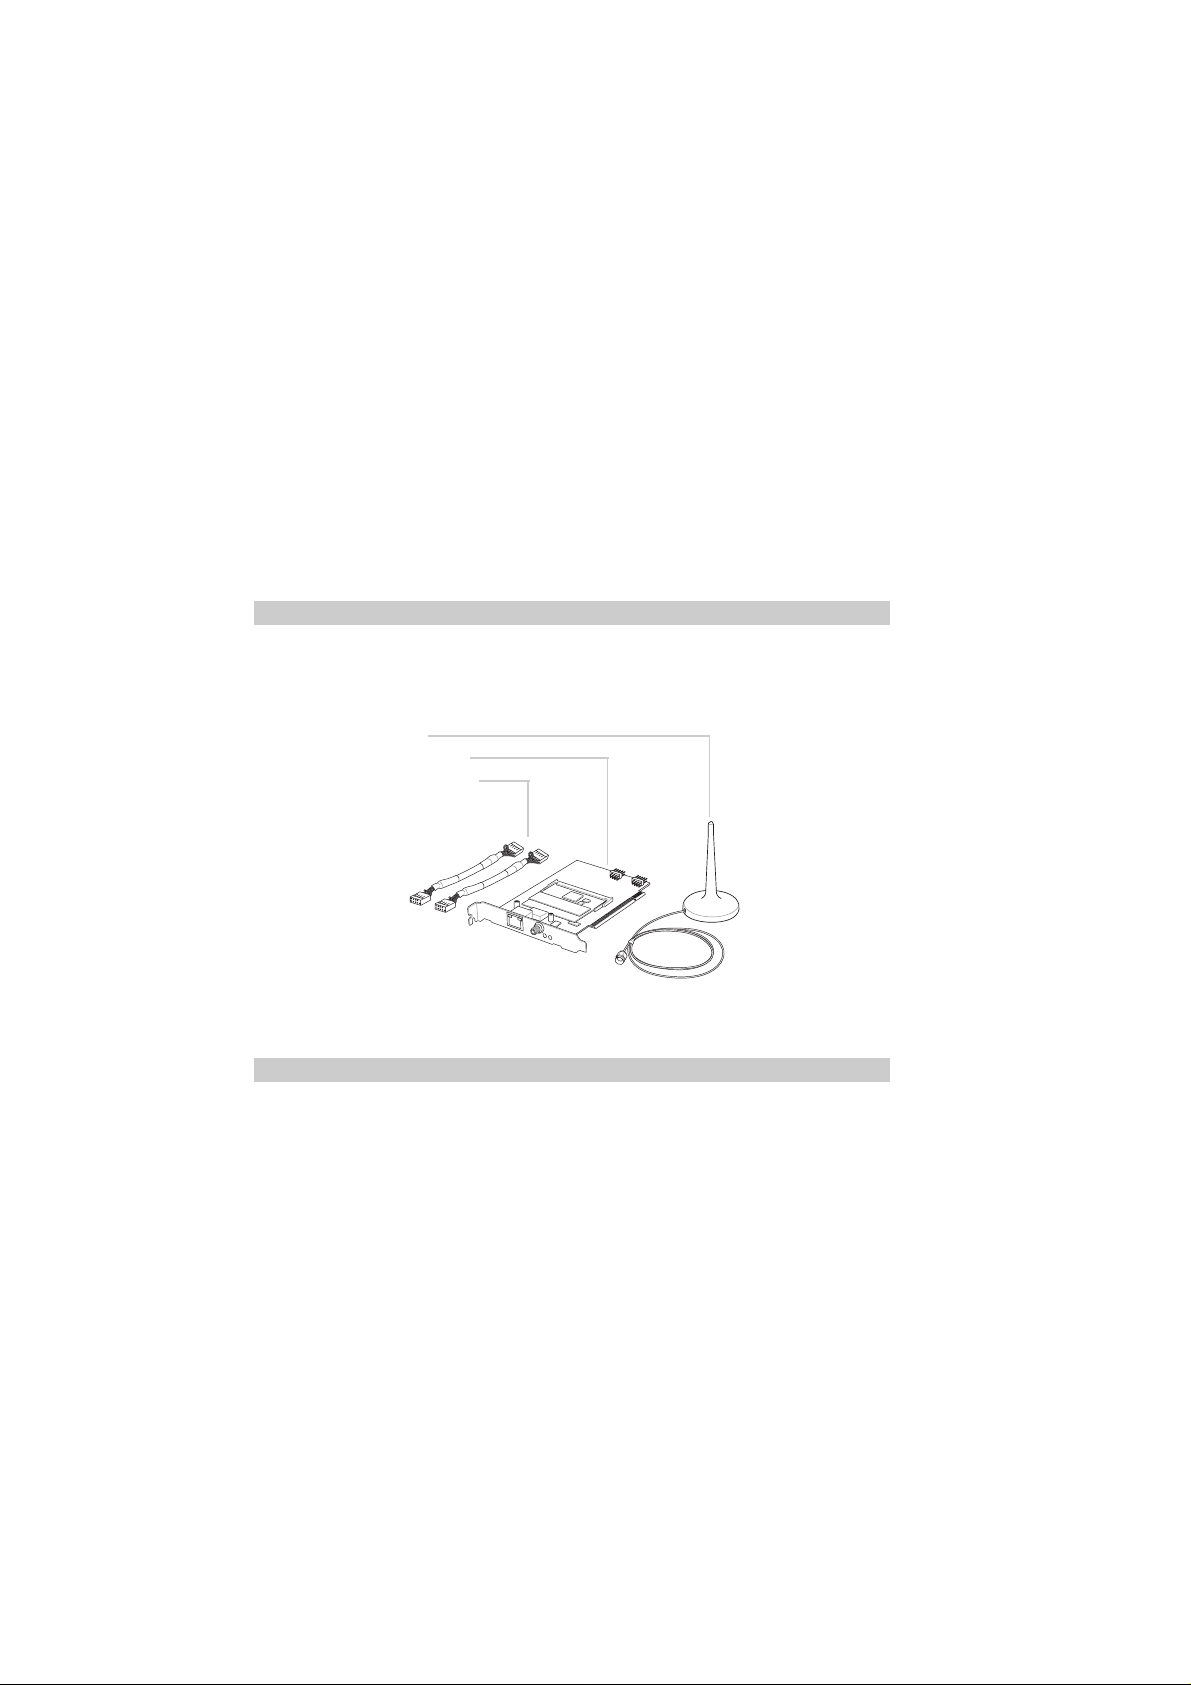
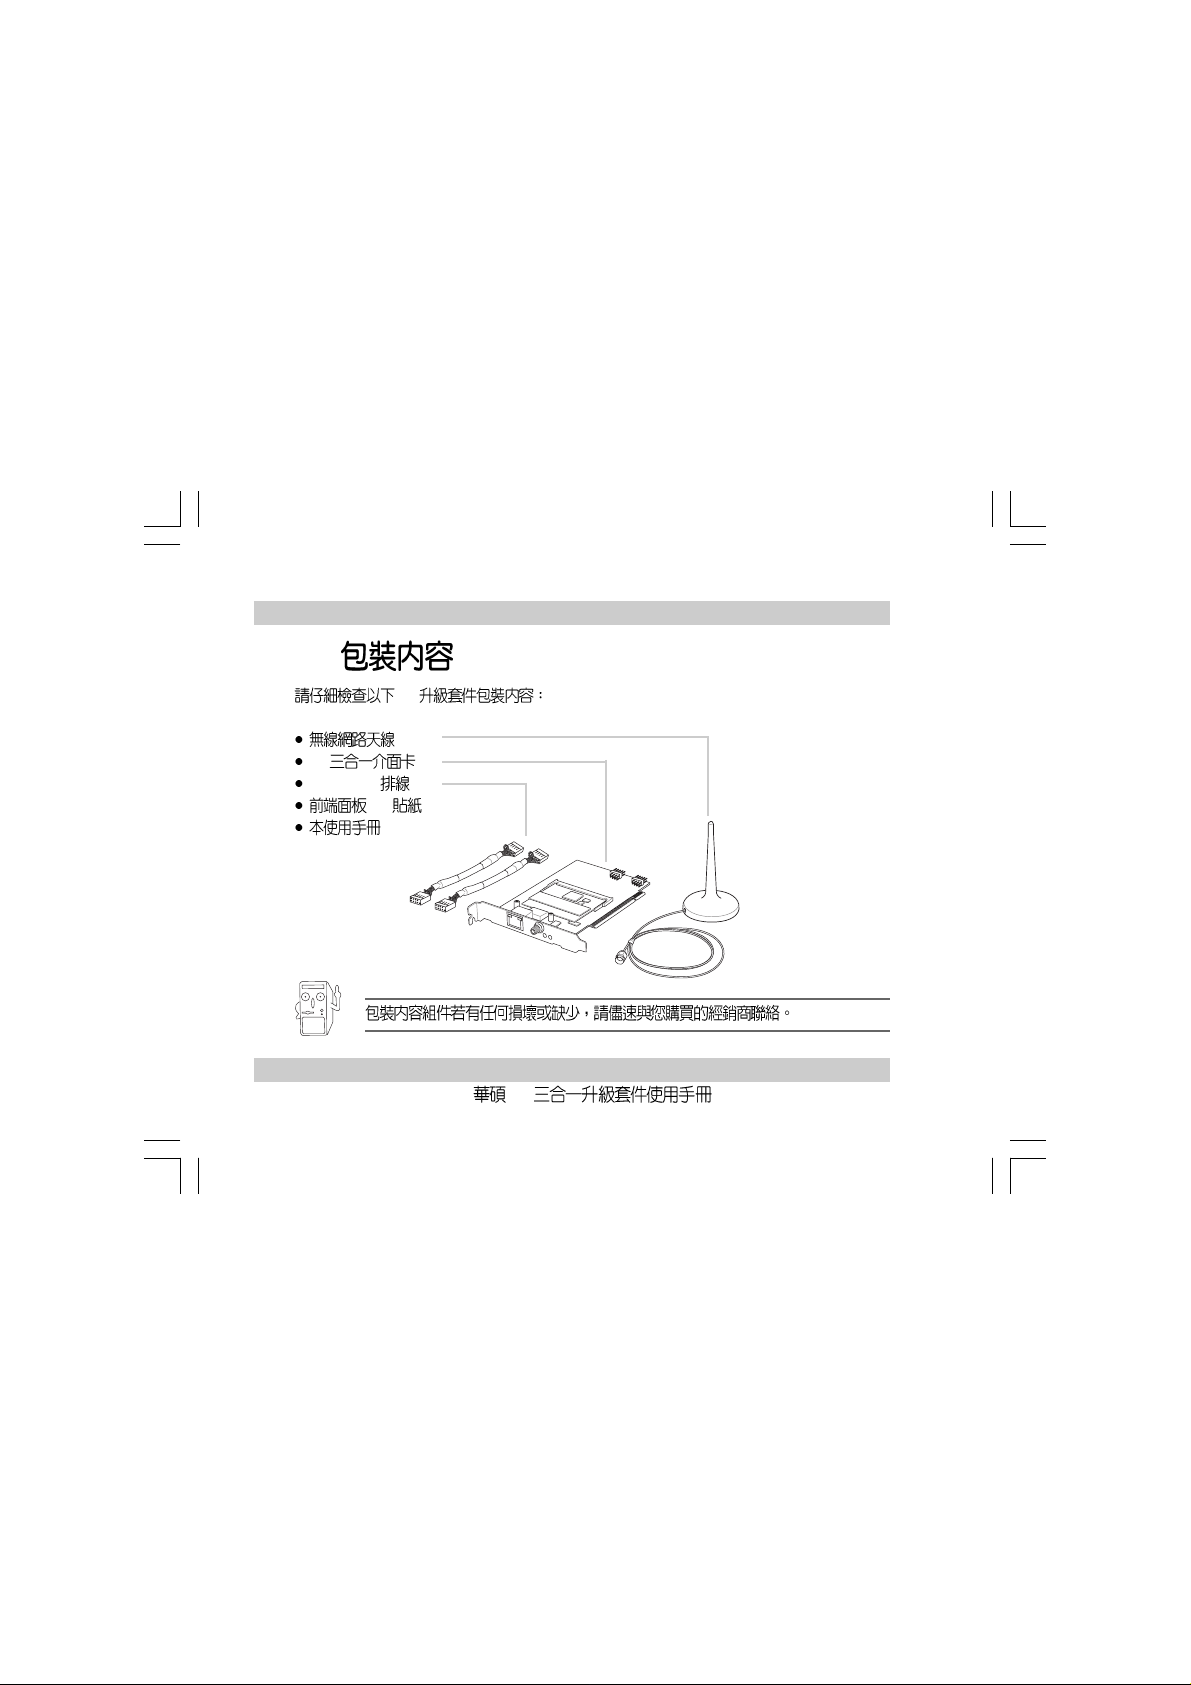
3. Package contents
Check your T2 3-in-1 package for the following items:
• Dipolar antenna
• T2 3-in-1 upgrade card
• IEEE 1394 signal cables
• Front panel I/O sticker
• User guide
NOTE:
If any of the following items are damaged or missing, contact your retailer.
6 ASUS T2 3-in-1 Upgrade User’s Guide
Page 7

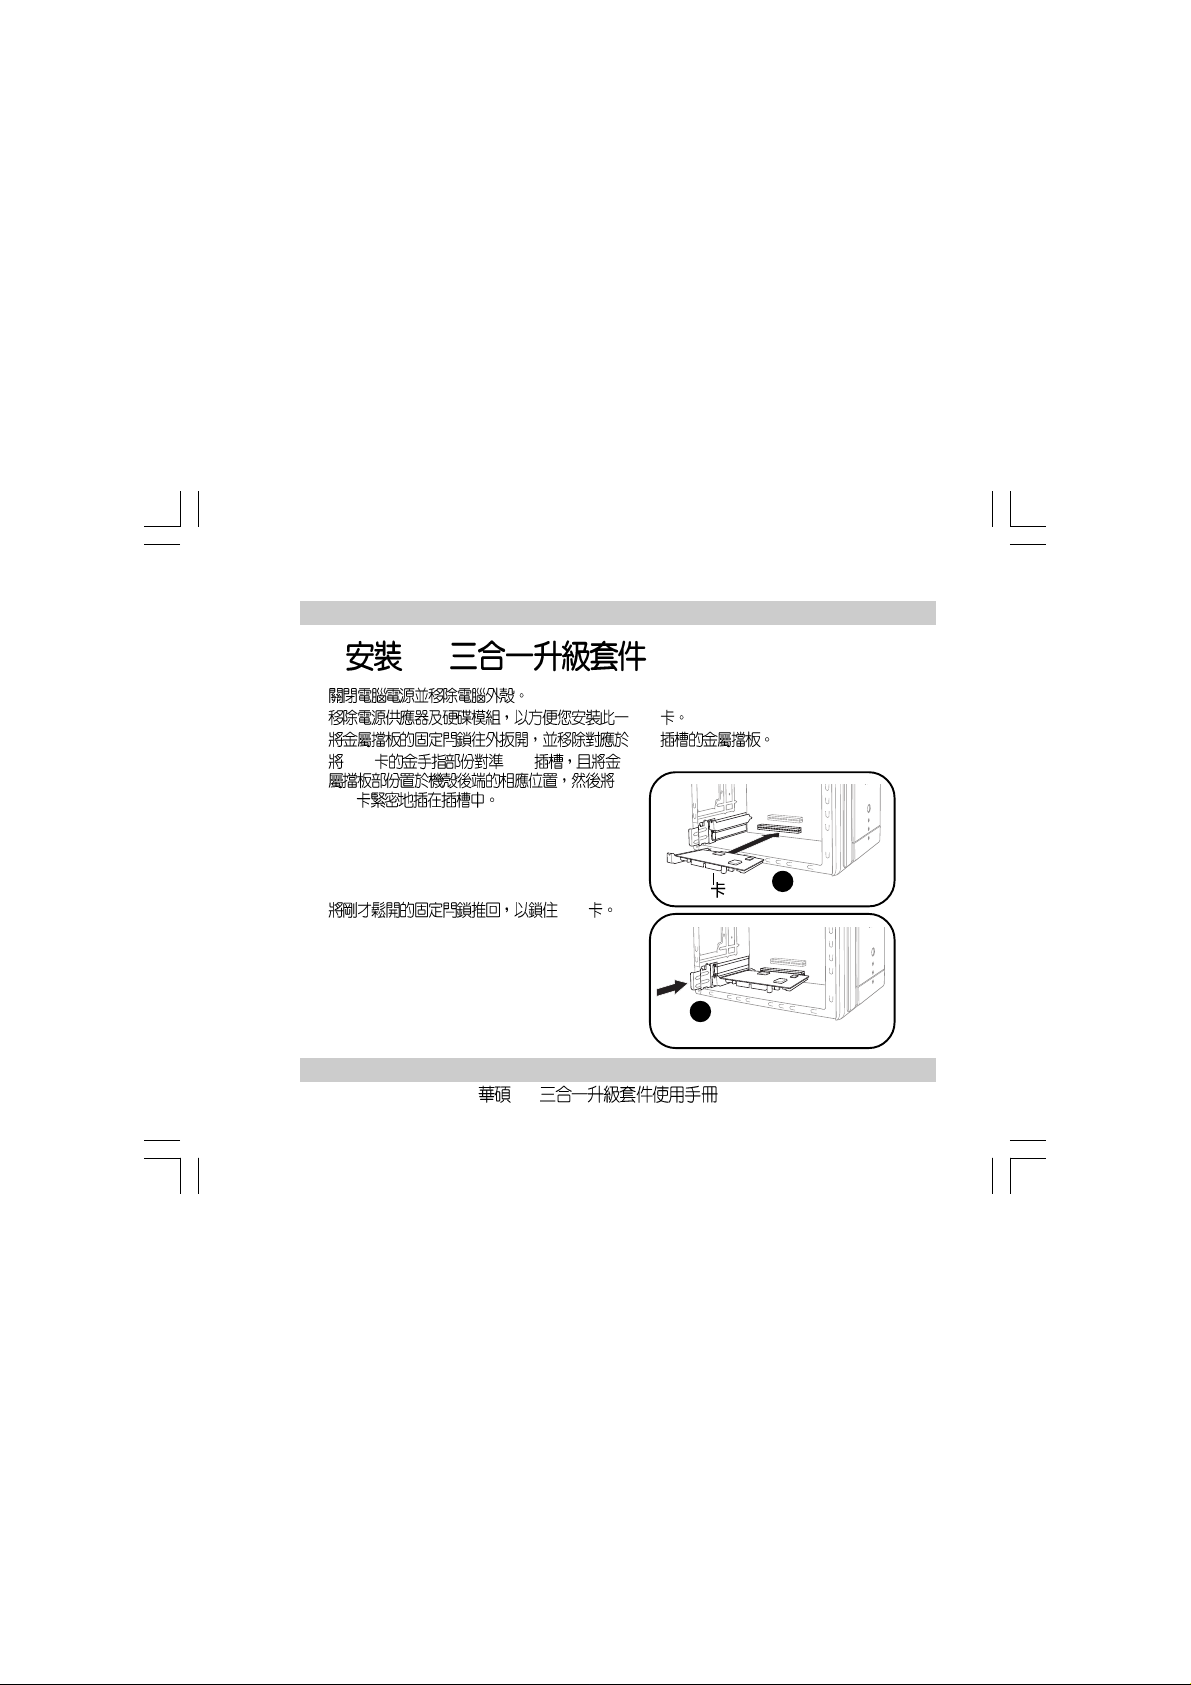
4. Installing the T2 3-in-1 Upgrade Card
1. Turn off the system and remove the system cover.
2. Remove possible static discharge by touching a bare metal chassis railing.
3. Identify the available PCI slot and remove the bracket opposite the slot that you will use.
4. Align the card connector with the slot and press
firmly until the card is completely seated on the
slot.
5. Replace the expansion card lock to secure the
card to the chassis.
ASUS T2 3-in-1 Upgrade User’s Guide 7
PCI card
5
4
Page 8
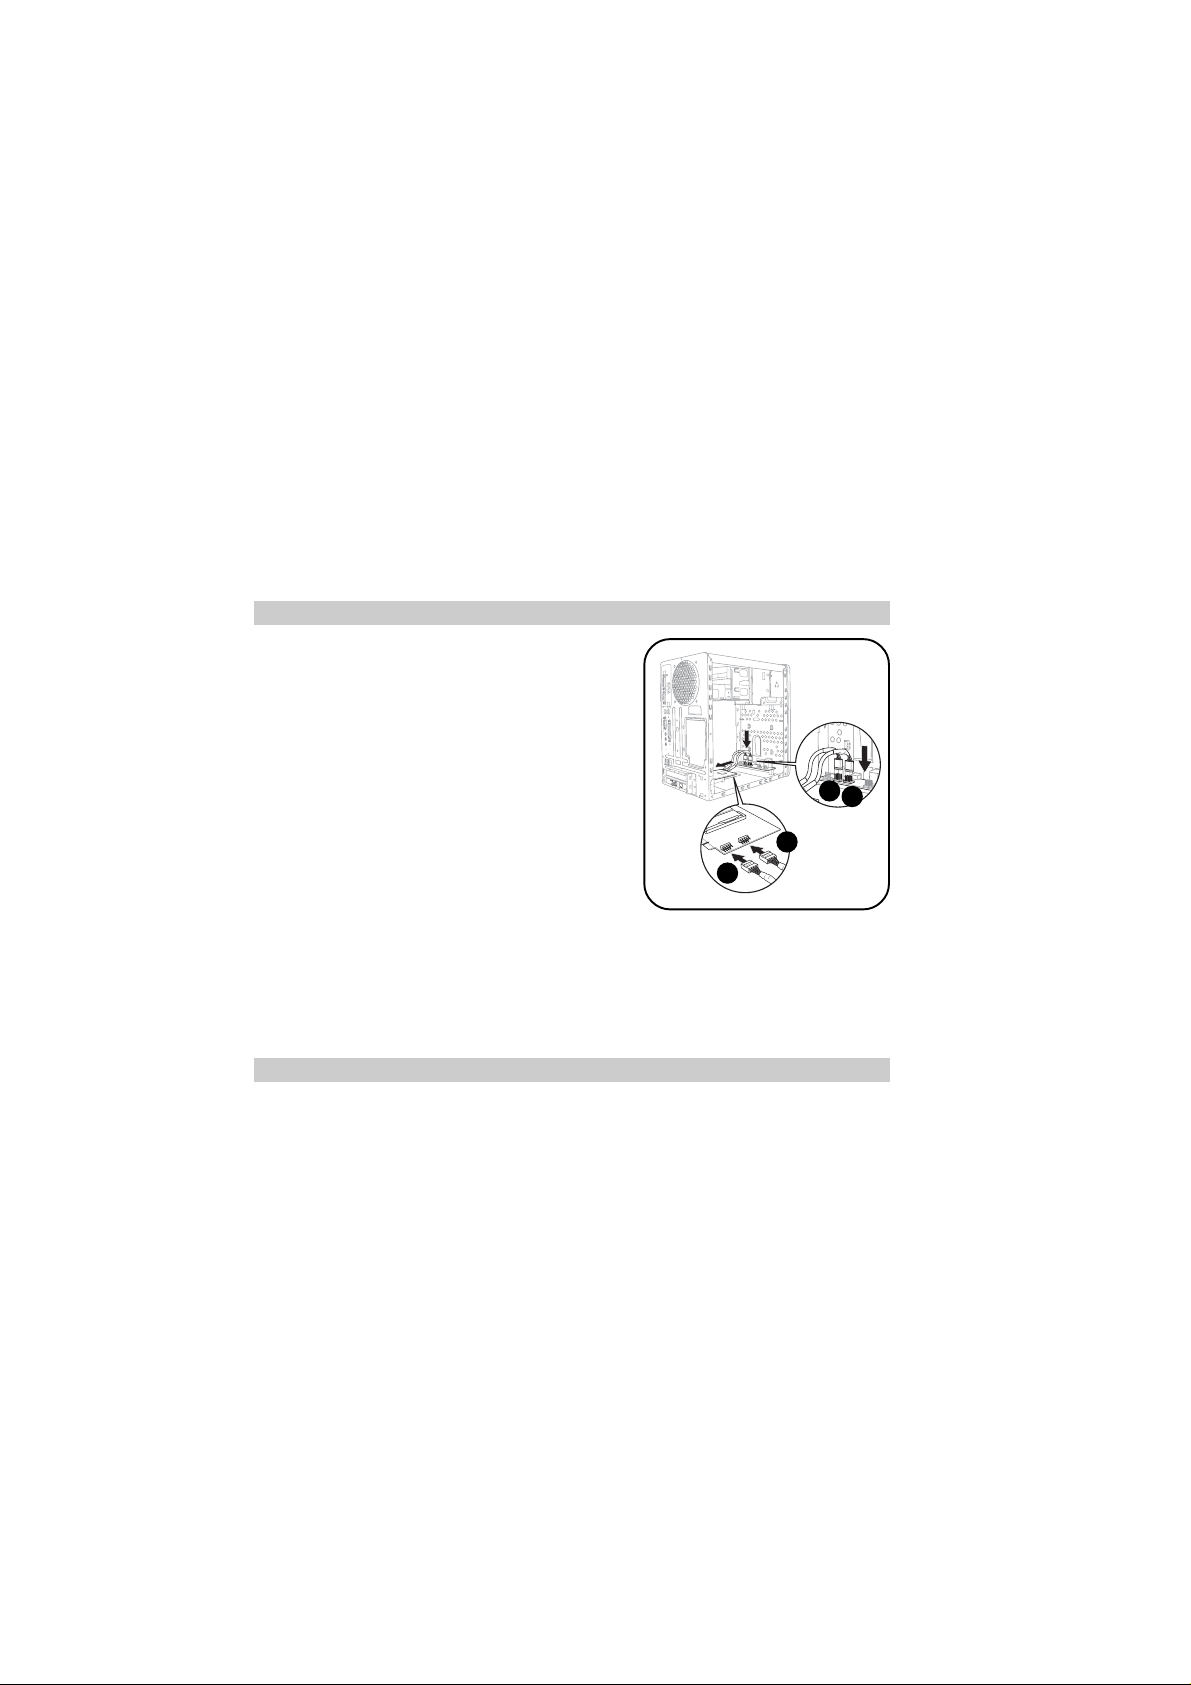
6. Connect one end of the first IEEE 1394 signal
cable to the IEEE 1394 connector labeled
IE1394_1 on the 3-in-1 card.
7. Connect one end of the second IEEE 1394
signal cable to the IEEE 1394 connector labeled
IE1394_2 on the 3-in-1 card.
8. Connect the other end of the first IEEE 1394
signal cable to the IEEE 1394 connector labeled
IE1394_1 on the front panel I/O daughterboard
of the Terminator 2 system.
9. Connect the other end of the second IEEE 1394
signal cable to the IEEE 1394 connector labeled
IE1394_2 on the front panel I/O daughterboard
of the Terminator 2 system.
10. Replace the system cover.
NOTE:
For details on PCI card installation, refer to “Chapter 2: Basic Installation” of the Terminator 2
User Guide.
7
8
6
8 ASUS T2 3-in-1 Upgrade User’s Guide
9
Page 9

11. Remove the installed front panel I/O sticker.
12. Place the bundled front panel I/O sticker.
ASUS T2 3-in-1 Upgrade User’s Guide 9
Page 10

5. Installation of devices
PCI-5IN1
R
IE1394_1
IE1394_2
The T2 3-in-1 Upgrade card supports one external RJ-45 port for Gigabit LAN, an IEEE
802.11b-compliant wireless LAN, and two internal IEEE 1394 10-1 pin connectors for connection
of additional 4-pin and 6-pin 1394 ports in the system front panel.
IEEE 1394 devices Dipolar antenna
RJ-45 Gigabit LAN
10 ASUS T2 3-in-1 Upgrade User’s Guide
Page 11

6. Driver Setup
The T2 3-in-1 Upgrade card is a Plug-n-Play device which can be auto-detected by Windows® 98/
2000/ME/XP. After the card is inserted into a PCI slot, turn on your computer. A Found New
Hardware Wizard window appears on the screen during startup. Follow the screen instructions
to setup the card driver. If your computer failed to detect the card, click Start > Control Panel >
Add New Hardware. Follow the instructions to setup the card driver manually.
NOTE:
For details on device driver installation, refer to “Chapter 3: Starting Up” of the Terminator 2 User
Guide.
7. T roubleshooting
Q: What should I do if:
• Windows can not detect the card during startup, or
• After the driver is loaded, an exclamation mark appears before PCI FireWire (IEEE 1394)
in the Device Manager?
A: Make sure that the card is firmly seated on the PCI slot.
ASUS T2 3-in-1 Upgrade User’s Guide 11
Page 12

ASUS Contact Information
ASUSTeK COMPUTER INC. (Asia-Pacific)
Marketing Technical Support
Address 150 Li-Te Road Telephone (MB/Components) +886-2-2890-7121 (English)
Telephone +886-2-2894-3447 (Desktop/Server) +886-2-2890-7123 (English)
Web Site www.asus.com.tw (Networking) +886-2-2890-7902 (English)
ASUS COMPUTER INTERNATIONAL (America)
Marketing Technical Support
Address 44370 Nobel Drive, Fremont, Telephone (General) +1-502-995-0883
Fax +1-510-608-4555 Support fax +1-502-933-8713
Email tmd1@asus.com Support e-mail tsd@asus.com
Website usa.asus.com
ASUS COMPUTER GmbH (Germany and Austria)
Marketing Technical Support
Address Harkort Str. 25, D-40880 Telephone +49-2102-95990
Telephone +49-2102-95990 Online support www.asuscom.de/support
Fax +49-2102-959911 Website www.asuscom.de/news
Online contact www.asuscom.de/sales
ASUS COMPUTER (Middle East and North Africa)
Marketing
Address P.O. Box 64133, Dubai, U.A.E. Telephone +9714-283-1774
Fax +9714-283-1775 Web site www.ASUSarabia.com
15-067047000
Peitou, Taipei, Taiwan 112 (Notebook) +886-2-2890-7122 (English)
Support Fax +886-2-2890-7698
CA 94538, USA (Notebook) +1-510-739-3777
Ratingen, Germany Fax +49-2102-959911
Page 13

V1
2004 3
T2
Page 14

©2004
T2
1.00
2004 3
2
T2
Page 15

T2
3
Page 16

................................................................................................................
1.
2.
3.
4. T2
5.
6.
7.
..........................................................................................
.........................................................................................................
.........................................................................................................
................................................................................
...............................................................................................
...............................................................................................
.......................................................................................................
...................................................................................................
3
5
5
6
7
10
11
11
12
4
T2
Page 17

1.
T2
IEEE 1394 T2 Gigabit LAN wireless LAN
Gigabit LAN IEEE 802.11b
DV DVD
2.
3COM Gigabit LAN
VIA VT6307 1394
IEEE 802.11b
8-pin IEEE 1394
I/O
T2
5
Page 18
3.
T2
IEEE 1394 x 2
I/O
T2
6
T2
Page 19
4. T2
1.
2. PCI
3. PCI
4. PCI PCI
PCI
5. PCI
T2
PCI
5
4
7
Page 20

6. IEEE 1394
PCI IE1394_1
7. IEEE 1394
PCI IE1394_2
8. IEEE 1394 T2
I/O IE1394_1
9. IEEE 1394 T2
I/O IE1394_2
10.
PCI T2 2.7
8
9
6
7
8
T2
Page 21

11. I/O
12. I/O
T2
I/O
9
Page 22

5.
PCI-5IN1
R
IE1394_1
IE1394_2
T2 Gigabit LAN RJ-45 IEEE 802.11b
IEEE 1394
IEEE 1394
RJ-45 Gigabit LAN
10
T2
Page 23

6.
T2 Windows 98/2000/XP
PCI T2
support CD
7.
Q.
PCI Window PCI
PCI PCI FireWire(IEEE1394)
A. PCI PCI
T2 5.2
T2
11
Page 24

ASUSTeK COMPUTER INC.
886-2-2894-3447
150
ASUS COMPUTER INTERNATIONAL
44370 Nobel Drive, Fremont,CA 94538, USA
+1-510-608-4555
tmdl@asus.com
ASUS COMPUTER GmbH
Harkort Str. 25, D-40880 Ratingen, Germany
49-2102-95990
49-2102-959911
www.asuscom.de
www.asuscom.de/sales
15-067047000
0800-093-456
886-2-2890-7698
www.asus.com.tw
+1-502-933-8713
+1-502-995-0883
tsd@asus.com
www.asus.com
49-2102-95990
49-2102-959911
www.asuscom.de/support
 Loading...