

Page 1
EeeBox PC
User Manual
English
Page 2

English
Index
1. English .................................................................................1
2. Deutsch ..............................................................................38
3. Français .............................................................................74
4. Italiano..............................................................................110
5. Nederlands .......................................................................148
Page 3

E6197
Third Edition V3
October 2010
English
Copyright © 2010 ASUSTeK COMPUTER INC. All Rights Reserved.
No part of this manual, including the products and software described in it, may
be reproduced, transmitted, transcribed, stored in a retrieval system, or translated
into any language in any form or by any means, except documentation kept by the
purchaser for backup purposes, without the express written permission of ASUSTeK
COMPUTER, INC. (“ASUS”).
Products and corporate names mentioned in this manual may or may not be
registered trademarks or copyrights of their respective companies, and are used
for identification purposes only. All trademarks are the property of their respective
owners.
Every effort has been made to ensure that the contents of this manual are correct
and up to date. However, the manufacturer makes no guarantee regarding the
accuracy of its contents, and reserves the right to make changes without prior
notice.
Page 4

Contents
English
Notices .......................................................................................................... 4
Safety information ....................................................................................9
Notes for this manual ............................................................................12
Welcome ....................................................................13
Package contents ....................................................................................13
Knowing your EeeBox PC .........................................14
Front view ..................................................................................................14
Rear view ....................................................................................................16
Top view .....................................................................................................18
Using the wireless antenna .................................................................19
Positioning your EeeBox PC .....................................20
Installing the stand (optional) ............................................................20
Installing your EeeBox PC to a monitor (optional) ......................21
Setting up your EeeBox PC ......................................22
Connecting to a display ........................................................................22
Connecting to USB devices .................................................................22
Connecting to a network device .......................................................23
Turning on the system ..........................................................................24
Using your EeeBox PC ..............................................25
Configuring wireless connection ......................................................25
Configuring wired connection ...........................................................26
ASUS Easy Update ..................................................................................30
Recovering your system ...........................................31
Using the Recovery Partition ..............................................................31
Recovering the OS to the Factory Default Partition (F9
Recovery) .............................................................................................31
Backing up the Factory Default Environment Data
to a USB Drive (F9 Backup) ............................................................31
Using the USB storage device (USB Restore) ................................32
4 EeeBox PC
Page 5

Notices
Federal Communications Commission Statement
This device complies with Part 15 of the FCC Rules. Operation is
subject to the following two conditions:
• This device may not cause harmful interference, and
• This device must accept any interference received including
interference that may cause undesired operation.
This equipment has been tested and found to comply with the limits
for a Class B digital device, pursuant to Part 15 of the FCC Rules.
These limits are designed to provide reasonable protection against
harmful interference in a residential installation. This equipment
generates, uses and can radiate radio frequency energy and, if not
installed and used in accordance with manufacturer’s instructions,
may cause harmful interference to radio communications. However,
there is no guarantee that interference will not occur in a particular
installation. If this equipment does cause harmful interference to
radio or television reception, which can be determined by turning
the equipment off and on, the user is encouraged to try to correct
the interference by one or more of the following measures:
• Reorient or relocate the receiving antenna.
• Increase the separation between the equipment and receiver.
• Connect the equipment to an outlet on a circuit different from
that to which the receiver is connected.
• Consult the dealer or an experienced radio/TV technician for
help.
English
CAUTION: Any changes or modifications not expressly approved by
the grantee of this device could void the user’s authority to operate
the equipment.
EeeBox PC 5
Page 6

English
RF exposure warning
This equipment must be installed and operated in accordance with
provided instructions and the antenna(s) used for this transmitter
must be installed to provide a separation distance of at least 20
cm from all persons and must not be co-located or operating in
conjunction with any other antenna or transmitter. End-users and
installers must be provide with antenna installation instructions
and transmitter operating conditions for satisfying RF exposure
compliance.
Declaration of Conformity
(R&TTE directive 1999/5/EC)
The following items were completed and are considered relevant
and sufficient:
• Essential requirements as in [Article 3]
• Protection requirements for health and safety as in [Article 3.1a]
• Testing for electric safety according to [EN 60950]
• Protection requirements for electromagnetic compatibility in
[Article 3.1b]
• Testing for electromagnetic compatibility according to [EN 301
489-1] & [EN 301 489-17]
• Effective use of the radio spectrum as in [Article 3.2]
• Radio test suites according to [EN 300 328-2]
6 EeeBox PC
Page 7

CE Marking
CE marking for devices without wireless LAN/Bluetooth
The shipped version of this device complies with the requirements
of the EEC directives 2004/108/EC “Electromagnetic compatibility”
and 2006/95/EC “Low voltage directive”.
CE marking for devices with wireless LAN/ Bluetooth
This equipment complies with the requirements of Directive 1999/5/
EC of the European Parliament and Commission from 9 March, 1999
governing Radio and Telecommunications Equipment and mutual
recognition of conformity.
Wireless Operation Channel for Different Domains
N. America 2.412-2.462 GHz Ch01 through CH11
Japan 2.412-2.484 GHz Ch01 through Ch14
Europe ETSI 2.412-2.472 GHz Ch01 through Ch13
English
EeeBox PC 7
Page 8

English
France Restricted Wireless Frequency Bands
Some areas of France have a restricted frequency band. The worst
case maximum authorized power indoors are:
• 10mW for the entire 2.4 GHz band (2400 MHz–2483.5 MHz)
• 100mW for frequencies between 2446.5 MHz and 2483.5 MHz
Channels 10 through 13 inclusive operate in the band 2446.6 MHz
to 2483.5 MHz.
There are few possibilities for outdoor use: On private property or on
the private property of public persons, use is subject to a preliminary
authorization procedure by the Ministry of Defense, with maximum
authorized power of 100mW in the 2446.5–2483.5 MHz band. Use
outdoors on public property is not permitted.
In the departments listed below, for the entire 2.4 GHz band:
• Maximum authorized power indoors is 100mW
• Maximum authorized power outdoors is 10mW
Departments in which the use of the 2400–2483.5 MHz band is
permitted with an EIRP of less than 100mW indoors and less than
10mW outdoors:
01 Ain 02 Aisne 03 Allier
05 Hautes Alpes 08 Ardennes 09 Ariège
11 Aude 12 Aveyron 16 Charente
24 Dordogne 25 Doubs 26 Drôme
32 Gers 36 Indre 37 Indre et Loire
41 Loir et Cher 45 Loiret 50 Manche
55 Meuse 58 Nièvre 59 Nord
60 Oise 61 Orne 63 Puy du Dôme
64 Pyrénées Atlantique 66 Pyrénées Orientales
67 Bas Rhin 68 Haut Rhin
70 Haute Saône 71 Saône et Loire
75 Paris 82 Tarn et Garonne
84 Vaucluse 88 Vosges 89 Yonne
90 Territoire de Belfort 94 Val de Marne
8 EeeBox PC
Page 9

This requirement is likely to change over time, allowing you to use
your wireless LAN card in more areas within France. Please check
with ART for the latest information (www.art-telecom.fr)
Your WLAN Card transmits less than 100mW, but more than 10mW.
Canadian Department of Communications Statement
This digital apparatus does not exceed the Class B limits for
radio noise emissions from digital apparatus set out in the
Radio Interference Regulations of the Canadian Department of
Communications.
This class B digital apparatus complies with Canadian ICES-003.
IC Radiation Exposure Statement for Canada
This equipment complies with IC radiation exposure limits set forth
for an uncontrolled environment. To maintain compliance with IC
RF exposure compliance requirements, please avoid direct contact
to the transmitting antenna during transmitting. End users must
follow the specific operating instructions for satisfying RF exposure
compliance.
English
Operation is subject to the following two conditions:
• This device may not cause interference and
• This device must accept any interference, including interference
that may cause undesired operation of the device.
REACH
Complying with the REACH (Registration, Evaluation, Authorization,
and Restriction of Chemicals) regulatory framework, we publish
the chemical substances in our products at ASUS REACH website at
http://green.asus.com/english/REACH.htm.
EeeBox PC 9
Page 10

English
Safety information
Your EeeBox PC is designed and tested to meet the latest standards
of safety for information technology equipment. However, to
ensure your safety, it is important that you read the following safety
instructions.
Setting up your system
• Read and follow all instructions in the documentation before you
operate your system.
• Do not use this product near water or a heated source such as a
radiator.
• Set up the system on a stable surface with the provided stand.
Never use the system alone without the stand.
• Openings on the chassis are for ventilation. Do not block or cover
these openings. Make sure you leave plenty of space around the
system for ventilation. Never insert objects of any kind into the
ventilation openings.
• Use this product in environments with ambient temperatures
between 0˚C and 35˚C.
• If you use an extension cord, make sure that the total ampere
rating of the devices plugged into the extension cord does not
exceed its ampere rating.
Care during use
• Do not walk on the power cord or allow anything to rest on it.
• Do not spill water or any other liquids on your system.
• When the system is turned off, a small amount of electrical
current still flows. Always unplug all power, modem, and network
cables from the power outlets before cleaning the system.
• If you encounter the following technical problems with the
product, unplug the power cord and contact a qualified service
technician or your retailer.
• The power cord or plug is damaged.
10 EeeBox PC
Page 11
• Liquid has been spilled into the system.
• The system does not function properly even if you follow
the operating instructions.
• The system was dropped or the cabinet is damaged.
• The system performance changes.
Lithium-Ion Battery Warning
CAUTION: Danger of explosion if battery is incorrectly
replaced. Replace only with the same or equivalent type
recommended by the manufacturer. Dispose of used batteries
according to the manufacturer’s instructions.
LASER PRODUCT WARNING
CLASS 1 LASER PRODUCT
NO DISASSEMBLY
The warranty does not apply to the products that
have been disassembled by users
English
DO NOT throw the EeeBox PC in municipal waste. This product has
been designed to enable proper reuse of parts and recycling. This
symbol of the crossed out wheeled bin indicates that the product
(electrical, electronic equipment, and mercury-containing button
cell battery) should not be placed in municipal waste. Check local
technical support services for product recycling.
DO NOT throw the battery in municipal waste. This symbol of the
crossed out wheeled bin indicates that the battery should not be
placed in municipal waste. Check local technical support services
for battery replacement.
EeeBox PC 11
Page 12

English
Takeback and Recycling
Old computers, notebook computers, and other electronic equipment
contain hazardous chemicals that are harmful to the environment
when disposed in a landfill with trash. By recycling the metals, plastics,
and components found in an old computer will be broken down and
reused to make new products. And, the environment is protected from
any uncontrolled release of harmful chemicals.
ASUS works with recycling vendors with the highest standards for
protecting our environment, ensuring worker safety, and complying
with global environmental laws. Our commitment to recycling our
old equipment grows out of our work to protect the environment in
many ways.
For further information about ASUS product recycling and contacts,
please visit GreenASUS Takeback and Recycling page (http://green.
asus.com/english/takeback.htm)
12 EeeBox PC
Page 13
Notes for this manual
To make sure that you perform certain tasks properly, take note of
the following symbols used throughout this manual.
WARNING: Vital information that you MUST follow to prevent
injury to yourself.
IMPORTANT: Instructions that you MUST follow to complete a
task.
TIP: Tips and useful information that help you complete a task.
NOTE: Additional information for special situations.
English
EeeBox PC 13
Page 14

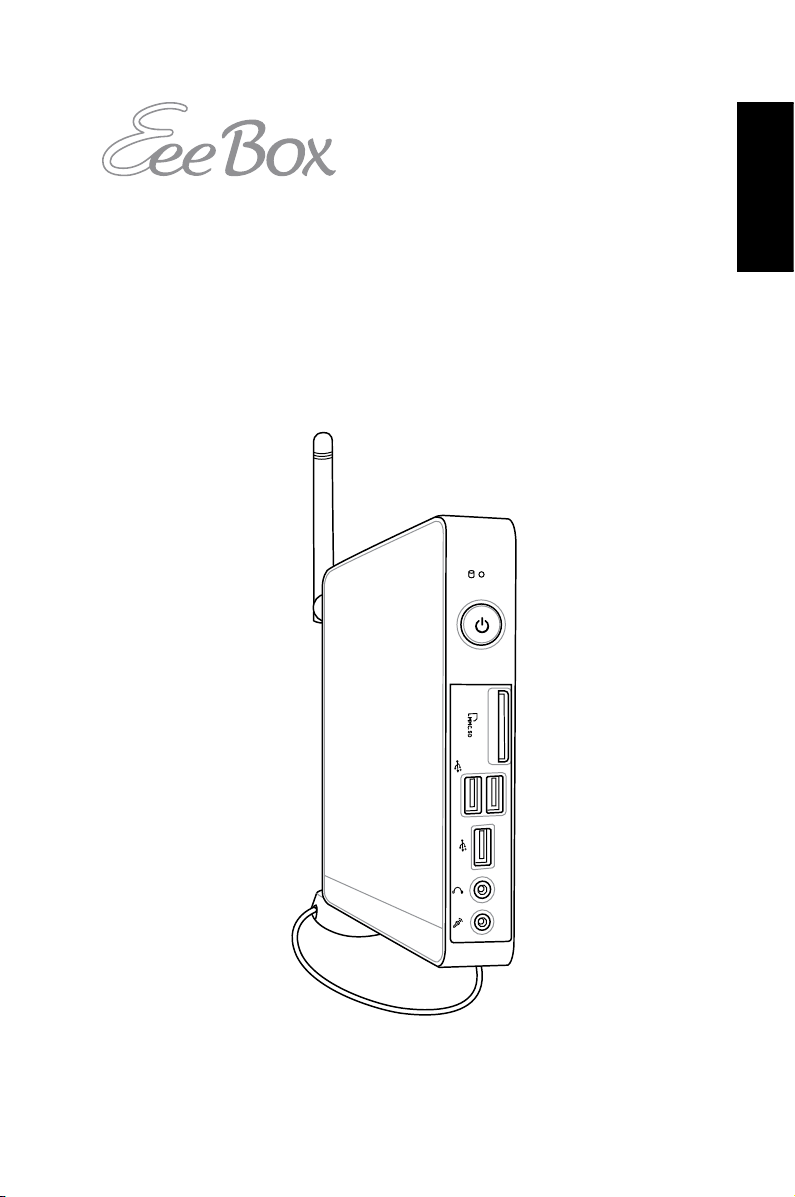
Welcome
Quick Start Guide
English
Congratulations on your purchase of the EeeBox PC. The following
illustration displays the package contents of your new EeeBox PC. If
any of the below items is damaged or missing, contact your retailer.
Package contents
EeeBox PC Stand (optional)
Mini jack to S/PDIF adapter
(optional)
AC adapter Power cord
VESA mount and Screw pack
(optional)
14 EeeBox PC
Warranty card Quick start guide
If the device or its components fail or malfunction during normal
and proper use within the warranty period, bring the warranty
card to the ASUS Service Center for replacement of the defective
components.
Page 15
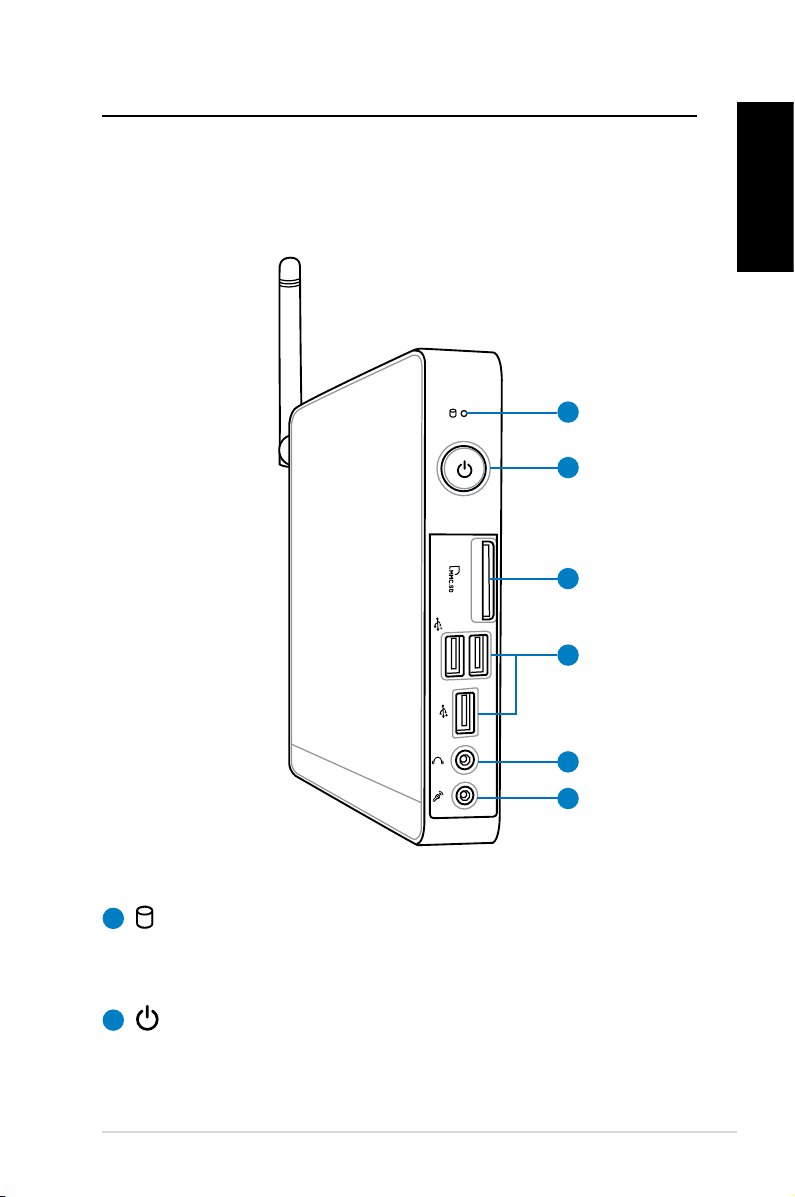
Knowing your EeeBox PC
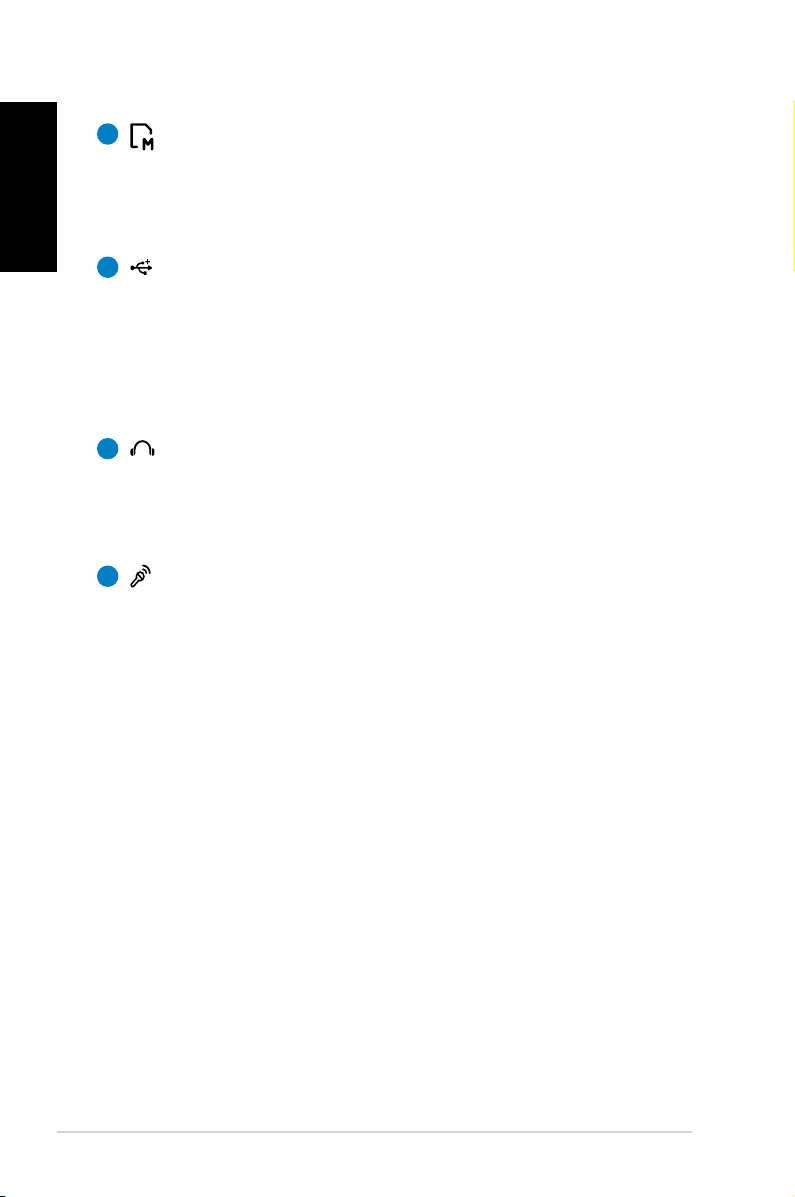
Front view
Refer to the diagram below to identify the components on this side
of the system.
1
2
3
4
5
English
6
1
Hard disk LED
The hard disk LED blinks when data is being written into or
read from the hard disk drive.
2
Power switch
The power switch allows powering ON and OFF the system.
EeeBox PC 15
Page 16
English
3
Memory card slot
The built-in memory card reader reads MMC/SD/SDHC
cards used in devices like digital cameras, MP3 players,
mobile phones, and PDAs.
4
USB port
The USB (Universal Serial Bus) port is compatible with
USB devices such as keyboards, mouse devices, cameras,
and hard disk drives. USB allows many devices to run
simultaneously on a single computer, with some peripheral
acting as additional plug-in sites or hubs.
5
Headphone/Audio Out jack
The stereo headphone jack (3.5mm) is used to connect
the system’s audio out signal to amplified speakers or
headphones.
6
Microphone jack
The microphone jack is designed to connect the
microphone used for video conferencing, voice narrations,
or simple audio recordings.
16 EeeBox PC
Page 17
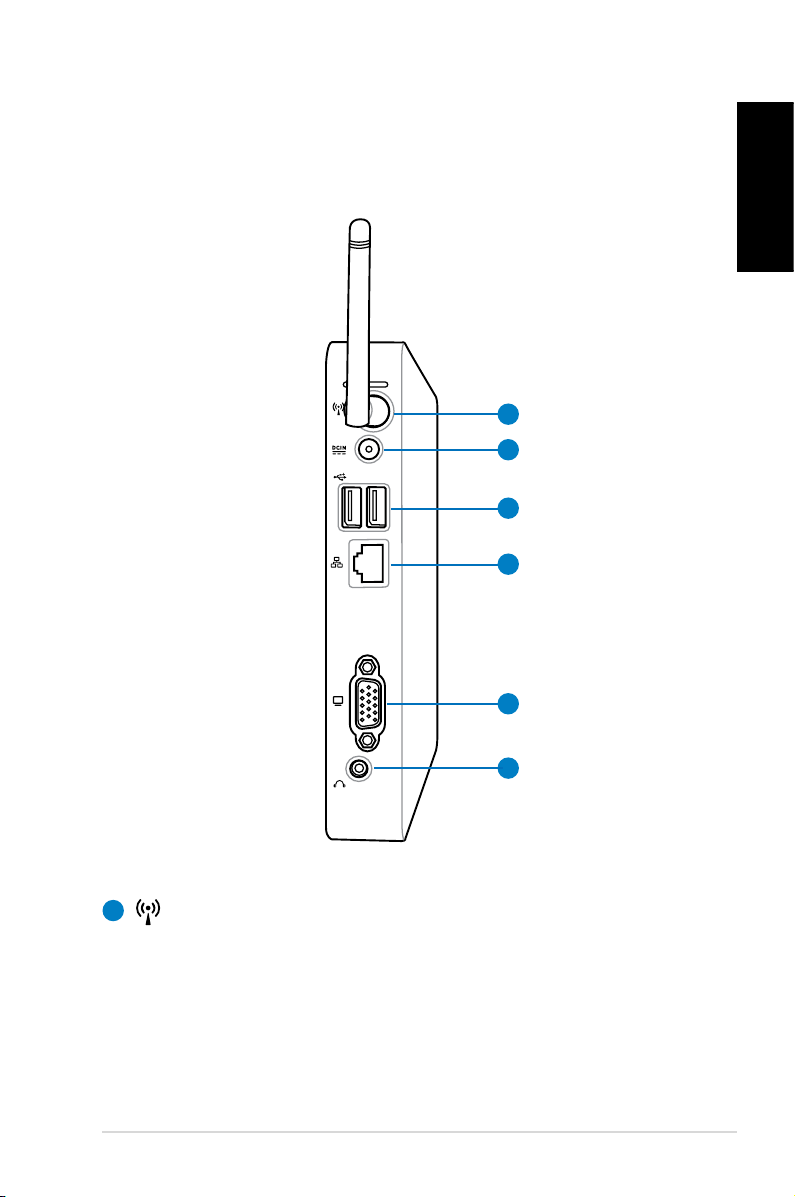
Rear view
Refer to the diagram below to identify the components on this side
of the system.
1
2
3
4
English
5
6
1
Wireless antenna jack
The jack is used to connect the supplied wireless antenna to
enhance wireless signal reception.
EeeBox PC 17
Page 18
English
2
Power input (DC 19V)
The supplied power adapter converts AC power to DC
power for use with this jack. Power supplied through this
jack supplies power to the PC. To prevent damage to the PC,
always use the supplied power adapter.
The power adapter may become warm to hot when in use. Do
not cover the adapter and keep it away from your body.
3
USB port
The USB (Universal Serial Bus) port is compatible with
USB devices such as keyboards, mouse devices, cameras,
and hard disk drives. USB allows many devices to run
simultaneously on a single computer, with some peripheral
acting as additional plug-in sites or hubs.
4
LAN port
The eight-pin RJ-45 LAN port supports a standard Ethernet
cable for connection to a local network.
5
Display (Monitor) Output
The 15-pin D-sub monitor port supports a standard
VGA-compatible device such as a monitor or projector to
allow viewing on a larger external display.
6
Audio Out (S/PDIF Out) jack
Plug an 3.5mm mini-jack audio cable into this jack for
18 EeeBox PC
analog or digital audio transfer.
For S/PDIF Out function, use the optional mini jack
to S/PDIF adapter to connect to your amplifier.
Page 19
E-SATA
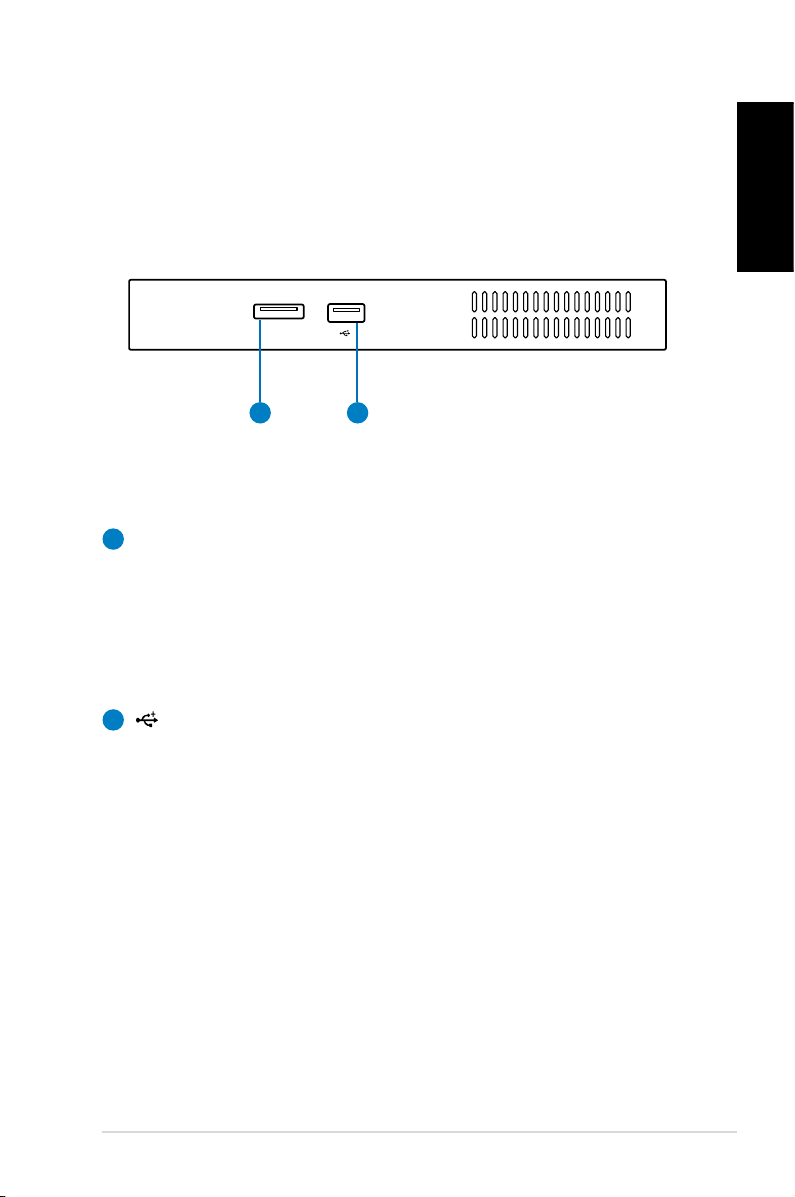
Top view
Refer to the diagram below to identify the components on this side
of the system.
1 2
E-SATA
1
e-SATA Port
External SATA or eSATA allows external connection of
Serial-ATA devices originally designed for use inside the
computer. It is up to six times faster than existing USB 2.0, &
1394 for external storage solutions and is also hot pluggable
using shielded cables and connectors up to two meters.
English
2
USB port
The USB (Universal Serial Bus) port is compatible with
USB devices such as keyboards, mouse devices, cameras,
and hard disk drives. USB allows many devices to run
simultaneously on a single computer, with some peripheral
acting as additional plug-in sites or hubs.
EeeBox PC 19
Page 20

English
Using the wireless antenna
The wireless antenna is connected to your EeeBox PC for enhancing
wireless signal reception. Do not rotate the wireless antenna to the
180°–270° angle for preventing damage.
20 EeeBox PC
Page 21
E-SATA
Positioning your EeeBox PC
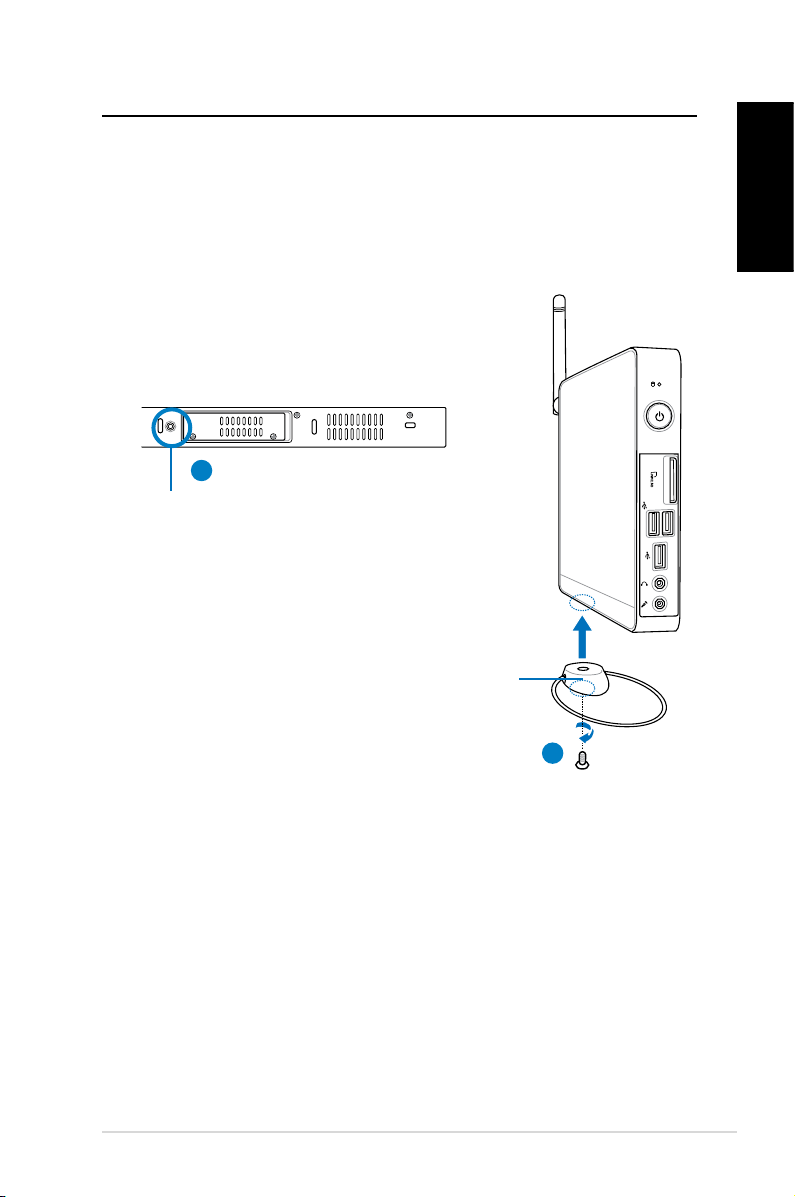
Installing the stand (optional)
Erect your EeeBox PC with the optional stand. To do so:
1. Locate the screw hole on the bottom of the EeeBox PC.
2. Align the stand screw to the PC screw hole, and then secure the
stand to the PC with a coin.
EeeBox PC bottom view
1
Screw hole
Stand screw
2
English
EeeBox PC 21
Page 22
English
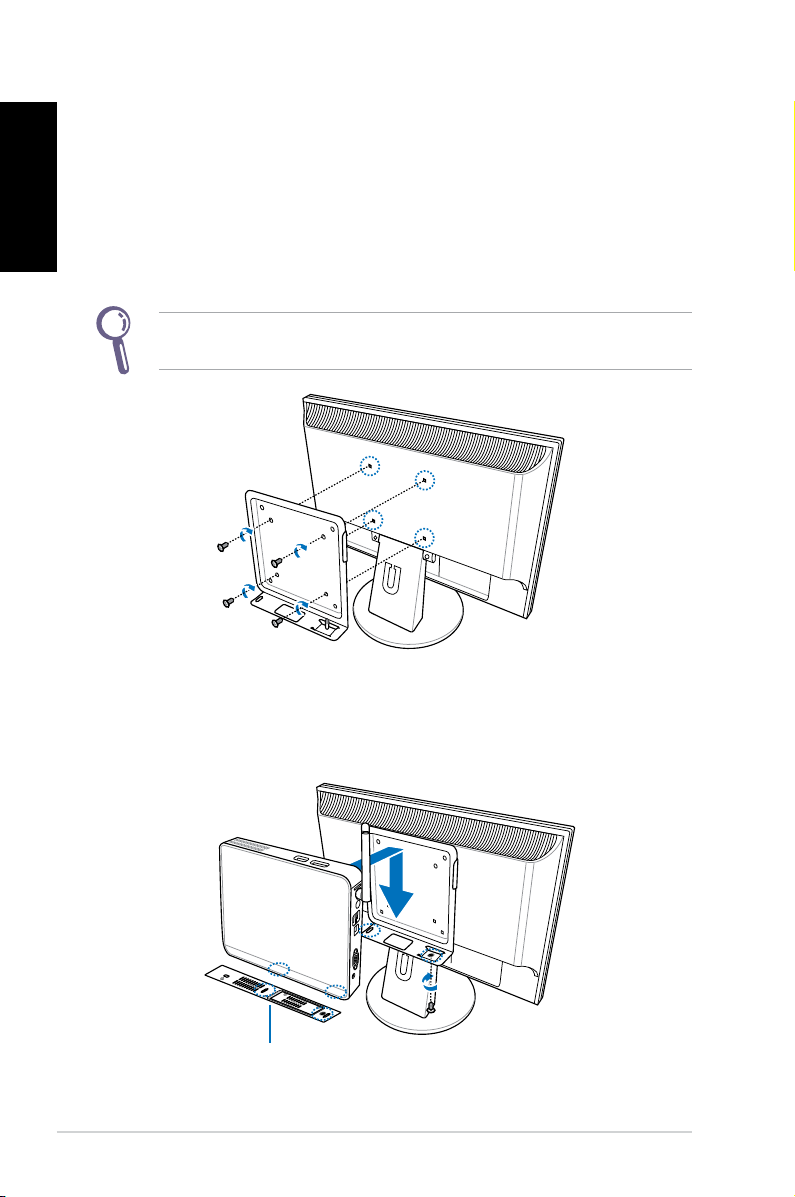
Installing your EeeBox PC to a monitor (optional)
You can also install your EeeBox PC to the back of a monitor. To do
so:
1. Secure the optional VESA mount to your monitor with four
screws (HNM/M4 x 8).
To fasten the VESA mount, your monitor must comply with VESA75
or VESA100 standard.
2. Place your EeeBox PC on the VESA mount noting the correct
alignment, and then secure the PC to the VESA mount with a
coin.
EeeBox PC bottom view
22 EeeBox PC
Page 23

Setting up your EeeBox PC
You need to connect peripherals before using your EeeBox PC.
Connecting to a display
Connect one end of the VGA cable to an LCD monitor (1) and the
other end to the Display (Monitor) Output port on the system rear
panel (2).
2
LCD monitor
1
Connecting to USB devices
Connect USB devices like wired/wireless keyboards (varying with
areas), mouse devices, and printers to the USB ports on the system
rear panel.
English
EeeBox PC 23
Page 24
English
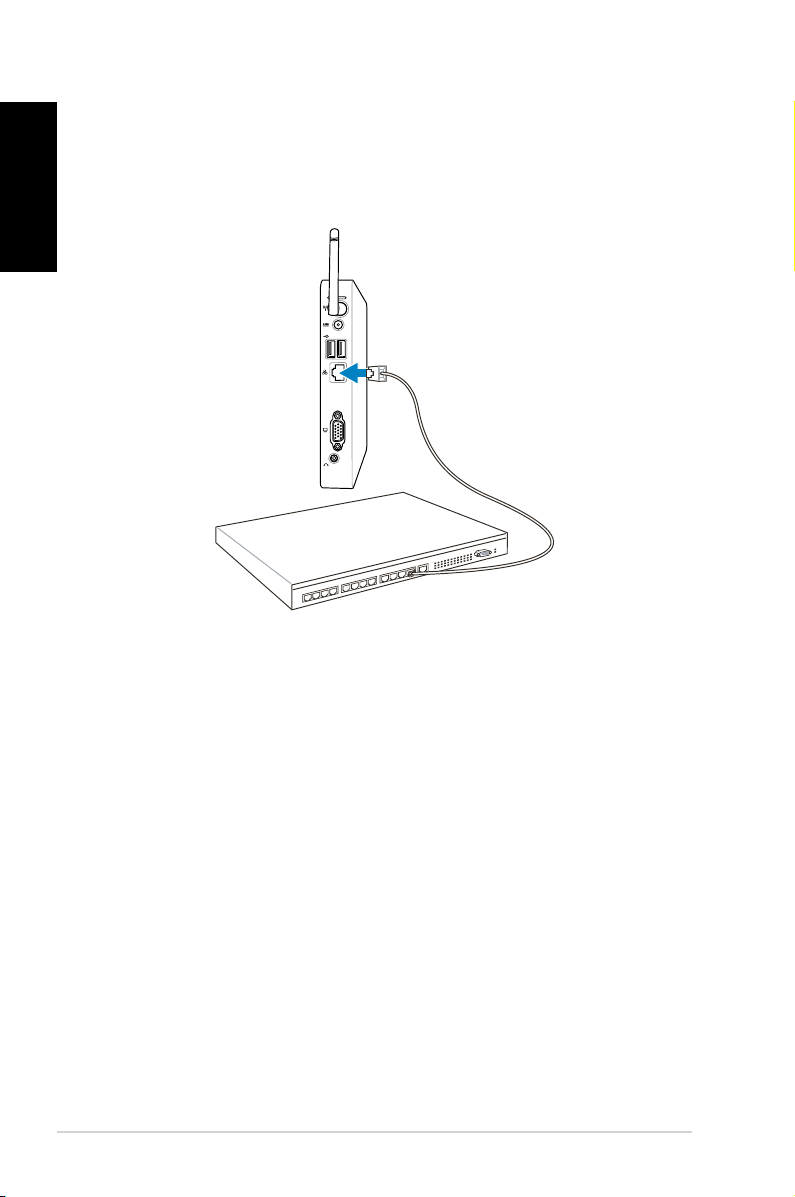
Connecting to a network device
Connect one end of a network cable to the LAN port on the system
rear panel and the other end to a hub or switch.
Network cable with RJ-45 connectors
Network hub or switch
24 EeeBox PC
Page 25
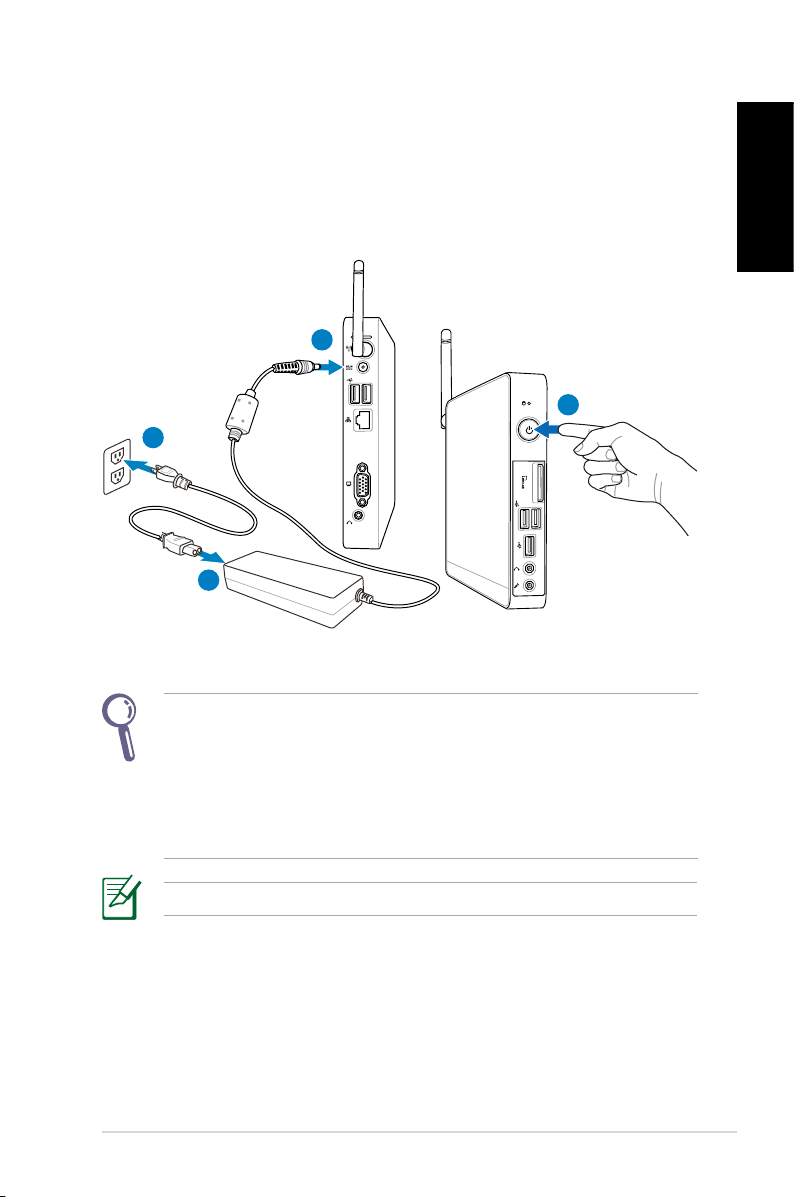
Turning on the system
Connect the supplied AC adapter to the DC IN jack on the system
rear panel, and then press the power switch on the front panel to
turn on the system.
3
4
2
1
English
• When your EeeBox PC is not in use, unplug the power adapter
or switch off the AC outlet to save on power consumption.
• Adjust the power management settings in the Window®
Control Panel. This is to ensure that your EeeBox PC is set to a
low power consumption mode and is fully operational at the
same time.
To enter the BIOS setup, press <F2> repeatedly during bootup.
EeeBox PC 25
Page 26
Using your EeeBox PC
English
All screenshots in this section are for reference only. Actual screen
images may vary with operating systems. Visit the ASUS website at
www.asus.com for the latest information.
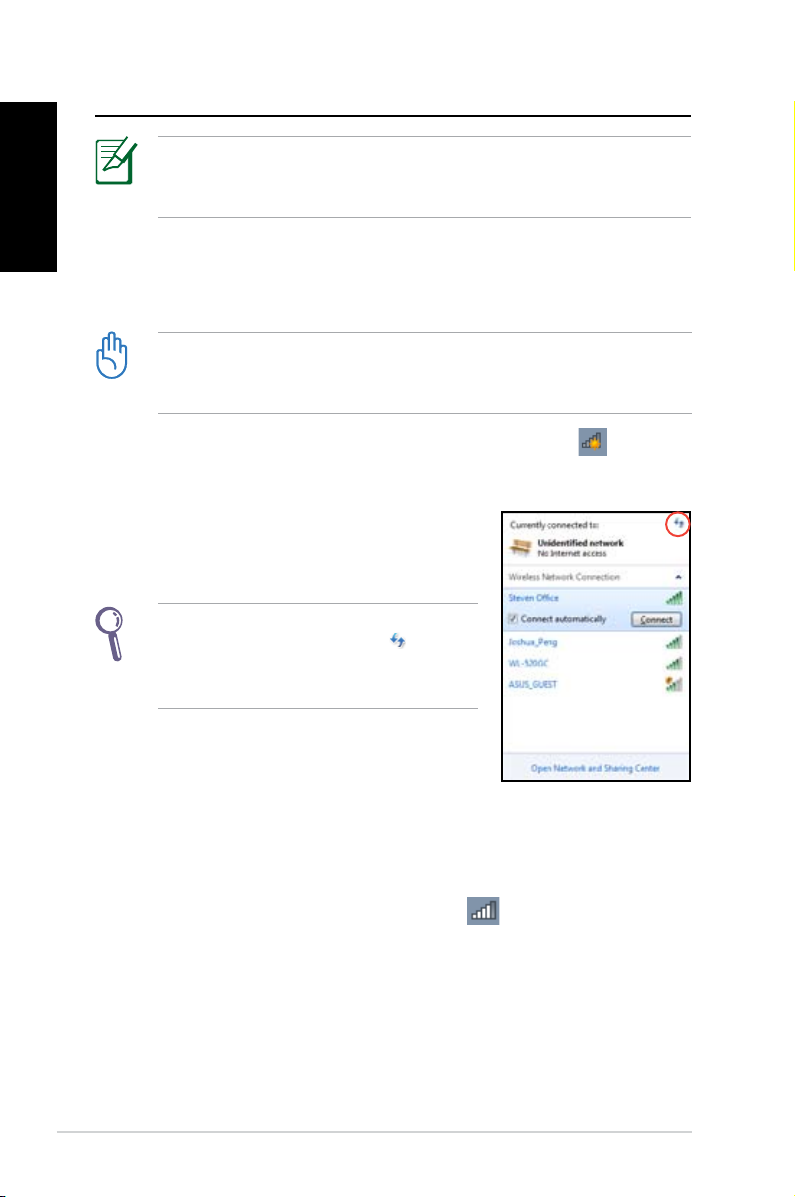
Conguring wireless connection
To connect to a wireless network, follow the instructions below:
For security concerns, DO NOT connect to an unsecured network.
Otherwise, the transmitted information without encryption might
be visible to others.
1. Click the wireless network icon with an orange star in the
Windows® Notification area.
2. Select the wireless access point you
want to connect to from the list and click
Connect to build the connection.
If you cannot find the desired access
point, click the Refresh icon on the
upper right corner to refresh and search
in the list again.
3. When connecting, you may have to enter a password.
4. After a connection has been established, the connection is
shown on the list.
5. You can see the wireless network icon
area.
26 EeeBox PC
in the Notification
Page 27
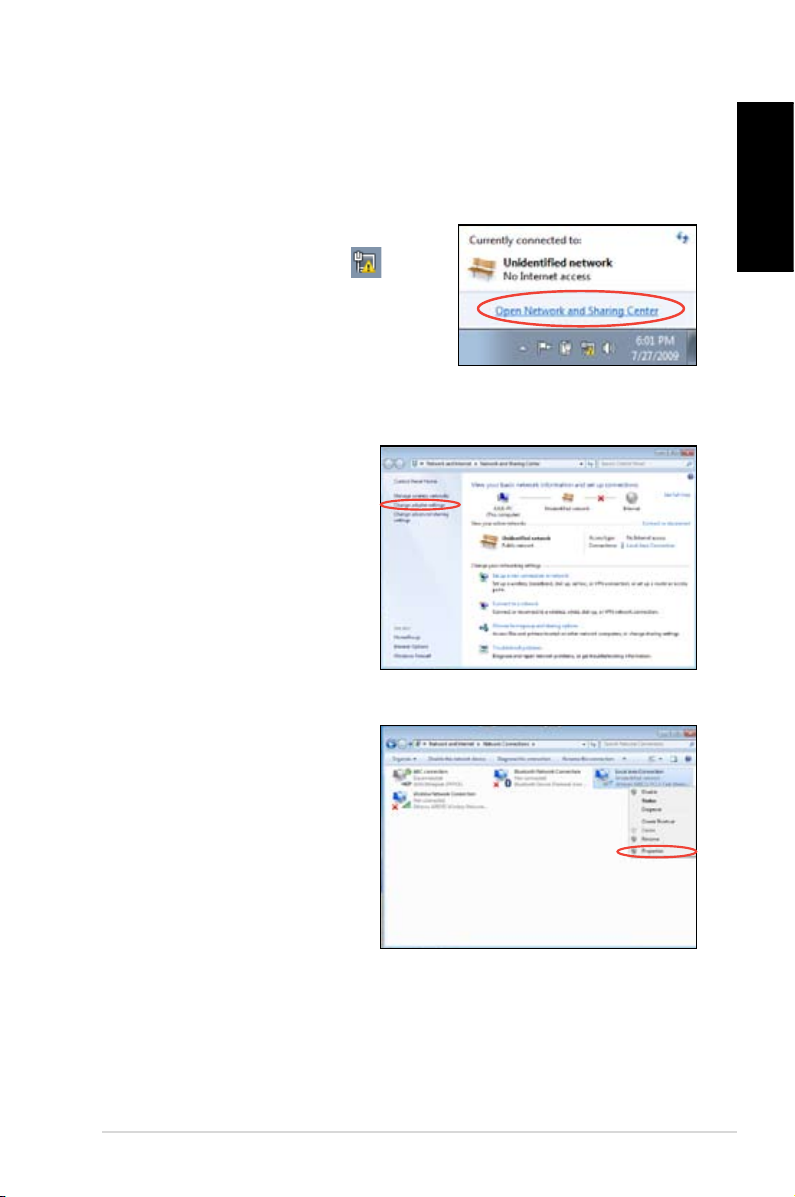
Conguring wired connection
To establish a wired network, follow the instructions below:
Using a dynamic IP / PPPoE network connection:
1. Click the network icon with a
yellow warning triangle in the
Windows® Notification area and
select Open Network and Sharing
Center.
English
2. Click
3. Right-click Local Area
Change adapter
settings in the left blue
pane.
Connection and select
Properties.
EeeBox PC 27
Page 28
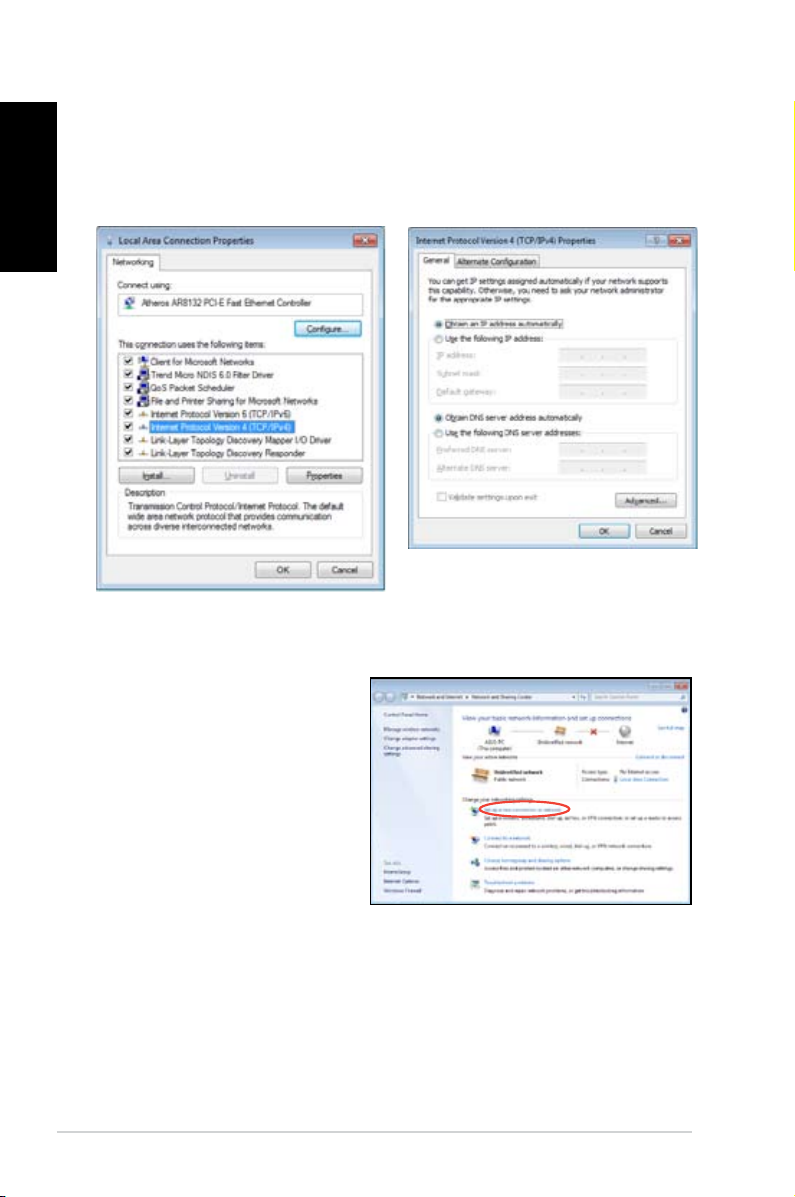
English
4. Click Internet Protocol
Version 4(TCP/IPv4) and
click Properties.
5. Click Obtain an IP address
automatically and click
OK.
(Continue the following steps if using PPPoE)
6. Return to the Network
and Sharing Center and
then click Set up a new
connection or network.
28 EeeBox PC
Page 29
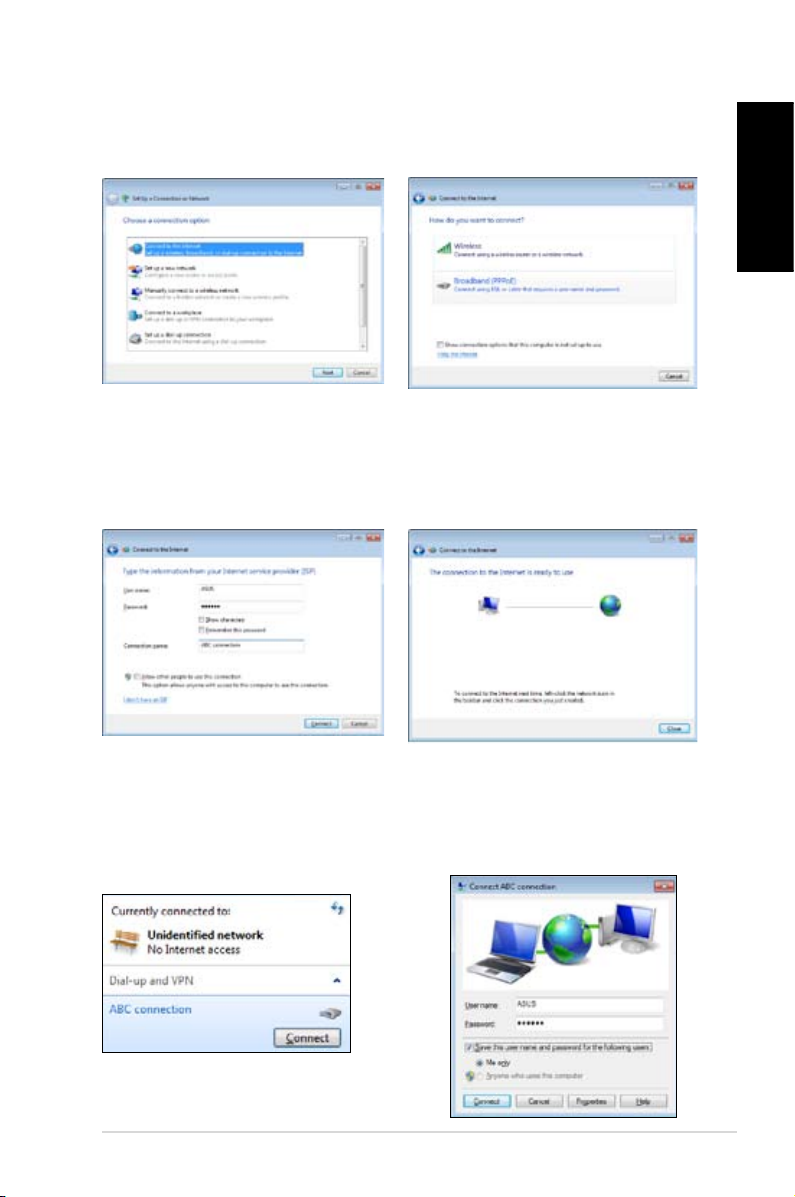
7. Select Connect to the
Internet and click Next.
8. Select Broadband (PPPoE)
and click Next.
English
9. Enter your User name and,
Password, and Connection
name. Click Connect.
11. Click the network icon
in the taskbar and click
the connection you just
created.
10. Click Close to finish the
configuration.
12. Enter your user name and
password. Click Connect to
connect to the Internet.
EeeBox PC 29
Page 30
English
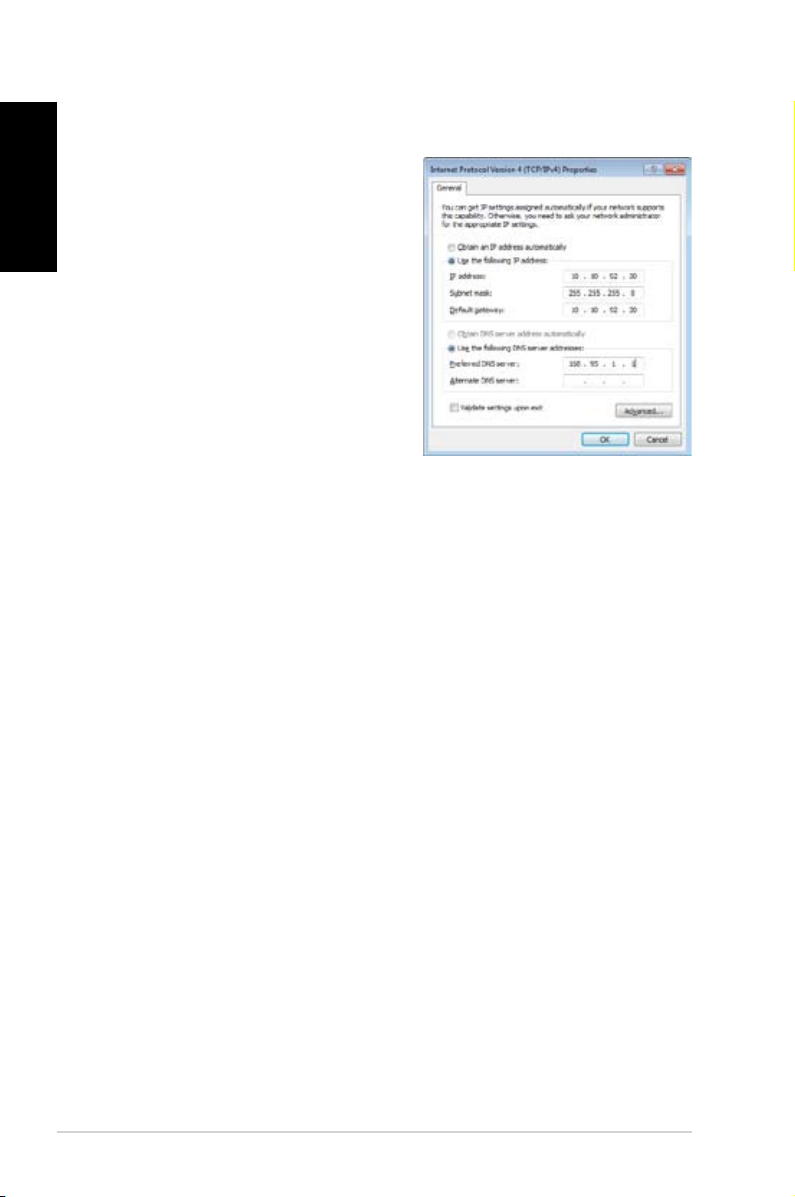
Using a static IP:
1. Repeat the step 1–4 of Using a
dynamic IP to start the static IP
network configuration.
2 Click
Use the following IP
address.
3. Enter the IP address, Subnet
mask and Gateway from your
service provider.
4. If needed, enter the preferred
DNS Server address and
alternative address.
5. After entering all the related values, click OK to build the
network connection.
30 EeeBox PC
Page 31

ASUS Easy Update
ASUS Easy Update is a software tool that automatically detects and
downloads the latest BIOS, drivers, and applications for your
EeeBox PC.
1. From the Windows® notification
area, right-click the ASUS Easy
Update icon.
English
2. Select
3. Select
4. Click
5. Check the item(s) you want
Schedule to set how
often you want to update
your system.
Update to activate
the update.
OK to display the
items you can download.
to download, and then click
OK.
EeeBox PC 31
Page 32

Recovering your system
English
Using the Recovery Partition
Recovering the OS to the Factory Default Partition (F9 Recovery)
1. Disable Boot Booster in BIOS setup.
2. Press [F9] during bootup.
3. Select
4. Select the language and click
5. Select
6. The factory default partition will be displayed. Click
7. Data on the default partition will be cleared. Click
8. When the recovery is completed successfully, click Reboot to
Backing up the Factory Default Environment Data to a USB Drive (F9 Backup)
Windows setup [EMS Enabled] when this item appears
and press [Enter].
Next.
Recover the OS to the Default Partition and click Next.
Next.
Recover to
start the system recovery.
You will lose all your data on the selected partition. Ensure to back
up your important data beforehand.
restart the system.
1. Repeat the step 1–4 in the previous section.
2. Select
3. Connect a USB storage device to your PC to start the Factory
4. Select a desired USB storage device if more than one USB
32 EeeBox PC
Backup the Factory Environment to a USB Drive and
click Next.
Default Environment backup.
The required size of the connected USB storage device should be
larger than 15GB. The actual size may vary with your PC model.
storage device is connected to your EeeTop PC/EeeBox PC and
click Next.
Page 33

If there is already a partition with proper size in the selected USB
storage device (for example, a partition that has been used as the
backup partition), the system will show this partiton automatically
and reuse it for backup.
5. Based on the different situations in the previous step, data on
the selected USB storage device or on the selected partition will
be cleared. Click Backup to start backup.
You will lose all your data on the selected USB storage device or
on the selected partition. Ensure to back up your important data
beforehand.
6. When backing up the factory default environment is completed
successfully, click Reboot to restart the system.
Using the USB storage device (USB Restore)
When the Recovery Partition in your system is crashed, use the USB
storage device to restore the system to the factory default partition
or the factory environment data to the entire hard disk.
1. Disable Boot Booster in BIOS setup.
2. Connect the USB storage device that you back up the factory
environment data to.
3. Press <ESC> for EeeTop PC or <F8> for EeeBox PC on bootup
and the Please select boot device screen appears. Select USB:
XXXXXX to boot from the connected USB storage device.
4. Select the language and click
5. Select
6. Select a task and click
Restore and click Next.
Next. Task options:
Next.
English
Restore the OS to the Default Partition only
Select this option if you simply want to restore the OS to the
factory default partition. This option deletes all data on the
system partition “C” and keeps the partition “D” unchanged.
(Continued on the next page)
EeeBox PC 33
Page 34

English
After you click Next, the factory default partition will be
displayed. Click Next again.
Restore the Whole Hard Disk
Select this option if you want to restore your EeeTop PC/EeeBox
PC to the factory default state. This option deletes all data from
your hard disk and creates a new system partition as drive “C” ,
an empty partition as drive “D“ and a Recovery Partition.
7. Data on the factory default partition or on the whole hard disk
will be cleared depending on the option you selected in the
previous step. Click Restore to start the task.
8. When the restore is completed successfully, click
Reboot to
restart the system.
34 EeeBox PC
Page 35

English
EeeBox PC 35
Page 36

English
EC Declaration of Conformity
We, the undersigned,
Manufacturer:
ASUSTek COMPUTER INC.
Address, City:
No. 150, LI-TE RD., PEITOU, TAIPEI 112, TAIWAN R.O.C.
Country:
TAIWAN
Authorized representative in Europe:
ASUS COMPUTER GmbH
Address, City: HARKORT STR. 21-23, 40880 RATINGEN
Country:
GERMANY
declare the following apparatus:
Product name : EeeBox PC
Model name : EeeBox B202, EeeBox EB1012, EeeBox EB1007, EeeBox
EB1012P
conform with the essential requirements of the following directives:
2004/108/EC-EMC Directive
EN 55022:2006+A1:2007
EN 61000-3-2:2006
EN 55013:2001+A1:2003+A2:2006
EN 55024:1998+A1:2001+A2:2003
EN 61000-3-3:2008
EN 55020:2007
1999/5/EC-R &TTE Directive
EN 300 328 V1.7.1(2006-05)
EN 300 440-1 V1.4.1(2008-05)
EN 300 440-2 V1.2.1(2008-03)
EN 301 511 V9.0.2(2003-03)
EN 301 908-1 V3.2.1(2007-05)
EN 301 908-2 V3.2.1(2007-05)
EN 301 893 V1.4.1(2005-03)
EN 50360:2001
EN 50371:2002
EN 62311:2008
EN 50385:2002
EN 301 489-1 V1.8.1(2008-04)
EN 301 489-3 V1.4.1(2002-08)
EN 301 489-4 V1.3.1(2002-08)
EN 301 489-7 V1.3.1(2005-11)
EN 301 489-9 V1.4.1(2007-11)
EN 301 489-17 V1.3.2(2008-04)
EN 301 489-24 V1.4.1(2007-09)
EN 302 326-2 V1.2.2(2007-06)
EN 302 326-3 V1.3.1(2007-09)
EN 301 357-2 V1.3.1(2006-05)
2006/95/EC-LVD Directive
EN 60950-1:2001+A11:2004
EN 60950-1:2006
EN60065:2002+A1:2006
EN 60950-1:2006+A11:2009
2009/125/EC-ErP Directive
Regulation (EC) No. 1275/2008
EN 62301:2005
Regulation (EC) No. 642/2009
EN 62301:2005
Regulation (EC) No. 278/2009
EN 62301:2005
CE marking
Declaration Date: May. 27, 2010
Year to begin affixing CE marking:2010
Position : CEO
Name : Jerry Shen
Signature : __________
(EC confo
rmity markin
g)
36 EeeBox PC
Page 37

ASUS contact information
ASUSTeK COMPUTER INC.
Address 15 Li-Te Road, Peitou, Taipei, Taiwan 11259
Telephone +886-2-2894-3447
Fax +886-2-2890-7798
E-mail info@asus.com.tw
Web site www.asus.com.tw
Technical Support
Telephone +86-21-38429911
Online support support.asus.com
ASUS COMPUTER INTERNATIONAL (America)
Address 800 Corporate Way, Fremont, CA 94539, USA
Telephone +1-510-739-3777
Fax +1-510-608-4555
Web site usa.asus.com
Technical Support
Telephone +1-812-282-2787
Support fax +1-812-284-0883
Online support support.asus.com
ASUS COMPUTER GmbH (Germany and Austria)
Address Harkort Str. 21-23, D-40880 Ratingen, Germany
Fax +49-2102-959911
Web site www.asus.de
Online contact www.asus.de/sales
English
Technical Support
Component Telephone +49-1805-010923
System/Notebook/Eee/ +49-1805-010920
LCD Telephone
Support Fax +49-2102-9599-11
Online support support.asus.com
EeeBox PC 37
Page 38

Deutsch
Deutsch
Eee Box PC
Benutzerhandbuch
Page 39

Deutsch
G6197
Dritte Ausgabe V3
November 2010
Deutsch
Copyright © 2010 ASUSTeK COMPUTER INC. Alle Rechte vorbehalten.
Kein Teil dieses Handbuchs, einschließlich der darin beschriebenen Produkte
und Software, darf ohne ausdrückliche, schriftliche Genehmigung von ASUSTeK
COMPUTER INC. (“ASUS”) in irgendeiner Form, ganz gleich auf welche Weise,
vervielfältigt, übertragen, abgeschrieben, in einem Wiedergewinnungssystem
gespeichert oder in eine andere Sprache übersetzt werden.
In diesem Handbuch angegebene Produkt- und Firmennamen können u.U.
eingetragene Warenzeichen oder Urheberrechte der entsprechenden Firmen sein
und dienen nur der Identifizierung oder Erklärung zu Gunsten des Eigentümers,
ohne Rechte verletzen zu wollen.
Es wurden keine Mühen gescheut, den Inhalt dieses Handbuchs korrekt und
aktuell zu gestalten. Dennoch kann für die Richtigkeit des Inhalts keine Haftbarkeit
übernommen werden. Der Hersteller behält sich das Recht vor, jederzeit ohne
Vorankündigung Änderungen am Handbuch vorzunehmen.
Page 40

Deutsch
Deutsch
Inhalt
Inhalt .............................................................................................................3
Erklärungen.................................................................................................4
Erklärung der Federal Communications Commission .......... 4
Sicherheitsinformationen ...................................................................... 9
Einstellen des Systems .....................................................................9
Vorsicht bei der Benutzung ............................................................ 9
LASER-PRODUKT DER KLASSE 1 ..................................................10
Lithium-Ionen-Akku-Warnung ....................................................10
Hinweise für dieses Handbuch ..........................................................12
Willkommen ..............................................................13
Paketinhalt ................................................................................................13
Kennenlernen Ihres
Vorderseite ................................................................................................14
Rückseite ....................................................................................................16
Oberseite ...................................................................................................18
Benutzen der Wireless-Antenne ........................................................19
Positioning your Eee Box PC ....................................20
Ständer installieren ................................................................................20
Eee Box PC an einem Bildschirm befestigen .................................21
Eee Box-PC vorbereiten ...........................................22
Bildschirm anschließen .........................................................................22
USB-Geräte anschließen .......................................................................22
An ein Netzwerkgerät anschließen ..................................................23
System einschalten ................................................................................24
Eee Box PC benutzen ................................................25
Wireless-Verbindung konfigurieren .................................................25
Kabelverbindung konfigurieren ........................................................26
ASUS Easy Update ..................................................................................30
Systemwiederherstellung ........................................31
Verwenden der versteckten Partition ..............................................31
Betriebssysten auf Standard-Partition wiederherstellen (F9-
Wiederherstellung) ..........................................................................31
Daten der Standard-Umgebung auf einen USB-Datenträger
sichern (F9 Backup) .........................................................................31
Benutzen des USB-Datenträgers (USB-
Wiederherstellung) .........................................32
Eee Box-PC .................................14
40 Eee Box PC
Page 41

Deutsch
Erklärungen
Erklärung der Federal Communications Commission
Dieses Gerät entspricht den FCC-Vorschriften, Teil 15. Sein Betrieb
unterliegt den folgenden zwei Bedingungen:
• Dieses Gerät darf keine schädigenden Interferenzen erzeugen,
und
• Dieses Gerät muss alle empfangenen Interferenzen aufnehmen,
einschließlich derjenigen, die einen unerwünschten Betrieb
erzeugen.
Dieses Gerät ist auf Grund von Tests für Übereinstimmung mit den
Einschränkungen eines Digitalgeräts der Klasse B, gemäß Teil 15
der FCC-Vorschriften, zugelassen. Diese Einschränkungen sollen bei
Installation des Geräts in einer Wohnumgebung auf angemessene
Weise gegen schädigende Interferenzen schützen. Dieses Gerät
erzeugt und verwendet Hochfrequenzenergie und kann, wenn
es nicht gemäß den Anweisungen des Herstellers installiert und
bedient wird, den Radio- und Fernsehempfang empfindlich
stören. Es wird jedoch nicht garantiert, dass bei einer bestimmten
Installation keine Interferenzen auftreten. Wenn das Gerät den
Radio- oder Fernsehempfang empfindlich stört, was sich durch
Aus- und Einschalten des Geräts feststellen lässt, ist der Benutzer
ersucht, die Interferenzen mittels einer oder mehrerer der folgenden
Maßnahmen zu beheben:
• Empfangsantenne neu ausrichten oder an einem anderen Ort
aufstellen.
• Den Abstand zwischen dem Gerät und dem Empfänger
vergrößern.
• Das Gerät an die Steckdose eines Stromkreises anschließen, an
die nicht auch der Empfänger angeschlossen ist.
• Den Händler oder einen erfahrenen Radio-/Fernsehtechniker um
Hilfe bitten.
Deutsch
ACHTUNG: Jede Änderung oder Modifikation die nicht ausdrücklich
vom Hersteller dieses Gerätes genehmigt wurde, läßt die
Betriebserlaubnis für dieses Gerät erlöschen.
Eee Box PC 41
Page 42

Deutsch
Deutsch
RF-Aussetzungswarnung
Dieses Gerät und die integrierte Antenne dürfen nicht näher als
20 cm an Ihrem Körper oder in der Nähe befindenden Personen
installiert und betrieben werden. Dieses Gerät und seine Antenne(n)
dürfen nicht zusammen oder in der Nähe mit anderen Antennen
oder Sendern betrieben werden. Endnutzer müssen die spezifischen
Betriebsanleitungen für eine RF-Aussetzung innerhalb der
anerkannten Bereiche befolgen.
Konformitätserklärung für die R&TTE-Direktive
1999/5/EC
Die folgenden Elemente wurden vervollständigt und werden als
relevant und ausreichend betrachtet:
• Grundlegende Anforderungen – Artikel 3
• Schutz der Gesundheit und Sicherheit – Artikel 3.1a
• Tests zur elektrischen Sicherheit, entsprechend EN 60950-1
• Schutzanforderungen zur elektromagnetischen Verträglichkeit
– Artikel 3.1b
• Tests zur elektromagnetischen Verträglichkeit entsprechend EN
301 489-1 und EN 301
• Tests entsprechend 489-17
• Effektive Nutzung der Funkfrequenzen – Artikel 3.2
• Funktests entsprechend EN 300 328- 2
42 Eee Box PC
Page 43

Deutsch
CE-Kennzeichen
CE-Zeichen für Geräte ohne Wireless LAN/Bluetooth
Die ausgelieferte Version dieses Gerätes erfüllt die Anforderungen
der EEC directives 2004/108/EC “Electromagnetic compatibility” und
2006/95/EC “Low voltage directive”.
CE-Zeichen für Geräte mit Wireless LAN/ Bluetooth
Diese Ausrüstung erfüllt die Anforderungen der Directive 1999/5/EC
of the European Parliament and Commission from 9 March, 1999
governing Radio and Telecommunications Equipment and mutual
recognition of conformity.
Wireless-Kanäle für unterschiedliche Gebiete
N. Amerika 2.412-2.462 GHz Kanal 01 bis Kanal 11
Japan 2.412-2.484 GHz Kanal 01 bis Kanal 14
Deutsch
Europa ETSI 2.412-2.472 GHz Kanal 01 bis Kanal 13
Eee Box PC 43
Page 44

Deutsch
Deutsch
Verbotene Wireless-Frequenzbänder in Frankreich
In einigen Gebiete in Frankreich sind bestimmte Frequenzbänder
ver boten . Die im höchsten Fall erla ubten Leistu ngen bei
Innenbetrieb sind:
• 10mW für das gesamte 2,4 GHz-Band (2400 MHz–2483,5 MHz)
• 100mW für Frequenzen zwischen 2446,5 MHz and 2483,5 MHz
Die Kanäle 10 bis 13 arbeiten ausschließlich im Band von 2446,6 MHz bis
2483,5 MHz.
Es gibt einige Möglichkeiten der Benutzung im Freien: Auf privaten
Grundstücken oder auf privaten Grundstücken öffentlicher Personen
ist die Benutzung durch eine vorausgehende Genehmigung des
Verteidigungsministers mit einer maximalen Leistung von 100mW
im 2446,5–2483,5 MHz-Band erlaubt. Die Benutzung im Freien auf
öffentlichen Grundstücken ist nicht gestattet.
In den unten aufgeführten Gebieten gilt für das gesamte 2,4GHzBand:
• Maximal erlaubte Leistung in Innenräumen ist 100mW
• Maximal erlaubte Leistung im Freien ist 10mW
Gebiete in denen der Gebrauch des 2400–2483,5 MHz-Bandes mit
einer EIRP von weniger als 100mW in Innenräumen und weniger als
10mW im Freien erlaubt ist:
01 Ain 02 Aisne 03 Allier
05 Hautes Alpes 08 Ardennes 09 Ariège
11 Aude 12 Aveyron 16 Charente
24 Dordogne 25 Doubs 26 Drôme
32 Gers 36 Indre 37 Indre et Loire
41 Loir et Cher 45 Loiret 50 Manche
55 Meuse 58 Nièvre 59 Nord
60 Oise 61 Orne 63 Puy du Dôme
64 Pyrénées Atl. 66 Pyrénées 67 Bas Rhin
68 Haut Rhin 70 Haute Saône
71 Saône et Loire 75 Paris 82 Tarn et Garonne
84 Vaucluse 88 Vosges 89 Yonne
90 Territoire de Belfort 94 Val de Marne
44 Eee Box PC
Page 45

Deutsch
Die Ausrüstungsanforderung unterliegt etwaigen späteren
Änderungen und ermöglicht Ihnen eventuell die Benutzung
Ihrer Wireless-LAN-Karte in mehreren Gebieten Frankreichs. Bitte
erkundigen Sie sich auf der ART-Webseite nach den neusten
Informationen (www.art-telecom.fr)
Ihre WLAN-Karte sendet mit weniger als 100mW, aber mehr als 10mW.
Erklärung des kanadischen Ministeriums für
Telekommunikation
Dieses Digitalgerät überschreitet keine Grenzwerte für
Funkrauschemissionen der Klasse B, die vom kanadischen
Ministeriums für Telekommunikation in den Funkstörvorschriften
festgelegt sind.
Dieses Digitalgerät der Klasse B stimmt mit dem kanadischen
ICES-003 überein.
IC-Strahlenbelastungserklärung für Kanada
Dieses Gerät erfüllt die IC-Strahlenbelastungsgrenzen für
unkontrollierte Umgebungen. Um die IC-Bestimmungen
einzuhalten, vermeiden Sie während des Betriebes
direkten Kontakt mit der Sendeantenne. Der Endbenutzer
muss den Bedienungsanweisungen Folge leisten, um die
Funkfrequenzbelastungsbestimmungen zu erfüllen.
Deutsch
Der Betrieb ist abhängig von folgenden zwei Bedingungen:
• Das Gerät darf keine Interferenzen verursachen und
• Das Gerät muss jegliche Interferenzen akzeptieren,
eingeschlossen Interferenzen, die einen ungewünschten
Gerätebetrieb verursachen.
REACH
Die rechtlichen Rahmenbedingungen für REACH (Registration,
Evaluation, Authorization, and Restriction of Chemicals) erfüllend,
veröffentlichen wir die chemischen Substanzen in unseren
Produkten auf unserer ASUS REACH-Webseite unter
http://csr.asus.com/english/REACH.htm.
Eee Box PC 45
Page 46

Deutsch
Deutsch
Sicherheitsinformationen
Ihr ASUS Eee Box PC wurde auf die neuesten Sicherheitsstandards
für Informationstechnologie geprüft und für gut befunden. Um
allerdings die sichere Handhabung des Produkts zu gewährleisten,
sollten Sie den Anweisungen in diesem Dokument unbedingt Folge
leisten.
Einstellen des Systems
• Lesen und befolgen Sie alle Anweisungen des Handbuchs, bevor
Sie das Gerät in Betrieb nehmen.
• Benutzen Sie das Gerät nicht in der Nähe von Wasser oder
Hitzequellen, z.B. Heizungen.
• Platzieren Sie das System auf einer stabilen Oberfläche.
• Die Öffnungen am Computergehäuse dienen der Belüftung
und sollten keinesfalls versperrt oder abgedeckt werden.
Vergewissern Sie sich, dass rund um den Computer genügend
Abstand (mind. 15 cm) zur optimalen Belüftung vorhanden ist.
Stecken Sie keine Gegenstände in die Luftschlitze.
• Benutzen Sie dieses Gerät in einer Umgebung, deren Temperatur
zwischen 0˚C und 35˚C liegt.
• Wenn Sie ein Verlängerungskabel mit mehreren Steckdosen für
das Gerät verwenden, vergewissern Sie sich, dass die zulässige
Stromstärke insgesamt nicht überschritten wird.
Vorsicht bei der Benutzung
• Treten Sie nicht auf das Stromkabel und stellen Sie nichts darauf ab.
• Halten Sie das Gerät von Wasser und anderen Flüssigkeiten fern.
• Wenn das System ausgeschaltet ist, fließen immer noch geringe
Mengen an Strom. Ziehen Sie immer alle Stecker von Strom- und
Modemkabeln ab, bevor Sie das System reinigen.
• Ziehen Sie den Stromstecker ab und geben Sie das Gerät zur
Reparatur an qualifiziertes Personal, wenn:
• das Stromkabel oder der Stromstecker beschädigt wurden
• Flüssigkeit im System verschüttet wurde
46 Eee Box PC
Page 47

Deutsch
• das System nicht ordnungsgemäß funktioniert, auch
wenn alle Betriebsanleitungen befolgt werden
• das Gerät fallen gelassen wurde oder das Gehäuse
beschädigt ist
• sich die Systemleistung drastisch verändert
Lithium-Ionen-Akku-Warnung
AUCHTUNG: Bei unsachgemäßem Austausch kann der Akku
explodieren. Verwenden Sie als Ersatz nur vom Hersteller
empfohlene oder ähnliche Modelle. Entsorgen Sie die Akkus
entsprechend den Anweisungen des Herstellers.
LASER-PRODUKTWARNUNG
LASER-PRODUKT DER KLASSE 1
ttthbfkjhskjhgdfkjhgsdkjhfkjsdhfgkjhs
NICHT AUSEINANDERNEHMEN
Die Garantie verfällt, wenn das Produkt vom Benutzer
auseinandergenommen wurde
Deutsch
Werfen Sie den Eee Box PC NICHT in den normalen Hausmüll.
Dieses Produkt wurde entwickelt, um ordnungsgemäß
wiederverwertet werden zu können. Dieses Symbol der
durchgestrichenen Mülltonne zeigt an, dass dieses Produkt
(elektrisches und elektronisches Zubehör, quecksilberhaltige
Knopfzellen) nicht im normalen Hausmüll entsorgt werden
darf. Erkundigen Sie sich bei Ihren örtlichen Behörden nach der
ordnungsgemäßen Geräteentsorgung.
Das durchgestrichene Symbol der Mülltonne zeigt an, dass der
Akku nicht im normalen Hausmüll entsorgt werden darf. Bitte
erkundigen Sie sich nach lokalen Regelungen zur Entsorgung von
Batterien und Akkus.
Eee Box PC 47
Page 48

Deutsch
Deutsch
Rücknahme und Wiederverwertung
Alte Computer, Notebook-Computer und andere elektronische
Ausrüstung enthalten für die Gesundheit und die Umwelt schädliche
Chemikalien, wenn diese auf einer normalen Mülldeponie entsorgt
werden. Bei der Wiederverwertung der Metalle, Plastik und
Komponenten aus alten Computern werden diese aufgebrochen,
sortiert und für die herstellung neuer Produkte wider verwendet.
Dadurch wird die Umwelt durch die unkontrollierte Freisetzung
schädlicher Chemikalien geschützt.
ASUS arbeitet mit Recycling-Firmen zusammen, die die höchsten
Standards für den Schutz der Umwelt, der Arbeitssicherheit und
den weltweiten Umweltgesetzen erfüllen. Unsere Verpflichtung
zur Wiederverwertung unserer alten Komponenten entstand aus
unserer Arbeit zum Schutz der Umwelt auf mehreren Wegen.
Für weitere Informationen über die ASUS-Produktwiederverwertung
und die Kontaktdaten besuchen Sie bitte die GreenASUS Takeback
and Recycling-Webseite (http://csr.asus.com/english/takeback.htm)
48 Eee Box PC
Page 49

Deutsch
Hinweise für dieses Handbuch
Um sicherzustellen, dass Sie bestimmte Aufgaben richtig ausführen,
beachten Sie bitte die folgenden Symbole, die in diesem Handbuch
verwendet werden.
GEFAHR/WARNUNG: Informationen zum Vermeiden von
Verletzungen beim Ausführen einer Aufgabe.
WICHTIG: Anweisungen, die Sie beim Ausführen einer Aufgabe
befolgen müssen.
TIPP: Tipps und nützliche Informationen zur Durchführung einer
Aufgabe.
ANMERKUNG: Tipps und nützliche Informationen für besondere
Umstände.
Deutsch
Eee Box PC 49
Page 50

Deutsch
Deutsch
Quick Start Guide
Willkommen
Herzlichen Glückwunsch zu Ihrem Kauf eines Eee Box-PCs. Der Inhalt
des Produktpakets wird im Folgenden aufgeführt. Sollten folgende
Artikel beschädigt oder nicht vorhanden sein, wenden Sie sich bitte
an Ihren Händler.
Paketinhalt
EeeBox PC Ständer (optional)
Mini-Buchse-S/PDIF-Adapter
(optional)
Garantiekarte Schnellstartanleitung
Wenn das Gerät oder seine Komponenten während normaler
Benutzung innerhalb der Garantiezeit nicht funktionieren oder
fehlerhaft arbeiten bringen Sie es zusammen mit der Garantiekarte
zur Reparatur oder zum Austausch der Komponenten zu Ihren
ASUS-Kundendienst.
VESA-Halterung +Schrauben
(optional)
Netzteil Netzkabel
50 Eee Box PC
Page 51

Deutsch
Kennenlernen Ihres
Eee Box-PC
Vorderseite
Die nachstehende Abbildung zeigt die Komponenten auf dieser
Seite des Systems.
1
2
3
4
Deutsch
5
6
1
Festplatten-LED
Diese LED blinkt, wenn Daten auf der Festplatte gelesen
oder auf ihr geschrieben werden..
2
Netzschalter
Dieser Schalter schaltet das System EIN und AUS.
Eee Box PC 51
Page 52

Deutsch
Deutsch
3
Speicherkartensteckplatz
Der integrierte Kartenleser liest MMC/SD/SDHC/MS/MS Pro-
Karten aus Geräten wie z.B. Digitalkameras, MP3-Playern,
Handys und PDAs.
4
USB-Anschluss
Der USB (Universal Serial Bus)-Anschluss ist kompatibel
mit USB-Geräten wie z.B. Tastaturen, USB-Mäuse, Kameras
und externe Laufwerke. USB macht es möglich, mehrere
Geräte gleichzeitig an einem Computer zu nutzen. Einige
Peripherigeräte können dabei als zusätzliche SteckMöglichkeiten oder Hubs genutzt werden.
5
Kopfhörer-/Audio-Ausgang
Die Stereo-Kopfhörerbuchse (3,5mm) dient zum Verbinden
des Audioausgangssignals des Systems mit verstärkten
Lautsprechern oder einem Kopfhörer.
6
Mikrofonbuchse
An den Mikrofonanschluss können Sie ein Mikrofon
anschließen, das Sie für Skype, Sprachanwendungen und
einfache Tonaufnahmen einsetzen können.
52 Eee Box PC
Page 53

Deutsch
Rückseite
Die nachstehende Abbildung zeigt die Komponenten auf dieser
Seite des Systems.
1
2
3
4
5
6
1
Wireless-Antennenbuchse
Diese Buchse verbindet mit der mitgelieferten Wireless-
Antenne, um den Signalempfang zu verbessern.
2
Netzteileingang (12V Gleichspannung)
Hier schließen Sie das mitgelieferte Netzteil an,
das Wechselspannung zum Betrieb Ihres Eee PC in
Gleichspannung umwandelt. Wenn das Netzteil mit diesem
Anschluss verbunden wird, versorgt es Ihren Eee PC mit
Strom. Damit es nicht zu Schäden am Eee PC kommt,
benutzen Sie ausschließlich das mitgelieferte Netzteil.
Deutsch
Eee Box PC 53
Page 54

Deutsch
Deutsch
Das Netzteil kann sich im Betrieb erhitzen. Decken Sie es nicht
ab und halten Sie es vom Körper fern.
3
USB-Anschluss
Der USB (Universal Serial Bus)-Anschluss ist kompatibel
mit USB-Geräten wie z.B. Tastaturen, USB-Mäuse, Kameras
und externe Laufwerke. USB macht es möglich, mehrere
Geräte gleichzeitig an einem Computer zu nutzen. Einige
Peripherigeräte können dabei als zusätzliche SteckMöglichkeiten oder Hubs genutzt werden.
4
LAN-Anschluss
Der 8-polige RJ-45 LAN-Anschluss unterstützt ein Standard
Ethernet-Kabel zum Anschluss an ein lokales Netzwerk.
5
Monitorausgang
An den 15-poligen D-SUB-Monitorausgang können Sie VGA-
kompatible Anzeigegeräte wie Monitore oder Projektoren
anschließen.
Audio-Ausgangsbuchse (S/PDIF-Ausgang)
6
Stecken Sie ein 3,5mm Mini-Buchsenaudiokabel an diesen
Anschluss, um analoges oder digitales Audio zu übertragen.
54 Eee Box PC
Verbinden Sie das mitgelieferte Mini-Buchsen-zu
S/PDIF-Adapter mit Ihrem Verstärker, um die S/PDIFAusgangsfunktion zu nutzen.
Page 55

Deutsch
E-SATA
Oberseite
Die nachstehende Abbildung zeigt die Komponenten auf dieser
Seite des Systems.
1 2
E-SATA
1
e-SATA-Anschluss
External SATA oder eSATA ermöglicht externe Verbindungen
mit seriellen ATA-Geräten, die ursprünglich für den
Gebrauch im Inneren des Computers vorgesehen waren.
Diese verbindung ist für externe Speicherlösungen bis zu
6x schneller als USB 2.0, & 1394 und auch Hot-Plug-fähig bei
der Benutzung abgeschirmter, bis zu 2 Meter langen Kabel
und Anschlüsse.
Deutsch
2
USB-Anschluss
Der USB (Universal Serial Bus)-Anschluss ist kompatibel
mit USB-Geräten wie z.B. Tastaturen, USB-Mäuse, Kameras
und externe Laufwerke. USB macht es möglich, mehrere
Geräte gleichzeitig an einem Computer zu nutzen. Einige
Peripherigeräte können dabei als zusätzliche SteckMöglichkeiten oder Hubs genutzt werden.
Eee Box PC 55
Page 56

Deutsch
Deutsch
Benutzen der Wireless-Antenne
Die Wireless-Antenne ist mit Ihren Eee Box PC verbunden, um den
Empfang des Wireless-Signals zu verbessern. Drehen Sie die Antenne
nicht in einen Winkel von 180°–270°, um deren Beschädigung zu
vermeiden.
56 Eee Box PC
Page 57

Deutsch
Positioning your Eee Box PC
Ständer installieren
Stellen Sie den Eee Box-PC mit dem mitgelieferten Ständer
folgendermaßen auf:
1. Suchen Sie die Schraubenlöcher auf der
Unterseite des Eee Box-PCs.
2. Richten Sie die Ständerschrauben auf die
Löcher aus, und befestigen Sie dann den
Ständer mit Hilfe einer Münze am PC.
Eee Box-PC Unterseite
1
Schraubenloch
Ständerschraube
Deutsch
2
Eee Box PC 57
Page 58

Deutsch
Deutsch
Eee Box PC an einem Bildschirm befestigen
Sie können Ihren Eee Box-PC auch an der Rückseite eines
Bildschirms befestigen. Gehen Sie dazu folgendermaßen vor:
1. Befestigen Sie die VESA-Halterung mit vier (HNM/M4 x 8)
Schrauben.
Um die VESA-Halterung befestigen zu können, muss Ihr Bildschirm
dem Standard VESA75 oder VESA100 entsprechen.
2. Stellen Sie den Eee Box-PC auf die VESA-Halterung. Achten Sie
auf die korrekte Ausrichtung. Befestigen Sie den PC mit Hilfe
einer Münze an der VESA-Halterung.
58 Eee Box PC
Eee Box-PC Unterseite
Page 59

Deutsch
Eee Box-PC vorbereiten
Bevor Sie Ihrem Eee Box-PC nutzen können, müssen Sie einige
Peripheriegeräte anschließen.
Bildschirm anschließen
Verbinden Sie ein Ende des HDMI/VGA-Kabels mit einen LCD-TV
oder einen LCD-Monitor (1) und das andere Ende mit dem HDMI/
Display (Monitor) -Ausgang auf der Rückseite des Systems (2).
Deutsch
2
LCD-Monitor
1
USB-Geräte anschließen
Verbinden Sie USB-Geräte wie Tastatur, Maus oder Drucker mit den
USB -Anschlüssen auf der Rückseite des Systems
Eee Box PC 59
Page 60

Deutsch
Deutsch
An ein Netzwerkgerät anschließen
Verbinden Sie ein Ende des Netzwerkkabels mit dem LAN-Anschluss
auf der Rückseite des Systems und das andere mit einem Hub oder
Netzwerkkabel mit RJ-45-Anschluss
Netzwerk-Hub oder Switch
60 Eee Box PC
Page 61

Deutsch
System einschalten
Verbinden Sie das Netzteil mit dem Anschluss DC IN auf der
Rückseite des Systems und drücken Sie dann den Netzschalter auf
der Vorderseite, um das System einzuschalten.
3
4
2
1
• Wenn Ihr Eee Box PC nicht benutzt wird, ziehen Sie bitte den
Stecker des Netzteils aus der Steckdose oder schalten den
Stromverteiler aus, um Energie zu sparen.
Deutsch
• Regeln Sie die Energiespareinstellungen in der Window®.
Systemsteuerung. Damit stellen Sie sicher, dass Ihr Eee Box PC
auf einen niedrigen Stromverbrauchsmodus gesetzt wurde
aber trotzdem voll funktionsfähig bleibt.
Um zum BIOS zu gelangen, drücken Sie während des
Startvorgangs wiederholt die Taste <F2>
Eee Box PC 61
Page 62

Deutsch
Eee Box PC benutzen
Alle Abbildungen in diesen Abschnitt sind nur zur Referenz
gedacht. Die tatsächlich angezeigten Bildschirminhalte können
sich je nach betriebssystem unterscheiden. Besuchen Sie die ASUSWebseite unter www.asus.com für die neusten Informationen.
Deutsch
Wireless-Verbindung kongurieren
Um sich mit einem Wireless-Netzwerk zu verbinden, gehen Sie
folgendermaßen vor:
Verbinden Sie sich aus Sicherheitsgründen NICHT mit einen
ungesicherten Netzwerk, da sonst die Möglichkeit besteht, dass
durch die fehlende Verschlüsselung Ihre Daten von anderen
gesehen werden..
1. Klicken Sie in der Taskleiste auf das Wireless-Netzwerksymbol
mit den orangen Stern .
2. Wählen Sie den Wireless-AP, mit dem Sie
sich verbinden wollen aus der Liste aus
und klicken Sie auf Verbinden, um die
Verbindung herzustellen
Wenn Sie den gewünschten AP nicht
finden können, klicken Sie in der
rechten oberen Ecke auf das Symbol
Aktualisieren , um die Liste zu
aktualisieren und erneut zu suchen.
3. Bei der Verbindungsherstellung müssen Sie möglicherweite ein
Kennwort eingeben.
4. Nachdem die Verbindung hergestellt wurde, wird diese in der
Liste angezeigt.
5. Sie sehen nun das Wireless-netzwerksymbol
in der
Taskleiste.
62 Eee Box PC
Page 63

Deutsch
Kabelverbindung kongurieren
So stellen Sie eine Kabelnetzwerkverbindung her:
Dynamische IP / PPPoE-Netzwerkverbindung benutzen:
1. Klicken Sie in der Taskleiste auf das
Netzwerksymbol mit den gelben
Ausrufezeichen und wählen
Sie Netzwrk- und Freigabecenter
öffnen.
2. Klicken Sie in der linken
blauen Spalte auf
Adaptereinstellungen
öffnen.
Deutsch
3. Rechtsklicken Sie auf
LAN-Verbindung
und wählen Sie
Eigenschaften.
Eee Box PC 63
Page 64

Deutsch
Deutsch
4. Markieren Sie Internet
Protocol Version 4(TCP/
IPv4) und klicken Sie auf
5. Wählen Sie IP-Adresse
automatisch beziehen
und klicken Sie auf OK.
Eigenschaften.
(Fahren Sie mit den folgenden Schritten fort, falls Sie PPPoE
benutzen)
6. Kehren Sie zum
Netzwerk- und
Freigabecenter zurück
und klicken Sie dann auf
Neue Verbindung oder
Netzwerk einrichten.
64 Eee Box PC
Page 65

Deutsch
7. Wählen Sie Verbindung
mit dem Internet
herstellen und klicken Sie
auf Weiter.
8. Wählen Sie Beitband
(PPPoE) und klicken Sie auf
Weiter.
Deutsch
9. Geben Sie Ihren
Benutzernamen und das
Passwort ein. Klicken Sie auf
Weiter.
11. Klicken Sie in der Taskleiste
auf das netzwerksymbol
und dann auf die
Verbindung, die Sie gerade
erstellt haben.
10. Klicken Sie auf Schließen,
um die Konfiguration zu
beenden.
12. Geben Sie Ihren
Benutzernamen und das
Passwort ein. Klicken Sie
auf Verbinden, um sich mit
dem Internet zu verbinden.
Eee Box PC 65
Page 66

Deutsch
Statisch IP benutzen:
Deutsch
1. Wiederholen Sie die Schritte
1–4 des vorherigen
Abschnittes.
2 Klicken Sie auf
Folgende IP-
Adresse verwenden.
3. Geben Sie Ihre IP-Adresse,
Subnetzmaske und
Standardgateway ein.
4. Wenn nötig, geben Sie die
Adresse für den Bevorzugten
DNS-Server ein.
5. Nach der Eingabe aller erforderlichen Daten, klicken Sie auf OK,
um die Verbindung zu erstellen.
66 Eee Box PC
Page 67

Deutsch
ASUS Easy Update
ASUS Easy Update ist eine Hilfs-Software, welche automatisch die
neuesten BIOS-Versionen, Treiber und Anwendungen für Ihren Eee
Box-PC erkennt und herunterlädt.
1. Rechtsklicken Sie in der
Windows®-Taskleiste auf das
Symbol ASUS Easy Update.
2. Wählen Sie
einzustellen, wie oft Sie Ihr
System aktualisieren wollen.
3. Wählen Sie
Aktualisierungsfunktion zu
aktivieren.
4. Klicken Sie auf
Elemente anzuzeigen, die Sie
herunterladen können.
5. Markieren Sie die Elemente,
die Sie herunterladen wollen
und klicken Sie dann auf OK.
Schedule, um
Update, um die
OK, um die
Deutsch
Eee Box PC 67
Page 68

Deutsch
Deutsch
Systemwiederherstellung
Verwenden der versteckten Partition
Betriebssysten auf Standard-Partition wiederherstellen (F9-Wiederherstellung)
1. Deaktivieren Sie im BIOS die Funktion Boot Booster.
2. Drücken Sie während des Boot-Vorgangs auf die Taste [F9].
3. Wählen Sie
die [Eingabetaste].
4. Wählen Sie die gewünschte Sprache aus und klicken Sie auf
Wählen Sie Recover the OS to the Default Partition und
5.
klicken Sie auf Next.
6. Sie vom Hersteller eingerichtete Standard-Partition wird
angezeigt. Klicken Sie auf Next.
7. Alle Daten dieser Standard-Partition werden gelöscht. Klicken
Sie auf Recover, um die Systemwiederherstellung zu beginnen.
Alle Daten auf der gewählten Partition werden gelöscht. Vergewissern
Sie sich, dass Sie wichtige Daten vorher gesichert haben.
8. Wenn die Systemwiederherstellung abgeschlossen ist, klicken
Sie bitte auf Reboot, um das System neu zu starten.
Windows setup [EMS Enabled] und drücken Sie
Next.
Daten der Standard-Umgebung auf einen USBDatenträger sichern (F9 Backup)
1. Wiederholen Sie die Schritte 1 - 4 des vorherigen Abschnittes.
2. Wählen Sie
und klicken Sie auf Next.
3. Verbinden Sie den USB-Datenträger mit Ihrem PC, um die
Sicherung der Standard-Umgebung zu starten.
Die erforderliche Größe des angeschlossenen USB-Datenträgers
sollte größer als 15GB betragen da die tatsächliche Größe von
Ihrem PC-Modell abhängig ist.
4. Wählen Sie den gewünschte USB-Datenträger aus, falls Sie
mehrere USB-Datenträger an Ihren PC angeschlossen haben
und klicken Sie auf Next.
68 Eee Box PC
Backup the Factory Environment to a USB Drive
Page 69

Deutsch
Wenn auf dem gewählten USB-Datenträger schon eine Partition
mit der erforderlichen Größe vorhanden ist (z.B. eine schon zur
Sicherung verwendete Partition), wird das Sytem diese erkennen
und automatisch für die Sicherung wiederverwenden.
5. Basierend auf den verschiedenen Situationen der
vorhergegangenen Schritte, werden die Daten auf dem
gewählten USB-Datenträger oder der gewählten Partition
gelöscht. Klicken Sie auf Backup, um die Sicherung zu beginnen.
Sie werden alle Daten auf dem gewählten USB-Datenträger oder
der gewählten Partition verlieren. Vergewissern Sie sich, dass Sie
wichtige Daten vorher gesichert haben.
6. Wenn die Sicherung der Standard-Umgebung erfolgreich
beendet wurde, klicken Sie bitte auf Reboot, um das System
neu zu starten.
Benutzen des USB-Datenträgers (USB-Wiederherstellung)
Wenn die Wiederherstellungspartition Ihres Systems beschädigt ist,
könnnen Sie einen USB-Datenträger benutzen, um Ihr System in den
Werkszustand auf der gesamten Festplatte zurück zu versetzen.
Deutsch
1. Deaktivieren Sie im BIOS die Funktion Boot Booster.
2. Verwenden Sie den USB-Datenträger, auf dem Sie die
Werkseinstellungen gespeichert haben.
3. Drücken Sie beim Bootvorgang, wenn der Bildschirm
Please
select boot device erscheint, auf die Taste <ESC> für EeeTop
PC oder <F8> für EeeBox PC. Wählen Sie USB:XXXXXX, um vom
angeschlossenen USB-Datenträger zu booten.
4. Wählen Sie die gewünschte Sprache aus und klicken Sie auf
Next.
5. Wählen Sie Restore und klicken Sie auf
Next.
Eee Box PC 69
Page 70

Deutsch
Deutsch
6. Wählen Sie eine Aufgabe und klicken Sie auf
Next. Optionen:
Restore the OS to the Default Partition only (Betriebssystem
nur auf der Standard-Partition wiederherstellen)
Wählen Sie diese Option, wenn Sie das Betriebssytem nur auf
der Standard-Partition wiederherstellen wollen. Diese Option
löscht alle Daten auf der Systemparetition “C” und behält die
Partition “D” unverändert in ihren Zustand.
Nachdem Sie auf Next geklickt haben, wird die Standard-
Partition angezeigt. Klicken Sie nun erneut auf Next.
Restore the Whole Hard Disk (Betriebssystem auf gesamter
Festplatte wiederherstellen)
Wählen Sie diese Option, wenn Sie Ihren All-in-one PC in den
Standard-Werkszustand zurück versetzen wollen. Diese Option
löscht alle Daten auf der gesamten Festplatte und erstellt eine
neue Systempartition als Laufwerk “C”, eine leere Partition als
Laufwerk “D“ und eine Wiederherstellungspartition.
7. Die Daten auf der Standard-Partition oder der gesamten
Festplatte werden abhängig von den vorher gewählten
Schritten gelöscht. Klicken Sie auf Restore, um die
Wiederherstellung zu beginnen.
8. Wenn die Systemwiederherstellung erfolgreich beendet wurde,
klicken Sie bitte auf Reboot, um das System neu zu starten.
70 Eee Box PC
Page 71

Deutsch
Deutsch
Eee Box PC 71
Page 72

Deutsch
Deutsch
72 Eee Box PC
Page 73

Deutsch
ASUS Kontaktinformationen
ASUSTeK COMPUTER INC.
Adresse 15 Li-Te Road, Peitou, Taipei, Taiwan 11259
Telefon +886-2-2894-3447
Fax +886-2-2890-7798
E-Mail info@asus.com.tw
Webseite www.asus.com.tw
Technische Unterstützung
Telefon +86-21-38429911
Online-Support support.asus.com
ASUS COMPUTER INTERNATIONAL (Amerika)
Adresse 800 Corporate Way, Fremont, CA 94539, USA
Telefon +1-510-739-3777
Fax +1-510-608-4555
Webseite usa.asus.com
Technische Unterstützung
Telefon +1-812-282-2787
Support-Fax +1-812-284-0883
Online-Support support.asus.com
ASUS COMPUTER GmbH (Deutschland & Österreich)
Adresse Harkort Str. 21-23, 40880 Ratingen, Deutschland
Fax +49-2102-959911
Webseite www.asus.de
Online-Kontakt www.asus.de/sales
Deutsch
Technische Unterstützung
Komponenten-Telefon +49-1805-010923
System/Notebook/Eee/ +49-1805-010920
LCD-Telefon
Support-Fax +49-2102-9599-11
Online-Support support.asus.com
Eee Box PC 73
Page 74

Italiano
Italiano
Italiano
EeeBox PC
Manuale Utente
Page 75

Italiano
I6197
Terza Edizione V3
Ottobre 2010
Copyright © 2010 ASUSTeK COMPUTER INC. Tutti i Diritti Riservati.
Alcuna parte di questo manuale, compresi i prodotti e i software in esso descritti,
può essere riprodotta,trasmessa, trascritta, archiviata in un sistema di recupero o
tradotta in alcuna lingua, in alcuna forma e in alcun modo, fatta eccezione per la
documentazione conservata dall’ acquirente, a scopi di backup, senza l’espressa
autorizzazione scritta di ASUSTeK COMPUTER INC. (“ASUS”).
I prodotti e nomi delle aziende che compaiono in questo manuale possono o meno
essere marchi registrati o diritti d’autore delle rispettive aziende, e sono usati solo a
scopo identicativo. Tutti i marchi sono di proprietà dei rispettivi proprietari.
E’ stato compiuto ogni sforzo per assicurare la correttezza e l’aggiornamento dei
contenuti di questo manuale. Tuttavia, il produttore non ore alcuna garanzia in
merito all’ accuratezza di tali contenuti e si riserva il diritto di modicarli senza
preavviso.
Italiano Italiano
Page 76

Italiano
Italiano
Condizioni e Limiti di Copertura
della Garanzia sul Prodotto
Le condizioni di garanzia variano a seconda del tipo di prodotto e sono
specificatamente indicate nel Certificato di Garanzia allegato, cui si fa espresso
rinvio.
Inoltre la presente garanzia non è valida in caso di danni o difetti dovuti ai
seguenti fattori: (a) uso non idoneo, funzionamento o manutenzione improprio,
incluso senza limitazioni l’utilizzo del prodotto con una finalità diversa da quella
conforme alle istruzioni di ASUSTeK COMPUTER INC. in merito all’idoneità di
utilizzo e alla manutenzione; (b) installazione o utilizzo del prodotto in modo
non conforme agli standard tecnici o di sicurezza vigenti nell’ Area Economica
Europea e in Svizzera; (c) collegamento a rete di alimentazione con tensione
non corretta; (d) utilizzo del prodotto con accessori di terzi, prodotti o dispositivi
ausiliari o periferiche; (e) tentativo di riparazione effettuato da una qualunque
terza parte diversa dai centri di assistenza ASUSTeK COMPUTER INC. autorizzati;
(f) incidenti,fulmini,acqua, incendio o qualsiasi altra causa il cui controllo non
dipende da ASUSTeK COMPUTER INC.; abuso, negligenza o uso commerciale.
La presente Garanzia non è valida per l’assistenza tecnica o il supporto per
l’ utilizzo del prodotto, compreso l’utilizzo dell’ hardware o del software. L’
assistenza e il supporto disponibili (se previsti), nonchè le spese e gli altri
termini relativi all’ assistenza e al supporto (se previsti) verranno specificati nella
documentazione destinata al cliente fornita a corredo con il Prodotto.
E’ responsabilità dell’utente, prima ancora di richiedere l’assistenza, effettuare
il backup dei contenuti presenti sul Prodotto, inclusi i dati archiviati o il
software installato nel prodotto. ASUSTeK COMPUTER INC. non è in alcun modo
responsabile per qualsiasi danno, perdita di programmi, dati o altre informazioni
archiviate su qualsiasi supporto o parte del prodotto per il quale viene richiesta
l’assistenza; ASUSTeK COMPUTER INC.non è in alcun modo responsabile
delle conseguenze di tali danni o perdite, incluse quelle di attività, in caso di
malfunzionamento di sistema, errori di programmi o perdita di dati.
E’ responsabilità dell’utente, prima ancora di richiedere l’assistenza, eliminare
eventuali funzioni, componenti, opzioni, modifiche e allegati non coperti
dalla presente Garanzia, prima di far pervenire il prodotto a un centro servizi.
ASUSTeK COMPUTER INC. ASUSTeK COMPUTER INC. non è in alcun modo
responsabile di qualsiasi perdita o danno ai componenti sopra descritti.
ASUSTeK COMPUTER INC. non è in alcun modo responsabile di eliminazioni,
modifiche o alterazioni ai contenuti presenti sul Prodotto compresi eventuali
dati o applicazioni prodottesi durante le procedure di riparazione del Prodotto
stesso. Il Prodotto verrà restituito all’utente con la configurazione originale di
vendita, in base alle disponibilità di software a magazzino
.
76 EeeBox PC
Page 77

Italiano
Licenza Software
I prodotti ASUS possono essere corredati da software, secondo la tipologia del
prodotto. I software, abbinati ai prodotti, sono in versione “OEM”: il software OEM
viene concesso in licenza all’utente finale, come parte integrante del prodotto;
ciò significa che non può essere trasferito ad altri sistemi hardware e che, in caso
di rottura, di furto o in ogni altra situazione che lo renda inutilizzabile, anche la
possibilità di utilizzare il prodotto OEM viene compromessa.
Chiunque acquisti, unitamente al prodotto, un software OEM, è tenuto ad
osservare i termini e le condizioni del contratto di licenza tra il proprietario del
software e l’utente finale, denominato “EULA”(End User Licence Agreement),
visualizzato a video, durante la fase di installazione del software stesso. Si avvisa
che l’accettazione, da parte dell’utente, delle condizioni dell’EULA, ha luogo al
momento dell’ installazione del software stesso.
Italiano
EeeBox PC 77
Page 78

Italiano
Italiano
Sommario
Condizioni e Limiti di Copertura della Garanzia sul Prodotto ..3
Licenza Software ....................................................................................... 4
Comunicazioni ........................................................................................... 6
Informazioni in materia di Sicurezza ................................................11
Note sul Manuale ....................................................................................14
Benvenuti ..................................................................15
Contenuto della Confezione ...............................................................15
Descrizione di EeeBox PC .........................................16
Lato Frontale .............................................................................................16
Lato Posteriore .........................................................................................18
Lato Superiore ..........................................................................................20
Come Utilizzare l’Antenna Wireless ..................................................21
Montaggio di Eee Box PC .........................................22
Montaggio del Piedistallo (Opzionale) ...........................................22
Montaggio di EeeBox PC su un Monitor (Opzionale) ................23
Installazione di Eee Box PC ......................................24
Connessione con un Display...............................................................24
Connessione con Dispositivi USB......................................................24
Connessione con un Dispositivo di Rete ..................................................25
Accensione del Sistema ........................................................................26
Utilizzo di EeeBox PC ................................................27
Configurazione Connessione Wireless ............................................27
Configurazione Connessione via Cavo ...........................................28
ASUS Easy Update ..................................................................................32
Ripristino del Sistema ..............................................33
Tramite Partizione di Ripristino .........................................................33
Ripristino del Sistema Operativo sulla Partizione Predefinita
(Ripristino con F9) ............................................................................33
Copia di Riserva delle Impostazioni Predefinite su Unità USB
(Backup con F9)..... ..................................................................................33
Utilizzo di un Dispositivo di Archiviazione USB (Ripristino via USB) ..34
78 EeeBox PC
Page 79

Italiano
Comunicazioni
Dichiarazione della FCC
(Federal Communications Commission)
Questo apparecchio rispetta i requisiti indicati nel regolamento FCC
Parte 15. Il funzionamento è soggetto alle seguenti due condizioni:
• Questo apparecchio non causa interferenze dannose
• Questo apparecchio accetta qualsiasi interferenza ricevuta,
comprese quelle che potrebbero causare un comportamento
indesiderato.
I collaudi cui è stato sottoposto questo apparecchio ne dimostrano
la conformità ai limiti stabiliti per i dispositivi digitali di Classe
B, come indicato dalla parte 15 delle Norme FCC. Questi limiti
sono stati definiti per offrire una ragionevole protezione contro
interferenze dannose quando l’apparecchio viene usato in ambienti
residenziali. Questo apparecchio genera, usa e può emettere
energia in radiofrequenza e, se non viene installato e utilizzato come
indicato dal manuale d’uso, può provocare interferenze dannose
alle comunicazioni radio. Non è tuttavia possibile garantire che non
si verifichino interferenze in casi particolari. Se questo apparecchio
causa interferenze dannose alla ricezione di programmi radiofonici e
televisivi, fatto verificabile spegnendo e riaccendendo l’apparecchio
stesso, si consiglia all’utente di provare a correggere l’interferenza in
uno o più dei modi seguenti:
Italiano
• Riorientare o riposizionare l’antenna di ricezione.
• Allontanare l’apparecchio dal ricevitore.
• Collegare l’apparecchio ad una diversa presa di corrente in modo
che apparecchio e ricevitore si trovino su circuiti diversi.
• Consultare il rivenditore o un tecnico radio/TV qualificato per
ulteriore assistenza
ATTENZIONE: Qualsiasi cambiamento o modifica non espressamente
approvata dal garante del dispositivo potrebbe far decadere il diritto
dell’ utente all’utilizzo di questo apparecchio.
EeeBox PC 79
Page 80

Italiano
Italiano
Avvertenza contro l’esposizione a RF
Questo apparecchio deve essere installato e utilizzato attenendosi
alle istruzioni fornite, mentre l’antenna(e) utilizzata(e) per questo
trasmettitore deve essere installata in modo da creare una distanza
di almeno 20cm. da tutte le persone e non essere collocata o
funzionare insieme ad altre antenne o trasmettitori. Gli utenti
finali e il personale addetto all’installazione devono avere le
istruzioni sul montaggio dell’antenna e sulle condizioni operative
del trasmettitore, in modo da rispettare le normative in materia di
esposizione a RF.
Dichiarazione di Conformità (Direttiva R&TTE 1999/5/EC)
Sono stati soddisfatti i seguenti requisiti, considerati attinenti e
sufficienti:
• Requisiti essenziali [Articolo 3]
• Requisiti di protezione per la salute e sicurezza [Articolo 3.1a]
• Testato per la sicurezza elettrica secondo [EN 60950]
• Requisiti di protezione per la compatibilità elettromagnetica
[Articolo 3.1b]
• Testato per la compatibilità elettromagnetica [EN 301 489-1] &
[EN 301]
• Testato per la compatibilità elettromagnetica [EN 301 489-1] & [EN
301 489-17]
• Utilizzo effettivo dello spettro radio come in [Articolo 3.2]
• Testato per i test radio secondo [EN 300 328-2]
80 EeeBox PC
Page 81

Italiano
Avviso Marchio CE
Marchio CE per dispositivi senza WLAN/Bluetooth
Questa versione del dispositivo è conforme ai requisiti previsti
dalla direttiva EEC 2004/108/EC “Electromagnetic compatibility”
(Compatibilità elettromagnetica) e 2006/95/EC “Low voltage
directive”(Direttiva per i Sistemi in Bassa Tensione).
Marchio CE per dispositivi con WLAN/Bluetooth
Questo apparecchio è conforme ai requisiti previsti dalla direttiva
1999/5/EC del Consiglio e del Parlamento Europeo del 9 Marzo 1999,che
regolamenta le apparecchiature radio e le apparecchiature terminali
di telecomunicazione e il reciproco riconoscimento della loro
conformità.
Canali Wireless Operativi per le Diverse Regioni
N. America 2.412-2.462 GHz Ch01 - CH11
Italiano
Giappone 2.412-2.484 GHz Ch01 - Ch14
Europa ETSI 2.412-2.472 GHz Ch01 - Ch13
EeeBox PC 81
Page 82

Italiano
Italiano
Restrizione delle Bande di Frequenza Wireless
(Francia)
Alcune zone della Francia hanno bande di frequenza limitate.In questi
casi la potenza massima all’interno è di:
• 10mW per l’intera banda dei 2.4 GHz (2400 MHz2483.5 MHz)
• 100mW per le frequenze tra 2446.5 MHz e 2483.5 MHz
I canali compresi tra 10 e 13 operano nella banda dei 2446.6 MHz e
2483.5 MHz.
L’utilizzo all’esterno è limitato.Nelle proprietà private o nelle proprietà
private di persone pubbliche,l’utilizzo è soggetto alla procedura di
autorizzazione preliminare concessa dal Ministero della Difesa, e con
la potenza massima autorizzata di 100mW nella banda dei 2446.5-
2483.5 MHz. Non è autorizzato l’utilizzo all’esterno in proprietà
pubbliche.
Nei dipartimenti elencati di seguito, per l’intera banda dei 2.4 GHz:
• La potenza massima autorizzata all’interno è di 100mW
• La potenza massima autorizzata all’interno è di 10mW
Nei dipartimenti in cui è permesso l’utilizzo della banda dei 2400-
2483.5 MHz con un EIRP inferiore a 100mW all’interno e inferiore a
10mW all’esterno:
01 Ain 02 Aisne 03 Allier
05 Hautes Alpes 08 Ardennes 09 Ariège
11 Aude 12 Aveyron 16 Charente
24 Dordogne 25 Doubs 26 Drôme
32 Gers 36 Indre 37 Indre et Loire
41 Loir et Cher 45 Loiret 50 Manche
55 Meuse 58 Nièvre 59 Nord
60 Oise 61 Orne 63 Puy du Dôme
64 Pyrénées Atlantique 66 Pyrénées Orientales
67 Bas Rhin 68 Haut Rhin
70 Haute Saône 71 Saône et Loire
75 Paris 82 Tarn et Garonne
84 Vaucluse 88 Vosges 89 Yonne
90 Territoire de Belfort 94 Val de Marne
82 EeeBox PC
Page 83

Italiano
Questo requisito è soggetto a cambiare nel tempo, permettendo
l’utilizzo della scheda LAN wireless in più aree all’interno della
Francia. Consultare ART per le informazioni più aggiornate (www.
art-telecom.fr)
La Scheda WLAN trasmette a meno di 100mW, ma a più di 10mW.
Dichiarazione del Ministero delle Comunicazioni
Canadese
Questo apparecchio digitale non supera i limiti di classe B per
emissioni radio, da parte di apparecchiature digitali, prescritti
nel Regolamento sulle Interferenze Radio del Ministero delle
Comunicazioni Canadese.
Questo apparecchio digitale di classe B è conforme alla normativa
Dichiarazione IC sull’ Esposizione alle Radiazioni per il
Canada
Il presente apparecchio è conforme ai limiti IC per esposizione
alle radiazioni, evidenziati per un ambiente non controllato. Per
uniformarsi ai requisiti di conformità IC per l’ esposizione a RF, si
è pregati di evitare il diretto contatto con l’antenna trasmittente,
quando è in fase di trasmissione. L’utente finale deve seguire le
istruzioni operative specificate, in modo da soddisfare tale requisito.
Italiano
Le operazioni sono soggette alle seguenti due condizioni:
• Questo apparecchio non causa interferenze dannose
• Questo apparecchio accetta qualsiasi interferenza ricevuta,
comprese quelle che potrebbero causare un comportamento
indesiderato.
Comunicazione REACH
Nel rispetto del regolamento REACH (Registration, Evaluation,
Authorisation and Restriction of Chemicals), le sostanze chimiche
contenute nei prodotti ASUS sono state pubblicate nel sito web
ASUS REACH http: //csr.asus.com/english/REACH.htm
EeeBox PC 83
Page 84

Italiano
Italiano
Informazioni in materia di Sicurezza
EeeBox PC è stato realizzato e testato per soddisfare i nuovissimi
standard di sicurezza per apparecchiature IT. Tuttavia, per garantirne l’
osservanza, è importante leggere le seguenti norme di sicurezza.
Installazione del Sistema
• Prima di utilizzare il sistema, leggere e seguire tutte le istruzioni
contenute nella documentazione.
• Non utilizzare questo prodotto in prossimità di acqua o di sorgenti
di calore, come un radiatore.
• Installare il sistema su una superficie stabile, utiizzando il piedistallo
in dotazione. Mai utilizzare il sistema senza il piedistallo
• I fori e le scanalature sul telaio servono per la ventilazione. Non
ostruire o coprire tali aperture. Assicurarsi di lasciare un ampio
spazio intorno al sistema per la ventilazione. Mai inserire oggetti
di alcun tipo sulle scanalature/fori destinati alla ventilazione.
• Utilizzare il prodotto in ambienti a temperature comprese fra 0˚C
e 35˚C.
• In caso di impiego di un cavo di estensione, assicurarsi che l’
amperaggio totale dei dispositivi inseriti non superi quello di Eee
Box PC.
Precauzioni d’Uso
• Non camminare sul cavo di alimentazione e non lasciare alcun
oggetto su di esso.
• Non versare acqua o altri liquidi sul sistema.
• Quando il sistema è spento, continua a circolare un seppur minimo
flusso di corrente elettrica. Prima di pulire il sistema, disinserire
sempre tutti i cavi (alimentazione, modem e di rete) dalle prese
elettriche.
• Se si verificano i seguenti problemi tecnici, disinserire il cavo di
alimentazione e contattare un tecnico qualificato o il proprio
rivenditore.
• La spina o il cavo di alimentazione sono danneggiati.
84 EeeBox PC
Page 85

Italiano
• Un liquido è stato rovesciato nel sistema.
• Il sistema non funziona correttamente, pur attenendosi alle
istruzioni operative.
• Il sistema è caduto o il cabinet è stato danneggiato.
• Le prestazioni del sistema non sono conformi.
Avvertenza Batteria Ioni-Litio
ATTENZIONE: Pericolo di esplosione se la batteria è sostituita
in modo non corretto. Sostituire solo con un tipo uguale o
equivalente,consigliato dal produttore. Eliminare le batterie
utilizzate, come da istruzioni del fabbricante.
AVVERTENZA SUI PRODOTTI LASER
PRODOTTO LASER CLASSE 1
NON DISASSEMBLARE
La garanzia non si applica ai prodotti
disassemblati dagli utenti
Italiano
NON gettare EeeBox PC nei rifiuti comunali. Il prodotto è stato
progettato per consentire un opportuno riutilizzo dei componenti
e il riciclaggio del materiale. Il simbolo del bidone sbarrato, con le
ruote, come da figura, indica che il prodotto (apparecchio elettrico
o elettronico e batterie a bottone contenenti mercurio) non deve
essere gettato nei rifiuti comunali. Controllare le normative locali in
materia di smaltimento dei prodotti elettronici.
NON gettare la batteria nei rifiuti comunali. Il simbolo del bidone
sbarrato, con le ruote, come da figura, indica che la batteria non deve
essere gettata nei rifiuti comunali. Verficare con il servizio di assistenza
tecnica nazionale le modalità di sostituizione delle batterie. .
EeeBox PC 85
Page 86

Italiano
Italiano
Ritiro e Riciclaggio
I vecchi computer, portatili e altre apparecchiature elettroniche
contengono sostanze chimiche nocive, che possono essere dannose
per l’ambiente, quando interrati nelle discariche dei comuni rifiuti
urbani. Attraverso il riciclaggio, le parti in metallo e in plastica ed i
componenti dei vecchi computer vengono decomposti e riutilizzati
per fabbricare nuovi prodotti, proteggendo l’ ambiente da emissioni
incontrollate di sostanze chimiche pericolose.
ASUS lavora con i fornitori di prodotti riciclabili, con standard elevati,
per proteggere l’ambiente, garantire la sicurezza dei lavoratori e
rispettare le normative internazionali in materia. Il nostro impegno nel
riciclaggio di vecchi dispositivi risponde all’ esigenza di collaborare in
modi diversi alla preservazione del patrimonio ambientale.
Per ulteriori informazioni sul riciclaggio dei prodotti ASUS, visitare
la pagina Green ASUS Takeback and Recycling (http://csr.asus.com/
english/takeback.htm).
86 EeeBox PC
Page 87

Italiano
Note sul Manuale
Per essere sicuri di eseguire certe operazioni in modo corretto,
ricordare la seguente simbologia, ricorrente in tutto il manuale.
AVVERTENZA: Informazioni importanti per un utilizzo sicuro del
dispositivo.
IMPORTANTE: Istruzioni da seguire OBBLIGATORIAMENTE per
completare un’ operazione.
SUGGERIMENTO: Informazioni utili di ausilio nel completamento
di un’ attività.
NOTA: Informazioni aggiuntive per situazioni particolari.
Italiano
EeeBox PC 87
Page 88

Italiano
Benvenuti
Quick Start Guide
Complimenti per l’acquisto di EeeBox PC. L’illustrazione sottostante
mostra il contenuto della confezione del nuovo EeeBox PC. Contattare
il rivenditore, in caso di danno o smarrimento di uno degli articoli
indicati di seguito.
Contenuto della Confezione
Italiano
EeeBox PC Piedistallo (opzionale)
Mini jack x adatt. S/PDIF
(opzionale)
Certficato di Garanzia Guida Rapida
In caso di mancato o errato funzionamento del dispositivo o dei suoi
componenti, in condizioni di normale e corretto utilizzo, durante il
periodo di garanzia, consegnare il certificato di garanzia al Centro
Assistenza ASUS per la sostituzione dei componenti difettosi.
Adattatore AC Cavo di Alimentazione
Pacch.viti e ripiano VESA
(opzionale)
88 EeeBox PC
Page 89

Italiano
Descrizione di EeeBox PC
Lato Frontale
Riferirsi alla figura sottostante per identificare i componenti su questo
lato del sistema.
1
2
3
4
Italiano
5
6
1
LED Disco Rigido
Il LED del disco rigido lampeggia in fase di scrittura o lettura
dati dal disco rigido.
2
Pulsante di Accensione
ll pulsante di accensione consente di ACCENDERE e SPEGNERE
il sistema.
EeeBox PC 89
Page 90

Italiano
3
Slot per Scheda di Memoria
Il lettore di schede di memoria integrato è in grado di
leggere le schede MMC/SD/SDHC utilizzato in dispositivi
come fotocamere digitali, lettori MP3, telefoni cellulari e
PDA.
Italiano
4
Porta USB
La porta USB (Universal Serial Bus) è compatibile con i
dispositivi USB, come tastiere, dispositivi di puntamento,
videocamere e dischi rigidi. USB consente a molti dispositivi
di operare contemporaneamente su uno stesso computer,
tramite periferiche che funzionano come hub o siti plugin
aggiuntivi.
5
Jack Uscita Cuffie/Audio
Il jack per cuffie stereo (3.5mm) è utilizzato per collegare
il segnale audio in uscita del sistema con altoparlanti
amplificati o cuffie.
6
Jack Microfono
Il jack per il microfono è stato progettato per collegare
un microfono esterno, in occasione di video conferenze,
narrazioni vocali o semplici registrazioni audio.
90 EeeBox PC
Page 91

Italiano
Lato Posteriore
Riferirsi alla figura sottostante per identificare i componenti presenti
su questo lato del sistema.
1
2
3
4
Italiano
5
6
1
Jack Antenna Wireless
Questo jack è utilizzato per collegare l’antenna wireless in
dotazione, in modo da migliorare la ricezione del segnale
wireless.
EeeBox PC 91
Page 92

Italiano
Italiano
2
Ingresso Alimentazione (DC 19V)
L’adattatore in dotazione converte la corrente elettrica
alternata di rete in corrente continua da utilizzare con
questo jack. L’energia elettrica fornita attraverso questo
jack alimenta il PC. Per evitare danni al PC, utilizzare sempre
l’adattatore in dotazione.
Quando in uso, l’adattatore può diventare piuttosto caldo. Non
coprire l’ adattatore e tenerlo lontano dal corpo.
3
Porta USB
La porta USB (Universal Serial Bus) è compatibile con i
dispositivi USB, come tastiere, dispositivi di puntamento,
videocamere e dischi rigidi. USB consente a molti dispositivi
di operare contemporaneamente su uno stesso computer,
tramite periferiche che funzionano come hub o siti plugin
aggiuntivi.
4
Porta LAN
La porta RJ-45 LAN a otto pin supporta un cavo standard
Ethernet per la connessione alla rete locale.
5
Usclta Display (Monitor)
La porta monitor di tipo D-sub a 15-pin consente il
collegamento di una perferica compatibile sandard VGA,
quale un monitor o un proiettore per la visualizzazione su
un display esterno di maggiori dimensioni.
6
Jack Uscita Audio (S/PDIF Out)
Inserire un cavo audio con mini-jack da 3.5mm in questo
jack per il trasferimento audio analogico o digitale.
92 EeeBox PC
Per la funzione S/PDIF Out, utilizzare il mini jack
in dotazione per adattatore S/PDIF da collegare
all’ amplificatore.
Page 93

Italiano
E-SATA
Lato Superiore
Riferirsi alla figura sottostante per identificare i componenti presenti
su questo lato del sistema.
1 2
E-SATA
1
Porta E-SATA
SATA Esterna o eSATA consente il collegamento esterno a
dispositivi Serial-ATA in origine progettati per un impiego
all’ interno del computer. E’ sino a sei volte più veloce dell’
attuale USB 2.0 & 1394 per operazioni di archiviazione
esterna ed è anche sostituibile a caldo mediante connettori
e cavi schermati lunghi sino a due metri.
Italiano
2
Porta USB
La porta USB (Universal Serial Bus) è compatibile con i
dispositivi USB, come tastiere, dispositivi di puntamento,
videocamere e dischi rigidi. USB consente a molti dispositivi
di operare contemporaneamente su uno stesso computer,
tramite periferiche che funzionano come hub o siti plugin
aggiuntivi.
EeeBox PC 93
Page 94

Italiano
Italiano
Come Utilizzare l’Antenna Wireless
L’antenna wireless si collega a EeeBox PC per migliorare la ricezione
dei segnali wireless. Non ruotare l’antenna wireless a 180°–270° per
evitare che sia danneggiata.
94 EeeBox PC
Page 95

Italiano
E-SATA
Montaggio di Eee Box PC
Montaggio del Piedistallo (Opzionale)
Porre EeeBox PC in posizione verticale sul piedistallo in dotazione.
A questo fine:
1. Individuare il foro per la vite sul lato inferiore di EeeBox PC.
2. Allineare la vite del piedistallo con il foro per la vite del PC, quindi
fissare il piedistallo al PC con una moneta.
Vista inferiore di EeeBox PC
1
Foro per la vite
Italiano
Vite del piedistallo
2
EeeBox PC 95
Page 96

Italiano
Italiano
Montaggio di EeeBox PC su un Monitor (Opzionale)
E’ inoltre possibile installare EeeBox PC sul retro di un monitor.
A questo fine:
1. Fissare il ripiano per il montaggio VESA al monitor con quattro
viti (HNM/M4 x 8).
Per l’ installazione del ripiano per il montaggio VESA, il monitor deve
essere conforme allo standard VESA75 o VESA100.
2. Collocare l’EeeBox PC sul ripiano VESA prestando attenzione
al corretto allineamento, poi fissare con una moneta il PC al
ripiano VESA.
Lato inferiore di EeeBox PC
96 EeeBox PC
Page 97

Italiano
Installazione di Eee Box PC
Prima di utilizzare EeeBox PC , è necessario collegare le periferiche.
Connessione con un Display
Collegare un’estremità del cavo VGA ad un monitor LCD (1) e l’
altra estremità alla porta Uscita Display (Monitor) sul pannello
posteriore del sistema (2).
2
Monitor LCD
1
Connessione con Dispositivi USB
Collegare dispositivi USB , come tastiere con o senza cavo (a seconda
della zona), mouse e stampanti, alle porte USB sul pannello posteriore
del sistema.
Italiano
EeeBox PC 97
Page 98

Italiano
Italiano
Connessione con un Dispositivo di Rete
Collegare un’estremità del cavo di rete alla porta LAN sul pannello
posteriore del sistema e l’altra estremità ad un hub o switch.
Cavo di rete con connettori RJ-45
Switch o hub di rete
98 EeeBox PC
Page 99

Italiano
Accensione del Sistema
Collegare l’adattatore AC in dotazione al jack DC IN sul pannello
posteriore del sistema, quindi premere il pulsante di accensione sul
pannello frontale per accendere il sistema.
3
4
2
1
• Quando EeeBox PC non è in funzione, disinserire l’adattatore di
corrente o disattivare la presa AC per ridurre i consumi.
Italiano
• Regolare le opzioni di risparmio energetico nel pannello
di controllo di Windows® per garantire che EeeBox PC sia
impostato in una modalità a basso consumo mantenendo, al
tempo stesso, una completa operatività.
Per accedere al BIOS,premere ripetutamente <F2> all’avvio.
EeeBox PC 99
Page 100

Italiano
Utilizzo di EeeBox PC
Tutte le schermate di questa sezione sono puramente indicative.
Le schermate eettive variano in base ai sistemi operativi. Per
informazioni più aggiornate, visitare il sito ASUS all’indirizzo www.
asus.com.
Congurazione Connessione Wireless
Per la connessione a una rete wireless, procedere come di seguito:
Pe ragioni di sicurezza, NON collegarsi ad una rete non protetta.
Altrimenti, le informazioni trasmesse senza crittografia potrebbero
essere visibili ad altri.
Italiano
1. Cliccare sull'icona di rete wireless con la stella arancione in
area di notica di Windows® .
Selezionare dall’elenco il punto di
2.
accesso senza li a cui collegarsi
e cliccare Connetti per stabilire la
connessione.
Se non si trova il punto di accesso,
liccare sull'icona Aggiorna
nell'angolo superiore destro per cercare
di nuovo nell'elenco.
3. In fase di connessione, potrebbe essere richiesto l’ inserimento di
una password.
4. La connessione così stabilita viene visualizzata nell’ elenco.
5. L’ icona della rete wireless
compare in area di notifica.
100 EeeBox PC
 Loading...