

Page 1
EeeBox PC
User Manual
English
EeeBox EB1007
Page 2

English
Index
1. English .................................................................................1
2. Türkçe ................................................................................38
3.
4.
5.
....................................................................................74
ไทย
簡体中文
...........................................................................
..............................................................................144
110
Page 3

E6197
Third Edition V3
October 2010
English
Copyright © 2010 ASUSTeK COMPUTER INC. All Rights Reserved.
No part of this manual, including the products and software described in it, may
be reproduced, transmitted, transcribed, stored in a retrieval system, or translated
into any language in any form or by any means, except documentation kept by the
purchaser for backup purposes, without the express written permission of ASUSTeK
COMPUTER, INC. (“ASUS”).
Products and corporate names mentioned in this manual may or may not be
registered trademarks or copyrights of their respective companies, and are used
for identification purposes only. All trademarks are the property of their respective
owners.
Every effort has been made to ensure that the contents of this manual are correct
and up to date. However, the manufacturer makes no guarantee regarding the
accuracy of its contents, and reserves the right to make changes without prior
notice.
Page 4

Contents
English
Notices .......................................................................................................... 4
Safety information ....................................................................................9
Notes for this manual ............................................................................12
Welcome ....................................................................13
Package contents ....................................................................................13
Knowing your EeeBox PC .........................................14
Front view ..................................................................................................14
Rear view ....................................................................................................16
Top view .....................................................................................................18
Using the wireless antenna .................................................................19
Positioning your EeeBox PC .....................................20
Installing the stand (optional) ............................................................20
Installing your EeeBox PC to a monitor (optional) ......................21
Setting up your EeeBox PC ......................................22
Connecting to a display ........................................................................22
Connecting to USB devices .................................................................22
Connecting to a network device .......................................................23
Turning on the system ..........................................................................24
Using your EeeBox PC ..............................................25
Configuring wireless connection ......................................................25
Configuring wired connection ...........................................................26
ASUS Easy Update ..................................................................................30
Recovering your system ...........................................31
Using the Recovery Partition ..............................................................31
Recovering the OS to the Factory Default Partition (F9
Recovery) .............................................................................................31
Backing up the Factory Default Environment Data
to a USB Drive (F9 Backup) ............................................................31
Using the USB storage device (USB Restore) ................................32
4 EeeBox PC
Page 5

Notices
Federal Communications Commission Statement
This device complies with Part 15 of the FCC Rules. Operation is
subject to the following two conditions:
• This device may not cause harmful interference, and
• This device must accept any interference received including
interference that may cause undesired operation.
This equipment has been tested and found to comply with the limits
for a Class B digital device, pursuant to Part 15 of the FCC Rules.
These limits are designed to provide reasonable protection against
harmful interference in a residential installation. This equipment
generates, uses and can radiate radio frequency energy and, if not
installed and used in accordance with manufacturer’s instructions,
may cause harmful interference to radio communications. However,
there is no guarantee that interference will not occur in a particular
installation. If this equipment does cause harmful interference to
radio or television reception, which can be determined by turning
the equipment off and on, the user is encouraged to try to correct
the interference by one or more of the following measures:
• Reorient or relocate the receiving antenna.
• Increase the separation between the equipment and receiver.
• Connect the equipment to an outlet on a circuit different from
that to which the receiver is connected.
• Consult the dealer or an experienced radio/TV technician for
help.
English
CAUTION: Any changes or modifications not expressly approved by
the grantee of this device could void the user’s authority to operate
the equipment.
EeeBox PC 5
Page 6

English
RF exposure warning
This equipment must be installed and operated in accordance with
provided instructions and the antenna(s) used for this transmitter
must be installed to provide a separation distance of at least 20
cm from all persons and must not be co-located or operating in
conjunction with any other antenna or transmitter. End-users and
installers must be provide with antenna installation instructions
and transmitter operating conditions for satisfying RF exposure
compliance.
Declaration of Conformity
(R&TTE directive 1999/5/EC)
The following items were completed and are considered relevant
and sufficient:
• Essential requirements as in [Article 3]
• Protection requirements for health and safety as in [Article 3.1a]
• Testing for electric safety according to [EN 60950]
• Protection requirements for electromagnetic compatibility in
[Article 3.1b]
• Testing for electromagnetic compatibility according to [EN 301
489-1] & [EN 301 489-17]
• Effective use of the radio spectrum as in [Article 3.2]
• Radio test suites according to [EN 300 328-2]
6 EeeBox PC
Page 7

CE Marking
CE marking for devices without wireless LAN/Bluetooth
The shipped version of this device complies with the requirements
of the EEC directives 2004/108/EC “Electromagnetic compatibility”
and 2006/95/EC “Low voltage directive”.
CE marking for devices with wireless LAN/ Bluetooth
This equipment complies with the requirements of Directive 1999/5/
EC of the European Parliament and Commission from 9 March, 1999
governing Radio and Telecommunications Equipment and mutual
recognition of conformity.
Wireless Operation Channel for Different Domains
N. America 2.412-2.462 GHz Ch01 through CH11
Japan 2.412-2.484 GHz Ch01 through Ch14
Europe ETSI 2.412-2.472 GHz Ch01 through Ch13
English
EeeBox PC 7
Page 8

English
France Restricted Wireless Frequency Bands
Some areas of France have a restricted frequency band. The worst
case maximum authorized power indoors are:
• 10mW for the entire 2.4 GHz band (2400 MHz–2483.5 MHz)
• 100mW for frequencies between 2446.5 MHz and 2483.5 MHz
Channels 10 through 13 inclusive operate in the band 2446.6 MHz
to 2483.5 MHz.
There are few possibilities for outdoor use: On private property or on
the private property of public persons, use is subject to a preliminary
authorization procedure by the Ministry of Defense, with maximum
authorized power of 100mW in the 2446.5–2483.5 MHz band. Use
outdoors on public property is not permitted.
In the departments listed below, for the entire 2.4 GHz band:
• Maximum authorized power indoors is 100mW
• Maximum authorized power outdoors is 10mW
Departments in which the use of the 2400–2483.5 MHz band is
permitted with an EIRP of less than 100mW indoors and less than
10mW outdoors:
01 Ain 02 Aisne 03 Allier
05 Hautes Alpes 08 Ardennes 09 Ariège
11 Aude 12 Aveyron 16 Charente
24 Dordogne 25 Doubs 26 Drôme
32 Gers 36 Indre 37 Indre et Loire
41 Loir et Cher 45 Loiret 50 Manche
55 Meuse 58 Nièvre 59 Nord
60 Oise 61 Orne 63 Puy du Dôme
64 Pyrénées Atlantique 66 Pyrénées Orientales
67 Bas Rhin 68 Haut Rhin
70 Haute Saône 71 Saône et Loire
75 Paris 82 Tarn et Garonne
84 Vaucluse 88 Vosges 89 Yonne
90 Territoire de Belfort 94 Val de Marne
8 EeeBox PC
Page 9

This requirement is likely to change over time, allowing you to use
your wireless LAN card in more areas within France. Please check
with ART for the latest information (www.art-telecom.fr)
Your WLAN Card transmits less than 100mW, but more than 10mW.
Canadian Department of Communications Statement
This digital apparatus does not exceed the Class B limits for
radio noise emissions from digital apparatus set out in the
Radio Interference Regulations of the Canadian Department of
Communications.
This class B digital apparatus complies with Canadian ICES-003.
IC Radiation Exposure Statement for Canada
This equipment complies with IC radiation exposure limits set forth
for an uncontrolled environment. To maintain compliance with IC
RF exposure compliance requirements, please avoid direct contact
to the transmitting antenna during transmitting. End users must
follow the specific operating instructions for satisfying RF exposure
compliance.
English
Operation is subject to the following two conditions:
• This device may not cause interference and
• This device must accept any interference, including interference
that may cause undesired operation of the device.
REACH
Complying with the REACH (Registration, Evaluation, Authorization,
and Restriction of Chemicals) regulatory framework, we publish
the chemical substances in our products at ASUS REACH website at
http://green.asus.com/english/REACH.htm.
EeeBox PC 9
Page 10

English
Safety information
Your EeeBox PC is designed and tested to meet the latest standards
of safety for information technology equipment. However, to
ensure your safety, it is important that you read the following safety
instructions.
Setting up your system
• Read and follow all instructions in the documentation before you
operate your system.
• Do not use this product near water or a heated source such as a
radiator.
• Set up the system on a stable surface with the provided stand.
Never use the system alone without the stand.
• Openings on the chassis are for ventilation. Do not block or cover
these openings. Make sure you leave plenty of space around the
system for ventilation. Never insert objects of any kind into the
ventilation openings.
• Use this product in environments with ambient temperatures
between 0˚C and 35˚C.
• If you use an extension cord, make sure that the total ampere
rating of the devices plugged into the extension cord does not
exceed its ampere rating.
Care during use
• Do not walk on the power cord or allow anything to rest on it.
• Do not spill water or any other liquids on your system.
• When the system is turned off, a small amount of electrical
current still flows. Always unplug all power, modem, and network
cables from the power outlets before cleaning the system.
• If you encounter the following technical problems with the
product, unplug the power cord and contact a qualified service
technician or your retailer.
• The power cord or plug is damaged.
10 EeeBox PC
Page 11
• Liquid has been spilled into the system.
• The system does not function properly even if you follow
the operating instructions.
• The system was dropped or the cabinet is damaged.
• The system performance changes.
Lithium-Ion Battery Warning
CAUTION: Danger of explosion if battery is incorrectly
replaced. Replace only with the same or equivalent type
recommended by the manufacturer. Dispose of used batteries
according to the manufacturer’s instructions.
LASER PRODUCT WARNING
CLASS 1 LASER PRODUCT
NO DISASSEMBLY
The warranty does not apply to the products that
have been disassembled by users
English
DO NOT throw the EeeBox PC in municipal waste. This product has
been designed to enable proper reuse of parts and recycling. This
symbol of the crossed out wheeled bin indicates that the product
(electrical, electronic equipment, and mercury-containing button
cell battery) should not be placed in municipal waste. Check local
technical support services for product recycling.
DO NOT throw the battery in municipal waste. This symbol of the
crossed out wheeled bin indicates that the battery should not be
placed in municipal waste. Check local technical support services
for battery replacement.
EeeBox PC 11
Page 12

English
Takeback and Recycling
Old computers, notebook computers, and other electronic equipment
contain hazardous chemicals that are harmful to the environment
when disposed in a landfill with trash. By recycling the metals, plastics,
and components found in an old computer will be broken down and
reused to make new products. And, the environment is protected from
any uncontrolled release of harmful chemicals.
ASUS works with recycling vendors with the highest standards for
protecting our environment, ensuring worker safety, and complying
with global environmental laws. Our commitment to recycling our
old equipment grows out of our work to protect the environment in
many ways.
For further information about ASUS product recycling and contacts,
please visit GreenASUS Takeback and Recycling page (http://green.
asus.com/english/takeback.htm)
12 EeeBox PC
Page 13
Notes for this manual
To make sure that you perform certain tasks properly, take note of
the following symbols used throughout this manual.
WARNING: Vital information that you MUST follow to prevent
injury to yourself.
IMPORTANT: Instructions that you MUST follow to complete a
task.
TIP: Tips and useful information that help you complete a task.
NOTE: Additional information for special situations.
English
EeeBox PC 13
Page 14
Welcome
English
Congratulations on your purchase of the EeeBox PC. The following
illustration displays the package contents of your new EeeBox PC. If
any of the below items is damaged or missing, contact your retailer.
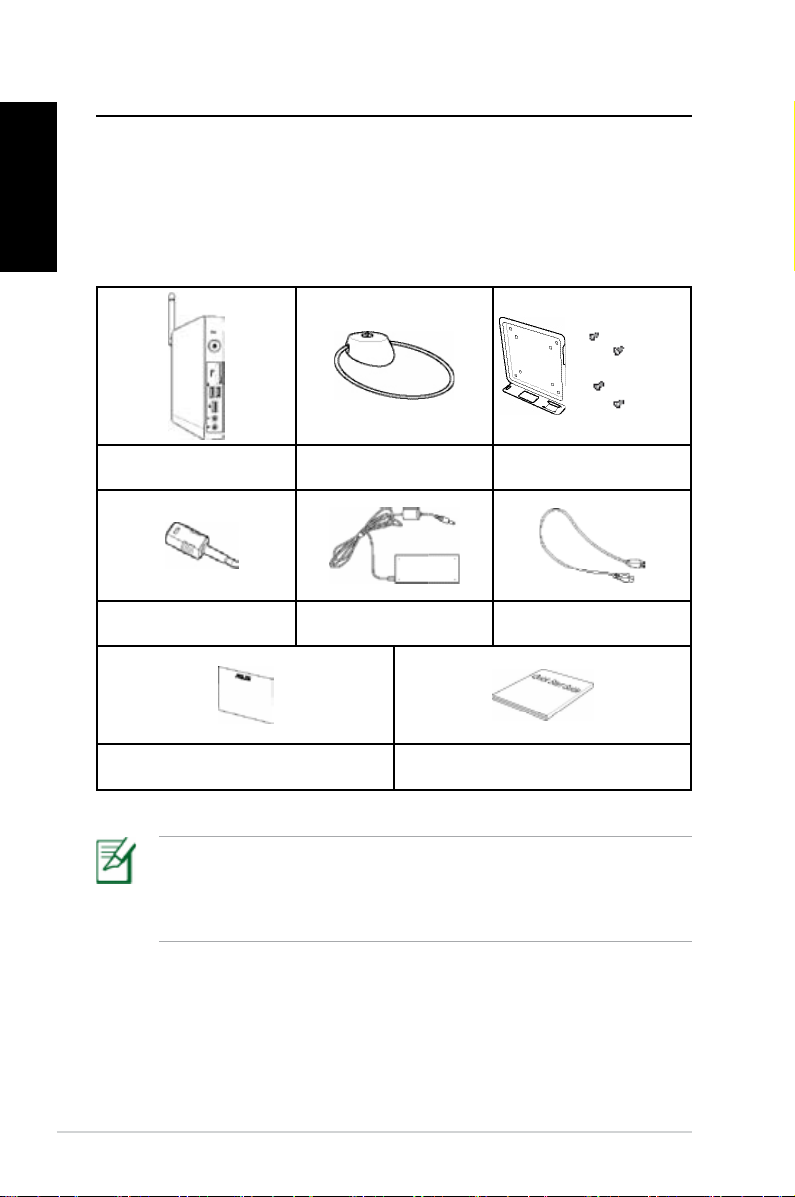
Package contents
EeeBox PC Stand (optional)
Mini jack to S/PDIF adapter
(optional)
AC adapter Power cord
VESA mount and Screw pack
(optional)
14 EeeBox PC
Warranty card Quick start guide
If the device or its components fail or malfunction during normal
and proper use within the warranty period, bring the warranty
card to the ASUS Service Center for replacement of the defective
components.
Page 15
Knowing your EeeBox PC
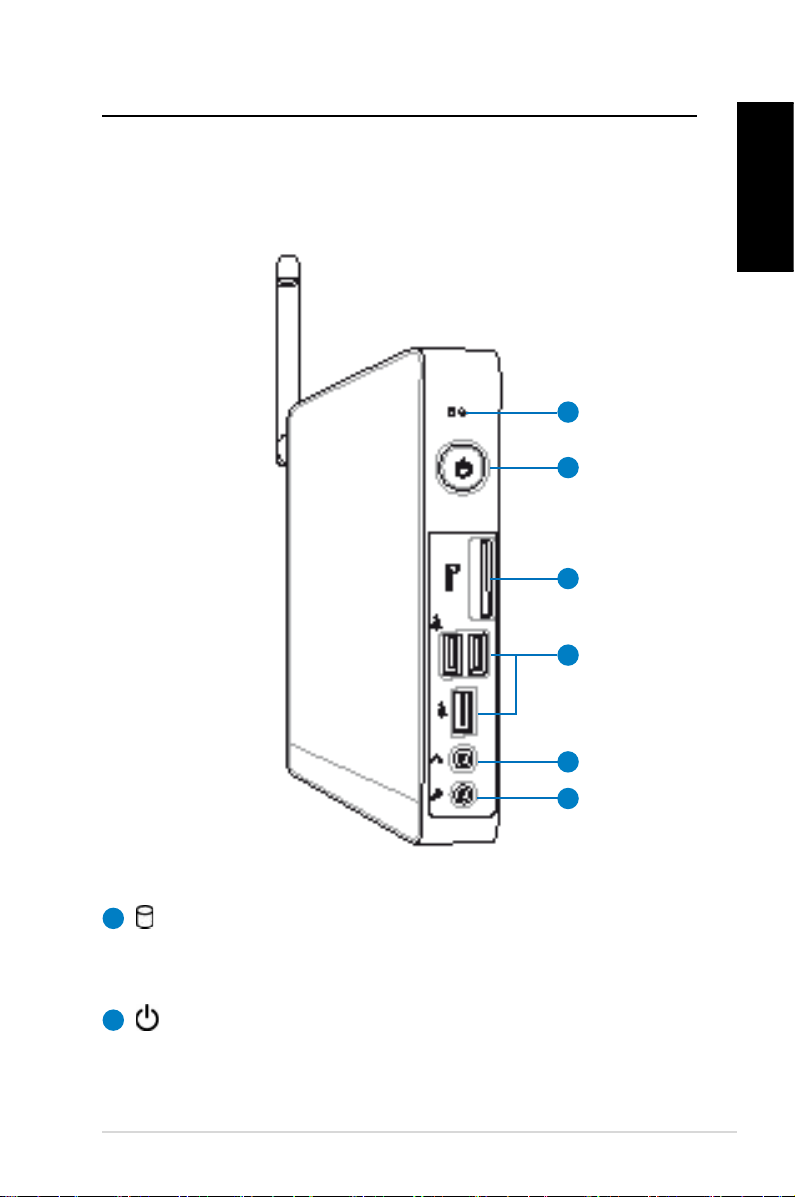
Front view
Refer to the diagram below to identify the components on this side
of the system.
1
2
3
4
5
English
6
1
Hard disk LED
The hard disk LED blinks when data is being written into or
read from the hard disk drive.
2
Power switch
The power switch allows powering ON and OFF the system.
EeeBox PC 15
Page 16
English
3
Memory card slot
The built-in memory card reader reads MMC/SD/SDHC
cards used in devices like digital cameras, MP3 players,
mobile phones, and PDAs.
4
USB port
The USB (Universal Serial Bus) port is compatible with
USB devices such as keyboards, mouse devices, cameras,
and hard disk drives. USB allows many devices to run
simultaneously on a single computer, with some peripheral
acting as additional plug-in sites or hubs.
5
Headphone/Audio Out jack
The stereo headphone jack (3.5mm) is used to connect
the system’s audio out signal to amplified speakers or
headphones.
6
Microphone jack
The microphone jack is designed to connect the
microphone used for video conferencing, voice narrations,
or simple audio recordings.
16 EeeBox PC
Page 17
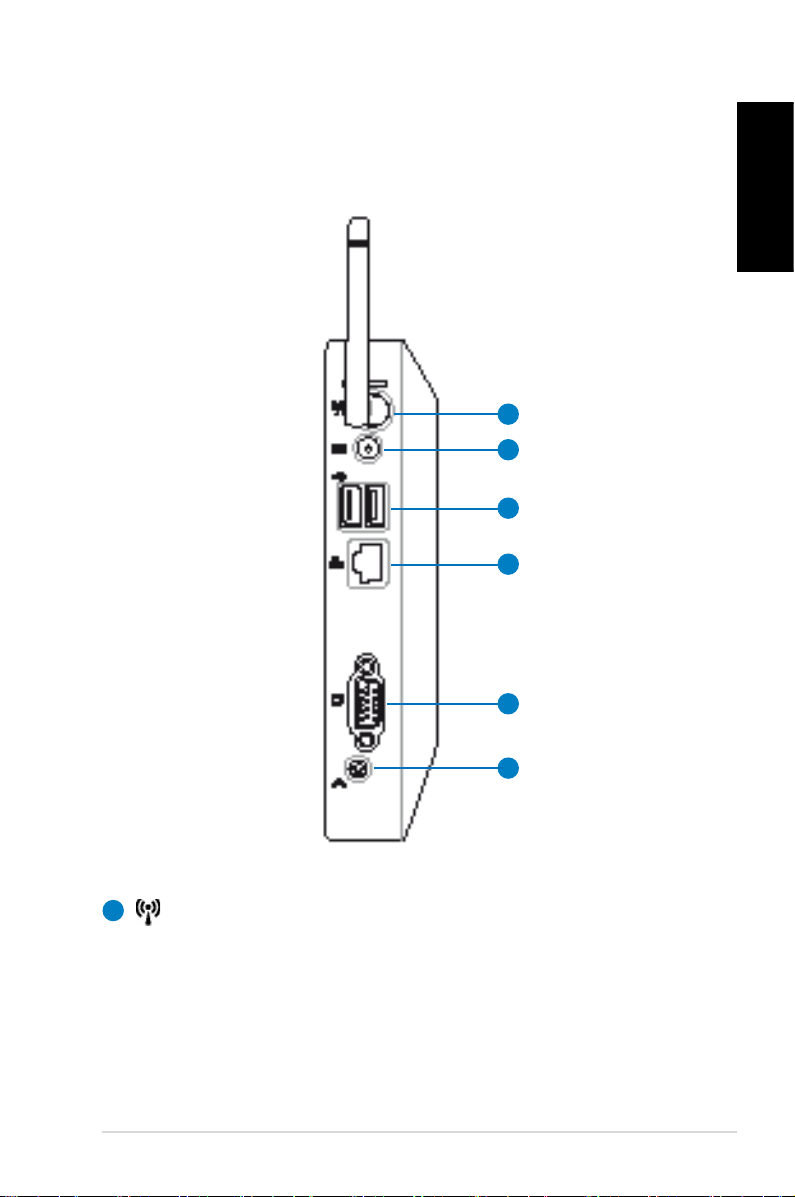
Rear view
Refer to the diagram below to identify the components on this side
of the system.
1
2
3
4
English
5
6
1
Wireless antenna jack
The jack is used to connect the supplied wireless antenna to
enhance wireless signal reception.
EeeBox PC 17
Page 18
English
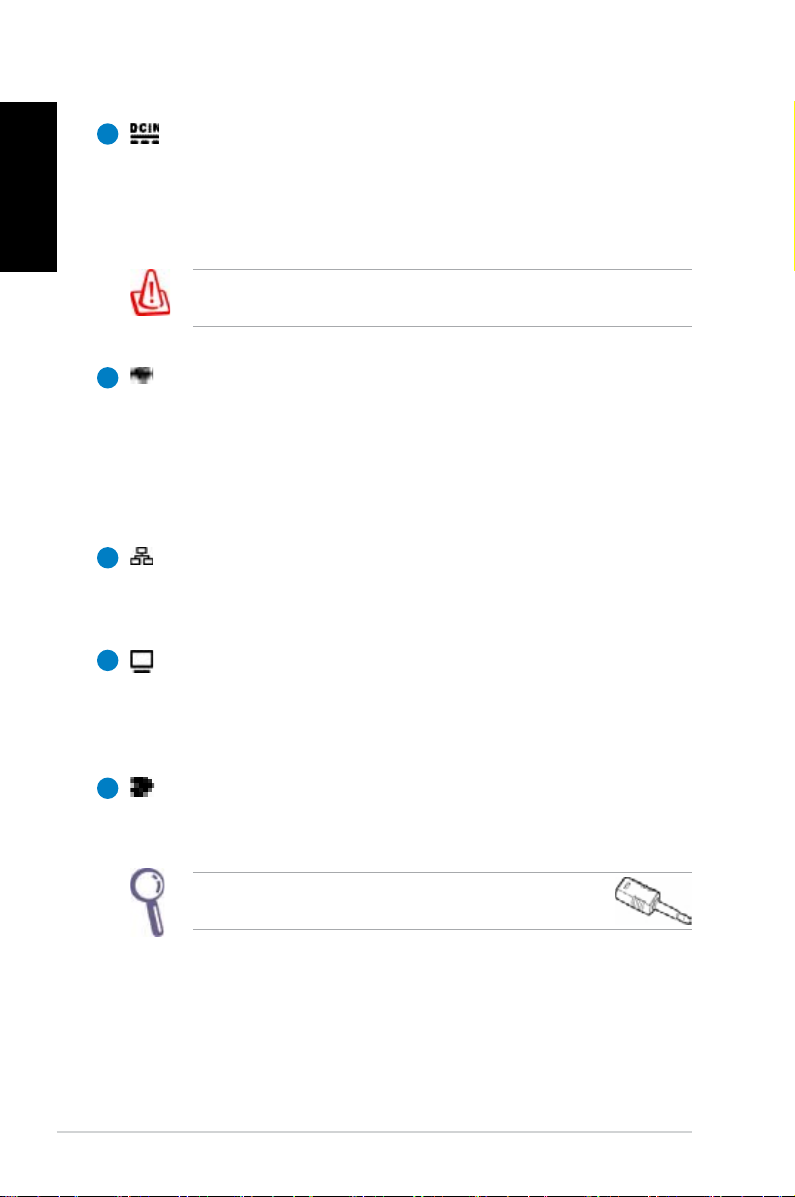
2
Power input (DC 19V)
The supplied power adapter converts AC power to DC
power for use with this jack. Power supplied through this
jack supplies power to the PC. To prevent damage to the PC,
always use the supplied power adapter.
The power adapter may become warm to hot when in use. Do
not cover the adapter and keep it away from your body.
3
USB port
The USB (Universal Serial Bus) port is compatible with
USB devices such as keyboards, mouse devices, cameras,
and hard disk drives. USB allows many devices to run
simultaneously on a single computer, with some peripheral
acting as additional plug-in sites or hubs.
4
LAN port
The eight-pin RJ-45 LAN port supports a standard Ethernet
cable for connection to a local network.
5
Display (Monitor) Output
The 15-pin D-sub monitor port supports a standard
VGA-compatible device such as a monitor or projector to
allow viewing on a larger external display.
6
Audio Out (S/PDIF Out) jack
Plug an 3.5mm mini-jack audio cable into this jack for
18 EeeBox PC
analog or digital audio transfer.
For S/PDIF Out function, use the optional mini jack
to S/PDIF adapter to connect to your amplifier.
Page 19
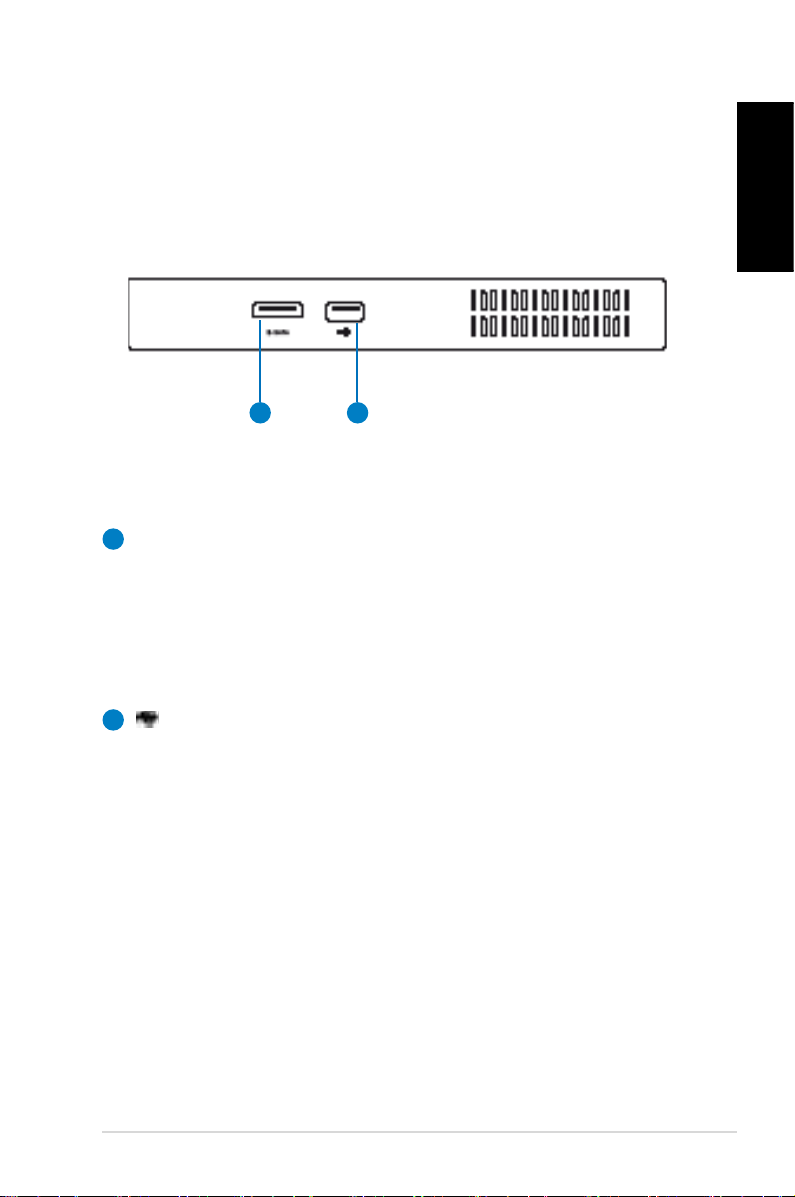
Top view
Refer to the diagram below to identify the components on this side
of the system.
1 2
E-SATA
1
e-SATA Port
External SATA or eSATA allows external connection of
Serial-ATA devices originally designed for use inside the
computer. It is up to six times faster than existing USB 2.0, &
1394 for external storage solutions and is also hot pluggable
using shielded cables and connectors up to two meters.
English
2
USB port
The USB (Universal Serial Bus) port is compatible with
USB devices such as keyboards, mouse devices, cameras,
and hard disk drives. USB allows many devices to run
simultaneously on a single computer, with some peripheral
acting as additional plug-in sites or hubs.
EeeBox PC 19
Page 20
English
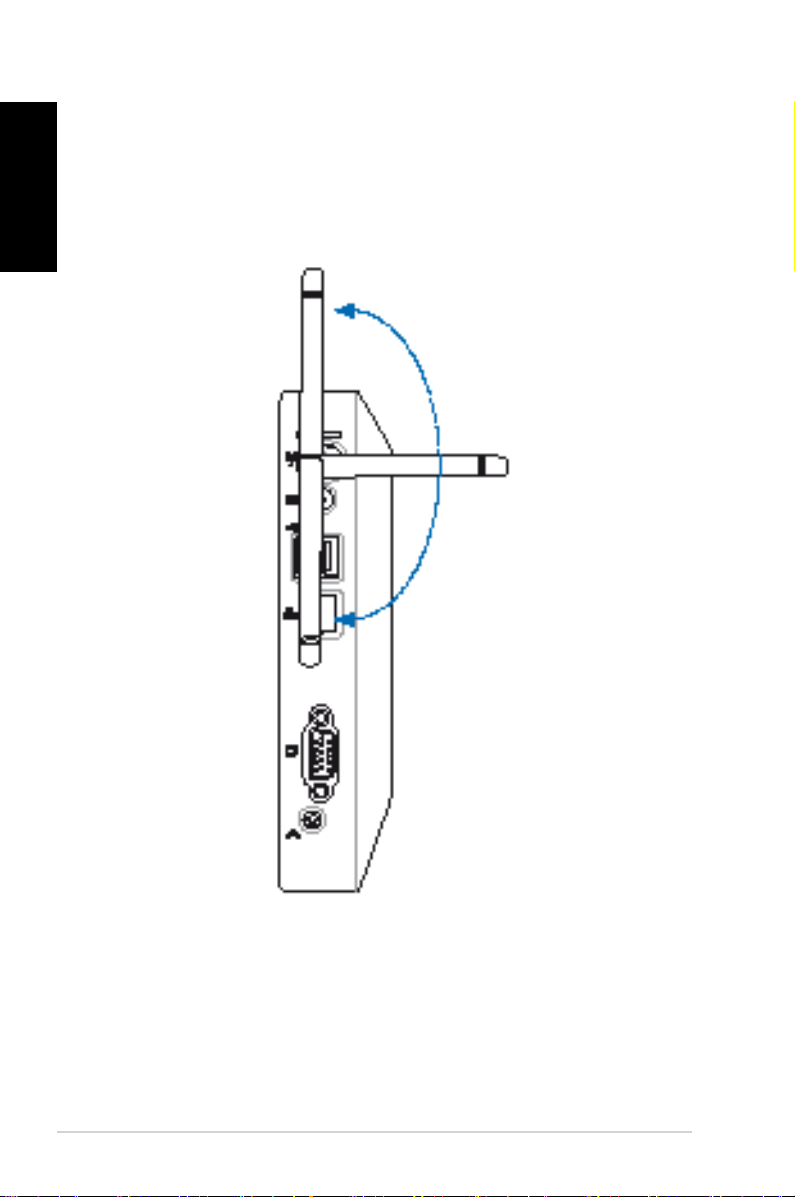
Using the wireless antenna
The wireless antenna is connected to your EeeBox PC for enhancing
wireless signal reception. Do not rotate the wireless antenna to the
180°–270° angle for preventing damage.
20 EeeBox PC
Page 21
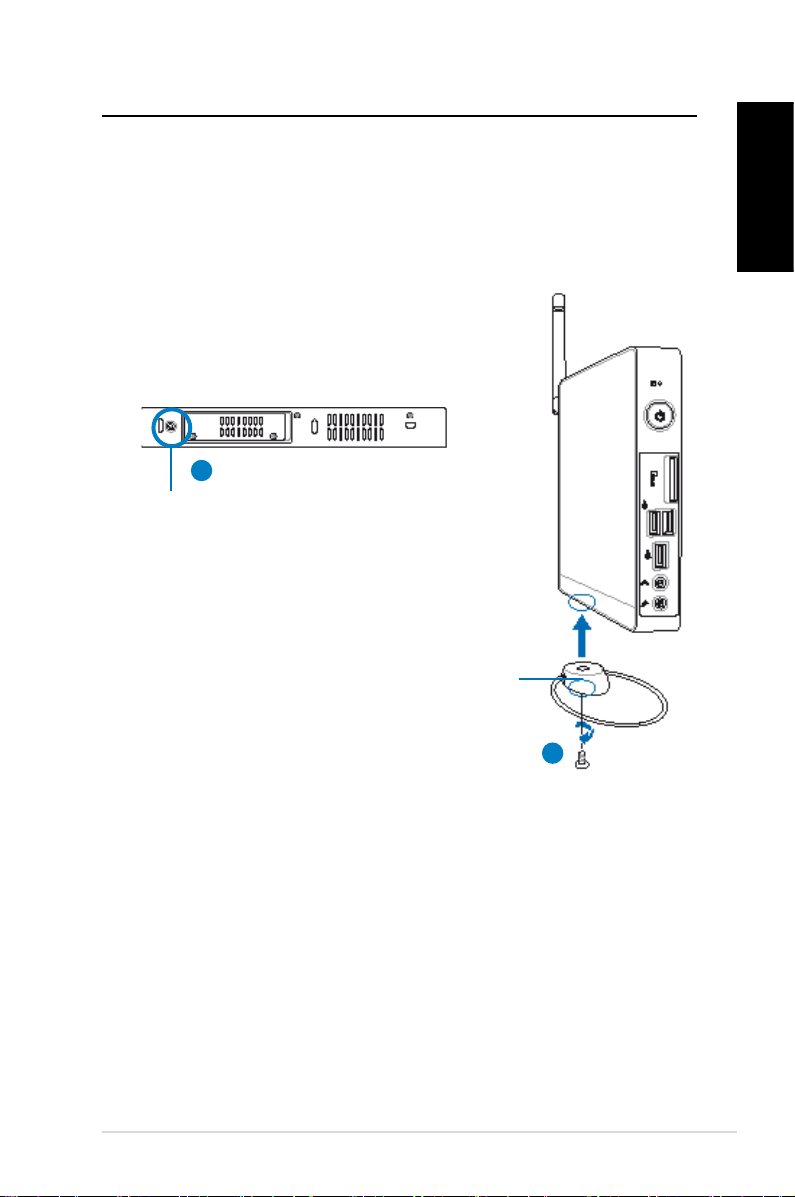
Positioning your EeeBox PC
Installing the stand (optional)
Erect your EeeBox PC with the optional stand. To do so:
1. Locate the screw hole on the bottom of the EeeBox PC.
2. Align the stand screw to the PC screw hole, and then secure the
stand to the PC with a coin.
EeeBox PC bottom view
1
Screw hole
Stand screw
2
English
EeeBox PC 21
Page 22
English
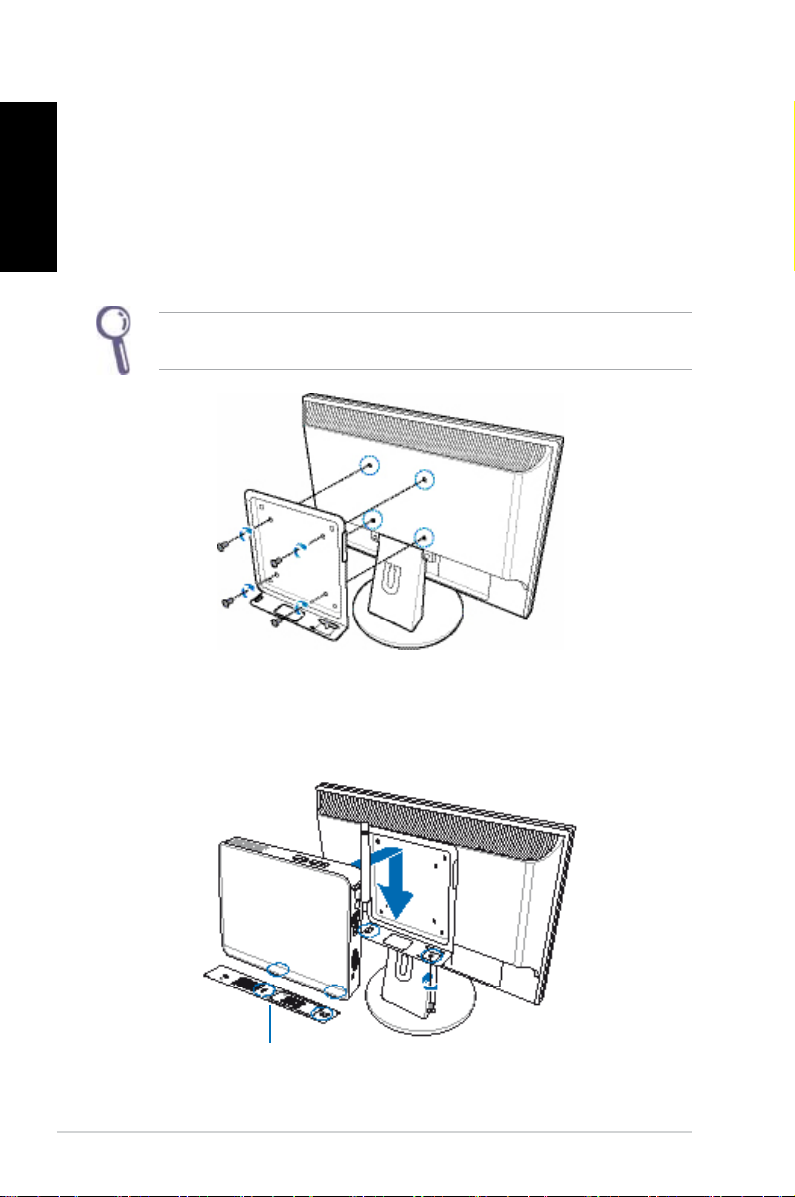
Installing your EeeBox PC to a monitor (optional)
You can also install your EeeBox PC to the back of a monitor. To do
so:
1. Secure the optional VESA mount to your monitor with four
screws (HNM/M4 x 8).
To fasten the VESA mount, your monitor must comply with VESA75
or VESA100 standard.
2. Place your EeeBox PC on the VESA mount noting the correct
alignment, and then secure the PC to the VESA mount with a
coin.
EeeBox PC bottom view
22 EeeBox PC
Page 23
Setting up your EeeBox PC
You need to connect peripherals before using your EeeBox PC.
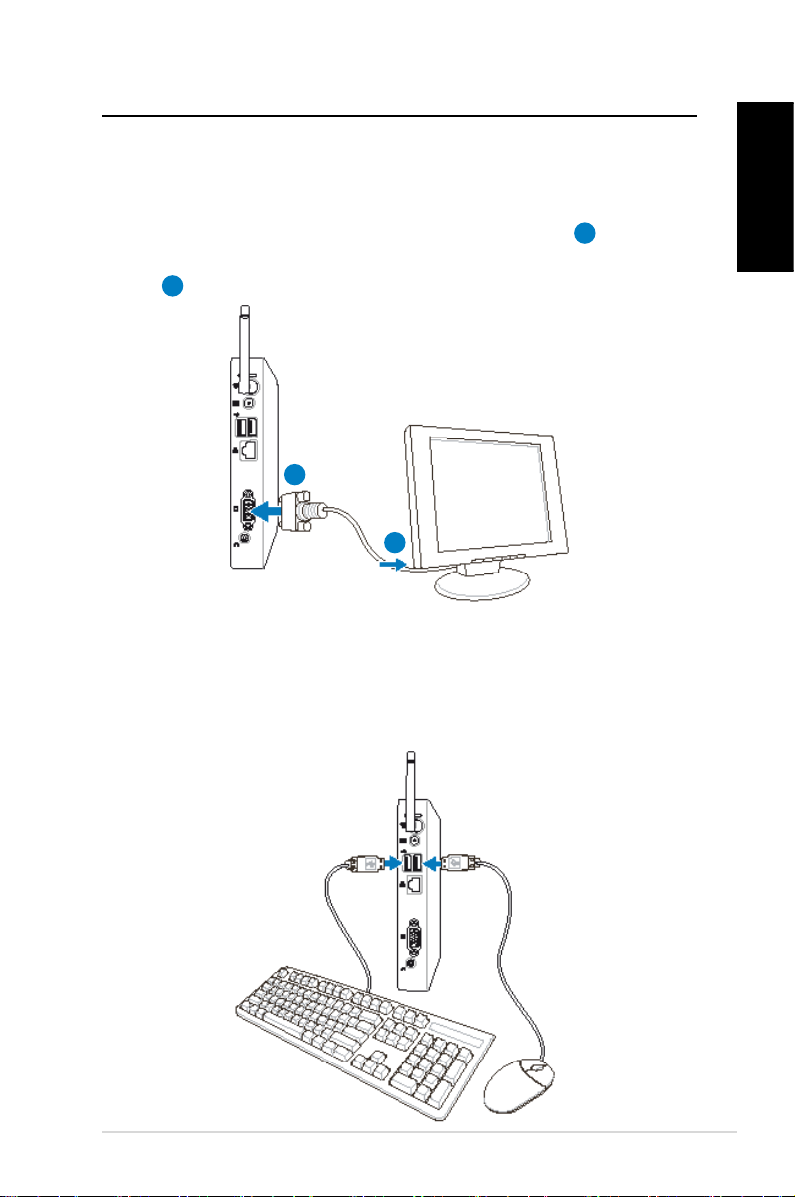
Connecting to a display
Connect one end of the VGA cable to an LCD monitor (1) and the
other end to the Display (Monitor) Output port on the system rear
panel (2).
2
LCD monitor
1
Connecting to USB devices
Connect USB devices like wired/wireless keyboards (varying with
areas), mouse devices, and printers to the USB ports on the system
rear panel.
English
EeeBox PC 23
Page 24
English
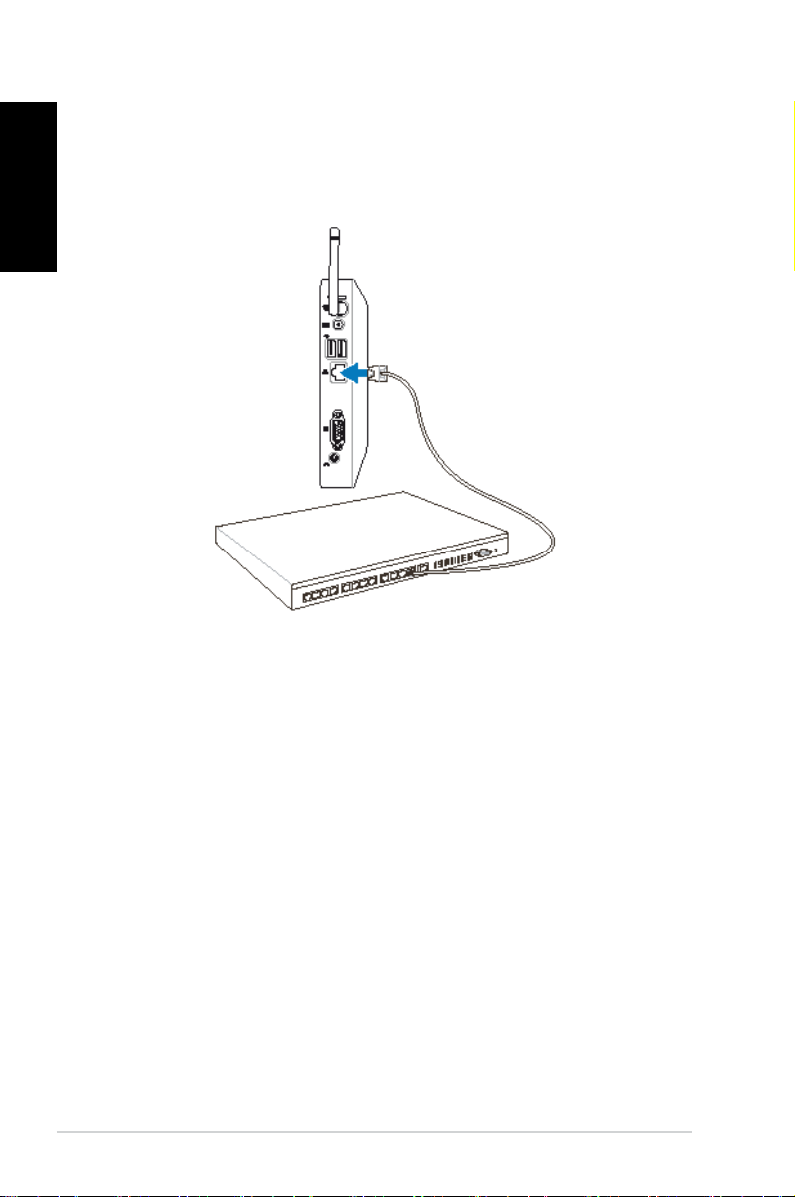
Connecting to a network device
Connect one end of a network cable to the LAN port on the system
rear panel and the other end to a hub or switch.
Network cable with RJ-45 connectors
Network hub or switch
24 EeeBox PC
Page 25
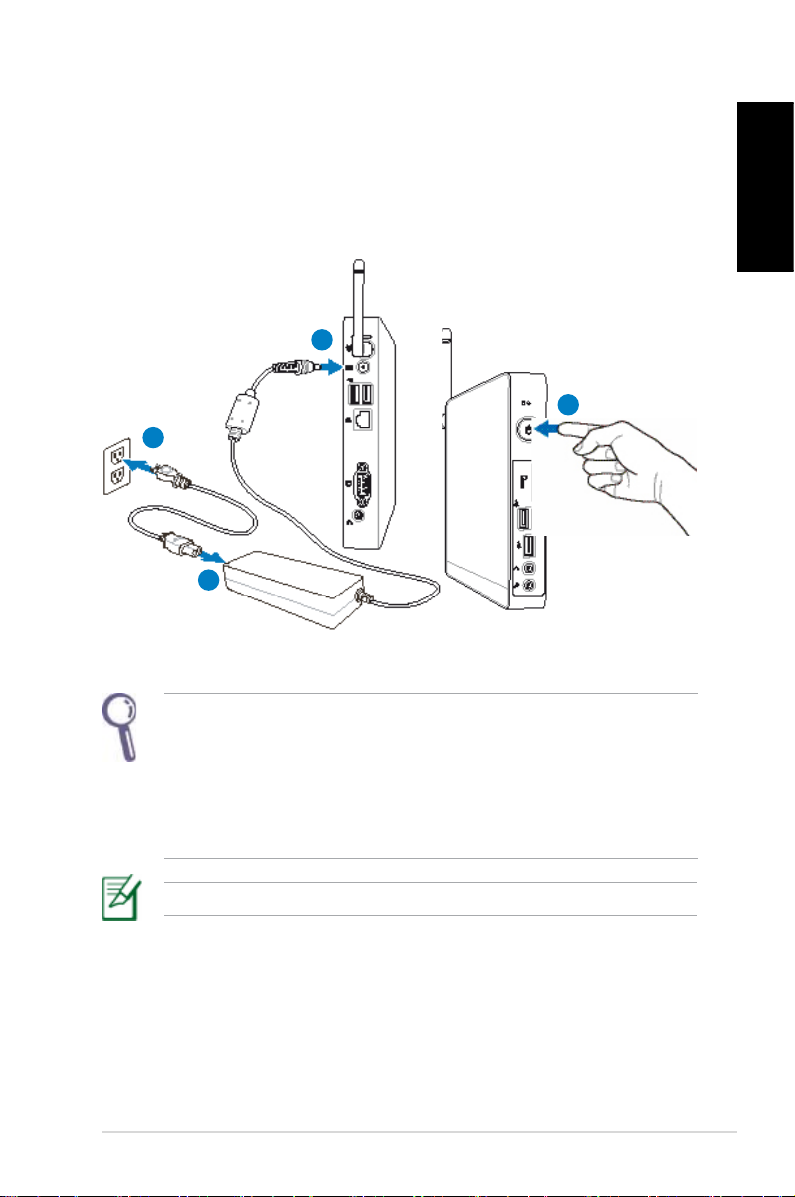
Turning on the system
Connect the supplied AC adapter to the DC IN jack on the system
rear panel, and then press the power switch on the front panel to
turn on the system.
3
4
2
1
English
• When your EeeBox PC is not in use, unplug the power adapter
or switch off the AC outlet to save on power consumption.
• Adjust the power management settings in the Window®
Control Panel. This is to ensure that your EeeBox PC is set to a
low power consumption mode and is fully operational at the
same time.
To enter the BIOS setup, press <F2> repeatedly during bootup.
EeeBox PC 25
Page 26
Using your EeeBox PC
English
All screenshots in this section are for reference only. Actual screen
images may vary with operating systems. Visit the ASUS website at
www.asus.com for the latest information.
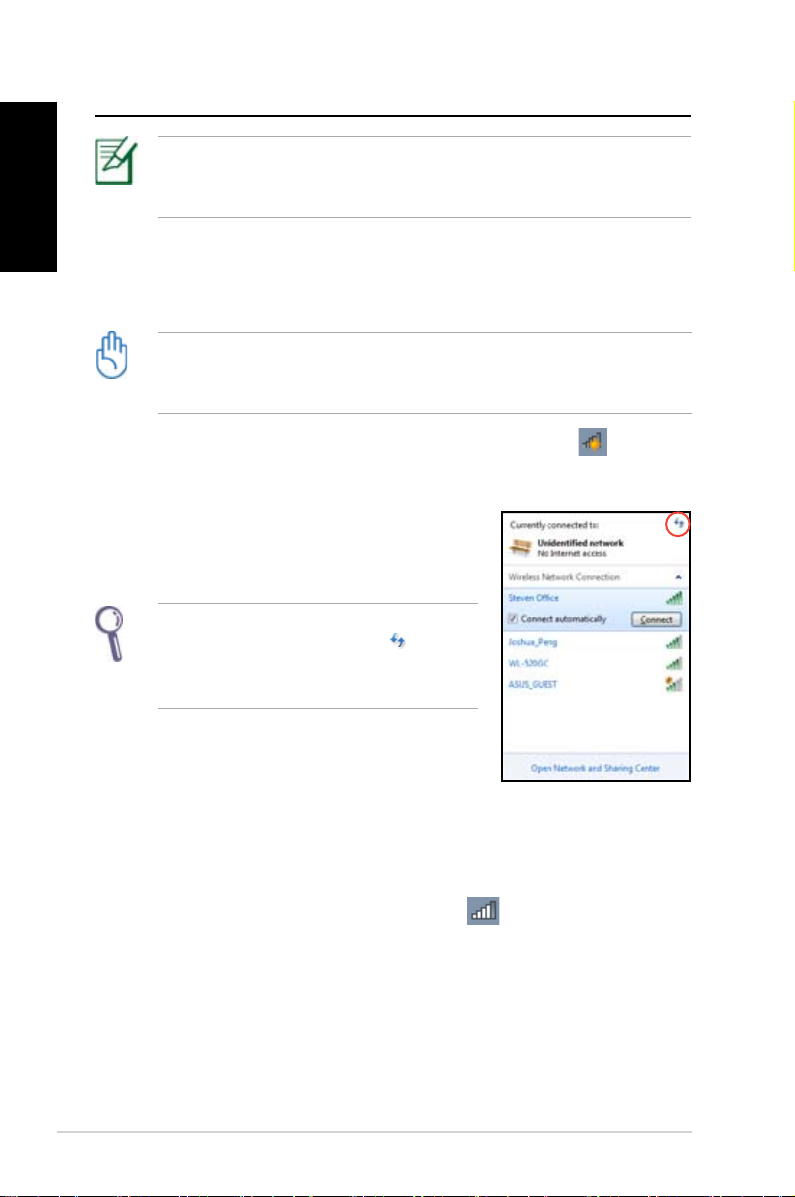
Conguring wireless connection
To connect to a wireless network, follow the instructions below:
For security concerns, DO NOT connect to an unsecured network.
Otherwise, the transmitted information without encryption might
be visible to others.
1. Click the wireless network icon with an orange star in the
Windows® Notification area.
2. Select the wireless access point you
want to connect to from the list and click
Connect to build the connection.
If you cannot find the desired access
point, click the Refresh icon on the
upper right corner to refresh and search
in the list again.
3. When connecting, you may have to enter a password.
4. After a connection has been established, the connection is
shown on the list.
5. You can see the wireless network icon
area.
26 EeeBox PC
in the Notification
Page 27
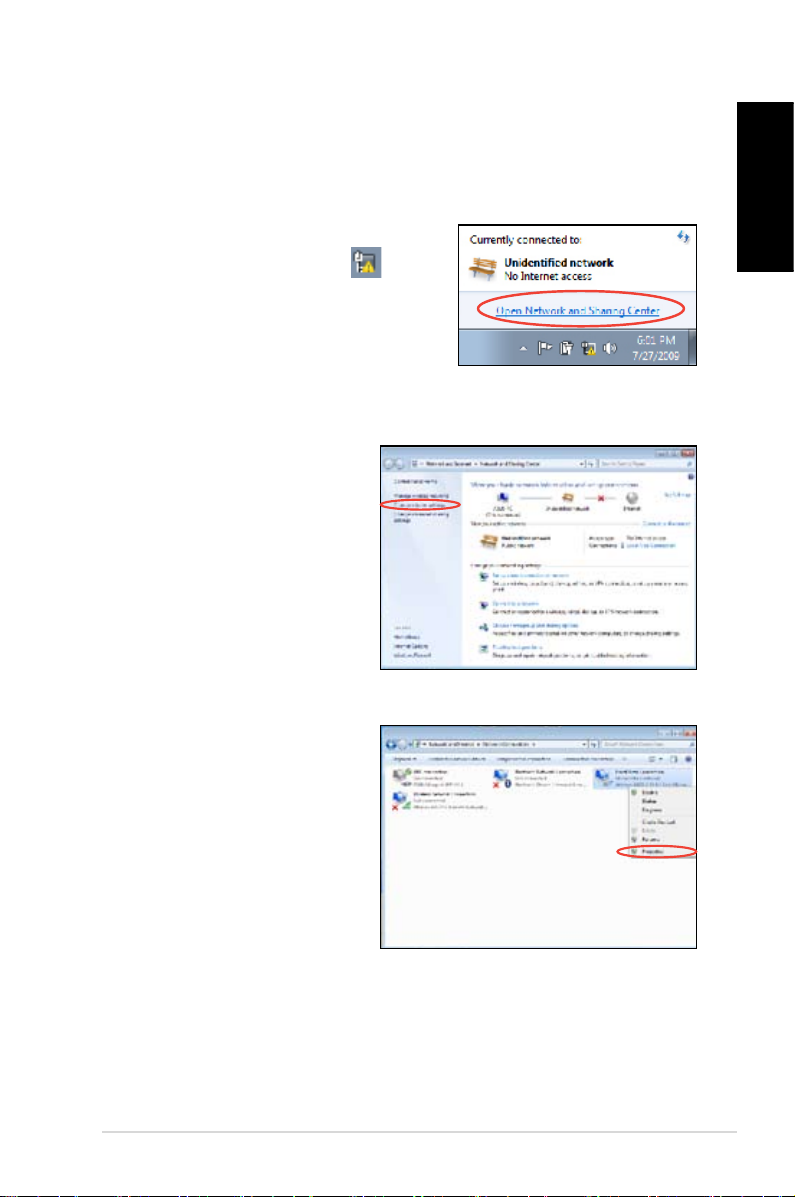
Conguring wired connection
To establish a wired network, follow the instructions below:
Using a dynamic IP / PPPoE network connection:
1. Click the network icon with a
yellow warning triangle in the
Windows® Notification area and
select Open Network and Sharing
Center.
English
2. Click
3. Right-click Local Area
Change adapter
settings in the left blue
pane.
Connection and select
Properties.
EeeBox PC 27
Page 28
English
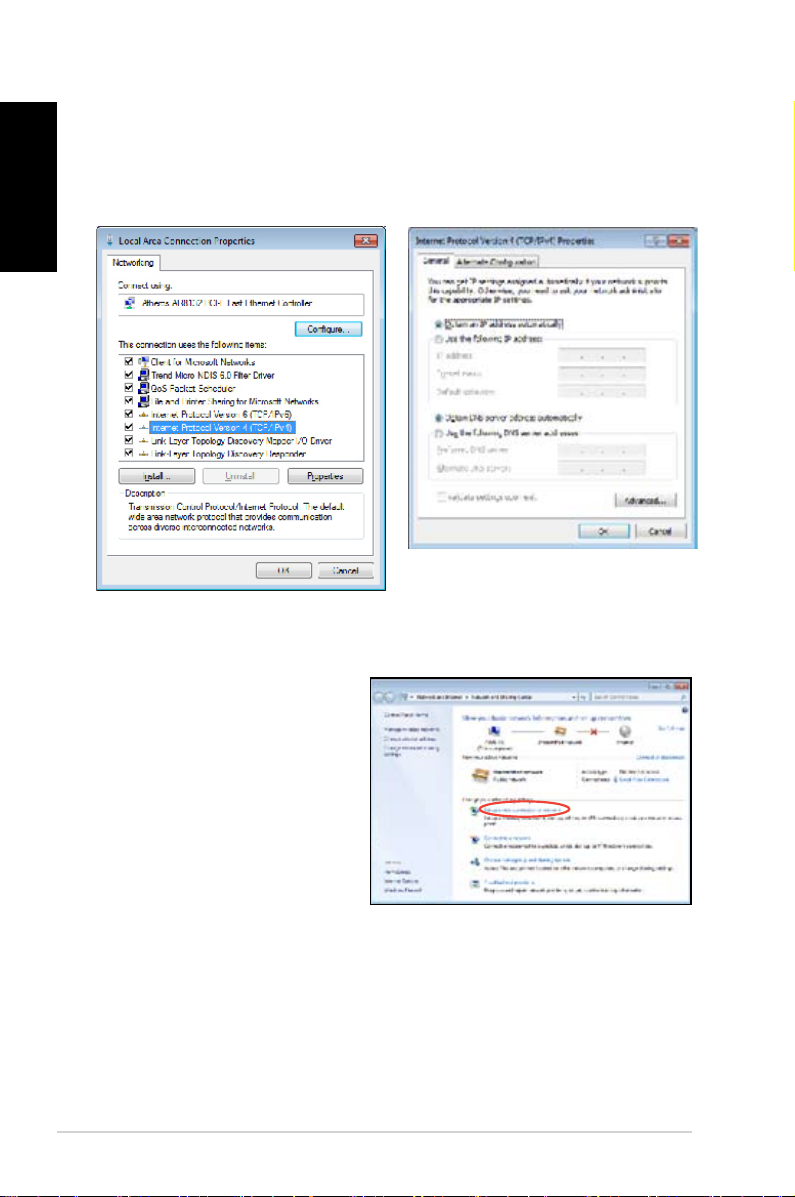
4. Click Internet Protocol
Version 4(TCP/IPv4) and
click Properties.
5. Click Obtain an IP address
automatically and click
OK.
(Continue the following steps if using PPPoE)
6. Return to the Network
and Sharing Center and
then click Set up a new
connection or network.
28 EeeBox PC
Page 29
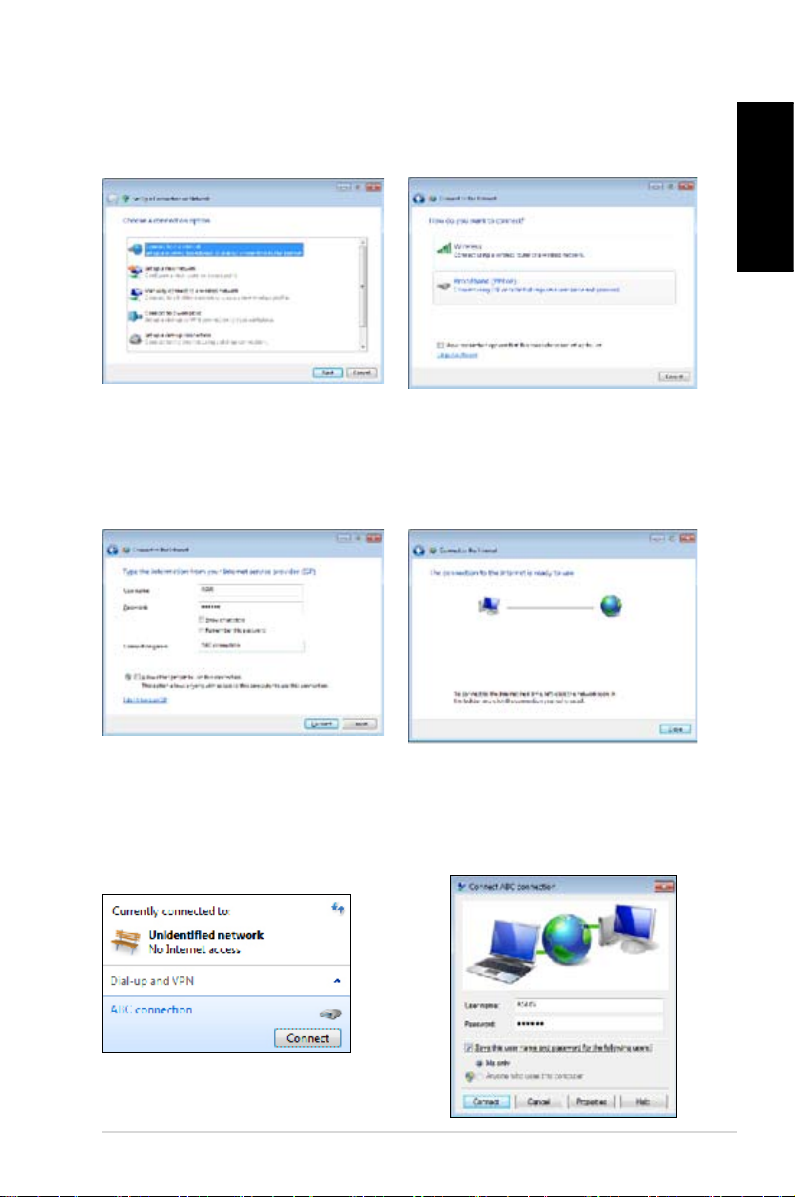
7. Select Connect to the
Internet and click Next.
8. Select Broadband (PPPoE)
and click Next.
English
9. Enter your User name and,
Password, and Connection
name. Click Connect.
11. Click the network icon
in the taskbar and click
the connection you just
created.
10. Click Close to finish the
configuration.
12. Enter your user name and
password. Click Connect to
connect to the Internet.
EeeBox PC 29
Page 30

English
Using a static IP:
1. Repeat the step 1–4 of Using a
dynamic IP to start the static IP
network configuration.
2 Click
Use the following IP
address.
3. Enter the IP address, Subnet
mask and Gateway from your
service provider.
4. If needed, enter the preferred
DNS Server address and
alternative address.
5. After entering all the related values, click OK to build the
network connection.
30 EeeBox PC
Page 31

ASUS Easy Update
ASUS Easy Update is a software tool that automatically detects and
downloads the latest BIOS, drivers, and applications for your
EeeBox PC.
1. From the Windows® notification
area, right-click the ASUS Easy
Update icon.
English
2. Select
3. Select
4. Click
5. Check the item(s) you want
Schedule to set how
often you want to update
your system.
Update to activate
the update.
OK to display the
items you can download.
to download, and then click
OK.
EeeBox PC 31
Page 32

Recovering your system
English
Using the Recovery Partition
Recovering the OS to the Factory Default Partition (F9 Recovery)
1. Disable Boot Booster in BIOS setup.
2. Press [F9] during bootup.
3. Select
4. Select the language and click
5. Select
6. The factory default partition will be displayed. Click
7. Data on the default partition will be cleared. Click
8. When the recovery is completed successfully, click Reboot to
Backing up the Factory Default Environment Data to a USB Drive (F9 Backup)
Windows setup [EMS Enabled] when this item appears
and press [Enter].
Next.
Recover the OS to the Default Partition and click Next.
Next.
Recover to
start the system recovery.
You will lose all your data on the selected partition. Ensure to back
up your important data beforehand.
restart the system.
1. Repeat the step 1–4 in the previous section.
2. Select
3. Connect a USB storage device to your PC to start the Factory
4. Select a desired USB storage device if more than one USB
32 EeeBox PC
Backup the Factory Environment to a USB Drive and
click Next.
Default Environment backup.
The required size of the connected USB storage device should be
larger than 15GB. The actual size may vary with your PC model.
storage device is connected to your EeeTop PC/EeeBox PC and
click Next.
Page 33

If there is already a partition with proper size in the selected USB
storage device (for example, a partition that has been used as the
backup partition), the system will show this partiton automatically
and reuse it for backup.
5. Based on the different situations in the previous step, data on
the selected USB storage device or on the selected partition will
be cleared. Click Backup to start backup.
You will lose all your data on the selected USB storage device or
on the selected partition. Ensure to back up your important data
beforehand.
6. When backing up the factory default environment is completed
successfully, click Reboot to restart the system.
Using the USB storage device (USB Restore)
When the Recovery Partition in your system is crashed, use the USB
storage device to restore the system to the factory default partition
or the factory environment data to the entire hard disk.
1. Disable Boot Booster in BIOS setup.
2. Connect the USB storage device that you back up the factory
environment data to.
3. Press <ESC> for EeeTop PC or <F8> for EeeBox PC on bootup
and the Please select boot device screen appears. Select USB:
XXXXXX to boot from the connected USB storage device.
4. Select the language and click
5. Select
6. Select a task and click
Restore and click Next.
Next. Task options:
Next.
English
Restore the OS to the Default Partition only
Select this option if you simply want to restore the OS to the
factory default partition. This option deletes all data on the
system partition “C” and keeps the partition “D” unchanged.
(Continued on the next page)
EeeBox PC 33
Page 34

English
After you click Next, the factory default partition will be
displayed. Click Next again.
Restore the Whole Hard Disk
Select this option if you want to restore your EeeTop PC/EeeBox
PC to the factory default state. This option deletes all data from
your hard disk and creates a new system partition as drive “C” ,
an empty partition as drive “D“ and a Recovery Partition.
7. Data on the factory default partition or on the whole hard disk
will be cleared depending on the option you selected in the
previous step. Click Restore to start the task.
8. When the restore is completed successfully, click
Reboot to
restart the system.
34 EeeBox PC
Page 35

English
EeeBox PC 35
Page 36

English
36 EeeBox PC
Page 37

ASUS contact information
ASUSTeK COMPUTER INC.
Address 15 Li-Te Road, Peitou, Taipei, Taiwan 11259
Telephone +886-2-2894-3447
Fax +886-2-2890-7798
E-mail info@asus.com.tw
Web site www.asus.com.tw
Technical Support
Telephone +86-21-38429911
Online support support.asus.com
ASUS COMPUTER INTERNATIONAL (America)
Address 800 Corporate Way, Fremont, CA 94539, USA
Telephone +1-510-739-3777
Fax +1-510-608-4555
Web site usa.asus.com
Technical Support
Telephone +1-812-282-2787
Support fax +1-812-284-0883
Online support support.asus.com
ASUS COMPUTER GmbH (Germany and Austria)
Address Harkort Str. 21-23, D-40880 Ratingen, Germany
Fax +49-2102-959911
Web site www.asus.de
Online contact www.asus.de/sales
English
Technical Support
Component Telephone +49-1805-010923
System/Notebook/Eee/ +49-1805-010920
LCD Telephone
Support Fax +49-2102-9599-11
Online support support.asus.com
EeeBox PC 37
Page 38

Türkçe
Türkçe
Eee Box PC
Kullanım Kılavuzu
Page 39

Türkçe
TR6173
Üçüncü Sürüm V3
Ekim 2010
Türkçe
Telif Hakkı © 2010 ASUSTeK COMPUTER INC. Tüm Hakları Saklıdır.
Tanımlanan ürünler ve yazılımlar da dahil olmak üzere bu el kitabının hiçbir
bölümü çoğaltılamaz, yayınlanamaz, kopyalanamaz, yeniden kullanılabilmesini
sağlayan sistemlerde saklanamaz veya satın alan kişi tarafından destek amacıyla
bulundurulması hariç tutulması koşuluyla, ASUSTeK COMPUTER INC. (“ASUS”)’un
yazılı izni olmaksızın herhangi bir biçimde başka bir dile çevrilemez.
Bu elkitabında adı geçen ürünler ve kurum isimleri ilgili şirketlerinin
tescilli ticari markaları veya telif haklarına sahip olabilir veya
olmayabilir ve ihlal etme gibi bir durum amaçlanmadan yalnızca
sahibinin çıkarına olmak üzere tanımlama veya açıklama amacıyla
kullanılmıştır. Tüm ticari markalar ilgili sahibinin mülkiyetindedir.
Bu elkitabının içeriğinin doğru olması için yapılan her çalışma doğru ve günceldir.
Ancak, içeriğin doğru olduğu yönünde herhangi bir garanti verilmemektedir ve
üretici rma önceden haber vermeden değişiklik yapma hakkını saklı tutmaktadır.
Page 40

Türkçe
İçindekiler
Duyurular ...................................................................................................39
Güvenlik bilgileri .....................................................................................43
Bu Kılavuz Hakkında Notlar .................................................................46
Hoşgeldiniz ...............................................................47
Paket içeriği ...............................................................................................47
Türkçe
Eee Box PC Cihazınızı Tanıma ..................................48
Ön görünüm .............................................................................................48
Arka Görünüm .........................................................................................50
Üstten görünüş ........................................................................................52
Kablosuz antenin kullanılması ...........................................................53
Eee Box PC’nizi konumlandırma ..............................54
Altlığı takma (isteğe bağlı bağlı)........................................................54
Eee Box PC’nizi bir monitöre takma (isteğe bağlı bağlı) ...........55
Eee Box PC’nizi Ayarlamak .......................................56
Bir ekrana takma .....................................................................................56
USB Aygıtlara Takma .............................................................................56
Bir Ağ Aygıtına Bağlanma ....................................................................57
Sistemi açma .............................................................................................58
Eee Box PC’nizi Kullanma .........................................59
Kablosuz bağlantıyı ayarlama ...........................................................59
Kablolu bağlantı yapılandırma...........................................................60
Statik IP kullanma .............................................................................63
ASUS Kolay Güncelleme .......................................................................64
Sistemin kurtarılması ...............................................65
Kurtarma Bölümünün Kullanımı .......................................................65
İşletim Sistemini Fabrika Varsayılan Bölümüne Kurtarma (F9
Kurtarma) ............................................................................................65
Fabrika Varsayılan Ortam Veirlerini USB Sürücüsüne
Yedekleme (F9 Yedekle) .................................................................65
USB depolama aygıtını kullanma (USB Geri Yükleme) ...............66
40 Eee Box PC
Page 41

Türkçe
Duyurular
Federal Haberleşme Komisyonu Beyanı
Bu cihaz FCC kuralları Bölüm 15 ile uyumludur. Çalıştırma aşağıda yer
alan iki koşula bağlıdır:
• Bu cihaz zararlı müdahaleye sebebiyet vermez, ve de
• Bu cihaz, istek dışı çalışmaya neden olabilen müdahale de dahil
olmak üzere maruz kalınan her hangi bir müdahaleyi kabul
etmelidir.
Bu ekipman test edilmiştir ve de Federal Communications
Commission ( FCC ) kurallarının 15 nolu Bölümüne göre Sınıf B
bir dijital cihazın limitleri ile uyumlu bulunmuştur. Bu limitler, bir
yerleşim yerine monte edilmesi halinde zararlı müdahalelerle karşı
makul korumayı sağlamak üzere tasarlanmıştır. Bu cihaz radyo
frekans enerjisi üretir, kullanır ve de yayabilir ve eğer yönergelere
riayet ederek monte edilmez ve de kullanılmaz ise, radyo
haberleşmesine zararlı etkiler yapabilir. Bununla birlikte, belirli bir
monte durumunda her hangi bir etkinin meydana gelmeyeceği
yönünde her hangi bir garanti söz konusu değildir. Eğer bu
ekipmanın, açılması yada kapatılması yoluyla radyo ya da televizyon
yayınına zararlı etkide bulunduğu tespit edilir ise, aşağıda yer alan
önlemlerin bir yada birden fazlasını kullanarak kullanıcının zararlı
etkiyi düzeltmeye çalışması önerilmektedir:
Türkçe
• Alıcı anteni yeniden yönlendirin ya da yeniden yerleştirin.
• Ekipman ve de alıcı arasındaki ayrımı artırın.
• Ekipmanı, bir devre üstünde alıcının bağlı olduğundan farklı bir
çıkış noktasına bağlayın.
• Yardım için deneyimli bir radyo/TV teknisyenine ya da satıcınıza
danışın.
DİKKAT: Uyum için sorumlu olan kişi tarafından açık bir şekilde
onaylanmayan değişiklikler yada modikasyonlar, sizin bu ekipmanı
kullanma yetkinizi sona erdirebilecektir.
Eee Box PC 41
Page 42

Türkçe
Türkçe
Kızılötesi maruziyet uyarısı
Bu donanım belirtilen talimatlara göre kurulmalı ve çalıştırılmalıdır,
bu verici için kullanılan anten insanlardan en az 20 cm’lik bir ayrım
mesafesi sağlayacak şekilde kurulmalı ve başka bir anten veya verici
ile birlikte yerleştirilmemeli ya da çalıştırılmamalıdır. Son kullanıcı
ve yükleyiciye kızılötesi maruziyet uygunluğu karşılamak için anten
kurulum talimatları ve verici kullanım koşulları sağlanmalıdır.
Uygunluk Beyanı (R&TTE Direkti 1999/5/EC)
Aşağıdaki öğeler tamamlanarak geçerli ve yeterli kabul edilmiştir:
• [Madde 3]’de olduğu gibi elzem gereksinimler
• [Madde 3.1a]’de olduğu gibi sağlık ve de güvenlik için koruma
gereksinimleri
• [EN 60950]’ye göre elektrik güvenliği için test etme
• [Madde 3.1b]’de olduğu gibi elektromanyetik uyumluluk için
koruma gereksinimleri
• [EN 301 489-1] & [EN 301] içindeki elektromanyetik uyumluluk
için test etme
• [489-17]’ye göre test etme
• [Madde 3.2]’de olduğu gibi radyo dalga bandının etkili bir
biçimde kullanımı
• [EN 300 328-2]’e göre radyo test dizileri
.
42 Eee Box PC
Page 43

Türkçe
CE İşareti Uyarısı
Kablosuz LAN/Bluetooth özelliği olmayan aygıtlar için CE
işareti
Bu aygıtın teslim edilen versiyonu, 2004/108/EC “Elektromanyetik
uygunluk” ve 2006/95/EC “Düşük voltaj direkti” başlıklı EEC
direktierinin gerekliliklerine uygundur.
Kablosuz LAN/Bluetooth özelliği olan aygıtlar için CE işareti
Bu aygıt, Avrupa Parlamentosu ve Komisyonunun, Radyo ve
Telekomünikasyon Aygıtlarını ve karşılıklı uygunluk kabulünü
kapsayan, 9 Mart, 1999 tarihli 1999/5/EC Direkti gerekliliklerine
uygundur.
Farklı Etki Alanları için Kablosuz Operasyon Kanalı
K. Amerika 2.412-2.462 GHz Ch01’den CH11’e
Japonya 2.412-2.484 GHz Ch01’den CH14’e
Türkçe
Avrupa ETSI 2.412-2.472 GHz Ch01’den CH13’e
Eee Box PC 43
Page 44

Türkçe
Türkçe
Fransa Sınırlandırılmış Kablosuz Frekans Bantları
Fransa’nın bazı alanlarında sınırlandırılmış frekans bantları vardır. En
kötü durumda maksimum yetkilendirilmiş güç alanları:
• Komple 2.4 GHz bandı (2400 MHz–2483.5 MHz) için 10mW
• 2446.5 MHz ila 2483.5 MHz arasındaki frekanslar için 100mW
10 ila 13 arasındaki kanallar 2446.6 MHz ila 2483.5 MHz bandında çalışır.
Dış mekan kullanımı için birkaç olasılık söz konusudur: Özel
mülkiyette ya da kamu temsilcilerinin özel mülkiyeti üstünde
kullanım Savunma Bakanlığı tarafından 2446.5–2483.5 MHz
bandında 100 nW' lik maksimum yetkilendirilmiş güç ile bir
başlangıç yetkilendirme prosedürüne tabidir. Kamu alanındaki dış
mekanlarda kullanıma izin verilmemektedir.
Aşağıda listelenen departmanlarda, komple 2.4 GHz nadı için:
• Maksimum yetkilendirilmiş güç iç mekanlarda 100mW’dir.
• Maksimum yetkilendirilmiş güç dış mekanlarda 10mW’dir.
2400–2483.5 MHz bandının kullanımı için departmanlar, iç mekanlar
için 100mW’den daha az ve de dış mekanlarda 10mW’den daha az
bir EIRP ile izin verilir:
01 Ain 02 Aisne 03 Allier
05 Hautes Alpes 08 Ardennes 09 Ariège
11 Aude 12 Aveyron 16 Charente
24 Dordogne 25 Doubs 26 Drôme
32 Gers 36 Indre 37 Indre et Loire
41 Loir et Cher 45 Loiret 50 Manche
55 Meuse 58 Nièvre 59 Nord
60 Oise 61 Orne 63 Puy du Dôme
64 Pyrénées Atlantique 66 Pyrénées Orientales
67 Bas Rhin 68 Haut Rhin
70 Haute Saône 71 Saône et Loire
75 Paris 82 Tarn et Garonne
84 Vaucluse 88 Vosges 89 Yonne
90 Territoire de Belfort 94 Val de Marne
44 Eee Box PC
Page 45

Türkçe
Bu gereksinim muhtemelen zamanla değişecektir ve de size Fransa
sınırları içerisinde bir çok alanda kablosuz LAN kartınızı kullanmanıza
izin verecektir (www.art-telecom.fr)
Sizin WLAN Kart 100mW’den daha az, ancak 10mW’den daha fazla
aktarır.
Kanada İletişim Departmanı Açıklaması
Bu dijital cihaz Kanada iletişim departmanının radyo parazit
yönergelerinde belirtilen dijital cihazlardan radio gürültü
emisyonuna ilişkin olan B Sınıfı limitlerini aşmamaktadır.
“B” Sınıfı bu aparat, Kanada ICES-003’e uygundur.
Kanada için IC Radyasyona Maruz Kalma Beyanı
Bu ekipman, kontrolsüz bir çevre için ortaya konulan IC radyasyona
maruz kalma limitleri ile uyumludur. IC RF maruz kalma uyum
gereksinimleri ile uyumu muhafaza etmek için, lütfen aktarım sırasında
aktarım antenine doğrudan temas etmemeye özen gösteriniz. RF
maruz kalma uyumunu sağlamak için nihai kullanıcılar spesik işletim
yönergelerini izlemelidirler.
Çalıştırma aşağıda yer alan iki koşula bağlıdır:
• Bu cihaz zararlı müdahaleye sebebiyet vermez, ve de
• Bu cihaz, istek dışı çalışmaya neden olabilen müdahale de dahil
olmak üzere maruz kalınan her hangi bir müdahaleyi kabul
etmelidir.
REACH
Türkçe
REACH (Kimyasalların Kayıt Altına Alınması, Değerlendirilmesi,
Ruhsatlandırılması ve Sınırlandırılması) düzenleyici çerçevesine
uygun olarak, ürünlerimizdeki kimyasal maddeleri http://csr.asus.
com/english/REACH.htm adresindeki ASUS REACH websitesinde
yayınlamaktayız.REACH.htm.
Eee Box PC 45
Page 46

Türkçe
Güvenlik bilgileri
Eee Box PC’niz bilgi teknolojisi ekipmanlarının en son güvenlik
standartlarını karşılamak için tasarlanıp test edilmiştir. Bununla
birlikte, güvenliğinizi sağlamak için aşağıdaki güvenlik talimatlarını
okumanız önemlidir.
Sisteminizin kurulumu
Türkçe
• Sistemi çalıştırmadan önce dokümanlarda bulunan tüm
talimatları okuyun ve bu talimatlara uyun.
• Bu ürünü su ya da radyatör gibi bir ısı kaynağı yakınında
kullanmayın.
• Sistemi hareketsiz, sabit bir yüzey üzerine kurun.
• Gövde üzerinde bulunan açıklıklar havalandırma içindir. Bu
açıklıkları kapatmayın ya da üzerlerini örtmeyin. Havalandırma
için sistemin çevresinde geniş bir alan bıraktığınızdan emin olun.
Havalandırma boşluklarına asla bir şey sokmayın.
• Bu ürünü ortam sıcaklığı 0˚C ve 35˚C arasında olan koşullarda
kullanın.
• Uzatma kablosu kullanıyorsanız, uzatma kablosuna takılı
cihazların toplam akım değerinin kablonun akım değerini
aşmadığından emin olun.
Kullanım sırasında dikkat edilmesi gereken hususlar
• Güç kablosu üzerine basmayın ya da herhangi bir şeyin kabloyu
ezmesine izin vermeyin.
• Sisteme su ya da diğer sıvıları dökmeyin.
• Sistem kapatıldığında dahi az miktarda bir elektrik akımı çeker.
Sistemi temizlemeden önce her zaman tüm güç, modem ve ağ
kablolarını prizden çekin.
• Ürün ile ilgili aşağıdaki teknik sorunlarla karşılaşırsanız, güç
kablosunun şini çekin ve yetkili bir servis teknisyeni ya da
bayinizle temasa geçin.
• Güç kablosu ya da şin hasarlı olması.
46 Eee Box PC
Page 47

Türkçe
• Sisteme sıvı dökülmesi.
• Çalıştırma talimatlarını izlemenize rağmen sistemin düzgün
çalışmaması.
• Sistemin yere düşürülmüş olması ya da kabinin hasarlı
olması.
• Sistem performansında değişiklik.
Lityum-İyon Pil Uyarısı
DİKKAT: Pil yanlış yerleştirilirse patlama riski mevcuttur.
Yalnız üreticinin önerdiği veya ona eşdeğer ürünle değiştirin.
Kullanılmış pilleri üreticinin talimatlarına göre atın.
CD-ROM Sürücüsü Güvenlik UYARISI
SINIF 1 LAZER ÜRÜNÜ
DEMONTE EDİLMEZ
Kullanıcılar tarafından demonte edilen ürünler
garanti dışındadır
Eee Box Bilgisayarı belediye çöplüğüne atmayın. Bu ürün parçaların
uygun şekilde yeniden kullanılmasını ve geri dönüşümünü
sağlamak üzere tasarlanmıştır. Çarpı konulmuş tekerlekli çöp
kutusu sembolü ürünün (elektrikli, elektronik donanım, civa içeren
yuvarlak pil) şehir çöplüğüne atılmaması gerektiğini gösterir. Ürün
geri dönüşümü için yerel teknik destek servisleri ile görüşün.
Türkçe
Pili belediye çöplüğüne atmayın. Çarpı konulmuş tekerlekli
çöp kutusu pilin şehir çöplüğüne atılmaması gerektiğini
göstermektedir. Pilin yenilenmesi için yerel teknik destek servisleri
ile görüşün. Ürün geri dönüşümü için yerel teknik destek servisleri
ile görüşün.
Eee Box PC 47
Page 48

Türkçe
Türkçe
Geri Götürme ve Geri Dönüşüm
Eski bilgisayarlar, dizüstü bilgisayarlar ve diğer elektronik ekipmanlar
atık depolama sahasına atıldığında çevreye zararlı olabilecek tehlikeli
kimyasallar içerir. Geri dönüşümle, eski bir bilgisayarda bulunan
metaller, plastikler ve bileşenler parçalanır ve yeni ürünlerin üretimi
için yeniden kullanılır. Bunun yanı sıra, çevre tehlikeli kimyasalların
denetimsiz olarak açığa çıkmasından korunur.
ASUS, çevremizi korumak, işçi güvenliğini sağlamak ve küresel çevre
yasalarına uymak için en yüksek standartlardaki geri dönüşüm
sağlayıcılarla çalışmaktadır. Eski ekipmanlarımızı geri dönüştürme
kararlılığımız çevreyi çok yönden koruma çalışmamızdan
kaynaklanmaktadır.
ASUS ürün geri dönüştürme ve iletişim bilgileri ile ilgili daha fazla
bilgi için, lütfen GreenASUS Geri Götürme ve Geri Dönüştürme
sayfasını ziyaret edin. (http://csr.asus.com/english/takeback.htm)
48 Eee Box PC
Page 49

Türkçe
Bu Kılavuz Hakkında Notlar
Belirli görevleri güvenli ve tam olarak yerine getirmek için bu
kılavuzda dikkat etmeniz gereken birkaç not ve uyarı kullanılmıştır.
Bu notlar aşağıda açıklandığı gibi farklı önem derecelerine sahiptir:
UYARI! Güvenli çalıştırma için izlenmesi gereken önemli bilgiler.
ÖNEMLİ! Veri, bileşen ve şahıslara zarar gelmesini önlemek için
izlenmesi gereken önemli bilgiler.
İPUCU: Görevleri tamamlamak için ipuçları.
NOT: Özel durumlar için bilgiler.
Türkçe
Eee Box PC 49
Page 50

Türkçe
Türkçe
Hoşgeldiniz
Eee Box PC’yi satın aldığınız için teşekkür ederiz. Aşağıdaki resimler
yeni Eee Box PC’nizin paket içeriğini göstermektedir. Aşağıdaki
parçalardan herhangi biri hasar görmüş ya da kayıp ise bayinizle
temasa geçin.
Paket içeriği
EeeBox PC
S/PDIF’e mini jak (isteğe
bağlı)
Garanti belgesi Hızlı Başlangıç Kılavuzu
Cihaz veya parçaları garanti süresi içinde normal ve doğru kullanım
sırasında sorun çıkarır veya arızalanırsa, garanti kartını bozuk
parçaların değiştirilmesi için ASUS Servis Merkezine götürün.
Ayak
(isteğe bağlı bağlı)
AC adaptör Güç kablosu
VESA bağlantı parçası ve
(isteğe bağlı bağlı)
50 Eee Box PC
Page 51

Türkçe
Eee Box PC Cihazınızı Tanıma
Ön görünüm
Sistemin bu yüzünde bulunan bileşenleri tanımlamak için aşağıdaki
diyagrama müracaat edin.
1
2
3
4
Türkçe
5
6
1
Sabit Disk LED’i
Sabit disk sürücüsünden veri okunuyor veya yazılıyorken,
sabit disk LED’i yanıp söner.
2
Güç anahtarı
Güç anahtarı sistemi AÇMANIZI ve KAPATMANIZI
sağlar.
Eee Box PC 51
Page 52

Türkçe
Türkçe
3
Bellek kartı yuvası
Yerleşik bellek kartı okuyucu dijital kameralar, MP3
oynatıcılar, cep telefonları ve PDA gibi aygıtlarda kullanılan
MMC/SD/SDHC kartları okur.
4
USB Portu
USB (Universal Serial Bus) portu klavye, fare aygıtı,
fotoğraf makinesi ve sabit disk sürücü gibi USB aygıtlarıyla
uyumludur. USB aracılığıyla ilave takma istasyonlar ya da
hub olarak çalışan bazı çevre birimleri ile tek bilgisayar
üzerinde birçok cihazın aynı anda çalıştırılması sağlanır.
5
Kulaklık/Ses Çıkış Jakı
Stereo kulaklık jakı (3.55mm) sistem ses çıkış sinyalini
güçlendirilmiş hoparlör ya da kulaklığa bağlamak için
kullanılır.
6
Mikrofon Jakı
Mikrofon jakı video konferans, sesli okuma ya da basit
ses kayıtları için kullanılan mikrofonu bağlamak amacıyla
tasarlanmıştır.
52 Eee Box PC
Page 53

Türkçe
Arka Görünüm
Sistemin bu yüzünde bulunan bileşenleri tanımlamak için aşağıdaki
diyagrama müracaat edin.
1
2
3
4
Türkçe
5
6
1
Kablosuz anten jakı
Jak, kablosuz sinyal alımını güçlendirmek için ürünle gelen
kablosuz anteni bağlamakta kullanılır.
Eee Box PC 53
Page 54

Türkçe
Türkçe
2
Güç girişi (DC 19V)
Birlikte verilen güç adaptörü bu jak ile AC gücü DC güce
çevirir. Bu jak içinden geçen güç ile bilgisayarın beslemesi
yapılır. Bilgisayarın hasar görmesini önlemek için her zaman
birlikte verilen güç adaptörünü kullanın.
Güç adaptörü kullanımda iken ılık veya sıcak olabilir.
Adaptörün üstünü kapatmayın ve bedeninizden uzak tutun.
3
USB Portu
USB (Universal Serial Bus) portu klavye, fare aygıtı,
fotoğraf makinesi ve sabit disk sürücü gibi USB aygıtlarıyla
uyumludur. USB aracılığıyla ilave takma istasyonlar ya da
hub olarak çalışan bazı çevre birimleri ile tek bilgisayar
üzerinde birçok cihazın aynı anda çalıştırılması sağlanır.
4
LAN Portu
Sekiz pinli RJ-45 LAN portu, bir yerel ağa bağlantı kurmak
için standart bir Ethernet kablosunu destekler.
5
Ekran (Monitör) Çıkışı
15 iğneli D-alt monitör bağlantı noktası, daha büyük harici
bir ekranda görüntüleme için monitör veya projektör gibi
standart VGA uyumlu bir aygıtı destekler.
6
Ses Çıkışı (S/PDIF Çıkışı) jakı
Analog veya dijital ses transferi için 3.5mm bir mini ses
54 Eee Box PC
kablosunu bu jaka takın.
S/PDIF Çıkışı işlevi için, amplikatörünüze
bağlamada ürünle gelen mini jakı S/PDIF
adaptörüne bağlayın.
Page 55

Türkçe
Üstten görünüş
Sistemin bu yüzünde bulunan bileşenleri tanımlamak için aşağıdaki
diyagrama müracaat edin.
1 2
E-SATA
1
e-SATA Bağlantı Noktası
Harici SATA ya da eSATA, aslında bilgisayar içinde
kullanılmak üzere tasarlanmış olan Seri ATA cihazların
haricen bağlanmasına olanak sağlar. Harici depolama
çözümleri için mevcut USB 2.0 ve 1394’ten altı kata kadar
daha hızlıdır ve ayrıca iki metreye kadar blendajlı kablo ve
konnektörler kullanılarak çalışır durumda takılıp çıkarılabilir.
Türkçe
USB bağlantı noktası
2
USB (Evrensel Seri Veri Yolu) portu klavye, fare aygıtı,
fotoğraf makinesi ve sabit disk sürücü gibi USB aygıtlarıyla
uyumludur. USB, bazı çevre aygıtları ek eklenti alanı veya
hub işlevi görecek şekilde, birçok aygıtın tek bir bilgisayarda
aynı anda çalışmasını sağlar.
Eee Box PC 55
Page 56

Türkçe
Türkçe
Kablosuz antenin kullanılması
Kablosuz anten sinyal alımını güçlendirmek için Eee Box PC’nize
bağlanmalıdır. Hasar görmesini önlemek için kablosuz anteni
180°–270° açıya döndürün.
56 Eee Box PC
Page 57

Türkçe
Eee Box PC’nizi konumlandırma
Altlığı takma (isteğe bağlı bağlı)
Ürünle gelen standı kullanarak Eee Box PC’nizi dik hale getirin. Bunu
yapmak için :
1. Eee Box PC’nin en altında bulunan vida deliğini bulun.
2. Altlık vidasını PC vida deliğiyle hizalayın, sonra bir metal parayla
altlığı PC’yle sağlamlaştırın.
Eee Box PC alttan görünüm
1
Vida deliği
Türkçe
Altlık vidası
2
Eee Box PC 57
Page 58

Türkçe
Eee Box PC’nizi bir monitöre takma (isteğe bağlı bağlı)
Eee Box PC’nizi bir monitörün arka tarafına da takabilirsiniz.
1. VESA bağlantı parçasını dört vidayla (HNM/M4 x 8
monitörünüze sabitleyin.
Türkçe
VESA bağlantı parçasını sıkıştırmak için, monitörünüz VESA75 veya
VESA100 standardıyla uyumlu olmalıdır.
2. Eee Box PC’nizi hizalamanın doğru olmasına dikkat ederek
VESA bağlantı parçasına yerleştirin ve ardından PC’yi bir bozuk
parayla VESA bağlantı parçasına sabitleyin.
58 Eee Box PC
Eee Box PC Alt görünüm
Page 59

Türkçe
Eee Box PC’nizi Ayarlamak
Eee Box PC’nizi kullanmadan önce, çevre birimleri takmanız gerekir.
Bir ekrana takma
VGA kablosunun bir ucunu bir LCD monitor (1) ’e bağlayın ve diğer
ucunu sistemin arka panelindeki Ekran (Monitör) Çıkış bağlantı
noktasına bağlayın (2).
Türkçe
2
LCD monitör
1
USB Aygıtlara Takma
Kablolu/kablosuz klavyeler (bölgeye göre değişir), mouse’lar ve
yazıcılar gibi USB aygıtlarını sistemin arka panelindeki USB bağlantı
noktalarına bağlayın.
Eee Box PC 59
Page 60

Türkçe
Türkçe
Bir Ağ Aygıtına Bağlanma
Ağ kablosunun bir ucunu sistem arka panelindeki LAN yuvasına,
diğer ucunu bir göbek veya anahtara takın.
RJ-45 konektörlere sahip Ağ kablosu
Ağ hub ya da switch’i
60 Eee Box PC
Page 61

Türkçe
Sistemi açma
Ürünle gelen AC adaptörünü sistem arka panelindeki DC IN jakına
takın, ve sonra sistemi açmak için ön paneldeki güç anahtarına
basın.
3
4
2
1
• Eee Box PC’nizi kullanmadığınız zamanlarda, güç tüketiminden
tasarruf etmek için güç adaptörünü çıkarın veya AC çıkışını
kapatın.
• Windows
ayarlayın. Bu, Eee Box PC’nizin düşük güç tüketim moduna
ayarlanmasını ve aynı zamanda tam olarak işlev göstermesini
sağlamak içindir.
®
Denetim Masası’ndaki güç yönetimi ayarlarını
Türkçe
BIOS ayarlarına girmek için, açılış sırasında <F2> tuşuna arka
arkaya basın.
Eee Box PC 61
Page 62

Türkçe
Eee Box PC’nizi Kullanma
Bu bölümdeki tüm ekran resimleri sadece referans içindir. Gerçek
ekran resimleri işletim sistemlerinden farklı olabilir. En son bilgileri
almak için www.asus.com ’dan ASUS websitesini ziyaret edin.
Kablosuz bağlantıyı ayarlama
Türkçe
Kablosuz bir ağa bağlanmak için, aşağıdaki talimatları takip edin:
Güvenlik nedeniyle, güvensiz bir ağa BAĞLANMAYIN. Aksi takdirde,
şifreleme olmadan iletilen bilgiler başkaları tarafından görülebilir.
1. Windows® Uyarı alanında orange star bulunan kablosuz ağ
simgesine tıklayın.
2. Listeden bağlanmak istediğiniz kablosuz
erişim noktasını seçin ve bağlantıyı
oluşturmak Connect (Bağlan)’a tıklayın.
İstediğiniz erişim noktasını
bulamazsanız, yenilemek ve listede
tekrar aramak için sağ üst köşedeki
Refresh (Yenile’yi tıklayın).
3. Bağlantı sırasında bir parola girmeniz gerekebilir.
4. Bağlantı kurulduktan sonra , bağlantı listede gösterilir.
5. Uyarı alanında kablosuz ağ simgesini
görebilirsiniz.
62 Eee Box PC
Page 63

Türkçe
Kablolu bağlantı yapılandırma
Kablolu bir ağ kurmak için aşağıdaki talimatları izleyin:
Dinamik IP kullanma / PPPoE ağ bağlantısı:
1. Windows®’daki sarı uyarı üçgeni
bulunan ağ simgesine
tıklayarak, Open Network and
Sharing Center (Ağ ve Paylaşım
Merkezi’ni Aç)’ı seçin.
2. Sol mavi bölmedeki
Change adapter
settings (Adaptör
ayarlarını değiştir)’i
tıklayın.
Türkçe
3. Yerel Ağ Bağlantısı
öğesine sağ tıklayın ve
Özellikler öğesini seçin.
Eee Box PC 63
Page 64

Türkçe
Türkçe
4. İnternet İletişim Kuralları
(TCP/IP) Versiyon 4 öğesini
vurgulayın ve Özellikler
5. Otomatik olarak bir IP
adresi al öğesini seçin ve
Taman’, tıklayın.
öğesini seçin.
(PPPoE kullanıyorsanız aşağıdaki adımları takip edin)
6. Network and Sharing
Center (Ağ ve Paylaşım
Merkezi)’ne geri dönün
ve daha sonra Set up
a new connection
or network (Yeni bir
bağlantı veya ağ kur)’a
tıklayın.
64 Eee Box PC
Page 65

Türkçe
7. Internet’e Bağlan’ı seçip
İleriyi tıklatın.
8. Geniş bant (PPPoE) ’ı seçip
İleriyi tıklatın.
Türkçe
9. Kullanıcı adı, Parola ve
Bağlantı adınızı girin.
Connect‘e (Bağlan)
tıklayın.
11. Görev çubuğundaki
ağ simgesine ve
oluşturduğunuz bağlantıya
tıklayın.
10. Yapılandırmayı
sonlandırmak için Close
(Kapat)’a tıklayın.
12. Kullanıcı adınızı ve parolanızı
girin. Internet’e bağlanmak
için Bağlan’ı tıklatın.
Eee Box PC 65
Page 66

Türkçe
Türkçe
Statik IP kullanma
1. Statik IP ağ yapılandırmasını
başlatmak için 1-4 arasındaki
dinamik IP kullanma adımlarını
tekrarlayın.
2
Use the following IP address
(Aşağıdaki IP adresini
kullan)’a tıklayın.
3. Hizmet sağlayıcınızdan
öğreneceğiniz IP adresini, Alt
ağ maskesini ve Ağ Geçidini
girin.
4. Gerekirse, tercih edilen DNS sunucusu adresini ve alternatif
adresi girin.
5. Bağlantılı tüm değerleri girdikten sonra, ağ bağlantısını kurmak
için OK (Tamam)’a tıklayın.
66 Eee Box PC
Page 67

Türkçe
ASUS Kolay Güncelleme
ASUS Easy Update, Eee Box PC’niz için en son BIOS, sürücüler ve
uygulamaları otomatik olarak bulup indiren bir yazılım aracıdır.
®
1. Windows
ASUS Easy Update simgesine
sağ tıklayın.
bildirim alanından
2. Sisteminizi ne kadar sıklıkla
güncellemek istediğinizi
belirlemek için Programla’yı
seçin.
3. Güncellemeyi etkinleştirmek
için Güncelle’yi seçin.
4. İndirebileceğiniz öğeleri
göstermek için Tamam’a
tıklayın.
5. İndirmek istediğiniz öğe(ler)i
kontrol edin ve daha sonra
Tamam’a tıklayın.
Türkçe
Eee Box PC 67
Page 68

Türkçe
Türkçe
Sistemin kurtarılması
Kurtarma Bölümünün Kullanımı
İşletim Sistemini Fabrika Varsayılan Bölümüne Kurtarma (F9 Kurtarma)
1. BIOS kurulumunda Boot Booster (Önyükleme Hızlandırıcısı)'nı
devredışı bırakın.
2.
Ön yükleme sırasında [F9] tuşuna basın.
3.
Bu öğe göründüğünde Windows setup [EMS Enabled]
(Windows kurulumu [EMS Etkin])'i seçin ve [Enter] tuşuna
basın.
4.
Dili seçin ve Next (İleri) düğmesini tıklatın.
5.
Recover the OS to the Default Partition (İşletim Sistemini
Varsayılan Bölüme Kurtar)'ı seçin ve Next (İleri)'yi tıklatın.
6.
Fabrika varsayılan bölümü görüntülenir. Next (İleri)'yi tıklatın.
7.
Varsayılan bölümdeki veriler silinir. Sistem kurtarmayı başlatmak
için Recovery (Kurtar)'ı tıklatın.
Seçilen bölümdeki tüm verilerinizi kaybedeceksiniz. İlk önce
önemli verilerinizi yedeklediğinizden emin oluın.
8. Kurtarma işlemi başarıyla tamamlandığında, sistemi yeniden
başlatmak için Reboot (Yeniden Başlat)'ı tıklatın.
Fabrika Varsayılan Ortam Veirlerini USB Sürücüsüne Yedekleme (F9 Yedekle)
1. Önceki bölümdeki adım 1—4'ü tekrarlayın.
2.
Backup the Factory Environment to a USB Drive (Fabrika
Ortamını USB Sürücüye Yedekle)'yi seçin ve Next (İleri)'yi
tıklatın.
3.
Fabrika Varsayılan Ortam yedeklemesini başlatmak için, USB
depolama aygıtını bilgisayarınıza bağlayın.
68 Eee Box PC
Page 69

Türkçe
Ba ğlanan USB depolama aygıtının boyutu 15GB'dan büyük
olmamalıdır. Gerçek boyutu bilgisayar modelinize göre değişebilir.
4. EeeTop PC/EeeBox PC2nize birden fazla USB depolama aygıtı
bağlıysa, istediğiniz USB depolama aygıtını seçin ve Next
(İleri)'yi tıklatın.
Seçilen USB depolama aygıtında uygun boyutta bölüm zaten
varsa (örneğin, yedekleme bölümü olarak kullanılmış bir bölüm),
sistem otomatik olarak bu bölümü gösterir ve yedekleme için bunu
kullanır.
5. Önceki adımda farklı durumlara göre, seçilen USB depolama
aygıtı veya seçilen bölümdeki veriler silinir. Yedekleme işlemini
başlatmak için Backup (Yedekle)'yi tıklatın.
Seçilen USB depolama aygıtı veya bölümdeki tüm verilerinizi
kaybedeceksiniz. İlk önce önemli verilerinizi yedeklediğinizden
emin oluın.
6. Fabrika varsayılan ortamına yedekleme işlemi başarıyla
tamamlandığında, sistemi yeniden başlatmak için Reboot
(Yeniden Başlat)'ı tıklatın.
Türkçe
USB depolama aygıtını kullanma (USB Geri Yükleme)
Sisteminizdeki Kurtarma Bölümü kilitlendiğinde, sistemi fabrika
varsayılan bölümüne ya da fabrika ortamı verilerini tüm sabit diske
geri yüklemek için USB depolama aygıtını kullanın.
BIOS kurulumunda Boot Booster (Önyükleme Hızlandırıcısı)'nı
1.
devredışı bırakın.
2.
Fabrika ortamı verilerini yedeklediğiniz USB depolama aygıtını
bağlayın.
3.
Önyüklemede, EeeTop PC için <ESC> veya EeeBoz PC için <F8>
tuşuna basın ve Please select boot device (Lütfen önyükleme
aygıtını seçin) ekranı görünür. Bağlanan USB depolama
aygıtından yüklemek için USB:XXXXXX'yi seçin.
Eee Box PC 69
Page 70

Türkçe
Türkçe
4. Dili seçin ve Next (İleri) düğmesini tıklatın.
5.
Geri Yükle'yi seçin ve Next (İleri)’yi tıklatın.
6.
Bir görev seçin ve Next (İleri)'yi tıklatın. Görev seçenekleri:
İşletim sistemini yalnızca Varsayılan Bölüme geri yükle
İşletim sistemini fabrika varsayılan bölümüne geri yüklemek
istiyorsanız, bu seçeneği belirleyin. Bu seçenek, sistem bölümü
“C”' deki tüm verileri siler ve bölüm “D” değiştirilmeden korur.
Next (İleri)'yi tıklattıktan sonra, fabrika varsayılan bölümü
gösterilir. Next (İleri)'yi tekrar tıklatın.
Tüm Sabit Diski Geri Yükle
EeeTop PC/EeeBox PC'nizi fabrika varsayılan durumuna geri
yüklemek istiyorsanız, bu seçeneği belirleyin. Bu seçenek sabit
disk sürücünüzdeki tüm verileri siler ve "C" sürücüsü olarak
yeni bir sistem bölümü ve “D“ sürücüsü olarak boş bir bölüm ve
Kurtarma Bölümü oluşturur.
7.
Fabrika varsayılan bölümü ve tüm sabit diskteki veriler önceki
adımda belirlediğiniz seçime bağlı olarak silinir. Görevi
başlatmak için Restore (Geri Yükle)'yi tıklatın.
8.
Geri yükleme işlemi başarıyla tamamlandığında, sistemi yeniden
başlatmak için Reboot (Yeniden Başlat)'ı tıklatın.
70 Eee Box PC
Page 71

Türkçe
Türkçe
Eee Box PC 71
Page 72

Türkçe
Türkçe
72 Eee Box PC
Page 73

Türkçe
ASUS İrtibat bilgileri
ASUSTeK COMPUTER INC.
Adres
15 Li-Te Road, Peitou, Taipei, Taiwan 11259
Telefon
+886-2-2894-3447
Faks
+886-2-2890-7798
E-mail info@asus.com.tw
Çevrimiçi destek
www.asus.com.tw
Teknik Destek
Telefon
+86-21-38429911
Online Destek support.asus.com
ASUS COMPUTER INTERNATIONAL (
Adres
800 Corporate Way, Fremont, CA 94539, USA
Telefon
+1-510-739-3777
Faks
+1-510-608-4555
Çevrimiçi destek
usa.asus.com
Amerika
)
Teknik Destek
Telefon
+1-812-282-2787
/Eee/LCD Telefon
Online Destek support.asus.com
+1-812-284-0883
ASUS COMPUTER GmbH (Almanya ve Avusturya)
Adres
Harkort Str. 21-23, D-40880 Ratingen, Germany
Faks
+49-2102-959911
Çevrimiçi destek
Çevrimiçi irtibat
Teknik Destek
Bileşen Telefonu
Sistem/Dizüstü Bilgisayar
/Eee/LCD Telefon
Destek Faksı
Online Destek support.asus.com
www.asus.de
www.asus.de/sales
+49-1805-010923
+49-1805-010920
+49-2102-9599-11
*
*
Türkçe
* Bir Almanya sabit hattından arama 0.14 Euro/dakika; cep telefonundan arama 0.42 Euro/dakika.
Eee Box PC 73
Page 74

ไทย
ไทย
EeeBox PC
คู่มือผู้ใช้
Page 75

ไทย
TH6197
พิมพ์ครั้งที่ 3
ตุลาคม
2010
ไทย
ลิขสิทธิ์ถูกต้อง © 2010 ASUSTeK COMPUTER INC. สงวนลิขสิทธิ์
ห้ามทำซ้ำ ส่งต่อ คัดลอก เก็บในระบบที่สามารถเรียกกลับมาได้ หรือแปลส่วนหนึ่งส่วนใดของคู่มือฉบับนี้เป็นภาษา
อื่น ซึ่งรวมถึงผลิตภัณฑ์และซอฟต์แวร์ที่บรรจุอยู่ภายใน ยกเว้นเอกสารที่ผู้ซื้อเป็นผู้เก็บไว้เพื่อจุดประสงค์ในการ
สำรองเท่านั้น โดยไม่ได้รับความยินยอมเป็นลายลักษณ์อักษรอย่างชัดแจ้งจาก ASUSTeK COMPUTER INC.
(“ASUS”)
ผลิตภัณฑ์และชื่อบริษัทที่ปรากฏในคู่มือนี้อาจเป็น หรือไม่เป็นเครื่องหมายการค้าจดทะเบียน หรือ
ลิขสิทธิ์ของบริษัทที่เป็นเจ้าของ และมีการใช้เฉพาะสำหรับการอ้างอิง หรืออธิบายเพื่อประโยชน์ของเจ้า
ของเท่านั้น โดยไม่มีวัตถุประสงค์ในการละเมิดใดๆ เครื่องหมายการค้าทั้งหมดเป็นทรัพย์สินของ
บริษัทที่เป็นเจ้าของ
เราใช้ความพยายามทุกวิถีทาง เพื่อให้มั่นใจว่าเนื้อหาในคู่มือฉบับนี้มีความถูกต้องและทันสมัย อย่างไร
ก็ตาม ไม่มีการรับประกันถึงความถูกต้องของเนื้อหาภายใน และผู้ผลิตสงวนสิทธิ์ในการเปลี่ยนแปลงใดๆ
โดยไม่ต้องแจ้งให้ทราบล่วงหน้า
Page 76

ไทย
สารบัญ
ประกาศ ................................................................. 73
ข้อมูลเพื่อความปลอดภัย ............................................ 78
หมายเหตุสำหรับคู่มือ ................................................ 81
ยินดีต้อนรับ ..................................................................82
รายการในกล่องบรรจุ ................................................ 82
ทำความรู้จัก Eee Box PC ของคุณ .........................83
ภาพด้านหน้า........................................................... 83
ภาพด้านหลัง ........................................................... 85
มุมมองด้านบน ........................................................ 87
การใช้เสาอากาศไร้สาย ............................................. 88
ไทย
การวางตำแหน่ง Eee Box PC ของคุณ ...................89
การติดตั้งขาตั้ง (อุปกรณ์เสริม) ................................... 89
การติดตั้ง Eee Box PC เข้ากับจอภาพ (อุปกรณ์เสริม) ....90
การตั้งค่า Eee Box PC ของคุณ .............................. 91
การเชื่อมต่อไปยังจอแสดงผล ...................................... 91
การเชื่อมต่อไปยังอุปกรณ์ USB .................................. 91
การเชื่อมต่อไปยังอุปกรณ์เครือข่าย .............................. 92
การเปิดระบบ ........................................................... 93
การใช้ Eee Box PC ของคุณ ....................................94
การคอนฟิกการเชื่อมต่อไร้สาย ................................... 94
การคอนฟิกการเชื่อมต่อแบบมีสาย ............................... 95
ASUS Easy Update ................................................. 99
การกู้คืนระบบของคุณ ............................................. 100
การใช้พาร์ติชั่นการกู้คืน .......................................... 100
การกู้คืน OS กลับเป็นพาร์ติชั่นเริ่มต้นจากโรงงาน (การกู้คืน
F9) ................................................................. 100
การสำรองข้อมูลสิ่งแวดล้อมเริ่มต้นจากโรงงานไปยัง USB
ไดรฟ์ (การสำรอง F9) ........................................ 100
การใช้อุปกรณ์เก็บข้อมูล USB (การกู้คืนด้วย USB) ........ 101
76
EeeBox PC
Page 77

ไทย
ประกาศ
ถ้อยแถลงของคณะกรรมการการสื่อสารกลาง
อุปกรณ์นี้สอดคล้องกับส่วนที่ 15 ของกฎข้อบังคับ FCC
การทำงานต้องเป็นไปตามเงื่อนไขสองข้อต่อไปนี้:
• อุปกรณ์ต้องไม่ก่อให้เกิดการรบกวนที่เป็นอันตราย และ
• อุปกรณ์ต้องสามารถทนต่อการรบกวนใดๆ ที่ได้รับ
รวมทั้งการรบกวนที่อาจก่อให้เกิดการทำงานที่ไม่พึงประสงค์
อุปกรณ์นี้ได้รับการทดสอบ และพบว่าสอดคล้องกับข้อจำกัดของอุปกรณ์
์ดิจิตอลคลาส B ซึ่งเป็นไปตามส่วนที่ 15 ของกฎข้อบังคับ FCC
ข้อจำกัดเหล่านี้ได้รับการออกแบบเพื่อให้การป้องกันที่เหมาะสมต่อการรบกวน
ที่เป็นอันตรายในการติดตั้งบริเวณที่พักอาศัย อุปกรณ์นี้สร้าง ใช้
และสามารถแผ่พลังงานความถี่คลื่นวิทยุ
และถ้าไม่ได้ติดตั้งและใช้อย่างเหมาะสมตามที่ระบุในขั้นตอนการใช้งาน
ของผู้ผลิต อาจก่อให้เกิดการรบกวนที่เป็นอันตรายต่อการสื่อสารวิทยุ
อย่างไรก็ตาม
ไม่มีการรับประกันว่าการรบกวนจะไม่เกิดขึ้นในกรณีที่ติดตั้งอย่างเหมาะสม
ถ้าอุปกรณ์นี้ก่อให้เกิดการรบกวนกับบริการการสื่อสารต่อวิทยุหรือการ
รับโทรทัศน์
ซึ่งสามารถทราบได้โดยการเปิดและปิดอุปกรณ์
คุณควรพยายามแก้ไขการรบกวนโดยใช้วิธีดังต่อไปนี้หนึ่งหรือหลายวิธีรวมกัน:
ไทย
• ปรับทิศทางหรือเปลี่ยนสถานที่ของเสาอากาศรับสัญญาณ
• เพิ่มระยะห่างระหว่างอุปกรณ์และเครื่องรับสัญญาณ
• เชื่อมต่ออุปกรณ์ลงในเต้าเสียบในวงจรที่แตกต่างจากที่ใช้เสียบเครื่อง
รับอยู่
• ปรึกษาตัวแทนจำหน่าย หรือช่างเทคนิควิทยุ/โทรทัศน์ที่มีประสบการณ์
เพื่อขอความช่วยเหลือ
ข้อควรระวัง:
การเปลี่ยนแปลงหรือการดัดแปลงที่ไม่ได้รับการเห็นชอบโดยองค์กร
ที่มีหน้าที่รับผิดชอบเรื่องความสอดคล้อง
จะทำให้สิทธิ์ในการใช้งานอุปกรณ์นี้ของผู้ใช้ สิ้นสุด
EeeBox PC
77
Page 78

ไทย
คำเตือนการสัมผัสถูก RF
อุปกรณ์นี้ต้องได้รับการติดตั้งและใช้งานอย่างสอดคล้องกับขั้นตอนที่มีไว้ให้
และต้องติดตั้งเสา
อากาศที่ใช้สำหรับการรับส่งสัญญาณโดยเว้นระยะห่างจากทุกคนอย่างน้อย
20 ซม. และต้องไม่ ตั้งอยู่ในสถานที่เดียวกับ
หรือใช้งานร่วมกับเสาอากาศหรือเครื่องรับส่งอื่นๆ ผู้ใช้และผู้ติดตั้งต้อง
ทำการติดตั้งเสาอากาศและสร้างสภาพแวดล้อมการทำงานของเครื่องรับส่งสัญญาณ
ให้สอด คล้องกับการสัมผัสถูก RF
ประกาศเกี่ยวกับความสอดคล้อง
ข้อกำหนด R&TTE (199/5/EC)
รายการต่อไปนี้มีความสมบูรณ์ และได้รับการพิจารณาว่ามีความเกี่ยวข้อง
และเพียงพอ:
ไทย
• ข้อกำหนดที่สำคัญ ใน [บทความ 3]
• ข้อกำหนดในการป้องกันสำหรับสุขภาพ และความปลอดภัย ใน
[บทความ 3.1a]
• การทดสอบความปลอดภัยทางไฟฟ้า ที่สอดคล้องกับ [EN 60950]
• ข้อกำหนดในการป้องกัน สำหรับความเข้ากันได้ทางแม่เหล็กไฟฟ้า
ใน [บทความ 3.1b]
• การทดสอบความเข้ากันได้ทางแม่เหล็กไฟฟ้า ใน [EN 301
489-1] & [EN 301]
• การทดสอบที่สอดคล้องกับ [489-17]
• การใช้คลื่นสเปกตรัมวิทยุอย่างมีประสิทธิภาพ ใน [บทความ 3.2]
• ชุดการทดสอบวิทยุ ที่สอดคล้องกับ [EN 300 328-2]
78
EeeBox PC
Page 79

ไทย
เครื่องหมาย CE
เครื่องหมาย CE สำหรับอุปกรณ์ที่ไม่มี LAN ไร้สาย/บลูทูธ
รุ่นที่ส่งมอบของอุปกรณ์นี้ สอดคล้องกับความต้องการของ
ข้อกำหนด EEC ที่ 2004/108/EC
“ความเข้ากันได้ทางแม่เหล็กไฟฟ้า”
และ 2006/95/EC “ข้อกำหนดแรงดันไฟฟ้าต่ำ”
เครื่องหมาย CE สำหรับอุปกรณ์ที่มี LAN ไร้สาย/บลูทูธ
อุปกรณ์นี้สอดคล้องกับความต้องการของข้อกำหนด 1999/5/EC
ของรัฐสภาและคณะกรรมการแห่ง สหภาพยุโรป ตั้งแต่วันที่ 9
มีนาคม 1999 ที่ควบคุมอุปกรณ์วิทยุและการสื่อสารโทรคมนาคม
และการรับรู้ถึงความสอดคล้องร่วมกัน
แชนเนลการทำงานไร้สายสำหรับโดเมนต่างๆ
อเมริกาเหนือ 2.412-2.462 GHz Ch01 ถึง CH11
ญี่ปุ่น 2.412-2.484 GHz Ch01 ถึง Ch14
ไทย
ยุโรป ETSI 2.412-2.472 GHz Ch01 ถึง Ch13
EeeBox PC
79
Page 80

ไทย
แถบความถี่ไร้สายที่ถูกจำกัดของฝรั่งเศส
บางพื้นที่ของประเทศฝรั่งเศส มีแถบความถี่ที่ถูกจำกัดการใช้งาน
พลังงานในอาคารที่ได้รับอนุญาตสูงสุดในกรณีที่เลวร้ายที่สุดคือ:
• 10mW สำหรับแถบ 2.4 GHz ทั้งหมด (2400 MHz–2483.5 MHz)
• 100mW สำหรับความถี่ระหว่าง 2446.5 MHz ถึง 2483.5 MHz
หมายเหตุ: แชนเนล 10 ถึง 13 รวมการทำงานในแถบ 2446.6 MHz ถึง 2483.5
MHz
การใช้งานภายนอกอาคาร มีความเป็นไปได้สองสามกรณี:
ในที่ดินซึ่งเป็นทรัพย์สินส่วนตัว หรือทรัพย์สินส่วนตัวของบุคคลสาธารณะ
การใช้เป็นไปตามกระบวนการที่ได้รับอนุญาตโดยกระทรวงกลาโหม
โดยมีพลังงานที่อนุญาตสูงสุด 100mW ในแถบ 2446.5–2483.5 MHz
ไม่อนุญาตให้ใช้นอกอาคารบริเวณที่ดินสาธารณะ
ไทย
ในเขตที่แสดงด้านล่าง สำหรับแถบ 2.4 GHz ทั้งหมด:
• พลังงานสูงสุดที่อนุญาตในอาคารคือ 100mW
• พลังงานสูงสุดที่อนุญาตนอกอาคารคือ 10mW
เขตซึ่งใช้แถบ 2400–2483.5 MHz ได้รับอนุญาต โดย EIRP
ในอาคารน้อยกว่า 100mW และนอกอาคารน้อยกว่า 10mW:
01 Ain 02 Aisne 03 Allier
05 Hautes Alpes 08 Ardennes 09 Ariège
11 Aude 12 Aveyron 16 Charente
24 Dordogne 25 Doubs 26 Drôme
32 Gers 36 Indre 37 Indre et Loire
41 Loir et Cher 45 Loiret 50 Manche
55 Meuse 58 Nièvre 59 Nord
60 Oise 61 Orne 63 Puy du Dôme
64 Pyrénées Atlantique 66 Pyrénées Orientales
67 Bas Rhin 68 Haut Rhin
70 Haute Saône 71 Saône et Loire
75 Paris 82 Tarn et Garonne
84 Vaucluse 88 Vosges 89 Yonne
90 Territoire de Belfort 94 Val de Marne
80
EeeBox PC
Page 81

ไทย
ข้อกำหนดนี้มักจะมีการเปลี่ยนแปลงเมื่อเวลาผ่านไป
ช่วยให้คุณใช้การ์ด LAN ไร้สายในพื้นที่ภายใน
ประเทศฝรั่งเศสได้มากขึ้น สำหรับข้อมูลล่าสุด โปรดตรวจสอบกับ ART
(www.art-telecom.fr)
หมายเหตุ: การ์ด WLAN ของคุณรับส่งข้อมูลด้วยพลังงานน้อยกว่า
100mW แต่มากกว่า 10mW
ถ้อยแถลงของกระทรวงสื่อสารของแคนาดา
อุปกรณ์ดิจิตอลนี้ต้องส่งสัญญาณรบกวนทางคลื่นวิทยุออกจากตัวอุปกรณ์
์ดิจิตอลไม่เกินข้อจำกัดคลาส B ที่มีการกำหนดไว้ในกฎระเบียบการรบ
กวนทางวิทยุของกระทรวงสื่อสารของแคนาดา
อุปกรณ์ดิจิตอลคลาส B นี้สอดคล้องกับมาตรฐานแคนาดา ICES-003
ถ้อยแถลงการสัมผัสถูกการแผ่รังสี IC
สำหรับแคนาดา
อุปกรณ์นี้สอดคล้องกับข้อจำกัดในการสัมผัสถูกการแผ่รังสี IC
ที่ตั้งขึ้นสำหรับสภาพแวดล้อมที่ไม่มีการควบคุม
เพื่อให้สอดคล้องกับข้อกำหนดความสอดคล้องกับการสัมผัสถูก RF ของ IC,
โปรดหลีกเลี่ยงการสัมผัสถูกเสาอากาศรับส่งโดยตรงระหว่างที่กำลังรับส่งข้อมูล
ผู้ใช้ต้องปฏิบัติตามขั้นตอนการทำงานเฉพาะ
เพื่อให้สอดคล้องกับการสัมผัสถูก RF ในระดับที่พอใจ
ไทย
การทำงานต้องเป็นไปตามเงื่อนไขสองข้อต่อไปนี้:
• อุปกรณ์ต้องไม่ก่อให้เกิดการรบกวน และ
• อุปกรณ์ต้องสามารถทนต่อการรบกวนใดๆ
รวมทั้งการรบกวนที่อาจก่อให้เกิดการทำงานที่ไม่พึงประสงค์ของอ
ุปกรณ์
REACH
เราเผยแพร่สารเคมีที่ใช้ในผลิตภัณฑ์ของเราซึ่งสอดคล้องกับเฟรมเ
วิร์กของข้อบังคับ REACH (การลงทะเบียน, การประเมิน, การอนุมัติ
และข้อจำกัดของสารเคมี) ไว้ที่เว็บไซต์ ASUS REACH ที่
http://csr.asus.com/english/REACH.htm
EeeBox PC
81
Page 82

ไทย
ไทย
ข้อมูลเพื่อความปลอดภัย
Eee Box PC ของคุณได้รับการออกแบบและทดสอบให้ตรงกับมาตราฐาน
ความปลอดภัยล่าสุด สำหรับอุปกรณ์เทคโนโลยีสารสนเทศ
อย่างไรก็ตาม เพื่อให้มั่นใจถึงความปลอดภัย
คุณควรอ่านขั้นตอนเพื่อความปลอดภัยต่อไปนี้
การตั้งค่าระบบของคุณ
• อ่านและปฏิบัติตามขั้นตอนทั้งหมดในเอกสาร ก่อนที่คุณจะใช้
งานระบบของคุณ
• อย่าใช้ผลิตภัณฑ์นี้ใกล้น้ำ หรือแหล่งกำเนิดความร้อน เช่น หม้อน้ำ
•
วางเครื่องบนพื้นผิวที่มั่นคงด้วยขาตั้งที่ให้มา อย่าใช้ระบบโดยไม่ใส่ขาตั้ง
•
ช่องเปิดต่างๆ บนตัวเครื่อง ใช้สำหรับการระบายอากาศ อย่า
ขวางกั้น หรือปิดช่องเปิดเหล่านี้ ตรวจดูให้แน่ใจว่าคุณเว้นที่ว่าง
รอบตัวเครื่องไว้มาก เพื่อการระบายอากาศ อย่าใส่วัตถุชนิดใดๆ
ก็ตามลงในช่องเปิดสำหรับระบายอากาศ
• ใช้ผลิตภัณฑ์นี้ในสภาพแวดล้อมที่มีอุณหภูมิอยู่ระหว่าง 0˚C ถึง 35˚C
• ถ้าคุณใช้เต้าเสียบไฟฟ้าแบบต่อพ่วงเพื่อเสียบ Media Center PC
ของคุณ ตรวจดูให้แน่ใจว่าการใช้
กระแสไฟรวมที่ระบุไว้บนผลิตภัณฑ์ที่เสียบอยู่กับเต้าเสียบไฟฟ้า
ไม่เกินปริมาณแอมแปร์ที่ระบุไว้
การดูแลระหว่างการใช้
• อย่าเดินบนสายไฟ หรือวางสิ่งใดๆ บนสายไฟ
• อย่าทำน้ำหรือของเหลวอื่นๆ กระเด็นใส่บนระบบของคุณ
• เมื่อระบบปิดอยู่ จะยังคงมีกระแสไฟฟ้าปริมาณเล็กน้อยไหลอยู่
ก่อนที่จะทำความสะอาดระบบ ให้ถอดปลั๊กไฟทั้งหมด โมเด็ม
และสายเคเบิลเครือข่ายต่างๆ จากเต้าเสียบไฟฟ้าเสมอ
• ถ้าคุณมีปัญหาทางด้านเทคนิคต่อไปนี้กับผลิตภัณฑ์ ให้ถอด
สายไฟออก และติดต่อช่างเทคนิคบริการที่มีคุณสมบัติ หรือ
ร้านค้าที่คุณซื้อผลิตภัณฑ์มา
82
EeeBox PC
Page 83

ไทย
• สายไฟหรือปลั๊กเสียหาย
• ของเหลวหกเข้าไปในระบบ
• ระบบไม่ทำงานอย่างเหมาะสม เมื่อปฏิบัติตามขั้นตอนการทำงาน
• ระบบหล่นพื้น หรือตัวเครื่องได้รับความเสียหาย
• สมรรถนะของระบบเปลี่ยนไป
คำเตือนเกี่ยวกับแบตเตอรี่ลิเธียม อิออน
ข้อควรระวัง: ถ้าใส่แบตเตอรี่อย่างไม่ถูกต้อง อาจมีอันตรายจากการระเบิด
ขึ้นได้ ใช้เฉพาะ แบตเตอรี่ชนิดเดียวกัน หรือเทียบเท่า ที่แนะนำโดยผู้ผลิต
เท่านั้น ทิ้งแบตเตอรี่ที่ใช้แล้วตาม ขั้นตอนของผู้ผลิต
คำเตือนผลิตภัณฑเลเซอร์
ผลิตภัณฑ์เลเซอร์ คลาส 1
ห้ามถอดชิ้นส่วน
การรับประกันไม่สามารถใช้กับผลิตภัณฑ์ที่ถูกถอด
ชิ้นส่วนโดยผู้ใช้
ไทย
อย่าทิ้งเครื่อง Eee Box PC ร่วมกับของเสียในชุมชน
ผลิตภัณฑ์นี้ได้รับการออกแบบเพื่อให้นำชิ้นส่วนต่างๆ มาใช้ซ้ำ
และรีไซเคิลได้อย่างเหมาะสม
สัญลักษณ์ถังขยะติดล้อที่มีเครื่องหมายกากบาทนี้
เป็นการระบุว่าไม่ควรทิ้งผลิตภัณฑ์ (อุปกรณ์ไฟฟ้า,
อิเล็กทรอนิกส์ และแบตเตอรี่เหรียญที่มีส่วนประกอบของปรอท)
ปะปนไปกับของเสียทั่วไปจากภายในบ้าน
ตรวจสอบบริการสนับสนุนด้านเทคนิคในท้องถิ่น
สำหรับการรีไซเคิลผลิตภัณฑ์
อย่าทิ้งแบตเตอรี่ปะปนกับของเสียทั่วไปภายในบ้าน
สัญลักษณ์ถังขยะติดล้อที่มีเครื่องหมายกากบาทนี้
เป็นการระบุว่าไม่ควรทิ้งผลิตภัณฑ์ปะปนไปกับของเสียทั่วไปจากภายในบ้าน
ตรวจสอบบริการสนับสนุนด้านเทคนิคในท้องถิ่น
สำหรับการเปลี่ยนแบตเตอรี่
EeeBox PC
83
Page 84

ไทย
ไทย
การส่งคืนและรีไซเคิล
คอมพิวเตอร์เก่า โน้ตบุ๊ก และอุปกรณ์อิเล็กทรอนิกส์อื่นๆ มีส่
วนประกอบที่เป็นสารเคมีอันตรายซึ่งทำลายสิ่งแวดล้อมเมื่อทำการ
ฝังกลบร่วมกับขยะทั่วไป การรีไซเคิลจะช่วยให้เราสามารถคัดแยก
โลหะ พลาสติก และส่วนประกอบต่างๆ ในคอมพิวเตอร์เก่า และ
นำมาใช้สร้างผลิตภัณฑ์ใหม่ได้ เป็นการรักษาสิ่งแวดล้อมเนื่องจาก
สารเคมีอันตรายจะได้รับการควบคุมไม่ให้ออกสู่โลกภายนอก
ASUS ทำงานร่วมกับผู้ค้าที่ทำหน้าที่รีไซเคิลซึ่งมีมาตรฐานสูงสุดเพื่อ
ปกป้องสภาพแวดล้อม ให้การทำงานที่ปลอดภัย และปฏิบัติตาม
กฎหมายสิ่งแวดล้อมระดับสากล ความมุ่งมั่นในการรีไซเคิลอุปกรณ์
เก่าของเราเป็นหนึ่งในความพยายามหลายๆ ทางในการปกป้อง
สิ่งแวดล้อมของเรา
หากต้องการข้อมุลเพิ่มเติมเกี่ยวกับการรีไซเคิลสินค้าของ ASUS
และสถานที่ติดต่อ โปรดเยี่ยมชมหน้าเว็บการรับคืนและรีไซเคิลของ
GreenASUS (http://green.asus.com/english/takeback.htm)
84
EeeBox PC
Page 85

ไทย
หมายเหตุสำหรับคู่มือ
ตลอดทั้งคู่มือฉบับนี้จะมีการใช้หมายเหตุ และคำเตือนที่แสดงเป็นตัวหนา
ซึ่งคุณควรให้ความระมัดระวัง เพื่อทำงานที่ต้องการได้อย่างสมบูรณ์และปลอดภัย
หมายเหตุเหล่านี้มีความสำคัญในระดับที่แตกต่างกัน ดังอธิบายด้านล่าง:
คำเตือน! ข้อมูลสำคัญซึ่งต้องได้รับการปฏิบัติตามเพื่อการทำงานที่ปลอดภัย
สำคัญ! ข้อมูลที่มีความสำคัญมาก ซึ่งต้องปฏิบัติตามเพื่อป้องกันความเ
สียหายต่อข้อมูล ชิ้นส่วนต่างๆ หรือบุคคลใดๆ
เทคนิค: เทคนิคและข้อมูลที่มีประโยชน์สำหรับทำงานให้สำเร็จ
หมายเหตุ: เทคนิคและข้อมูลสำหรับสถานการณ์พิเศษ
ไทย
EeeBox PC
85
Page 86

ไทย
ยินดีต้อนรับ
ขอแสดงความยินดีที่คุณซื้อ Eee Box PC ภาพประกอบต่อไปนี้
แสดงสิ่งที่อยู่ในกล่องบรรจุ Eee Box PC ใหม่ของคุณ
หากมีรายการใดที่ด้านล่างชำรุดหรือขาดหาย
โปรดติดต่อร้านค้าของคุณ
รายการในกล่องบรรจุ
ไทย
EeeBox PC ขาตั้ง (อุปกรณ์เสริม)
มินิแจ็คไปยัง S/PDIF
(อุปกรณ์เสริม)
ใบรับประกัน คู่มือเริ่มต้นฉบับย่อ
ถ้าอุปกรณ์หรือชิ้นส่วนของอุปกรณ์ทำงานล้มเหลวหรือเสียระหว่าง
การใช้งานปกติภายในระยะเวลารับประกัน ให้นำใบรับประกันมายัง
ศูนย์บริการ ASUS เพื่อเปลี่ยนชิ้นส่วนที่เสีย
อะแดปเตอร์ AC สายไฟ
ชุดติดตั้ง VESA และสกรู
(อุปกรณ์เสริม)
86
EeeBox PC
Page 87

ไทย
ทำความรู้จัก Eee Box PC ของคุณ
ภาพด้านหน้า
โปรดดูไดอะแกรมด้านล่าง ที่แสดงส่วนประกอบต่างๆ ของเครื่องด้านนี้
1
2
3
4
ไทย
5
6
1
LED ฮาร์ดดิสก์
LED ฮาร์ดดิสก์กะพริบเมื่อข้อมูลกำลังถูกเขียน หรืออ่านจาก
ฮาร์ดดิสก์ไดรฟ์
2
สวิตช์ไฟ
สวิตช์ไฟช่วยในการปิดเปิดเครื่อง
EeeBox PC
87
Page 88

ไทย
ไทย
3
สล็อตใส่การ์ดหน่วยความจำ
เครื่องอ่านการ์ดหน่วยความจำในตัวสามารถอ่าน MMC/
SD/SDHC/MS/MS Pro
การ์ดที่ใช้ในอุปกรณ์ต่างๆ เช่น กล้องดิจิตอล, เครื่องเล่น
MP3, โทรศัพท์มือถือ และ PDA
4
พอร์ต USB
พอร์ต USB (Universal Serial Bus) ใช้ได้กับอุปกรณ์ USB
เช่นเมาส์ กล้องถ่ายรูป และฮาร์ดดิสก์ USB ช่วยให้อุปกรณ์หลาย
อย่างทำงานพร้อมกันได้บนคอมพิวเตอร์เครื่องเดียว
โดยมีอุปกรณ์ต่อพ่วงบางตัวเป็นไซต์หรือฮับแบบต่อเพิ่มเติม
5
แจ็คหูฟัง/เสียงออก
แจ็คหูฟังสเตอริโอ (3.5 มม.) ใช้เพื่อเชื่อมต่อสัญญาณเสียงออก
ของระบบไปยังลำโพงที่มีแอมปลิฟายขับ หรือหูฟัง
ช่องเสียบไมโครโฟน
6
ช่องเสียบไมค์ได้รับการออกแบบให้เชื่อมต่อไมโครโฟนที่ใช้
กับการประชุมด้วยภาพ เสียงบรรยาย หรือการอัดเสียง
ธรรมดา
88
EeeBox PC
Page 89

ไทย
ภาพด้านหลัง
โปรดดูไดอะแกรมด้านล่าง ที่แสดงส่วนประกอบต่างๆ ของเครื่องด้านนี้
1
2
3
4
ไทย
5
6
1
แจ็คเสาอากาศไร้สาย
แจ็คใช้สำหรับเชื่อมต่อเสาอากาศไร้สายที่ให้มาเพื่อเร่งความ
แรงของการรับสัญญาณไร้สาย
EeeBox PC
89
Page 90

ไทย
ไทย
2
อินพุตเพาเวอร์ (DC 12V)
อะแดปเตอร์ไฟฟ้าที่ให้มาจะเปลี่ยนไฟกระแสสลับให้เป็น
กระแสตรงเพื่อใช้กับช่องเสียบนี้ ไฟที่จ่ายผ่านช่องนี้จะเป็น
ไฟกระแสตรงเข้าพีซี
โปรดใช้อะแดปเตอร์ไฟที่ให้มาทุกครั้งเพื่อป้อนกันมิให้พีซีเสียหาย
อะแดปเตอร์ไฟฟ้านี้อาจมีอุณหภูมิสูงและร้อนเมื่อใช้งาน อย่า
คลุมอะแดปเตอร์และวางให้ห่างจากตัวคุณ
พอร์ต USB
3
พอร์ต USB (Universal Serial Bus) ใช้ได้กับอุปกรณ์ USB
เช่นเมาส์ กล้องถ่ายรูป และฮาร์ดดิสก์ USB
ช่วยให้อุปกรณ์หลายอย่างทำงานพร้อมกันได้บนคอมพิวเตอร์เครื่องเดียว
โดยมีอุปกรณ์ต่อพ่วงบางตัวเป็นไซต์หรือฮับแบบต่อเพิ่มเติม
4
พอร์ต LAN
พอร์ต RJ-45 LAN ชนิดแปดพิน รองรับสายอีเทอร์เน็ต
มาตรฐานได้เมื่อเชื่อมต่อกับเครือข่ายท้องถิ่น
5
เอาต์พุตจอแสดงผล (จอภาพ)
พอร์ตจอภาพ D-sub 15 พิน สนับสนุนอุปกรณ์แสดงผล
VGA มาตรฐาน เช่น จอภาพ หรือ โปรเจ็กเตอร์
เพื่อให้รับชมภาพบนจอแสดงผลภายนอกที่มีขนาดใหญ่ขึ้นได้
90
6
แจ็คสัญญาณเสียงออก (S/PDIF ออก)
เสียบปลั๊กสายเคเบิลเสียงแบบมินิแจ็ค 3.5 มม.
ลงในแจ็คนี้สำหรับถ่ายโอนเสียงอนาล็อกหรือดิจิตอล
สำหรับฟังก์ชั่น S/PDIF ออก, ให้ใช้มินิแจ็คไปยังอะแดปเตอร์
S/PDIF ที่ให้มา เพื่อเชื่อมต่อไปยังแอมปลิฟายของคุณ
EeeBox PC
Page 91

ไทย
มุมมองด้านบน
โปรดดูไดอะแกรมด้านล่าง เพื่อระบุถึงส่วนประกอบต่างๆ
ของเครื่องด้านนี้
1 2
E-SATA
1
พอร์ต e-SATA
SATA ภายนอก หรือ eSATA ใช้สำหรับการเชื่อมต่ออุปกรณ์ซีเรียล
ATA ภายนอก ซึ่งในช่วงเริ่ม
แรกถูกออกแบบมาสำหรับใช้ภายในคอมพิวเตอร์
พอร์ตนี้มีความเร็วกว่าพอร์ต USB 2.0 & 1394 แบบเดิมถึง
6 เท่า ใช้สำหรับโซลูชั่นการเก็บข้อมูลภายนอก
และยังมีคุณสมบัติฮ็อตพลักโดยใช้
สายเคเบิลและขั้วต่อที่มีฉนวนหุ้มที่มีความยาวได้สูงสุด 2 เมตร
ไทย
2
พอร์ต USB
พอร์ต USB (Universal Serial Bus) ใช้ได้กับอุปกรณ์
USB เช่นแป้นพิมพ์ เมาส์ กล้องถ่ายรูป และฮาร์ดดิสก์ USB
ช่วยให้อุปกรณ์หลายอย่างทำงานร่วมกับคอมพิวเตอร์ตัวเดียวได้พร้อมกัน
โดยมีอุปกรณ์ต่อพ่วงบางตัว ทำหน้าที่เป็นฮับหรือไซต์ปลั๊กอินเพิ่มเติม
EeeBox PC
91
Page 92

ไทย
ไทย
การใช้เสาอากาศไร้สาย
เสาอากาศไร้สายเชื่อมต่ออยู่กับ Eee Box PC ของคุณ
เพื่อเพิ่มความแรงในการรับสัญญาณ ไร้สาย
อย่าหมุนเสาอากาศไร้สายไปเป็นมุม 180°–270°
เพื่อป้องกันความเสียหาย
92
EeeBox PC
Page 93

ไทย
การวางตำแหน่ง Eee Box PC ของคุณ
การติดตั้งขาตั้ง (อุปกรณ์เสริม)
ตั้ง Eee Box PC ของคุณด้วยขาตั้งที่ให้มา ในการดำเนินการ:
1. ค้นหารูใส่สกรูที่ด้านล่างของ Eee Box PC
2. จัดให้สกรูของขาตั้งตรงกับรูสกรูของ PC, จากนั้นยึดขาตั้งเข้ากับ
PC โดยใช้เหรียญ
มุมมองด้านล่างของ Eee Box PC
1
รูสกรู
ไทย
สกรูขาตั้ง
2
EeeBox PC
93
Page 94

ไทย
การติดตั้ง Eee Box PC เข้ากับจอภาพ (อุปกรณ์เสริม)
คุณยังสามารถติดตั้ง Eee Box PC ที่ด้านหลังของจอภาพได้ด้วย
ไทย
1. ยึดที่ยึด VESA เข้ากับจอภาพของคุณให้แน่นด้วยสกรู 4 ตัว
(HNM/M4 x 8)
ในการยึดที่ยึด VESA ให้แน่น, จอภาพของคุณต้องสอดคล้อง
กับมาตรฐาน VESA75 หรือ VESA100
2. วาง Eee Box PC ของคุณบนที่ยึด VESA
โดยจัดทิศทางให้ถูกต้อง จากนั้นยึด PC เข้ากับที่ยึด VESA
โดยใช้เหรียญ
94
มุมมองด้านล่างของ Eee Box PC
EeeBox PC
Page 95

ไทย
การตั้งค่า Eee Box PC ของคุณ
คุณจำเป็นต้องเชื่อมต่ออุปกรณ์เสริมก่อนที่จะใช้ Eee Box PC ของคุณ.
การเชื่อมต่อไปยังจอแสดงผล
เชื่อมต่อปลายด้านหนึ่งของสายเคเบิล VGA ที่ให้มาเข้ากับ
หรือจอภาพ LCD (1) และปลายอีกด้านหนึ่งเข้ากับพอร์ต
เอาต์พุตจอแสดงผล (จอภาพ) ที่แผงด้าน หลังของระบบ (2)
2
จอภาพ LCD
1
การเชื่อมต่อไปยังอุปกรณ์ USB
เชื่อมต่ออุปกรณ์ USB เช่น แป้นพิมพ์แบบมีสาย/ไร้สาย
(แตกต่างกันไปตามพื้นที่), อุปกรณ์เมาส์ และเครื่องพิมพ์เข้ากับพอร์ต
USB ที่แผงด้านหลังของระบบ
ไทย
EeeBox PC
95
Page 96

ไทย
ไทย
การเชื่อมต่อไปยังอุปกรณ์เครือข่าย
เชื่อมต่อปลายด้านหนึ่งของสายเคเบิลเครือข่ายเข้ากับพอร์ต LAN
ที่แผงด้านหลังของระบบ และปลายอีกด้านหนึ่งไปยังฮับหรือสวิตช์
สายเคเบิลเครือข่ายที่มีขั้วต่อ RJ-45
ฮับเครือข่ายหรือสวิตช์
96
EeeBox PC
Page 97

ไทย
การเปิดระบบ
เชื่อมต่ออะแดปเตอร์ AC ที่ให้มาเข้ากับแจ็ค DC IN (DC เข้า)
ที่แผงด้านหลังของระบบ จากนั้นกด สวิตช์เพาเวอร์ ที่แผงด้านหน้า
เพื่อเปิดระบบ
3
4
2
1
ไทย
•
เมื่อไม่ได้ใช้งาน Eee Box PC, ให้ถอดปลั๊กอะแดปเตอร์เพาเวอร์
หรือปิดเต้าเสียบ AC เพื่อประหยัดการสิ้นเปลืองพลังงาน
• ปรับการตั้งค่าการจัดการพลังงานในแผงควบคุมของ Window®
การทำเช่นนี้เพื่อให้มั่นใจว่า Eee Box PC ถูกตั้งค่าไว้ที่โหมด
การสิ้นเปลืองพลังงานต่ำ และทำงานได้อย่างสมบูรณ์ในเวลา
เดียวกัน
ในการเข้าสู่โปรแกรมตั้งค่า BIOS, กด <F2> ซ้ำๆ ระหว่างการบูต
EeeBox PC
97
Page 98

ไทย
การใช้ Eee Box PC ของคุณ
ภาพทั้งหมดที่แสดงในส่วนนี้ ใช้สำหรับการอ้างอิงเท่านั้น
ภาพบนหน้าจอที่แท้จริงอาจแตกต่างกันไปตาม ระบบปฏิบัติการ
สำหรับข้อมูลล่าสุด ให้เยี่ยมชมเว็บไซต์ ASUS ที่ www.asus.com
การคอนฟิกการเชื่อมต่อไร้สาย
ในการเชื่อมต่อไปยังเครือข่ายไร้สาย ให้ปฏิบัติตามขั้นตอนด้านล่าง:
เพื่อเหตุผลด้านความปลอดภัย อย่าเชื่อมต่อเข้ากับเครือข่ายที่ไม่มี
การป้องกัน ไม่เช่นนั้น ผู้อื่นอาจมองเห็นข้อมูลที่ส่งโดยไม่มีการ
เข้ารหัสได้
ไทย
1. คลิกไอคอนเครือข่ายไร้สายที่มีดาวสีส้ม
ในบริเวณการแจ้งเตือนของ Windows
®
2. เลือกจุดเชื่อมต่อไร้สายที่คุณต้องการเชื่อมต่อจากรายการ
แล้วคลิก Connect (เชื่อมต่อ)
เพื่อสร้างการเชื่อมต่อ
ถ้าคุณไม่พบจุดเชื่อมต่อที่ต้องการ
, ให้คลิกไอคอน Refresh (รีเฟรช)
ที่มุมขวาบน เพื่อรีเฟรชและ
ค้นหาในรายการอีกครั้ง
3. ขณะทำการเชื่อมต่อ คุณอาจต้องใส่รหัสผ่าน
4. หลังจากเชื่อมต่อได้แล้ว การเชื่อมต่อนั้นจะปรากฏขึ้นในรายการ
5. คุณจะสังเกตเห็นแถบความแรงสัญญาณไร้สาย
ได้ในบริเวณแจ้งข้อมูล
98
EeeBox PC
Page 99

ไทย
การคอนฟิกการเชื่อมต่อแบบมีสาย
เพื่อสร้างเครือข่ายแบบมีสาย ให้ปฏิบัติตามขั้นตอนด้านล่าง:
การใช้สแตติก IP / การเชื่อมต่อเครือข่าย PPPoE:
1. คลิกไอคอนเครือข่ายที่มี
สัญลักษณ์
สามเหลี่ยมเตือนสีเหลือง
ในบริเวณแจ้งเตือน
ของ Windows® และเลือก
Open Network and
Sharing Center
(เปิดศูนย์เครือข่ายและการแชร์)
2. คลิก
3. คลิกขวาที่ Local Area
Change adapter
settings (เปลี่ยนการ
ตั้งค่าอะแดปเตอร์) ใน
หน้าต่างสีน้ำเงิน
ด้านซ้าย
Connection และเลือก
คุณสมบัติ
ไทย
EeeBox PC
99
Page 100

ไทย
ไทย
4. คลิก Internet Protocol
5. คลิก รับที่อยู่ IP
เวอร์ชั่น 4(TCP/IPv4) และ
คลิก คุณสมบัติ
(ทำต่อในขั้นตอนต่อไปนี้ถ้าใช้ PPPoE)
6. กลับไปยัง Network and
Sharing Center (ศูนย์
เครือข่ายและการ
แชร์) จากนั้นคลิก
Set up a new
connection
or network (ตั้งค่าการ
เชื่อมต่อใหม่หรือ
เครือข่าย)
โดยอัตโนมัติ และคลิก
ตกลง
100
EeeBox PC
 Loading...