

ASUS DVD-E616, DVD-E612 User Manual [ru]

®
DVD-ROM Drive
ATAPI / Enhanced IDE Interface
E976
USER’S MANUAL
USER’S MANUAL

Copyrights/Disclaimer
Copyright © 2002 ASUSTeK COMPUTER INC. All Rights Reserved.
No part of this manual, including the products and software described in it, may be reproduced, transmitted,
transcribed, stored in a retrieval system, or translated into any language in any form or by any means,
except documentation kept by the purchaser for backup purposes, without the express written permission
of ASUSTeK COMPUTER INC. (“ASUS”).
ASUS PROVIDES THIS MANUAL “AS IS” WITHOUT WARRANTY OF ANY KIND, EITHER
EXPRESS OR IMPLIED, INCLUDING BUT NOT LIMITED T O THE IMPLIED W ARRANTIES OR
CONDITIONS OF MERCHANTABILITY OR FITNESS FOR A PARTICULAR PURPOSE. IN NO
EVENT SHALL ASUS, ITS DIRECT ORS, OFFICERS, EMPLOYEES OR AGENTS BE LIABLE FOR
ANY INDIRECT, SPECIAL, INCIDENTAL, OR CONSEQUENTIAL DAMAGES (INCLUDING
DAMAGES FOR LOSS OF PROFITS, LOSS OF BUSINESS, LOSS OF USE OR DATA,
INTERRUPTION OF BUSINESS AND THE LIKE), EVEN IF ASUS HAS BEEN ADVISED OF THE
POSSIBILITY OF SUCH DAMAGES ARISING FROM ANY DEFECT OR ERROR IN THIS MANUAL
OR PRODUCT.
Product warranty or service will not be extended if: (1) the product is repaired, modified or altered, unless
such repair, modification of alteration is authorized in writing by ASUS; or (2) the serial number of the
product is defaced or missing.
The product name and revision number are both printed on the product itself. Manual revisions are
released for each product design represented by the digit before and after the period of the manual revision
number. Manual updates are represented by the third digit in the manual revision number.
SPECIFICA TIONS AND INFORMATION CONT AINED IN THIS MANUAL ARE FURNISHED FOR
INFORMATIONAL USE ONLY, AND ARE SUBJECT TO CHANGE AT ANY TIME WITHOUT
NOTICE, AND SHOULD NOT BE CONSTRUED AS A COMMITMENT BY ASUS. ASUS ASSUMES
NO RESPONSIBILITY OR LIABILITY FOR ANY ERRORS OR INACCURACIES THAT MAY
APPEAR IN THIS MANUAL, INCLUDING THE PRODUCTS AND SOFTWARE DESCRIBED IN
IT.
Products and corporate names appearing in this manual may or may not be registered trademarks or
copyrights of their respective companies, and are used only for identification or explanation and to the
owners’ benefit, without intent to infringe.
Product Name: ASUS DVD-ROM Drive
Manual Revision: 1.03 E976
Release Date: March 2002
2 ASUS High-Speed DVD-ROM Drive

FCC & DOC COMPLIANCE
Federal Communications Commission Statement
This device complies with FCC Rules Part 15. Operation is subject to the following
two conditions:
• This device may not cause harmful interference, and
• This device must accept any interference received, including interference that
may cause undesired operation.
This equipment has been tested and found to comply with the limits for a Class B
digital device, pursuant to Part 15 of the FCC Rules. These limits are designed to
provide reasonable protection against harmful interference in a residential installation.
This equipment generates, uses and can radiate radio frequency energy and, if not
installed and used in accordance with manufacturer’s instructions, may cause harmful
interference to radio communications. However, there is no guarantee that interference
will not occur in a particular installation. If this equipment does cause harmful
interference to radio or television reception, which can be determined by turning the
equipment off and on, the user is encouraged to try to correct the interference by one
or more of the following measures:
• Re-orient or relocate the receiving antenna.
• Increase the separation between the equipment and receiver.
• Connect the equipment to an outlet on a circuit different from that to which the
receiver is connected.
• Consult the dealer or an experienced radio/TV technician for help.
W ARNING! Any changes or modifications to this product not expressly approved
by the manufacturer could void any assurances of safety or performance and
could result in violation of Part 15 of the FCC Rules.
Canadian Department of Communications Statement
This digital apparatus does not exceed the Class B limits for radio noise emissions
from digital apparatus set out in the Radio Interference Regulations of the Canadian
Department of Communications.
This Class B digital apparatus complies with Canadian ICES-003.
Cet appareil numérique de la classe B est conforme à la norme NMB-003 du Canada.
ASUS High-Speed DVD-ROM Drive 3

SAFETY WARNINGS
ASUS DVD-ROM Drive Safety Warnings
CLASS I LASER PRODUCT
APPAREIL A LASER DE CLASSE 1
KLASSE 1 LASER APPARAT
LUOKAN 1 LASERLAITE
PRODUIT LASER CATEGORIE 1
DANGER INVISIBLE LASER RADIATION WHEN OPEN. DO NOT STARE INTO BEAM.
ADVARSEL LASERSTRÅLING VED ÅBNING SE IKKE IND I STRÅLEN.
ADVARSEL LASERSTRÅLING NÅR DEKSEL ÅPNES. STIRR IKKE INN I STRÅLEN.
VARNING LASERSTRÅLNING NÅR DENNA DEL ÄR ÖPPNAD. STIRRA EJ IN I STRÅLEN.
VARO! AVA TT AESSA OLET AL TTIINA LASERSÄTEILYLLE.
VARNING LASERSTRÅLNING NÄR DENNA DEL ÄR ÖPPNAD. ÄLÄ TUIJOT A
SÄTEESEEN. STIRRA EJ IN I STRÅLEN.
VORSICHT UNSICHTBARE LASERSTRAHLUNG WENN GEÖFFNET. NICT IN DEN
STRAHL SEHEN.
ATTENTION RADIATION DU FAISCEAU LASER INVISIBLE EN CAS D’OUVERTURE.
EVITER TOUTE EXPOSITION AU FAISCEAU.
CAUTION USE OF ANY CONTROLS OR ADJUSTMENTS OR PROCEDURES OTHER
THAN THOSE SPECIFIED HEREIN MAY RESULT IN HAZARDOUS RADIATION EXPOSURE. TO PREVENT EXPOSURE TO LASER EMANATIONS (HARMFUL TO HUMAN
EYES), DO NOT ATTEMPT TO DISASSEMBLE THIS UNIT.
4 ASUS High-Speed DVD-ROM Drive

I. INTRODUCTION
Thank you for purchasing an ASUS DVD-ROM Drive. The DVD-ROM Drive
complements your system with audio and video capabilities for that complete all-inone versatile personal PC or home theater.
DVD-ROM, short for Digital Versatile Disc Read-Only Memory or Digital Video
Disc Read-Only Memory, is a type of read-only compact disk which supports a
minimum of 4.7GB. That’s enough memory to provide you with hours of film and
music enjoyment right at the comfort of your home.
The ASUS DVD-ROM Drive is backward-compatible and, aside from DVDs, allows
you to play CDs, CD-I disks, CD-R disks, and VCDs. So there’s no need to throw
away that favorite old CD, and still take advantage of the new and more sophisticated
DVD titles.
The ASUS DVD-ROM Drive uses your computer’s IDE connector thereby
eliminating the cumbersome use of an interface card.
This User’s Manual explains how to install the ASUS DVD-ROM Drive and the
software to get it started. Basic trouble-shooting procedures are included to help you
detect and solve problems that your drive may encounter.
I. Introduction
Item Checklist
The package contains the following items along with the drive. Check to see if there
are damaged or missing items and, if so, contact your retailer.
(1) DVD-ROM Drive
(1) Audio Cable
(1) Mounting Screw Package
(1) Emergency Ejection Pin
(1) DVD-ROM Driver Disk
(1) Latest Bundle Software CD
(1) User’s Manual and Multi-language Quick Installation Guide
NOTE: The above items are available in retail boxes only.
ASUS High-Speed DVD-ROM Drive 5
II. HARDWARE INSTALLATION
Safety Information
Observe the following precautions before installing and using the ASUS DVD-ROM
Drive!
Installation Notices
HardwareInstallaton
II.
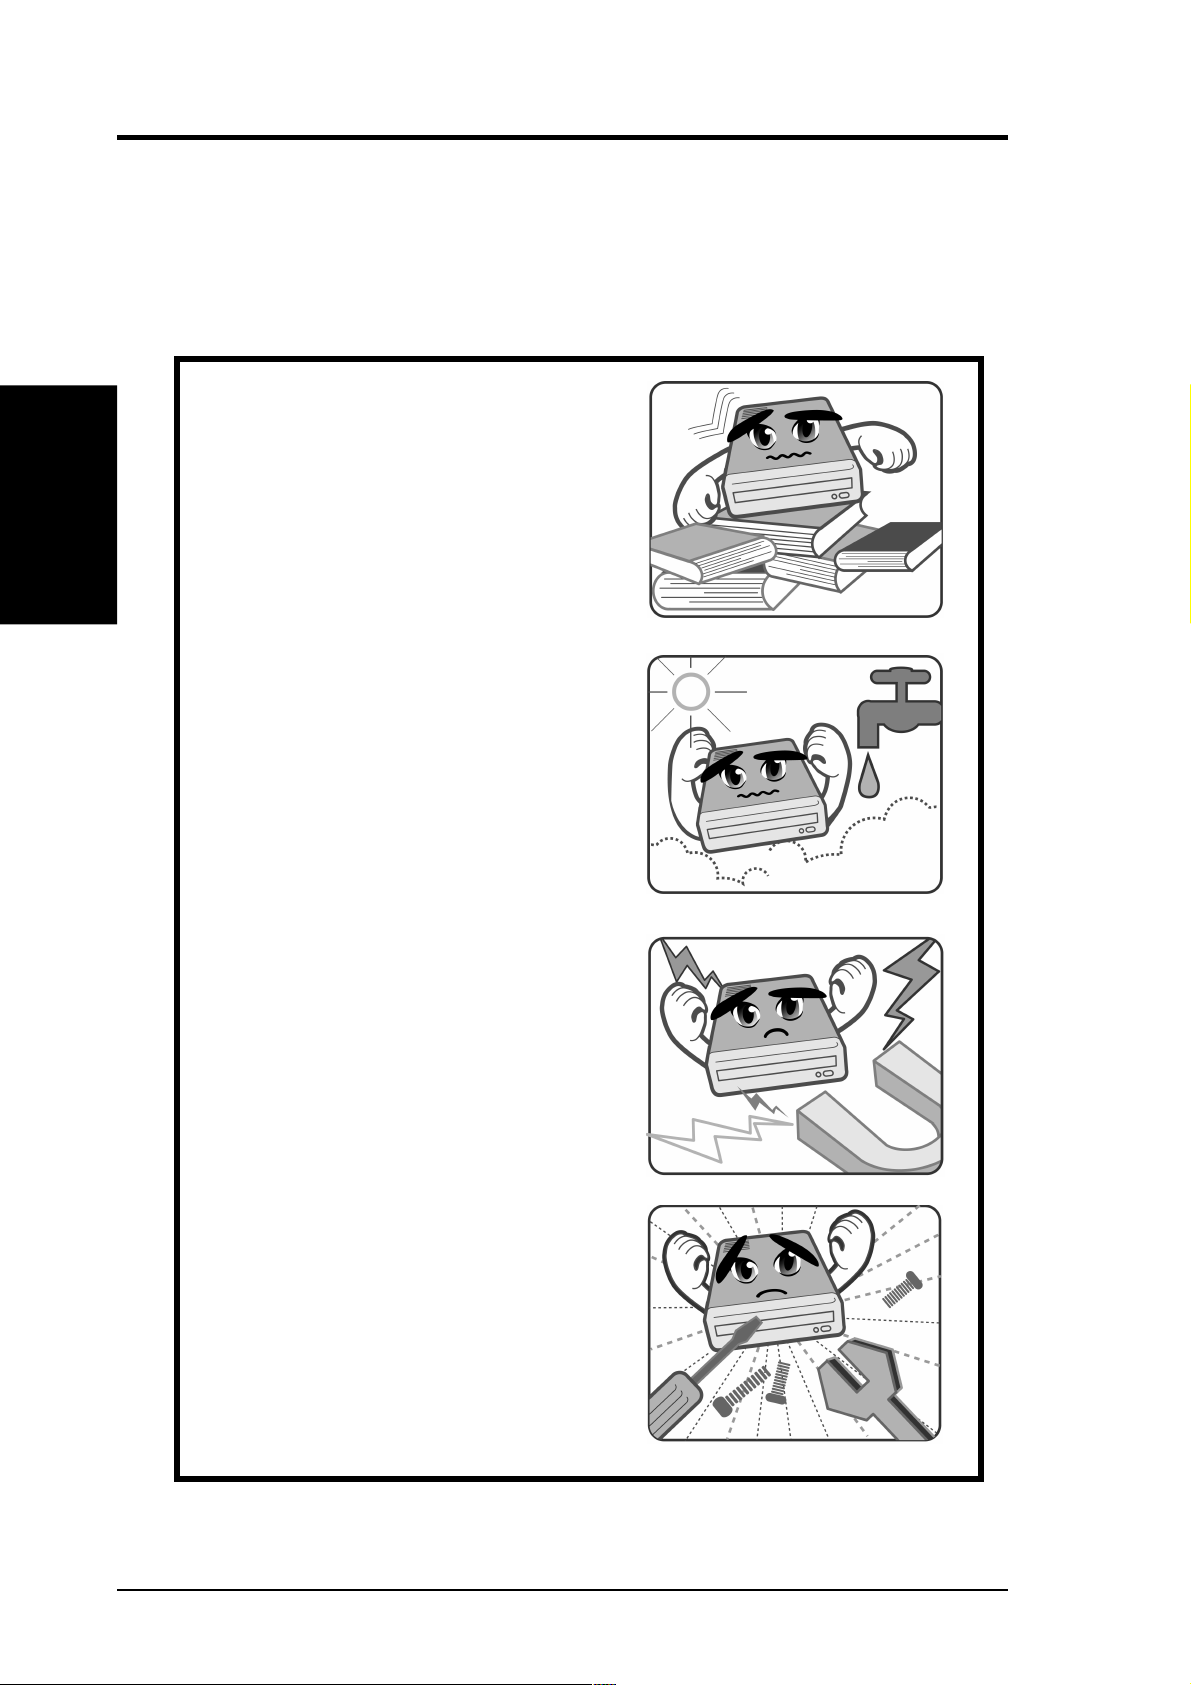
Do not place this device in an unstable
position, or in one that vibrates.
Do not place this device in areas where
there is direct sunlight, high humidity ,
or damp condition.
Do not use or place this device near
magnetic fields, televisions, or radios,
where there is interference that may
affect the performance of the drive.
Do not attempt to disassemble or repair
the drive. Opening the drive may result
to exposure to laser radiation.
6 ASUS High-Speed DVD-ROM Drive

II. HARDWARE INSTALLATION
Safety Information
SAFETY WARNINGS
CAUTION 1. Use of any controls or adjustments or procedures other than
specified herein may result in hazardous radiation exposure.
2. To prevent exposure to laser emanations (harmful to human
eye), do not attempt to disassemble this unit.
Using the Device
• Do not place damaged or warped discs inside the device. A warped disc may
break while in use and damage the device, or cause body injury.
• Do not move the device from a cold to a warm or hot environment. Drastic
change of temperature is harmful to the device.
• Before moving or uninstalling the drive, remove a disc from it, if any.
• Prevent liquids or any metal to get into the device. If this situation occurs, contact
your retailer for help.
• Do not use any evaporating solvents to clean the device. If you accidentally
sprayed any solvent on the device, use a clean cloth to wipe it. You may also use
a neutral cleaner to dilute the solvent to easily wipe it from the device.
• Try not to interrupt the supply of power while the device is in reading or writing
mode.
• Do not place discs into the device immediately if they came from a cold
environment, specially during cold seasons. Wait until the discs have reached
room temperature.
II.
HardwareInstallaton
ASUS High-Speed DVD-ROM Drive 7

HardwareInstallaton
II. HARDWARE INSTALLATION
Rear Panel Features
CABLE SELECT
DIGITAL
AUDIO
DG
ANALOG
AUDIO
SLAVE
MASTER
L
GRG
39
40
IDE INTERFACE
1
+5V G G+12V
2
POWER
➀➁➂➃➄➅
II.
D: Digital; G: Ground; R: Right audio channel; L: Left audio channel
NOTE: The pin settings or definitions of the connectors and jumpers are also engraved
on the Rear Panel of your DVD-ROM Drive.
1. Power Supply connector connects to the computer’s power supply.
2. IDE Interface connector connects to the 40-pin interface cable.
3. Device configuration jumper allows you to set your DVD-ROM Drive as the
Master or Slave drive. The default setting is Slave, wherein the jumper is on
“SLAVE”. “CABLE SELECT” is reserved and should not be used.
4. Analog Audio line out connector has two channels, right (“R”) and left (“L”)
audio outputs, and allows you to direct audio output from your DVD-ROM Drive
to your sound card when connected using a CD audio cable. “G” is for Ground.
5. Digital Audio output connector offers high quality audio effect by outputting
digital signal to a D/A converter or for recording to a digital audio tape (DAT) or
professional audio recording system. The connector follows the EBU-IEC958
standard set by the European Broadcast Union.
6. Testing jumpers are reserved for manufacturer’s internal testing/diagnostic purposes.
Setting Your DVD-ROM Drive
Set your drive as either the Master or Slave (default) drive by placing the jumper cap
on the desired jumper ¬.
Slave Drive (Default) Master Drive
NOTE: If your computer only allows you to connect a maximum of two devices and you
have two hard disks, remove the Slave hard disk — you need the other IDE connector for
your DVD-ROM Drive. If you only have one hard disk, set your DVD-ROM Drive as
Slave. If your computer has two IDE connectors and two hard disks installed, either set
your DVD-ROM Drive as Master on the secondary IDE connector or remove the Slave
hard disk and replace it with your DVD-ROM Drive. Refer to your computer’s manual for
the system configuration and instructions on hardware installation.
8 ASUS High-Speed DVD-ROM Drive

II. HARDWARE INSTALLATION
Inserting Your DVD-ROM Drive into Your Computer
Insert the DVD-ROM Drive into one of the free 5.25-inch bays available for disk drives.
NOTE: Do not slide the drive completely into the vacant drive bay. Leave some space at
the rear so that it will be easier for you to connect cables to your drive.
Connecting Cables to the DVD-ROM Drive
II.
HardwareInstallaton
Pin 1
Audio Cable
Red stripe (IDE Ribbon Cable)
Power Supply Cable
1. Connect an unused power supply cable to the back ¿ of your DVD-ROM Drive.
2. Connect the 40-pin IDE ribbon cable to the back ¡ of your DVD-ROM Drive.
NOTE: Orient the red stripe on the cable with Pin 1 of the DVD-ROM Drive’s IDE
Interface connector.
3. If you have a sound card, connect the 4-pin CD audio cable to the D VD-ROM
Drive’s Analog Audio line out connector 4. Otherwise, proceed to the next step.
NOTE: If the pin definitions on your sound card are not the same as that (see preceding
section) on your DVD-ROM Drive, check with your dealer for a compatible cable.
4. If you do not have a sound card, plug earphones, headphones, or powered/selfamplified speakers to the Headphone Jack on your DVD -ROM’s front panel (see
DVD-ROM DRIVE OPERATION). Set the volume controls of your drive and
powered/self-amplified speakers to minimum before starting or restarting your
computer. This will prevent possible damage to the earphones, headphones, or
speakers.
NOTE: The Headphone Jack is used solely for headphones.
ASUS High-Speed DVD-ROM Drive 9
 Loading...