

Bezdrôtový ADSL smerovač s
modemom 11n
(pre užívateľské rozhranie ASUS EZ)
Návod na obsluhu

SK4549
Prvé vydanie
Marec 2009
Autorské práva © 2009 ASUSTeK COMPUTER INC. Všetky práva sú vyhradené.
Žiadna časť tohto návodu na obsluhu, a to vrátane výrobkov a softvéru v ňom popísaných,
nesmie byť bez vyjadrenia spoločnosti ASUSTeK COMPUTER INC. (“ASUS”), a to
prostredníctvom písomného súhlasu kopírovaná, prenášaná, prepisovaná, uložená do
pamäte vyhľadávacieho systému, alebo prekladaná do iného jazyka v akejkoľvek forme
alebo akýmikoľvek prostriedkami, a to okrem dokumentácie kupujúceho slúžiacej pre potreby
zálohovania.
Záruka vzťahujúca sa na výrobok alebo službu nebude predĺžená v prípade ak: (1) bol
výrokov opravený, upravovaný alebo zmenený, a to pokiaľ takáto oprava, úprava alebo
zmena nebola písomne autorizovaná spoločnosťou ASUS; alebo (2) ak sériové číslo výrobku
bolo zmazané alebo chýba.
SPOLOČNOSŤ ASUS POSKYTUJE TENTO NÁVOD NA OBSLUHU “TAK AKO JE”, BEZ
ZÁRUKY AKÉHOKOĽVEK DRUHU, ČI UŽ VÝSLOVNEJ ALEBO ZAHRNUTEJ, VRÁTANE,
ALE NIE OBMEDZENE NA ZAHRNUTÉ ZÁRUKY ALEBO PODMIENKY TÝKAJÚCE SA
NEPORUŠENIA, PREDAJNOSTI ALEBO VHODNOSTI PRE URČITÝ ÚČEL. SPOLOČNOSŤ
ASUS, JEJ RIADITELIA, ÚRADNÍCI, ZAMESTNANCI ALEBO PREDAJCOVIA NEBUDÚ
ZODPOVEDNÍ ZA AKÉKOĽVEK NEPRIAME, ZVLÁŠTNE, NÁHODNÉ ALEBO VYPLÝVAJÚCE
ŠKODY (VRÁTANE ŠKÔD SPÔSOBENÝCH STRATOU NA ZISKU, STRATOU V OBLASTI
PODNIKATEĽSKÝCH AKTIVÍT A PODOBNE), A TO AJ AK SPOLOČNOSŤ ASUS BOLA
OBOZNÁMENÁ S MOŽNOSŤOU TAKÝCHTO ŠKÔD, KTORÉ SÚ DÔSLEDKOM CHYBY
ALEBO OMYLU V RÁMCI TOHO NÁVODU ALEBO V RÁMCI VÝROBKU.
TECHNICKÉ ŠPECIFIKÁCIE A INFORMÁCIE, KTORÉ SÚ SÚČASŤOU TOHTO
NÁVODU, SÚ UVEDENÉ IBA PRE INFORMATÍVNE ÚČELY A MÔŽU BYŤ KEDYKOĽVEK
ZMENENÉ BEZ PREDCHÁDZAJÚCEHO OZNÁMENIA, PRIČOM BY TO NEMALO BYŤ
INTERPRETOVANÉ AKO POVINNOSŤ SPOLOČNOSTI ASUS. SPOLOČNOSŤ ASUS
NEPREBERÁ ZODPOVEDNOSŤ ANI ZA ZÁVÄZKY TÝKAJÚCE SA AKÝCHKOĽVEK CHÝB
ALEBO NEPRESNOSTÍ, KTORÉ SA MÔŽU V RÁMCI TOHTO NÁVODU VYSKYTNÚŤ, A TO
VRÁTANE V NÁVODE POPÍSANÝCH VÝROBKOV A SOFTVÉRU.
Výrobky a remné označenia, ktoré sa objavujú v tomto návode, môžu a nemusia byť
obchodnými značkami alebo autorskými právami patričných spoločností a používajú sa
iba na označenie alebo na vysvetľovanie, a to v prospech ich vlastníkov a bez zámeru ich
porušovania.
2

Obsah
O tomto návode ..................................................................................... 4
Ako je tento návod usporiadaný ........................................................ 4
Dohody používané v rámci tohto návodu .......................................... 5
Kapitola 1: Spoznajte svoj bezdrôtový smerovač
Obsah balenia ........................................................................................ 6
Systémové požiadavky ......................................................................... 6
Skôr ako budete pokračovať ................................................................ 6
Funkcie hardvéru ................................................................................... 7
Predný panel ..................................................................................... 7
Zadný panel ...................................................................................... 8
Funkcie výrobku ................................................................................ 8
Spodný panel .................................................................................... 9
Možnosti montáže ................................................................................ 10
Nastavenie bezdrôtového smerovača ................................................11
Nastavenie káblového pripojenia .....................................................11
Kapitola 2: Nastavenie hardvéru
Nastavenie bezdrôtového spojenia ................................................. 12
Kapitola 3: Kongurácia sieťových klientov
Prístup k bezdrôtovému smerovaču .................................................. 13
Nastavenie IP adresy pre klienta s káblovým
alebo bezdrôtovým pripojením ........................................................ 13
Kapitola 4: Kongurácia pomocou internetového grackého
užívateľského rozhrania (GUI)
Kongurácia pomocou internetového grackého
užívateľského rozhrania (GUI) ............................................................ 21
Používanie funkcie Network map (Mapa siete) ................................. 22
Nastavenie WAN pomocou rýchleho internetového nastavenia (QIS) ..23
Manuálne nastavenie internetového pripojenia
Správa šírky pásma EzQoS ................................................................ 25
Inovácia rmvéru ................................................................................. 26
Obnovenie/uloženie/odoslanie nastavení ......................................... 27
............................... 23
Kapitola 5: Riešenie problémov
Riešenie problémov ............................................................................. 28
Služba ASUS DDNS ............................................................................. 31
Často kladené otázky ...................................................................... 31
3

Obsah
Prílohy
Vyhlásenia ............................................................................................ 33
GNU - všeobecná verejná licencia ..................................................... 37
Kontaktné informácie spoločnosti ASUS .......................................... 44
O tomto návode
Tento návod na obsluhu obsahuje informácie, ktoré potrebujete pre inštaláciu a
konguráciu bezdrôtového smerovača ASUS.
Ako je tento návod usporiadaný
Návod obsahuje nasledujúce časti:
• Kapitola 1: Spoznajte svoj bezdrôtový smerovač
Táto kapitola uvádza informácie o obsahu balenia, systémových požiadavkách,
funkciách hardvéru a o LED indikátoroch bezdrôtového smerovača ASUS.
• Kapitola 2: Nastavenie hardvéru
Táto kapitola uvádza pokyny ohľadne nastavenia, získavania prístupu a o
kongurácii bezdrôtového smerovača
• Kapitola 3: Kongurácia sieťových klientov
Táto kapitola uvádza pokyny ohľadne nastavenia klientov v rámci vašej siete,
ktorí budú pracovať s vašim bezdrôtovým smerovačom
ASUS.
ASUS.
• Kapitola 4: Kongurácia pomocou internetového grackého
užívateľského rozhrania (GUI)
Táto kapitola uvádza pokyny ohľadne kongurácie bezdrôtového smerovača
ASUS pomocou internetového grackého užívateľského rozhrania (internetové
GUI).
4
• Kapitola 5: Riešenie problémov
Táto kapitola predstavuje sprievodcu riešením bežných problémov, ktoré sa
môžu vyskytnúť počas používania bezdrôtového smerovača ASUS.
• Prílohy
Táto kapitola uvádza regulačné oznámenia a bezpečnostné upozorn
enia.
Dohody používané v rámci tohto návodu
VÝSTRAHA: Informácie s cieľom zabrániť poraneniu pri vykonávaní
činnosti.
UPOZORNENIE: Informácie s cieľom zabrániť poškodeniu prvkov pri
vykonávaní činnosti.
DÔLEŽITÉ: Pokyny, ktoré MUSÍTE dodržiavať v prípade vykonávania
činnosti.
POZNÁMKA: Tipy a dodatočné informácie, ktoré napomáhajú vykonať
činnosť.
5
Spoznajte svoj
1
bezdrôtový smerovač
Obsah balenia
V rámci balenia bezdrôtového smerovača ASUS skontrolujte nasledujúce položky.
WiFi ADSL smerovač DSL-N11 11n
Adaptér striedavého prúdu (typ sa líši na základe regiónu)
Ethernet kábel kategórie 5 (CAT5)
Kábel RJ-11
CD s podporou (návod)
Rozdeľovač (typ sa líši na základe regiónu)
Stručný návod na používanie
Poznámka: Ak je ktorákoľvek z uvedených položiek poškodená alebo chýba, spojte sa so
svojim predajcom.
Systémové požiadavky
Pred nainštalovaním bezdrôtového smerovača ASUS sa presvedčte, že váš
systém/sieť spĺňa nasledujúce požiadavky:
•
Ethernet RJ-45 port (10Base-T/100Base-TX)
• Minimálne jedno zariadenie IEEE 802.11b/g/n s bezdrôtovou kapacitou
• Nainštalovaný TCP/IP a internetový prehliadač
Skôr ako budete pokračovať
Skôr ako nainštalujete bezdrôtový smerovač ASUS, zapamätajte si nasledujúce:
• Dĺžka Ethernet kábla, ktorým sa zariadenie pripája k sieti (rozbočovač, ADSL/
káblová modem, smerovač, stenová zásuvka) nesmie presiahnuť 100 metrov.
•
Zariadenie umiestnite na rovný, stabilný povrch, a to čo najďalej od zeme.
• Do blízkosti zariadenia neukladajte žiadne kovové prekážky a chráňte ho pred
účinkami priameho slnečného žiarenia.
Zariadenie umiestnite v dostatočnej vzdialenosti od transformátorov,
•
masívnych motorov, žiariviek, mikrovlnných rúr, chladničiek a ďalšieho
priemyselného zariadenia, a to s cieľom zabrániť strate signálu.
• Zariadenie nainštalujte v stredovej ploche, aby ste zabezpečili ideálne pokrytie
všetkých bezdrôtových mobilných zariadení.
DSL-N11 Kapitola 1: Spoznajte svoj bezdrôtový smerovač
6
Zariadenie nainštalujte vo vzdialenosti aspoň 20 cm od osôb, aby ste
•
zabezpečili, že výrobok je prevádzkovaný v súlade s predpismi týkajúcimi sa
vystavenia osôb účinkom vysokofrekvenčného žiarenia prijatými Federálnym
výborom pre telekomunikácie.
Funkcie hardvéru
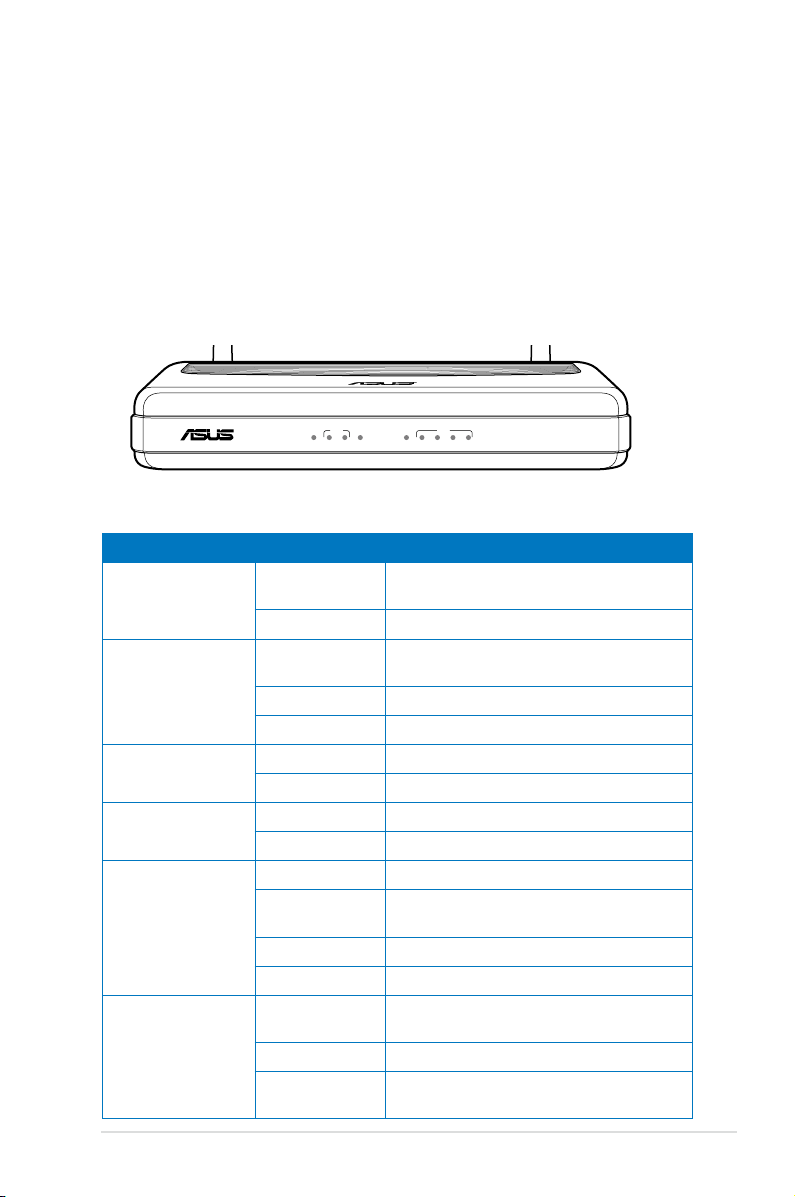
Predný panel
Na prednom paneli WiFi ADSL smerovača DSL-N11 11n sa nachádzajú LED
indikátory, ktoré zobrazujú stav DSL-N11.
R
DSL-N11
ADSL
POWER Sync Data WLAN WPS 1 2 3 4
LAN
Indikátory stavu
LED indikátor Stav Indikácia
Power
(Napájanie)
ADSL SYNC
(ADSL
Synchronizácia)
ADSL Data
(ADSL údaje)
WLAN Bliká (zelená) Vytvára sa WLAN spojenie
WPS Bliká Prebieha proces
LAN1-LAN4 Trvale svieti
Trvale svieti
zelená
Napájanie je zapnuté; štandardná
prevádzka
Nesvieti Napájanie je vypnuté; porucha
Trvale svieti
ADSL spojenie je vytvorené
zelená
Bliká (zelená) Nie je možné vytvoriť ADSL spojenie
Nesvieti Bez ADSL spojenia
Bliká (zelená) Odosielanie/príjem údajov
Nesvieti Žiadny prenos údajov
Nesvieti Neexistuje bezdrôtové spojenie
Bliká
Chyba
(červená)
Zelená Úspešné
Nesvieti Bez spojenia
Neexistuje fyzické spojenie so sieťou
zelená
pomocou Ethernet káblov
Bliká (zelená) Odosielanie alebo príjem údajov
Nesvieti Vypnuté alebo neexistuje fyzické
spojenie
Kapitola 1: Spoznajte svoj bezdrôtový smerovač DSL-N11
7
ADSL LAN1-LAN4
Reset
Power
On/Off
WPS
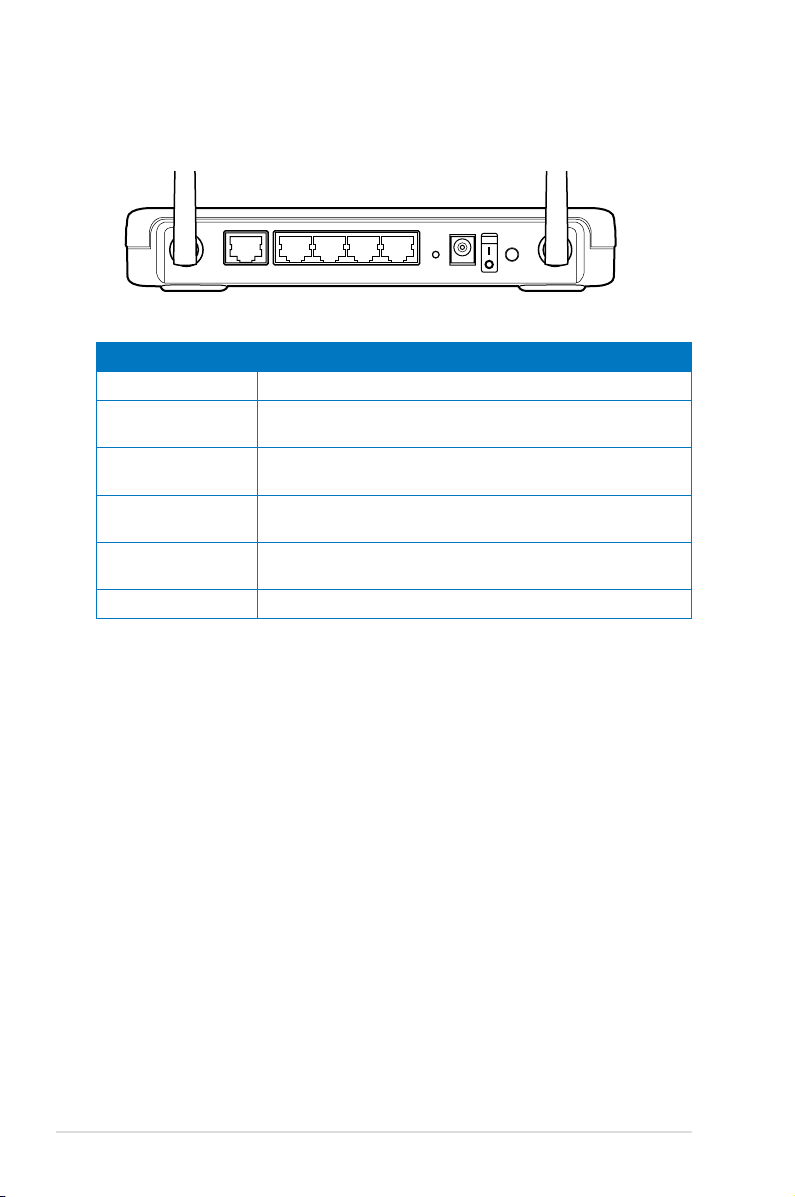
Zadný panel
Položka Popis
ADSL K zabudovanému rozdeľovaču pripojte kábel RJ-11.
LAN1-LAN4 K týmto portom pripojte Ethernet RJ-45 káble s cieľom
vytvoriť pripojenie do LAN.
RESET Pomocou tohto tlačidla dôjde k obnoveniu výrobných
predvolených nastavení systému.
POWER
(NAPÁJANIE)
ON/OFF (ZAP./
.)
VYP
Do tohto portu zasuňte adaptér striedavého prúdu s
cieľom pripojiť smerovač k sieťovému zdroju.
Stlačením tohto tlačidla zapnete/vypnete napájanie.
WPS Týmto tlačidlom sa spúšťa nástroj WPS.
Funkcie výrobku
Bezdrôtový smerovač ponúka nasledujúce funkcie:
Zabudovaný ADSL modem.
•
Zabudovaná brána rewall.
•
Na norme IEEE802.11n založená bezdrôtová sieť, ktorá je spätne kompatibilná
•
so zariadeniami 802.11b/g.
Nové užívateľské rozhranie ASUS - objektívne a na činnosť zamerané
•
internetové konguračné rozhranie.
Rýchle internetové nastavenie (QIS) pre ASDL pripojenie, kongurácia
•
bezdrôtového pripojenia a kongurácia zabezpečenia.
Mapa siete pre priame posielanie sieťových informácií a správu.
•
EZQoS na správu šírky pásma na báze aplikácií s intuitívnym ovládacím
•
rozhraním.
DSL-N11 Kapitola 1: Spoznajte svoj bezdrôtový smerovač
8
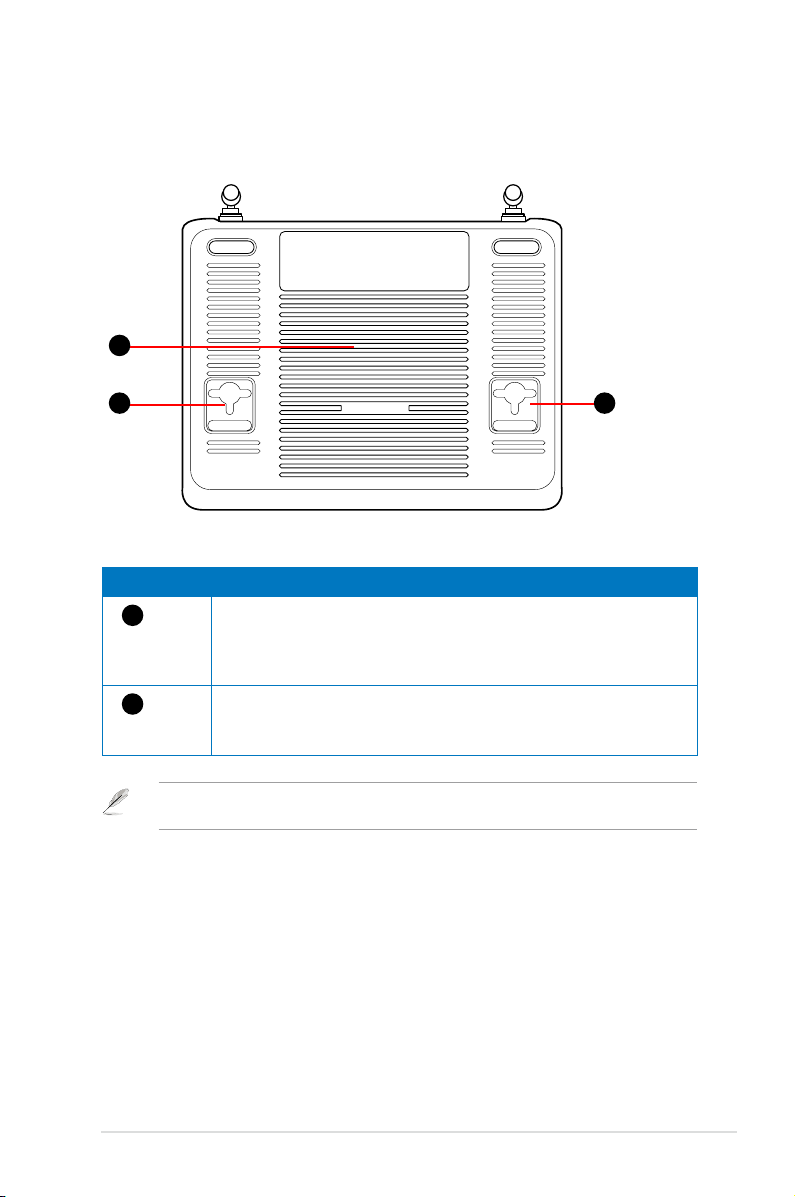
Spodný panel
2
1 1
Položka Popis
1
2
Montážne háčiky
Pomocou montážnych háčikov namontujete svoj smerovač na
betónové alebo drevené povrchy, a to pomocou dvoch skrutiek
s okrúhlou hlavou.
Vetracie otvory
Tieto vetracie otvory zabezpečujú ventiláciu vzduchu pre váš
smerovač.
Poznámka: Informácie o namontovaní smerovača na stenu alebo strop nájdete v časti
Mounting options (Možnosti montáže) na ďalšej strane tohto návodu na obsluhu.
Kapitola 1: Spoznajte svoj bezdrôtový smerovač DSL-N11
9
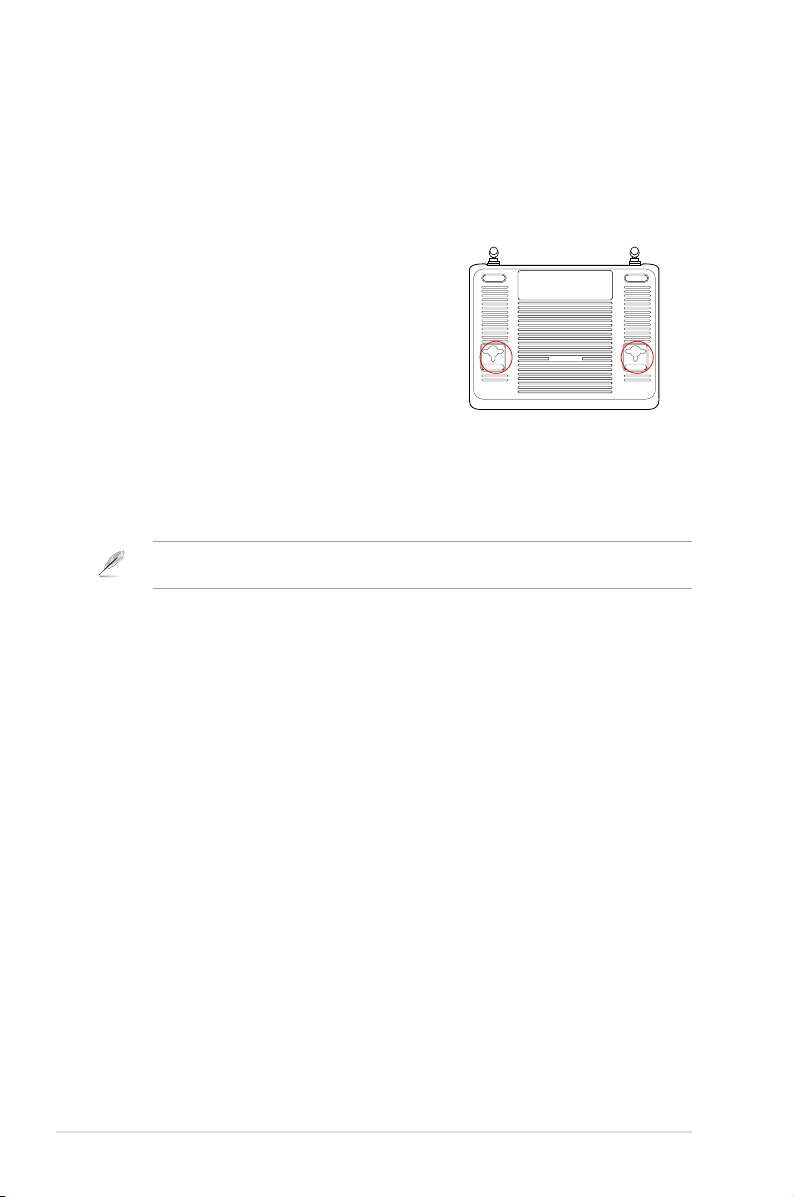
Možnosti montáže
Vonkajšok skrinky bezdrôtového smerovača ASUS je navrhnutý tak, aby sa dal
položiť na vyvýšený rovný povrch, akým je napríklad registračná skrinka alebo
polica na knihy. Jednotku možno taktiež prispôsobiť tak, aby sa dala namontovať
na stenu alebo na strop.
Ako namontovať bezdrôtový smerovač
ASUS:
1. Na spodnej strane nájdite dva montážne
háčiky
.
2. N
a rovnom povrchu poznačte polohu dvoch
horných otvorov.
3. Do otvorov naskrutkujte skrutky do hĺbky
pri ktorej bude zo skrutky trčať cca 0,6 cm
(1/4”).
4. Na skrutky nastrčte háčiky bezdrôtového
smerovača ASUS.
Poznámka: Ak nedokážete bezdrôtový smerovač ASUS nasadiť na skrutky, alebo ak je
prichytený veľmi voľne, prispôsobte naskrutkovanie skrutiek.
,
DSL-N11 Kapitola 1: Spoznajte svoj bezdrôtový smerovač
10
Nastavenie
ADSL
DC In
LAN1-4
2
hardvéru
Nastavenie bezdrôtového smerovača
Bezdrôtový smerovač ASUS vyhovuje pri správnej kongurácii rôznym pracovným
scenárom. Aby ste splnili požiadavky v rámci svojho bezdrôtového prostredia,
možno bude potrebné zmeniť predvolené nastavenia bezdrôtového smerovača.
Poznámky: V prípade počiatočnej kongurácie vám odporúčame používať káblové pripojenie,
čím predídete problémom pri nastavení v dôsledku nestability bezdrôtového pripojenia.
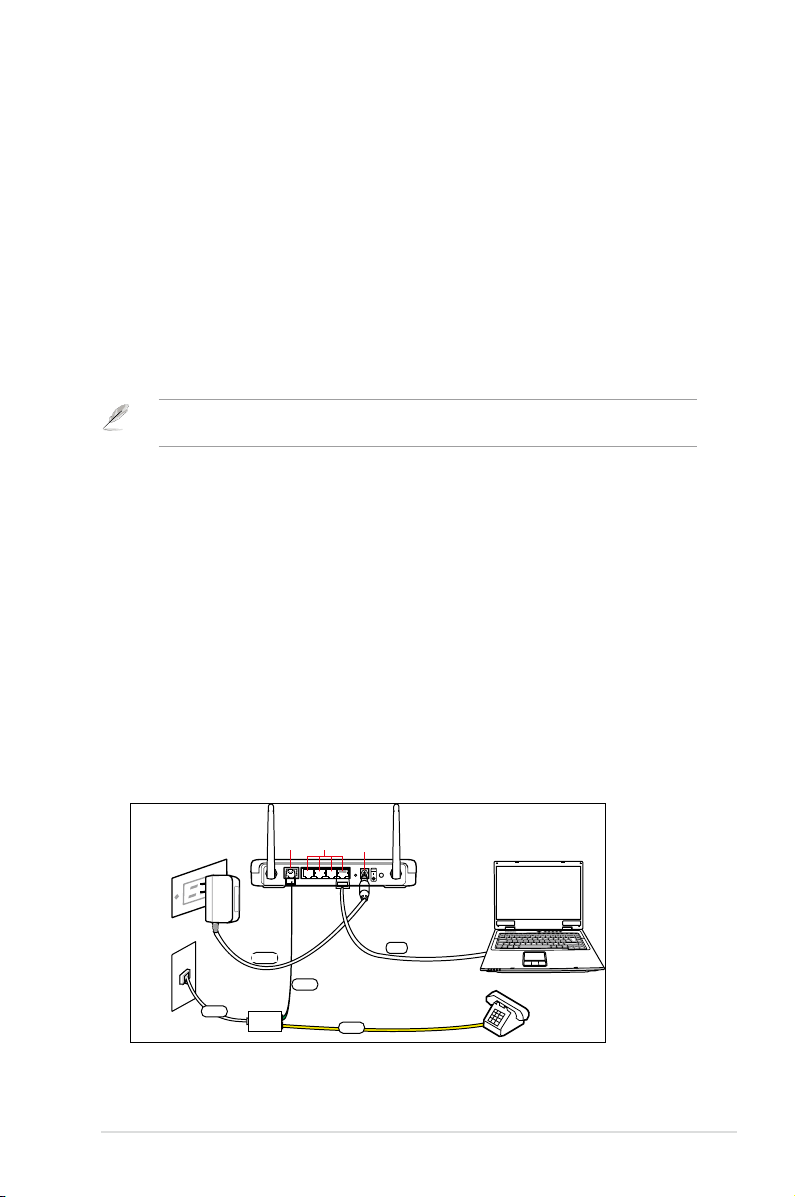
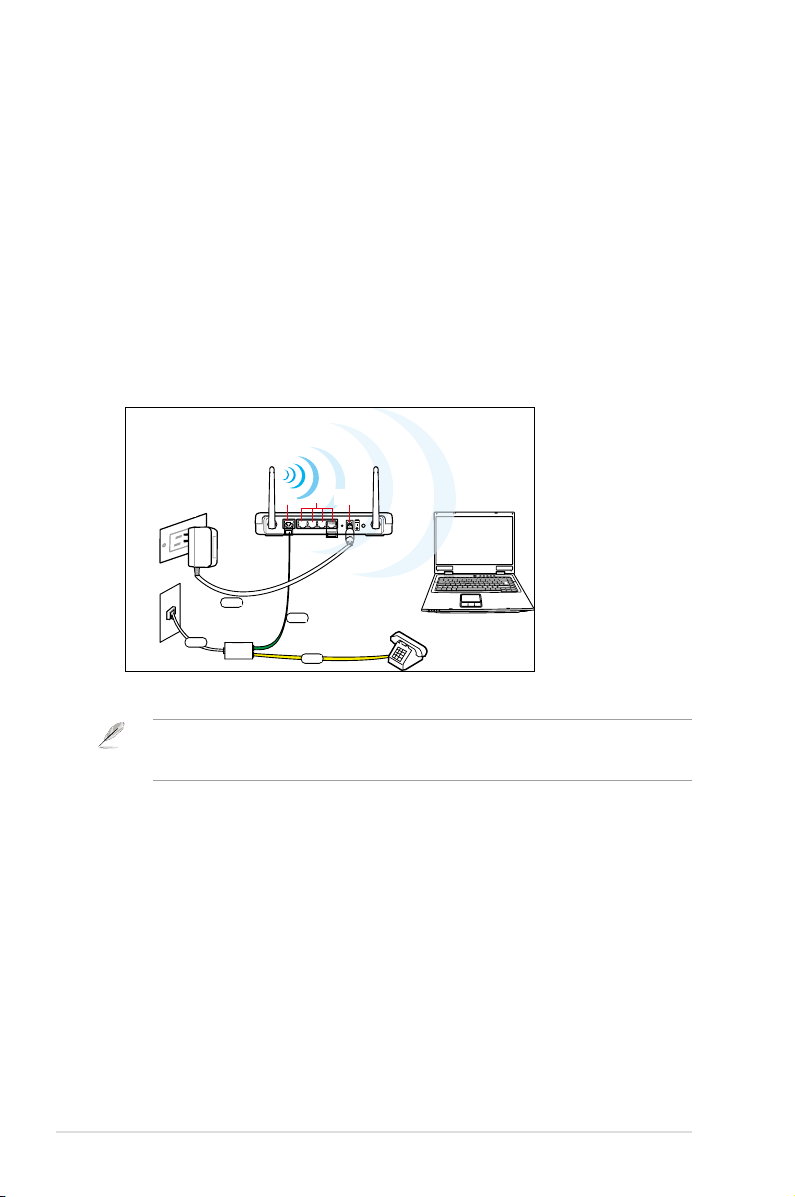
Nastavenie káblového pripojenia
Bezdrôtový smerovač ASUS sa dodáva s káblom RJ11, LAN káblom RJ45 a
rozdeľovačom, ktoré nájdete v balení. Bezdrôtový smerovač je vybavený funkciou
automatického kríženia, z tohto dôvodu je možne aby ste pre káblové pripojenie
používali priamy alebo krížový kábel.
Nastavenie káblového spojenia:
1.
Zasuňte linkový konektor rozdeľovača do telefónnej zásuvky a svoj telefón
pripojte k portu pre pripojenie telefónu (A).
2. Prepojte port LINE (Linka) na bezdrôtovom smerovači a DSL
rozdeľovači (B).
3. Pomocou priloženého LAN kábla RJ45 pripojte svoj počítač k LAN portu
bezdrôtového smerovača (C).
port na
DC In
(Vstup pre prívod
Sieťová stenová zásuvka
Telefónna stenová zásuvka
Kapitola 2: Nastavenie hardvéru DSL-N11
Linka
ADSL
Napájanie
Line (Linka)
DSL Phone
Telefón )
(DSL
Rozdeľovač
jednosmerného
LAN1-4
prúdu)
(C)
LAN
(B)
DSL
(A)
Telefón
11
Nastavenie bezdrôtového spojenia
ADSL
DC In
LAN1-4
Nastavenie káblového spojenia:
1. Zasuňte linkový konektor rozdeľovača do telefónnej zásuvky a svoj telefón
pripojte k portu pre pripojenie telefónu (A).
2. Prepojte port LINE (Linka) na bezdrôtovom smerovači a DSL
rozdeľovači (B).
apnite počítač a dvakrát kliknite na ikonu bezdrôtového spojenia v rámci lišty
3. Z
úloh pre Windows
®
, čím zobrazíte dostupné siete. Zvoľte svoj bezdrôtový
smerovač. V rámci predvoľby nie je zadenovaný bezpečnostný kľúč pre
bezdrôtový smerovač. Kliknite na Connect (Pripojiť) a pripojenie sa zrealizuje
počas niekoľkých sekúnd.
DC In
(Vstup pre prívod
jednosmerného
ADSL
LAN1-4
Sieťová zásuvka na stene
prúdu)
(B)
port na
Napájanie
Line
(Linka)
(Linka)
Rozdeľovač
Telefónna zásuvka na stene
Aby ste chránili svoju sieť pred škodlivými útokmi alebo neoprávneným prístupom, v rámci
internetového grackého užívateľského rozhrania GUI kliknite na Advanced Setting (Pokročilé
nastavenia) > Wireless (Bezdrôtová komunikácia).
DSL-N11 Kapitola 2: Nastavenie hardvéru
12
DSL
DSL Phone
Telefón)
Line
(DSL
(A)
Telefón

Kongurácia sieťových
3
klientov
Prístup k bezdrôtovému smerovaču
Nastavenie IP adresy pre klienta s káblovým alebo
bezdrôtovým pripojením
Pre prístup na bezdrôtový smerovač ASUS je potrebné, aby ste mali správne
nastavenia TCP/IP pre klientov s káblovým alebo bezdrôtovým pripojením. Presvedčte
sa, že IP adresy klientov sa nachádzajú v rámci rovnakej podsiete ako bezdrôtový
smerovač ASUS.
V rámci predvoľby, bezdrôtový smerovač ASUS integruje funkciu DHCP servera,
ktorá automaticky priraďuje IP adresy klientom v rámci vašej siete.
Avšak v niektorých prípadoch možno budete chcieť manuálne priradiť statické
IP adresy niektorým klientom alebo počítačom vo vašej sieti radšej, ako je
automatické získanie IP adries z vášho bezdrôtového smerovača.
Postupujte podľa dolu uvedených pokynov, ktoré vyhovujú pre nainštalovaný
operačný systém klienta alebo počítača.
Poznámka: Ak chcete manuálne priradiť IP adresu svojmu klientovi, odporúčame vám použiť
nasledujúce nastavenie:
• IP adresa: 192.168.1.xxx (xxx môže byť akékoľvek číslo v rozsahu 2 až 254. Presvedčte sa,
že IP adresu nepoužíva žiadne iné zariadenie)
• Maska podsiete
• Brána
: 192.168.1.1 (bezdrôtový smerovač ASUS) alebo priraďte známy DNS server v rámci
• DNS
svojej siete
Kapitola 3: Kongurácia klientov
: 255.255.255.0 (rovnaké ako v prípade bezdrôtového smerovača ASUS)
: 192.168.1.1 (IP adresa bezdrôtového smerovača ASUS)
13
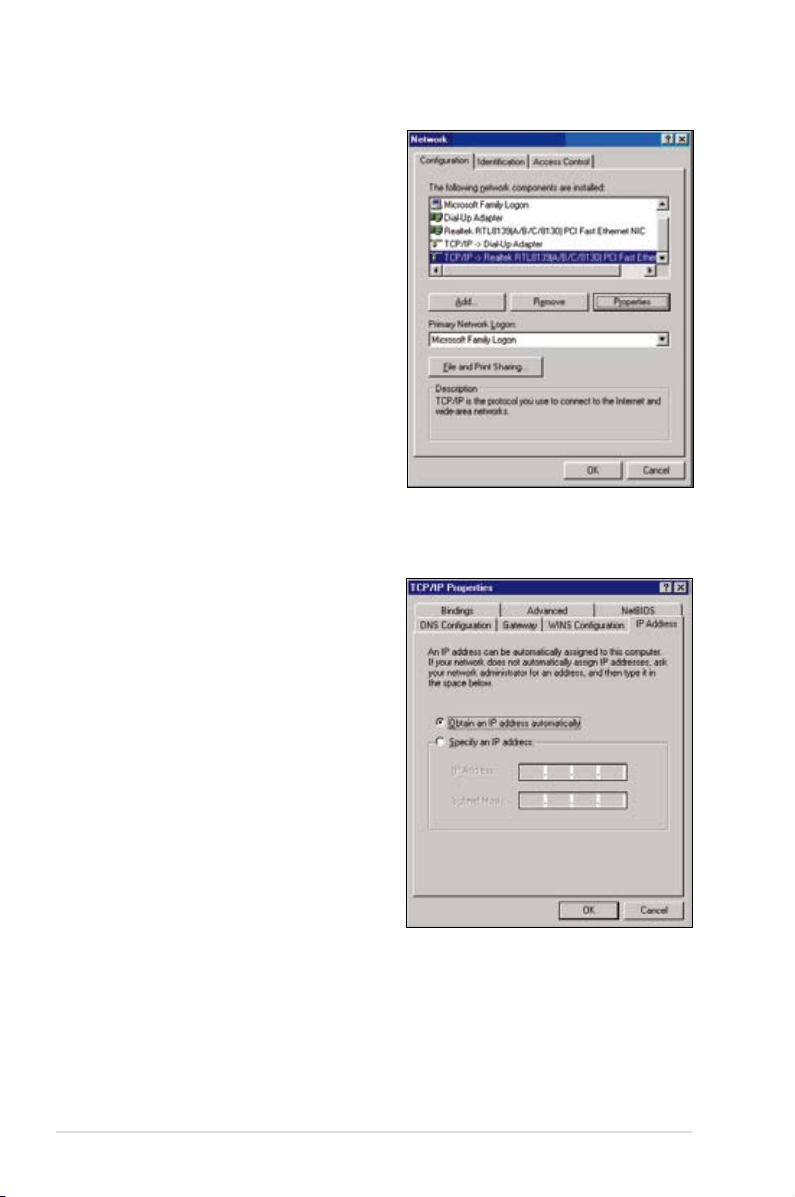
Windows® 9x/ME
1. Kliknutím na Start (Štart) >
Control Panel (Ovládací panel) >
Network (Sieť) zobrazíte okno pre
nastavenie siete.
2. Zvoľte TCP/IP
na Properties (Vlastnosti).
3. Ak chcete, aby váš počítač
automaticky získal IP adresu,
kliknite na Obtain an IP address
automatically (Získať IP adresu
automaticky) a následne kliknite
na OK. V opačnom prípade
kliknite na Specify an IP address
(Vyšpecikovať IP adresu);
následne napíšte IP address (IP
adresu) a Subnet Mask (Masku
podsiete).
a následne kliknite
DSL-N11 Kapitola 3: Kongurácia klientov
14

4. Zvoľte kartu Gateway (Brána)
a napíšte New gateway (Novú
bránu); následne kliknite na Add
(Pridať).
5. Zvoľte kartu DNS conguration
(Kongurácia DNS) a kliknite na
Enable DNS (Aktivovať DNS).
Napíšte Host (Hostiteľa), Domain
(Doménu) a DNS Server Search
Order (Poradie vyhľadávania
DNS servera); následne kliknite na
Add (Pridať).
6.
Kliknite na OK
.
Kapitola 3: Kongurácia klientov
15

Windows® NT4.0
1. Prejdite na Control Panel
(Ovládací panel) > Network (Sieť);
zobrazí sa okno pre nastavenie
siete. Následne zvoľte kartu
Protocols (Protokoly).
2. V zozname Network Protocols
(Sieťové protokoly) zvoľte TCP/IP
Protocol (Protokol TCP/IP) a
následne kliknite na Properties
(Vlastnosti).
3. Na karte IP Address (IP adresa)
v rámci okna Microsoft TCP/IP
Properties (Vlastnosti Microsoft
TCP/IP) dokážete:
• V
ybrať typ sieťového adaptéra
nainštalovaného vo vašom
systéme.
• Nastaviť smerovač tak, a došlo
k automatickému priradeniu IP
adresy.
• Manuálne nastaviť IP
masku podsiete a predvolenú
bránu.
adresu,
DSL-N11 Kapitola 3: Kongurácia klientov
16

4. Zvoľte kartu DNS a kliknite
na Add (Pridať) v rámci DNS
Service Search Order (Poradie
vyhľadávania služby DNS) a
napíšte DNS.
Windows® 2000
1. Kliknite na Start (Štart) > Control
Panel (Ovládací panel) > Network
and Dial-up Connection (Sieťové
a telefónne pripojenie). Pravým
tlačidlom kliknite na Local Area
Connection (Miestne pripojenie) a
kliknite na Properties (Vlastnosti).
Kapitola 3: Kongurácia klientov
17

2. Zvoľte Internet Protocol
(Internetový protokol) (TCP/IP)
a následne kliknite na Properties
(Vlastnosti).
3. Zvoľte Obtain an IP
automatically (Získať IP adresu
automaticky) ak chcete, aby boli
nastavenia IP priradené automaticky.
V opačnom prípade zvoľte Use
the following IP address (Použiť
nasledujúcu IP adresu): a zadajte
IP address (IP adresu), Subnet
mask (Masku podsiete) a Default
gateway (Predvolenú bránu).
4.
Zvoľte Obtain an IP
automatically (Získať IP adresu
automaticky) ak chcete, aby
boli nastavenia DNS servera
priradené automaticky. V opačnom
prípade zvoľte Use the following
DNS server address (Použiť
nasledujúcu adresu DNS servera):
a zadajte Preferred (Preferovaný)
a Alternate DNS server (Náhradný
DNS server).
5.
Po dokončení kliknite na OK
address
address
.
Windows® XP
1. Kliknite na Start (Štart) > Control
Panel (Ovládací panel) > Network
Connection (Sieťové pripojenie).
Pravým tlačidlom kliknite na
Local Area Connection (Miestne
pripojenie) a následne zvoľte
Properties (Vlastnosti).
DSL-N11 Kapitola 3: Kongurácia klientov
18

2. Zvoľte Internet Protocol
(Internetový protokol) (TCP/IP)
a následne kliknite na Properties
(Vlastnosti).
3. Zvoľte Obtain an IP
address
automatically (Získať IP adresu
automaticky) ak chcete, aby
boli nastavenia IP priradené
automaticky. V opačnom prípade
zvoľte Use the following IP
address (Použiť nasledujúcu IP
adresu): a zadajte IP address (IP
adresu), Subnet mask (Masku
podsiete) a Default gateway
(Predvolenú bránu).
4.
Zvoľte Obtain DNS server
address automatically (Získať
adresu DNS servera automaticky)
ak chcete, aby boli nastavenia DNS
servera priradené automaticky
. V
opačnom prípade zvoľte Use the
following DNS server addresses
(Použiť nasledujúce adresy DNS
servera): a zadajte Preferred
and Alternate DNS server
(Preferovaný a náhradný DNS
server).
5.
Po dokončení kliknite na OK
.
Kapitola 3: Kongurácia klientov
19

Windows® Vista
1. Kliknite na Start (Štart), zvoľte
Control Panel (Ovládací panel)
> Network and Sharing Center
(Centrum sietí). Pravým tlačidlom
kliknite na Local Area Connection
(Miestne pripojenie) a následne
zvoľte Properties (Vlastnosti).
2. Zvoľte Internet Protocol Version
4 (Internetový protokol verzia 4)
(TCP/IPv4) a následne kliknite na
Properties (Vlastnosti).
3.
Zvoľte Obtain an IP
address automatically (Získať IP adresu automaticky)
ak chcete, aby boli nastavenia IP priradené automaticky. V opačnom prípade
zvoľte Use the following IP address (Použiť nasledujúcu IP adresu): a
zadajte IP address (IP adresu), Subnet mask (Masku podsiete) a Default
gateway (Predvolenú bránu).
4.
Zvoľte Obtain DNS server address automatically (Získať adresu DNS
servera automaticky) ak chcete, aby boli nastavenia DNS servera priradené
automaticky
. V opačnom prípade zvoľte Use the following DNS server
addresses (Použiť nasledujúce adresy DNS servera): a zadajte Preferred
and Alternate DNS server (Preferovaný a náhradný DNS server).
5. Po dokončení kliknite na OK
Odporúčame vám, aby ste nastavili predvolenú IP adresu smerovača ako predvolenú bránu.
DSL-N11 Kapitola 3: Kongurácia klientov
20
.

Kongurácia pomocou
4
internetového grackého
užívateľského rozhrania (GUI)
Kongurácia pomocou internetového
grackého užívateľského rozhrania (GUI)
Internetové gracké užívateľské rozhranie (internetové GUI) smerovača vám
umožňuje nakongurovať tieto funkcie: Network Map (Mapa siete), EZQoS
Bandwidth Management (Správa šírky pásma EZQoS) a ďalšie Advanced
Setting (Pokročilé nastavenia).
Kongurácia pomocou internetového grackého užívateľského rozhrania
(GUI):
1. Po zrealizovaní káblového alebo bezdrôtového pripojenia spustite internetový
prehliadač. Automaticky sa načíta prihlasovacia stránka.
Poznámka: Internetové rozhranie smerovača môžete spustiť aj manuálnym napísaním
predvolenej IP adresy smerovača (192.168.1.1).
2. V rámci prihlasovacej stránky napíšte predvolené užívateľské meno (admin) a
heslo (admin).
Kapitola 4: Kongurácia pomocou internetového grackého užívateľského rozhrania (GUI) DSL-N11
21

3. V rámci hlavnej stránky klinike na menu navigácie alebo na odkazy s cieľom
nakongurovať rôzne funkcie bezdrôtového smerovača ASUS.
Používanie funkcie Network map (Mapa siete)
Network Map (Mapa siete) vám umožňuje zobraziť stav a nakongurovať
nastavenia pripojenia pre internet, systém a klientov v rámci vašej siete. Umožňuje
vám rýchlo nastaviť vašu bezdrôtovú sieť WAN (WAN) pomocou funkcie rýchleho
internetového nastavenia (QIS) alebo vám umožňuje rýchlo nastaviť vašu miestnu
počítačovú sieť (LAN).
Pre zobrazenie stavu alebo konguráciu nastavení kliknite na jednu z ikon
zobrazených na hlavnej strane:
Ikona Popis
Internet status (Stav internetu)
Kliknutím na túto ikonu zobrazíte stav pripojenia do
internetu, IP adresu WAN, DNS, typ pripojenia a adresu
brány. V rámci obrazovky Stav internetu dokážete
pomocou funkcie rýchleho internetového nastavenia (QIS)
rýchlo nastaviť svoju WAN.
Poznámka: Viac informácii o funkcii QIS nájdete v časti
Setting up WAN using the Quick Internet Setup (QIS)
(Nastavenie WAN pomocou rýchleho internetového
nastavenia (QIS)) na nasledujúcej strane.
System status (Stav systému)
Kliknutím na túto ikonu zobrazíte informácie o SSID,
spôsobe autentikácie, kódovaní WEP, IP LAN, PIN kóde,
MAC adrese alebo zapnete/vypnete bezdrôtové rádio. V
rámci obrazovky Stav systému spustite funkciu WPS.
Client status (Stav klienta)
Kliknutím na túto ikonu zobrazíte informácie o klientoch
alebo počítačoch v rámci siete a umožňuje vám
zablokovať/odblokovať klienta.
DSL-N11 Kapitola 4: Kongurácia pomocou internetového grackého užívateľského rozhrania (GUI)
22

Nastavenie WAN pomocou rýchleho internetového
nastavenia (QIS)
Funkcia rýchleho internetového nastavenia (QIS) ASUS automaticky zistí
nastavenia internetového pripojenia. Pokiaľ bezdrôtový smerovač ASUS nedokáže
automaticky zistiť typ vášho internetového pripojenia, bude potrebné, aby ste
manuálne nastavili svoje nastavenia internetového pripojenia.
Aby ste mohli používať službu rýchleho internetového nastavenia (QIS) ASUS
1.
Spustite internetový
zistí typ vášho internetového pripojenia.
2. V r
ámci typu pripojenia napíšte svoje užívateľské meno a heslo a následne
kliknite na
3. Po dokončení nastavenia internetového pripojenia zvoľte jednu z týchto
možností:
•
Prejsť na internet: Kliknutím môžete začať surfovať na internete.
•
Jednoduché nastavenie zabezpečenia bezdrôtovej komunikácie
nakongurujete nastavenia zabezpečenia bezdrôtovej komunikácie.
Apply (Použiť)
prehliadač. Počkajte asi 20 sekúnd pokiaľ QIS automaticky
.
: Kliknutím
Manuálne nastavenie internetového pripojenia
Ak chcete manuálne nastaviť internetové pripojenie:
1. Pokiaľ funkcia ASUS QIS nedokáže automaticky zistiť typ internetového
pripojenia, kliknite na
nastavenia)
.
Skip to manual settings (Preskočiť na manuálne
Kapitola 4: Kongurácia pomocou internetového grackého užívateľského rozhrania (GUI) DSL-N11
23

2. Zvoľte
Country (Krajina) a ISP
krajina a ISP nenachádzajú v zozname, zvoľte
napíšte svoje
VPI
a
VCI
a následne kliknite na
; následne kliknite na
Next (Ďalej)
. Ak sa vaša
Not list (Nie je v zozname)
Next (Ďalej)
. O hodnoty VPI/VCI
môžete požiadať svojho ISP.
3. V
rámci prihlasovacej stránky napíšte predvolené užívateľské meno (admin) a
heslo (admin).
4. Smerovač
podporuje tieto typy pripojenia: PPP pomocou ATM (PPPoA), PPP
pomocou Ethernetu (PPPoE), MAC zapuzdrenie pre cestu sieťou (MER),
IP pomocou ATM (IPoA), a premosťovanie. Zvoľte typ svojho pripojenia a
postupujte podľa pokynov na obrazovke.
Od svojho poskytovateľa internetovej služby (ISP) si vyžiadajte požadované informácie o type
svojho internetového pripojenia.
a
5. Po dokončení kliknite na
Poznámka: Viac podrobností o ASUS QIS nájde v návode na obsluhu na CD s podporou.
Save/Reboot (Uložiť/Reštartovať)
.
DSL-N11 Kapitola 4: Kongurácia pomocou internetového grackého užívateľského rozhrania (GUI)
24

Správa šírky pásma EzQoS
Správa šírky pásma EzQoS vám umožňuje nastaviť prioritu šírky pásma a
spravovať sieťový komunikáciu.
Nastavenie priority šírky pásma:
1. V rámci menu navigácie na ľavej strane obrazovky kliknite na EzQoS
Bandwidth Management (Správa šírky pásma EzQoS)
2. Pre nastavenie priority šírky pásma kliknite na každú z týchto štyroch aplikácií:
Ikona Popis
Gameing Blaster (Zvuková hracia karta)
Smerovač spracuje komunikáciu v rámci hry ako prvú prioritu.
.
Internet Application (Internetová aplikácia)
Smerovač spracuje e-mail, surfovanie po internete a ďalšiu
komunikáciu v rámci internetových aplikácií ako prvú prioritu.
FTP
Smerovač spracuje ako prvú prioritu komunikáciu sťahovania/
ukladania údajov z/na FTP server.
Voip/Video Streaming (Vysielanie prúdu Voip/video
údajov)
Smerovač spracuje zvukovú/video komunikáciu ako prvú
prioritu.
3. Kliknutím na Save (Uložiť)
Kapitola 4: Kongurácia pomocou internetového grackého užívateľského rozhrania (GUI) DSL-N11
uložte nastavenia kongurácie.
25

Inovácia rmvéru
Poznámka: Zo stránky spoločnosti ASUS na adrese http://www.asus.com si stiahnite najnovší
rmvér.
Ako vykonať inováciu rmvéru:
1. V rámci menu navigácie na ľavej strane obrazovky kliknite na Advanced
Setting (Pokročilé nastavenia).
2. V rámci ikony Administration (Správa) kliknite na Firmware Upgrade (Inovácia
rmvéru).
3. V
políčku New Firmware File (Súbor nového rmvéru) kliknite na Browse
(Vyhľadávať) s cieľom nájsť nový rmvér vo vašom počítači.
liknite na Upload (Odoslať). Proces odosielania trvá asi tri minúty.
4. K
Poznámka: Pokiaľ proces inovácie zlyhá, bezdrôtový smerovač automaticky prejde do
núdzového režimu alebo do režimu chyby a LED indikátor napájania na prednom paneli
začne pomaly blikať. Na obnovu alebo opravu systému použite pomocný program Firmware
Restoration (Obnova rmvéru).
DSL-N11 Kapitola 4: Kongurácia pomocou internetového grackého užívateľského rozhrania (GUI)
26

Obnovenie/uloženie/odoslanie nastavení
Ako obnoviť/uložiť/odoslať nastavenia:
1. V rámci menu navigácie na ľavej strane obrazovky kliknite na Advanced
Setting (Pokročilé nastavenia).
2. V
rámci menu Administration (Správa) kliknite na Restore/Save/Upload Setting
(Obnoviť/uložiť/odoslať nastavenia).
yberte úlohu, ktorú chcete vykonať:
3. V
• Pre obnovu predvolených výrobných nastavení kliknite na Restore (Obnoviť) a
následne kliknite na OK v rámci správy pre potvrdenie.
• Ak
chcete uložiť aktuálne nastavenie pre systém, kliknite na Save (Uložiť) a
následne kliknite na Save (Uložiť) v rámci okna pre stiahnutie súboru s cieľom
uložiť systémový súbor na vami preferované miesto.
• Pre obnovenie predchádzajúcich systémových nastavení kliknite na Browse
(Prehľadávať) aby ste našli systémový súbor, ktorý chcete obnoviť a následne
kliknite na Upload (Odoslať).
Kapitola 4: Kongurácia pomocou internetového grackého užívateľského rozhrania (GUI) DSL-N11
27

Riešenie problémov
5
Riešenie problémov
Tento sprievodca riešením problémov poskytuje odpovede na bežné problémy,
s ktorými sa môžete stretnúť počas inštalácie a/alebo počas používania
bezdrôtového smerovača ASUS. Tieto problémy vyžadujú jednoduché riešenie,
ktoré môžete zrealizovať sami. Pokiaľ sa vyskytnú problémy, ktoré nie sú uvedené
v tejto časti, spojte sa s technickou podporou ASUS.
Problém Činnosť
Nedokážeme získať
prístup do internetového
prehliadača s cieľom
nakongurovať smerovač.
Klient nedokáže vytvoriť
bezdrôtové spojenie so
smerovačom.
1. Spustite internetový prehliadač, následne
kliknite na T
Options... (Možnosti internetu...)
2. V rámci adresára Temporary Internet les
(Dočasné internetové súbory) kliknite na
Delete Cookies... (Vymazať Cookies...) a
Delete Files... (Vymazať súbory...)
Mimo rozsahu:
• Presuňte smerovač bližšie k bezdrôtovému
klientovi.
yskúšajte zmeniť nastavenie kanála.
• V
ools (Nástroje) > Internet
Overenie:
• Na pripojenie smerovača použite pripojenie
káblom.
• Skontrolujte nastavenie zabezpečenia
bezdrôtovej komunikácie.
• Stlačte tlačidlo Restore (Obnoviť) na
zadnom paneli počas doby dlhšej ako päť
sekúnd.
Nie je možné nájsť smerovač:
• Stlačte tlačidlo Restore (Obnoviť) na
zadnom paneli počas doby dlhšej ako päť
sekúnd.
• Skontrolujte nastavenie adaptéra
bezdrôtového pripojenia, ako je nastavenie
SSID a kódovania.
DSL-N11 Kapitola 5: Riešenie problémov
28

Problém Činnosť
Nie je možné získať prístup
do internetu pomocou
• Presuňte smerovač bližšie k bezdrôtovému
klientovi.
adaptéra bezdrôtovej LAN
• Skontrolujte, či je adaptér bezdrôtového
pripojenia pripojený ku správnemu
bezdrôtovému smerovaču.
• Skontrolujte, či používaný kanál bezdrôtovej
komunikácie vyhovuje pre kanály dostupné
vo vašej krajine/oblasti.
• Skontrolujte nastavenie kódovania.
Skontrolujte správnosť káblového pripojenia
•
alebo pripojenia ADSL.
• Pokúste sa ešte raz použitím iného Ethernet
kábla.
Internet nie je dostupný • Skontrolujte indikátory stavu na
ADSL
modeme a bezdrôtovom smerovači.
• Skontrolujte, či LED indikátor „WAN“ na
bezdrôtovom smerovači SVIETI. Ak LED
indikátor NESVIETI, vymeňte kábel a skúste
znova.
Pokiaľ indikátor „Link“
• Reštartujte počítač.
(Linka) na ADSL modeme
SVIETI (nebliká), znamená
to, že prístup do internetu je
možný.
Pozrite si stručný návod na nastavenie
•
bezdrôtového smerovača a vykonajte
prekongurovanie nastavení.
• Skontrolujte, či LED indikátor „WAN“ na
bezdrôtovom smerovači SVIETI.
• Skontrolujte nastavenie kódovania
bezdrôtovej komunikácie.
• Skontrolujte, či počítač dokáže získať IP
adresu (ako prostredníctvom káblovej siete,
tak aj prostredníctvom bezdrôtovej siete).
• Presvedčte sa, že váš internetový
prehliadač je nakongurovaný na využívanie
miestnej LAN a nie je nakongurovaný na
využívanie Proxy servera.
Kapitola 5: Riešenie problémov DSL-N11
29

Problém Činnosť
Ak indikátor „LINK“ (LINKA)
na ADSL neustále bliká
alebo nesvieti, prístup do
internetu nie je možný
- smerovač nie je schopný
vytvoriť spojenie so sieťou
ADSL.
Zabudli ste názov siete
alebo kódovacie kľúče
Ako obnoviť predvolené
systémové nastavenia
• Presvedčte sa, že vaše káble sú správne
pripojené.
• Odpojte sieťový kábel od
ADSL alebo
káblového modemu, počkajte niekoľko
minút a následne kábel opätovne pripojte.
• Ak indikátor na ADSL aj naďalej bliká alebo
NESVIETI, spojte s poskytovateľom služby
ADSL.
• Pokúste sa vytvoriť káblové spojenie
a konguráciu kódovania bezdrôtovej
komunikácie ešte raz.
• Stlačte tlačidlo Restore (Obnoviť) na
zadnom paneli bezdrôtového smerovača
počas doby dlhšej ako päť sekúnd.
• Stlačte tlačidlo Restore (Obnoviť) na
zadnom paneli bezdrôtového smerovača
počas doby dlhšej ako päť sekúnd.
V ďalšom sú uvedené predvolené výrobné
nastavenia:
Užívateľské meno: admin
admin
Heslo:
Aktivovať DHCP: Áno (pokiaľ je zastrčený
kábel pre WAN)
IP adresa: 192.168.1.1
Názov domény: (prázdny)
Maska podsiete: 255.255.255.0
DNS Server 1: 192.168.1.1
DNS Server 2: (prázdny)
SSID: predvoľba
DSL-N11 Kapitola 5: Riešenie problémov
30

Služba ASUS DDNS
DSL-N11 je prvým modelom, ktorý podporuje službu ASUS DDNS. Pokiaľ pri
výmene zariadení v servisnom stredisku máte zaregistrovanú službu ASUS DDNS
a chcete si ponechať pôvodný názov domény, prenos údajov je povinnosťou. Viac
informácií získate vo svojom miestnom servisnom stredisku.
Poznámky:
Pokiaľ v rámci domény nedôjde k žiadnej aktivite - ako je prekongurovanie smerovača
alebo prístup k zaregistrovanému názvu domény - počas 90 dní, systém automaticky vymaže
zaregistrované informácie.
Ak sa pri používaní zariadenia vyskytnú problémy alebo ťažkosti, spojte sa so servisným
strediskom.
Často kladené otázky
1. Dôjde k strate zaregistrovaných údajov alebo budú zaregistrované inými
osobami?
Pokiaľ ste si počas 90 dní neaktualizovali zaregistrované údaje, systém
automaticky vymaže zaregistrované údaje a názov domény môže byť
zaregistrovaný inými osobami.
2. Nezaregistroval som službu ASUS DDNS pre smerovač zakúpený pred
šiestimi mesiacmi. Môžem ho stále zaregistrovať?
Áno, stále môžete zaregistrovať službu ASUS DDNS pre svoj smerovač.
Služba DDNS je zabudovaná v rámci vášho zariadenia a preto službu ASUS
DDNS môžete zaregistrovať kedykoľvek. Pred registráciou kliknite na Query
(Dotaz) a overte, či je názov hostiteľa zaregistrovaný alebo nie. Pokiaľ nie je,
systém automaticky zaregistruje názov hostiteľa.
3.
Získal som názov domény skôr a fungoval dokiaľ mi moji priatelia
nepovedali, že nemôžu k môjmu názvu domény získať prístup.
Skontrolujte nasledovné:
1. Internet pracuje správne.
2. DNS server pracuje správne.
3. Kedy ste naposledy aktualizovali názov domény.
Pokiaľ problémy pri získavaní prístupu k vášmu názvu domény pretrvávajú,
spojte sa so servisným strediskom.
4. Môžem zaregistrovať dva názvy domén s cieľom samostatného prístupu
na môj http a ftp server?
Nie, nemôžete. Pre jeden smerovač môžete zaregistrovať iba jeden názov
domény. Pre zavedenie zabezpečenia siete použite funkciu mapovania portov.
Kapitola 5: Riešenie problémov DSL-N11
31

5. Po reštartovaní smerovača vidím iné WAN IP v rámci MS DOS a iné na
stránke kongurácie smerovač.
Toto je normálny jav
. Časový interval medzi serverom ISP DNS a ASUS DDNS
spôsobí rôzne WAN IP v rámci MS DOS a na stránke kongurácie smerovača.
Rôzne ISP môžu mať rôzne časové intervaly pre aktualizáciu IP.
6. Je služba ASUS DDNS bezplatná alebo ide iba o skúšobnú verziu?
Služba ASUS DDNS je bezplatná a ide o službu zabudovanú v niektorých
smerovačoch ASUS. Skontrolujte, čí váš smerovač ASUS podporuje službu
ASUS DDNS.
DSL-N11 Kapitola 5: Riešenie problémov
32

Prílohy
Vyhlásenia
Federal Communications Commission Statement
This device complies with Part 15 of the FCC Rules. Operation is subject to the
following two conditions:
• This device may not cause harmful interference.
•
This device must accept any interference received, including interference that
may cause undesired operation.
This equipment has been tested and found to comply with the limits for a class
B digital device, pursuant to part 15 of the FCC Rules. These limits are designed
to provide reasonable protection against harmful interference in a residential
installation.
This equipment generates, uses and can radiate radio frequency energy and, if
not installed and used in accordance with the instructions, may cause harmful
interference to radio communications. However, there is no guarantee that
interference will not occur in a particular installation. If this equipment does cause
harmful interference to radio or television reception, which can be determined
by turning the equipment off and on, the user is encouraged to try to correct the
interference by one or more of the following measures:
•
Reorient or relocate the receiving antenna.
•
Increase the separation between the equipment and receiver.
• Connect the equipment into an outlet on a circuit different from that to which
the receiver is connected.
• Consult the dealer or an experienced radio/TV technician for help.
Caution: Any changes or modications not expressly approved by the party responsible for
compliance could void the user’s authority to operate the equipment.
REACH
Complying with the REACH (Registration, Evaluation, Authorisation, and
Restriction of Chemicals) regulatory framework, we published the chemical
substances in our products at ASUS REACH website at http://green.asus.com/
english/REACH.htm
Prohibition of Co-location
This device and its antenna(s) must not be co-located or operating in conjunction with
any other antenna or transmitter
Prílohy DSL-N11
33

Safety Information
To maintain compliance with FCC’s RF exposure guidelines, this equipment should
be installed and operated with minimum distance 20cm between the radiator and
your body. Use on the supplied antenna.
Declaration of Conformity for R&TTE directive
1999/5/EC
Essential requirements – Article 3
Protection requirements for health and safety – Article 3.1a
Testing for electric safety according to EN 60950-1 has been conducted. These
are considered relevant and sufcient.
Protection requirements for electromagnetic compatibility – Article 3.1b
Testing for electromagnetic compatibility according to EN 301 489-1 and EN 301
489-17 has been conducted. These are considered relevant and sufcient.
Effective use of the radio spectrum – Article 3.2
Testing for radio test suites according to EN 300 328- 2 has been conducted.
These are considered relevant and sufcient.
CE Mark Warning
This is a Class B product, in a domestic environment, this product may cause radio
interference, in which case the user may be required to take adequate measures.
FCC Radiation Exposure Statement
This equipment complies with FCC radiation exposure limits set forth for an
uncontrolled environment. This equipment should be installed and operated with
minimum distance 20cm between the radiator & your body.
This transmitter must not be co-located or operating in conjunction with any other
antenna or transmitter. 2.4GHz operation of this product in the U.S.A. is rmwarelimited to channels 1 through 11.
DSL-N11 Wireless Router Quick Start Guide DSL-N11 ADSL POWER Sync Data WLAN
WPS 1 2 3 4 R LAN
DSL-N11 Prílohy
34

FCC Part 68 REQUIREMENTS
This equipment complies with Part 68 of the FCC rules and the requirements
adopted by the ACTA. On the bottom of this equipment is a label that
contains, among other information, a product identier in the format US:
ASUDL01BDSLN11. If requested, this number must be provided to the telephone
company.
The REN is used to determine the number of devices that may be connected to a
telephone line. Excessive RENs on a telephone line may result in the devices not
ringing in response to an incoming call. In most but not all areas, the sum of RENs
should not exceed ve (5.0). To be certain of the number of devices that may be
connected to a line, as determined by the total RENs, contact the local telephone
company. For products approved after July 23, 2001, the REN for this product
is part of the product identier that has the format US: ASUDL01BDSLN11. The
digits represented by 01are the REN without a decimal point (e.g., 03 is a REN of
0.3). For earlier products, the REN is separately shown on the label.
A plug and jack used to connect this equipment to the premises wiring and
telephone network must comply with the applicable FCC Part 68 rules and
requirements adopted by the ACTA. A compliant telephone cord and modular
plug is provided with this product. It is designed to be connected to a compatible
modular jack that is also compliant. See installation instructions for details.
If your equipment causes harm to the telephone network, the telephone company
may discontinue your service temporarily. If possible, they will notify you in
advance. But if advance notice is not practical, you will be notied as soon as
possible. You will be informed of your right to le a complaint with the FCC. Your
telephone company may make changes in it is facilities, equipment, operations or
procedures that could affect the proper functioning of your equipment. If they do,
you will be notied in advance to give you an opportunity to maintain uninterrupted
telephone service.
If you experience trouble with this telephone equipment, Please contact the
following address and phone number for information on obtaining service or
repairs.
The telephone company may ask that you disconnect this equipment from the
network until the problem has been corrected or until you are sure that the
equipment is not malfunctioning.
This equipment may not be used on coin service provided by the telephone
company. Connection to party lines is subject to state tariffs.
COMPANY: ASUS Computer International
ADDRESS: 44370 Nobel Drive, Fremount, CA 94536 USA
TEL NO: 510-739-3777 ext.4530
DSL-N11 Wireless Router Quick Start Guide DSL-N11 ADSL POWER Sync Data WLAN
WPS 1 2 3 4 R LAN
Prílohy DSL-N11
35

IC (Canada)
1. 2.4GHz Mobile device (ex. 11b/g/n AP/Router) with xed antenna:
( Industry Canada Statement )
This device complies with RSS-210 of the Industry Canada Rules.
Operation is subject to the following two conditions:
1) this device may not cause interference and
2) this device must accept any interference, including interference that may cause
undesired operation of the device
This Class A digital apparatus complies with Canadian ICES-003.
Cet appareil numerique de la class A est conforme a la norme NMB-003 du
Canada.
IC Radiation Exposure Statement
This equipment complies with Canada radiation exposure limits set forth for
uncontrolled environments. This equipment should be installed and operated with
minimum distance 20cm between the radiator & your body.
This transmitter must not be co-located or operating in conjunction with any other
antenna or transmitter.
2.4GHz operation of this product in Canada is rmware-limited to channels 1
through
11.
CE (Europe)
WLAN 2.4GHz device:
This device can be operated in the EU without restrictions indoor.
However, operated outdoors in France is restricted to 2400 ~ 2454 MHz
(Channel 1 ~ 7).
Safety
1. For apply CSA not control power adapter:
This unit is to be used with an external power adaptor of a Class 2 or level 3 type
and Approved type suitable for use in the North America of equipment installation,
having an output voltage rating of 15 V dc, and output current rating of 0.8
equivalent.
The external AC adapter must be complied with the requirements of LPS (Limited
Power Sources).
Power Supply
Leader
EU: MV12-Y150080-C5
UK: MV12-Y150080-B2
AU: MU12-2150080-A3
DSL-N11 Prílohy
36
A
or

GNU General Public License
Licensing information
This product includes copyrighted third-party software licensed under the terms of
the GNU General Public License. Please see The GNU General Public License
for the exact terms and conditions of this license. We include a copy of the GPL
with every CD shipped with our product. All future rmware updates will also
be accompanied with their respective source code. Please visit our web site for
updated information. Note that we do not offer direct support for the distribution.
GNU GENERAL PUBLIC LICENSE
Version 2, June 1991
Copyright (C) 1989, 1991 Free Software Foundation, Inc.
59 Temple Place, Suite 330, Boston, MA 02111-1307 USA
Everyone is permitted to copy and distribute verbatim copies of this license
document, but changing it is not allowed.
Preamble
The licenses for most software are designed to take away your freedom to
share and change it. By contrast, the GNU General Public License is intended
to guarantee your freedom to share and change free software--to make sure the
software is free for all its users. This General Public License applies to most of the
Free Software Foundation’s software and to any other program whose authors
commit to using it. (Some other Free Software Foundation software is covered
by the GNU Library General Public License instead.) You can apply it to your
programs, too.
When we speak of free software, we are referring to freedom, not price. Our
General Public Licenses are designed to make sure that you have the freedom to
distribute copies of free software (and charge for this service if you wish), that you
receive source code or can get it if you want it, that you can change the software or
use pieces of it in new free programs; and that you know you can do these things.
To protect your rights, we need to make restrictions that forbid anyone to deny
you these rights or to ask you to surrender the rights. These restrictions translate
to certain responsibilities for you if you distribute copies of the software, or if you
modify it.
For example, if you distribute copies of such a program, whether gratis or for a
fee, you must give the recipients all the rights that you have. Y
that they
Prílohy DSL-N11
, too, receive or can get the source code. And you must show them these
ou must make sure
37

terms so they know their rights.
We protect your rights with two steps: (1) copyright the software, and (2) offer you
this license which gives you legal permission to copy, distribute and/or modify the
software.
Also, for each author’s protection and ours, we want to make certain that everyone
understands that there is no warranty for this free software. If the software is
modied by someone else and passed on, we want its recipients to know that what
they have is not the original, so that any problems introduced by others will not
reect on the original authors’ reputations.
Finally, any free program is threatened constantly by software patents. We wish to
avoid the danger that redistributors of a free program will individually obtain patent
licenses, in effect making the program proprietary. To prevent this, we have made
it clear that any patent must be licensed for everyone’s free use or not licensed at
all.
The precise terms and conditions for copying, distribution and modication follow
erms & conditions for copying, distribution, & modication
T
.
0. This License applies to any program or other work which contains a notice
placed by the copyright holder saying it may be distributed under the terms of
this General Public License.
The “Program”, below, refers to any such program
or work, and a “work based on the Program” means either the Program or
any derivative work under copyright law: that is to say, a work containing
the Program or a portion of it, either verbatim or with modications and/or
translated into another language. (Hereinafter, translation is included without
limitation in the term “modication”.) Each licensee is addressed as “you”.
Activities other than copying, distribution and modication are not covered
by this License; they are outside its scope. The act of running the Program is
not restricted, and the output from the Program is covered only if its contents
constitute a work based on the Program (independent of having been made by
running the Program). Whether that is true depends on what the Program does.
1.
Y
ou may copy and distribute verbatim copies of the Program’s source code
as you receive it, in any medium, provided that you conspicuously and
appropriately publish on each copy an appropriate copyright notice and
disclaimer of warranty; keep intact all the notices that refer to this License and
to the absence of any warranty; and give any other recipients of the Program a
copy of this License along with the Program.
You may charge a fee for the physical act of transferring a copy
, and you may
at your option offer warranty protection in exchange for a fee.
ou may modify your copy or copies of the Program or any portion of it,
2. Y
DSL-N11 Prílohy
38

thus forming a work based on the Program, and copy and distribute such
modications or work under the terms of Section 1 above, provided that you
also meet all of these conditions:
a) Y
ou must cause the modied les to carry prominent notices stating that
you changed the les and the date of any change.
b) Y
ou must cause any work that you distribute or publish, that in whole or in
part contains or is derived from the Program or any part thereof, to be licensed
as a whole at no charge to all third parties under the terms of this License.
c) If the modied program normally reads commands interactively when run,
you must cause it, when started running for such interactive use in the most
ordinary way, to print or display an announcement including an appropriate
copyright notice and a notice that there is no warranty (or else, saying that
you provide a warranty) and that users may redistribute the program under
these conditions, and telling the user how to view a copy of this License.
(Exception: if the Program itself is interactive but does not normally print such
an announcement, your work based on the Program is not required to print an
announcement.)
These requirements apply to the modied work as a whole. If identiable
sections of that work are not derived from the Program, and can be reasonably
considered independent and separate works in themselves, then this License,
and its terms, do not apply to those sections when you distribute them as
separate works. But when you distribute the same sections as part of a whole
which is a work based on the Program, the distribution of the whole must be on
the terms of this License, whose permissions for other licensees extend to the
entire whole, and thus to each and every part regardless of who wrote it.
Thus, it is not the intent of this section to claim rights or contest your rig
work written entirely by you; rather
, the intent is to exercise the right to control
hts to
the distribution of derivative or collective works based on the Program.
In addition, mere aggregation of another work not based on the Program with
the Program (or with a work based on the Program) on a volume of a storage
or distribution medium does not bring the other work under the scope of this
License.
3. Y
ou may copy and distribute the Program (or a work based on it, under Section
2) in object code or executable form under the terms of Sections 1 and 2 above
provided that you also do one of the following:
a) Accompany it with the complete corresponding machine-readable
source
code, which must be distributed under the terms of Sections 1 and 2 above on
a medium customarily used for software interchange; or,
b) Accompany it with a written offer, valid for at least three years, to give any
third party, for a charge no more than your cost of physically performing source
distribution, a complete machine-readable copy of the corresponding source
code, to be distributed under the terms of Sections 1 and 2 above on a medium
customarily used for software interchange; or,
Prílohy DSL-N11
39

c) Accompany it with the information you received as to the offer to distribute
corresponding source code. (This alternative is allowed only for noncommercial
distribution and only if you received the program in object code or executable
form with such an offer, in accord with Subsection b above.)
The source code for a work means the preferred form of the work for making
modications to it. For an executable work, complete source code means
all the source code for all modules it contains, plus any associated interface
denition les, plus the scripts used to control compilation and installation of
the executable. However, as a special exception, the source code distributed
need not include anything that is normally distributed (in either source or
binary form) with the major components (compiler, kernel, and so on) of the
operating system on which the executable runs, unless that component itself
accompanies the executable.
If distribution of executable or object code is made by of
fering access to copy
from a designated place, then offering equivalent access to copy the source
code from the same place counts as distribution of the source code, even
though third parties are not compelled to copy the source along with the object
code.
4. Y
ou may not copy, modify, sublicense, or distribute the Program except as
expressly provided under this License. Any attempt otherwise to copy, modify,
sublicense or distribute the Program is void, and will automatically terminate
your rights under this License. However, parties who have received copies, or
rights, from you under this License will not have their licenses terminated so
long as such parties remain in full compliance.
5. Y
ou are not required to accept this License, since you have not signed it.
However, nothing else grants you permission to modify or distribute the
Program or its derivative works. These actions are prohibited by law if you do
not accept this License. Therefore, by modifying or distributing the Program (or
any work based on the Program), you indicate your acceptance of this License
to do so, and all its terms and conditions for copying, distributing or modifying
the Program or works based on it.
6. Each time you redistribute the Program (or any work based on the Program),
the recipient automatically receives a license from the original licensor to copy,
distribute or modify the Program subject to these terms and conditions. You
may not impose any further restrictions on the recipients’ exercise of the rights
granted herein. You are not responsible for enforcing compliance by third
parties to this License.
7. If, as a consequence of a court judgment or allegation of patent infringement
or for any other reason (not limited to patent issues), conditions are imposed
DSL-N11 Prílohy
40

on you (whether by court order, agreement or otherwise) that contradict the
conditions of this License, they do not excuse you from the conditions of this
License. If you cannot distribute so as to satisfy simultaneously your obligations
under this License and any other pertinent obligations, then as a consequence
you may not distribute the Program at all. For example, if a patent license
would not permit royalty-free redistribution of the Program by all those who
receive copies directly or indirectly through you, then the only way you could
satisfy both it and this License would be to refrain entirely from distribution of
the Program.
If any portion of this section is held invalid or unenforceable under any
particular circumstance, the balance of the section is intended to apply and the
section as a whole is intended to apply in other circumstances.
It is not the purpose of this section to induce you to infringe any patents or
other property right claims or to contest validity of any such claims; this section
has the sole purpose of protecting the integrity of the free software distribution
system, which is implemented by public license practices. Many people have
made generous contributions to the wide range of software distributed through
that system in reliance on consistent application of that system; it is up to the
author/donor to decide if he or she is willing to distribute software through any
other system and a licensee cannot impose that choice.
This section is intended to make thoroughly clear what is believed to be a
consequence of the rest of this License.
8.
If the distribution and/or use of the Program is restricted in certain countries
either by patents or by copyrighted interfaces, the original copyright holder
who places the Program under this License may add an explicit geographical
distribution limitation excluding those countries, so that distribution is permitted
only in or among countries not thus excluded. In such case, this License
incorporates the limitation as if written in the body of this License.
9. The Free Software Foundation may publish revised and/or new versions of the
General Public License from time to time. Such new versions will be similar in
spirit to the present version, but may dif
fer in detail to address new problems or
concerns.
Each version is given a distinguishing version number. If the Program s
pecies
a version number of this License which applies to it and “any later version”, you
have the option of following the terms and conditions either of that version or
of any later version published by the Free Software Foundation. If the Program
does not specify a version number of this License, you may choose any version
ever published by the Free Software Foundation.
10. If you wish to incorporate parts of the Program into other free programs whose
distribution conditions are different, write to the author to ask for permission.
Prílohy DSL-N11
41

For software which is copyrighted by the Free Software Foundation, write to
the Free Software Foundation; we sometimes make exceptions for this. Our
decision will be guided by the two goals of preserving the free status of all
derivatives of our free software and of promoting the sharing and reuse of
software generally.
NO WARRANTY
1
BECAUSE THE PROGRAM IS LICENSED FREE OF CHARGE, THERE IS
1
NO WARRANTY FOR THE PROGRAM, TO THE EXTENT PERMITTED BY
APPLICABLE LAW. EXCEPT WHEN OTHERWISE STATED IN WRITING
THE COPYRIGHT HOLDERS AND/OR OTHER PARTIES PROVIDE
THE PROGRAM “AS IS” WITHOUT WARRANTY OF ANY KIND, EITHER
EXPRESSED OR IMPLIED, INCLUDING, BUT NOT LIMITED TO, THE
IMPLIED WARRANTIES OF MERCHANTABILITY AND FITNESS FOR
A PARTICULAR PURPOSE. THE ENTIRE RISK AS TO THE QUALITY
AND PERFORMANCE OF THE PROGRAM IS WITH YOU. SHOULD THE
PROGRAM PROVE DEFECTIVE, YOU ASSUME THE COST OF ALL
NECESSARY SERVICING, REPAIR OR CORRECTION.
12
IN NO EVENT
UNLESS REQUIRED BY APPLICABLE LAW OR AGREED
TO IN WRITING WILL ANY COPYRIGHT HOLDER, OR ANY OTHER
PARTY WHO MAY MODIFY AND/OR REDISTRIBUTE THE PROGRAM AS
PERMITTED ABOVE, BE LIABLE TO YOU FOR DAMAGES, INCLUDING
ANY GENERAL, SPECIAL, INCIDENTAL OR CONSEQUENTIAL DAMAGES
ARISING OUT OF THE USE OR INABILITY TO USE THE PROGRAM
(INCLUDING BUT NOT LIMITED TO LOSS OF DATA OR DATA BEING
RENDERED INACCURATE OR LOSSES SUSTAINED BY YOU OR THIRD
PARTIES OR A FAILURE OF THE PROGRAM TO OPERATE WITH ANY
OTHER PROGRAMS), EVEN IF SUCH HOLDER OR OTHER PARTY HAS
BEEN ADVISED OF THE POSSIBILITY OF SUCH DAMAGES.
END OF TERMS AND CONDITIONS
DSL-N11 Prílohy
42

Manufacturer:
Authorised representative
in Europe:
Authorised distributors
in Turkey:
ASUSTeK Computer Inc.
Tel: +886-2-2894-3447
Address: No. 150, LI-DE RD., PEITOU, TAIPEI 112,
TAIWAN
ASUS Computer GmbH
Address: HARKORT STR. 21-23, 40880 RATINGEN,
GERMANY
BOGAZICI BIL GISAYAR SAN. VE TIC. A.S.
Tel: +90 212 3311000
Address: AYAZAGA MAH. KEMERBURGAZ CAD.
NO.10 AYAZAGA/ISTANBUL
INDEX BILGISAYAR SISTEMLERI MUHENDISLIK
SAN. VE TIC. A.S.
Tel: +90 212 3312121
Address: AYAZAGA MAH: CENDERE YOLU NO:9
AYAZAGA/ISTANBUL
Prílohy DSL-N11
43

Kontaktné informácie spoločnosti ASUS
ASUSTeK COMPUTER INC. (Ázia - Tichomorie)
Adresa 15 Li-Te Road, Peitou, Taipei, Taiwan 11259
Internetová stránka www.asus.com
Technická podpora
Telefón +886228943447
Faxové číslo oddelenia podpory +886228907698
Stiahnutie softvéru support.asus.com*
ASUS COMPUTER INTERNATIONAL (Amerika)
Adresa 800 Corporate Way, Fremont, CA 94539, USA
Telefón +15029550883
Fax +15029338713
Internetová stránka usa.asus.com
Stiahnutie softvéru support.asus.com*
ASUS COMPUTER GmbH (Nemecko a Rakúsko)
Adresa Harkort Str. 21-23, D40880 Ratingen, Nemecko
Fax +492102959911
Internetová stránka www.asus.de
On-line kontakt www.asus.de/sales
Technická podpora
Telefón - komponenty +49-1805-010923
Telefón systémy/notebooky
/Eee/LCD +49-1805-010920
Faxové číslo oddelenia podpory +492102959911
On-line podpora support.asus.com*
* Na tejto stránke je k dispozícii on-line Technical Inquiry Form (Formulár žiadosti o technickú
pomoc), ktorý môžete vyplniť s cieľom spojenia sa s oddelením technickej podpory.
DSL-N11 Prílohy
44
 Loading...