

Page 1

®
System Management Software
User’s Manual
Page 2

Disclaimer/Copyrights
Checklist
No part of this manual, including the products and software described in it,
may be reproduced, transmitted, transcribed, stored in a retrieval system, or
translated into any language in any form or by any means, except
documentation kept by the purchaser for backup purposes, without the
express written permission of ASUSTeK COMPUTER INC. (“ASUS”).
ASUS PROVIDES THIS MANUAL “AS IS” WITHOUT W ARRANTY OF ANY
KIND, EITHER EXPRESS OR IMPLIED, INCLUDING BUT NOT LIMITED
TO THE IMPLIED WARRANTIES OR CONDITIONS OF
MERCHANT ABILITY OR FITNESS FOR A P ARTICULAR PURPOSE. IN NO
EVENT SHALL ASUS, ITS DIRECTORS, OFFICERS, EMPLOYEES OR
AGENTS BE LIABLE FOR ANY INDIRECT, SPECIAL, INCIDENTAL, OR
CONSEQUENTIAL DAMAGES (INCLUDING DAMAGES FOR LOSS OF
PROFITS, LOSS OF BUSINESS, LOSS OF USE OR DA T A, INTERRUPTION
OF BUSINESS AND THE LIKE), EVEN IF ASUS HAS BEEN ADVISED OF
THE POSSIBILITY OF SUCH DAMAGES ARISING FROM ANY DEFECT
OR ERROR IN THIS MANUAL OR PRODUCT.
Product warranty or service will not be extended if: (1) the product is repaired,
modified or altered, unless such repair, modification of alteration is authorized
in writing by ASUS; or (2) the serial number of the product is defaced or
missing.
Products and corporate names appearing in this manual may or may not be
registered trademarks or copyrights of their respective companies, and are
used only for identification or explanation and to the owners’ benefit, without
intent to infringe.
The product name and revision number are both printed on the product itself.
Manual revisions are released for each product design represented by the
digit before and after the period of the manual revision number. Manual
updates are represented by the third digit in the manual revision number.
For previous or updated manuals, BIOS, drivers, or product release
information, contact ASUS at http://www.asus.com.tw or through any of the
means indicated on the following page.
SPECIFICATIONS AND INFORMATION CONTAINED IN THIS MANUAL
ARE FURNISHED FOR INFORMA TIONAL USE ONL Y, AND ARE SUBJECT
TO CHANGE AT ANY TIME WITHOUT NOTICE, AND SHOULD NOT BE
CONSTRUED AS A COMMITMENT BY ASUS. ASUS ASSUMES NO
RESPONSIBILITY OR LIABILITY FOR ANY ERRORS OR INACCURACIES
THA T MA Y APPEAR IN THIS MANUAL, INCLUDING THE PRODUCTS AND
SOFTWARE DESCRIBED IN IT.
Copyright © 2001 ASUSTeK COMPUTER INC. All Rights Reserved.
Product Name: ASMS
Manual Revision: 1.00 E791
Release Date: July 2001
2 ASUS System Management Software User’s Manual
Page 3

ASUS Contact Information
ASUSTeK COMPUTER INC. (Asia-Pacific)
Marketing
Address: 150 Li-Te Road, Peitou, Taipei, Taiwan 112
Telephone: +886-2-2894-3447
Fax: +886-2-2894-3449
Email: info@asus.com.tw
Technical Support
Tel (English): +886-2-2890-7123
Tel (Chinese): +886-2-2890-7113
Fax: +886-2-2893-7775
Email: tsd@asus.com.tw
Newsgroup: news2.asus.com.tw
WWW: www.asus.com.tw
FTP: ftp.asus.com.tw/pub/ASUS
ASUS COMPUTER INTERNATIONAL (America)
Features
Marketing
Address: 6737 Mowry Avenue, Mowry Business Center, Building 2
Newark, CA 94560, USA
Fax: +1-510-608-4555
Email: info-usa@asus.com.tw
Technical Support
Fax: +1-510-608-4555
BBS: +1-510-739-3774
Email: tsd@asus.com
WWW: www.asus.com
FTP: ftp.asus.com.tw/pub/ASUS
ASUS COMPUTER GmbH (Europe)
Marketing
Address: Harkortstr. 25, 40880 Ratingen, BRD, Germany
Fax: +49-2102-442066
Email: sales@asuscom.de (for marketing requests only)
Technical Support
Hotline: MB/Others: +49-2102-9599-0
Notebook: +49-2102-9599-10
Fax: +49-2102-9599-11
Support (Email): www.asuscom.de/de/support (for online support)
WWW: www.asuscom.de
FTP: ftp.asuscom.de/pub/ASUSCOM
3ASUS System Management Software User’s Manual
Page 4

Contents
Chapter Descriptions................................................................... 7
ASMA Introduction....................................................................... 8
Installing ASMA Software for Windows ..................................... 9
Install ASMA for Windows 2000 (CD Item 1)............................ 10
Installing SNMP (for ASMA) ..........................................................11
Configuring SNMP (for ASMA)..................................................... 12
ASMA for WinNT Performance Monitor Extensions..................... 14
ASMA for Windows NT Event Viewer .......................................... 16
ASUS System Web-based Management (Windows) ................... 17
Overview of ASWM for Windows............................................ 17
Requirements ......................................................................... 17
Features ................................................................................. 18
Install ASWM for Windows 2000 (CD Item 2)........................... 19
Uninstalling ASWM (or other software) ........................................ 21
Accessing ASWM for Windows .................................................... 22
Using ASUS System Web-based Management ....................... 23
(1) The System Summary Information Screen............................. 23
ASWM Web Display ............................................................... 24
Exception situation ................................................................. 24
Properties ............................................................................... 24
System Information................................................................. 24
(2) System Summary Front View ................................................. 25
(3) System Summary Rear View.................................................. 25
(4) System Summary Top View.................................................... 26
(5) Detailed Heath Information ..................................................... 27
Health: MB Fans..................................................................... 27
Health: MB Temperatures ....................................................... 27
Health: MB Voltages ............................................................... 28
Health: Power Supply ............................................................. 28
Health: Backplane .................................................................. 29
Remapping the Backplane ..................................................... 30
Health: Drives ......................................................................... 31
Health: Memory ...................................................................... 31
Health: CPU Utilization ........................................................... 31
4 ASUS System Management Software User’s Manual
Page 5

Contents
(6) Inventory Items ....................................................................... 32
OS Information ....................................................................... 32
FRU Information ..................................................................... 32
PCI Devices............................................................................ 32
Network Cards........................................................................ 32
Event Log Viewer ................................................................... 32
System Warning........................................................................... 33
System Real Time Chart .............................................................. 34
VNC Client ................................................................................... 35
ASMA Configuration - General..................................................... 36
ASMA Configuration - Alert Mail................................................... 37
ASWM Configuration - General.................................................... 38
IP Access Restrictions ............................................................ 38
Overview of ASMA for Linux......................................................... 39
Installation and Configuration....................................................... 40
Configuration Files ....................................................................... 43
Function Description .................................................................... 45
Utility and MIB File ....................................................................... 45
System/ASMA Log ....................................................................... 45
Using SCSI RAID ......................................................................... 46
ASMA for Linux FAQ .................................................................... 47
Overview of ASWM for Linux ....................................................... 49
Requirements............................................................................... 50
Operation System:.................................................................. 50
Prerequisite Software: ............................................................ 50
Features ....................................................................................... 51
System summary.................................................................... 51
Installing ASWM for Linux ............................................................ 52
I. Configuration of Apache HTTP Server for ASWM .............. 52
II. Configuration of ASMA Agent Info. for ASWM................... 53
III. Configuration of IP Access Information for ASWM ........... 54
IV. Startup ASWM.................................................................. 55
Operations.................................................................................... 55
Uninstalling ASWM for Linux........................................................ 56
5ASUS System Management Software User’s Manual
Page 6

Contents
Using ASUS System Web-based Management ....................... 57
(1) The System Summary Information Screen............................. 57
(2) System Summary Front View ................................................. 59
(3) System Summary Rear View.................................................. 59
(4) System Summary Top View.................................................... 60
(5) Detailed Heath Information ..................................................... 61
Remapping the Backplane ..................................................... 64
(6) Inventory Items ....................................................................... 66
System Warning........................................................................... 67
System Real Time Chart .............................................................. 68
VNC Client ................................................................................... 69
ASMA Configuration - General..................................................... 71
ASMA Configuration - Alert Mail................................................... 73
ASWM Configuration - General.................................................... 74
IP Access Restrictions ............................................................ 74
ASWM for Linux FAQ ................................................................... 75
Install ASMA for Netware 4.x/5.x/6.x (CD Item 3).................... 79
Install and configure SNMP service on Netware 4.x/5.x/6.x ........ 80
Uninstalling ASMA for NetWare.............................................. 81
Appendix..................................................................................... 84
Temperature Conversion Chart.................................................... 84
6 ASUS System Management Software User’s Manual
Page 7

About this Manual
This User’s Manual is intended for advanced system administrators
with hardware and software knowledge of server systems.
Chapter Descriptions
This User’s Manual contains the following parts:
Chapter 1: ASMA for Windows
This chapter describes installation procedures and information for
proper setup of the ASUS System Monitoring Agent software in
Microsoft Windows 2000.
Chapter 2: ASWM for Windows
This chapter describes installation procedures and information for
proper setup of the ASUS System Web-based Management (ASWM)
software in Microsoft Windows 2000.
Chapter 3: ASMA for Linux
This chapter describes installation procedures and usage information
for the ASUS System Monitoring Agent software in Linux.
Chapter 4: ASWM for Linux
This chapter describes installation procedures and usage information
for the ASUS System Web-based Management software in Linux.
Chapter 5: ASMA for Netware
This chapter describes installation procedures and information for
proper setup of the ASUS System Monitoring Agent in Novell
Netware. Note: ASWM is not supported in Netware.
7ASUS System Management Software User’s Manual
Page 8

ASMA for Windows
ASMA Introduction
ASUS System Monitoring Agent is an SNMP agent. This software
module enables computers to be managed by Network Management
Stations (NMSs) through the Internet. ASUS System Monitoring Agent
can report computer fan RPMs, voltage levels, system temperatures,
CPU temperatures, and chassis intrusion to the NMS. ASUS System
Monitoring Agent can enable or disable Automatic Server Restart
(ASR) function remotely from an NMS through the Internet. ASR is a
function that can reboot the computer system automatically when a
computer system hangs. ASUS System Monitoring Agent also support
Remote Reboot function. Users can reboot the computer system from
an NMS through the Internet.
ASUS System Monitoring Agent provides extensions to the Windows
NT Performance Monitor utility that allow you to monitor the computer
fan speeds, voltage levels, system temperatures, and CPU
temperatures on either the local or remote computers without using
an NMS. All you needed is the Windows NT Performance Monitor.
If you have installed a Web Administration for Microsoft Windows NT
Server (software module from Windows NT Resource Kit) and ASUS
System Monitoring Agent on the same server , then authorized users
can monitor computer fan speeds, voltage levels, system
temperatures, and CPU temperatures from any Web browser.
ASUS System Monitoring Agent can record the history of ASUS
System Monitoring Agent status. The status includes the time during
which alert events (fan/voltage/temperature) occur and what type alert
events (fatal/warning/normal) occur. The status also logs the time
ASR/Remote Reboot/Chassis Intrusion is enabled or disabled. These
status events are all logged in the Windows NT Application event log
file. Users can view these event log easily from Windows NT event
viewer. These status events are displayed in different colors (for
example, red for critical events, yellow for warning events, and blue
for normal indication events). Through different colors, one quick look
at the screen will cover the entire scope of every computer status
across the enterprise. Users can also view another computer's ASUS
System Monitoring Agent's event log remotely by logging into that
server’s Windows NT event viewer.
8 ASUS System Management Software User’s Manual
Page 9
ASMA for Windows
Installing ASMA Software for Windows
This chapter will show you the installation procedures and information
needed to complete the software setup.
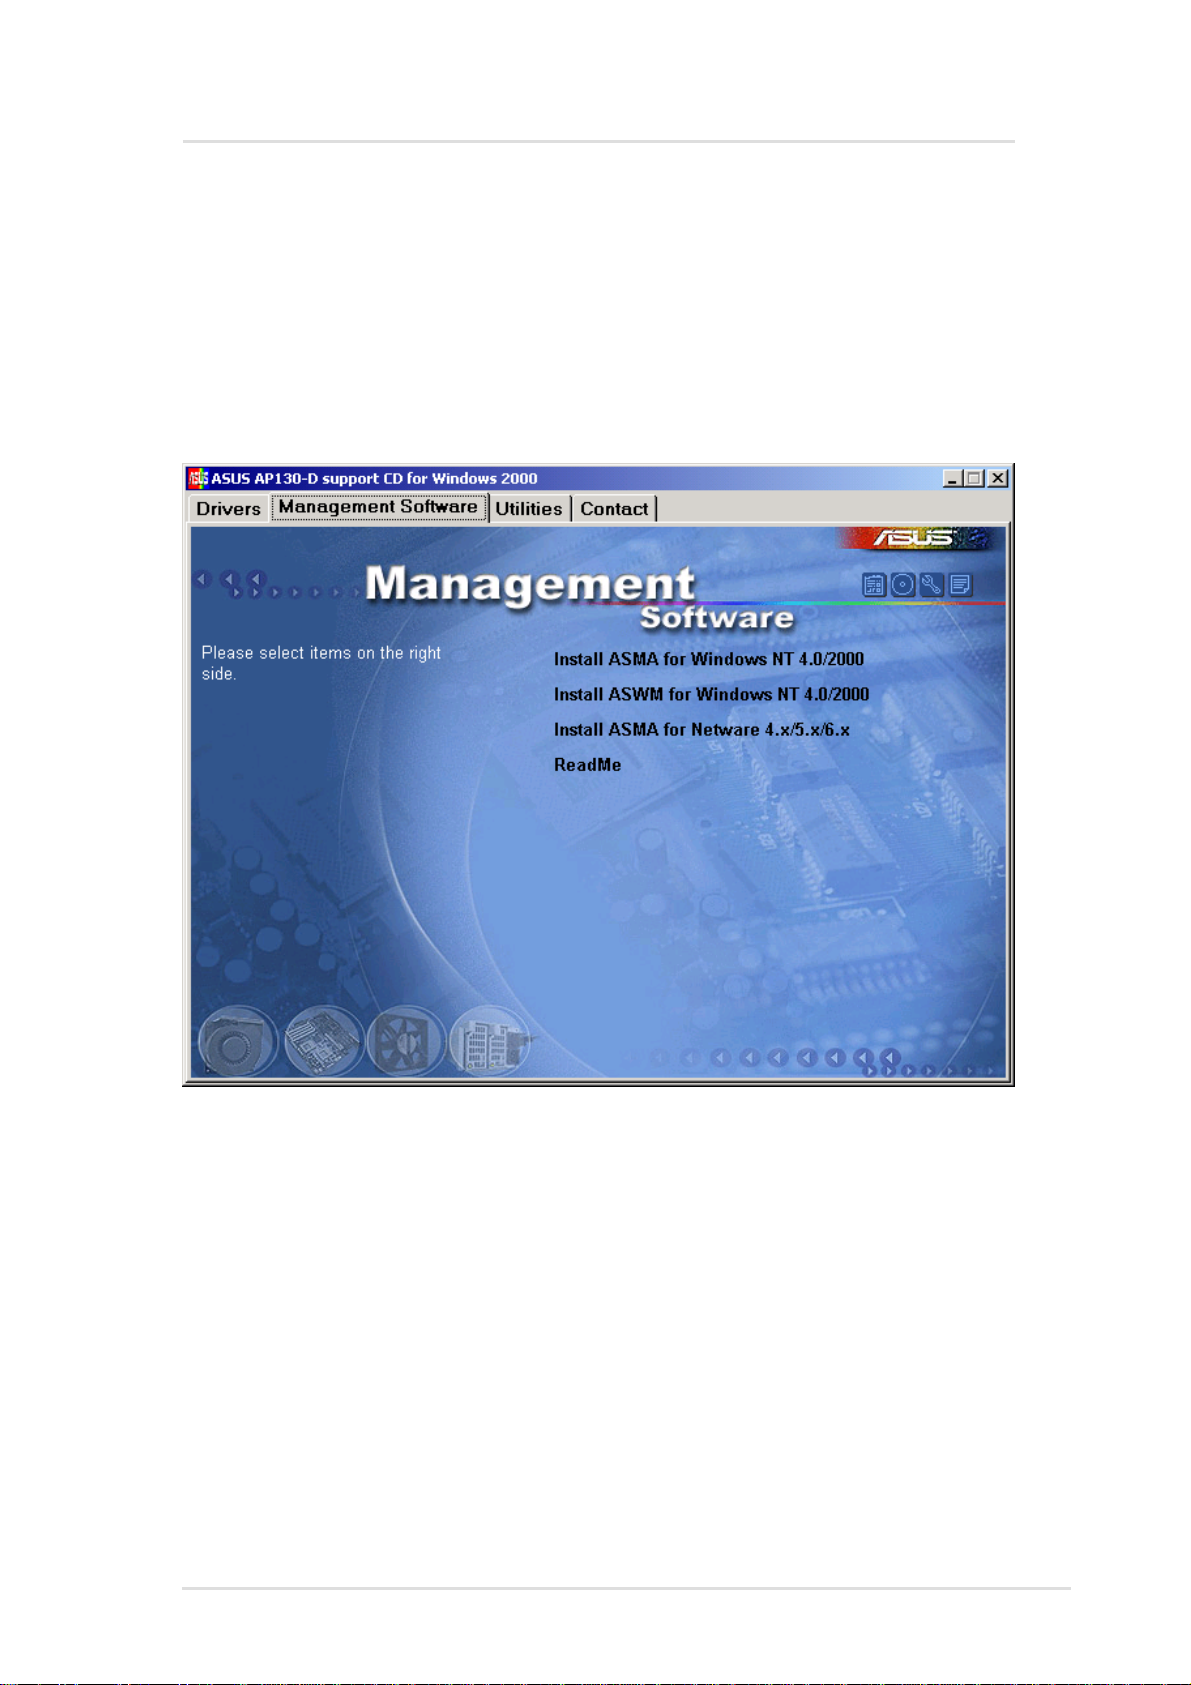
When you insert the support CD in Windows, the following autorun
menu will show. If your autorun is disabled, run bin\ASSETUP.EXE
in the root of the CD.
Chapter 2 : ASMA Software for Windows
9
Page 10
ASMA for Windows
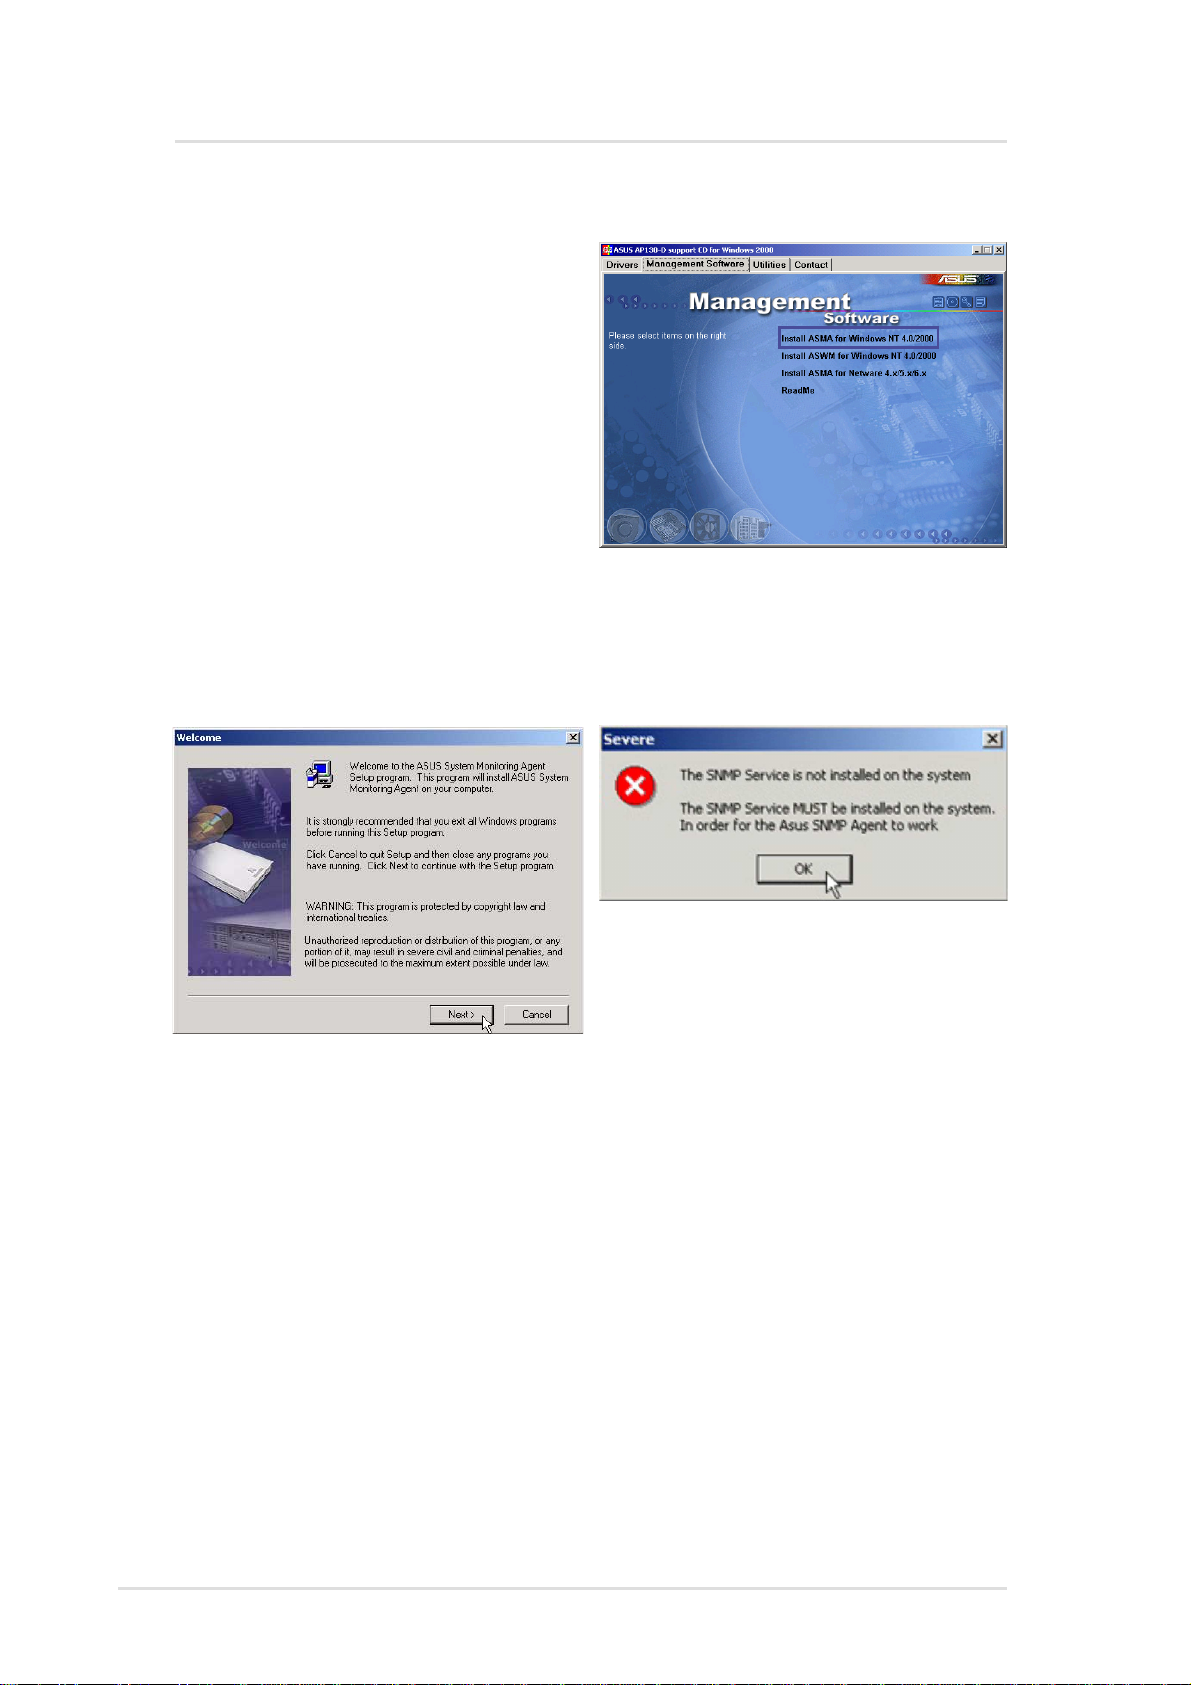
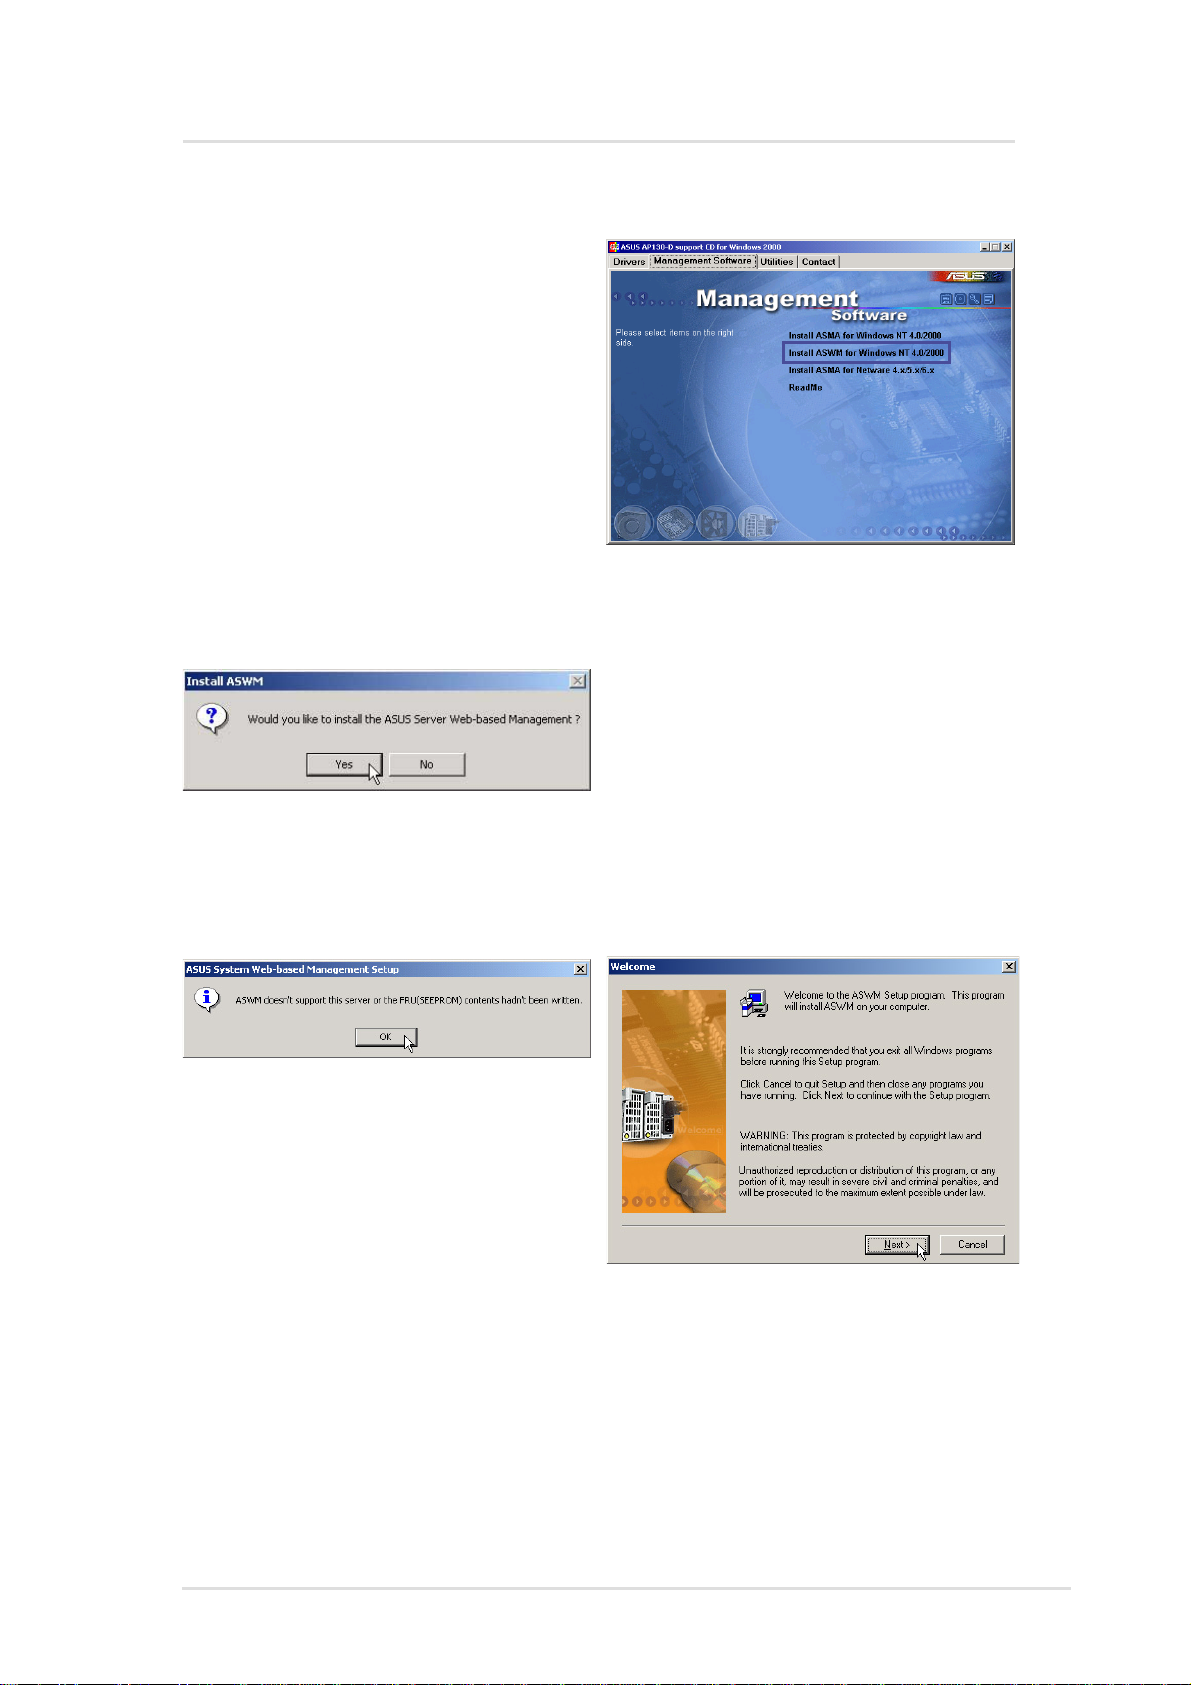
Install ASMA for Windows 2000 (CD Item 1)
Installs ASUS system monitoring
agent for Windows 2000/NT4.
NOTE: You must first install
SNMP service before installing
ASMA
Before you install ASUS System
Monitoring Agent, you should
make sure that SNMP Service is
already installed because the
ASUS System Monitoring Agent need Windows SNMP service to
work correctly. This software also supports Windows NT4.0
(Workstation and Server).
Click Install ASMA for Windows
2000 on the autorun menu. Click Next
after reading the “W elcome” screen.
If SNMP service is not installed on
your system, installation will stop
and you will get this warning
message. Clicking OK will exit the
installation wizard.
10 ASUS System Management Software User’s Manual
Page 11
ASMA for Windows
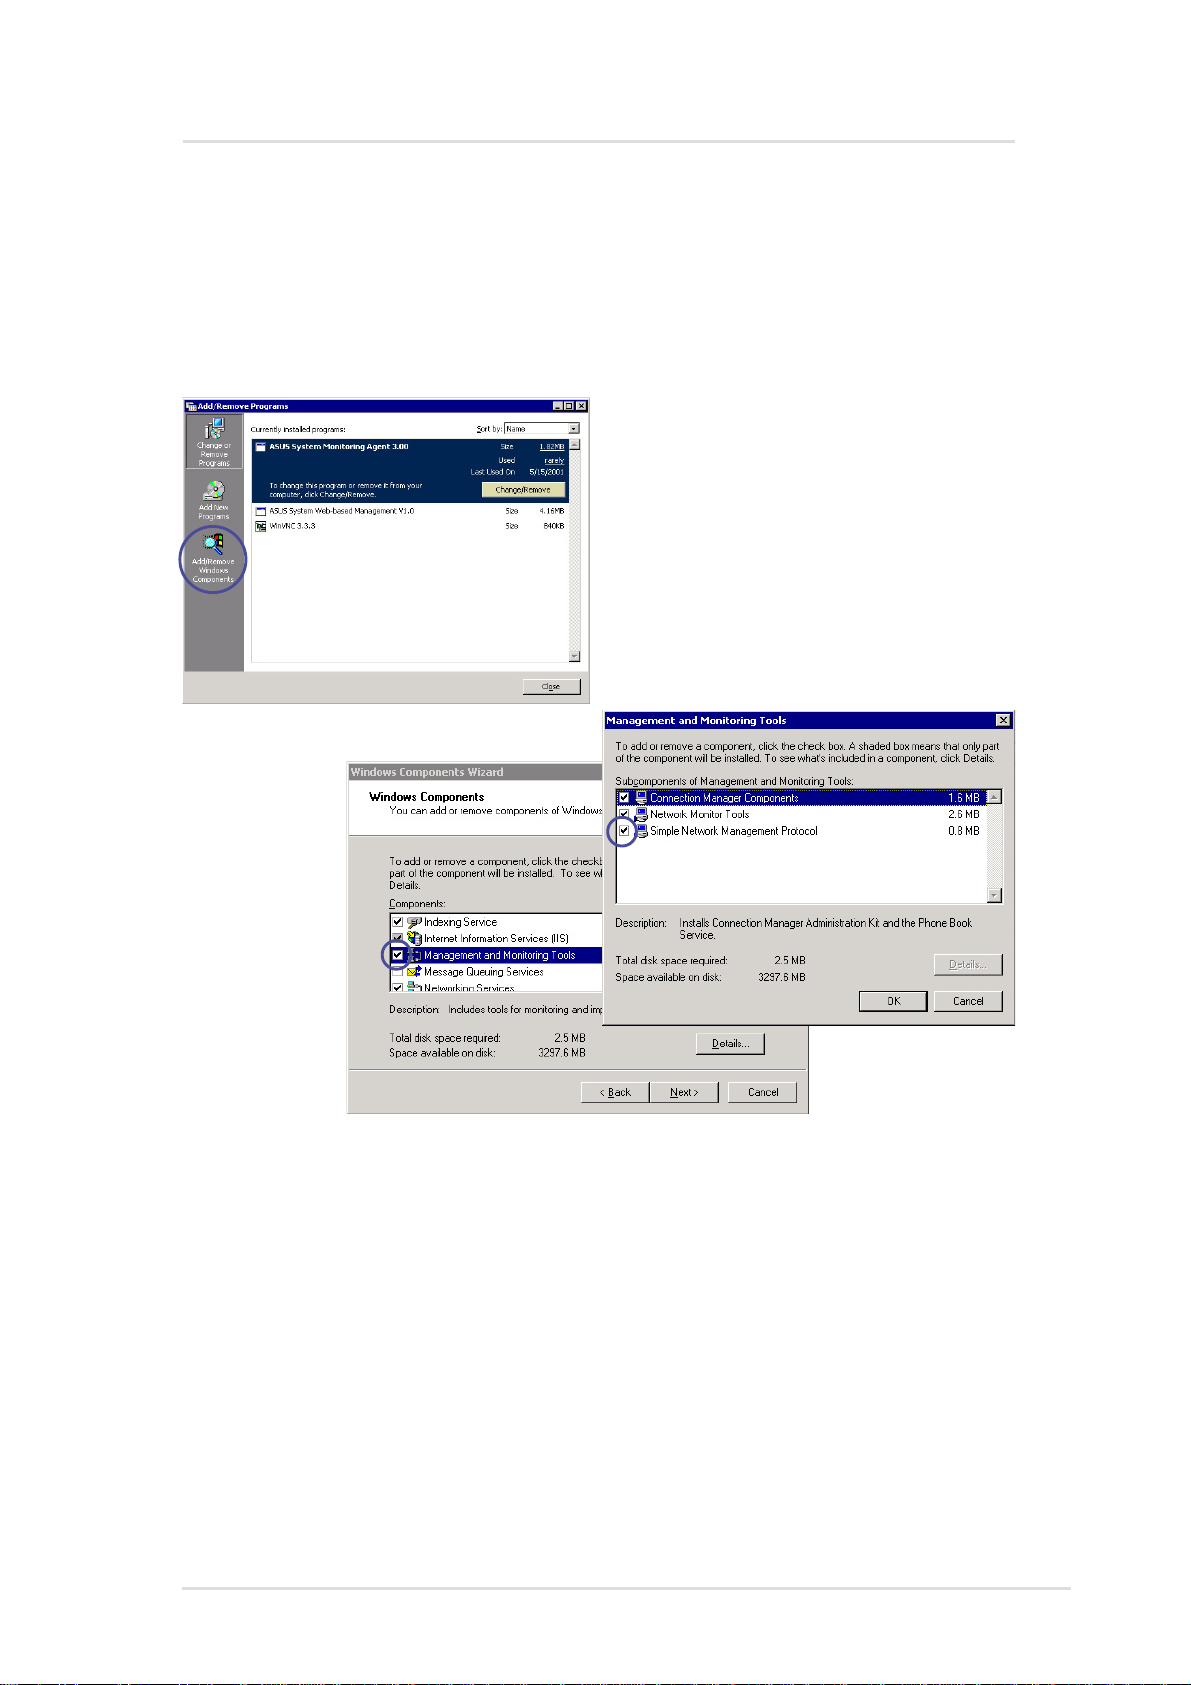
Installing SNMP (for ASMA)
If you did not install SNMP, you will have to do it now. Find “Add/
Remove Programs” in the Control Panel and select Management
and Monitoring Tools which will include Simple Network Management
Protocol (SNMP).
Chapter 2 : ASMA Software for Windows
11
Page 12
ASMA for Windows
Install ASMA for Windows 2000 (Cont’)
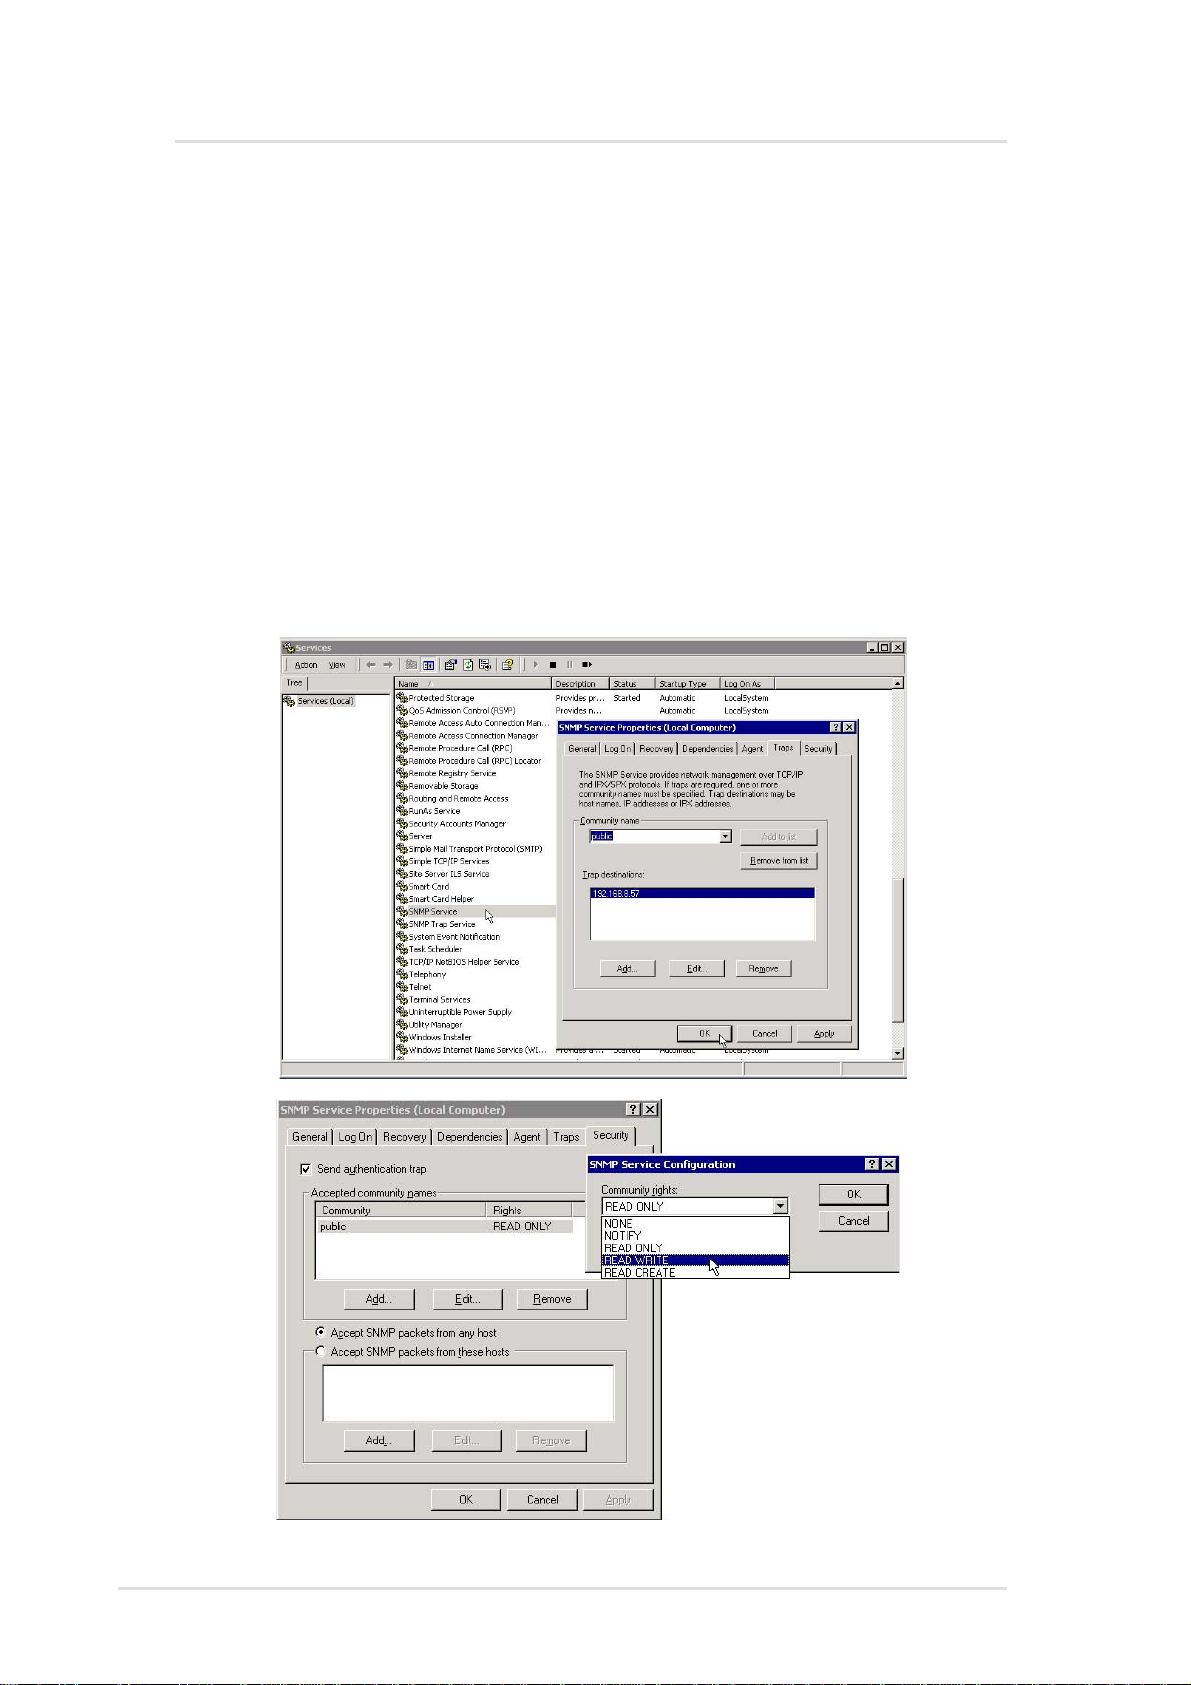
Configuring SNMP (for ASMA)
1. Double click the SNMP Service in “Start | Administrative Tools |
Services”
2. Click the T raps tab
3. Enter a “Community name” such as Public
4. Set a “T rap destination” IP address to the console you want the
messages sent to.
5. Click the Security tab.
6. Change the “Public” community “rights” to READ WRITE
12 ASUS System Management Software User’s Manual
Page 13
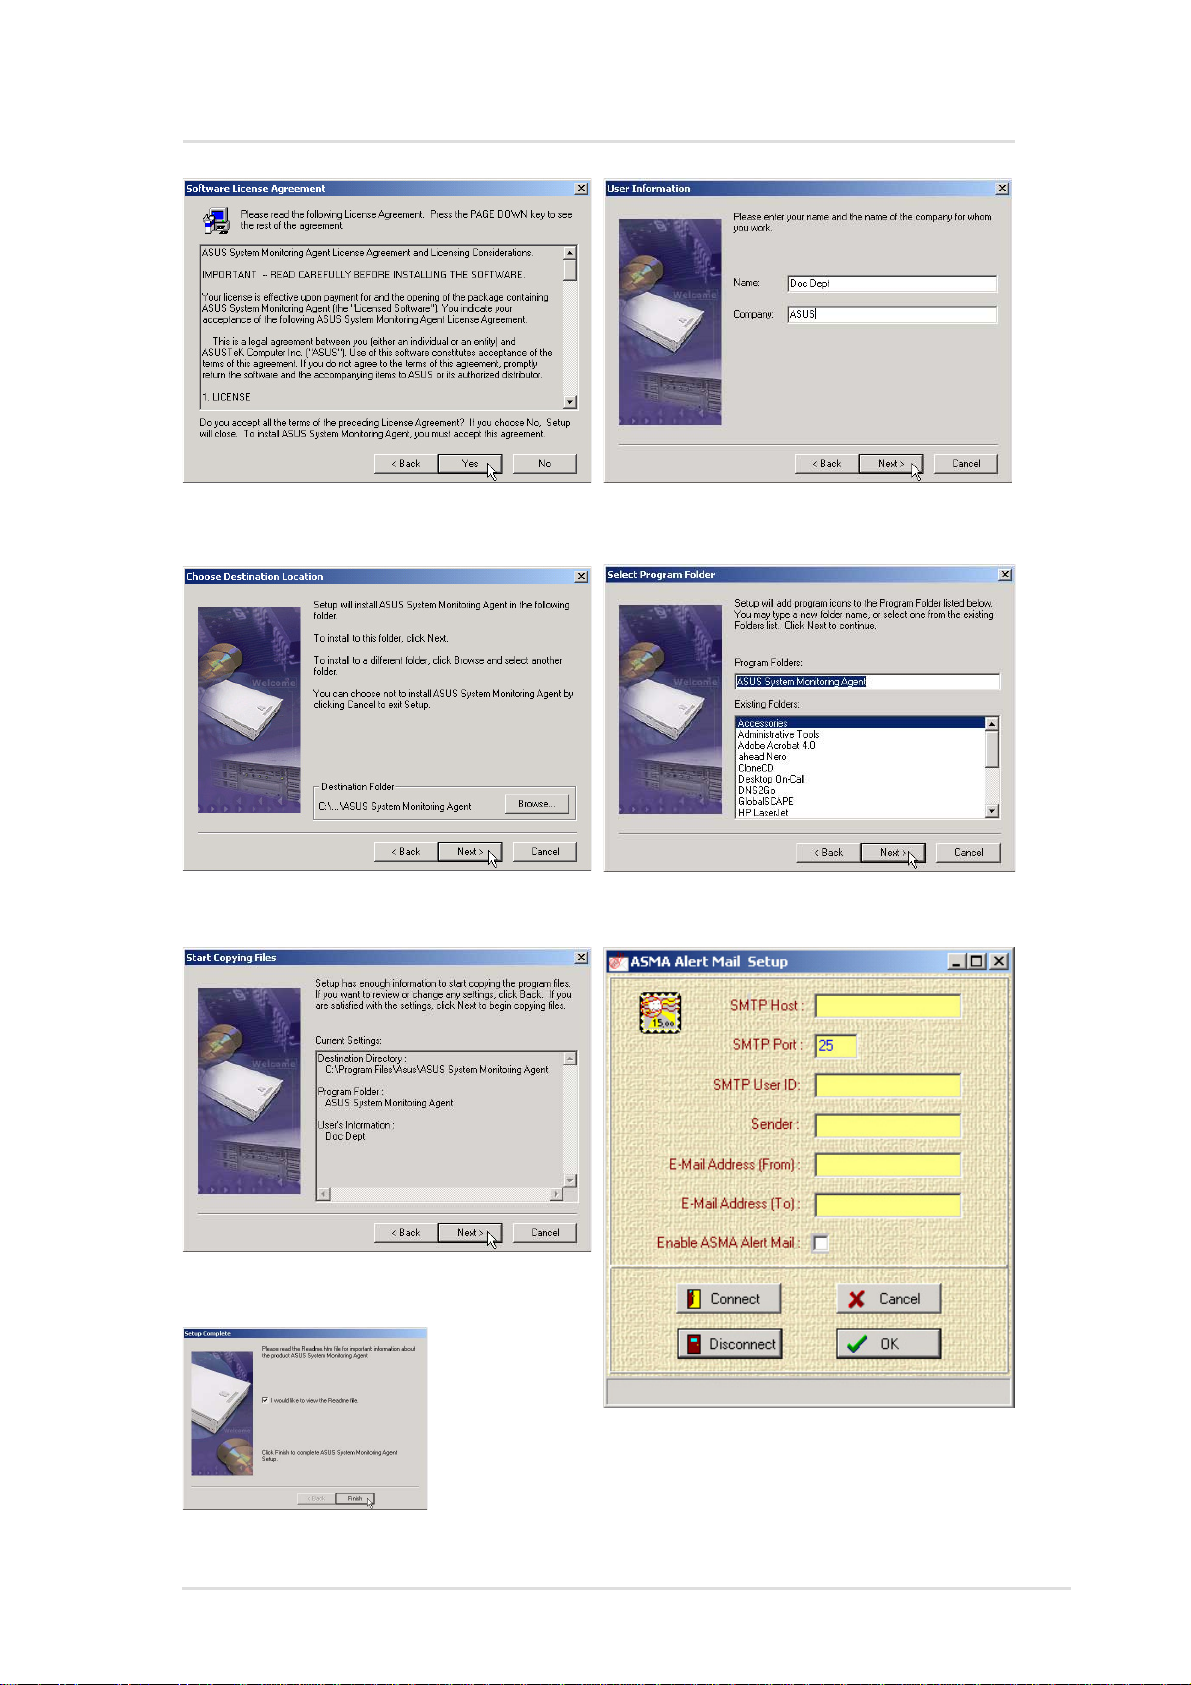
ASMA for Windows
Click Y es after reading the “License
Agreement”
Browse to another folder or click
Next to use the default folder.
Enter a user name and company
name, then click Next to continue.
Specify a program folder for the
icons or click Next to use the default.
V erify the information and click Next
to continue.
Once setup is
complete, you
can select to
view the readme
and click Finish.
Chapter 2 : ASMA Software for Windows
Enter your SMTP information and
select “Enable ASMA Alert Mail”. You
can also enter/edit this information later.
13
Page 14
ASMA for Windows
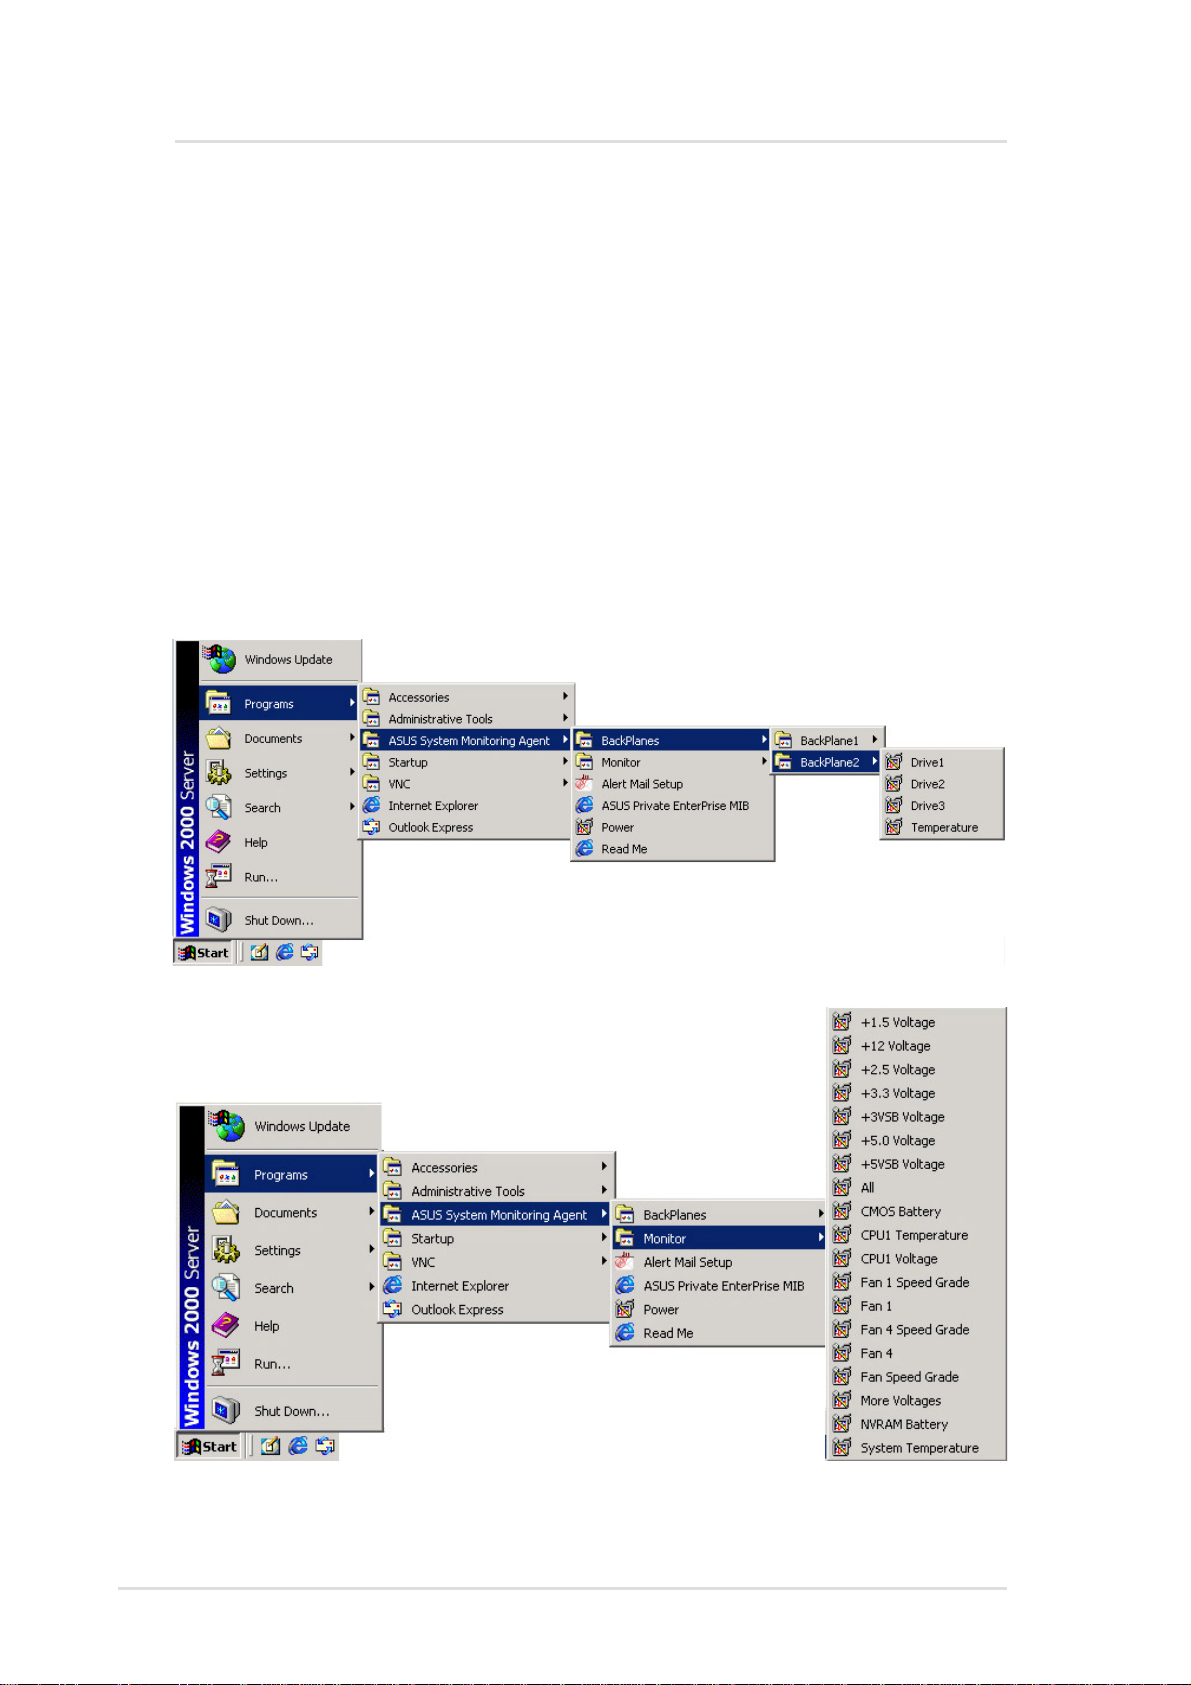
ASMA for WinNT Performance Monitor Extensions
There are two ways that a user can monitor system temperature,
voltage level and fan speed from NT Performance Monitor.
Method 1:
From the Windows NT desktop, choose Start | Programs | ASUS
System Monitor Agent | Monitor . Click the icons from the Monitor that
you can monitor the status of the system's temperature, voltages
and fan speed.
14 ASUS System Management Software User’s Manual
Page 15
ASMA for Windows
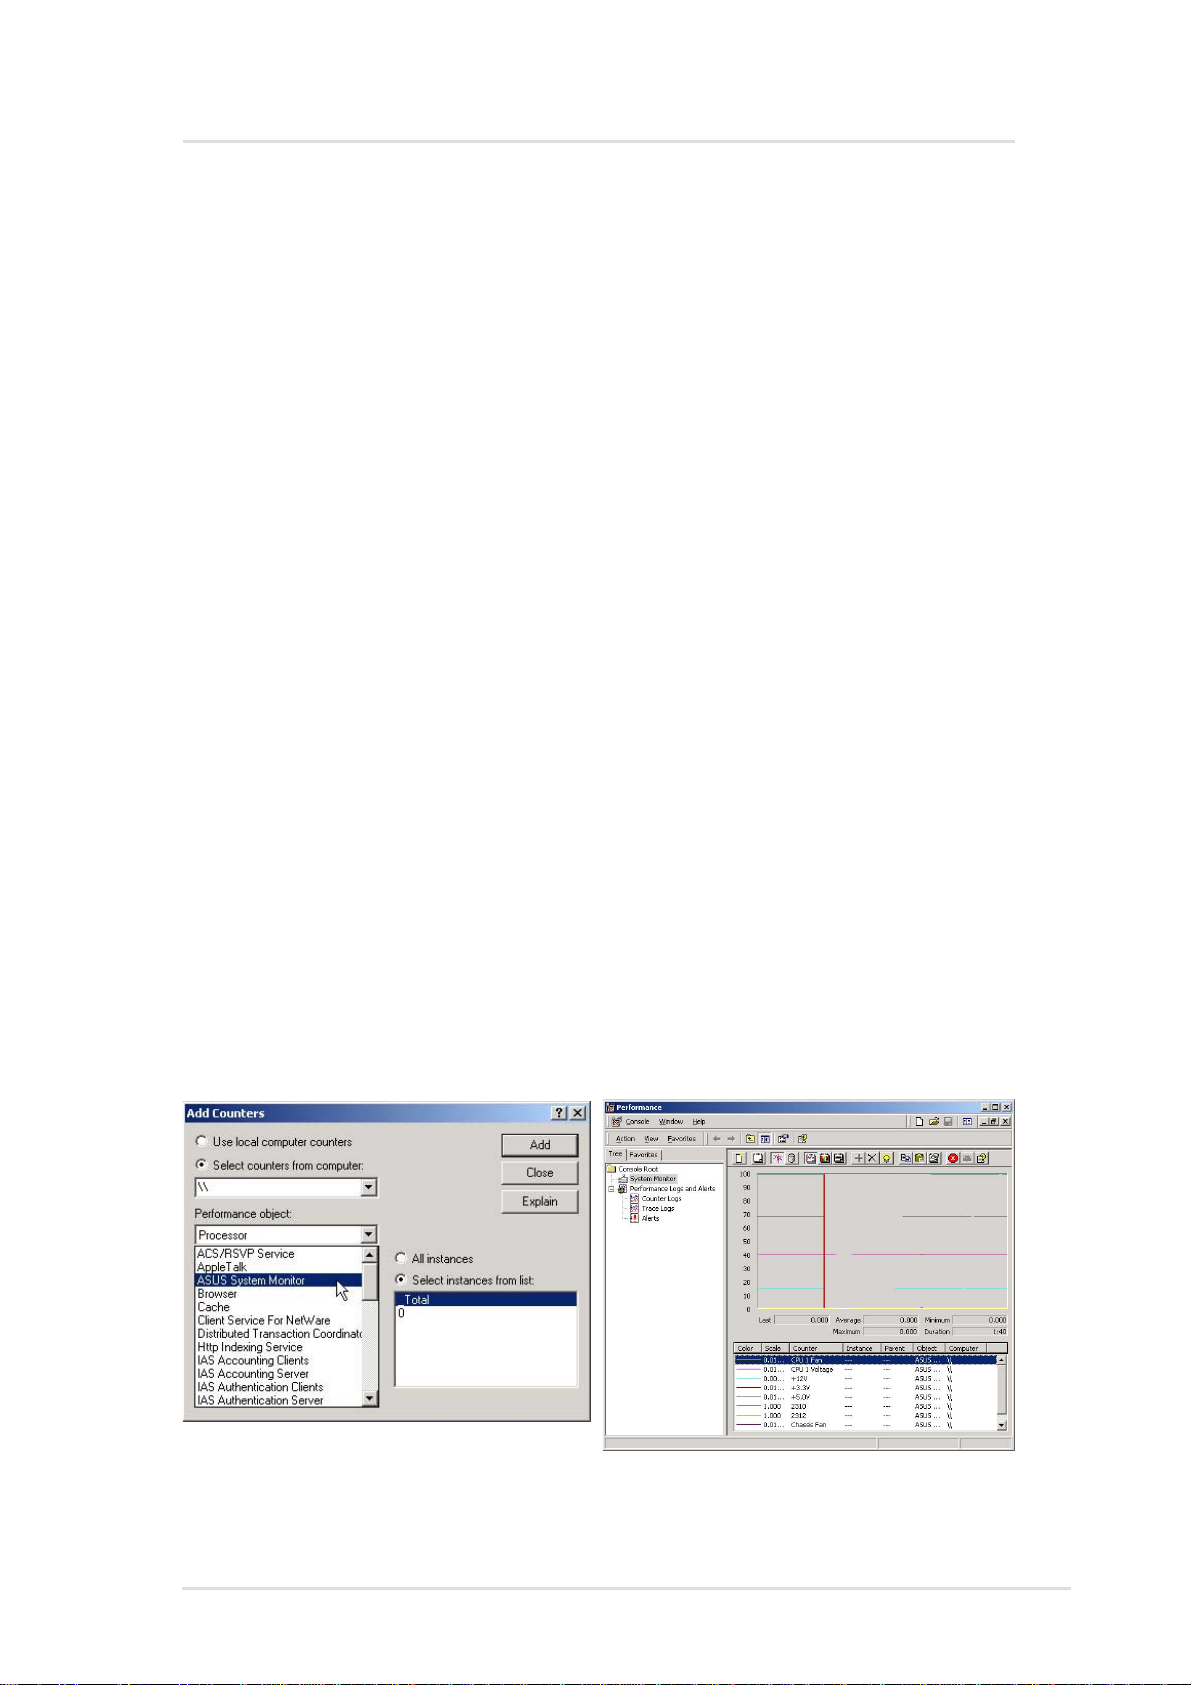
Method 2:
1. From the Windows NT desktop, choose Start | Programs |
Administrative Tools (Common) | Performance Monitor.
2. From the Performance Monitor choose Edit | Add to Chart to
display the Add to Chart dialog box. Y our computer's name should
appear in the Computer field. To monitor a different computer,
click the ... button to the right of the field, which displays a dialog
box.
3. Select the computer you want to monitor from the list and click
OK.
4. From the Object list, choose ASUS System Monitor . This displays
a list of ASUS System Monitor performance counters in the
Counter list box.
5. T o see a description of a counter , click the counter in the Counter
list box, and click the Explain button. This displays a Counter
Definition panel that describes the counter .
6. In the Counter list box, click a performance counter you want to
monitor , and click the Add button. Repeat this step for all counters
you want to monitor .
7. When you are finished adding counters to the chart, close the
Add to Chart dialog box. You can now observe the color-codes
graphs of the counters you have chosen as they illustrate current.
Using Method 2 a user can monitor another computer that is
installed with the ASUS System Monitoring Agent remotely from
the network.
Chapter 2 : ASMA Software for Windows
15
Page 16
ASMA for Windows
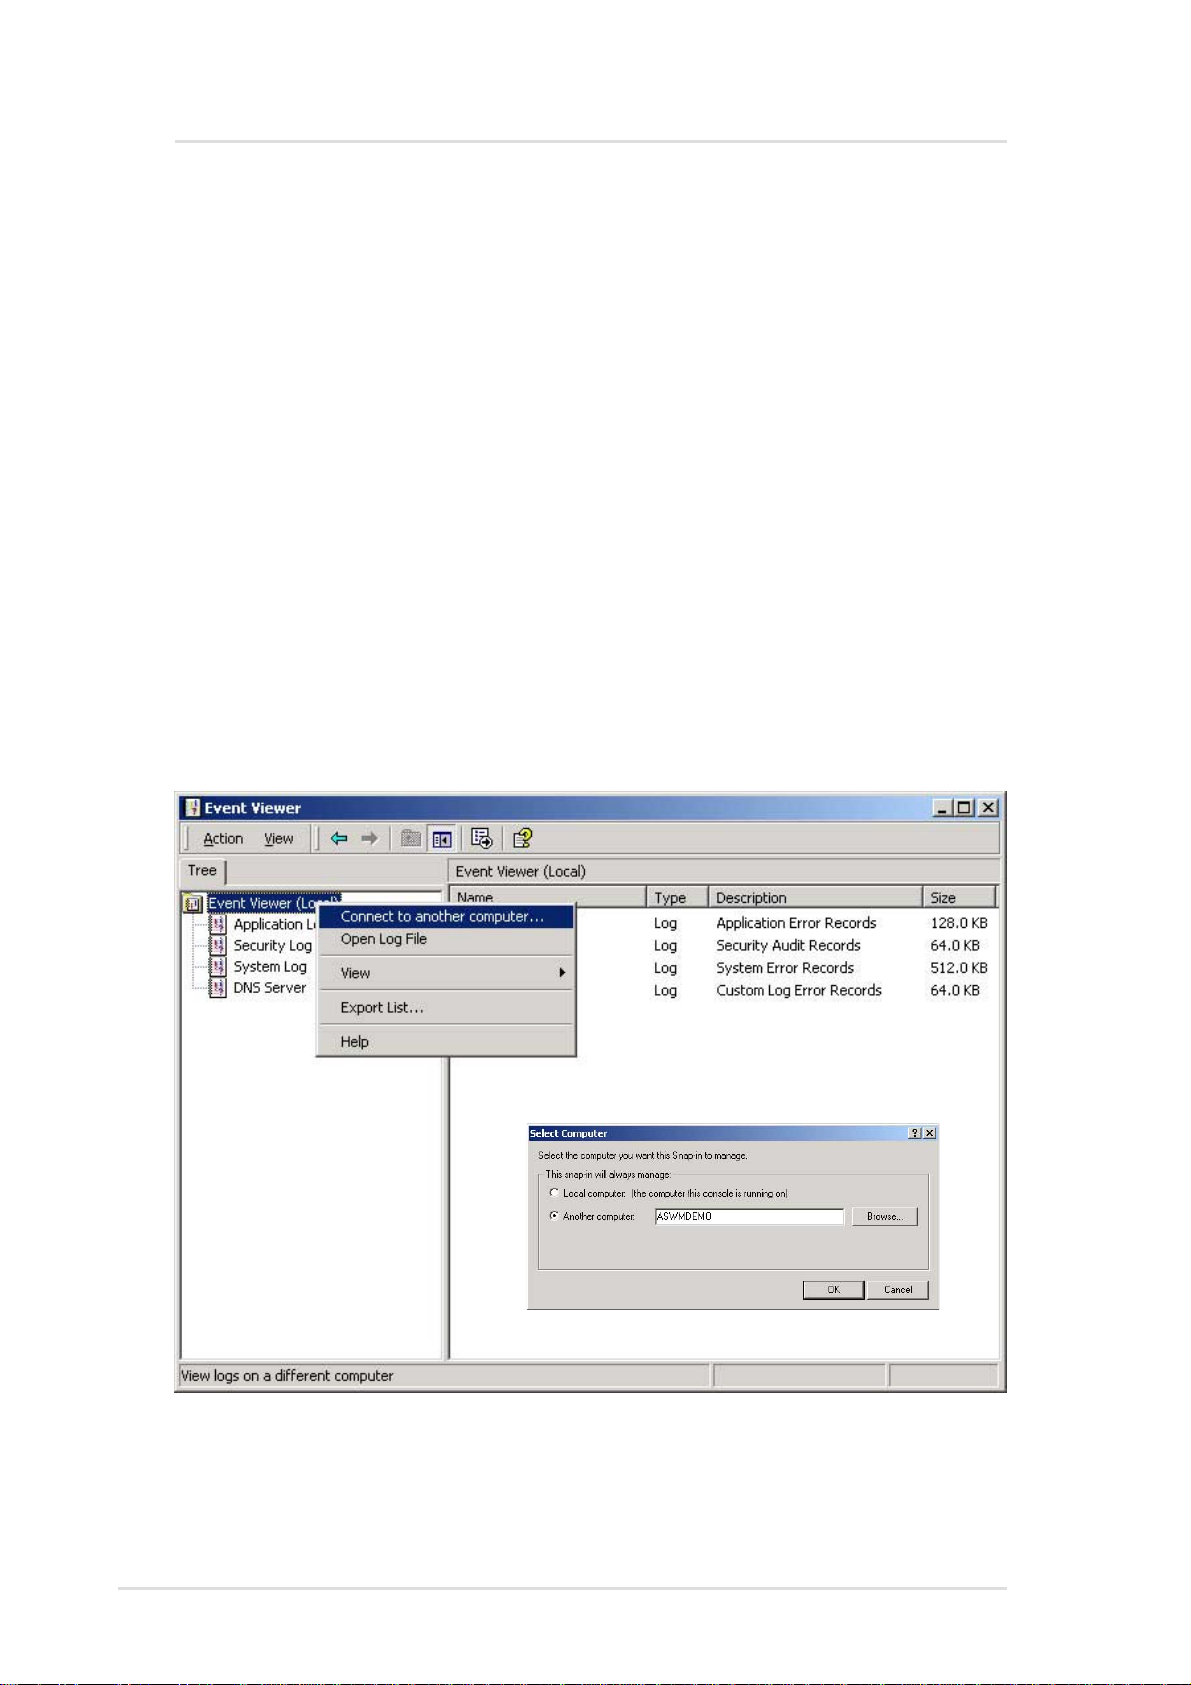
ASMA for Windows NT Event Viewer
There is one method that a user can view ASUS System Monitoring
Agent event log from Windows NT
1. From the Windows NT desktop, choose Start | Programs |
Administrative Tools (common) | Event Viewer and click it.
2. From the Event Viewer choose Log | Select Computer to display
Select Computer dialog box. T o view a dif ferent computer, select
the computer you want to view from the list and click OK.
3. From the Event Viewer choose Log | Application to view the
ASUS System Monitoring Agent's events from ASMA at the
Source field.
By skipping step 2 a user can view local machine ASUS System
Monitoring Agent's events log. For all steps a user can view another
machine events log that is installed with the ASUS System Monitoring
Agent remotely from the network.
16 ASUS System Management Software User’s Manual
Page 17

ASWM for Windows
ASUS System Web-based Management (Windows)
Overview of ASWM for Windows
ASWM is a web-base tool installed in server site to offer managed
ability from HTTP protocol. That is, you can manage server just from
any machine by web browser.
Here are a few of the advantages you can acquire from ASWM.
• The installation and configuration are easy . Only password and
install directory need the choice of user .
• ASWM is web-base tool. Only web browsers is a requirement in
client site.
• Get the REAL server system image from remote site through
browser . (What you see is What you get)
• View up to date data from server side without refresh the page
of browser . And there are icons to indicate the situation of server .
It's easy to locate what problem occurred in server .
• Friendly and straightforward user interface to enhance the ability
to focus the problems of server quickly and easily.
Requirements
Agent (Server) Side
• Operating System:
Windows NT 4.0 (except NT4 workstation)+SP5+Option pack
or Windows 2000 (professional or server).
• Install ASUS System W eb-based Management (ASWM)
• Install ASUS System Management Agent (ASMA) 3.0 or above.
NOTE: If using Windows 2000 professional, only one local web
site can be active so ASWM will disable any other local web site.
Client (User) Side
• Only web browser is required
• Microsoft Internet Explorer 4.0 or above.
• Netscape 4.0 or above, but not Netscape 6.
Chapter 3 : ASWM Software for Windows
17
Page 18

ASWM for Windows
ASUS System Web-based Management
Features
• Real Time Chart
System summary - Health devices
• MB Fans
• MB Temperatures
• MB Voltages
• Backplane
• Drives
• Memory
• CPU
Inventory information
• OS Information
• FRU Information
• PCI devices (Not supported in Windows NT)
• Network cards
• Event log viewer
• VNC client
Configuration
• ASMA Configuration
• ASWM Configuration
18 ASUS System Management Software User’s Manual
Page 19
ASWM for Windows
Install ASWM for Windows 2000 (CD Item 2)
Installs ASUS System Web-based
Management for Windows 2000.
Y ou cannot reinstall ASWM if it has
already been installed. If you are
installing a new version, you
should uninstall the current
version. Because files are shared
out, it is highly recommended that
you install ASWM on an NTFS
partition for better security.
NOTE: You must first install ASMA before installing ASWM.
After you install ASMA successfully ,
you will be asked to install ASWM if
it is not detected on your system.
If your motherboard does not have
the proper information written to the
FRU, you will not be able to continue
with ASWM installation. That is why
it is necessary to buy the ASUS 1U
or 2U server together with this
software package.
Click Next after reading the
“Welcome” message.
Chapter 3 : ASWM Software for Windows
19
Page 20
ASWM for Windows
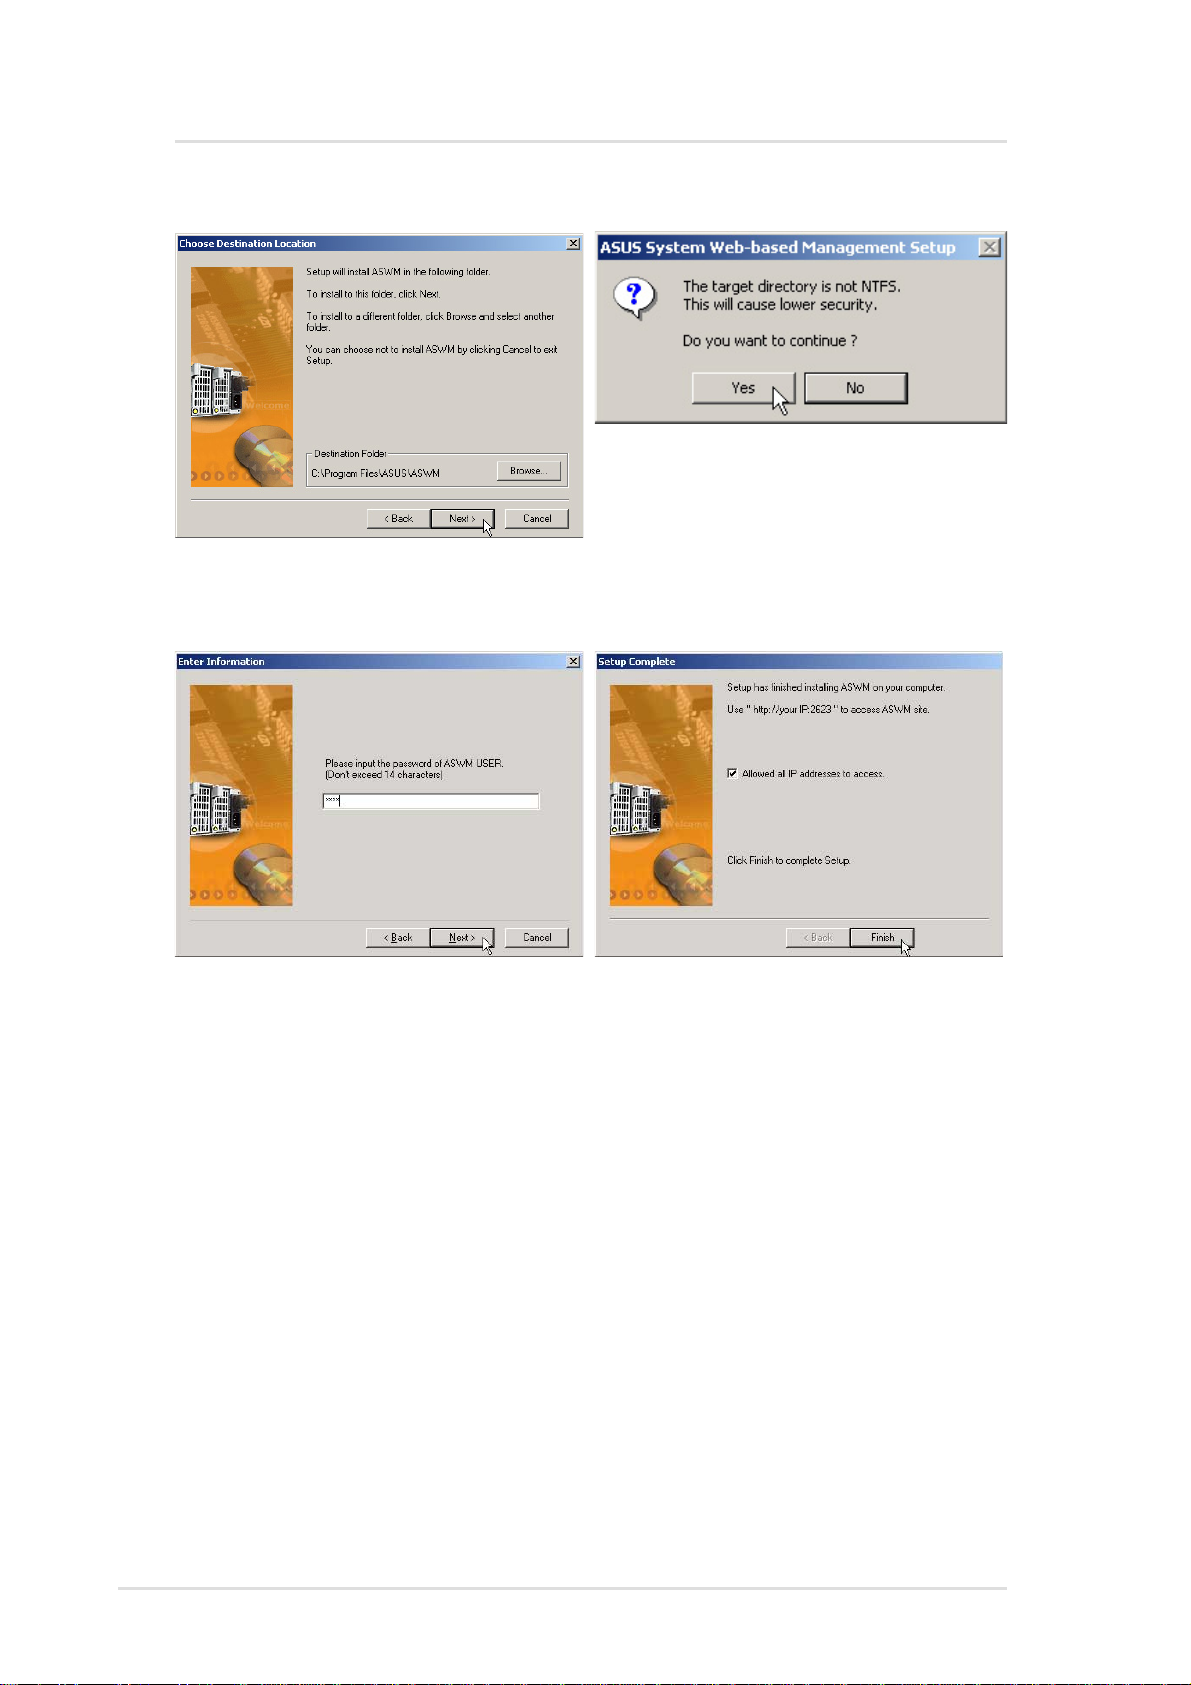
Install ASWM for Windows 2000 (Cont’)
This message lets you know that
Browse to a new destination folder
or click Next to use the default.
NTFS is recommended, but you
may still continue.
Enter a password for accessing
ASWM and click Next. Remember
this password, you will need it to
access ASWM using a Web
browser. A default user “ASWM
USER” will be automatically
created.
After setup is complete, select
whether you want to allow all IP
addresses to access ASWM. If you
deselect it, ASWM can only be
accessed from the host (server where
you installed ASMA/ASWM). Click
Finish to exit the installation wizard.
20 ASUS System Management Software User’s Manual
Page 21
ASWM for Windows
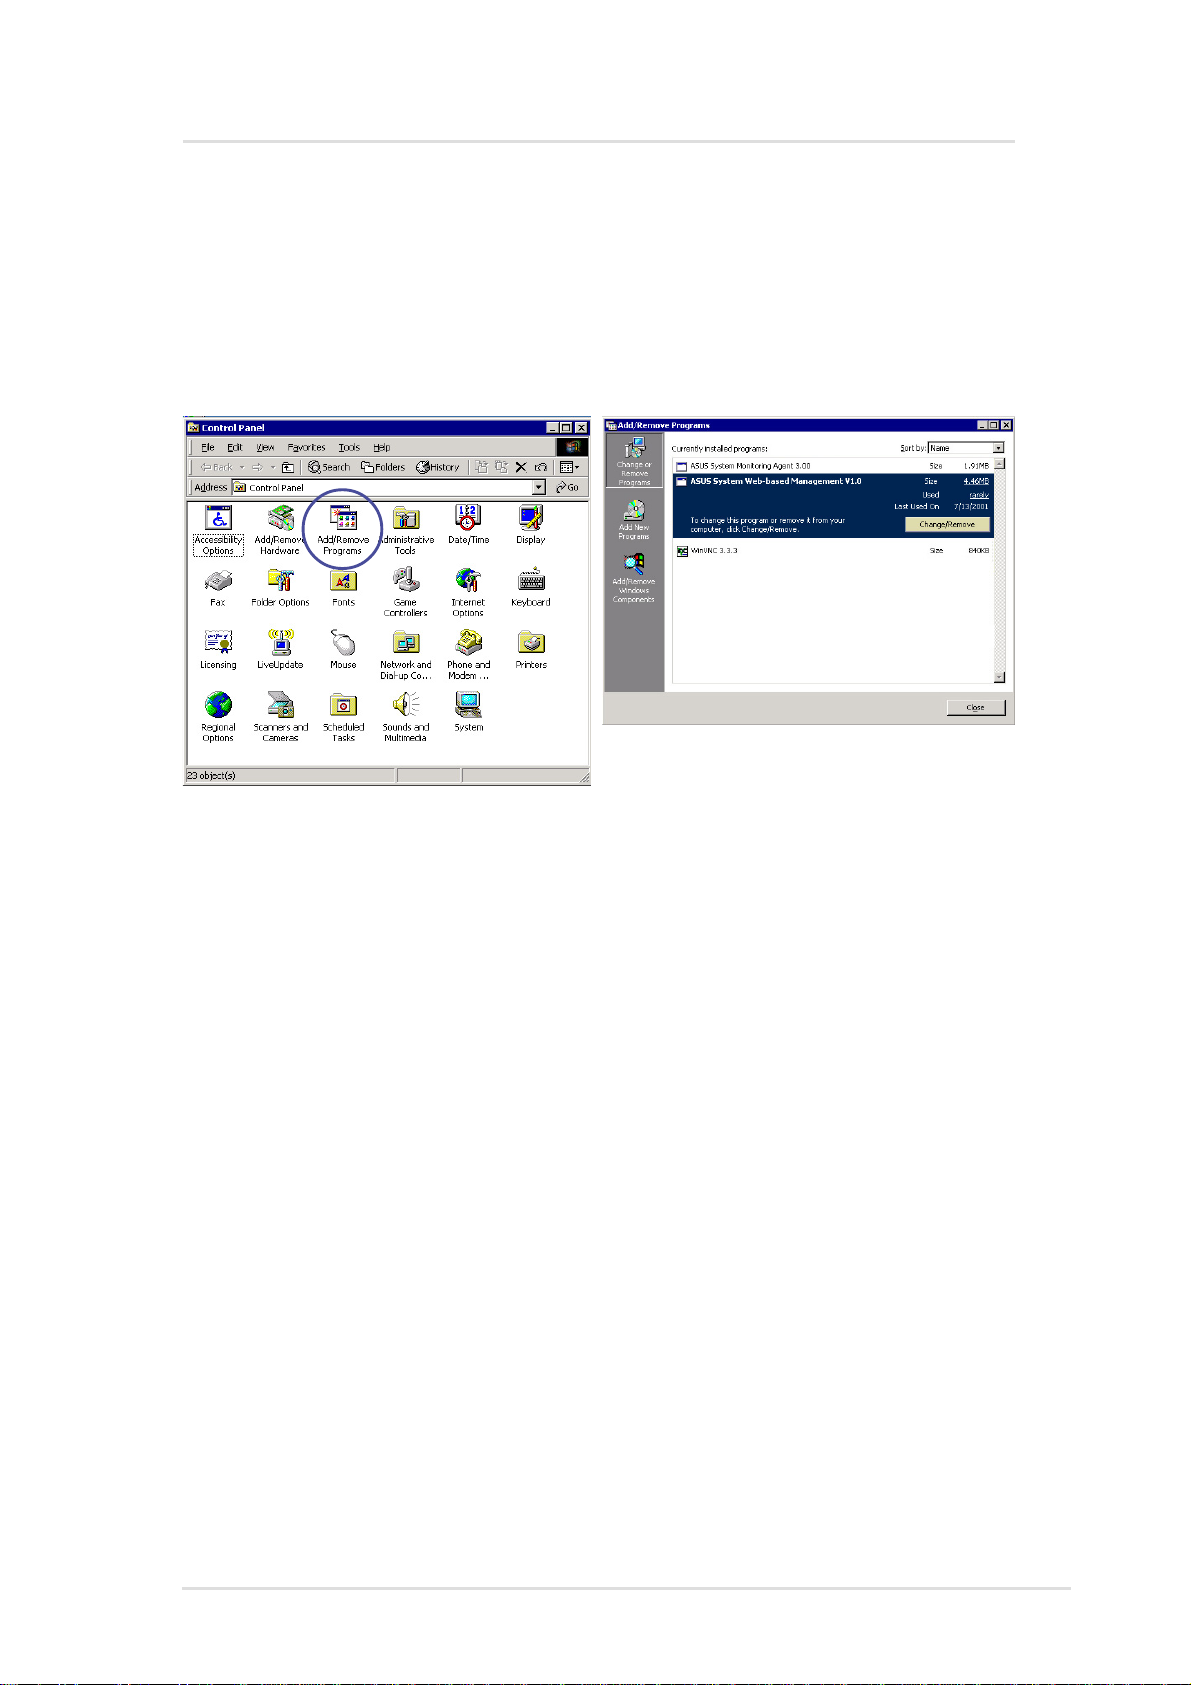
Uninstalling ASWM (or other software)
1. Double-click Add/Remove Program in “Start | Settings | Control
Panel”.
2. Select “ASWM Server Web-based Management”, and click
Change/Remove to uninstall ASWM.
Chapter 3 : ASWM Software for Windows
21
Page 22

ASWM for Windows
Accessing ASWM for Windows
After you install the ASWM on the server , you can monitor the server
using a web browser (Microsoft Internet Explorer recommended).
Locally (on the server):
Open your browser and type in:
http://xxx:2623 or http://127.0.0.1:2623
Use your server name in place of “xxx” or use “127.0.0.1” as this is
the universal address for the local computer. “2623” is the default
port for the ASWM software. From here you can see the “TCPIP
Address” in the middle of the screen for remote access.
Remote (any computer with Internet access):
Open your browser and type in: http://xxx.xxx.xxx.xxx:2623
“xxx” being your server IP address and “2623” being the default port
for the ASWM software.
When you see the login window , enter the user name ASWM USER
and your password entered during the ASWM installation.
NOTE: Name and password are case sensitive. If you forget the
password, you must reinstall the ASWM software.
22 ASUS System Management Software User’s Manual
Page 23
ASWM for Windows
Using ASUS System W eb-based Management
This chapter will introduce the ASWM software and explain how to
use the ASWM to monitor your ASUS server system.
The ASWM software accepts both Microsoft and Netscape browsers.
This section will show examples using Explorer and the Linux section
later in this manual will show examples of using Navigator/Communicator .
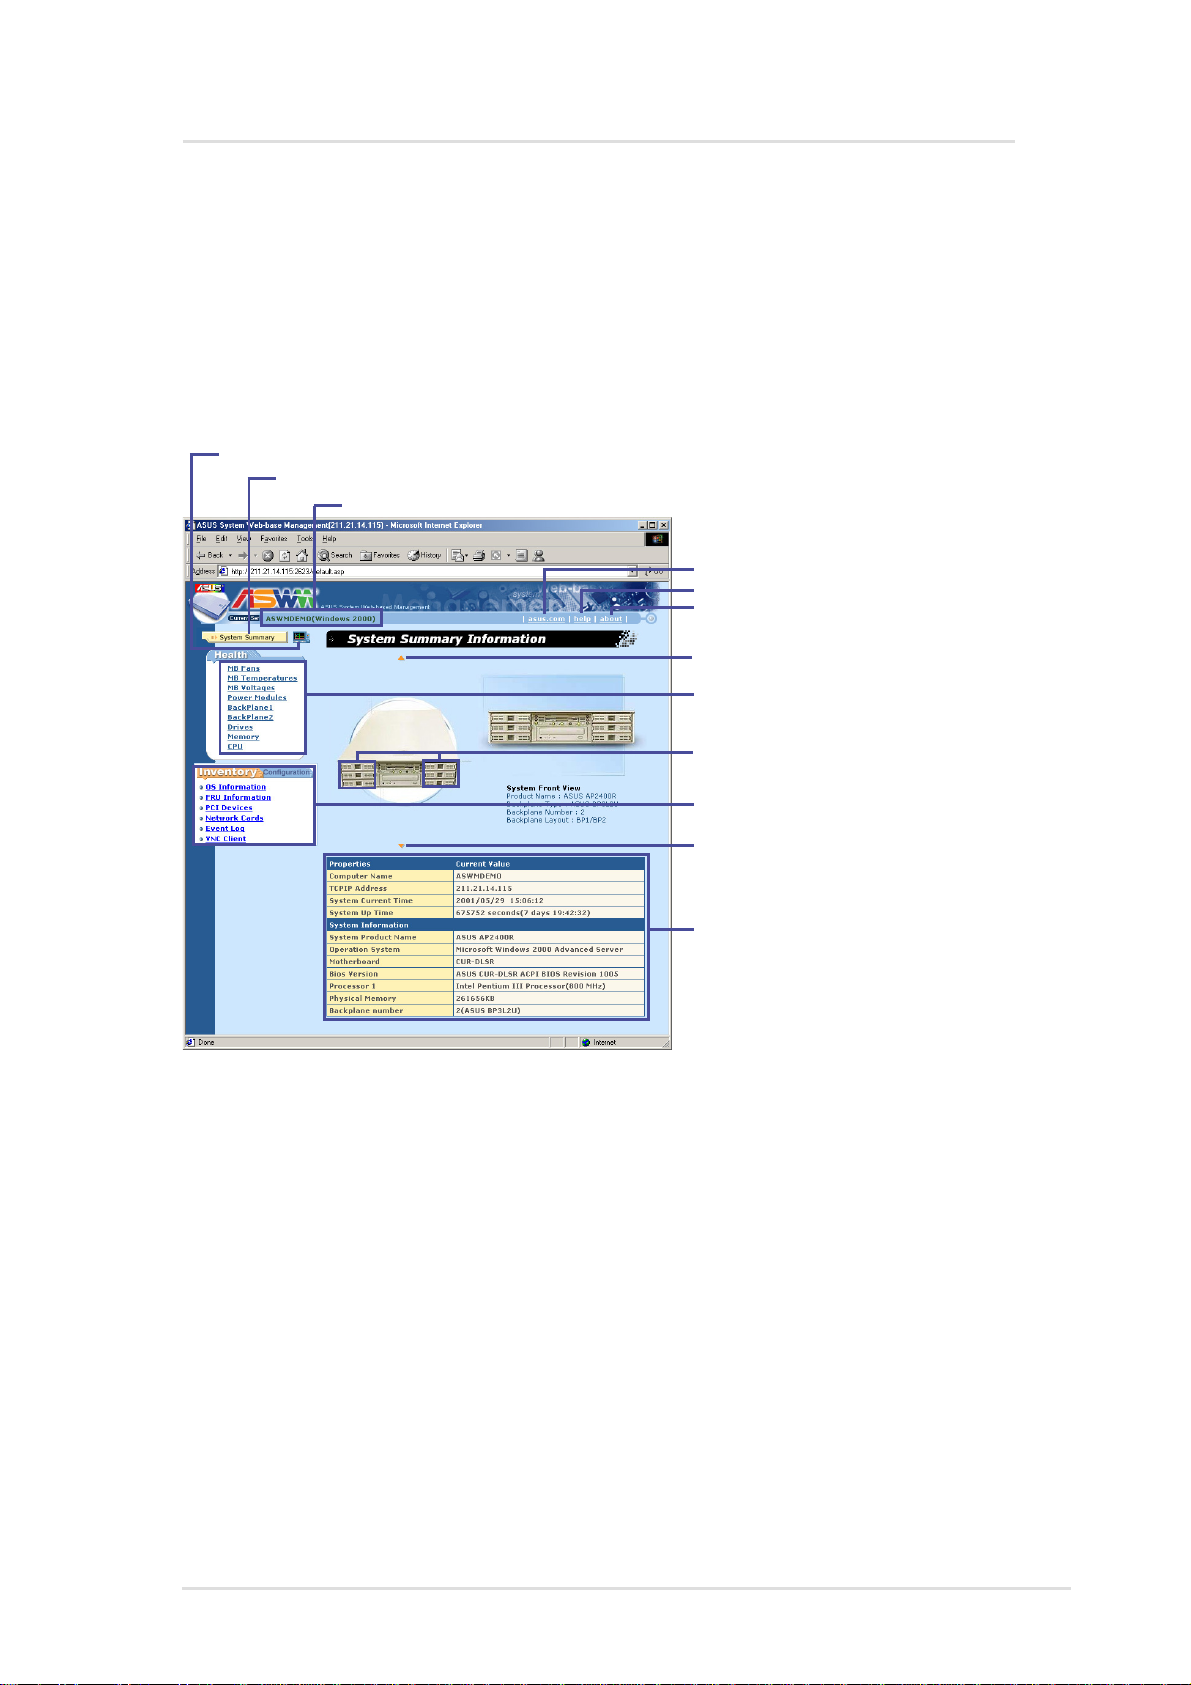
Click to display real time chart
Click to display this page with system front view
Displays the server name + (OS Platform) (System Properties | Network Identification)
Click to visit the ASUS web site
Click for latest help information
Click for software version information
Click for top view of the system
Click for detailed health information
Mouse over for backplane information
System inventory information and
ASMA/ASWM configuration
Click for rear view of the system
Server information summary
4
5
2
6
3
(1) The System Summary Information Screen
The system image overview is the unique characteristic of ASWM.
The major features are as follows:
• Physical pictures, positions, layouts, and monitored information
can be remotely viewed without physically inspecting the system.
• System data is automatically updated so that you can get system
information as they occur .
• Specific details about each system component is shown simply
by moving the cursor over the image.
• If a system error occurs, icons will flash on the component that
has the problem so that problem location can be made visually
without having to inspect the physical system (only with Microsoft
Internet Explorer).
Chapter 3 : ASWM Software for Windows
23
Page 24

ASWM for Windows
ASWM Web Display
Each page of the ASWM will be dif ferent depending on the model of
the ASUS server that you connect to. Microsoft Internet Explorer is
recommended to utilize all the features in the ASWM. Netscape
Navigator will have the following limitations:
• In the system summary page, no outlines (red rectangles) will
be shown to indicate the current selection of the system image.
• Arrows cannot be dragged to set threshold values.
Exception situation
This pertains to “The connection to server have failed” when automatic
update is enable. ASWM will connect to the server once every update
interval. If the connection cannot be made, you will see a message in
the status bar: "Communicate with server failed and automatic update
stop! Refresh to get updated data." When connection has been
restored, you must manually refresh your web browser to reconnect
with the ASWM server.
Properties
Computer Name: The name of the server you are connecting to.
TCP IP Address: The IP address of the server you are connecting to.
System Current Time: The clock time of the server (not GMT T ime).
System Up Time: The operation time from system bootup of the server.
System Information
System Product Name: The model name or product name of the server .
Operating System: The operating system of the server .
Motherboard: The motherboard model name of the server .
BIOS Version: The BIOS model and version number of the server .
Processor 1: CPU 1 model, type, and speed of the server.
Processor 2: CPU 2 (if available) model, type, and speed.
Physical Memory: The amount of total system memory in KB.
Backplane Number: Indicates the number and model of any available
backplanes on the server you are connecting to.
24 ASUS System Management Software User’s Manual
Page 25
ASWM for Windows
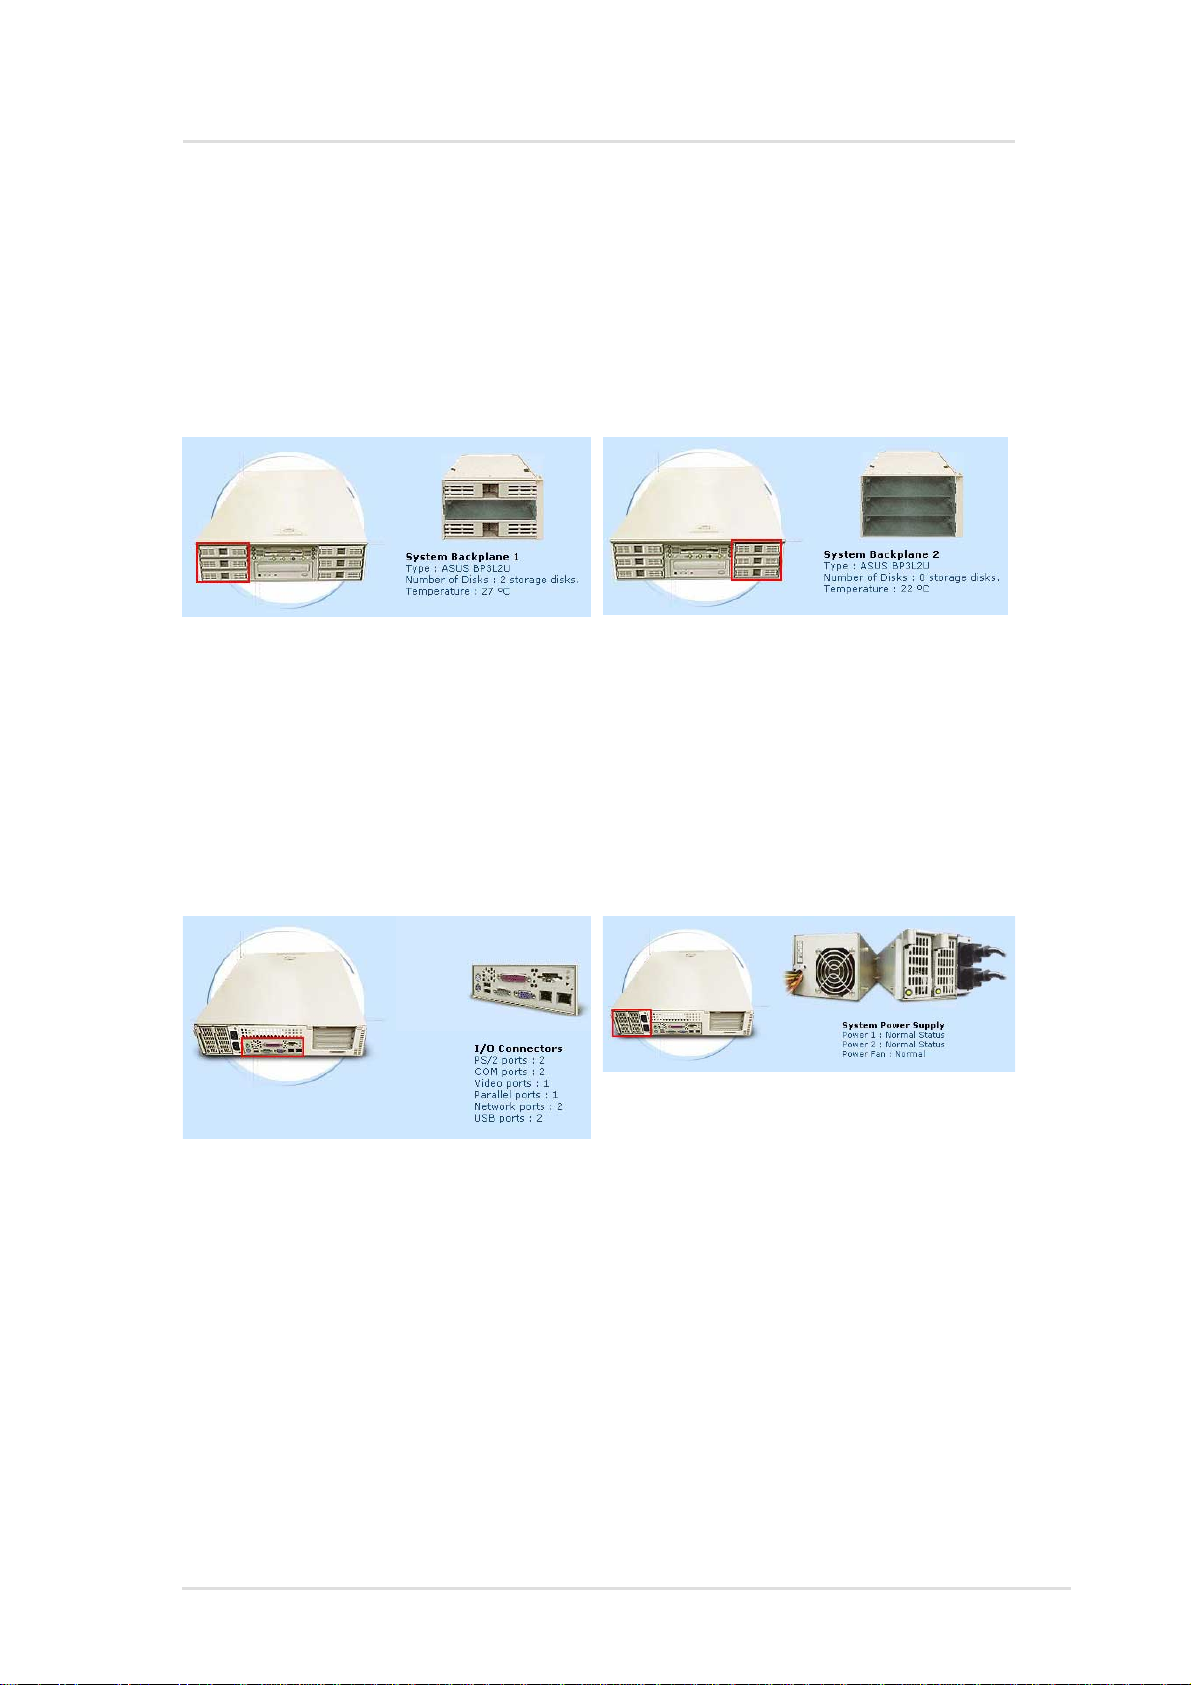
(2) System Summary Front View
The backplane can detect the presence of hard disk drives (not the
hot swap tray) and display pictures with an empty bay. Because it’s
hard to show no hard drives while in the hot swap tray, the pictures
will also show the trays removed even if you did not remove them.
The Backplane will show the model number, number of disks (1, 2, 3), and temperature (˚C). The default
safe upper temperature for the hard disk bays is 50˚C. When the temperature exceeds the set threshold, a
warnings will be given by yellow text and critical events by red text, both with flashing icons.
NOTE: The temperature unit (˚C) cannot be changed. To convert to (˚F), please see the appendix at the
end of this manual.
(3) System Summary Rear View
The rear view has two hot spots; the connectors and power supply
The power supply information will show:
Power 1 / Power 2: (if available) with Normal
Status, Warning, Critical Status
This is only motherboard port information and will
not change.
Power Fan will show: Normal, Warning, Critical
If the power cord is unplugged, a red “x” will
appear over the power cord, if the power supply
fails, red “x” will appear over power supply and
power cord because either or both may have a
problem.
Yellow text are warnings. Red text are critical items.
NOTE: The values shown in this section are for reference purposes
only and may not reflect the values shown by your system. The
pictures shown will vary depending on server model and configuration.
Chapter 3 : ASWM Software for Windows
25
Page 26
ASWM for Windows
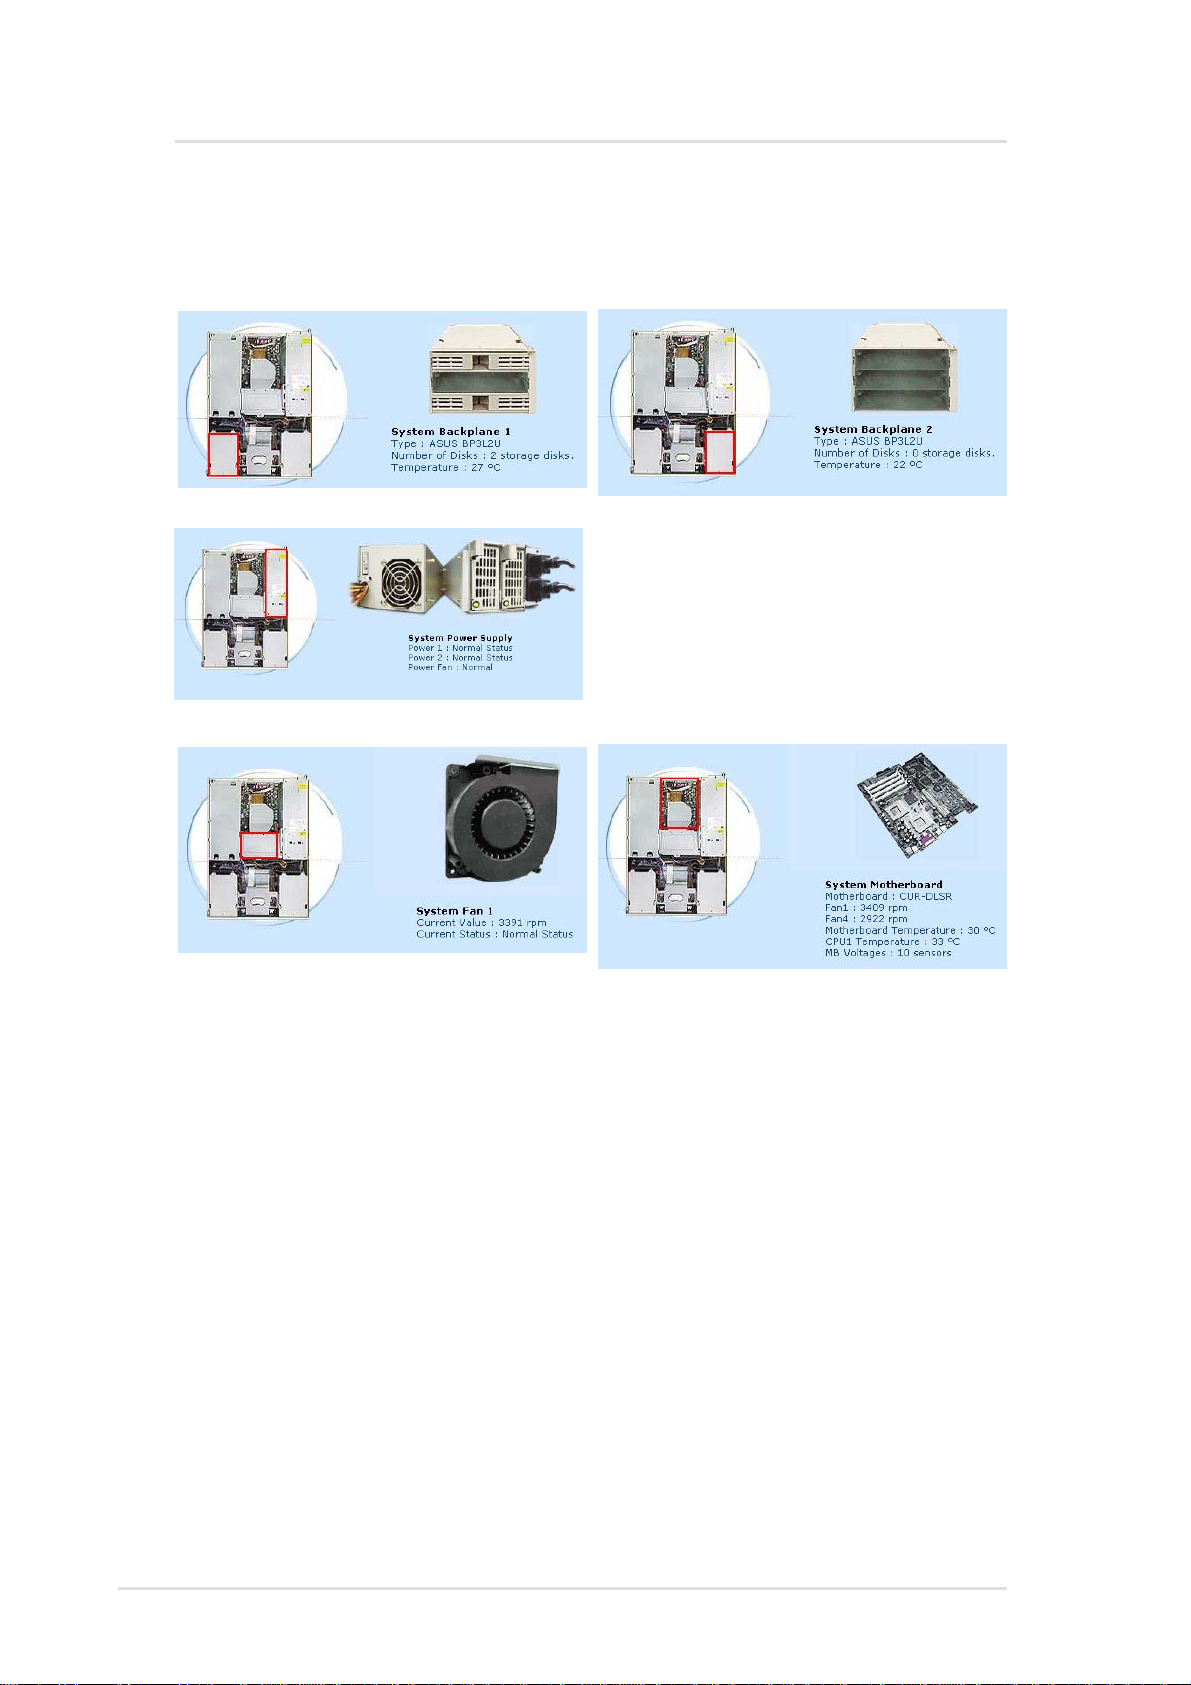
(4) System Summary Top View
The top view has five hot spots; the blower, motherboard, left
backplane, right backplane, and power supply
(see front view for explanation)
(see front view for explanation)
The system fan will show the RPM and status. The
normal RPM range is preset by the factory. The
Status will show: Normal, Warning, Critical.
(see front view for explanation)
The motherboard will show model name, Fan1
RPM, Fan2 RPM, motherboard temperature, CPU1
temperature, CPU2 temperature (if installed), and
number of motherboard voltage sensors.
NOTE: The values shown in this section are for reference purposes
only and may not reflect the values shown by your system. The
pictures shown will vary depending on server model and configuration.
26 ASUS System Management Software User’s Manual
Page 27

ASWM for Windows
(5) Detailed Heath Information
Click on a link in the Health window
to show detailed health information
and threshold settings.
Health: MB Fans
The page will display the fan devices status of motherboard. The
data contains name, current value, sketch map of current value, event
status, statistic data and threshold value setting.
Click to reset statistics
Click to show threshold settings
Statistics during this session is shown here
Fan1 is the PCI cage fan. The threshold ranges are:
Critical: 0 to 1500 (red slider)
Warning: 1500 to 2000 (orange slider)
Click and drag to move threshold levels
Fan4 is the
Critical: 0 to 1500 (red slider)
Warning: 1500 to 2000 (orange slider)
CPU blower. The threshold ranges are:
Health: MB Temperatures
This page shows data on CPU and
motherboard thermal sensors.
Motherboard thermal sensor. The threshold ranges are:
Critical: Upper: 70 to 150 Lower: -50 to -10
(high : top red, low : bottom red)
Warning:Upper: 60 to 70 Lower: -10 to 0
(high : top orange, low : bottom orange)
CPU thermal sensor. The threshold ranges are:
Critical: Upper: 90 to 150 Lower: -50 to -10
(high : top red, low : bottom red)
Warning:Upper: 80 to 90 Lower: -10 to 0
(high : top orange, low : bottom orange)
Chapter 3 : ASWM Software for Windows
27
Page 28

ASWM for Windows
Click on a link in the Health window
to show detailed health information
and threshold settings.
Health: MB Voltages
The page shows data supplied by
the many motherboard’s voltage
sensors.
Health: Power Supply
The page consist of three parts. The
outline of the power modules, the
status of each power module, and
the status of the power fans.
1. Outline of the power module:
The outline is the status
representation of the power supply
module including the power cord
status (whether it is plugged in or
not). The image will change if the
power status has changed.
2. Power Module Status
Reports the status and values of
each power monitor . A warning will
be made if power cord or power
module fails or is unplugged. Note:
If the power cord fails (disconnected
or damaged) only the power cord
will be noted as disconnected, but
if a power module fails, there may
be two or more warnings because
any one of the dependent items
may have failed.
3. Power Fan Status
Reports the status of the power fan
in the power modules. If the power
fan fails, the system will shutdown
and a record will be made in the
system event log.
NOTE: The values shown in this section are for reference purposes
only and may not reflect the values shown by your system. The
pictures shown will vary depending on server model and configuration.
28 ASUS System Management Software User’s Manual
Page 29

ASWM for Windows
Click on a link in the Health window
to show detailed health information
and threshold settings.
Health: Backplane
ASWM will report the values
supplied by the backplane monitors.
Y ou can investigate each monitor to
see specific information pertaining
to the individual backplane. Each
backplane's page consists of 4 parts,
the surface of the backplane board,
the layout of the backplane, the
situation of each drive bay, and the
backplane temperature.
1. Surface of the Backplane board
This section located on the top left
corner will show the outline of
backplane board based on the
server's model.
2. Layout of the Backplane
This section located on the top right
corner will reflect the layout of the
backplane in real time. For example,
the picture will change if someone
remove a hard drive or insert a hard
drive.
3. Drive Bay Situation
The table in the middle of the page
reflects the situation of each drive
bay in real time. If there are any
problems on the backplane, it will
show WARNING/CRITICAL icons
on the relative positions.
4. Backplane Temperature
This section will show you the
current temperatures, calculated
maximum/minimum/average
temperatures, status information,
and customized threshold settings.
You can drag the arrows or edit the
text fields to change these settings.
NOTE: The values shown in this section are for reference purposes
only and may not reflect the values shown by your system. The
pictures shown will vary depending on server model and configuration.
Chapter 3 : ASWM Software for Windows
29
Page 30

ASWM for Windows
Remapping the Backplane
Here is an example of remapping the backplane.
T wo drives were originally detected
when ASMA was installed.
Click “remap” to remove the second
drive from the backplane.
One disk has been intentionally
removed.
A warning is given under the
backplane:
“The layout of Backplane 1 has
been changed. If it is a reasonable
circumstance, please
keep away this trap, otherwise,
please check over the server.”
This message means that if the
drive change was unintentional,
you should visually check the
server for problems.
If the change was intentional, click
“remap” to update the ASMA data.
remap it to
30 ASUS System Management Software User’s Manual
Page 31

ASWM for Windows
Click on a link in the Health window
to show detailed health information
and threshold settings.
Health: Drives
The page will show local hard
drives, floppy drives, and CDROM drives on the server. It will
also show volume names, file
systems, storage loading,
capacities, free space, status
information, and customized
threshold settings of hard drives.
You can drag the arrows or edit
the numeric fields to change
threshold value settings.
Health: Memory
This page contains the health
information of the system’s
physical and virtual memory
usage. The fatal and warning
threshold values can be set here.
Furthermore, physical memory
and virtual memory information
are also shown.
Because CPU utilization have many peaks,
warnings may not be necessary so warning
events are disabled by default. You can click
here to enable warning events.
Health: CPU Utilization
The page contains the healthy
information of system CPU utilization.
That is not by individual CPU.
Chapter 3 : ASWM Software for Windows
31
Page 32

ASWM for Windows
(6) Inventory Items
OS Information
The page provides the information of
operation system, including name,
version, build number and service
pack.
FRU Information
The page will enumerate several FRU information based on the layout
of the server's hardware. You can click the tab on the top to browse
individual FRU information.
PCI Devices
The page will enumerate PCI devices on the right side. You can click
the link to browse the information of the device on the left side. The
information consists of 3 columns. The first column is General, it'll
show device type, manufacturer and device location. The second
one is Driver , it'll show driver name, provider, build date, version, and
status information of the device driver . The last one is Resource, it'll
show the system resource that the device occupied.
Network Cards
The page will show something about network cards in the server. If
ASWM detects no network cards, it will only show one tab on the
page to notify you that there's no cards in the server , otherwise it will
show one more tabs to present information of each network card.
The information within each network card include product name,
manufacturer, MAC address, location information, driver's version,
driver's build date, IP address, subnet mask, gateway, and Wins
server. If the network card use DHCP to connect to the network, it'll
also show DHCP server.
Event Log Viewer
The page will show system event logs. It consists of four tabs
representing separate event logs for ASMA/ASWM, applications,
security , and system. You can click the tab to view different event log
types.
32 ASUS System Management Software User’s Manual
Page 33

ASWM for Windows
System Warning
When warning events occur , yellow triangles will flash. When critical
events occur red triangles will flash and the problem item marked
with an “x”. When possible, a description is written in the monitor.
NOTE: The values shown in this section are for reference purposes
only and may not reflect the values shown by your system. The
pictures shown will vary depending on server model and configuration.
Chapter 3 : ASWM Software for Windows
33
Page 34

ASWM for Windows
System Real Time Chart
Every value that you see in the ASWM corresponds to data while you
are in the Real T ime Chart view . So you cannot see historical values.
You can let the Real Time Chart run over a few days to discover the
highs and lows of a particular monitor.
You can choose to chart fans,
temperatures, voltages, backplane,
drives, memory, and CPU. After
choosing a category, choose the
specific device. (You cannot chart
multiple devices or multiple
categories.)
If the “Manual” button is avialable,
click on it to show chart navigation
buttons: Up, Down, Zoom In,
Zoom Out, Revert.
Up: scroll up on the chart
Down: scroll down on the chart
Zoom In: zoom in on the chart
(If you zoom in and data is no longer in
view, wait a few seconds and the chart
will automatically scroll to the data.)
Zoom Out: zoom out on the chart
Revert: reverts to default zoom
(not the same as auto)
34 ASUS System Management Software User’s Manual
Page 35

ASWM for Windows
VNC Client
The VNC client (installed with ASWM)
allows you to remote control the server
through any web browser just like “IBM
Desktop on Call”. This allows true
remote control to allow login/logout and
shutdown/restart capabilities.
Click the link to open the VNC Client in
your web browser . A password will be required by the VNC. You can
modify the password setting on server side but make sure it is a
secure password. The installation program will set the default
password to "aswm".
NOTE: The password for VNC is case-sensitive.
IMPORTANT: Change the VNC
password as soon as possible
to protect your system from
unwanted access.
VNC Configuration (on server)
Login Screen Remote Control Session
VNC Links in Start Menu (server)
Chapter 3 : ASWM Software for Windows
35
Page 36

ASWM for Windows
ASMA Configuration General
ASWM allows you to configure
ASMA settings. You can set the
event action and device polling
intervals on the General tab or set mail settings on the Alert Mail tab if
you want ASWM to send an Email if something should go wrong. This
page consists of two divisions; General settings and Alert Mail settings.
Event Action Type
If an overheat event occurs, ASWM will
trigger the action you assigned here. You
can request ASWM to send an SNMP trap,
reboot system, power off, or shutdown
system if something should go wrong.
Polling Interval
You can assign an interval value here
to instruct how often ASWM polls
hardware devices.
Enable ASR System Reboot
ASR reboots the system when the
motherboard detects a system hang.
You can enable/disable here.
Enable System Reboot
Y ou can enable/disable general system
reboot here.
Enable Repeated Trap
You can enable/disable multiple
warnings (until problem corrected) for
the same problem.
Reboot System
Reboot system immediately.
Reconfig Backplane
If you intentionally remove or insert hard
drives in the hot swap bays, you should
remap the backplane layout to stop
repeated traps from being sent.
Reset
Resets all device threshold values and
ASMA settings to its default value.
36 ASUS System Management Software User’s Manual
Page 37

ASWM for Windows
ASMA Configuration - Alert Mail
This page allows you to configure
Alert Mail properties for ASWM.
All ASMA events are logged in the
Windows event log but if you want
to also email events to a specific location, you can setup this function
here.
Enable Send EMail
Enable/Disable: To email ASMA
events.
SMTP Host
Name/IP: SMTP host name used
to send emails.
SMTP Port
xx: SMTP port used to send emails.
Mail Account
Name: The email account on the
email server.
From Address
Any Text: Specify where the email
is sent from.
To Address
Email Address: Specify the email
address of the recipient.
Sender Name
Any Text: Specify who is sending
the emails.
Chapter 3 : ASWM Software for Windows
37
Page 38

ASWM for Windows
ASWM Configuration General
This page allows you to configure
General and IP Access properties
for ASWM.
Automatic update
Enable means you always can view
the updated data without refreshing
the web page. If you disable the item,
you have to refresh page manually to
view updated data.
Update Interval
The time interval for ASWM to update the data. The value must be 5 seconds
or more.
NOTE: The “General” settings are saved in a cookie for your browser. If you do
not enable receiving cookies, you can only use the default values shown here.
IP Access Restrictions
All IP Enable
If you want to allow access from
anywhere, select this item to allow
all IP address to connect to ASWM.
Only Allow IP List Below
If you want to restrict access to
ASWM, you can define address or
address ranges which can connect.
Enter one IP address on each line.
The IP address must be the format
"n.n.n.n". “n” must be 0 to 255.
The asterisk (*) can be used in place
of all valid #s. 192.168.0.* would
mean 192.168.0.0 to 192.168.0.255
38 ASUS System Management Software User’s Manual
Page 39

ASMA for Linux
ASMA (ASUS System Monitor Agent) for LINUX
Overview of ASMA for Linux
Software Block Diagram:
asma_agent
asma driver
H/W
The above diagram shows that the ASMA driver is the basis for the
asma package. To enable ASUS SNMP agent, you need to start
asma_agent by issuing the asma_agent start command.
Once the ASMA package has been correctly installed and started,
you can use any SNMP console like HP’s OpenV iew with ASUS’ MIB
file to get or set ASUS MIB variables.
Chapter 4 : ASMA Software for Linux
39
Page 40

ASMA for Linux
Installation and Configuration
Installation
Type: rpm -ivh asma-3.0-18.i386.rpm
Uninstallation
Type: rpm -e asma-3.0-18
Because ASWM sits on top of ASMA, you cannot remove ASMA
directly. Type: rpm -e --nodeps asma-3.0-18 inorder to bypass the
dependency check to remove ASMA while leaving ASWM.
Configuration
To configure ASMA, type: asma_post_install
Press [Enter] on a question to use the default setting in
asma_post_install.
40 ASUS System Management Software User’s Manual
Page 41

ASMA for Linux
I. INSTALLATION PATH
This screen will ask for paths to install the ASMA software,
configuration files. You will also be asked for the path to the UCDSNMP tools that you have installed inorder to use the system’s SNMP
funtion correctly.
II. SNMP INFORMATION
This screen shows setting up the system’s SNMP configuration using
asma_post_install. After asma_post_install, if you want to change
these settings by yourself, you can manually edit /etc/snmp/
snmpd.conf (see example on next page). Once “/etc/snmp/
snmpd.conf” has been changed, you need to kill “/user/sbin/snmpd”
process and restart it to make it effective.
Chapter 4 : ASMA Software for Linux
41
Page 42

ASMA for Linux
Example for “/etc/snmp/snmpd.conf”:
###############################################################################
# Access Control
###############################################################################
# First, map community name into a security name
# sec.name source community
com2sec mynetwork 192.168.0.0/16 public
####
# Second, map security names into group names:
# sec.model sec.name
group MyRWGroup v1 mynetwork
####
# Third, make a view
# incl/excl subtree mask
view all included .1 80
####
# Finally, grant groups access with read/write permissions:
#
access MyRWGroup v1 noauth prefix all all all
context sec.model sec.level prefix read write notif
III. MISC
This screen asks if you want to start ASUS SNMP agent now . Answer
y for “yes” or n for “no”.
42 ASUS System Management Software User’s Manual
Page 43

ASMA for Linux
Configuration Files
The following example assumes {ASMA configuration path} is
/etc/asus (default setting)
a. /etc/asus/install_path.conf: setting for install path setting. There
are two configuration types: one is ASMA (extension agent
software) binary/configuration path; the other is snmpd daemon
(system daemon) binary/configuration path.
b. /etc/asus/asma.conf: setting for snmp upper/lower threshold
value and ASR/Chassis Intrusion enable setting value. If this file
does not exist, it will be created automatically based on the system
situation when issuing the asma_agent start command. For
example:
* PollFreq=8; (Sent SNMP Trap to Console Freq.)
Min—>Max
—WL—L—Normal—WH—H—-
(WL=Warning Low Limit, L=Low Limit, WH=W arning High Limit, H=High Limit)
* TemperatureHighLimit=70;
* TemperatureLowLimit=-10;
* TemperatureWarningHighLimit=60;
* TemperatureWarningLowLimit=0;
* ASREnable=0; ASR (Automatic Server Restart) can reboot the
system automatically when the system hangs. Y ou need to enable
this item first, and then issue asma_agent start to make effective)
* ChassisEnable=0; (Enable chassis intrusion alarm can be sent
to the system log or to an SNMP Console like HP OpenV iew)
* RebootSystemEnable=0; (Enable Reboot System Function)
Chapter 4 : ASMA Software for Linux
43
Page 44

ASMA for Linux
c. /etc/asus/asma_misc.conf: if this file doesn’t exist, it will be
created automatically based on the system situation when issuing
the asma_agent start command.
* LM78ChassisIntrusionExist=0;
Motherboard hardware configuration for chassis intrusion type.
0 (none)
1 (photo sensor)
2 (micro switch - default)
The user needs to know which type of motherboard is used.
* ASRTimeOut=5; [ASR (Automatically System Restart) time out
value, unit by min.]
* SNMPSetT imeOut=180; [SNMP Set time out value in agent side
(in contract, SNMP console software can set SNMP time out
value in server side), unit by 333msec]
d. /etc/asus/snmp_trap.conf:
* TrapHostIP=127.0.0.1; (SNMP Console IP to Get/Log SNMP
agent information)
* CommunityString=asma; (SNMP community string used in snmp
protocol to restrict access control)
e. /etc/asus/shm_id.txt: (Share Memory ID used by asma_agent)
f. /etc/tmp: (temporary directory to place asma utility)
g. asma_post_install will copy shell script (S16asma_agent,
K16asma_agent in /etc/rc.d/rc0.d, /etc/rc.d/rc2.d, /etc/rc.d/rc3.d,
/etc/rc.d/rc4.d/, /etc/rc.d/rc5.d and /etc/rc.d/rc6.d). If you don’t want
those files, please move them to another file prefix with a dot
symbol like .S16asma_agent.
NOTE: If you change any value in the above files, please issue
“asma_agent restart” command to make it effective.
44 ASUS System Management Software User’s Manual
Page 45

ASMA for Linux
Function Description
a. SNMP function
1. Get/Get Next: allows the SNMP console to get the attribute
values of the managed system such as fan speed, working
voltage, and system temperature.
2. Set: sets the attribute values of the managed system from the
SNMP console.
3. T rap: managed computer system can inform the SNMP console
of some event (when the interested attributes, such as fan,
voltage, temperature, over or under thresholds) asynchronously .
b. ASR function: Automatic Server Restart is a function that can
reboot the computer system automatically when the computer
system hangs.
c. Chassis Intrusion: Chassis intrusion warns when the server
chassis is opened and logs the event. This provides some security
over the computer hardware.
d. System Log (in /var/log/messages): SNMP agent will also
produce error/warning messages in /var/log/messages for super
user system maintenance.
Utility and MIB File
a. asma_agent {start | stop}: Start/Stop ASMA SNMP extension
agent.
c. asma_driver {start | stop}: Start/Stop ASMA driver.
d. asus.mib: ASUS mib file ; and it locate in /etc/asus
System/ASMA Log
ASMA will keep the whole asma warning/error messages to /var/log/
messages and /etc/asus/aswm.log.
Chapter 4 : ASMA Software for Linux
45
Page 46

ASMA for Linux
Using SCSI RAID
If your system has a SCSI RAID card, you will need to type the
appropriate commands to load the driver into the system.
Drivers
Boot Driver
insmod /etc/asus/tmp/${kernel_version}/rd124f.o
Single Processor Driver
insmod rd124f (or insmod /etc/asus/tmp/${kernel_version}/rd124f_mod.o)
SMP Driver
insmod rd124f (or insmod /etc/asus/tmp/${kernel_version}/rd124f_mod_smp.o)
Enterprise Driver
insmod /etc/asus/tmp/${kernel_version}/rd124f_mod_ent.o
Application
Run raidman to manage your SCSI RAID card.
46 ASUS System Management Software User’s Manual
Page 47

ASMA for Linux
ASMA for Linux FAQ
Q. Why does ucd-snmpd complain about security mode while it is
starting?
A. You need to check snmpd.conf for the following lines,
(a)
# groupName securityModel securityName
group notConfigGroup any notConfigUser
—> “securityModel” field needs to be “v1” (or “v2”/...) instead of “any”
(b)
# group context sec.model sec.level prefix read write notif
access notConfigGroup any noauth 0 systemview none none
—> “sec.Model” needs to be “v1” (or “v2”/...) instead of “any”
—> “prefix” field needs to be “prefix” instead of “0”
Q. Why can’t SNMP console get ASUS SNMP agent data?
A. You need to check whether the following programs or drivers are
started.
(a) asma driver: check by lsmod command
(b) asus_agent daemon: check by ps command
(c) snmpd daemon: starts by the snmpd command and can be
checked by the ps command; if your “/etc/snmp/snmpd.conf” is
wrong, snmpd will complain about that and may no start.
NOTE: The ASR function is based on the asus_agent daemon; so,
don’t kill the asus_agent process while the ASREnable=1 on /etc/
asus/asma.conf (/etc/asus is the default configuration path). If the
asus_agent does not exist while the ASREnable=1 on /etc/asus/
asma.conf, the ASR function will work abnormally, and then the system
will reboot randomly.
Chapter 4 : ASMA Software for Linux
47
Page 48

48 ASUS System Management Software User’s Manual
Page 49

ASWM for Linux
Overview of ASWM for Linux
Thank you for choosing ASUS hardware products. We believe that
you will be very satisfied with ASUS hardware products due to its
stability and quality. Now, ASUS tries its best to serve you further by
offering you ASUS Web-based Management (ASWM) system with
ASUS Management Agent (ASMA). Both of these software products
will help you ease your daily system management tasks when you
choose the LINUX operating system as your primary platform.
If you do not yet know what ASMA is, here is a brief description.
ASMA is developed by ASUSTeK Computer Inc. (ASUS) and is
packaged with enhanced LINUX kernel drivers to monitor ASUS
hardware for component failures. Including applications which are
also packaged within ASMA, you can monitor voltages, temperatures,
FAN rotation speeds, and other hardware conditions. Meanwhile,
ASMA can also issue SNMP traps and even send audits through the
email right to your personal computer. ASMA interacts with
administrators through the SNMP. Currently, ASMA is based on the
well-known SNMP utilities which were developed by Carnegie Mellon
and University of California at Davis (visit “http://netsnmp.sourceforge.net/” for more information.)
However, utilizing ASMA may not be an easy job for many system
administrators. Most system administrators have to purchase a thirdparty software and learn how to use them (such as HP
Also not that in order to use third-party management software, you
have to first acquire all the ASUS MIB extensions. But now you do
not have to worry about this any more because ASUS provides ASWM.
ASWM is a Web-based interface for system administrators to
customize their own ASMA environments. With simple web browser
operations, everyone can easily manage ASMA with a few mouse
clicks and keystrokes.
ASWM was compiled using highly compatible web pages (which are
supported by most popular web browsers). ASWM itself utilizes the
world-accepted Apache HTTP Server . ASWM also provides safe and
flexible security control. All these are natively done by the strongest
Linux and Apache security features.
®
OpenView™).
Chapter 5 : ASWM Software for Linux
49
Page 50

ASWM for Linux
ASWM can also be easy customized. ASUS has prepared a very
simple "post install" shell script to help system administrators
customize a minimum working ASWM environment. Experienced
administrators are welcomed to adjust anything and adopt these
changes into the configuration files after you read “/usr/share/doc/
aswm-1.0/README”.
Requirements
Agent Site: Need to install ASWM
Operation System:
* GNU/Linux with Kernel V2.2 or above.
Prerequisite Software:
* ASUS System Management Agent (ASMA) V3.0 Build 16 or above.
* UCD/Net SNMP packages V4.1 or above.
* Apache HTTP Server V1.3 or above.
Client Site: Only web browser is required
®
* GUI Systems such as Microsoft
®
* Microsoft
* Netscape
Microsoft
Internet Explorer™ 4.0 or above.
®
Navigator/Communicator V4.0 or above (both for
®
Windows™ or X Window System).
Windows™ or X Window System
50 ASUS System Management Software User’s Manual
Page 51

ASWM for Linux
Features
System summary
Health devices
* M/B Fans
* M/B Temperatures
* M/B Voltages
* Power Modules (selected ASUS hardware configurations only)
* Backplane(s)
* Drives
* Memory
* CPU utilization
Inventory information
* FRU Information
* PCI Devices
* Network Cards
* Message Logs
* VNC client
Configuration
* ASMA Configuration
* ASWM Configuration
Chapter 5 : ASWM Software for Linux
51
Page 52

ASWM for Linux
Installing ASWM for Linux
* Install the ASWM RPM distribution file as usual.
# rpm -Uvh aswm-1.0-1.i386.rpm
* After RPM installed, you should execute the shell script:
/usr/bin/aswm_post_install
immediately and this will bring you a very simple conversation
and it guides you how to set up some important values and
parameters which ASWM will use.
* The following contents describe how the post installation is going.
I. Configuration of Apache HTTP Server for ASWM
1. Input the full DNS name (host.domain) of this ASWM host.
Because ASWM utilizes Apache HTTP Server to process web pages,
ASWM needs to know the correct server name of the host. It is often
the full DNS name such as www.asus.com.tw for example. If your
ASWM host does not have a DNS name registered, IP address are
also permitted to use. Do not use hostname or samba hostname (via
NetBIOS) because if web browsers come from outside your domain,
then they will not be able to access this host.
52 ASUS System Management Software User’s Manual
Page 53

ASWM for Linux
2. Input the password for the login id 'aswm' to access ASWM.
ASWM uses Apache HTTP Server's password protection mechanism.
Here you should set up the password for the default login ID 'aswm'.
All web browsers connected to ASWM host will be asked the ID and
password. ID is always 'aswm' and the password would be entered
initially here. Please note that Apache maintains its own password
file rather than the shadow password and user information file which
used by the operating system itself.
II. Configuration of ASMA Agent Info. for ASWM
3. Input ASMA Agent's SNMP Community name?
Since ASMA is based on SNMP, ASWM also need to know the
community name of ASMA installed. The default string is 'asma'.
Change it if you have your own customized ASMA host. You could
refer to the answer to the Question 8 ("Input SNMP community string")
in ASMA's post installation procedures.
Chapter 5 : ASWM Software for Linux
53
Page 54

ASWM for Linux
III. Configuration of IP Access Information for ASWM
4. Input the IP address for a workstation to access ASWM?
ASWM will dynamically check the web client's IP address and see if
it is allowed to access ASWM. Here you could specify which IP
addresses are permitted to view ASWM pages. The explanation of
this question has revealed the input rules.
a. Add IP addresses per line for clients which could access ASWM.
b. By inputting * (asterisk symbol) character , all clients are able to
access ASWM. (not recommended since no IP address blocking
to protect ASWM accessing)
c. By inputting END, it will stop this configuration.
d. To add a single IP address, input as it is.
e. To add a group of clients in single class, input the class. For
example, input 192.168.1 as private Class-C of clients. (No bit-
mask supported at this version)
f. To remove any existed IP address from the list, add - (minus
symbol) character before the IP address.
g. By inputting -* (minus asterisk) characters, * could be removed.
h. You have to remain at least one IP address in the list.
Please also read the file description about “/var/www/aswm/conf/
aswmclients.conf” in the document file /usr/share/doc/aswm-1.0/
README.
54 ASUS System Management Software User’s Manual
Page 55

ASWM for Linux
IV. Startup ASWM
5. Do you want to startup ASWM right now?
Answer "Yes" if you want to start up ASWM daemon now or "No" to
start it upon your next system bootup.
NOTE: The ASWM service is dependent on the ASMA service. Make
sure that you have installed ASMA before ASWM
Operations
After you installed the ASWM on the agent side and start the service,
you can begin to manage the server using your web browser.
* Open a new web browser window and connect ASWM's by URL:
http://xxx.xxx.xxx.xxx:2623/
* The login dialog will soon show up. Input the login ID aswm (or
the ID that you have set) and the password you set in the post
installation
* W ait about 2 or 3 seconds and the ASWM web pages will appear
in your browser .
* If you want to manage the server locally (at the server itself), you
can just input the URL http://127.0.0.1:2623/
Chapter 5 : ASWM Software for Linux
55
Page 56

ASWM for Linux
Uninstalling ASWM for Linux
* First, make sure there are no resource lock to /var/www/aswm
directory (since it has to be removed after uninstallation. Second,
login system as root identity and execute the following rpm
command to uninstall ASWM. i.e.,
# rpm -e aswm-1.0-1
* If you want to uninstall ASWM manually. You have to remove
the following files from your host:
/var/www/aswm/*
/etc/rc.d/rc3.d/S86httpd_aswm
/etc/rc.d/rc5.d/S86httpd_aswm
/etc/rc.d/rc0.d/K14httpd_aswm
/etc/rc.d/init.d/httpd_aswm
/usr/share/doc/aswm-1.0/*
/usr/bin/aswm_post_install
Before you are doing manually removal, stop Apache daemon first by:
# kill -TERM `cat /var/run/httpd_aswm.pid
or
#/etc/init.d/httpd_aswm stop
56 ASUS System Management Software User’s Manual
Page 57

ASWM for Linux
Using ASUS System W eb-based Management
This chapter will introduce the ASWM software and explain how to
use the ASWM to monitor your ASUS server system.
The ASWM software accepts both Microsoft and Netscape browsers. This
section will show examples using Navigator/Communicator and the
Windows section earlier in this manual shows examples of using Explorer.
Click to display real time chart
Click to display this page with system front view
Displays the server name + (OS Platform)
Click to visit the ASUS web site
Click for latest help information
Click for software version information
Click for top view of the system
Click for detailed health information
Mouse over for backplane information
System inventory information and
ASMA/ASWM configuration
Click for rear view of the system
Server information summary
4
5
2
6
3
(1) The System Summary Information Screen
The system image overview is the unique characteristic of ASWM.
The major features are as follows:
• Physical pictures, positions, layouts, and monitored information
can be remotely viewed without physically inspecting the system.
• System data is automatically updated so that you can get system
information as they occur .
• Specific details about each system component is shown simply
by moving the cursor over the image.
• If a system error occurs, icons will flash on the component that
has the problem so that problem location can be made visually
without having to inspect the physical system.
Chapter 5 : ASWM Software for Linux
57
Page 58

ASWM for Linux
Properties
Computer Name: The name of the server you are connecting to.
System Current Time: The clock time of the server (not GMT T ime).
System Up Time: The operation time from system bootup of the server.
System Product Name: The model name or product name of the server .
Operating System: The operating system of the server .
Motherboard: The motherboard model name of the server .
BIOS Version: The BIOS model and version number of the server .
Processor 1: CPU 1 model, type, and speed of the server.
Processor 2: CPU 2 (if available) model, type, and speed.
Physical Memory: The amount of total system memory in KB.
58 ASUS System Management Software User’s Manual
Page 59

ASWM for Linux
(2) System Summary Front View
The backplane can detect the presence of hard disk drives (not the
hot swap tray) and display pictures with an empty bay. Because it’s
hard to show no hard drives while in the hot swap tray, the pictures
will also show the trays removed even if you did not remove them.
The Backplane will show the model name, temperature (˚C), and the default drive bay’s status. The default
safe upper temperature for the drive disk bays is 60˚C. When the temperature exceeds the set threshold, a
warning will be given by flashing icons. NOTE: The temperature unit (˚C) cannot be changed. To convert to
(˚F), please see the appendix at the end of this manual.
(3) System Summary Rear View
The rear view has two hot spots; the connectors and power supply
This is only motherboard port information and will
not change.
The power supply information will show:
Power 1 / Power 2: (if available) with
Not Available, Offline, Online
If the power cord is unplugged, a red “x” will
appear over the power cord, if the power supply
fails, red “x” will appear over power supply and
power cord because either or both may have a
problem.
NOTE: The values shown in this section are for reference purposes
only and may not reflect the values shown by your system. The
pictures shown will vary depending on server model and configuration.
Chapter 5 : ASWM Software for Linux
59
Page 60

ASWM for Linux
(4) System Summary Top View
The top view has five hot spots; the blower, motherboard, left
backplane, right backplane, and power supply
(see front view for explanation)
(see front view for explanation)
(see front view for explanation)
The motherboard will show model name, Fan1
RPM, Fan2 RPM, motherboard temperature, CPU1
temperature, and CPU2 temperature (if installed)
The system fan will show the RPM and status. The
normal RPM range is preset by the factory.
Fan4 is the CPU blower. The threshold ranges are:
Critical: 0 to 1500
Warning: 1500 to 2000
NOTE: The values shown in this section are for reference purposes
only and may not reflect the values shown by your system. The
pictures shown will vary depending on server model and configuration.
60 ASUS System Management Software User’s Manual
Page 61

ASWM for Linux
(5) Detailed Heath Information
Click on a link in the Health window
to show detailed health information
and threshold settings.
Health: MB Fans
The page will display the fan devices status of motherboard. The
data contains name, current value, event status, statistic data and
threshold value setting.
Click to reset statistics
Click to show threshold settings
Statistics during this session is shown here
Fan1 is the PCI cage fan. The threshold ranges are:
Critical: 0 to 1500
Warning: 1500 to 2000
Enter threshold values here
Health: MB Temperatures
This page shows data on CPU and
motherboard thermal sensors.
Click on the small arrow in front of
the device name to expand.
Motherboard thermal sensor. The threshold ranges are:
Critical: Upper: 70 to 150 Lower: -50 to -10
Warning:Upper: 60 to 70 Lower: -10 to 0
CPU thermal sensor. The threshold ranges are:
Critical: Upper: 90 to 150 Lower: -50 to -10
Warning:Upper: 85 to 90 Lower: -10 to 0
Chapter 5 : ASWM Software for Linux
61
Page 62

ASWM for Linux
Click on a link in the Health window
to show detailed health information
and threshold settings.
Health: MB Voltages
The page shows data supplied by
the many motherboard’s voltage
sensors.
Health: Power Supply
The page consist of two parts: The
status of each power module and
the status of the power fans.
Power Module Status
Reports the status and values of
each power monitor . A warning will
be made if power cord or power
module fails or is unplugged.
Power Fan Status
Reports the status of the power fan
in the power modules. If the power
fan fails, the system will shutdown
and a record will be made in the
system event log.
NOTE: The values shown in this section are for reference purposes
only and may not reflect the values shown by your system. The
pictures shown will vary depending on server model and configuration.
62 ASUS System Management Software User’s Manual
Page 63

ASWM for Linux
Click on a link in the Health window
to show detailed health information
and threshold settings.
Health: Backplane
ASWM will report the values
supplied by the backplane
monitors. Y ou can investigate each
monitor to see specific information
pertaining to the individual
backplane. Each backplane's
page consists of 2 parts, the
situation of each drive bay , and the
backplane name and temperature.
Remap Back Plane
If you intentionally remove or
insert hard drives in the hot swap
bays, you should remap the
backplane layout to stop repeated
traps from being sent.
Drive Bay Situation
The table in the middle of the page
reflects the situation of each drive
bay in real time. If there are any
problems on the backplane, it will
show WARNING / CRITICAL
messages on the relative positions.
Backplane Temperature
This section will show you the
current temperatures, calculated
maximum/minimum/average
temperatures, status information,
and customized threshold settings.
You can edit the text fields to
change these settings.
NOTE: The values shown in this section are for reference purposes
only and may not reflect the values shown by your system. The
pictures shown will vary depending on server model and configuration.
Chapter 5 : ASWM Software for Linux
63
Page 64

ASWM for Linux
Remapping the Backplane
Here is an example of remapping the backplane.
T wo drives were originally detected
when ASMA was installed.
One disk has been intentionally
removed.
A warning is given under the
backplane:
“The Hard Drive is plugged out
Drive Bay 2 of the (IDSEL1=ON &
IDSEL0=ON) BackPlane board”
This message means that if the
drive change was unintentional,
you should visually check the
server for problems.
If the change was intentional, click
“Remap Back Plane” and select
“Yes” to update the ASMA data.
Drive Bay 2 will then be removed
from the “Health - Back Plane”
64 ASUS System Management Software User’s Manual
Page 65

ASWM for Linux
Click on a link in the Health window
to show detailed health information
and threshold settings.
Health: Drives
The page will show mounted file
systems. It will also show file
systems, storage loading,
capacities, free space, and
customized threshold settings of
the file systems. You can edit the
numeric fields to change threshold
value settings.
Because CPU utilization have many peaks,
warnings may not be necessary so warning
events are disabled by default. You can click
here to enable warning events.
Health: Memory
This page contains the health
information of the system’s
physical and virtual memory
usage. The fatal and warning
threshold values can be set here.
Furthermore, physical memory
and virtual memory information
are also shown.
Health: CPU Utilization
The page contains the healthy
information of system CPU utilization.
That is not by individual CPU.
Chapter 5 : ASWM Software for Linux
65
Page 66

ASWM for Linux
(6) Inventory Items
FRU Information
The page will enumerate several
FRU information based on the
layout of the server's hardware.
You can click the tab on the top to
browse individual FRU information.
PCI Devices
The page will enumerate PCI devices on the right side. You can click
the link to browse the information of the device on the left side. The
information consists of 3 columns. The first column is General, it'll
show device type, manufacturer and device location. The second
one is Driver , it'll show driver name, provider, build date, version, and
status information of the device driver . The last one is Resource, it'll
show the system resource that the device occupied.
Network Cards
The page will show something about network cards in the server. If
ASWM detects no network cards, it will only show one tab on the
page to notify you that there's no cards in the server , otherwise it will
show one more tabs to present information of each network card.
The information within each network card include product name,
manufacturer, MAC address, location information, driver's version,
driver's build date, IP address, subnet mask, and gateway.
Message Logs
The page will show the system message logs. It consists of two tabs
representing separate the message logs for ASMA and system. You
can click the tab to view the different message log types.
66 ASUS System Management Software User’s Manual
Page 67

ASWM for Linux
System Warning
When warning events occur , yellow triangles will flash. When critical
events occur red triangles will flash and the problem item marked
with an “x”. When possible, a description is written in the monitor.
NOTE: The values shown in this section are for reference purposes
only and may not reflect the values shown by your system. The
pictures shown will vary depending on server model and configuration.
Chapter 5 : ASWM Software for Linux
67
Page 68

ASWM for Linux
System Real Time Chart
Every value that you see in the ASWM corresponds to data while you
are in the Real T ime Chart view . So you cannot see historical values.
You can let the Real Time Chart run over a few days to discover the
highs and lows of a particular monitor.
You can choose to chart fans,
temperatures, voltages, backplane,
drives, memory, and CPU. After
choosing a category, choose the
specific device. (You cannot chart
multiple devices or multiple
categories.)
If the “Manual” button is available,
click on it to show chart navigation
buttons: Up, Down, Zoom In,
Zoom Out, Revert.
Up: scroll up on the chart
Down: scroll down on the chart
Zoom In: zoom in on the chart
(If you zoom in and data is no longer in
view, wait a few seconds and the chart
will automatically scroll to the data.)
Zoom Out: zoom out on the chart
Revert: reverts to default zoom
(not the same as auto)
68 ASUS System Management Software User’s Manual
Page 69

ASWM for Linux
VNC Client
The VNC client allows you to remote
control the server through any web
browser just like “IBM Desktop on Call”.
This allows true remote control to allow
login/logout and shutdown/restart
capabilities.
Click the link to open the VNC Client in your web browser . A password
will be required by the VNC. You can modify the password setting on
server side but make sure it is a secure password.
NOTE: The password for VNC is case-sensitive.
Login Screen
VNC Session 1 VNC Session 2
Linux servers can provide multiple VNC sessions so multiple users
can work on separate screens.
Remote Control Session
Chapter 5 : ASWM Software for Linux
69
Page 70

ASWM for Linux
VNC Client:
Click this link to start a VNC session in your Internet browser. A
password will be required by VNC. You can modify the password
using the vncpasswd utility . It is highly recommended that you change
the password as soon as possible to prevent unwanted users.
In Linux systems, you can open numerous “vncservers” as you like.
Each one has its own VNC display number. In fact, there are "virtual"
X displays. Try to use ps to find out how many Xvnc daemons are
started and which display numbers are assigned to them.
Set Password
When you start the “vncserver” for the first time, you will be asked to
enter a password.
Change Password
Type vncpasswd to change the VNC password.
IMPORT ANT: Change the VNC password as soon as possible to
protect your system from unwanted access.
70 ASUS System Management Software User’s Manual
Page 71

ASWM for Linux
ASMA Configuration General
ASWM allows you to configure
ASMA settings. You can set the
event action and device polling intervals on the General tab or set mail
settings on the Alert Mail tab if you want ASWM to send an Email if
something should go wrong. This page consists of two divisions;
General settings and Alert Mail settings.
Event Action Type
If an overheat event occurs, ASWM
will trigger the action you assigned
here. You can request ASWM to
send an SNMP trap, reboot system,
power off, or shutdown system if
something should go wrong.
Polling Interval
You can assign an interval value
here to instruct how often ASWM
polls hardware devices.
Enable ASR System Reboot
ASR reboots the system when the
motherboard detects a system
hang. Y ou can enable/disable here.
Enable System Reboot
You can enable/disable general
system reboot here.
Chapter 5 : ASWM Software for Linux
71
Page 72

ASWM for Linux
Enable Repeated Trap
You can enable/disable multiple
warnings (until problem corrected)
for the same problem.
Reboot System
Reboot system immediately.
Reset
Resets all device threshold values
and ASMA settings to its default
value.
72 ASUS System Management Software User’s Manual
Page 73

ASWM for Linux
ASMA Configuration - Alert Mail
This page allows you to configure
Alert Mail properties for ASWM.
All ASMA events are logged in the
Windows event log but if you want
to also email events to a specific location, you can setup this function
here.
Enable Send Email
Enable/Disable: To email ASMA
events.
From Address
Any Text: Specify where the email
is sent from.
To Address
Email Address: Specify the email
address of the recipient.
Chapter 5 : ASWM Software for Linux
73
Page 74

ASWM for Linux
ASWM Configuration General
This page allows you to configure
General and IP Access properties
for ASWM.
Automatic update
Enable means you always can view
the updated data. (See the FAQ at
the end of this chapter for more
explanation.)
Update Interval
The time interval for ASWM to update the data. The value must be 5
seconds or more.
IP Access Restrictions
All IP Enable
If you want to allow access from
anywhere, select this item to allow
all IP address to connect to
ASWM.
Only Allow IP List Below
If you want to restrict access to
ASWM, you can define address or
address ranges which can connect.
Enter one IP address on each line.
The IP address must be the format
"n.n.n.n". “n” must be 0 to 255.
Enter only “n.n.n” or “n.n” for groups
of IPs, “*” cannot be used on Linux
servers. 192.168.0 would mean
192.168.0.0 to 192.168.0.255
74 ASUS System Management Software User’s Manual
Page 75

ASWM for Linux
ASWM for Linux FAQ
Q. How do I know that ASWM is installed on a host?
A. There are many ways to check this.
First, you can use rpm: # rpm -qa | grep aswm
rpm will report a package named aswm-1.0-1 (version and release
numbers will vary) if ASWM is installed.
Second, you can check if the directory /var/www/aswm exists
along with the file /etc/rc.d/init.d/httpd_aswm.
Q. What will happen if I did not do a "post installation"?
A. Without post installation, all parameters for ASWM are set to default
values including the “aswm” login password. ASWM will assume:
a. The IP address binding on interface “eth0” will be chosen for
Apache as ServerName and hence this IP address has to be
able to connect outside the ASWM host.
b. ASMA for Linux is installed on the same host.
c. * (asterisk) will be added into “aswmclients.conf”
As a result, all IP addresses will be able to access ASWM.
d. Default login password to ASWM will be “aswm”.
NOTE: Default values are unsafe and may not function
properly. It is highly recommended that you to do post
installation immediately.
Chapter 5 : ASWM Software for Linux
75
Page 76

ASWM for Linux
Q. How can I check whether ASWM has started? And how do I start
it manually if it has not started?
A. You can use the “ps” command to check. For example:
# ps ax | grep http
And if you see some process entry such as
XXXXX ? S X:XX /usr/sbin/httpd -f /var/www/aswm/conf/httpd.conf
where X could be any digit. Then at least the Apache HTTP Server
has started.
If ASWM has not started, just login as the root user and execute:
# /etc/rc.d/init.d/httpd_aswm start
then recheck by using the “ps” command again.
Q. I opened “http://xxx.xxx.xxx.xxx:2623/” (x being the server’s IP
address) but the browser does not show anything. Why?
A. Usually this is possibly caused by a failure of the ASMA host.
ASWM will connect to the ASMA host and inquire some initiative
values by SNMP. Check the ASMA host and see if UCD SNMP
daemon has started and that ASMA has been properly installed
and started. Also make certain that ASMA's SNMP extension is
correctly hooked on the SNMP daemon. You can check SNMP
functions by using UCD SNMP utilities such as “snmpwalk” or
“snmpget”.
Q. When I use Netscape Communicator/Navigator to browse ASWM
pages and resize its window size, there are errors on the page or
blanks. Why does this happen?
A. Netscape Communicator/Navigator does not handle resize window
correctly, this is a well-known disadvantage for those frameenabled web pages. Unfortunately, ASWM's web pages
extensively uses frames. To solve this problem, just press [Alt]+[R]
in Linux to reload the page.
76 ASUS System Management Software User’s Manual
Page 77

ASWM for Linux
Q. The browser showed a message “Browser lost connection to
ASWM server. Close and reopen a new browser and connect
ASWM server after the problem is fixed.” Is anything wrong here?
A. While automatic update feature is enabled, ASWM pages will
routinely detect the network status. If network problems occurs
that stops your Internet connection, the links on the left side will
no longer respond. An alert message will remind you that the
browser has detected some unusual network situations and it has
actively stopped all automatic update actions.
At this moment, you need to resolve your network problem and
click refresh in your browser to rebuild the connection with the
ASWM server.
A better method would be to close the browser and reopen the
browser. Because it is not clear how long the browser has lost
connection with the ASWM server. It is possible that all session
data have timeout and lost on the Apache HTTP Server. If this
worst case happened, reloading pages will only provide no data
or old data.
Q. I saw ASWM supports VNC Server. How do I customize my VNC
Server?
A. ASWM supports connection to a VNC Server which is installed
on the ASMA host. You have to do a full installation of the VNC
Server because ASWM display is provided through Java. Also,
do not forget to startup Xvnc daemon on the ASMA host. Please
note that ASWM connects to the VNC Server on your ASMA host,
it does not connect through your ASWM host.
In "ASWM Configuration", you can set your desired VNC display
number if the default display “1” is not applied to your primary
vncserver terminal. You can also startup as many sessions as
you want and then switch to different sessions through the ASWM
configuration.
Chapter 5 : ASWM Software for Linux
77
Page 78

ASWM for Linux
Q. The manual emphasizes that ASWM uses web pages based on
the Apache HTTP Server. Is there anything I should know about
the ASWM's configuration file for httpd?
A. ASWM are web pages which perform ASMA functions. However,
these web pages are written in PHP scripts and extensively
dependent on the SNMP functions in the Apache's PHP module.
Since SNMP features are not initially included in PHP module
libphp4.so, we compiled an updated version of PHP module and
packaged it within our ASWM product. However , we will not try to
overwrite your PHP module. Instead, we just initiated another
instance of httpd daemon and it only loads our specific module.
If users compiled Apache HTTP Server by themselves, there will
be a very critical issue. When users build up an Apache HTTP
Server in a static-binding way, the PHP module will fail to load
while ASWM is trying to start. In this case, users have to rebuild
their Apache HTTP Server if their static-binding PHP modules do
not have SNMP extensions.
After rebuilding a static-binding Apache HTTP Server with PHP/
SNMP extensions, users also have to manually modify the
configuration file of httpd for ASWM. It is located at “/var/www/
aswm/conf/httpd.conf”. Detailed modifications can only be done
by experienced users. In the future release of ASWM, a more
smooth distribution process will be considered to solve such issues.
Q. I was told that ASWM also has a sibling version for Microsoft
Windows NT/2000 system. It seems that they have very different
appearances than the Linux version. Do both versions have the
same features?
A. ASWM for Microsoft Windows NT/2000 is more appealing compared
to the Linux version because it has good graphics display on
Microsoft Internet Explorer. ASWM's NT/2000 version has more
dynamic HTML compared to the Linux version. For the Linux version,
compatibility with earlier Netscape Communicator/Navigator is the
most important consideration, hence very few dynamic HTML can
be utilized. Y ou may feel that the Linux version of ASWM is tailored.
In fact, almost all features are implemented on both versions and
users of Linux version do not need to worry about losing any
important features compared with the Windows NT/2000 version.
78 ASUS System Management Software User’s Manual
Page 79

ASMA for Netware
Install ASMA for Netware 4.x/5.x/6.x (CD Item 3)
NOTE: ASMA for Netware does
not support ASWM. On some
server models, ASMA is not
supported on Netware 5.x.
Before you install ASUS System Monitoring Agent For NetW are, you
should make sure that SNMP NLM is already installed properly in the
Netware system, because the ASUS System Monitoring Agent For
NetWare needs NWSNMP (Netware SNMP) to work correctly. This
Software can run on Netware 3.12, Netware 4.x, 5.x, 6.x. For Netware
3.12, a patch file LIB312A.EXE must be installed. For details, please
visit the Novell Website: http://support.novell.com/misc/patlst.htm
Chapter 3 : ASMA Software for Netware
79
Page 80

ASMA for Netware
Install and configure SNMP service on Netware 4.x/5.x/6.x
Installing:
- When Netware Server installed successfully, then NWSNMP is
installed too.
- NWSNMP loads automatically when Netware server starts.
Default NWSNMP service is SNMP Get function (monitoring
only).
- User can Configure NWSNMP option to own SNMP Set and
SNMP T rap functions.
Configuring SNMP Set:
- User can add/modify the LOAD SNMP line in the
AUTOEXEC.NCF.
For example, T o allow any community name to be used for read/
write access, use the following command:
"LOAD SNMP ControlCommunity="
- Detail info please reference the Novell Netware documents.
Configuring SNMP Trap:
- To receive Traps sent by NWSNMP, make sure your remote
client address is listed in the IP or IPX section of the
SYS:\ETC\TRAPT ARG.CFG file. Edit the file with any ASCII text
editor and follow the instructions given in the file comments.
80 ASUS System Management Software User’s Manual
Page 81

ASMA for Netware
Install ASMA for Netware 4.x / 5.x / 6.x (Cont’)
To Install ASMA for Netware, you must specify the install path to
\\Network Computer Name\SYS\SYSTEM. For example, you can specify
a mapp ed drive (such as N) to \\Network Computer Name\SYS, and
specify the install path to N:\SYSTEM (Where N is your mapped drive).
When you install ASMA, you should follow the procedures listed below.
At "Choose Destination Location" dialog box.
1. Click Browser to choose a destination.
2. Click Network to map a Network computer.
3. For Windows NT4.0/2000:
a. Choose a mapped drive (such as N: or another),
b. At “Choose Directories”, Click Netware or compatible Network.
c. Select the Network computer that you want to map (Note: You
must map to \\Network Computer Name\SYS)
d. Type your login name and password to access the Network
Computer , click OK.
e. Click OK, return to "choose folder" dialog box.
If your installation path does not contain netware system files, a
warning will be given. Clicking Yes allows you to specify another
path, clicking No will ignore this problems and continue the
installation wizard.
Uninstalling ASMA for NetWare
You can uninstall ASUS System Monitoring Agent For NetWare by
deleting the following files in “Netware SYS:SYSTEM”:
ASUSSMB.NLM ASUSLM78.NLM ASUSASR.NLM
ASUSBP.NLM ASUSMIB.NLM ASUSRAID.NLM
ASUSMIB.INI ASUSCONF.INI ASUSSNMP.NCF
ASUSMIB.MIB READASMA.TXT
Chapter 3 : ASMA Software for Netware
81
Page 82

ASMA for Netware
Install ASMA for Netware 4.x / 5.x / 6.x - Installation Screens
Click Install ASMA for Windows
2000 on the autorun menu. Click Next
after reading the “Welcome” message.
Click Next after reading the
“Information”.
Click Yes after reading the “License
Agreement”.
Click Next after to confirm installation
directory. NOTE: The above path is
incorrect. You must install to a drive
letter that is mapped to Novell
Netware’s \SYS\SYSTEM directory .
Choose the type of chassis intrusion
censor used in your server.
82 ASUS System Management Software User’s Manual
When setup is complete, click
Finish to exit the installation wizard.
Page 83

83
Page 84

Appendix
Appendix
Temperature Conversion Chart
Celsius Fahrenheit
00 C 32.0 F
01 C 33.8 F
02 C 35.6 F
03 C 37.4 F
04 C 39.2 F
05 C 41.0 F
06 C 42.8 F
07 C 44.6 F
08 C 46.4 F
09 C 48.2 F
10 C 50.0 F
11 C 51.8 F
12 C 53.6 F
13 C 55.4 F
14 C 57.2 F
15 C 59.0 F
16 C 60.8 F
17 C 62.6 F
18 C 64.4 F
19 C 66.2 F
20 C 68.0 F
21 C 69.8 F
22 C 71.6 F
23 C 73.4 F
24 C 75.2 F
25 C 77.0 F
26 C 78.8 F
27 C 80.6 F
28 C 82.4 F
29 C 84.2 F
30 C 86.0 F
The equation for converting Fahrenheit to Celsius is:
[(Deg. F) - 32] x (5/9) = Deg. C
84 ASUS System Management Software User’s Manual
 Loading...