

Page 1
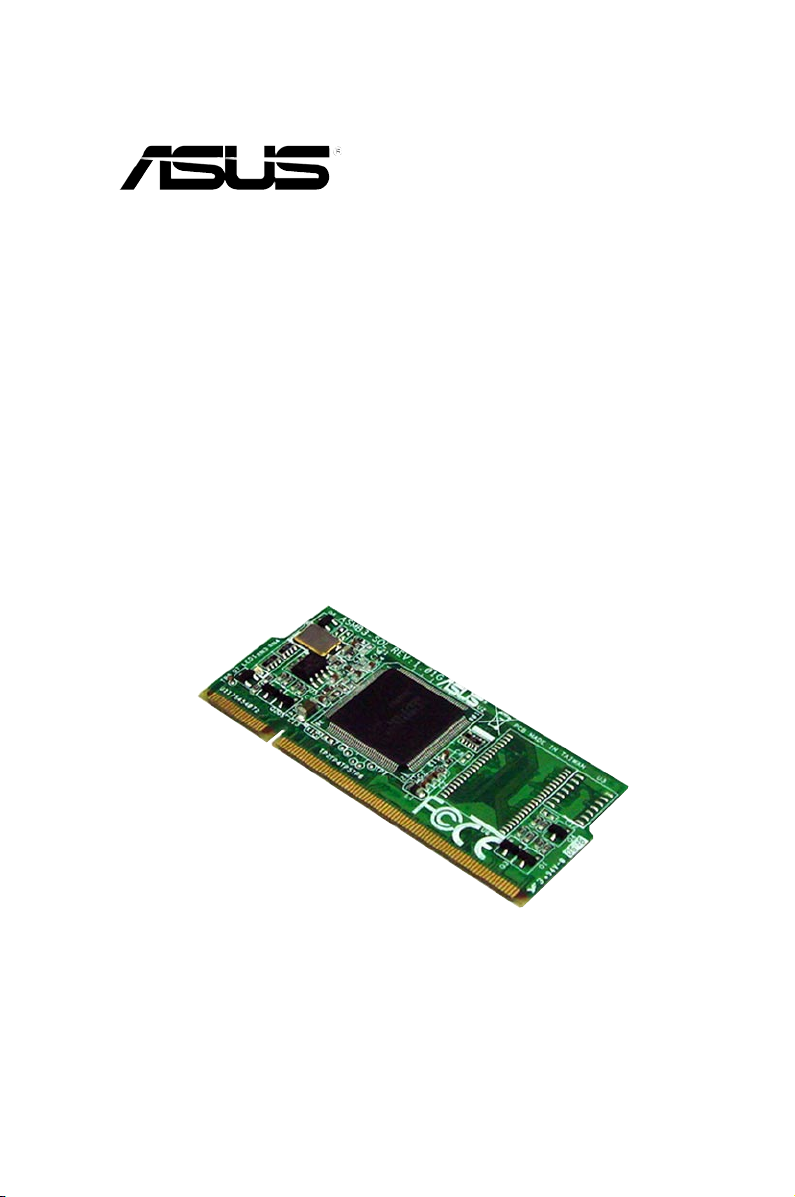
ASMB3-SOL
Server Management Board
Page 2

E3204
Second Edition V2
August 2007
Copyright © 2007 ASUSTeK COMPUTER INC. All Rights Reserved.
No part of this manual, including the products and software described in it, may be reproduced,
transmitted, transcribed, stored in a retrieval system, or translated into any language in any form or by any
means, except documentation kept by the purchaser for backup purposes, without the express written
permission of ASUSTeK COMPUTER INC. (“ASUS”).
Product warranty or service will not be extended if: (1) the product is repaired, modied or altered, unless
such repair, modication of alteration is authorized in writing by ASUS; or (2) the serial number of the
product is defaced or missing.
ASUS PROVIDES THIS MANUAL “AS IS” WITHOUT WARRANTY OF ANY KIND, EITHER EXPRESS
OR IMPLIED, INCLUDING BUT NOT LIMITED TO THE IMPLIED WARRANTIES OR CONDITIONS OF
MERCHANTABILITY OR FITNESS FOR A PARTICULAR PURPOSE. IN NO EVENT SHALL ASUS, ITS
DIRECTORS, OFFICERS, EMPLOYEES OR AGENTS BE LIABLE FOR ANY INDIRECT, SPECIAL,
INCIDENTAL, OR CONSEQUENTIAL DAMAGES (INCLUDING DAMAGES FOR LOSS OF PROFITS,
LOSS OF BUSINESS, LOSS OF USE OR DATA, INTERRUPTION OF BUSINESS AND THE LIKE),
EVEN IF ASUS HAS BEEN ADVISED OF THE POSSIBILITY OF SUCH DAMAGES ARISING FROM ANY
DEFECT OR ERROR IN THIS MANUAL OR PRODUCT.
SPECIFICATIONS AND INFORMATION CONTAINED IN THIS MANUAL ARE FURNISHED FOR
INFORMATIONAL USE ONLY, AND ARE SUBJECT TO CHANGE AT ANY TIME WITHOUT NOTICE,
AND SHOULD NOT BE CONSTRUED AS A COMMITMENT BY ASUS. ASUS ASSUMES NO
RESPONSIBILITY OR LIABILITY FOR ANY ERRORS OR INACCURACIES THAT MAY APPEAR IN THIS
MANUAL, INCLUDING THE PRODUCTS AND SOFTWARE DESCRIBED IN IT.
Products and corporate names appearing in this manual may or may not be registered trademarks or
copyrights of their respective companies, and are used only for identication or explanation and to the
owners’ benet, without intent to infringe.
ii
Page 3

Contents
Notices ......................................................................................................... -v
Safety information ..................................................................................... -vi
About this guide ....................................................................................... -vii
ASMB3-SOL specications summary ...................................................... -ix
Chapter 1: Product introduction
1.1 Welcome! ...................................................................................... 1-2
1.2 Package contents .........................................................................
1.3 Board layout .................................................................................
1.4 System requirements ...................................................................
1.5 Network and smart phone setup ................................................
Chapter 2: Installation
2.1 Before you proceed ..................................................................... 2-2
2.2 Hardware installation ...................................................................
2.3 Firmware update ..........................................................................
®
2.3.1 For motherboards with Broadcom
2.4 BIOS conguration ......................................................................
2.4.1 AMI BIOS setup ..............................................................
2.4.2 Phoenix BIOS setup ......................................................
2.5 Running the ASMC utility ..........................................................
2.5.1 Conguring the LAN controller ......................................
2.5.2 Using ASWM to update the ASMB3-SOL rmware .......
2.6 Software installation ..................................................................
2.6.1 Installing the ARC .........................................................
2.6.2 Launching ARC .............................................................
5721 LAN ................ 2-5
1-2
1-3
1-3
1-4
2-2
2-5
2-8
2-8
2-12
2-17
2-18
2-20
2-21
2-21
2-22
Chapter 3: Software support
3.1 ASUS Remote Console (ARC) ..................................................... 3-2
3.1.1 ARC sections ..................................................................
3.1.2 Connecting to the remote server .....................................
3.1.3 Retrieving sensor information .........................................
3.1.4 Displaying FRU information ..........................................
3.1.5 Displaying system event logs .........................................
3.1.6 Using Remote Console .................................................
3.1.7 Displaying all remote server sensors ............................
3.1.8 Adjusting the monitoring settings ..................................
3-3
3-6
3-8
3-10
3-11
3-12
3-13
3-14
iii
Page 4

Contents
3.1.9 Updating the remote server BIOS le ........................... 3-16
3.1.10 Controlling the remote server power .............................
3.1.11 Viewing PET information ...............................................
3.2 ASUS Host Management Controller Setup ...................................
3.2.1 Installing and launching the ASUS Host
Management Controller Setup utility ............................. 3-21
3.2.2 Command elds ............................................................
3.2.3 Initial ..............................................................................
3.2.4 View ..............................................................................
3.2.5 Set .................................................................................
3.2.6 Monitor ..........................................................................
3.2.7 Help ...............................................................................
Appendix: Reference information
A.1 LAN port for server management ...............................................A-2
A.2 BMC socket ...................................................................................
A.3 Converting decimal to hexadecimal ...........................................
A.4 Troubleshooting ...........................................................................
3-17
3-18
3-21
3-22
3-22
3-22
3-25
3-26
3-26
A-3
A-4
A-5
iv
Page 5

Notices
Federal Communications Commission Statement
This device complies with Part 15 of the FCC Rules. Operation is subject to the
following two conditions:
•
This device may not cause harmful interference, and
•
This device must accept any interference received including interference that
may cause undesired operation.
This equipment has been tested and found to comply with the limits for a
Class B digital device, pursuant to Part 15 of the FCC Rules. These limits are
designed to provide reasonable protection against harmful interference in a
residential installation. This equipment generates, uses and can radiate radio
frequency energy and, if not installed and used in accordance with manufacturer’s
instructions, may cause harmful interference to radio communications. However,
there is no guarantee that interference will not occur in a particular installation. If
this equipment does cause harmful interference to radio or television reception,
which can be determined by turning the equipment off and on, the user is
encouraged to try to correct the interference by one or more of the following
measures:
•
Reorient or relocate the receiving antenna.
•
Increase the separation between the equipment and receiver.
•
Connect the equipment to an outlet on a circuit different from that to which the
receiver is connected.
•
Consult the dealer or an experienced radio/TV technician for help.
The use of shielded cables for connection of the monitor to the graphics card is
required to assure compliance with FCC regulations. Changes or modications
to this unit not expressly approved by the party responsible for compliance
could void the user’s authority to operate this equipment.
Canadian Department of Communications Statement
This digital apparatus does not exceed the Class B limits for radio noise emissions
from digital apparatus set out in the Radio Interference Regulations of the
Canadian Department of Communications.
This class B digital apparatus complies with Canadian ICES-003.
v
Page 6

Safety information
Electrical safety
•
To prevent electrical shock hazard, disconnect the power cable from the
electrical outlet before relocating the server.
•
When adding or removing devices to or from the server, ensure that the
power cables for the devices are unplugged before the signal cables are
connected. If possible, disconnect all power cables from the existing server
before you add a device.
•
Before connecting or removing signal cables from the server, ensure that all
power cables are unplugged.
•
Seek professional assistance before using an adapter or extension cord.
These devices could interrupt the grounding circuit.
•
Make sure that your power supply is set to the correct voltage in your area.
If you are not sure about the voltage of the electrical outlet you are using,
contact your local power company.
•
If the power supply is broken, do not try to x it by yourself. Contact a
qualied service technician or your retailer.
Operation safety
•
Before installing any component to the server, carefully read all the manuals
that came with the package.
•
Before using the product, make sure all cables are correctly connected and the
power cables are not damaged. If you detect any damage, contact your dealer
immediately.
•
To avoid short circuits, keep paper clips, screws, and staples away from
connectors, slots, sockets and circuitry.
•
Avoid dust, humidity, and temperature extremes. Do not place the product in
any area where it may become wet.
•
Place the product on a stable surface.
•
If you encounter technical problems with the product, contact a qualied
service technician or your retailer.
This symbol of the crossed out wheeled bin indicates that the product (electrical,
electronic equipment, and mercury-containing button cell battery) should not
be placed in municipal waste. Check local regulations for disposal of electronic
products.
vi
Page 7

About this guide
This user guide contains the information you need when installing and conguring
the server management board.
How this guide is organized
This guide contains the following parts:
• Chapter 1: Product introduction
This chapter describes the server management board features and the new
technologies it supports.
• Chapter 2: Installation
This chapter provides instructions on how to install the board to the server
system and install the utilities that the board supports.
• Chapter 3: Software support
This chapter tells you how to use the software applications that the server
management board supports.
• Appendix: Reference Information
The Appendix shows the location of the LAN port for server management and
BMC socket on several motherboards. This section also presents common
problems that you may encounter when installing or using the server
management board.
Where to nd more information
Refer to the following sources for additional information and for product and
software updates.
1. ASUS websites
The ASUS website provides updated information on ASUS hardware and
software products. Refer to the ASUS contact information.
2. Optional documentation
Your product package may include optional documentation, such as warranty
yers, that may have been added by your dealer. These documents are not
part of the standard package.
vii
Page 8

Conventions used in this guide
To make sure that you perform certain tasks properly, take note of the following
symbols used throughout this manual.
DANGER/WARNING: Information to prevent injury to yourself
when trying to complete a task.
CAUTION: Information to prevent damage to the components
when trying to complete a task.
IMPORTANT: Instructions that you MUST follow to complete a
task.
NOTE: Tips and additional information to help you complete a
task.
Typography
Bold text Indicates a menu or an item to select.
Italics
Used to emphasize a word or a phrase.
<Key> Keys enclosed in the less-than and greater-than sign means
that you must press the enclosed key.
Example: <Enter> means that you must press the Enter or
Return key.
<Key1+Key2+Key3> If you must press two or more keys simultaneously, the key
names are linked with a plus sign (+).
Example: <Ctrl+Alt+D>
Command Means that you must type the command exactly as shown,
then supply the required item or value enclosed in
brackets.
Example: At the DOS prompt, type the command line:
format a:
viii
Page 9
ASMB3-SOL specications summary
IPMI features IPMI 2.0-compliant and supports:
CPU 16-bit H8S/2000 core 33 MHz
Chipset Renesas H8S/2168
Internal RAM 40 KB
Internal ROM 256 KB
Interrupt I2C, Timer, UART, LPC
Timers 16-bit system timer
System interface Low Pin Count
Serial/Modem interface Basic Mode
LAN interface IPMI 2.0 Shared LAN
LED BMC heartbeat
Bus Two I2C bus
Features Remote power on/off
Software support ASUS Remote Console (ARC)
- Auto monitoring sensor and event logging
- IPMI Host I/O interface
- Receiving and logging of event messages
- IPMB/I2C system interface
- System Watchdog Timer (ASR)
Watchdog timer
Supports Keyboard Controller Style (KCS)
One IPMB bus
Two UART bus
Remote BIOS update
Short Message Service (SMS)
Remote Console Redirection (text mode)
Serial-Over-LAN (SOL)
Remote reboot
Upgradeable rmware
Platform Event Trap (PET)
ASUS Host Management Controller Utility (DOS-based)
Specications are subject to change without notice.
ix
Page 10

x
Page 11

This chapter describes the server
management board features and the new
technologies it supports.
introduction
Product
1
Page 12

1.1 Welcome!
Thank you for buying an ASUS® ASMB3-SOL server management board!
The ASUS ASMB3-SOL is an Intelligent Platform Management Interface (IPMI)
2.0-compliant board that allows you to monitor, control, and manage a remote
server from the local or central server in your local area network (LAN).
The ASMB3-SOL comes with the proprietary ASUS Remote Console (ARC)
application that offers round-the-clock remote server monitoring through the
component sensors. With ARC, you can monitor the remote server CPU(s)
temperature(s), system temperature, fan rotations, and power supply voltages. The
ASMB3-SOL records each remote server system event for accurate and efcient
troubleshooting.
ARC allows you to update the remote server system BIOS le when it gets
outdated or corrupted. It also lets you move through the BIOS le menus using the
Remote Console Redirection feature. To keep you always informed of the remote
server system status, ARC is also capable of sending Short Message Service
(SMS) or text message to your mobile or PDA phone.
The ASMB3-SOL comes with a power management feature that allows you to
power on/off or reset the remote server giving you full control during power-critical
situations. The server management board also comes with a Field Replaceable
Unit (FRU) information feature that gathers information on replaceable system
components or modules such as the motherboard or backplane model name,
serial number, manufacturer, etc. You can use the FRU information when reporting
and/or replacing server system components.
Before you start installing the server management board check the items in your
package with the list below.
1.2 Package contents
Check your server management board package for the following items.
• ASUS ASMB3-SOL board
• Support CD
• User guide
If any of the above items is damaged or missing, contact your retailer.
1-2 Chapter 1: Product introduction
Page 13
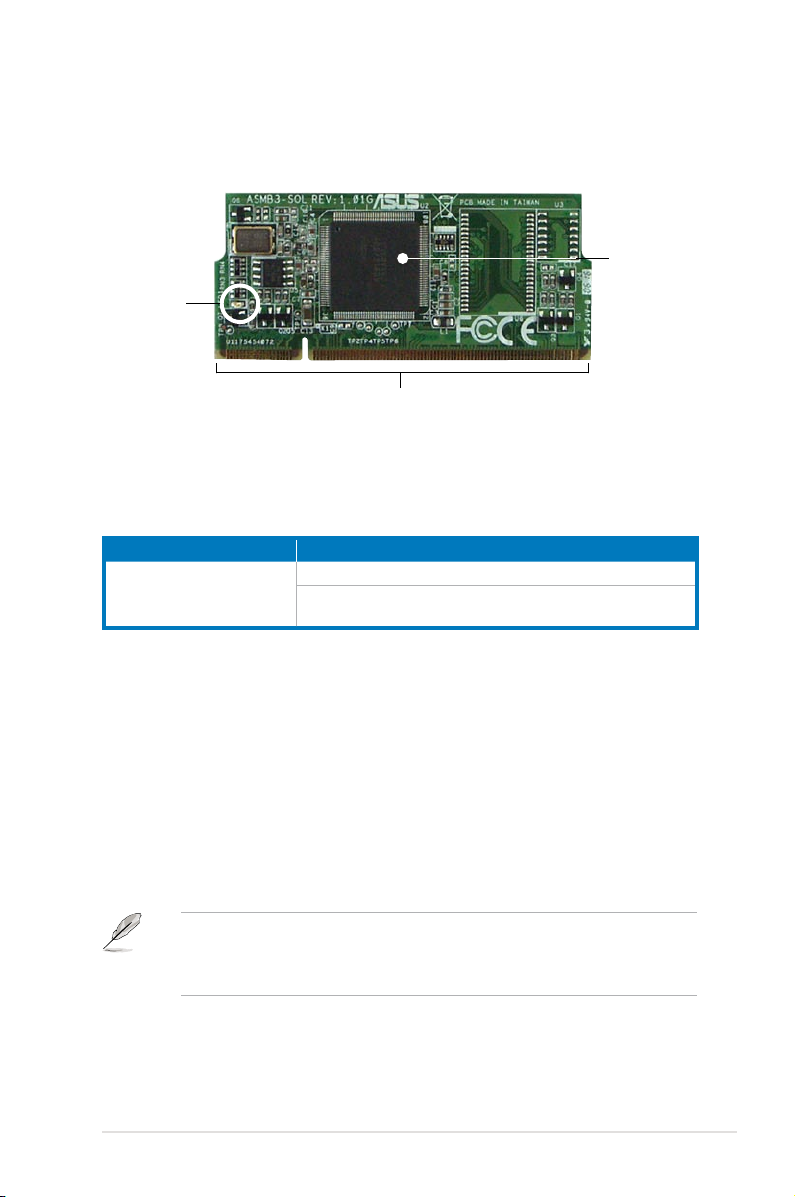
1.3 Board layout
The ASUS ASMB3-SOL comes in a BMC package. The illustration below shows
the major components of the server management board.
Server
management
BMC
heartbeat
LED
Board connectors
LED indicators
The ASMB3-SOL board comes with a BMC heartbeat LED. Refer to the table
below for the LED indications.
LED Name Status Description
LED1 BMC Heartbeat Blinking ASMB3-SOL rmware is in execution
Off The ASMB3-SOL rmware is corrupted or the
server system standby-power is off.
chip
1.4 System requirements
Before you install the ASMB3-SOL board, check if the remote server system meets
the following requirements:
• ASUS server motherboard with Baseboard Management Controller (BMC)
socket*
• LAN (RJ-45) port for server management**
®
• Microsoft
ASUS ASMB3-SOL 1-3
Internet Explorer 5.5 or later
* Visit the ASUS website (www.asus.com) for an updated list of server
motherboards that support the ASMB3-SOL.
** See the Appendix for details.
Page 14
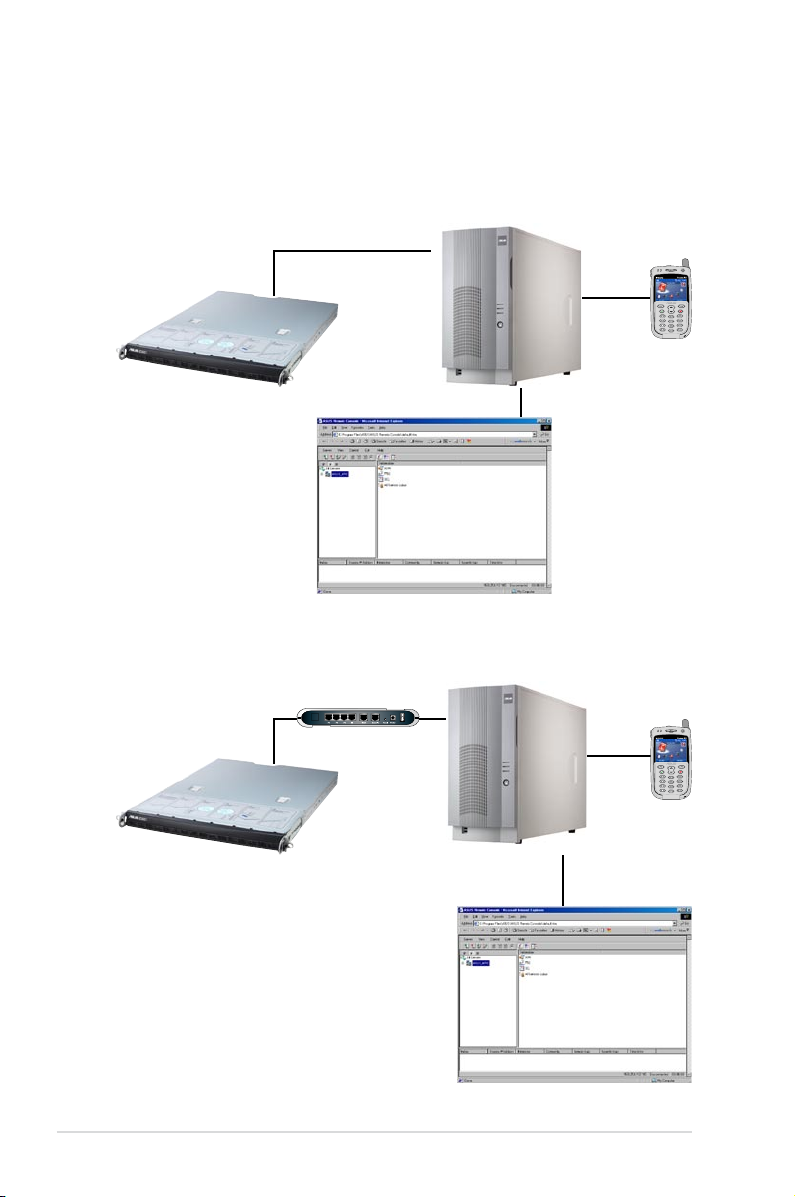
1.5 Network and smart phone setup
The ASMB3-SOL server management board installed on the remote server
connects to a local/central server via direct LAN connection or through a network
hub. Below are the supported server management congurations.
Direct LAN connection
RJ-45 cable
USB
cable
Remote host
with ASMB3-SOL
LAN connection through a network hub
Local host with
ASUS Remote
Controller (ARC)
Hub or router
USB
cable
Remote host
with ASMB3-SOL
Local host with ASUS
Remote Controller
(ARC)
1-4 Chapter 1: Product introduction
Page 15

This chapter provides instructions on how
to install the board to the server system and
install the utilities that the board supports.
Installation
2
ASUS ASMB3-SOL 2-1
Page 16
2.1 Before you proceed
Take note of the following precautions before you install the server management
board to the remote server system.
• Unplug the server system power cord from the wall socket before touching
any component.
• Use a grounded wrist strap or touch a safely grounded object or to
a metal object, such as the power supply case, before handling
components to avoid damaging them due to static electricity.
• Hold components by the edges to avoid touching the ICs on them.
• Whenever you uninstall any component, place it on a grounded
antistatic pad or in the bag that came with the component.
• Before you install or remove any component, ensure
that the power supply is switched off or the power cord is detached from
the power supply. Failure to do so may cause severe damage to the
motherboard, peripherals, and/or components.
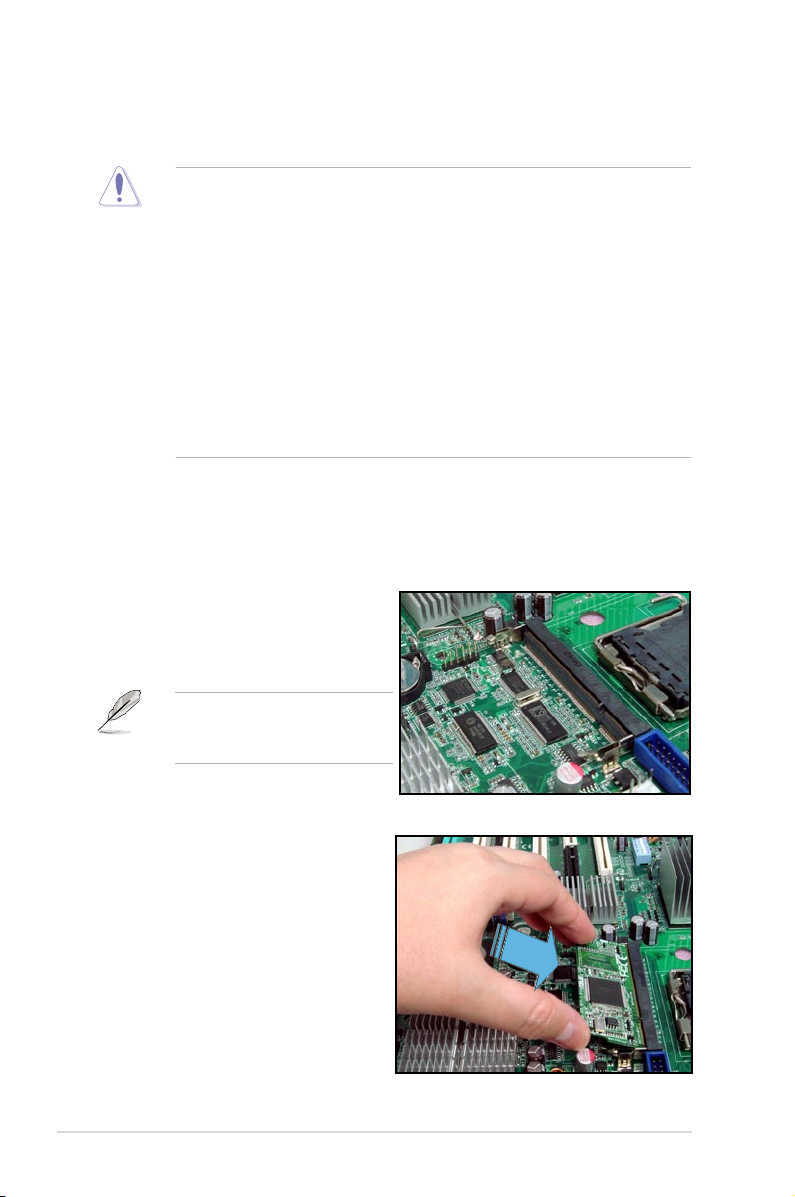
2.2 Hardware installation
To install the server management board:
1. Remove the remote server system
cover, then locate the Baseboard
Management Controller (BMC)
socket on the motherboard.
Refer to the Appendix section for
the location of the BMC socket
on supported motherboards.
2. Position the board at a 30º-45º
angle, then match the notch on the
board with the break on the socket.
3. Carefully push the board to the
socket until its connectors (golden
ngers) are fully-inserted to the
socket.
2-2 Chapter 2: Installation
Page 17
4. Press the board rmly until the BMC
socket retaining clips snap back and
secure the board in place.
When installed, the board appears
as shown.
5. Reinstall the server system cover, then connect the power plug to a grounded
wall socket.
6. Insert the LAN cable plug to the LAN port for server management.
Refer to the Appendix for the location of the LAN port for server management
on various server motherboards.
7. For direct LAN conguration, connect the other end of the LAN cable to the
local/central server LAN port.
For connection to a network hub or router, connect the other end of the LAN
cable to the network hub or router.
ASUS ASMB3-SOL 2-3
Page 18
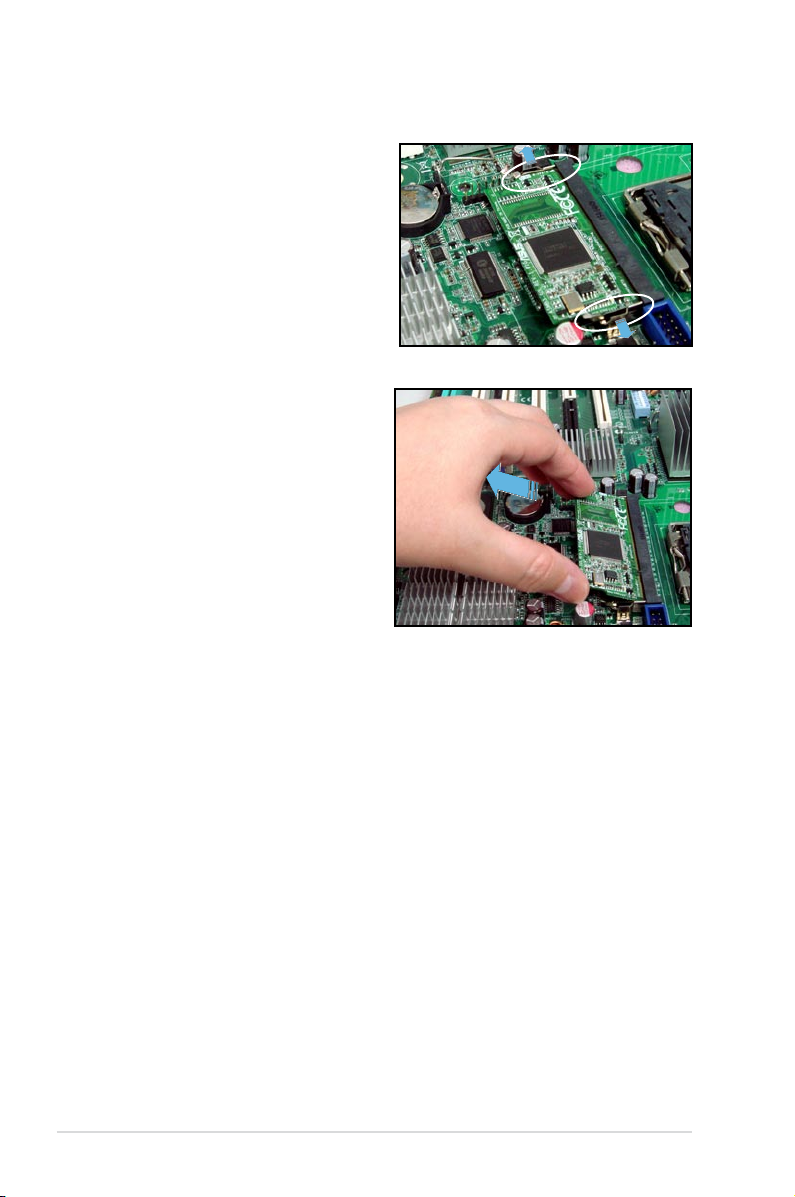
To uninstall the board:
1. Simultaneously push the BMC
socket retaining clips outward
until the board tilts up.
2. Carefully pull the board out from
the BMC socket, then set aside.
2-4 Chapter 2: Installation
Page 19

2.3 Firmware update
You need to update the Broadcom® IPMI and ASMB3-SOL rmware before you
start using the ASMB3-SOL board.
2.3.1 Broadcom® 5721 LAN rmware update
To update the rmware:
1. Insert the support CD into the optical drive.
2. Restart the remote server, then press <Del> during POST to enter the BIOS
setup.
3. Go to Boot menu and set the Boot Device Priority item to [CD-ROM].
4. When nished, press <F10> to save your changes and exit the BIOS setup.
5. On reboot, the main menu appears. Type <c> (Broadcom IPMI Firmware
Update).
MB: KFN4-DRE
a) FreeDOS command prompt
b) Broadcom ASF Firmware Update
c) Broadcom IPMI Firmware Update
d) ASMB3-SOL Firmware Update
Please choose a to d:
6. A screen appears, showing the current (if any) rmware version, and the new
rmware version. The screen also displays a conrmation message asking
whether or not you want to update the rmware appears. Press <Y> to
update.
started logle ’C:fwver.log
none
none
Current BroadCom ASF/IPMI rmware revision : none
New BroadCom ASF/IPMI rmware revision : ASFIPMI v6.09
Update the IPMI rmware ?(y/n) _
The rmware updating process starts.
********************************************************************
Copyright(c) 2000-2005 Broadcom Corporation
Broadcom NetXtreme User Diagnostics 8.30 (18/21/05)
********************************************************************
C Brd:Rv Bus PCI Spd Base Irq EEP MAC Fmw Conguration
- ------ --- --- --- ---- --- --- --- --- ------------
0 5721:C1 02:00:0 Ex1 250 CFCF 5 128k 00E018042100 5721-v3.49a W,auto
1 5721:C1 04:00:0 Ex1 250 CFCF 9 128k 00E018042101 5721-v3.55a W,auto
0 5721:C1 02:00:0 Ex1 250 CFCF 5 128k 00E018042100 5721-v3.49a W,auto
Programming... 131072
OK
ASUS ASMB3-SOL 2-5
Page 20

7. When the update process is complete, the following screen displays the
following summary.
********************************************************************
Copyright(c) 2000-2005 Broadcom Corporation
Broadcom NetXtreme User Diagnostics 8.30 (18/21/05)
********************************************************************
C Brd:Rv Bus PCI Spd Base Irq EEP MAC Fmw Conguration
- ------ --- --- --- ---- --- --- --- --- ------------
0 5721:C1 02:00:0 Ex1 250 CFCF 5 128k 00E018042100 5721-v3.49a W,auto
1 5721:C1 04:00:0 Ex1 250 CFCF 9 128k 00E018042101 5721-v3.49a W,auto
Testing Device:
0 5721:C1 02:00:0 Ex1 250 CFCF 5 128k 00E018042100 5721-v3.49a W,auto
Checking IRQ................................ : passed
Checking NVRAM Content...................... : passed
Programming ASF SMB Address: CC............. : passed
Enabling IPMI............................... : Done
Checking Bond ID.............................: passed
Manufacturing revision...................... : C
Firmware Version............................ : 5721-v3.49a
MAC Address................................. : 00-E0-18-04-21-00
NVRAM Size in KBytes........................ : 128/0x/80
TPM Size in KBytes.......................... : 0/0x0
8. When the update is complete, turn off the system and unplug the AC power
cord for 5 seconds before restarting the system.
2-6 Chapter 2: Installation
Page 21

2.3.2 ASMB3-SOL rmware update
1. Repeat the step1~4 in the previous sub-section.
2. Type <d> (ASMB3-SOL Firmware Update).
MB: KFN4-DRE
a) FreeDOS command prompt
b) Broadcom ASF Firmware Update
c) Broadcom IPMI Firmware Update
d) ASMB3-SOL Firmware Update
Please choose a to d:
3. A screen appears, showing the current (if any) rmware version, and the new
rmware version. The screen also displays a conrmation message asking
whether or not you want to update the rmware appears. Press <Y> to
update.
Current Firmware Version : 1.01 (DSBF-D/SAS, DSBF-D, DSBV-D, DSCC-D12/SAS, DSCCD12, DSCC-DW
Update Firmware Version : 1.01 (KFN4-DRE)
Do you want to update rmware (y/n)?
The rmware updating process starts.
Update Firmware Version : 1.01 (DSBF-D/SAS, DSBF-D, DSBV-D, DSCC-D12/SAS, DSCCD12, DSCC-DW
Update Firmware Version : 1.01 (KFN4-DRE)
Do you want to update rmware (y/n)?
Now, Starting to update rmware
Detect Flash Type - 2168
Programming Flash ...
Progress : 100
Initial BMC. Please wait..
Wait BMC ready.
Initial BMC O.K.
Update rmware Finish!
Detect MotherBoard -> (KFN4-DRE)
Detect KCS Interface
Size of SDR is 1728 bytes
enter update mode
Clear SDR ? (Y/N)
Clear SDR.
Loading SDR
SDR Loaded !
Exit update mode
Please turn off the stand by power !!
Press any key to continue . . ._
4. When the update is complete, turn off the system and unplug the AC power
cord for 5 seconds before restarting the system.
ASUS ASMB3-SOL 2-7
Page 22

2.4 BIOS conguration
You need to adjust the settings in the BIOS setup of the remote server for correct
conguration and connection to the cental server.
Update the remote server BIOS le following the instructions in the
motherboard/system user guide. Visit the ASUS website (www.asus.com) to
download the latest BIOS le for the motherboard.
2.4.1 AMI BIOS setup
Remote Access setup
To adjust the Remote Access settings:
1. Restart the remote server, then press <Del> during POST to access the
BIOS setup.
2. Go to the Server menu, select the Remote Access Conguration sub-menu,
then press <Enter>.
3. Enable Remote Access, then set the following sub-menu items:
• Serial Port Number to [COM2]
• Baudrate to [57600]
• Terminal Type to [VT-UTF8]
• Media Type to [Serial]
Server
Congure Remote Access type and parameters
Remote Access [Enabled]
Serial Port Number [COM2]
Baudrate [57600]
Flow Control [None]
Redirection After BIOS POST [Always]
Terminal Type [VT-UTF8]
Media Type [Serial]
BIOS SETUP UTILITY
Select Remote Access
type.
Select Screen
Select Item
+- Change Option
F1 General Help
F10 Save and Exit
ESC Exit
v02.58 (C)Copyright 1985-2004, American Megatrends, Inc.
4. Press <Esc>, then select IPMI Conguration sub-menu from the Server
menu.
5. Use this sub-menu to adjust the remote server LAN settings or view the
System Event Log (SEL).
6. When nished, press <F10> to save your changes and exit the BIOS setup.
2-8 Chapter 2: Installation
Page 23

You must congure the network settings of both the remote server and the local/
central server to establish communication for remote server control and monitoring.
Prepare the support CD and a bootable oppy disk to congure the network
settings.
Running the BIOS IPMI conguration
To congure the IPMI in the BIOS:
1. Restart the remote server, then press <Del> during POST to enter the BIOS
setup.
2. Go to the Server menu, then select the IPMI Conguration sub-menu. Use
this sub-menu to congure the IPMI settings.
3. When nished, press <F10> to save your changes and exit the BIOS setup.
Server
Server Features
Remote Access Conguration
IPMI Conguration
v02.58 (C)Copyright 1985-2004, American Megatrends, Inc.
BIOS SETUP UTILITY
IPMI Conguration
Server
IPMI Conguration
BMC Firmware version: 1.00-1.00
Boot Option Uses [System]
OS Boot Timeout [Disabled]
Timeout Value [ 0]
Clear System Even Log [Disabled]
BMC Time Sync. [Enabled]
System Event Log
LAN Setting
v02.58 (C)Copyright 1985-2004, American Megatrends, Inc.
BIOS SETUP UTILITY
Select Screen
Select Item
+- Change Option
F1 General Help
F10 Save and Exit
ESC Exit
System: Boot Option
is controlled by
BIOS.
BMC: Boot Option is
controlled by BMC.
Select Screen
Select Item
+- Change Option
F1 General Help
F10 Save and Exit
ESC Exit
ASUS ASMB3-SOL 2-9
Page 24

Boot Option Uses [System]
Set this item to [System] if you want the BIOS to control the boot option. Set
to [BMC] if you want the BMC to control the boot option.
OS Boot Timeout [Disabled]
A system reset occurs after the specied timeout if the operating system
boot fails (does not connect to the Server Manager). Conguration options:
[Disabled] [Enabled]
Timeout Value [ 0]
Allows you to set the operating system boot timeout in minutes. Valid input
ranges from 1 to 100 minutes, with 0 signifying that the boot timeout is
inactive.
Clear System Event Log [Disabled]
Allows you to clear the system event log.
Conguration options: [Disabled] [Enabled]
BMC Time Sync. [Enabled]
Allows you to synchronize the BIOS time with the BMC time.
Conguration options: [Disabled] [Enabled]
System Event Log
Allows you to view all the events in the BMC event log. It will take a maximum
of 15 seconds to read all the BMC SEL records.
Server
Total number of entries: 0
SEL Entry Number: [N/A]
BIOS SETUP UTILITY
Use +/- to traverse
the event log.
Select Screen
Select Item
+- Change Option
F1 General Help
F10 Save and Exit
ESC Exit
v02.58 (C)Copyright 1985-2004, American Megatrends, Inc.
2-10 Chapter 2: Installation
Page 25

LAN Setting
Allows you to set the BMC LAN Parameter settings.
Server
Local IP Address 0.0.0.0
Subnet Mask 0.0.0.0
Gateway Address 0.0.0.0
Local IP Address [ 0]
• [ 0]
• [ 0]
• [ 0]
Subnet Mask [ 0]
• [ 0]
• [ 0]
• [ 0]
Gateway Address [ 0]
• [ 0]
• [ 0]
• [ 0]
v02.58 (C)Copyright 1985-2004, American Megatrends, Inc.
Local IP Address
Allows you to provide information to set the BMC IP address.
Subnet Mask
Allows you to provide information to set the BMC subnet mask. We recommend that
you use the same Subnet Mask you have specied on the operating system network
for the used network card.
Gateway Address
Allows you to provide information to set the gateway address. We recommend that
you use the same gateway address you have specied on the operating system
network for the used network card.
BIOS SETUP UTILITY
Information to set the
BMC IP address.
Select Screen
Select Item
+- Change Option
F1 General Help
F10 Save and Exit
ESC Exit
ASUS ASMB3-SOL 2-11
Page 26

2.4.2 Phoenix BIOS setup
Console Redirection setup
To adjust the Console Redirection settings:
1. Restart the remote server, then press <Del> during POST to access the
BIOS setup.
2. Go to the Server menu, select the Console Redirection sub-menu, then press
<Enter>.
3. Set the following sub-menu items:
• Com Port Address to [On-board COM B] or [On-board COM2 port]
• Baudrate to [57.6K]
• Console Type to [VT-UTF8]
• Flow Control to [None]
• Console connection to [Direct]
• Continue C.R. after POST to [On]
• # of Pages to Support to [1]
Main Advanced Server Security Boot Exit
Console Redirection
Com Port Address [On-board COM B]
Baud Rate [57.6K]
Console Type [VT-UTF8]
Flow Control [None]
Console Redirection [Direct]
Continue C.R. after POST [On]
# of video pages to support [1]
F1 Help ↑↓ Select Item -/+ Change Values F9 Setup Defaults
ESC: Exit →← Select Menu Enter Select Sub-menu F10 Save and Exit
PhoenixBIOS Setup Utility
Item Specic Help
If enabled, it will use a
port on the motherboard.
4. Press <Esc>, then select IPMI Conguration sub-menu from the Server
menu.
5. Use this sub-menu to adjust the remote server LAN settings or view the
System Event Log (SEL).
6. When nished, press <F10> to save your changes and exit the BIOS setup.
2-12 Chapter 2: Installation
Page 27

Running the BIOS IPMI conguration
To congure the IPMI in the BIOS:
1. Restart the remote server, then press <Del> during POST to enter the BIOS
setup.
2. Go to the Server menu, then select the IPMI Conguration sub-menu. Use
this sub-menu to congure the IPMI settings.
3. When nished, press <F10> to save your changes and exit the BIOS setup.
Main Advanced Server Security Boot Exit
Console Redirection
DMI Event Logging
IPMI
F1 Help ↑↓ Select Item -/+ Change Values F9 Setup Defaults
ESC: Exit →← Select Menu Enter Select Sub-menu F10 Save and Exit
PhoenixBIOS Setup Utility
Item Specic Help
Additional setup menus to
congure console.
IPMI Conguration
Main Advanced Server Security Boot Exit
IPMI Specication Version 2.0
BMC Firmware Version 1.04
System Event Logging [Enabled]
Clear System Event Log [Disabled]
Existing Event Log number 34
Event Log Control
SYS Firmware Progress [Disabled]
BIOS POST Errors [Enabled]
BIOS POST Watchdog [Disabled]
OS Boot Watchdog [Disabled]
Timer for loading OS (min) [ 10]
Time out action [No action]
Date Format to show [MM DD YYYY]
Date Separator [/]
PhoenixBIOS Setup Utility
IPMI
Item Specic Help
Enable/Disable IPMI
event logging. Disabling
will still log events
received via the system
interface.
F1 Help ↑↓ Select Item -/+ Change Values F9 Setup Defaults
ESC: Exit →← Select Menu Enter Select Sub-menu F10 Save and Exit
ASUS ASMB3-SOL 2-13
Page 28

IPMI Specification Version
This item shows the auto-detected IPMI specication version.
BMC Firmware Version
This item shows the auto-detected BMC rmware version
System Event Logging [Enabled]
Allows you to enable or disable the IPMI event logging feature.
Conguration options: [Enabled] [Disabled]
Clear System Event Log [Disabled]
Enabling this item forces the BIOS to clear the system event log on the next
cold boot. Conguration options: [Disabled] [Enabled]
Existing Event Log number
This item shows the auto-detected quantity of existing/remaining event logs.
Event Log Control
The following sub-items allow you to control the event logs.
SYS Firmware Progress [Disabled]
Allows you to enable or disable the POST progress log feature.
Conguration options: [Disabled] [Enabled]
BIOS POST Errors [Enabled]
Allows you to enable or disable the POST error log feature.
Conguration options: [Disabled] [Enabled]
BIOS POST Watchdog [Disabled]
Allows you to enable or disable the BIOS POST watchdog feature.
Conguration options: [Disabled] [Enabled]
OS Boot Watchdog [Disabled]
Allows you to enable or disable the OS boot watchdog feature.
Conguration options: [Disabled] [Enabled]
Timer for loading OS (min) [10]
Allows you to set the timer value for the watchdog timer. Use the numeric keypad
to enter your desired value, or use the <+>/<-> key to increase/decrease the value.
Valid input values range from [1] ~ [100].
Time out action [No action]
Allows you to specify what action to take if the OS fails to boot.
Conguration options: [No Action] [Reset] [Power Off] [Power Cycle]
Date Format to show [MM DD YYYY]
Allows you to choose the date format to be displayed.
Conguration options: [MM DD YYYY] [DD MM YYYY] [YYYY DD MM]
2-14 Chapter 2: Installation
Page 29

Date Separator [/]
Allows you to choose which character to use in date entries.
Conguration options: [.] [/]
Scroll down to display more items.
Main Advanced Server Security Boot Exit
System Event Log
System Event Log (list mode)
IP Address [000.000.000.000]
F1 Help ↑↓ Select Item -/+ Change Values F9 Setup Defaults
ESC: Exit →← Select Menu Enter Select Sub-menu F10 Save and Exit
To congure your subnet mask and gateway address, refer to page 2-19 for
more information on using ASMC utility.
PhoenixBIOS Setup Utility
IPMI
Item Specic Help
Display the System Event
Log.
System Event Log
Press <Enter> to open the System Event Log, which allows you to view log
entries. Use the arrow keys to browse entry numbers.
Main Advanced Server Security Boot Exit
SEL Entry Number = 1
SEL Record ID = 0001
SEL Record Type = 02-System Event Record
Timestamp = 04/17/2006 16:10:44
Generator Id = 20 00
SEL Message Rev = 04
Sensor Type = 01 - Temperature
Sensor Number = 32 - CPU2temperature1
SEL Event Type = 01 - Threshold
Event Description = Upper Non-critical Going High, Assertion
SEL Event Data = 57 80 50
PhoenixBIOS Setup Utility
System Event Log
F1 Help ↑↓ Select Item -/+ Change Values F9 Setup Defaults
ESC: Exit →← Select Menu Enter Select Sub-menu F10 Save and Exit
ASUS ASMB3-SOL 2-15
Page 30

System Event Log (list mode)
Press <Enter> to open the System Event Log in list mode.
Main Advanced Server Security Boot Exit
Event ID Sensor Name Sensor Type Date/Time Stamp
------------------------------------------------------------------------------
001 CPU2temperature1 Temp 04/17/2006 16:10:44
Upper Non-critical Going High, Assertion
002 CPU2temperature1 Temp 04/17/2006 16:10:44
Upper Critical Going High, Assertion
003 CPU2temperature2 Temp 04/17/2006 16:10:44
Upper Non-critical Going High, Assertion
004 CPU2temperature2 Temp 04/17/2006 16:10:44
Upper Critical Going High, Assertion
005 DIMM_01 AMB temp Temp 04/17/2006 16:10:44
Lower Non-critical Going Low, Assertion
006 DIMM_01 AMB temp Temp 04/17/2006 16:10:45
Upper Critical Going Low, Assertion
F1 Help ↑↓ Select Item -/+ Change Values F9 Setup Defaults
ESC: Exit →← Select Menu Enter Select Sub-menu F10 Save and Exit
PhoenixBIOS Setup Utility
System Event Log (list mode)
Choose an event ID, then press <Enter> to view the details.
Main Advanced Server Security Boot Exit
[0001 CPU2temperature1 Temp 04/17/2006 16:10:44 ]
SEL Entry Number = 1
SEL Record ID = 0001
SEL Record Type = 02-System Event Record
Timestamp = 04/17/2006 16:10:44
Generator Id = 20 00
SEL Message Rev = 04
Sensor Type = 01 - Temperature
Sensor Number = 32 - CPU2temperature1
SEL Event Type = 01 - Threshold
Event Description = Upper Non-critical Going High, Assertion
SEL Event Data = 57 80 50
PhoenixBIOS Setup Utility
F1 Help ↑↓ Select Item -/+ Change Values F9 Setup Defaults
ESC: Exit →← Select Menu Enter Select Sub-menu F10 Save and Exit
IP Address
Allows you to provide information to set the BMC IP address.
2-16 Chapter 2: Installation
Page 31

2.5 Running the ASMC utility
The ASUS Server Management Card Utility allows you to know the MAC address
of the server motherboard and to set the IP address. This utility is available from
the support CD that came with the package.
To run the ASMC utility:
1. Restart the remote server, then place the support CD to the
optical drive.
2. Press <a> (FreeDOS command prompt) when the screen prompts you to
select from available boot options.
3. When the
optical drive).
4. When the
name)\IDE(model type)*, then press <Enter>.
5. At the prompt, type
Help Menu. The screen appears as shown.
Refer to the table on the next page for a description of the help menu options.
A:> prompt appears, type X: (where X is the drive letter of the
X:> prompt appears, type cd\asmb3\model\KFN4-DRE(model
asmc ?, then press <Enter> to display the ASMC Utility
* The path varies based on the motherboard model you purchase. Locate the
ASMC le under the correct folder.
ASUS ASMB3-SOL 2-17
Page 32

ASMC Help Menu options
Options Description
-ash -load lename Update the ASMB3-SOL rmware
-sdr -save lename Save the SDR data to le
-sdr -load lename Update the SDR data from le
-kcs[smic/bt/pci_smic] NetFn command data....
-bmc_ip [ip_addr]
(e.g., bmc_ip 10.10.10.20)
--pet_ip_mac [ip_addr] [mac_addr]
(e.g., pet_ip_mac 10.10.10.20 010203040506)
-adm_name new_name_string
-user_name new_name_string
-adm_password new_adm_password
-user_password new_user_password
-init_asmb Initialize ASMB3-SOL
-sol_baud [baud rate]
(e.g., sol_baud 57600)
-bmc_info Displays the BMC and PET IP and
*-bmc_submask subnet mask
*-bmc_gateway gateway address
The options marked with * may not be available for all ASMC utility versions. If
your bundled utility does not include these options, refer to the section below to
manually congure the items.
Send IPMI command
Write the BMC IP address
Write the PET destination IP and MAC
addresses
Change the administration name
Change the user name
Change the administration password
Change the user password
Set the communication Baud rate
MAC addresses
Write the subnet mask
Write the gateway address
2.5.1 Conguring the LAN controller
Before you can establish connection to the ASMB3-SOL board, you must congure
the LAN port for server management used by the remote server to connect to the
local/central server.
To congure the LAN port of the remote server:
1. On the prompt, type asmc -init_asmb, then press <Enter>. The screen
displays the auto-detected information including the system/motherboard
name, and the IPMI2.0 interface. The screen also shows the status of the
ASMB3-SOL.
c:\dos>asmc -init_asmb
Detect System -> DSBF-D/SAS
Detect Motherboard -> (DSBF-D/SAS)
Detect KCS Interface
Initial BMC O.K.
2. Shut down the remote server, then disconnect the power plug from the
electrical socket to initialize the ASMB3-SOL.
2-18 Chapter 2: Installation
Page 33

3. Restart the remote server from the support CD.
4. Run the ASMC utility from the support CD following the instructions in the
previous section.
5. Type asmc -bmc_ip xxx.xxx.xxx.xxx, then press <Enter> to assign any IP
address to the remote server LAN port. The screen displays the request and
response buffer. Write the remote server IP address in a piece of paper for
reference.
c:\dos>asmc -bmc_ip 10.10.10.20
Detect System -> DSBF-D/SAS
Detect Motherboard -> (DSBF-D/SAS)
Detect KCS Interface
New BMC IP : 10.10.10.20
When nished, the utility returns to the DOS prompt.
Make sure that the assigned IP address for both remote and local/central
servers are in the same subnet. You can use the network settings utility in your
OS to check.
6. Congure your (a) subnet mask and (b) gateway address if needed.
(a) Type asmc -kcs 30 01 01 05 FF FF FF 00 (your subnet mask
encoded in hexadecimal system)
(b) Type asmc -kcs 30 01 01 0C
0A 0A 0A FE (your gateway address
encoded in hexadecimal system)
Refer to Appendix if you have trouble converting your subnet mask/gateway
address to hexadecimal value representation.
7. Type asmc -init_asmb to effect the conguration.
8. Type asmc -bmc_info on the prompt, then press <Enter> to display the BMC
and PET IP and MAC addresses.
Firmware Version : 1.01 (DSBF-D/SAS, DSBF-D, DSBV-D, DSCC-D12/SAS, DSCC-D12,
DSCC-DW
BMC IP : 10.10.10.10
BMC MAC : 00 E0 18 51 10 7A
PET IP : 00.00.00.00
PET MAC : 00 00 00 00 00 00
SOL BAUD: 57600
9. Restart the remote server, enter the BIOS setup, then boot from the hard disk
drive.
10. Congure the ASMB3-SOL baud rate (asmc -sol_baud 57600).
Make sure that the ASMB3-SOL baud rate is the same as the Remote Access
baud rate that you previously set in the BIOS. See section 2.4 BIOS remote
console for details.
11. Adjust the local/central server network settings, if necessary.
ASUS ASMB3-SOL 2-19
Page 34

2.5.2 Using ASWM to update the ASMB3-SOL rmware
You can use the ASUS System Web-based Management (ASWM) application to
update the ASMB3-SOL rmware. To do this:
1. Download the latest ASMB3-SOL rmware from the ASUS website (www.
asus.com), then save the rmware le.
2. Launch the ASWM application. If ASWM is not yet installed on your server
system, use the motherboard support CD to install the application.
3. Click the
Conguration link, then select IPMI Flash from the menu.
3
4
5
4. Click
5. Click
6. When the update is complete, turn off the system and
2-20 Chapter 2: Installation
Browse to locate the latest rmware you downloaded earlier. When
selected, the rmware path and lename appears in the Firmware Image
Name eld.
Apply to update the ASMB3-SOL rmware.
unplug the AC power
cord for 5 seconds before restarting the system.
Page 35

2.6 Software installation
You can monitor, control, or manage the remote server from the local/central
server using the ASUS Remote Console (ARC). The ARC is a web-based
application available from the support CD that came with the ASMB3-SOL
package. You must install the ARC on the local/central server to access the remote
server.
Before you install the ARC:
• For SNMP Service: View the Platform Event Trap (PET) information. See
page 3-18 for details.
®
• For Microsoft
details.
2.6.1 Installing the ARC
To install the ARC to the local/central server:
1. Place the support CD to the optical drive. The CD automatically displays the
Drivers menu if Autorun is enabled in your computer.
If Autorun is NOT enabled in your computer, browse the contents of the support
CD to locate the le ARC.EXE in the ARC folder. Double-click the ARC.EXE to
install the application.
2. Click the Utilities tab, then click the item ASUS Remote Console.
ActiveSync: Enable the SMS feature. See page 3-15 for
ASUS ASMB3-SOL 2-21
Page 36

3. Follow the installation wizard instructions to install the utility.
2.6.2 Launching ARC
To launch the ARC utility, click Start > All Programs > ASUS Remote Console >
ASUS Remote Console from the Windows® desktop.
OR
®
Double-click the ASUS Remote Console icon on the Windows
2-22 Chapter 2: Installation
desktop.
Page 37

This chapter tells you how to use the
software applications that the server
management board supports.
Software
3
support
Page 38

3.1 ASUS Remote Console (ARC)
The ASUS Remote Console (ARC) is a web-based utility that allows you to monitor
the remote host’s hardware information including temperatures, fan rotations,
voltages, and power. This application also lets you instantly power on/off or reset
the remote server.
1
3
The ARC window is made up of six sections:
1. Menu bar
2. Tool bar
3. Navigation window
4. Detail/SEL window
5. Event window, and
6. Status bar
2
4
5
6
Refer to the following sections for details.
3-2 Chapter 3: Software support
Page 39

3.1.1 ARC sections
Menu bar
The Menu bar contains all the commands for the ARC application. Click on a menu
to display a list of available commands.
Menu Available commands
Server add, delete, connect, disconnect server or change the server
View show or hide the tool bar, status bar, navigation, and PET windows
Control power down/up, reset, power cycle, power on Lan
Edit delete the System Event Log (SEL), PET log, Reset PET destination,
Help open Help contents or view information about the ARC application
Tool bar
The Tool bar buttons correspond to commonly used commands. The Tool bar
offers faster access and execution of these commands. Roll the mouse pointer
over a button to display its function.
Navigation window
The Navigation window displays the directory
of connected and disconnected remote
server(s). For multiple monitoring, this window
allows you to navigate through the remote
servers. Click the All Servers root directory
to display all connected and disconnected
servers, then click on the server you want to
monitor or control.
Click before the server connection to
display available remote server information
including the SDR (Sensor Data Record),
FRU (Field Replaceable Unit), SEL
(System Event Log), and Remote
Console.
settings; load/save server node list; general setting; dump/restore all
conguration
Reset Baud Rate; Set MAC address
ASUS ASMB3-SOL 3-3
Page 40

Some remote server information (such as the SDR) contains several sensor
groups such as Temperature, Voltage, and Fan. Click before the remote server
information to display the sensor groups.
Click before a sensor group to display individual sensors. For example,
clicking before the sensor group Temperature displays the CPU1 and system
temperatures.
Sensor groups
You can also change the server directory
display by clicking the buttons on top of the
window. For example, clicking the IP button
displays the remote server IP address instead
of the remote server name (N). Selecting ID
displays the remote server ID instead of the
server name or IP address.
Sensors
3-4 Chapter 3: Software support
Page 41

Detail/SEL window
The Detail/SEL window displays the detailed SDR and FRU information, and
the SEL (System Event Log). The window provides the link for detailed sensor
information or system events and allows you to adjust the sensor threshold values.
Event window
The Event window displays the Platform Event Trap (PET) received by the ARC.
The PET information includes the event index, source IP address, enterprise,
community, generic and specic traps, and time ticks. The PET information is
a system management alert in SNMP Trap format and is used is used for IPMI
alerting as well as alerts using the ASF specication.
Status bar
The Status bar located at the bottom of the ARC window displays the connection
status to the remote server, connection duration, IP address of the remote server,
and the progress of SDR/SEL/FRU information download.
ASUS ASMB3-SOL 3-5
Page 42

3.1.2 Connecting to the remote server
To connect to the remote server:
1. From the menu bar, click
Server,
then select New. An Add new
server connection window
appears.
2. Type the remote server name and
IP address on the elds. Click
Save Default to set the remote
server connection as the default.
Otherwise, click OK to continue or
Cancel to close the window.
The default server connection name and IP address are automatically displayed
everytime you add a new server connection.
3. When prompted, select IPMI
Server, then click Continue.
3-6 Chapter 3: Software support
Page 43

The navigation window displays
the remote server. The available
remote server information are
displayed on the Detail/SEL
window.
4. Use any of these options to connect to the server:
• Click
before the remote server to display the remote server information,
then select from the list.
• Double-click a remote server information from the
• Click
Server, then select Connect.
Detail/SEL window.
5. When prompted, enter the default
user name (admin) and password
(admin).
6. Set the connection request level
authentication and privilege, then
click OK.
The default connection request level authentication is HMAC-SHA1 with
Administrator privileges. You may change these conguration according to your
network settings or preference.
ASUS ASMB3-SOL 3-7
Page 44

3.1.3 Retrieving sensor information
The Sensor Data Record (SDR) provides remote server system information
through available sensors including CPU/system/power temperatures, voltages,
fan speeds, chassis intrusion, etc. The SDR also provides information on the
sensor location (e.g. CPU1, CPU2, FAN1), event generation, and access
information.
To retrieve a sensor information:
1. From the navigation window, click
remote server information.
2. Click
before the SDR to display the sensor groups (e.g. Temperature),
then click before a sensor group to display the individual sensors. Select
a sensor (e.g. CPU1 THERMAL) to display its values in the Detail/SEL
window.
before the server name to display the
The Detail/SEL window displays the sensor data attributes, values, and
meanings. From this window, you can adjust the sensor threshold values by
clicking the up/down arrow button after each value.
3-8 Chapter 3: Software support
Page 45

3. Click More. A sensor window
appears displaying additional
information on the sensor.
The Information tab displays basic
sensor information including the
sensor name, current status,
current value, and sensor type.
The tab also displays the sensor
record ID and SDR version.
4. Click the Settings tab to adjust
the sensor threshold values. Click
on the up/down arrow button after
each threshold value to adjust.
Click
OK to close the window.
ASUS ASMB3-SOL 3-9
Page 46

3.1.4 Displaying FRU information
The Field Replaceable Unit (FRU) information provides the manufacturer, product
name, and/or serial number of various modules and components installed on
the remote server. For example, the FRU feature can display the remote server
motherboard name, model, and serial number. You can use this feature when
retrieving information on a module or component installed on the remote server.
• The FRU information feature allows you to obtain component or module
information even when the remote server is down or off.
• The motherboard information is not included in the FRU information.
To display the FRU information:
1. From the navigation window, click
before the server name to open the
remote server information.
2. Click
before the FRU to display available FRU information, then click
before the module/component. Select a module or component from the list to
display the FRU information in the Detail/SEL window.
3-10 Chapter 3: Software support
Page 47

3.1.5 Displaying system event logs
The System Event Log (SEL) is a non-volatile storage area where all remote
server system events are stored for real-time tracking or later retrieval. The ARC
application can display system events for efcient remote server monitoring and
troubleshooting.
To display the sytem events:
1. From the navigation window, click
click SEL. The status bar displays the progress of the SEL download. When
nished, the Detail/SEL window displays the system events in chronological
order.
2. Double-click an event to display
an Event Information window.
This window displays the sensor
type and record ID, event
message, current and threshold
values, and other system event
information.
3. Click
OK to close the window.
before the server connection, then
ASUS ASMB3-SOL 3-11
Page 48

3.1.6 Using Remote Console
The Remote Console feature lets you see the remote server screen (text only) and
is useful when you update the remote server BIOS le or adjust the BIOS settings.
Refer to section 3.1.9 Updating the remote server BIOS le for details on remote
BIOS update.
To display the remote server console, press the Remote Console item from the
navigation window. The remote server screen appears in the Detail/SEL window.
F1~F10 keyboard function keys
Delete key
ARC function keys
(used in combination with other keys)
Reboot to enter BIOS setup menu
BIOS update
3-12 Chapter 3: Software support
Page 49

3.1.7 Displaying all remote server sensors
To display all remote server sensors in graphical format:
1. From the navigation window, click
remote server information.
2. Click
The color bar represents the upper/lower threshold values of each sensor.
All Sensors value. All remote server sensors are displayed on the
Information window in graphical format.
The green pointer indicates the current value of the sensor.
before the server name to open the
ASUS ASMB3-SOL 3-13
Page 50

3.1.8 Adjusting the monitoring settings
The ARC application allows you to adjust the remote server monitoring settings
including SEL polling, SDR reading, ASF, and PET.
To adjust the monitoring settings:
1. Click
2. Click on the up/down arrow
3. Click
Server on the menu bar,
then select General Setting from
the drop-down menu. A Server
Settings window appears.
button after each setting to
adjust the value.
OK to save your changes
and close the window;
otherwise, click Cancel to ignore
your changes.
3-14 Chapter 3: Software support
Page 51

Enabling the Short Message Service (SMS) feature
The Short Message Service or SMS feature allows you to receive Platform Event
Trap (PET) information on your smart phone (ASUS P505).
You must install Microsoft® ActiveSync® before you enable the SMS feature.
Visit www.microsoft.com to download Microsoft® ActiveSync® .
To enable the SMS feature:
1. Check the box before the
Enable Short Message Service
feature.
2. Click
Set Phone List.
3. When the
SyncSMS mobile
phone number setup window
opens, key-in the mobile or PDA
phone number in the box.
You may click the box before each
phone number to disable it.
4. Press
OK.
1
2
ASUS ASMB3-SOL 3-15
Page 52

3.1.9 Updating the remote server BIOS le
The ASMB3-SOL features a remote BIOS le update capability that allows you to
update the BIOS le of the remote server when the le gets outdated or corrupted.
Make sure to download and save the latest BIOS le for the remote server
motherboard. Visit the ASUS website for the latest BIOS le.
To update the remote server BIOS le:
1. Download and save the latest BIOS le for the remote server motherboard.
2. From the navigation window, click
server screen. See section 3.1.6 for details.
3. Click the update BIOS icon [
4. Locate the latest BIOS le when the Open window appears, the click
5. Click
Yes when the Conrm
reset dialog box appears.
ARC resets the remote server,
then automatically updates the
BIOS le.
6. When nished, establish
connection with the remote
server, then use the toolbars to
adjust the BIOS setup.
Remote Console to display the remote
] in the toolbar.
Open.
3-16 Chapter 3: Software support
Page 53

3.1.10 Controlling the remote server power
ARC allows you to power up, power down, or reset the remote server using the
power menu.
Before turning off or resetting the remote server, make sure that it is not being
used and that no application is currently running on it to avoid data loss.
To power down the remote server:
1. Click
Control on the menu bar,
then select Power down from the
drop-down menu.
OR
Click the power down button on the
tool bar.
2. Click
Yes when the Conrm power
down window appears.
3. The remote server is turned off.
Click OK to close the window.
Use the same instructions as
reference when powering up or
resetting the remote server.
Power Down
ASUS ASMB3-SOL 3-17
Page 54

3.1.11 Viewing PET information
The Platform Event Trap or PET is an SNMP trap used for system management
alerts. When the ARC receives a PET, it displays a pop-up window notifying you of
the alert and its source (IP address). Right-click the window to close.
You need to install an SNMP service to the remote server to receive
PET information.
To install an SNMP service to the remote service:
1. On the Windows
Start > Settings > Control
Panel.
®
taskbar, click
2. Double-click Add/Remove
Programs.
3. Double-click Add Windows
Components.
3-18 Chapter 3: Software support
Page 55

4. Double-click Management and
Monitoring Tools.
5. Select Simple Network
Management Protocol (SNMP).
6. Click
OK.
ASUS ASMB3-SOL 3-19
Page 56

Important notice for Windows® XP (Service Pack 2) users
If the remote server system is behind a rewall, you must create a UDP port to
receive PET information.
To create a UDP port:
1. Double-click the
the My Network Places link.
2. Click the
the remote server system is using.
3. Right-click the LAN connection, then select
menu.
4. Click the
5. On the
6. Type a name on the
7. Type the IP address of the local/central server, then set the
8. Select
You must also adjust the Internet Explorer settings to allow active contents to run
in the local/central server. To do this:
1. From the
2. Click the
3. Enable the item “
4. Click the
Services tab, click the Add button to display a Service Settings
window.
Internal Port number to 162.
UDP, then click OK. The created service is displayed in the Services
list. Check the box before the service, then click OK.
from the drop-down menu.
My Computer icon from the Windows® desktop, then click
View network connections link, then select the LAN connection
Properties from the drop-down
Advanced tab, then click the Settings button.
Description of service eld (i.e. ASUS ARC).
External and
Internet Explorer menu, click Tools, then select Internet Options
Advanced tab.
Allow active content to run in les on My Computer”.
Apply button, then click OK to close the window.
3-20 Chapter 3: Software support
Page 57

3.2 ASUS Host Management Controller Setup
The ASUS Host Management Controller Setup utility provides precise conguration
and basic functions including System Event Log (SEL) generation and System
Data Record (SDR) reading in DOS mode.
This utility also supplies conguration sequences for the type of host interface
as well as direct real-time monitoring of system information including CPU
temperature(s), fan speeds and system voltages.
3.2.1 Installing and launching the ASUS Host
Management Controller Setup utility
To install the ASUS Host Management Controller Setup utility:
1. Boot the server in DOS mode using the support CD.
2. When the
optical drive).
3. When the
name)\IDE(model type)*, then press <Enter>.
4. At the prompt, type
Help Menu. The screen appears as shown.
A:\>x:
X:\>cd\asmb3\model\KFN4-DRE\IDE
X:\>asmc
A:> prompt appears, type X: (where X is the drive letter of the
X:> prompt appears, type cd\asmb3\model\KFN4-DRE(model
asmc, then press <Enter> to display the ASMC Utility
5. The main utility screen appears. Press <Enter>.
* The path varies based on the motherboard model you purchase. Locate and
install the ASMC le under the correct folder.
ASUS ASMB3-SOL 3-21
Page 58

3.2.2 Command elds
The utility menu bar has ve commands: Initial, View, Set, Monitor and Help. You
can select a command using the left or right arrow button on the keyboard. After
selecting a command, use the down arrow key to display available options. Select
a command, then press <Enter> to execute.
Menu options
Menu bar
3.2.3 Initial
The Initial command allows you to clear the SEL information or exit the utility.
Go to Initial command, then select Clear SEL to empty all System Event Log
information for a refresh set of data records. Use the Clear SEL command when
creating a new log that begins at an exact time for precise system monitoring.
Select Exit to close the utility and return to the DOS prompt.
3.2.4 View
The View command displays the Baseboard Management Controller (BMC) data
record including the System Event Log (SEL), the System Data Record (SDR), and
general BMC information.
3-22 Chapter 3: Software support
Page 59

To view the System Event Log (SEL):
1. Select BMC SEL from the View command option, then press <Enter>. A
complete list of system event records appear on the left pane. The right pane
displayes the SEL information.
The number on the left bottom of the window shows the system event
displayed in the right window pane over the total number of system events in
the remote host.
2. Use the down arrow key to display the next sensor event.
3. Press <Esc> to return to the main screen.
To view the System Data Record (SDR):
1. Select BMC SDR from the View command option, then press <Enter>.
A complete list of data records appears on the left pane. The right pane
displays the sensor data information.
The number on the bottom left of the screen indicates the data record
displayed in the right window pane over the total number of sensor data
records in the remote host.
2. Use the down arrow key to display the next sensor data record.
3. Press <Esc> to return to the main screen.
ASUS ASMB3-SOL 3-23
Page 60

To view the BMC information:
1. Select BMC Info from the View command option, then press <Enter>. A list
of BMC information appears on the left pane.
2. Use the down arrow button to select a BMC information. The BMC
information is displayed in the right pane.
3. Press <Esc> to return to the main screen.
3-24 Chapter 3: Software support
Page 61

3.2.5 Set
The Set command controls the host interface type and the correct BMC time.
To select the host interface:
1. Select Host Interface from the Set command option, then press <Enter>.
The screen displays the host interfaces supported by the server management
board.
2. Use the down arrow button to select a host interface, then press <Enter>.
You can select from the following interfaces:
KCS Interface - Keyboard Controller Style
SMIC Interface - Server Management Interface Chip
BF Interface - Block Transfer
PCI Interface - Peripheral Component Interconnect
3. When nished, press <Esc> to return to the main screen.
To set the BMC Timer:
1. Select BMC Timer from the Set command option, then press <Enter>.
2. Set the BMC IPMI timer to the current system time.
3. When nished, press <Esc> to return to the main screen.
ASUS ASMB3-SOL 3-25
Page 62

3.2.6 Monitor
The Monitor command displays real-time data on the remote server system and
CPU temperatures, voltages, and fan speeds.
To display a remote server information:
1. Select a sensor from the Monitor command options, then press <Enter>. A
list of server information appears on the left pane.
2. Use the down arrow button to select a monitor information. The selected
monitor information details are displayed in the right pane.
3. Press <Esc> to return to the main screen.
3.2.7 Help
The Help command displays the available utility options, utility version, and
copyright information.
3-26 Chapter 3: Software support
Page 63

The Appendix shows the location of the LAN
port for server management and BMC socket
on several motherboards. This section also
presents common problems that you may
encounter when installing or using the server
management board.
Reference
information
A
Page 64

A.1 LAN port for server management
1
2
4
5
6
3
7
The ASUS server motherboards that support the ASMB3-SOL comes with two LAN
(RJ-45) ports: one for network connection and the other for server management.
For easy identication, the LAN port for server management is the LAN1 port*
(usually near the VGA port). You must use the LAN1 port for server management
to connect the remote server to the local/central host (direct LAN connection) or to
the network hub or router.
Refer to the illustrations below to identify the LAN1 port for server management on
some server motherboard.
KFN4-DRE motherboard
You can refer to motherboard manual for the location of LAN1 port.
A-2 Appendix: Reference information
Page 65

A.2 BMC socket
Socket F (1207)
Socket F (1207)
DDR2 DIMM_D2 (128 bit,240-pin module)
DDR2 DIMM_C2 (128 bit,240-pin module)
DDR2 DIMM_D1 (128 bit,240-pin module)
DDR2 DIMM_C1 (128 bit,240-pin module)
DDR2 DIMM_A1 (128 bit,240-pin module)
DDR2 DIMM_B1 (128 bit,240-pin module)
DDR2 DIMM_A2 (128 bit,240-pin module)
DDR2 DIMM_B2 (128 bit,240-pin module)
nForce
Professional 2200
PRI_IDE1
SEC_IDE1
FLOPPY1
SATA1
SATA4
SATA3
SATA2
ATXPWR1
ATX12V1
LAN1
LAN2
REAR_FAN4
REAR_FAN3
REAR_FAN2
REAR_FAN1
FRNT_FAN4
FRNT_FAN3
FRNT_FAN1
FRNT_FAN2
FRNT_FAN1
FRNT_FAN2
AUX_PANEL1
BPSMB1
PANEL1
Super I/O
PCI_E1
HTX2
HTX1
SB_PWR1
PCI1
TPM1
CR2032 3V
Lithium Cell
CMOS Power
COM2
LPT1
HDLED1
KBPWR1
USBPW12
LAN1_EN1
LAN2_EN1
CLRTC1
RECOVERY1
USBPW23
VGA_EN1
USB34
PS/2KBMS
T: Mouse
B: Keyboard
USB12
COM1
VGA1
BUZZ1
PSUSMB1
Broadcom
BCM5721
Broadcom
BCM5721
R
KFN4-DRE
8Mb
BIOS
MEM_WARN1
CPU_WARN1
BMCSOCKET1
The ASUS server motherboards that support the ASMB-LE comes with a
Baseboard Management Controller (BMC) socket.
Refer to the illustrations below to locate the BMC socket on different server
motherboards.
KFN4-DRE motherboard
ASUS ASMB3-SOL A-3
Page 66

A.3 Converting decimal to hexadecimal
1. Divide the decimal number by 16 and you will get a quotient and a remainder.
2. Divide the quotient by 16 again to get another quotient and another
remainder.
3. Repeatedly divide the quotient by 16 until the quotient is 0.
4. Encoded all the remainders in the hexadecimal system.
Conversion table
Decimal 0 1 2 3 4 5 6 7 8 9 10 11 12 13 14 15
Hexadecimal 0 1 2 3 4 5 6 7 8 9 A B C D E F
5. The hexadecimal representation of your decimal number is the digit
sequence of all the remainders from the last to the rst.
Here is an example of how to convert decimal to hexadecimal.
254 (in decimal)
1. When dividing 254 by 16, the quotient is 15 and the remainder is 14.
2. Divide the quotient 15 by 16 again to get the quotient 0 and the
remainder 15.
3. Refer to the table above and convert the remainders from decimal to
hexadecimal. The last (second) remainder is F (15 decimal). The second
last (rst) remainder is E (14 decimal).
4. Write down the last (second) remainder in the most signicant digit, and
the second last (rst) remainder in the least (less) signicant digit.
5. The hexadecimal expression of 254 is FE.
A-4 Appendix: Reference information
Page 67

A.4 Troubleshooting
This troubleshooting guide provides answers to some common problems
that you may encounter while installing and/or using ASUS ASMB-LE. These
problems require simple troubleshooting that you can perform by yourself.
Contact the Wireless LAN Technical Support if you encounter problems not
mentioned in this section.
Problem Solution
The local/central server cannot connect
to the ASMB3-SOL board.
The ARC cannot receive PET
information from the remote server.
Short Message Service (SMS) 1. Check if the USB cable is connected
Serial Over LAN (SOL) 1. Check the BIOS remote console
1. Check if the LAN cable is connected
to the LAN port for server
management. See page A-2 for
details.
2. Check if the remote server LAN port
is working properly. If you have not
previously installed the LAN controller
driver, install the same using the
system support CD.
3. Make sure that the AC power cord
has been unplugged for at least 5
seconds after the rmware updating.
4. Make sure that the IP address of both
the remote and local/central servers
are on the same subnet.
5. Set the remote server IP address and
MAC address using the ASUS Host
Management Controller Setup. See
Chapter 2 for details.
Install SNMP service. See section 3.1.11
Viewing PET information for details.
properly.
2. Check if your smart phone (ASUS
P505) is working properly.
3. Install Microsoft
4. Set the phone number.
setting. See section 2.4 for details.
2. Check if the rmware baud rate is
the same as the BIOS setting. See
section 2.5.1 Conguring the LAN
controller for details.
®
ActiveSync.
ASUS ASMB3-SOL A-5
Page 68

A-6 Appendix: Reference information
 Loading...