

Page 1
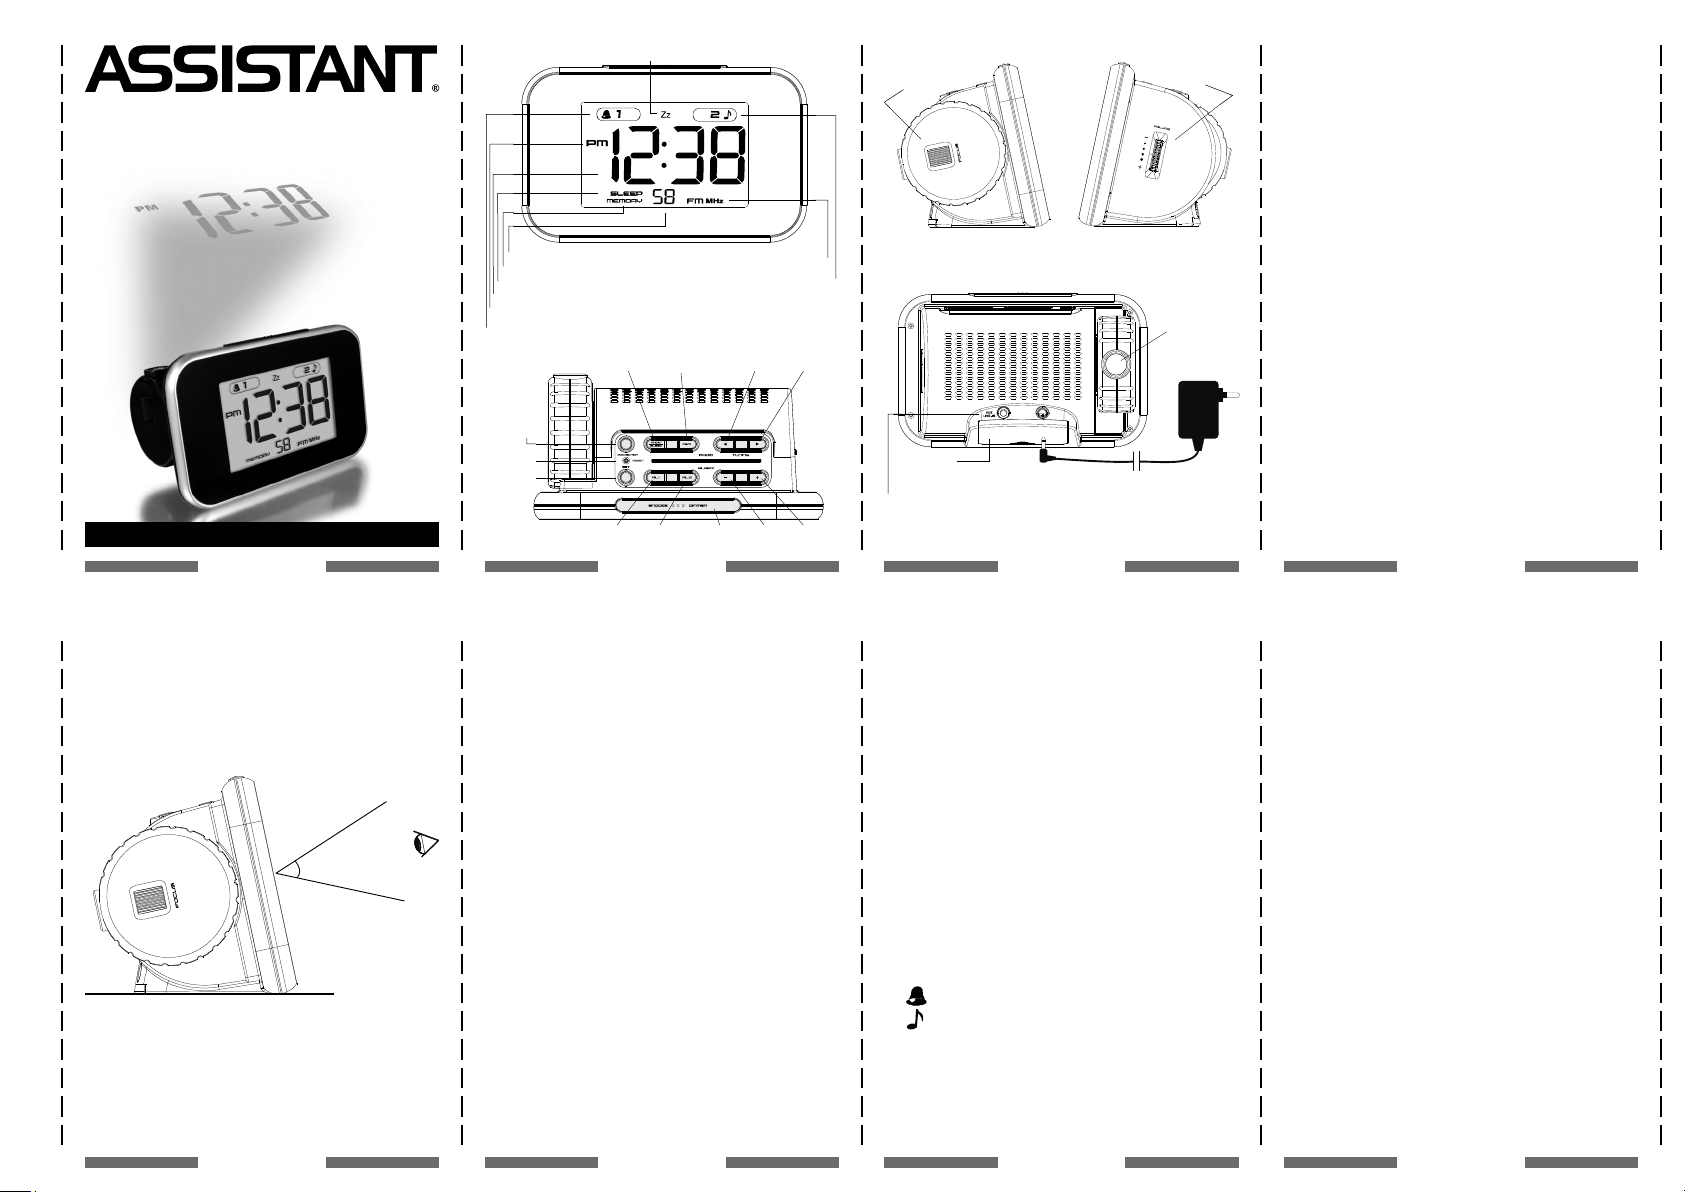
SNOOZE ICON
FOCUS KNOB
VOLUME TUNNER
Plug the AC/DC adaptor to any household AC outlet,
INSTALLATION
then plug the DC jack to the back of the clock radio. Your
PROJECTION ALARM CLOCK
clock radio is ready to work for you.
WITH RADIO
Model AH-1522
PRESENT RADIO MEMORY
MEMORY
SLEEP TIMER
TIME
PM INDICATOR
WAKE BY BUZZER (ALARM 1)
RADIO/SLEEP
PROJECTION
RESET
SET
OWNER’S MANUAL
ENGLISH ENGLISH ENGLISH ENGLISH ENGLISH ENGLISH ENGLISH ENGLISH
– 1 – – 2 – – 3 – – 4 –
ALARM 1 ALARM 2 SNOOZE/DIMMER – +
PRESENT READIO
MEMORY
FM RADIO BAND ICON
WAKE BY BUZZER (ALARM 2)
BACKWARD FORWARD
INSERT
3 x AAA BATTERIES INSIDE THE BATTERY
COMPARTMENT
AUX LINE-IN
PROJECTOR
AC/DC ADAPTOR
INSERT AC/DC ADAPTOR JACK
BATTERY BACK-UP INSTALLATION
In the event that the AC/DC adaptor power is disconnected or a power failure or other interruptions occur,
the back-up batteries will maintain the time and alarm
settings.
Wake-by-Buzzer still functions by battery back-up. The
radio, projection clock, LCD backlight and the Wake-byRadio will resume to work when AC power is restored.
1. Remove the battery cover at the bottom of the clock
radio.
2. Insert 3 x AAA batteries (alkaline batteries preferred)
by observing the + and–polarity signs inside the battery compartment.
3. Replace the battery cover, making sure the cover
locks into place.
Note: for best reception, release and extend the FM wire
antenna. Do not strip, alter or attach to other antennas.
LCD VIEWING ANGLE
This clock radio is designed for bedside use.
The effective viewing angle of the LCD display is de-
scribed in the attached drawing.
1. Press [SET] to enter time set mode, the time digits
flash.
2. Press [+] or [-] on the top of your clock radio to set
your desired time. Press and hold [-]/[+] will accelerate
setting in faster speed.
TO SET TIME
TO SET THE SNOOZE DURATION
1. Press [SET] again, the clock display shows Zz and
05 flashes.
2. Press [+] or [-] to set your desired snooze duration
from 5 to 60 minutes.
3. Press [SET] again (or if no key is pressed within 5
seconds) to return to normal clock display mode.
TO SET 12HR OR 24 HR TIME FORMAT
EFFECTIVE
VIEWING ANGLE
1. Then press [SET] again, the clock display shows 24Hr
and flashes.
2. Press [+] or [-] to select 12Hr or 24Hr. When 12Hr time
format is selected, the PM icon will appear on the clock
display to indicate the afternoon time.
1. To set Alarm 1, press [ALM 1] button once, the clock
display shows 1 and 6:00 flashes.
2. Press [+] or [-] to set your desired alarm time. Press
and hold [+] or [-] will accelerate setting in faster speed.
3. Press [ALM 1] again to select Wake-by-Buzzer
(
4. (
5. To set Alarm 2, just repeat Step 1–3 above but use
[ALM 2] button.
ENGLISH ENGLISH ENGLISH ENGLISH
– 5 – – 7 –
ENGLISH ENGLISH
– 6 –
TO SET THE ALARMS
icon appears) or Wake-By-Radio
icon appears)
TO TURN ON OR OFF ALARM 1
AND/OR ALARM 2
1. Press [ALM 1] or [ALM 2] button once to review the
currently set alarm time(s).
2. Press the button again to turn on or turn off the alarm.
When the alarm is turned on, the related alarm icon
appears. When no alarm icon is showing, the related
alarm icon is off and the alarm function is turned off.
TO STOP AND RESET THE ALARM
TO COME ON THE NEXT DAY
When Alarm 1 sounds, press the [ALM 1] button to stop
the alarm sound and automatically reset it to come on the
following day. Similarly, stop the alarm by pressing [ALM 2]
button when Alarm 2 sounds.
ENGLISH ENGLISH
– 8 –
Page 2
TO USE THE SNOOZE ALARM
When alarm sounds, press the [SNOOZE/DIMMER]
once, the alarm will be silenced and come on again according to the set snooze duration.
TO USE THE PROJECTION CLOCK
Press [PROJECTION] button to turn on or off the projection clock. Turn the focus knob on the projector to adjust
the image of the projected time onto the wall or ceiling.
Press and hold the [PROJECTION] button for 2 seconds
to flip the projected time 180 degree.
TO USE THE HI-LO DIMMER
This clock radio features an adjustable display backlight
with dim, medium and bright settings. To select a backlight
setting, press the [SNOOZE/DIMMER] button until the
brightness is reached. This setting can only be selected
when the radio is not playing.
Note: Please note the always-on backlight will not work while
the clock is operating on battery power.
TO SET UP THE FM ANTENNA
Extend the FM wire antenna fully and vary the direction for best FM reception. Do not strip, alter or attach to
other antennas.
TO TUNE AND PLAY THE RADIO
1. Press [SLEEP/RADIO], the clock display will show
“ON” and flashes.
2. Then press [
station. To scan the stations, press [ ] or [ ]
for a few seconds and release. The radio will search
and stop on the next strong station. Remark: keep your
radio away from fluorescent lamps, which may cause interference to the radio.
3. You may also use the MEMORY function to select a
preset radio station. See the TO USE THE MEMORY
SET FUNCTION.
4. Rotate the VOLUME dial to adjust the volume level.
5. Press [SNOOZE/DIMMER] button to turn off the radio.
] or [ ] to tune into a desired radio
TO USE THE MEMORY SET
(RADIO PRESET) FUNCTION
This clock radio features a total of 5 preset memory of
FM radio .These allow you to preset your favorite stations
and access them quickly.
1. Turn on the radio by press of [RADIO / SLEEP]. Press
] or [ ] to select a radio station you like to
[
preset memory.
2. Then press and hold the MEMORY until “MEM” ap-
pears and “01” flashes below the time digits.
3. Then press [MEMORY] again to store Memory 01.
4. Press [
to preset . Then press and hold [MEMORY] until “MEM”
appears and “01” flashes below the time digits. Press
[+] or [–] button to select “02” on the lower display,
then press [MEMORY] again to store.
5. Repeat Step 4 to preset up to five FM stations.
6. To listen to a preset station at any time, simply press
the [MEMORY] to select a preset station while the
radio is on.
7. To edit a preset station, select another station and
then repeat Step 2-4. This overrides the original setting.
] or [ ] to select another station you like
ENGLISH ENGLISH ENGLISH ENGLISH ENGLISH ENGLISH ENGLISH ENGLISH
TO USE THE SLEEP TIMER
1. Press the [RADIO/SLEEP] button twice to enter the
sleep mode. The clock display shows the SLEEP icon
and “5” (5 minutes) and flashes, keep pressing the
[RADIO/SLEEP] to select a 10-,15-, 30-, 45-, 60-,
75-, 90-minute sleep timer. The sleep timer display
remains for few seconds and then returns to normal
clock display. The SLEEP icon will appear, showing
– 9 – – 10 – – 11 – – 12 –
TROUBLE SHOOTING
If your clock displays irrelevant time or does not function
properly, which maybe caused by electro-static discharge
or other interference, use a thin object to press the
[RESET] button on top. The clock radio will be reset to
default settings and you need to set it again.
4. Do not mix old and new batteries. Do not mix alkaline,
standard (carbon-zinc), or rechargeable (nickelcadimium) batteries.
5. If the unit is not to be used for a prolonged period, such
as a month or longer, remove the batteries to prevent
possible corrosion. Should the battery compartment
become corroded or dirty, clean the compartment
thoroughly and replace the batteries.
Stamp Печать магазина
Date of sale Дата продажи
the radio timer is activated.
2. The radio will play for the programmed sleep time and
then shut off. To check how many sleep time is remaining, press [RADIO/SLEEP] button once.
3. To turn off the radio before the sleep time has elapsed,
press [SNOOZE/DIMMER] once.
1. Place your clock radio on a stable surface, away from
2. Protect your furniture when placing your units on a
CARE OF YOUR PRODUCT
Model Номер модели
sources of direct sunlight or excessive heat or moisture.
natural wood and lacquered finish by using a cloth or
protective material between it and the furniture.
3. Clean your unit with a soft cloth moistened only with
Warranty period Гарантийный срок
mild soap and water. Stronger agents such as benzine,
thinner or similar materials can damage the surface
of the unit. Make sure the unit is unplugged before
cleaning.
ENGLISH ENGLISH ENGLISH ENGLISH
– 13 – – 15 –
ENGLISH ENGLISH
– 14 –
ENGLISH ENGLISH
– 16 –
Page 3

ЗНАЧОК ОТСРОЧКИ БУДИЛЬНИКА
РЕГУЛЯТОР ФОКУСА
РЕГУЛЯТОР
ГРОМКОСТИ
Подключите адаптер переменного/постоянного тока
УСТАНОВКА
в сеть переменного тока, затем вставьте его разъем
в гнездо питания радиочасов. Радиочасы готовы к
ЧАСЫ С ПРОЕКЦИЕЙ ВРЕМЕНИ,
работе.
БУДИЛЬНИКОМ И РАДИО
Модель AH-1522
ТЕКУЩАЯ ПАМЯТЬ РАДИО
ПАМЯТЬ
ТАЙМЕР ОТКЛЮЧЕНИЯ
ВРЕМЯ
ИНДИКАТОР ВРЕМЕНИ СУТОК
ПОДАЧА ЗВУКОВОГО СИГНАЛА БУДИЛЬНИКА (БУДИЛЬНИК 1)
РАДИО/ОТКЛЮЧЕНИЕ
ПРОЕКЦИЯ
СБРОС
НАСТРОЙКА
РУКОВОДСТВО ПО ЭКСПЛУАТАЦИИ
RUSSIAN РУССКИЙ RUSSIAN РУССКИЙ RUSSIAN РУССКИЙ RUSSIAN РУССКИЙ
– 1 – – 2 – – 3 – – 4 –
БУДИЛЬНИК 1 БУДИЛЬНИК 2 ОТСРОЧКА/
ЗНАЧОК РАДИОДИАПАЗОНА FM
ПОДАЧА ЗВУКОВОГО СИГНАЛА
БУДИЛЬНИКА (БУДИЛЬНИК 2)
ТЕКУЩАЯ ПАМЯТЬ
РАДИО
ПОДСВЕТКА
НАЗАД ВПЕРЕД
– +
УСТАНОВИТЕ
3 ЭЛЕМЕНТА ААА В ОТДЕЛЕНИЕ ДЛЯ
ЭЛЕМЕНТОВ ПИТАНИЯ
ЛИНЕЙНЫЙ ВХОД
ПРОЕКТОР
АДАПТЕР
ПЕРЕМЕННОГО/
ПОСТОЯННОГО ТОКА
ПОДКЛЮЧИТЕ РАЗЪЕМ
АДАПТЕРА ПЕРЕМЕННОГО/
ПОСТОЯННОГО ТОКА
УСТАНОВКА РЕЗЕРВНОЙ БАТАРЕИ
В случае отключения сетевого адаптера либо из-за
сбоя в сети питания, благодаря резервным батареям,
сохранятся настройки времени и будильника.
При питании от батарей, функция подачи звукового
сигнала будильника продолжает работать. Радио,
проектор времени, светодиодная подсветка и функция включения радио по будильнику заработают
после возобновления питания от сети переменного
тока
.
1. Снимите крышку отделения для элементов питания
в нижней части радиочасов.
2. Вставьте 3 элемента AAA (желательно, щелочного
типа), соблюдая при этом полярность, ориентируйтесь по знакам + и – внутри отделения для
элементов питания.
3. Установите крышку отделения на место, убедитесь,
что она зафиксировалась.
Примечание: для улучшения качества приема,
вытащите штырьковую FM-антенну. Не разбирайте и
не модифицируйте ее, не подключайте другие антенны.
УГОЛ ОБЗОРА ЖК-ДИСПЛЕЯ
Радиочасы предназначены для установки на тум-
бочку у кровати.
Оптимальный угол обзора ЖК-дисплея показан на
следующем рисунке:
1. Нажмите кнопку [SET], чтобы перейти в режим
2. Нажимая кнопки [+] или [-], находящиеся на верх-
УСТАНОВКА ФОРМАТА ВРЕМЕНИ 12
УСТАНОВКА ВРЕМЕНИ
установки времени, числа времени начнут мигать.
ней крышке радиочасов, установите нужное время.
Если нажать и удерживать одну из кнопок [+] или
[-], настройка будет происходить быстрее.
ИЛИ 24 ЧАСА
НАСТРОЙКА ДЛИТЕЛЬНОСТИ
ОТСРОЧКИ
1. Вновь нажмите кнопку [SET], на дисплее часов
появятся мигающие значки Zz и 05.
2. Нажимая кнопку [+] или [-], установите нужное
время отсрочки сигнала, от 5 до 60 минут.
3. Вновь нажмите кнопку [SET] (либо не нажимайте
кнопок в течение 5 секунд), часы перейдут в штатный режим отображения времени.
1. Вновь нажмите кнопку [SET], на часах отображается мигающий значок 24Hr.
2. Нажимая кнопки [+] или [-], выберите формат времени 12Hr или 24Hr. Если выбран формат времени
ОПТИМАЛЬНЫЙ
УГОЛ ОБЗОРА
RUSSIAN РУССКИЙ RUSSIAN РУССКИЙ
– 5 – – 7 –
12Hr, на дисплее часов отобразится значок PM,
означающий вторую половину дня.
RUSSIAN РУССКИЙ
– 6 –
НАСТРОЙКА БУДИЛЬНИКА
1. Чтобы установить сигнал будильника 1, однократно
нажмите кнопку [ALM 1], на дисплее часов отобра-
зится цифра 1 и мигающее время 6:00.
2. Нажимая кнопку [+] или [-], установите нужное
время подачи сигнала. Если нажать и удерживать
одну из кнопок [+] или [-], настройка будет происходить быстрее.
3. Вновь нажмите кнопку [ALM 1], чтобы выбрать
функцию
значок ) либо включения радио по будильнику
(появляется значок )
4. Чтобы установить сигнал будильника 2, повторите
вышеописанные шаги 1 – 3, но нажимайте кнопку
[ALM 2].
RUSSIAN РУССКИЙ
подачи тонового сигнала (появляется
– 8 –
Page 4

ВКЛЮЧЕНИЕ И ОТКЛЮЧЕНИЕ
БУДИЛЬНИКА 1 И/ИЛИ БУДИЛЬНИКА 2
1. Однократно нажмите кнопку [ALM 1] или [ALM 2],
чтобы проверить текущее установленное время
будильника.
2. Вновь нажмите эту кнопку, чтобы включить или
выключить будильник. Если будильник включен,
появляется соответствующий значок будильника.
Если значок будильника не отображается, значит,
он выключен, и сигнал подаваться не будет.
ОСТАНОВКА СИГНАЛА БУДИЛЬНИКА И
ЕГО ПОДАЧА НА СЛЕДУЮЩИЙ ДЕНЬ
Если сработал будильник 1, нажмите кнопку [ALM 1],
чтобы остановить его и автоматически установить его
подачу на следующий день. Точно так же, остановите
сигнал будильника 2, нажав кнопку [ALM 2].
ИСПОЛЬЗОВАНИЕ ОТСРОЧКИ
СИГНАЛА БУДИЛЬНИКА
Когда сработал будильник, однократно нажмите
кнопку [SNOOZE/DIMMER], подача сигнала прекратится и возобновится по истечении установленного
времени отсрочки.
ИСПОЛЬЗОВАНИЕ ПРОЕКТОРА
ВРЕМЕНИ
Чтобы включить проектор времени, нажмите кнопку
[PROJECTION]. Вращая регулятор фокуса, отрегули-
руйте резкость проецируемого изображения времени
на стене или на потолке. Чтобы повернуть проецируемое изображение на 180 градусов, нажмите и удерживайте кнопку [PROJECTION] в течение 2 секунд.
РЕГУЛИРОВАНИЕ ЯРКОСТИ
ПОДСВЕТКИ
Дисплей часов снабжен подсветкой с регулируемой яркостью, с низким, средним и ярким уровнем.
Чтобы настроить яркость подсветки, жмите кнопку
[SNOOZE/DIMMER], пока не установится нужная
яркость. Настройку можно производить только при
выключенном радио.
Примечание: отметьте, что постоянная подсветка не
будет работать при питании часов от резервной батареи.
УСТАНОВКА FM-АНТЕННЫ
Вытащите FM-антенну на всю длину и, наклоняя
ее в разные стороны, добейтесь наилучшего приема
радиостанции. Не разбирайте и не модифицируйте
ее, не подключайте другие антенны.
НАСТРОЙКА И ПРОСЛУШИВАНИЕ
РАДИО
1. Нажмите кнопку [SLEEP/RADIO,] на дисплее часов
отобразится и замигает значок “ON”.
2. Нажимая кнопки [
на нужную радиостанцию. Для сканирования
диапазона, нажмите кнопку [ ] или [ ] на
несколько секунд и отпустите ее. Радиоприемник
начнет поиск и остановится на следующей станции
с сильным сигналом. Замечание: устанавливайте
радио вдали от ламп дневного света, так они могут
создавать помехи его работе.
3. Для выбора радиостанции можно также использовать функцию памяти MEMORY. См. пункт ИСПОЛЬЗОВАНИЕ ФУНКЦИИ ПАМЯТИ.
4. Вращая регулятор
руйте громкость звука.
5. Чтобы выключить радио, нажмите кнопку
[SNOOZE/DIMMER].
] или [ ], настройтесь
громкости VOLUME, отрегули-
RUSSIAN РУССКИЙ RUSSIAN РУССКИЙ RUSSIAN РУССКИЙ RUSSIAN РУССКИЙ
ИСПОЛЬЗОВАНИЕ ФУНКЦИИ ПАМЯТИ
(ИЗБРАННЫЕ РАДИОСТАНЦИИ)
Радиочасы могут запоминать настройки 5 радиостанций. Это позволяет вам сохранить свои любимые
радиостанции и быстро на них переключаться.
1. Включите радио, нажав кнопку [RADIO / SLEEP].
Нажимая кнопку или , выберите радиостанцию,
которую вы хотите записать в память.
2. Затем нажмите и удерживайте кнопку [MEMORY],
пока на дисплее не появится значок “MEM”, а ниже
чисел времени
3. Вновь нажмите кнопку [MEMORY], чтобы сохранить
избранную радиостанцию 01.
4. Нажимая кнопку или , выберите другую радио-
станцию. Затем нажмите и удерживайте кнопку
[MEMORY], пока на дисплее не появится значок
“MEM”, а ниже чисел времени не замигает значок
“01”. Нажимая кнопку + или –, выставьте внизу дис-
плея значение “02”, затем вновь нажмите
MEMORY, чтобы сохранить радиостанцию.
5. Повторите шаг 4 для запоминания пяти FM-
радиостанций.
6. Чтобы перейти к сохраненной в памяти радио-
станции, нажмите кнопку [MEMORY] и выберите
RUSSIAN РУССКИЙ RUSSIAN РУССКИЙ
– 9 – – 10– – 11 – – 12 –
нужную радиостанцию; радио должно быть
включено.
7. Чтобы отредактировать сохраненную запись, выберите другую радиостанцию и повторите шаги 2-4.
При этом исходные настройки переписываются.
ИСПОЛЬЗОВАНИЕ ТАЙМЕРА
ОТКЛЮЧЕНИЯ
не замигает значок “01”.
кнопку
– 13 – – 15 –
1. Дважды нажмите кнопку [RADIO/SLEEP], чтобы
перейти в режим настройки отключения. На
дисплее часов отобразится значок SLEEP и мигающая цифра “5” (5 минут); удерживая кнопку
[RADIO/SLEEP], выберите время таймера 10,15,
30, 45, 60, 75, 90 минут. Через несколько секунд
дисплей переключится в режим отображения времени. Появится значок SLEEP, который указывает
на то, что включен таймер радио.
2. Радио будет
мированного отрезка времени, а затем отключится. Чтобы посмотреть, сколько времени
осталось до отключения, однократно нажмите кнопку
[RADIO/SLEEP].
RUSSIAN РУССКИЙ
работать в течение запрограм-
– 14 –
3. Чтобы выключить радио до того, как истекло
время таймера, однократно нажмите кнопку
[SNOOZE/DIMMER].
УСТРАНЕНИЕ НЕИСПРАВНОСТЕЙ
Если часы неверно отображают время либо работают неправильно, причиной чего может быть разряд
статического электричества или помехи от других
устройств, с помощью острого предмета нажмите
кнопку RESET на верхней крышке устройства. Настройки радиочасов будут сброшены на установки
по умолчанию, вам потребуется настроить их заново.
УХОД ЗА ИЗДЕЛИЕМ
1. Располагайте часы на устойчивой поверхности,
вдали от прямых солнечных лучей, источников
тепла, в сухом месте.
2. Если устройство ставится на лакированную по-
верхность из натурального дерева, защитите ее
от царапин, поместив под часы кусок ткани либо
другого защитного материала.
3. Протирайте устройство мягкой тканью, смоченной
только слабым мыльным раствором. Более сильные реагенты, такие как бензин либо похожие материалы могут повредить поверхность устройства.
Перед его очисткой, убедитесь, что устройство
отключено от сети.
4. Не используйте новые и старые элементы питания
вместе. Не используйте одновременно щелочные,
обычные (угольно-цинковые) или перезаряжаемые
(никель-кадмиевые) элементы питания.
5. Если устройство не будет использоваться в
длительного времени, например, месяц и более,
вытащите из него элементы питания, чтобы избежать возможной коррозии. Если в отделении
для элементов питания появилась коррозия или
грязь, тщательно очистите его и замените элементы питания.
RUSSIAN РУССКИЙ
– 16 –
течение
Page 5

ЗНАЧОК ВІДСТРОЧКИ БУДИЛЬНИКА
РЕГУЛЯТОР ФОКУСА
РЕГУЛЯТОР
ГУЧНОСТІ
Підключіть адаптер змінного/постійного струму до
ВСТАНОВЛЕННЯ
мережі змінного струму, а потім вставте його штекер
у гніздо живлення радіогодинника. Радіогодинник
ГОДИННИК З ПРОЕКЦІЄЮ ЧАСУ,
готовий до роботи.
БУДИЛЬНИКОМ ТА РАДІО
Модель AH-1522
ПОТОЧНА ПАМ’ЯТЬ РАДІО
ПАМ’ЯТЬ
ТАЙМЕР ВІДКЛЮЧЕННЯ
ЧАС
ІНДИКАТОР ЧАСУ ДНЯ
ПОДАЧА ЗВУКОВОГО СИГНАЛУ БУДИЛЬНИКА (БУДИЛЬНИК 1)
РАДІО/ВІДКЛЮЧЕННЯ ПОТОЧНА ПАМ’ЯТЬ
ПРОЕКЦІЯ
СКИДАННЯ
НАЛАШТУВАННЯ
РУКОВОДСТВО ПО ЭКСПЛУАТАЦИИ
UKRAINIAN УКРАЇНСЬКА UKRAINIAN УКРАЇНСЬКА UKRAINIAN УКРАЇНСЬКА UKRAINIAN УКРАЇНСЬКА
– 1 – – 2 – – 3 – – 4 –
БУДИЛЬНИК 1 БУДИЛЬНИК 2 ВІДСТРОЧКА/
ЗНАЧОК РАДІОДІАПАЗОНУ FM
ПОДАЧА ЗВУКОВОГО СИГНАЛУ
БУДИЛЬНИКА (БУДИЛЬНИК 2)
НАЗАД ВПЕРЕД
– +
ПІДСВІЧУВАННЯ
ВСТАНОВІТЬ
3 ЕЛЕМЕНТИ ААА У ВІДДІЛЕННЯ ДЛЯ
ЕЛЕМЕНТІВ ЖИВЛЕННЯ
ЛІНІЙНИЙ ВХІД
ПРОЕКТОР
АДАПТЕР
ЗМІННОГО/
ПОСТІЙНОГО СТРУМУ
ПІДКЛЮЧІТЬ ШТЕКЕР
АДАПТЕРА ЗМІННОГО/
ПОСТІЙНОГО СТРУМУ
ВСТАНОВЛЕННЯ РЕЗЕРВНОЇ БАТАРЕЇ
У разі відключення мережевого адаптера або через
збій в мережі живлення, завдяки резервним батареям,
збережуться налаштування часу й будильника.
При живленні від батарей, функція подачі звукового сигналу будильника продовжує працювати.
Радіо, проектор часу, світлодіодне підсвічування
і функція вмикання радіо за будильником запрацюють після відновлення живлення від мережі
змінного струму
1. Зніміть кришку відділення для елементів живлення
в нижній частині радіогодинника.
2. Вставте 3 елементи AAA (бажано, лужного типу),
дотримуючись при цьому полярності, орієнтуйтеся
по знаках + і - всередині відділення для елементів
живлення.
.
3. Встановіть кришку відділення на місце, переконай-
теся, що вона зафіксувалася.
Зауваження: для поліпшення якості прийому, витягніть
штиркову FM-антену. Не розбирайте та не модифікуйте
її, не підключайте інші антени.
1. Натисніть кнопку [SET], щоб перейти в режим уста-
2. Натискаючи кнопки [+] або [-], що знаходяться на
КУТ ОБЗОРУ РК-ДИСПЛЕЯ
Радіогодинник призначений для встановлення на
тумбочку біля ліжка.
Оптимальний кут обзору РК-дисплея показаний на
наступному малюнку:
ОПТИМАЛЬНИЙ
КУТ ОБЗОРУ
UKRAINIAN УКРАЇНСЬКА UKRAINIAN УКРАЇНСЬКА UKRAINIAN УКРАЇНСЬКА UKRAINIAN УКРАЇНСЬКА
– 5 – – 6 – – 7 – – 8 –
ВСТАНОВЛЕННЯ ФОРМАТУ ЧАСУ 12
1. Знову натисніть кнопку [SET], на годиннику відо-
2. Натискаючи кнопки [+] або [-], виберіть формат
ВСТАНОВЛЕННЯ ЧАСУ
новки часу, числа часу почнуть блимати.
верхній кришці радіогодинника, встановіть потрібний час. Якщо натиснути і утримувати одну з кнопок
[+] або [-], налаштування буде відбуватися швидше.
АБО 24 ГОДИНИ
бражається значок 24Hr, що блимає.
часу 12Hr або 24Hr. Якщо вибрано формат часу
12Hr, на дисплеї годинника відобразиться значок
PM, що означає другу половину дня.
НАЛАШТУВАННЯ ТРИВАЛОСТІ
ВІДСТРОЧКИ
1. Знову натисніть кнопку [SET], на дисплеї годинника
з'являться значки Zz і 05, що блимають.
2. Натискаючи кнопку [+] або [-], встановіть потрібний
час відстрочки сигналу, від 5 до 60 хвилин.
3. Знову натисніть кнопку [SET] (або не натискайте
кнопок протягом 5 секунд), годинник перейде в
штатний режим відображення часу.
НАЛАШТУВАННЯ БУДИЛЬНИКА
1. Щоб встановити сигнал будильника 1, одноразово
натисніть кнопку [ALM 1], на дисплеї годинника
відобразиться цифра 1 і час 6:00, що блимає.
2. Натискаючи кнопку [+] або [-], встановіть потрібний
час подачі сигналу. Якщо натиснути і утримувати
одну з кнопок [+] або [-], налаштування буде відбуватися швидше.
3. Знову натисніть кнопку [ALM 1], щоб вибрати функцію подачі тонового сигналу (з'являється значок
) або вмикання радіо по будильнику (з'являється
значок )
4. Щоб встановити сигнал будильника 2, повторіть
вищеописані кроки 1 - 3, але натискайте кнопку
[ALM 2].
Page 6

ВМИКАННЯ ТА ВИМИКАННЯ
БУДИЛЬНИКА 1 ТА/АБО
БУДИЛЬНИКА 2
1. Одноразово натисніть кнопку [ALM 1] або
[ALM 2], щоб перевірити поточний встановлений
час будильника.
2. Знову натисніть цю кнопку, щоб увімкнути або ви-
мкнути будильник. Якщо будильник увімкнений,
з'являється відповідний значок будильника. Якщо
значок будильника не відображається, значить, він
вимкнений, і сигнал подаватися не буде.
ЗУПИНКА СИГНАЛУ БУДИЛЬНИКА ТА
ЙОГО ПОДАЧА НАСТУПНОГО ДНЯ
Якщо спрацював будильник 1, натисніть кнопку
[ALM 1], щоб зупинити його і автоматично встановити
його подачу на наступний день. Так само зупиніть
сигнал будильника 2, натиснувши кнопку [ALM 2].
ВИКОРИСТАННЯ ВІДСТРОЧКИ
СИГНАЛУ БУДИЛЬНИКА
Коли спрацював будильник, одноразово натисніть
кнопку [SNOOZE/DIMMER], подача сигналу припиниться і відновиться після закінчення встановленого
часу відстрочки.
ВИКОРИСТАННЯ ПРОЕКТОРА ЧАСУ
Щоб увімкнути проектор часу, натисніть кнопку
[PROJECTION]. Обертаючи регулятор фокусу, відрегулюйте різкість проектованого зображення часу
на стіні або на стелі. Щоб повернути зображення, що
проектується, на 180 градусів, натисніть і утримуйте
кнопку [PROJECTION] протягом 2 секунд.
РЕГУЛЮВАННІ ЯСКРАВОСТІ
ПІДСВІЧУВАННЯ
Дисплей годинника має підсвічування з регульованою яскравістю, з низьким, середнім і яскравим рівнем.
Щоб налаштувати яскравість підсвічування, тисніть
кнопку [SNOOZE/DIMMER], поки не встановиться потрібна яскравість. Налаштування можна проводити
тільки при вимкненому радіо.
Зауваження: відзначте, що постійне підсвічування не буде
працювати при живленні годинника від резервної батареї.
ВСТАНОВЛЕННЯ FM-АНТЕНИ
Витягніть FM-антену на всю довжину і, нахиляючи
її в різні боки, добийтеся найкращого прийому радіостанції. Не розбирайте та не модифікуйте її, не
підключайте інші антени.
НАЛАШТУВАННЯ І
ПРОСЛУХОВУВАННЯ РАДІО
1. Натисніть кнопку [SLEEP/RADIO], на дисплеї годин
відобразиться і мигтить значок "ON".
2. Натискаючи кнопки [
теся на потрібну радіостанцію. Для сканування
діапазону, натисніть кнопку [ ] або [ ] на
кілька секунд і відпустіть її. Радіоприймач почне
пошук і зупиниться на наступній станції з сильним
сигналом. Зауваження: встановлюйте радіо далеко
від ламп денного світла, бо вони можуть створювати
перешкоди для його роботи.
3. Для вибору радіостанції можна також використовувати функцію пам'яті MEMORY. Див. пункт ВИКОРИСТАННЯ ФУНКЦІЇ ПАМ'
4. Обертаючи регулятор гучності VOLUME, відрегулюйте гучність звуку.
5. Щоб вимкнути радіо, натисніть кнопку
[SNOOZE/DIMMER].
] або [ ], налаштуй-
ЯТІ.
UKRAINIAN УКРАЇНСЬКА UKRAINIAN УКРАЇНСЬКА UKRAINIAN УКРАЇНСЬКА UKRAINIAN УКРАЇНСЬКА
ВИКОРИСТАННЯ ФУНКЦІЇ ПАМ'ЯТІ
(ВИБРАНІ РАДІОСТАНЦІЇ)
Радіогодинник може запам'ятовувати налаштування 5 радіостанцій. Це дозволяє вам зберегти
свої улюблені радіостанції та швидко на них перемикатися.
1. Увімкніть радіо, натиснувши кнопку [RADIO/SLEEP].
Натискаючи кнопку [
ріть радіостанцію, яку ви хочете записати в
пам'ять.
2. Потім натисніть і утримуйте кнопку [MEMORY], поки
не з'явиться значок "MEM", а нижче чисел часу не
заблимає значок "01".
3. Знову натисніть кнопку [MEMORY], щоб зберегти
вибрану радіостанцію 01.
4. Натискаючи кнопку [
іншу станцію. Потім натисніть і утримуйте кнопку
[MEMORY], поки не з'явиться значок "MEM", а нижче чисел часу не заблимає значок "01". Натискаючи
кнопку [+] або [-], виставте внизу дисплея значення
"02", потім знову натисніть кнопку [MEMORY], щоб
зберегти радіостанцію.
5. Повторіть крок 4 для запам'ятовування п'яти
FM-радіостанцій.
UKRAINIAN УКРАЇНСЬКА UKRAINIAN УКРАЇНСЬКА UKRAINIAN УКРАЇНСЬКА UKRAINIAN УКРАЇНСЬКА
– 9 – – 10 – – 11 – – 12 –
перейти до збереженої в пам'яті радіостанції,
6. Щоб
натисніть кнопку [MEMORY] і виберіть потрібну
радіостанцію; радіо повинно бути увімкнено.
7. Щоб відредагувати збережений запис, виберіть іншу
станцію і повторіть кроки 2-4. При цьому вихідні
налаштування переписуються.
] або [ ], вибе-
] або [ ], виберіть
– 13 – – 14 – – 15 – – 16 –
ВИКОРИСТАННЯ ТАЙМЕРА
ВІДКЛЮЧЕННЯ
1. Двічі натисніть кнопку [RADIO/SLEEP], щоб перейти
в режим налаштування відключення. На дисплеї
годинника відобразиться значок SLEEP, і заблимає
цифра "5" (5 хвилин); утримуючи кнопку RADIO/
SLEEP, виберіть час таймера 10,15, 30, 45, 60,
75, 90 хвилин. Через кілька секунд дисплей пере-
ключиться в режим відображення часу. З'явиться
значок SLEEP, який вказує на те, що включений
таймер радіо.
2. Радіо буде працювати
відрізка часу, а потім відключиться. Щоб подивитися, скільки часу залишилося до відключення, одноразово натисніть кнопку [RADIO/SLEEP].
3. Щоб вимкнути радіо до того, як минув час таймера,
одноразово натисніть кнопку [SNOOZE/DIMMER].
протягом запрограмованого
УСУНЕННЯ НЕСПРАВНОСТЕЙ
Якщо годинник невірно відображає час або працює
неправильно, причиною чого може бути розряд
статичної електрики або перешкоди від інших пристроїв, за допомогою гострого предмета натисніть
кнопку [RESET] на верхній кришці пристрою.
Налаштування радіогодинника будуть скинуті на
установки за замовчуванням, вам потрібно буде
виставити їх заново.
ДОГЛЯД ЗА ВИРОБОМ
1. Розташовуйте годинник на стійкій поверхні, подалі
від прямих сонячних променів, джерел тепла, в
сухому місці.
2. Якщо пристрій ставиться на лаковану поверхню з
натурального дерева, захистіть її від подряпин, помістивши під годинник шматок тканини або іншого
захисного матеріалу.
3. Протирайте пристрій м'якою тканиною, змоченою
тільки слабким мильним розчином. Сильніші
вини, такі як бензин або схожі матеріали можуть
речо-
пошкодити поверхню пристрою. Перед його очищенням, переконайтеся, що пристрій відключено
від мережі.
4. Не використовуйте нові і старі елементи живлення
разом. Не використовуйте одночасно лужні, звичайні (вугільно-цинкові) або придатні для перезарядки
(нікель-кадмієві) елементи живлення.
5. Якщо пристрій не
тягом тривалого часу, наприклад, місяць і більше,
витягніть з нього елементи живлення, щоб уникнути
можливої корозії. Якщо у відділенні для елементів
живлення з'явилася корозія або бруд, ретельно
очистіть його та замініть елементи живлення.
буде використовуватись про-
 Loading...