

Page 1
AUTOSET LCD WEATHER STATION
1
2
3
DST SET
SNOOZE
ALARM SET
ON
OFF
ALARM
MSK
EETWET
CET
4
7
8
5
9
10
6
Clock must be plugged
in when replacing the
button cell battery.
12
15
17
16
11
13
14
18
19
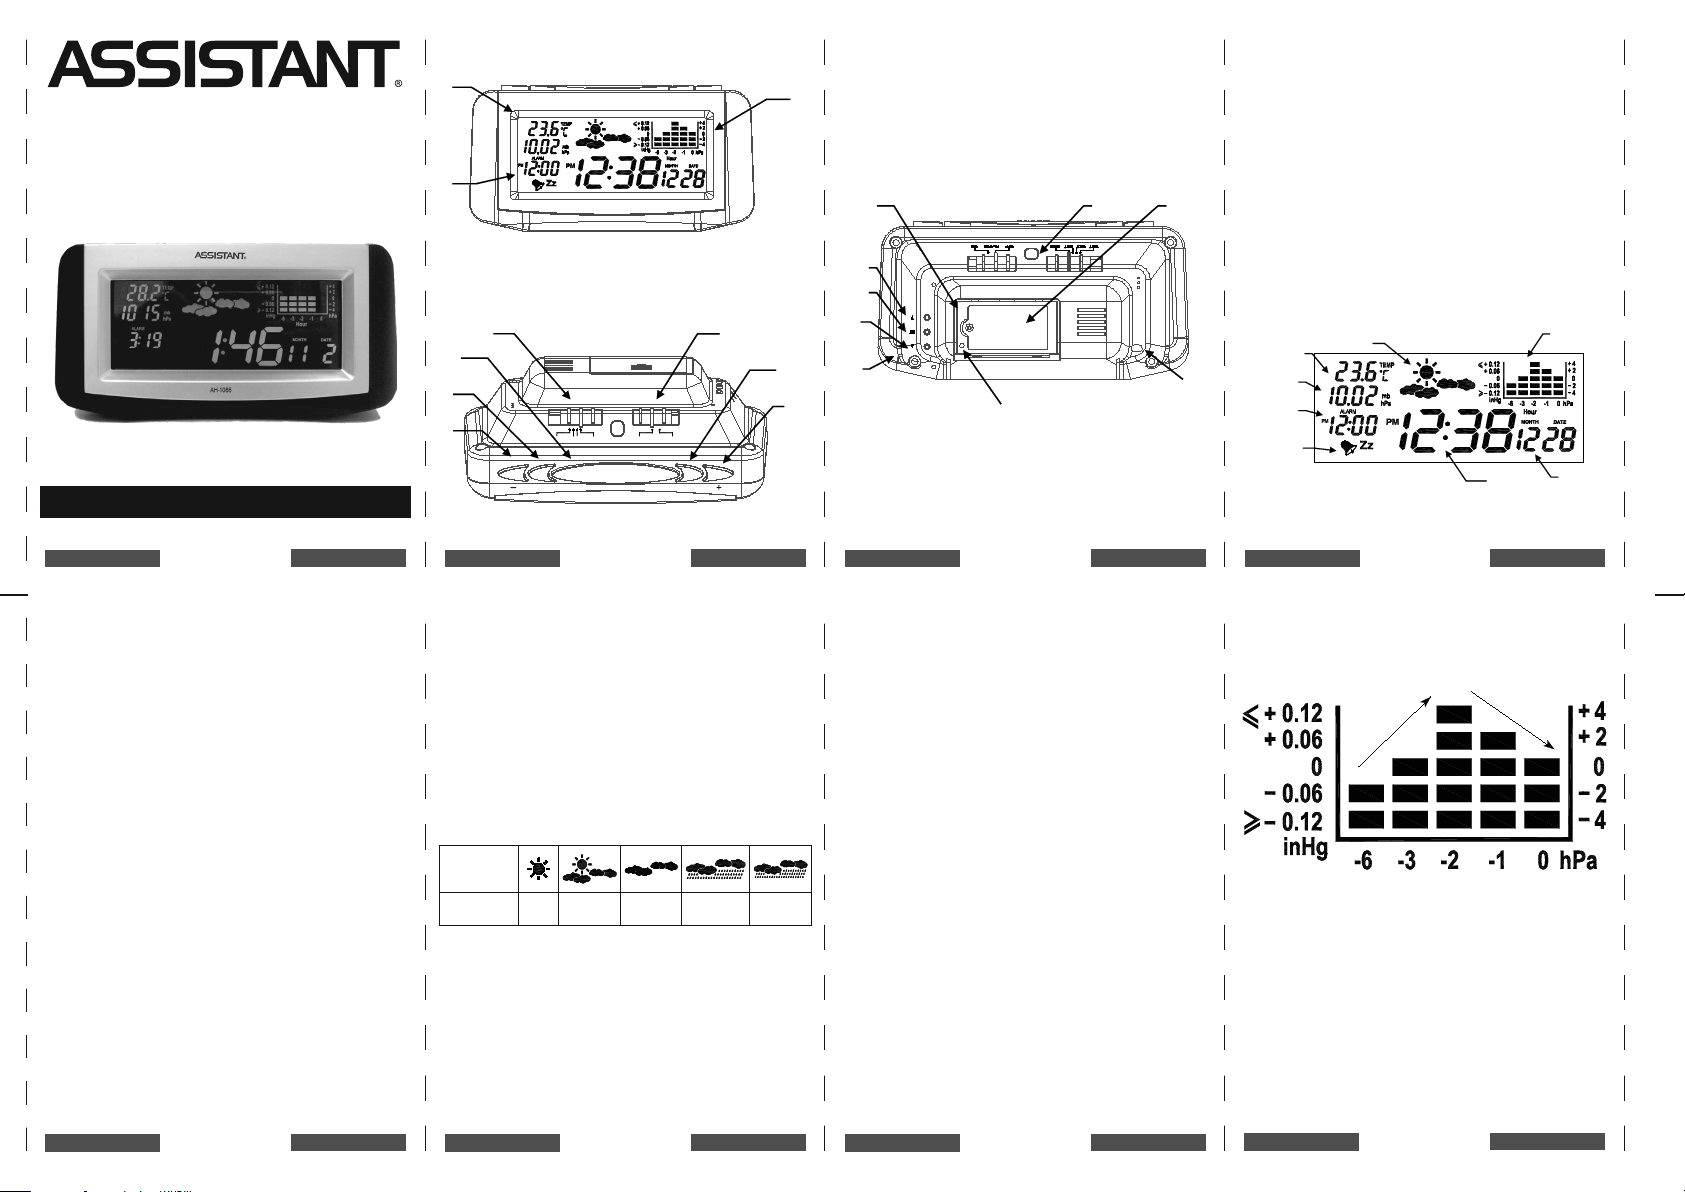
Temperature
Air Pressure
Alarm Time
Alarm Icons
Weather Forecast
Air Pressure
Bar Graph
Month and
Date
Real Time
Falling(down)
Rising(up)
Model AH-1086
OPERATION MANUAL
1. APPEARANCE
1. Blue color display
2. Time, month, date and alarm time
3. Weather station panel
4. [BACKWARD], [-] button
5. [ALARM SET] button
6. [SNOOZE] Button
7. [TIME ZONE] switch
8. [ALARM ON/OFF] switch
9. [DST SET] button
10. [FORWARD], [+] button
11. Temperature sensor
12. Weather set button [] - forward
13. Weather set button [SET]
14. Weather set button [] - backward
15. 9V battery compartment
16. Auto-dimmer sensor
17. 3V lithium button cell compartment
18. 9V AC adaptor jack
19. [RESET] button
2. FEATURES OF THE
WEATHER STATION
The auto-set LCD weather station is a high
performance and low power consumption weather
station which provide the weather forecast, real
time clock, alarm time, month and date, pressure
tendency, barometric and temperature display:
english
– 1 –
3. WEATHER STATION
- Total 5 modes of weather forecast
- Selectable digital barometer by mb, hPa or inHg
unit
- Operating altitude by meter or feet unit
- Pressure history bar graph
- Selectable temperature by °C or °F unit
4. REAL TIME CLOCK
- The real time backup feature by Real Time
Recovery Technology (RTRT)
- Blue backlight with auto-dimmer feature
- Four European time zones
- Automatically adjustable Daylight Saving Time
(DST)
- 12 hour or 24 hour
- 100 years calendar
- Alarm with Snooze
english
– 5 –
english
english
english
– 2 –
english
5. WEATHER FORECAST
The weather forecasting feature is estimated
to be 75% accurate. The weather forecast is based
solely upon the change of air pressure over time.
The average of past air pressure readings provides
an accurate forecast for 6-12 hours. Until the unit
has run for at least 6 hours after the unit has been
setup, reset, or moved from one altitude to another,
weather forecasts given should be discarded to allow
the unit sucient time for air pressure.
Indicator,
displayed
on the unit
Forecast Sunny
Slightly
cloudy
Cloudy Rainy Storm
6: WEATHER ICONS
Indication of a consistent altitude provides
more accurate readings. If this station moves from
horizontal axis to another level, please see the
procedure to adjust the altitude or reset the station.
Common to weather forecasting, absolute accuracy
cannot be guaranteed but it will give users an
indication of the expected weather.
english
– 6 –
english
english
– 3 –
english
7. SETTING THE VISIBLE
WEATHER AND ALTITUDE
Press and hold the [SET] button for 3 seconds
to enter the weather icon setting mode. The weather
icon will be ashing, and press [] or [] to choose
the visible weather icon then press the [SET] button
to conrm. Then, the digit “0” will be ashing, press
[] or [] to set the altitude level in term of meter
(at °C) / feet (at °F), and then press the [SET] button
to conrm and leave this mode.
Note: Altitude setting is not applicable for this
weather station; press [SET] when “0” is ashing.
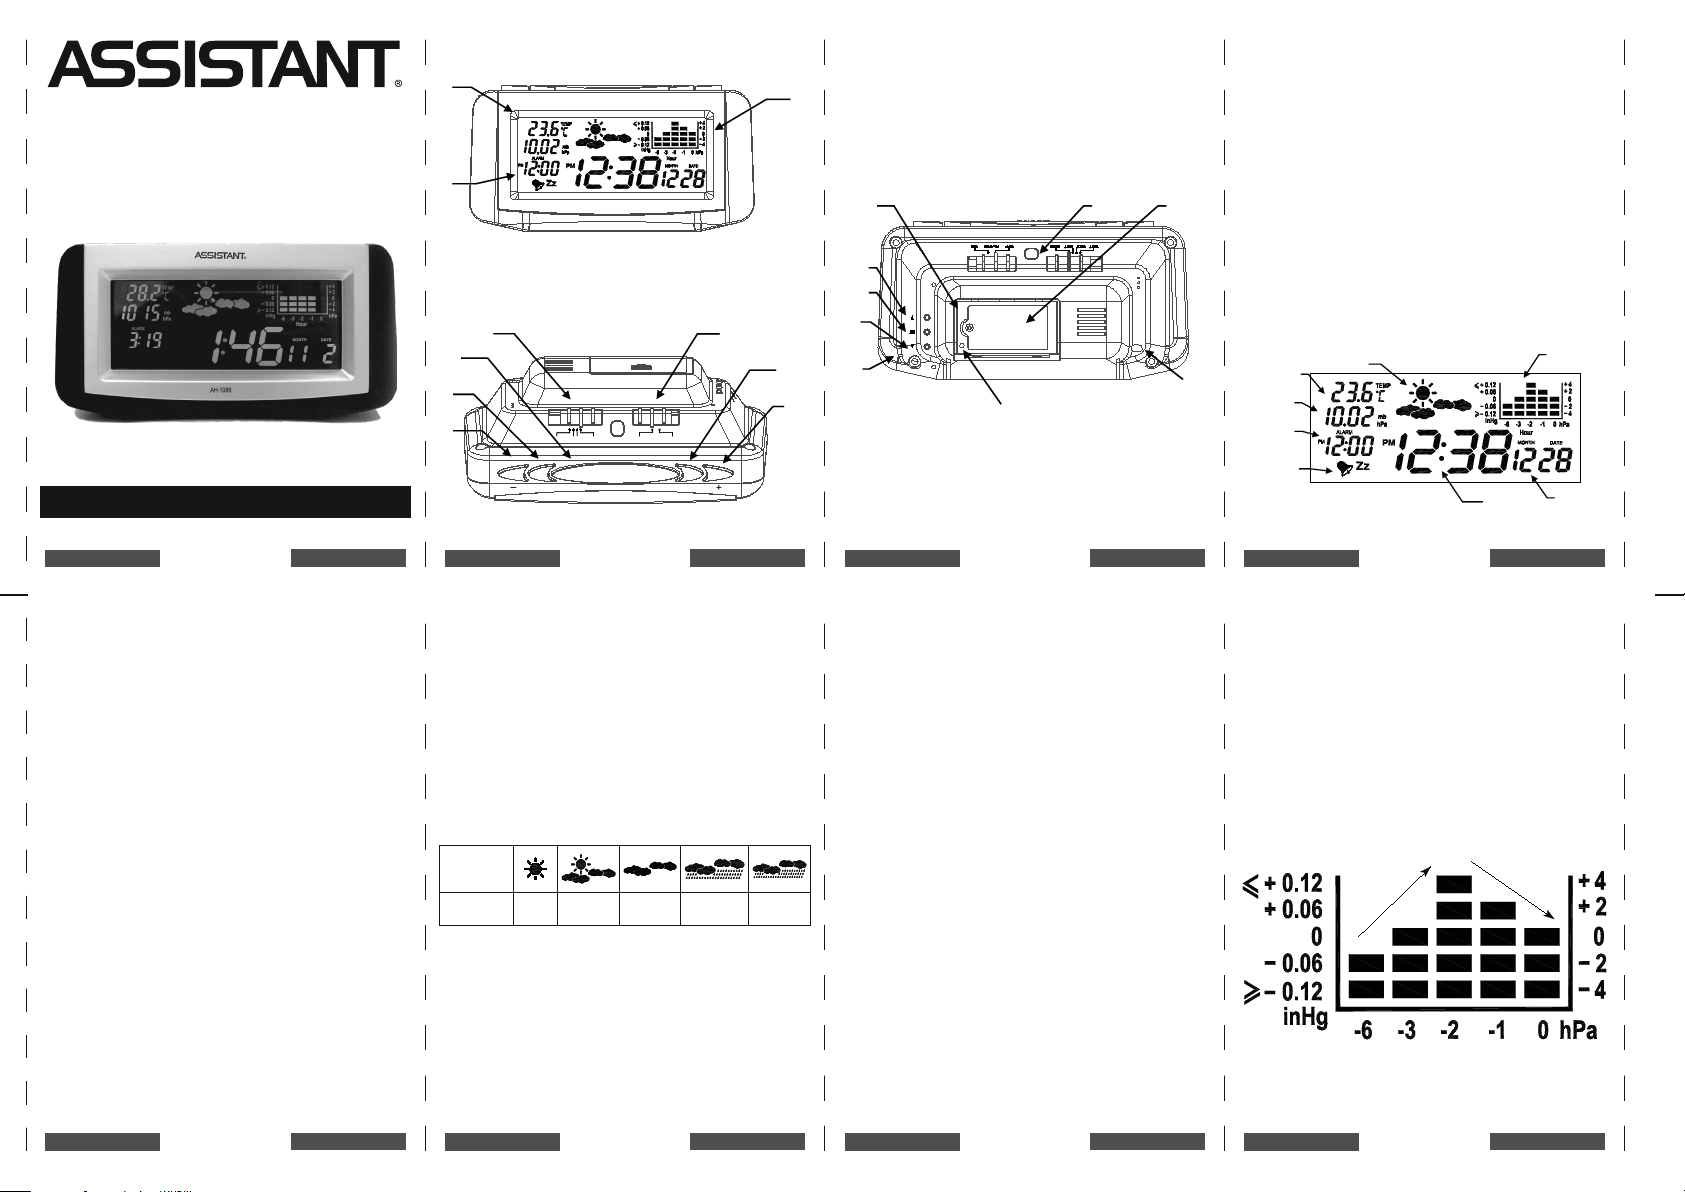
8. THE AIR PRESSURE BAR GRAPH
The air pressure bar graph indicates the air
pressure trend over the past 6 hours with each bar
along the horizontal axis. The middle of the vertical
axis represents the current air pressure and each
single bar change on the vertical axis. If the bars are
rising, it means that the weather is improving due
to the increase in air pressure. If the bars go down,
english
– 7 –
english
english
– 4 –
english
it means the air pressure has dropped and the
weather is expected to become worse.
9. DISPLAYING THE PRESSURE
AND THE TEMPERATURE BY °C/°F
Press the [] forward button to change the
pressure and temperature readout:
- Temperature readout °F & pressure readout
to inHg
- Temperature readout °C & pressure readout
to mbar/hPa
english
– 8 –
english
Page 2

WWW.TIWELL.COM
WWW.ASSISTANT.UA
Digital barometer specication:
- The pressure range: form 800 mbar to 1100 mbar
The temperature specication:
- The reading range: 0 °C to 50 °C (32 °F to 122 °F)
- The resolution: 0.1 °C/°F
10. TO OPERATE THE CLOCK
When the clock is plugged in, the real time, month
and date (e.g. “12 31” means Dec 31) will be displayed
after a few seconds
11. SELECT THE 12 OR 24
HOUR TIME FORMAT
The clock has 12 hour and indicate the PM time as
the default. To exchange the 12/24 hours, hold [+]
button for 2 seconds, the “24H” icon will display on
left center.
Slide the [TIME ZONE] switch to display the time
in the desired time zone. The default time zone is
Western European Time (WET).
See below table:
WET Western European Time Greenwich Mean Time (GMT)
CET Central European Time GMT +1 hour
EET Eastern European Time GMT +2 hours
MSK Moscow Standard Time GMT +3 hours
12. SETTING DAYLIGHTSAVING TIME
DST
The clock has DST in the ON position as the default.
To change the DST to the OFF position, press the
[DST] button once and “dof” (DST O) appears. To
restore “don” (DST On) by pressing the [DST] button
once. In a few seconds the real time will be displayed
again.
DST Start: Last Sunday in March at 1 am
DST End: Last Sunday in October at 1 am
13. DISPLAYING THE YEAR
To display the year, press [-] button once.
14. SETTING THE ALARM
To set the alarm, press the [ALARM SET] button
once, press either [+] or [-] button to enter the correct
hour (Be sure that the AM/PM is correct). Press the
[ALARM SET] button once again and press either
[+] or [-] button to enter the desired minute. In a few
seconds the time will be displayed.
15. OPERATE THE ALARM
AND SNOOZE
Slide the [ALARM ON/OFF] switch to display the
bell icon. The alarm will sound at the alarm time set.
When the alarm sounds, press [SNOOZE] to get an
extra 10 minutes of sleep (ashing “Zz”). The snooze
will be repeated up to four times. Press the [ALARM
SET] button to stop the alarm sound and repeat at
next day. To turn the alarm o, slide to “ALARM OFF”
position to disable the alarm.
16. REAL TIME INCORRECT
If for some reason the real time is incorrect or
lost, press and hold the [ALARM SET] button for 5-7
seconds, and the year will begin to blink, then press
the [+] or [-] button to set the year. Press the [ALARM
SET] button again to set the month by pressing the
[+] or [-] button. Press the [ALARM SET] button again
to set the day, again to set the hour, again to set the
minute, and once more to secure all in the memory.
17. NO TIME DISPLAYED WHEN
PLUGGED INTO THE AC POWER
If the display is blank when plugged into the AC
outlet, press reset button at left lower corner of the 9V
battery compartment. In a few seconds, the display
will be ON, and show 12:00 (at time zone WET). Now
repeat the procedure to reset the real time memory
above. After you have completed the time setting
procedure, insert the RTRT battery (lithium button
cell) and the time will be automatically stored in the
clock.
18. BATTERY BACKUP
(BATTERY NOT INCLUDED)
Install one 9V alkaline battery in the rear
compartment using the battery connecter. Note this
english
battery can be installed with disconnecting the clock
power. If the power fails, the battery back up will
automatically continue the time and alarm operation
but the display will disappear. During a power outage,
the alarm will sound at the set time. The duration for
the battery backup is 12 Hours. When the power is
restored the display digits will reappear with the
correct time.
– 9 –
english
19. BUTTON CELL REPLACEMENT
A RTRT cell battery that will last up to 3 years
maintains the real time. To maintain the real time
feature, we recommend this cell battery be replaced
approximately every 3 years. When changing the
RTRT battery, the AC power must be on or have a
9V battery installed. However, if you do lose the Real
Time, please see the procedure to reset the real time
memory above.
Caution: Danger of explosion if the battery is
incorrectly replaced. Replace only with the same or
equivalent type.
english
– 10 –
english
20. WARNING
To prevent re or shock hazard
- Do not expose this appliance to rain or moisture
- Do not immerse any of the units in water
- If you have damaged this product, do not
attempt to make any repairs. Please, take this unit
to a qualied technician or the technical support for
assistance
- The ventilation should not be impeded by
covering the ventilation openings with items, such as
newspapers, tablecloths, curtains, etc.
Power Source:
Main Power: VDE external adaptor AC230V / DC9V
Alarm Backup Power: DC9V alkaline battery (Not
included)
RTRT Backup Power: DC3V CR2032 lithium button
cell (Included)
english
– 11 –
english
CAUTION
RISK OF ELECTRIC SHOCK
DO NOT OPEN
- Uninsulated “dangerous voltage” is present within
the product’s enclosure: that may be of sucient
magnitude to constitute a risk of electric shock to a
person.
- There are important operating and maintenance
(servicing) instructions in the literature accompanying
the appliance.
english
– 12 –
english
english
– 13 –
english
english
– 14 –
english
english
– 15 –
english
Page 3
SELBSTEINSTELLENDE LCD
1
2
3
DST SET
SNOOZE
ALARM SET
ON
OFF
ALARM
MSK
EETWET
CET
4
7
8
5
9
10
6
Clock must be plugged
in when replacing the
button cell battery.
12
15
17
16
11
13
14
18
19
Temper atur
Luftdruck
Weckerzeit
Weckericon
Wettervorhers age
Staelbild
des Drucks
Monat und
Datum
Zeit
Falling(down)
Rising(up)
WETTERSTATION
Modell AH-1086
BETRIEBSANLEITUNG
1. AUSSEHEN
1. Blaues Display
2. Zeit, Monat, Datum und Weckerzeit
3. Messungen von der Wetterstation
4. [BACKWARD], [-] Taste
5. [ALARM SET] Taste
6. [SNOOZE] Taste
7. [TIME ZONE] Umschalter
8. [ALARM ON/OFF] Umschalter
9. [DST SET] Taste
10. [FORWARD], [+] Taste
11. Temperatursensor
12. Wetterstationtaste [] – vorwärts
13. Wetterstationtaste [SET]
14. Wetterstationtaste [] - rückwärts
15. Fach für die Reservebatterie (9V)
16. Sensor der Selbstabstimmung von der
Schirmhelligkeit
17. Fach für die Tablettebatterie (3V)
18. Steckanschluß für den Wechselstromadapter (9В)
19. [RESET] Taste
2. FUNKTIONEN VON DER
WETTERSTATION
Automatische LCD Wetterstation ist intensives
und energiesparendes Gerät, das gibt die
Wettervorhersage, die Zeit, den Wecker, den Monat,
das Datum, die Änderung von dem Luftdruck, den
Druck und die Temperatur:
geRMAn
– 1 –
DeUTsCh
3. WETTERSTATION
- 5 Varianten der Wettervorhersage
- Wahl der Druckmesseinheit: Millibar, hPa, Zoll des
Quecksilberfadens
- Staelbild des Drucks
- Die Temperatur nach Celsius oder nach
Fahrenheit
4. ZEIT
- Die Tablettebatterie für die Zeitverwahrung, sie
ist auf die Technologie von RTRT (die Technologie
von der Zeitverwahrung) begründet.
- Blaue Ausleuchtung mit automatischer
Ausschaltung
- Vier europäische Stundenkreise
- Automatische Benutzung von der Sommerzeit
(DST)
- 12/24 Zeitformat
- Kalender auf 100 Jahre
- Wecker mit der Snoozefunktion
geRMAn
– 5 –
DeUTsCh
geRMAn
– 2 – – 3 – – 4 –
5. WETTERVORHERSAGE
Die Wettervorhersage ist nur auf 75% zuverlässig.
Die vorhersage gründet sich auf die Änderung von
den Luftdruckmessungen. Der Mittelwert von dem
Druck versieht Sie mit der Wettervorhersage auf
6.12 Stunden. Nachdem das Gerät eingestellt war,
6 Stunden funktioniert hat, von einer Seehöhe auf
die andere Seehöhe umgestellt war, soll man die
Wettervorhersage löschen, damit das Gerät den
Druck messen könnte.
Icon auf
dem Display
Wettervorhersage
Sonnig Bewölkt Trübe Regen Gewitter
6. WETTERICONS
Die Seehöhe hilft man die genauere
Wettervorhersage zu bekommen. Wenn man die
Wetterstation von einer Seehöhe auf andere Seehöhe
stellt um, stellen sie die Seehöhe noch mal ein, oder
stellen Sie die ganze Wetterstation ein. Das Wetter
geRMAn
– 6 – – 7 – – 8 –
DeUTsCh
DeUTsCh
geRMAn
kann man auf 100% nicht vorhersagen, aber man
kann die erwartende Wettervorhersage bekommen.
7. EINSTELLUNG DER
WETTERVORHERSAGE
UND DER SEEHÖHE
Halten Sie die Taste [SET] auf 3 Sekunden, um die
Einstellung der Wettervorhersage zu beginnen. Das
Icon von der Wettervorhersage wird erscheinen, dann
drucken Sie Taste [] oder [], um das Icon von dem
laufenden Wetter, drucken Sie die Taste [SET], um zu
bestätigen. Die Zier „0“ wird blinken, drucken Sie
die Taste [] oder [], um die Seehöhe einzustellen
in Meter (bei der Temperatur nach Celsius) oder in
Fuß (bei der Temperatur nach Fahrenheit), dann
drucken Sie die Taste [SET], um zu bestätigen und
die Einstellung aufzuhören.
Anmerkung: Diese Wetterstation benutzt die
Seehöheeinstellung nicht, drucken Sie die Taste
[SET], die Zier „0“ wird blinken.
geRMAn
DeUTsCh
DeUTsCh
geRMAn
DeUTsCh
8. STAFFELBILD DES LUFTDRUCKS
Das Staelbild von dem Luftdruck zeigt die
Änderung des Drucks in den letzten 6 Stunden.
Das Mittel von der waagerechten Achse zeigt
das laufenden Druck und seine Änderungen im
Vergleich zu der senkrecht Achse. Wenn die Stapel
höher werden, verbessert das Wetter, wegen der
Druckhöhung. Wenn die Stapel niedriger werden,
verschlechtert sich das Wetter bald.
geRMAn
DeUTsCh
Page 4

9. DRUCK UND TEMPERATUR IN °C/°F
Drucken Sie die Taste [], um die Messeinheiten
zu wechseln:
- Temperatur nach °F und das Druck in Zoll des
Quecksilberfaden
- Temperatur nach °C und das Druck in mb/hPa
Digital Barometer:
- Anzeigebereich: von 800mb bis 1100mb
Thermometer:
- Anzeigebereich: von 0 °C bis 50 °C (von 32 °F bis
122 °F)
- Empndlichkeit der Thermometer: 0.1 °C/°F
10. UHR
Wenn die Uhr am Netz angeschlossen ist, werden
das Datum, der Monat und die zeit in einigen
Sekunden auf dem Display erscheinen. (z.B.: „12 31“
bedeutet 31 Dezember).
11. WAHL VON 12/24 ZEITFORMAT
Die Uhr hat 12 Zeitformat als der Standardwert,
sie zeigt PM automatisch. Um das Format zu ändern,
halten Sie die taste [+] auf 2 Sekunden, das Icon „24H“
wird nach Links auf dem Display erscheinen.
Bringen Sie den Umschalter [TIME ZONE] in die
Position von Ihrem Stundenkreis. Der Standardwert
für den Stundenkreis ist – westeuropäische Zonenzeit
(WET).
Beachten Sie die Tabelle:
WET westeuropäische Zonenzeit Greenwichzeit (GMT)
CET mitteleuropäische Zonenzeit Greenwichzeit (GMT) +1 Stunde
EET osteuropäische Zonenzeit Greenwichzeit (GMT) +2 Stunden
MSK Mosk auzeit Greenwichzeit (GMT) +3 Stunden
12. SOMMERZEITEINSTELLUNG DST
Die Uhr hat die Funktion von der Sommerzeit
(DST), sie ist eingeschaltet. Um die automatische
Sommerzeitfunktion auszuschalten, drucken Sie die
Taste [DST], die Aufschrift “dof” (Sommerzeitfunktion
ausgeschaltet) wird erscheinen. Um die automatische
Sommerzeitfunktion einzuschalten, drucken Sie die
Taste [DST], die Aufschrift “don” (Sommerzeitfunktion
eingeschaltet) wird erscheinen. In einigen Sekunden
wird die Zeit auf dem Display erscheinen.
Sommerzeit beginnt: der letzten Sonntag des
Märzes um 1:00.
Sommerzeit endet: der letzten Sonntag des
Oktobers um 1:00.
13. JAHR
Um das Jahr zu sehen, drucken Sie die Taste [-]
einmal.
14. WECKEREINSTELLUNG
Um das Wecker einzustellen, drucken Sie die Taste
[ALARM SET] einmal, dann drucken Sie die Taste [+]
oder [-], um die Stunden einzugeben, (Beachten Sie
AM/PM Indikator). Drucken Sie die Taste [ALARM
SET] noch mal, dann drucken Sie die Taste [+] oder
[-], um die Minuten einzugeben. Die Zeit wird auf
dem Display in einigen Sekunden erscheinen.
15. WECKER MIT DER
SNOOZEFUNKTION
Bewegen Sie den Umschalter [ALARM ON/OFF],
um das Klingelicon zu sehen. Das Wecker wird in der
vorgesehenen Zeit klingeln. Während des Signals des
Weckers drucken Sie die Taste [SNOOZE], um noch
10 Minuten zu schlaen (das Icon “Zz” wird blinken).
Die Snoozefunktion wird bis zu 4 Male wiederholt.
Drucken Sie die Taste [ALARM SET], um das Signal zu
stoppen, damit es wieder am nächsten Tag klingelt.
Um das Wecker auszuschalten bringen Sie den
Umschalter [ALARM SET] in der Position «ALARM
OFF».
16. FALSCHE ZEIT
Wen die Uhr zeigt falsche Zeit oder zeigt keine Zeit,
halten Sie die Taste [ALARM SET] auf 5-7 Sekunden,
die Jahresziern werden blinken, drucken Sie die
Taste [+] oder [-], um das Jahr einzugeben. Drucken
Sie die Taste [ALARM SET] noch mal, um das Monat
geRMAn
einzugeben mit der Hilfe der Taste [+] oder [-].
Drucken Sie die taste [ALARM SET] noch mal, um
die Stunden einzugeben, noch mal um die Minuten
einzugeben und noch mal um die Einstellungen zu
erhalten.
– 9 –
DeUTsCh
17. ES GIBT KEINE ZEIT
AUF DEM DISPLAY
Wenn es kein Bild auf dem Display gibt, aber
ist die Uhr ans Netz anschlossen, drucken Sie die
taste [RESET] in der linken unten Ecke des Fachs
für die Reservebatterie (9V). Das Display wird in
einigen Sekunden eingeschaltet, die Zeit wird als
12:00 (beim westeuropäische Zonenzeit (WET))
gezeigt. Wiederholen sie die Zeiteinstellung, die
oben beschrieben ist. Danach Sie die Zeiteinstellung
beendet haben, setzen Sie die Tablettebatterie für
die Technologie RTRT ein, die Zeit wird automatisch
erhaltet.
geRMAn
– 10 – – 11 – – 12 –
DeUTsCh
18. RESERVEBATTERIE
(GEHT NICHT MIT)
Setzen Sie eine Alkalibatterie (9V) in das Fach an der
Ruckseite des Geräts. Beachten Sie, dass die Uhr man
von dem Netz abschalten soll. Beim Energieaussetzer
wird die Reservebatterie die Arbeit von der Uhr und
dem Wecker sichern, aber das Bild von dem Display
verschwinden. Beim Energieaussetzer wird das
Wecker wie normal klingeln. Die Arbeitzeit von der
Reservebatterie ist 12 Stunden. Wenn Einspeisung
erneuert wird, wird die richtige Zeit auf den Display
erscheinen.
19. TABLETTEBATTERIEERSETZEN
Die Tablettebatterie sichert die Zeitverwahrung,
sie ist auf die Technologie von RTRT (die Technologie
von der Zeitverwahrung) begründet. Sie funktioniert
3 Jahre. Damit die Zeit erhaltet wäre, ersetzen Sie
diese Batterie jede drei Jahre. Beim Ersetzung soll
geRMAn
das Gerät and Netz anschließen, oder soll man die
Reservebatterie einsetzen. Aber wenn die Zeit ist
doch verliert, folgen Sie die Zeiteinstellung, die oben
beschrieben ist.
Achtung: Die Batterie kann explodieren, wenn sie
unrichtig eingesetzt. Ersetzen Sie die Batterie durch
genaue Batterie oder durch den äquivalenten Typ.
DeUTsCh
20. WARNUNG
Um dem Feuer oder dem Elektroschock zu
entgehen:
- Setzen Sie Das Gerät dem Regen oder der Nässe
nicht aus.
- Eintauchen Sie das Gerät und seine Bestandteilen
ins Wasser nicht.
- Wenn Sie das Gerät beschädigt haben, versuchen
Sie nicht das Gerät selbst zu reparieren. Haben Sie es
repariert oder wenden Sie am Servicezentrum.
- Man soll die Lüftung nicht hemmen, verdecken
Sie die Luftönungen mit verschiedenem Dingen
wie Zeitungen, Tischtuche, Vorhänge usw. nicht.
geRMAn
DeUTsCh
Speisung:
Hauptspeisung: 230V/9V Adapter
Reserveeinspeisung: Alkalibatterie (9V) (geht
nicht mit)
Speisung für die Zeitverwahrung (RTRT): Tablette-
batterie CR2032 (3V) (mitgeht)
ACHTUNG
GEFAHR VON DEM ELEKTROSCHOCK
ÖFFNEN SIE DAS GEHÄUSE NICHT
- Unter dem Gehäuse gibt es Hochspannung:
Stromstärke kann genug sein, um dem Mensch zu
verletzen
- Die Betriebsanleitung geht mit dem Gerät mit.
geRMAn
DeUTsCh
geRMAn
– 14 – – 15 –– 13 –
DeUTsCh
geRMAn
DeUTsCh
Page 5

АВТОМАТИЧЕСКАЯ LCD
1
2
3
1
2
3
Clock must be plugged
in when replacing the
button cell battery.
12
15
17
16
11
13
14
18
19
Температура
Давление
Время
будильника
Будильник
Прогноз погоды
Гистограмма
давления
Месяц
и дата
Время
Falling(down)
Rising(up)
МЕТЕОСТАНЦИЯ
Модель AH-1086
ИНСТРУКЦИЯ
ПО ЭКСПЛУАТАЦИИ
RUssiAn
– 1 –
Русский
1. ВНЕШНИЙ ВИД
1. Дисплей голубого цвета
2. Время, месяц, дата и время будильника
3. Дисплей метеостанции
4. Кнопка [BACKWARD], [-]
5. Кнопка [ALARM SET]
6. Кнопка [SNOOZE]
7. Переключатель [TIME ZONE]
RUssiAn
– 2 – – 3 – – 4 –
Русский
8. Переключатель [ALARM ON/OFF]
9. Кнопка [DST SET]
10. Кнопка [FORWARD], [+]
11. Датчик температуры
12. Кнопка метеостанции [] – вперед
13. Кнопка метеостанции [SET]
14. Кнопка метеостанции [] - назад
15. Отделение для резервной батарейки (9В)
16. Автоматический регулятор яркости дисплея
17. Отделение для батарейки таблеточного типа (3В)
18. Гнездо адаптера переменного тока (9В)
19. Кнопка [RESET]
RUssiAn
Русский
2. ФУНКЦИИ МЕТЕОСТАНЦИИ
Автоматическая LCD метеостанция
является высокоэффективной метеостанцией
потребляющей небольшое количество
электроэнергии, которая включает в себя прогноз
погоды, показания времени, будильник, месяц
и дату, тенденцию изменения атмосферного
давления и показания давления и температуры:
3. МЕТЕОСТАНЦИЯ
- 5 вариантов прогноза погоды
- Выбор показаний цифрового барометра в следующих единицах: миллибар, гПа или в миллиметрах ртутного столба
RUssiAn
Русский
- Высота над уровнем моря в метрах или футах
на выбор
- Изменения давления в виде гистограммы
- Выбор показаний температуры в °C или в °F
4. ПОКАЗАНИЯ
ТЕКУЩЕГО ВРЕМЕНИ
- Резервная батарейка для сохранения настроек
времени, основанная на технологии сохранения
точного времени (RTRT)
- Голубая подсветка с автоматической
настройкой яркости
- Четыре европейских часовых пояса
- Автоматически настраиваемый переход на
летнее время (DST)
- 12 часовой или 24 часовой формат
- календарь на 100 лет
- будильник с функцией Snooze
5. ПРОГНОЗ ПОГОДЫ
Прогноз погоды достоверен на 75%. Прогноз
погоды основан исключительно на изменении
атмосферного давления. Средняя величина
последних показаний атмосферного давления
RUssiAn
– 5 –
Русский
обеспечивает точный прогноз погоды на 6-12
часов. После того как прибор был настроен,
проработал по крайней мере 6 часов, был настроен
заново или перемещен с одной высоты над уровнем
моря на другую, полученные показания прогноза
погоды должны быть сброшены для того, чтобы
предоставить устройству необходимое время для
определения атмосферного давления.
Изображение на
дисплее
Прогноз Солнечно Об лачно Пасмурно Дождь Гроза
6. ИКОНКИ,
ПОКАЗЫВАЮЩИЕ ПОГОДУ
Соответствующая высота над уровнем моря
обеспечивает более точные показания прогноза
погоды. Если метеостанция перемещается
с одного уровня на другой, пожалуйста, следуйте
процедуре настройки высоты над уровнем моря
или настройте метеостанцию заново. Погода
не может быть предсказана со стопроцентной
точностью, однако метеостанция может сообщить
пользователю ожидаемый прогноз.
RUssiAn
– 6 – – 7 – – 8 –
Русский
7. НАСТРОЙКА ТЕКУЩЕГО
ПРОГНОЗА ПОГОДЫ И ВЫСОТЫ
НАД УРОВНЕМ МОРЯ
Нажмите и удерживайте кнопку [SET] в течение
3 секунд для входа в режим настройки отображения
прогноза погоды. Должна будет высветиться
иконка прогноза погоды, затем нажмите [] или
[] для выбора иконки текущей погоды и нажмите
кнопку [SET] для подтверждения. Цифра “0” будет
мигать, затем нажмите кнопку [] или [] для
установки высоты над уровнем моря в метрах (при
температуре в °C) / в футах (при температуре в °F),
затем нажмите кнопку [SET] для подтверждения
и выхода из данного режима.
Примечание: Для данной метеостанции установка
высоты над уровнем моря не применяется; нажмите
[SET], после чего загорится “0”.
8. ГИСТОГРАММА
АТМОСФЕРНОГО ДАВЛЕНИЯ
Гистограмма атмосферного давления
показывает тенденцию изменения атмосферного
давления за последние 6 часов в виде столбиков,
RUssiAn
Русский
расположенных на горизонтальной оси.
Середина вертикальной оси показывает текущее
атмосферное давление и изменение каждого
отдельного столбика относительно вертикальной
оси. Если высота столбиков увеличивается, это
означает, что погода улучшается из-за повышения
атмосферного давления. Если высота столбиков
уменьшается, то это означает, что атмосферное
давления падает и, ожидается, что погодные
условия будут ухудшаться.
RUssiAn
Русский
Page 6

9. ОТОБРАЖЕНИЕ ДАВЛЕНИЯ
И ТЕМПЕРАТУРЫ В °C/°F
Нажмите кнопку [] для изменения единиц
измерения температуры и давления:
- Температура в °F и давление в миллиметрах
ртутного столба
- Температура в °C и давление в миллибарах/гПа
Характеристика цифрового барометра:
- Диапазон измерения давления: от 800мб до
1100мб
Характеристика термометра:
- Диапазон показаний: от 0 °C до 50 °C (от 32 °F
до 122 °F)
- Чувствительность термометра: 0.1 °C/°F
10. ЧАСЫ
Когда часы включены в сеть, то по истечении
нескольких секунд на дисплее высветится время,
месяц и дата (например “12 31” означает 31 декабря).
11. ВЫБОР 12 ИЛИ 24 ЧАСОВОГО
ФОРМАТА ВРЕМЕНИ
Часы установлены на 12 часовой формат
времени и показывают время после полудня по
умолчанию. Для того, чтобы изменить формат
12/24, удерживайте кнопку [+] в течении 2 секунд,
слева на дисплее появится иконка “24H”.
Передвиньте переключатель [TIME ZONE] на
необходимый часовой пояс. Часовая зона по
умолчанию – западноевропейское поясное время
(WET).
Смотрите табличку ниже:
WET западноевропейское
поясное время
CET центральноевропейское
время
EET восточноевропейское
время
MSK московское время гринвичское среднее время
гринвичское среднее поясное
время (GMT)
гринвичское среднее время
(GMT) +1 час
гринвичское среднее время
(GMT) +2 часа
(GMT) +3 часа
12. НАСТРОЙКА РЕЖИМА
ПЕРЕХОДА НА ЛЕТНЕЕ ВРЕМЯ DST
Часы имеют функцию перехода не летнее
время (DST ), которая по умолчанию находится
во включенном режиме «ON». Для того чтобы
отключить автоматический переход на летнее
время, нажмите кнопку [DST], появится надпись
“dof” (переход на летнее время отключен). Для
того чтобы включить автоматический переход на
летнее время, однократно нажмите кнопку [DST],
появится надпись “don” (переход на летнее время
включен). Через несколько секунд на дисплее
снова появятся показания текущего времени.
Переход не летнее время: последнее
воскресенье марта в 1 ночи
Перехода на зимнее время: последнее
воскресенье октября в 1 ночи
13. ГОД
Для того чтобы просмотреть год, нажмите
кнопку [-] один раз.
14. УСТАНОВКА БУДИЛЬНИКА
Для того, чтобы установить будильник,
однократно нажмите кнопку [ALARM SET], затем
нажмите кнопку [+] или [-] для того, чтобы ввести
показания часов (Удостоверьтесь в том, что режим
AM/PM установлен верно). Нажмите кнопку
[ALARM SET] еще раз, потом нажмите кнопку [+]
или [-] для того, чтобы ввести минуты. Показания
времени появятся на дисплее спустя несколько
секунд.
15. БУДИЛЬНИК
И ФУНКЦИЯ SNOOZE
Передвиньте переключатель [ALARM ON/OFF]
для того, чтобы на дисплее появилось изображения
колокольчика. Будильник зазвонит в установленное
время. Во время звонка будильника, нажмите
[SNOOZE] для того, чтобы поспать еще 10 минут
(значок “Zz” будет мигать). Функция snooze
будет повторяться до четырех раз. Нажмите
кнопку [ALARM SET] для того, чтобы остановить
звонок будильника и чтобы он снова зазвонил
на следующий день. Для того чтобы выключить
будильник, передвиньте переключатель [ALARM
SET] в положение «ALARM OFF».
16. НЕВЕРНЫЕ ПОКАЗАНИЯ
ТЕКУЩЕГО ВРЕМЕНИ
Если по какой-либо причине часы показывают
неверное время или не показывают его вообще,
нажмите и удерживайте в течение 5-7 секунд
кнопку [ALARM SET], начнут мигать показания
RUssiAn
года, затем нажмите кнопку [+] или [-] для
установки года. Нажмите кнопку [ALARM SET]
снова для того, чтобы установить показания
месяца, нажатием кнопки [+] или [-]. Снова нажмите
кнопку [ALARM SET] для того, чтобы установить
часы и снова, чтобы установить минуты и еще раз,
чтобы сохранить результаты.
– 9 –
Русский
17. ПРИ ПОДКЛЮЧЕНИИ К СЕТИ
ВРЕМЯ НЕ ОТОБРАЖАЕТСЯ
Если на дисплее нет изображения при
подключении прибора к сети, нажмите
кнопку [RESET] в правом нижнем углу отсека
для батареек (9В). Дисплей включится через
несколько секунд, время будет отображено как
12:00 (при западноевропейском часовом поясе
(WET)). Повторите процедуру, описанную выше,
для установки текущего времени. После того,
как вы закончили процедуру установки времени,
вставьте батарейку таблеточного типа, которая
обеспечивает технологию RTRT (технология
сохранения точного времени) и время будет
автоматически сохранено.
RUssiAn
Русский
RUssiAn
– 10 – – 11 – – 12 –
Русский
18. РЕЗЕРВНАЯ БАТАРЕЙКА
(БАТАРЕЙКА В КОМПЛЕКТ НЕ ВХОДИТ)
Вставьте одну щелочную батарейку (9В)
в отделение, находящееся на тыльной стороне
прибора. Примите во внимание, что эта
батарейка должна вставляться только если часы
отключены от сети. Если происходят перебои
с электроэнергией, резервная батарейка будет
автоматически поддерживать работу часов
и будильника, но показания с дисплея исчезнут.
Во время отключения питания, будильник
зазвонит в установленное время. Время работы
резервной батарейки составляет 12 часов. При
возобновлении подачи питания, на дисплее
появится правильное время.
19. ЗАМЕНА БАТАРЕЙКИ
ТАБЛЕТОЧНОГО ТИПА
Батарейка, обеспечивающая сохранение
точного времени (RTRT), будет работать в течение
3 лет. Для сохранения показаний текущего
времени мы рекомендуем заменять эту батарейку
RUssiAn
– 14 – – 15 –– 13 –
Русский
RUssiAn
каждые три года. При замене таблеточной
батарейки, прибор должен быть подключен
к сети, либо должна быть вставлена резервная
батарейка (9В). Однако, если показания времени
были потеряны, пожалуйста, следуйте процедуре
установки времени, описанной выше.
Осторожно: Существует опасность взрыва
батарейки, если она вставлена некорректно.
Производите замену батарейки только на
батарейку эквивалентного или такого же типа.
Русский
20. ПРЕДУПРЕЖДЕНИЕ
Для предотвращения возникновения пожара
или опасности поражения током:
- Не подвергайте данный прибор воздействию
дождя или влаги
- Не погружайте устройство или его
составляющие в воду
- Если вы повредили данный прибор, не
пытайтесь самостоятельно отремонтировать
устройство. Пожалуйста, отнесите данный прибор
в ремонт или обратитесь за помощью в сервисный
центр.
RUssiAn
Русский
RUssiAn
- Нельзя препятствовать вентиляции, закрывая
вентиляционные отверстия различными предметами, такими как газеты, скатерти, шторы и т.п.
Русский
Источник питания:
Основной источник питания: внешний
адаптер 230В переменного / 9В постоянного тока
Резервный источник питания: щелочная
батарейка (9В) (не входит в комплект)
Резервный источник питания для сохранения
точного времени (RTRT): литиевая батарейка
CR2032 (3В) (входит в комплект)
ОСТОРОЖНО
ОПАСНОСТЬ ПОРАЖЕНИЯ
ЭЛЕКТРИЧЕСКИМ ТОКОМ
НЕ ОТКРЫВАТЬ
- Под корпусом устройства находятся провода
под опасным напряжением: сила тока может быть
достаточна для травмирования человека.
- В комплекте с устройством предоставляется
так же инструкция по эксплуатации.
Page 7

АВТОМАТИЧНА LCD
1
2
3
1
2
3
Clock must be plugged
in when replacing the
button cell battery.
12
15
17
16
11
13
14
18
19
Температура
Тиск
Час
будильника
Будильник
Прогноз погоди
Гістограма
тиску
Місяць
та дата
Час
Falling(down)
Rising(up)
МЕТЕОСТАНЦІЯ
Модель AH-1086
ІНСТРУКЦІЯ З ЕКСПЛУАТАЦІЇ
UKRAiniAn
– 1 –
укРАЇНсЬкА
1. ЗОВНІШНІЙ ВИГЛЯД
1. Дисплей блакитного кольору
2. Час, місяць, дата і час будильника
3. Панель метеостанції
4. Кнопка [BACKWARD], [-]
5. Кнопка [ALARM SET]
UKRAiniAn
– 2 – – 3 – – 4 –
укРАЇНсЬкА
6. Кнопка [SNOOZE]
7. Перемикач [TIME ZONE]
8. Перемикач [ALARM ON/OFF]
9. Кнопка [DST SET]
10. Кнопка [FORWARD], [+]
11. Датчик температури
12. Кнопка для налаштування показників погоди
[] - уперед
13. Кнопка для налаштування показників погоди
[SET]
14. Кнопка для налаштування показників погоди
[] - назад
UKRAiniAn
укРАЇНсЬкА
15. Відділення для резервної батарейки (9В)
16. Автоматичний регулятор яскравості
дисплея
17. Відділення для літієвої батарейки кнопкового
типу
18. Гніздо адаптера змінного струму (9В)
19. Кнопка [RESET]
2. ФУНКЦІЇ МЕТЕОСТАНЦІЇ
Автоматична LCD метеостанція є високоефективною метеостанцією низьким рівнем споживання електроенергії, що надає показники прогнозу
погоди, будильник, показники місяця і дати, тенденцію зміни атмосферного тиску і показники тиску та температури.
UKRAiniAn
укРАЇНсЬкА
3. МЕТЕОСТАНЦІЯ
- 5 варіантів прогнозу погоди
- Вибір відображення тиску у наступних
одиницях: мілібар, гПа або у міліметрах ртутного
стовпчика
- Висота над рівнем моря у метрах або у футах
- Зміни тиску у вигляді гістограми
- Вибір відображення температури у °C або у °F
4. ПОТОЧНИЙ ЧАС
- Резервна батарейка для збереження
налаштувань часу, яке базується на технології
збереження точного часу (RTRT)
- Блакитне підсвічування з автоматичним
загасанням
- Чотири європейські часові пояси
- Автоматичний перехід на літній час (DST)
- 12 годинний або 24 годинний формат часу
- Календар на 100 років
- Будильник з функцією Snooze
Прогноз погоди точний на 75%. Прогноз
погоди, заснований виключно на зміні показників
UKRAiniAn
5. ПРОГНОЗ ПОГОДИ
– 5 –
укРАЇНсЬкА
атмосферного тиску. Середня величина цих
показників забезпечує точний прогноз погоди
на 6-12 годин. Після того, як прилад був
налагоджений, працював принаймні протягом
6 годин, був знову налагоджений або переміщений
з однієї висоти над рівнем моря на іншу, отримані
показники прогнозу погоди повинні бути скинуті
для того, щоб надати пристрою необхідний час
для вимірювання атмосферного тиску.
Зображення
на дисплеї
Прогноз Сонячно Змінна
хмарність
Хмарно Дощ Гроза
6. ІКОНКИ,
ЩО ПОКАЗУЮТЬ ПОГОДУ
Відповідна висота над рівнем моря забезпечує
найбільш точні показники прогнозу погоди. Якщо
метеостанція переміщується з одного рівня на
інший, будь ласка, дотримуйтесь процедури
налаштування висоти над рівнем моря або
не може бути наданий зі стовідсотковою точністю,
але метеостанція може повідомити користувачу
очікувану погоду.
7. НАЛАШТУВАННЯ ПОТОЧНОГО
ПРОГНОЗУ ПОГОДИ І ВИСОТИ
НАД РІВНЕМ МОРЯ
Натисніть і утримуйте кнопку [SET] протягом
3 секунд для входу до режиму відображення іконки
прогнозу погоди. Повинна висвітитися іконка
прогнозу погоди, потім натисніть [] або [] для
вибору іконки наявної погоди і натисніть кнопку
[SET] для підтвердження. Загориться цифра “0”,
натисніть [] або [] для встановлення висоти
над рівнем моря у метрах (при вимірюванні у °C)
/ у футах (при вимірюванні у °F), потім натисніть
кнопку [SET] для підтвердження і виходу з даного
режиму.
Примітка: Для даної метеостанції не
застосовується налаштування висоти над рівнем
моря; натисніть [SET], після чого загориться “0”.
8. ГІСТОГРАМА
АТМОСФЕРНОГО ТИСКУ
Гістограма атмосферного тиску показує
тенденцію зміни атмосферного тиску за останні
6 годин у вигляді стовпчиків, що розташовані
на горизонтальній вісі. Середина вертикальної
вісі показує поточний атмосферний тиск і зміну
кожного стовпчика відносно вертикальної осі.
Якщо висота стовпчиків збільшується, то це
означає, що погода покращиться із-за підвищення
атмосферного тиску. Якщо висота стовпчиків
зменшується, то це означає, що атмосферний тиск
падає і очікується погіршення погодних умов.
налаштуйте метеостанцію знову. Прогноз погоди
UKRAiniAn
– 6 – – 7 – – 8 –
укРАЇНсЬкА
UKRAiniAn
укРАЇНсЬкА
UKRAiniAn
укРАЇНсЬкА
Page 8

9. ВИСВІЧУВАННЯ НА
ДИСПЛЕЇ ПОКАЗНИКІВ ТИСКУ
І ТЕМПЕРАТУРИ У °C/°F
Натисніть кнопку [] для зміни одиниць виміру
температури та тиску:
- Температура у °F і тиск у міліметрах ртутного
стовпчика
- Температура у °C і тиск у мб/гПа
Характеристики цифрового барометра:
- Діапазон вимірювання тиску: від 800мб до
1100мб
Характеристики термометра:
- Діапазон вимірювання: від 0 °C до 50 °C (від 32
°F до 122 °F)
- Чутливість термометра: 0.1 °C/°F
10. ГОДИННИК
Коли годинник підключено до мережі, через
декілька секунд на дисплеї з’явиться час, місяць і
дата (наприклад “12 31” означає 31 грудня).
11. ВИБІР 12 АБО 24
ГОДИННОГО ФОРМАТУ ЧАСУ
Годинник за замовчуванням налаштований на
12 годинний формат часу і показує час пополудні
автоматично. Для того, щоб змінити 12/24 формат,
утримуйте кнопку [+] протягом 2 секунд, зліва на
дисплеї з’явиться напис “24H”.
Пересуньте перемикач [TIME ZONE] на необхідний
часовий пояс. Часова зона за замовчуванням –
західноєвропейський поясний час (WET ).
Дивіться табличку нижче:
WET західноєвропейський поясний час час за Гринвічем (GMT)
CET центральноєвропейський час час за Гринвічем (GMT)
EET східноєвропейський час час за Гринвічем (GMT)
MSK московський час час за Гринвічем (GMT)
+1 година
+2 години
+3 години
12. НАЛАШТУВАННЯ РЕЖИМУ
ПЕРЕХОДУ НА ЛІТНІЙ ЧАС DST
Годинник має функцію переходу на літній час
(DST), яка ввімкнена за замовчуванням - «ON». Для
того, щоб вимкнути цю функцію - «OFF», натисніть
кнопку [DST], на дисплеї з'явиться напис “dof”
(перехід на літній час вимкнено). Для того, щоб
ввімкнути функцію автоматичного переходу на
літній час, натисніть кнопку [DST] один раз, на
дисплеї з’явиться напис “don” (перехід на літній
час ввімкнено). Через декілька секунд на дисплеї
з'являться показники поточного часу.
Перехід на літній час: остання неділя березня
о 1 годині ночі
Перехід на зимній час: остання неділя жовтня
о 1 ночі
13. РІК
Для того, щоб продивитися поточний рік,
натисніть кнопку [-] один раз.
14. НАЛАШТУВАННЯ БУДИЛЬНИКА
Для того, щоб налаштувати будильник, натисніть
кнопку [ALARM SET] один раз, потім натисніть
кнопку [+] або [-] для того, щоб ввести години
(Упевніться у тому, що режим AM/PM встановлено
правильно). Натисніть кнопку [ALARM SET] ще
раз, а також натисніть кнопку [+] або [-] для того,
щоб ввести хвилини, показники часу з'являться на
дисплеї через декілька секунд.
15. БУДИЛЬНИК ТА
ФУНКЦІЯ SNOOZE
Пересуньте перемикач [ALARM ON/OFF] для
того, щоб на дисплеї з'явилася іконка з дзвоником.
Будильник буде дзвонити у встановлений час. Під
час дзвінка будильника, натисніть [SNOOZE] для
того, щоб поспати ще 10 хвилин (значок “Zz” буде
блимати). Функція snooze буде повторюватися до
чотирьох разів. Натисніть кнопку [ALARM SET]
для того, щоб зупинити дзвінок будильника і щоб
він знову задзвонив наступного дня. Для того,
щоб вимкнути будильник, пересуньте перемикач
[ALARM SET] у положення «ALARM OFF».
16. ВІДОБРАЖЕННЯ
НЕВІРНОГО ЧАСУ
Якщо з будь-якої причини годинник показує
невірний час або не показує його взагалі, натисніть
і утримуйте протягом 5-7 секунд кнопку [ALARM
SET], почнуть блимати показники року, потім
UKRAiniAn
натисніть кнопку [+] або [-] для введення року.
Натисніть кнопку [ALARM SET] знову, щоб ввести
місяць натисненням кнопки [+] або [-]. Знову
натисніть кнопку [ALARM SET] для того, щоб
ввести години і знову, щоб встановити хвилини
і ще раз, щоб запам'ятати результати.
– 9 –
укРАЇНсЬкА
17. ПРИ ПІДКЛЮЧЕННІ ДО МЕРЕЖІ
ЧАС НЕ ВІДОБРАЖУЄТЬСЯ
Якщо на дисплеї немає зображення, підклю-
чіть прилад до мережі, натисніть кнопку [RESET]
у правому нижньому куті відсіку для резервної батарейки. Дисплей ввімкнеться через декілька секунд і покаже 12:00 (при налаштованому західноєвропейському часовому поясі (WET). Потім повторіть процедуру налаштування поточного часу,
як це описано вище. Після того, як ви закінчили
процедуру налаштування часу, вставте батарейку
кнопкового типу для забезпечення RTRT (технології збереження точного часу), час буде автоматично збережено.
UKRAiniAn
укРАЇНсЬкА
UKRAiniAn
– 10 – – 11 – – 12 –
укРАЇНсЬкА
18. РЕЗЕРВНА БАТАРЕЙКА
(БАТАРЕЙКА ДО КОМПЛЕКТУ НЕ ВХОДИТЬ)
Вставте одну лужну батарейку у відсік, що
знаходиться на тильній стороні приладу.
Прийміть до уваги, що ця батарейка повинна
вставлятися тільки при тій умові, якщо прилад
відімкнений від мережі. Якщо відбуваються
перебої з електроенергією, резервна батарейка
буде автоматично підтримувати роботу годинника
і будильника, але показники з дисплею зникнуть.
Під час вимкнення живлення, будильник буде
дзвонити у встановлений час. Час роботи резервної
батарейки складає 12 годин. При відновленні
подачі живлення, зображення на дисплеї з'явиться
знову з правильними показниками часу.
19. ЗАМІНА БАТАРЕЙКИ
Батарейка кнопкового типу, що забезпечує
збереження точного часу за технологією RTRT,
буде працювати протягом 3 років. Для збереження
показників часу, ми рекомендуємо заміняти цю
батарейку кожні три роки. При заміні батарейки
UKRAiniAn
– 14 – – 15 –– 13 –
укРАЇНсЬкА
UKRAiniAn
прилад повинен бути підключений до мережі або
ж повинна бути вставлена резервна батарейка
(9В). Проте, якщо налаштування часу було
втрачено, будь ласка, дотримуйтеся процедури
налаштування часу, що описана вище.
Обережно: Існує небезпека вибуху батарейки,
якщо вона встановлена невірно. Замінюйте
батарейку тільки на батарейку еквівалентного або
такого ж типу.
укРАЇНсЬкА
20. ПОПЕРЕДЖЕННЯ
Для запобігання виникнення пожежі або
небезпеки поразки струмом:
- Не піддавайте даний прилад впливу дощу або
вологи
- Не занурюйте пристрій або його складові
у воду
- Якщо ви пошкодили даний прилад, не
намагайтеся самостійно відремонтувати пристрій.
Будь ласка, віднесіть даний прилад у ремонт
до спеціаліста або зверніться за допомогою до
сервісного центру.
UKRAiniAn
укРАЇНсЬкА
UKRAiniAn
- Не можна перешкоджати вентиляції,
не затуляйте вентиляційні отвори різними
предметами, такими як газети, скатертини, штори
і т.п.
укРАЇНсЬкА
Джерело живлення:
Основне джерело живлення: зовнішній
адаптер змінного 230В / постійного 9В струму
Резервне джерело живлення: лужна батарейка
(9В) (не входить до комплекту).
Резервне живлення для збереження точного
часу (RTRT): літієва батарейка CR2032 (3В) (входить
до комплекту)
ОБЕРЕЖНО
НЕБЕЗПЕКА УРАЖЕННЯ
ЕЛЕКТРИЧНИМ СТРУМОМ
НЕ ВІДКРИВАТИ
- Під корпусом пристрою знаходяться проводи
під небезпечною напругою: сила струму може
бути достатньою для травмування людини.
- В комплекті з пристроєм надається також
інструкція з експлуатації.
 Loading...