

Page 1
B
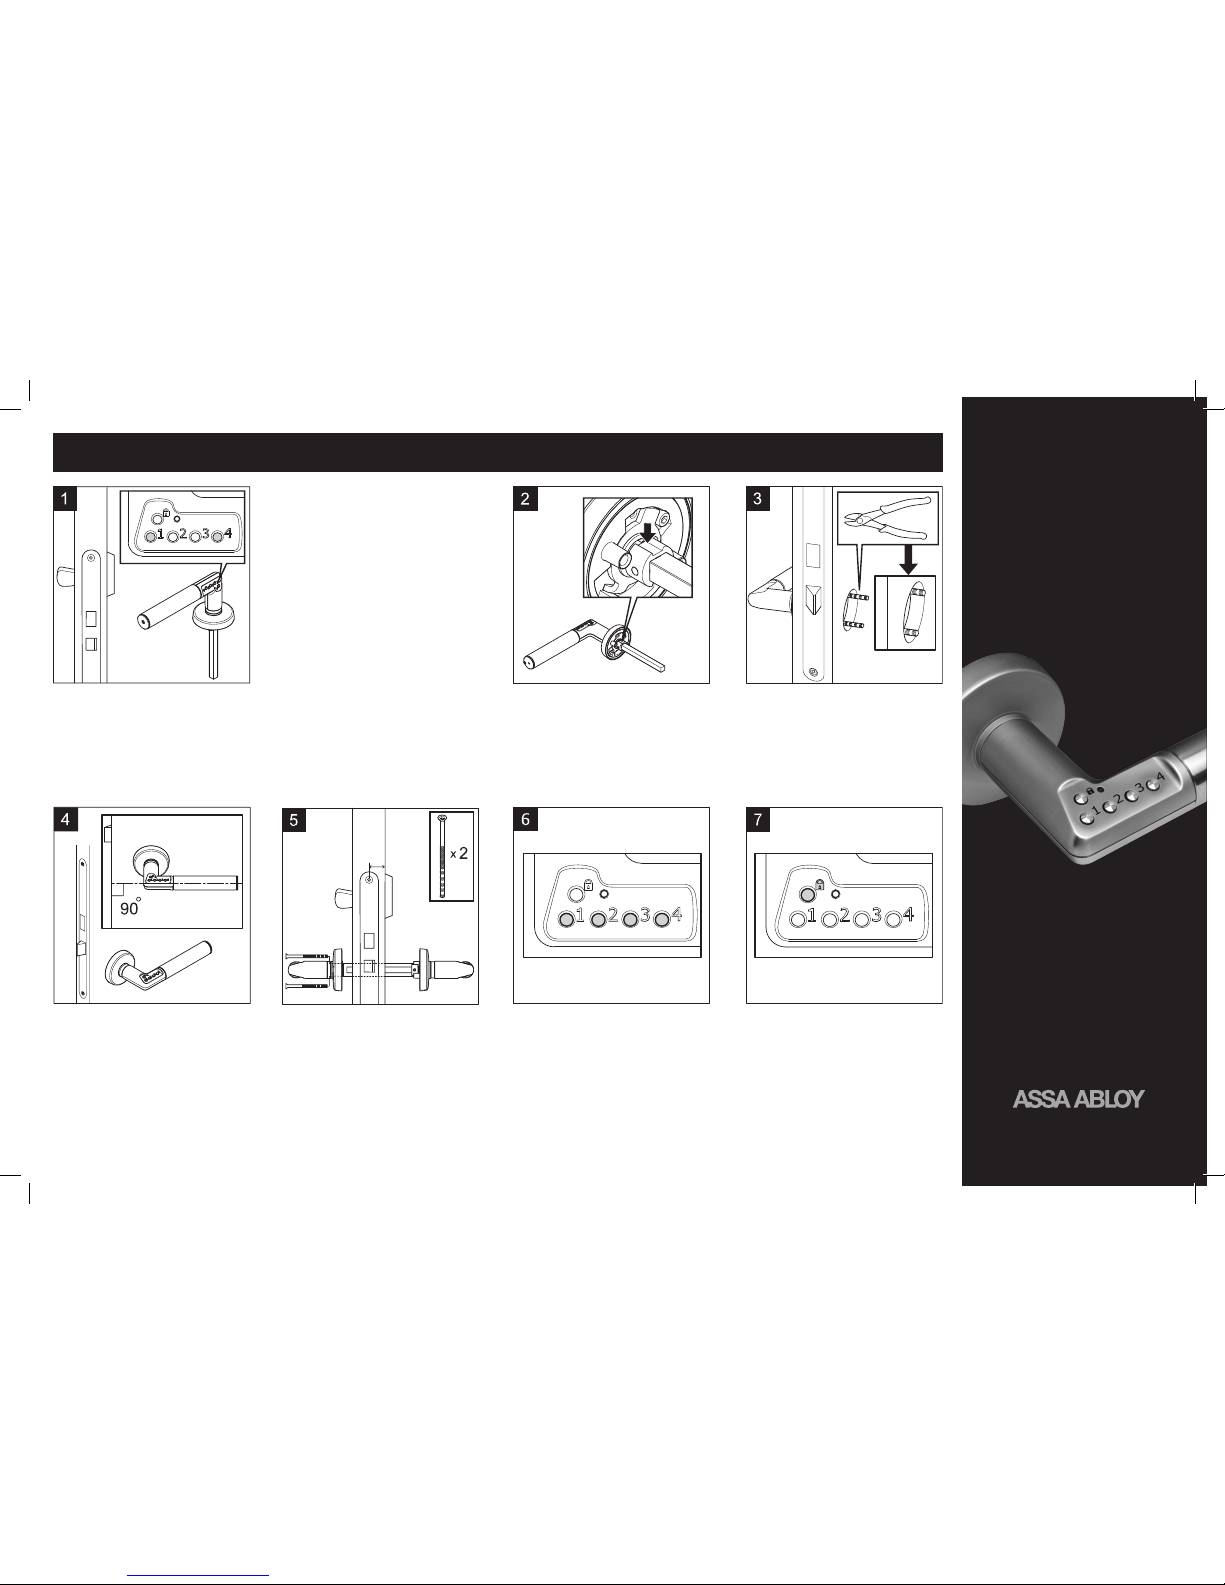
4. Fit the outside handle (with keypad) on
the door. Make sure to keep the handle
horizontal during when fixing.
5. Connect the inner- and outer handle
with the screws. Be sure to fit the handle
correctly, so that both handles rotate back
without any problems.
The handle fit door thickness of 35-80 mm
with a B-measurement (see image 5) of at
least 21 mm. For smaller B-measurement
down to 14 mm, use distance ring 8820.
6.
1. Add at least one user code, see instructions on the opposite side.
2. Unlock the handle by keying the correct
code using the keys 1-4.
If the wrong code is used the light will alter
between red and green. (The handle will
remain open when the correct code is used
provided that auto locking mode has not
been selected, see opposite side).
7. Lock the handle by pressing the padlock
key.
ASSA ABLOY
Code Handle
Fitting- and operating
instruction
ASSA ABLOY, the global leader
in door opening solutions.
Fitting instruction
Before fitting
Before fitting the handle to the door, it has
to be initiated with an administration code.
The handle has no administration code
when delivered.
1. Keep the handle horizontal with the
spindle pointing down.
2. Press button 1 and 4 at the same time.
The led will flash red.
3. Stop pressing the buttons. The green
light will stay on constantly.
4. Enter a 6 digit administration code. The
light will flash green rapidly. The administration code is valid.
To change administration code, repeat
the notes above. N.B. that all user codes
will disappear when you change administration code.
2. Turn the spindle so that the track will
point upwards, as shown on the picture.
Keep this position when fitting, according
to picture 4.
3. Place the inner handle on the door and
fit the enclosed screws through the door
blade. Cut the screws in the nearest waist
on the screw, max 6 mm outside the doorblade. A 22 mm (minimum) hole through
the door is needed to accommodate for the
cam around the spindle.
B
Master CHD manual_M 2198.1012_KT810E.indd 1 2010-12-13 10.59
Page 2
Operating instruction
Batteries
ASSA ABLOY Code Handle is supplied with
2 pcs CR2 batteries installed. The lifetime of
the batteries should be at least a couple of
years depending on number of operation
and the effect in the batteries. If the light
signals red when pushing down a key it is
time to change batteries. The handle will
remember all codes during the change.
It is important to choose batteries of good
quality when changing. Use CR2 batteries of
well known brand.
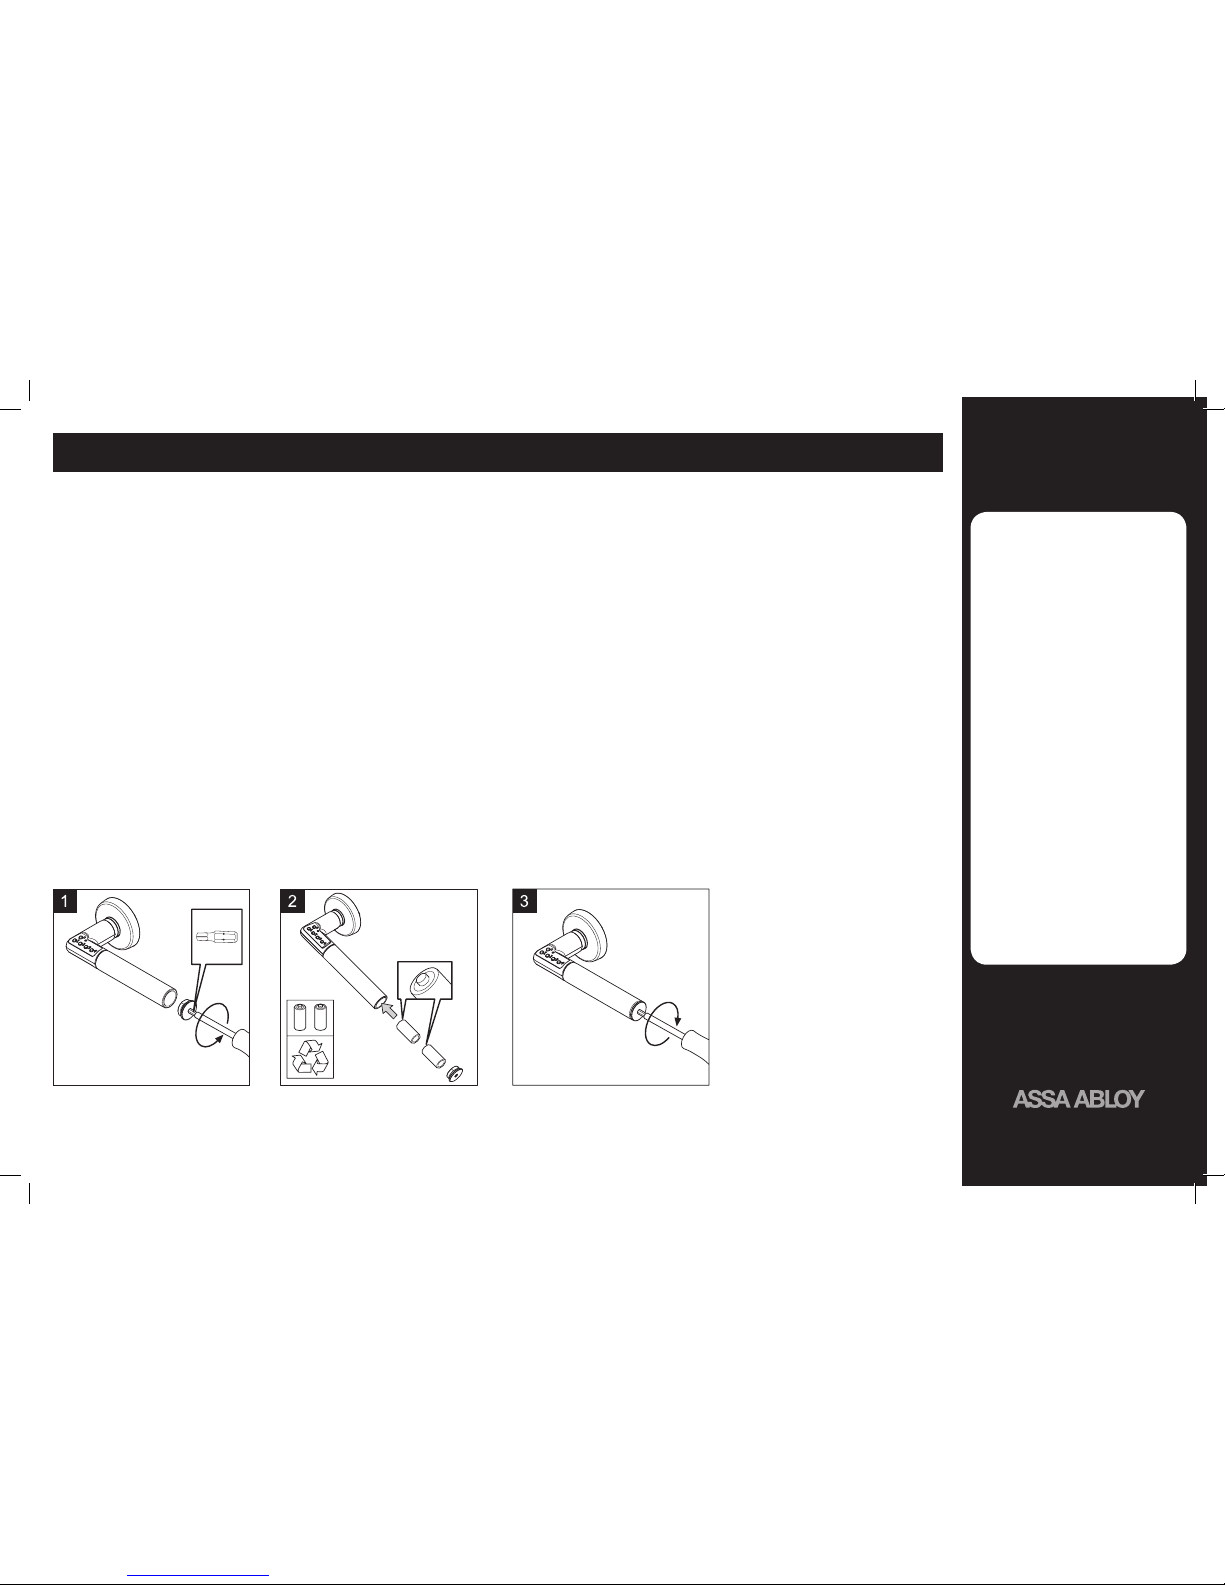
When changing batteries follow the instruction on image 1-3 and follow necessary
safety precautions:
• Install the batteries correctly, see image 2.
Be aware of the polarity
• Do not mix used and new batteries. Do
not mix different brands.
• Change both batteries at the same time
• Do not incinerate batteries.
• Properly dispose of used batteries
• Do not leave them within the reach of
children.
M 2198.1012 KT810E
DOCUMENT THE CODES
Store safety
Administration code:
Code ______________________
User codes:
Code 1 _____________________
Code 2 _____________________
Code 3 _____________________
Code 4 _____________________
Code 5 _____________________
Code 6 _____________________
Code 7 _____________________
Code 8 _____________________
Code 9 _____________________
Security
If a wrong code is entered five times the
handle is locked-out for 3 minutes and the
light will flash red every five seconds. To pass
the lock-out, enter the correct code twice
and then once more to gain access.
User codes
ASSA ABLOY Code Handle has room for 9
different user codes which can be programmed by use of the selected administrator
code.
Add or change a code in the memory:
1. Press the padlock key until a red, steady
light appears.
2. Enter the administration code within 5
sec. The light shines green.
3. To store the code in one of the 9 memory
positions use key number 1 and press
the number of times corresponding to
selected memory position; one press for
memory position 1 and two presses for
memory position 2 etc.
4. Wait until a green, steady light appears.
5. Enter the new user code, consisting of 4,
5 or 6 digits.
6. Press the padlock key to confirm or wait
until the green light is turned off.
7. More user codes can be storaged on the
remaining memory positions. Follow the
instructions above and store according
to point 3.
Delete a code from memory:
1. Press the padlock key until a red, steady
light appears.
2. Enter the administration code within 5
sec. The light shines green.
3. Select which one of the 9 memory
positions to be deleted by pressing key
number 1 the required number of times;
one time for memory position 1 and two
times for memory position 2 etc.
4. Wait until a green, steady light appears.
5. Delete by pressing the pad lock key. The
light shines red and the selected memory
place is now deleted.
6. To delete more memory positions repeat
the instruction above and indicate corresponding memory position by following
instructions in point no 3.
Sound signal
The handle is delivered with the sound
signal on and can be turned off/on as
follows:
1. Press the padlock key until a red, steady
light appears.
2. Enter the administration code within 5
sek. The light shines green.
3. Press one time on key number 2 to turn
off/turn on the sound. A weak signal
indicates that the sound is off and a
strong double signal indicates that the
sound is on.
4. Press the padlock key to confirm or wait
until the green light is turned off
Automatic locking
The handle is delivered in manual mode.
Automatic locking within 9 sec after correct
code is keyed can be selected provided that
the handle is back in horizontal position
within this time.
To change mode follow the instructions
below:
1. Press the padlock key until a red, steady
light appears.
2. Enter the administration code within 5
sec. The light shines green.
3. Press one time on key number 3 to
change the mode to/from automatic
locking.
4. Press the pad-lock key to confirm the
change or wait until the green light stops.
Temporary leave open function when in
automatic locking mode
Key the correct user code and directly after
the light stops flashing, press button 1 and
4 at the same time. The door is now left
unlocked until the next time either the lock
button or the user code is keyed, where after
it goes back into automatic locking mode.
Memory reset
The handle can be reset back to factory
settings by changing the administrator
code. (Read before fitting, opposite side)
The handle is supplied as:
• No user code set
• Sound signal on
• Auto-lock off
1. Unscrew the battery cover with the
enclosed security bits.
2. Press the handle down and let the two
batteries fall out.
Fit two new batteries. Be sure to fit them in
correct position.
3. Replace the battery cover.
ASSA ABLOY, the global leader
in door opening solutions.
Master CHD manual_M 2198.1012_KT810E.indd 2 2010-12-13 10.59
 Loading...