

Page 1
Page 2

Table of Contents
Chapter 1 Introduction ....................................................................................................................... 1
1.1 Package Contents ............................................................................................................... 1
1.2 Installation Instructions ..................................................................................................... 2
Chapter 2 Specifications.................................................................................................................... 7
2.1 Monitor specifications ........................................................................................................ 7
2.2 Preset Display Modes ......................................................................................................... 8
Chapter 3 Monitor Overview ........................................................................................................... 10
Chapter 4 Adjusting the Viewing Angle ....................................................................................... 14
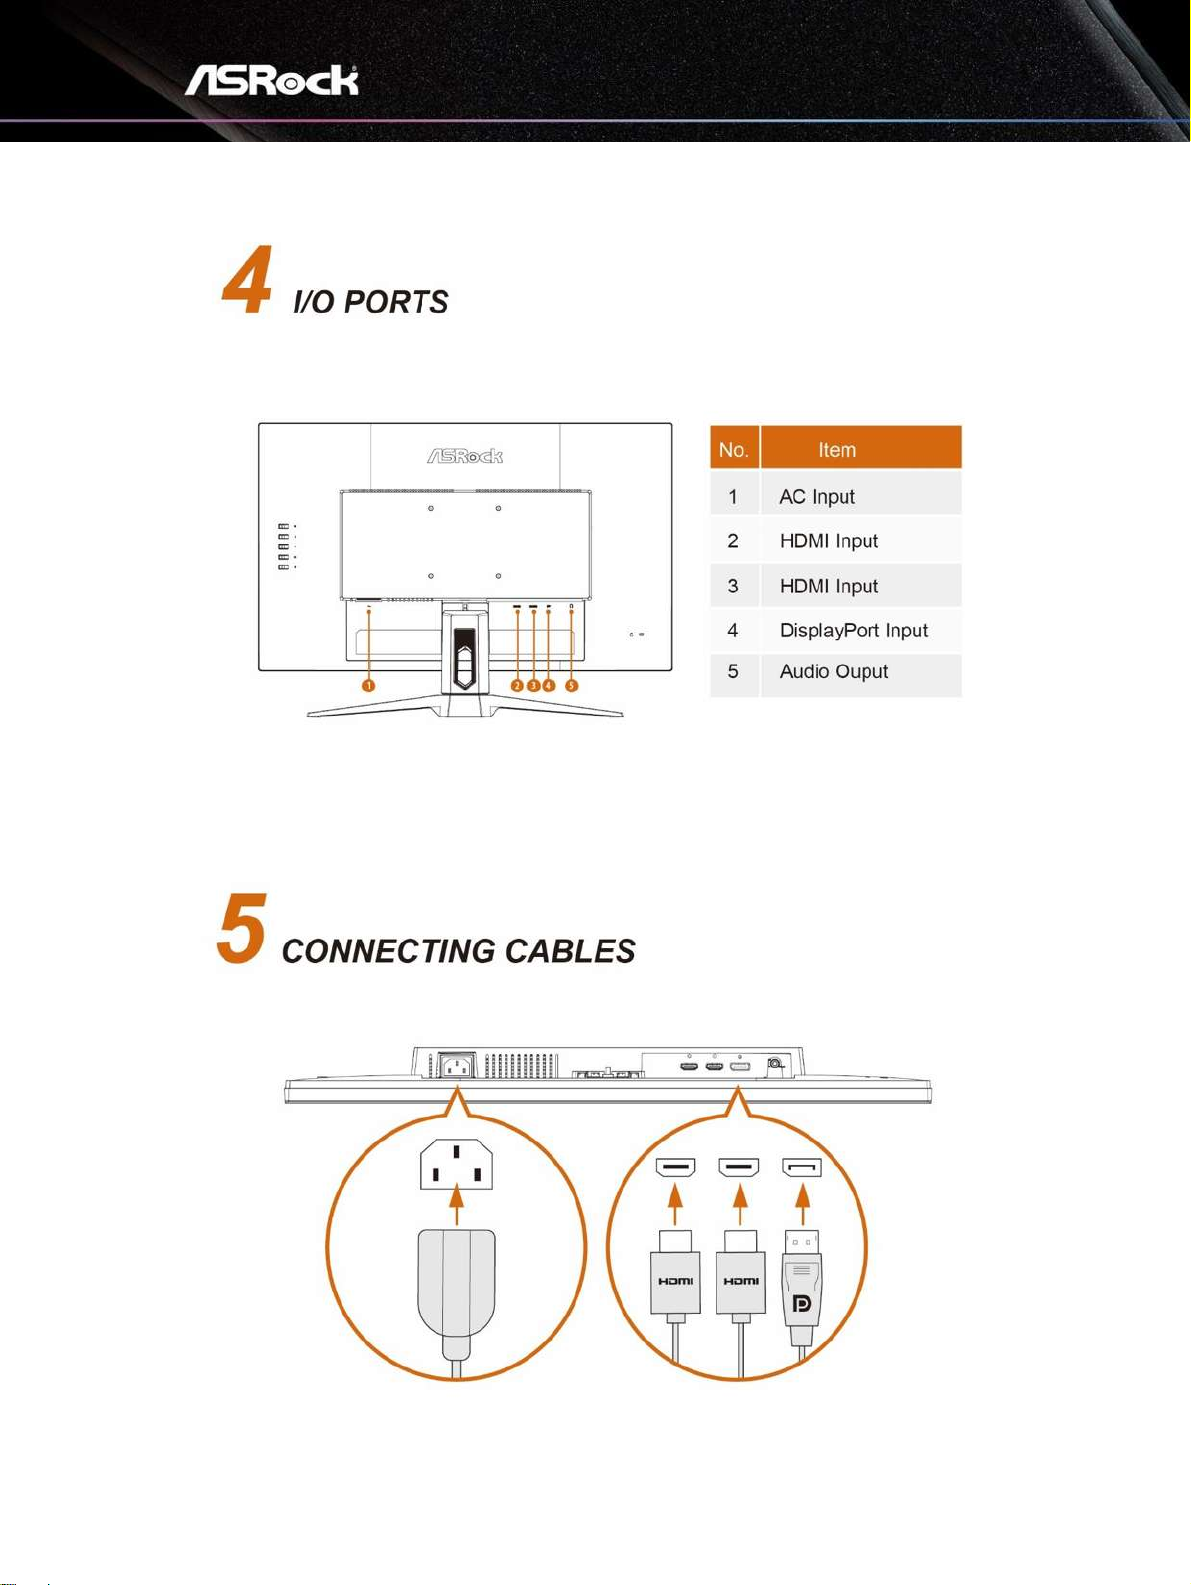
Chapter 5 Connecting the Monitor ................................................................................................ 15
Chapter 6 OSD Setup ........................................................................................................................ 16
6.1 OSD Keys ............................................................................................................................. 16
6.2 OSD Menus (The descriptions for function control) ................................................. 17
Chapter 7 Troubleshooting ............................................................................................................. 23
Chapter 8 Safety Instructions ......................................................................................................... 24
Page 3

1
Chapter 1 Introduction
Thank you for purchasing PG27FF1A, a reliable monitor produced under ASRock’s
consistently stringent quality control. It delivers excellent performance with robust design
conforming to ASRock’s commitment to quality and endurance.
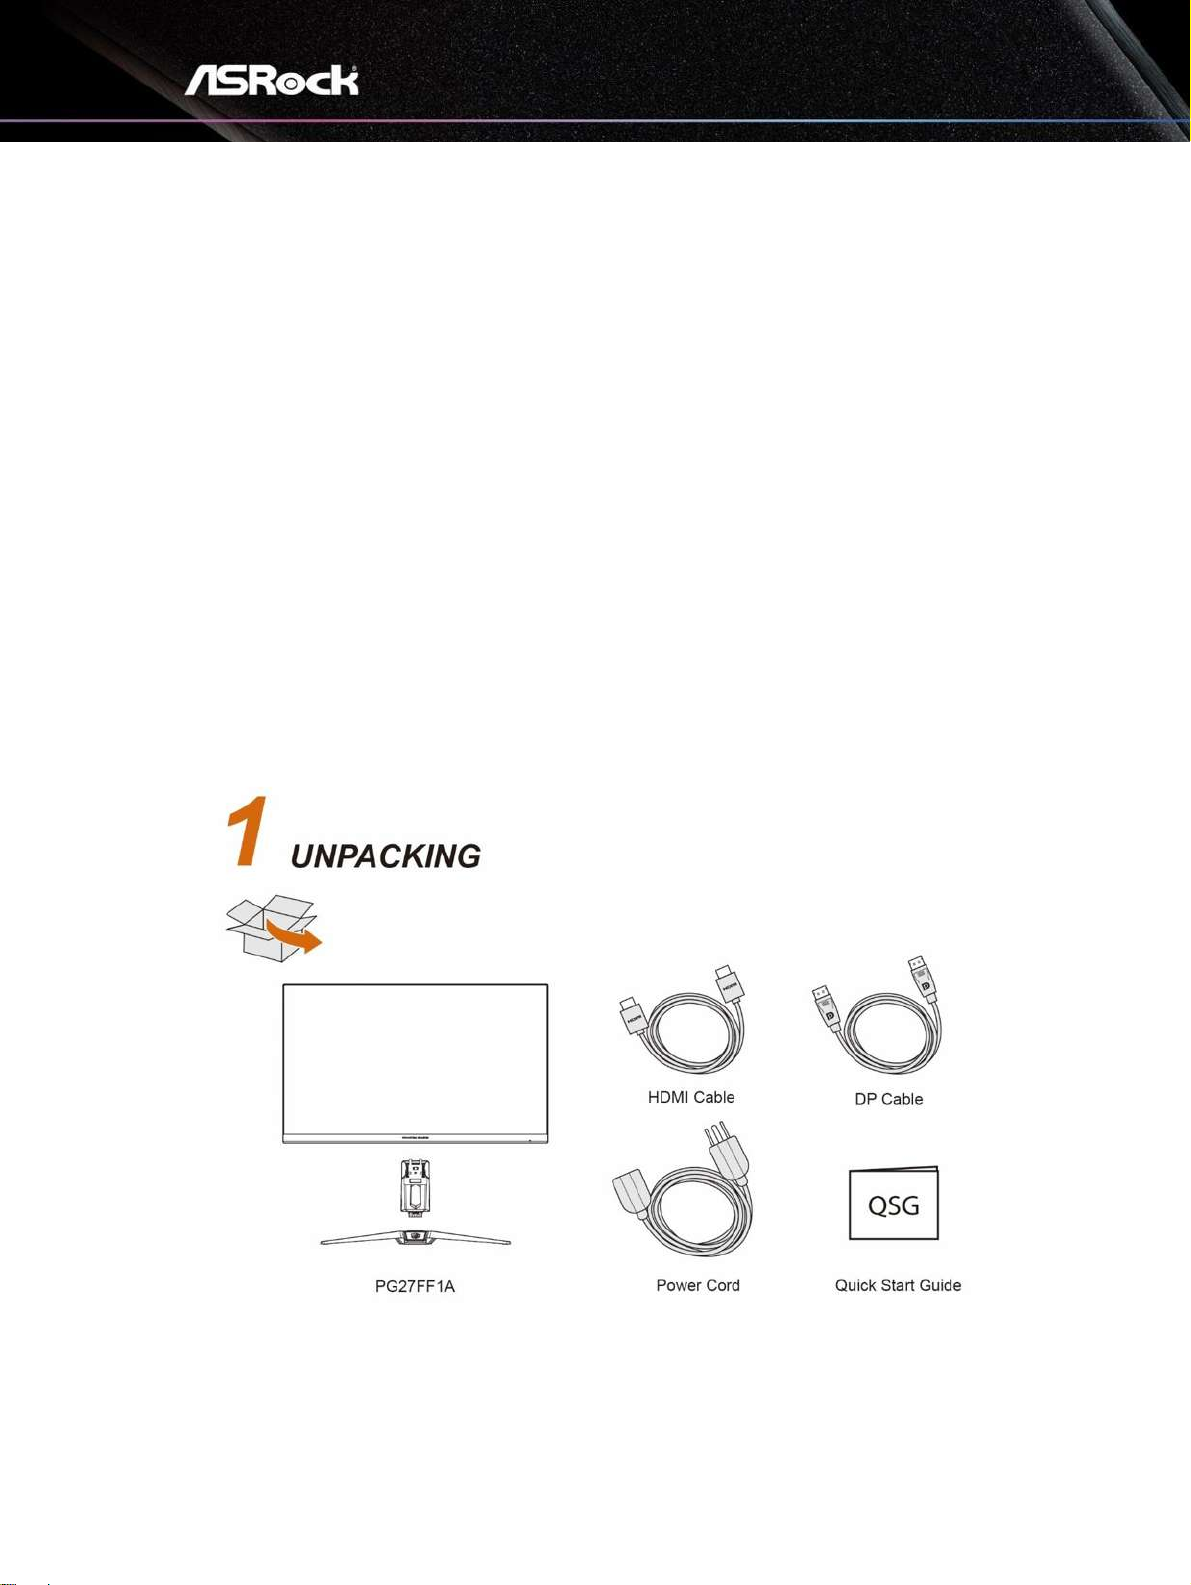
1.1 Package Contents
• ASRock PG27FF1A Monitor Head
• ASRock PG27FF1A Stand
• ASRock PG27FF1A Quick Start Guide
• DisplayPort Cable (DisplayPort to DisplayPort)
• HDMI Cable
• Power Cord
⚠
Important
Contact your place of purchase or local distributor if any of the items is damaged or
missing.
Package contents may vary by country.
The included power cord is exclusively for this monitor and should not be used with other
products.
Page 4
2
1.2 Installation Instructions
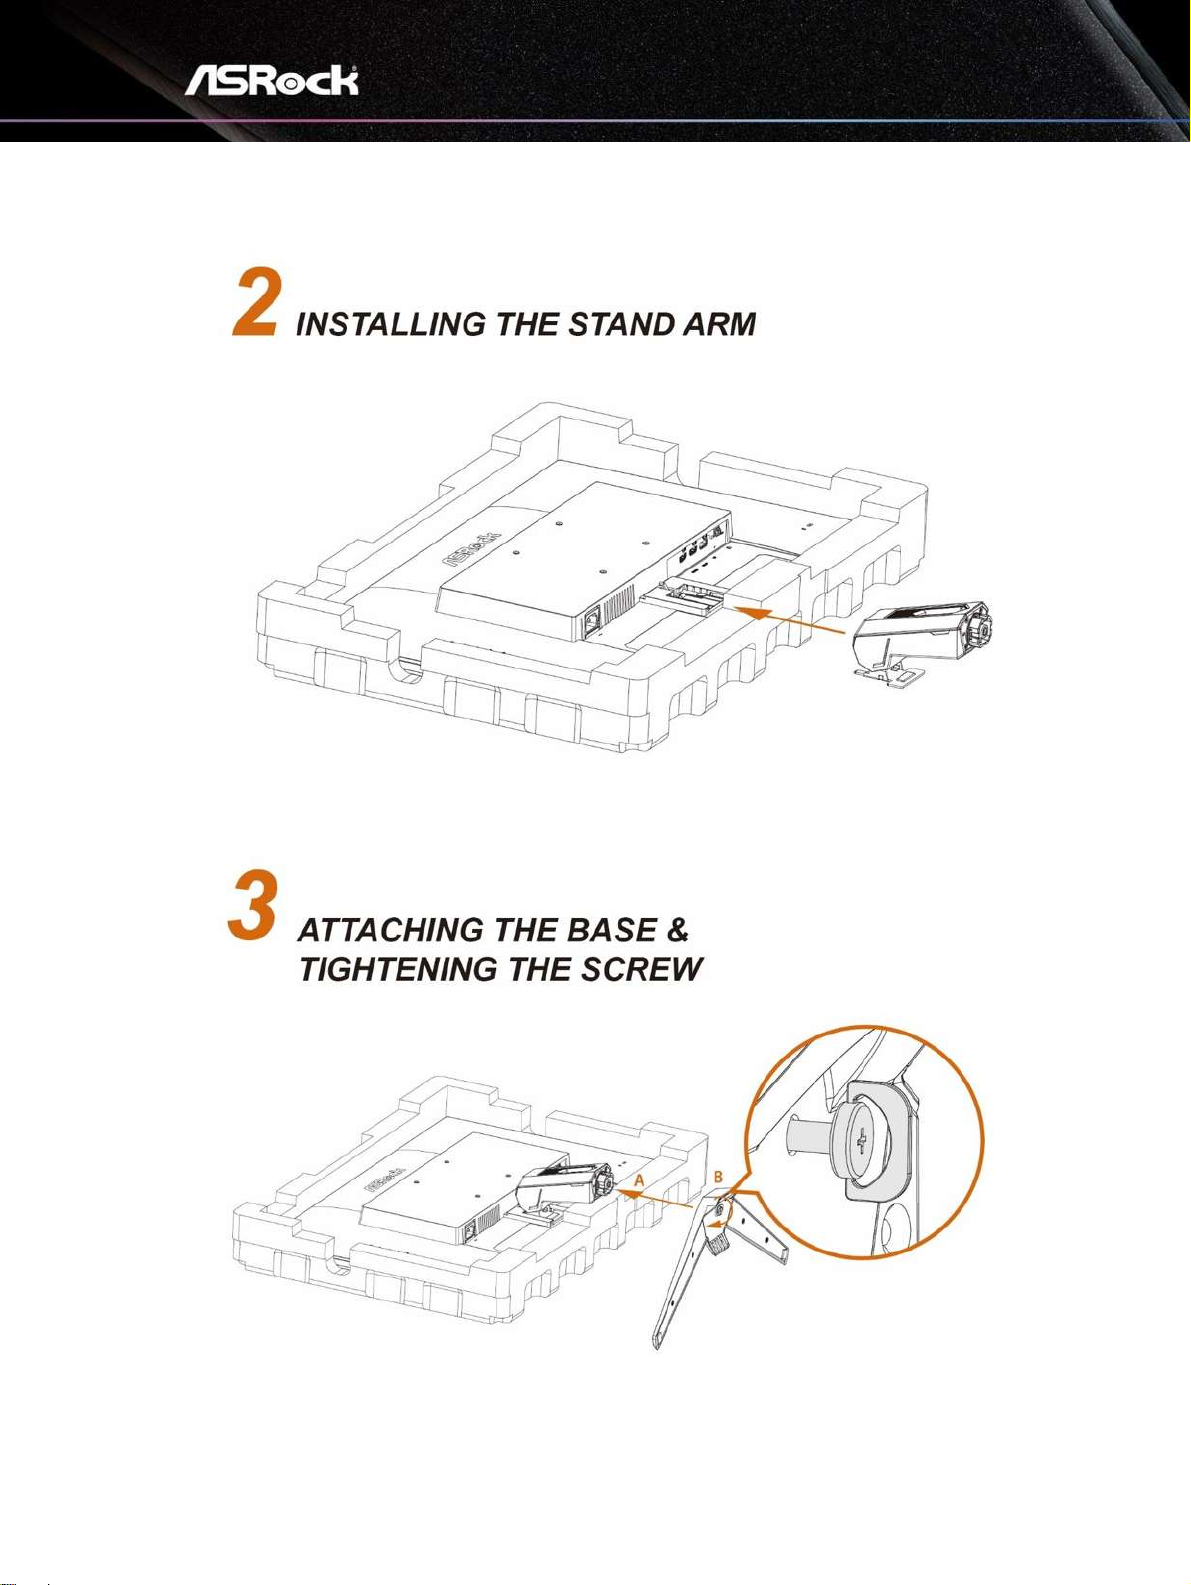
Leave the monitor in its protective foam packaging. Align the latches of the stand to the
monitor. Tighten the stand with screws.
Connect the stand base to the stand and tighten the screw to secure the stand base.
Align the latches to place the stand cover.
Adjust the angle of the stand, make sure the stand assembly is properly installed before
setting the monitor upright.
⚠
Important
Remove the screws on the monitor groove if needed before installing the stand.
Place the monitor on a soft, protected surface to avoid scratching the display panel.
Do not use any sharp objects on the panel.
The groove for installing the stand bracket can also be used for wall mount. Please contact
your dealer for proper wall mount kit.
Page 5
3
Page 6
4
Page 7
5
Page 8
6
Page 9
7
Chapter 2 Specifications
2.1 Monitor specifications
Monitor
ASRock PG27FF1A
Size
27 inch
Curvature
Flat
Panel Type
IPS
Resolution
1920 x 1080
Digital Signal Frequency
HDMI:
30KHz~183KHz (H); 48Hz~165Hz (V)
DisplayPort:
30KHz~183KHz (H); 48Hz~165Hz (V)
Aspect Ratio
16:9
Brightness (nits)
250(Typ.)
Contrast Ratio
1100:1(Typ.)
Refresh Rate
165Hz(Max.)
Response Time
1ms(MPRT), 6ms(GTG)
I/O Ports
1*DisplayPort™ 1.2
2*HDMI™ 2.0
1*Earphone Jack (3.5 mm)
View Angles
178°(H) , 178°(V)
Color Space
94% DCI-P3 / sRGB 123%
Surface Treatment
Anti-Glare
Display Colors
16.7M
Monitor Power Options
100~240Vac, 50/60Hz, 1.5A
Power Consumption
Power On(Max) ≦ 42W;
Power Saving: ≦0.5W;
Power Off: ≦0.3W
Adjustment (Tilt)
-5° ~ 23°
Adjustment (Swivel)
-20° ~ 20°
VESA Mounting
• Plate Type: 100 x 100mm
• Screw Type: M4 x 10 mm
Dimension (W x H x D)
Dimension with Stand:
612.42*434.83*192.61mm
Dimension without stand:
612.42*367.03*47.20mm
Page 10
8
Weight
4.48 Kg (With Stand)
3.75 Kg (Without Stand)
Environment
Operating
• Temperature: 0℃ to 40℃
• Humidity: 10% to 85%, non-condensing
• Altitude: 0 ~ 3658m
Storage
• Temperature: -20℃ to 60℃
• Humidity: 5% to 80%, non-condensing
• Altitude : 0~12192m
Page 11
9
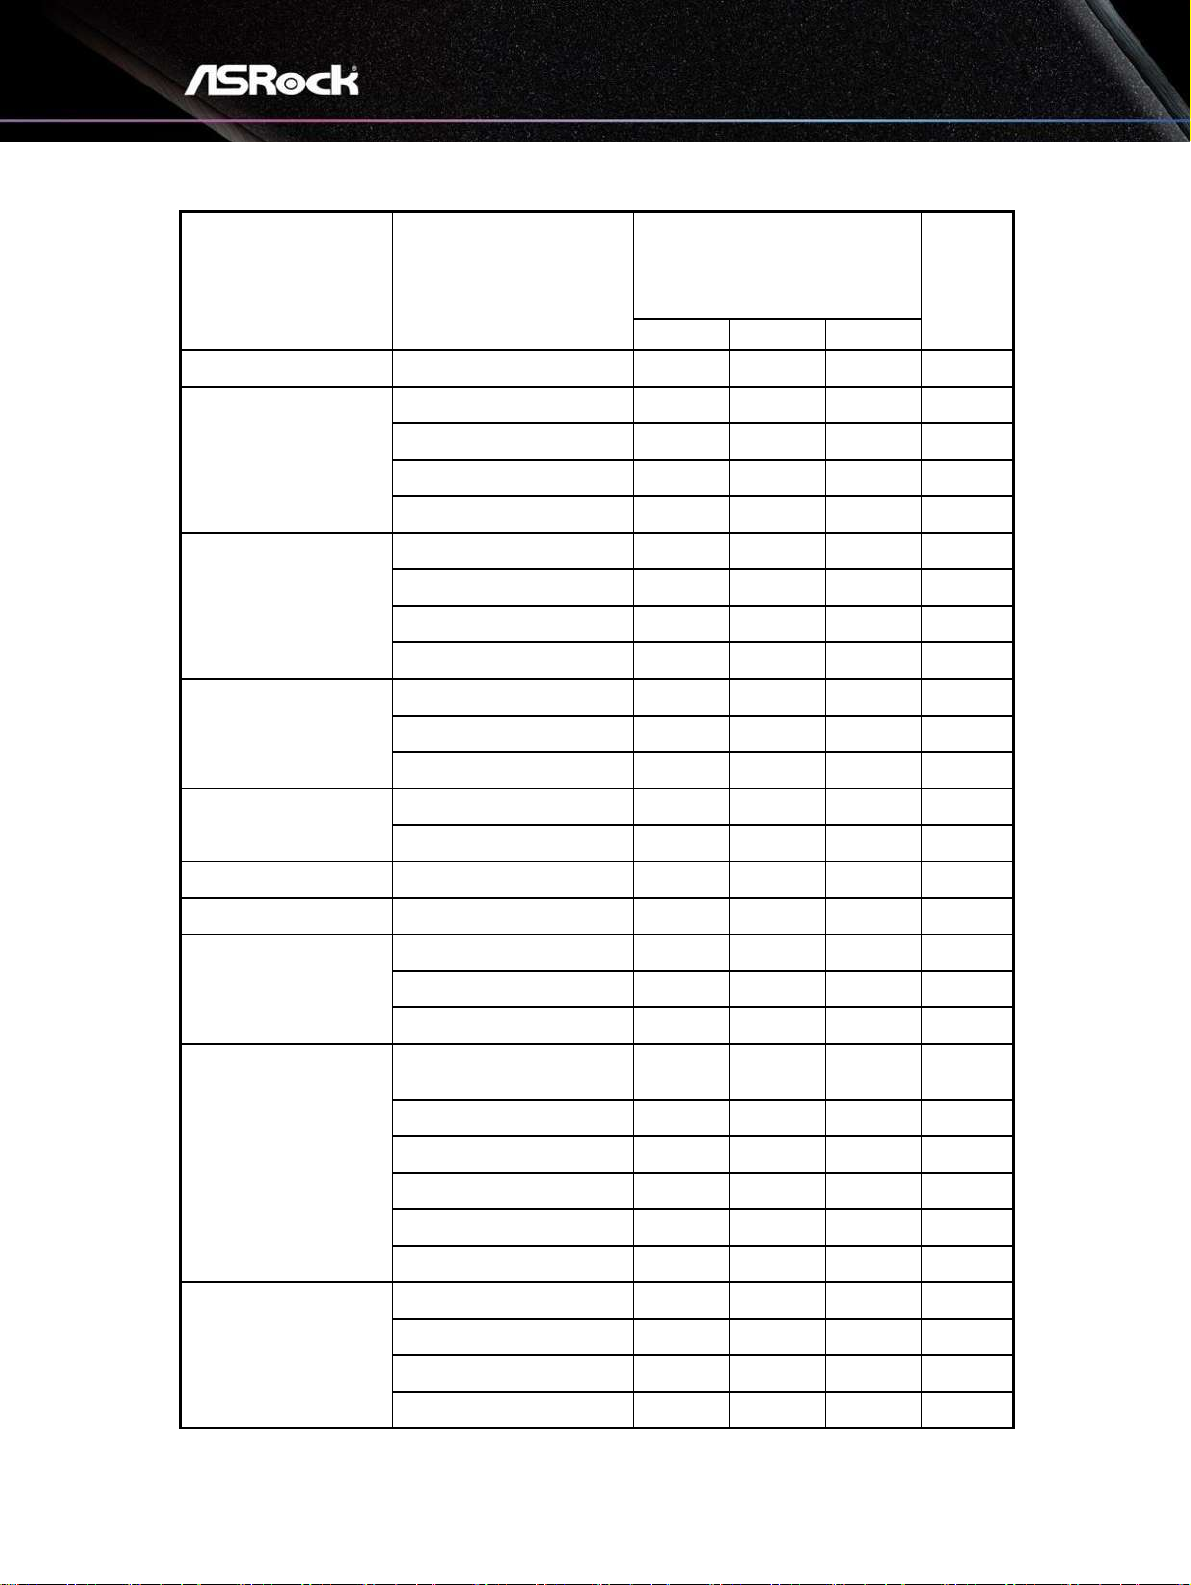
2.2 Preset Display Modes
Standard
Resolution
PG27FF1A
Remark
HDMI
DP
HDR
IBM MODE DOS
720x400 @70Hz
V V
VGA
640x480 @60Hz
V V
640x480 @67Hz
V V
640x480 @72Hz
V V
640x480 @75Hz
V V
SVGA
800x600 @56Hz
V V
800x600 @60Hz
V V
800x600 @72Hz
V V
800x600 @75Hz
V V
XGA
1024x768 @60Hz
V V
1024x768 @70Hz
V V
1024x768 @75Hz
V V
SXGA
1280x1024 @60Hz
V V
1280x1024 @75Hz
V V
WXGA+
1440x900 @60Hz
V V
WSXGA+
1680x1050 @60Hz
V V
----
1152x864 @75Hz
V V
1280x960 @60Hz
V V
1280x720 @60Hz
V V
Full HD
1920x1080 @60Hz
V V V
DTD
(Default)
1920x1080 @100Hz
DTD
1920x1080 @120Hz
V V V
DTD
1920x1080 @144Hz
V V V
DTD
1920x1080 @165Hz
V V V
DTD
1920x1080 @240Hz
QHD
2560x1440 @60Hz
2560x1440 @120Hz
2560x1440 @144Hz
2560x1440 @165Hz
Page 12
10
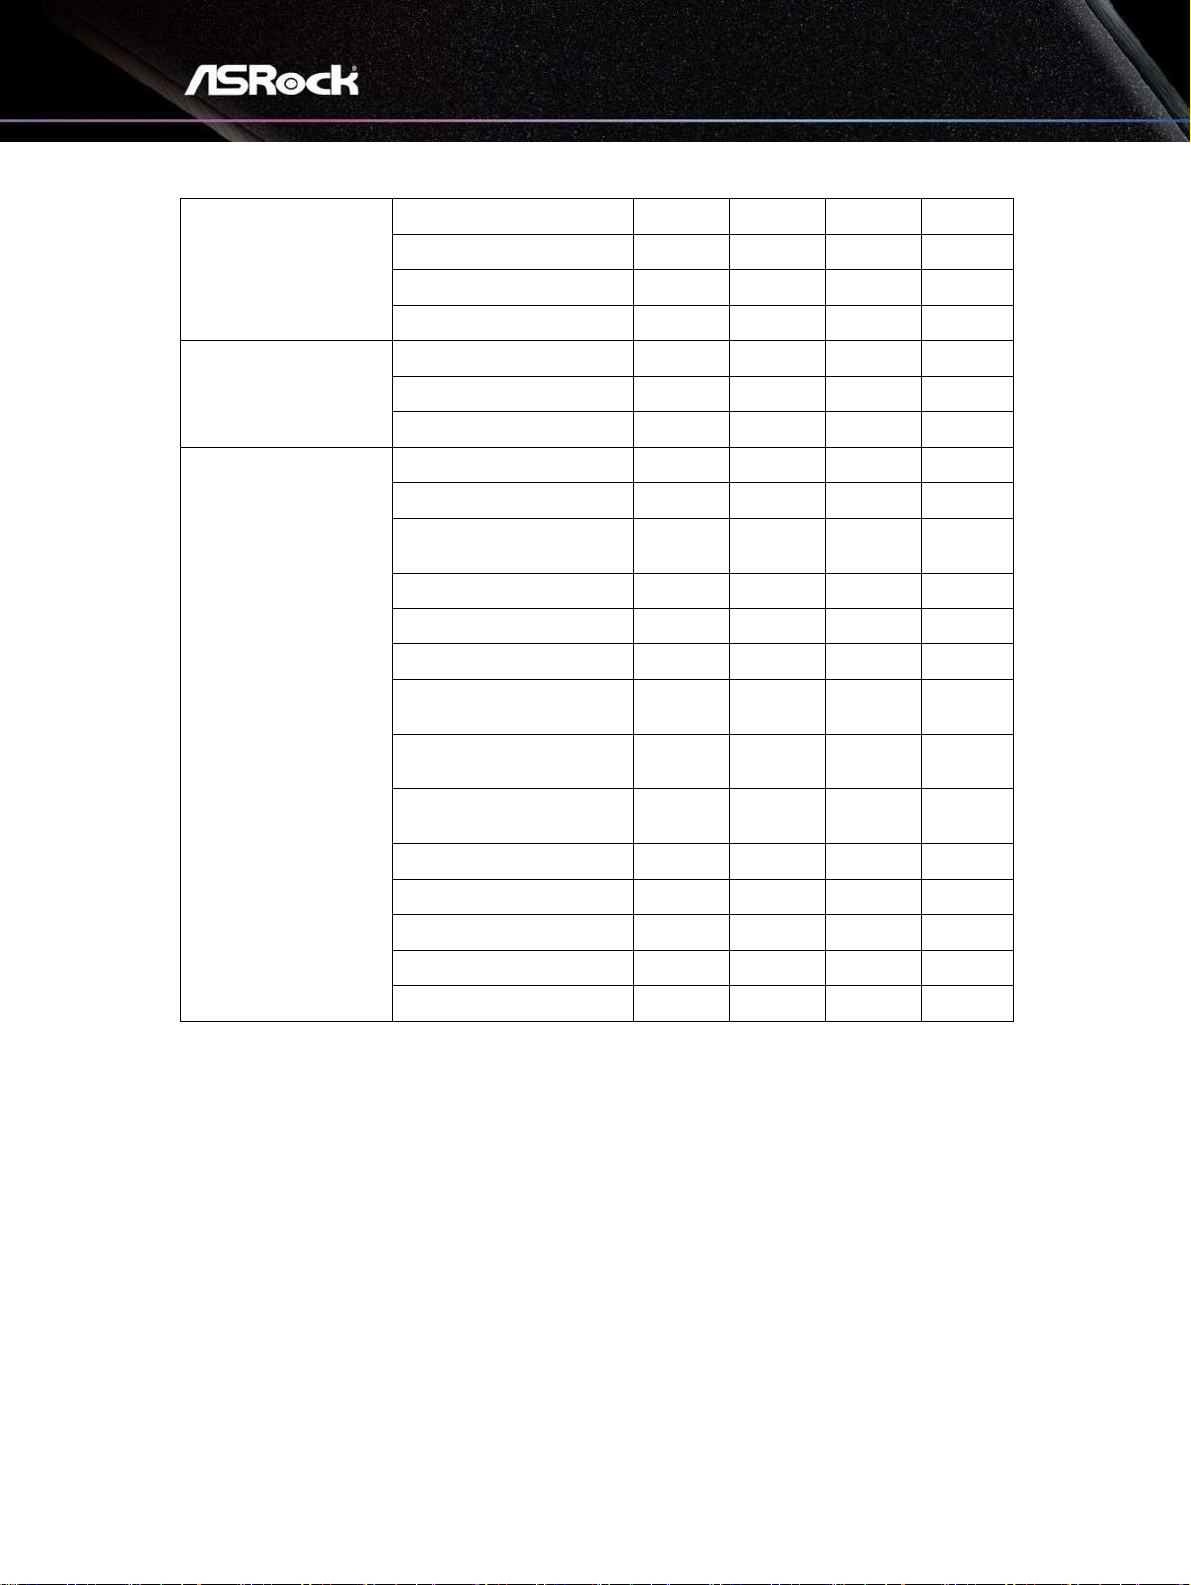
WQHD
3440x1440 @60Hz
3440x1440 @120Hz
3440x1440 @144Hz
3440x1440 @165Hz
UHD
3840x2160 @60Hz
3840x2160 @120Hz
3840x2160 @144Hz
Video Timing
Resolution
640x480P 59.94/60Hz 4:3
V V
720x480P 59.94/60Hz 4:3
720x480P 59.94/60Hz
16:9
V V
720x576P 50Hz 4:3
720x576P 50Hz 16:9
V V
1280x720P 50Hz 16:9
V V
1280x720P 59.94/60Hz
16:9
V V
1920x1080P 59.94/60Hz
16:9
V V V
1920x1080P
119.88/120Hz 16:9/1:1
V V V
2160P @25Hz
2160P @30Hz
2160P @50Hz
2160P @60Hz
2160p @120Hz
Page 13
11
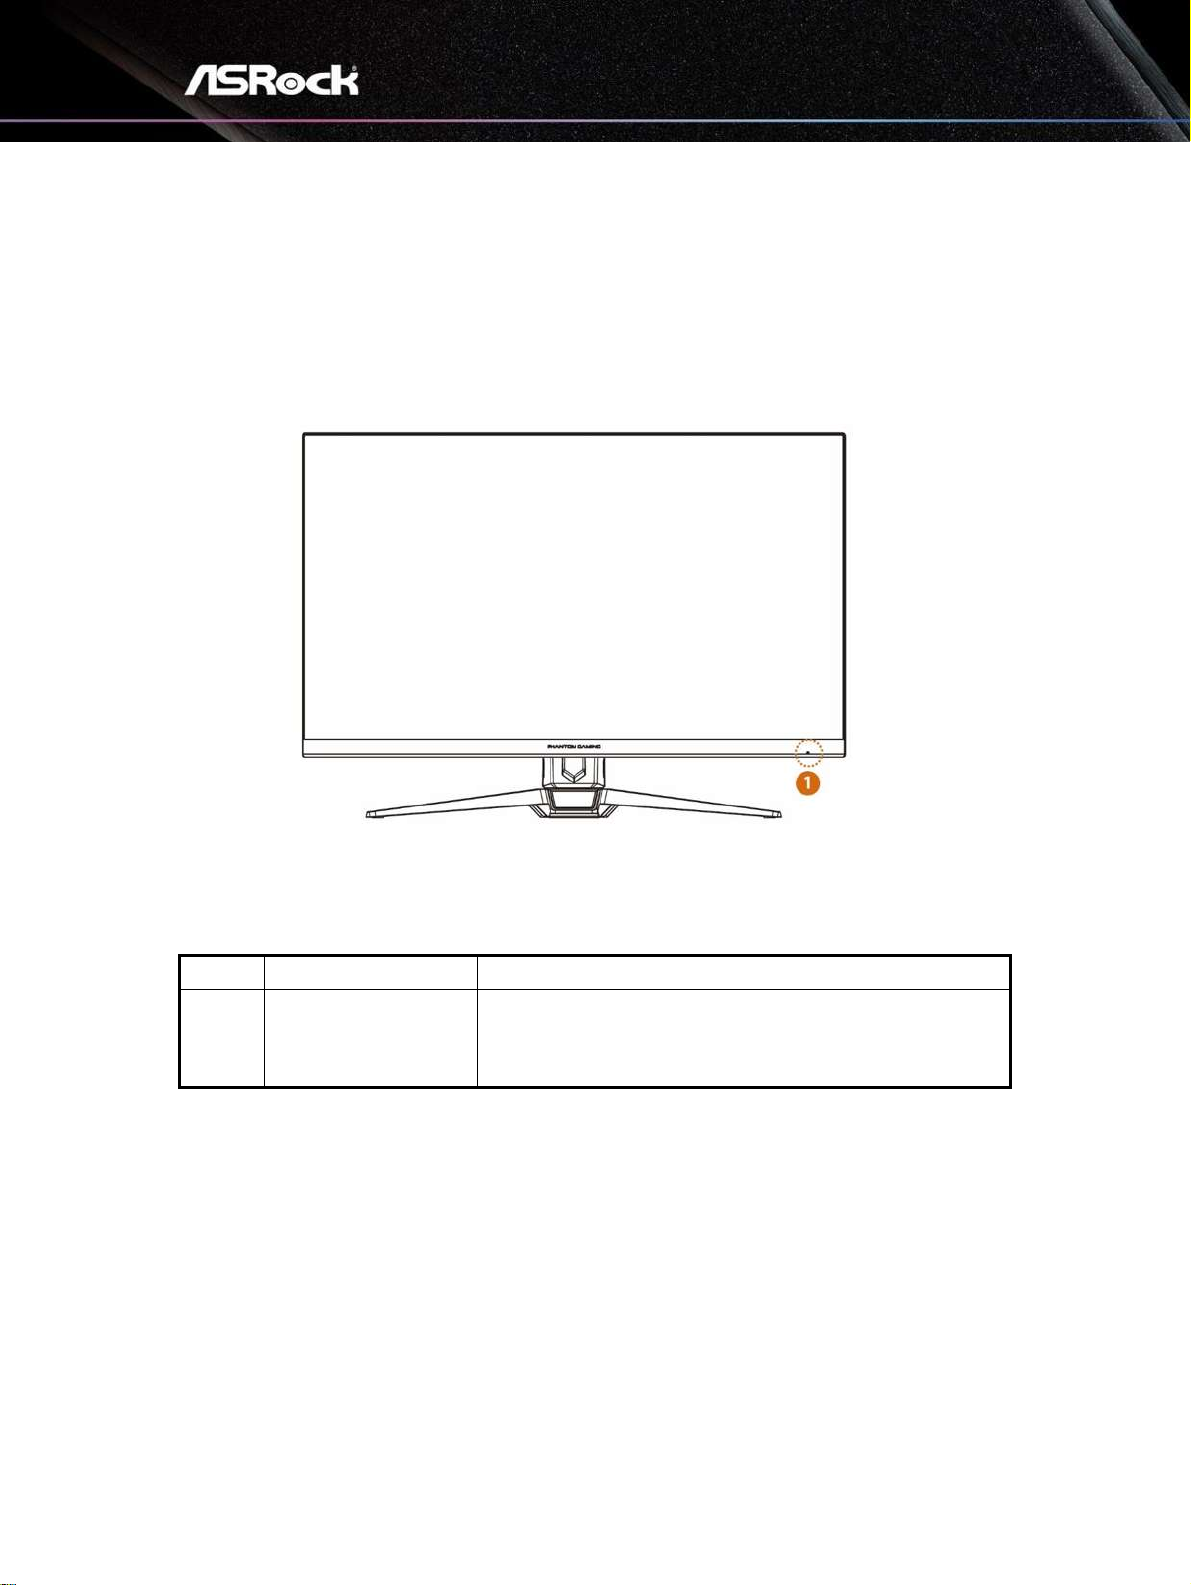
Chapter 3 Monitor Overview
Front view
No.
Item
LED Indication
1
Power Indicator
• Blue - Power on mode
• Orange - Standby mode
• LED Off - Off mode
Page 14
12
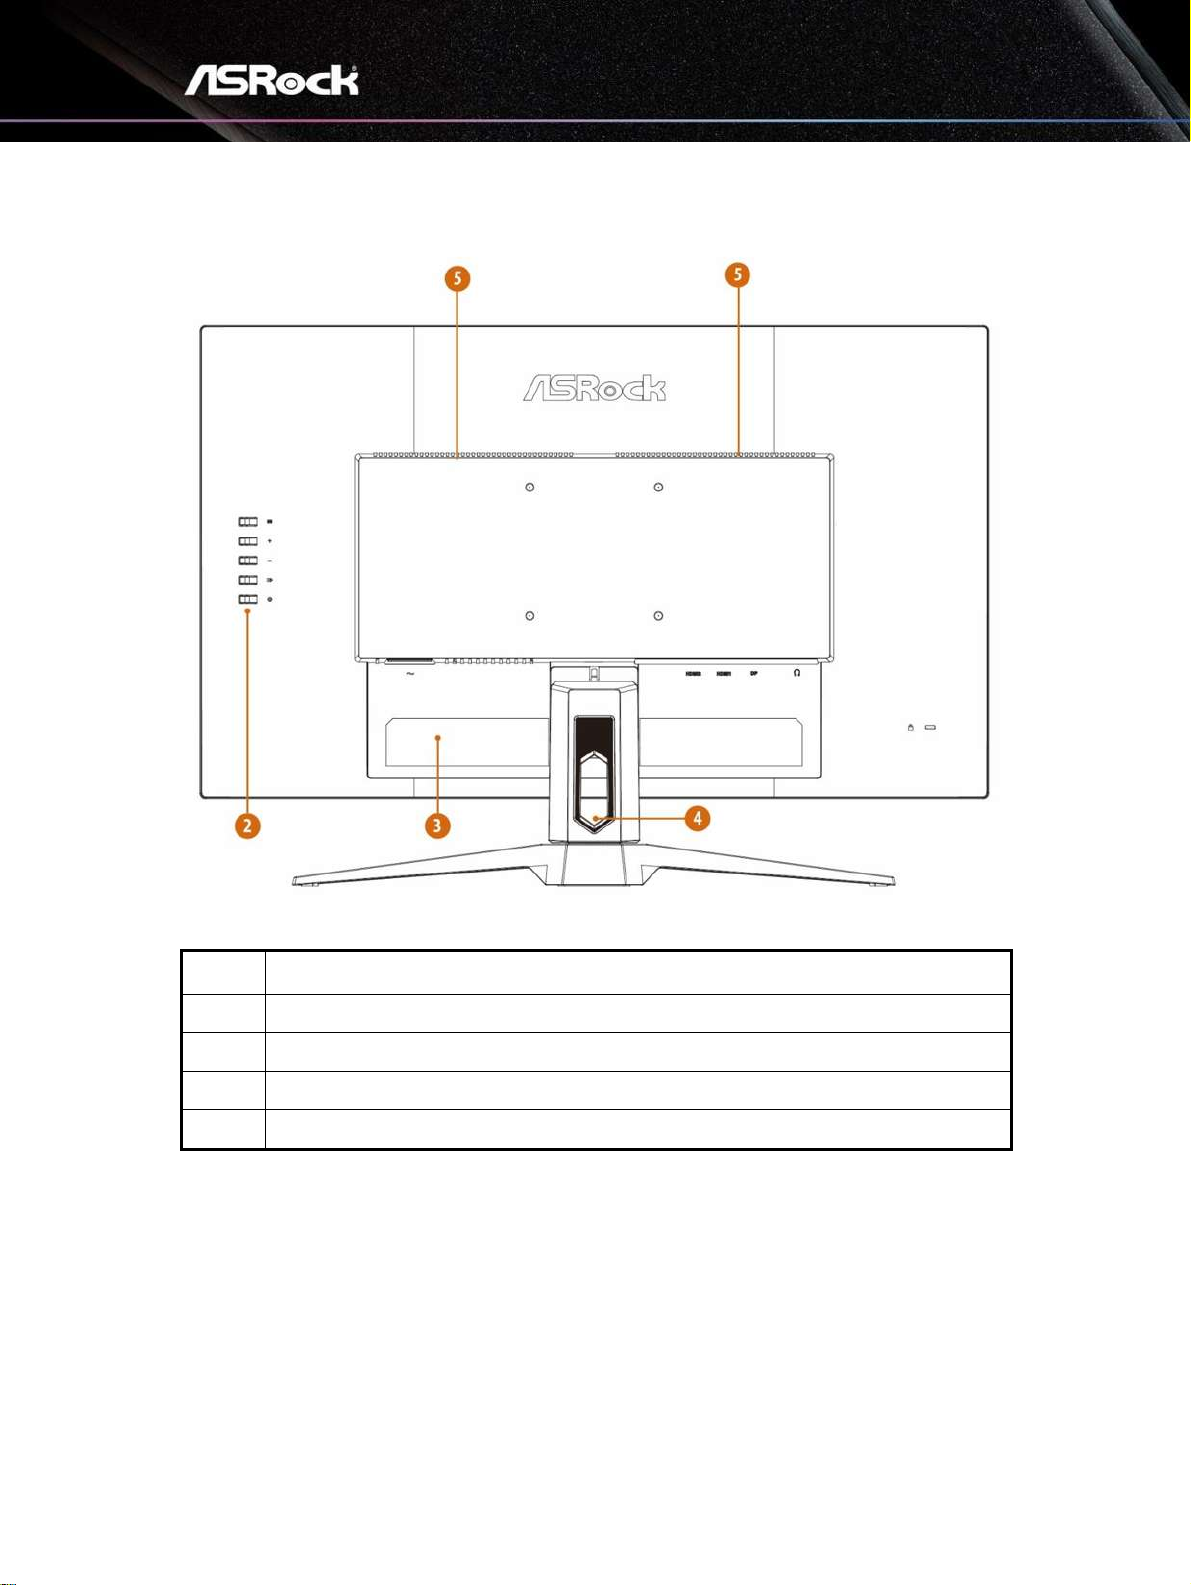
Back side
No.
Description
2
Power and OSD Keys
3
Serial Label
4
Cable Management Slot
5
Built-in Speakers (2x2W)
Page 15
13
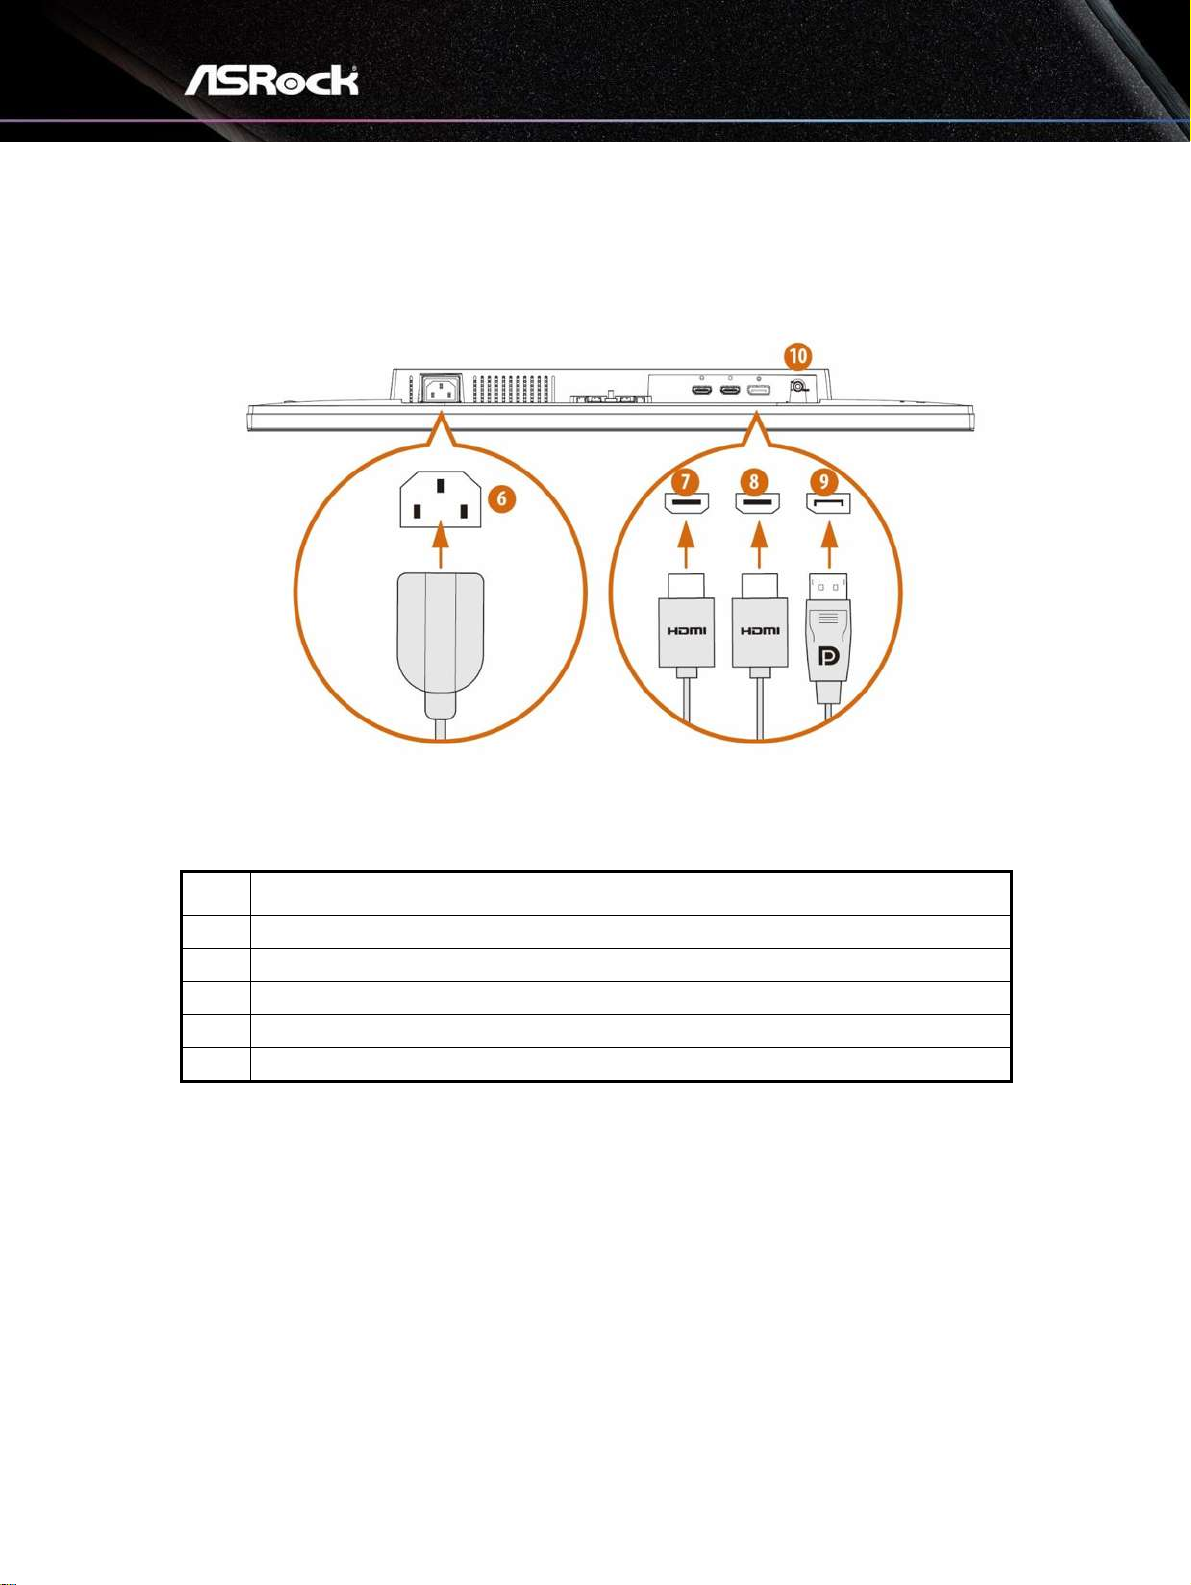
Bottom Side
No.
Item
6
AC input
7
HDMI input
8
HDMI input
9
DisplayPort input
10
Audio output
Page 16
14
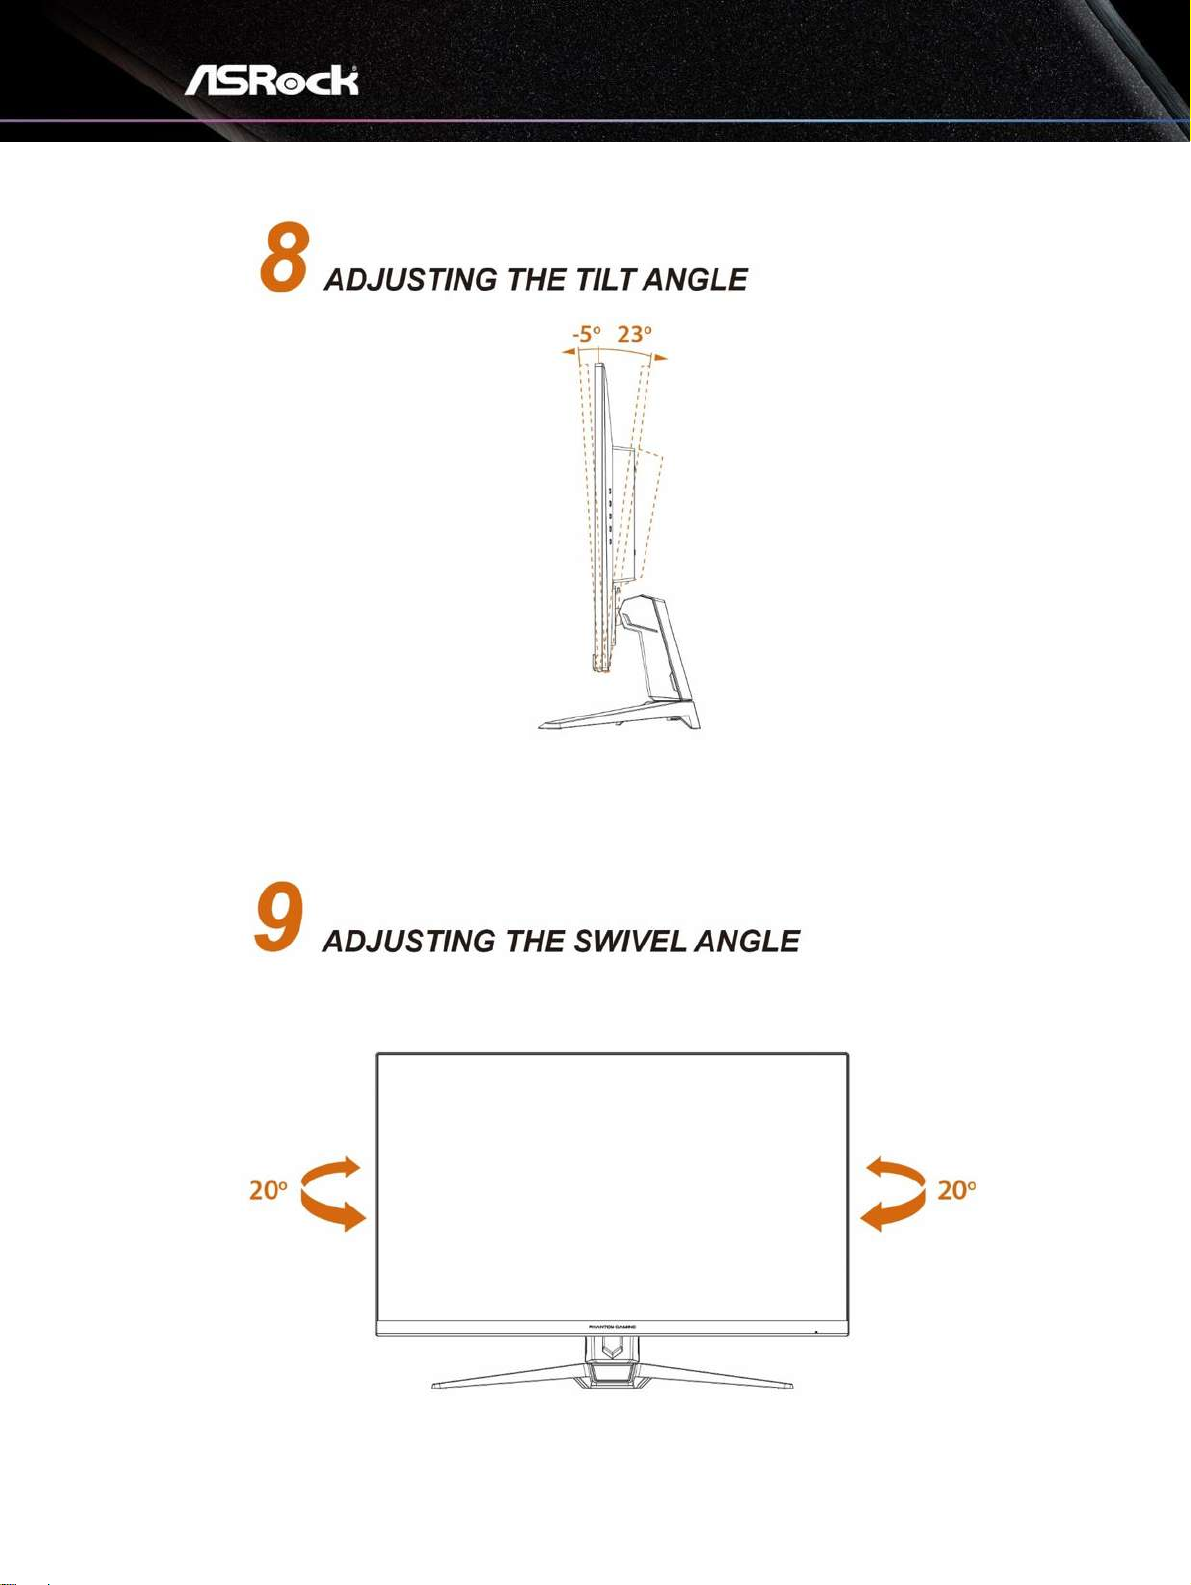
Chapter 4 Adjusting the Viewing Angle
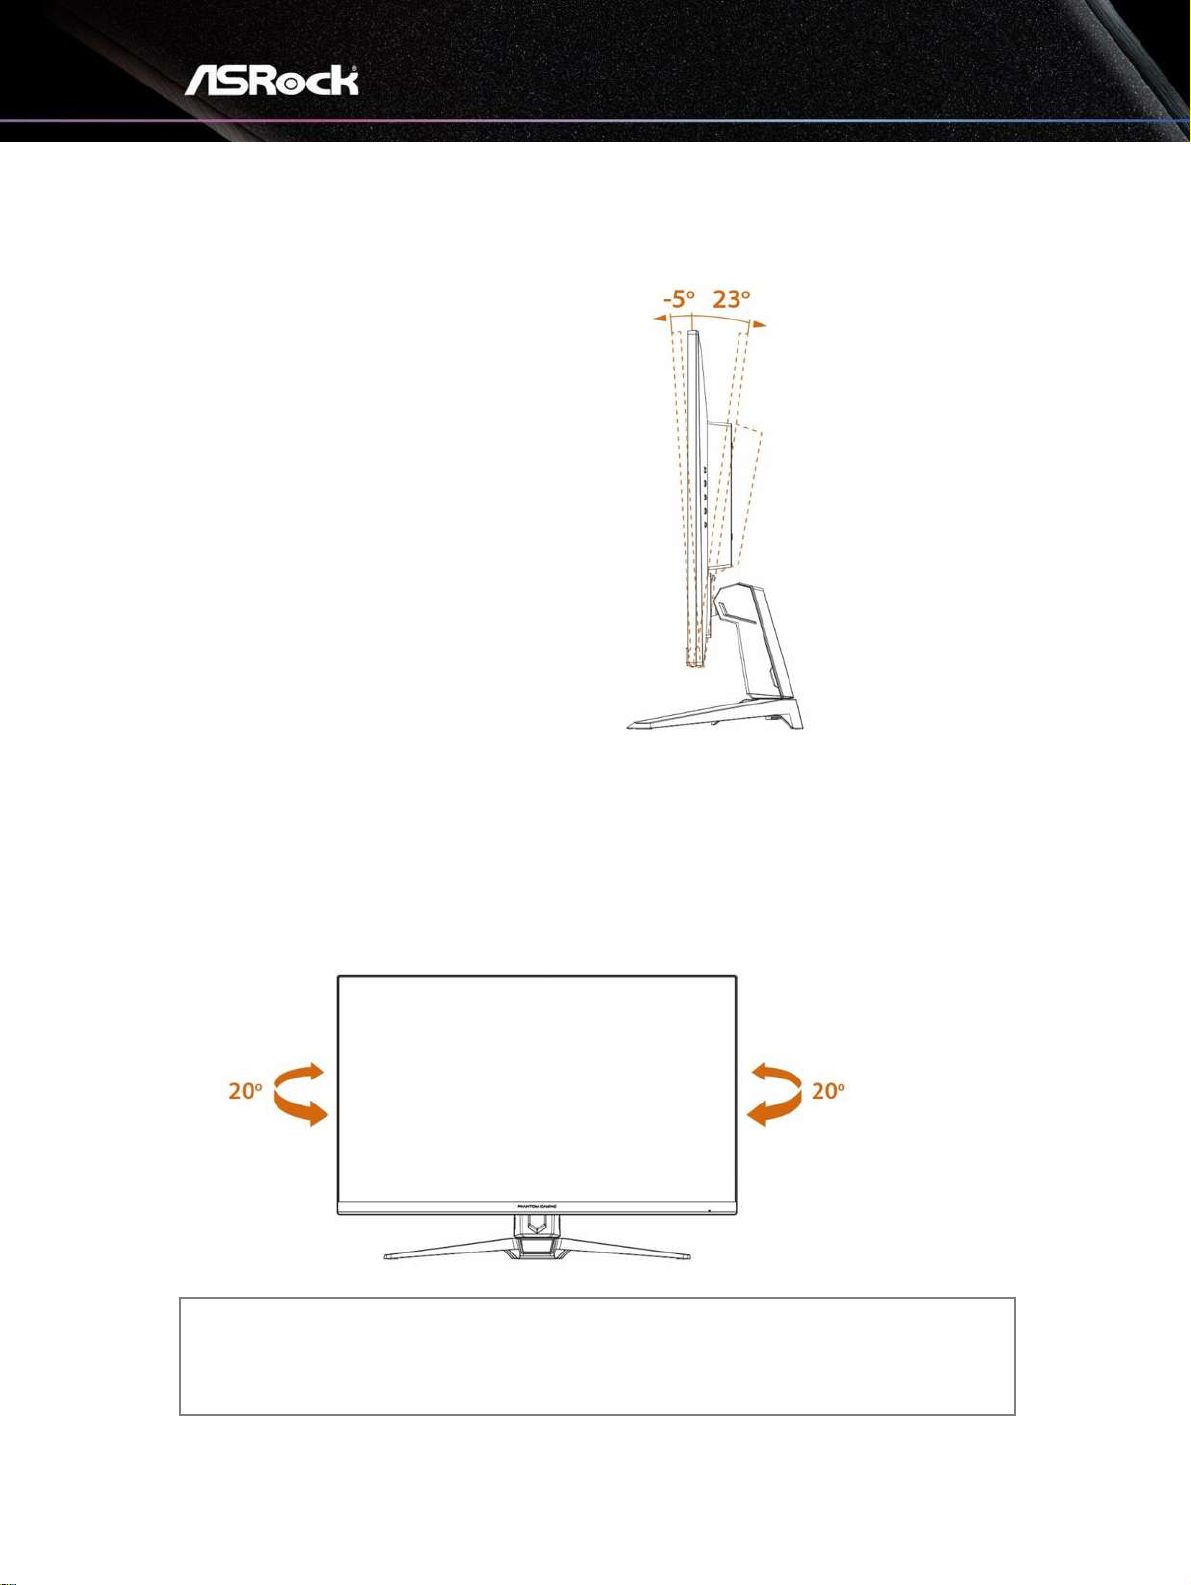
For optimal viewing, it is recommended to
look at the full face of the monitor, and
then adjust the monitor’s angle to your
own preference.
Hold the stand so you do not topple the
monitor when you adjust the monitor’s
angle.
You are able to adjust the tilted angle from
-5° to 23°.
⚠
Important
Avoid touching the display panel when adjusting the monitor.
You are able to swivel the monitor for the angle.
NOTE:
Do not touch the LCD screen when you adjust the angle. It may cause damage or break
the LCD screen.
Careful attention is required not to catch your fingers or hands when you adjust the angle.
Page 17
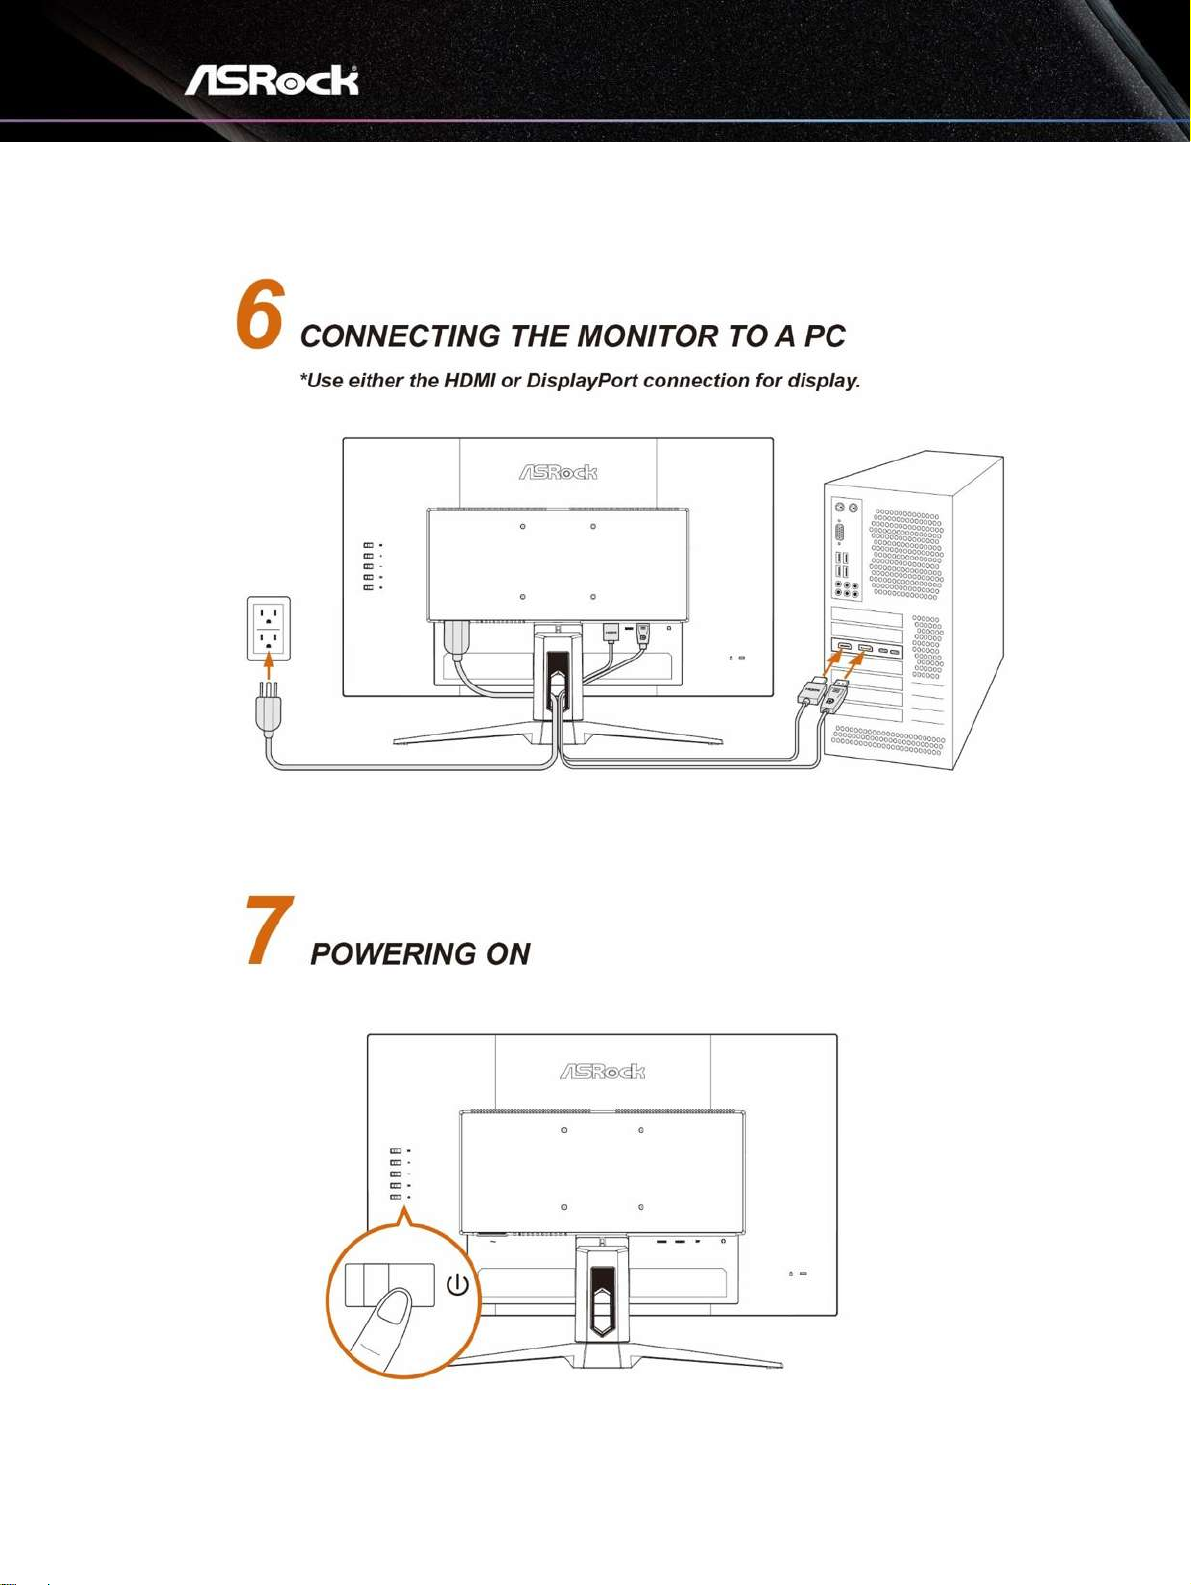
15
Chapter 5 Connecting the Monitor
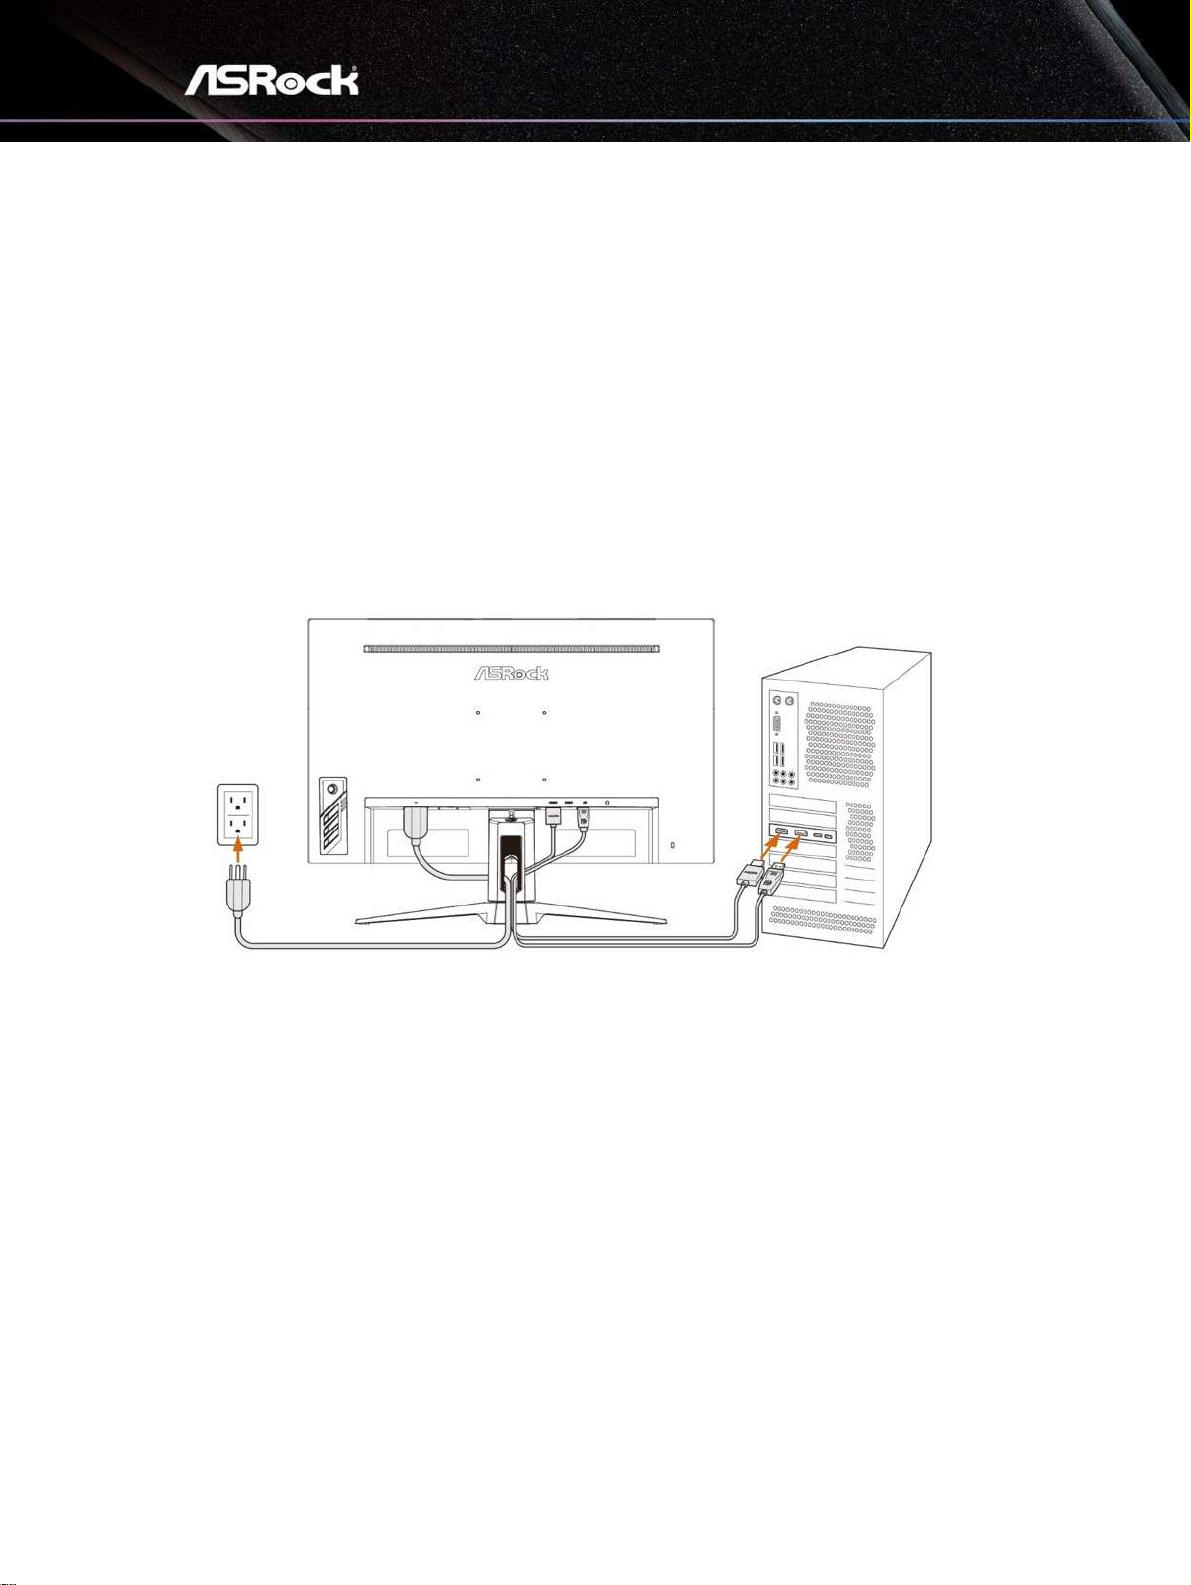
1.
Turn off your computer.
2.
Connect the video cable from the monitor to your computer.
3.
Connect the power cord to the monitor power jack.
4.
Plug the power cord into the electrical outlet.
5.
Turn on the monitor.
6.
Power on the computer and the monitor will auto detect the signal source.
7.
Plug one end of the DisplayPort/HDMI cable to the monitor’s DisplayPort/HDMI port.
*Use either the HDMI or DisplayPort connection for display.
8.
Connect the other end of the DisplayPort/HDMI cable to your computer's
DisplayPort/HDMI port.
Page 18
16
Chapter 6 OSD Setup
This chapter provides you with essential information on OSD Setup.
⚠
Important
All information is subject to change without prior notice.
6.1 OSD Keys
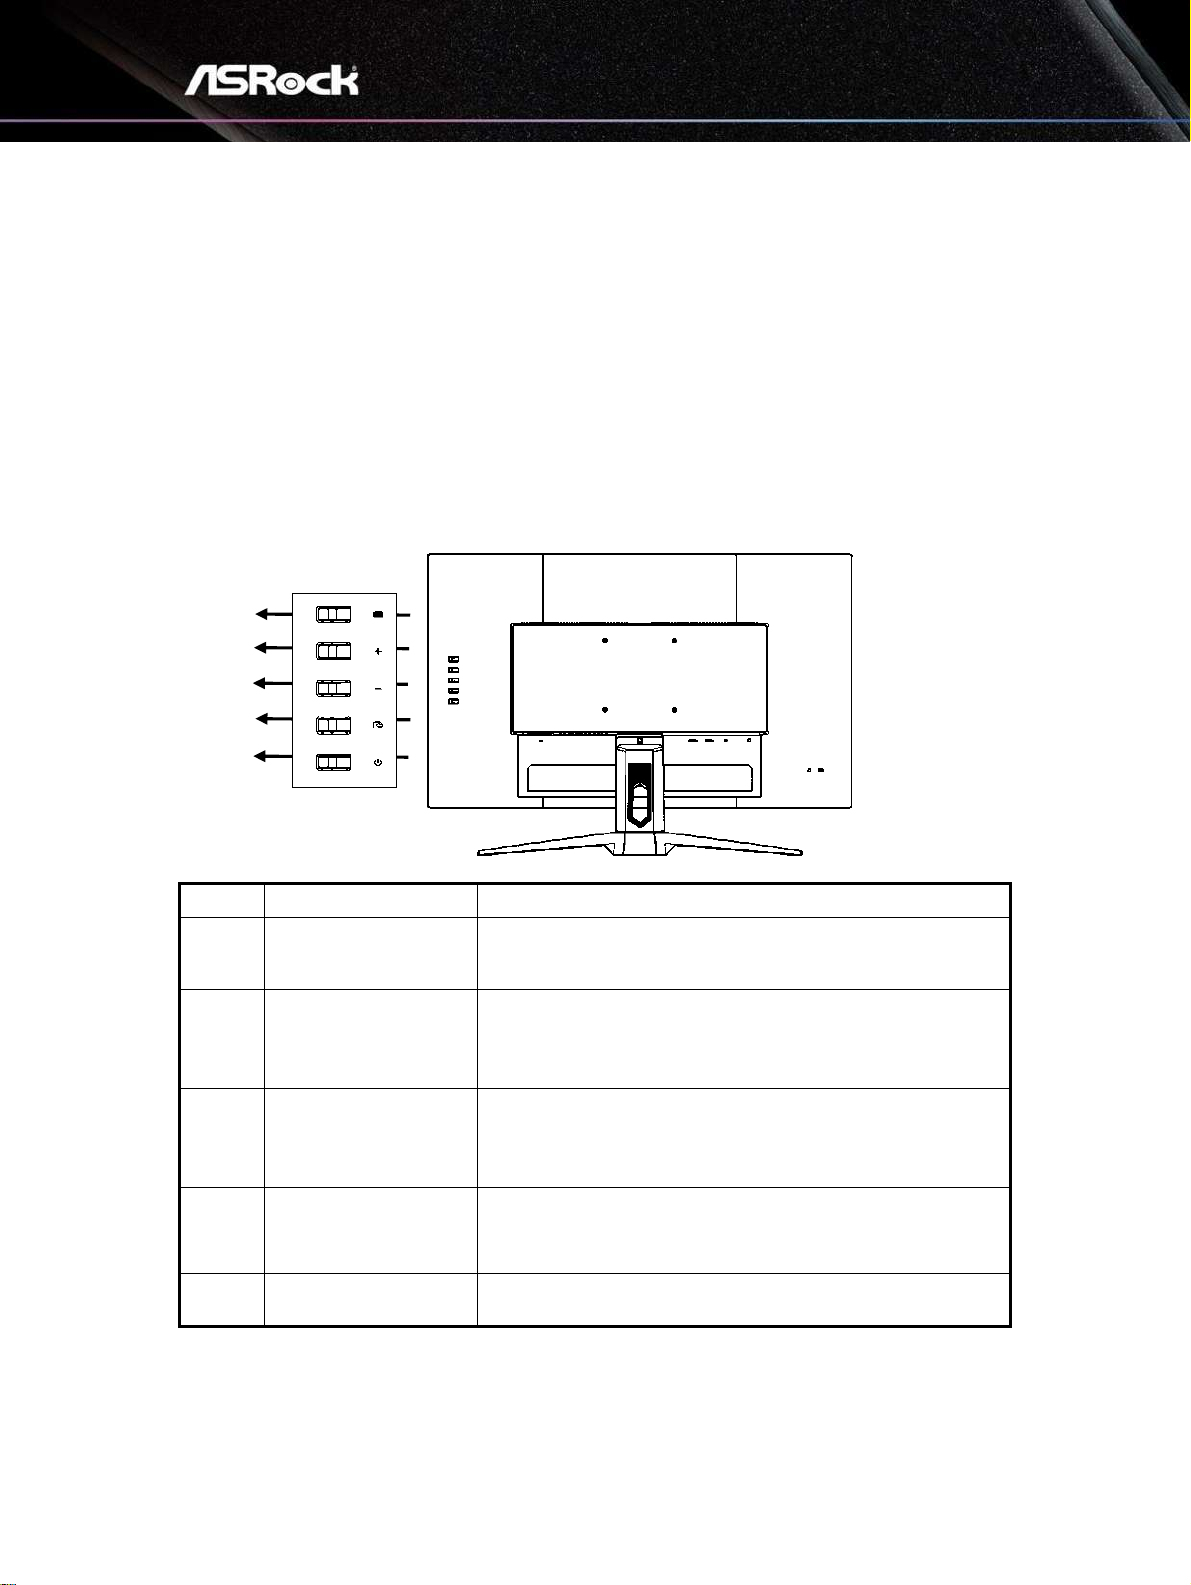
The monitor comes with OSD Keys that help navigate the On-Screen Display (OSD)
menu.
No.
Item
Description
1
Navi Key
When there is no OSD, Press to display the OSD or
confirm the selection.
2
Volume / +
Activates the Volume control when the OSD is OFF,
navigate through adjustment icons when OSD is ON, or
adjust a function when function is activated.
3
Preset Modes / -
Activates the Presets Modes function when the OSD is
OFF, navigate through adjustment icons when OSD is
ON, or adjust a function when function is activated.
4
Input Select / EXIT
• Press to select input from external sources.
• When OSD menu is on, press to exit the OSD menu.
5
Power
Press the power button to turn on/off the monitor.
1 2 3
4
5
Page 19
17
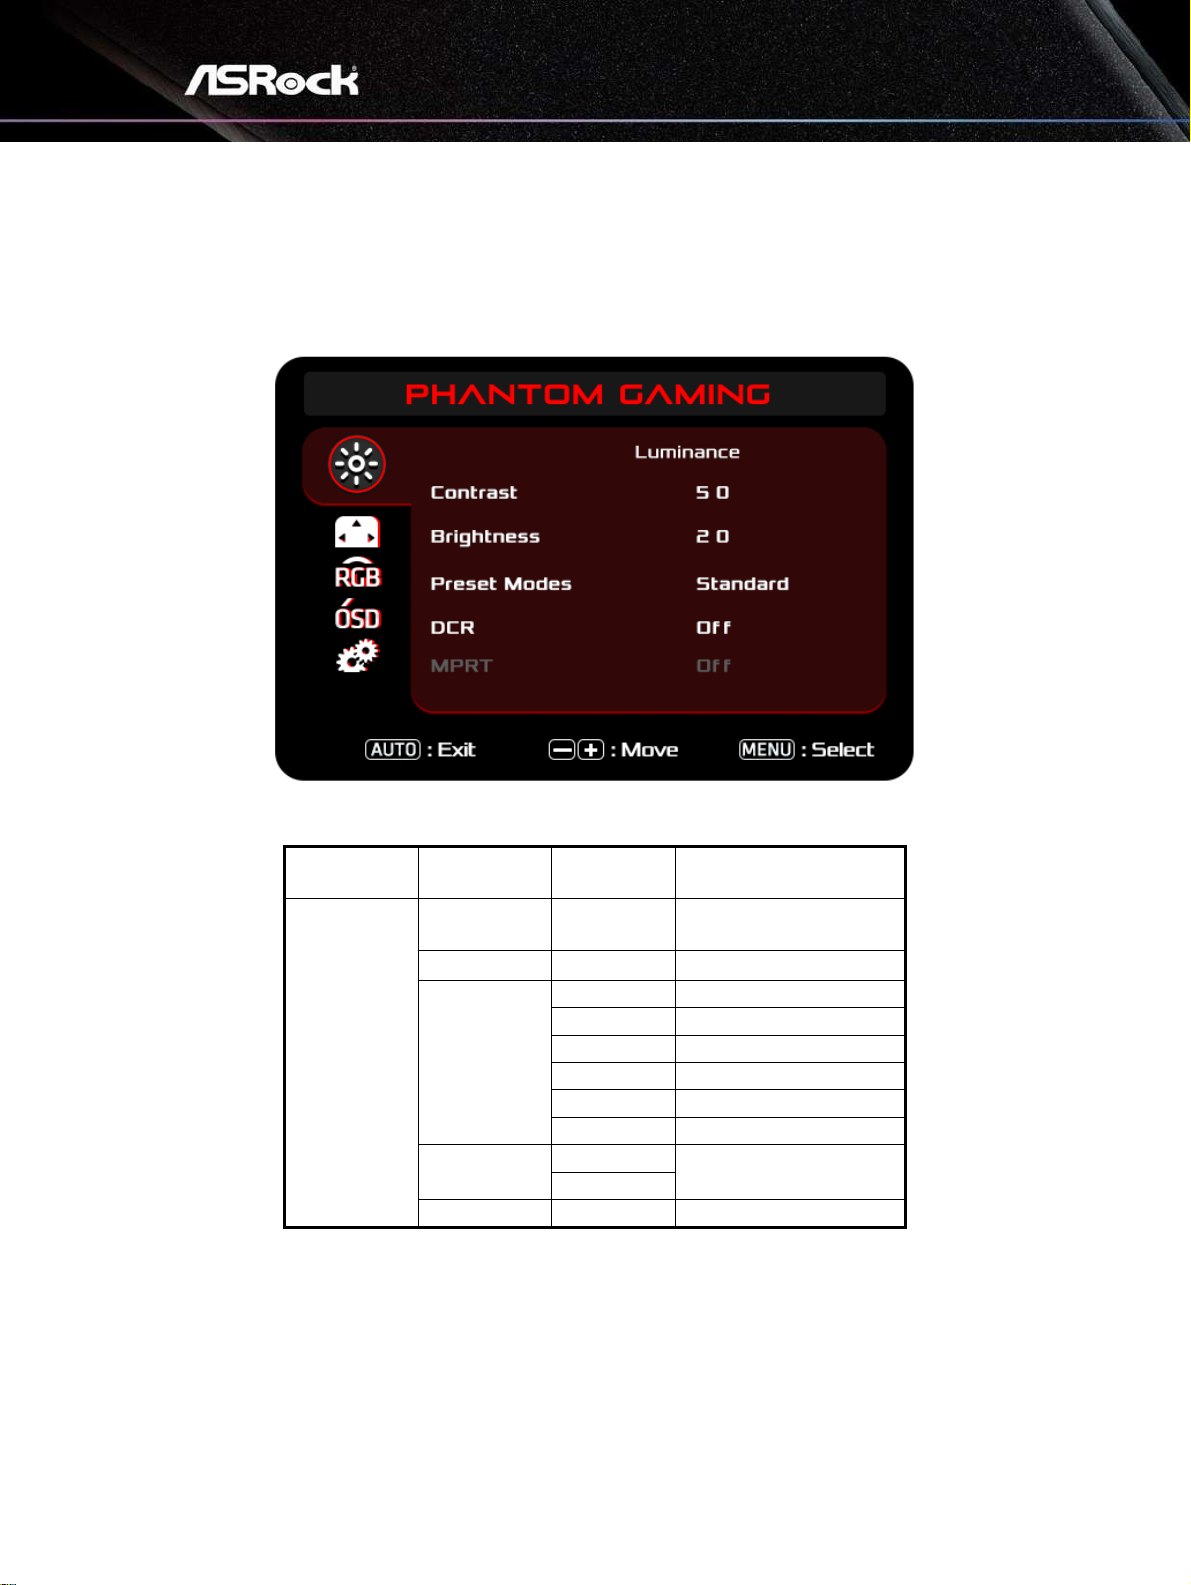
6.2 OSD Menus (The descriptions for function control)
Function: Luminance
Main Menu
Item
Sub Menu
Item
Sub Menu
Description
Luminance
Contrast
0-100
Contrast from Digitalregister.
Brightness
0-100
Backlight Adjustment
Preset
Modes
Standard
Standard Mode
Text
Text Mode
Internet
Internet Mode
Game
Game Mode
Movie
Movie Mode
Sports
Sports Mode
DCR
On
Dynamic contrast ratio
Off
MPRT
On
MPTRT function On/Off
Page 20
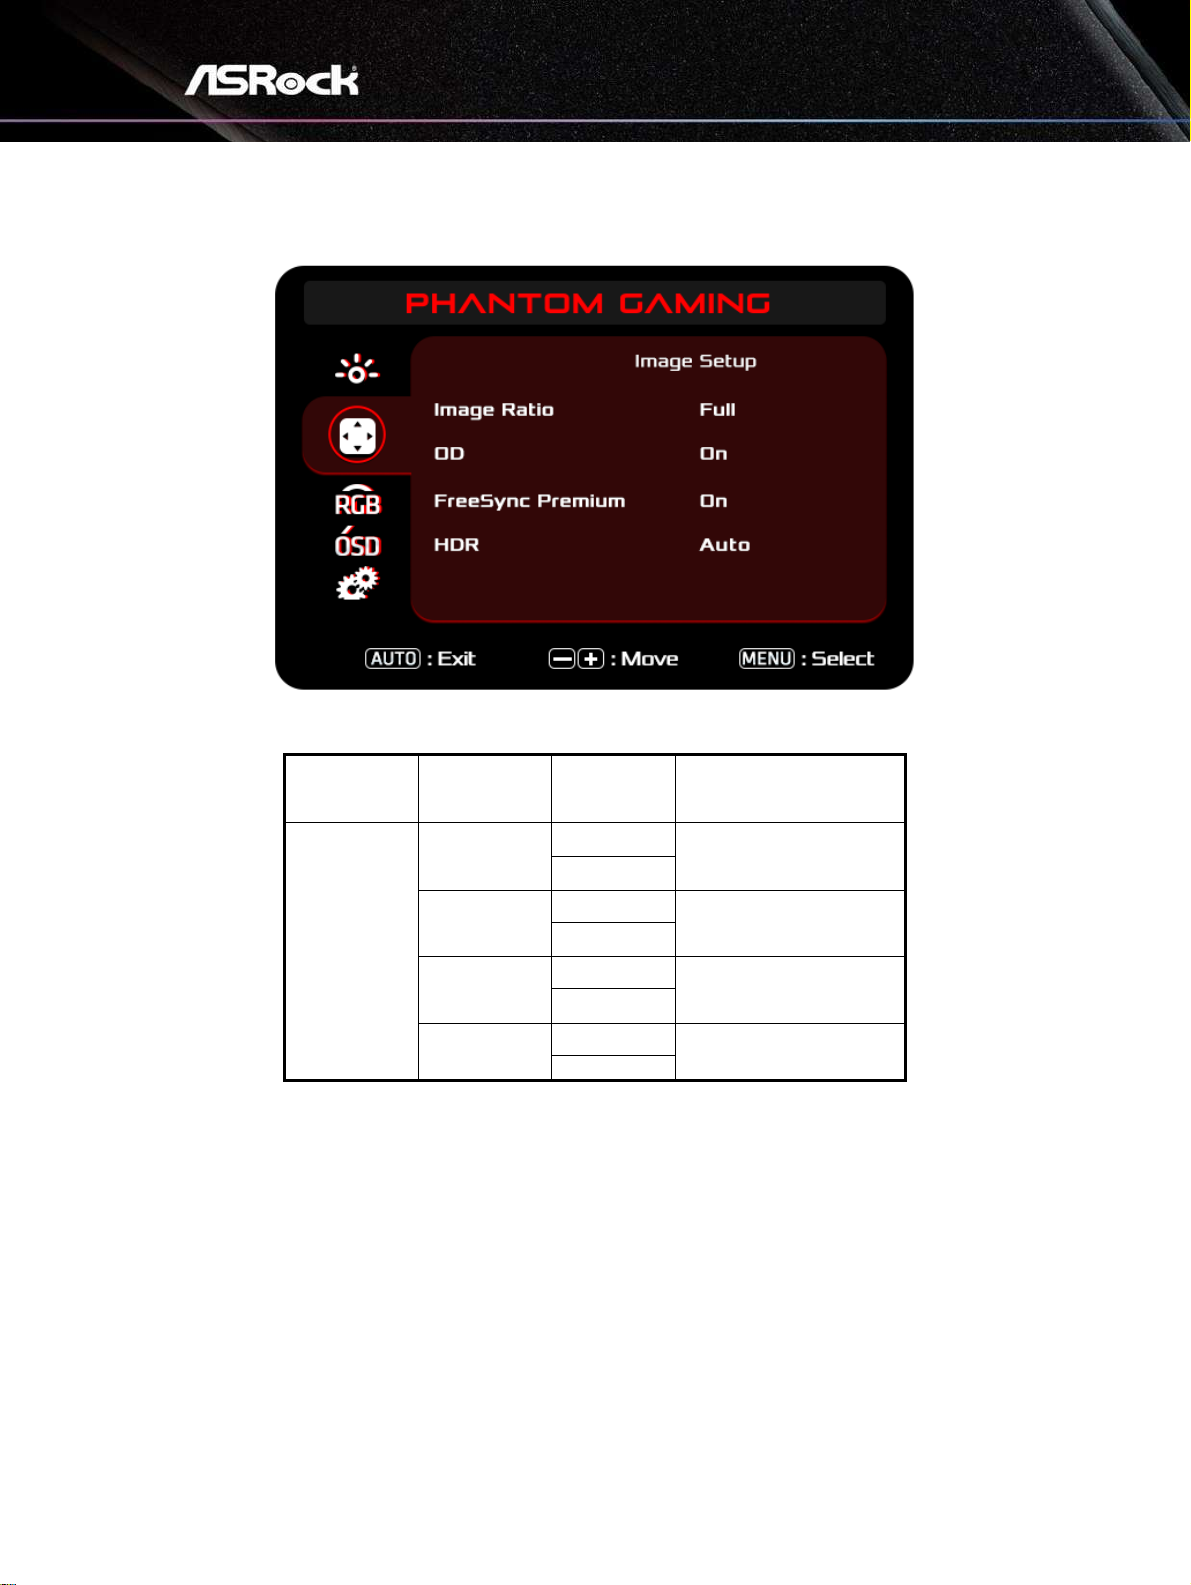
18
Function: Image Setup
Main Menu
Item
Sub Menu
Item
Sub Menu
Description
Image
Setup
Image Ratio
Wide
Select Image Aspect
Ratio
4:3
OD
On
Overdrive Adjustment
Off
FreeSync
Premium
On
FreeSync Premium On
or Off
Off
HDR
Auto
HDR Auto or Off
Off
Page 21
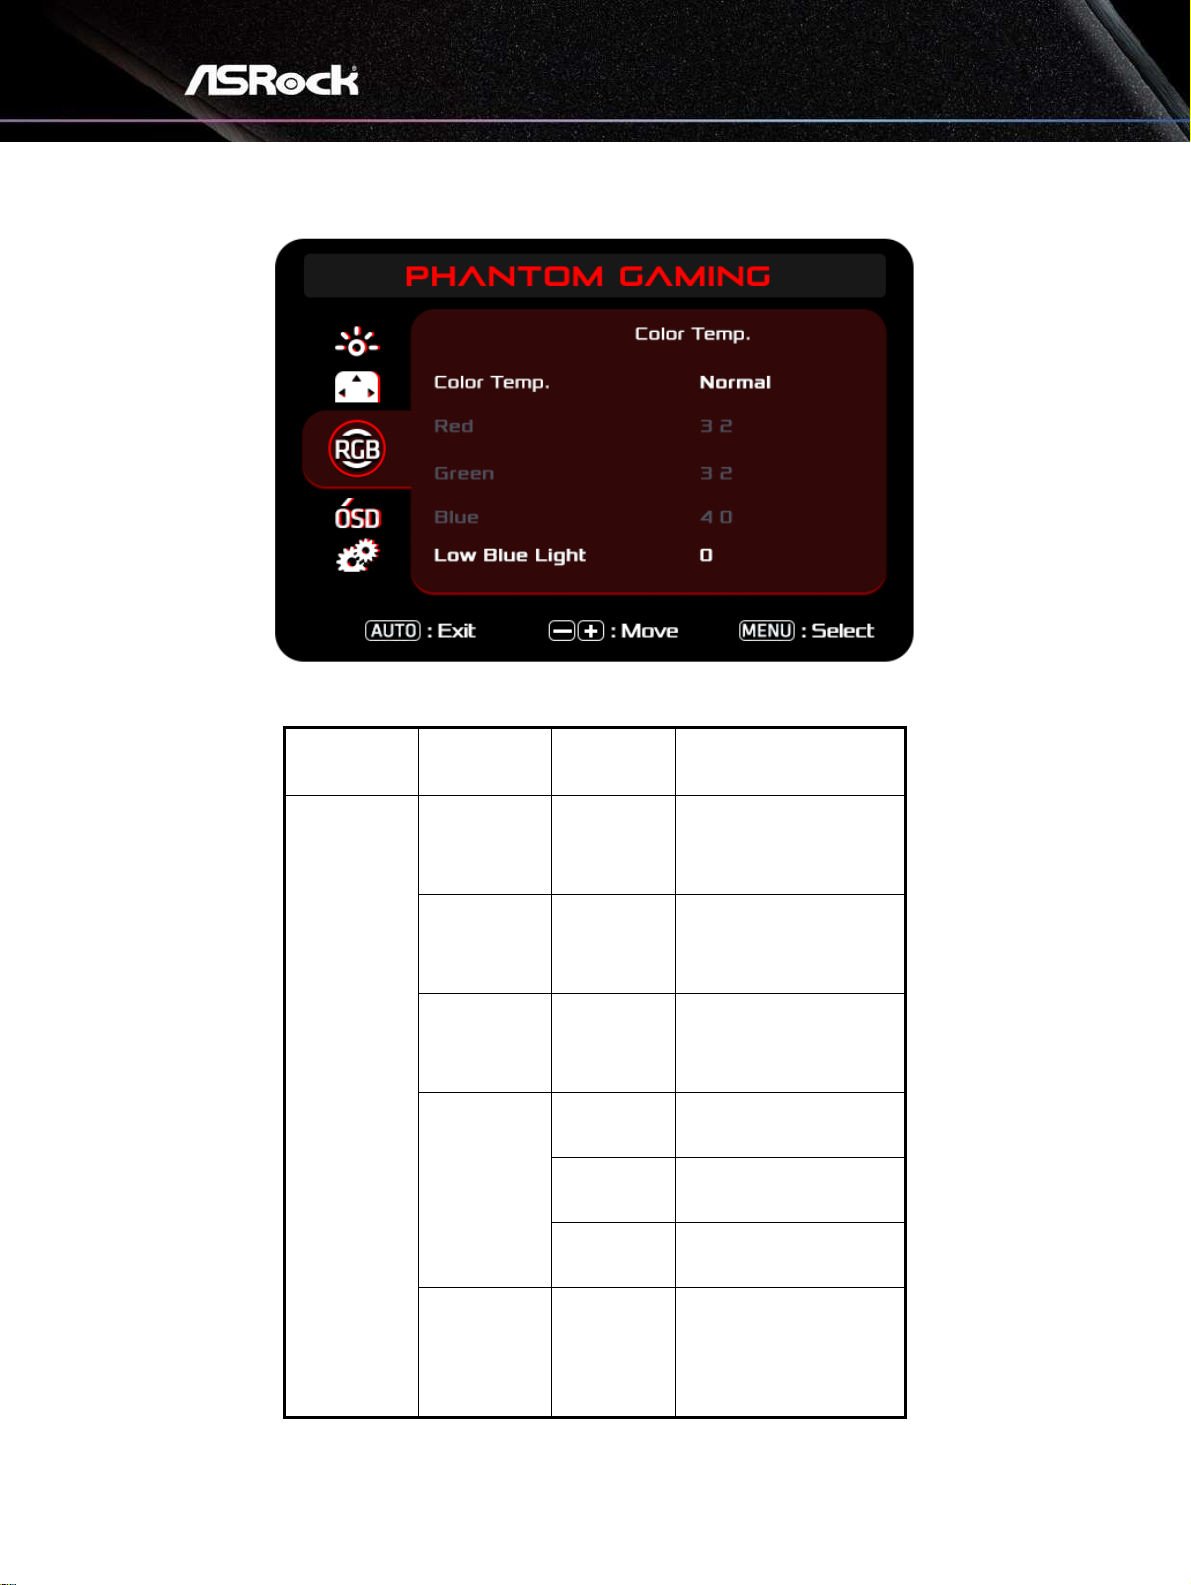
19
Function: Color Temp.
Main Menu
Item
Sub Menu
Item
Sub Menu
Description
Color Temp.
Warm
─
Recall Warm Color
Temperature from
EEPROM.
Normal
─
Recall Normal Color
Temperature from
EEPROM.
Cool
─
Recall Cool Color
Temperature from
EEPROM.
User
Red
Red Gain from Digitalregister.
Green
Green Gain from
Digital-register.
Blue
Blue Gain from Digitalregister.
sRGB
─
Recall sRGB Color
Temperature from
EEPROM.
Page 22
20
Low Blue
Light
0~10(Level)
Phantom Gaming
Monitor with ASRock
Low Blue Light
Technology reduces
the emission of harmful
blue lights on a display
to prevent eye fatigue.
Page 23
21
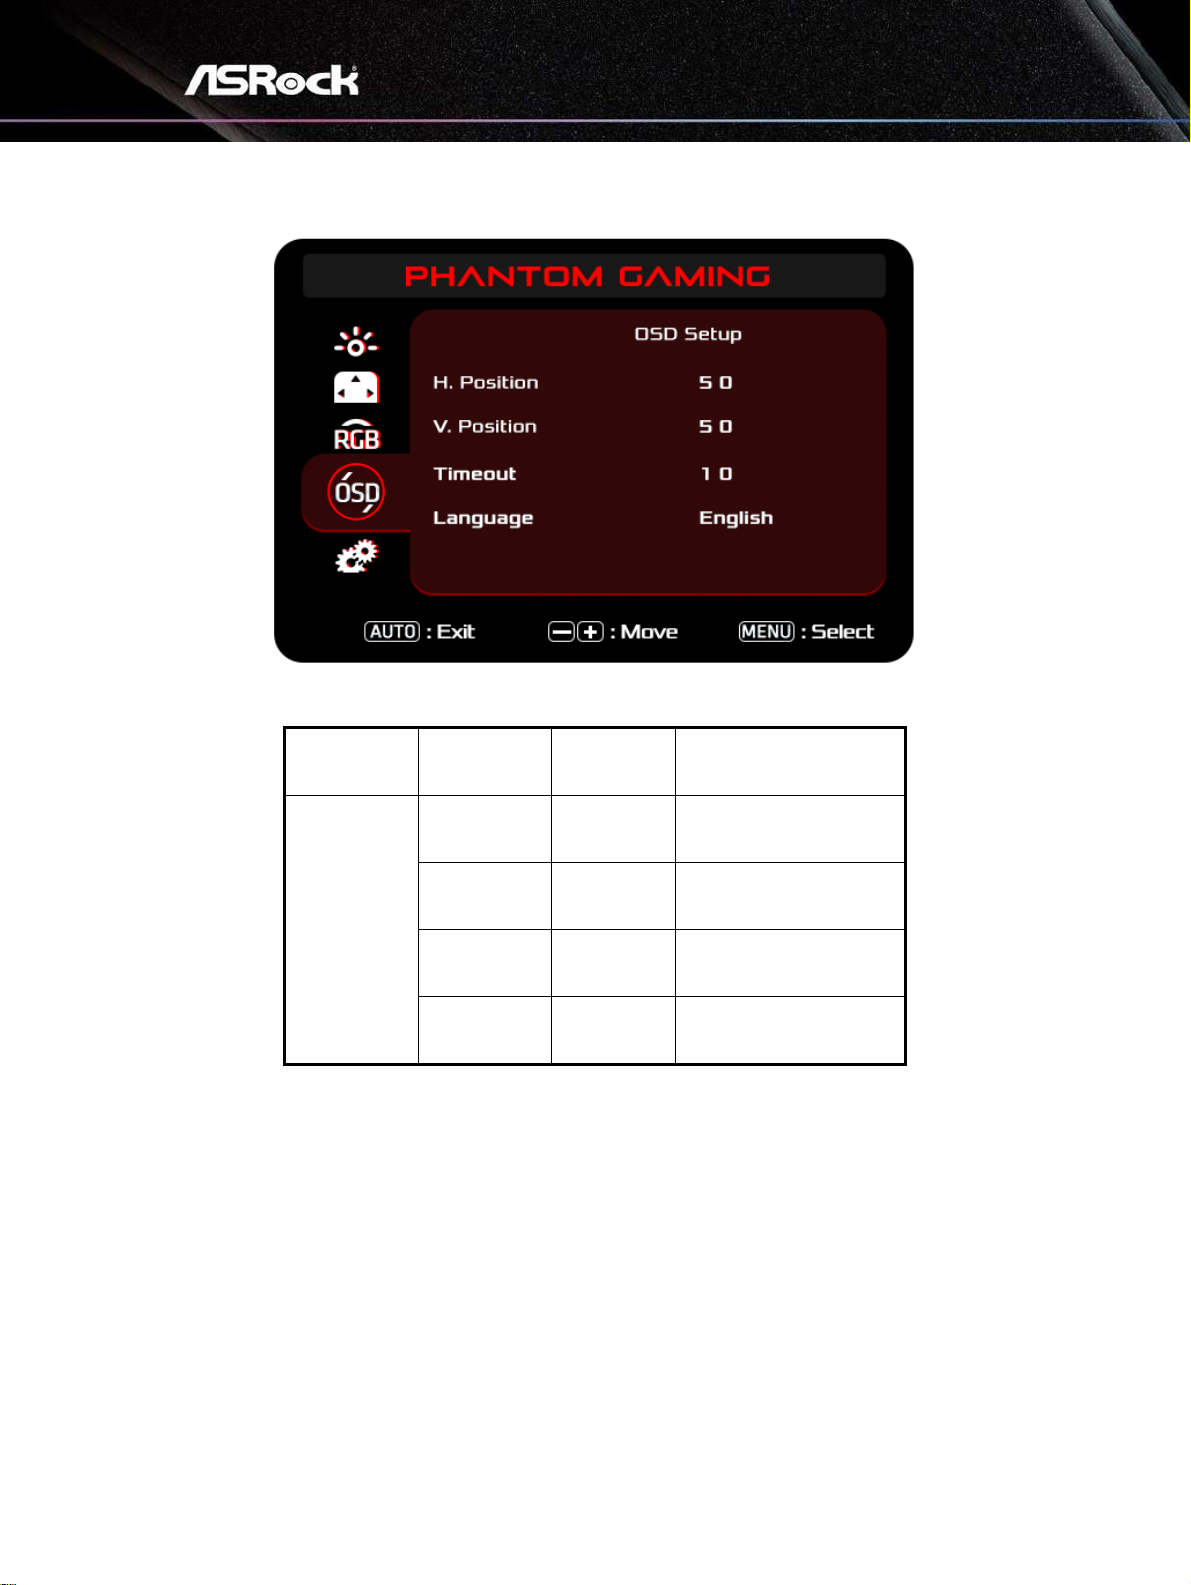
Function: OSD Setup
Main Menu
Item
Sub Menu
Item
Sub Menu
Description
OSD Setup
H. Position
0-100
Adjust the horizontal
position of OSD
V. Position
0-100
Adjust the vertical
position of OSD
Timeout
5-100
Adjust the OSD
Timeout
Language
─
Select the OSD
language
Page 24
22
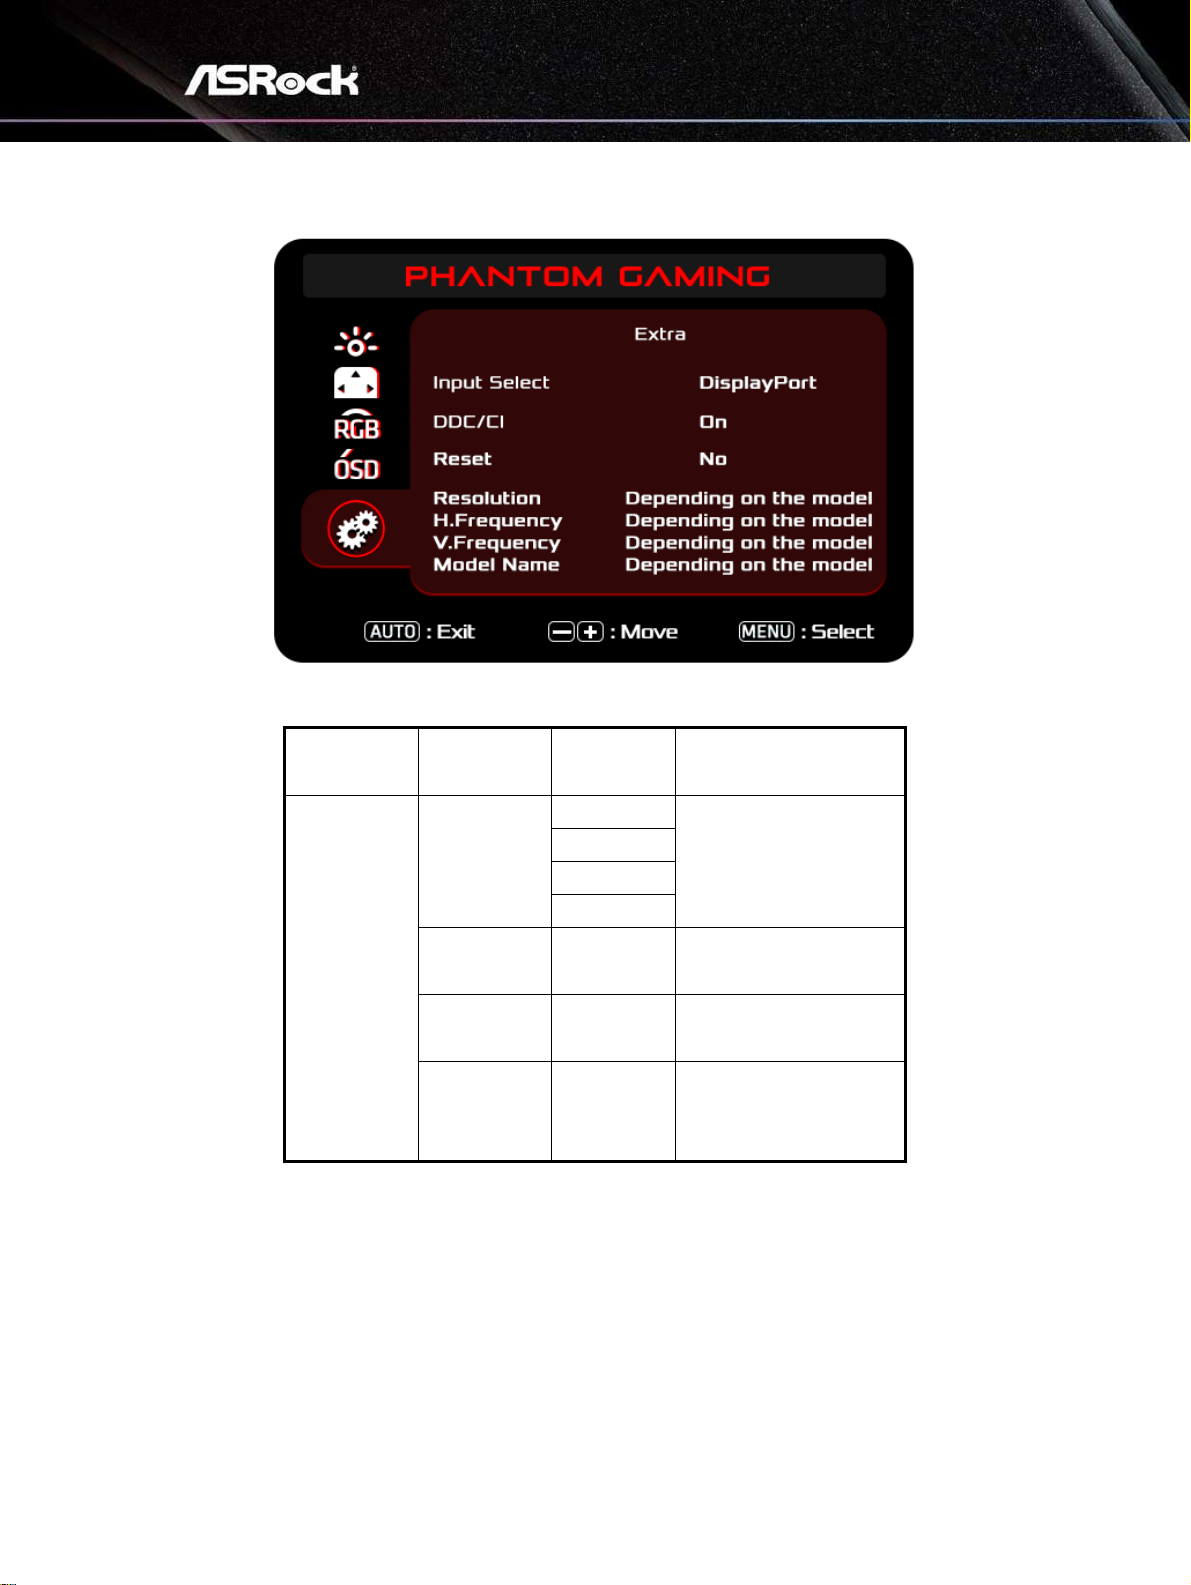
Function: Extra
Main Menu
Item
Sub Menu
Item
Sub Menu
Description
Extra
Input Select
Auto
Select input source
HDMI1
HDMI2
DisplayPort
DDC/CI
On or Off
Turn ON/OFF DDC/CI
Support
Reset
Yes or No
Reset the menu to
default.
Information
─
Show the information
of the main image
source.
Page 25
23
Chapter 7 Troubleshooting
Problem and
Question
Possible Solution
Power LED is not on
• Check if the Power Switch is in the ON position.
• Power Cord should be connected.
No signal
• Check that the signal-cable is properly connected. If the connector is
loose, tighten the connector’s screws.
• Check the signal-cable’s connection pins for damage.
Picture is fuzzy
• Adjust the Contrast and Brightness Controls.
Picture bounces or
a wave pattern is
present in the
picture
• Move electrical devices that may cause electrical interference.
The power LED is
ON (Orange) but
there’s no video or
no picture.
• Computer Power Switch should be in the ON position.
• Computer Video Card should be snugly seated in its slot.
• Make sure Monitor’s video cable is properly connected to the
computer.
• Inspect Monitor’s video cable and make sure none of the pins are
bent.
• Make sure computer is operational by hitting the CAPS LOCK key on
the keyboard while observing the CAPS LOCK LED.The LED should
either turn ON or OFF after hitting the CAPS LOCK key.
Missing one of the
primary colors
(RED, GREEN, or
BLUE)
• Inspect the Monitor’s video cable and make sure that none of the
pins are bent.
Picture has color
defects (white does
not look white)
• Adjust RGB color or select color temperature.
Poor brightness or
contrast
• When the brightness of the screen lowers after being used for a
certain period and the function of the display is affected, send it to our
authorized service center for repair.
Unable to open OSD
menu.
• Turn off your monitor, unplug the power cord and plug it back in,
then power on the monitor.
• Check if the OSD menu is locked? If so, please press and hold the
Navi Key for 5~6 seconds to unlock the OSD menu.
Page 26
24
Chapter 8 Safety Instructions
• Read the safety instructions carefully and thoroughly.
• All cautions and warnings on the device or User Guide should be noted.
• Refer servicing to qualified personnel only.
Power
• Make sure that the power voltage is within its safety range and has been adjusted
properly to the value of 100~240V before connecting the device to the power outlet.
• If the power cord comes with a 3-pin plug, do not disable the protective earth pin
from the plug. The device must be connected to an earthed mains socket-outlet.
• Please confirm the power distribution system in the installation site shall provide
the circuit breaker rated 120/240V, 20A (maximum).
• Always disconnect the power cord or switch the wall socket off if the device would
be left unused for a certain time to achieve zero energy consumption.
• Place the power cord in a way that people are unlikely to step on it. Do not place
anything on the power cord.
• If this device comes with an adapter, use only the ASRock provided AC adapter
approved for use with this device.
European Union:
Batteries, battery packs, and accumulators should not be disposed of as unsorted
household waste. Please use the public collection system to return, recycle, or treat
them in compliance with the local regulations.
California, USA:
The button cell battery may contain perchlorate material and requires special
handling when recycled or disposed of in California. For further information please
visit: https://dtsc.ca.gov/perchlorate/
Page 27

25
Environment
• To reduce the possibility of heat-related injuries or of overheating the device, do
not place the device on a soft, unsteady surface or obstruct its air ventilators.
• Use this device only on a hard, flat and steady surface.
• To prevent the device from tipping over, secure the device to a desk, wall or fixed
object with an anti-tip fastener that helps to properly support the device and keep it
safe in place.
• To prevent fire or shock hazard, keep this device away from humidity and high
temperature.
• Do not leave the device in an unconditioned environment with a storage
temperature
above 60℃ or below -20℃, which may damage the device.
• The maximum operating temperature is around 40℃.
• When cleaning the device, be sure to remove the power plug. Use a piece of soft
cloth rather than industrial chemical to clean the device. Never pour any liquid into
the opening; that could damage the device or cause electric shock.
• Always keep strong magnetic or electrical objects away from the device.
• If any of the following situations arises, get the device checked by service
personnel:
• The power cord or plug is damaged.
• Liquid has penetrated into the device.
• The device has been exposed to moisture.
• The device does not work well or you can not get it working according to the User
Guide.
• The device has dropped and damaged.
• The device has obvious sign of breakage.
Warning!
Overuse of screens is likely to affect eyesight.
Recommendations:
Take a 10-minute break for every 30 minutes of screen time.
Children under 2 years of age should have no screen time. For children aged 2
years and over, screen time should be limited to less than one hour per day.
Page 28

26
CE Conformity
This device complies with the requirements set out in the Council Directive on the
Approximation of the Laws of the Member States relating to
Electromagnetic Compatibility (2014/30/EU), Low-voltage Directive
(2014/35/EU), ErP Directive (2009/125/EC) and RoHS directive
(2011/65/EU). This product has been tested and found to comply with the
harmonized standards for Information Technology Equipment published under
Directives of Official Journal of the European Union.
ASRock Contact Information
ASRock EUROPE B.V.
Address : Bijsterhuizen 11-11, 6546 AR Nijmegen,The Netherlands
Phone: +31-24-345-44-33
Technical Support
Phone: +31-24-345-44-33
Online Support https://event.asrock.com/tsd.asp
Product information for EU energy label
https://eprel.ec.europa.eu/qr/1115756
Page 29

27
FCC-B Radio Frequency Interference Statement
This equipment has been tested and found to comply with the limits for a Class B
digital device, pursuant to Part 15 of the FCC Rules. These limits
are designed to provide reasonable protection against harmful
interference in a residential installation. This equipment generates,
uses and can radiate radio frequency energy and, if
not installed and used in accordance with the instruction manual, may cause harmful
interference to radio communications. However, there is no guarantee that
interference will not occur in a particular installation. If this equipment does cause
harmful interference to radio or television reception, which can be determined
by turning the equipment off and on, the user is encouraged to try to correct the
interference by one or more of the measures listed below:
• Reorient or relocate the receiving antenna.
• Increase the separation between the equipment and receiver.
• Connect the equipment into an outlet on a circuit different from that to which the
receiver is connected.
• Consult the dealer or an experienced radio/television technician for help.
Notice 1
The changes or modifications not expressly approved by the party responsible for
compliance could void the user’s authority to operate the equipment.
Notice 2
Shielded interface cables and AC power cord, if any, must be used in order to
comply with the emission limits.
This device complies with Part 15 of the FCC Rules. Operation is subject to the
following two conditions:
This device may not cause harmful interference, and
This device must accept any interference received, including interference that may
cause undesired operation.
ASRock Contact Information
ASRock America, Inc.
Address : 13848 Magnolia Ave, Chino, CA91710, U.S.A.
Phone: +1-909-590-8308
Technical Support
Phone: +1-909-590-8308
Online Support https://event.asrock.com/tsd.asp
Page 30

28
WEEE Statement
Under the European Union (“EU”) Directive on Waste Electrical and Electronic
Equipment, Directive 2012/19/EU, products of “electrical and electronic equipment”
cannot be discarded as municipal waste anymore and manufacturers of covered
electronic equipment will be obligated to take back such products at the end of
their useful life.
Chemical Substances Information
In compliance with chemical substances regulations, such as the EU REACH Regulation
(Regulation EC No. 1907/2006 of the European Parliament and the Council), ASRock
provides the information of chemical substances in products at:
RoHS Statement
Japan JIS C 0950 Material Declaration
A Japanese regulatory requirement, defined by specification JIS C 0950, mandates that
manufacturers provide material declarations for certain categories of electronic products
offered for sale after July 1, 2006.
India RoHS
This product complies with the “India E-waste (Management and Handling) Rule 2016” and
prohibits use of lead, mercury, hexavalent chromium, polybrominated biphenyls or
polybrominated diphenyl ethers in concentrations exceeding 0.1 weight % and 0.01 weight %
for cadmium, except for the exemptions set in Schedule 2 of the Rule.
The terms HDMI, HDMI High-Definition Multimedia Interface,
HDMI trade dress and the HDMI Logos are trademarks or
registered trademarks of HDMI Licensing Administrator, Inc.
Page 31

29
Copyright and Trademarks Notice
Copyright © ASRock Inc. All rights reserved. The ASRock logo used is a registered trademark
of ASRock Inc. All other marks and names mentioned may be trademarks of their respective
owners. No warranty as to accuracy or completeness is expressed or implied. ASRock
reserves the right to make changes to this document without prior notice.
Technical Support
If a problem arises with your product and no solution can be obtained from the user’s manual,
please contact your place of purchase or local distributor. Alternatively, please visit
https://www.asrock.com for further guidance.
Published November 2022
Copyright© 2022 ASRock INC. All rights reserved.
Page 32

30
Copyright Notice
No part of this documentation may be reproduced, transcribed, transmitted, or translated in
any language, in any form or by any means, except duplication of documentation by the
purchaser for backup purpose, without written consent of ASRock Inc.
Products and corporate names appearing in this documentation may or may not be registered
trademarks or copyrights of their respective companies, and are used only for identification or
explanation and to the owners’ benefit, without intent to infringe.
This device complies with Part 15 of the FCC Rules. Operation is subject to the following two
conditions:
(1) this device may not cause harmful interference, and
(2) this device must accept any interference received, including interference that may cause
undesired operation.
Disclaimer
Because the monitor specifications and the firmware might be updated, the content of this
documentation will be subject to change without notice. In case any modifications of this
documentation occur, the updated version will be available on ASRock’s website without
further notice. If you require technical support related to this motherboard, please visit our
website for specific information about the model you are using. You may find the latest
monitor support list on ASRock’s website as well.
ASRock Website: http://www.asrock.com
 Loading...