

Page 1
Page 2
Safety Information
Your system is designed and tested to meet the latest standards of safety for
information technolog y equipment. However, to ensure your safety, it is important
that you read the following safety instructions.
Setting up your system
Read and follow all instructions in the documentation before you operate your system.
•
Do not use this product near water or a heated source such as a radiator. Set up the
•
system on a stable surface.
Openings on the chassis are for ventilation. Do not block or cover these openings.
•
Make sure you leave plenty of space around the system for ventilation. Never insert
objects of any kind into the ventilation openings.
Use this product in environments with ambient temperatures between 0°C and 35°C.
•
If you use an extension cord, make sure that the total ampere rating of the devices
•
plugged into the extension cord does not exceed its ampere rating.
Care during use
Do not walk on the power cord or allow anything to rest on it.
•
Do not spill water or any other liquids on your system.
•
When the system is turned OFF, a small amount of electrical current still ow. Always
•
unplug all power, modem, and network cables from the power outlets before cleaning
the system.
IF you encounter the following technical problems with the product, unplug the power
•
cord and contact a qualied service technician or your retailer:
■ e power cord or plug is damaged.
■ Liquid has been spilled into the system.
■ e system does not function properly even if you follow the operating instructions.
■ e system was dropped or the cabinet is damaged.
■ e system performance changes.
No disassembly
IM PORTA NT: e warranty does not apply to products that have been disassembly
by users.
Battery replacement and disposal
WARNING: Risk of explosion if battery is replaced by an incorrect ty pe. Dispose of
used batteries according to local regulations.
Product disposal notice
IMPORTANT: is symbol of the crossed out wheeled bin indicates that
the product (electrical, electronic equipment, and mercury- containing
button cell batter y) should not be placed in municipal waste. Check local
regulations for disposal of electronic products.
CE Mark Warning
is is a Class B product, in a domestic environment, this product may cause radio
interference, in which case the user may be required to take adequate measures.
Page 3

AUSTRALIA ONLY
Our goods come with guarantees that cannot be excluded under the Australian Consumer
Law. You are entitled to a replacement or refund for a major failure and compensation for
any other reasonably foreseeable loss or damage caused by our goods. You are also entitled
to have the goods repaired or replaced if the goods fail to be of acceptable quality and the
failure does not amount to a major failure. If you require assistance please call ASRock Tel
: +886-2-28965588 ext.123 (Standard International call charges apply)
e terms HDMI® and HDMI High-Denition Multimedia Interface, and the HDMI
logo are trademarks or registered trademarks of HDMI Licensing LLC in the United
States and other countries.
INTEL END USER SOFTWARE LICENSE AGREEMENT
IMPORTANT - READ BEFORE COPYING, INSTALLING OR USING.
LICENSE. Licensee has a license under Intel’s copyrights to reproduce Intel’s Soware
only in its unmodied and binary form, (with the accompanying documentation, the
“Soware”) for Licensee’s personal use only, and not commercial use, in connection with
Intel-based products for which the Soware has been provided, subject to the following
conditions:
(a) Licensee may not disclose, distribute or transfer any part of the Soware, and You agree
to prevent unauthorized copying of the Soware.
(b) Licensee may not reverse engineer, decompile, or disassemble the Soware.
(c) Licensee may not sublicense the Soware.
(d) e Soware may contain the soware and other intellectual property of third party
suppliers, some of which may be identied in, and licensed in accordance with, an enclosed
license.txt le or other text or le.
(e) Intel has no obligation to provide any support, technical assistance or updates for the
Soware.
OWNERSHIP OF SOFTWARE AND COPYRIGHTS. Title to all copies of the Soware
remains with Intel or its licensors or suppliers. e Soware is copyrighted and protected
by the laws of the United States and other countries, and international treaty provisions.
Licensee may not remove any copyright notices from the Soware. Except as otherwise
expressly provided above, Intel grants no express or implied right under Intel patents,
copyrights, trademarks, or other intellectual property rights. Transfer of the license terminates Licensee’s right to use the Soware.
DISCLAIMER OF WARR ANTY. e Soware is provided “AS IS” without warranty of
any kind, EITHER EXPRESS OR IMPLIED, INCLUDING WITHOUT LIMITATION,
WARRANTIES OF MERCHANTABILITY OR FITNESS FOR ANY PARTICULAR PURPOSE.
LIMITATION OF LIABILITY. NEITHER INTEL NOR ITS LICENSORS OR SUPPLIERS
WILL BE LIABLE FOR ANY LOSS OF PROFITS, LOSS OF USE, INTERRUPTION OF
BUSINESS, OR INDIRECT, SPECIAL, INCIDENTAL, OR CONSEQUENTIAL DAMAG
Page 4

ES OF ANY KIND WHETHER UNDER THIS AGREEMENT OR OTHERWISE, EVEN
IF INTEL HAS BEEN ADVISED OF THE POSSIBILITY OF SUCH DAMAGES.
LICENSE TO USE COMMENTS AND SUGGESTIONS. is Agreement does NOT
obligate Licensee to provide Intel with comments or suggestions regarding the Soware.
However, if Licensee provides Intel with comments or suggestions for the modication,
correction, improvement or enhancement of (a) the Soware or (b) Intel products or
processes that work with the Soware, Licensee grants to Intel a non-exclusive, worldwide,
perpetual, irrevocable, transferable, royalty-free license, with the right to sublicense, under
Licensee’s intellectual property rights, to incorporate or otherwise utilize those comments
and suggestions.
TERMINATION OF THIS LICENSE. Intel or the sublicensor may terminate this license
at any time if Licensee is in breach of any of its terms or conditions. Upon termination,
Licensee will immediately destroy or return to Intel all copies of the Soware.
THIRD PARTY BENEFICIARY. Intel is an intended beneciary of the End User License
Agreement and has the right to enforce all of its terms.
U.S. GOVERNMENT RESTRICTED R IGHTS. e Soware is a commercial item (as
dened in 48 C.F.R. 2.101) consisting of commercial computer soware and commercial
computer soware documentation (as those terms are used in 48 C.F.R. 12.212), consistent
with 48 C.F.R. 12.212 and 48 C.F.R 227.7202-1 through 227.7202-4. You will not provide
the Soware to the U.S. Government. Contractor or Manufacturer is Intel Corporation,
2200 Mission College Blvd., Santa Clara, CA 95054.
EXPORT LAWS. Licensee agrees that neither Licensee nor Licensee’s subsidiaries will
export/re-export the Soware, directly or indirectly, to any country for which the U.S.
Department of Commerce or any other agency or department of the U.S. Government
or the foreign government from where it is shipping requires an export license, or other
governmental approval, without rst obtaining any such required license or approval. In
the event the Soware is exported from the U.S.A. or re-exported from a foreign destination by Licensee, Licensee will ensure that the distribution and export/re-export or import
of the Soware complies with all laws, regulations, orders, or other restrictions of the U.S.
Export Administration Regulations and the appropriate foreign government.
APPLICABLE LAWS. is Agreement and any dispute arising out of or relating to it will
be governed by the laws of the U.S.A. and Delaware, without regard to conict of laws
principles. e Parties to this Agreement exclude the application of the United Nations
Convention on Contracts for the International Sale of Goods (1980). e state and federa l
courts sitting in Delaware, U.S.A. will have exclusive jurisdiction over any dispute arising
out of or relating to this Agreement. e Parties consent to personal jurisdiction and venue
in those courts. A Party that obtains a judgment against the other Party in the courts identied in this section may enforce that judgment in any court that has jurisdiction over the
Parties.
Licensee’s specic rights may vary from country to country.
Page 5

Product Specications/ Especicaciones del producto/
Технические характеристики/
产品规范
製品仕様 /
CPU/ CPU/
GPU/ GPU/
Видеоадаптер/
M/B Form Factory/
Factor de forma de la placa base/
M/B フォ ームファ クトリー /
Форм-фактор материнской
платы/
Memory/ Memoria/
Память/
M.2 slot/ Ranura M.2/
M.2 ス ロット /
/ ЦП/
CPU
/
GPU
GPU
M/B 规格尺寸
内存
Слот M.2/
CPU
メモリ /
M.2 插槽
AMD Ryzen™ Series Mobile Processors
AMD Radeon™ Graphics
Proprietary design (7.0” x 5.7")
Diseño exclusivo (7.0” x 5.7")
専用設計 (7.0 インチ x 5.7 インチ )
Фирменная конструкция (17,8х14,5см;
7,0 x 5,7дюйма)
专利设计 (7.0” x 5.7")
2 x SO-DIMM DDR4-3200,
Max. 64GB (non-ECC)
Supports 1 x M.2 SSD slot
(Support PCIe 3.0x4/ SATA3 type 2260/ 2280
M.2 SSD)
Compatible con 1 x ranura M.2 SSD
(Compatible con 2260/ 2280 M.2 SSD tipo
PCIe 3.0x4/ SATA3)
1 x M.2 SSD ス ロット に 対 応
(PCIe 3.0x4/ SATA3 タイプ 2260/ 2280 M.2
SSD に対応 )
Предусмотрен 1 слот M.2 SSD
(поддерживаются SSD-накопители M.2
PCIe 3.0x4/ SATA3 типа 2260/ 2280)
支持 1 x M.2 SSD 插槽
(支持 PCIe 3.0x4/ SATA3 类型 2260/ 2280
M.2 SSD)
Page 6

HDD/ HDD/
Жесткий диск/
WLAN/ WLAN/
HDD/
HDD
WLAN/
Беспроводная сеть/
WLAN
Supports 7mm/ 9.5mm 2.5“ SATA HDD
or SSD
Compatible con SATA HDD O SSD de 7mm/
9,5mm 2,5“
7 mm/ 9.5 mm 2.5 インチ SATA HDD または
SSD に対応
Поддерживается 2,5-дюймовый жесткий
диск или SSD-накопитель SATA, толщиной
7 или 9,5мм
支持 7mm/ 9.5mm 2.5“ SATA HDD 或 SSD
Supports M.2 (2230) WiFi/ BT module
Compatible con módulo M.2 (2230) WiFi/ BT
M.2 (2230) Wi-Fi/BT モジュール に 対 応
Поддерживается модуль WiFi/ BT M.2
(2230)
支持 M.2 (2230) WiFi/ BT 模块
Audio codec/ Códec de audio/
オーディオコーデック /
Аудиокодек/
音频编解码器
Power Adaptor/ Adaptador de
alimentación/
Блок питания/
電 源 アダプタ /
电源适配器
Front I/O / E/S en el frontal/
前面出入力 /
порты ввода-вывода/
Фронтальные
前 I/O
ALC233 codec/ Códec ALC233/
ALC233 コ ー デ ック /
码器
65 W/ 19V
65 W/ 19V
65 W/ 19V
65Вт/ 19В
65 W/ 19V
Card Reader (SD/SDHC/SDXC/MMC)*1 /
USB 2.0*2 (Quick charge*1)/ USB 3.2 Gen1
Type-A*2/ USB 3.2 Gen1 Type-C*1
Lector de tarjeta (SD/SDHC/SDXC/MMC)*1 /
USB 2.0*2 (Carga rápida*1)/ USB 3.2 Gen1
Tipo-A*2/ USB 3.2 Gen1 Tipo-C*1
カードリー ダー (SD/SDHC/SDXC/MMC)*1 /
USB 2.0*2 (Quick charge*1)/ USB 3.2 Gen1
Type-A*2/ USB 3.2 Gen1 Type-C*1
1 кардридер (SD/SDHC/SDXC/MMC);
1 порт USB 2.0*2 (с быстрой зарядкой);
2 порта USB 3.2 Gen1 Type-A; 1 порта
USB 3.2 Gen1 Type-C
读卡器 (SD/SDHC/SDXC/MMC)*1/ USB 2.0*2
(快 速 充电 器 *1)/ USB 3.2 Gen1 A 型 *2/
USB 3.2 Gen1 C 型 *1
ALC233/
ALC233 编解
2 3
Page 7

Rear I/O/ E/S en posterior/
リア I/O/
ввода-вывода/
Тыловые порты
后 I/O
LED Indicator/
Indicador LED/
LED インジケータ /
Светодиодный индикатора/
LED 指示灯
HDMI*1 (4K@60 Hz)/ VGA*1/
USB 3.2 Gen1 Type-A*2/ LAN*1/ DC Jack/
Headphone Jack/ Mic-in
HDMI*1 (4K@60 Hz)/ VGA*1/
USB 3.2 Gen1 Tipo-A*2/ LAN*1/ Conector
CC/ Conector de auriculares/ Entrada de
micro
HDMI*1 (
VGA*1/ USB 3.2 Gen1 Type-A*2/ LAN*1/
DC ジャック / ヘッド ホ ン ジ ャッ ク / マイク
入力
1 порт HDMI (4K@60 Hz);
1 порт VGA; 2 порта USB 3.2 Gen1 Type-A;
1 порт ЛВС; вход питания пост.тока;
разъем для наушников; микрофонный
вход
HDMI*1(
VGA*1/ USB 3.2 Gen1 A 型 *2/ LAN*1/ DC
插孔 / 耳机插孔 / 麦克风输入
Power LED (Color: blue)
LED de energía (Color: azul)
電源 LED ( 色 : 青 )
Индикатор питания (синего цвета)
电源 LED(颜色:蓝)
4K@60 Hz
4K@60 Hz
)/
)/
VESA mount/ Montaje VESA/
VESA マウント
Крепление VESA/
/
VESA 底座
Kensington lock/ Cable de
seguridad Kensington/
Kensington ロック /
Противокражный замок
Kensington/
Kensington 锁
Supports VESA standard 100x100mm &
75x75mm
Compatible con VESA estándar 100 x 100 mm
y 75 x 75 mm
VESA 規格 100x100mm および 75x75mm に
対応
Совместимо с кронштейнами стандарта
VESA 100x100мм и 75x75мм
支持 VESA 标准 10 0x100mm & 75x75mm
Reserved at the rear cover
Reservado en la cubierta posterior
背面カバー に予 約 済
На задней панели
预留在后盖上
Page 8

Stand/ Soporte/
Подставка/
Dimension/ Dimensiones/
Габариты/
OS/ SO/
OS/
системы/
スタ ンド /
支架
尺寸
Операционные
操作系统
寸法 /
Safety/EMC Certication/
Certicado Seguridad/EMC/
安全 /EMC 認定 /
Сертификаты безопасности
и электромагнитной
совместимости/
安全 /EMC 认证
128.7x72.2x24.3mm
128,7 x 72,2 x 24,3 mm
128.7x72.2x24.3mm
128,7x72,2x24,3мм
128.7x72.2x24.3mm
194mm (L)*150mm (W) *26mm (H)
194 mm (Largo) * 150 mm (Ancho) * 26 mm
(alto)
194mm ( 長さ ) x 150mm ( 幅) x 26mm ( 高さ)
194 (Д) х 150 (Ш) х 26 (В) мм
194mm (L)*150mm (W) *26mm (H)
Windows® 10 64-bit / 11 64-bit
Windows® 10 64 bit / 11 64 bit
Windows® 10 64 ビット / 11 64 ビット
Windows® 10 64-разрядная/ 11
64-разрядная
Windows® 10 64 位 / 11 64 位
FCC, CE
ErP/EuP ready (ErP/EuP ready power supply
is required)
FCC y CE
Preparado para ErP/EuP (se necesita una
fuente de alimentación preparada para ErP/
EuP)
FCC、CE
ErP/EuP Ready(ErP/Eu P 対応電源供給装置
が必 要です)
FCC, CE
Совместимость с ErP/EuP (необходим блок
питания, соответствующий стандарту ErP/
EuP)
FCC、CE
ErP/ EuP 支持(需要支持 ErP/E uP 的电源)
4 5
Page 9
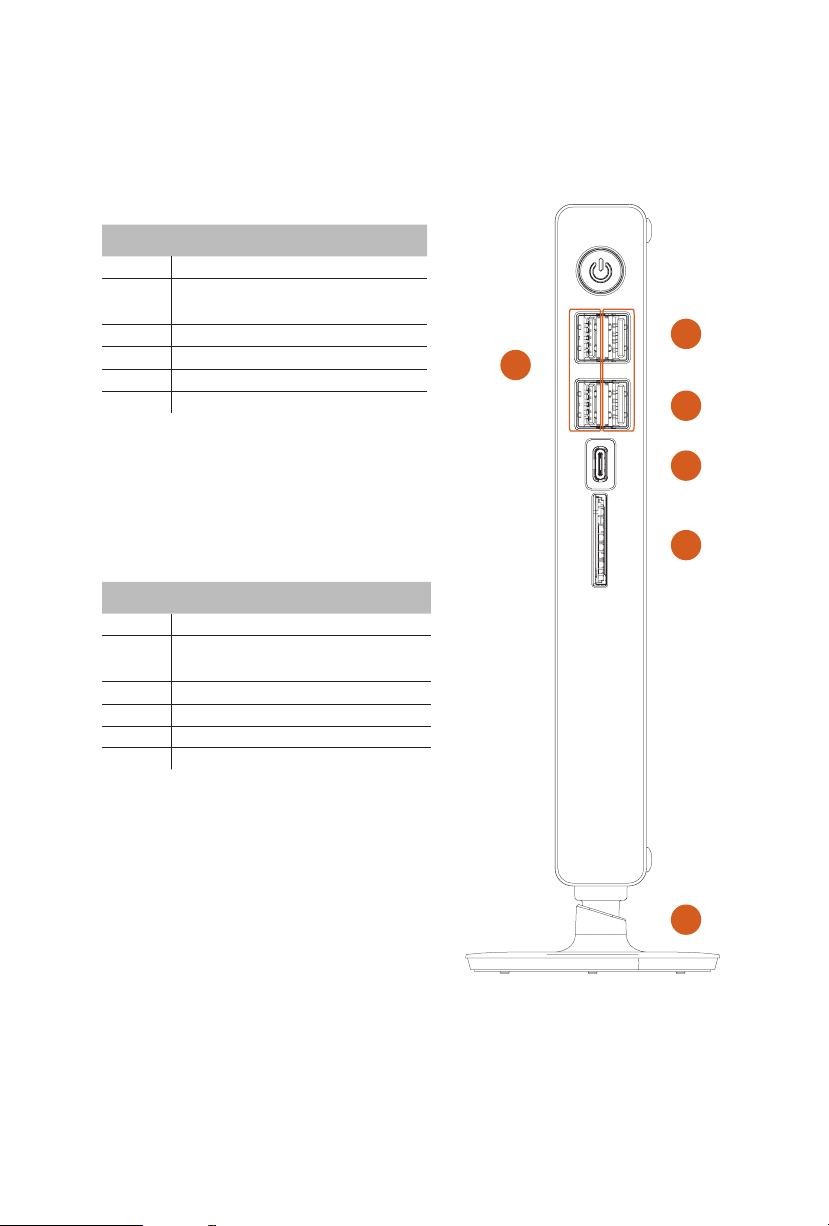
System Front View/ Vista frontal del sistema/
システム前 面 図 /
No. Feature Item
1 USB 2.0 Port*1
USB 2.0 Port*1
2
(Quick Cha rger Suppor t)
3 USB 3.2 Gen1 Type-C Port*1
4 Card Reader
5 Base stand screw
6 USB 3.2 Gen1 Type-A Ports*2
NOTE:
Quick Charge function work under S5 mode.
*1 support S3/S4 wake-up function
*2 support S3/S4/S5 wake-up function
Nº Producto característico
1 Puerto USB 2.0
Puerto USB 2.0 (compatible con
2
Carga rápida)
3 Puerto USB 3.2 Gen1 Tipo C*1
4 Lector de tarjeta
5 Tornillo de base del soporte
6 Puertos USB 3.2 Gen1 Tipo A*2
Вид системы спереди/
系统正视图
6
1
2
3
4
NOTA:
La función de carga rápida funciona en el
modo S5.
*1 Compatibilidad con función de reactivación S3/S4
*2 Compatibilidad con función de reactivación S3/S4/S5
5
Page 10

System Front View/ Vista frontal del sistema/
システム前 面 図 /
番号 機能 /項目
1 USB 2.0 ポ ート
USB 2.0 ポ ート
2
( クイック 充 電 対応 )
3 USB 3.2 Gen1 Type-C ポ ート
4 カードリー ダー
5 ベーススタンド用ネジ
6 USB 3.2 Gen1 Type-A ポ ート
注記 :
クイック 充 電 機 能 は 、S5 モ ード下 で 動 作しま す。
*1 S3/S4 ウェ イク アップ 機 能 を サ ポートし ま す
*2 S3/S4/S5 ウェ イク アップ 機 能 を サ ポ ートし ま す
Вид системы спереди/
*1
*2
系统正视图
6
1
2
3
№ Компоненты
1 Порт USB 2.0
Порт USB 2.0 (с поддержкой
2
быстрой зарядки)
3 Порт USB 3.2 Gen1 Type-C*1
4 Кардридер
5 Винт подставки
6 Порты USB 3.2 Gen1 Type-A*2
ПРИМЕЧАНИЕ
Функция быстрой зарядки работает в режиме S5.
*1 поддержка функции пробуждения S3/S4
*2 поддержка фу нкции пробуждения S3/S4/S5
编号 功能项
1 USB 2.0 端口
USB 2.0 端口(支持快 速 充 电 器)
2
3 USB 3.2 Gen1 C 型端口
4 读卡器
5 底座支架螺丝
6 USB 3.2 Gen1 A 型端口
注:
快速充电功 能仅可用于 S5 模 式 下。
*1 支持 S3 / S4 唤醒功能
*2 支持 S3 / S4 / S5 唤醒功能
*1
*2
4
5
6 7
Page 11

System Rear View/ Vista trasera el sistema/
Вид системы сзади/
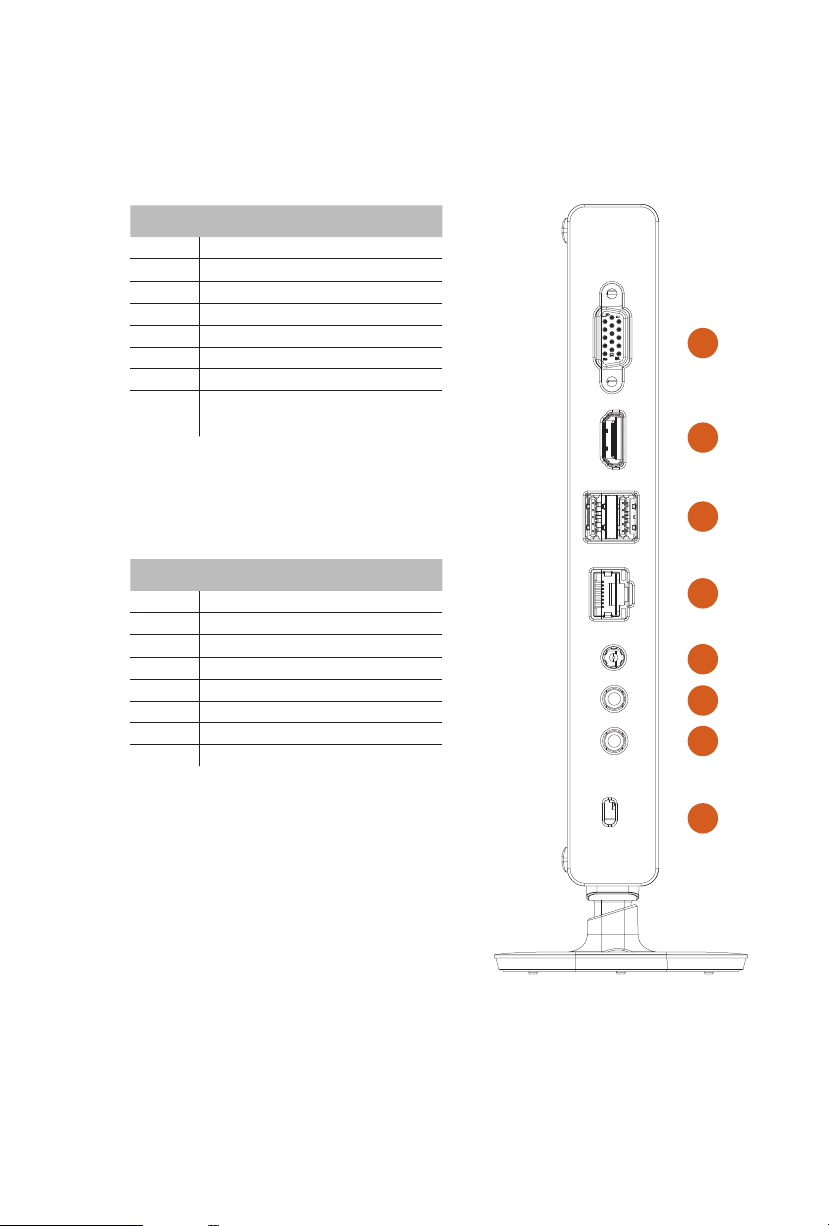
No. Feature Item
1 D-Sub Output
2 HDMI Output
3 USB 3.2 Gen1 Ports*1
4 LAN Port
5 DC IN
6 Headphone Jack
7 Microphone Input
8 Kensington lock
系统后视图
システム背 面 図 /
1
NOTE:
*1 support S3/S4 wake-up function
Nº Producto característico
1 Salida D-Sub
2 Salida HDMI
3 Puertos USB 3.2 Gen1*1
4 Puerto LAN
5 Entrada DC
6 Conector de auriculares
7 Entra de micrófono
8 Cable de seguridad Kensington
NOTA:
*1 Compatibilidad con función de reactivación S3/S4
番号 機能 /項目
1 D-Sub 出力
2 HDMI 出力
3 USB 3.2 Gen1 ポ ート
4 LAN ポ ート
5 DC 入力
6 ヘッド ホ ン ジャック
7 マイク入 力
8 Kensington ロック
*1
2
3
4
5
6
7
8
注記 :
*1 S3/S4 ウェ イク アップ 機 能 を サ ポートし ま す
Page 12
System Rear View/ Vista trasera el sistema/
Вид системы сзади/
№ Компоненты
1 Выход D-Sub
2 Выход HDMI
3 Порты USB3.2 Gen1*1
4 Порт LAN
5 Вход питания постоянного тока
6 Гнездо для наушников
7 Микрофонный вход
8 Противокражный замок
Kensington
ПРИМЕЧАНИЕ
*1 поддержка функции пробуждения S3/S4
系统后视图
システム背 面 図 /
1
2
3
编号 功能项
1 D-Sub 输出
2 HDMI 输出
3 USB 3.2 Gen1 端口
4 LAN 端口
5 DC IN
6 耳机插孔
7 麦克风输入
8 Kensington 锁
注:
*1 支持 S3 / S4 唤醒功能
4
*1
5
6
7
8
8 PB
Page 13
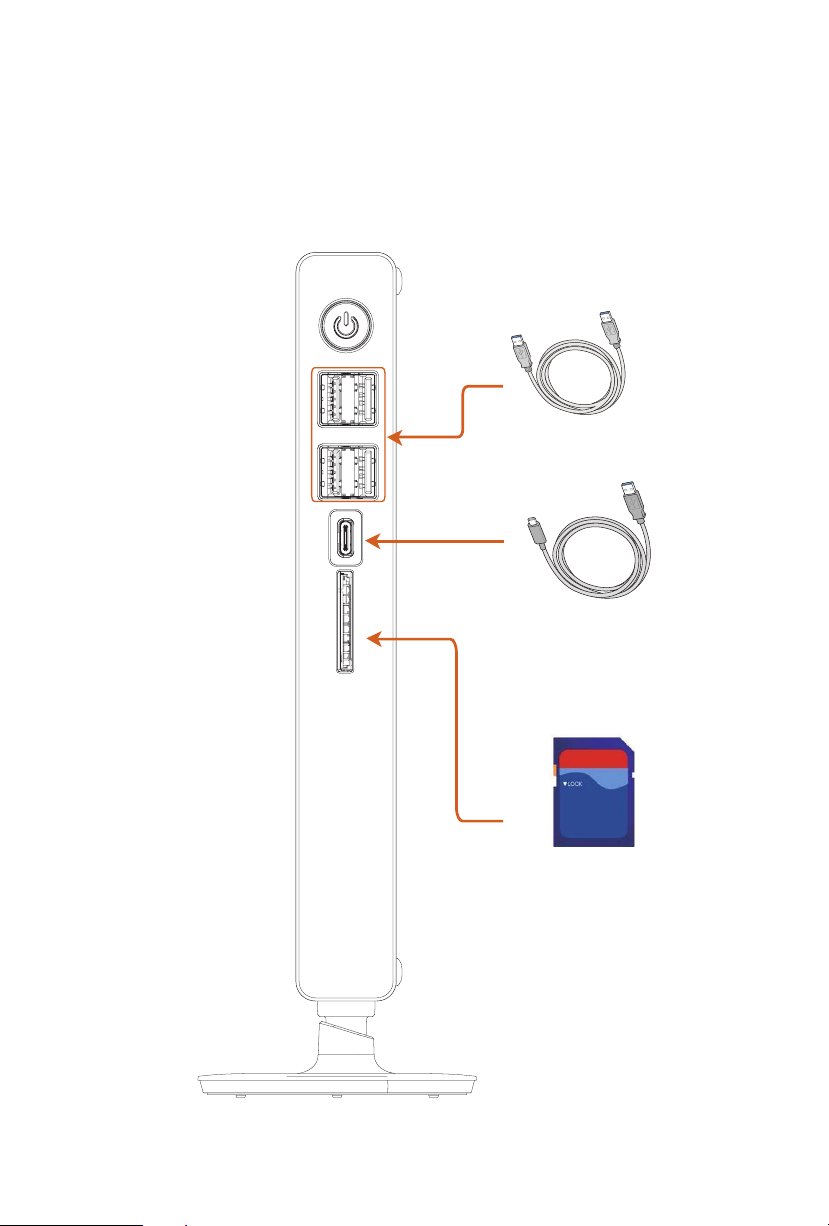
Connection Examples (Front)/ Ejemplos de conexión
(Frontal)/
接続例 ( 前面 )/
(фронтальные порты)/
Примеры подключений
连 接 示 例( 前 )
USB Cable
Cable USB/
USB ケーブル
Кабель USB/
USB Type C Cable
Cable USB Tipo C/
USB Type C ケーブ ル
Кабель USB Type C/
C 型 USB 线
USB 线
/
/
SD Cards
Tarjetas SD/
Карты SD/
SD カード
SD 卡
/
Page 14
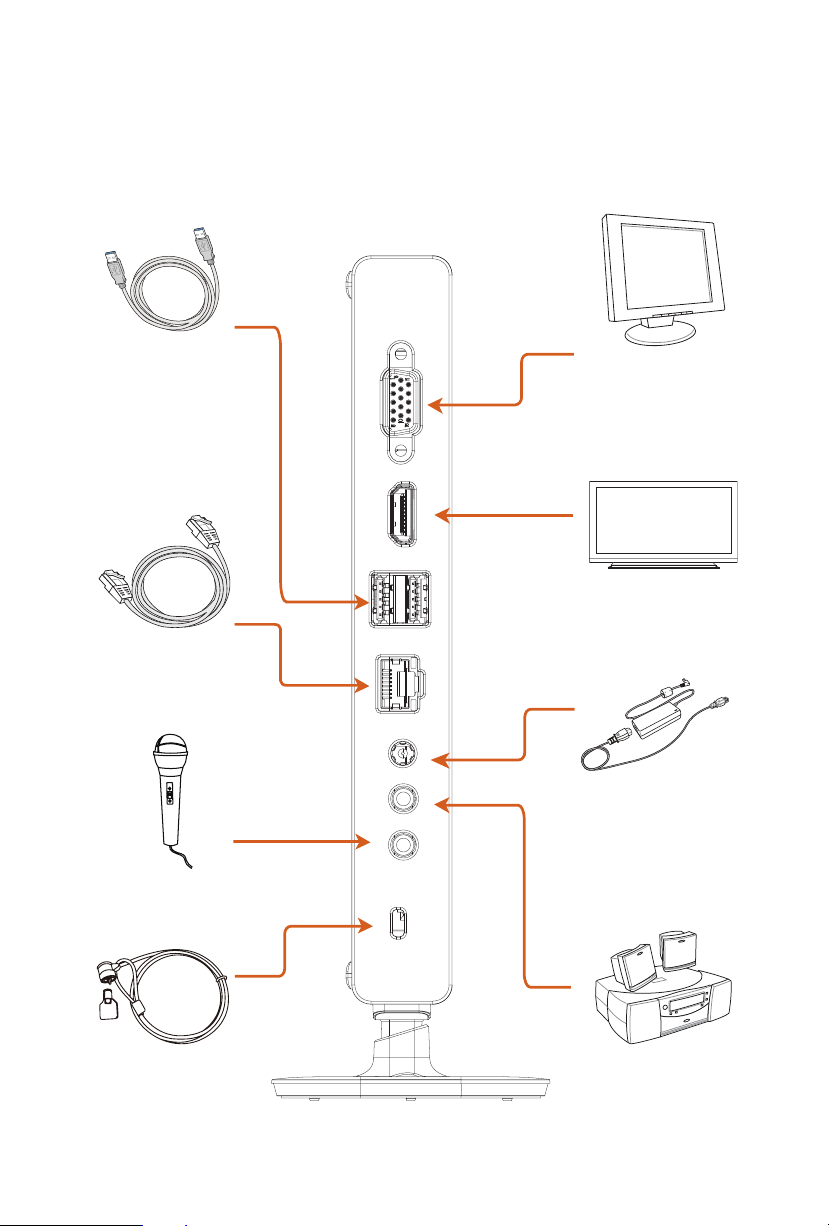
Connection Examples (Rear)/ Ejemplos de conexión
(Traseros)/
接続例 ( 背面 )/
(тыловые порты)/
连 接 示 例( 后 )
Примеры подключений
USB Cable
Cable USB/
Кабель USB/
LAN Cable
Cable LA N/
Сетевой кабель/
Microphone
Micrófono/
Микрофон/
USB ケーブル
USB 线
LAN ケ ーブル
LAN 线
マイク ロ フ ォン
麦克风
/
Computer Display
Pantalla del ordenador/
コンピューターディスプレイ
Компьютерный монитор/
/
计算器显示器
HD TV
Televisión HD/
ТВ высокой четкости/
/
HD テレビ
/
HD TV
Power Adapter
Adaptador de alimentación/
電 源 アダ プタ
/
/ Блок питани я/
电源适配器
Kensington lock Speaker
Altavoz/
Cable de seguridad Kensington/
Kensington ロック
Противокражный замок
Kensington/
/
Kensington 锁
Акус тическа я система/
スピーカ ー
10 11
/
扬声器
Page 15

Vesa Mount/Stand Installation/ Montaje VESA/Instalación
de soporte/
Vesa マウ ント / スタンドの取り付け
/
Установка кронштейна VESA и подставки/
Vesa 底座 / 支架安装
Installing the VESA Bracket
Attach the VESA Bracket to the rear of a compatible display using the four screws.
*Choose mounting holes depending on the mounting hole pattern of your LCD screen
(75 mm × 75 mm or 100 mm × 100 mm).
Instalar el soporte VESA
Conecte el soporte VESA a la parte trasera de una pantalla compatible utilizando los 4
tornillos.
*Escoja los oricios de montaje dependiendo del patrón de oricio de montaje de su
pantalla LCD (75 mm x 75 mm o 100 mm x 100mm).
VESAブラケットの取り付け
4 本のネジを使用して、互換性のあるディスプレイの背面に VESA ブラケットを取り付け
ます。
* LCD 画 面の 取り付 け 穴 パ ターン (75 mm × 75 mm または 100 mm × 100 mm) に応じ
て 、取 り 付 け 穴 を 選 択 し ま す 。
Установка кронштейна VESA
Прикрепите кронштейн VESA на заднюю панель совместимого монитора с
помощью 4-х винтов.
* Выберите крепежные отверстия, соответствующие отверстиям на ЖК-мониторе
(75 × 75мм или 100 × 100мм).
安装 VESA 托架
使用四枚螺 丝将 VESA 托 架 连 接 到 兼 容 显 示 器 的 后 侧。
* 根据 LCD 显示屏的安装孔图纸选择安装孔 (75 mm × 75 mm or 100 mm × 100 mm)。
Page 16
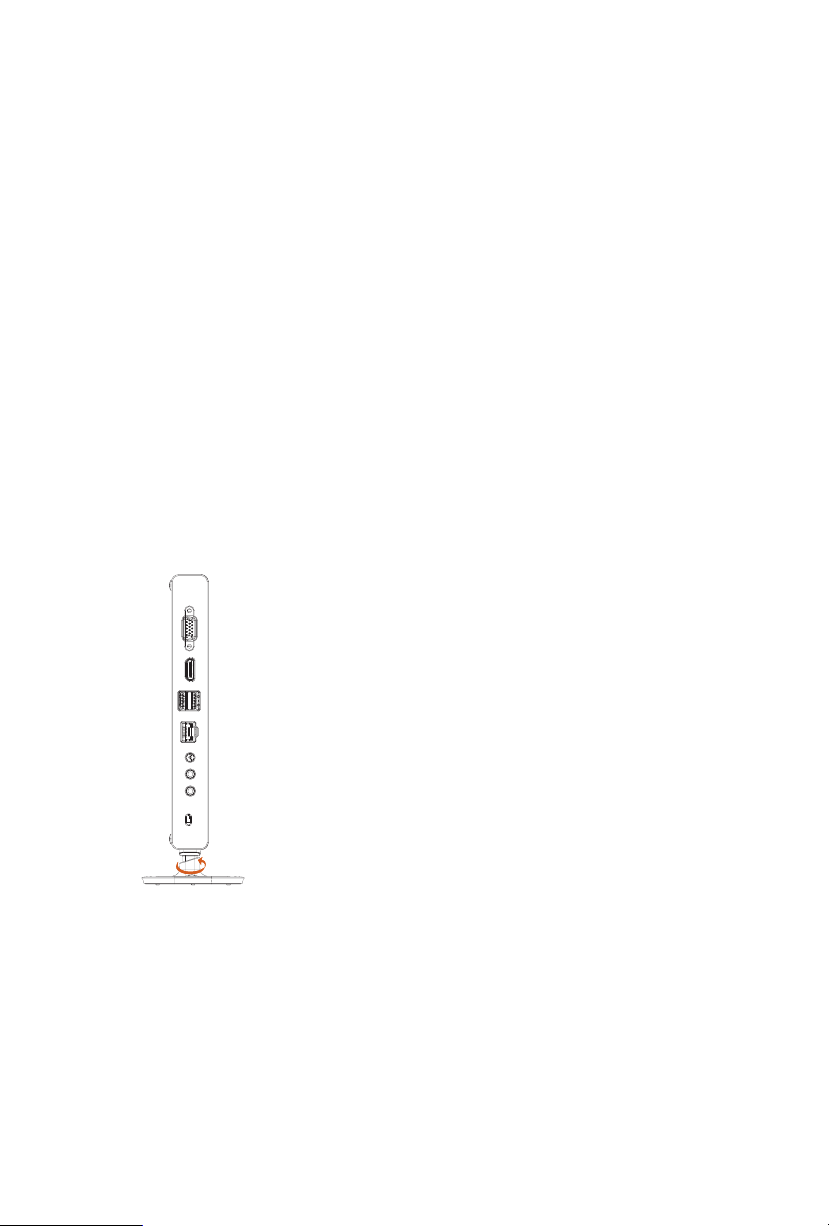
Installing the Base Stand
Attach the base stand to the unit, then hand tighten the screw.
Instalar la base del soporte
Conecte la base del soporte a la unidad, y a continuación, apriete los tornillos.
ベーススタンドの取り付 け
ベーススタンドをユニットに取り付け、ネジを手で 締めます。
Установка подставки
Прикрепите подставку к компьютеру и вручную затяните винт.
安装底座支架
将底座支架连接到装置上,然后用螺丝拧紧。
12 13
Page 17
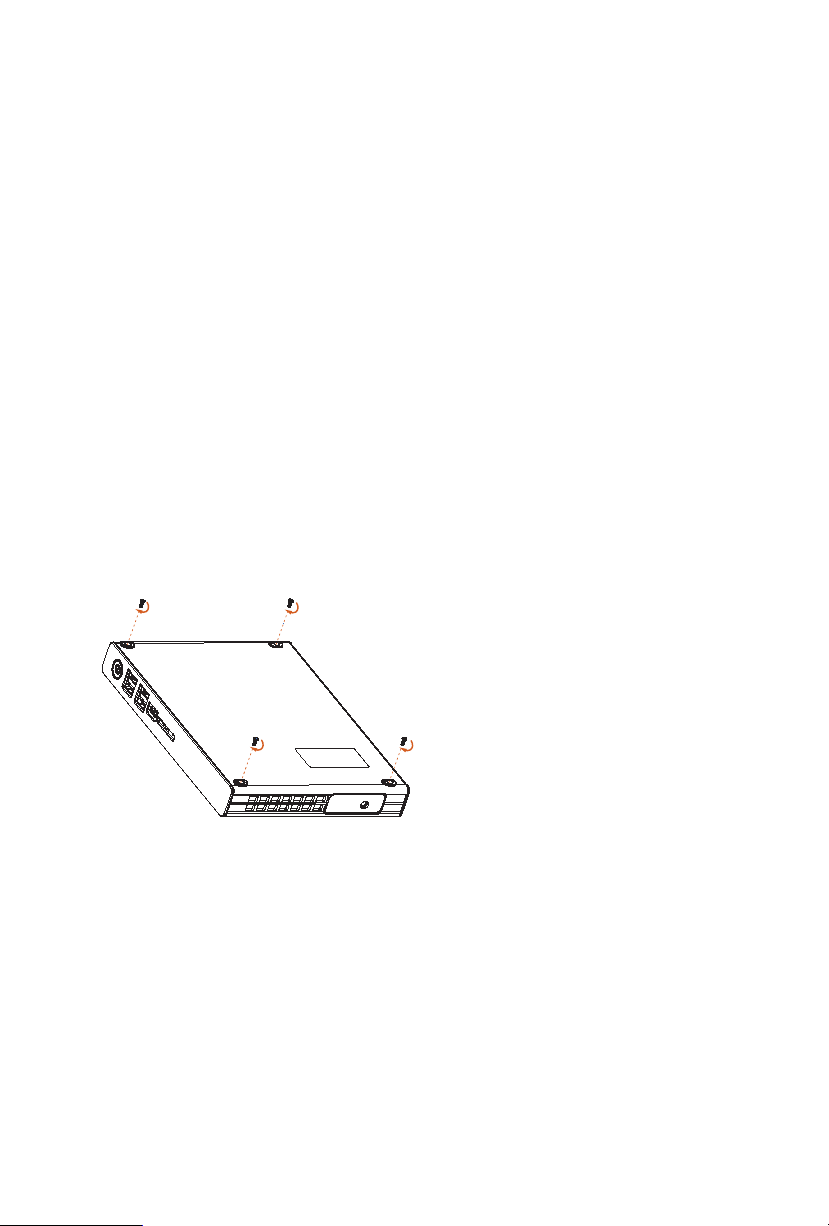
Key Parts Installation
Partes clave de la instalación/
主要部 品の取り付け
Установка основных компонентов/
Removing the Top Case
Remove the four screws rst.
Sacar la carcasa superior
Primero quite los cuatro tornillos.
トップカバ ーの 取り 外 し
最初に、ネジを取り外します。
Снятие верхней крышки корпуса
Сначала удалите 4 винта.
拆除顶部机箱
先拧下四枚螺丝。
/
主要零部件安装
Page 18

To remove the top case, place your ngers in the edge as shown in the image below.
en, li the cover.
Para quitar la carcasa superior, coloque los dedos en el borde como se muestra en la imagen
de abajo.
A continuación, levanta la carcasa.
トップケースを取り外すために、下図に示すように、縁に指を入れてください。
次に、カバーを持ち上げます。
Чтобы снять верхнюю крышку корпуса, возьмитесь за его край, как показано на
рисунке ниже.
Затем поднимите крышку.
要拆除顶部机箱,请将手指放置在下图所示的边缘处。
然后抬起盖板。
14
Page 19
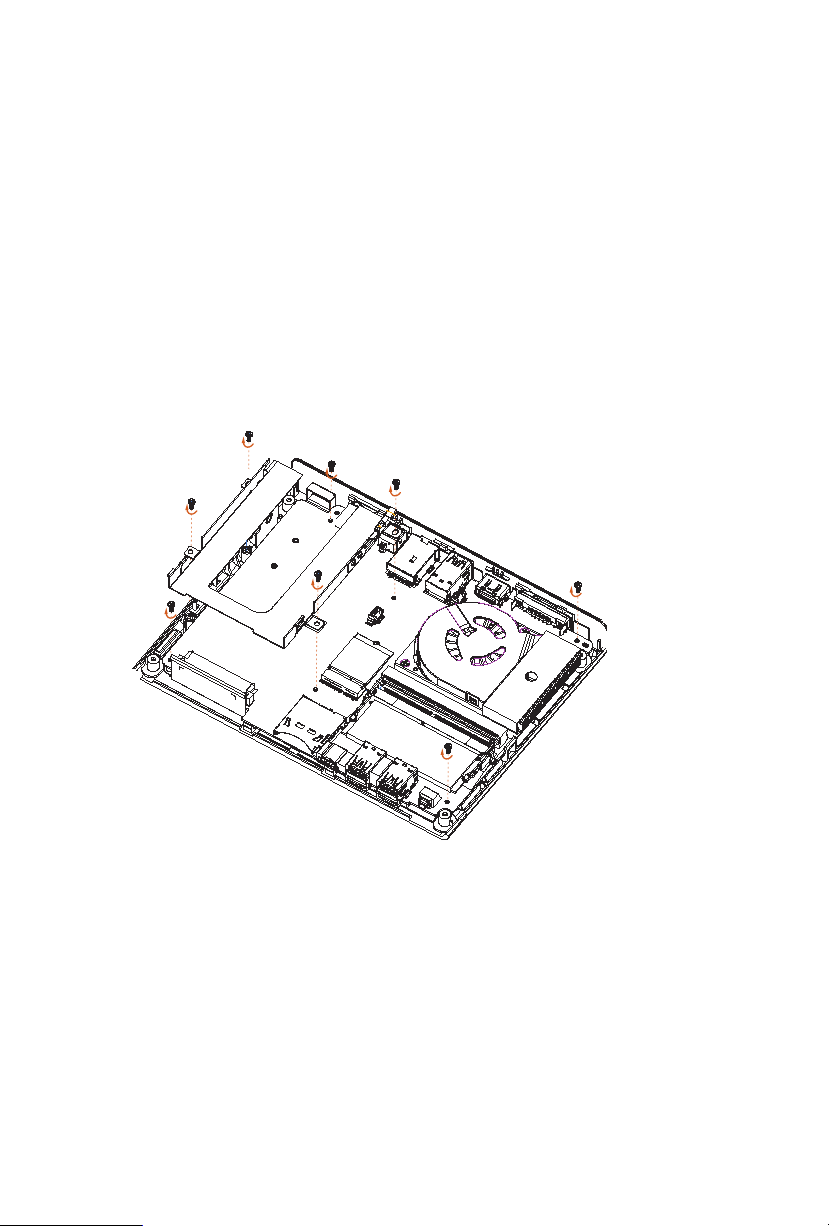
Installing the M.2 SSD/ Instalar el SSD M.2/
Установка SSD-накопителя M.2/
1. Unscrew the three screws holding the HDD bracket and the ve screws that holding the
motherboard.
1. Desatornille los 3 tornillos sujetando el soporte HDD y los cinco tornillos que sujetan
al placa base.
1. HDD ブ ラ ケット を 保 持 す る 3 本のネジを緩め、マザーボードを保持する、5 本 のネジ
を 緩 めます。
1. Вывинтите 3 винта, удерживающих кронштейн для жесткого диска, и 5 винтов,
удерживающих материнскую плату.
1. 拧下固定 HDD 托架的三枚螺丝以及固定主板的五枚螺丝。
安装 M.2 SSD
M.2SSDの取り付け /
Page 20

2. Li the motherboard.
2. Levante la placa base.
2. マ ザ ーボード を 持 ち上 げ ま す。
2. Поднимите материнску ю плату.
2. 抬 起 主 板。
2
3. Locate the M.2 Slot on the bottom of motherboard
3. Localice la ranura M.2 en la parte trasera de la placa base
3. マ ザ ーボ ード の 下 部 の M.2 ス ロ ットを 探しま す。
3. Найдите слот M.2 на нижней стороне материнской платы.
3. 找到主板底部的 M.2 插 槽。
1
16
Page 21
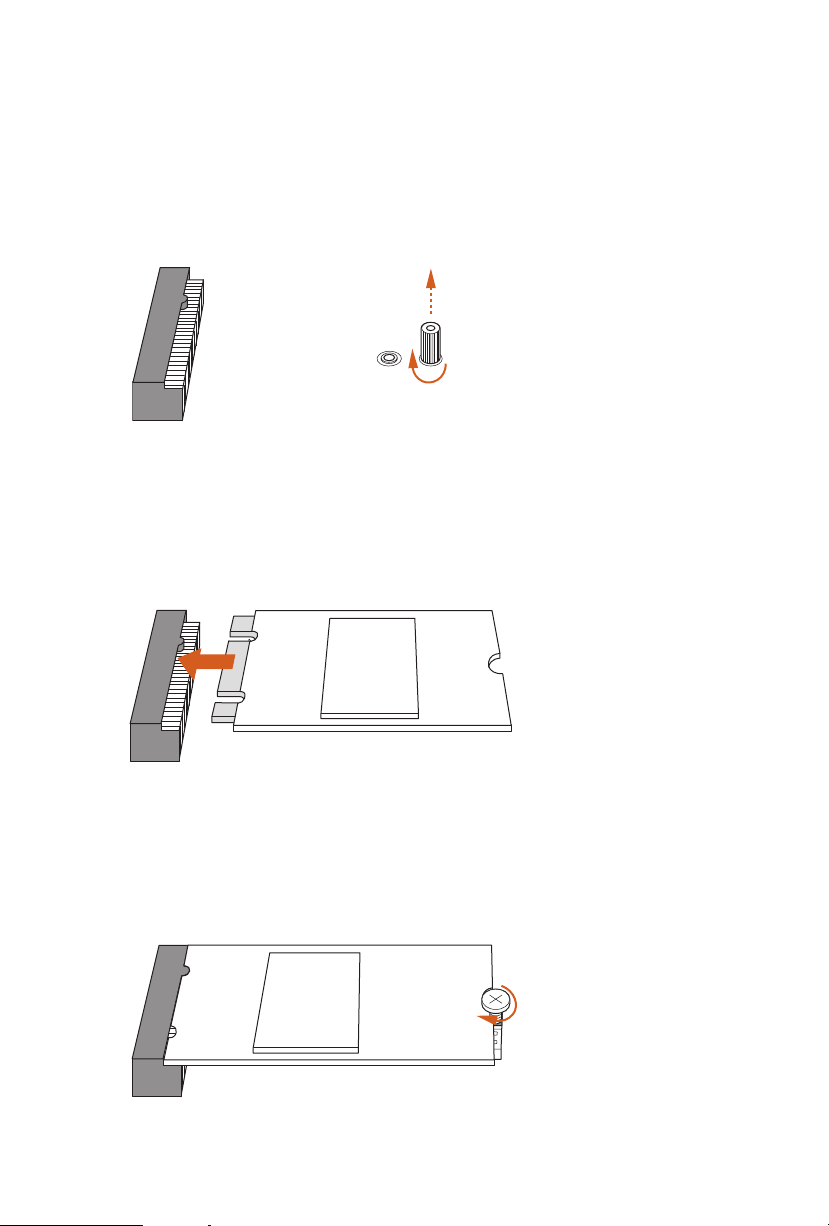
4. Remove the stando screw and keep this screw for later use.
4. Retire el tornillo de separación y guarda este tornillo para más tarde.
4. スタッフオフネジを取り外します。後で使 用するために、ネジを保管してください。
4. Удалите проставочный винт и сохраните его для последующего использования.
4. 拧 下 平 衡 螺 丝 并 妥 善 曝 光,以 便 今 后 使 用 。
5. Carefully insert the M.2 SSD into the slot.
5. Con cuidado, inserte la SDD M.2 en la ranura.
5. M.2 SSD を 慎 重 に ス ロット に 挿入し ま す。
5. Осторожно вставьте SSD-накопитель M.2 в слот.
5. 小心地将 M.2 SSD 插 入 插 槽 中。
6. Tighten the screw to secure the M.2 SSD to the motherboard.
6. Apriete el tornillo para asegurar la SSD M.2 en la placa base.
6. ネジを締め、M.2 SSD をマ ザ ーボードに固定します。
6. Затяните винт, чтобы закрепить SSD-накопитель M.2 на материнской плате.
6. 拧 紧 螺 丝,将 M.2 SSD 固 定 到 主 板 上。
Page 22
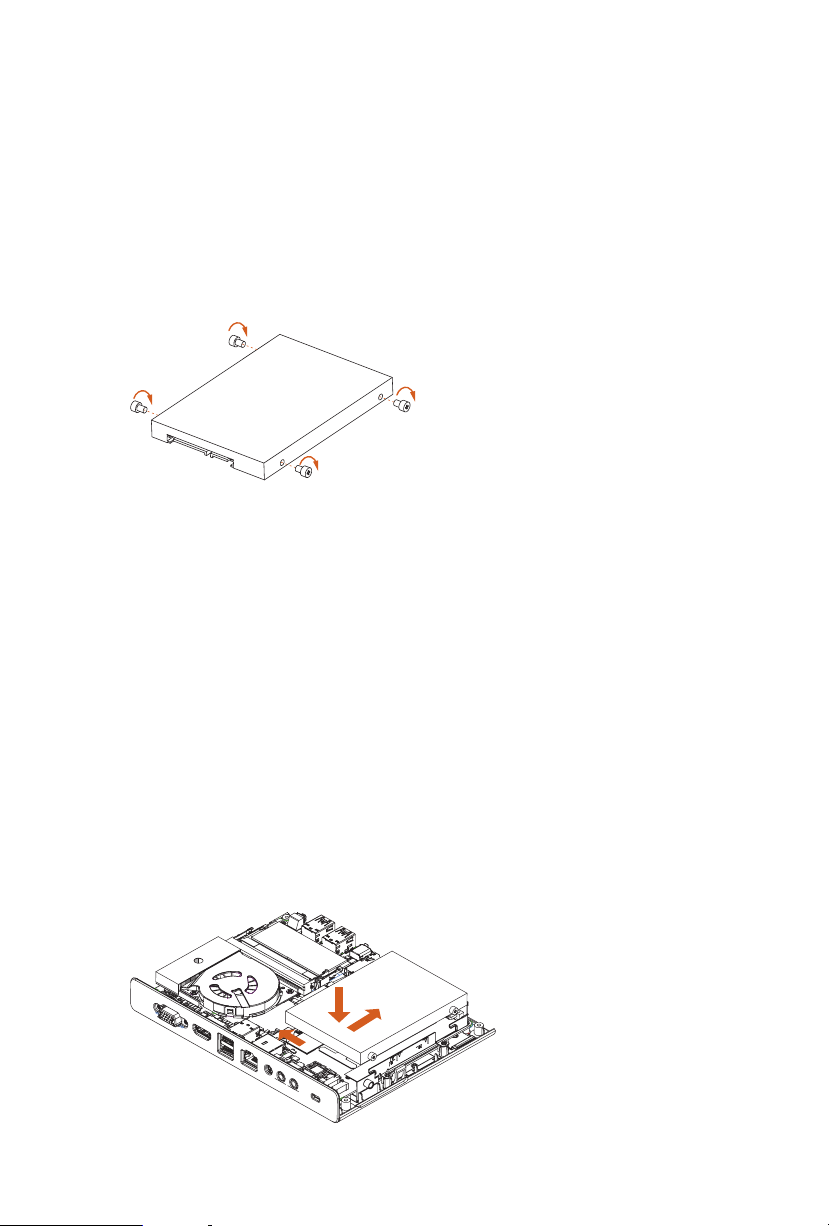
Installing the HDD/ Instalar el HDD/
Установка жесткого диска/
HDDの取り付け /
安装 HDD
Tighten the four screws to secure the HDD.
Apriete los cuatro tornillos para asegurar el HDD.
4 本のネジを締め、HDD を 固 定しま す。
Затяните 4 винта, чтобы закрепить жесткий диск.
拧 紧 四 枚 螺 丝,固 定 HDD。
1. Pull the release lever out.
2. Place the 2.5-inch hard drive into the bracket.
3. Slide the 2.5-inch hard drive into the connector rmly
1. Tire de la palanca de liberación
2. Coloque los discos duros de 2.5 pulgadas en el soporte.
3. Deslice rmemente los discos duros de 2.5 pulgadas en el conector
1. リリースレバーを外向きに引きます。
2. 2.5 インチハードドライブをブラケットに配置します。
3. 2.5 インチハードドライブをコネクタにしっかりスライドさせます。
1. Потяните рычаг фиксатора наружу.
2. Поместите 2,5-дюймовый жесткий диск в кронштейн.
3. Плотно вставьте 2,5-дюймовый жесткий диск в разъем.
1. 拉 出 释放 杆。
2. 将 2.5 英 寸 硬 盘 驱 动 器 放 入 托 架 中。
3. 将 2.5 英 寸 硬 盘 稳 定 地 滑入 接口 中。
2
3
1
Page 23

*15G067047000AK* *1506-1NJ9000*
15G067047000AK 1506-1NJ9000
 Loading...