

Page 1

Page 2

Version 1.1
Published December 2016
Copyright©2016 ASRock INC. All rights reserved.
Copyright Notice:
No part of this documentation may be reproduced, transcribed, transmitted, or translated
in any language, in any form or by any means, except duplication of documentation by the
purchaser for backup purpose, without written consent of ASRock Inc.
Products and corporate names appearing in this documentation may or may not be
registered trademarks or copyrights of their respective companies, and are used only for
identication or explanation and to the owners’ benet, without intent to infringe.
Disclaimer:
Specications and information contained in this documentation are furnished for
informational use only and subject to change without notice, and should not be
constructed as a commitment by ASRock. ASRock assumes no responsibility for any errors
or omissions that may appear in this documentation.
With respect to the contents of this documentation, ASRock does not provide warranty of
any kind, either expressed or implied, including but not limited to the implied warranties
or conditions of merchantability or tness for a particular purpose.
In no event shall ASRock, its directors, ocers, employees, or agents be liable for any
indirect, special, incidental, or consequential damages (including damages for loss of
prots, loss of business, loss of data, interruption of business and the like), even if ASRock
has been advised of the possibility of such damages arising from any defect or error in the
documentation or product.
Regulatory Information
FCC Statement and Declaration: ASRock Wireless declares that t his device complies
with Part 15 of the FCC Rules and requlations. Operation of this device is subject to the
following two conditions:
is device may not cause harmful interface.
•
is device must accept any interference received, including interference that may
•
cause undesired operation.
FCC Notice: is equipment has been tested and found to comply with the limits for a
Class B digital device, pursuant to Part 15 of the FCC Rules. ese limits are designed to
provide reasonable protection against harmful interference in a residential installation.
is equipment generates, uses and can radiate radio frequency energy and, if not installed
and used in accordance wit h the instructions, may cause harmful interference to radio
communications. However, there is no g uarantee that interference will not occur in a
particular insta llation. If th is equipment does c ause harmful interference to radio or
television reception, which can be determined by turning the equipment o and on, the
Page 3

user is encouraged to try and correct the interference by one or more of t he followi ng
measures:
Reorient or relocate the receiving antenna.
•
Increase the distance between the equipment and the receiver.
•
Connect the equipment to an outlet on a circuit dierence from that to which the
•
receiver is connected.
Consult the dealer or an experienced radio/TV technician for help.
•
FC C Caution: A ny changes or mod i fic ations not e xpress ly a pproved b y the p arty
responsible for compliance could void the user’s authority to operate this equipment.
IMPORTANT NOTE:
Radiation Exposure Statement
is equipment complies with FCC radiation exposure limits set forth for an uncontrolled
environment. End users must follow the specific operating instructions for satisfying
RF exposure compliance. To maintain complia nce with FCC RF exposure compliance
requirement, please follow operation instructions as documented in this manual.
This t ra nsmitter mu st not be co-located or ope rati ng i n conjunction with ant other
antenna or transmitter.
Industry Canada Statement:
is Class B digital apparatus complies with Canadian ICE-003.
Cet appareil numerique de la classe B conforme a la norme NMB-003 du Canada
This device complies with RSS st andards of t he Industr y Ca nada Rules. Operat ion is
subjext to the following two conditions:
(1) is device may not cause harmful interference, and
(2) This device must accept any interference received, including interference that may
cause undesired operation.
Ce dispositif est conforme a la norme CNR- standards d’Industrie Canada applicable aux
appa reils radio exempts de licence. Son fonctionnement est sujet aux deux conditions
suivantes:
(1) le dispositif ne doit pas produire de brouillage prejudiciable, et
(2) ce dispositif doit accepter tout brouillage recu, y compris un brouillage susceptible de
provoquer un fonctionnement indesirable.
IMPORTANT NOTE
Radiation Exposure Statement:
is equipment complies with IC radiation exposure limits set forth for an uncontrolled
environment. is equipment should be installed and operated with a minimum distance
of 20cm between the radiator and your body.
Déclaration d’exposition aux radiations:
Cet équ ipement est conforme au x limites d'exposition aux rayonnements IC établies
pour un environnement non contrôlé. Cet équipement doit être installé et utilisé avec un
minimum de 20 cm de distance entre la source de rayonnement et votre corps.
Caution: e device for operation in the band 5150-5250 MHz is only for indoor use to
Page 4

reduce the potential for harmful interference to co-channel mobile satellite systems.
Avertissement: les dispositifs fonctionnant dans la bande 5150-5250 MHz sont réser vés
uniquement pour une utilisation à l’intérieur afin de rédu ire les risques de brouil lage
préjudiciable aux systèmes de satellites mobiles utilisant les mêmes canaux.
CALIFORNIA, USA ONLY
e Lithium battery adopted on this motherboard contains Perchlorate, a toxic substance
controlled in Perchlorate Best Management Practices (BMP) regulations passed by the
California Legislature. When you discard the Lithium battery in California, USA, please
follow the related regulations in advance.
“Perchlorate Material-special handling may apply, see www.dtsc.ca.gov/hazardouswaste/
perchlorate”
e terms HDMI™ and HDMI High-Denition Multimedia Interface, and the HDMI
logo are trademarks or registered trademarks of HDMI Licensing LLC in the United
States and other countries.
Electrical Powering
e powering of the product must adhere to the power specications indicated on the
marking labels.
e power supply must be class II and a Limited Power Source in accordance with the
requirements of IEC60950-1/EN60950-1, Clause 2.5 and rated as indicated on the label on
your product. It must be tested and approved to national or local standards.
ASRock Website: http://www.asrock.com
Page 5

Contents
Chapter 1 Introduction 1
1.1 Package Contents 1
1.2 The Wireless Router Label 2
1.3 Positioning Your Router 2
Chapter 2 Wireless Router Overview 3
2.1 The Front View 3
2.2 The Rear View 4
Chapter 3 Setting up the Wireless Router 5
3.1 Connections 5
3.2 Network Conguration 6
3.2.1 Wired Network 6
3.2.2 Wireless Network 7
Chapter 4 Setup Wizard 9
4.1 Starting the Setup Wizard for the First Time 9
4.2 Setting up Basic Congurations 9
Chapter 5 Dashboard 14
5.1 Overview 14
5.2 General Settings 15
5.2.1 WAN Information 15
5.2.2 Wireless Information 16
5.2.3 Client Information 17
5.2.4 USB Information 17
Page 6

5.2.5 Advanced 18
5.2.6 Guests 18
5.2.7 Parental Control 19
5.2.8 Lighting 19
5.2.9 WiFi 19
Chapter 6 Advanced Settings 20
6.1 Wireless Settings 20
6.1.1 Wireless 21
6.1.2 Guests 23
6.1.3 WPS 24
6.2 LAN Settings 25
6.3 Internet Settings 27
6.3.1 Internet 27
6.3.2 Port Trigger 28
6.3.3 Port Forwarding 28
6.3.4 DMZ 29
6.3.5 DDNS 29
6.4 Gaming Boost Settings 31
6.5 Parental Control 32
6.6 Firewall 33
6.7 USB Application 33
6.8 Administration 35
6.8.1 Router Status 35
6.8.2 Operation Mode 35
Page 7

6.8.3 Set Password 36
6.8.4 Firmware Upgrade 37
6.8.5 Self Healing 37
6.8.6 Restore / Save 38
6.8.7 System Log 39
Chapter 7 ASRock Router APP 40
7.1 Registration 40
7.2 Signing in 42
7.3 Adding Routers 43
7.4 Router Settings 44
7.5 IR Control 45
7.6 Storage 47
Chapter 8 Troubleshooting 48
8.1 How to Restart Your Network 48
8.2 Wireless Settings 48
8.3 Standard LED Behavior When the Router Is Powered On 48
8.4 Unable Log In to the Router 49
8.5 Unable Access the Internet 49
8.6 Wireless Connectivity 50
8.7 Restore to the factory default settings 50
Appendix - Factory default settings 51
Appendix - Specications 52
Page 8

Page 9

ASRock G10 Gaming Router
Chapter 1 Introduction
ASRock AC2600 G10 Gaming Router is equipped with four high-performance
internal antennas oering a combined speed of 2.53Gbps. Ideal for homes where
high volumes of network trac is needed. e dynamic Quality of Service (QoS)
feature optimizes the networking performances on your devices. With the ASRock
APP, you can even remote control your home appliances.
1.1 Package Contents
•ASRock AC2600 G10 Gaming Router
•HDMI 2-in-1 Router •Power Adapter •Network RJ45 Cable
•Micro USB Cable •HDMI Cable •Quick Installation Guide
Keep the original packaging material in case you would need future warranty services such
as repair or replacement.
English
1
Page 10

1.2 The Wireless Router Label
Vie w the label on the back of the wireless router to ident ify t he seria l number, port
connectors, and default login information.
*e images in this docume nt are examples only and may be dierent f rom the product you purchase .
The label on the router shows the login information, WiFi network name and network
password, MAC address and serial number.
1.3 Positioning Your Router
For the best wireless signal transmission between the wireless router and the connected
client device, please follow the guidelines below to position your router.
•Place the wireless router in a centralized area for maximum wireless coverage for
other network devices.
•Place the wireless router on an elevated location, minimizing the number of walls
and ceilings between the router and other devices.
•Place the wireless router away from large metal surfaces, large glass surfaces, and
insulated walls.
•Make sure that the wireless router is within reach of an AC power outlet and near
Ethernet cables for wired computers.
English
2
Page 11

ASRock G10 Gaming Router
Chapter 2 Wireless Router Overview
is chapter provides diagrams showing the location of important components of
the Wireless Router.
2.1 The Front View
e status LED on the front of the ASRock router allows you to verif y various conditions.
Flash ing Dark
Blue
Star ting up
Solid Da rk Blue Flashing Yellow S olid Yellow Flash ing Light
Blue
Connec ted to the
interne t
ADSL mod em not
detec ted / WPS
connection failed
Modem detected
but no inter net
connection
Connec ting to
a WPS- enabled
device
Solid Light Blue
WPS connected
English
3
Page 12

2.2 The Rear View
*H2R may or may not be supplied
depending on the model you purchase.
2.4G WPS
H2R
IR Tx
5G WPS
1
2
3
4
English
GbE WAN
Reset
DC-In 12V
5
6
7
8
9
10
GbE LAN x 4
Dual USB 3.0
Power On/Off
No. Description Function
HDMI 2-in-1
1
Router (H2R)
Infrared Trans-
2
mitters
3 5G WPS Button
2.4G WPS But-
4
ton
5 LA N1~4
6 WAN Po r t
7 USB3.0 Ports
8 Reset Button
Wireless access point or HDMI Miracast / EZplay and DLNA
*H2R may or may not be supplied depending on the model you purcha se.
Communicate with receivers
Press to connect to a wireless network without password
using WPS on 5GHz band.
Press to connect to a wireless network without password
using WPS on 2.4GHz band.
Four local Ethernet ports for connecting local computers
and other wired network devices
Connect a network cable into this port to establish a WAN
connection.
Plug the USB printers, ash drives, and other USB devices
into this port to share the network connection
Press to reset the system or press and hold the button for
more than 10 seconds to restore the factor y default settings.
9 Power Button Press to power on or o the router.
10 DC-in Port Connect the provided AC power adapter to this port.
4
Page 13

ASRock G10 Gaming Router
Chapter 3 Setting up the Wireless Router
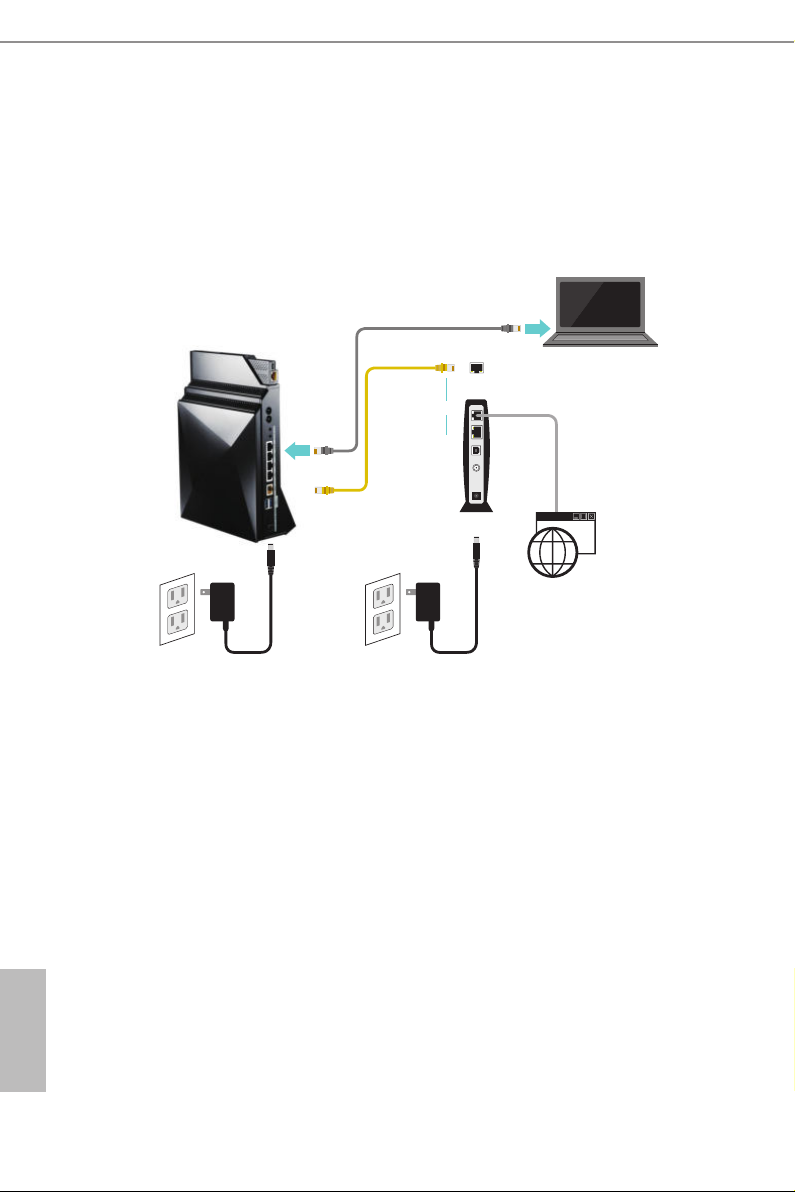
3.1 Connections
or
Ethernet Cable
Router
Network
RJ45 Cable
WAN Port
or
DSL or Cable
Modem
Internet
Power Adapter12V Power Adapter
1. Turn on your modem and unplug your existing modem’s power supply.
2. Connect one end of the supplied yellow Network RJ45 Cable to the WAN port on the
rear of the G10 Gaming Router and the other end to your modem or a WAN port.
3. Plug in the modem’s power supply and turn on your modem.
4. Connect one end of the power cord to the port labeled DCIN 12V on the back of the
G10 Gaming Router and the other end to a power outlet.
5. Press the on/o button to turn on the router.
English
5
Page 14
3.2 Network Conguration
ere are two methods to connect your computer, tablet or smartphone to the network on
the G10 Gaming Router: Wired or wireless connections.
3.2.1 Wired Network
Ethernet Cable
Router
12V Power Adapter
Network RJ45
Cable
WAN Port
or
DSL or Cable
Modem
Internet
Power Adapter
1. Connect one end of the Ethernet cable to any LAN port on the rear of the G10
Gaming Router and the other end to your device.
2. Make sure that the status LED on the router is lit up dark blue.
English
6
Page 15

3.2.2 Wireless Network
ASRock G10 Gaming Router
WAN Port
or
DSL or Cable
Modem
Internet
Power Adapter
Router
12V Power Adapter
Network RJ45
Cable
Please make sure your device is wireless-enabled.
* For computers, a wireless card or adaptor is required. For handheld dev ices, v isit your device’s WiFi Set tings
menu and e nsure that WiFi is turned on.
Your device can connect to the wireless network on the G10 Gaming Router in two ways:
(1) Using SSID and Password
On your device, locate and select the Wi-Fi network name (SSID), “ASRock” or
“ASRock_5G” in a list of available networks. Enter your wireless password listed on the
bottom of the router. Select “Connect”.
SSID Network Password
2.4 G
5G
ASRock
ASRock_5G
(Check product label
on the bottom of the router)
(Check product label
on the bottom of the router)
English
7
Page 16

(2) Using WPS
(Wi-Fi Protected Setup)
WPS stands for Wi-Fi Protected Setup and it is a wireless networking standard that tries to
make connections between a router and wireless devices faster and easier.
Press and hold the WPS 2.4G/5G button on the rear of the G10 Gaming Router for more
than 5 seconds. e status LED on the front of the router will ash light blue at this stage.
If you use a handheld device, locate and press the WPS button shown as
two curved arrows to connect.
If you use a computer, locate and select the Wi-Fi network name (SSID),
“ASRock” or “ASRock_ 5G”. Select “Connect”.
When WPS is connected successfully, the Status LED indicator on the front of the router
turns to a solid light blue.
*e WPS f unction may or may not be supported depending on your de vice.
LED Indicator Variations:
Successful Pairing:
5G WPS
2.4G WPS
English
8
Press the “WPS“
button
Pairing Failed:
5G WPS
2.4G WPS
Press the “WPS“
button
Pairing
(About 2 mins)
Pairing
(About 2 mins)
Pairing
successfully
(5 secs)
Pairing failed
(About 1 min)
WA N
connected
WA N
connected
Page 17

ASRock G10 Gaming Router
Chapter 4 Setup Wizard
4.1 Starting the Setup Wizard for the First Time
Your ASRock router comes with an intuitive wizard that allows you to easily congure its
various features through a web browser, such as the Internet Explorer, Firefox, Safari, or
Google Chrome.
1. When your device is successfully connected to the Internet, open your web
browser (Google Chrome recommended).
2. If Setup Wizard does not launch automatically, enter the default IP address:
http://192.168.1.1 or "ASRock.router" into the browser address bar. Press
Enter.
4.2 Setting up Basic Congurations
Step 1. Change Login Password
1. When the Setup Wizard appears, you need to change the login password to
proceed.
NOTE: It is required to change the login password at this step to secure your network and the route r. Changing
the login username is optional .
IP address
Default Username
Password
http://192.168.1.1 or ASRock.router
admin (Optional to be changed)
(Required to be changed)
*Passwords must be at leas t 5 characters and are case sensitive .
English
9
Page 18

2. Write down your new username and password on your Quick Start Guide or
somewhere else that you can keep it carefully.
3. Press "Next" to continue. en follow the step-by-step Setup Wizard to
complete the basic conguration.
NOTE: You need to re-login if idle for more than 5 minutes.
Step 2. Update rmware if required
When you proceed, if a new version of rmware is available, you will see the screen
below. Select “Yes” to update the rmware immediately. If your rmware is already
up-to-date, you will skip this step.
ATTENTION! Please do NOT turn o your router while updating the rmware.
When the update is complete, the router will restart automatically.
Step 3. Connect to the Internet
e setup wizard will automatically detect the Internet connection type provided by your
ISP and guide you to nish all necessary steps.
English
10
If auto-detection failed, you will see the message below. Press "OK" and start to manually
set up your router.
You might need the following information to set up your router:
•Fixed or static IP address setting. (Special deployment by ISP)
•ISP login name and password.
•ISP conguration information for your DSL account.
Page 19

ASRock G10 Gaming Router
If you do not have the information above , ask your ISP to provide it.
A digital subscr iber line (DSL) modem is a device used to connect a computer or router to a telephone line which
provides the dig ital subscriber line service for conne ctivity to the Inter net.
1. Choose your Internet connection type.
2. Select "Next" to continue.
3. Follow the setup instructions and enter the required information for your ISP
connection type.
NOTE: Aer you comple te the Setup Wizard conguration, you can always change the settings aer wards. See 6.3
WAN Settings.
Step 4. Change default wireless name(SSID) and password
When the Wireless Security Setting page appears, you can check your default
wireless name and password.
We strongly recommend you to change the default wireless name and password
immediately for better network security.
English
11
Page 20

1. Select "I want to change the wireless name and password".
2. Enter the wireless name and password you desire in the text boxes.
NOTE: A valid password must be comprised of at least 8 characters .
3. If you select "Copy 2.4G setting to 5G", the identical password is used for both
5G and 2.4G networks.
4. Press "Next" to continue.
If you are asked to enter the login information to proceed, enter the wireless name
and password you have set in the Step 4.
5. en the Dashbaord page appears. Please see "Dashboard" for more instructions.
Step 5. Check the bandwidth of Gaming Boost
e router supports Gaming Boost natively, which identies and intelligently
manages your internet trac, allocating more bandwidth for your online games
or video game consoles automatically, so that gamers may have more stable and
smoother gameplay.
Please set the correct bandwidth to ensure the best gaming and streaming quality.
English
12
Click or tap "Speed Test" to nd out your actual uplink and downlink speed.
Select "I want to change the default bandwidth value" and enter the values of your
uplink and downlink.
NOTE: For reaching the optimal perfor mance, please connect client and router through a network cable.
Select "Next" to continue.
Page 21

ASRock G10 Gaming Router
Step 6. Router reboots automatically
e router will restart automatically to apply the settings.
If your device is "wirelessly" connected to the router, you need to reconnect your
device to the router using the new wireless name and password you have just set.
1. On your device, refresh your network list.
2. Select the new Wi-Fi network name (SSID).
3. Enter the new password.
4. Select “Connect”.
When successfully connected, you will be automatically directed to the Dashboard
page.
13
English
Page 22

English
Chapter 5 Dashboard
5.1 Overview
e dashboard allows you to congure your network’s security settings, manage your
network clients, monitor your USB device, and control the general functions.
5 6 7 8 9
1 2 3
4
10 11 12 13 14
15 16 17 18 19
No Item Description
Internet Displays router’s Internet information
1
2 Router Displays router’s operation mode and rmware version
3 Client
4 USB View the information of the connected USB device
5 Reboot Press to reboot the ASRock X10 router
6 Logout Press to log out the site.
7 Help Press to go to ASRock’s support website.
8 Home Press to go to the dashboard page.
9 Language
10 WAN Enable or disable Internet access
11 Parenta l Control Parental control congurations
12 Guest Guest network congurations
13 WIFI Enable or disable the wireless SSID broadcast
14 Advanced Press to enter the Advanced Settings page.
View the information of the clients that are connected to
your router
e language is set to English by default. Users can select
dierent languages in the drop down list.
14
Page 23

ASRock G10 Gaming Router
15 VPN VPN feature congurations
16 Self-Healing Enable or disable the Self-Healing feature
17 Lighting Enable or disable the LED indicators on the router
18 Gaming Boost Enable or disable the Gaming Boost feature.
19 Setup Wizard Launch the Setup Wizard
5.2 General Settings
On the dashboard homepage, you can check and congure general settings. Aer the
conguration, press "Apply" to save the settings and reboot the router for the settings to
take eect.
To access advanced settings, click or tap "Enter" under the Advanced item on the
dashboard for more options.
5.2.1 WAN Information
Press "WAN" to open up the pop up window where you can check your WAN information.
•Connection Type: Displays your internet service provider type.
•WAN IP: Displays the WAN IP address.
•WAN MAC Address: Displays the WAN MAC address.
•DNS Information: Displays the DNS address.
•Gateway Information: Displays the Gateway address.
English
15
Page 24

5.2.2 Wireless Information
Press "Router" to open up the pop up window where you can easily congure your wireless
information.
2.4G
•Wireless Name: Displays the unique name of your wireless network. You can modify
the name in the eld.
•Authentication Method: Displays the encryption method for your wireless network.
•WPA-PSK Key: Displays the WPA-PSK key.
•2.4G Wireless MAC Address: Displays the 2.4G wireless MAC address.
•PIN Code: Displays the PIN code.
Press "edit" (or go to Advanced > Wireless > Wireless-2.4G) to congure the Wireless-
2.4GHz settings.
5G
•Wireless name: Displays the unique name of your wireless network. You can modify
the name in the eld.
•Authentication Method: Displays the encryption method for your wireless network.
•WPA-PSK Key: Displays the WPA-PSK key.
•5G Wireless MAC Address: Displays the 5G wireless MAC address.
•PIN Code: Displays the PIN code.
Press "edit" (or go to Advanced > Wireless > Wireless-5G) to congure the Wireless-5G
settings.
16
Page 25

ASRock G10 Gaming Router
Information
•LAN IP address: Displays the default LAN IP address.
•LAN MAC address: Displays the LAN MAC address.
Press "edit" (or go to Advanced > LAN) to congure the LAN settings.
Press "Apply" to save the settings and reboot the router.
5.2.3 Client Information
Press "Client" to open up the pop up window where you can check your client
information. You will see the IP address, device name, MAC address of all the wired
and wireless devices connected to your router.
5.2.4 USB Information
Press “USB” to open up the pop up window where you can check the device name, total
space, free space of the connected USB device(s).
•Safely Remove USB Device: Select the USB device(s) you want to remove and press
Safely Remove USB Device to disconnect the USB device(s) safely.
•Advanced: Press "Advanced" (or go to Advanced > USB Application) to congure
advanced settings.
English
17
Page 26

When a USB device is reconnected to the router, press "Home" to go to the dashboard page
and refresh the status.
5.2.5 Advanced
Press "Enter" to enter the Advanced Settings page. Once you enter the Advanced Settings
page, you will see a preview of information about the router, Internet Port, and Wireless-
2.4G and Wireless-5G connections. Select an item on the le panel to congure its
advanced settings. For more information, please see the section entitled "Advanced
Settings".
English
18
5.2.6 Guests
You can enable or disable your guest network and set the guest access passwords and
durations in the pop up window. For more options, go to Advanced > Wireless > Guest.
Page 27

ASRock G10 Gaming Router
5.2.7 Parental Control
Parental control allows you to set the time limit for a client's network usage. Press to enter
the parental control settings page or go to Advanced > Parental Control.
1. Select a client from the drop down list.
2. Press
3. Press under the Add/Delete column to add the client to the parental control list.
4. Press "Apply" to save the settings and reboot the router for the settings to take eect.
under the Schedule column to open up a time management schedule and de-
select the time allowed to access the network. e green dots
will be accessible. e gray dots mean the network will not be accessible.
means the network
5.2.8 Lighting
You can enable or disable the LED indicators on the router.
5.2.9 WiFi
You can enable or disable the wireless SSID broadcast.
NOTE: If you disable the WiFi connections, when you reboot the router, plea se use wired connections instead to
connec t your device to the router and l og in the router site where you can enable the WiFi.
English
19
Page 28

Chapter 6 Advanced Settings
6.1 Wireless Settings
e router’s internal wireless radios broadcast signals in the 2.4GHz and 5GHz range. By
default, they are on so that you can connect wirelessly to the router. When the wireless
radios are o, you can still use an Ethernet cable for a LAN connection to the router.
English
20
Page 29

ASRock G10 Gaming Router
6.1.1 W ireless
Wireless - 2.4G/5G
•Enable Radio: Enable or disable wireless radios. By default, the radios are “on”. If you
turn o the wireless radios, you can’t log in to the router.
•Wireless On/O Schedule: You can specif y which days of the week wireless
networking are enabled
•Wireless Channel: You can change your WiFi router channel to optimize your
wireless signal. If you are not sure how to pick the right channel, keep the default
“Au t o”.
•Wireless SSID: e Service Set Identier (SSID) is a name used to connect to a
wireless network so you can identify your network.
•Wireless Mode: By default, the wireless mode is set to “Auto”. 802.11ac, 802.11n,
802.11g and 802.11b devices are allowed to be connected to the wireless router.
•CTS Protection: Clear to send (CTS) Protection mode is a wireless setting that
ensures computers on a network can connect to a wireless router when many
communications devices are present. When an 802.11b and an 802.11g device are
both connected to the access point, set the CTS Protection to "ON" (Default). Since
an 802.11b device is unable to detect when an 802.11g device is transmitting, CTS
protection ensures that each device takes turns transmitting in order to avoid
collisions. If the wireless devices connected to the access point are either all 802.11b
or all 802.11g, set the CTS protection to "OFF".
•Bandwidth: For best performance in a 2.4GHz network using wireless-B, wireless-G
and wireless-N devices, keep the default, “20/40”. For a bandwidth of 20MHz,
select 20MHz only. For the best performance in a 5GHz network, keep the default
English
21
Page 30

20/40/80MHz.
•Broadcast SSID: When wireless clients survey the local area for wireless networks
to associate with, they will detect the SSID broadcast by the router. Keep the default
“ON” to broadcast the router’s SSID. Select “OFF” if you do not want to broadcast the
router’s SSID.
•Preamble Type: By default, the preamble ty pe is set to "Auto". Select "Short" for a busy
wireless network with high network trac. Select "Long" if your wireless network is
composed of older or legacy wireless devices.
•RTS reshold: Adjusts the size of RTS (Request to Send) data packets. By default,
the RTS value is 2347. Lower values reduce throughput, but allow the system to
recover quicker from interference or collisions. Higher values provide the fastest
throughput.
•DTIM Interval: e Delivery Trac Indication Message (DTIM) interval helps
routers to broadcast wireless trac to multiple hosts with greater eciency. DTIM
interval or Data beacon rate is the time interval before a signal is sent to a wireless
device in sleep mode indicating that a data packet is awaiting deliver y. e default
value is 3 milliseconds.
•TX Power Adjustment: TX power adjustment refers to the milliwatts (mW) needed to
power the radio signal output of the wireless router.
•WMM Function: Prioritizes multimedia data over the wireless network.
English
22
Wireless Security
•Authentication Method: Select an Authentication method for the wireless network.
•Password: Enter a password for protecting your wireless network.
Radius Server
RADIUS (Remote Authentication Dial-In User Ser vice) authenticates the local and remote
users on a network. e RADIUS ser ver is identied by its IP address and UDP port
numbers for the dierent services it provides.
•IP: Enter the IP address of the RADIUS server.
•Port: Make sure that the port number RADIUS uses for authentication appears in
the Port text box.
•Shared Key: Enter the shared secret key for the RADIUS server.
Page 31

ASRock G10 Gaming Router
6.1.2 Guests
Guest Network - 2.4G/5G
e guest network provides temporary visitors with internet connectivity via access to
separate SSIDs or networks without providing access to your private network.
Check the checkbox to enable the selected SSID broadcast and set the guest access
password and duration. Press "Apply" to save the settings and reboot the router.
23
English
Page 32

6.1.3 WPS
WPS - 2.4G / WPS -5G
WPS (Wi-Fi Protected Setup) is a wireless security standard that allows you to connect
devices to a wireless network.
WPS Function: Enable or disable the WPS function. e default is set to “ON”.
•
•WPS Method: Choose whether you want to push the WPS "Push button" on
the router or enter the "Client PIN code". e default is set to "Push button".
•PIN Code: Specify the PIN code by pressing "Start" to initiate WPS. Press the
WPS button on the router within two minutes.
English
24
•Default PIN Code: View the PIN Code of the router.
Page 33

ASRock G10 Gaming Router
6.2 LAN Settings
e LAN IP screen allows you to modify the LAN settings of your wireless router.
LAN Setting
IP address: e default IP address is “192.168.1.1”. You can change the IP address of
•
the router.
Subnet Mask: e default subnet mask is “255.255.255.0”.
•
DHCP
DHCP Server: By default, the DHCP server is set to “ON”.
•
Domain Name: Enter a domain name for the wireless router.
•
Starting IP Address: You can specify the IP address range. Enter the starting IP
•
address for assigning IP addresses to connecting devices.
NOTE: is option is skipped when "Auto Setting" is sele cted.
Ending IP Address: You can specify the IP address range. Enter the last IP address for
•
assigning IP addresses to connecting devices.
NOTE: is option is skipped when “Auto Setting” is selected.
Lease Time: Specify i n seconds when an assigned IP address wi ll expire. Once it
•
reaches this time limit, the DHCP server will then assign a new IP address.
Manual IP Assignment
Select a client's MAC address from the drop down list. Assign a xed IP address for your
English
25
Page 34

client device. Press under the Add/Delete column to add the client to the list.
Press "Apply" to save the settings and reboot the router.
English
26
Page 35

ASRock G10 Gaming Router
6.3 Internet Settings
You can view or congure Wide Area Network (WAN) settings for the internet port. You
can set up a demilitarized zone (DMZ) server, change the maximum transmit unit (MTU)
size, and so on.
6.3.1 Internet
Con nection Type: Choose you r internet service provider t ype. Options include:
•
Dynamic IP, PPPoE, PPPoA, L2TP, and PPTP.
WAN IP: By default, the IP address is acquired from your ISP automatically.
•
WAN DNS: By default, the DNS address is acquired from your ISP automatically.
•
MTU Value: e Maximum Transmit Unit (MTU) denes the largest size of packets
•
that an interface can transmit without the need to fragment. Change the MTU value
only when it is necessary for your ISP connection.
MAC Clone: e Router can use a MAC (Media Access Control) address that you
•
dene as its own. is is oen used when an internet provider only authorizes one
MAC address to access the internet.
Press "Apply" to save the settings and reboot the router.
English
27
Page 36

6.3.2 Port Trigger
Some internet applications use alternate ports to communicate between the server and
LAN host. When you want to use these applications, enter the triggering (outgoing) port
and alternate incoming port in the port triggering table. en the router will forward the
incoming packets to the specied LAN host.
Service: Enable Port Trigger and add a service.
•
Trigger Port: Enter the port number for the service.
•
Incoming Port: Enter the starting and ending port numbers of the trigger port range.
•
TCP/UDP: Choose the protocol.
•
: Add a service.
•
6.3.3 Port Forwarding
You may use this function to establish a web server or FTP server via an IP gateway. Make
sure that you enter a valid IP address. (You may need to establish a static IP address in
order to properly run an internet server.) For added security, internet users will be able
to communicate with the server, but they will not actually be connected. e packets will
simply be forwarded through the router.
English
28
Service: Enable Port Forwarding and add a service.
•
Port Range: Enter the port range.
•
Local IP: Enter the LAN IP address of the server that you want the internet users to
•
access.
Page 37

ASRock G10 Gaming Router
Local Port: Enter a specic port to receive forwarded packets.
•
TCP/UDP: Choose the required protocol.
•
: Add a service.
•
6.3.4 DMZ
e router is programmed to recognize some of the applications and to work correct ly
with them, but other applicat ions might not function well . In some cases, one lo ca l
computer can run the application correctly if the IP address for that computer is entered
as the default DMZ ser ver. Using DMZ (Demilitarized Zone) can eliminate the need to
specify many individual port forwarding rules. However, by exposing all the ports on the
local device, the local device may become more susceptible to attacks.
WARNING:
DMZ servers pose a security risk. A computer designed as the default DMZ server loses
much of t he protection of the firewa ll a nd is exposed to exploits from the internet. If
compromised, the DMZ server computer can be used to attack other computers on your
networks.
Host IP Address: Enable DMZ and select an IP address.
•
6.3.5 DDNS
Setting up DDNS allows you to access the router from outside your network through the
DDNS service.
English
29
Page 38

Service Provider: Enable DDNS and choose a ser vice provider for DDNS.
•
Host Name: Enter the host name.
•
User Name: Enter the user name for your account.
•
Password: Enter the password for your DDNS account.
•
Press "Apply" to save the settings and reboot the router.
English
30
Page 39

6.4 Gaming Boost Settings
Gaming Boost
Enable: Enable or disable the Gaming Boost.
•
Auto Update: Enable or disable the Gaming Boost auto update.
•
Last Update Time: Displays last update time
•
ASRock G10 Gaming Router
Bandwidth
e router supports Gaming Boost natively, which identies and intelligently
manages your internet trac. Allocating more bandwidth for your online games
or video game consoles automatically, so that gamers may have more stable and
smoother gameplay. Please set the correct bandwidth to ensure the best gaming and
st re ami ng quality.
1. Press "Speed Test" to nd out your actual uplink and downlink speed.
2. Enter the values of your uplink and downlink.
NOTE: For reaching the optimal perfor mance, please connect the client and router through a network cable.
Priority
e table lists the devices connected to your router. Press "Refresh Status" to get the
latest information.
Select the priority of the connected devices to allocate the bandwidth from the drop
down list.
English
31
Page 40

6.5 Parental Control
Parental Control allows you to control the internet access time, by setting the time limit
for a client’s network usage.
Enable Parenta l Control: The default is "OFF". Sw itch the but ton to enable t he
•
service.
Client Information: Select the client whose network usage you want to control.
•
Schedule: Set up the allowed time limit in time management table. Press to open
•
up a time management schedu le a nd deselect the time a llowed to be access the
network. e green dots
mean the network will not be accessible.
mean the network will be accessible. e gray dots
English
32
: Add or delete the client’s prole.
•
Page 41

ASRock G10 Gaming Router
6.6 Firewall
e router provides a rewall for your network.
Firewall
Firewall: Enable or disable the rewall.
•
Ping Block: Enable or disable the ICMP ping block.
•
DoS Protection: Protect your network from DoS (Denial of Service) attacks though
•
this may aect your router’s performance.
Port Scan Block: Protect your network from port scan attacks.
•
UPnP: Enable or disable Universal Plug and Play feature.
•
Access Block List
You can deny certain devices from connecting to the internet if necessary.
1. Select the devices from the drop down list.
2. Press to add it into the list.
Press "Apply" to save the settings and reboot the router.
6.7 USB Application
e USB Application function provides the information of USB storage status and USB
printer status, and allows you to congure USB storage server, media server, and download
agent.
Insert a USB storage device, such as a ash driver or external hard drive to the USB port on
the back of the router. e computer must be connected to the router to access the storage
device. You may also want to map the network drive so it shows up as a standard drive on
your computer for easier access.
English
33
Page 42

English
USB Storage Status
Displays the information of the connected device(s). Press
safely. Press "Refresh Status" to update the status.
USB Printer Status
Displays the information of the connected device(s). Press "Refresh Status" to update the
status.
USB Storage Server
Enable or disable the USB storage server.
•Account: Specify the account to access the USB storage server.
•Password: Specify the password to access the USB storage server.
Media Server
•Media Server Name: Enable the media server and specify the media server name.
to remove the USB device(s)
34
Page 43

6.8 Administration
6.8.1 Router Status
Here displays the router status and usage information.
1. Select Advanced > Administration > Router Status.
ASRock G10 Gaming Router
2. View the information.
6.8.2 Operation Mode
e operation mode page allows you to select the appropriate mode for your
network.
English
35
Page 44

To set up the operation mode.
1. Select Advanced > Administration > Operation Mode.
2. Select any of these operation modes:
•Wireless router mode (Default): In wireless router mode, the router connects
to the internet and provides internet access to available devices on its own
local network.
•Repeater mode: In wireless repeater mode, the repeater will extend your
current wireless signal for smart devices.
6.8.3 Set Password
Lets you change the default password and user name to log in the router. is
password is not the one that you use for wireless access.
To set a new password and user name:
English
36
1. Select Administration > Set Password.
2. Router Login Name: Type the new log-in name for your router. e default is “admin”.
3. Old Password: Display the default password or type the previously set
password.
4. Set Password: Type the new password for your router.
5. Repeat New Password: Type the new password for your router again to double
check.
6. Press “Apply” to change the setting. Reboot the router for the settings to take
eect.
Page 45

ASRock G10 Gaming Router
6.8.4 Firmware Upgrade
e router rmware is stored in ash memor y. You can check to see if new rmware
is available and update your product.
To check for new rmware and update your router:
1. Select Administration > Firmware Upgrade.
2. Press “Check & Update”. If there is newer rmware available on the server, you
will see a message: “New rmware available and download process initiating”.
3. Press “OK”. Start to download the new rmware.
WARNING: To avoid the risk of corrupting the rmware, do not turn o the router
and interrupt the upgrade.
Manual Update
To manually update the new rmware for your router, press "Select Files" and then
"Select and Update".
6.8.5 Self Healing
e self-healing feature is a way to have the router automatically rebooted itself.
Select Advanced > Administration > Self Healing.
•Self Healing: Press the button to ON/OFF the function.
•Time Schedule: Press "Edit" to set a time for the self-healing. In the table, press
to select the time to reboot the router automatically.
English
37
Page 46
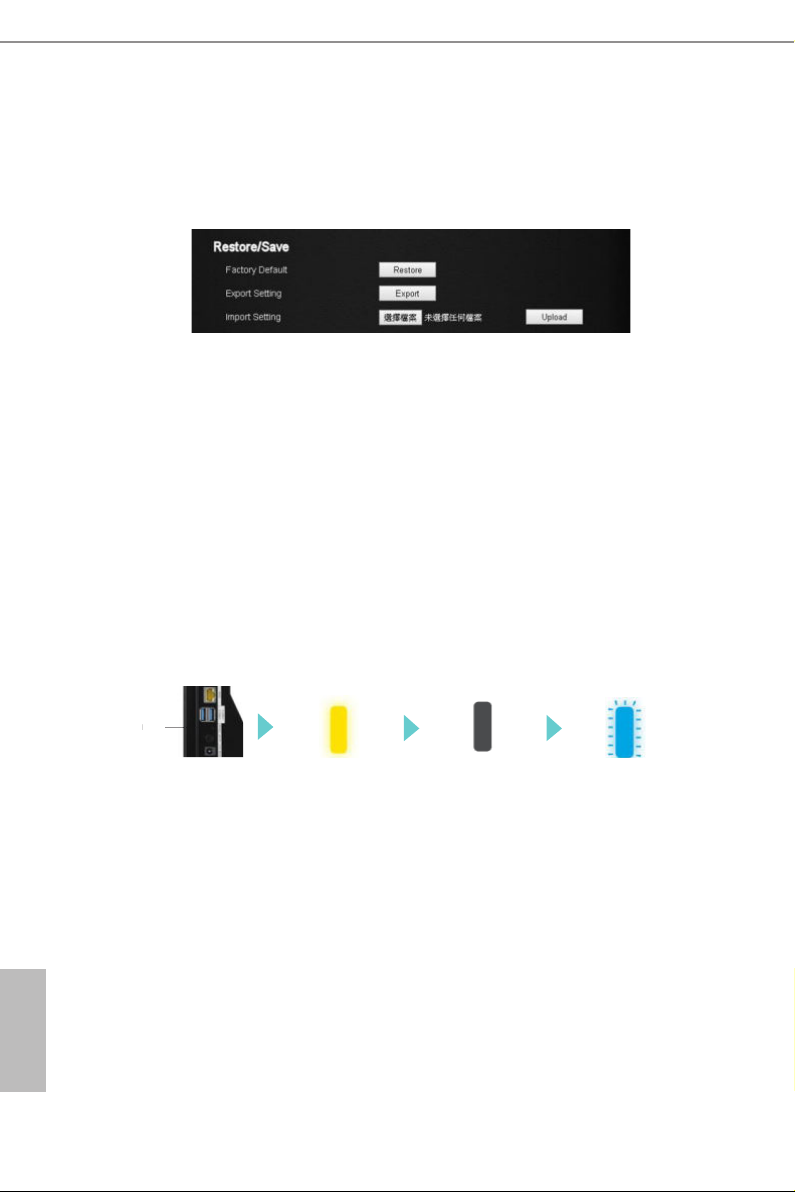
6.8.6 Restore / Save
eset
e conguration settings of the router are stored within the router in a
conguration le. You can export this le to your computer, restore it, or reset it to
the factory default settings.
Restore to Factory Default Setting
You can erase the current conguration and restore the default settings.
1. Select Advanced > Administration > Restore/Save.
2. Press the Restore button.
e factory default settings are restored. e user name is "admin", the password is
"admin", and the LAN IP address is 192.168.1.1.
You can also press and hold the "Reset" button for more than 10 seconds on the rear
of the router to restore the default settings.
LED Indicator Variations:
English
ResetR
Press Reset for
more than 10 sec
Ready
Exporting Router Congurations
1. Select Advanced > Administration > Restore/Save.
2. Press the Export button.
A copy of the current setting is saved in the location you specied.
Importing Router Conguration
1. Select Advanced > Administration > Restore/Save.
2. Press the Select Files button.
38
Shutdown
Restoring the
default settings
Page 47

ASRock G10 Gaming Router
3. Press the Upload button.
e le is uploaded to the router and the router will reboot.
6.8.7 System Log
e log is a detailed record of the websites you access or attempted to access and
other router actions.
1. Select Advanced > Administration > System Log.
2. You can view the history of your network activities.
Press "Save" to save a copy of the event log to your device. Press "Restore" to clear
event logs.
English
39
Page 48

Chapter 7 ASRock Router APP
ASRock Router app allows you to control ASRock G10 Gaming Router, including
conguring router settings, remotely controlling home appliances, and accessing the
external storage of the router.
Before using this application, please make sure of the following:
•You are running the Setup Wizard of your router through a web browser. For more
details, please refer to Chapter 4: Setup Wizard.
•Your ASRock G10 Gaming Router has updated to the latest rmware. See "Firmware
Upgrade" in Chapter 6.
7.1 Registration
Download and install the ASRock Router app on your smartphone or tablet.
For rst time users, please register an account.
1. Tap to launch the ASRock Router app.
2. Tap "REGISTER NOW".
English
40
Page 49

3. Enter you name, email address and
password. Tap "Show" if you want to
reveal the password.
4. Tap "REGISTER NOW" to continue.
5. A conrmation email is sent to your
registered email address. Check your
email and activate your account.
ASRock G10 Gaming Router
41
English
Page 50

7.2 Signing in
Before you sign in the app, make sure your smartphone or tablet is wirelessly connected to
the router. For more details, please refer to "Wireless Network" in Chapter 3.
NOTE: If you have change d your SSID and password in the Setup Wizard or Dashboard, remember to u se your
new SSID and pass word.
Sign in the app
1. Tap to launch the ASRock Router app.
2. Tap "SIGN IN".
3. Enter your email address and
password.
Log out the app
1. If you want to log out the app, tap the
"Settings" icon on the upper le corner.
English
42
2. Tap "Logout".
Page 51

ASRock G10 Gaming Router
7.3 Adding Routers
When you successfully sign in the app, you can add as many routers as you want in the
“Router List“ page.
NOTE: Be fore adding a route r in the app, please make sure your smartphone or ta blet is s uccessful ly wire-
lessly connected to th e router.
1. Tap add icon “+” on the upper right
corner.
2. Verify the listed serial number and
check if it is identical with the number
on the bottom of your router.
3. Rename your router.
4. Tap "SAVE" to add the router to the
list.
5. Tap "OK" when the router is
successfully added.
6. You will nd the router you have just
added to the Router List.
English
43
Page 52

7.4 Router Settings
You can change the congurations of the router in "Router Setting".
1. Tap to select the router to be
congured in "Router List".
2. Tap "ROUTER SETTING" to open up
the browser to enter the Dashboard
page.
English
44
3. Enter the username and password to
log in. Tap "OK".
NOTE: e de fault account an d password are
both “admin”. For more details, pl ease refer to
“Setup Wizard” in Chapter 4.
4. Congure the settings of the router.
For more instructions, please refer to
Chapter 5 and 6.
Page 53

ASRock G10 Gaming Router
7.5 IR Control
e IR Control feature can let your device learn the codes of other infrared devices
and turn your smartphone or tablet into a universal remote controller for your home
appliances.
To learn the infrared signals of your remote controller, please follow the steps below.
1. Tap "IR CONTROL".
2. In the "IR Control List", tap "Add New
IR Control ". You can add up to ve
commands for each router.
3. Rename the IR Control.
Note: For example, if you want to learn the
signals of the TV on/o button on your remote
control ler, you can name the IR Control Name
as TV on/o, so you can cl early know what func-
tion it is .
4. Tap "OK".
English
45
Page 54

5. Tap "LEARN".
e LED indicator on the front of the
router will be ashing light blue.
6. Now point your remote controller
directly to the front panel of your G10
router (within 10 cm) and press the
button on your remote controller. If
the signal is successfully learned, the
front LED indicator will turn into
solid light blue.
7. You can tap "TEST" to check if the
command is copied.
English
46
Tap “L EAR N”
8. Tap "SAVE" to save the setting.
Tap "CLEAR" to clear the learned
command.
9. Now you can use your mobile device
to remotely manipulate your router to
control your home appliances.
Learning
(About 15 secs)
Done
(About 5 secs)
OR
Failed
(Flashes twice)
Page 55

ASRock G10 Gaming Router
7.6 Storage
You can access the les in the USB storage devices connected to your G10 router through
this app.
1. Make sure your USB storage device is
properly installed into the USB ports
on the router.
2. Tap "STORAGE".
3. Enter your storage login username and
password. Tap "OK".
e default username is "admin" and
the default password is "1234".
You can change the default username
and password in the "ROUTER
SE TTI NG".
NOTE: To change Storage username and
password, go to “ROUTER SETTING” > “USB”
> “Advanced” and enter the new account and
password in the elds under the “USB Storage
Server” section. For more detail s, plea se refer to
“USB Application” in Chapter 6.
4. Tap the disk to enter the disk and
access the les.
English
47
Page 56

Chapter 8 Troubleshooting
is section describes tips for troubleshooting some common problems.
8.1 How to Restart Your Network
When you need to restart your network, follow this sequence:
1. Turn o and unplug the modem.
2. Turn o the router
3. Plug in the modem and turn it on.
4. Turn on the router and wait.
8.2 Wireless Settings
Make sure that the wireless settings on the computer and router match exactly. e
wireless network name (SSID) and wireless security settings of the router and wireless
computer must match exactly.
If you set up an access list in the Advanced Wireless Settings screen, you must add each
wireless computer’s MAC address to the router’s access list.
8.3 Standard LED Behavior When the Router Is Powered On
Aer you turn on power to the router, the following sequence of events occurs:
English
48
Flash ing Dark
Blue
Star ting up
Solid Da rk Blue Flashing Yellow Solid Yellow Flashi ng Light
Blue
Connec ted to the
interne t
ADSL mod em not
detec ted / WPS
connection failed
Modem detected
but no inter net
connection
Connec ting to
a WPS- enabled
device
Solid Light Blue
WPS connected
Page 57

ASRock G10 Gaming Router
8.4 Unable Log In to the Router
If you cannot log in to the router from a computer or wireless devices on your local
network, please check the following:
•If you use an Ethernet connected computer, check if the Ethernet connection between
the computer and the router is working.
•If you use a wireless connected computer or wireless devices, check if the wireless
SSID connection between computer and wireless devices are working.
•If your router’s IP address was changed and you do not know the current IP address,
clear the router’s conguration to factory default. is sets the router’s IP address to
192.168.1.1.
•Make sure that you are using the correct login information. e default user name is
"admin", and the default password is "admin". Make sure that Caps Lock is o when
you enter this information.
8.5 Unable Access the Internet
If you can access your router but not the internet, check to see if the router can obtain an
IP address from your internet ser vice provider (ISP). Unless your ISP provides a xed IP
address, your router requests an IP address from the ISP.
To check the WAN IP address:
1. Launch a web browser from a computer or wireless device that is connected to the
network.
2. Select an external site such as www.asrock.com.tw.
3. Type asrock.router or 192.168.1.1. A login screen should appear.
4. Enter the router’s user name and password. e default user name is "admin", and the
default password is "admin".
5. Press ADVANCED > Next button. e ADVANCED home screen should appear.
6. Check if a valid IP address is shown for the internet port. If 0.0.0.0 is shown, it means
your router has not obtained an IP address from your ISP. If your router cannot
obtain an IP address from the ISP, you may need to force your cable or DSL modem
to recognize your new router by restarting your network.
If your router is still unable to obtain an IP address from the ISP, the problem might be one
of the following:
•Your internet service provider (ISP) might require a login program.
•If your ISP requires a login, the login name and password might be set incorrectly.
•Your ISP might check for your computer’s host name.
•If your ISP allows only one Ethernet MAC address to connect to internet and checks
English
49
Page 58

for your computer’s MAC address, do one of the following:
- Inform your ISP that you bought a new network device and ask them to use the
router’s MAC address.
- Congure your router to clone your computer’s MAC address.
8.6 Wireless Connectivity
If you are having trouble to connect wireless to the router, try to isolate the problem:
Does the wireless device or computer that you are using nd your wireless network?
•If you disable the router’s SSID broadcast, then your wireless network will be
hidden and will not be displayed in your wireless client’s scanning list.
•If not, check the dashboard Wi-Fi on/o button from the Web GUI. If it is
o, you can press the Wi-Fi on/o button on the dashboard to turn the router
wireless radios back on.
If your wireless device nds your network but the signal strength is weak, check
these conditions:
•Is your router too far from your computer or too close? Place your computer
near the router but at least 6 feet away and see whether the signal strength
improves.
English
50
8.7 Restore to the factory default settings
You can return the router to its factory settings. Use the end of a paper clip or a
similar object to press and hold the Reset button on the back of the router for at
least ten seconds.
Go to Advanced > Administration > Restore/Save, and press "Restore".
Page 59

ASRock G10 Gaming Router
Appendix - Factory default settings
e router resets and returns to the factory conguration settings shown in the following
table.
Feature Default Behavior
User Login URL 192.168.1.1 or ASRock.router
Router Login
Internet
Connection
Local Network
(LAN)
Wireless
User Name admin
Login Password admin
WAN MAC Address Use default hardware address
WAN MTU Size 1436
Port Speed AutoSensing
LAN IP 192.168.1.1
Subnet Mask 255.255.255.0
DHCP Server Enable
DHCP Range 192.168.1.2 to 192.168.1.254
DHCP Starting IP
Address
DHCP Ending IP
Address
Wireless Radio Enable
Wireless Name See router label
Security WPA2-AES
Broadcast SSID Enable
Country/Region Varies by region
RF Channel Auto for 2.4GHz/5GHz
Operating Mode Router Mode:
192.168.1.2
192.168.1.254
Up to 800Mbps at 2.4GHz, 1733Mps at 5GHz
51
English
Page 60

Appendix - Specications
English
Dimensions
Wei ght
Wireless Standard 802.11a/b/g/n/ac
Frequency Band 2.4GHz, 5GHz Simultaneous
Wireless Speed
Ampliers
Wireless Security WPA, WPA2,Mixed, WPS
Wireless Access Scheduling Specic day and time
Wireless TX power adj
Antennas 8 x internal high performance antennas
Ports
Features
Power Source
Warranty 1 Ye ar
Package Contents
Operating temperature 0゜to 40゜(32゜to 104゜F)
Operating humidity 90% maximum relative humidity, noncondensing
Certication FCC, IC , CE
G10 Router 266.5 x 184 x 82 mm
H2R 115 x 35 x 17.3 mm
G10 Router 620g
H2R 43g
2.4GHz: 800Mbps
5GHz: 1733Mbps
4 x 2.4GHz Ampliers
4 x 5GHz Ampliers
8 x Low Noise Ampliers
0~100 %
1 x RJ45 10/100/1000 WAN Port (WAN Port)
4 x RJ45 10/100/1000 LAN Ports (LAN Ports)
2 x USB 3.0 Ports for USB Storage / Printer Server
Easy Setup
Guest Wireless Networks (Up to 6 additional)
Parental Control
Self-healing
Smart Gamingboost
Beamforming
MU-MIMO
APP Cloud Service
Model : Asian Power Device WA-36A12R
Input: 100-240V~ 50/60Hz 0.9A max
Output: 12Vdc / 3A
AC2600 G10 Gaming Router
H2R (HDMI 2-in-1 Router)
12V Power Adapter
Network RJ45 Cable
Micro USB Cable
HDMI Cable
Quick Installation Guide
52
 Loading...