

Page 1

Laser F/XTM Remote Control
For use with Proxima DP5800
Multimedia Projector
Page 2

WARRANTY
Proxima Corporation warrants that the Proxima® Laser F/X Remote Control product
manufactured by Proxima is free from defects in materials and workmanship under normal
use during the Warranty Period. The Warranty Period commences on the day of purchase
by the end-user. The Warranty Period is one year.
The end-user’s sales receipt or invoice showing the date of purchase of the product and the
name of the Reseller is proof of date of purchase. The Warranty extends only to the original
purchaser and is not transferable.
During the Warranty Period, Proxima will, at no additional charge, repair or replace defective
parts or at the option of Proxima, replace the entire unit.
This limited Warranty does not extend to any Proxima product that has been damaged or
been rendered defective (a) as a result of accident, misuse or other abuse; (b) by the use of
parts not manufactured or sold by Proxima; (c) by modification of the product; or (d) as a
result of servicing by non-authorized personnel.
FCC Statement
Warning: This equipment generates, uses and can radiate radio frequency energy and, if not
installed and used in accordance with the instruction manual, may cause interference to radio
communications. It has been tested and found to comply with limits for a Class “A”
computing device pursuant to Subpart B of Part 15 of the FCC Rules, which are designed to
provide reasonable protection against such interference when operated in a commercial
environment. Operation of this equipment in a residential area is likely to cause interference
in which case the user, at his own expense, will be required to take whatever measures may be
necessary to correct the interference.
Limitation of Warranties
The foregoing Warranty is expressly in lieu of any other expressed or implied warranties
including, without limitation, warranties of merchantability or fitness for a particular
purpose. To the extent not prohibited by law, all statutory warranties are hereby waived and
excluded from this Warranty. Proxima expressly disclaims all warranties not stated in this
Limited Warranty.
Trademarks, Patents, and Copyrights
Proxima is a registered trademark of Proxima Corporation. Desktop Projector, Desktop
Projection, and Laser F/X are trademarks of Proxima Corporation. Other trademarks are the
property of their respective owners. US patents applied for.
© 1997 Proxima Corporation. All rights reserved. Specifications are subject to change without notice.
Proxima Corporation
Main Office
9440 Carroll Park Drive
San Diego, CA 92121-2298
USA
Phone (619) 457-5500
Fax (619) 457-9647
http://www.proxima.com
Proxima Europe LTD.
St. Thomas House
28-32 Spittal Street
Marlow Bucks SL7 1DB
United Kingdom
Phone +44 (0) 1628 481 555
Fax +44 (0) 1628 487 744
11/97 710-00520-2
Page 3

USING THE LASER F/XTM REMOTE CONTROL
2
1
1
The Laser F/X Remote Control provides all of the main functions available
on your projector control panel as well as several additional features.
AVOID EXPOSURE
Laser radiation is emmitted
from the APERTURE
5mW
<
4
LASER DIODE
DIRECT EYE EXPOSURE
DANGER
LASER RADIATION-AVOID
Max Output
Wavelength 630 680
CLASS IIIA LASER PRODUCT
Joystick
3
Top View Front View Bottom View
TOP VIEW
F2(screen position) Press and hold F2(screen position) while moving the joystick
to move the full image around on the screen.
Joystick Acts like a mouse. Move the joystick in the direction that
you want to move the screen cursor. The further you move
the joystick in any direction, the faster the cursor will move.
The joystick also allows you to navigate the projector menus.
Drag Left/Right Press and release to drag a screen object. The button glows
when the remote control is in Drag mode. Press and release a
second time to drop the object at the new screen location.
Mouse Left/Right Provide the same functions as your left and right mouse
buttons.
Timer Sets the projector break timer.
Page 4

TOP VIEW, CONT.
Menu Display or hide the projector menus.
Power Projector on and off.
Blank Blanks the screen. Use the projector menus to select a blank
screen color.
Computer Switch between connected computers (RGB1 or RGB2).
Video Switch between connected video inputs (video 1, video 2).
Focus +/- Focus the projector image.
Volume +/- Decrease or increase the volume of internal and external
speakers.
Zoom +/- Increase or decrease the image size.
Mute Turn the audio on or off.
FRONT VIEW
1 Infrared lenses
2 Laser lens. Caution: Laser light is emitted from this aperture.
BOTTOM VIEW
3 Laser On/Off. Press and hold this momentary switch to
activate the laser.
4 Laser warning label. See warning below.
WARNING!
Use caution when operating the Laser
F/X remote control. Laser light can
cause harm if projected at the human
eye. Observe the cautions on the Laser
0.5"
Warning label located on the bottom of
the remote control. Do not point the
laser directly into any person’s eyes.
DANGER
LASER RADIATION-AVOID
DIRECT EYE EXPOSURE
LASER DIODE
Wavelength 630 680
Max Output< 5mW
CLASS IIIA LASER PRODUCT
0.75"
from the APERTURE
Laser radiation is emitted
AVOID EXPOSURE
Page 5
USING THE LASER F/X REMOTE CONTROL
For best results, aim the remote control at the projection screen or at the
projector’s front panel. Do not obstruct the red infrared eye located on the
front of the projector.
Use the Laser F/X controls as described in the tables above. Refer to your
projector User’s Guide for more information about specific projector
functions, in particular, how to connect the projector to your PC or Mac
and how to use the remote to control the mouse.
MAINTENANCE
Your Laser F/X remote control should be protected from water, dust and
heat. If the projected laser beam appears blurred or distorted, clean the
output window with an alcohol-dipped cotton swab. Like all electronic
equipment, your Laser F/X remote control should be handled with care.
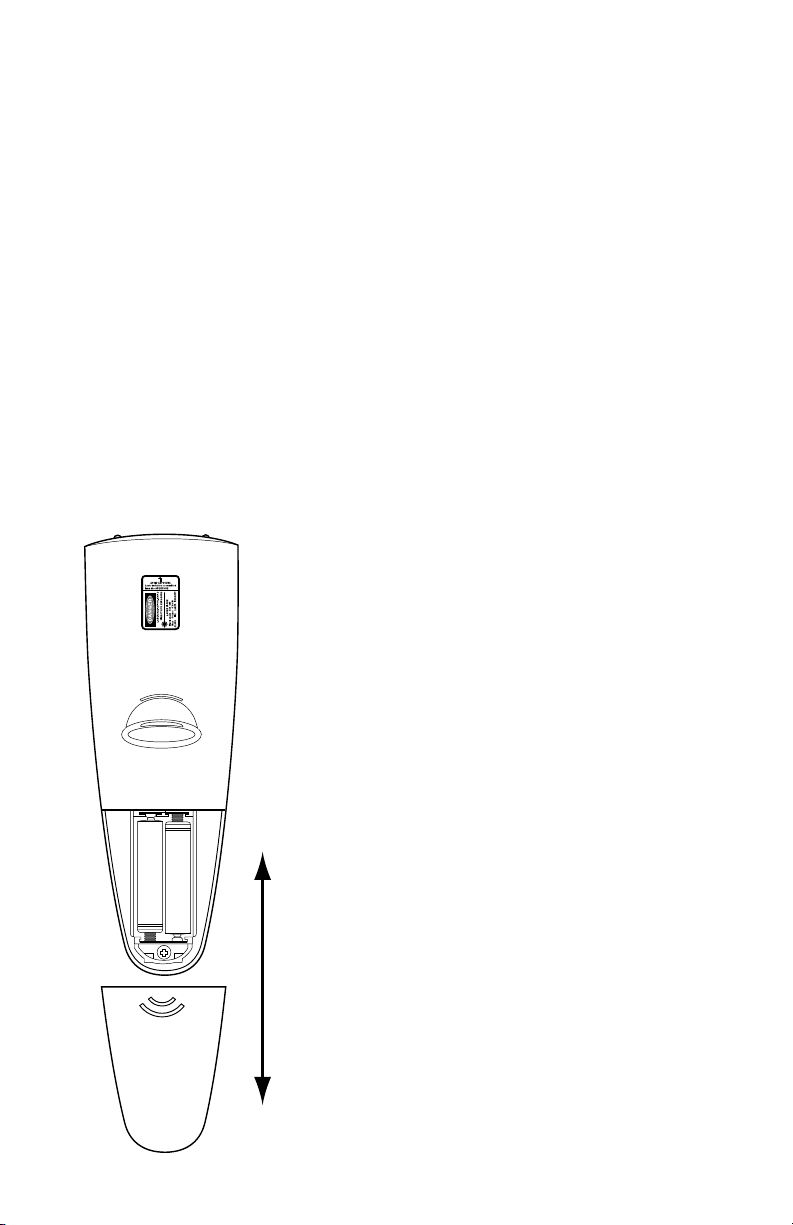
CHANGING BATTERIES
To install or change the two AAA alkaline
batteries in the remote control unit:
1 Locate the battery compartment at the lower
rear of the base. Slide the cover open.
2 Remove the old batteries and replace them
with new ones. Make sure to align the
batteries in the proper +/- orientation.
3 Replace the cover on the battery
compartment.
 Loading...