

Page 1

Installation Instructions
FI Dishwasher
CONTENTS
INTRODUCTION ......................................................................................................................... 2
WHAT YOU NEED ...................................................................................................................... 2
SAFETY INSTRUCTIONS ............................................................................................................ 3
BEFORE STARTING THE INSTALLATION .................................................................................. 3
XXL DISHWASHERS ................................................................................................................... 4
– UNIT DIMENSIONS ............................................................................................................... 4
– PREPARING THE LOCATION ................................................................................................ 4
ADA AND XL DISHWASHERS .................................................................................................... 5
– UNIT DIMENSIONS ............................................................................................................... 5
– PREPARING THE LOCATION ................................................................................................ 5
– ADAFI TRIM KIT INSTALLATION OPTIONS .......................................................................... 6
STEP 1. FITTING THE DISHWASHER IN PLACE........................................................................ 7
STEP 2. ATTACHING THE ACCESSORY DOOR OR CUSTOM PANEL .................................... 10
STEP 3. ADJUSTING THE DOOR SPRINGS ............................................................................ 11
STEP 4. CONNECTING ELECTRICITY, WATER, AND DRAIN .................................................. 13
STEP 5. CHECKING DISHWASHER FUNCTION AND FIT ....................................................... 16
STEP 6. SECURING THE DISHWASHER.................................................................................. 16
STEP 7. ATTACHING THE TOE KICK (IF APPLICABLE) .......................................................... 18
INSTALLATION CHECKLIST ..................................................................................................... 20
IMPORTANT!
READ ALL OF THESE INSTRUCTIONS BEFORE INSTALLING THE DISHWASHER.
SAVE THESE INSTRUCTIONS FOR FUTURE REFERENCE.
Page 2
INTRODUCTION
Read these instructions carefully and completely before
you install the machine. The installation should be
carried out by a qualified person who is familiar with all
local codes and ordinances for electrical and plumbing
connections.
WHAT YOU NEED
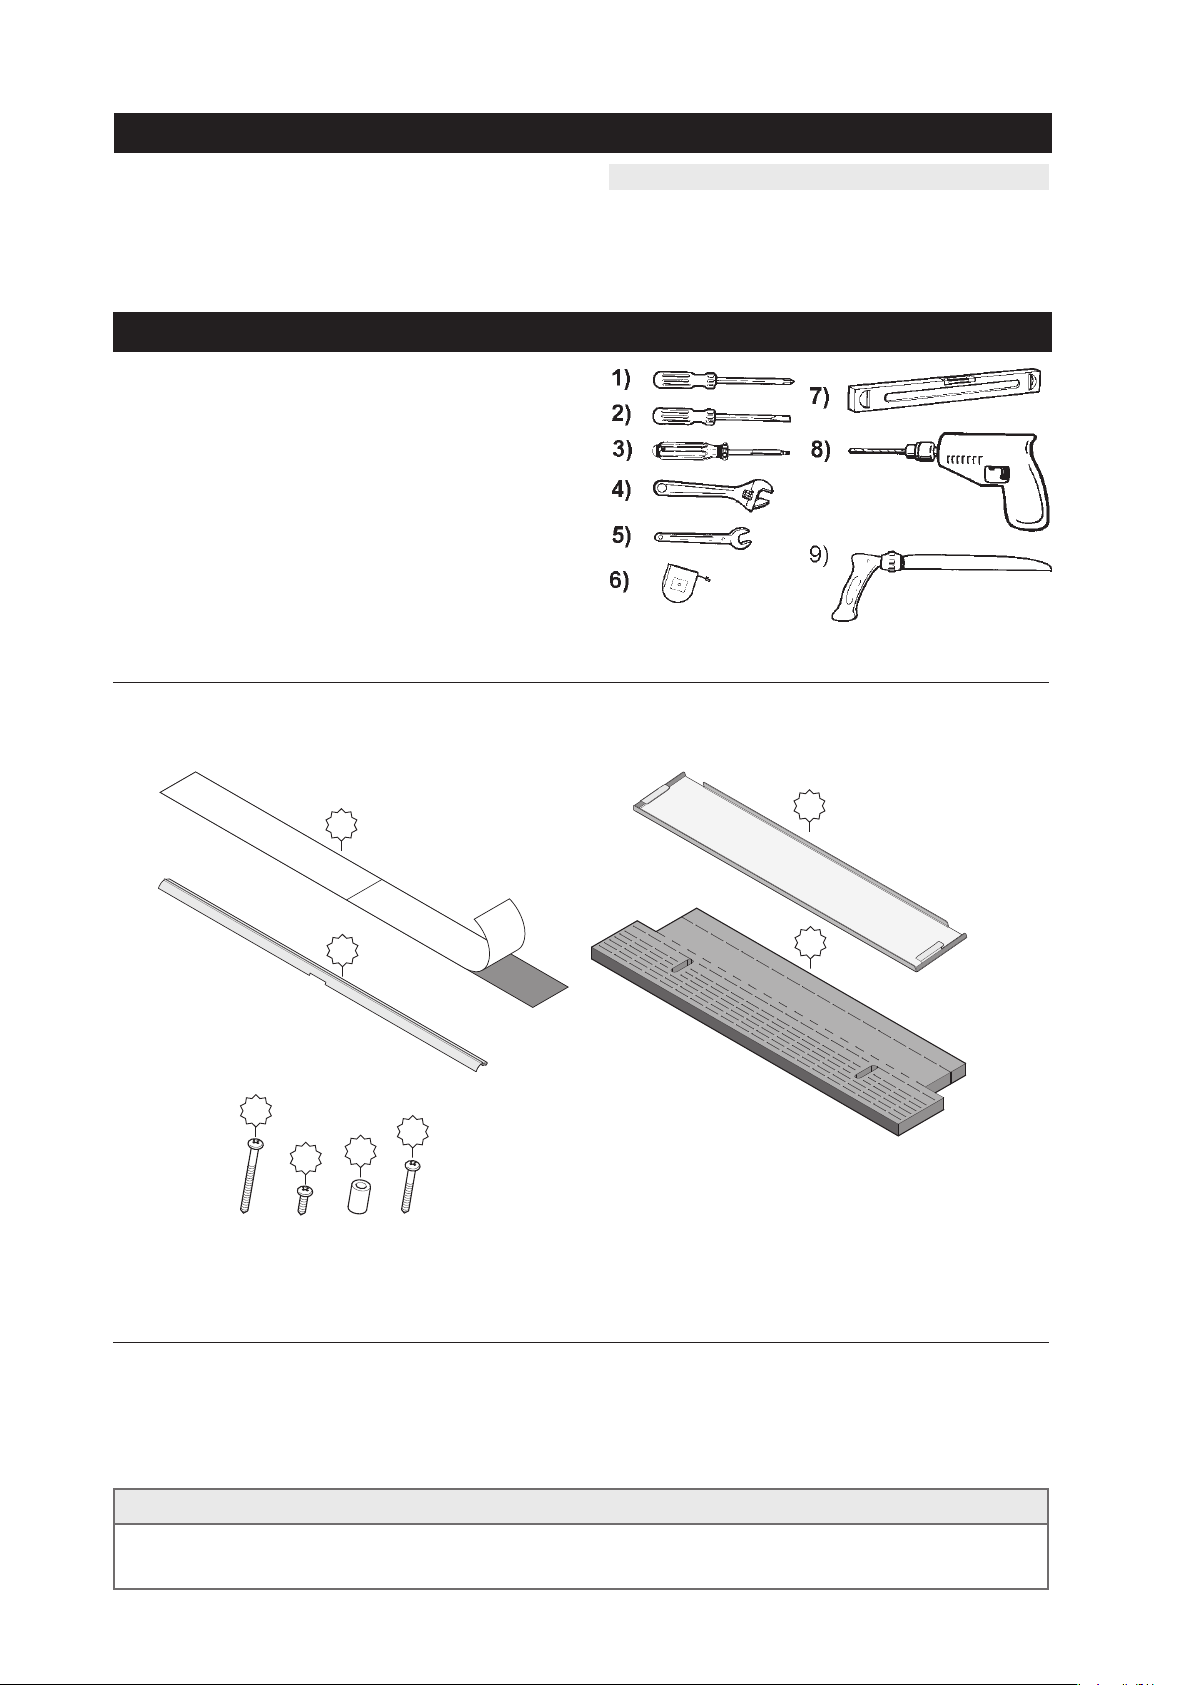
TOOLS
1) Phillips No. 2 screwdriver
2) Flat blade screwdriver
3) Torx screwdriver size T 20
4) Adjustable wrenches (if you use copper fittings)
5) Open-ended wrench
(1/2˝ [12 mm], 5/8˝ [16 mm] and 1˝ [24 mm])
6) Tape measure
7) Spirit level
8) Electric drill with 1-1/2˝ drill bit
9) Keyhole saw
MATERIALS SUPPLIED
NOTE:
Cosmetic damage must be reported to the ASKO dealer
within five days from the date of purchase. As soon as
you unpack the dishwasher, thoroughly check it for
cosmetic damage.
*
1
*
2
3
6
5
4
6x
1-1/2"
(38 mm)
2x
3/8"
(10 mm)
2x
2x
1"
(25 mm)
* Only select models.
MATERIALS
• Minimum 3/8" OD copper tubing of sufficient length
for your installation
• Shut-off valve and fittings for water supply line
*
7
*
8
AUTOMATIC HIGH LOOP
The drain hose is fastened to the back of the machine at the best height. To eliminate potential drain problems,
leave this hose in place.
2 3
CUSTOMER CARE CENTER 1-800-898-1879 • WWW.ASKONA.COM CUSTOMER CARE CENTER 1-800-898-1879 • WWW.ASKONA.COM
Page 3
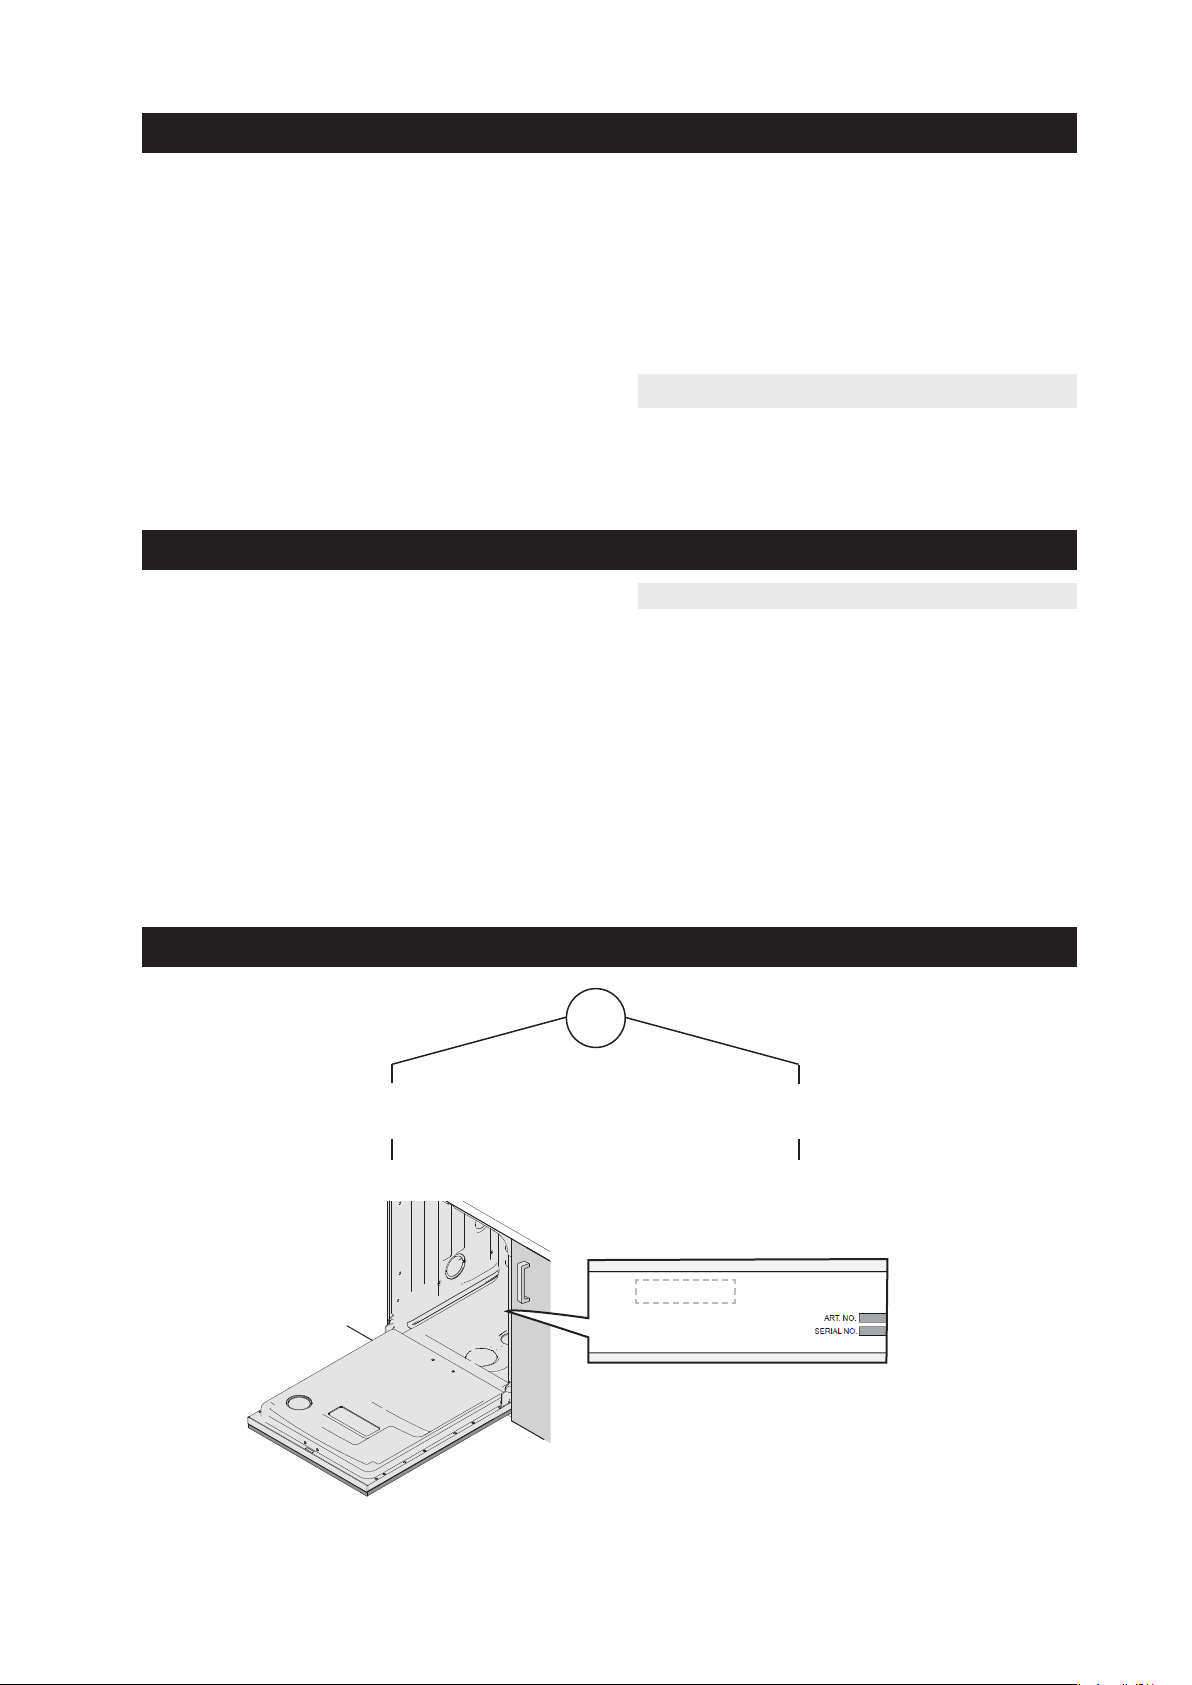
SAFETY INSTRUCTIONS
[mm]
• It is important that you closely follow the instructions
provided here.
• An incorrect or defective installation can lead to
higher consumption of energy, water and dishwashing
detergent, which can lead to higher costs and poor
cleaning results.
• Plumbing and electrical installations must be carried
out by qualified professionals.
• Exercise caution during the installation! Wear
protective gloves! Always work in pairs!
BEFORE STARTING THE INSTALLATION
Connection to water supply:
• There must be a shut off valve on the water supply
pipe. The shut off valve should be installed in a
location that is easily accessible so that the water may
be shut off in the event that the dishwasher needs to
be moved.
Installation advice:
• Cable holes for wires/cables need not be larger than
1-1/2˝ (38 mm).
• Attach the light shielding film (see FITTING THE
DISHWASHER IN PLACE). Only select models.
• The power outlet for the dishwasher should be
installed in a location that is easily accessible once
the dishwasher is installed.
• Always follow the applicable regulations for water,
drain and electrical connection.
• If a dishwasher must be hard wired, it must be
connected to a grounded circuit.
WARNING!
Turn off the water supply when installing the
dishwasher!
NOTE:
Check that the fitting and connection measurements
are correct. See UNIT DIMENSIONS and PREPARING
THE LOCATION.
XXL/XL?
?
XXL XL
See page 5 See page 4
XL / XXL
Page 4
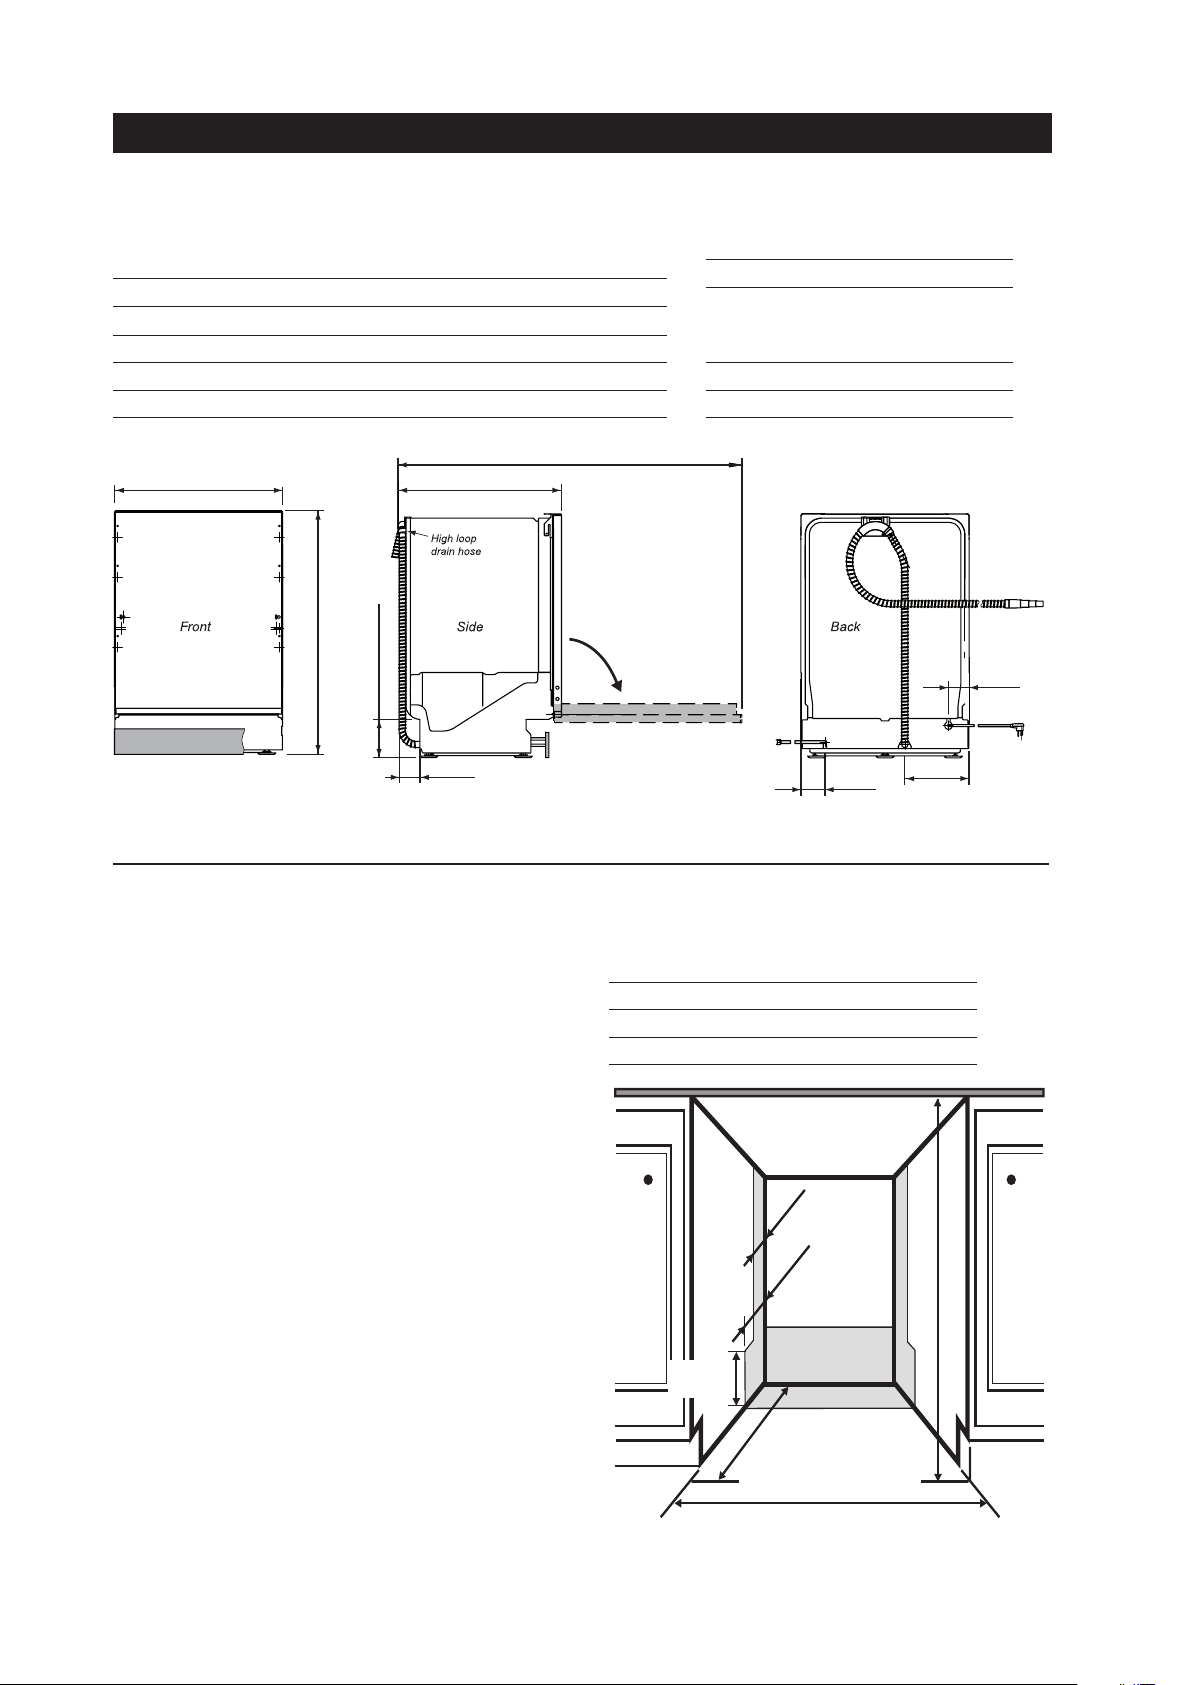
XXL DISHWASHERS
23-5/8" – 24"
600 – 610 mm
24"
610 mm
4"
102 mm
5-3/8"
136 mm
**33-7/8" – 36" minimum
**860 – 914 mm
2"
51 mm
UNIT DIMENSIONS
U.S. Metric
Height (Adjustable) 33-7/8˝ to 35-7/8˝ 860 mm to 912 mm
Width 23-5/8˝ 600 mm
Depth (Includes high loop) 22-7/8˝ 581 mm
Depth W/Door Open 49-1/2˝ 1257 mm
Weight 110 Ib 50 kg
23-5/8"
600 mm
22-7/8"
581 mm
Technical Data
Electricity 120V, 60Hz, 15 amp
Water pressure 4.2 - 140 psi,
0.03-1.0 MPa,
0.3-10 Bar
Heating element 1200 watt
Max loading 1300 watt
49-1/2"
1257 mm
33-7/8" to 35-7/8"
860 mm to 912 mm
5-3/8" to 7-3/8"
137 mm to 187 mm
3-1/8"
79 mm
PREPARING THE LOCATION
The best place for your dishwasher is in the kitchen near
the sink. This makes it easier to connect the water and
drain supply lines.
A built-in dishwasher must be enclosed on the top, both
sides and the back.
The power-supply receptacle for the appliance shall
be installed in a cabinet or on a wall adjacent to the
undercounter space in whitch the appliance is to be
installed.
The electrical and water supplies should enter through
the area indicated by the shading on the illustration at
right. Preferably, they should come through the right side
of the machine. The access hole must be round and
smooth and no bigger than 1-1/2˝ (38 mm) in diameter. If
the partition is metal, it needs to be covered with an edge
protector. Use caution when the appliance is installed
or removed, to reduce the likelihood of damage to the
power-supply cord.
Door
3-3/8"
86 mm
229 mm
Cutout Dimensions
U.S. Metric
Height** 33-7/8˝ – 36˝ 860 – 914 mm
Width 23-5/8 – 24˝ 600 – 610 mm
Depth 24˝ 610 mm
2-7/8"
73 mm
9"
** If accessory FI fill strips are used, then 1/2˝ (13 mm) must
be added to the dishwasher height and cutout. Additionally,
3/8˝ (10 mm) must be added to the dishwasher width and
cutout width.
4 5
CUSTOMER CARE CENTER 1-800-898-1879 • WWW.ASKONA.COM CUSTOMER CARE CENTER 1-800-898-1879 • WWW.ASKONA.COM
Page 5
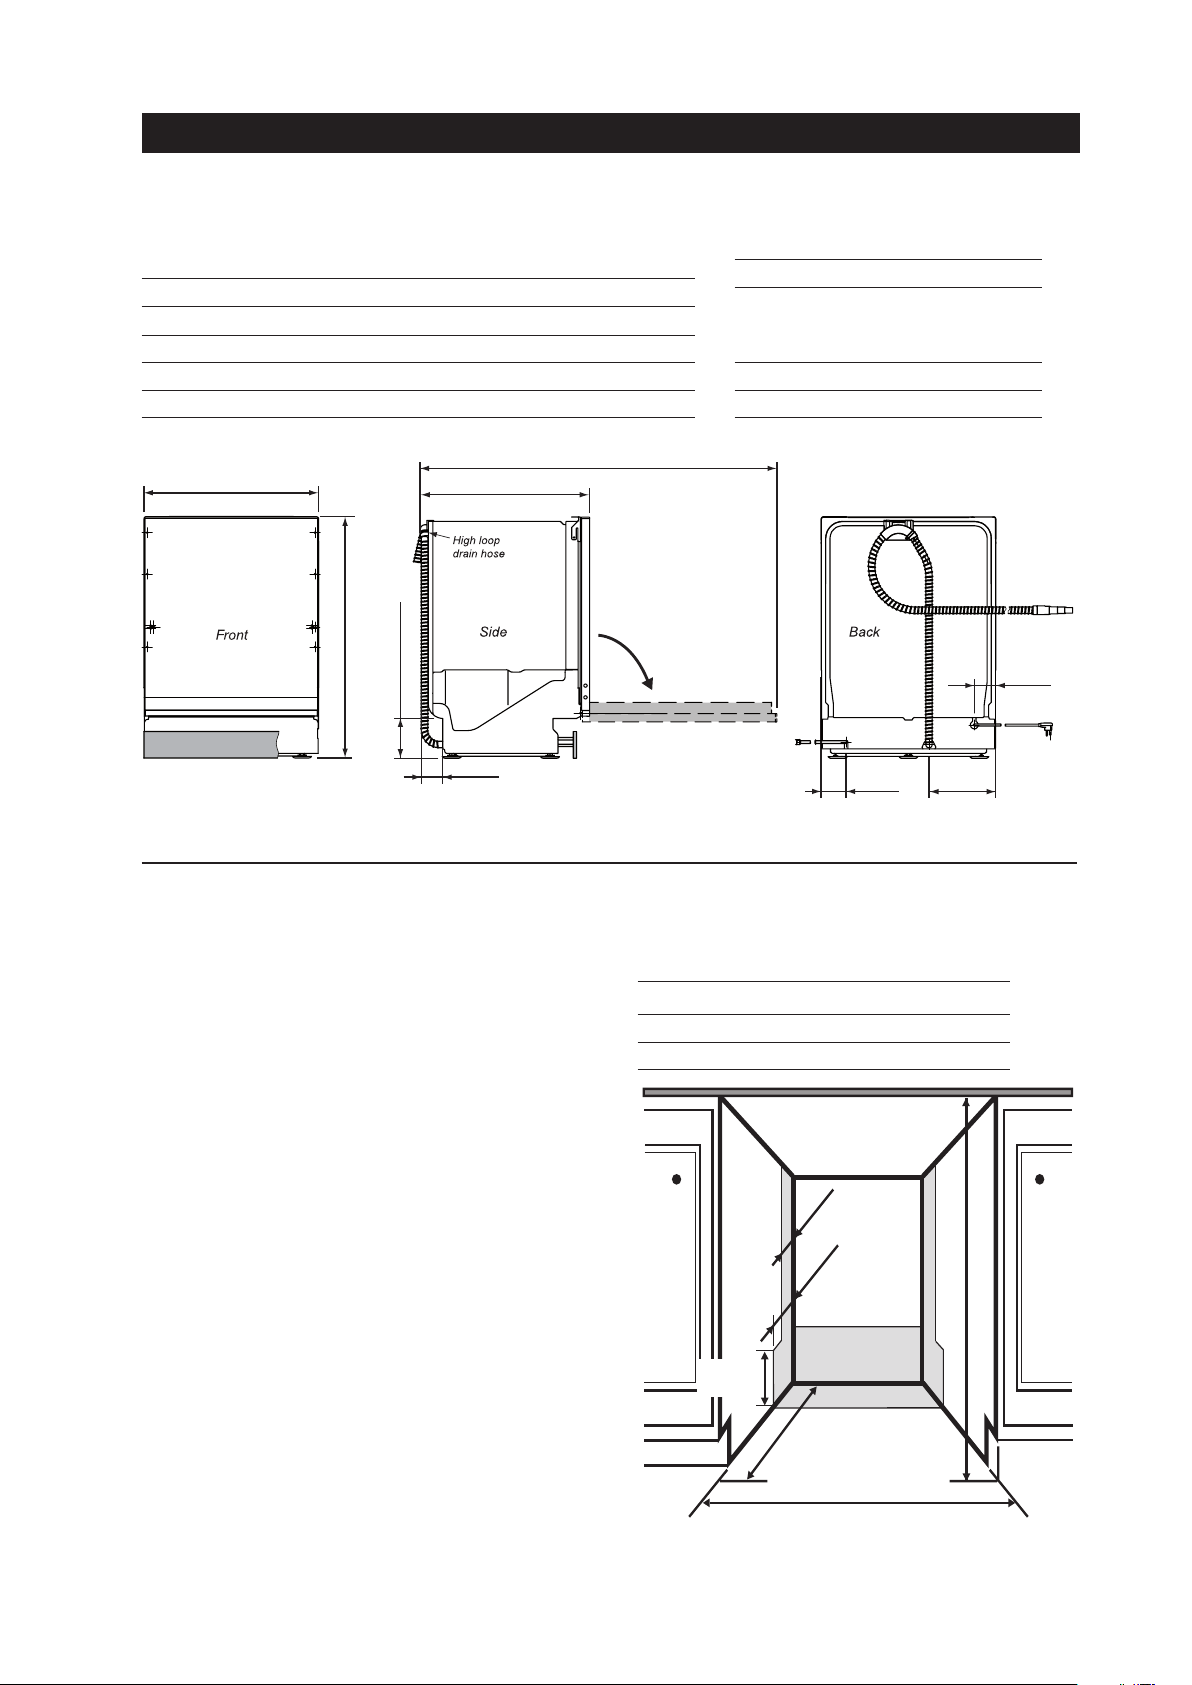
ADA AND XL DISHWASHERS
23-5/8” – 24"
600 mm – 610 mm
24"
610 mm
4"
102 mm
5-3/8"
136 mm
*32-1/4" – 34" minimum
*819 – 864 mm
2"
51 mm
UNIT DIMENSIONS
U.S. Metric
Height (Adjustable)* 32-3/8˝ to 34-1/4˝ 820 mm to 872 mm
Width 23-5/8˝ 600 mm
Depth (Includes high loop) 22-7/8˝ 581 mm
Depth W/Door Open 48-3/8˝ 1229 mm
Weight 108 Ib 49 kg
23-5/8"
600 mm
22-7/8"
581 mm
Technical Data
Electricity 120V, 60Hz, 15 amp
Water pressure 4.2 - 140 psi,
0.03-1.0 MPa,
0.3-10 Bar
Heating element 1200 watt
Max loading 1300 watt
48-3/8"
1229 mm
*32-3/8" to 34-1/4"
*820 mm to 872 mm
5-3/8" to 7-3/8"
137 mm to 187 mm
3-1/8"
79 mm
PREPARING THE LOCATION
The best place for your dishwasher is in the kitchen near
the sink. This makes it easier to connect the water and
drain supply lines.
A built-in dishwasher must be enclosed on the top, both
sides and the back.
The power-supply receptacle for the appliance shall
be installed in a cabinet or on a wall adjacent to the
undercounter space in whitch the appliance is to be
installed.
The electrical and water supplies should enter through
the area indicated by the shading on the illustration at
right. Preferably, they should come through the right side
of the machine. The access hole must be round and
smooth and no bigger than 1-1/2˝ (38 mm) in diameter. If
the partition is metal, it needs to be covered with an edge
protector. Use caution when the appliance is installed
or removed, to reduce the likelihood of damage to the
power-supply cord.
Door
3-3/8"
86 mm
9"
228 mm
Cutout Dimensions
U.S. Metric
Height* 32-1/4˝ – 34˝ 819 – 864 mm
Width 23-5/8 – 24˝ 600 – 610 mm
Depth 24˝ 610 mm
2-7/8"
73 mm
* 32-1/4˝ (819 mm) height requires removal of top trim, and
lowering side trim (2).
Page 6
ADAFI TRIM KIT INSTALLATION OPTIONS
ASKO XLADAFI dishwashers can be installed either with or without accessory fill strips depending on the type of
installation. If the dishwasher cutout has been cut to European widths of 23-5/8˝ (600 mm), the unit won’t require fill
strips. If the dishwasher cutout is a standard 24˝ (610 mm) wide, we have fill strips that make the unit 24˝ (610 mm) wide.
23-5/8˝ (600 mm) Wide Door Panels
The ASKO accessory fill kit for 23 5/8˝ (600 mm) Width
Door Panels (445006), which includes the counter saver
fill strip and both side fill strips, should be installed in the
back mounting holes.
23-7/8˝ (606 mm) Wide Door Panels
The ASKO accessory fill kit for 23-7/8˝ (606 mm) Width
Door Panels (445008) which includes the counter saver
fill strip and both side fill strips, should be installed in the
front mounting holes.
6 7
CUSTOMER CARE CENTER 1-800-898-1879 • WWW.ASKONA.COM CUSTOMER CARE CENTER 1-800-898-1879 • WWW.ASKONA.COM
Page 7

STEP 1. FITTING THE DISHWASHER IN PLACE
2x
1
5/8" (16 mm)
1. Be sure to remove the transport protection for the
door when unpacking the dishwasher.
2. Attach the light shielding film (packed in the
document bag) to the underside of the countertop
above the touch buttons. (Only certain models).
The light shielding film ensures optimal button
!
functionality.
NOTE:
The surface on which the protective film is to be
attached must be clean and dry.
1
3. Attach the supplied door sealing
(only certain models).
This strip is an essential part of the Turbo Dry
Express system and must be installed to ensure
an optimum seal between the dishwasher tank
and door.
4. Start by measuring the height from the floor to the
bottom edge of the counter top. Measure the height
from the floor to the top edge of the dishwasher.
5. Loosen the lock nuts on the dishwasher’s steel
feet using a 5/8 inch (16 mm) open-ended wrench.
Screw the lock nuts down as close to the floor as
possible.
2
2
Page 8

STEP 1. FITTING THE DISHWASHER IN PLACE
6. Adjust the front feet by turning them clockwise to
raise or counterclockwise to lower the dishwasher.
Leave enough space to adjust them later.
7. Screw in the back foot completely by turning the
adjustment screw at the front counterclockwise.
Use a flat-bladed screwdriver or a 1/4˝ nut driver.
(Only models with front adjustable rear foot).
If the machine does not have a front adjustable
rear foot, level the remaining rear legs just as you
did the front legs.
1˝ (24 mm)
8. Push the dishwasher into the cabinet. At the same
time, pull the power cord, the drain hose, and the
fill hose through the appropriate cut outs.
Use caution when sliding the dishwasher into
place. The protective slides could cause damage to certain types of soft flooring.
NOTE:
If installing in a metal cabinet, the hole(s) for the
drain hose and connection pipe must be fitted with
edge protectors/rubber grommets.
9. Lift the dishwasher a little at the front and turn the
front feet to lower them.
1˝ (24 mm)
10. Check that the height of the machine corresponds
to the height from the floor to the bottom edge of
the counter top.
8 9
CUSTOMER CARE CENTER 1-800-898-1879 • WWW.ASKONA.COM CUSTOMER CARE CENTER 1-800-898-1879 • WWW.ASKONA.COM
Page 9

STEP 1. FITTING THE DISHWASHER IN PLACE
11. Adjust the back foot by turning the adjustment
screw at the front clockwise. (Only models with
front adjustable rear foot.)
If the machine does not have a front adjustable
rear foot, level the remaining rear legs just as you
did the front legs.
12. Place the spirit level on the dishwasher door
to check that the machine is level and adjust if
necessary. The door must be fully closed!
NOTE:
The dishwasher must be level!
An unlevel machine can affect the amount of water
taken in, the door can be difficult to close, and the
baskets difficult to place securely.
Page 10

STEP 2. ATTACHING THE ACCESSORY DOOR OR CUSTOM PANEL
2x
1"
(25 mm)
2x
1
6
5
2
*
*
7
*
8
*
Follow the separate instructions supplied with the
dishwasher to attach the chosen accessory door
or custom panel to the front of the machine.
NOTE:
Once you have fitted the accessory door or
custom panel to the dishwasher, the door springs
may need adjusting. Check that the door stays
6x
1-1/2"
(38 mm)
3
in the position in which it is placed. If the door
drops down when you open it, the springs need
to be tightened. If the door shuts on its own, the
springs need to be loosened. See step 3 for further
instructions.
NOTE:
The custom panel must not cover the air nozzle
and thereby block the flow of air.
4
2x
3/8"
(10 mm)
Custom Panel Dimensions
XXL DISHWASHERS ADA AND XL DISHWASHERS
Width 24˝ (610 mm) minimum to cabinet width minus
Height 28-1/8˝ (714 mm) for 6˝ toe kick to 30-1/8˝ (765
Thickness 3/4˝ (19mm) 3/4˝ (19mm)
1/4˝ reveal
mm) for 4˝ toe kick
24˝ (610 mm) minimum to cabinet width minus
1/4˝ reveal
28-1/8˝ (714 mm) for 4˝ toe kick
10 11
CUSTOMER CARE CENTER 1-800-898-1879 • WWW.ASKONA.COM CUSTOMER CARE CENTER 1-800-898-1879 • WWW.ASKONA.COM
Page 11

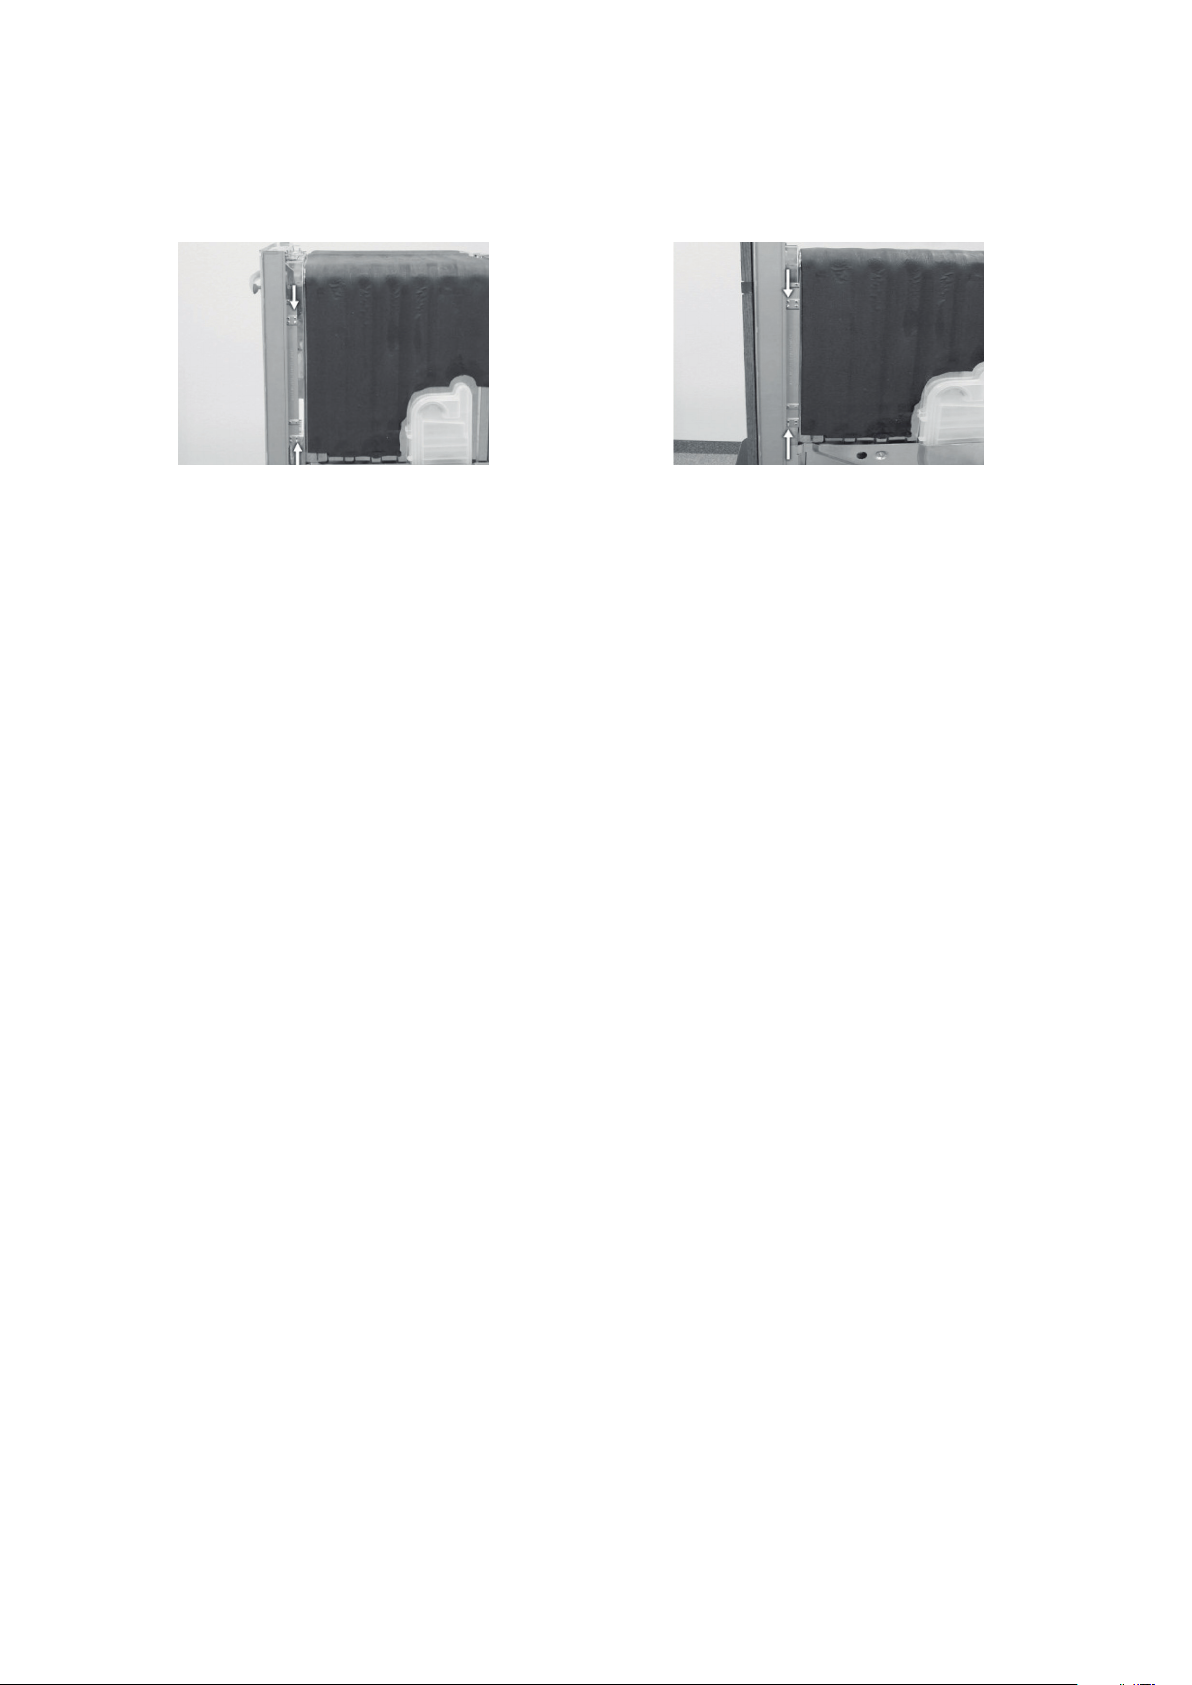
STEP 3. ADJUSTING THE DOOR SPRINGS
XL = 3-11 kg
XXL = 1-9 kg
Check that the door is balanced. It should not fall open
or snap shut. Adjust as necessary.
TYPE A
The door springs are on the sides of the dishwasher.
If necessary, pull out the dishwasher and adjust the
tension of the door springs. A good idea is to try
adjusting one side only first.
1. Be sure the door is closed.
TYPE A
TYPE B (SEE PAGE 12)
2. Grab the front end of the spring and pull it up and
forward to release it from the forward mount.
3. Loosen the spring from the rear mount by turning
it outwards.
4. Adjust the spring tension using one of the following
methods depending on how much adjustment is
needed.
If you need to adjust the spring a lot, place the
rear mount in another hole. Place the spring further
forward to reduce the tension and further back to
increase the tension.
If you want to make small adjustments to the
spring, hold the back end with one hand and turn
the forward mount clockwise or counterclockwise
one or more times. Turn the mount clockwise to
increase spring tension and counterclockwise to
reduce spring tension.
Increase spring tension
Reduce spring tension
Reduce spring tension
Increase spring tension
Page 12

STEP 3. ADJUSTING THE DOOR SPRINGS
5. Replace the back end of the spring by holding the
spring at a right angle to the side of the dishwasher
and pushing the end of the spring into the hole,
then turning the spring in towards the dishwasher.
6. Reattach the front end of the spring by pulling it up
and forward to fasten it in the mount.
7. Open the door and check the spring tension again.
If necessary, make further adjustments as above.
5
6
XXL DISHWASHERS
The machine is delivered from the factory with
two blue door springs that are designed to
accommodate a door panel that weighs up to 15
lbs. For panels that weigh between 15 and 19 lbs,
remove one blue spring that came with the unit and
replace it with a green (700202) spring. For panels
that weigh between 19 and 23 lbs, remove both
springs that came with the unit and replace them
with two green (700202) springs.
TYPE B
If you need to adjust the door spring tension, use
1.
a screwdriver to turn the hexagonal headed screw
located at the front of the machine.
The maxium weight for the door panel on units with
this type of springs is 19 lbs. Heavier springs are
not available for this unit.
ADA AND XL DISHWASHERS
The machine is delivered from the factory with one
red, and one blue door spring that are designed to
accommodate a panel that weighs up to 17 lbs. For
panels that weigh between 18 and 22 lbs, remove
the red spring that came with the unit and replace it
with a blue (700528) spring. For panels that weigh
between 22 and 27 lbs, remove both springs that
came with the unit and replace them with two green
(700202) springs.
12 13
CUSTOMER CARE CENTER 1-800-898-1879 • WWW.ASKONA.COM CUSTOMER CARE CENTER 1-800-898-1879 • WWW.ASKONA.COM
Page 13

STEP 4. CONNECTING ELECTRICITY, WATER, AND DRAIN
1.
CONNECT DRAIN HOSE
ASKO provides a 7/8˝ (22 mm) diameter corrugated
drain hose which is connected to the back of the
unit to form a high loop.
NOTE:
Do not use any fittings anywhere in the drain
line that are less than 7/8˝ (22 mm) OD.
The access hole for the drain line should be 1-5/8˝ (41
mm)- 2˝ (50mm) max.
The end of the drain line
is 1/2˝ (12 mm), but it
is adjustable to 7/8˝, 3/4˝, 5/8˝ (22mm, 19 mm,
and 16 mm). If the drain connection is larger than
1/2˝ (12 mm), you can easily cut the drain line to fit
the connection.
The illustrations to the right show three ways to
connect the drain supply line.
THE HIGH LOOP
The high loop is necessary for
proper draining. Therefore, all
ASKO dishwashers have the drain
hoses attached to the drain pump
and fastened to the top back of
the unit, as illustrated. This gives the drain hose an
automatic high loop, which is necessary for proper
draining. The drain hose is fastened at the best
high loop height.
To eliminate potential drain problems, simply leave
this hose in place.
DO NOT REMOVE THE HIGH LOOP ATTACHED TO
THE BACK OF THE DISHWASHER!
THREE WAYS TO INSTALL
DRAIN CONNECTIONS
A) Typical connection to sink plumbing before trap
(high loop drain)
508
B) Connection to air gap then to the trap
508
IMPORTANT THINGS TO REMEMBER:
• Failure to provide the proper drain connection
height (minimum of 20˝ (508 mm) above the
bottom of the dishwasher base) or a 20˝ (508
mm) high loop will result in improper drainage,
which will damage the machine.
• No part of the drain hose should be higher than
35˝ (889 mm) from the bottom of the dishwasher.
• The drain hose can be extended to a maximum
length of 10 feet (3048 mm). Joints and jointed
tubes, if any, must have a minimum 7/8˝ (22
mm) OD.
• If the drain line is going to be connected to a
waste disposer, be sure to remove the knockout
or plug from the fitting on the disposer before
connecting the drain line.
• Do not use fittings smaller than 7/8˝ (22 mm)
OD; otherwise the water may not drain properly.
C) Connection to waste disposer with air gap
508
NOTE:
Don’t forget to remove the knockout or plug from the
disposer fitting.
Page 14

STEP 4. CONNECTING ELECTRICITY, WATER, AND DRAIN
2. CONNECT WATER SUPPLY HOSE
WARNING!
Plumbing connections must comply with
applicable sanitary, safety and plumbing codes
in your area.
The machine can be connected to either a hot
(max. 160 °F, 70 °C) or cold water supply. We
recommend a cold water supply. The water
pressure should be 4.2-140 psi.
Connect to cold water...
If you use oil or electricity to heat your home.
Connect to hot water (max 160 °F, 70 °C)...
If you use district heating, solar power, or
geothermal power to heat your home. Choosing
a hot water connection cuts program times and
reduces the dishwasher’s electricity consumption.
For service convenience, a shut-off valve (not
supplied) should be installed in the supply line in
an easily accessible location, such as, beneath
the sink.
In order to prevent heat damage to the inlet valve,
all solder connections must be made before the
water supply line is connected.
Flush the water supply line prior to connecting it
to the water fill tube.
The unit has a float switch in the base pan to protect
against flooding. If the inlet valve connection is not
seated properly, water may leak into the base pan
and activate the float switch.
Water connection should be carried out by a
qualified professional. It is important that the water
supply line and the shut-off valve have a sufficient
flow volume. At least 3 gallons (12 liters) per minute
must be able to pass through the line. Connect the
machine using the accompanying supply hose.
Water pressure should be 4.2-140 PSI. There
should be a shut off valve on the water pipe.
Use the supplied O ring and tighten the connection
by hand plus a quarter turn with a wrench.
If the pipes are newly installed, it may be wise
to flush them so that any debris is washed
away. Otherwise, debris can clog the filter in the
machine’s water intake and cut off the water supply.
Only use the inlet hose supplied with the machine.
Do not reuse old or other loose inlet hoses.
(1) Water supply
(2) Water supply valve (not supplied)
NOTE:
Be sure to run the PEX tubing through the hole leading
to the sink compartment before moving the dishwasher
into position.
Shutoff
valve
Grounded
outlet
Water connection
14 15
CUSTOMER CARE CENTER 1-800-898-1879 • WWW.ASKONA.COM CUSTOMER CARE CENTER 1-800-898-1879 • WWW.ASKONA.COM
Page 15

STEP 4. CONNECTING ELECTRICITY, WATER, AND DRAIN
3. CONNECT THE PLUG
Ensure that the power outlet is within the range of
the power cable. Do not use an extension cord!
The dishwasher must be connected to a grounded
outlet.
GROUNDING INSTRUCTIONS
This appliance must be grounded. In the event of
a malfunction or breakdown, grounding will reduce
the risk of electric shock by providing a path of least
resistance for electric current. This appliance is
equipped with a cord having an equipment-grouding
conductor and a grounding plug. The plug must be
plugged into an appropriate outlet that is installed
and grouded in accordance with all local codes and
ordinances.
WARNING!
Improper connection of the equipmentgrounding conductor can result in a risk of
electric shock. Check with a qualied electrican
or service representative if you are in doubt
whether the appliance is properly grounded.
Do not modify the plug provided with the
appliance, if it will not t the outlet, have proper
outlet installed by a qualied electrician.
Plug
Grounded
outlet
Page 16

STEP 5. CHECKING DISHWASHER FUNCTION AND FIT
Test the dishwasher with the Rinse & Hold program.
Check that the dishwasher fills and drains properly.
Also check that none of the connections leak.
Also check that adjacent drawers and cabinet
doors can be opened when the dishwasher door
is open.
STEP 6. SECURING THE DISHWASHER
1. Pull out the upper basket, and the center basket
if present, and turn the basket stop on the runner
outward.
2. To make more space available when installing the
machine, remove the upper and center basket if
present.
3. Remove the lower basket. Otherwise it easily rolls
out if you need to adjust the dishwasher during
installation.
4. Screw the dishwasher to the counter from the inside
or to the cabinets on either side. If the counter
is a hard material, such as marble, screw the
dishwasher to the side cabinets. Use the supplied
plastic spacers when mounting the dishwasher
into place!
6
5
Alt. 2Alt. 1
5
6
NOTE:
When it is not possible to attach the dishwasher
to the cabinet or the underside of the counter
top, you should install tip guards to prevent the
machine from tipping when you open the door.
Sold individually.
Tip Guards
(P/N 441487)
16 17
CUSTOMER CARE CENTER 1-800-898-1879 • WWW.ASKONA.COM CUSTOMER CARE CENTER 1-800-898-1879 • WWW.ASKONA.COM
Page 17

STEP 6. SECURING THE DISHWASHER
5. Check that the dishwasher’s steel feet are solidly
placed on the floor. Make sure the dishwasher is
not hanging in the air by the mounting tabs. If it is,
turn the front feet to lower them until the machine
is resting on the feet.
6. Also adjust the dishwasher’s steel feet so that the
dishwasher is level.
7. Tighten the lock nuts on the steel feet with a 5/8
inch (16 mm) open-ended wrench.
5/8" (16 mm)
Page 18

STEP 7. ATTACHING THE TOE KICK (IF APPLICABLE)
x
7
*
8
*
1.
7
4.
5.
8
Insulation material
x
2.
3.
6.
18 19
CUSTOMER CARE CENTER 1-800-898-1879 • WWW.ASKONA.COM CUSTOMER CARE CENTER 1-800-898-1879 • WWW.ASKONA.COM
Page 19

NOTES
Page 20

INSTALLATION CHECKLIST
ASKO - DISHWASHER
Appliance Installation Checklist
• Remove packaging and check for cosmetic damages.
• Remove the information packets from inside the dishwasher.
•
Attach any accessories as required by the installation. Fill strips, light shielding
film, supplied door sealing, accessory door, custom panel...
•
Attach the drain line using the largest section of the disposer boot allowable.
Leave the high loop in place.
• Attach the PEX fill hose. Don’t forget to use the O-ring.
• Plug the dishwasher into the wall.
• Turn on the water and check the fill line connections for leaks.
• Slide the unit into the cabinet and level the machine front to rear, and left to right.
• Mount the unit to the cabinet.
Turn the power to the unit on and start a cycle. Make sure there are no drain
•
leaks.
•
Show the customer their warranty card, and help them locate the model and
serial number on the unit.
• Leave all user books for consumer.
en (01-15)
20
CUSTOMER CARE CENTER 1-800-898-1879 • WWW.ASKONA.COM
Art. No 492181 Rev. 01
 Loading...