

Page 1
DISHWASHER D4
I
E
Start
Stop
OPERATING INSTRUCTIONS • ENGLISH
Page 2

TROUBLEFREE HOUSEKEEPING
ASKO/ONE quality is equally high worldwide,
but the guarantees vary from country to coun-
try depending on legislation and other factors.
Guarantees and terms of sale are presented on a
separate page that accompanies your machine.
TROUBLEFREE HOUSEKEEPING
A household appliance should always offer Trou-
blefree performance. It cannot just suddenly stop
working, it should not be noisy or vibrate, nor
should it be dirty or ugly, waste water and elec-
tricity, or blink obstinately while refusing to
allow itself to be programmed. The whole point
of household appliances is to make your life
troublefree – not be the cause of your troubles!
nufacturer can guarantee 100% reliability, we
created a unique service concept for our ASKO/
ONE customers which guarantees that we will
take care of any problem that might arise – befo-
re it starts to trouble you.
We call it T
ROUBLEFREE HOUSEKEEPING. For us
this is a way to stay in touch with our customers,
to make sure that you are still satisfied after 3
years, as well as after 13. In practice, the Trou-
blefree housekeeping concept gives you the best
service possible.
You can call on the T
ROUBLEFREE LINE at any
time to ask questions or request service.
We will still stay in touch with you and your
appliance for as long as you use it – and we
expect that to be a long time!
When we created ASKO/ONE we did all
we could to prevent problems by incorporating
high quality, reliability, timeless design, and effi-
cient features into a few, carefully selected mo-
dels.
However, no matter how hard you try, at
some point someone may require service on an
appliance. Since neither we, nor any other ma-
2
Page 3

CONTENTS
READ FIRST
Safety 4
Children’s safety 5
The parts of the dishwasher 6
Technical data 6
Baskets 7
Control panel, symbols 8
Dispenser 8
HOW TO USE THE DISHWASHER
Before you start 9
Basic instructions 9-12
Standard programmes 14-15
Programme options 16
Eco wash 17
Delicate and sensitive washing up 18
CARE
Cleaning 20-21
Rinse Aid 22
Salt 23
SETTINGS
Settings 24-26
FAULTS
Fault indications 27
Trouble shooting - Dishwashingresults 28-29
Trouble shooting - Dishwasher 30
MISCELLANEOUS
Performance information 31
Quick guide 32
INSTALLATION
See instructions for installation
INDEX
Children’s safety 5
Crystal glass, see Delicate wash
Degree of hardness, see water hardness
Delicate wash 18
Detergent 8, 10
Dispenser 8
Disposal 4
Display 13
Energy consumption 14-15
Energy saving 14-17
Environment 4, 14-17
Lime deposits 20
Options 16
Plastic items, see Delicate wash
Poor results 20-23, 28-29
Quick guide 32
Rinse aid 22
Safety 4-5
Salt 23
SCS (Super Cleaning System) 9
Service, Troublefree line
Settings 24-26
Silver, see Delicate wash
Times 14-15
Troublefree Housekeeping 2
Troublefree line 2
Water consumption 14-15
Water setting, see Installation
Water softener 23, 26
Water hardness 9, 23, 26
Programmes 14-15
Wetting agent, see Rinse aid
Winter storage 4
3
Page 4

SAFETY
GENERAL
• Study and save the operating instructions for
future reference.
• Services to the dishwasher, ie, water supply,
drain, electric power, should be connected by
an authorized person.
• Do not use the dishwasher for other purposes
than those stated in the operating instructions.
• Do not subject the dishwasher door or the
baskets to any other load in addition to the
dishware.
• Use only
dishwasher detergent.
• Place cutlery and other sharp objects so that
they cannot cause injury, or damage to the app-
liance.
• Do not touch the heating element at the bot-
tom of the dishwasher - it is very hot during and
PULL-LATCH (FULLY INTEGRATED MACHINES ONLY)
The machine will stop if the door is opened
during operation. However, since the machine
is fitted with a pull-latch, splashing may occur
if the door is opened too quickly. Therefore,
unlatch the door carefully and wait until the
spray arms have stopped rotating before ope-
ning fully.
OVERFILL PROTECTION
The overfill protection starts the drain pump
and switches off the water inlet if water rises
above the normal level. If the overfill protec-
tion becomes activated, turn off the water supply
and call for service.
CLEANING
for a period following the dishwashing process.
Never place items containing remains of sol-
vents in the machine, ie, danger of explosion.
Dishware containing ashes, wax or lubricating
grease may not be washed in the machine.
Place objects made of wood or plastic in the
upper basket, ie, so that they do not fall down
onto the heating element at the bottom of the
machine (fire hazard).
INSTALLATION
See the enclosed instructions for installation.
TRANSPORT/WINTER STORAGE
Transport the machine in an upright position or
lying on its back. Drain off all water from the
drain pump and the inlet valve if the machine is
Use only a damp cloth to clean the edge around
the door. Do not use a spray. Water can enter
the lock and come into contact with the elec-
tric components.
WRAPPINGS
Sort the wrapping material according to recom-
mendations by the local authorities.
DISPOSAL
When the machine is no longer useful and is to
be scrapped it should be made unusable. Dis-
connect and cut off the electric cable close to
the machine.
Get in touch with the refuse collection service
or your local authorities for advice on how to
scrap the machine in a proper manner.
The machine is made and marked for recycling.
to be transported, or stored in unheated premi-
ses, in the winter - call the ASKO T
LINE
for advice.
4
ROUBLEFREE
Page 5
CHILDREN’S SAFETY
CHILD-SAFE STOPPING AND STARTING
To stop a dishwashing programme, the stop
button must be pressed for three seconds. This
delay is integrated.
To prevent the machine from being started
by mistake by a child, it is possible to program-
me a similar delay in the starting mode, see Set-
tings.
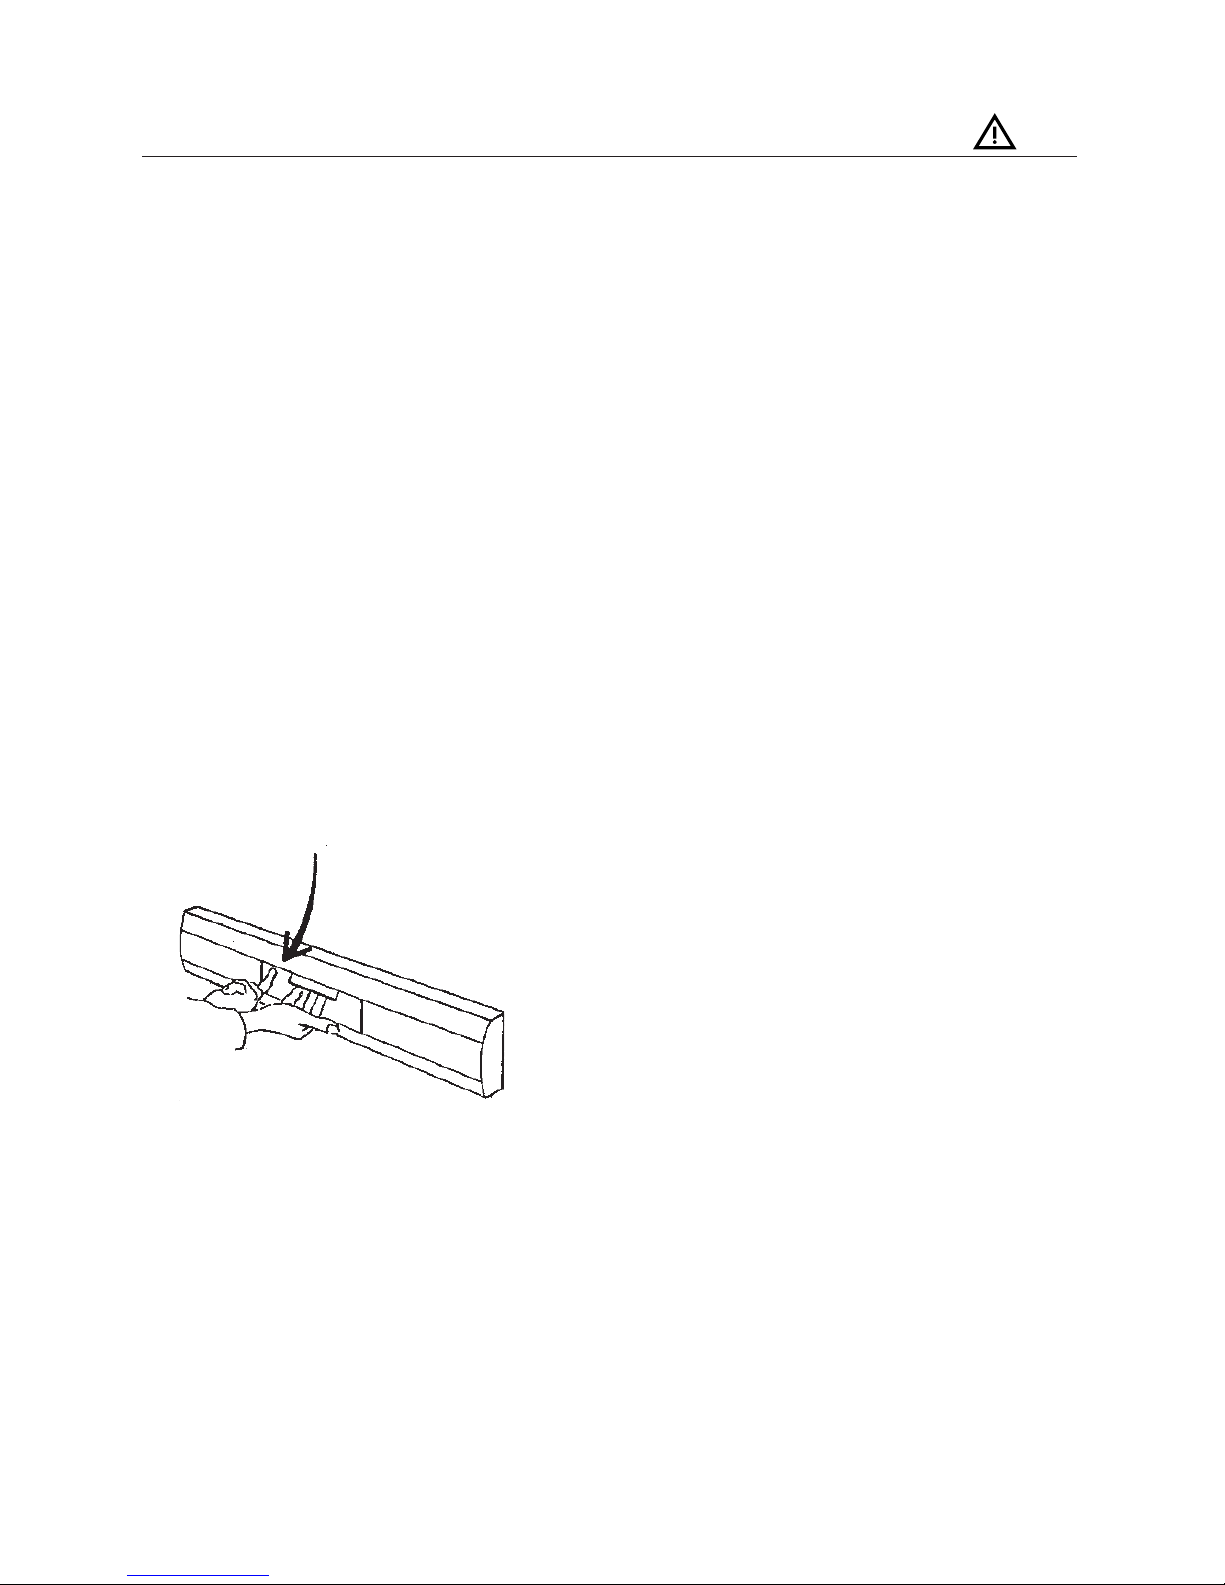
MACHINE WITH CHILD-SAFETY LOCK?
To activate the child-safety lock, if fitted, lift
and turn the screw slot with a screwdriver to a
horizontal position. The screw slot is located
to the left of the handle. Reset by turning the
slot to its vertical position.
To open the door, hold the catch with your
left hand and pull the main catch with your right
CHILD-SAFE DISHWASHING
Use the knife basket, or the knife rack, for all
long or sharp items. If this feature is not fitted,
put such objects in the cutlery basket with the
sharp edge downwards.
Always close the door and start the program-
me as soon as you have filled with detergent.
Keep small children away from the machine
when it is open. There may be remains of deter-
gent left inside the machine.
Do not allow children to use or play with
the machine. Take particular care when the door
is open.
PROTECT CHILDREN - MACHINE DETERGENT IS
CORROSIVE
Keep detergent and rinse aid out of the reach
hand in the usual way.
of children. If anyone swallows dishwasher de-
tergent, give plenty to drink immediately, ie, one
or two glasses of milk or water. Do not try to
induce vomiting. Seek medical advice without
delay.
If dishwasher detergent gets in the eyes, rin-
se with plenty of water for at least 15 minutes.
5
Page 6
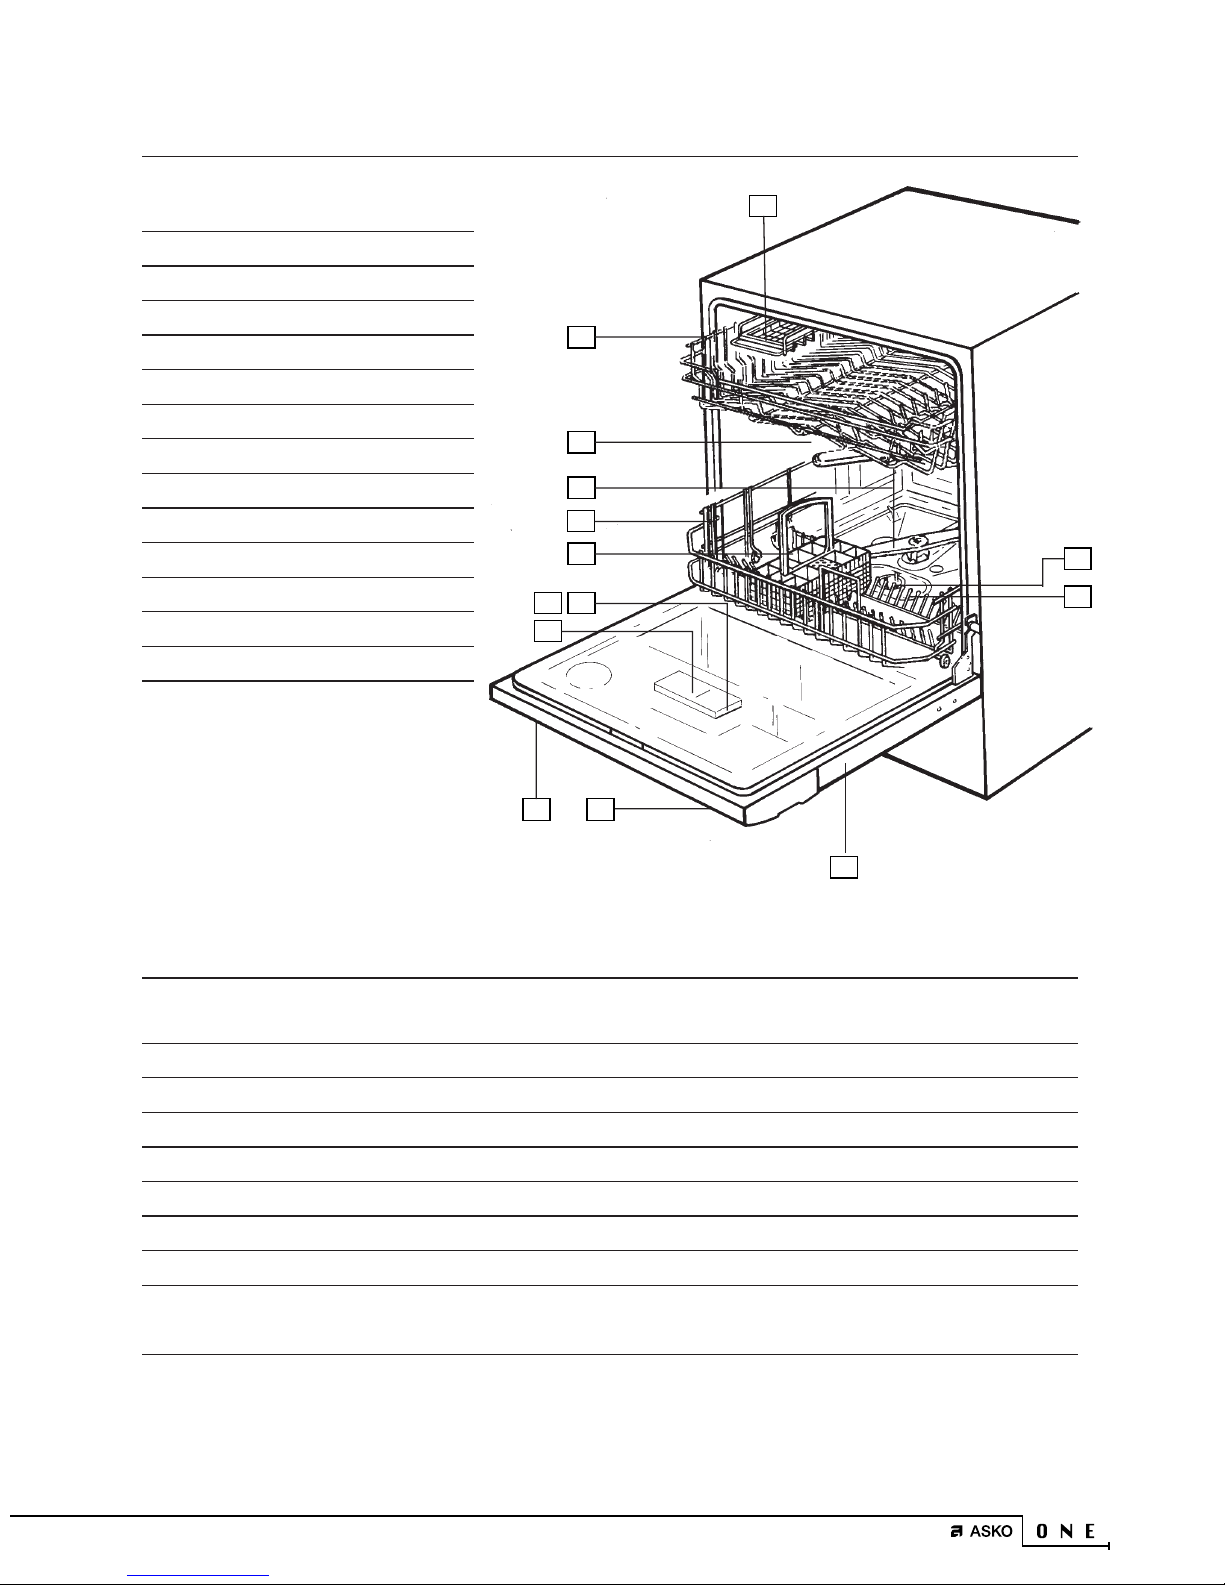
THE PARTS OF THE DISHWASHER*
1. KNIFE BASKET
2. UPPER BASKET
3. LAMP
4. SPRAY ARMS
5. LOWER BASKET
6. CUTLERY BASKET
7. RINSE AID FILLING
8. RINSE AID DISPENSER
9. DETERGENT COMPARTMENT
10. MAIN POWER SWITCH
11. PROGRAMME PANEL
12. COARSE FILTER
13. FINE FILTER
14. TYPE PLATE
* Deviations may occur depending
on the model and the market con-
1
2
3
4
5
6
8
7
9
12
13
cerned.
10
11
14
TECHNICAL DATA
HEIGHT 820–890 MM
WIDTH 596 MM
DEPTH 550 MM****
WEIGHT 48 KG/51 KG WITH SOFTENER*
CAPACITY** 14 COVERS
WATER PRESSURE 0.03–1.0 MPA (0.3–10 KP/CM2)
POWER SUPPLY SINGLE PHASE, 1-FAS, 230 V, 50HZ 10/16A***
MAX. CONNECTING POWER 2 000 W***
ACCESSORIES WORKTOP, SIDE PLATES,
ANTI-TIP DEVICE, TRIMMING FRAMES
**According to standard, AS 2007-1988.
***See type plate.
****Without wooden door fitted. (Integrated )
6
Page 7
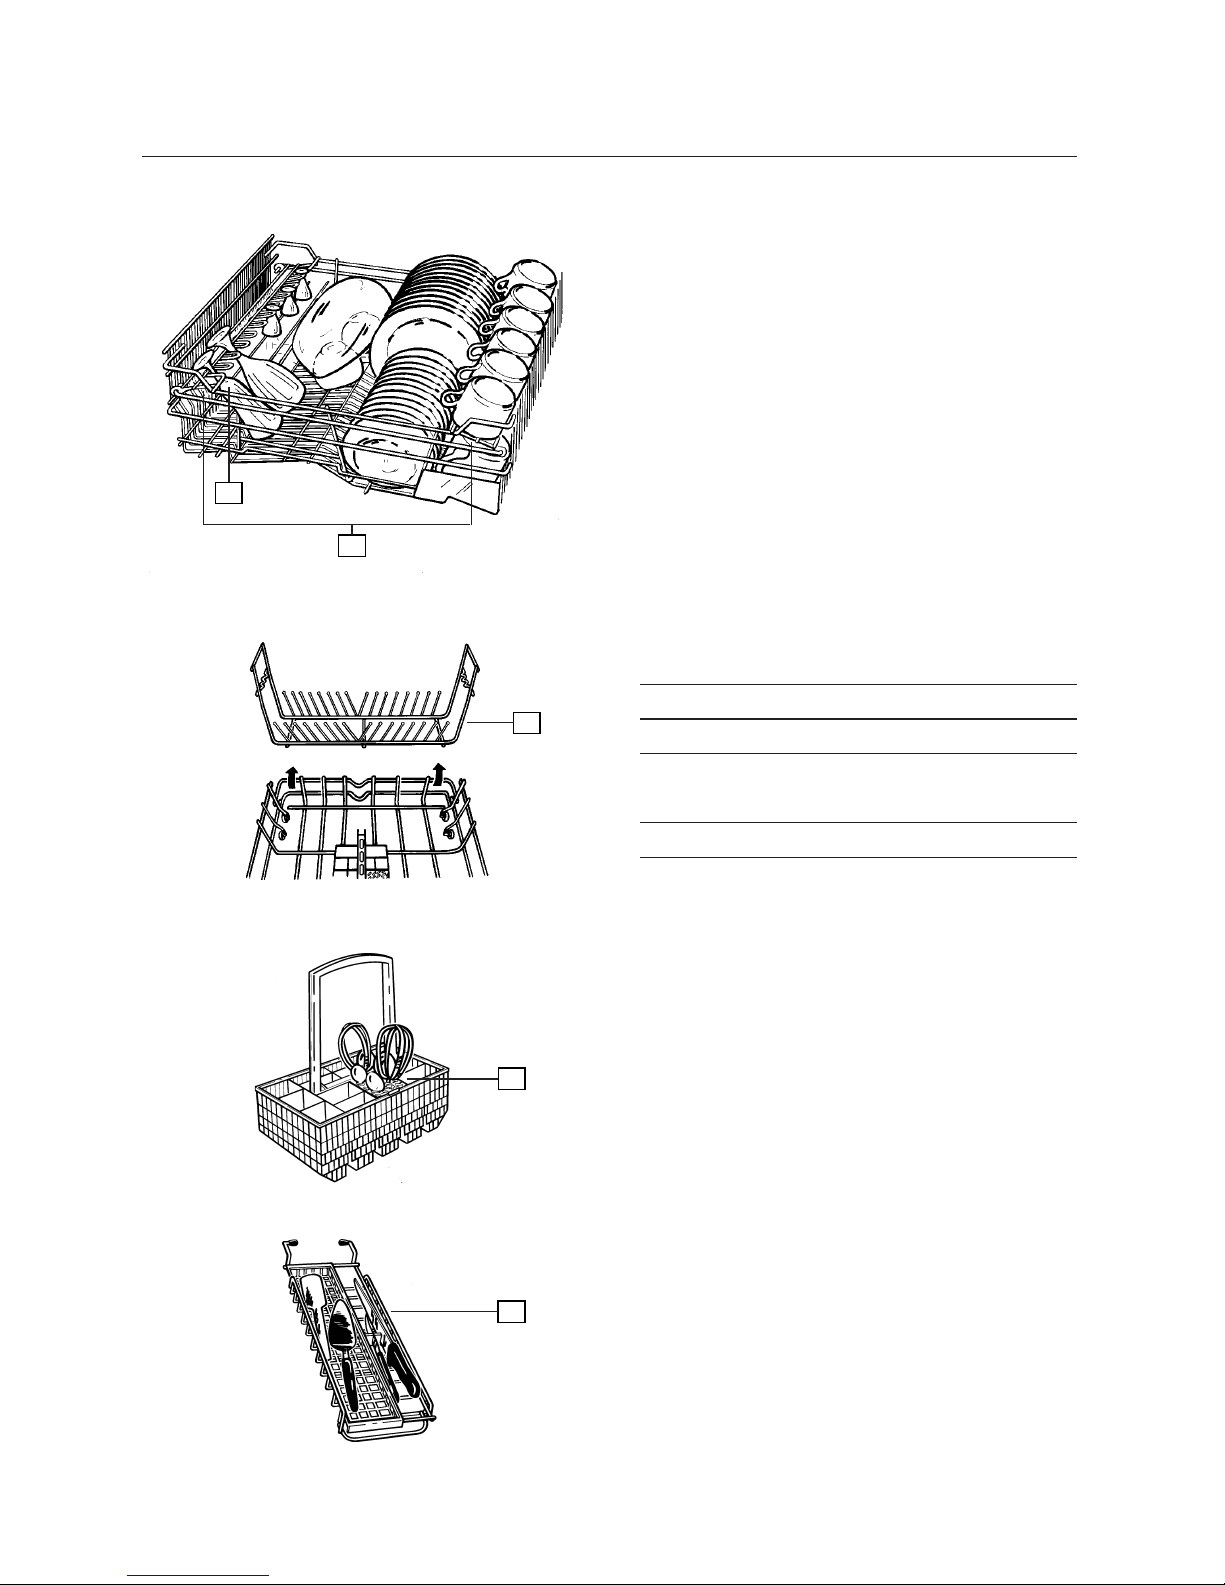
DISHWARE BASKETS*
Upper basket
1
2
Lower basket
Cutlery basket
1. ADJUSTABLE RACK FOR LONG-STEMMED
GLASSES
2. ADJUSTABLE AND FOLDING RACKS
3
3. DETACHABLE PLATE RACK
4. CUTLERY BASKET WITH ADJUSTABLE AND
FOLDING COVER
5. KNIFE RACK
* Deviations may occur depending on the mo-
del and the market concerned.
4
Knife rack
5
7
Page 8
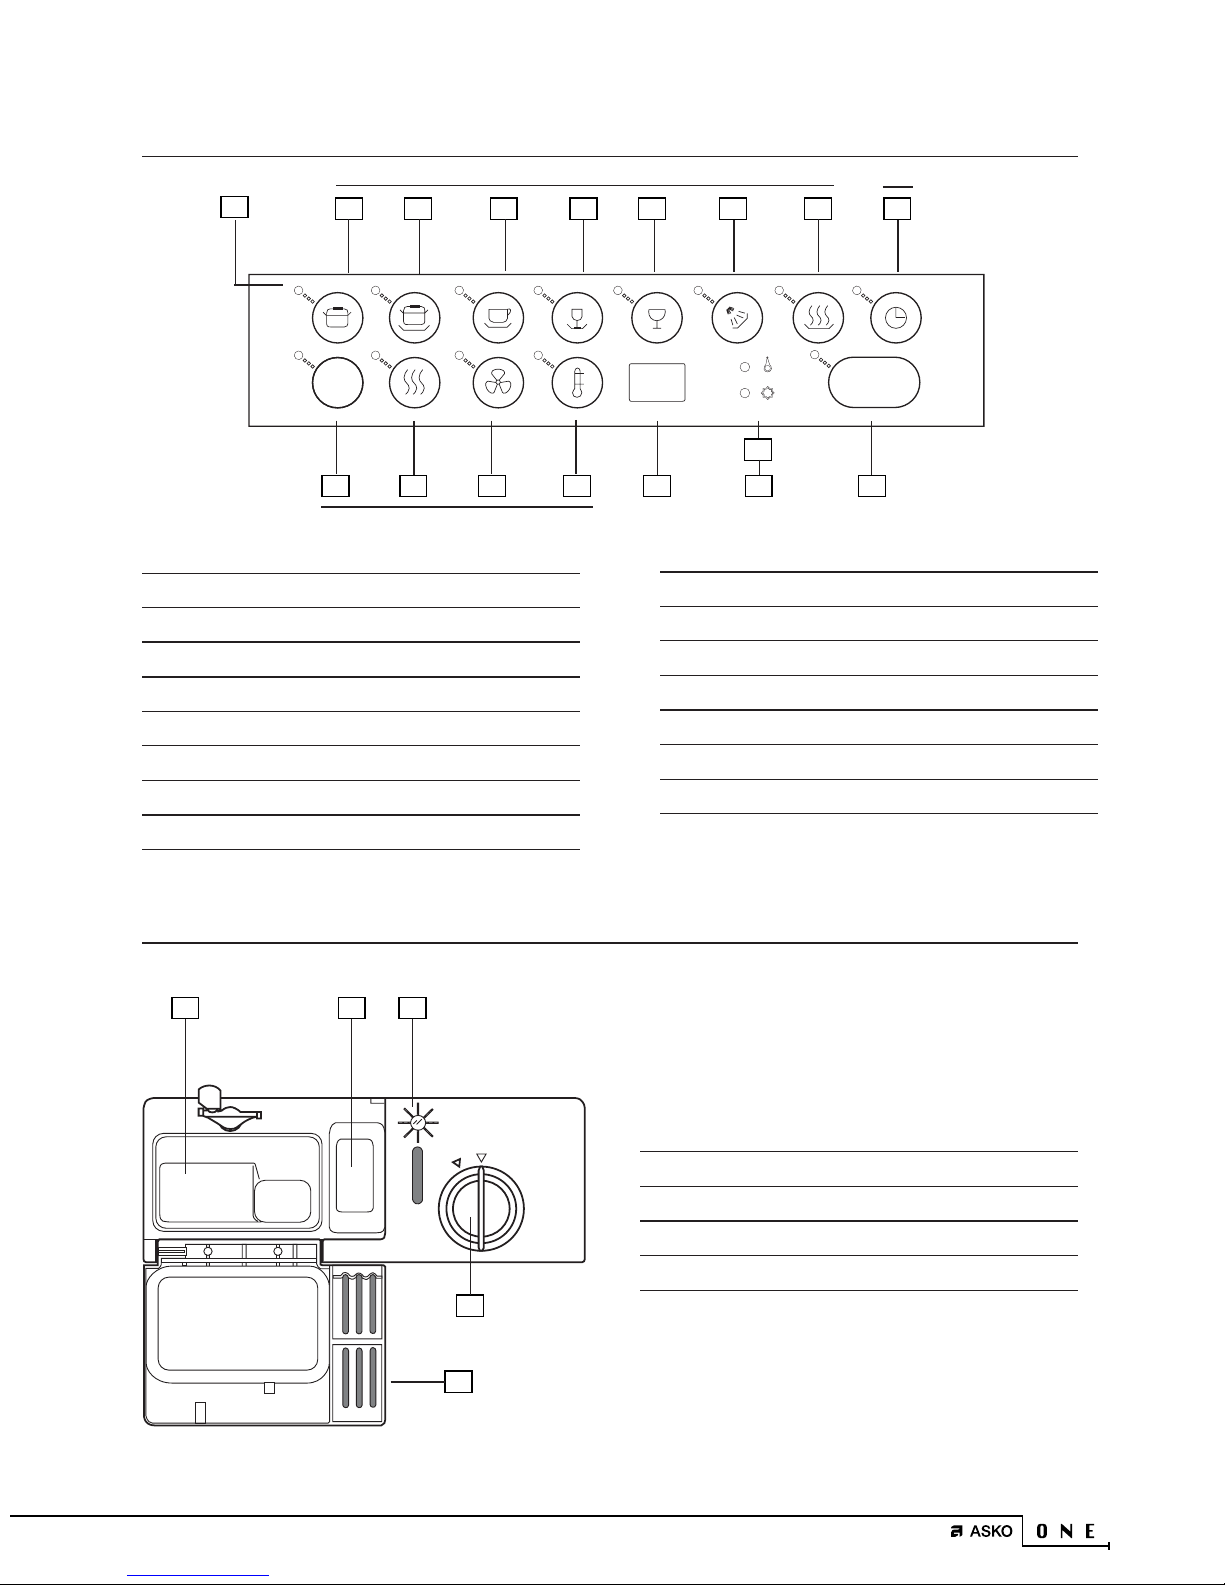
CONTROL PANEL
1
E
10 11 12 13 16
1. INDICATION LAMPS
2. INTENSIVE WASH
3. STRONG WASH
4. NORMAL WASH
5. LIGHT WASH
6. QUICK WASH
7. RINSE & HOLD
8. PLATE HEATING
PROGRAMMES
2 3 4 5 6 7 8 9
15
14 17
OPTIONS
10. ECO/BIO-FUNCTION
11. DRYING HEAT
12. FAN
13. TEMPERATURE CHOICE
14. DISPLAY
15. RINSE-AID INDICATION
16. SALT INDICATION
17. START/STOP
OPTION
Start
Stop
9. DELAYED START
DISPENSER
1 3
2
1. COMPARTMENT FOR MAIN-WASH
DETERGENT
2. COMPARTMENT FOR PRE-WASH DETERGENT
3. RINSE-AID INDICATOR
4. RINSE-AID LID
5. DETERGENT COMPARTMENT LID
4
5
8
Page 9
BEFORE USING THE DISHWASHER FOR THE FIRST TIME
READ THE OPERATING INSTRUCTIONS
Read through the operating instructions before
attempting to use the dishwasher, particularly
the sections: Safety, Children’s safety, and Basic
instructions.
BE CAUTIOUS WITH CERTAIN MATERIALS
Read the Delicate wash section before washing
any porcelain or china that has “on-glaze“ dec-
oration, or crystal glassware, or items made of
wood or plastic material.
CHECK THE DOOR SETTING
Ensure that the door of the machine is properly
balanced, ie, open it a little and release it. Does
BASIC INSTRUCTIONS
it stop exactly where you released it? If not,
check the installation instructions or consult
the person responsible for the installation.
CHECK HARDNESS OF THE WATER
Call your local water company to find out what
degree of water hardness applies. This has signi-
ficance in relation to the amount of detergent
and rinse aid that should be dispensed.
IF YOUR MACHINE IS EQUIPPED WITH A WATER
SOFTENER
Set the softener when you know what degree of
water hardness applies, see Softener. Fill with
salt before starting the machine, see Salt.
The following step-by-step instructions will help
you to achieve the best possible results.
FILL THE BASKETS PROPERLY
Your dishwasher features the ASKO Super Cle-
aning System™.
After the pre-wash, the main wash is started
with clean water and a clean machine and the-
refore it is not necessary to rinse dishware befo-
re washing up.
However, remove large particles of food and
waste. This is convenient and environment
friendly.
Place glasses, cups, saucers and small plates
in the upper basket, with long-stemmed glasses
leaning against the recessed rack, and knives in
the knife rack if fitted.
N.B.
Position the soiled surfaces facing downwards
or inwards.
Place larger plates, dishes, pots, saucepans
and cutlery (in the cutlery basket) in the lower
9
Page 10

basket. The detachable plate rack that is supp-
lied with some models can easily be lifted out to
provide space for big plates, saucepans and pots,
or be fitted in one of the three different posi-
tions.
Place cutlery with the handles downwards
and spread out as much as possible. Make cer-
tain that spoons do not “nest“ with each other.
Avoid placing cutlery made of different ma-
terials in the same compartment, eg, silver and
stainless because of the risk of discolouration.
The cutlery basket has a folding cover in the
middle, which can be used to protect small items
or in which to insert slender handles, eg, electric
DOSING THE DETERGENT
The amount of detergent used should be in re-
lation to hardness of the water.
Follow the instructions on the detergent
packet. If your dishwasher is equipped with a
softener, use the dose recommended for soft
water.
Pour detergent into the detergent compart-
ment. There is one space for pre-wash and one
for main wash, see Dispenser. Call the maker of
the detergent if you have any questions concer-
ning the detergent.
whisks.
Put long cutlery and knives in the special
knife basket, if fitted, or in the upper basket.
Ensure that the spray arms can rotate freely.
See Delicate wash, if you wish to wash sensitive
WARNING!
Dishwasher detergent is corrosive - Take care
to keep it out of reach of children.
CAUTION!
Use dishwasher detergent only.
Detergents intended for washing up by hand
are unsuitable and should not be used because
the lather would obstruct the working of the
machine.
CLOSE THE DOOR
items.
10
Page 11

SELECT A PROGRAMME
The easiest way is to choose a standard
dishwashing programme. Just press one of the
seven programme symbols, and the machine does
the rest. Or you can select the washing tempe-
Normal wash
Use this programm for normal washing. It is
devised for normally soiled glasses, cups and
saucers, plates, dishes, etc.
rature, number of rinses, heated drying, etc, your-
self. See Options.
If you used one of the standard programmes
for the previous wash, ie, Intensive-/Strong or
Normal wash, the machine will remember it and
all you have to do is press the Start push button
to get the same programme.
Intensive wash
Use the intensive wash programme for very
dirty ware, such as pots, pans, casseroles and
gratin forms mixed with normal household
wash-up.
Strong wash
Light wash
If the wash is not particularly heavily soiled. It
is provided for china, which are very slightly
dirty.
Quick wash
Use this programme if items are very slightly
soiled. It is intended for glasses and china that
have just been used and therefore do not requi-
re a more powerful programme.
Delicate ware
can be washed using the Quick-wash program-
me. Eliminate heated drying if you want to be
extra careful. See also, Delicate wash.
Use the Intensive wash programme for dirty
ware, such as pots and pans, and gratin forms.
The dishwasher can suitably be loaded with
other items if not completely filled.
11
Page 12

Rinse and hold
For rinsing, with the intention of waiting until
the machine is full before washing.
If you stop the machine with the main power
switch
(or if there is a power failure) before the pro-
gramme is finished, the programme will conti-
nue from where it was interrupted when power
Plate heating
Use this programme to heat plates.
PRESS THE START BUTTON AND THE
MAIN POWER SWITCH
The machine will start, and automatically car-
ry out the entire washing programme. The mach-
ine will not start if the door is not fully closed.
WANT TO CHANGE YOUR MIND?
If you want to change the programme after you
have started the machine, press Stop for three
seconds. Then select a new programme by pres-
is restored.
N.B.
If the power is turned off, or if the door is open
for more than two minutes, during the drying
phase, the programme will be reset.
AFTER WASHING
When the machine has stopped, it consumes
extremely little power. When the programme
has stopped the indication-lamps are lightning,
this shows that the programme is ready. To
switch it off completely, turn off the main po-
wer switch. Turn off the water tap if the mach-
ine is to be left unattended for a long period, eg,
during holidays.
sing the appropriate symbol and then the Start
button.
Integrated machine, first open the door and do
as above. Close the door again.
Want to put more things in the dishwasher?
Open the door, and the machine will stop auto-
matically. Put the dishes in the machine, close
the door and the machine will continue where
it left off.
12
Page 13

THE DISPLAY WINDOW
The display window has four functions. It can show the temperature, the fault indication, the
remaining programme time and the re-programming
SHOWS HOW MUCH PROGRAMME TIME REMAINS.
When a programme starts, the display shows the length of time it took when it was last run. As the
programme proceeds, the display counts down, showing the time remaining. Times can vary slightly
from one time to another, due to variations in the incoming water temperature etc.
NB! The programme time is not stored in the memory if you open the door, or if the machine has a
fault indication during the programme.
As the time proceeds, the time is counted down and the estimated time remaining is displayed . If the time
exceeds 60 minutes, the display alternates between the number of hours, followed by h, and the number of
minutes: e.g. 1h–25–1h–25, which says that 1 hour and 25 minutes remain of the programme.
NOTE!
If the machine is connected to a coldwater suply, the time display for remaining time will be incorrect the
first time that each programme is run. The timo on the display stops on 1 minute until the programme is
done. Do not open the door until the machine has stopped.
On subsequent runs of the respective programmes, the machine will calculate the time on the basis of how
long the programme took on the previous run. The figures are approximated.
13
Page 14

STANDARD PROGRAMMES
PROGRAMME
PRESS
Programme
Options
HOW THE MACHINE WORKS
INTENSIVE WASH
STRONG WASH
NORMAL WASH 65°C
NORMAL WASH 55°
Temperature
Pre-wash with SCS* (number)
Main wash (number)
Rinsing (number)
Drying heat
Fan
CONSUMPTION FIGURES
Washing time (ca. min)**
Energy (ca. kWh)
1
2
Water (litre)***
* SCS = Super Cleaning System™.
** Washing time can vary depending on temperature of the water, variations in power, etc.
*** Water consumption is about two litres more for machine fitted with softener filter.
1
2
Washing time (ca. min)**
Energy (ca. kWh)
Connection to hot water ca. 60°C.
Connection to cold water ca. 15°C.
70° 65° 65° 55°
2222
1111
4322
YesYesYesYes
YesYesYesYes
90 80 75 75
1.0 0.8 0.8 0.6
120 110 95 90
2.0 1.8 1.4 1.2
25.0 21.0 17.5 17.5
14
Page 15

STANDARD PROGRAMMES
LIGHT WASH
ECONOMY WASH 55°
55° 55° 45°
12 1
11 1
22 2
No No No
Ye s Ye s N o
QUICK WASH 55°
RINSING
PROGRAMME
PLATE HEATING
PRESS
Programme
Options
HOW THE MACHINE WORKS
Temperature
Pre-wash with SCS* (number)
Main wash (number)
Rinsing (number)
Drying heat
Fan
70 85 29 4 8
0.4 0.3 0.2 0.01 0.2
85 105 41 4 8
1.0 1.0 0.6 0.01 0.2
14.0 17.5 14.0 3.5 _
* SCS = Super Cleaning System™.
** Washing time can vary depending on temperature of the water, variations in power, etc.
*** Water consumption is about two litres more for machine fitted with softener filter.
1
2
Connection to hot water ca. 60°C.
Connection to cold water ca. 15°C.
CONSUMPTION FIGURES
Washing time (ca. min)**
1
Energy (ca. kWh)
Washing time (ca. min)**
2
Energy (ca. kWh)
Water (litre)***
15
Page 16

OPTIONS
DELAYED START
If you want the machine to start after a delay
(e.g. in a cheap-rate electricity period), press
this pushbuttonthe same number of times as
you want hours´ delay (1–12 hours). Then press
the Start pushbutton. The number of hours´
delay you have set, is displayed in the window.
Pressing the the pushbutton a thirteenth time
will reset the number of hours tp zero.
ECO/BIO FUNCTION
The Eco/Bio function reduces temperature of
the main wash to 50°C and extends duration of
the washing phase by 15 minutes. This saves
energy. Use the Eco/Bio function to give the
right temperature when using detergents con-
taining enzymes.
FAN
Press this button if you want the fan to cool
down the dishes during thirty minutes after the
drying sequence.
TEMPERATURE OPTION
The Temperature option allows you to choose
a washing temperature, as follows:
INTENSIVE, STRONG WASH
AND NORMALWASH: 75/70/65/ 55°C
LIGHT AND QUICK WASH: 65/55/45°C
The lamp lights if you choose the higher tempe-
rature. Your choice remains in the programme
until it is altered. N.B. 45°C is not saved.
DRYING HEAT
The drying heat button lights if drying heat is
selected. Press again if you want a programme
without drying heat, and the lamp will go out.
The fan dries the dishware even if heat is not
switched on. Not in Quick wash.
16
Page 17

ECO WASH
CHOOSE ECONOMY WASH
Press the E-button to reduce temperature of
the main wash to 50°C. Duration of the main
washing phase will be extended by 15 minutes
to compensate the lower temperature. Deter-
gents that contain enzymes are more efficient
at lower temperature and in longer washing pro-
grammes.
WASH ONLY WHEN FULL
Save energy by not running the machine until it
is completely full.
WASH AT LOWER TEMPERATURE
If dishware is only lightly soiled you can suita-
bly reduce the temperature for Intensive-/
Strong and Normal wash to 55°C, and Light-/
SELECT A PROGRAMME WITHOUT DRYING HEAT
If you choose an Intensive-/Strong -/Normal or
Light wash programme without drying heat, the
machine will dry using the fan only. When wash-
ing is completed, leave the door ajar to speed
up the drying process by allowing moist air to
escape.
AVOID RINSING BEFORE WASHING
Thanks to the Super Cleaning System™, you
do not need to rinse your dishes under running
water before putting them in the dishwasher.
The machine always starts the main wash with
clean water and a clean machine.
USE AN ENVIRONMENT-FRIENDLY DETERGENT
Study the environment information on the packet.
Quick wash to 45°C.
CONNECT TO COLD WATER SUPPLY
If the machine is connected to a cold water
supply, running time will be longer because hea-
ting of the water will take longer. The longer
washing phase allows you to run a programme
at a lower washing temperature and still get the
same results.
However, if you are connected to a district
heating supply it will probably be more econo-
mical to connect the dishwasher to the hot wa-
ter supply.
17
Page 18

DELICATE AND SENSITIVE DISHWARE
For a variety of reasons, some articles are unsu-
itable for machine washing. Some materials can-
not withstand high temperature, others can be
damaged by dishwasher detergents.
SENSITIVE DECORATION
China that has “on-glaze“ decoration (feels a
little rough) should not be machine washed.
GLASSWARE/CRYSTAL
Position the items so that they do not knock
against one another. Use the lowest dishwash-
ing temperature and the shortest possible pro-
gramme. No drying heat. Antique objects and
very delicate items should not be machine was-
hed.
Glasses that are washed in a dishwasher at
high temperature can in time permanently loose
their lustre. Wash glasses at 45°C and a small
CUTLERY WITH BONDED HANDLES
Some types of adhesive cannot withstand mach-
ine washing, ie, cutlery handles are likely to
loosen.
WOODEN ITEMS
Wooden items should only be machine washed
if especially recommended.
ALUMINIUM
Aluminium can be dulled by machine washing.
However, good quality aluminium saucepans
can be machine washed, although you must ex-
pect their polished finish to be affected.
PLASTIC MATERIAL
Some plastic materials cannot withstand the
high temperature used in a dishwasher.
amount of detergent.
SILVER
Silver and stainless steel items should not be
allowed to touch each other because the silver
could otherwise become stained.
To protect plastic items
Select a low-temperature programme, 55°C
without heat drying. Place the objects in the
upper basket away from the heating element.
18
Page 19

19
Page 20

CLEANING
CLEANING
The inside of the machine is made of stainless
steel, which is kept clean by normal use. Howe-
ver, deposits of lime can be formed inside the
Tubular
strainer
Fine filter
Coarse
filter
machine if the water is hard. If this happens,
run a Normal wash programme with two table-
spoonful of citric acid in the detergent compart-
ment.
Coarse filter
The coarse filter catches larger particles of food
that would otherwise tend to clog the drain
pump. Lift out the coarse filter and clean as
required. Remember to put it back into place.
Fine filter
Remains caught by the fine filter are flushed
away automatically each time the machine is
used. Clean the fine filter a few times a year. To
release the fine filter, screw out the tubular part
and lift it and the coarse filter straight up. Cle-
an using a dishbrush. When replacing the fine
filter, ensure that its edges seal properly.
Drain pump
The pump can be reached from inside the mach-
ine. First remove the coarse filter, fine filter and
tubular part. Then remove the small black adap-
ting piece to the left in the bottom drain.
There you can reach the pump blade and
remove any obstruction. Fit the adapting piece,
the filters and the tubular part back into place.
WARNING
Don’t forget to fit the adapting piece.
20
Page 21

Spray arms
Spray-arm jets and bearings may sometimes
become clogged. Screw off the nut and take off
the washer on top of the spray arm and lift off
the arm. Poke out any obstructions with a ske-
wer or other suitable pointed tool. The spray-
arm jets face downwards.
Door
To clean the edge round the door, use only a
damp rag and possibly a little detergent. To pre-
vent penetration of water into the door lock
and electrical components, do not use a spray
of any kind.
WARNING
Do not use a spray of any kind close to the door lock.
21
Page 22

RINSE AID
The rinse-aid indicating lamp on the panel will light when
the rinse-aid container becomes empty.* Not all machines
are fitted with the indicating lamp.
TOPPING UP WITH RINSE AID
Drying will be faster if you use rinse aid. The
rinse-aid indicating lamp on the panel will light
when the rinse-aid container becomes empty.*
There is also an indicator on the dispenser. See
the figure. There is sufficient rinse aid available
if the indicator is completely black. If the size
of the black dot is reduced, the container should
be topped up. Turn and lift the lid of the rinse-
aid container, to the right of the dispenser, and
Open
Indicator
Closed
Rinse-aid lid
Open by turning and lifting the lid
*N.B.
After refilling, there may be some delay before
the indicating lamp goes out.
fill with rinse aid until the indicator is comple-
tely black. Adjust the amount of rinse aid needed
for each run as required in accordance with the
instructions below. Remember to close the lid.
CHOOSE THE DOSE
The dispenser is normally set at 1, but it may be
necessary to adjust depending on hardness of
the water.
Open the rinse-aid lid to gain access to the
setting knob of the dispenser. Set between 1 and
6, ie, the harder the water the higher the setting.
If the water supply in your area indicates
hardness higher than 10 to 12°dH, a rinse aid
containing citric acid (acidic rinse-aid) should
preferably be used, ie, if the machine is not equip-
ped with its own water softener. Set the dispen-
ser for soft water if your machine has a softener.
Excessive use of rinse aid can result in lather.
If the water in your area is very soft, you can
22
suitably dilute the rinse aid with an equal amount
of water.
Too much rinse aid will cause streaks on the
dishware, while too little may result in drying
marks.
Page 23

SALT
The salt indicating lamp on the panel will light when there
is no salt left. Not all machines are fitted with the indicating
lamp. In such cases a green indicator is fitted on the lid of
the salt container, see arrow.
Applies to dishwashers with water softener only.
FILLING WITH SALT
The salt compartment must be filled with salt
before using a machine that is equipped with a
water softener. Use coarse salt or regenerating
salt that is especially intended for dishwashers.
The salt should preferably be filled just be-
fore running the dishwasher because it is neces-
sary to rinse the machine directly after filling.
Proceed as follows the first time: Unscrew
the lid of the salt container, as illustrated. Insert
Lock till saltbehållaren
*N.B.
After refilling, there may be some delay before
the indicating lamp goes out.
the funnel, supplied with the dishwasher, into
the filler hole. Pour in about one litre of water
and then enough salt to fill the container, max.
1.5 kg. Wipe away any spilled salt, so that the lid
will seal properly, and screw on the lid firmly.
Run a complete programme to ensure that any
remaining salt is rinsed away.
The salt indicating lamp on the panel will
light when the salt container becomes empty.*
Following the first wash cycle the salt container
will be full of water. Unscrew the lid and fill the
container with salt, which should preferably be
done immediately before a wash programme is
started. Wipe away any spilled salt and screw on
the lid. Run a complete programme to ensure
that any remaining salt is rinsed away.
If the indicator does not work it may be
because the float, fitted underneath the lid, is
sticking in salt residues. Push it up and down to
loosen it. The float is reached through the green
WARNING
Never pour detergent into the salt compart-
ment because it would ruin the softener.
arm underneath the lid. Restore the float arm to
the lower position. Models that are not fitted
with an indicator lamp show a green colour in
the lid when there is sufficient salt.
23
Page 24

SETTINGS
REPROGRAMMING
Some of the machine functions can be reprogrammed. Access to reprogramming of the machine is
gained via the ordinary control buttons as explained below. Any alteration made will remain intact
until the next time you alter the functions.
Even if the machine is turned off using the main power switch, or if power is cut off in any other way,
the selections made prior to loss of power will remain intact.
The selection is shown for two seconds by the indicator lamps, after which the machine returns to
the main programme.
Empty lamp symbol implies lamp off.
Filled lamp symbol implies lighted lamp.
Filled lamp symbol crossed out and underlined implies flashing lamp
CHILD-SAFE STARTING
Inadvertent starting of the machine by a child can be counteracted by programming the machine to
start only if the start button is pressed for three seconds to enable it to start.
Display Lamps
1. PRESS LIGHT WASH FIVE TIMES* (WITHIN 15 SECONDS)
2. PRESS QUICK WASH ONCE TO OBTAIN CHILD-SAFE START 3
OR RESET:
2. PRESS LIGHT WASH ONCE AND YOU WILL GET NORMAL FUNCTION -
* The latest selected setting will be shown.
COOL DOWN
If you wash-up delicious items as fine china or thin glasses, big temperature changes mean risk for
cracking, if the machine is connected to cold water, you can make the machine cool down the dishes,
before cold water enters the machine for the next step.
E
1. PRESS FIVE TIMES ON THE ECO/BIO FUNCTION* (WITHIN 15 SECONDS)
2. PRESS THE QUICK WASH ONCE TO GET COOL DOWN C
OR RESET:
2. PRESS LIGHT WASH ONCE AND YOU WILL GET NORMAL FUNCTION -
* The latest selected setting will be shown.
24
Page 25

ADD ADDITIONAL RINSING
Proceed as follows to give an extra rinse in the Intensive, Strong and Normal wash:
Display Lamps
1. PRESS STRONG WASH FIVE TIMES* (WITHIN 15 SECONDS)
2. PRESS QUICK WASH ONCE TO OBTAIN AN EXTRA RINSE 1
OR RESET:
2. PRESS LIGHT WASH ONCE AND YOU WILL GET NORMAL FUNCTION -
* The latest selected setting will be shown.
SETTING THE WATER LEVEL
The machine takes in a suitable amount of water when the level reaches the mark on the lower spray
pipe bearing, see illustration. Check the level by opening the door after about 2 minutes during a
Normal programme. If there is insufficient water in the machine it may be due to extremely low
pressure of the water supply, in which case the input time can be modified. Some models are level
controlled, ie, the machine senses itself when the level is correct (but you can alter the level as follows
if you wish).
Right level
1. PRESS QUICK WASH* FIVE TIMES (WITHIN 15 SECONDS)
2. PRESS NORMAL WASH ONCE FOR NORMAL INLET TIME 1
OR
2. PRESS LIGHT WASH ONCE FOR 25% INCREASE IN INLET TIME 2
2. PRESS QUICK WASH ONCE FOR 50% INCREASE IN INLET TIME 3
2. PRESS RINSING ONCE FOR 100% INCREASE IN INLET TIME 4
2. PRESS PLATE HEATING ONCE FOR 150% INCREASE IN INLET TIME 5
2. PRESS DELAYED START ONCE FOR 200% INCREASE IN INLET TIME 6
* The latest selected setting will be shown.
25
Page 26

SETTING THE PUMPING-OUT TIME
The pumping-out time can suitably be extended if you are using a long drain hose, max. 3 metres, or
if the machine for any other reason has difficulty in pumping out the waste water in time. Proceed as
follows:
Display Lamps
1. PRESS NORMAL WASH* (WITHIN 15 SECONDS)
2. PRESS NORMAL WASH ONCE FOR 20 SECONDS PUMPING-OUT TIME 20
OR
2. PRESS LIGHT WASH ONCE FOR 25 SECONDS PUMPING-OUT TIME (NORMAL) 25
2. PRESS QUICK WASH ONCE FOR 35 SECONDS PUMPING-OUT TIME 35
2. PRESS RINSING ONCE FOR 45 SECONDS PUMPING-OUT TIME 45
2. PRESS PLATE HEATING ONCE FOR 85 SECONDS PUMPING-OUT TIME 85
* The latest selected setting will be shown.
SETTING THE WATER HARDNESS
If you have a dishwasher that is equipped with a water softener you may wish to alter its setting
depending on hardness of the water in your area. The softener is set at 10-14°dH on delivery.
1. PRESS PLATE HEATING FIVE TIMES* (WITHIN 15 SECONDS)
2. PRESS STRONG WASH ONCE FOR WATER HARDNESS 0-9** 1
OR
2. PRESS NORMAL WASH ONCE FOR WATER HARDNESS 10-14** 2
2. PRESS LIGHT WASH ONCE FOR WATER HARDNESS 15-19** 3
2. PRESS QUICK WASH ONCE FOR WATER HARDNESS 20-24** 4
2. PRESS RINSING ONCE FOR WATER HARDNESS 25-34** 5
2. PRESS PLATE HEATING ONCE FOR WATER HARDNESS 35-49** 6
2. PRESS DELAYED START ONCE FOR WATER HARDNESS 50-70** 7
* The latest selected setting will be shown.
** °dH
26
Page 27

FAULT INDICATIONS
INDICATOR LAMPS
IINDICATION DISPLAY TYPE OF FAULT ACTION
DOOR IS OPEN PREVENTING START OF CLOSE THE DOOR
THE SELECTED PROGRAMME
ELEMENT MALFUNCTION CONSULT SERVICE
TOO MUCH WATER IN THE MACHINE SEE SETTING OF WATER /
DRAINPUMP
A SENSOR ERROR HAS OCCURRED CONSULT SERVICE
WATERINLET MALFUNCTION CHECK WATER SUPPLY
(MACHINE WITH LEVELSENSOR)
TROUBLE-SHOOTING PROGRAMME
It will be possible for you to locate the fault if the machine is not working properly. This facilitates the
work of the repair man and reduces repair time. To start the trouble-shooting programme, press the
Rinsing selection button five time within 15 seconds. The lamps will flash alternately.
Then press the relevant symbol to see if the appertaining component according to the table below is
working. (Press Start to exit the test programme).
SYMBOL TESTS THE FOLLOWING WILL HAPPEN AFTER CLOSING THE
DOOR IF THERE IS NOTHING WRONG
WATER SOFTENER INLET VALVE WATER CAN BE HEARD ENTERING (ONLY MACHINES EQUIPPED
WITH WATER SOFTENER)
WATER INLET VALVE WATER CAN BE HEARD ENTERING
DETERGENT/RINSE-AID DISPENSER THERE WILL BE A CLICK, AND DETERGENT/RINSE AID WILL BE
DISPENSED
HEATING ELEMENT THE ELEMENT HEATS UP. N.B. DO NOT TOUCH THE ELEMENT
CIRCULATION PUMP THE PUMP STARTS
DRAIN PUMP THE PUMP STARTS
FAN MOTOR THE FAN STARTS AND BLOWS OUT AIR BELOW THE LOWER
LEFT CORNER OF THE DOOR
27
Page 28

TROUBLE SHOOTING - DISHWASHING RESULTS
FAULT - POOR WASHING PERFORMANCE
Possible causes
1. Rotation of spray arms prevented by protruding object. Check also that jets in the spray arms are
not clogged.
2. Spray arms slowed down by impurities in the bearings. Spin the arms by hand and if they do not
spin freely lift them off and wipe the fittings clean.
3. Insufficient flow of water in the machine. Check the inlet hose for kinks or sharp bends. Water
pressure may be too low, compensate by increasing the intake time, see Settings.
4. Deteriorated detergent. Do not use old or caked detergent. Keep the detergent dry and cool in a
closed pack. Remember that detergent is perishable. Avoid large packs.
5. Inferior detergent. Try a different one.
6. Unsuitable dosing of detergent. Ensure that the dose suits hardness of the water.
7. The fine filter is not fitted properly. If it is soiled, clean it.
8. Wash programme is too weak. Change to a more intensive programme and higher temperature.
9. Dishware not arranged properly. Make certain that soiled parts face downwards and inwards.
If washing results continue to be unsatisfactory, it is possible to make an improvement by program-
ming the machine to give an extra rinse, see Settings.
FAULT - GREY FILM OR MARKS ON WASHED DISHWARE
Possible causes
To establish the cause of the grey film make a test using distilled water: Pour on a few drops, rub
thoroughly and dry. Clean? If so, the cause can be one of the following:
• Water level is too low. Adjust, see Settings.
• Inadequate drain pumping. Adjust, see Settings.
• Glasses and cups have tipped over. Adjust, see Settings.
• Salt leaking from the softener. Make certain the lid is tight, otherwise call for service.
• Rinse-aid dispenser incorrectly set. Adjust, see Rinse aid.
Not cleaned with distilled water? Test using citric acid: Dissolve 1 tsp citric acid in 1 dl boiling water.
Pour on a few drops, rub thoroughly and dry.
Did citric acid make it clean? If so, the fault can be one of the following:
• Malfunctioning or incorrectly set softener. Adjust, see Settings.
• Wrong type of salt. Replace the salt.
• Salt container is empty. Refill, see Salt.
28
Page 29

• Very hard water. Compensate with acidic rinse aid.
Still not clean after testing with citric acid?
• The cause is probably temperature that is too high and/or too much detergent. This type of film, or
etching, cannot be remedied, only prevented. Wash glasses at low temperature and dispense the
amount detergent with care, and avoid heated drying. Consult the maker of the detergent.
FAULT - DISHWARE HAS STICKY WHITE/BLUE FILM
Possible causes
Concentration of rinse aid is too high. Modify the dose, see Rinse aid. If the water is very soft it may
be suitable to dilute the rinse aid with an equal amount of water, see Rinse aid.
FAULT - STAINS ON SILVER OR STAINLESS STEEL
Possible causes
Some remains of food, eg, mustard, mayonnaise, lemon, vinegar, salt or dressing can cause stains on
stainless steel if left for too long. Rinse away this type of substance if the machine is not to be run
straight away. All types of stainless steel can result in stains on silver if contact is made while being
washed.
Aluminium can result in marks on other objects if contact is made while being washed.
FAULT - STAINS NOT WASHED OFF
Possible cause
Detergent that does not contain chlorine (recommended to protect the environment) may be unable
to remove severe stains, eg, lipstick, tea stains.
FAULTS - MISCELLANEOUS
Knocking sound while the machine is running - spray arms hitting protruding objects.
Rattling noises while the machine is running - dishware not properly arranged.
Dishware is not dried - programme without drying was selected or insufficient dose of rinse aid, see
Rinse aid.
29
Page 30

TROUBLE SHOOTING - DISHWASHER
If the machine does not work, check first to find out if the reason is a simple fault that you can remedy
yourself. Try to locate the fault with the aid of the following description. Try the trouble-shooting
programme also, see Fault indications.
FAULT - DISHWASHER WILL NOT START
Possible causes
1. Main switch is OFF.
2. Door not properly closed.
3. Fuse has blown.
4. Power supply plug not plugged in.
5. Water tap not opened.
FAULT - WATER REMAINS IN THE MACHINE
The drain pump will start automatically if the machine takes in too much water. If water is not
pumped out, the fault may be due to one of the following reasons:
Possible causes
1. Drain hose is clogged. Make certain that there is nothing blocking the connection of the drain hose
to the sink drain trap. Waste can fasten at the end of the connecting pipe. Check also that the tapered
connecting pipe is cut so that the inside diameter is as large as possible, but at least 18 mm.
2. Kink in the drain hose. Check the hose to eliminate any kinks or sharp bends.
3. Filters are clogged. Clean the tubular strainer, coarse filter and fine filter.
4. Drain pump is clogged. Clean the pump.
5. Ensure that the black adapting piece is correctly fitted on the left in the bottom drain by the drain
pump.
30
Page 31

PERFORMANCE INFORMATION
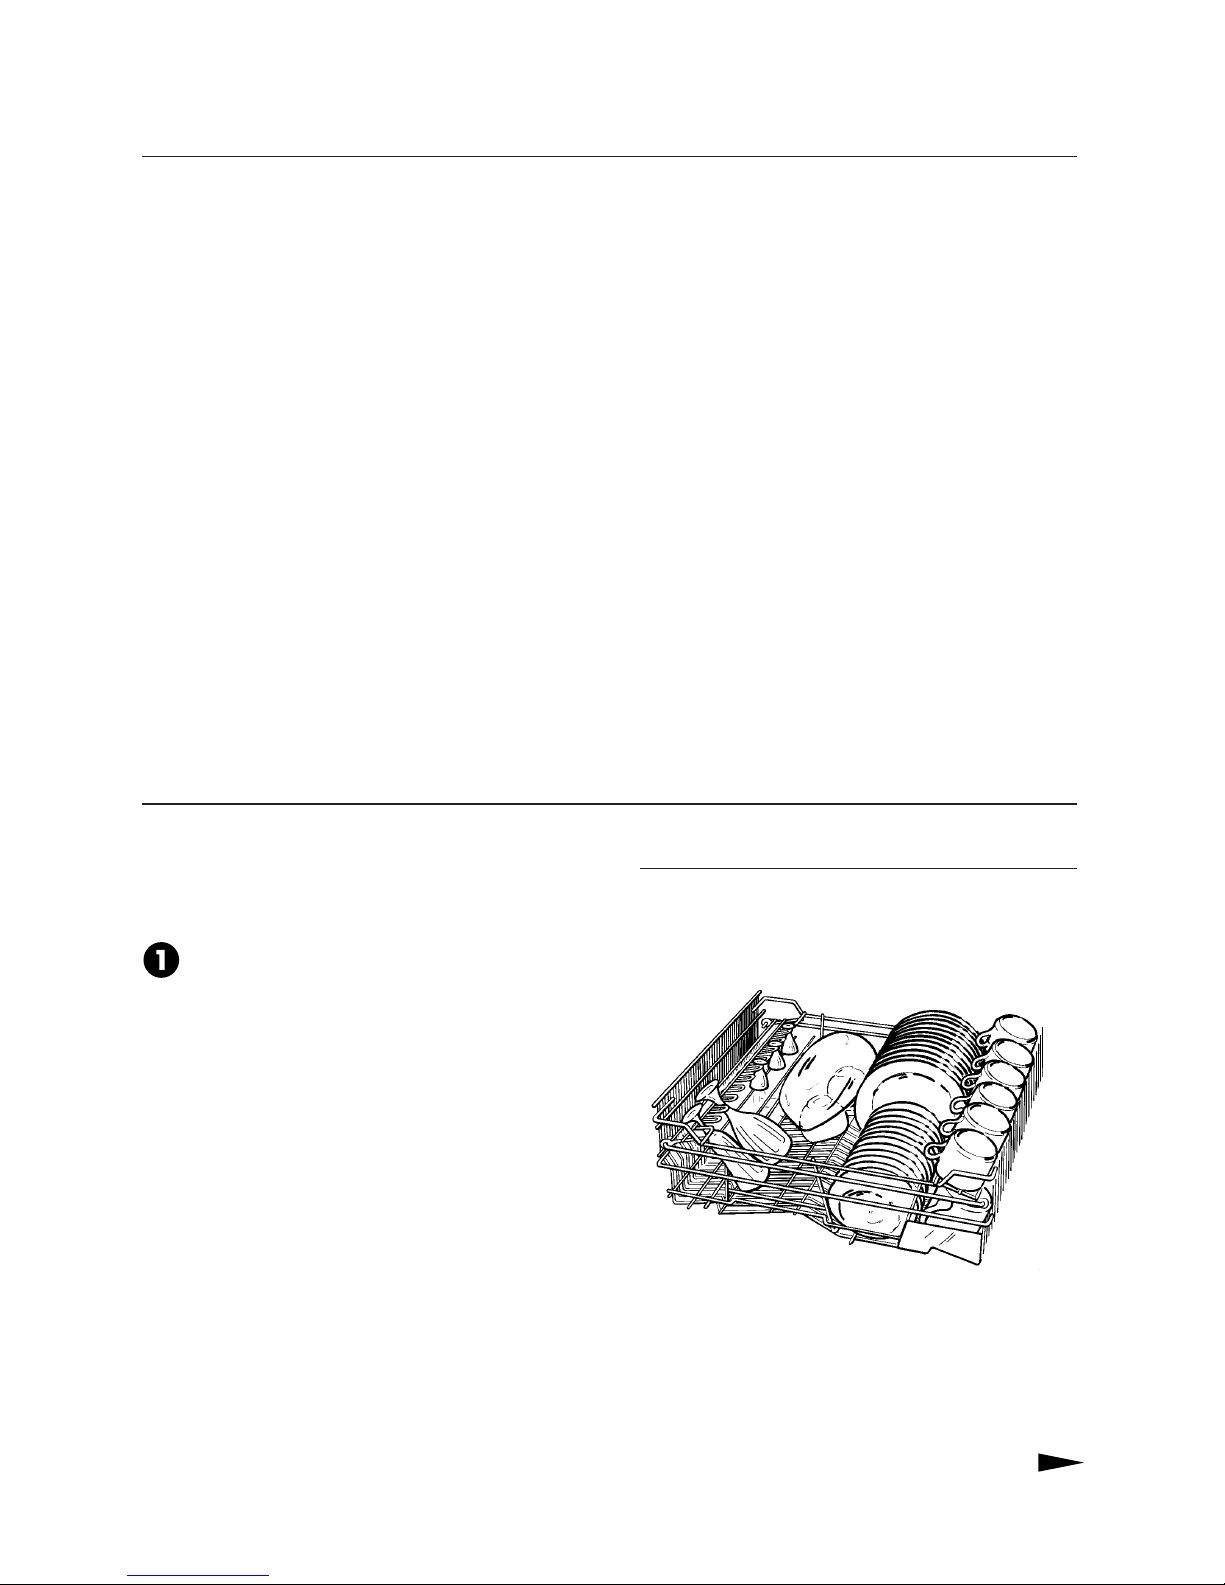
EXAMPLE OF HOW TO LOAD THE MACHINE
STANDARD TESTS
Dishwashing and drying performance
Australia: AS 2007-1988
Dishwashing programme:
Connection: Cold water
Quick wash 45°C without heat drying
TEST DOSES
Main wash 20 grammes Standard detergent.
Test method, noise: IEC-704-1
TECHNICAL DATA
Height: 820–890 mm
Width: 596 mm
Weight: 48 kg*
51kg with water softener*
Capacity: 14 AS covers
Water pressure: 0.03–1.0 MPa
0.3–10 kp/cm
2
(Bar)
3-100 N/cm
Connection: See data plate
Max. power: See data plate
* The weight may vary depending on different
specifications.
2
31
Page 32

QUICK GUIDE
1. FILL THE BASKETS
Remove large particles of food and waste. It is not necessary to rinse, thanks to the
Super Cleaning System
2. DOSE THE DETERGENT
The detergent compartment has a small space for pre-wash and a larger space for the main wash.
3. ENSURE THAT THE SPRAY ARMS CAN ROTATE FREELY.
4. TURN ON THE MAIN POWER SWITCH
5. CLOSE THE DOOR
6. SELECT THE PROGRAMME AND PRESS START
™
.
MINI PROGRAMME GUIDE
PROGRAMME
INTENSIVE WASH
PRESS
Programme
Options
HOW THE
MACHINE WORKS
Temperature
70° 65° 65° 55° 55° 55° 55° 45° - 55°
STRONG WASH
NORMAL WASH 65°
NORMAL WASH 55°
NORMAL WASH (without drying heat)
LIGHT WASH
ECONOMY WASH 55°
QUICK WASH
RINSING
PLATE HEATING
Drying heat
Art. No.: 80 715 62· The right to make changes is reserved.
Printed on environment friendly paper.
Yes Yes Yes Yes No Yes N o No N o Yes
 Loading...