

Page 1

Instructions for use
WASHING MACHINE
GB
English,1
I
Italiano,37
WMSD 723
PL
Polski,13
CIS
Русский,49
UA
Українська,25
Contents
Installation, 2-3
Unpacking and levelling
Connecting the electricity and water supplies
The first wash cycle
Technical data
Care and maintenance, 4
Cutting off the water or electricity supply
Cleaning the washing machine
Cleaning the detergent dispenser drawer
Caring for the door and drum of your appliance
Cleaning the pump
Checking the water inlet hose
Precautions and tips, 5
General safety
Disposal
Opening the porthole door manually
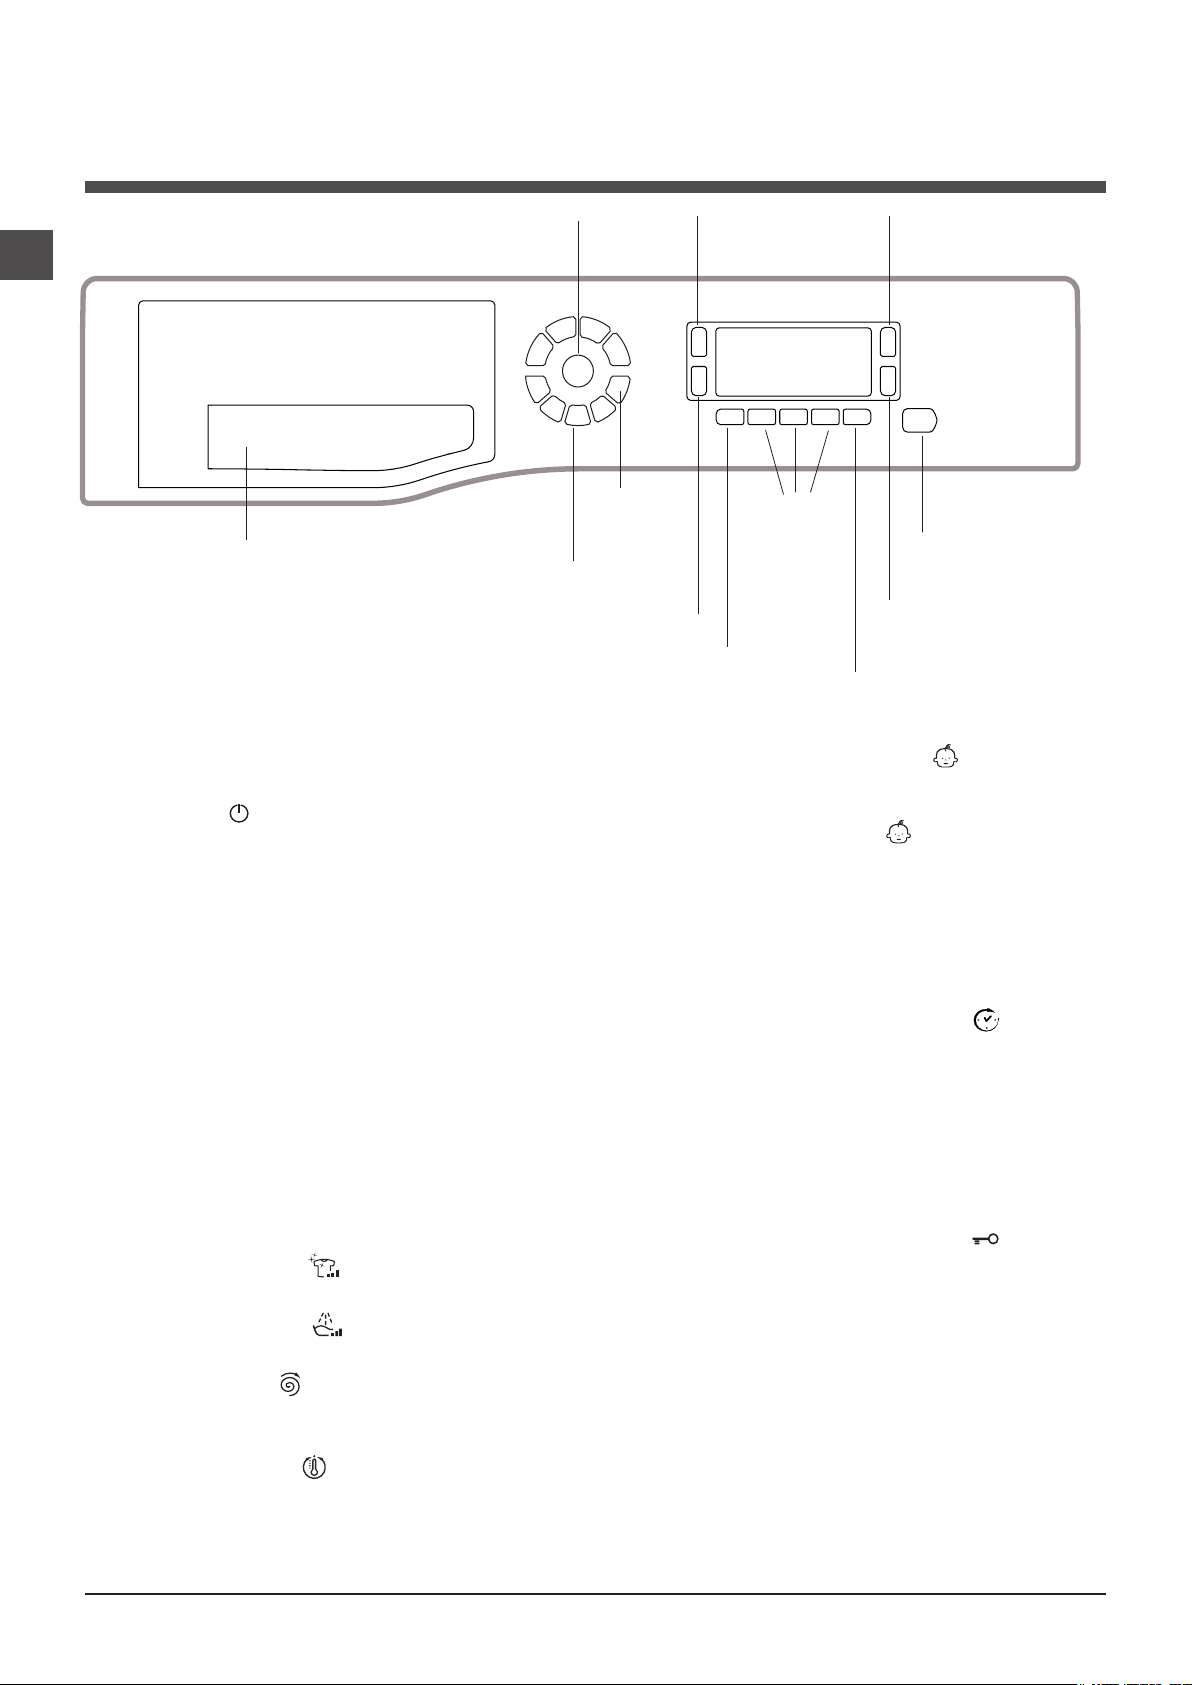
Description of the washing machine, 6-7
Control panel
Display
GB
Running a wash cycle, 8
Wash cycles and functions, 9
Table of wash cycles
Wash functions
Detergents and laundry, 10
Detergent dispenser drawer
Preparing the laundry
Special wash cycles
Load balancing system
Troubleshooting, 11
Service, 12
1
Page 2
Installation
GB
! This instruction manual should be kept in a
safe place for future reference. If the washing
machine is sold, transferred or moved, make
sure that the instruction manual remains with
the machine so that the new owner is able to
familiarise himself/herself with its operation
and features.
! Read these instructions carefully: they contain vital information relating to the safe installation and operation of the appliance.
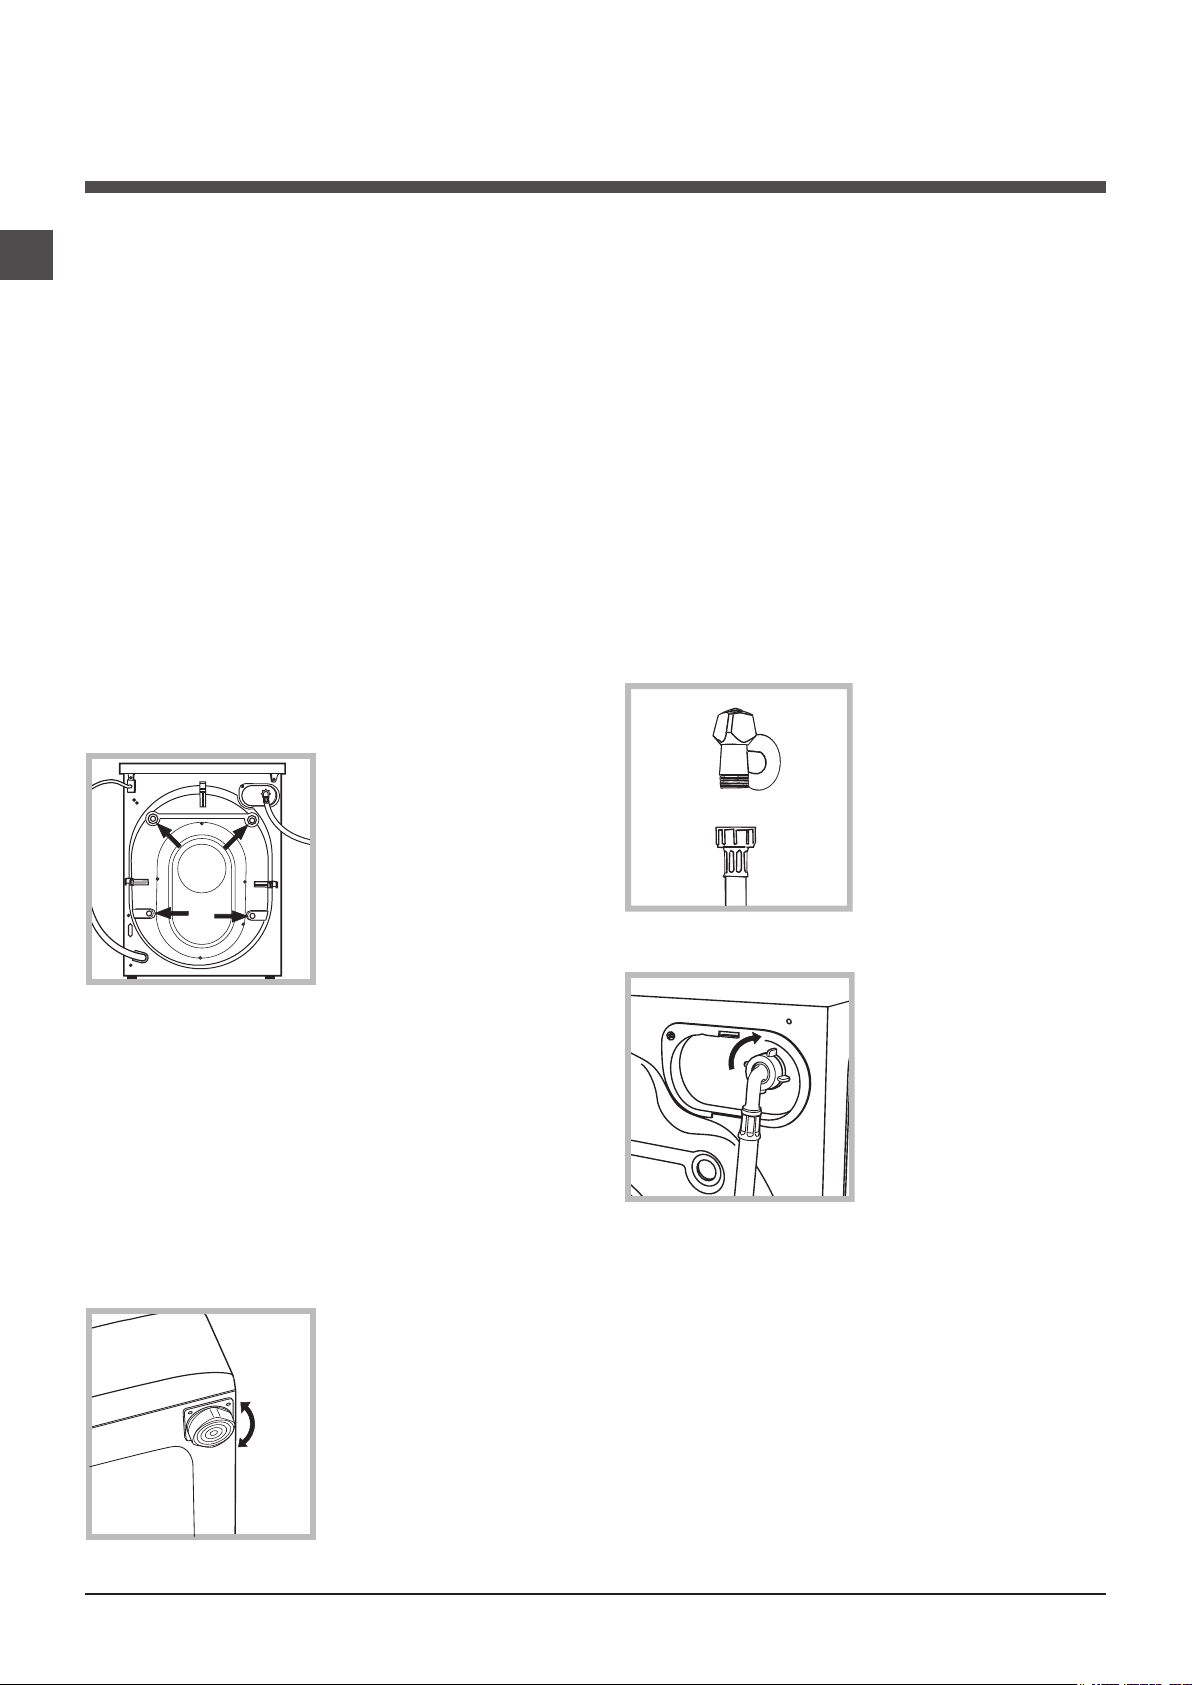
Unpacking and levelling
Unpacking
1. Remove the washing machine from its
packaging.
2. Make sure that the washing machine has
not been damaged during the transportation
process. If it has been damaged, contact the
retailer and do not proceed any further with
the installation process.
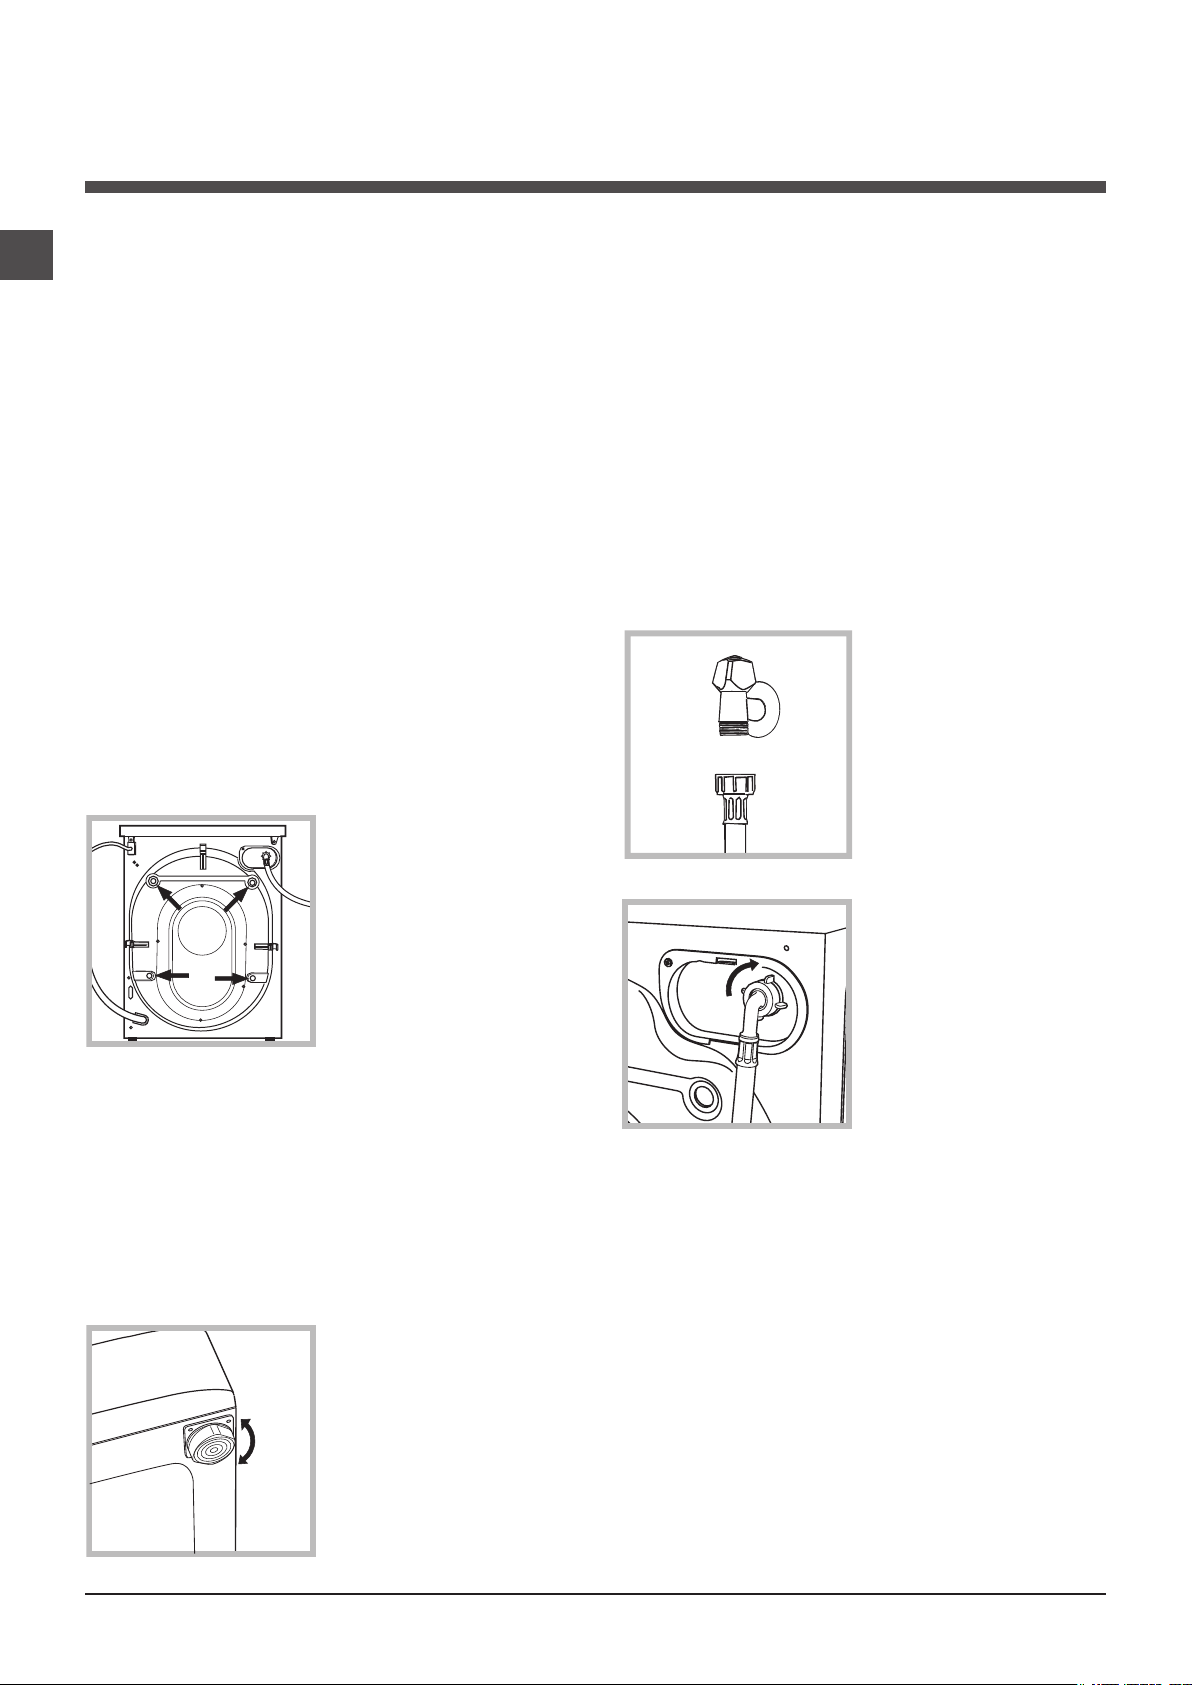
3. Remove the 4 protective screws (used
during transportation)
and the rubber washer with the corresponding spacer,
located on the rear
part of the appliance
(see figure).
4. Close off the holes using the plastic plugs
provided.
5. Keep all the parts in a safe place: you will
need them again if the washing machine needs to be moved to another location.
! Packaging materials should not be used as
toys for children.
Levelling
venness by tightening or loosening the adjustable front feet (see figure); the angle of inclination, measured in relation to the worktop,
must not exceed 2°.
Levelling the machine correctly will provide
it with stability, help to avoid vibrations and
excessive noise and prevent it from shifting
while it is operating. If it is placed on carpet or
a rug, adjust the feet in such a way as to allow
a sufficient ventilation space underneath the
washing machine.
Connecting the electricity and
water supplies
Connecting the water inlet hose
1. Connect the inlet
hose by screwing it to
a cold water tap using
a 3/4 gas threaded
connection (see figu-
re).
Before performing the
connection, allow the
water to run freely until it is perfectly clear.
2. Connect the inlet
hose to the washing
machine by screwing
it onto the corresponding water inlet of the
appliance, which is
situated on the top
right-hand side of the
rear part of the appliance (see figure).
3. Make sure that the hose is not folded over
or bent.
! The water pressure at the tap must fall within
the range of values indicated in the Technical
data table (see next page).
1. Install the washing
machine on a flat
sturdy floor, without
resting it up against
walls, furniture cabinets or anything else.
2. If the floor is not
perfectly level, compensate for any une-
2
! If the inlet hose is not long enough, contact a
specialised shop or an authorised technician.
! Never use second-hand hoses.
! Use the ones supplied with the machine.
Page 3
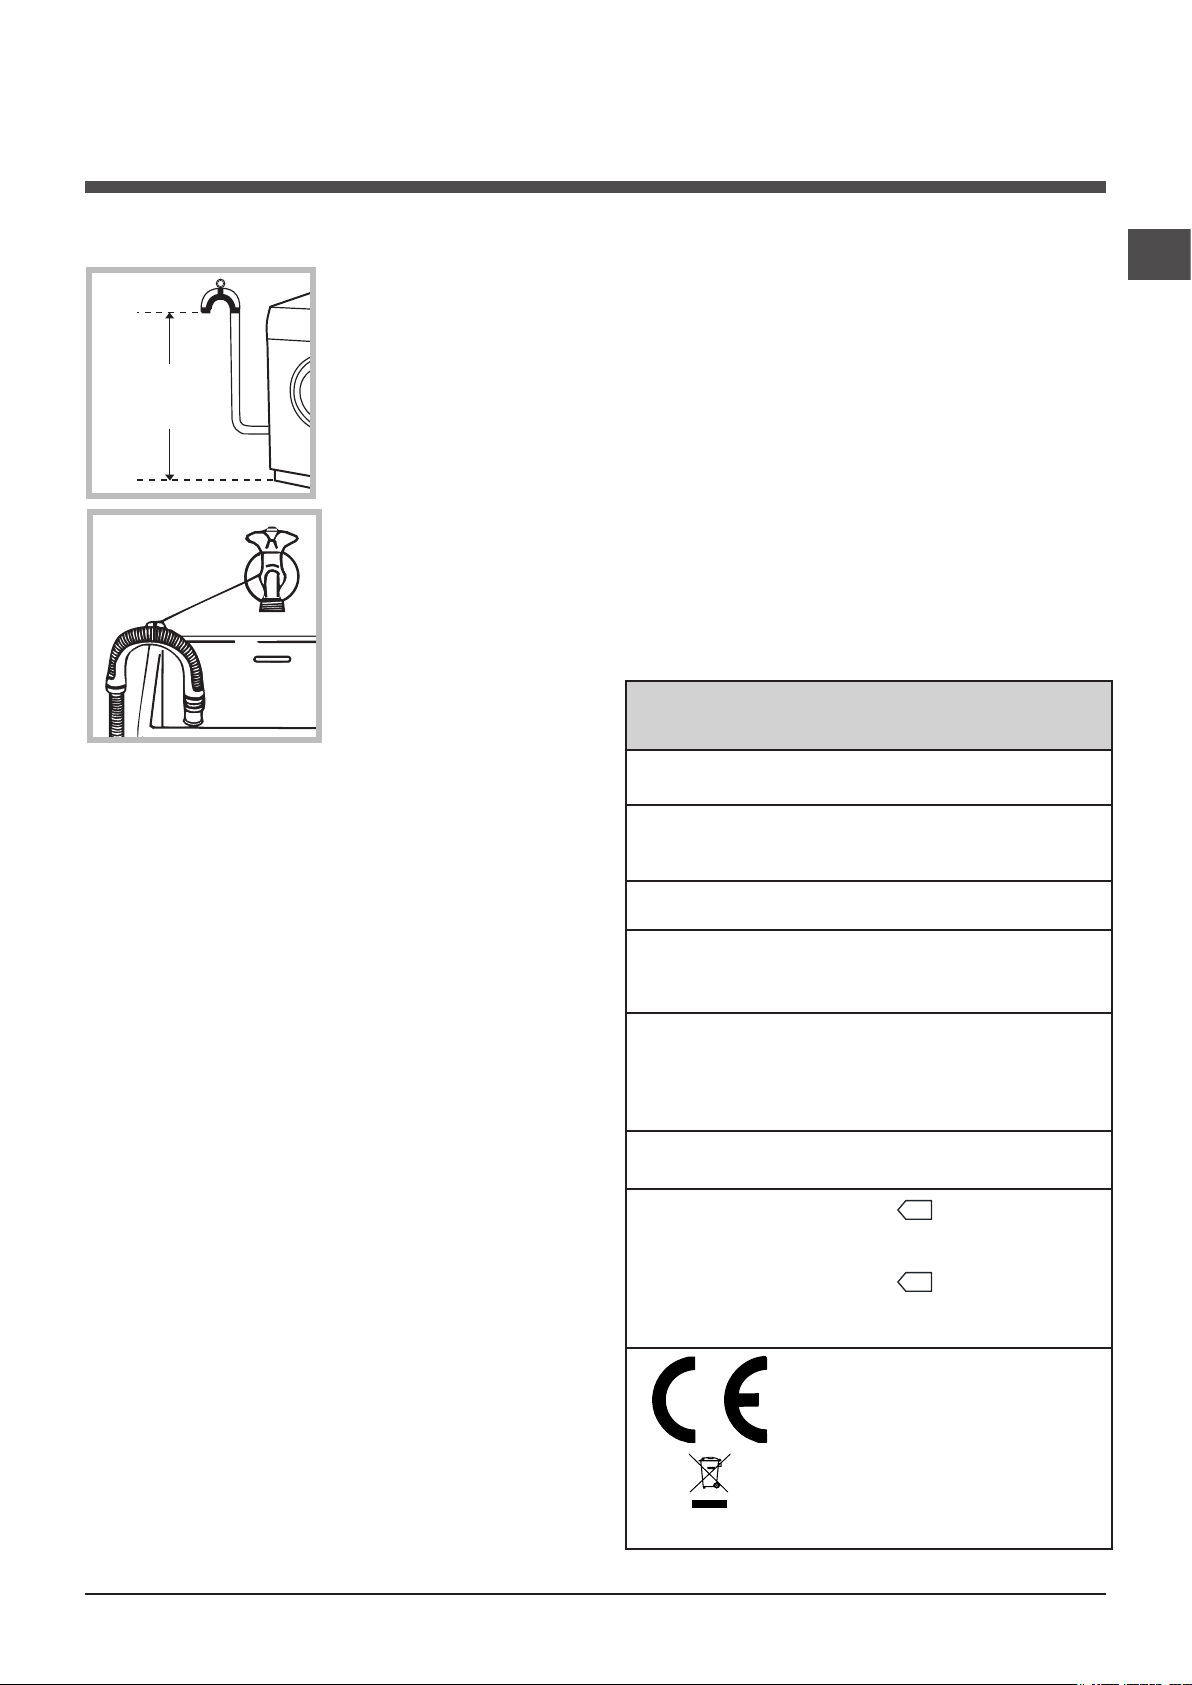
Connecting the drain hose
65 - 100 cm
Connect the drain
hose, without bending
it, to a drain duct or
a wall drain situated
between 65 and 100
cm from the floor;
alternatively, placed
it over the edge of a
basin, sink or tub, fastening the duct supplied to the tap (see
figure). The free end
of the hose should
not be underwater.
! Do not use extension cords or multiple sockets.
! The cable should not be bent or compressed.
! The power supply cable must only be replaced by authorised technicians.
Warning! The company shall not be held responsible in the event that these standards are
not observed.
The first wash cycle
Once the appliance has been installed, and
before you use it for the first time, run a wash
cycle with detergent and no laundry, using
wash cycle number “Auto Clean”.
GB
! We advise against the use of hose extensions;
if it is absolutely necessary, the extension must
have the same diameter as the original hose
and must not exceed 150 cm in length.
Electrical connections
Before plugging the appliance into the electricity socket, make sure that:
• the socket is earthed and complies with all
applicable laws;
• the socket is able to withstand the maximum power load of the appliance as indicated
in the Technical data table (see opposite);
• the power supply voltage falls within the values indicated in the Technical data table (see
opposite);
• the socket is compatible with the plug of the
washing machine. If this is not the case, replace the socket or the plug.
! The washing machine must not be installed
outdoors, even in covered areas. It is extremely dangerous to leave the appliance exposed
to rain, storms and other weather conditions.
! When the washing machine has been installed, the electricity socket must remain within
easy reach.
Technical data
Model
Dimensions
Capacity
Electrical
connections
Water connections
Spin speed
Test wash
cycles in
accordance with
directives
1061/2010
1015/2010
WMSD 723
width 59.5 cm
height 85 cm
depth 43,5 cm
from 1 to 7 kg
please refer to the technical
data plate fixed to the machine
maximum pressure
1 MPa (10 bar)
minimum pressure
0.05 MPa (0.5 bar)
drum capacity 48 litres
up to 1200 rotations per
minute
programme
press of the button); Cotton
Standard 60°.
programme (40°) (2nd
press of the button); Cotton
Standard 40°.
This appliance conforms to
the following EC Directives:
- 2004/108/EC (Electromagnetic Compatibility)
- 2006/95/EC (Low Voltage)
- 2002/96/EC
(60°) (1st
3
Page 4
Care and maintenance
1
2
GB
Cutting off the water and electricity supplies
• Turn off the water tap after every wash cycle.
This will limit wear on the hydraulic system inside the washing machine and help to prevent
leaks.
• Unplug the washing machine when cleaning
it and during all maintenance work.
Cleaning the washing machine
• The outer parts and rubber components
of the appliance can be cleaned using a soft
cloth soaked in lukewarm soapy water. Do not
use solvents or abrasives.
• The washing machine has a “Auto Clean”
programme for its internal parts that must be
run with no load in the drum.
A
programme every 40 wash cycles.
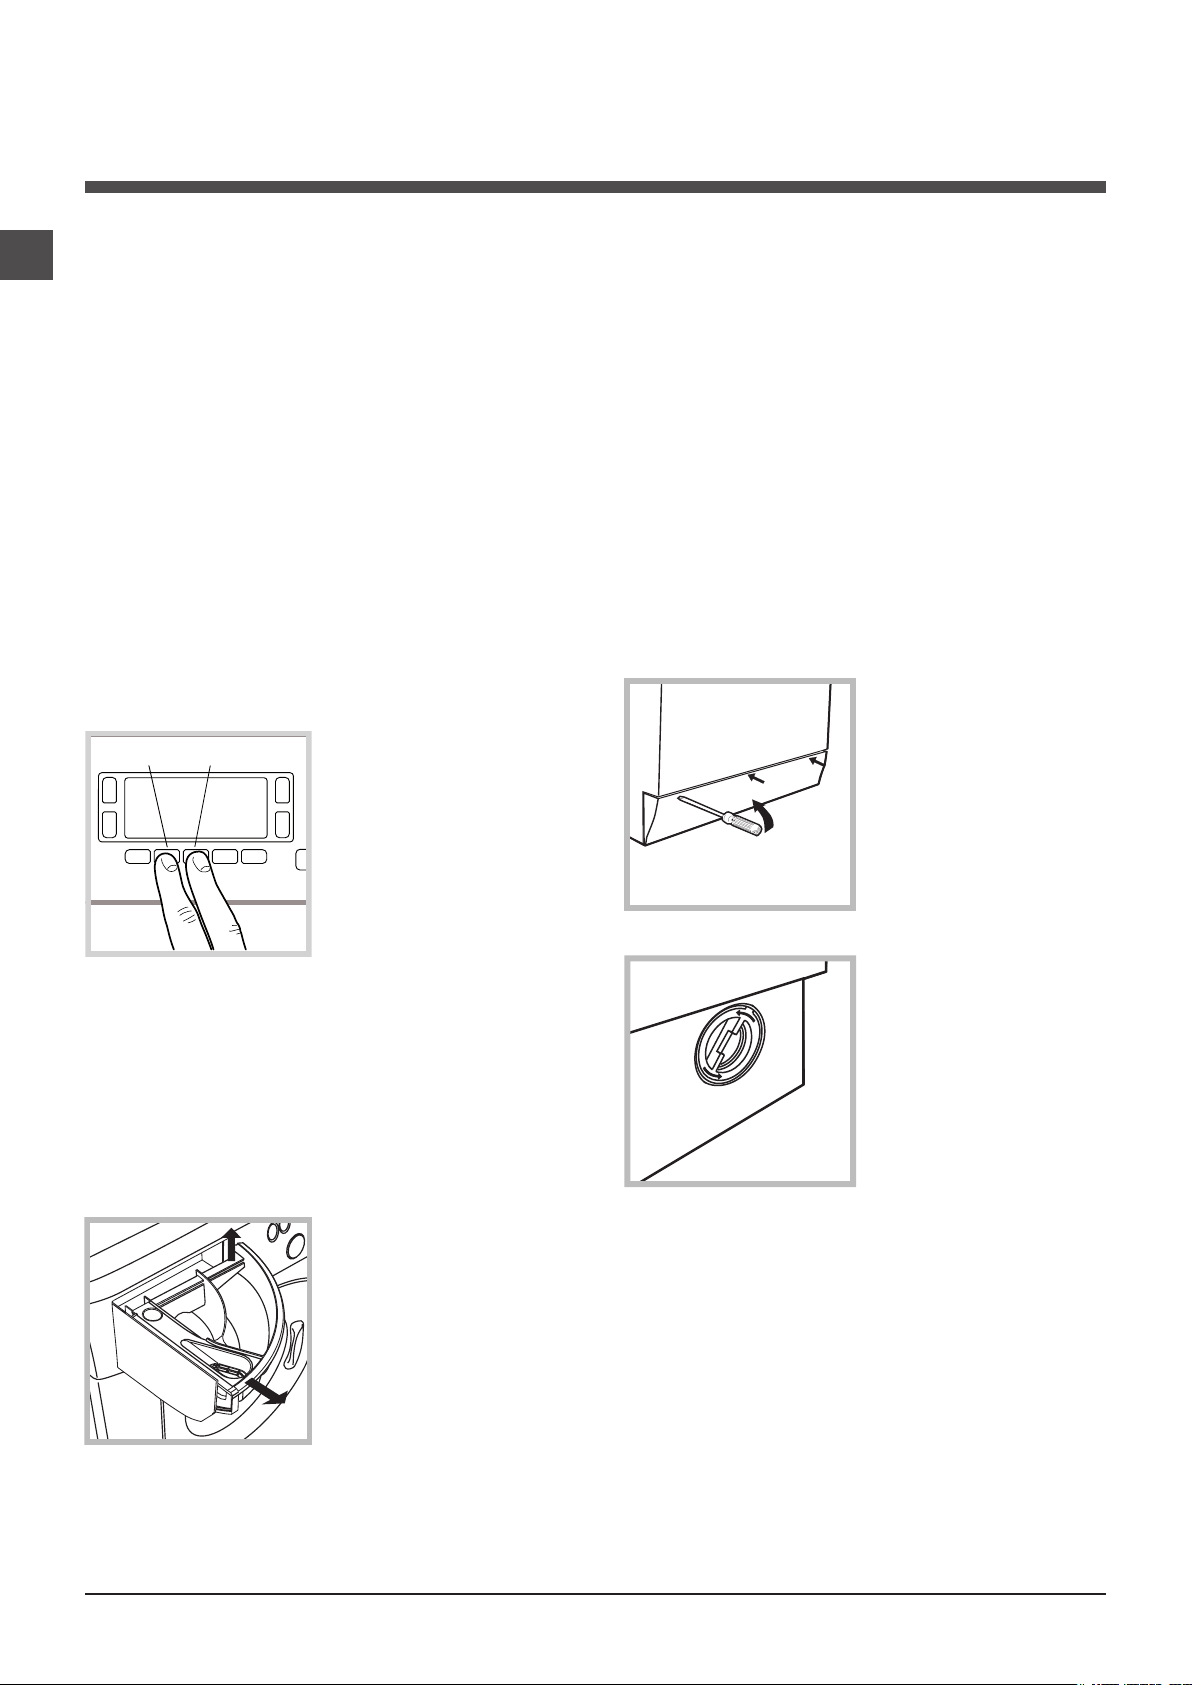
To start the programme press buttons A and
B simultaneously for 5 seconds (see figure).
The programme will start automatically and will
run for about 70 minutes. To stop the cycle
press the START/PAUSE button.
B
To help the wash cycle
you may want to use
either the detergent
(i.e. a quantity 10% the
quantity specified for
lightly-soiled garments)
or special additives to
clean the washing machine. We recommend
running a cleaning
Caring for the door and drum of
your appliance
• Always leave the porthole door ajar in order
to prevent unpleasant odours from forming.
Cleaning the pump
The washing machine is fitted with a self-cleaning pump which does not require any maintenance. Sometimes, small items (such as coins
or buttons) may fall into the pre-chamber which
protects the pump, situated in its bottom part.
! Make sure the wash cycle has finished and
unplug the appliance.
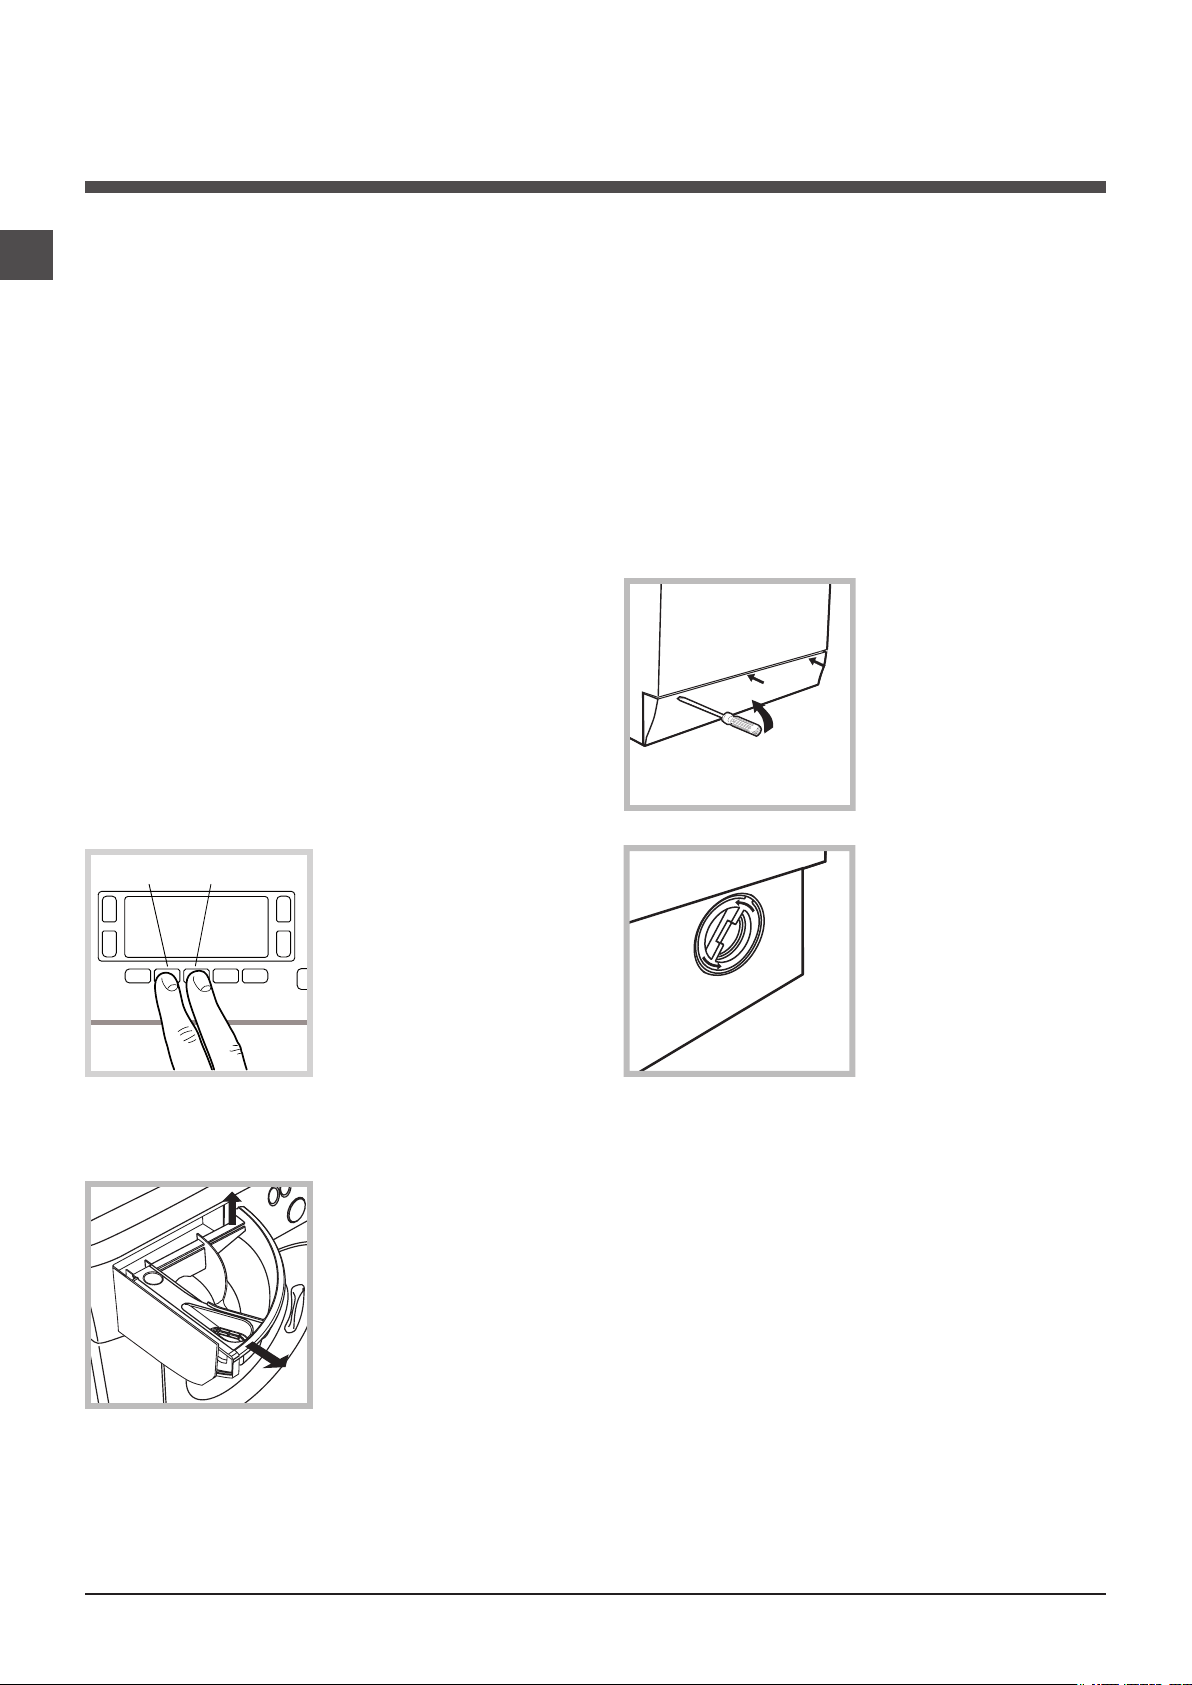
To access the pre-chamber:
1. using a screwdriver, remove the cover
panel on the lower
front part of the washing machine (see
figure);
2. unscrew the lid
by rotating it anticlockwise (see figu-
re): a little water may
trickle out. This is
perfectly normal;
Cleaning the detergent dispenser
drawer
Remove the dispenser
by raising it and pulling it out (see figure).
Wash it under running
water; this operation
should be repeated
frequently.
4
3. clean the inside thoroughly;
4. screw the lid back on;
5. reposition the panel, making sure the hooks
are securely in place before you push it onto
the appliance.
Checking the water inlet hose
Check the inlet hose at least once a year. If
there are any cracks, it should be replaced
immediately: during the wash cycles, water
pressure is very strong and a cracked hose
could easily split open.
! Never use second-hand hoses.
Page 5
Precautions and tips
20
! This washing machine was designed and constructed in
accordance with international safety regulations. The following information is provided for safety reasons and must
therefore be read carefully.
General safety
• This appliance was designed for domestic use only.
• This appliance can be used by children aged
from 8 years and above and persons with reduced physical, sensory or mental capabilities
or lack of experience and knowledge if they
have been given supervision or instruction
concerning use of the appliance in a safe way
and understand the hazards involved. Children shall not play with the appliance. Cleaning and user maintenance shall not be made
by children without supervision.
• Do not touch the machine when barefoot or with wet or
damp hands or feet.
• Do not pull on the power supply cable when unplugging
the appliance from the electricity socket. Hold the plug
and pull.
• Do not open the detergent dispenser drawer while the
machine is in operation.
• Do not touch the drained water as it may reach extremely high temperatures.
• Never force the porthole door. This could damage the safety
lock mechanism designed to prevent accidental opening.
• If the appliance breaks down, do not under any circumstances access the internal mechanisms in an attempt
to repair it yourself.
• Always keep children well away from the appliance while
it is operating.
• The door can become quite hot during the wash cycle.
• If the appliance has to be moved, work in a group of two
or three people and handle it with the utmost care. Never
try to do this alone, because the appliance is very heavy.
• Before loading laundry into the washing machine, make
sure the drum is empty.
Disposal
• Disposing of the packaging materials: observe local regu-
lations so that the packaging may be re-used.
• The European Directive 2002/96/EC on Waste Electrical
and Electronic Equipment, requires that old household
electrical appliances must not be disposed of in the normal
unsorted municipal waste stream. Old appliances must be
collected separately in order to optimise the recovery and
recycling of the materials they contain and reduce the impact on human health and the environment. The crossed
out “wheeled bin” symbol on the product reminds you of
your obligation, that when you dispose of the appliance it
must be separately collected. Consumers should contact
their local authority or retailer for information concerning the
correct disposal of their old appliance.
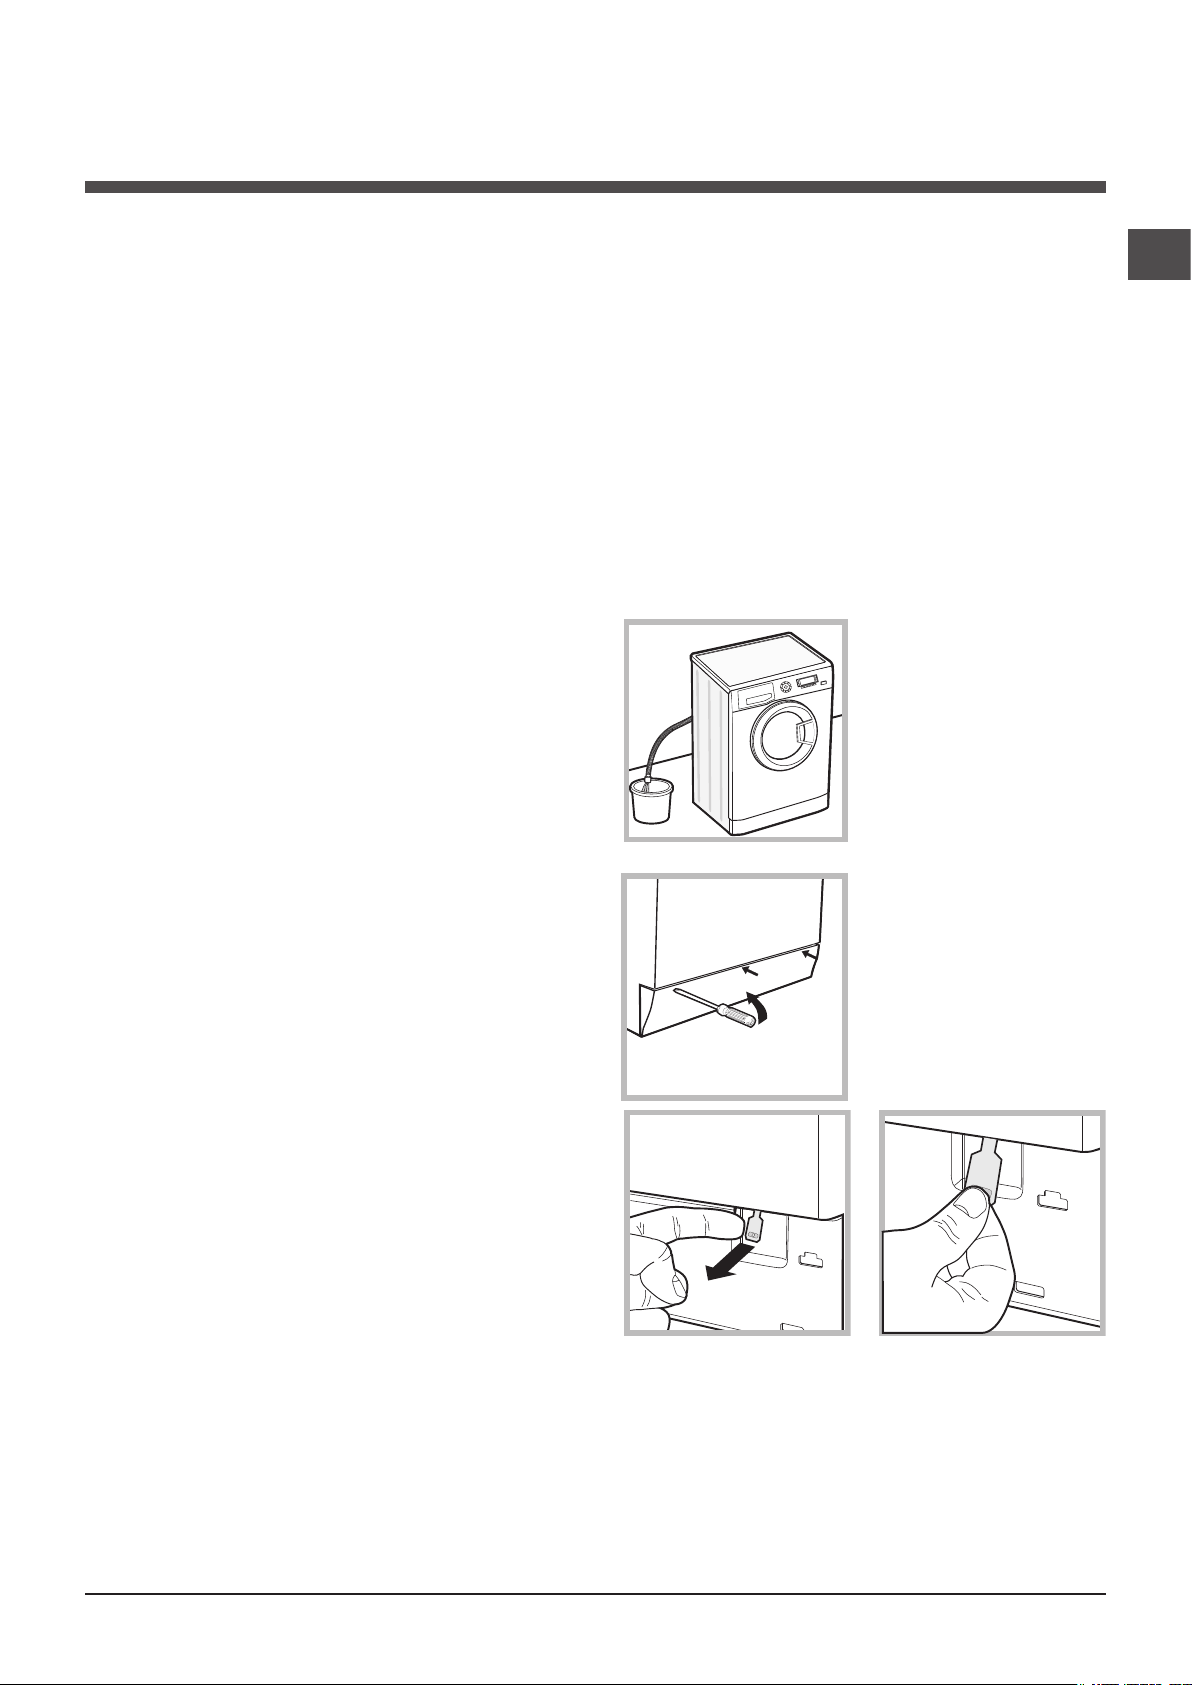
Opening the porthole door manually
In the event that it is not possible to open the porthole
door due to a powercut, and if you wish to remove the
laundry, proceed as follows:
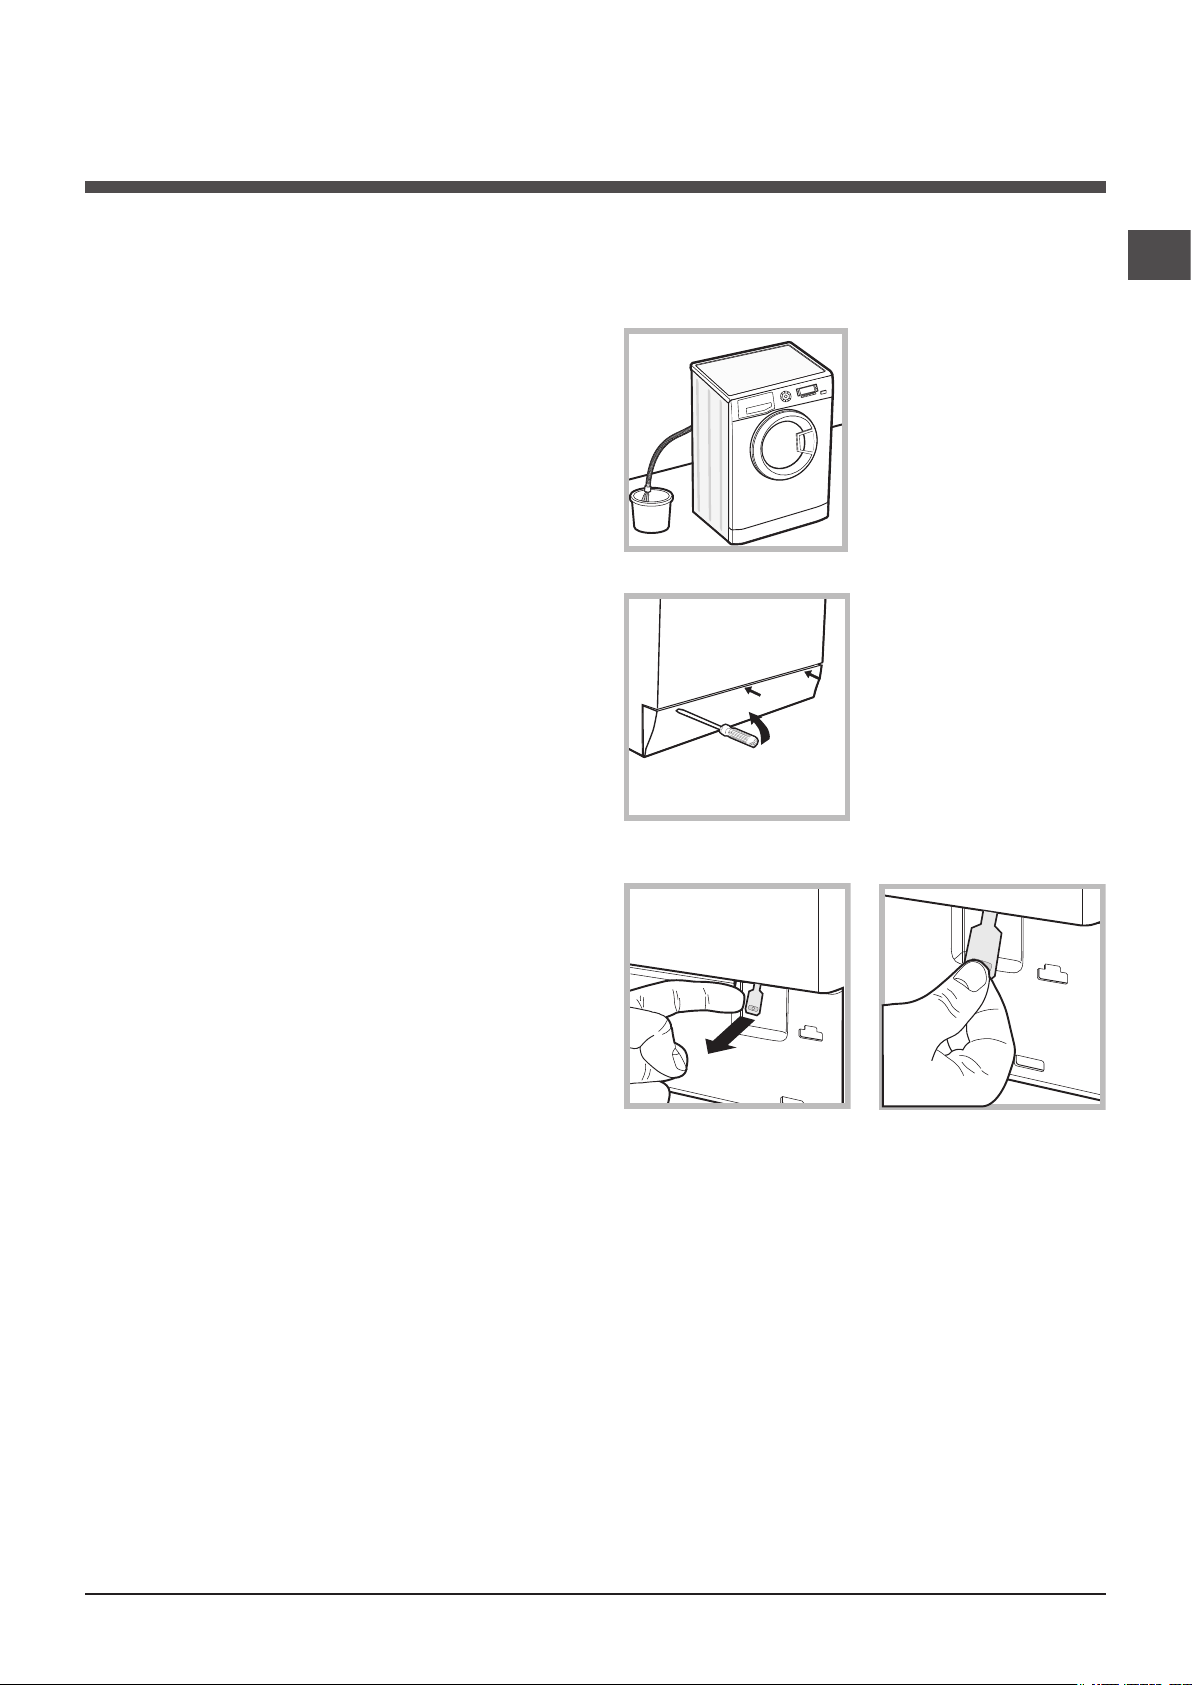
1. remove the plug from the
electrical socket.
2. make sure the water level
inside the machine is lower
than the door opening; if it
is not, remove excess water
using the drain hose, collecting it in a bucket as indicated
in the figure.
3. using a screwdriver, remove the cover panel on the lower front part of the washing
machine (see figure).
4. pull outwards using the tab as indicated in the figure,
until the plastic tie-rod is freed from its stop position; pull
downwards and open the door at the same time.
5. reposition the panel, making sure the hooks are securely
in place before you push it onto the appliance.
GB
5
Page 6
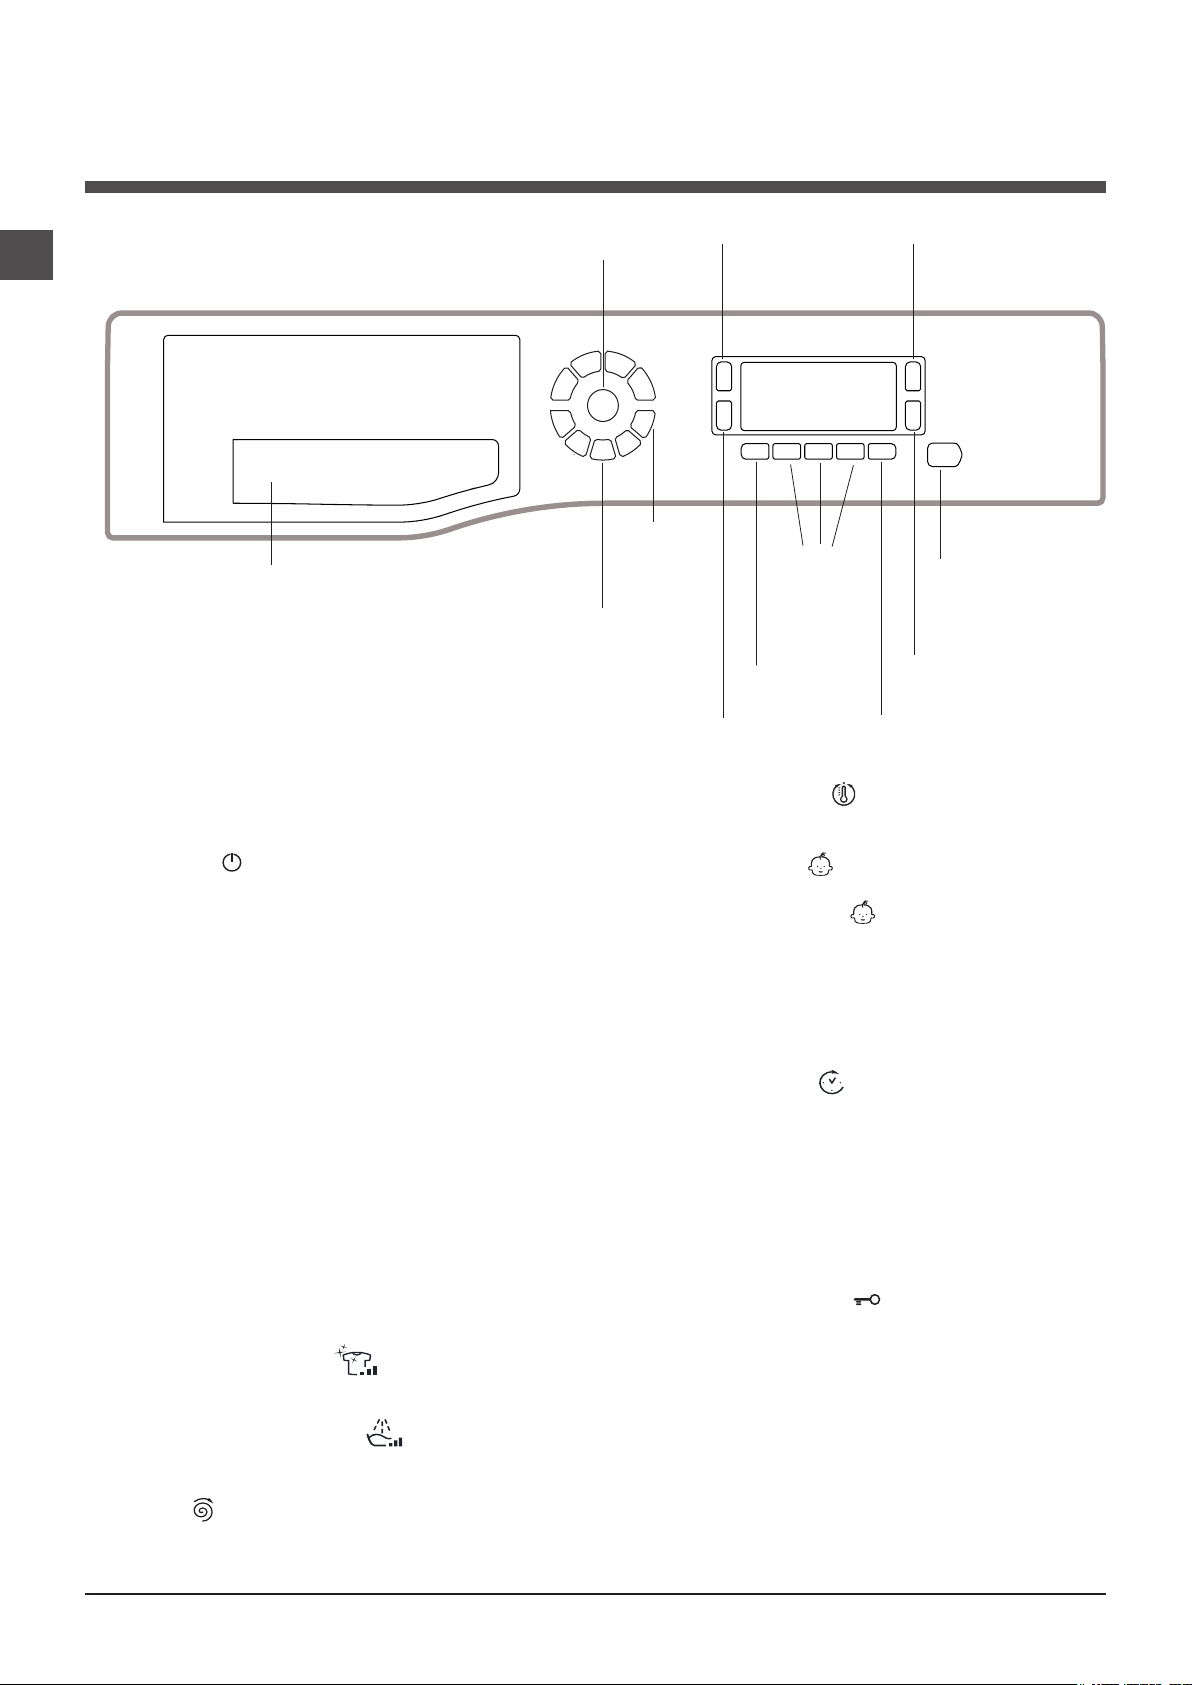
Description of the washing machine
GB
Control panel
ON/OFF
WASH
Detergent dispenser drawer
Detergent dispenser drawer: used to dispense deter-
gents and washing additives (see “Detergents and laundry”).
CYCLE
SELECTOR
buttons
button
CLEANING
ACTION
button
DISPLAY
MY
CYCLE
button
ANTI
ALLERGY
RINSE
button
TEMPERATURE button : press to decrease the tem-
perature: the value will be shown on the display.
FUNCTION
buttons
DELAY
TIMER
button
SPIN SPEED
button
START/PAUSE
button with
indicator light
TEMPERATURE
button
CHILD LOCK
button
ON/OFF button : press this briefly to switch the machine on or off. The START/PAUSE indicator light, which
flashes slowly in a green colour shows that the machine is
switched on. To switch off the washing machine during the
wash cycle, press and hold the button for approximately 3
seconds; if the button is pressed briefly or accidentally the
machine will not switch off. If the machine is switched off
during a wash cycle, this wash cycle will be cancelled.
WASH CYCLE SELECTOR buttons: used to set the
desired wash cycle (see “Table of wash cycles”).
MY CYCLE button: press and hold the button to store a
cycle with your own set of preferences in the memory of
the machine. To recall a previously stored cycle, press the
MY CYCLE button.
FUNCTION buttons: press the button to select the
desired function. The corresponding indicator light on the
display will switch on.
CLEANING ACTION
wash intensity.
ANTI ALLERGY RINSE
the desired rinse type.
SPIN button : press to reduce or completely exclude
the spin cycle - the value is indicated on the display.
button : to select the desired
button : press to select
CHILD LOCK button : to activate the control panel
lock, press and hold the button for approximately 2
seconds. When the symbol is illuminated, the control
panel is locked (apart from the ON/OFF button). This
means it is possible to prevent wash cycles from being
modified accidentally, especially where there are children in
the home. To deactivate the control panel lock, press and
hold the button for approximately 2 seconds.
DELAY TIMER button : press to set a delayed start
time for the selected wash cycle. The delay time will be
shown on the display.
START/PAUSE button with indicator light: when the green indicator light flashes slowly, press the button to start a
wash cycle. Once the cycle has started the indicator light
will remain lit in a fixed manner. To pause the wash cycle,
press the button again; the indicator light will flash in an
orange colour. If the symbol is not illuminated, the door
may be opened. To start the wash cycle from the point at
which it was interrupted, press the button again.
Standby mode
This washing machine, in compliance with new energy saving regulations, is fitted with an automatic standby system
which is enabled after about 30 minutes if no activity is
detected. Press the ON-OFF button briefly and wait for the
machine to start up again.
Consumption in off-mode: 0,5 W
Consumption in Left-on: 0,5 W
6
Page 7
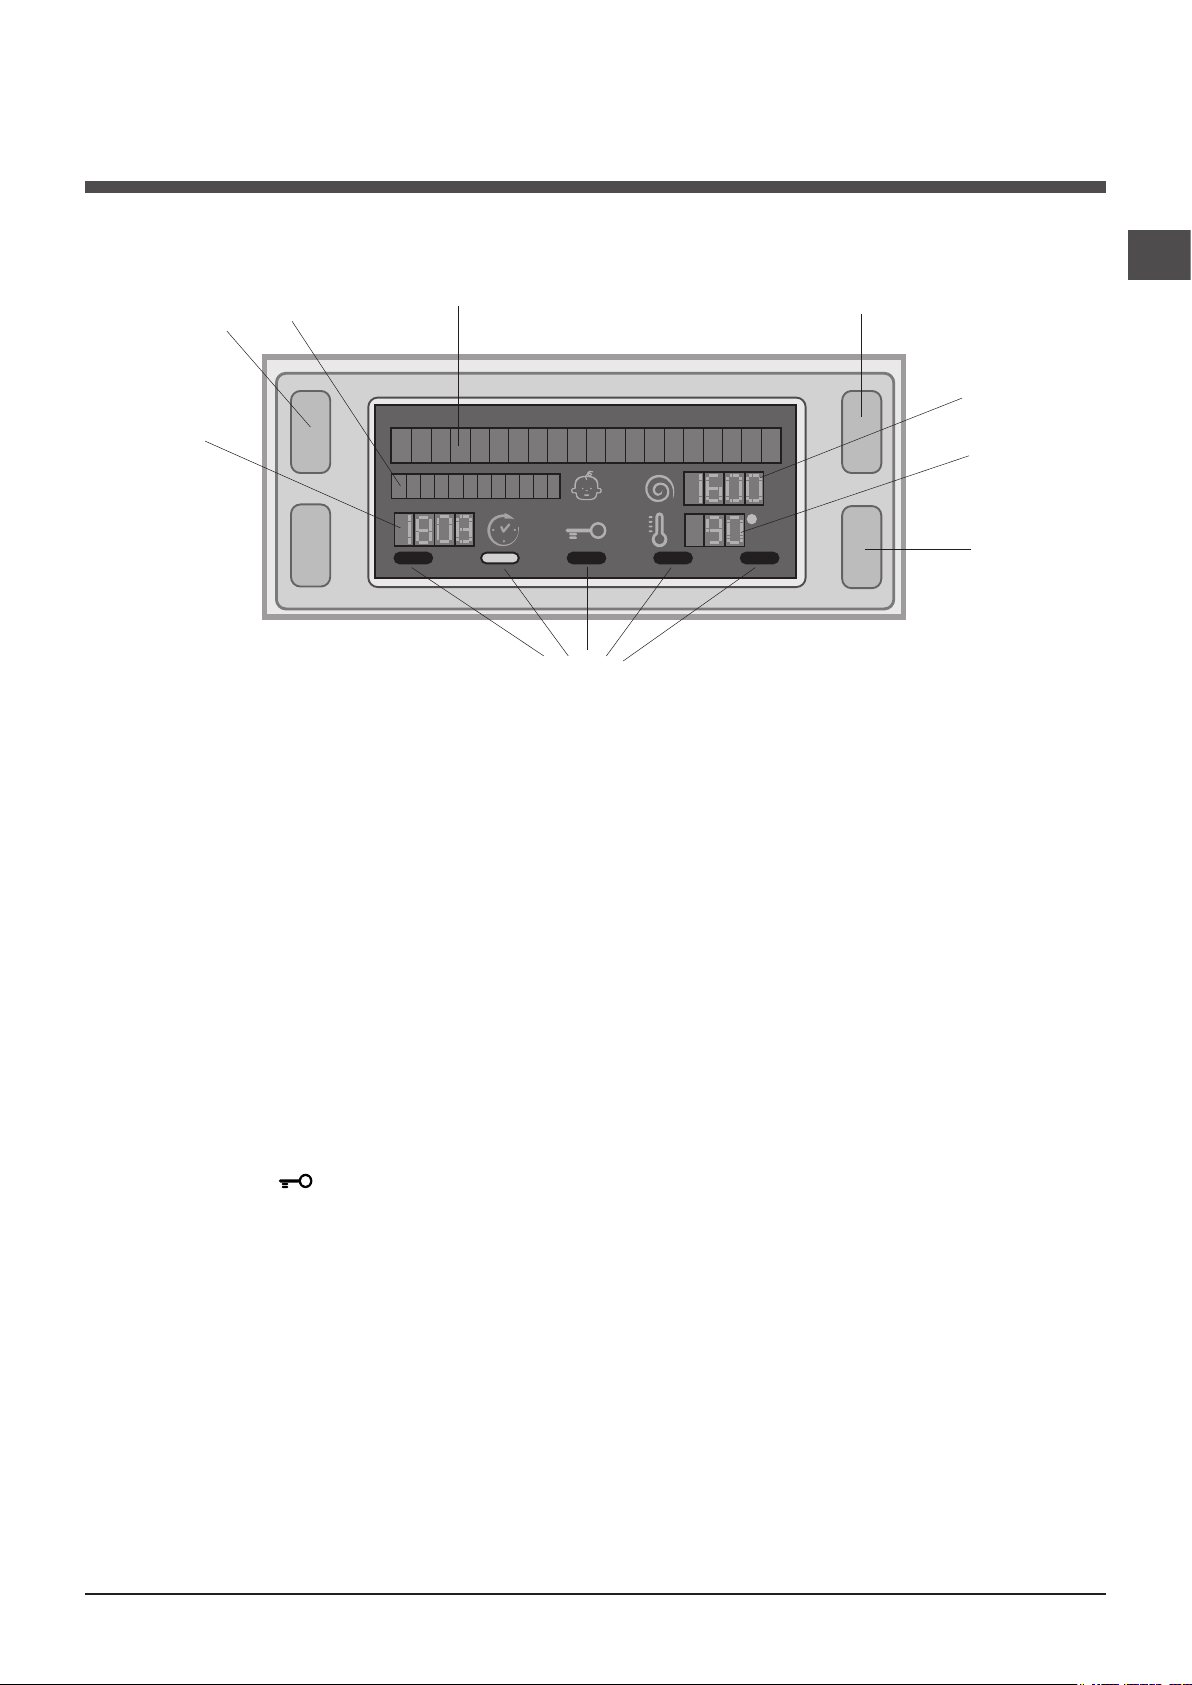
Display
GB
Z
B
A
X
D
C
E
Y
F
The display is useful when programming the machine and provides a great deal of information.
The two upper strings A and B provide details of the wash cycle selected, the wash cycle phase in progress and all information relating to the progress status of the wash cycle.
String C shows the time remaining until the end of the wash cycle in progress and, if a DELAYED START has been set, the
time remaining until the start of the selected wash cycle.
String D shows the maximum spin speed value (this depends on the selected wash cycle); if the wash cycle does not include
a spin cycle, the string remains unused.
String E shows the maximum temperature value which may be selected (this depends on the wash cycle used); if the temperature of the wash cycle cannot be modified, the string remains unused.
Indicator lights F correspond to the functions and light up when the selected function is compatible with the set wash cycle.
Door locked symbol
If the symbol is lit, this indicates that the washing machine door is blocked to prevent it from being opened accidentally. To
prevent any damage from occurring, wait for the symbol to switch itself off before opening the appliance door.
N.B.: if the DELAYE TIMER function has been activated, the door cannot be opened; pauses the machine by pressing the
START/PAUSE button if you wish to open it.
! The first time the machine is switched on, you will be asked to select the language and the display will automatically show
the language selection menu.
To select the desired language press the X and Y buttons; to confirm the selection press the Z button.
To change the language switch off the machine and press buttons X, Y, Z simultaneously until an alarm is heard: the
language-selection menu will be displayed again.
7
Page 8
Running a wash cycle
GB
1. SWITCH THE MACHINE ON. Press the On/Off
button ; the text POWER ON will appear on the
display and the START/PAUSE indicator light will flash
slowly in a green colour.
2. LOAD THE LAUNDRY. Open the porthole door.
Load the laundry, making sure you do not exceed
the maximum load value indicated in the table of
programmes on the following page.
3. MEASURE OUT THE DETERGENT. Open the
detergent dispenser drawer and pour the detergent into
the relevant compartments as described in “Detergents
and laundry”.
4. CLOSE THE DOOR.
5. SELECT THE WASH CYCLE. Press one of the WASH
CYCLE SELECTOR buttons to select the required wash
cycle; the name of the wash cycle will appear on the
display. A temperature and spin speed is set for each
wash cycle; these may be adjusted. The duration of the
cycle will appear on the display.
6. CUSTOMISE THE WASH CYCLE. Use the relevant
buttons:
Modifying the temperature and/or spin
speed. The machine automatically selects the
maximum temperature and spin speed set for the
selected wash cycle; these values cannot therefore
be increased. The temperature can be decreased by
pressing the button, until the cold wash “OFF”
setting is reached. The spin speed may be progressively
reduced by pressing the button, until it is completely
excluded (the “OFF” setting). If these buttons are
pressed again, the maximum values are restored.
! Exception: if the
programme is selected, the temperature can be
increased up to a value of 90°C.
Setting a delayed start.
To set a delayed start for the selected programme,
press the corresponding button repeatedly until the
required delay period has been reached. When this
option is enabled, the symbol lights up on the
display. To remove the delayed start function press the
button until the text “OFF” appears on the display.
Set the desired wash intensity.
Option makes it possible to optimise washing
based on the level of soil in the fabrics and on desired
wash cycle intensity.
Select the wash programme: the cycle will be
automatically set to “Normal” as optimised for garments
with an average level of soil (this setting is not applicable to
the “Wool” cycle, which is automatically set to “Delicate”).
For heavily-soiled garments press button until
the “Super Wash” level is reached. This level ensures
a high-performance wash due to a larger quantity of
water used in the initial phase of the cycle and due to
increased drum rotation. It is useful when removing the
most stubborn stains.
It can be used with or without bleach. If you wish to
bleach the items insert the additional compartment
(4) into compartment 1. When pouring the bleach, be
careful not to exceed the “max” level marked on the
central pivot (see figure pag. 10).
(60°)
(1st press of the button)
For lightly-soiled garments or a more delicate treatment
of the fabrics, press button until the “Delicate” level
is reached.
The cycle will reduce the drum rotation to ensure
washing results are perfect for delicate garments.
Set the rinse type.
Option makes it possible to select the desired rinse
type for sensitive skin. Press the button once for the
“Extra Rinse” level, which makes it possible to select
an additional rinse after the standard cycle rinse and
remove all traces of detergent. Press the button again
for the “Sensitive Skin” level, which makes it possible to
select two additional rinses to the standard cycle rinses; it
is recommended for very sensitive skin. Press the button
for the third time for the “Anti allergy Rinse” level, which
makes it possible to select three additional rinses to the
standard cycle rinses and remove major allergens such as
pollen, mites, cat and dog hair. Press the button again to
go back to the “Normal Rinse” rinse type. If the current
adjustment can be neither set nor changed, the display will
show “Not allowed”.
Modifying the cycle settings.
• Press the button to enable the function; the indicator
light corresponding to the button will switch on.
• Press the button again to disable the function; the
indicator light will switch off.
! If the selected function is not compatible with the
programmed wash cycle, the indicator light will flash
and the function will not be activated.
! If the selected function is not compatible with
another function which has been selected previously,
the indicator light corresponding to the first function
selected will flash and only the second function will
be activated; the indicator light corresponding to the
enabled function will remain lit.
! The functions may affect the recommended load value
and/or the duration of the cycle.
7. START THE PROGRAMME. Press the START/PAUSE
button. The corresponding indicator light will become
green, remaining lit in a fixed manner, and the door will be
locked (the DOOR LOCKED symbol will be on). During
the wash cycle, the name of the phase in progress will
appear on the display. To change a wash cycle while
it is in progress, pause the washing machine using the
START/PAUSE button (the START/PAUSE indicator light
will flash slowly in an orange colour); then select the
desired cycle and press the START/PAUSE button again.
To open the door while a cycle is in progress, press
the START/PAUSE button; if the DOOR LOCKED
symbol is switched off the door may be opened. Press
the START/PAUSE button again to restart the wash cycle
from the point at which it was interrupted.
8. THE END OF THE WASH CYCLE. This will be
indicated by the text “END OF CYCLE” on the display;
when the DOOR LOCKED symbol switches off
the door may be opened. Open the door, unload the
laundry and switch off the machine.
! If you wish to cancel a cycle which has already begun,
press and hold the button. The cycle will be stopped
and the machine will switch off.
8
Page 9

Wash cycles and functions
Table of wash cycles
Detergents
Description of the wash cycle
Wash cycles
Anti Stain
Cotton Standard 60° (1st press of the button) (1): heavily soiled whites
and delicate colours.
Cotton Standard 40° (2nd press of the button) (2): lightly soiled whites
and delicate colours.
Cotton Standard 20° (3rd press of the button): lightly soiled whites and
delicate colours.
Synthetics (1st press of the button): heavily soiled resistant colours. 60° 800
Synthetics (1st press of the button) (4): lightly soiled resistant colours. 40° 800
Synthetics (2nd press of the button): lightly soiled delicate colours. 40° 800
Fast Wash 60' (1st press of the button): to refresh normal soiled garments quic-
kly (not suitable for wool, silk and clothes which require washing by hand).
Fast Wash 30' (2nd press of the button): to refresh lightly soiled garments quic-
kly (not suitable for wool, silk and clothes which require washing by hand).
M
My Cycle: allows for any wash cycle to be stored.
Bed&Bath: washes bathroom laundry and bedlinen. 60° 1200
Wool: for wool, cashmere, etc. 40° 800 -
Delicates
Spin (1st press of the button) - 1200 - - - - 7 - - - 16’
Rinse (2nd press of the button) - 1200 - - -
Pump out (3rd press of the button) - 0 - - - - 7 - - - 2’
The length of cycle shown on the display or in this booklet is an estimation only and is calculated assuming standard working conditions. The actual duration can vary according to factors such as
water temperature and pressure, the amount of detergent used, the amount and type of load inserted, load balancing and any wash options selected.
Max.
temp.
(°C)
40° 1200
60°
(Max. 90°)
40° 1200 -
20° 1200 -
60° 1200 -
30° 800 -
30° 0 -
Max.
speed
(rpm)
1200
Wash
Prewash
(3)
Bleach
-
-
-
-
-
-
(kg)
pness %
Max. load
Fabric
softener
Residual dam-
Energy consum-
4 - - - 180’
7 53 0,99 57 190’
7 53 1,09 92 175’
7 - - - 175’
3,5 49 0,87 42 90’
3,5 49 0,56 42 85’
3,5 - - - 80’
3,5 53 0,81 36 60’
3 71 0,19 39 30’
7 - - - 135’
1,5 - - - 80’
1 - - - 75’
7 - - - 49’
ption kWh
Total water lt
GB
Cycle duration
1) Test wash cycle in compliance with directive 1061/2010: set wash cycle 60°C (1st press of the button).
This cycle is designed for cotton loads with a normal soil level and is the most efficient in terms of both electricity and water consumption; it should be used for garments
which can be washed at 60°C. The actual washing temperature may differ from the indicated value.
2) Test wash cycle in compliance with directive 1061/2010: set wash cycle 40°C (2nd press of the button).
This cycle is designed for cotton loads with a normal soil level and is the most efficient in terms of both electricity and water consumption; it should be used for garments
which can be washed at 40°C. The actual washing temperature may differ from the indicated value.
3) At 60 °C the “Prewash” function cannot be selected.
For all Test Institutes:
2) Long wash cycle for cottons: set wash cycle 40°C (2nd press of the button).
4) Long wash cycle for synthetics: set wash cycle 60°C (1st press of the button); temperature of 40°C (press TEMPERATURE button).
Wash functions
Prewash
If this function is selected, the pre-wash cycle will run; this
is useful for removing stubborn stains.
N.B.: put the detergent in the relevant compartment.
! It cannot be used in conjunction with wash cycles ,
, , ,
(60°), (40°),
.
Easy Iron
By selecting this function, the wash and spin cycles will be
modified in order to reduce the formation of creases.
At the end of the cycle the washing machine will perform
slow rotations of the drum; the “Easy Iron” and START/
PAUSE indicator lights will flash (orange) and the text “END
OF CYCLE” will appear on the display. To end the cycle,
press the START/PAUSE button or the “Easy Iron” button.
! It cannot be used with the , “Fast Wash 30’”, , , .
Eco Wash
The Eco Wash function saves energy by not heating the
water used to wash your laundry – an advantage both to
the environment and to your energy bill. Instead, intensified
wash action and water optimisation ensure great wash
results in the same average time of a standard cycle.
For the best washing results we recommend the usage of
a liquid detergent.
! It cannot be used with the , , , , , .
9
Page 10
M
AX
1
2
4
3
A
B
Detergents and laundry
GB
Detergent dispenser drawer
Good washing results also depend on the correct dose of
detergent: adding too much detergent will not necessarily
result in a more efficient wash, and may in fact cause a
build up on the inside of your appliance and contribute to
environmental pollution.
! Use powder detergent for white cotton garments, for
pre-washing, and for washing at temperatures over 60°C.
! Follow the instructions given on the detergent packaging.
! Do not use hand washing detergents because these
create too much foam.
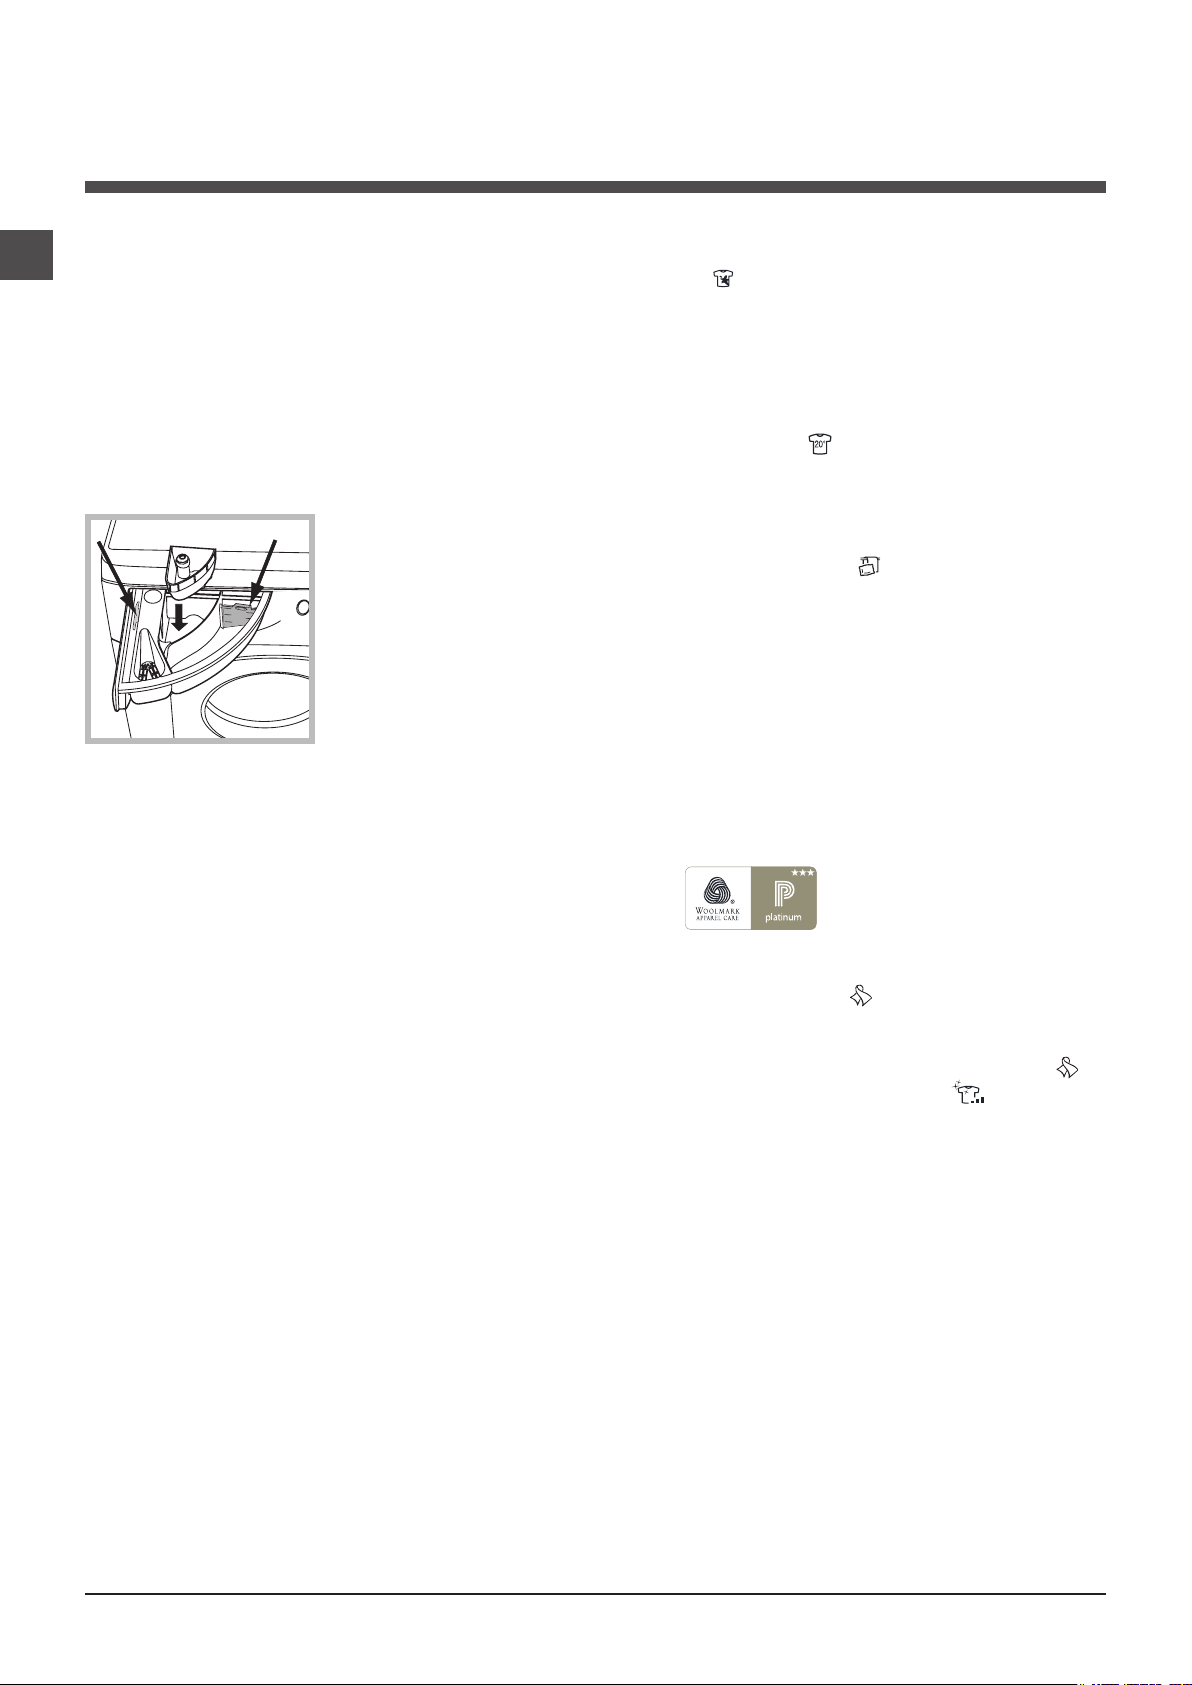
Open the detergent dispenser drawer and pour
in the detergent or washing
additive, as follows.
compartment 1: Pre-wash detergent (powder)
Before pouring in the detergent, make sure that extra compartment 4 has been removed.
compartment 2: Detergent for the wash cycle
(powder or liquid)
If liquid detergent is used, it is recommended that the
removable plastic partition A (supplied) be used for proper
dosage.
If powder detergent is used, place the partition into slot B.
compartment 3: Additives (fabric softeners, etc.)
The fabric softener should not overflow the grid.
extra compartment 4: Bleach
Preparing the laundry
• Divide the laundry according to:
- the type of fabric/the symbol on the label
- the colours: separate coloured garments from whites.
• Empty all garment pockets and check the buttons.
• Do not exceed the listed values, which refer to the
weight of the laundry when dry: see “Table of wash
cycles”.
How much does your laundry weigh?
1 sheet 400-500 g
1 pillow case 150-200 g
1 tablecloth 400-500 g
1 bathrobe 900-1200 g
1 towel 150-250 g
Special wash cycles
Anti Stain : this programme is suitable to heavily-soiled
garments with resistant colours. It ensures a washing
class that is higher than the standard class (A class). When
running the programme, do not mix garments of different
colours. We recommend the use of powder detergent.
Pre-treatment with special additives is recommended if
there are obstinate stains.
Cotton Standard 20° : ideal for heavily soiled cotton
loads. The effective performance levels achieved at cold
temperatures, which are comparable to washing at 40°,
are guaranteed by a mechanical action which operates at
varying speed, with repeated and frequent peaks.
Bed&Bath: use programme to wash bed linen
and towels in one single cycle: it optimises softener
performance and helps you save time and energy. We
recommend the use of powder detergent.
Wool: the wool wash cycle on this Hotpoint machine has
been tested and approved by The Woolmark Company
for washing wool garments labelled as hand washable
provided that the garments are washed according to the
instructions on the garment label and those issued by the
manufacturer of this washing machine. Hotpoint is the
first washing machine brand to be approved by The
Woolmark Company for Apparel Care- Platinum for its
washing performance and consumption of energy and
water.
In UK, Eire, Hong Kong and India the Woolmark trade
mark is a Certification trade mark.
Delicates: use programme to wash very delicate
garments with decorative features, such as diamantes and
sequins.
To wash silk garments and curtains select the cycle
and set the “Delicate” level from option .
We recommend turning the garments inside out before
washing and placing small items into the special bag
for washing delicates. Use liquid detergent on delicate
garments for best results.
Load balancing system
Before every spin cycle, to avoid excessive vibrations and
to distribute the load in a uniform manner, the drum rotates
continuously at a speed which is slightly greater than the
washing rotation speed. If, after several attempts, the load
is not balanced correctly, the machine spins at a reduced
spin speed. If the load is excessively unbalanced, the
washing machine performs the distribution process instead
of spinning. To encourage improved load distribution and
balance, we recommend small and large garments are
mixed in the load.
10
Page 11

Troubleshooting
Your washing machine could fail to work. Before contacting the Technical Assistance Centre (see “Assistance”), make sure
that the problem cannot be solved easily using the following list.
Problem:
The washing machine does not
switch on.
The wash cycle does not start.
The washing machine does not
take in water (the text “NO WATER,
CHECK SUPPLY” appears on the
display).
The washing machine continuously
takes in and
drains water.
Possible causes / Solutions:
• The appliance is not plugged into the socket fully, or is not making contact.
• There is no power in the house.
• The washing machine door is not closed properly.
• The ON/OFF button has not been pressed.
• The START/PAUSE button has not been pressed.
• The water tap has not been opened.
• A delayed start has been set (see “Running a wash cycle”).
• The water inlet hose is not connected to the tap.
• The hose is bent.
• The water tap has not been opened.
• There is no water supply in the house.
• The pressure is too low.
• The START/PAUSE button has not been pressed.
• The drain hose is not fitted at a height between 65 and 100 cm from the floor
(see “Installation”).
• The free end of the hose is under water (see “Installation”).
• The wall drainage system is not fitted with a breather pipe.
If the problem persists even after these checks, turn off the water tap, switch
the appliance off and contact the Assistance Service. If the dwelling is on one of
the upper floors of a building, there may be problems relating to water drainage,
causing the washing machine to fill with water and drain continuously. Special
anti-draining valves are available in shops and help to avoid this inconvenience.
GB
The washing machine does not
drain or spin.
The washing machine vibrates a lot
during the spin cycle.
The washing machine leaks.
The machine is locked and the display
flashes, indicating an
error code (e.g. F-01, F-..).
There is too much foam.
• The wash cycle does not include draining: some wash cycles require the drain
phase to be started manually (see “Wash cycles and functions”).
• The EASY IRON function has been activated: To complete the wash cycle,
press the START/PAUSE button (see “Wash cycles and functions”).
• The drain hose is bent (see “Installation”).
• The drainage duct is clogged.
• The drum was not unlocked correctly during installation (see “Installation”).
• The washing machine is not level (see “Installation”).
• The washing machine is trapped between cabinets and walls (see “Installation”).
• The water inlet hose is not screwed on properly (see “Installation”).
• The detergent dispenser drawer is blocked (for cleaning instructions, see “Care
and maintenance”).
• The drain hose is not fixed properly (see “Installation”).
• Switch off the machine and unplug it, wait for approximately 1 minute and then
switch it back on again.
If the problem persists, contact the Technical Assistance Service.
• The detergent is not suitable for machine washing (it should display the text
“for washing machines” or “hand and machine wash”, or the like).
• Too much detergent was used.
11
Page 12

Service
GB
Before calling for Assistance:
• Check whether you can solve the problem alone (see “Troubleshooting”);
• Restart the programme to check whether the problem has been solved;
• If this is not the case, contact an authorised Technical Assistance Centre using the telephone number provided on the
guarantee certificate.
! Always request the assistance of authorised technicians.
Have the following information to hand:
• the type of problem;
• the appliance model (Mod.);
• the serial number (S/N).
This information can be found on the data plate applied to the rear of the washing machine, and can also be found on the
front of the appliance by opening the door.
12
Page 13

Instrukcja obsługi
PRALKA
PL
Polski
WMSD 723
Spis treści
Instalacja, 14-15
Rozpakowanie i wypoziomowanie
Podłączenia hydrauliczne i elektryczne
Pierwszy cykl prania
Dane techniczne
Utrzymanie i konserwacja, 16
Odłączenie wody i prądu elektrycznego
Czyszczenie pralki
Czyszczenie szuadki na środki piorące
Konserwacja okrągłych drzwiczek i bębna
Czyszczenie pompy
Kontrola przewodu doprowadzającego wodę
Zalecenia i środki ostrożności, 17
Ogólne zasady bezpieczeństwa
Utylizacja
Ręczne otwieranie okrągłych drzwiczek
Opis pralki, 18-19
Panel sterowania
Wyświetlacz
PL
W jaki sposób wykonać cykl prania, 20
Programy i funkcje, 21
Tabela programów
Funkcje prania
Środki piorące i bielizna, 22
Szuadka na środki piorące
Przygotowanie bielizny
Programy specjalne
System równoważenia ładunku
Nieprawidłowości w działaniu i sposoby
ich usuwania, 23
Serwis Techniczny, 24
13
Page 14
Instalacja
PL
! Należy zachować niniejszą książeczkę,
aby móc z niej skorzystać w każdej chwili. W
przypadku sprzedaży, odstąpienia lub przeniesienia pralki w inne miejsce należy zadbać
o przekazanie instrukcji wraz z nią, aby nowy
właściciel mógł się zapoznać z działaniem
urządzenia i z dotyczącymi go ostrzeżeniami.
! Należy uważnie przeczytać instrukcję
obsługi: zawiera ona ważne informacje
dotyczące instalacji oraz właściwego i
bezpiecznego użytkowania pralki.
Rozpakowanie i wypoziomowanie
Rozpakowanie
1. Rozpakować pralkę.
2. Sprawdzić, czy nie doznała ona
uszkodzeń w czasie transportu. W przypadku
stwierdzenia uszkodzeń, nie podłączać pralki
i skontaktować się ze sprzedawcą.
3. Odkręcić 4 śruby
zabezpieczające
urządzenie na czas
transportu oraz
zdjąć gumowy element z podkładką,
znajdujący się w
tylnej części pralki
(patrz rysunek).
4. Zatkać otwory przy pomocy plastikowych
zaślepek, znajdujących się w wyposażeniu
urządzenia.
5. Zachować wszystkie części: w razie
konieczności przewiezienia pralki w inne
miejsce, powinny one zostać ponownie zamontowane.
! Części opakowania nie są zabawkami dla
dzieci.
Poziomowanie
odkręcając lub dokręcając przednie nóżki
(patrz rysunek); kąt nachylenia, zmierzony na górnym blacie pralki, nie powinien
przekraczać 2°.
Staranne wypoziomowanie pralki zapewnia jej stabilność i zapobiega wibracjom,
hałasowi oraz przesuwaniu się urządzenia
w czasie pracy. W przypadku ustawienia na
dywanie lub wykładzinie dywanowej, należy
tak wyregulować nóżki, aby pod pralką
pozostawała wolna przestrzeń niezbędna dla
wentylacji.
Podłączenia hydrauliczne i elektryczne
Podłączenie przewodu doprowadzającego
wodę
1. Podlacz przewód
zasilajacy poprzez
przykrecenie go do
zaworu zimnej wody
z koncówka gwintowana (patrz rysunek):
Przed podłączeniem
spuszczać wodę do
momentu, aż stanie
się ona całkowicie
przezroczysta.
2. Podłączyć do
urządzenia przewód
doprowadzający
wodę, przykręcając
go do odpowiedniego przyłącza wody,
znajdującego się w
tylnej części pralki, z
prawej strony u góry
(patrz rysunek).
3. Zwrócić uwagę, aby przewód nie był
pozaginany ani przygnieciony.
14
1. Ustawić pralkę
na płaskiej i twardej podłodze, nie
opierając jej o ściany,
meble itp.
2. Jeśli podłoga
nie jest idealnie
pozioma, należy
skompensować
nierówności,
! Ciśnienie wody w kurku powinno mieścić
się w przedziale podanym w tabeli Danych
technicznych (patrz strona obok).
! Jeśli długość przewodu doprowadzającego
wodę jest niewystarczająca, należy zwrócić
się do specjalistycznego sklepu lub do autoryzowanego technika.
! Nigdy nie instalować przewodów, które były
już używane.
! Stosować przewody znajdujące się w
wyposażeniu urządzenia.
Page 15
Podłączenie przewodu odpływowego
65 - 100 cm
następującymi przepisami CE:
Podłączyć przewód
odpływowy, nie
zginając go, do rury
ściekowej lub do otworu odpływowego w
ścianie, które powinny się znajdować na
wysokości od 65 do
100 cm od podłogi;
albo oprzeć go na br-
zegu zlewu lub wanny, przymocowując
do kranu prowadnik,
znajdujący się w
wyposażeniu pralki
(patrz rysunek). Wolny koniec przewodu
odpływowego nie
powinien być zanurzony w wodzie.
! Przewód zasilania elektrycznego może być
wymieniany wyłącznie przez autoryzowanych
techników.
Uwaga! Producent nie ponosi żadnej
odpowiedzialności, jeśli powyższe zasady
nie będą przestrzegane.
Pierwszy cykl prania
Po zainstalowaniu pralki, przed przystąpieniem
do jej użytkowania, należy wykonać jeden cykl
prania ze środkiem piorącym, ale bez wsadu,
nastawiając program “OPCJA CZYSZCZENIA
PRALKI” .
Dane techniczne
PL
! Odradza się używanie rur przedłużających;
jednak jeśli jest to konieczne, przedłużacz
powinien mieć taki sam przekrój, jak oryginalna rura, a jego długość nie powinna
przekraczać 150 cm.
Podłączenie elektryczne
Przed włożeniem wtyczki do gniazdka elektrycznego należy się upewnić, czy:
• gniazdko posiada uziemienie i jest zgodne
z obowiązującymi przepisami;
• gniazdko jest w stanie wytrzymać maksy-
malne obciążenie mocy urządzenia, wskazane w tabeli Danych technicznych (patrz
obok);
• napięcie zasilania mieści się w wartościach
wskazanych w tabeli Danych technicznych
(patrz obok);
• gniazdko pasuje do wtyczki pralki. W pr-
zeciwnym razie należy wymienić gniazdko
lub wtyczkę.
! Nie należy instalować pralki na otwartym
powietrzu, nawet w osłoniętym miejscu, gdyż
wystawienie urządzenia na działanie deszczu i burz jest bardzo niebezpieczne.
! Po zainstalowaniu pralki gniazdko elektryczne powinno być łatwo dostępne.
! Nie używać przedłużaczy ani
rozgałęźników.
! Kabel nie powinien być pozginany ani przygnieciony.
Model WMSD 723
szerokość cm 59,5
Wymiary
wysokość cm 85
głębokość cm 43,5
Pojemność od 1 do 7 kg
Dane prądu
elektrycznego
dane techniczne umieszczone są na tabliczce na
maszynie
Maksymalne ciśnienie
Dane sieci
wodociągowej
1 MPa (10 barów)
ciśnienie minimalne
0,05 MPa (0,5 barów)
pojemność bębna 48 litrów
Szybkość
wirowania
Programy
testowe
zgodnie z
dyrektywami
1061/2010 i
1015/2010
do 1200 obrotów na minutę
Program
zycisku)
(60°)
; Bawełna Standardowy
60°C.
Program (40°)
zycisku)
; Bawełna Standardowy
40°C.
Urządzenie to zostało wyprodukowane zgodnie z
- 2004/108/CE (o
Kompatybilności Elektromagnetycznej)
- 2002/96/CE
- 2006/95/CE (o Niskim
Napięciu)
(1. naciśnięcie pr-
(2. naciśnięcie pr-
15
Page 16
Utrzymanie i konserwacja
1
2
A
B
PL
Odłączenie wody i prądu elektrycznego
• Zamknąć kurek dopływu wody po każdym
praniu. W ten sposób zmniejsza się zużycie
instalacji hydraulicznej pralki oraz eliminuje
się niebezpieczeństwo wycieków.
• Przed przystąpieniem do czyszczenia pralki
oraz do czynności konserwacyjnych wyjąć
wtyczkę z gniazdka.
Czyszczenie pralki
• Obudowę zewnętrzną i gumowe części
pralki można myć ściereczką zmoczoną
w letniej wodzie z mydłem. Nie stosować
rozpuszczalników ani ściernych środków
czyszczących.
• Pralka jest wyposażona w program
“OPCJA CZYSZCZENIA PRALKI” części
wewnętrznych, który należy przeprowadzać
nie wprowadzając niczego do kosza pralki.
Środek piorący (w ilości równej 10% ilości
zalecanej dla lekko zabrudzonej odzieży) lub
dodatki przeznaczone specjalnie do czyszczenia pralek, mogą zostać użyte jako środki
pomocnicze podczas programu czyszczenia.
Zaleca się przeprowadzanie programu czyszczenia co 40 cykli prania.
W celu uruchomienia
programu, należy
nacisnąć przycisk A
przez 5 sek. (zob.
rysunek).
Program rozpocznie
się automatycznie i
będzie trwał około
70 minut. W celu
zakończenia cyklu,
należy nacisnąć przycisk START/PAUSE.
Czyszczenie szuadki na środki
piorące
Wysunąć szuadkę,
unosząc ją lekko ku
górze i wyciągając
na zewnątrz (patrz
rysunek).
Wypłukać szuadkę
pod bieżącą wodą.
Czynność tę należy
wykonywać stosunkowo często.
Konserwacja okrągłych drzwiczek i
bębna
• Drzwiczki pralki należy zawsze
pozostawiać uchylone, aby zapobiec tworzeniu się nieprzyjemnych zapachów.
Czyszczenie pompy
Pralka wyposażona jest w pompę
samoczyszczącą, która nie wymaga zabiegów konserwacyjnych. Może się jednak zdarzyć, że drobne przedmioty (monety, guziki) wpadną do komory wstępnej
zabezpieczającej pompę, która znajduje się
w jej dolnej części.
! Należy się upewnić, że cykl prania został
zakończony i wyjąć wtyczkę z gniazdka.
Aby dostać się do komory wstępnej:
1. zdjąć panel pokrywy z przedniej
strony pralki przy
pomocy śrubokrętu
(patrz rysunek);
2. odkręcić pokrywę,
obracając ją w kierunku przeciwnym
do ruchu wskazówek
zegara (patrz rysu-
nek): wypłynięcie
niewielkiej ilości
wody jest normalnym
zjawiskiem;
3. dokładnie wyczyścić wnętrze;
4. ponownie przykręcić pokrywę;
5. ponownie założyć panel upewniwszy się,
przed dociśnięciem go do maszyny, czy zatrzaski zostały umieszczone w odpowiednich
otworach.
Kontrola przewodu
doprowadzającego wodę
Przynajmniej raz w roku należy sprawdzić
przewód doprowadzający wodę. Jeśli widoczne są na nim pęknięcia i rysy, należy go
wymienić: w trakcie prania duże ciśnienie
może bowiem spowodować jego nagłe rozerwanie.
! Nigdy nie instalować już używanych pr-
zewodów.
16
Page 17
Zalecenia i środki
20
ostrożności
! Pralka została zaprojektowana i wyprodukowana zgod-
nie z międzynarodowymi normami bezpieczeństwa. Niniejsze ostrzeżenia zostały tu zamieszczone ze względów
bezpieczeństwa i należy je uważnie przeczytać.
Ogólne zasady bezpieczeństwa
• Urządzenie to zostało zaprojektowane wyłącznie do
użytkowania w warunkach domowych.
• Z niniejszego urządzenia mogą korzystać
dzieci powyżej 8 roku życia i osoby o
ograniczonych zdolnościach zycznych,
zmysłowych bądź umysłowych, jak również
osoby nieposiadające doświadczenia lub
znajomości urządzenia, jeśli znajdują się one
pod nadzorem innych osób lub jeśli zostały
pouczone na temat bezpiecznego sposobu
użycia urządzenia oraz zdają sobie sprawę ze
związanych z nim zagrożeń. Dzieci nie powinny bawić się urządzeniem. Prace związane
z czyszczeniem i konserwacją nie mogą być
wykonywane przez dzieci, jeśli nie są one
nadzorowane.
• Nie dotykać pralki stojąc przy niej boso lub mając
mokre lub wilgotne ręce albo stopy.
• Nie wyjmować wtyczki z gniazdka ciągnąc za kabel,
należy trzymać za wtyczkę.
• W trakcie pracy maszyny nie otwierać szuadki na
środki piorące.
• Nie dotykać odprowadzanej wody, gdyż może ona być
bardzo gorąca.
• W żadnym wypadku nie otwierać na siłę drzwiczek pralki:
grozi to uszkodzeniem mechanizmu zabezpieczającego
drzwiczki przed przypadkowym otwarciem.
• W razie wystąpienia usterki nie należy w żadnym
wypadku ingerować w wewnętrzne części pralki z
zamiarem samodzielnego dokonania naprawy.
• Zawsze uważać, aby dzieci nie zbliżały się do
pracującej pralki.
• W czasie prania drzwiczki pralki nagrzewają się.
• Jeśli trzeba przenieść pralkę w inne miejsce, należy to
robić bardzo ostrożnie, w dwie lub trzy osoby. Nigdy
nie należy samodzielnie przenosić urządzenia, gdyż
jest ono bardzo ciężkie.
• Przed włożeniem bielizny sprawdzić, czy bęben jest
pusty.
stopień odzysku i recyrkulacji materiałów, z których
są one zbudowane, oraz aby zapobiec potencjalnym szkodom dla zdrowia i środowiska. Symbol
przekreślonego kosza jest umieszczony na wszystkich
produktach w celu przypominania o obowiązku ich
segregacji.
Właściciele urządzeń gospodarstwa domowego
mogą uzyskać dodatkowe informacje dotyczące ich
prawidłowej utylizacji, zwracając się do odpowiednich
służb publicznych lub do sprzedawców tych urządzeń.
Ręczne otwieranie okrągłych drzwiczek
Jeśli z powodu przerwy w dostawie energii elektrycznej nie jest możliwe otwarcie okrągłych drzwiczek,
w celu wyjęcia i rozwieszenia prania należy wykonać
następujące czynności:
1. wyjąć wtyczkę z gniazdka
elektrycznego.
2. sprawdzić, czy poziom
wody wewnątrz maszyny
znajduje się poniżej poziomu otwarcia drzwiczek; w
przeciwnym wypadku usunąć
nadmiar wody przez przewód
odpływowy, zbierając ją do
wiaderka w sposób wskazany na rysunku.
3. zdjąć panel pokrywy z
przedniej strony pralki przy
pomocy śrubokrętu (patrz
rysunek).
PL
Utylizacja
• Utylizacja opakowania:
stosować się do lokalnych przepisów, dzięki temu opako-
wanie będzie mogło zostać ponownie wykorzystane.
• Dyrektywa europejska 2002/96/WE dotycząca odpa-
dów urządzeń elektrycznych i elektronicznych przewiduje, że elektryczne urządzenia gospodarstwa domowego nie powinny być utylizowane w normalnym ciągu
utylizacji stałych odpadów miejskich. Stare urządzenia
powinny być zbierane oddzielnie, aby zoptymalizować
4. pociągnąć na zewnątrz klapkę wskazaną na rysunku, aż
do wyzwolenia się z zacisku plastikowego zaczepu; następnie
pociągnąć go w dół i równocześnie otworzyć drzwiczki.
5. ponownie założyć panel upewniwszy się, przed
dociśnięciem go do maszyny, czy zatrzaski zostały umieszczone w odpowiednich otworach.
17
Page 18
Opis pralki
PL
Panel sterowania
Szuadka na środki piorące
Szuadka na środki piorące: do dozowania środków
piorących i dodatków (patrz „Środki piorące i bielizna”).
Przycisk ON/OFF : nacisnąć krótko przycisk w celu
włączenia lub wyłączenia maszyny. Kontrolka START/PAUSE, która pulsuje powoli w kolorze zielonym wskazuje, że
maszyna jest włączona. W celu wyłączenia pralki podczas
prania konieczne jest dłuższe przytrzymanie naciśniętego
przycisku, przez około 3 sek.; krótkie lub przypadkowe
naciśnięcie wystarczy do wyłączenia maszyny. Wyłączenie
maszyny podczas trwającego prania anuluje program prania.
PRZEŁĄCZNIKA
PROGRAMÓW
Przycisk
ON/OFF
Przyciski
Przycisk
OPCJE
PRANIA
Wyświetlacz
Przycisk
MY CYCLE
Przycisk
TYP
PŁUKANIA
Przycisk
URUCHOMIENIE
OPÓŹNIONE
Przycisk BLOKADA PRZYCISKÓW : w celu
uruchomienia lub wylaczenia blokady panelu sterowania
nalezy przytrzymac nacisniety przycisk przez okolo 2
sekundy. Podswietlony symbol wskazuje, ze panel
sterowania zostal zablokowany (z wyjątkiem przycisk
ON/OFF). W ten sposób uniemozliwia sie dokonywanie
przypadkowych zmian w programach, zwlaszcza, jesli
w domu obecne sa dzieci. W celu wylaczenia blokady
panelu sterowania nalezy przytrzymac nacisniety
przycisk przez okolo 2 sekundy.
Przyciski
FUNKCJI
Przycisk
WIROWANIA
Przycisk z
kontrolką
START/PAUSE
Przycisk
TEMPERATURY
Przycisk
BLOKADA
PRZYCISKÓW
Przyciski PRZEŁĄCZNIKA PROGRAMÓW: w celu wybra-
nia potrzebnego programu (patrz „Tabela programów”).
Przycisk
w celu zapisania w pamięci cyklu oraz własnych preferowanych personalizacji. W celu przywołania cyklu zapisanego uprzednio należy nacisnąć przycisk
Przyciski FUNKCJI: nacisnąć przycisk w celu wybrania potrzebnej funkcji. Na wyświetlaczu zaświeci się
odpowiednia kontrolka.
Przycisk
żądanego stopnia intensywności prania.
Przycisk
nia żądanego rodzaju płukania.
Przycisk WIROWANIA : nacisnąć w celu zmniejszenia
lub całkowitego wyłączenia wirówki – wartość ukazana
zostanie na wyświetlaczu.
Przycisk TEMPERATURY : nacisnąć w celu zmniejsze-
nia temperatury: wartość zostaje wyświetlona na ekranie.
MY CYCLE
OPCJE PRANIA
TYP PŁUKANIA
: przytrzymać naciśnięty przycisk
MY CYCLE
: nacisnąć w celu wybrania
: nacisnąć w celu wybra-
.
Przycisk URUCHOMIENIE OPÓZNIONE : nacisnąc w
celu ustawienia opóźnionego uruchomienia wybranego
programu. Opóźnienie wyświetlone zostanie na ekranie.
Przycisk z kontrolką START/PAUSE: kiedy zielona kon-
trolka pulsuje powoli, nacisnąć przycisk w celu uruchomienia prania. Po uruchomieniu cyklu kontrolka świeci w
sposób ciągły. W celu wybrania pauzy w praniu należy
nacisnąć ponownie przycisk, kontrolka zacznie pulsować
w kolorze pomarańczowym. Jeśli symbol nie świeci
się, można otworzyć drzwiczki. W celu ponownego uruchomienia prania od miejsca, w którym zostało przerwane, należy ponownie nacisnąć przycisk.
Funkcja stand by
Pralka ta, w myśl nowych norm europejskich związanych
z oszczędnością elektryczną, posiada system auto
wyłączenia (stand by), który włącza się po 30 minutach
nie użytkowania. Ponownie lekko wcisnąć przycisk
ON/OFF i poczekać, aż pralka ponownie włączy się.
Zużycie w trybie wyłączenia: 0,5 W
Zużycie w trybie czuwania: 0,5 W
18
Page 19

Wyświetlacz
PL
Z
B
A
X
D
C
E
Y
F
Wyświetlacz potrzebny jest w celu programowania maszyny i dostarcza wielu informacji.
W obu wierszach górnych A i B wyświetlane są: wybrany program prania, faza prania bieżącego oraz wszelkie wskazania związane ze stanem zaawansowania programu.
W wierszu C wyświetlany jest czas pozostały do końca cyklu prania bieżącego oraz, jeśli zaprogramowano URUCHOMIENIE OPÓŹNIONE, czas brakujący do uruchomienia wybranego programu.
W wierszu D wyświetlana jest maksymalna wartość szybkości wirówki, jaką maszyna może uzyskać w przypadku wybranego programu; jeśli program nie przewiduje wirowania wiersz pozostaje wygaszony.
W wierszu E wyświetlana jest maksymalna wartość temperatury, jaką można wybrać w przypadku wybranego programu,
jeśli program nie przewiduje ustawiania temperatury, wiersz pozostaje wygaszony.
Kontrolki F związane są z funkcjami i włączają się, kiedy wybrana funkcja zgodna jest z wybranym programem.
Symbol zablokowanych drzwiczek
Zapalony symbol oznacza, że okrągłe drzwiczki pralki są zablokowane, aby zapobiec przypadkowemu ich otworzeniu.
Aby uniknąć uszkodzenia pralki, należy odczekać, aż symbol ten zgaśnie, zanim przystąpi się do otwierania drzwiczek
pralki.
Uwaga: jeśli aktywna jest funkcja URUCHOMIENIE OPÓŹNIONE drzwiczek nie można otworzyć. W celu ich otwarcia
należy ustawić maszynę w pauzie poprzez naciśnięcie przycisku START/PAUSE.
! Podczas pierwszego uruchomienia wymagane będzie dokonanie wyboru języka a wyświetlacz ustawi się automatycznie
na menu wyboru języka.
W celu wybrania żądanego języka nacisnąć przyciski X i Y, dla potwierdzenia wyboru nacisnąć przycisk Z.
Aby zmienić język, należy wyłączyć urządzenie, nacisnąć równocześnie przyciski X, Y, Z, aż do usłyszenia sygnału
dźwiękowego, wyświetli się menu wyboru języka.
19
Page 20

W jaki sposób wykonać cykl prania
PL
1. WŁĄCZENIE MASZYNY. Nacisnąć przycisk , na
wyświetlaczu pojawi się napis WŁĄCZENIE, kontrolka
START/PAUSE zacznie powoli pulsować w kolorze zielonym.
2. WKŁADANIE BIELIZNY. Otworzyć szklane drzwiczki.
Włożyć bieliznę uważając, aby nie przekroczyć wielkości
wsadu wskazanej w tabeli programów na następnej stronie.
3. DOZOWANIE ŚRODKA PIORĄCEGO. Wysunąć
szuadkę i wsypać detergent do odpowiednich komór w
sposób wyjaśniony w „Środki piorące i bielizna”.
4. ZAMKNĄĆ DRZWICZKI.
5. WYBÓR PROGRAMU. Nacisnąć jeden z przycisków
PRZEŁĄCZNIKA PROGRAMÓW w celu wybrania
potrzebnego programu, nazwa programu pojawi się na
wyświetlaczu; z nim powiązana jest temperatura oraz
prędkość wirowania, które mogą zostać zmienione. Na
wyświetlaczu pojawi się czas trwania cyklu.
6. PERSONALIZACJA CYKLU PRANIA.
Przy pomocy odpowiednich przycisków:
Zmienić temperaturę i/lub wirówkę. Maszyna
wybierze automatycznie temperaturę oraz wirówkę
maksymalne przewidziane dla danego programu, dlatego
nie mogą one być zwiększane. Poprzez naciskanie
przycisku stopniowo zmniejsza się temperaturę aż do
prania w zimnej wodzie „OFF”. Naciskając przycisk
stopniowo zmniejsza się wirówkę aż do jej wyłączenia
„OFF”. Dodatkowe naciśnięcie przycisków przywróci
maksymalne wartości przewidywane.
! Wyjątek: wybierając program 60°
przycisku)
W celu ustawienia opóźnionego rozpoczęcia wybranego
programu należy naciskać odpowiedni przycisk aż do
osiągnięcia żądanego czasu opóźnienia. Kiedy opcja ta jest
aktywna, na wyświetlaczu pojawia się symbol . W celu
usunięcia opóźnionego uruchomienia należy naciskać
przycisk aż do pojawienia się napisu “OFF”.
Ustawić żądany stopień intensywności prania.
Opcja umożliwia optymalizację prania w
zależności od stopnia zabrudzenia tkanin oraz żądanej
intensywności prania.
Wybrać program prania, cykl zostanie automatycznie
ustawiony na poziomie „NORMALNY”, przeznaczonym
dla średnio zabrudzonej odzieży, (ustawienie to
nie stosuje się dla cyklu „Wełna”, który ustawia się
automatycznie na poziomie „DELIKATNE”).
W przypadku silnie zabrudzonej odzieży, należy nacisnąć
przycisk aż do przejścia do poziomu „SUPER
PRANIE”. Poziom ten gwarantuje wysokiej jakości
pranie, dzięki użyciu większej ilości wody w początkowej
fazie cyklu i intensywniejszym ruchom mechanicznym
służy do usuwania najoporniejszych plam. Może być
używany z wybielaczem i bez niego.
Jeśli chce się przeprowadzić wybielanie, należy włożyć
dodatkową szuadkę 4, znajdującą się w wyposażeniu,
do szuadki 1. Nie przekraczać poziomu „max”
wybielacza w płynie, podanej na środkowym wskaźniku
(zobacz rysunek na str. 22).
W przypadku lekko zabrudzonej odzieży lub w celu
delikatnego obchodzenia się z tkaninami, należy nacisnąć
przycisk aż do przejścia do poziomu „DELIKATNE”.
Cykl zredukuje ruchy mechaniczne, aby zagwarantować
doskonały efekt prania delikatnej odzieży.
temperaturę można podnieść aż do 90°.
Ustawienie opóźnionego rozpoczęcia.
(1. naciśnięcie
Ustawić rodzaj płukania.
Opcja umożliwia wybranie rodzaju płukania
przeznaczonego do jak największej ochrony delikatnej
skóry. Po pierwszym naciśnięciu przycisku, zostaje
ustawiony poziom „EXTRA PŁUKANIE”, który pozwala
wybrać dodatkowe płukanie, oprócz standardowego,
w celu usunięcia wszelkich pozostałości detergentu.
Po drugim naciśnięciu przycisku, zostaje ustawiony
poziom „WRAŻLIWA SKÓRA”, który pozwala wybrać
dwa dodatkowe płukania, oprócz standardowego, w
celu jak najlepszej ochrony delikatnej skóry. Po trzecim
naciśnięciu przycisku, zostaje ustawiony poziom
„ANTYALERGICZNE”, który pozwala wybrać trzy
dodatkowe płukania, oprócz standardowego, w celu
usunięcia głównych alergenów, takich jak pyłki, roztocza,
sierść psów i kotów. Nacisnąć ponownie przycisk, aby
powrócić do „PŁUKANIE STANDARDOWE” rodzaju
płukania. Jeśli któreś z ustawień lub zmiana ustawienia
nie jest możliwe, na wyświetlaczu pojawi się napis
„ZABLOKOWANE”.
Zmiana charakterystyki cyklu.
• Naciskać przycisk w celu uruchomienia funkcji;
zaświeci się kontrolka odpowiadająca przyciskowi.
• Nacisnąć ponownie przycisk w celu wyłączenia funkcji,
kontrolka zgaśnie.
! Jeśli wybrana funkcja nie jest zgodna z wybranym
programem, kontrolka będzie pulsować, a funkcja nie
zostanie uruchomiona.
! Jeśli wybrana funkcja nie jest zgodna z inną, ustawioną
uprzednio, kontrolka odpowiadająca pierwszej funkcji
będzie pulsowała i uruchomiona zostanie jedynie druga
funkcja a kontrolka uruchomionej funkcji zaświeci się.
! Funkcje mogą zmieniać zalecane obciążenie i/lub czas
trwania cyklu.
7. URUCHOMIENIE PROGRAMU. Nacisnąć przycisk
START/PAUSE. Odpowiednia kontrolka zaświeci się
kolorem zielonym i drzwiczki zostaną zablokowane
(symbol ZABLOKOWANYCH DRZWICZEK świeci
się). Podczas prania na wyświetlaczu pojawi się nazwa
bieżącej fazy. W celu zmiany programu w czasie trwania
cyklu należy ustawić pralkę w pauzie naciskając przycisk
START/PAUSE (kontrolka START/PAUSE zacznie powoli
pulsować w kolorze pomarańczowym); następnie wybrać
potrzebny cykl i ponownie nacisnąć przycisk START/
PAUSE. W celu otwarcia drzwiczek w trakcie wykonywania
cyklu należy nacisnąć przycisk START/PAUSE; jeśli
symbol ZABLOKOWANYCH DRZWICZEK jest
wyłączony możliwe będzie otwarcie drzwiczek Nacisnąć
ponownie przycisk START/PAUSE, aby uruchomić
program od punktu, w którym został przerwany.
8. KONIEC PROGRAMU. Wskazywany jest napisem
„KONIEC CYKLU” na wyświetlaczu, kiedy symbol
ZABLOKOWANYCH DRZWICZEK wyłączy się,
możliwe będzie otwarcie drzwiczek. Otworzyć drzwiczki,
wyjąć bieliznę i wyłączyć maszynę.
! Jeśli zamierza się anulować uruchomiony juz cykl,
przytrzymać dłużej naciśnięty przycisk . Cykl zostanie
przerwany i maszyna wyłączy się.
20
Page 21

Programy i funkcje
Tabela programów
Prêd-
Opis programu
Programy
ODPLAMIANIE
BAWEŁNA STANDARDOWY 60° (1° naciœniêcie przycisku) (1): tkaniny
bia³e i kolorowe, wytrzyma³e, mocno zabrudzone.
BAWEŁNA STANDARDOWY 40° (2° naciœniêcie przycisku) (2): tkaniny
kolorowe, wytrzyma³e, lekko zabrudzone.
BAWEŁNA STANDARDOWY 20° (3° naciœniêcie przycisku): tkaniny
kolorowe, wytrzyma³e, lekko zabrudzone.
SYNTETYCZNE INTENSYWNY (1° naciœniêcie przycisku): tkaniny kolorowe,
wytrzyma³e, mocno zabrudzone.
SYNTETYCZNE INTENSYWNY (4) (1° naciœniêcie przycisku): tkaniny kolorowe,
wytrzyma³e, mocno zabrudzone.
SYNTETYCZNE DELIKATNE (2° naciœniêcie przycisku): delikatne kolory Lekko
zabrudzone.
SZYBKIE PRANIE 60’ (1° naciœniêcie przycisku): w celu szybkiego
odœwie¿enia mocno zabrudzonych tkanin (niewskazany dla we³ny, jedwabiu i tkanin przeznaczonych do prania rêcznego).
SZYBKIE PRANIE 30’ (2° naciœniêcie przycisku): w celu szybkiego
odœwie¿enia lekko zabrudzonych tkanin (niewskazany dla we³ny, jedwabiu
i tkanin przeznaczonych do prania rêcznego).
MY CYCLE (PAMIEÆ): pozwala na zmemoryzowanie ka¿dego typu prania.
M
POŚCIEL I RĘCZNIKI: do bielizny poœcielowej i k¹pielowej.
Woolmark Platinum (WE£NA): do we³ny, kaszmiru, itp.
DELIKATNE
WIROWANIE (1° naciœniêcie przycisku).
PŁUKANIE (2° naciœniêcie przycisku).
ODPROWADZANIE WODY (3° naciœniêcie przycisku).
Czas trwania cyklu wskazany na wyświetlaczu lub w instrukcji jest czasem oszacowanym dla standardowych warunków. Rzeczywisty czas trwania cyklu może się zmieniać w zależności od wielu
czynników, takich jak temperatura i ciśnienie wody na wlocie, temperatura otoczenia, ilość detergentu, ilość i rodzaj pranej odzieży, wyważenie ładunku, wybrane opcje dodatkowe.
1) Program sterowania zgodny z normą 1061/2010:
Ten cykl jest odpowiedni do prania średnio zabrudzonej odzieży bawełnianej i jest najbardziej wydajnym cyklem pod względem łącznego zużycia energii elektrycznej i wody; należy go używać
do odzieży przeznaczonej do prania w 60°C. Rzeczywista temperatura prania może się różnić od podanej.
2) Program sterowania zgodny z normą 1061/2010:
Ten cykl jest odpowiedni do prania średnio zabrudzonej odzieży bawełnianej i jest najbardziej wydajnym cyklem pod względem łącznego zużycia energii elektrycznej i wody; należy go używać
do odzieży przeznaczonej do prania w 40°C. Rzeczywista temperatura prania może się różnić od podanej.
3) W temperaturze 60 °C nie można włączyć funkcji “Pranie wstępne”.
Dla wszystkich Test Institutes:
2) Program bawełna, długi:
4)
Program tkaniny syntetyczne długi: ustawić
ustawić
program 40°C
ustawić
program 60°C
ustawić
program 40°C
(2. naciśnięcie przycisku)
program 60°C
(1. naciśnięcie przycisku)
Temp.
max.
(°C)
40° 1200
60°
(Max. 90°)
40° 1200 -
20° 1200 -
60° 800
40° 800
40° 800
60° 1200 -
30° 800 -
60° 1200
40° 800 -
30° 0 -
(1. naciśnięcie przycisku)
(2. naciśnięcie przycisku)
.
koϾ
max
(obro-
tów na
minu-
1200
- 1200 - - - - 7 - - - 16’
- 1200 - - -
- 0 - - - - 7 - - - 2’
z temperaturą 40°C
Pranie
tê)
(3)
.
.
Œrodki pior¹ce
(kg)
Pranie
Wybie-
wstępne
-
lacz
zmiêk-
Œrodek
Wilgotno�� re-
£adunek max
czaj¹cy
4 - - - 180’
7 53 0,99 57 190’
7 53 1,09 92 175’
7 - - - 175’
3,5 49 0,87 42 90’
3,5 49 0,56 42 85’
3,5 - - - 80’
(nacisnąć przycisk TEMPERATURA).
-
-
-
-
-
3,5 53 0,81 36 60’
3 71 0,19 39 30’
7 - - - 135’
1,5 - - - 80’
1 - - - 75’
7 - - - 49’
kWh
sztkowa %
Zu�ycie energii
Czas trwania
Woda ł�cznie lt
PL
cyklu
Funkcje prania
Pranie Wstępne
W przypadku wyboru tej funkcji zostanie wykonane pranie wstępne, które ułatwia usunięcie uporczywych plam.
N.B.Należy umieścić środek piorący w odpowiedniej
przegródce.
! Funkcja ta nie jest dostępna w przypadku programów
, , , ,
Łatwe prasowanie
Po wybraniu tej funkcji, pranie oraz wirówka zostaną
odpowiednio zmienione w celu ograniczenia
powstawania zgnieceń. Po zakończeniu cyklu pralka
wykona powolne obroty bębna, kontrolka funkcji ŁATWE
PRASOWANIE zaświeci się, a kontrolka START/PAUSE
będzie pulsowała powoli w kolorze pomarańczowym. W
celu zakończenia cyklu należy nacisnąć przycisk START/
PAUSE lub przycisk ŁATWE PRASOWANIE.
! Nie można go uruchomić w programach , “Szybkie
Pranie 30’”, , , .
(60°), (40°),
.
Eco wash
Funkcja Eco Wash umożliwia oszczędności pod
względem zużywanej energii, nie podgrzewając wody
używanej do prania, co niesie za sobą korzyści zarówno
dla środowiska naturalnego, jak i dla rachunku za prąd.
Wzmocniona siła działania i zoptymalizowane zużycie
wody gwarantują doskonałe rezultaty przy długości
cyklu takiej samej, jak w przypadku cyklu standard. Aby
uzyskać jak najlepsze rezultaty, zalecamy korzystać z
płynu do prania.
! Nie można jej uruchomić w programach , , , ,
, .
21
Page 22

Środki piorące i bielizna
M
AX
1
2
4
3
A
B
PL
Szuadka na środki piorące
Dobry rezultat prania zależy również od prawidłowego
dozowania środka piorącego: użycie jego nadmiernej
ilości nie poprawia skuteczności prania, lecz przyczynia
się do powstawania nalotów na wewnętrznych częściach
pralki i do zanieczyszczania środowiska.
! Środki piorące w proszku należy stosować do tkanin z
białej bawełny i do prania wstępnego oraz do prania w
temperaturze przekraczającej 60°C.
! Należy stosować się do zaleceń podanych na opako-
waniu środka piorącego.
! Nie stosować środków do prania ręcznego, ponieważ
tworzą one za dużo piany.
Wysunąć szuadkę i
umieścić w niej środek
piorący lub dodatkowy w
następujący sposób.
Przegródka 1: Środek piorący do prania wstępnego (w
proszku)
Przed wsypaniem środka piorącego należy sprawdzić, czy
nie jest włożony dodatkowy pojemnik 4.
Przegródka 2: Środek piorący do prania zasadniczego (w proszku lub w płynie)
W przypadku stosowania środka piorącego w płynie, zaleca się użycie ścianki A dostarczonej na wyposażeniu,
która ułatwia prawidłowe dozowanie. W celu użycia
środka piorącego w proszku, należy wsunąć ściankę w
zgłębienie B.
Przegródka 3: Środki dodatkowe (zmiękczające, itp.)
Środek zmiękczający nie powinien wypływać poza kratkę.
dodatkowy pojemnik 4: Wybielacz
Przygotowanie bielizny
• Podzielić bieliznę do prania według:
- rodzaju tkaniny / symbolu na etykietce.
- kolorów: oddzielić tkaniny kolorowe od białych.
• Opróżnić kieszenie i sprawdzić guziki.
• Nie przekraczać wskazanego ciężaru suchej bielizny:
patrz “Tabela programów”.
Ile waży bielizna?
1 prześcieradło 400-500 gr.
1 poszewka 150-200 gr.
1 obrus 400-500 gr.
1 szlafrok 900-1.200 gr.
1 ręcznik 150-250 gr.
Programy specjalne
ODPLAMIANIE: program odpowiedni do prania silnie
zabrudzonej odzieży o trwałych kolorach. Program gwarantuje klasę prania wyższą od standardowej (klasa A).
Nie używać programu, gdy miesza się odzież w różnych
kolorach. Zalecamy stosowanie środka piorącego w
proszku. W przypadku szczególnie opornych plam, zalecamy wcześniej zastosowanie specjalnych dodatków.
Bawełna Standardowy 20° : idealny do zabrudzonej bielizny bawełnianej. Dobre wyniki prania w zimnej
wodzie, porównywalne z praniem w 40°, są gwarantowane dzięki działaniu mechanicznemu, wykonywanemu
ze zmienną prędkością, której maksymalne wartości
powtarzają się w krótkich odstępach czasu.
POŚCIEL I RĘCZNIKI: w celu wyprania bielizny
kąpielowej i pościelowej w jednym cyklu, należy użyć
programu , który optymalizuje zużycie środka
piorącego i pozwala oszczędzać czas i pieniądze. Zalecamy stosowanie środka piorącego w proszku.
Wełna: cykl prania „Wełna” niniejszej pralki HotpointAriston został przetestowany i zatwierdzony przez
Woolmark Company jako odpowiedni do prania odzieży
wełnianej przeznaczonej wyłącznie do prania ręcznego,
pod warunkiem, że pranie jest przeprowadzane zgodnie z instrukcjami podanymi na etykiecie ubrania oraz
ze wskazówkami dostarczonymi przez producenta
urządzenia. Hotpoint-Ariston to pierwsza marka pralek, która uzyskała od Woolmark Company certykat
Woolmark Apparel Care - Platinum ze względu na
osiągane rezultaty prania oraz zużycie wody i energii.
DELIKATNE: używać programu do prania bardzo
delikatnej odzieży, ozdobionej cekinami lub koralikami.
Do prania jedwabiu i zasłon, należy wybrać cykl i
ustawić poziom „DELIKATNE” opcji .
Zalecamy wywrócenie ubrań na lewą stronę i włożenie
małych części odzieży do woreczka przeznaczonego
specjalnie do prania delikatnych ubrań.
Dla osiągnięcia najlepszych efektów, zalecamy
stosowanie środka piorącego w płynie do tkanin
delikatnych.
System równoważenia ładunku
Przed każdym wirowaniem, aby uniknąć nadmiernych
drgań oraz jednorodnie rozłożyć wsad, bęben wykonuje obroty z prędkością nieco większą niż podczas
prania. Jeśli pomimo kolejnych prób wsad nie zostanie
równomiernie rozłożony, maszyna wykona wirowanie
z prędkością mniejszą od przewidzianej. W przypadku nadmiernego niezrównoważenia pralka wykona
rozłożenie wsadu zamiast wirowania. Aby zapewnić lepsze rozłożenie wsadu oraz jego właściwe zrównoważenie,
zaleca się wymieszanie dużych i małych sztuk bielizny.
22
Page 23

Nieprawidłowości w działaniu
i sposoby ich usuwania
Może się zdarzyć, że pralka nie działa. Przed wezwaniem Serwisu Technicznego (patrz „Serwis Techniczny”) należy
sprawdzić, czy problemu nie da się łatwo rozwiązać przy pomocy poniższego wykazu.
Nieprawidłowości w działaniu:
Pralka nie włącza się.
Cykl prania nie rozpoczyna się.
Pralka nie pobiera wody (na
wyświetlaczu pojawi się napis „BRAK
WODY, SPRAWDŹ DOPŁYW WODY”).
Pralka cały czas pobiera i odprowadza wodę.
Możliwe przyczyny / Rozwiązania:
• Wtyczka nie jest włączona do gniazdka lub jest wsunięta za słabo, tak że nie
ma styku.
• W domu nastąpiła przerwa w dostawie prądu.
• Drzwiczki pralki nie są dobrze zamknięte.
• Nie został wciśnięty przycisk ON/OFF.
• Nie został wciśnięty przycisk START/PAUSE.
• Kurek dopływu wody jest zamknięty.
• Zostało nastawione opóźnienie startu (patrz “W jaki sposób wykonać cykl
prania”).
• Przewód doprowadzający wodę nie jest podłączony do kurka.
• Przewód jest zgięty.
• Kurek dopływu wody jest zamknięty.
• W domu nastąpiła przerwa w dostawie wody.
• Ciśnienie wody nie jest wystarczające.
• Nie został wciśnięty przycisk START/PAUSE.
• Przewód odpływowy nie został zainstalowany na wysokości między 65 a
100 cm od podłogi (patrz „Instalacja”).
• Końcówka przewodu odpływowego jest zanurzona w wodzie (patrz „Instalacja”).
• Otwór odpływowy w ścianie nie posiada odpowietrznika.
Jeśli po sprawdzeniu tych możliwości problem nie zostanie rozwiązany, należy
zamknąć kurek dopływu wody, wyłączyć pralkę i wezwać Serwis Techniczny. Jeśli mieszkanie znajduje się na najwyższych piętrach budynku, może
wystąpić efekt syfonu, w wyniku którego pralka cały czas pobiera i odprowadza wodę. W celu wyeliminowania tej niedogodności należy zakupić specjalny
zawór, zapobiegający powstawaniu efektu syfonu.
PL
Pralka nie odprowadza wody i nie
odwirowuje prania.
Pralka mocno wibruje w fazie wirowania.
Z pralki wycieka woda.
Maszyna jest zablokowana, wyświetlacz
pulsuje i sygnalizuje kod anomalii (np.:
F-01, F-..).
Tworzy się zbyt duża ilość piany.
• Program nie przewiduje odprowadzania wody: w przypadku niektórych programów należy uruchomić je ręcznie (patrz „Programy i funkcje”).
• Włączona jest funkcja ŁATWE PRASOWANIE: aby zakończyć program,
należy nacisnąć przycisk START/PAUSE („Programy i funkcje”).
• Przewód odpływowy jest zgięty (patrz „Instalacja”).
• Instalacja odpływowa jest zatkana.
• Podczas instalacji pralki bęben nie został prawidłowo odblokowany (patrz
„Instalacja”).
• Pralka nie jest właściwie wypoziomowana (patrz „Instalacja”).
• Pralka, zainstalowana pomiędzy meblami a ścianą, ma za mało miejsca
(patrz „Instalacja”).
• Przewód doprowadzający wodę nie jest dobrze przykręcony (patrz „Instalacja”).
• Szuadka na środki piorące jest zatkana (w celu jej oczyszczenia patrz „Utr-
zymanie i konserwacja”).
• Przewód odpływowy nie jest dobrze zamocowany(patrz „Instalacja”).
• Wyłączyć maszynę i wyjąć wtyczkę z gniazdka, odczekać około 1 minuty,
następnie włączyć ją ponownie.
Jeśli problem nie ustępuje, należy wezwać Serwis Techniczny.
• Środek piorący nie jest odpowiedni do pralek automatycznych (na opakowaniu musi być umieszczony napis: „do pralek”, „do prania ręcznego i w
pralce” lub podobny).
• Użyto za dużo środka piorącego.
23
Page 24

Serwis Techniczny
PL
Przed skontaktowaniem się z Serwisem Technicznym:
• Sprawdzić, czy problemu nie można rozwiązać samodzielnie (patrz„Nieprawidłowości w działaniu i sposoby ich usuwania”);
• Ponownie uruchomić program i sprawdzić, czy problem nie zniknął;
• Jeśli nie, zwrócić się do autoryzowanego Serwisu Technicznego, dzwoniąc pod numer podany w karcie gwarancyjnej.
! Nigdy nie wzywać nieautoryzowanych techników.
Należy podać:
• rodzaj nieprawidłowości;
• model maszyny (Mod.);
• numer seryjny (S/N).
Informacje te znajdują się na tabliczce umieszczonej w tylnej części pralki oraz widocznej z przodu po otwarciu drzwiczek.
24
Page 25

Iнструкцiї з експлуатацiї
ПРАЛЬНА МАШИНА
UA
Українська
WMSD 723
Зміст
Встановлення, 26-27
Розпакування і вирівнювання
Підключення води та електроенергії
Перший цикл прання
Технiчнi данi
Опис пральної машини, 28-29
Панель керування
Дисплей
Як здійснювати цикл прання, 30
Програми та функції, 31
Таблиця програм
Функції прання
Миючі засоби і білизна, 32
Касета з миючим засобом
Підготовка білизни
Особливi програми
Система балансування завантаження
UA
Запобіжні заходи та поради, 33
Загальна безпека
Утилізація
Ручне відкривання дверцят люку
Технічне обслуговування та догляд, 34
Відключення води й електричного живлення
Очищення пральної машини
Чистка касети для миючих засобів
Догляд за люком та барабаном
Миття насосу
Контроль шланга для подачі води
Несправності та засоби їх усунення, 35
Допомога, 36
25
Page 26

Встановлення
UA
! Необхідно зберігати дану брошуру, щоб мати
мати нагоду звернутися до неї у будь-який момент.
У раз продажу, передачі іншій особі або переїзду
переконайтеся, що інструкція перебуває разом
із пральною машиною й новий власник може
ознайомитися з її принципами роботи й відповідними
запобіжний заходами.
! Уважно вивчіть інструкцію: в ній міститься важлива
інформація про встановлення, використання та
безпеку.
Розпакування і вирівнювання
Розпакування
1. Розпакування пральної машини.
2. Вдоскональтеся, що машина не зазнала ушкоджень
пiд час транспортування. Якщо такі є, не виконуйте
нiяких пiдключень та негайно зверніться до
постачальника.
3. Видаліть 4
запобіжнi гвинти для
транспортування та
прокладку з відповідною
розпірною деталлю, якi
знаходяться позаду (див.
малюнок).
Належне вирiвнювання забезпечить стабiльнiсть
машинi та запобiжить вiбрацiям, шуму та
пересуванням пiд час роботи. У випадку
встановлення машини на килимовому покритті або
килимах, ніжки необхідно відрегулювати таким чином,
щоб гарантувати під пральною машиною необхідний
простір для вентиляції.
Підключення води й електроенергії
Пiд’єднання шланга для подачі води
1. Підключити живлячий
трубопровід, прикрутивши
його до крану холодної
води за допомогою
штуцеру з газовою
різьбою 3/4 (див.
малюнок).
Перед пiдключенням
спустiть воду, доки вона
не стане прозорою.
2. Підключіть шланг
подачі води до пральної
машини, під’єднавши
його до водорозбiрного
крану, який знаходиться
угорі праворуч на
задньому боцi машини
(див. малюнок).
4. Закрийте отвори пластмасовими пробками з
комплекту постачання.
5. Зберiгайте всi компоненти: у разi транспортування
пральної машини їх потрiбно повернути на мiсце.
! Забороняйте дiтям гратися з упаковками.
Вирівнювання
1. Встановіть пральну машину на плоскій та твердій
підлозі, не притуляючи її до стін, меблів, тощо.
2. Якщо пiдлога не
iдеально горизонтальна,
компенсуйте нерiвностi
за допомогою переднiх
нiжок (див. малюнок)
– розкручуючи чи
закручуючи їх; кут
нахилу вiдносно робочої
поверхнi не повинен
перевищувати 2°.
3. Зверніть увагу, щоб шланг не мав згинів та утисків.
! Тиск води в крані має відповідати значенням у
таблиці Технічних даних (див. сторінку поруч).
! Якщо довжини шланга для води не вистачає,
зверніться у спеціалізовану крамницю або до
уповноваженого фахівця.
! Не користуйтеся шлангами, якi були вже у вживаннi.
! Використовуйте шланги з комплекту постачання.
26
Page 27

Підключення шланга для зливу води
65 - 100 cm
Пiдключiть шланг для
зливу води, не згинаючи
його, до вiдводячого
трубопроводу або до
стiнного зливу, якi мають
знаходитись на вiдстанi
65 -100 см вiд пiдлоги;
або розташуйте його
на краю вмивальника
чи ванної, приєднавши
направляючу з
комплекту до крану (див.
малюнок). Не залишайте
вільний кінець зливного
шланга зануреним у
воду.
! Кабель не повинен мати згинів або утисків.
UA
! Проводити замiну кабелю живлення можуть тiльки
вповноваженi фахiвцi.
Увага! Підприємство знімає з себе відповідальність за
умови недотримання вказаних норм.
Перший цикл прання
Пiсля встановлення, перш нiж розпочати
використання машини, виконайте цикл прання з
пральним засобом, але не завантажуючи бiлизну,
встановивши програму «Самоочищення».
! Використання подовжувача шланга не
рекомендоване. В разi необхiдностi використання
подовжувача шланга, переконайтеся у тому, що він
має той самий діаметр та його довжина не перевищує
150 см.
Електричні підключення
Перш нiж увiмкнути вилку в електричну розетку,
переконайтеся, що:
• розетка має заземлення у відповідності до
встановлених норм;
• розетка розрахована на максимальне навантаження
у межах потужності машини, зазначене у таблиці
Технічних даних (див. малюнок поруч);
• напруга живлення перебуває у межах, зазначених у
таблиці Технічних даних (див. малюнок поруч);
• розетка підходить до вилки пральної машини. В
іншому випадку замініть розетку або вилку.
! Машину не можна встановлювати поза
приміщенням, навіть в захищених мiсцях, тому що
дуже небезпечно піддавати її впливу дощу і грози.
! Коли машину вже встановлено, забезпечте вільний
доступ до електричної розетки.
! Не використовуйте подовжувачі й трійники.
Технiчнi данi
Модель WMSD 723
ширина 59,5 см
Розмiри
Кiлькiсть бiлизни вiд 1 до 7 кг
Електричні
підключення
Водопровднi
пiдключення
Швидкiсть
центрифуги
Програма
випробувань
відповідно до
Директиви
EN 60456
висота 85 см
глибина 43,5 см
див. шильдік з технiчними даними на
машинi
максимальний тиск 1 мПа (10 бар)
мiнiмальний тиск 0,05 мПа (0,5 бар)
об’єм баку – 48 лiтри
до 1200 обертiв на хвилину
програма
натискання на кнопку); температура 60°C;
виконується з завантаженням 7 кг.
Цей прилад вiдповiдає таким
європейським директивам:
- 2004/108/CE (Електромагнітна
сумiснiсть)
- 2002/96/CE
- 2006/95/CE (Низька напруга)
(40°) (шляхом другого
27
Page 28

Опис пральної машини
UA
Панель керування
Кнопка ON/OFF
Касета з миючим засобом
ПЕРЕМИКАЧА
Касета з миючим засобом: для завантаження миючих
засобiв та присадок (див. “Миючi засоби та бiлизна”).
Кнопка ON/OFF : швидко натисніть і відпустіть кнопку
для увiмкнення або вимикання машини. Iндикаторна
лампа START/PAUSE блимає зеленим свiтлом з
повільними інтервалами, вказуючи на те, що машину
ввiмкнено. Для вимикання пральної машини під час
прання необхідно утримувати кнопку натиснутою
приблизно більш ніж 3 сек.; короткочасне або випадкове
натискання не дозволить вимкнути машину. Вимикання
машини під час циклу прання вiдмiнює це прання.
Кнопки
ПРОГРАМ
ПРОТИАЛЕРГІЙНОГО
ОПОЛІСКУВАННЯ
Кнопка
ТИП
ПРАННЯ
Дисплей
Кнопка
MY CYCLE
Кнопка
Кнопка
ВIДСТРОЧЕНИЙ
ПУСК
Кнопка ТЕМПЕРАТУРА : натискання викликає
зменшення температури: значення вiдображається на
дисплеї.
Кнопка БЛОКУВАННЯ КНОПОК : щоб активувати
блокування панелі управління натиснiть та утримуйте
кнопку впродовж 2 секунд. Ввімкнена позначка
показує, що панель управління заблоковано (за
винятком кнопки ON/OFF). У цей спосіб перешкоджають
випадковій зміні програм, передусім, якщо у домі є
діти. Для вiдключення блокування панелi управління
натиснiть та утримуйте кнопку впродовж 2 секунд.
Кнопки
ФУНКЦIЯ
Кнопка
ВIДЖИМУ
Кнопка з ін дикаторною
лампою
START/PAUSE
Кнопка
ТЕМПЕРАТУРА
Кнопка
БЛОКУВАННЯ
КНОПОК
Кнопки ПЕРЕМИКАЧА ПРОГРАМ: використовуються
для вибору бажаної програми для задання бажаної
програми (див.“Таблиця програм”).
Кнопка MY CYCLE: утримуйте кнопку натиснутою,
щоб внести у пам’ять цикл та власнi налаштування.
Щоб викликати цикл, попередньо внесений у пам’ять,
натиснiть на кнопку MY CYCLE.
Кнопки ФУНКЦIЯ: для вибору бажаної функції
натиснiтьна кнопку. На дисплеї запалиться спалахує
вiдповiдна iндикаторна лампа.
Кнопка
бажаної інтенсивності прання.
Кнопка
натиснути для вибору бажаного типу ополіскування.
Кнопка ВIДЖИМУ : натискання викликає
зменшення або виключення режиму вiджиму взагалi;
значення вiдображається на дисплеї.
ТИП ПРАННЯ
ПРОТИАЛЕРГІЙНОГО ОПОЛІСКУВАННЯ
: натиснути для вибору
:
Кнопка ВIДСТРОЧЕНИЙ ПУСК : натиснiть для
того, що б задати режим вiдстроченого пуску обраної
програми. Вiдстрочення вiдображатиметься на дисплеї.
Кнопка з індикаторною лампою START/PAUSE: коли
зелена індикаторна лампа блимає з повільними
інтервалами, натисніть на кнопку для запуску прання.
Якщо цикл розпочався, індикаторна лампа горить
постійно. Щоб увійти в режим паузи під час прання,
знову натисніть на кнопку; індикаторна лампа почне
горіти померанцевим кольором. Якщо позначка не
свiтиться, ви можете вiдкрити люк. Щоб продовжити
прання з місця, де воно було перерване, знову
натисніть на кнопку.
Режим очiкування
Вiдповiдно до норм, пов’язаних з заощадження
енергiї, цю пральну машину оснащено системою
автовимкнення (stand by), яка активується через 30
секунд вiдсутностi роботи з боку машини. Швидко
натиснiть кнопку ON/OFF та зачекайте вiдновлення
роботи машини.
28
Page 29

Дисплей
Z
B
A
UA
X
D
C
E
Y
F
Дисплей є зручним для програмування машини; вiн надає рiзноманiтну iнформацiю.
У перших двох рядках А та В вiдображається обрана програма прання, поточна фаза прання, а також усi вказiвки
щодо стану встановленої програми.
У рядку С вiдображається час, який залишився до завершення поточного циклу прання, та в разi заданого
ВIДСТРОЧЕНОГО ПУСКУ – час до запуску обраної програми.
В рядку D вiдображається максимальне значення швидкостi вiджиму, який машина виконує згiдно з встановленою
програмою; якщо у програмi не передбачений вiджим, рядок залишається вимкненим.
В рядку E вiдображається максимальне значення температури, яку можна вибрати згiдно з встановленою
програмою; якщо у програмi не передбачене встановлення температури, рядок залишається вимкненим.
Iндикаторнi лампи F пов’язанi з функцiями: вони світяться запалюються, якщо обрана функцiя є сумiсною із
встановленою програмою.
Позначка Люк заблоковано
Увiмкнена позначка вказує на те, що люк заблоковано, щоб запобiгти його випадковому вiдкриттю. З метою
запобiгання ушкоджень, перш нiж вiдкрити люк, переконайтеся вдоскональтеся, що позначка не горить.
Увага: при активованiй функцiї ВIДСТРОЧЕНОГО ПУСКУ забороняється вiдкривати люк, для вiдкриття люку
встановiть машину в режим паузи, натиснувшни на кнопку START/PAUSE.
! При першому ввiмкненнi з’являється запит щодо вибору мови, дисплей автоматично ввiйде в меню вибору мови.
Для вибору бажаної мови натиснiть на кнопки X та Y, щоб пiдтвердити зроблений вибiр, натиснiть на кнопку Z.
Для зміни однієї мови на іншу вимкніть прилад, натисніть одночасно на кнопки X, Y, Z і зачекайте на звукову
сигналізацію, яка сповіщає про появу меню для вибору мови.
29
Page 30

Як здійснювати цикл прання
UA
1. УВІМКНЕННЯ МАШИНИ. Натиснiтьна кнопку : на
дисплеї з’явиться WELCOME; iндикаторна лампа
START/PAUSE блиматиме зеленим свiтлом з
повiльними iнтервалами.
2. ЗАВАНТАЖЕННЯ БІЛИЗНИ. Відкрийте дверцята
люку. Завантажте білизну, звертаючи увагу, щоб не
перевищити кількість білизни, зазначену в таблиці
програм на наступній сторінці.
3. ДОДАННЯ МИЮЧОГО ЗАСОБУ. Витягніть касету
і додайте миючий засіб у відповідні ванночки, як
вказано в роздiлi “Миючі засоби і білизна”.
4. ЗАКРИЙТЕ ЛЮК.
5. ВИБІР ПРОГРАМИ. Для вибору бажаної програми
натиснiть на одну з кнопок ПЕРЕМИКАЧА ПРОГРАМ;
назва програми з’явиться на дисплеї; ви можете
змiнювати пов’язанi з програмою значення
температури та швидкостi вiджиму. На дисплеї
з’явиться тривалiсть циклу.
6. НАЛАШТУВАННЯ ЦИКЛУ ПРАННЯ ПIД ВЛАСНI
ПОТРЕБИ. Використайте вiдповiднi кнопки:
Зміна температури та/або швидкостi
віджиму. Машина автоматично вибирає максимальну
температуру і швидкість віджиму, передбачені для
даної програми, тому неможливо їх збільшити.
Натискаючи на кнопку , поступово зменшують
температуру прання аж до прання у холодній воді
“OFF”. Натискаючи на кнопку поступово зменшують
швидкість віджиму, аж до його відключення “OFF”.
Наступне натискання на кнопки призводить до
повернення до максимальних значень.
! Виключення: при виборі програми
(шляхом другого натискання на кнопку), температура може
60°C
збільшитися до 90 градусів.
Встановiть вiдстрочений пуск.
Для встановлення вiдстроченого пуску обраної
програми натискайте на вiдповiдну кнопку, доки не
з’явиться необхiдний час вiдстрочки. Якщо цю опцiю
активовано, на дисплеї запалюється позначка . Щоб
скасувати вiдстрочений пуск натискайте на кнопку, доки
на дисплеї не з’явиться OFF.
Як задати бажану інтенсивність прання.
За допомогою кнопки можна оптимізувати прання
залежно від ступеню забруднення речей і від бажаної
інтенсивності прання.
Виберіть програму прання, автоматично задається
цикл “Normal” (Нормального) прання, який
передбачає прання речей з середнім ступенем
забруднення (цей параметр не буде дійсним для
циклу «Вовна», під час якого автоматично задається
“Delicate” (Делікатне) прання).
Для дуже забруднених речей слід натиснути кнопку
і вибрати “Super Wash” (Інтенсивне). На цьому
рівні гарантується високоефективне прання завдяки
використанню більшої кількості води на початку циклу
і значнішої механічної роботи; рекомендується для
видалення стійких плям. Може використовуватися з
вибілювачем або без.
Щоб відбілити речі, вставте додаткову ванночку 4 з
комплекту постачання у ванночку 1. Пiд час дозування
вiдбiлювача не перевищуйте максимальний рiвень
«max» на центральному стрижнi (див.малюнок на
стор. 32).
Якщо речі не дуже забруднені або потребується
делікатне поводження з тканинами, натисніть на
кнопку , щоб обрати “Delicate” (Делікатне).
У цьому циклі механічна робота зменшується, щоб
гарантувати оптимальні результати прання для
делікатних речей.
Як задати тип ополіскування.
За допомогою опції можна вибрати тип
ополіскування, спеціально передбачений для чутливої
шкіри. При першому натисканні на кнопку задається
“Extra Rinse” (Додаткове полоскання) на додаток до
стандартного, щоб видалити усі залишки прального
засобу. При другому натисканні на кнопку задається
опція “Sensitive Skin” (Чутлива шкіра), яка дозволяє
обрати два додаткових полоскання на додаток до
стандартного; рекомендується для осіб з підвищеною
чутливістю шкіри. При третьому натисканні на кнопку
задається “Anti allergy Rinse” (Протиалергійне
полоскання), яке дозволяє обрати три додаткових
полоскання на додаток до стандартного, щоб видалити
основні алергени, такі як пилок, кліщи, котяча і собача
шерсть. Ще раз натисніть кнопку, щоб повернутися до
“Normal Rinse” (Нормального) ополіскування. Якщо
неможливо задати або змінити існуючі параметри, на
дисплеї з’явиться напис “Not allowed” (Не дозволено).
Модифiкацiя характеристик циклу.
• Натиснiть на кнопку для активацiї функцiї;
увiмкнеться вiдповiдна iндикаторна лампа.
• Натисніть знову на кнопку, щоб вiдминити функцiю;
індикаторна лампа згасне.
! При виборі обраннi функції, несумісної з заданою
програмою, індикаторна лампа почне блимати й цю
функцiю не буде активовано.
! Якщо вибрана функція не є сумісною з іншою,
раніше вибраною, індикаторна лампа попередньої
функції почне блимати, при цьому буде активовано
тільки останню функцiю, запалиться індикаторна
лампа активованої функцiї.
! Функцiї можуть змiнювати рекомендоване
завантаження та/або тривалiсть циклу.
7. ЗАПУСК ПРОГРАМИ. Натисніть кнопку START/
PAUSE. Вiдповiдна iндикаторна лампа засвiтиться
зеленим свiтлом, при цьому люк буде заблоковано
(свiтитиметься позначка ЛЮК ЗАБЛОКОВАНО )
Пiд час прання на дисплеї з’являється назва поточної
фази. Для змiни програми пiд час виконання циклу
виведiть машину в режим паузи, натиснувши на START/
PAUSE (iндикаторна кнопка START/PAUSE блиматиме
померанцевим кольором з повiльними iнтервалами);
виберiть бажаний цикл та знову натиснiть кнопку START/
PAUSE . Щоб відкрити дверцята люку під час виконання
циклу натисніть на кнопку START/PAUSE; якщо
індикаторна лампа ЛЮК ЗАБЛОКОВАНО згасне,
це означає, що люк можна відкрити. Знову натисніть на
кнопку START/PAUSE, щоб запустити програму з того
мiсця, де її було перервано.
8. ЗАВЕРШЕННЯ ПРОГРАМИ. На це вказує надпис “END
OF CYCLE” на дисплеї; коли згасне позначка ЛЮК
ЗАБЛОКОВАНО , люк можна вiдкрити. Відкрийте
люк, витягніть білизну й вимкніть машину.
! Для вiдмiни вже працюючого циклу натиснiть кнопку ,
утримуючи її, й цикл буде перервано, пiсля чого машина
вимкнеться.
30
Page 31

Програми та функції
Таблиця програм
Макс.
Опис програми
Програми
Антикорозійний 40° 1200
Бiла бавовна (шляхом одного натискання на кнопку): дуже забрудненi
стiйкi бiлi та кольоровi тканини.
Бавовна (1) (шляхом другого натискання на кнопку): Злегка забрудненi
делiкатнi бiлi та кольоровi тканини.
Бавовна (шляхом третього натискання на кнопку): Злегка забрудненi
делiкатнi бiлi та кольоровi тканини.
Синтетичнi (шляхом одного натискання на кнопку): дуже забрудненi
кольоровi стiйкi тканини.
Синтетичнi (шляхом другого натискання на кнопку): ніжні кольори злегка
забрудненої.
Mix 60’ (шляхом одного натискання на кнопку): Для швидого освiження
забруднених речей (не рекомендоване для вовняних, шовкових
речей або речей для ручного прання).
Mix 30’ (шляхом другого натискання на кнопку): Для швидого освiження
злегка забруднених речей (не рекомендоване для вовняних,
шовкових речей або речей для ручного прання).
My Cycle: утримуйте кнопку натиснутою, щоб внести у пам’ять цикл та власнi налаштування
M
Білизна за тиждень: для постільної білизни і банного приладдя. 60° 1200
Вовна: для речей з вовни, кашемiру, тощо. 40° 800 -
Делікатне 30° 0 -
Вiджим (шляхом другого натискання на кнопку) - 1200 - - - -
ополіскування (шляхом одного натискання на кнопку) - 1200 - - -
Злив (шляхом третього натискання на кнопку) - 0 - - - -
Тривалість циклу, вказана на дисплеї або в керівництві, разрахована на основі стандартних умов роботи. Фактичний час може залежати від чисельних факторів, таких як температура і
тиск подаваної води, температура у приміщенні, кількість миючого засобу, кількість і тип завантаженої білизни, зрівноваження завантаженої білизни, додаткові обрані опції.
Для всiх Установ з проведення випробувань:
1) Програма керування згiдно до норми EN 60456: задайте програму (40°) (шляхом другого натискання на кнопку); температура 60°C.
2) При температурі 60 °C функцію “Попереднє прання” не можна буде активувати.
Макс.
темп.
(Max. 90°)
(Max. 60°)
швидкiсть
(обертiв
(єС)
60°
40°
20° 1200 -
60° 800
40° 800
60° 1200 -
30° 800 -
за
хвилину)
1200
1200 -
Миючий зас³б
Попе-
Пра-
реднє
прання
(2)
Відбіл-
ння
ювач
-
-
-
-
-
-
-
Пом’
якшувач
Макс.
(кг)
3,5
3,5
3.5
1.5
Трива-
лiсть
циклу
4
7
7
7
3
7
1
7
7
7
Тривалiсть програм вiдображується на дисплеї.
завантаження
UA
Функції прання
Попереднє прання
Вибiр цiєї функцiї вмикає попереднє прання, яке є
корисним для видалення стiйких плям.
Увага: Додайте миючий засiб у вiдповiдне вiддiлення.
! Не активується у програмах , , , ,
(40°),
.
Полегшене прасування
При виборі даної функції режими прання і віджиму
будуть відповідно змінені для зменшення утворення
складок. Наприкiнцi циклу пральна машина виконає
повiльнi оберти барабану; Iндикаторнi лампи функцiй
ПОЛЕГШЕНОГО ПРАННЯ блиматимуть, а на дисплеї
з’явиться надпис “END OF CYCLE”. Для завершення
циклу натиснiть на кнопку START/PAUSE або на
кнопку ПОЛЕГШЕНОГО ПРАСУВАННЯ.
! Не активується на програмах , “Mix 30’”, , , .
(60°),
Eco wash
Функція Eco Wash сприяє енергозбереженню,
тому що не відбувається нагрівання води для
прання – користь для довкілля і для користувача
завдяки зменшеному рахунку за електроенергію.
Дійсно, посилена дія й оптимізоване споживання
води гарантують добрі результати, при цьому
тривалість дорівнюватиме часу стандартного
циклу. Щоб отримати найкращі результати прання,
рекомендується вживати рідкий засіб.
! Не активується у програмах , , , , , .
31
Page 32
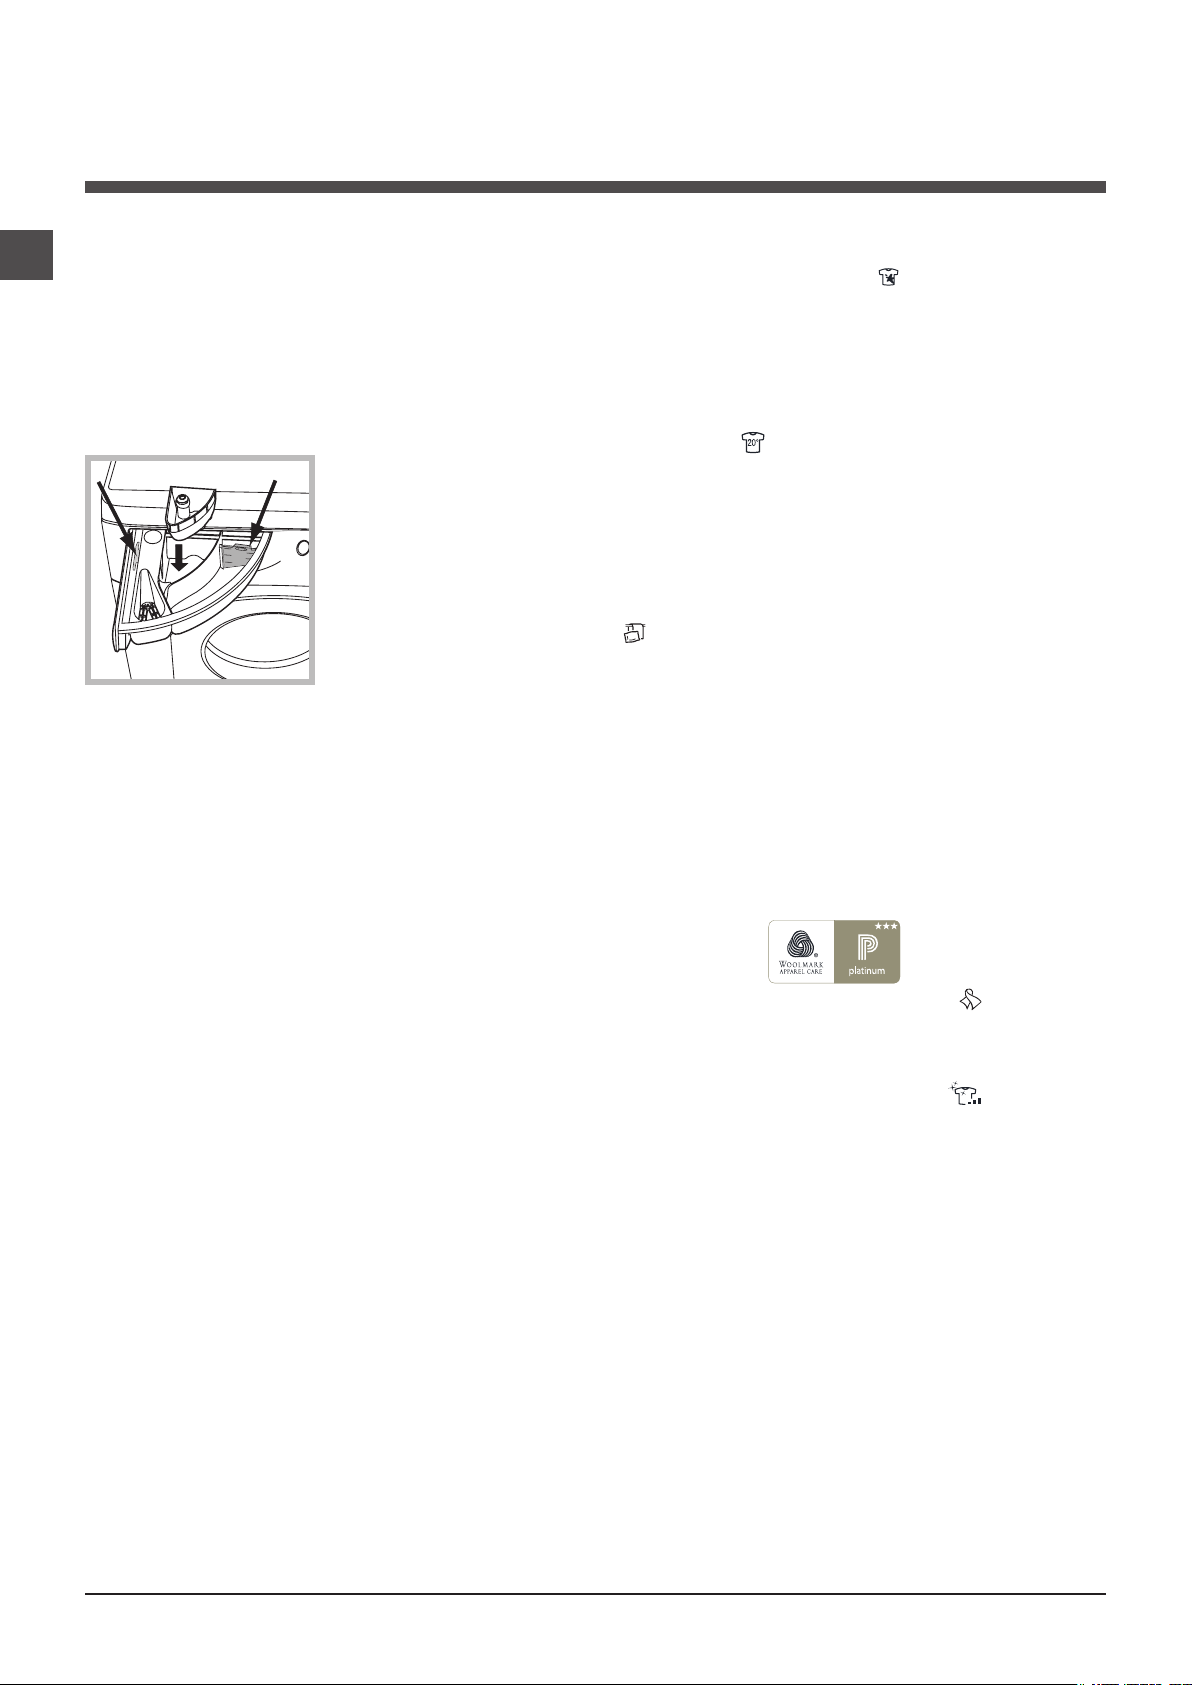
Миючі засоби і білизна
M
AX
1
2
4
3
A
B
UA
Касета з миючим засобом
Добрий результат прання залежить також вiд
правильного дозування миючого засобу: надлишок
миючого засобу приведе до неефективного прання
та сприятиме утворенню накипу всереденi пральної
машини, а також забрудненню довкiлля.
! Не використовуйте миючі засоби для ручного
прання, тому що вони утворюють надто багато піни.
Виймiть касету для
миючих засобiв та
додайте миючi засоби
або присадки, як вказано
нижче.
ванночка 1: Засiб для попереднього прання
(порошковий)
Перш нiж додати пральний засіб, перевірте, щоб не
була вставлена додаткова ванночка 4.
ванночка 2: Засiб для прання
(порошковий чи рiдкий)
Якщо використовується рідкий пральний засіб,
рекомендується застосовувати вимірювальний
компонент A з комплекту постачання для правильного
дозування. При використанні порошкового прального
засобу вставьте цей компонент у нішу B.
ванночка 3: Засоби з догляду
(пом’якшувач, тощо)
Пом’якшувач не має витікати з решітки.
додаткова ванночка 4: Відбілювач
Підготовка білизни
• Роздiлiть бiлизну, враховуючи:
- тип тканини / позначку на етикетцi.
- кольори: вiдокремте кольоровi речi вiд бiлих.
• Перевірте кишені й ґудзики.
• Не перевищуйте вказанi значення щодо ваги сухої
бiлизни: (див. “Таблиця програм”).
Скільки важить білизна?
1 простирадло 400-500 г
1 наволочка 150-200 г
1 скатертина 400-500 г
1 махровий халат 900-1 200 г
1 рушник 150-250 г
Особливi програми
Антикорозійний: Програма призначена
для прання дуже забруднених речей зі стійким
фарбуванням. Програма гарантує вищий у порівнянні
зі стандартним клас прання (клас A). Не застосовуйте
у цій програмі речі різних кольорів. Рекомендується
використання миючих засобів у порошку. Стійкі плями
краще обробити попередньо спеціальними засобами.
Бавовна 20° : ідеальна для бавовняних
забруднених речей. Добре прання, в тому числі у
холодній воді, яке можна порівняти з пранням при 40°,
гарантується механічною роботою, яка здійснюється
на змінній швидкості із частими повторюваними піками.
Білизна для ванної і постільна білизна: ця пральна
машина дозволяє випрати білизну для ванної і
постільну білизну за допомогою єдиної програми
, що оптимізує використання пом’якшувача
й заощаджує час і енергію. Рекомендується
використання порошкових миючих засобів.
Вовна: Цикл прання “Вовна” цієї пральної машини
Hotpoint-Ariston протестований і затверджений
компанією Woolmark у відношенні до прання вовняних
речей, класифікованих як для “ручного прання”,
за умови виконання прання згідно до інструкцій,
наведених на етикетці виробу, і вказівок виробника
електропобутового приладу. Hotpoint-Ariston - перша
марка пральних машин, яка отримала від компанії
Woolmark сертифікацію Woolmark Apparel Care Platinum за власні показники прання і витрати води й
електроенергії.
Делікатне: використовуйте програму для прання
дуже делікатних речей, наприклад, зі стразами або
іншими оздобленнями.
Для прання шовкових речей або портьєр оберіть
“Delicate” (Делікатне) прання в опції .
Перш ніж запускати прання, рекомендується
вивернути речі навиворіт і вкласти дрібні речі в
спеціальний мішечок для прання делікатних речей.
Кращі результати досягаються при використанні
рідкого прального засобу для делікатних речей.
Система балансування завантаженнÿ
Перед кожним віджимом, для запобігання
надмірній вібрації та для рівномірного розподілу
навантаження, барабан здійснює оберти на дещо
більшій швидкості, ніж швидкість прання. Якщо по
закінченні декількох спроб завантажені речі ще не
були правильно відбалансовані, машина здійснює
віджим на швидкості, нижчій від передбаченої. У
випадку надмірної незбалансованості пральна
машина здійснює розподіл замість віджиму. З
метою оптимального розподілу завантаження та
його правильного балансування рекомендується
одночасне прання великих і малих речей.
32
Page 33

Запобіжні заходи та
20
поради
! Машину була спроектовано і вироблено у
відповідності з міжнародними нормами безпеки. Дані
попередження складені для забезпечення безпеки і
тому їх треба уважно прочитати.
Загальна безпека
• Дане обладнання було розроблене виключно для
побутового використання.
• Цей апарат не має використовуватися дітьми або
особами з обмеженими фізичними, сенсорними чи
розумовими можливостями, або якщо їм бракує
досвіду та необхідних знань. Винятки складають
ситуації, коли користування відбувається під
наглядом або за вказівками осіб, відповідальних за
їхню безпеку. Дорослі мають стежити, щоб діти не
гралися з апаратом.
• Машина має використовуватися тільки повнолітніми
особами і згідно з інструкціями, наведеними у даній
брошурі.
• Не торкайтеся до машини голими ногами або
мокрими чи вологими руками й ногами.
• Не виймайте штепсель з електричної розетки,
витягуючи його за провід, тримайтеся тільки за
самий штепсель.
• Не вiдкривайте касету з миючими засобами пiд час
роботи машини.
• Будьте обережні: вода, що зливається, може мати
високу температуру.
• У жодному випадку не застосовуйте силу до люку:
це може ушкодити запобiжний механiзм проти
випадкових вiдкривань.
• Якщо машина не працює у разi поломки, у жодному
випадку не намагайтеся дiстатися внутрiшнiх
механiзмiв з метою самостійного ремонту.
• Слiдкуйте, щоб дiти не наближалися до працюючої
машини.
• Пiд час прання люк нагрiватиметься.
• Пересування машини має здiйснюватися двома або
трьома особами за умови максимальної уваги. Нi в
якому разi - однiєю особою, тому що машина дуже
важка.
• Перш ніж завантажити білизну, перевірте, щоб
барабан був порожній.
усунення потенційної шкоди для здоров’я та
навколишнього середовища. Символ закресленої
корзини, зображений на всіх виробах, нагадує про
необхідність окремої утилізації. Для подальшої
інформації про правильне зняття з експлуатації
побутових електроприладів, їхні власники можутьз
вернутися у відповідну муницiпальну службу або до
продавця приладу.
Ручне відкривання дверцят люку
У випадку, якщо неможливо відкрити дверцята люку
із-за відсутності електроенергії і ви хотіли б розвісити
речі, треба діяти таким чином:
1. витягніть штепсель з
електричної розетки.
2. перевірте, щоб рівень
води усередині машини
був нижчим за рівень
отвору люку; якщо це не
так, злийте надлишок
води через зливний шланг,
збираючи її у відрі, як
показано на малюнку.
3. зніміть декоративну
панель на лицевому
боці пральної машини за
допомогою викрутки (див.
малюнок).
UA
Утилізація
• Утилізація пакувального матеріалу: додержуйтесь
місцевих норм, так як пакування може бути
використане повторно.
• Європейська директива 2002/96/CE з відходів
від електричної й електронної апаратури
передбачає, що побутові електроприлади не
можуть перероблятися у звичайному порядку
для твердих міських відходів. Зняті з експлуатації
побутові прилади мають бути зібрані окремо для
оптимізації ступеню відновлення й рециклювання
матеріалів, що входять до їхнього складу, і з метою
4. За допомогою вказаного на малюнку язичка тягнiть
пластмасову тягу з упору назовнi, аж доки її не буде
звiльнено; потiм протягнiть її донизу, одночасно
вiдкриваючи дверцята.
5. встановіть панель на місце, пересвідчіться у тому,
що крюки були вставлені у спеціальні петлі, пiсля чого
притиснiть її до машини.
33
Page 34

Технічне обслуговування та
1
2
A
B
догляд
UA
Відключення води й електричного
живлення
• Закривайте водопровідний кран після кожного
прання. У такий спосіб зменшується знос
гідравлічної частини машини й усувається
небезпека витоку.
• Виймайте штепсель з розетки під час миття машини
та під час робіт з технічного обслуговування.
Очищення пральної машини
• Зовнішня частина і гумові деталі можуть бути
вимиті тканиною, змоченою у теплій воді й милі. Не
використовуйте розчинники або абразиви.
• Пральна машина оснащена програмою
«Самоочищення» внутрішніх частин, яку слід
запускати без будь-яких речей всередині
барабану.
Пральний засіб (його кількість має складати 10% від
рекомендованої для злегка забруднених речей) або
спеціальні засоби для очищення пральної машини
можна використовувати як допоміжні у программі
прання. Рекомендується виконувати програму
очищення через кожні 40 циклів прання.
Для пуску програми слід одночасно натиснути на
кнопки A і B впродовж 5 сек. (див. малюнок).
Програма запускається автоматично і триває
приблизно 70 хвилин. Для припинення циклу
натиснiть на кнопку START/PAUSE.
Догляд за люком та барабаном
• Завжди залишайте відкритими дверцята люку, тоді
не утворюватимуться неприємні запахи.
Миття насосу
Пральну машину обладнано насосом з автоматичною
чисткою, який не вимагає технічного обслуговування.
Може трапитися так, що малі предмети (монети,
ґудзики) потраплять до форкамери, що захищає
насос, розташований у її нижній частині.
! Переконайтеся у тому, що цикл прання закінчено, і
витягніть штепсель з розетки.
Щоб потрапити до форкамери:
1. зніміть декоративну
панель на лицевому
боці пральної машини за
допомогою викрутки (див.
малюнок);
2. відкрутіть кришку,
обертаючи її проти
годинникової стрілки
(див. малюнок): виток
незначної кiлькостi води
є нормальним;
Чистка касети для миючих засобів
Виймiть касету, пiднявши
її та витягнувши назовнi
(див. малюнок).
Промийте під проточною
водою; ця процедура має
проводитися регулярно.
34
3. акуратно очистіть внутрішню частину;
4. накрутіть кришку;
5. встановіть панель на місце, пересвідчіться у тому,
що крюки були вставлені у спеціальні петлі, пiсля чого
притиснiть її до машини.
Контроль шланга для подачі води
Перевіряйте шланг для подачі води не менше одного
разу на рік. Якщо на ньому є тріщини, він підлягає
заміні: під час прання високий тиск може призвести
до розірвання.
! Не користуйтеся шлангами, якi були вже у вживаннi.
Page 35

Несправності та засоби
їх усунення
Може трапитися так, що пральна машина не буде працювати. До того як зателефонувати у Сервiсний центр (див.
“Допомога”), перевірте, чи не є дана несправність проблемою, що легко вирішується, звернувшись до списку нижче.
Несправності:
Пральна машина не вмикається.
Цикл прання не розпочинається.
Пральна машина не завантажує
воду (На дисплеї з’явиться надпис
““No water, check supply”).
Машина безперервно завантажує і
зливає воду.
Можливі причини/Рішення:
• Штепсель не вставлений в електричну розетку або вставлений не до кiнця.
• У будинку немає електроенергії.
• Погано закритий люк.
• Кнопку ON/OFF не було натиснуто.
• Кнопку START/PAUSE не було натиснуто.
• Водопровідний кран закритий.
• Якщо вiдстрочення задане на час запуску (див. “Як здійснювати цикл прання”).
• Шланг подачі води не підключено до водопровiдного крану.
• Перегин у шлангу.
• Водопровідний кран закритий.
• У водопроводі немає води.
• Недостатній тиск.
• Кнопку START/PAUSE не було натиснуто.
• Зливний шланг не знаходиться на відстані від 65 до 100 см від підлоги
(див. “Встановлення”).
• Кінець зливного шланга занурений у воду (див. “Встановлення”).
• Стiнний каналiзацiйний злив не має віддушини для виходу повiтря.
Якщо після таких перевірок проблема залишається, закрийте
водопровідний кран, вимкніть машину і зателефонуйте у Сервiсний
центр. Якщо квартира знаходиться на верхніх поверхах будинку,
можливо, відбувається сифонний ефект, при якому машина безперервно
завантажує й зливає воду. Щоб його ліквідувати, існують спеціальні
антисифонні клапани, які можна придбати у торговельній мережі.
UA
Пральна машина не зливає воду чи
не вiджимає.
Пральна машина дуже вiбрує пiд
час вiджиму.
Пральна машина пропускає воду.
Машину заблоковано, дисплей
блимає та вказує код неполадки
(напр.: F-01, F-..).
Утворюється занадто багато піни.
• Програма не передбачає зливання: у деяких програмах його потрібно
вмикати вручну (див. “Програми та функції”).
• Активовано функцiю ПОЛЕГШЕНОГО ПРАСУВАННЯ для завершення
програми натиснiть на кнопку START/PAUSE (“Програми та функції”).
• Перегин зливного шланга (див. “Встановлення”).
• Засмітився зливний шланг.
• Барабан, у момент встановлення, не був правильно розблокований
(див. “Встановлення”).
• Машина стоїть не на плоскій поверхні (див. “Встановлення”).
• Машину затиснуто між меблями і стіною (див. “Встановлення”).
• Погано пригвинчений шланг подачі води (див. “Встановлення”).
• Забруднена касета для миючих засобів (як вимитидив. “Технічне
обслуговування і догляд”).
• Погано закріплений зливний шланг (див. “Встановлення”).
• Вимкніть машину й витягніть штепсель з розетки, зачекайте близько 1
хвилини й увімкніть її повторно.
Якщо несправність не усунено, зателефонуйте у Сервiсний центр.
• Миючий засіб не підходить для пральної машини (має бути напис “для
машинного прання”, “для ручного й машинного прання”, або подібний).
• Перевищена доза миючого засобу.
35
Page 36

Допомога
UA
Перш ніж телефонувати у Сервiсний центр:
• Перевірте, чи можна самостійно вирішити проблему (див. “Несправності і засоби їх усунення”);
• Запустіть програму повторно, щоб перевірити чи усунено несправність;
• Якщо нi, зв’яжiться з авторизованим Сервiсним Центром, зателефонувавши за номером, вказаним у
гарантiйному свiдоцтвi.
! Звертайтеся виключно до уповноважених фахівців.
Повідомити:
• тип несправності;
• модель машини (Мод.);
• серійний номер (С/Н).
Цю iнформацiю ви знайдете на заводськiй табличцi позаду пральної машини та в її переднiй частинi, якщо ви
вiдкриєте люк.
36
Page 37

Istruzioni per l’uso
LAVABIANCHERIA
I
Italiano
WMSD 723
Sommario
Installazione, 38-39
Disimballo e livellamento
Collegamenti idraulici ed elettrici
Primo ciclo di lavaggio
Dati tecnici
Manutenzione e cura, 40
Escludere acqua e corrente elettrica
Pulire la lavabiancheria
Pulire il cassetto dei detersivi
Curare oblò e cestello
Pulire la pompa
Controllare il tubo di alimentazione dell’acqua
Precauzioni e consigli, 41
Sicurezza generale
Smaltimento
Apertura manuale della porta oblò
Descrizione della lavabiancheria, 42-43
Pannello di controllo
Display
I
Come effettuare un ciclo di lavaggio, 44
Programmi e funzioni, 45
Tabella dei programmi
Funzioni di lavaggio
Detersivi e biancheria, 46
Cassetto dei detersivi
Preparare la biancheria
Programmi particolari
Sistema bilanciamento del carico
Anomalie e rimedi, 47
Assistenza, 48
Assistenza Attiva 7 giorni su 7
37
Page 38

Installazione
! È importante conservare questo libretto per
I
poterlo consultare in ogni momento. In caso di
vendita, di cessione o di trasloco, assicurarsi
che resti insieme alla lavabiancheria per informare il nuovo proprietario sul funzionamento e
sui relativi avvertimenti.
! Leggere attentamente le istruzioni: ci sono
importanti informazioni sull’installazione,
sull’uso e sulla sicurezza.
Disimballo e livellamento
Disimballo
1. Disimballare la lavabiancheria.
2. Controllare che la lavabiancheria non abbia
subìto danni nel trasporto. Se fosse danneggiata non collegarla e contattare il rivenditore.
3. Rimuovere le 4 viti
di protezione per il
trasporto e il gommino
con il relativo distanziale, posti nella parte
posteriore (vedi figura).
4. Chiudere i fori con i tappi di plastica in dota-
zione.
5. Conservare tutti i pezzi: qualora la lavabian-
cheria debba essere trasportata, dovranno
essere
rimontati.
Un accurato livellamento dà stabilità alla
macchina ed evita vibrazioni, rumori e spostamenti durante il funzionamento. In caso di
moquette o di un tappeto, regolare i piedini in
modo da conservare sotto la lavabiancheria
uno spazio sufficiente per la ventilazione.
Collegamenti idraulici ed elettrici
Collegamento del tubo di alimentazione
dell’acqua
1. Collegare il tubo
di alimentazione
avvitandolo a un
rubinetto d’acqua
fredda con bocca
filettata da 3/4 gas
(vedi figura).
Prima di allacciare,
far scorrere l’acqua
finché non sia limpida.
2. Collegare il tubo
di alimentazione alla
lavabiancheria
avvitandolo all’apposita presa d’acqua,
nella parte posteriore
in alto a destra (vedi
figura).
3. Fare attenzione che nel tubo non ci siano
né pieghe né strozzature.
! Gli imballaggi non sono giocattoli per bambini.
Livellamento
1. Installare la lavabiancheria su un pavimento
piano e rigido, senza appoggiarla a muri, mobili
o altro.
2. Se il pavimento non
fosse perfettamente
orizzontale, compensare le irregolarità
svitando o avvitando
i piedini anteriori (vedi
figura); l’angolo di
inclinazione, misurato
sul piano di lavoro, non
deve superare i 2°.
38
! La pressione idrica del rubinetto deve essere compresa nei valori della tabella Dati tecnici (vedi pagina a fianco).
! Se la lunghezza del tubo di alimentazione
non fosse sufficiente, rivolgersi a un negozio
specializzato o a un tecnico autorizzato.
! Non utilizzare mai tubi già usati.
! Utilizzare quelli in dotazione alla macchina.
Page 39
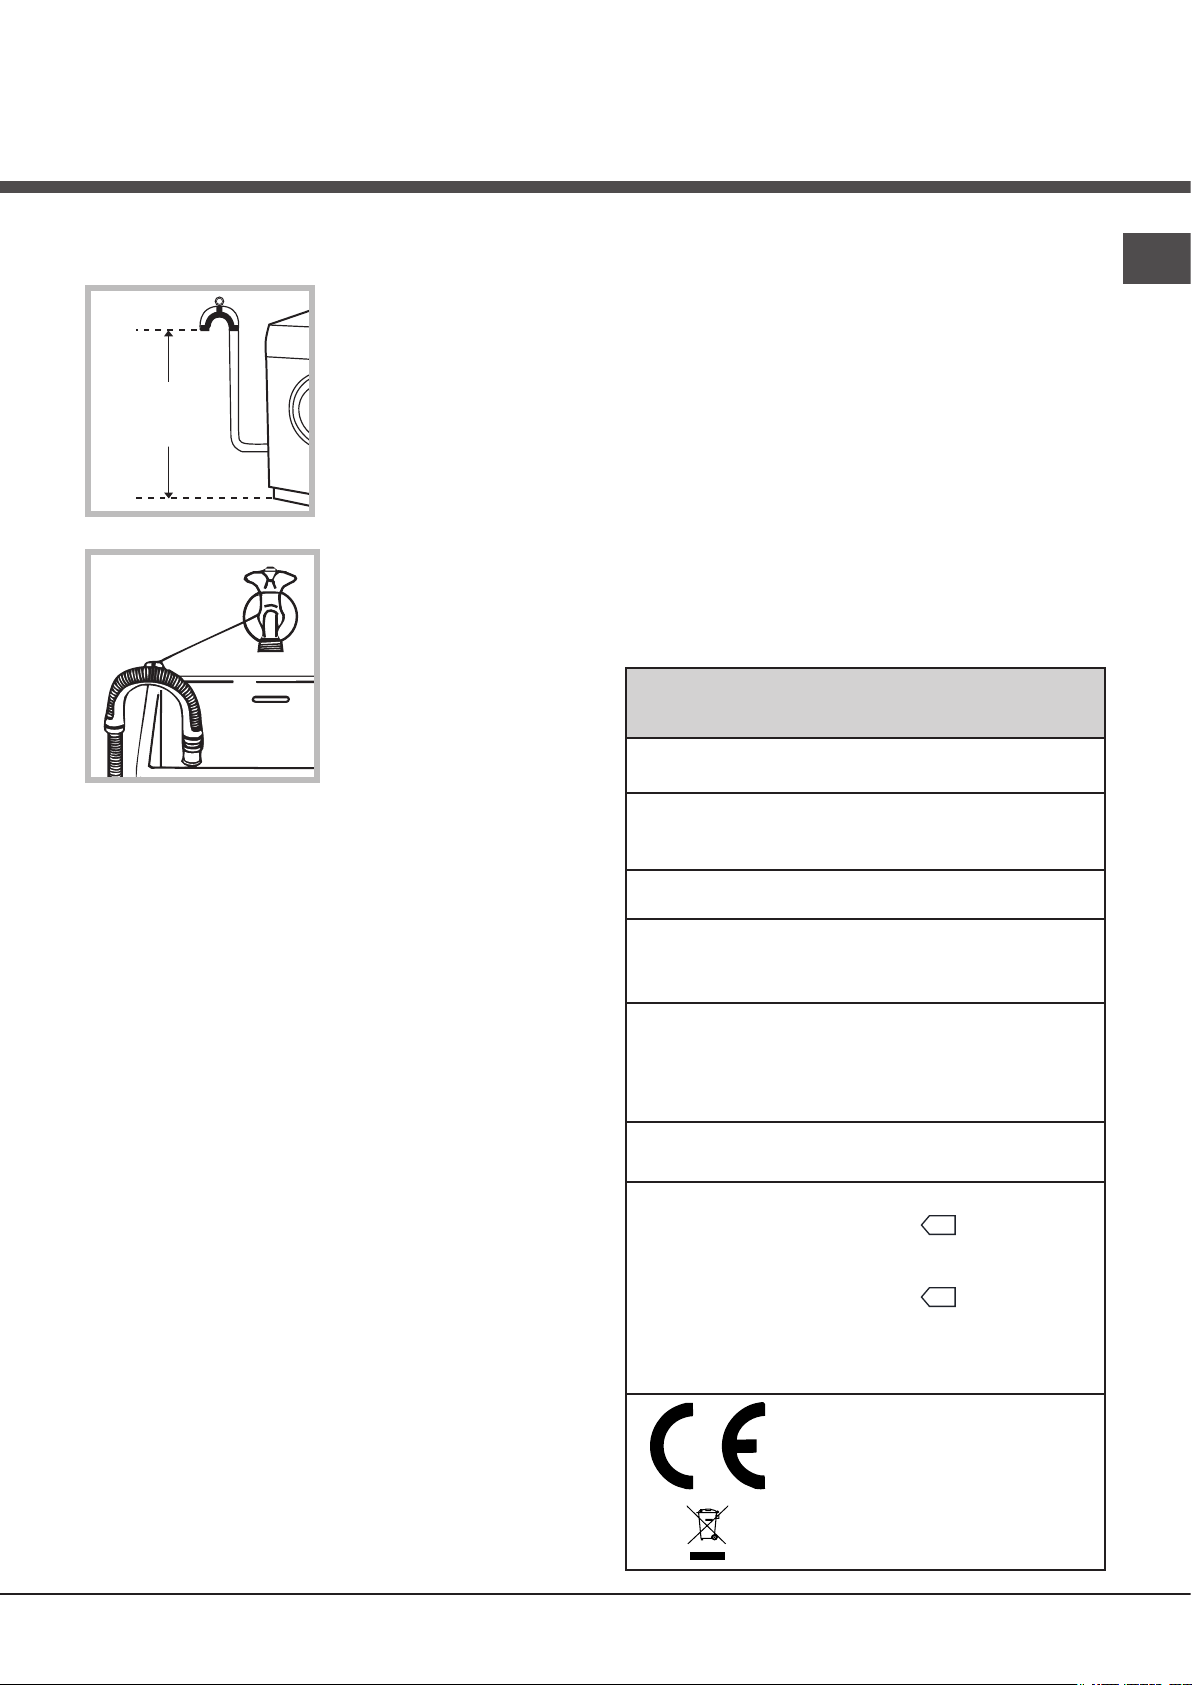
- 2006/95/CE (Bassa Tensione)
Collegamento del tubo di scarico
65 - 100 cm
Collegare il tubo di
scarico, senza piegarlo, a una conduttura di scarico o a
uno scarico a muro
posti tra 65 e 100
cm da terra;
oppure appoggiarlo
al bordo di un lavandino o di una vasca,
legando la guida in
dotazione al
rubinetto (vedi figu-
ra). L’estremità libera
del tubo di scarico
non deve rimanere
immersa nell’acqua.
! È sconsigliato usare tubi di prolunga; se indispensabile, la prolunga deve avere lo stesso diametro del tubo originale e non superare
i 150 cm.
! Il cavo di alimentazione deve essere sostituito
solo da tecnici autorizzati.
Attenzione! L’azienda declina ogni responsabilità qualora queste norme non vengano rispettate.
Primo ciclo di lavaggio
Dopo l’installazione, prima dell’uso, effettuare
un ciclo di lavaggio con detersivo e senza biancheria impostando il programma “Auto Pulizia”.
Dati tecnici
Modello
Dimensioni
Capacità
WMSD 723
larghezza cm 59,5
altezza cm 85
profondità cm 43,5
da 1 a 7 kg
I
Collegamento elettrico
Prima di inserire la spina nella presa della
corrente, accertarsi che:
• la presa abbia la messa a terra e sia a nor-
ma di legge;
• la presa sia in grado di sopportare il carico
massimo di potenza della macchina, indicato
nella tabella Dati tecnici (vedi a fianco);
• la tensione di alimentazione sia compresa
nei valori indicati nella tabella Dati tecnici (vedi
a fianco);
• la presa sia compatibile con la spina della
lavabiancheria. In caso contrario sostituire la
presa o la spina.
! La lavabiancheria non va installata all’aperto, nemmeno se lo spazio è riparato, perché
è molto pericoloso lasciarla esposta a pioggia
e temporali.
! A lavabiancheria installata, la presa della
corrente deve essere facilmente raggiungibile.
! Non usare prolunghe e multiple.
! Il cavo non deve subire piegature o com-
pressioni.
Collegamenti elettrici
Collegamenti idrici
Velocità di
centrifuga
Programmi
di controllo
secondo
la direttive
1061/2010
1015/2010
vedi la targhetta caratteristiche tecniche applicata sulla
macchina
pressione massima
1 MPa (10 bar)
pressione minima
0,05 MPa (0,5 bar)
capacità del cesto 48 litri
sino a 1200 giri al minuto
programma
sione del tasto); Cotone Standard
(60°C) (1° pres-
60°C.
programma (40°C) (2° pres-
sione del tasto); Cotone Standard
40°C.
Questa apparecchiatura è
conforme alle seguenti Direttive Comunitarie:
- 2004/108/CE (Compatibilità
Elettromagnetica)
- 2002/96/CE
39
Page 40
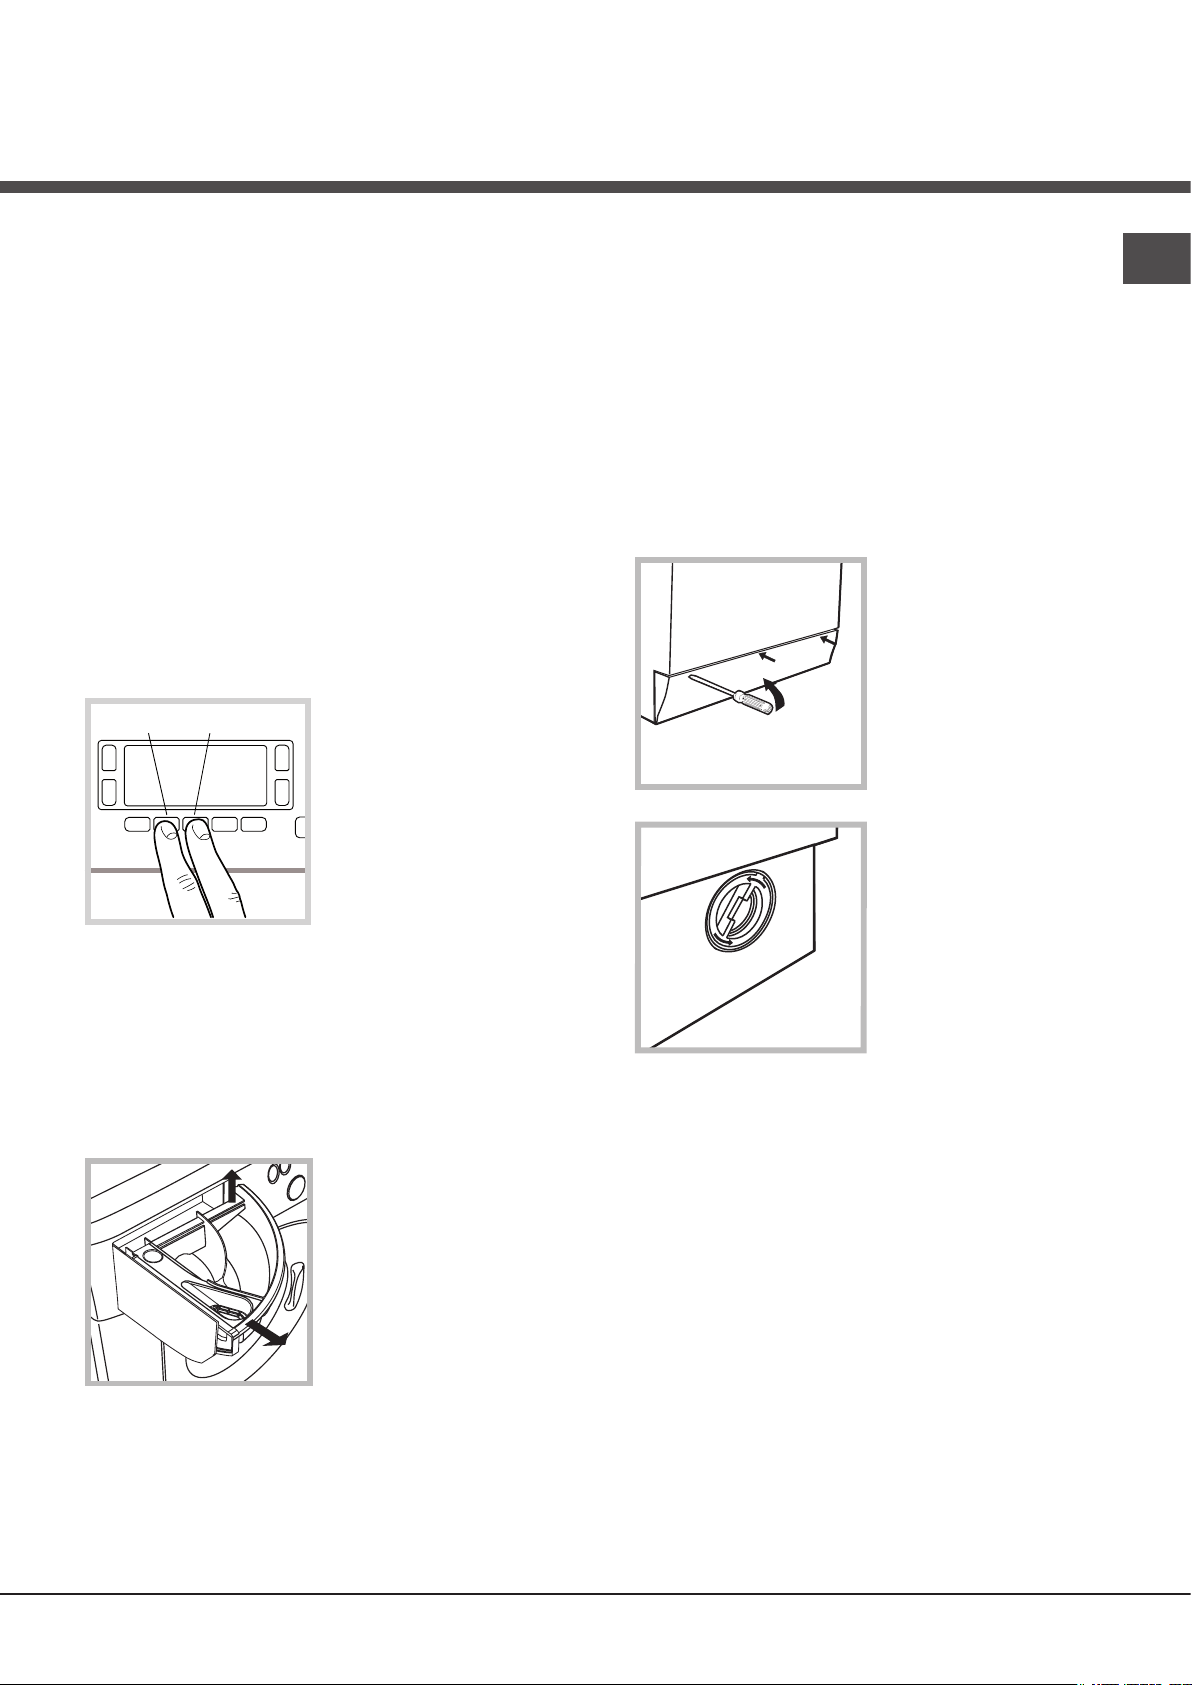
Manutenzione e cura
1
2
Escludere acqua e corrente elettrica
• Chiudere il rubinetto dell’acqua dopo ogni la-
vaggio. Si limita così l’usura dell’impianto idraulico della lavabiancheria e si elimina il pericolo di
perdite.
• Staccare la spina della corrente quando si
pulisce la lavabiancheria e durante i lavori di
manutenzione.
Pulire la lavabiancheria
• La parte esterna e le parti in gomma pos-
sono essere puliti con un panno imbevuto di
acqua tiepida e sapone. Non usare solventi o
abrasivi.
• La lavabiancheria è dotata di un programma
di “Auto Pulizia” delle parti interne che deve
essere effettuato senza alcun tipo di carico
nel cesto.
Il detersivo (nella quan-
A
ogni 40 cicli di lavaggio.
Per attivare il programma premere contemporaneamente il tasto A e B per 5 sec. (vedi figura).
Il programma partirà automaticamente ed avrà
una durata di circa 70 minuti. Per fermare il
ciclo premere il tasto START/PAUSE.
B
tità pari al 10% di quella
consigliata per capi
poco sporchi) o additivi
specifici per la pulizia
della lavabiancheria,
potranno essere utilizzati
come coadiuvanti nel
programma di lavaggio.
Si consiglia di effettuare
il programma di pulizia
Pulire il cassetto dei detersivi
Sfilare il cassetto sollevandolo e tirandolo
verso l’esterno (vedi
figura).
Lavarlo sotto l’acqua
corrente; questa pulizia
va effettuata
frequentemente.
Pulire la pompa
La macchina è dotata di una pompa autopulente che non ha bisogno di manutenzione. Può però succedere che piccoli oggetti
(monete, bottoni) cadano nella precamera
che protegge la pompa, situata nella parte
inferiore di essa.
! Assicurarsi che il ciclo di lavaggio sia terminato e staccare la spina.
Per accedere alla precamera:
1. rimuovere il pannello di copertura sul
lato anteriore della
macchina con l’ausilio di un giravite (vedi
figura);
2. svitare il coperchio ruotandolo in
senso antiorario
(vedi figura): è normale che fuoriesca
un po’ d’acqua;
3. pulire accuratamente l’interno;
4. riavvitare il coperchio;
5. rimontare il pannello assicurandosi, prima
di spingerlo verso la macchina, di aver inserito i ganci nelle apposite asole.
Controllare il tubo di alimentazione dell’acqua
Controllare il tubo di alimentazione almeno
una volta all’anno. Se presenta screpolature e
fessure va sostituito: durante i lavaggi le forti
pressioni potrebbero provocare improvvise
spaccature.
I
Curare oblò e cestello
• Lasciare sempre socchiuso l’oblò per evitare
che si formino cattivi odori.
! Non utilizzare mai tubi già usati.
40
Page 41
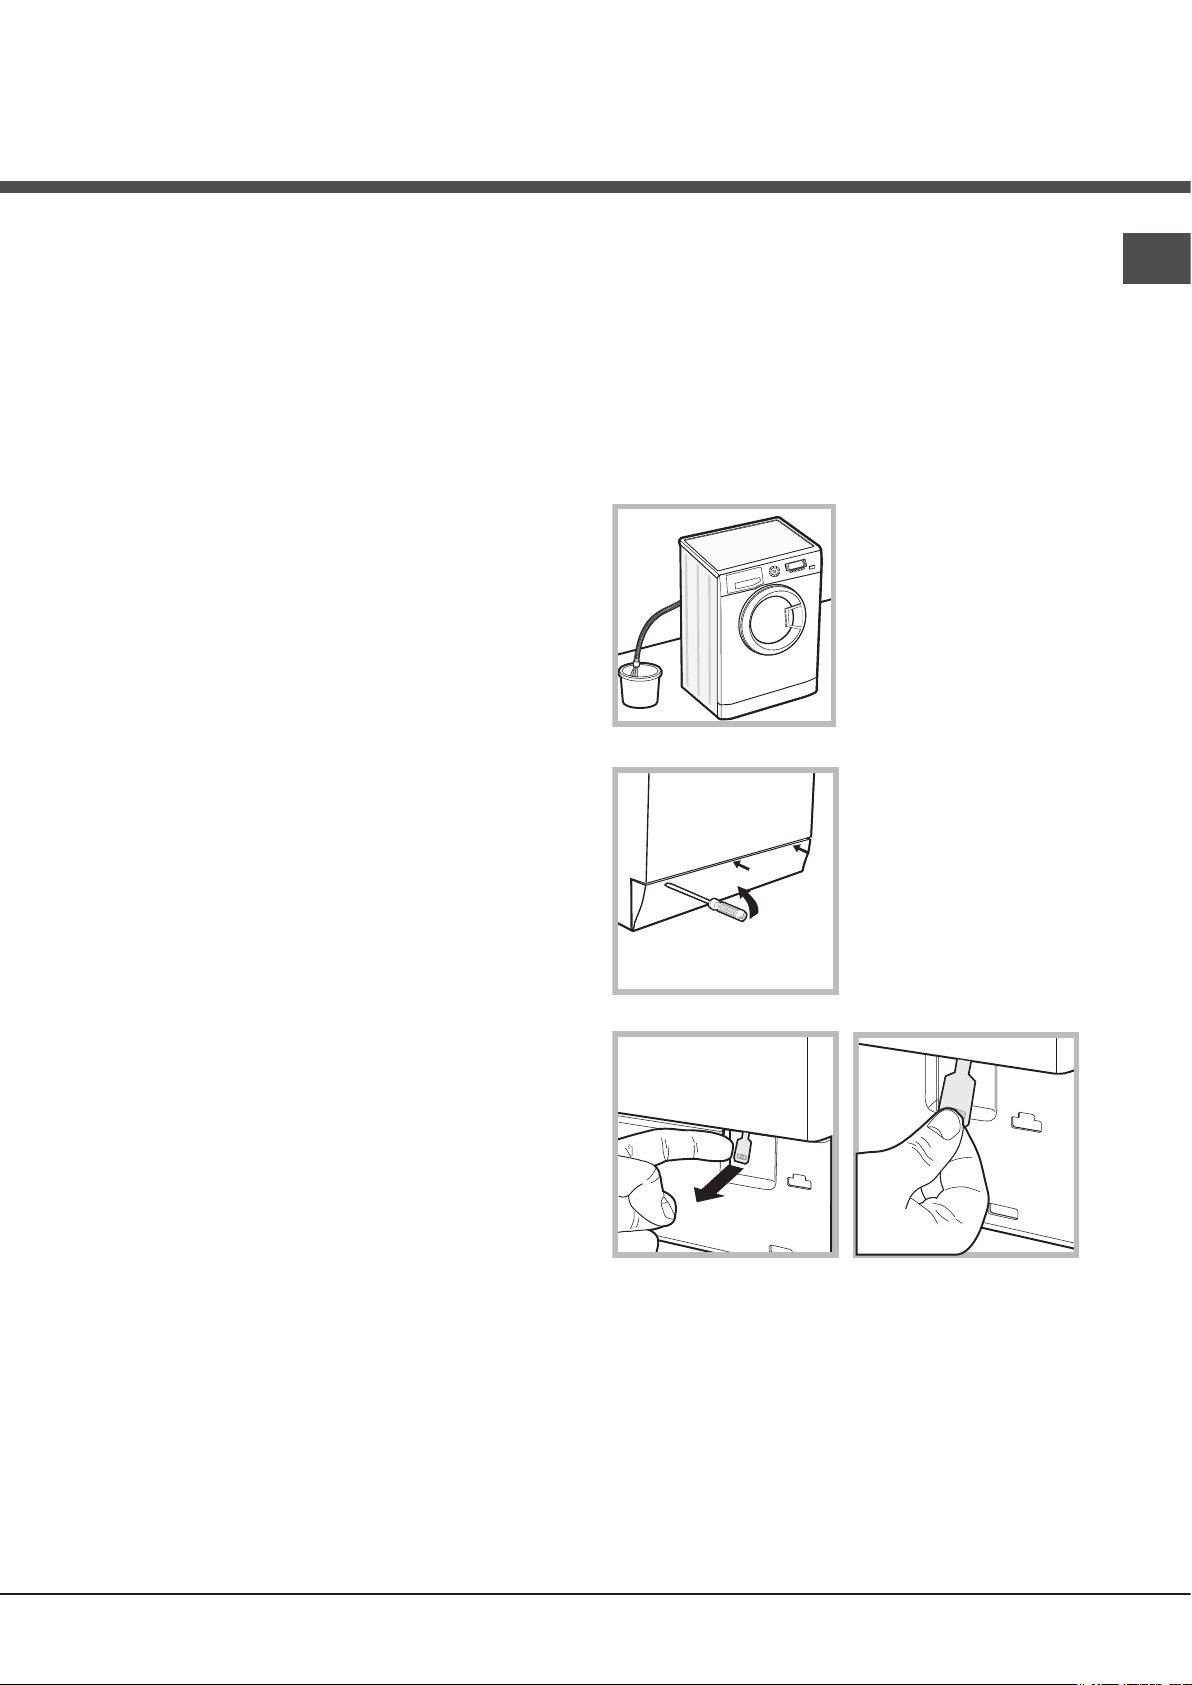
Precauzioni e consigli
20
! La lavabiancheria è stata progettata e costruita in
conformità alle norme internazionali di sicurezza. Queste
avvertenze sono fornite per ragioni di
sicurezza e devono essere lette attentamente.
Sicurezza generale
• Questo apparecchio è stato concepito esclusivamente
per un uso di tipo domestico.
•Questo apparecchio può essere usato da
bambini da 8 anni in su e da persone con
capacità fisiche, sensoriali o mentali ridotte
o con esperienza e conoscenze insufficienti
se sono supervisionati o se hanno ricevuto
adeguata formazione in merito all’uso dell’apparecchio in modo sicuro e capendo i pericoli
connessi. I bambini non devono giocare con
l’apparecchio. Manutenzione e pulizia non
devono essere effettuati dai bambini senza
supervisione.
• Non toccare la macchina a piedi nudi o con le mani o i
piedi bagnati o umidi.
• Non staccare la spina dalla presa della corrente tirando il
cavo, bensì afferrando la spina.
• Non aprire il cassetto dei detersivi mentre la macchina è
in funzione.
• Non toccare l’acqua di scarico, che può raggiungere
temperature elevate.
• Non forzare in nessun caso l’oblò: potrebbe danneggiarsi
il meccanismo di sicurezza che protegge da aperture
accidentali.
• In caso di guasto, in nessun caso accedere ai meccanismi
interni per tentare una riparazione.
• Controllare sempre che i bambini non si avvicinino alla
macchina in funzione.
• Durante il lavaggio l’oblò tende a scaldarsi.
• Se dev’essere spostata, lavorare in due o tre persone con
la massima attenzione. Mai da soli perché la macchina è
molto pesante.
• Prima di introdurre la biancheria controlla che il cestello
sia vuoto.
Il simbolo del cestino barrato è riportato su tutti i prodotti per
ricordare gli obblighi di raccolta separata.
Per ulteriori informazioni, sulla corretta dismissione degli
elettrodomestici, i detentori potranno rivolgersi al servizio
pubblico preposto o ai rivenditori.
Apertura manuale della porta oblò
Nel caso non sia possibile aprire la porta oblò a causa della
mancanza di energia elettrica e volete stendere il bucato,
procedere come segue:
1. togliere la spina dalla presa
di corrente.
2. verificate che il livello
dell’acqua all’interno della
macchina sia inferiore rispetto
all’apertura dell’oblò; in caso
contrario togliere l’acqua in
eccedenza attraverso il tubo
di scarico raccogliendola in un
secchio come indicato in figura.
3. rimuovere il pannello di
copertura sul lato anteriore della
lavabiancheria con l’ausilio di un
giravite (vedi figura).
I
Smaltimento
• Smaltimento del materiale di imballaggio:
attenersi alle norme locali, così gli imballaggi potranno
essere riutilizzati.
• La direttiva Europea 2002/96/CE sui rifiuti di apparecchia-
ture elettriche ed elettroniche, prevede che gli elettrodomestici non debbano essere smaltiti nel normale flusso dei
rifiuti solidi urbani. Gli apparecchi dismessi devono essere
raccolti separatamente per ottimizzare il tasso di recupero
e riciclaggio dei materiali che li compongono ed impedire
potenziali danni per la salute e l’ambiente.
4. utilizzando la linguetta indicata in figura tirare verso
l’esterno fino a liberare il tirante in plastica dal fermo; tirarlo
successivamente verso il basso e contemporaneamente
aprire la porta.
5. rimontare il pannello assicurandosi, prima di spingerlo
verso la macchina, di aver inserito i ganci nelle apposite asole.
41
Page 42

Descrizione della lavabiancheria
Pannello di controllo
I
Cassetto dei detersivi
Cassetto dei detersivi: per caricare detersivi e additivi
(vedi “Detersivi e biancheria”).
Tasto ON/OFF
Tasti
SELETTORE
PROGRAMMI
Tasto
MY
CYCLE
Tasto
TIPO DI
RISCIACQUO
Tasto
PARTENZA
PROGRAMMATA
Tasto TEMPERATURA : premere per ridurre la tem-
peratura; il valore viene indicato nel display.
Tasto
TIPO DI
LAVAGGIO
DISPLAY
Tasti
FUNZIONE
Tasto
CENTRIFUGA
Tasto con spia
START/PAUSE
Tasto
TEMPERATURA
Tasto
BLOCCI
TASTI
Tasto ON/OFF : premere brevemente il tasto per accendere o spegnere la macchina. La spia START/PAUSE che
lampeggia lentamente di colore verde indica che la macchina è accesa. Per spegnere la lavabiancheria durante il lavaggio è necessario tenere premuto il tasto più a lungo, circa 3
sec.; una pressione breve o accidentale non permetterà lo
spegnimento della macchina.
Lo spegnimento della macchina durante un lavaggio in
corso annulla il lavaggio stesso.
Tasti SELETTORE PROGRAMMI: per impostare il programma desiderato (vedi “Tabella dei programmi”).
Tasto MY CYCLE: tenere premuto il tasto per memorizzare
un ciclo e le proprie personalizzazioni preferite. Per richiamare un ciclo precedentemente memorizzato premere il
tasto MY CYCLE.
Tasti FUNZIONE: premere il tasto per selezionare la funzione desiderata. Sul display si illuminerà la spia relativa.
Tasto
TIPO DI LAVAGGIO
l’intensità di lavaggio desiderata.
Tasto
TIPO DI RISCIACQUO
nare il tipo di risciacquo desiderato.
Tasto CENTRIFUGA : premere per ridurre o escludere
del tutto la centrifuga; il valore viene indicato nel display.
: premere per selezionare
: premere per selezio-
Tasto BLOCCO TASTI : per attivare il blocco del
pannello di controllo, tenere premuto il tasto per circa 2
secondi. Il simbolo acceso indica che il pannello di
controllo è bloccato (ad eccezione del tasto ON/OFF). In
questo modo si impediscono modifiche accidentali dei
programmi, soprattutto se in casa ci sono dei bambini.
Per disattivare il blocco del pannello di controllo, tenere
premuto il tasto per circa 2 secondi.
Tasto PARTENZA RITARDATA : premere per impo-
stare una partenza ritardata del programma prescelto; il
ritardo viene indicato nel display.
Tasto con spia START/PAUSE: quando la spia verde lam-
peggia lentamente, premere il tasto per avviare un lavaggio.
A ciclo avviato la spia diventa fissa. Per mettere in pausa il
lavaggio, premere nuovamente il tasto; la spia lampeggerà
con colore arancione. Se il simbolo non è illuminato, si
potrà aprire l’oblò. Per far ripartire il lavaggio dal punto in cui
è stato interrotto, premere nuovamente il tasto.
Modalità di stand by
Questa lavatrice, in conformità alle nuove normative
legate al risparmio energetico, è dotata di un sistema di
autospegnimento (stand by) che entra in funzione dopo
circa 30 minuti nel caso di non utilizzo. Premere brevemente
il tasto ON/OFF e attendere che la macchina si riattivi.
Consumo in off-mode: 0,5 W
Consumo in Left-on: 0,5 W
42
Page 43

Display
I
Z
B
A
X
D
C
E
Y
F
Il display è utile per programmare la macchina e fornisce molteplici informazioni.
Nelle due stringhe superiori A e B vengono visualizzati il programma di lavaggio selezionato, la fase di lavaggio in corso e
tutte le indicazioni relative allo stato d’avanzamento del programma.
Nella stringa C viene visualizzato il tempo residuo alla fine del ciclo di lavaggio in corso e nel caso fosse stata impostata una
PARTENZA RITARDATA, il tempo mancante all’avvio del programma selezionato.
Nell’area D viene visualizzato il valore massimo della velocità della centrifuga che la macchina può effettuare in base al programma impostato; se il programma non prevede la centrifuga l’area resta spenta.
Nell’area E viene visualizzato il valore massimo della temperatura che si può selezionare in base al programma impostato; se il
programma non prevede l’impostazione della temperatura l’area resta spenta.
Le spie F sono relative alle funzioni e si accendono quando la funzione selezionata è compatibile con il programma impostato.
Simbolo Oblò bloccato
Il simbolo acceso indica che l’oblò è bloccato per impedire aperture accidentali. Per evitare danni è necessario attendere che
il simbolo si spenga prima di aprire l’oblò.
N.B.: se è attiva la funzione PARTENZA RITARDATA l’oblo non si può aprire, per aprirlo mettere la macchina in pausa premendo il tasto START/PAUSE.
! Alla prima accensione verrà richiesto di selezionare la lingua ed il display entrerà automaticamente nel menu di selezione lingua.
Per scegliere la lingua desiderata premere i tasti X e Y, per confermare la scelta premere il tasto Z.
Se si vuole cambiare lingua, spegnere la macchina, premere contemporaneamente i tasti X, Y, Z fino a sentire un segnale
acustico, verrà visualizzato di nuovo il menu di selezione lingua.
43
Page 44

Come effettuare un ciclo di
lavaggio
1. ACCENDERE LA MACCHINA. Premere il tasto , sul
I
display comparirà la scritta “ACCENSIONE IN CORSO”; la
spia START/PAUSE lampeggia lentamente di colore verde.
2. CARICARE LA BIANCHERIA. Aprire la porta oblò.
Caricare la biancheria facendo attenzione a non superare
la quantità di carico indicata nella tabella programmi della
pagina seguente.
3. DOSARE IL DETERSIVO. Estrarre il cassetto e versare
il detersivo nelle apposite vaschette come spiegato in
“Detersivi e biancheria”.
4. CHIUDERE L’OBLO’.
5. SCEGLIERE IL PROGRAMMA. Premere uno dei
tasti del SELETTORE PROGRAMMI per selezionare il
programma desiderato; il nome del programma comparirà
sul display; ad esso è associata una temperatura e una
velocità di centrifuga che possono essere modificate. Sul
display comparirà la durata del ciclo.
6. PERSONALIZZARE IL CICLO DI LAVAGGIO. Agire
sugli appositi tasti:
Modificare la temperatura e/o la centrifuga. La
macchina seleziona automaticamente la temperatura e la
centrifuga massime previste per il programma impostato
e non possono pertanto essere aumentate. Premendo il
tasto si riduce progressivamente la temperatura sino
al lavaggio a freddo “OFF”. Premendo il tasto si riduce
progressivamente la centrifuga sino alla sua esclusione
“OFF”. Un’ulteriore pressione dei tasti riporterà i valori al
massimo consentito per il ciclo selezionato.
! Eccezione: selezionando il programma
(1° pressione del tasto) la temperatura può essere portata sino
a 90°.
Impostare una partenza ritardata.
Per impostare la partenza ritardata del programma
prescelto, premere il tasto relativo fino a raggiungere
il tempo di ritardo desiderato. Quando tale opzione è
attiva, sul display si illumina il simbolo . Per rimuovere
la partenza ritardata premere il tasto fino a che sul display
compare la scritta “OFF”.
Impostare l’intensità di lavaggio desiderata.
L’opzione permette di ottimizzare il lavaggio in base
al grado di sporco dei tessuti e all’intensità di lavaggio
desiderata.
Selezionare il programma di lavaggio, il ciclo viene
impostato automaticamente sul livello “Normale”,
ottimizzato per capi mediamente sporchi, (impostazione
non valida per il ciclo “Lana”, che si imposta
automaticamente sul livello “Delicato”).
Per capi molto sporchi premere il tasto fino al
raggiungimento del livello “Lavaggio Intensivo”. Questo
livello garantisce un lavaggio di alte prestazioni grazie
all’utilizzo di una maggiore quantità di acqua nella fase
iniziale del ciclo ed una maggiore movimentazione
meccanica, ed è utile per eliminare le macchie più
resistenti. Può essere utilizzato con o senza candeggina.
Se si desidera effettuare il candeggio inserire la
vaschetta aggiuntiva 4, in dotazione, nella vaschetta 1.
Nel dosare la candeggina non superare il livello “max”
indicato sul perno centrale (vedi figura a pag. 46).
Per capi poco sporchi o per un trattamento più delicato
dei tessuti, premere il tasto fino al raggiungimento
del livello “Delicato”.
(60°C)
Il ciclo ridurrà la movimentazione meccanica per
garantire risultati di lavaggio perfetti per i capi delicati.
Impostare il tipo di risciacquo.
L’opzione consente di selezionare il tipo di
risciacquo desiderato per la massima cura delle
pelli sensibili. Alla prima pressione del tasto viene
impostato il livello “Extra risciacquo” che permette di
selezionare un risciacquo aggiuntivo a quelli standard
del ciclo, per eliminare tutte le tracce di detergente.
Alla seconda pressione del tasto viene impostato il
livello “Pelli Sensibili” che permette di selezionare due
risciacqui aggiuntivi a quelli standard del ciclo ed è
consigliato per le pelli più sensibili. Alla terza pressione
del tasto viene impostato il livello “Anti Allergico” che
permette di selezionare tre risciacqui aggiuntivi a quelli
standard del ciclo, per rimuovere i principali allergeni
come polline, acari, peli del gatto e cane. Premere
nuovamente il tasto per tornare al tipo di risciacquo
“Risciacquo Normale”. Se non è possibile impostare
o modificare la regolazione esistente, sul display verrà
visualizzato “Non permesso”.
Modificare le caratteristiche del ciclo.
• Premere il tasto per attivare la funzione; la spia
corrispondente al pulsante si accenderà.
• Premere nuovamente il tasto per disattivare la
funzione; la spia si spegnerà.
! Se la funzione selezionata non è compatibile con
il programma impostato, la spia lampeggerà e la
funzione non verrà attivata.
! Se la funzione selezionata non è compatibile con
un’altra precedentemente impostata, la spia relativa
alla prima funzione selezionata lampeggerà e verrà
attivata solo la seconda, la spia della funzione attivata
si illuminerà.
! Le funzioni possono variare il carico raccomandato
e/o la durata del ciclo.
7. AVVIARE IL PROGRAMMA. Premere il tasto
START/PAUSE. La spia relativa si illuminerà di
colore verde fisso e l’oblò si bloccherà (simbolo
OBLO’BLOCCATO acceso). Durante il lavaggio,
sul display comparirà il nome della fase in corso. Per
cambiare un programma mentre un ciclo è in corso,
mettere la lavabiancheria in pausa premendo il tasto
START/PAUSE (la spia START/PAUSE lampeggerà
lentamente di colore arancione); selezionare quindi
il ciclo desiderato e premere nuovamente il tasto
START/PAUSE. Per aprire la porta mentre un ciclo è
in corso premere il tasto START/PAUSE; se il simbolo
OBLO’BLOCCATO è spenta sarà possibile aprire
l’oblò. Premere nuovamente il tasto START/PAUSE
per far ripartire il programma dal punto in cui era stato
interrotto.
8. FINE DEL PROGRAMMA. Viene indicata dalla
scritta “FINE CICLO” sul display, quando il simbolo
OBLO’BLOCCATO si spegnerà sarà possibile
aprire l’oblò. Aprire l’oblò, scaricare la biancheria e
spegnere la macchina.
! Se si desidera annullare un ciclo già avviato, premere a
lungo il tasto . Il ciclo verrà interrotto e la macchina si
spegnerà.
44
Page 45

Programmi e funzioni
Tabella dei programmi
Velo-
Descrizione del Programma
Programmi
Antimacchia
Cotone Standard 60° (1) (1° pressione del tasto): bianchi e colorati
resistenti molto sporchi.
Cotone Standard 40° (2) (2° pressione del tasto): bianchi e colorati
delicati poco sporchi.
Cotone Standard 20° (3° pressione del tasto): bianchi e colorati
delicati poco sporchi.
Sintetici Resistenti (1° pressione del tasto): colori resistenti molto sporchi.
Sintetici Resistenti (4) (1° pressione del tasto): colori resistenti molto sporchi.
Sintetici Delicati (2° pressione del tasto): colori delicati poco sporchi.
Rapido 60' (1° pressione del tasto): per rinfrescare rapidamente capi
normalmente (non indicato per lana, seta e capi da lavare a mano).
Rapido 30' (2° pressione del tasto): per rinfrescare rapidamente capi
poco sporchi (non indicato per lana, seta e capi da lavare a mano).
My Cycle (Memo): permette di memorizzare un qualsiasi ciclo di lavaggio.
M
Biancheria 7 giorni: per biancheria da letto e da bagno.
Woolmark Platinum (Lana): per lana, cachemire, ecc.
Delicati
Centrifuga (1° pressione del tasto).
Risciacquo (2° pressione del tasto).
Scarico (3° pressione del tasto).
La durata del ciclo indicata sul display o sul libretto è una stima calcolata in base a condizioni standard. Il tempo effettivo può variare in base a numerosi fattori
quali la temperatura e la pressione dell’acqua in ingresso, la temperatura ambiente, la quantità di detersivo, la quantità ed il tipo di carico, il bilanciamento del
carico, le opzioni aggiuntive selezionate.
1) Programma di controllo secondo la direttiva 1061/2010: impostare il programma
Questo ciclo è adatto per pulire un carico di cotone normalmente sporco ed è il più efficiente in termini di consumo combinato di energia e di acqua, da usare su capi lavabili a 60 °C. La
temperatura effettiva di lavaggio può differire da quella indicata.
2) Programma di controllo secondo la direttiva 1061/2010: impostare il programma 40°C
Questo ciclo è adatto per pulire un carico di cotone normalmente sporco ed è il più efficiente in termini di consumo combinato di energia e di acqua, da usare su capi lavabili a 40°C. La
temperatura effettiva di lavaggio può differire da quella indicata.
3) Alla temperatura di 60° la funzione “Prelavaggio“ non può essere attivata.
Per tutti Test Institutes:
2) Programma cotone lungo: impostare il programma
4) Programma sintetico lungo: impostare il programma a 60°C
40°C
(2° pressione del tasto)
(1° pressione del tasto)
Temp.
max.
(°C)
40° 1200
60°
(Max. 90°)
40° 1200 -
20° 1200 -
60° 800
40° 800
40° 800
60° 1200 -
30° 800 -
60° 1200
40° 800 30° 0 -
cità
max.
(giri al
minu-
to)
1200
- 1200 - - - - 7 - - - 16’
- 1200 - - -
- 0 - - - - 7 - - - 2’
60°C
(1° pressione del tasto)
(2° pressione del tasto)
.
; temperaura di 40°C
Detersivi
gio
Prelavag-
(3)
gina
Candeg-
Lavaggio
-
dente
Ammobi-
-
-
-
-
-
.
.
(premere il tasto TEMPERATURA).
%
Umidità residua
Carico max. (Kg)
gia kWh
Consumo ener-
Acqua
4 - - - 180’
7 53 0,99 57 190’
7 53 1,09 92 175’
7 - - - 175’
3,5 49 0,87 42 90’
3,5 49 0,56 42 85’
3,5 - - - 80’
3,5 53 0,81 36 60’
3 71 0,19 39 30’
7 - - - 135’
1,5 - - - 80’
1 - - - 75’
7 - - - 49’
totale lt
Durata ciclo
I
Funzioni di lavaggio
Prelavaggio
Selezionando questa funzione si effettua il prelavaggio,
utile per rimuovere macchie ostinate.
N.B.: Aggiungere il detersivo nell’apposito scomparto.
! Non è attivabile sui programmi
(40°),
.
Stira facile
Selezionando questa funzione, il lavaggio e la centrifuga
saranno opportunamente modificati per ridurre la
formazione di pieghe.
Al temine del ciclo la lavabiancheria effettuerà delle lente
rotazioni del cestello; la spia della funzione STIRA FACILE
lampeggerà e la scritta “FINE CICLO” apparirà su display.
Per terminare il ciclo si dovrà premere il tasto START/
PAUSE o il tasto STIRA FACILE.
! Non è attivabile sui programmi , “Rapido 30’”, ,
, .
, , , ,
(60°),
Eco wash
La funzione Eco Wash contribuisce al risparmio energetico
non riscaldando l’acqua utilizzata per lavare il bucato – un
vantaggio sia per l’ambiente, sia per la bolletta elettrica.
Infatti, l’azione rafforzata e il consumo ottimizzato dell’acqua
garantiscono ottimi risultati nella stessa durata media di un
ciclo standard.
Per ottenere i migliori risultati di lavaggio, si consiglia l’uso di
un detersivo liquido.
! Non è attivabile sui programmi , , , , , .
45
Page 46

Detersivi e biancheria
M
AX
1
2
4
3
A
B
Cassetto dei detersivi
I
Il buon risultato del lavaggio dipende anche dal corretto
dosaggio del detersivo: eccedendo non si lava in modo più
efficace e si contribuisce a incrostare le parti interne della
lavabiancheria e a inquinare l’ambiente.
! Usare detersivi in polvere per capi in cotone bianchi e per il
prelavaggio e per lavaggi con temperatura superiore a 60°C.
! Seguire le indicazioni riportate sulla confezione di detersivo.
! Non usare detersivi per il lavaggio a mano, perché formano
troppa schiuma.
Estrarre il cassetto dei detersivi e inserire il detersivo o
l’additivo come segue.
vaschetta 1: Detersivo per prelavaggio
(in polvere)
Prima di versare il detersivo verificare che non sia inserita la
veschetta aggiuntiva 4.
vaschetta 2: Detersivo per lavaggio
(in polvere o liquido)
Nel caso di utilizzo di detersivo liquido si consiglia di utilizzare la paretina A in dotazione per un corretto dosaggio.
Per l’utilizzo del detersivo in polvere riporre la paretina nella
cavità B.
vaschetta 3: Additivi (ammorbidente, ecc.)
L’ammorbidente non deve fuoriuscire dalla griglia.
vaschetta aggiuntiva 4: Candeggina
Preparare la biancheria
• Suddividere la biancheria secondo:
- il tipo di tessuto / il simbolo sull’etichetta.
- i colori: separare i capi colorati da quelli bianchi.
• Vuotare le tasche e controllare i bottoni.
• Non superare i valori indicati, riferiti al peso della
biancheria asciutta: vedi “Tabella dei programmi”.
Quanto pesa la biancheria?
1 lenzuolo 400-500 gr.
1 federa 150-200 gr.
1 tovaglia 400-500 gr.
1 accappatoio 900-1200 gr.
1 asciugamano 150-250 gr.
Programmi speciali
Antimacchia: il programma è adatto al lavaggio di
capi molto sporchi, con colori resistenti. Il programma
garantisce una classe di lavaggio superiore alla classe
standard (classe A). Non eseguire il programma mescolando capi di colore diverso. Si consiglia l’utilizzo di
detersivo in polvere. Per macchie ostinate è consigliato il
pretrattamento con additivi specifici.
Cotone Standard 20° : ideale per carichi in cotone
sporchi. Le buone performance anche a freddo, comparabili con un lavaggio a 40°, sono garantite da un’azione
meccanica che lavora con variazione di velocità a picchi
ripetuti e ravvicinati
Biancheria da bagno e da letto: per lavare la biancheria da bagno e da letto in un unico ciclo, utilizzare il
programma che ottimizza l’uso dell’ammorbidente e
ti consente di risparmiare tempo ed energia. Si consiglia
l’utilizzo di detersivo in polvere.
Lana: il ciclo di lavaggio “Lana” di questa lavatrice
Hotpoint-Ariston è stato testato e approvato dalla
Woolmark Company per il lavaggio di capi in lana
classificati come “lavabili a mano”, purché il lavaggio
venga eseguito nel rispetto delle istruzioni riportate
sull’etichetta dell’indumento e delle indicazioni fornite dal
produttore dell’elettrodomestico. Hotpoint-Ariston è la
prima marca di lavatrici ad aver ottenuto dalla Woolmark
Company la certificazione Woolmark Apparel Care Platinum per le sue prestazioni di lavaggio e il consumo di
acqua ed energia.
Delicati: utilizzare il programma per il lavaggio dei capi
molto delicati, che presentano applicazioni quali strass o
paillettes.
Per il lavaggio dei capi in seta e tende, selezionare il ciclo
ed impostare il livello “Delicato” dell’opzione .
Si raccomanda di rovesciare i capi prima del lavaggio e di
inserire gli indumenti piccoli nell’apposito sacchetto per il
lavaggio dei capi delicati.
Per risultati migliori si raccomanda l’utilizzo del detersivo
liquido per capi delicati.
Sistema bilanciamento del carico
Prima di ogni centrifuga, per evitare vibrazioni eccessive
e per distribuire il carico in modo uniforme, il cestello
effettua delle rotazioni ad una velocità leggermente
superiore a quella del lavaggio. Se al termine di ripetuti
tentativi il carico non fosse ancora correttamente
bilanciato la macchina effettua la centrifuga ad una
velocità inferiore a quella prevista.
In presenza di eccessivo sbilanciamento la lavabiancheria
effettua la distribuzione anzichè la centrifuga. Per favorire
una migliore distribuzione del carico e il suo corretto
bilanciamento si consiglia di mescolare capi grandi e
piccoli.
46
Page 47

Anomalie e rimedi
Può accadere che la lavabiancheria non funzioni. Prima di telefonare all’Assistenza (vedi “Assistenza”), controllare che non si
tratti di un problema facilmente risolvibile aiutandosi con il seguente elenco.
Anomalie:
La lavabiancheria
non si accende.
Il ciclo di lavaggio
non inizia.
La lavabiancheria non carica acqua (nel display apparirà la sctitta
“Manca l’acqua, apri il rubinetto”).
La lavabiancheria carica e scarica
acqua di continuo.
Possibili cause / Soluzione:
• La spina non è inserita nella presa della corrente, o non abbastanza
da fare contatto.
• In casa non c’è corrente.
• L’oblò non è ben chiuso.
• Il tasto ON/OFF non è stato premuto.
• Il tasto START/PAUSE non è stato premuto.
• Il rubinetto dell’acqua non è aperto.
• Si è impostato un ritardo sull’ora di avvio (PARTENZA RITARDATA,
vedi “Come effettuare un ciclo di lavaggio”).
• Il tubo di alimentazione dell’acqua non è collegato al rubinetto.
• Il tubo è piegato.
• Il rubinetto dell’acqua non è aperto.
• In casa manca l’acqua.
• Non c’è sufficiente pressione.
• Il tasto START/PAUSE non è stato premuto.
• Il tubo di scarico non è installato fra 65 e 100 cm da terra (vedi “Installazione”).
• L’estremità del tubo di scarico è immersa nell’acqua (vedi “Installazione”).
• Lo scarico a muro non ha lo sfiato d’aria.
Se dopo queste verifiche il problema non si risolve, chiudere il rubinetto dell’acqua, spegnere la lavabiancheria e chiamare l’Assistenza. Se l’abitazione si trova
agli ultimi piani di un edificio, è possibile che si verifichino fenomeni di sifonaggio, per cui la lavabiancheria carica e scarica acqua di continuo. Per eliminare
l’inconveniente sono disponibili in commercio apposite valvole anti-sifonaggio.
I
La lavabiancheria non scarica
o non centrifuga.
La lavabiancheria vibra
molto durante la centrifuga.
La lavabiancheria perde acqua.
La macchina è bloccata, il display
lampeggia e segnala un codice di
anomalia (es.: F-01, F-..).
Si forma troppa schiuma.
• Il programma non prevede lo scarico: con alcuni programmi occorre
avviarlo manualmente.
• È attiva la funzione STIRA FACILE: per completare il programma
premere il tasto START/PAUSE (“Programmi e funzioni”).
• Il tubo di scarico è piegato (vedi “Installazione”).
• La conduttura di scarico è ostruita.
• Il cestello, al momento dell’installazione, non è stato sbloccato
correttamente (vedi “Installazione”).
• La lavabiancheria non è in piano (vedi “Installazione”).
• La lavabiancheria è stretta tra mobili e muro (vedi “Installazione”).
• Il tubo di alimentazione dell’acqua non è ben avvitato (vedi “Installazione”).
• Il cassetto dei detersivi è intasato (per pulirlo vedi “Manutenzione e cura”).
• Il tubo di scarico non è fissato bene (vedi “Installazione”).
• Spegnere la macchina e togliere la spina dalla presa, attendere circa 1
minuto quindi riaccenderla.
Se l’anomalia persiste, chiamare l’Assistenza.
• Il detersivo non è specifico per lavabiancheria (deve esserci la
dicitura “per lavatrice”, “a mano e in lavatrice”, o simili).
• Il dosaggio è stato eccessivo.
47
Page 48
Assistenza
Prima di contattare l’Assistenza:
I
• Verificare se l’anomalia può essere risolta da soli (vedi “Anomalie e rimedi”);
• Riavviare il programma per controllare se l’inconveniente è stato ovviato;
• In caso negativo, contattare il Numero Unico 199.199.199*.
! Non ricorrere mai a tecnici non autorizzati.
Comunicare:
• il tipo di anomalia;
• il modello della macchina (Mod.);
• il numero di serie (S/N);
Queste informazioni si trovano sulla targhetta applicata nella parte posteriore della lavabiancheria e nella parte anteriore
aprendo l’oblò.
Assistenza Attiva 7 giorni su 7
In caso di necessità d’intervento chiamare il Numero Unico Nazionale 199.199.199*.
Un operatore sarà a completa disposizione per fissare un appuntamento con il Centro Assistenza Tecnico
Autorizzato più vicino al luogo da cui si chiama.
È attivo 7 giorni su 7, sabato e domenica compresi, e non lascia mai inascoltata una richiesta.
*
* Al costo di 14,25 centesimi di Euro al minuto (iva inclusa) dal Lun. al Ven. dalle 08:00 alle 18:30, il Sab. dalle 08:00 alle 13:00 e di 5,58 centesimi di
Euro al minuto (iva inclusa) dal Lun. al Ven. dalle 18:30 alle 08:00, il Sab. dalle 13:00 alle 08:00 e i giorni festivi, per chi chiama da telefono fisso.
Per chi chiama da radiomobile le tariffe sono legate al piano tariffario dell’operatore telefonico utilizzato.
Le suddette tariffe potrebbero essere soggette a variazione da parte dell’operatore telefonico; per maggiori informazioni consultare il sito
www.hotpoint-ariston.it.
48
Page 49

Руководство по
эксплуатации
CIS
Русский
WMSD 723
СТИРАЛЬНАЯ МАШИНА
Содержание
Установка 50-51
Распаковка и нивелировка
Подключение к водопроводной и электрической сети
Первый цикл стирки
Технические характеристики
Описание стиральной машины, 52-53
Панель управления
Дисплей
Порядок выполнения цикла стирки, 54
Программы и функции, 55
Таблица программ
Функции стирки
Стиральные вещества и типы белья, 56
Распределитель моющих средств
Подготовка белья
Специальные программы
Система балансировки белья
CIS
Предосторожности и рекомендации, 57
Общие требования к безопасности
Утилизация
Аварийное открытие люка
Техническое обслуживание и уход, 58
Отключение воды и электрического тока
Уход за стиральной машиной
Уход за распределителем моющих средств
Уход за люком и барабаном
Уход за насосом
Проверка водопроводного шланга
Неисправности и методы их устранения, 59
Сервисное обслуживание, 60
49
Page 50
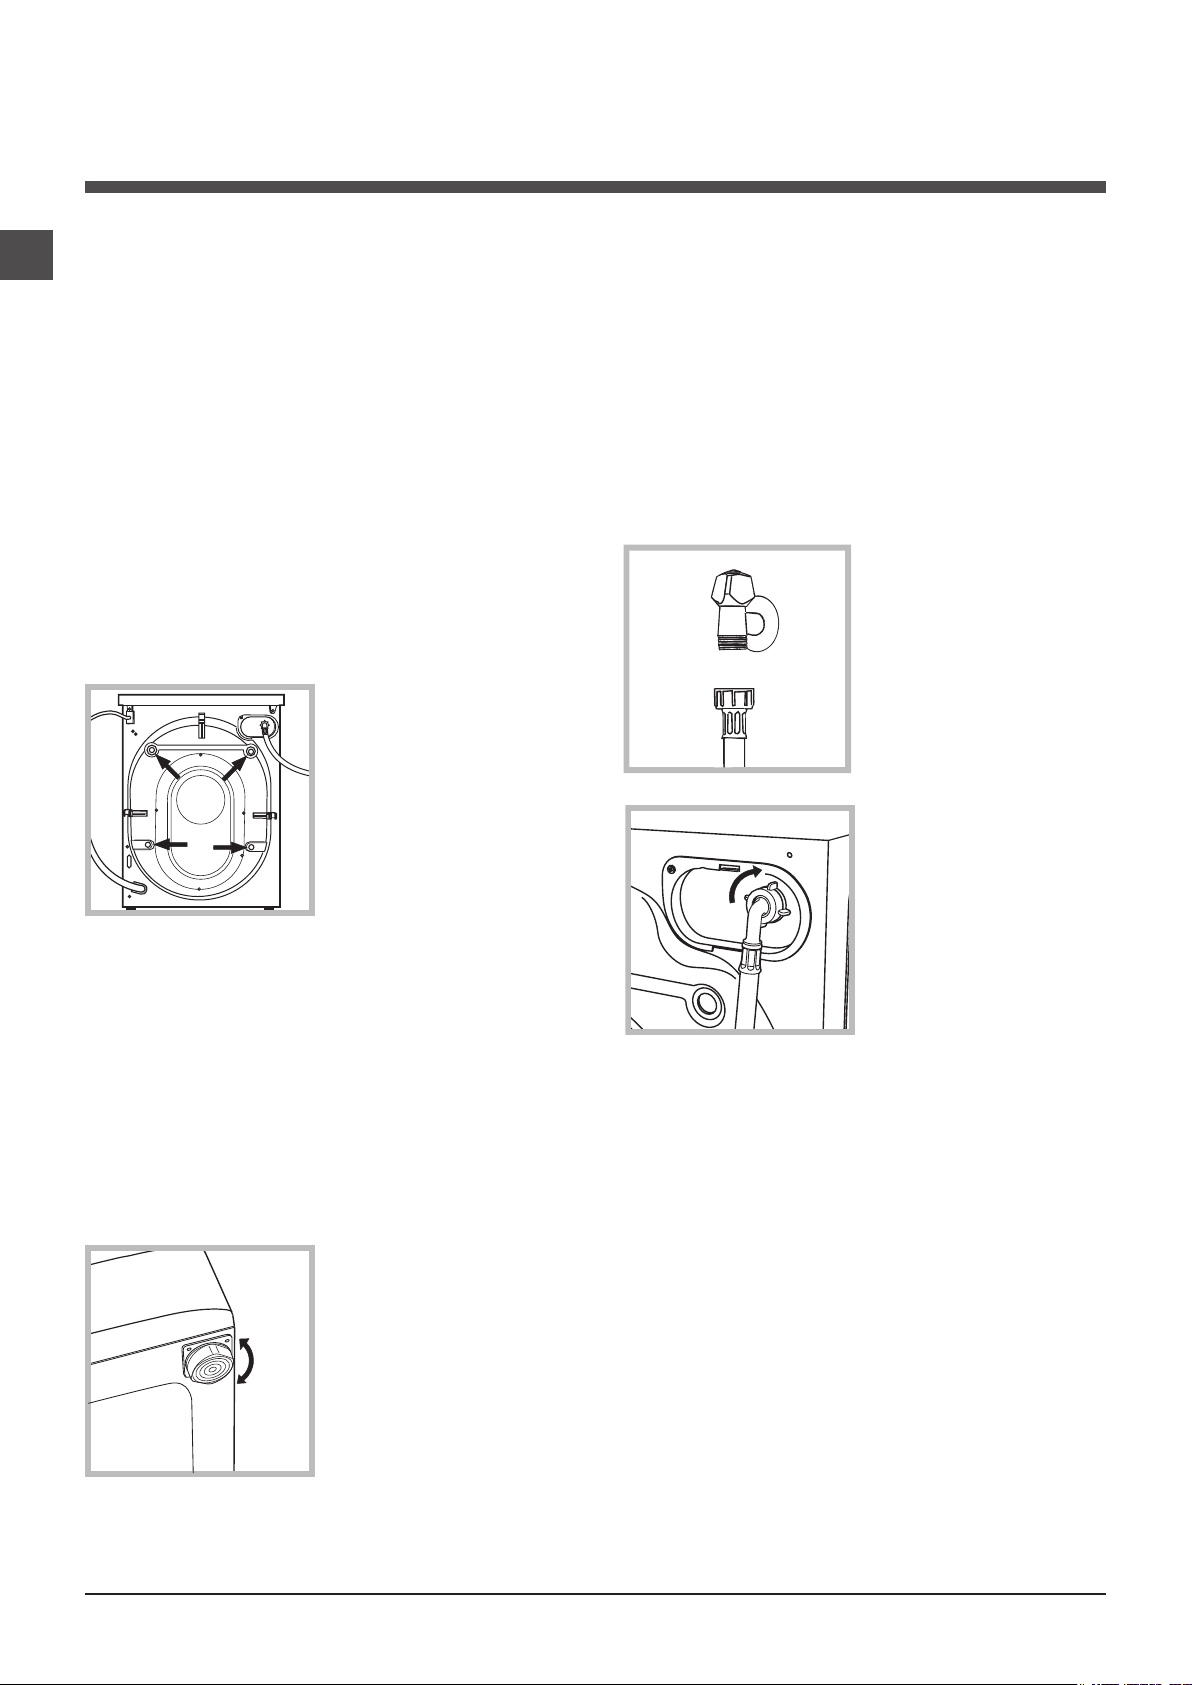
Установка
CIS
! Сохраните данное руководство. Оно должно быть в
комплекте со стиральной машиной в случае продажи,
передачи оборудования или при переезде на новую
квартиру, чтобы новый владелец оборудования мог
ознакомиться с правилами его функционирования и
обслуживания.
! Внимательно прочитайте руководство: в нем
содержатся важные сведения по установке и
безопасной эксплуатации стиральной машины.
Распаковка и выравнивание
Распаковка
1. Распакуйте стиральную машину.
2. Убедитесь, что оборудование не было повреждено
во время транспортировки. При обнаружении
повреждений – не подключайте машину –
свяжитесь с поставщиком немедленно.
3. Удалите четыре
транспортировочных
винта и резиновые
пробки с прокладками,
расположенные в задней
части стиральной
машины (см. рис.).
4. Закройте отверстия прилагающимися
пластиковыми заглушками.
5. Сохраняйте все детали: они Вам понадобятся
при последующей транспортировке стиральной
машины.
! Не разрешайте детям играть с упаковочными
материалами.
Выравнивание
1. Установите стиральную машину на ровном и
прочном полу, так чтобы она не касалась стен,
мебели и прочих предметов.
2. После установки
машины на место
отрегулируйте ее
устойчивое положение
путем вращения
передних ножек (см.
рис.). Для этого сначала
ослабьте контргайку,
после завершения
регулировки контргайку
затяните.
После установки машины на место проверьте по уровню
горизонтальность верхней крышки корпуса, отклонение
горизонтали должно быть не более 2°.
Правильное выравнивание оборудования поможет
избежать шума, вибраций и смещений во время работы
машины.
Если стиральная машина стоит на полу, покрытом
ковром, убедитесь, что ее основание возвышается
над ковром. В противном случае вентиляция будет
затруднена или вовсе невозможна.
Подключение к водопроводной и
электрической сети
Подсоединение заливного шланга
1. Прикрутите шланг
подачи к крану холодной
воды с резьбовым
отверстием 3/4 газ (см.
схему).
Перед подсоединением
откройте водопроводный
кран до тех пор, пока из
него не потечет чистая
вода.
2. Подсоедините
заливной шланг к
стиральной машине,
навинтив его на
водоприемник,
расположенный в задней
верхней части справа
(см. рис.).
3. Убедитесь, что шланг не перекручен и не пережат.
! Давление воды должно быть в пределах значений,
указанных в таблице Технических характеристик
(см. с. 3).
! Если длина водопроводного шланга окажется
недостаточной, обратитесь в Авторизованный
cервисный центр.
! Никогда не используйте шланги, бывшие в
употреблении.
50
Page 51

Подсоединение сливного шланга
65 - 100
CM
минимальное давление 0,05 МПа (0,5 бар)
Подсоедините сливной
шланг, не перегибая его,
к сливной трубе или к
настенному сливному
отверстию, распложенному
на высоте от 65 до 100 см
от пола,
Внимание! Фирма снимает с себя всякую ответственность
в случае несоблюдения вышеописанных правил.
Первый цикл стирки
По завершении установки, перед началом эксплуатации
необходимо произвести один цикл стирки со стиральным
порошком, но без белья, по программе «АВТООЧИСТКА».
CIS
Или поместите шланг
в раковину или в ванну,
закрепив прилагающуюся
направляющую к крану (см.
схему). Свободный конец
сливного шланга не должен
быть погружен в воду.
! Не рекомендуется использовать удлинители для
сливного шланга. При необходимости удлинение
должно иметь такой же диаметр, что и оригинальный
шланг, и его длина не должна превышать 150 см.
Подключение к электросети
Перед включением изделия в розетку электросети
необходимо проверить следующее:
• заземляющий контакт двухполюсной розетки
должен быть соединён с заземлением и
соответствовать нормативам;
• розетка электросети должна быть расчитана на
максимальную мощность стиральной машины,
указанную в таблице Технические данные (см.
таблицу сбоку);
• напряжение электросети должно соответствовать
значениям, указанным в таблице Технические
данные (см. таблицу сбоку);
• электрическая розетка и штепсельная вилка
стиральной машины должны быть одного типа. В
противном случае необходимо заменить розетку.
! Запрещается устанавливать стиральную машину на
улице, даже под навесом, так как опасно подвергать
ее воздействию дождя и грозы.
! Стиральная машина должна быть расположена
таким образом, чтобы доступ к розетке электросети
оставался свободным.
! Не используйте удлинители и тройники.
! Сетевой кабель изделия не должен быть согнут или сжат.
! Замена сетевого кабеля может осуществляться
только уполномоченными сервисными центрами.
Технические данные
Модель WMSD 723
Страна-
изготовитель
Габаритные
размеры
Вместимость от 1 до 7 кг
Номинальное
значение
напряжения
электропитания
или диапазон
напряжения
Условное
обозначение рода
электрического тока
или номинальная
частота
переменного тока
Класс защиты
от поражения
электрическим
током
Водопроводное
подсоединение
Скорость отжима до 1200 оборотов в минуту
Программы
управления в
соответствии с
Директивой
EN 60456
Степень защиты от попадания твердых частиц и влаги,
обеспечиваемая защитной оболочкой, за исключением
низковольтного оборудования, не имеющего защиты от
влаги:
Дату производства
данной техники
можно получить из
серийного номера,
расположенного
под штрих-кодом
(S/N XXXXXXXXX),
следующим
образом
Класс
энергопотребления
IPX04
Италия
ширина 59,5 см.
высота 85 см.
глубина 43,5 см.
220-240 V ~
50 Hz
Класс защиты I
максимальное давление 1 МПа (10 бар)
емкость барабана 48 литра
àà
кнопки) àà
à
Данное изделие соответствует
следующим Директивам Европейского
Сообщества:
- 2004/108/СЕ (Электромагнитная
совместимость);
- 2006/95/CE (Низкое напряжение)
- 2002/96/CE
(40°) (2 нажатие
- 1-ая цифра в S/N соответствует
последней цифре года,
- 2-ая и 3-я цифры в S/N порядковому номеру месяца года,
- 4-ая и 5-ая цифры в S/N - день
A
51
Page 52

Описание стиральной машины
CIS
Панель управления
Ячейка для стирального
вещества
Ячейки для стирального вещества: для загрузки
стиральных веществ и добавок (см. «Стиральные
вещества и типы белья»).
Кнопка ON/OFF
Кнопки
ВЫБОРА
ПРОГРАММ
Кнопка
МOЯ
Программà
Кнопка
ТИП
ПОЛОСКАНИЯ
Кнопка
ЗАДЕРЖКА
ЗАПУСКА
Кнопка ТЕМПЕРАТУРА : нажмите эту кнопку
для уменьшения значения температуры: значение
показывается на дисплее.
Кнопка
ТИП СТИРКИ
Дисплей
Кнопки
ДОПОЛНИТЕ-
ЛЬНЫХ
ФУНКЦИИ
Кнопка
ОТЖИМА
Кнопка с
индикатором
START/PAUSE
Кнопка
ТЕМПЕРАТУРЫ
Кнопка
БЛОКИРОВКА
КНОПОК
Кнопка ON/OFF : быстро нажмите эту кнопку для
включения или выключения машины. Индикатор
START/PAUSE, редко мигающий зеленым цветом,
означает, что машина включена. Для выключения
стиральной машины в процессе стирки необходимо
держать нажатой кнопку, примерно 3 секунды.
Короткое или случайное нажатие не приведет к
отключению машины. В случае выключения машины
в процессе стирки текущий цикл отменяется.
Кнопки ВЫБОРА ПРОГРАММ: служат для выбора
нужной программы (см. «Таблица программ»).
Кнопка МOЯ Программà: держите нажатой эту
кнопку для сохранения цикла и персонализированных
вами программ. Для вызова ранее сохраненного
цикла нажмите кнопку МOЯ Программà.
Кнопки ДОПОЛНИТЕЛЬНЫХ ФУНКЦИЙ: нажмите
кнопку для выбора нужной вам функции. На дисплее
загорится соответствующий индикатор.
Кнопка
желаемую интенсивность стирки.
Кнопка
нужного режима ополаскивания.
Кнопка ОТЖИМ : нажмите эту кнопку для
сокращения скорости или полного исключения
отжима – значение показывается на дисплее.
ТИП СТИРКИ
ТИП ПОЛОСКАНИЯ
: нажать, чтобы выбрать
: нажать для выбора
Кнопка БЛОКИРОВКА КНОПОК : для включения
блокировки консоли управления держите кнопку
нажатой примерно 2 секунды. Включенный
символ означает, что консоль управления
заблокирована. Таким образом, программа не может
быть случайно изменена, особенно если в доме дети.
Для отключения блокировки консоли управления
держите кнопку нажатой примерно 2 секунды.
Кнопка
для программирования времени задержки
пуска выбранной программы. Время задержки
показывается на дисплее.
Кнопка с индикатором START/PAUSE: когда зеленый
индикатор редко мигает, нажмите кнопку для
запуска цикла стирки. После пуска цикла индикатор
перестает мигать. Для прерывания стирки вновь
нажмите эту кнопку; индикатор замигает оранжевым
цветом. Если символ не горит, можно открыть люк
машины. Для возобновления стирки с момента, когда
она была прервана, вновь нажмите эту кнопку.
Режим ожидания
Настоящая стиральная машина отвечает
требованиям новых нормативов по экономии
электроэнергии, укомплектована системой
автоматического отключения (режим сохранения
энергии), включающейся через 30 минут простоя
машины. Нажмите один раз кнопку ON/OFF. и
подождите, пока машина вновь включится.
ЗАДЕРЖКА ЗАПУСКА
: нажмите
52
Page 53

Дисплей
Z
B
A
CIS
X
D
C
E
Y
F
Дисплей служит для программирования машины и предоставляет пользователю множество сведений.
На двух верхних строках А и В показываются выбранная программа стирки, текущая фаза стирки и все сведения
о выполнении программы.
На строке С показывается время, остающееся до конца текущего цикла стирки и, если был задан ЗАДЕРЖКА
ЗАПУСКА, время, остающееся до запуска выбранной программы.
На строке D показывается максимальное значение скорости отжима, который машина может выполнить в
зависимости от выбранной программы; если выбранная программа не предусматривает отжим, данная строка не
включается.
На строке Е показывается максимальное значение температуры, которое можно выбрать в зависимости от
выбранной программы; если выбранная программа не предусматривает настройку температуры, данная строка
не включается.
Индикаторы F относятся к функциям и загораются, когда выбранная функция является совместимой с заданной
программой.
Символ заблокированного люка
Включенный символ означает, что люк заблокирован во избежание его случайного открывания. Во избежание
повреждений, перед тем как открыть люк, необходимо дождаться, пока погаснет символ.
ПРИМЕЧАНИЕ: если включена функция ЗАПУСК С ЗАДЕРЖКОЙ, люк открыть нельзя. Для этого необходимо
переключить машину в режим паузы при помощи кнопки START/PAUSE.
! При первом включении машины потребуется выбрать язык, и дисплей автоматически покажет страницу меню
выбора языка.
Для выбора нужного языка нажмите кнопки X и Y, для подтверждения выбора нажмите кнопку Z.
Если требуется сменить язык, выключите машину, нажмите одновременно кнопки X, Y, Z подождите до звукового
сигнала, откроется меню выбора языка.
53
Page 54

Порядок выполнения цикла
стирки
CIS
1. ПОРЯДОК ВКЛЮЧЕНИЯ МАШИНЫ. Нажмите кнопку
, на дисплее появится надпись “ВКЛ.”. Индикатор START/
PAUSE редко мигает зеленым цветом.
2. ПОРЯДО К ЗАГ РУЗ КИ БЕ ЛЬЯ. От крой те л юк
машины. Загрузите в барабан белье, не превышая
максимальный допустимый вес, указанный в таблице
программ на следующей странице.
3. ДОЗИРОВКА М ОЮЩЕГО СРЕДСТ ВА. В ыньте
распределитель и засыпьте моющее средство в
специальные ячейки, как описано в разделе
«Стиральные вещества и типы белья».
4. ЗАКРОЙТЕ ЛЮК.
5. ВЫБОР ПРОГРАММ. Нажмите одну из кнопок
ВЫБОРА ПРОГРАММ для выбора нужной программы.
Название программы появится на дисплее. Вместе с
программой будет показана температура и скорость
отжима, которые могут быть изменены. На дисплее
показывается продолжительность данного цикла.
6. ПЕРСОНАЛИЗАЦИЯ ЦИКЛА СТИРКИ. Нажмите
соответствующие кнопки:
Порядок изменения температуры и/или скорости
отжима. Машина автоматически устанавливает
максимальные температуру и скорость от жима,
допустимые для выбранной программы, следовательно,
эти значения не могут быть увеличены. При помощи
кнопки можно постепенно уменьшить температуру
вплоть до стирки в холодной воде “OFF”. При помощи
кнопки можно постепенно уменьшить скорость отжима
вплоть до его исключения “OFF”. При еще одном нажатии
этих кнопок вернутся максимальные допустимые
значения.
! Исключение: при выборе программы (60°)
(1 нажатие кнопки) температура может быть
увеличена до 90°.
Программирование задержка
Для программирования задержки пуска выбранной
программы нажмите соответствующую кнопку вплоть до
получения нужного значения задержки. Когда включена
функция задержки, на дисплее загорается символ .
Для отмены задержки пуска нажмите кнопку вплоть до
появления на дисплее надписи OFF.
Как задать нужную интенсивность стирки.
Кнопка позволяет оптимизировать стирку в
зависимости от степени загрязнения белья и нужной
интенсивности стирки.
Выберите программу стирки, цикл автоматически
выбирает режим «НОРМАЛЬНАЯ», оптимизированный
для менее загрязненного белья (выбор недействителен
для цикла «Шерсть», который автоматически выбирает
режим «ДЕЛИКАТНАЯ»).
Для очень грязного белья нажмите кнопку
вплоть до нахождения режима “СУПЕРСТИРКА”.
Этот режим обеспечивает высок оэффективную
стирку благодаря использованию большего объема
воды в начальной фазе цикла и более интенсивного
механического движения, а также служит для удаления
трудновыводимых пятен. Может использоваться как
с отбеливателем, так и без него. При использовании
отбеливателя вставьте дополнительный прилагающийся
дозатор 4 в дозатор 1. Не превышайте “маx.” уровень,
указанный на стержне в центре (см. схему на стр. 56).
Для белья с незначительным загрязнением или для
более деликатной стирки белья нажмите кнопку
зап
уска.
вплоть до выбора режима «ДЕЛИКАТНАЯ».
Цик л со кращает меха ническо е де йствие для
обеспечения отличных результатов стирки деликатного
белья.
Как задать режим ополаскивания.
Дополнительная функция позволяет выбрать
нужный режим полоскания для чувствительной
кожи. При первом нажатии кнопки задается режим
«ДОП. ПОЛОСКАНИЕ», позволяющий выбрать
дополнительное полоскание помимо стандартного
цикла полоскания, для удаления всех остатков
стирального вещества. В зависимости от нажатия
кнопки задается режим «ЧУВСТВИТЕЛЬНАЯ КОЖА»,
позволяющий выбрать два дополнительных режима
полоскания помимо стандартного цикла полоскания,
что рекомендуется для наиболее чувствительной
кожи. При третьем нажатии на кнопку задается режим
«АНТИ - АЛЛЕРГИИЯ», позволяющий выбрать
три дополнительных режима полоскания помимо
стандартного цикла полоскания, для удаления
основных аллергенов - пыльцы, чесоточных клещей,
собачьей или кошачьей шерсти. Вновь нажмите кнопку
для возврата к “ПОЛОСКАНИЕ» режиму полоскания.
Если невозможно задать или изменить данную
настройку, на дисплее отображается «ОТКЛЮЧЕНО».
Изменение параметров цикла.
• Нажмите кнопку для включения функции; загорится
индикатор соответствующей кнопки.
• Вновь нажмите кнопку для отключения функции;
индикатор погаснет.
! Если выбранная функция является несовместимой с
заданной программой, индикатор будет мигать, и такая
функция не будет включена.
! Если выбранная функция является несовместимой
с другой, ранее заданной дополнительной функцией,
будет мигать индикатор первой выбранной функции,
и будет включена только вторая дополнительная
функция, индикатор включенной функции загорится.
! Допол н ител ьные функции м о гут изме н ить
р е к о м ен д у ем у ю з а гр у з к у м а ш и н ы и / ил и
продолжительность цикла.
7. ПУСК ПРОГРАММЫ. Нажмите кнопку START/PAUSE:
Соответствующий индикатор загорится зеленым светом,
и люк заблокируется (символ ЛЮК ЗАБЛОКИРОВАН
загорится). В процессе стирки на дисплее показывается
название текущей фазы. Для изменения программы
в процессе выполнения цикла переключите машину
в режим паузы при помощи кнопки START/PAUSE
(индикатор START/PAUSE редко мигает оранжевым
цветом). Затем выберите новый цикл и вновь нажмите
кнопку START/PAUSE. Если требуется открыть люк
после пуска цикла, нажмите кнопку START/PAUSE. Когда
погаснет индикатор, ЛЮК ЗАБЛОКИРОВАН , можно
открыть люк. Вновь нажмите кнопку START/PAUSE для
возобновления программы с момента, в который она
была прервана.
8. ЗАВЕ Р ШЕНИЕ П РОГРАММ Ы . Показы вает ся
сообщением на дисплее «КОНЕЦ ЦИКЛА». После
того, как погаснет символ ЛЮК ЗАБЛОКИРОВАН
, можно будет открыть люк. Откройте люк, выгрузите
белье и выключите машину.
! Для отмены уже запущенного цикла нажмите на несколько
секунд кнопку . Цикл прервется и машина выключится.
54
Page 55

Программы и функции
Таблица программ
à à
à à
Программы
УДАЛЕНИЕ ПЯТЕН
ХЛОПОК (1 нажатие кнопки): à
ХЛОПОК (2 нажатие кнопки) (1): à à
ХЛОПОК ( нажатие кнопки): à à
СИНТЕТИКА (1 нажатие кнопки): à
СИНТЕТИКА (2 нажатие кнопки): àà
БЫСТРАЯ СТИРКА 60' (1 нажатие кнопки):
àзภà
БЫСТРАЯ СТИРКА 30’ (2 нажатие кнопки):
àзภà
МOЯ Программà: Позволяет ввести в память машины любую программу стирки.
M
ПОСТЕЛЬНОЕ БЕЛЬЕ
ШЕРСТЬ àà
ДЕЛИКАТНАЯ СТИРКА
ОТЖИМ (1 нажатие кнопки)
ПОЛОСКАНИЕ (2 нажатие кнопки)
СЛИВ ( нажатие кнопки)
Продолжительность цикла, показанная на дисплее или указанная в инструкциях является рассчетом, сделанным на основании стандартных условий. Фактическая продолжительность
может варьировать в зависимости от многочисленных факторов таких как температура и давление воды на подаче, температура помещения, количество моющего средства, количество
и тип загруженного белья, балансировка белья, выбранные дополнительные функции.
à
40° 1200
60°
(Max. 90°)
40°
(Max. 60°)
20° 1200 -
60° 800
40° 800
60° 1200 -
30° 800 -
60° 1200
40° 800 -
30° 0 -
- 1200 - - - - 7
- 1200 - - -
- 0 - - - - 7
à
1200
1200 -
à
à
à
(2)
à
-
-
-
-
-
-
à
à
à
4
7
7
7
3,5
3,5
3,5
3
7
1,5
1
7
à àà
дисплею.
Продолжительность программ стирки можно проверять по
CIS
à
Для всех институтов тестирования:
1) Программы управления в соответствии с Директивой EN 60456: задайте программу (40°) (2 нажатие кнопки); температурой 60°C.
2) При температуре 60°C нельзя включить функцию “Предварительная стирка”.
Функции стирки
Предварительная стирка
При выборе данной функции производится
предварительная стирка, способствующая удалению
наиболее трудновыводимых пятен.
ПРИМЕЧАНИЕ: Поместите стиральный порошок в
специальную ячейку.
! Функция не может быть включена с программами
, , , ,
(60°), (40°),
.
Eco wash
Функция Eco Wash позволяет экономить энергию за
счет отсутствия необходимости подогрева воды для
стирки белья – неоценимого преимущества как для
окружающей среды, так и для счета за электроэнергию.
Действительно, усиленное действие и оптимальное
потребление воды гарантируют отличный результат за ту
же продолжительность стандартного цикла.
Для более эффективной стирки рекомендуется
использовать жидкое моющее средство
! Функция не может быть включена с программами
Легкая глажка
При выборе этой функции циклы стирки и отжима
, , , , , .
изменяются таким образом, чтобы сократить
сминаемость белья. По завершении цикла машина
производит медленное вращение барабана. Индикатор
функции ЛЕГКАЯ ГЛАЖКА загорается редко мигает. Для
завершения цикла нажмите кнопку START/PAUSE или
кнопку ЛЕГКАЯ ГЛАЖКА.
! Функция не может быть включена с программами
, “БЫСТРАЯ СТИРКА 30’”, , , .
55
Page 56

Стиральные вещества
M
AX
1
2
4
3
A
B
и типы белья
CIS
Распределитель моющих средств
Хороший результат стирки зависит также от
правильной дозировки стирального вещества:
избыток стирального вещества не гарантирует
более эффективную стирку, напротив, способствует
образованию налетов внутри стиральной машины и
загрязнению окружающей среды.
! Не используйте моющие средства для ручной
стирки, так как они образуют слишком много пены.
Выньте распределитель
и поместите в него
моющее средство или
добавку в следующем
порядке.
Oтделение 1: моющее средство для
предварительной стирки (порошок)
Перед засыпкой стирального порошка убедитесь, что
отделение 4 для отбеливателя в н¸м нe установлено.
Oтделение 2: моющее средство для стирки
(порошок или жидкое)
В случае использования жидкого стирального
вещества рекомендуется использовать
прилагающийся дозатор А для правильной
дозировки. Для использования стирального порошка
вставьте дозатор в нишу В.
Oтделение 3: добавки (ополаскиватель и т.д.)
Не наливайте ополаскиватель выше решетки отделения.
Дополнительное отделение 4: oтбеливатель
Подготовка белья
• Разделите белье по следующим признакам:
- тип ткани / обозначения на этикетке.
- цвет: отделите цветное белье от белого.
• Выньте из карманов все предметы и проверьте пуговицы.
• Не превышайте значения, указанные в «Таблице
программ», указывающие вес сухого белья:
Сколько весит белье?
1 простыня 400-500 гр.
1 наволочка 150-200 гр.
1 скатерть 400-500 гр.
1 халат 900-1200 гр.
1 полотенце 150-250 гр.
Специальные программы
Удаление пятен: программа для стирки очень
грязного белья . Программа обеспечивает уровень
стирки выше стандартного (уровень А). Не пользуйтесь
этой программой, при стирке белья разных цветов.
Рекомендуется использовать стиральный порошок. Для
трудновыводимых пятен рекомендуется обработать их
специальными добавками.
ХЛОПОК : стандартная программа идеально
подходит для стирки х/б белья со средним
загрязнением. Отличные результаты получаются
также при стирке в холодной воде, сравнимые со
стиркой при 40°, обеспечиваются механическим
действием с разной скоростью с повторяющимися
частыми пиками.
Постельное белье и полотенца: для стирки
банного и постельного белья по единой программе
используйте программу , оптимизирующую
использование ополаскивателя и позволяющей
сэкономить время и электроэнергию. Рекомендуется
использовать стиральный порошок.
Шерсть: Цикл стирки “Шерсть» данной стиральной
машины Hotpoint-Ariston прошел тестирование и был
подтвержден Компанией Woolmark Company для
стирки шерстяных изделий, классифицированных
как «для ручной стирки» с тем, чтобы стирка
выполнялась в соответствии с инструкциями на
этикетке вещи и инструкциями, прилагаемыми
изготовителем бытового электроприбора. HotpointAriston – это первая марка стиральных машин,
получившая от Woolmark Company сертификацию
Woolmark Apparel Care - Platinum за качество стирки
и за экономный расход воды и электроэнергии.
ДЕЛИКАТНАЯ СТИРКА: используйте программу
для стирки очень деликатного белья со стразами или
блестками.
Для стирки шелковых изделий и занавесок
выберите цикл и задайте в режиме
«ДЕЛИКАТНАЯ» дополнительную функцию .
Рекомендуется вывернуть наизнанку белье перед
стиркой и поместить мелкое белье в специальный
мешочек для стирки деликатного белья.
Для оптимизации результатов рекомендуется
использовать жидкое стиральное вещество для
деликатного белья.
Система балансировки белья
Перед каждым отжимом во избежание чрезмерных
вибраций и для равномерного распределения белья в
барабане машина производит вращения со скоростью,
слегка превышающей скорость стирки. Если после
нескольких попыток белье не будет правильно
сбалансировано, машина произведет отжим на
меньшей скорости по сравнению с предусмотренной.
56
Page 57

Предосторожности и
20
рекомендации
! Стиральная машина спроектирована и изготовлена
в соответствии с международными нормативами по
безопасности. Необходимо внимательно прочитать
настоящие предупреждения, составленные в целях
вашей безопасности.
Общие требования к безопасности
• После использования машины обязательно
отключайте ее от сети переменного тока и
закрывайте водопроводный кран.
• Данное изделие предназначено исключительно для
домашнего использования.
• Не разрешайте пользоваться машиной лицам
(включая детей) с ограниченными физическими,
сенсорными, умственными способностями и не
обладающих достаточными знаниями и опытом,
если только они не пользуются машиной под
наблюдением и после инструктажа со стороны лиц,
ответственных за их безопасность. Не разрешайте
детям играть с машиной.
• Стиральной машиной должны пользоваться
только взрослые лица, соблюдающие инструкции,
приведенные в данном техническом руководстве.
• Не прикасайтесь к изделию влажными руками,
босиком или во влажной одежде.
• Не тяните за сетевой кабель для отсоединения
изделия из электро розетки, возьмитесь за вилку
рукой.
• Не открывайте распределитель порошка в процессе
стирки.
• Избегайте контактов со сливаемой водой, так как
она может быть очень горячей.
• Категорически запрещается открывать люк силой:
это может привести к повреждению защитного
механизма, предохраняющего от случайного
открытия машины.
• В случае неисправности категорически
запрещается открывать внутренние механизмы
изделия с целью их самостоятельного ремонта.
• Избегайте контактов детей с работающей
стиральной машиной.
• В процессе стирки люк стиральной машины может
нагреться.
• При необходимости переместить стиральную
машину следует выполнять эту операцию вдвоем
или втроем с предельной осторожностью. Никогда
не перемещайте машину в одиночку, так как
машина очень тяжелая.
• Перед загрузкой в стиральную машину белья
проверьте, чтобы барабан был пуст.
должны собираться отдельно для оптимизации
их утилизации и рекуперации составляющих их
материалов, а также для безопасности окружающей
среды и здоровья. Символ зачеркнутая мусорная
корзинка, имеющийся на всех приборах, служит
напоминанием об их отдельной утилизации.
За более подробной информацией о правильной
утилизации бытовых электроприборов
пользователи могут обратиться в специальную
государственную организацию или в магазин.
Аварийное открытие люка
Если по причине отключения электроэнергии
невозможно открыть люк машины, чтобы выгрузить
чистое белье, действуйте следующим образом:
1. выньте штепсельную
вилку машины из электро
розетки.
2. проверьте, чтобы
уровень воды в машине
был ниже отверстия
люка. В противном случае
слейте излишек воды
через сливную трубу в
ведро, как показано на
схеме.
3. снимите переднюю
панель стиральной
машины при помощи
отвертки (см. схему).
CIS
Утилизация
• Уничтожение упаковочных материалов: соблюдайте
местные нормативы с целью повторного
использования упаковочных материалов.
• Согласно Европейской Директиве 2002/96/
СЕ касательно утилизации электронных и
электрических электроприборов электроприборы
не должны выбрасываться вместе с обычным
городским мусором. Выведенные из строя приборы
4. потяните наружу язычок, показанный на
схеме, вплоть до освобождения пластикового
блокировочного винта. Затем потяните его вниз и
одновременно откройте люк.
5. установите на место переднюю панель, проверив
перед ее прикреплением к машине, чтобы крюки
вошли в соответствующие петли.
57
Page 58

Техническое обслуживание
1
2
A
B
и уход
CIS
Отключение воды и электрического тока
• Перекрывайте водопроводный кран после каждой стирки.
Таким образом сокращается износ водопроводной
системы машины и сокращается риск утечек.
• Выньте штепсельную вилку из электро розетки
в процессе чистки и технического обслуживания
стиральной машины.
Уход за стиральной машиной
• Для чистки наружных и резиновых частей
стиральной машины используйте тряпку, смоченную
теплой водой с мылом. Не используйте растворители
или абразивные чистящие средства.
• Стиральная машина укомплектована программой
«АВТООЧИСТКА» внутренних деталей, которую
необходимо выполнять без какого-либо белья в
барабане.
Стиральное вещество (в объеме 10% от
рекомендуемого для очень грязного белья) или
специальные добавки для чистки стиральной машины
можно использовать в качестве вспомогательных
в программе стирки. Рекомендуется выполнять
программу чистки машины каждые 40 циклов стирки.
Для запуска программы нажмите одновременно
кнопки А и В на 5 сек. (см. Схему).
Программа автоматически запустится и длится
примерно 70 минут. Для остановки цикла нажмите
кнопку START/PAUSE.
Уход за насосом
Стиральная машина оснащена самочистящимся
насосом, не нуждающимся в техническом обслуживании.
Тем не менее мелкие предметы (монеты, пуговицы)
могут упасть за кожух, предохраняющий насос,
расположенный в его нижней части.
! Проверьте, чтобы цикл стирки завершился, и выньте
штепсельную вилку из сетевой розетки.
Для доступа к кожуху:
1. снимите переднюю
панель стиральной
машины при помощи
отвертки (см. схему);
2. отвинтите крышку,
повернув ее против
часовой стрелки (см.
схему): небольшая
утечка воды является
нормальным явлением;
Уход за распределителем моющих средств
Выньте распределитель,
приподняв его и потянув
наружу (см. схему).
Промойте
распределитель теплой
водой. Эта операция
должна выполняться
регулярно.
Уход за люком и барабаном
• После использования стиральной машины всегда
следует оставлять люк полуоткрытым во избежание
образования неприятных запахов в барабане.
58
3. тщательно прочистите внутри кожуха;
4. завинтите крышку на место;
5. установите на место переднюю панель, проверив
перед ее прикреплением к машине, чтобы крюки
вошли в соответствующие петли.
Проверка водопроводного шланга
Проверяйте шланг подачи воды не реже одного раза
в год. При обнаружении трещин или разрывов шланга
замените его: в процессе стирки сильное давление
воды в водопроводе может привести к внезапному
отсоединению шланга.
! Никогда не пользуйтесь б/у шлангами.
Page 59

Неисправности и методы
их устранения
Если ваша стиральная машина не работает. Прежде чем обратиться в Центр Сервисного обслуживания
(см. Сервисное обслуживание), проверьте, можно ли устранить неисправность, следуя рекомендациям,
приведенным в следующем перечне.
Неисправности:
Стиральная машина не включается.
Цикл стирки не запускается.
Стиральная машина не заливает
воду (На дисплее показывается
сообщение «НЕТ ПОДАЧИ ВОДЫ»).
Машина непрерывно заливает и
сливает воду.
Возможные причины / Методы устранения:
• Штепсельная вилка не соединена с электро розеткой или отходит и не
обеспечивает контакта.
• В доме отключено электричество.
• Люк машины закрыт неплотно.
• Не была нажата кнопка ON/OFF.
• Не была нажата кнопка START/PAUSE.
• Перекрыт водопроводный кран.
• Была запрограммирована задержка запуска цикла.
• Водопроводный шланг не подсоединен к крану.
• Шланг согнут.
• Перекрыт водопроводный кран.
• В доме нет воды.
• Недостаточное водопроводное давление.
• Не была нажата кнопка START/PAUSE.
• Сливной шланг не находится на высоте 65 – 100 см. от пола (см. «Установка»).
• Конец сливного шланга погружен в воду (см. «Установка»).
• Настенное сливное отверстие не оснащено вантузом для выпуска
воздуха.
Если после вышеперечисленных проверок неисправность не будет
устранена, следует перекрыть водопроводный кран, выключить
стиральную машину и обратиться в Центр Сервисного Обслуживания.
Если ваша квартира находится на последних этажах здания, могут
наблюдаться явления сифона, поэтому стиральная машина производит
непрерывный залив и слив воды. Для устранения этой аномалии в
продаже имеются специальные клапаны против явления сифона.
CIS
Стиральная машина не сливает
воду и не отжимает белье.
Стиральная машина сильно
вибрирует в процессе отжима.
Утечки воды из стиральной
машины.
Машина заблокирована, дисплей
мигает и показывает код
неисправности (наприм., F-01, F-..).
В процессе стирки образуется
слишком обильная пена.
• Выбранная программа не предусматривает слив воды: для некоторых
программ необходимо включить слив вручную.
• Включена функция ЛЕГКАЯ ГЛАЖКА: для завершения программы
нажмите кнопку START/PAUSE (см. «Программы и функции»).
• Сливной шланг согнут (см. «Установка»).
• Засорен сливной трубопровод.
• В момент установки стиральной машины барабан был разблокирован
неправильно (см. «Установка»).
• Стиральная машина установлена неровно (см. «Установка»).
• Машина зажата между стеной и мебелью (см. «Установка»).
• Плохо прикручен водопроводный шланг (см. «Установка»).
• Засорен распределитель моющего средства (порядок его чистки см. в
параграфе «Техническое обслуживание и уход»).
• Сливной шланг плохо закреплен (см. «Установка»).
• Выключите машину и выньте штепсельную вилку из сетевой розетки,
подождите 1 минуту и вновь включите машину.
Если неисправность не устраняется, обратитесь в Сервисную Службу.
• Моющее средство непригодно для стирки в стиральной машине (на
упаковке должно быть указано «для стирки в стиральной машине»,
«для ручной и машинной стирки» или подобное).
• В распределитель было помещено чрезмерное количество моющего
средства.
59
Page 60

Сервисное
обслуживание
195104459.02
09/2012 - Xerox Fabriano
CIS
Мы заботимся о своих покупателях и стараемся сделать сервисное обслуживание наиболее
качественным. Мы постоянно совершенствуем наши продукты, чтобы сделать Ваше общение с техникой
простым и приятным.
Уход за техникой
Продлите срок эксплуатации и снизьте вероятность поломки техники.
Воспользуйтесь профессиональными средствами для ухода за техникой от Indesit Professional для наиболее
простого, эффективного и легкого ухода за Вашей бытовой техникой.
Продукты Indesit Professional производятся в Италии с соблюдением высоких европейских стандартов в области
качества, экологии и безопасности использования и созданы с учетом многолетнего опыта производителя
техники. Узнайте подробнее на сайте www.hotpoint-ariston.com в разделе «Сервис» и спрашивайте в магазинах
Вашего города.
Авторизованные сервисные центры
Чтобы быть ближе к нашим потребителям, мы создали широкую сервисную сеть, особенностью которой является
высокая подготовка, профессионализм и честность сервисных мастеров. На сегодняшний день она насчитывает
около 350 сервисных центров на территории России и СНГ.
Их контакты Вы можете найти в сервисном сертификате и на сайте www.hotpoint-ariston.com в разделе «Сервис».
Если вам надо обратиться в сервисный центр:
Внимание! При ремонте требуйте использования оригинальных запасных частей.
Перед тем как обратиться в Службу Сервиса:
• Проверьте, нельзя ли устранить неисправность самостоятельно (см. «Неисправности и методы их
устранения»);
• Вновь запустите программу для проверки исправности машины;
• В противном случае обратитесь в Авторизованный Сервисный Центр по телефонам, указанным в гарантийном
таллоне.
! Никогда не обращайтесь к неавторизованным сервисным центрам.
При обращении в Сервисную Службу необходимо сообщить:
• тип неисправности;
• номер гарантийного документа (сервисной книжки, сервисного сертификата и т.п.);
• модель машины (Мод.) и серийный номер (S/N), указанные в информационной табличке, расположенной на
задней панели стиральной машины.
Другую полезную информацию и новости Вы можете найти на сайте www.hotpoint-ariston.com в разделе
«Сервис».
60
 Loading...