

Page 1
DAILY REFERENCE
WWW
GUIDE
EN
THANK YOU FOR PURCHASING AN
ARISTON PRODUCT
To receive more comprehensive help and
support, please register your product at
www. aristonchannel. com
Before using the appliance carefully read the Health and Safety guide.
PRODUCT DESCRIPTION
1
2
3
4
5
You can download the Safety Instructions
and the Use and Care Guide by visiting our
website www. aristonchannel. com and
following the instructions on the back of
this booklet.
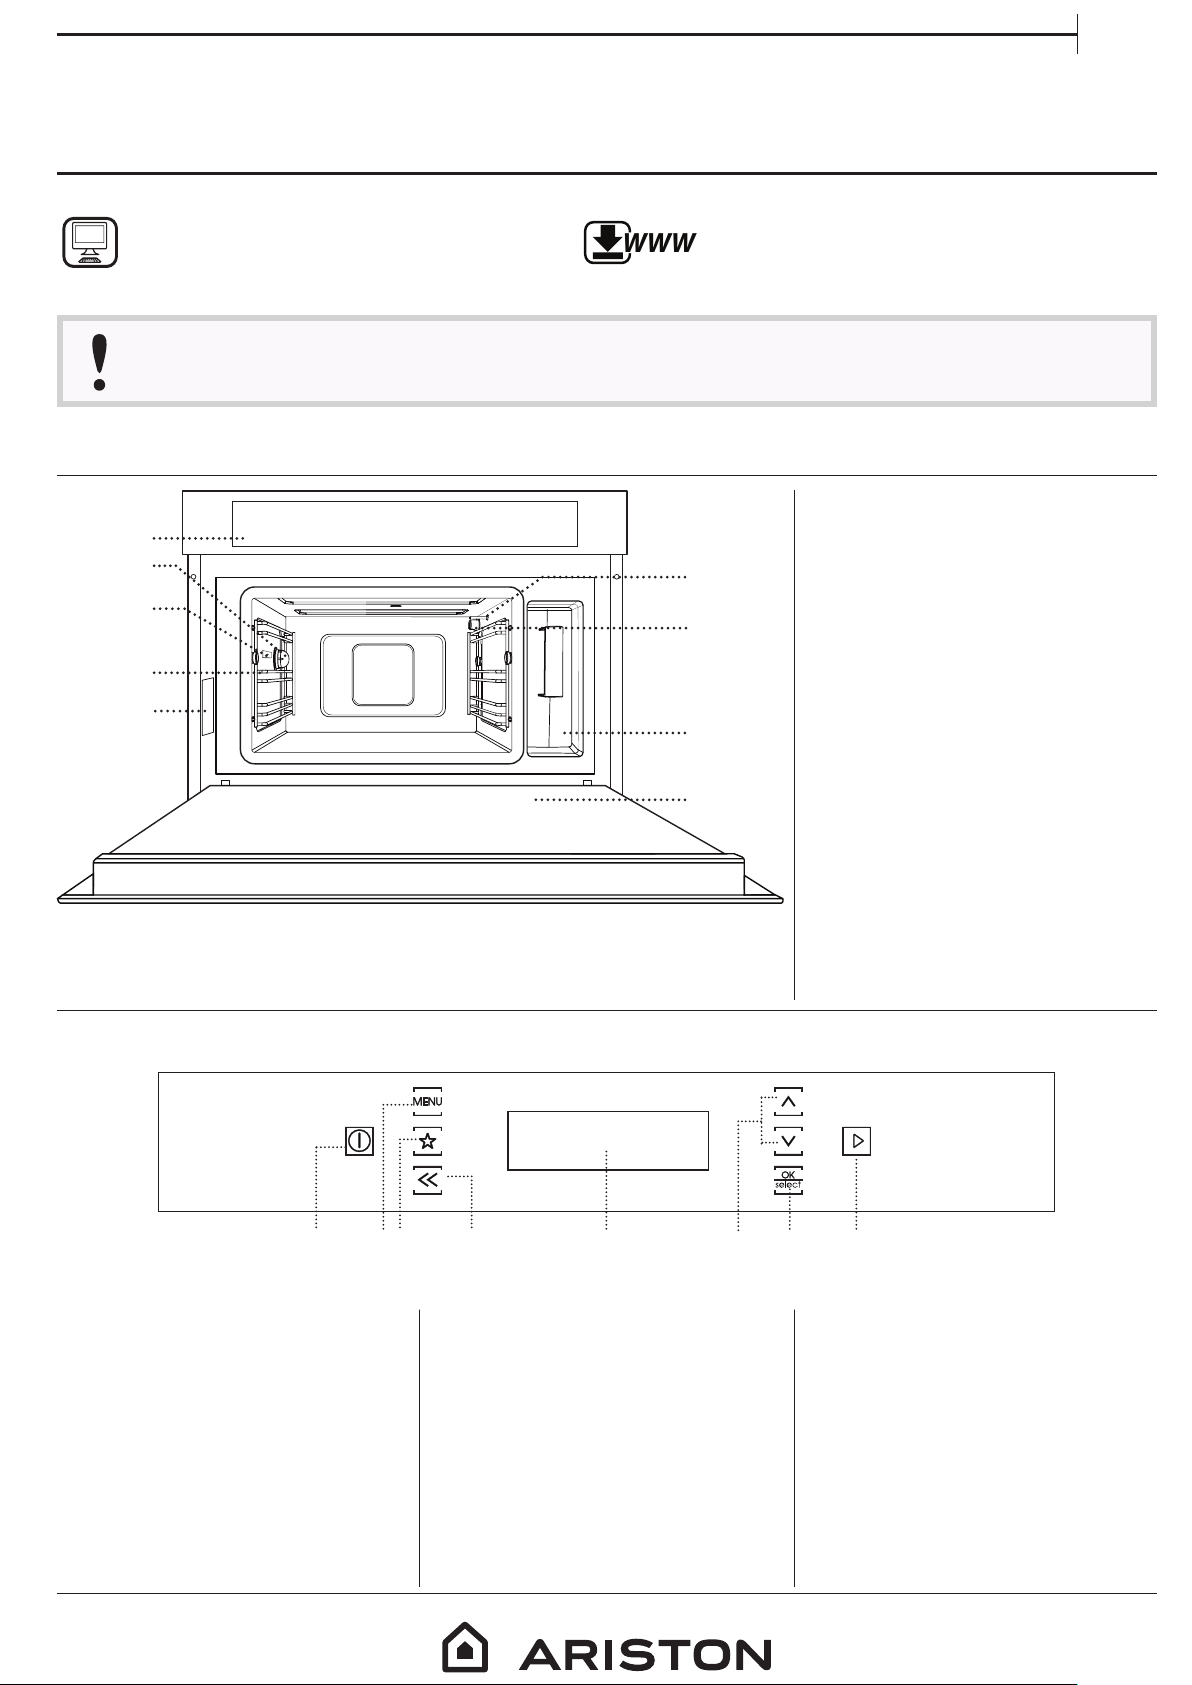
1. Control panel
2. Light
6
7
8
9
3. Connection for food probe
4. Shelf guides
5. Identification plate
(do not remove)
6. Temperature sensor
7. Steam inlet valve
8. Water reservoir
9. Door
CONTROL PANEL
1 4
1. ON / OFF / PAUSE
For switching the oven on or off
and for pausing or stopping a
function.
2. MENU
For gaining quick access to the
main menu.
3. FAVOURITES
For accessing the 10 most used
functions.
32 5
4. BACK
For returning to the previous
menu.
5. DISPL AY
6. NAVIGATION BUTTONS
For navigating through menus,
moving the cursor and changing
settings.
76 8
7. OK / SELECT
For selecting functions and
confirming settings.
8. START
For starting the function that has
been selected.
1
Page 2
ACCESSORIES
WWW
Download the Use and Care Guide from
www. aristonchannel. com for more information
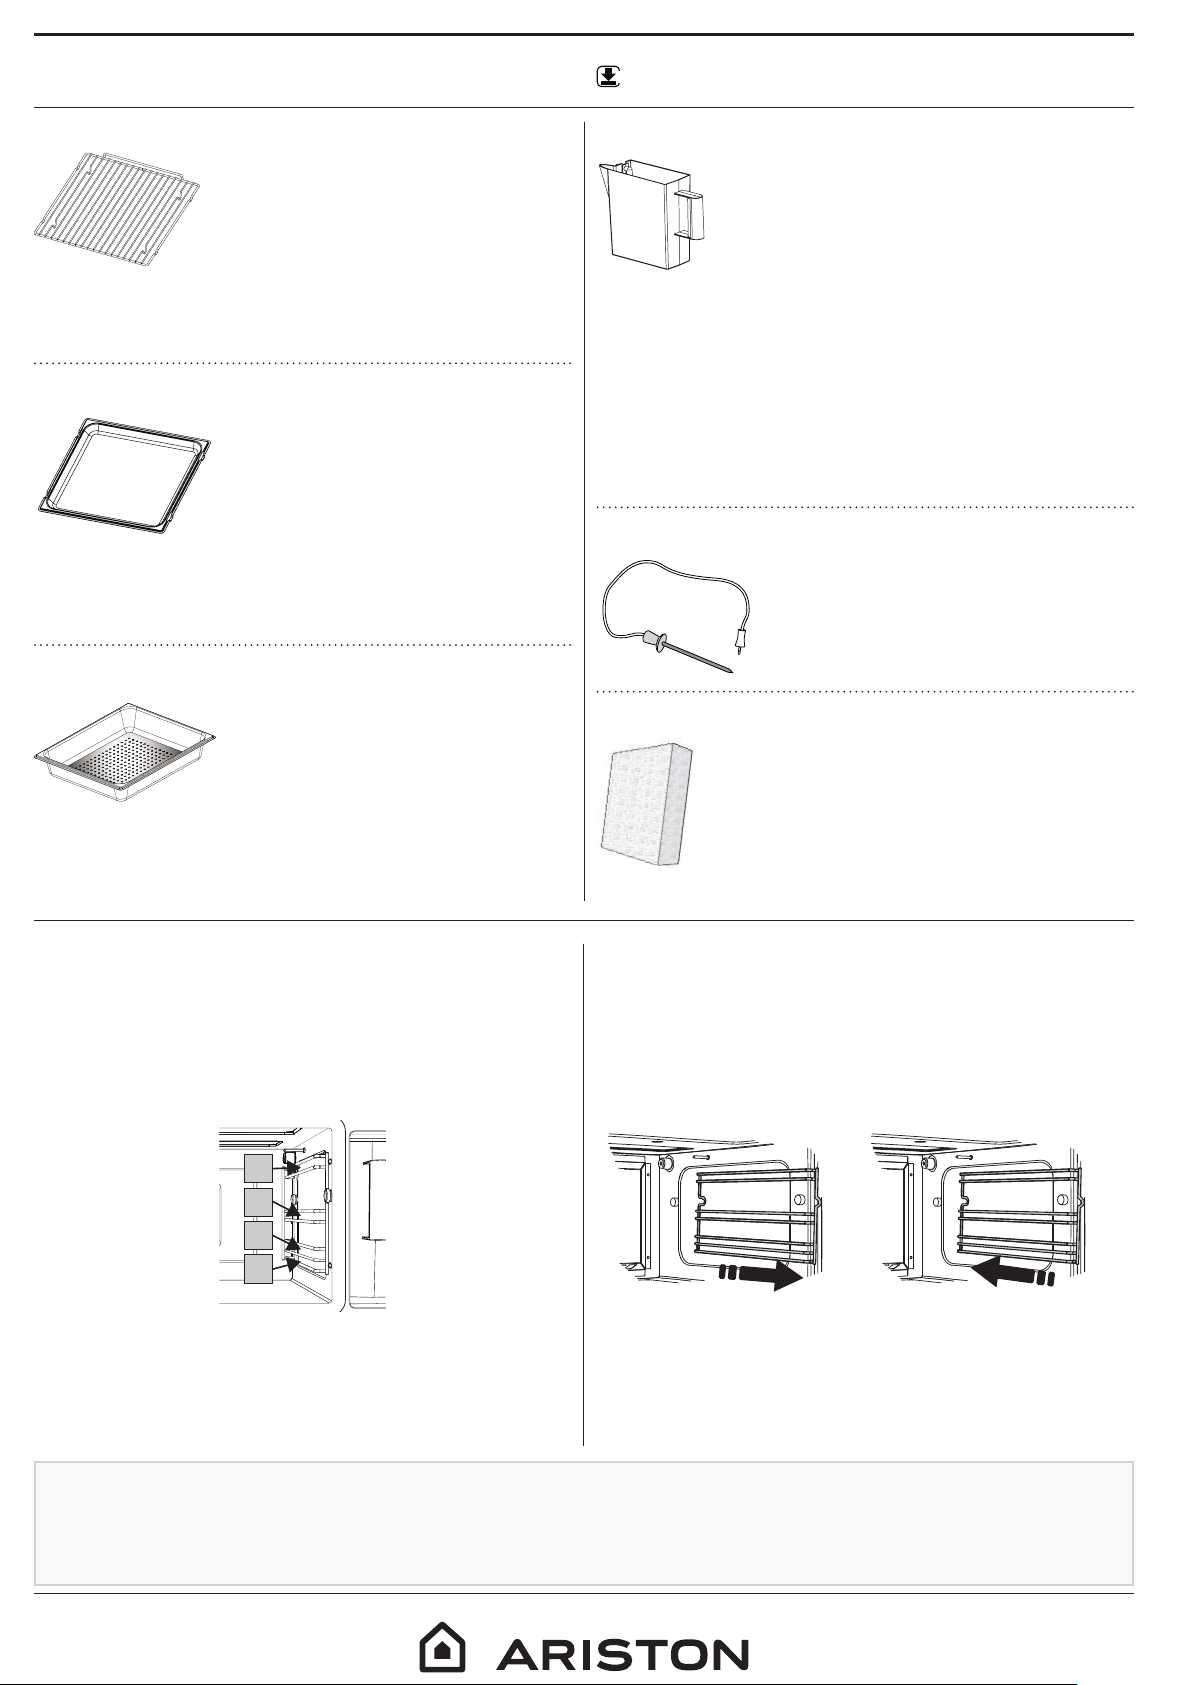
WIRE SHELF
This allows the hot air to circulate
effectively. Place food directly on
the wire shelf or use it to support
baking trays and tins or other
heat-resistant ovenware. When
cooking food directly on the wire
shelf, place the dripping pan on the level below it.
It can also be placed on top of either the dripping pan
or the steamer tray on the same level.
DRIPPING PAN
This is used as a baking tray with
the “Forced Air” function to cook
meat, fish, vegetables, or different
types of bread and pastries.
It is also useful for supporting
heat-resistant ovenware as it
means you do not have to place
items on the bottom of the oven.
It collects the cooking juices when placed below the
wire shelf or the steamer tray.
STEAMER TRAY
This makes it easier for steam to
circulate, which helps cook the
food evenly. Place the dripping
pan on the level below to collect
the cooking juices.
WATER RESERVOIR
The water reservoir can be easily
accessed by opening the door. Remove
it by lifting it slightly upwards and then
pulling it towards you.
Fill the water reservoir with drinking
water up to the “MAX” mark.
Once full, put the water reservoir back in its holder.
Make sure that it is positioned correctly: The top and
the right-hand side of the water reservoir should be
touching the sides of the holder.
Insert the water reservoir fully and then push it
downwards until it clicks into place.
Carefully remove the water reservoir and empty it
after every use. Take care to pour water out of the
tube as well.
FOOD PROBE
For measuring the core
temperature of food during
cooking.
SPONGE
For removing any condensation that
forms during cooking.
PLACING ACCESSORIES ON THE SHELF GUIDES
Insert the steamer tray horizontally by sliding it across
the shelf guides, making sure that the side with the
raised edge is facing upwards.
The levels (shelf guides) on which the accessories can
be placed are numbered, with 1 being the lowest and
4 being the highest.
4
3
2
1
Before purchasing other accessories that are
available on the market, make sure that they are
heat-resistant and suitable for steaming.
REMOVING AND REFITTING THE SHELF GUIDES
To remove the shelf guides, slide them forwards and
pull them towards you to unhook them from the
brackets (fig. a).
To refit the shelf guides, hook them into the brackets
by pushing down on them gently until they click into
place (fig. b).
a. b.
Make sure that there is a gap of at least 30 mm
between the top of any container and the walls
of the boiler in order to allow steam to ow
suciently.
2
Page 3
FUNCTIONS
WWW
EN
Download the Use and Care Guide from
www. aristonchannel. com for more information
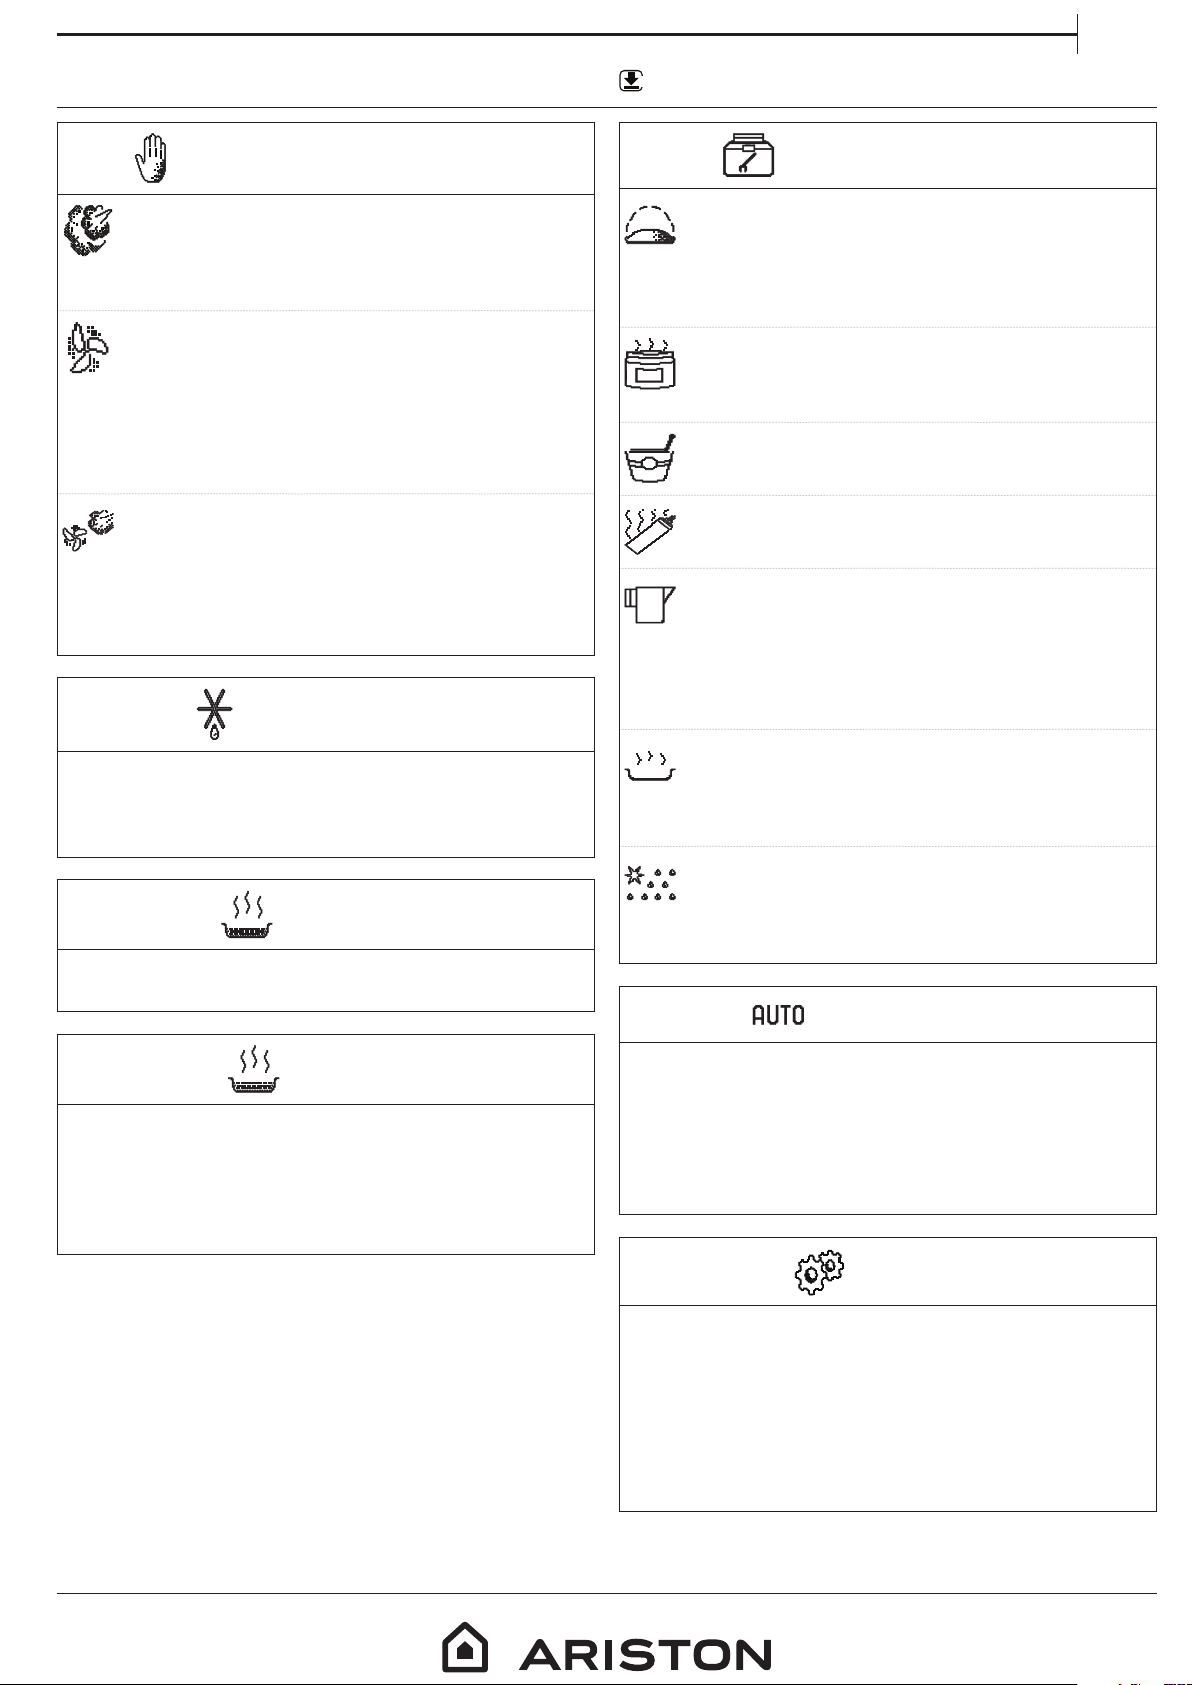
TRADITIONAL FUNCTIONS
STEAM
For cooking natural and healthy dishes using
steam. This function is particularly suited to cooking
vegetables, fish and fruit, and also for blanching.
FORCED AIR
For cooking dishes in a way that achieves
similar results to using a conventional oven.
We recommend using the wire shelf with this
function as it allows the air to circulate effectively.
The baking tray or other cookware that is suitable for
oven use can be used to cook certain foods.
FORCED AIR + STEAM
This function combines the features of oven
cooking with the properties of steam to cook food
efficiently and effectively, producing dishes that are
crispy on the outside but tender and succulent on
the inside.
STEAM DEFROST
For defrosting meat, poultry, fish, vegetables, bread
and fruit. For best results, do not defrost the food
completely but allow the process to finish during
standing time.
SPECIAL FUNCTIONS
PROVING
For optimal proving of sweet or savoury
dough. To maintain the quality of proving, do not
activate the function if the oven is still hot following
a cooking cycle.
PRESERVATION
For making preserves out of fruit and
vegetables.
YOGHURT
For making yoghurt.
DISINFECTION
For disinfecting baby bottles or jars.
DRAIN
For draining the boiler automatically to
prevent residual water remaining in there when
the appliance will not be used for a certain period
of time. The function will only activate if the
temperature of the oven is below 60 °C.
DESCALE
For removing limescale deposits from the
boiler. We recommend using this function at regular
intervals.
REHEATING
For reheating ready-made food that is either frozen,
chilled or at room temperature.
FINISHING
For optimising the cooking of read-made food while
keeping it soft and juicy. We recommend placing
food on the baking tray and steaming it on level
3 with the dripping pan on the level below. You
should set the temperature of the oven at the final
temperature you would like the food to have.
STEAM CLEANING
For making it easier to clean the boiler. Regular
use prevents deposits from forming, which could
damage the surface.
ASSISTED MODE
For selecting one of the numerous preset recipes
that enable you to cook pasta, rice, vegetarian meals,
meat, fish, poultry, side dishes, pizzas, pies, bread,
cakes, eggs and desserts more effectively. The oven
automatically applies the recommended settings for
each type of dish and sometimes offers instructions
for you to follow in order to achieve optimal results.
SETTINGS
For accessing a menu that allows you to change the
settings for the oven and the display (language, time,
brightness, volume of the audible signal, Eco mode,
calibration).
Please note: When Eco mode is active, the brightness of the
display will be reduced after a few seconds to save energy.
The display is reactivated automatically whenever any of
the buttons are pressed, etc.
3
Page 4

USING THE APPLIANCE FOR THE FIRST TIME
Please select language
Italiano
Türkçe
English
Premere per impostare il tempo, OK per terminare
HH MM
12:00
1. PLEASE SELECT THE LANGUAGE
You will need to set the language and the time when
you switch on the appliance for the first time: The
display will show you a list of available languages.
Use or to select the language you require and
press
Please note: The language can also be changed later from
the “Settings” menu item.
2. SET THE TIME
After selecting the language, you will need to set the
current time: 12:00 will flash on the display.
Use or to set the time and press to
confirm.
Please note: You may need to set the time again following
lengthy power outages.
to confirm.
HH MM
Press to set time, OK when done
3. RINSE AND FILL THE WATER RESERVOIR
Remove the sponge, then rinse and fill the water
reservoir with drinking water up to the “MAX” mark.
4. CALIBRATING
To enable the oven to produce steam efficiently, it
needs to be calibrated before being used for cooking.
Once you have filled the water reservoir and put it in
place, press
to switch on the oven, then use or
to select the “Settings” menu item and press .
Select “Calibrate” and press
Press
to start calibrating, making sure that the
again to confirm.
oven door remains closed until the process has ended.
Once calibration is complete, leave the oven to cool
down and dry the boiler with a cloth.
Please note: A large amount of steam may be generated
during this process: This is perfectly normal.
5. REHEAT THE OVEN
Before starting to cook food, we recommend that
you reheat the oven with it empty in order to remove
any odours that may have been left behind during
manufacturing.
We recommend heating the oven to 200 °C for around
one hour using the “Forced Air” function. Follow the
instructions for setting the function correctly.
Please note: It is advisable to air the room after using the
appliance for the rst time.
DAI LY USE
1. SELECTING A FUNCTION
Impostazioni
Settings
1
Funzioni di cottura manuali
Manual cooking functions
Manual
Manuale
Scong. a vapore
Steam Defrost
SWITCH ON THE OVEN
Press
: The display will show the main menu.
NAVIGATE THE MENU
Press
or to navigate through the main menu
and highlight the function you would like to select.
SELECT AN ITEM FROM THE MENU
Once the item you would like to select is highlighted
on the display, press
to confirm and go to
the settings menu for the function or to the list of
functions.
2
3
4
1. Symbol for the function selected
2. Function selected
3. Other available functions
4. Description of the function selected
SELECT A FUNCTION
Press
Press
or to navigate through the list given.
to confirm and go to the settings menu.
FOOD PROBE OPTION
Once you have selected the function you require,
some automatic functions will prompt you to specify
whether or not you are using a food probe. Press
to highlight the option you require and press
or
to confirm.
4
Page 5

Preriscaldamento
TEMPERATURA
160°C
INSERIRE IN
-00:10
LIVELLO VAPORE
Alto
TEMPERATURA
180 °C
TEMPO COTTURA
AVVIO IN
-00:36
00:20
Aria forzata + Vap.
2. SETTING AND ACTIVATING A FUNCTION
2
180 °C
TEMPERATURE
TEMPERATURA
1
High
Alto
LIVELLO VAPORE
STEAM LEVEL
Aria forzata + Vap.
Forced Air + Steam
5
00:20
COOK TIME
TEMPO COTTURA
18:30
TEMPO FINE
END TIME
EN
1. Settings for the function
(temperature, steam level, etc.)
2. Cursor
(highlights the setting selected)
3
4
3. Duration
4. Time at which the function will finish
5. Name of the function
MOVE THE CURSOR
Press
or to move the cursor onto the settings
that you can modify.
APPLY SETTINGS
Once the cursor is in position, change the setting by
pressing
: The setting you have selected will start
to flash.
Use
or to change the setting and press to
confirm.
Please note: You can change the settings later, even while
cooking is in progress, by following these steps again.
. PREH EATING
The “Forced Air” function (and automatically for
certain recipes in “Assisted Mode”) can be used to
preheat the oven before cooking.
Selecting “Yes” will activate preheating. Once the
function has been activated, the display will show
how preheating is progressing.
TEMPERATURE COOK TIME
Preheating
Once preheating has finished, an audible signal will
sound and the display will indicate that the oven has
reached the set temperature: At this point you can
add the food and press
to start cooking.
Please note: The food probe cannot be used during the
preheating phase.
Selecting “No” will reduce the overall cooking time (including
preheating) and energy consumption by up to 25%.
Placing the food in the oven before preheating has nished
may have an adverse eect on the nal cooking result.
ACTIVATE THE FUNCTION
Once the settings displayed are those that you
require, press
to activate the function.
Please note: Once the function has been activated, you can
pause it by pressing once.
To resume the function, press .
. SET THE COOKING END TIME/START DELAYED
Many functions allow you to program the cooking
end time by delaying the time at which the function
starts. When setting the duration of the function, the
display will show what time cooking is expected to be
complete.
Use
press
Use
to end and press
Press
or to move the cursor to END TIME and
: The time will flash.
or to select the time you require cooking
.
and place the food in the oven, then press
again to activate the function: The oven will
switch on automatically after the period of time that
has been calculated in order for cooking to end at the
time you have set.
TEMPERATURE
High
STEAM LEVEL
Forced Air + Steam
COOK TIME
START IN
Note: You can activate this function immediately and cancel
the waiting time by pressing .
. FUNCTIONS USING STEAM
When you select a function that requires the use of
steam, the display will always remind you to fill the
water reservoir completely.
Once you have confirmed that you have filled it with
drinking water up to the “MAX” mark, press
to go
to the settings menu for the function.
5
Page 6

. USING THE FOOD PROBE
Roast Beef
TEMPERATURA
200°C
SONDA
55°C
SVUOTAMENTO CALDAIA
20 %
Using the food probe enables
you to measure the core
temperature of the food during
cooking.
Insert the food probe deep into
the meat, avoiding bones or
fatty areas.
Poultry: Insert the tip into the
centre of the breast, avoiding
hollow areas.
Joints or legs of meat: Insert the
tip into the thickest part.
Fish (whole): Position the tip in
the thickest part, avoiding the
spine.
USING THE MANUAL FUNCTION
Place the food in the oven. We recommend
placing the food on the wire shelf and positioning the
dripping pan below it to collect any cooking juices.
Remove the cap covering the handle of the food
probe and connect the plug. Make sure that the cable
is to free to move before closing the oven door.
Select a manual function: The settings menu for the
function allows you to change the temperature of the
oven or the steam and the temperature required for
the food probe.
100 °C
TEMPERATURE
TEMPERATURA
Steam
Vapore
57°C
SONDA
FOOD PROBE
18:20
START TIME
ORA D INIZIO
Once you have applied all the settings you require,
press START to activate the function: An audible signal
will sound and the display will indicate when the food
probe has reached the required temperature.
Please note: You cannot connect the food probe once the
function has been activated.
IN ASSISTED MODE
Some of the recipe functions in Assisted Mode
allow you to use the food probe: Select the FOOD
PROBE option and then follow the instructions given
on the display.
When prompted to do so, place the dishes in the oven
and connect the food probe to the appropriate plug.
TEMPERATURE FOOD PROBE
Roast Beef
Note: If preheating has been selected, you will not be able to
add food or connect the food probe until this has nished.
. USING THE SPECIAL FUNCTIONS
PRESERVATION
We recommend using only fresh, high-quality
fruit or vegetables to make jams and preserves.
Fill the jars with fruit or vegetables (precooked, if
possible) and top them up with preserving liquid or
canning syrup, leaving approx. 2 cm at the top. Then
put the lids on loosely without tightening them.
Place the wire shelf on level 2 with the dripping pan
on the level below and place the jars on the wire
shelf. Alternatively, you can place the jars directly on
the dripping pan.
Activate the function. Once finished, tighten the lids
on the jars fully (wearing oven gloves or protecting
you hands with a heat-resistant cloth when doing
so) and then leave them to cool down to room
temperature.
Please note: We recommend using the “Disinfection” function
to clean the jars eectively.
YOGHURT
Before activating the function, add approx.
100g of commercially available fresh whole yoghurt
to one litre of whole milk at room temperature.
Please note: If using unpasteurised milk, heat it to a simmer
before leaving it to cool down to room temperature.
Pour the mixture into heat-resistant jars, cover them
with heat-resistant lids or film and then place them on
the wire shelf, inserted at level 2.
Select the function and set the duration to five hours
(the temperature cannot be changed).
Once the function has finished, leave the yoghurt
to cool in the refrigerator for several hours before
serving. It will keep for 1-2 weeks. You can use some
of this yoghurt to make another batch within 5-7 days.
Please note: We recommend using the “Disinfection” function
to thoroughly clean the utensils and jars you need to make
yoghurt.
DRAIN
To prevent residual water from remaining inside
the boiler, it is advisable to activate this function
every time the oven will not be used for a certain
period of time.
Please note: If the boiler is too hot, the function will not
be activated until the temperature in the oven is below 60
°C. The function will be activated automatically once the
compartment has reached this temperature.
Activate the function and follow the steps given on
the display. Once finished, drain and rinse the water
reservoir with drinking water.
6
DRAINING BOILER
Page 7

DESCALE
FASE
1/3
TEMPO FASE
TEMPO FINE
18:20
00:32
Tratt. disincrostante
TEMPO FINE
15:45
Pulizia con vapore
Le funzioni di cottura utilizzate più di frequente
Mun
Lasagne
Vapore
When used at regular intervals, this special
function keeps the boiler in optimum condition.
Activate the function and follow the steps given on
the display, pressing
to proceed.
For best results, we recommend filling the water
reservoir with 250 ml of white vinegar and then
topping it up with drinking water until the “MAX”
mark.
Descaling takes around 30 minutes: Do not switch off
the oven during this time. Cooking functions cannot
be activated during the cleaning cycle.
PHASE
Descaling
PHASE TIME
END TIME
Once finished, to prevent any residue from forming,
rinse the water reservoir with drinking water and then
activate the “Steam Cleaning” function with the oven
empty.
STEAM CLEANING
This function softens deposits and food
residues, which makes it easier to clean the oven.
When used regularly, it enables you to easily remove
any food residues or deposits in the compartment.
Please note: We recommend removing any accessories from
the oven before activating this function.
Steam Cleaning
END TIME
EN
. FAVOURITES
The oven will automatically compile a list of the
functions that you use the most.
Press the
press
frequently.
Use or to select the function you require, press
to confirm and then modify – if necessary – the
settings according to your needs (those suggested are
basic settings).
Once finished, press
. TIMER
When the oven is switched off, the display can be
used as a timer.
To activate the function, make sure that the oven is
switched off and then press
on the display.
Premere per impostare il timer, OK per avviare
Use or to set the length of time you require and
then press
will sound once the timer has finished counting down
the selected time.
Please note: You can stop the timer at any time by pressing
.
button to switch on the oven, then
to display the list of functions you use most
Lasagna
Steam
Muns
Your most used cooking functions
to activate the function.
: The timer will flash
00 : 01 : 00
(HH) (MM) (SS)
(HH) (MM) (SS)
Press to set timer, OK to start
to activate the timer. An audible signal
Once finished, wait for the oven to cool down and
then finish cleaning by drying the surfaces with a
sponge or cloth.
. KEYPAD LOCK
To lock the keypad, press and hold and at the
same time for at least five seconds. Do this again to
unlock the keypad.
Please note: This function can also be activated during
cooking. For safety reasons, it can be switched o at any time
by pressing the button.
7
Page 8

COOKING TABLE
FOOD FUNCTION PREHEAT
Gateaux (cakes)
Cookies
Choux buns
Bread
Swiss rolls
Quiche
Pu pastry
Gnocchi
Frozen Bualo wings
Turkey breast
Ribs
Fish gratin
TEMPERATURE
(°C)
Yes 160 - 35-40
Yes 165 - 175 - 12 - 15
Yes 190 - 200 - 25 - 30
Yes 180 - 190 Low - medium 35 - 40
Yes 230 - 7 - 8
Yes 180 - 190 - 35 - 40
Yes 180 - 190 - 15 - 20
- 90 - 100 - 10 - 15
Yes 190 - 200 - 15 - 18
Yes 200 - 210 Medium 50 - 60
Yes 160 - 170 Low 80 - 90
Yes 190 - 200 Low 15- 25
STEAM
LEVEL
DURATION
LEVEL
AND ACCESSORIES
2
2
2
2
2
2
2
3 1
2
2 1
2 1
2 1
Fish terrine
Boiled eggs
Roasted vegetables
Beetroot
Red cabbage
White cabbage
White beans
Ready meal
Soup / broth
Vegetables
Rice / pasta
Potatoes
Meat in slices
- 75 - 80 - 60 - 90
- 90 - 20 - 25
Yes 200 - 210 Medium - high 20 - 30
- 100 - 50 - 60
- 100 - 30 - 35
- 100 - 25 - 30
- 100 - 75 - 90
- 100 - 18 - 25
- 100 - 20 - 25
- 100 - 20 - 25
- 100 - 15 - 20
- 100 - 20 - 25
- 100 - 15 - 20
3
3
2 1
3 1
3 1
3 1
3 2/1
3 2/1
3
3 2/1
3 2/1
3 2/1
3 2/1
Meat in sauce
Fish llets
Steam Forced Air Forced Air + Steam Finishing
8
- 100 - 25 - 30
- 100 - 10 - 15
3
3 2/1
Page 9

STEAM DEFROST
EN
ME AT
PO ULTRY
FISH
VEGETABLES
BREAD
FOOD
Minced
WEIGHT
(g)
DURATION
RESTING
TIME
TEMPERATURE (°C)
30 - 35 60
500 25 -30
Sliced 20 - 25 60
Bratwurst 450 10 - 15 10 - 15 60
Whole 1000 60 - 70 40 - 50 60
Fillets
25 - 30 20 - 25 60
500
Legs 30 - 35 25 - 30 60
Whole 600 30 - 40 25 - 30 60
Fillets 300 10 - 15 10 - 15 60
Block 400 20 - 25 20 - 25 60
Block 300 25 - 30 20 - 25 60
Pieces 400 10 - 15 5 - 10 60
Bread loaf 500 15 - 20 25 - 30 60
Slices
8 - 12 5 - 10 60
250
Rolls / buns 10 - 12 5 - 10 60
LEVEL AND
ACCESSORIES
3 1
3 1
3 1
3 1
3 1
3 1
3 1
3 1
3 1
Cake 400 8 - 10 15 - 20 60
Mixed 400 10 - 15 5 - 10 60
FRUIT
Berries 250 5 - 8 3 - 5 60
ASSISTED FUNCTIONS *
RECIPE DURATION
Lasagna 25 - 35
Frozen Lasagna 40 - 50
Black rice
(300 g + 450 ml water)
Basmati rice
(300 g + 450 ml water)
Long White Rice
(300 g + 450 ml water)
RICE AND PASTA
Bulgur
(300 g + 600 ml water)
Couscous
(300 g + 300 ml water)
20 - 60
25 - 30
35 - 40
10 - 40
10 - 15
LEVEL
AND ACCESSORIES
2
2
3
3
3
3
3
RECIPE DURATION
Potato gratin 40 - 50
Baked Potatoes 45 - 55
Frozen gratin 20 - 30
Stuffed tomatoes 30 - 35
Stuffed peppers 35 - 40
VEGETARIAN MEALS
Stuffed Squash 20 - 30
Stuffed Egg Plant 35 - 40
* Please note: For more information, recipes and helpful advice on using this function, read and download the Use and Care
Guide at www. aristonchannel. com
LEVEL
AND ACCESSORIES
2
2
2
2
2
2
2
Wire shelf
Ovenware on
the wire shelf
Dripping pan Steamer tray Food probe (optional)
9
Page 10

RECIPE DURATION
Hot dog, boiled 10 - 15
Meat loaf 35 - 45
ME AT
Roast lamb 60 - 90
Roast beef 40 - 60
Roast veal 50 - 70
Steamed fillets 25 - 30
Roast chicken 50 - 60
PO ULTRY
Chicken pieces 25 - 30
Roast duck 60 - 90
Steamed cutlets 12 - 18
Fish fillets 15 - 20
Steamed whole fish 35 - 55
Baked Whole Fish 25 - 40
FISH
Frozen gratin 35 - 45
Mussels 8 - 12
Shrimps 8 - 12
Frozen vegetables 12 - 20
Whole potato 30 - 40
Potato pieces 20 - 30
Broccoli 15 - 25
Carrots 20 - 30
Cauliflower 20 - 30
Corn on cob 20 - 30
Green beans 20 - 30
Steamed peppers 8 - 12
SIDE DISHES
Steamed squash 5 - 10
Asparagus 20 - 30
Artichokes 40 - 55
Brussels sprouts 20 - 35
Potato wedges 30 - 40
Frozen French fries 15 - 25
LEVEL
AND ACCESSORIES
3 1
2
2 1
2 1
2 1
3 1
2 1
3 1
2 1
3 1
3
1
3 1
2
2
3 1
3 1
3 1
3 1
3 1
3 1
3 1
3 1
3 1
3 1
3 1
3
3 1
3 1
3 1
2
2
RECIPE DURATION
Frozen pan pizza 12 - 20
Frozen thin pizza 8 - 12
Chilled pizza 7 - 12
Home Made Pizza 12 - 18
Quiche Lorraine 30 - 45
PIZZA & SALTY CAKES
Frozen quiche 20 - 30
Bread loaf 30 - 40
Bread dough 10 - 15
Frozen rolls 10 - 13
Vacuum-packed rolls 8 - 10
Canned rolls 10 - 14
Cookies 10 - 15
BREAD / CAKES
Meringues 50 - 60
Muffins 15 - 20
Sponge cake 35 - 50
Scones 9 - 13
Hard 15 - 18
EGGS
Medium 12 - 15
Soft-boiled 9 - 12
Fruit compote 10 - 20
Pre baked frozen fruit pie 15 - 20
Fruit pie 20 - 30
DESSERT
Soufflé 35 - 50
Baked apples 20 - 30
Crème brûlée 20 - 30
PRESERVATION
FOOD QUANTITY
VEGETABLES
FRUIT
1 l 40 - 120
500 ml 25 - 105
1 l 30 - 50
500 ml 15 - 35
TIME
(MIN)
LEVEL
AND ACCESSORIES
2
2
2
2
2
2
2
2
2
2
2
2
2
2
2
2
3 1
3 1
3 1
3 1
2
2
2
2
2 1
LEVEL
AND ACCESSORIES
3 2/1
3 2/1
3 2/1
3 2/1
Note: This table of tested recipes has been compiled for certication authorities in accordance with the standard IEC 60350-1.
It can be read by downloading the Use and Care Guide at www. aristonchannel. com
Wire shelf
Ovenware on
the wire shelf
Dripping pan Steamer tray Food probe (optional)
10
Page 11

EN
MAINTENANCE AND
CLEANING
Make sure that the appliance has cooled down
before carrying out any maintenance or cleaning.
Do not use steam cleaners.
Wear protective gloves.
EXTERIOR SURFACES
• Clean the surfaces with a damp microfibre cloth.
If they are very dirty, add a few drops of pH-neutral
detergent. Finish off with a dry cloth.
• Clean the glass in the door with a suitable liquid
detergent.
INTERIOR SURFACES
• After every use, leave the oven to cool and then
clean it, preferably while it is still warm, to remove any
deposits or stains caused by food residues.
• To remove the moisture generated by steaming,
leave the oven to cool and then wipe the
compartment with a cloth or the sponge provided.
We recommend using the steam cleaning function
regularly.
WWW
Do not use wire wool, abrasive scourers or abrasive/
corrosive cleaning agents, as these could damage
the surfaces of the appliance.
The appliance must be disconnected from the
mains before carrying out any kind of maintenance
work.
www. aristonchannel. com for more information
Download the Use and Care Guide from
ACCESSORIES
• The majority of accessories can be washed in the
dishwasher, including the shelf guides.
• The water reservoir and the food probe, however,
are not dishwasher safe. Clean the water reservoir
carefully using a sponge and a little pH-neutral
detergent. Rinse with drinking water.
• The food probe can be cleaned using a damp cloth
or kitchen towel.
BOILER
To ensure that the oven always works at optimum
performance and to help prevent the build-up of
limescale deposits over time, we recommend using
the “Drain” and “Descale” functions regularly.
REPLACING THE LIGHT
1. Disconnect the oven from the power supply.
2. Unscrew the cover from the light and carefully
remove the seals and the washer.
3. Replace the light and screw the cover back on,
taking care to refit the seals and the washer correctly.
4. Reconnect the oven to the power supply.
Please note: Use 10 W/12 V type G4, T300 °C halogen lamps.
The bulb used in the appliance is specically designed for
domestic appliances and is not suitable for general room
lighting within the home (EC Regulation 244/2009). Lamps
are available from our After-sales Service.
- Do not handle bulbs with your bare hands as your
ngerprints could damage them.
Do not use the oven until the lamp cover has been retted.
11
Page 12

TROUBLESHOOTING
WWW
Problem Possible cause Solution
Check for the presence of mains electrical power
The oven is not working.
Power cut.
Disconnection from the
mains.
and whether the oven is connected to the
electricity supply.
Turn o the oven and restart it to see if the fault
persists.
Download the Use and Care Guide from
www. aristonchannel. com for more information
The oven is not producing
steam.
The display shows the letter “F”
followed by a number.
Water reservoir not inserted
correctly.
Water reservoir empty.
Software problem.
Check whether the water reservoir has been placed
in the correct position and whether it is lled with
drinking water up to the “MAX” mark, then start the
function you require again.
Contact you nearest Client After-sales Service
Centre and state the number following the letter “F”.
PRODUCT FICHE
WWW
The product fiche with energy data of this
appliance can be downloaded from our website
www. aristonchannel. com
HOW TO OBTAIN THE USE AND CARE GUIDE
WWW
>
Download the Use and Care Guide
from our website www. aristonchannel. com
(you can use this QR Code), specifying the
product’s commercial code.
> Alternatively, contact our Client After-sales Service.
001
12
CONTACTING OUR AFTERSALES SERVICE
You can find our
contact details in the
warranty manual. When
contacting our Client
After-sales Service,
please state the codes
provided on your
product's identification
plate.
XXXXXXXXXXXX
XXXXXXXXXXXX
XXX/XXX
400010882386
Printed in I taly
 Loading...