

Page 1
www.hotpoint.eu/register
Page 2

SAFETY INSTRUCTIONS
IMPORTANT TO BE READ AND OBSERVED
Before using the appliance, read these safety
instructions. Keep them nearby for future
reference.
These instructions and the appliance itself
provide important safety warnings, to be
observed at all times. The manufacturer
declines any liability for failure to observe these
safety instructions, for inappropriate use of the
appliance or incorrect setting of controls.
Very young children (0-3 years) should be
kept away from the appliance. Young children
(3-8 years) should be kept away from the
appliance unless continuously supervised.
Children from 8 years old and above and
persons with reduced physical, sensory or
mental capabilities or lack of experience and
knowledge can use this appliance only if they
are supervised or have been given instructions
on safe use and understand the hazards
involved.
Children must not play with the appliance.
Cleaning and user maintenance must not be
carried out by children without supervision.
WARNING: The appliance and its accessible
parts become hot during use. Care should be
taken to avoid touching heating elements.
Children less than 8 years of age must be kept
away unless continuously supervised.
Never leave the appliance unattended
during food drying. If the appliance is suitable
for probe usage, only use a temperature probe
recommended for this oven - risk of fire.
Keep clothes or other flammable materials
away from the appliance, until all the
components have cooled down completely risk of fire. Always be vigilant when cooking
foods rich in fat, oil or when adding alcoholic
beverages - risk of fire. Use oven gloves to
remove pans and accessories. At the end of
cooking, open the door with caution, allowing
hot air or steam to escape gradually before
accessing the cavity - risk of burns. Do not
obstruct hot air vents at the front of the oven risk of fire.
Exercise caution when the oven door is in
the open or down position, to avoid hitting the
door.
PERMITTED USE
CAUTION: The appliance is not intended to
be operated by means of an external switching
device, such as a timer, or separate remote
controlled system.
This appliance is intended to be used in
household and similar applications such as:
staff kitchen areas in shops, offices and other
working environments; farm houses; by clients
in hotels, motels, bed & breakfast and other
residential environments.
No other use is permitted (e.g. heating
rooms).
This appliance is not for professional use. Do
not use the appliance outdoors.
Do not store explosive or flammable
substances (e.g. gasoline or aerosol cans) inside
or near the appliance - risk of fire.
INSTALLATION
The appliance must be handled and installed
by two or more persons - risk of injury. Use
protective gloves to unpack and install - risk of
cuts.
Installation, including water supply (if any),
electrical connections and repairs must be
carried out by a qualified technician. Do not
repair or replace any part of the appliance
unless specifically stated in the user manual.
Keep children away from the installation site.
After unpacking the appliance, make sure that
it has not been damaged during transport.
In the event of problems, contact the dealer or
your nearest After-sales Service. Once installed,
packaging waste (plastic, styrofoam parts
etc.) must be stored out of reach of children
- risk of suffocation. The appliance must be
disconnected from the power supply before
any installation operation - risk of electric
shock. During installation, make sure the
appliance does not damage the power cable
- risk of fire or electric shock. Only activate
the appliance when the installation has been
completed.
Carry out all cabinet cutting operations
before fitting the appliance and remove all
wood chips and sawdust.
Do not obstruct the minimum gap between the
worktop and the upper edge of the oven - risk
of burns.
Do not remove the oven from its polystyrene
foam base until the time of installation.
After installation, the bottom of the
appliance must no longer be accessible - risk of
burns.
Do not install the appliance behind a
decorative door - risk of fire.
ELECTRICAL WARNINGS
The rating plate is on the front edge of the
oven (visible when the door is open).
It must be possible to disconnect the
appliance from the power supply by
unplugging it if plug is accessible, or by a
multi-pole switch installed upstream of the
socket in accordance with the wiring rules and
2
Page 3

the appliance must be earthed in conformity
with national electrical safety standards.
Do not use extension leads, multiple sockets
or adapters. The electrical components must
not be accessible to the user after installation.
Do not use the appliance when you are wet
or barefoot. Do not operate this appliance if it
has a damaged power cable or plug, if it is not
working properly, or if it has been damaged or
dropped.
If the supply cord is damaged, it must be
replaced
with an identical one by the manufacturer, its
service
agent or similarly qualified persons in order to
avoid a hazard - risk of electric shock.
In case of replacement of power cable,
contact an authorised service centre.
CLEANING AND MAINTENANCE
WARNING: Ensure that the appliance is
switched off and disconnected from the power
supply before performing any maintenance
operation; never use steam cleaning
equipment - risk of electric shock.
Do not use harsh abrasive cleaners or metal
scrapers to clean the door glass since they
can scratch the surface, which may result in
shattering of the glass.
Ensure the appliance is cooled down before
any cleaning or maintenance - risk of burns.
WARNING: Switch off the appliance before
replacing the lamp - risk of electric shock.
DISPOSAL OF PACKAGING MATERIALS
The packaging material is 100% recyclable and is marked with the
recycle symbol
The various parts of the packaging must therefore be disposed of
responsibly and in full compliance with local authority regulations
governing waste disposal.
.
DISPOSAL OF HOUSEHOLD APPLIANCES
This appliance is manufactured with recyclable or reusable materials.
Dispose of it in accordance with local waste disposal regulations.
For further information on the treatment, recovery and recycling
of household electrical appliances, contact your local authority,
the collection service for household waste or the store where you
purchased the appliance. This appliance is marked in compliance
with European Directive 2012/19/EU, Waste Electrical and Electronic
Equipment (WEEE).
By ensuring this product is disposed of correctly, you will help
prevent negative consequences for the environment and human
health.
The symbol
documentation indicates that it should not be treated as domestic
waste but must be taken to an appropriate collection centre for the
recycling of electrical and electronic equipment.
on the product or on the accompanying
ENERGY SAVING TIPS
Only preheat the oven if specified in the cooking table or your
recipe.
Use dark lacquered or enamelled baking trays as they absorb heat
better.
Food requiring prolonged cooking will continue to cook even once
the oven is switched off.
ECO DESIGN DECLARATION
This appliance meets the Eco Design requirements of European
Regulations n. 65/2014 and 66/2014 in conformity with the
European standard EN 60350-1.
3
Page 4
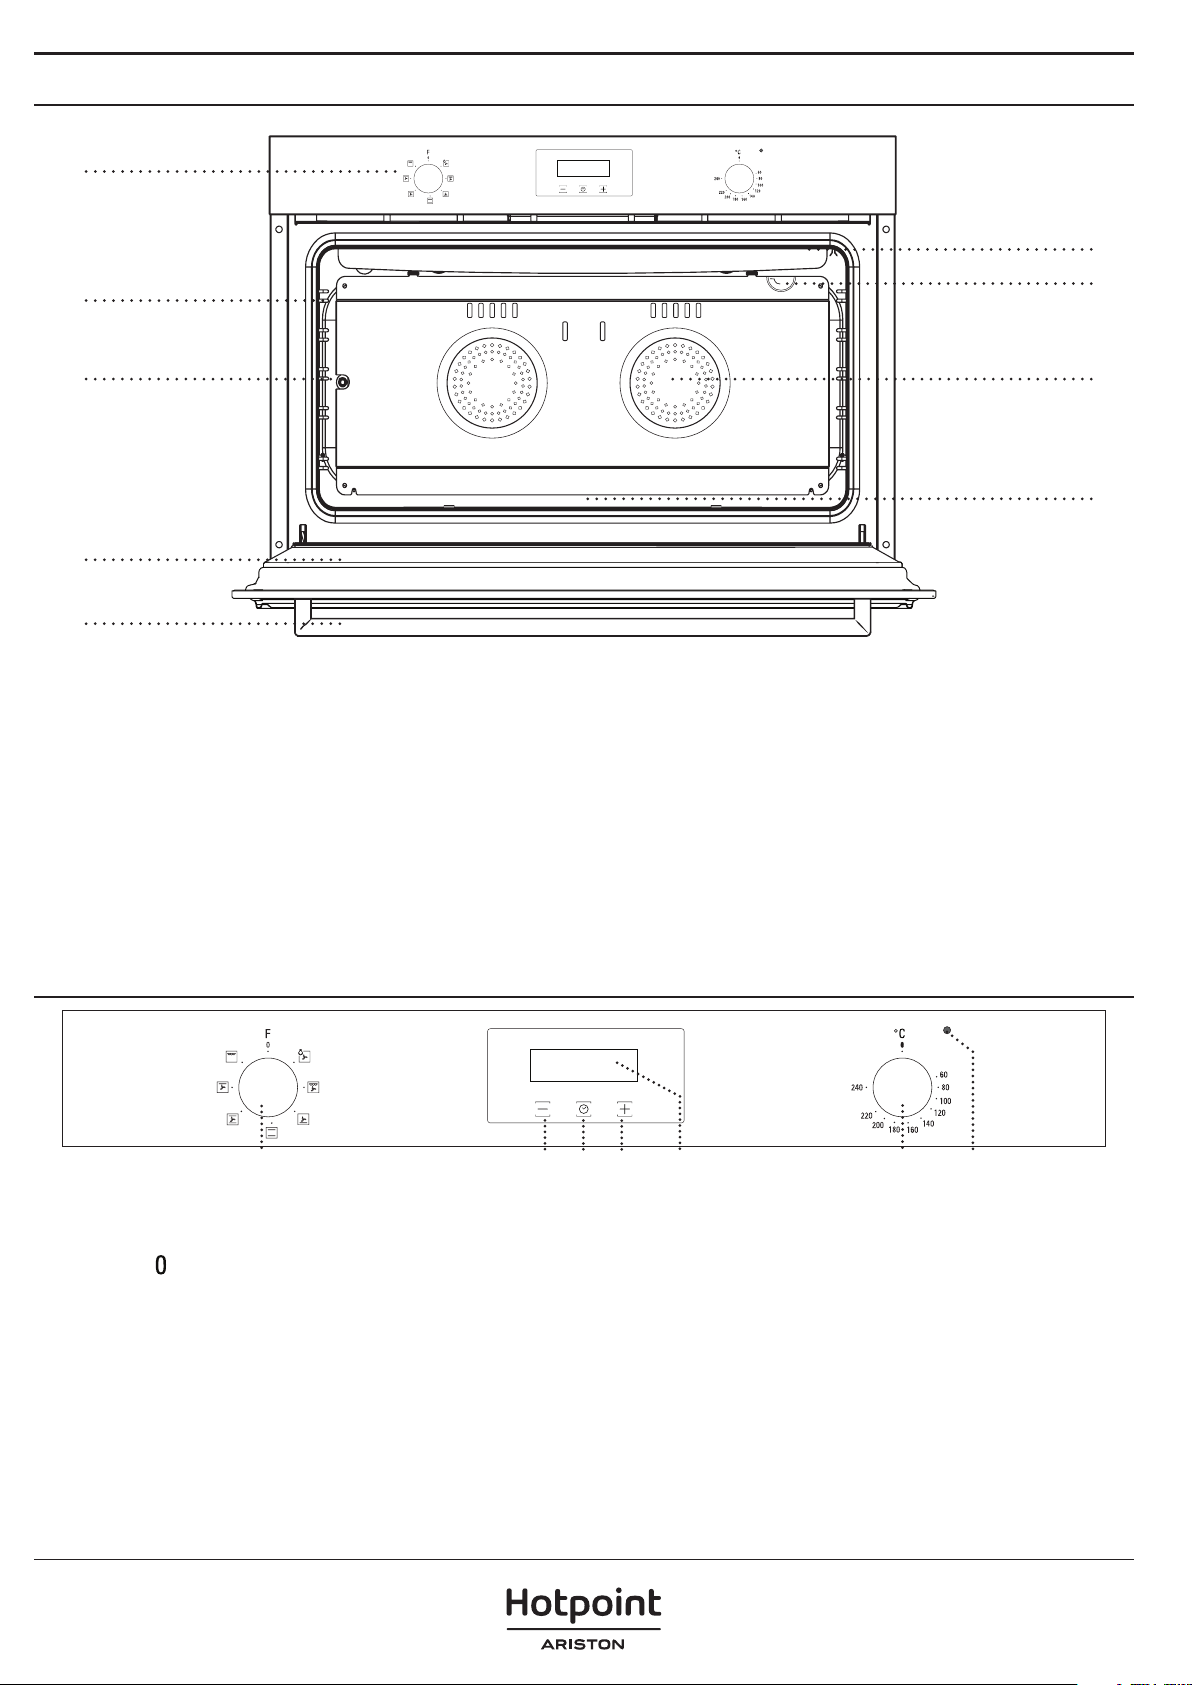
PRODUCT DESCRIPTION
1
6
2
3
4
5
1. Control Panel
2. Shelf guides
(the level is indicated on the front of the oven)
3. Turnspit insert point
4. Oven Door
5. Handle
7
8
9
6. Upper heating element/grill
7. Lamp
8. Fan and circular heating elements
9. Lower heating element
(not visible)
CONTROL PANEL DESCRIPTION
1 4
1. SELECTION KNOB
For switching the oven on by selecting a function.
Turn to the
2. + / - BUTTON
To decrease or increase the value shown on the
display.
3. TIME BUTTON
For selecting the various settings: duration, cooking
end time, timer.
position to switch the oven off.
3 22
4. DISPLAY
5. THERMOSTAT KNOB
Turn to select the desired temperature.
6. LED THERMOSTAT / PREHEATING
Switches on during the heating process. Switches off
once the desired temperature is reached.
5
6
4
Page 5

ACCESSORIES
WIRE SHELF DRIP TRAY WIRE TRAY TURNSPIT
Use to cook food or as a
support for pans, cake tins
and other ovenproof items
of cookware.
The number and the type of accessories may vary depending on which model is purchased.
Other accessories can be purchased separately from the After-sales Service.
INSERTING THE WIRE SHELF AND OTHER
ACCESSORIES
Insert the wire shelf horizontally by sliding it across
the shelf guides, making sure that the side with the
raised edge is facing upwards.
Other accessories, such as the drip tray and the
baking tray, are inserted horizontally in the same way
as the wire shelf.
REMOVING AND REFITTING THE SHELF GUIDES
Use as an oven tray for
cooking meat, sh,
vegetables, focaccia, etc. or
position underneath the
wire shelf to collect cooking
juices.
To be placed inside the
drip tray, creating a useful
set for grilling meat, sh or
vegetables.
USING THE TURNSPIT
Some ovens may be equipped with an electric motor,
spit and skewers for roasting poultry or meat. Skewer
the meat and secure it in place using the two forks. Put
turnspit rod into the drive unit (A) and the groove into
the bend (B). Slide the shelf into the oven runners
ensuring that the rod slots into hole. The turnspit shelf
must always be fitted in the middle of the oven (second
position from bottom).
• To remove the shelf guides, take strongly and pull
out the bottom part of the guide by lowering them
down. Then gently pull the upper part out of their
seating.
• To refit the shelf guides, first fit them back into
A
their upper seating, second lower in place near to
the lower seating and then push the bottom part
to fit them to the cavity.
For grilling poultry and
roasts.
B
2
Place the tray to collect the cooking juices: Position it on
the bottom level, adding some drinking water.
1
To operate the turnspit, select the "Turbogril lfunction".
At the end of cooking take the turnspit out of the oven
only by using its handle and oven gloves.
5
Page 6

FUNCTIONS
LIGHT AND FAN
For switching on the light in the compartment.
The fan is useful to speed up defrosting of food. Place
food on the middle shelf. Leave food in its packaging
to prevent it from drying out on the outside.
TURBOGRILL
For roasting large joints of meat (legs, roast
beef, chicken). We recommend using a drip tray to
collect the cooking juices:
Position the tray on any
of the levels below the wire shelf and add 500 ml of
drinking water.
4
Grilled Chicken
Grilled Fish 220 35 - 40 *
* Turn food halfway through cooking.
220 25 - 35 *
3
4
3
BOTTOM + FAN
To finish cooking food with a very liquid
consistency and to obtain crisp, golden bases. Also
useful for thickening sauces.
CONVENTIONAL
For cooking any kind of dish on one shelf only.
CONVECTION BAKE
For cooking meat, filled pies (cheesecake,
strudel, fruit pies) and stuffed vegetables on one level
only. This function can also be used for cooking on
two shelves. Switch the position of the dishes to cook
food more evenly.
Pastries
180 - 200 20 - 25
2
TOP HEATING ELEMENT + FAN
For keeping just-cooked food hot and crisp (e.g:
meat, fried food or flans) or cooking ready meals kept
at room temperature or from fridge.
GRILL
For grilling steaks, kebabs and sausages,
cooking vegetables au gratin or toasting bread. When
grilling meat, we recommend using a drip tray to
collect the cooking juices: Position the tray on any
of the levels below the wire shelf and add 500 ml of
drinking water.
4
Calf Steak Max 30 *
Grilled Meatball Max 40 *
3
4
3
Cake 180 70
Small Cake 180 40
Pie 200 70
Cookie 175 20
Apple Pie 180 - 190 150
Sponge cake 175 45 - 50
Pizza 190 25
Lasagne 180 - 200 50 - 60
Meringues 100 60
FIRST TIME USE
1. SETTING THE TIME AND THE TONE
You will need to set the time of the day when you
switch on the appliance for the first time: “A” and
“0.00” flash on the display.
* Turn food halfway through cooking.
2
2
HOW TO READ THE COOKING TABLES
2
The table lists recipes
temperature , cooking time , accessories and level
2
suggested for cooking. Cooking times start from the moment
food is placed in the oven, excluding preheating (where
1
required). Cooking temperatures and times are approximate
2
and depend on the amount of food and the type of accessory
used. Use the lowest recommended settings to begin with
2
and, if the food is not cooked enough, then switch to higher
settings. Use the accessories supplied and preferably dark-
2
coloured metal cake tins and baking trays. You can also use
Pyrex or stoneware pans and accessories, but bear in mind
2
, if preheating is needed ,
that cooking times will be slightly longer.
Accessories showed:
Wire Shelf Cake tin on wire shelf
Drip tray Tray with water
Cake tin on wire shelf or drip tray
To set the time of day, press buttons and at the
same time: Set the time of day using the
buttons.
Press the time button to confirm.
Please note: To change the time of the day afterwards for
example following lengthy power outages, proceed as
described above.
and
6
Page 7

2. HEAT THE OVEN
A new oven may release odours that have been left
behind during manufacturing: this is completely normal.
Before starting to cook food, we therefore recommend
heating the oven with it empty in order to remove any
possible odours.
DAILY USE
1. SELECT A FUNCTION
To select a function, turn the selection knob to the
symbol for the function you require.
2. ACTIVATE A FUNCTION
To start the function you have selected, turn the
thermostat knob to set the temperature you require.
To interrupt the function at any time, switch off the
oven, turn the selection knob and the thermostat
knob to
3. USING THE ELECTRONIC PROGRAMMER
By pressing the time button it is possible to select
various mode to keep or program the cooking time.
Please note: After few seconds without any
interaction, a buzzer sounds and all settings will be
confirmed.
SETTING THE MINUTE MINDER
This option does not interrupt or activate cooking but
allows you to use the display as a timer, both while a
function is active and when the oven is off.
To activate the timer, long press the time button: the
symbol flashes on the display (1).
Use the
the countdown begins after a few seconds. The
display shows the time of the day and the
lit, confirmating the timer has been set (2).
At the end, long press the time button to deactivate
the alarm.
and .
and buttons to set the desired duration:
remains
Remove any protective cardboard or transparent film
from the oven and remove any accessories from inside
it. Heat the oven to 240 °C for about one hour. The oven
must be empty during this time. Follow the instructions
for setting the function correctly.
Please note: It is advisable to air the room after using the
appliance for the rst time.
3 4 5
Please note: To see how much time is left and change the
remaining cooking time repeat the steps above.
When the set cooking time is over, an alarm will
sound and the cooking will be stopped (6).
6
Long press the time button to deactivate the alarm.
Return the selection knob and thermostat knob to
and
to switch off the oven.
FULLY AUTOMATIC PROGRAM / DELAYED START
You can delay the start of the function by
programming its end time.
After setting the duration, press the time button until
the display shows END (7).
Press the buttons
and to select the desired
cooking end time. After a few seconds the display
shows the time of the day, while the symbol
switches off and A remains lit, confirming the setting
(8).
Please note: To see and change the settings set repeat the
steps above.
The function will remain paused until the symbol
lights up: at that point the oven proceeds
automatically with the selecetd cooking mode (9).
1 2
Please note: To view the countdown and change it if
necessary, press the time button 2 seconds again.
SETTING THE DURATION
After selecting and activating the function, in order
to stop it automatically, you can set a cooking time.
Long press the time button: the
symbol flashes (3).
Press the time button again: DUR and A will flash on
the display (4).
Set the duration using the
and buttons.
After a few seconds, the display will show the time
of the day while AUTO remains lit, confirming the
setting (5).
7 8 9
At the end, long press the time button to deactivate
the alarm. Return the selection knob and thermostat
knob to
Please note: By only selecting the end time (with no duration
setting), the function will immediately start. The cooking will
continue up to the required end time.
and to switch off the oven.
OPTIONS
ALARM TONE
To set the alarm tone, long press button
To select the desired tone, press buttons
press the time button to confirm.
BRIGHTNESS
To set the brightness of display, long press button
To select the desired tone, press buttons
press the time button to confirm.
.
or , then
or , then
.
7
Page 8

KEY LOCK
The key lock will be active within 30 seconds after
the last button pression. The
icon will appear on
display. To deactivate it, long press the time button.
4. PREHEATING
Once the function has been activated, the LED
thermostat will switch on signalling that the
preheating process has begun.
At the end of this process, the LED thermostat
switches off indicating that the oven has reached the
set temperature: at this point, place the food inside
CLEANING AND MAINTENANCE
and proceed with cooking.
Please note: placing the food in the oven before preheating
has nished may have an adverse eect on the nal cooking
result.
COOLING SYSTEM
The cooling fan may switch itself on every so
often during cooking in order to reduce energy
consumption.
Once cooking is complete and the oven has been
switched off, the cooling fan may continue to run for
a certain period of time.
Make sure that the oven has
cooled down before carrying out
any maintenance or cleaning.
Do not use steam cleaners.
Do not use wire wool, abrasive
scourers or abrasive/corrosive
cleaning agents, as these could
damage the surfaces of the
appliance.
EXTERIOR SURFACES
• Clean the surfaces with a damp microfibre cloth.
If they are very dirty, add a few drops of pH-neutral
detergent. Finish off with a dry cloth.
• Do not use corrosive or abrasive detergents. If
any of these products inadvertently comes into
contact with the surfaces of the appliance, clean
immediately with a damp microfibre cloth.
INTERIOR SURFACES
• After every use, leave the oven to cool and then
clean it, preferably while it is still warm, to remove
any deposits or stains caused by food residues To
dry any condensation that has formed as a result
of cooking foods with a high water content, let the
oven to cool completely and then wipe it with a
cloth or sponge.
• Clean the glass in the door with a suitable liquid
detergent.
• The oven door can be removed to facilitate
cleaning.
ACCESSORIES
Soak the accessories in a washing-up liquid solution
after use, handling them with oven gloves if they
are still hot. Food residues can be removed using a
washing-up brush or a sponge.
REPLACING THE LAMP
• Disconnect the oven from the power supply.
• Unscrew the cover from the lamp, replace the bulb
and screw the cover back on the lamp.
• Reconnect the oven to the power supply.
Wear protective gloves.
The oven must be disconnected
from the mains before carrying
out any kind of maintenance work.
designed for domestic appliances and is not suitable for
general room lighting within the home (EC Regulation
244/2009).
Light bulbs are available from our After-Sales Service.
When using halogen bulbs, do not handle them with your
bare hands as your ngerprints could cause damage. Do not
use the oven until the lamp cover has been retted.
REMOVING AND REFITTING THE DOOR
To remove the door, open it fully and lower the
catches until they are in the unlock position.
Set the hinge lock to the widest angle. Adjust both
hinges connecting oven door to the oven to the same
position.
Later, close the opened oven door so that it will be in
a position to contact with hinge lock.
Please note: Only use 15-25 W/220-240 V type G9, T300°C
halogen bulbs. The bulb used in the product is specically
8
Page 9

Fake a firm hold of the door with both hands – do
~15°
not hold it by the handle. Simply remove the door by
continuing to close it while pulling it upwards at the
same time until it is released from its seating.
b
a
Put the door to one side, resting it on a soft surface.
Reversely perform respectively what you did while
opening door to reinstall oven door back.
COOKING TABLE
RECIPE FUNCTION
Cake 180 70
Small Cake 180 40
Pie 200 70
Pastry 180 - 200 20 - 25
Cookies 175 20
Apple Pie 180 - 190 150
Sponge Cake 175 45 - 50
Meringue 100 60
Pizza 190 25
Lasagne 180 - 200 50 - 60
Grilled Chicken* 220 25 - 35 4
TEMPERATURE
(°C)
DURATION
(MIN)
LEVEL
2
2
2
2
2
1
2
2
2
2
Grilled Fish* 220 35 - 40 4
Calf Steak* Max. 30
Grilled Meatball* Max.
* Food must be turned after half of the cooking time.
FUNCTIONS
Static
Static + fan Grill + fan Grill
40
4
4
9
Page 10

TROUBLESHOOTING
Problem Possible cause Solution
The oven will not switch on
In the event of problems, turn the adjustment knob back to the position and open the oven door.
Power cut.
Disconnection from the
mains elec tricit y.
Switch-on procedure carried
out incorrectly.
Check for the presence of mains electrical power
and whether the oven is connected to the
electricity supply.
Wait at least one minute, then try to switch the
oven on again and see if the problem persists.
Wait at least one minute and then repeat the steps
described in the “How to operate the oven”
section.
AFTER-SALES SERVICE
Before calling the After-Sales Service:
See if you can solve the problem yourself
with the help of the suggestions given in the
“Troubleshooting”.
If after the above checks the fault still occurs, get in
touch with the nearest After-sales Service.
Always specify:
• a brief description of the fault;
• the type and exact model of the oven;
• the service number (number after the word
Service on the rating plate), located on the right hand
edge of the oven cavity (visible when the oven door
is open). The service number is also indicated on the
guarantee booklet;
• your full address;
• your telephone number.
If any repairs are required, please contact an
authorised After-sales Service (to guarantee that
original spare parts will be used and repairs carried
out correctly).
10
Page 11

x2
90°C
11
Page 12

565
840
595
545
89° max
896
5
4
870
810
600
35
550
(min.)
35
550
(min.)
590
870
5
12
Page 13

x 2
400011311833
Printed in I taly
13
 Loading...