

DAILY REFERENCE
WWW
GUIDE
EN
THANK YOU FOR PURCHASING AN
ARISTON PRODUCT
To receive more comprehensive help and
support, please register your product at
www . aristonchannel . com
Before using the appliance carefully read the Health and Safety guide.
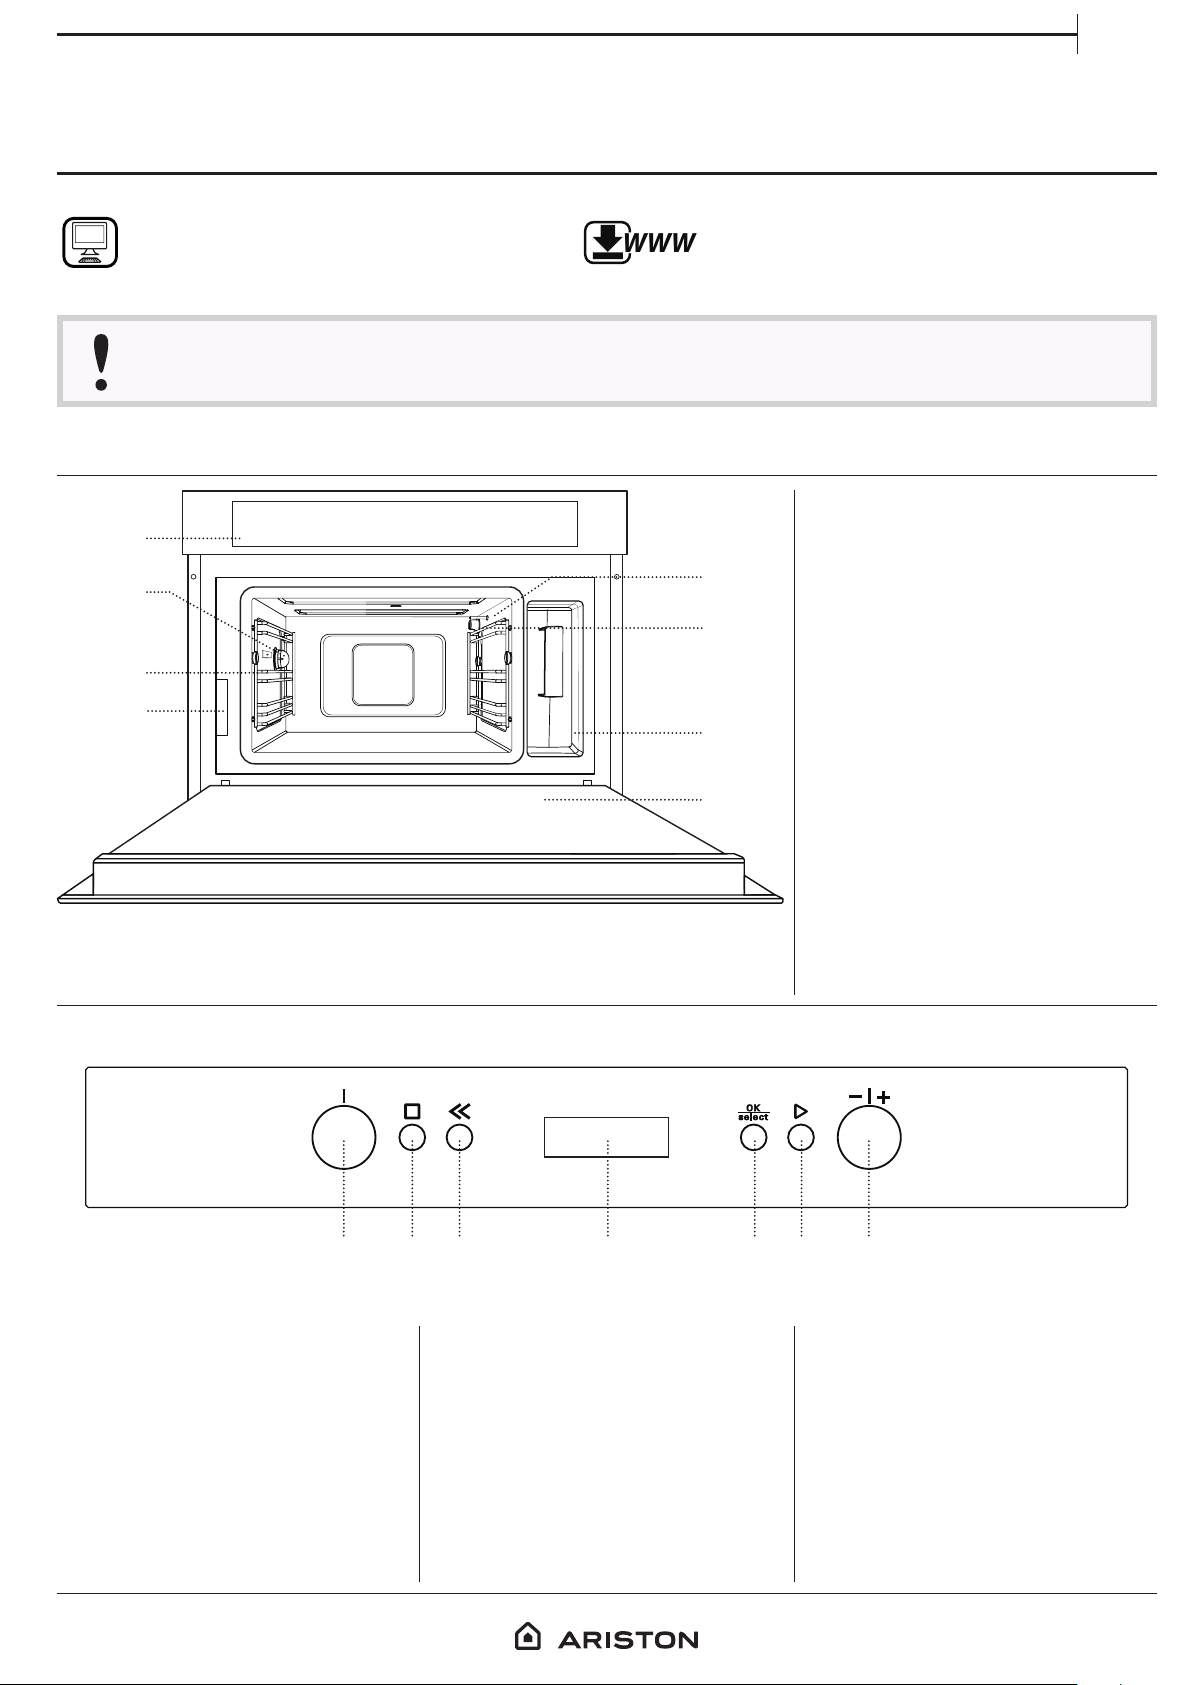
PRODUCT DESCRIPTION
1
2
3
4
You can download the Safety Instructions
and the Use and Care Guide by visiting our
website www . aristonchannel . com and
following the instructions on the back of
this booklet.
1. Control panel
2. Lamp
5
6
7
3. Shelf guides
4. Identification plate
(do not remove)
5. Temperature sensor
6. Steam inlet valve
7. Water reservoir
8. Door
CONTROL PANEL
1 2 3 4 5 6 7
1. ROTARY SWITCH KNOB
For switching the oven on by
selecting a function.
Turn to the “0” position to switch
the oven off.
2. STOP
For stopping the function that is
currently active at any time and
putting the oven into standby
mode.
8
3. BACK
For returning to the previous
menu.
4. D ISPLAY
5. CONFIRMATION BUTTON
For confirming a selected function
or a set value.
6. START
For starting a function.
7. ADJUSTMENT KNOB
For scrolling through the menus
and applying or changing settings.
Please note: All knobs are pushactivated knobs. Push down on the
centre of the knob to release it from its
seating.
1
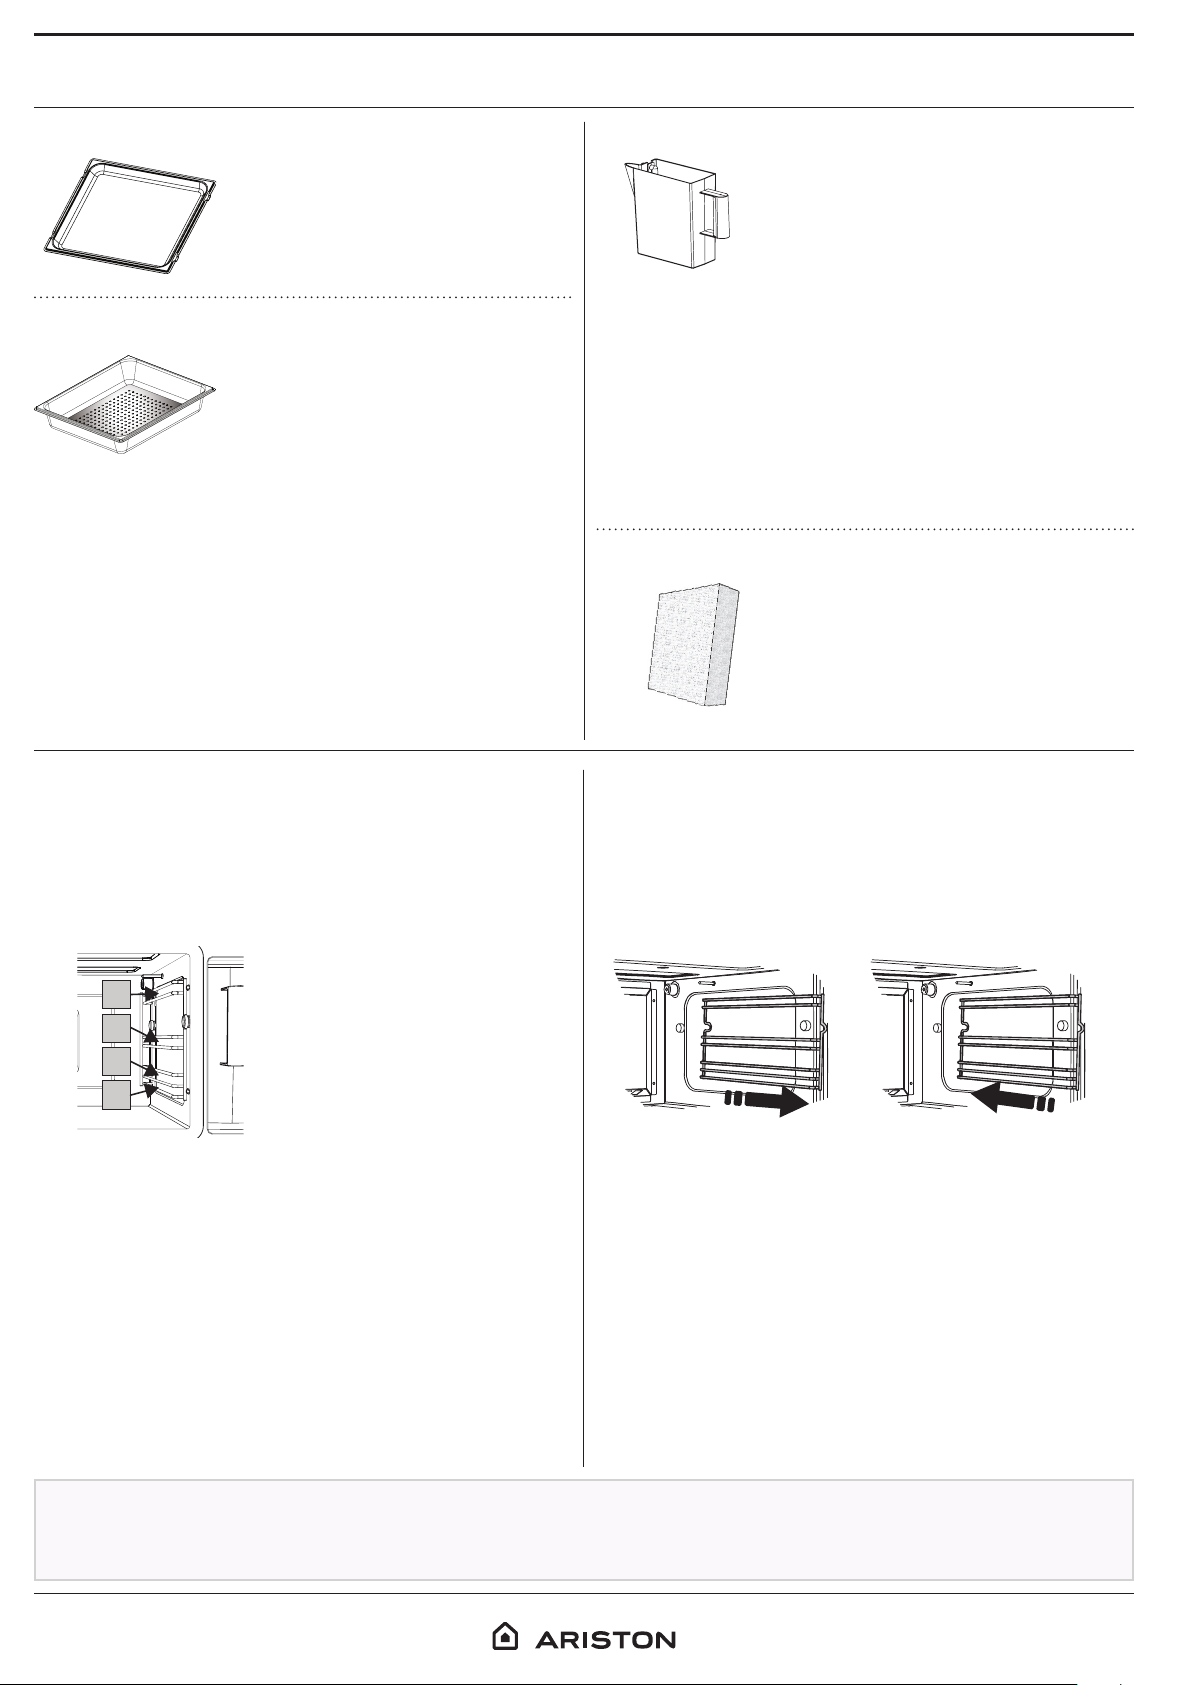
ACCESSORIES
DRIPPING PAN
STEAMER TRAY
It is also useful for supporting
heat-resistant ovenware as it
means you do not have to place
items on the bottom of the oven.
It collects the cooking juices when
placed below the steamer tray.
This makes it easier for steam to
circulate, which helps cook the
food evenly. Place the dripping
pan on the level below to collect
the cooking juices.
WATER RESERVOIR
The water reservoir can be easily
accessed by opening the door.
Remove it by lifting it slightly
upwards and then pulling it
towards you.
Fill the water reservoir with
drinking water up to the “MAX” mark.
Once full, put the water reservoir back in its holder.
Make sure that it is positioned correctly: The top and
the right-hand side of the water reservoir should be
touching the sides of the holder.
Insert the water reservoir fully and then push it
downwards until it clicks into place.
Carefully remove the water reservoir and empty it
after every use. Take care to pour water out of the
tube as well.
SPONGE
For removing any condensation
that forms during cooking.
PLACING ACCESSORIES ON THE SHELF GUIDES
Insert the steamer tray horizontally by sliding it across
the shelf guides, making sure that the side with the
raised edge is facing upwards.
The levels (shelf guides) on which the accessories can
be placed are numbered, with 1 being the lowest and
4 being the highest.
4
3
2
1
REMOVING AND REFITTING THE SHELF GUIDES
To remove the shelf guides, slide them forwards and
pull them towards you to unhook them from the
brackets (fig. a).
To refit the shelf guides, hook them into the brackets
by pushing down on them gently until they click into
place. (fig. b).
a. b.
Before purchasing other accessories that are
available on the market, make sure that they are
heat-resistant and suitable for steaming.
2
Make sure that there is a gap of at least 30 mm
between the top of any container and the walls of
the cooking compartment in order to allow steam
to ow suciently.
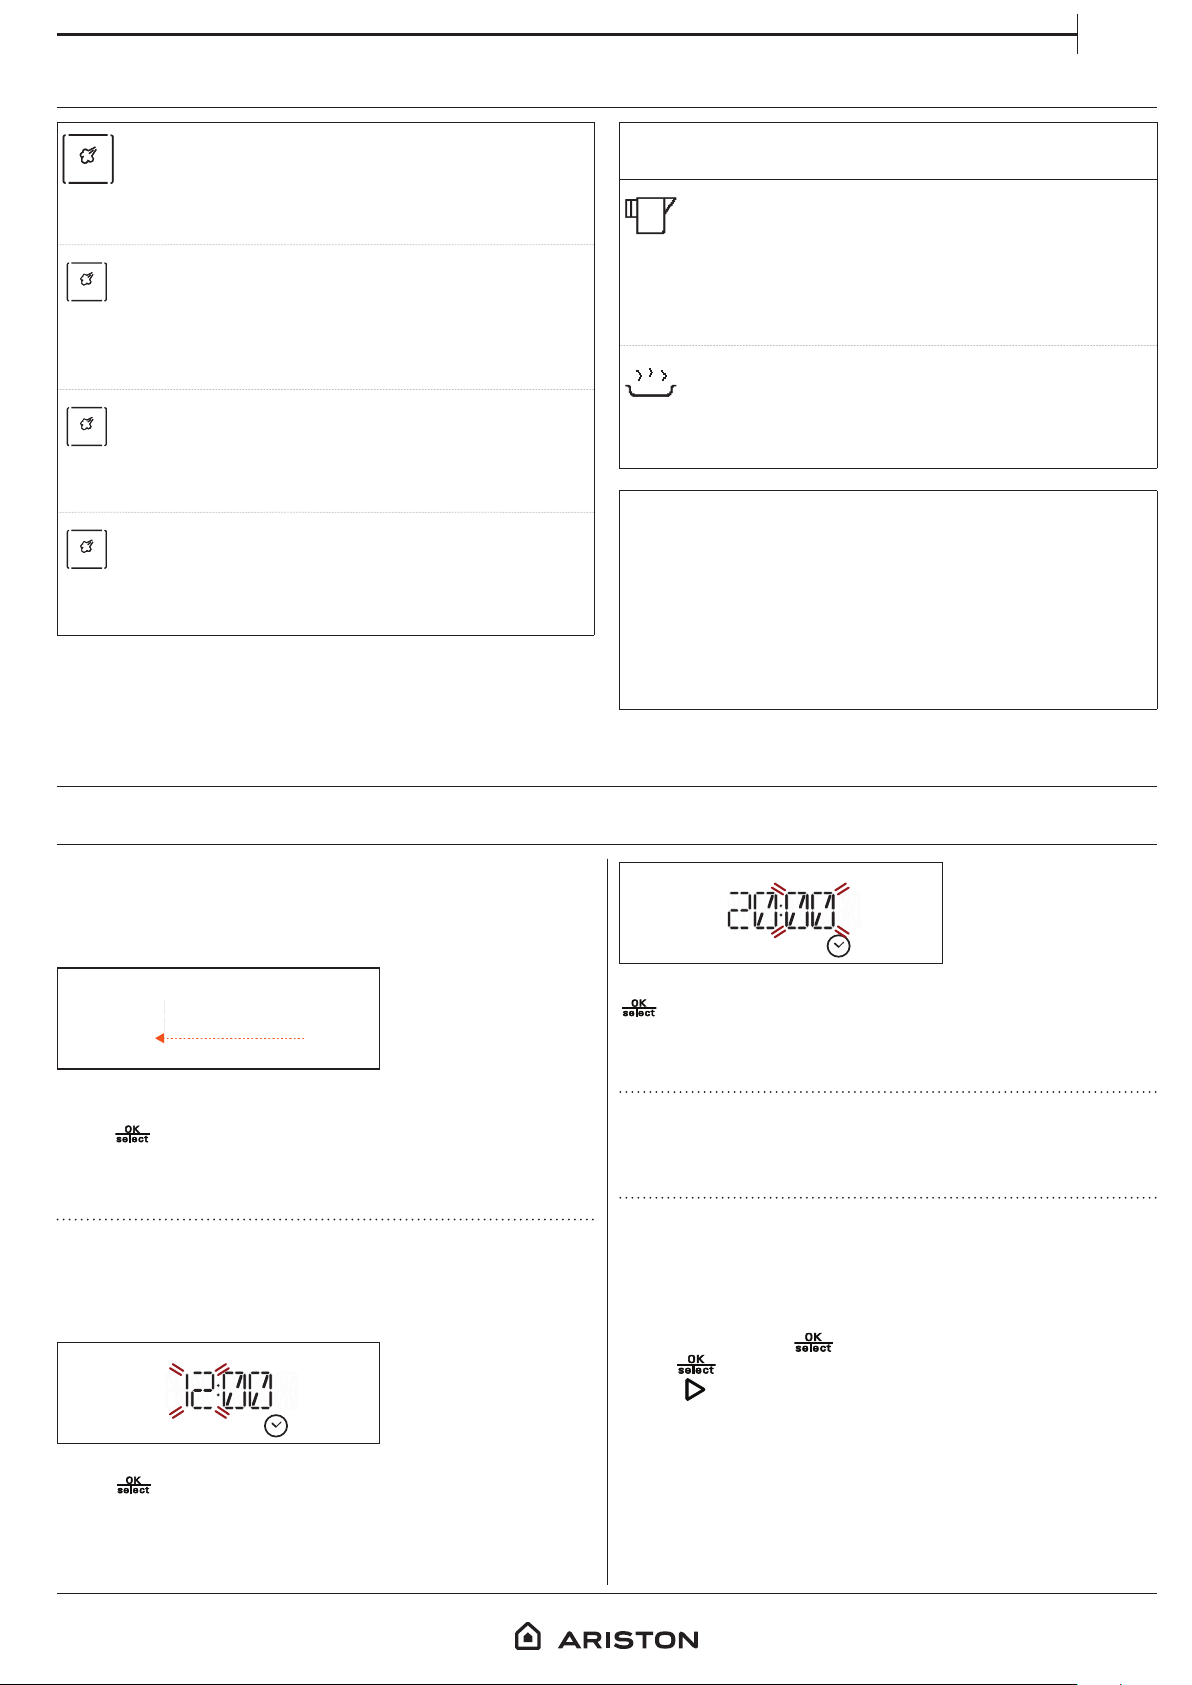
FUNCTIONS
EN
STEAM
For cooking natural and healthy dishes using
steam. This function is particularly suited to cooking
vegetables, fish and fruit, and also for blanching.
FISH
obtain optimum results when cooking fish (whole,
steaks or fillets), shellfish and molluscs, keeping
them soft and full of flavour.
VEGET
either fresh or frozen, and preserving their
nutritional value.
POULT
slowly and gently, making it beautifully tender and
succulent.
STEAM FISH
This function uses gentle steam to
STEAM VEGETABLES
For cooking all types of vegetables,
STEAM POULTRY
This function cooks white meat
SPECIALS
EMPTY
For draining the cooking compartment
automatically to prevent residual water remaining in
there when the oven will not be used for a certain
period of time. The function will only activate if the
temperature of the oven is below 60 °C.
DESCALE
For removing limescale deposits from the
cooking compartment. We recommend using this
function at regular intervals.
SETTI
(language, time, audible signal volume, brightness,
Eco mode, calibration).
Please note: When Eco mode is active, the brightness of the
display will be reduced after a few seconds to save energy.
It is reactivated automatically whenever any of the buttons
are pressed, etc.
SETTINGS
For changing the oven settings
USING THE APPLIANCE FOR THE FIRST TIME
1. SELECT THE LANGUAGE
You will need to set the language and the time
when you switch on the appliance for the first time:
“ENGLISH” will scroll along the display.
Turn the adjustment knob to set the minutes and press
ENGLI
Turn the adjustment knob to scroll through the list of
available languages and select the one you require.
Press
Please note: The language can subsequently be changed
from the “Settings” menu.
2. SET THE TIME
After selecting the language, you will need to set the
current time: The two digits for the hour will flash on
the display.
Turn the adjustment knob to set the correct hour and
press
to confirm your selection.
: The minutes will flash on the display.
to confirm.
Please note: You may need to set the time again following
lengthy power outages.
3. RINSE AND FILL THE WATER RESERVOIR
Remove the sponge, then rinse and fill the water
reservoir with tap water up to the “MAX” mark.
4. CALIBRATING
To enable the oven to produce steam efficiently, it
needs to be calibrated before being used for cooking.
After filling the water reservoir and putting it in place,
turn the adjustment knob to select the “Settings”
menu item. Press
press
Press
oven door remains closed until the process has ended.
Once calibration is complete, leave the oven to cool
down and dry the cooking compartment with a cloth.
Please note: A large amount of steam may be generated
during this process: This is perfectly normal.
again to confirm.
to start calibrating, making sure that the
, select “Calibrate” and then
3

DAI LY USE
1. SELECT A FUNCTION
Turn the adjustment knob until the function you
require is shown on the display: If necessary, press
to confirm and view the settings menu for the
function.
To select an item from the menu (the display will
show the first available item), turn the adjustment
knob until the item you require is shown.
SETTI
Press to confirm your selection: The display will
show the settings menu or the steps you then need to
follow.
2. SET THE FUNCTION
After having selected the function you require, you
can change its settings.
The display will show the settings that can be
changed in sequence.
With the setting flashing on the display, turn the
adjustment knob to change the setting, then press
to confirm and continue with the settings that
follow.
. PAUSE
To pause an active function, for example to stir or turn
the food, simply open the door.
Cooking will resume automatically when you close
the door again.
. AUTOMATIC EMPTYING
The automatic emptying function may activate
automatically once cooking has finished in order
to prevent residual water remaining in the cooking
compartment.
Wait until the emptying process is complete before
draining and rinsing the water reservoir with drinking
water.
SPECIALS
EMPTY
To prevent residual water from remaining inside
the cooking compartment, it is advisable to activate
this function every time the oven will not be used for
a certain period of time.
Activate the function and follow the steps given on
the display. Once finished, drain and rinse the water
reservoir with drinking water.
Please note: If the cooking compartment is too hot, the
function will not be activated until the temperature in
the oven is below 60 °C. The function will be activated
automatically once the compartment has reached this
temperature.
Note: Pressing allows you to change the previous setting
again.
3. ACTIVATE THE FUNCTION
Once you have applied the settings you require, press
to activate the function.
PRESS
You can press at any time to pause the function
that is currently active.
4
DESCALE
When used at regular intervals, this special
function keeps the cooking compartment in optimum
condition.
Activate the function and follow the steps given on
the display, pressing
For best results, we recommend filling the water
reservoir with 250 ml of white vinegar and then
topping it up with drinking water until the “MAX”
mark.
Descaling takes around 30 minutes: Do not switch off
the oven during this time.
Cooking functions cannot be activated during the
cleaning cycle.
Once finished, drain and rinse the water reservoir with
drinking water to remove any residue.
to proceed.

. TIMER
When the oven is switched off, the display can be
used as a timer. To activate the function and set the
length of time you require, turn the adjustment knob.
Press to activate the timer: An audible signal will
sound and the display will indicate once the timer has
finished counting down the selected time.
Once the timer has been activated, you can activate
a function as well: The timer will continue to count
down the selected time automatically without having
any effect on the function.
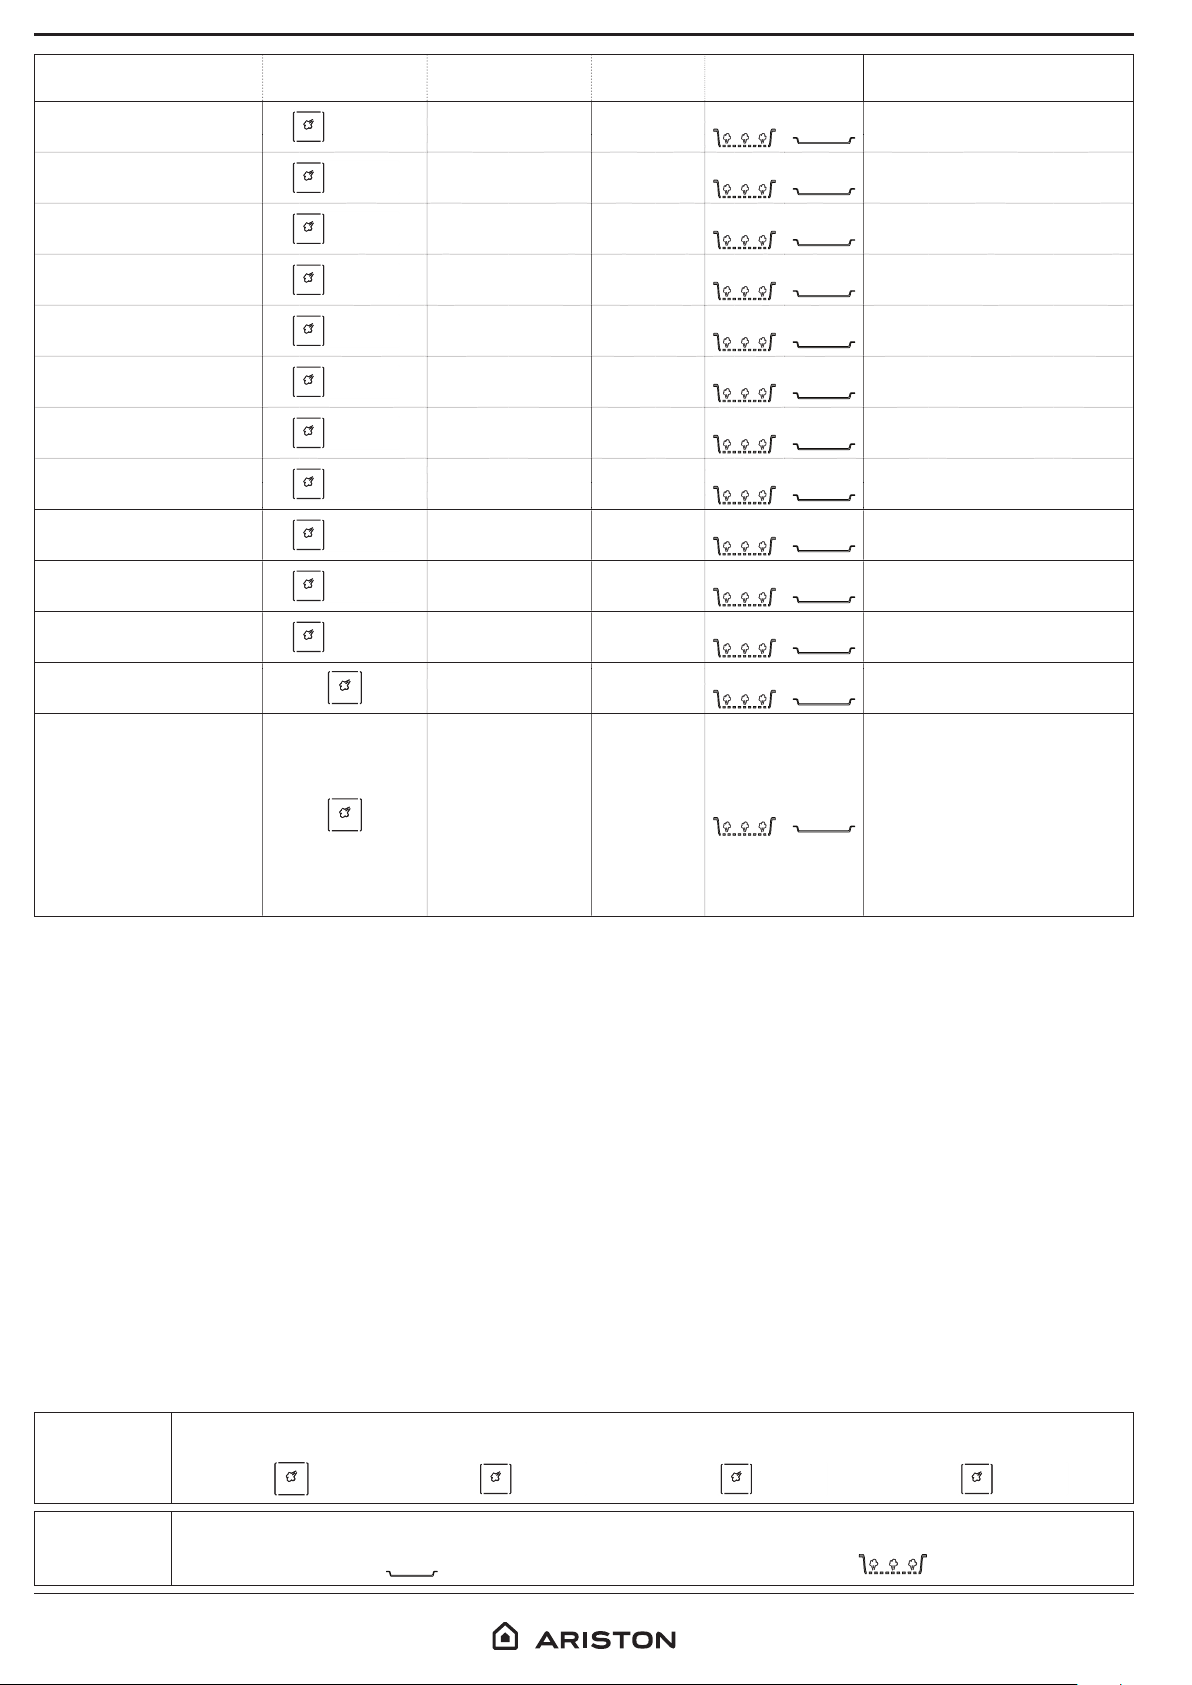
COOKING TABLE
EN
To go back to viewing the timer, wait for the function
to finish or stop the oven function by pressing
Please note: The timer does not activate any of the cooking
cycles.
To change the time set for the timer, press to pause it and
then press twice to go back to viewing the current time.
FOOD FUNCTION TEMPERATURE (°C) DURATION
Black rice 100 20-60
Basmati rice 100 25-30
Long White Rice 100 35-40
Bulgur 100 10- 40
Couscous 100 10 -15
Hard-boiled eggs 100 15-18
Medium-boiled eggs 100 12-15
Soft-boiled eggs 100 9-12
Hot dog, boiled 75 10 -15
Chicken pieces
Chicken breasts
Whole sh
Steamed cutlets
Fish llets
POULT
POULT
FISH
FISH
FISH
100 30-40
100 25-30
75 35-55
75 12-18
75 15-20
LEVEL AND
ACCESSORIES
3
3
3
3
3
3
3
3
3
3
3
3
3
3
1
1
1
1
1
1
1
1
1
NOTES
(300 g + 500 ml water)
(300 g + 450 ml water)
(300 g + 450 ml water)
(300 g + 600 ml water)
(300 g + 300 ml water)
Spread out in a single layer
Season and spread out in a
single layer
Season and spread out in a
single layer
Season rst and sprinkle
aromatic herbs inside
Season and spread out in a
single layer
Season and spread out in a
single layer
FUNCTIONS
ACCESSORIES
Steam Poultry Fish Vegetables
POULT
Drip tray Steamer tray
FISH
VEGET
5
FOOD FUNCTION TEMPERATURE (°C) DURATION
Mussels, shrimps
FISH
75 8-12
LEVEL AND
ACCESSORIES
3
1
NOTES
Spread out in a single layer
Frozen vegetables
Carrots, asparagus,
peas
Artichokes
Broccoli
Brussels sprouts
Peppers
Squash
Corn on the cob
Whole potatoes
Potato wedges
VEGET
VEGET
VEGET
VEGET
VEGET
VEGET
VEGET
VEGET
VEGET
VEGET
100 12-20
100 20-30
100 40-55
100 15-25
100 20-35
100 8-12
100 5-10
100 25-35
100 30-40
100 20-30
Fruit compote 100 10-20
Crème brûlée 90 20-30
3
3
3
3
3
3
3
3
3
3
1
Spread out in a single layer
1
1
1
1
1
1
Cut into pieces
Cut into pieces
1
1
Use potatoes of a similar size
1
Cut into pieces of a similar
size
3
1
Cut the fruit into pieces.
For four portions: Mix 2 egg
yolks and 2 whole eggs with
3 tablespoons sugar and
vanilla. Heat 100 ml of cream
3
1
+ 200 ml of milk and add
this to the eggs (or use your
own favourite recipe). Pour
the mixture into individual
moulds and cover with lm.
FUNCTIONS
ACCESSORIES
6
Steam Poultry Fish Vegetables
POULT
Drip tray Steamer tray
FISH
VEGET

MAINTENANCE
AND CLEANING
EN
Make sure that the oven has cooled down before
carrying out any maintenance or cleaning.
Do not use steam cleaners.
Do not use wire wool, abrasive scourers or abrasive/
corrosive cleaning agents, as these could damage
the surfaces of the appliance.
EXTERIOR SURFACES
• Clean the surfaces with a damp microfibre cloth.
If they are very dirty, add a few drops of pH-neutral
detergent. Finish off with a dry cloth.
• Clean the glass in the door with a suitable liquid
detergent.
INTERIOR SURFACES
• After every use, leave the oven to cool and then
clean it, preferably while it is still warm, to remove any
deposits or stains caused by food residues.
• To remove the moisture generated by steaming,
leave the oven to cool and then wipe the
compartment with a cloth or the sponge provided.
The oven must be disconnected from the mains
before carrying out any kind of maintenance work.
Wear protective gloves.
ACCESSORIES
• The majority of accessories can be washed in the
dishwasher, including the shelf guides.
• The water reservoir is not dishwasher-safe. Clean the
water reservoir carefully using a sponge and a little
pH-neutral detergent. Rinse with drinking water.
COOKING COMPARTMENT
To ensure that the oven always works at optimum
performance and to help prevent the build-up of
limescale deposits over time, we recommend using
the “Empty” and “Descale” functions regularly.
REPLACING THE LAMP
1. Disconnect the oven from the power supply.
2.. Unscrew the cover from the light and carefully
remove the seals and the washer.
3. Replace the light and screw the cover back on,
taking care to refit the seals and the washer correctly.
4. Reconnect the oven to the power supply.
Please note: Use 10 W/12 V type G4, T300 °C halogen lamps.
The bulb used in the product is specically designed for
domestic appliances and is not suitable for general room
lighting within the home (EC Regulation 244/2009). Lamps
are available from our After-sales Service.
- Do not handle bulbs with your bare hands as your
ngerprints could damage them.
Do not use the oven until the lamp cover has been retted.
7

TROUBLESHOOTING
WWW
Problem Possible cause Solution
Download the Use and Care Guide from
www . aristonchannel . com for more information
The oven is not working.
The oven is not producing
steam.
flash on the display after
activating a function.
The display is showing “Err”.
Power cut.
Disconnection from the
mains.
Fault.
Water reservoir not inserted
correctly.
Water reservoir empty.
Software problem.
Check for the presence of mains electrical power
and whether the oven is connected to the
electricity supply.
Turn o the oven and restart it to see if the fault
persists.
Check whether the water reservoir has been placed
in the correct position and whether it is lled with
drinking water up to the “MAX” mark, then start the
function you require again.
Contact you nearest After-sales Service Centre and
state the letter or number that follows “Err”.
PRODUCT FICHE
WWW
The product fiche with energy data of this
appliance can be downloaded from the website
www . aristonchannel . com
HOW TO OBTAIN THE USE AND CARE GUIDE
WWW
>
Download the Use and Care Guide
from our website www . aristonchannel . com
(you can use this QR Code), specifying the
product’s commercial code.
> Alternatively, contact our Client After-sales Service.
8
CONTACTING OUR AFTERSALES SERVICE
You can find our
contact details in the
warranty manual. When
contacting our Client
After-sales Service,
please state the codes
provided on your
product's identification
plate.
XXXXXXXXXXXX
XXXXXXXXXXXX
XXX/XXX
400011201624
Printed in I taly
 Loading...