

Page 1
DAILY REFERENCE
WWW
GUIDE
EN
THANK YOU FOR PURCHASING AN
ARISTON PRODUCT
To receive more comprehensive help and
support, please register your product at
www.aristonchannel.com
Before using the appliance carefully read the
Health and Safety guide.
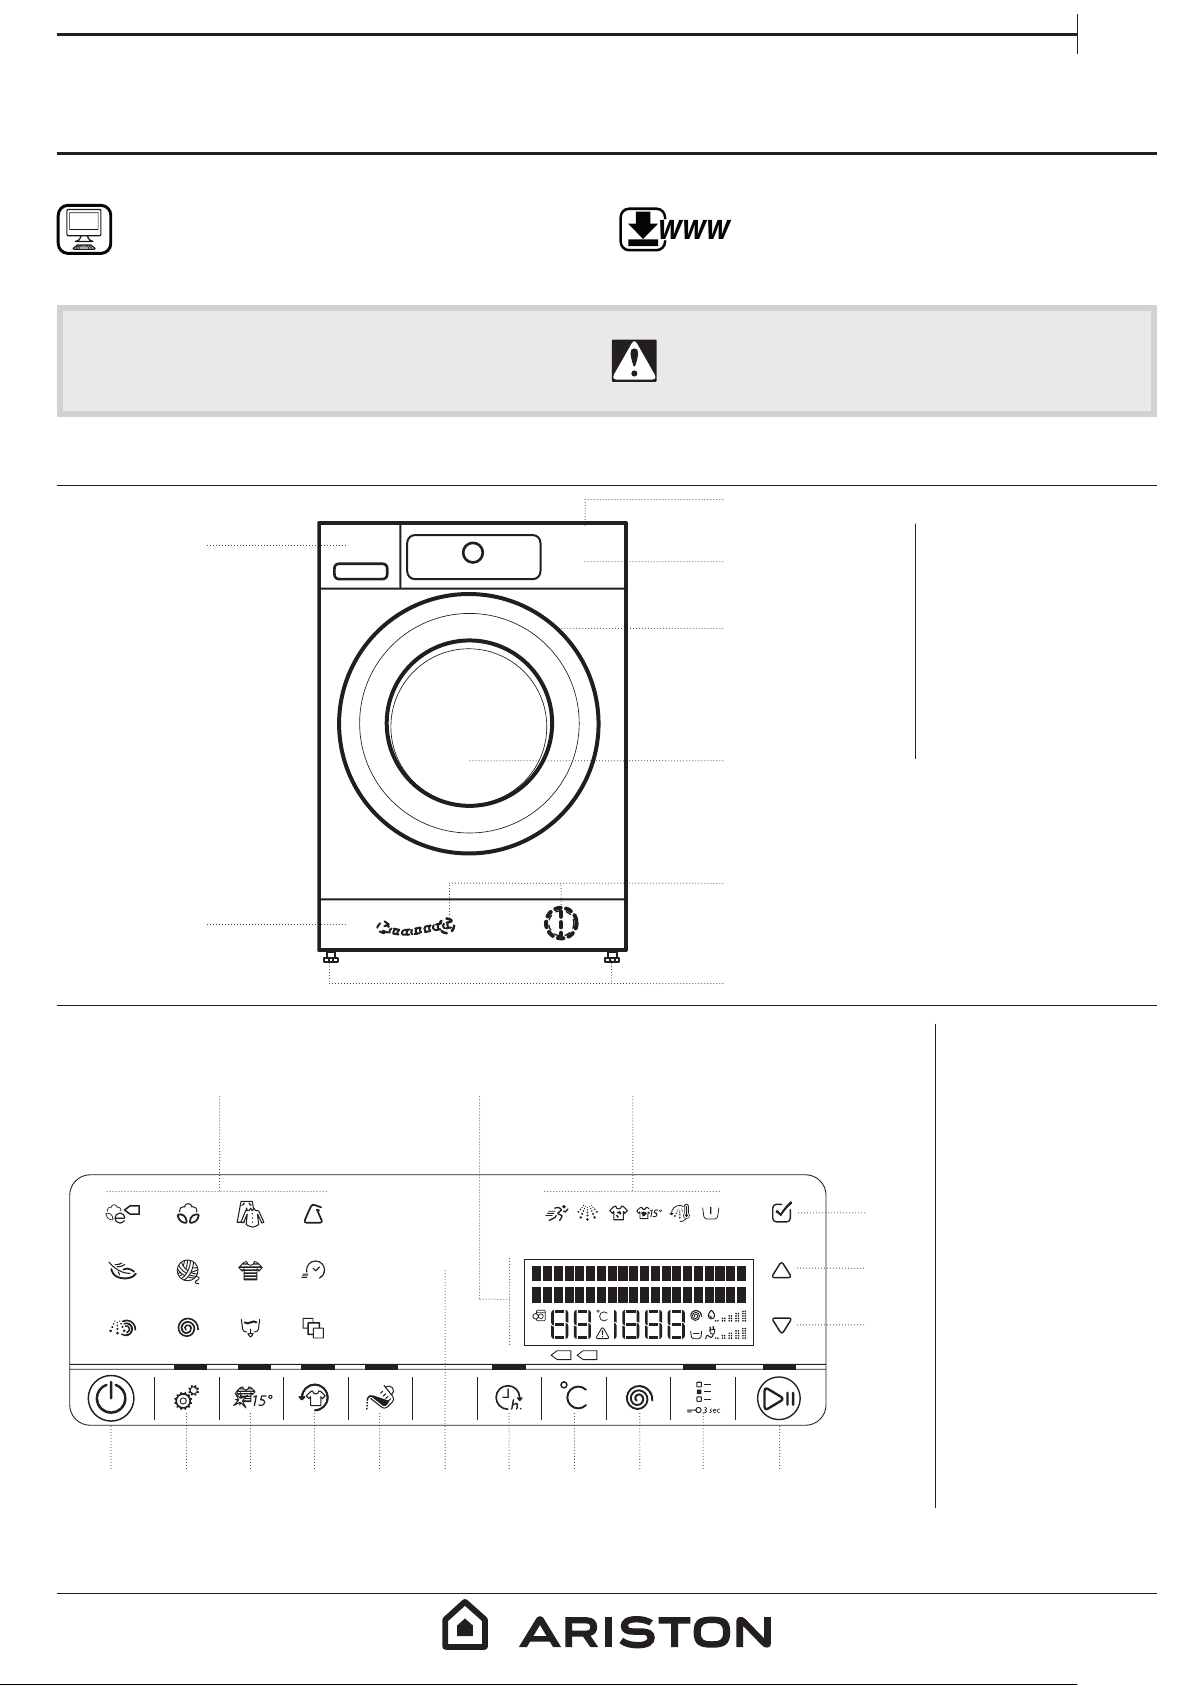
PRODUCT DESCRIPTION
APPLIANCE
2.
You can download the Safety Instructions
and the Use and Care Guide by visiting our
website
www.aristonchannel.com and following
the instructions on the back of this booklet.
Before using the machine, it is imperative that the
transport bolts are removed.
For more detailed instructions on how to remove
them, see the Installation Guide.
1.
1. Worktop
3.
4.
5.
2. Detergent dispenser
3. Control panel
4. Door handle
5. Door
6. Water lter/emergency
drain hose
(if available) - behind
plinth -
7. Plinth (removable)
8. Adjustable feet (4)
CONTROL PANEL
1.
2. 8.3. 9.4. 5. 6. 10. 11.
6.
7.
8.
1. On/O button
(Reset/Drain if pressed
17.
16.15.
12.
30’
kg
40° 60°
7.
13.
14.
and held down)
2. Settings button
3. Colours 15° button
4. Fresh Care button
5. Dosing Aid button
6. Sensing indicator
7. Finish in button
8. Temperature button
9. Spin Speed button
10. Options button
(Key lock if pressed and
held down)
11. Start / Pause button
12. OK key (to conrm)
13. UP key
14. DOWN key
15. Display
16. Option indicators
17. Programme keys
1
Page 2
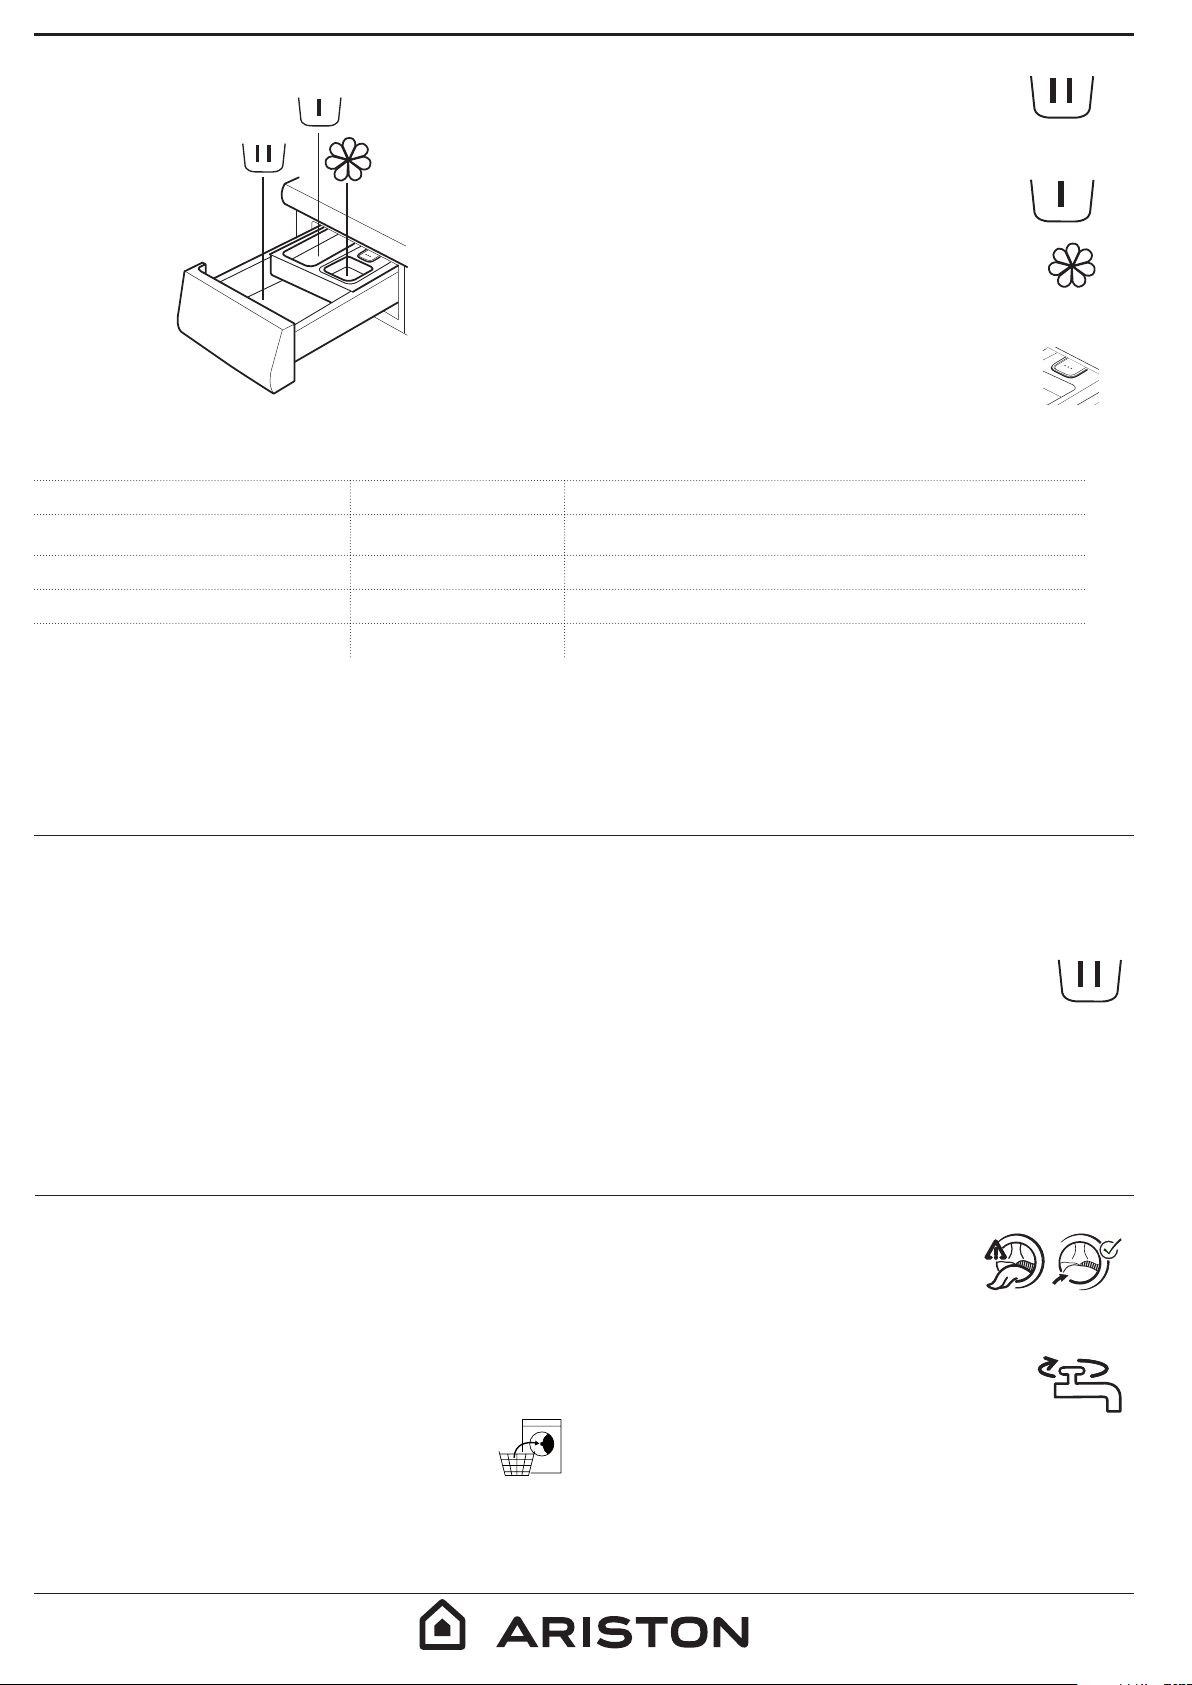
DETERGENT DISPENSER
1. Main wash compartment
• Detergent for the main wash
• Stain remover
• Water softener *
2. Prewash compartment
• Detergent for the prewash.
3. Softener compartment
• Fabric softener
• Liquid starch
Pour in softener or starch solution only up to the “max” mark.
4. Release button
(Press to remove the detergent dispenser for cleaning).
Detergent recommenDations for various types of launDry
White robust laundry (cold-95°C) Heavy duty detergents
White delicate laundry (cold-40°C) Mild detergents containing whitener and/or optical brighteners
Light/pastel colours (cold-60°C) Detergents containing whitener and/or optical brighteners
Intensive colours (cold-60°C) Colour detergents without whitener/optical brighteners
Black/dark colours (cold-60°C) Special detergents for black/dark laundry
* Find water softener appropriate for your washing machine under
www.aristonchannel.com
FIRST TIME USE
See the section on DAILY USE for information on how to select and start a
programme.
FIRST CYCLE
If you plug in the washing machine, it will switch on automatically. You
will be asked to set the desired display language.
Press the UP or DOWN key to select the desired language, afterwards
conrm by pressing the OK key.
Afterwards you can adapt the water hardness setting of your washing
machine to your regional water hardness. This is recommended in
order to optimize the Dosing Aid function.
DAILY USE
See Use and Care Guide for more details on functions / see last page for
information on how to obtain the Use and Care Guide
1. LOAD LAUNDRY
• Prepare your laundry according to the recommendations in section
“HINTS AND TIPS”.
• Make sure that fasteners are closed and ribbons tied together,
fasteners closed and ribbons tied together.
• Open the door and load the laundry.
Observe the maximum load sizes given in the programme
chart
Choose between soft / medium / hard and conrm by pressing the OK
key.
To remove any residues from the manufacturing process:
• Select the “Cotton” programme at a temperature of 95 °C
• Add a small amount of heavy duty detergent to the
main wash compartment of the detergent dispenser
(maximum 1/3 of the quantity recommended by the
detergent manufacturer for lightly soiled laundry)
• Start the programme without adding any laundry.
2. CLOSE DOOR
• Make sure that no laundry gets stuck between
door glass and rubber seal.
• Close the door so that you can hear it click shut.
3. OPEN THE WATER TAP
• Make sure that the washing machine is connected to the
mains.
• Open the water tap
2
Page 3
EN
4. SWITCH ON WASHING MACHINE
• Press the On/O button. An animation appears, and there is
a sound. The programme which was used last lights up.
Afterwards the washing machine is ready to be operated.
5. SET THE DESIRED PROGRAMME
• Select programme:
Press the programme symbol on the control panel. Programme name,
default duration, temperature and spin speed as well as maximum
laundry load appear on the display.
• Change temperature, if needed
Press the temperature button; the display indicates that the
temperature can be set.
• Press the temperature button repeatedly
OR
• press the UP or DOWN key
until the needed temperature appears on the display.
• Change spin speed, if needed
Press the Spin button; the display indicates that the spin
speed can be set.
• Press the Spin button repeatedly
OR
• press the UP or DOWN key
until the needed spin speed, or Rinse hold, appears on the display.
• Select options, if needed
Press the options button. The options which are selectable for
the programme appear on the display.
Press the UP or DOWN key to navigate through the list of options. Press
the OK key to select an option; the option symbol lights up on the
control panel.
To deselect a selected option, press the OK key again.
Some options / functions can be selected by directly pressing the
button:
7. START PROGRAMME
• Press and hold “Start/Pause” until the button lights up
solidly; the programme starts.
• If you have selected “Dosing Aid”, the washing machine will
indicate you the recommended detergent amount for your laundry
load after programme start. Follow the instructions as indicated in
section OPTIONS, FUNCTIONS AND INDICATORS / Dosing Aid.
8. CHANGE A RUNNING PROGRAMME, IF NEEDED
You can still change the settings while a programme is running. The
changes will be applied, provided the respective programme phase
has not nished yet.
• Press the relevant button (for example the “Spin speed” button to
change the spin speed). The display indicates that the value can be
set.
• Press the UP or DOWN key to adjust the value. For options selectable
with the options button: press UP or DOWN key to select an option;
afterwards press the OK key to conrm or deselect the option.
The programme will continue automatically.
To change the settings of a running programme, you can also
• Press “Start/Pause” to pause the running programme
• Change your settings
• Press “Start/Pause” again to continue the programme.
9. PAUSE A RUNNING PROGRAMME AND OPEN
THE DOOR, IF NEEDED
• Press and hold “Start/Pause” to pause a running
programme.
• Provided water level is not too high, or laundry is not
too hot, the door indicator lights up. You can open the
door, for example to add/remove laundry.
• Close the door again and press “Start/Pause” to proceed
with the programme.
10. RESET A RUNNING PROGRAMME, IF NEEDED
• Press and hold the “On/O ” button until the display
indicates that the programme is cancelled.
The water drains, the programme ends and the door
unlocks.
If such an option is not selectable for the programme, it switches o
automatically when the button is pressed.
Refer to section OPTIONS, FUNCTIONS AND INDICATORS for more
information.
6. ADD DETERGENT
• If you do not use the Dosing Aid function, pull out the
detergent dispenser and add detergent (and additives/
softener) now, as indicated in section DETERGENT
DISPENSER.
Observe the dosing recommendations on the detergent pack. If you
have selected PREWASH or FINISH IN, observe the recommendations
in section OPTIONS, FUNCTIONS AND INDICATORS. Afterwards
carefully close the detergent dispenser.
• If you use the “Dosing Aid” function, add detergent later, after you
have started the programme. Refer to section OPTIONS, FUNCTIONS
AND INDICATORS.
• After having added detergent /additives, do not open the detergent
dispenser anymore, to avoid overow.
11. SWITCH OFF THE WASHING MACHINE AFTER
PROGRAMME END
• The display indicates that the cycle has ended, and the
“Door open” indicator lights up – you can take out your
laundry
• Press “On/O ” to switch o the washing machine. If you do not switch
it o, the washing machine will switch o automatically after about a
quarter of an hour after programme end, to save energy.
• Leave the door ajar, so that the inside of the washing machine can
dry.
3
Page 4

SETTINGS
The following settings can be changed / selected:
Display language / key tones / cycle end alert/ display contrast / water
hardness / dosing aid (adjust dosing amounts for the detergents you
use) / eco mode (automatic switch-o function after programme end) /
return to factory settings.
• Press and hold the Settings button for at least 3 seconds.
• Select the setting which you want to change by pressing the UP or
DOWN key. Afterwards press the OK key.
HINTS AND TIPS
SORT YOUR LAUNDRY ACCORDING TO
• Type of fabric / care label (cotton, mixed bres, synthetics, wool,
handwash items)
• Colour (separate coloured and white items, wash new coloured
articles separately)
• Size (wash items of dierent sizes in the same wash load to improve
washing eciency and distribution in the drum)
• Delicates (wash small items – like nylon stockings – and items with
hooks – like bras – in a cloth bag or pillow case with zip.
EMPTY ALL POCKETS
• Objects like coins or safety pins can damage your laundry as well as
the drum.
WASH CARE LABELS
The temperature in the washtub symbol indicates the maximum
possible temperature for washing the item.
• Press the UP or DOWN key to select the setting, afterwards conrm it
by pressing the OK key.
• To exit the Settings mode, either press UP or DOWN key until the
display indicates that you can exit – then conrm by pressing the OK
key. Or wait for a few seconds until the Settings mode will be ended
automatically.
CLEAN THE WATER FILTER REGULARLY
• Helps to avoid that it can get clogged and that the drain water cannot
be pumped out anymore. Refer to section CARE AND MAINTENANCE /
“Cleaning the water lter” in the Use and Care guide.
SAVINGS AND ENVIRONMENT
• Achieve the best use of energy, water, detergent and time by using
the recommended maximum load size for the programmes, as
indicated in the programme chart.
• Do not exceed the detergent dosages indicated in the detergent
manufacturer’s instructions. Use the Dosing Aid function.
• Save energy by using a 60 °C instead of a 95 °C wash programme or a
40 °C instead of a 60 °C wash programme. For cottons, the ECOCotton
programme at 40 °C or 60 °C is recommended.
• Save energy and time by selecting a high spin speed to reduce the
water content in the laundry before using a tumble dryer.
Normal mechanical action
Reduced mechanical action
Much reduced mechanical action
Hand wash only
Do not wash
CONSUMPTION DATA
This data may dier in your home due to changing conditions in inlet water temperature, water pressure etc.
APPROXIMATE
PROGRAMME TEMPERATURE
(°C)
MIXED 40 7.0 01:00 00:55
COTTON 95 10.0 03:15 -
COTTON 60 10.0 02:35 01:55
COTTON 40 10.0 03:30 02:10
SYNTHETICS 60 4.0 02:20 01:20
SYNTHETICS 40 4.0 02:20 01:20
ECO Cotton 40 11. 0 06:40 04:40
LOAD
(KG)
PROGRAMME DURATION (H:MIN)
WITHOUT RAPID WITH RAPID
Approximate programme duration values refer to the
default setting of the programmes, without options.
4
ECOCotton 40°C 1400rpm is the reference programme
for Energy and Water Labelling, according to the
Australian Standards AS/NZS 2040.1 and AS/NZS 2040.2.
Page 5

PROGRAMME CHART
EN
Selectable using the Options
button
Care labels
Programme
ECO Cotton Cold/60°C max — — — — max
COTTON Cold/95°C 10.0 max
MIXED Cold/60°C 7.0 — — max
SYNTHETICS Cold/60°C 4.0 — max
DELICATES Cold/40°C 3.0 — — — — 1000
WOOL Cold/40°C 2.0 — — — — — 1000
COLOURS Cold/60°C 7.0 — — 1000
Temperature
Max load (Kg)
Prewash
Hot Finish
Bio Stain 15
Heavy Soil
Intensive Rinse
Selectable directly Spin Detergent and
Rapid
Colours 15°
Fresh Care
Dosing Aid
Finish in
Max. spin
speed (rpm)
additives
Rinse hold
Prewash
—
—
—
Main Wash
Softener
RAPID 30’
RINSE&SPIN — max — — — — — — — max
SPIN — max — — — — — — — — max —
DRAIN — max — — — — — — — — — —
SHIRTS Cold/40°C 3.0 — — — — 1000
DUVET Cold/60°C 3.5 — 1000
BED LINEN Cold/60°C 3.5 — max
CASHMERE Cold/30°C 2.0 — — — — — 400
SPORT Cold/40°C 4.0 — — max
JEANS Cold/60°C 6.0 1000
BABY ITEMS Cold/60°C 6.0 1000
MINI LOAD Cold/40°C 1.0 — — — — max
30’
Cold/30°C 3.0 — — — — — — max
—
— —
— — —
— — —
—
—
—
Selectable/optional
—
Not selectable/applicable Dosing required Dosing optional
5
Page 6

PROGRAMMES
Observe the recommendations on the care labels of your laundry.
ECO Cotton
Normally soiled cotton laundry. At 40°C and 60°C
standard cotton programme and most favourable
programme in terms of combined water and energy
consumption for washing cotton laundry.
The values on the Energy label are based on this
programme at 40°C 1400rpm.
COTTON
Normally to heavily soiled and robust cotton and linen
laundry, such as towels, underwear, table linen etc.
MIXED
Lightly to normally soiled robust laundry made of cotton,
linen, articial bres and their blends. 1-hour programme.
SYNTHETICS
Normally soiled laundry made of articial bres (like
polyester, polyacryle, viscose etc.) or their blends with
cotton.
DE LIC ATES
Fine laundry made of delicate fabrics, which needs gentle
treatment.
WOOL
Woolens, labeled with the Woolmark and identied as
machine washable, as well as textiles made of silk, linen,
wool and viscose marked as handwashable.
RAPID 30’
Lightly soiled laundry made of cotton, synthetics and their
blends. Refresh programme for laundry without stains.
COLOURS
Lightly to normally soiled laundry made of cotton,
synthetics or their blends; also delicates. Helps preserving
colours.
RINSE AND SPIN
Separate rinse and intensive spin programme. For robust
laundry.
SPIN
Separate intensive spin programme. For robust laundry.
30’
DRAIN
Separate programme to drain the water, without spinning.
SPECIAL PROGRAMMES
To set one of the following programmes, select the
special programmes position. Press the DOWN and UP
keys to select one of the programmes mentioned below.
The selected programme is marked with “ > “.
Press the OK key to conrm the selected programme.
SHIRTS
Shirts, blouses and ne business clothes made of cotton, synthetics or
their blends.
DUVET
Big items such as sleeping bags, washable blankets, bathmats, pillows
and duvets lled with feathers or synthetic material.
BED LINEN
White or coloured bed linen made of cotton and synthetic bers, or
blends of both.
CASHMERE
High-quality cashmere garments identied as machine washable or
hand washable.
SPORT
Normally soiled and sweaty sportswear made of cotton jersey or
microbers.
Includes a prewash cycle – you can add detergent also to the prewash
chamber. Do not use softener.
JEANS
Normally soiled cotton jeans-wear and garments made of robust
jeans-like material, such as trousers and jackets.
BABY ITEMS
Normally soiled baby clothes made of cotton and/or linen.
The suds are rinsed out even more thoroughly, which helps to protect
sensitive baby skin.
MINI LOAD
Cotton and/or synthetic laundry made of stable fabric types.
Ideal programme for washing a small laundry load in an economic
way.
OPTIONS, FUNCTIONS AND INDICATORS
Refer to the Programme Chart to check if options are available for the
selected programme
OPTIONS which are directly selectable by pressing the dedicated
button
Colours 15°
Helps to preserve the colours of your laundry by
washing it with cold water (15°C). Saves energy for
water heating, while keeping a good wash result.
Suitable for lightly soiled coloured laundry without stains.
• Make sure that your detergent is suitable for cold wash temperatures
(15 or 20 °C).
• Not selectable for Cotton 95 °.
Fresh Care
Helps to keep your laundry fresh if you cannot unload it
soon after programme end.
The washing machine will start to tumble the laundry
periodically a short time after programme end. This tumbling will last
up to approximately 6 hours after end of your wash programme. You
can stop it at any time by pressing any button; the door unlocks and
you can take out your laundry.
Dosing Aid
Helps to dose the right amount of detergent for your
laundry load.
Prepare the option as described in DOSING AID / FIRST USE
in the Use and Care Guide.
• After you have loaded the laundry, closed the door and selected
programme and options, press the Dosing Aid button. The button
lights up.
• Start the programme by pressing “Start/Pause”. – The
drum rotates to detect the laundry load; the display
indicates the load sensing phase. On the control panel, an
animation occurs. Afterwards the recommended
detergent amount for the main wash compartment in ml appears on
the display.
If you have selected “Prewash” option, the display alternately shows
the amount for prewash (I) and main wash (II) compartment.
• Pull out the detergent dispenser and pour the
recommended detergent quantity into the main wash (II)
and, if Prewash is selected, also into the prewash (I)
compartment of the detergent dispenser.
• Close the detergent dispenser and press “Start/Pause” to
continue the programme.
6
Page 7

OPTIONS which are selectable by pressing the Options
button
Prewash
Helps to clean heavily soiled laundry by adding a prewash
phase to the wash programme selected.
Extends the programme by about 20 minutes.
Add detergent to the prewash compartment of the detergent
dispenser as well, or directly into the drum. Use powder detergent for
the main wash in order to ensure that the detergent stays in the
detergent dispenser until the start of the main wash phase.
Hot Finish
The programme ends with a warm rinse phase. This relaxes
the bres of your laundry, and the laundry feels comfortably
warm when taking it out a short time after programme end.
Bio Stains 15°
Helps to remove all kinds of stains, except grease/oil.
The programme begins with a cold water wash phase.
Extends the programme by about 10 minutes.
Pre-treatment recommended for stubborn stains.
Not selectable for Cotton 95°C.
Heavy Soil
Helps to clean heavily soiled, stained laundry by optimising
the eciency of additives for stain removal.
Add an appropriate amount of in-wash additive for stain
removal (powder) to the main wash compartment, together with your
detergent (powder only). May extend the programme by up to
15 minutes.
Appropriate for use with oxygen-based stain removers and bleaching
agents.
Chlorine or perborate bleaches must not be used!
Intensive Rinse
Helps to avoid detergent residues in the laundry by
extending the rinse phase.
Particularly suitable for washing baby laundry, for people
suering from allergies and for areas with soft water.
Rapid
Enables quicker washing.
Recommendable for only lightly soiled laundry.
Not selectable for Cotton 95 °C.
FUNCTIONS
Rinse hold (selectable with Spin button)
Avoids automatic spinning of the laundry at the end of the
programme. The laundry remains in the last rinse water, the
display indicates the rinse hold and the programme does not continue.
Suitable for delicate laundry which is not appropriate for spinning, or
which should be spun with a low spin speed. Not suitable for silk.
To select “Rinse hold”:
• Press the spin button; select Rinse hold. The Rinse hold symbol on the
display lights up.
The display indicates when the programme has reached the Rinse hold.
Choose to:
• drain the water, no spin:
press the Spin button, or the UP or DOWN key, to select
spin speed “0”. Or select programme Drain. Afterwards
press Start/Pause: the water will be drained and the
programme ended
• spin the laundry:
the default spin speed blinks - start the spin cycle by
pressing Start/Pause. Or select a dierent spin speed by
pressing the Spin button and the UP or DOWN key, and
press Start/Pause.
Finish in
EN
Enables to have the laundry ready at a particular time by
setting a delay until end of the programme.
Choose a delay up to 23:30 hours. Do not use liquid
detergent with this function.
• Select programme, temperature and options.
• Press the “Finish in” button – the button lights up.
• Press UP or DOWN key to select a delay up to 23:30 hours.
• Press “Start / Pause” - the countdown of the delay starts. The display
indicates the Finish in period (= time until end of programme), as well
as the default programme duration.
• The programme starts automatically, in time to be nished at the end
of the delay period. On programme start, the delay on the display is
replaced by the current programme status.
To cancel the delay
• either press Start/Pause to cancel the delay; to start the selected
programme immediately, press Start/Pause again
• or press and hold On/O to cancel the complete programme setting.
Key lock
To lock the buttons and keys of the control panel against
unwanted operation.
To lock:
• The washing machine must be switched on.
• Press and hold the option button until the display indicates
that the keys are locked. The buttons and keys are locked
now; only On/O works.
If you switch the washing machine o and on again, the key
lock remains active until you unlock it.
To unlock: press and hold the option button again for at least 3
seconds, until the display indicates that the keys are unlocked.
INDICATORS
Door can be opened
Energy / Water monitor
Gives feedback about the energy and water
consumption of your programme setting.
The less indicators light up, the more economic is
your programme setting. Can still adapt after
sensing phase of laundry load.
Failure: Observe the display message.
For any failures , refer to section Troubleshooting in the
“Use and Care Guide”.
Descaling
A display message will remind you regularly to descale the washing
machine. Find descaler appropriate for the washing machine on
www.aristonchannel.com.
To cancel the display reminder, press the OK key.
7
Page 8

PRODUCT FICHE
WWW
WWW
The product che with energy data of this
appliance can be downloaded from the Website
www.aristonchannel.com
HOW TO OBTAIN THE USE AND CARE GUIDE
>
Download the Use and Care Guide
from our website
www.aristonchannel.com (you can use this
QR code), specifying the product’s commercial
code.
> Alternatively, contact our Client After-sales Service
8
CONTACTING OUR AFTER‑SALES SERVICE
You can nd our contact details in
the warranty manual. When
xxxxxxxxxxxx
contacting our Client After-sales
Service, please state the codes
provided on your product’s
identication plate.
400 011158782
Printed in I taly
 Loading...