

Page 1

Instructions for use
WASHING MACHINE
GB
English,1
ARXL 95
CIS
РУССКИЙ, 13
Contents
GB
Installation, 2-3
Unpacking and levelling
Connecting the electricity and water supplies
The first wash cycle
Technical data
Description of the washing machine
and starting a wash cycle, 4-5
Control panel
Indicator lights
Starting a wash cycle
Wash cycles, 6
Table of wash cycles
Personalisation, 7
Setting the temperature
Setting the spin speed
Functions
Detergents and laundry, 8
Detergent dispenser drawer
Bleach cycle
Preparing the laundry
Garments requiring special care
Load balancing system
Precautions and tips, 9
General safety
Disposal
Opening the porthole door manually
Care and maintenance, 10
Cutting off the water or electricity supply
Cleaning the washing machine
Cleaning the detergent dispenser drawer
Caring for the door and drum of your appliance
Cleaning the pump
Checking the water inlet hose
Troubleshooting, 11
Service, 12
1
Page 2
Installation
GB
This instruction manual should be kept in a safe
place for future reference. If the washing machine is
sold, transferred or moved, make sure that the
instruction manual remains with the machine so that
the new owner is able to familiarise himself/herself
with its operation and features.
Read these instructions carefully: they contain vital
information relating to the safe installation and
operation of the appliance.
Unpacking and levelling
Unpacking
1. Remove the washing machine from its packaging.
2. Make sure that the washing machine has not been
damaged during the transportation process. If it has
been damaged, contact the retailer and do not
proceed any further with the installation process.
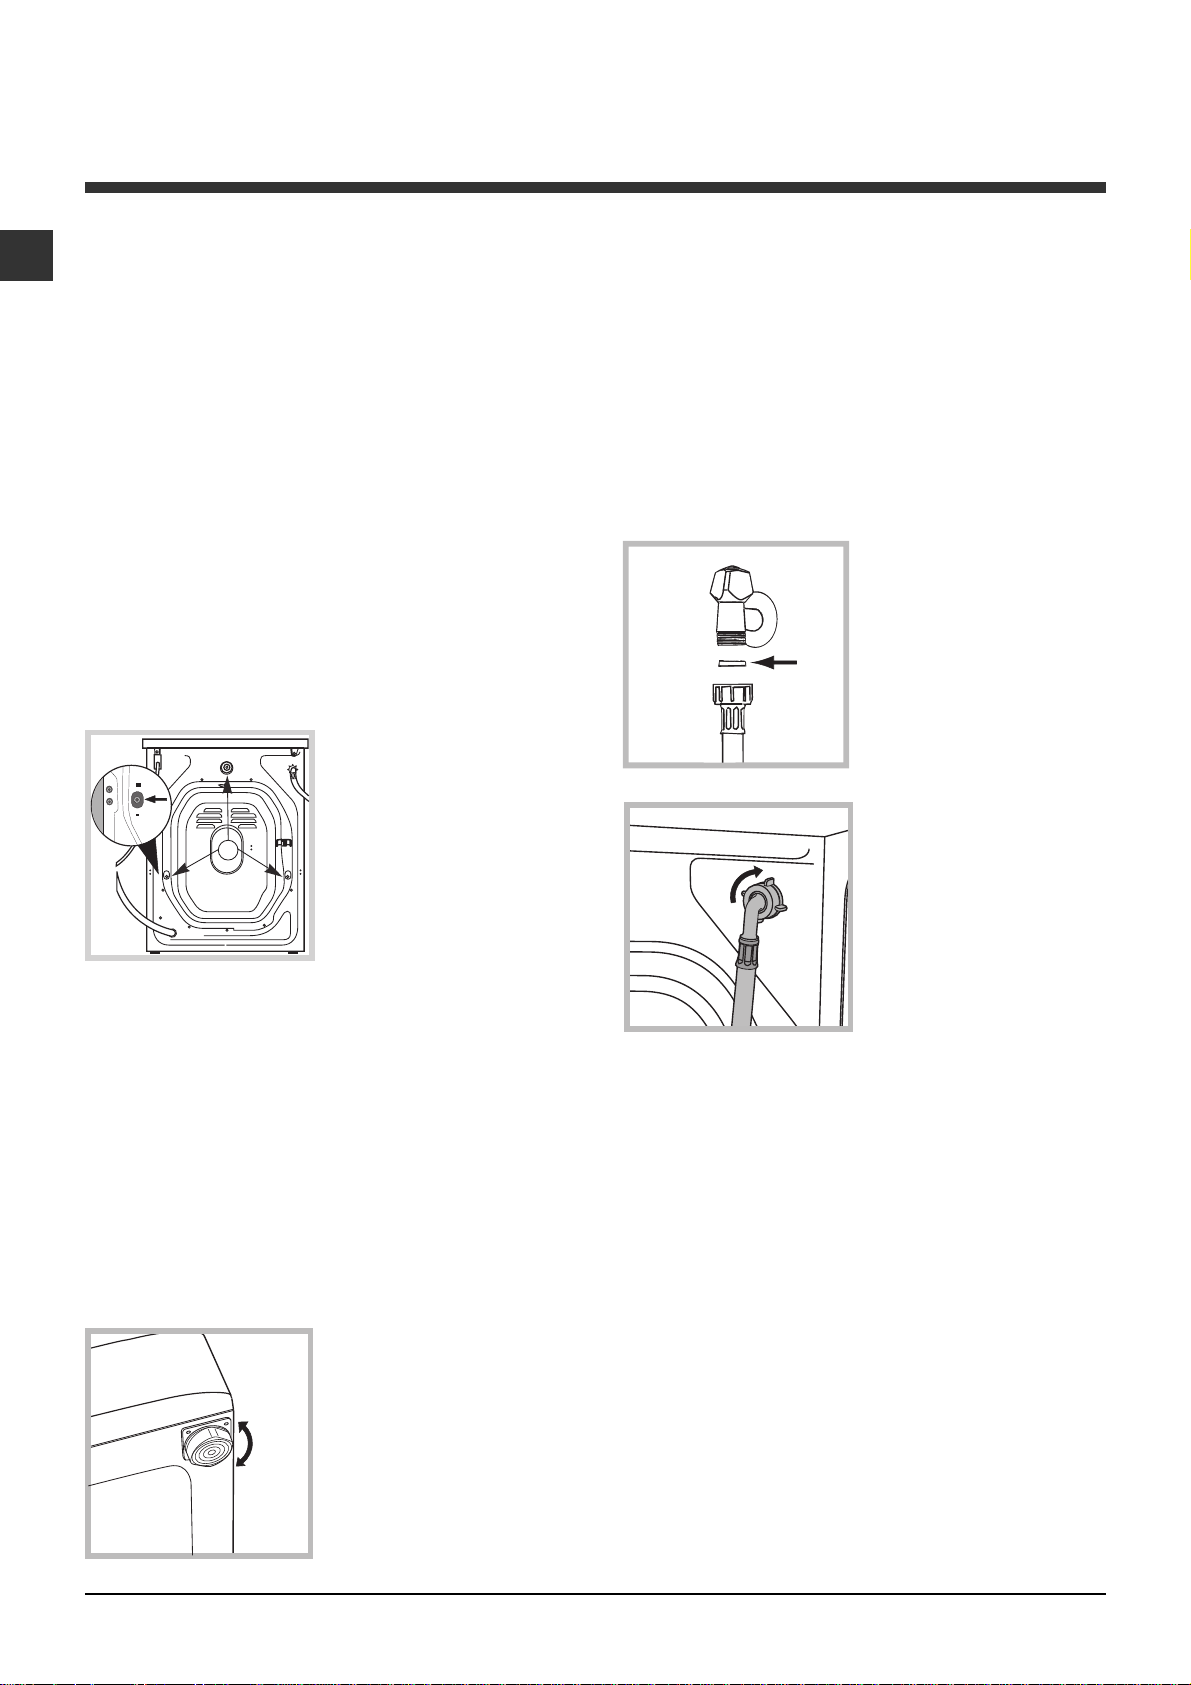
3. Remove the 3
protective screws (used
during transportation) and
the rubber washer with
the corresponding
spacer, located on the
rear part of the appliance
(see figure).
4. Close off the holes using the plastic plugs provided.
5. Keep all the parts in a safe place: you will need
them again if the washing machine needs to be
moved to another location.
Levelling the machine correctly will provide it with
stability, help to avoid vibrations and excessive noise
and prevent it from shifting while it is operating. If it is
placed on carpet or a rug, adjust the feet in such a
way as to allow a sufficient ventilation space
underneath the washing machine.
Connecting the electricity and water
supplies
Connecting the water inlet hose
1. Insert seal A into the
end of the inlet hose and
screw the latter onto a
cold water tap with a 3/4
A
3. Make sure that the hose is not folded over or bent.
gas threaded opening
(see figure).
Before performing the
connection, allow the
water to run freely until it
is perfectly clear.
2. Connect the inlet hose
to the washing machine
by screwing it onto the
corresponding water inlet
of the appliance, which is
situated on the top righthand side of the rear part
of the appliance (see
figure).
Packaging materials should not be used as toys for
children.
Levelling
1. Install the washing machine on a flat sturdy floor,
without resting it up against walls, furniture cabinets
or anything else.
2. If the floor is not
perfectly level, compensate for any unevenness
by tightening or loosening
the adjustable front feet
(see figure); the angle of
inclination, measured in
relation to the worktop,
must not exceed 2°.
2
The water pressure at the tap must fall within the
values indicated in the Technical details table (see
next page).
If the inlet hose is not long enough, contact a
specialised shop or an authorised technician.
Never use second-hand hoses.
Use the ones supplied with the machine.
Page 3
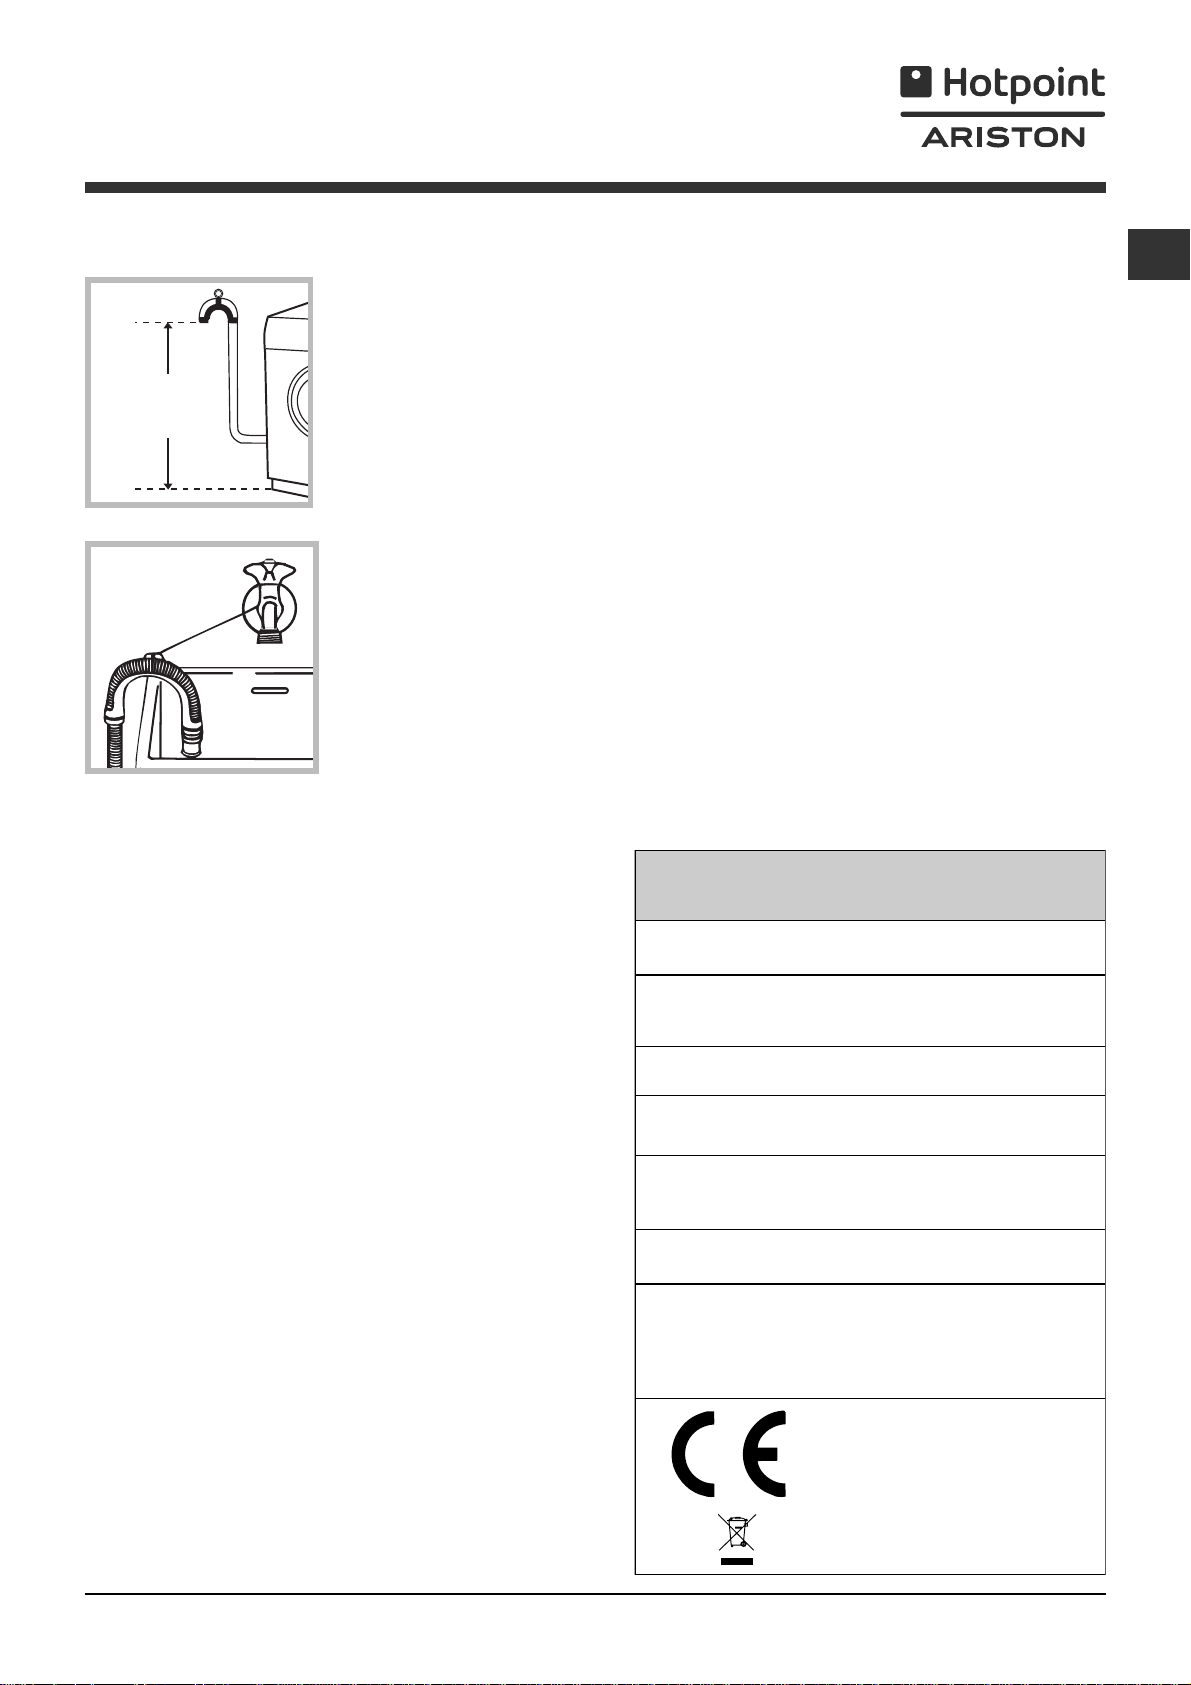
Connecting the drain hose
65 - 100 cm
Connect the drain hose,
without bending it, to a
drainage duct or a wall
drain located at a height
between 65 and 100 cm
from the floor;
Do not use extension cords or multiple sockets.
GB
The cable should not be bent or compressed.
The power supply cable must only be replaced by
authorised technicians.
Warning! The company shall not be held responsible
in the event that these regulations are not respected.
The first wash cycle
alternatively, rest it on
the side of a washbasin
or bathtub, fastening the
duct supplied to the tap
(see figure). The free end
of the hose should not
be underwater.
We advise against the use of hose extensions; if it is
absolutely necessary, the extension must have the
same diameter as the original hose and must not
exceed 150 cm in length.
Electrical connections
Before plugging the appliance into the electricity
socket, make sure that:
the socket is earthed and complies with all
applicable laws;
the socket is able to withstand the maximum power
load of the appliance as indicated in the Technical
data table (see opposite);
the power supply voltage falls within the values
indicated in the Technical data table (see opposite);
the socket is compatible with the plug of the
washing machine. If this is not the case, replace
the socket or the plug.
The washing machine must not be installed
outdoors, even in covered areas. It is extremely
dangerous to leave the appliance exposed to rain,
storms and other weather conditions.
When the washing machine has been installed, the
electricity socket must be within easy reach.
Once the appliance has been installed, and before
you use it for the first time, run a wash cycle with
detergent and no laundry, using the wash cycle 1.
Technical data
Model
Dimensions
Capacity
Electrical
connections
Water connections
Spin speed
Energy rated
programmes
according to
regulation
EN 60456
ARXL 95
width 59.5 cm
height 85 cm
depth 52,5 cm
from 1 to 6 kg
please refer to the technical data
plate fixed to the machine
maximum pressure 1 MPa (10 bar)
minimum pressure 0.05 MPa (0.5 bar)
drum capacity 46 litres
up to 900 rotations per minute
programme 6; temperature 60°C;
using a load of 6 kg.
This appliance conforms to the
following EC Directives:
- 72/23/EEC dated 19/02/73 (Low
Voltage) and subsequent modifications
- 89/336/EEC dated 03/05/89
(Electromagnetic Compatibility) and
subsequent modifications
- 2002/96/EC
3
Page 4
Description of the washing machine
and starting a wash cycle
GB
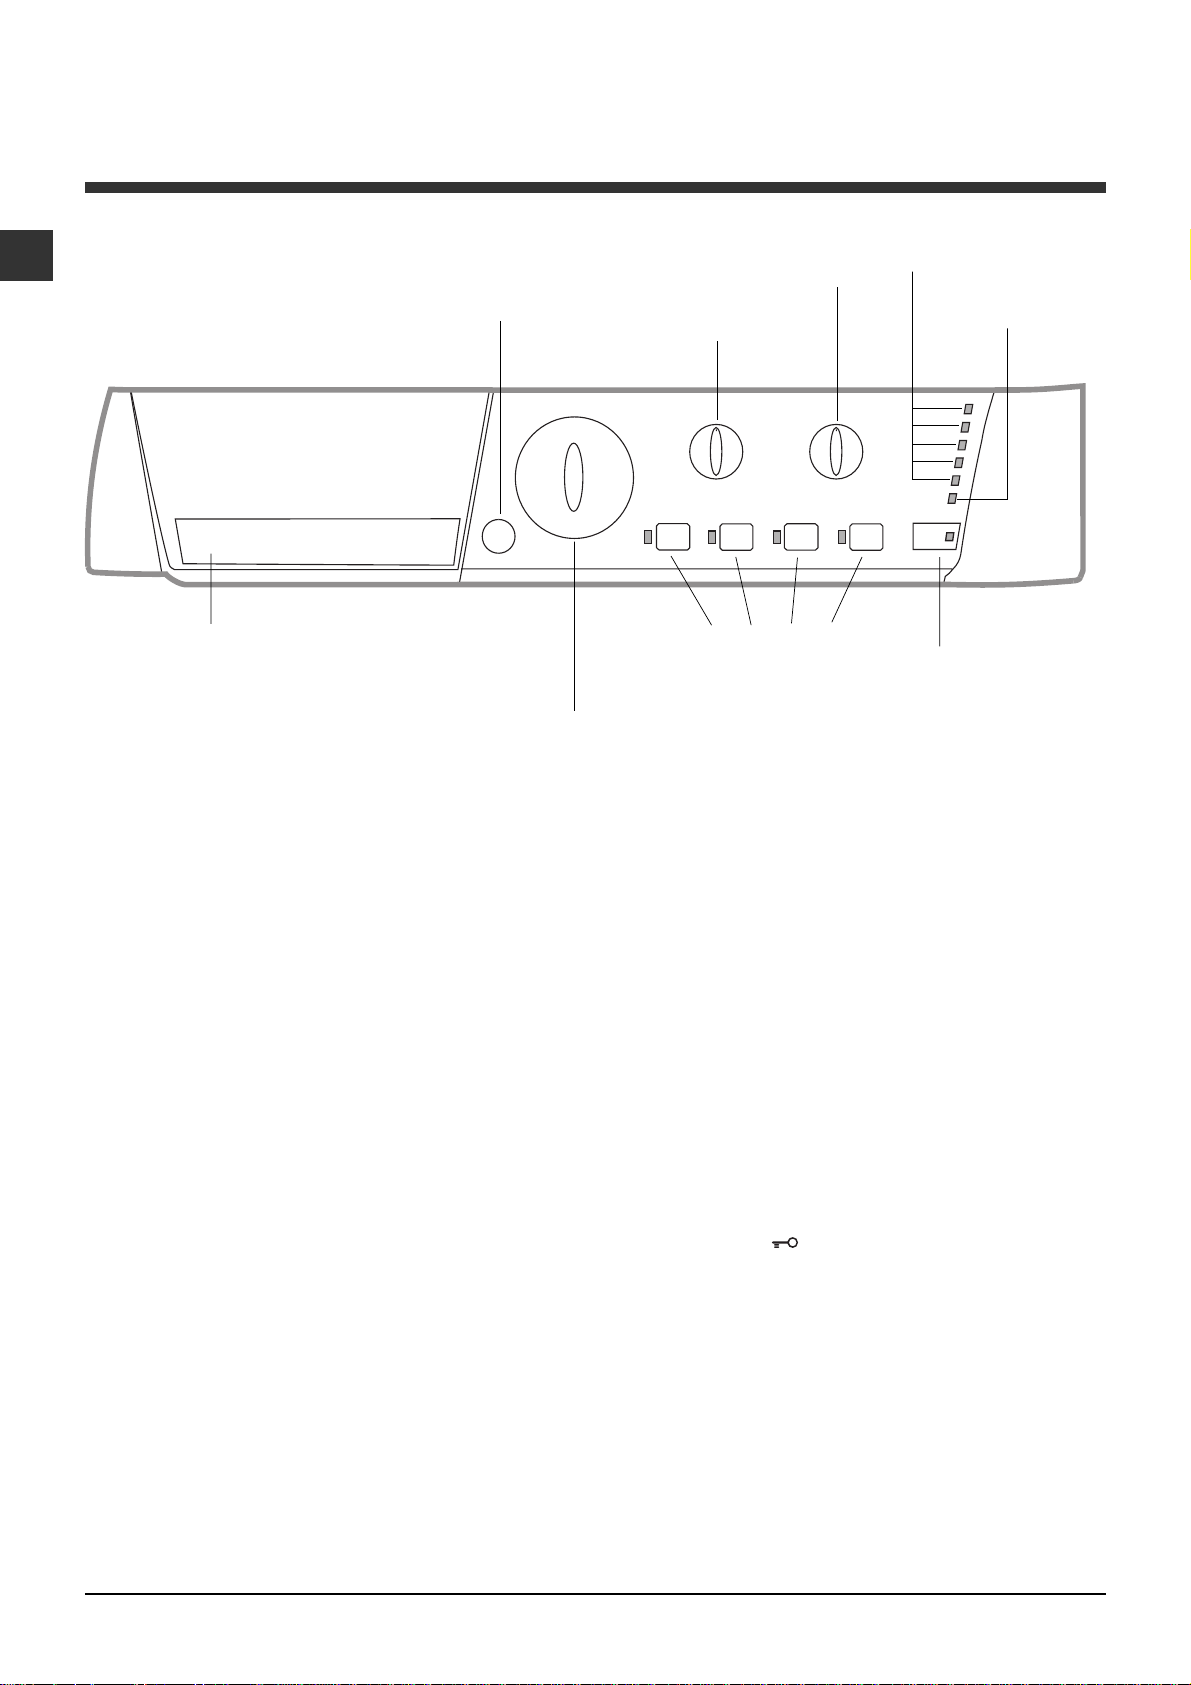
Control panel
ON/OFF
Detergent dispenser drawer
Detergent dispenser drawer: used to dispense
detergents and washing additives (see Detergents
and laundry).
There is a key which provides a summary of the
available wash cycles inside the detergent dispenser
drawer; this may be consulted at any time.
ON/OFF button: switches the washing machine on
and off.
WASH CYCLE knob: programmes the wash cycles.
During the wash cycle, the knob does not move.
FUNCTION buttons with indicator light: used to
select the available functions. The indicator light
corresponding to the selected function will remain lit.
TEMPERATURE knob: sets the temperature or the
cold wash cycle (see Personalisation).
SPIN SPEED knob: sets the spin speed or exclude
the spin cycle completely (see Personalisation).
button
WASH CYCLE
knob
TEMPERATURE
knob
WASH CYCLE PROGRESS/DELAY TIMER
indicator light
wash cycle.
The illuminated indicator light shows which phase is in
progress.
If the Delay Timer function has been set, the time
remaining until the wash cycle starts will be indicated
(see next page).
DOOR LOCKED indicator light: indicates whether
the door may be opened or not (see next page).
START/PAUSE button with indicator light: starts or
temporarily interrupts the wash cycles.
N.B. To pause the wash cycle in progress, press this
button; the corresponding indicator light will flash
orange, while the indicator light for the current wash
cycle phase will remain lit in a fixed manner. If the
DOOR LOCKED
door may be opened.
To start the wash cycle from the point at which it was
interrupted, press this button again.
WASH CYCLE PROGRESS/
DELAY TIMER
SPIN SPEED
knob
FUNCTION
buttons with
indicator lights
s: used to monitor the progress of the
indicator light is switched off, the
indicator lights
START/PAUSE
button with indicator
light
DOOR
LOCKED
indicator light
4
Page 5
Indicator lights
The indicator lights provide important information.
This is what they can tell you:
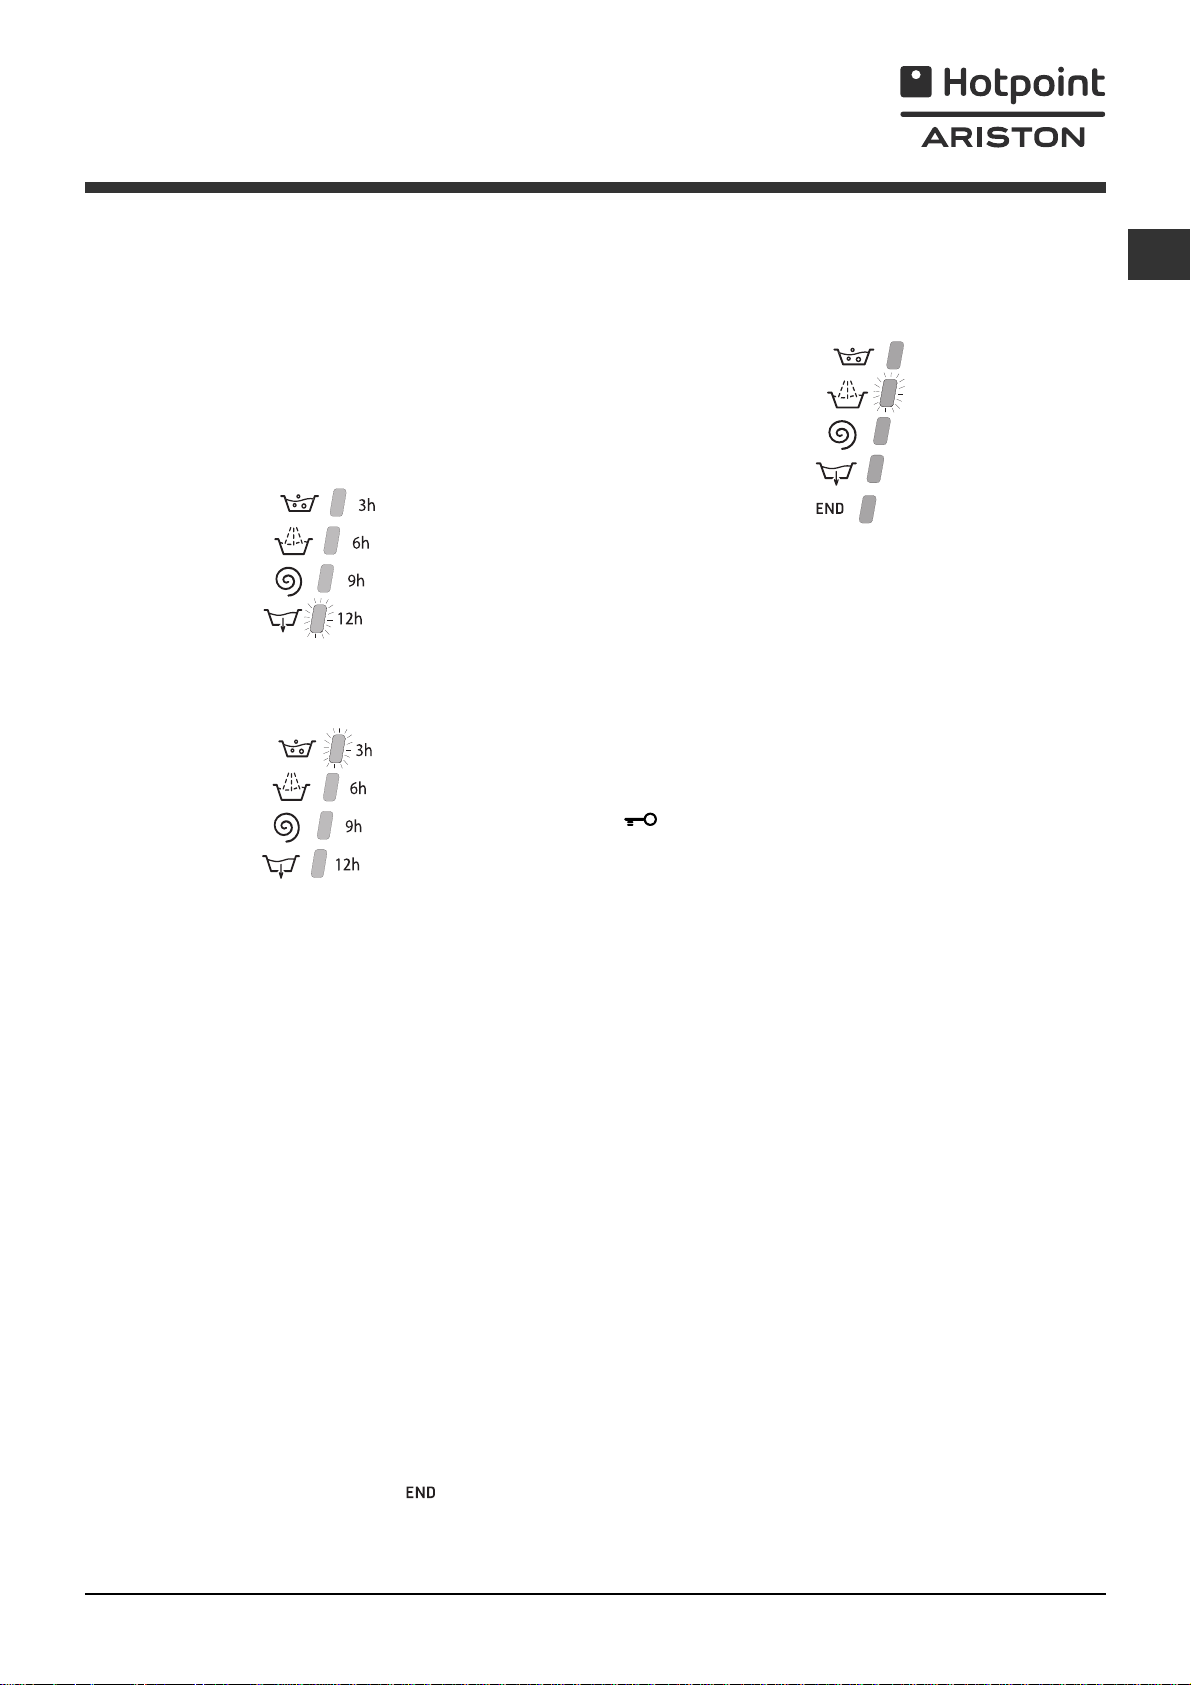
Wash cycle phase indicator lights
Once the desired wash cycle has been selected and has
begun, the indicator lights switch on one by one to
indicate which phase of the cycle is currently in progress.
GB
Delayed start
If the DELAY TIMER function has been activated (see
Personalisation), after the wash cycle has been
started the indicator light corresponding to the
selected delay period will begin to flash:
As time passes, the remaining delay will be displayed
and the corresponding indicator light will flash:
Once the set delay has elapsed, the flashing indicator
light will switch off and the selected wash cycle will
begin.
Wash
Rinse
Spin
Drain no spin
End of wash cycle
Function buttons and corresponding indicator
lights
When a function is selected, the corresponding
indicator light will illuminate.
If the selected function is not compatible with the
programmed wash cycle, the corresponding indicator
light will flash and the function will not be activated.
If a function which is incompatible with another
function selected previously, only the most recent
selection will remain active.
Door locked indicator light
If this indicator light is on, the appliance door is locked
to prevent it from being opened accidentally; to avoid
any damage, wait for the indicator light to switch off
before you open the appliance door.
N.B. If the DELAY TIMER function is activated, the door
cannot be opened; pause the machine by pressing the
START/PAUSE button if you wish to open it.
If the START/PAUSE indicator light (orange) flashes
rapidly at the same time as the function indicator
light, this indicates a problem has occurred (see
Troubleshooting).
Starting a wash cycle
1. Switch the washing machine on by pressing the ON/OFF button. All indicator lights will switch on for a few
seconds, then they will switch off and the START/PAUSE indicator light will pulse.
2. Load the laundry and close the door.
3. Set the WASH CYCLE knob to the desired programme.
4. Set the washing temperature (see Personalisation).
5. Set the spin speed (see Personalisation).
6. Measure out the detergent and washing additives (see Detergents and laundry).
7. Select the desired functions.
8. Start the wash cycle by pressing the START/PAUSE button and the corresponding indicator light will remain lit
in a fixed manner, in green.
To cancel the set wash cycle, pause the machine by pressing the START/PAUSE button and select a new cycle.
9. At the end of the wash cycle the
off, indicating that the door may be opened. Take out your laundry and leave the appliance door ajar to make
sure the drum dries completely.
Switch the washing machine off by pressing the ON/OFF button.
indicator light will switch on. The DOOR LOCKED indicator light will switch
5
Page 6
Wash cycles
GB
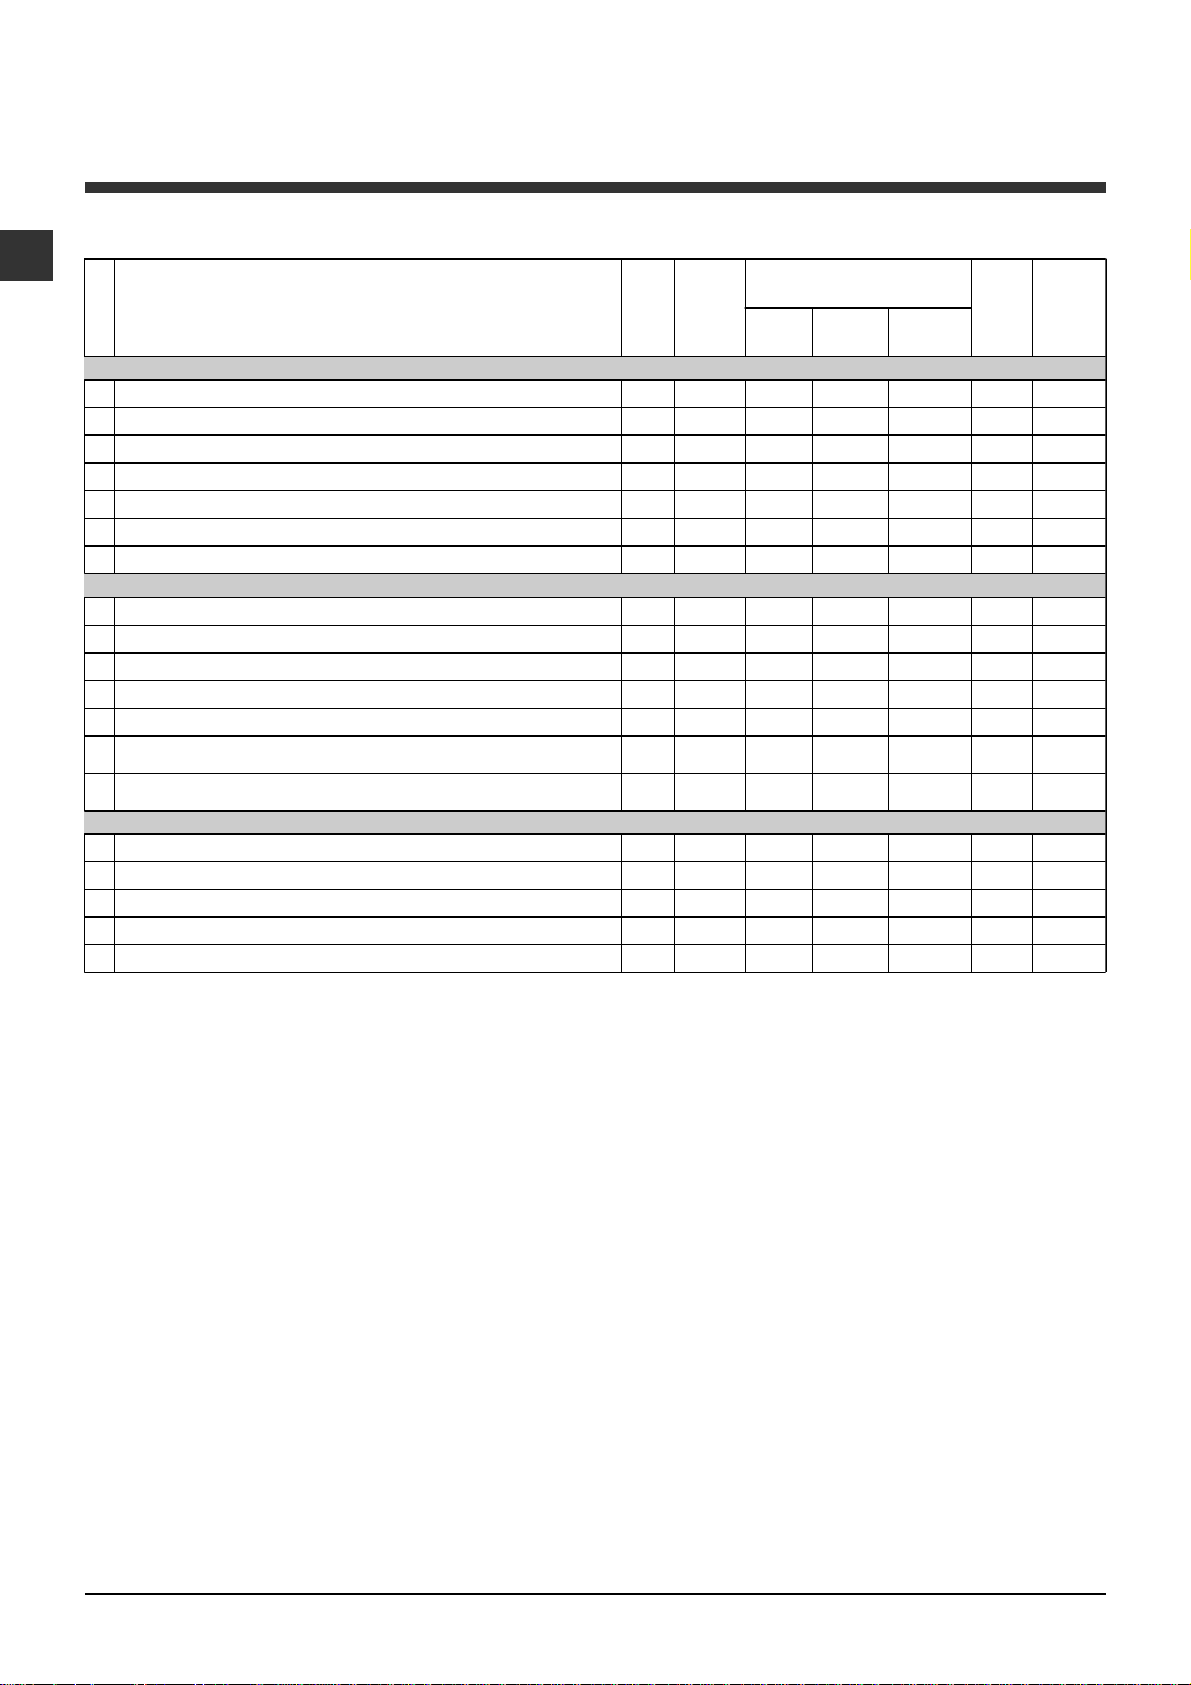
Table of wash cycles
Max
Description of the wash cycle
Wash cycles
Special cycles
Sanitizing cycle:
6
Sanitizing cycle (1):
6
Goodnigt cycle:
7
Baby cycle:
8
Shirts
9
Silk/Curtains:
10
Wool:
For wool, cashmere, etc.
11
1
1
2
3
3
4
5
A
B
C
D
E
Everyday wash cycles (Daily)
Cotton:
Heavily soiled whites and resistant colours.
Cotton (2):
Coloured Cottons (3):
Synthetics resistents:
Synthetics delicates:
Mix 30':
To refresh lightly soiled garments quickly (not suitable
for wool, silk and clothes which require washing by hand).
Mix 15':
To refresh lightly soiled garments quickly (not suitable
for wool, silk and clothes which require washing by hand).
Partials wash cycles
Rinse - 900 - Light rinse - 800 - Spin - 900 - - - 616
Light spin - 800 - - - 2,5 12
Drain no spin - 0 - - - 62
Extremely soiled whites.
Heavily soiled whites and resistant colours.
Lightly soiled delicate colours.
Heavily soiled delicate colours.
For garments in silk and viscose, lingerie.
Heavily soiled whites and delicate colours.
Lightly soiled whites and delicate colours.
Heavily soiled resistant colours.
Lightly soiled resistant colours.
temp.
Max.
speed
(°C)
(rpm )
Bleach Wash
90° 900
60° 900 40° 800 40° 800 40° 600 30° 0 40° 600 -
60° 900
40° 900
40° 900
60° 800 40° 800 -
30° 800 -
30° 800 -
Detergents
Fabric
softener
ll l
ll
ll
ll
ll
ll
ll
ll l
ll l
ll l
ll
ll
ll
ll
l
l
Max.
load
(kg)
Cycle
duration
6165
6 155
4290
2 118
270
155
1,5 55
6 130
6 115
685
2,5 85
2,5 70
330
1,5 15
644
2,5 37
The information contained in the table is intended as a guide only.
For all Test Institutes:
1) Test wash cycle in compliance with regulation EN 60456: set wash cycle 6 with a temperature of 60°C.
2) Long wash cycle for cottons: set wash cycle 1 with a temperature of 40°C.
3) Short wash cycle for cottons: set wash cycle 2 with a temperature of 40°C.
Specials wash cycles
Sanitizing cycle (wash cycle 6). A high-temperature hygienic wash cycle (over 60°C) which requires the use of bleach.
Pour the bleach, the detergent and the additives into the relevant compartments (see paragraph entitled
Detergent dispenser drawer).
Goodnigt cycle (wash cycle 7). This is a silent cycle which can be run at night, when the electricity prices are lower. The
wash cycle is designed for cottons and synthetics. At the end of the cycle the machine stops while there is still water in
the drum; to spin and drain the laundry press the START/PAUSE button; alternatively the machine will perform the spin
cycle and drain the water automatically after 8 hours.
Baby cycle (wash cycle 8). This wash cycle can be used to remove the soiling typically caused by babies, while ensuring
that all detergent is removed from nappies in order to prevent the delicate skin of babies from suffering allergies. The
cycle has been designed to reduce the amount of bacteria by using a greater quantity of water and optimising the effect
of special disinfecting additives added to the detergent.
At the end of the wash cycle, the machine will slowly rotate the drum to prevent the formation of creases; to end the cycle
press the START/PAUSE button.
Mix 30 (wash cycle 4) this wash cycle was designed to wash lightly soiled garments quickly: it lasts just 30 minutes and
therefore saves both energy and time. By selecting this wash cycle (4 at 30°C), it is possible to wash different fabrics
together (except for wool and silk items), with a maximum load of 3 kg.
Mix 15(wash cycle 5) this wash cycle was designed to wash lightly soiled garments quickly: it lasts just 15 minutes and
therefore saves both energy and time. By selecting this wash cycle (5 at 30°C), it is possible to wash different fabrics
together (except for wool and silk items), with a maximum load of 1.5 kg.
6
Page 7
Personalisation
Setting the temperature
Turn the TEMPERATURE knob to set the wash temperature (see Table of wash cycles).
The temperature may be lowered, or even set to a cold wash (
The washing machine will automatically prevent you from selecting a temperature which is higher than the
maximum value set for each wash cycle.
).
Setting the spin speed
Turn the SPIN SPEED knob to set the spin speed for the selected wash cycle.
The maximum spin speeds available for each wash cycle are as follows:
Wash cycles Maximum spin speed
Cottons 900 rpm
Synthetics 800 rpm
Wool 600 rpm
Silk drain only
The spin speed may be lowered, or the spin cycle can be excluded altogether by selecting the symbol
The washing machine will automatically prevent you from selecting a spin speed which is higher than the
maximum speed set for each wash cycle.
.
Functions
The various wash functions available with this washing machine will help to achieve the desired results, every time.
To activate the functions:
1. Press the button corresponding to the desired function;
2. the function is enabled when the corresponding indicator light is illuminated.
Note: If the indicator light flashes rapidly, this signals that this particular function may not be selected in
conjunction with the selected wash cycle.
GB
Delay timer
This timer delays the start time of the wash cycle by up to 12 hours.
Press the button repeatedly until the indicator light corresponding to the desired delay time switches on. The fifth time
the button is pressed, the function will be disabled.
N.B. Once you have pressed the START/PAUSE button, the delay time may only be decreased if you wish to modify it.
This option is enabled with all programmes.
Easy iron
By selecting this function, the wash and spin cycles will be modified in order to reduce the formation of creases.
At the end of the cycle the washing machine will perform slow rotations of the drum; the EASY IRON and START/
PAUSE indicator lights will flash (orange) and the
the START/PAUSE button or the EASY IRON button.
For the Silk (10) wash cycle, the machine will end the cycle while the laundry is soaking, the EASY IRON and
START/PAUSE indicator lights will flash (orange) and the RINSE phase will remain lit in a fixed manner. To drain the
water so that the laundry may be removed, press the START/PAUSE button or the EASY IRON button.
phase will remain lit in a fixed manner. To end the cycle, press
This function may not be used in conjunction with wash cycles 4, 5, 6, 7, 8, 11, C, D, E.
Extra rinse
By selecting this function, the efficiency of the rinse is increased and optimal detergent removal is guaranteed. It is
particularly useful for sensitive skin.
This function may not be used in conjunction with wash cycles 4, 5, C, D, E.
Super Wash
Because a greater quantity of water is used in the initial phase of the cycle, and because of the increased cycle
duration, this function offers a high-performance wash.
This function may not be used in conjunction with wash cycles 4, 5, 6, 10, 11, A, B, C, D, E.
7
Page 8
Detergents and laundry
GB
Detergent dispenser drawer
Good washing results also depend on the correct
dose of detergent: adding too much detergent will not
necessarily result in a more efficient wash, and may in
fact cause build up on the inside of your appliance
and contribute to environmental pollution.
Do not use hand washing detergents because these
create too much foam.
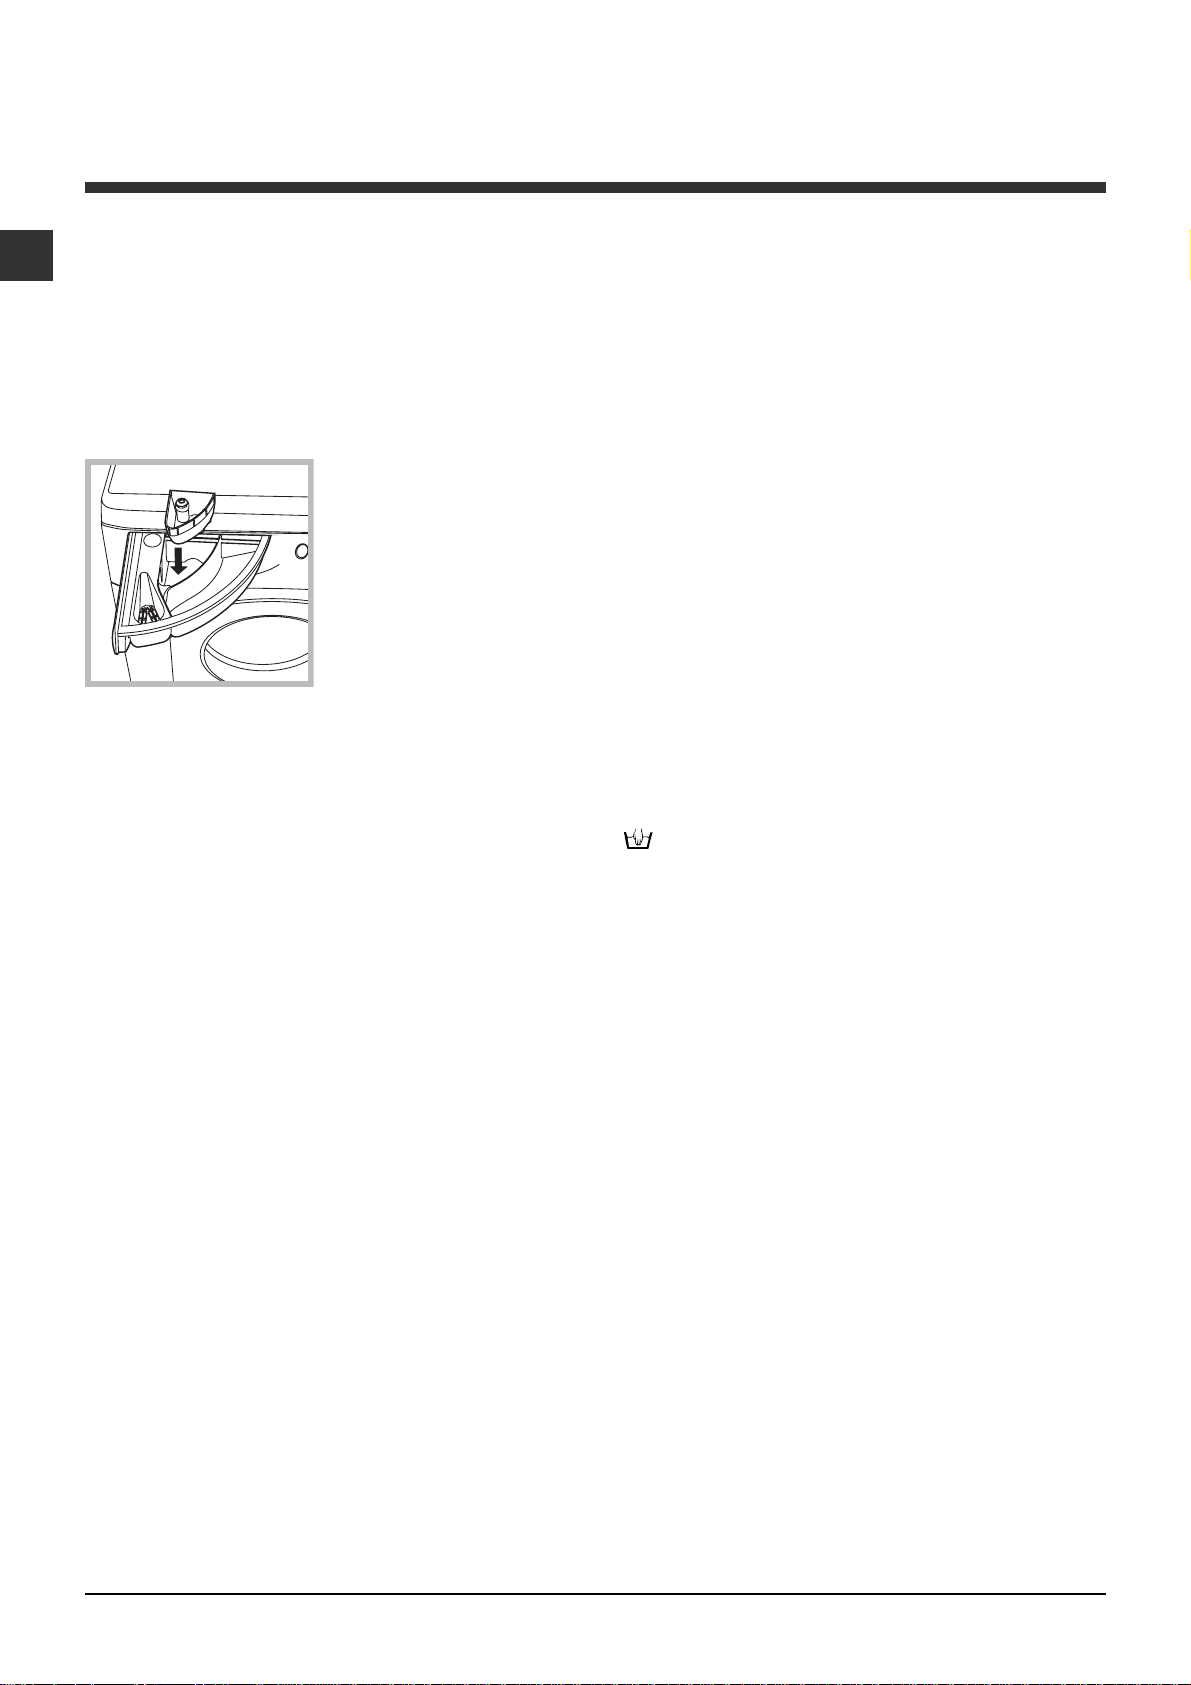
Open the detergent
4
MAX
1
3
compartment 1: Pre-wash detergent (powder)
Before pouring in the detergent, make sure that extra
compartment 4 has been removed.
compartment 2: Detergent for the wash cycle
(powder or liquid)
Liquid detergent should only be poured in immediately
prior to the start of the wash cycle.
compartment 3: Additives (fabric softeners, etc.)
The fabric softener should not overflow the grid.
extra compartment 4: Bleach
2
dispenser drawer and
pour in the detergent or
washing additive, as
follows.
Bleach cycle
Bleaching may only be performed in conjunction with
wash cycles 1, 2, 6.
Pour the bleach into extra compartment 4; pour the
detergent and softener into the corresponding
compartments, then select one of the
abovementioned wash cycles.
This option is recommended only for very soiled
cotton garments.
Preparing the laundry
How much does your laundry weigh?
1 sheet 400-500 g
1 pillow case 150-200 g
1 tablecloth 400-500 g
1 bathrobe 900-1200 g
1 towel 150-250 g
Garments requiring special care
Shirts: use special wash cycle 9 to wash shirts in
various fabrics and colours.
It guarantees maximum care is taken of the garments
and minimises the formation of creases.
Silk: use special wash cycle 10 to wash all silk
garments. We recommend the use of special
detergent which has been designed to wash delicate
clothes.
Curtains: fold curtains and place them in a pillow
case or mesh bag. Use wash cycle 10.
Wool: Hotpoint/Ariston is the only washing machine
manufacturer to have been awarded the prestigious
Woolmark Platinum Care endorsement (M.0508) by
the Woolmark Company, which means that all
woollen garments may be washed in the washing
machine, even those which state hand wash only
on the label. Wash cycle 11 therefore offers
complete peace of mind when washing woollen
garments in the washing machine (max. load 1.5 kg)
and guarantees optimal performance.
Load balancing system
Before every spin cycle, to avoid excessive vibrations
and to distribute the load in a uniform manner, the drum
rotates continuously at a speed which is slightly greater
than the washing rotation speed. If, after several attempts, the load is not balanced correctly, the machine
spins at a reduced spin speed. If the load is excessively
unbalanced, the washing machine performs the distribution process instead of spinning. To encourage improved load distribution and balance, we recommend
small and large garments are mixed in the load.
Divide the laundry according to:
- the type of fabric/the symbol on the label
- the colours: separate coloured garments from
whites.
Empty all garment pockets and check the buttons.
Do not exceed the listed values, which refer to the
weight of the laundry when dry:
Durable fabrics: max. 6 kg
Synthetic fabrics: max. 2,5 kg
Delicate fabrics: max. 2 kg
Wool: max. 1.5 kg
8
Page 9

Precautions and tips
This washing machine was designed and
constructed in accordance with international safety
regulations. The following information is provided for
safety reasons and must therefore be read carefully.
General safety
This appliance was designed for domestic use only.
The washing machine must only be used by adults, in
accordance with the instructions provided in this manual.
Do not touch the machine when barefoot or with
wet or damp hands or feet.
Do not pull on the power supply cable when
unplugging the appliance from the electricity
socket. Hold the plug and pull.
Do not open the detergent dispenser drawer while
the machine is in operation.
Do not touch the drained water as it may reach
extremely high temperatures.
Never force the porthole door. This could damage
the safety lock mechanism designed to prevent
accidental opening.
If the appliance breaks down, do not under any
circumstances access the internal mechanisms in
an attempt to repair it yourself.
Always keep children well away from the appliance
while it is operating.
The door can become quite hot during the wash cycle.
If the appliance has to be moved, work in a group
of two or three people and handle it with the utmost
care. Never try to do this alone, because the
appliance is very heavy.
Before loading laundry into the washing machine,
make sure the drum is empty.
Opening the porthole door manually
In the event that it is not possible to open the
porthole door due to a powercut, and if you wish to
remove the laundry, proceed as follows:
1. remove the plug from
the electrical socket.
2. make sure the water
level inside the machine is
20
lower than the door
opening; if it is not, remove
excess water using the
drain hose, collecting it in a
bucket as indicated in the
figure.
3. using a screwdriver,
remove the cover panel on
the lower front part of the
washing machine (see
figure).
GB
Disposal
Disposing of the packaging materials: observe local
regulations so that the packaging may be re-used.
The European Directive 2002/96/EC on Waste
Electrical and Electronic Equipment, requires that
old household electrical appliances must not be
disposed of in the normal unsorted municipal waste
stream. Old appliances must be collected
separately in order to optimise the recovery and
recycling of the materials they contain and reduce
the impact on human health and the environment.
The crossed out "wheeled bin" symbol on the
product reminds you of your obligation, that when
you dispose of the appliance it must be separately
collected.
Consumers should contact their local authority or
retailer for information concerning the correct
disposal of their old appliance.
4. pull outwards using the tab as indicated in the
figure, until the plastic tie-rod is freed from its stop
position; pull downwards and open the door at the
same time.
5. reposition the panel, making sure the hooks are
securely in place before you push it onto the
appliance.
9
Page 10

Care and maintenance
GB
Cutting off the water and electricity
supplies
Turn off the water tap after every wash cycle. This
will limit wear on the hydraulic system inside the
washing machine and help to prevent leaks.
Unplug the washing machine when cleaning it and
during all maintenance work.
Cleaning the washing machine
The outer parts and rubber components of the
appliance can be cleaned using a soft cloth soaked
in lukewarm soapy water. Do not use solvents or
abrasives.
Cleaning the detergent dispenser
drawer
1
Remove the dispenser
by raising it and pulling it
out (see figure).
Wash it under running
water; this operation
should be repeated
frequently.
2
Cleaning the pump
The washing machine is fitted with a self-cleaning
pump which does not require any maintenance.
Sometimes, small items (such as coins or buttons)
may fall into the pre-chamber which protects the
pump, situated in its bottom part.
Make sure the wash cycle has finished and unplug
the appliance.
To access the pre-chamber:
1. using a screwdriver,
remove the cover panel
on the lower front part of
the washing machine
(see figure);
2. unscrew the lid by
rotating it anti-clockwise
(see figure): a little water
may trickle out. This is
perfectly normal;
Caring for the door and drum of your
appliance
Always leave the porthole door ajar in order to
prevent unpleasant odours from forming.
3. clean the inside thoroughly;
4. screw the lid back on;
5. reposition the panel, making sure the hooks are
securely in place before you push it onto the
appliance.
Checking the water inlet hose
Check the inlet hose at least once a year. If there are
any cracks, it should be replaced immediately: during
the wash cycles, water pressure is very strong and a
cracked hose could easily split open.
Never use second-hand hoses.
10
Page 11

Troubleshooting
Your washing machine could fail to work. Before contacting the Technical Assistance Centre (see Assistance),
make sure that the problem cannot be not solved easily using the following list.
Problem:
The washing machine does not
switch on.
The wash cycle does not start.
The washing machine does not
take in water (the indicator light
for the first wash cycle stage
flashes rapidly).
The washing machine
continuously takes in and drains
water.
Possible causes / Solutions:
The appliance is not plugged into the socket fully, or is not making contact.
There is no power in the house.
The washing machine door is not closed properly.
The ON/OFF button has not been pressed.
The START/PAUSE button has not been pressed.
The water tap has not been opened.
A delayed start has been set (see Personalisation).
The water inlet hose is not connected to the tap.
The hose is bent.
The water tap has not been opened.
There is no water supply in the house.
The pressure is too low.
The START/PAUSE button has not been pressed.
The drain hose is not fitted at a height between 65 and 100 cm from
the floor (see Installation).
The free end of the hose is under water (see Installation).
The wall drainage system is not fitted with a breather pipe.
If the problem persists even after these checks, turn off the water tap,
switch the appliance off and contact the Assistance Service. If the
dwelling is on one of the upper floors of a building, there may be problems
relating to water drainage, causing the washing machine to fill with water
and drain continuously. Special anti-draining valves are available in shops
and help to avoid this inconvenience.
GB
The washing machine does not
drain or spin.
The washing machine vibrates a
lot during the spin cycle.
The washing machine leaks.
The START/PAUSE indicator light
(orange) and the function
indicator lights flash rapidly.
There is too much foam.
The wash cycle does not include draining: some wash cycles require
the drain phase to be started manually.
The EASY IRON function has been activated: To complete the wash
cycle, press the START/PAUSE button (Personalisation).
The drain hose is bent (see Installation).
The drainage duct is clogged.
The drum was not unlocked correctly during installation (see Installation).
The washing machine is not level (see Installation).
The washing machine is trapped between cabinets and walls (see Installation).
The water inlet hose is not screwed on properly (see Installation).
The detergent dispenser drawer is blocked (for cleaning instructions, see
Care and maintenance).
The drain hose is not fixed properly (see Installation).
Switch off the machine and unplug it, wait for approximately 1 minute
and then switch it back on again.
If the problem persists, contact the Technical Assistance Service.
The detergent is not suitable for machine washing (it should display the
text for washing machines or hand and machine wash, or the like).
Too much detergent was used.
11
Page 12

Service
GB
Before calling for Assistance:
Check whether you can solve the problem alone (see Troubleshooting);
Restart the programme to check whether the problem has been solved;
If this is not the case, contact an authorised Technical Assistance Centre using the telephone number
provided on the guarantee certificate.
Always request the assistance of authorised technicians.
Have the following information to hand:
the type of problem;
the appliance model (Mod.);
the serial number (S/N).
This information can be found on the data plate applied to the rear of the washing machine, and can also
be found on the front of the appliance by opening the door.
12
Page 13

Руководство по
эксплуатации
CIS
Русский
ARXL 95
СТИРАЛЬНАЯ МАШИНА
Содержание
CIS
Установка 14-15
Распаковка и нивелировка
Подключение к водопроводу и электричеству
Первый цикл стирки
Технические характеристики
Описание стиральной машины и
порядка запуска программы, 16-17
Панель управления
Индикаторы
Порядок запуска программы
Программы, 18
Таблица программ
Персонализированные настройки, 19
Регулировка температуры
Выбор скорости отжима
Дополнительные функции
Моющие средства и типы белья, 20
Распределитель моющих средств
Отбеливание
Подготовка белья
Изделия, требующие деликатной стирки
Система балансировки белья
Предосторожности и рекомендации, 21
Общие требования к безопасности
Утилизация
Аварийное открытие люка
Техническое обслуживание и уход, 22
Отключение воды и электрического тока
Уход за стиральной машиной
Уход за распределителем моющих средств
Уход за люком и барабаном
Уход за насосом
Проверка водопроводного шланга
Поиск неисправностей и методы их
устранения, 23
Сервисное обслуживание, 24
13
Page 14

Установка
CIS
Важно сохранить данное руководство для его
последующего использования случае продажи,
передачи или переезда на новую квартиру необходимо
проверить, чтобы руководство оставалось вместе со
стиральной машиной, чтобы ее новый владелец мог
ознакомиться с порядком ее функционирования и
соответствующими предупреждениями.
Внимательно прочитайте инструкции: в них
содержатся важные сведения об установке изделия,
его эксплуатации и безопасности.
Распаковка и нивелировка
Снятие упаковки
1. Снимите с машины упаковку.
2. Проверьте, чтобы стиральная машина не была
повреждена в процессе перевозки. В случае
обнаружения повреждений немедленно обратитесь к
поставщику, не подключая машину.
3. Снимите 3
транспортировочных
болта, предохраняющие
машину в процессе
перевозки, и резиновую
заглушку с
соответствующей
распорной шайбой,
расположенные в задней
части стиральной
машины (см. схему).
4. Закройте отверстия прилагающимися
пластиковыми заглушками.
5. Сохраните все детали: они должны быть
установлены на стиральную машину в случае ее
перевозки.
Не разрешайте детям играть с упаковочными
материалами.
Нивелировка
1. Установите стиральную машину на ровном и
прочном полу, не прислоняя ее к стенам, мебели и
прочим предметам.
2. Если пол не является
идеально
горизонтальным,
необходимо
компенсировать
неровность,
отрегулировав по высоте
передние ножки (ñì.
схему). Уклон,
измеренный при помощи
уровня, установленного
на поверхность машины,
не должен превышать 2°.
Точная нивелировка обеспечивает стабильность
стиральной машины, помогает избежать ее вибраций
и смещений в процессе функционирования. В случае
установки машины на ковер или ковролин
отрегулируйте ножки таким образом, чтобы под
стиральной машиной оставался достаточный зазор
для вентиляции.
Подключение к водопроводу и
электричеству
Порядок подключения к водопроводному шлангу
1. Вставьте прокладку А в
конец водопроводного
шланга и привинтите его к
водопроводному крану
холодной воды с
A
3. Проверьте, чтобы водопроводный шланг не был
заломлен или сжат.
Давление воды в водопроводном кране должно
быть в пределах значений, указанных в таблице
Технические данные (см. страницу рядом).
Если длина водопроводного шланга будет
недостаточной, следует обратиться в
специализированный магазин или в уполномоченный
сервисный центр
Никогда не пользуйтесь б/у шлангами.
Используйте шланги, прилагающиеся к машине.
резьбовым отверстием
3/4 газ (см. схему).
Перед подсоединением
откройте водопроводный
кран до тех пор, пока из
него не потечет чистая
вода.
2. Подсоедините
водопроводный шланг к
машине, привинтив его к
специальному
водопроводному крану,
расположенному в
задней верхней части
справа (см. схему).
14
Page 15

Подсоединение сливного шланга
Подсоедините сливной
шланг, не перегибая его,
к сливной трубе или к
настенному сливному
отверстию,
65 - 100 cm
распложенному на
высоте от 65 до 100 см от
пола,
или поместите шланг в
раковину или в ванну,
закрепив
прилагающуюся
направляющую к крану
(см. схему). Свободный
конец сливного шланга
не должен быть погружен
в воду.
Не используйте удлинители и тройники.
CIS
Сетевой кабель изделия не должен быть согнут
èëè ñæàò.
Замена сетевого кабеля может осуществляться
только уполномоченными сервисными центрами.
Внимание! Фирма снимает с себя всякую
ответственность в случае несоблюдения
вышеописанных правил.
Первый цикл стирки
По завершении установки, перед началом
эксплуатации необходимо произвести один цикл
стирки со стиральным порошком, но без белья, по
программе 1.
Не рекомендуется использовать удлинительные
шланги. При необходимости удлинение должно иметь
такой же диаметр, что и оригинальный шланг, и его
длина не должна превышать 150 см.
Подключение к электросети
Перед включением изделия к розетке электросети
неоюходимо проверить следующее:
розетка электросети должна быть соединена с
заземлением и соответствовать нормативам;
розетка электросети должна быть расчитана на
максимальную мощность стиральной машины,
указанную в таблице Технические данные (ñì.
таблицу сбоку);
напряжение электросети должно соответствовать
значениям, указанным в таблице Технические
данные (см. таблицу сбоку);
электрическая розетка должна подходить к
штепсельной вилке стиральной машины. В
противном случае необходимо заменить розетку.
Запрещается устанавливать стиральную машину на
улице, даже под навесом, так как опасно подвергать
ее воздействию дождя и грозы.
Стиральная машина должна быть расположена
таким образом, чтобы доступ к розетке электросети
оставался свободным.
Технические характеристики
Ìîäå ë ü
Размеры
Загрузка
Электрические
параметры
Гидравлические
параметры
Скорость
отжима
Kонтрольные
программы
согласно
нормативу
EN 60456
ARXL 95
ши ри н а 5 9, 5 с м
высота 85 см
глубина 52,5 см
1 - 6 êã
cмотрите паспортную табличку с
техническими характеристиками на
машине
max давление 1 Мпа (10 бар)
min давление 0,05 Мпа (0,5 бар)
объем барабана 46 л
äî 900 îá/ìèí
программа 6; температура 60°С;
при загрузке до 6 кг.
Машина соответствует следующим
Директивам Европейского
Экономического с ообществ а:
- 73/23/ ЕЕС от 19.02.73 (низкого
напряжения) и последующие модификации
- 89/336 /ЕЕС от 03.05.89 (электромагнитной совместимости) и
последующие модификации
- 2 002 / 96/ CE
15
Page 16

Описание стиральной машины и
порядка запуска программы
CIS
Панель управления
Распределитель моющих
средств
Кнопка
ÂÊË/ÂÛÊË
Рукоятка выбора
ПРОГРАММА
ТЕМПЕРАТУРЫ
Регулятор
Индикаторы ВЫПОЛНЕНИЯ ФАЗ
ЦИКЛА/ЗАПУСКА С
ЗАДЕРЖКОЙ
Скорости
ОТЖИМА
Кнопки с
индикаторами
дополнительных
ФУНКЦИЙ
Индикатор
БЛОКИРОВКИ
ЛЮКA
Кнопка с
индикатором
ПУСК/ПАУЗА
Распределитель моющих средств: для
загрузки стиральных веществ и добавок (ñì.
«Моющие средства и типы белья»).
Внутри распределителя моющих средств имеется
краткий перечень программ.
Кнопка ÂÊË/ÂÛÊË: служит для включения и
выключения стиральной машины.
Рукоятка выбора ПРОГРАММА: служит для
выбора программ. В процессе выполнения
программы рукоятка не вращается.
Кнопки с индикаторами дополнительных
ФУНКЦИЙ: служат для выбора имеющихся
дополнительных функций. Индикатор,
соответствующий выбранной функции, останется
включенным.
Скорости ОТЖИМА: служит для выбора скорости
отжима или для его исключения
(см «Персонализированные настройки»).
Регулятор ТЕМПЕРАТУРЫ: служит для настройки
температуры или для стирки в холодной воде
(см. «Персонализированные настройки»).
индикаторы ВЫПОЛНЕНИЯ ФАЗ ЦИКЛА/
ЗАПУСКА С ЗАДЕРЖКОЙ: показывают
последовательность выполнением программы
стирки.
Включенный индикатор соответствует текущей
фазе.
Если была включена функция Таймер отсрочки,
индикаторы будут показывать время, остающееся
до запуска программы (см. страницу сбоку).
Индикатор БЛОКИРОВКИ ЛЮКA: показывает,
можно ли открыть люк (см. страницу сбоку).
Кнопка с индикатором ПУСК/ПАУЗА: служит для
запуска или для временного прерывания
программы.
ПРИМЕЧАНИЕ: для временного прерывания
текущего цикла стирки нажмите эту кнопку.
Соответствующий индикатор замигает
оранжевымцветом, а индикатор текущей фазы
стирки будет гореть, не мигая. Если индикатор
БЛОКИРОВКИ ЛЮКA
люк.
Для возобновления цикла стирки с момента, когда
он был прерван, вновь нажмите ПУСК/ПАУЗА.
погас, можно открыть
16
Page 17

Индикаторы
Индикаторы сообщают пользователю важные
сведения. Значение индикаторов:
Индикаторы текущей фазы цикла:
После выбора и запуска цикла стирки индикаторы
будут загораться один за другим, показывая
последовательность выполнения программы:
CIS
Таймер отсрочки
Если была включена функция Таймер отсрочки
(см. «Персонализированные настройки»), после
запуска программы начнет мигать индикатор,
соответствующий заданному времени задержки:
По мере отсчета времени будет показываться
остающееся время вместе с миганием
соответствующего индикатора.
По прошествии заданного времени задержки
мигающий индикатор погаснет, и запустится заданная
программа.
Cтирка
Полоскание
Отжим
Слив без отжима
Конец цикла
Кнопки дополнительный функций и
соответствующие индикаторы
При выборе функции загорается соответствующая
кнопка.
Если выбранная функция является несовместимой с
заданной программой, соответствующий индикатор
будет мигать, и такая функция не будет включена.
Если будет выбрана функция, несовместимая с
другой, ранее выбранной функцией, останется
включенной только последняя выбранная функция.
Индикатор блокировки люка:
Включенный индикатор означает, что люк
заблокирован во избежание его случайного
открывания. Во избежание его повреждения
необходимо дождаться, когда индикатор погаснет,
перед тем как открыть люк.
ПРИМЕЧАНИЕ: если включена функция Таймер
отсрочки, люк открыть нельзя. Для этого необходимо
переключить машину в режим паузы при помощи
кнопки ПУСК/ПАУЗА.
Быстрое мигание индикатора ПУСК/ПАУЗА
(оранжевый) одновременно с индикатором функций
означает неисправность (см. «Неисправности и
методы их устранения»).
Порядок запуска программы
1. Включите стиральную машину, нажав кнопку ВКЛ/ВЫКЛ. Все индикаторы загорятся на несколько секунд,
затем погаснут, останется мигать индикатор ПУСК/ПАУЗА.
2. Загрузите белье в барабан и закройте люк.
3. Задайте рукояткой ПРОГРАММА нужную программу.
4. Задайте температуру стирки (см. «Персонализированные настройки»).
5. Задайте скорость отжима (см. «Персонализированные настройки»).
6. Поместите моющие средства и добавки (см. «Стиральные вещества и типы белья»).
7. Включите нужные дополнительные функции.
8. Запустите программу при помощи кнопки ПУСК/ПАУЗА, соответствующий индикатор загорится зеленым цветом.
Для отмены заданного цикла переключите машину в режим паузы при помощи кнопки ПУСК/ПАУЗА и выберите новый цикл.
9. По завершении программы загорится индикатор
что теперь можно открыть люк. Выньте белье и оставить люк полуоткрытым для сушки барабана.
Выключите стиральную машину, нажав кнопку ВКЛ/ВЫКЛ.
. Индикатор БЛОКИРОВКИ ЛЮКA погаснет, показывая,
17
Page 18

Программы
CIS
Таблица программ
Стир альные ср е дс тв а
Отбел-
иватель
Стирка Ополаски-
ватель
ll l
ll
ll
ll
ll
ll
ll
ll l
ll l
ll l
ll
ll
ll
ll
l
l
Опис ание прогр аммы
Программы
Специальные программы
ЦИKЛ АНТИБАKТЕРИЯ: сильнозагрязненное белое белье.
6
ЦИKЛ АНТИБАKТЕРИЯ (1): сильнозагрязненное белое и прочное
6
цветное белье.
НОЧНОЙ ЦИKЛ: слабозагрязненное деликатное цветное белье.
7
ДЕТСKОЕ БЕЛЬЕ: сильнозагрязненное деликатное цветное белье.
8
РУБАШKИ
9
ШЕЛK/ЗАНАВЕСKИ: Для изделий из шелка, вис козы и нижнего белья.
10
ØÅ Ð Ñ Ò Ü : Ä ë ÿ øåð ñ òè, êà øåì èð à è ò. ä.
11
Ежедневные программы
ХЛОПОK: сильнозагрязненное белое и прочное цветное белье.
1
ХЛОПОK (2): сильнозагрязненное белое и деликатное цветное белье.
1
ХЛОПОK (3): сильнозагрязненное белое и цветное деликатное белье.
2
СИНТЕТ ИKА : Сильнозаягрязненное белье прочное цветное белье.
3
СИНТЕТ ИKА : Слабозагрязненное прочное цветное белье.
3
MÈKÑ 30': Для быстрого освежения малогрязного белья (не для
4
øå ðñ ò è, øå ëê à è è ç äå ë èÿ ð ó÷ í î é ñ òè ðê è ).
MÈKÑ 15': Для быстрого осв ежения малогрязного белья (не для
5
øå ðñ ò è, øå ëê à è è ç äå ë èÿ ð ó÷ í î é ñ òè ðê è ).
Дoполнительные программы
Ïîë îñê àíèå
A
Деликатное Полоскание
B
Отжим
C
Деликатный отжим
D
Слив без отжима
E
Ìàêñ
òåìï.
Ìàêñ .
скорость
(îá./ìèí.)
(°C)
90° 900
60° 900 -
40° 800 -
40° 800 -
40° 600 -
30° 0 -
40° 600 -
60° 900
40° 900
40° 900
60° 800 -
40° 800 -
30° 800 -
30° 800 -
- 900 - -
- 800 - -
- 900 - - - 616
- 800 - - - 2,5 12
- 0 - - - 62
Приведенные в таблице значения являются примерными.
Для всех институтов тестирования:
1) Программы управления в соответствии с Директивой EN 60456: задайте программу 6 с температурой 60°C.
2) Длинная программа для х/б белья: задайте программу 1 с температурой 40°C.
3) Короткая программа для х/б белья: задайте программу 2 с температурой 40°C.
Ìàêñ .
çàãð óçêà
(êã)
6165
6155
4290
2118
270
155
1,5 55
6130
6115
685
2,5 85
2,5 70
330
1,5 15
644
2,5 37
Продол-
житть
цикла
Специальные программы
ЦИKЛ АНТИБАKТЕРИЯ
использование отбеливателя при температуре выше 60°C.
(программа 6). Дезинфецирующая программа с высокой температурой, предусматривающая
Для отбеливания залейте отбеливатель, моющее средство
и добавки в соответствующие ячейки (см параграф «Распределитель моющих средств»).
НОЧНОЙ ЦИKЛ
(программа 7). Это бесшумный цикл, который можно включить ночью, экономя электроэнергию.
Данная программа расчитана на стирку синтетических и х/б вещей. По завершении цикла машина останавливается с
водой в барабане; для слива и отжима нажмите кнопку ПУСК/ПАУЗА, в противном случае по прошествии 8 часов
машина автоматически произведет слив воды и отжим.
ДЕТСKОЕ БЕЛЬЕ
(программа 8). Программа удаляет типичные загрязнения детской одежды, гарантируя удаление
моющего средства из ткани во избежание аллергии чувствительной детской кожи. Данный цикл расчитан на
сокращение количества бактерий благодаря использованию большего объема воды и оптимизируя воздействие
специальных дезинфицирующих добавок старильного вещества.
По завершении стирки машина продолжит медленно вращать барабан во избежание сминания белья. Для остановки
цикла нажмите кнопку ПУСК/ПАУЗА.
MÈKÑ 30'
(программа 4) предназначена для быстрой стирки слабозагрязненного белья цикл длится всего 30 минут,
что позволяет сэкономить время и электроэнергию. По этой программе (4, 30°C) можно стирать вместе белье из
разных тканей (за исключением шерсти и шелка) с максимальной загрузкой 3 кг.
MÈKÑ 15'
(программа 5) предназначена для быстрой стирки слабозагрязненного белья цикл длится всего 15 минут,
что позволяет сэкономить время и электроэнергию. По этой программе (5, 30°C) можно стирать вместе белье из
разных тканей (за исключением шерсти и шелка) с максимальной загрузкой 1,5 кг.
18
Page 19

Персонализированные
настройки
Регулировка температуры
Настройка температуры стирки производится при помощи регулятора ТЕМПЕРАТУРЫ (см.Таблицу программ).
Значение температуры может быть уменьшено вплоть до стирки в холодной воде (
Машина автоматически не допускает выбор температуры, превышающийs максимальное значение,
предусмотренное для каждой прораммы.
).
Выбор скорости отжима
Выбор скорости отжима выбранной программы производится при помощи регулятора скорости ОТЖИМ.
Для разных программ предусматривается разная максимальная скорость отжима:
Программы Максимальная скорость отжима
Хлопок 900 оборотов в минуту
Синтетические ткани 800 оборотов в минуту
Шерсть 600 оборотов в минуту
Шелк без отжима
Скорость отжима может быть уменьшена, или же отжим может быть совсем исключен, повернув регулятор в
положение
Машина автоматически не допускает выбор скорости отжима, превышающий максимальную скорость,
предусмотренную для каждой прораммы.
.
Дополнительные функции
Различные функции стирки машины позволяют достичь желаемой чистоты и белизны вашего белья.
Порядок выбора функций:
1. нажмите кнопку нужной вам функции;
2. включение соответствующего индикатора означает, что функция включена.
Примечание: Частое мигание индикатора означает, что данная функция не может быть выбрана для заданной
программы.
CIS
Таймер отсрочки
Задерживает запуск цикла вплоть до 12 часов.
Нажмите кнопку несколько раз вплоть до включения индикатора, соответствующего нужному значению задержки.
При пятом нажатии кнопки функция отключается.
ПРИМЕЧАНИЕ: После нажатия кнопки ПУСК/ПАУЗА, можно изменить значение задержки только в сторону
уменьшения.
Эта функция совместима с любой программой.
Легкая глажка
При выборе этой функции циклы стирки и отжима изменяются таким образом, чтобы сократить складки на белье.
По завершении цикла машина производит медленное вращение барабана. Индикатор функции ЛЕГКАЯ ГЛАЖКА è
индикатор ПУСК/ПАУЗА мигают (оранжевым цветом), индикатор фазы
нажмите кнопку ПУСК/ПАУЗА или кнопку ЛЕГКАЯ ГЛАЖКА.
При выборе программы Øåëê (10) машина завершает цикл без слива воды, индикатор функции ЛЕГКАЯ ГЛАЖКА
и индикатор ПУСК/ПАУЗА мигают (оранжевым цветом), индикатор фазы Полоскание горит, не мигая. Для слива
воды и выгрузки белья необходимо нажать кнопку ПУСК/ПАУЗА или кнопку ЛЕГКАЯ ГЛАЖКА.
горит, не мигая. Для завершения цикла
Эта функция несовместима с программами 4, 5, 6, 7, 8, 11, C, D, E.
Дополнительное Полоскание
При выборе этой функции повышается эффективность ополаскивания, обеспечивая максимальное удаление
моющего вещества. Эта функция особенно удобна для людей с кожей, чувствительной к стиральным веществам.
Эта функция несовместима с программами 4, 5, C, D, E.
Суперстирка
Обеспечивает оптимальную стирку благодаря использованию большего объема воды в начале цикла и большей
продолжительности цикла.
Эта функция несовместима с программами 4, 5, 6, 10, 11, A, B, C, D, E.
19
Page 20

Моющие средства и
типы белья
CIS
Распределитель моющих средств
Хороший результат стирки зависит также от
правильной дозировки стирального вещества:
избыток стирального вещества не гарантирует более
эффективную стирку, напротив, способствует
образованию налетов внутри стиральной машины и
загрязнению окружающей среды.
Не используйте моющие средства для ручной
стирки, так как они образуют слишком много пены.
Выньте распределитель и
4
AX
M
1
3
отделение 1: моющее средство для
предварительной стирки (порошок)
Перед засыпкой стирального порошка необходимо
проверить, чтобы не был установлен дополнительный
отделение 4.
отделение 2: Моющее средство для стирки
(порошок или жидкое)
Моющее средство для стирки заливается
непосредственно перед запуском машины.
отделение 3: Добавки (ополаскиватель и т.д.)
Не наливайте ополаскиватель выше решетки
отделения.
дополнительное отделение 4: Отбеливатель
2
поместите в него
моющее средство или
добавку в следующем
порядке.
Отбеливание
Отбеливание производится только с программами
1, 2, 6.
Поместите отбеливатель в дополнительный отделение
4, моющее средство и ополаскиватель в
соответствующие отделения, затем выберите одну из
вышеуказанных программ.
Рекомендуется только для очень грязного х/б белья.
Сколько весит белье?
1 простыня 400-500 гр.
1 наволочка 150-200 гр.
1 скатерть 400-500 гр.
1 халат 900-1200 гр.
1 полотенце 150-250 гр.
Изделия, требующие деликатной
стирки
Рубашки: используйте специальную программу 9
для стирки рубашек из разных тканей и разных
цветов.
Это обеспечит максимальную сохранность вещей и
сделает их менее мятыми.
Øåëê: используйте специальную программу 10 для
стирки всех шелковых вещей. Рекомендуется
использовать специальное стиральное вещество
для деликатных тканей.
Занавески: рекомендуется свернуть их и
поместить в прилагающийся мешок. Используйте
программу 10.
Шерсть: Стиральная машина марки Hotpoint/Ariston
единственная получила престижный знак Woolmark
Platinum Care (M.0508) от Компании The Woolmark
Company, который сертифицирует машинную стирку
всех шерстяных изделий, даже тех, на этикетках
которых указано «только ручная стирка»
выборе программы 11 вы можете надежно и
эффективно стирать любые шерстяные изделия
(макс. 1,5 кг) с гарантированным лучшими
результатами.
. Ïðè
Система балансировки белья
Перед каждым отжимом во избежание чрезмерных
вибраций и для равномерного распределения белья
в барабане машина производит вращения со
скоростью, слегка превышающей скорость стирки.
Если после нескольких попыток белье не будет
правильно сбалансировано, машина произведет
отжим на меньшей скорости по сравнению с
предусмотренной.
Подготовка белья
Разделите белье по следующим признакам:
- тип ткани / обозначения на этикетке.
- цвет: отделите цветное белье от белого.
Выньте из карманов все предметы и проверьте пуговицы.
Не превышайте максимальную загрузку барабана,
указанную для сухого белья:
Прочные ткани: макс. 6 кг
Синтетические ткани: макс. 2,5 кг
Деликатные ткани: макс. 2 кг
Шерсть: макс. 1,5 кг
20
Page 21

Предосторожности и
рекомендации
Стиральная машина спроектирована и изготовлена в
соответствии с международными нормативами по
безопасности. Необходимо внимательно прочитать
настоящие предупреждения, составленные в целях
вашей безопасности.
Общие требования к безопасности
Данное изделие предназначено исключительно для
домашнего использования.
Стиральной машиной должны пользоваться только
взрослые лица, соблюдающие инструкции,
приведенные в данном техническом руководстве.
Не прикасайтесь к изделию влажными руками,
босиком или во влажной одежде.
Не тяните за сетевой кабель для отсоединения
изделия из электро розетки, возьмитесь за вилку
рукой.
Не открывайте распределитель порошка в процессе
стирки.
Избегайте контактов со сливаемой водой, так как
она может быть очень горячей.
Категорически запрещается открывать люк силой:
это может привести к повреждению защитного
механизма, предохраняющего от случайного
открытия машины.
В случае неисправности категорически
запрещается открывать внутренние механизмы
изделия с целью их самостоятельного ремонта.
Избегайте контактов детей с работающей
стиральной машиной.
В процессе стирки люк стиральной машины может
нагреться.
При необходимости переместить стиральную
машину следует выполнять эту операцию вдвоем
или втроем с предельной осторожностью. Никогда
не перемещайте машину в одиночку, так как
машина очень тяжелая.
Перед загрузкой в стиральную машину белья
проверьте, чтобы барабан был пуст.
Утилизация
Уничтожение упаковочных материалов: соблюдайте
местные нормативы с целью повторного
использования упаковочных материалов.
Согласно Европейской Директиве 2002/96/СЕ
касательно утилизации электронных и электрических
электроприборов электроприборы не должны
выбрасываться вместе с обычным городским
мусором. Выведенные из строя приборы должны
собираться отдельно для оптимизации их утилизации и
рекуперации составляющих их материалов, а также
для безопасности окружающей среды и здоровья.
Символ зачеркнутая мусорная корзинка, имеющийся
на всех приборах, служит напоминанием об их
отдельной утилизации.
За более подробной информацией о правильной
утилизации бытовых электроприборов пользователи
могут обратиться в специальную государственную
организацию или в магазин.
Аварийное открытие люка
Если по причине отключения электроэнергии
невозможно открыть люк машины, чтобы выгрузить
чистое белье, действуйте следующим образом:
1. выньте штепсельную
вилку машины из электро
розетки.
2. проверьте, чтобы
20
4. потяните наружу язычок, показанный на схеме,
вплоть до освобождения пластикового
блокировочного винта. Затем потяните его вниз и
одновременно откройте люка.
5. установите на место переднюю панель, проверив
перед ее прикреплением к машине, чтобы крюки
вошли в соответствующие петли.
уровень воды в машине
был ниже отверстия люка.
В противном случае слейте
излишек воды через
сливную трубу в ведро, как
показано на схеме.
3. снимите переднюю
панель стиральной
машины при помощи
отвертки (см. схему).
CIS
21
Page 22

Техническое обслуживание
и уход
CIS
Отключение воды и электрического
тока
Перекрывайте водопроводный кран после
каждой стирки. Таким образом сокращается
износ водопроводной системы машины и
сокращается риск утечек.
Выньте штепсельную вилку из электро розетки
в процессе чистки и технического
обслуживания стиральной машины.
Уход за стиральной машиной
Для чистки наружных и резиновых частей
стиральной машины используйте тряпку,
смоченную теплой водой с мылом. Не
используйте растворители или абразивные
чистящие средства.
Уход за распределителем моющих
средств
Уход за насосом
Стиральная машина оснащена самочистящимся
насосом, не нуждающимся в техническом
обслуживании. Тем не менее мелкие предметы
(монеты, пуговицы) могут упасть за кожух,
предохраняющий насос, расположенный в его
нижней части.
Проверьте, чтобы цикл стирки завершился, и
выньте штепсельную вилку из сетевой розетки.
Для доступа к кожуху:
1. снимите переднюю
панель стиральной
машины при помощи
отвертки (ñì. схему);
1
Выньте
распределитель,
приподняв ее и
потянув наружу (ñì.
схему).
Промойте
распределитель теплой
водой. Эта операция
2
должна выполняться
регулярно.
Уход за люком и барабаном
После использования стиральной машины
всегда следует оставлять люк полуоткрытым
во избежание образования неприятных
запахов в барабане.
2. отвинтите крышку,
повернув ее против
часовой стрелки (ñì.
схему): небольшая
утечка воды является
нормальным явлением;
3. тщательно прочистите внутри кожуха;
4. завинтите крышку на место;
5. установите на место переднюю панель,
проверив перед ее прикреплением к машине,
чтобы крюки вошли в соответствующие петли.
Проверка водопроводного шланга
Проверяйте шланг подачи воды не реже одного
раза в год. При обнаружении трещин или
разрывов шланга замените его: в процессе стирки
сильное воды в водопроводе давление может
привести к внезапному отсоединению шланга.
22
Никогда не пользуйтесь б/у шлангами.
Page 23

Поиск неисправностей и
методы их устранения
Если ваша стиральная машина не работает. Прежде чем обратиться в Центр Сервисного обслуживания
(см. Сервисное обслуживание), проверьте, можно ли устранить неисправность, следуя рекомендациям,
приведенным в следующем перечне.
Неисправности:
Стиральная машина не
включается.
Цикл стирки не запускается.
Стиральная машина не заливает
воду (часто мигает индикатор
первой фазы стирки).
Машина непрерывно заливает и
сливает воду.
Возможные причины / Методы устранения:
Штепсельная вилка не соединена с электро розеткой или отходит и не
обеспечивает контакта.
В доме отключено электричество.
Люк машины закрыт неплотно.
Не была нажата кнопка ВКЛ/ВЫКЛ.
Не была нажата кнопка ПУСК/ПАУЗА.
Перекрыт водопроводный кран.
Была запрограммирована задержка запуска цикла (Таймер отсрочки,
(см. «Персонализированные настройки»).
Водопроводный шланг не подсоединен к крану.
Шланг согнут.
Перекрыт водопроводный кран.
В доме нет воды.
Недостаточное водопроводное давление.
Не была нажата кнопка ПУСК/ПАУЗА.
Сливной шланг не находится на высоте 65 100 см. от пола (см. «Установка»).
Конец сливного шланга погружен в воду (см. «Установка»).
Настенное сливное отверстие не оснащено вантузом для выпуска
воздуха.
Если после вышеперечисленных проверок неисправность не будет
устранена, следует перекрыть водопроводный кран, выключить
стиральную машину и обратиться в Центр Сервисного Обслуживания.
Если ваша квартира находится на последних этажах здания, могут
наблюдаться явления сифона, поэтому стиральная машина производит
непрерывный залив и слив воды. Для устранения этой аномалии в
продаже имеются специальные клапаны против явления сифона.
CIS
Стиральная машина не сливает
воду и не отжимает белье.
Стиральная машина сильно
вибрирует в процессе отжима.
Утечки воды из стиральной
машины.
Индикатор ПУСК/ПАУЗА
(оранжевый) и индикаторы
функций часто мигают.
В процессе стирки образуется
слишком обильная пена.
Выбранная программа не предусматривает слив воды: для некоторых
программ необходимо включить слив вручную.
Включена функция ЛЕГКАЯ ГЛАЖКА: для завершения программы
нажмите кнопку ПУСК/ПАУЗА (см. «Персонализированные
настройки»).
Сливной шланг согнут (см. «Установка»).
Засорен сливной трубопровод.
В момент установки стиральной машины барабан был разблокирован
неправильно (см. «Установка»).
Стиральная машина установлена неровно (см. «Установка»).
Машина зажата между стены и мебелью (см. «Установка»).
Плохо прикручен водопроводный шланг (см. «Установка»).
Засорен распределитель моющего средства (порядок его чистки ñì. â
параграфе «Техническое обслуживание и уход»).
Сливной шланг плохо закреплен (см. «Установка»).
Выключите машину и выньте штепсельную вилку из сетевой розетки,
подождите 1 минуту и вновь включите машину.
Если неисправность не устраняется, обратитесь в Сервисную Службу.
Моющее средство непригодно для стирки в стиральной машине (на
упаковке должно быть указано «для стирки в стиральной машине»,
«для ручной и машинной стирки» или подобное).
В распределитель было помещено чрезмерное количество моющего
средства.
23
Page 24

Сервисное
обслуживание
195067147.00
10/2007 - Xerox Business Services
CIS
Перед тем как обратиться в Службу Сервиса:
Проверьте, нельзя ли устранить неисправность самостоятельно (см. «Неисправности и методы
их устранения»);
Вновь запустите программу для проверки исправности машины;
В протвном случае обратиться в Авторизованный Сервисный Центр по телефонам, указанным в
гарантийном таллоне.
Никогда не обращайтесь к неавторизованным сервисным центрам.
При обращении в Сервисную Службу необходимо сообщить:
тип неисправности;
модель изделия (Мод.);
номер тех. паспорта (серийный ¹).
Серийный номер и модель указаны на паспортной табличке, расположенной на задней панели и
спереди люка стиральной машины.
24
 Loading...