

Page 1

Instructions for use
WASHING MACHINE
GB
English,1
GR
ЕллзнйкЬ,37
ARTXL 89
FR
Français,13
CIS
РУССКИЙ, 25
Contents
GB
Installation, 2-3
Unpacking and levelling
Connecting the electricity and water supplies
The first wash cycle
Technical data
Description of the washing machine
and starting a wash cycle, 4-5
Control panel
Indicator lights
How to open and shut the drum
Starting a wash cycle
Wash cycles, 6
Table of wash cycles
Personalisation, 7
Setting the temperature
Setting the spin speed
Functions
Detergents and laundry, 8
Detergent dispenser drawer
Bleach cycle
Preparing the laundry
Garments requiring special care
Load balancing system
Precautions and tips, 9
General safety
Disposal
Saving energy and respecting the environment
Care and maintenance, 10
Cutting off the water or electricity supply
Cleaning the washing machine
Caring for your appliance door and drum
Cleaning the pump
Checking the water inlet hose
How to clean the detergent dispenser
Troubleshooting, 11
Service, 12
1
Page 2
Installation
GB
Keep this instruction manual in a safe place for
future reference. Should the appliance be sold,
transferred or moved, make sure the instruction
manual accompanies the washing machine to inform
the new owner as to its operation and features.
Read these instructions carefully: they contain vital
information on installation, use and safety.
Unpacking and levelling
Unpacking
1. Unpack the
washing machine.
2. Check whether the
washing machine has
been damaged during
transport. If this is the
case, do not install it
and contact your
retailer.
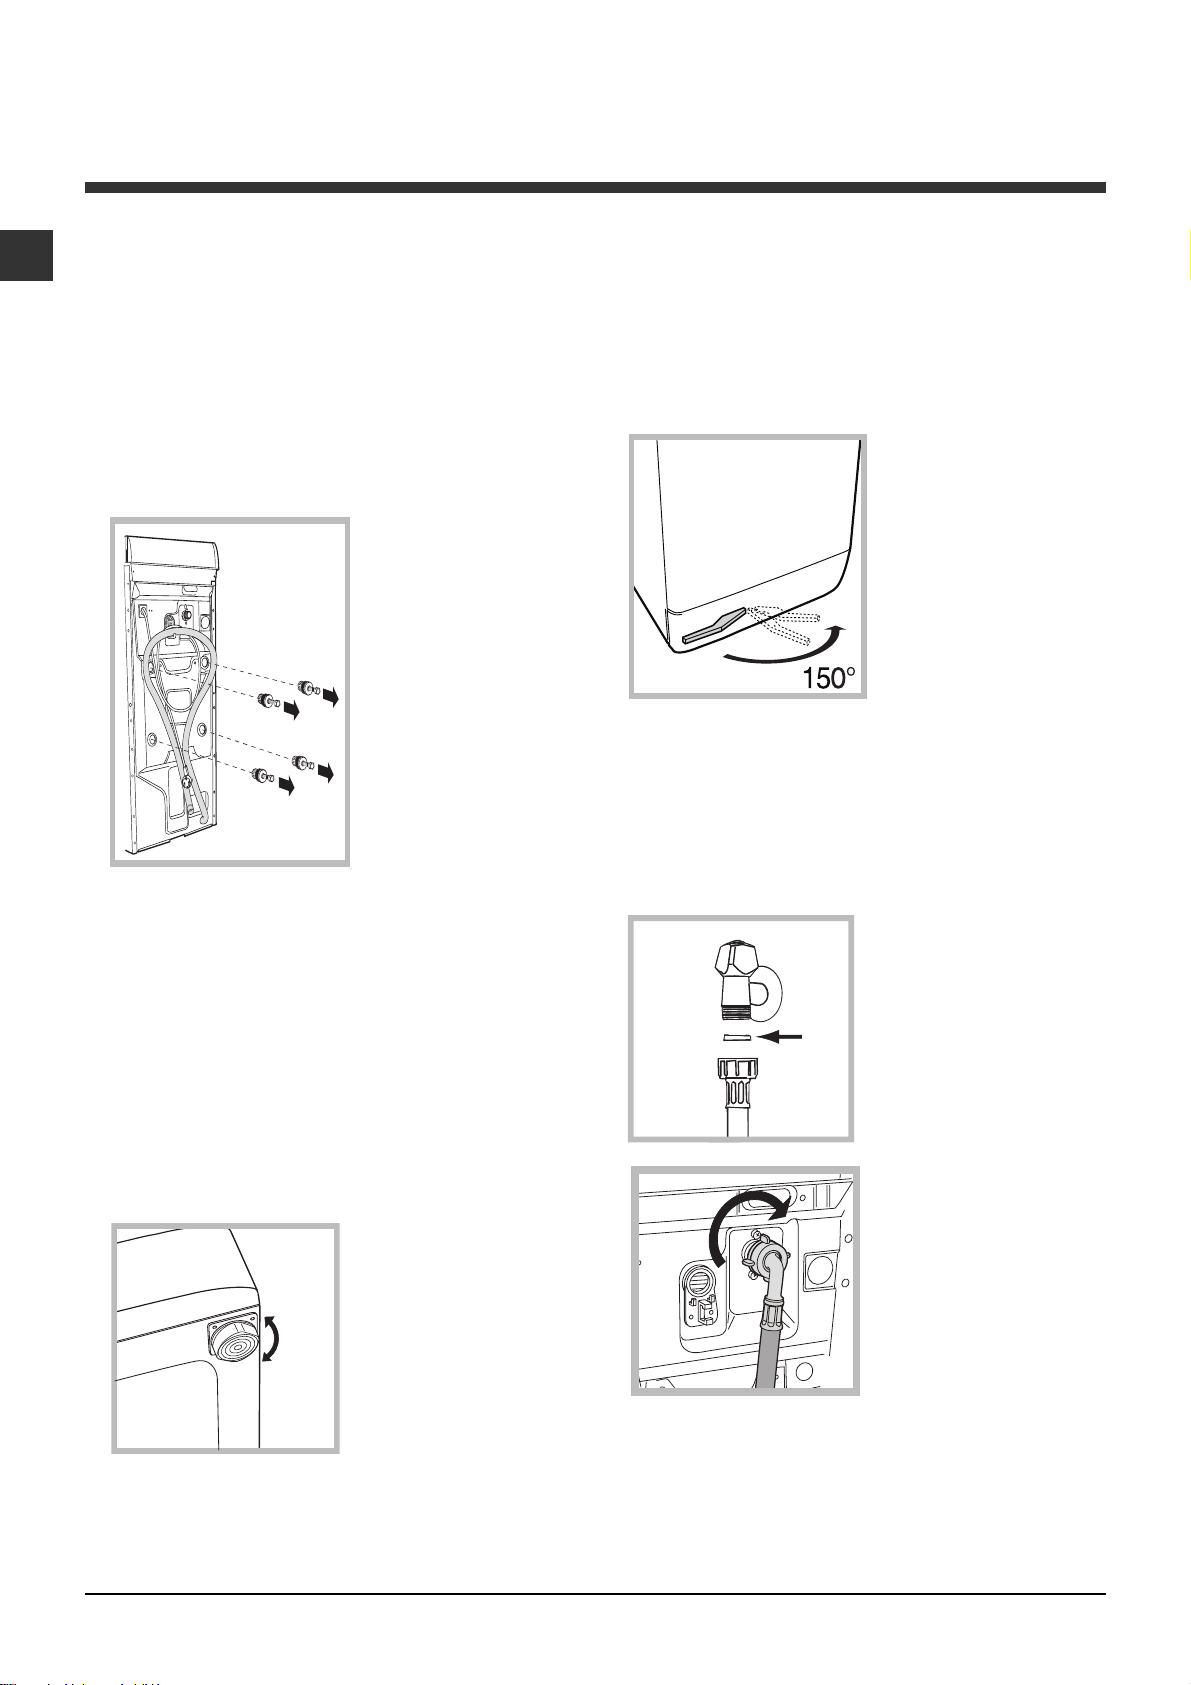
3. Remove the four
protective screws and
the rubber washer
with the respective
spacer, situated on
the rear of the
appliance (see figure).
4. Seal the gaps using the plastic plugs provided.
5. Keep all the parts: you will need them again if
the washing machine needs to be moved to
another location.
Warning: should the screws be re-used, make sure
you fasten the shorter ones at the top.
Packaging materials are not children's toys.
Levelling
Your machine may make a considerable amount of
noise if the two front feet have not been adjusted
correctly.
1. Install the washing
machine on a flat
sturdy floor, without
resting it up against
walls, furniture cabinets
or other.
2. If the floor is not
perfectly level, compensate for any
unevenness by
tightening or loosening
the adjustable front feet (see figure); the angle of
inclination, measured according to the worktop,
must not exceed 2°.
Levelling your appliance correctly will provide it with
stability and avoid any vibrations, noise and shifting
during operation. If it is placed on a fitted or loose
carpet, adjust the feet in such a way as to allow
enough room for ventilation beneath the washing
machine.
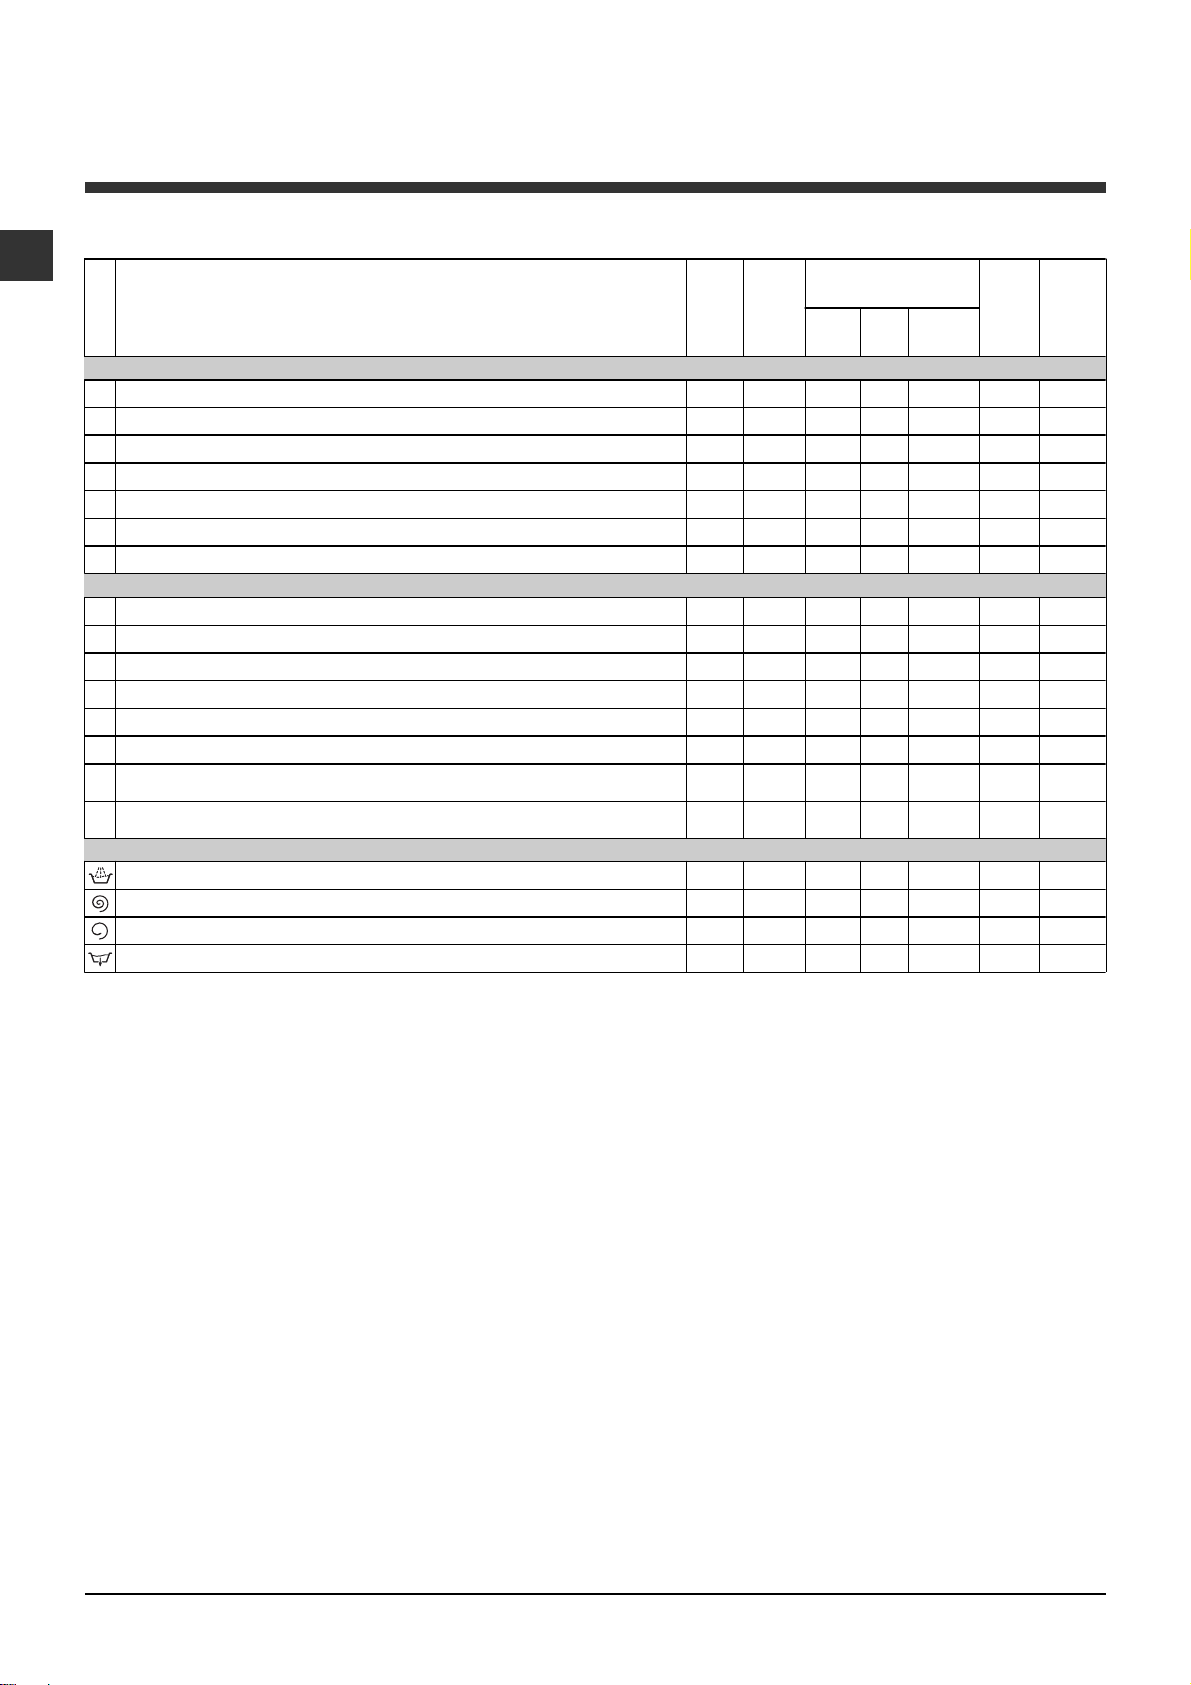
Putting your appliance in place and moving it.
If your washing
machine is equipped
with a special set of
retractable wheels you
can easy move it. To
lower the wheels and
thus move the
appliance effortlessly,
just pull the lever,
situated on the lefthand side beneath the
base. Once the
appliance is in the required position, put the lever
back in place. The washing machine is now firmly in
place (see figure).
Electric and water connections
Connecting the water inlet hose
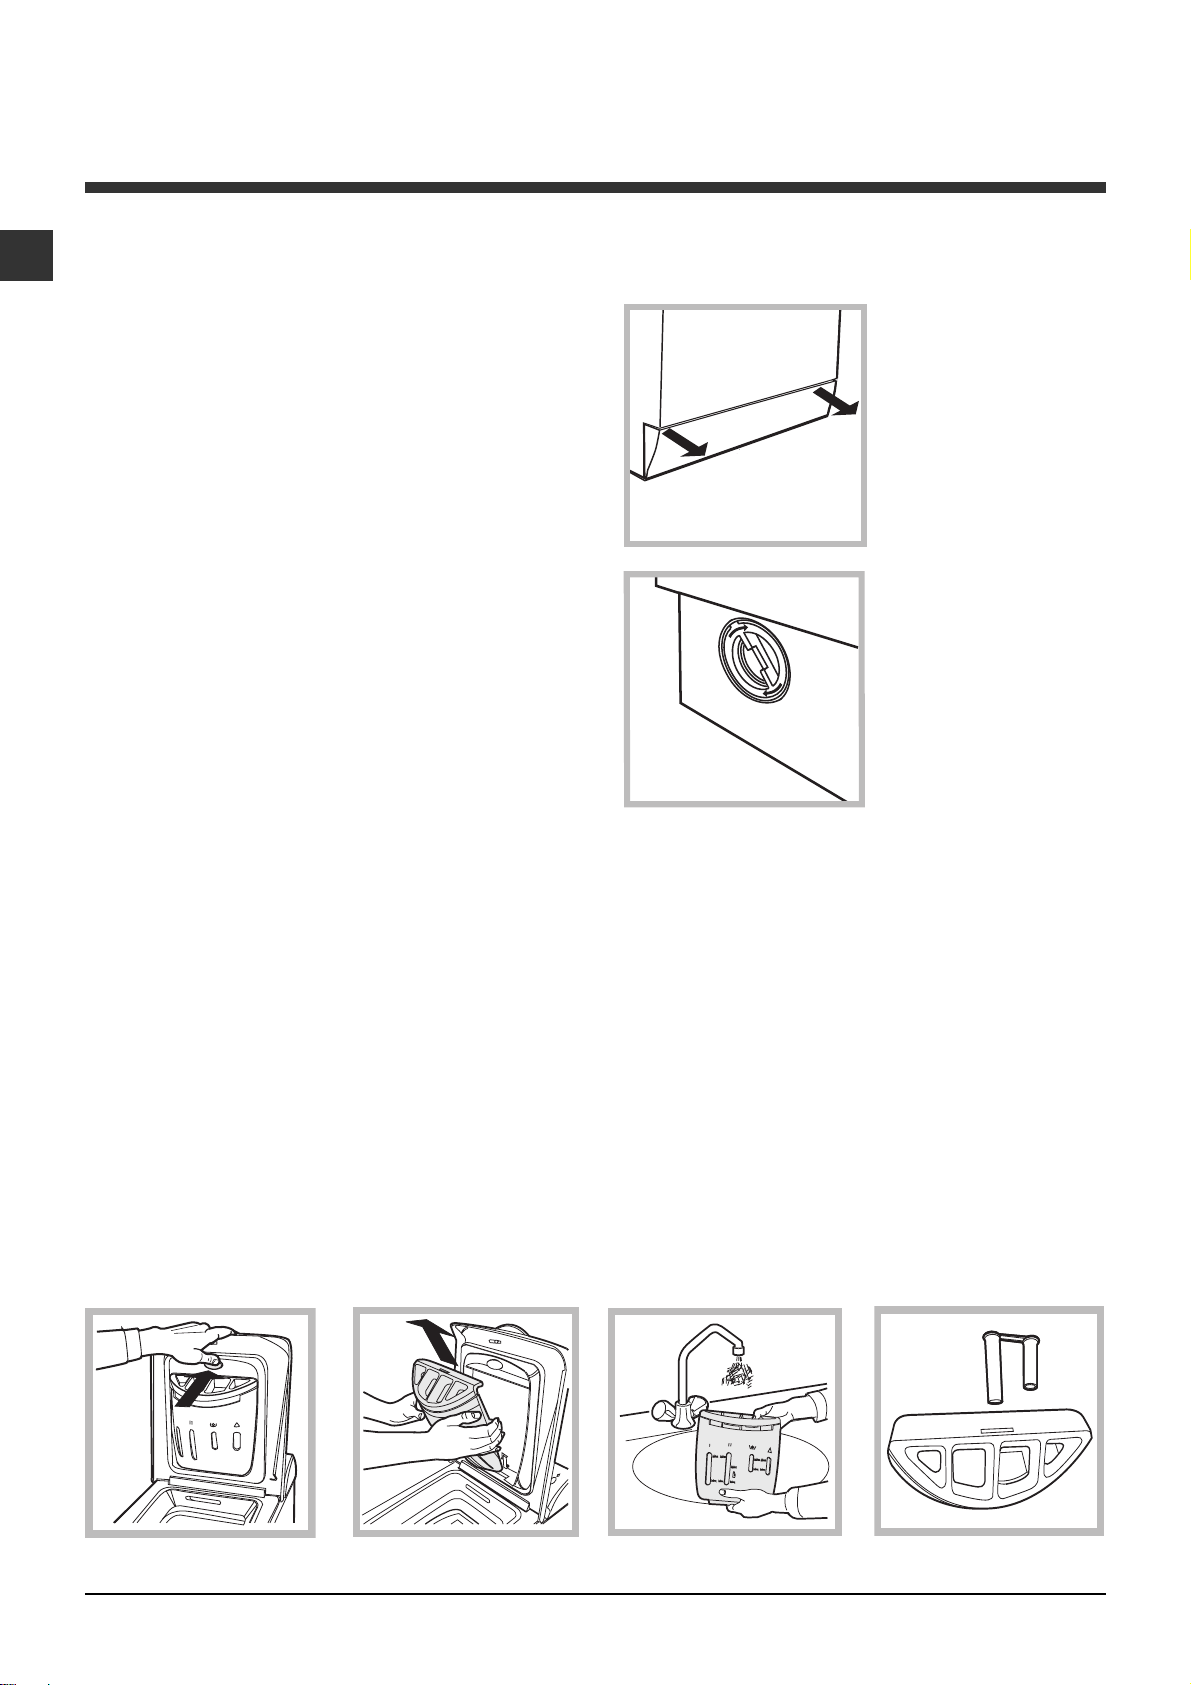
1. Insert seal A into the
end of the inlet hose and
screw the latter onto a
cold water tap with a 3/4
gas threaded mouth (see
A
3. Make sure there are no kinks or bends in the hose.
The water pressure at the tap must be within the
values indicated in the Technical details table
(on the next page).
If the water inlet hose is not long enough, contact
a specialist store or an authorised serviceman.
figure).
Before making the
connection, allow the
water to run freely until it
is perfectly clear.
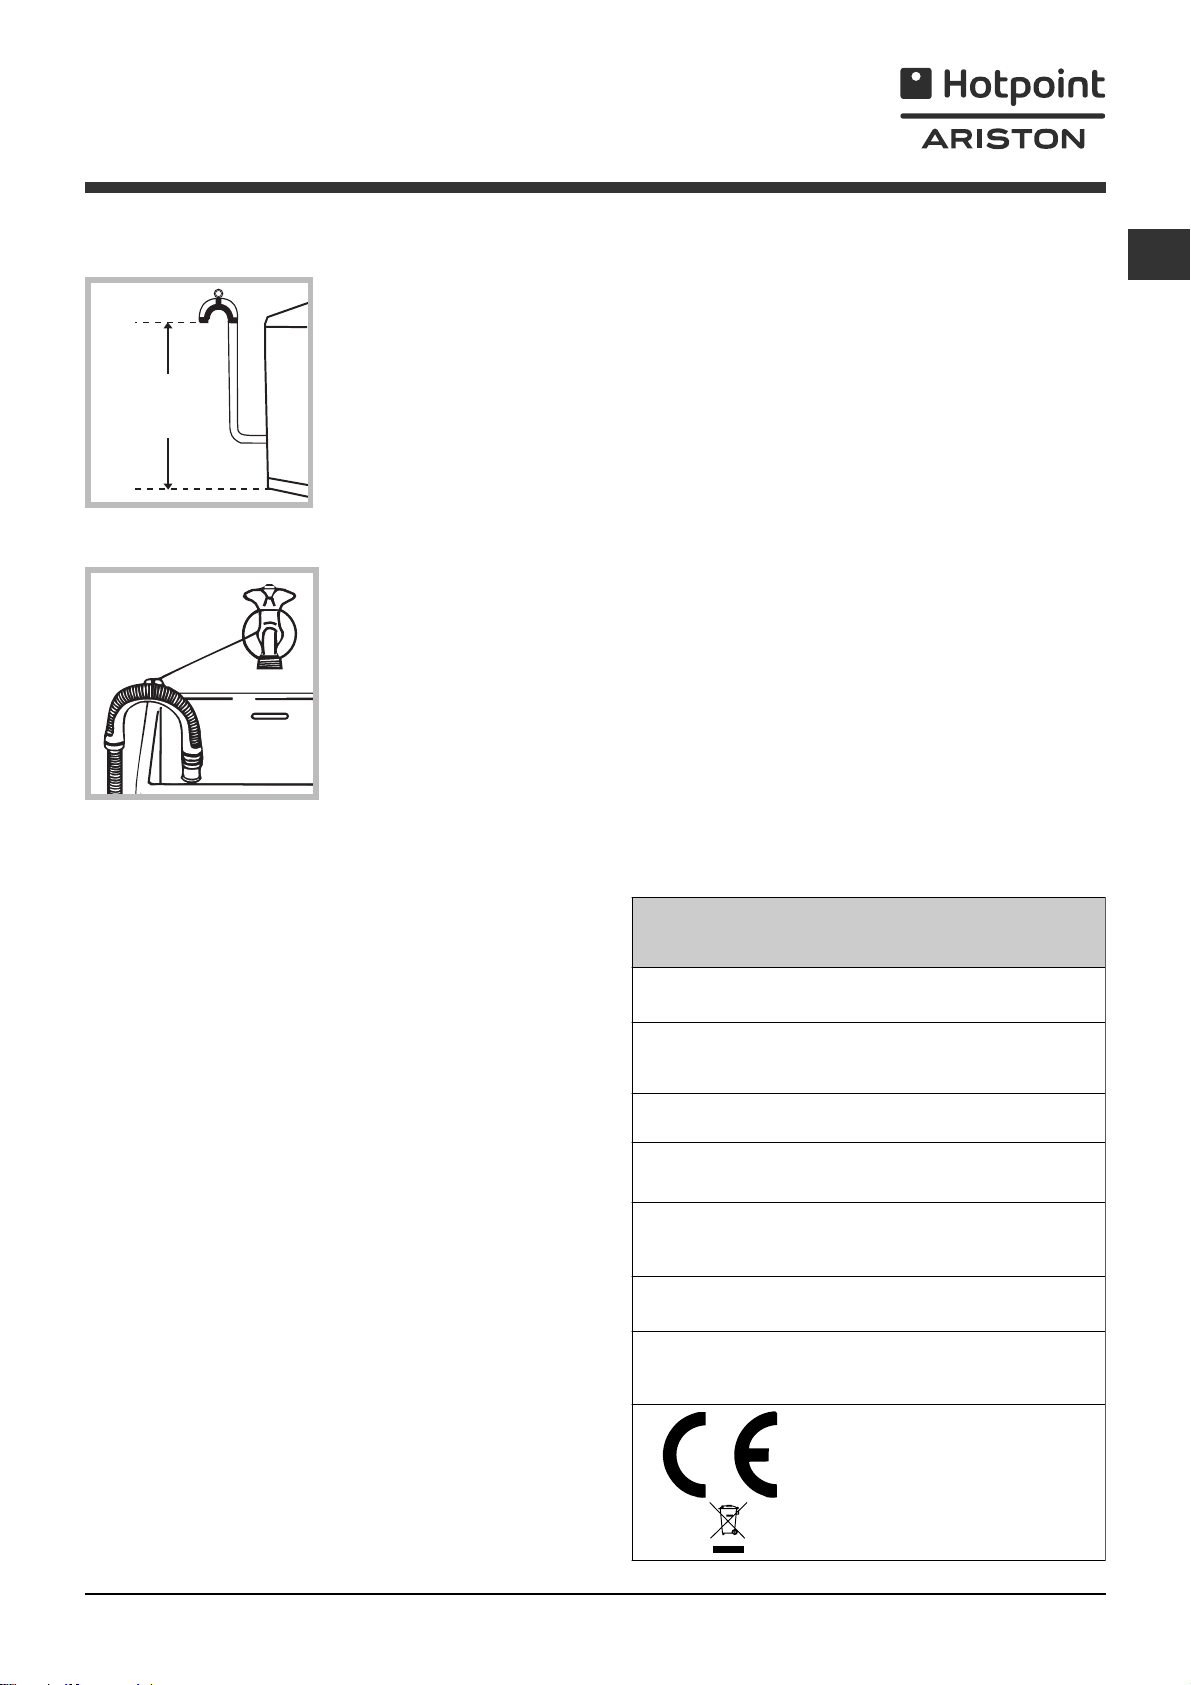
2. Connect the other
end of the water inlet
hose to the washing
machine, screwing it
onto the appliance's
cold water inlet, situated
on the top right-hand
side on the rear of the
appliance (see figure).
2
Page 3

Connecting the drain hose
65 - 100 cm
Connect the drain hose,
without bending it, to a
drainage duct or a wall
drain located at a height
between 65 and 100 cm
from the floor;
Do not use extension cords or multiple sockets.
GB
The cable should not be bent or compressed.
The power supply cable must only be replaced by
authorised technicians.
Warning! The company shall not be held responsible
in the event that these regulations are not respected.
The first wash cycle
alternatively, rest it on
the side of a washbasin
or bathtub, fastening the
duct supplied to the tap
(see figure). The free end
of the hose should not
be underwater.
We advise against the use of hose extensions; if it is
absolutely necessary, the extension must have the
same diameter as the original hose and must not
exceed 150 cm in length.
Electrical connections
Before plugging the appliance into the electricity
socket, make sure that:
the socket is earthed and complies with all
applicable laws;
the socket is able to withstand the maximum power
load of the appliance as indicated in the Technical
data table (see opposite);
the power supply voltage falls within the values
indicated in the Technical data table (see opposite);
Once the appliance has been installed, and before
you use it for the first time, run a wash cycle with
detergent and no laundry, using the wash cycle 2.
Technical data
Model
Dimensions
Capacity
Electrical
connections
Water connections
Spin speed
ARTXL 89
width 40 cm
height 85 cm
depth 60 cm
from 1 to 6 kg
please refer to the technical data
plate fixed to the machine
maximum pressure 1 MPa (10 bar)
minimum pressure 0.05 MPa (0.5 bar)
drum capacity 42 litres
up to 800 rotations per minute
the socket is compatible with the plug of the
washing machine. If this is not the case, replace
the socket or the plug.
The washing machine must not be installed
outdoors, even in covered areas. It is extremely
dangerous to leave the appliance exposed to rain,
storms and other weather conditions.
When the washing machine has been installed, the
electricity socket must be within easy reach.
Energy rated
programmes
according to
regulation
EN 60456
programme 7; temperature 60°C;
using a load of 6 kg.
This appliance conforms to the
following EC Directives:
- 89/336/EEC dated 03/05/89
(Electromagnetic Compatibility) and
subsequent modifications
- 2002/96/EC
- 2006/95/EC (Low Voltage)
3
Page 4

Description of the washing machine
and starting a wash cycle
GB
Control panel
ON/OFF
ON/OFF button: switches the washing machine on
and off.
button
WASH CYCLE
TEMPERATURE
knob
SPIN SPEED
knob
knob
FUNCTION
buttons with
indicator lights
To start the wash cycle from the point at which it was
interrupted, press this button again.
WASH CYCLE PROGRESS/
DELAY TIMER
indicator lights
LID LOCKED
indicator light
START/PAUSE
button with indicator
light
WASH CYCLE knob: programmes the wash cycles.
During the wash cycle, the knob does not move.
FUNCTION buttons with indicator light: used to
select the available functions. The indicator light
corresponding to the selected function will remain lit.
TEMPERATURE knob: sets the temperature or the
cold wash cycle (see Personalisation).
SPIN SPEED knob: sets the spin speed or exclude
the spin cycle completely (see Personalisation).
WASH CYCLE PROGRESS/DELAY TIMER
indicator light
wash cycle. The illuminated indicator light shows
which phase is in progress.
If the Delay Timer function has been set, the time
remaining until the wash cycle starts will be indicated
(see next page).
LID LOCKED indicator light: indicates whether the
door may be opened or not (see next page).
START/PAUSE button with indicator light: starts or
temporarily interrupts the wash cycles.
N.B. To pause the wash cycle in progress, press this
button; the corresponding indicator light will flash
orange, while the indicator light for the current wash
cycle phase will remain lit in a fixed manner. If the LID
LOCKED
may be opened.
s:used to monitor the progress of the
indicator light is switched off, the door
Indicator lights
The indicator lights provide important information.
This is what they can tell you:
Delayed start
If the DELAY TIMER function has been activated (see
Personalisation), after the wash cycle has been
started the indicator light corresponding to the
selected delay period will begin to flash:
As time passes, the remaining delay will be displayed
and the corresponding indicator light will flash:
Once the set delay has elapsed, the flashing indicator
light will switch off and the selected wash cycle will begin.
Wash cycle phase indicator lights
Once the desired wash cycle has been selected and
has begun, the indicator lights switch on one by one
to indicate which phase of the cycle is currently in
progress.
4
Page 5

Wash
Rinse
Spin
Drain
End of wash cycle
Function buttons and corresponding indicator lights
When a function is selected, the corresponding
indicator light will illuminate.
If the selected function is not compatible with the
programmed wash cycle, the corresponding indicator
light will flash and the function will not be activated.
If a function which is incompatible with another
function selected previously, only the most recent
selection will remain active.
Lid locked indicator light
If this indicator light is on, the appliance door is locked to
prevent it from being opened accidentally; to avoid any
damage, wait for the indicator light to switch off (it will take
about three minutes) before you open the appliance door.
N.B. If the DELAY TIMER function is activated, the door
cannot be opened; pause the machine by pressing the
START/PAUSE button if you wish to open it.
If the START/PAUSE indicator light (orange) flashes
rapidly at the same time as the function indicator
light, this indicates a problem has occurred (see
Troubleshooting).
How to open and to close the drum
Fig. 1
Fig. 2
A) Opening (Fig. 1):
Lift the external lid and open it completely.
B) Opening the drum (Soft opening):
With one finger, push the button indicated in fig. 2
and the drum will open delicately.
C) Loading the washing machine (Fig. 3).
D) Shutting (Fig. 4):
- close the drum fully by first shutting the front
door followed by the rear one;
- then ensure the hooks on the front door are
perfectly housed within the seat of the rear door;
- after the hooks have clicked into position, press
both doors lightly downwards to make sure they
do not come loose;
- finally shut the external lid.
Starting a wash cycle
1. Switch the washing machine on by pressing the
ON/OFF button. All indicator lights will switch on for a
few seconds, then they will switch off and the START/
PAUSE indicator light will pulse.
2. Load the laundry, close the door and the lid.
3. Set the WASH CYCLE knob to the desired
programme.
4. Set the washing temperature (see
Personalisation).
5. Set the spin speed (see Personalisation).
6. Measure out the detergent and washing additives
(see Detergents and laundry).
7. Select the desired functions.
8. Start the wash cycle by pressing the START/
PAUSE button and the corresponding indicator light
will remain lit in a fixed manner, in green.
To cancel the set wash cycle, pause the machine by
pressing the START/PAUSE button and select a new
cycle.
9. At the end of the wash cycle the
will switch on. The LID LOCKED indicator light will
switch off, indicating that the door may be opened.
Take out your laundry and leave the appliance door
ajar to make sure the drum dries completely.
indicator light
GB
Fig. 3
Switch the washing machine off by pressing the ON/
OFF button.
Fig. 4
5
Page 6
Wash cycles
GB
Table of wash cycles
.
Max
Description of the wash cycle
Wash cycles
Special cycles
Sanitizing cycle 90°:
7
Sanitizing cycle 90° (1):
7
Goodnigt cyc le:
8
Baby cycle:
9
Shirts
10
Silk /C urtains:
11
Wool:
12
Everyday wash cycles (Daily)
Cotton + Prewash 90°:
1
Cotton:
2
Cotton (2):
2
Coloured Cottons (3):
3
Synthetics resistents:
4
Synthetics delicates:
4
Mix 30':
5
silk and clothes which require washing by hand).
Mix 15':
6
silk and clothes which require washing by hand).
Partials wash cycles
Heavily soiled delicate colours.
For wool, cashmere, etc.
Heavily soiled whites and resistant colours.
Heavily soiled whites and delicate colours.
To refresh lightly soiled garments quickly (not suitable for wool,
To refresh lightly soiled garments quickly (not suitable for wool,
Extremely soiled whites.
Heavily soiled whites and resistant colours.
Lightly soiled delicate colours.
For garments in silk and viscose, lingerie.
Extremely soiled whites.
Lightly soiled whites and delicate colours.
Heavily soiled resistant colours.
Lightly soiled resistant colours.
temp.
Max.
speed
(°C)
(rpm)
90° 800
60° 800 40° 800 40° 800 40° 600 30° 0 40° 600 -
90° 800 60° 800
40° 800
40° 800
60° 800 40° 800 -
30° 800 -
30° 800 -
Rinse - 800
Spin - 800 - - - 616
Light spin - 800 - - - 2,5 12
Drain no spin - 0 - - - 62
Detergents
Bleach Wash
Fabric
softener
ll l
ll
ll
ll
ll
ll
ll
ll
ll l
ll l
ll l
ll
ll
ll
ll
l
l
-
Max.
load
duration
(kg)
6165
6 141
4288
2 116
269
155
155
6164
6 138
6 123
689
2,5 85
2,5 73
330
1,5 15
636
Cycle
The information contained in the table is intended as a guide only.
For all Test Institutes:
1) Test wash cycle in compliance with regulation EN 60456: set wash cycle 7 with a temperature of 60°C.
2) Long wash cycle for cottons: set wash cycle 2 with a temperature of 40°C.
3) Short wash cycle for cottons: set wash cycle 3 with a temperature of 40°C.
Specials wash cycles
Sanitizing cycle (wash cycle 7). A high-temperature hygienic wash cycle (over 60°C) which requires the use of bleach.
Pour the bleach, the detergent and the additives into the relevant compartments (see paragraph entitled
Detergent dispenser drawer).
Goodnigt cycle (wash cycle 8). This is a silent cycle which can be run at night, when the electricity prices are lower. The
wash cycle is designed for cottons and synthetics. At the end of the cycle the machine stops while there is still water in
the drum; to spin and drain the laundry press the START/PAUSE button; alternatively the machine will perform the spin
cycle and drain the water automatically after 8 hours.
Baby cycle (wash cycle 9). This wash cycle can be used to remove the soiling typically caused by babies, while ensuring
that all detergent is removed from nappies in order to prevent the delicate skin of babies from suffering allergies. The
cycle has been designed to reduce the amount of bacteria by using a greater quantity of water and optimising the effect
of special disinfecting additives added to the detergent.
Mix 30 (wash cycle 5) this wash cycle was designed to wash lightly soiled garments quickly: it lasts just 30 minutes and
therefore saves both energy and time. By selecting this wash cycle (5 at 30°C), it is possible to wash different fabrics
together (except for wool and silk items), with a maximum load of 3 kg.
Mix 15(wash cycle 6) this wash cycle was designed to wash lightly soiled garments quickly: it lasts just 15 minutes and
therefore saves both energy and time. By selecting this wash cycle (6 at 30°C), it is possible to wash different fabrics
together (except for wool and silk items), with a maximum load of 1.5 kg.
6
Page 7

Personalisation
Setting the temperature
Turn the TEMPERATURE knob to set the wash temperature (see Table of wash cycles).
The temperature may be lowered, or even set to a cold wash (
The washing machine will automatically prevent you from selecting a temperature which is higher than the
maximum value set for each wash cycle.
).
Setting the spin speed
Turn the SPIN SPEED knob to set the spin speed for the selected wash cycle.
The maximum spin speeds available for each wash cycle are as follows:
Wash cycles Maximum spin speed
Cottons 800 rpm
Synthetics 800 rpm
Wool 600 rpm
Silk drain only
The spin speed may be lowered, or the spin cycle can be excluded altogether by selecting the symbol
The washing machine will automatically prevent you from selecting a spin speed which is higher than the
maximum speed set for each wash cycle.
.
Functions
The various wash functions available with this washing machine will help to achieve the desired results, every time.
To activate the functions:
1. Press the button corresponding to the desired function;
2. the function is enabled when the corresponding indicator light is illuminated.
Note: If the indicator light flashes rapidly, this signals that this particular function may not be selected in
conjunction with the selected wash cycle.
GB
Super Wash
Because a greater quantity of water is used in the initial phase of the cycle, and because of the increased cycle
duration, this function offers a high-performance wash.
This function may not be used in conjunction with wash cycles 5, 6, 7, 11, 12,
Extra rinse
By selecting this function, the efficiency of the rinse is increased and optimal detergent removal is guaranteed. It is
particularly useful for sensitive skin.
This function may not be used in conjunction with wash cycles 5, 6,
Easy iron
By selecting this function, the wash and spin cycles will be modified in order to reduce the formation of creases. At
the end of the cycle the washing machine will perform slow rotations of the drum.
For the 4, 8, 11 wash cycle, the machine will end the cycle while the laundry is soaking, the EASY IRON and
START/PAUSE indicator lights will flash (orange) and the RINSE phase will remain lit in a fixed manner. To drain the
water so that the laundry may be removed, press the START/PAUSE button or the EASY IRON button.
, , .
, , , .
This function may not be used in conjunction with wash cycles 5, 6, 7, 8, 9, 12, , , .
Delay timer
This timer delays the start time of the wash cycle by up to 12 hours.
Press the button repeatedly until the indicator light corresponding to the desired delay time switches on. The fifth time
the button is pressed, the function will be disabled.
N.B. Once you have pressed the START/PAUSE button, the delay time may only be decreased if you wish to modify it.
This option is enabled with all programmes.
7
Page 8

Detergents and laundry
GB
Detergent dispenser drawer
Good washing results also depend on the correct
dose of detergent: adding too much detergent won't
necessarily make for a more efficient wash, and may
in fact cause build up on the interior of your appliance
and even pollute the environment.
Open up the detergent
dispenser and pour in
the detergent and fabric
softener, as follows.
compartment 1: Detergent for pre-wash
compartment 2: Detergent for the wash cycle
(powder or liquid)
It is recommended that you place liquid detergent
directly into the compartment using the appropriate
dosing cup.
compartment 3: Additives (softener, etc.)
When pouring the softener in compartment 3, avoid
exceeding the "max" level indicated.
The softener is added automatically into the machine
during the last wash. At the end of the wash
programme, some water will be left in compartment
3. This is used for the inlet of denser fabric softeners
into the machine, i.e. to dilute the more concentrated
softeners. Should more than a normal amount of
water remain in compartment 3, this means the
emptying device is blocked. For cleaning instructions,
see Care and maintenance.
compartment 4: Bleach
Bleach cycle
Bleaching may only be performed in conjunction with
wash cycles 2, 3, 7,
Pour the bleach into compartment 4; pour the
detergent and softener into the corresponding
compartments, then select one of the
abovementioned wash cycles.
This option is recommended only for very soiled
cotton garments.
.
Preparing the laundry
Divide the laundry according to:
- the type of fabric/the symbol on the label
- the colours: separate coloured garments from
whites.
Empty all garment pockets and check the buttons.
Do not exceed the listed values, which refer to the
weight of the laundry when dry:
Durable fabrics: max. 6 kg
Synthetic fabrics: max. 2,5 kg
Delicate fabrics: max. 2 kg
Wool: max. 1 kg
How much does your laundry weigh?
1 sheet 400-500 g
1 pillow case 150-200 g
1 tablecloth 400-500 g
1 bathrobe 900-1200 g
1 towel 150-250 g
Garments requiring special care
Shirts: use special wash cycle 10 to wash shirts in
various fabrics and colours.
It guarantees maximum care is taken of the garments
and minimises the formation of creases.
Silk: use special wash cycle 11 to wash all silk
garments. We recommend the use of special
detergent which has been designed to wash delicate
clothes.
Curtains: fold curtains and place them in a pillow
case or mesh bag. Use wash cycle 11.
Wool: Hotpoint/Ariston is the only washing machine
manufacturer to have been awarded the prestigious
Woolmark Platinum Care endorsement (M.0508) by
the Woolmark Company, which means that all
woollen garments may be washed in the washing
machine, even those which state hand wash only
on the label. Wash cycle 12 therefore offers
complete peace of mind when washing woollen
garments in the washing machine (max. load 1 kg)
and guarantees optimal performance.
Load balancing system
Before every spin cycle, to avoid excessive vibrations
and to distribute the load in a uniform manner, the
drum rotates continuously at a speed which is slightly
greater than the washing rotation speed. If, after
several attempts, the load is not balanced correctly,
the machine spins at a reduced spin speed. If the
load is excessively unbalanced, the washing machine
performs the distribution process instead of spinning.
To encourage improved load distribution and balance,
we recommend small and large garments are mixed
in the load.
8
Page 9

Precautions and tips
This washing machine was designed and
constructed in accordance with international safety
regulations. The following information is provided for
safety reasons and must therefore be read carefully.
General safety
This appliance was designed for domestic use only.
The washing machine must only be used by adults,
in accordance with the instructions provided in this
manual.
Do not touch the machine when barefoot or with
wet or damp hands or feet.
Do not pull on the power supply cable when
unplugging the appliance from the electricity
socket. Hold the plug and pull.
Do not touch the drained water as it may reach
extremely high temperatures.
Never force the porthole door. This could damage
the safety lock mechanism designed to prevent
accidental opening.
If the appliance breaks down, do not under any
circumstances access the internal mechanisms in
an attempt to repair it yourself.
Always keep children well away from the appliance
while it is operating.
If the appliance has to be moved, work in a group
of two or three people and handle it with the utmost
care. Never try to do this alone, because the
appliance is very heavy.
Before loading laundry into the washing machine,
make sure the drum is empty.
Disposal
Disposing of the packaging materials: observe local
regulations so that the packaging may be re-used.
Saving energy and respecting the
environment
Saving on detergent, water, energy and time
To avoid wasting resources, the washing machine
should be used with a full load. A full load instead
of two half loads allows you to save up to 50% on
energy.
The pre-wash cycle is only necessary on
extremely soiled garments. Avoiding it will save on
detergent, time, water and between 5 and 15%
energy.
Treating stains with a stain remover or leaving
them to soak before washing will cut down the
need to wash them at high temperatures. A
programme at 60°C instead of 90°C or one at
40°C instead of 60°C will save up to 50% on
energy.
Use the correct quantity of detergent depending
on the water hardness, how soiled the garments
are and the amount of laundry you have, to avoid
wastage and to protect the environment: despite
being biodegradable, detergents do contain
ingredients that alter the natural balance of the
environment. In addition, avoid using fabric
softener as much as possible.
If you use your washing machine from late in the
afternoon until the early hours of the morning, you
will help reduce the electricity board's peak load.
The Delay Timer option helps to organise your
wash cycles accordingly.
If your laundry has to be dried in a tumble dryer,
select a high spin speed. Having the least water
possible in your laundry will save you time and
energy in the drying process.
GB
The European Directive 2002/96/EC on Waste
Electrical and Electronic Equipment, requires that
old household electrical appliances must not be
disposed of in the normal unsorted municipal waste
stream. Old appliances must be collected
separately in order to optimise the recovery and
recycling of the materials they contain and reduce
the impact on human health and the environment.
The crossed out "wheeled bin" symbol on the
product reminds you of your obligation, that when
you dispose of the appliance it must be separately
collected.
Consumers should contact their local authority or
retailer for information concerning the correct
disposal of their old appliance.
9
Page 10
Care and maintenance
GB
Cutting off the water or electricity
supply
Turn off the water tap after every wash. This will
limit the wear of your appliance's water system
and also prevent leaks.
Unplug your appliance when cleaning it and during
all maintenance operations.
Cleaning your appliance
The exterior and rubber parts of your appliance can
be cleaned with a soft cloth soaked in lukewarm
soapy water. Do not use solvents or abrasives.
Caring for your appliance door and
drum
Always leave the appliance door ajar to prevent
unpleasant odours from forming.
Cleaning the pump
The washing machine is fitted with a self-cleaning
pump that does not require any maintenance.
Sometimes, small items (such as coins or buttons)
may fall into the pre-chamber that protects the
pump, situated in the lower part of the same.
Make sure the wash cycle has ended and unplug
the appliance.
To recover any objects that have fallen into the prechamber:
1. remove the plinth at
the bottom on the front
side of the washing
machine by pulling from
the side with your
hands (see figure);
2. unscrew the lid
rotating it anticlockwise (see figure): a little
water may trickle out.
This is perfectly normal;
3. clean the interior
thoroughly;
4. screw the lid back on;
5. reposition the panel,
making sure the hooks
are securely in place
before you push it onto
the appliance.
Checking the water inlet hose
Check the water inlet hose at least once a year. If
you see any cracks, replace it immediately: during the
wash cycles, water pressure is very strong and a
cracked hose could easily split open.
How to clean the detergent dispenser
Disassembly:
Press lightly on the large
button on the front of the
detergent dispenser and
pull it upwards (fig. 1, 2).
Fig. 1 Fig. 2
Cleaning:
Then clean the dispenser under a tap (fig. 3) using an
old toothbrush and, once the pair of siphons inserted in
the top of compartments 1 and 2 (fig. 4) have been pulled
out, check whether the same are not clogged and then
rinse them.
Never use hoses that have already been used.
Reassembly:
Do not forget to reinsert the
pair of siphons into the special housings and then to
replace the dispenser into
its seat, clicking it into place
(fig. 4, 2 and 1).
Fig. 3
Fig. 4
10
Page 11

Troubleshooting
Your washing machine could fail to work. Before contacting the Technical Assistance Centre (see Assistance),
make sure that the problem cannot be not solved easily using the following list.
Problem:
The washing machine does not
switch on.
The wash cycle does not start.
The washing machine does not
take in water (the indicator light
for the first wash cycle stage
flashes rapidly).
The washing machine
continuously takes in and drains
water.
Possible causes / Solutions:
The appliance is not plugged into the socket fully, or is not making contact.
There is no power in the house.
The appliance Lid is not shut properly.
The ON/OFF button has not been pressed.
The START/PAUSE button has not been pressed.
The water tap has not been opened.
A delayed start has been set (see Personalisation).
The water inlet hose is not connected to the tap.
The hose is bent.
The water tap has not been opened.
There is no water supply in the house.
The pressure is too low.
The START/PAUSE button has not been pressed.
The drain hose is not fitted at a height between 65 and 100 cm from
the floor (see Installation).
The free end of the hose is under water (see Installation).
The wall drainage system is not fitted with a breather pipe.
If the problem persists even after these checks, turn off the water tap,
switch the appliance off and contact the Assistance Service. If the
dwelling is on one of the upper floors of a building, there may be problems
relating to water drainage, causing the washing machine to fill with water
and drain continuously. Special anti-draining valves are available in shops
and help to avoid this inconvenience.
GB
The washing machine does not
drain or spin.
The washing machine vibrates a
lot during the spin cycle.
The washing machine leaks.
The START/PAUSE indicator light
(orange) and the function
indicator lights flash rapidly.
There is too much foam.
The wash cycle does not include draining: some wash cycles require
the drain phase to be started manually.
The EASY IRON function has been activated: To complete the wash
cycle, press the START/PAUSE button (Personalisation).
The drain hose is bent (see Installation).
The drainage duct is clogged.
The drum was not unlocked correctly during installation (see Installation).
The washing machine is not level (see Installation).
The washing machine is trapped between cabinets and walls (see Installation).
The water inlet hose is not screwed on properly (see Installation).
The detergent dispenser drawer is blocked (for cleaning instructions, see
Care and maintenance).
The drain hose is not fixed properly (see Installation).
Switch off the machine and unplug it, wait for approximately 1 minute
and then switch it back on again.
If the problem persists, contact the Technical Assistance Service.
The detergent is not suitable for machine washing (it should display the
text for washing machines or hand and machine wash, or the like).
Too much detergent was used.
11
Page 12

Service
GB
Before calling for Assistance:
Check whether you can solve the problem alone (see Troubleshooting);
Restart the programme to check whether the problem has been solved;
If this is not the case, contact an authorised Technical Assistance Centre using the telephone number
provided on the guarantee certificate.
Always request the assistance of authorised technicians.
Have the following information to hand:
the type of problem;
the appliance model (Mod.);
the serial number (S/N).
This information can be found on the data plate situated on the rear of the washing machine.
12
Page 13

Mode demploi
LAVE-LINGE
FR
Français
ARTXL 89
Sommaire
FR
Installation, 14-15
Déballage et mise à niveau
Raccordements eau et électricité
Premier cycle de lavage
Caractéristiques techniques
Description du lave-linge et
démarrage dun programme, 16-17
Bandeau de commandes
Voyants
Comment ouvrir et fermer le tambour
Démarrage dun programme
Programmes,18
Tableau des programmes
Personnalisations, 19
Sélection de la température
Sélection de lessorage
Fonctions
Produits lessiviels et linge, 20
Tiroir à produits lessiviels
Cycle blanchissage
Triage du linge
Linge ou vêtements particuliers
Système déquilibrage de la charge
Précautions et conseils, 21
Sécurité générale
Mise au rebut
Economies et respect de l'environnement
Entretien et soin, 22
Coupure de larrivée deau et du courant
Nettoyage du lave-linge
Entretien du couvercle et du tambour
Nettoyage de la pompe
Contrôle du tuyau darrivée de leau
Comment nettoyer le tiroir à produits lessiviels
Anomalies et remèdes, 23
Assistance, 24
13
Page 14

Installation
FR
Conservez ce mode d'emploi pour pouvoir le
consulter à tout moment. En cas de vente, de cession
ou de déménagement, veillez à ce qu'il suive toujours
le lave-linge pour que son nouveau propriétaire soit
informé sur son mode de fonctionnement et puisse
profiter des conseils correspondants.
Lisez attentivement les instructions: elles fournissent
d'importantes informations sur l'installation, l'utilisation
et la sécurité.
Déballage et mise à niveau
Déballage: enlever les 4 vis
1. Déballez le lave-linge.
2. Contrôlez que le
lave-linge n'a pas été
endommagé pendant le
transport. S'il est
abîmé, ne le raccordez
pas et contactez votre
revendeur.
3. Enlevez les quatre vis
de protection pour le
transport, le
caoutchouc et la cale,
placés dans la partie
arrière (voir figure).
4. Bouchez les trous à l'aide des bouchons plastique
fournis.
5. Conservez bien toutes ces pièces: il faudra les
remonter en cas de transport du lave-linge.
Attention: en cas de réutilisation, les vis plus
courtes doivent être montées dessus.
Les emballages ne sont pas des jouets pour enfants.
Mise à niveau
Votre appareil peut savérer bruyant si vous navez
pas bien réglé ses deux pieds avant.
1.Installez le lave-linge sur un sol plat et rigide, sans
l'appuyer contre des murs, des meubles ou autre.
2. Si le sol n'est pas
parfaitement horizontal,
vissez ou dévissez les
petits pieds avant (voir
figure) pour niveler
l'appareil; son angle
d'inclinaison, mesuré sur
le plan de travail, ne doit
pas dépasser 2°.
machine est posée sur de la moquette ou un tapis,
réglez les petits pieds de manière à ce qu'il y ait
suffisamment d'espace pour assurer une bonne
ventilation.
Mise en place, deplacements
Si votre lave-linge est
muni d'un chariot spécial
avec roues rétractiles,
vous pouvez le déplacer
facile-ment. Pour faire
descendre ce chariot et
pouvoir ainsi déplacer
sans effort votre lavelinge, vous devez tirer le
levier situé en bas à
gauche, sous la base.
Une fois le lave-linge
déplacé, remettez-le
dans la position initiale. Le lave-linge est ainsi solidement
mis en place. Voir figure (seulement pour les modéles
prevues).
Raccordements hydrauliques et
électriques
Raccordement du tuyau d'arrivée de l'eau
1. Montez le joint A sur
l'extrémité du tuyau
d'alimentation et vissez-le
à un robinet d'eau froide
A
La pression de l'eau doit être comprise entre les
valeurs indiquées dans le tableau des Caractéristiques
techniques (voir page ci-contre).
à embout fileté 3/4 gaz
(voir figure).
Faites couler l'eau
jusqu'à ce qu'elle soit
limpide et sans impuretés
avant de raccorder.
2. Raccordez le tuyau
d'alimentation au lavelinge en le vissant à la
prise d'eau prévue, dans
la partie arrière en haut à
droite (voir figure).
3. Faites attention à ce
que le tuyau ne soit ni
plié ni écrasé.
Une bonne mise à niveau garantit la stabilité de la
machine et évite qu'il y ait des vibrations, du bruit et
des déplacements en cours de fonctionnement. Si la
14
Si la longueur du tuyau d'alimentation ne suffit pas,
adressez-vous à un magasin spécialisé ou à un
technicien agréé.
Page 15
Raccordement du tuyau de vidange
Raccorder le tuyau
dévacuation, sans le
plier, à un conduit
dévacuation ou à une
évacuation murale placés
65 - 100 cm
à une distance du sol
comprise entre 65 et 100
cm;
Nutiliser ni rallonges ni prises multiples.
FR
Le câble ne doit être ni plié ni trop écrasé.
Le câble dalimentation ne doit être remplacé que
par des techniciens agréés.
Attention! Nous déclinons toute responsabilité en cas
de non-respect des normes énumérées ci-dessus.
Premier cycle de lavage
ou bien laccrocher à un
évier ou à une baignoire,
dans ce cas, fixer le
support en plastique
fourni avec lappareil au
robinet (voir figure).
Lextrémité libre du tuyau
dévacuation ne doit pas
être plongée dans leau.
Lutilisation dun tuyau de rallonge est absolument
déconseillée mais si on ne peut faire autrement, il faut
absolument quil ait le même diamètre que le tuyau
original et sa longueur ne doit pas dépasser 150 cm.
Branchement électrique
Avant de brancher la fiche dans la prise de courant,
sassurer que:
la prise est bien reliée à la terre et est conforme aux
réglementations en vigueur;
Avant la première mise en service de lappareil,
effectuer un cycle de lavage avec un produit lessiviel
mais sans linge et sélectionner le programme 2.
Caractéristiques techniques
Modèle
Dimensions
Capacité
ARTXL 89
largeur 40 cm
hauteur 85 cm
profondeur 60 cm
de 1 à 6 kg
la prise est bien apte à supporter la puissance
maximale de lappareil indiquée dans le tableau des
Caractéristiques techniques (voir ci-contre);
la tension dalimentation est bien comprise entre les
valeurs figurant dans le tableau des Caractéristiques
techniques (voir ci-contre);
la prise est bien compatible avec la fiche du lave-
linge. Autrement, remplacer la prise ou la fiche.
Le lave-linge ne doit pas être installé dehors, même
à labri, car il est très dangereux de le laisser exposé
à la pluie et aux orages.
Après installation du lave-linge, la prise de courant
doit être facilement accessible.
Raccordements
électriques
Raccordements
hydrauliques
Vitesse
d'essorage
Programmes de
contrôle selon la
norme EN 60456
Voir la plaque signalétique appliquée
sur la machine
pression maximale 1 MPa (10 bar)
pression minimale 0,05 MPa (0,5 bar)
capacité du tambour 42 litres
jusqu'à 800 tours minute
programme 7; température 60°C;
effectué avec une charge de 6 kg.
Cet appareil est conforme aux
Directives Communautaires suivantes:
- 89/336/CEE du 03/05/89
(Compatibilité électromagnétique) et
modifications suivantes
- 2002/96/CE
- 2006/95/CE (Basse Tension)
15
Page 16

Description du lave-linge et
démarrage dun programme
FR
Bandeau de commandes
Touche
MARCHE/
ARRÊT
PROGRAMMES
Touche MARCHE/ARRÊT: pour allumer ou éteindre
le lave-linge.
Bouton PROGRAMMES: pour sélectionner les
programmes. Pendant le programme, le bouton ne
tournera pas.
TEMPÉRATURE
Bouton
ESSORAGE
Bouton
Bouton
Touches avec voyants
FONCTION
phase en cours restera allumé fixe. Si le voyant
COUVERCLE VERROUILLÉ
ouvrir la porte.
Pour faire redémarrer le lavage exactement de
lendroit où il a été interrompu, appuyer une nouvelle
fois sur la touche.
Voyants
CYCLE/DÉPART DIFFÉRÉ
DÉROULEMENT
Voyant
COUVERCLE
VERROUILLÉ
Touche avec voyant
MARCHE/
PAUSE
est éteint, on peut
Touches avec voyants FONCTION: pour sélectionner
les fonctions disponibles. Le voyant correspondant à
la fonction sélectionnée restera allumé.
Bouton TEMPÉRATURE: pour sélectionner la
température ou un lavage à froid (voir
Personnalisations).
Bouton ESSORAGE: pour sélectionner lessorage ou
le supprimer (voir Personnalisations).
Voyants DÉROULEMENT CYCLE/DÉPART
DIFFÉRÉ: pour suivre le stade davancement du
programme de lavage.
Le voyant allumé indique la phase de lavage en
cours.
Si la fonction Départ différé (départ différé) a été
sélectionnée, ils indiquent le temps restant jusquau
démarrage du programme (voir page ci-contre).
Voyant COUVERCLE VERROUILLÉ: indique si la
porte est verrouillée (voir page ci-contre).
Touche avec voyant MARCHE/PAUSE: pour
démarrer les programmes ou les interrompre
momentanément.
N.B.: pour effectuer une pause du lavage en cours,
appuyer sur cette touche, le voyant correspondant se
mettra à clignoter en orange tandis que celui de la
Voyants
Les voyants fournissent des informations importantes.
Voilà ce quils signalent:
Départ différé
Si la fonction Départ différé a été activée (voir
Personnalisations), le voyant correspondant au temps
sélectionné se mettra à clignoter, après avoir lancé le
programme :
Au fur et à mesure que le temps passe, le temps
restant est affiché avec clignotement du voyant
correspondant.
Quand le temps sélectionné touche à sa fin, le voyant
clignotant séteint et le programme sélectionné démarre.
Voyants phase en cours
Une fois que le cycle de lavage sélectionné a
démarré, les voyants sallument progressivement pour
indiquer son stade davancement:
16
Page 17

Lavage
Rinçage
Essorage
Vidange
Fin de Lavage
Touches fonction et voyants correspondants
La sélection dune fonction entraîne lallumage du
voyant correspondant.
Si la fonction sélectionnée est incompatible avec le
programme sélectionné, le voyant correspondant se
met à clignoter et la fonction nest pas activée.
En cas de sélection dune fonction incompatible avec
une autre précédemment sélectionnée, la seule à
être activée sera celle choisie en dernier.
Voyant couvercle verrouillé
Le voyant allumé indique que le couvercle est
verrouillé pour empêcher toute ouverture accidentelle.
Pour éviter dendommager lappareil, attendre que le
voyant cesse de clignoter avant douvrir la porte
(l'attente est denviron trois minutes).
N.B: si la fonction DÉPART DIFFÉRÉ est activée, le
couvercle ne souvre pas. Pour louvrir il faut appuyer
sur la touche MARCHE/PAUSE qui met lappareil en
pause.
Un clignotement rapide du voyant MARCHE/PAUSE
(orange) simultané à celui des fonctions signale une
anomalie (voir Anomalies et remèdes).
Comment ouvrir et fermer le tambour
Fig. 1
Fig. 2
A) Ouvrez le couvercle (Fig. 1). Soulevez le
Couvercle externe et ouvrez le complètement;
Ouverture douce du tambour (Fig. 2):
B)
Appuyez d'un doigt sur le bouton comme illustré et
le tambour s'ouvrira délicatement.
C) Introduisez le linge (Fig. 3).
D) Fermer (Fig. 4).
refermez bien le tambour en baissant dabord la
porte antérieure et posez ensuite la porte
postérieure;
faites attention à parfaitement positionner les
crochets de la porte antérieure dans leur siège
dans la porte postérieure;
vous entendrez un clac qui confirmera la
bonne fixation;
appuyez alors légèrement vers le bas sur les
deux portes qui ne doivent pas se décrocher;
fermez enfin le couvercle externe.
Démarrage dun programme
1. Allumer le lave-linge en appuyant sur la touche
MARCHE/ARRÊT. Tous les voyants sallument
pendant quelques secondes puis séteignent, seul le
voyant MARCHE/PAUSE flashe.
2. Charger le linge et fermer les portes et le
couvercle.
3. Sélectionner à laide du bouton PROGRAMMES le
programme désiré.
4. Sélectionner la température de lavage (voir
Personnalisations).
5. Sélectionner la vitesse dessorage (voir
Personnalisations).
6. Verser les produits lessiviels et les additifs (voir
Produits lessiviels et linge).
7. Sélectionner les fonctions désirées.
8. Appuyer sur la touche MARCHE/PAUSE pour
démarrer le programme, le voyant correspondant vert
restera allumé en fixe.
Pour annuler le cycle sélectionné, appuyer sur la
touche MARCHE/PAUSE pour placer lappareil en
pause et choisir un nouveau cycle.
9. A la fin du programme, le voyant
voyant COUVERCLE VERROUILLÉ séteint pour
signaler que le couvercle peut être ouvert. Sortir le
linge et laisser le couvercle entrouvert pour faire
sécher le tambour.
Eteindre le lave-linge en appuyant sur la touche
MARCHE/ARRÊT.
sallume. Le
FR
Fig. 3
Fig. 4
17
Page 18

Programmes
FR
Tableau des programmes
Vitesse
Description du Programme
Programmes
Programmes Spécial
Anti-bactérien 90°C:
7
Anti-bactérien 90°C (1):
7
Bonne Nuit:
8
Bébé:
9
Chemises
10
Soie/Voilages:
11
Laine:
12
Programmes Quotidien
Coton Prélavage 90°C:
1
Coton:
2
Coton (2):
2
Coton (3):
3
Synthétique:
4
Synthétique:
4
MIX 30':
5
la laine, la soie et le linge à laver à la main).
MIX 15':
6
la laine, la soie et le linge à laver à la main).
Cycle
couleurs délicates peu sales.
couleurs délicates très sales.
pour laine, cachemire, etc.
blancs et couleurs résistantes très sales.
blancs et couleurs délicates très sales.
blancs peu sales et couleurs délicates.
couleurs résistantes très sales.
couleurs résistantes peu sales.
pour rafraîchir rapidement du linge peu sale (ne convient pas pour
pour rafraîchir rapidement du linge peu sale (ne convient pas pour
blancs extrêmement sales.
blancs et couleurs résistantes très sales.
pour linge en soie, viscose, lingerie.
blancs extrêmement sales.
Te m p .
maxi
maxi.
(tours
(°C)
minute)
90° 800
60° 800 40° 800 40° 800 40° 600 30° 0 40° 600 -
90° 800 60° 800
40° 800
40° 800
60° 800 40° 800 -
30° 800 -
30° 800 -
Rinçage - 800
Essorage - 800 - - - 616
Essorage délicat - 800 - - - 2,5 12
Vidange - 0 - - - 62
Prod uits lessiviels
Eau
de
Javel
Lavage
Adou
cissant
ll l
ll
ll
ll
ll
ll
ll
ll
ll l
ll l
ll l
ll
ll
ll
ll
l
l
-
Charge
maxi
-
(Kg)
6 165
6 141
4288
2 116
269
155
155
6 164
6 138
6 123
689
2,5 85
2,5 73
330
1,5 15
636
Durée
cycle
Les données dans le tableau sont reprises à titre indicatif.
Pour tous les instituts qui effectuent ces tests :
1) Programme de contrôle selon la norme EN 60456: sélectionner le programme 7 et une température de 60°C.
2) Programme coton long: sélectionner le programme 2 et une température de 40°C.
3) Programme coton court: sélectionner le programme 3 et une température de 40°C.
Programmes spéciaux
Anti-bactérien (programme 7). Un programme hautes températures qui prévoit lutilisation de produits javelisés à des
températures supérieures à 60°C. Pour blanchir, verser le produit javelisé, les lessives et les additifs dans les
compartiments correspondants (voir paragraphe Tiroir à produits lessiviels).
Bonne nuit (programme 8). Cest un cycle silencieux qui permet de faire fonctionner le lave-linge la nuit quand le tarif
délectricité est plus bas. Ce programme est spécialement conçu pour les synthétiques et le coton. A la fin du cycle
lappareil sarrête, cuve pleine. Pour procéder à lessorage et à la vidange, appuyer sur la touche MARCHE/PAUSE, à
défaut, lappareil procédera automatiquement au bout de 8 heures à lessorage et à la vidange de leau.
Bébé (programme 9). Programme spécial, idéal pour le lavage des vêtements denfants souvent très sales, il élimine
toute trace de lessive du linge pour protéger leur peau délicate et éviter tout risque dallergie. Spécialement conçu pour
diminuer la charge bactérienne, ce cycle utilise une plus grande quantité deau et optimise leffet des additifs
désinfectants spécifiques ajoutés à la lessive.
Mix 30 (programme 5) spécialement conçu pour laver du linge peu sale en un rien de temps: il ne dure que 30 minutes
et permet ainsi de faire des économies dénergie et de temps. La sélection de ce programme (5 à 30°C) permet de
laver ensemble des textiles différents (sauf laine et soie) en ne dépassant pas 3 kg de charge.
Mix 15 (programme 6) spécialement conçu pour laver du linge peu sale en un rien de temps: il ne dure que 15 minutes
et permet ainsi de faire des économies dénergie et de temps. La sélection de ce programme (6 à 30°C) permet de
laver ensemble des textiles différents (sauf laine et soie) en ne dépassant pas 1,5 kg de charge.
18
Page 19

Personnalisations
Sélection de la température
Tourner le bouton TEMPÉRATURE pour sélectionner la température de lavage (voir Tableau des programmes).
La température peut être abaissée jusquau lavage à froid (
La machine interdira automatiquement toute sélection dune température supérieure à la température maximale
prévue pour chaque programme.
).
Sélection de lessorage
Tourner le bouton ESSORAGE pour sélectionner la vitesse dessorage du programme sélectionné.
Les vitesses maximales prévues pour les programmes sont:
Programmes Vitesse maximale
Coton 800 tours/minute
Synthétiques 800 tours/minute
Laine 600 tours/minute
Soie vidange seule
La vitesse dessorage peut être réduite ou lessorage supprimé en sélectionnant le symbole
La machine interdira automatiquement tout essorage à une vitesse supérieure à la vitesse maximale prévue pour
chaque programme.
.
Fonctions
Les différentes fonctions de lavage prévues par le lave-linge permettent dobtenir la propreté et le blanc souhaités.
Pour activer les fonctions:
1. appuyer sur la touche correspondant à la fonction désirée;
2. lallumage du voyant correspondant signale que la fonction est activée.
Remarque: Le clignotement rapide du voyant signale que la fonction correspondante nest pas disponible pour le
programme sélectionné.
FR
Intensif
Grâce à l'utilisation d'une plus grande quantité d'eau au cours de la phase initiale du cycle et à l'emploi de
davantage de temps, cette fonction permet d'obtenir un lavage très performant.
Cette option nest pas activable avec les programmes 5, 6, 7, 11, 12, , , , .
Rinçage plus
La sélection de cette fonction permet daugmenter lefficacité du rinçage et déliminer toute trace de lessive. Elle
est très utile en cas de peaux particulièrement sensibles.
Cette option nest pas activable avec les programmes 5, 6,
Repassage facile
En cas de sélection de cette fonction, le lavage et lessorage seront dûment modifiés pour réduire le froissage.
Pour le programme 4, 8, 11 lappareil arrive au bout du cycle en laissant le linge tremper, le voyant de la fonction
REPASSAGE FACILE et celui de MARCHE/PAUSE se mettent à clignoter (orange), la phase RINCAGE reste
allumée en fixe. Pour vidanger leau et pouvoir sortir le linge, il faut appuyer sur la touche MARCHE/PAUSE ou sur
la touche REPASSAGE FACILE.
, , .
Cette option nest pas activable avec les programmes 5, 6, 7, 8, 9, 12, , , .
Départ différé
Pour différer la mise en marche de la machine jusquà 12 heures.
Appuyer plusieurs fois de suite sur la touche jusquà ce que le voyant correspondant au retard souhaité sallume. A
la cinquième pression sur la touche, la fonction se désactive.
N.B: Après avoir appuyé sur la touche MARCHE/PAUSE, le retard programmé ne peut être modifié que pour le
diminuer.
Il est activé avec tous les programmes.
19
Page 20

Produits lessiviels et linge
FR
Tiroir à produits lessiviels
Un bon résultat de lavage dépend aussi d'un bon
dosage de produit lessiviel: un excès de lessive ne
lave pas mieux, il incruste l'intérieur de votre lavelinge et pollue l'environnement.
Sortez le tiroir à produits
lessiviels et versez la
lessive ou l'additif
comme suit.
bac 1: Lessive prélavage (en poudre)
bac 2: Lessive lavage (en poudre ou liquide)
En cas d'utilisation de lessive liquide, il est conseillé
d'introduire la boule doseuse directement dans la cuve.
bac 3: Additifs (adoucissant, etc.)
L'assouplissant ne doit pas déborder de la grille (max).
Le lave-linge prélève automatiquement lassouplissant
lors du dernier rinçage.
A la fin du programme de lavage il reste dans le bac 3
un résidu deau. Cette eau sert au prélèvement des
assouplissants très denses ou à dissoudre les
assouplissants concentrés. Si dans le bac 3 il reste un
peu plus deau que dhabitude, cela signifie que le
dispositif de vidange est bouché et empêche leffet
aspirant du dispositif.
bac 4: Eau de javel
Cycle blanchissage
Le blanchissage nest possible quavec les
programmes 2, 3, 7,
Verser le produit javelisé dans le bac 4, la lessive et
lassouplissant dans les bacs correspondants, puis
sélectionner un des programmes sus-indiqués.
Conseillé en cas de linge en coton très sale.
.
Triage du linge
Trier correctement le linge daprès:
- le type de textile / le symbole sur létiquette.
- les couleurs: séparer le linge coloré du blanc.
Vider les poches et contrôler les boutons.
Ne pas dépasser les valeurs indiquées
correspondant au poids de linge sec :
Textiles résistants: 6 kg max.
Textiles synthétiques: 2,5 kg max.
Textiles délicats: 2 kg max.
Laine: 1 kg max.
Combien pèse le linge ?
1 drap 400-500 g
1 taie doreiller 150-200 g
1 nappe 400-500 g
1 peignoir 900-1200 g
1 serviette éponge 150-250 g
Linge ou vêtements particuliers
Chemises: sélectionner le programme 10 approprié
au lavage de chemises de couleurs et textiles
différents. Il en prend le plus grand soin en réduisant
le froissage.
Soie: sélectionner le programme de lavage spécial 11
pour vêtements en soie. Il est conseillé dutiliser une
lessive spéciale pour linge délicat.
Rideaux: pliez-les bien et glissez-les dans une taie
d'oreiller ou dans un sac genre filet. Sélectionner le
programme 11.
Laine: Hotpoint/Ariston est le seul lave-linge à avoir
obtenu le prestigieux label Woolmark Platinum Care
(M.0508) délivré par The Woolmark Company qui
garantit le lavage à la machine de tous les vêtements
en laine, y compris ceux qui portent létiquette lavage
à la main uniquement
on peut donc laver à la machine, en toute tranquillité,
tous les vêtements en laine (max. 1 kg) avec des
performances de lavage optimales.
. Grâce au programme 12
Système déquilibrage de la charge
Avant tout essorage, pour éviter toute vibration
excessive et répartir le linge de façon uniforme, le
lave-linge fait tourner le tambour à une vitesse
légèrement supérieure à la vitesse de lavage. Si au
bout de plusieurs tentatives, la charge nest toujours
pas correctement équilibrée, lappareil procède à un
essorage à une vitesse inférieure à la vitesse
normalement prévue. En cas de déséquilibre excessif,
le lave-linge préfère procéder à la répartition du linge
plutôt quà son essorage. Pour une meilleure
répartition de la charge et un bon équilibrage, nous
conseillons de mélanger de grandes et petites pièces
de linge.
20
Page 21

Précautions et conseils
Ce lave-linge a été conçu et fabriqué conformément
aux normes internationales de sécurité. Ces
consignes sont fournies pour des raisons de sécurité,
il faut les lire attentivement.
Sécurité générale
Cet appareil est conçu pour un usage domestique.
Ce lave-linge ne doit être utilisé que par des adultes
en suivant les instructions reportées dans ce mode
demploi.
Ne jamais toucher lappareil si lon est pieds nus et
si les mains sont mouillées ou humides.
Ne jamais tirer sur le câble pour débrancher la fiche
de la prise de courant.
Ne pas toucher à leau de vidange, elle peut
atteindre des températures très élevées.
Ne pas forcer pour ouvrir le couvercle: le
verrouillage de sécurité qui protège contre les
ouvertures accidentelles pourrait sendommager.
En cas de panne, éviter à tout prix daccéder aux
mécanismes internes pour tenter une réparation.
Veiller à ce que les enfants ne sapprochent pas de
lappareil pendant son fonctionnement.
Deux ou trois personnes sont nécessaires pour
déplacer lappareil avec toutes les précautions
nécessaires. Ne jamais le déplacer tout seul car il
est très lourd.
Avant dintroduire le linge, sassurer que le tambour
est bien vide.
Mise au rebut
Mise au rebut du matériel demballage: se
conformer aux réglementations locales de manière
à ce que les emballages puissent être recyclés.
La Directive Européenne 2002/96/EC sur les
Déchets des Equipements Electriques et Electroniques, exige que les appareils ménagers usagés ne
soient pas jetés dans le flux normal des déchets
municipaux. Les appareils usagés doivent être
collectés séparément afin d'optimiser le taux de
récupération et le recyclage des matériaux qui les
composent et réduire l'impact sur la santé humaine
et l'environnement. Le symbole de la ''poubelle
barrée'' est apposée sur tous les produits pour
rappeler les obligations de collecte séparée. Les
consommateurs devront contacter les autorités
locales ou leur revendeur concernant la démarche
à suivre pour l'enlèvement de leur vieil appareil.
Economies et respect de l'environnement
FR
Economie de produit lessiviel, d'eau, d'électricité et de temps
Pour ne pas gaspiller de ressources, utilisez le lave-
linge à sa charge maximale. Mieux vaut une pleine
charge que deux demies, vous économiserez
jusqu'à 50% d'électricité.
Un prélavage n'est nécessaire qu'en cas de linge
très sale. S'en passer permet de faire des économies de produit lessiviel, de temps, d'eau et entre
5 et 15% d'électricité.
Si vous traitez les taches avec un produit
détachant ou si vous les laissez tremper avant de
les laver, vous éviterez d'avoir à laver à de hautes
températures. Un programme à 60°C au lieu de
90°C ou un à 40°C au lieu de 60°C, fait
économiser jusqu'à 50% d'électricité.
Bien doser la quantité de produit lessiviel en fonc-
tion de la dureté de l'eau, du degré de salissure et
de la quantité de linge à laver évite les gaspillages
et protège l'environnement: bien que biodégradables, les produits lessiviels contiennent des éléments qui altèrent l'équilibre de la nature. Evitez le
plus possible l'utilisation d'assouplissant.
Effectuer ses lavages tard dans l'après-midi et
jusqu'aux premières heures du matin permet de
réduire la charge d'absorption des opérateurs
énergétiques. L'option Départ différé aide à mieux
organiser les lavages en ce sens.
Si le linge doit être séché dans un sèche-linge,
sélectionnez une haute vitesse d'essorage. Du
linge qui contient moins d'eau fait écomiser du
temps et de l'électricité dans le programme de
séchage.
21
Page 22

Entretien et soin
FR
Coupure de l'arrivée d'eau et de courant
Fermez le robinet de l'eau après chaque
lavage: vous limiterez ainsi l'usure de l'installation
hydraulique de votre lave-linge et éliminerez le
danger de fuites.
Débranchez la fiche de la prise de courant quand
vous nettoyez votre lave-linge et pendant tous vos
travaux d'entretien.
Nettoyage du lave-linge
Pour nettoyer l'extérieur et les parties en caoutchouc,
utilisez un chiffon imbibé d'eau tiède et de savon.
N'utilisez ni solvants ni abrasifs.
Entretien du couvercle
et du tambour
Quand vous nutilisez pas votre lave-linge, laissez
toujours le couvercle entrouvert pour éviter la
formation de mauvaises odeurs.
Nettoyage de la pompe
Le lave-linge est équipé d'une pompe autonettoyante
qui n'exige aucune opération d'entretien. Il peut
toutefois arriver que de menus objets (pièces de
monnaie, boutons) tombent dans la préchambre qui
protège la pompe, placée en bas de cette dernière.
Contrôlez que le cycle de lavage est bien terminé et
débranchez la fiche.
Pour récupérer les objets qui pourraient être tombés
dans la préchambre :
1. déposez la base à
l'avant de votre lavelinge en la saisissant
sur les côtés et en la
tirant des deux mains
(voir figure);
2. dévissez le cou
vercle en le faisant
tourner dans le sens
inverse des aiguilles
d'une montre (voir
figure): il est normal
qu'un peu d'eau
s'écoule;
3. nettoyez soigneusement à l'intérieur;
4. revissez le couvercle;
5. remontez le panneau
en veillant à bien enfiler
les crochets dans les
fentes prévues avant de
le pousser contre la
machine.
Contrôle du tuyau d'arrivée de l'eau
Contrôlez le tuyau d'alimentation au moins une fois par
an. Remplacez-le dès que vous remarquez des
craquèlements et des fissures: les fortes pressions subies
pendant le lavage pourraient provoquer des cassures.
Comment nettoyer le tiroir à produits lessiviels
Démontage:
Appuyez légèrement sur la
grosse touche située sur la
partie antérieure du tiroir à
produits lessiviels et tirez
vers le haut (fig. 1, 2).
Fig. 1
N'utilisez jamais de tuyaux usés.
Nettoyage:
Nettoyez le tiroir sous le robinet (fig. 3) à l'aide par exemple
d'une vieille brosse à dents; tirez sur les deux petits siphons placés dans la partie supérieure des bacs 1 et 2
(fig. 4), contrôlez qu'ils ne soient pas bouchés et rincezles.
Fig. 2 Fig. 3 Fig. 4
Remontage:
N'oubliez pas de replacez
les deux petits siphons dans
leurs emplacements spéciaux et remettez enfin le
tiroir dans son siège en le
fixant (fig. 4, 2, 1).
22
Page 23

Anomalies et remèdes
Il peut arriver que le lave-linge ne fonctionne pas bien. Avant dappeler le Service de dépannage (voir
Assistance), contrôler sil ne sagit pas par hasard dun problème facile à résoudre à laide de la liste suivante.
Anomalies:
Le lave-linge ne sallume pas.
Le cycle de lavage ne démarre
pas.
Il ny a pas darrivée deau (le
voyant de la première phase de
lavage clignote rapidement).
Le lave-linge prend leau et
vidange continuellement.
Causes / Solutions possibles:
La fiche nest pas branchée dans la prise de courant ou mal branchée.
Il y a une panne de courant.
Le couvercle n'est pas bien fermé (le voyant Couvercle Verrouillé clignote).
La touche MARCHE/ARRÊT na pas été enfoncée.
La touche MARCHE/PAUSE na pas été enfoncée.
Le robinet de leau nest pas ouvert.
Un départ différé a été sélectionné (voir Personnalisations).
Le tuyau darrivée de leau nest pas raccordé au robinet.
Le tuyau est plié.
Le robinet de leau nest pas ouvert.
Il y a une coupure deau.
La pression nest pas suffisante.
La touche MARCHE/PAUSE na pas été enfoncée.
Le tuyau de vidange nest pas installé à une distance du sol comprise
entre 65 et 100 cm (voir Installation).
Lextrémité du tuyau de vidange est plongée dans leau (voir Installation).
Lévacuation murale na pas dévent.
Si après ces vérifications, le problème persiste, fermer le robinet de leau,
éteindre la machine et appeler le service Assistance. Si lappartement est
situé en étage dans un immeuble, il peut y avoir des phénomènes de
siphonnage qui font que le lave-linge prend et évacue leau
continuellement. Pour supprimer cet inconvénient, on trouve dans le
commerce des soupapes spéciales anti-siphonnage.
FR
Le lave-linge ne vidange pas et
nessore pas.
Le lave-linge vibre beaucoup
pendant lessorage.
Le lave-linge a des fuites.
Le voyant MARCHE/PAUSE
(orange) ainsi que les voyants des
fonctions clignotent rapidement.
Il y a un excès de mousse.
Le programme ne prévoit pas de vidange: pour certains programmes, il
faut la faire partir manuellement.
La fonction REPASSAGE FACILE est activée: pour compléter le programme,
appuyer sur la touche MARCHE/PAUSE (Personnalisations).
Le tuyau de vidange est plié (voir Installation).
La conduite dévacuation est bouchée.
Le tambour na pas été débloqué comme il faut lors de linstallation du
lave-linge (voir Installation).
Le lave-linge nest pas posé à plat (voir Installation).
Le lave-linge est coincé entre des meubles et le mur (voir Installation).
Le tuyau darrivée de leau nest pas bien vissé (voir Installation).
Le tiroir à produits lessiviels est bouché (pour le nettoyer voir Entretien et soin).
Le tuyau de vidange nest pas bien fixé (voir Installation).
Eteindre lappareil et débrancher la fiche de la prise de courant,
attendre 1 minute environ avant de rallumer.
Si lanomalie persiste, appeler le service dassistance.
Le produit de lavage utilisé nest pas une lessive spéciale machine (il faut quil y
ait linscription pour lave-linge, main et machine, ou autre semblable).
La quantité utilisée est excessive.
23
Page 24

Assistance
FR
Avant dappeler le service après-vente:
Vérifier si on ne peut pas résoudre lanomalie par ses propres moyens (voir Anomalies et Remèdes);
Remettre le programme en marche pour contrôler si linconvénient a disparu;
Autrement, contacter le Centre dAssistance technique agréé au numéro de téléphone indiqué sur le
certificat de garantie.
Ne jamais sadresser à des techniciens non agréés.
Communiquer:
le type de panne;
le modèle de lappareil (Mod.);
son numéro de série (S/N).
Vous trouverez tous ces renseignements sur la plaquette signalétique située sur le panneau arrière de votre
lave-linge.
Consultation à tout moment
Pour toute demande concernant nos produits, nhésitez pas à contacter notre Service Consommateurs
0.825.05.44.44.
24
Page 25

Руководство по
эксплуатации
CIS
Русский
ARTXL 89
СТИРАЛЬНАЯ МАШИНА
Содержание
CIS
Установка, 26-27
Распаковка и нивелировка
Подключение к водопроводу и электричеству
Первый цикл стирки
Технические характеристики
Описание стиральной машины и
порядка запуска программы, 28-29
Панель управления
Индикаторы
Как открыть и закрыть барабан
Порядок запуска программы
Программы, 30
Таблица программ
Персонализированные настройки, 31
Регулировка температуры
Выбор скорости отжима
Дополнительные функции
Моющие средства и типы белья, 32
Распределитель моющих средств
Отбеливание
Подготовка белья
Изделия, требующие деликатной стирки
Система балансировки белья
Предосторожности и рекомендации, 33
Общие требования к безопасности
Утилизация
Экономия энергии и охрана окружающей среды
Техническое обслуживание и уход, 34
Отключение воды и электричества
Уход за стиральной машиной
ход за дверцей машины и барабаном
Чистка насоса
Проверка заливного шланга
Как чистить распределитель моющих средств
Поиск неисправностей и методы их
устранения, 35
Сервисное обслуживание, 36
25
Page 26

Установка
CIS
Сохраните данное руководство. Оно должно быть
в комплекте со стиральной машиной в случае
продажи, передачи оборудования или при
переезде на новую квартиру, чтобы новый
владелец оборудования мог ознакомиться с
правилами его функционирования и обслуживания.
Внимательно прочитайте руководство: в нем
содержатся важные сведения по установке и
безопасной эксплуатации стиральной машины.
Распаковка и выравнивание
Распаковка
1. Распакуйте
стиральную машину.
2. Убедитесь, что
оборудование не было
повреждено во время
транспортировки. При
обнаружении повреждений не подключайте
машину свяжитесь с
поставщиком
немедленно.
3. Удалите четыре
транспортировочных
винта и резиновые
пробки с
прокладками,
расположенные в задней части стиральной
машины (ñì. ðèñ.).
4. Закройте отверстия прилагающимися
пластиковыми заглушками.
5. Сохраняйте все детали: они Вам понадобятся
при последующей транспортировке стиральной
машины.
áолты, резиновые шайбы и большую металличес-
кую поперечную планку. Закройте образовавшиеся
отверстия пластмассовыми заглушками.
Не разрешайте детям играть с упаковочными
материалами.
Выравнивание
1. Установите стиральную
машину на ровном и
прочном полу, так чтобы
она не касалась стен,
мебели и прочих
предметов.
2. После установки
машины на место
отрегулируйте ее
устойчивое положение
путем вращения передних ножек (ñì. ðèñ.). Для
этого сначала ослабьте контргайку, после завершения регулировки контргайку затяните. После
установки машины на место проверьте по уровню
горизонтальность верхней крышки корпуса,
отклонение горизонтали должно быть не более 2°.
Правильное выравнивание оборудования поможет
избежать шума, вибраций и смещений во время
работы машины.
Если стиральная машина стоит на полу, покрытом
ковром, убедитесь, что ее основание возвышается над ковром. В противном случае вентиляция
будет затруднена или вовсе невозможна.
Установка машины на место и перемещение
Ваша стиральная
машина может быть
оснащена специальными убирающимися колесами для облегчения
ее перемещения.
Чтобы опустить колеса
и передвинуть оборудование, просто потяните за рычаг,
расположенный слева
под основанием маши-
ны. После установки
оборудования в требуемое положение верните
рычаг в исходное поло.
Подключение к водопроводной и
электрической сети
Подсоединение заливного шланга
1. Вставьте прокладку А в
конец заливного шланга
и наверните его на
вывод водопровода
A
Давление воды должно быть в пределах значе-
ний, указанных в таблице Технических характеристик (ñì. ñ. 3).
Если длина водопроводного шланга окажется
недостаточной, обратитесь в Авторизованный
Сервисный центр.
холодной воды с резьбовым отверстием 3/4
дюйма (ñì. ðèñ .).
Перед подсоединением
откройте водопроводный
кран и дайте стечь
грязной воде.
2. Подсоедините заливной шланг к стиральной
машине, навинтив его
на водоприемник,
расположенный в
задней верхней части
справа (ñì. ðèñ.).
3.Убедитесь, что шланг
не перекручен и не
пережат.
26
Page 27

Подсоединение сливного шланга
Повесьте загнутый конец
сливного шланга на край
раковины, ванны, или
поместите в
специальный вывод
65 - 100 cm
канализации. Шланг не
должен перегибаться.
Верхняя точка сливного
шланга должна находиться на высоте 65-100
см от пола. Расположение сливного шланга
должно обеспечивать
разрыв струи при сливе
(конец шланга не
должен быть опущен в
воду).
В случае крепления на
край ванной или раковины, шланг вешается с
помощью направляющей
(входит в комплект
поставки), которая
крепится к крану (ðèñ.).
Не рекомендуется применение удлинителей для
сливного шланга, при необходимости допускается
его наращивание шлангом такого же диаметра и
длиной не более 150 см.
Подсоединение к электросети
Внимание! Оборудование обязательно должно быть
заземлено!
1. Машина подключается к электрической сети при помощи двухполюсной розетки с заземляющим контактом
(розетка не поставляется с машиной). Фазный провод
должен быть подключен через автомат защиты сети, рассчитанный на максимальный ток (ток срабатывания) 16
А, и имеющий время срабатывания не более 0,1 с.
2. При наличии вблизи от предполагаемого места установки машины розетки с заземляющим контактом,
имеющей трехпроводную подводку кабеля с медными
жилами сечением не менее 1,5 кв. мм (или алюминиевыми жилами сечением не менее 2,5 кв. мм), доработка
электросети не производится. При отсутствии указанной
розетки и проводки следует провести их монтаж.
3. Прокладка заземления отдельным проводом не
допускается.
4. Для доработки электрической сети рекомендуется
применять провод типа ППВ 3х1,5 380 ГОСТ 6223-79.
Допускается применение других марок кабеля, обеспечивающих пожаро- и электробезопасность при эксплуатации машины.
Перед включением машины в сеть убедитесь, что:
l розетка и проводка соответствуют требованиям, изло-
женным в данном разделе инструкции;
l напряжение и частота тока сети соответствуют данным
машины;
l розетка и вилка одного типа;
l розетка заземлена в соответствии с нормами безо-
пасности, описанными в данном разделе инструкции
(допускается организация заземления рабочим нулем, при условии, что защитная линия не имеет разрыва и подключена напрямую в обвод каких-либо
приборов (например, электрического счетчика).
Если вилка не подходит к розетке, ее следует заменить
на новую, соответствующую розетке, или заменить питающий кабель. Замена кабеля должна производиться
только квалифицированным персоналом.
Запрещается использование переходников, двойных и
более розеток и удлинителей (они создают опасность
возгорания). Если Вы считаете их использование необходимым, применяйте один единственный удлинитель,
удовлетворяющий требованиям безопасности.
Оборудование, подключенное с нарушением требований безопасности бытовых приборов большой
мощности, изложенных в данной инструкции, является потенциально опасным.
Производитель не несет ответственности за ущерб
здоровью и собственности, если он вызван
несоблюдением указанных норм установки.
Первый цикл стирки
По завершении установки, перед началом эксплуатации
необходимо произвести один цикл стирки со
стиральным порошком, но без белья, по программе 2.
Технические характеристики
Ìîä å ë ü
Размеры
Загрузка
Электрические
параметры
Гидравлические
параметры
Скорость отжима
Kонтрольные
программы
согласно нормативу
EN 604 5 6
ARTXL 89
ши ри н а 4 0 с м
высота 85 см
глубина 60 см
1 - 6 êã
cмотрите паспортную табличку с
техническими характеристиками на
машине
max давление 1 Мпа (10 бар)
min давление 0,05 Мпа (0,5 бар)
объем барабана 42 л
äî 800 îá/ìèí
программа 7; температура 60°С;
при заг рузке до 6 кг.
Машина соответствует следующим
Директивам Европейского
Экономического сообщества:
- 89/336 /ЕЕС от 03.05.89 (электромагнитной совместимости) и
последу ющие модификации
- 2002/96/CE
- 2006/95/CE (низкого напряжения)
CIS
27
Page 28

Описание стиральной машины и
порядка запуска программы
CIS
Панель управления
Кнопка
ÂÊË/ÂÛÊË
Рукоятка выбора
ПРОГРАММА
Кнопка ÂÊË/ÂÛÊË: служит для включения и
выключения стиральной машины.
Рукоятка выбора ПРОГРАММА: служит для
выбора программ. В процессе выполнения
программы рукоятка не вращается.
Кнопки с индикаторами дополнительных
ФУНКЦИЙ: служат для выбора имеющихся
дополнительных функций. Индикатор,
соответствующий выбранной функции, останется
включенным.
Скорости ОТЖИМА: служит для выбора скорости
отжима или для его исключения
(см «Персонализированные настройки»).
Регулятор ТЕМПЕРАТУРЫ: служит для настройки
температуры или для стирки в холодной воде
(см. «Персонализированные настройки»).
ТЕМПЕРАТУРЫ
Регулятор
Индикаторы ВЫПОЛНЕНИЯ ФАЗ
ЦИКЛА/ЗАПУСКА С ЗАДЕРЖКОЙ
Скорости
ОТЖИМА
Кнопки с индикаторами
дополнительных
ФУНКЦИЙ
стирки будет гореть, не мигая. Если индикатор
БЛОКИРОВКИ ЛЮКA
Для возобновления цикла стирки с момента, когда
он был прерван, вновь нажмите ПУСК/ПАУЗА.
Индикаторы
Индикаторы сообщают пользователю важные
сведения. Значение индикаторов:
Таймер отсрочки
Если была включена функция Таймер отсрочки
(см. «Персонализированные настройки»), после
запуска программы начнет мигать индикатор,
соответствующий заданному времени задержки:
Индикатор БЛОКИРОВКИ
ËÞÊA
Кнопка с
индикатором
ПУСК/ПАУЗА
погас, можно открыть люк.
индикаторы ВЫПОЛНЕНИЯ ФАЗ ЦИКЛА/
ЗАПУСКА С ЗАДЕРЖКОЙ: показывают
последовательность выполнением программы
стирки. Включенный индикатор соответствует
текущей фазе.Если была включена функция
Таймер отсрочки, индикаторы будут показывать
время, остающееся до запуска программы (ñì.
страницу сбоку).
Индикатор БЛОКИРОВКИ ЛЮКA: показывает,
можно ли открыть люк (см. страницу сбоку).
Кнопка с индикатором ПУСК/ПАУЗА: служит для
запуска или для временного прерывания
программы.
ПРИМЕЧАНИЕ: для временного прерывания
текущего цикла стирки нажмите эту кнопку.
Соответствующий индикатор замигает
оранжевымцветом, а индикатор текущей фазы
28
По мере отсчета времени будет показываться
остающееся время вместе с миганием
соответствующего индикатора.
По прошествии заданного времени задержки мигающий
индикатор погаснет, и запустится заданная программа.
Индикаторы текущей фазы цикла:
После выбора и запуска цикла стирки индикаторы
будут загораться один за другим, показывая
последовательность выполнения программы:
Page 29

Cтирка
Полоскание
A) ОТКРЫВАНИЕ (рис. 1).
Поднимите внешнюю крышку и полностью ее
откройте.
CIS
Отжим
Ñëèâ
Конец цикла
Кнопки дополнительный функций и
соответствующие индикаторы
При выборе функции загорается соответствующая кнопка.
Если выбранная функция является несовместимой с
заданной программой, соответствующий индикатор будет
мигать, и такая функция не будет включена.
Если будет выбрана функция, несовместимая с другой,
ранее выбранной функцией, останется включенной только
последняя выбранная функция.
Индикатор блокировки люка:
Включенный индикатор означает, что люк заблокирован во
избежание его случайного открывания. Во избежание его
повреждения необходимо дождаться, когда индикатор
погаснет, перед тем как открыть люк (Обычно индикатор
гаснет через 3 минуты после окончания стирки).
ПРИМЕЧАНИЕ: если включена функция Таймер
отсрочки, люк открыть нельзя. Для этого необходимо
переключить машину в режим паузы при помощи
кнопки ПУСК/ПАУЗА.
Быстрое мигание индикатора ПУСК/ПАУЗА
(оранжевый) одновременно с индикатором функций
означает неисправность (см. «Неисправности и
методы их устранения»).
Как открыть и закрыть барабан
ðèñ. 1
ðèñ. 2
B) Открывание барабана (Soft opening Плавное
открывание):
Нажмите кнопку, показанную на ðèñ. 2, крышка
барабана плавно откроется.
C) ЗАГРУЗКА СТИРАЛЬНОЙ МАШИНЫ (рис. 3).
D) ЗАКРЫВАНИЕ (рис. 4).
- закройте полностью барабан, опуская сначала
переднюю дверцу, а затем заднюю;
- затем удостоверьтесь, что крюки передней
дверцы точно вошли в предназначенные места на
задней дверце;
- после того, как крюки защелкнулись, нажмите обе
дверцы слегка вниз, чтобы убедиться они закрыты
плотно;
- и, наконец, закройте внешнюю крышку.
Порядок запуска программы
1. Включите стиральную машину, нажав кнопку ВКЛ/
ВЫКЛ. Все индикаторы загорятся на несколько
секунд, затем погаснут, останется мигать индикатор
ПУСК/ПАУЗА.
2. Загрузите белье, закройте дверцы и крышку.
3. Задайте рукояткой ПРОГРАММА нужную
программу.
4. Задайте температуру стирки (см.
«Персонализированные настройки»).
5. Задайте скорость отжима (см.
«Персонализированные настройки»).
6. Поместите моющие средства и добавки (см.
«Стиральные вещества и типы белья»).
7. Включите нужные дополнительные функции.
8. Запустите программу при помощи кнопки ПУСК/ПАУЗА,
соответствующий индикатор загорится зеленым цветом.
Для отмены заданного цикла переключите машину в
режим паузы при помощи кнопки ПУСК/ПАУЗА и выберите
новый цикл.
9. По завершении программы загорится индикатор
. Индикатор БЛОКИРОВКИ ЛЮКA погаснет,
показывая, что теперь можно открыть люк. Выньте
белье и оставить люк полуоткрытым для сушки
барабана.
Выключите стиральную машину, нажав кнопку ВКЛ/
ВЫКЛ.
ðèñ. 3
ðèñ. 4
29
Page 30

Программы
CIS
Таблица программ
Описание программы
Программы
Специальные программы
ЦИKЛ АНТИБАKТЕРИЯ: сильнозагрязненное белое белье.
7
ЦИKЛ АНТИБАKТЕРИЯ (1): сильнозагрязненное белое и прочное цветное
7
белье.
НОЧНОЙ ЦИKЛ: слабозагрязненное деликатное цветное белье.
8
ДЕТСKОЕ БЕЛЬЕ: сильнозагрязненное деликатное цветное белье.
9
РУБАШKИ
10
ШЕЛK/ЗАНАВЕСKИ: для изделий из шелка, вискозы и нижнего белья.
11
ØÅ Ð Ñ Ò Ü : для шерсти, кашемира и т.д.
12
Ежедневные прогр аммы
ПРЕД ВАРИТ ЕЛЬНАЯ + ХЛОПОK 90°: очень сильно загрязненное белое белье.
1
ХЛОПОK: сильнозагря зненное белое и прочное цветное белье.
2
ХЛОПОK (2): сильнозагрязненное белое и деликатное цветное белье.
2
ХЛОПОK (3): сильнозагрязненное белое и цветное деликатное белье.
3
СИНТЕТ ИKА : сильнозаягрязненное белье прочное цветное белье.
4
СИНТЕТ ИKА : слабозагрязненное прочное цветное белье.
4
MÈKÑ 30 ': для быстрого освежения малогрязного белья (не для шерсти,
5
шелка и изделия ручной стирки).
MÈKÑ 15 ': для быстрого освежения малогрязного белья (не для шерсти,
6
шелка и изделия ручной стирки).
Дoполнительные программы
Ïîë îñ êàíè å
Отжим
Дел икатный отжим
Ñëèâ
Ìàêñ
òåìï.
Ìàêñ.
скорость
(îá./ìèí.)
(°C)
90° 800
60° 800 -
40° 800 -
40° 800 -
40° 600 -
30° 0 -
40° 600 -
0°
9
60° 800
40° 800
40° 800
60° 800 -
40° 800 -
30° 800 -
30° 800 -
800 -
- 800
- 800 - - - 616
- 800 - - - 2,5 12
- 0 - - - 62
Стир альны е средства
Îòáå ë-
иватель
Стирка Ополаски-
ll l
ll l
ll l
ll l
l
ватель
ll
ll
ll
ll
ll
ll
ll
ll
ll
ll
ll
-
l
Ìàêñ .
çàãð ó çêà
Продол-
житть
(êã)
2,5 85
2,5 73
1,5 15
цикла
6165
6141
4288
2116
269
155
155
6164
6138
6123
689
330
636
Приведенные в таблице значения являются примерными.
Для всех институтов тестирования:
1) Программы управления в соответствии с Директивой EN 60456: задайте программу 7 с температурой 60°C.
2) Длинная программа для х/б белья: задайте программу 2 с температурой 40°C.
3) Короткая программа для х/б белья: задайте программу 3 с температурой 40°C.
Специальные программы
ЦИKЛ АНТИБАKТЕРИЯ
использование отбеливателя при температуре выше 60°C.
(программа 7). Дезинфецирующая программа с высокой температурой, предусматривающая
Для отбеливания залейте отбеливатель, моющее
средство и добавки в соответствующие ячейки (см параграф «Распределитель моющих средств»).
НОЧНОЙ ЦИKЛ
(программа 8). Это бесшумный цикл, который можно включить ночью, экономя электроэнергию.
Данная программа расчитана на стирку синтетических и х/б вещей. По завершении цикла машина
останавливается с водой в барабане; для слива и отжима нажмите кнопку ПУСК/ПАУЗА, в противном случае по
прошествии 8 часов машина автоматически произведет слив воды и отжим.
ДЕТСKОЕ БЕЛЬЕ
(программа 9). Программа удаляет типичные загрязнения детской одежды, гарантируя удаление
моющего средства из ткани во избежание аллергии чувствительной детской кожи. Данный цикл расчитан на
сокращение количества бактерий благодаря использованию большего объема воды и оптимизируя воздействие
специальных дезинфицирующих добавок старильного вещества.
MÈKÑ 30'
(программа 5) предназначена для быстрой стирки слабозагрязненного белья цикл длится всего 30 минут,
что позволяет сэкономить время и электроэнергию. По этой программе (5, 30°C) можно стирать вместе белье из
разных тканей (за исключением шерсти и шелка) с максимальной загрузкой 3 кг.
MÈKÑ 15'
(программа 6) предназначена для быстрой стирки слабозагрязненного белья цикл длится всего 15 минут,
что позволяет сэкономить время и электроэнергию. По этой программе (6, 30°C) можно стирать вместе белье из
разных тканей (за исключением шерсти и шелка) с максимальной загрузкой 1,5 кг.
30
Page 31

Персонализированные
настройки
Регулировка температуры
Настройка температуры стирки производится при помощи регулятора ТЕМПЕРАТУРЫ (см.Таблицу программ).
Значение температуры может быть уменьшено вплоть до стирки в холодной воде (
Машина автоматически не допускает выбор температуры, превышающийs максимальное значение,
предусмотренное для каждой прораммы.
).
Выбор скорости отжима
Выбор скорости отжима выбранной программы производится при помощи регулятора скорости ОТЖИМ.
Для разных программ предусматривается разная максимальная скорость отжима:
Программы Максимальная скорость отжима
Хлопок 800 оборотов в минуту
Синтетические ткани 800 оборотов в минуту
Шерсть 600 оборотов в минуту
Шелк без отжима
Скорость отжима может быть уменьшена, или же отжим может быть совсем исключен, повернув регулятор в
положение
Машина автоматически не допускает выбор скорости отжима, превышающий максимальную скорость,
предусмотренную для каждой прораммы.
.
Дополнительные функции
Различные функции стирки машины позволяют достичь желаемой чистоты и белизны вашего белья.
Порядок выбора функций:
1. нажмите кнопку нужной вам функции;
2. включение соответствующего индикатора означает, что функция включена.
Примечание: Частое мигание индикатора означает, что данная функция не может быть выбрана для заданной
программы.
CIS
Суперстирка
Обеспечивает оптимальную стирку благодаря использованию большего объема воды в начале цикла и большей
продолжительности цикла.
Эта функция несовместима с программами 5, 6, 7, 11, 12, , , , .
Дополнительное Полоскание
При выборе этой функции повышается эффективность ополаскивания, обеспечивая максимальное удаление
моющего вещества. Эта функция особенно удобна для людей с кожей, чувствительной к стиральным веществам.
Эта функция несовместима с программами 5, 6, , , .
Легкая глажка
При выборе этой функции циклы стирки и отжима изменяются таким образом, чтобы сократить складки на
белье. По завершении цикла машина производит медленное вращение барабана.
При выборе программы 4, 8, 11 машина завершает цикл без слива воды, и Индикатор функции ЛЕГКАЯ
ГЛАЖКА и индикатор ПУСК/ПАУЗА мигают (оранжевым цветом), индикатор фазы Полоскание горит, не
мигая. Для слива воды и выгрузки белья необходимо нажать кнопку ПУСК/ПАУЗА или кнопку ЛЕГКАЯ
ГЛАЖКА.
Эта функция несовместима с программами 5, 6, 7, 8, 9, 12, , , .
Таймер отсрочки
Задерживает запуск цикла вплоть до 12 часов.
Нажмите кнопку несколько раз вплоть до включения индикатора, соответствующего нужному значению задержки.
При пятом нажатии кнопки функция отключается.
ПРИМЕЧАНИЕ: После нажатия кнопки ПУСК/ПАУЗА, можно изменить значение задержки только в сторону
уменьшения.
Эта функция совместима с любой программой.
31
Page 32

Моющие средства и
типы белья
CIS
Распределитель моющих средств
Хороший результат стирки зависит также от правильной дозировки моющего средства: его избыток не
гарантирует более эффективную стирку, напротив
может привести к образованию налетов внутри
машины и загрязнению окружающей среды.
Выдвиньте распределитель и заполните его
отделения моющим
средством и смягчителем:
Отделение 1: моющее средство для предварительной стирки (порошок)
ячейка 2: Стиральное вещество
(порошок или жидкость)
Жидкое стиральное вещество следует помещать
непосредственно в барабан в специальном
круглом пластмассовом дозаторе.
ячейка 3: Добавки (ополаскиватель и т.д.)
Когда вы наливаете ополаскиватель в ячейку 3,
обращайте внимание, чтобы не превысить
максимальный уровень, указанный отметкой «max».
Ополаскиватель автоматически подается в
барабан в процессе последнего ополаскивания.
По завершении программы стирки в ячейке 3
остается вода. Она необходима для подачи в
барабан очень густых ополаскивателей, т.е. для
разбавления концентрированных
ополаскивателей. Если в ячейке 3 останется воды
больше нормального, это значит, что канал слива
ополаскивателя в барабан засорился. Смотрите
описание чистки ячеек на стр. Техническое
обслуживание и уход.
ячейка 4:
Цикл отбеливания
Отбеливание
Отбеливание производится только с программами
2, 3, 7,
Добавьте отбеливатель в чашу 4, моющее средство и
ополаскиватель в соответствующие отделения, затем
выберите одну из вышеуказанных программ.
Рекомендуется только для очень грязного х/б белья.
.
Подготовка белья
Разделите белье по следующим признакам:
- тип ткани / обозначения на этикетке.
- цвет: отделите цветное белье от белого.
Выньте из карманов все предметы и проверьте пуговицы.
Не превышайте максимальную загрузку барабана,
указанную для сухого белья:
Прочные ткани: макс. 6 кг
Синтетические ткани: макс. 2,5 кг
Деликатные ткани: макс. 2 кг
Шерсть: макс. 1 кг
Сколько весит белье?
1 простыня 400-500 гр.
1 наволочка 150-200 гр.
1 скатерть 400-500 гр.
1 халат 900-1200 гр.
1 полотенце 150-250 гр.
Изделия, требующие деликатной
стирки
Рубашки: используйте специальную программу 10
для стирки рубашек из разных тканей и разных
цветов.
Это обеспечит максимальную сохранность вещей и
сделает их менее мятыми.
Øåëê: используйте специальную программу 11 для
стирки всех шелковых вещей. Рекомендуется
использовать специальное стиральное вещество
для деликатных тканей.
Занавески: сверните и положите в наволочку или в
сетчатый мешочек. Используйте программу 11.
Шерсть: Стиральная машина марки Hotpoint/Ariston
единственная получила престижный знак Woolmark
Platinum Care (M.0508) от Компании The Woolmark
Company, который сертифицирует машинную стирку
всех шерстяных изделий, даже тех, на этикетках
которых указано «только ручная стирка»
выборе программы 12 вы можете надежно и
эффективно стирать любые шерстяные изделия
(макс. 1 кг) с гарантированным лучшими
результатами.
. Ïðè
Система балансировки белья
Перед каждым отжимом во избежание чрезмерных
вибраций и для равномерного распределения белья
в барабане машина производит вращения со
скоростью, слегка превышающей скорость стирки.
Если после нескольких попыток белье не будет
правильно сбалансировано, машина произведет
отжим на меньшей скорости по сравнению с
предусмотренной.
32
Page 33

Предосторожности и
рекомендации
Стиральная машина спроектирована и изготовлена в
соответствии с международными нормативами по
безопасности. Необходимо внимательно прочитать
настоящие предупреждения, составленные в целях
вашей безопасности.
Общие требования к безопасности
Данное изделие предназначено исключительно для
домашнего использования.
Стиральной машиной должны пользоваться только
взрослые лица, соблюдающие инструкции,
приведенные в данном техническом руководстве.
Не прикасайтесь к изделию влажными руками,
босиком или во влажной одежде.
Не тяните за сетевой кабель для отсоединения
изделия из электро розетки, возьмитесь за вилку
рукой.
Избегайте контактов со сливаемой водой, так как
она может быть очень горячей.
Категорически запрещается открывать люк силой:
это может привести к повреждению защитного
механизма, предохраняющего от случайного
открытия машины.
В случае неисправности категорически
запрещается открывать внутренние механизмы
изделия с целью их самостоятельного ремонта.
Избегайте контактов детей с работающей
стиральной машиной.
При необходимости переместить стиральную
машину следует выполнять эту операцию вдвоем
или втроем с предельной осторожностью. Никогда
не перемещайте машину в одиночку, так как
машина очень тяжелая.
Перед загрузкой в стиральную машину белья
проверьте, чтобы барабан был пуст.
Утилизация
Уничтожение упаковочных материалов: соблюдайте
местные нормативы с целью повторного
использования упаковочных материалов.
Согласно Европейской Директиве 2002/96/СЕ
касательно утилизации электронных и электрических
электроприборов электроприборы не должны
выбрасываться вместе с обычным городским
мусором. Выведенные из строя приборы должны
собираться отдельно для оптимизации их утилизации и
рекуперации составляющих их материалов, а также
для безопасности окружающей среды и здоровья.
Символ зачеркнутая мусорная корзинка, имеющийся
на всех приборах, служит напоминанием об их
отдельной утилизации.
За более подробной информацией о правильной
утилизации бытовых электроприборов пользователи
могут обратиться в специальную государственную
организацию или в магазин.
Экономия энергии и охрана
окружающей среды
Экономия моющих средств, воды, электроэнергии и времени
Для экономии ресурсов следует максимально
загружать стиральную машину. Один цикл стирки
при полной загрузке вместо двух циклов с
наполовину загруженным барабаном позволяет
сэкономить до 50% электроэнергии.
Цикл предварительной стирки необходим только
для очень грязного белья. При цикле
предварительной стирки расходуется больше
стирального порошка, времени, воды и на 5
15% больше электроэнергии.
Если вы обработаете пятна пятновыводителем
или замочите белье перед стиркой, это поможет
избежать стирки при высоких температурах.
Использование программы стирки при 60°C
вместо 90°C, или 40°C вместо 60°C позволяет
сэкономить до 50% электроэнергии.
Правильная дозировка стирального порошка в
зависимости от жесткости воды, степени
загрязнения и объема загружаемого белья
помогает избежать нерационального расхода
моющего средства и загрязнения окружающей
среды: хотя стиральные порошки и являются
биоразлагаемыми, они содержат вещества,
отрицательно влияющие на экологию. Кроме
того, по возможности избегайте использовать
ополаскиватели.
Использование стиральной машины утром или
вечером уменьшит пиковую нагрузку на
электросеть. С помощью функции «Таймер
отсрочки» можно запрограммировать начало
стирки с вышеуказанной целью.
Если белье должно сушиться в автоматической
сушке, необходимо выбрать большую скорость
отжима. Интенсивный отжим сэкономит время и
электроэнергию при автоматической сушке.
CIS
33
Page 34

Техническое обслуживание
и уход
CIS
Отключение воды и электричества
Перекрывайте водопроводный кран после каж-
дой стирки. Таким образом сокращается износ
водопроводной системы стиральной машины и
устраняется вероятность протечек.
Всегда вынимайте вилку из розетки перед мой-
кой и обслуживанием машины.
Уход за стиральной машиной
Внешние и резиновые части машины очищайте
мягкой тканью с теплой мыльной водой. Не используйте растворители или абразивные чистящие
средства.
Уход за дверцей машины
и барабаном
После каждой стирки оставляйте дверцу маши-
ны полуоткрытой во избежание образования в
барабане неприятных запахов и плесени.
Чистка насоса
Стиральная машина имеет сливной насос самоочищающегося типа, который не требует очистки или
особого обслуживания. Однако мелкие предметы
(монеты, пуговицы и др.) могут случайно попасть в
насос. Для их извлечения насос оборудован
«уловителем» фильтром, доступ к которому
закрыт нижней передней панелью.
Убедитесь, что цикл стирки закончился, и отклю-
чите оборудование от сети.
Как достать предметы, упавшие в пространство
между барабаном и кожухом машины:
1. снимите нижний
плинтус в передней
части стиральной
машины, потянув
обеими руками за его
края (смотрите
рисунок);
2. выверните крышку
фильтра, вращая ее
против часовой стрел-
êè (ñì. ðèñ.): из
насоса может вылиться немного воды это
нормальное явление.
3.тщательно прочистите
фильтр изнутри;
4. заверните крышку
обратно;
5. установите на
место переднюю
панель, предваритель-
но убедившись, что крюки вошли в
соответствующие петли.
Проверка заливного шланга
Проверяйте шланг не реже одного раза в год. При
любых признаках течи или повреждения немедленно замените шланг. Во время работы машины
неисправный шланг, находящийся под давлением
воды, может внезапно лопнуть.
Никогда не используйте шланги, бывшие в
употреблении.
Разборка:
Слегка нажмите на большую
кнопку на передней стороне
распределителя и вытяните
его вверх (ðèñ. 1, 2)
ðèñ. 1
34
.
Как чистить распределитель моющих средств
Чистка:
Затем промойте распределитель под струей воды (ðèñ. 3),
используя старую зубную щетку. Выньте пару сифонов,
вставленных в вершину отделений 1 и 2 (ðèñ. 4), проверьте
не забиты ли они и промойте их.
ðèñ. 2
ðèñ. 3
Сборка:
Установите пару сифонов в
специальные отверстия и затем поместите распределитель на место, вставляя его
до щелчка (ðèñ. 4, 2, 1).
ðèñ. 4
Page 35

Поиск неисправностей и
методы их устранения
Если ваша стиральная машина не работает. Прежде чем обратиться в Центр Сервисного обслуживания
(см. Сервисное обслуживание), проверьте, можно ли устранить неисправность, следуя рекомендациям,
приведенным в следующем перечне.
Неисправности:
Стиральная машина не
включается.
Цикл стирки не запускается.
Стиральная машина не заливает
воду (часто мигает индикатор
первой фазы стирки).
Машина непрерывно заливает и
сливает воду.
Возможные причины / Методы устранения:
Штепсельная вилка не соединена с электро розеткой или отходит и не
обеспечивает контакта.
В доме отключено электричество.
Люк плохо закрыт.
Не была нажата кнопка ВКЛ/ВЫКЛ.
Не была нажата кнопка ПУСК/ПАУЗА.
Перекрыт водопроводный кран.
Была запрограммирована задержка запуска цикла (Таймер отсрочки,
(см. «Персонализированные настройки»).
Водопроводный шланг не подсоединен к крану.
Шланг согнут.
Перекрыт водопроводный кран.
В доме нет воды.
Недостаточное водопроводное давление.
Не была нажата кнопка ПУСК/ПАУЗА.
Сливной шланг не находится на высоте 65 100 см. от пола (см. «Установка»).
Конец сливного шланга погружен в воду (см. «Установка»).
Настенное сливное отверстие не оснащено вантузом для выпуска
воздуха.
Если после вышеперечисленных проверок неисправность не будет
устранена, следует перекрыть водопроводный кран, выключить
стиральную машину и обратиться в Центр Сервисного Обслуживания.
Если ваша квартира находится на последних этажах здания, могут
наблюдаться явления сифона, поэтому стиральная машина производит
непрерывный залив и слив воды. Для устранения этой аномалии в
продаже имеются специальные клапаны против явления сифона.
CIS
Стиральная машина не сливает
воду и не отжимает белье.
Стиральная машина сильно
вибрирует в процессе отжима.
Утечки воды из стиральной
машины.
Индикатор ПУСК/ПАУЗА
(оранжевый) и индикаторы
функций часто мигают.
В процессе стирки образуется
слишком обильная пена.
Выбранная программа не предусматривает слив воды: для некоторых
программ необходимо включить слив вручную.
Включена функция ЛЕГКАЯ ГЛАЖКА: для завершения программы
нажмите кнопку ПУСК/ПАУЗА (см. «Персонализированные
настройки»).
Сливной шланг согнут (см. «Установка»).
Засорен сливной трубопровод.
В момент установки стиральной машины барабан был разблокирован
неправильно (см. «Установка»).
Стиральная машина установлена неровно (см. «Установка»).
Машина зажата между стены и мебелью (см. «Установка»).
Плохо прикручен водопроводный шланг (см. «Установка»).
Засорен распределитель моющего средства (порядок его чистки ñì. â
параграфе «Техническое обслуживание и уход»).
Сливной шланг плохо закреплен (см. «Установка»).
Выключите машину и выньте штепсельную вилку из сетевой розетки,
подождите 1 минуту и вновь включите машину.
Если неисправность не устраняется, обратитесь в Сервисную Службу.
Моющее средство непригодно для стирки в стиральной машине (на
упаковке должно быть указано «для стирки в стиральной машине»,
«для ручной и машинной стирки» или подобное).
В распределитель было помещено чрезмерное количество моющего
средства.
35
Page 36

Сервисное
обслуживание
CIS
Перед тем как обратиться в Службу Сервиса:
Проверьте, нельзя ли устранить неисправность самостоятельно (см. «Неисправности и методы
их устранения»);
Вновь запустите программу для проверки исправности машины;
В протвном случае обратиться в Авторизованный Сервисный Центр по телефонам, указанным в
гарантийном таллоне.
Никогда не обращайтесь к неавторизованным сервисным центрам.
При обращении в Сервисную Службу необходимо сообщить:
тип неисправности;
номер гарантийного документа (сервисной книжки, сервисного сертификата и т.п.);
модель машины (Мод.) и серийный номер (S/N), указанные в информационной табличке, распо-
ложенной на задней панели стиральной машины.
36
Page 37

ПдзгЯет чсЮузт
РЛХНФЗСЙП СПХЧЩН
GR
ЕллзнйкЬ
ARTXL 89
Ресйечьменб
GR
ЕгкбфЬуфбуз, 38-39
БрпухукехбуЯб кбй псйжпнфЯщуз
ХдсбхлйкЭт кбй злекфсйкЭт ухндЭуейт
Рсюфпт кэклпт рлхуЯмбфпт
ФечнйкЬ уфпйчеЯб
РесйгсбцЮ фпх рлхнфзсЯпх кбй еккЯнзуз
еньт рспгсЬммбфпт, 40-41
РЯнбкбт елЭгчпх
ЕндейкфйкЬ цщфЬкйб
Рщт бнпЯгей кбй клеЯней п кЬдпт
ЕккЯнзуз еньт рспгсЬммбфпт
РспгсЬммбфб, 42
РЯнбкбт фщн РспгсбммЬфщн
Еобфпмйкеэуейт, 43
ИЭуфе фз иесмпксбуЯб
ИЭуфе фп уфэшймп
ЛейфпхсгЯет
БрпссхрбнфйкЬ кбй мрпхгЬдб, 44
ИЮкз брпссхрбнфйкюн
Кэклпт леэкбнузт
РспефпймбуЯб фзт мрпхгЬдбт
ЕйдйкЬ спэчб
Уэуфзмб йупуфЬимйузт фпх цпсфЯпх
РспцхлЬоейт кбй ухмвпхлЭт, 45
ГенйкЮ буцЬлейб
ДйЬиеуз
Еопйкпньмзуз енЭсгейбт кбй уевбумьт фпх
ресйвЬллпнфпт
УхнфЮсзуз кбй цспнфЯдб, 46
КлеЯуймп рбспчюн неспэ кбй злекфсйкпэ сеэмбфпт
Кбибсйумьт фпх рлхнфзсЯпх
ЦспнфЯдб фзт рьсфбт кбй фпх кЬдпх
Кбибсйумьт фзт бнфлЯбт
¸легчпт фпх ущлЮнб фспцпдпуЯбт фпх неспэ
Рщт кбибсЯжефбй з иЮкз брпссхрбнфйкпэ
БнщмблЯет кбй лэуейт, 47
ХрпуфЮсйоз, 48
37
Page 38

ЕгкбфЬуфбуз
GR
! ЕЯнбй узмбнфйкь нб цхлЬоефе фп егчейсЯдйп бхфь гйб
нб мрпсеЯфе нб фп ухмвпхлеэеуфе прпйбдЮрпфе
уфйгмЮ. Уе ресЯрфщуз рюлзузт, рбсбчюсзузт Ю
мефбкьмйузт, вевбйщиеЯфе ьфй рбсбмЭней мбжЯ ме фп
рлхнфЮсйп гйб нб рлзспцпсеЯ фпн нЭп йдйпкфЮфз гйб фз
лейфпхсгЯб кбй фйт учефйкЭт рспейдпрпйЮуейт.
! ДйбвЬуфе рспуекфйкЬ фйт пдзгЯет: хрЬсчпхн
узмбнфйкЭт рлзспцпсЯет гйб фзн егкбфЬуфбуз, фз
чсЮуз кбй фзн буцЬлейб.
БрпухукехбуЯб кбй псйжпнфЯщуз
БрпухукехбуЯб
1. БрпухукехЬуфе фп
рлхнфЮсйп.
2. ЕлЭгофе бн фп
рлхнфЮсйп Эчей хрпуфеЯ
жзмйЭт кбфЬ фз
мефбцпсЬ. Бн Эчей
хрпуфеЯ жзмйЭт мзн фп
ухндЭефе кбй
ерйкпйнщнЮуфе ме фпн
мефбрщлзфЮ.
3. БцбйсЭуфе фйт фЭууесйт
вЯдет мефбцпсЬт кбй фп
лбуфйчЬкй ме фп учефйкь
дйбчщсйуфйкь, рпх
всЯукпнфбй уфп рЯущ
мЭспт (влЭре ейкьнб).
4. КлеЯуфе фйт прЭт ме фб рлбуфйкЬ рюмбфб рпх убт
рбсЭчпнфбй.
5. ДйбфзсеЯуфе кбй фб фсЯб фемЬчйб: бн фп рлхнфЮсйп
чсейбуфеЯ нб мефбцесиеЯ, иб рсЭрей нб обнбмпнфбсйуфпэн.
РспупчЮ: уе ресЯрфщуз ербнбчсзуймпрпЯзузт пй
рйп кпнфЭт вЯдет рсЭрей нб мпнфбсйуфпэн ерЬнщ.
! Пй ухукехбуЯет ден еЯнбй рбйчнЯдйб гйб мйксЬ
рбйдйЬ.
ПсйжпнфЯщуз
1. ЕгкбфбуфЮуфе фп рлхнфЮсйп уе Энб дЬредп ерЯредп кбй
бниекфйкь, чщсЯт нб фп бкпхмрЮуефе уе фпЯчпхт, Эрйрлб Ю
Ьллп.
2. Бн фп дЬредп ден еЯнбй
брьлхфб ерЯредп,
псйжпнфйюуфе фзн ухукехЮ
вйдюнпнфбт Ю оевйдюнпнфбт
фйт ейдйкЭт вЬуейт уфп
мрспуфйнь фмЮмб фзт
ухукехЮт (влЭре ейкьнб). З
гщнЯб клЯузт, мефсзмЭнз
уфзн ерйцЬнейб есгбуЯбт,
ден рсЭрей нб оереснЬей фйт
2°.
З ущуфЮ псйжпнфЯщуз рспудЯдей уфбиесьфзфб уфп
мзчЬнзмб кбй брпупвеЯ дпнЮуейт, ипсэвпхт кбй
мефбфпрЯуейт кбфЬ фз лейфпхсгЯб. Бн фп рлхнфЮсйп
фпрпиефзиеЯ рЬнщ уе мпкЭфб Ю фЬрзфб, схимЯуфе фб
рпдбсЬкйб Эфуй юуфе нб хрЬсчей кЬфщ брь фп
рлхнфЮсйп бскефьт чюспт гйб фпн бесйумь.
ФпрпиЭфзуз, мефбфпрЯуейт
Бн фп рлхнфЮсйь убт
дйбиЭфей Энб ейдйкь
фсьлеы ме фспчпэт рпх
мбжеэпнфбй, иб
дйехкплхниеЯфе уфз
мефбфьрйуз. Гйб нб
кбфЭвей фп фсьлеы бхфь
кбй гйб фз мефбкЯнзуз
чщсЯт дхукплЯб, рсЭрей
нб фсбвЮоефе фп мпчль,
рпх всЯукефбй кЬфщ
бсйуфесЬ, кЬфщ брь фз
вЬуз. Бцпэ
плпклзсюуефе фз мефбкЯнзуз обнбцЭсфе фпн уфзн
бсчйкЮ фпх иЭуз. Уфп узмеЯп бхфь, фп мзчЬнзмб еЯнбй
уфбиесЬ фпрпиефзмЭнп. ВлЭре ейкьнб (Ìüíï ãéá ôá
рспвлерьменб мпнфЭлб).
ХдсбхлйкЭт кбй злекфсйкЭт ухндЭуейт
Уэндеуз фпх ущлЮнб фспцпдпуЯбт неспэ
1. ЕйуЬгефе фзн фуймпэчб
A уфп Ьксп фпх ущлЮнб
фспцпдпуЯбт кбй вйдюуфе
фз мйб всэуз ксэпх неспэ
ме уфьмйп урейсюмбфпт 3/
A
! З рЯеуз фпх неспэ рсЭрей нб кхмбЯнефбй мефбоэ фщн
фймюн фпх рЯнбкб ме фб фечнйкЬ уфпйчеЯб (влЭре
ерьменз уелЯдб).
! Бн фп мЮкпт фпх ущлЮнб фспцпдпуЯбт неспэ ден
ербскеЯ, иб рсЭрей нб брехихниеЯфе уе ейдйкехмЭнп
кбфЬуфзмб Ю уе еопхуйпдпфзмЭнп фечнйкь.
4 gas (влЭре ейкьнб).
Рсйн фзн уэндеуз бцЮуфе
фп несь нб фсЭоей мЭчсй
бхфь нб еЯнбй дйбхгЭт.
2. УхндЭуфе фп ущлЮнб
фспцпдпуЯбт уфп
рлхнфЮсйп вйдюнпнфЬт фп
уфзн бнфЯуфпйчз еЯупдп
неспэ, уфп рЯущ мЭспт
ерЬнщ деойЬ (влЭре
ейкьнб).
3. ВевбйщиеЯфе ьфй п
ущлЮнбт ден еЯнбй
фубкйумЭнпт уе кбнЭнб
узмеЯп фпх.
38
Page 39

Уэндеуз фпх ущлЮнб бдейЬумбфпт
УхндЭуфе бдейЬумбфпт,
чщсЯт нб фпн дйрлюуефе,
уе Энбн бгщгь
еккЭнщузт Ю уе мйб
ерйфпЯчйб брпчЭфехуз уе
65 - 100 cm
брьуфбуз брь 65 Эщт
100 cm брь фп Эдбцпт.
Мз чсзуймпрпйеЯфе рспекфЬуейт кбй рплэрсйжб.
GR
Фп кблюдйп ден рсЭрей нб цЭсей рфхчЭт Ю нб еЯнбй
ухмрйеумЭнп.
Фп кблюдйп фспцпдпуЯбт рсЭрей нб бнфйкбиЯуфбфбй
мьнп брь еопхуйпдпфзмЭнпхт фечнйкпэт.
РспупчЮ! З ерйчеЯсзуз брпрпйеЯфбй кЬие ехиэнзт
уе ресЯрфщуз рпх ден фзспэнфбй бхфпЯ пй кбньнет.
ДйбцпсефйкЬ брпиЭуфе
фпн уфп чеЯлпт еньт
нйрфЮсб Ю мйбт лекЬнзт,
дЭнпнфбт фпн пдзгь рпх
убт рбсЭчефбй
уфпнкспхнь (влЭре
ейкьнб). Фп елеэиесп
Ьксп фпх ущлЮнб
бдейЬумбфпт ден рсЭрей
нб рбсбмЭней
вхийумЭнп уфп несь.
Ден ухнйуфЬфбй з чсЮуз рспекфЬуещн ущлЮнщн.
Бн брбйфеЯфбй, з рспЭкфбуз рсЭрей нб Эчей фзн Ядйб
дйЬмефсп фпх бсчйкпэ ущлЮнб кбй нб мзн оереснЬей
фб 150 cm.
ЗлекфсйкЮ уэндеуз
Рсйн ейуЬгефе фп вэумб уфзн злекфсйкЮ рсЯжб,
вевбйщиеЯфе ьфй:
з рсЯжб дйбиЭфей геЯщуз кбй фзсеЯ фйт ек фпх ньмпх
рспдйбгсбцЭт.
З рсЯжб нб еЯнбй уе иЭуз нб хрпцЭсей фп мЭгйуфп
цпсфЯп йучэпт фзт мзчбнЮт, рпх бнбцЭсефбй уфпн
рЯнбкб Фечнйкюн уфпйчеЯщн (влЭре дЯрлб).
З фЬуз фспцпдпуЯбт нб кхмбЯнефбй мефбоэ фщн
фймюн рпх бнбцЭспнфбй уфпн рЯнбкб Фечнйкюн
уфпйчеЯщн (влЭре дЯрлб).
З рсЯжб нб еЯнбй ухмвбфЮ ме фп вэумб фпх
рлхнфзсЯпх. Уе бнфЯиефз ресЯрфщуз,
бнфйкбфбуфЮуфе фзн рсЯжб Ю фп вэумб.
Фп рлхнфЮсйп ден егкбиЯуфбфбй уе бнпйчфь чюсп,
бкьмз кбй бн п чюспт еЯнбй кблхммЭнпт, дйьфй еЯнбй
рплэ ерйкЯндхнп нб фп бцЮнефе екфеиеймЭнп уе
вспчЮ кбй кбкпкбйсЯб.
Ме фзн егкбфЬуфбуз фпх рлхнфзсЯпх, з рсЯжб
сеэмбфпт рсЭрей нб еЯнбй еэкплб рспувЬуймз.
Рсюфпт кэклпт рлхуЯмбфпт
МефЬ фзн егкбфЬуфбуз, рсйн фз чсЮуз, дйенесгЮуфе
Энб кэклп рлхуЯмбфпт ме брпссхрбнфйкь кбй чщсЯт
спэчб иЭфпнфбт фп рсьгсбммб 2.
ФечнйкЬ уфпйчеЯб
МпнфЭлп
ДйбуфЬуейт
Чщсзфйкьфзфб
ЗлекфсйкЭт
ухндЭуейт
УхндЭуейт неспэ
Фбчэфзфб
уфхшЯмбфпт
РспгсЬммбфб
елЭгчпх уэмцщнб
ме фпн кбнпнйумь
EN 60456
ARTXL 89
рлЬфпт cm 40
эшпт cm 85
вЬипт cm 60
áðü 1 Ýùò 6 kg
ВлЭре фзн рйнбкЯдб
чбсбкфзсйуфйкюн ерЯ фзт мзчбнЮт
мЭгйуфз рЯеуз 1 MPa (10 bar)
ЕлЬчйуфз рЯеуз 0,05 MPa (0,5 bar)
чщсзфйкьфзфб фпх кЬдпх 42 лЯфсб
мЭчсй 800 уфспцЭт фп лерфь
рсьгсбммб 7; иесмпксбуЯб 60°C;
екфелпэменп ме 6 kg мрпхгЬдбт.
З ухукехЮ бхфЮ еЯнбй уэмцщнз
ме фйт бкьлпхиет пйнпфйкЭт
ПдзгЯет:
- 89/336/CEE фзт 03/05/89
(ЗлекфспмбгнзфйкЮ Ухмвбфьфзфб)
кбй мефбгенЭуфесет фс прпрпйЮуейт
- 2002/96/CE
- 2006/95/CE (ЧбмзлЮ ФЬуз)
39
Page 40

РесйгсбцЮ фпх рлхнфзсЯпх кбй
еккЯнзуз еньт рспгсЬммбфпт
GR
РЯнбкбт елЭгчпх
УФХШЙМБФПУ
БНБММБФПУ/
УВЗУЙМБФПУ
КпхмрЯ БНБММБФПУ/УВЗУЙМБФПУ: Гйб нб
бнЬшефе Ю нб увЮуефе фп рлхнфЮсйп.
ЕрйлпгЭбт РСПГСБММБФЩН: гйб нб иЭуефе фб
рспгсЬммбфб. КбфЬ фз дйЬскейб фпх рспгсЬммбфпт п
ерйлпгЭбт рбсбмЭней бкЯнзфпт.
КпхмрЯ
ИЕСМПКСБУЙБ
ЕрйлпгЭбт
РСПГСБММБФЩН
ЕрйлпгЭбт
ЕрйлпгЭбт
Кпхмрй Ь ме ендейкфйкЬ
цщфЬкйб
ЛЕЙФПХСГЙБУ
цщфЬкй иб бнЬшей ме рпсфпкблЯ чсюмб еню екеЯнп фзт
уе еоЭлйозт цЬузт иб еЯнбй ухнечют бнбммЭнп. Бн фп
ендейкфйкь цщфЬкй РПСФБ БУЦБЛЙУМЕНЗ
мрпсеЯфе нб бнпЯоефе фзн рьсфб.
Гйб нб оекйнЮуей рЬлй фп рлэуймп брь фп узмеЯп
дйбкпрЮт, рбфЮуфе ек нЭпх фп кпхмрЯ бхфь.
ЕНДЕЙКФЙКБ ЦЩФБКЙБ РСПЩИЗУЗУ
КХКЛПХ/КБИХУФЕСЗМЕНЗУ
ЕККЙНЗУЗУ
Ендейкфйкь цщфЬкй
РПСФБ
БУЦБЛЙУМЕНЗ
КпхмрЯ ме ендейкфйкь цщфЬкй
ЕККЙНЗУЗ/РБХУЗ
увЮуей,
Кпхмрй Ь ме ендейкфйкЬ цщфЬкйб ЛЕЙФПХСГЙБУ: гйб
нб ерйлЭоефе фйт дйбиЭуймет лейфпхсгЯет. Фп учефйкь
ме фзн ерйлегеЯуб лейфпхсгЯб ендейкфйкь цщфЬкй иб
рбсбмеЯней бнбммЭнп.
ЕрйлпгЭбт УФХШЙМБФПУ: гйб нб иЭуефе фп уфэшймп
Ю нб фп брпклеЯуефе (влЭре Еобфпмйкеэуейт).
ЕрйлпгЭбт ИЕСМПКСБУЙБ: гйб нб иЭуефе фз
иесмпксбуЯб Ю фп рлэуймп уе ксэп несь (влЭре
«Еобфпмйкеэуейт»).
ЕНДЕЙКФЙКБ ЦЩФБКЙБ РСПЩИЗУЗУ КХКЛПХ/
КБИХУФЕСЗМЕНЗУ ЕККЙНЗУЗУ: ãéá íá
бкплпхиеЯфе фзн кбфЬуфбуз рспьдпх фпх
рспгсЬммбфпт рлхуЯмбфпт.
Фп бнбммЭнп ендейкфйкь цщфЬкй деЯчней фзн уе
еоЭлйоз цЬуз.
Бн фЭизке з лейфпхсгЯб КбихуфесзмЭнз еккЯнзуз,
иб деЯчнпхн фпн чсьнп рпх хрплеЯрефбй гйб фзн
Энбсоз фпх рспгсЬммбфпт (влЭре уелЯдб дЯрлб).
Ендейкфйкь цщфЬкй РПСФБ БУЦБЛЙУМЕНЗ: ãéá íá
кбфблЬвефе бн з рьсфб бнпЯгей (влЭре уелЯдб дЯрлб).
КпхмрЯ ме ендейкфйкь цщфЬкй ЕККЙНЗУЗ/РБХУЗ: гйб
фзн еккЯнзуз фщн рспгсбммЬфщн Ю фзн рспущсйнЮ
дйбкпрЮ фпхт.
УЗМЕЙЩУЗ: гйб нб иЭуефе уе рбэуз фп уе еоЭлйоз
рлэуймп, рйЭуфе фп кпхмрЯ бхфь, фп учефйкь ендейкфйкь
ЕндейкфйкЬ цщфЬкйб
Фб ендейкфйкЬ цщфЬкйб рбсЭчпхн узмбнфйкЭт рлзспцпсЯет.
Нб фй мбт лЭне:
КбихуфесзмЭнз еккЯнзуз
Бн енесгпрпйЮизке з лейфпхсгЯб КбихуфесзмЭнз
еккЯнзуз (влЭре Еобфпмйкеэуейт), бцпэ еккйнЮуефе фп
рсьгсбммб, иб бсчЯуей нб бнбвпувЮней фп ендейкфйкь
цщфЬкй фп учефйкь ме фзн ерйлегмЭнз кбихуфЭсзуз:
Ме фп рЭсбумб фпх чсьнпх иб брейкпнЯжефбй з
хрплейрьменз кбихуфЭсзуз, ме фп учефйкь
ендейкфйкь цщфЬкй нб бнбвпувЮней.
Бцпэ дйбнхиеЯ з ерйлегеЯуб кбихуфЭсзуз фп
ендейкфйкь цщфЬкй рпх бнбвпувЮней иб увЮуей кбй
иб бсчЯуей фп феиЭн рсьгсбммб.
ЕндейкфйкЬ цщфЬкй цЬузт уе еоЭлйоз
КбфЬ фпн ерйихмзфь кэклп рлхуЯмбфпт, фб ендейкфйкЬ
цщфЬкйб иб бнЬшпхн рсппдехфйкЬ гйб нб деЯопхн фзн
кбфЬуфбуз рспюизузт:
40
Page 41

Рлэуймп
ОЭвгблмб
Уфэшймп
¢дейбумб
ФЭлпт РлхуЯмбфпт
КпхмрйЬ лейфпхсгЯбт кбй учефйкЬ ендейкфйкЬ цщфЬкйб
ЕрйлЭгпнфбт мйб лейфпхсгЯб фп учефйкь ендейкфйкь
цщфЬкй иб цщфйуфеЯ. Бн з ерйлегмЭнз лейфпхсгЯб ден
еЯнбй ухмвбфЮ ме фп феиЭн рсьгсбммб фп учефйкь
ендейкфйкь цщфЬкй иб бнбвпувЮней кбй з лейфпхсгЯб ден
иб енесгпрпйзиеЯ. Уфзн ресЯрфщуз рпх феиеЯ мйб
лейфпхсгЯб мз ухмвбфЮ ме мйб Ьллз рпх ерйлЭчизке
рспзгпхмЭнщт иб рбсбмеЯней енесгЮ мьнп з фелехфбЯб
ерйлпгЮ.
Ендейкфйкь цщфЬкй буцблйумЭнзт рьсфбт
Фп бнбммЭнп ендейкфйкь цщфЬкй деЯчней ьфй з рьсфб еЯнбй
буцблйумЭнз гйб фзн рбсемрьдйуз фхчбЯщн бнпйгмЬфщн.
Гйб фзн брпцхгЮ жзмйюн рсЭрей нб ресймЭнефе нб увЮуей
фп ендейкфйкь цщфЬкй рсйн фп Ьнпйгмб фзт рьсфбт (З
бнбмпнЮ дйбскеЯ ресЯрпх фсЯб лерфЬ).
УЗМЕЙЩУЗ: бн еЯнбй енесгЮ з лейфпхсгЯб
КбихуфесзмЭнз еккЯнзуз з рьсфб ден мрпсеЯ нб
бнпЯоей, гйб нб фзн бнпЯоефе иЭуфе фз мзчбнЮ уе рбэуз
рйЭжпнфбт фп кпхмрЯ ЕККЙНЗУЗ/РБХУЗ.
Фп фбчэ бнбвпувЮуймп фпх цщфьт ЕККЙНЗУЗ/РБХУЗ
(рпсфпкблЯ) фбхфьчспнб ме екеЯнп фщн лейфпхсгйюн
ерйузмбЯней мйб бнщмблЯб (влЭре БнщмблЯет кбй лэуейт).
Рщт бнпЯгей кбй клеЯней п кЬдпт
Åéê. 1
Åéê. 2
A) БНПЙГМБ (Ейк. 1):
Бнбузкюуфе фп еощфесйкь кбрЬкй кбй бнпЯофе фелеЯщт.
B) ¢нпйгмб кЬдпх (Soft opening):
Ме Энб дЬчфхлп рйЭуфе фп кпхмрЯ рпх
хрпдейкнэефбй уфзн ейк. 2 кбй п кЬдпт иб бнпЯоей
брблЬ.
C) ЕЙУБГЩГЗ СПХЧЩН (Ейк. 3).
D) КЛЕЙУЙМП (Ейк. 4):
- клеЯуфе кблЬ фпн кЬдп чбмзлюнпнфбт рсюфб фзн
рсьуийб рьсфб кбй брпиЭфпнфбт кбфьрйн фзн рЯущ;
- вевбйщиеЯфе кбфьрйн ьфй пй гЬнфжпй фзт рсьуийбт
рьсфбт еЯнбй Ьшпгб фпрпиефзмЭнпй уфзн Эдсб фзт
рЯущ рьсфбт;
- бцпэ бкпэуефе фп клбк фпх кпхмрюмбфпт,
еобукЮуфе мйб елбцсЬ рЯеуз рспт фб кЬфщ уе
бмцьфесет фйт рьсфет рпх ден рсЭрей нб
брбуцблйуфпэн;
- фЭлпт, клеЯуфе фп еощфесйкь кбрЬкй.
ЕккЯнзуз еньт рспгсЬммбфпт
1. БнЬшфе фп рлхнфЮсйп рйЭжпнфбт фп кпхмрЯ БНБММБ/
УВЗУЙМП. ¼лб фб ендейкфйкЬ цщфЬкй иб бнЬшпхн месйкЬ
дехфесьлерфб, мефЬ иб увЮупхн кбй иб рЬллефбй фп
ендейкфйкь цщфЬкй ЕККЙНЗУЗ/РБХУЗ.
2. Цпсфюуфе фб бурсьспхчб, клеЯуфе фйт ихсЯдет кбй фп
кбрЬкй.
3. ИЭуфе ме фпн ерйлпгЭб РСПГСБММБФЩН фп
ерйихмзфь рсьгсбммб.
4. ИЭуфе фз иесмпксбуЯб рлхуЯмбфпт (влЭре
«Еобфпмйкеэуейт»).
5. ИЭуфе фзн фбчэфзфб уфхшЯмбфпт (влЭре «Еобфпмйкеэуейт»).
6. Чэуфе брпссхрбнфйкь кбй рсьуиефб (влЭре
«БрпссхрбнфйкЬ кбй мрпхгЬдб»).
7. ЕрйлЭоефе фйт дйбиЭуймет лейфпхсгЯет.
8. ЕккйнЮуфе фп рсьгсбммб рйЭжпнфбт фп кпхмрЯ
ЕККЙНЗУЗ/РБХУЗ кбй фп учефйкь ендейкфйкь цщфЬкй иб
рбсбмеЯней бнбммЭнп ухнечют ме рсЬуйнп чсюмб.
Гйб нб бкхсюуефе фпн феиЭнфб кэклп иЭуфе фз мзчбнЮ уе
рбэуз рйЭжпнфбт фп кпхмрЯ ЕККЙНЗУЗУ/РБХУЗУ кбй
ерйлЭофе Энб нЭп кэклп.
9. Уфп фЭлпт фпх рспгсЬммбфпт иб цщфйуфеЯ фп ендейкфйкь
цщфЬкй
иб увЮуей деЯчнпнфбт ьфй з рьсфб мрпсеЯ нб бнпЯоей.
ВгЬлфе фз мрпхгЬдб кбй бцЮуфе фзн рьсфб мйуьклейуфз
гйб нб уфегнюуей п кЬдпт.
УвЮуфе фп рлхнфЮсйп рйЭжпнфбт фп кпхмрЯ БНБММБ/
УВЗУЙМП.
. Фп ендейкфйкь цщфЬкй РПСФБ БУЦБЛЙУМЕНЗ
GR
Åéê. 3
Åéê. 4
41
Page 42

РспгсЬммбфб
GR
РЯнбкбт фщн РспгсбммЬфщн
РесйгсбцЮ фпх РспгсЬµµбфпт
РспгсЬммбфб
ЕйдйкЬ РспгсЬµµбфб
KХKЛПУ БРПУФЕЙСЩУЗУ:
7
KХKЛПУ БРПУФЕЙСЩУЗУ (1
7
бниекфйкЬ, рплэ лесщµЭнб.
БЛЗНХЧФБ:
8
ÐAÕÓÇ ÃÉÁ ÌÙÑÁ:
9
РПЙKБМЙУБ
10
МЕФБОЩФ¢/ ПХСФºНЕУ
11
М¢ЛЛЙНБ:
12
РспгсЬµµбфб гйб ьлет фйт µЭсет
ВБМВБKЕС¢ РСПРЛХУЗ:
1
ВБМВБKЕС¢:
2
ëåñùµÝíá.
ВБМВБKЕС¢: (2):
2
ВБМВБKЕС¢ ЧСЩМБФЙУФ¢ (3):
3
ехбЯуизфб чсюµбфб.
УХНИЕФЙKБ:
4
УХНИЕФЙKБ 40°:
4
ЦСЕУKБСЙУМБ 30':
елбцсЬ лесщµЭнщн (ден ендеЯкнхфбй гйб µЬллйнб, µефбощфЬ
5
кбй спэчб рпх рлЭнпнфбй уфп чЭсй).
ЦСЕУKБСЙУМБ 15':
елбцсЬ лесщµЭнщн (ден ендеЯкнхфбй гйб µЬллйнб, µефбощфЬ
6
кбй спэчб рпх рлЭнпнфбй уфп чЭсй).
ЕрЯ µЭспхт рспгсЬµµбфб
ОЕВГБЛМБ ВБМВБKЕСБ
УФХШЙМП БНИЕKФЙKБ
УЕХШЙМП ЕХБЙУИЗФБ
БМПЧЕФЕХУЗ НЕСПХ
ЧсщµбфйуфЬ ехб Яуизфб лЯгп лесщµЭнб.
Гйб µЬллйнб, cachemire, клр.
ЛехкЬ кбй чсщµбфйуфЬ бниекфйкЬ, рплэ
ЛехкЬ кбй чсщµбфйуфЬ ехбЯуизфб, рплэ лесщµЭнб.
ЧсщµбфйуфЬ бниекфйкЬ, рплэ лесщµЭнб.
ЧсщµбфйуфЬ бниекфйкЬ, лЯгп лесщµЭнб.
ЛехкЬ еобйсефйкЬ лесщµЭнб.
): ЛехкЬ кбй чсщµбфйуфЬ
ЧсщµбфйуфЬ ехб Яуизфб лЯгп лесщµЭнб.
: Гйб µефбощфЬ спэчб, вйукьжз, лйнЬ.
ЛехкЬ еобйсефйкЬ лесщмЭнб.
ЛехкЬ лЯгп лесщµЭнб кбй
Гйб фп гсЮгпсп цсеукЬсйуµб спэчщн
Гйб фп гсЮгпсп цсеукЬсйуµб спэчщн
МЭгйуфз
èåñµïêñ.
(°C)
90° 800
60° 800
40° 800
40° 800
40° 600
30° 0
40° 600
90° 800
60° 800
40° 800
40° 800
60° 800
40° 800
30° 800
30° 800
-
-
-
-
МЭгйуфз
фбчэфзфб
(уфс пцЭ т
áíÜ
лерфь)
800
800
800
0
Фб уфпйчеЯб рпх бнбцЭспнфбй уфпн рЯнбкб еЯнбй ендейкфйкЬ.
БрпссхрбнфйкЬ
Лехкбн-
Рлэуйµп Мблбкфйкь
ôéêü
ll l
-
-
-
-
-
-
-
ll
ll
ll
ll
ll
ll
ll
ll l
ll l
ll l
-
-
-
-
l
ll
ll
ll
ll
-
-- -
-- -
-- -
Ãéá üëá ôá Test Institutes:
1) Рсьгсбммб елЭгчпх уэмцщнб ме фзн рспдйбгсбцЮ EN 60456: иЭуфе фп рсьгсбммб 7 уе мйб иесмпксбуЯб 60°C.
2) Рсьгсбммб вбмвбкесюн мбксэ: иЭуфе фп рсьгсбммб 2 уе мйб иесмпксбуЯб 40°C.
3) Рсьгсбммб вбмвбкесюн уэнфпмп: иЭуфе фп рсьгсбммб 3 уе мйб иесмпксбуЯб 40°C.
МЭгйуфп
ЦпсфЯп.
(Kg)
2,5 85
2,5 73
1,5 15
l
2,5 12
ДйЬскейб
кэклпх
6 165
6 141
4 288
2 116
269
155
155
6 164
6 138
6 123
689
330
636
616
62
ЕйдйкЬ рспгсЬммбфб
KХKЛПУ БРПУФЕЙСЩУЗУ (рсьгсбммб 7). ¸нб еохгйбнфйкь рсьгсбммб уе хшзлЭт иесмпксбуЯет рпх рспвлЭрей фз чсЮуз
лехкбнфйкпэ уе иесмпксбуЯет бнюфесет фщн 60°C.
Гйб фз леэкбнуз чэуфе фп лехкбнфйкь, фб брпссхрбнфйкЬ кбй фб рсьуиефб
уфб учефйкЬ дйбмесЯумбфб (влЭре рбсЬгсбцп УхсфЬсй фщн брпссхрбнфйкюн).
БЛЗНХЧФБ (рсьгсбммб 8). ЕЯнбй Энбт биьсхвпт кэклпт рпх мрпсеЯ нб дпхлеэей фз нэчфб ьфбн фп фймпльгйп фпх
злекфсйкпэ еЯнбй мейщмЭнп. Фп рсьгсбммб мелефЮизке гйб ухниефйкЬ кбй вбмвбкесЬ фпэчб. Уфп фЭлпт фпх кэклпх з
мзчбнЮ уфбмбфЬей ме фп несь уфз лекЬнз. Гйб фп уфэшймп кбй фп Ьдейбумб рйЭуфе фп кпхмрЯ ЕККЙНЗУЗ/РБХУЗ,
дйбцпсефйкЬ мефЬ брь 8 юсет з мзчбнЮ иб кЬней бхфьмбфб фп уфэшймп кбй фп Ьдейбумб фпх неспэ.
ÐAÕÓÇ ÃÉÁ ÌÙÑÁ (рсьгсбммб 9). Рсьгсбммб йкбнь нб брпмбксэней фпхт лекЭдет фхрйкпэт фщн мщсюн,
дйбуцблЯжпнфбт фзн брпмЬксхнуз фпх брпссхрбнфйкпэ брь фб спэчб гйб фзн брпцхгЮ бллесгйюн уфп ехбЯуизфп
дЭсмб фщн мщсюн. П кэклпт мелефЮизке гйб нб мейюней фп вбкфзсйдйбкь цпсфЯп чсзуймпрпйюнфбт мйксьфесз рпуьфзфб
неспэ кбй велфйуфпрпйюнфбт фзн ерЯдсбуз фщн ейдйкюн еохгйбнфйкюн рсьуиефщн уфп брпссхрбнфйкь.
ЦСЕУKБСЙУМБ 30' (рсьгсбммб 5) мелефЮизке гйб фп рлэуймп спэчщн елбцсЬ лесщмЭнщн уе уэнфпмп чсьнп: дйбскеЯ
мьнп 30 лерфЬ кбй убт еопйкпнпмеЯ чсьнп кбй енЭсгейб. ИЭфпнфбт фп рсьгсбммб (5 уе 30°C) мрпсеЯфе нб рлэнефе мбжЯ
хцЬумбфб дйбцпсефйкЮт цэузт (екфьт мЬллйнщн кбй мефбощфюн) ме Энб мЭгйуфп цпсфЯп 3 kg.
ЦСЕУKБСЙУМБ 15' (рсьгсбммб 6) мелефЮизке гйб фп рлэуймп спэчщн елбцсЬ лесщмЭнщн уе уэнфпмп чсьнп: дйбскеЯ
мьнп 15 лерфЬ кбй убт еопйкпнпмеЯ чсьнп кбй енЭсгейб. ИЭфпнфбт фп рсьгсбммб (6 уе 30°C) мрпсеЯфе нб рлэнефе мбжЯ
хцЬумбфб дйбцпсефйкЮт цэузт (екфьт мЬллйнщн кбй мефбощфюн) ме Энб мЭгйуфп цпсфЯп 1,5 kg.
42
Page 43

Еобфпмйкеэуейт
ИЭуфе фз иесмпксбуЯб
УфсЭцпнфбт фпн ерйлпгЭб ИЕСМПКСБУЙБ фЯиефбй з иесмпксбуЯб рлхуЯмбфпт (влЭре РЯнбкб рспгсбммЬфщн).
З иесмпксбуЯб мрпсеЯ нб мейщиеЯ мЭчсй фп рлэуймп уе ксэп несь (
Фп мзчЬнзмб иб рбсемрпдЯуей бхфьмбфб фз иЭуз иесмпксбуЯбт мегблэфесзт фзт мЭгйуфзт рспвлерьмензт гйб
кЬие рсьгсбммб.
).
ИЭуфе фп уфэшймп
УфсЭцпнфбт фпн ерйлпгЭб УФХШЙМП фЯиефбй з фбчэфзфб уфхшЯмбфпт фпх ерйлегмЭнпх рспгсЬммбфпт.
Пй мЭгйуфет рспвлерьменет фбчэфзфет гйб фб рспгсЬммбфб еЯнбй:
РспгсЬммбфб МЭгйуфз фбчэфзфб
ВбмвбкесЬ 800 уфспцЭт бнЬ лерфь
УхниефйкЬ 800 уфспцЭт бнЬ лерфь
МЬллйнб 600 уфспцЭт бнЬ лерфь
МефбощфЬ мьнп Ьдейбумб
З фбчэфзфб уфхшЯмбфпт мрпсеЯ нб елбффщиеЯ Ю нб брпклейуфеЯ ерйлЭгпнфбт фп уэмвплп
Фп мзчЬнзмб иб рбсемрпдЯуей бхфьмбфб фз дйенЭсгейб уфхшЯмбфпт мегблэфеспх фпх мЭгйуфпх рспвлерьменпх
гйб кЬие рсьгсбммб.
.
ЛейфпхсгЯет
Пй дйЬцпсет лейфпхсгЯет рлхуЯмбфпт рпх рспвлЭрпнфбй брь фп рлхнфЮсйп ерйфсЭрпхн фзн ерЯфехоз фпх
кбибсйумпэ кбй фпх лехкпэ рпх ерйихмеЯфе.
Гйб фзн енесгпрпЯзуз фщн лейфпхсгйюн:
1. рйЭуфе фп рлЮкфсп фп учефйкь ме фзн ерйлегмЭнз лейфпхсгЯб.
2. Фп Ьнбммб фпх ендейкфйкпэ цщфьт ерйузмбЯней ьфй з лейфпхсгЯб еЯнбй енесгЮ.
РбсбфЮсзуз: Фп гсЮгпсп бнбвпувЮуймп фпх ендейкфйкпэ цщфьт деЯчней ьфй з учефйкЮ лейфпхсгЯб ден мрпсеЯ нб
ерйлегеЯ гйб фп феиЭн рсьгсбммб.
GR
Super Wash
ЧЬсз уфз чсЮуз мегблэфесзт рпуьфзфбт неспэ уфзн бсчйкЮ цЬуз фпх кэклпх кбй уфз чсЮуз ресйууьфеспх
чсьнп, з дхнбфьфзфб бхфЮ еобуцблЯжей Энб рлэуймп хшзлюн ерйдьуещн.
Ден еЯнбй енесгь уфб рспгсЬммбфб 5, 6, 7, 11, 12, , , , .
¸офсб ОЭвгблмб
ЕрйлЭгпнфбт фз дхнбфьфзфб бхфЮ бхоЬнефбй з брпфелеумбфйкьфзфб фпх оевгЬлмбфпт кбй еобуцблЯжефбй з
мЭгйуфз брпмЬксхнуз фпх брпссхрбнфйкпэ. ЕЯнбй чсЮуймп гйб ерйдесмЯдет йдйбЯфесб ехбЯуизфет.
Ден еЯнбй енесгь уфб рспгсЬммбфб 5, 6, , , .
Еэкплп уйдЭсщмб
ЕрйлЭгпнфбт фз лейфпхсгЯб бхфЮ, фп рлэуймп кбй фп уфэшймп иб фспрпрпйзипэн кбфЬллзлб гйб фз меЯщуз
учзмбфйумпэ фублбкщмЬфщн.
Уфп рсьгсбммб 4, 8, 11 з мзчбнЮ иб фелейюуей фпн кэклп ме фзн мрпхгЬдб уе мпэлйбумб кбй фп ендейкфйкь
цщфЬкй фзт лейфпхсгЯбт ЕХКПЛП УЙДЕСЩМБ кбй фзт ЕККЙНЗУЗУ/РБХУЗУ иб бнбвпувЮнпхн (рпсфпкблЯ) кбй
з цЬуз ОЕВГБЛМБФПУ иб рбсбмеЯней ухнечют бнбммЭнз. Гйб нб бдейЬуефе фп несь кбй нб мрпсеЯфе нб вгЬлефе
фзн мрпхгЬдб рсЭрей нб рбфЮуефе фп кпхмрЯ ЕККЙНЗУЗ/РБХУЗ Ю фп кпхмрЯ ЕХКПЛП УЙДЕСЩМБ.
Ден еЯнбй енесгь уфб рспгсЬммбфб 5, 6, 7, 8, 9, 12,
КбихуфесзмЭнз еккЯнзуз
КбихуфесеЯ фзн еккЯнзуз фпх мзчбнЮмбфпт мЭчсй 12 юсет.
РйЭуфе рпллЭт цпсЭт фп рлЮкфсп мЭчсй нб бнЬшей фп ендейкфйкь цщфЬкй фп учефйкь ме фзн ерйихмзфЮ кбихуфЭсзуз. Уфзн
рЭмрфз цпсЬ рпх иб рйЭуефе фп кпхмрЯ з лейфпхсгЯб иб бренесгпрпйзиеЯ.
УЗМЕЙЩУЗ: Бцпэ рбфзиеЯ фп рлЮкфсп ЕККЙНЗУЗ/РБХУЗ, мрпсеЯфе нб бллЬоефе фзн фймЮ кбихуфЭсзузт мьнп мейюнпнфЬт фзн.
, , .
ЕЯнбй енесгь ме ьлб фб рспгсЬммбфб.
43
Page 44

БрпссхрбнфйкЬ кбй мрпхгЬдб
GR
ИЮкз брпссхрбнфйкюн
Фп кбль брпфЭлеумб фпх рлхуЯмбфпт еобсфЬфбй ерЯузт кбй
брь фз ущуфЮ дпуплпгЯб фпх брпссхрбнфйкпэ:
хресвЬллпнфбт ден рлЭнпхме брпфелеумбфйкьфесб кбй
ерйрлЭпн ухнфелпэме уфз дзмйпхсгЯб кспэуфбт уфб еущфесйкЬ
мЭсз фпх рлхнфзсЯпх кбй уфз мьлхнуз фпх ресйвЬллпнфпт.
ВгЬлфе фз иЮкз
брпссхрбнфйкюн кбй
ейуЬгефе фп
брпссхрбнфйкь Ю фп
рсьуиефп щт еоЮт.
лекбнЯфуб 1: Брпссхрбнфйкь гйб рсьрлхуз (уе
укьнз)
лекбнЯфуб 2: Брпссхрбнфйкь гйб рлэуймп
(уе укьнз Ю уе хгсь)
фп хгсь брпссхрбнфйкь еЯнбй кбль нб фп егчэефе бр
ехиеЯбт уфз лекЬнз мЭущ фзт бнфЯуфпйчзт мрблЯфубт
дпупмЭфсзузт.
лекбнЯфуб 3: Рсьуиефб (мблбкфйкь, клр.)
¼фбн чэнефе фп мблбкфйкь уфп дйбмЭсйумб 3,
рспуЭофе нб мзн оересЬуей фзн хрпдейкнхьменз
уфЬимз "max".
Фп мблбкфйкь ейуЬгефбй бхфьмбфб уфз мзчбнЮ кбфЬ
фп фелехфбЯп оЭвгблмб. Уфп фЭлпт фпх рспгсЬммбфпт
рлэузт уфп дйбмЭсйумб 3 рбсбмЭней хрьлейммб
неспэ. Бхфь чсзуймеэей гйб фзн ейучюсзуз рплэ
рхкнюн мблбкфйкюн, дзлбдЮ гйб нб бсбйюуей фб
ухмрхкнщмЭнб. Бн уфп дйбмЭсйумб 3 рбсбмеЯней несь
ресйууьфесп брь фп кбнпнйкь, бхфь узмбЯней ьфй з
дйЬфбоз еккЭнщузт еЯнбй впхлщмЭнз. Гйб фпн
кбибсйумь влЭре УхнфЮсзуз кбй цспнфЯдб.
лекбнЯфуб 4: ЧлщсЯнз
Кэклпт леэкбнузт
З леэкбнуз мрпсеЯ нб дйенесгзиеЯ мьнп ме фб
рспгсЬммбфб 2, 3, 7,
Чэуфе фп лехкбнфйкь уфз иЮкз 4, фп брпссхрбнфйкь кбй
фп мблбкфйкь уфйт учефйкЭт лекбнЯфует, кбфьрйн иЭуфе
Энб брь фб рспбнбцесиЭнфб рспгсЬммбфб.
ЕндеЯкнхфбй мьнп гйб спэчб вбмвбкесЬ рплэ
лесщмЭнб.
.
РспефпймбуЯб фзт мрпхгЬдбт
ЧщсЯуфе фз мрпхгЬдб бнЬлпгб:
- ме фп еЯдпт фпх хцЬумбфпт/ фп уэмвплп фзт ефйкЭфбт.
- фб чсюмбфб: чщсЯуфе фб чсщмбфйуфЬ спэчб брь фб
лехкЬ.
Еккенюуфе фйт фуЭрет кбй елЭгофе фб кпхмрйЬ.
Мзн оереснЬфе фйт хрпдейкнхьменет фймЭт, уе учЭуз
ме фп вЬспт фзт уфегнЮт мрпхгЬдбт:
БниекфйкЬ хцЬумбфб: max 6 kg
УхниефйкЬ хцЬумбфб: max 2,5 kg
ЕхбЯуизфб хцЬумбфб: max 2 kg
МЬллйнб: max 1 kg
Рьуп жхгЯжей з мрпхгЬдб;
1 уенфьнй 400-500 gr.
1 мбойлбспиЮкз 150-200 gr.
1 фсбрежпмЬнфйлп 400-500 gr.
1 мрпхснпэжй 900-1.200 gr.
1 рефуЭфб 150-250 gr.
ЕйдйкЬ спэчб
Рпйкбмйуб: чсзуймпрпйЮуфе фп бнфЯуфпйчп рсьгсбммб
10 гйб нб рлэнефе рпхкЬмйуб дйбцьсщн ейдюн
хцЬумбфпт кбй чсюмбфпт.
ЕобуцблЯжей фз мЭгйуфз цспнфЯдб елбчйуфпрпйюнфбт фп
учзмбфйумь фублбкщмЬфщн.
МефбощфЬ: чсзуймпрпйЮуфе фп бнфЯуфпйчп рсьгсбммб
11 гйб нб рлэнефе ьлб фб мефбощфЬ спэчб. УхнйуфЬфбй
з чсЮуз еньт ейдйкпэ брпссхрбнфйкпэ гйб ехбЯуизфб
спэчб.
КпхсфЯнет: дйрлюуфе фйт мЭуб уе Энб мбойлЬсй Ю уе Энб
дйкфхщфь убкпэлй. ЧсзуймпрпйЮуфе фп рсьгсбммб 11.
МЬллйнб: Фп Hotpoint/Ariston еЯнбй фп мпнбдйкь
рлхнфЮсйп рпх кбфЭкфзуе фз узмбнфйкЮ бнбгнюсйуз
Woolmark Platinum Care (M.0508) ек мЭспхт фзт The
Woolmark Company, рпх рйуфпрпйеЯ фп рлэуймп уфп
рлхнфЮсйп ьлщн фщн мЬллйнщн спэчщн кбиют кбй екеЯнщн
рпх цЭспхн фзн ефйкЭфб мьнп рлэуймп уфп чЭсй
Ме фп рсьгсбммб 12 Эчефе ухнерют брьлхфз
вевбйьфзфб нб рлЭнефе уфп рлхнфЮсйп ьлб фб мЬллйнб
спэчб (max. 1 kg) ме фзн еггэзуз фщн кблэфесщн
ерйдьуещн.
.
Уэуфзмб йупуфЬимйузт фпх цпсфЯпх
Рсйн брь кЬие уфэшймп, гйб нб брпцэгефе дпнЮуейт
хресвплйкЭт кбй гйб нб кбфбнеЯмефе пмпйьмпсцб фп
цпсфЯп, п кЬдпт дйенесгеЯ ресйуфспцЭт уе мйб фбчэфзфб
елбцсЬ бнюфесз екеЯнзт фпх рлхуЯмбфпт. Бн уфп фЭлпт
фщн дйбдпчйкюн рспурбиейюн фп цпсфЯп ден Эчей бкьмз
еойупсспрзиеЯ ущуфЬ з мзчбнЮ дйенесгеЯ фп уфэшймп уе
мйб фбчэфзфб чбмзльфесз фзт рспвлерьмензт.
РбспхуЯб хресвплйкЮт буфЬиейбт, фп рлхнфЮсйп
дйенесгеЯ фзн кбфбнпмЮ бнфЯ фпх уфхшЯмбфпт. Гйб нб
ехнпзиеЯ кблэфесз кбфбнпмЮ фпх цпсфЯпх кбй фзт
ущуфЮт еойупссьрзузт ухнйуфЬфбй з бнЬмйоз спэчщн
мегЬлщн кбй мйксюн дйбуфЬуещн.
44
Page 45

РспцхлЬоейт кбй
ухмвпхлЭт
Фп рлхнфЮсйп учедйЬуфзке кбй кбфбукехЬуфзке
уэмцщнб ме фпхт дйеинеЯт кбньнет буцблеЯбт. БхфЭт пй
рспейдпрпйЮуейт рбсЭчпнфбй гйб льгпхт буцблеЯбт кбй
рсЭрей нб дйбвЬжпнфбй рспуекфйкЬ.
ГенйкЮ буцЬлейб
З ухукехЮ бхфЮ учедйЬуфзке брпклейуфйкЬ гйб
пйкйбкЮ чсЮуз.
Фп рлхнфЮсйп рсЭрей нб чсзуймпрпйеЯфбй мьнп брь
енЮлйкб Ьфпмб кбй уэмцщнб ме фйт пдзгЯет рпх
бнбцЭспнфбй уфп рбсьн егчейсЯдйп.
Мзн бггЯжефе фп мзчЬнзмб ме гхмнЬ рьдйб Ю ме фб
чЭсйб Ю фб рьдйб всегмЭнб.
Мзн вгЬжефе фп вэумб брь фзн злекфсйкЮ рсЯжб
фсбвюнфбт фп кблюдйп, бллЬ нб рйЬнефе фзн рсЯжб.
Мзн бггЯжефе фп несь бдейЬумбфпт, бцпэ мрпсеЯ нб
цфЬуей уе хшзлЭт иесмпксбуЯет.
Мзн жпсЯжефе уе кбмЯб ресЯрфщуз фзн рьсфб: иб
мрпспэуе нб чблЬуей п мзчбнйумьт буцблеЯбт рпх
рспуфбфеэей брь фхчбЯб бнпЯгмбфб.
Уе ресЯрфщуз влЬвзт, уе кбмЯб ресЯрфщуз нб мзн
еремвбЯнефе уфпхт еущфесйкпэт мзчбнйумпэт
рспурбиюнфбт нб фзн ерйукехЬуефе.
Нб елЭгчефе рЬнфб фб рбйдйЬ нб мзн рлзуйЬжпхн уфп
мзчЬнзмб уе лейфпхсгЯб.
Бн рсЭрей нб мефбфпрйуфеЯ, ухнесгбуфеЯфе дэп Ю фсЯб
Ьфпмб ме фз мЭгйуфз рспупчЮ. РпфЭ мьнпй убт гйбфЯ
фп мзчЬнзмб еЯнбй рплэ вбсэ.
Рсйн ейуЬгефе фз мрпхгЬдб елЭгофе бн п кЬдпт еЯнбй
Ьдейпт.
ДйЬиеуз
ДйЬиеуз фпх хлйкпэ ухукехбуЯбт: фзсеЯфе фпхт
фпрйкпэт кбнпнйумпэт, юуфе пй ухукехбуЯет нб
мрпспэн нб ербнбчсзуймпрпйзипэн.
З ехсщрбъкЮ пдзгЯб 2002/96/EK гйб фб Брьвлзфб
Злекфсйкпэ кбй Злекфспнйкпэ Еопрлйумпэ, брбйфеЯ
ьфй пй рблбйЭт пйкйбкЭт злекфсйкЭт ухукехЭт ден
рсЭрей нб брпвЬлпнфбй мбжЯ ме фб хрьлпйрб
брьвлзфб фпх дзмпфйкпэ дйкфэпх. Пй рблбйЭт
ухукехЭт рсЭрей нб ухллечипэн чщсйуфЬ
рспкеймЭнпх нб велфйуфпрпйзипэн з
брпкбфЬуфбуз кбй з бнбкэклщуз фщн хлйкюн рпх
ресйЭчпхн кбй ме укпрь фз меЯщуз фщн влбвесюн
ерйрфюуещн уфзн бнисюрйнз хгеЯб кбй фп
ресйвЬллпн. Фп уэмвплп ме фп дйегсбммЭнп дпчеЯп
брпвлЮфщн уфп рспъьн хренихмЯжей уе убт фзн
хрпчсЭщуЮ убт, рщт ьфбн ерйихмеЯфе нб рефЬоефе
фз ухукехЮ ,рсЭрей нб ухллечиеЯ чщсйуфЬ.
Пй кбфбнблщфЭт иб рсЭрей нб брехиэнпнфбй уфйт
фпрйкЭт бсчЭт Ю уфб кбфбуфЮмбфб лйбнйкЮт гйб
рлзспцпсЯет рпх бцпспэн фз ущуфЮ дйЬиеуз фщн
рблбйюн злекфсйкюн ухукехюн.
Еопйкпньмзуз енЭсгейбт кбй уевбумьт
фпх ресйвЬллпнфпт
Еопйкпньмзуз брпссхрбнфйкпэ, неспэ,
енЭсгейбт кбй чсьнпх
Гйб нб мзн опдеэефе рьспхт иб рсЭрей нб
чсзуймпрпйеЯфе фп рлхнфЮсйп ме фп мЭгйуфп цпсфЯп.
¸нб рлЮсет цпсфЯп уфз иЭуз дэп мйуюн убт
еопйкпнпмеЯ мЭчсй фп 50% енЭсгейбт.
З рсьрлхуз еЯнбй бнбгкбЯб мьнп фб бурсьспхчб
рпх еЯнбй рплэ лесщмЭнб. БрпцеэгпнфЬт фз
еопйкпнпмеЯфе брпссхрбнфйкь, чсьнп, несь кбй
брь 5 Эщт 15% енЭсгейбт.
Реснюнфбт фпхт лекЭдет ме Энб кбибсйуфйкь Ю
бцЮнпнфЬт фпхт уе мпэлйбумб рсйн фп рлэуймп,
мейюнефбй з бнбгкбйьфзфб рлхуЯмбфпт уе хшзлЭт
иесмпксбуЯет. ¸нб рсьгсбммб уе 60°C бнфЯ фщн
90°C Ю Энб уе 40°C бнфЯ фщн 60°C, убт еопйкпнпмеЯ
мЭчсй 50% енЭсгейбт.
Нб дпуплпгеЯфе кблЬ фп брпссхрбнфйкь ме вЬуз
фзн уклзсьфзфб фпх неспэ, фп вбимь всщмйЬт кбй
фзн рпуьфзфб фзт мрпхгЬдбт юуфе нб брпупвеЯфе
урбфЬлет кбй нб рспуфбфеэефе фп ресйвЬллпн:
бкьмб кбй фб вйпдйбурюменб брпссхрбнфйкЬ
ресйЭчпхн уфпйчеЯб рпх бллпйюнпхн фзн йупсспрЯб
уфзн цэуз. ЕрйрлЭпн нб брпцеэгефе фп мЭгйуфп
дхнбфьн фп мблбкфйкь.
РлЭнпнфбт бсгЬ фп брьгехмб мЭчсй фйт рсюфет
рсщйнЭт юсет ухмвЬллефе уфзн меЯщуз фпх
брбйфпэменпх злекфсйкпэ цпсфЯпх брь рлехсЬт
ерйчейсЮуещн злекфсйкЮт енЭсгейбт.
З дхнбфьфзфб КбихуфесзмЭнз еккЯнзуз впзиЬей
рплэ уфзн псгЬнщуз фщн рлхуймЬфщн ме фзн
Эннпйб бхфЮ.
Бн з мрпхгЬдб рсЭрей нб уфегнюуей уе Энб
уфегнщфЮсйп, ерйлЭофе хшзлЮ фбчэфзфб уфхшЯмбфпт.
ЛЯгп несь уфзн мрпхгЬдб убт еопйкпнпмеЯ чсьнп кбй
енЭсгейб уфп рсьгсбммб уфегнюмбфпт.
GR
45
Page 46

УхнфЮсзуз кбй цспнфЯдб
GR
КлеЯуймп рбспчюн неспэ кбй злекфсйкпэ
сеэмбфпт
КлеЯнефе фзн всэуз мефЬ брь кЬие рлэуймп. ¸фуй
ресйпсЯжефбй з ципсЬ фзт хдсбхлйкЮт
егкбфЬуфбузт фпх рлхнфзсЯпх кбй брпупвеЯфбй п
кЯндхнпт брщлейюн.
ВгЬлфе фп вэумб брь фп сеэмб ьфбн кбибсЯжефе
фп рлхнфЮсйп кбй кбфЬ фйт есгбуЯет ухнфЮсзузт.
Кбибсйумьт фпх рлхнфзсЯпх
Фп еощфесйкь мЭспт кбй фб лбуфйчЭнйб мЭсз мрпспэн
нб кбибсЯжпнфбй ме Энб рбнЯ всегмЭнп ме члйбсь несь
кбй убрпэнй. Мз чсзуймпрпйеЯфе дйблэфет Ю
брпохуфйкЬ.
ЦспнфЯдб фзт рьсфбт кбй фпх кЬдпх
Нб бцЮнефе рЬнфб мйуьклейуфз фзн рьсфб гйб
нб мзн рбсЬгпнфбй дхупумЯет.
Гйб нб бнбкфЮуефе ендечьменб реумЭнб бнфйкеЯменб
уфпн рспиЬлбмп:
1. брпмбксэнефе фп
рпдбсЬкй кЬфщ уфп
рсьуийп рлехсь фпх
рлхнфзсЯпх фсбвюнфбт
ме фб чЭсйб брь фб
рлбънЬ (влЭре ейкьнб).
2. оевйдюуфе фп кбрЬкй
уфсЭцпнфЬт фп
бсйуфесьуфспцб (влЭре
ейкьнб): еЯнбй цхуйкь нб
вгбЯней лЯгп несь.
3.кбибсЯуфе ерймелют
фп еущфесйкь.
4.обнбвйдюуфе фп
кбрЬкй.
5.обнбмпнфЬсефе фп
фбмрль ьнфбт уЯгпхспй,
рсйн фп урсюоефе рспт
фп мзчЬнзмб, ьфй Эчефе
ейуЬгей фб гбнфжЬкйб
уфйт бнфЯуфпйчет
еупчЭт.
Кбибсйумьт фзт бнфлЯбт
Фп рлхнфЮсйп дйбиЭфей мйб бнфлЯб бхфпкбибсйжьменз
рпх ден чсейЬжефбй ухнфЮсзуз. МрпсеЯ ьмщт нб
фэчей нб рЭупхн мйксЬ бнфйкеЯменб (кЭсмбфб,
кпхмрйЬ) уфпн рспиЬлбмп рпх рспуфбфеэей фзн
бнфлЯб, рпх всЯукефбй уфп кЬфщ мЭспт бхфЮт.
! ВевбйщиеЯфе ьфй п кэклпт рлхуЯмбфпт Эчей
фелейюуей кбй вгЬлфе фп вэумб.
Рщт кбибсЯжефбй з иЮкз брпссхрбнфйкпэ
Брпухнбсмпльгзуз:
ЕобукЮуфе мйб елбцсЬ
рЯеуз уфп мегЬлп кпхмрЯ
уфп рсьуийп мЭспт фзт
иЮкзт брпссхрбнфйкпэ кбй
фсбвЮофе фзн рспт фб рЬнщ
(åéê. 1, 2).
Кбибсйумьт:
Кбфьрйн, кбибсЯуфе фз иЮкз кЬфщ брь фз всэуз (åéê. 3)
чсзуймпрпйюнфбт мйб пдпнфьвпхсфуб кбй, бцпэ фсбвЮоефе
фп жехгЬсй фщн уйцпнЯщн рпх еЯнбй вблмЭнб уфп ерЬнщ мЭспт
фщн дйбмесйумЬфщн 1 кбй 2 (åéê. 4), елЭгофе бн фб Ядйб еЯнбй
впхлщмЭнб кбй оерлэнефЭ фб.
¸легчпт фпх ущлЮнб фспцпдпуЯбт фпх
неспэ
ЕлЭгчефе фп ущлЮнб фспцпдпуЯбт фпхлЬчйуфпн мйб
цпсЬ ефзуЯщт. Бн рбспхуйЬжей укбуЯмбфб кбй
учйумЭт бнфйкбиЯуфбфбй: кбфЬ фб рлхуЯмбфб пй
йучхсЭт рйЭуейт иб мрпспэубн нб рспкблЭупхн
обцнйкЬ урбуЯмбфб.
! Мз чсзуймпрпйеЯфе рпфЭ ущлЮнет чсзуймпрпйзмЭнпхт.
Ербнбухнбсмпльгзуз:
Мзн оечнЬфе нб ербнейуЬгефе
фп жехгЬсй фщн уйцпнЯщн уфйт
бнфЯуфпйчет Эдсет кбй, фЭлпт,
нб обнбвЬлефе фз иЮкз уфзн
Эдсб фзт ецбсмьжпнфЬт фз
(åéê. 4, 2, 1).
Åéê. 1
46
Åéê. 2 Åéê. 3
Åéê. 4
Page 47

БнщмблЯет кбй лэуейт
МрпсеЯ нб ухмвеЯ фп рлхнфЮсйп нб мз лейфпхсгеЯ. Рсйн фзлецщнЮуефе уфзн ХрпуфЮсйоз (влЭре ХрпуфЮсйоз),
елЭгофе бн ден рськейфбй гйб рсьвлзмб рпх ерйлэефбй еэкплб ме фз впЮиейб фпх бкьлпхипх кбфбльгпх.
БнщмблЯет:
Фп рлхнфЮсйп ден бнЬвей.
П кэклпт рлхуЯмбфпт ден оекйнЬей.
Фп рлхнфЮсйп ден цпсфюней несь
(бнбвпувЮней гсЮгпсб фп
ендейкфйкь цщфЬкй фзт рсюфзт
цЬузт рлэузт).
Фп рлхнфЮсйп цпсфюней кбй бдейЬжей
несь ухнечют.
ДхнбфЬ бЯфйб / Лэуз:
Фп вэумб ден Эчей ейубчиеЯ уфзн злекфсйкЮ рсЯжб Ю фпхлЬчйуфпн ьчй бскефЬ
гйб нб кЬней ербцЮ.
Уфп урЯфй ден хрЬсчей сеэмб.
З рьсфб ден еЯнбй кблЬ клейуфЮ.
Фп кпхмрЯ БНБММБ/УВЗУЙМП ден рбфЮизке.
Фп кпхмрЯ ЕККЙНЗУЗ/РБХУЗ ден рбфЮизке.
З всэуз фпх неспэ ден еЯнбй бнпйчфЮ.
ФЭизке мйб кбихуфЭсзуз уфпн чсьнп еккЯнзузт (влЭре «Еобфпмйкеэуейт»).
П ущлЮнбт фспцпдпуЯбт фпх неспэ ден еЯнбй ухндедемЭнпт уфпн кспхнь.
П ущлЮнбт еЯнбй дйрлщмЭнпт.
З всэуз фпх неспэ ден еЯнбй бнпйчфЮ.
Уфп урЯфй леЯрей фп несь.
Ден хрЬсчей бскефЮ рЯеуз.
Фп кпхмрЯ ЕККЙНЗУЗ/РБХУЗ ден рбфЮизке.
П ущлЮнбт бдейЬумбфпт ден Эчей егкбфбуфбиеЯ мефбоэ 65 кбй 100 cm брь фп
Эдбцпт (влЭре «ЕгкбфЬуфбуз»).
Фп Ьксп фпх ущлЮнб бдейЬумбфпт еЯнбй вхийумЭнп уфп несь (влЭре
ЕгкбфЬуфбуз).
Фп ерйфпЯчйп Ьдейбумб ден Эчей брбЭсщуз.
Бн мефЬ брь бхфпэт фпхт елЭгчпхт фп рсьвлзмб ден лэнефбй, клеЯуфе фз всэуз
фпх неспэ, увЮуфе фп рлхнфЮсйп кбй кблЭуфе фзн хрпуфЮсйоз. Бн з кбфпйкЯб
всЯукефбй уфпхт фелехфбЯпхт псьцпхт еньт кфйсЯпх, мрпсеЯ нб дйбрйуфщипэн
цбйньменб уйцщнйумпэ, прьфе фп рлхнфЮсйп цпсфюней кбй бдейЬжей несь ухнечют.
Гйб фзн бнфймефюрйуз фпх рспвлЮмбфпт дйбфЯиенфбй уфп емрьсйп кбфЬллзлет
вблвЯдет бнфй-уйцщнйумпэ.
GR
Фп рлхнфЮсйп ден цпсфюней Ю ден
уфэвей.
Фп рлхнфЮсйп дпнеЯфбй рплэ кбфЬ
фп уфэшймп.
Фп рлхнфЮсйп чЬней несь.
Фп ендейкфйкь цщфЬкй ЕККЙНЗУЗ/
РБХУЗ (рпсфпкблЯ) кбй фб ендейкфйкЬ
цщфЬкйб бнбвпувЮнпхн гсЮгпсб.
УчзмбфЯжефбй рплэт бцсьт.
Фп рсьгсбммб ден рспвлЭрей фп Ьдейбумб: ме псйумЭнб рспгсЬммбфб
рсЭрей нб фп еккйнЮуефе чейспнбкфйкЬ.
ЕЯнбй енесгЮ з лейфпхсгЯб ЕХКПЛП УЙДЕСЩМБ: гйб фзн плпклЮсщуз фпх
рспгсЬммбфпт рйЭуфе фп кпхмрЯ ЕККЙНЗУЗ/РБХУЗ («Еобфпмйкеэуейт»).
П ущлЮнбт бдейЬумбфпт еЯнбй дйрлщмЭнпт (влЭре «ЕгкбфЬуфбуз»).
П бгщгьт еккЭнщузт еЯнбй впхлщмЭнпт.
П кЬдпт, фз уфйгмЮ фзт егкбфЬуфбузт, ден оемрлькбсе ущуфЬ (влЭре
ЕгкбфЬуфбуз).
Фп рлхнфЮсйп ден еЯнбй псйжпнфйщмЭнп (влЭре ЕгкбфЬуфбуз).
Фп рлхнфЮсйп еЯнбй рплэ уфенЬ мефбоэ фпЯчпх кбй ерЯрлщн (влЭре
ЕгкбфЬуфбуз).
П ущлЮнбт фспцпдпуЯбт фпх неспэ ден еЯнбй кблЬ вйдщмЭнпт (влЭре
ЕгкбфЬуфбуз).
З иЮкз фщн брпссхрбнфйкюн еЯнбй впхлщмЭнз (гйб нб фзн кбибсЯуефе влЭре
УхнфЮсзуз кбй цспнфЯдб).
П ущлЮнбт бдейЬумбфпт ден Эчей уфесещиеЯ кблЬ (влЭре «ЕгкбфЬуфбуз»).
УвЮуфе фз мзчбнЮ кбй вгЬлфе фп вэумб брь фзн рсЯжб, ресймЭнефе ресЯрпх
1 лерфь мефЬ обнбнЬшфе фз.
Бн з бнщмблЯб ерймЭней, кблЭуфе фзн ХрпуфЮсйоз.
Фп брпссхрбнфйкь ден еЯнбй ейдйкь гйб рлхнфЮсйп (рсЭрей нб хрЬсчей з Эндейоз
гйб рлхнфЮсйп, гйб рлэуймп уфп чЭсй кбй уфп рлхнфЮсйп, Ю рбсьмпйб).
З дпуплпгЯб хрЮсое хресвплйкЮ.
47
Page 48

ХрпуфЮсйоз
195072321.00
07/2008 - Xerox Business Services
GR
Рсйн ерйкпйнщнЮуефе ме фзн ХрпуфЮсйоз:
ЕлЭгофе бн з бнщмблЯб мрпсеЯфе нб фзн бнфймефщрЯуефе мьнпй убт (влЭре БнщмблЯет кбй лэуейт);
ЕрбнеккйнЮуфе фп рсьгсбммб гйб нб елЭгоефе бн фп рсьвлзмб бнфймефщрЯуфзке;
Уе бснзфйкЮ ресЯрфщуз, ерйкпйнщнЮуфе ме фзн еопхуйпдпфзмЭнз ФечнйкЮ ХрпуфЮсйоз уфпн фзлецщнйкь бсйимь
рпх хрЬсчей уфп рйуфпрпйзфйкь еггэзузт.
Мзн кбфбцеэгефе рпфЭ уе мз еопхуйпдпфзмЭнпхт фечнйкпэт.
ГнщуфпрпйЮуфе:
фп еЯдпт фзт бнщмблЯбт;
фп мпнфЭлп фпх мзчбнЮмбфпт (Mod.);
фпн бсйимь уейсЬт (S/N).
Пй рлзспцпсЯет бхфЭт всЯукпнфбй уфзн фбмрелЯфуб рпх хрЬсчей уфп рЯущ мЭспт фпх рлхнфзсЯпх.
48
 Loading...