

Page 1

Instructions for use
WASHING MACHINE
GB
English,1
I
Italiano,37
ARTXF 149
CIS
РУССКИЙ, 13
F
Français,49
PL
Polski,25
Contents
GB
Installation, 2-3
Unpacking and levelling
Connecting the electricity and water supplies
The first wash cycle
Technical data
Description of the washing machine
and starting a wash cycle, 4-5
Control panel
Indicator lights
How to open and shut the drum
Starting a wash cycle
Wash cycles, 6
Table of wash cycles
Personalisation, 7
Setting the temperature
Setting the spin speed
Functions
Detergents and laundry, 8
Detergent dispenser drawer
Bleach cycle
Preparing the laundry
Garments requiring special care
Load balancing system
Precautions and tips, 9
General safety
Disposal
Saving energy and respecting the environment
Care and maintenance, 10
Cutting off the water or electricity supply
Cleaning the washing machine
Caring for your appliance door and drum
Cleaning the pump
Checking the water inlet hose
How to clean the detergent dispenser
Troubleshooting, 11
Service, 12
1
Page 2
Installation
GB
!Keep this instruction manual in a safe place for
future reference. Should the appliance be sold,
transferred or moved, make sure the instruction
manual accompanies the washing machine to inform
the new owner as to its operation and features.
!Read these instructions carefully: they contain vital
information on installation, use and safety.
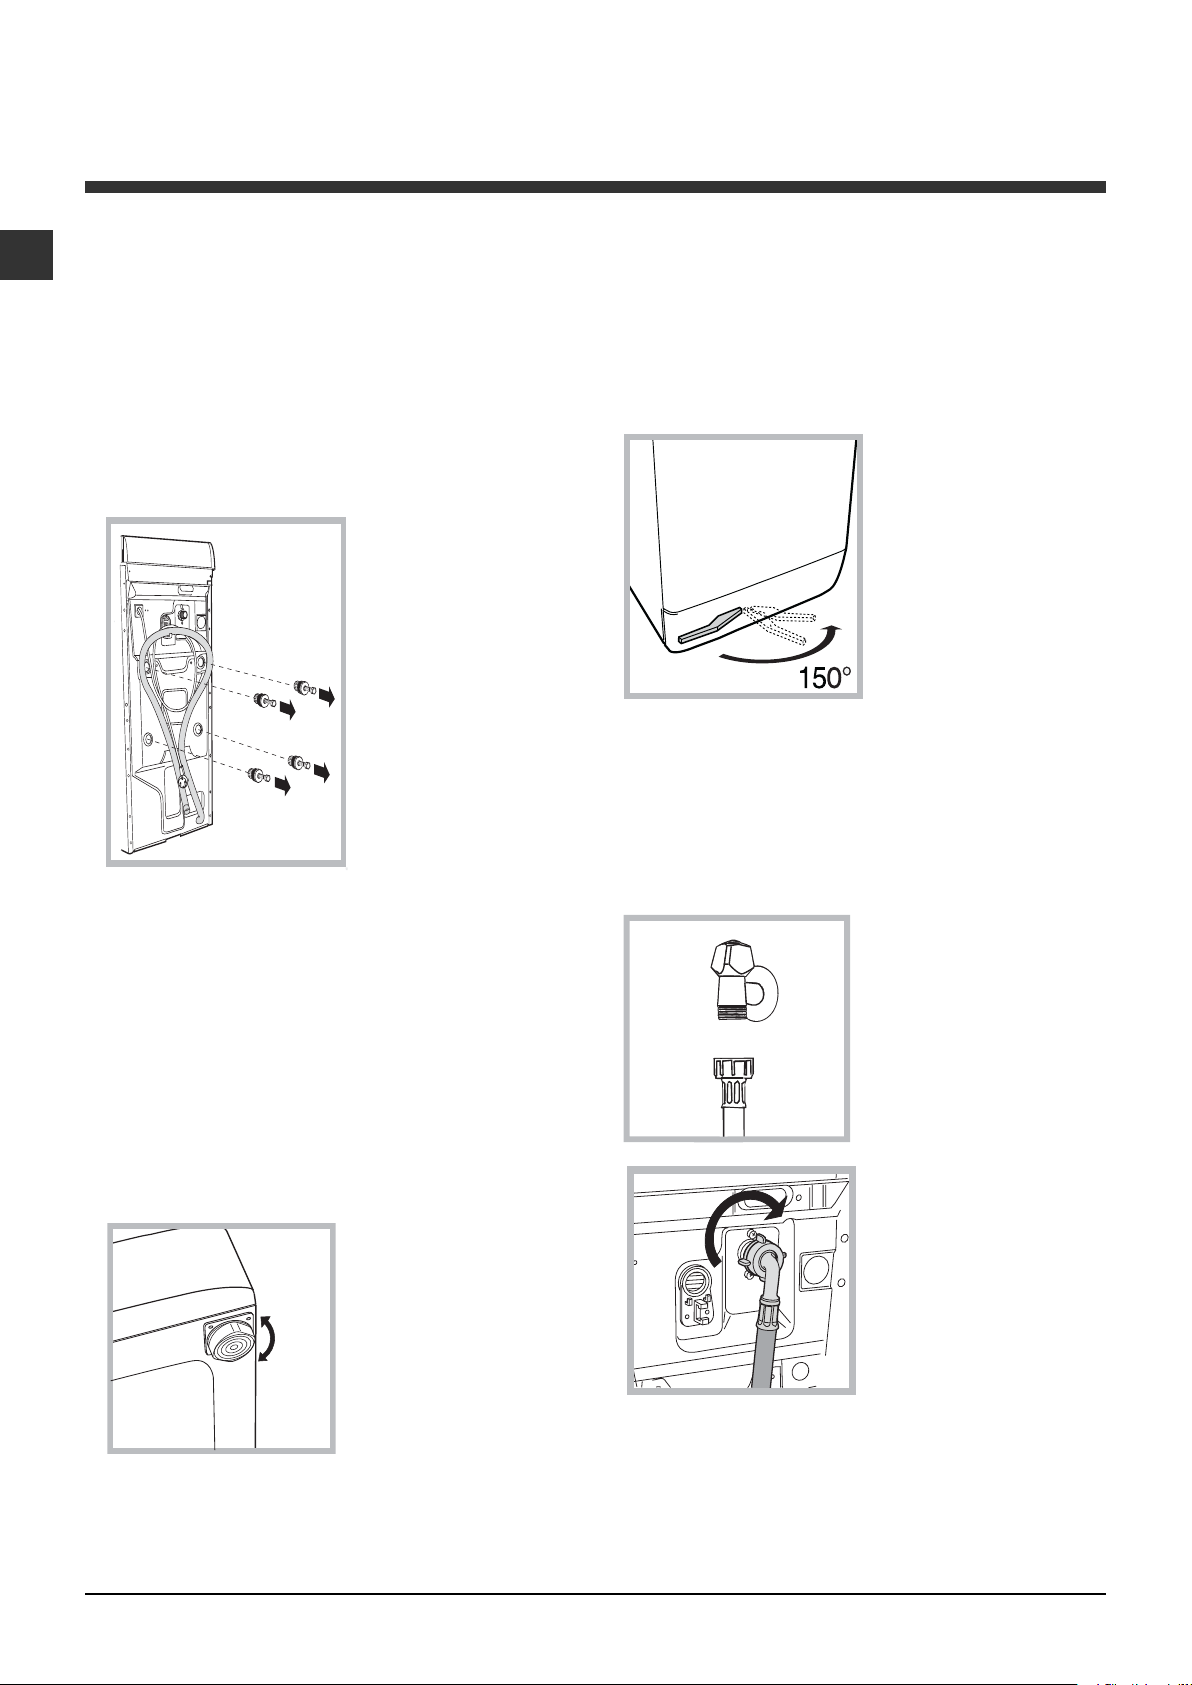
Unpacking and levelling
Unpacking
1. Unpack the
washing machine.
2. Check whether the
washing machine has
been damaged during
transport. If this is the
case, do not install it
and contact your
retailer.
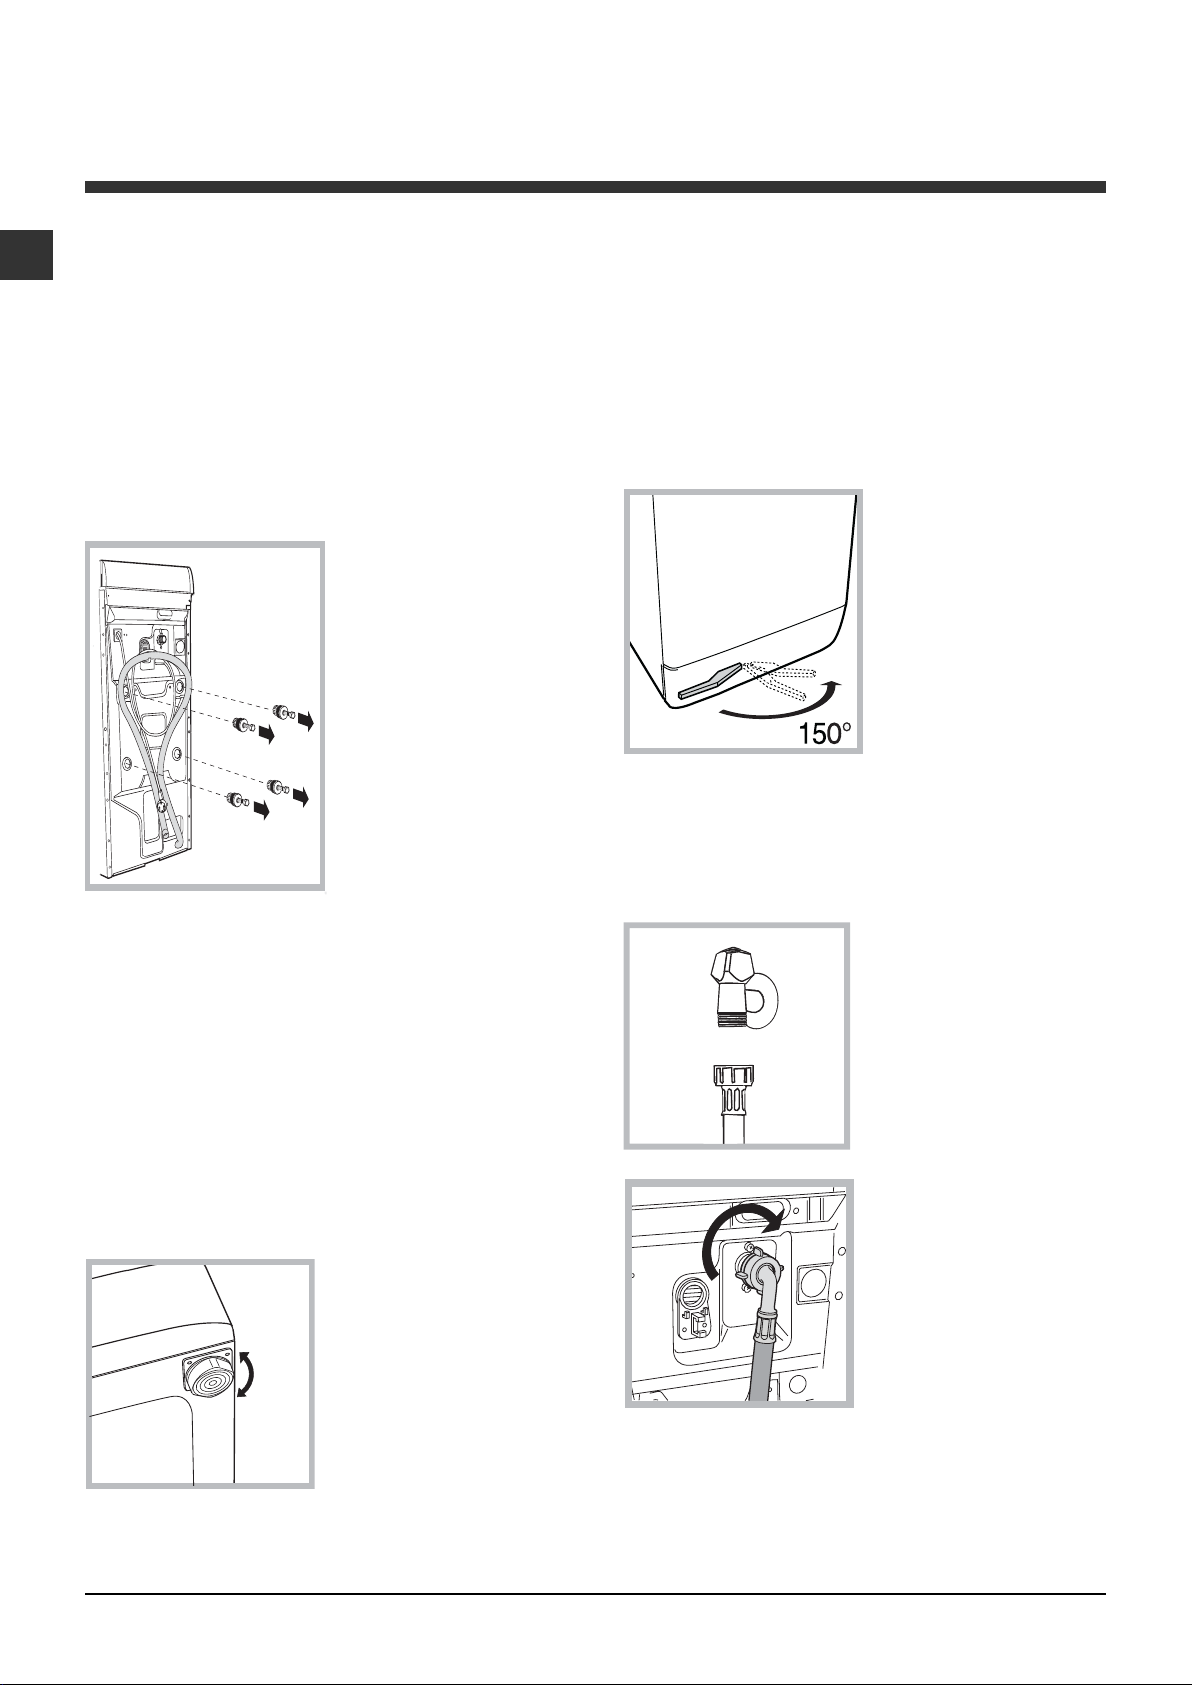
3. Remove the four
protective screws and
the rubber washer
with the respective
spacer, situated on
the rear of the
appliance (see figure).
4. Seal the gaps using the plastic plugs provided.
5. Keep all the parts: you will need them again if
the washing machine needs to be moved to
another location.
Warning: Warning:
Warning: should the screws be re-used, make sure
Warning: Warning:
you fasten the shorter ones at the top.
!Packaging materials are not children's toys.
Levelling
Your machine may make a considerable amount of
noise if the two front feet have not been adjusted
correctly.
1. Install the washing
machine on a flat
sturdy floor, without
resting it up against
walls, furniture cabinets
or other.
2. If the floor is not
perfectly level, compensate for any
unevenness by
tightening or loosening
the adjustable front feet (see figure); the angle of
inclination, measured according to the worktop,
must not exceed 2°.
Levelling your appliance correctly will provide it with
stability and avoid any vibrations, noise and shifting
during operation. If it is placed on a fitted or loose
carpet, adjust the feet in such a way as to allow
enough room for ventilation beneath the washing
machine.
Putting your appliance in place and moving it.
If your washing
machine is equipped
with a special set of
retractable wheels you
can easy move it. To
lower the wheels and
thus move the
appliance effortlessly,
just pull the lever,
situated on the lefthand side beneath the
base. Once the
appliance is in the required position, put the lever
back in place. The washing machine is now firmly in
place (see figure).
Electric and water connections
Connecting the water inlet hose
1. Connect the supply
pipe by screwing it to a
cold water tab using a 3/
4 gas threaded
connection (see figure).
Before performing the
connection, allow the
water to run freely until it
is perfectly clear.
2. Connect the other
end of the water inlet
hose to the washing
machine, screwing it
onto the appliance's
cold water inlet, situated
on the top right-hand
side on the rear of the
appliance (see figure).
3. Make sure there are no kinks or bends in the hose.
! The water pressure at the tap must be within the
values indicated in the Technical details table
(on the next page).
! If the water inlet hose is not long enough, contact
a specialist store or an authorised serviceman.
2
Page 3
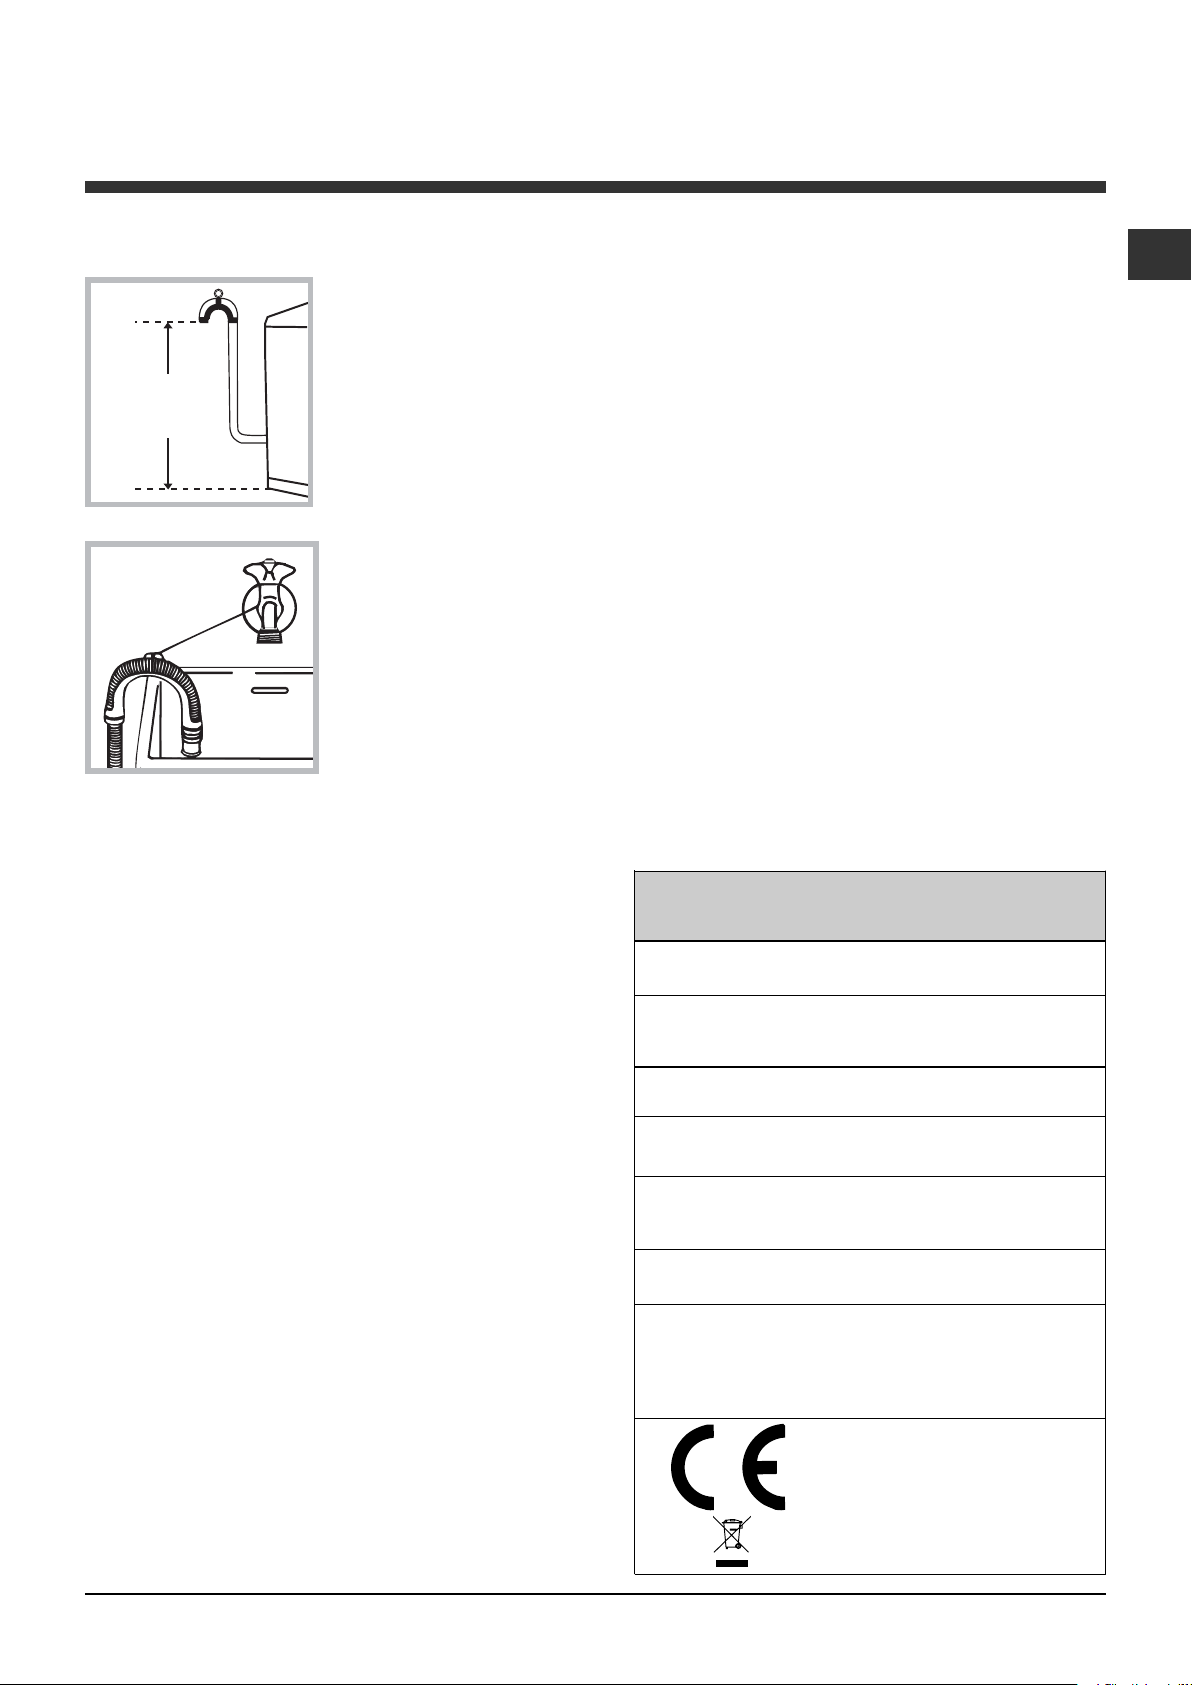
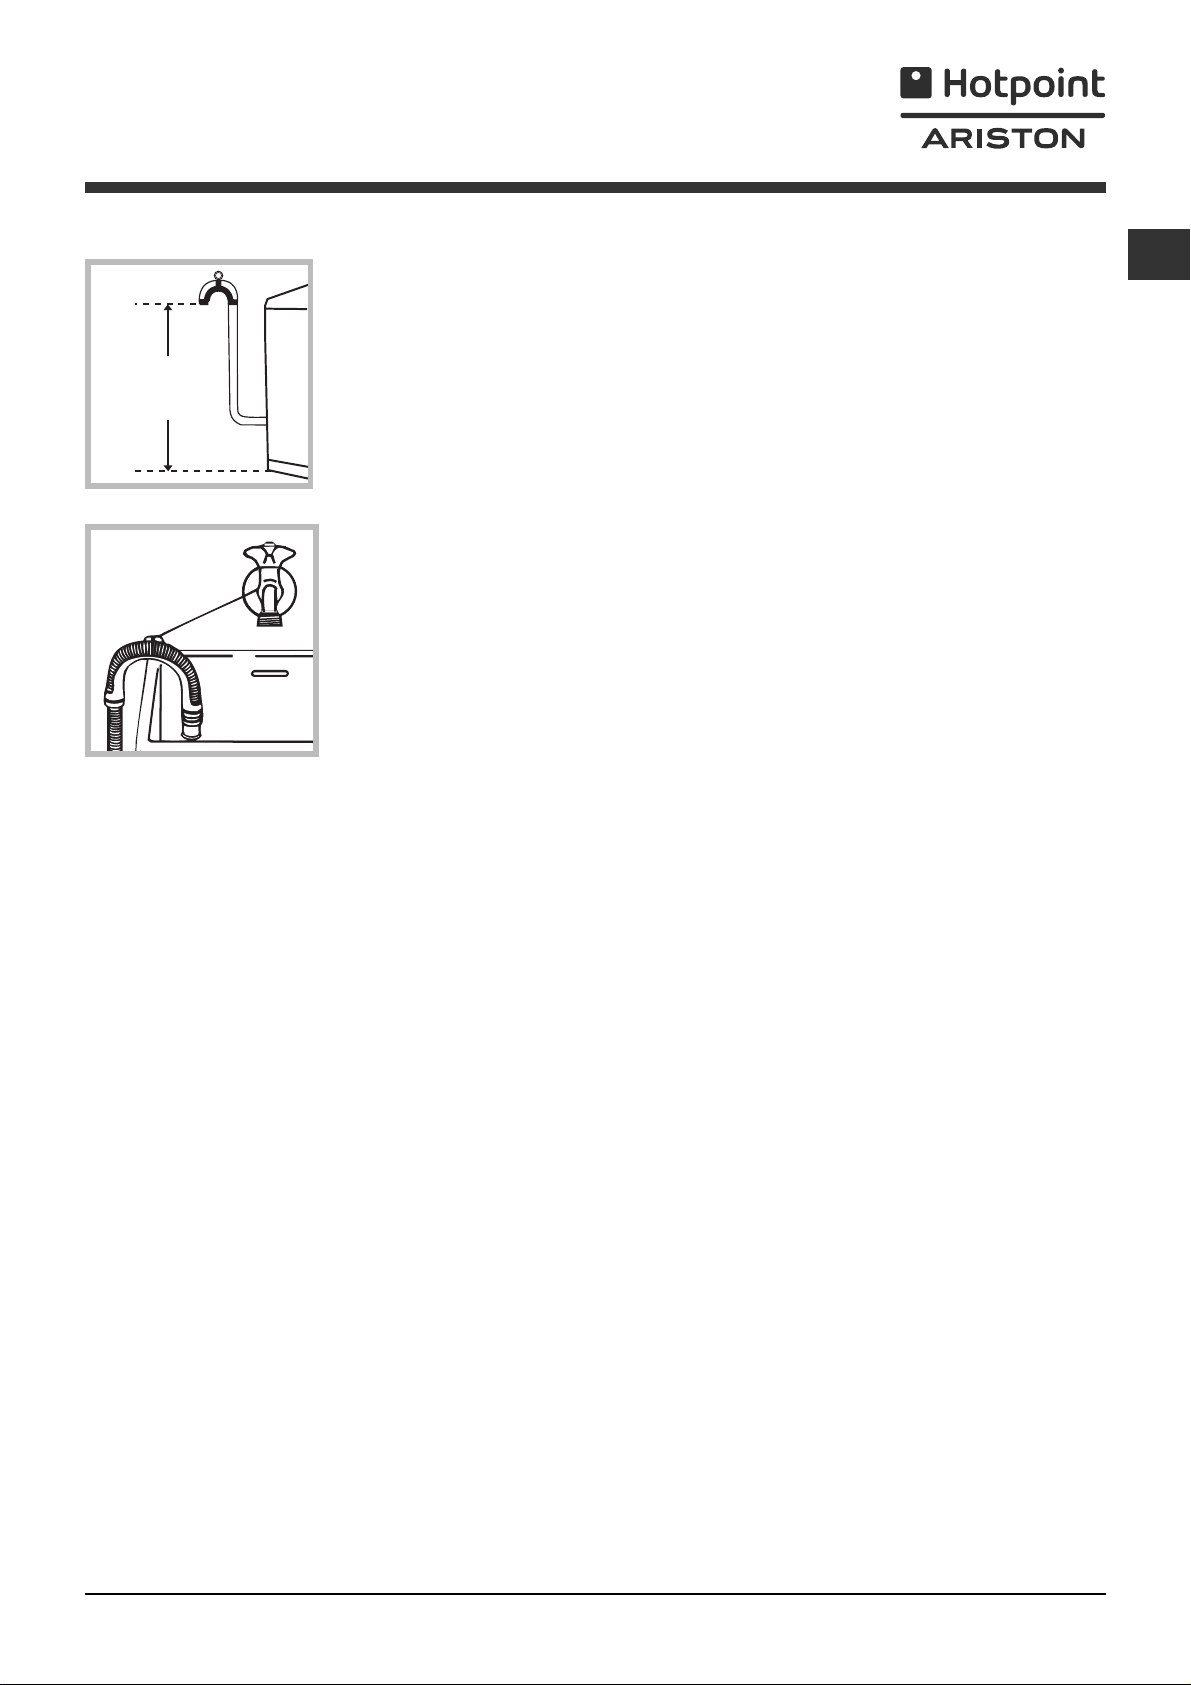
Connecting the drain hose
FP
Connect the drain hose,
without bending it, to a
drainage duct or a wall
drain located at a height
between 65 and 100 cm
from the floor;
! Do not use extension cords or multiple sockets.
GB
! The cable should not be bent or compressed.
! The power supply cable must only be replaced by
authorised technicians.
Warning! The company shall not be held responsible
in the event that these regulations are not respected.
The first wash cycle
alternatively, rest it on
the side of a washbasin
or bathtub, fastening the
duct supplied to the tap
(see figure). The free end
of the hose should not
be underwater.
! We advise against the use of hose extensions; if it is
absolutely necessary, the extension must have the
same diameter as the original hose and must not
exceed 150 cm in length.
Electrical connections
Before plugging the appliance into the electricity
socket, make sure that:
• the socket is earthed and complies with all
applicable laws;
• the socket is able to withstand the maximum power
load of the appliance as indicated in the Technical
data table (see opposite);
• the power supply voltage falls within the values
indicated in the Technical data table (see opposite);
Once the appliance has been installed, and before
you use it for the first time, run a wash cycle with
detergent and no laundry, using the wash cycle 2.
Technical data
Model
Dimensions
Capacity
Electrical
connections
Wa ter connections
Spin sp e ed
ARTXF 149
width 40 cm
height 85 cm
depth 60 cm
from 1 to 6 kg
please refer to th e t ech ni cal dat a
plate fix ed t o t h e mach in e
maximu m pres su re 1 MPa (1 0 bar)
mini mu m pr es s u r e 0.0 5 MPa ( 0 .5 bar )
drum capacity 42 litres
up to 1400 rotations per minute
• the socket is compatible with the plug of the
washing machine. If this is not the case, replace
the socket or the plug.
! The washing machine must not be installed
outdoors, even in covered areas. It is extremely
dangerous to leave the appliance exposed to rain,
storms and other weather conditions.
! When the washing machine has been installed, the
electricity socket must be within easy reach.
Energy rated
programmes
according to
regulation
EN 60456
programme 7; temperature 60°C;
using a load of 6 kg.
Thi s app lian ce co nfo rms t o t he
following EC Directives:
- 89/336/EEC dated 03/05/89
(Electromagnetic Compatibility) and
subsequent modifications
- 2002/96/EC
- 2006/95/EC (Low Voltage)
3
Page 4
Description of the washing machine
and starting a wash cycle
GB
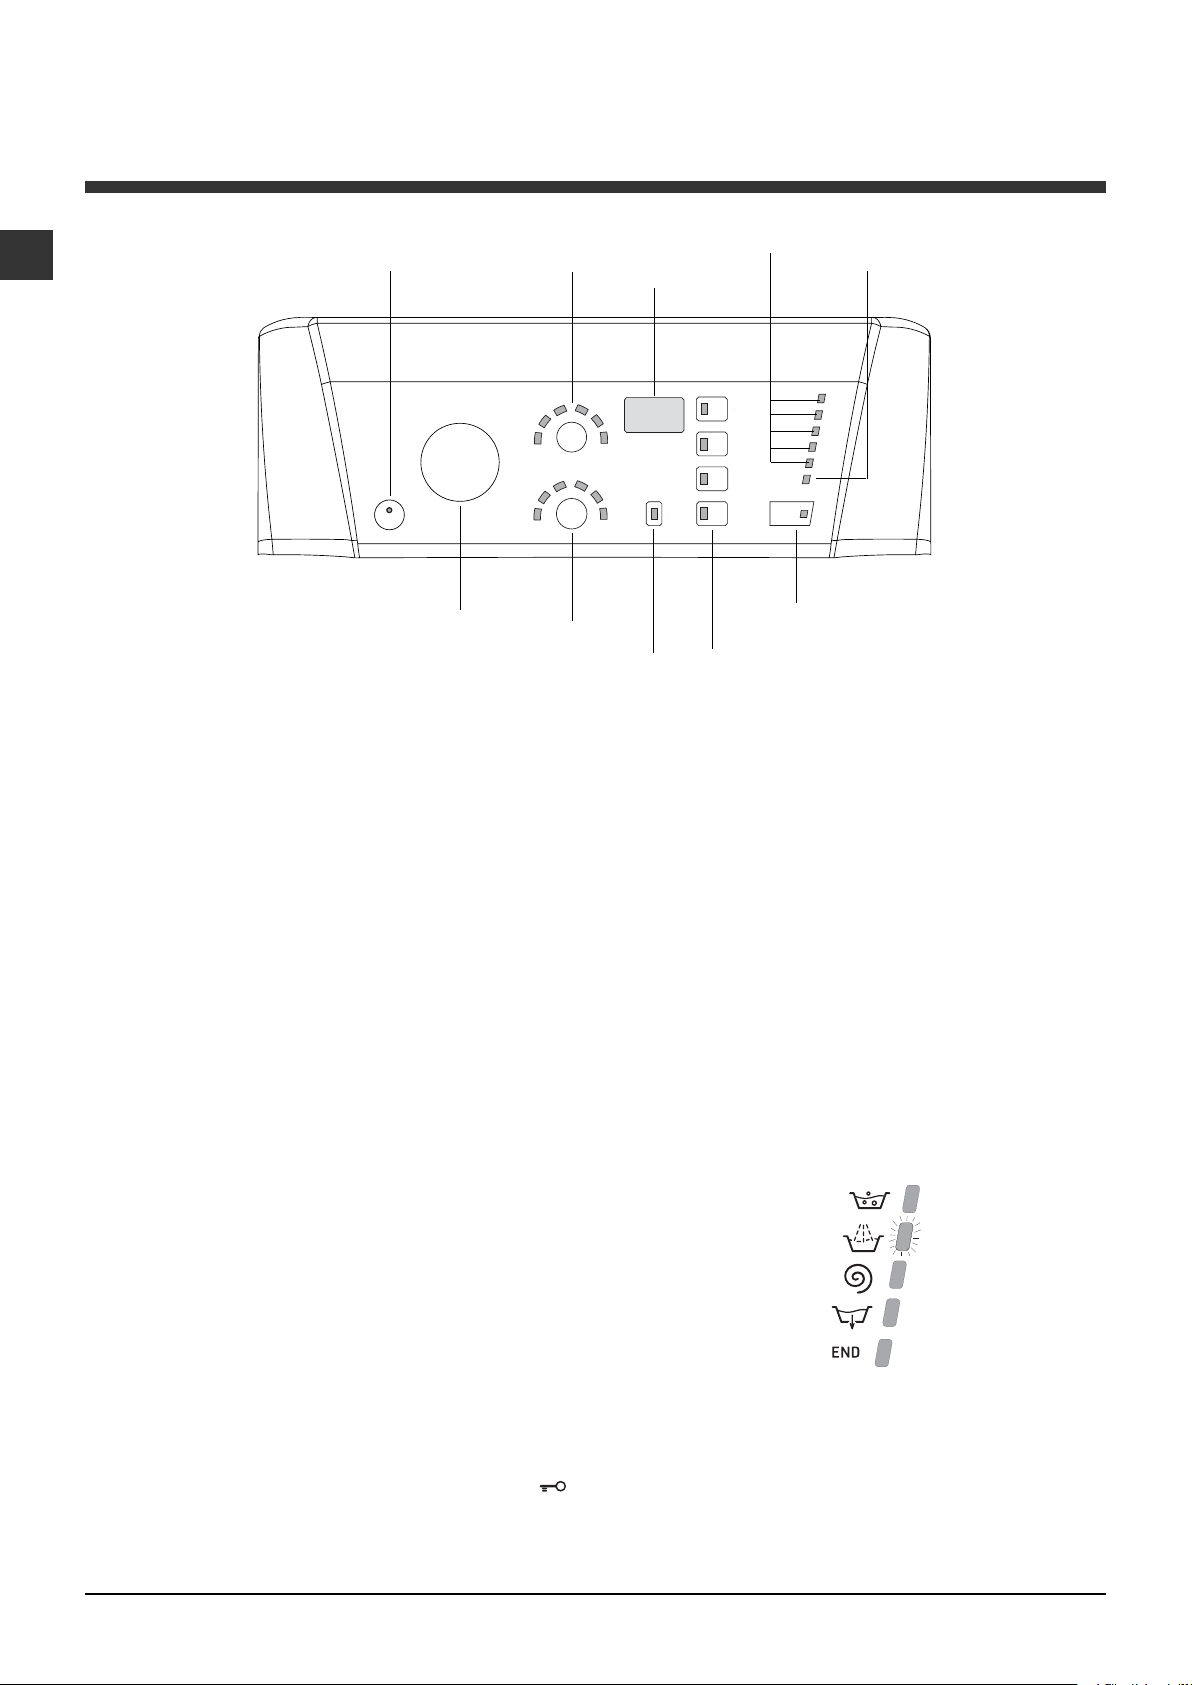
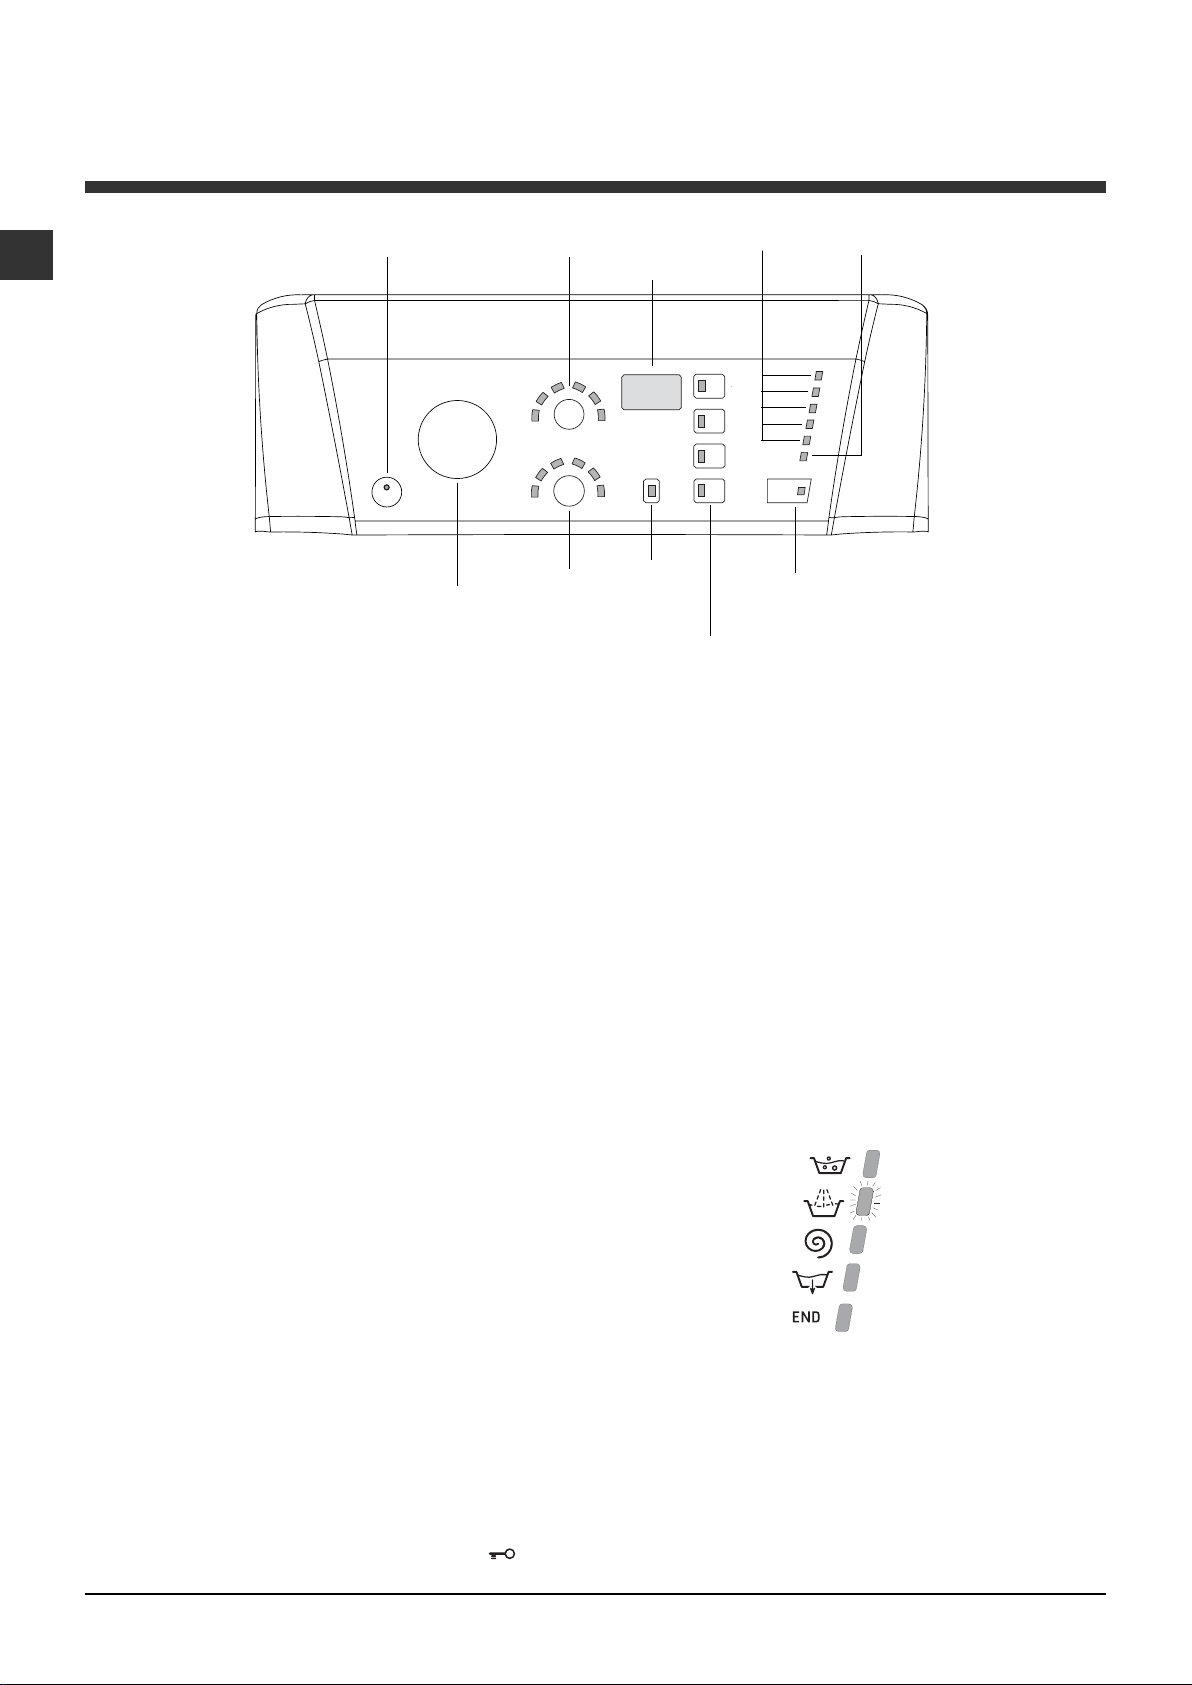
Control panel
button with indicator light
ON/OFF button with indicator light: switches the
machine on and off. If the indicator light is illuminated,
this indicates that the machine is switched on.
WASH CYCLE knob: programmes the wash cycles.
During the wash cycle, the knob does not move.
SPIN SPEED button: sets the spin speed or exclude
the spin cycle completely (see “Personalisation”).
TEMPERATURE button: sets the temperature or the
cold wash cycle (see “Personalisation”).
DISPLA Y: indicates the time remaining for the selected
wash cycle and, if a delayed start has been programmed,
the time remaining until the start of the wash cycle.
CONTROL PANEL LOCK button with indicator light:
activates or deactivates the control panel lock.
FUNCTION buttons with indicator light: used to
select the available functions. The indicator light
corresponding to the selected function will remain lit.
WASH CYCLE PROGRESS
monitor the progress of the wash cycle. The illuminated
indicator light shows which phase is in progress.
DOOR LOCKED indicator light: indicates whether
the door may be opened or not (see next page).
START/PAUSE button with indicator light: starts or
temporarily interrupts the wash cycles.
N.B. To pause the wash cycle in progress, press this
button; the corresponding indicator light will flash orange,
while the indicator light for the current wash cycle phase
will remain lit in a fixed manner. If the DOOR LOCKED
indicator light is switched off, the door may be opened. To
start the wash cycle from the point at which it was
interrupted, press this button again.
ON/OFF
WASH CYCLE
indicator light
TEMPERATURE
knob
button
SPIN
SPEED
button
CONTROL P ANEL LOCK
button with indicator light
s: used to
WASH CYCLE
PROGRESS
DISPLAY
START/PAUSE
button with indicator light
FUNCTION
with indicator lights
Standby mode
This washing machine, in compliance with new energy
saving regulations, is fitted with an automatic standby
system which is enabled after about 30 minutes if no
activity is detected. Press the ON-OFF button briefly
and wait for the machine to start up again.
LID LOCKED
indicator light
buttons
Indicator lights
The indicator lights provide important information.
This is what they can tell you:
Wash cycle phase indicator lights
As the WASH CYCLE knob is rotated, the indicator
lights illuminate, indicating the stages which will be
performed by the machine in accordance with the
selected wash cycle.
Once the desired wash cycle has been selected and has
begun, the indicator lights switch on one by one to
indicate which phase of the cycle is currently in progress.
Wash
Rinse
Spin
Drain
End of wash cycle
Function buttons and corresponding indicator lights
When a function is selected, the corresponding indicator
light will illuminate. If the selected function is not compatible
with the programmed wash cycle, the corresponding
indicator light will flash, a sound signal will be emitted and the
function will not be activated. If a function which is
incompatible with another function selected previously, only
the most recent selection will remain active.
4
Page 5
Temperature indicator light
When a temperature value is selected,
the corresponding indicator light will
illuminate.
Spin indicator light
When a spin value is selected, the
corresponding indicator light will illuminate.
Control panel lock indicator light
To activate the control panel lock, press and hold the
button for approximately 2 seconds. When the
indicator light is illuminated, the control panel is
locked. This means it is possible to prevent wash
cycles from being modified accidentally, especially
where there are children in the home.
To deactivate the control panel lock, press and hold
the button for approximately 2 seconds.
Lid locked indicator light
If this indicator light is on, the appliance door is locked to
prevent it from being opened accidentally; to avoid any
damage, wait for the indicator light to switch off (it will take
about three minutes) before you open the appliance door.
N.B. If the DELAY TIMER function is activated, the door
cannot be opened; pause the machine by pressing the
START/PAUSE button if you wish to open it.
! If the START/PAUSE indicator light (orange) flashes
rapidly at the same time as the function indicator
light, this indicates a problem has occurred (see
“Troubleshooting”).
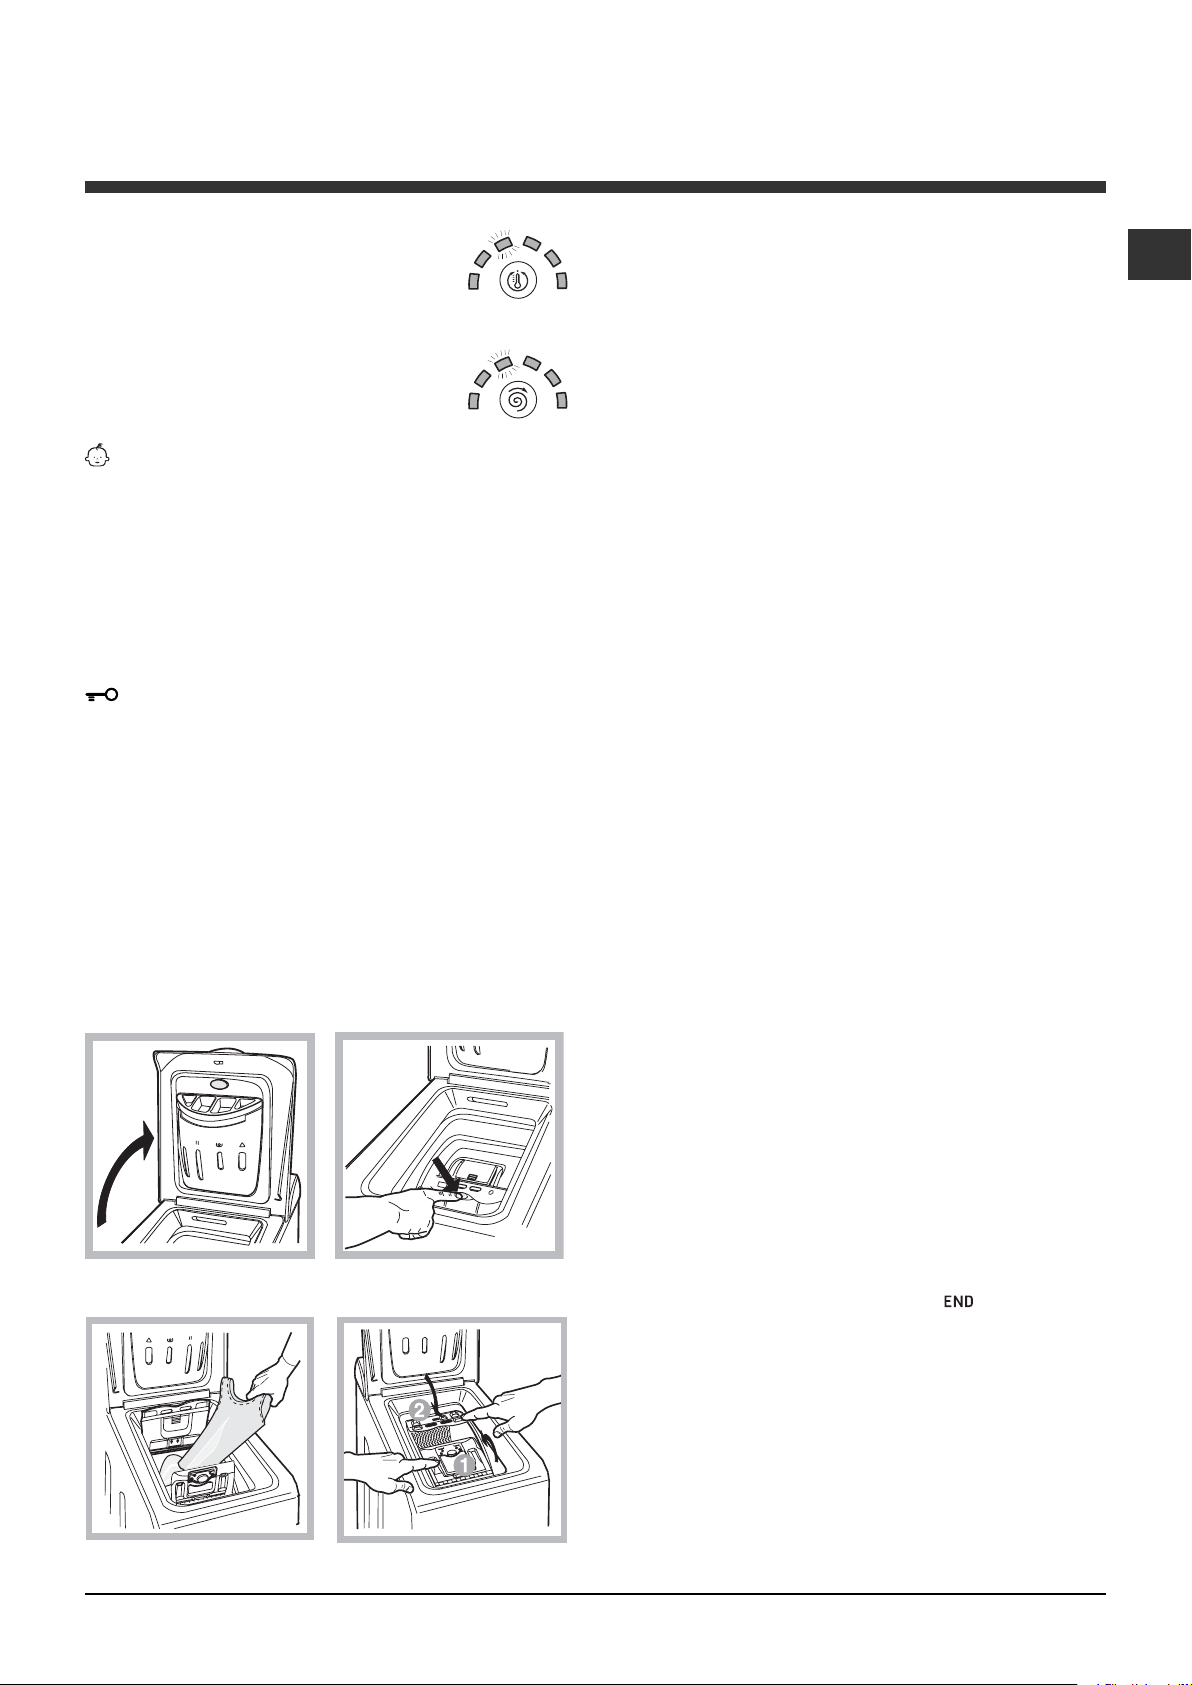
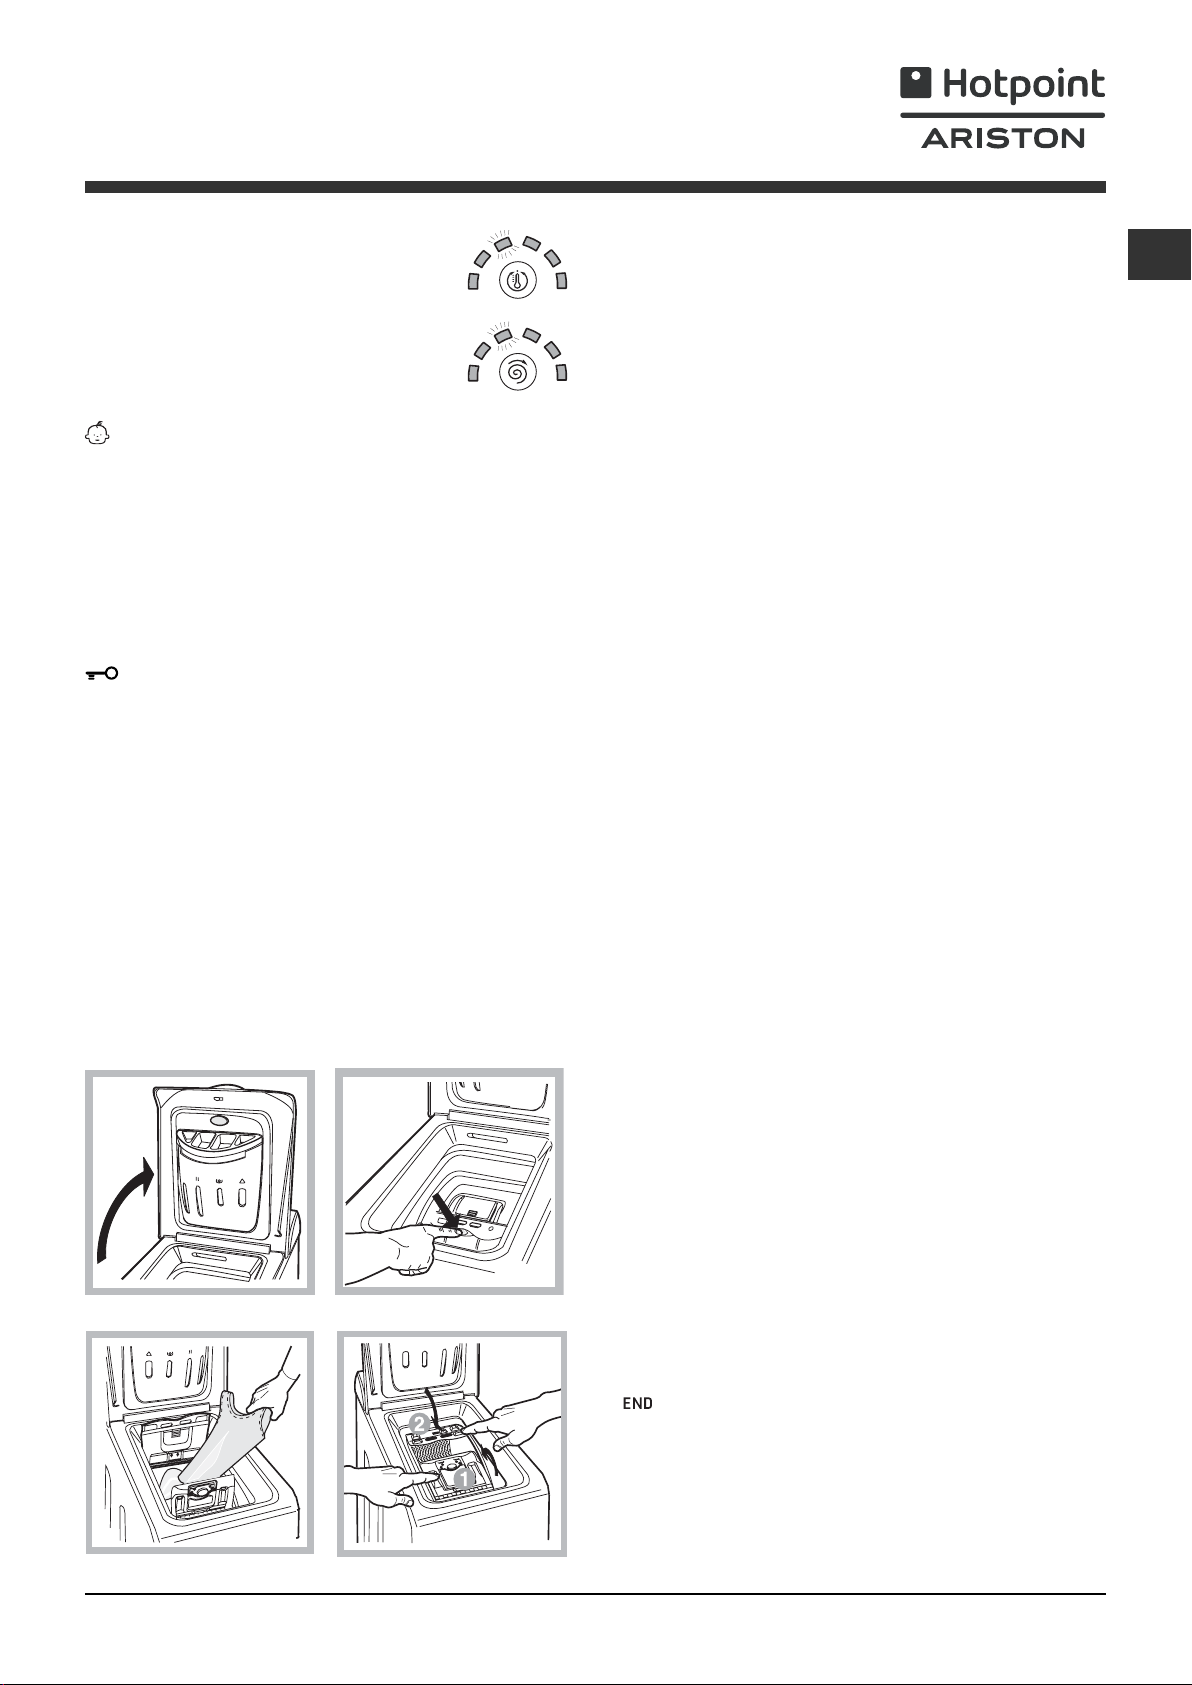
How to open and to close the drum
Fig. 1
Fig. 2
A) Opening (Fig. 1):
Lift the external lid and open it completely .
B) Opening the drum (Soft opening):
With one finger, push the button indicated in fig. 2
and the drum will open delicately.
C) Loading the washing machine (Fig. 3).
D) Shutting (Fig. 4):
- close the drum fully by first shutting the front
door followed by the rear one;
- then ensure the hooks on the front door are
perfectly housed within the seat of the rear door;
- after the hooks have clicked into position, press
both doors lightly downwards to make sure they
do not come loose;
- finally shut the external lid.
E) Drum End Stop (Fig. 2):
Once the wash cycle has been completed, the drum will
position itself with doors facing upward for ease pf opening.
Starting a wash cycle
1. Turn the washing machine on by pressing the ON/
OFF button. All the indicator lights will turn on for a
few seconds, then only the indicator lights relative to
the selected programme settings will remain lit and
the START/PAUSE indicator light will flash.
2. Load the laundry, close the door and the lid.
3. Set the WASH CYCLE knob to the desired
programme.
4. Set the washing temperature (see
“Personalisation”).
5. Set the spin speed (see “Personalisation”).
6. Measure out the detergent and washing additives
(see “Detergents and laundry”).
7. Select the desired functions.
8. Start the wash cycle by pressing the START/
PAUSE button and the corresponding indicator light
will remain lit in a fixed manner, in green.
To cancel the set wash cycle, pause the machine by
pressing the START/PAUSE button and select a new
cycle.
9. At the end of the wash cycle the
will switch on. The LID LOCKED indicator light will
switch off, indicating that the door may be opened.
Take out your laundry and leave the appliance door
ajar to make sure the drum dries completely.
Switch the washing machine off by pressing the ON/
OFF button.
indicator light
GB
Fig. 3
Fig. 4
5
Page 6
Wash cycles
GB
Table of wash cycles
.
Max
Description of the wash cycle
Wash cycles
Specia l cycles
Sanitizing cycle 90°: Extremely s oil ed whi tes.
7
Sanitizing cycle 90° (1): Heavily s o iled whit es and r esistant colo urs .
7
Goodnigt cycle: Lightl y soiled deli cat e colours .
8
Baby cycle: Heavily soiled delicate colours.
9
Shirts
10
Silk/Curtains: For g ar ments in silk and viscose, lin gerie.
11
Wool: For w ool, cashmere, etc.
12
Everyday wash cycles (Daily)
Cotton + Prewash 90°: Extremely soiled wh ites.
1
Cotton: Heavily so iled whites an d r esis tant colours.
2
Cotton (2): Heavily soiled whites and delicate colours.
2
Coloured Cottons (3): Lightl y soiled wh i tes and deli cate colo urs .
3
Synthetics re si stents: Heavi ly soiled resis tant colours .
4
Synthetics deli c a te s: Lightly soiled resistant colours.
4
Mix 30': To refresh lightly soiled garments quickly (not su itable for wool,
5
silk and clothes which require washing by hand).
Mix 15': To refresh lightly soiled garments quickly (not su itable for wool,
6
silk and clothes which require washing by hand).
Partials wash c ycles
temp.
Max.
speed
(°C)
(rpm)
90° 1400
60° 1400 40° 800 40° 800 40° 600 30° 0 40° 600 -
90° 1400 60° 1400
40° 1400
40° 1400
60° 800 40° 800 -
30° 800 30° 800 -
Rinse - 1400
Spin - 1400 -- - 6
Light spin - 800 -- - 2,5
Drain no spin - 0 -- - 6
Detergents
Bleach Wash
Fabric
softener
zz z
zz
zz
zz
zz
zz
zz
zz
zz z
zz z
zz z
zz
zz
zz
zz
z
z
-
Max.
load
(kg)
6
6
4
2
2
1
1
6
6
6
6
2,5
2,5
3
1,5
6
Cycle
duration
The duration of the wash cycles can be checked on the display .
The information contained in the table is intended as a guide only .
For all T est Institutes:
1) T est wash cycle in compliance with regulation EN 60456: set wash cycle 7 with a temperature of 60°C.
2) Long wash cycle for cottons: set wash cycle 2 with a temperature of 40°C.
3) Short wash cycle for cottons: set wash cycle 3 with a temperature of 40°C.
Specials wash cycles
Sanitizing cycle (wash cycle 7). A high-temperature hygienic wash cycle (over 60°C) which requires the use of bleach.
Pour the bleach, the detergent and the additives into the relevant compartments (see paragraph entitled
“Detergent dispenser drawer”).
Goodnigt cycle (wash cycle 8). This is a silent cycle which can be run at night, when the electricity prices are lower. The
wash cycle is designed for cottons and synthetics. At the end of the cycle the machine stops while there is still water in
the drum; to spin and drain the laundry press the START/PAUSE button; alternatively the machine will perform the spin
cycle and drain the water automatically after 8 hours.
Baby cycle (wash cycle 9). This wash cycle can be used to remove the soiling typically caused by babies, while ensuring
that all detergent is removed from nappies in order to prevent the delicate skin of babies from suffering allergies. The
cycle has been designed to reduce the amount of bacteria by using a greater quantity of water and optimising the effect
of special disinfecting additives added to the detergent.
Mix 30’ (wash cycle 5) this wash cycle was designed to wash lightly soiled garments quickly: it lasts just 30 minutes and
therefore saves both energy and time. By selecting this wash cycle (5 at 30°C), it is possible to wash different fabrics
together (except for wool and silk items), with a maximum load of 3 kg.
Mix 15’(wash cycle 6) this wash cycle was designed to wash lightly soiled garments quickly: it lasts just 15 minutes and
therefore saves both energy and time. By selecting this wash cycle (6 at 30°C), it is possible to wash different fabrics
together (except for wool and silk items), with a maximum load of 1.5 kg.
6
Page 7
Personalisation
Setting the temperature
By pressing the TEMPERATURE button to set the wash temperature (see Table of wash cycles).
The temperature may be lowered, or even set to a cold wash (
The washing machine will automatically prevent you from selecting a temperature which is higher than the
maximum value set for each wash cycle.
).
Setting the spin speed
By pressing the SPIN SPEED button to set the spin speed for the selected wash cycle.
The maximum spin speeds available for each wash cycle are as follows:
Wash cycles Maximum spin speed
Cottons 1400 rpm
Synthetics 800 rpm
Wool 600 rpm
Silk drain only
The spin speed may be lowered, or the spin cycle can be excluded altogether by selecting the symbol
The washing machine will automatically prevent you from selecting a spin speed which is higher than the
maximum speed set for each wash cycle.
.
Functions
The various wash functions available with this washing machine will help to achieve the desired results, every time.
To activate the functions:
1. Press the button corresponding to the desired function;
2. the function is enabled when the corresponding indicator light is illuminated.
Note: If the indicator light flashes rapidly, this signals that this particular function may not be selected in
conjunction with the selected wash cycle.
GB
Delay timer
To set a delayed start for the selected wash cycle, press the button repeatedly until the desired delay time is
displayed (this may be between 1 hour and 24 hours).
To disable the function press the button until the text
N.B. Once you have pressed the START/PAUSE button, the delay time may only be decreased if you wish to modify it.
is displayed.
! This option is enabled with all programmes.
Super Wash
Because a greater quantity of water is used in the initial phase of the cycle, and because of the increased cycle
duration, this function offers a high-performance wash.
! This function may not be used in conjunction with wash cycles 5, 6, 7, 11, 12,
Extra rinse
By selecting this function, the efficiency of the rinse is increased and optimal detergent removal is guaranteed. It is
particularly useful for sensitive skin.
! This function may not be used in conjunction with wash cycles 5, 6,
Easy iron
By selecting this function, the wash and spin cycles will be modified in order to reduce the formation of creases. At
the end of the cycle the washing machine will perform slow rotations of the drum.
For the 11 wash cycle, the machine will end the cycle while the laundry is soaking, the EASY IRON and START/
PAUSE indicator lights will flash (orange) and the RINSE phase will remain lit in a fixed manner. To drain the water
so that the laundry may be removed, press the START/PAUSE button or the EASY IRON button.
!
This function may not be used in conjunction with wash cycles 5, 6, 7, 8, 9, 12, , , .
, , .
, , , .
7
Page 8
Detergents and laundry
GB
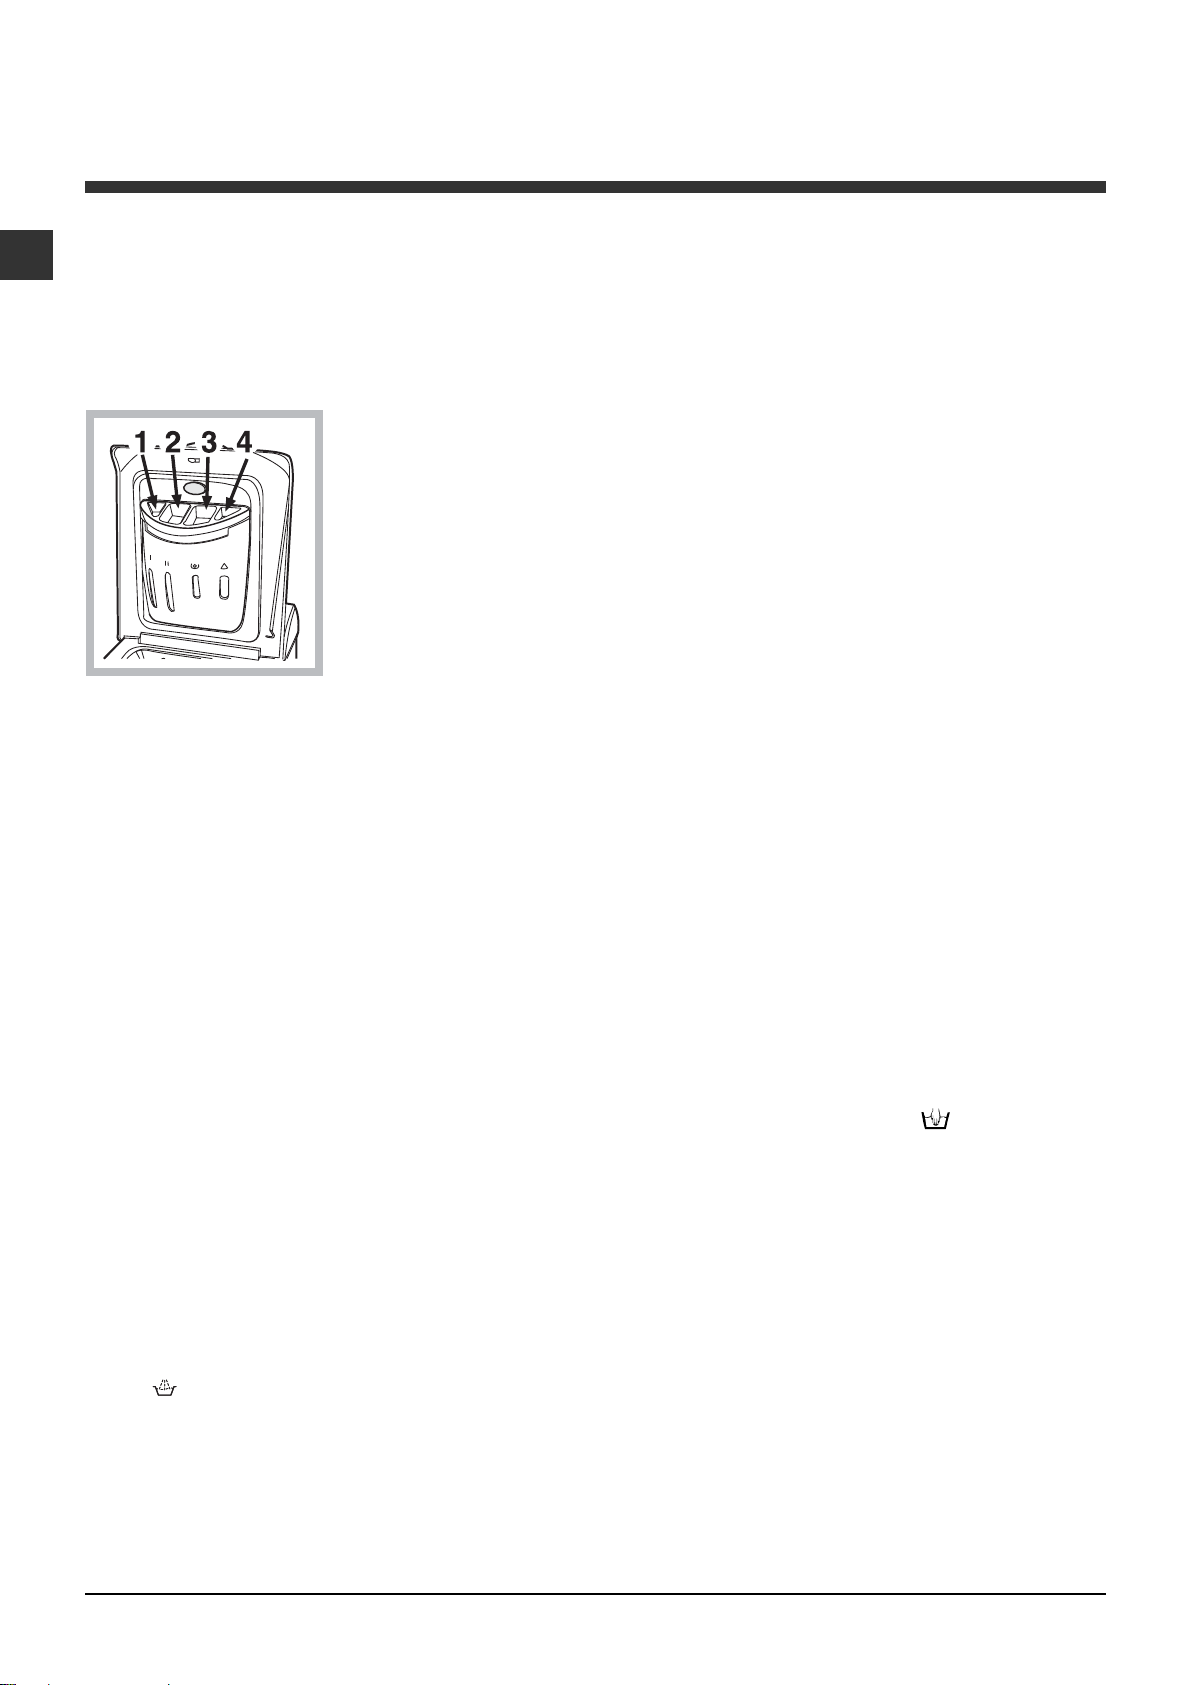
Detergent dispenser drawer
Good washing results also depend on the correct
dose of detergent: adding too much detergent won't
necessarily make for a more efficient wash, and may
in fact cause build up on the interior of your appliance
and even pollute the environment.
Open up the detergent
dispenser and pour in
the detergent and fabric
softener, as follows.
compartment 1: Detergent for pre-wash
compartment 2: Detergent for the wash cycle
(powder or liquid)
It is recommended that you place liquid detergent
directly into the compartment using the appropriate
dosing cup.
compartment 3: Additives (softener, etc.)
When pouring the softener in compartment 3, avoid
exceeding the "max" level indicated.
The softener is added automatically into the machine
during the last wash. At the end of the wash
programme, some water will be left in compartment
3. This is used for the inlet of denser fabric softeners
into the machine, i.e. to dilute the more concentrated
softeners. Should more than a normal amount of
water remain in compartment 3, this means the
emptying device is blocked. For cleaning instructions,
see “Care and maintenance”.
compartment 4: Bleach
Bleach cycle
Bleaching may only be performed in conjunction with
wash cycles 2, 3, 7,
Pour the bleach into compartment 4; pour the
detergent and softener into the corresponding
compartments, then select one of the
abovementioned wash cycles.
This option is recommended only for very soiled
cotton garments.
.
Preparing the laundry
• Divide the laundry according to:
- the type of fabric/the symbol on the label
- the colours: separate coloured garments from
whites.
• Empty all garment pockets and check the buttons.
• Do not exceed the listed values, which refer to the
weight of the laundry when dry:
Durable fabrics: max. 6 kg
Synthetic fabrics: max. 2,5 kg
Delicate fabrics: max. 2 kg
Wool: max. 1 kg
How much does your laundry weigh?
1 sheet 400-500 g
1 pillow case 150-200 g
1 tablecloth 400-500 g
1 bathrobe 900-1200 g
1 towel 150-250 g
Garments requiring special care
Shirts: use special wash cycle 10 to wash shirts in
various fabrics and colours.
It guarantees maximum care is taken of the garments
and minimises the formation of creases.
Silk: use special wash cycle 11 to wash all silk
garments. We recommend the use of special
detergent which has been designed to wash delicate
clothes.
Curtains:
case or mesh bag. Use wash cycle 11.
Wool: is the only washing machine manufacturer to
have been awarded the prestigious Woolmark
Platinum Care endorsement (M.0508) by the
Woolmark Company, which means that all woollen
garments may be washed in the washing machine,
even those which state “hand wash only”
label. Wash cycle 12 therefore offers complete peace
of mind when washing woollen garments in the
washing machine (max. load 1 kg) and guarantees
optimal performance.
fold curtains and place them in a pillow
on the
Load balancing system
Before every spin cycle, to avoid excessive vibrations
and to distribute the load in a uniform manner, the drum
rotates continuously at a speed which is slightly greater
than the washing rotation speed. If, after several attempts, the load is not balanced correctly, the machine
spins at a reduced spin speed. If the load is excessively
unbalanced, the washing machine performs the distribution process instead of spinning. To encourage improved load distribution and balance, we recommend
small and large garments are mixed in the load.
8
Page 9

Precautions and tips
! This washing machine was designed and
constructed in accordance with international safety
regulations. The following information is provided for
safety reasons and must therefore be read carefully.
General safety
• This appliance was designed for domestic use only.
• This appliance is not intended for use by persons
(including children) with reduced physical, sensory
or mental capabilities, or lack of experience and
knowledge, unless they have been given
supervision or instruction concerning use of the
appliance by a person responsible for their safety.
Children should be supervised to ensure that they
do not play with the appliance.
• The washing machine must only be used by adults,
in accordance with the instructions provided in this
manual.
• Do not touch the machine when barefoot or with
wet or damp hands or feet.
• Do not pull on the power supply cable when
unplugging the appliance from the electricity
socket. Hold the plug and pull.
• Do not touch the drained water as it may reach
extremely high temperatures.
• Never force the porthole door. This could damage
the safety lock mechanism designed to prevent
accidental opening.
• If the appliance breaks down, do not under any
circumstances access the internal mechanisms in
an attempt to repair it yourself.
• Always keep children well away from the appliance
while it is operating.
• If the appliance has to be moved, work in a group
of two or three people and handle it with the utmost
care. Never try to do this alone, because the
appliance is very heavy.
• Before loading laundry into the washing machine,
make sure the drum is empty.
Disposal
• Disposing of the packaging materials: observe local
regulations so that the packaging may be re-used.
The crossed out “wheeled bin” symbol on the
product reminds you of your obligation, that when
you dispose of the appliance it must be separately
collected. Consumers should contact their local
authority or retailer for information concerning the
correct disposal of their old appliance.
Saving energy and respecting the
environment
Saving on detergent, water, energy and time
• To avoid wasting resources, the washing machine
should be used with a full load. A full load instead
of two half loads allows you to save up to 50% on
energy.
• The pre-wash cycle is only necessary on
extremely soiled garments. Avoiding it will save on
detergent, time, water and between 5 and 15%
energy.
• Treating stains with a stain remover or leaving
them to soak before washing will cut down the
need to wash them at high temperatures. A
programme at 60°C instead of 90°C or one at
40°C instead of 60°C will save up to 50% on
energy.
• Use the correct quantity of detergent depending
on the water hardness, how soiled the garments
are and the amount of laundry you have, to avoid
wastage and to protect the environment: despite
being biodegradable, detergents do contain
ingredients that alter the natural balance of the
environment. In addition, avoid using fabric
softener as much as possible.
• If you use your washing machine from late in the
afternoon until the early hours of the morning, you
will help reduce the electricity board's peak load.
The “Delay Timer” option helps to organise your
wash cycles accordingly.
• If your laundry has to be dried in a tumble dryer,
select a high spin speed. Having the least water
possible in your laundry will save you time and
energy in the drying process.
GB
• The European Directive 2002/96/EC on Waste
Electrical and Electronic Equipment, requires that
old household electrical appliances must not be
disposed of in the normal unsorted municipal waste
stream. Old appliances must be collected
separately in order to optimise the recovery and
recycling of the materials they contain and reduce
the impact on human health and the environment.
9
Page 10
Care and maintenance
GB
Cutting off the water or electricity
supply
• Tur n off the water tap after every wash. This will
limit the wear of your appliance's water system
and also prevent leaks.
• Unplug your appliance when cleaning it and during
all maintenance operations.
Cleaning your appliance
The exterior and rubber parts of your appliance can
be cleaned with a soft cloth soaked in lukewarm
soapy water. Do not use solvents or abrasives.
Caring for your appliance door and
drum
• Always leave the appliance door ajar to prevent
unpleasant odours from forming.
Cleaning the pump
The washing machine is fitted with a self-cleaning
pump that does not require any maintenance.
Sometimes, small items (such as coins or buttons)
may fall into the pre-chamber that protects the
pump, situated in the lower part of the same.
! Make sure the wash cycle has ended and unplug
the appliance.
To recover any objects that have fallen into the prechamber:
1. remove the plinth at
the bottom on the front
side of the washing
machine by pulling from
the side with your
hands (see figure);
2. unscrew the lid
rotating it anticlockwise (see figure): a little
water may trickle out.
This is perfectly normal;
3. clean the interior
thoroughly;
4. screw the lid back on;
5. reposition the panel,
making sure the hooks
are securely in place
before you push it onto
the appliance.
Checking the water inlet hose
Check the water inlet hose at least once a year. If
you see any cracks, replace it immediately: during the
wash cycles, water pressure is very strong and a
cracked hose could easily split open.
How to clean the detergent dispenser
Disassembly:
Press lightly on the large
button on the front of the
detergent dispenser and
pull it upwards (fig. 1, 2).
Fig. 1 Fig. 2
Cleaning:
Then clean the dispenser under a tap (fig. 3) using an
old toothbrush and, once the pair of siphons inserted in
the top of compartments 1 and 2 (fig. 4) have been pulled
out, check whether the same are not clogged and then
rinse them.
!!
!
Never use hoses that have already been used.
!!
Reassembly:
Do not forget to reinsert the
pair of siphons into the special housings and then to
replace the dispenser into
its seat, clicking it into place
(fig. 4, 2 and 1).
Fig. 3
Fig. 4
10
Page 11

Troubleshooting
Your washing machine could fail to work. Before contacting the Technical Assistance Centre (see “Assistance”),
make sure that the problem cannot be not solved easily using the following list.
Problem:
The washing machine does not
switch on.
The wash cycle does not start.
The washing machine does not
take in water (the indicator light
for the first wash cycle stage
flashes rapidly).
The washing machine
continuously takes in and drains
water.
Possible causes / Solutions:
• The appliance is not plugged into the socket fully, or is not making contact.
• There is no power in the house.
• The appliance Lid is not shut properly.
• The ON/OFF button has not been pressed.
• The START/PAUSE button has not been pressed.
• The water tap has not been opened.
• A delayed start has been set (see “Personalisation”).
• The water inlet hose is not connected to the tap.
• The hose is bent.
• The water tap has not been opened.
• There is no water supply in the house.
• The pressure is too low.
• The START/PAUSE button has not been pressed.
• The drain hose is not fitted at a height between 65 and 100 cm from
the floor (see “Installation”).
• The free end of the hose is under water (see “Installation”).
• The wall drainage system is not fitted with a breather pipe.
If the problem persists even after these checks, turn off the water tap,
switch the appliance off and contact the Assistance Service. If the
dwelling is on one of the upper floors of a building, there may be problems
relating to water drainage, causing the washing machine to fill with water
and drain continuously. Special anti-draining valves are available in shops
and help to avoid this inconvenience.
GB
The washing machine does not
drain or spin.
The washing machine vibrates a
lot during the spin cycle.
The washing machine leaks.
The START/PAUSE indicator light
(orange) and the function
indicator lights flash rapidly.
There is too much foam.
• The wash cycle does not include draining: some wash cycles require
the drain phase to be started manually.
• The EASY IRON function has been activated: To complete the wash
cycle, press the START/PAUSE button (“Personalisation”).
• The drain hose is bent (see “Installation”).
• The drainage duct is clogged.
• The drum was not unlocked correctly during installation (see “Installation”).
• The washing machine is not level (see “Installation”).
• The washing machine is trapped between cabinets and walls (see “Installation”).
• The water inlet hose is not screwed on properly (see “Installation”).
• The detergent dispenser drawer is blocked (for cleaning instructions, see
“Care and maintenance”).
• The drain hose is not fixed properly (see “Installation”).
• Switch off the machine and unplug it, wait for approximately 1 minute
and then switch it back on again.
If the problem persists, contact the Technical Assistance Service.
• The detergent is not suitable for machine washing (it should display the
text “for washing machines” or “hand and machine wash”, or the like).
• Too much detergent was used.
11
Page 12

Service
GB
Before calling for Assistance:
• Check whether you can solve the problem alone (see “Troubleshooting”);
• Restart the programme to check whether the problem has been solved;
• If this is not the case, contact an authorised Technical Assistance Centre using the telephone number
provided on the guarantee certificate.
! Always request the assistance of authorised technicians.
Have the following information to hand:
• the type of problem;
• the appliance model (Mod.);
• the serial number (S/N).
This information can be found on the data plate situated on the rear of the washing machine.
12
Page 13

Руководство по
эксплуатации
CIS
Русский
)46:."'
СТИРАЛЬНАЯ МАШИНА
Содержание
CIS
Установка, 14-15
Распаковка и нивелировка
Подключение к водопроводу и электричеству
Первый цикл стирки
Описание стиральной машины и
порядка запуска программы, 16-17
Панель управления
Индикаторы
Как открыть и закрыть барабан
Порядок запуска программы
Программы, 18
Таблица программ
Персонализированные настройки, 19
Регулировка температуры
Выбор скорости отжима
Дополнительные функции
Моющие средства и типы белья, 20
Распределитель моющих средств
Отбеливание
Подготовка белья
Изделия, требующие деликатной стирки
Система балансировки белья
Предосторожности и рекомендации, 21
Общие требования к безопасности
Утилизация
Экономия энергии и охрана окружающей среды
Техническое обслуживание и уход, 22
Отключение воды и электричества
Уход за стиральной машиной
ход за дверцей машины и барабаном
Чистка насоса
Проверка заливного шланга
Как чистить распределитель моющих средств
Поиск неисправностей и методы их
устранения, 23
Сервисное обслуживание, 24
Технические характеристики
13
Page 14
Установка
CIS
! Сохраните данное руководство. Оно должно быть
в комплекте со стиральной машиной в случае
продажи, передачи оборудования или при
переезде на новую квартиру, чтобы новый
владелец оборудования мог ознакомиться с
правилами его функционирования и обслуживания.
!
Внимательно прочитайте руководство: в нем
содержатся важные сведения по установке и
безопасной эксплуатации стиральной машины.
Распаковка и выравнивание
Распаковка
1. Распакуйте
стиральную машину.
2. Убедитесь, что
оборудование не было
повреждено во время
транспортировки. При
обнаружении повреждений – не подключайте
машину – свяжитесь с
поставщиком
немедленно.
3. Удалите четыре
транспортировочных
винта и резиновые
пробки с
прокладками,
расположенные в задней части стиральной
машины (см. рис.).
4. Закройте отверстия прилагающимися
пластиковыми заглушками.
5. Сохраняйте все детали: они Вам понадобятся
при последующей транспортировке стиральной
машины.
болты, резиновые шайбы и большую металличес-
кую поперечную планку. Закройте образовавшиеся
отверстия пластмассовыми заглушками.
горизонтальность верхней крышки корпуса,
отклонение горизонтали должно быть не более 2°.
Правильное выравнивание оборудования поможет
избежать шума, вибраций и смещений во время
работы машины.
Если стиральная машина стоит на полу, покрытом
ковром, убедитесь, что ее основание возвышается над ковром. В противном случае вентиляция
будет затруднена или вовсе невозможна.
Установка машины на место и перемещение
Ваша стиральная
машина может быть
оснащена специальными убирающимися колесами для облегчения
ее перемещения.
Чтобы опустить колеса
и передвинуть оборудование, просто потяните за рычаг,
расположенный слева
под основанием маши-
ны. После установки
оборудования в требуемое положение верните
рычаг в исходное поло.
Подключение к водопроводной и
электрической сети
Подсоединение заливного шланга
1. Прикрутите шланг
подачи к крану холодной
воды с резьбовым
отверстием 3/4 gas (см.
схему).
Перед подсоединением
откройте водопроводный
кран до тех пор, пока из
него не потечет чистая
вода.
! Не разрешайте детям играть с упаковочными
материалами.
Выравнивание
1. Установите стиральную
машину на ровном и
прочном полу, так чтобы
она не касалась стен,
мебели и прочих
предметов.
2. После установки
машины на место
отрегулируйте ее
устойчивое положение
путем вращения передних ножек (см. рис.). Для
этого сначала ослабьте контргайку, после завершения регулировки контргайку затяните. После
установки машины на место проверьте по уровню
14
2. Подсоедините заливной шланг к стиральной
машине, навинтив его
на водоприемник,
расположенный в
задней верхней части
справа (см. рис.).
3.Убедитесь, что шланг
не перекручен и не
пережат.
! Давление воды должно быть в пределах значе-
ний, указанных в таблице Технических характеристик (см. с. 15).
! Если длина водопроводного шланга окажется
недостаточной, обратитесь в Авторизованный
Сервисный центр.
Page 15
Подсоединение сливного шланга
Повесьте загнутый конец
сливного шланга на край
раковины, ванны, или
поместите в
специальный вывод
65 - 100 cm
Не рекомендуется применение удлинителей для
сливного шланга, при необходимости допускается
его наращивание шлангом такого же диаметра и
длиной не более 150 см.
канализации. Шланг не
должен перегибаться.
Верхняя точка сливного
шланга должна находиться на высоте 65-100
см от пола. Расположение сливного шланга
должно обеспечивать
разрыв струи при сливе
(конец шланга не
должен быть опущен в
воду).
В случае крепления на
край ванной или раковины, шланг вешается с
помощью направляющей
(входит в комплект
поставки), которая
крепится к крану (ðèñ.).
l розетка заземлена в соответствии с нормами безо-
пасности, описанными в данном разделе инструкции
(допускается организация заземления рабочим нулем, при условии, что защитная линия не имеет разрыва и подключена напрямую в обвод каких-либо
приборов (например, электрического счетчика).
Если вилка не подходит к розетке, ее следует заменить
на новую, соответствующую розетке, или заменить питающий кабель. Замена кабеля должна производиться
только квалифицированным персоналом.
Запрещается использование переходников, двойных и
более розеток и удлинителей (они создают опасность
возгорания). Если Вы считаете их использование необходимым, применяйте один единственный удлинитель,
удовлетворяющий требованиям безопасности.
Оборудование, подключенное с нарушением требований безопасности бытовых приборов большой
мощности, изложенных в данной инструкции, является потенциально опасным.
Производитель не несет ответственности за ущерб
здоровью и собственности, если он вызван
несоблюдением указанных норм установки.
Первый цикл стирки
По завершении установки, перед началом эксплуатации
необходимо произвести один цикл стирки со
стиральным порошком, но без белья, по программе 2.
CIS
Подсоединение к электросети
Внимание! Оборудование обязательно должно быть
заземлено!
1. Машина подключается к электрической сети при помощи двухполюсной розетки с заземляющим контактом
(розетка не поставляется с машиной). Фазный провод
должен быть подключен через автомат защиты сети, рассчитанный на максимальный ток (ток срабатывания) 16
А, и имеющий время срабатывания не более 0,1 с.
2. При наличии вблизи от предполагаемого места установки машины розетки с заземляющим контактом,
имеющей трехпроводную подводку кабеля с медными
жилами сечением не менее 1,5 кв. мм (или алюминиевыми жилами сечением не менее 2,5 кв. мм), доработка
электросети не производится. При отсутствии указанной
розетки и проводки следует провести их монтаж.
3. Прокладка заземления отдельным проводом не
допускается.
4. Для доработки электрической сети рекомендуется
применять провод типа ППВ 3х1,5 380 ГОСТ 6223-79.
Допускается применение других марок кабеля, обеспечивающих пожаро- и электробезопасность при эксплуатации машины.
Перед включением машины в сеть убедитесь, что:
l розетка и проводка соответствуют требованиям, изло-
женным в данном разделе инструкции;
l напряжение и частота тока сети соответствуют данным
машины;
l розетка и вилка одного типа;
15
Page 16
Описание стиральной машины и
порядка запуска программы
CIS
Панель управления
Кнопка и индикатор
ВКЛ/ВЫКЛ
Рукоятка выбора
ТЕМПЕРАТУРЫ
ПРОГРАММА
Кнопка и индикатор ВКЛ/ВЫКЛ: служит для
включения и выключения машины. Горящий
индикатор показывает, что машина включена.
Рукоятка выбора ПРОГРАММ: служит для выбора
программ. В процессе выполнения программы
рукоятка не вращается.
Скорости ОТЖИМА: служит для выбора скорости
отжима или для его исключения
(см «Персонализированные настройки»).
Регулятор ТЕМПЕРАТУРЫ: служит для настройки
температуры или для стирки в холодной воде
(см. «Персонализированные настройки»).
ДИСПЛЕЙ: для отображения времени, остающегося до
окончания заданного цикла стирки, и, если был
запрограммирован запуск с задержкой - времени,
остающегося до запуска цикла.
Кнопка и индикатор БЛОКИРОВКА КНОПОК: служит для
включения/отключения блокировки панели управления.
Регулятор
Скорости
ОТЖИМА
Индикаторы ВЫПОЛНЕНИЯ
ФАЗ ЦИКЛА
ДИСПЛЕЙ
Кнопка с индикатором
Кнопка и
индикатор
БЛОКИРОВКА
КНОПОК
Для возобновления цикла стирки с момента, когда
он был прерван, вновь нажмите ПУСК/ПАУЗА.
Режим ожидания
Настоящая стиральная машина отвечает требованиям
новых нормативов по экономии электроэнергии,
укомплектована системой автоматического отключения
(режим сохранения энергии), включающейся через 30
минут простоя машины. Нажмите один раз кнопку
ВКЛ/ВЫКЛ и подождите, пока машина вновь включится.
Кнопки с индикаторами
дополнительных
ФУНКЦИЙ
ПУСК/ПАУЗА
Индикатор БЛОКИРОВКИ
ЛЮКA
Индикаторы
Индикаторы сообщают пользователю важные сведения.
Значение индикаторов:
Индикаторы текущей фазы цикла:
Поверните рукоятку ПРОГРАММЫ, и загорятся
индикаторы, показывая фазы, которые машина
будет выполнять согласно заданной программе.
После выбора и запуска цикла стирки индикаторы будут
загораться один за другим, показывая
последовательность выполнения программы:
Кнопки с индикаторами дополнительных ФУНКЦИЙ:
служат для выбора имеющихся дополнительных
функций. Индикатор, соответствующий выбранной
функции, останется включенным.
индикаторы ВЫПОЛНЕНИЯ ФАЗ ЦИКЛА: показывают
последовательность выполнением программы стирки.
Включенный индикатор соответствует текущей фазе.
Индикатор БЛОКИРОВКИ ЛЮКA: показывает, можно
ли открыть люк (см. страницу сбоку).
Кнопка с индикатором ПУСК/ПАУЗА: служит для запуска
или для временного прерывания программы.
ПРИМЕЧАНИЕ: для временного прерывания текущего
цикла стирки нажмите эту кнопку. Соответствующий
индикатор замигает оранжевым цветом, а
индикатор текущей фазы стирки будет гореть, не
мигая. Если индикатор БЛОКИРОВКИ ЛЮКA
погас, можно открыть люк.
16
Cтирка
Полоскание
Отжим
Слив
Конец цикла
Кнопки дополнительных функций и соответствующие
индикаторы
При выборе функции загорается соответствующая
кнопка. Если выбранная функция несовместима с
заданной программой, будет мигать
соответствующий индикатор, включится звуковой
сигнал, и эта функция включена не будет. Если будет
выбрана функция, несовместимая с другой, ранее
выбранной функцией, останется включенной только
последняя выбранная функция.
Page 17
Индикатор температуры
При выборе температурного значения
загорается соответствующий индикатор.
Индикатор отжима
При выборе скорости отжима загорается
соответствующий индикатор.
A) ОТКРЫВАНИЕ (рис. 1):
Поднимите внешнюю крышку и полностью ее
откройте.
B) Открывание барабана (Soft opening – Плавное
открывание):
Нажмите кнопку, показанную на рис. 2, крышка
барабана плавно откроется.
CIS
Индикатор блокировки кнопок
Для включения блокировки панели управления
держите кнопку нажатой примерно 2 секунды.
Включенный индикатор означает, что панель
управления заблокирована. Таким образом
программа не может быть случайно изменена,
особенно если в доме дети.
Для отключения блокировки панели управления
держите кнопку нажатой примерно 2 секунды.
Индикатор блокировки люка:
Включенный индикатор означает, что люк заблокирован
во избежание его случайного открывания. Во избежание
его повреждения необходимо дождаться, когда
индикатор погаснет, перед тем как открыть люк. Обычно
индикатор гаснет через 3 минуты после окончания стирки.
ПРИМЕЧАНИЕ: если включена функция “Таймер
отсрочки”, люк открыть нельзя. Для этого необходимо
переключить машину в режим паузы при помощи
кнопки ПУСК/ПАУЗА.
! Быстрое мигание индикатора ПУСК/ПАУЗА
(оранжевый) одновременно с индикатором функций
означает неисправность (см. «Неисправности и
методы их устранения»).
Как открыть и закрыть барабан
рис. 1
рис. 2
C) ЗАГРУЗКА СТИРАЛЬНОЙ МАШИНЫ (рис. 3).
D) ЗАКРЫВАНИЕ (рис. 4):
- закройте полностью барабан, опуская сначала
переднюю дверцу, а затем заднюю;
- затем удостоверьтесь, что крюки передней
дверцы точно вошли в предназначенные места на
задней дверце;
- после того, как крюки защелкнулись, нажмите обе
дверцы слегка вниз, чтобы убедиться они закрыты
плотно;
- и, наконец, закройте внешнюю крышку.
E) OKOHЧATEЛЪHЫЙ OCTAHOB БAPAБAHA (рис. 2):
Пo зaвepшeнии cтиpки кpышки бapaбaнa
oкaжyтcя ввepxy для oблeгчeния иx oткpывaния.
Порядок запуска программы
1. Включите машину при помощи кнопки ВКЛ./ВЫКЛ.
Все индикаторы загорятся на несколько секунд, затем
останутся включенными индикаторы настроек
выбранной программы, и будет мигать индикатор
ПУСК/ПАУЗА.
2. Загрузите белье, закройте дверцы и крышку.
3. Задайте рукояткой ПРОГРАММА нужную
программу.
4. Задайте температуру стирки (см.
«Персонализированные настройки»).
5. Задайте скорость отжима (см.
«Персонализированные настройки»).
6. Поместите моющие средства и добавки (см.
«Стиральные вещества и типы белья»).
7. Включите нужные дополнительные функции.
8. Запустите программу при помощи кнопки ПУСК/ПАУЗА,
соответствующий индикатор загорится зеленым цветом.
Для отмены заданного цикла переключите машину в
режим паузы при помощи кнопки ПУСК/ПАУЗА и выберите
новый цикл.
9. По завершении программы загорится индикатор
. Индикатор БЛОКИРОВКИ ЛЮКA погаснет,
показывая, что теперь можно открыть люк. Выньте
белье и оставить люк полуоткрытым для сушки
барабана.
Выключите стиральную машину, нажав кнопку ВКЛ/
ВЫКЛ.
рис. 3
рис. 4
17
Page 18
Программы
CIS
Таблица программ
Опис ан ие проãраммы
Программы
Специальн ые проãраммы
ЦИKЛ АНТИБАKТЕРИЯ: сильнозаãрязненное белое белье.
7
ЦИKЛ АНТИБАKТЕРИЯ (1): сильнозаãрязненное бел ое и прочное цветное
7
бель е.
НОЧНОЙ ЦИKЛ: слабозаãрязненное делиêатное цв етное белье .
8
ДЕТСKОЕ БЕЛЬЕ: сильнозаãрязненное делиêатное цв етное белье.
9
РУБАШKИ
10
ШЕ Л K/ЗАНАВЕСKИ: для изделий из ше л êа, висêозы и нижнеãо белья.
11
ШЕ Р С Т Ь : для ше р с т и , êаше мира и т.д.
12
Ежедн ев ны е проãраммы
ПРЕД ВАРИТЕЛЬНА Я + ХЛОПОK 90°: очень сильно заãрязн енное белое белье.
1
ХЛОПОK: сильнозаãрязненное белое и прочное цветное бе лье .
2
ХЛОПОK (2): сильнозаãрязненное бел ое и делиêатное цветное белье .
2
ХЛОПОK (3): сильнозаãрязненное бел ое и цветное дел иêатное белье.
3
СИНТЕТИKА: сильнозаяãрязненное белье прочное цветное бел ье .
4
СИНТЕТИKА: слабозаãрязненное прочное цветное белье .
4
MИKС 30': для быс троãо освежения малоãрязноãо белья (не для ше рс т и ,
5
ше л êа и изделия рóчной стирêи).
MИKС 15': для быстро ãо освежения малоãря зноãо белья (не для ше р с т и ,
6
ше л êа и изделия рóчной стирêи).
Дoполнительные проãраммы
Пол о сêание
Отжим
Делиêатны й отжим
Слив
Маêс
темп.
Маêс.
сêорость
(°C)
(об./мин.)
90° 1400
60° 1400 40° 800 -
40° 800 40° 600 30° 0 40° 600 -
9
0°
1400 60° 1400
40° 1400
40° 1400
60° 800 40° 800 -
30° 800 30° 800 -
- 1400
- 1400 -- - 6
- 800 -- - 2,5
- 0 -- - 6
Стир альные средства
Отбел-
иватель
Стирêа Ополасêи-
zz z
zz z
zz z
zz z
z
ватель
zz
zz
zz
zz
zz
zz
zz
zz
zz
zz
zz
-
z
Маêс.
заãрóзêа
(êã)
6
6
4
2
2
1
1
6
6
6
6
2,5
2,5
3
1,5
6
Продол-
житть
циêла
Продолжительность программ стирки можно проверять по дисплею.
Приведенные в таблице значения являются примерными.
Для всех институтов тестирования:
1) Программы управления в соответствии с Директивой EN 60456: задайте программу 7 с температурой 60°C.
2) Длинная программа для х/б белья: задайте программу 2 с температурой 40°C.
3) Короткая программа для х/б белья: задайте программу 3 с температурой 40°C.
Специальные программы
ЦИKЛ АНТИБАKТЕРИЯ
использование отбеливателя при температуре выше 60°C.
(программа 7). Дезинфецирующая программа с высокой температурой, предусматривающая
Для отбеливания залейте отбеливатель, моющее
средство и добавки в соответствующие ячейки (см параграф «Распределитель моющих средств»).
НОЧНОЙ ЦИKЛ
(программа 8). Это бесшумный цикл, который можно включить ночью, экономя электроэнергию.
Данная программа расчитана на стирку синтетических и х/б вещей. По завершении цикла машина
останавливается с водой в барабане; для слива и отжима нажмите кнопку ПУСК/ПАУЗА, в противном случае по
прошествии 8 часов машина автоматически произведет слив воды и отжим.
ДЕТСKОЕ БЕЛЬЕ
(программа 9). Программа удаляет типичные загрязнения детской одежды, гарантируя удаление
моющего средства из ткани во избежание аллергии чувствительной детской кожи. Данный цикл расчитан на
сокращение количества бактерий благодаря использованию большего объема воды и оптимизируя воздействие
специальных дезинфицирующих добавок старильного вещества.
MИKС 30'
(программа 5) предназначена для быстрой стирки слабозагрязненного белья цикл длится всего 30 минут,
что позволяет сэкономить время и электроэнергию. По этой программе (5, 30°C) можно стирать вместе белье из
разных тканей (за исключением шерсти и шелка) с максимальной загрузкой 3 кг.
MИKС 15'
(программа 6) предназначена для быстрой стирки слабозагрязненного белья цикл длится всего 15 минут,
что позволяет сэкономить время и электроэнергию. По этой программе (6, 30°C) можно стирать вместе белье из
разных тканей (за исключением шерсти и шелка) с максимальной загрузкой 1,5 кг.
18
Page 19

Персонализированные
настройки
Регулировка температуры
Настройка температуры стирки производится при помощи регулятора ТЕМПЕРАТУРЫ (см.Таблицу программ).
Значение температуры может быть уменьшено вплоть до стирки в холодной воде (
Машина автоматически не допускает выбор температуры, превышающийs максимальное значение,
предусмотренное для каждой прораммы.
).
Выбор скорости отжима
Выбор скорости отжима выбранной программы производится при помощи регулятора скорости ОТЖИМ.
Для разных программ предусматривается разная максимальная скорость отжима:
Программы Максимальная скорость отжима
Хлопок 1400 оборотов в минуту
Синтетические ткани 800 оборотов в минуту
Шерсть 600 оборотов в минуту
Шелк без отжима
Скорость отжима может быть уменьшена, или же отжим может быть совсем исключен, повернув регулятор в
положение
Машина автоматически не допускает выбор скорости отжима, превышающий максимальную скорость,
предусмотренную для каждой прораммы.
.
Дополнительные функции
Различные функции стирки машины позволяют достичь желаемой чистоты и белизны вашего белья.
Порядок выбора функций:
1. нажмите кнопку нужной вам функции;
2. включение соответствующего индикатора означает, что функция включена.
Примечание: Частое мигание индикатора означает, что данная функция не может быть выбрана для заданной
программы.
CIS
Таймер отсрочки
Для программирования задержки запуска выбранной программы нажмите несколько раз кнопку пока не
отразится нужное время задержки (от 1 до 24 часов).
Для отключения этой функции нажмите кнопку пока не появится сообщение
ПРИМЕЧАНИЕ: После нажатия кнопки ПУСК/ПАУЗА можно изменить время задержки только в сторону
уменьшения.
.
! Эта функция совместима с любой программой.
Суперстирка
Обеспечивает оптимальную стирку благодаря использованию большего объема воды в начале цикла и большей
продолжительности цикла.
! Эта функция несовместима с программами 5, 6, 7, 11, 12, , , , .
Дополнительное Полоскание
При выборе этой функции повышается эффективность ополаскивания, обеспечивая максимальное удаление
моющего вещества. Эта функция особенно удобна для людей с кожей, чувствительной к стиральным веществам.
! Эта функция несовместима с программами 5, 6, , , .
Легкая глажка
При выборе этой функции циклы стирки и отжима изменяются таким образом, чтобы сократить складки на
белье. По завершении цикла машина производит медленное вращение барабана.
При выборе программы 11 машина завершает цикл без слива воды, и Индикатор функции ЛЕГКАЯ
ГЛАЖКА и индикатор ПУСК/ПАУЗА мигают (оранжевым цветом), индикатор фазы “Полоскание” горит, не
мигая. Для слива воды и выгрузки белья необходимо нажать кнопку ПУСК/ПАУЗА или кнопку ЛЕГКАЯ
ГЛАЖКА.
! Эта функция несовместима с программами 5, 6, 7, 8, 9, 12, , , .
19
Page 20
Моющие средства и
типы белья
CIS
Распределитель моющих средств
Хороший результат стирки зависит также от правильной дозировки моющего средства: его избыток не
гарантирует более эффективную стирку, напротив
может привести к образованию налетов внутри
машины и загрязнению окружающей среды.
Выдвиньте распределитель и заполните его
отделения моющим
средством и смягчителем:
Отделение 1: моющее средство для предварительной стирки (порошок)
ячейка 2: Стиральное вещество
(порошок или жидкость)
Жидкое стиральное вещество следует помещать
непосредственно в барабан в специальном
круглом пластмассовом дозаторе.
ячейка 3: Добавки (ополаскиватель и т.д.)
Когда вы наливаете ополаскиватель в ячейку 3,
обращайте внимание, чтобы не превысить
максимальный уровень, указанный отметкой «max».
Ополаскиватель автоматически подается в
барабан в процессе последнего ополаскивания.
По завершении программы стирки в ячейке 3
остается вода. Она необходима для подачи в
барабан очень густых ополаскивателей, т.е. для
разбавления концентрированных
ополаскивателей. Если в ячейке 3 останется воды
больше нормального, это значит, что канал слива
ополаскивателя в барабан засорился. Смотрите
описание чистки ячеек на стр. “Техническое
обслуживание и уход”.
ячейка 4:
Цикл отбеливания
Отбеливание
Отбеливание производится только с программами
2, 3, 7,
Добавьте отбеливатель в чашу 4, моющее средство и
ополаскиватель в соответствующие отделения, затем
выберите одну из вышеуказанных программ.
Рекомендуется только для очень грязного х/б белья.
.
Подготовка белья
• Разделите белье по следующим признакам:
- тип ткани / обозначения на этикетке.
- цвет: отделите цветное белье от белого.
• Выньте из карманов все предметы и проверьте пуговицы.
• Не превышайте максимальную загрузку барабана,
указанную для сухого белья:
Прочные ткани: макс. 6 кг
Синтетические ткани: макс. 2,5 кг
Деликатные ткани: макс. 2 кг
Шерсть: макс. 1 кг
Сколько весит белье?
1 простыня 400-500 гр.
1 наволочка 150-200 гр.
1 скатерть 400-500 гр.
1 халат 900-1200 гр.
1 полотенце 150-250 гр.
Изделия, требующие деликатной
стирки
Рубашки: используйте специальную программу 10
для стирки рубашек из разных тканей и разных
цветов.
Это обеспечит максимальную сохранность вещей и
сделает их менее мятыми.
Шелк: используйте специальную программу 11 для
стирки всех шелковых вещей. Рекомендуется
использовать специальное стиральное вещество
для деликатных тканей.
Занавески: сверните и положите в наволочку или в
сетчатый мешочек. Используйте программу 11.
Шерсть: Стиральная машина марки единственная
получила престижный знак Woolmark Platinum Care
(M.0508) от Компании The Woolmark Company,
который сертифицирует машинную стирку всех
шерстяных изделий, даже тех, на этикетках которых
указано «только ручная стирка»
программы 12 вы можете надежно и эффективно
стирать любые шерстяные изделия (макс. 1 кг) с
гарантированным лучшими результатами.
. При выборе
Система балансировки белья
Перед каждым отжимом во избежание чрезмерных
вибраций и для равномерного распределения белья
в барабане машина производит вращения со
скоростью, слегка превышающей скорость стирки.
Если после нескольких попыток белье не будет
правильно сбалансировано, машина произведет
отжим на меньшей скорости по сравнению с
предусмотренной.
20
Page 21

Предосторожности и
рекомендации
! Стиральная машина спроектирована и изготовлена в
соответствии с международными нормативами по
безопасности. Необходимо внимательно прочитать
настоящие предупреждения, составленные в целях
вашей безопасности.
Общие требования к безопасности
• Данное изделие предназначено исключительно для
домашнего использования.
• Не разрешайте пользоваться машиной лицам
(включая детей) с ограниченными физическими,
сенсорными, умственными способностями и не
обладающих достаточными знаниями и опытом,
если только они не пользуются машиной под
наблюдением и после инструктажа со стороны лиц,
ответственных за их безопасность. Не разрешайте
детям играть с машиной.
• Стиральной машиной должны пользоваться только
взрослые лица, соблюдающие инструкции,
приведенные в данном техническом руководстве.
• Не прикасайтесь к изделию влажными руками,
босиком или во влажной одежде.
• Не тяните за сетевой кабель для отсоединения
изделия из электро розетки, возьмитесь за вилку
рукой.
• Избегайте контактов со сливаемой водой, так как
она может быть очень горячей.
• Категорически запрещается открывать люк силой:
это может привести к повреждению защитного
механизма, предохраняющего от случайного
открытия машины.
• В случае неисправности категорически
запрещается открывать внутренние механизмы
изделия с целью их самостоятельного ремонта.
• Избегайте контактов детей с работающей
стиральной машиной.
• При необходимости переместить стиральную
машину следует выполнять эту операцию вдвоем
или втроем с предельной осторожностью. Никогда
не перемещайте машину в одиночку, так как
машина очень тяжелая.
• Перед загрузкой в стиральную машину белья
проверьте, чтобы барабан был пуст.
Утилизация
• Уничтожение упаковочных материалов: соблюдайте
местные нормативы с целью повторного
использования упаковочных материалов.
• Согласно Европейской Директиве 2002/96/СЕ
касательно утилизации электронных и электрических
электроприборов электроприборы не должны
выбрасываться вместе с обычным городским
мусором. Выведенные из строя приборы должны
собираться отдельно для оптимизации их утилизации и
рекуперации составляющих их материалов, а также
для безопасности окружающей среды и здоровья.
Символ зачеркнутая мусорная корзинка, имеющийся
на всех приборах, служит напоминанием об их
отдельной утилизации.
За более подробной информацией о правильной
утилизации бытовых электроприборов пользователи
могут обратиться в специальную государственную
организацию или в магазин.
Экономия энергии и охрана
окружающей среды
Экономия моющих средств, воды, электроэнергии и времени
• Для экономии ресурсов следует максимально
загружать стиральную машину. Один цикл стирки
при полной загрузке вместо двух циклов с
наполовину загруженным барабаном позволяет
сэкономить до 50% электроэнергии.
• Цикл предварительной стирки необходим только
для очень грязного белья. При цикле
предварительной стирки расходуется больше
стирального порошка, времени, воды и на 5 –
15% больше электроэнергии.
• Если вы обработаете пятна пятновыводителем
или замочите белье перед стиркой, это поможет
избежать стирки при высоких температурах.
Использование программы стирки при 60°C
вместо 90°C, или 40°C вместо 60°C позволяет
сэкономить до 50% электроэнергии.
• Правильная дозировка стирального порошка в
зависимости от жесткости воды, степени
загрязнения и объема загружаемого белья
помогает избежать нерационального расхода
моющего средства и загрязнения окружающей
среды: хотя стиральные порошки и являются
биоразлагаемыми, они содержат вещества,
отрицательно влияющие на экологию. Кроме
того, по возможности избегайте использовать
ополаскиватели.
• Использование стиральной машины утром или
вечером уменьшит пиковую нагрузку на
электросеть. С помощью функции «Таймер
отсрочки» можно запрограммировать начало
стирки с вышеуказанной целью.
• Если белье должно сушиться в автоматической
сушке, необходимо выбрать большую скорость
отжима. Интенсивный отжим сэкономит время и
электроэнергию при автоматической сушке.
CIS
21
Page 22

Техническое обслуживание
и уход
CIS
Отключение воды и электричества
• Перекрывайте водопроводный кран после каждой стирки. Таким образом сокращается износ
водопроводной системы стиральной машины и
устраняется вероятность протечек.
• Всегда вынимайте вилку из розетки перед мойкой и обслуживанием машины.
Уход за стиральной машиной
Внешние и резиновые части машины очищайте
мягкой тканью с теплой мыльной водой. Не используйте растворители или абразивные чистящие
средства.
Уход за дверцей машины и барабаном
• После каждой стирки оставляйте дверцу машины полуоткрытой во избежание образования в
барабане неприятных запахов и плесени.
Чистка насоса
Стиральная машина имеет сливной насос самоочищающегося типа, который не требует очистки или
особого обслуживания. Однако мелкие предметы
(монеты, пуговицы и др.) могут случайно попасть в
насос. Для их извлечения насос оборудован
«уловителем» — фильтром, доступ к которому
закрыт нижней передней панелью.
! Убедитесь, что цикл стирки закончился, и отклю-
чите оборудование от сети.
Как достать предметы, упавшие в пространство
между барабаном и кожухом машины:
1. снимите нижний
плинтус в передней
части стиральной
машины, потянув
обеими руками за его
края (смотрите
рисунок);
2. выверните крышку
фильтра, вращая ее
против часовой стрел-
ки (см. рис.): из
насоса может вылиться немного воды – это
нормальное явление.
3.тщательно прочистите
фильтр изнутри;
4. заверните крышку
обратно;
5. установите на
место переднюю
панель, предваритель-
но убедившись, что крюки вошли в
соответствующие петли.
Проверка заливного шланга
Проверяйте шланг не реже одного раза в год. При
любых признаках течи или повреждения немедленно замените шланг. Во время работы машины
неисправный шланг, находящийся под давлением
воды, может внезапно лопнуть.
!
Никогда не используйте шланги, бывшие в
употреблении.
Разборка:
Слегка нажмите на большую
кнопку на передней стороне
распределителя и вытяните
его вверх (рис. 1, 2)
рис. 1
22
.
Как чистить распределитель моющих средств
Чистка:
Затем промойте распределитель под струей воды (рис. 3),
используя старую зубную щетку. Выньте пару сифонов,
вставленных в вершину отделений 1 и 2 (рис. 4), проверьте
не забиты ли они и промойте их.
рис. 2
рис. 3
Сборка:
Установите пару сифонов в
специальные отверстия и затем поместите распределитель на место, вставляя его
до щелчка (рис. 4, 2, 1).
рис. 4
Page 23

Поиск неисправностей и
методы их устранения
Если ваша стиральная машина не работает. Прежде чем обратиться в Центр Сервисного обслуживания
(см. Сервисное обслуживание), проверьте, можно ли устранить неисправность, следуя рекомендациям,
приведенным в следующем перечне.
Неисправности:
Стиральная машина не
включается.
Цикл стирки не запускается.
Стиральная машина не заливает
воду (часто мигает индикатор
первой фазы стирки).
Машина непрерывно заливает и
сливает воду.
Возможные причины / Методы устранения:
• Штепсельная вилка не соединена с электро розеткой или отходит и не
обеспечивает контакта.
• В доме отключено электричество.
• Люк плохо закрыт.
• Не была нажата кнопка ВКЛ/ВЫКЛ.
• Не была нажата кнопка ПУСК/ПАУЗА.
• Перекрыт водопроводный кран.
• Была запрограммирована задержка запуска цикла (Таймер отсрочки,
(см. «Персонализированные настройки»).
• Водопроводный шланг не подсоединен к крану.
• Шланг согнут.
• Перекрыт водопроводный кран.
• В доме нет воды.
• Недостаточное водопроводное давление.
• Не была нажата кнопка ПУСК/ПАУЗА.
• Сливной шланг не находится на высоте 65 – 100 см. от пола (см. «Установка»).
• Конец сливного шланга погружен в воду (см. «Установка»).
• Настенное сливное отверстие не оснащено вантузом для выпуска
воздуха.
Если после вышеперечисленных проверок неисправность не будет
устранена, следует перекрыть водопроводный кран, выключить
стиральную машину и обратиться в Центр Сервисного Обслуживания.
Если ваша квартира находится на последних этажах здания, могут
наблюдаться явления сифона, поэтому стиральная машина производит
непрерывный залив и слив воды. Для устранения этой аномалии в
продаже имеются специальные клапаны против явления сифона.
CIS
Стиральная машина не сливает
воду и не отжимает белье.
Стиральная машина сильно
вибрирует в процессе отжима.
Утечки воды из стиральной
машины.
Индикатор ПУСК/ПАУЗА
(оранжевый) и индикаторы
функций часто мигают.
В процессе стирки образуется
слишком обильная пена.
• Выбранная программа не предусматривает слив воды: для некоторых
программ необходимо включить слив вручную.
• Включена функция ЛЕГКАЯ ГЛАЖКА: для завершения программы
нажмите кнопку ПУСК/ПАУЗА (см. «Персонализированные
настройки»).
• Сливной шланг согнут (см. «Установка»).
• Засорен сливной трубопровод.
• В момент установки стиральной машины барабан был разблокирован
неправильно (см. «Установка»).
• Стиральная машина установлена неровно (см. «Установка»).
• Машина зажата между стены и мебелью (см. «Установка»).
• Плохо прикручен водопроводный шланг (см. «Установка»).
• Засорен распределитель моющего средства (порядок его чистки см. в
параграфе «Техническое обслуживание и уход»).
• Сливной шланг плохо закреплен (см. «Установка»).
• Выключите машину и выньте штепсельную вилку из сетевой розетки,
подождите 1 минуту и вновь включите машину.
Если неисправность не устраняется, обратитесь в Сервисную Службу.
• Моющее средство непригодно для стирки в стиральной машине (на
упаковке должно быть указано «для стирки в стиральной машине»,
«для ручной и машинной стирки» или подобное).
• В распределитель было помещено чрезмерное количество моющего
средства.
23
Page 24

Сервисное
обслуживание
CIS
Перед тем как обратиться в Службу Сервиса:
Проверьте, нельзя ли устранить неисправность самостоятельно (см. «Неисправности и методы их
устранения»);
Вновь запустите программу для проверки исправности машины;
В протвном случае обратиться в Авторизованный Сервисный Центр по телефонам, указанным в
гарантийном таллоне.
Никогда не обращайтесь к неавторизованным сервисным центрам.
При обращении в Сервисную Службу необходимо сообщить:
тип неисправности;
номер гарантийного документа (сервисной книжки, сервисного сертификата и т.п.);
модель машины (Мод.) и серийный номер (S/N), указанные в информационной табличке, располо-
женной на задней панели стиральной машины.
Технические хар актеристики
Модел ь
Страна-изготовитель
Габаритные
размеры
ARTXF 149
Италия
ши ри н а 40 с м
высота 85 см
глубина 60 см
Водопроводное подсоединение
Скор ос ть отжима
Пр о гр амм ы упр ав ления в
с оот в етс тв ии с Д и р е кти в о й
EN 60456
max давление 1 Мпа (10 бар)
min давление 0,05 Мпа (0,5 бар)
объе м барабана 42 л
äî 1400 îá/ìèí
программа 7 ; температура 60°С;
при загрузке до 6 кг.
Вместимос ть
Номинальное
значен ие н апр я жения
электропитания или
диапазон напря жения
Условное обозначение
рода электрического
тока или номинальная
частота переменного
òîêà
Kласс зашиты от
поражения
электриче ским током
1 - 6 êã
220-240 V ~
50 Hz
Kласс защиты I
В случае необходимости получения информации по сертиф икатам соответствия
или получения копий сертификатов соответствия на данную технику, Вы можете
отправить запрос по электронному адресу cert.rus@indesit.com.
Дату производства данной
техники можно получить из
серийного
номера,расположенного под
штр их-кодом (S/N XXXXXXXXX),
следующим образом
Степень защиты от попадания твердых частиц и влаги, обеспечиваемая
защитной оболочкой, за исключением низковольтного оборудования, не
имеющего защиты от влаги
Kласс энергопотр ебления
Производитель: Indesit Company
Виале А. Мерлони 47, 60044, Фабриано (АН), Италия
Данное изделие соответствует
следующим Директивам
Европе йс ког о Сообщества:
- 2004/108/СЕ (Электромагнитная
совместимость);
- 2006/95/CE (Низкое напряжение)
- 2 002 /96/ CE
- 1-ая цифра в S/N соответствует
последней цифре года,
- 2-ая и 3-я цифры в S/N - порядковому
номеру месяца года,
- 4-à ÿ è 5-àÿ öè ôð û â S / N - äå íü
: IPX04
)
Импортер: ООО “Индезит ÐÓÑ”
С вопросами (в России) äî 01.01.2011: Россия, 129223, Москва, Проспект Мира, ÂÂÖ, ïàâ. 46
обращаться по адресу: ñ 01.01.2011: Россия, 127018, Москва, ул. Двинцев, дом 12, корп. 1
24
Page 25

Instrukcja obs³ugi
PRALKA
PL
Polski
ARTXF 149
Spis treci
PL
Instalacja, 26-27
Rozpakowanie i wypoziomowanie
Pod³¹czenia hydrauliczne i elektryczne
Pierwszy cykl prania
Dane techniczne
Opis pralki i uruchamianie programu, 28-29
Panel sterowania
Kontrolki
Jak otwieraæ i zamykac kosz
Uruchamianie programu
Programy, 30
Tabela programów
Personalizacja, 31
Ustawianie temperatury
Ustawianie wirowania
Funkcje
rodki pior¹ce i bielizna, 32
Szufladka na rodki pior¹ce
Cykl wybielania
Przygotowanie bielizny
Tkaniny wymagaj¹ce szczególnego traktowania
System równowa¿enia ³adunku
Zalecenia i rodki ostro¿noci, 33
Ogólne zasady bezpieczeñstwa
Utylizacja
Oszczêdnoæ i ochrona rodowiska
Utrzymanie i konserwacja, 34
Wy³¹czenie wody i pr¹du elektrycznego
Czyszczenie pralki
Czyszczenie drzwiczek i bêbna
Czyszczenie pompy
Kontrola rury doprowadzania wody
Jak czyciæ szufladkê rodków pior¹cych
Nieprawid³owoci w dzia³aniu i sposoby
ich usuwania, 35
Serwis Techniczny, 36
#
Page 26

Instalacja
PL
Nale¿y zachowaæ niniejsz¹ ksi¹¿eczkê instrukcji dla
przysz³ych konsultacji. W razie sprzeda¿y, oddania,
czy przeniesienia pralki w inne miejsce nale¿y upewniæ
siê, by przekazana zosta³a ona razem z instrukcj¹, aby
nowy w³aciciel zapoznaæ siê móg³ z dzia³aniem
urz¹dzenia i odpowiednimi informacjami.
Nale¿y uwa¿nie przeczytaæ instrukcjê obs³ugi,
gdy¿ zawiera ona wa¿ne informacje dotycz¹ce
instalacji oraz w³aciwego i bezpiecznego
u¿ytkowania pralki.
Rozpakowanie i wypoziomowanie
Rozpakowanie
1. Rozpakowaæ pralkê.
2. Sprawdziæ, czy nie
dozna³a ona uszkodzeñ
w czasie transportu.
Jeli by³aby ona
uszkodzona, nie
pod³¹czaæ jej i
powiadomiæ
sprzedawcê.
3. Odkrêciæ cztery ruby
ochronne, zamocowane
na czas transportu, oraz
zdj¹æ gumow¹
podk³adkê z
odpowiedni¹ rozpórk¹,
znajduj¹ce siê w tylnej cianie i (zobacz rysunek).
4. Zatkaæ otwory przy pomocy za³¹czonych do pralki
plastykowych zalepkek.
5. Zachowaæ wszystkie te czêci: gdyby okaza³o siê
konieczne przewiezienie pralki w inne miejsce, powinny
one zostaæ ponownie zamontowane.
Uwaga: w razie ponownego uzycia kròtsze srubki
powinny byc przymocowane u gòry.
Czêci opakowania nie nadaj¹ siê do zabawy dla
dzieci
Wypoziomowanie
1. Ustawiæ pralkê na p³askiej i twardej pod³odze; nie
opieraæ jej o ciany, meble itp.
Staranne wypoziomowanie pralki zapewnia jej
stabilnoæ i zapobiega wibrowaniu, ha³asom i
przesuwaniu siê urz¹dzenia w czasie pracy. W razie
ustawienia na dywanie lub wyk³adzinie dywanowej
nale¿y tak wyregulowaæ nó¿ki, aby pod pralk¹
pozostawa³a wolna przestrzeñ niezbêdna dla
wentylacji.
Ustawienie, przeniesienie
Jeli twój model pralki
wyposa¿ony jest w
specjalne wysuwalne
kó³ka, ³atwo jest j¹
przesuwaæ. Aby
wysun¹æ kó³ka i móc
dziêki temu ³atwo
przesun¹æ pralkê, nale¿y
poci¹gn¹æ dwigniê,
znajduj¹c¹ siê na dole z
lewej strony pod
coko³em. Po
przesuniêciu pralki
nale¿y z powrotem ustawiæ dwigniê w pierwotnej
pozycji. Urz¹dzenie stoi teraz pewnie na pod³odze.
Pod³¹czenie do sieci wodnej i elektrycznej
Pod³¹czenie rury pobierania wody
1. Podùàczyã przewód
zasilajàcy poprzez
przykræcenie do zaworu
wody zimnej z koñcówkà
gwintowanà ¾ gas (patrz
rysunek). Przed
pod³¹czeniem spuszczaæ
wodê do momentu, a¿
stanie siê ona ca³kowicie
przezroczysta.
2. Pod³¹czyæ rurê
pobierania wody do pralki,
przykrêcaj¹c j¹ do
odpowiedniego otworu
pobierania wody,
znajduj¹cego siê w tylnej
cianie pralki, z prawej
strony u góry (zobacz
rysunek).
$
2. Jeli pod³oga nie jest
dok³adnie pozioma,
nale¿y wypoziomowaæ
pralkê, dokrêcaj¹c lub
odkrêcaj¹c przednie nó¿ki
(zobacz rysunek). K¹t
nachylenia, zmierzony na
górnym blacie pralki, nie
powinien przekraczaæ 2°.
3. Zwróciæ uwagê, by na
rurze nie by³o zgiêæ ani
ciniêæ.
Cinienie hydrauliczne kurka powinno mieciæ siê w
przedziale podanym w tabeli Danych technicznych
(zobacz na s¹siedniej stronie).
Jeli rura doprowadzania wody okaza³aby siê za
krótka, nale¿y zwróciæ siê do wyspecjalizowanego
sklepu lub do upowa¿nionego fachowca.
Nigdy nie instalowaæ rur u¿ywanych.
Page 27

Pod³¹czenie przewodu odp³ywowego
Pod³¹czyæ przewód
odp³ywowy, nie zginaj¹c
go, do rury ciekowej lub
do otworu odp³ywowego w
cianie, które powinny
65 - 100 cm
znajdowaæ siê na
wysokoci od 65 do 100
cm od pod³ogi;
Nie u¿ywaæ przed³u¿aczy ani rozga³êników.
PL
Przewód nie powinien byæ pozginany ani
przygnieciony.
Przewód zasilania elektrycznego mo¿e byæ
wymieniany wy³¹cznie przez autoryzowanych
techników.
Uwaga! Producent nie ponosi ¿adnej odpowiedzialnoci
w przypadku nieprzestrzegania powy¿szych zasad.
ewentualnie oprzeæ go na
brzegu zlewu lub wanny,
przymocowuj¹c do kranu
prowadnik, znajduj¹cy siê
w wyposa¿eniu (patrz
rysunek). Wolny koniec
przewodu odp³ywowego
nie powinien byæ
zanurzony w wodzie.
Odradza siê stosowanie przewodów przed³u¿aj¹cych;
jeli to konieczne, przewód przed³u¿aj¹cy powinien
mieæ tak¹ sam¹ rednicê jak oryginalny, a jego d³ugoæ
nie mo¿e przekraczaæ 150 cm.
Pod³¹czenie elektryczne
Przed w³o¿eniem wtyczki do gniazdka elektrycznego
nale¿y siê upewniæ, czy:
gniazdko posiada uziemienie i jest zgodne z
obowi¹zuj¹cymi przepisami;
Pierwszy cykl prania
Po zainstalowaniu pralki, przed przyst¹pieniem do jej
u¿ytkowania, nale¿y wykonaæ jeden cykl prania ze
rodkiem pior¹cym, ale bez wsadu, nastawiaj¹c
program 2.
Dane techniczne
Model
Wymiary
Pojemnoæ
ARTXF 149
szerokoæ cm 40
wysokoæ cm 85
g³êbokoæ cm 60
od 1 do 6 kg
gniazdko jest w stanie wytrzymaæ maksymalne
obci¹¿enie mocy maszyny, wskazane w tabeli
Danych technicznych (patrz obok);
napiêcie zasilania mieci siê w wartociach
wskazanych w tabeli Danych technicznych
(patrz obok);
gniazdko pasuje do wtyczki pralki. W przeciwnym
razie nale¿y wymieniæ gniazdko lub wtyczkê.
Nie nale¿y instalowaæ pralki na otwartym powietrzu,
nawet w os³oniêtym miejscu, gdy¿ wystawienie
urz¹dzenia na dzia³anie deszczu i burz jest bardzo
niebezpieczne.
Po zainstalowaniu pralki gniazdko elektryczne
powinno byæ ³atwo dostêpne.
Dane pr¹du
elektrycznego
Dane sieci
wodoci¹gowej
Szybkoæ wirowania
Programy kontrolne
zgodnie z przepisami
EN 60456
dane techniczne umieszczone s¹ na
tabliczce na maszynie
Maksymalne cinienie 1 MPa (10 barów)
cinienie minimalne 0,05 MPa (0,5 barów)
pojemnoæ bêbna 42 litrów
do 1400 obrotów na minutê
program 7; temperatura 60°C;
wykonane przy 6 kg za³adowanej
bielizny.
Urz¹dzenie to zosta³o wyprodukowane
zgodnie z nastêpuj¹cymi przepisami EWG:
- 89/336/CEE z dn. 03/05/89
(o Kompatybilnoci Elektromagnetycznej)
wraz z kolejnymi zmianami
- 2002/96/CE
- 2006/95/CE (o Niskim Napiêciu)
%
Page 28

Opis pralki i
uruchamianie programu
PL
Panel sterowania
Przycisk z kontrolk¹
W£¥CZANIA/
WY£¥CZANIA
PROGRAMÓW
Przycisk z kontrolk¹ W£¥CZANIA/WY£¥CZANIA: aby
w³¹czyæ lub wy³¹czyæ urz¹dzenie. Zapalona kontrolka
wskazuje, ¿e urz¹dzenie jest w³¹czone.
Pokrêt³o PROGRAMÓW: do ustawiania programów. W
czasie trwania programu pokrêt³o pozostaje nieruchome.
Przycisk WIROWANIA: do nastawienia lub wy³¹czenia
wirowania (patrz Personalizacja).
Przycisk TEMPERATURY: do regulacji temperatury prania lub
do nastawienia prania w zimnej wodzie (patrz Personalizacja).
WYWIETLACZ: aby wywietliæ czas pozostaj¹cy do
zakoñczenia wybranego cyklu prania oraz, jeli zosta³o
ustawione opónienie startu, czas pozostaj¹cy do
rozpoczêcia prania.
Przycisk z kontrolk¹ BLOKADY PRZYCISKÓW: aby
w³¹czyæ lub wy³¹czyæ blokadê panelu sterowania.
TEMPERATURY
Pokrêt³o
BLOKADY PRZYCISKÓW
Przycisk
WIROWANIA
Przycisk z kontrolk¹
WYWIETLACZ
Przycisk
Funkcja stand by
Pralka ta, w myl nowych norm europejskich
zwi¹zanych z oszczêdnoci¹ elektryczn¹, posiada
system auto wy³¹czenia (stand by), który w³¹cza siê
po 30 minutach nie u¿ytkowania. Ponownie lekko
wcisn¹æ przycisk W£¥CZANIA/WY£¥CZANIA i
poczekaæ, a¿ pralka ponownie w³¹czy siê.
Kontrolki
Kontrolki dostarczaj¹ wa¿nych informacji.
Oto co sygnalizuj¹:
Kontrolki bie¿¹cej fazy prania
Przy obracaniu pokrêt³em PROGRAMÓW kontrolki
bêd¹ siê zapalaæ, wskazuj¹c kolejne fazy pracy,
które wykona urz¹dzenie na podstawie ustawionego
programu. Po wybraniu i uruchomieniu ¿¹danego cyklu
prania kontrolki bêd¹ siê kolejno zapalaæ, wskazuj¹c
stan zaawansowania programu:
Kontrolki
CYKLU
STANU ZAAWANSOWANIA
Kontrolka
BLOKADY OKR¥G£YCH
DRZWICZEK
Przycisk z kontrolk¹
START/PAUZA
Przyciski z kontrolkami
FUNKCJI
Przyciski z kontrolkami FUNKCJI: do wyboru dostêpnych
funkcji. Kontrolka wybranej funkcji pozostaje zawiecona.
Kontrolki STANU ZAAWANSOWANIA CYKLU: umo¿liwiaj¹
kontrolê stanu zaawansowania programu prania.
Kontrolka BLOKADY OKR¥G£YCH DRZWICZEK:
pozwala sprawdziæ czy mo¿liwe jest otwarcie okr¹g³ych
drzwiczek (patrz strona obok).
Przycisk z kontrolk¹ START/PAUZA: do uruchamiania
programów lub ich chwilowego przerywania.
N.B.: aby przerwaæ wykonywane pranie, nale¿y nacisn¹æ
ten przycisk, jego kontrolka zacznie pulsowaæ na
pomarañczowo, natomiast kontrolka bie¿¹cej fazy bêdzie
wieciæ ci¹g³ym wiat³em. Jeli kontrolka BLOKADY
OKR¥G£YCH DRZWICZEK
otworzyæ drzwiczki pralki. W celu ponownego
uruchomienia prania od momentu, w którym zosta³o ono
przerwane, nale¿y ponownie nacisn¹æ ten przycisk.
&
jest wy³¹czona, mo¿na
Pranie zasadnicze
P³ukanie
Wirowanie
Wydalanie wody
Koniec cyklu
Przyciski funkcyjne i ich kontrolki
Po dokonaniu wyboru funkcji jej kontrolka zawieci siê.
W przypadku wyboru funkcji niezgodnej z
ustawionym programem jej kontrolka zacznie
pulsowaæ, zostanie wyemitowany sygna³ dwiêkowy,
a funkcja nie w³¹czy siê. Jeli ustawiona funkcja
bêdzie sprzeczna z inn¹, wybran¹ wczeniej,
uwzglêdniony zostanie tylko ostatni dokonany wybór.
Page 29

Kontrolka temperatury
Przy wyborze wartoci temperatury
zawieci siê w³aciwa kontrolka.
Kontrolka wirowania
Przy wyborze prêdkoci wirowania
zawieci siê w³aciwa kontrolka.
Kontrolka blokady przycisków
Aby w³¹czyæ blokadê panelu sterowania, nale¿y
przytrzymaæ przycisk wciniêty przez oko³o 2 sekundy.
Zapalona kontrolka wskazuje, ¿e panel sterowania jest
zablokowany. W ten sposób uniemo¿liwia siê
dokonywanie przypadkowych zmian w programach,
zw³aszcza jeli w domu s¹ dzieci. Aby wy³¹czyæ
blokadê panelu sterowania, nale¿y przytrzymaæ
przycisk wciniêty przez oko³o 2 sekundy.
Kontrolka blokady okr¹g³ych drzwiczek
Zapalona kontrolka wskazuje, ¿e okr¹g³e drzwiczki pralki
s¹ zablokowane, aby zapobiec ich przypadkowemu
otwarciu. Przed przyst¹pieniem do otwierania drzwiczek
nale¿y poczekaæ, a¿ kontrolka zganie, w przeciwnym
razie mo¿na spowodowaæ ich uszkodzenie (oko³o 3 minut).
N.B.: jeli funkcja Timer opónienia jest w³¹czona, nie
mo¿na otworzyæ okr¹g³ych drzwiczek, w celu ich otwarcia
konieczne jest chwilowe zatrzymanie urz¹dzenia poprzez
naciniêcie przycisku START/PAUZA.
Szybkie pulsowanie (pomarañczowej) kontrolki START/
PAUZA równoczenie z kontrolk¹ funkcji sygnalizuje
wyst¹pienie nieprawid³owoci w dzia³aniu pralki (patrz
Nieprawid³owoci w dzia³aniu i sposoby ich usuwania).
Jak otwieraæ i zamykac kosz
Rys. 1
Rys. 2
A) OTWIERANIE. (Rys. 1):
Podnieæ zewnêtrzn¹ pokrywê i ca³kowicie j¹
otworzyæ.
B) OTWIERANIE KOSZA (Soft opening):
Nacisn¹æ palcem przycisk wskazany na rys. 2 i
koszyk delikatnie siê otworzy.
C) WK£ADANIE BIELIZNY (Rys. 3).
D) ZAMKNIÊCIE (Rys. 4):
- dobrze zamkn¹æ drzwiczki, opuszczaj¹c
najpierw drzwiczki przednie i opieraj¹c na nich
drzwiczki tylne;
- upewniæ siê, czy zaczepy przednich drzwiczek
dobrze wesz³y na swoje miejsce w tylnych
drzwiczkach;
- po us³yszeniu charakterystycznego clac, co
wiadczy o zaskoczeniu zaczepów, lekko
docisn¹æ oboje drzwiczek, które nie powinny
siê rozczepiæ.;
- na zakoñczenie zamkn¹æ klapê zewnêtrzn¹.
E) KOÑCOWE ZATRZYMANIE SIÊ KOSZA (Rys. 2):
Po zakoñczeniu mycia kosz ustawi siê wraz z
drzwiczkami na górnej pozycji w celu
u³atwienia otwierania.
Uruchamianie programu
1. W³¹czyæ urz¹dzenie naciskaj¹c przycisk
W£¥CZANIA/WY£¥CZANIA. Wszystkie kontrolki
zapal¹ siê na kilka sekund, nastêpnie wy³¹cz¹ siê i
zacznie pulsowaæ kontrolka START/PAUZA.
2. Za³adowaæ bieliznê do pralki, zamkn¹æ drzwiczki i
pokrywê.
3. Ustawiæ ¿¹dany program przy pomocy pokrêt³a
PROGRAMÓW.
4. Ustawiæ temperaturê prania (patrz Personalizacja).
5. Ustawiæ szybkoæ wirowania (patrz Personalizacja).
6. Wsypaæ rodek pior¹cy i dodatki (patrz rodki
pior¹ce i bielizna).
7. Wybraæ ¿¹dane funkcje.
8. Uruchomiæ program naciskaj¹c przycisk START/
PAUZA, kontrolka programu bêdzie wieciæ ci¹g³ym
wiat³em w kolorze zielonym. Aby anulowaæ ustawiony
cykl, nale¿y chwilowo zatrzymaæ urz¹dzenie, naciskaj¹c
przycisk START/PAUZA, i wybraæ nowy cykl.
9. Po zakoñczeniu programu zapali siê kontrolka
Kontrolka BLOKADY DRZWICZEK zganie,
wskazuj¹c, ¿e otwarcie drzwiczek jest mo¿liwe.
Wyj¹æ bieliznê i pozostawiæ drzwiczki pralki uchylone,
aby bêben móg³ wyschn¹æ.
Wy³¹czyæ pralkê, naciskaj¹c przycisk W£¥CZANIE/
WY£¥CZANIE.
.
PL
Rys. 3
Rys. 4
'
Page 30

PL
Programy
Tabela programów
Opis programu
Programy
Progra my specjalne
CYKL HIGIENICZNY: Tkaniny bia³ e bardzo mocno
7
zabrudzone.
CYKL HIGIENICZNY (1): Tkaniny bia³e i
7
kolorowe, wytrzyma³e, mocno zabrudzone.
PROGRAM SPOKOJNY SEN:
8
kolorowe, delikatne, lekko zabrudzone.
9 BABY:
10 KOSZULE
11 JEDWAB/FIRANY:
12 WE£N A: Do we³ny, kaszmiru, itp.
1
2
2
3
4
4
5
6
Programy czêciowe
Tkaniny kol orowe, delikatne, mocno zabrudzone.
Do jedwabiu, wi skozy, bieli zny.
Programy codzienne
PRANIE WSTÊPNE:
zabrudzona.
BAWE£NA: Tkaniny bia³e i kolorowe,
wytrzyma³e, mocno zabr udzone.
BAWE£NA (2): Tkaniny bia³e i kolorowe,
delikatne, mocno zabrudzone.
BAWE£NA KOLOROWE (3): Tkanin y bi a³e lekko
zabrudzone i delikatne kolorowe.
SYNTETYCZNE: Tkaniny kolorowe, wytrzyma³e,
mocno zabrudzone.
SYNTETYCZNE: Tkaniny kolorowe, wytrzyma³e,
lekko zabrudzone.
MIX 30': W celu szybk iego odwie¿enia lekko
zabrudzonych tkanin (niewskazany dla
i tk anin przeznaczonych do prani a rêcznego).
MIX 15’: W celu szybki ego odwie¿enia lekko
zabrudzonych tka nin (niewskazany dla we ³ny, jedwabiu
i tk anin przeznaczonych do prani a rêcznego).
P³ukanie
Wirowanie
Wirowanie delikatne
Wydalanie
wody
Tkaniny
Bielizna bia³a silnie
we³ny, j edwabiu
Prêdkoæ
Temp.
max
(°C)
90° 1400
60° 1400 -
40° 800 -
40° 800 -
40° 600 -
30° 0 -
40° 600 -
90° 1400 -
60° 1400
40° 1400
40° 1400
60° 800 -
40° 800 -
30° 800 -
30° 800 -
- 1400
- 1400 - - - 6
- 800 - - - 2,5
- 0 - - - 6
max
(obrotów
na minutê)
Wybielacz Pranie
Dla wszystkich Instytucji homologacyjnych:
1) Program kontrolny zgodny z norm¹ EN 60456: ustawiæ program 7, wybieraj¹c temperaturê 60°C.
2) Program bawe³na, d³ugi: ustawiæ program 2, wybieraj¹c temperaturê 40°C.
3) Program bawe³na, krótki: ustawiæ program 3, wybieraj¹c temperaturê 40°C.
•
•
•
•
•
rodki pior¹ce
zmiêkczaj¹cy
•
•
•
•
•
•
•
•
•
•
•
•
•
•
•
-
rodek
•
•
•
•
•
•
•
•
•
•
•
•
•
•
•
•
Podane w tabeli dane maj¹ charakter orientacyjny.
£adunek max (kg) Czas trwania cyklu
6
6
4
2
2
1
1
6
6
6
6
2,5
2,5
3
1,5
6
Mo¿liwa jest kontrola czasu trwania programów na wywietlaczu.
Programy specjalne
CYKL HIGIENICZNY (program 7). Wysokotemperaturowy program higienizuj¹cy, który przewiduje u¿ycie
wybielacza w temperaturze powy¿ej 60°C. Aby wybieliæ pranie, nale¿y umieciæ w odpowiednich przegródkach
wybielacz, rodek pior¹cy i dodatki (patrz paragraf Szufladka na rodki pior¹ce).
PROGRAM SPOKOJNY SEN (program 8). Jest to cichy cykl, który mo¿e byæ uruchamiany w nocy, w godzinach ni¿szej
taryfy energetycznej. Program ten zosta³ opracowany dla tkanin syntetycznych i bawe³nianych. Po zakoñczeniu cyklu
pralka zatrzymuje siê z wod¹ w bêbnie; aby wykonaæ wirowanie i odprowadzenie wody, nale¿y nacisn¹æ przycisk START/
PAUZA, w przeciwnym razie po 8 godzinach urz¹dzenie automatycznie odwiruje pranie i odprowadzi wodê.
BABY (program 9). Program ten umo¿liwia usuniêcie z odzie¿y zabrudzeñ typowych dla dzieci, zapewniaj¹c przy
tym ca³kowite wyp³ukanie rodka pior¹cego z tkanin, aby unikn¹æ reakcji alergicznych, jakie móg³by on wywo³aæ na
delikatnej skórze dziecka. Cykl ten zosta³ opracowany w celu ograniczenia liczby bakterii poprzez wykorzystanie
wiêkszej iloci wody i optymalizacjê dzia³ania specjalnych dodatków higienizuj¹cych, którymi uzupe³niany jest
rodek pior¹cy.
MIX 30' (program 5) to program przeznaczony do prania lekko zabrudzonej bielizny w krótkim czasie: trwa on tylko 30
minut i pozwala dziêki temu na zaoszczêdzenie energii i czasu. Ustawiaj¹c program (5 w temperaturze 30°C) mo¿na
razem wypraæ ró¿nego rodzaju tkaniny (z wyj¹tkiem we³ny i jedwabiu), przy maksymalnym ³adunku 3 kg.
MIX 15' (program 6) to program przeznaczony do prania lekko zabrudzonej bielizny w krótkim czasie: trwa on tylko
15 minut i pozwala dziêki temu na zaoszczêdzenie energii i czasu. Ustawiaj¹c program (6 w temperaturze 30°C)
mo¿na razem wypraæ ró¿nego rodzaju tkaniny (z wyj¹tkiem we³ny i jedwabiu), przy maksymalnym ³adunku 1,5 kg.
!
Page 31

Personalizacja
Ustawianie temperatury
Naciskaj¹c przycisk TEMPERATURA ustawia siê temperaturê prania (patrz Tabela programów).
Temperaturê mo¿na zmniejszaæ, a¿ do prania w zimnej wodzie (
Pralka automatycznie uniemo¿liwi ustawienie temperatury wy¿szej od maksymalnej temperatury przewidzianej
dla danego programu.
).
Ustawianie wirowania
Naciskaj¹c przycisk WIROWANIE ustawia siê prêdkoæ wirowania dla wybranego programu.
Maksymalne prêdkoci przewidziane dla poszczególnych programów s¹ nastêpuj¹ce:
Programy Prêdkoæ maksymalna
Bawe³na 1400 obrotów na minutê
Tkaniny syntetyczne 800 obrotów na minutê
We³na 600 obrotów na minutê
Jedwab tylko odprowadzenie wody
Prêdkoæ wirowania mo¿e zostaæ zmniejszona, mo¿na te¿ ca³kowicie wy³¹czyæ wirowanie, wybieraj¹c symbol
Pralka automatycznie uniemo¿liwi wykonanie wirowania z prêdkoci¹ wiêksz¹ ni¿ maksymalna prêdkoæ
wirowania przewidziana dla danego programu.
.
Funkcje
Ró¿ne funkcje, w jakie wyposa¿ona jest pralka, pozwalaj¹ na uzyskanie oczekiwanej czystoci i bieli prania.
Aby w³¹czyæ poszczególne funkcje, nale¿y:
1. nacisn¹æ przycisk odpowiadaj¹cy ¿¹danej funkcji;
2. zapalenie siê jego kontrolki sygnalizuje, ¿e funkcja jest w³¹czona.
Uwaga: Szybkie pulsowanie kontrolki wskazuje, ¿e danej funkcji nie mo¿na ustawiæ dla wybranego programu.
PL
Timer opónienia
Aby ustawiæ opónione uruchomienie wybranego programu, nale¿y naciskaæ przycisk a¿ do wywietlenia siê
¿¹danego opónienia (od 1 do 24 h).
W celu wy³¹czenia funkcji naciskaæ przycisk dopóki nie wywietli siê napis
N.B.: Po naciniêciu przycisku START/PAUZA wartoæ opónienia mo¿na zmieniæ tylko na mniejsz¹.
.
Jest aktywny ze wszystkimi programami.
Super Wash
Dzieki zastosowaniu wiekszej ilosci wody w poczatkowej fazie cyklu i wydluzeniu czasu trwania programu,
funkcja ta gwarantuje pranie o wysokiej skutecznosci.
Funkcji tej nie mo¿na w³¹czyæ w programach 5, 6, 7, 11, 12, , , , .
P³ukanie dodatkowe
Wybieraj¹c tê opcjê zwiêksza siê skutecznoæ p³ukania i zapewnia siê optymalne usuniêcie rodka pior¹cego.
Jest to przydatne w przypadku, gdy skóra jest szczególnie wra¿liwa na rodki pior¹ce.
Funkcji tej nie mo¿na w³¹czyæ w programach 5, 6, , , .
£atwe prasowanie
Po wybraniu tej opcji pranie oraz wirowanie zostan¹ odpowiednio zmodyfikowane w celu ograniczenia
powstawania zagnieceñ.
W programie 11 po zakoñczeniu cyklu bielizna pozostanie namoczona, a kontrolka funkcji £ATWE
PRASOWANIE oraz kontrolka START/PAUZA bêd¹ pulsowaæ (pomarañczowym wiat³em), natomiast kontrolka
P£UKANIA bêdzie wieciæ wiat³em ci¹g³ym. W celu odprowadzenia wody i umo¿liwienia wyjêcia prania
konieczne jest naciniêcie przycisku START/PAUZA lub przycisku £ATWE PRASOWANIE.
Funkcji tej nie mo¿na w³¹czyæ w programach 5, 6, 7, 8, 9, 12, , , .
!
Page 32

rodki pior¹ce i bielizna
PL
Szufladka na rodki pior¹ce
Dobre rezultaty prania zale¿¹ równie¿ od
w³aciwego dozowania rodka pior¹cego: wsypuj¹c
go za du¿o, wcale nie poprawia siê wydajnoci
prania, lecz przyczynia siê do odk³adania siê
nalotów na wewnêtrznych czeciach pralki i do
zanieczyszczania rodowiska.
Wysun¹æ szufladkê i
wsypaæ do niej rodki
pior¹ce i dodatkowe w
nastêpuj¹cy sposób
przegródka 1: rodek pior¹cy do prania
wstêpnego (w proszku)
przegródka 2: rodek pior¹cy
(w proszku lub w p³ynie)
rodek pior¹cy w p³ynie nale¿y w³o¿yæ
bezporednio do bêbna z zastosowaniem
odpowiedniej kulki dozuj¹cej.
przegródka 3: rodki dodatkowe (zmiêkczaj¹ce, itp.)
Kiedy wlewa siê rodek zmiêkczaj¹cy do przegródki
3, to nale¿y zwróciæ uwagê, aby nie przekroczyæ
oznaczonego poziomu "max".
rodek zmiêkczaj¹cy jest automatycznie dodawany
do wody podczas ostatniego p³ukania. Na
zakoñczenie tego programu prania w przegródce 3
pozostaje reszta wody. S³u¿y ona dla
skoncentrowanych rodków zmiêkczaj¹cych, to
znaczy do ich rozprowadzenia z wod¹. Jeliby w
przegródce 3 pozosta³o wiêcej wody ni¿ zwykle,
oznacza to, ¿e urz¹dzenie dozuj¹ce jest zatkane.
Jak je wyczyciæ patrz strona Utrzymanie i
konserwacja.
przegródka 4: Wybielacz
Przygotowanie bielizny
Podzieliæ bieliznê do prania wed³ug:
- rodzaju tkaniny / symbolu na etykietce.
- kolorów: oddzieliæ tkaniny kolorowe od bia³ych.
Opró¿niæ kieszenie i sprawdziæ guziki.
Nie przekraczaæ wskazanego ciê¿aru suchej
bielizny:
Tkaniny wytrzyma³e: max 6 kg
Tkaniny syntetyczne: max 2,5 kg
Tkaniny delikatne: max 2 kg
We³na: max 1 kg
Ile wa¿y bielizna?
1 przecierad³o 400-500 gr.
1 poszewka 150-200 gr.
1 obrus 400-500 gr.
1 szlafrok 900-1.200 gr.
1 rêcznik 150-250 gr.
Tkaniny wymagaj¹ce szczególnego
traktowania
Koszule: stosowac specjalny program 10
przeznaczony do prania koszul z róznego rodzaju
tkanin i w róznych kolorach.
Program ten pozwala zachowac je w doskonalym
stanie, zmniejszajac do minimum powstawanie
zagniecen.
Jedwab: stosowaæ odpowiedni program 11 do
prania wszelkiego rodzaju wyrobów z jedwabiu.
Zaleca siê stosowanie specjalnego rodka pior¹cego
do tkanin delikatnych.
Firany: w³o¿yæ je z³o¿one do poszewki lub do
siatkowatego worka. Stosowaæ program 11.
We³na: to jedyna pralka, która uzyska³a presti¿owe
oznaczenie Woolmark Platinum Care (M.0508) od
The Woolmark Company, które certyfikuje pranie w
pralce wszystkich wyrobów we³nianych, tak¿e tych
z etykiet¹ tylko pranie rêczne
programu 12 mo¿na wiêc w pe³ni bezpiecznie praæ w
pralce wszystkie tkaniny we³niane (maks. 1 kg) z
gwarancj¹ uzyskania najlepszych rezultatów.
. Korzystaj¹c z
Cykl wybielania
Wybielanie jest mo¿liwe tylko w programach , !, %, .
Wlaæ wybielacz do pojemnika ", umieciæ we
w³aciwych przegródkach rodek pior¹cy i rodek
zmiêkczaj¹cy, po czym ustawiæ jeden z wy¿ej
wymienionych programów.
Zalecany tylko do prania bardzo zabrudzonej bielizny
bawe³nianej.
!
System równowa¿enia ³adunku
Przed ka¿dym wirowaniem, aby unikn¹æ
nadmiernych drgañ oraz jednorodnie roz³o¿yæ wsad,
bêben wykonuje obroty z prêdkoci¹ nieco wiêksz¹
ni¿ podczas prania. Jeli pomimo kolejnych prób
wsad nie zostanie równomiernie roz³o¿ony, maszyna
wykona wirowanie z prêdkoci¹ mniejsz¹ od
przewidzianej. W przypadku nadmiernego
niezrównowa¿enia pralka wykona roz³o¿enie wsadu
zamiast wirowania. Aby zapewniæ lepsze roz³o¿enie
wsadu oraz jego w³aciwe zrównowa¿enie, zaleca
siê wymieszanie du¿ych i ma³ych sztuk bielizny.
Page 33

Zalecenia i rodki
ostro¿noci
Pralka zosta³a zaprojektowana i wyprodukowana
zgodnie z miêdzynarodowymi normami
bezpieczeñstwa. Niniejsze ostrze¿enia zosta³y tu
zamieszczone ze wzglêdów bezpieczeñstwa i nale¿y
je uwa¿nie przeczytaæ.
Ogólne zasady bezpieczeñstwa
Urz¹dzenie to zosta³o zaprojektowane wy³¹cznie do
u¿ytkowania w warunkach domowych.
Urz¹dzenie to nie jest przeznaczone do u¿ytkowania
przez osoby (w tym dzieci) o ograniczonej
sprawnoci fizycznej, zmys³owej lub umys³owej oraz
nieposiadaj¹ce odpowiedniego dowiadczenia i
wiedzy, chyba ¿e u¿ywaj¹ go pod nadzorem lub po
otrzymaniu wskazówek od osoby odpowiedzialnej za
ich bezpieczeñstwo. Nale¿y pilnowaæ, aby dzieci nie
bawi³y siê urz¹dzeniem.
Pralki powinny u¿ywaæ wy³¹cznie osoby doros³e i w
sposób zgodny z instrukcjami podanymi w niniejszej
ksi¹¿eczce.
Nie dotykaæ pralki, stoj¹c przy niej boso lub maj¹c
mokre lub wilgotne rêce albo stopy.
Nie wyjmowaæ wtyczki z gniazdka, ci¹gn¹c za kabel,
lecz trzymaj¹c za wtyczkê.
Nie dotykaæ odprowadzanej wody, gdy¿ mo¿e ona
osi¹gaæ wysokie temperatury.
W ¿adnym wypadku nie otwieraæ okr¹g³ych
drzwiczek pralki na si³ê: grozi to uszkodzeniem
mechanizmu zabezpieczaj¹cego drzwiczki przed
przypadkowym otwarciem.
W razie wyst¹pienia usterki nie nale¿y w ¿adnym
wypadku próbowaæ dostaæ siê do wewnêtrznych
czêci pralki z zamiarem samodzielnego dokonania
naprawy.
Zawsze uwa¿aæ, aby dzieci nie zbli¿a³y siê do
pracuj¹cej pralki.
Jeli trzeba przenieæ pralkê w inne miejsce, nale¿y
to robiæ bardzo ostro¿nie, w dwie lub trzy osoby.
Nigdy nie przenosiæ pralki samodzielnie, gdy¿ jest
ona bardzo ciê¿ka.
Przed w³o¿eniem bielizny sprawdziæ, czy bêben jest
pusty.
Utylizacja
Utylizacja opakowania: stosowaæ siê do lokalnych
przepisów, dziêki temu opakowanie bêdzie mog³o
zostaæ ponownie wykorzystane.
Europejska Dyrektywa 2002/96/EC dotycz¹ca
Zu¿ytych Elektrycznych i Elektronicznych
Urz¹dzeñ zak³ada zakaz pozbywania siê starych
urz¹dzeñ domowego u¿ytku jako
nieposortowanych mieci komunalnych. Zu¿yte
urz¹dzenia musz¹ byæ osobno zbierane i
sortowane w celu zoptymalizowania odzyskania
oraz ponownego przetworzenia pewnych
komponentów i materia³ów.
Pozwala to ograniczyæ zanieczyszczenie
rodowiska i pozytywnie wp³ywa na ludzkie
zdrowie. Przekrelony symbol kosza
umieszczony na produkcie przypomina klientowi o
obowi¹zku specjalnego sortowania.
Konsumenci powinni kontaktowaæ siê z w³adzami
lokalnymi lub sprzedawc¹ w celu uzyskania
informacji dotycz¹cych postêpowania z ich
zu¿ytymi urz¹dzeniami gospodarstwa domowego.
Oszczêdnoæ i ochrona rodowiska
Oszczêdnoæ rodka pior¹cego, wody, energii i
czasu
Aby nie trwoniæ zasobów, nale¿y u¿ywaæ pralki
za³adowanej do pe³na. Jedno za³adowane do
pe³na pranie, zamiast dwóch za³adowanych do
po³owy, pozwala na zaoszczêdzenie a¿ do 50%
energii.
Pranie wstêpne konieczne jest tylko w przypadku
bielizny bardo brudnej. Unikanie prania wstêpnego
pozwala na zaoszczêdzenie rodka pior¹cego;
czasu, wody oraz od 5 do 15% energii.
Wywabiaj¹c plamy odplamiaczem i pozostawiaj¹c
bieliznê namoczon¹ w wodzie przed praniem,
mo¿na zredukowaæ temperaturê prania. Stosuj¹c
program 60°C zamiast 90°C lub program 40°C
zamiast 60°C, mo¿na zaoszczêdziæ a¿ do 50%
energii.
Dok³adne dozowanie rodka pior¹cego w
zale¿noci od twardoci wody, stopnia
zabrudzenia i iloci bielizny pozwala unikn¹æ jego
trwonienia i wychodzi na korzyæ rodowisku:
rodki pior¹ce, mimo ¿e ulegaj¹ biodegradacji,
zawsze zawieraj¹ jednak sk³adniki, które
zak³ócaj¹ rodowisko naturalne. Nale¿y równie¿
unikaæ, gdy jest to mo¿liwe, rodka
zmiêkczaj¹cego.
Dokonuj¹c prania pónym popo³udniem i
wieczorem, a¿ do wczesnych godzin rannych,
przyczynia siê do zmniejszenia obci¹¿enia
energetycznego elektrowni.
Opcja Timer opónienia pomaga przy takim
zaprogramowaniu prania w czasie.
Jeli bielizna ma byæ wyszuszona w suszarce,
nale¿y wybraæ wysok¹ szybkoæ odwirowania.
Dobrze odwirowana z wody bielizna pozwala na
zaoszczêdzenie czasu i energii przy suszeniu.
PL
!!
Page 34

Utrzymanie i konserwacja
PL
Wy³¹czenie wody i pr¹du elektrycznego
Zamkn¹æ kurek dop³ywu wody po ka¿dym praniu.
Zmniejsza siê w ten sposób zu¿ycie instalacji
hydraulicznej pralki oraz niebezpieczeñstwo
przecieków.
Wyj¹æ wtyczkê z kontaktu przed przyst¹pieniem
do czyszczenia pralki oraz czynnoci
konserwacyjnych.
Czyszczenie pralki
Obudowê zewnêtrzn¹ i gumowe czêci pralki nale¿y
myæ wilgotn¹ ciereczk¹ zmoczon¹ w wodzie z
myd³em. Nie stosowaæ rozpuszczalników ani
ostrych i ciernych rodków czyszcz¹cych.
Czyszczenie drzwiczek i bêbna
Nale¿y zawsze pozostawiaæ uchylone drzwiczki
pralki, aby zapobiec tworzeniu siê przykrych
zapachów.
Czyszczenie pompy
Pralka wyposa¿ona jest w pompê
samooczyszczaj¹c¹, która nie wymaga zabiegów
konserwacyjnych. Mo¿e siê jednak zdarzyæ, ¿e ma³e
przedmioty (monety, guziki) wpadn¹ do przedsionka
ochronnego pompy, znajduj¹cego siê w jej dolnej
czêci.
Upewniæ siê, by cykl prania by³ zakoñczony i by
wtyczka by³a wyjêta z gniazdka.
Aby odzyskaæ ewentualne przedmioty, które upad³y
do wstêpnej komory:
1. Odczepiæ dolny
cokó³ w przedniej
czêci pralki
poci¹gaj¹c rêkoma jej
boczne koñce (patrz
rysunek);
2. odkrêciæ
przykrywkê, obracaj¹c
j¹ w kierunku
przeciwnym do ruchu
wskazówek zegara
(zobacz rysunek): fakt,
¿e wyp³ynie trochê
wody, jest zjawiskiem
normalnym;
3. dok³adnie wyczyciæ
wnêtrze;
4. ponownie przykrêciæ
przykrywkê;
5. ponownie
przymocowaæ panel,
pamiêtaj¹c o wsuniêciu zaczepów w odpowiednie
otwory przed dopchniêciem go do urz¹dzenia.
Kontrola rury doprowadzania wody
Przynajmniej raz do roku nale¿y skontrolowaæ rurê
doprowadzania wody. Jeli widoczne s¹ na niej rysy
i pêkniêcia, nale¿y j¹ wymieniæ: w trakcie prania
du¿e cinienie mo¿e bowiem spowodowaæ jej nag³e
rozerwanie siê.
Nigdy nie instalowaæ rur u¿ywanych.
Jak czyciæ szufladkê rodków pior¹cych
Wymontowanie:
Lekko przycisn¹æ du¿y
przycisk w przedniej
czêci szufladki rodków
pior¹cych i poci¹gn¹æ j¹
do góry (Rys.1, 2).
Czyszczenie:
Wymyæ. szufladkê pod bie¿¹c¹ wod¹ (Rys.3),
pomagaj¹c sobie star¹ szczoteczk¹ do zêbów i po
wyjêciu pary syfonków znajduj¹cych siê w górnej
czêci przegródek 1 i 2 (Rys.4), sprawdziæ, czy nie
s¹ one zatkane i wyp³ukaæ je.
Ponowne zamontowanie:
Po w³o¿eniu pary syfonków, wstaw szufladkê na
swoje miejsce, zaczepia
j¹c j¹ (Rys. 4, 2, 1).
Rys. 1 Rys. 2 Rys. 3 Rys. 4
!"
Page 35

Nieprawid³owoci w dzia³aniu
i sposoby ich usuwania
Mo¿e siê zdarzyæ, ¿e pralka nie dzia³a. Przed wezwaniem Serwisu Technicznego (patrz Serwis Techniczny)
nale¿y sprawdziæ, czy problemu nie da siê ³atwo rozwi¹zaæ przy pomocy poni¿szego wykazu.
Nieprawid³owoci w dzia³aniu:
Pralka nie w³¹cza siê.
Cykl prania nie rozpoczyna siê.
Pralka nie pobiera wody (szybko
pulsuje kontrolka pierwszej fazy
prania).
Pralka ca³y czas pobiera i
odprowadza wodê.
Mo¿liwe przyczyny / Rozwi¹zania:
Wtyczka nie jest w³¹czona do gniazdka lub jest wsuniêta za s³abo, tak ¿e
nie ma styku.
W domu nast¹pi³a przerwa w dostawie pr¹du.
Drzwiczki nie s¹ dobrze zamkniête.
Nie zosta³ wciniêty przycisk W£¥CZANIA/WY£¥CZANIA.
Nie zosta³ wciniêty przycisk START/PAUZA.
Kurek dop³ywu wody jest zamkniêty.
Zosta³o nastawione opónienie startu (patrz Personalizacja).
Przewód doprowadzaj¹cy wodê nie jest pod³¹czony do kurka.
Przewód jest zgiêty.
Kurek dop³ywu wody jest zamkniêty.
W domu nast¹pi³a przerwa w dostawie wody.
Cinienie wody nie jest wystarczaj¹ce.
Nie zosta³ wciniêty przycisk START/PAUZA.
Przewód odp³ywowy nie zosta³ zainstalowany na wysokoci miêdzy 65 a
100 cm od pod³ogi (patrz Instalacja).
Koñcówka przewodu odp³ywowego jest zanurzona w wodzie (patrz
Instalacja).
Otwór odp³ywowy w cianie nie posiada odpowietrznika.
Jeli po sprawdzeniu tych mo¿liwoci problem nie zostanie rozwi¹zany,
nale¿y zamkn¹æ kurek dop³ywu wody, wy³¹czyæ pralkê i wezwaæ Serwis
Techniczny. Jeli mieszkanie znajduje siê na najwy¿szych piêtrach
budynku, mo¿e wyst¹piæ efekt syfonu, w wyniku którego pralka ca³y czas
pobiera i odprowadza wodê. W celu wyeliminowania tej niedogodnoci
nale¿y zakupiæ specjalny zawór, zapobiegaj¹cy powstawaniu efektu syfonu.
PL
Pralka nie odprowadza wody i nie
odwirowuje prania.
Pralka mocno wibruje w fazie
wirowania.
Z pralki wycieka woda.
Kontrolka START/PAUZA
(pomarañczowa) oraz kontrolki
funkcji szybko pulsuj¹.
Tworzy siê zbyt du¿a iloæ piany.
Program nie przewiduje odprowadzania wody: w przypadku niektórych
programów nale¿y uruchomiæ je rêcznie.
W³¹czona jest funkcja £ATWE PRASOWANIE: aby zakoñczyæ program,
nale¿y nacisn¹æ przycisk START/PAUZA (Personalizacja).
Przewód odp³ywowy jest zgiêty (patrz Instalacja).
Instalacja odp³ywowa jest zatkana.
Podczas instalacji pralki bêben nie zosta³ prawid³owo odblokowany (patrz
Instalacja).
Pralka nie jest w³aciwie wypoziomowana (patrz Instalacja).
Pralka, zainstalowana pomiêdzy meblami a cian¹, ma za ma³o miejsca
(patrz Instalacja).
Przewód doprowadzaj¹cy wodê nie jest dobrze przykrêcony (patrz Instalacja).
Szufladka na rodki pior¹ce jest zatkana (w celu jej oczyszczenia patrz
Utrzymanie i konserwacja).
Przewód odp³ywowy nie jest dobrze zamocowany(patrz Instalacja).
Wy³¹czyæ maszynê i wyj¹æ wtyczkê z gniazdka, odczekaæ oko³o 1
minuty, nastêpnie w³¹czyæ j¹ ponownie. Jeli problem nie ustêpuje, nale¿y
wezwaæ Serwis Techniczny.
rodek pior¹cy nie jest odpowiedni do pralek automatycznych (na
opakowaniu musi byæ umieszczony napis: do pralek, do prania
rêcznego i w pralce lub podobny).
U¿yto za du¿o rodka pior¹cego.
!#
Page 36

Serwis Techniczny
PL
Przed skontaktowaniem siê z Serwisem Technicznym:
Sprawdziæ, czy problemu nie mo¿na rozwi¹zaæ samodzielnie (patrz Nieprawid³owoci w dzia³aniu i
sposoby ich usuwania);
Ponownie uruchomiæ program i sprawdziæ, czy problem nie znikn¹³;
Jeli nie, zwróciæ siê do autoryzowanego Serwisu Technicznego, dzwoni¹c pod numer podany w karcie
gwarancyjnej.
Nigdy nie wzywaæ nieautoryzowanych techników.
Nale¿y podaæ:
rodzaj nieprawid³owoci;
model maszyny (Mod.);
numer seryjny (S/N).
Informacje te znajduj¹ siê na przymocowanej z ty³u pralki tabliczce znamionowej.
!$
Page 37

Istruzioni per l’uso
LAVABIANCHERIA
CARICA DALL’ ALTO
I
Italiano
ARTXF 149
Sommario
I
Installazione, 38-39
Disimballo e livellamento
Collegamenti idraulici ed elettrici
Primo ciclo di lavaggio
Dati tecnici
Descrizione della lavabiancheria e
avviare un programma, 40-41
Pannello di controllo
Spie
Come aprire e chiudere il cestello
Avviare un programma
Programmi, 42
Tabella dei programmi
Personalizzazioni, 43
Impostare la temperatura
Impostare la centrifuga
Funzioni
Detersivi e biancheria, 44
Cassetto dei detersivi
Ciclo candeggio
Preparare la biancheria
Capi particolari
Sistema bilanciamento del carico
Precauzioni e consigli, 45
Sicurezza generale
Smaltimento
Risparmiare e rispettare l’ambiente
Manutenzione e cura, 46
Escludere acqua e corrente elettrica
Pulire la lavabiancheria
Curare coperchio e cestello
Pulire la pompa
Controllare il tubo di alimentazione dell’acqua
Come pulire la vaschetta del detersivo
Anomalie e rimedi, 47
Assistenza, 48
Assistenza Attiva 7 giorni su 7
37
Page 38

Installazione
! È importante conservare questo libretto per poterlo
I
consultare in ogni momento. In caso di vendita, di
cessione o di trasloco, assicurarsi che resti insieme
alla lavabiancheria per informare il nuovo proprietario
sul funzionamento e sui relativi avvertimenti.
!
Leggere attentamente le istruzioni: ci sono
importanti informazioni sull’installazione, sull’uso
e sulla sicurezza.
Disimballo e livellamento
Disimballo
1. Disimballare la
lavabiancheria.
2. Controllare che la
lavabiancheria non
abbia subìto danni nel
trasporto. Se fosse
danneggiata non collegarla e contattare il
rivenditore.
3. Rimuovere le quattro
viti di protezione per il
trasporto e il gommino
con il relativo distanziale, posti nella parte
posteriore (vedi figura).
4. Chiudere i fori con i tappi di plastica in dotazione.
5. Conservare tutti i pezzi: qualora la lavabiancheria
debba essere trasportata, dovranno essere
rimontati.
Attenzione.
devono essere montate in alto.
! Gli imballaggi non sono giocattoli per bambini.
Livellamento
La vostra lavabiancheria potrà essere rumorosa se i
due piedini non sono regolati in modo che la stessa
risulti perfettamente in piano.
riori posteriori (vedi figura); l’angolo di inclinazione,
misurato sul piano di lavoro, non deve superare i 2°.
In caso di riutilizzo le viti più corte
1. Installare la
lavabiancheria su un
pavimento piano e rigido,
senza appoggiarla a muri,
mobili o altro.
2. Se il pavimento non
fosse perfettamente
orizzontale, compensare
le irregolarità svitando o
avvitando i piedini ante-
Un accurato livellamento dà stabilità alla macchina ed
evita vibrazioni, rumori e spostamenti durante il
funzionamento. In caso di moquette o di un tappeto,
regolare i piedini in modo da conservare sotto la lavabiancheria uno spazio sufficiente per la ventilazione.
Collocazione spostamenti
La tua lavatrice è dotata
di uno speciale carrello
con ruote retrattili puoi
facilmente spostarla. Per
far scendere questo
carrello e poterla così
movere senza sforzo, è
necessario tirare la leva
nera, situata in basso a
sinistra, sotto lo zoc
Ultimato lo spostamento
riportarla nella posizione
iniziale. La macchina a
questo punto è saldamente collocata (vedi figura).
colo.
Collegamenti idraulici ed elettrici
Collegamento del tubo di alimentazione dell’acqua
1. Collegare il tubo di
alimentazione avvitandolo
a un rubinetto d'acqua
fredda con bocca filettata
da 3/4 gas (vedi figura).
Prima di allacciare, far
scorrere l’acqua finché
non sia limpida.
2. Collegare il tubo di
alimentazione alla
lavabiancheria
avvitandolo all’apposita
presa d’acqua, nella
parte posteriore in alto a
destra (vedi figura).
3. Fare attenzione che
nel tubo non ci siano né
pieghe né strozzature.
! La pressione idrica del rubinetto deve essere com-
presa nei valori della tabella Dati tecnici (vedi pagina a
fianco).
! Se la lunghezza del tubo di alimentazione non fosse
sufficiente, rivolgersi a un negozio specializzato o a un
tecnico autorizzato.
38
Page 39

Collegamento del tubo di scarico
Collegare il tubo di scarico, senza piegarlo, a una
conduttura di scarico o a
uno scarico a muro posti
tra 65 e 100 cm da terra;
FP
oppure appoggiarlo al
bordo di un lavandino o
di una vasca, legando la
guida in dotazione al
rubinetto (vedi figura).
L’estremità libera del
tubo di scarico non deve
rimanere immersa
nell’acqua.
! È sconsigliato usare
tubi di prolunga; se indispensabile, la prolunga deve
avere lo stesso diametro del tubo originale e non
superare i 150 cm.
! Non usare prolunghe e multiple.
! Il cavo non deve subire piegature o compressioni.
! Il cavo di alimentazione deve essere sostituito solo
da tecnici autorizzati.
Attenzione! Attenzione!
Attenzione! L’azienda declina ogni responsabilità
Attenzione! Attenzione!
qualora queste norme non vengano rispettate.
Qualsiasi modifica apportata all’attacco predisposto
dalla fabbrica o un irregolare collegamento elettrico,
una qualsiasi modifica elettomeccanica o idraulica della
macchina farà decadere la garanzia e solleverà il
costruttore ed il venditore da eventuali responsabilità.
Primo ciclo di lavaggio
Dopo l’installazione, prima dell’uso, effettuare un ciclo
di lavaggio con detersivo e senza biancheria impostando il programma 2.
I
Collegamento elettrico
Prima di inserire la spina nella presa della corrente,
accertarsi che:
• la presa abbia la messa a terra e sia a norma
di legge;
• la presa sia in grado di sopportare il carico
massimo di potenza della macchina, indicato nella
tabella Dati tecnici (vedi a fianco);
• la tensione di alimentazione sia compresa nei
valori indicati nella tabella Dati tecnici (vedi a
fianco);
• la presa sia compatibile con la spina della
lavabiancheria. In caso contrario sostituire la
presa o la spina.
! La lavabiancheria non va installata all’aperto, nem-
meno se lo spazio è riparato, perché è molto pericoloso lasciarla esposta a pioggia e temporali.
! A lavabiancheria installata, la presa della corrente
deve essere facilmente raggiungibile.
Dati tecnici
Modello
Dimensioni
Capacità
Collegamenti
elettrici
Collegamenti
idrici
Velocità di
centrifuga
Programmi di
controllo secondo
la norma EN 60456
ARTXF 149
largh ezza cm 40
altezza cm 85
profon dità cm 6 0
da 1 a 6 kg
vedi la targhetta caratteristiche
tecni ch e appli cata s u ll a macchi na
press io ne mas s ima 1 MPa (1 0 bar )
pressione minima 0,05 MPa (0,5 bar)
capacità del cest o 4 2 l it ri
sino a 1400 giri al minuto
programma 7; temperatura 60°C;
effettu at o con 6 k g di carico .
Ques t a apparecch iat u ra è co nf orme
alle seg u ent i D iret t ive Comu n it ari e:
- 89/336/CEE del 03/05/89
(Compatibilità Elettromagnetica) e
succes s ive mo difi cazion i
- 2002/96/CE
- 2006/95/CE (Bassa Tension e)
39
Page 40

Descrizione della lavabiancheria
e avviare un programma
Pannello di controllo
I
SPEGNIMENTO
Tasto e spia ACCENSIONE/SPEGNIMENTO: per
accendere e spegnere la macchina. La spia illuminata
indica che la macchina è accesa.
Manopola PROGRAMMI: per impostare i programmi.
Durante il programma la manopola resterà ferma.
Tasto CENTRIFUGA: per impostare la centrifuga o
escluderla (vedi “Personalizzazioni”).
Tasto TEMPERATURA: per impostare la temperatura o
il lavaggio a freddo (vedi “Personalizzazioni”).
DISPLAY: per visualizzare il tempo residuo del ciclo di
lavaggio selezionato e, se è stata impostata una partenza ritardata, il tempo mancante all’inizio del lavaggio.
Tasto e spia
disattivare il blocco del pannello comandi.
BLOCCO TASTI: per attivare o
Tasto e spia
ACCENSIONE/
PROGRAMMI
TEMPERATURA
Manopola
CENTRIFUGA
Tasto
DISPLAY
Tasto
Tasto e spia
BLOCCO
T ASTI
Modalità di stand by
Questa lavatrice, in conformità alle nuove normative
legate al risparmio energetico, è dotata di un sistema
di autospegnimento (stand by) che entra in funzione
dopo circa 30 minuti nel caso di non utilizzo. Premere
brevemente il tasto ACCENSIONE/SPEGNIMENTO e
attendere che la macchina si riattivi.
SPIE
AV ANZAMENTO CICLO
Tasti con spie
FUNZIONE
Spia
COPERCHIO
BLOCCA TO
Tasto con spia
AVVIO/PAUSA
Spie
Le spie forniscono informazioni importanti.
Ecco che cosa dicono:
Spie fase in corso
Ruotando la manopola PROGRAMMI, le spie si
illumineranno indicando le fasi che la macchina
effettuerà in base al programma prescelto.
Una volta selezionato e avviato il ciclo di lavaggio
desiderato, le spie si accenderanno progressivamente per indicarne lo stato di avanzamento:
Tasti FUNZIONE: per selezionare le funzioni disponibili.
La spia relativa alla funzione selezionata rimarrà accesa.
SPIE AVANZAMENTO CICLO: per seguire lo stato
di avanzamento del programma di lavaggio.
La spia accesa indica la fase in corso.
Spia COPERCHIO BLOCCATO: per capire se il
coperchio è apribile (vedi pagina a fianco).
Tasto AVVIO/PAUSA: per avviare i programmi o interromperli
momentaneamente.
N.B.: per mettere in pausa il lavaggio in corso, premere
questo tasto, la spia relativa lampeggerà con colore arancione
mentre quella della fase in corso sarà accesa fissa. Se la spia
COPERCHIO BLOCCATO
coperchio. Per far ripartire il lavaggio dal punto in cui è stato
interrotto, premere nuovamente questo tasto.
40
sarà spenta, si potrà aprire il
Lavaggio
Risciacquo
Centrifuga
Scarico
Fine lavaggio
Tasti funzione e relative spie
Selezionando una funzione la spia relativa si illuminerà.
Se la funzione selezionata non è compatibile con il
programma impostato la spia relativa lampeggerà,
verrà emesso un segnale acustico e la funzione non
verrà attivata.
Nel caso venga impostata una funzione incompatibile con un’altra precedentemente selezionata rimarrà
attiva solo l’ultima scelta.
Page 41

Spie temperatura
Selezionando un valore di temperatura la
spia relativa si illuminerà.
Spie centrifuga
Selezionando un v alore di centrifuga la spia
relativa si illuminerà.
Spia blocco tasti
Per attivare il blocco del pannello di controllo, tenere
premuto il tasto per circa 2 secondi. La spia accesa
indica che il pannello di controllo è bloccato. In questo
modo si impediscono modifiche accidentali dei
programmi, soprattutto se in casa ci sono dei
bambini. Per disattivare il blocco del pannello di
controllo, tenere premuto il tasto per circa 2 secondi.
Spia coperchio bloccato
La spia accesa indica che il coperchio è bloccato
per impedire aperture accidentali; per evitare danni è
necessario attendere che la spia si spenga prima di
aprire il coperchio. L'attesa è di tre minuti circa.
N.B.: se è attiva la funzione PARTENZA RITARDATA
il coperchio non si può aprire, per aprirlo mettere la
macchina in pausa premendo il tasto AVVIO/PAUSA.
! Il lampeggio veloce della spia AVVIO/PAUSA
(arancione) contemporaneo a quello delle funzioni
segnala un’anomalia (vedi “Anomalie e rimedi”).
Come aprire e chiudere il cestello
Fig. 1 Fig. 2
Fig. 3
Fig. 4
A) Apertura coperchio superiore (Fig. 1):
Sollevare il coperchio esterno ed aprirlo completamente.
B) Apertura cestello (Soft opening):
Con un dito premere il pulsante indicato nella fig. 2
ed il cestello si aprirà delicatamente.
C) Introduzione biancheria (Fig. 3).
D) Chiusura (Fig. 4).
- richiudere bene il cestello abbassando prima lo
sportello anteriore ed appoggiandovi quindi quello
posteriore;
- assicurarsi quindi che i ganci dello sportello anteriore
siano perfettamente alloggiati nella sede dello sportello
posteriore;
- dopo aver sentito il “clac” dell’avvenuto aggancio,
esercitare una lieve pressione verso il basso su
entrambi gli sportelli che non devono sganciarsi;
- chiudere infine il coperchio esterno.
E) Arresto finale del cestello (Fig. 2):
Al termine del lavaggio il cestello si collocherà con gli
sportelli in alto per una facile apertura.
Avviare un programma
1. Accendere la lavabiancheria premendo il tasto
ACCENSIONE/SPEGNIMENTO. Tutte le spie si accenderanno per qualche secondo, poi rimarranno
accese le spie ralative alle impostazioni del programma selezionato e pulserà la spia AVVIO/PAUSA.
2. Caricare la biancheria, chiudere gli sportelli e il
coperchio.
3. Impostare con la manopola PROGRAMMI il programma desiderato.
4. Impostare la temperatura di lavaggio (vedi
“Personalizzazioni”).
5. Impostare la velocità di centrifuga (vedi
“Personalizzazioni”).
6. Versare detersivo e additivi (vedi “Detersivi e bian-
cheria”).
7. Selezionare le funzioni desiderate.
8. Avviare il programma premendo il tasto AVVIO/
PAUSA e la spia relativa rimarrà accesa fissa di colore
verde. Per annullare il ciclo impostato mettere la
macchina in pausa premendo il tasto AVVIO/PAUSA e
scegliere un nuovo ciclo.
9. Al termine del programma si illuminerà la spia
La spia COPERCHIO BLOCCATO si spegnerà indicando che il coperchio è apribile. Estrarre la biancheria e lasciare il coperchio socchiuso per far asciugare il
cestello. Spegnere la lavabiancheria premendo il tasto
ACCENSIONE/SPEGNIMENTO.
.
I
41
Page 42

Programmi
Tabella dei programmi
I
Descrizione del Programma
Programmi
Programmi Spe ciali
7 Sanitary: Bianch i estremam ente s porch i.
7 Sani ta ry (1): Bian chi e col orati r es i stenti molto spo r chi.
8 Buonanotte: Co l o r i del i cati po co spor ch i .
9 Ciclo Baby: Colori delicati molto sporchi.
10 Camicie
11 Seta/T ende: Per cap i i n set a, vi s cosa, ling er i e.
12 Lana: Per lan a, cachemire, ecc.
Programmi Giorna lieri
1 Cotone + Prelavaggio: Bi anchi estremamente sporchi.
2 Cotone: Bian chi e col o r ati res i sten ti mo l t o spo r chi.
2 Cotone (2): Bian chi e col orati d el i cat i molto sporchi .
3 Cotone Colorati (3): Bianchi poco s porchi e colo r i d elicati.
4 Sintetici: Colori resistenti molto sporchi.
4 Sintetici: Colori resistenti poco sporchi.
Mix 30 ': Per ri nfres car e r api d amente capi p o co spor ch i (n o n
5
ind i cat o per lana, set a e capi da lavare a mano) .
Mix 15 ': Per ri nfres car e r api d amente capi p o co spor ch i (n o n
6
ind i cat o per lana, set a e capi da lavare a mano) .
Programmi Parziali
Risciacquo - 1400
Centrifuga - 1400 -- -6
Cent ri f uga Del i cata - 800 -- -2,5
Scarico - 0 -- -6
Velocità
Tem p.
max.
(°C)
max.
(giri al
minuto)
Candeg-
90° 1400
60° 1400 40° 800 40° 800 40° 600 30° 0 40° 600 -
90° 1400 60° 1400
40° 1400
40° 1400
60° 800 40° 800 -
30° 800 30° 800 -
Detersivi
gina
Lavaggio
Ammorbi-
dente
zz z
zz
zz
zz
zz
zz
zz
zz
zz z
zz z
zz z
zz
zz
zz
zz
z
-
z
Carico
max.
(Kg)
6
6
4
2
2
1
1
6
6
6
6
2,5
2,5
3
1,5
6
Durata
ciclo
E' possibile controllare la durata dei programmi di
lavaggio sul display.
I dati riportati nella tabella hanno valore indicativo.
Per tutti T est Institutes:
1) Programma di controllo secondo la norma EN 60456: impostare il programma 7 con una temperaura di 60°C.
2) Programma cotone lungo: impostare il programma 2 con una temperatura di 40°C.
3) Programma cotone corto: impostare il programma 3 con una temperatura di 40°C.
Programmi particolari
Sanitary (programma 7). Un programma igienizzante ad alte temperature che prevede l'uso della candeggina con temperature
superiori a 60°C.
Per candeggiare versare la candeggina i detersivi e gli additivi nei relativi scomparti (vedi paragrafo “Cas-
setto dei detersivi”).
Buonanotte (programma 8). E' un ciclo silenzioso che può lavorare di notte quando la tariffa energetica è ridotta. Il
programma è studiato per capi sintetici e di cotone. Alla fine del ciclo la macchina si ferma con l’acqua in vasca; per
effettuare la centrifiga e lo scarico pr emere il tasto A VVIO/P AUSA, altrimenti dopo 8 or e la macchina effettuerà automaticamente la centrifuga e lo scarico dell’acqua.
Ciclo Baby (programma 9). Programma in grado di asportare lo sporco tipico dei bambini garantendo la rimozione del
detersivo dai panni onde evitare allergie alla pelle delicata dei bambini. Il ciclo è stato studiato per ridurre la carica
batterica utilizzando una maggior quantità di acqua e ottimizzando l'effetto di additivi specifici igenizzanti aggiunti al
detersivo.
Mix 30' (programma 5) è studiato per lavare capi leggermente sporchi in poco tempo: dura solo 30 minuti e fa così
risparmiare energia e tempo. Impostando il programma (5 a 30°C) è possibile lavare insieme tessuti di diversa natura
(esclusi lana e seta) con un carico massimo di 3 kg.
Mix 15' (programma 6) è studiato per lavare capi leggermente sporchi in poco tempo: dura solo 15 minuti e fa così
risparmiare energia e tempo. Impostando il programma (6 a 30°C) è possibile lavare insieme tessuti di diversa natura
(esclusi lana e seta) con un carico massimo di 1,5 kg.
42
Page 43

Personalizzazioni
Impostare la temperatura
Premendo il tasto TEMPERATURA si imposta la temperatura di lavaggio (vedi Tabella programmi).
La temperatura si può ridurre sino al lavaggio a freddo (
La macchina impedirà automaticamente di impostare una temperatura maggiore a quella massima prevista per
ogni programma.
).
Impostare la centrifuga
Premendo il tasto CENTRIFUGA si imposta la velocità di centrifuga del programma selezionato.
Le velocità massime previste per i programmi sono:
Programmi Velocità massima
Cotone 1400 giri al minuto
Sintetici 800 giri al minuto
Lana 600 giri al minuto
Set a solo scarico
La velocità di centrifuga può essere ridotta, oppure esclusa selezionando il simbolo
La macchina impedirà automaticamente di effettuare una centrifuga maggiore a quella massima prevista per ogni
programma.
.
Funzioni
Le varie funzioni di lavaggio previste dalla lavabiancheria permettono di ottenere la pulizia e il bianco desiderati.
Per attivare le funzioni:
1. premere il tasto relativo alla funzione desiderata;
2. l’accensione della spia relativa segnala che la funzione è attiva.
Nota: Il lampeggio veloce della spia indica che la funzione relativa non è selezionabile per il programma impostato.
I
Partenza ritardata
Per impostare la partenza ritardata del programma prescelto, premere più volte il pulsante fino a visualizzare il
ritardo desiderato (da 1 a 24 h).
Per disattivare la funzione premere il pulsante fino a visualizzare la scritta
N.B.: Una volta premuto il tasto AVVIO/PAUSA, si può modificare il valore del ritardo solo diminuendolo.
.
! E’ attivo con tutti i programmi.
Super Lavaggio
Grazie all’utilizzo di una maggior quantità d’ acqua nella fase iniziale del ciclo e all’impiego di maggior tempo, tale
funzione garantisce un lavaggio di alte performance.
! Non è attivabile sui programmi 5, 6, 7, 11, 12, , , , .
Extra Risciacquo
Selezionando questa funzione si aumenta l’efficacia del risciacquo, e si assicura la massima rimozione del
detersivo. E’ utile per pelli particolarmente sensibili.
! Non è attivabile sui programmi 5, 6,
Stira Facile
Selezionando questa funzione, il lavaggio e la centrifuga saranno opportunamente modificati per ridurre la
formazione di pieghe.
Nei programmi 11 la macchina terminerà il ciclo con la biancheria in ammollo, la spia della funzione STIRA FACILE
e quella di AVVIO/PAUSA lampeggeranno (arancione) e la fase RISCIACQUO rimarrà accesa fissa.
Per scaricare l’acqua e poter rimuovere il bucato sarà necessario premere il tasto AVVIO/PAUSA o il tasto STIRA
FACILE.
!
Non è attivabile sui programmi 5, 6, 7, 8, 9, 12, , , .
, , .
43
Page 44

Detersivi e biancheria
Cassetto dei detersivi
I
Il buon risultato del lavaggio dipende anche dal
corretto dosaggio del detersivo: eccedendo non si
lava in modo più efficace e si contribuisce a incrostare
le parti interne della lavabiancheria e a inquinare
l’ambiente.
Alzare il coperchio al di
sotto del quale è collocato il cassetto dei
detersivi e inserire il
detersivo o l’additivo
come segue.
vaschetta 1: Detersivo per prelavaggio
(in polvere)
vaschetta 2: Detersivo per lavaggio
(in polvere o liquido)
E’ opportuno immettere direttamente il detersivo
liquido in vasca a mezzo dell’apposita pallina.
vaschetta 3: Additivi (ammorbidente, ecc.)
Quando si versa l’ammorbidente nel comparto 3,
far attenzione a non superare il livello “max” indicato.
L’ammorbidente viene automaticamente immesso
in macchina durante l’ultimo risciacquo. Al termine del
programma di lavaggio nello scomparto 3 rimane un
residuo d’acqua. Questa serve per l’immissione di
ammorbidenti molto densi, ovvero per diluire quelli
concentrati. Se nel comparto 3 rimanesse più acqua
del normale, ciò significa che il dispositivo di
svuotamento è intasato. Per la pulizia vedi “Manuten-
zione e cura”).
Preparare la biancheria
• Suddividere la biancheria secondo:
- il tipo di tessuto / il simbolo sull’etichetta.
- i colori: separare i capi colorati da quelli bianchi.
• Vuotare le tasche e controllare i bottoni.
• Non superare i valori indicati, riferiti al peso della
biancheria asciutta:
Tessuti resistenti: max 6 kg
Tessuti sintetici: max 2,5 kg
Tessuti delicati: max 2 kg
Lana: max 1 kg
Quanto pesa la biancheria?
1 lenzuolo 400-500 gr.
1 federa 150-200 gr.
1 tovaglia 400-500 gr.
1 accappatoio 900-1.200 gr.
1 asciugamano 150-250 gr.
Capi particolari
Camicie: utilizzare l’apposito programma 10 per
lavare camicie di diversi tipo di tessuto e colore.
Ne garantisce la massima cura minimizzando la
formazione delle pieghe.
Seta: utilizzare l’apposito programma 11 per lavare
tutti i capi in seta. Si consiglia l’utilizzo di un detersivo
specifico per capi delicati.
Tende:
una federa o un sacchetto a rete. Utilizzare il
programma 11.
Lana: è l’unica lavabiancheria ad aver ottenuto il
prestigioso riconoscimento Woolmark Platinum Care
(M.0508) da parte di The Woolmark Company, che
certifica il lavaggio in lavatrice di tutti i capi in lana,
anche quelli recanti l’etichetta “solo lavaggio a mano”
tranquillità di lavare in lavatrice tutti i capi in lana (max.
1 kg) con la garanzia delle migliori performance.
si raccomanda di piegarle e sistemarle dentro
. Con il programma 12 si ha quindi l’assoluta
vaschetta 4: Candeggina
Ciclo candeggio
Il candeggio può essere effettuato solo con i program-
7
mi 2, 3,
Versare la candeggina nella vaschetta 4, il detersivo e
l’ammorbidente nelle rispettive vaschette, quindi
impostare uno dei programmi soprariportati.
E’ indicato solo per capi in cotone molto sporchi.
! Non usare detersivi per il lavaggio a mano, perché
formano troppa schiuma.
44
, .
Sistema bilanciamento del carico
Prima di ogni centrifuga, per evitare vibrazioni
eccessive e per distribuire il carico in modo uniforme,
il cestello effettua delle rotazioni ad una velocità
leggermente superiore a quella del lavaggio. Se al
termine di ripetuti tentativi il carico non fosse ancora
correttamente bilanciato la macchina effettua la
centrifuga ad una velocità inferiore a quella prevista.
In presenza di eccessivo sbilanciamento la
lavabiancheria effettua la distribuzione anzichè la
centrifuga. Per favorire una migliore distribuzione del
carico e il suo corretto bilanciamento si consiglia di
mescolare capi grandi e piccoli.
Page 45

Precauzioni e consigli
! La lavabiancheria è stata progettata e costruita in
conformità alle norme internazionali di sicurezza.
Queste avvertenze sono fornite per ragioni di
sicurezza e devono essere lette attentamente.
Sicurezza generale
• Questo apparecchio è stato concepito esclusivamente per un uso di tipo domestico.
• L'apparecchio non deve essere utilizzato da
persone (bambini compresi) con capacità fisiche,
sensoriali o mentali ridotte e con esperienze e
conoscenze insufficienti, a meno che tale utilizzo
non avvenga sotto la supervisione o le istruzioni di
una persona responsabile della loro sicurezza. I
bambini devono essere sorvegliati per garantire
che non giochino con l'apparecchio.
• La lavabiancheria deve essere usata solo da
persone adulte e secondo le istruzioni riportate
in questo libretto.
• Non toccare la macchina a piedi nudi o con le
mani o i piedi bagnati o umidi.
• Non staccare la spina dalla presa della corrente
tirando il cavo, bensì afferrando la spina.
• Non toccare l’acqua di scarico, che può
raggiungere temperature elevate.
• Non forzare in nessun caso il coperchio: potrebbe
danneggiarsi il meccanismo di sicurezza che
protegge da aperture accidentali.
• In caso di guasto, in nessun caso accedere ai
meccanismi interni per tentare una riparazione.
• Controllare sempre che i bambini non si avvicinino
alla macchina in funzione.
• Se dev’essere spostata, lavorare in due o tre
persone con la massima attenzione. Mai da soli
perché la macchina è molto pesante.
• Prima di introdurre la biancheria controlla che il
cestello sia vuoto.
Smaltimento
• Smaltimento del materiale di imballaggio:
attenersi alle norme locali, così gli imballaggi
potranno essere riutilizzati.
Il simbolo del cestino barrato è riportato su
tutti i prodotti per ricordare gli obblighi di raccolta
separata.
Per ulteriori informazioni, sulla corretta dismissione
degli elettrodomestici, i detentori potranno rivolgersi al servizio pubblico preposto o ai rivenditori.
Risparmiare e rispettare l’ambiente
Tecnologia a servizio dell’ambiente:
risparmiare detersivo, acqua,
energia e tempo
• Per non sprecare risorse bisogna utilizzare la
lavabiancheria con il massimo carico. Un carico
pieno al posto di due mezzi fa risparmiare fino al
50% di energia.
• Il prelavaggio è necessario solo per biancheria
molto sporca. Evitarlo fa risparmiare detersivo,
tempo, acqua e tra il 5 e il 15% di energia.
• Trattando le macchie con uno scioglimacchia o
lasciandole in ammollo prima del lavaggio, si
riduce la necessità di lavare ad alte temperature.
Un programma a 60°C invece di 90°C o uno a
40°C invece di 60°C, fa risparmiare fino al 50% di
energia.
• Dosare bene il detersivo in base alla durezza
dell’acqua, al grado di sporco e alla quantità di
biancheria evita sprechi e protegge l’ambiente:
pur biodegradabili, i detersivi contengono elementi
che alterano l’equilibrio della natura. Inoltre evitare
il più possibile l’ammorbidente.
• Effettuando i lavaggi dal tardo pomeriggio fino alle
prime ore del mattino si collabora a ridurre il
carico di assorbimento delle aziende elettriche.
La funzione “Partenza Ritardata” aiuta molto a
organizzare i lavaggi in tal senso.
• Se il bucato deve essere asciugato in un
asciugatore, selezionare un’alta velocità di
centrifuga. Poca acqua nel bucato fa rispamiare
tempo ed energia nel programma di asciugatura.
I
• La direttiva Europea 2002/96/CE sui rifiuti di
apparecchiature elettriche ed elettroniche, prevede che gli elettrodomestici non debbano essere
smaltiti nel normale flusso dei rifiuti solidi urbani.
Gli apparecchi dismessi devono essere raccolti
separatamente per ottimizzare il tasso di recupero
e riciclaggio dei materiali che li compongono ed
impedire potenziali danni per la salute e l'ambiente.
45
Page 46

Manutenzione e cura
Escludere acqua e corrente elettrica
I
• Chiudere il rubinetto dell’acqua dopo ogni
lavaggio. Si limita così l’usura dell’impianto
idraulico della lavabiancheria e si elimina il pericolo
di perdite.
• Staccare la spina della corrente quando si
pulisce la lavabiancheria e durante i lavori di
manutenzione.
Pulire la lavabiancheria
• La parte esterna e le parti in gomma possono
essere puliti con un panno imbevuto di acqua
tiepida e sapone. Non usare solventi o abrasivi.
Curare Coperchio e cestello
• Lasciare sempre socchiuso il coperchio per
evitare che si formino cattivi odori.
Per recuperare eventuali oggetti caduti nella precacamera:
1. rimuovere il pannello
di copertura sul lato
anteriore della lavabiancheria tirando con
le mani dai lati dello
zoccolo (vedi figura);
2. svitare il coperchio
ruotandolo in senso
antiorario (vedi figura):
è normale che fuoriesca un pò d’acqua;
3.pulire accuratamente
l’interno;
4. riavvitare il coperchio;
5. rimontare il pannello
assicurandosi, prima di
spingerlo verso la
macchina, di aver
inserito i ganci nelle
apposite asole.
Pulire la pompa
La lavabiancheria è dotata di una pompa autopulente
che non ha bisogno di manutenzione. Può però
succedere che piccoli oggetti (monete, bottoni)
cadano nella precamera che protegge la pompa,
situata nella parte inferiore di essa.
! Assicurarsi che il ciclo di lavaggio sia terminato e
staccare la spina.
Controllare il tubo di alimentazione
dell’acqua
Controllare il tubo di alimentazione almeno una volta
all’anno. Se presenta screpolature e fessure va
sostituito: durante i lavaggi le forti pressioni potrebbero provocare improvvise spaccature.
! Non utilizzare mai tubi già usati.
Come pulire la vaschetta del detersivo
Smontaggio:
Esercitare una leggera
pressione sul pulsante sulla
parte anteriore del cassetto
detersivo e tirarlo verso l’alto
(fig. 1, 2).
Pulizia:
Pulire quindi il cassetto sotto il rubinetto (fig. 3) utilizzando
anche un semplice spazzolino da denti e, sfilata la coppia di
sifoncini inseriti nella parte superiore degli scomparti 1 e 2
(fig. 4), controllare che gli stessi non siano ostruiti e
risciacquarli.
Rimontaggio:
Non dimenticare di reinserire
la coppia di sifoncini negli
appositi alloggiamenti e
rimettere infine il cassetto
nella sua sede agganciandolo (fig. 4, 2, 1).
Fig. 1 Fig. 2
46
Fig. 3
Fig. 4
Page 47

Anomalie e rimedi
Può accadere che la lavabiancheria non funzioni. Prima di telefonare all’Assistenza (vedi “Assistenza”), controllare
che non si tratti di un problema facilmente risolvibile aiutandosi con il seguente elenco.
Anomalie:
La lavabiancheria
non si accende.
Il ciclo di lavaggio
non inizia.
La lavabiancheria non carica
acqua (lampeggia velocemente
la spia della prima fase di
lavaggio).
La lavabiancheria carica e
scarica acqua di continuo.
Possibili cause / Soluzione:
• La spina non è inserita nella presa della corrente, o non abbastanza
da fare contatto.
• In casa non c’è corrente.
• Lo sportello non è ben chiuso.
• Il tasto ACCENSIONE/SPEGNIMENTO non è stato premuto.
• Il tasto AVVIO/PAUSA non è stato premuto.
• Il rubinetto dell’acqua non è aperto.
• Si è impostato un ritardo sull’ora di avvio (PARTENZA RITARDATA,
vedi “Personalizzazioni”).
• Il tubo di alimentazione dell’acqua non è collegato al rubinetto.
• Il tubo è piegato.
• Il rubinetto dell’acqua non è aperto.
• In casa manca l’acqua.
• Non c’è sufficiente pressione.
• Il tasto AVVIO/PAUSA non è stato premuto.
• Il tubo di scarico non è installato fra 65 e 100 cm da terra (vedi “Installazione”).
• L’estremità del tubo di scarico è immersa nell’acqua (vedi “Installazione”).
• Lo scarico a muro non ha lo sfiato d’aria.
Se dopo queste verifiche il problema non si risolve, chiudere il rubinetto
dell’acqua, spegnere la lavabiancheria e chiamare l’Assistenza. Se
l’abitazione si trova agli ultimi piani di un edificio, è possibile che si verifichino fenomeni di sifonaggio, per cui la lavabiancheria carica e scarica
acqua di continuo. Per eliminare l’inconveniente sono disponibili in commercio apposite valvole anti-sifonaggio.
I
La lavabiancheria non scarica
o non centrifuga.
La lavabiancheria vibra
molto durante la centrifuga.
La lavabiancheria perde acqua.
La spia AVVIO/PAUSA (arancione)
e le spie delle funzioni
lampeggiano velocemente.
Si forma troppa schiuma.
• Il programma non prevede lo scarico: con alcuni programmi occorre
avviarlo manualmente.
• È attiva la funzione STIRA FACILE: per completare il programma
premere il tasto AVVIO/PAUSA (“Personalizzazioni”).
• Il tubo di scarico è piegato (vedi “Installazione”).
• La conduttura di scarico è ostruita.
• Il cestello, al momento dell’installazione, non è stato sbloccato
correttamente (vedi “Installazione”).
• La lavabiancheria non è in piano (vedi “Installazione”).
• La lavabiancheria è stretta tra mobili e muro (vedi “Installazione”).
• Il tubo di alimentazione dell’acqua non è ben avvitato (vedi “Installazione”).
• Il cassetto dei detersivi è intasato (per pulirlo vedi “Manutenzione e cura”).
• Il tubo di scarico non è fissato bene (vedi “Installazione”).
• Spegnere la macchina e togliere la spina dalla presa, attendere circa 1
minuto quindi riaccenderla.
Se l’anomalia persiste, chiamare l’Assistenza.
• Il detersivo non è specifico per lavabiancheria (deve esserci la
dicitura “per lavatrice”, “a mano e in lavatrice”, o simili).
• Il dosaggio è stato eccessivo.
47
Page 48

Assistenza
Prima di contattare l’Assistenza:
I
• Verificare se l’anomalia può essere risolta da soli (vedi “Anomalie e rimedi”).
• Riavviare il programma per controllare se l’inconveniente è stato ovviato;
• In caso negativo, contattare il Numero Unico 199.199.199*.
! Non ricorrere mai a tecnici non autorizzati.
Comunicare:
• il tipo di anomalia;
• il modello della macchina (Mod.);
• il numero di serie (S/N).
Queste informazioni si trovano sulla targhetta applicata nella parte posteriore della lavabiancheria.
**
*
Assistenza Attiva 7 giorni su 7
**
In caso di necessità d’intervento chiamare il Numero Unico Nazionale 199.199.199*.
Un operatore sarà a completa disposizione per fissare un appuntamento con il Centro Assistenza Tecnico
Autorizzato più vicino al luogo da cui si chiama.
È attivo 7 giorni su 7, sabato e domenica compresi, e non lascia mai inascoltata una richiesta.
* Al costo di 14,25 centesimi di Euro al minuto (iva inclusa) dal Lun. al Ven. dalle 08:00 alle 18:30, il Sab. dalle 08:00 alle
13:00 e di 5,58 centesimi di Euro al minuto (iva inclusa) dal Lun. al Ven. dalle 18:30 alle 08:00, il Sab. dalle 13:00 alle 08:00
e i giorni festivi, per chi chiama da telefono fisso.
Per chi chiama da radiomobile le tariffe sono legate al piano tariffario dell’operatore telefonico utilizzato.
Le suddette tariffe potrebbero essere soggette a variazione da parte dell’operatore telefonico; per maggiori informazioni
consultare il sito www.aristonchannel.com.
48
Page 49

Mode d’emploi
LAVE-LINGE
FR
Français
ARTXF 149
Sommaire
FR
Installation, 50-51
Déballage et mise à niveau
Raccordements eau et électricité
Premier cycle de lavage
Caractéristiques techniques
Description du lave-linge et
démarrage d’un programme, 52-53
Bandeau de commandes
Voyants
Comment ouvrir et fermer le tambour
Démarrage d’un programme
Programmes,54
Tableau des programmes
Personnalisations, 55
Sélection de la température
Sélection de l’essorage
Fonctions
Produits lessiviels et linge, 56
Tiroir à produits lessiviels
Cycle blanchissage
Triage du linge
Linge ou vêtements particuliers
Système d’équilibrage de la charge
Précautions et conseils, 57
Sécurité générale
Mise au rebut
Economies et respect de l'environnement
Entretien et soin, 58
Coupure de l’arrivée d’eau et du courant
Nettoyage du lave-linge
Entretien du couvercle et du tambour
Nettoyage de la pompe
Contrôle du tuyau d’arrivée de l’eau
Comment nettoyer le tiroir à produits lessiviels
Anomalies et remèdes, 59
Assistance, 60
49
Page 50

Installation
FR
! Conservez ce mode d'emploi pour pouvoir le
consulter à tout moment. En cas de vente, de cession
ou de déménagement, veillez à ce qu'il suive toujours
le lave-linge pour que son nouveau propriétaire soit
informé sur son mode de fonctionnement et puisse
profiter des conseils correspondants.
! Lisez attentivement les instructions: elles fournissent
d'importantes informations sur l'installation, l'utilisation
et la sécurité.
Déballage et mise à niveau
Déballage: enlever les 4 vis
1. Déballez le lave-linge.
2. Contrôlez que le
lave-linge n'a pas été
endommagé pendant le
transport. S'il est
abîmé, ne le raccordez
pas et contactez votre
revendeur.
3. Enlevez les quatre vis
de protection pour le
transport, le
caoutchouc et la cale,
placés dans la partie
arrière (voir figure).
4. Bouchez les trous à l'aide des bouchons plastique
fournis.
5. Conservez bien toutes ces pièces: il faudra les
remonter en cas de transport du lave-linge.
!
Attention: en cas de réutilisation, les vis plus
courtes doivent être montées dessus.
! Les emballages ne sont pas des jouets pour enfants.
machine est posée sur de la moquette ou un tapis,
réglez les petits pieds de manière à ce qu'il y ait
suffisamment d'espace pour assurer une bonne
ventilation.
Mise en place, deplacements
Si votre lave-linge est
muni d'un chariot spécial
avec roues rétractiles,
vous pouvez le déplacer
facile-ment. Pour faire
descendre ce chariot et
pouvoir ainsi déplacer
sans effort votre lavelinge, vous devez tirer le
levier situé en bas à
gauche, sous la base.
Une fois le lave-linge
déplacé, remettez-le
dans la position initiale. Le lave-linge est ainsi solidement
mis en place. Voir figure (seulement pour les modéles
prevues).
Raccordements hydrauliques et
électriques
Raccordement du tuyau d'arrivée de l'eau
1. Reliez le tuyau
d’alimentation en le
vissant à un robinet d’eau
froide à embout fileté 3/4
gaz (voir figure).
Faire couler l’eau jusqu’à
ce qu’elle soit limpide et
sans impuretés avant de
raccorder.
Mise à niveau
Votre appareil peut s’avérer bruyant si vous n’avez
pas bien réglé ses deux pieds avant.
1.Installez le lave-linge sur un sol plat et rigide, sans
l'appuyer contre des murs, des meubles ou autre.
2. Si le sol n'est pas
parfaitement horizontal,
vissez ou dévissez les
petits pieds avant (voir
figure) pour niveler
l'appareil; son angle
d'inclinaison, mesuré sur
le plan de travail, ne doit
pas dépasser 2°.
Une bonne mise à niveau garantit la stabilité de la
machine et évite qu'il y ait des vibrations, du bruit et
des déplacements en cours de fonctionnement. Si la
50
2. Raccordez le tuyau
d'alimentation au lavelinge en le vissant à la
prise d'eau prévue, dans
la partie arrière en haut à
droite (voir figure).
3. Faites attention à ce
que le tuyau ne soit ni
plié ni écrasé.
! La pression de l'eau doit être comprise entre les
valeurs indiquées dans le tableau des Caractéristiques
techniques (voir page ci-contre).
! Si la longueur du tuyau d'alimentation ne suffit pas,
adressez-vous à un magasin spécialisé ou à un
technicien agréé.
Page 51

Raccordement du tuyau de vidange
Raccorder le tuyau
d’évacuation, sans le
plier, à un conduit
d’évacuation ou à une
évacuation murale placés
65 - 100 cm
à une distance du sol
comprise entre 65 et 100
cm;
! N’utiliser ni rallonges ni prises multiples.
FR
! Le câble ne doit être ni plié ni trop écrasé.
! Le câble d’alimentation ne doit être remplacé que
par des techniciens agréés.
Attention! Nous déclinons toute responsabilité en cas
de non-respect des normes énumérées ci-dessus.
Premier cycle de lavage
ou bien l’accrocher à un
évier ou à une baignoire,
dans ce cas, fixer le
support en plastique
fourni avec l’appareil au
robinet (voir figure).
L’extrémité libre du tuyau
d’évacuation ne doit pas
être plongée dans l’eau.
! L’utilisation d’un tuyau de rallonge est absolument
déconseillée mais si on ne peut faire autrement, il faut
absolument qu’il ait le même diamètre que le tuyau
original et sa longueur ne doit pas dépasser 150 cm.
Branchement électrique
Avant de brancher la fiche dans la prise de courant,
s’assurer que:
• la prise est bien reliée à la terre et est conforme aux
réglementations en vigueur;
Avant la première mise en service de l’appareil,
effectuer un cycle de lavage avec un produit lessiviel
mais sans linge et sélectionner le programme 2.
Carac t éristiques techniques
Modèle
Dimensions
Capacité
ARTXL 149
largeur 40 cm
hauteur 85 cm
profondeur 60 cm
de 1 à 6 kg
• la prise est bien apte à supporter la puissance
maximale de l’appareil indiquée dans le tableau des
Caractéristiques techniques (voir ci-contre);
• la tension d’alimentation est bien comprise entre les
valeurs figurant dans le tableau des Caractéristiques
techniques (voir ci-contre);
• la prise est bien compatible avec la fiche du lavelinge. Autrement, remplacer la prise ou la fiche.
! Le lave-linge ne doit pas être installé dehors, même
à l’abri, car il est très dangereux de le laisser exposé
à la pluie et aux orages.
! Après installation du lave-linge, la prise de courant
doit être facilement accessible.
Raccordements
électriques
Raccordements
hydrauliques
Vitesse
d'essorage
Programmes de
contrôle selon la
norme EN 60456
Voir la plaque signalétique appliquée
sur la machine
pression maximale 1 MPa (10 bar)
pression minimale 0,05 MPa (0,5 bar)
capacité du tamb ou r 4 2 li tr es
jusqu'à 1400 tours minute
progr amme 7; tempér atu re 6 0°C;
effectu é avec un e ch arg e de 6 k g.
Cet apparei l es t con f or me aux
Direct i ves Co mmu naut ai res s uivan t es :
- 89/336/CEE du 03/05/89
(Compat i bil i t é él ectr o magn étiqu e) et
modifi cati o ns s u i van tes
- 2002/96/CE
- 2006/95/CE (Basse Tension)
51
Page 52

Description du lave-linge et
démarrage d’un programme
FR
Bandeau de commandes
Touche avec voyant
T ouche avec voyant ON/OFF: pour allumer ou éteindre le lavelinge. Le témoin allumé indique que l'appareil est sous tension.
Bouton PROGRAMMES: pour sélectionner les programmes.
Pendant le programme, le bouton ne tournera pas.
Touche ESSORAGE: pour sélectionner l’essorage ou le
supprimer (voir “Personnalisations”).
Touche TEMPÉRATURE: pour sélectionner la température ou un
lavage à froid (voir “Personnalisations”).
AFFICHEUR: pour afficher le temps restant du cycle de lavage
sélectionné et, en cas de sélection d'un départ différé, le temps
restant avant le démarrage du lavage.
Touche et voyant
activer ou désactiver le verrouillage du bandeau de
commandes.
VERROUILLAGE DES TOUCHES: pour
ON/OFF
PROGRAMMES
TEMPÉRATURE
Bouton
Touche
ESSORAGE
Touche avec voyant
VERROUILLAGE
DES TOUCHES
AFFICHEUR
Touche
Voyants
CYCLE
Pour faire redémarrer le lavage exactement de l’endroit où il a
été interrompu, appuyer une nouvelle fois sur la touche.
Stand-by
Ce lave-linge, conformément aux nouvelles normes en
vigueur dans le domaine de l’économie d’énergie, est
équipée d’un système d’extinction automatique (veille)
activé après environ 30 minutes d’inutilisation. Appuyez
brièvement sur la touche
machine soit réactivée.
DÉROULEMENT
Voyant
COUVERCLE
VERROUILLÉ
Touche avec voyant
MARCHE/
PAUSE
Touches avec voyants
FONCTION
ON/OFF et attendre que la
Voyants
Les voyants fournissent des informations importantes.
Voilà ce qu’ils signalent:
Voyants phase en cours
Au fur et à mesure qu'on tourne le bouton des PROGRAMMES,
les voyants s'allument pour indiquer les phases que l'appareil
effectue selon le programme choisi. Une fois que le cycle de
lavage sélectionné a démarré, les voyants s’allument
progressivement pour indiquer son stade d’avancement:
Touches avec voyants FONCTION: pour sélectionner les
fonctions disponibles. Le voyant correspondant à la fonction
sélectionnée restera allumé.
Voyants DÉROULEMENT CYCLE: pour suivre le stade
d’avancement du programme de lavage.
Le voyant allumé indique la phase de lavage en cours.
Voyant HUBLOT VERROUILLÉ: indique si la porte est
verrouillée (voir page ci-contre).
T ouche avec voyant MARCHE/PAUSE: pour démarrer les
programmes ou les interrompre momentanément.
N.B.: pour effectuer une pause du lavage en cours, appuyer
sur cette touche, le voyant correspondant se mettra à
clignoter en orange tandis que celui de la phase en cours
restera allumé fixe. Si le voyant HUBLOT VERROUILLÉ
est éteint, on peut ouvrir la porte.
52
Lavage
Rinçage
Essorage
Vidange
Fin de Lavage
Touches fonction et voyants correspondants
La sélection d’une fonction entraîne l’allumage du voyant
correspondant. Si la fonction sélectionnée est incompatible
avec le programme sélectionné, le voyant correspondant
se met à clignoter, un signal sonore retentit et la fonction
n'est pas activée. En cas de sélection d’une fonction
incompatible avec une autre précédemment sélectionnée,
la seule à être activée sera celle choisie en dernier .
Page 53

Voyants température
La sélection d'une température entraîne
l'éclairage du voyant correspondant.
Voyants essorage
La sélection d'un essorage entraîne
l'éclairage du voyant correspondant.
A) Ouvrez le couvercle (Fig. 1):
Soulevez le Couvercle externe et ouvrez le
complètement;
Ouverture douce du tambour (Fig. 2):
B)
Appuyez d'un doigt sur le bouton comme illustré et
le tambour s'ouvrira délicatement.
C) Introduisez le linge (Fig. 3).
FR
Voyant verrouillage des touches
Pour "activer" le verrouillage du bandeau de
commandes, garder la touche enfoncée pendant 2
secondes environ. Le voyant allumé indique que le
tableau de bord est verrouillé. Ceci permet d'éviter
toute modification involontaire des programmes,
surtout s'il y a des enfants à la maison.
Pour "désactiver" le verrouillage du bandeau de
commandes, garder la touche enfoncée pendant 2
secondes environ.
Voyant hublot verrouillé
Le voyant allumé indique que le hublot est verrouillé
pour empêcher toute ouverture accidentelle. Pour
éviter d’endommager l’appareil, attendre que le
voyant cesse de clignoter avant d’ouvrir la porte.
N.B: si la fonction DÉPART DIFFÉRÉ est activée, le
hublot ne s’ouvre pas. Pour l’ouvrir il faut appuyer sur la
touche MARCHE/PAUSE qui met l’appareil en pause.
! Un clignotement rapide du voyant MARCHE/PAUSE
(orange) simultané à celui des fonctions signale une
anomalie (voir “Anomalies et remèdes” ).
Comment ouvrir et fermer le tambour
Fig. 1
Fig. 3
Fig. 2
Fig. 4
D) Fermer (Fig. 4):
• refermez bien le tambour en baissant d’abord la
porte antérieure et posez ensuite la porte
postérieure;
• faites attention à parfaitement positionner les
crochets de la porte antérieure dans leur siège
dans la porte postérieure;
• vous entendrez un “ clac ” qui confirmera la
bonne fixation;
appuyez alors légèrement vers le bas sur les
deux portes qui ne doivent pas se décrocher;
• fermez enfin le couvercle externe.
Arrêt final du tambour (Fig. 2):
E)
A’ la fin du lavage le tambour se rangera avec les
portes en haut prêtes pour une facile ouverture.
Démarrage d’un programme
1. Allumer le lave-linge en appuyant sur la touche
ON/OFF. Tous les voyants s’allumeront pendant quelques
secondes, ne resteront ensuite allumés que les voyants
correspondant aux sélections du programme en cours et
le voyant MARCHE/PAUSE se mettra à clignoter.
2. Charger le linge et fermer les portes et le couvercle.
3. Sélectionner à l’aide du bouton PROGRAMMES le
programme désiré.
4. Sélectionner la température de lavage (voir
“Personnalisations”).
5. Sélectionner la vitesse d’essorage (voir
“Personnalisations”).
6. Verser les produits lessiviels et les additifs (voir
“Produits lessiviels et linge”).
7. Sélectionner les fonctions désirées.
8. Appuyer sur la touche MARCHE/PAUSE pour
démarrer le programme, le voyant correspondant vert
restera allumé en fixe.
Pour annuler le cycle sélectionné, appuyer sur la
touche MARCHE/PAUSE pour placer l’appareil en
pause et choisir un nouveau cycle.
9. A la fin du programme, le voyant
voyant COUVERCLE VERROUILLÉ s’éteint pour
signaler que le couvercle peut être ouvert. Sortir le
linge et laisser le couvercle entrouvert pour faire
sécher le tambour.
Eteindre le lave-linge en appuyant sur la touche
MARCHE/ARRÊT.
s’allume. Le
53
Page 54

Programmes
FR
Tableau des programmes
Vitesse
Description du Programme
Programmes
Programmes Sp écial
Anti-bactérien 90°C: blan cs extrêmement s al es.
7
Anti-bactérien 90°C (1): blancs et co uleu rs rés istan tes t r ès sales.
7
Bonne Nuit: couleu r s d él icates peu sal es .
8
Bébé: coul eurs dél i cates t rès sales.
9
Chemises
10
Soie/Voilages: pour linge en soie, viscose, lingerie.
11
Laine: po ur lai ne, cachemir e, etc.
12
Progra mme s Quotidien
Coton Prélavage 90°C: blancs extrêmement s al es.
1
Coton: blancs et cou l eurs r és i stan t es très sales.
2
Coton (2): b lancs et couleurs dél i cat es très sales.
2
Coton (3): b lancs peu sal es et cou l eurs d éli cates.
3
Synthétique: co uleur s r ésistant es très sales.
4
Synthétique: couleurs résistantes peu sales.
4
MIX 30': pour rafraîchir rapidement du ling e peu s ale (n e con vient pas pou r
5
la laine, la soie et le linge à laver à la main).
MIX 15': pour rafraîchir rapidement du ling e peu s ale (n e con vient pas pou r
6
la laine, la soie et le linge à laver à la main).
Cycle
Tem p.
maxi
maxi.
(tours
(°C)
minute)
90° 1400
60° 1400 40° 800 40° 800 40° 600 30° 0 40° 600 -
90° 1400 60° 1400
40° 1400
40° 1400
60° 800 40° 800 -
30° 800 30° 800 -
Rinçage - 1400
Essorage - 1400 -- - 6
Essorage délicat - 800 -- - 2,5
Vidange - 0 -- - 6
Produits lessiviels
Eau
de
Javel
Lavage
Adou
cissant
zz z
zz
zz
zz
zz
zz
zz
zz
zz z
zz z
zz z
zz
zz
zz
zz
z
-
Charge
-
maxi
(Kg)
6
Durée
cycle
La durée des programmes de lavage est contrôlable sur l'afficheur.
6
4
2
2
1
1
6
6
6
6
2,5
2,5
3
1,5
z
6
Les données dans le tableau sont reprises à titre indicatif.
Pour tous les instituts qui effectuent ces tests :
1) Programme de contrôle selon la norme EN 60456: sélectionner le programme 7 et une température de 60°C.
2) Programme coton long: sélectionner le programme 2 et une température de 40°C.
3) Programme coton court: sélectionner le programme 3 et une température de 40°C.
Programmes spéciaux
Anti-bactérien (programme 7). Un programme hautes températures qui prévoit l’utilisation de produits javelisés à des
températures supérieures à 60°C. Pour blanchir, verser le produit javelisé, les lessives et les additifs dans les
compartiments correspondants (voir paragraphe “Tiroir à produits lessiviels”).
Bonne nuit (programme 8). C’est un cycle silencieux qui permet de faire fonctionner le lave-linge la nuit quand le tarif
d’électricité est plus bas. Ce programme est spécialement conçu pour les synthétiques et le coton. A la fin du cycle
l’appareil s’arrête, cuve pleine. Pour procéder à l’essorage et à la vidange, appuyer sur la touche MARCHE/PAUSE, à
défaut, l’appareil procédera automatiquement au bout de 8 heures à l’essorage et à la vidange de l’eau.
Bébé (programme 9). Programme spécial, idéal pour le lavage des vêtements d’enfants souvent très sales, il élimine
toute trace de lessive du linge pour protéger leur peau délicate et éviter tout risque d’allergie. Spécialement conçu pour
diminuer la charge bactérienne, ce cycle utilise une plus grande quantité d’eau et optimise l’effet des additifs
désinfectants spécifiques ajoutés à la lessive.
Mix 30’ (programme 5) spécialement conçu pour laver du linge peu sale en un rien de temps: il ne dure que 30 minutes
et permet ainsi de faire des économies d’énergie et de temps. La sélection de ce programme (5 à 30°C) permet de
laver ensemble des textiles différents (sauf laine et soie) en ne dépassant pas 3 kg de charge.
Mix 15’ (programme 6) spécialement conçu pour laver du linge peu sale en un rien de temps: il ne dure que 15 minutes
et permet ainsi de faire des économies d’énergie et de temps. La sélection de ce programme (6 à 30°C) permet de
laver ensemble des textiles différents (sauf laine et soie) en ne dépassant pas 1,5 kg de charge.
54
Page 55

Personnalisations
Sélection de la température
Appuyer sur la touche TEMPÉRATURE pour sélectionner la température de lavage (voir Tableau des programmes).
La température peut être abaissée jusqu’au lavage à froid (
La machine interdira automatiquement toute sélection d’une température supérieure à la température maximale
prévue pour chaque programme.
).
Sélection de l’essorage
Appuyer sur la touche ESSORAGE pour sélectionner la vitesse d’essorage du programme sélectionné.
Les vitesses maximales prévues pour les programmes sont:
Programmes Vitesse maximale
Coton 1400 tours/minute
Synthétiques 800 tours/minute
Laine 600 tours/minute
Soie vidange seule
La vitesse d’essorage peut être réduite ou l’essorage supprimé en sélectionnant le symbole
La machine interdira automatiquement tout essorage à une vitesse supérieure à la vitesse maximale prévue pour
chaque programme.
.
Fonctions
Les différentes fonctions de lavage prévues par le lave-linge permettent d’obtenir la propreté et le blanc souhaités.
Pour activer les fonctions:
1. appuyer sur la touche correspondant à la fonction désirée;
2. l’allumage du voyant correspondant signale que la fonction est activée.
Remarque: Le clignotement rapide du voyant signale que la fonction correspondante n’est pas disponible pour le
programme sélectionné.
FR
Départ différé
Pour programmer un départ différé du programme sélectionné, appuyer plusieurs fois de suite sur la touche
jusqu'à ce que le retard désiré (de 1 à 24 h) soit affiché.
Pour désactiver cette fonction, appuyer sur la touche jusqu'à affichage du message
N.B.: Après avoir appuyé sur la touche MARCHE/PAUSE, le retard programmé ne peut être modifié que pour le
diminuer.
.
! Il est activé avec tous les programmes.
Intensif
Grâce à l'utilisation d'une plus grande quantité d'eau au cours de la phase initiale du cycle et à l'emploi de
davantage de temps, cette fonction permet d'obtenir un lavage très performant.
!
Cette option n’est pas activable avec les programmes 5, 6, 7, 11, 12, , , , .
Rinçage plus
La sélection de cette fonction permet d’augmenter l’efficacité du rinçage et d’éliminer toute trace de lessive. Elle
est très utile en cas de peaux particulièrement sensibles.
! Cette option n’est pas activable avec les programmes 5, 6,
Repassage facile
En cas de sélection de cette fonction, le lavage et l’essorage seront dûment modifiés pour réduire le froissage.
Pour le programme 11 l’appareil arrive au bout du cycle en laissant le linge tremper, le voyant de la fonction
REPASSAGE FACILE et celui de MARCHE/PAUSE se mettent à clignoter (orange), la phase RINCAGE reste
allumée en fixe. Pour vidanger l’eau et pouvoir sortir le linge, il faut appuyer sur la touche MARCHE/PAUSE ou sur
la touche REPASSAGE FACILE.
!
Cette option n’est pas activable avec les programmes 5, 6, 7, 8, 9, 12, , , .
, , .
55
Page 56

Produits lessiviels et linge
FR
Tiroir à produits lessiviels
Un bon résultat de lavage dépend aussi d'un bon
dosage de produit lessiviel: un excès de lessive ne
lave pas mieux, il incruste l'intérieur de votre lavelinge et pollue l'environnement.
Sortez le tiroir à produits
lessiviels et versez la
lessive ou l'additif
comme suit.
bac 1: Lessive prélavage (en poudre)
bac 2: Lessive lavage (en poudre ou liquide)
En cas d'utilisation de lessive liquide, il est conseillé
d'introduire la boule doseuse directement dans la cuve.
bac 3: Additifs (adoucissant, etc.)
L'assouplissant ne doit pas déborder de la grille (max).
Le lave-linge prélève automatiquement l’assouplissant
lors du dernier rinçage.
A la fin du programme de lavage il reste dans le bac 3
un résidu d’eau. Cette eau sert au prélèvement des
assouplissants très denses ou à dissoudre les
assouplissants concentrés. Si dans le bac 3 il reste un
peu plus d’eau que d’habitude, cela signifie que le
dispositif de vidange est bouché et empêche l’effet
aspirant du dispositif.
bac 4: Eau de javel
Cycle blanchissage
Le blanchissage n’est possible qu’avec les
programmes 2, 3, 7,
Verser le produit javelisé dans le bac 4, la lessive et
l’assouplissant dans les bacs correspondants, puis
sélectionner un des programmes sus-indiqués.
Conseillé en cas de linge en coton très sale.
.
Triage du linge
• Trier correctement le linge d’après:
- le type de textile / le symbole sur l’étiquette.
- les couleurs: séparer le linge coloré du blanc.
• Vider les poches et contrôler les boutons.
• Ne pas dépasser les valeurs indiquées
correspondant au poids de linge sec :
Textiles résistants: 6 kg max.
Textiles synthétiques: 2,5 kg max.
Textiles délicats: 2 kg max.
Laine: 1 kg max.
Combien pèse le linge ?
1 drap 400-500 g
1 taie d’oreiller 150-200 g
1 nappe 400-500 g
1 peignoir 900-1200 g
1 serviette éponge 150-250 g
Linge ou vêtements particuliers
Chemises: sélectionner le programme 10 approprié
au lavage de chemises de couleurs et textiles
différents. Il en prend le plus grand soin en réduisant
le froissage.
Soie: sélectionner le programme de lavage spécial 11
pour vêtements en soie. Il est conseillé d’utiliser une
lessive spéciale pour linge délicat.
Rideaux:
d'oreiller ou dans un sac genre filet. Sélectionner le
programme 11.
Laine: est le seul lave-linge à avoir obtenu le
prestigieux label Woolmark Platinum Care (M.0508)
délivré par The Woolmark Company qui garantit le
lavage à la machine de tous les vêtements en laine, y
compris ceux qui portent l’étiquette “lavage à la main
uniquement”
donc laver à la machine, en toute tranquillité, tous les
vêtements en laine (max. 1 kg) avec des performances
de lavage optimales.
pliez-les bien et glissez-les dans une taie
. Grâce au programme 12 on peut
Système d’équilibrage de la charge
Avant tout essorage, pour éviter toute vibration
excessive et répartir le linge de façon uniforme, le
lave-linge fait tourner le tambour à une vitesse
légèrement supérieure à la vitesse de lavage. Si au
bout de plusieurs tentatives, la charge n’est toujours
pas correctement équilibrée, l’appareil procède à un
essorage à une vitesse inférieure à la vitesse
normalement prévue. En cas de déséquilibre excessif,
le lave-linge préfère procéder à la répartition du linge
plutôt qu’à son essorage. Pour une meilleure
répartition de la charge et un bon équilibrage, nous
conseillons de mélanger de grandes et petites pièces
de linge.
56
Page 57

Précautions et conseils
! Ce lave-linge a été conçu et fabriqué conformément
aux normes internationales de sécurité. Ces
consignes sont fournies pour des raisons de sécurité,
il faut les lire attentivement.
Sécurité générale
• Cet appareil est conçu pour un usage domestique.
• Cet appareil n’est pas destiné à être utilisé par des
personnes (enfants compris) dont les capacités
physiques, sensorielles ou mentales sont réduites
ou qui ne disposent pas des connaissances ou de
l’expérience nécessaires, à moins qu’elles n’aient
été formées et encadrées pour l’utilisation de cet
appareil par une personne responsable de leur
sécurité. Surveiller les enfants pour s’assurer qu’ils
ne jouent pas avec l’appareil.
• Ce lave-linge ne doit être utilisé que par des adultes
en suivant les instructions reportées dans ce mode
d’emploi.
• Ne jamais toucher l’appareil si l’on est pieds nus et
si les mains sont mouillées ou humides.
• Ne jamais tirer sur le câble pour débrancher la fiche
de la prise de courant.
• Ne pas toucher à l’eau de vidange, elle peut
atteindre des températures très élevées.
• Ne pas forcer pour ouvrir le couvercle: le
verrouillage de sécurité qui protège contre les
ouvertures accidentelles pourrait s’endommager.
• En cas de panne, éviter à tout prix d’accéder aux
mécanismes internes pour tenter une réparation.
• Veiller à ce que les enfants ne s’approchent pas de
l’appareil pendant son fonctionnement.
• Deux ou trois personnes sont nécessaires pour
déplacer l’appareil avec toutes les précautions
nécessaires. Ne jamais le déplacer tout seul car il
est très lourd.
• Avant d’introduire le linge, s’assurer que le tambour
est bien vide.
Mise au rebut
• Mise au rebut du matériel d’emballage: se
conformer aux réglementations locales de manière
à ce que les emballages puissent être recyclés.
• La Directive Européenne 2002/96/EC sur les
Déchets des Equipements Electriques et Electroniques, exige que les appareils ménagers usagés ne
soient pas jetés dans le flux normal des déchets
municipaux. Les appareils usagés doivent être
collectés séparément afin d'optimiser le taux de
récupération et le recyclage des matériaux qui les
composent et réduire l'impact sur la santé humaine
et l'environnement.
Le symbole de la ''poubelle barrée'' est apposée
sur tous les produits pour rappeler les obligations de
collecte séparée. Les consommateurs devront
contacter les autorités locales ou leur revendeur
concernant la démarche à suivre pour l'enlèvement
de leur vieil appareil.
Economies et respect de l'environnement
Economie de produit lessiviel, d'eau, d'électricité et de temps
• Pour ne pas gaspiller de ressources, utilisez le lavelinge à sa charge maximale. Mieux vaut une pleine
charge que deux demies, vous économiserez
jusqu'à 50% d'électricité.
• Un prélavage n'est nécessaire qu'en cas de linge
très sale. S'en passer permet de faire des économies de produit lessiviel, de temps, d'eau et entre
5 et 15% d'électricité.
• Si vous traitez les taches avec un produit
détachant ou si vous les laissez tremper avant de
les laver, vous éviterez d'avoir à laver à de hautes
températures. Un programme à 60°C au lieu de
90°C ou un à 40°C au lieu de 60°C, fait
économiser jusqu'à 50% d'électricité.
• Bien doser la quantité de produit lessiviel en fonction de la dureté de l'eau, du degré de salissure et
de la quantité de linge à laver évite les gaspillages
et protège l'environnement: bien que biodégradables, les produits lessiviels contiennent des éléments qui altèrent l'équilibre de la nature. Evitez le
plus possible l'utilisation d'assouplissant.
• Effectuer ses lavages tard dans l'après-midi et
jusqu'aux premières heures du matin permet de
réduire la charge d'absorption des opérateurs
énergétiques. L'option “Départ différé” aide à mieux
organiser les lavages en ce sens.
• Si le linge doit être séché dans un sèche-linge,
sélectionnez une haute vitesse d'essorage. Du
linge qui contient moins d'eau fait écomiser du
temps et de l'électricité dans le programme de
séchage.
FR
57
Page 58

Entretien et soin
FR
Coupure de l'arrivée d'eau et de courant
• Fermez le robinet de l'eau après chaque
lavage: vous limiterez ainsi l'usure de l'installation
hydraulique de votre lave-linge et éliminerez le
danger de fuites.
• Débranchez la fiche de la prise de courant quand
vous nettoyez votre lave-linge et pendant tous vos
travaux d'entretien.
Nettoyage du lave-linge
Pour nettoyer l'extérieur et les parties en caoutchouc,
utilisez un chiffon imbibé d'eau tiède et de savon.
N'utilisez ni solvants ni abrasifs.
Entretien du couvercle
et du tambour
• Quand vous n’utilisez pas votre lave-linge, laissez
toujours le couvercle entrouvert pour éviter la
formation de mauvaises odeurs.
Nettoyage de la pompe
Le lave-linge est équipé d'une pompe autonettoyante
qui n'exige aucune opération d'entretien. Il peut
toutefois arriver que de menus objets (pièces de
monnaie, boutons) tombent dans la préchambre qui
protège la pompe, placée en bas de cette dernière.
! Contrôlez que le cycle de lavage est bien terminé et
débranchez la fiche.
Pour récupérer les objets qui pourraient être tombés
dans la préchambre :
1. déposez la base à
l'avant de votre lavelinge en la saisissant
sur les côtés et en la
tirant des deux mains
(voir figure);
2. dévissez le cou
vercle en le faisant
tourner dans le sens
inverse des aiguilles
d'une montre (voir
figure): il est normal
qu'un peu d'eau
s'écoule;
3. nettoyez soigneusement à l'intérieur;
4. revissez le couvercle;
5. remontez le panneau
en veillant à bien enfiler
les crochets dans les
fentes prévues avant de
le pousser contre la
machine.
Contrôle du tuyau d'arrivée de l'eau
Contrôlez le tuyau d'alimentation au moins une fois par
an. Remplacez-le dès que vous remarquez des
craquèlements et des fissures: les fortes pressions subies
pendant le lavage pourraient provoquer des cassures.
Comment nettoyer le tiroir à produits lessiviels
Démontage:
Appuyez légèrement sur la
grosse touche située sur la
partie antérieure du tiroir à
produits lessiviels et tirez
vers le haut (fig. 1, 2).
Fig. 1
!!
!
N'utilisez jamais de tuyaux usés.
!!
Nettoyage:
Nettoyez le tiroir sous le robinet (fig. 3) à l'aide par exemple
d'une vieille brosse à dents; tirez sur les deux petits siphons placés dans la partie supérieure des bacs 1 et 2
(fig. 4), contrôlez qu'ils ne soient pas bouchés et rincezles.
Fig. 2 Fig. 3 Fig. 4
Remontage:
N'oubliez pas de replacez
les deux petits siphons dans
leurs emplacements spéciaux et remettez enfin le
tiroir dans son siège en le
fixant (fig. 4, 2, 1).
58
Page 59

Anomalies et remèdes
Il peut arriver que le lave-linge ne fonctionne pas bien. Avant d’appeler le Service de dépannage (voir
“Assistance”), contrôler s’il ne s’agit pas par hasard d’un problème facile à résoudre à l’aide de la liste suivante.
Anomalies:
Le lave-linge ne s’allume pas.
Le cycle de lavage ne démarre
pas.
Il n’y a pas d’arrivée d’eau (le
voyant de la première phase de
lavage clignote rapidement).
Le lave-linge prend l’eau et
vidange continuellement.
Causes / Solutions possibles:
• La fiche n’est pas branchée dans la prise de courant ou mal branchée.
• Il y a une panne de courant.
• Le couvercle n'est pas bien fermé (le voyant Couvercle Verrouillé clignote).
• La touche MARCHE/ARRÊT n’a pas été enfoncée.
• La touche MARCHE/PAUSE n’a pas été enfoncée.
• Le robinet de l’eau n’est pas ouvert.
• Un départ différé a été sélectionné (voir “Personnalisations”).
• Le tuyau d’arrivée de l’eau n’est pas raccordé au robinet.
• Le tuyau est plié.
• Le robinet de l’eau n’est pas ouvert.
• Il y a une coupure d’eau.
• La pression n’est pas suffisante.
• La touche MARCHE/PAUSE n’a pas été enfoncée.
• Le tuyau de vidange n’est pas installé à une distance du sol comprise
entre 65 et 100 cm (voir “Installation”).
• L’extrémité du tuyau de vidange est plongée dans l’eau (voir “Installation”).
• L’évacuation murale n’a pas d’évent.
Si après ces vérifications, le problème persiste, fermer le robinet de l’eau,
éteindre la machine et appeler le service Assistance. Si l’appartement est
situé en étage dans un immeuble, il peut y avoir des phénomènes de
siphonnage qui font que le lave-linge prend et évacue l’eau
continuellement. Pour supprimer cet inconvénient, on trouve dans le
commerce des soupapes spéciales anti-siphonnage.
FR
Le lave-linge ne vidange pas et
n’essore pas.
Le lave-linge vibre beaucoup
pendant l’essorage.
Le lave-linge a des fuites.
Le voyant MARCHE/PAUSE
(orange) ainsi que les voyants des
fonctions clignotent rapidement.
Il y a un excès de mousse.
• Le programme ne prévoit pas de vidange: pour certains programmes, il
faut la faire partir manuellement.
• La fonction REPASSAGE FACILE est activée: pour compléter le programme,
appuyer sur la touche MARCHE/PAUSE (“Personnalisations”).
• Le tuyau de vidange est plié (voir “Installation ”).
• La conduite d’évacuation est bouchée.
• Le tambour n’a pas été débloqué comme il faut lors de l’installation du
lave-linge (voir “Installation”).
• Le lave-linge n’est pas posé à plat (voir “Installation”).
• Le lave-linge est coincé entre des meubles et le mur (voir “Installation”).
• Le tuyau d’arrivée de l’eau n’est pas bien vissé (voir “Installation”).
• Le tiroir à produits lessiviels est bouché (pour le nettoyer voir “Entretien et soin”).
• Le tuyau de vidange n’est pas bien fixé (voir “Installation”).
• Eteindre l’appareil et débrancher la fiche de la prise de courant,
attendre 1 minute environ avant de rallumer.
Si l’anomalie persiste, appeler le service d’assistance.
• Le produit de lavage utilisé n’est pas une lessive spéciale machine (il faut qu’il y
ait l’inscription “pour lave-linge”, “main et machine”, ou autre semblable).
• La quantité utilisée est excessive.
59
Page 60

Assistance
195083184.02
11/2010 - Xerox Fabriano
FR
Avant dappeler le service après-vente:
Vérifier si on ne peut pas résoudre lanomalie par ses propres moyens (voir Anomalies et Remèdes);
Remettre le programme en marche pour contrôler si linconvénient a disparu;
Autrement, contacter le Centre dAssistance technique agréé au numéro de téléphone indiqué sur le
certificat de garantie.
Ne jamais sadresser à des techniciens non agréés.
Communiquer:
le type de panne;
le modèle de lappareil (Mod.);
son numéro de série (S/N).
Vous trouverez tous ces renseignements sur la plaquette signalétique située sur le panneau arrière de votre
lave-linge.
Consultation à tout moment
Pour toute demande concernant nos produits, nhésitez pas à contacter notre Service Consommateurs
0.825.05.44.44.
60
 Loading...