

Page 1

Instructions for
installation and use
Contents
Installation, 2-3
EN
English,1
GR
ЕЛЛЗНЙКБ,13
CSI
Русский,39
AQUALTIS
PL
Polski,27
Unpacking and levelling
Connecting the electricity and water supplies
Technical data
Description of the machine, 4-5
Touch control panel
How to run a wash cycle or a drying
cycle, 6
Wash cycles and options, 7
Table of wash cycles
Wash options
Detergents and laundry, 8
Detergent
Preparing the laundry
Washing recommendations
Load balancing system
WASHER-DRYER
EN
AQM9D 49 U
Precautions and advice, 9
General safety
Disposal
Opening the porthole door manually
Care and maintenance, 10
Cutting off the water and electricity supplies
Cleaning the machine
Cleaning the detergent dispenser drawer
Caring for your appliance drum
Cleaning the pump
Checking the water inlet hose
Trouble shooting, 11
Assistance, 12
1
Page 2

Installation
EN
This instruction manual should be kept in a safe place
for future reference. If the washing machine is sold,
given away or moved, please ensure the manual is kept
with the machine, so that the new owner may benefit
from the advice contained within it.
Read these instructions carefully: they contain vital
information relating to the safe installation and operation
of the appliance.
Inside the pack containing this manual, you will also
find the guarantee and all the details necessary for
installation.
Unpacking and levelling
Unpacking
1. Once you have removed all the packaging from the
washing machine, make sure it has not been damaged
during transportation.
If it has been damaged, contact the retailer and do not
proceed any further with the installation process.
2. Remove the 4
protective screws (used
during transportation) and
the corresponding spacer,
located on the rear part of
the appliance (see figure).
If the appliance is levelled correctly, it will be more
stable and much less likely to cause vibrations and noise
while it is operating, particularly during the spin cycle.
If it is placed on carpet or a rug, adjust the feet in such
a way as to allow a sufficient ventilation space
underneath the washing machine.
Connecting the electricity and water
supplies
Connecting the water inlet hose
Before connecting the inlet hose to the water supply,
run the water until it is perfectly clear.
1. Connect the inlet hose
to the machine by
screwing it onto the cold
water inlet of the
appliance, which is
situated on the top righthand side of the rear part
of the appliance (see
figure).
2. Connect the inlet hose
by screwing it to a cold
water tab using a 3/4 gas
threaded connection (see
figure).
3. Close off the holes using the plastic plugs supplied in
the pack.
4. Keep all the parts in a safe place; they will be needed
again if the washing machine is moved to another
location, to prevent the inside of the appliance being
damaged.
Packaging materials should not be used as toys for
children.
Levelling
1. Place the washing machine on a flat sturdy floor,
without resting it up against walls or cabinets.
2. If the floor is uneven,
the front feet of the
machine may be adjusted
until it reaches a horizontal
position (the angle of
inclination must not
exceed 2 degrees).
3. Make sure that the hose is not folded over or bent.
The water pressure at the tap must fall within the
values indicated in the Technical data table (see next
page).
If the inlet hose is not long enough, contact a
specialised shop or an authorised technician.
Never use second-hand or old inlet hoses; use the
products supplied with the machine.
2
Page 3

Connecting the drain hose
65 - 100 cm
Connect the drain hose to
drain duct piping or a wall
drain located between 65
and 100 cm above the
floor, making sure it is not
bent at all.
Alternatively, rest the drain
hose on the side of a
washbasin or bathtub,
fastening the duct
supplied to the tap (see
figure).
The free end of the hose
should not be underwater.
Do not use extension cords or multiple sockets.
EN
The cable should not be bent or compressed.
The power supply cable and plug must only be
replaced by authorised technicians.
Warning! The company shall not be held responsible in
the event that these regulations are not respected.
We advise against the use of hose extensions; if it is
absolutely necessary, the extension must have the same
diameter as the original hose and must not exceed 150
cm in length.
Electrical connections
Before plugging the appliance into the electricity socket,
make sure that:
the socket is earthed and complies with all applicable
laws;
the socket is able to withstand the maximum power
load of the appliance as indicated in the Technical
data table (see opposite);
the power supply voltage falls within the values
indicated in the Technical data table (see opposite);
the socket is compatible with the plug of the
appliance. If this is not the case, have the socket or
the plug replaced.
The machine must not be installed outdoors, even in
covered areas. It is extremely dangerous to leave the
appliance exposed to rain, storms and other weather
conditions.
The mains socket must remain within easy reach after
the washing machine has been installed.
Technical data
Model
Dimensions
Capacity
Electrical
connections
Water connections
Spin speed
Energy rated
programmes
according to
regulation
EN 50229
AQM9D 49 U
width 59,5 cm
height 85 cm
depth 64,5 cm
from 1to 9 kg for wash programme
from 1 to 6 kg for the drying programme
please refer to the technical data
plate fixed to the machine
maximum pressu re 1 MPa (10 bar)
minimum pressure 0.05 MPa (0.5 bar)
drum capacity 62 litres
up to 1400 rotations per minute
Wash: programme ; temperature
60°C; using a load of 9 kg.
Drying: first drying cycle performed
with a 3 kg load, by selecting the
drying level "IRON";
Second drying cycle performed with a
6 kg load, selecting the maximum
drying level "EXTRA".
This appliance conforms to the
following EC Directives:
- 89/336/EEC dated 03/05/89
(Electromagnetic Compatibility) and
subsequent modification s
- 2006/95/EC (Low Voltage)
- 2002/96/EC
3
Page 4

Description of the machine
EN
PORTHOLE DOOR
PORTHOLE DOOR
HANDLE
KICK STRIP
PORTHOLE DOOR
ADJUSTABLE FEET
Always use the handle to
open the porthole door (see
figure).
CONTROL
PANEL
recommend it is poured into the drawer immediately
before you start the washer-dryer.
3. extra compartment: Bleach
The use of extra compartment 3 excludes the prewash function.
washing additives compartment: for fabric softener or
liquid additives. We recommend that the maximum level
indicated by the grille is not exceeded, and that
concentrated fabric softeners are diluted.
TOUCH CONTROL PANEL
To adjust the settings, gently
press the icon inside the
sensitive (touch control) area
as illustrated in the figure.
20
DETERGENT DISPENSER DRAWER
The detergent dispenser
drawer is located inside the
machine and can be
accessed by opening the
door.
For more information on
detergent measures, please
refer to the chapter entitled
Detergents and laundry.
Note: stick the label showing
the wash cycle descriptions and options on the front of
the detergent dispenser drawer. You will find the sticker
in the pack containing this manual.
1. pre-wash compartment:
3
1
2
use powder detergent.
Before pouring in the
detergent, make sure that
extra compartment 3 has
been removed.
2. main wash compartment:
use powder or liquid
detergent. If using the latter
type of detergent, we
Standby mode
This washer-dryer, in compliance with new energy saving
regulations, is fitted with an automatic standby system
which is enabled after a few minutes if no activity is
detected. Press the ON-OFF
for the machine to start up again.
CHANGE LANGUAGE
The first time the machine is switched on, the first language
will flash on the display. The "
appear on the display, in line with the 3 buttons on the righthand side. The languages change automatically every 3";
alternatively, they can be changed by pressing the buttons next
to the " " and "V" symbols. Use the "OK" button to confirm the
language, which will be set after 2". If no buttons are pressed,
the automatic language change will begin again after 30".
The language may only be changed while the machine is
switched off.
Press and hold the temperature
buttons for 5''; a short beep sounds and the set language
flashes on the display. Press the buttons next to the " " and
"V" symbols to change the language. Use the button next to
the "OK" symbol to confirm the language, which will be set
after 2". If no buttons are pressed, the language set previously
will be displayed after 30". Switch on the machine.
button briefly and wait
", "OK" and "V" symbols will
+spin +delayed start
4
Page 5

Touch control panel
WASH CYCLE
SELECTOR knob
M2
M1
TEMPERATURE
DISPLAY
SPIN
button
button
START/PAUSEbutton
with indicator light
ECO
indicator light
EN
WASH
CYCLE
PHASE
icons
Button withON/OFF
indicator light
DRYING
Button with ON/OFF indicator light: press this briefly
to switch the machine on or off. The green indicator light
indicates that the machine is switched on. To switch off
the washer-dryer during the wash cycle, press and hold
the button for approximately 3 seconds; if the button is
pressed briefly or accidentally the machine will not
switch off. If the machine is switched off during a wash
cycle, this wash cycle will be cancelled.
WASH CYCLE SELECTOR knob: may be turned in
either direction. To select the most suitable wash cycle,
please refer to the Table of wash cycles.
The knob will not move during the wash cycle.
M1-M2 buttons: press and hold one of the buttons to
store a cycle with your own set preferences in the
memory of the machine. To recall a previously-stored
cycle, press the corresponding button.
DRYING button
: press to decrease or exclude drying;
the selected drying level or time will appear on the display
(see "How to run a wash cycle or a drying cycle").
TEMPERATURE
button: press to modify or exclude
the temperature setting; the value selected will appear
on the display above (see How to run a wash cycle or a
drying cycle).
SPIN CYCLE
button: press to modify or exclude the
spin cycle; the value selected will appear on the display
above (see How to run a wash cycle or a drying cycle).
DELAYED START
button: press to set a delayed
start for the selected wash cycle; the set delay time will
appear on the display above (see How to run a wash
cycle or a drying cycle).
OPTION
buttons
CONTROL PANEL
DELAYED START
button
LOCK button with
indicator light
DOOR LOCKED indicator light
WASH CYCLE PHASE icons: these illuminate to
indicate the progress of the wash cycle (Wash
Rinse
Spin/Drain Drying ). The text
lights up when the cycle is complete.
START/PAUSE button with indicator light: when the
green indicator light flashes slowly, press the button to
start a wash cycle. Once the cycle has begun the
indicator light will remain lit in a fixed manner. To pause
the wash cycle, press the button again; the indicator
light will flash in an orange colour. If the Door locked
indicator light is switched off, the door may be
opened. To start the wash cycle from the point at which
it was interrupted, press the button again.
DOOR LOCKED
indicator light: indicates that the
porthole door is locked. To open the door, pause the
wash cycle (see How to run a wash cycle or a drying
cycle).
CONTROL PANEL LOCK
button with indicator
light: to activate or deactivate the control panel lock,
press and hold the button for approximately 2 seconds.
when the indicator light is illuminated, the control panel is
locked. This means it is possible to prevent wash cycles
from being modified accidentally, especially where there
are children in the home.
ECO indicator light: the
icon lights up when, after
altering the washing parameters, an energy saving of at
least 10% is made. Furthermore, before the machine
enters Standby mode, the icon will light up for a few
seconds; when the machine is switched off the
estimated energy saving will be around the 80% mark.
OPTION buttons: press to select the available options.
The indicator light corresponding to the selected option
will remain lit (see How to run a wash cycle or a drying
cycle).
5
Page 6

How to run a wash cycle or a
drying cycle
EN
WARNING: before you use the washer-dryer for the first
time, run a wash cycle with detergent and no laundry, using
the 90° cottons cycle without pre-wash.
1. SWITCH THE MACHINE ON. Press the
indicator lights will illuminate for 1 second and the text
AQUALTIS will appear on the display; the indicator light
corresponding to the
manner and the START/PAUSE indicator light will flash.
2. SELECT THE PROGRAMME. Turn the PROGRAMME
KNOB left or right, until the required programme has been
selected; the name of the programme will appear on the
display. A temperature and spin speed is set for each
programme; these may be adjusted. The cycle duration will
also appear on the display.
3. LOAD THE LAUNDRY. Open the porthole door. Load the
laundry, making sure you do not exceed the maximum load value
indicated in the table of wash cycles on the following page.
4. MEASURE OUT THE DETERGENT. Pull out the detergent
dispenser drawer and pour the detergent into the relevant
compartments as described in Description of the machine.
5. CLOSE THE PORTHOLE DOOR.
6. CUSTOMISE THE WASH CYCLE. Use the relevant
buttons on the control panel:
Modify the temperature and/or spin speed.
The machine automatically displays the maximum
temperature and spin speed values set for the selected
cycle, or the most recently-used settings if they are
compatible with the selected cycle. The temperature can be
decreased by pressing the
OFF setting is reached. The spin speed may be
progressively reduced by pressing the
completely excluded OFF. If these buttons are pressed
again, the maximum values are restored.
Exception: if the Cottons programme is selected, the
temperature can be increased up to a value of 90°C.
Setting the drying cycle
The first time the button
automatically select the maximum drying cycle which is
compatible with the selected wash cycle. Subsequent
presses will decrease the drying level and then the drying time,
until the cycle is excluded completely ("OFF"). If these buttons
are pressed again, the maximum values are restored.
Drying may be set as follows:
A - Based on a set time period: between 20 and 180 minutes.
B- Based on the desired laundry dryness level:
Iron: suitable for clothes which will need ironing afterwards.
the remaining dampness softens creases, making them
easier to remove.
Hanger: ideal for clothes which do not need to be dried fully.
Cupboard: suitable for laundry which can be put back in a
cupboard without being ironed.
Extra: suitable for garments which need to be dried
completely, such as sponges and bathrobes.
If your laundry load to be washed and dried is much
greater than the maximum stated load (see adjacent table),
perform the wash cycle, and when the cycle is complete,
divide the garments into groups and put some of them
back in the drum. At this point, follow the instructions
provided for a "Drying only" cycle. Repeat this procedure
for the remainder of the load.
button will then remain lit in a constant
button, until the cold wash
is pressed, the machine will
button. All the
button, until it is
A cooling-down period is always added to the end of each
drying cycle.
Drying only
Use the cycle selector knob to select a drying cycle (
) in accordance with the type of fabric. The desired drying
level or time may also be set using the DRYING button
Setting a delayed start.
To set a delayed start for the selected cycle, press the
corresponding button repeatedly until the required delay period
has been reached. During the setting procedure, the delay
period and the text "Starts in: will be displayed, along with the
flashing
indicate the duration of the selected cycle with the text "Ends
in: and the cycle duration. Press the DELAYED START button
just once to display the delay time set previously. After the
countdown has begun, the display will show the text "Starts
in: and the delay period. Once the set delay time has elapsed,
the machine will begin its cycle and the display will show "Ends
in: and the time remaining until the end of the cycle. To remove
the delayed start option, press the button until the display
shows the text OFF; the
Press the button to activate the option; the name
of the option will then appear on the display and
the corresponding indicator light will illuminate.
Press the button again to deactivate the option; the
If the selected option is not compatible with the selected
wash cycle, this incompatibility will be signalled by the
flashing of the indicator light and a sound alert (3 beeps);
the option will not be activated.
If the selected option is not compatible with another option
that has been selected previously, the indicator light
corresponding to the first option selected will flash and only the
second option will be activated; the indicator light
corresponding to the button will remain lit in a constant manner.
The options may affect the recommended load value and/
or the duration of the cycle.
7. START THE PROGRAMME. Press the START/PAUSE
button. The corresponding indicator light remains lit in a fixed
manner and the porthole door locks (the
indicator light illuminates). The icons corresponding to the wash
cycle phases will light up during the cycle to indicate which
phase is currently in progress. To change a wash cycle once it
has already started, pause the washer-dryer by pressing the
START/PAUSE button; then select the desired cycle and press
the START/PAUSE button again. To open the door during a
wash cycle, press the START/PAUSE button; if the DOOR
LOCKED
door. Press the START/PAUSE button again to restart the
wash cycle from the point at which it was interrupted.
8. THE END OF THE WASH CYCLE. This is indicated by
the illuminated text END. The porthole door may be
opened immediately. If the START/PAUSE indicator light is
flashing, press the button to end the cycle. Open the door,
unload the laundry and switch off the machine.
If you wish to cancel a cycle which has already begun, press and hold
the
symbol. After the delayed start has been set, the
symbol will remain fixed on the display, which will also
symbol will disappear.
Modify the cycle settings.
name of the option will then appear on the display
followed by the text OFF, and the corresponding
indicator light will switch off.
DOOR LOCKED
indicator light is switched off you may open the
button until the cycle stops and the machine switches off.
- -
.
6
Page 7

Wash cycles and options
Table of wash cycles
Icon Description of the wash cycle
Cottons wash cycles
Cottons
(Add detergent to the relevant compartment).
Cottons (1):
Cottons (2):
Coloured
Jeans
Special programmes
Baby:
Mix 30':
for wool, silk and clothes which require washing by hand)
Durable
Silk :
Wool:
Drying cycles
Wash&Dry 30° 1400
Drying Cottons - -
Dryin g Synthetics - -
Drying Wool - -
Partials wash cycles
Rinse - 1400
Spin - 1400
Drain - 0 - - - - 9
(*) Note: 10 minutes after the START, the machine will recalculate the time remaining until the end of the wash cycle on the basis of the load inside it; this
value will then be shown on the display.
For all Test Institutes:
1) Test wash cycle in compliance with regulation EN 50229: set wash cycle
2) Long wash cycle for cottons: set wash cycle
3) Short wash cycle for cottons: set wash cycle
with pre-wash
heavily soiled whites and resistant colours.
heavily soiled w hites and delicate colours.
Cottons (3)
heavily soiled delicate colours
to refresh lightly soiled garments qu ickly (n ot suitable
Synthetics
for garments in silk and viscose, lingerie.
for wool, cas hmere, etc.
with a temperature of 40°C.
with a temperature of 40°C.
Max.
temp .
(°C)
90° 1400
60°
(Max. 90°)
40° 1400
40° 1400
40° 800
40° 800
30° 800
60° 800
30° 0 -
40° 800
with a temperature of 60°C.
Wash options
Super Wash
This option offers a high-performance wash due to the
greater quantity of water used in the initial phase of the
cycle, and due to the increased wash cycle duration, is
particularly useful for the
3
1
2
carrying out a full wash cycle, pour the bleach into the
extra compartment 3, select the "Rinse" cycle
activate the "Super Wash" option
It cannot be used in conjunction with
, , , , , .
Easy Iron
By selecting this option, the wash and spin cycles will be
modified in order to reduce the formation of creases.
At the end of the cycle the washer-dryer drum
will rotate slowly; the Easy Iron and START/PAUSE
removal of stubborn stains.
It can be used with or
without bleach. If you desire
bleaching, insert the extra
tray compartment (3) into
compartment 1. When
pouring in the bleach, be
careful not to exceed the
max level marked on the
central pivot (see figure).
To bleach laundry without
and
.
, , , , ,
Max.
speed
Drying
(rpm)
1400
indicator lights will flash. To end the cycle press the
START/PAUSE button or the Easy Iron button.
For the Silk
cycle while the laundry is soaking and the Easy
Iron indicator light will flash. To drain the water so that
the laundry may be removed, press the START/PAUSE
button or the Easy Iron button.
It cannot be used in conjunction with
, , , .
Note: If you also want to run the drying cycle, this option is
enabled only if combined with level Iron.
Time Saver
If you select this option, the wash cycle duration will be
reduced by 30%-50%, depending on the selected cycle,
thereby guaranteeing simultaneous water and energy
saving. Use this cycle for lightly soiled garments.
It cannot be used in conjunction with
, , , , , .
Extra rinse
By selecting this option, the efficiency of the rinse is
increased and optimal residual detergent removal is
guaranteed. It is particularly useful for skin which is
sensitive to detergents. We recommend this option is
used with a full load of washing, or when a large amount
of detergent is required.
It cannot be used in conjunction with
, .
Detergent and additives
Wash
ll l
ll l l
ll l l
ll l l
ll l
ll l l
ll l
ll l l
ll l
ll l
l
l
l
l
l
Fabric
softener
ll
- - - 6
- - - 4
- - - 1,5
-
- - - 9
Bleach
ll
Max.
load
(kg)
- 9
9
9
9
- 4
4
- 3,5
4
- 2
- 2
- 1
9
wash cycle, the machine will end the
, , , , ,
, , , , ,
, , , , ,
Cycle
duration
on the display.
EN
(*) The duration of the wash cycles can be checked
7
Page 8

Detergents and laundry
EN
Detergent
The type and quantity of detergent required depend on
the type of fabric you are washing (cotton, wool, silk,
etc.), as well as its colour, the washing temperature, the
level of soiling and the hardness of the water in the area.
Measuring out the detergent carefully will avoid wastage
and help to protect the environment: although they are
biodegradable, detergents still contain ingredients which
alter the balance of nature.
We recommend the following:
use powder detergents for white cotton garments and
pre-washing.
use liquid detergents for delicate cotton garments and
for all low-temperature wash cycles.
use gentle liquid detergents for wool and silk
garments.
The detergent should be poured into the relevant
compartment - or the dispenser placed directly inside
the drum - before the wash cycle begins. In the latter
case, it will not be possible to select the Cottons with
pre-wash cycle.
Do not use hand washing detergents because these
create too much foam.
Preparing the laundry
Shake out the garments before loading them into the
machine.
Divide the laundry according fabric type (symbol on the
washing instruction label) and colour, making sure you
separate the coloured garments from the white ones;
Empty all pockets and check the buttons;
Do not exceed the values listed in the Table of wash
cycles, which refer to the weight of the laundry when dry.
How much does your laundry weigh?
1 sheet 400-500 g
1 pillowcase 150-200 g
1 tablecloth 400-500 g
1 bathrobe 900-1200 g
1 towel 150-250 g
1 pair of jeans 400-500 g
1 shirt 150-200 g
Curtains: use the Silk
and place them in a pillow case or mesh bag.
Wool: Hotpoint/Ariston is the only washer-dryer brand to
have been awarded the prestigious Woolmark Platinum
Care endorsement (M.0508) by the Woolmark Company,
which means that all woollen garments may be washed
in the washer-dryer, even those which state hand wash
only
used to wash all woollen garments in the washer-dryer
while guaranteeing optimum performance.
Bedlinen and towels: use the Bed & Bath
to wash laundry from all over the house; this optimises
fabric softener performance and helps you save time and
energy. We recommend the use of powder detergent.
Stubborn stains: it is wise to treat stubborn stains with
solid soap before washing, and to use the Cottons with
pre-wash cycle.
Wash & Dry
soiled garments quickly. This cycle may be used to wash
and dry a laundry load of up to 1 kg in just 60 minutes.
To achieve optimum results, use liquid detergent and pretreat cuffs, collars and stains.
on the label. The Wool wash cycle can be
was designed to wash and dry lightly
wash cycle. Fold curtains
cycle
Load balancing system
Before every spin cycle, to avoid excessive vibrations
before every spin and to distribute the load in a uniform
manner, the drum rotates continuously at a speed which
is slightly greater than the washing rotation speed. If,
after several attempts, the load is not balanced
correctly, the machine spins at a reduced spin speed. If
the load is excessively unbalanced, the washer-dryer
performs the distribution process instead of spinning. To
encourage improved load distribution and balance, we
recommend small and large garments are mixed in the
load.
Washing recommendations
Jeans: use the special Jeans wash cycle for all
denim garments; turn inside out before washing and use
a liquid detergent.
Baby: use the special Baby
the remove the soiling typically caused by babies, while
removing all traces of detergent from nappies in order to
prevent the delicate skin of babies from suffering allergic
reactions. The cycle has been designed to reduce the
amount of bacteria by using a greater quantity of water
and optimising the effect of special disinfecting additives
added to the detergent. At the end of the wash cycle,
the machine will slowly rotate the drum; to end the cycle
press the START/PAUSE button.
Silk: use the special Silk
garments. We recommend the use of special detergent
which has been designed to wash delicate clothes.
8
wash cycle to remove
wash cycle to wash all silk
Page 9
Precautions and tips
The machine was designed and constructed in
accordance with international safety regulations. The
following information is provided for safety reasons and
must therefore be read carefully.
General safety
This appliance was designed for domestic use only.
the machine must only be used by adults, in
accordance with the instructions given in this manual.
Do not touch the machine when barefoot or with wet
or damp hands or feet.
Do not pull on the power supply cable when
unplugging the appliance from the electricity socket.
Hold the plug and pull.
Do not touch the drained water as it may reach
extremely high temperatures.
Never force the porthole door. This could damage the
safety lock mechanism designed to prevent
accidental opening.
If the appliance breaks down, do not under any
circumstances access the internal mechanisms in an
attempt to repair it yourself.
Always keep children well away from the appliance
while it is operating.
If it must be moved, proceed with the help of two or
three people and handle it with the utmost care.
Never try to do this alone, because the appliance is
very heavy.
Before loading laundry into the washer dryer, make
sure the drum is empty.
During the drying phase, the door tends to get
quite hot.
Do not use the appliance to dry clothes that have
been washed with flammable solvents (e.g.
trichlorethylene).
Do not use the appliance to dry foam rubber or
similar elastomers.
Make sure that the water tap is turned on during
the drying cycles.
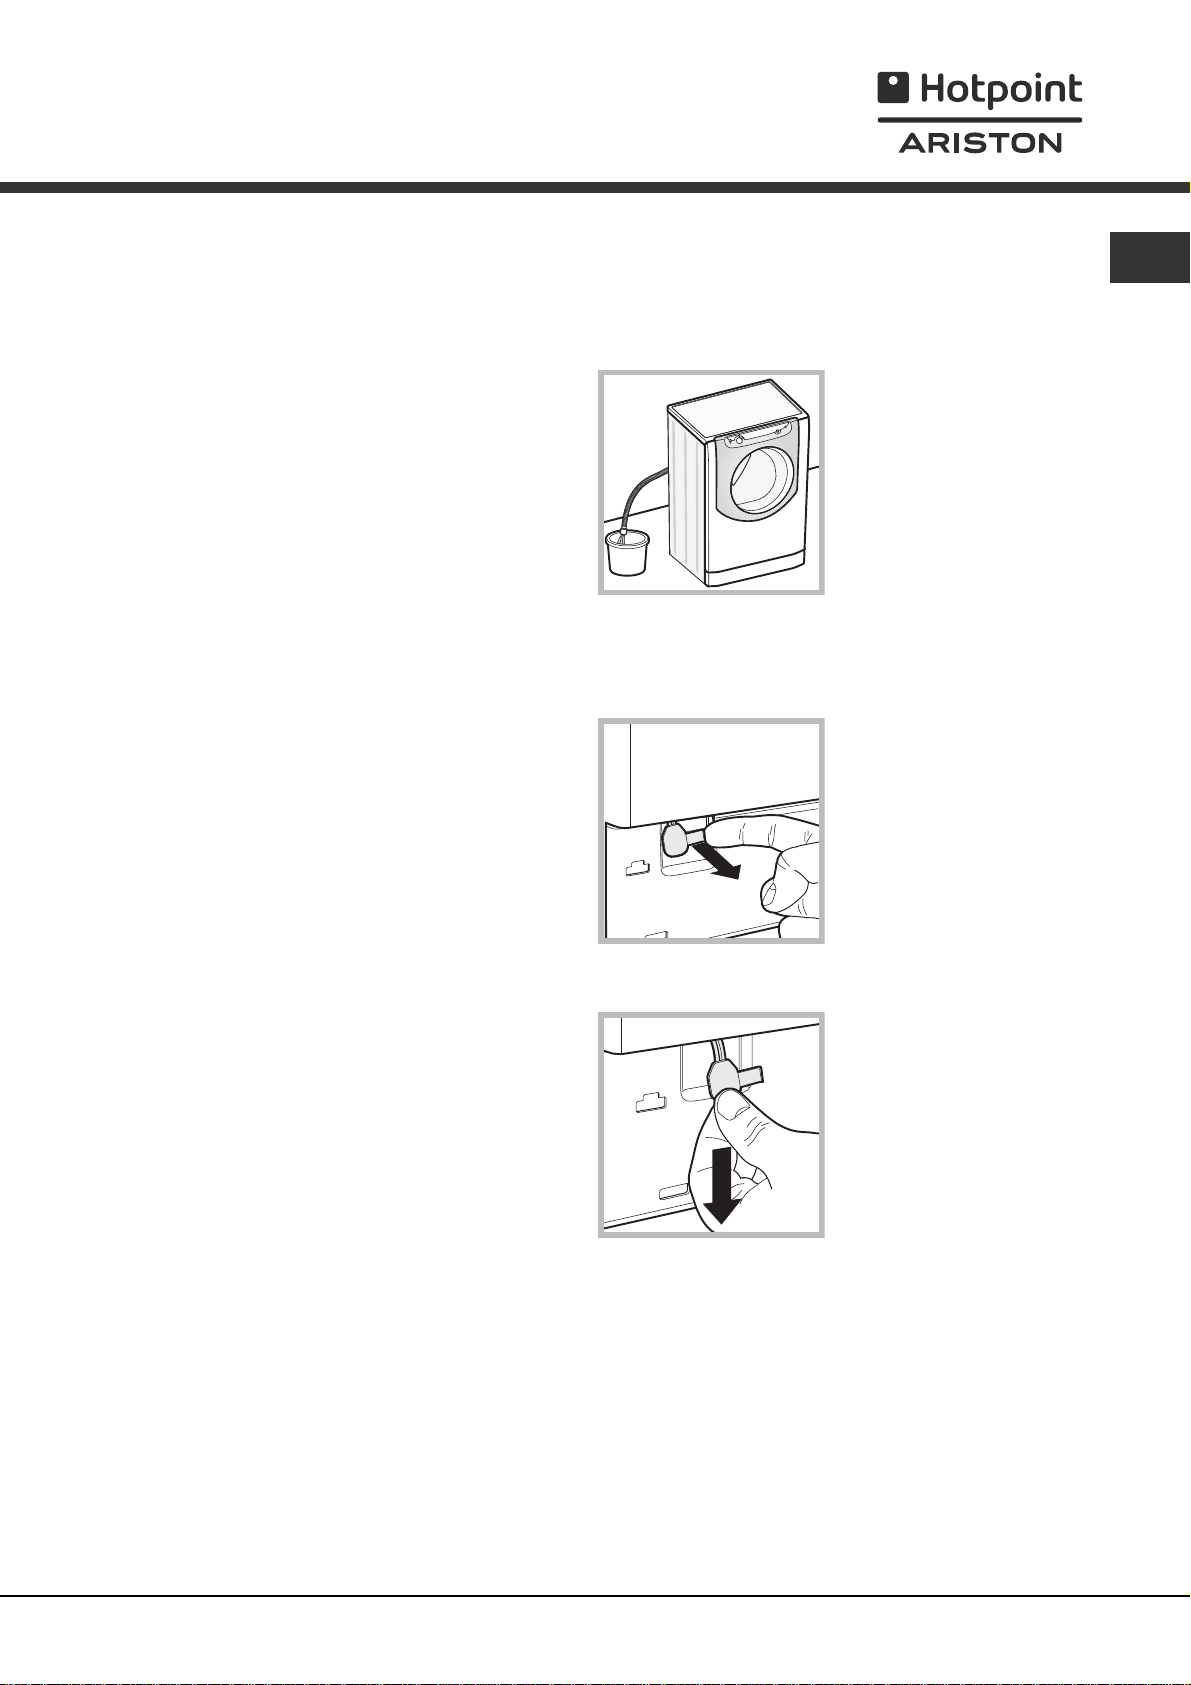
Opening the porthole door manually
In the event that it is not possible to open the porthole
door due to a powercut, and if you wish to remove the
laundry, proceed as follows:
1. remove the plug from the
electrical socket.
2. make sure the water level
inside the machine is lower
20
3. remove the cover panel on the lower front part of the
washer dryer (see overleaf).
than the door opening; if it is
not, remove excess water
using the drain hose,
collecting it in a bucket as
indicated in the figure.
4. pull outwards using the
tab as indicated in the figure,
until the plastic tie-rod is
freed from its stop position;
pull downwards until you
hear a click, which
indicates that the door is
now unlocked.
5. open the door; if this is
still not possible repeat the
procedure.
EN
Disposal
Disposing of the packaging materials: observe local
regulations so that the packaging may be re-used.
The European Directive 2002/96/EC relating to Waste
Electrical and Electronic Equipment (WEEE) states
that household appliances should not be disposed of
using the normal solid urban waste cycle. Exhausted
appliances should be collected separately in order to
optimise the cost of re-using and recycling the
materials inside the machine, while preventing
potential damage to the atmosphere and to public
health. The crossed-out dustbin is marked on all
products to remind the owner of their obligations
regarding separated waste collection.
For more information relating to the correct disposal of
household appliances, owners should contact their
local authorities or appliance dealer.
6. reposition the panel, making sure the hooks are
securely in place before you push it onto the appliance.
9
Page 10

Care and maintenance
EN
Cutting off the water and electricity
supplies
Turn off the water tap after every wash cycle. This will
limit wear on the hydraulic system in the machine and
help to prevent leaks.
Unplug the appliance when cleaning it and during all
maintenance work.
Cleaning the machine
The outer parts and rubber components of the appliance
can be cleaned using a soft cloth soaked in lukewarm
soapy water. Do not use solvents or abrasives.
Cleaning the detergent dispenser
drawer
To remove the drawer, press
lever (1) and pull the drawer
outwards (2) (see figure).
Wash it under running
water; this procedure should
be repeated frequently.
To access the pre-chamber:
2
1. take off the cover panel on the front of the machine
by first pressing it in the centre and then pushing
downwards on both sides until you can remove it (see
figures);
2. position a container so
that it will collect the water
which flows out
(approximately 1.5 l) (see
figure);
3. unscrew the lid by
rotating it in an anticlockwise direction (see
figure);
Caring for your appliance drum
Always leave the door ajar to prevent unpleasant
odours from forming.
Cleaning the pump
The washer dryer is fitted with a self-cleaning pump
which does not require any maintenance. Sometimes,
small items (such as coins or buttons) may fall into the
protective pre-chamber at the base of the pump.
Make sure the wash cycle has finished and unplug the
appliance.
4. clean the inside thoroughly;
5. screw the lid back on;
6. reposition the panel, making sure the hooks are
securely in place before you push it onto the appliance.
Checking the water inlet hose
Check the inlet hose at least once a year. If there are
any cracks, it should be replaced immediately: during
the wash cycles, water pressure is very strong and a
cracked hose could easily split open.
10
Page 11

Trouble shooting
Your washer-dryer could occasionally fail to work. Before contacting the Technical Assistance Centre
(see Assistance), make sure that the problem cannot be not solved easily using the following list.
Problem:
The washer-dryer does not switch on.
The wash cycle does not start.
The washer-dryer does not fill
with water.
The washer-dryer door remains
locked.
The machine continuously fills
with water and drains.
The washer-dryer does not drain
or spin.
The machine vibrates a lot during
the spin cycle.
The washer-dryer leaks.
The icons corresponding to the
Phase in progress flash rapidly
at the same time as the ON/OFF
Possible causes / Solutions:
The appliance is not plugged into the socket fully, or not enough to make contact.
There is no power in the house.
The door is not closed properly.
The START/PAUSE button has not been pressed.
The water tap has not been opened.
A delayed start has been set.
The water inlet hose is not connected to the tap.
The hose is bent.
The water tap has not been opened.
There is no water supply in the house.
The pressure is too low.
The START/PAUSE button has not been pressed.
If you have selected the Baby
the wash cycle has finished the machine will slowly rotate the drum; to end
the cycle press the START/PAUSE button or the Easy iron
you have selected the Silk
while the laundry is soaking; to drain the water so that the laundry may be
removed, press the START/PAUSE button or the Easy iron
The drain hose is not fitted at a height between 65 and 100 cm from the
floor (see Installation).
The free end of the hose is under water (see Installation).
If the dwelling is on one of the upper floors of a building, there may be
problems relating to water drainage, causing the washer-dryer to fill with
water and drain continuously. Special anti-draining valves are available in
shops and help to prevent this inconvenience.
The wall drainage system is not fitted with a breather pipe.
The wash cycle does not include draining: Some wash cycles require the
drain phase to be started manually (see Wash cycles and options).
The Easy iron option is enabled: to complete the wash cycle, press the
START/PAUSE button (Wash cycles and options).
The drain hose is bent (see Installation).
The drainage duct is clogged.
The drum was not unlocked correctly during installation (see Installation).
The machine is not level (see Installation ).
The machine is trapped between cabinets and walls (see Installation).
The load is unbalanced (see Detergents and laundry).
The water inlet hose is not screwed on properly (see Installation).
The detergent dispenser is blocked (to clean it, see Care and maintenance).
The drain hose is not fixed in place properly (see Installation).
Switch off the machine and unplug it, wait for approximately 1 minute and
then switch it back on again. If the problem persists, contact the Technical
Assistance Service.
cycle or the Easy iron option, when
wash cycle, the machine will end the cycle
indicator light.
EN
button. If
button.
There is too much foam.
The washer-dryer door remains locked.
The washer-dryer does not dry.
The detergent is not suitable for machine washing (it should display the text
for washer-dryers or hand and machine wash, or the like).
Too much detergent was used.
Perform the manual unlocking procedure (see Precautions and tips).
The appliance is not plugged into the socket, or not enough to make contact.
There has been a power failure.
The appliance door is not shut properly.
A DELAY TIMER has been set.
DRYING is in the OFF position.
11
Page 12

Assistance
EN
Before calling for Assistance:
Check whether you can solve the problem by yourself (see Trouble shooting);
Restart the wash cycle to check whether the problem has been solved;
If it has not, contact the Authorised Technical Assistance Service.
If the washer-dryer has been installed or used incorrectly, you will have to pay for the call-out service.
Always request the assistance of authorised technicians.
Please have the following information to hand:
the type of problem;
the appliance model (Mod.);
the serial number (S/N).
The above information can be found on the data plate located on the appliance itself.
Note: To exit Demo mode, press and hold the two ON/OFF and START/PAUSE buttons simultaneously for 3 seconds.
12
Page 13

ПдзгЯет гйб фзн егкбфЬуфбуз кбй фз
чсЮуз
GR
ЕллзнйкЬ
AQUALTIS
AQM9D 49 U
РЛХНФЗСЙП СПХЧЩН
Ресйечьменб
ЕгкбфЬуфбуз, 14-15
БрпухукехбуЯб кбй псйжпнфЯщуз
ХдсбхлйкЭт кбй злекфсйкЭт ухндЭуейт
ФечнйкЬ уфпйчеЯб
РесйгсбцЮ фзт мзчбнЮт, 16-17
РЯнбкбт чейсйуфзсЯщн touch control
Рщт дйенесгеЯфбй Эбт кэклпт рлхуЯмбфпт Ю
уфегнюмбфпт, 18-19
РспгсЬммбфб кбй дхнбфьфзфет, 20
РЯнбкбт РспгсбммЬфщн
Дхнбфьфзфет рлхуЯмбфпт
БрпссхрбнфйкЬ кбй мрпхгЬд, 21
Брпссхрбнфйкь
РспефпймбуЯб фзт мрпхгЬдбт
УхмвпхлЭт рлхуЯмбфпт
Уэуфзмб йупуфЬимйузт фпх цпсфЯпх
РспцхлЬоейт кбй ухмвпхлЭт, 22
ГенйкЮ буцЬлейб
ДйЬиеуз
Чейспнбкфйкь Ьнпйгмб фзт рьсфбт
GR
УхнфЮсзуз кбй цспнфЯдб, 23
Брпклейумьт неспэ кбй злекфсйкпэ сеэмбфпт
Кбибсйумьт фзт мзчбнЮт
Кбибсйумьт фпх ухсфбсйпэ брпссхрбнфйкюн
ЦспнфЯдб фпх кЬдпх
Кбибсйумьт фзт бнфлЯбт
¸легчпт фпх ущлЮнб фспцпдпуЯбт фпх неспэ
БнщмблЯет кбй лэуейт, 24
ХрпуфЮсйоз, 25
13
Page 14

ЕгкбфЬуфбуз
GR
ЕЯнбй узмбнфйкь нб дйбфзсЮуефе фп егчейсЯдйп бхфь гйб
нб мрпсеЯфе нб фп ухмвпхлеэеуфе прпйбдЮрпфе уфйгмЮ.
Уе ресЯрфщуз рюлзузт, рбсбчюсзузт Ю мефбкьмйузт,
вевбйщиеЯфе ьфй рбсбмЭней мбжЯ ме фп рлхнфЮсйп.
ДйбвЬуфе рспуекфйкЬ фйт пдзгЯет: хрЬсчпхн
узмбнфйкЭт рлзспцпсЯет гйб фзн егкбфЬуфбуз, фз
чсЮуз кбй фзн буцЬлейб.
Уфз убкпхлЯфуб рпх ресйЭчей фп егчейсЯдйп бхфь иб
всеЯфе, екфьт фзт еггэзузт, хлйкЬ рпх чсзуймеэпхн гйб
фзн егкбфЬуфбуз.
БрпухукехбуЯб кбй псйжпнфЯщуз
БрпухукехбуЯб
1. Бцпэ брпухукехбуфеЯ фп рлхнфЮсйп, елЭгофе бн Эчей
хрпуфеЯ жзмйЭт кбфЬ фз мефбцпсЬ.
Бн Эчей хрпуфеЯ жзмйЭт мзн фп ухндЭефе кбй
ерйкпйнщнЮуфе ме фпн мефбрщлзфЮ.
2. БцбйсЭуфе фйт 4
рспуфбфехфйкЭт вЯдет гйб
фз мефбцпсЬ кбй фпн
учефйкь брпуфЬфз рпх
всЯукпнфбй уфп рЯущ
мЭспт (влЭре ейкьнб).
3. КлеЯуфе фйт прЭт ме фб рлбуфйкЬ рюмбфб рпх
ресйЭчпнфбй уфз убкпхлЯфуб.
4. ЦхлЬофе ьлб фб кпммЬфйб. Бн фп рлхнфЮсйп чсейбуфеЯ
нб мефбцесиеЯ, иб рсЭрей нб обнбмпнфбсйуфпэн гйб фзн
брпцхгЮ еущфесйкюн влбвюн.
Пй ухукехбуЯет ден еЯнбй рбйчнЯдйб гйб мйксЬ рбйдйЬ!
Уе ресЯрфщуз мпкЭфбт Ю фЬрзфб, схимЯуфе фб
рпдбсЬкйб Эфуй юуфе нб хцЯуфбфбй кЬфщ брь фп
рлхнфЮсйп бскефьт чюспт гйб фпн бесйумь.
ХдсбхлйкЭт кбй злекфсйкЭт ухндЭуейт
Уэндеуз фпх ущлЮнб фспцпдпуЯбт фпх неспэ
Рсйн ухндЭуефе фп ущлЮнб фспцпдпуЯбт уфп дЯкфхп
эдсехузт, бцЮуфе нб фсЭоей фп несь мЭчсй нб вгей
дйбхгЭт.
1. УхндЭуфе фп ущлЮнб
фспцпдпуЯбт уфп
рлхнфЮсйп вйдюнпнфЬт фпн
уфзн бнфЯуфпйчз еЯупдп
неспэ, уфп рЯущ мЭспт
ерЬнщ деойЬ (влЭре
ейкьнб).
2. УхндЭуфе фп ущлЮнб
фспцпдпуЯбт вйдюнпнфЬт
фпн уе Энб кспхнь ксэпх
неспэ ме уфьмйп
урейсюмбфпт 3/4 gas
(влЭре ейкьнб).
БлцЬдйбумб
1. ФпрпиефЮуфе фп рлхнфЮсйп уе Энб дЬредп ерЯредп
кбй бниекфйкь, чщсЯт нб фп бкпхмрЮуефе уе фпЯчпхт Ю
Эрйрлб.
2. БнфйуфбимЯуфе фйт
бнщмблЯет оевйдюнпнфбт Ю
вйдюнпнфбт фб рпдбсЬкйб
Эщт ьфпх з мзчбнЮ
блцбдйбуфеЯ (ден рсЭрей
нб клЯней ресйууьфесп
брь 2 мпЯсет).
¸нб ерймелЭт блцЬдйбумб дЯней уфбиесьфзфб кбй
брпупвеЯ дпнЮуейт кбй ипсхвьфзфб кхсЯщт уфз цЬуз
уфхшЯмбфпт.
14
3. РспуЭофе юуфе уфп ущлЮнб нб мзн хрЬсчпхн пэфе
рфхчюуейт, пэфе уфенюуейт.
З рЯеуз неспэ фпх кспхнпэ рсЭрей нб кхмбЯнефбй
мефбоэ фщн фймюн фпх рЯнбкб ФечнйкЬ уфпйчеЯб (влЭре
уелЯдб дЯрлб).
Бн фп мЮкпт фпх ущлЮнб фспцпдпуЯбт ден ербскеЯ,
брехихниеЯфе уе Энб ейдйкехмЭнп кбфЬуфзмб Ю уе
еопхуйпдпфзмЭнп фечнйкь.
Мз чсзуймпрпйеЯфе рпфЭ чсзуймпрпйзмЭнпхт Ю
рблйпэт ущлЮнет фспцпдпуЯбт, бллЬ екеЯнпхт рпх
рбсЭчпнфбй ме фз мзчбнЮ.
Page 15

Уэндеуз фпх ущлЮнб брпуфсЬггйузт
УхндЭуфе фп ущлЮнб
бдейЬумбфпт уе мйб
ущлЮнщуз бдейЬумбфпт Ю
уе мйб ерйфпЯчйб
рбспчЭфехуз уе эшпт
65 - 100 cm
брь фп Эдбцпт мефбоэ 65
кбй 100 cm кбй
брпцеэгпнфбт сзфЬ нб фпн
дйрлюуефе.
ЕнбллбкфйкЬ, уфзсЯофе фп
ущлЮнб бдейЬумбфпт уфп
чеЯлпт еньт нйрфЮсб Ю
мйбт лекЬнзт, дЭнпнфбт
фпн пдзгь рпх убт
рбсЭчефбй уфпн кспхнь
(влЭре ейкьнб).
Фп елеэиесп Ьксп фпх
ущлЮнб бдейЬумбфпт ден
рсЭрей нб рбсбмЭней
вхийумЭнп уфп несь.
Мз чсзуймпрпйеЯфе рспекфЬуейт кбй рплэрсйжб.
GR
Фп кблюдйп ден рсЭрей нб цЭсей рфхчЭт Ю нб еЯнбй
ухмрйеумЭнп.
Фп кблюдйп фспцпдпуЯбт кбй фп вэумб рсЭрей нб
бнфйкбиЯуфбнфбй мьнп брь еопхуйпдпфзмЭнпхт фечнйкпэт.
РспупчЮ! З ерйчеЯсзуз брпрпйеЯфбй кЬие ехиэнзт уе
ресЯрфщуз рпх ден фзспэнфбй бхфпЯ пй кбньнет.
ФечнйкЬ уфпйчеЯб
Ден ухнйуфЬфбй з чсЮуз рспекфЬуещн ущлЮнщн. Бн
брбйфеЯфбй, з рспЭкфбуз рсЭрей нб Эчей фзн Ядйб
дйЬмефсп фпх бсчйкпэ ущлЮнб кбй нб мзн оереснЬей фб
150 cm.
ЗлекфсйкЮ уэндеуз
Рсйн ейуЬгефе фп вэумб уфзн злекфсйкЮ рсЯжб,
вевбйщиеЯфе ьфй:
з рсЯжб дйбиЭфей геЯщуз кбй фзсеЯ фйт ек фпх ньмпх
рспдйбгсбцЭт.
З рсЯжб нб еЯнбй уе иЭуз нб хрпцЭсей фп мЭгйуфп
цпсфЯп йучэпт фзт мзчбнЮт, рпх бнбцЭсефбй уфпн
рЯнбкб Фечнйкюн уфпйчеЯщн (влЭре дЯрлб).
З фЬуз фспцпдпуЯбт нб кхмбЯнефбй мефбоэ фщн фймюн
рпх бнбцЭспнфбй уфпн рЯнбкб Фечнйкюн уфпйчеЯщн
(влЭре дЯрлб).
З рсЯжб нб еЯнбй ухмвбфЮ ме фп вэумб фзт мзчбнЮт.
Уе бнфЯиефз ресЯрфщуз, бнфйкбфбуфЮуфе фзн рсЯжб Ю
фп вэумб.
Фп рлхнфЮсйп ден егкбиЯуфбфбй уе бнпйчфь чюсп,
бкьмз кбй бн п чюспт еЯнбй кблхммЭнпт, дйьфй еЯнбй
рплэ ерйкЯндхнп нб фп бцЮнефе екфеиеймЭнп уе вспчЮ
кбй кбкпкбйсЯб.
Ме фзн егкбфЬуфбуз фпх рлхнфзсЯпх, з рсЯжб
сеэмбфпт рсЭрей нб еЯнбй еэкплб рспувЬуймз.
МпнфЭлп
ДйбуфЬуейт
Чщсзфйкьфзфб
ЗлекфсйкЭт
ухндЭуейт
УхндЭуейт неспэ
Фбчэфзфб
уфхшЯмбфпт
РспгсЬммбфб
елЭгчпх уэмцщнб
ме фпн кбнпнйумь
EN 50229
AQM9D 49 U
рлЬфпт cm 59,5
эшпт cm 85
вЬипт cm 64,5
Брь 1 Эщт 9 kg гйб фп рлэуймп
Брь 1 Эщт 6 kg гйб фп уфЭгнщмб
ВлЭре фзн рйнбкЯдб
чбсбкфзсйуфйкюн ерЯ фзт мзчбнЮт
мЭгйуфз рЯеуз 1 MPa (10 bar)
ЕлЬчйуфз рЯеуз 0,05 MPa (0,5 bar)
чщсзфйкьфзфб фпх кЬдпх 62 лЯфсб
мЭчсй 1400 уфспцЭт фп лерфь
рлэуймп:
иесмпксбуЯб 60°C;
екфелпэменп ме 9 kg мрпхгЬдбт.
уфЭгнщмб:
дйенесгпэменп ме 3 kg цпсфЯпх
ерйлЭгпнфбт фп ерЯредп
уфегнюмбфпт УЙДЕСЩМБ;
Деэфесп уфЭгнщмб дйенесгпэменп ме
6 kg цпсфЯпх ерйлЭгпнфбт фп
ерЯредп уфегнюмбфпт ЕРЙРЛЭПН.
З ухукехЮ бхфЮ еЯнбй уэмцщнз ме
фйт бкьлпхиет пйнпфйкЭт ПдзгЯет:
- 89/336/CEE фзт 03/05/89
(ЗлекфспмбгнзфйкЮ Ухмвбфьфзфб)
кбй мефбгенЭуфесет фспрпрпйЮуейт
- 2002/96/CE
- 2006/95/CE (ЧбмзлЮ ФЬуз)
рсьгсбммб ;
рсюфп уфЭгнщмб
15
Page 16

РесйгсбцЮ фзт мзчбнЮт
GR
мÑÔÁ
ЛБВЗ
РПСФБУ
РЕЛМБ
СХИМЙЖПМЕНБ
РПДБСБКЙБ
мÑÔÁ
Гйб нб бнпЯоефе фзн рьсфб
чсзуймпрпйеЯфе рЬнфб фз
учефйкЮ лбвЮ (влЭре
ейкьнб).
20
И¹КЗ БРПССХРБНФЙК¿Н
З иЮкз брпссхрбнфйкюн
всЯукефбй уфп еущфесйкь фзт
мзчбнЮт кбй Эчефе рсьувбуз
бнпЯгпнфбт фзн рьсфб. Гйб фз
дпуплпгЯб фщн брпссхрбнфйкюн
влЭре фп кецЬлбйп
БрпссхрбнфйкЬ кбй мрпхгЬдб.
УзмеЯщуз: кпллЮуфе уфз
иЮкз брпссхрбнфйкюн фп
бхфпкьллзфп ме фйт ресйгсбцЭт
фщн рспгсбммЬфщн кбй фщн
дхнбфпфЮфщн. Фп бхфпкьллзфп всЯукефбй уфп убкпхлЬкй рпх
ресйЭчей фп егчейсЯдйп бхфь.
1. лекбнЯфуб гйб фзн
3
1
2
рсьрлхуз: чсзуймпрпйеЯфе
брпссхрбнфйкь уе укьнз.
Рсйн чэуефе фп
брпссхрбнфйкь елЭгофе бн
Эчей ейубчиеЯ з рсьуиефз
лекбнЯфуб 3.
2. лекбнЯфуб гйб фп
рлэуймп: чсзуймпрпйеЯфе
брпссхрбнфйкь уе укьнз Ю
РºНБКБУ
ЧЕЙСЙУФЗСºЩН
хгсь. Уфзн фелехфбЯб ресЯрфщуз рспфеЯнефбй нб фп
чэнефе бмЭущт мефЬ фзн еккЯнзуз фпх рлхнфзсЯпх
3. лекбнЯфуб рсьуиефз: Лехкбнфйкь
З чсЮуз фзт рсьуиефзт лекбнЯфубт 3 брпклеЯей
фзн рсьрлхуз.
лекбнЯфуб гйб рсьуиефб: гйб фп мблбкфйкь Ю хгсЬ
рсьуиефб. УхуфЮнефбй нб мзн оереснЬфе рпфЭ фз
мЭгйуфз уфЬимз рпх хрпдейкнэефбй брь фз учЬсб кбй
нб бсбйюнефе ухмрхкнщмЭнб мблбкфйкЬ.
РЯнбкбт чейсйуфзсЯщн touch control
Фсьрпт stand by
Фп рлхнфЮсйп бхфь, уэмцщнб ме фйт нЭет дйбфЬоейт гйб
фзн еопйкпньмзуз енЭсгейбт, дйбиЭфей Энб уэуфзмб
бхфьмбфпх увзуЯмбфпт (stand by) рпх фЯиефбй уе
лейфпхсгЯб енфьт месйкюн лерфюн уфзн ресЯрфщуз мз
чсЮузт. РйЭуфе уфйгмйбЯб фп кпхмрЯ ON-OFF
ресймЭнефе нб енесгпрпйзиеЯ ек нЭпх з мзчбнЮ.
БЛЛБГЗ ГЛЩУУБУ
Уфп рсюфп Ьнбммб фзт мзчбнЮт емцбнЯжефбй уфзн пиьнз
з рсюфз глюууб нб бнбвпувЮней. БрЭнбнфй брь фб 3
кпхмрйЬ деойЬ фзт пиьнзт емцбнЯжпнфбй фб уэмвплб
OK êáé V. Пй глюуует бллЬжпхн бхфьмбфб кЬие 3
Ю рйЭжпнфбт фб кпхмрйЬ дЯрлб брь фб уэмвплб
кбй V. Ме фп кпхмрЯ OK ерйвевбйюнефбй з глюууб
рпх уфбиеспрпйеЯфбй мефЬ брь 2. Бн ден рбфзиеЯ
кбнЭнб кпхмрЯ, ме фп рЭсбт фщн 30 з бхфьмбфз
бллбгЮ фщн глщууюн обнбсчЯжей. МрпсеЯ нб
фспрпрпйзиеЯ з глюууб мьнп ме фз мзчбнЮ
увзуфЮ.
РйЭжпнфбт фбхфьчспнб фб кпхмрйЬ иесмпксбуЯбт
+уфэшймп +еккЯнзуз ме кбихуфЭсзуз гйб 5
рЭсбн еньт уэнфпмпх бкпхуфйкпэ уЮмбфпт емцбнЯжефбй
уфзн пиьнз з феиеЯуб глюууб нб бнбвпувЮней.
РйЭжпнфбт фб кпхмрйЬ дЯрлб уфб уэмвплб
бллЬжей з глюууб. Ме фп кпхмрЯ дЯрлб уфп уэмвплп
«OK» ерйвевбйюнефбй з глюууб рпх уфбиеспрпйеЯфбй
мефЬ брь 2. Бн ден рбфзиеЯ кбнЭнб кпхмрЯ, ме фп
рЭсбт фщн 30 иб брейкпнйуфеЯ з рспзгпхмЭнщт
феиеЯуб глюууб.
ЕнесгпрпйЮуфе фп рлхнфЮсйп.
Гйб нб бллЬоефе фйт
схимЯуейт рйЭуфе елбцсЬ
уфп ейкпнЯдйп уфп еущфесйкь
фзт ехбЯуизфзт ресйпчЮт
(touch control) ьрщт
хрпдейкнэефбй уфзн ейкьнб.
êáé
,
êáé V
16
Page 17

РЯнбкбт чейсйуфзсЯщн touch control
ЕрйлпгЭбт
РСПГСБММБФЩН
M1
M2
Пиьнз
КпхмрЯ УФХШЙМП
РлЮкфсп
ИЕСМПКСБУЙБ
КпхмрЯ ме
ендейкфйкь
цщфЬкй START/PAUSE
Ендейкфйкь
цщфЬкй ECO
GR
ЕйкпнЯдйб
ЦБУЕЙУ
РЛХУЙМБФПУ
КпхмрЯ ме ендейкфйкь
цщфЬкй ÏÍ/OFF
КпхмрЯ
УФЕГНЩМБ
КпхмрЯ ме ендейкфйкь цщфЬкй ON/OFF: рйЭуфе
уэнфпмб фп кпхмрЯ гйб нб бнЬшефе Ю нб увЮуефе фз
мзчбнЮ. Фп рсЬуйнп ендейкфйкь цщфЬкй деЯчней ьфй з
мзчбнЮ еЯнбй бнбммЭнз. Гйб нб увЮуефе фп рлхнфЮсйп
кбфЬ фп рлэуймп рсЭрей нб ксбфЬфе рбфзмЭнп фп
кпхмрЯ рйп рплэ, ресЯрпх 3 sec. УфйгмйбЯп Ю фхчбЯп
рЬфзмб ден ерйфсЭрей фп увЮуймп фзт мзчбнЮт. Фп
увЮуймп фзт мзчбнЮт кбфЬ фп рлэуймп уе еоЭлйоз
бкхсюней фп Ядйп фп рлэуймп.
ЕрйлпгЭбт РСПГСБММБФБ: мрпсеЯ нб уфсбцеЯ уе
бмцьфесет фйт кбфехиэнуейт. Гйб нб иЭуефе фп рлЭпн
ущуфь рсьгсбммб деЯфе фпн РЯнбкбт РспгсбммЬфщн.
КбфЬ фп рлэуймп п ерйлпгЭбт рбсбмЭней бкЯнзфпт.
КпхмрйЬ M1-M2: ксбфЮуфе рбфзмЭнп Энб брь фб
кпхмрйЬ гйб фзн брпиЮкехуз еньт кэклпх кбй фщн
рспущрйкюн убт рспфймЮуещн. Гйб фзн бнЬклзуз еньт
кэклпх рпх брпизкеэфзке рспзгпхмЭнщт рбфЮуфе фп
учефйкь кпхмрЯ.
Кпхмрй УФЕГНЩМБ
: рйЭуфе гйб нб мейюуефе Ю нб
брпклеЯуефе фп уфЭгнщмб. Фп ерЯредп Ю п ерйлегмЭнпт
чсьнпт уфегнюмбфпт цбЯнесбй уфзн пиьнз (влЭре Рщт
дйенесгеЯфбй Эбт кэклпт рлхуЯмбфпт Ю уфегнюмбфпт).
КпхмрЯ
ИЕСМПКСБУЙБ: рйЭуфе гйб нб бллЬоефе Ю
нб брпклеЯуефе фз иесмпксбуЯб. З ерйлегеЯуб фймЮ
хрпдейкнэефбй брь фзн брь рЬнщ пиьнз (влЭре Рщт
дйенесгеЯфбй Эбт кэклпт рлхуЯмбфпт Ю уфегнюмбфпт).
КпхмрЯ
УФХШЙМП: рйЭуфе гйб нб бллЬоефе Ю нб
брпклеЯуефе фп уфэшймп. З ерйлегеЯуб фймЮ
хрпдейкнэефбй брь фзн брь рЬнщ пиьнз (влЭре Рщт
дйенесгеЯфбй Эбт кэклпт рлхуЯмбфпт Ю уфегнюмбфпт).
КпхмрЯ
ЕККЙНЗУЗ МЕ ЧСПНЙКЗ ХУФЕСЗУЗ:
рбфЮуфе гйб нб иЭуефе мйб еккЯнзуз ме хуфЭсзуз фпх
рсперйлегмЭнпх рспгсЬммбфпт. З феиеЯуб фймЮ фзт
хуфЭсзузт хрпдейкнэефбй брь фзн ерйкеЯменз пиьнз
(влЭре Рщт дйенесгеЯфбй Эбт кэклпт рлхуЯмбфпт Ю
уфегнюмбфпт).
КпхмрйЬ
ХНБФПФЗФЕУ
КпхмрйЬ ме ендейкфйкЬ цщфЬкйб ДХНБФПФЗФЕУ:
рйЭуфе гйб нб ерйлЭоефе фйт дйбиЭуймет дхнбфьфзфет. Фп
ендейкфйкь цщфЬкй фп учефйкь ме фзн ерйлегмЭнз
дхнбфьфзфб иб рбсбмеЯней бнбммЭнп (влЭре Рщт
дйенесгеЯфбй Эбт кэклпт рлхуЯмбфпт Ю уфегнюмбфпт).
ЕйкпнЯдйб ЦБУЕЙУ РЛХУЙМБФПУ: цщфЯжпнфбй
деЯчнпнфбт фзн рспюизуз фпх кэклпх (Рлэуймп
ОЭвгблмб
Эндейоз
КпхмрЯ ме ендейкфйкь цщфЬкй START/PAUSE: üôáí ôï
рсЬуйнп ендейкфйкь цщфЬкй бнбвпувЮней бсгЬ, рйЭуфе
фп кпхмрЯ гйб фзн еккЯнзуз еньт рлхуЯмбфпт. Ме фзн
еккЯнзуз фпх кэклпх фп ендейкфйкь цщфЬкй
уфбиеспрпйеЯфбй. Гйб нб иЭуефе мйб рбэуз уфп
рлэуймп, рбфЮуфе ек нЭпх фп кпхмрЯ. Фп ендейкфйкь
цщфЬкй иб бнбвпувЮней ме рпсфпкблЯ чсюмб. Бн фп
ендейкфйкь цщфЬкй БУЦБЛЙУЗ РПСФБУ
увзуфь, мрпсеЯфе нб бнпЯоефе фзн рьсфб. Гйб нб
оекйнЮуей рЬлй фп рлэуймп брь фп узмеЯп дйбкпрЮт,
рбфЮуфе ек нЭпх фп кпхмрЯ.
Ендейкфйкь цщфЬкй
з рьсфб еЯнбй буцблйумЭнз. Гйб нб бнпЯоефе фзн рьсфб
иЭуфе фпн кэклп уе рбэуз (влЭре Рщт дйенесгеЯфбй
Энб кэклпт рлхуЯмбфпт).
КпхмрЯ ме ендейкфйкь цщфЬкй
КПХМРЙЩН: гйб фзн енесгпрпЯзуз Ю бренесгпрпЯзуз
фпх мрлпк фпх рЯнбкб чейсйуфзсЯщн, ксбфЮуфе
рбфзмЭнп фп кпхмрЯ гйб ресЯрпх 2 дехфесьлерфб. Фп
бнбммЭнп цщфЬкй деЯчней ьфй п рЯнбкбт чейсйуфзсЯщн
еЯнбй буцблйумЭнпт. Ме фпн фсьрп бхфьн
рбсемрпдЯжпнфбй фхчбЯет фспрпрпйЮуейт фщн
рспгсбммЬфщн, кхсЯщт бн уфп урЯфй хрЬсчпхн рбйдйЬ.
Ендейкфйкь цщфЬкй ECO: фп ейкпнЯдйп
ьфбн, фспрпрпйюнфбт фйт рбсбмЭфспхт рлхуЯмбфпт,
ерйфехчиеЯ мйб еопйкпньмзуз енЭсгейбт фпхлЬчйуфпн
10%. Бкьмз, рсйн з мзчбнЮ ейуЭлией уе кбфЬуфбуз
Stand by фп ейкпнЯдйп иб бнЬшей гйб лЯгб
дехфесьлерфб. Ме фз мзчбнЮ увзуфЮ з енесгейбкЮ
бнЬкфзуз екфймЬфбй ьфй иб еЯнбй ресЯрпх 80%.
КпхмрЯ ме ендейкфйкь
КпхмрЯ ЕККЙНЗУЗ
МЕ ХУФЕСЗУЗ
Ендейкфйкь цщфЬкй
БУЦБЛЙУЗУ РПСФБУ
цщфЬкй БУЦБЛЙУЗУ
КПХМРЙЩН
- Уфэшймп/¢нфлзуз - УфЭгнщмб ). Ç
цщфЯжефбй ьфбн п кэклпт фелейюуей.
БУЦБЛЙУЗ РПСФБУ: деЯчней ьфй
БУЦБЛЙУЗ
иб бнЬшей
-
еЯнбй
17
Page 18

Рщт дйенесгеЯфбй Эбт кэклпт
рлхуЯмбфпт Ю уфегнюмбфпт
GR
УЗМЕЙЩУЗ: фзн рсюфз цпсЬ рпх чсзуймпрпйеЯфе фп
рлхнфЮсйп, дйенесгЮуфе Энб кэклп рлхуЯмбфпт чщсЯт спэчб
бллЬ ме брпссхрбнфйкь, иЭфпнфбт фп рсьгсбммб
вбмвбкесюн 90° чщсЯт рсьрлхуз.
1. БНБШФЕ ФЗ РЛХНФЗСЙП.РбфЮуфе фп кпхмрЯ
ендейкфйкЬ цщфЬкйб иб бнЬшпхн гйб 1 дехфесьлерфп кбй
уфзн пиьнз иб емцбнйуфеЯ з Эндейоз AQUALTIS. МефЬ иб
рбсбмеЯней бнбммЭнп ухнечют фп ендейкфйкь цщфЬкй фпх
кпхмрйпэ
бнбвпувЮней.
2. ЕРЙЛЕОФЕ ФП РСПГСБММБ. УфсЭшфе фпн ерйлпгЭбт
РСПГСБММБФЩН рспт фб деойЬ Ю рспт фб бсйуфесЬ
мЭчсй нб ерйлЭоефе фп ерйихмзфь рсьгсбммб. Фп ьнпмб
фпх рспгсЬммбфпт иб емцбнйуфеЯ уфзн пиьнз кбй уе
бхфь бнфйуфпйчЯжефбй мйб иесмпксбуЯб кбй мйб фбчэфзфб
уфхшЯмбфпт рпх мрпспэн нб фспрпрпйзипэн. Уфзн
пиьнз иб емцбнйуфеЯ з дйЬскейб фпх кэклпх.
3. ЦПСФЩУЗ ФЗУ МРПХГБДБУ. БнпЯофе фзн рьсфб.
Цпсфюуфе фзн мрпхгЬдб рспуЭчпнфбт нб мзн оересЬуей
фзн рпуьфзфб цпсфЯпх рпх бнбцЭсефбй уфпн рЯнбкб
рспгсбммЬфщн фзт ерьмензт уелЯдбт.
4. ДПУПЛПГЙБ ФПХ БРПССХРБНФЙКПХ. ВгЬлфе фп ухсфЬсй
кбй чэуфе фп брпссхрбнфйкь уфйт бнфЯуфпйчет лекбнЯфует
ьрщт еозгеЯфбй уфзн РесйгсбцЮ фзт мзчбнЮт.
5. КЛЕЙУФЕ ФЗН РПСФБ.
6. ЕОБФПМЙКЕХУЗ ФПХ КХКЛПХ РЛХУЙМБФПУ. ЕнесгЮуфе
уфб бнфЯуфпйчб кпхмрйЬ фпх рЯнбкб чейсйуфзсЯщн:
ФспрпрпйЮуфе фз иесмпксбуЯб Ю/кбй фп уфэшймп.
З мзчбнЮ брейкпнЯжей бхфьмбфб фйт фймЭт мЭгйуфзт
иесмпксбуЯбт кбй уфхшЯмбфпт рпх рспвлЭрпнфбй гйб фп
феиЭн рсьгсбммб Ю фйт фелехфбЯет ерйлегеЯует бн еЯнбй
ухмвбфЭт ме фп ерйлегмЭнп рсьгсбммб. Рбфюнфбт фп
кпхмрЯ
фп рлэуймп уе ксэп несь (OFF). Рбфюнфбт фп кпхмрЯ
мейюнефбй рсппдехфйкЬ фп уфэшймп мЭчсй фпн брпклейумь
фпх (OFF). РесбйфЭсщ рЬфзмб фщн кпхмрйюн ербнбцЭсей
фйт фймЭт уфйт мЭгйуфет рспвлерьменет.
ЕобЯсеуз: ерйлЭгпнфбт фп рсьгсбммб ВБМВБКЕСБ
ЛЕХКБ з иесмпксбуЯб мрпсеЯ нб бхозиеЯ мЭчсй 90°.
кбй фп ендейкфйкь цщфЬкй START/PAUSE иб
мейюнефбй рсппдехфйкЬ з иесмпксбуЯб мЭчсй
. ¼ëá ôá
ИЭуфе фп уфЭгнщмб
Mе фп рсюфп рЬфзмб фпх кпхмрйпэ
з мзчбнЮ
ерйлЭгей бхфьмбфб фп мЭгйуфп ерЯредп уфегнюмбфпт
ухмвбфь ме фп ерйлегмЭнп рсьгсбммб. Фб ерьменб
рбфЮмбфб мейюнпхн фп ерЯредп кбй бкплпэищт фп
чсьнп уфегнюмбфпт мЭчсй фпн брпклейумь фпх OFF.
РесбйфЭсщ рЬфзмб фщн кпхмрйюн ербнбцЭсей фйт фймЭт
уфйт мЭгйуфет рспвлерьменет.
МрпсеЯфе нб иЭуефе фп уфЭгнщмб:
A - Ме вЬуз фп чсьнп: Брь 20 Ýùò 180 лерфЬ.
B - ме вЬуз фп ерЯредп ерйихмзфпэ уфегнюмбфпт:
УйдЭсщмб: ендеЯкнхфбй гйб спэчб рпх рсЭрей мефЬ нб
уйдесщипэн. Фп ерЯредп хрплейрьмензт хгсбуЯбт
мблбкюней фйт рфхчЭт кбй дйехкплэней фзн еобцЬнйуЮ фпхт.
КсЭмбумб: йдбнйкь гйб фб спэчб екеЯнб рпх ден
брбйфпэн рлЮсет уфЭгнщмб.
НфпхлЬрб: кбфЬллзлп гйб фзн мрпхгЬдб рпх иб
вЬлефе уфзн нфпхлЬрб чщсЯт уйдЭсщмб.
ЕрйрлЭпн: кбфЬллзлп гйб спэчб рпх брбйфпэн
рлЮсет уфЭгнщмб ьрщт рефуефЭ кбй мрпхснпэжйб.
Бн, еобйсефйкЬ, фп цпсфЯп спэчщн гйб рлэуймп кбй
уфЭгнщмб еЯнбй мегблэфесп фпх мЭгйуфпх
рспвлерьменпх (влЭре рЯнбкб уфп рлЬй),
дйенесгЮуфе фп рлэуймп, кбй ме фп рЭсбт фпх
рспгсЬммбфпт, чщсЯуфе фп цпсфЯп кбй обнбвЬлфе Энб
мЭспт уфп кблбиЬкй. Уфп узмеЯп бхфь бкплпхиЮуфе
фйт пдзгЯет гйб нб екфелЭуефе «Ìüíï ôï
уфЭгнщмб». ЕрбнЬлбве фйт Ядйет енЭсгейет гйб фп
хрьлпйрп цпсфЯп.
РБСБФ¹СЗУЗ: уфп фЭлпт фпх уфегнюмбфпт
екфелеЯфбй рЬнфб мйб цЬуз шэозт.
Мьнп фп уфЭгнщмб
ЕрйлЭофе ме фпн ерйлпгЭб фщн рспгсбммЬфщн Энб
уфЭгнщмб (
- - ) ме вЬуз фпн фэрп хцЬумбфпт.
МрпсеЯфе нб иЭуефе кбй фп ерЯредп Ю фпн ерйихмзфь
чсьнп уфегнюмбфпт ме фп кпхмрЯ УФЕГНЩМБ
ИЭуфе мйб еккЯнзуз ме хуфЭсзуз.
Гйб нб иЭуефе фзн еккЯнзуз ме хуфЭсзуз фпх
рсперйлегмЭнпх рспгсЬммбфпт, рбфЮуфе фп учефйкь
кпхмрЯ мЭчсй нб ерйфехчиеЯ п чсьнпт фзт ерйихмзфЮт
хуфЭсзузт. КбфЬ фз сэимйуз брейкпнЯжефбй п чсьнпт
хуфЭсзузт мбжЯ ме фзн Эндейоз Енбсжз уе: кбй фп
уэмвплп
хуфЭсзуз з Пиьнз иб брейкпнЯуей фп уэмвплп
уфбиесь кбй з пиьнз иб ерйуфсЭшей уфзн брейкьнйуз фзт
дйЬскейбт фпх феиЭнфпт кэклпх ме фйт ендеЯоейт ËÞæç
óå: кбй фз дйЬскейб фпх кэклпх. РйЭжпнфбт фп кпхмрЯ
ЕККЙНЗУЗ МЕ ХУФЕСЗУЗ мйб мьнп цпсЬ брейкпнЯжефбй
п рспзгпхмЭнщт феиеЯт чсьнпт хуфЭсзузт.
МефЬ фзн еккЯнзуз з пиьнз иб брейкпнЯуей фзн Эндейоз
Енбсжз уе: кбй фп чсьнп кбихуфЭсзузт. Бцпэ дйбнхиеЯ
п феиеЯт чсьнпт кбихуфЭсзузт, з мзчбнЮ иб оекйнЮуейт
кбй з пиьнз иб брейкпнЯуей ËÞæç óå: кбй фпн
хрплейрьменп чсьнп гйб фп фЭлпт фпх кэклпх.
Гйб нб брблеЯшефе фзн еккЯнзуз ме хуфЭсзуз рбфЮуфе фп
кпхмрЯ мЭчсйт ьфпх емцбнйуфеЯ уфзн пиьнз з Эндейоз
OFF. Фп уэмвплп
ФспрпрпйЮуфе фб чбсбкфзсйуфйкЬ фпх
кэклпх.
РбфЮуфе фп кпхмрЯ гйб нб енесгпрпйЮуефе мйб
дхнбфьфзфб. Уфзн пиьнз иб емцбнйуфеЯ фп ьнпмб фзт
дхнбфьфзфбт кбй фп цщфЬкй фпх бнфЯуфпйчпх кпхмрйпэ
иб бнЬшей.
РбфЮуфе ек нЭпх фп кпхмрЯ гйб нб бренесгпрпйЮуефе
мйб дхнбфьфзфб. Уфзн пиьнз иб емцбнйуфеЯ фп ьнпмб
фзт дхнбфьфзфбт кбй фп OFF кбй фп цщфЬкй иб увЮуей.
Бн з ерйлегмЭнз дхнбфьфзфб ден еЯнбй ухмвбфЮ ме фп
феиЭн рсьгсбммб, з бухмвбфьфзфб иб ерйузмбниеЯ ме
фзн бнблбмрЮ фзт ендейкфйкЮт лхчнЯбт кбй Энб зчзфйкь
уЮмб (3 мрйр) кбй з дхнбфьфзфб ден иб енесгпрпйзиеЯ.
Бн з ерйлегмЭнз дхнбфьфзфб ден еЯнбй ухмвбфЮ ме мйб
Ьллз рпх ерелЭгз рспзгпхмЭнщт, фп учефйкь цщфЬкй фзт
рсюфзт ерйлегмЭнзт дхнбфьфзфбт иб бнбвпувЮней кбй иб
енесгпрпйзиеЯ мьнп з деэфесз, фп ендейкфйкь цщфЬкй фпх
кпхмрйпэ иб уфбиеспрпйзиеЯ.
Пй дхнбфьфзфет мрпсеЯ нб фспрпрпйпэн фп
рспфейньменп цпсфЯп Ю/кбй фз дйЬскейб фпх кэклпх.
бнбвпувЮней. Бцпэ иЭуефе фзн еккЯнзуз ме
иб увЮуей.
.
18
Page 19

7. ЕККЙНЗУЗ ФПХ РСПГСБММБФПУ. РйЭуфе фп кпхмрЯ v.
Фп учефйкь ендейкфйкь цщфЬкй иб уфбиеспрпйзиеЯ кбй з
рьсфб иб буцблйуфеЯ (ендейкфйкь цщфЬкй БУЦБЛЙУЗ
РПСФБУ
цЬуейт рлхуЯмбфпт иб цщфйуфпэн кбфЬ фпн кэклп
деЯчнпнфбт фзн уе еоЭлйоз цЬуз. Гйб нб бллЬоефе Энб
рсьгсбммб еню еЯнбй уе еоЭлйоз Энбт кэклпт, иЭуфе фп
рлхнфЮсйп уе рбэуз рйЭжпнфбт фп кпхмрЯ START/PAUSE.
Кбфьрйн ерйлЭофе фпн ерйихмзфь кэклп кбй рбфЮуфе ек
нЭпх фп кпхмрЯ START/PAUSE. Гйб нб бнпЯоефе фзн рьсфб
еню еЯнбй уе еоЭлйоз Энбт кэклпт рбфЮуфе фп кпхмрЯ
START/PAUSE. Бн фп ендейкфйкь цщфЬкй; БУЦБЛЙУЗ
РПСФБУ
рьсфб. РбфЮуфе ек нЭпх фп кпхмрЯ START/PAUSE гйб нб
оекйнЮуей рЬлй фп рсьгсбммб брь фп узмеЯп дйбкпрЮт.
8. ФЕЛПУ ФПХ РСПГСБММБФПУ. Хрпдейкнэефбй брь фзн
Эндейоз END бнбммЭнз. З рьсфб иб мрпсеЯ нб бнпЯоей
бмЭущт. Бн фп ендейкфйкь цщфЬкй START/PAUSE
бнбвпувЮней, рбфЮуфе фп кпхмрЯ гйб нб фелейюуей п
кэклпт. БнпЯофе фзн рьсфб, бдейЬуфе фб спэчб кбй
увЮуфе фз мзчбнЮ.
Бн ерйихмеЯфе нб бкхсюуефе Энбн кэклп рпх Юдз оекЯнзуе,
ксбфЮуфе рбфзмЭнп фп кпхмрЯ
кэклпт кбй нб увЮуей з мзчбнЮ.
бнбммЭнп). Фб ейкпнЯдйб фб учефйкЬ ме фйт
еЯнбй увзуфь иб мрпсеЯфе нб бнпЯоефе фзн
мЭчсй нб дйбкпреЯ п
GR
19
Page 20

РспгсЬммбфб кбй дхнбфьфзфет
GR
РЯнбкбт РспгсбммЬфщн
Åéêï-
РесйгсбцЮ фпх РспгсЬммбфпт
нЯдйп
РспгсЬммбфб В бмвбке сюн
ВбмвбкесЬ
брпссхрбнфйкь уфп бнфЯуфпйчп дйбмЭсйумб).
ВбмвбкесЬ
бниекфйкЬ, рплэ лесщмЭнб.
ВбмвбкесЬ
ехбЯуизфб, рплэ лесщмЭнб.
ВбмвбкесЬ
Фжйн
ЕйдйкЬ РспгсЬммбфб
МщспхдйбкЬ:
МейкфЬ 30:
елбцсЬ лесщмЭнщн (ден ендеЯкнхфбй гйб мЬллйнб,
мефбощфЬ кбй спэчб р пх рлЭнпнфбй уфп чЭс й).
УхниефйкЬ
МефбощфЬ:
МЬллйнб:
РспгсЬµµбфб УфЭгнщмб
KБИБСБ& УФЕГНБ
УфЭгнщмб «В бмвбк есЬ» - УфЭгнщмб «УхниефйкЬ» - УфЭгнщмб «МЬллйнб» - -
ЕрЯ мЭспхт рспгсЬммбфб
ОЭвгблмб
Уфэшймп
¢нфлзуз
(*) УзмеЯщуз: мефЬ брь ресЯрпх 10 лерфЬ брь фп START, з мзчбнЮ ме вЬуз фп рсбгмбфпрпйзиЭн цпсфЯп, иб ербнхрплпгЯуей кбй иб брейкпнЯуей фпн
хрплейрьменп чсьнп гйб фп фЭлпт фпх рспгсЬммбфпт.
Ãéá üëá ôá Test Institutes:
1) Рсьгсбммб елЭгчпх уэмцщнб ме фзн рспдйбгсбцЮ EN 50229: иЭуфе фп рсьгсбммб
2) Рсьгсбммб вбмвбкесюн мбксэ: иЭуфе фп рсьгсбммб
3) Рсьгсбммб вбмвбкесюн уэнфпмп: иЭуфе фп рсьгсбммб
лехкЬ ме рсьрлхуз(РспуиЭу фе фп
(1):
лехкЬ
лехкЬ
чсщмбфйуфЬ
ЧсщмбфйуфЬ ехбЯуизфб лЯгп лесщмЭнб.
Гйб фп гсЮгпсп цсеукЬсйумб спэчщн
бниекфйкЬ
Гйб мефбощфЬ спэчб, вйукьжз, лйнЬ.
Гйб мЬллйнб, cache mire, клр.
ЛехкЬ кбй чс щмбфйуфЬ
(2):
ЛехкЬ кбй чс щмбфйуфЬ
(3)
ò
МЭгйуфз
иесмпкс.
(Max. 90°)
уе мйб иесмпксбуЯб 40°C.
уе мйб иесмпксбуЯб 40°C.
МЭгйуфз
фбчэфзфб
(óô ñïö Ý-
(°C )
90° 1400
60°
40° 1400
40° 1400
40° 800
40° 800
30° 800
60° 800
30° 0
40° 800
30° 1400
ò áíÜ
лерфь).
1400
1400
-
1400
-
-
0
УфЭгн-
ùìá
ll l
ll l l
ll l l
ll l l
ll l
ll l l
ll l
ll l l
-
ll l
ll l
l
l
l
l
l
-- - -
уе мйб иесмпксбуЯб 60°C.
БрпссхрбнфйкЬ
Рлэуймп Мблбкфйкь
ll
- - -
- - -
- - -
-
-- -
Лехкбн-
ôéêü
-
-
-
-
-
-
ll
МЭгйуфп
ЦпсфЯп
(Kg)
9
9
9
4
4
4
3,5
4
2
2
1
6
4
1,5
9
9
9
ДйЬскейб
кэклпх
(*) МрпсеЯфе нб елЭгоефе фз дйЬскейб фщн рспгсбммЬфщн
рлхуЯмбфпт уфзн пиьнз.
Дхнбфьфзфет рлхуЯмбфпт
Super Wash
З дхнбфьфзфб бхфЮ еобуцблЯжей Энб рлэуймп хшзлюн
ерйдьуещн чЬсз уфз чсЮуз мегблэфесзт рпуьфзфбт
неспэ уфзн бсчйкЮ цЬуз фпх кэклпх кбй уфз
мегблэфесз дйЬскейб фпх рспгсЬммбфпт.
МрпсеЯ нб чсзуймпрпйеЯфбй
3
1
2
кбй енесгпрпйЮуфе фз дхнбфьфзфб Super Wash .
Ден енесгпрпйеЯфбй уфб рспгсЬммбфб
, , , , , .
Еэкплп УйдЭсщмб
ЕрйлЭгпнфбт фз дхнбфьфзфб бхфЮ, фп рлэуймп кбй фп уфэшймп
иб фспрпрпйзипэн кбфЬллзлб гйб фз меЯщуз учзмбфйумпэ
фублбкщмЬфщн. Уфп фЭлпт фпх кэклпх фп рлхнфЮсйп иб
дйенесгеЯ бсгЭт ресйуфспцЭт фпх кЬдпх. Фб ендейкфйкЬ цщфЬкйб
Еэкплп УйдЭсщмб кбй START/PAUSE иб бнбвпувЮнпхн. Гйб
фп рЭсбт фпх кэклпх рбфЮуфе фп кпхмрЯ START/PAUSE Ю фп
кпхмрЯ Еэкплп УйдЭсщмб. Уфп рсьгсбммб «МефбощфЬ»
ìå Þ чщсЯт лехкбнфйкь. Бн
ерйихмеЯфе нб дйенесгЮуефе
кбй фз леэкбнуз ейуЬгефе
фзн рсьуиефз лекбнЯфуб 3,
рпх рбсЭчефбй, уфз
лекбнЯфуб 1. Бн ерйихмеЯфе
мьнп леэкбнуз чщсЯт
рлЮсет рлэуймп, чэуфе фп
лехкбнфйкь уфзн рсьуиефз
лекбнЯфуб 3, иЭуфе фп
рсьгсбммб ОЭвгблмб
, , , , ,
ç
мзчбнЮ иб фелейюуей фпн кэклп ме фзн мрпхгЬдб уе мпэлйбумб
кбй фп ендейкфйкь цщфЬкй Еэкплп УйдЭсщмб иб бнбвпувЮней.
Гйб нб бдейЬуефе фп несь кбй нб мрпсеЯфе нб вгЬлефе фзн
мрпхгЬдб рсЭрей нб рбфЮуефе фп кпхмрЯ START/PAUSE Ю фп
кпхмрЯ «Еэкплп УйдЭсщмб».
Ден еЯнбй дйбиЭуймп уфб рспгсЬммбфб
, , , , ,
, , , .
УзмеЯщуз: Бн иЭлефе нб дйенесгЮуефе кбй фп уфЭгнщмб, фп
кпхмрЯ бхфь еЯнбй енесгь мьнп бн ухндхЬжефбй ме фп
ерЯредп УйдЭсщмб.
Еопйкпньмзуз Чсьнпх
ЕрйлЭгпнфбт фз дхнбфьфзфб бхфЮ мейюнефбй з дйЬскейб
фпх рспгсЬммбфпт кбфЬ 30%-50% ме вЬуз фпн
ерйлегмЭнп кэклп, еобуцблЯжпнфбт ен фщ мефбоэ
еопйкпньмзуз енЭсгейбт кбй неспэ. ЧсзуймпрпйеЯфе фпн
кэклп бхфьн гйб спэчб ьчй хресвплйкЬ лесщмЭнб.
Ден еЯнбй дйбиЭуймз уфб рспгсЬммбфб
, , , , ,
, , , , , .
ЕрйрлЭпн ОЭвгблмб
ЕрйлЭгпнфбт фз дхнбфьфзфб бхфЮ бхоЬнефбй з
брпфелеумбфйкьфзфб фпх оевгЬлмбфпт кбй еобуцблЯжефбй з
мЭгйуфз брпмЬксхнуз фпх брпссхрбнфйкпэ. ЕЯнбй чсЮуймп гйб
ерйдесмЯдет йдйбЯфесб ехбЯуизфет уфб брпссхрбнфйкЬ.
УхнйуфЬфбй з чсЮуз фзт дхнбфьфзфбт бхфЮт ме фп рлхнфЮсйп уе
рлЮсет цпсфЯп Ю ме фз чсЮуз хшзлюн дьуещн брпссхрбнфйкпэ.
Ден еЯнбй дйбиЭуймп уфб рспгсЬммбфб
, , , , ,
, .
20
Page 21

БрпссхрбнфйкЬ кбй
мрпхгЬдб
Брпссхрбнфйкь
З ерйлпгЮ кбй з рпуьфзфб фпх брпссхрбнфйкпэ
еобсфюнфбй брь фпн фэрп хцЬумбфпт (вбмвбкесЬ,
мЬллйнб, мефбощфЬ...), брь фп чсюмб, брь фз
иесмпксбуЯб рлхуЯмбфпт, брь фп вбимь всщмйЬт кбй
брь фзн уклзсьфзфб фпх неспэ.
З кблЮ дпуплпгЯб фпх брпссхрбнфйкпэ брпупвеЯ
урбфЬлет кбй рспуфбфеэей фп ресйвЬллпн: бн кбй
вйпдйбурюменб, фб брпссхрбнфйкЬ ресйЭчпхн уфпйчеЯб
рпх бллпйюнпхн фзн йупсспрЯб уфз цэуз.
УхнйуфЬфбй:
з чсЮуз брпссхрбнфйкюн уе укьнз гйб спэчб лехкЬ
вбмвбкесЬ кбй гйб фзн рсьрлхуз.
нб чсзуймпрпйеЯфе хгсЬ брпссхрбнфйкЬ гйб
ехбЯуизфб спэчб вбмвбкесЬ кбй гйб ьлб фб
рспгсЬммбфб уе чбмзлЮ иесмпксбуЯб.
нб чсзуймпрпйеЯфе хгсЬ брпссхрбнфйкЬ брблЬ гйб
мЬллйнб кбй мефбощфЬ.
Фп брпссхрбнфйкь рсЭрей нб чэнефбй рсйн фзн Энбсоз фпх
рлхуЯмбфпт уфзн бнфЯуфпйчз лекбнЯфуб Ю нб фп вЬжефе
брехиеЯбт уфпн кЬдп. Уфзн ресЯрфщуз бхфЮ ден мрпсеЯфе
нб ерйлЭоефе фпн кэклп ВбмвбкесЬ ме рсьрлхуз.
Мз чсзуймпрпйеЯфе брпссхрбнфйкЬ гйб фп рлэуймп
уфп чЭсй, дйьфй рбсЬгпхн рплэ бцсь.
РспефпймбуЯб фзт мрпхгЬдбт
БнпЯофе кблЬ фб спэчб рсйн фб фпрпиефЮуефе.
ЧщсЯуфе фзн мрпхгЬдб бнЬлппгб ме фпн фэрп фпх
хцЬумбфпт (уэмвплп уфзн ефйкЭфб фпх спэчпх) кбй
фп чсюмб рспуЭчпнфбт нб чщсЯуефе фб чсщмбфйуфЬ
спэчб брь фб лехкЬ.
Еккенюуфе фйт фуЭрет кбй елЭгофе фб кпхмрйЬ.
Мзн оереснЬфе фйт хрпдейкнхьменет фймЭт уфпн
РЯнбкбт РспгсбммЬфщн уе учЭуз ме фп вЬспт фзт
уфегнЮт мрпхгЬдбт.
Рьуп жхгЯжей з мрпхгЬдб;
1 уенфьнй 400-500 gr.
1 мбойлбспиЮкз 150-200 gr.
1 фсбрежпмЬнфйлп 400-500 gr.
1 мрпхснпэжй 900-1200 gr.
1 рефуЭфб 150-250 gr.
1 jean 400-500 gr.
1 рпхкЬмйуп 150-200 gr.
УхмвпхлЭт рлхуЯмбфпт
Уфп фЭлпт фпх рлхуЯмбфпт з мзчбнЮ дйенесгеЯ бсгЭт
ресйуфспцЭт фпх кЬдпх. Гйб нб фелейюуей п кэклпт
рйЭуфе фп кпхмрЯ START/PAUSE.
МефбощфЬ: чсзуймпрпйЮуфе фп бнфЯуфпйчп рсьгсбммб
«МефбощфЬ»
спэчб. УхнйуфЬфбй з чсЮуз еньт ейдйкпэ
брпссхрбнфйкпэ гйб ехбЯуизфб спэчб.
КпхсфЯнет: ЧсзуймпрпйЮуфе фп рсьгсбммб
«МефбощфЬ»
уе Энб дйкфхщфь убкпэлй.
МЬллйнб: Фп Hotpoint/Ariston еЯнбй фп мпнбдйкь
рлхнфЮсйп рпх кбфЭкфзуе фз узмбнфйкЮ бнбгнюсйуз
Woolmark Platinum Care (M.0508) ек мЭспхт фзт The
Woolmark Company, рпх рйуфпрпйеЯ фп рлэуймп уфп
рлхнфЮсйп ьлщн фщн мЬллйнщн спэчщн кбиют кбй
екеЯнщн рпх цЭспхн фзн ефйкЭфб мьнп рлэуймп уфп чЭсй
. Ме фп рсьгсбммб МЬллйнб мрпсеЯфе нб рлЭнефе
уфп рлхнфЮсйп ьлб фб мЬллйнб спэчб ме фзн еггэзуз
фщн кблэфесщн ерйдьуещн.
ЛекЭдет бниекфйкпЯ: еЯнбй кбль нб реснЬфе фпхт
бниекфйкпэт лекЭдет ме хгсь убрпэнй рсйн фп рлэуймп
кбй нб чсзуймпрпйеЯфе фп рсьгсбммб Вбмвбкесюн ме
рсьрлхуз.
KБИБСБ&УФЕГНБ
уфЭгнщмб спэчщн елбцсЬ лесщмЭнщн уе лЯгп чсьнп.
ЕрйлЭгпнфбт фпн кэклпп бхфьн мрпсеЯфе нб рлэнефе кбй
нб уфегнюуефе мЭчсй 1 kg мрпхгЬдбт уе мьнп 60
лерфЬ. Гйб нб рефэчефе фб вЭлфйуфб брпфелЭумбфб
чсзуймпрпйеЯфе хгсь брпссхрбнфйкь. Рспрлэнефе
мбнйкЭфйб, лбймпэт кбй лекЭдет.
гйб нб рлэнефе ьлб фб мефбощфЬ
. Дйрлюуфе фйт мЭуб уе Энб мбойлЬсй Ю
:
мелефЮизке гйб рлэуймп кбй
Уэуфзмб йупуфЬимйузт фпх цпсфЯпх
Рсйн брь кЬие уфэшймп, гйб нб брпцэгефе дпнЮуейт
хресвплйкЭт кбй гйб нб кбфбнеЯмефе пмпйьмпсцб фп
цпсфЯп, п кЬдпт дйенесгеЯ ресйуфспцЭт уе мйб фбчэфзфб
елбцсЬ бнюфесз екеЯнзт фпх рлхуЯмбфпт. Бн уфп фЭлпт
фщн дйбдпчйкюн рспурбиейюн фп цпсфЯп ден Эчей бкьмз
еойупсспрзиеЯ ущуфЬ з мзчбнЮ дйенесгеЯ фп уфэшймп уе
мйб фбчэфзфб чбмзльфесз фзт рспвлерьмензт.
РбспхуЯб хресвплйкЮт буфЬиейбт, фп рлхнфЮсйп
дйенесгеЯ фзн кбфбнпмЮ бнфЯ фпх уфхшЯмбфпт. Гйб нб
ехнпзиеЯ кблэфесз кбфбнпмЮ фпх цпсфЯпх кбй фзт
ущуфЮт еойупссьрзузт ухнйуфЬфбй з бнЬмйоз спэчщн
мегЬлщн кбй мйксюн дйбуфЬуещн.
GR
Ôæéí: чсзуймпрпйЮуфе фп бнфЯуфпйчп рсьгсбммб Фжйн
гйб ьлб фб спэчб ме эцбумб Denim. БнбрпдпгхсЯуфе
фб спэчб рсйн фп рлэуймп кбй чсзуймпрпйЮуфе хгсь
брпссхрбнфйкь.
МщспхдйбкЬ: чсзуймпрпйЮуфе фп бнфЯуфпйчп
рсьгсбммб МщспхдйбкЬ
фхрйкпэт лекЭдет фщн рбйдйюн кбй нб брпмбксэнефе фп
брпссхрбнфйкь брь фб спэчб гйб нб мзн хрЬсопхн
бллесгйкЭт бнфйдсЬуейт уфп ехбЯуизфп дЭсмб фщн
рбйдйюн. П кэклпт бхфь мелефЮизке гйб нб мейюней фп
вбкфзсйдйбкь цпсфЯп чсзуймпрпйюнфбт мегблэфесз
рпуьфзфб неспэ кбй велфйуфпрпйюнфбт фзн ерЯдсбуз фщн
ейдйкюн еохгйбнфйкюн рсьуиефщн уфп брпссхрбнфйкь.
гйб нб бцбйсЭуефе фпхт
21
Page 22

РспцхлЬоейт кбй ухмвпхлЭт
GR
Фп рлхнфЮсйп учедйЬуфзке кбй кбфбукехЬуфзке
уэмцщнб ме фпхт дйеинеЯт кбньнет буцблеЯбт. БхфЭт пй
рспейдпрпйЮуейт рбсЭчпнфбй гйб льгпхт буцблеЯбт кбй
рсЭрей нб дйбвЬжпнфбй рспуекфйкЬ.
ГенйкЮ буцЬлейб
З ухукехЮ бхфЮ учедйЬуфзке брпклейуфйкЬ гйб
пйкйбкЮ чсЮуз.
З мзчбнЮ рсЭрей нб чсзуймпрпйеЯфбй мьнп брь
енЮлйкб Ьфпмб кбй уэмцщнб ме фйт пдзгЯет фпх
рбсьнфпт егчейсйдЯпх.
Мзн бггЯжефе фп мзчЬнзмб ме гхмнЬ рьдйб Ю чЭсйб Ю
фб рьдйб всегмЭнб.
Мзн вгЬжефе фп вэумб брь фзн злекфсйкЮ рсЯжб
фсбвюнфбт фп кблюдйп, бллЬ нб рйЬнефе фзн рсЯжб.
Мзн бггЯжефе фп несь бдейЬумбфпт, бцпэ мрпсеЯ нб
цфЬуей уе хшзлЭт иесмпксбуЯет.
Мзн жпсЯжефе уе кбмЯб ресЯрфщуз фзн рьсфб: иб
мрпспэуе нб чблЬуей п мзчбнйумьт буцблеЯбт рпх
рспуфбфеэей брь фхчбЯб бнпЯгмбфб.
Уе ресЯрфщуз влЬвзт, уе кбмЯб ресЯрфщуз нб мзн
еремвбЯнефе уфпхт еущфесйкпэт мзчбнйумпэт
рспурбиюнфбт нб ерйукехЬуефе.
Нб елЭгчефе рЬнфб фб рбйдйЬ нб мзн рлзуйЬжпхн уфп
мзчЬнзмб уе лейфпхсгЯб.
Бн рсЭрей нб мефбфпрйуфеЯ, ухнесгбуфеЯфе дэп Ю фсЯб
Ьфпмб ме фз мЭгйуфз рспупчЮ. РпфЭ мьнпй убт гйбфЯ
фп мзчЬнзмб еЯнбй рплэ вбсэ.
Рсйн ейуЬгефе фз мрпхгЬдб елЭгофе бн п кЬдпт еЯнбй
Ьдейпт.
З рьсфб кбфЬ фп уфЭгнщмб феЯней нб иесмбЯнефбй.
Мз уфегнюнейт спэчб рлхмЭнб ме еэцлекфпхт
дйблэфет (р.ч. фсйелЯнз).
Мз уфегнюнейт бцсюдз ухниефйкЬ Ю бнЬлпгб
елбуфпмесЮ.
Вевбйюупх ьфй кбфЬ фйт цЬуейт фпх уфегнюмбфпт
п кспхньт фпх неспэ еЯнбй бнпйчфьт.
ДйЬиеуз
ДйЬиеуз фпх хлйкпэ ухукехбуЯбт: фзсеЯфе фпхт
фпрйкпэт кбнпнйумпэт, юуфе пй ухукехбуЯет нб
мрпспэн нб ербнбчсзуймпрпйзипэн.
З ЕхсщрбъкЮ ПдзгЯб 2002/96/CE гйб фб
брпссЯммбфб злекфсйкюн кбй злекфспнйкюн
ухукехюн, рспвлЭрей ьфй пй пйкйбкЭт злекфсйкЭт
ухукехЭт ден рсЭрей нб дйбфЯиенфбй уфзн кбнпнйкЮ
спЮ фщн уфесеюн буфйкюн брпссйммЬфщн. Пй
брпссйрфьменет ухукехЭт рсЭрей нб ухллЭгпнфбй
чщсйуфЬ гйб нб велфйуфпрпйеЯфбй фп рпупуфь
бнЬкфзузт кбй бнбкэклщузт фщн хлйкюн рпх фйт
брпфелпэн кбй нб брпцеэгпнфбй дхнзфйкЭт жзмйЭт гйб
фзн хгеЯб кбй фп ресйвЬллпн. Фп уэмвплп фпх
дйбгсбммЭнпх кблбийпэ хрЬсчей уе ьлб фб рспъьнфб
гйб нб ихмЯжей фйт хрпчсеюуейт чщсйуфЮт ухллпгЮт.
Гйб ресбйфЭсщ рлзспцпсЯет, гйб фз ущуфЮ
брпмЬксхнуз фщн пйкйбкюн злекфсйкюн ухукехюн, пй
кЬфпчпй иб мрпспэн нб брехиэнпнфбй уфзн бсмьдйб
дзмьуйб хрзсеуЯб Ю уфпхт мефбрщлзфЭт.
Чейспнбкфйкь Ьнпйгмб фзт рьсфбт
Уфзн ресЯрфщуз бдхнбмЯбт бнпЯгмбфпт фзт рьсфбт ео
бйфЯбт брпхуЯбт злекфсйкЮт енЭсгейбт еню иЭлефе нб
брлюуефе фзн мрпхгЬдб, рспчщсЮуфе щт бкплпэищт:
1. вгЬлфе фп вэумб брь фзн
злекфсйкЮ рсЯжб.
2. вевбйщиеЯфе ьфй з уфЬимз
фпх неспэ уфп еущфесйкь
20
фп уе Энб кпхвЬ ьрщт цбЯнефбй уфзнейкьнб.
3. бцбйсЭуфе фп фбмрль кЬлхшзт уфп рсьуийп рлехсь
фпх рлхнфзсЯпх (влЭре ерьменз уелЯдб).
фзт мзчбнЮт еЯнбй
чбмзльфесз уе учЭуз ме фп
Ьнпйгмб фзт рьсфбт. Уе
бнфЯиефз ресЯрфщуз
бцбйсЭуфе фп уе ресЯууейб
несь мЭущ фпх ущлЮнб
бдейЬумбфпт ухллЭгпнфЬт
4. чсзуймпрпйюнфбт фз
глщууЯфуб рпх цбЯнефбй
уфзн ейкьнб фсбвЮофе рспт
фЬ Эощ мЭчсй нб
елехиесюуефе фп рлбуфйкь
брь фп уфпр. ФсбвЮофе фп
бкплпэищт рспт фб кЬфщ
мЭчсй нб бкпэуефе фп клйк
рпх деЯчней ьфй з рьсфб
еЯнбй брбуцблйумЭнз.
5. БнпЯофе фзн рьсфб. Уфзн
ресЯрфщуз рпх бкьмз ден
еЯнбй дхнбфьн ербнблЬвефе
фз дйесгбуЯб.
22
Page 23

УхнфЮсзуз кбй цспнфЯдб
Брпклейумьт неспэ кбй злекфсйкпэ
сеэмбфпт
КлеЯуфе фпн кспхнь фпх неспэ мефЬ брь кЬие
рлэуймп. ¸фуй ресйпсЯжефбй з ципсЬ фзт хдсбхлйкЮт
егкбфЬуфбузт фпх рлхнфзсЯпх кбй брпупвеЯфбй п
кЯндхнпт брщлейюн.
Нб вгЬжефе фп вэумб брь фп сеэмб ьфбн кбибсЯжефе
фп мзчЬнзмб кбй кбфЬ фйт есгбуЯет ухнфЮсзузт.
Кбибсйумьт фзт мзчбнЮт
Фп еощфесйкь мЭспт кбй фб лбуфйчЭнйб мЭсз мрпспэн нб
кбибсЯжпнфбй ме Энб рбнЯ всегмЭнп ме члйбсь несь кбй
убрпэнй. Мз чсзуймпрпйеЯфе дйблэфет Ю брпохуфйкЬ.
Кбибсйумьт фпх ухсфбсйпэ
брпссхрбнфйкюн
Гйб нб вгЬлефе фп ухсфЬсй
рбфЮуфе фп мпчль (1) кбй
фсбвЮофе фпн рспт фб Эощ
(2) (влЭре ейкьнб).
РлЭнефЭ фп кЬфщ брь
фсечпэменп несь. П
кбибсйумьт бхфьт
дйенесгеЯфбй ухчнЬ.
ЦспнфЯдб фпх кЬдпх
Гйб нб Эчефе рсьувбуз уфпн рспиЬлбмп:
GR
2
1. бцбйсЭуфе фп рЬнел кЬлхшзт уфп рсьуийп рлехсь
фзт мзчбнЮт рспт фп кЭнфсп, кбфьрйн щиЮуфе рспт фб
кЬфщ бмцьфесб фб рлехсЬ кбй вгЬлфе фп (влЭре
ейкьнет).
2. фпрпиефЮуфе Энб дпчеЯп
гйб фз ухллпгЮ фпх неспэ
рпх иб вгей (ресЯрпх 1,5 lt)
(влЭре ейкьнб).
3. Оевйдюуфе фп кбрЬкй
уфсЭцпнфЬт фп
бсйуфесьуфспцб (влЭре
ейкьнб).:
4. кбибсЯуфе ерймелют фп еущфесйкь
5. обнбвйдюуфе фп кбрЬкй
6. обнбмпнфЬсефе фп рЬнел ьнфбт уЯгпхспй, рсйн фп
урсюоефе рспт фз мзчбнЮ, ьфй Эчефе ейуЬгей фб
гбнфжЬкйб уфйт бнфЯуфпйчет еупчЭт.
Нб бцЮнефе рЬнфб мйуьклейуфз фзн рьсфб гйб нб мзн
рбсЬгпнфбй дхупумЯет.
Кбибсйумьт фзт бнфлЯбт
Фп рлхнфЮсйп дйбиЭфей мйб бхфпкбибсйжьменз бнфлЯб
рпх ден чсейЬжефбй ухнфЮсзуз. МрпсеЯ, ьмщт, нб фэчей
нб рЭупхн мйксЬ бнфйкеЯменб (кЭсмбфб, кпхмрйЬ) уфпн
рспиЬлбмп рпх рспуфбфеэей фзн бнфлЯб, рпх всЯукефбй
уфп кЬфщ мЭспт бхфЮт.
ВевбйщиеЯфе ьфй п кэклпт рлхуЯмбфпт Эчей фелейюуей
кбй вгЬлфе фп вэумб.
¸легчпт фпх ущлЮнб фспцпдпуЯбт фпх
неспэ
ЕлЭгчефе фп ущлЮнб фспцпдпуЯбт фпхлЬчйуфпн мйб
цпсЬ ефзуЯщт. Бн рбспхуйЬжей укбуЯмбфб кбй учйумЭт
бнфйкбиЯуфбфбй: кбфЬ фб рлхуЯмбфб пй йучхсЭт рйЭуейт
иб мрпспэубн нб рспкблЭупхн бнбрЬнфечб
урбуЯмбфб.
23
Page 24

БнщмблЯет кбй лэуейт
GR
МрпсеЯ нб ухмвеЯ фп мзчЬнзмб нб мз лейфпхсгеЯ. Рсйн фзлецщнЮуефе уфзн ХрпуфЮсйоз ( влЭре ХрпуфЮсйоз),
елЭгофе бн ден рськейфбй гйб рсьвлзмб рпх ерйлэефбй еэкплб ме фз впЮиейб фпх бкьлпхипх кбфбльгпх.
БнщмблЯет:
Фп мзчЬнзмб ден бнЬвей.
П кэклпт рлхуЯмбфпт ден оекйнЬей.
Фп рлхнфЮсйп ден гемЯжей несь.
З рьсфб фзт мзчбнЮт рбсбмЭней
буцблйумЭнз.
Фп рлхнфЮсйп цпсфюней кбй бдейЬжей несь
ухнечют.
Фп мзчЬнзмб ден цпсфюней Ю ден уфэвей.
Фп мзчЬнзмб дпнеЯфбй рплэ кбфЬ фп
уфэшймп.
Фп мзчЬнзмб чЬней несь.
Фб ейкпнЯдйб фб учефйкЬ ме фз ЦЬуз уе
еоЭлйоз бнбвпувЮнпхн гсЮгпсб
фбхфьчспнб уфп ендейкфйкь цщфЬкй ON/OFF.
УчзмбфЯжефбй рплэт бцсьт.
З рьсфб фзт мзчбнЮт рбсбмЭней
буцблйумЭнз.
ДхнбфЬ бЯфйб / Лэуз:
Фп вэумб ден Эчей ейубчиеЯ уфзн злекфсйкЮ рсЯжб Ю ьчй бскефЬ гйб нб кЬней ербцЮ.
Уфп урЯфй ден хрЬсчей сеэмб.
З рьсфб ден еЯнбй кблЬ клейумЭнз.
Фп кпхмрЯ START/PAUSE ден рбфЮизке.
З всэуз фпх неспэ ден еЯнбй бнпйчфЮ.
ФЭизке мйб кбихуфЭсзуз уфзн юсб еккЯнзузт.
П ущлЮнбт фспцпдпуЯбт фпх неспэ ден еЯнбй ухндедемЭнпт уфпн кспхнь.
П ущлЮнбт еЯнбй дйрлщмЭнпт.
З всэуз фпх неспэ ден еЯнбй бнпйчфЮ.
Уфп урЯфй леЯрей фп несь.
Ден хрЬсчей бскефЮ рЯеуз.
Фп кпхмрЯ START/PAUSE ден рбфЮизке.
ЕрйлЭгпнфбт фпн кэклп МщспхдйбкЬ
, уфп фЭлпт фпх кэклпх фп рлхнфЮсйп иб дйенесгЮуей бсгЭт ресйуфспцЭт фпх
кЬдпх. Гйб нб фелейюуей п кэклпт рйЭуфе фп кпхмрЯ START/PAUSE Ю фп кпхмрЯ
Еэкплп УйдЭсщмб
фелейюуей фпн кэклп ме фзн мрпхгЬдб уе мпэлйбумб. Гйб нб бдейЬуефе фп несь кбй
нб бцбйсЭуефе фзн мрпхгЬдб рсЭрей нб рбфЮуефе фп кпхмрЯ START/PAUSE Ю фп
кпхмрЯ Еэкплп УйдЭсщмб
П ущлЮнбт бдейЬумбфпт ден Эчей егкбфбуфбиеЯ мефбоэ 65 кбй 100 cm брь фп
Эдбцпт ( влЭре «ЕгкбфЬуфбуз»).
Фп Ьксп фпх ущлЮнб бдейЬумбфпт еЯнбй вхийумЭнп уфп несь (влЭре «ЕгкбфЬуфбуз»).
Бн з кбфпйкЯб всЯукефбй уфпхт фелехфбЯпхт псьцпхт еньт кфйсЯпх, мрпсеЯ нб
дйбрйуфщипэн цбйньменб уйцщнйумпэ, прьфе фп рлхнфЮсйп цпсфюней кбй
бдейЬжей несь ухнечют. Гйб фзн бнфймефюрйуз фпх рспвлЮмбфпт дйбфЯиенфбй уфп
емрьсйп кбфЬллзлет вблвЯдет бнфй-уйцщнйумпэ.
Фп ерйфпЯчйп Ьдейбумб ден Эчей брбЭсщуз.
Фп рсьгсбммб ден рспвлЭрей фп Ьдейбумб: ме псйумЭнб рспгсЬммбфб рсЭрей нб фп
еккйнЮуефе чейспнбкфйкЬ (влЭре РспгсЬммбфб кбй дхнбфьфзфет).
ЕЯнбй енесгЮ з дхнбфьфзфб «Еэкплп УйдЭсщмб»: гйб нб плпклзсюуефе фп рсьгсбммб,
рбфЮуфе фп рлЮкфсп START/PAUSE (влЭре «РспгсЬммбфб кбй дхнбфьфзфет»).
П ущлЮнбт бдейЬумбфпт еЯнбй дйрлщмЭнпт (влЭре «ЕгкбфЬуфбуз»).
З ущлЮнщуз бдейЬумбфпт еЯнбй впхлщмЭнз.
П кЬдпт, фз уфйгмЮ фзт егкбфЬуфбузт, ден оемрлькбсе ущуфЬ (влЭре
ЕгкбфЬуфбуз).
З мзчбнЮ ден еЯнбй ерйредщмЭнз (влЭре ЕгкбфЬуфбуз).
Фп мзчЬнзмб буцхкфйЬ мефбоэ ерЯрлщн кбй фпЯчпх (влЭре ЕгкбфЬуфбуз).
Фп цпсфЯп еЯнбй бнйуьсспрп (влЭре БрпссхрбнфйкЬ кбй мрпхгЬдб).
П ущлЮнбт фспцпдпуЯбт фпх неспэ ден еЯнбй кблЬ вйдщмЭнпт (влЭре ЕгкбфЬуфбуз).
З иЮкз фщн брпссхрбнфйкюн еЯнбй впхлщмЭнз (гйб нб фзн кбибсЯуефе влЭре
УхнфЮсзуз кбй цспнфЯдб).
П ущлЮнбт бдейЬумбфпт ден еЯнбй ущуфЬ уфесещмЭнпт (влЭре ЕгкбфЬуфбуз).
УвЮуфе фз мзчбнЮ кбй вгЬлфе фп вэумб брь фзн рсЯжб, ресймЭнефе ресЯрпх 1 лерфь
мефЬ обнбнЬшфе фз. Бн з бнщмблЯб ерймЭней, кблЭуфе фзн ХрпуфЮсйоз.
Фп брпссхрбнфйкь ден еЯнбй ейдйкь гйб рлхнфЮсйп (рсЭрей нб хрЬсчей з Эндейоз гйб
рлхнфЮсйп, гйб рлэуймп уфп чЭсй кбй уфп рлхнфЮсйп, Ю рбсьмпйб).
З дпуплпгЯб хрЮсое хресвплйкЮ.
ЕкфелЭуфе фз дйбдйкбуЯб чейспнбкфйкЮт брбуцЬлйузт (влЭре «РспцхлЬоейт кбй
ухмвпхлЭт»).
. ЕрйлЭгпнфбт фпн кэклп МефбощфЬ з мзчбнЮ иб
.
Ю фз дхнбфьфзфб Еэкплп УйдЭсщмб
Фп РлхнфЮсйп ме УфегнщфЮсйп ден
уфегнюней.
24
Фп вэумб ден Эчей ейубчиеЯ уфзн злекфсйкЮ рсЯжб, Ю фпхлЬчйуфпн ьчй бскефЬ гйб
нб кЬней ербцЮ.
Уфп урЯфй ден хрЬсчей сеэмб.
З рьсфб ден еЯнбй кблЬ клейуфЮ.
ФЭизке мйб кбихуфЭсзуз уфпн чсьнп еккЯнзузт.
Фп УФЕГНЩМБ еЯнбй уфз иЭуз OFF.
Page 25

ХрпуфЮсйоз
Рсйн ерйкпйнщнЮуефе ме фзн ХрпуфЮсйоз:
ЕлЭгофе бн з бнщмблЯб мрпсеЯ нб бнфймефщрйуфеЯ бхфьнпмб (влЭре «БнщмблЯет кбй Лэуейт»);
ЕрбнеккйнЮуфе фп рсьгсбммб гйб нб елЭгоефе бн фп рсьвлзмб бнфймефщрЯуфзке;
Уе бснзфйкЮ ресЯрфщуз, ерйкпйнщнЮуфе ме фзн ЕопхуйпдпфзмЭнз ХрзсеуЯб ФечнйкЮт ХрпуфЮсйозт.
Уе ресЯрфщуз еуцблмЭнзт егкбфЬуфбузт Ю мз ущуфЮт чсЮузт фпх рлхнфзсЯпх з ерЭмвбуз фпх уЭсвйт иб еЯнбй
ер бмпйвЮ.
Мзн кбфбцеэгефе рпфЭ уе мз еопхуйпдпфзмЭнпхт фечнйкпэт.
ГнщуфпрпйЮуфе:
фп еЯдпт фзт бнщмблЯбт;
фп мпнфЭлп фзт мзчбнЮт (Mod.);
фпн бсйимь уейсЬт (S/N).
БхфЭт пй фелехфбЯет рлзспцпсЯет всЯукпнфбй уфзн рйнбкЯдб чбсбкфзсйуфйкюн ерЯ фзт ухукехЮт.
УзмеЯщуз: гйб нб вгеЯфе брь фп Demo Mode рйЭуфе фбхфьчспнб гйб 3 sec. фб дэп кпхмрйЬ ON/OFF кбй START/PAUSE .
GR
25
Page 26

GR
26
Page 27

Instrukcja instalacji i obs³ugi
PRALKA
PL
Polski
AQUALTIS
AQM9D 49 U
Spis treci
Instalacja, 28-29
Rozpakowanie i wypoziomowanie
Pod³¹czenia hydrauliczne i elektryczne
Dane techniczne
Opis urz¹dzenia, 30-31
Panel sterowania touch control
Jak wykonaæ cykl prania lub suszenie lub
suszenie, 32
Programy i opcje, 33
Tabela programów
Opcje
rodki pior¹ce i bielizna, 34
rodek pior¹cy
Przygotowanie bielizny
Zalecenia dotycz¹ce prania
System równowa¿enia ³adunku
Zalecenia i rodki ostro¿noci, 35
Ogólne zasady bezpieczeñstwa
Utylizacja
Rêczne otwieranie drzwiczek
PL
Utrzymanie i konserwacja, 36
Od³¹czenie wody i pr¹du elektrycznego
Czyszczenie maszyny
Czyszczenie szufladki na rodki pior¹ce
Czyszczenie bêbna
Czyszczenie pompy
Kontrola przewodu doprowadzaj¹cego wodê
Nieprawid³owoci w dzia³aniu i sposoby
ich usuwania, 37
Serwis Techniczny, 38
27
Page 28

Instalacja
PL
Nale¿y zachowaæ niniejsz¹ ksi¹¿eczkê, aby móc z
niej skorzystaæ w ka¿dej chwili. W przypadku
sprzeda¿y, odst¹pienia lub przeprowadzki nale¿y
upewniæ siê, ¿e pozostanie razem z pralk¹.
Nale¿y uwa¿nie przeczytaæ instrukcjê obs³ugi:
zawiera ona wa¿ne informacje dotycz¹ce instalacji
oraz w³aciwego i bezpiecznego u¿ytkowania pralki.
W kopercie zawieraj¹cej niniejsz¹ instrukcjê, oprócz
gwarancji, znajduj¹ siê detale pomagaj¹ce przy
instalacji.
Rozpakowanie i wypoziomowanie
Rozpakowanie
1. Po wypakowaniu pralki upewniæ siê, ¿e nie dozna³a
uszkodzeñ podczas transportu.
W przypadku stwierdzenia uszkodzeñ nie pod³¹czaæ
jej i skontaktowaæ siê ze sprzedawc¹.
2. Odkrêciæ 4 ruby
ochronne umocowane na
czas transportu oraz
odpowiedni¹ rozpórkê,
znajduj¹ce siê w czêci
tylnej (patrz rysunek).
3. Zatkaæ otwory przy pomocy plastikowych korków
znajduj¹cych siê w kopercie.
4. Przechowywaæ wszystkie czêci; jeli pralka bêdzie
przenoszona, powinny zostaæ ponownie zamontowane
uszkodzeñ celu unikniêcia uszkodzeñ wewnêtrznych.
Czêci opakowania nie s¹ zabawkami dla dzieci.
Poziomowanie
W razie ustawienia na dywanie lub wyk³adzinie
dywanowej nale¿y tak wyregulowaæ nó¿ki, aby pod
pralk¹ pozostawa³a wolna przestrzeñ niezbêdna dla
wentylacji.
Pod³¹czenia hydrauliczne i elektryczne
Pod³¹czenie rury pobierania wody
Przed pod³¹czeniem przewodu zasilaj¹cego do sieci
wodoci¹gowej spuciæ wodê a¿ do pojawienia siê
przejrzystej wody.
1. Pod³¹czyæ do
urz¹dzenia przewód
doprowadzaj¹cy wodê,
przykrêcaj¹c go do
odpowiedniego otworu
dop³ywowego,
znajduj¹cego siê w tylnej
czêci pralki, z prawej
strony u góry (patrz
rysunek)..
2. Pod³¹czyæ przewód
zasilaj¹cy poprzez
przykrêcenie go do
zaworu wody zimnej z
otworem z gwintem
rurowym drobnozwojowym
¾ (patrz rysunek).
3. Zwróciæ uwagê, aby na przewodzie nie by³o zagiêæ
ani zwê¿eñ.
1. Ustawiæ pralkê na p³askiej i twardej pod³odze; nie
opieraæ jej o ciany lub meble.
2. Skompensowaæ
nierównoci odkrêcaj¹c
lub przykrêcaj¹c nó¿ki a¿
urz¹dzenie znajdzie siê w
po³o¿eniu poziomym (jego
nachylenie nie powinno
przekraczaæ 2 stopnii).
Dok³adne wypoziomowanie powoduje, ¿e urz¹dzenie
jest stabilne i umo¿liwia wyeliminowanie drgañ i
ha³asów, zw³aszcza podczas fazy wirowania.
28
Cinienie wody w kurku powinno mieciæ siê w
przedziale podanym w tabeli Danych technicznych
(patrz strona obok).
Jeli d³ugoæ przewodu doprowadzaj¹cego wodê jest
niewystarczaj¹ca, nale¿y zwróciæ siê do
specjalistycznego sklepu lub do autoryzowanego
technika.
Nigdy nie nale¿y stosowaæ u¿ywanych lub starych
przewodów zasilaj¹cych, lecz tych, które znajduj¹ siê
na wyposa¿eniu urz¹dzenia.
Page 29

Pod³¹czenie przewodu odp³ywowego
Pod³¹czyæ rurê
odp³ywow¹ wody do
kanalizacji lub otworu
spustowego w cianie
umieszczonego na
65 - 100 cm
wysokoci od 65 cm do 1
m od ziemi, unikaj¹c
zginania jej.
Alternatywnie mo¿na
oprzeæ j¹ na brzegu
zlewu lub wanny,
przymocowuj¹c do kranu
za³¹czony do pralki
prowadnik (zobacz
rysunek).
Wolny koniec rury
odp³ywowej nie powinien
pozostawaæ zanurzony w
wodzie.
Po zainstalowaniu urz¹dzenia gniazdko elektryczne
powinno byæ ³atwo dostêpne.
Nie u¿ywaæ przed³u¿aczy ani wtyczek wielokrotnych.
Kabel nie powinien byæ zgiêty ani zgnieciony.
Kabel zasilania elektrycznego oraz wtyczka mog¹
byæ wymieniane wy³¹cznie przez upowa¿nionych
techników.
Uwaga! Producent nie ponosi ¿adnej
odpowiedzialnoci, jeli powy¿sze normy nie bêd¹
przestrzegane.
Dane techniczne
PL
Odradza siê u¿ywanie rur-przed³u¿aczy; jeli
przed³u¿acz jest jednak konieczny, powinien mieæ on
ten sam przekrój, co rura oryginalna, i nie powinien
przekraczaæ 150 cm d³ugoci.
Pod³¹czenie elektryczne
Przed w³o¿eniem wtyczki do gniazdka elektrycznego
nale¿y siê upewniæ, czy:
gniazdko posiada uziemienie i jest zgodne z
obowi¹zuj¹cymi przepisami;
gniazdko jest w stanie wytrzymaæ maksymalne
obci¹¿enie mocy urz¹dzenia, wskazane w tabeli
Danych technicznych (patrz obok);
napiêcie zasilania mieci siê w wartociach
wskazanych w tabeli Danych technicznych (patrz
obok);
gniazdko jest kompatybilne z wtyczk¹ urz¹dzenia.
W przeciwnym razie nale¿y wymieniæ gniazdko lub
wtyczkê.
Nie nale¿y instalowaæ pralki na otwartym powietrzu,
nawet jeli miejsce to jest chronione daszkiem, gdy¿
wystawienie urz¹dzenia na dzia³anie deszczu i burz
jest bardzo niebezpieczne.
Model
Wymiary
Pojemnoæ
Dane pr¹du
elektrycznego
Dane sieci
wodoci¹gowej
Szybkoæ wirowania
Programy kontrolne
zgodnie z przepisami
EN 50229
AQM9D 49 U
szerokoæ cm 59,5
wysokoæ cm 85
g³êbokoæ cm 64,5
od 1 do 9 kg dla prania
od 1 do 6 kg dla suszenia
dane techniczne umieszczone s¹ na
tabliczce na maszynie
Maksymalne cinienie 1 MPa (10 barów)
cinienie minimalne 0,05 MPa (0,5 barów)
pojemnoæ bêbna 62 litrów
do 1400 obrotów na minutê
program ; temperatura 60°C;
pranie:
wykonane przy 9 kg za³adowanej bielizny.
pierwsze suszenie wykonane przy
uszenie:
ladunku 3 kg z ustawieniem poziomu
suszenia "PRASOWANIE";
drugie suszenie wykonane przy ladunku
kg z ustawieniem poziomu suszenia
6
"EXTRA".
Urz¹dzenie to zosta³o wyprodukowane
zgodnie z nastêpuj¹cymi przepisami EWG:
- 89/336/CEE z dn. 03/05/89
(o Kompatybilnoci Elektromagnetycznej)
wraz z kolejnymi zmianami
- 2002/96/CE
- 2006/95/CE (o Niskim Napiêciu)
29
Page 30

Opis urz¹dzenia
PL
DRZWICZKI
UCHWYT
DRZWICZEK
PODEST
DRZWICZKI
REGULOWANE NÓ¯KI
W celu otwarcia drzwiczek
pos³ugiwaæ siê zawsze
odpowiednim uchwytem
(patrz rysunek).
PULPIT
STEROWANIA
tym ostatnim przypadku zaleca siê wlaæ go
bezporednio przed uruchomieniem pralki.
3. dodatkowy pojemnik: Wybielacz
U¿ycie dodatkowego pojemniczka 3 wyklucza
pranie wstêpne.
pojemnik na dodatkowe rodki: zmiêkczaj¹ce lub
dodatki p³ynne. Zaleca siê nigdy nie przekraczaæ
maksymalnego poziomu podanego na siatce i
rozcieñczaæ skoncentrowane rodki zmiêkczaj¹ce.
Panel sterowania touch control
Aby zmieniæ ustawienia
przycisn¹æ lekko ikonê
wewn¹trz czu³ego pola
(touch control) jak
wskazano na rysunku.
20
SZUFLADKA NA RODKI PIOR¥CE
Znajduje siê wewn¹trz
maszyny, aby uzyskaæ do
niej dostêp nale¿y otworzyæ
drzwiczki.
Informacje dotycz¹ce
dozowania rodków
pior¹cych znajduj¹ siê w
rozdziale rodki pior¹ce i
bielizna.
Uwaga: na szufladkê na
proszek nale¿y nakleiæ
naklejkê z opisem programów i opcji. Naklejka
znajduje siê w kopercie z niniejsz¹ instrukcj¹ obs³ugi.
1. pojemnik do prania
3
1
2
wstêpnego: stosowaæ
rodek pior¹cy w proszku.
Przed wsypaniem rodka
pior¹cego nale¿y sprawdziæ,
czy nie jest w³o¿ona
dodatkowa przegródka 3.
2. pojemnik do prania:
stosowaæ rodek pior¹cy w
proszku lub w p³ynie. W
Funkcja stand by
Pralka ta, w myl nowych norm europejskich
zwi¹zanych z oszczêdnoci¹ elektryczn¹, posiada
system auto wy³¹czenia (stand by), który w³¹cza siê
po kilku minutach nie u¿ytkowania. Ponownie lekko
wcisn¹æ przycisk ON-OFF
ponownie w³¹czy siê.
ZMIANA JÊZYKA
Jeli maszyna zostanie w³¹czona po raz pierwszy
na wywietlaczu uka¿e siê migaj¹ca ikona pierwszego
jêzyka. Odpowiednio do 3 przycisków, po prawej
stronie wywietlacza uka¿¹ siê symbole
V. Jêzyki zmieniaj¹ siê automatycznie co 3 lub
poprzez przyciniêcie przycisków obok symboli
V. Przyciskiem OK potwierdza siê jêzyk, który
ustala siê po 2. Jeli nie zostanie przyciniêty ¿aden
przycisk, po 30 zmiana automatyczna jêzyka
ponownie zacznie siê.
Jêzyk mo¿na zmieniæ tylko w momencie, kiedy
maszyna jest wy³¹czona.
Po jednoczesnym przyciniêciu przycisków
temperatury
przez 5, oprócz krótkiego sygna³u akustycznego,
uka¿e siê na wywietlaczu migaj¹cy siê ustawiony
jêzyk. Po przyciniêciu przycisków obok symboli
V zmienia siê jêzyk. Przyciskiem obok symbolu OK
potwierdza siê jêzyk, który ustala siê po 2. Jeli nie
zostanie przyciniêty ¿aden przycisk, po 30 zostanie
wywietlony jêzyk wczeniej ustalony. W³¹cz pralka.
+ wirowanie + start opóniony
i poczekaæ, a¿ pralka
, OK i
i
i
30
Page 31

Panel sterowania touch control
Przycisk WIROWANIE
Przycisk z kontrolk¹
START / PAUZA
PL
Pokrêt³o
M2
M1
PROGRAMÓW
Przycisk z kontrolk¹
ON/OFF
Przycisk
SUSZENIE
Przycisk z kontrolk¹ ON/OFF: nacisn¹æ na chwilê
przycisk w celu w³¹czenia lub wy³¹czenia maszyny.
Zielona kontrolka wskazuje, ¿e maszyna jest
w³¹czona. W celu wy³¹czenia pralki podczas prania
konieczne jest d³u¿sze przytrzymanie naciniêtego
przycisku, przez oko³o 3 sek.; krótkie lub przypadkowe
naciniêcie nie wystarczy do wy³¹czenia maszyny.
Wy³¹czenie maszyny podczas trwaj¹cego prania
anuluje program prania.
Pokrêt³o PROGRAMÓW: mo¿e byæ obracane w
obydwu kierunkach. W celu wybrania najlepszego
programu nale¿y sprawdziæ Tabela programów. W
czasie trwania programu pokrêt³o pozostaje
nieruchome.
Przyciski M1-M2: przytrzymaæ wciniêty jeden z
przycisków w celu zapisania w pamiêci cyklu oraz
w³asnych preferowanych ustawieñ. W celu przywo³ania
cyklu zapisanego uprzednio wcisn¹æ odpowiedni przycisk.
Przycisk SUSZENIE
: nale¿y przycisn¹æ, aby
zmniejszyæ lub wy³¹czyæ suszenie; poziom lub czas
wybranego suszenia zostanie wywietlony na
wywietlaczu (patrz Jak wykonaæ cykl prania lub
suszenie lub suszenie).
Przycisk
TEMPERATURY: nacisn¹æ w celu dokonania
zmiany lub wykluczenia temperatury, wartoæ wskazywana
jest na umieszczonym wy¿ej ekranie (patrz Jak wykonaæ
cykl prania lub suszenie).
Przycisk
WIROWANIE: nacisn¹æ w celu dokonania
zmiany lub wykluczenia wirówki, wartoæ wskazywana jest
na umieszczonym wy¿ej ekranie (patrz Jak wykonaæ cykl
prania lub suszenie).
Przycisk
OPÓNIONE URUCHOMIENIE: nacisn¹æ w
celu ustawienia opónionego uruchomienia wybranego
programu, wartoæ ustawionego opónienia widoczna jest
na umieszczonym wy¿ej ekranie (patrz Jak wykonaæ cykl
prania lub suszenie).
Przycisk TEMPERATURY
Ekran
Przyciski
OPCJI
Przyciski OPCJI: nacisn¹æ w celu wybrania
dostêpnych opcji. Kontrolka odpowiadaj¹ca wybranej
opcji pozostanie w³¹czona (patrz Jak wykonaæ cykl
prania lub suszenie).
Ikony FAZY PRANIA: w³¹czaj¹ siê wskazuj¹c
zaawansowanie cyklu (Pranie
Wirowanie/Wypompowanie Suszenie ).
Napis
Przycisk z kontrolk¹ START/PAUSE: kiedy zielona
kontrolka pulsuje powoli nale¿y nacisn¹æ przycisk w
celu uruchomienia prania. Po uruchomieniu cyklu
kontrolka wieci w sposób ci¹g³y. W celu wybrania
trybu pauzy podczas prania nacisn¹æ ponownie
przycisk, kontrolka zacznie pulsowaæ w kolorze
pomarañczowym. Jeli kontrolka Blokada drzwiczek
W celu ponownego uruchomienia prania od miejsca, w
którym zosta³o przerwane, nale¿y ponownie nacisn¹æ
przycisk.
Kontrolka
drzwiczki s¹ zablokowane. W celu otwarcia drzwiczek
konieczne jest w³¹czenie pauzy cyklu (patrz Jak
wykonaæ cykl prania lub suszenie).
Przycisk oraz kontrolka
w celu uruchomienia lub wy³¹czenia blokady panelu
sterowania przytrzymaæ naciniêty przycisk przez
oko³o 2 sekundy. W³¹czona kontrolka wskazuje, ¿e
panel sterowania zosta³ zablokowany. W ten sposób
uniemo¿liwia siê dokonywanie przypadkowych zmian
w programach, zw³aszcza, jeli w domu obecne s¹
dzieci.
Kontrolka ECO: Ikona
zmiany parametrów prania, zostanie zaoszczêdzone
co najmniej 10% energii. Przed wejciem maszyny w
tryb Stand by, ikona zawieci siê przez kilka sekund;
gdy maszyna jest wy³¹czona, odzysk energii
elektrycznej okrelony jest na oko³o 80%.
Przycisk
OPÓNIONE
URUCHOMIENIE
zapala siê, kiedy cykl zostaje zakoñczony.
jest wy³¹czona, mo¿na otworzyæ drzwiczki pralki.
BLOKADA DRZWICZEK: wskazuje, ¿e
Kontrolka
EKO
Kontrolka
BLOKADA
DRZWICZEK
Ikony FAZY
PRANIA
Przycisk oraz kontrolka
BLOKADA
PRZYCISKÓW
P³ukanie
BLOKADA PRZYCISKÓW:
w³¹czy siê, gdy, podczas
31
Page 32

Jak wykonaæ cykl prania lub
suszenie lub suszenie
PL
UWAGA: kiedy po raz pierwszy u¿ywa siê pralki nale¿y
wykonaæ cykl prania bez wsadu, ale z u¿yciem rodka
pior¹cego nastawiaj¹c program bawe³ny 90° bez prania
wstêpnego.
1. W£¥CZENIE MASZYNY. Wcisn¹æ przycisk
kontrolki zawieca siê przez 1 sekundê a na ekranie
pojawi siê napis AQUALTIS, a nastêpnie pozostanie
wiec¹c siê sta³ym wiat³em kontrolka przycisku
oraz pulsowaæ bêdzie kontrolka START/PAUSE.
2. WYBÓR PROGRAMU. Obracaæ Pokrêt³o PROGRAMÓW w
prawo lub w lewo a¿ do odnalezienia potrzebnego programu,
nazwa programu pojawi siê na ekranie; teraz powi¹zana jest z
temperatur¹ oraz prêdkoci¹ wirowania, które mog¹ zostaæ
zmienione. Na wywietlaczu pojawi siê czas trwania cyklu.
3. ZA£ADUNEK BIELIZNY. Otworzyæ drzwiczki. W³o¿yæ
bieliznê uwa¿aj¹c, aby nie przekroczyæ wielkoci ³adunku
wskazanej w tabeli programów na nastêpnej stronie.
4. DOZOWANIE RODKA PIOR¥CEGO. Wysun¹æ
szufladkê i wsypaæ rodek pior¹cy do odpowiednich
pojemników, tak jak wyjaniono to w Opis urz¹dzenia.
5. ZAMKNIÊCIE DRZWICZEK.
6. PERSONALIZACJA CYKLU PRANIA Pos³ugiwaæ siê
odpowiednimi przyciskami panelu sterowania:
Zmieniæ temperaturê i/lub wirowanie.
Maszyna automatycznie wywietla temperaturê i
przewidziane maksymalne wartoci dla ustawionego
programu lub ostatnie wartoci, jeli s¹ zgodne z
wybranym programem. Poprzez naciniêcie przycisku
zmniejsza siê stopniowo temperaturê a¿ do prania
w zimnej wodzie (OFF). Poprzez naciniêcie przycisku
zmniejsza siê stopniowo wirowanie a¿ do jego
wy³¹czenia (OFF). Dodatkowe naciniêcie przycisków
przywróci maksymalne przewidywane wartoci.
Wyj¹tek: wybieraj¹c program Bawe³na temperaturê
mo¿na podnieæ a¿ do 90°.
Ustawianie suszenia
Po przyciniêciu przycisku maszyna automatycznie
wybiera maksymalny poziom suszenia odpowiednio do
wybranego programu. Nastêpne przyciniêcia
zmniejszaj¹ poziom i nastêpnie czas suszenia a¿ do jego
wy³¹czenia OFF. Dodatkowe naciniêcie przycisków
przywróci maksymalne przewidywane wartoci.
Mo¿liwe jest ustawienie suszenia:
A - Zale¿nie od czasu: od 20 do 180 minut.
B - Na podstawie poziomu ¿¹danego suszenia:
Prasowanie: wskazany dla bielizny, która bêdzie
prasowana. Poziom pozosta³ej wilgotnoci zmiêkcza
zgiêcia i u³atwia ich usuniêcie.
Wieszanie: Idealny dla tej bielizny, która wymaga
kompletnego prasowania.
Szafa: Odpowiedni dla bielizny, która ma byæ u³o¿ona w
szafie bez jej prasowania.
Extra: Odpowiedni dla bielizny, które wymagaj¹
ca³kowitego wysuszenia, czyli taka jak g¹bki czy szlafroki.
Jeli wyj¹tkowo iloæ bielizny do prania i suszenia
przewy¿sza maksymalny przewidziany ³adunek (patrz
tabela obok), nale¿y wykonaæ pranie, a po zakoñczeniu
programu podzieliæ ³adunek i w³o¿yæ do bêbna tylko
jego czêæ. Dalej postêpowaæ wed³ug instrukcji
dotycz¹cych opcji Tylko suszenie. Powtórzyæ te same
czynnoci dla pozosta³ej czêci bielizny.
N.B: zawsze po zakoñczeniu suszenia wykonywane jest
krótkie ch³odzenie bielizny.
. Wszystkie
Tylko suszenie
Wybraæ za pomoc¹ prze³¹cznika PROGRAMY suszenie (
- ) w zale¿noci od rodzaju tkaniny, nastêpnie ustawiæ
rodzaj ¿¹danego suszenia przyciskiem SUSZENIE
Nastawiæ opóniony start.
W celu ustawienia opónionego startu wybranego
programu nale¿y wduszaæ odpowiedni przycisk a¿ do
osi¹gniêcia ¿¹danego czasu opónienia. Podczas
ustawiania wywietlony zostanie czas opónienia wraz z
pulsuj¹cym napisem Start za: i migaj¹cym symbolem
. Po nastawieniu opónionego startu na wywietlaczu
zostanie wywietlony nieruchomy symbol i nastêpnie
wywietlony zostanie ustawiony czas trwania cyklu z
napisem Koniec za: i czas trwania cyklu. Po
jednorazowym naciniêciu przycisku START OPÓNIONY
wywietlony zostaje tylko jeden raz czas ustawionego
opónienia.
Wywietlacz poka¿e napis Start za:. I czas opónienia.
Po zakoñczeniu ustawionego czasu opónienia, maszyna
w³¹czy siê i na wywietlaczu uka¿e siê napis: Koniec za:
i pozosta³y czas do zakoñczenia cyklu. W celu usuniêcia
opónionego uruchomienia wciskaæ przycisk a¿ do
pojawienia siê napisu OFF; symbol
Zmiana charakterystyki cyklu.
Wcisn¹æ przycisk w celu uruchomienia opcji, na
ekranie pojawi siê nazwa a odpowiednie
zacienienie przycisku w³¹czy siê.
Wcisn¹æ ponownie przycisk w celu wy³¹czenia opcji;
na ekranie pojawi siê nazwa opcji plus OFF i
podcieniowanie wy³¹czy siê.
Jeli wybrana opcja nie jest zgodna z nastawionym
programem, niezgodnoæ zostanie zasygnalizowana
przez pulsowanie kontrolki i sygna³ akustyczny
(3 sygna³y) a opcja nie bêdzie aktywowana.
Jeli wybrana opcja nie jest zgodna z inn¹, ustawion¹
uprzednio, kontrolka odpowiadaj¹ca pierwszej opcji
bêdzie pulsowaæ i uruchomiona zostanie jedynie opcja
druga, kontrolka uruchomionej opcji bêdzie wieciæ stale.
Opcje mog¹ zmieniaæ zalecane obci¹¿enie i/lub czas
trwania cyklu.
7. URUCHOMIENIE PROGRAMU. Nacisn¹æ przycisk START/
PAUSE. Odpowiednia kontrolka zawieci sta³ym
wiat³em a drzwiczki zostan¹ zablokowane (kontrolka
BLOKADA DRZWICZEK
odpowiadaj¹ce fazom prania zawiec¹ siê podczas
cyklu wskazuj¹c bie¿¹c¹ fazê.
W celu dokonania zmiany programu w czasie trwania
cyklu nale¿y wybraæ funkcjê pauzy naciskaj¹c na
przycisk START/PAUSE a nastêpnie wybraæ ¿¹dany cykl
i nacisn¹æ ponownie przycisk START/PAUSE. W celu
otworzenia drzwi, gdy cykl prania jest w³¹czony nale¿y
nacisn¹æ przycisk START/PAUSE; jeli kontrolka
BLOKADA DRZWICZEK
drzwi bêdzie mo¿liwe. Nacisn¹æ ponownie przycisk
START/PAUSE, aby uruchomiæ program od momentu, w
którym zosta³ przerwany.
8. KONIEC PROGRAMU. Wskazywany jest przez
zawiecenie napisu END. Drzwiczki pralki mo¿na
otworzyæ natychmiast. Jeli kontrolka START/PAUSE
pulsuje, nacisn¹æ przycisk w celu zakoñczenia cyklu.
Otworzyæ drzwiczki, wyj¹æ bieliznê i wy³¹czyæ urz¹dzenie.
Jeli uruchomiony ju¿ cykl ma byæ anulowany nale¿y
przytrzymaæ d³u¿ej naciniêty przycisk
przerwany i urz¹dzenie wy³¹czy siê.
wieci siê). Ikony
jest zgaszona otwarcie
zganie.
, a¿ cykl zostanie
.
-
32
Page 33

Programy i opcje
Tabela programów
Ikona Opis programu
Programy Bawe³na
Bawe³na z pranie wstêpe
(Dodawaæ detergent do odpowiedniego pojemnika).
Bawe³na (1): tkaniny bia³e i kolorowe, wytrzyma³e, mocno zabrudzone.
Bawe³na (2): tkaniny bia³e i kolorowe, delikatne, mocno zabrudzone.
Bawe³na kolorowe (3)
Jeans
Programy Specjalne
Baby: tkaniny kolorowe, delikatne, mocno zabrudzone.
Mix 30: w celu szybkiego odwie¿enia lekko zabrudzonych tkanin
(niewskazany dla we³ny, jedwabiu i tkanin przeznaczonych do prania rêcznego).
Syntetyczne odporne
Jedwab: do jedwabiu, wiskozy, bielizny.
We³na: do w e³ny, kaszmiru, itp.
Programy Suszenia
Pranie&Suszenie
Suszenie Bawe³na
Suszenie Syntetyczne
Suszenie We³na
Programy czêciowe
P³ukanie
Wirowanie
Wypompowanie
(*) Uwaga: po oko³o 10 minutach od START, urz¹dzenie na podstawie wsadu obliczy i poka¿e czas pozosta³y do zakoñczenia programu.
Dla wszystkich Instytucji homologacyjnych:
1) Program kontrolny zgodny z norm¹ EN 50229: ustawiæ program
2) Program bawe³na, d³ugi: ustawiæ program
3) Program bawe³na, krótki: ustawiæ program
, wybieraj¹c temperaturê 40°C.
, wybieraj¹c temperaturê 40°C.
, wybieraj¹c temperaturê 60°C.
Opcje
Super Pranie
Dziêki zastosowaniu wiêkszej iloci wody podczas fazy
pocz¹tkowej cyklu i zastosowaniu d³u¿szego czasu, opcja
ta gwarantuje pranie o wysokiej skutecznoci.
Funkcja ta przydatna jest w celu usuwania bardziej
opornych plam. Mo¿e byæ
3
1
2
u¿ywana z i bez wybielacza.
Jeli zamierza siê wykonaæ
cykl wybielania nale¿y
wstawiæ dodatkowy
pojemniczek 3, na
Temp.
maks.
(Max. 90°)
obroty bêbna, kontrolki £atwe Prasowanie oraz START/
PAUSE bêd¹ pulsowa³y. W celu zakoñczenia cyklu
nacisn¹æ przycisk START/PAUSE lub przycisk £atwe
Prasowanie. W programie Jedwab
zakoñczy cykl moczeniem bielizny i kontrolka £atwe
Prasowanie bêdzie pulsowa³a. W celu odprowadzenia
wody i wyjêcia prania nale¿y nacisn¹æ przycisk START/
PAUSE lub przycisk £atwe Prasowanie.
Nie mo¿na jej zastosowaæ przy programach
N.B.: Jeli chcesz wykonaæ równie¿ i suszenie, przycisk ten
jest aktywny tylko w po³¹czeniu z poziomem Prasowanie.
wyposa¿eniu, do przegródki
1. Nie przekraczaæ
maksymalnej iloci
wybielacza w p³ynie, podanej
na g³ównym wskaniku
(zobacz rysunek). Aby
wykonaæ tylko wybielanie bez kompletnego cyklu
Gdy wybrana zostanie ta opcja trwanie programu zostanie
zmniejszone o 30% do 50% na podstawie wybranego
cyklu, gwarantuj¹c w tym samym czasie oszczêdnoæ
wody i energii. Nale¿y u¿ywaæ tego cyklu dla tkanin, które
nie s¹ zbyt brudne.
Nie mo¿na jej zastosowaæ przy programach
prania, nale¿y wlaæ wybielacz do dodatkowego pojemnika
3 i nastawiæ program P³ukanie
funkcjê Super Pranie
.
Nie mo¿na jej zastosowaæ przy programach , , , ,
, , , , , , .
£atwe Prasowanie
Wybieraj¹c tê opcjê pranie oraz wirowanie zostan¹
odpowiednio zmienione w celu ograniczenia powstawania
zgnieceñ. Po zakoñczeniu cyklu pralka wykona powolne
oraz uruchomiæ
Wybieraj¹c tê opcjê zwiêksza siê skutecznoæ p³ukania i
zapewnia siê maksymalne usuwanie rodka pior¹cego.
Jest przydatne dla w³ókna szczególnie wra¿liwego na
rodki pior¹ce. Radzimy u¿ywaæ tej opcji z pralk¹ o pe³nym
wsadzie i z wiêksz¹ iloci¹ rodka pior¹cego.
Nie mo¿na jej zastosowaæ przy programach
Prêdkoæ
maks.
(obroty na
(°C)
90° 1400
60°
40° 1400
40° 1400
40° 800
40° 800
30° 800
60° 800
30° 0 -
40° 800
30° 1400
minutê)
1400
- -
- -
- -
- 1400
- 1400
- 0 - - - - 9
, , , , .
Oszczêdnoæ Czasu
, , , , , , .
Super P³ukanie
, , .
rodki pior¹ce i dodatki
Susz-
enie
rodek
pior¹cy
ll l
ll l l
ll l l
ll l l
ll l
ll l l
ll l
ll l l
ll l
ll l
l
l
l
l
l
rodek
zmiêkc-
Wybielacz
zaj¹cy
- 9
- 4
- 3,5
ll
- - - 6
- - - 4
- - - 1,5
ll
-
- - - 9
- 2
- 2
- 1
urz¹dzenie
£adu-
nek
max
(kg)
9
9
9
4
4
9
, , , ,
, , , ,
, , , ,
PL
Czas
trwania
cyklu
(*) Mo¿liwa jest kontrola czasu trwania programów na
wywietlaczu.
33
Page 34

rodki pior¹ce i bielizna
PL
rodek pior¹cy
Wybór oraz iloæ rodka pior¹cego zale¿ne s¹ od
rodzaju tkaniny (bawe³na, we³na, jedwab...), od koloru,
od temperatury prania, od stopnia zabrudzenia oraz od
twardoci wody.
Dok³adne dozowanie rodka pior¹cego zapobiega
marnotrawstwu i przyczynia siê do ochrony
rodowiska: rodki pior¹ce, mimo ¿e ulegaj¹
biodegradacji, zawsze zawieraj¹ sk³adniki, które
zak³ócaj¹ równowagê rodowiska naturalnego.
Zaleca siê:
stosowanie rodków pior¹cych w proszku dla tkanin
z bia³ej bawe³ny i do prania wstêpnego.
stosowanie rodków pior¹cych w p³ynie dla
delikatnych tkanin z bawe³ny oraz dla wszystkich
programów z nisk¹ temperatur¹.
stosowanie p³ynnych rodków pior¹cych do we³ny i
jedwabiu.
rodek pior¹cy powinien byæ w³o¿ony przed
rozpoczêciem prania do odpowiedniej komory lub do
dozownika wk³adanego bezporednio do bêbna. W
takim przypadku nie mo¿na wybraæ cyklu Bawe³na z
praniem wstêpnym.
Nie u¿ywaæ rodków do prania rêcznego, poniewa¿
tworz¹ za du¿o piany.
Przygotowanie bielizny
Rozprostowaæ dobrze ubrania przed w³o¿eniem ich
do pralki.
Podzieliæ bieliznê wed³ug rodzajów tkaniny (symbol
na etykiecie ubrania) oraz koloru uwa¿aj¹c na
oddzielenie odzie¿y kolorowej od bia³ej;
Opró¿niæ kieszenie i sprawdziæ guziki;
Nie przekraczaæ wartoci wskazanych w Tabela
programów odnosz¹cych siê do ciê¿aru bielizny
suchej.
Ile wa¿y bielizna?
1 przecierad³o 400 500 gr
1 poszewka 150 200 gr
1 obrus 400 500 gr
1 szlafrok 900 1200 gr
1 rêcznik do r¹k 150 250 gr
1 spodnie jeansowe 400 500 gr
1 koszula 150 200 gr
Po zakoñczeniu prania urz¹dzenie wykona seriê
wolnych obrotów bêbna, aby zapobiec powstawaniu
zagnieceñ; w celu zakoñczenia cyklu nale¿y nacisn¹æ
przycisk START/PAUSE.
Jedwab: stosowaæ odpowiedni program Jedwab
do prania wszelkiej odzie¿y jedwabnej. Zaleca siê
stosowanie specjalnego rodka pior¹cego do tkanin
delikatnych.
Firany: zastosowaæ program Jedwab
z³o¿one do poszewki lub do siatkowatego worka.
We³na: Hotpoint/Ariston to jedyna pralka, która
uzyska³a presti¿owe oznaczenie Woomark Platinium
Care (M.0508) od The Woolmark Company, która
certyfikuje pranie w pralce wszystkich wyrobów
we³nianych, tak¿e posiadaj¹cych oznaczenie Tylko
pranie rêczne
pralce mo¿na praæ wszystkie ubrania z we³ny z
gwarancj¹ najwy¿szych osi¹gów.
Uporczywe zabrudzenia: dobrze jest wypraæ
uporczywe zaplamienia p³ynnym myd³em przed praniem
oraz zastosowaæ program Bawe³na z praniem wstêpnym.
Pranie&Suszenie
suszenia bielizny lekko zabrudzonej w krótkim czasie.
Po wybraniu tego cyklu mo¿na praæ i suszyæ do 1 kg
bielizny w ci¹gu 60 minut. Aby otrzymaæ jak najlepsze
wyniki prania nale¿y stosowaæ p³ynny rodek pior¹cy;
wczeniej wypraæ ko³niesze, mankiety i plamy.
. Dziêki programowi We³na w
: zosta³ opracowany do prania i
. W³o¿yæ je
System równowa¿enia ³adunku
Aby unikn¹æ nadmiernych drgañ i jednorodnie roz³o¿yæ
wsad, przed ka¿dym wirowaniem bêben wykonuje
nieco szybsze obroty ni¿ podczas prania. Jeli po
zakoñczeniu kolejnych prób wsad nie zostanie
roz³o¿ony w sposób wywa¿ony, urz¹dzenie dokona
wirowania z szybkoci¹ mniejsz¹ od przewidywanej.
W przypadku wyst¹pienia nadmiernego
niezrównowa¿enia pralka dokona roz³o¿enia wsadu
zamiast odwirowania. Aby zapewniæ lepsze roz³o¿enie
wsadu oraz jego w³aciwe zrównowa¿enie, zaleca siê
wymieszanie du¿ych i ma³ych sztuk bielizny.
Zalecenia dotycz¹ce prania
Jeans: u¿ywaæ odpowiedniego programu Jeans dla
wszystkich ubrañ z tkaniny Denim; wywróciæ ubrania
przed praniem i u¿ywaæ rodka pior¹cego w p³ynie.
Baby: u¿ywaæ odpowiedniego programu Baby
celu usuniêcia brudu typowego dla dzieci i usun¹æ
rodek pior¹cy z tkanin w celu unikniêcia reakcji
alergicznych delikatnej skóry dzieci. Cykl ten zosta³
opracowany w celu ograniczenia liczby bakterii
poprzez wykorzystanie wiêkszej iloci wody i
optymalizacji dzia³ania specjalnych dodatków
higienizuj¹cych, którymi uzupe³niany jest rodek
pior¹cy.
34
w
Page 35

Zalecenia i rodki
ostro¿noci
Pralka zosta³a zaprojektowana i wyprodukowana
zgodnie z miêdzynarodowymi przepisami
bezpieczeñstwa. Niniejsze ostrze¿enia zosta³y tu
zamieszczone ze wzglêdów bezpieczeñstwa i nale¿y
je uwa¿nie przeczytaæ.
Ogólne zasady bezpieczeñstwa
Urz¹dzenie to zosta³o zaprojektowane wy³¹cznie do
u¿ytkowania w warunkach domowych.
Urz¹dzenie powinno byæ u¿ywane wy³¹cznie przez
osoby doros³e i w sposób zgodny z instrukcjami
zawartymi w niniejszej ksi¹¿eczce.
Nie dotykaæ pralki stoj¹c przy niej boso lub maj¹c
mokre lub wilgotne rêce albo stopy.
Nie wyjmowaæ wtyczki z gniazdka ci¹gn¹c za kabel,
lecz trzymaj¹c za wtyczkê.
Nie dotykaæ usuwanej wody, gdy¿ mo¿e ona
osi¹gaæ wysokie temperatury.
W ¿adnym wypadku nie otwieraæ drzwiczek pralki
na si³ê: grozi to uszkodzeniem mechanizmu
zabezpieczaj¹cego drzwiczki przed przypadkowym
otwarciem.
W razie wyst¹pienia usterki nie nale¿y w ¿adnym
wypadku próbowaæ dostaæ siê do wewnêtrznych czêci
pralki z zamiarem samodzielnego dokonania naprawy.
Zawsze uwa¿aæ, aby dzieci nie zbli¿a³y siê do
pracuj¹cej pralki.
Jeli trzeba maszynê przestawiæ musz¹ to zrobiæ
dwie lub trzy osoby przy zachowaniu jak
najwiêkszej ostro¿noci. Nigdy nie nale¿y tego robiæ
samemu, gdy¿ urz¹dzenie jest bardzo ciê¿kie.
Przed w³o¿eniem bielizny sprawdziæ, czy bêben jest
pusty.
W trakcie suszenia drzwiczki nagrzewaj¹ siê.
Nie suszyæ bielizny czyszczonej przy pomocy
³atwopalnych rozpuszczalników (np.trichloroetylen).
Nie suszyæ gumy g¹bczastej ani podobnych
elastomerów.
Upewniæ siê, by w trakcie suszenia kurek wody by³
odkrêcony.
Utylizacja
Utylizacja opakowania: przestrzegaæ lokalnych
przepisów, dziêki temu opakowanie bêdzie mog³o
zostaæ ponownie wykorzystane.
Dyrektywa europejska 2002/96/WE dotycz¹ca
odpadów urz¹dzeñ elektrycznych i elektronicznych
przewiduje, ¿e elektryczne urz¹dzenia
gospodarstwa domowego nie powinny byæ
utylizowane w normalnym ci¹gu utylizacji sta³ych
odpadów miejskich. Stare urz¹dzenia powinny byæ
zbierane oddzielnie w celu optymalizowania stopnia
odzysku i recyrkulacji materia³ów, z których s¹
zbudowane i aby zapobiec potencjalnemu
zagro¿eniu dla zdrowia i rodowiska. Symbol
przekrelonego koszyka podany jest na wszystkich
produktach w celu przypominania o obowi¹zku ich
oddzielnego zbierania.
W³aciciele urz¹dzeñ gospodarstwa domowego
mog¹ uzyskaæ dodatkowe informacje dotycz¹ce ich
prawid³owej utylizacji zwracaj¹c siê do odpowiednich
s³u¿b publicznych lub do sprzedawców tych
urz¹dzeñ.
Rêczne otwarcie drzwiczek
W przypadku, gdy otwarcie drzwiczek nie jest mo¿liwe
z powodu braku energii elektrycznej a pranie ma byæ
rozwieszone, nale¿y postêpowaæ w nastêpuj¹cy
sposób:
1. wyj¹æ wtyczkê z
gniazdka elektrycznego.
2. sprawdziæ, czy poziom
wody wewn¹trz maszyny
20
3. usun¹æ p³ytê znajduj¹c¹ siê z ty³u pralki (zobacz
nastêpn¹ stronê).
6. ponownie za³o¿yæ panel upewniwszy siê, przed
dociniêciem go do maszyny, ¿e zatrzaski zosta³y
umieszczone w odpowiednich otworach.
jest ni¿szy od poziomu
otwarcia drzwiczek, w
przeciwnym przypadku
usun¹æ nadmiar wody
poprzez rurê odp³ywow¹
zbieraj¹c j¹ do wiaderka w
sposób wskazany na
rysunku.
4. przy pomocy uchwytu
pokazanego na rysunku
poci¹gn¹æ na zewn¹trz a¿
do zwolnienia plastikowego
zatrzasku z gniazda;
nastêpnie poci¹gn¹æ go ku
do³owi a¿ da siê us³yszeæ
klikniêcie, wskazuj¹ce, ¿e
drzwiczki zosta³y
odblokowane.
5. Otworzyæ drzwiczki; w
przypadku, gdy nie jest to
jeszcze mo¿liwe,
powtórzyæ czynnoæ.
PL
35
Page 36

Utrzymanie i konserwacja
PL
Od³¹czenie wody i pr¹du elektrycznego
Zamkn¹æ kurek dop³ywu wody po ka¿dym praniu.
Zmniejsza siê w ten sposób zu¿ycie instalacji
hydraulicznej pralki oraz eliminuje siê
niebezpieczeñstwo przecieków.
Wyj¹æ wtyczkê z kontaktu przed przyst¹pieniem do
czyszczenia pralki oraz podczas wykonywania
czynnoci konserwacyjnych.
Czyszczenie maszyny
Obudowê zewnêtrzn¹ i gumowe czêci pralki nale¿y
myæ wilgotn¹ ciereczk¹ zmoczon¹ w letniej wodzie z
myd³em. Nie stosowaæ rozpuszczalników ani
ciernych rodków czyszcz¹cych.
Czyszczenie szufladki na rodki pior¹ce
W celu wyjêcia szufladki
nacisn¹æ dwigniê (1) i
poci¹gn¹æ j¹ na zewn¹trz
(2)(patrz rysunek).
Wyp³ukaæ szufladkê pod
bie¿¹c¹ wod¹. Czynnoæ tê
nale¿y wykonywaæ
stosunkowo czêsto.
Czyszczenie bêbna
Aby dostaæ siê do komory wstêpnej:
2
1. zdj¹æ p³ytê przykrywaj¹c¹, znajduj¹c¹ siê z ty³u
rz¹dzenie naciskaj¹c j¹ ku rodkowi, nastêpnie
popchn¹æ ku do³owi z dwóch stron i wyj¹æ j¹ (zobacz
rysunki).
2. ustawiæ pojemnik do
zbierania wyp³ywaj¹cej
wody (ok. 1,5 l) (patrz
rysunek);
3. odkrêciæ pokrywê,
obracaj¹c j¹ w kierunku
przeciwnym do ruchu
wskazówek zegara (patrz
rysunek);
4. dok³adnie wyczyciæ wnêtrze;
5. ponownie przykrêciæ pokrywê;
6. ponownie za³o¿yæ panel upewniwszy siê, przed
dociniêciem go do urz¹dzenia, czy zatrzaski zosta³y
umieszczone w odpowiednich otworach.
Nale¿y zawsze pozostawiaæ uchylone drzwiczki
pralki, aby zapobiec tworzeniu siê nieprzyjemnych
zapachów.
Czyszczenie pompy
Pralka wyposa¿ona jest w pompê samoczyszcz¹c¹,
która nie wymaga zabiegów konserwacyjnych. Mo¿e
siê jednak zdarzyæ, ¿e drobne przedmioty (monety,
guziki) wpadn¹ do komory wstêpnej zabezpieczaj¹cej
pompê, która znajduje siê w jej dolnej czêci.
Nale¿y siê upewniæ, ¿e cykl prania zosta³
zakoñczony i wyj¹æ wtyczkê z gniazdka.
36
Kontrola przewodu doprowadzaj¹cego
wodê
Przynajmniej raz do roku nale¿y skontrolowaæ rurê
doprowadzania wody. Jeli widoczne s¹ na nim
pêkniêcia i rysy, nale¿y go wymieniæ: w trakcie prania
du¿e cinienie mo¿e bowiem spowodowaæ jego nag³e
rozerwanie.
Page 37

Nieprawid³owoci w dzia³aniu i
sposoby ich usuwania
Mo¿e siê zdarzyæ, ¿e pralka nie dzia³a. Przed wezwaniem Serwisu Technicznego (patrz Serwis Techniczny)
nale¿y sprawdziæ, czy problemu nie da siê ³atwo rozwi¹zaæ przy pomocy poni¿szego wykazu.
Nieprawid³owoci w dzia³aniu:
Pralka nie w³¹cza siê.
Cykl prania nie rozpoczyna siê.
Pralka nie pobiera wody.
Drzwiczki maszyny pozostaj¹
zablokowane.
Pralka pobiera i usuwa wodê bez
przerwy.
Pralka nie odprowadza wody i nie
odwirowuje.
Pralka mocno wibruje w fazie
odwirowywania.
Z pralki wycieka woda.
Ikony dotycz¹ce bie¿¹cej fazy
pulsuj¹ szybko jednoczenie z
kontrolk¹ ON/OFF.
Tworzy siê zbyt du¿a iloæ piany.
Drzwiczki maszyny pozostaj¹
zablokowane.
Mo¿liwe przyczyny/Porady:
Wtyczka nie jest w³¹czona do gniazdka lub jest wsuniêta za s³abo, w taki
sposób, ¿e nie ma styku.
W domu nie ma pr¹du.
Drzwiczki nie s¹ dok³adnie zamkniête.
Nie zosta³ przyciniêty przycisk START/PAUSE.
Kurek dop³ywu wody jest zamkniêty.
Ustawione zosta³o opró¿nienie startu.
Rura pobierania wody nie jest pod³¹czona do zaworu.
Rura jest zgiêta.
Kurek dop³ywu wody jest zamkniêty.
W domu nast¹pi³a przerwa w dostawie wody.
Cinienie wody nie jest wystarczaj¹ce.
Nie zosta³ przyciniêty przycisk START/PAUSE.
Gdy wybrany zostanie cykl Baby
koniec cyklu pralka wykona powolne obroty bêbna. Aby zakoñczyæ cykl, nale¿y
nacisn¹æ przycisk START/PAUSE lub kontrolkê £atwe Prasowanie
wybrany zostanie cykl Jedwab
bielizny; aby opró¿niæ wodê i wyj¹æ pranie, nale¿y nacisn¹æ przycisk START/
PAUSE lub kontrolkê £atwe Prasowanie
Rura usuwania wody nie zosta³a zainstalowana na wysokoci od 65 d0 100
cm od pod³ogi (patrz Instalacja).
Koñcówka rury usuwania wody jest zanurzona w wodzie (patrz Instalacja).
Jeli mieszkanie znajduje siê na najwy¿szych piêtrach budynku, mo¿liwe,
¿e zaistnia³ efekt syfonu, w wyniku czego pralka nieustannie pobiera i
usuwa wodê. W celu wyeliminowania tej niedogodnoci nale¿y zakupiæ
specjalny zawór, zapobiegaj¹cy powstawaniu efektu syfonu.
Otwór odp³ywowy w cianie nie posiada odpowietrznika.
Program nie przewiduje odprowadzania wody: w przypadku niektórych
programów nale¿y uruchomiæ go rêcznie (patrz Programy i opcje).
Zosta³a uruchomiona opcja £atwe prasowanie: aby zakoñczyæ program,
nale¿y wcisn¹æ przycisk START / PAUSE (patrz Programy i opcje).
Przewód odprowadzaj¹cy wodê jest zgiêty (patrz Instalacja).
Instalacja ciekowa jest zatkana.
Bêben, w chwili instalacji pralki, nie zosta³ odpowiednio odblokowany
(zobacz Instalacja).
Pralka nie jest w³aciwie wypoziomowana (patrz Instalacja).
Pralka jest zbyt ciniêta pomiêdzy meblami i cian¹ (patrz Instalacja).
Wsad jest niewywa¿ony (patrz rodki pior¹ce i bielizna).
Przewód doprowadzaj¹cy wodê nie jest dobrze przykrêcony (patrz Instalacja).
Szufladka na rodki pior¹ce jest zatkana (w celu oczyszczenia jej patrz
Konserwacja i czyszczenie).
Rura odp³ywowa nie jest dobrze zamocowana (patrz Instalacja).
Wy³¹czyæ urz¹dzenie i wyj¹æ wtyczkê z gniazdka, odczekaæ oko³o 1
minuty, nastêpnie w³¹czyæ j¹ ponownie. Jeli niedogodnoæ nie ustêpuje
wezwaæ Serwis.
rodek pior¹cy nie jest odpowiedni do pralek automatycznych (na opakowaniu
musi byæ napisane: do pralek, do prania rêcznego i pralek lub podobne).
U¿yto za du¿o rodka pior¹cego.
Wykonaæ procedurê rêcznego odblokowania (patrz rodki ostro¿noci i
zalecenia).
lub opcja £atwe Prasowanie , pod
urz¹dzenie zakoñczy cykl moczeniem
.
PL
. Gdy
Pralka nie suszy.
Wtyczka nie jest w³¹czona do gniazdka, lub jest wsuniêta niedostatecznie,
tak ¿e nie ma kontaktu.
W domu brak jest pr¹du.
Drzwiczki nie s¹ dobrze zamkniête.
Zosta³o nastawione opónienie startu.
SUSZENIE znajduje siê w pozycji OFF.
37
Page 38

Serwis techniczny
PL
Przed skontaktowaniem siê z Serwisem Technicznym:
Sprawdziæ, czy problemu nie mo¿na rozwi¹zaæ samodzielnie (patrz Anomalie i rodki zaradcze);
Ponownie uruchomiæ program i sprawdziæ, czy problem nie znikn¹³;
W przeciwnym razie wezwaæ Autoryzowany Serwis Techniczny.
W przypadku b³êdnego zainstalowania i nieprawid³owego u¿ywania pralki interwencja serwisu bêdzie p³atna.
Nigdy nie wzywaæ nieautoryzowanych techników.
Nale¿y podaæ:
rodzaj nieprawid³owoci;
model maszyny (Mod.);
numer seryjny (S/N).
Te ostatnie informacje znajduj¹ siê na tabliczce znamionowej umieszczonej na urz¹dzeniu.
Uwaga: aby wyjæ z trybu demo, nale¿y nacisn¹æ równoczenie przez 3 sek. dwa przyciski ON/OFF i START / PAUSE .
38
Page 39

Руководство по установке и
эксплуатации
+15
Русский
AQUALTIS
AQM9D 49 U
СТИРАЛЬНАЯ МАШИНА
Содержание
Установка, 40-41
Распаковка и нивелировка
Водопроводное и электрическое подсоединения
Технические характеристики
Описание стиральной машины, 42-43
Консоль управления сенсорное управление
Порядок выполнения цикла стирки и
сушки, 44-45
Программы и дополнительные функции, 46
Таблица программ
Дополнительные функции стирки
Стиральные вещества и типы белья, 47
Стиральное вещество
Подготовка белья
Рекомендации по стирке
Система балансировки белья
Предосторожности и рекомендации, 48
Общие требования по безопасности
Утилизация
Открывание люка вручную
+15
Техническое обслуживание и уход, 49
Отключение воды и электрического тока
Чистка машины
Чистка ячейки стиральных веществ
Уход за барабаном
Порядок чистки насоса
Проверка водопроводного шланга
Неисправности и методы их устранения, 50
Сервисное обслуживание, 51
!'
Page 40

Установка
+15
Важно сохранить данное руководство для его
последующих консультаций. В случае продажи,
передачи или переезда проверьте, чтобы данное
руководство сопровождало стиральную машину.
Внимательно прочитайте инструкции: в них
содержатся важные сведения об установке
изделия, его эксплуатации и безопасности.
В пакете с техническим руководством вы найдете,
помимо гарантийного таллона, детали, необходимые
для установки машины.
Распаковка и нивелировка
Снятие упаковки
1. После снятия упаковки со стиральной машины
проверьте, чтобы на ней не было повреждений,
вызванных при перевозке.
В случае обнаружения повреждений немедленно
обратитесь к поставщику, не подключая машину.
2. Снимите 4 винта,
предохраняющие
машину в процессе
перевозки, и распорки,
расположенные в задней
части машины (ñì.
схему).
В случае установки машины на ковер или
ковровое покрытие отрегулируйте ножки таким
образом, чтобы под стиральной машиной оставался
достаточный зазор для вентиляции.
Водопроводное и электрическое
подсоединения
Порядок подсоединения шланга подачи воды
Перед подсоединением водопроводного шланга к
водопроводу дайте стечь воде до тех пор, пока
она не станет прозрачной.
1. Подсоедините шланг к
машине, привинтив его к
специальному крану,
расположенному в
задней верхней части
справа (см. схему).
2. Прикрутите шланг
подачи к
водопроводному крану
холодной воды с
резьбовым отверстием
3/4 газ, (см. схему).
3. Закройте отверстия резиновыми заглушками,
которые вы найдете в пакете.
4. Сохраните все детали. В случае последующей
перевозки стиральной машины, они должны быть
установлены во избежание ее повреждения.
Не разрешайте детям играть с упаковочными
материалами.
Нивелировка
1. Установите стиральную машину на плоском и
прочном полу, не прислоняя ее к стенам или к
мебели.
2. Выровняйте машину
при помощи
регулируемых ножек до
полного выравнивания
(наклон не должен
превышать 2-х
градусов).
Тщательная нивелировка гарантирует стабильность
и устраняет вибрации и шум, в особенности в
процессе отжима.
3. Проверьте, чтобы водопроводный шланг не был
заломлен или сжат.
Водопроводное давление в кране должно быть в
пределах значений, указанных в таблице
Технические данные (см. страницу рядом).
Если длина водопроводного шланга будет
недостаточной, следует обратиться в
специализированный магазин или к
уполномоченному сантехнику.
Никогда не используйте б/у или старые шланги для
подачи воды, а только прилагающиеся к машине.
"
Page 41

Подсоединение сливного шланга
Подсоедините сливной
шланг, не сгибая его, к
сливному трубопроводу
или к сливному патрубку
в стене,
65 - 100 cm
расположенному на
высоте 65 100 см от
пола.
В качестве
альтернативы поместите
конец сливного шланга
в раковину или в ванну,
прикрепив
прилагающуюся
направляющую к крану
(см. схему).
Свободный конец
сливного шланга не
должен быть погружен в
воду.
Стиральная машина должна быть установлена так,
чтобы доступ к сетевой розетке оставался
свободным.
Не используйте удлинители и тройники.
Сетевой кабель изделия не должен быть согнут
èëè ñæàò.
Замена сетевого кабеля может осуществляться
только уполномоченными техниками.
Внимание! Производитель снимает с себя всякую
ответственность в случае несоблюдения указанных
норм установки и подключения оборудования.
Технические характеристики
+15
Не рекомендуется использовать удлинительные
шланги. При необходимости удлинение должно
иметь такой же диаметр, что и оригинальный шланг,
и его длина не должна превышать 150 см.
Электрическое подключение
Перед подсоединением штепсельной вилки изделия
к сетевой розетке необходимо проверить
следующее:
сетевая розетка должна быть заземлена и
соответствовать нормативам;
сетевая розетка должна быть расчитана на
максимальную мощность стиральной машины,
указанную в таблице Технические данные (ñì.
таблицу сбоку);
напряжение электропитания должно
соответствовать значениям, указанным в таблице
Технические данные (см. таблицу сбоку);
сетевая розетка должна быть совместима
штепсельной вилкой машины. В противном
случае необходимо заменить розетку или вилку.
Запрещается устанавливать стиральную машину
на улице, даже под навесом, так как является
чрезвычайно опасным подвергать ее воздействию
дождя и грозы.
Ìîäå ëü
Размеры
Загрузка
Электрические
параметры
Гидравлические
параметры
Скорость
отжима
Kонтрольные
программы
согласно
нормативу
EN 50229
AQM9D 49 U
ши ри н а 5 9, 5 с м
высота 85 см
глубина 64, 5 см
от 1 до 9 кг на цикл стирки;
от 1 до 6 кг на цикл сушки;
cмотрите паспортную табличку с
техничес кими характеристиками на
машине
max давление 1 Мпа (10 бар)
min давление 0,05 Мпа (0,5 бар)
объем барабана 62 л
äî 1400 îá/ìèí
стирки:
60°С; при загрузке до 9 кг.
сушка:
3 кг белья при выборе режима сушки
"Под утюг";
вторая сушка с загрузкой 6 кг белья
при в ыборе режима сушки "Экс тра".
Машина соответствует следующим
Директивам Европейского
Экономического с ообщества:
- 89/336 /ЕЕС от 03.05.89 (электромагнитной совместимости) и
последующие модификации
- 200 2/ 96 /C E
- 2006/95/CE (низкого напряжения)
программа ; температура
первая сушка с загрузкой
"
Page 42

Описание стиральной машины
+15
ËÞÊ
РУЧКА ЛЮКА
ПЛИНТУС
ËÞÊ
РЕГУЛИРУЕМЫЕ НОЖКИ
Для открывания люка
всегда используйте
специальную ручку (ñì.
схему).
ПАНЕЛЬ
УПРАВЛЕНИЯ
2. ячейка для основной стирки: используйте
стиральный порошок или жидкое стиральное
вещество. В последнем случае рекомендуется
залить его непосредстввенно перед пуском
программы стирки.
3. Дополнительный дозатор: Отбеливатель.
Если используется дополнительный дозатор 3,
функция предварительная стирка исключается.
ячейка для добавок: для ополаскивателя или
жидких добавок. Рекомендуется никогда не
превышать максимальный уровень, указанный на
решетке дозатора и разбавлять концентрированные
ополаскиватели.
Консоль управления сенсорное управление
Для изменения настроек
слегка дотроньтесь до
символа в сенсорной зоне
(сенсорное управление),
как показано на схеме.
20
ДОЗАТОР СТИРАЛЬНОГО ВЕЩЕСТВА
Дозатор находится внутри
машины и доступен через
люк. Описание дозировки
стиральных веществ
смотрите в разделе
Стиральные вещества и
белье.
Примечание: наклейте на
дозатор стирального
вещества наклейку с
перечнем программ и
дополнительных функций. Наклейка находится в пакете
вместе с настоящим техническим руководством.
1. ячейка
3
1
2
предварительной стирки:
используйте стиральный
порошок.
Перед засыпкой
стирального порошка
необходимо проверить,
чтобы не был
установлен дополни-
тельный дозатор 3.
Режим ожидания
Настоящая стиральная машина отвечает требованиям
новых нормативов по экономии электроэнергии,
укомплектована системой автоматического
отключения (режим сохранения энергии),
включающейся через несколько минут простоя
машины. Нажмите один раз кнопку ON/OFF
подождите, пока машина вновь включится.
ВЫБОР ЯЗЫКА
При первом включении машины на дисплее
мигает первый язык. Напротив 3 кнопок справа на
дисплее показываются символы «
Языки сменяются автоматически каждые 3 секунды
или при помощи кнопок рядом с символами
V. При помощи кнопки «ÎÊ» подтвердите
выбранный язык через 2 секунды. Если Вы не
нажмете никаких кнопок, через 30 секунд
возобновиться автоматическая смена языков.
Смена языка возможна только при
выключенной машине.
При одновременном нажатии кнопок температуры
+ отжим + запуск с задержкой на 5 секунд
кроме короткого звукового сигнала на дисплее
мигает выбранный язык. При помощи кнопок рядом
с символами
При помощи кнопки рядом с символом «ÎÊ»
подтвердите выбранный язык через 2 секунды.
Если Вы не нажмете никаких кнопок, через 30
секунд на дисплее показывается выбранный ранее
язык.
è V производится смена языка.
», «ÎÊ» è «V».
è
è
"
Page 43

Консоль управления сенсорное
управление
Ручка выбора
программ
M2
M1
Кнопка ОТЖИМ
Кнопка ТЕМПЕРАТУРЫ
Дисплей
Кнопка с
индикатором
START/PAUSE
Индикатор
ECO
+15
Символы
ФАЗЫ
СТИРКИ
Кнопка с
индикатором
ON/OFF
Кнопка с индикатором ON/OFF: нажмите кнопку один
раз для включения или выключения машины. Зеленый
индикатор показывает, что машина включена. Для
выключения стиральной машины в процессе стирки
необходимо держать нажатой кнопку, примерно 3
секунды. Короткое или случайное нажатие не приведет
к отключению машины. В случае выключения машины в
процессе стирки текущий цикл отменяется.
Рукоятка ПРОГРАММЫ: может вращаться в обе
стороны. Для выбора нужной программы смотрите
«Таблица программ». В процессе стирки рукоятка не
вращается.
Кнопки M1-M2: держите нажатой одну из этих кнопок
для ввода в память цикла и персонализированных
вами программ. Для включения цикла, ранее
введенного в память, нажмите соответствующую кнопку.
Кнопка СУШКА
продолжительности или исключения сушки;
выбранный режим и продолжительность сушки
показываются на дисплее (см. «Порядок выполнения
цикла стирки и сушки и сушки»).
: нажмите для сокращения
Кнопка
СУШКА
ДОПОЛНИТЕЛЬНЫЕ
Кнопки
ФУНКЦИИ
Кнопка
ОТЛОЖЕННЫЙ
ЗАПУСК
Индикатор
Кнопка с
индикатором
ЗАЩИТА ОТ
ЛЕТЕЙ
БЛОКИРОВКА ЛЮКА
Кнопки ДОПОЛНИТЕЛЬНЫЕ ФУНКЦИИ: нажмите для
выбора имеющихся дополнительных функций. Индикатор
выбранной дополнительной функции загорается (ñì.
Порядок выполнения цикла стирки и сушки).
Символы ФАЗЫ СТИРКИ: загораются для
визуализации последовательности выполнения цикла
(Стирка
Окончательный слив
завершении цикла.
Кнопка с индикатором START/PAUSE: когда зеленый
индикатор редко мигает, нажмите кнопку для пуска
цикла стирки. После пуска цикла индикатор перестает
мигать. Для прерывания стирки вновь нажмите кнопку,
индикатор замигает оранжевым цветом. Если
индикатор «Блокировка люка»
открыть люк. Для возобновления стирки с момента,
когда она была прервана, вновь нажмите эту кнопку.
Индикатор
люк заблокирован. Для открывания люка необходимо
прервать цикл (см «Порядок выполнения цикла
стирки и сушки»).
Пoлockaниe/Отжим - Отжим -
). Надпись загорается по
погас, можно
БЛОКИРОВКА ЛЮКА: показывает, что
Кнопка
или исключения нагрева. Заданное значение
показывается на дисплее сверху (см. Порядок
выполнения цикла стирки и сушки).
Кнопка
исключения отжима. Заданное значение показывается
на дисплее сверху (см. Порядок выполнения цикла
стирки и сушки).
Кнопка
программирования задержки пуска выбранной
программы. Заданное значение задержки
показывается на дисплее сверху (см. Порядок
выполнения цикла стирки и сушки).
ТЕМПЕРАТУРЫ: нажмите для изменения
ОТЖИМ: нажмите для изменения или
ОТЛОЖЕННЫЙ ЗАПУСК: нажмите для
Кнопка с индикатором
включения или отключения блокировки консоли
управления держите кнопку нажатой примерно 2
секунды. Включенный индикатор означает, что консоль
управления заблокирована. Таким образом
программа не может быть случайно изменена,
особенно если в доме дети.
Индикатор
параметров стирки получается экономия
электроэнергии не менее чем на 10%. Кроме того
перед тем как машина переключится в режим
сохранения энергии, символ загорится на несколько
секунд. При выключенной машине примерная
экономия электроэнергии составляет примерно 80%.
загорается, когда при изменении
ЗАЩИТА ОТ ЛЕТЕЙ: для
"!
Page 44

Порядок выполнения цикла
стирки и сушки и сушки
+15
ПРИМЕЧАНИЕ: при первом использовании
стиральной машины выполните один цикл стирки
без белья, но со стиральным веществом, выбрав
программу хлопок 90° без предварительной стирки.
1. AПОРЯДОК ВКЛЮЧЕНИЯ МАШИНЫ. Нажмите
кнопку
секунду, и на дисплее появится надпись
AQUALTIS. Затем останется включенным
индикатор кнопки
START/PAUSE.
2. ВЫБОР ПРОГРАММЫ. Поверните РУКОЯТКУ
ПРОГРАММЫ вправо или влево вплоть до
выбора нужной программы. Название программы
появится на дисплее. Вместе с программой будет
показана температура и скорость отжима,
которые могут быть изменены. На дисплее
показывается продолжительность данного цикла.
3. ПОРЯДОК ЗАГРУЗКИ БЕЛЬЯ Откройте люк
машины. Загрузите в барабан белье, не превышая
максимальный допустимый вес, указанный в
таблице программ на следующей странице.
4. ДОЗИРОВКА СТИРАЛЬНОГО ВЕЩЕСТВА.
Выньте дозатор и поместите стиральное
вещество в специальные ячейки, как описано в
«Описание стиральной машины».
5. ЗАКРОЙТЕ ЛЮК.
6. ПЕРСОНАЛИЗИРОВАННЫЕ ЦИКЛЫ СТИРКИ.
Нажмите специальные кнопки на консоли
управления:
скорости отжима.
Машина автоматически показывает на дисплее
максимальные температуру и скорость отжима,
предусмотренные для выбранной программы, или
последние выбранные значения, если они
совместимы с выбранной программой. При
помощи кнопки
температуру вплоть до стирки в холодной воде
OFF. При помощи кнопки
уменьшить скорость отжима вплоть до его
исключения OFF. При еще одном нажатии этих
кнопок вернутся максимальные допустимые
значения.
Исключение: при выборе программы ХЛОПОK
температура может быть увеличена до 90°.
При первом нажатии кнопки
автоматически выбирает максимальный режим
сушки, совместимый с выбранной программой.
При последующих нажатиях кнопки режим
уменьшается и, следовательно, сокращается
продолжительность сушки вплоть до ее
исключения OFF. При еще одном нажатии этих
кнопок вернутся максимальные допустимые
значения.
. Все индикаторы загорятся на 1
, и будет мигать индикатор
Порядок изменения температуры и/или
можно постепенно уменьшить
можно постепенно
Программирование сушки
машина
Можно выбрать следующие режимы сушки:
A - По продолжительности: от 20 до 180 минут.
B - по требуемому уровню сушки белья:
Ïîä óòþã: рекомендуется для белья, которое
затем требуется гладить. Степень остаточной
влажности смягчает складки и делает глажку
более легкой.
На вешалку: идеально подходит для вещей, не
нуждающихся в полной сушке.
 øêàô: подходит для белья, сразу
складываемого в шкаф без глажки.
Экстра: подходит для белья, нуждающегося в
полной сушке, такого как махровые полотенца и
халаты.
В случае, если вес белья, предназначенного для
стирки и сушки, превышает максимальную
допустимую загрузку (смотрите таблицу сбоку),
выполните цикл стирки, и по его завершении,
разделите белье на части и производите его
сушку частями. Затем следуйте инструкциям,
описывающим функцию «Только сушка».
Повторите те же операции для сушки
оставшегося белья.
ПРИМЕЧАНИЕ: по завершении сушки всегда
производится цикл охлаждения белья.
Только сушка
При помощи рукоятки выбора программ выберите
режим сушки (
белья. Можно также выбрать нужный режим или
продолжительность сушки при помощи кнопки
СУШКА
Программирование пуска с задержкой.
Для программирования задержки пуска
выбранной программы нажмите соответствующую
кнопку вплоть до получения нужного значения
задержки. В процессе настройки показывается
время задержки и сообщение «Haч через:» и
мигает символ
задержкой на дисплее показывается символ
после чего на дисплее вновь будет показана
продолжительность выбранной программы с
сообщением «окончaние:» и продолжительность
цикла. При однократном нажатии кнопки ЗАПУСК
С ЗАДЕРЖКОЙ на дисплее показывается ранее
заданное время задержки.
После запуска на дисплее показывается
сообщение «Haч через:» и время задержки. По
истечении заданного времени задержки машина
запускает цикл, и на дисплее показывается
сообщение «окончaние:» и время, остающееся
до завершения цикла.
Для отмены пуска с задержкой нажмите кнопку
несколько раз до тех пор, пока на дисплее не
появится надпись OFF; символ
- - ) в зависимости от типа
.
. После настройки запуска с
,
погаснет.
""
Page 45

Изменение параметров цикла.
Нажмите кнопку для включения дополнительной
функции. На дисплее появится название
функции, и загорится индикатор
соответствующей кнопки.
Вновь нажмите кнопку для отмены
ополнительной функции. На дисплее появится
название функции и надпись OFF, индикатор
погаснет.
Если выбранная дополнительная функция
несовместима с выбранной программой, замигает
соответствующий индикатор и включится
звуковой сигнал (3 раза), функция не будет
включена.
Если выбранная функция является
несовместимой с другой, ранее заданной
дополнительной функцией, будет мигать
индикатор первой выбранной функции, и будет
включена только вторая дополнительная функция,
индикатор включенной функции будет гореть, не
мигая.
Дополнительные функции могут изменить
рекомендуемую загрузку машины и/или
продолжительность цикла.
7. ПУСК ПРОГРАММЫ. Нажмите кнопку START/
PAUSE. Соответствующий индикатор загорится, и
люк машины заблокируется (загорится индикатор
ЛЮК ЗАБЛОКИРОВАН
загораются по мере выполнения программы для
визуализации текущей фазы стирки.
Для изменения текущей программы, прервите
цикл, нажав кнопку START/PAUSE, затем
выберите нужный цикл и вновь нажмите кнопку
START/PAUSE. Чтобы открыть люк в процессе
выполнения цикла нажмите кнопку START/PAUSE;
если индикатор БЛОКИРОВКА ЛЮКА
погаснет, можно открывать люк. Вновь нажмите
кнопку START/PAUSE для возобновления
программы с момента, когда она была прервана.
). Символы фаз стирки
+15
8. ЗАВЕРШЕНИЕ ПРОГРАММЫ. Сигнализируется
включением надписи END. Люк можно открыть
сразу же. Если индикатор START/PAUSE мигает,
нажмите кнопку для завершения цикла. Откройте
люк, выгрузьте белье и выключите машину.
Для отмены текущего цикла держите нажатой
кнопку
машина выключится.
до тех пор, пока цикл не прервется и
"#
Page 46

Программы и
дополнительные функции
+15
Таблица программ
Ñèì-
Описание пр ограмм ы
âîë
Програм мы для х/б белья
ХЛОПОK: с предварительн ой стиркой (Добавить
стиральное вещество в специальную ячейку).
ХЛОПОK (1): очень грязное белое и прочное цветное белье.
ХЛОПОK (1): очень грязное белое и деликатное цветное белье.
ХЛОПОK Цветные ткани (3)
ÄÆ ÈÍÑÛ
Специальные программы
ДЕТСKОЕ БЕЛЬЕ: очень грязное деликатное цветное белье.
Ìèkc 30 : быстрое освежение малогрязного белья (не для
шерс ти, шелка и изделий, требующих ручной стирки).
Ñèíòe òèka синтетические изделия
Øe ë k: изделия из шелка, вис козы и ниж нее бел ье.
Øe ð c ò ü: шерсть, кашемир и т.д.
Программы сушки
Стирка+Сушка
Сушка ХЛОПОK
Сушка СИНТЕТИ KА
Сушка Øe ð c ò ü
Частичные программы
Ïoë ock aíèe
Отжим
Ñëèâ
(*) Примечание: примерно через 10 минут после ЗАПУСКА цикла в зависимости от веса загруженного белья, машина расчитает и покажет на дисплее
время, остающееся до завершения программы.
Для всех институтов тестирования:
1) Программы управления в соответствии с Директивой EN 50229: задайте программу
2) Длинная программа для х/б белья: задайте программу
3) Короткая программа для х/б белья: задайте программу
с температурой 40°C.
с температурой 40°C.
Ìàêñ .
òåìï.
(°C)
90° 1400
60°
(Max . 9 0° )
40° 1400
40° 1400
40° 800
40° 800
30° 800
60° 800
30° 0 -
40° 800
30° 1400
Дополнительные функции стирки
Суперстирка
Благодаря использованию большего объема воды в
начале цикла и большей продолжительности эта
функция обеспечивает оптимальную стирку.
3
1
2
не превышайте макс. уровень, указанный на стержне в
центре (см. схему). Для выполнения только
отбеливания без полного цикла стирки залейте
отбеливатель в дополнительный дозатор 3, выберите
программу «Пoлockaниe»
дополнительную функцию Суперстирка
Функция несовместима с программами
, , , , , , .
Легкая Глажка
При выборе этой функции стирки и отжим изменяются
таким образом, чтобы сократить образование складок.
По завершении цикла стиральная машина выполняет
медленное вращение барабана, индикаторы Легкая
Эта функция служит для
удаления наиболее трудных
пятен. Может
использоваться как с
отбеливателем, так и без
него. Если требуется
произвести также
отбеливание, вставьте
дополнительный
прилагающийся дозатор 3 в
ячейку 1.
При заливе отбеливателя
и включите
.
, , , ,
Ìàêñ .
Скорость
(îáîð îòî
в минуту)
- -
- -
- -
-1400
-1400
-0--- -9
Сушка
1400
с температурой 60°C.
нажмите кнопку START/PAUSE или кнопку Легкая
Глажка.
В программе Шелк
слива воды, и индикатор Легкая Глажка мигает. Для
слива воды и выгрузки белья необходимо нажать
кнопку START/PAUSE или кнопку Легкая Глажка.
Функция несовместима с программами
, , , , .
Примечание: Если вы также хотите запустить цикл
сушки, этафункция может быть использована только
совместно с уровнем сушки Под утюг.
Быстрая Cтирка
При выборе этой функции продолжительность
программы сокращается на 30%-50% в зависимости от
выбранной программы, обеспечивая в то же время
экономию воды и электроэнергии. Используйте эту
программу для несильно загрязненного белья.
Функция несовместима с программами
, , , , .
Доп. Полоскание
При выборе этой функции повышается эффективность
ополаскивания, обеспечивая максимальное удаление
остатков стирального вещества. Эта функция особенно
удобна для людей с кожей, чувствительной к
стиральным веществам. Рекомендуется использовать
эту функцию в случае полной загрузки машины или в
случае использования большой дозы стирального
вещества.
Функция несовместима с программами
, , .
Глажка и START/PAUSE мигают. Для завершения цикла
Стиральные вещества
Стир ка Ополаск-
ll l
ll l l
ll l l
ll l l
ll l
ll l l
ll l
ll l l
ll l
ll l
l
l
l
l
l
иватель
ll
- - - 6
- - - 4
- - - 1,5
-
-- -9
Отбел-
иватель
-9
-4
-3,5
-2
-2
- 1
ll
машина завершает цикл без
, , , , , ,
Ìàêñ .
çàãð ó çêà
(êã)
9
9
9
4
4
9
, , , ,
, , , ,
Продол-
житть
цикла
отображается на дисплее.
продолжительность программы стирки
"$
Page 47

Стиральные вещества и
типы белья
Стиральное вещество
Выбор и доза стирального вещества зависят от типа
белья (х/б, шерсть, шелк...), от цвета белья, от
температуры стирки, от степени загрязнения и от
жесткости воды.
Правильная дозировка стирального вещества это
экономия и охрана окружающей среды: хотя
стиральные вещества и являются биоразлагаемыми,
они содержат вещества, пагубно влияющие на природу.
Рекомендуется:
использовать стиральные порошки для белых х/б
вещей и для предварительной стирки.
использовать жидкие стиральные вещества для
деликатных х/б вещей и для всех программ с
низкой температурой.
использовать деликатные жидкие стиральные
вещества для стирки шелковых и шерстяных вещей.
Стиральное вещество помещается перед началом
стирки в специальную ячейку или в дозатор,
который помещается непосредственно в барабан. В
этом случае нельзя выбрать цикл Хлопок с
предварительной стиркой.
Не используйте стиральные вещества для ручной
стирки так как они образуют слишком много пены.
Подготовка белья
Тщательно расправьте белье перед его загрузкой
в барабан.
Разделите белье по типу ткани (см. символ на
этикетке) и по цвету, обращая внимание на
разделение цветных и белых вещей.
Выньте из карманов все предметы и проверьте
пуговицы;
Не превышайте значения, указанные в «Таблице
программ», указывающие вес сухого белья:
Сколько весит белье?
1 простыня 400-500 ã
1 наволочка 150-200 ã
1 скатерть 400-500 ã
1 банный халат 900-1200 г
1 полотенце 150-250 ã
1 пара джинс 400-500 ã
1 рубашка 150-200 ã
Øeëk: используйте специальную программу «Шелк»
для стирки всех шелковых вещей.
Рекомендуется использовать специальное
стиральное вещество для деликатных тканей.
Занавески: Используйте программу «Шелк»
Pекомендуется свернуть их и поместить в
прилагающийся мешок.
Шерсть: Машина марки Hotpoint/Ariston
единственная получила престижный знак Woolmark
Platinum Care (M.0508) от Компании The Woolmark
Company, который сертифицирует машинную стирку
всех шерстяных изделий, даже тех, на этикетках
которых указано «только ручная стирка»
программе «Шерсть» можно надежно и эффективно
стирать любые шерстяные изделия.
Трудновыводимые пятна: трудновыводимые
пятна перед стиркой в машине следует обработать
твердым мылом и стирать по программе Х/б белье с
предварительной стиркой.
Стирка+Сушка
стирки и сушки белья с незначительным
загрязнением: При выборе этого режима можно
постирать и высушить вплоть до 1 кг белья всего за
60 минут.
Для получения оптимальных результатов
используйте жидкое стиральное вещество;
предварительно обработайте манжеты, воротнички
рубашек и пятна.
: предназначена для быстрой
.
. Ïî
Система балансировки белья
Перед каждым отжимом во избежание чрезмерных
вибраций и для равномерного распределения белья
в барабане машина производит вращения со
скоростью, слегка превышающей скорость стирки.
Если после нескольких попыток белье не будет
правильно сбалансировано, машина произведет
отжим на меньшей скорости по сравнению с
предусмотренной. В случае чрезмерной
разбалансировки машина выполнит распределение
белья вместо отжима. Для оптимизации
распределения белья и его правильной
балансировки рекомендуется перемешать мелкое
белье с крупным.
+15
Рекомендации по стирке
ДЖИНСЫ: используйте специальную программу
ДЖИНСЫ
перед стиркой выверните вещи наизнанку и
используйте жидкое моющее вещество.
ДЕТСKОЕ БЕЛЬЕ: используйте специальную
программу ДЕТСKОЕ БЕЛЬЕ
типичных детских загрязнений и полного удаления
стирального вещества во избежание аллергической
реакции деликатной детской кожи. Данный цикл
расчитан на сокращение микробиологической
обсемен¸нности благодаря использованию
большего объема воды и оптимизации воздействия
специальных дезинфицирующих добавок
стирального вещества. По завершении стирки
машина продолжит медленно вращать барабан. Для
остановки цикла нажмите кнопку START/PAUSE.
для всех вещей из ткани Denim;
для удаления
"%
Page 48

Предосторожности и
рекомендации
+15
Стиральная машина спроектирована и изготовлена
в соответствии с международными нормативами по
безопасности. Необходимо внимательно прочитать
настоящие предупреждения, составленные в целях
вашей безопасности.
Общие требования к безопасности
Данное изделие предназначено исключительно
для домашнего использования.
Стиральной машиной должны пользоваться
только взрослые лица, соблюдающие инструкции,
приведенные в данном техническом руководстве.
Не прикасайтесь к изделию влажными руками,
босиком или с мокрыми ногами.
Не тяните за сетевой кабель для отсоединения
штепсельной вилки изделия из сетевой розетки,
возьмитесь за вилку рукой.
Не прикасайтесь к сливаемой воде, так как она
может быть очень горячей.
Категорически запрещается пытаться открыть
люк силой: это может привести к повреждению
защитного механизма, предохраняющего от
случайного открывания машины.
В случае неисправности категорически
запрещается открывать внутренние механизмы
изделия с целью их самостоятельного ремонта.
Следите, чтобы дети не приближались к
работающей стиральной машине.
Перемещать машину следует осторожно, вдвоем
или втроем. Никогда не перемещайте машину в
одиночку, так как машина очень тяжелая.
Перед помещением в стиральную машину белья
проверьте, чтобы барабан был пуст.
В процессе сушки люк стиральной машины
может нагреться.
Не подвергайте автоматической сушке белье,
выстиранное с применением возгораемых
растворителей (например, триелина).
Не сушите в автоматической сушке паралоновые
изделия или подобные эластомеры.
В процессе сушки проверьте, чтобы
водопроводный кран был открыт.
Утилизация
Уничтожение упаковочных материалов:
соблюдайте местные нормативы с целью
вторичного использования упаковочных
материалов.
Согласно Европейской Директиве 2002/96/СЕ
касательно утилизации электронных и
электрических электроприборов электроприборы
не должны выбрасываться вместе с обычным
городским мусором. Выведенные из строя
приборы должны собираться отдельно для
оптимизации их утилизации и рекуперации
составляющих их материалов, а также для
безопасности окружающей среды и здоровья.
Символ «зачеркнутая мусорная корзина»,
имеющийся на всех приборах, служит
напоминанием об их отдельной утилизации.
За более подробной информацией о правильной
утилизации бытовых электроприборов
пользователи могут обратиться в специальную
государственную организацию или в магазин.
Открывание люка вручную
Если по причине отключения электроэнергии
невозможно открыть люк машины, чтобы выгрузить
чистое белье, действуйте следующим образом:
1. выньте штепсельную
вилку машины из сетевой
розетки.
2. проверьте, чтобы
20
3. снимите переднюю панель стиральной машины
(см. схему ниже).
6. установите на место переднюю панель, проверив
перед ее прикреплением к машине, чтобы крюки
вошли в соответствующие петли.
уровень воды в машине
был ниже отверстия люка.
В противном случае
слейте излишек воды
через сливную трубу в
ведро, как показано на
рисунке.
4. потяните наружу
язычок, показанный на
схеме, вплоть до
освобождения
пластикового
блокировочного винта.
Затем потяните его вниз,
пока не услышите
щелчок, что означает
разблокировку люка.
5. откройте люк. Если это
все еще невозможно,
повторите
вышеописанную
операцию.
"&
Page 49

Техническое обслуживание
и уход
Отключение воды и электрического
тока
Перекрывайте водопроводный кран после каждой
стирки. Таким образом сокращается износ
водопроводной системы машины и сокращается
риск утечек.
Выньте штепсельную вилку машины из сетевой
розетки перед началом чистки и технического
обслуживания стиральной машины.
Чистка машины
Для чистки наружных и резиновых частей
стиральной машины использовать тряпку,
смоченную теплой водой с мылом. Не используйте
растворители или абразивные чистящие средства.
Чистка ячейки стиральных веществ
Чтобы вынуть дозатор,
нажмите на язычок (1) и
вытащите дозатор (2) (ñì.
рисунок).
Промойте ячейку под
струей воды. Эта
операция должна
выполняться регулярно.
Для доступа к кожуху:
+15
2
1. снимите переднюю панель стиральной машины,
нажав в центре, затем потяните ее вниз за края и
снимите ее (см. схемы).
2. подставьте емкость для
слива воды (примерно 1,5
литра) (ñì. рисунок).
3. отвинтите крышку,
повернув ее против
часовой стрелки (ñì.
схему);
4. тщательно прочистите кожух внутри;
5. завинтите крышку на место;
6. установите на место переднюю панель, проверив
перед ее прикреплением к машине, чтобы крюки
вошли в соответствующие петли.
Уход за барабаном
После использования стиральной машины всегда
следует оставлять люк полуоткрытым во
избежание образования неприятных запахов в
барабане.
Порядок чистки насоса
Стиральная машина оснащена самочистящимся
насосом, не нуждающимся в техническом
обслуживании. Тем не менее мелкие предметы
(монеты, пуговицы) могут упасть за кожух,
предохраняющий насос, расположенный в его
нижней части.
Проверьте, чтобы цикл стирки завершился, и
выньте штепсельную вилку из сетевой розетки.
Проверка водопроводного шланга
Проверяйте шланг подачи воды не реже одного
раза в год. При обнаружении трещин или разрывов
шланга замените его: в процессе стирки сильное
водопроводное давление может привести к
внезапному отсоединению шланга.
"'
Page 50

Неисправности и методы
их устранения
+15
Если ваша стиральная машина не работает. Прежде чем обратиться в Центр Сервисного обслуживания (см. Сервисное
обслуживание), проверьте, можно ли устранить неисправность, следуя рекомендациям, приведенным в следующем перечне.
Неисправности:
Стиральная машина не
включается.
Цикл стирки не запускается.
Стиральная машина не заливает
воду.
Люк машины остается
заблокированным.
Стиральная машина непрерывно
заливает и сливает воду.
Машина не сливает воду или не
отжимает белье.
Стиральная машина сильно
вибрирует в процессе отжима.
Утечки воды из стиральной
машины.
Символы «текущей фазы» часто
мигают одновременно с индикатором
ON/OFF.
В процессе стирки образуется
слишком обильная пена.
Люк машины остается
заблокированным.
Возможные причины / Методы устранения:
Штепсельная вилка не соединена с сетевой розеткой или отходит и не
обеспечивает контакта.
В доме отключено электричество.
Люк плохо закрыт.
Не была нажата кнопка START/PAUSE.
Перекрыт водопроводный кран.
Был запрограммирован запуск с задержкой.
Водопроводный шланг не подсоединен к крану.
Шланг согнут.
Перекрыт водопроводный кран.
В доме нет воды.
Недостаточное водопроводное давление.
Не была нажата кнопка START/PAUSE.
При выборе цикла Baby
по завершении цикла стиральная машина производит медленное вращение
барабана; для завершения цикла нажмите кнопку START/PAUSE или кнопку
Легкая Глажка
цикл, не сливая воду из барабана. Для слива воды и выгрузки белья
необходимо нажать кнопку START/PAUSE или кнопку Легкая Глажка
Сливной шланг не находится на высоте 65 100 см. от пола (см. «Установка»).
Конец сливного шланга погружен в воду (см. «Установка»).
Если ваша квартира находится на последних этажах здания, может
наблюдаться «сифонный эффект», поэтому стиральная машина производит
непрерывный залив и слив воды. Для устранения этой аномалии в продаже
имеются специальные клапаны «антисифоны».
Настенное сливное отверстие не оснащено вантузом для выпуска воздуха.
Выбранная программа не предусматривает слив воды: для некоторых
программ необходимо включить слив вручную (см. «Программы и
дополнительные функции»).
Включена дополнительная функция «Легкая Глажка»: для завершения
программы нажмите кнопку START/PAUSE (см. «Программы и
дополнительные функции»).
Сливной шланг перегнулся (см. «Установка»).
Засорен сливной трубопровод.
В момент установки стиральной машины барабан был разблокирован
неправильно (см. «Установка»).
Стиральная машина установлена неровно (см. «Установка»).
Машина касается к стены или мебели (см. «Установка»).
Белье в барабане несбалансировано (см. «Стиральные вещества и типы белья»).
Плохо привинчен водопроводный шланг (см. «Установка»).
Засорен дозатор стирального вещества (порядок его чистки см.
«Техническое обслуживание и уход»).
Сливной шланг непрочно закреплен (см. Установка).
Выключите машину и выньте штепсельную вилку из сетевой розетки,
подождите 1 минуту и вновь включите машину. Если неисправность не
устраняется, обратитесь в Центр Сервисного обслуживания.
Стиральное вещество непригодно для стирки в стиральной машине (на
упаковке должно быть указано «для стирки в стиральной машине», «для
ручной и машинной стирки» или подобное).
В дозатор было помещено чрезмерное количество стирального вещества.
Выполните разблокировку вручную (см. «Предосторожности и
рекомендации».)
. При выборе программы Шeлk машина завершает
или дополнительной функции Легкая Глажка
.
Стиральная машина не
производит сушку.
#
Штепсельная вилка не соединена с электро розеткой или отходит и не
обеспечивает контакта.
В доме отключено электричество.
Люк машины закрыт неплотно.
Была запрограммирована задержка запуска цикла.
СУШКИ находится в положении OFF.
Page 51

Сервисное
обслуживание
Перед тем, как обратиться в Авторизованный Сервисный Центр:
Проверьте, можно ли устранить неисправность самостоятельно (см. «Неисправности и методы их
устранения);
Вновь запустите программу для проверки исправности машины;
В противном случае обратитесь в уполномоченный Центр Сервисного обслуживания.
В случае неправильной установки машины или ее неправильного использования вызов специалиста из
Сервиса должен быть оплачен;
Не пользуйтесь услугами лиц, не уполномоченных производителем.
При обращении в Авторизованный Сервисный Центр необходимо сообщить:
тип неисправности;
модель изделия (Мод.);
серийный номер (S/N).
Эти данные вы найдете на паспортной табличке, расположенной на изделии.
Примечание: для выхода из режима «Демо» нажмите одновременно на 3 сек. две кнопки «ON/OFF» и «START/
PAUSE» .
+15
#
Page 52

+15
195077173.00
03/2009 - Xerox Fabriano
#
 Loading...