

Page 1

Page 2

Table of Contents
PhotoImpression Quick Start Guide
2
Table of Contents:
Software Installation . . . . . . . . . . . . . . . . . . . . . . . . . . . . . . . . . . . . . . . . . . .2
Welcome to PhotoImpression . . . . . . . . . . . . . . . . . . . . . . . . . . . . . . . . . . . .3
System Requirements . . . . . . . . . . . . . . . . . . . . . . . . . . . . . . . . . . . . . . . . . .4
Main Screen . . . . . . . . . . . . . . . . . . . . . . . . . . . . . . . . . . . . . . . . . . . . . . . . .5
Get Photo . . . . . . . . . . . . . . . . . . . . . . . . . . . . . . . . . . . . . . . . . . . . . . . . . . .8
Edit Screen . . . . . . . . . . . . . . . . . . . . . . . . . . . . . . . . . . . . . . . . . . . . . . . . . .9
Create Screem . . . . . . . . . . . . . . . . . . . . . . . . . . . . . . . . . . . . . . . . . . . . . .15
Save Screen . . . . . . . . . . . . . . . . . . . . . . . . . . . . . . . . . . . . . . . . . . . . . . . .17
Print Screen . . . . . . . . . . . . . . . . . . . . . . . . . . . . . . . . . . . . . . . . . . . . . . . .18
Software Installation:
Installing Photo Impressions 3
Insert the Installation Software CD in the CD drive tray. Your System should
automatically recognize the CD drive and start automatically. The Arcsoft
Photo Impressions setup dialog box should appear on your Windows Desktop.
Click the "Next" button to start the installation and follow the instructions on
the screen.
If the Photo Impressions CD does not automatically start, make sure the CD
drive's door is completely shut. It the CD still doesn't start, the Autorun
option on your computer is turned off. You can start the CD by going to
Window Explorer. Select the drive where the Photo Impressions CD is
located. Locate the file named setup.exe and double click on it to start set up.
The Arcsoft Photo Impressions setup dialog box should appear. Click on the
"Next" button to begin the installation and follow the instructions on the
screen to complete the installation.
Page 3

PhotoImpression Quick Start Guide
3
PhotoImpression Quick Start Guide
4
Welcome to PhotoImpression
Visioneer brings you ArcSoft PhotoImpression™, a simple yet powerful
program for editing your imagings and creating fun photo projects. The
program enables you to edit, retouch, enhance or add special effects to digital
images with point-n-click simplicity. It offers many project templates for
greeting cards and calenders, along with the ability to print your creations on
specialized photo paper.
Highlights of PhotoImpression
• A robust, easy-to-understand graphic user interface ensures that you can learn the
program in the shortest possible time.
• Powerful, comprehensive editing and retouching tools provide a total digital
image-editing solution.
• A wide variety of special effect and enhancement options give you the incredible
power to manipulate images like a pro.
• Huge collections of frames, brushes and shapes let you add an artistic appeal to
your images.
• An easy-to-use text tool allows you to add catchy titles and captions to images.
You can even add a shadow to create a 3-D effect.
• A dynamic image layer feature enables you to work on one specific image layer at
a time without affecting the whole picture.
• Multiple undo/redo functionality makes it possible for you to experiment with
various commands and options without the fear of making irreversible errors.
• Huge assortments of project templates enable you to create customized greeting
cards and calendars with your own images.
• TWAIN compliance allows you to acquire images directly from devices such as
digital cameras and scanners.
• Powerful print command allow you to print a single image, multiple images of
different sizes, thumbnails, or greeting cards on a single sheet of paper.
System Requirements
• Windows 98/ME/2000/XP
• Pentium-based PC or equivalent
• 175 MB free hard disk space
• 64 MB RAM
• 16-bit (or higher) color display
Page 4
PhotoImpression Quick Start Guide
5
PhotoImpression Quick Start Guide
6
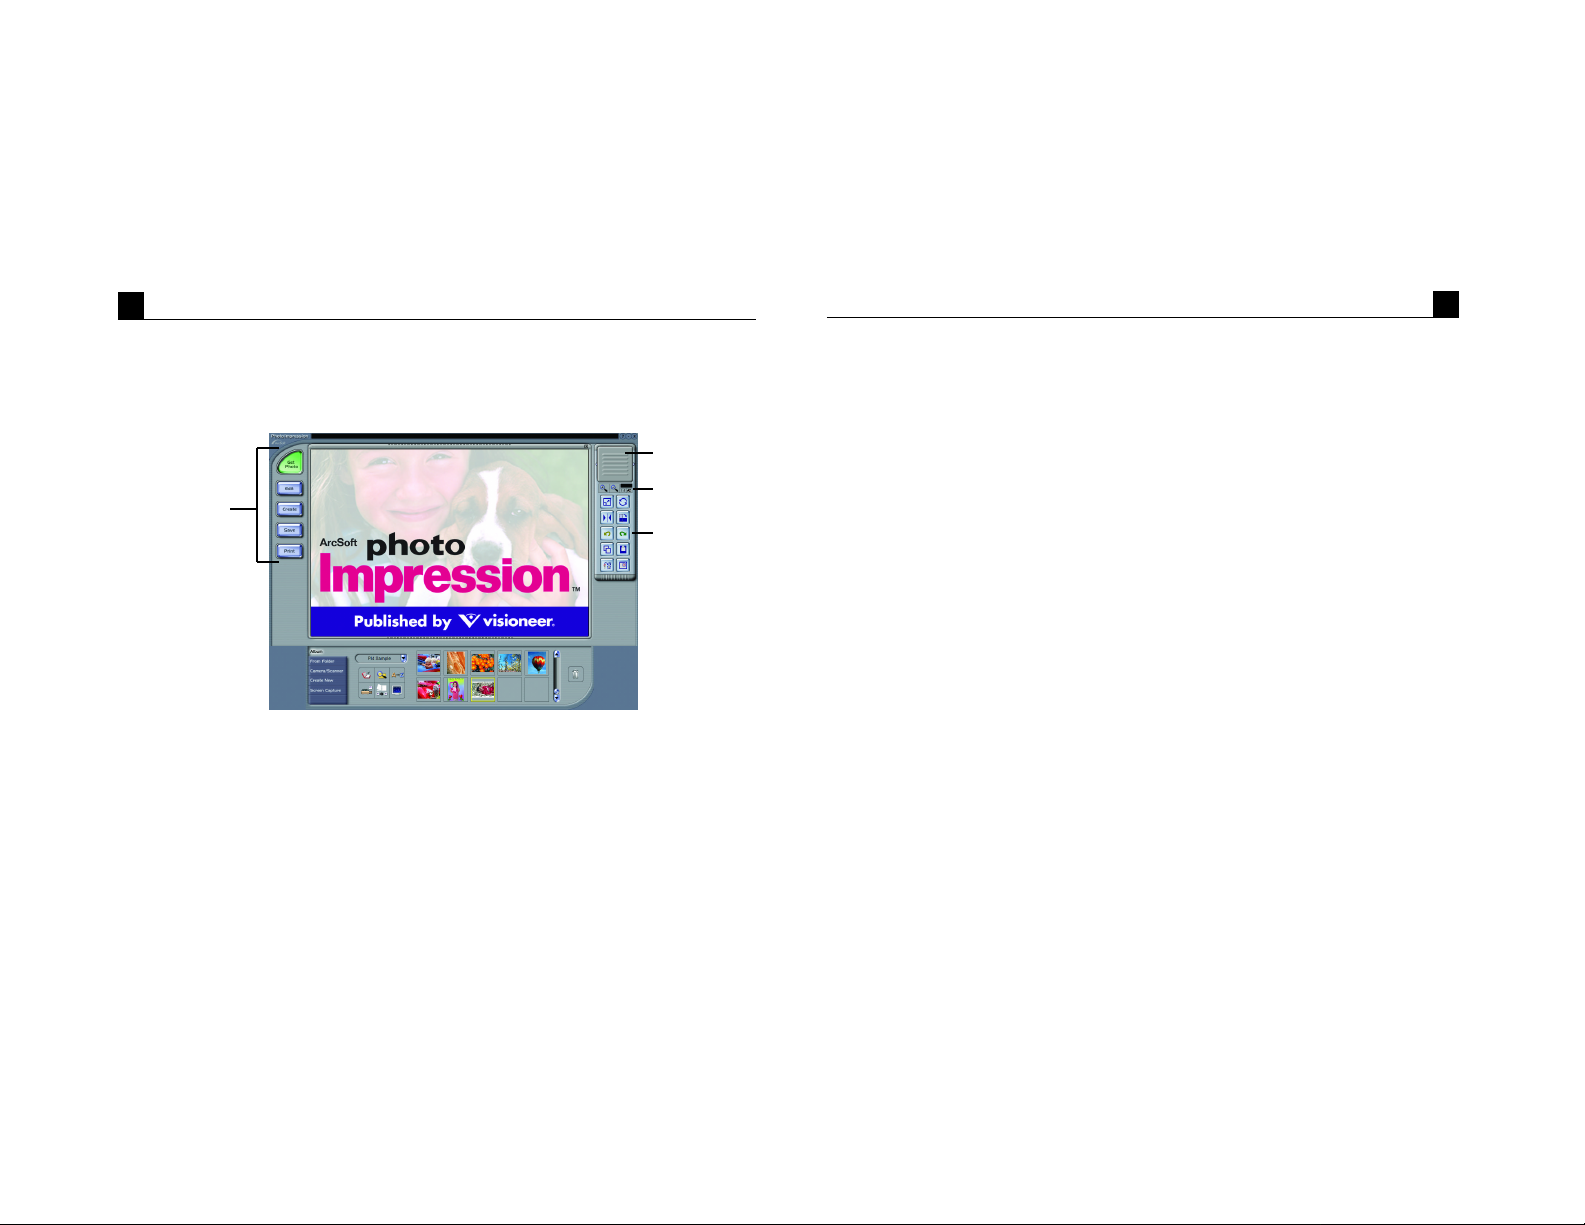
Main Screen
Command
Buttons
Command Buttons:
Get Photo - opens images from an album (Album) or a disk drive (From
Folder). You can also acquire images from TWAIN devices
(Camera/Scanner), get screenshots (Screen Capture), and create new
images from scratch (Create New).
Edit - brings up editing tools for manipulating images. Options include
Select/Crop, Retouch, Text, Enhance, Effects, and Layers.
Nagivation
Window
Magnification
Toolbar
Create - brings up creative options, including Frames & Edges, Cookie
Cutter, Calendars, Greeting Cards, and Photo Fun.
Save - lets you save or export your image in a variety of ways. The To File
option lets you either save your image normally, or as a new file. The
Email option lets you send the image in various sizes as a file attachment
in an email (a MAPI-compliant software program is required). The To
Desktop option lets you set the current image as your desktop background.
Print – offers three printing options: one image per page (Standard Printing),
multiple images of different sizes per page (Greeting Card/Multiple
Printing), and album printing (Thumbnail Printing).
View Controls:
Navigation Window - shows a miniature view of the current image. Even if
you zoom in on a specific part of the image, you will still be able to see
the whole picture in the Navigation Window. You can drag the box in the
Navigation Window to focus on specific areas of the image.
Magnification Controls - display the currently viewed size of the image as a
percentage. They allow you to zoom in (+), out (-), or reset the image to
its original, full size (1:1). The Full Screen icon (to the right of the 1:1
icon) allows you to display the image on the entire screen. You can get
out of the full screen mode by pressing the Esc key on the keyboard.
Page 5

PhotoImpression Quick Start Guide
7
PhotoImpression Quick Start Guide
8
Toolbar:
Resize
Flip Hor.
Undo
Copy
Delete Layer
Free Rotate
Rotate
Redo
Paste
Close Image
Resize Layer- resizes the layer when the corner handles are dragged. You can
also reposition the image by dragging it.
Freehand Rotate - rotates the currently selected layer at the user's discretion
when the corner handles are dragged.
Flip Horizontally - applies a mirror effect to the currently selected layer by
flipping it.
Rotate All Layers - rotates the image in 90-degree increments.
Undo - reverses the last change you've made.
Redo – reverses the last action you’ve undone.
Copy - copies the selected area, layer, or image onto the Clipboard.
Paste - pastes what’s on the Clipboard onto the selected image as a new layer.
Delete Layer - deletes the currently selected layer.
Close Image - closes the currently selected image.
Get Photo:
Album - Photo albums allow easy identification and access to images for
viewing, editing, print, etc. Albums do not store the image, they provide
thumbnails that reference the original file. For example, if a thumbnail is
added into an album from a floppy disk, that floppy must be in the drive
in order to view the file.
From File - You can open an image that is stored on your hard drive or any
removable media. Browse to select the desired drive or folder. One you
select it, you’ll see the images within the folder appear as thumbnails on
the screen.
Camera / Scanner - PhotoImpression accepts images acquired via standard
TWAIN devices. Use the drop down list to select the device you want to
use.
Create New - Allows you to create a blank picture to color on.
Screen Capture - Captures a windows screen for editing.
Online Service
Page 6

PhotoImpression Quick Start Guide
9
Edit Screen
Crop:
Rectangle - allows you to select a rectangular area on an image.
Circle - works the same as the Rectangle tool except a circle is drawn instead
of a rectangle.
Polygon - allows you to make a "freehand" selection by clicking and dragging
over the image in a desired path or shape. You can select a polygonal area
by clicking on the points of the desired shape in a connect-the-dots
fashion.
Magic - selects an area of an image based on color similarity.
Inverse - inverts the selection on an image. For example, if you’ve created a
rectangular selection and then used the Inverse tool, the area selected
would be outside of the box instead of inside.
Copy Selection As New Layer - creates a new layer out of the selected area.
PhotoImpression Quick Start Guide
Soft Edge Slider - gives cropped edges a warm fade based on the position of
the slider.
Apply To All Layers - crops all layers to the selected area when checked.
Crop - crops the image to only show areas that have been selected.
10
Page 7

PhotoImpression Quick Start Guide
11
Retouch:
Brush Palette - offers various sizes for certain editing tools. The larger the
brush size, the larger the affected area when a tool is used. The Intensity
slider adjusts the degree of effect applied.
Color Palette - offers various colors for use when painting or doing other
color editing. The two color squares on the left of the Color Palette show
you the active (top) and alternative (bottom) colors. You can change the
alternative color to the active color simply by clicking on it.
Paintbrush - turns the mouse pointer into a paintbrush tip and applies an
opaque layer of the active color to the current layer.
Pen - works similar to the Paintbrush tool but draws like a felt-tip pen or
marker.
Airbrush - simulates the effect of a spray can, putting a light layer of color on
the active layer.
PhotoImpression Quick Start Guide
Eraser - removes color on a layer, making it a transparent background
(white).
Clone - duplicates a selected area of an image to another location. Right-click
(Windows) or Shift-click (Macintosh) to select the clone source, which
will be indicated by a plus (+) sign. Then click and drag over the area of
the image to be painted with the clone source.
Smudge - simulates the effect of a finger smearing wet paint.
Red Eye - reduces the red-eye effect common in flash photography.
Blur - smoothes rough edges.
Sharpen - sharpens fuzzy areas.
Darken - lowers brightness.
Lighten - raises brightness.
EyeDropper - lets you set a color on your image as the active color.
Bucket Fill - covers the area you click on (based on color similarity) with the
active color.
Pattern Fill - fills a layer or image with a selected pattern.
Gradient Fill - fills the current image or layer with a gradient from the
alternative color to the active color. Select the desired colors in the Color
Palette, click at the point where you want the gradient to start, and drag to
designate the length and direction of the transition.
12
Page 8

PhotoImpression Quick Start Guide
13
Text:
When text is added, a new layer will be automatically created. Settings
include font, style, size, and color. You can add a shadow to the text as well.
Enhance:
Enhance includes tools for enhancing the overal appearence of your imaging.
Auto Enhance - applies a quick, overall enhancement to an image with one
click.
Brightness/Contrast - allows you to adjust the brightness and contrast of the
current layer.
Hue/Saturation - allows all the colors on the same layer to be shifted by the
same degree (hue), and adjusts the intensity of the colors (saturation).
Tone - can be used to adjust the highlight, midtones, and shadow of the
selected layer. It offers more control than Brightness/Contrast.
Blur - decreases the contrast between adjacent pixels, creating a fuzzy effect
over the entire layer.
Sharpen - pixelates the entire layer, eliminating smoother edges in the image.
PhotoImpression Quick Start Guide
Equalization - evenly redistributes the grayscale or color values of the pixels
in an image. The effects are varied depending on the image, but in
general, the lines in the highlight and shadow areas will be sharpened.
Negative - inverts the grayscale or color brightness values for the entire layer.
This will make your image look like a photographic negative.
Effects:
PhotoImpression includes a variety of
special effects to transform images in a
number of interesting ways. Click on a
desired effect to preview it on your
image. You can use the Intensity slider
to adjust the intensity of the effect. To
keep the effect, click Apply. To cancel,
choose any other effect or click a
different button.
14
Page 9

PhotoImpression Quick Start Guide
15
Layers:
The Layers Palette shows thumbnails of each layer. The currently selected
layer will have a highlight around the thumbnail. Toggling the green light
above the thumbnail on and off displays and hides the layer, respectively. The
slider above the thumbnail adjusts the transparency of the layer.
Note: An image can have multiple layers. You can retain separation of the
multiple layers of an image only if it is saved as a PSF file.
Create Screen
PhotoImpression Quick Start Guide
Frames & Edges:
You can add a frame or edge to an image by selecting the option you wish,
and then clicking Apply. (You can preview different options before settling on
a particular one.)
Cookie Cutter:
You can "stamp" out a template of your image by selecting the shape you want
to use, and then clicking Apply.
Calendars:
You can create customized calendars by inserting your image into a calendar
template. Select the month, year, and style that you want, then click Apply.
Greeting Cards:
Several different styles of greeting cards are available for you to use with your
images. Simply choose a style that you like, then click Apply.
Photo Fantasy:
You can create fun and hilarious pictures from many templates in various
categories. For example, you can put your head on a hockey or football
player, or a pilot. Select the template that you want, use the Toolbar to finetune your image within the template, and then click Apply.
16
Page 10

PhotoImpression Quick Start Guide
17
PhotoImpression Quick Start Guide
18
Save Screen
Once you’ve clicked on the Save button on the Main Screen, the following
options will become available:
To File:
• Save - saves the changes that you’ve made to the existing file.
• Save As - allows you to save the file in a new location, with a new name, and even
a new file type.
Email:
By clicking the Wallpaper button, you can set the current image as your
desktop background.
Note: If your email program is not MAPI-compliant, or if MAPI is not
enabled in the program, you will not be able to use this function. You can use
the “insert” or “attach” function in your email program to manually select the
image file(s) for inclusion in an email.
To Internet:
Click the Wallpaper button to set the current image as your desktop
background.
Print Screen
PhotoImpression provides three different print options:
Image Printing: prints one image on a page. You can add a title, center the
image and title, change the paper orientation, add a frame (a black outline)
around the image, resize the image, and select the number of copies
(Windows only) that you want printed. You can also crop your print to
preset dimensions. Select your crop area from the Select Crop Templates
pull-down. The Auto Rotate and Auto Crop buttons can be clicked to
have your image maximized for the largest possible print. The Nudge
command can be used to make minor alignment adjustments to the top
and/or left margins in pixels or 1/64" increments. Check the PIM box to
enable PIM (Epson PRINTImage Matching) printing. This option will
only be available if the image has PIM information and you have a PIM
printer. PIM images print at a much higher quality than standard images,
but take longer to do so. Also, PIM is not available for all versions of
PhotoImpression.
Greeting Card / Multiple Printing: prints more than one image per page.
There are several templates for you to choose from, one set which consists
of greeting card layouts. Your albums will be displayed so if you can
easily drag and drop images to specific areas on the selected template.
Click the Add All button to add all of the images in the current album to
the current template. PhotoImpression supports the printing of multiple
pages at one time, so if you have more images than cells on your template,
Page 11

PhotoImpression Quick Start Guide
19
new pages will be made to accommodate all of your images. You can
scroll through each page to preview them. At this point, you can also add
text to images just for printing. Auto Rotate, Auto Crop, and Nudge
commands are available.
Thumbnail Printing: prints album thumbnails. You can print an entire album,
or specific thumbnails. You can also choose different spacing options, add
file names below the images, and review every page to be printed.
Getting Help
PhotoImpression provides extensive online help. If you need more information
or instructions on how to use a specific feature or tool, click the Help (?)
button in the upper right-hand corner of the screen.
PhotoImpression Quick Start Guide
20
Page 12

 Loading...